

Lenovo IdeaCentre A600, IdeaCentre A, A600 - IdeaCentre 3011 6DU All-in-One PC, 30113HU, IdeaCentre A Series User Manual

Version 1.2 2009.8
User Guide
31039406
31039406_A6_UG_FM_EN_V1.2.indd 1 2009.7.17 10:01:13 AM
Important Safety Information
Before using this manual, it is important that you read and understand all of the
related safety information for this product. Refer to the Safety and Warranty Guide
that you received with this product for the latest safety information. Reading and
understanding this safety information reduces the risk of personal injury or damage
to your product.
Danger: Be aware of extremely hazardous or lethal situations.
Attention: Be aware of possible damage to programs, devices, or data.
Note: Pay attention to this important information.
© Copyright Lenovo 2009.
31039406_A6_UG_EN_V1.2.indd 1 2009.8.7 4:48:15 PM

31039406_A6_UG_EN_V1.2.indd 2 2009.8.7 4:48:15 PM
1
Contents
Contents
Important Safety Information
Chapter 1
Using the Computer Hardware .............................. 1
1.1 Left and right view of the computer .........................................2
1.2 Rear view of the computer .......................................................
3
1.3 Connecting your computer ......................................................3
1.4 Computer instruction ...............................................................
9
1.5 Keyboard and Mouse (wired)
.................................................11
Chapter 2 Using the Rescue System .................................... 13
2.1 OneKey Recovery ..................................................................14
2.2 Driver and Application Installation ..........................................
14
2.3 System Setup ........................................................................15
2.4 System Backup .....................................................................
16
2.5 System Recovery ..................................................................
16
2.6 Create Recovery Disc ............................................................
16
Chapter 3 Using the Computer Software ............................. 17
3.1 Power2Go — Burning Discs .................................................18
3.2 WinDVD
.................................................................................19
3.3 Lenovo Healthcare Software
..................................................20
3.4 McAfee Security Center .........................................................
23
3.5 Media Show ..........................................................................24
3.6 Lenovo CamSuite ..................................................................
25
Chapter 4 System Maintenance and Recovery .................... 27
4.1 Restoring the System ............................................................28
4.2 Backup and Restore ..............................................................
28
4.3 Cleaning Up the Disk .............................................................
28
31039406_A6_UG_EN_V1.2.indd 1 2009.8.7 4:48:15 PM

2
Contents
4.4 Checking For, and Correcting Disk Errors ..............................29
4.5 Defragmenting the Disk(s) ......................................................
29
4.6 Performing Daily Maintenance Tasks ......................................
29
Chapter 5 Troubleshooting and Confirming Setup .............. 31
5.1 Troubleshooting Display Problems .........................................32
5.2 Troubleshooting Audio Problems ............................................33
5.3 Troubleshooting Software Problems .......................................33
5.4 Troubleshooting Problems with Optical Drives and
Hard Disks .............................................................................34
5.5 Special considerations for troubleshooting Windows .............
35
31039406_A6_UG_EN_V1.2.indd 2 2009.8.7 4:48:16 PM

1
2
3
4
5
Chapter
This chapter contains the following
topics:
ÿ
Computer hardware introduction
ÿ
Information on computer connections
Note: The descriptions in this chapter might
vary from your computer, depending on
computer models and configurations.
User Guide
1
Using the Computer Hardware
31039406_A6_UG_EN_V1.2.indd 1 2009.8.7 4:48:17 PM
2
User Guide
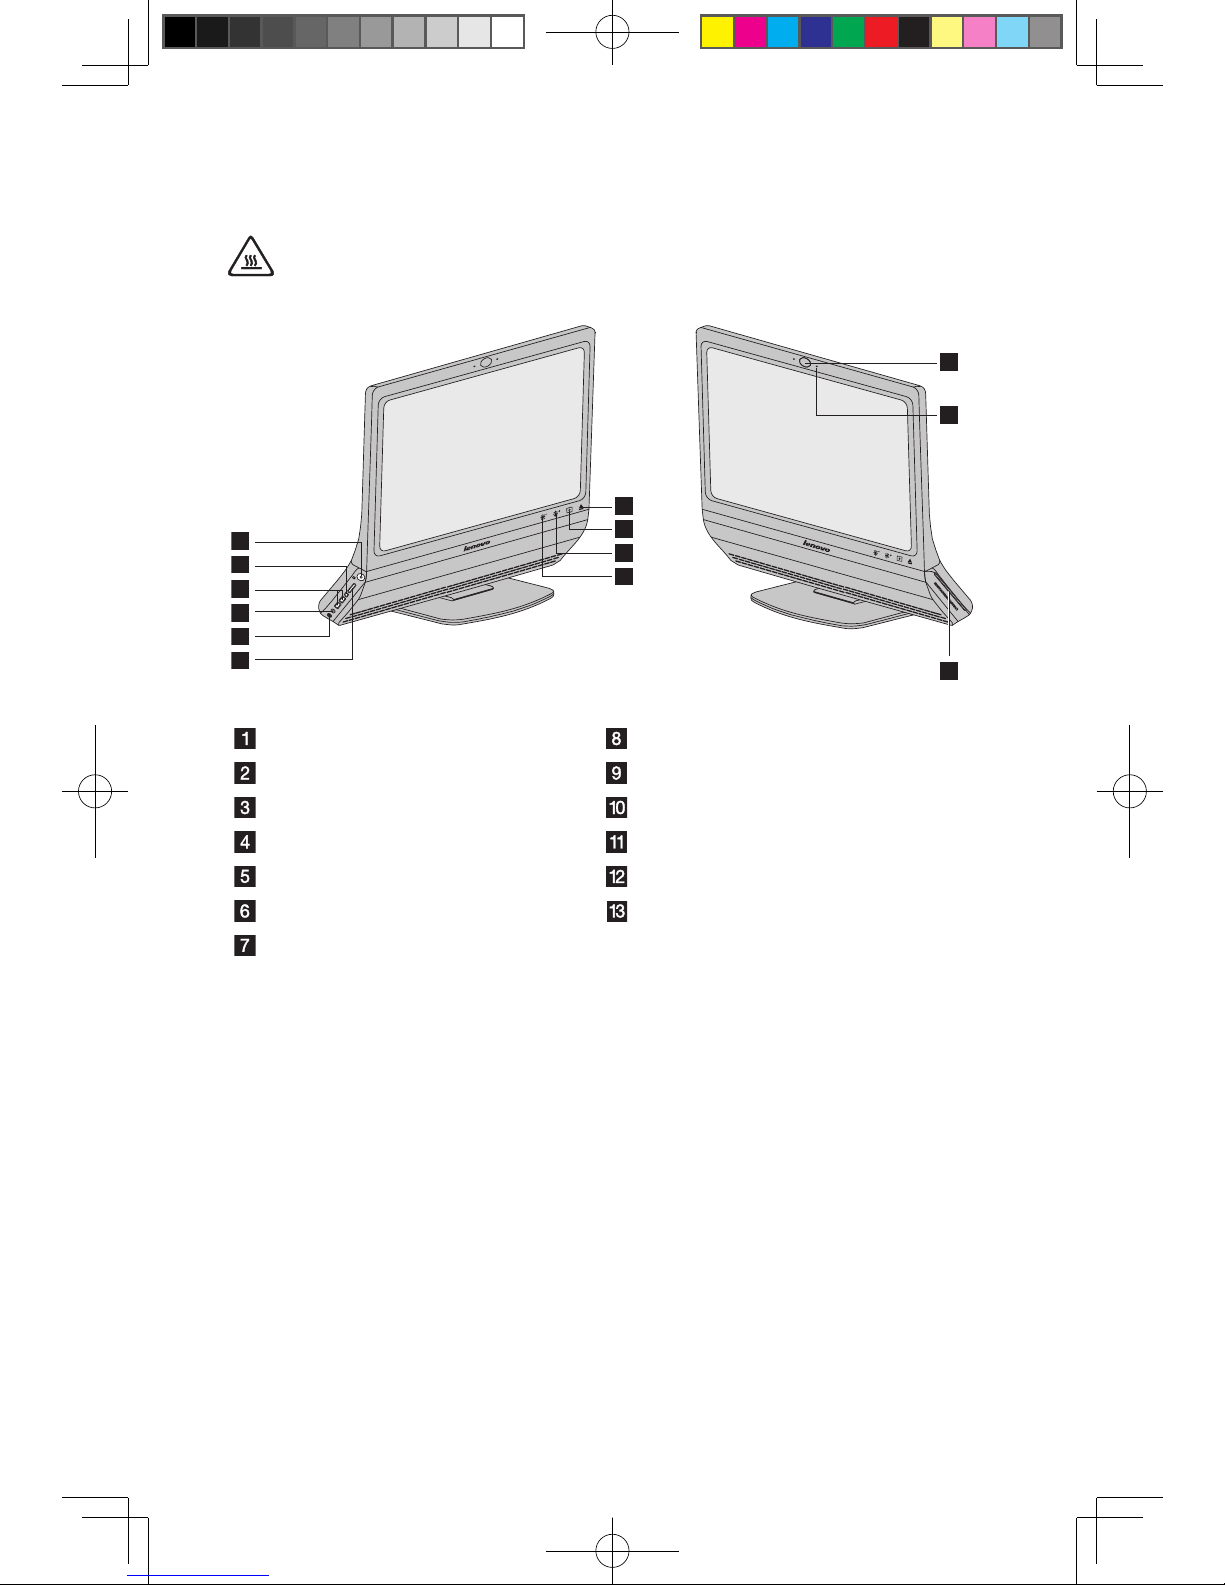
1.1 Left and right view of the computer
Attention: Be sure not to block any air vents on the computer. Blocked
air vents can cause thermal problems.
1
2
3
4
5
6
12
11
10
9
13
8
7
Power button Camera
IEEE 1394 connector Brightness down touch button
USB ports (2) Brightness up touch button
Headphone connector LCD On/Off
Microphone connector Optical drive eject touch button
Memory card reader Built-in microphone
Optical drive slot
31039406_A6_UG_EN_V1.2.indd 2 2009.8.7 4:48:19 PM
3
User Guide
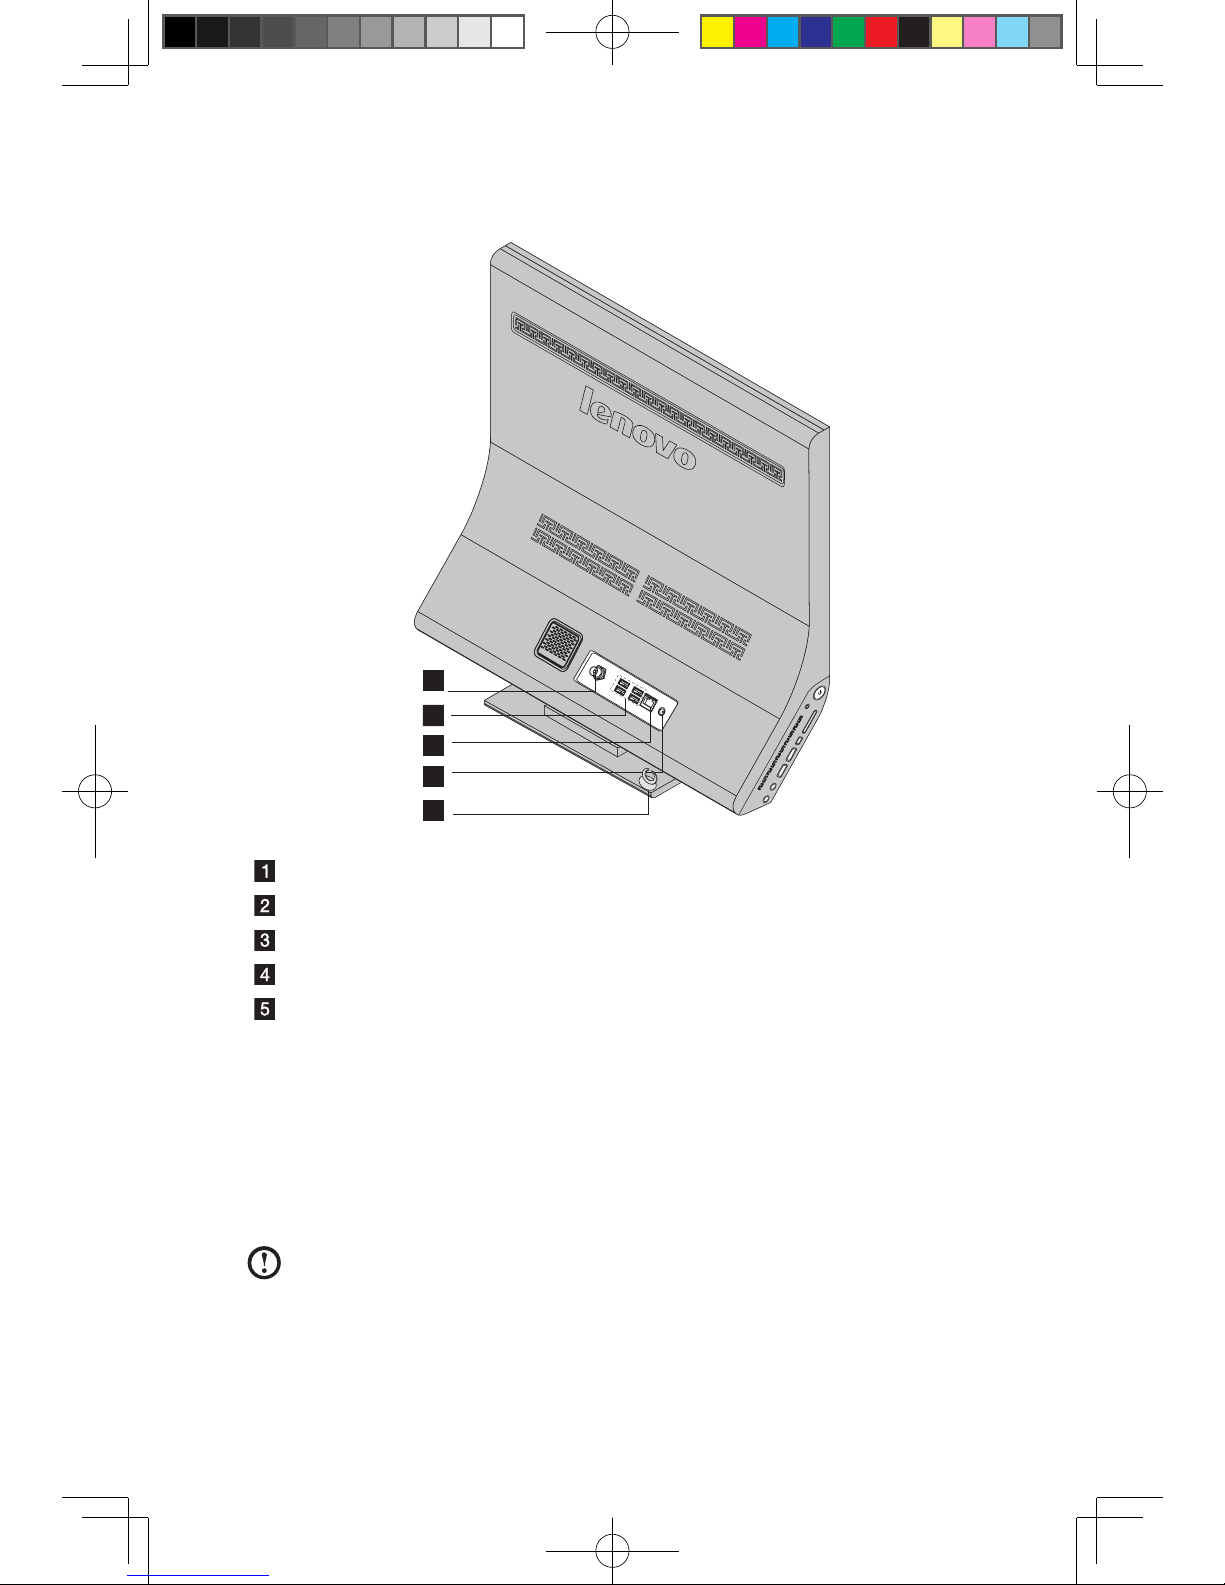
1.2 Rear view of the computer
1
2
3
4
5
TV tuner (Select models only)
USB ports (4)
Ethernet connector
Power connector
Cable routing clip
1.3 Connecting your computer
Use the following information to connect your computer:
• Look for the small connector icons on the back of your computer. Match the
connectors to the icons.
Note: Your computer might not have all of the connectors that are
described in this section.
31039406_A6_UG_EN_V1.2.indd 3 2009.8.7 4:48:20 PM
4
User Guide
1.3.1
Check the voltage rating before you connect the equipment to an
electrical outlet to ensure that the required voltage and frequency
match the available power source.
If your computer uses an AC adapter:
Note: Use only the Lenovo provided AC adapter approved for use with this
device. Use of another AC adapter may cause a fire or explosion.
1.3.2
Connect the keyboard cable to the appropriate keyboard
connector (USB connector).
1.3.3
Connect the mouse cable to the appropriate mouse connector
(USB connector).
Note: If your computer is equipped with a wireless keyboard or mouse,
follow those installation instructions.
31039406_A6_UG_EN_V1.2.indd 4 2009.8.7 4:48:20 PM

5
User Guide
1.3.4 Computer stand
5˚
15˚
Use the stand to position the display to your preference. It can be adjusted from 5˚
forward to 15˚ backward.
The stand provides stability to the computer; it is not a removable part.
Attention: The computer stand must remain installed at all times to
ensure maximum system stability.
Do not pull the screen
forward beyond the
stand’s fixed limit of 5
degrees, or the computer
could fall over and the
screen could be damaged.
Do not push the screen
back beyond the stand’s
fixed limit of 15 degrees,
or the computer could
fall over.
Do not put your
hand on the stand
joint when adjusting
the screen.
15˚
5˚
31039406_A6_UG_EN_V1.2.indd 5 2009.8.7 4:48:22 PM

6
User Guide
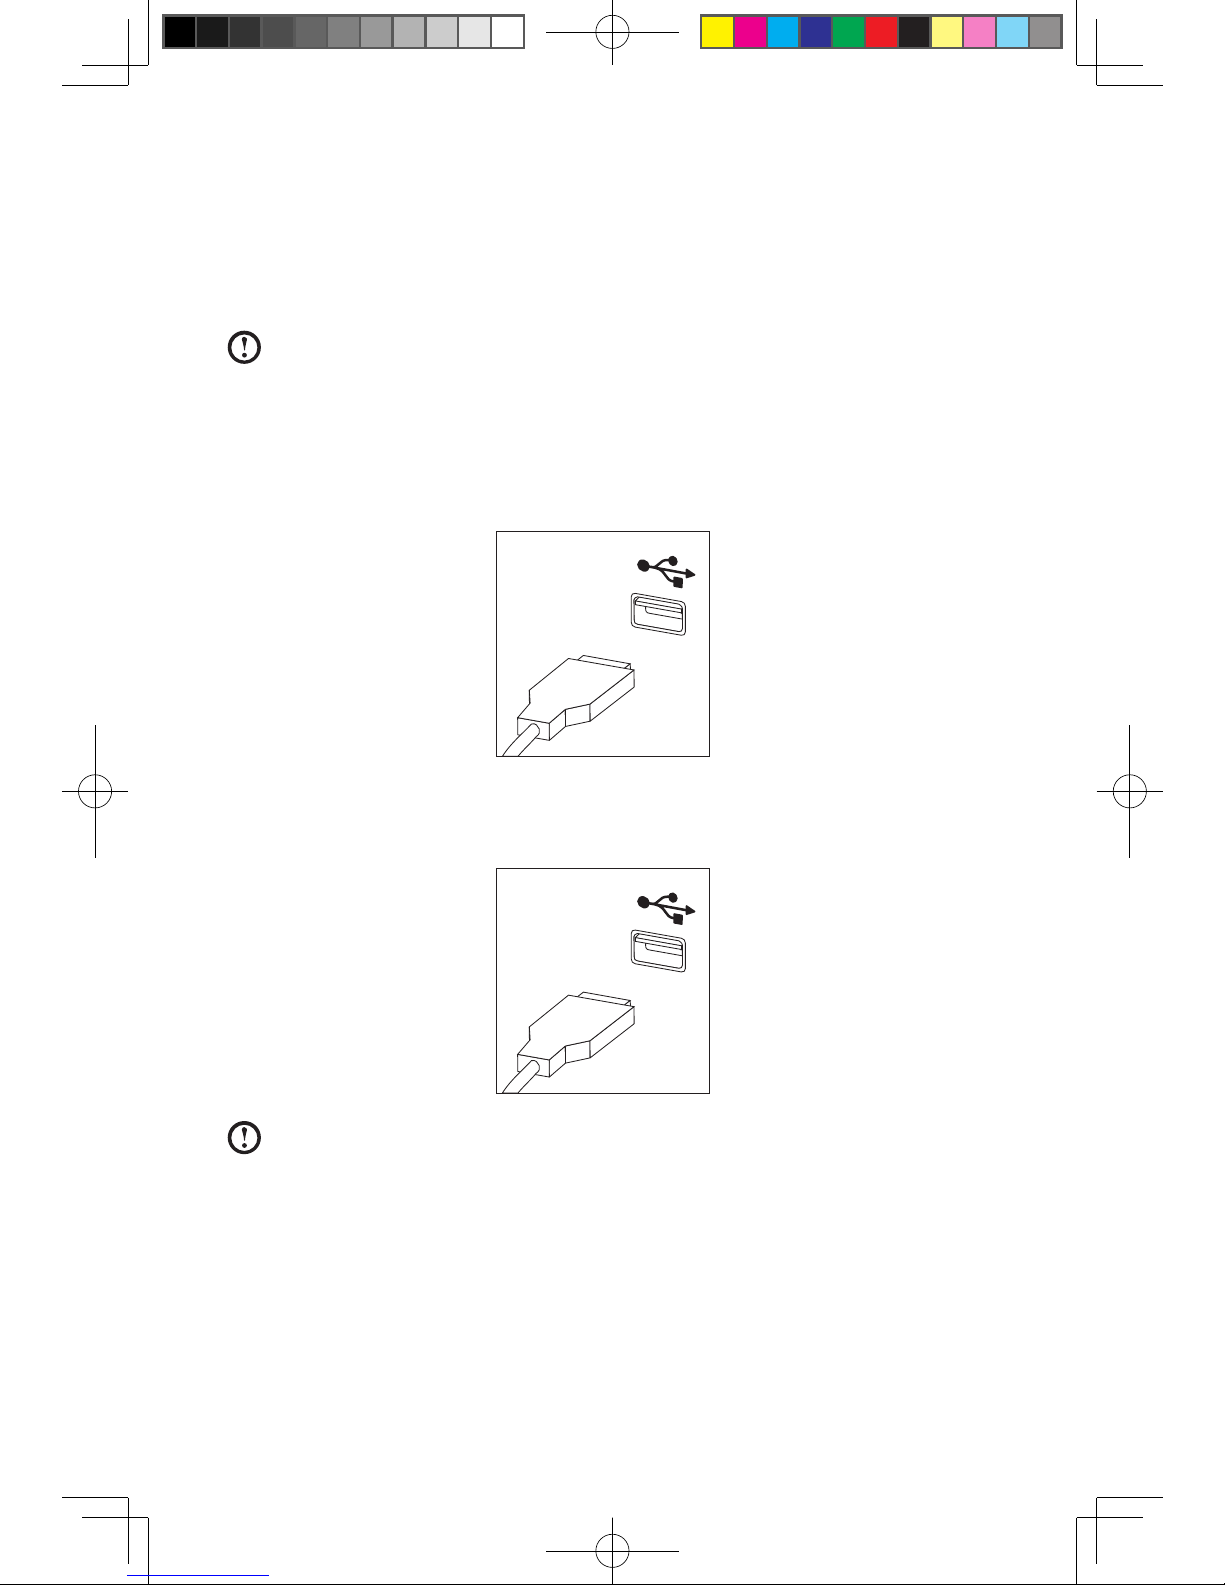
1.3.5
If you have audio devices, attach them using the following
instructions:
1 2
Microphone Use this connector to attach a microphone (purchased separately)
to your computer when you want to record sound or if you use
speech-recognition software.
Headphone Use this connector to attach headphones (purchased separately)
to your computer when you want to listen to music or other
sounds without disturbing anyone.
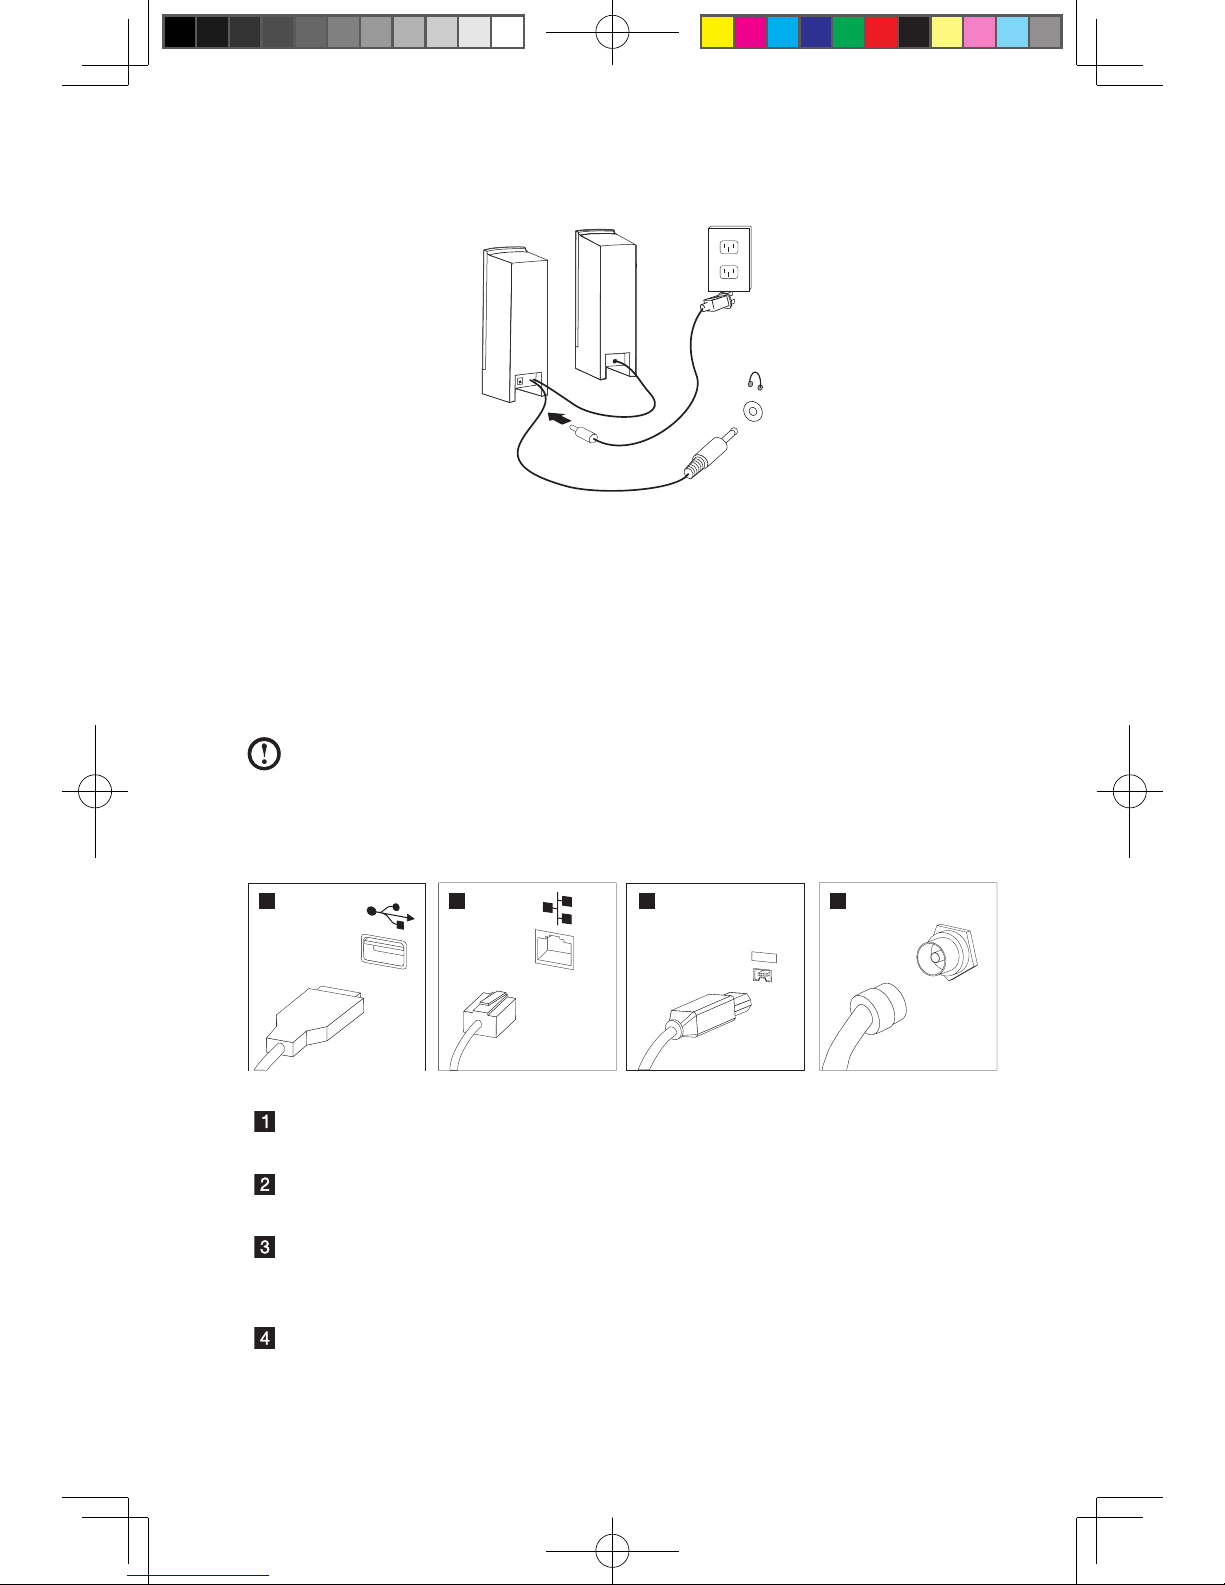
1.3.6 If you have powered speakers with an adapter:
a. Connect the cable that runs between the speakers if necessary. On some
speakers, this cable is permanently attached.
b. Connect the adapter cable to the speaker if necessary. On some speakers, this
cable is permanently attached.
c. Connect the speakers to the Headphone port on the computer.
d. Connect the adapter to the power source.
31039406_A6_UG_EN_V1.2.indd 6 2009.8.7 4:48:24 PM
7
User Guide
1.3.7 If you have powered speakers without an adapter
:
a. Connect the cable between the two speakers, if necessary. On some speakers,
this cable is permanently attached.
b. Connect the cable to the speaker if necessary. On some speakers, this cable is
permanently attached.
c. Connect the speakers to the Headphone port on the computer.
d. Connect the power cord plug to the power source.
Note: Some models are not equipped with external speakers.
1.3.8
Connect any additional devices that you have. Your computer
might not have all connectors shown.
1 2 3 4
1394
USB connector Use this connector to attach a device that requires a
USB connection.
Network adapter
connector
Use this connector to attach the computer to an
ethernet-type local area network.
IEEE 1394 This connector provides connection to several types
of consumer electronics including digital audio devices
and scanners.
TV-Tuner connector Only supported on systems with optional TV tuner
card.
31039406_A6_UG_EN_V1.2.indd 7 2009.8.7 4:48:25 PM
8
User Guide
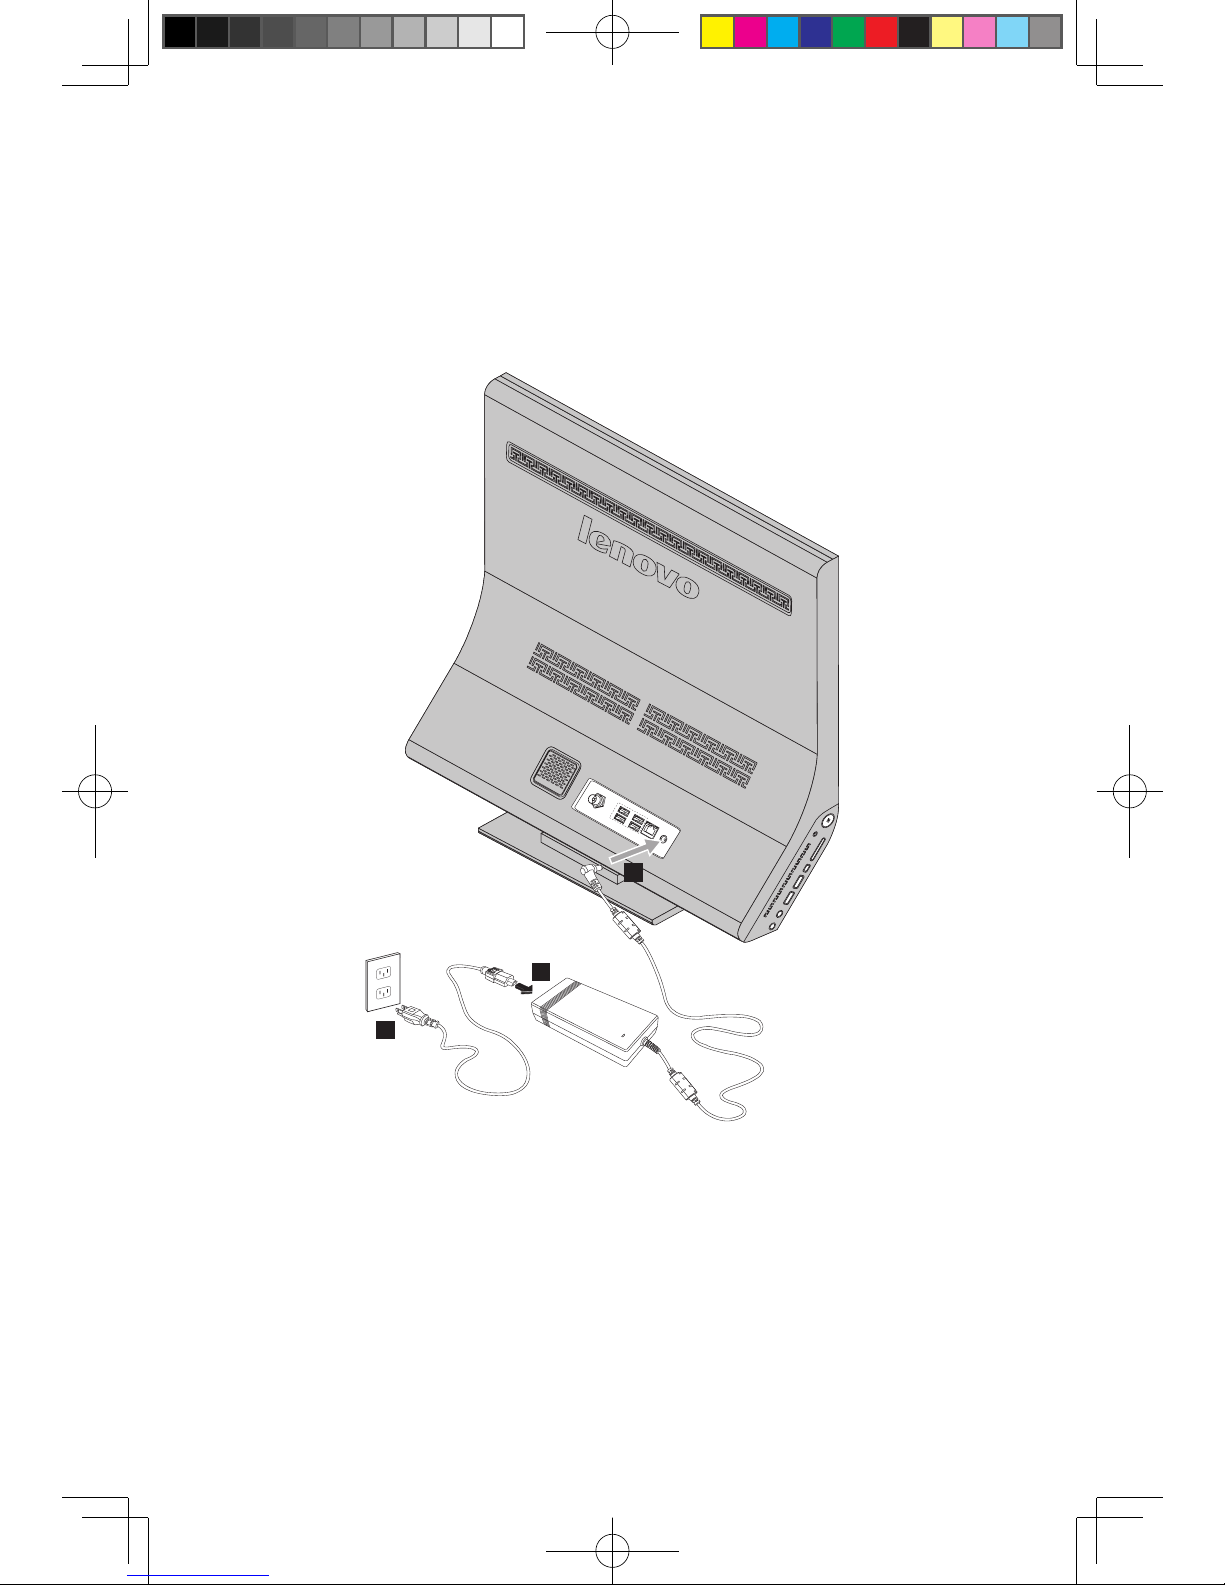
1.3.9 Connect the power cords properly to grounded electrical
outlets.
1. Plug the power adapter cord into the back of the computer.
2. Plug the power cord into the AC adapter.
3. Plug the power cord into an AC power source.
1
2
3
1.3.10
If your computer is equipped with a Memory Card Reader
connector, it is able to read/write data from:
Secure Digital (SD)
MultiMediaCard (MMC)
xD
Memory Stick (MS)
Memory Stick PRO (MS pro)
31039406_A6_UG_EN_V1.2.indd 8 2009.8.7 4:48:25 PM
 Loading...