

Page 1
,
Read the safety notices and important tips in the
included manuals before using your computer.
Notes
Before using the product, be sure to read Lenovo Safety and General Information Guide first.
Some instruc tions in this guide may a ss ume tha t y ou a re using the Android sy st em. If you are using another operating s ys te m, so me
operat ions may be di ffere nt.
The feat ures described in this guide are c ommon to most models. S ome f ea tures may not be available o n your c ompute r or your
computer may include featur es that are no t desc ribed in this user guide.
The illustrations in this manual may differ from the actual product. Please refer to the actual product.
Regulatory Noti ce
The Regulatory Notice provides information about the radio frequency and safety standards. Be sure to read it before using wireless devices on your
computer.
To refer to it, go to
http: //support. leno vo .c om, click SUPPORT, and then click GUIDES & MANUALS.
Page 2
First Edition (July 2013)
© Copyright Lenovo 2013.
Chapter 1 Getting to know your computer
Chapter 2 Starting to use your compuer
Chapter 3 Troubleshooting
Trademarks
CHAPTER 1
Top view
Page 3

Not e: The dashed areas indicate parts that are not visible externally.
Attention:
When closing the display panel, be careful not to leave pens or any other objects in between the display panel and the keyboard. Otherwise, the display
panel may be damaged.
1
Integrated camera (on select models) Use the camera for the video communication.
2
Wireless LAN antennas Connect to the wireless adapter to receive and send wireless radio.
3
Multi-touch screen Functions as the v isual display as well a s o ne o f the tw o primary input metho ds. For detai ls,
Gestures.
see
4
Caps lock indicator ON: All typed letters are uppercase by default.
5
Touch pad The touch pad functions as a conventional mouse.
Touch pad: To move the pointer on the screen, slide your fingertip over the pad in the
directio n in which you want the pointer to move .
Touch pad buttons: The functions of the left/right side correspond to those of the left/right
mouse button on a conventional mouse.
Not e: You can enable/dis able the touch pad by pressing .
Keyboard hotkeys
You can access certain system settings quickly by pressing the appropriate hotkey.
Page 4
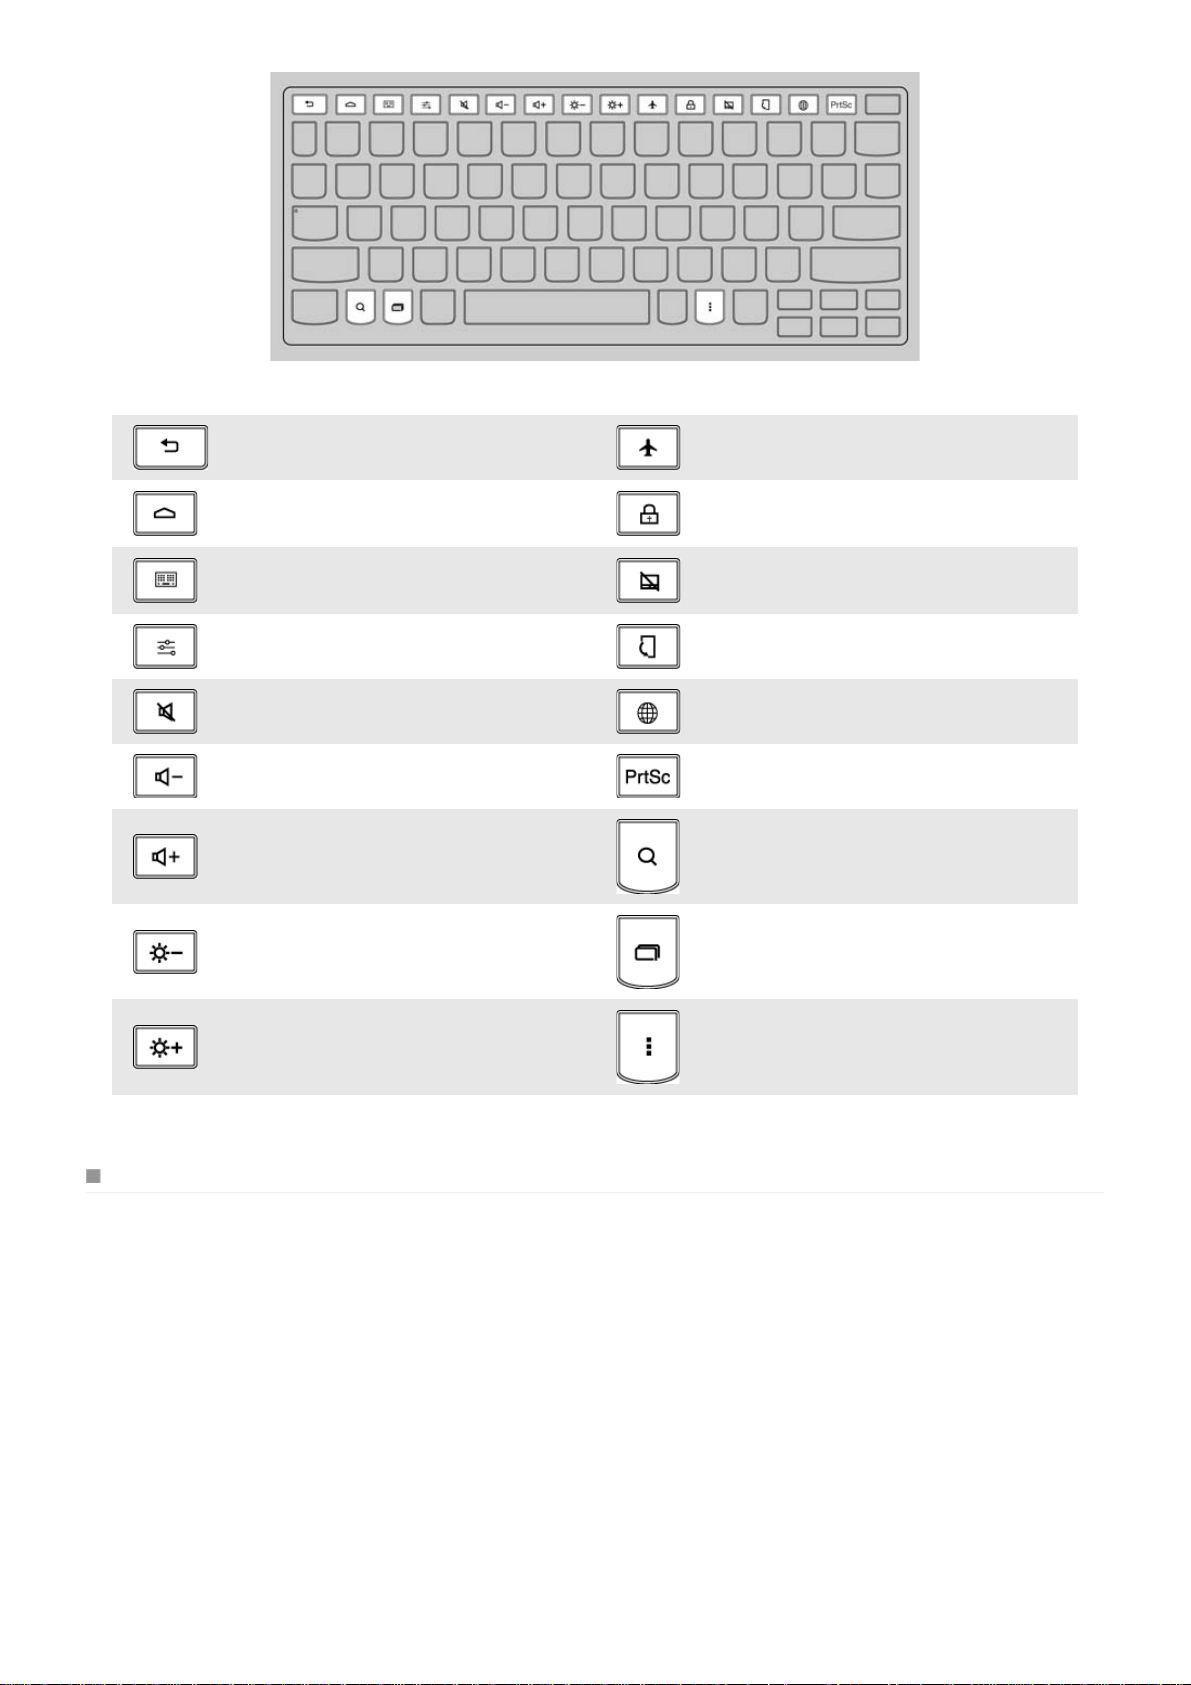
Goes back to the previous screen. Enable s/ dis able s Airplane mode.
Opens the home screen (similar to the
Home ico n) .
Opens the Apps screen (similar to the Apps
launcher i co n).
Opens the settings screen. Forces to be the landscape mode.
Mutes/unmutes the sound. Opens the browser screen.
Decreases the volume level. Takes a snapshot of the current screen.
Increases the volume level. Opens the search screen.
Decreases the display brightness.
Increa se s t he di spla y brightness. Opens a shortcut menu.
Locks the screen.
Enable s/ dis able s t he touch pad.
Toggles the scre en be tween differe nt apps.
Positioning the display panel
The display panel can be opened up to 300 de grees.
Notebook Mode
Page 5

Suit able for ta sks tha t require a key boa rd a nd mouse (s uch a s c re ating documents, writing emails, and so on).
Stand Mode (Theater Mode)
Suit able for ta sks tha t require li ttle or no touc h (such a s v ie wing photos or pla yi ng vi deo s).
Attention:
Do not open the display with too much force, otherwise the panel or hinges may be damaged.
Page 6

Note: The keyboard and touch pad are automatically locked if the keyboard panel faces down.
Left-side view
1
Power button Press this button to turn on the computer.
2
USB port Connects to USB devices. For details, see
3
Combo audio jack Connects to headsets.
Notes:
The combo audio jack does not support conventional microphones.
The recording function may not be supported if third-party headphones or headsets are connected, due to different industry standards.
Conne ct ing USB dev ic es .
Connecting USB devices
Your computer comes with two USB ports compatible with USB devices. To set up the connection, plug the USB connector of the USB device into the
USB port on yo ur computer.
Before disconnecting a USB storage device, make sure your computer has finished transferring data to that device, otherewise the data may be
damaged. Then perform the fo llowing steps:
1 Select → Se ttings → Storage.
2 Select Remove Storage Device.
3 Select OK to remove it. Disconnect the device after it is saf ely removed.
Note: If your USB device uses a power cord, connect the device to a power source before connecting it. Otherwise, the device may not be
rec ognized.
Right-side view
1
USB port Connects to USB devices.
2
Memory card slot Insert memory cards (not supplied) here. For details, see
3
Micro USB p ort Connects the USB cable of the AC power adapter, to charge the computer battery or transfer
data.
Using memory cards ( not supplied).
Page 7

4
System status indicators
Indicator Indicator status Charge status Meaning
On (orange)
On (blue) Charging The battery’s charge is more than 10%.
Battery status indicator
Note: When disconnected from the AC power adapter, a prompt appears on the screen to warn you if the battery's charge reaches low and critical
powe r levels.
5
Micro HDMI port Conne ct s t o device s with HDMI input such as a TV or an externa l dis play.
6
Built-in microphones Capt ure sound whic h can be used for vi deo co nferenc ing, vo ic e na rrati on, or audio re co rding.
Blinking every 2s
(orange)
Blinking every 2s (blue) / New unread messages to be handled.
Off
Charging The battery’s charge is less than 10%.
Low battery The battery needs to be charged.
/ New unread messages to be handled.
Unplugging of cha rging
cable
The computer is off or the battery electricity is
more than 10%.
Using memory cards (not supplied)
Your computer supports the micro-SD cards (up to 64 GB).
Inserting a memory card
1 Align the memory card with the memory card slot.
2 Slide the memo ry card in until it clicks into place.
Removing a memory card
1 Push the me mo ry card in until you hear a clic k.
2 Gently pull the memory card out of the memory card slot.
Bottom view
1
Reset hole Resets your computer.
Page 8

2
3
SIM card slot (on select models) Insert a SIM c ar d (not supplied) here. For details, see
Speaker Provides audio output.
Using SIM cards (not supplied)
Your co mputer suppo rts standard SIM cards.
Inserting a SIM card
1 Align the S IM card with the SIM card slot.
2 Slide the SIM card in until it clicks into place.
Removing a SIM card
1 Push the SIM card in until you hear a click.
2 Gently pull the S IM card out of the SI M card slo t.
Note: Some SIM cards may not be supported. For details, consult the local service provider.
CHAPTER 2
Using SIM c ards (not s upplie d).
First use
Reading instructions
Rea d the instructi on manuals befo re operat ing y our computer.
Connecting to a power supply
1 Connec t the USB c able to the AC p ower adapter.
2 Securely connect the USB cable to the Micro USB port on the right side of the computer.
3 Insert the power plug of the AC power adapter into a power socket.
Starting the computer
Press and hold the Power button for five seconds or more. The Lenovo logo and startup screen appear.
Shutting down the computer
To shut down the computer, do one of the following:
In the status drop-down list, select Shut Down → OK.
Press and hold the Power button for five seconds or more and select Shut Down.
Note: If the system does not respond or you cannot shut it down, use the reset hole to reset your computer.
Graphical user interface
Page 9

The graphical user interface (GUI) changes interactively, such as the home screen or Apps screen.
Note: Screenshots are only for reference and may differ from your screen.
Home screen
1 Status bar: displays information ab out wireless connection, powe r supply, battery s tate, and c loc k.
2 Apps launcher: launches the A pps scre en.
3 Custom app icons: displays custom app icons.
4 Show/hide app icons: shows or hides the app icons on the task bar.
Apps screen
1 Home: accesses the home screen.
2 Back: returns to the previous screen.
Page 10

Status drop-down list
The status dr op-down li st co ntains the following fre quently us ed funct ions.
Enable or disable Wi-Fi, Bluetooth, airplane mode, or screen rotation.
Increase or decrease volume and brightness.
Restart the computer, put it to sleep, or shut it do wn.
To open this list, use the touch pad or gesture to drag the status bar in the upper right corner of the screen downwards.
Gestures
Ges tures allow yo u to intera ct with the apps by manipulat ing t he s creen objects. The fo llowing ta ble s hows the core ges ture set.
Touch
Press, lift
Triggers the default func ti ona lity for a giv en i te m.
Long press
Press, wait, lift
Allows you to select one or more items in a view
and act upon the dat a.
Page 11

Swipe
Press, move, lift
Scrolls ov er flowing c ont ent, or nav iga tes betwe en
views in the same hierarchy.
Drag
Long pres s, move, li ft
Rearranges data within a view, or moves data into
a container.
Double touch
Two touches in quic k suc cession
Zooms into content. Also used as a secondary
gesture for text s ele ctio n.
Pinch
2-f inge r pre ss, move outwards /inwards, lif t
Zooms into or out of content.
Connecting to wireless LAN
Your computer comes with a wireless network card. It enables you access Internet via a wireless network.
Enable Wi-Fi
To enable the Wi-Fi function, select → Settings → Wi-Fi, and then toggle the Wi-Fi switch to ON. After wireless has been enabled, the
computer will automatically scan for available wireless networks and display them in the wireless LAN network list. You can select any network in the
list. After selecting a network, click Connect. You can also select
or add a network.
→ Advanced to make the advanced Wi-Fi settings. You can also manually scan
Note: Eac h Wi-Fi ne twork na me has a sta tus ic on f ollowed.
indicates the net work is enc ry pte d and y ou c an o nly s uccessfully connect it after a prope r passwor d is input.
indicates the ac cess password is not require d and y ou c an di rectly connect it.
Page 12

Disable Wi-Fi
To disable the Wi-Fi function, do one of the following:
Select → Settings → Wi-F i and toggle the Wi-Fi switch to OFF.
Select → Settings → More and check the Airplane mode option.
Not e: All wireless connections on the computer will be disabled as soon as the airplane mode is enabled.
CHAPTER 3
Frequently asked questions
This section lists frequently aske d ques tions by c ategory.
Finding information
What safety precautions should I follow when using my computer?
The Lenovo Safety and General Information Guide which c ame with yo ur computer conta ins safe ty precautions for usi ng yo ur computer. Read
and fo llow all the pre ca uti ons when using your computer.
Where can I find the hardware specifi cati ons for m y computer?
You can find hardware spe ci fica tion for y our computer on the printed flyers which c ame with your co mputer.
Where can I find warranty information?
For the warranty applicable to your computer, including the warranty period and type of warranty service, see the Lenovo limited warra nty flyer
that came with your computer.
Getting help
How can I contact the customer support center?
See “Chapter 3. Getting help and service” in the Lenovo Safety and General Information Guide.
Troubleshooting
If y ou do not find your pro blem here, see Cha pte r 1.
Display pro ble ms
When I turn on the computer, nothing appears
on the screen.
If the screen is b lank, make sure that:
- The USB cable is connec ted to the computer, and the AC power adapter i s plugged into a working electr ical
outlet.
- The computer power is on. (Pr ess the Power button again for c onfi rmation.)
Page 13

If these items are properly set, and the screen remains blank, have the computer serviced.
The screen goes blank while the computer is on. Do one of the following to resume from sleep mode:
- Press any key on the key board. (Notebook mode only)
- Press the Power button.
Sleep problems
The critical low-battery error message appears,
The battery power is getting low. Connect the USB cab le and the A C power adapter to the co mputer.
and the computer immediately turns off.
The computer enters sleep mode immediately
after power-on.
Make sure that:
- The battery is charged.
- The operating temperature i s within the acc eptable range. See “ Chapter 2. Use and care inf ormation” i n the
Lenovo Safety and General Information Guide.
Not e: If the battery is charged and the temperature is within range, have the computer serviced.
The computer does not return from sleep mode
and the computer does not work.
If your computer is in sleep mode, connect the USB cable and the AC power adapter to the computer,
then press the Power button.
If your computer is powered-off, connect the USB cable and the AC power adapter to the computer,
then press the Power button to resume operation.
Not e: If the system still does not return from sleep mode, your system has stopped responding, and you cannot turn off the computer; reset the
computer. Unsaved data may be lost. Use the reset hole to reset the computer.
Display panel problems
The screen is blank.
Do the f ollowing:
- If you ar e using the AC power adapter or the battery, and the battery status indicator is on, pr ess
make the screen bri ghter.
- If the computer is i n sleep mode, press any key to wake it up.
Incorrect characters appear on the screen. Are the operating system or programs installed correctly? If they are installed and configured correctly,
have the computer serviced.
Sound problems
No sound can be heard from the speaker even
when th e v o lum e is tu rned up.
Make sure that:
- The Mute function is off.
- The combo audio jack i s not being used.
- Speakers are selected as the playbac k device.
Battery problems
Your computer shuts down before the battery
Recharge the battery.
status indicator shows empty.
- or -
Your computer operates after the battery status
indicator shows empty.
Other problems
Your computer does not respond.
Press and hold the Power button for five seconds or more and select Shut Down to turn off your
computer. If the computer still does not res pond, use the reset ho le to re set your comp uter.
The connected external device does not work. Do not connect or disc onne ct any e xternal de vice cab les other than US B while the com pute r po wer is
on. Otherwise, you might damage your computer.
Page 14

The following terms are trademarks or registered trademarks of Lenovo in the United States, other countries, or both.
Lenovo
IdeaPad
Andro id
en-US
Rev.AA00
 Loading...