

Page 1

ThinkCentre
UserGuide
MachineTypes:0804,0809,0811,0822,0825,0828,0830,0833,
0837,0843,0845,0847,and0849
Page 2

Note:Beforeusingthisinformationandtheproductitsupports,besuretoreadandunderstandthe
ThinkCentreSafetyandWarrantyGuideandAppendixA“Notices”onpage69.
SecondEdition(September2011)
©CopyrightLenovo2010,2011.
LIMITEDANDRESTRICTEDRIGHTSNOTICE:IfdataorsoftwareisdeliveredpursuantaGeneralServicesAdministration
“GSA”contract,use,reproduction,ordisclosureissubjecttorestrictionssetforthinContractNo.GS-35F-05925.
Page 3

Contents
Importantsafetyinformation.....iii
Chapter1.Productoverview......1
Features..................1
Specications................3
Softwareoverview..............4
SoftwareprovidedwithyourWindows
operatingsystem.............4
Locations..................6
Locatingconnectors,controls,andindicators
onthefrontofyourcomputer........6
Locatingconnectorsandpartsontherearof
yourcomputer..............7
Locatingcomponents...........8
Locatingpartsonthesystemboard.....8
Locatinginternaldrives..........9
Chapter2.Installingorreplacing
hardware...............11
Handlingstatic-sensitivedevices.......11
Installingorreplacinghardware........11
Installingexternaloptions........11
Removingthecomputercover.......12
Removingandreinstallingthefrontbezel..13
Accessingthesystemboardcomponentsand
drives................14
InstallingorreplacingaPCIcard......15
Installingorreplacingamemorymodule...18
Replacingthebattery..........20
Replacingtheheatsinkandfanassembly..21
Replacingthemicroprocessor.......24
Replacingthepowersupplyassembly...27
Replacingtheopticaldrive........31
Replacingtheharddiskdrive.......34
Replacingthefrontfanassembly.....37
ReplacingtheUSBkeyboardormouse...39
Completingthepartsreplacement.....40
Obtainingdevicedrivers...........41
Basicsecurityfeatures...........41
Integratedcablelock..........42
Padlock...............43
Passwordprotection..........43
Erasingalostorforgottenpassword(clearing
CMOS)................43
Usingrecoverymedia..........46
Performingbackupandrecoveryoperations...46
Performingabackupoperation......47
Performingarecoveryoperation......47
UsingtheRescueandRecoveryworkspace...48
Creatingandusingarescuemedium......48
Creatingarescuemedium........49
Usingarescuemedium.........49
Installingorreinstallingdevicedrivers.....50
Solvingrecoveryproblems..........50
Chapter4.UsingtheSetupUtility
program................51
StartingtheSetupUtilityprogram.......51
Viewingorchangingsettings.........51
Usingpasswords..............51
Passwordconsiderations.........52
Power-onpassword...........52
Administratorpassword.........52
Setting,changing,ordeletingapassword..52
Enablingordisablingadevice........52
Selectingastartupdevice..........53
Selectingatemporarystartupdevice....53
Viewingorchangingthestartupdevice
sequence...............53
ExitingtheSetupUtilityprogram.......54
Chapter5.Updatingsystem
programs...............55
Usingsystemprograms...........55
Updating(ashing)theBIOSfromadisc....55
Updating(ashing)theBIOSfromyouroperating
system..................56
RecoveringfromaPOSTandBIOSupdate
failure..................56
Chapter6.Troubleshootingand
diagnosticprograms.........59
Basictroubleshooting............59
Diagnosticprograms............60
LenovoThinkVantageT oolbox.......60
PC-DoctorforRescueandRecovery....60
PC-DoctorforDOS...........61
Cleaninganopticalmouse..........61
Chapter3.Recoveryinformation...45
Creatingandusingrecoverymedia......45
Creatingrecoverymedia.........45
©CopyrightLenovo2010,2011
Chapter7.Gettinginformation,help,
andservice..............63
Informationresources............63
i
Page 4

OnlineBooksfolder...........63
LenovoThinkVantageT ools........63
ThinkVantageProductivityCenter.....64
LenovoWelcome............64
AccessHelp..............64
Safetyandwarranty...........64
LenovoWebsite(http://www.lenovo.com)..64
LenovoSupportWebsite.........65
Helpandservice..............65
Usingthedocumentationanddiagnostic
programs...............65
Callingforservice............66
Usingotherservices..........66
Purchasingadditionalservices......67
AppendixA.Notices..........69
Televisionoutputnotice...........70
EuropeanconformanceCEmark.......70
Trademarks................70
Additionalregulatoryinformation.......70
RecyclinginformationforBrazil........70
BatteryrecyclinginformationforT aiwan.....71
BatteryrecyclinginformationfortheEuropean
Union..................71
Index..................73
iiThinkCentreUserGuide
Page 5

Importantsafetyinformation
CAUTION:
Beforeusingthismanual,besuretoreadandunderstandalltherelatedsafetyinformationforthis
product.RefertotheinformationinthissectionandthesafetyinformationintheThinkCentreSafety
andWarrantyGuidethatyoureceivedwiththisproduct.Readingandunderstandingthissafety
informationreducestheriskofpersonalinjuryanddamagetoyourproduct.
IfyounolongerhaveacopyoftheThinkCentreSafetyandWarrantyGuide,youcanobtainaPortable
DocumentFormat(PDF)versionfromtheLenovo
LenovoSupportWebsitealsoprovidestheThinkCentreSafetyandWarrantyGuideandthisThinkCentre
UserGuideinadditionallanguages.
®
SupportWebsiteathttp://support.lenovo.com.The
©CopyrightLenovo2010,2011
iii
Page 6

ivThinkCentreUserGuide
Page 7

Chapter1.Productoverview
Thischapterprovidesinformationaboutthecomputerfeatures,specications,preinstalledsoftware
programs,andlocationsofconnectors,components,partsonthesystemboard,andinternaldrives.
Thischaptercontainsthefollowingtopics:
•“Features”onpage1
•“Specications”onpage3
:Thissectionprovidesinformationaboutthecomputerfeatures.
:Thissectionliststhephysicalspecicationsforyourcomputer.
•“Softwareoverview”onpage4:Thissectionprovidesinformationaboutthesoftwareprogramsprovided
withyourcomputer.
•“Locations”onpage6:Thissectionprovidesinformationtohelpyoulocateyourcomputerconnectors,
components,partsonthesystemboard,andinternaldrives.
Features
Thissectionprovidesinformationaboutthecomputerfeatures.
Systeminformation
Thefollowinginformationcoversavarietyofmodels.Forinformationaboutyourspecicmodel,usethe
SetupUtilityprogram.SeeChapter4“UsingtheSetupUtilityprogram”onpage51
Microprocessor
Yourcomputercomeswithoneofthefollowingmicroprocessors(internalcachesizevariesbymodeltype):
•Intel
®
Celeron
®
microprocessor
•IntelCore™2microprocessor
•IntelPentium
®
microprocessor
Memorymodule(s)
.
•Supportsuptotwodoubledatarate3dualinlinememorymodules(DDR3DIMMs)
Internaldrives
•Cardreader(availableinsomemodels)
•Opticaldrive
•SerialAdvancedT echnologyAttachment(SA TA)harddiskdrive
Videosubsystem
•IntegratedgraphicscardfunctioningthroughaVideoGraphicsArray(VGA)connector
•PeripheralComponentInterconnect(PCI)Expressx16graphicscardslotonthesystemboardfora
discretegraphicscard
Audiosubsystem
•Integratedhigh-denition(HD)audio
•Headphoneconnectorandmicrophoneconnectoronthefrontpanel
•Audioline-inconnector,audioline-outconnector,andmicrophoneconnectorontherearpanel
©CopyrightLenovo2010,2011
1
Page 8

Connectivity
•10/100/1000MbpsintegratedEthernetcontroller
Systemmanagementfeatures
•Abilitytostorethepower-onself-test(POST)hardwaretestresults
•AdvancedCongurationandPowerInterface(ACPI)
•Automaticpower-onstartup
•DesktopManagementInterface(DMI)
•IntelTrustedExecutionTechnology(TXT)
•PrebootExecutionEnvironment(PXE)
•SystemManagement(SM)BasicInput/OutputSystem(BIOS)andSMsoftware
•WakeonLAN(WOL)
•WindowsManagementInstrumentation(WMI)(WMIistheinfrastructureformanagementdataand
operationsonWindowsoperatingsystems.)
Input/Output(I/O)features
•9-pinserialport(onestandardandoneoptional)
•Ethernetconnector
•SixUniversalSerialBus(USB)connectors(twoUSBconnectorsonthefrontpanelandfourUSB
connectorsontherearpanel)
•Threeaudioconnectorsontherearpanel(audioline-inconnector,audioline-outconnector,and
microphoneconnector)
•T woaudioconnectorsonthefrontpanel(headphoneconnectorandmicrophoneconnector)
•VGAmonitorconnectorontherearpanel
Formoreinformation,referto“Locatingconnectors,controls,andindicatorsonthefrontofyourcomputer”
onpage6
and“Locatingconnectorsandpartsontherearofyourcomputer”onpage7.
Expansion
•Oneharddiskdrivebay
•Oneopticaldrivebay
•OnePCIExpressx1cardslot
•OnePCIExpressx16graphicscardslot
•Oneslimcardreaderdrivebay
•T woPCIcardslots
PowersupplyYourcomputercomeswithoneofthefollowingpowersupplies:
•240-wattuniversalinputpowersupply
Securityfeatures
•Apower-onpasswordandanadministratorpasswordtodeterunauthorizeduseofyourcomputer
•Computrace
•Coverpresenceswitch(alsocalledintrusionswitch)(availableinsomemodels)
•EnablingordisablingSATAdevices
2ThinkCentreUserGuide
Page 9

•Enablingordisablingtheserialport
•EnablingordisablingUSBconnectors
•Keyboardwithngerprintreader(shippedwithsomemodels)
•Startupsequencecontrol
•Startupwithoutkeyboardormouse
•Supportfortheadditionofanintegratedcablelock(Kensingtonlock.See“Integratedcablelock”on
page42
formoreinformation.)
•Supportfortheadditionofapadlock(see“Padlock”onpage43formoreinformation)
Preinstalledsoftwareprograms
Yourcomputerispreinstalledwithsomesoftwareprogramstohelpyouworkmoreeasilyandsecurely.For
moreinformation,see“Softwareoverview”onpage4.
Preinstalledoperatingsystem
Yourcomputerispreinstalledwithoneofthefollowingoperatingsystems:
•Microsoft
®
Windows
•MicrosoftWindowsVista
®
7
®
•MicrosoftWindowsXPProfessional(preinstalledthroughdowngraderightsinWindows7Professional
orWindowsVistaBusiness)
Operatingsystem(s),certiedortestedforcompatibility
•Linux
®
1
Specications
Thissectionliststhephysicalspecicationsforyourcomputer.
Dimensions
Width:99mm(3.9inches)
Height:335mm(13.19inches)
Depth:382mm(15.04inches)
Weight
Maximumcongurationasshipped:6.6kg(14.55lb)
Environment
•Airtemperature:
Operating:10°Cto35°C(50°Fto95°F)
Storage:-40°Cto60°C(-40°Fto140°F)inoriginalshippingpackage
Storage:-10°Cto60°C(14°Fto140°F)withoutpackage
•Humidity:
Operating:20%to80%(non-condensing)
Non-operating:20%to90%(non-condensing)
•Altitude:
(variesbymodeltype)
1.Theoperatingsystem(s)listedherearebeingcertiedortestedforcompatibilityatthetimethispublicationgoesto
press.AdditionaloperatingsystemsmightbeidentiedbyLenovoascompatiblewithyourcomputerfollowingthe
publicationofthismanual.Thislistissubjecttochange.Todetermineifanoperatingsystemhasbeencertiedor
testedforcompatibility,checktheWebsiteoftheoperatingsystemvendor.
Chapter1.Productoverview3
Page 10

Operating:-50to10000ft(-15.2to3048m)
Non-operating:-50to35000ft(-15.2to10668m)
Electricalinput
•Inputvoltage:
–Lowrange:
Minimum:100Vac
Maximum:127Vac
Inputfrequencyrange:50to60Hz
Voltage-selectionswitchsetting:115Vac
–Highrange:
Minimum:200Vac
Maximum:240Vac
Inputfrequencyrange:50to60Hz
Voltage-selectionswitchsetting:230Vac
Softwareoverview
Thecomputercomeswithapreinstalledoperatingsystemandseveralpreinstalledapplications.
SoftwareprovidedwithyourWindowsoperatingsystem
ThissectionprovidesinformationaboutthesoftwareprovidedwithyourWindowsoperatingsystem.
SoftwareprovidedbyLenovo
ThefollowingsoftwareprogramsareprovidedbyLenovotohelpyouimproveproductivityandreducethe
costassociatedwithmaintainingyourcomputer.Softwareprogramsprovidedwithyourcomputermight
varydependingonyourmodeltypeandpreinstalledoperatingsystem.
LenovoThinkVantageT ools
TheLenovoThinkVantage
accesstovarioustoolstohelpyouworkmoreeasilyandsecurely.Formoreinformation,see“Lenovo
ThinkVantageTools”onpage63
Note:TheLenovoThinkVantageT oolsprogramisonlyavailableoncomputerswiththeWindows7operating
systemfromLenovo.
ThinkVantageProductivityCenter
TheThinkVantageProductivityCenterprogramguidesyoutoahostofinformationsourcesandtoolsto
helpyousetup,understand,andmaintainyourcomputer,andenhanceyourcomputerperformance.For
moreinformation,see“ThinkVantageProductivityCenter”onpage64.
Note:TheThinkVantageProductivityCenterprogramisonlyavailableoncomputerspreinstalledwiththe
WindowsVistaoperatingsystemortheWindowsXPoperatingsystemfromLenovo.
LenovoWelcome
TheLenovoWelcomeprogramintroducessomeinnovativebuilt-infeaturesofLenovotoyouandguidesyou
throughsomeimportantsetuptaskstohelpyoumakethemostofyourcomputer.
®
Toolsprogramguidesyoutoahostofinformationsourcesandprovideseasy
.
Note:TheLenovoWelcomeprogramisonlyavailableoncomputerspreinstalledwiththeWindows7
operatingsystemortheWindowsVistaoperatingsystemfromLenovo.
4ThinkCentreUserGuide
Page 11

ProductRecovery
TheProductRecoveryprogramenablesyoutorestorethecontentsoftheharddiskdrivetothefactory
defaultsettings.
ThinkVantageRescueandRecovery
TheThinkVantageRescueandRecovery®programisaonebuttonrecoveryandrestoresolutionthat
includesasetofself-recoverytoolstohelpyoudiagnosecomputerproblems,gethelp,andrecoverfrom
systemcrashes,evenifyoucannotstarttheWindowsoperatingsystem.
PasswordManager
ThePasswordManagerprogramautomaticallycapturesandllsinauthenticationinformationforWindows
applicationsandWebsites.
Note:ThePasswordManagerprogramisonlyavailableoncomputerspreinstalledwiththeWindows7
operatingsystemfromLenovo.
ThinkVantageClientSecuritySolution
TheThinkVantageClientSecuritySolution(CSS)programhelpsyouprotectyourinformation,includingvital
securityinformationlikepasswords,encryptionkeys,andelectroniccredentials,whileguardingagainst
unauthorizeduseraccesstodata.
Note:TheThinkVantageClientSecuritySolutionprogramisonlyavailableoncomputerspreinstalledwith
theWindowsVistaoperatingsystemortheWindowsXPoperatingsystemfromLenovo.
PowerManager
ThePowerManagerprogramprovidesconvenient,exible,andcompletepowermanagementforyour
ThinkCentre®computer.ByusingthePowerManagerprogram,youcanadjustyourpowersettingsto
achievethebestbalancebetweensystemperformanceandpowersaving.
ThinkVantageSystemUpdate
TheThinkVantageSystemUpdate(TVSU)programhelpsyoukeepthesoftwareonyourcomputerup-to-date
bydownloadingandinstallingsoftwarepackages(ThinkVantageapplications,devicedrivers,BIOS
updates,andotherthirdpartyapplications).Someexamplesofsoftwarethatyoushouldkeepupdated
areprogramsprovidedbyLenovo,suchastheRescueandRecoveryprogramandtheThinkVantage
ProductivityCenterprogram.
FingerprintSoftware
TheintegratedngerprintreaderprovidedonsomekeyboardsworkswiththeFingerprintSoftwareprogram
toenableyoutoenrollyourngerprintandassociateitwithyourWindowspassword.Asaresult,ngerprint
authenticationcanreplaceyourpasswordandenablesimpleandsecureuseraccess.Angerprintreader
keyboardisavailablewithcertaincomputersorcanbepurchasedforcomputersthatsupportthisoption.
LenovoThinkVantageT oolbox
TheLenovoThinkVantageToolboxprogramhelpsyoumaintainyourcomputer,improvecomputingsecurity,
diagnosecomputerproblems,getfamiliarwiththeinnovativetechnologiesprovidedbyLenovo,andgetmore
informationaboutyourcomputer.Formoreinformation,see“LenovoThinkVantageToolbox”onpage60
PC-DoctorforRescueandRecovery
ThePC-DoctorforRescueandRecoverydiagnosticprogramispreinstalledonyourThinkCentrecomputer
aspartoftheRescueandRecoveryworkspacetohelpyoudiagnosehardwareproblems.Itcanalsoreport
operating-system-controlledsettingsthatinterferewiththecorrectoperationofyoursystem.Usethe
PC-DoctorforRescueandRecoverydiagnosticprogramifyouareunabletostarttheWindowsoperating
system.Formoreinformation,see“PC-DoctorforRescueandRecovery”onpage60
.
.
Chapter1.Productoverview5
Page 12
AdobeReader
TheAdobeReaderprogramisatoolusedtoview,print,andsearchPDFdocuments.
See“OnlineBooksfolder”onpage63formoreinformationaboutaccessingandviewingthepublications.
Antivirussoftware
Yourcomputercomeswithantivirussoftwarethatyoucanusetodetectandeliminateviruses.Lenovo
providesafullversionofantivirussoftwareonyourcomputerwithafree30-daysubscription.After30days,
youmustrenewthelicensetocontinuereceivingtheantivirussoftwareupdates.
Formoreinformationabouthowtouseyourantivirussoftware,refertothehelpsystemofyourantivirus
software.
Locations
Thissectionprovidesinformationtohelpyoulocateyourcomputerconnectors,components,partson
thesystemboard,andinternaldrives.
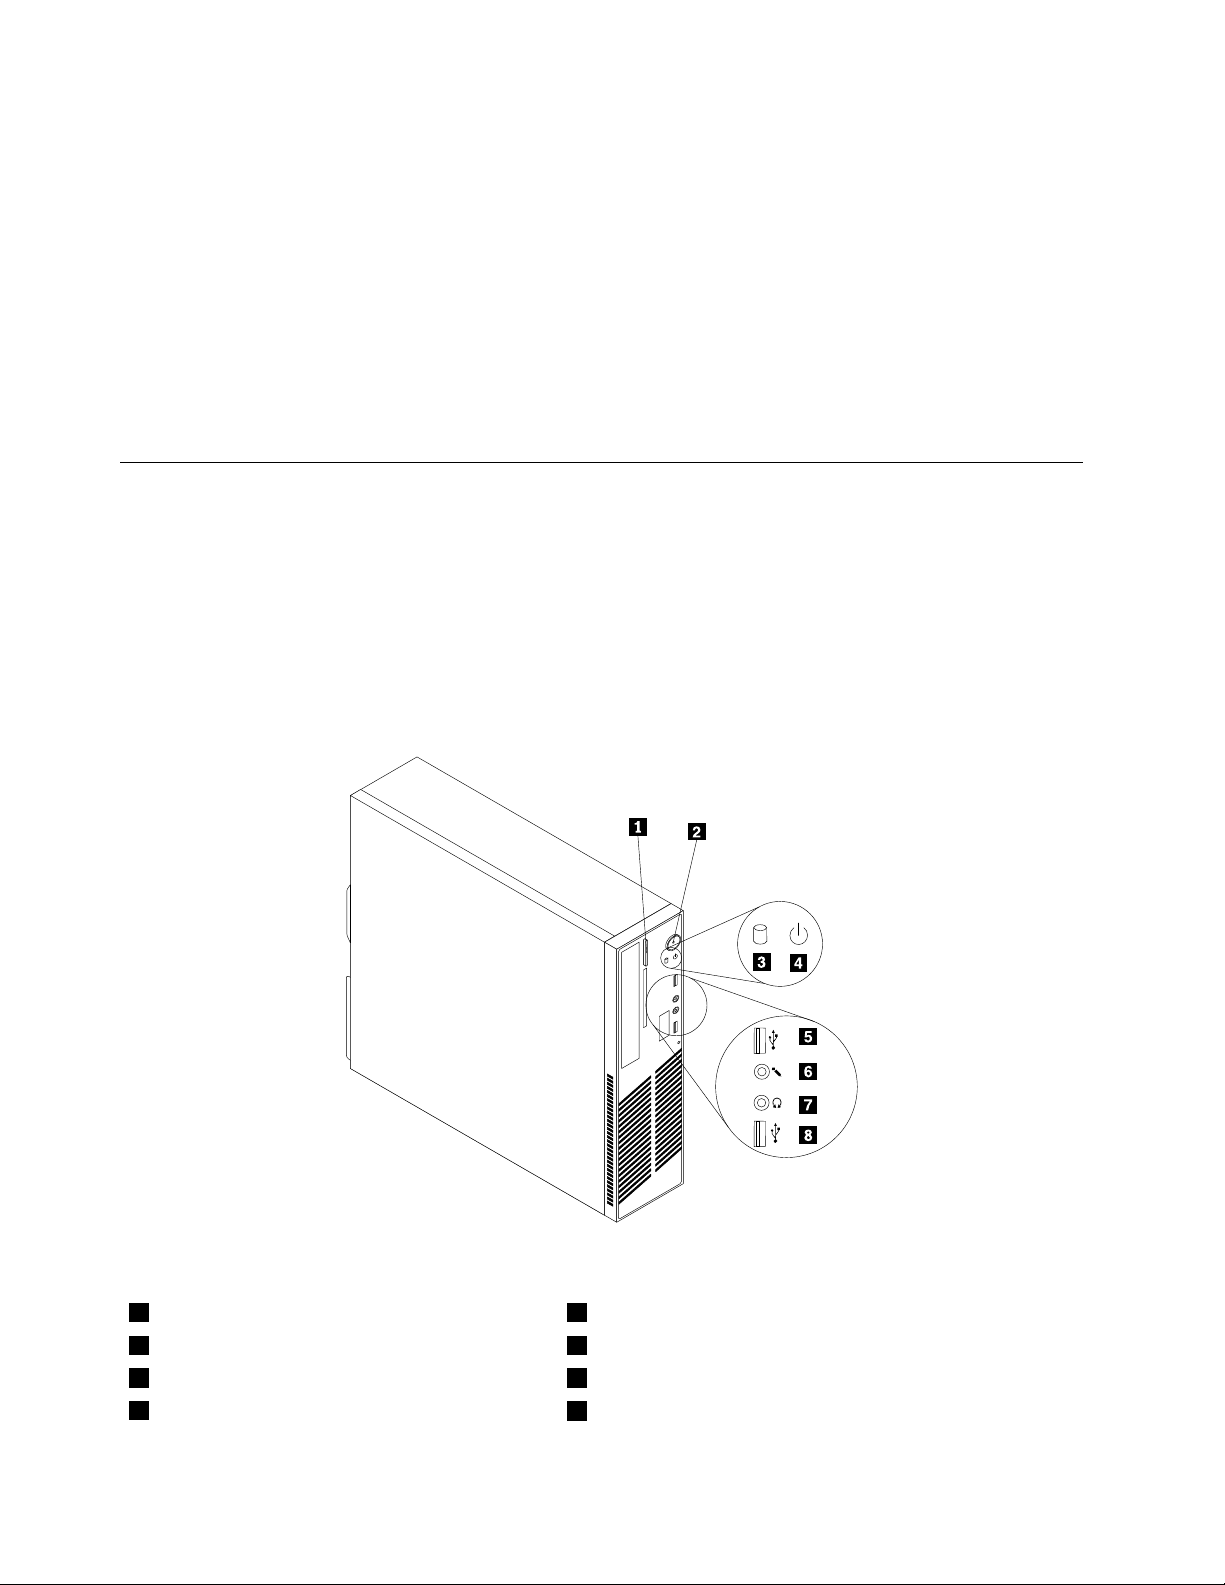
Locatingconnectors,controls,andindicatorsonthefrontofyour computer
Figure1“Frontconnector,control,andindicatorlocations”onpage6showsthelocationsoftheconnectors,
controls,andindicatorsonthefrontofyourcomputer.
Figure1.Frontconnector,control,andindicatorlocations
1Opticaldriveeject/closebutton5USBconnector
2Powerswitch6Microphoneconnector
3Harddiskdriveactivityindicator7Headphoneconnector
4Powerindicator
6ThinkCentreUserGuide
8USBconnector
Page 13
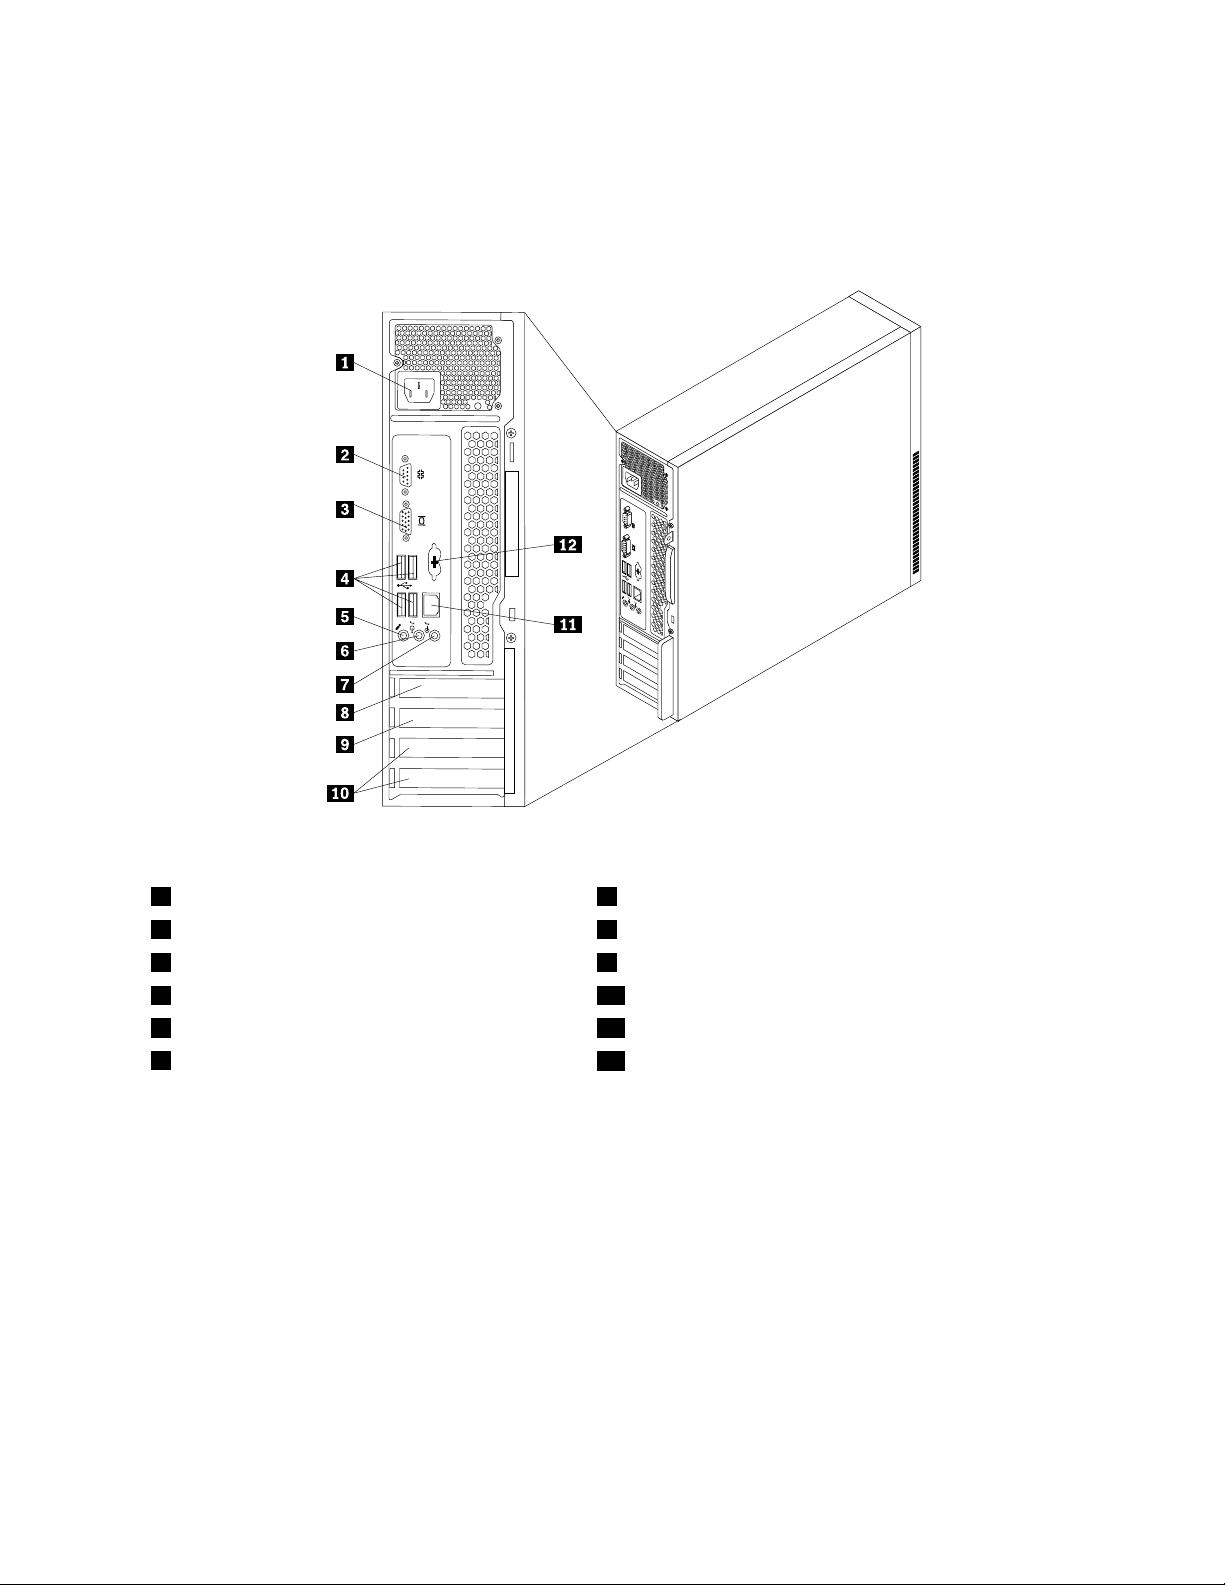
Locatingconnectorsandpartsontherearofyourcomputer
Figure2“Rearconnectorandpartlocations”onpage7showsthelocationsoftheconnectorsandparts
ontherearofyourcomputer.Someconnectorsontherearofyourcomputerarecolor-codedtohelpyou
determinewheretoconnectthecablesonyourcomputer.
Figure2.Rearconnectorandpartlocations
1Powercordconnector7Audioline-inconnector
2Serialport8PCIExpressx16graphicscardslot
3VGAmonitorconnector9PCIExpressx1cardslot
4USBconnectors(4)10PCIcardslots(2)
5Microphoneconnector11Ethernetconnector
6Audioline-outconnector
12PersonalSystem/2(PS/2)keyboardandmouseconnector
(availableonsomemodels)
ConnectorDescription
Audioline-inconnector
Usedtoreceiveaudiosignalsfromanexternalaudiodevice,suchasastereo
system.Whenyouattachanexternalaudiodevice,acableisconnectedbetween
theaudioline-outconnectorofthedeviceandtheaudioline-inconnectorof
thecomputer.
Audioline-outconnector
Usedtosendaudiosignalsfromthecomputertoexternaldevices,suchas
poweredstereospeakers(speakerswithbuilt-inampliers),headphones,
multimediakeyboards,theaudioline-inconnectoronastereosystem,orother
externalrecordingdevices.
Ethernetconnector
UsedtoattachanEthernetcableforalocalareanetwork(LAN).
Note:TooperatethecomputerwithinFCCClassBlimits,useaCategory5
Ethernetcable.
Chapter1.Productoverview7
Page 14
ConnectorDescription
MicrophoneconnectorUsedtoattachamicrophonetoyourcomputerwhenyouwanttorecordsoundor
ifyouusespeech-recognitionsoftware.
Serialport
USBconnectorUsedtoattachadevicethatusesaUSBconnector,suchasaUSBkeyboard,
VGAmonitorconnectorUsedtoattachaVGAmonitororotherdevicesthatuseaVGAmonitorconnector.
Usedtoattachanexternalmodem,aserialprinter,orotherdevicesthatusea
9-pinserialport.
aUSBmouse,aUSBscanner,oraUSBprinter.IftheUSBconnectorsonyour
computerarenotenoughforyoutoconnectallyourUSBdevices,youcan
purchaseaUSBhub,whichyoucanusetoconnectadditionalUSBdevices.
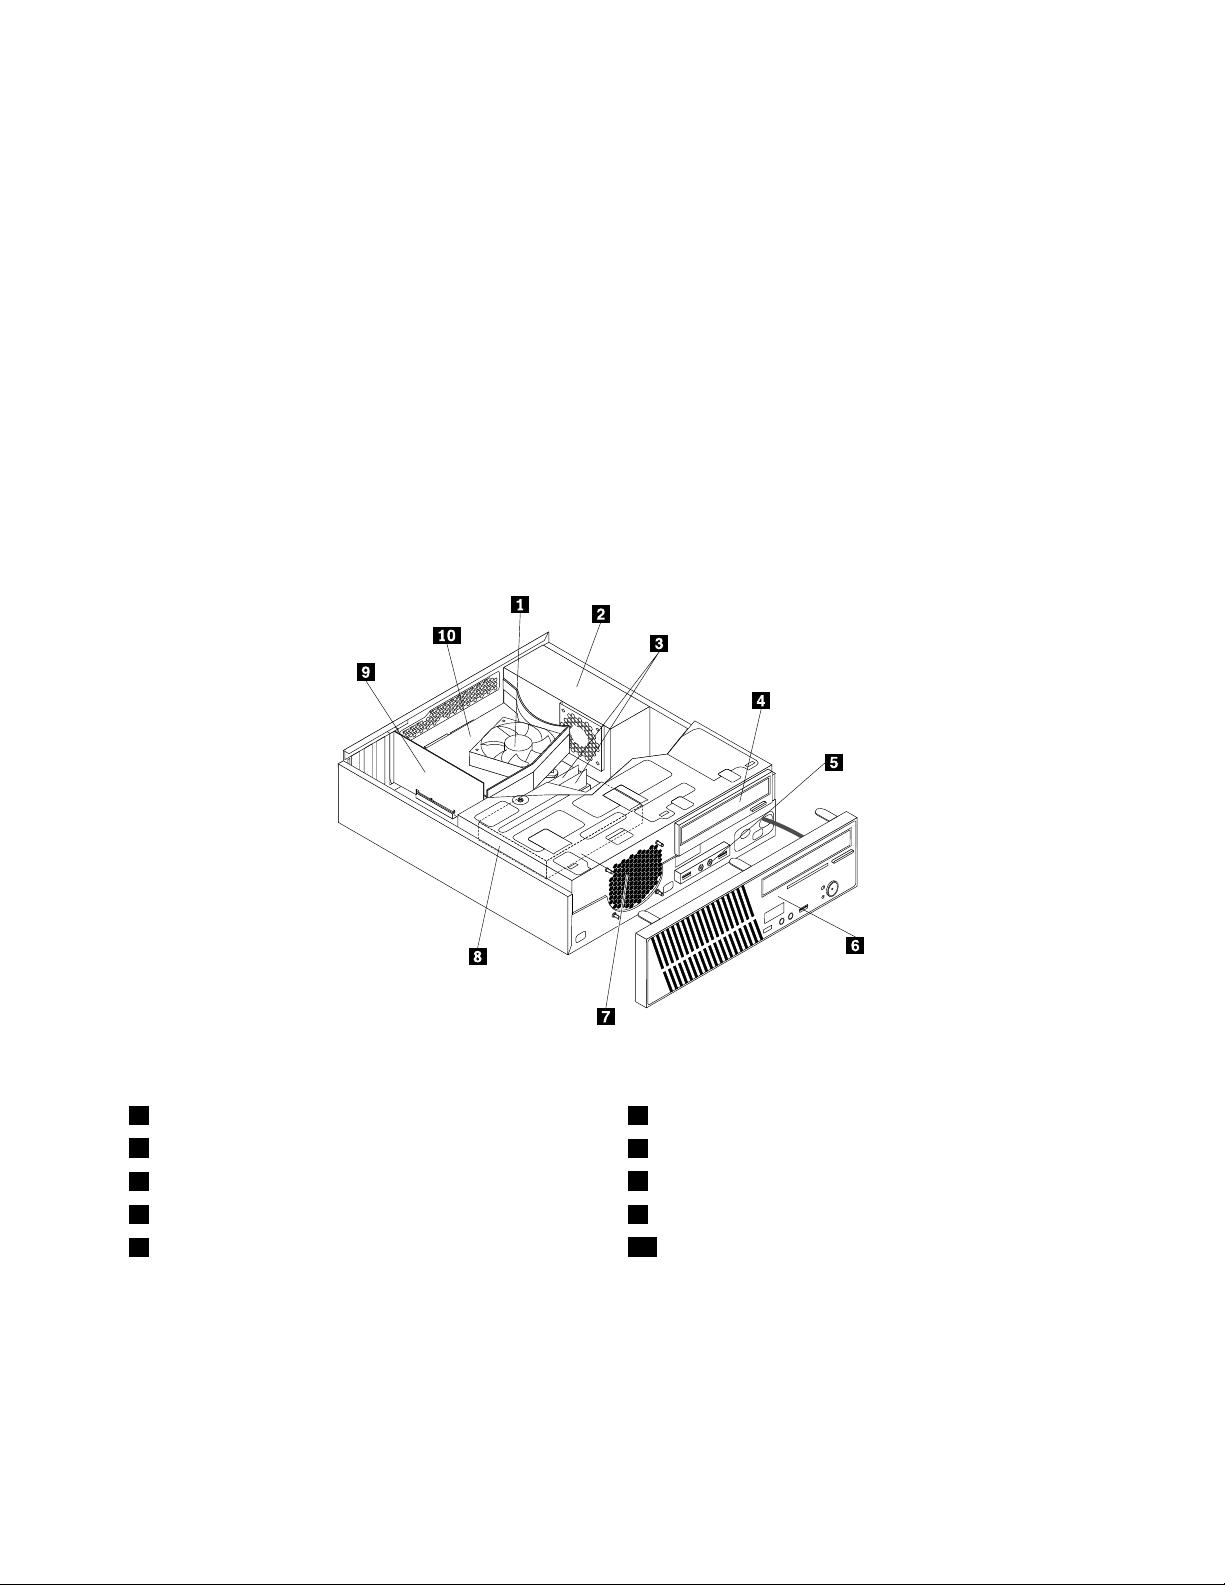
Locatingcomponents
Figure3“Componentlocations”onpage8showsthelocationsofthevariouscomponentsinyourcomputer.
Toremovethecomputercoverandgainaccesstotheinsideofthecomputer,see“Removingthecomputer
cover”onpage12
.
Figure3.Componentlocations
1Heatsinkandfanassembly
2Powersupplyassembly
3Memorymodules(2)
4Opticaldrive9PCIcard(availableinsomemodels)
5FrontUSBandaudioassembly
6Frontbezel
7Frontfanassembly
8Harddiskdrive
10Heatsinkfanduct
Locatingpartsonthesystemboard
Figure4“Systemboardpartlocations”onpage9showsthelocationsofthepartsonthesystemboard.
8ThinkCentreUserGuide
Page 15
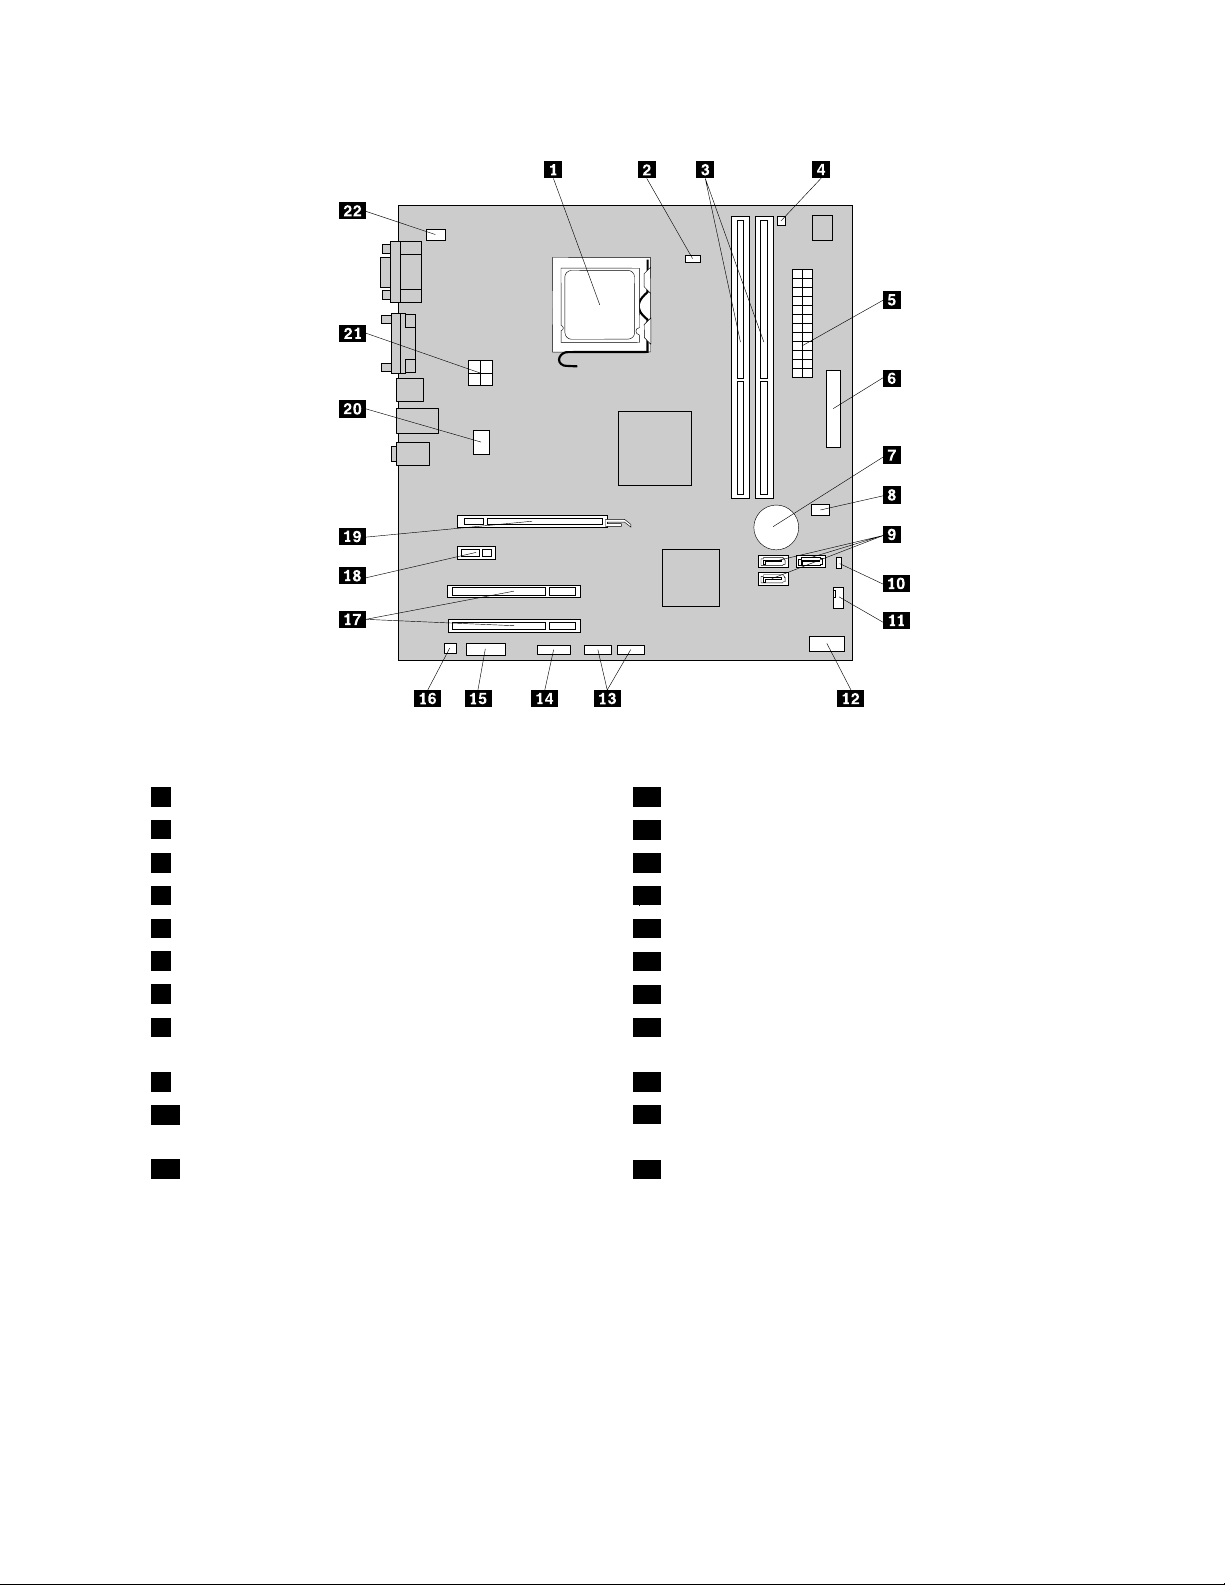
Figure4.Systemboardpartlocations
1Microprocessor12Frontpanelconnector
2Microprocessorfanconnector
3Memoryslots(2)14Serial(COM2)connector
4Thermalsensorconnector15Frontaudioconnector
524-pinpowerconnector16Internalspeakerconnector
6Parallelconnector
7Battery
8Coverpresenceswitchconnector(Intrusionswitch
13USBconnectors(2)
17PCIcardslots(2)
18PCIExpressx1cardslot
19PCIExpressx16graphicscardslot
connector)(availableinsomemodels)
9SA TAconnectors(3)20Systemfanconnector
10ClearCMOS(ComplementaryMetalOxide
214-pinpowerconnector
Semiconductor)/Recoveryjumper
11Powerfanconnector
22PS/2keyboardandmouseconnector
Locatinginternaldrives
Internaldrivesaredevicesthatyourcomputerusestoreadandstoredata.Y oucanadddrivestoyour
computertoincreasestoragecapacityandenableyourcomputertoreadothertypesofmedia.Internal
drivesareinstalledinbays.Inthismanual,thebaysarereferredtoasbay1,bay2,andsoon.
Wheninstallingorreplacinganinternaldrive,itisimportanttonotethetypeandsizeofthedrivethatyou
caninstallorreplaceineachbayandcorrectlyconnectthecablestothedriveinstalled.Refertothe
appropriatesectioninChapter2“Installingorreplacinghardware”onpage11
forinstructionsonhowto
installorreplaceinternaldrivesforyourcomputer.
Chapter1.Productoverview9
Page 16
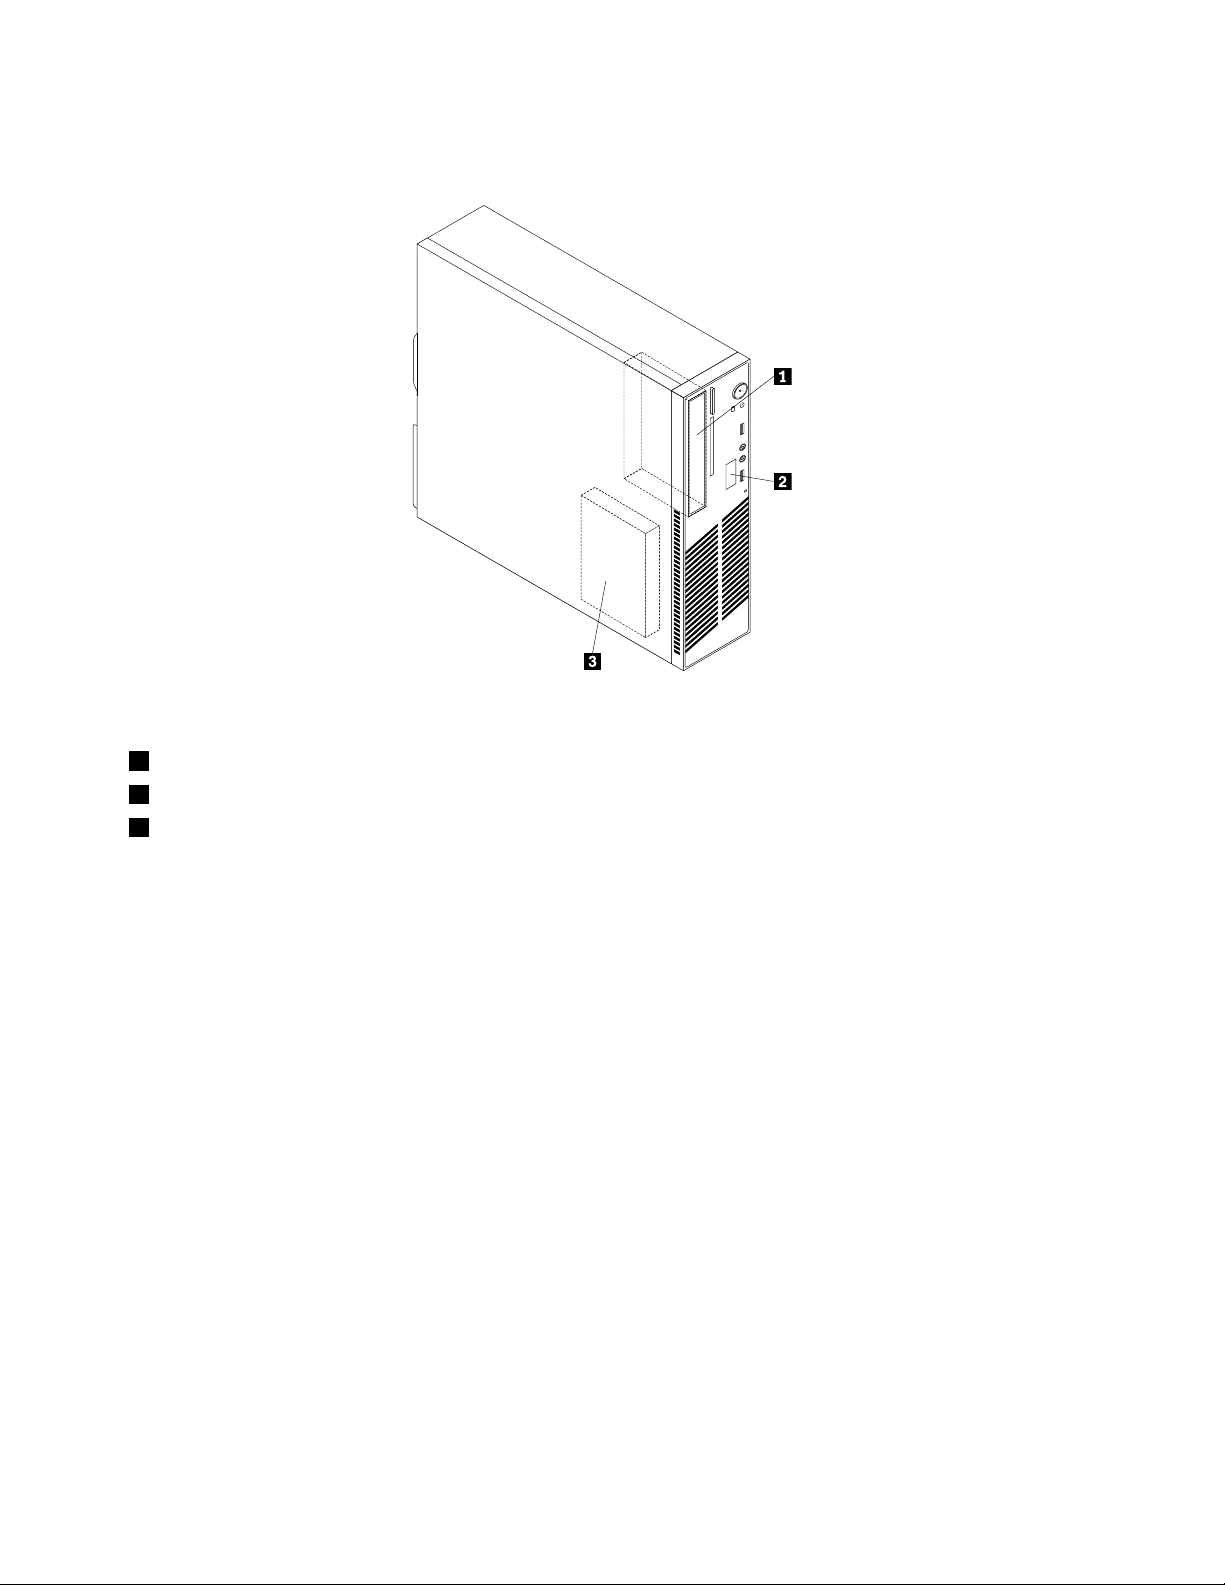
Figure5“Drivebaylocations”onpage10showsthelocationsofthedrivebaysinyourcomputer.
Figure5.Drivebaylocations
1Bay1-Opticaldrivebay(withanopticaldriveinstalled)
2Bay2-Slimcardreaderdrivebay
3Bay3-SA TAharddiskdrivebay
10ThinkCentreUserGuide
Page 17

Chapter2.Installingorreplacinghardware
Thischapterprovidesinstructionsonhowtoinstallorreplacehardwareforyourcomputer.
Thischaptercontainsthefollowingtopics:
•“Handlingstatic-sensitivedevices”onpage11
•“Installingorreplacinghardware”onpage11
•“Obtainingdevicedrivers”onpage41
•“Basicsecurityfeatures”onpage41
Handlingstatic-sensitivedevices
Donotopenthestatic-protectivepackagecontainingthenewpartuntilthedefectiveparthasbeenremoved
fromthecomputerandyouarereadytoinstallthenewpart.Staticelectricity,althoughharmlesstoyou,can
seriouslydamagecomputercomponentsandparts.
Whenyouhandlecomputerpartsandcomponents,taketheseprecautionstoavoidstatic-electricitydamage:
•Limityourmovement.Movementcancausestaticelectricitytobuilduparoundyou.
•Alwayscarefullyhandlethepartsandothercomputercomponents.HandlePCIcards,memorymodules,
systemboards,andmicroprocessorsbytheedges.Nevertouchexposedcircuitry.
•Preventothersfromtouchingthepartsandothercomputercomponents.
•Beforeyoureplaceanewpart,touchthestatic-protectivepackagecontainingthenewparttoametal
expansion-slotcoverorotherunpaintedmetalsurfaceonthecomputerforatleasttwoseconds.This
reducesstaticelectricityfromthepackageandyourbody.
•Removethenewpartfromthestatic-protectivepackageanddirectlyinstallitinthecomputerwithout
placingitonanyothersurface.Ifitishardforyoutodothisinyourspecicsituation,placethe
static-protectivepackageofthenewpartonasmooth,levelsurface,andthenplacethenewparton
thestatic-protectivepackage.
•Donotplacethepartonthecomputercoverorothermetalsurface.
Installingorreplacinghardware
Thissectionprovidesinstructionsonhowtoinstallorreplacehardwareforyourcomputer.Y oucanexpand
thecapabilitiesofyourcomputerbyaddingmemorymodules,PCIcards,ordrives,andmaintainyour
computerbyreplacingthefailinghardware.
Notes:
1.UseonlycomputerpartsprovidedbyLenovo.
2.Wheninstallingorreplacinganoption,usetheappropriateinstructionsinthissectionalongwiththe
instructionsthatcomewiththeoption.
Installingexternaloptions
Youcaninstallexternaloptionstoyourcomputer,suchasexternalspeakers,aprinter,orascanner.For
someexternaloptions,youmustinstalladditionalsoftwareinadditiontomakingthephysicalconnection.
Whenyouinstallanexternaloption,see“Locatingconnectors,controls,andindicatorsonthefrontofyour
computer”onpage6and“Locatingconnectorsandpartsontherearofyourcomputer”onpage7to
©CopyrightLenovo2010,2011
11
Page 18
identifytherequiredconnector.Then,usetheinstructionsthatcomewiththeoptiontohelpyoumakethe
connectionandinstallsoftwareordevicedriversthatarerequiredfortheoption.
Removingthecomputercover
Attention:Donotopenyourcomputerorattemptanyrepairbeforereadingandunderstandingthe“Importantsafety
information”intheThinkCentreSafetyandWarrantyGuidethatcamewithyourcomputer.Toobtainacopyofthe
ThinkCentreSafetyandWarrantyGuide,goto:
http://support.lenovo.com
Thissectionprovidesinstructionsonhowtoremovethecomputercover.
CAUTION:
Turnoffthecomputerandwaitthreetoveminutestoletthecomputercoolbeforeremovingthe
computercover.
Toremovethecomputercover,dothefollowing:
1.Removeallmediafromthedrives.Then,turnoffallattacheddevicesandthecomputer.
2.Disconnectallpowercordsfromelectricaloutlets.
3.Disconnectthepowercord,Input/Outputcables,andallothercablesthatareconnectedtothe
computer.
4.Removeanylockingdevicethatsecuresthecomputercover,suchasanintegratedcablelockora
padlock.See“Integratedcablelock”onpage42or“Padlock”onpage43.
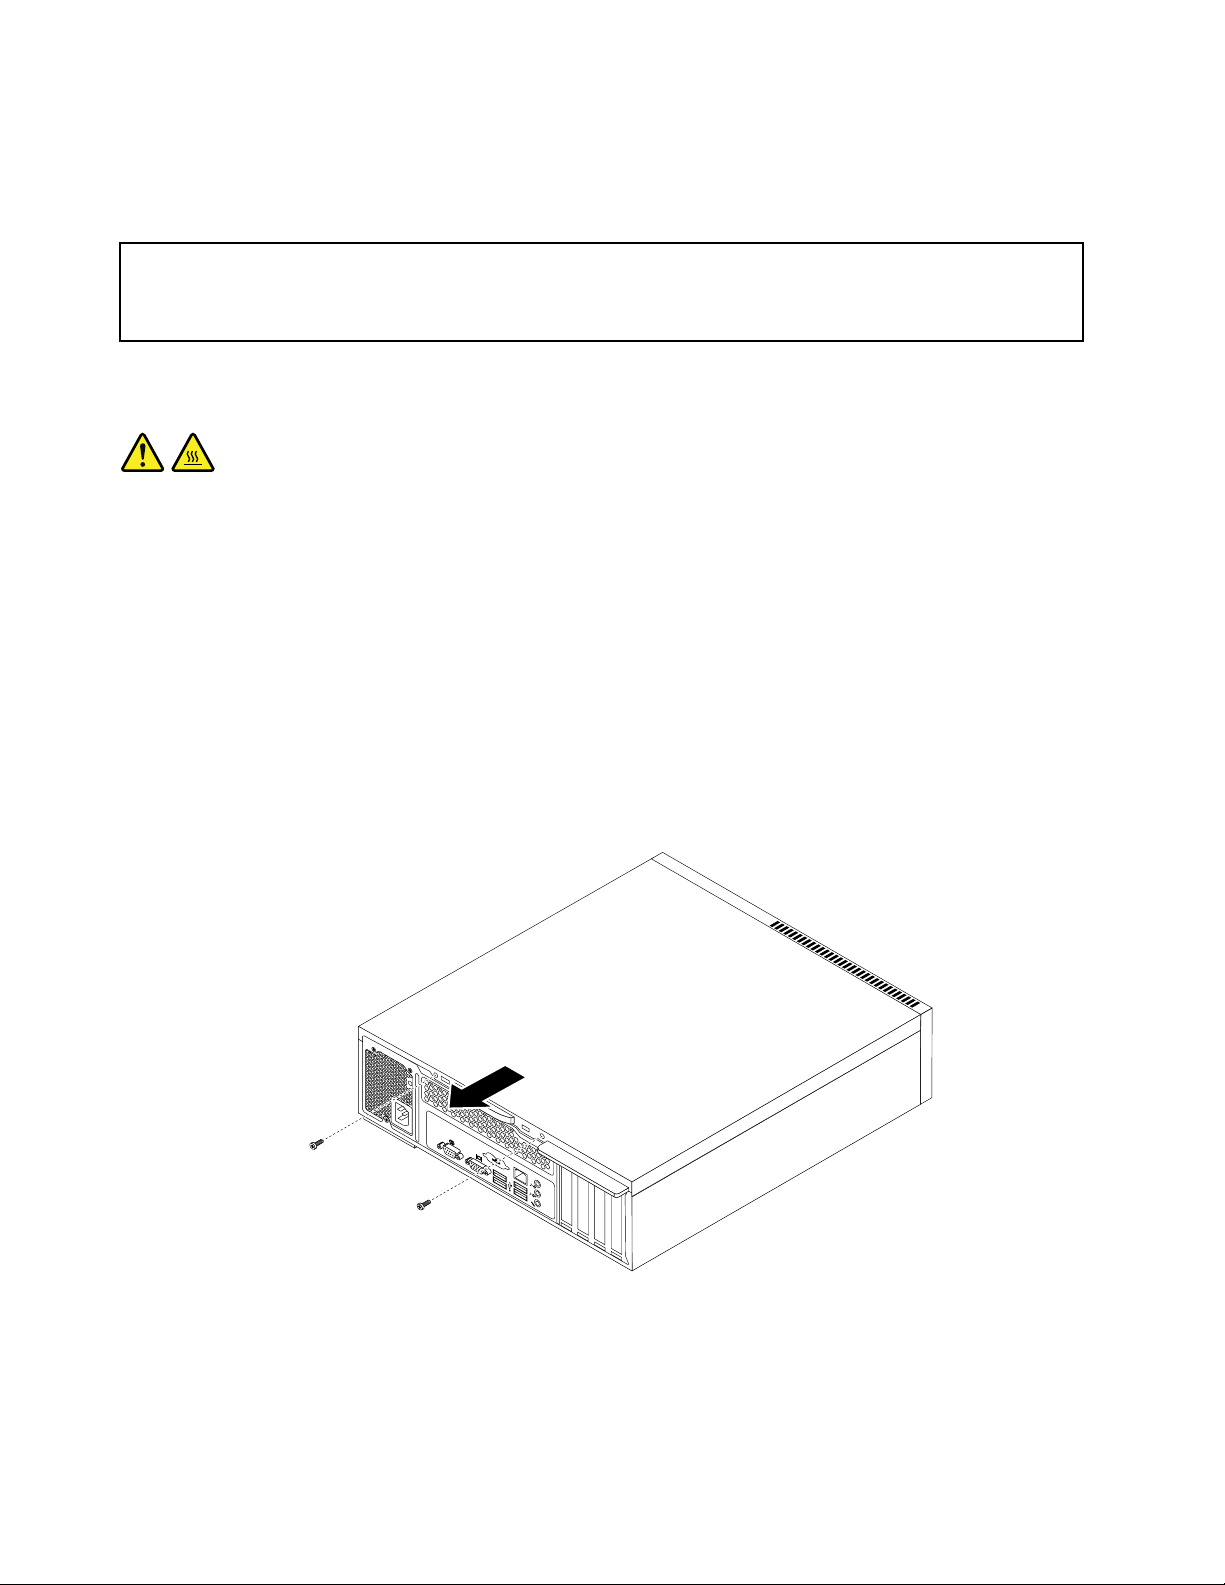
5.Removethetwoscrewsthatsecurethecomputercoverandslidethecomputercovertotherearto
removeit.
Figure6.Removingthecomputercover
12ThinkCentreUserGuide
Page 19
Removingandreinstallingthefrontbezel
Attention:Donotopenyourcomputerorattemptanyrepairbeforereadingandunderstandingthe“Importantsafety
information”intheThinkCentreSafetyandWarrantyGuidethatcamewithyourcomputer.Toobtainacopyofthe
ThinkCentreSafetyandWarrantyGuide,goto:
http://support.lenovo.com
Thissectionprovidesinstructionsonhowtoremoveandreinstallthefrontbezel.
Toremoveandreinstallthefrontbezel,dothefollowing:
1.Removeallmediafromthedrivesandturnoffallattacheddevicesandthecomputer.Then,disconnect
allpowercordsfromelectricaloutletsanddisconnectallcablesthatareconnectedtothecomputer.
2.Removethecomputercover.See“Removingthecomputercover”onpage12.
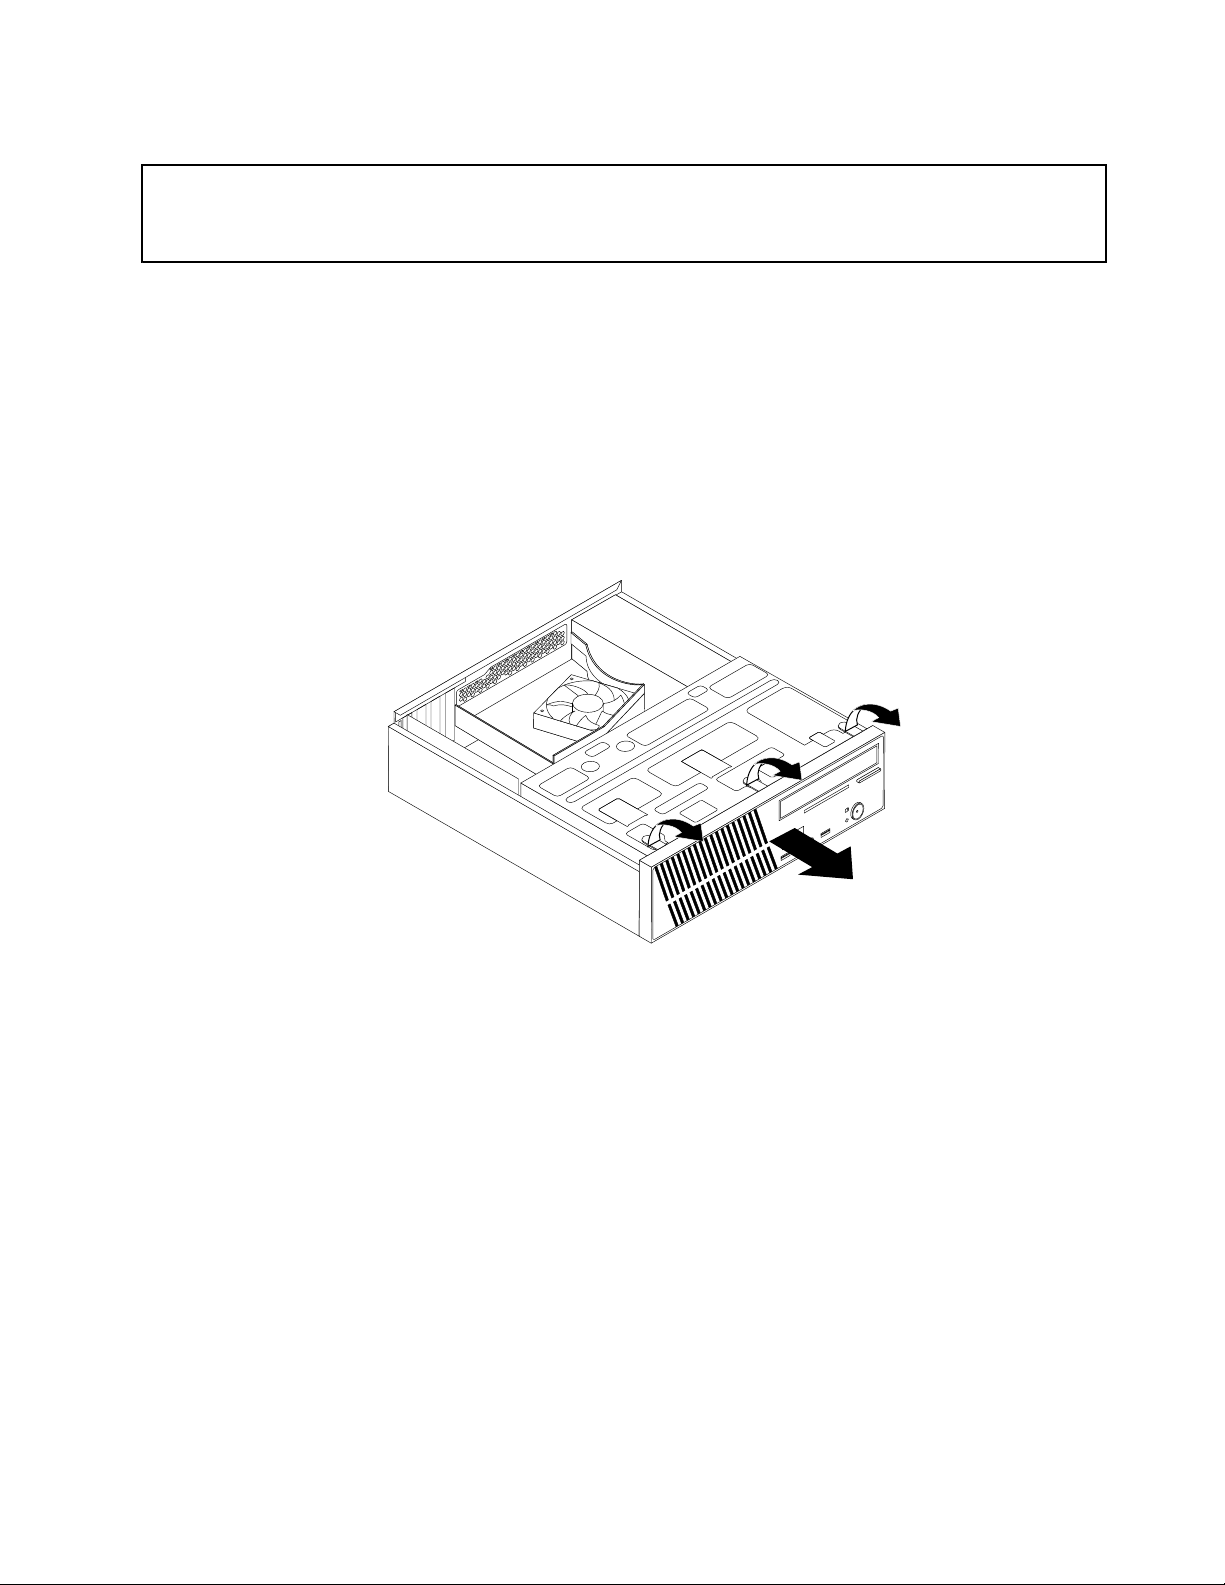
3.Removethefrontbezelbyreleasingthethreeplastictabsonthetopofthefrontbezelandpivoting
thefrontbezeloutwardtoremoveitfromthecomputer.Carefullylaythefrontbezelasidewithout
disconnectingthepowerswitchandlight-emittingdiode(LED)assemblycable.
Figure7.Removingthefrontbezel
Chapter2.Installingorreplacinghardware13
Page 20
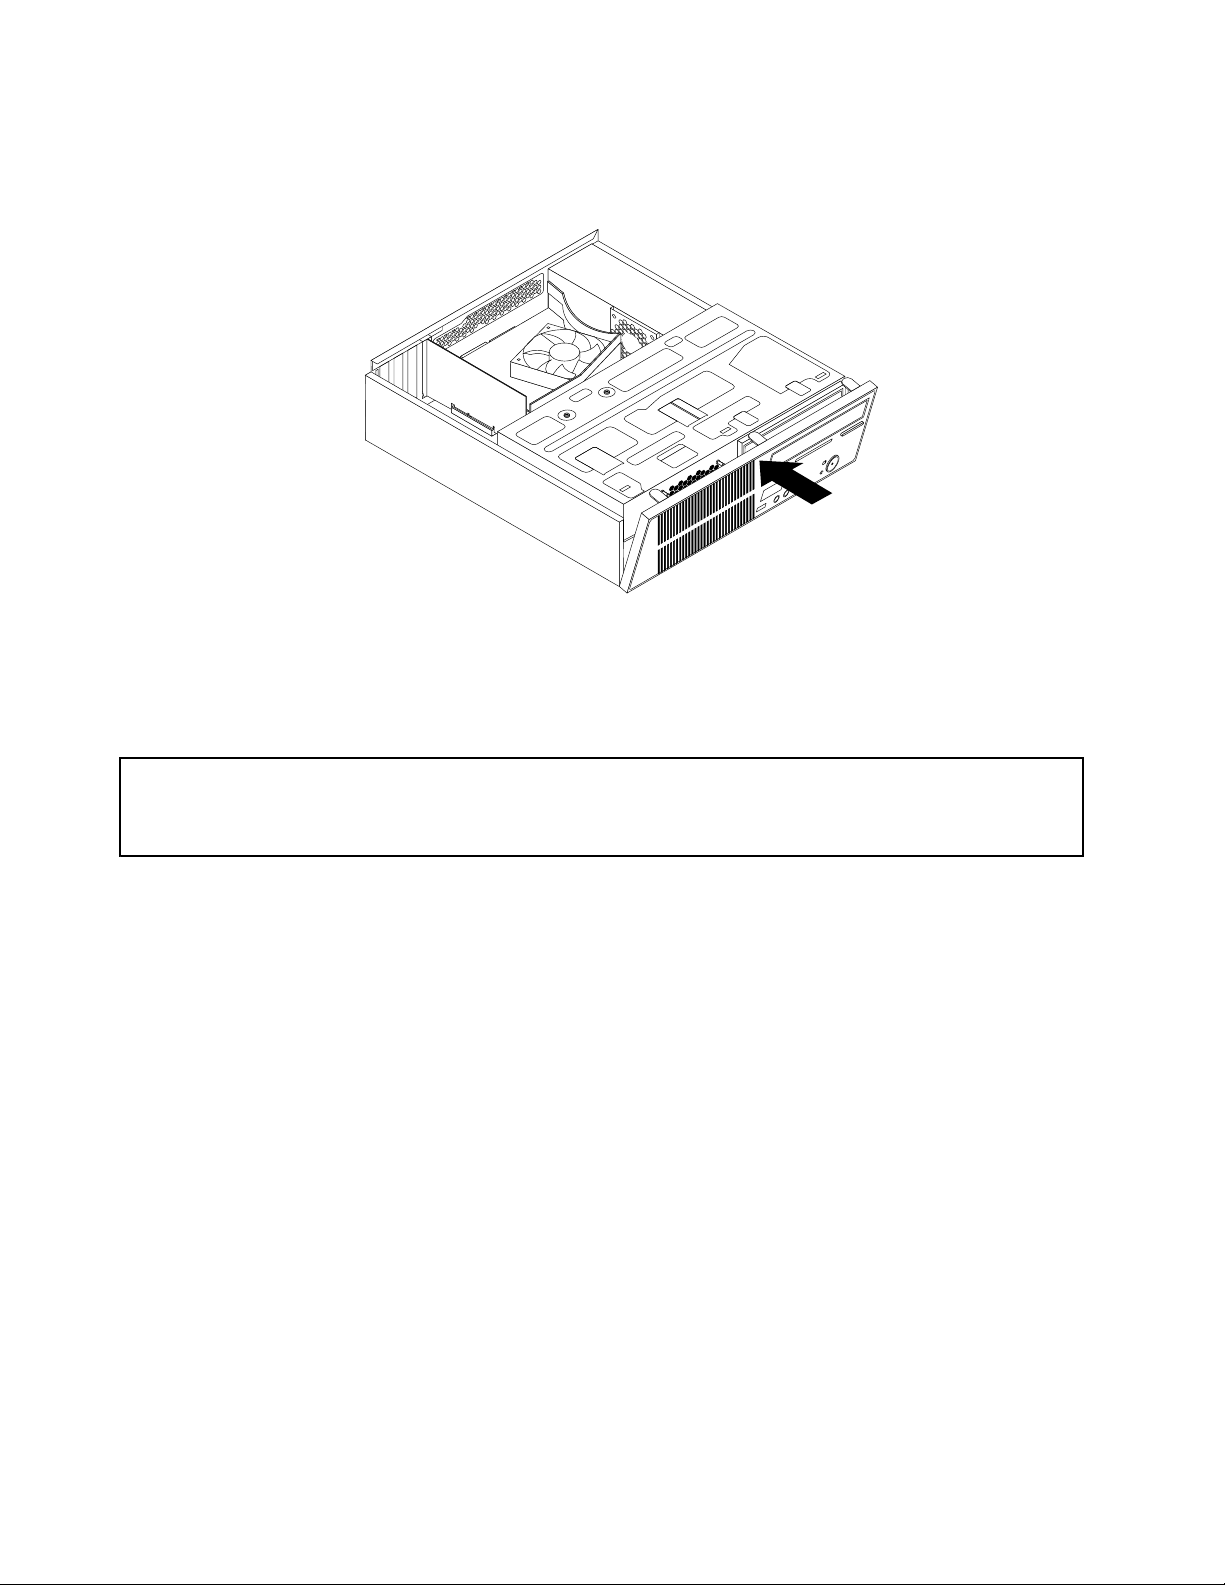
4.T oreinstallthefrontbezel,aligntheotherthreeplastictabsonthebottomofthefrontbezelwiththe
correspondingholesinthechassis,thenpivotthefrontbezelinwarduntilitsnapsintoposition.
Figure8.Reinstallingthefrontbezel
5.Goto“Completingthepartsreplacement”onpage40.
Accessingthesystemboardcomponentsanddrives
Attention:Donotopenyourcomputerorattemptanyrepairbeforereadingandunderstandingthe“Importantsafety
information”intheThinkCentreSafetyandWarrantyGuidethatcamewithyourcomputer.Toobtainacopyofthe
ThinkCentreSafetyandWarrantyGuide,goto:
http://support.lenovo.com
Thissectionprovidesinstructionsonhowtoaccessthesystemboardcomponentsanddrives.
Toaccessthesystemboardcomponentsanddrives,dothefollowing:
1.Removeallmediafromthedrivesandturnoffallattacheddevicesandthecomputer.Then,disconnect
allpowercordsfromelectricaloutletsanddisconnectallcablesthatareconnectedtothecomputer.
2.Removethecomputercovertoaccessthesystemboardcomponents.See“Removingthecomputer
cover”onpage12
3.Removethefrontbezel.
.
14ThinkCentreUserGuide
Page 21
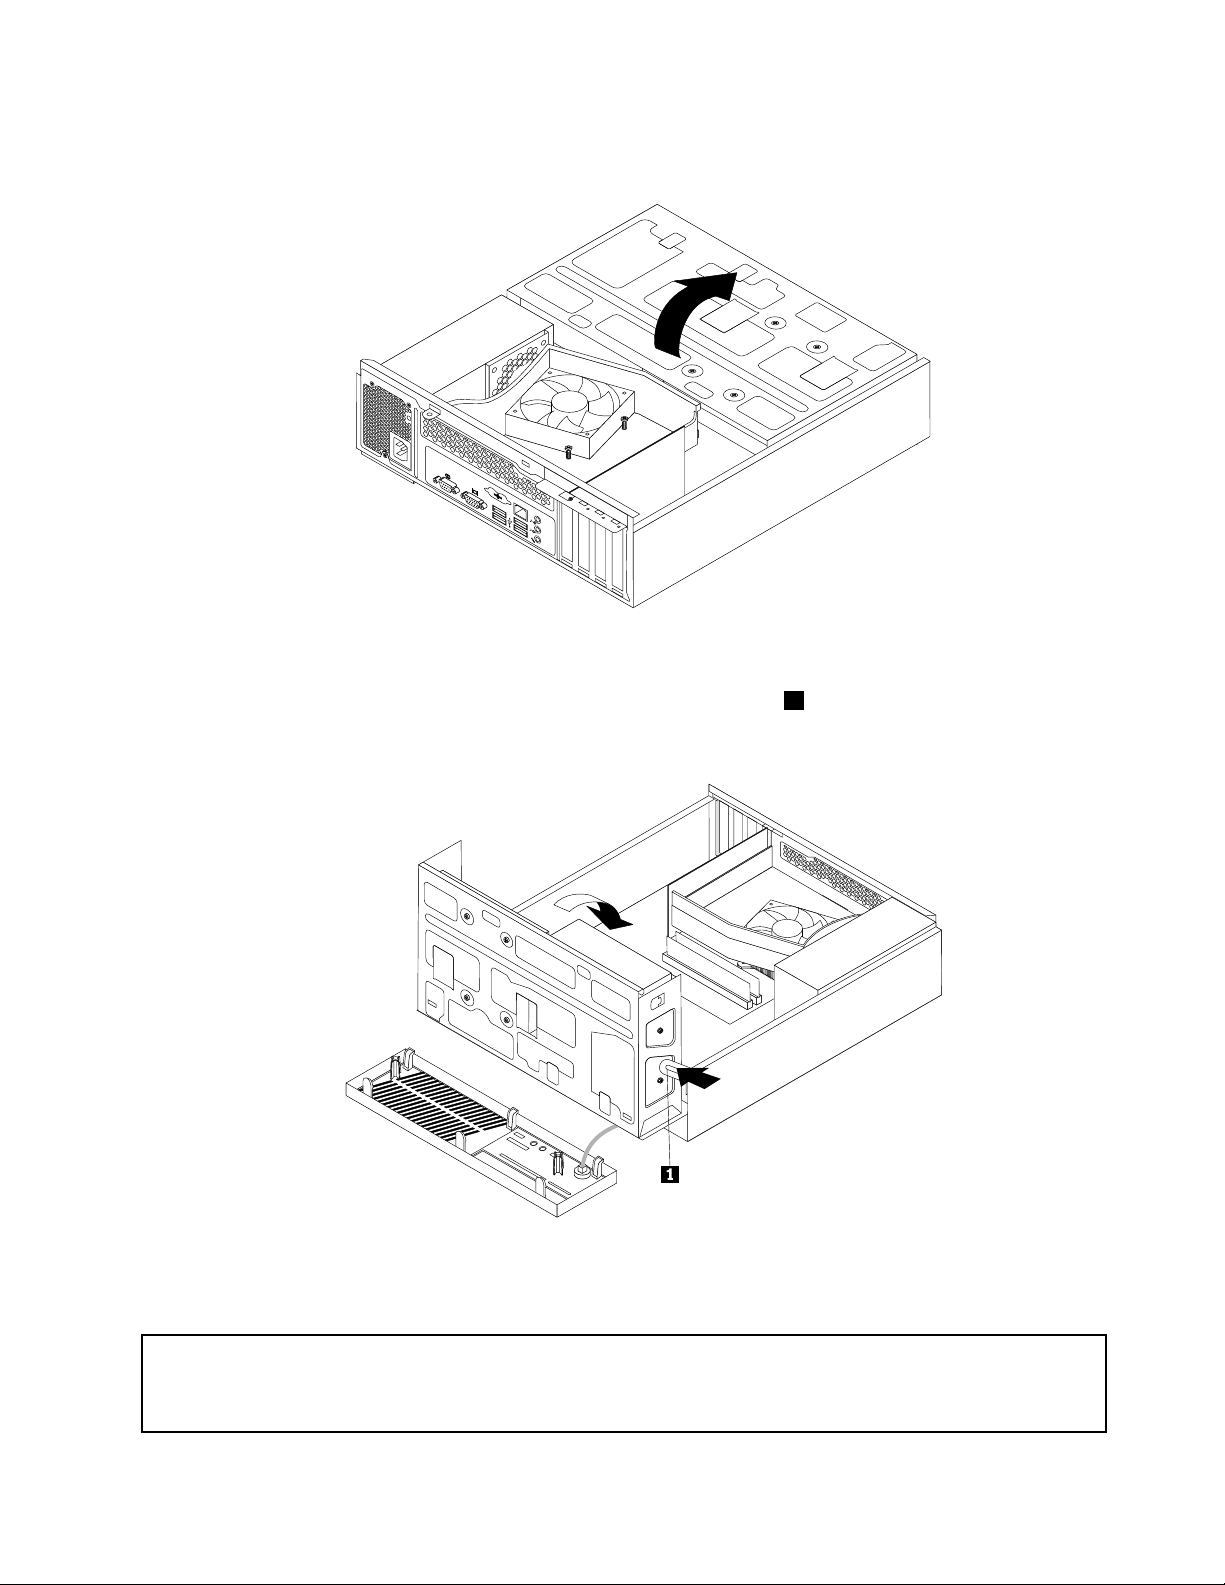
4.Pivotthedrivebayassemblyupwardtoaccessalltheinternaldrives,cables,andothercomponents.
Figure9.Pivotingthedrivebayassemblyupward
5.T olowerthedrivebayassembly,pressthedrivebayassemblyclip1inwardandpivotthedrivebay
assemblydownwardasshown.
Figure10.Loweringthedrivebayassembly
InstallingorreplacingaPCIcard
Attention:Donotopenyourcomputerorattemptanyrepairbeforereadingandunderstandingthe“Importantsafety
information”intheThinkCentreSafetyandWarrantyGuidethatcamewithyourcomputer.Toobtainacopyofthe
ThinkCentreSafetyandWarrantyGuide,goto:
http://support.lenovo.com
Chapter2.Installingorreplacinghardware15
Page 22
ThissectionprovidesinstructionsonhowtoinstallorreplaceaPCIcard.
YourcomputerhastwostandardPCIcardslots,onePCIExpressx1cardslot,andonePCIExpressx16
graphicscardslot.See“Locatingpartsonthesystemboard”onpage8.
ToinstallorreplaceaPCIcard,dothefollowing:
1.Removeallmediafromthedrivesandturnoffallattacheddevicesandthecomputer.Then,disconnect
allpowercordsfromelectricaloutletsanddisconnectallcablesthatareconnectedtothecomputer.
2.Removethecomputercover.See“Removingthecomputercover”onpage12.
3.Dooneofthefollowing:
•IfyouarereplacingaPCIcard,removethescrewthatsecurestheoldPCIcardandreleasetheold
PCIcardfromthePCIcardslot.Then,carefullyremovetheoldPCIcardfromthechassis,asshown
inRemovingthePCIcard.
Notes:
a.IfthereareanycablesbetweenthePCIcardandthesystemboard,notethecableroutingand
thendisconnectthecables.
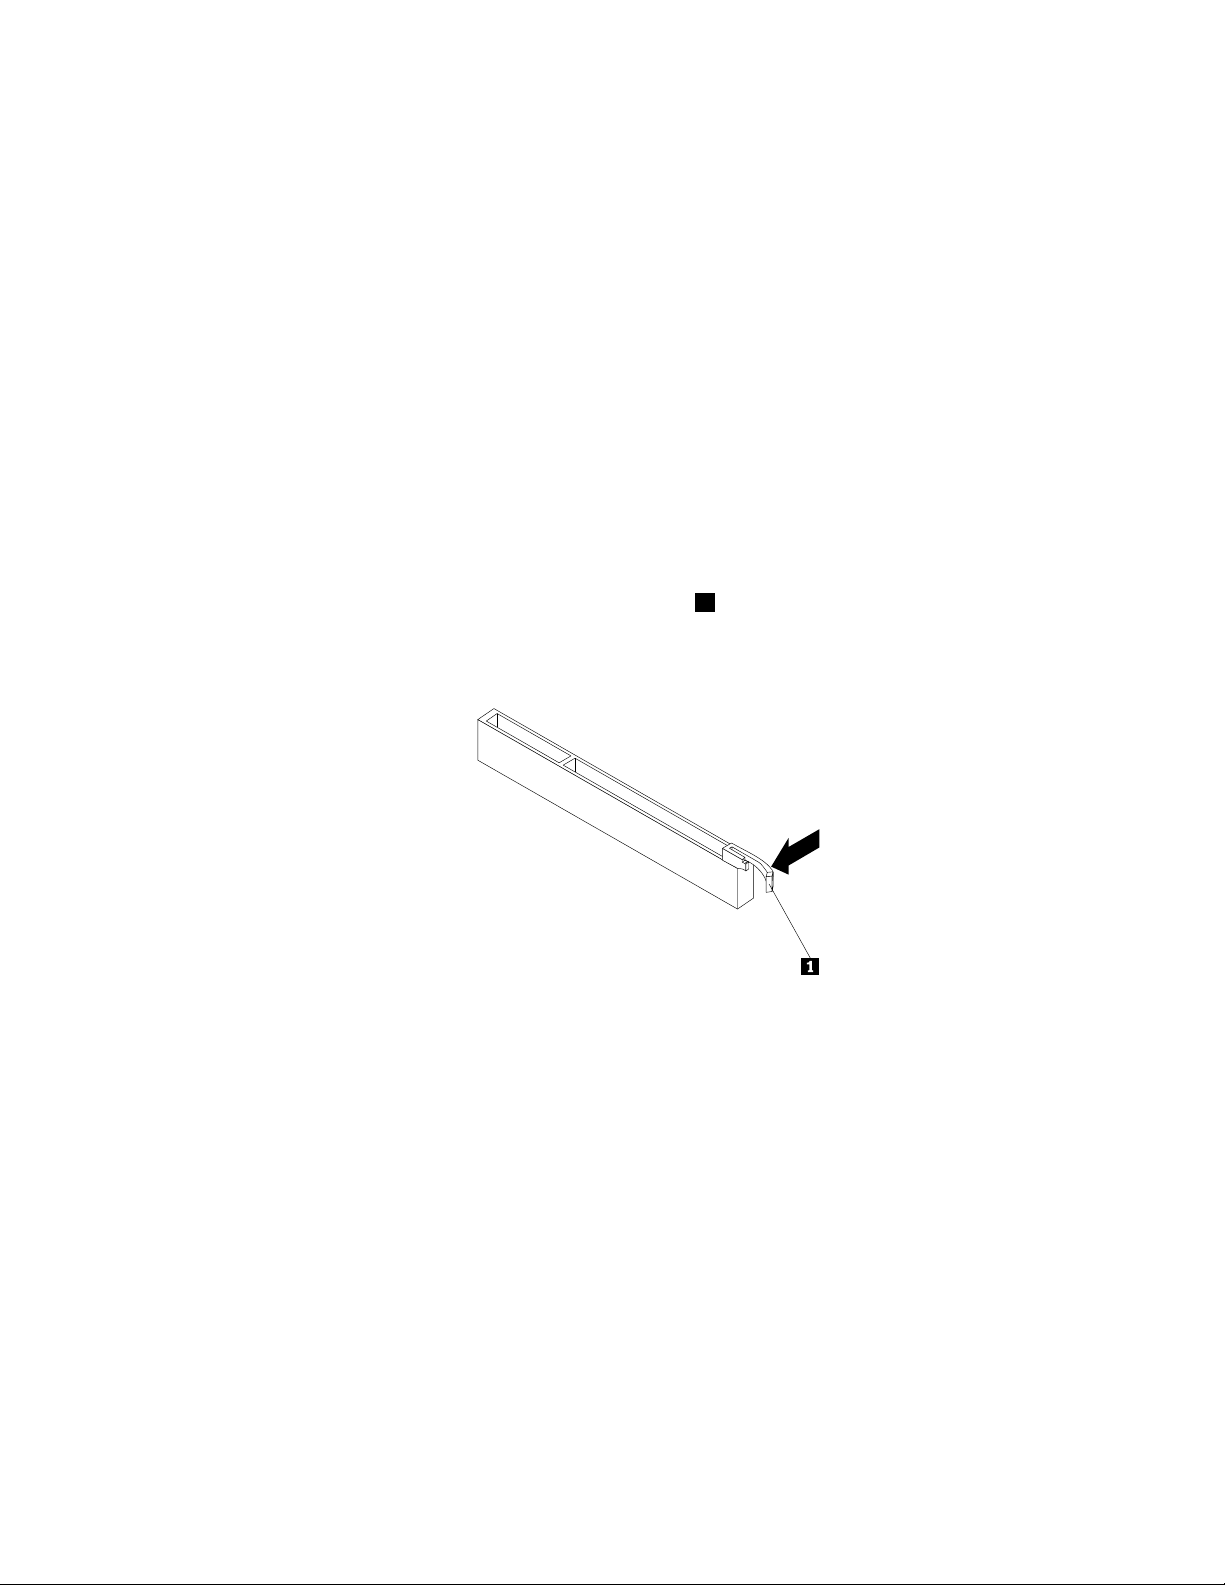
b.IfthePCIcardissecuredinplacebyaretaininglatch1,presstheretaininglatchtoreleasethe
PCIcardfromthelatch.Then,graspthePCIcardbytheedgesandcarefullypullitoutofthe
PCIcardslot.Ifnecessary,alternatemovingeachsideofthePCIcardasmallandequalamount
untilitiscompletelyremovedfromtheslot.
c.Youmightneedtoremovethefrontbezelandpivotthedrivebayassemblyupwardtoavoid
interferencewithremovingthePCIcard.See“Removingandreinstallingthefrontbezel”onpage
13and“Accessingthesystemboardcomponentsanddrives”onpage14.
16ThinkCentreUserGuide
Page 23
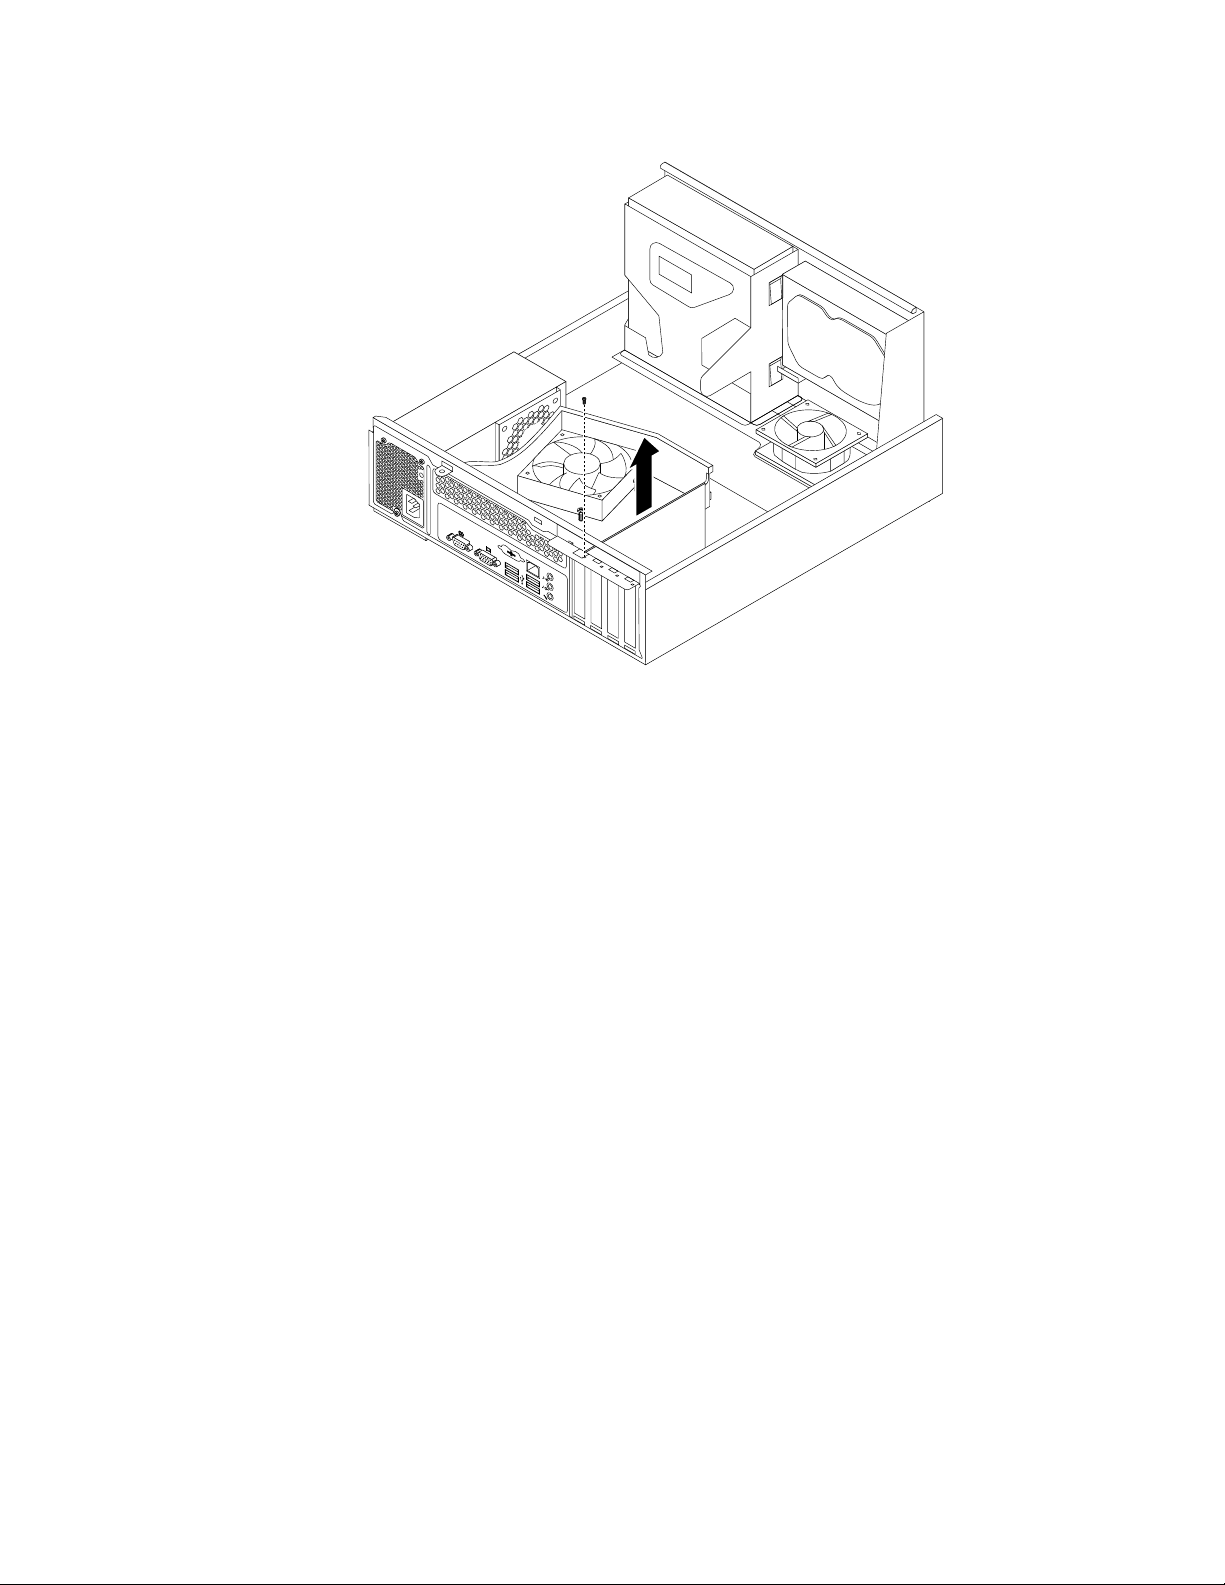
Figure11.RemovingthePCIcard
•IfyouareinstallingaPCIcard,removetheappropriatePCIcardslotcover.See“Locatingpartson
thesystemboard”onpage8toidentifythetypesofPCIcardslots.
4.RemovethenewPCIcardfromitsstatic-protectivepackage.
Chapter2.Installingorreplacinghardware17
Page 24
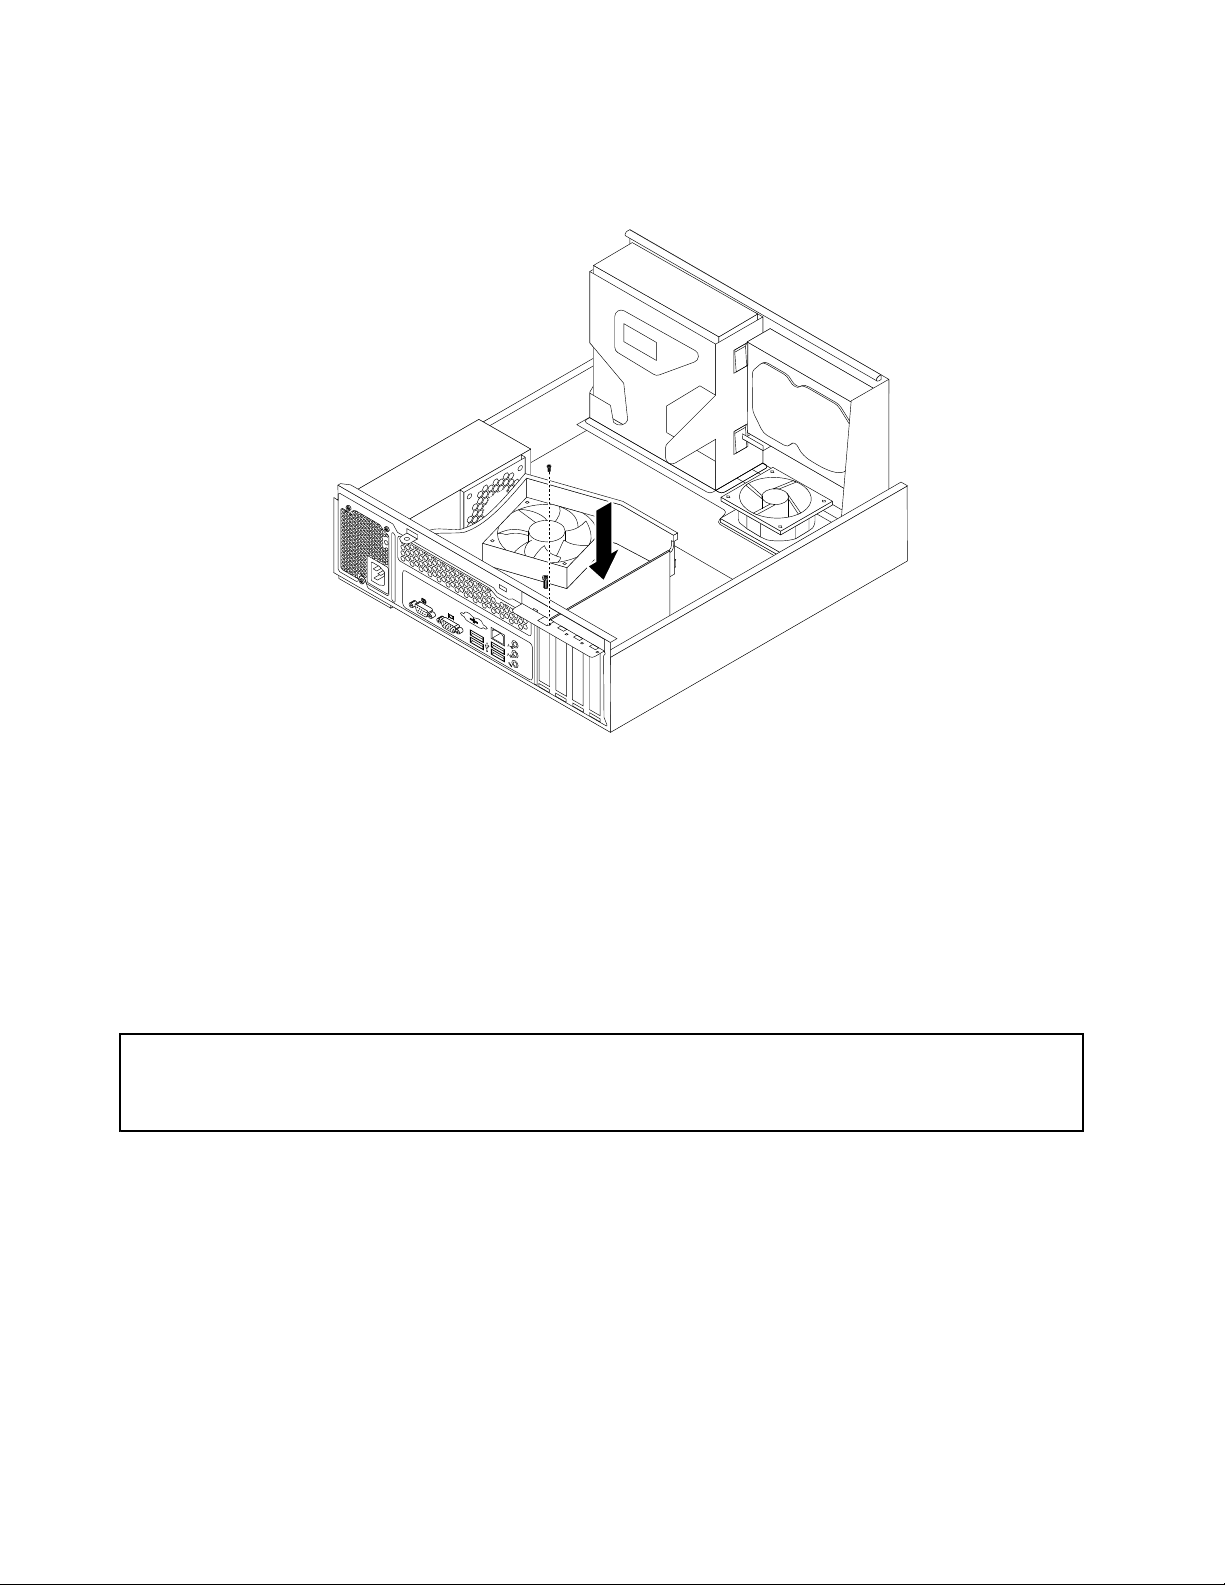
5.InstallthenewPCIcardintotheappropriatePCIcardslotonthesystemboard.Then,installthescrew
tosecurethenewPCIcardinplace.
Figure12.InstallingthePCIcard
6.Ifnecessary,connectanycablesbetweenthePCIcardandthesystemboard.See“Locatingpartson
thesystemboard”onpage8toidentifythevariousconnectorsonthesystemboard.
Whattodonext:
•T oworkwithanotherpieceofhardware,gototheappropriatesection.
•T ocompletetheinstallationorreplacement,goto“Completingthepartsreplacement”onpage40.
Installingorreplacingamemorymodule
Attention:Donotopenyourcomputerorattemptanyrepairbeforereadingandunderstandingthe“Importantsafety
information”intheThinkCentreSafetyandWarrantyGuidethatcamewithyourcomputer.Toobtainacopyofthe
ThinkCentreSafetyandWarrantyGuide,goto:
http://support.lenovo.com
Thissectionprovidesinstructionsonhowtoinstallorreplaceamemorymodule.
YourcomputerhastwomemoryslotsforinstallingorreplacingDDR3SDRAMDIMMsthatprovideuptoa
maximumof4GBofsystemmemory.Wheninstallingorreplacingamemorymodule,use1GBor2GB
DDR3SDRAMDIMMsinanycombinationuptoamaximumof4GBofsystemmemory.
Toinstallorreplaceamemorymodule,dothefollowing:
1.Removeallmediafromthedrivesandturnoffallattacheddevicesandthecomputer.Then,disconnect
allpowercordsfromelectricaloutletsanddisconnectallcablesthatareconnectedtothecomputer.
2.Removethecomputercover.See“Removingthecomputercover”onpage12.
3.Laythecomputeronitssideforeasieraccesstothesystemboard.
18ThinkCentreUserGuide
Page 25
4.Locatethememoryslotsonthesystemboard.See“Locatingpartsonthesystemboard”onpage8.
5.Removeanypartsanddisconnectanycablesthatmightpreventyouraccesstothememoryslots.
6.Dooneofthefollowing:
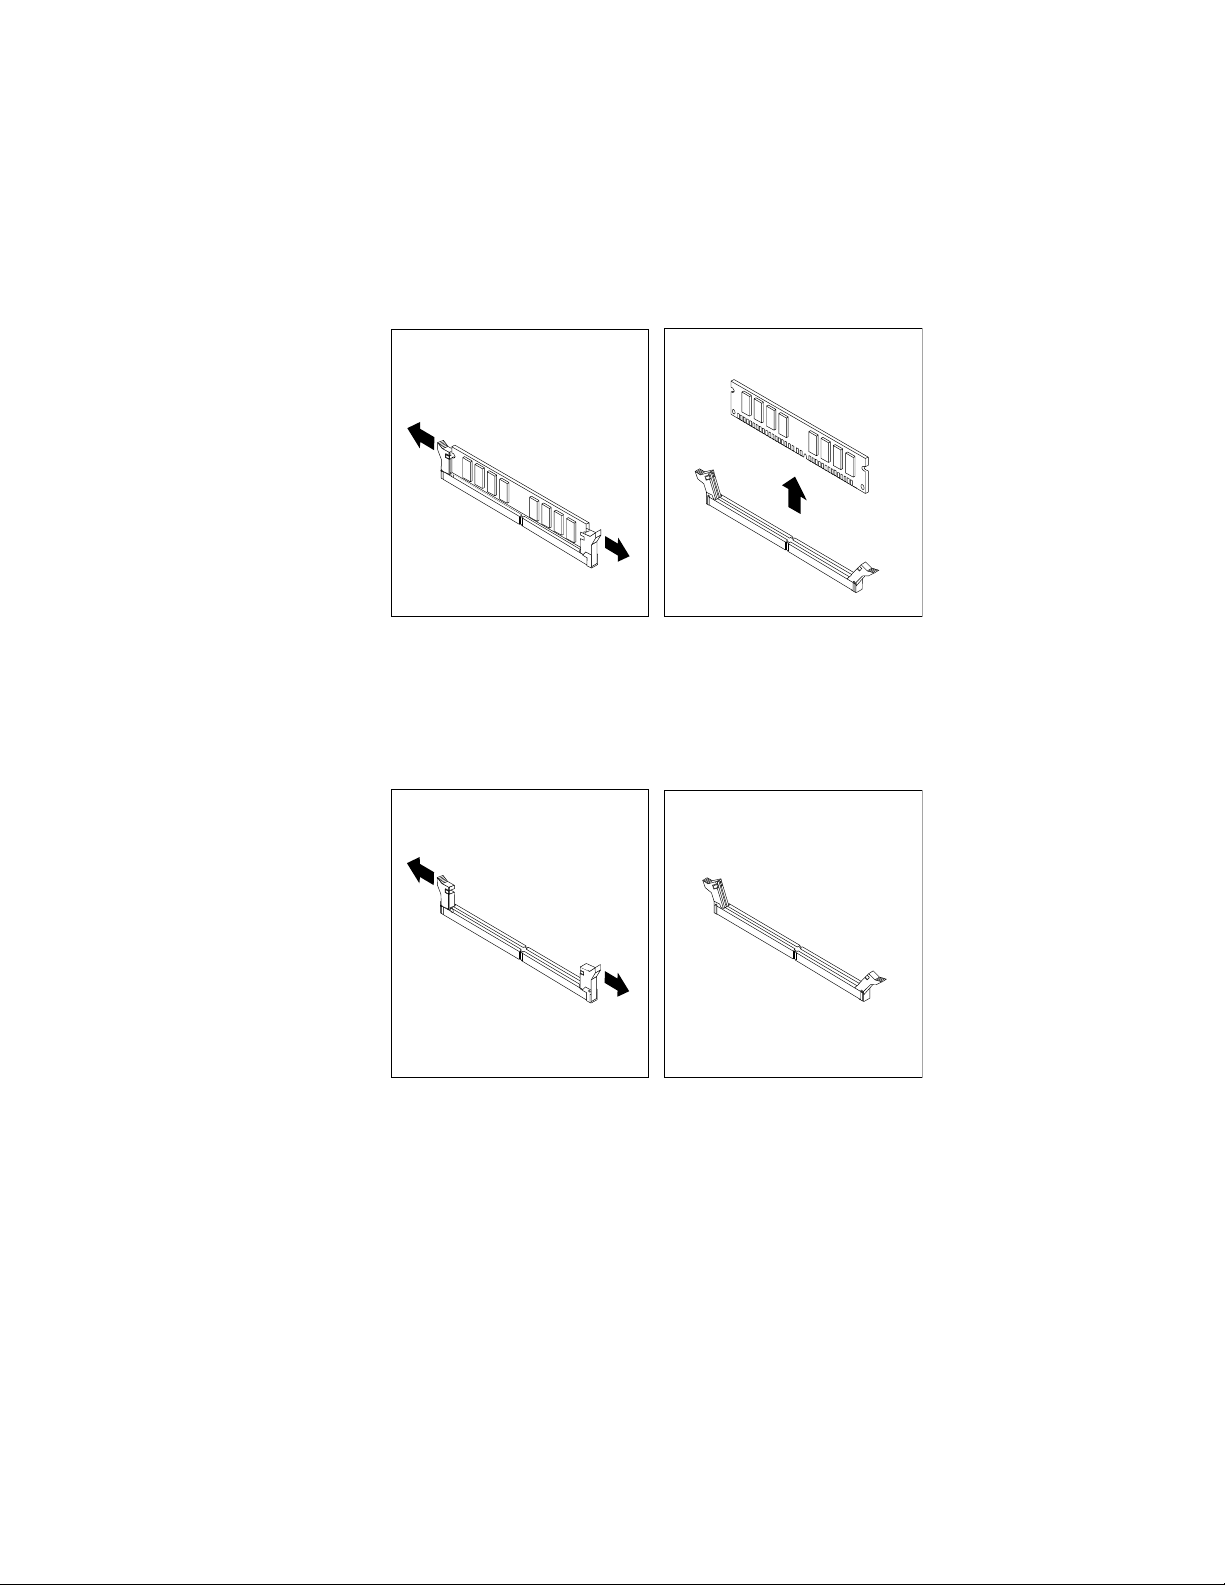
•Ifyouarereplacingamemorymodule,opentheretainingclipsandremovetheoldmemorymodule
thatiscurrentlyinstalled.
Figure13.Removingthememorymodule
•Ifyouareinstallingamemorymodule,opentheretainingclipsofthememoryslotintowhichyou
wanttoinstallthememorymodule.
Figure14.Openingtheretainingclipsofthememoryslot
Chapter2.Installingorreplacinghardware19
Page 26
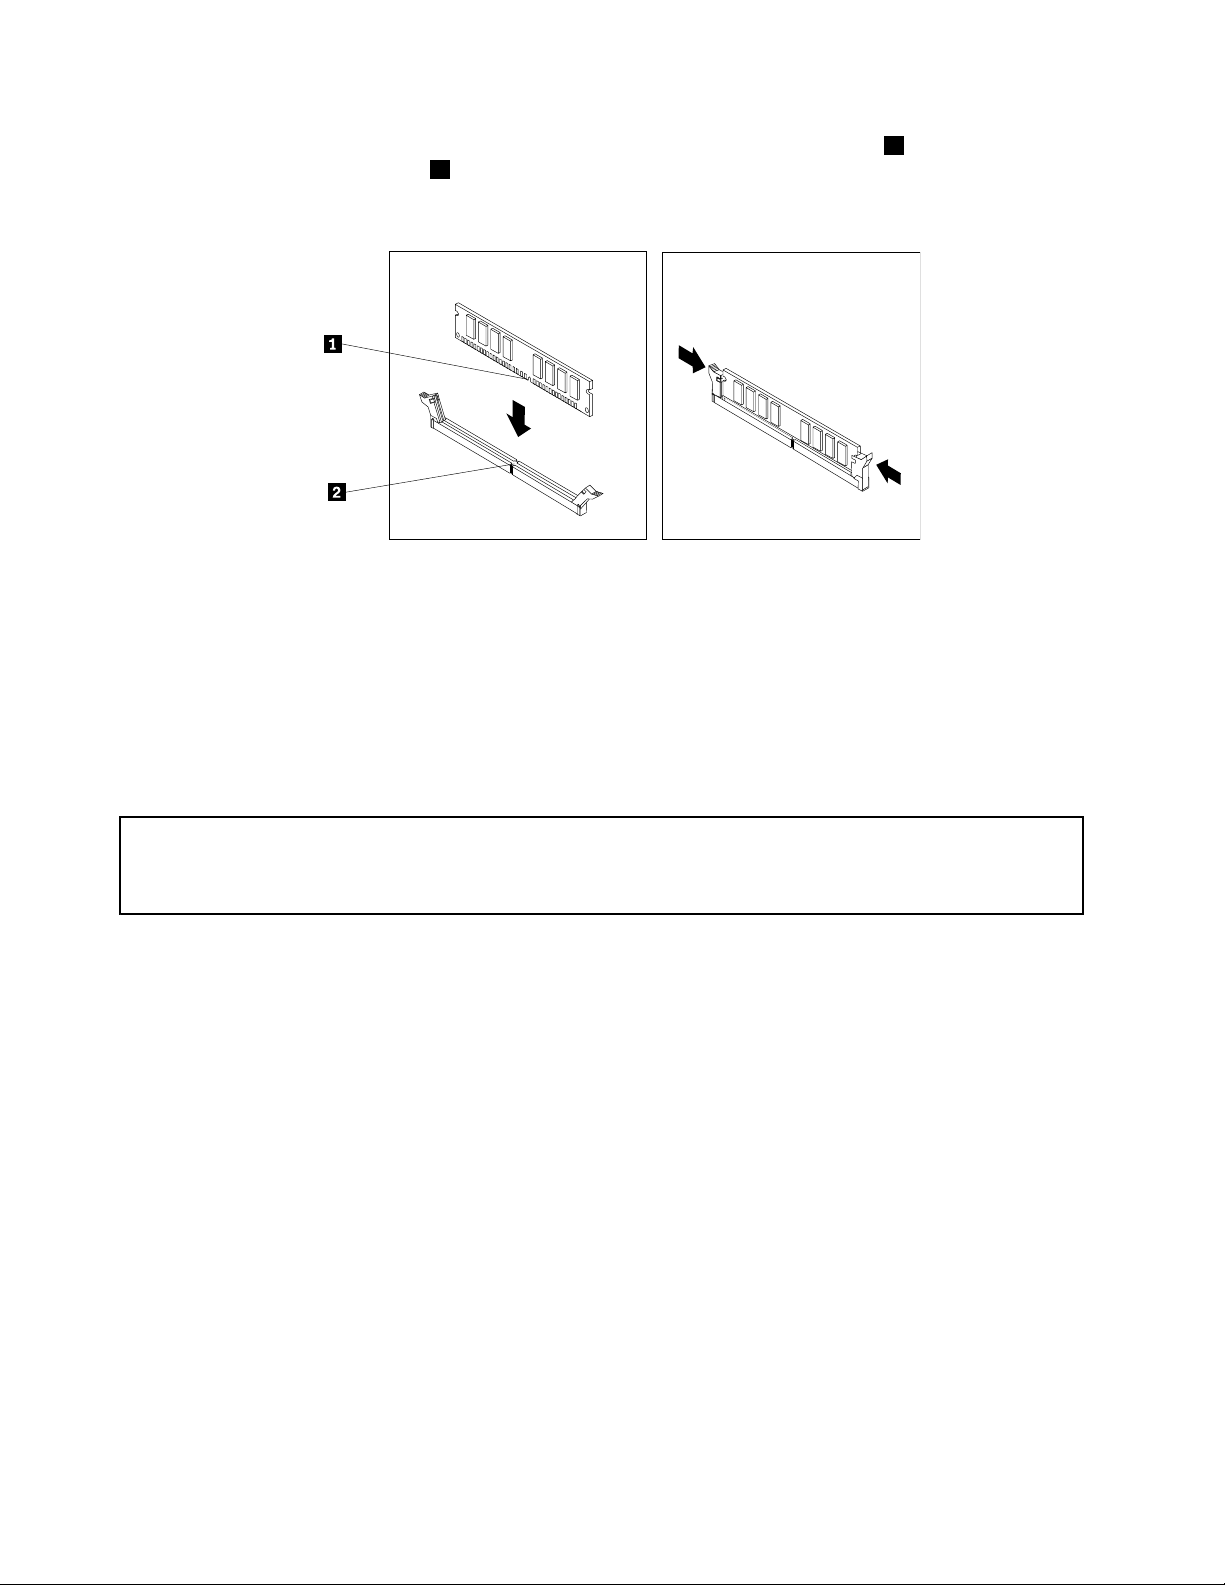
7.Positionthenewmemorymoduleoverthememoryslot.Makesurethatthenotch1onthenewmemory
moduleisalignedwiththekey2inthememoryslot.Then,pressthenewmemorymodulestraightdown
intothememoryslotuntiltheretainingclipscloseandthenewmemorymodulesnapsintoposition.
Figure15.Installingthememorymodule
8.Reinstallanypartsandreconnectanycablesthathavebeenremovedordisconnected.
Whattodonext:
•T oworkwithanotherpieceofhardware,gototheappropriatesection.
•T ocompletetheinstallationorreplacement,goto“Completingthepartsreplacement”onpage40
.
Replacingthebattery
Attention:Donotopenyourcomputerorattemptanyrepairbeforereadingandunderstandingthe“Importantsafety
information”intheThinkCentreSafetyandWarrantyGuidethatcamewithyourcomputer.Toobtainacopyofthe
ThinkCentreSafetyandWarrantyGuide,goto:
http://support.lenovo.com
Yourcomputerhasaspecialtypeofmemorythatmaintainsthedate,time,andcongurationinformationfor
built-infeatures.Thebatterykeepsthisinformationactivewhenyouturnoffthecomputer.
Thebatterynormallyrequiresnochargingormaintenancethroughoutitslife;however,nobatterylasts
forever.Ifthebatteryfails,thedate,time,andcongurationinformation,includingpasswords,arelost.An
errormessageisdisplayedwhenyouturnonthecomputer.
Beforeperformingthefollowingprocedure,besuretoreadandunderstandtheinformationaboutreplacing
anddisposingofthebatteryinthe“Batteries”and“Lithiumbatterynotice”sectionsoftheThinkCentre
SafetyandWarrantyGuide.
Toreplacethebattery,dothefollowing:
1.Removeallmediafromthedrivesandturnoffallattacheddevicesandthecomputer.Then,disconnect
allpowercordsfromelectricaloutletsanddisconnectallcablesthatareconnectedtothecomputer.
2.Removethecomputercover.See“Removingthecomputercover”onpage12.
3.Pivotthedrivebayassemblyupward.See“Accessingthesystemboardcomponentsanddrives”
onpage14.
4.Locatethebattery.See“Locatingpartsonthesystemboard”onpage8.
5.Removeanypartsanddisconnectanycablesthatmightpreventyouraccesstothebattery.
20ThinkCentreUserGuide
Page 27
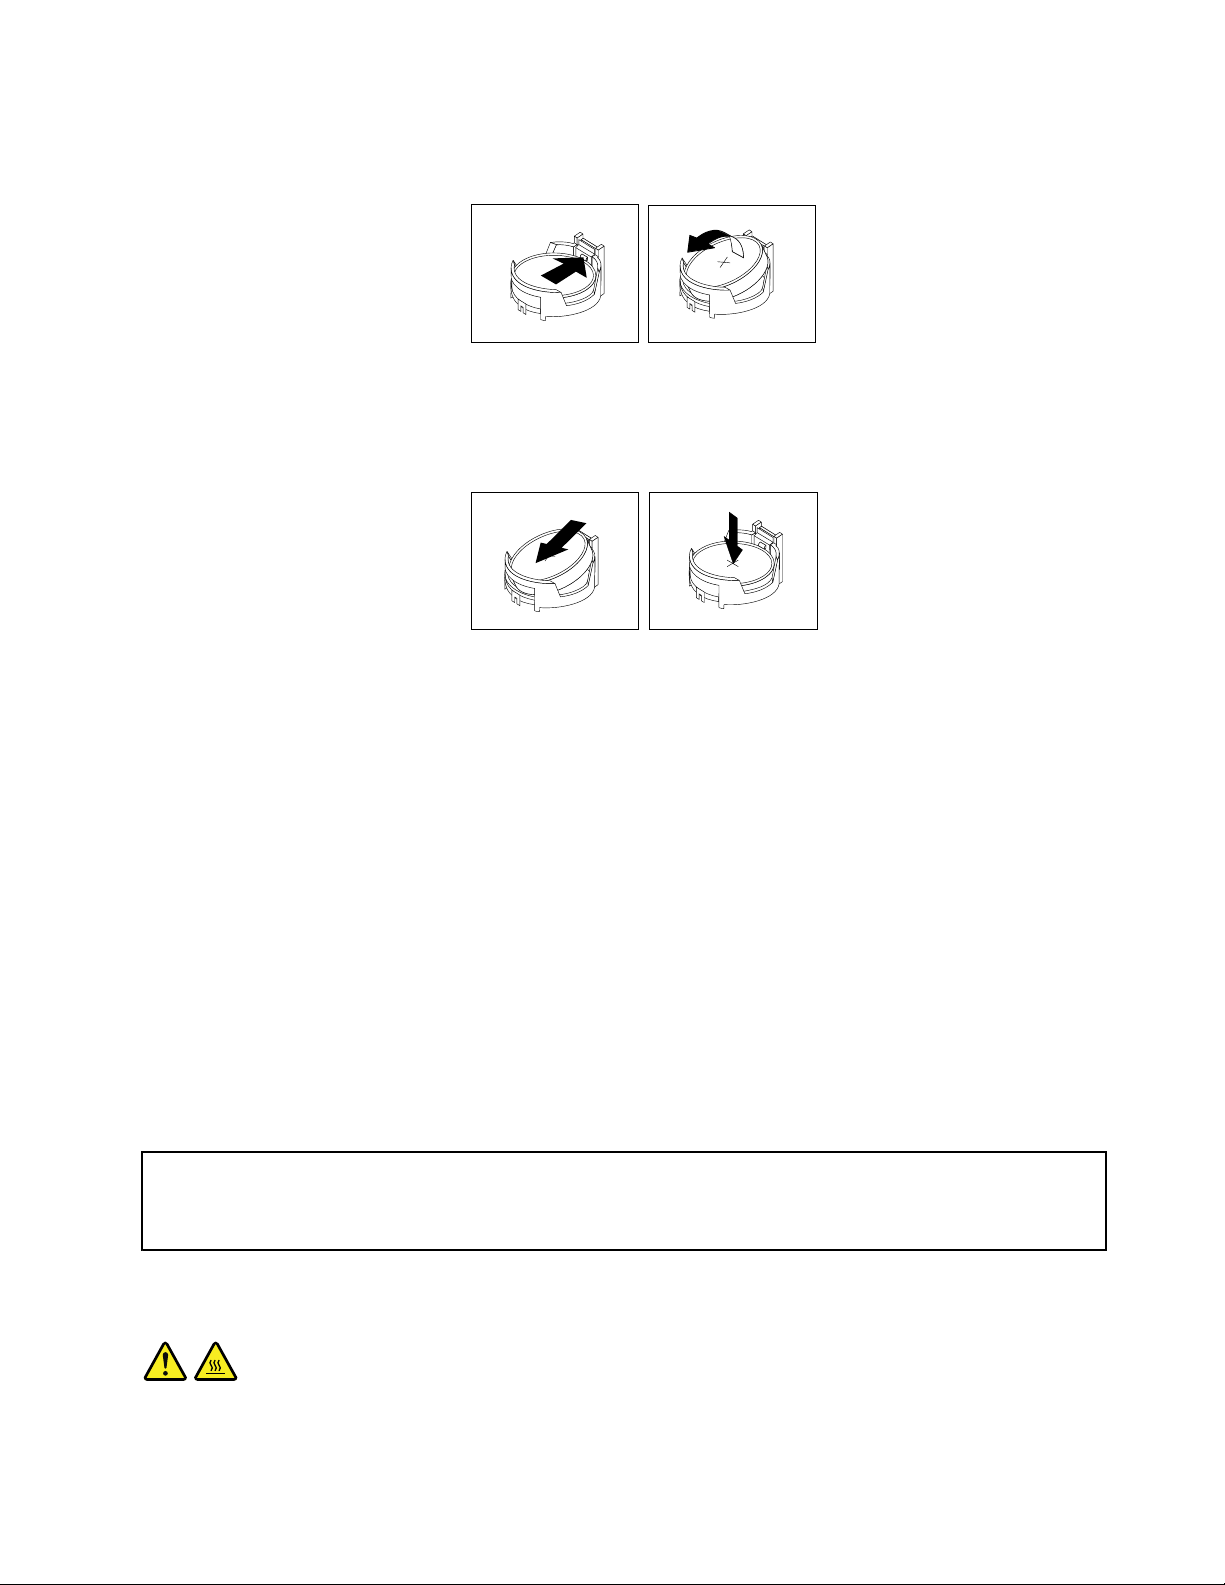
6.Removetheoldbattery.
Figure16.Removingtheoldbattery
7.Installthenewbattery.
Figure17.Installingthenewbattery
8.Reinstallanypartsandreconnectanycablesthathavebeenremovedordisconnected.
9.Lowerthedrivebayassembly.See“Accessingthesystemboardcomponentsanddrives”onpage14.
10.Reinstallthecomputercoverandreconnectallexternalcables.See“Completingthepartsreplacement”
onpage40.
11.T urnonthecomputerandallattacheddevices.
Note:Whenthecomputeristurnedonforthersttimeafterreplacingthebattery,anerrormessage
mightbedisplayed.Thisisnormalafterreplacingthebattery.
12.UsetheSetupUtilityprogramtosetthedate,time,passwords,andanyothercongurationinformation.
SeeChapter4“UsingtheSetupUtilityprogram”onpage51.
Whattodonext:
•T oworkwithanotherpieceofhardware,gototheappropriatesection.
•T ocompletethereplacement,goto“Completingthepartsreplacement”onpage40.
Replacingtheheatsinkandfanassembly
Attention:Donotopenyourcomputerorattemptanyrepairbeforereadingandunderstandingthe“Importantsafety
information”intheThinkCentreSafetyandWarrantyGuidethatcamewithyourcomputer.Toobtainacopyofthe
ThinkCentreSafetyandWarrantyGuide,goto:
http://support.lenovo.com
Thissectionprovidesinstructionsonhowtoreplacetheheatsinkandfanassembly.
CAUTION:
Theheatsinkandfanassemblymightbeveryhot.T urnoffthecomputerandwaitthreetove
minutestoletthecomputercoolbeforeremovingthecomputercover.
Chapter2.Installingorreplacinghardware21
Page 28
Toreplacetheheatsinkandfanassembly,dothefollowing:
1.Removeallmediafromthedrivesandturnoffallattacheddevicesandthecomputer.Then,disconnect
allpowercordsfromelectricaloutletsanddisconnectallcablesthatareconnectedtothecomputer.
2.Removethecomputercover.See“Removingthecomputercover”onpage12.
3.Removethefrontbezel.See“Removingandreinstallingthefrontbezel”onpage13.
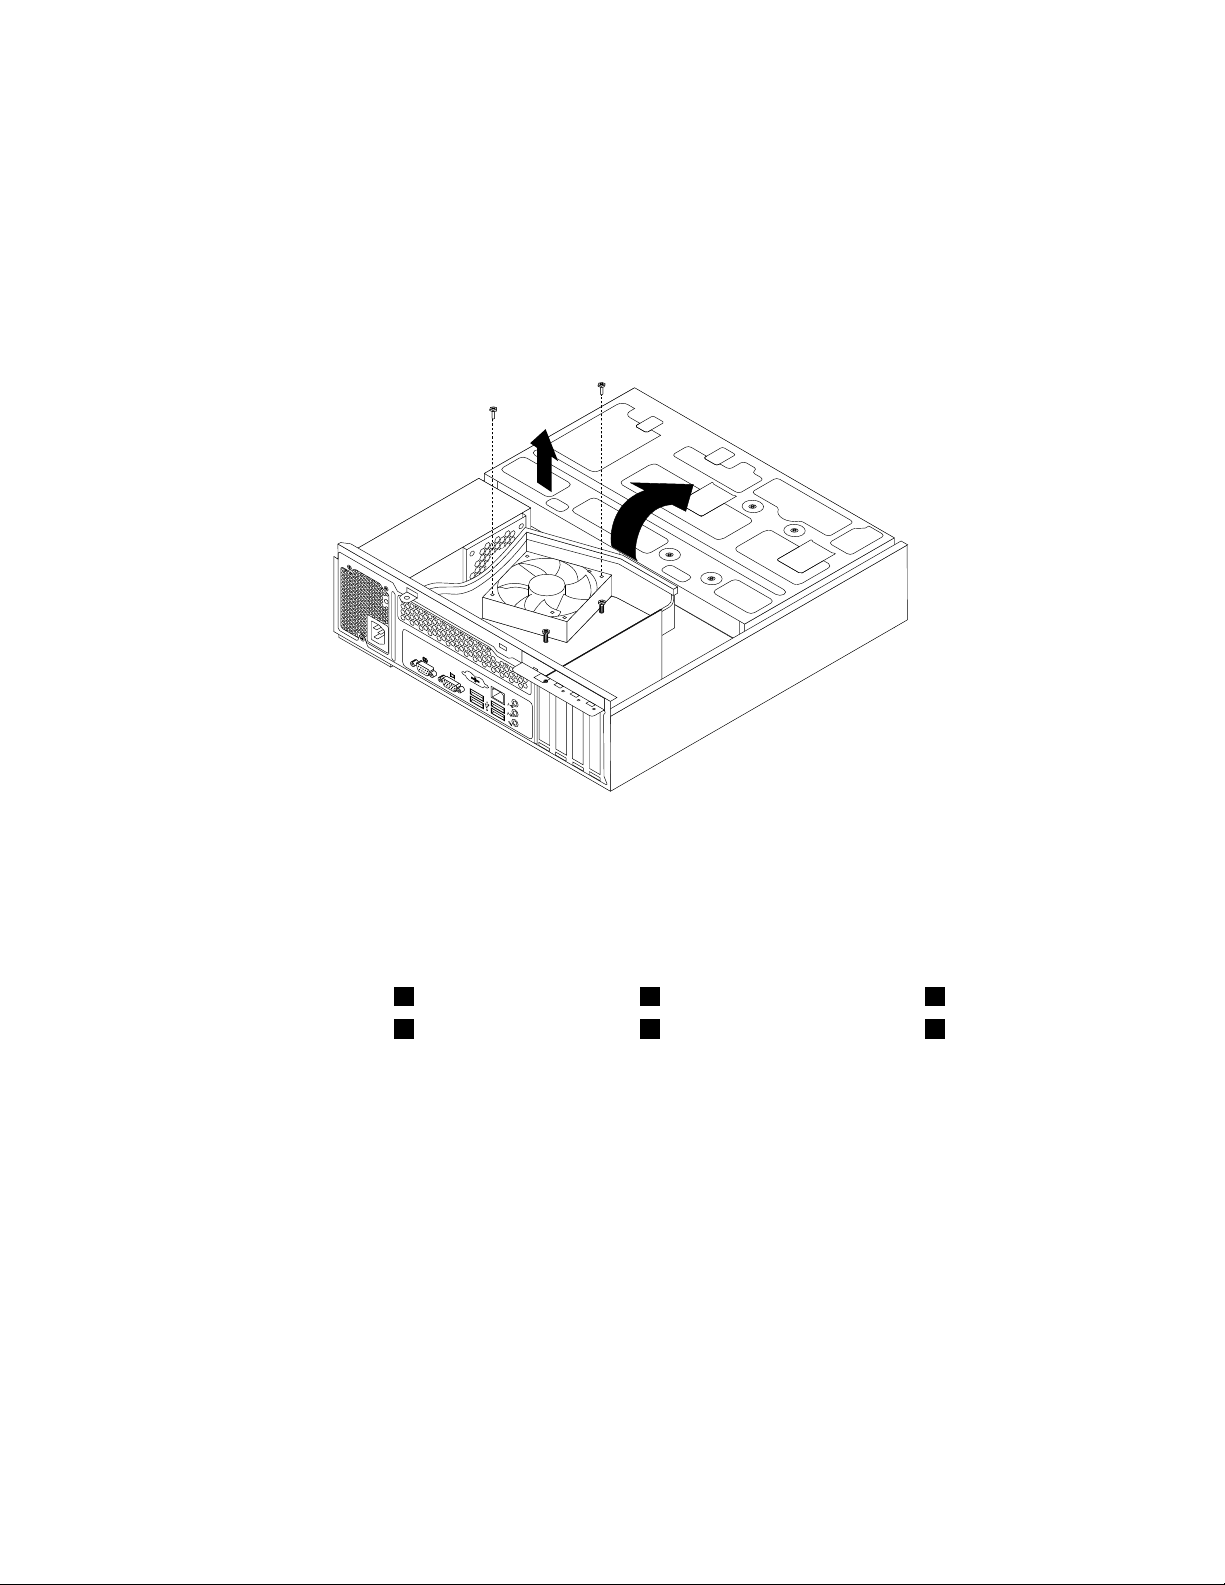
4.Pivotthedrivebayassemblyupward.Removethetwoscrewsthatsecuretheheatsinkfanductand
thenlifttheheatsinkfanductuptoremoveitfromthechassis.
Figure18.Removingtheheatsinkfanduct
5.Disconnecttheheatsinkandfanassemblycablefromthemicroprocessorfanconnectoronthesystem
board.See“Locatingpartsonthesystemboard”onpage8.
6.Followthissequencetoremovethefourscrewsthatsecuretheheatsinkandfanassemblytothe
systemboard:
a.Partiallyremovescrew1,thenfullyremovescrew2,andthenfullyremovescrew1.
b.Partiallyremovescrew3,thenfullyremovescrew4,andthenfullyremovescrew3.
Note:Carefullyremovethefourscrewsfromthesystemboardtoavoidanypossibledamagetothe
systemboard.Thefourscrewscannotberemovedfromtheheatsinkandfanassembly.
22ThinkCentreUserGuide
Page 29
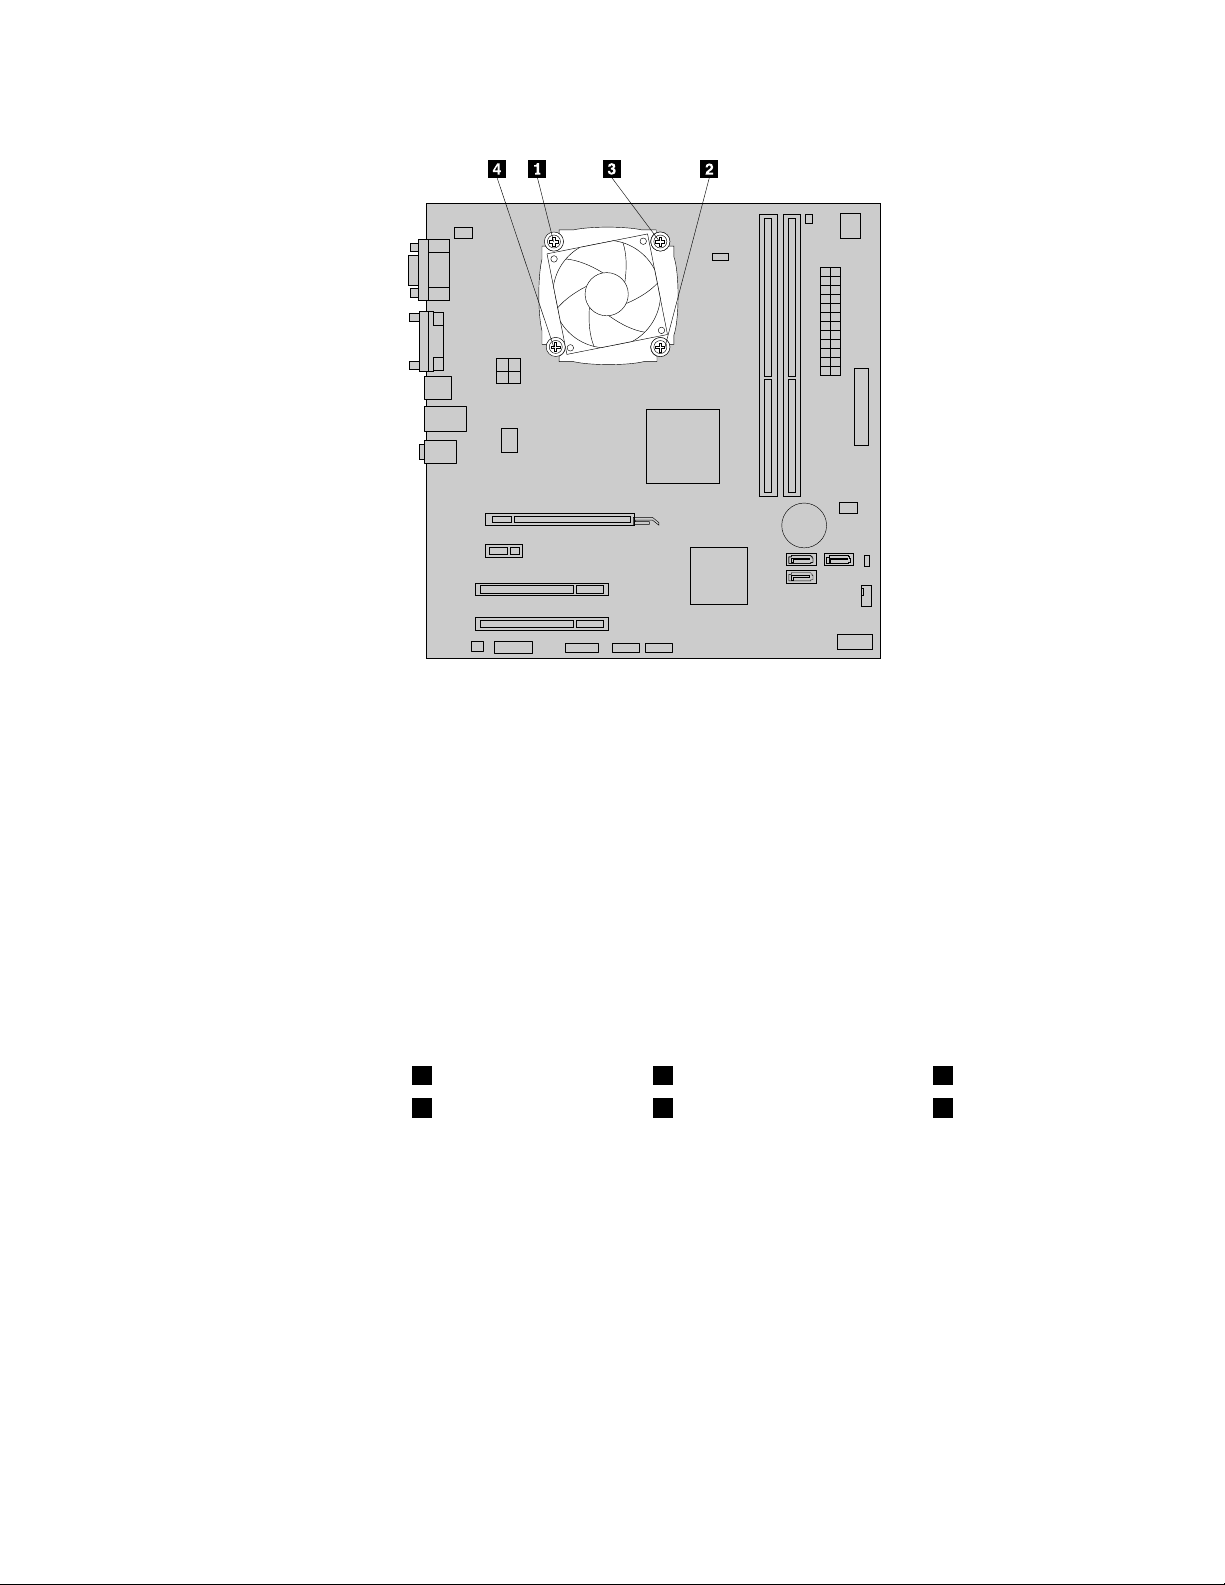
Figure19.Screwsthatsecuretheheatsinkandfanassembly
7.Lifttheheatsinkandfanassemblyoffthesystemboard.
Notes:
a.Youmighthavetogentlytwisttheheatsinkandfanassemblytofreeitfromthemicroprocessor.
b.Whenhandlingtheheatsinkandfanassembly,donottouchthethermalgreaseonthebottom
oftheheatsinkandfanassembly.
8.Placethenewheatsinkandfanassemblyonthesystemboardsothatthefourscrewsarealigned
withthecorrespondingholesinthesystemboard.Makesurethatyouproperlyplacethenewheat
sinkandfanassemblysothatyoucaneasilyconnectthenewheatsinkandfanassemblycabletothe
microprocessorfanconnectoronthesystemboard.
9.Followthissequencetoinstallthefourscrewstosecurethenewheatsinkandfanassembly,asshown
inScrewsthatsecuretheheatsinkandfanassembly:
a.Partiallytightenscrew1,thenfullytightenscrew2,andthenfullytightenscrew1.
b.Partiallytightenscrew3,thenfullytightenscrew4,andthenfullytightenscrew3.
10.Connectthenewheatsinkandfanassemblycabletothemicroprocessorfanconnectoronthesystem
board.See“Locatingpartsonthesystemboard”onpage8
.
Chapter2.Installingorreplacinghardware23
Page 30
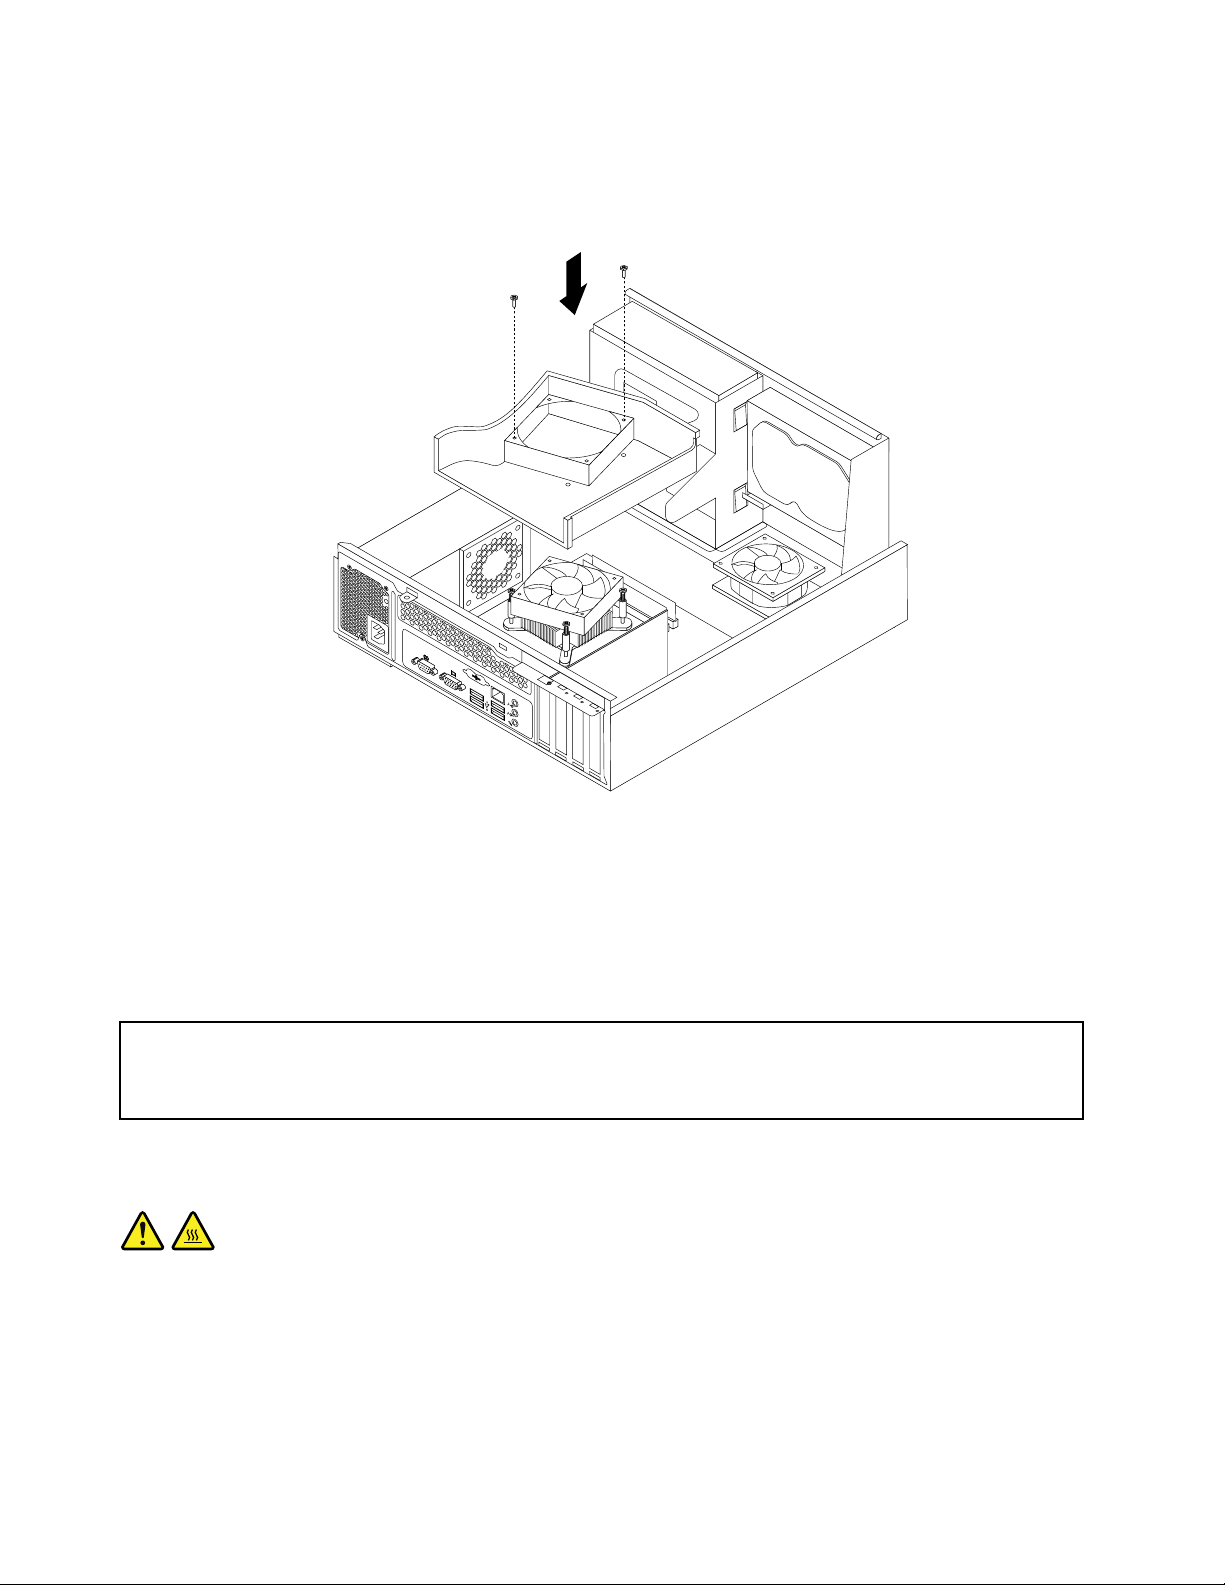
11.Lowerandpositiontheheatsinkfanductonthetopoftheheatsinkandfanassemblyuntilthetwo
screwholesintheheatsinkfanductarealignedwiththoseintheheatsinkandfanassembly.Install
thetwoscrewstosecuretheheatsinkfanduct.
Figure20.Installingtheheatsinkfanduct
Whattodonext:
•T oworkwithanotherpieceofhardware,gototheappropriatesection.
•T ocompletethereplacement,goto“Completingthepartsreplacement”onpage40.
Replacingthemicroprocessor
Attention:Donotopenyourcomputerorattemptanyrepairbeforereadingandunderstandingthe“Importantsafety
information”intheThinkCentreSafetyandWarrantyGuidethatcamewithyourcomputer.Toobtainacopyofthe
ThinkCentreSafetyandWarrantyGuide,goto:
http://support.lenovo.com
Thissectionprovidesinstructionsonhowtoreplacethemicroprocessor.
CAUTION:
Theheatsinkandmicroprocessormightbeveryhot.T urnoffthecomputerandwaitthreetove
minutestoletthecomputercoolbeforeremovingthecomputercover.
Toreplacethemicroprocessor,dothefollowing:
1.Removeallmediafromthedrivesandturnoffallattacheddevicesandthecomputer.Then,disconnect
allpowercordsfromelectricaloutletsanddisconnectallcablesthatareconnectedtothecomputer.
2.Removethecomputercover.See“Removingthecomputercover”onpage12.
24ThinkCentreUserGuide
Page 31
3.Removetheheatsinkandfanassembly.See“Replacingtheheatsinkandfanassembly”onpage21.
Note:Placetheheatsinkandfanassemblyonitssidesothatthethermalgreaseonthebottomofit
doesnotgetincontactwithanything.
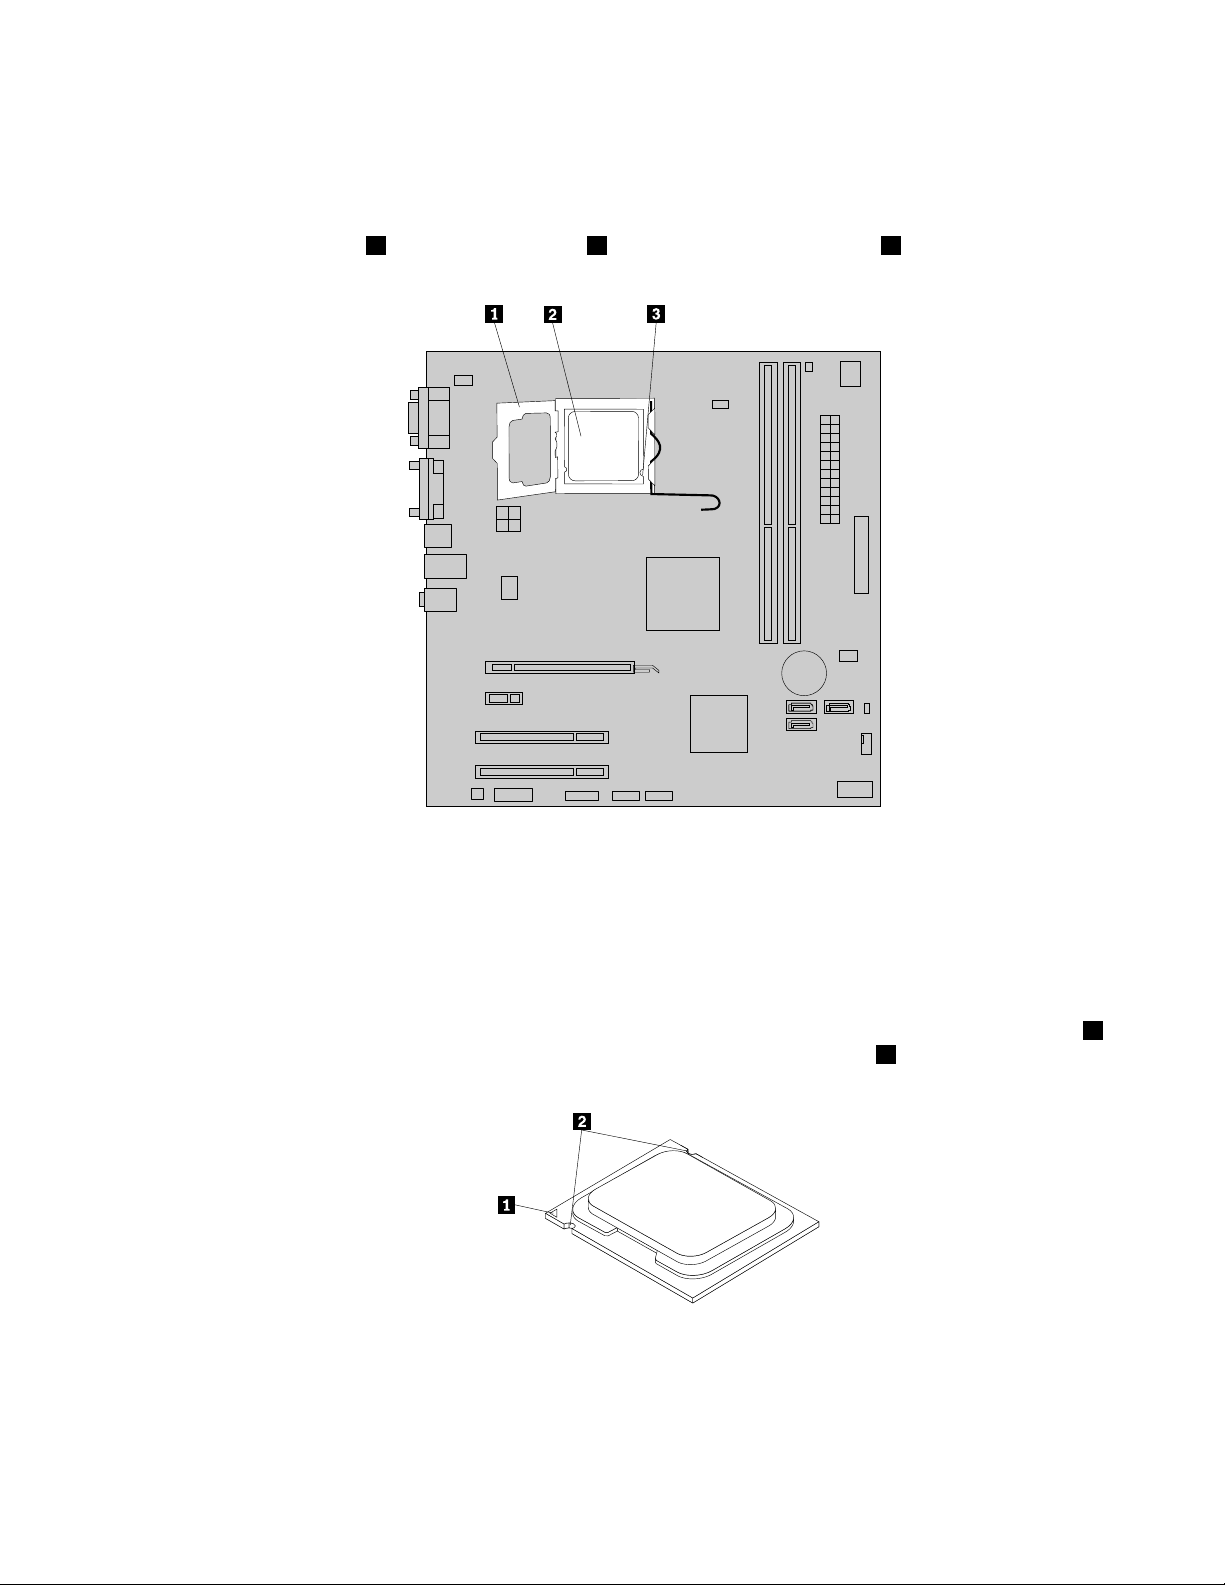
4.Liftthesmallhandle3andopentheretainer1toaccessthemicroprocessor2.
Figure21.Accessingthemicroprocessor
5.Liftthemicroprocessorstraightupandoutofthemicroprocessorsocket,asshowninFigure22
“Removingthemicroprocessor”onpage26
.
Notes:
a.Yourmicroprocessorandsocketmightlookdifferentfromtheoneillustrated.
b.Notetheorientationofthemicroprocessorinthesocket.Youcaneitherlookforthesmalltriangle1
ononecornerofthemicroprocessorornotetheorientationofthenotches2onthemicroprocessor.
Thisisimportantwheninstallingthenewmicroprocessoronthesystemboard.
c.Touchonlytheedgesofthemicroprocessor.Donottouchthegoldcontactsonthebottom.
d.Donotdropanythingontothemicroprocessorsocketwhileitisexposed.Thesocketpinsmustbe
keptascleanaspossible.
Chapter2.Installingorreplacinghardware25
Page 32
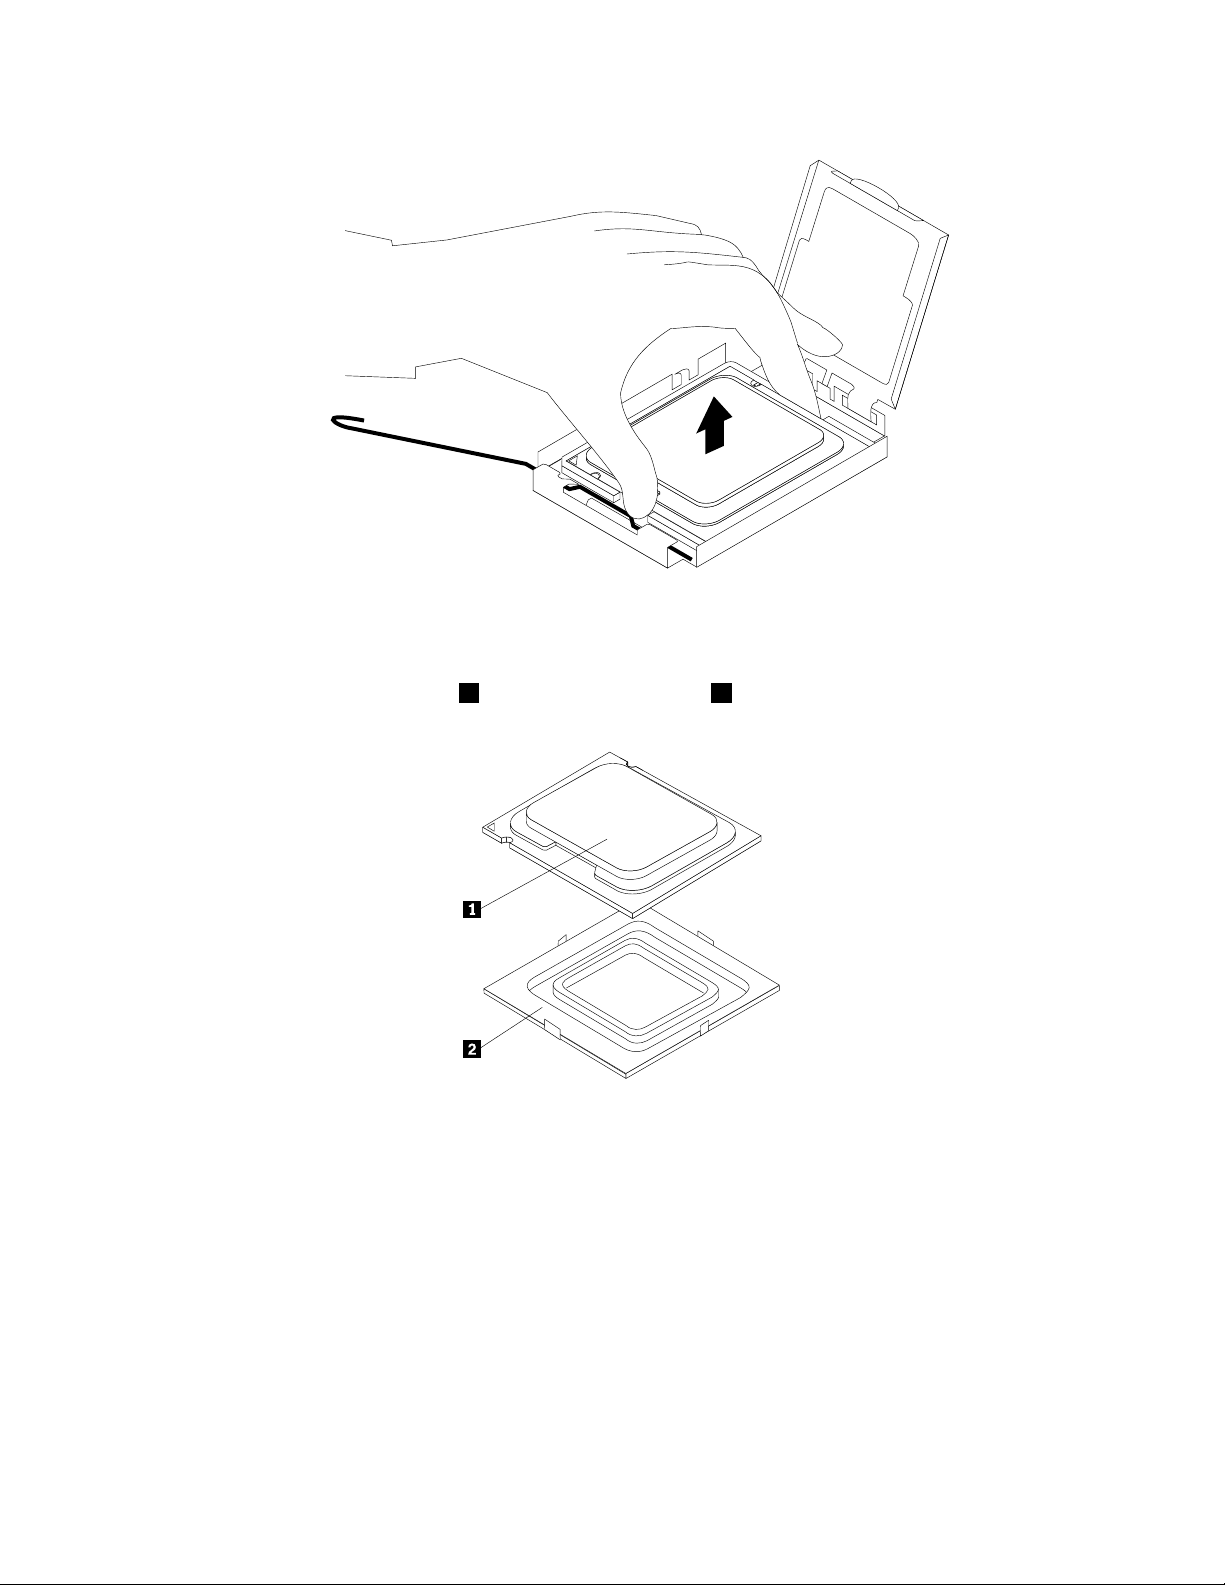
Figure22.Removingthemicroprocessor
6.Makesurethatthesmallhandleisintheraisedposition.
7.Removethenewmicroprocessor1fromtheprotectivecover2thatprotectsthegoldcontactsofthe
newmicroprocessor.
8.Holdthenewmicroprocessorbytheedgesandalignthenotchesonitwiththetabsinthe
microprocessorsocket,oralignthesmalltriangleononecornerofthemicroprocessorwiththe
correspondingbeveledcornerofthemicroprocessorsocket.
9.Lowerthenewmicroprocessorstraightdownintothemicroprocessorsocketonthesystemboard.
10.Closethemicroprocessorretainerandlockitintopositionwiththesmallhandletosecurethenew
microprocessorinthesocket.
11.Reinstalltheheatsinkandfanassembly.See“Replacingtheheatsinkandfanassembly”onpage21.
12.Reinstallanypartsandreconnectanycablesthathavebeenremovedordisconnected.
Whattodonext:
•T oworkwithanotherpieceofhardware,gototheappropriatesection.
•T ocompletethereplacement,goto“Completingthepartsreplacement”onpage40
26ThinkCentreUserGuide
.
Page 33
Replacingthepowersupplyassembly
Attention:Donotopenyourcomputerorattemptanyrepairbeforereadingandunderstandingthe“Importantsafety
information”intheThinkCentreSafetyandWarrantyGuidethatcamewithyourcomputer.Toobtainacopyofthe
ThinkCentreSafetyandWarrantyGuide,goto:
http://support.lenovo.com
Thissectionprovidesinstructionsonhowtoreplacethepowersupplyassembly.
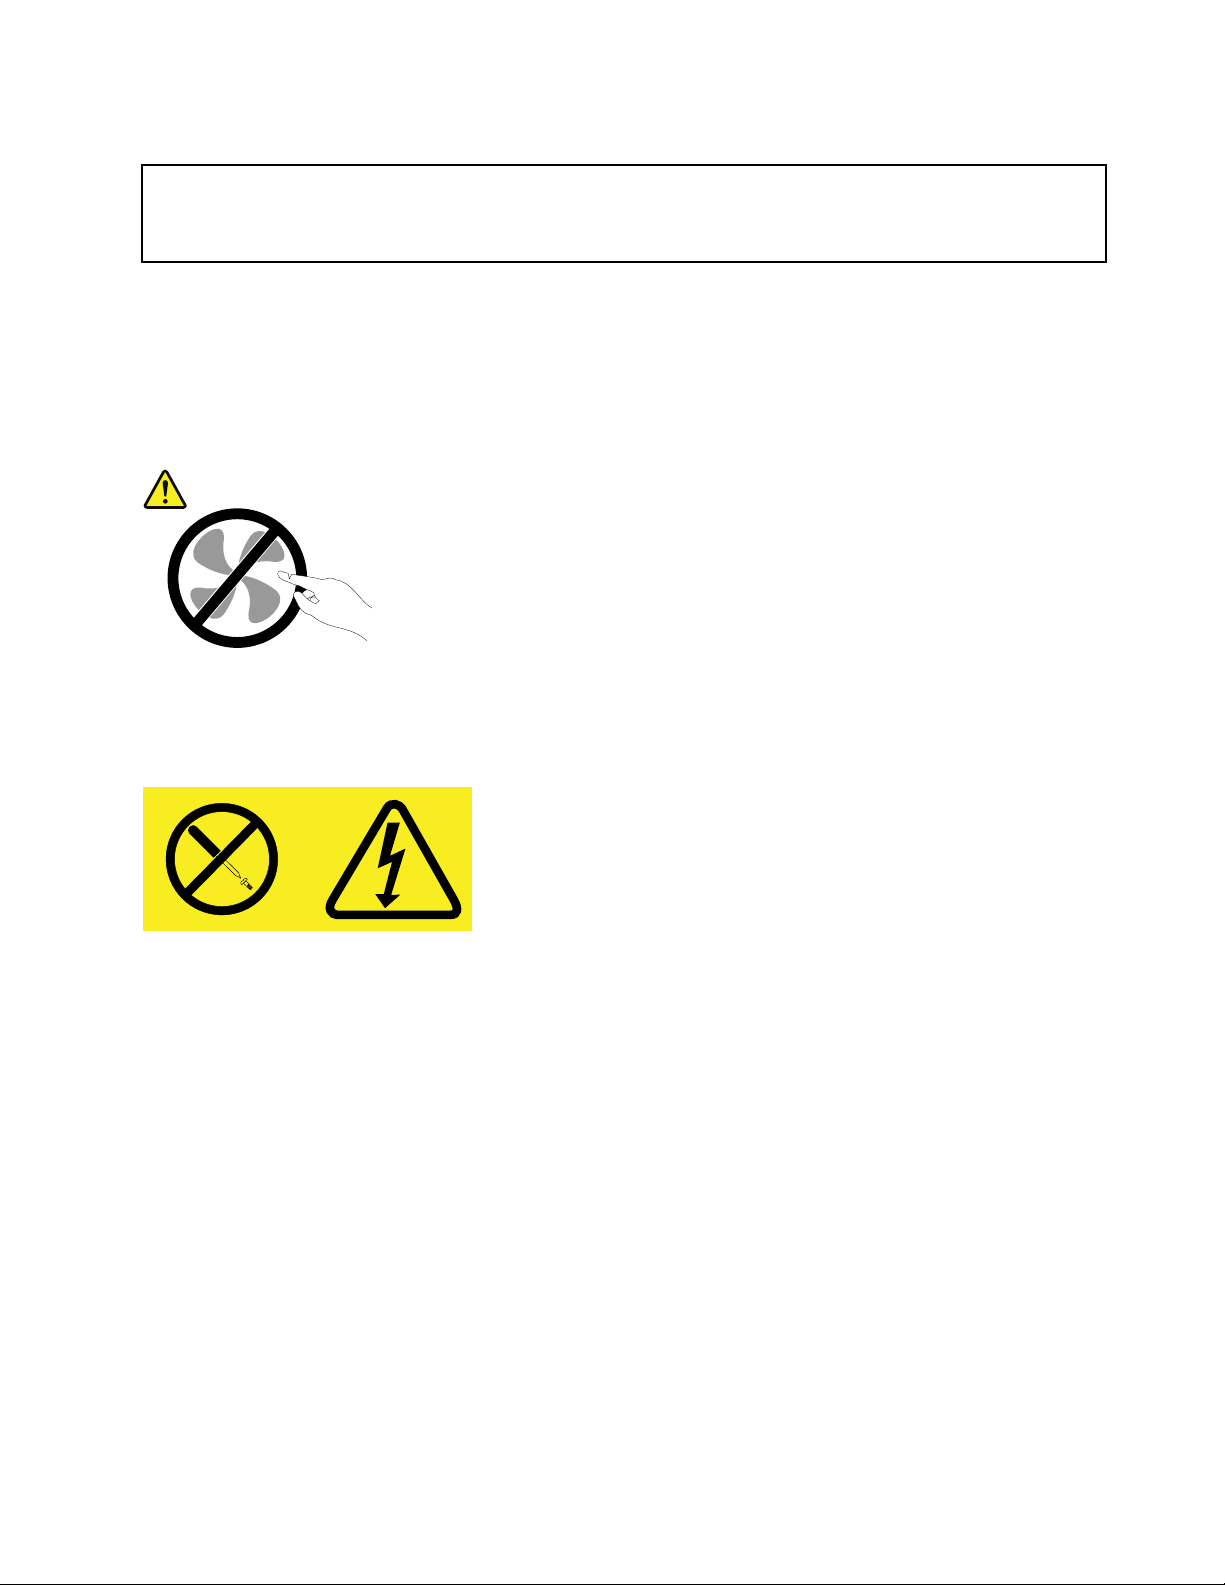
Althoughtherearenomovingpartsinyourcomputerafterthepowercordhasbeendisconnected,the
followingwarningsarerequiredforyoursafetyandproperUnderwritersLaboratories(UL)certication.
CAUTION:
Hazardousmovingparts.Keepngersandotherbodypartsaway.
CAUTION:
Neverremovethecoveronapowersupplyoranypartthathasthefollowinglabelattached.
Hazardousvoltage,current,andenergylevelsarepresentinsideanycomponentthathasthislabel
attached.Therearenoserviceablepartsinsidethesecomponents.Ifyoususpectaproblemwith
oneoftheseparts,contactaservicetechnician.
Toreplacethepowersupplyassembly,dothefollowing:
1.Removeallmediafromthedrivesandturnoffallattacheddevicesandthecomputer.Then,disconnect
allpowercordsfromelectricaloutletsanddisconnectallcablesthatareconnectedtothecomputer.
2.Removethecomputercover.See“Removingthecomputercover”onpage12.
3.Removethefrontbezel.See“Removingandreinstallingthefrontbezel”onpage13.
Chapter2.Installingorreplacinghardware27
Page 34
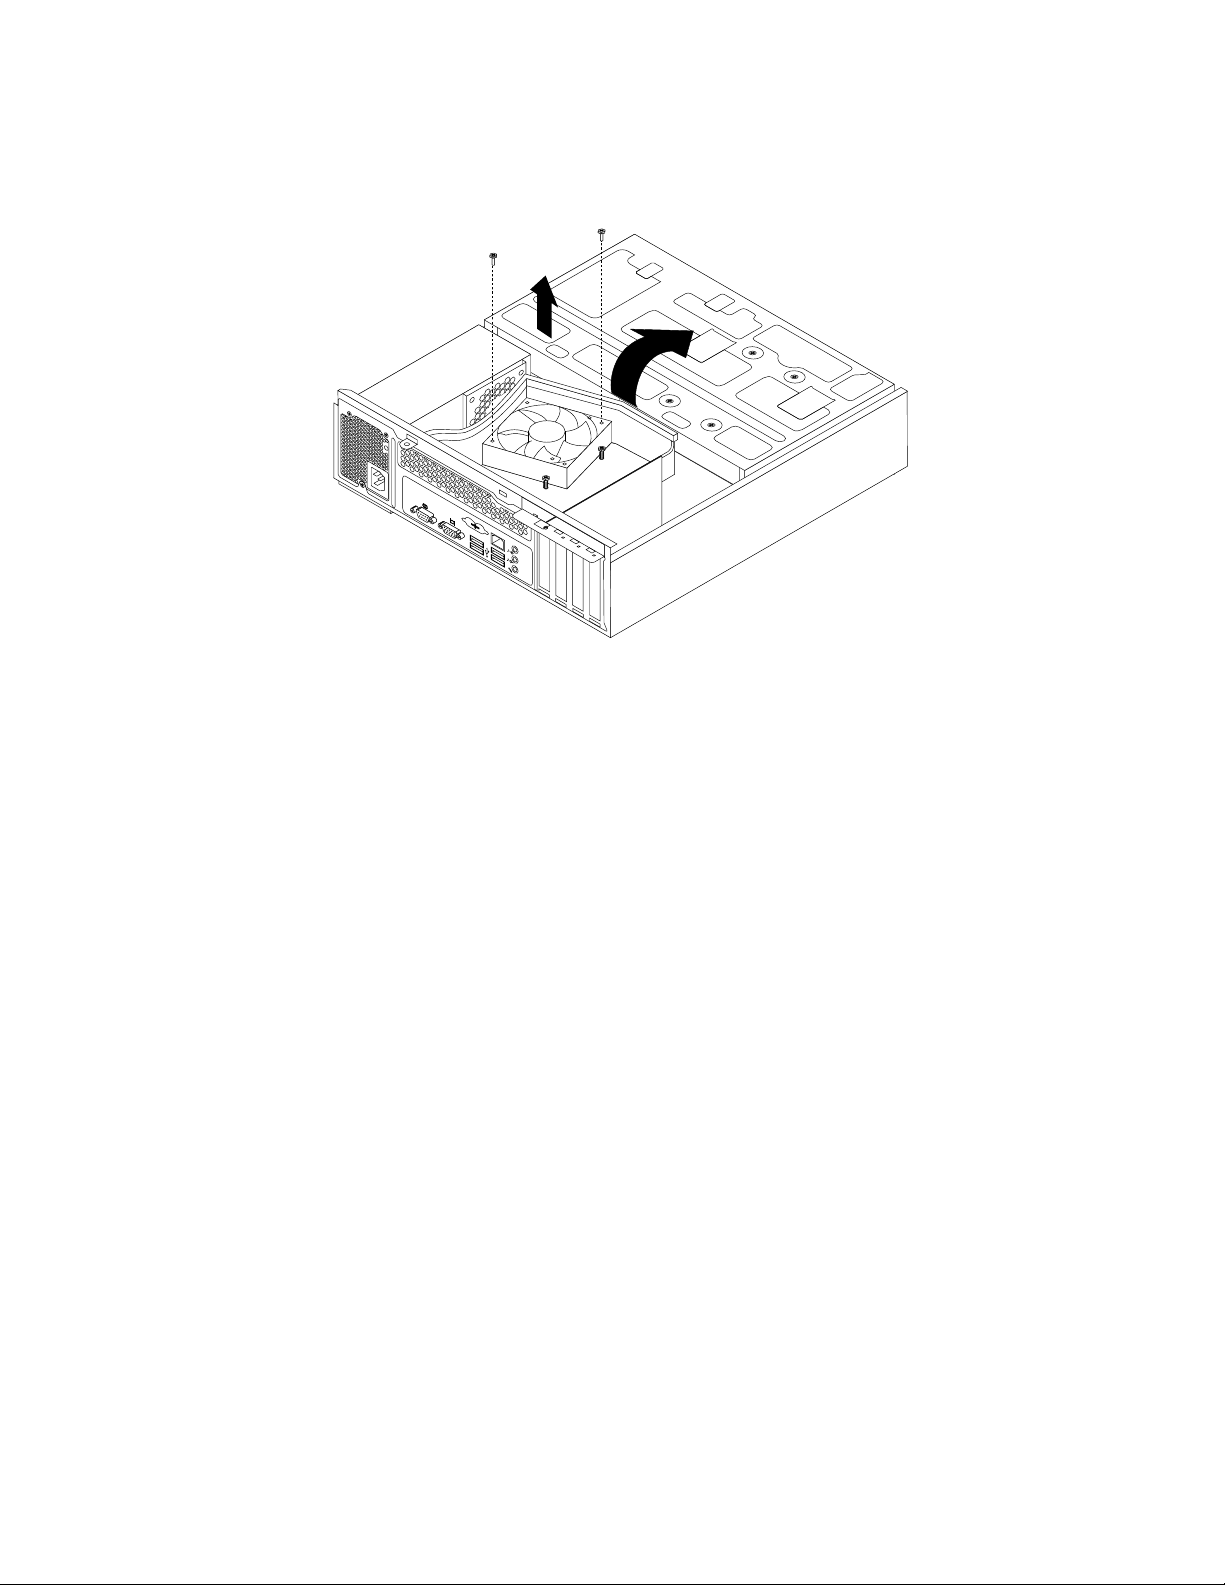
4.Pivotthedrivebayassemblyupward,removethetwoscrewsthatsecuretheheatsinkfanduct,and
thenlifttheheatsinkfanductoutofthechassis.
Figure23.Removingtheheatsinkfanduct
5.Disconnectthepowersupplyassemblycablesfromalldrivesandfromthe24-pinpowerconnectorand
4-pinpowerconnectoronthesystemboard.See“Locatingpartsonthesystemboard”onpage8.
Note:Youmightalsoneedtoreleasethepowersupplyassemblycablesfromsomecableclipsorties
thatsecurethecablestothechassis.Makesurethatyounotethecableroutingbeforedisconnecting
thecables.
28ThinkCentreUserGuide
Page 35
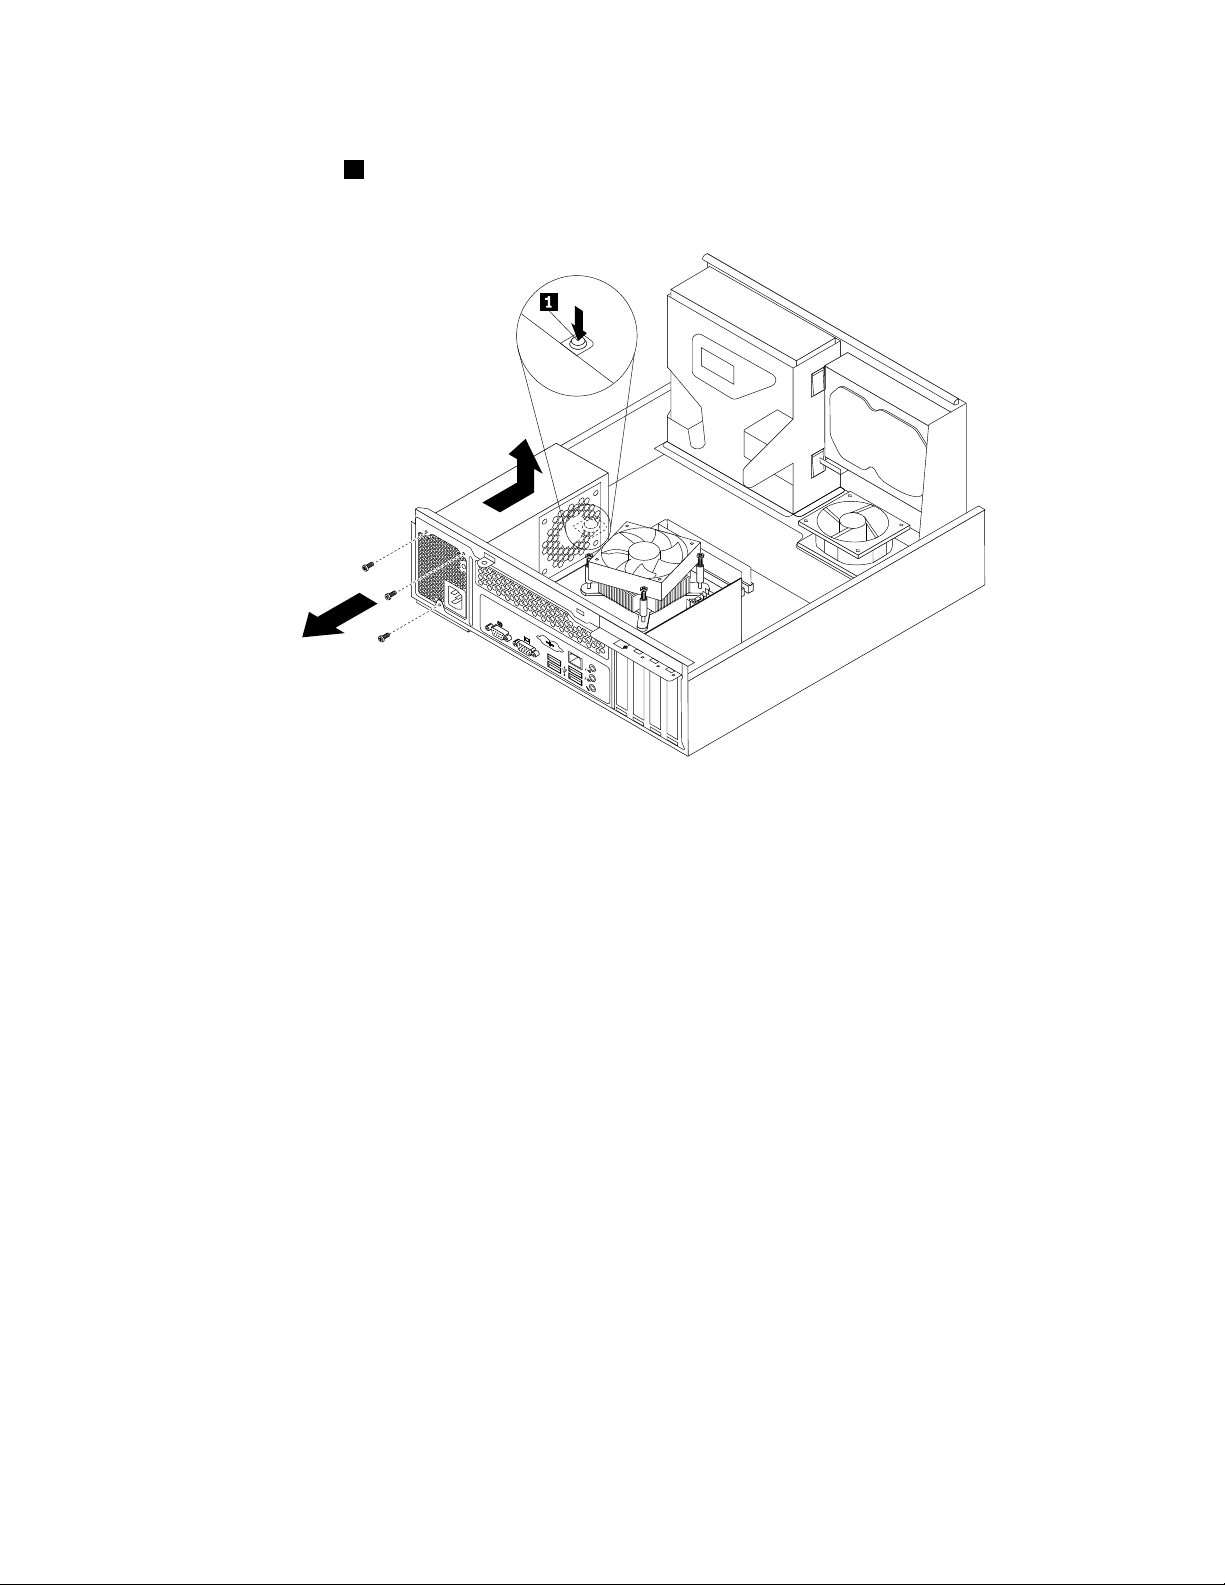
6.Attherearofthecomputer,removethethreescrewsthatsecurethepowersupplyassembly.Pressthe
powersupplyclip1downwardtoreleasethepowersupplyassemblyandthenslidethepowersupply
assemblytothefrontofthecomputer.Liftthepowersupplyassemblyoutofthecomputer.
Figure24.Removingthepowersupplyassembly
7.Makesurethatthenewpowersupplyassemblyisthecorrectreplacement.Somepowersupply
assembliesautomaticallysensethevoltageoracceptuniversalinput,somepowersupplyassemblies
arevoltagespecic,andsomepowersupplyassemblieshaveavoltage-selectionswitch.Ifyourpower
supplyassemblyhasavoltage-selectionswitch,makesurethatyousetthevoltage-selectionswitch
tomatchthevoltageavailableatyourelectricaloutlet.Ifnecessary,useaballpointpentoslidethe
voltage-selectionswitchtothecorrectposition.
•Ifthevoltagesupplyrangeinyourlocalcountryorregionis100–127Vac,setthevoltage-selection
switchto115V.
•Ifthevoltagesupplyrangeinyourlocalcountryorregionis200–240Vac,setthevoltage-selection
switchto230V.
Chapter2.Installingorreplacinghardware29
Page 36
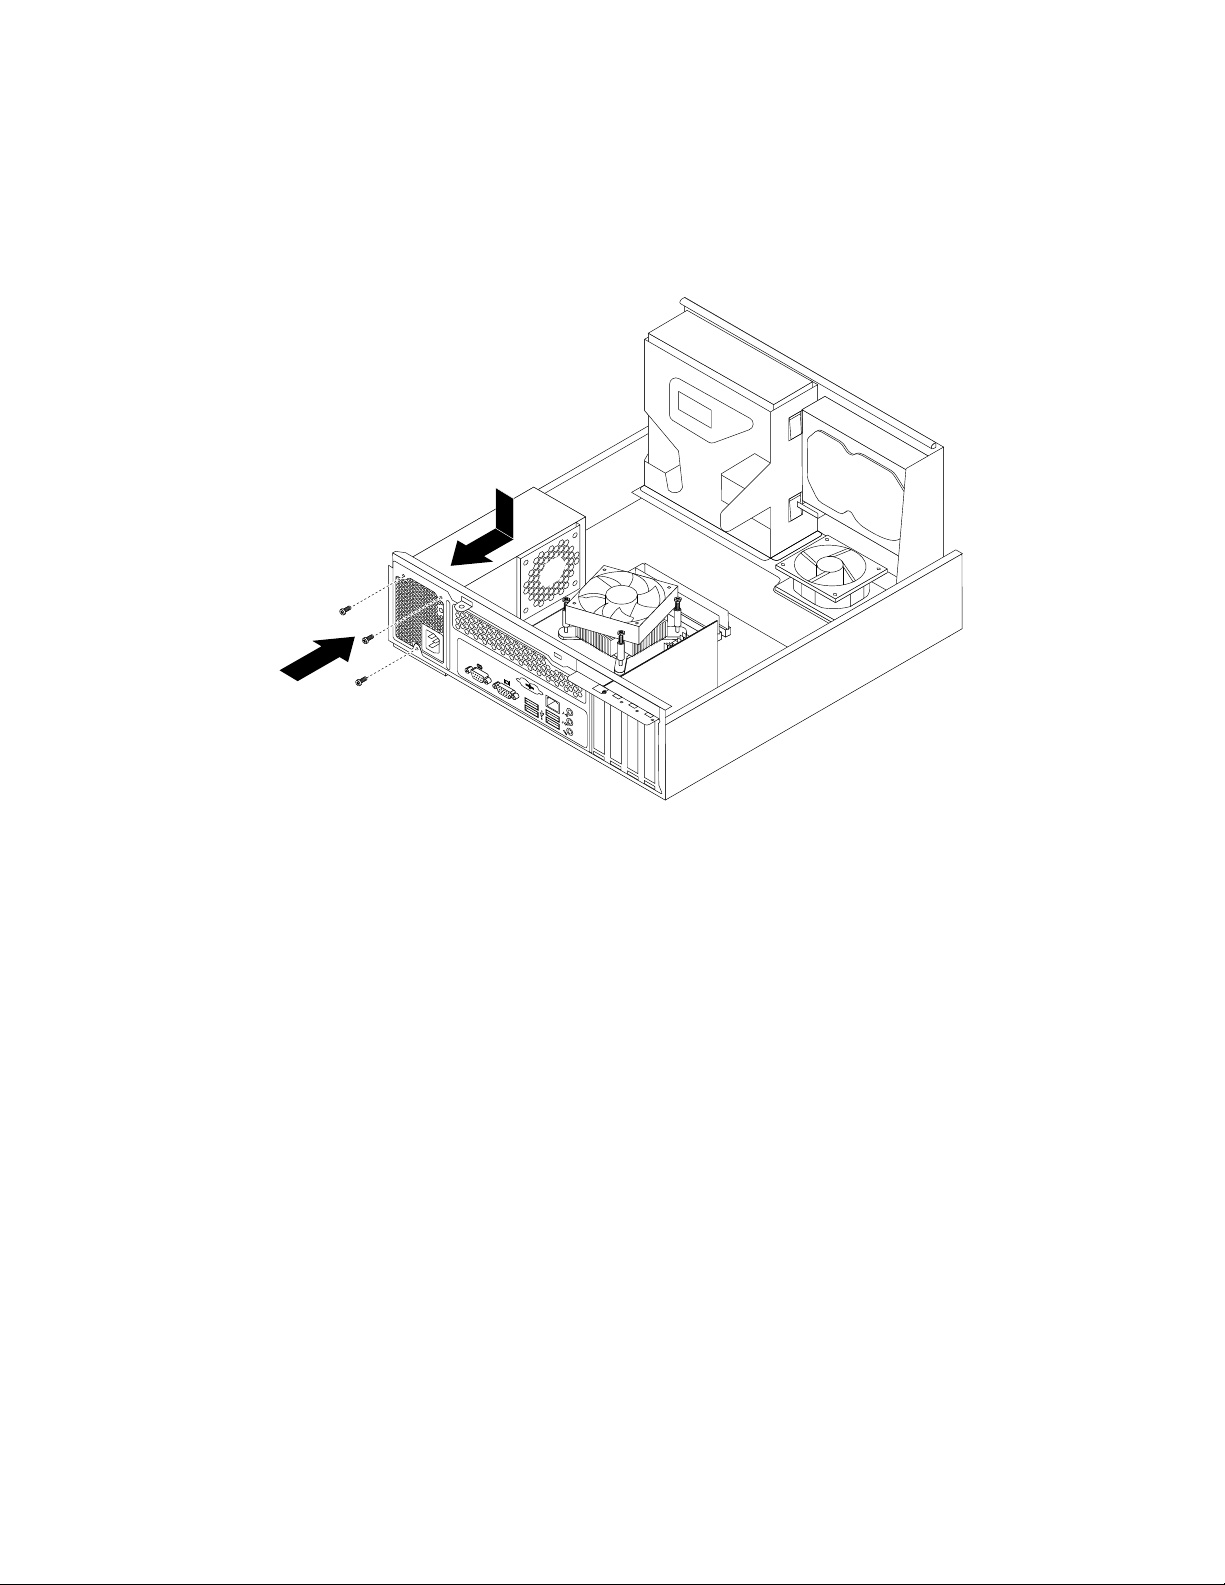
8.Installthenewpowersupplyassemblyintothechassissothatthescrewholesinthenewpowersupply
assemblyarealignedwiththecorrespondingholesintherearofthechassis.Then,installthethree
screwstosecurethenewpowersupplyassemblyinplace.
Note:UseonlyscrewsprovidedbyLenovo.
Figure25.Installingthepowersupplyassembly
9.Connectthenewpowersupplyassemblycablestoalldrivesandthesystemboard.See“Locating
partsonthesystemboard”onpage8
.
30ThinkCentreUserGuide
Page 37
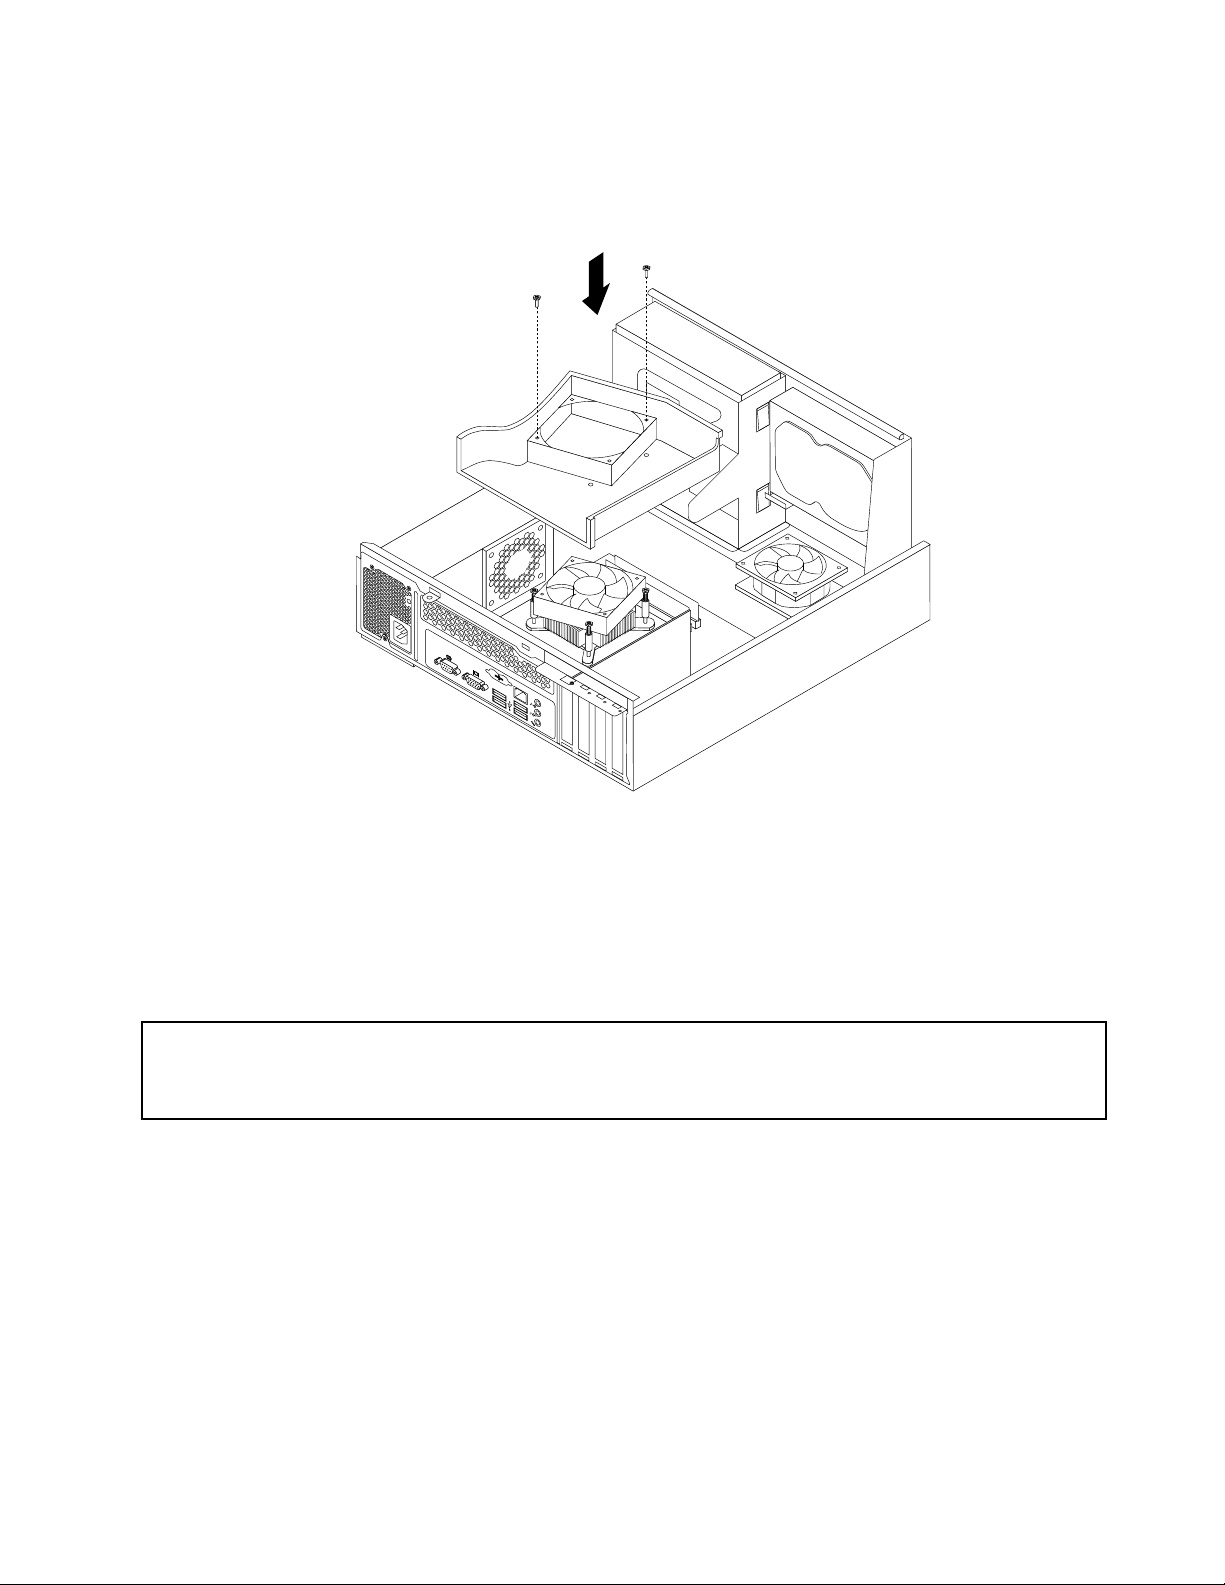
10.Lowerandpositiontheheatsinkfanductonthetopoftheheatsinkandfanassemblyuntilthetwo
screwholesintheheatsinkfanductarealignedwiththecorrespondingholesintheheatsinkandfan
assembly.Then,installthetwoscrewstosecuretheheatsinkfanductinplace.
Figure26.Installingtheheatsinkfanduct
Whattodonext:
•T oworkwithanotherpieceofhardware,gototheappropriatesection.
•T ocompletethereplacement,goto“Completingthepartsreplacement”onpage40.
Replacingtheopticaldrive
Attention:Donotopenyourcomputerorattemptanyrepairbeforereadingandunderstandingthe“Importantsafety
information”intheThinkCentreSafetyandWarrantyGuidethatcamewithyourcomputer.Toobtainacopyofthe
ThinkCentreSafetyandWarrantyGuide,goto:
http://support.lenovo.com
Thissectionprovidesinstructionsonhowtoreplacetheopticaldrive.
Toreplacetheopticaldrive,dothefollowing:
1.Removeallmediafromthedrivesandturnoffallattacheddevicesandthecomputer.Then,disconnect
allpowercordsfromelectricaloutletsanddisconnectallcablesthatareconnectedtothecomputer.
2.Removethecomputercover.See“Removingthecomputercover”onpage12.
3.Removethefrontbezel.See“Removingandreinstallingthefrontbezel”onpage13.
4.Pivotthedrivebayassemblyupward.See“Accessingthesystemboardcomponentsanddrives”
onpage14.
5.Disconnectthesignalcableandthepowercablefromtheopticaldrive.
Chapter2.Installingorreplacinghardware31
Page 38
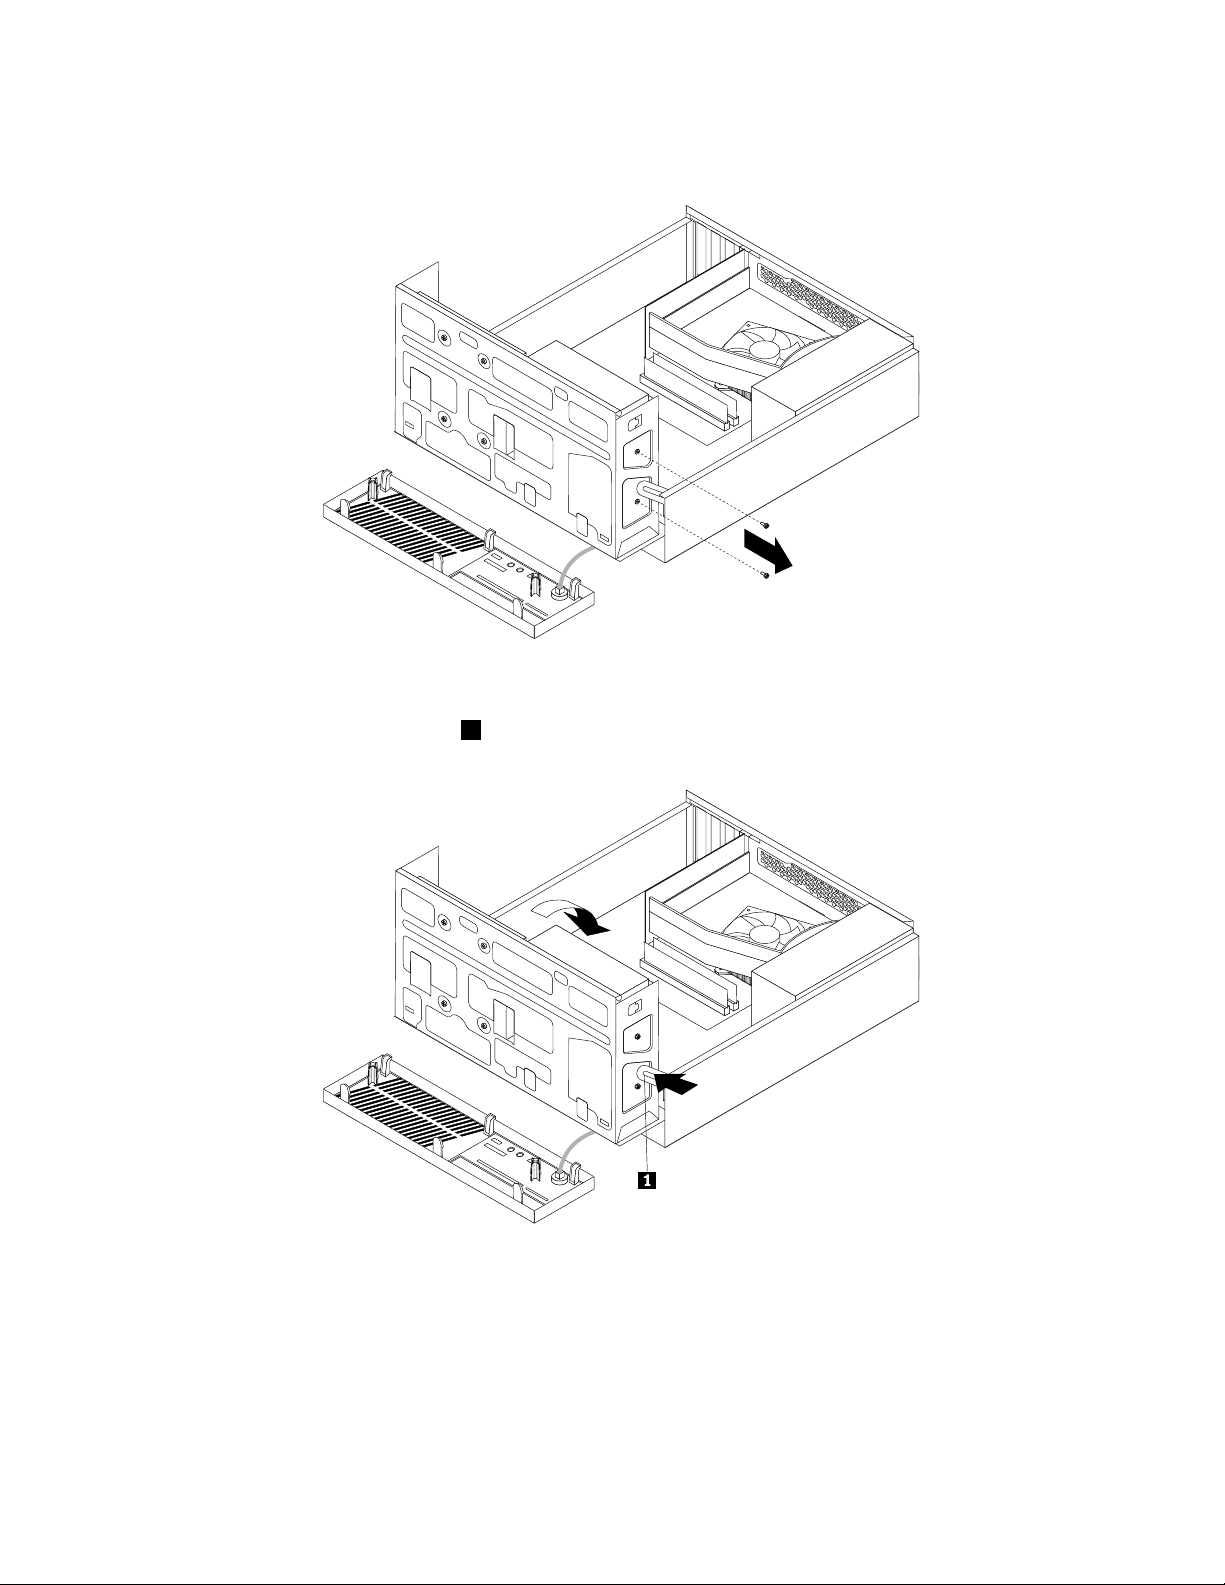
6.Holdtheopticaldriveandremovethetwoscrewsthatsecuretheopticaldrive.
Figure27.Removingtheopticaldrivescrews
7.Pressthedrivebayassemblyclip1inwardandpivotthedrivebayassemblydownwardasshown.
Figure28.Loweringthedrivebayassembly
32ThinkCentreUserGuide
Page 39
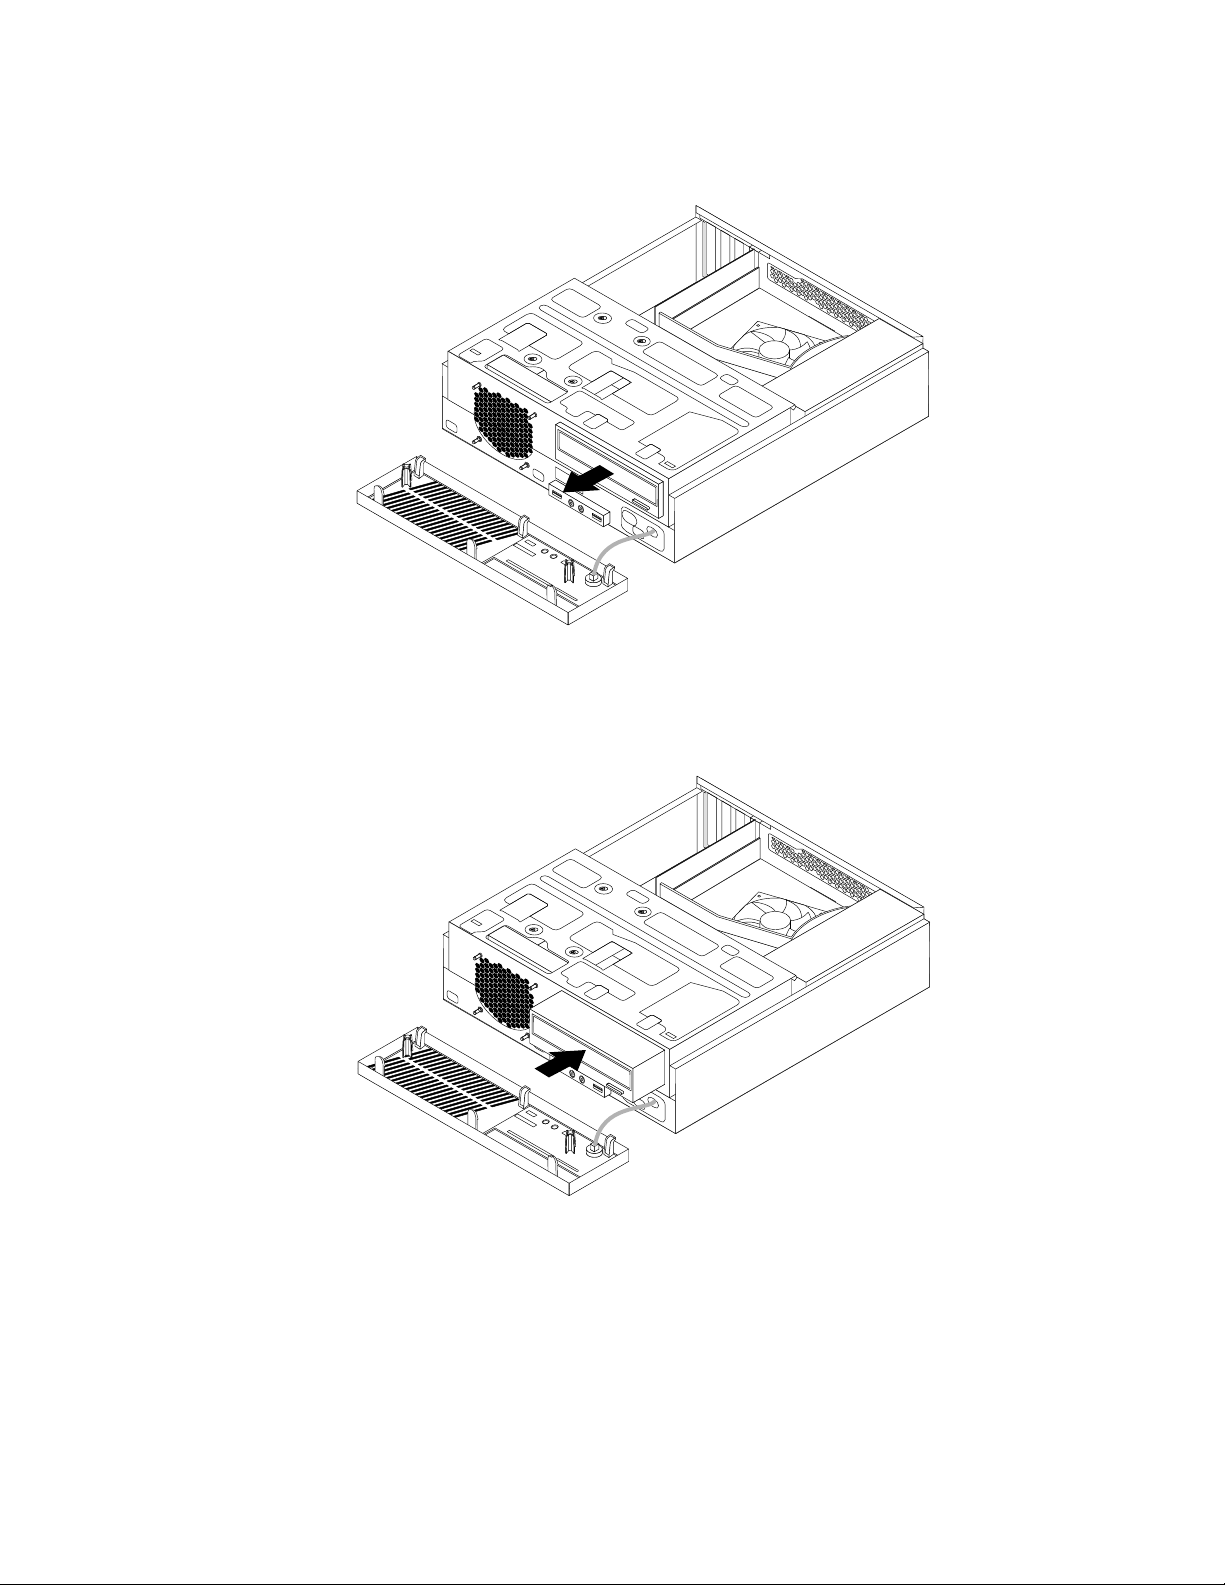
8.Slidetheopticaldriveoutofthefrontofthecomputer.
Figure29.Removingtheopticaldrive
9.Slidethenewopticaldriveintotheopticaldrivebayfromthefrontofthecomputer.
Figure30.Installinganewopticaldrive
Chapter2.Installingorreplacinghardware33
Page 40
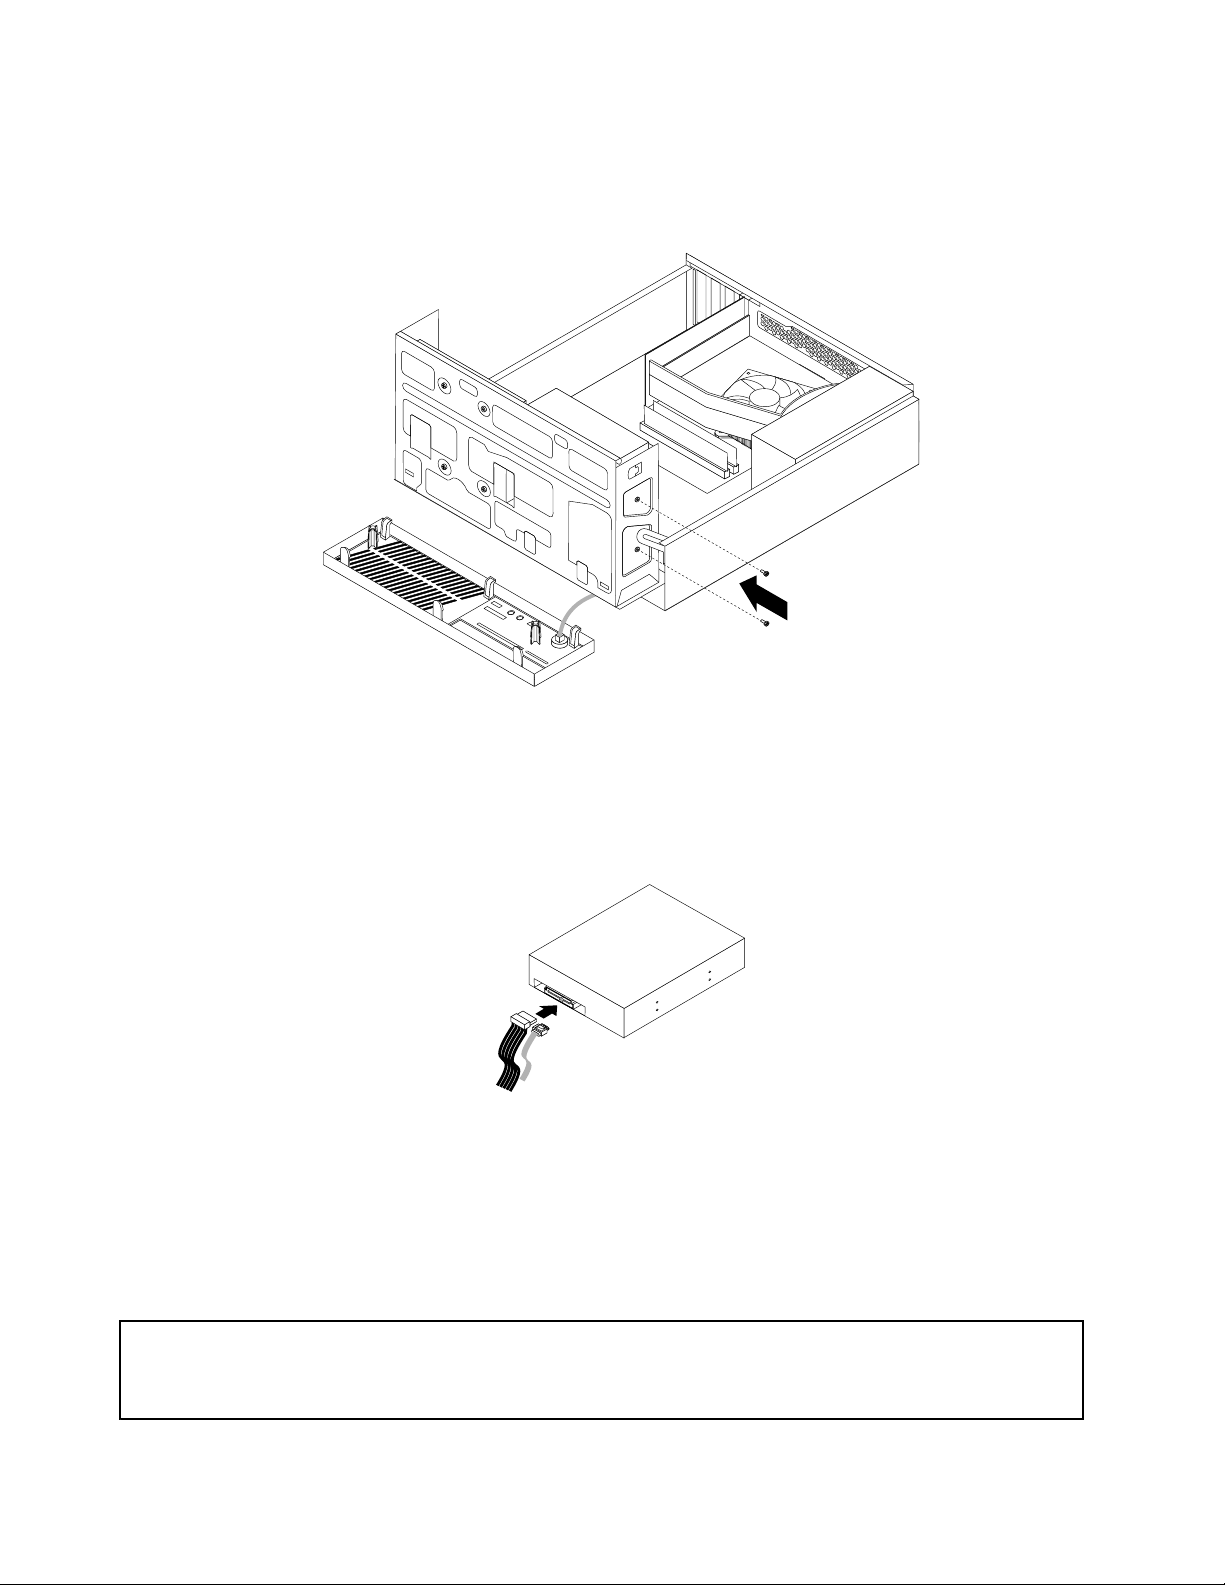
10.Holdthenewopticaldriveandpivotthedrivebayassemblyupward.Alignthescrewholesinthenew
opticaldrivewiththecorrespondingholesinthedrivebay.Then,installthetwoscrewstosecure
thenewopticaldriveinplace.
Figure31.Installingtheopticaldrive
11.Connectoneendofthesignalcabletotherearofthenewopticaldriveandtheotherendtoanavailable
SATAconnectoronthesystemboard.See“Locatingpartsonthesystemboard”onpage8.Then,
locateanavailableve-wirepowerconnectorandconnectittotherearofthenewopticaldrive.
Figure32.ConnectingaSATAopticaldrive
Whattodonext:
•T oworkwithanotherpieceofhardware,gototheappropriatesection.
•T ocompletethereplacement,goto“Completingthepartsreplacement”onpage40
.
Replacingtheharddiskdrive
Attention:Donotopenyourcomputerorattemptanyrepairbeforereadingandunderstandingthe“Importantsafety
information”intheThinkCentreSafetyandWarrantyGuidethatcamewithyourcomputer.Toobtainacopyofthe
ThinkCentreSafetyandWarrantyGuide,goto:
http://support.lenovo.com
34ThinkCentreUserGuide
Page 41
Thissectionprovidesinstructionsonhowtoreplacetheharddiskdrive.
Toreplacetheharddiskdrive,dothefollowing:
1.Removeallmediafromthedrivesandturnoffallattacheddevicesandthecomputer.Then,disconnect
allpowercordsfromelectricaloutletsanddisconnectallcablesthatareconnectedtothecomputer.
2.Removethecomputercover.See“Removingthecomputercover”onpage12.
3.Removethefrontbezel.See“Removingandreinstallingthefrontbezel”onpage13.
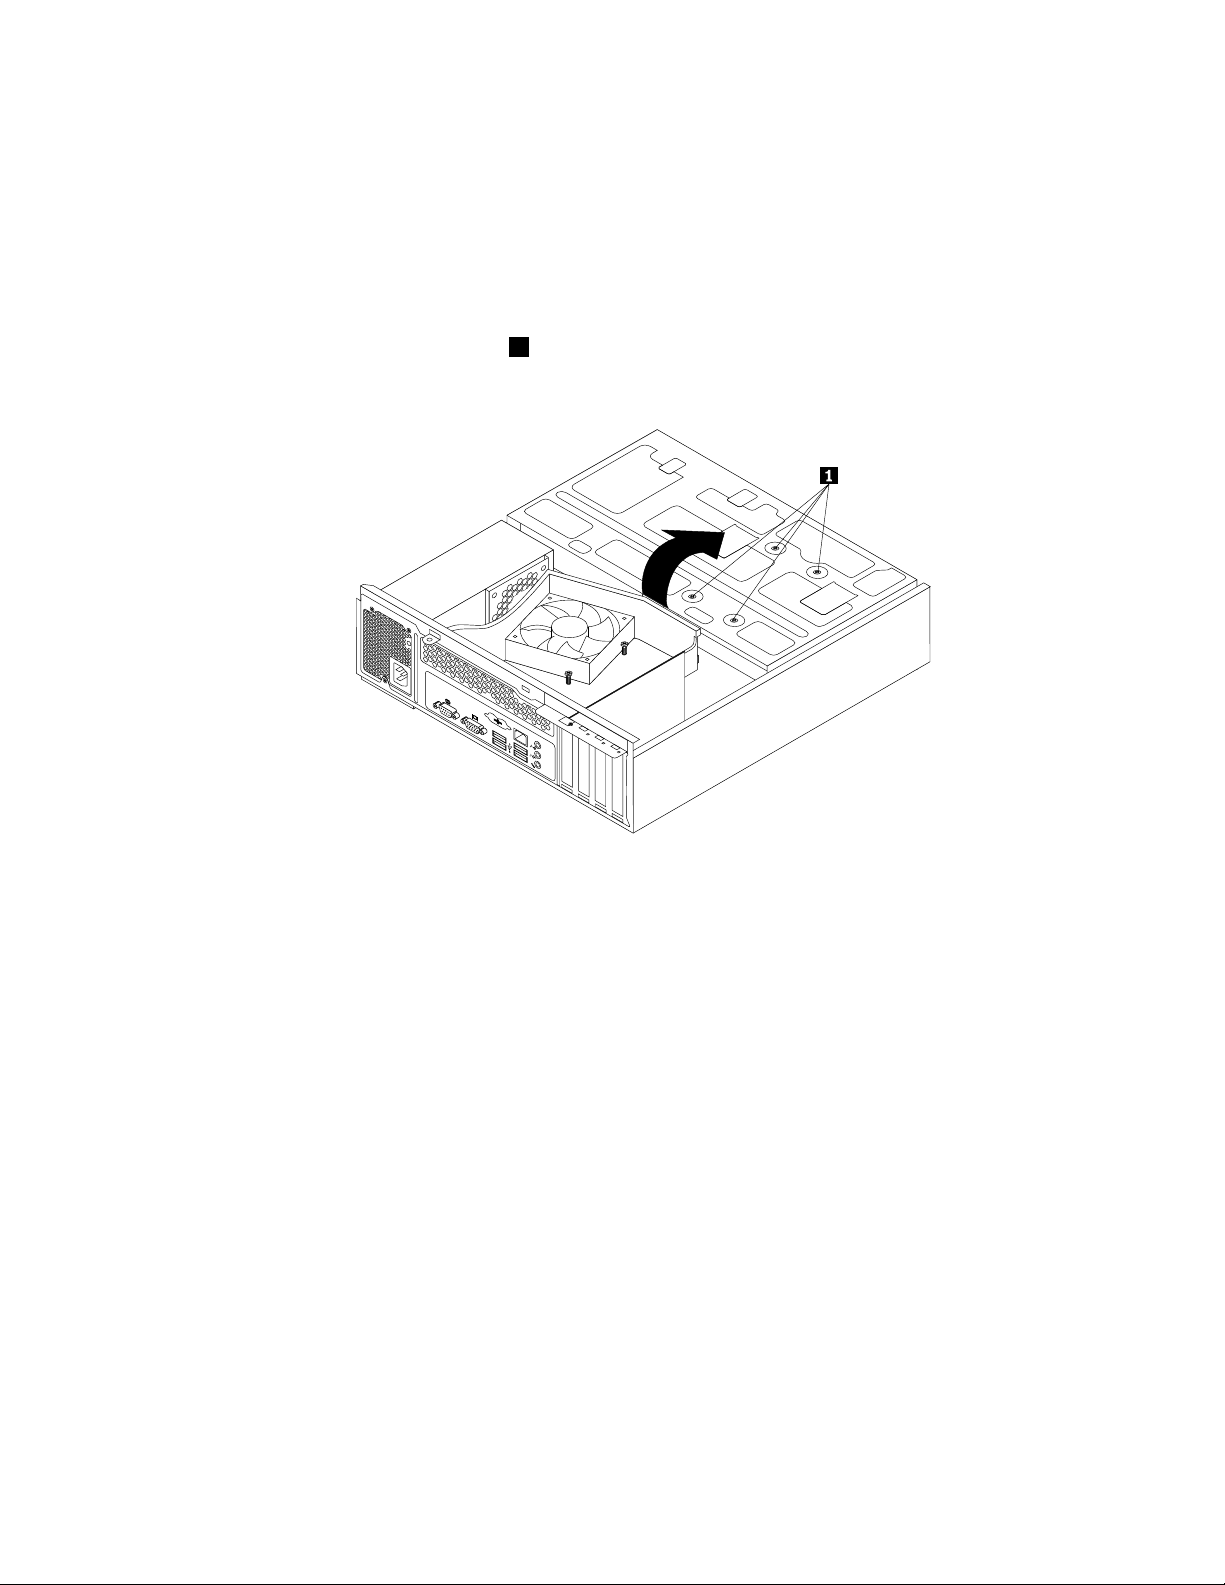
4.Notethelocationofthefourscrews1thatsecuretheharddiskdrive.Then,pivotthedrivebay
assemblyupward.
Figure33.Pivotingthedrivebayassembly
Chapter2.Installingorreplacinghardware35
Page 42
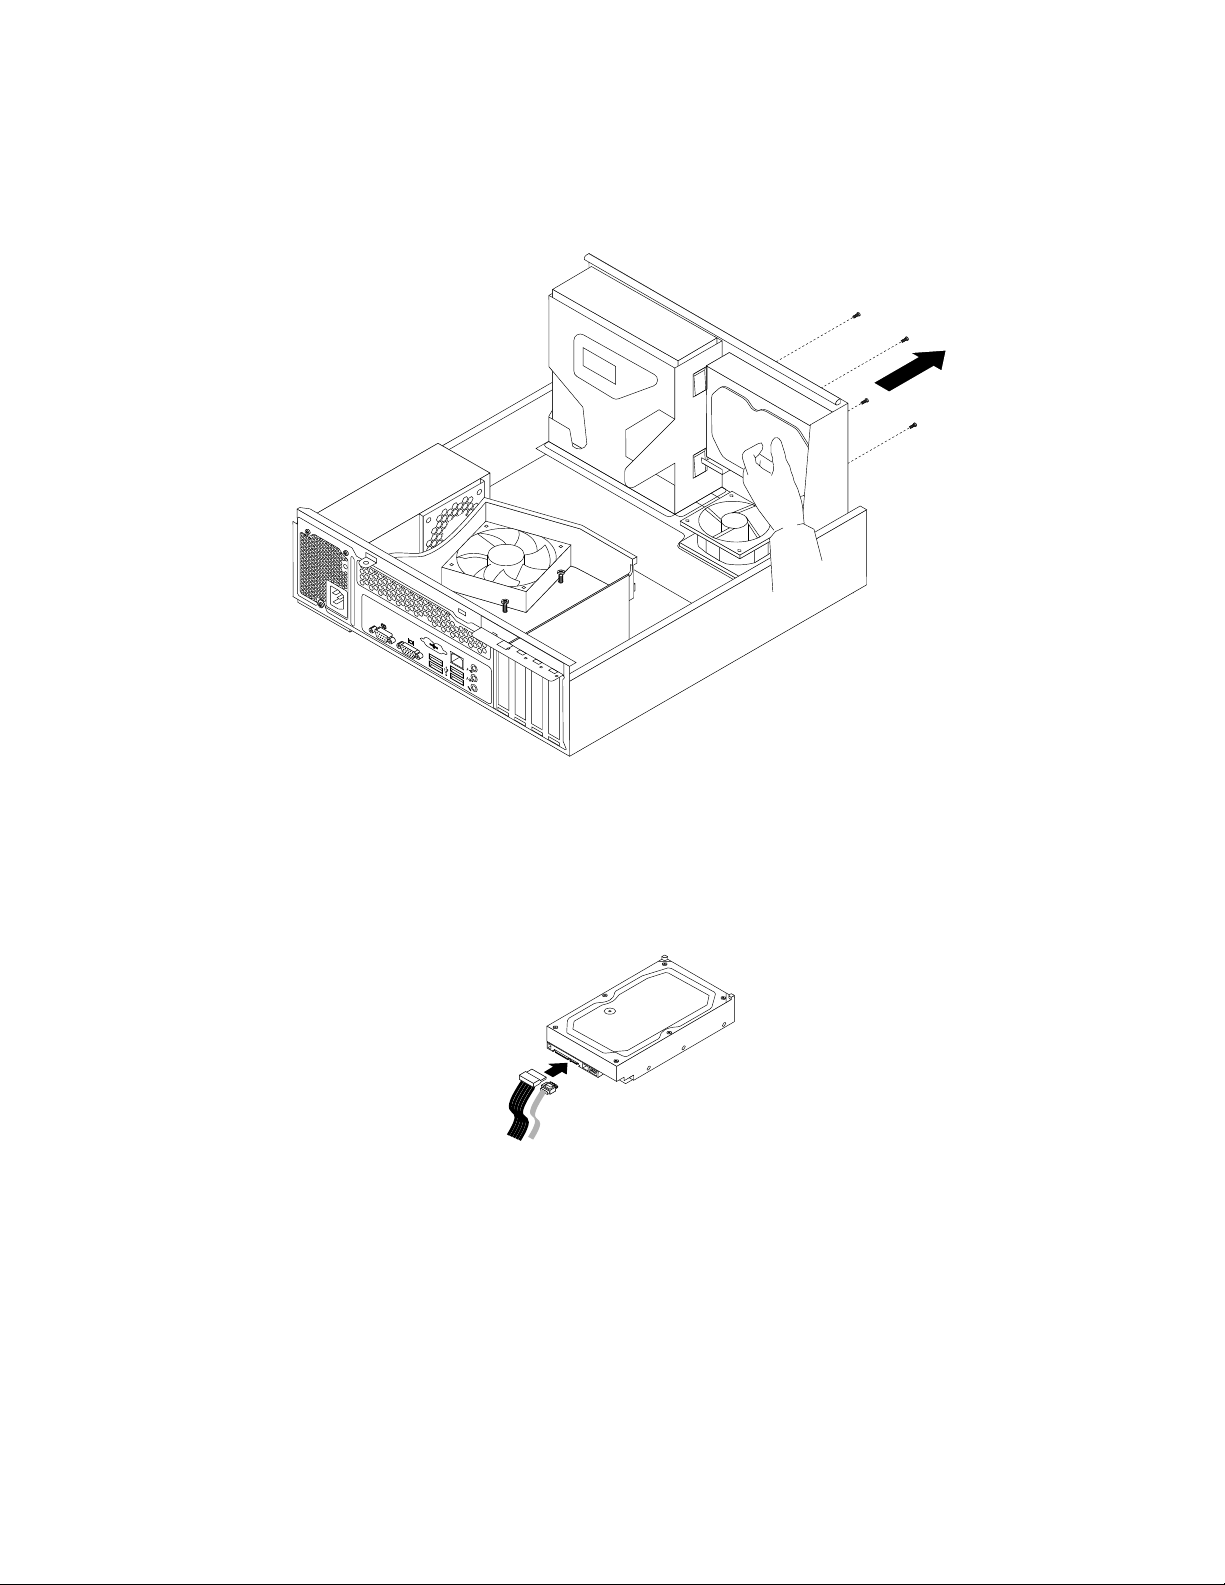
5.Holdtheharddiskdriveandremovethefourscrewsthatsecuretheharddiskdrive.Then,removethe
harddiskdrivefromthedrivebayassemblyanddisconnectthesignalcableandthepowercablefrom
therearoftheharddiskdrivetocompletelyremoveitfromthechassis.
Figure34.Removingtheharddiskdrive
6.Connectoneendofthesignalcabletotherearofthenewharddiskdriveandtheotherendtoan
availableSAT Aconnectoronthesystemboard.See“Locatingpartsonthesystemboard”onpage8
Then,locateanavailableve-wirepowerconnectorandconnectittotherearofthenewharddiskdrive.
Figure35.ConnectingaSATAharddiskdrive
.
36ThinkCentreUserGuide
Page 43
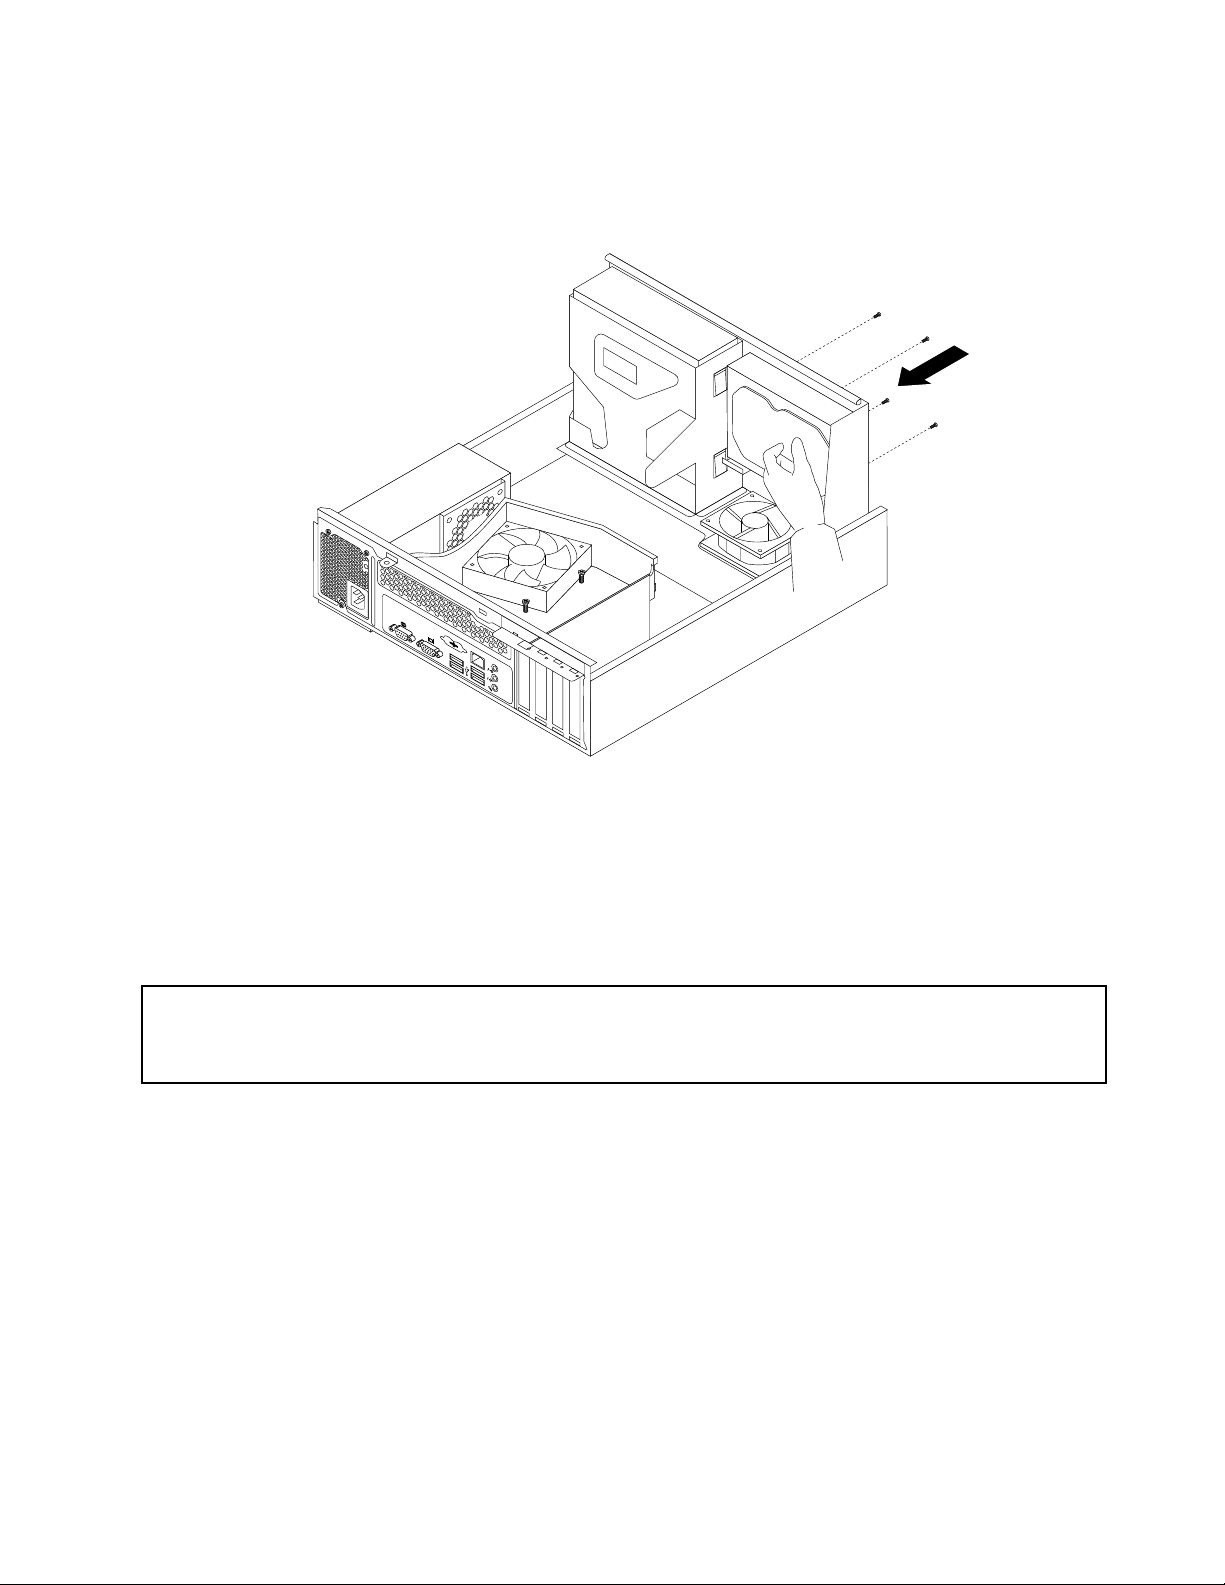
7.Positionthenewharddiskdriveintotheharddiskdrivebayandalignthescrewholesinthenewhard
diskdrivewiththecorrespondingholesinthedrivebay.Then,installthefourscrewstosecurethe
newharddiskdriveinplace.
Figure36.Installingtheharddiskdrive
Whattodonext:
•T oworkwithanotherpieceofhardware,gototheappropriatesection.
•T ocompletetheinstallationorreplacement,goto“Completingthepartsreplacement”onpage40.
Replacingthefrontfanassembly
Attention:Donotopenyourcomputerorattemptanyrepairbeforereadingandunderstandingthe“Importantsafety
information”intheThinkCentreSafetyandWarrantyGuidethatcamewithyourcomputer.Toobtainacopyofthe
ThinkCentreSafetyandWarrantyGuide,goto:
http://support.lenovo.com
Thissectionprovidesinstructionsonhowtoreplacethefrontfanassembly.
Toreplacethefrontfanassembly,dothefollowing:
1.Removeallmediafromthedrivesandturnoffallattacheddevicesandthecomputer.Then,disconnect
allpowercordsfromelectricaloutletsanddisconnectallcablesthatareconnectedtothecomputer.
2.Removethecomputercover.See“Removingthecomputercover”onpage12.
3.Removethefrontbezel.See“Removingandreinstallingthefrontbezel”onpage13.
4.Pivotthedrivebayassemblyupwardtogainaccesstothefrontfanassembly.See“Accessingthe
systemboardcomponentsanddrives”onpage14.
5.Removetheharddiskdriveforeasieraccesstothefrontfanassembly.See“Replacingthehard
diskdrive”onpage34.
6.Removetheheatsinkfanduct.SeeFigure18“Removingtheheatsinkfanduct”onpage22.
Chapter2.Installingorreplacinghardware37
Page 44
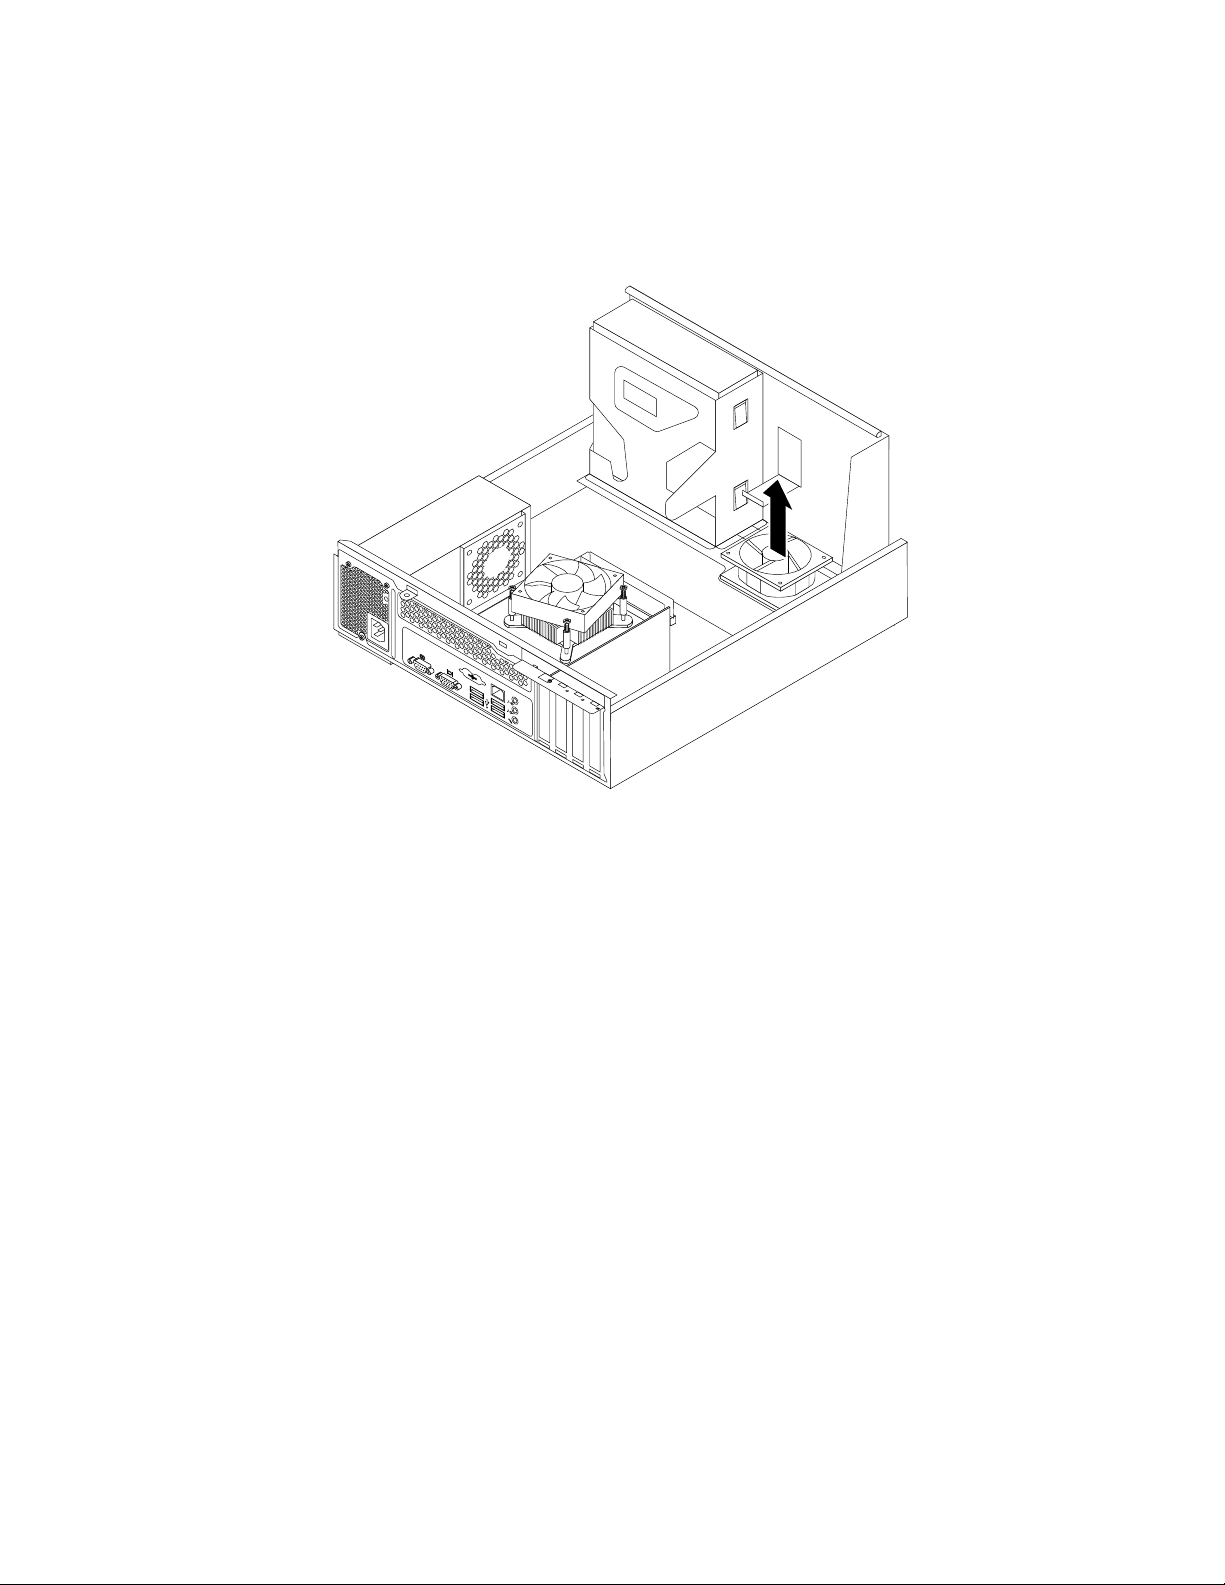
7.Notethecableroutinganddisconnectthefrontfanassemblycablefromthesystemfanconnectoron
thesystemboard.See“Locatingpartsonthesystemboard”onpage8.
8.Thefrontfanassemblyisattachedtothechassisbyfourrubbermounts.Removethefrontfanassembly
bycuttingtherubbermountsandliftingthefrontfanassemblyoutofthechassis.
Figure37.Removingthefrontfanassembly
38ThinkCentreUserGuide
Page 45
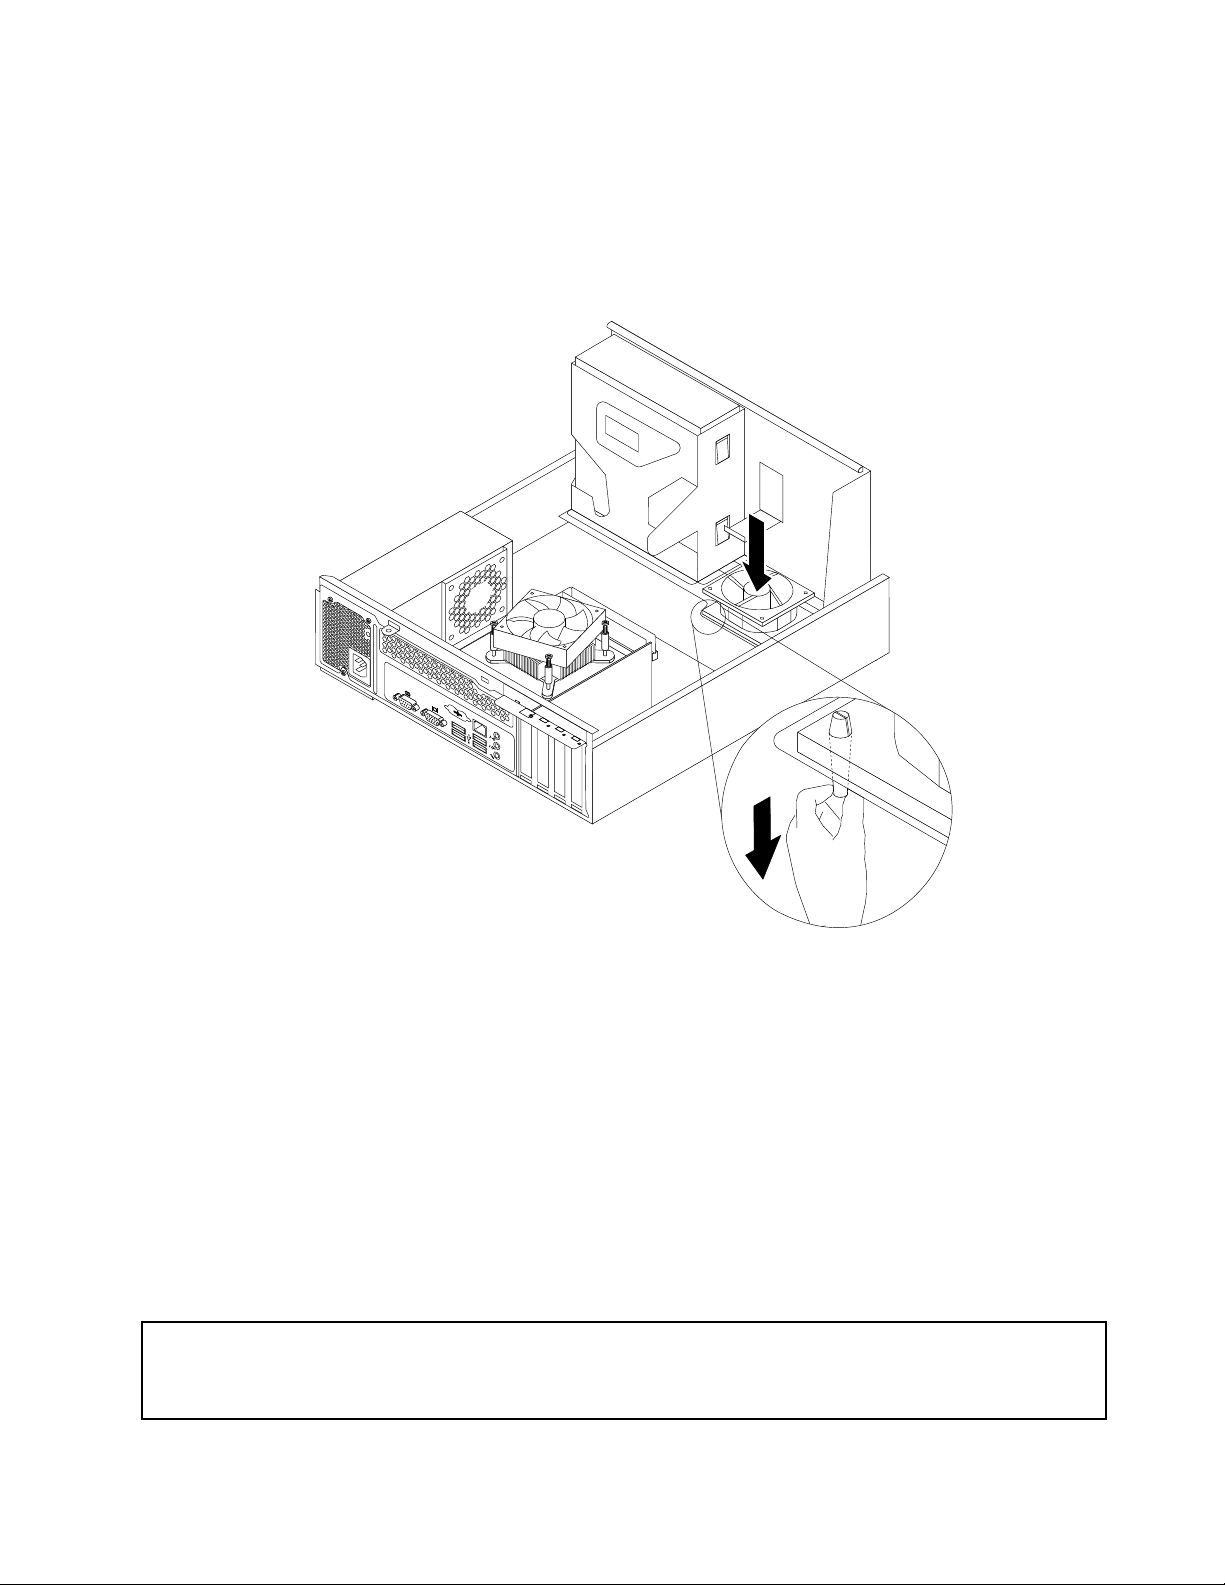
9.Installthenewfrontfanassemblybyaligningthenewrubbermountsthatcamewiththenewfrontfan
assemblywiththecorrespondingholesinthechassis,andthenpushtherubbermountsthroughthe
holes.Then,carefullypullonthetipsoftherubbermountsfromthebottomuntilthenewfrontfan
assemblyissecuredinplace.
Note:Thenewfrontfanassemblywillhavefournewrubbermountsattached.
Figure38.Installingthefrontfanassembly
10.Connectthenewfrontfanassemblycabletothesystemfanconnectoronthesystemboard.See
“Locatingpartsonthesystemboard”onpage8
.
11.Reinstalltheheatsinkfanduct.SeeFigure20“Installingtheheatsinkfanduct”onpage24.
12.Reinstalltheharddiskdrive.See“Replacingtheharddiskdrive”onpage34.
Whattodonext:
•T oworkwithanotherpieceofhardware,gototheappropriatesection.
•T ocompletethereplacement,goto“Completingthepartsreplacement”onpage40.
ReplacingtheUSBkeyboardormouse
Attention:Donotopenyourcomputerorattemptanyrepairbeforereadingandunderstandingthe“Importantsafety
information”intheThinkCentreSafetyandWarrantyGuidethatcamewithyourcomputer.Toobtainacopyofthe
ThinkCentreSafetyandWarrantyGuide,goto:
http://support.lenovo.com
Chapter2.Installingorreplacinghardware39
Page 46
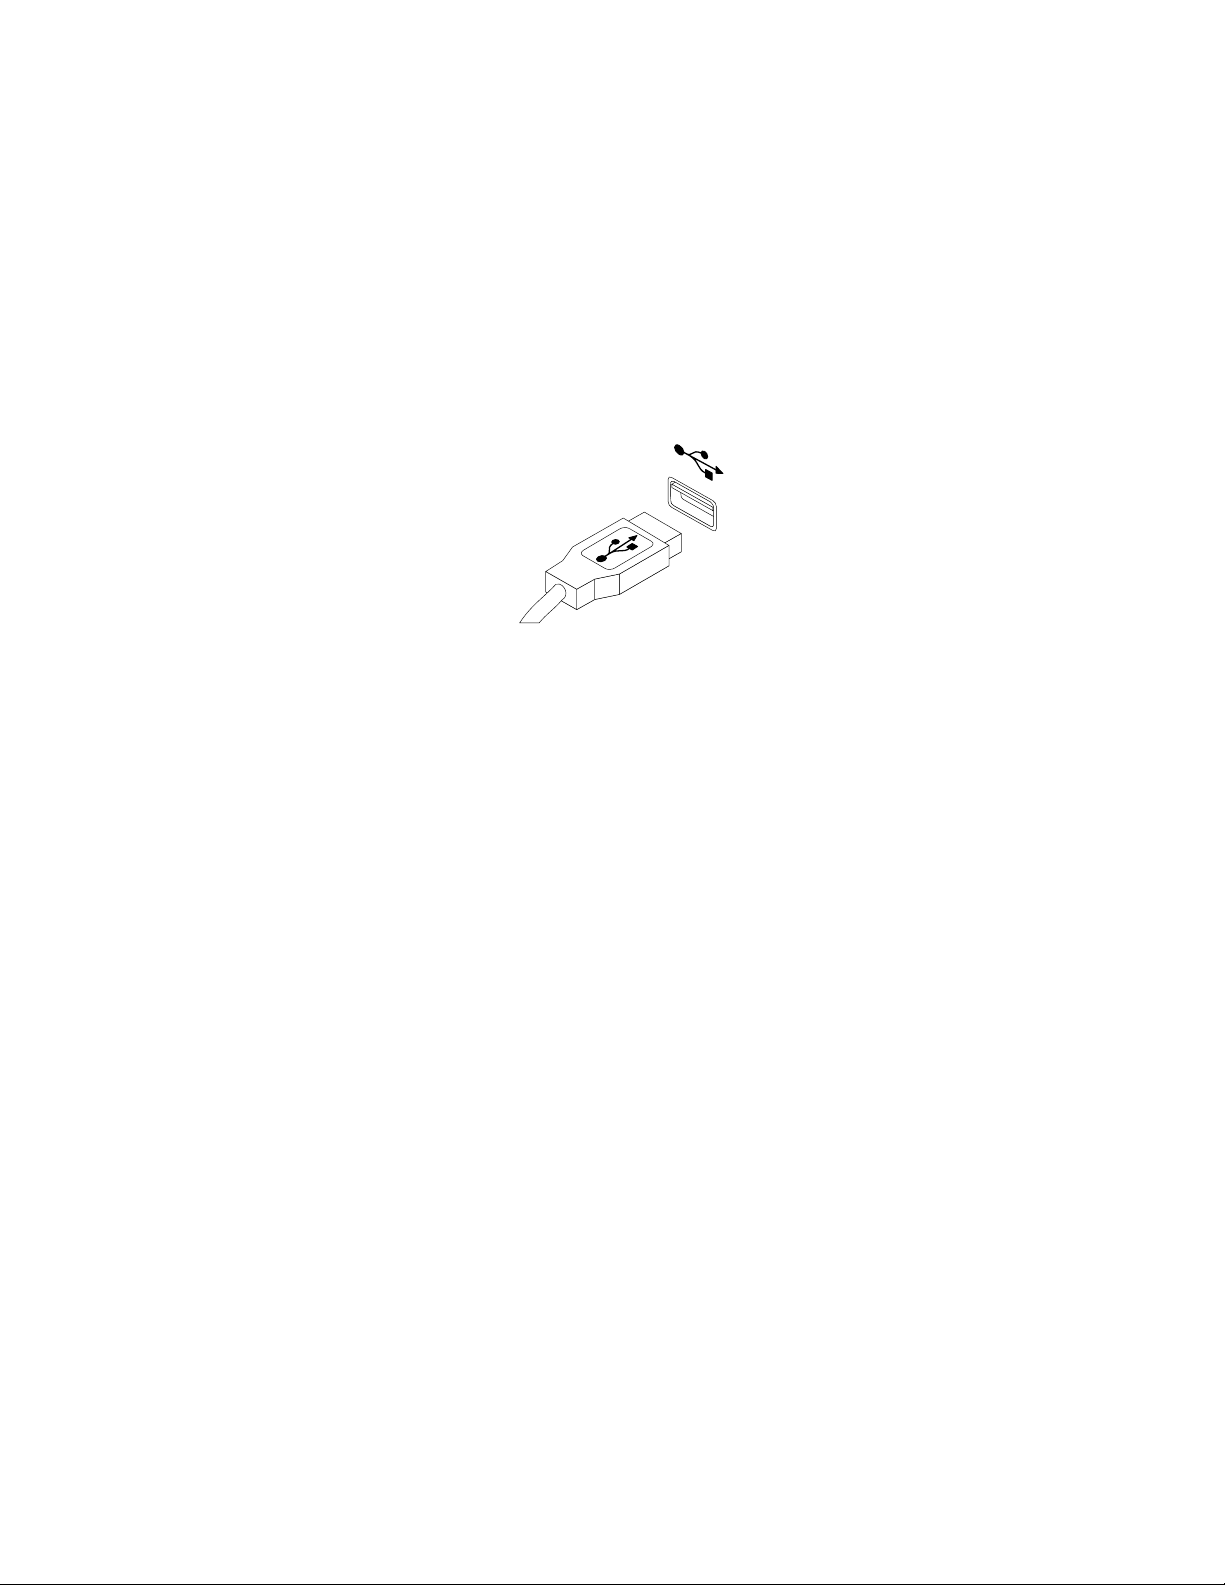
ThissectionprovidesinstructionsonhowtoreplacetheUSBkeyboardormouse.
ToreplacetheUSBkeyboardormouse,dothefollowing:
1.Removeallmediafromthedrivesandturnoffallattacheddevicesandthecomputer.Then,disconnect
allpowercordsfromelectricaloutlets.
2.DisconnectthecableoftheoldUSBkeyboardormousefromthecomputer.
3.ConnectthecableofthenewUSBkeyboardormousetooneoftheUSBconnectorsonthecomputer.
DependingonwhereyouwanttoconnectthenewUSBkeyboardormouse,see“Locatingconnectors,
controls,andindicatorsonthefrontofyourcomputer”onpage6
therearofyourcomputer”onpage7.
Figure39.ConnectingtheUSBkeyboardormouse
Whattodonext:
•T oworkwithanotherpieceofhardware,gototheappropriatesection.
•T ocompletethereplacement,goto“Completingthepartsreplacement”onpage40.
or“Locatingconnectorsandpartson
Completingthepartsreplacement
Aftercompletingtheinstallationorreplacementforallparts,youneedtoreinstallthecomputercover
andreconnectcables.
Toreinstallthecomputercoverandreconnectcablestoyourcomputer,dothefollowing:
1.Makesurethatallcomponentshavebeenreassembledcorrectlyandthatnotoolsorloosescrews
areleftinsideyourcomputer.See“Locatingcomponents”onpage8forthelocationsofthevarious
componentsinyourcomputer.
2.Makesurethatalltheinternalcablesareroutedproperlytoavoidinterferencewithloweringthedrivebay
assemblyandclosingthecomputercover.Keepthecablesclearofthehingesandsidesofthechassis.
3.Lowerthedrivebayassembly.See“Accessingthesystemboardcomponentsanddrives”onpage14.
4.Ifyouhaveremovedthefrontbezel,reinstallit.
40ThinkCentreUserGuide
Page 47
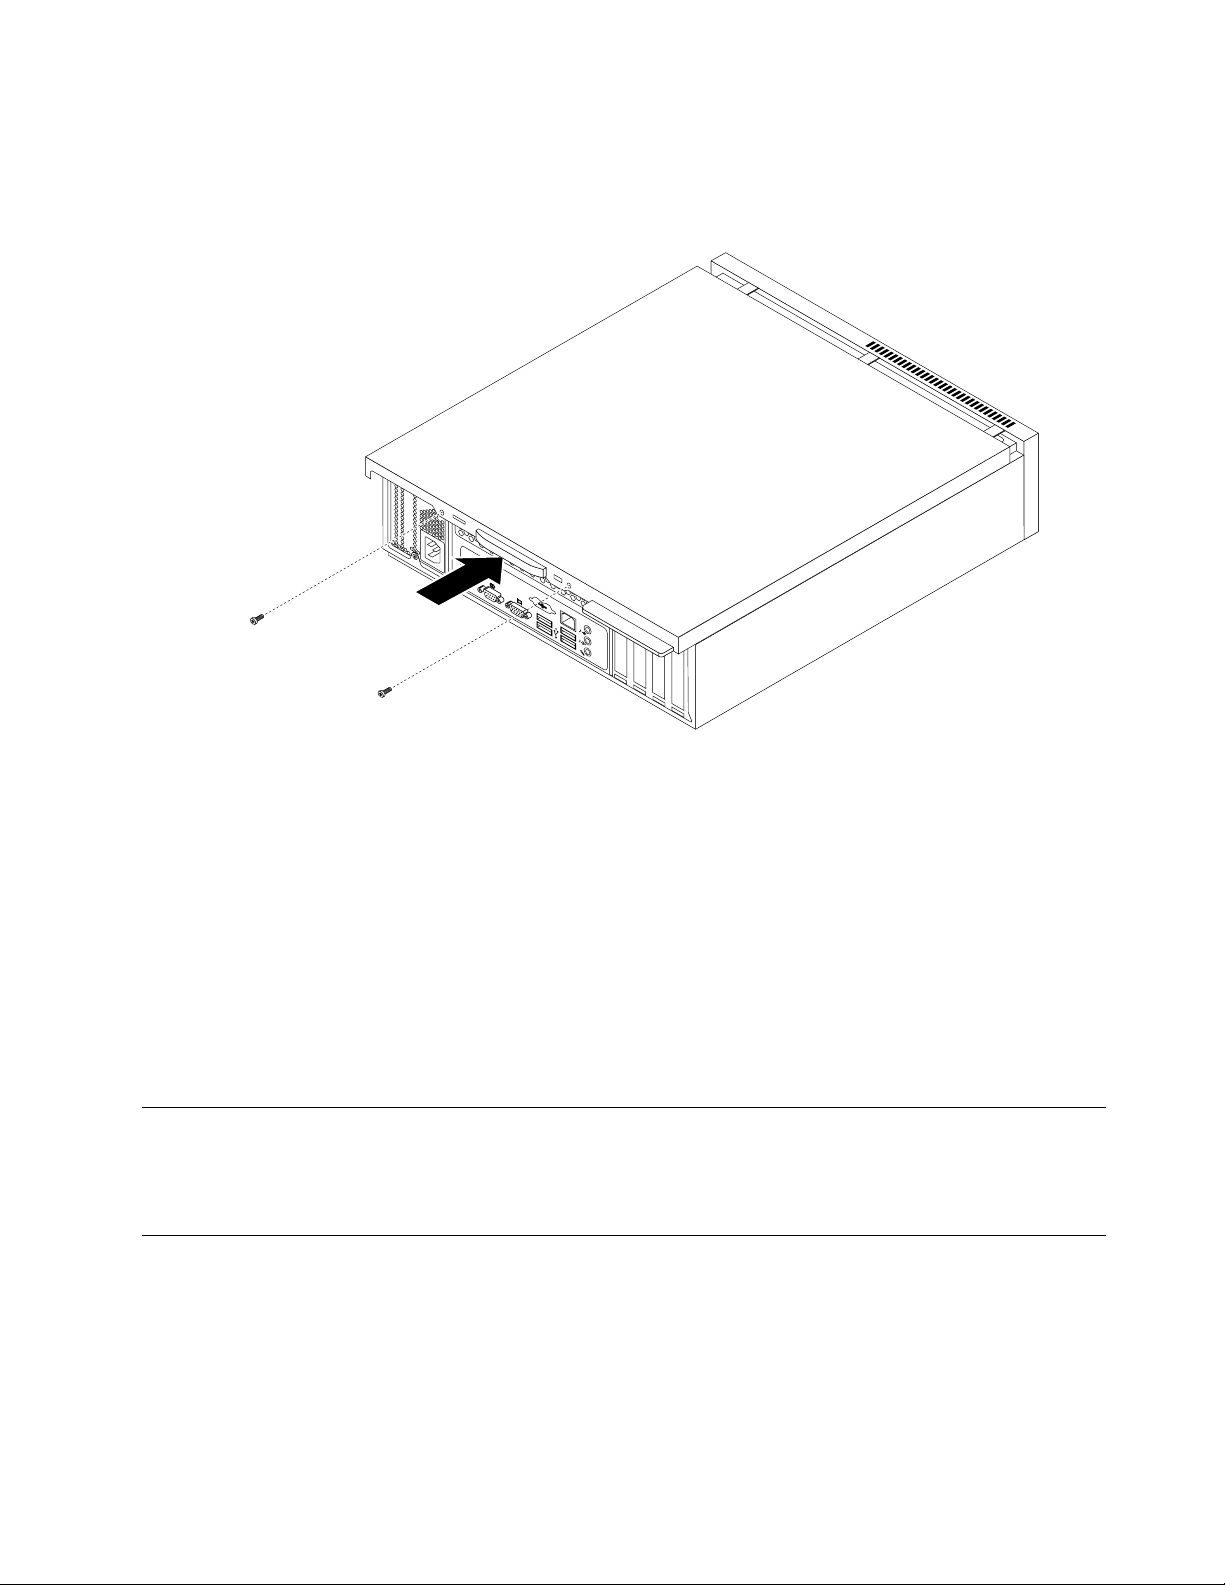
5.Positionthecomputercoveronthechassissothattherailguidesonthecomputercoverengagethe
railsonthechassis.Then,slidethecomputercovertothefrontofthecomputeruntilitsnapsinto
positionandisclosed.Then,installthetwoscrewstosecurethecomputercover.
Figure40.Reinstallingthecomputercover
6.Lockthecomputercoverifyouhaveacomputercoverlock.See“Integratedcablelock”onpage
42
or“Padlock”onpage43.
7.Reconnectthepowercordandallotherexternalcablestothecomputer.Forconnectorlocations,see
“Locatingconnectors,controls,andindicatorsonthefrontofyourcomputer”onpage6and“Locating
connectorsandpartsontherearofyourcomputer”onpage7
8.Dependingonthepartsyouinstalledorreplaced,youmightneedtoconrmtheupdatedinformationin
theSetupUtilityprogram.SeeChapter4“UsingtheSetupUtilityprogram”onpage51
Note:Inmostareasoftheworld,LenovorequiresthereturnofthedefectiveCustomerReplaceableUnits
(CRUs).InformationaboutthiswillcomewiththenewCRUsorwillcomeafewdaysafteryoureceivethe
newCRUs.
.
.
Obtainingdevicedrivers
Youcanobtaindevicedriversforoperatingsystemsthatarenotpreinstalledathttp://support.lenovo.com.
Installationinstructionsareprovidedinreadmeleswiththedevice-driverles.
Basicsecurityfeatures
Thereareseveralsecurityoptionsavailabletohelpyoupreventhardwaretheftandunauthorizedaccessto
yourcomputer.Inadditiontophysicallocks,youcanalsopreventunauthorizeduseofyourcomputerbya
softwarelockthatlocksthekeyboarduntilacorrectpasswordistypedin.
Chapter2.Installingorreplacinghardware41
Page 48
Integratedcablelock
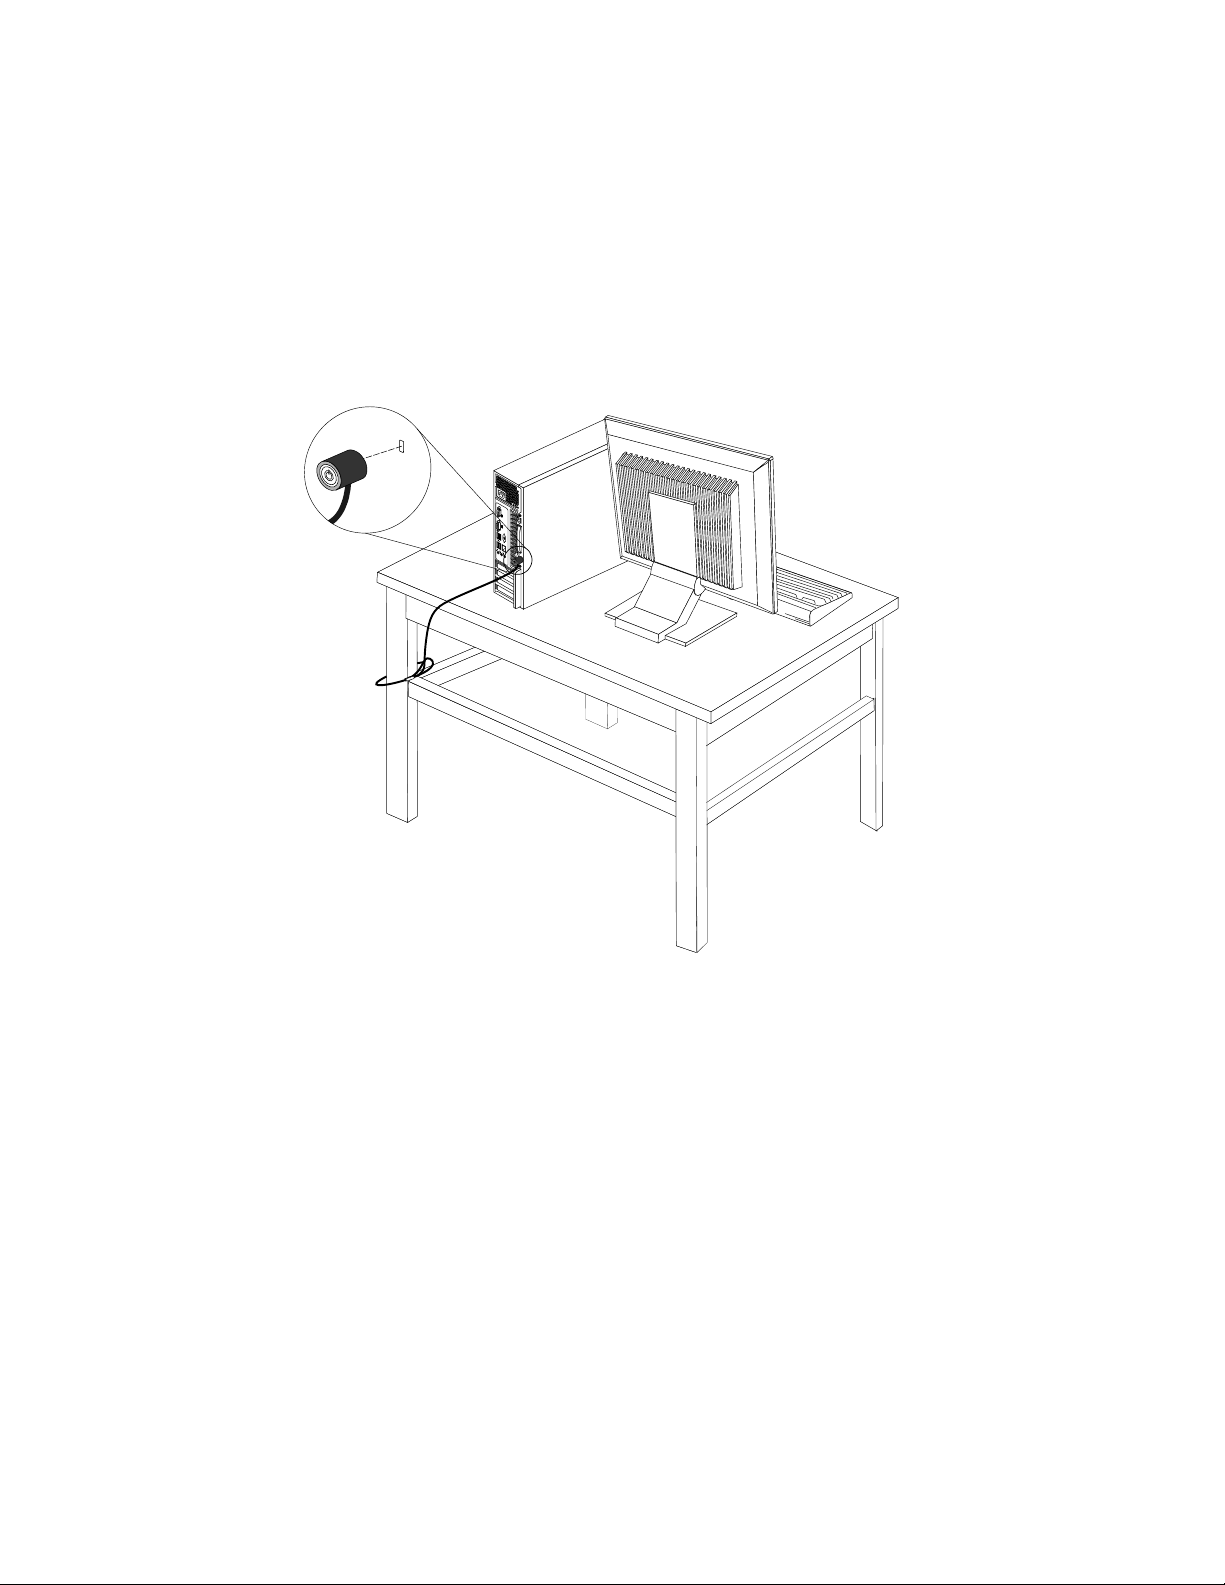
Anintegratedcablelock,sometimesreferredtoastheKensingtonlock,canbeusedtosecureyour
computertoadesk,table,orothernon-permanentxture.Thecablelockattachestoasecurityslotatthe
rearofyourcomputerandisoperatedwithakey.Thecablelockalsolocksthecomputercover.SeeFigure
41“Installinganintegratedcablelock”onpage42
computers.YoucanorderanintegratedcablelockfromLenovobysearchingforKensingtonat:
http://support.lenovo.com
Note:Makesurethattheintegratedcablelockyouinstalleddoesnotinterferewithothercomputercables.
.Thisisthesametypeoflockusedwithmanynotebook
Figure41.Installinganintegratedcablelock
42ThinkCentreUserGuide
Page 49
Padlock
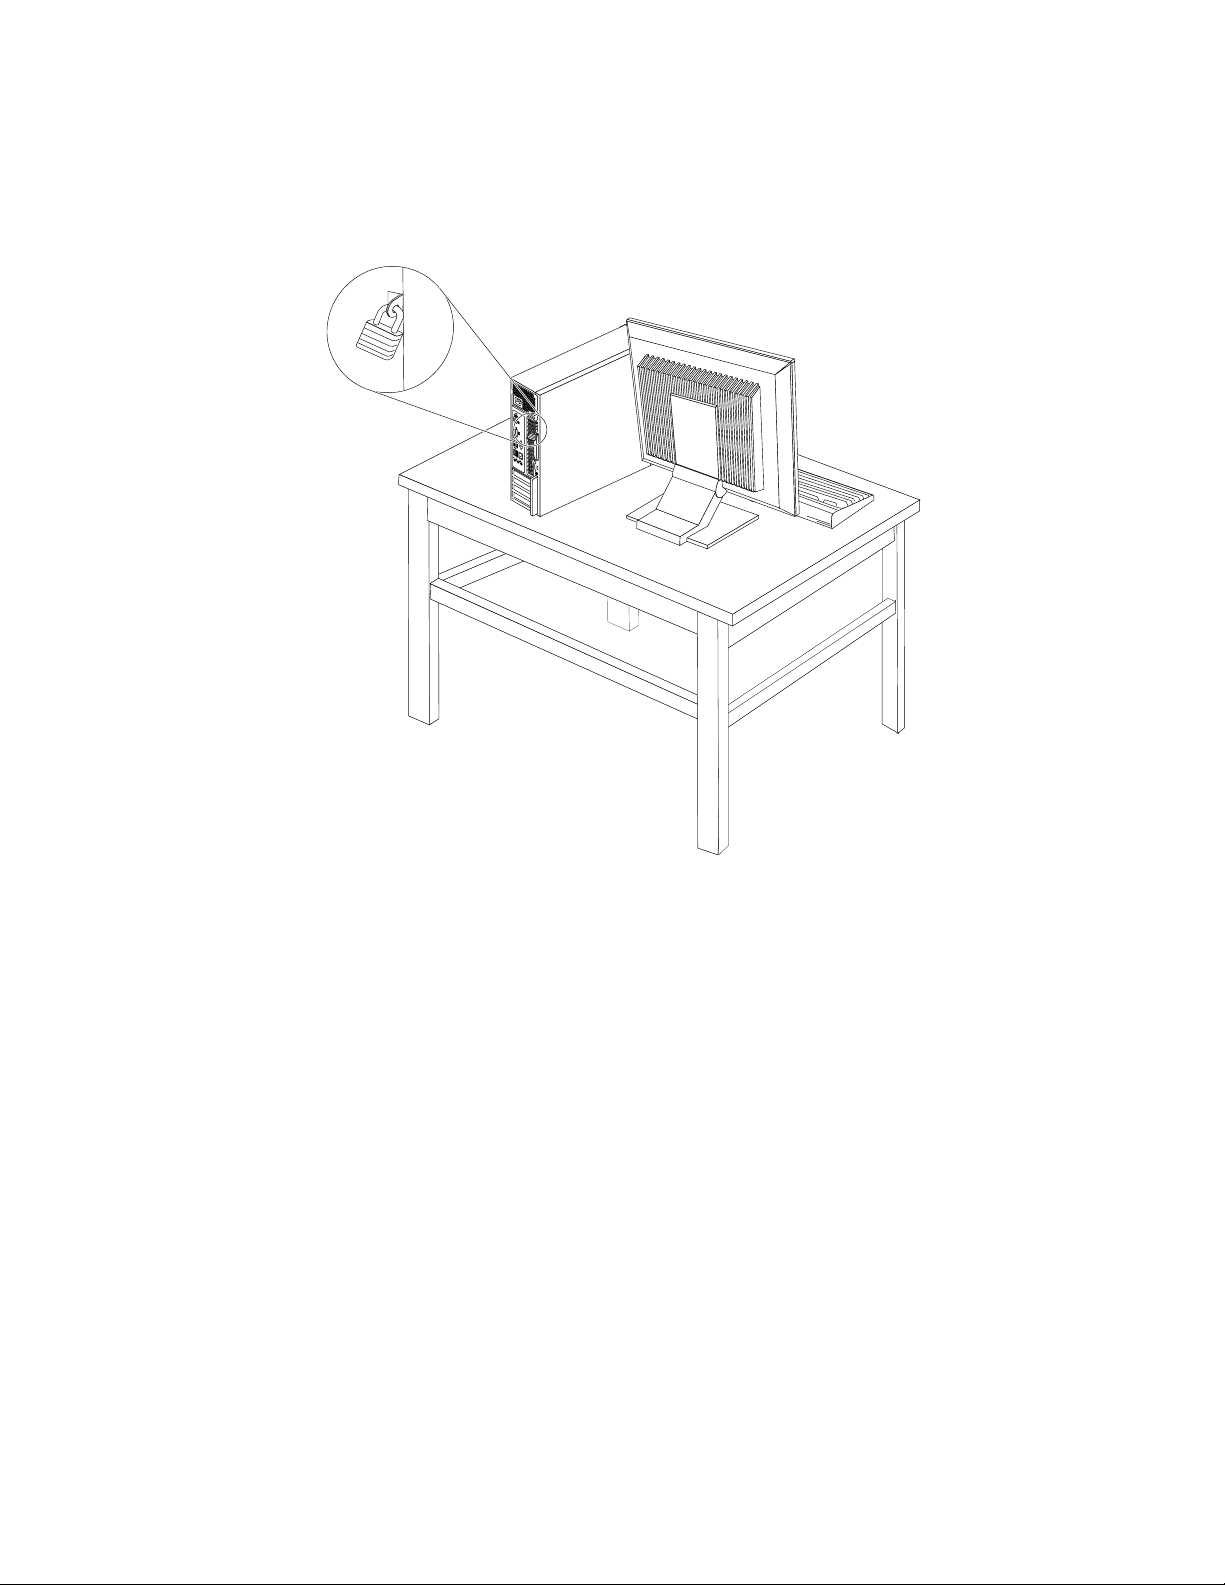
Yourcomputerisequippedwithapadlockloopsothatthecomputercovercannotberemovedwhen
apadlockisinstalled.
Figure42.Installingapadlock
Passwordprotection
Todeterunauthorizeduseofyourcomputer,youcanusetheSetupUtilityprogramtosetapassword.When
youturnonyourcomputer,youarepromptedtotypethepassword.Thecomputercannotbeuseduntil
avalidpasswordistypedin.RefertoChapter4“UsingtheSetupUtilityprogram”onpage51
information.
formore
Erasingalostorforgottenpassword(clearingCMOS)
Thissectionprovidesinstructionsonhowtoerasealostorforgottenpassword,suchasauserpassword.
Toerasealostorforgottenpassword,dothefollowing:
1.Removeallmediafromthedrivesandturnoffallattacheddevicesandthecomputer.Then,disconnect
allpowercordsfromelectricaloutletsanddisconnectallcablesthatareconnectedtothecomputer.
2.Removethecomputercover.See“Removingthecomputercover”onpage12.
3.LocatetheClearCMOS/Recoveryjumperonthesystemboard.See“Locatingpartsonthesystem
board”onpage8.
4.RemoveanypartsanddisconnectanycablesthatmightpreventyouraccesstotheClearCMOS
/Recoveryjumper.
Chapter2.Installingorreplacinghardware43
Page 50

5.Movethejumperfromthestandardposition(pin1andpin2)tothemaintenanceposition(pin2and
pin3).
6.Reinstallanypartsandreconnectanycablesthathavebeenremovedordisconnected.
7.Reinstallthecomputercoverandreconnectthepowercordsforthecomputerandmonitor.See
“Completingthepartsreplacement”onpage40.
8.T urnonthecomputerandleaveitonforapproximately10seconds.Then,turnoffthecomputerby
holdingthepowerswitchforapproximatelyveseconds.
9.Repeatstep1throughstep4.
10.MovetheClearCMOS/Recoveryjumperbacktothestandardposition(pin1andpin2).
11.Reinstallanypartsandreconnectanycablesthathavebeenremovedordisconnected.
12.Reinstallthecomputercoverandreconnectallcables.See“Completingthepartsreplacement”on
page40
.
13.T urnonthecomputer.Y ourpasswordhasbeenerasedandyoucanusetheSetupUtilityprogramtoset
anewpassword.SeeChapter4“UsingtheSetupUtilityprogram”onpage51
formoreinformation.
44ThinkCentreUserGuide
Page 51

Chapter3.Recoveryinformation
ThischapterprovidesinformationabouttherecoverysolutionsprovidedbyLenovo.
Thischaptercontainsthefollowingtopics:
•“Creatingandusingrecoverymedia”onpage45
•“Performingbackupandrecoveryoperations”onpage46
•“UsingtheRescueandRecoveryworkspace”onpage48
•“Creatingandusingarescuemedium”onpage48
•“Installingorreinstallingdevicedrivers”onpage50
•“Solvingrecoveryproblems”onpage50
Notes:
1.Thereareavarietyofmethodstochoosefromwhenconsideringhowtorecoverintheeventofa
software-orhardware-relatedproblem.Somemethodsvarydependingonthetypeofyouroperating
system.
2.Theproductontherecoverymediamaybeusedonlyforthefollowingpurposes:
•Restoretheproductpreinstalledonyourcomputer
•Reinstalltheproduct
•ModifytheproductusingtheAdditionalFiles
Creatingandusingrecoverymedia
Youcanuserecoverymediatorestoretheharddiskdrivetothefactorydefaultsettings.Recoverymedia
areusefulifyoutransferthecomputertoanotherarea,sellthecomputer,recyclethecomputer,orputthe
computerinanoperationalstateafterallothermethodsofrecoveryhavefailed.Asaprecautionarymeasure,
itisimportanttocreaterecoverymediaasearlyaspossible.
Note:Therecoveryoperationsyoucanperformusingrecoverymediavarydependingontheoperating
systemfromwhichtherecoverymediawerecreated.Therecoverymediamightcontainabootmedium
andadatamedium.YourMicrosoftWindowslicensepermitsyoutocreateonlyonedatamedium,soitis
importantthatyoustoretherecoverymediainasafeplaceafteryouhavemadethem.
Creatingrecoverymedia
Thissectionprovidesinstructionsonhowtocreaterecoverymediaondifferentoperatingsystems.
Note:OntheWindows7operatingsystem,youcancreaterecoverymediausingdiscsorexternalUSB
storagedevices.OntheWindowsVistaandWindowsXPoperatingsystems,youcancreaterecoverymedia
usingonlydiscs,sothisoperationisalsocalled“creatingProductRecoverydiscs.”
•T ocreaterecoverymediaontheWindows7operatingsystem,clickStart➙AllPrograms➙Lenovo
ThinkVantageTools➙FactoryRecoveryDisks.Then,followtheinstructionsonthescreen.
•T ocreateProductRecoverydiscsontheWindowsVistaoperatingsystem,clickStart➙AllPrograms➙
ThinkVantage➙CreateProductRecoveryMedia.Then,followtheinstructionsonthescreen.
•T ocreateProductRecoverydiscsontheWindowsXPoperatingsystem,clickStart➙AllPrograms➙
ThinkVantage➙CreateRecoveryMedia.Then,followtheinstructionsonthescreen.
©CopyrightLenovo2010,2011
45
Page 52

Usingrecoverymedia
Thissectionprovidesinstructionsonhowtouserecoverymediaondifferentoperatingsystems.
•OntheWindows7operatingsystemandtheWindowsVistaoperatingsystem,youcanuserecovery
mediatorestorethecomputertothefactorydefaultsettingsonly.Y oucanuserecoverymediatoputthe
computerinanoperationalstateafterallothermethodsofrecoveryhavefailed.
Attention:Whenyouuserecoverymediatorestorethecomputertothefactorydefaultsettings,allthe
lescurrentlyontheharddiskdrivewillbedeletedandreplacedbythefactorydefaultsettings.
TouserecoverymediaontheWindows7operatingsystemortheWindowsVistaoperatingsystem,
dothefollowing:
1.Dependingonthetypeofyourrecoverymedia,connectthebootmedium(memorykeyorotherUSB
storagedevice)tothecomputer,orinsertthebootdiscintotheopticaldrive.
2.RepeatedlypressandreleasetheF12keywhenturningonthecomputer.WhentheStartupDevice
Menuopens,releasetheF12key.
3.SelectthedesiredstartupdeviceandpressEnter.Therestoreprocessbegins.
4.Followtheinstructionsonthescreentocompletetheoperation.
Notes:
1.Afterrestoringyourcomputertothefactorydefaultsettings,youmighthavetoreinstalldevicedrivers
forsomedevices.See“Installingorreinstallingdevicedrivers”onpage50.
2.SomecomputerscomewithMicrosoftOfceorMicrosoftWorkspreinstalled.Ifyouneedtorecover
orreinstallyourMicrosoftOfceorMicrosoftWorksapplications,youmustusetheMicrosoftOfce
CDorMicrosoftWorksCD.ThesediscsareprovidedonlywithcomputerspreinstalledwithMicrosoft
OfceorMicrosoftWorks.
•OntheWindowsXPoperatingsystem,youcanuseProductRecoverydiscstorestoreyourcomputerto
thefactorydefaultsettings,performacustomfactoryrecovery,orperformotherrescueandrecovery
operationssuchasrescuingindividualles.Y ouwillbegiventheoptiontoentertheRescueandRecovery
workspaceandchoosefromavarietyofrecoveryoperations.
Attention:WhenyouuseProductRecoverydiscstorestorethecomputertothefactorydefaultsettings,
allthelescurrentlyontheharddiskdrivewillbedeletedandreplacedbythefactorydefaultsettings.
Duringtherestoreprocess,youwillbegiventheoptiontosaveoneormorelescurrentlyonthehard
diskdrivetoothermediabeforethedataisdeleted.
TouseProductRecoverydiscsontheWindowsXPoperatingsystem,dothefollowing:
1.RepeatedlypressandreleasetheF12keywhenturningonthecomputer.WhentheStartupDevice
Menuopens,releasetheF12key.
2.Insertthebootdiscintotheopticaldrive.
3.SelecttheopticaldrivewiththebootdiscasthestartupdeviceandpressEnter.Afterashortdelay,
theRescueandRecoveryworkspaceopens.
4.OntheRescueandRecoverymenu,clickRestoreyoursystem.
5.Followtheinstructionsonthescreen.InserttheappropriateProductRecoverydiscwhenprompted.
Performingbackupandrecoveryoperations
TheRescueandRecoveryprogramenablesyoutobackupallyourharddiskdrivecontentsincludingthe
operatingsystem,datales,softwareprograms,andpersonalsettings.Youcandesignatewherethe
RescueandRecoveryprogramstoresthebackup:
•Inaprotectedareaofyourharddiskdrive
46ThinkCentreUserGuide
Page 53

•Onthesecondaryharddiskdriveifasecondaryharddiskdriveisinstalledinyourcomputer
•OnanattachedexternalUSBharddiskdrive
•Onanetworkdrive
•Onrecordablediscs(arecordableopticaldriveisrequiredforthisoption)
Afteryouhavebackedupthecontentsontheharddiskdrive,youcanrestorethecompletecontentsofthe
harddiskdrive,restoreonlytheselectedles,orrestoreonlytheWindowsoperatingsystemandapplications.
Performingabackupoperation
ThissectionprovidesinstructionsonhowtoperformabackupoperationusingtheRescueandRecovery
programondifferentoperatingsystems.
•T operformabackupoperationusingtheRescueandRecoveryprogramontheWindows7operating
system,dothefollowing:
1.FromtheWindowsdesktop,clickStart➙AllPrograms➙LenovoThinkVantageTools➙
EnhancedBackupandRestore.TheRescueandRecoveryprogramopens.
2.IntheRescueandRecoverymainwindow,clicktheLaunchadvancedRescueandRecoveryarrow.
3.ClickBackupyourharddriveandselectbackupoperationoptions.Then,followtheinstructionson
thescreentocompletethebackupoperation.
•T operformabackupoperationusingtheRescueandRecoveryprogramontheWindowsVistaoperating
systemortheWindowsXPoperatingsystem,dothefollowing:
1.FromtheWindowsdesktop,clickStart➙AllPrograms➙ThinkVantage➙RescueandRecovery.
TheRescueandRecoveryprogramopens.
2.IntheRescueandRecoverymainwindow,clickLaunchadvancedRescueandRecovery➙Back
upyourharddrive,andselectbackupoperationoptions.
3.Followtheinstructionsonthescreentocompletethebackupoperation.
Performingarecoveryoperation
ThissectionprovidesinstructionsonhowtoperformarecoveryoperationusingtheRescueandRecovery
programondifferentoperatingsystems.
•T operformarecoveryoperationusingtheRescueandRecoveryprogramontheWindows7operating
system,dothefollowing:
1.FromtheWindowsdesktop,clickStart➙AllPrograms➙LenovoThinkVantageTools➙
EnhancedBackupandRestore.TheRescueandRecoveryprogramopens.
2.IntheRescueandRecoverymainwindow,clicktheLaunchadvancedRescueandRecoveryarrow.
3.ClicktheRestoreyoursystemfromabackupicon.
4.Followtheinstructionsonthescreentocompletetherecoveryoperation.
•T operformarecoveryoperationusingtheRescueandRecoveryprogramontheWindowsVistaoperating
systemortheWindowsXPoperatingsystem,dothefollowing:
1.FromtheWindowsdesktop,clickStart➙AllPrograms➙ThinkVantage➙RescueandRecovery.
TheRescueandRecoveryprogramopens.
2.IntheRescueandRecoverymainwindow,clickLaunchadvancedRescueandRecovery.
3.ClicktheRestoreyoursystemfromabackupicon.
4.Followtheinstructionsonthescreentocompletetherecoveryoperation.
FormoreinformationaboutperformingarecoveryoperationfromtheRescueandRecoveryworkspace,see
“UsingtheRescueandRecoveryworkspace”onpage48.
Chapter3.Recoveryinformation47
Page 54

UsingtheRescueandRecoveryworkspace
TheRescueandRecoveryworkspaceresidesinaprotected,hiddenareaofyourharddiskdrivethat
operatesindependentlyfromtheWindowsoperatingsystem.Thisenablesyoutoperformrecovery
operationsevenifyoucannotstarttheWindowsoperatingsystem.Y oucanperformthefollowingrecovery
operationsfromtheRescueandRecoveryworkspace:
•Rescuelesfromyourharddiskdriveorfromabackup:TheRescueandRecoveryworkspaceenables
youtolocatelesonyourharddiskdriveandtransferthemtoanetworkdriveorotherrecordablemedia,
suchasaUSBdeviceoradisc.Thissolutionisavailableevenifyoudidnotbackupyourlesorif
changesweremadetothelessinceyourlastbackupoperation.Y oucanalsorescueindividuallesfrom
aRescueandRecoverybackuplocatedonyourlocalharddiskdrive,aUSBdevice,oranetworkdrive.
•RestoreyourharddiskdrivefromaRescueandRecoverybackup:Ifyouhavebackedupyourharddisk
driveusingtheRescueandRecoveryprogram,youcanrestoretheharddiskdrivefromaRescueand
Recoverybackup,evenifyoucannotstarttheWindowsoperatingsystem.
•Restoreyourharddiskdrivetothefactorydefaultstate:TheRescueandRecoveryworkspaceenables
youtorestorethecompletecontentsofyourharddiskdrivetothefactorydefaultstate.Ifyouhave
multiplepartitionsonyourharddiskdrive,youhavetheoptiontorestoretheC:partitionandleavethe
otherpartitionsintact.BecausetheRescueandRecoveryworkspaceoperatesindependentlyfrom
theWindowsoperatingsystem,youcanrestoretheharddiskdrivetothefactorydefaultstateevenif
youcannotstarttheWindowsoperatingsystem.
Attention:IfyourestoretheharddiskdrivefromaRescueandRecoverybackuporrestoretheharddisk
drivetothefactorydefaultsettings,alllesontheprimaryharddiskdrivepartition(usuallydriveC:)willbe
deletedintherecoveryprocess.Ifpossible,makecopiesofimportantles.Ifyouareunabletostartthe
Windowsoperatingsystem,youcanusetherescuelesfeatureoftheRescueandRecoveryworkspaceto
copylesfromyourharddiskdrivetoothermedia.
TostarttheRescueandRecoveryworkspace,dothefollowing:
1.Makesurethecomputeristurnedoff.
2.T urnonyourcomputer.Whenyouseethelogoscreen,pressEnter,andthenpressF11toenterthe
RescueandRecoveryworkspace.
3.IfyouhavesetaRescueandRecoverypassword,typeyourpasswordwhenprompted.TheRescue
andRecoveryworkspaceopensafterashortdelay.
Note:IftheRescueandRecoveryworkspacefailstoopen,see“Solvingrecoveryproblems”onpage50
4.Dooneofthefollowing:
•T orescuelesfromyourharddiskdrive,clickRescuelesandfollowtheinstructionsonthescreen.
•T orestoreyourharddiskdrivefromaRescueandRecoverybackuportorestoreyourharddiskdrive
tothefactorydefaultsettings,clickFullRestoreandfollowtheinstructionsonthescreen.
FormoreinformationaboutthefeaturesoftheRescueandRecoveryworkspace,clickHelp.
Note:Afterrestoringyourharddiskdrivetothefactorydefaultstate,youmighthavetoreinstalldevice
driversforsomedevices.See“Installingorreinstallingdevicedrivers”onpage50.
Creatingandusingarescuemedium
Witharescuemedium,suchasadiscoraUSBharddiskdrive,youcanrecoverthecomputerfromfailures
thatpreventyoufromgainingaccesstotheRescueandRecoveryworkspaceonyourharddiskdrive.
.
48ThinkCentreUserGuide
Page 55

Notes:
1.Therecoveryoperationsyoucanperformusingarescuemediumvarydependingontheoperating
system.
2.Therescuedisccanbestartedinalltypesofopticaldrives.
3.Y oucanalsorunthePC-DoctorforRescueandRecoverydiagnosticprogram,afterusingarescue
mediumtorecoverthecomputerfromfailuresandgainingaccesstotheRescueandRecovery
workspace.
Creatingarescuemedium
Thissectionprovidesinstructionsonhowtocreatearescuemediumondifferentoperatingsystems.
•T ocreatearescuemediumontheWindows7operatingsystem,dothefollowing:
1.FromtheWindowsdesktop,clickStart➙AllPrograms➙LenovoThinkVantageTools➙
EnhancedBackupandRestore.TheRescueandRecoveryprogramopens.
2.IntheRescueandRecoverymainwindow,clicktheLaunchadvancedRescueandRecoveryarrow.
3.ClicktheCreateRescueMediaicon.TheCreateRescueandRecoveryMediawindowopens.
4.IntheRescueMediaarea,selectthetypeoftherescuemediumyouwanttocreate.Youcancreate
arescuemediumusingadisc,aUSBharddiskdrive,orasecondaryinternalharddiskdrive.
5.ClickOKandfollowtheinstructionsonthescreentocreatearescuemedium.
•T ocreatearescuemediumontheWindowsVistaoperatingsystemortheWindowsXPoperatingsystem,
dothefollowing:
1.FromtheWindowsdesktop,clickStart➙AllPrograms➙ThinkVantage➙CreateRecovery
Media.TheCreateRescueandRecoveryMediawindowopens.
2.IntheRescueMediaarea,selectthetypeoftherescuemediumyouwanttocreate.Youcancreate
arescuemediumusingadisc,aUSBharddiskdrive,orasecondaryinternalharddiskdrive.
3.ClickOKandfollowtheinstructionsonthescreentocreatearescuemedium.
Usingarescuemedium
Thissectionprovidesinstructionsonhowtousetherescuemediumyouhavecreated.
•Ifyouhavecreatedarescuemediumusingadisc,usethefollowinginstructionstousetherescuemedium:
1.T urnoffyourcomputer.
2.RepeatedlypressandreleasetheF12keywhenturningonthecomputer.WhentheStartupDevice
Menuopens,releasetheF12key.
3.OntheStartupDeviceMenu,selectthedesiredopticaldriveastherstbootdevice.Then,insert
therescuediscintotheopticaldriveandpressEnter.Therescuemediumstarts.
•IfyouhavecreatedarescuemediumusingaUSBharddiskdrive,usethefollowinginstructionsto
usetherescuemedium:
1.AttachtheUSBharddiskdrivetooneoftheUSBconnectorsonyourcomputer.
2.RepeatedlypressandreleasetheF12keywhenturningonthecomputer.WhentheStartupDevice
Menuopens,releasetheF12key.
3.OntheStartupDeviceMenu,selecttheUSBharddiskdriveastherstbootdeviceandpressEnter.
Therescuemediumstarts.
Whentherescuemediumstarts,theRescueandRecoveryworkspaceopens.Thehelpinformationfor
eachfeatureisavailablefromtheRescueandRecoveryworkspace.Followtheinstructionstocomplete
therecoveryprocess.
Chapter3.Recoveryinformation49
Page 56

Installingorreinstallingdevicedrivers
Beforeinstallingorreinstallingdevicedrivers,makesurethatyouhaveapreinstalledoperatingsystemand
thedocumentationandsoftwaremediaforthedevice.
Devicedriversforfactory-installeddevicesarelocatedonthecomputerharddiskdrive(usuallydriveC:)inthe
SWTOOLS\DRIVERSsubdirectory.Thelatestdevicedriversforfactory-installeddevicesarealsoavailableat
http://support.lenovo.com.Otherdevicedriversareonthesoftwaremediathatcomewithindividualdevices.
Toinstallorreinstallthedevicedriverforafactory-installeddevice,dothefollowing:
1.T urnonthecomputer.
2.GototheC:\SWTOOL Sdirectory.
3.OpentheAPPSfolder.WithintheAPPSfolder,thereareseveralsubfoldersnamedforvarious
applicationsinstalledinyourcomputer.
4.Opentheappropriateapplicationsubfolder.
5.Intheapplicationsubfolder,lookforaSETUP.EXEleorotherappropriateEXElesforsetup.
Double-clicktheleandfollowtheinstructionsonthescreentocompletetheinstallation.
Solvingrecoveryproblems
IfyouareunabletoaccesstheRescueandRecoveryworkspaceortheWindowsenvironment,doone
ofthefollowing:
•UsearescuemediumtostarttheRescueandRecoveryworkspace.See“Creatingandusingarescue
medium”onpage48.
•Userecoverymediaifallothermethodsofrecoveryhavefailedandyouneedtorestoretheharddisk
drivetothefactorydefaultsettings.See“Creatingandusingrecoverymedia”onpage45.
Note:IfyouareunabletoaccesstheRescueandRecoveryworkspaceortheWindowsenvironmentfroma
rescuemedium,arecoveryrepairdiskette,orrecoverymedia,youmightnothavetherescuedevice(an
internalharddiskdrive,adisc,aUSBharddiskdrive,orotherexternaldevices)setastherstbootdevicein
thestartupdevicesequence.Y oumustrstmakesurethatyourrescuedeviceissetastherstbootdevice
inthestartupdevicesequenceintheSetupUtilityprogram.See“Selectingastartupdevice”onpage53for
detailedinformationabouttemporarilyorpermanentlychangingthestartupdevicesequence.Formore
informationabouttheSetupUtilityprogram,seeChapter4“UsingtheSetupUtilityprogram”onpage51.
Itisimportanttocreatearescuemediumandasetofrecoverymediaasearlyaspossibleandstorethem
inasafeplaceforfutureuse.
50ThinkCentreUserGuide
Page 57

Chapter4.UsingtheSetupUtilityprogram
YoucanusetheSetupUtilityprogramtoviewandchangethecongurationsettingsofyourcomputer,
regardlessofwhichoperatingsystemyouareusing.However,theoperatingsystemsettingsmightoverride
anysimilarsettingsintheSetupUtilityprogram.
ThischapterprovidesinformationaboutthefollowingtopicstohelpyouusetheSetupUtilityprogram:
•“StartingtheSetupUtilityprogram”onpage51
•“Viewingorchangingsettings”onpage51
•“Usingpasswords”onpage51
•“Enablingordisablingadevice”onpage52
•“Selectingastartupdevice”onpage53
•“ExitingtheSetupUtilityprogram”onpage54
StartingtheSetupUtilityprogram
ThissectionprovidesinstructionsonhowtostarttheSetupUtilityprogram.
TostarttheSetupUtilityprogram,dothefollowing:
1.Makesureyourcomputeristurnedoff.
2.RepeatedlypressandreleasetheF1keywhenturningonthecomputer.Whenyouhearmultiplebeeps
orseealogoscreen,releasetheF1key.TheSetupUtilityprogramopens.
Note:Ifapasswordhasbeenset,theSetupUtilityprogrammenuwillnotbedisplayeduntilyoutype
thecorrectpassword.Formoreinformation,see“Usingpasswords”onpage51.
Viewingorchangingsettings
TheSetupUtilityprogrammenulistsvariousitemsaboutthesystemcongurationsettings.Toviewor
changethesettings,starttheSetupUtilityprogram.See“StartingtheSetupUtilityprogram”onpage
51.Then,followtheinstructionsonthescreen.
WhenworkingwiththeSetupUtilityprogram,youmustusethekeyboard.Thekeysusedtoperformvarious
tasksaredisplayedatthebottomofeachscreen.
Usingpasswords
ByusingtheSetupUtilityprogram,youcansetapasswordtopreventunauthorizedaccesstoyour
computeranddata.Thefollowingoptionsareavailabletohelpyousetapower-onpasswordoran
administratorpassword:
•SetPower-OnPassword
•SetAdministratorPassword
Youdonothavetosetapasswordtouseyourcomputer.However,usingapasswordimprovescomputing
security.Ifyoudecidetosetapassword,readthefollowingsections.
©CopyrightLenovo2010,2011
51
Page 58

Passwordconsiderations
Apasswordcanbeanycombinationofupto16(1to16)alphabeticandnumericcharacters.Forsecurity
reasons,itisrecommendedtouseastrongpasswordthatcannotbeeasilycompromised.Tosetastrong
password,usethefollowingguidelines:
Note:TheSetupUtilityprogrampasswordsarenotcasesensitive.
•Haveatleasteightcharactersinlength
•Containatleastonealphabeticcharacterandonenumericcharacter
•Notbeyournameoryourusername
•Notbeacommonwordoracommonname
•Besignicantlydifferentfromyourpreviouspasswords
Power-onpassword
Afteryouhavesetapower-onpasswordusingtheSetPower-OnPasswordoption,apasswordpromptis
displayedeachtimeyouturnonthecomputer.Y oucannotusethecomputeruntilavalidpasswordistyped
in.Formoreinformationabouthowtosetapassword,see“Setting,changing,ordeletingapassword”
onpage52
.
Administratorpassword
TheSetAdministratorPasswordoptionenablesyoutosetanadministratorpassword,whichdeters
unauthorizedusersfromchangingcongurationsettings.Ifyouareresponsibleformaintainingthesettings
ofseveralcomputers,youmightwanttosetanadministratorpassword.Formoreinformationabouthowto
setapassword,see“Setting,changing,ordeletingapassword”onpage52
.
Afteryouhavesetanadministratorpassword,apasswordpromptisdisplayedeachtimeyoutrytoaccess
theSetupUtilityprogram.Y oucannotaccesstheSetupUtilityprogramuntilavalidpasswordistypedin.
Ifyouhavesetbothapower-onpasswordandanadministratorpassword,youcantypeeitherpassword
touseyourcomputer.However,tochangeanycongurationsettings,youmustuseyouradministrator
password.
Setting,changing,ordeletingapassword
Thissectionprovidesinstructionsonhowtoset,change,ordeleteapassword.
Toset,change,ordeleteapassword,dothefollowing:
1.StarttheSetupUtilityprogram.See“StartingtheSetupUtilityprogram”onpage51.
2.FromtheSetupUtilityprogrammainmenu,selectSecurity➙SetPower-OnPasswordorSet
AdministratorPassword.
3.Followtheinstructionsonthescreentoset,change,ordeleteapassword.
Note:Apasswordcanbeanycombinationofupto16(1to16)alphabeticandnumericcharacters.
Formoreinformation,see“Passwordconsiderations”onpage52.
Enablingordisablingadevice
Thissectionprovidesinstructionsonhowtoenableordisableuseraccesstoadevice.
52ThinkCentreUserGuide
Page 59

SATAControllerWhenthisoptionissettoDisabled,alldevicesconnectedtotheSAT Aconnectors
(suchastheharddiskdriveandtheopticaldrive)aredisabledandwillnotbe
displayedinthesystemconguration.
USBSetupUsethisoptiontosetupUSBconnectors.
Toenableordisableadevice,dothefollowing:
1.StarttheSetupUtilityprogram.See“StartingtheSetupUtilityprogram”onpage51.
2.FromtheSetupUtilityprogrammainmenu,selectDevices.
3.Dependingonthedeviceyouwanttoenableordisable,dooneofthefollowing:
•SelectATADrivesSetup➙SAT AControllertoenableordisablethedevicesconnectedtothe
SATAconnectorsonthesystemboard.
•SelectUSBSetupandfollowtheinstructionsonthescreentoenableordisabletheUSBconnector(s)
ofyourchoice.
4.SelectthedesiredsettingsandpressEnter.
5.PressEsctoreturntotheSetupUtilityprogrammainmenu.YoumighthavetopressEscseveraltimes.
6.PressF10tosavethenewsettingsandexittheSetupUtilityprogram.
Notes:
a.Ifyoudonotwanttosavethenewsettings,selectExit➙DiscardChangesandExit.
b.Ifyouwanttoreturntothedefaultsettings,pressF9orselectExit➙LoadOptimalDefaults.
Selectingastartupdevice
Ifyourcomputerdoesnotstartupfromadevice(suchasaharddiskdriveorthediscinanopticaldrive)as
expected,dooneofthefollowingtoselectthedesiredstartupdevice.
Selectingatemporarystartupdevice
Thissectionprovidesinstructionsonhowtoselectatemporarystartupdevice.Y oucanusetheinstructions
inthissectiontostartupfromanystartupdevice.
Note:Notalldiscsandharddiskdrivesarebootable.
Toselectatemporarystartupdevice,dothefollowing:
1.T urnoffyourcomputer.
2.RepeatedlypressandreleasetheF12keywhenturningonthecomputer.WhentheStartupDevice
Menuopens,releasetheF12key.
3.SelectthedesiredstartupdeviceontheStartupDeviceMenuandpressEnter.
Note:SelectingastartupdeviceontheStartupDeviceMenudoesnotpermanentlychangethestartup
devicesequence.
Viewingorchangingthestartupdevicesequence
Thissectionprovidesinstructionsonhowtovieworpermanentlychangetheconguredstartupdevice
sequence.
Tovieworpermanentlychangetheconguredstartupdevicesequence,dothefollowing:
1.StarttheSetupUtilityprogram.See“StartingtheSetupUtilityprogram”onpage51.
Chapter4.UsingtheSetupUtilityprogram53
Page 60

2.SelectStartup➙PrimaryBootSequence.Readtheinformationdisplayedontherightsideofthe
screen.
3.Selecttherstbootdevice,secondbootdevice,andsoon.
4.PressEsctoreturntotheStartupmenu.Then,selectthedevicesfortheAutomaticBootSequence
andErrorBootSequence.
5.PressEsctoreturntotheSetupUtilityprogrammainmenu.YoumighthavetopressEscseveraltimes.
6.PressF10tosavethenewsettingsandexittheSetupUtilityprogram.
Notes:
a.Ifyoudonotwanttosavethenewsettings,selectExit➙DiscardChangesandExit.
b.Ifyouwanttoreturntothedefaultsettings,pressF9orselectExit➙LoadOptimalDefaults.
ExitingtheSetupUtilityprogram
Afteryounishviewingorchangingsettings,pressEsctoreturntotheSetupUtilityprogrammainmenu.
YoumighthavetopressEscseveraltimes.Then,youcandooneofthefollowing:
•IfyouwanttosavethenewsettingsandexittheSetupUtilityprogram,pressF10.Otherwise,your
changeswillnotbesaved.
•Ifyoudonotwanttosavethenewsettings,selectExit➙DiscardChangesandExit.
•Ifyouwanttoreturntothedefaultsettings,pressF9orselectExit➙LoadOptimalDefaults.
54ThinkCentreUserGuide
Page 61

Chapter5.Updatingsystemprograms
ThischapterprovidesinformationaboutupdatingthePOSTandBIOS,andhowtorecoverfromaPOST
andBIOSupdatefailure.
Thischaptercontainsthefollowingtopics:
•“Usingsystemprograms”onpage55
•“Updating(ashing)theBIOSfromadisc”onpage55
•“Updating(ashing)theBIOSfromyouroperatingsystem”onpage56
•“RecoveringfromaPOSTandBIOSupdatefailure”onpage56
Usingsystemprograms
Systemprogramsarethebasiclayerofsoftwarebuiltintoyourcomputer.Systemprogramsincludethe
POST,theBIOS,andtheSetupUtilityprogram.ThePOSTisasetoftestsandproceduresthatare
performedeachtimeyouturnonyourcomputer.TheBIOSisalayerofsoftwarethattranslatesinstructions
fromotherlayersofsoftwareintoelectricalsignalsthatthecomputerhardwarecanexecute.Youcanuse
theSetupUtilityprogramtovieworchangethecongurationsettingsofyourcomputer.SeeChapter4
“UsingtheSetupUtilityprogram”onpage51
Yourcomputersystemboardhasamodulecalledelectricallyerasableprogrammableread-onlymemory
(EEPROM,alsoreferredtoasashmemory).Y oucaneasilyupdatethePOST,theBIOS,andtheSetup
Utilityprogrambystartingyourcomputerwithasystem-program-updatediscorrunningaspecialupdate
programfromyouroperatingsystem.
fordetailedinformation.
LenovomightmakechangesandenhancementstothePOSTandBIOS.Whenupdatesarereleased,they
areavailableasdownloadablelesontheLenovoWebsiteathttp://www.lenovo.com.Instructionsforusing
thePOSTandBIOSupdatesareavailableinaTXTlethatisincludedwiththeupdateles.Formost
models,youcandownloadeitheranupdateprogramtocreateasystem-program-updatediscoranupdate
programthatcanberunfromtheoperatingsystem.
Updating(ashing)theBIOSfromadisc
Thissectionprovidesinstructionsonhowtoupdate(ash)theBIOSfromadisc.
Note:Y oucandownloadaself-startingbootablediscimage(knownasanISOimage)withthesystem
programupdatestocreateasystem-program-updatedisc.Goto:
http://support.lenovo.com
Toupdate(ash)theBIOSfromadisc,dothefollowing:
1.T urnoffyourcomputer.
2.RepeatedlypressandreleasetheF12keywhenturningonthecomputer.WhentheStartupDevice
Menuopens,releasetheF12key.
3.OntheStartupDeviceMenu,selectthedesiredopticaldriveasthestartupdevice.Then,insertthe
discintothisopticaldriveandpressEnter.Theupdatebegins.
4.Whenpromptedtochangetheserialnumber,itissuggestedthatyoudonotmakethischangeby
pressingN.However,ifyoudowanttochangetheserialnumber,pressY,thentypeintheserialnumber
andpressEnter.
©CopyrightLenovo2010,2011
55
Page 62

5.Whenpromptedtochangethemachinetypeandmodel,itissuggestedthatyoudonotmakethis
changebypressingN.However,ifyoudowanttochangethemachinetypeandmodel,pressY,then
typeinthemachinetypeandmodelandpressEnter.
6.Followtheinstructionsonthescreentocompletetheupdate.Aftertheupdateiscompleted,removethe
discfromtheopticaldrive.
Updating(ashing)theBIOSfromyouroperatingsystem
Note:BecauseLenovomakesconstantimprovementstoitsWebsites,theWebpagecontentsaresubject
tochangewithoutnotice,includingthecontentsreferencedinthefollowingprocedure.
Toupdate(ash)theBIOSfromyouroperatingsystem,dothefollowing:
1.Gotohttp://support.lenovo.com.
2.Dothefollowingtolocatethedownloadablelesforyourmachinetype:
a.IntheEnteraproductnumbereld,typeyourmachinetypeandclickGo.
b.ClickDownloadsanddrivers.
c.SelectBIOSfromtheReneresultsdrop-downlistboxtoeasilylocatealltheBIOSrelatedlinks.
d.ClicktheBIOSupdatelink.
3.ClicktheTXTlethatcontainstheinstructionsforupdating(ashing)theBIOSfromyouroperating
system.
4.Printtheseinstructions.Thisisveryimportantbecausetheseinstructionswillnotbedisplayedon
thescreenafterthedownloadbegins.
5.Followtheprintedinstructionstodownload,extract,andinstalltheupdate.
RecoveringfromaPOSTandBIOSupdatefailure
IfthepowertoyourcomputerisinterruptedwhilethePOSTandBIOSisbeingupdated,yourcomputer
mightnotrestartcorrectly.Ifthishappens,performthefollowingprocedure,whichiscommonlycalled
Boot-blockRecovery.
1.Removeallmediafromthedrivesandturnoffallattacheddevicesandthecomputer.Then,disconnect
allpowercordsfromelectricaloutletsanddisconnectallcablesthatareconnectedtothecomputer.
2.Removethecomputercover.See“Removingthecomputercover”onpage12.
3.LocatetheClearCMOS/Recoveryjumperonthesystemboard.See“Locatingpartsonthesystem
board”onpage8.
4.RemoveanypartsanddisconnectanycablesthatmightpreventyouraccesstotheClearCMOS
/Recoveryjumper.
5.Movethejumperfromthestandardposition(pin1andpin2)tothemaintenanceposition(pin2and
pin3).
6.Reinstallanypartsandreconnectanycablesthathavebeenremovedordisconnected.
7.Reinstallthecomputercoverandreconnectthepowercordsforthecomputerandmonitor.See
“Completingthepartsreplacement”onpage40.
8.T urnonthecomputerandtheninsertthePOSTandBIOSupdate(ashupdate)discintotheoptical
drive.Therecoverysessionbegins.Therecoverysessionwilltaketwotothreeminutes.Duringthis
time,youwillhearaseriesofbeeps.
9.Aftertherecoverysessioniscompleted,therewillbenovideo,theseriesofbeepswillend,andthe
systemwillautomaticallyturnoff.
10.Repeatstep1throughstep4.
11.Movethejumperbacktothestandardposition(pin1andpin2).
56ThinkCentreUserGuide
Page 63

12.Reinstallanypartsandreconnectanycablesthathavebeenremovedordisconnected.
13.Reinstallthecomputercoverandreconnectpowercordsandallotherexternalcables.See“Completing
thepartsreplacement”onpage40.
14.T urnonthecomputerandremovethediscfromtheopticaldrive.
Chapter5.Updatingsystemprograms57
Page 64

58ThinkCentreUserGuide
Page 65

Chapter6.Troubleshootinganddiagnosticprograms
Thischapterprovidesinformationaboutsomebasictroubleshootinganddiagnosticprograms.Ifyour
computerproblemisnotdescribedinthischapter,seeChapter7“Gettinginformation,help,andservice”on
page63
Thischaptercontainsthefollowingtopics:
•“Basictroubleshooting”onpage59
•“Diagnosticprograms”onpage60
•“Cleaninganopticalmouse”onpage61
Basictroubleshooting
Thefollowingtableprovidessomebasicinformationtohelpyoutroubleshootyourcomputerproblems.
Note:Ifyoucannotsolvetheproblemafterdoingthebasictroubleshooting,havethecomputerserviced.
RefertotheThinkCentreSafetyandWarrantyGuidethatcamewithyourcomputerforthesafetyand
warrantyinformationandthelistofserviceandsupporttelephonenumbers.Youcanalsogetthelatest
serviceandsupporttelephonenumbersandaPDFversionoftheThinkCentreSafetyandWarrantyGuide
fromtheLenovoSupportWebsiteat:
http://support.lenovo.com
Thecomputerdoesnotstart
whenyoupressthepower
switch.
Themonitorscreenisblank.
TheUSBkeyboardormouse
doesnotwork.
foradditionaltroubleshootingresources.
SymptomAction
Verifythat:
•Thepowercordiscorrectlyconnectedtotherearofthecomputerandtoa
workingelectricaloutlet.
•Thepowerindicatoronthefrontofthecomputerison.
•Thecomputervoltagematchesthevoltageavailableattheelectricaloutletfor
yourcountryorregion.
Verifythat:
•Themonitorsignalcableiscorrectlyconnectedtothemonitorandtothe
appropriatemonitorconnectoronthecomputer.IfyourcomputerhasaPCI
graphicscardinstalled,besuretousethemonitorconnectoronthegraphics
cardratherthantheintegratedoneonthesystemboard.
•Themonitorpowercordiscorrectlyconnectedtothemonitorandtoaworking
electricaloutlet.
•Themonitoristurnedonandthebrightnessandcontrastcontrolsareset
correctly.
•Thecomputervoltagematchesthevoltageavailableattheelectricaloutletfor
yourcountryorregion.
Verifythat:
•Thecomputeristurnedon.
•TheUSBkeyboardormouseiscorrectlyconnectedtooneoftheUSB
connectorsonthecomputer.
•FortheUSBkeyboard,nokeysarestuck.
•TheUSBmouseisclean.Referto“Cleaninganopticalmouse”onpage61.
©CopyrightLenovo2010,2011
59
Page 66

SymptomAction
Theoperatingsystemdoesnot
start.
Thecomputerbeepsmultiple
timesbeforetheoperating
systemstarts.
Verifythatyoulistthedevicewheretheoperatingsystemresidesinthestartup
devicesequence.Usually,theoperatingsystemisontheharddiskdrive.Formore
information,see“Selectingastartupdevice”onpage53
Verifythatnokeysarestuck.
.
Diagnosticprograms
Diagnosticprogramsareusedtotesthardwarecomponentsofyourcomputer.Diagnosticprogramscan
alsoreportoperating-system-controlledsettingsthatinterferewiththecorrectoperationofyoursystem.
Therearetwoprogramspreinstalledonyourcomputertohelpyoudiagnosecomputerproblems:
•LenovoThinkVantageT oolbox(usedwhenyouarerunningtheWindowsoperatingsystem)
•PC-DoctorforRescueandRecovery(usedwhenyoucannotstarttheWindowsoperatingsystem)
Notes:
1.Y oucanalsodownloadthePC-DoctorforDOSdiagnosticprogramfromhttp://support.lenovo.com.
See“PC-DoctorforDOS”onpage61fordetailedinformation.
2.Ifyouareunabletoisolateandrepairtheproblemyourselfafterrunningtheprograms,saveandprint
theloglescreatedbytheprograms.YouwillneedthelogleswhenyouspeaktoaLenovotechnical
supportrepresentative.
LenovoThinkVantageT oolbox
TheLenovoThinkVantageToolboxprogramhelpsyoumaintainyourcomputer,improvecomputingsecurity,
diagnosecomputerproblems,getfamiliarwiththeinnovativetechnologiesprovidedbyLenovo,andget
moreinformationaboutyourcomputer.YoucanusethediagnosticsfeatureoftheLenovoThinkVantage
Toolboxprogramtotestdevices,diagnosecomputerproblems,createbootablediagnosticmedia,update
systemdrivers,andviewsysteminformation.
•T oruntheLenovoThinkVantageT oolboxprogramontheWindows7operatingsystem,clickStart➙All
Programs➙LenovoThinkVantageTools➙SystemHealthandDiagnostics.Followtheinstructions
onthescreen.
•T oruntheLenovoThinkVantageT oolboxprogramontheWindowsVistaoperatingsystemortheWindows
XPoperatingsystem,clickStart➙AllPrograms➙ThinkVantage➙LenovoThinkVantageToolbox.
Followtheinstructionsonthescreen.
ForadditionalinformationaboutrunningtheLenovoThinkVantageToolboxprogram,refertotheLenovo
ThinkVantageToolboxhelpsystem.
PC-DoctorforRescueandRecovery
ThePC-DoctorforRescueandRecoveryprogramispartoftheRescueandRecoveryworkspaceonyour
Lenovocomputer.UsethePC-DoctorforRescueandRecoveryprogramifyouareunabletostartthe
Windowsoperatingsystem.
TorunthePC-DoctorforRescueandRecoveryprogramfromtheRescueandRecoveryworkspace,do
thefollowing:
1.T urnoffthecomputer.
2.RepeatedlypressandreleasetheF11keywhenturningonthecomputer.Whenyouhearbeepsorsee
alogoscreen,releasetheF11key.TheRescueandRecoveryworkspaceopensafterashortdelay.
60ThinkCentreUserGuide
Page 67

3.FromtheRescueandRecoveryworkspace,selectLaunchadvancedRescueandRecovery➙
Diagnosehardware.ThePC-DoctorforRescueandRecoveryprogramopens.
4.Selectthedesireddiagnostictest.Then,followtheinstructionsonthescreen.
ForadditionalinformationaboutrunningthePC-DoctorforRescueandRecoveryprogram,refertothe
PC-DoctorforRescueandRecoveryhelpsystem.
Note:IfyouencounterfailuresthatpreventyoufromgainingaccesstotheRescueandRecovery
workspace,youcanrunthePC-DoctorforRescueandRecoveryprogramafterusingarescuemedium
torecoverthecomputerfromfailuresandgainingaccesstotheRescueandRecoveryworkspace.See
“Creatingandusingarescuemedium”onpage48
.
PC-DoctorforDOS
YoucanalsodownloadthelatestversionofthePC-DoctorforDOSdiagnosticprogramfrom
http://support.lenovo.com.ThePC-DoctorforDOSdiagnosticprogramrunsindependentlyoftheWindows
operatingsystem.UsethePC-DoctorforDOSdiagnosticprogramifyouareunabletostarttheWindows
operatingsystem.YoucanrunthePC-DoctorforDOSdiagnosticprogramfromadiagnosticdiscthat
youcreated.
Creatingadiagnosticdisc
Thissectionprovidesinstructionsonhowtocreateadiagnosticdisc.
Tocreateadiagnosticdisc,dothefollowing:
1.Downloadaself-startingbootablediscimage(knownasanISOimage)ofthediagnosticprogramfrom:
http://support.lenovo.com
2.UseanydiscburningsoftwaretocreateadiagnosticdiscwiththeISOimage.
Runningthediagnosticprogramfromthediagnosticdisc
Thissectionprovidesinstructionsonhowtorunthediagnosticprogramfromthediagnosticdiscthat
youcreated.
Torunthediagnosticprogramfromthediagnosticdiscthatyoucreated,dothefollowing:
1.Makesureyourcomputeristurnedoff.
2.RepeatedlypressandreleasetheF12keywhenturningonthecomputer.WhentheStartupDevice
Menuopens,releasetheF12key.
3.Insertthediagnosticdiscintotheopticaldrive.
4.SelecttheopticaldrivewiththediagnosticdiscasthestartupdeviceandpressEnter.Thediagnostic
programopens.
5.Followtheinstructionsonthescreentorunthedesireddiagnostictest.Foradditionalhelp,press
theF1key.
6.Removethediagnosticdiscfromtheopticaldriveaftercompletingthediagnostictest.
Cleaninganopticalmouse
Thissectionprovidesinstructionsonhowtocleananopticalmouse.
AnopticalmouseusesanLEDandanopticalsensortonavigatethepointer.Ifthepointeronthescreen
doesnotmovesmoothlywiththeopticalmouse,youmightneedtocleanthemouse.
Tocleananopticalmouse,dothefollowing:
1.T urnoffyourcomputer.
Chapter6.Troubleshootinganddiagnosticprograms61
Page 68

2.Disconnectthemousecablefromthecomputer.
3.T urnthemouseupsidedowntocheckthelens.
a.Ifthereisasmudgeonthelens,gentlycleantheareawithaplaincotton-tippedswab.
b.Ifthereisdebrisinthelens,gentlyblowthedebrisawayfromthearea.
4.Checkthesurfaceonwhichyouareusingthemouse.Ifyouhaveaveryintricatepictureorpattern
beneaththemouse,itmaybedifcultforthedigitalsignalprocessor(DSP)todeterminechanges
inthemouseposition.
5.Reconnectthemousecabletothecomputer.
6.T urnyourcomputerbackon.
62ThinkCentreUserGuide
Page 69

Chapter7.Gettinginformation,help,andservice
Thischapterprovidesinformationabouthelp,service,andtechnicalassistanceforLenovoproducts.
Thischaptercontainsthefollowingtopics:
•“Informationresources”onpage63
•“Helpandservice”onpage65
Informationresources
Youcanusetheinformationinthissectiontoaccessusefulresourcesrelatingtoyourcomputingneeds.
OnlineBooksfolder
TheOnlineBooksfolderpreinstalledonyourcomputercontainstheThinkCentreUserGuide,whichprovides
informationaboutyourcomputertohelpyousetup,use,andmaintainyourcomputer.Itrequiresno
Internetaccesstoviewthepublication.
Toviewthepublication,clickStart➙AllPrograms➙OnlineBooks➙OnlineBooks,thendouble-click
thepublicationforyourcomputer.ThepublicationisalsoavailableontheLenovoSupportWebsiteat:
http://support.lenovo.com
Notes:
1.ThepublicationisinPDFversion.Toviewthepublication,youneedtohavetheAdobeReaderprogram
preinstalledonyourcomputer.IftheAdobeReaderprogramhasnotbeeninstalledonyourcomputer,a
messagewillbedisplayedwhenyouattempttoviewthePDFleandyouwillbeguidedthrough
theAdobeReaderinstallation.
2.ThepublicationisavailableinotherlanguagesontheLenovoSupportWebsiteat:
http://support.lenovo.com
3.IfyouwanttoinstalladifferentlanguageversionoftheAdobeReaderprogramratherthantheversion
preinstalledonyourcomputer,downloadthedesiredlanguageversionfromtheAdobeWebsiteat:
http://www.adobe.com
LenovoThinkVantageT ools
Note:TheLenovoThinkVantageT oolsprogramisonlyavailableoncomputerswiththeWindows7operating
systemfromLenovo.
TheLenovoThinkVantageToolsprogramhelpsyouworkmoreeasilyandsecurelybyprovidingeasyaccess
tovarioustechnologies,suchas:
•LenovoThinkVantageToolbox
•PasswordManager(availableonsomemodels)
•PowerManager
•ProductRecovery
•RescueandRecovery
•SystemUpdate
ToaccesstheLenovoThinkVantageToolsprogram,clickStart➙AllPrograms➙LenovoThinkVantage
Tools.
©CopyrightLenovo2010,2011
63
Page 70

ThinkVantageProductivityCenter
Note:TheThinkVantageProductivityCenterprogramisonlyavailableoncomputerspreinstalledwiththe
WindowsVistaoperatingsystemortheWindowsXPoperatingsystemfromLenovo.
TheThinkVantageProductivityCenterprogramcontainsinformationsourcesandtoolsdesignedtomake
computingeasyandsecure.Itprovideseasyaccesstovarioustechnologies,suchas:
•ClientSecuritySolution(availableonsomemodels)
•PowerManager
•ProductRecovery
•RescueandRecovery
•SystemUpdate
ToaccesstheThinkVantageProductivityCenterprogram,clickStart➙AllPrograms➙ThinkVantage
➙ProductivityCenter.
LenovoWelcome
Note:TheLenovoWelcomeprogramisonlyavailableoncomputerspreinstalledwiththeWindows7
operatingsystemortheWindowsVistaoperatingsystemfromLenovo.
TheLenovoWelcomeprogramintroducessomeinnovativebuilt-infeaturesofLenovotoyouandguidesyou
throughsomeimportantsetuptaskstohelpyoumakethemostofyourcomputer.
AccessHelp
TheAccessHelpinformationsystemprovidesinformationaboutgettingstarted,doingbasictasks,
customizingsettingsforyourpersonalpreference,protectingdata,expandingandupgrading,and
troubleshooting.
•T oopentheAccessHelpinformationsystemontheWindows7operatingsystem,clickStart➙Help
andSupport➙LenovoAccessHelp.
•T oopentheAccessHelpinformationsystemontheWindowsVistaoperatingsystemortheWindowsXP
operatingsystem,clickStart➙AllPrograms➙ThinkVantage➙AccessHelp.
AfteryouhaveopenedtheAccessHelpinformationsystem,usetheleftpaneltomakeaselectionfromthe
ContentstabortheIndextab,orusetheSearchtabtondaparticularwordorphrase.
Safetyandwarranty
TheThinkCentreSafetyandWarrantyGuidethatcamewithyourcomputercontainsinformationabout
safety,warranty,serviceandsupportphonenumbers,CRUs,andothernoticesandinformationresources.
YoucanalsogetthelatestserviceandsupporttelephonenumbersandaPDFversionoftheThinkCentre
SafetyandWarrantyGuidefromtheLenovoSupportWebsiteat:
http://support.lenovo.com
Beforeusingtheinformationinthismanualandtheproductitsupports,besuretoreadandunderstandthe
ThinkCentreSafetyandWarrantyGuideandAppendixA“Notices”onpage69
.
LenovoWebsite(http://www.lenovo.com)
TheLenovoWebsiteprovidesup-to-dateinformationandservicestohelpyoubuy,upgrade,andmaintain
yourcomputer.Youcanalsodothefollowing:
64ThinkCentreUserGuide
Page 71

•Shopfordesktopandnotebookcomputers,monitors,projectors,upgradesandaccessoriesforyour
computer,andspecialoffers.
•Purchaseadditionalservices,suchassupportforhardware,operatingsystems,softwareprograms,
networksetupandconguration,andcustominstallations.
•Purchaseupgradesandextendedhardwarerepairservices.
•Downloadthelatestdevicedriversandsoftwareupdatesforyourcomputermodel.
•Accesstheonlinemanualsforyourproducts.
•AccesstheLenovoLimitedWarranty.
•Accesstroubleshootingandsupportinformationforyourcomputermodelandothersupportedproducts.
•Findtheserviceandsupportphonenumbersforyourcountryorregion.
•FindaServiceProviderlocatednearyou.
LenovoSupportWebsite
TechnicalsupportinformationisavailableontheLenovoSupportWebsiteat:
http://support.lenovo.com
Thisportalisupdatedwiththelatestinformationaboutthefollowingsubjects:
DownloadDrivers&SoftwareDownloaddrivers,ashtheBIOS,andupdateyour
software.
Diagnose&FixUseself-diagnostictoolstodiagnosetheproblem
yourself,searchcommunityboards,orworkwithour
VirtualAgenttoanswerquestions.
Product&ServiceWarrantyCheckyourwarrantystatusandupgradeyourwarranty.
Product&PartsDetailFindpartnumbersforreplacementparts,learnhowto
replaceparts,andviewotherpartsinformationrelated
toyourproduct.
UserGuides&Manuals
Research&Learn
Readordownloadthedocumentationrelatedtoyour
product.
Searchthecommunityknowledgebaseforyourcomputer
toshareanddiscoverinformationwithotherusers.
Helpandservice
Thissectionprovidesinformationaboutobtaininghelpandservice.
Usingthedocumentationanddiagnosticprograms
Ifyouexperienceproblemswithyourcomputer,seeChapter6“T roubleshootinganddiagnosticprograms”
onpage59
see“Informationresources”onpage63.
Ifyoususpectasoftwareproblem,seethedocumentationthatcamewiththeoperatingsystemorsoftware
program,includingreadmelesandonlinehelp.
Mostcomputerscomewithasetofdiagnosticprogramsthatyoucanusetohelpyouidentifyhardware
problems.Forinstructionsonhowtousethediagnosticprogramsonyourcomputer,see“Diagnostic
programs”onpage60
.Forinformationaboutadditionalresourcestohelpyoutroubleshootyourcomputerproblems,
.
Chapter7.Gettinginformation,help,andservice65
Page 72

YoucangetthelatesttechnicalinformationanddownloaddevicedriversandupdatesfromtheLenovo
SupportWebsiteat:
http://support.lenovo.com
Callingforservice
Duringthewarrantyperiod,youcangethelpandinformationfromtheLenovoCustomerSupportCenterby
telephone.
Thefollowingservicesareavailableduringthewarrantyperiod:
•Problemdetermination-Trainedservicepersonnelareavailabletoassistyouwithdetermininga
hardwareproblemanddecidingwhatactionisnecessarytosolvetheproblem.
•Hardwarerepair-Iftheproblemiscausedbyhardwareunderwarranty,trainedservicepersonnelare
availabletoprovidetheapplicablelevelofservice.
•EngineeringChangemanagement-Theremightbechangesthatarerequiredafteraproducthas
beensold.LenovooryourresellerwillmakeselectedEngineeringChanges(ECs)thatapplytoyour
hardwareavailable.
Thefollowingitemsarenotcoveredbythewarranty:
•ReplacementoruseofpartsnotmanufacturedfororbyLenovoornon-warrantedLenovoparts
•Identicationofsoftwareproblemsources
•CongurationoftheBIOSaspartofaninstallationorupgrade
•Changes,modications,orupgradestodevicedrivers
•Installationandmaintenanceofnetworkoperatingsystems(NOS)
•Installationandmaintenanceofapplicationprograms
Refertothesafetyandwarrantyinformationthatisprovidedwithyourcomputerforacompleteexplanation
ofwarrantyterms.Y oumustretainyourproofofpurchasetoobtainwarrantyservice.
ForalistoftheLenovoSupportphonenumbersforyourcountryorregion,gotohttp://support.lenovo.com
andclickSupportphonelistorrefertotheThinkCentreSafetyandWarrantyGuidethatisprovidedwith
yourcomputer.
Note:Theserviceandsupportphonenumbersaresubjecttochangewithoutnotice.Ifthenumberforyour
countryorregionisnotprovided,contactyourLenovoresellerorLenovomarketingrepresentative.
Ifpossible,beatyourcomputerwhenyoucallandhavethefollowinginformationavailable:
•Machinetypeandmodel
•Serialnumbersofyourhardwareproducts
•Descriptionoftheproblem
•Exactwordingofanyerrormessages
•Hardwareandsoftwarecongurationinformation
Usingotherservices
Ifyoutravelwithyourcomputerorrelocateittoacountrywhereyourdesktopornotebookcomputer
machinetypeissold,yourcomputermightbeeligibleforInternationalWarrantyService,whichautomatically
entitlesyoutoobtainwarrantyservicethroughoutthewarrantyperiod.Servicewillbeperformedbyservice
providersauthorizedtoperformwarrantyservice.
Servicemethodsandproceduresvarybycountry,andsomeservicesmightnotbeavailableinallcountries.
InternationalWarrantyServiceisdeliveredthroughthemethodofservice(suchasdepot,carry-in,or
on-siteservice)thatisprovidedintheservicingcountry.Servicecentersincertaincountriesmightnotbe
66ThinkCentreUserGuide
Page 73

abletoserviceallmodelsofaparticularmachinetype.Insomecountries,feesandrestrictionsmight
applyatthetimeofservice.
TodeterminewhetheryourcomputeriseligibleforInternationalWarrantyServiceandtoviewalistofthe
countrieswhereserviceisavailable,gotohttp://support.lenovo.com,clickProduct&ServiceWarranty,
andfollowtheinstructionsonthescreen.
FortechnicalassistancewiththeinstallationoforquestionsrelatedtoServicePacksforyour
preinstalledMicrosoftWindowsproduct,refertotheMicrosoftProductSupportServicesWebsiteat
http://support.microsoft.com/directoryoryoucancontacttheCustomerSupportCenter.Somefeesmight
apply.
Purchasingadditionalservices
Duringandafterthewarrantyperiod,youcanpurchaseadditionalservices,suchassupportforhardware,
operatingsystems,andapplicationprograms;networksetupandconguration;upgradedorextended
hardwarerepairservices;andcustominstallations.Serviceavailabilityandservicenamemightvaryby
countryorregion.Formoreinformationabouttheseservices,gototheLenovoWebsiteat:
http://www.lenovo.com
Chapter7.Gettinginformation,help,andservice67
Page 74

68ThinkCentreUserGuide
Page 75

AppendixA.Notices
Lenovomaynotoffertheproducts,services,orfeaturesdiscussedinthisdocumentinallcountries.Consult
yourlocalLenovorepresentativeforinformationontheproductsandservicescurrentlyavailableinyour
area.AnyreferencetoaLenovoproduct,program,orserviceisnotintendedtostateorimplythatonlythat
Lenovoproduct,program,orservicemaybeused.Anyfunctionallyequivalentproduct,program,orservice
thatdoesnotinfringeanyLenovointellectualpropertyrightmaybeusedinstead.However,itistheuser’s
responsibilitytoevaluateandverifytheoperationofanyotherproduct,program,orservice.
Lenovomayhavepatentsorpendingpatentapplicationscoveringsubjectmatterdescribedinthis
document.Thefurnishingofthisdocumentdoesnotgiveyouanylicensetothesepatents.Youcansend
licenseinquiries,inwriting,to:
Lenovo(UnitedStates),Inc.
1009ThinkPlace-BuildingOne
Morrisville,NC27560
U.S.A.
Attention:LenovoDirectorofLicensing
LENOVOPROVIDESTHISPUBLICATION“ASIS”WITHOUTWARRANTYOFANYKIND,EITHEREXPRESS
ORIMPLIED,INCLUDING,BUTNOTLIMITEDTO,THEIMPLIEDWARRANTIESOFNON-INFRINGEMENT ,
MERCHANTABILITYORFITNESSFORAPARTICULARPURPOSE.Somejurisdictionsdonotallow
disclaimerofexpressorimpliedwarrantiesincertaintransactions,therefore,thisstatementmaynotapply
toyou.
Thisinformationcouldincludetechnicalinaccuraciesortypographicalerrors.Changesareperiodically
madetotheinformationherein;thesechangeswillbeincorporatedinneweditionsofthepublication.
Lenovomaymakeimprovementsand/orchangesintheproduct(s)and/ortheprogram(s)describedinthis
publicationatanytimewithoutnotice.
Theproductsdescribedinthisdocumentarenotintendedforuseinimplantationorotherlifesupport
applicationswheremalfunctionmayresultininjuryordeathtopersons.Theinformationcontainedinthis
documentdoesnotaffectorchangeLenovoproductspecicationsorwarranties.Nothinginthisdocument
shalloperateasanexpressorimpliedlicenseorindemnityundertheintellectualpropertyrightsofLenovo
orthirdparties.Allinformationcontainedinthisdocumentwasobtainedinspecicenvironmentsandis
presentedasanillustration.Theresultobtainedinotheroperatingenvironmentsmayvary.
Lenovomayuseordistributeanyoftheinformationyousupplyinanywayitbelievesappropriatewithout
incurringanyobligationtoyou.
Anyreferencesinthispublicationtonon-LenovoWebsitesareprovidedforconvenienceonlyanddonotin
anymannerserveasanendorsementofthoseWebsites.ThematerialsatthoseWebsitesarenotpartof
thematerialsforthisLenovoproduct,anduseofthoseWebsitesisatyourownrisk.
Anyperformancedatacontainedhereinwasdeterminedinacontrolledenvironment.Therefore,theresult
obtainedinotheroperatingenvironmentsmayvarysignicantly.Somemeasurementsmayhavebeen
madeondevelopment-levelsystemsandthereisnoguaranteethatthesemeasurementswillbethesame
ongenerallyavailablesystems.Furthermore,somemeasurementsmayhavebeenestimatedthrough
extrapolation.Actualresultsmayvary.Usersofthisdocumentshouldverifytheapplicabledatafortheir
specicenvironment.
©CopyrightLenovo2010,2011
69
Page 76

Televisionoutputnotice
Thefollowingnoticeappliestomodelsthathavethefactory-installedtelevision-outputfeature.
ThisproductincorporatescopyrightprotectiontechnologythatisprotectedbymethodclaimsofcertainU.S.
patentsandotherintellectualpropertyrightsownedbyMacrovisionCorporationandotherrightsowners.
UseofthiscopyrightprotectiontechnologymustbeauthorizedbyMacrovisionCorporation,andisintended
forhomeandotherlimitedviewingusesonlyunlessotherwiseauthorizedbyMacrovisionCorporation.
Reverseengineeringordisassemblyisprohibited.
EuropeanconformanceCEmark
Trademarks
ThefollowingtermsaretrademarksofLenovointheUnitedStates,othercountries,orboth:
Lenovo
TheLenovologo
RescueandRecovery
ThinkCentre
ThinkVantage
Microsoft,Windows,andWindowsVistaaretrademarksoftheMicrosoftgroupofcompanies.
Celeron,Intel,IntelCore,andPentiumaretrademarksofIntelCorporationintheUnitedStates,other
countries,orboth.
LinuxisatrademarkofLinusT orvaldsintheUnitedStates,othercountries,orboth.
Othercompany,product,orservicenamesmaybetrademarksorservicemarksofothers.
Additionalregulatoryinformation
Foradditionalregulatoryinformation,refertotheThinkCentreRegulatoryNoticeshippedwithyourcomputer.
Dependingonthecongurationofyourcomputerandthecountryorregionwherethecomputerwas
purchased,youmighthavereceivedadditionalprintedregulatorynotices.Allregulatorynoticesareavailable
ontheLenovoSupportWebsiteinelectronicformat.T oaccesselectroniccopiesofthedocumentation,
gotohttp://support.lenovo.comandclickUserGuides&Manuals.
RecyclinginformationforBrazil
DeclaraçõesdeReciclagemnoBrasil
DescartedeumProdutoLenovoForadeUso
Equipamentoselétricoseeletrônicosnãodevemserdescartadosemlixocomum,masenviadosàpontosde
coleta,autorizadospelofabricantedoprodutoparaquesejamencaminhadoseprocessadosporempresas
especializadasnomanuseioderesíduosindustriais,devidamentecerticadaspelosorgãosambientais,de
acordocomalegislaçãolocal.
70ThinkCentreUserGuide
Page 77
ALenovopossuiumcanalespecícoparaauxiliá-lonodescartedessesprodutos.Casovocêpossua
umprodutoLenovoemsituaçãodedescarte,ligueparaonossoSACouencaminheume-mailpara:
[email protected],informandoomodelo,númerodesérieecidade,amdeenviarmosasinstruções
paraocorretodescartedoseuprodutoLenovo.
BatteryrecyclinginformationforTaiwan
BatteryrecyclinginformationfortheEuropeanUnion
Notice:ThismarkappliesonlytocountrieswithintheEuropeanUnion(EU).
BatteriesorpackagingforbatteriesarelabeledinaccordancewithEuropeanDirective2006/66/EC
concerningbatteriesandaccumulatorsandwastebatteriesandaccumulators.TheDirectivedeterminesthe
frameworkforthereturnandrecyclingofusedbatteriesandaccumulatorsasapplicablethroughoutthe
EuropeanUnion.Thislabelisappliedtovariousbatteriestoindicatethatthebatteryisnottobethrown
away,butratherreclaimeduponendoflifeperthisDirective.
InaccordancewiththeEuropeanDirective2006/66/EC,batteriesandaccumulatorsarelabeledtoindicate
thattheyaretobecollectedseparatelyandrecycledatendoflife.Thelabelonthebatterymayalso
includeachemicalsymbolforthemetalconcernedinthebattery(Pbforlead,Hgformercury,andCdfor
cadmium).Usersofbatteriesandaccumulatorsmustnotdisposeofbatteriesandaccumulatorsasunsorted
municipalwaste,butusethecollectionframeworkavailabletocustomersforthereturn,recycling,and
treatmentofbatteriesandaccumulators.Customerparticipationisimportanttominimizeanypotential
effectsofbatteriesandaccumulatorsontheenvironmentandhumanhealthduetothepotentialpresenceof
hazardoussubstances.Forpropercollectionandtreatment,goto:
http://www.lenovo.com/lenovo/environment
AppendixA.Notices71
Page 78

72ThinkCentreUserGuide
Page 79

Index
A
arescuemedium,creatingandusing48
AccessHelp64
accessing
systemboardcomponentsanddrives14
administratorpassword52
antivirussoftware6
audioline-inconnector7
audioline-outconnector7
audiosubsystem1
B
backupandrecoveryoperations46
basictroubleshooting59
battery,replacing20
Boot-blockRecovery56
C
cablelock,security42
changing
startupdevicesequence53
cleaninganopticalmouse61
CMOS,clearing43
components,internal8
computercover
removing12
computercover,reinstalling40
connectordescription7
connectors
rear7
connectors,controls,indicators
front6
considerations,password52
creating
andusingarescuemedium48
creatingandusing
recoverymedia45
CRU
completingtheinstallation40
completingthereplacement40
D
devicedrivers41
installing50
reinstalling50
devices,handlingstatic-sensitive11
diagnosticprograms,troubleshooting59
diagnosticprograms,using65
documentation,using65
drivers,device41
drives
internal9
E
environment,operating4
Ethernet2
Ethernetconnector7
exiting,SetupUtilityprogram54
expansion2
externaloptions,installing11
F
failure,recoveringfromaPOSTandBIOSupdate56
features1
ashingtheBIOS55
front
connectors,controls,indicators6
frontbezel
removing,reinstalling13
frontfanassembly
replacing37
G
getting
help63
information63
service63
H
harddiskdrive,replacing34
heatsinkandfanassembly
replacing21
help
AccessHelp64
andservice65
getting63
I
importantsafetyinformationiii
information
getting63
importantsafetyiii
resources63
safety64
warranty64
Input/Output(I/O)features2
installing
devicedrivers50
installingoptions
©CopyrightLenovo2010,2011
73
Page 80

securityfeatures41
installing,replacing
memorymodule18
PCIcard15
internal
drives9
internaldrives1
K
keyboard,replacing39
L
LenovoCustomerSupportCenter66
LenovoThinkVantageToolbox60
LenovoThinkVantageTools63
LenovoWebsite64
LenovoWelcome4
locatingcomponents8
M
media,creatingandusingrecoverymedia45
memorymodule1,18
installing,replacing18
microphoneconnector8
microprocessor1
replacing24
mouse,replacing39
N
notice,televisionoutput70
notices69
O
OnlineBooksfolder63
operations,backupandrecovery46
opticaldrive
replacing31
opticalmouse
cleaning61
P
padlock43
partsreplacement,completing40
password
considerations52
erasing43
lostorforgotten43
setting,changing,deleting52
passwordprotection43
PC-DoctorforDOS61
PC-DoctorforRescueandRecovery60
PCIcard15
installing,replacing15
slots16
physicalspecications3
powersupply
features2
powersupplyassembly
replacing27
power-onpassword52
power-onself-test(POST)55
programs,updatingsystem55
protection,password43
purchasingadditionalservices67
R
rearconnectors7
recovering
fromaPOSTandBIOSupdatefailure56
software45
recovery
Boot-blockRecovery56
operations,backupand46
problems,solving50
recoverymedia,creatingandusing45
reinstalling
devicedrivers50
removing
computercover12
removing,reinstalling
frontbezel13
replacing
battery20
frontfanassembly37
harddiskdrive34
heatsinkandfanassembly21
keyboard39
microprocessor24
mouse39
opticaldrive31
powersupplyassembly27
RescueandRecovery45
workspace,RescueandRecovery48
RescueandRecoveryworkspace48
resources,information63
S
safetyiii
safetyinformation64
security
cablelock42
enablingordisabling52
features2,41
padlock43
selecting
startupdevice53
temporarystartupdevice53
serialport8
service
andhelp65
getting63
LenovoCustomerSupportCenter66
74ThinkCentreUserGuide
Page 81

services
other66
purchasingadditional67
SetAdministratorPassword52
SetPower-OnPassword52
settings
changing51
viewing51
SetupUtilityprogram51
SetupUtilityprogram,exiting54
SetupUtilityprogram,starting51
software
recovering45
softwareoverview4
solvingrecoveryproblems50
startingtheSetupUtilityprogram51
startupdevice53
sequence,changing53
temporary,selecting53
static-sensitivedevices,handling11
system
management2
programs55
systemboard
connectors9
locatingparts8
location8
systemboardcomponentsanddrives
accessing14
viewingorchangingsettings51
W
warrantyinformation64
Website,Lenovo64
workspace,backupandrecovery48
T
televisionoutputnotice70
temporarystartupdevice53
theBIOS,updating(ashing)55–56
ThinkVantageProductivityCenter64
trademarks70
troubleshooting,basic59
troubleshooting,diagnosticprograms59
U
updating
(ashing)theBIOS55
systemprograms55
updating(ashing)theBIOS56
USBconnector8
using
arescuemedium,creatingand48
diagnosticprograms65
documentation65
otherservices66
passwords51
SetupUtilityprogram51
V
VGAmonitorconnector8
videosubsystem1
©CopyrightLenovo2010,2011
75
Page 82

76ThinkCentreUserGuide
Page 83

Page 84

PartNumber:71Y8530
(1P)P/N:71Y8530
*71Y8530*
 Loading...