

Page 1
Page 2

Page 3

ThinkCentre
User Guid e
Page 4

Note
Before using this information and the product it supports, be sure to read and understand the ThinkCentre Safety and
Warranty Guide and “Notices,” on page 65.
First Edition (March 2009)
© Copyright Lenovo 2009. All rights reserved.
LENOVO products, data, computer software, and services have been developed exclusively at private expense and
are sold to governmental entities as commercial items as defined by 48 C.F.R. 2.101 with limited and restricted
rights to use, reproduction and disclosure.
LIMITED AND RESTRICTED RIGHTS NOTICE: If products, data, computer software, or services are delivered
pursuant a General Services Administration ″GSA″ contract, use, reproduction, or disclosure is subject to restrictions
set forth in Contract No. GS-35F-05925.
Page 5

Contents
Important safety information . . . . . .v
Chapter 1. Product overview . . . . . .1
Features . . . . . . . . . . . . . . . .1
Specifications . . . . . . . . . . . . . .4
Software overview . . . . . . . . . . . .5
Software provided with your Windows operating
system . . . . . . . . . . . . . . .5
Antivirus software . . . . . . . . . . .6
Locations . . . . . . . . . . . . . . .6
Locating connectors on the front of your computer 6
Locating connectors on the rear of your computer 7
Locating components . . . . . . . . . .9
Locating parts on the system board . . . . .10
Chapter 2. Installing options and
replacing hardware . . . . . . . . .11
Handling static-sensitive devices . . . . . . .11
Installing options and replacing hardware . . . .11
Installing external options . . . . . . . .11
Opening the computer cover . . . . . . .12
Accessing the system board components and
drives . . . . . . . . . . . . . . .13
Installing or replacing a memory module . . .13
Installing or replacing an adapter card . . . .15
Installing internal drives . . . . . . . . .17
Replacing the hard disk drive . . . . . . .21
Replacing the optical drive . . . . . . . .23
Replacing the battery . . . . . . . . . .25
Replacing the power supply assembly . . . .27
Replacing the heat sink and fan assembly . . .29
Replacing the microprocessor . . . . . . .31
Replacing the keyboard . . . . . . . . .34
Replacing the mouse . . . . . . . . . .34
Completing the parts replacement . . . . . .35
Installing security features . . . . . . . . .37
Integrated cable lock . . . . . . . . . .37
Password protection . . . . . . . . . .37
Erasing lost or forgotten passwords (clearing
CMOS) . . . . . . . . . . . . . . .38
Chapter 3. Recovery information . . .39
Creating and using Product Recovery discs . . . .39
Performing backup and recovery operations . . .40
Using the Rescue and Recovery workspace . . . .42
Creating and using rescue media . . . . . . .43
Creating and using a Recovery Repair diskette . .44
Recovering or installing device drivers . . . . .44
Setting a rescue device in the startup sequence . .45
Solving recovery problems . . . . . . . . .45
Viewing and changing settings . . . . . . . .47
Using passwords . . . . . . . . . . . .47
Password considerations . . . . . . . . .48
Power-On Password . . . . . . . . . .48
Privileged Access Password . . . . . . . .48
Setting, changing, and deleting a password . . .48
Enabling or disabling a device . . . . . . . .49
Selecting a startup device . . . . . . . . . .49
Selecting a temporary startup device . . . . .49
Selecting or changing the startup device sequence 50
Advanced settings . . . . . . . . . . . .50
Exiting from the Setup Utility program . . . . .50
Chapter 5. Updating system programs 51
Using system programs . . . . . . . . . .51
Updating (flashing) BIOS from a disc . . . . . .51
Updating (flashing) BIOS from your operating
system . . . . . . . . . . . . . . . .52
Recovering from a POST/BIOS update failure . . .52
Chapter 6. Troubleshooting and
diagnostics . . . . . . . . . . . . .55
Basic troubleshooting . . . . . . . . . . .55
Diagnostic programs . . . . . . . . . . .56
Lenovo System Toolbox . . . . . . . . .57
PC-Doctor for Windows PE . . . . . . . .57
PC-Doctor for DOS . . . . . . . . . . .58
Cleaning the mouse . . . . . . . . . . .58
Optical mouse . . . . . . . . . . . .58
Non-optical mouse . . . . . . . . . . .59
Chapter 7. Getting information, help,
and service . . . . . . . . . . . . .61
Information resources . . . . . . . . . . .61
Online Books folder . . . . . . . . . .61
Lenovo Care . . . . . . . . . . . . .61
Lenovo Welcome . . . . . . . . . . .62
Access Help . . . . . . . . . . . . .62
Safety and Warranty . . . . . . . . . .62
Lenovo We b site (http://www.lenovo.com) . . .62
Help and service . . . . . . . . . . . .63
Using the documentation and diagnostic
programs . . . . . . . . . . . . . .63
Calling for service . . . . . . . . . . .63
Using other services . . . . . . . . . .64
Purchasing additional services . . . . . . .64
Appendix. Notices . . . . . . . . . .65
Television output notice . . . . . . . . . .66
Trademarks . . . . . . . . . . . . . .66
Chapter 4. Using the Setup Utility . . .47
Starting the Setup Utility program . . . . . . .47
© Copyright Lenovo 2009 iii
Index . . . . . . . . . . . . . . .67
Page 6

iv User Guide
Page 7

Important safety information
CAUTION:
Before using this manual, be sure to read and understand all the related safety
information for this product. Refer to the ThinkCentre Safety and Warranty Guide
that you received with this product for the latest safety information. Reading
and understanding this safety information reduces the risk of personal injury
and or damage to your product.
If you no longer have a copy of the ThinkCentre Safety and Warranty Guide, you can
obtain a Portable Document Format (PDF) version from the Lenovo® Support Web
site at:
http://www.lenovo.com/support
© Copyright Lenovo 2009 v
Page 8

vi User Guide
Page 9

Chapter 1. Product overview
This chapter provides an introduction to the features and options that are available
for your computer. You can expand the capabilities of your computer by adding
memory modules, drives, or adapter cards. When installing or replacing an option,
use these instructions along with the instructions that come with the option.
Important: Before you install or replace any option, be sure to read and
understand the “Important safety information” first. These precautions
and guidelines will help you work safely.
Use only computer parts provided by Lenovo.
Note:
Features
This section provides an overview of the computer features and preinstalled
software.
System information
The following information covers a variety of models. For information about
your specific model, use the Setup Utility program. See Chapter 4, “Using the
Setup Utility,” on page 47.
Microprocessor
v Intel® Celeron® processor
v Intel Celeron dual-core processor
v Intel Pentium® dual-core processor
v Intel Core™ 2 Duo processor
v Intel Core 2 Quad processor
v Internal cache (size varies by model type)
Memory
v Supports up to two DDR2 DIMMs
(double data rate 2 dual inline memory modules)
v Flash memory for system programs (varies by model type)
Internal
drives
v Card reader
v Serial Advanced Technology Attachment (SATA) internal hard disk drive
v Optical drive (some models)
subsystem
Video
v Integrated graphics for a Video Graphics Array (VGA) connector
v Peripheral Component Interconnect (PCI) Express (x16) graphics slot on the
system board for discrete graphics card
© Copyright Lenovo 2009 1
Page 10

Audio subsystem
v Audio line-in connector, audio line-out connector, and microphone connector on
the rear panel
v Integrated high-definition (HD) audio with RTL ALC662 Audio Codec
v Microphone connector and headphone connector on the front panel
v Mono internal speaker (some models)
Connectivity
v 10/100/1000 Mbps integrated Ethernet controller
v PCI V.90 Data/Fax modem (some models)
System
management features
v Ability to store power-on self-test (POST) hardware test results
v Automatic power-on startup
v Preboot Execution Environment (PXE)
v Remote Administration
v System Management (SM) BIOS and SM software
v Wake on LAN
®
v Wake on Ring (in the Setup Utility program, this feature is called Serial Port
Ring Detect for an external modem)
Input/Output
(I/O) features
v 9-pin serial port (one standard and one optional)
v Ethernet connector
v One standard 25-pin parallel port
v Standard keyboard connector
v Standard mouse connector
v Six USB connectors (two on the front panel and four on the rear panel)
v Two audio connectors on the front panel (microphone connector and headphone
connector)
v Three audio connectors on the rear panel (audio line-in connector, audio line-out
connector, and microphone connector)
v VGA monitor connector
2 User Guide
Expansion
v One hard disk drive bay
v One optical drive bay
v One drive bay for a card reader
v One PCI 32-bit adapter card slot
v One PCI Express x16 graphics adapter card slot (varies by model type)
Power
v 280-watt auto-sensing power supply
v Advanced Configuration and Power Interface (ACPI) support
Page 11

Security features
v Computrace
v Cover presence switch (also called intrusion switch) (some models)
v Diskette drive and hard disk drive I/O control
v Hard disk drive password
v Keyboard with fingerprint reader (some models)
v Power-On Password (POP) and Privileged Access Password (PAP) for BIOS
access
v Serial and parallel port I/O control
v Startup sequence control
v Startup without diskette drive, keyboard, or mouse
v Support for the addition of an integrated cable lock (Kensington lock)
v USB switch on/off
Preinstalled software
Your computer might come with preinstalled software. If it does, an operating
system, device drivers to support built-in features, and other support programs are
included.
Operating system, preinstalled
Microsoft® Windows Vista
®
Note: The Windows Vista operating system might not be available or supported in
all countries or regions.
Operating systems, certified or tested for compatibility1 (varies by model type)
v Microsoft Windows® XP
v Linux
®
1. The operating systems listed here are being certified or tested for compatibility at the time this publication goes to press.
Additional operating systems might be identified by Lenovo as compatible with your computer following the publication of this
booklet. Corrections and additions to this list are subject to change. To determine if an operating system has been certified or
tested for compatibility, check the We b site of the operating system vendor.
Chapter 1. Product overview 3
Page 12

Specifications
This section lists the physical specifications for your computer.
Dimensions
Width: 317 mm (12.48 inches)
Height: 99 mm (3.9 inches)
Depth: 355 mm (13.98 inches)
Weight
Maximum configuration as shipped: 7.5 kg (16.53 lbs)
Environment
Air temperature:
Humidity:
Maximum altitude:
Electrical
Input voltage:
High range:
Operating: 10° to 35°C (50° to 95°F)
Non-operating: -40° to 60°C (-40° to 140°F) (with package)
Non-operating: -10° to 60°C (14° to 140°F) (without package)
Operating: 10% to 80% (10% per hour, non condensing)
Non-operating: 10% to 90% (10% per hour, non condensing)
Operating: -50 to 10,000 ft (-15.2 to 3048 m)
Non-operating: -50 to 35,000 ft (-15.2 to 10,668 m)
input
Low range:
Minimum: 100 V AC
Maximum: 127 V AC
Input frequency range: 50 to 60 Hz
Voltage-selection switch setting: 115 V AC
Minimum: 200 V AC
Maximum: 240 V AC
Input frequency range: 50 to 60 Hz
Voltage-selection switch setting: 230 V AC
4 User Guide
Page 13

Software overview
The computer is manufactured with a preloaded operating system, Windows Vista,
and several preloaded applications.
Software provided with your Windows operating system
This section describes the Windows applications provided with your computer.
Software provided by Lenovo
The following software applications are provided by Lenovo to help you improve
productivity and reduce the cost associated with maintaining your computer.
Software provided with your computer may vary depending on your model type.
Lenovo Care: The Lenovo Care
SM
program guides you to a host of information
and tools to help you set up, understand, maintain, and enhance your computer.
Product Recovery: The Product Recovery program enables you to restore your
system to the factory-installed state.
ThinkVantage Rescue and Recovery: The ThinkVantage® Rescue and Recovery
®
(RnR) program is a one button recovery and restore solution that includes a set of
self-recovery tools to help you diagnose computer problems, get help, and recover
from system crashes quickly, even if the primary operating system could not start.
Password Manager: The Password Manager program helps you automatically
capture and fill in authentication information for Windows applications and Web
sites.
ThinkVantage System Update: The ThinkVantage System Update (TVSU)
program helps you keep the software on your system up-to-date by downloading
and installing software packages (TVT applications, device drivers, BIOS flashes,
and other third party applications). Some examples of software that you should
keep updated are programs provided by Lenovo, such as the ThinkVantage Rescue
and Recovery program and the Lenovo Care program.
Fingerprint software: The integrated fingerprint reader provided on some
keyboards enables you to enroll your fingerprint and associate it with your
power-on password, hard disk drive password, and Windows password. As a
result, fingerprint authentication can replace passwords and enable simple and
secure user access. A fingerprint reader keyboard is available with select computers
or can be purchased for computers that support this option.
Lenovo System Toolbox
The Lenovo System Toolbox diagnostic program is preinstalled on your hard disk
drive. This diagnostic program works through the Windows operating system to
diagnose hardware problems and report operating-system-controlled settings that
can cause hardware failures. See “Lenovo System Toolbox” on page 57 for more
information.
PC-Doctor for Windows PE
The PC-Doctor for Windows PE diagnostic program is preinstalled on your hard
disk drive. It is part of the Rescue and Recovery workspace on each Lenovo
computer to diagnose hardware problems and report operating-system-controlled
settings that can cause hardware failures. Use the PC-Doctor for Windows PE if
you are unable to start the Windows operating system or if the Lenovo System
Chapter 1. Product overview 5
Page 14
Antivirus software
Locations
Toolbox has not been successful in isolating a possible problem. See “PC-Doctor for
Windows PE” on page 57 for more information.
Adobe Reader
The Adobe Reader is a tool used to view, print, and search PDF documents.
See “Online Books folder” on page 61 for more information about accessing the
online books and the Lenovo We b site.
Your computer comes with antivirus software that you can use to detect and
eliminate viruses. Lenovo provides a full version of antivirus software on your
hard disk drive with a free 30-day subscription. After 30 days, you must renew the
license to continue receiving the antivirus program updates.
For more information about updating your antivirus software, refer to the Access
Help online help system. See “Access Help” on page 62 for instructions on how to
open the online help system.
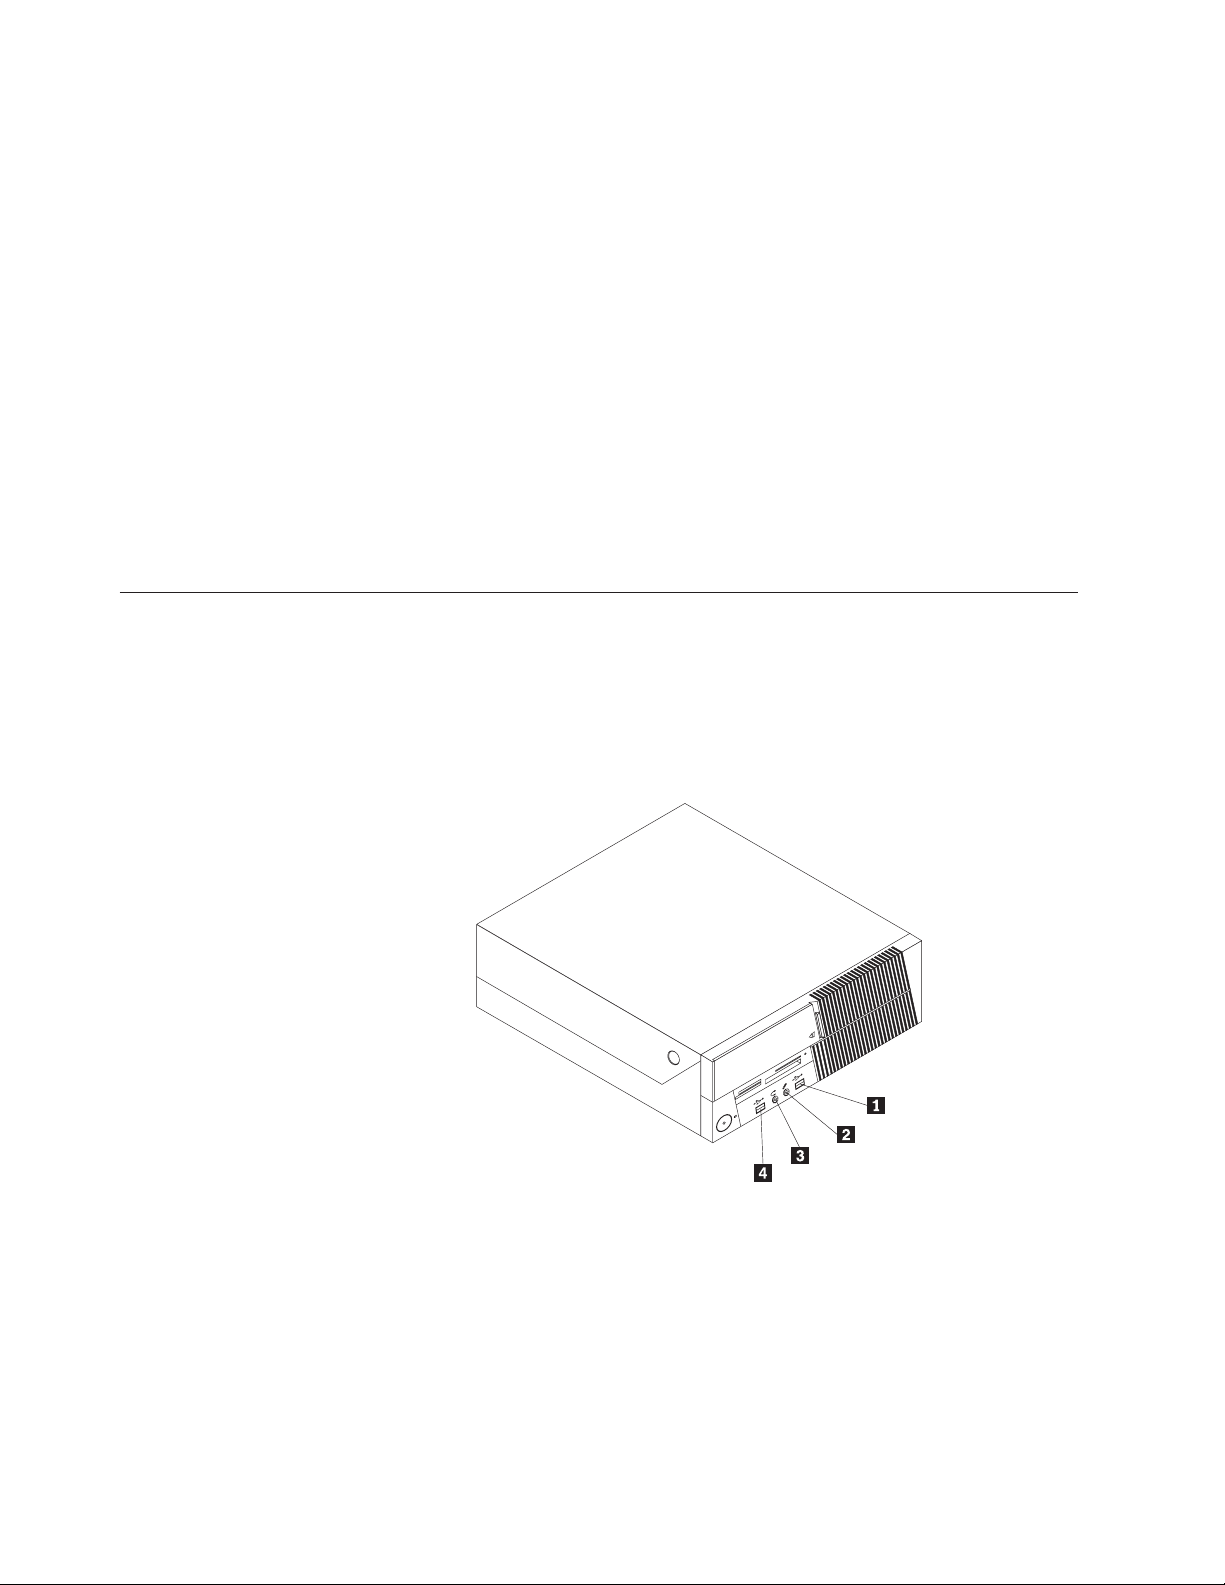
Locating connectors on the front of your computer
Figure 1 shows the location of the connectors on the front of your computer.
Note: Not all computer models have the following connectors.
Figure 1. Front connector locations
1 USB connector 3 Microphone connector
2 Headphone connector 4 USB connector
6 User Guide
Page 15
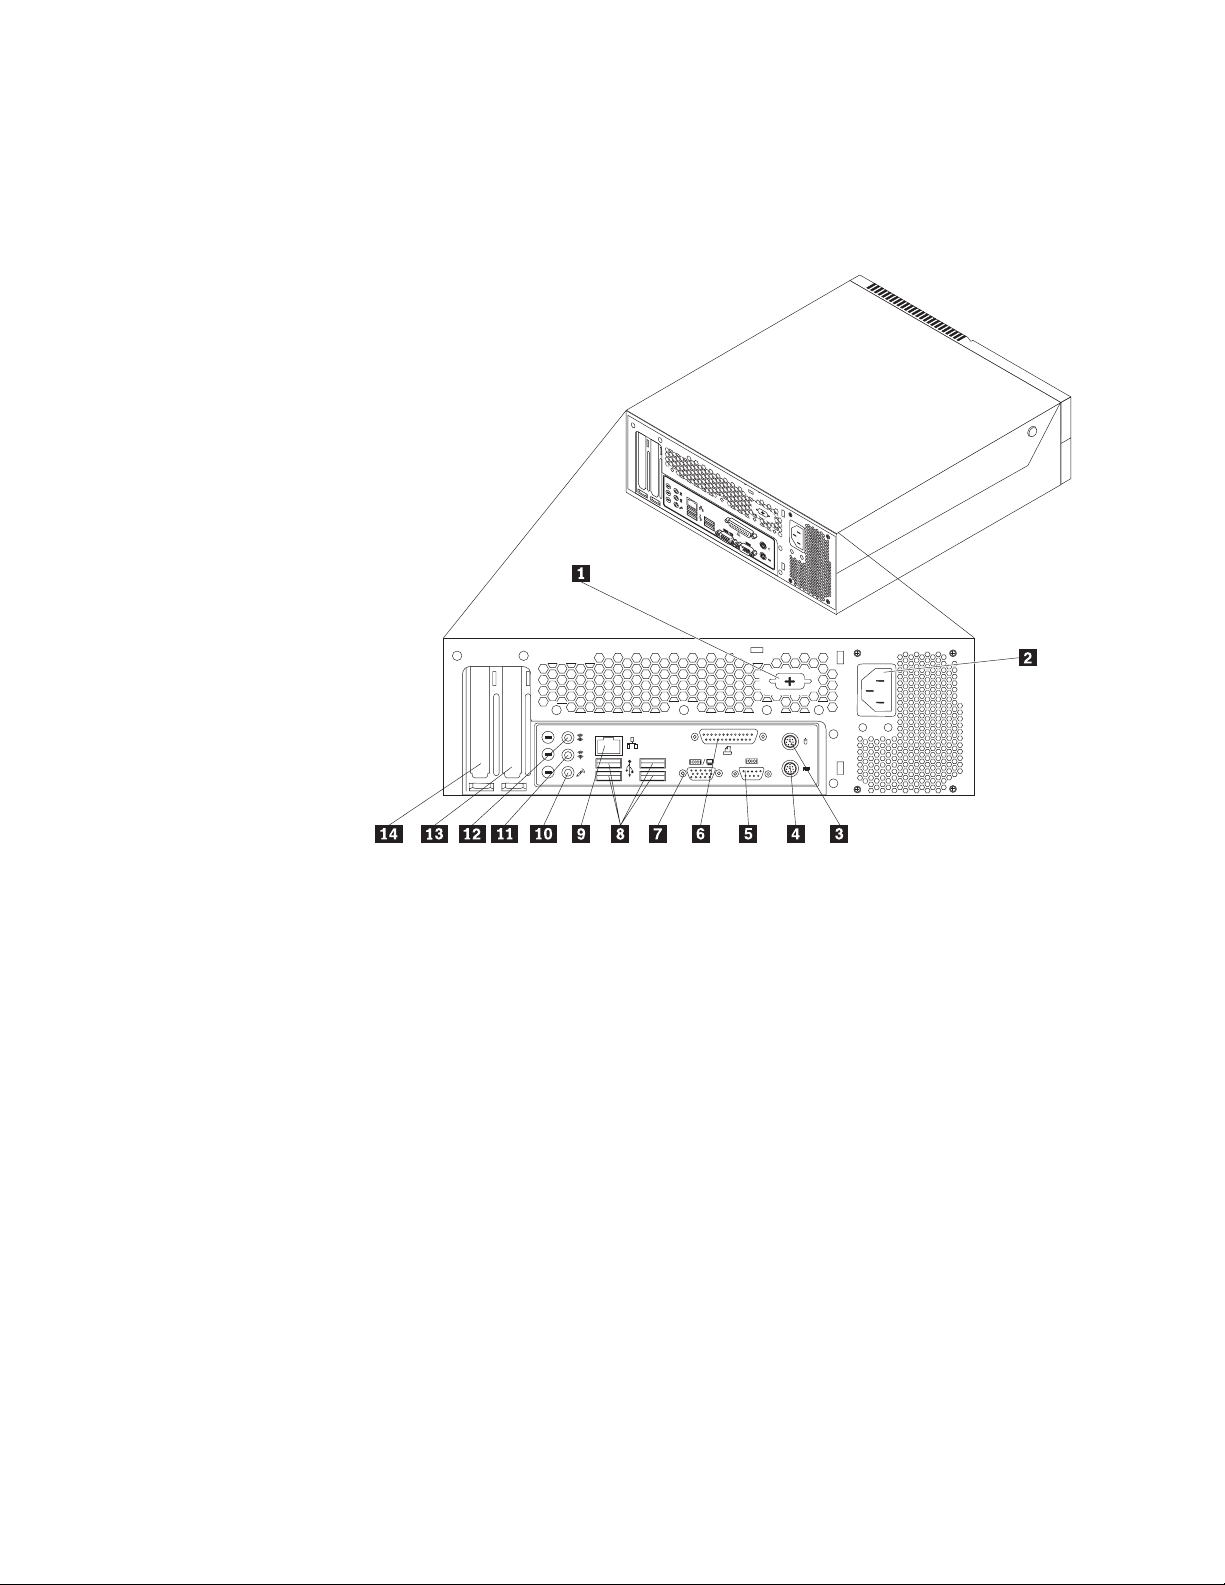
Locating connectors on the rear of your computer
Figure 2 shows the location of the connectors on the rear of your computer. Some
connectors on the rear of your computer are color-coded to help you determine
where to connect the cables on your computer.
Figure 2. Rear connector locations
1 Serial port (some models) 8 USB connectors (4)
2 Power cord connector 9 Ethernet connector
3 Standard mouse connector 10 Microphone connector
4 Standard keyboard connector 11 Audio line-out connector
5 Serial port 12 Audio line-in connector
6 Parallel port 13 PCI Express x16 graphics adapter card slot
7 VGA monitor connector 14 PCI adapter card slot
Chapter 1. Product overview 7
Page 16

Connector Description
Audio line-in connector Used to receive audio signals from an external audio device,
such as a stereo system. When you attach an external audio
device, a cable is connected between the audio line-out
connector of the device and the audio line-in connector of the
computer.
Audio line-out connector Used to send audio signals from the computer to external
devices, such as powered stereo speakers (speakers with
built-in amplifiers), headphones, multimedia keyboards, or the
audio line-in connector on a stereo system or other external
recording devices.
Ethernet connector Used to attach an Ethernet cable for a local area network
(LAN).
Note: To operate the computer within FCC Class B limits, use
a Category 5 Ethernet cable.
Microphone connector Used to attach a microphone to your computer when you want
to record sound or if you use speech-recognition software. This
connector might be located on the front of the computer.
Parallel port Used to attach a parallel printer, a parallel scanner, or other
devices that use a 25-pin parallel port.
Standard keyboard
connector
Used to attach a keyboard that uses a standard keyboard
connector.
Standard mouse connector Used to attach a mouse, a trackball, or other pointing devices
that use a standard mouse connector.
Serial port Used to attach an external modem, a serial printer, or other
devices that use a 9-pin serial port.
USB connector Used to attach a device that requires a Universal Serial Bus
(USB) connector, such as a USB keyboard, a USB mouse, a USB
scanner, or a USB printer. If you have more than six USB
devices, you can purchase a USB hub, which you can use to
connect additional USB devices.
VGA monitor connector Used to attach a VGA monitor or other devices that use a VGA
monitor connector.
8 User Guide
Page 17
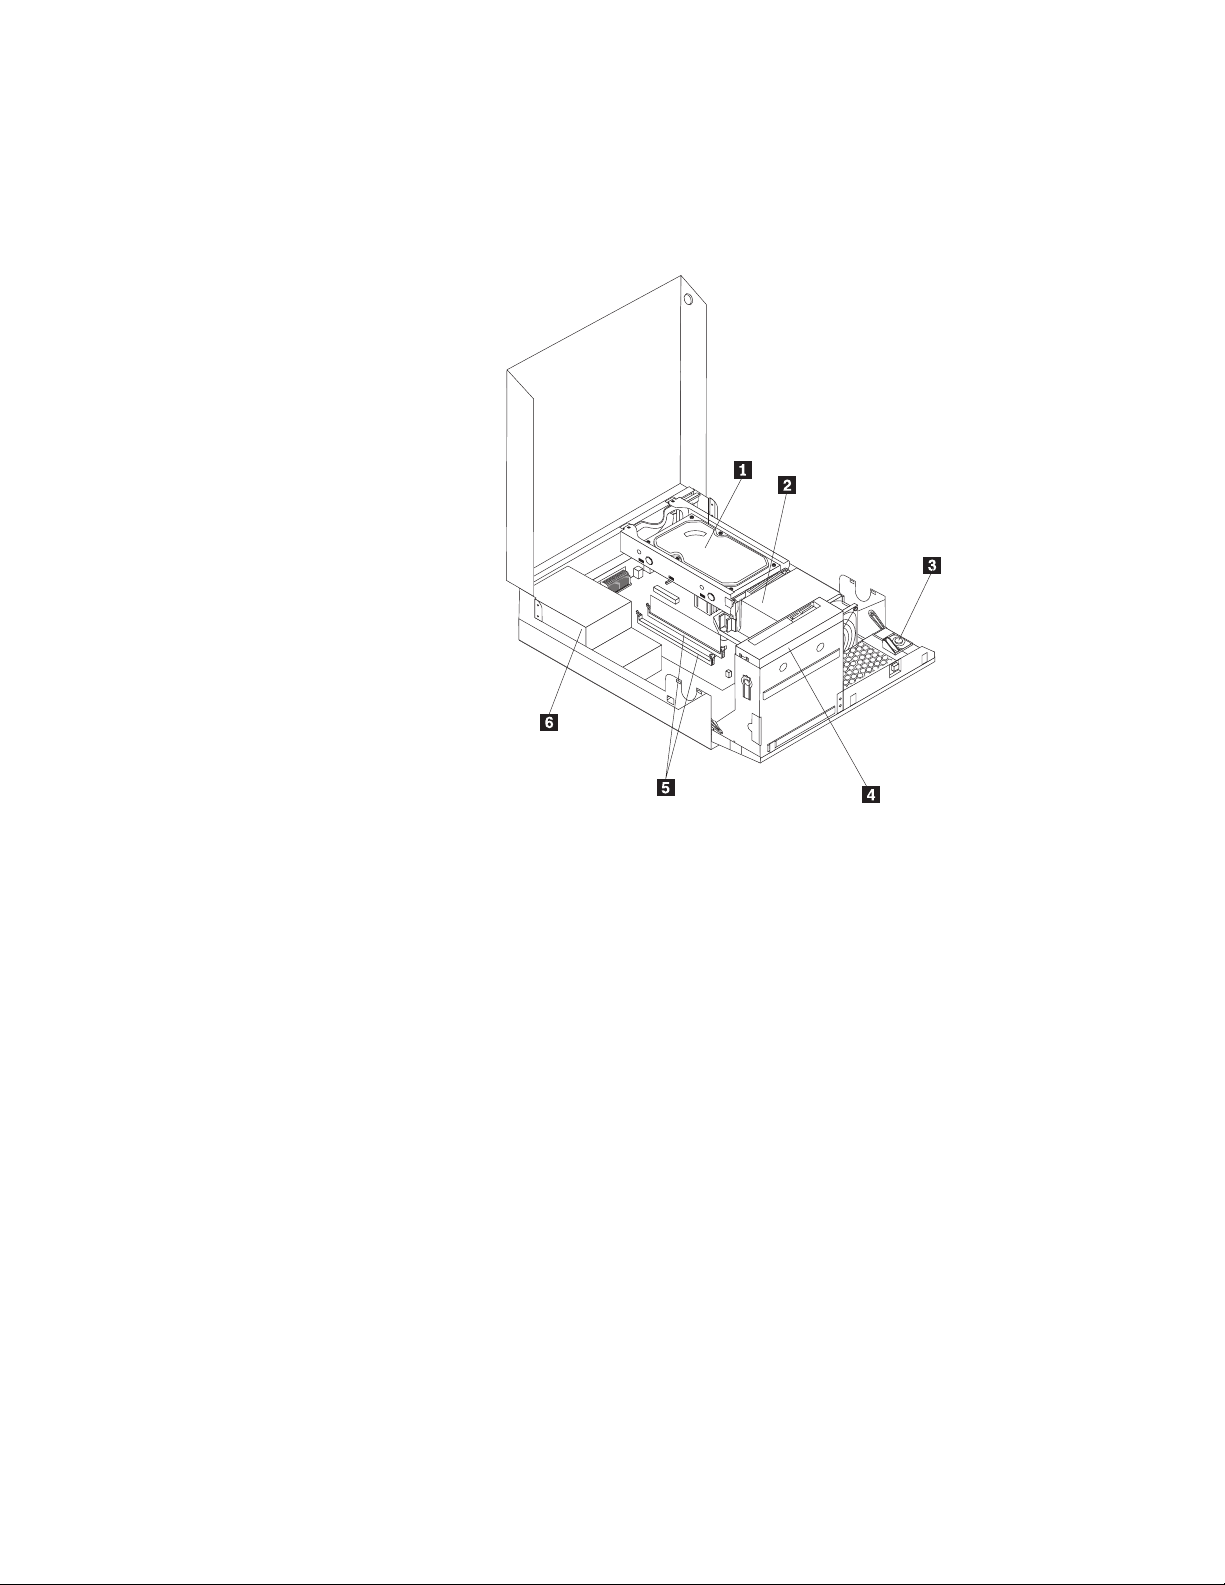
Locating components
To open the computer cover, see “Opening the computer cover” on page 12.
Figure 3 shows the location of the various components in your computer.
Figure 3. Component locations
1 Hard disk drive 4 Optical drive
2 Heat sink and fan assembly 5 Memory slots
3 Internal speaker 6 Power supply assembly
Chapter 1. Product overview 9
Page 18
Locating parts on the system board
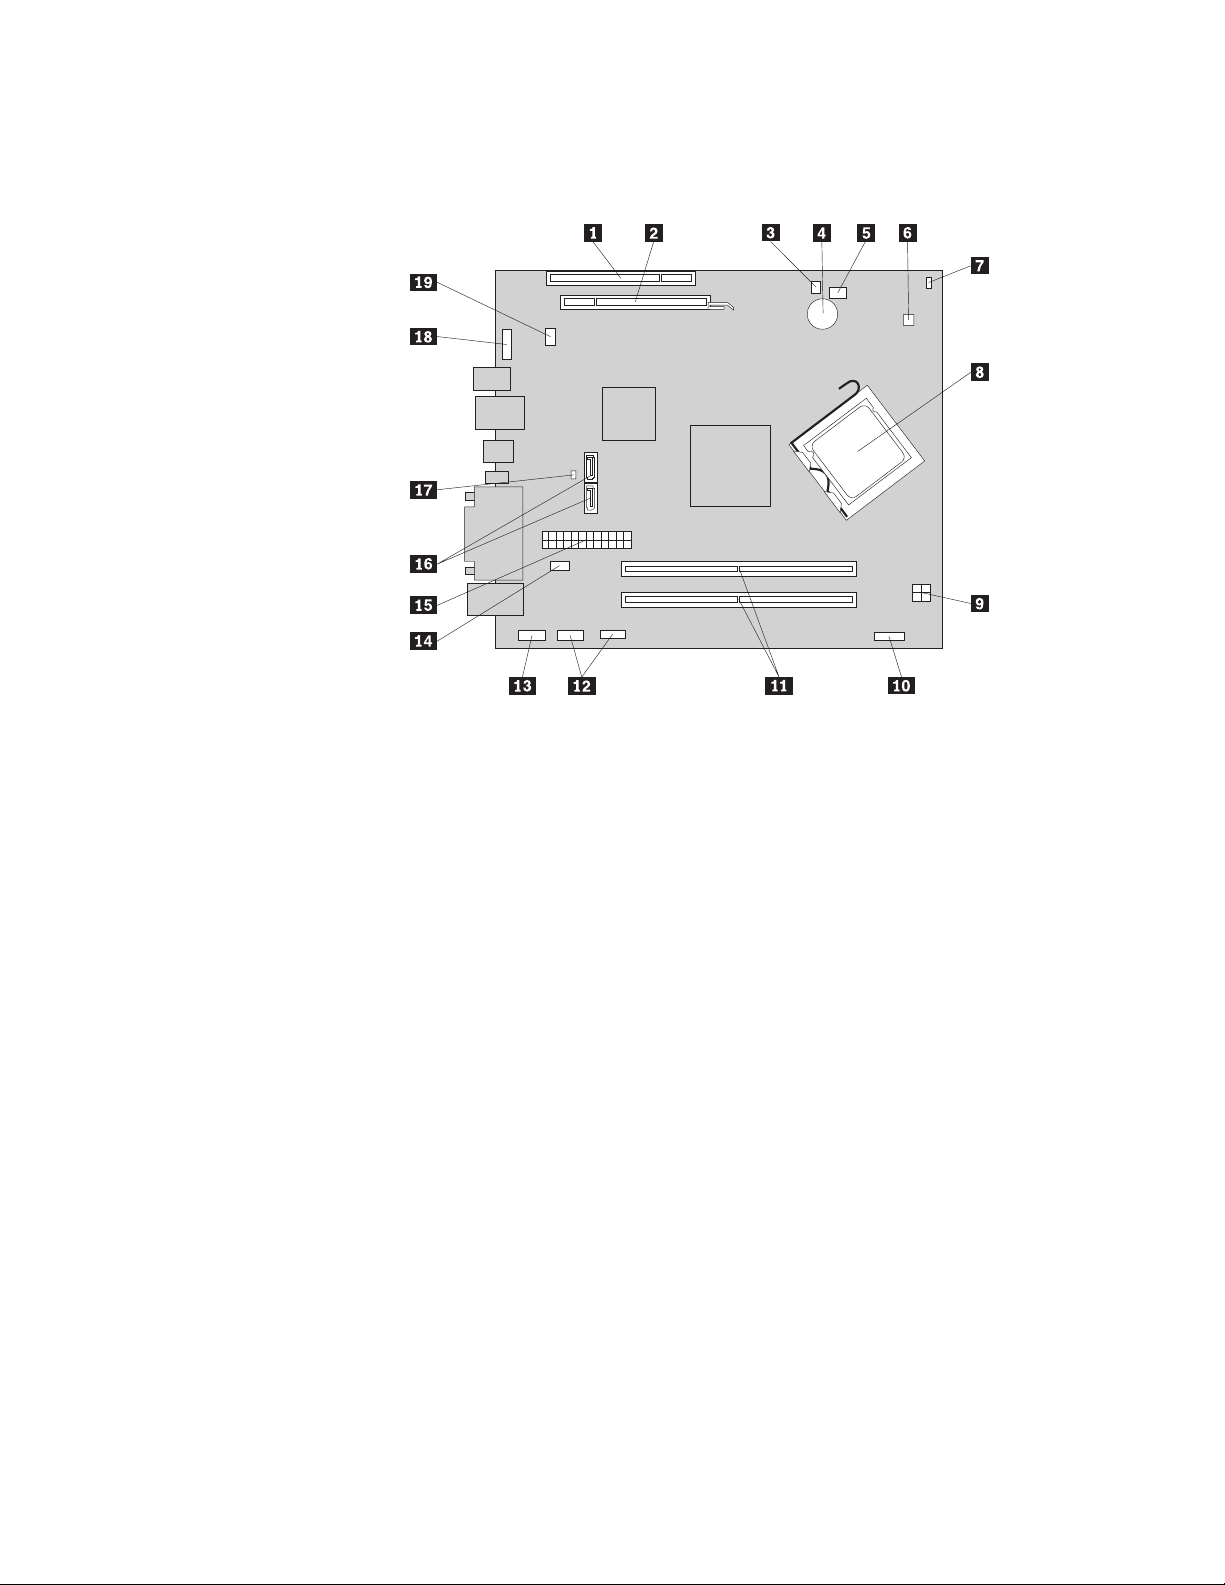
Figure 4 shows the location of the parts on the system board.
Figure 4. System board parts locations
1 PCI adapter card slot 11 Memory slots (2)
2 PCI Express x16 graphics adapter
12 Front USB connectors (2)
card slot
3 Internal speaker connector 13 Serial (COM 2) connector
4 Battery 14 Power fan connector
5 Microprocessor fan connector 15 24-pin power connector
6 Thermal sensor connector 16 S ATA connectors (2)
7 Cover presence (Intrusion) switch
connector
17 Clear CMOS (Complementary Metal Oxide
Semiconductor)/Recovery jumper
8 Microprocessor 18 Front audio connector
9 4-pin power connector 19 System fan connector
10 Front panel connector
10 User Guide
Page 19

Chapter 2. Installing options and replacing hardware
This chapter provides instructions for installing options and replacing hardware for
your computer. You can expand the capabilities of your computer by adding
memory modules, adapter cards, or drives. When installing or replacing an option,
use these instructions along with the instructions that come with the option.
Handling static-sensitive devices
Do not open the static-protective package containing the new part until the
defective part has been removed from the computer and you are ready to install
the new part. Static electricity, although harmless to you, can seriously damage
computer components and parts.
When you handle parts and other computer components, take these precautions to
avoid static-electricity damage:
v Limit your movement. Movement can cause static electricity to build up around
you.
v Always handle parts and other computer components carefully. Handle adapter
cards, memory modules, system boards, and microprocessors by the edges.
Never touch any exposed circuitry.
v Prevent others from touching the parts and other computer components.
v Before you replace a new part, touch the static-protective package containing the
part to a metal expansion-slot cover or other unpainted metal surface on the
computer for at least two seconds. This reduces static electricity in the package
and your body.
v When possible, remove the new part from the static-protective packaging, and
install it directly in the computer without setting the part down. When this is
not possible, place the static-protective package that the part came in on a
smooth, level surface and place the part on it.
v Do not place the part on the computer cover or other metal surface.
Installing options and replacing hardware
This section provides introductions for installing options and replacing hardware
for your computer. When installing or replacing an option, use these instructions
along with the instructions that come with the option.
Attention
Do not open your computer or attempt any repair before reading and understanding the
“Important safety information” in the ThinkCentre Safety and Warranty Guide that came with
your computer. To obtain a copy of the ThinkCentre Safety and Warranty Guide, go to:
http://www.lenovo.com/support
Note: Use only computer parts provided by Lenovo.
Installing external options
External speakers, a printer, or a scanner can be connected to your computer. For
some external options, you must install additional software in addition to making
the physical connection. When installing an external option, see “Locating
© Copyright Lenovo 2009 11
Page 20
connectors on the front of your computer” on page 6 and “Locating connectors on
the rear of your computer” on page 7 to identify the required connector, and then
use the instructions that come with the option to help you make the connection
and install any software or device drivers that are required for the option.
Opening the computer cover
This section provides instructions on how to open the computer cover.
CAUTION:
Turn off the computer and wait three to five minutes to let the computer cool
before opening the computer cover.
Important
Be sure to read and understand “Handling static-sensitive devices” on page
11 before opening the computer cover.
To open the computer cover:
1. Remove any media from the drives, shut down your operating system, and
turn off all attached devices and the computer.
2. Unplug all power cords from electrical outlets.
3. Disconnect the cables attached to the computer. This includes power cords,
input/output (I/O) cables, and any other cables that are connected to the
computer. See “Locating connectors on the front of your computer” on page 6
and “Locating connectors on the rear of your computer” on page 7.
4. Remove any locking devices, such as a cable lock that secures the computer
cover.
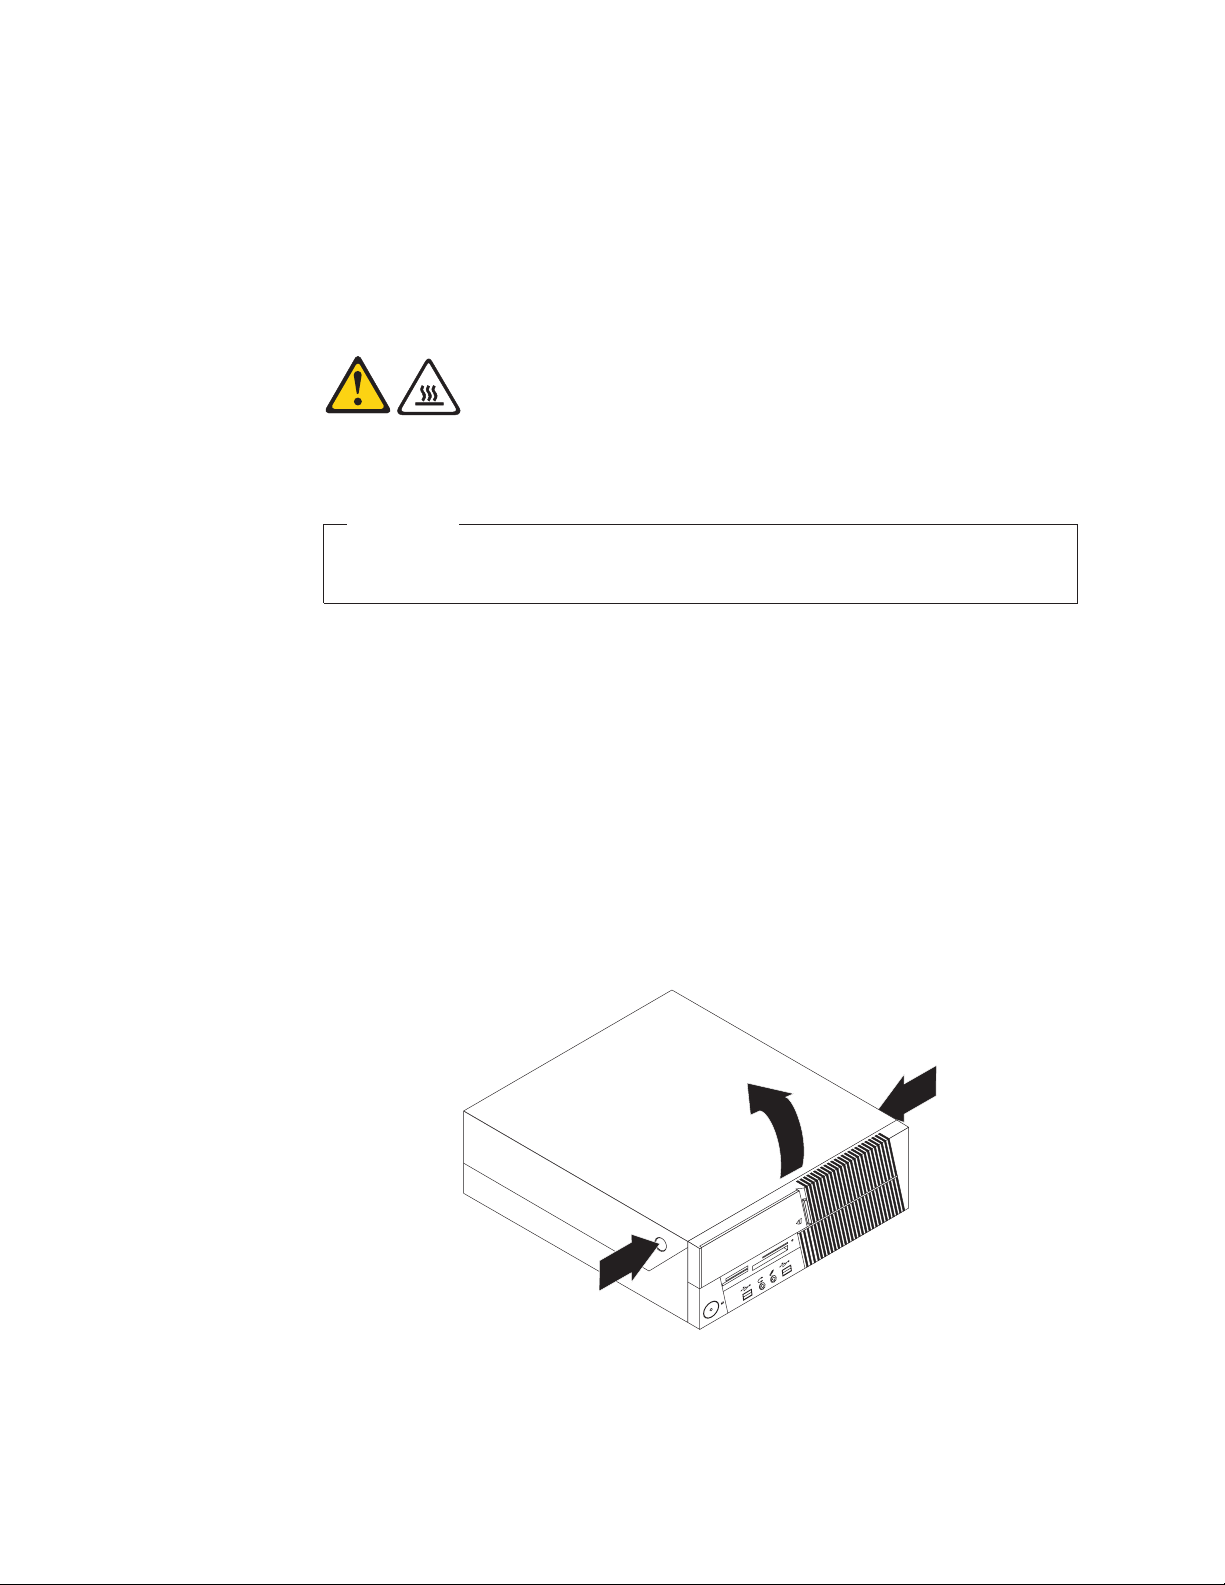
5. Press the buttons on the sides of the computer and pivot the computer cover
upward to open.
12 User Guide
Figure 5. Opening the computer cover
Page 21
Accessing the system board components and drives
This section provides instructions on how to access the system board components
and drives.
To access the system board components and drives:
1. Open the computer cover. See “Opening the computer cover” on page 12.
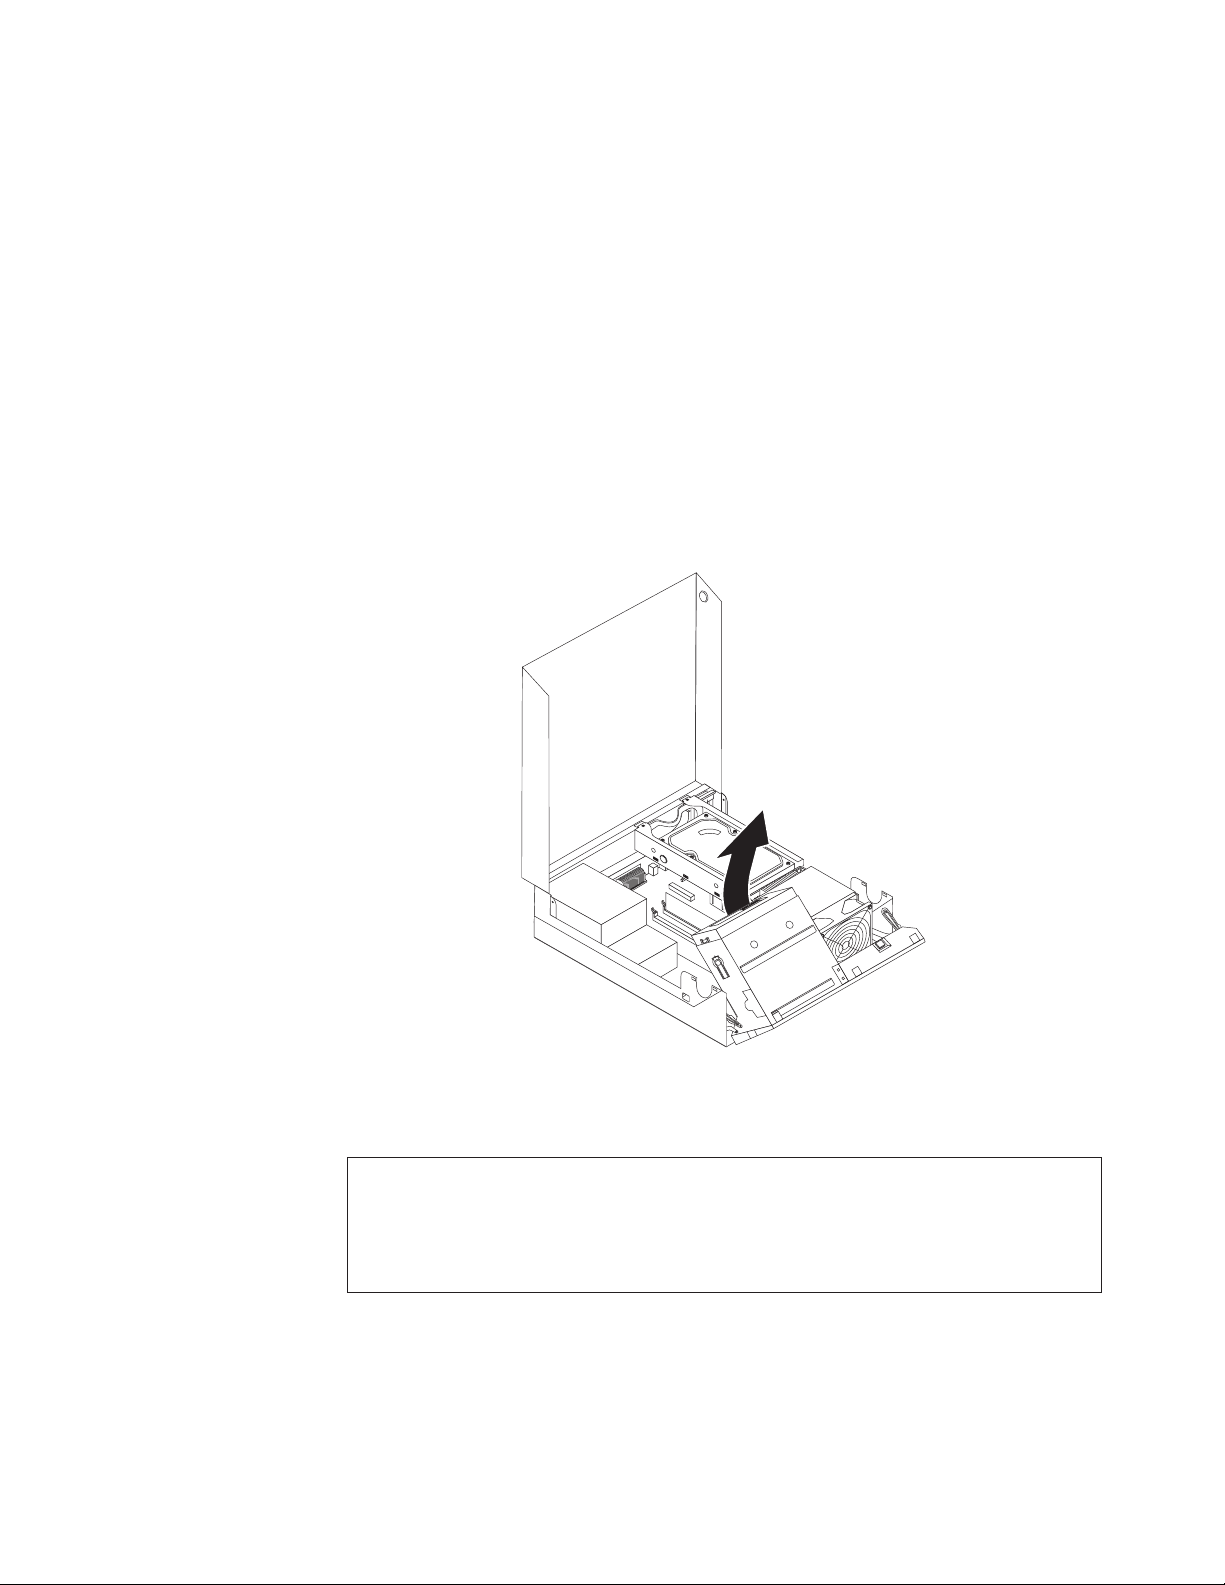
2. On some models, you might need to pivot the drive bay assembly upward and
remove the hard disk drive to access the internal components. See “Replacing
the hard disk drive” on page 21.
Note: Make sure you note the location of any cables that you disconnect from
the drives or the system board.
Attention: Make sure the hard disk drive assembly is in the latched down
position before closing the computer cover to prevent damage to the hard disk
drive assembly.
Figure 6. Pivoting the drive bay assembly
Installing or replacing a memory module
Attention
Do not open your computer or attempt any repair before reading and understanding the
“Important safety information” in the ThinkCentre Safety and Warranty Guide that came with
your computer. To obtain a copy of the ThinkCentre Safety and Warranty Guide, go to:
http://www.lenovo.com/support
This section provides instructions on how to install or replace a memory module.
Your computer has two slots for installing or replacing DDR2 DIMMs (double data
rate 2 dual inline memory modules) that provide up to a maximum of 4 GB
system memory.
Chapter 2. Installing options and replacing hardware 13
Page 22
When installing or replacing a memory module, use the following guidelines:
v Use 1.8 V, 240-pin, DDR2 DIMMs (double data rate 2 dual inline memory
modules).
v Use 512 MB, 1 GB, or 2 GB memory modules in any combination up to a
maximum of 4 GB.
Only DDR2 SDRAM DIMMs can be used.
Note:
To install or replace a memory module:
1. Open the computer cover. See “Opening the computer cover” on page 12.
2. Pivot the drive bay assembly upward to access the memory slots. See
“Accessing the system board components and drives” on page 13.
3. Remove any parts that might prevent your access to the memory slots.
4. Locate the memory slots.
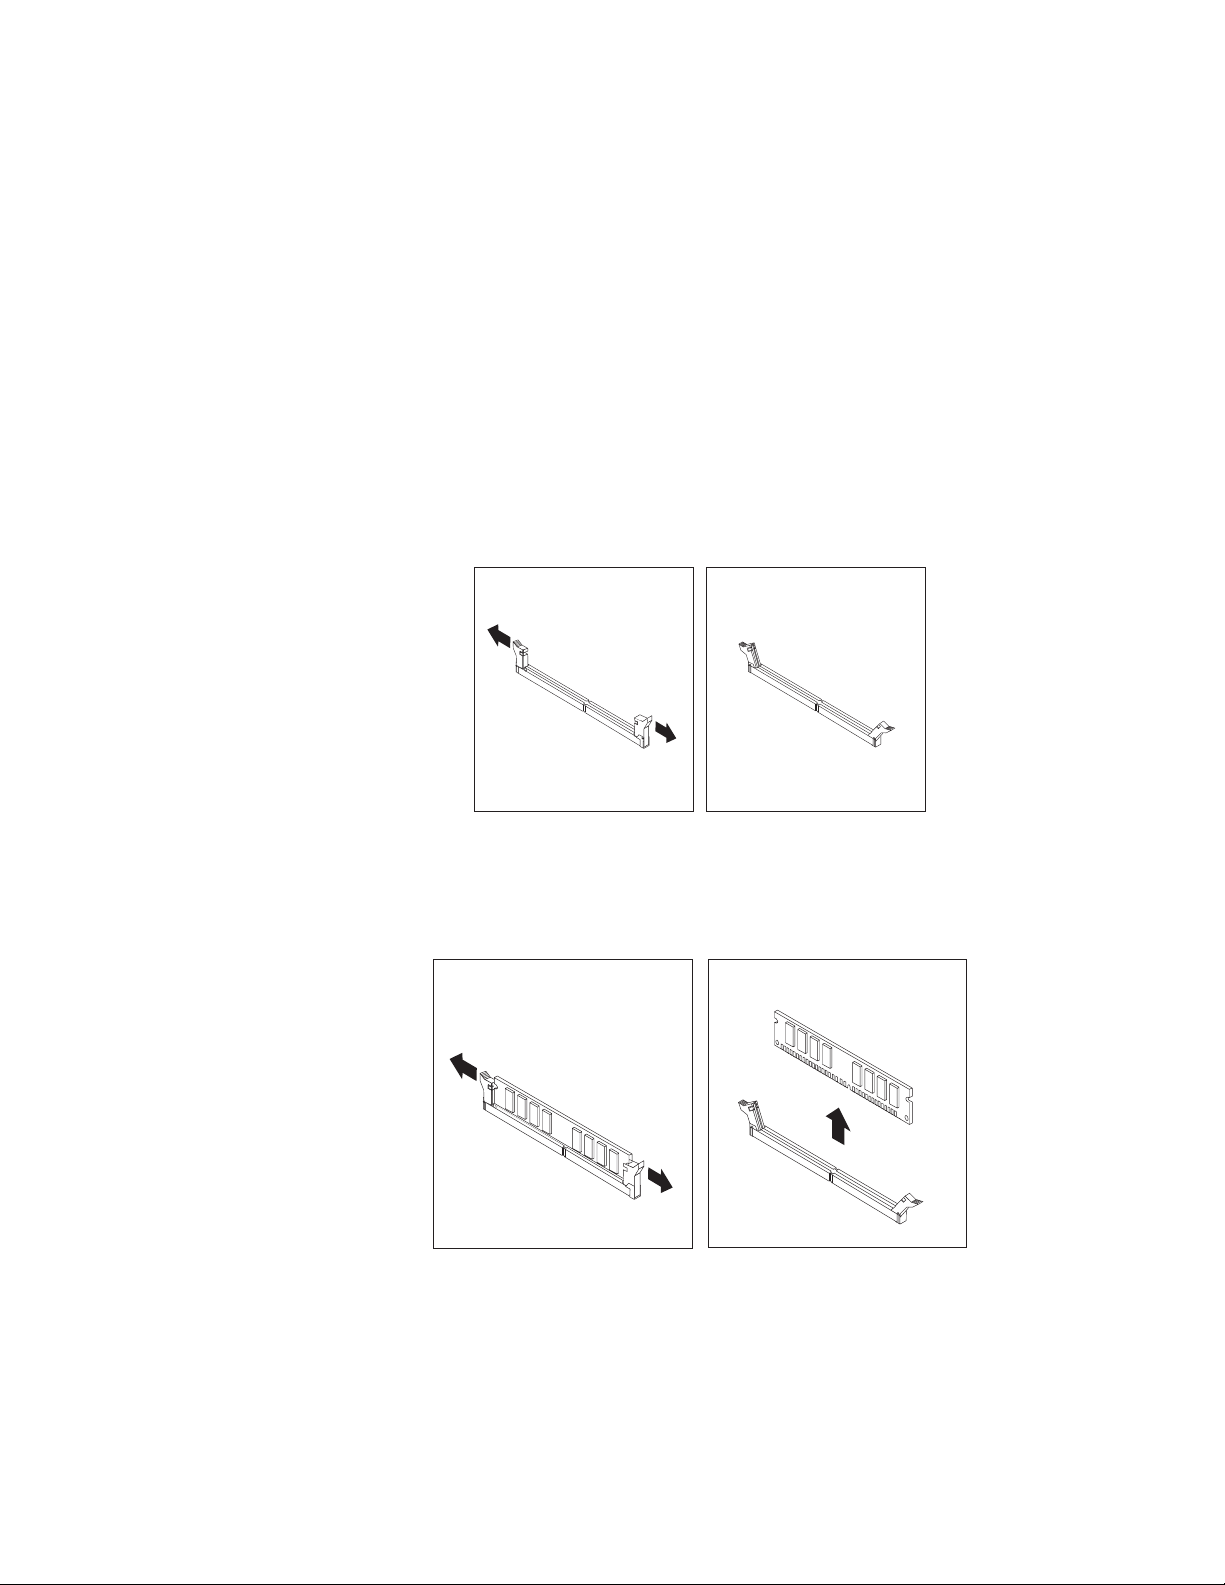
5. Open the retaining clips.
Figure 7. Opening the retaining clips
If you are replacing an old memory module, open the retaining clips and
remove the memory module being replaced as shown.
Figure 8. Removing the old memory module
14 User Guide
Page 23
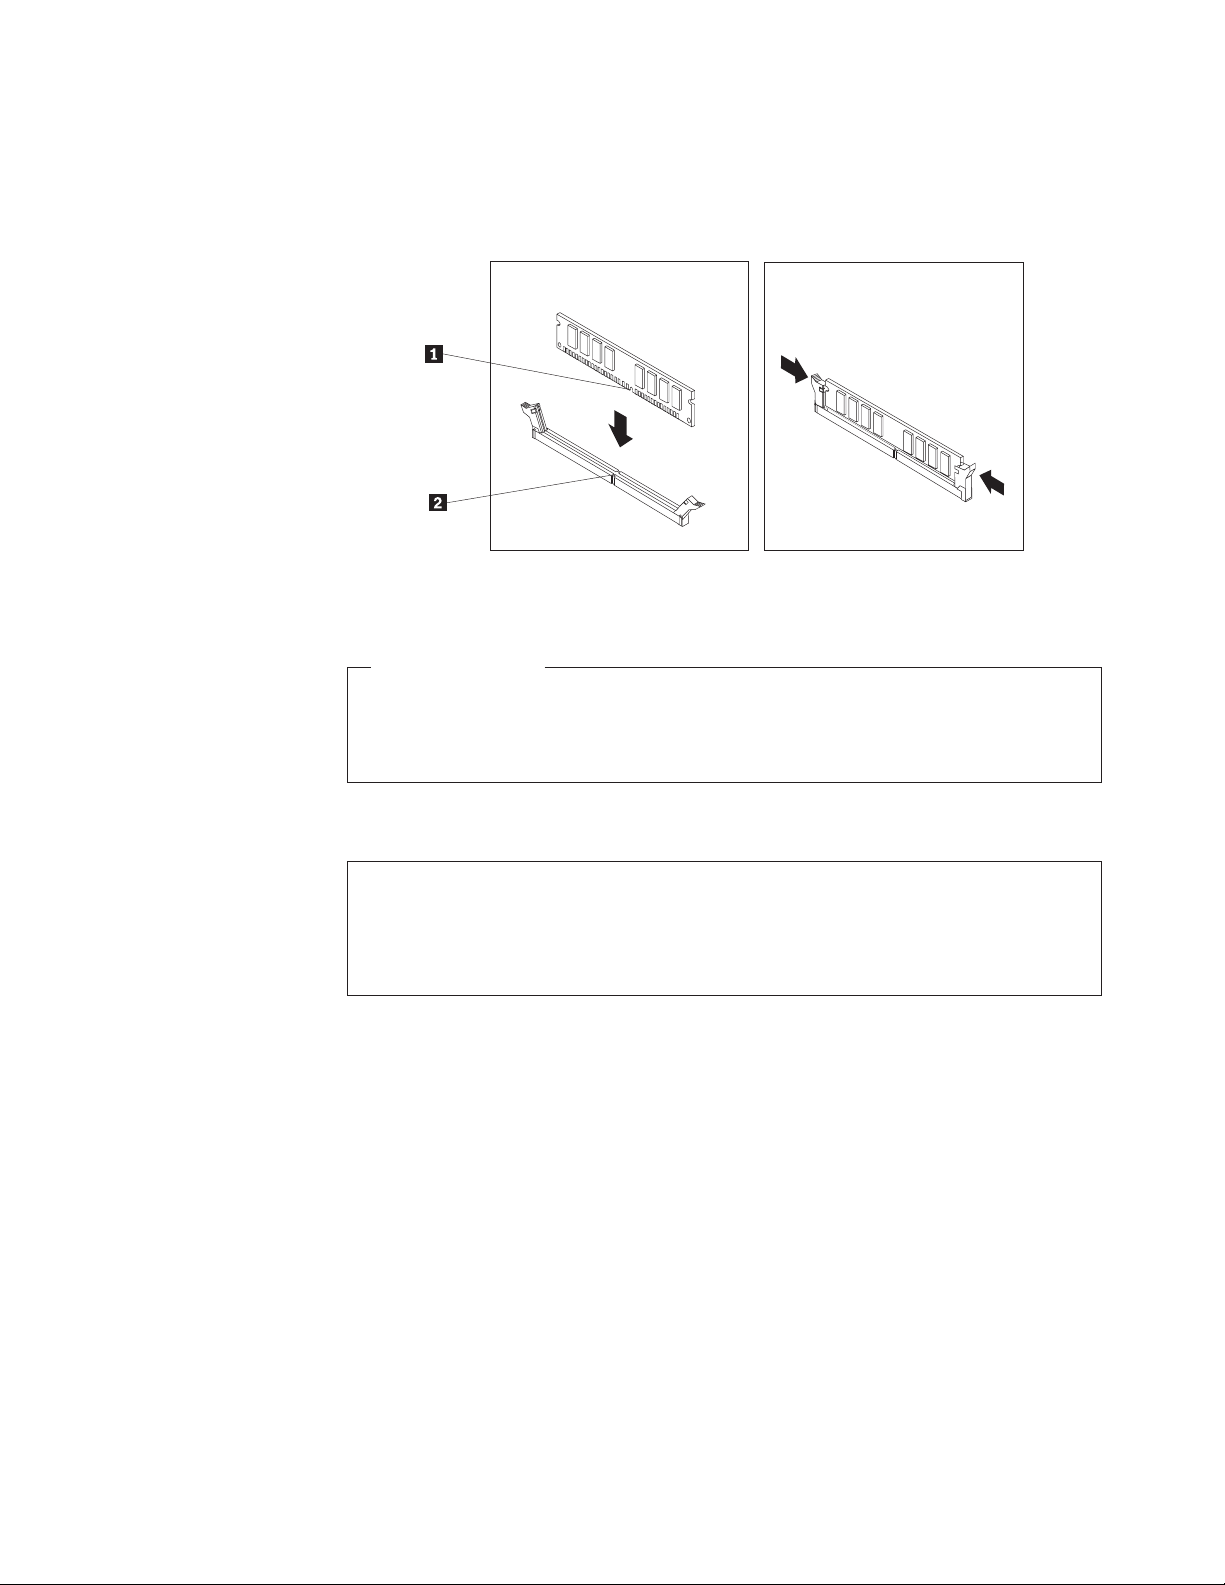
6. Position the memory module over the memory slot. Make sure that the notch
1 on the memory module aligns correctly with the slot key 2 on the system
board. Push the memory module straight down into the slot until the retaining
clips close.
Figure 9. Installing the memory module
What to do next:
v To work with another option, go to the appropriate section.
v To complete the installation, go to “Completing the parts replacement” on
page 35.
Installing or replacing an adapter card
Attention
Do not open your computer or attempt any repair before reading and understanding the
“Important safety information” in the ThinkCentre Safety and Warranty Guide that came with
your computer. To obtain a copy of the ThinkCentre Safety and Warranty Guide, go to:
http://www.lenovo.com/support
This section provides instructions on how to install or replace an adapter card.
Your computer has one standard adapter card slot and one PCI Express x16
graphics adapter card slot.
To install or replace an adapter card:
1. Open the computer cover. See “Opening the computer cover” on page 12.
2. Rotate the adapter card retainer to the open position.
3. Remove the adapter card from its static-protective package.
Chapter 2. Installing options and replacing hardware 15
Page 24
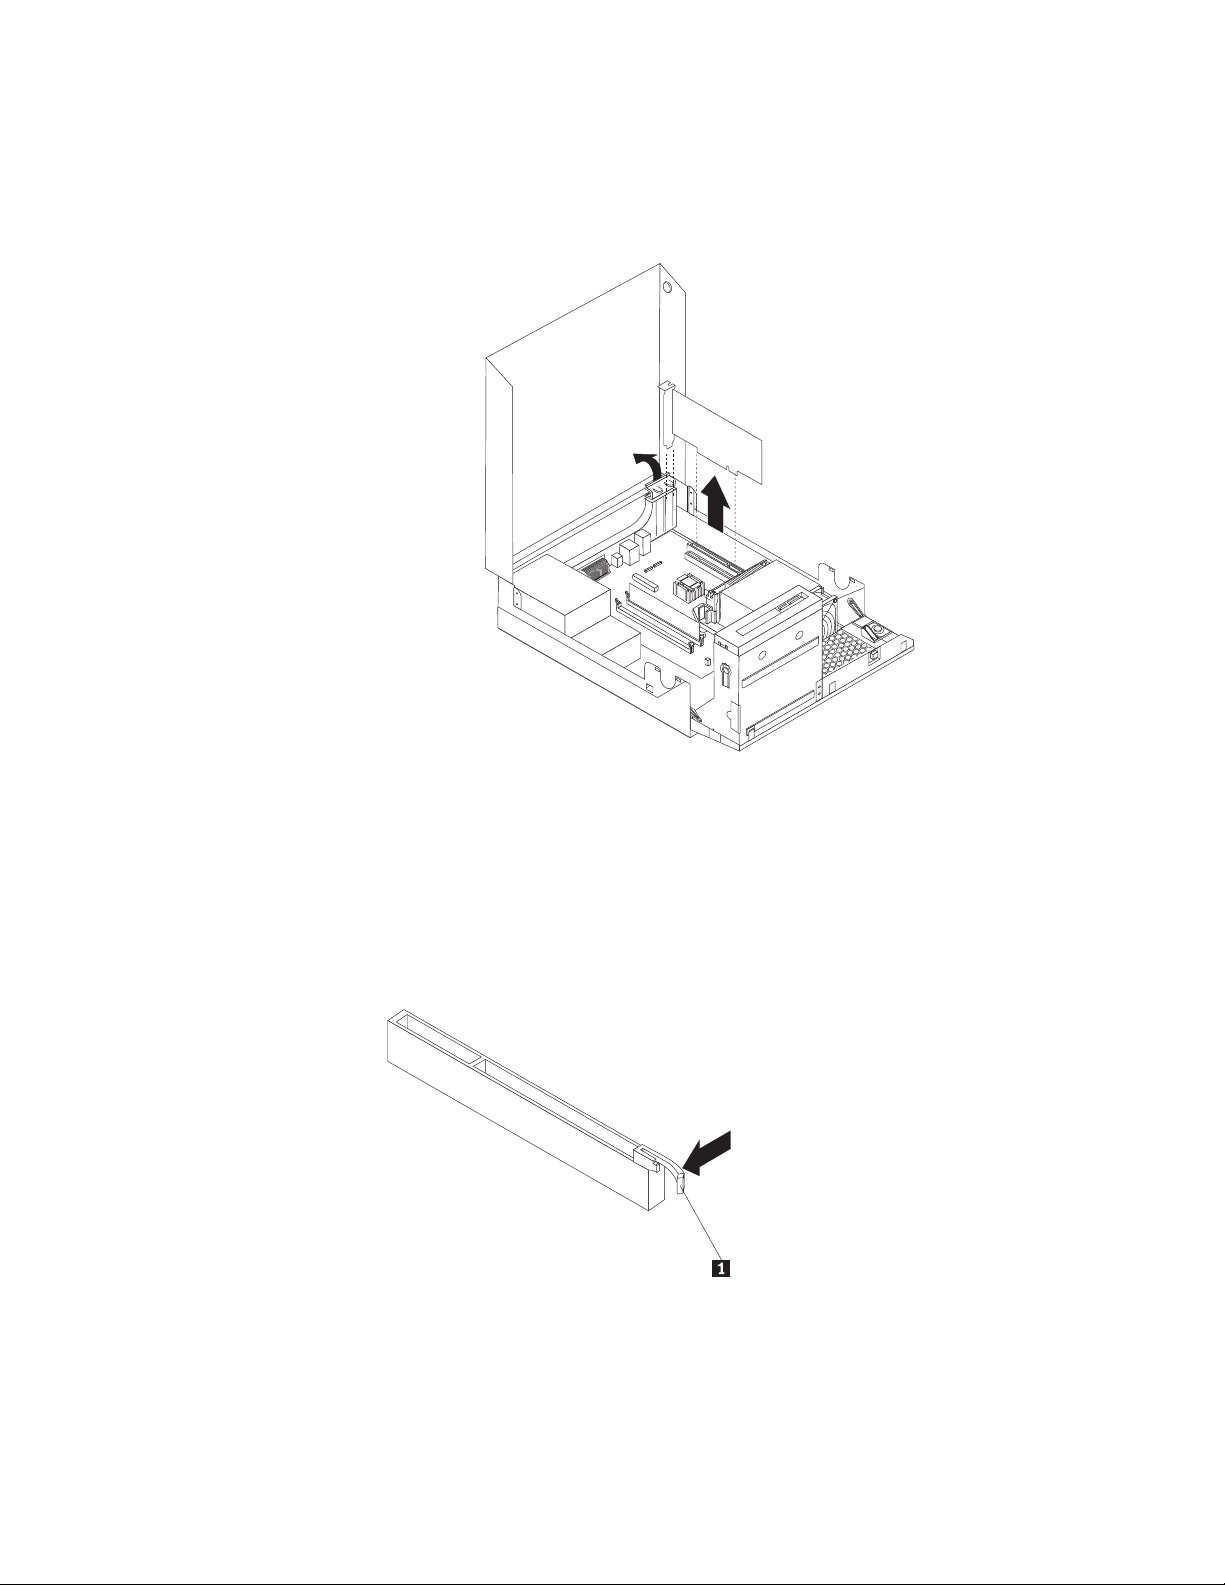
4. Install the adapter card into the appropriate adapter card slot on the system
board, see “Locating parts on the system board” on page 10. If you are
replacing an old adapter card, remove the adapter card being replaced before
installing the new one.
Figure 10. Removing the adapter card
Notes:
a. The adapter card fits tightly into the adapter card slot. If necessary, alternate
moving each side of the adapter card a small amount until it is removed
from the adapter card slot.
b. If the adapter card is held in place by a retaining latch, press the adapter
card retaining latch 1 as shown to disengage the latch. Grasp the adapter
card and then gently pull the adapter card out of the slot.
16 User Guide
Page 25
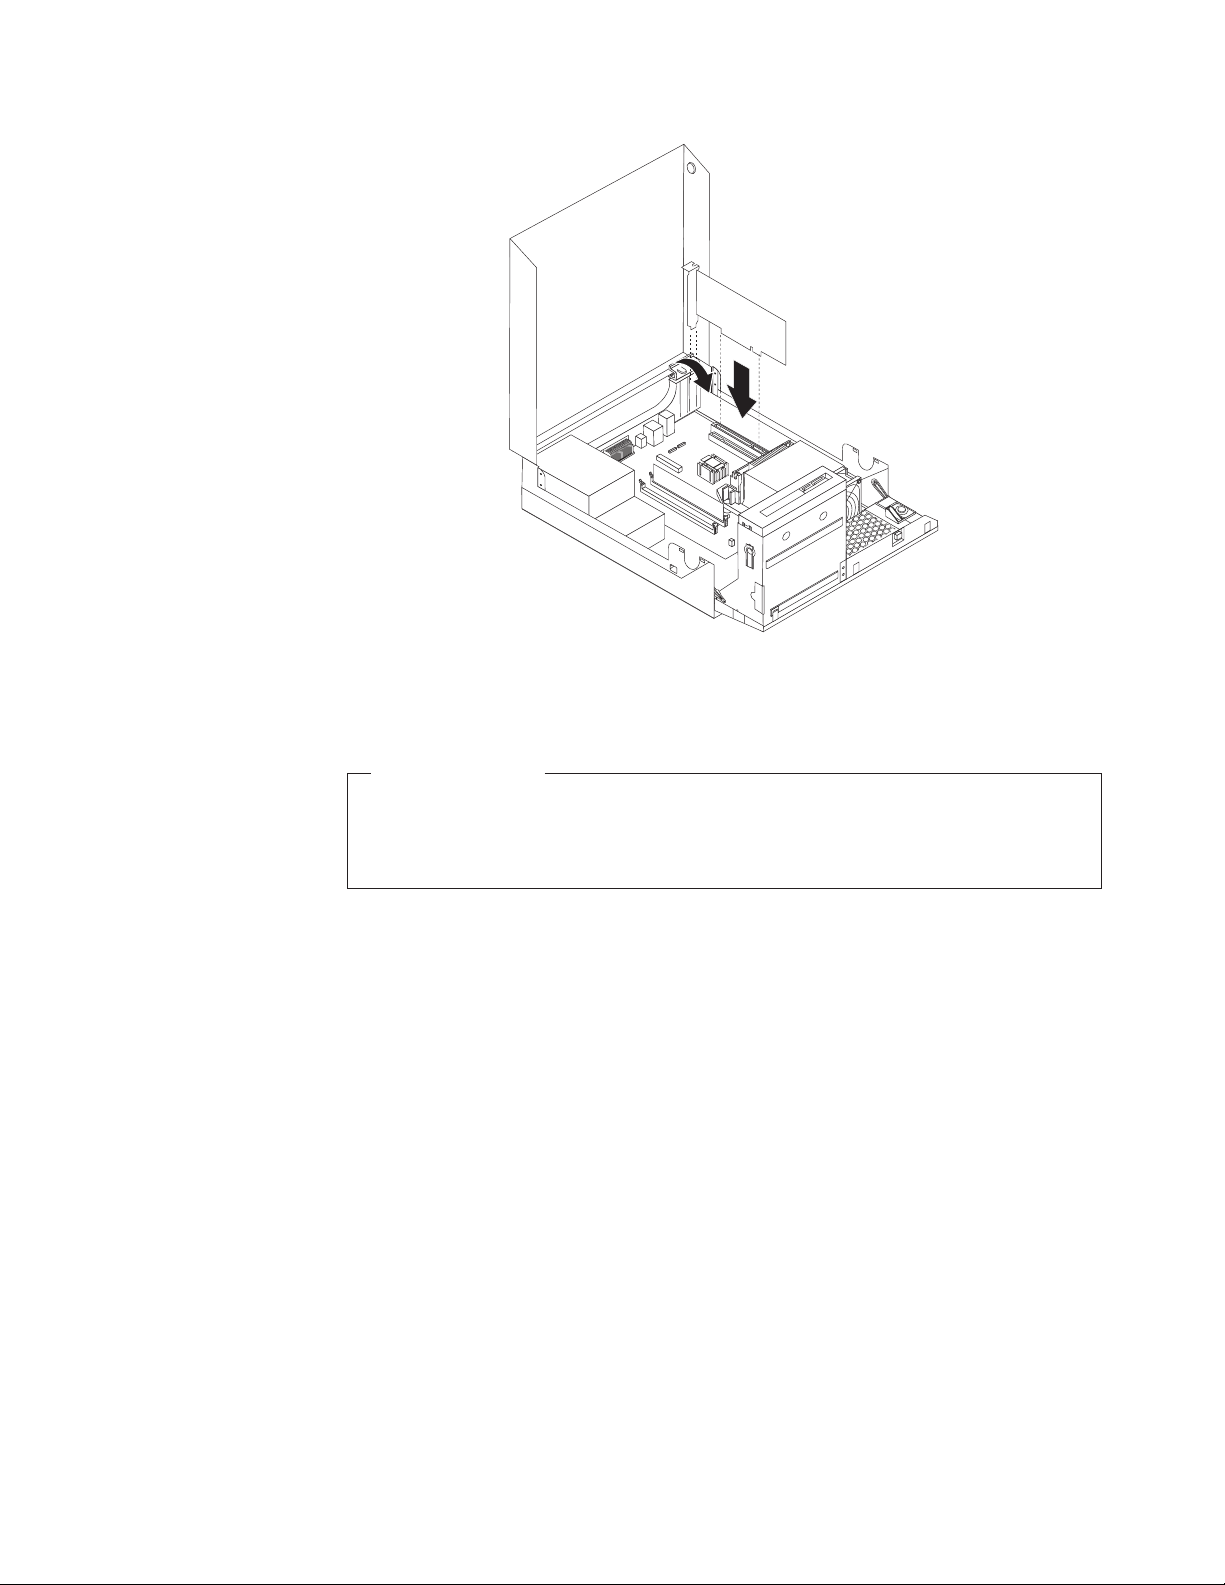
Figure 11. Installing the adapter card
5. Rotate the adapter retainer to the closed position.
What to do next:
v To work with another option, go to the appropriate section.
v To complete the installation, go to “Completing the parts replacement” on
page 35.
Installing internal drives
This section provides instructions on how to install the internal drives.
Internal drives are devices that your computer uses to read and store data. Yo u can
add drives to your computer to increase storage capacity and enable your
computer to read other types of media. Some of the types of drives that are
available for your computer are:
v Serial Advanced Technology Attachment (SATA) hard disk drives
v SATA optical drives, such as CD drives or DVD drives
v Removable media drives
These types of drives are also referred to as integrated drive electronics
Note:
(IDE) drives.
Internal drives are installed in bays. In this manual, the bays are referred to as
bay 1, bay 2, and so on.
When you install an internal drive, it is important to note the type and size of the
drive that you can install in each bay. Also, it is important to correctly connect the
internal drive cables to the installed drive.
Chapter 2. Installing options and replacing hardware 17
Page 26
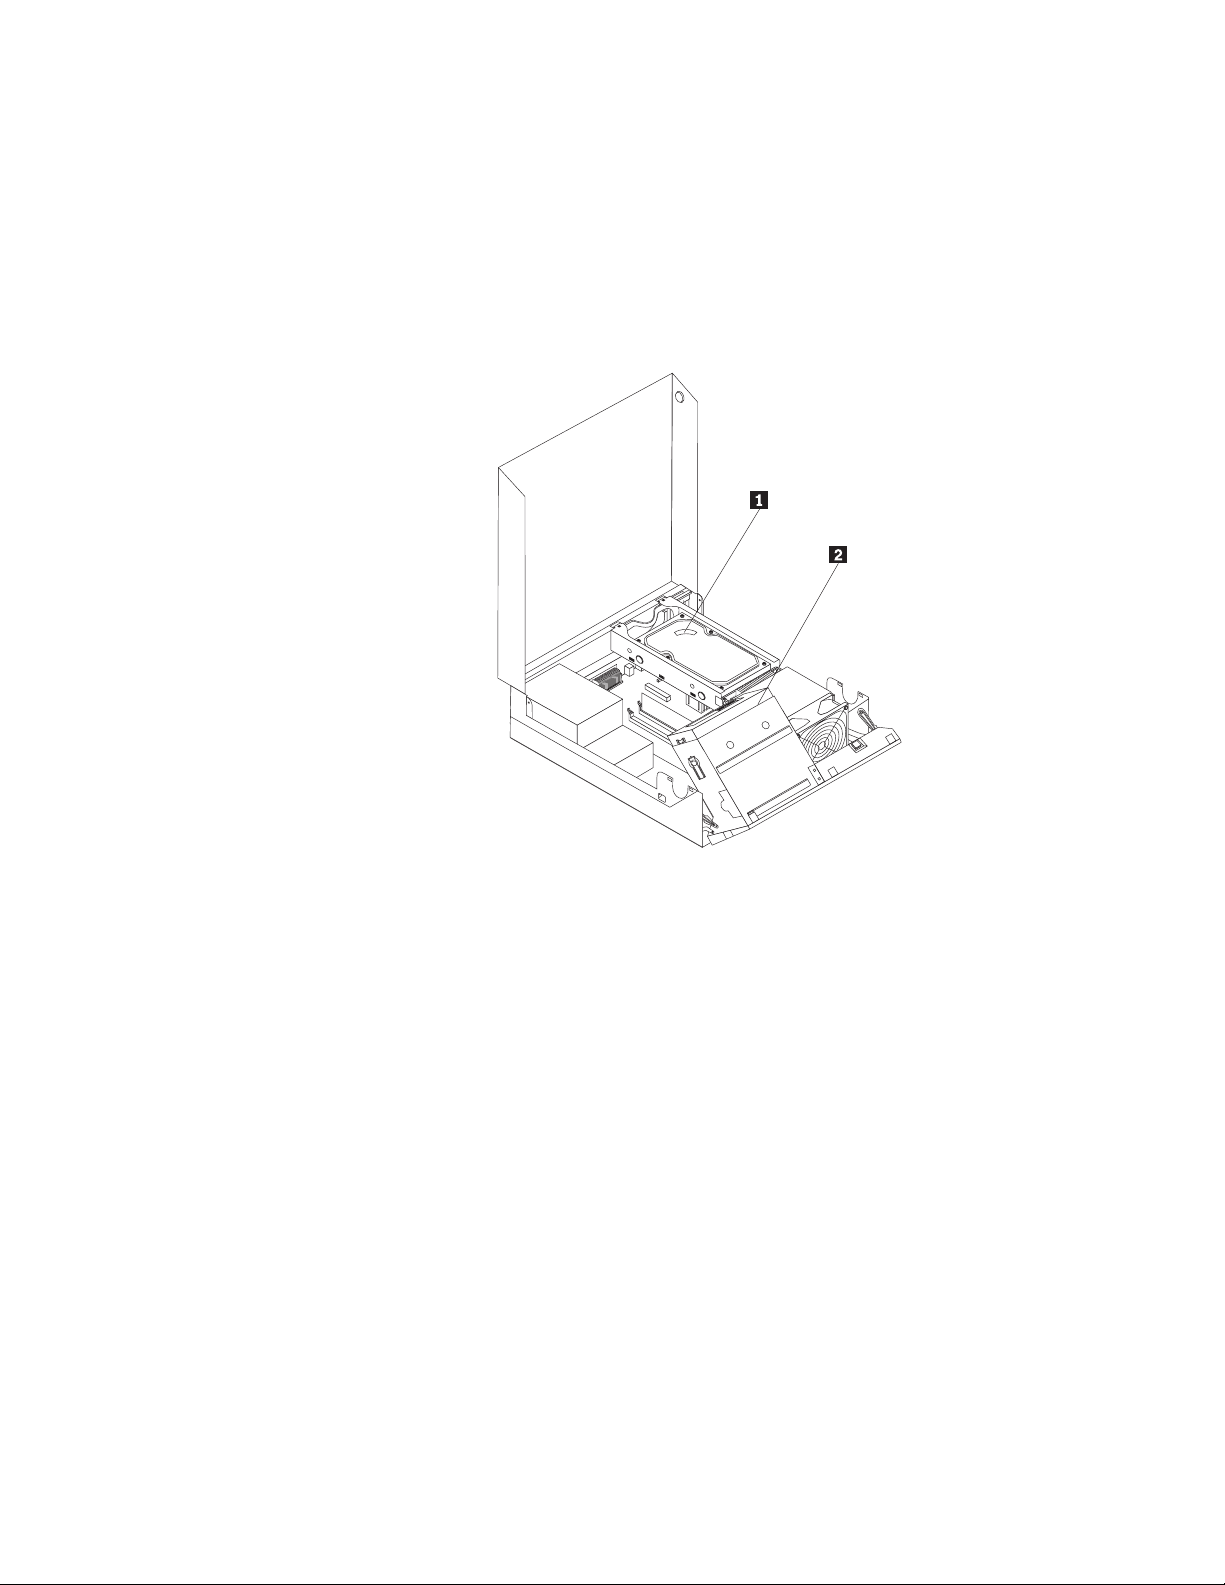
Drive specifications
Your computer comes with the following factory-installed drives:
v A 3.5-inch hard disk drive in bay 1
v An optical drive in bay 2 (some models)
bay that does not have a drive installed has a static shield and bay panel
Any
installed.
Figure 12 shows the location of the drive bays.
Figure 12. Drive bay locations
The following list describes the type and size of the drive that you can install in
each bay:
1 Bay 1 - Maximum height: 25.8 mm (1 inch) Internal hard disk drive
2 Bay 2 - Maximum height: 43.0 mm (1.7 inches)
Maximum
length: 180 mm (7.08 inches)
Optical drive, such as a CD drive or a
DVD drive (preinstalled in some
models)
5.25-inch hard disk drive
18 User Guide
Page 27
Installing a drive in bay 2
Attention
Do not open your computer or attempt any repair before reading and understanding the
“Important safety information” in the ThinkCentre Safety and Warranty Guide that came with
your computer. To obtain a copy of the ThinkCentre Safety and Warranty Guide, go to:
http://www.lenovo.com/support
To install an optical drive or an additional hard disk drive in bay 2:
1. Open the computer cover. See “Opening the computer cover” on page 12.
2. Remove the metal shield from the drive bay by using a flat-blade screwdriver
to gently pry it loose.
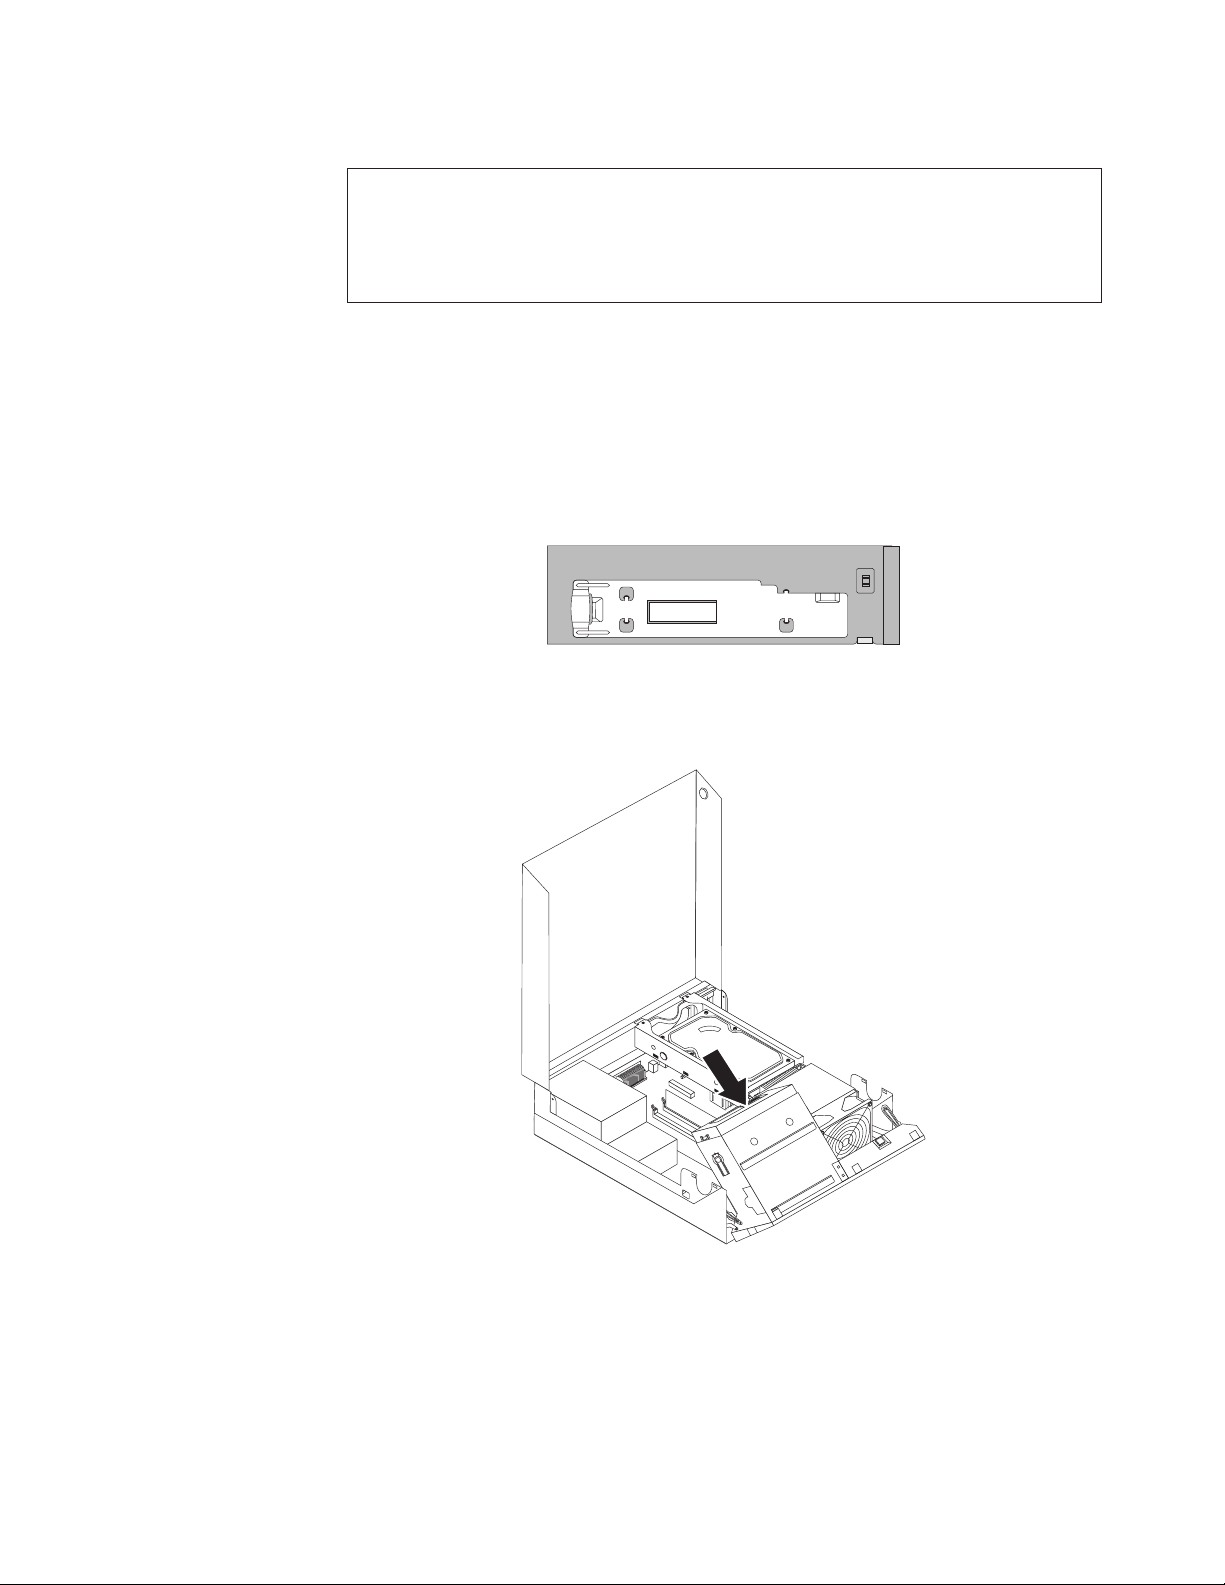
3. Install the optical drive retainer on the left side of the optical drive to be
installed.
Figure 13. Installing the retainer
4. Slide the drive into the bay until it locks into position.
Figure 14. Installing the drive
5. Pivot the drive bay assembly upward to gain access to the cable connections
and connect the signal cable and the power cable for the drive.
6. Continue at “Connecting a SATA drive” on page 20.
Chapter 2. Installing options and replacing hardware 19
Page 28
Connecting a S ATA drive
A SATA optical drive or a SATA hard disk drive can be connected to any available
SATA connector.
To connect a SATA drive:
1. Locate the signal cable that comes with the new drive.
2. Locate an available SATA connector on the system board. See “Locating parts
on the system board” on page 10.
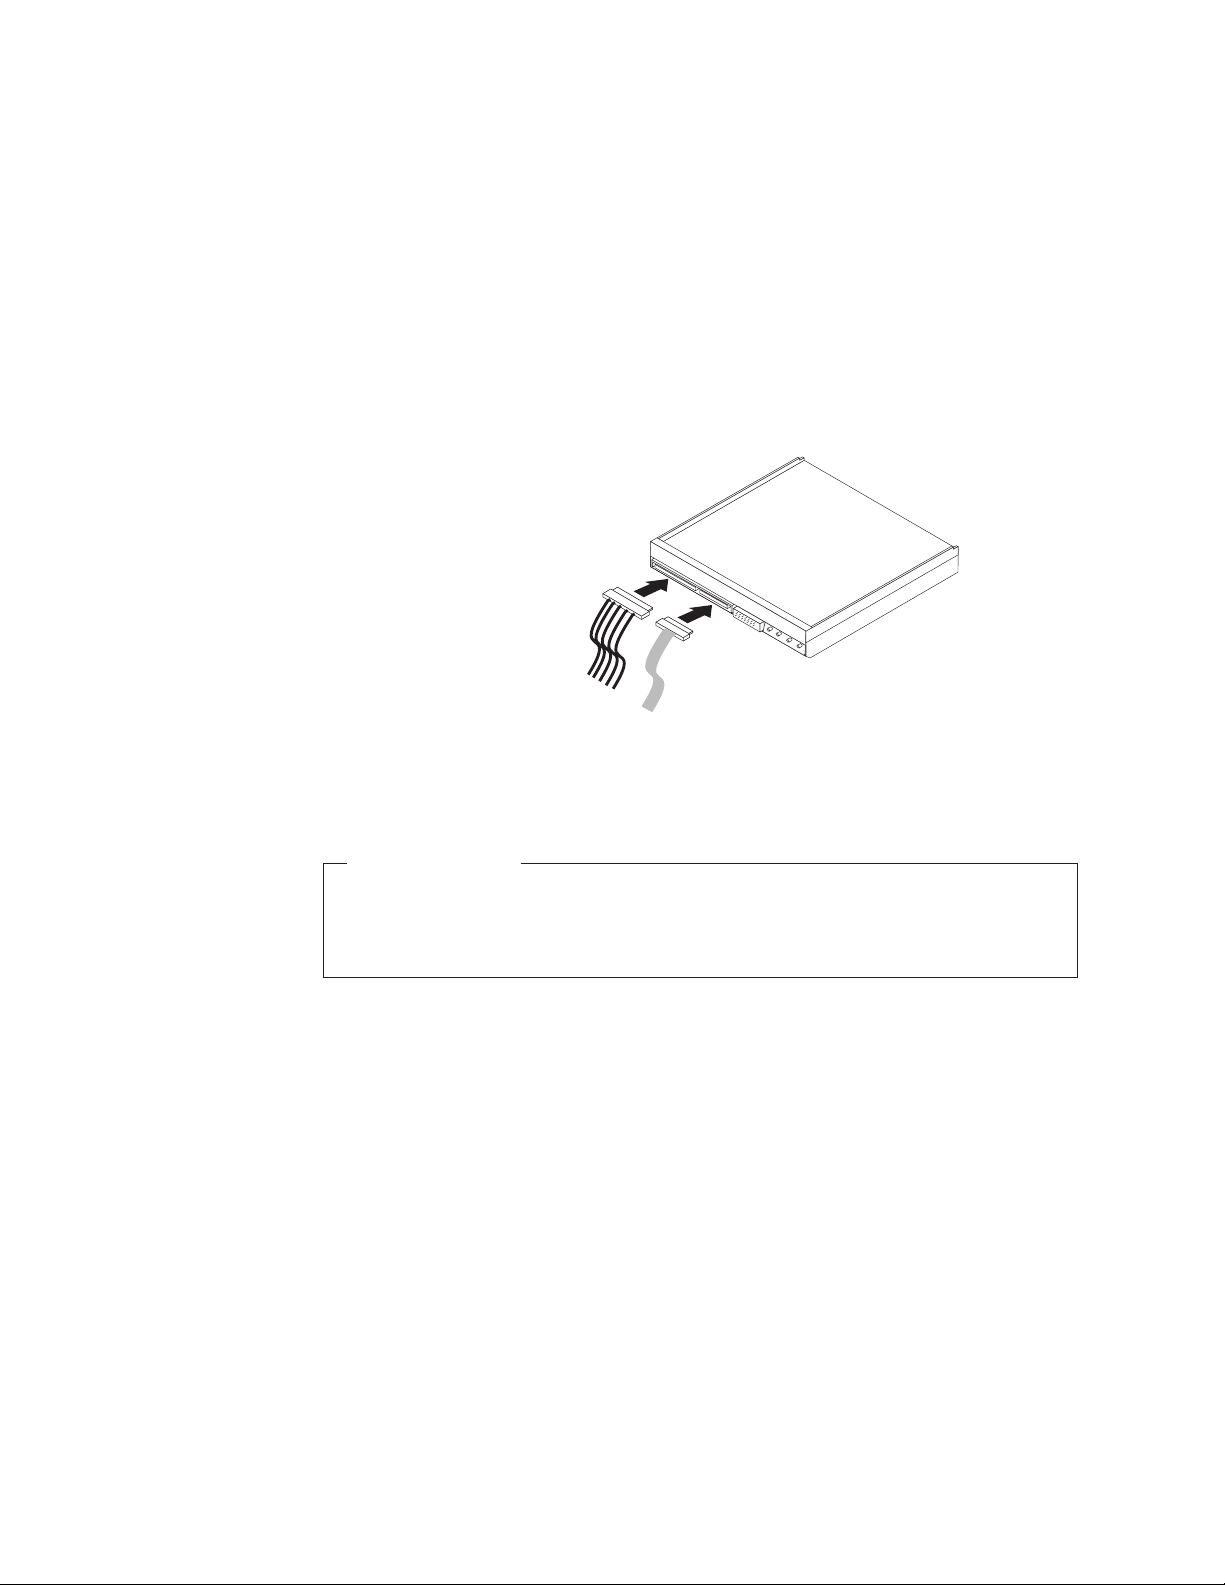
3. Connect one end of the signal cable to the drive and the other end to the
available SATA connector on the system board.
4. Locate one of the extra five-wire power connectors and connect it to the drive.
Figure 15. Connecting a SATA drive
What to do next:
v To work with another option, go to the appropriate section.
v To complete the installation, go to “Completing the parts replacement” on
page 35.
20 User Guide
Page 29
Replacing the hard disk drive
Attention
Do not open your computer or attempt any repair before reading and understanding the
“Important safety information” in the ThinkCentre Safety and Warranty Guide that came with
your computer. To obtain a copy of the ThinkCentre Safety and Warranty Guide, go to:
http://www.lenovo.com/support
This section provides instructions on how to replace the hard disk drive.
Important
When you receive a new hard disk drive, you also receive a set of Product
Recovery discs. The set of Product Recovery discs enables you to restore the
contents of the hard disk drive to the factory-installed state. For more
information on recovering factory-installed software, refer to Chapter 3,
“Recovery information,” on page 39.
To replace the hard disk drive:
1. Open the computer cover. See “Opening the computer cover” on page 12.
2. You might need to pivot the drive bay assembly upward to gain easy access
to the hard disk drive.
3. Locate the hard disk drive.
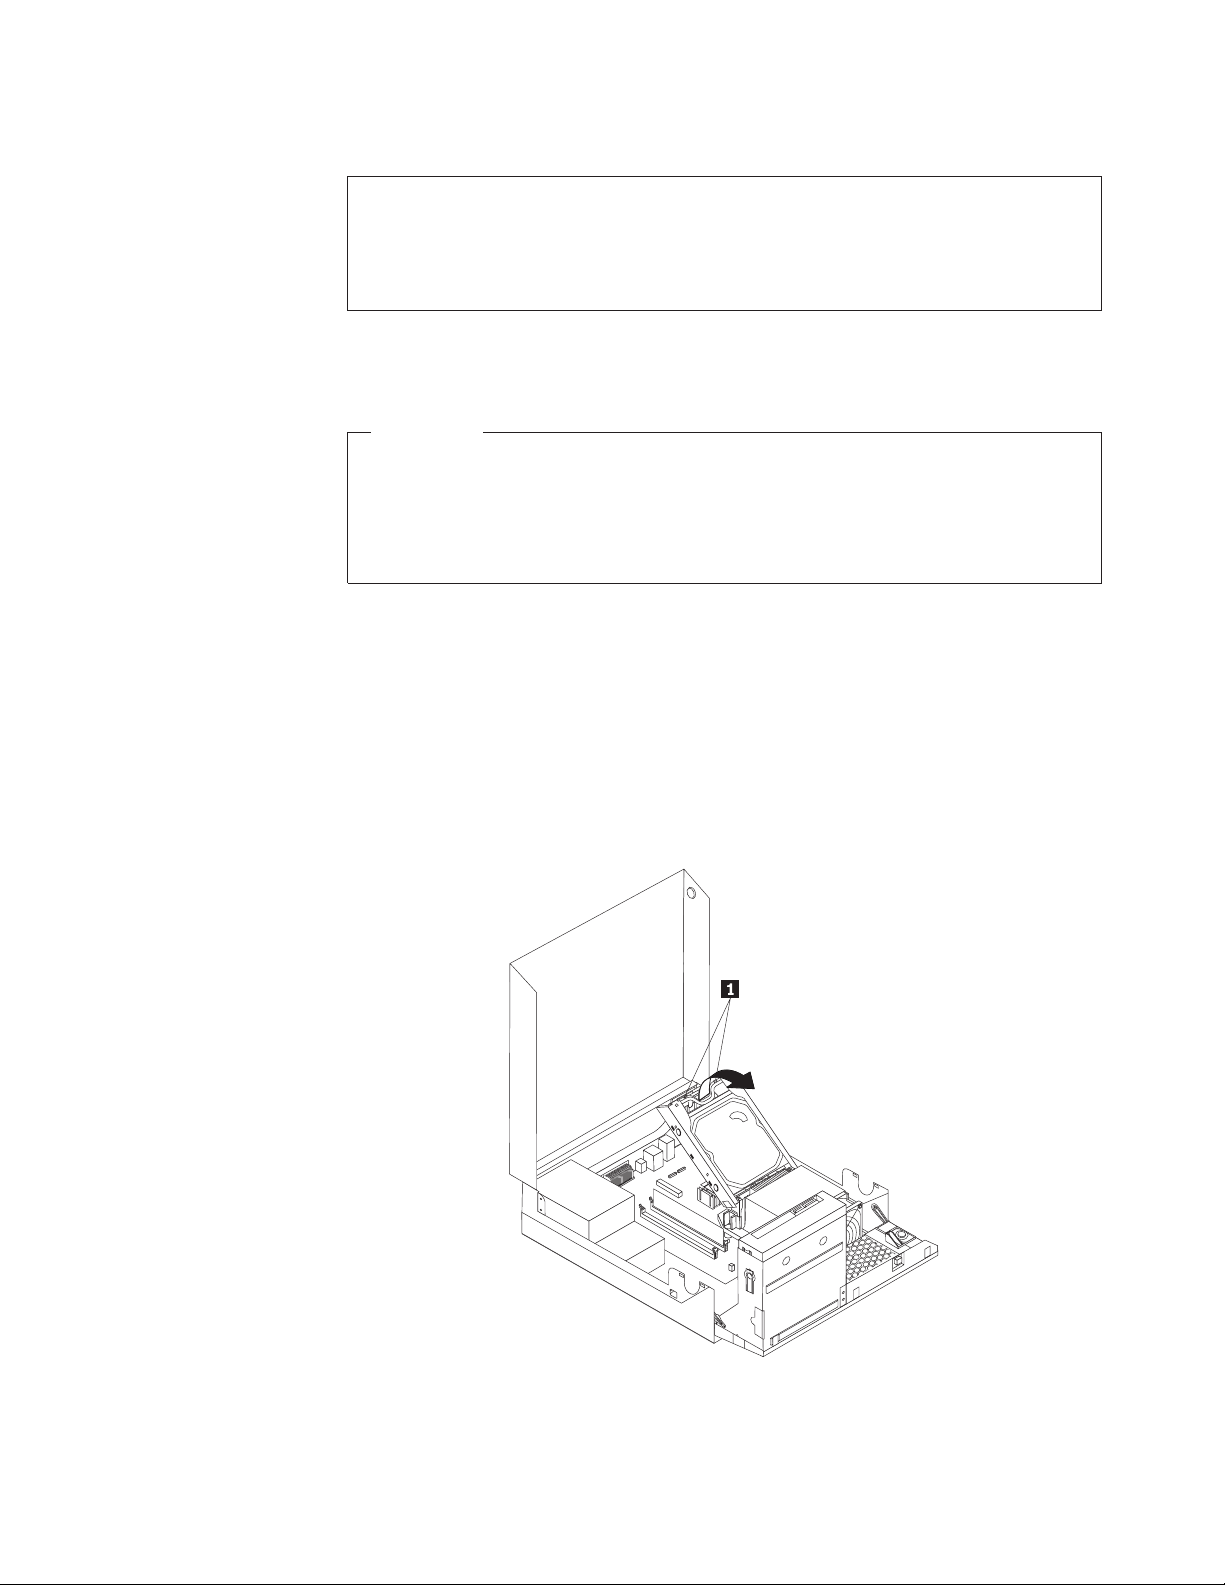
4. Push the blue handle of the hard disk drive bracket inwards to release the two
clips 1 that secure the hard disk drive to the chassis, and then rotate the
hard disk drive upwards and lift it up to remove it from the computer.
Figure 16. Removing the hard disk drive
5. Disconnect the signal cable and the power cable from the hard disk drive.
Chapter 2. Installing options and replacing hardware 21
Page 30
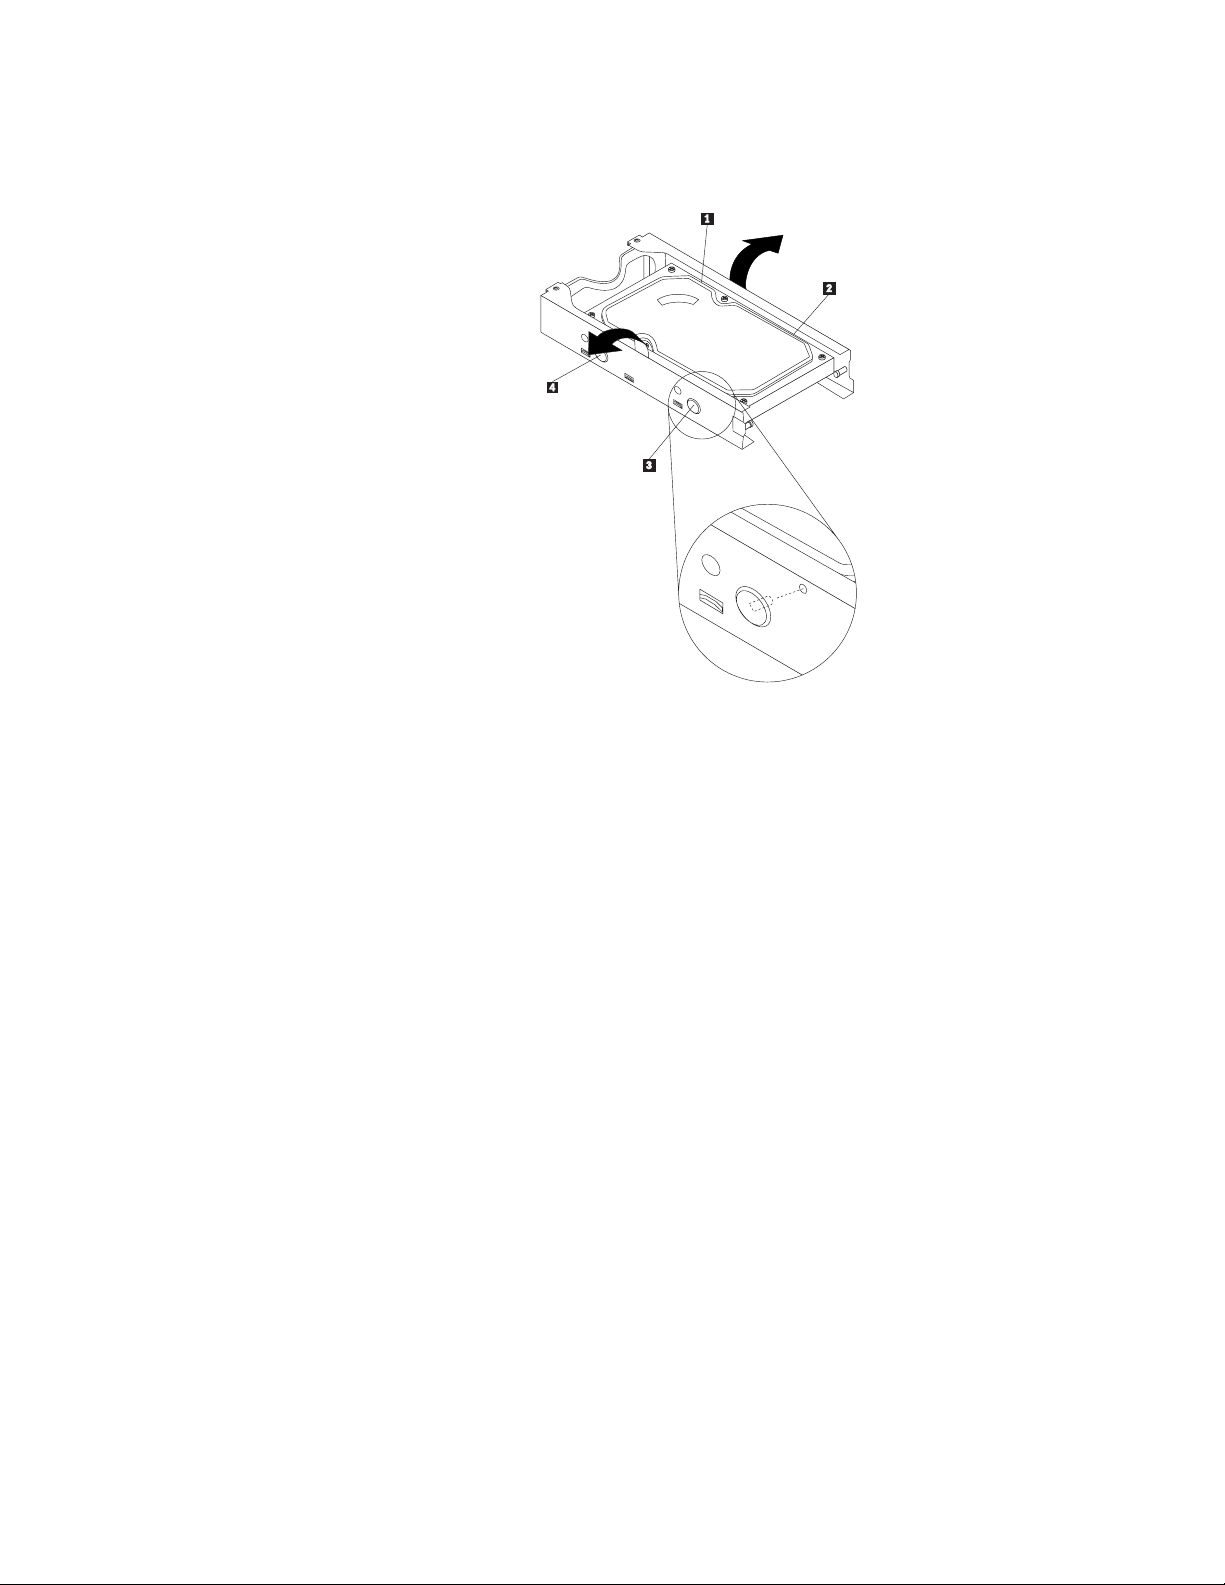
6. Remove the old hard disk drive from the bracket by flexing the sides of the
bracket enough to slide it free from the hard disk drive.
Figure 17. Removing the hard disk drive from the bracket
7. To install a new hard disk drive into the bracket, flex the bracket and align
pin 1, pin 2, pin 3, and pin 4 on the bracket with the holes in the
hard disk drive.
Important: Do not touch the circuit board on the bottom of the hard disk
drive.
8. Connect the signal cable and the power cable to the new hard disk drive.
9. Install the new hard disk drive and bracket into the rear retainer and rotate
down until the two clips on the blue handle of the hard disk drive bracket
snap into position.
10. Go to “Completing the parts replacement” on page 35.
22 User Guide
Page 31

Replacing the optical drive
Attention
Do not open your computer or attempt any repair before reading and understanding the
“Important safety information” in the ThinkCentre Safety and Warranty Guide that came with
your computer. To obtain a copy of the ThinkCentre Safety and Warranty Guide, go to:
http://www.lenovo.com/support
This section provides instructions on how to replace the optical drive.
To replace the optical drive:
1. Open the computer cover. See “Opening the computer cover” on page 12.
2. Pivot the drive bay assembly upward to gain access to the optical drive. See
“Accessing the system board components and drives” on page 13.
3. Disconnect the signal cable and the power cable from the rear of the optical
drive.
Chapter 2. Installing options and replacing hardware 23
Page 32
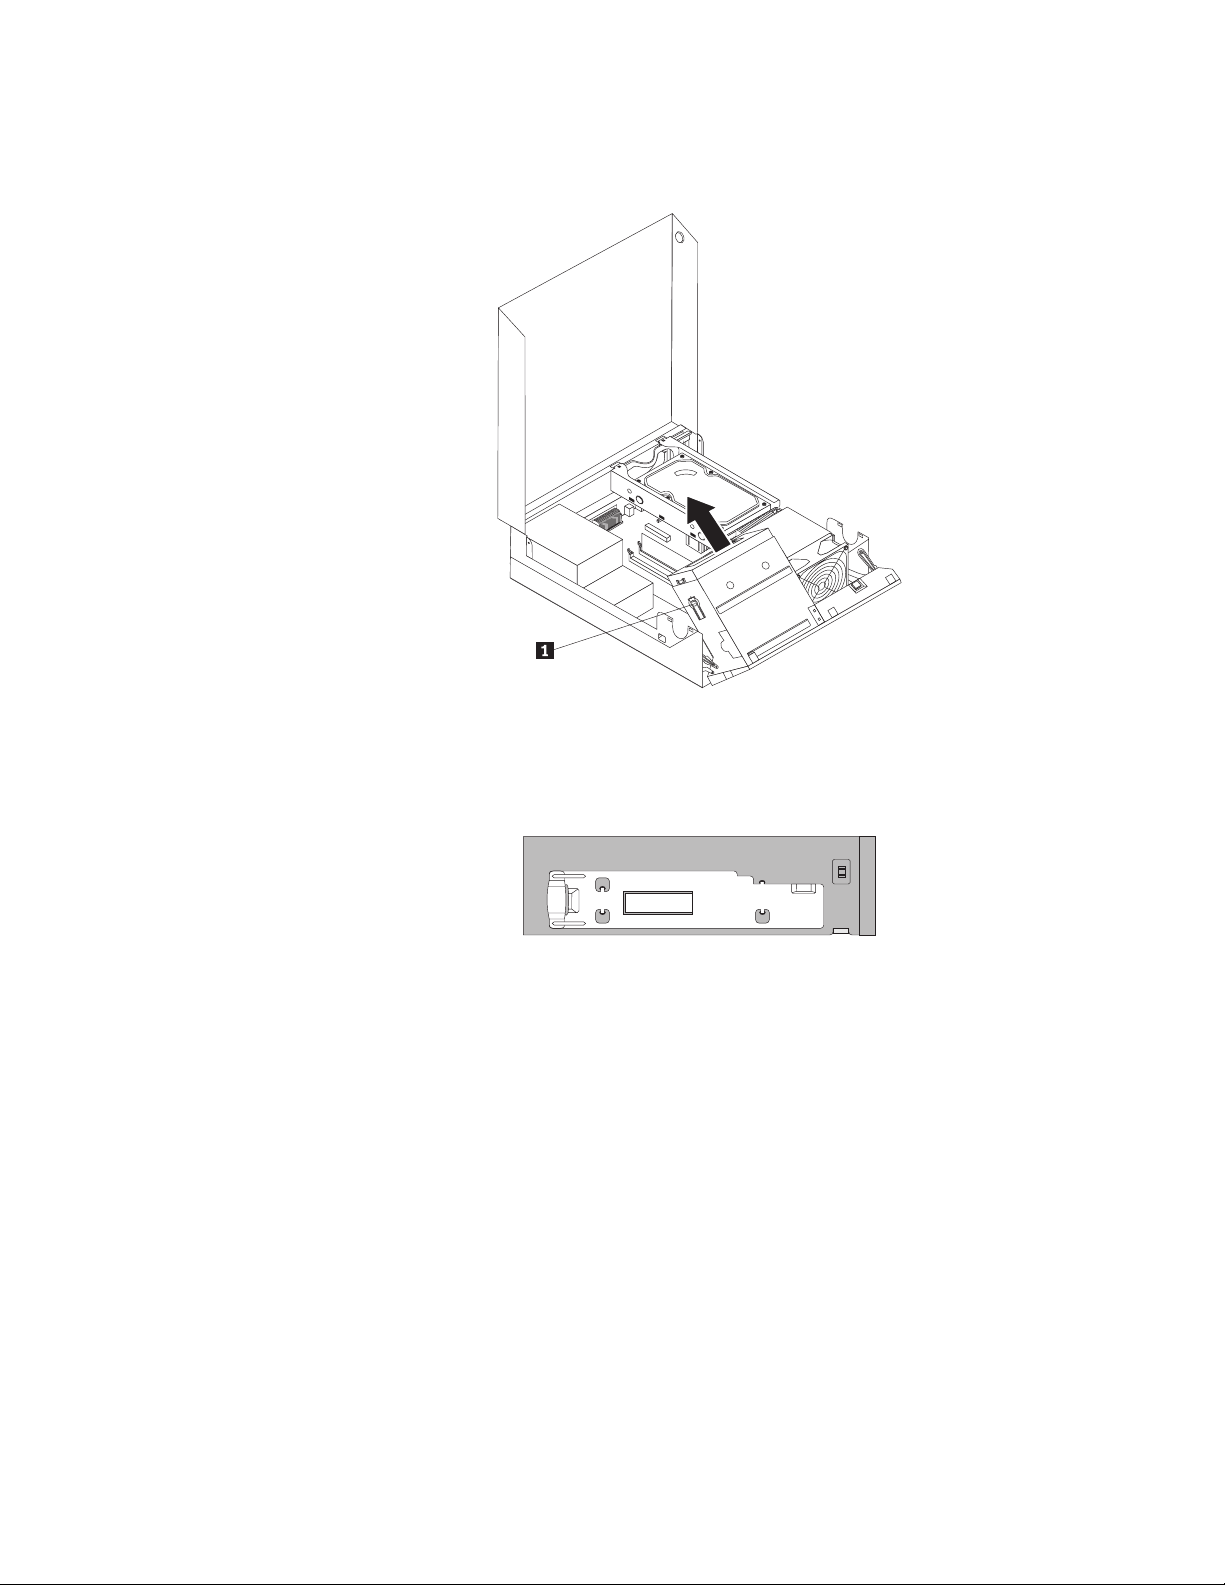
4. Press the optical drive lock 1 and slide the optical drive out the rear of the
drive bay assembly.
Figure 18. Removing the old optical drive
5. Remove the optical drive retainer from the old optical drive and then install it
on the left side of the new optical drive.
Figure 19. Installing the retainer
24 User Guide
Page 33
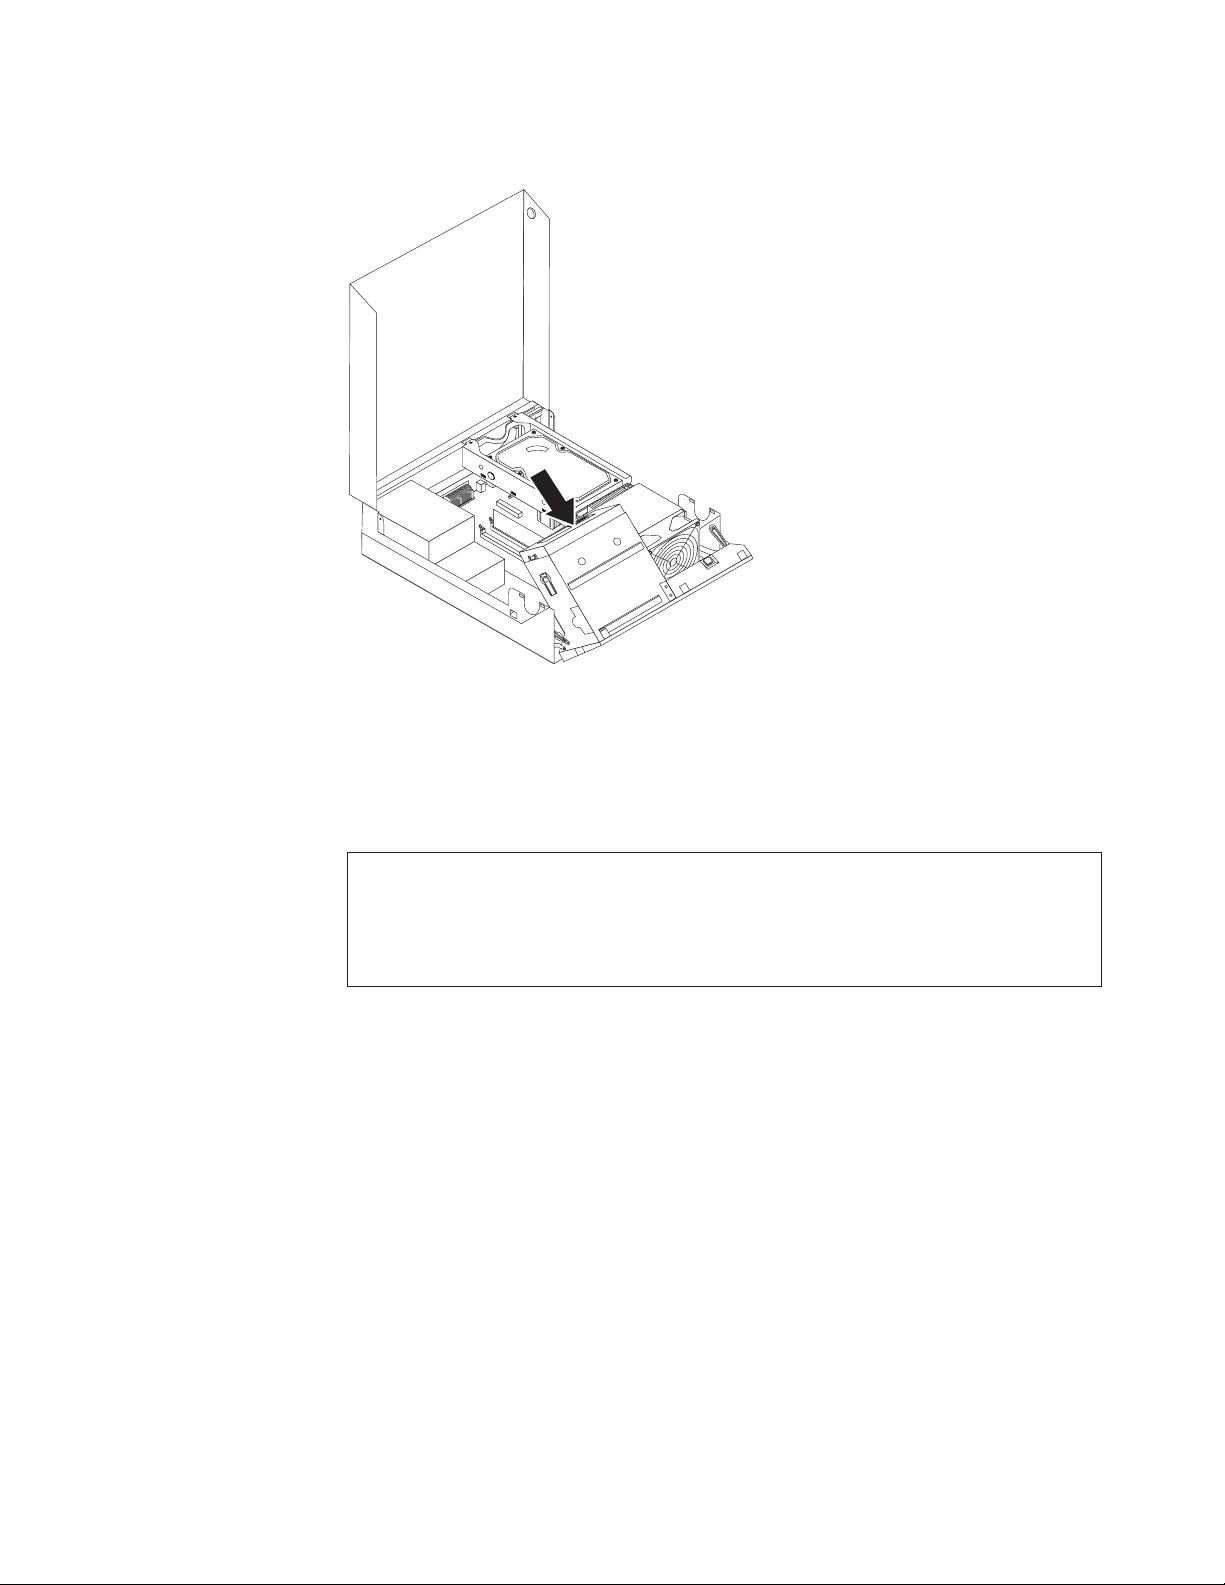
6. Slide the new optical drive into the bay until it snaps into position.
Figure 20. Installing the new optical drive
7. Connect the signal and power cables to the rear of the optical drive.
8. Go to “Completing the parts replacement” on page 35.
Replacing the battery
Attention
Do not open your computer or attempt any repair before reading and understanding the
“Important safety information” in the ThinkCentre Safety and Warranty Guide that came with
your computer. To obtain a copy of the ThinkCentre Safety and Warranty Guide, go to:
http://www.lenovo.com/support
This section provides instructions on how to replace the battery.
Your computer has a special type of memory that maintains the date, time, and
settings for built-in features, such as parallel-port assignments (configuration). A
battery keeps this information active when you turn off the computer.
The battery normally requires no charging or maintenance throughout its life;
however, no battery lasts forever. If the battery fails, the date, time, and
configuration information (including passwords) are lost. An error message is
displayed when you turn on the computer.
Refer to the “Lithium battery notice” in the ThinkCentre Safety and Warranty Guide
for information about replacing and disposing of the battery.
To replace the battery:
1. Open the computer cover. See “Opening the computer cover” on page 12.
2. Locate the battery. See “Locating parts on the system board” on page 10.
Chapter 2. Installing options and replacing hardware 25
Page 34
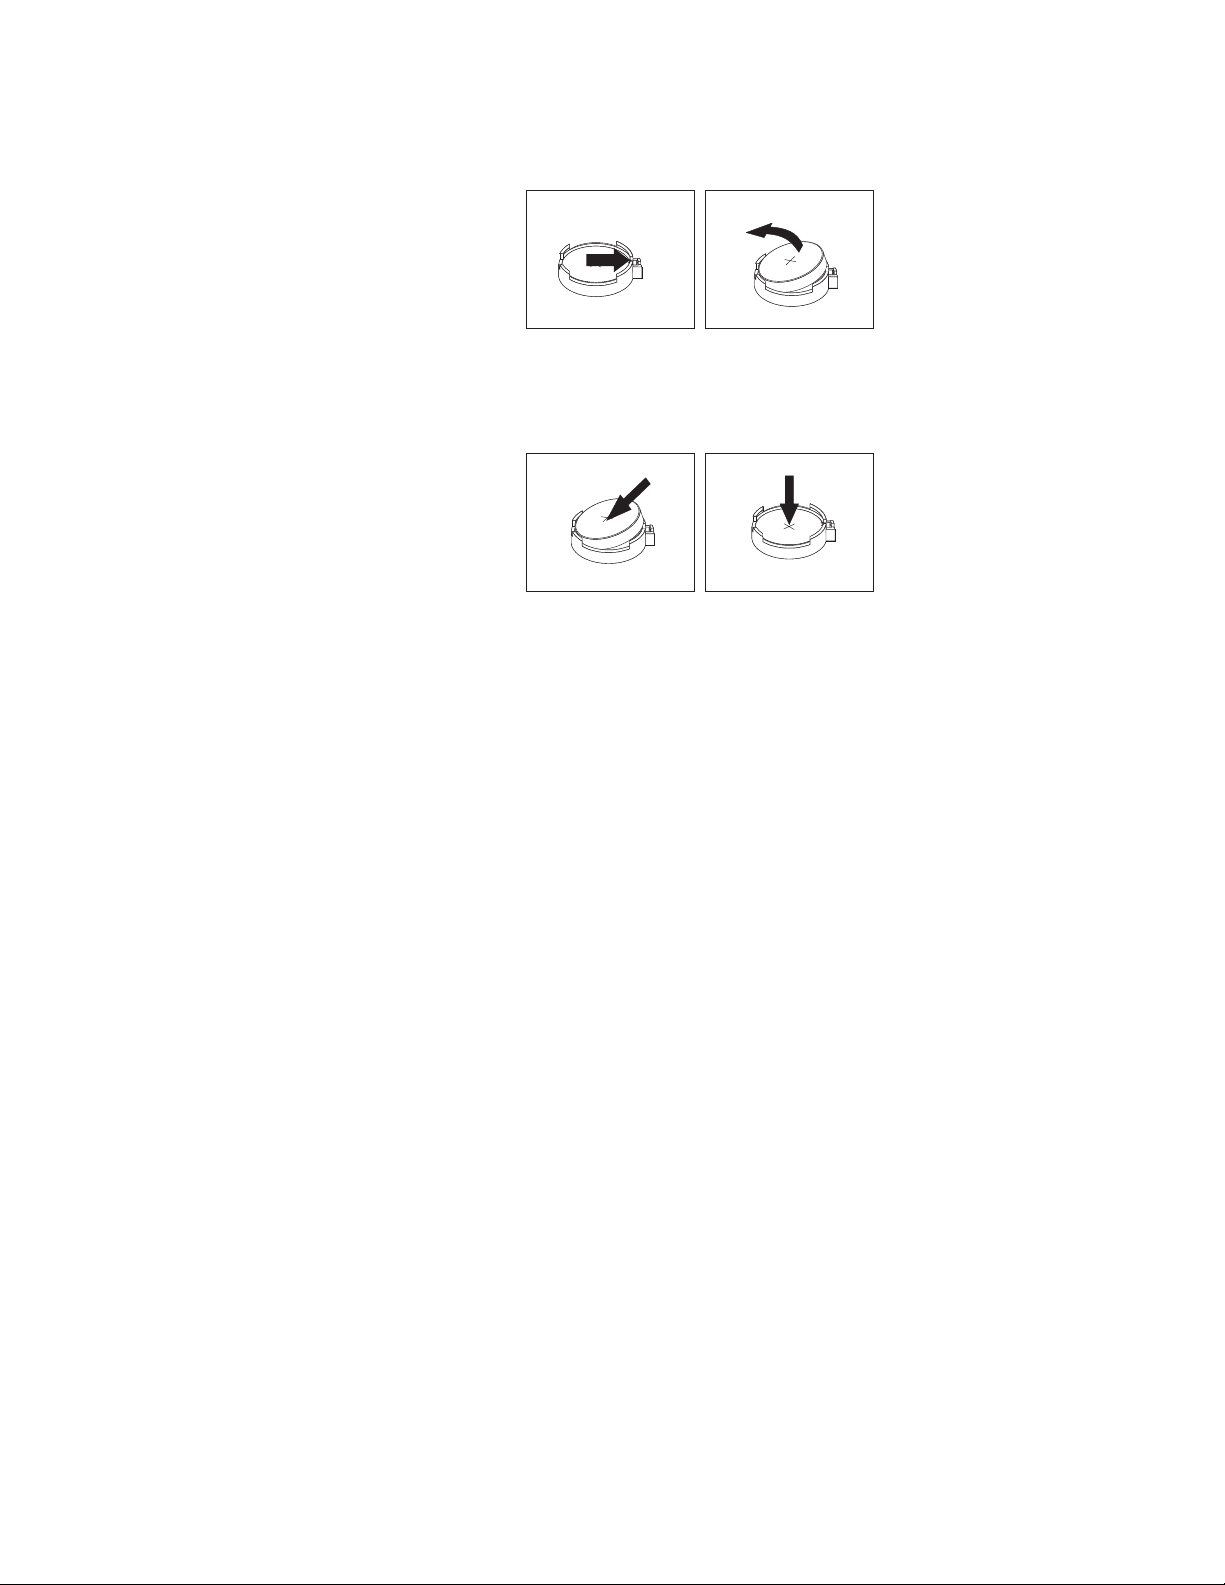
3. Remove the old battery.
Figure 21. Removing the old battery
4. Install a new battery.
Figure 22. Installing a new battery
5. Reinstall the computer cover and connect the cables. See “Completing the parts
replacement” on page 35.
Note: When the computer is turned on for the first time after replacing the
battery, an error message might be displayed. This is normal after
replacing the battery.
6. Turn on the computer and all attached devices.
7. Use the Setup Utility program to set the date, time, and any passwords. See
Chapter 4, “Using the Setup Utility,” on page 47.
26 User Guide
Page 35
Replacing the power supply assembly
Attention
Do not open your computer or attempt any repair before reading and understanding the
“Important safety information” in the ThinkCentre Safety and Warranty Guide that came with
your computer. To obtain a copy of the ThinkCentre Safety and Warranty Guide, go to:
http://www.lenovo.com/support
This section provides instructions on how to replace the power supply assembly.
To replace the power supply assembly:
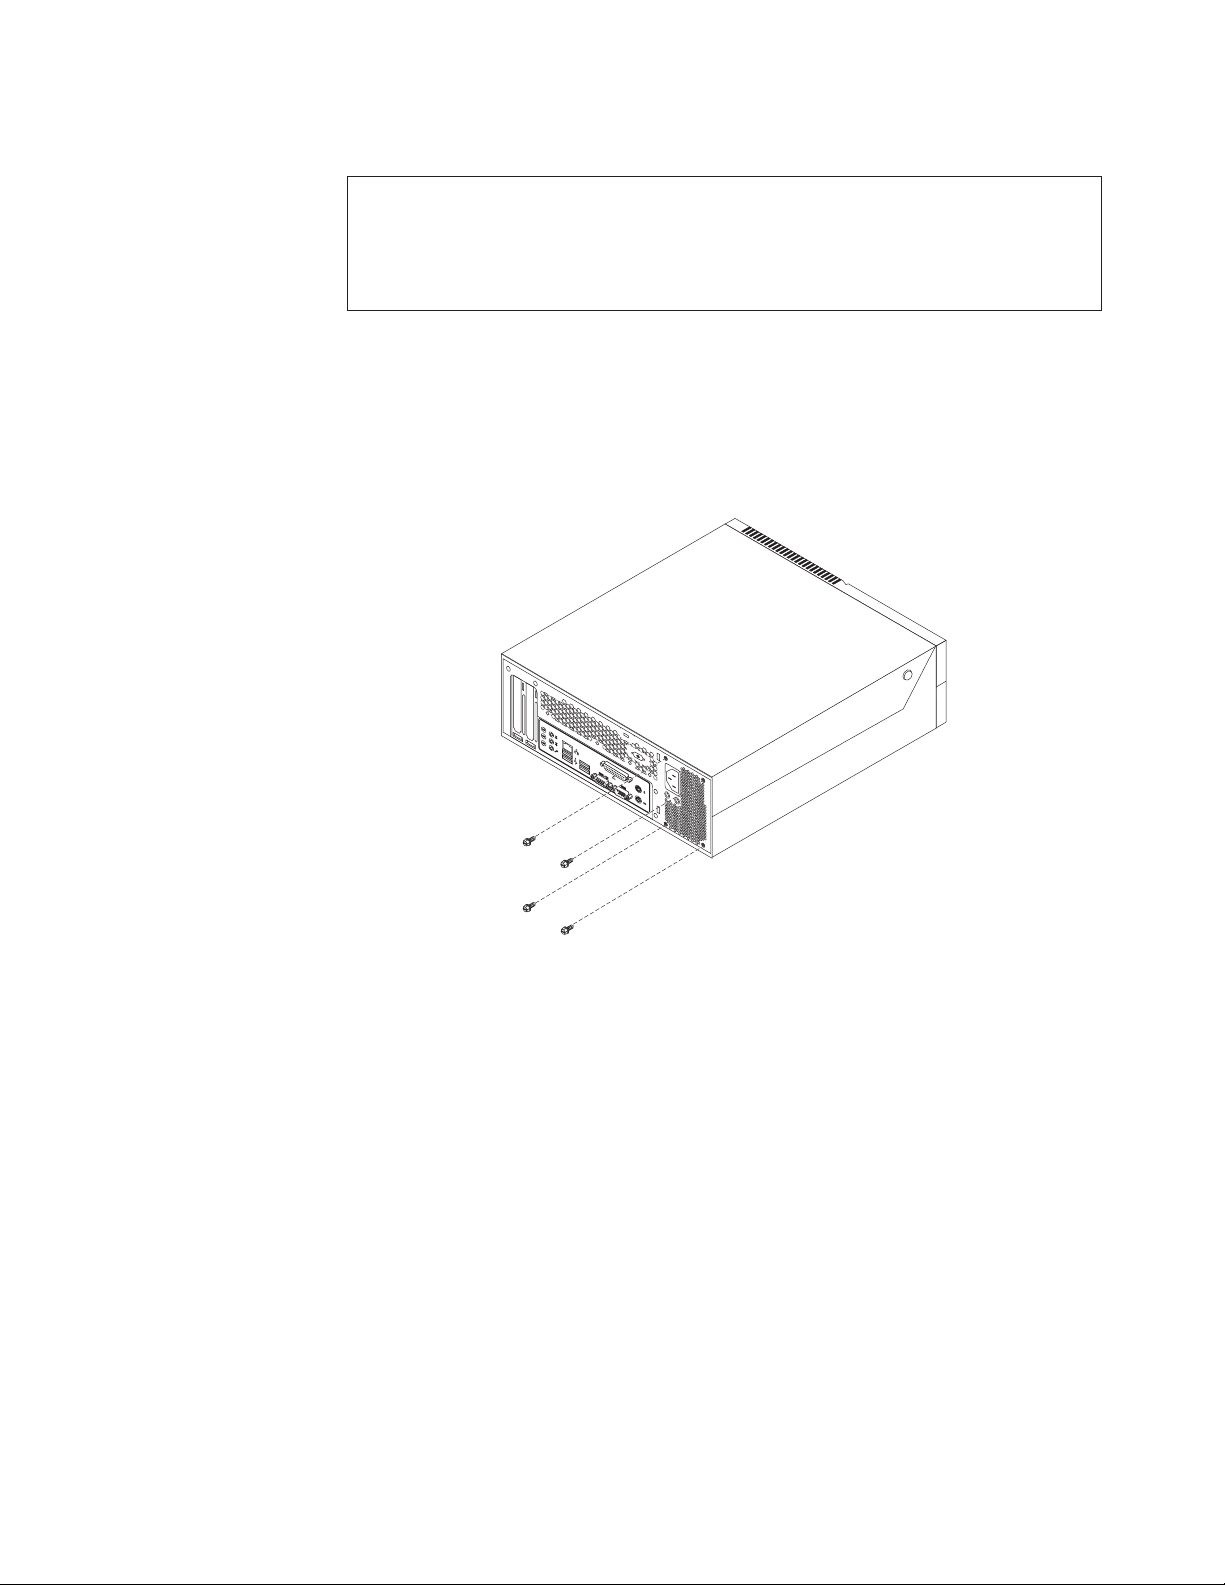
1. Remove the four screws at the rear of the chassis that secure the power
supply assembly.
Figure 23. Removing the retaining screws for the power supply assembly
2. Open the computer cover. See “Opening the computer cover” on page 12.
3. Pivot the drive bay assembly upward to gain access to the power supply
assembly.
4. Locate the power supply assembly. See “Locating components” on page 9.
Chapter 2. Installing options and replacing hardware 27
Page 36
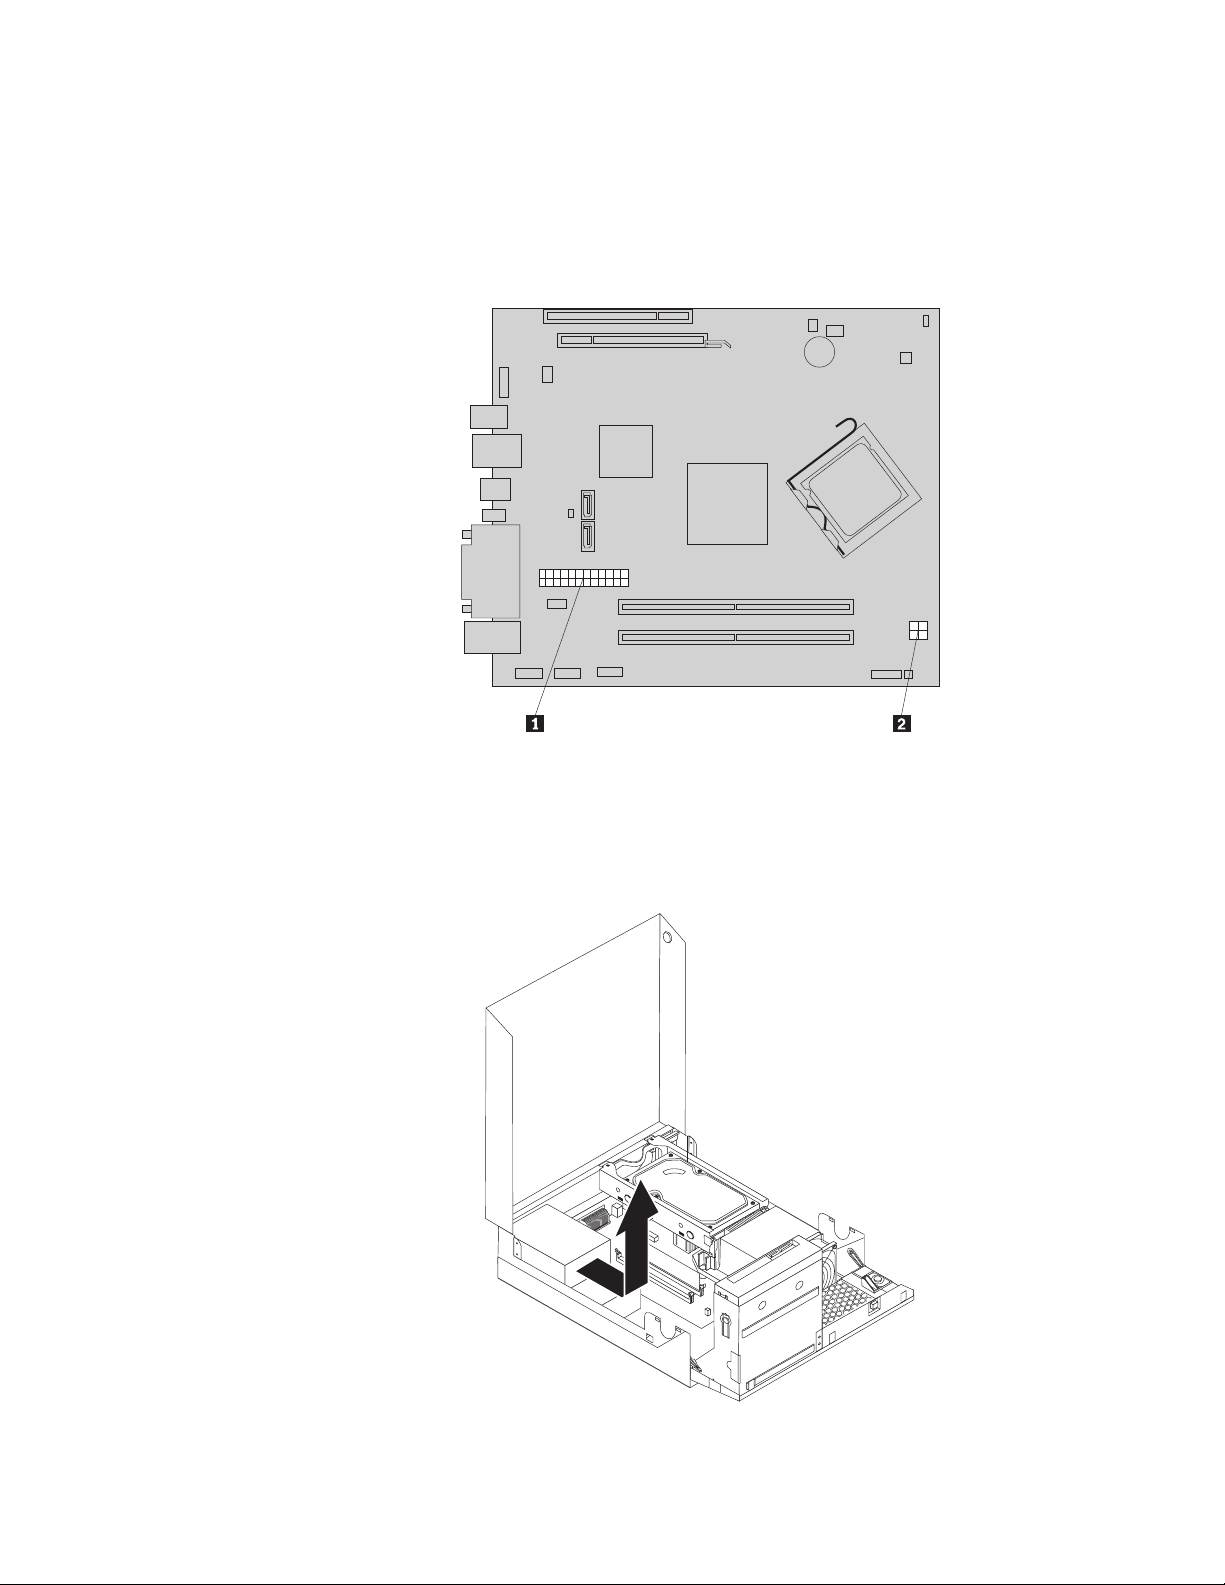
5. Disconnect the power supply assembly cables from all drives and from the
power connectors 1 and 2.
You might need to remove the hard disk drive to gain easy access to
Note:
the power connector 1. See “Replacing the hard disk drive” on page
21.
Figure 24. Power connectors on the system board
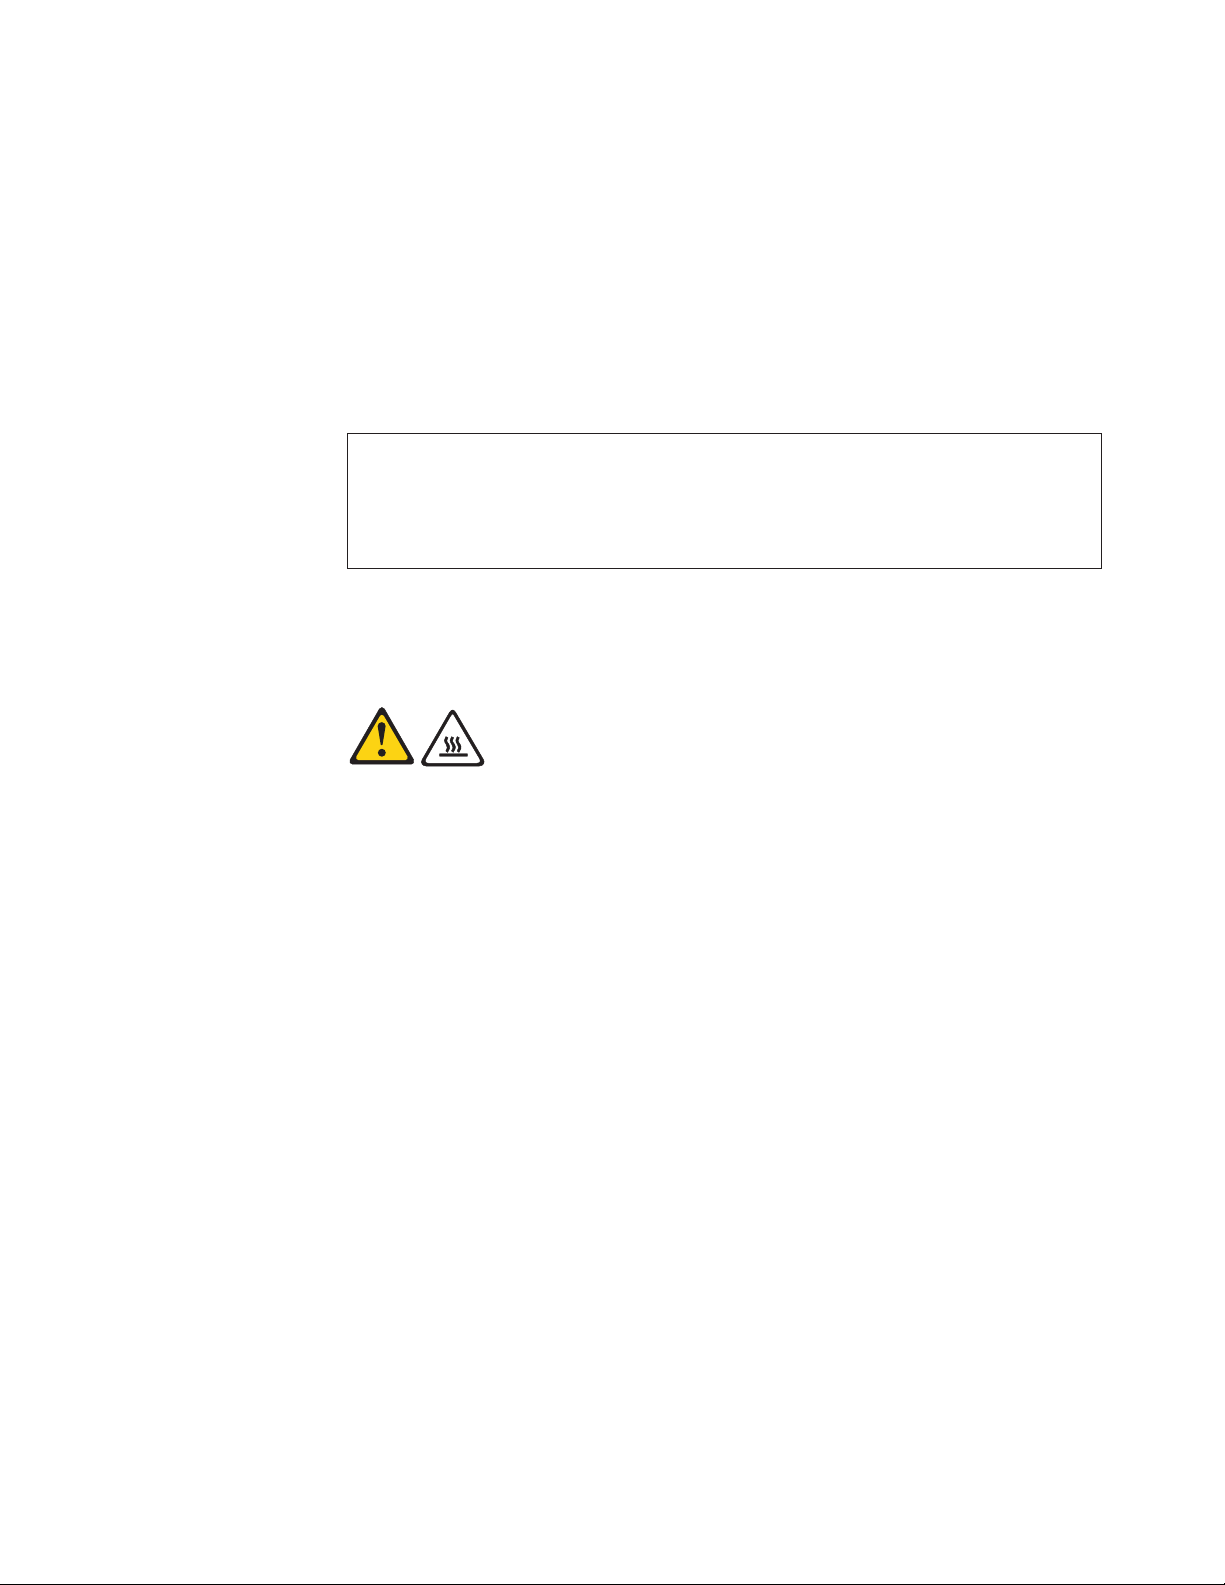
6. Remove the power supply assembly cables from the cable clips and ties.
7. Slide the power supply assembly away from the chassis and remove it from
the computer.
28 User Guide
Figure 25. Removing the power supply assembly
Page 37
8. Install the new power supply assembly into the chassis so that the screw holes
in the new power supply assembly align with those in the chassis.
9. Install and tighten the four screws at the rear of the chassis to secure the
power supply assembly.
Use only the screws provided by Lenovo.
Note:
10. Reconnect all the power supply assembly cables to the drives and the system
board.
11. Go to “Completing the parts replacement” on page 35.
Replacing the heat sink and fan assembly
Attention
Do not open your computer or attempt any repair before reading and understanding the
“Important safety information” in the ThinkCentre Safety and Warranty Guide that came with
your computer. To obtain a copy of the ThinkCentre Safety and Warranty Guide, go to:
http://www.lenovo.com/support
This section provides instructions on how to replace the heat sink and fan
assembly.
CAUTION:
The heat sink and fan assembly might be very hot. Turn off the computer and
wait three to five minutes to let the computer cool before opening the computer
cover.
To replace the heat sink and fan assembly:
1. Open the computer cover. See “Opening the computer cover” on page 12.
2. Pivot the drive bay assembly upward to gain access to the heat sink and fan
assembly. See “Accessing the system board components and drives” on page
13.
3. Locate the heat sink and fan assembly and disconnect the heat sink and fan
assembly cable from the microprocessor fan connector on the system board. See
“Locating parts on the system board” on page 10.
Chapter 2. Installing options and replacing hardware 29
Page 38
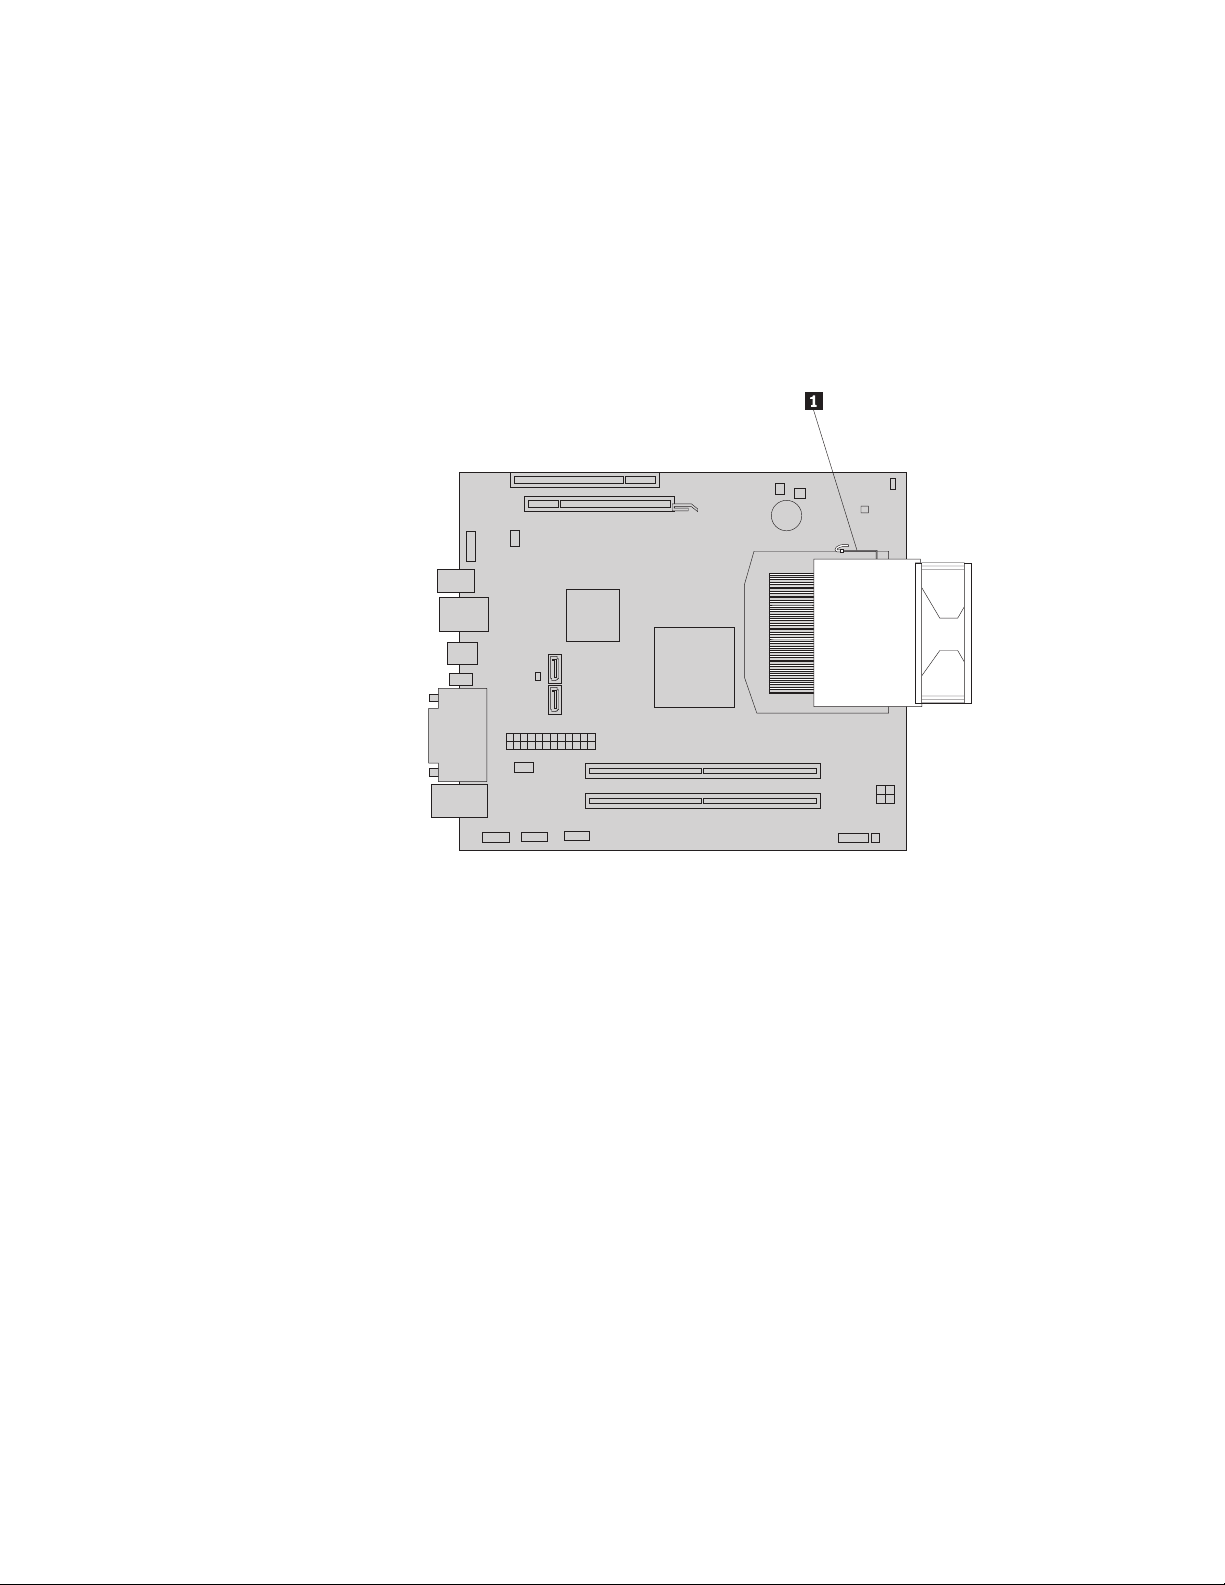
4. Remove the heat sink and fan assembly from the system board by pivoting the
lever 1 that secures the heat sink and fan assembly until it is fully in the up
position. Carefully lift the heat sink and fan assembly off the system board.
Notes:
a. You might have to gently twist the heat sink and fan assembly to free it
from the microprocessor.
b. Do not touch the thermal grease while handling the heat sink and fan
assembly.
Figure 26. Removing the heat sink and fan assembly
5. Place the new heat sink and fan assembly into position and lower the lever to
secure the new heat sink and fan assembly.
6. Connect the new heat sink and fan assembly cable to the microprocessor fan
connector on the system board.
7. Go to “Completing the parts replacement” on page 35.
30 User Guide
Page 39
Replacing the microprocessor
Attention
Do not open your computer or attempt any repair before reading and understanding the
“Important safety information” in the ThinkCentre Safety and Warranty Guide that came with
your computer. To obtain a copy of the ThinkCentre Safety and Warranty Guide, go to:
http://www.lenovo.com/support
This section provides instructions on how to replace the microprocessor.
CAUTION:
The heat sink and microprocessor might be very hot. Turn off the computer and
wait three to five minutes to let the computer cool before opening the computer
cover.
To replace the microprocessor:
1. Open the computer cover. See “Opening the computer cover” on page 12.
2. Pivot the drive bay assembly upward to gain access to the system board. See
“Accessing the system board components and drives” on page 13.
3. Locate the heat sink and fan assembly and disconnect the heat sink and fan
assembly cable from the microprocessor fan connector on the system board.
See “Locating parts on the system board” on page 10.
4. Remove the heat sink and fan assembly. See “Replacing the heat sink and fan
assembly” on page 29.
5. Place the heat sink and fan assembly on its side so that the thermal grease
does not come in contact with anything.
6. Remove the hard disk drive. See “Replacing the hard disk drive” on page 21.
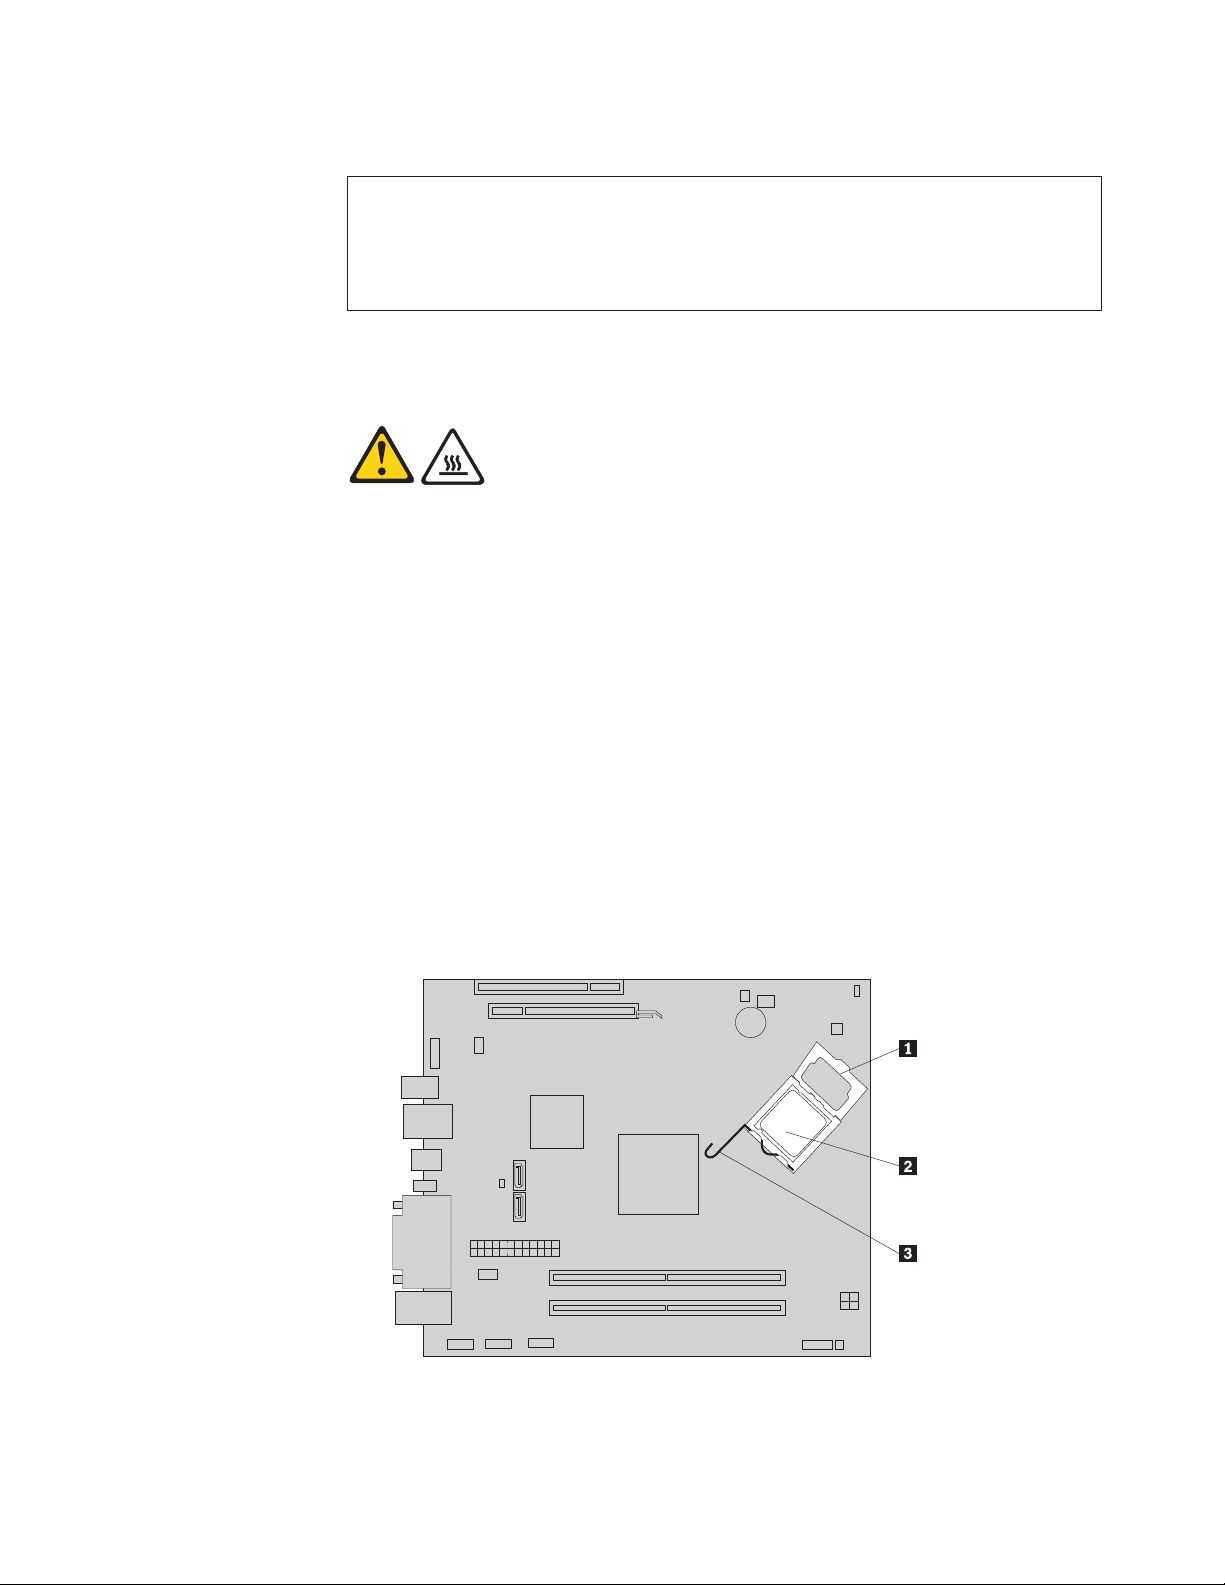
7. Lift the small handle 3 and open the retainer 1 to access the
microprocessor 2.
Chapter 2. Installing options and replacing hardware 31
Page 40
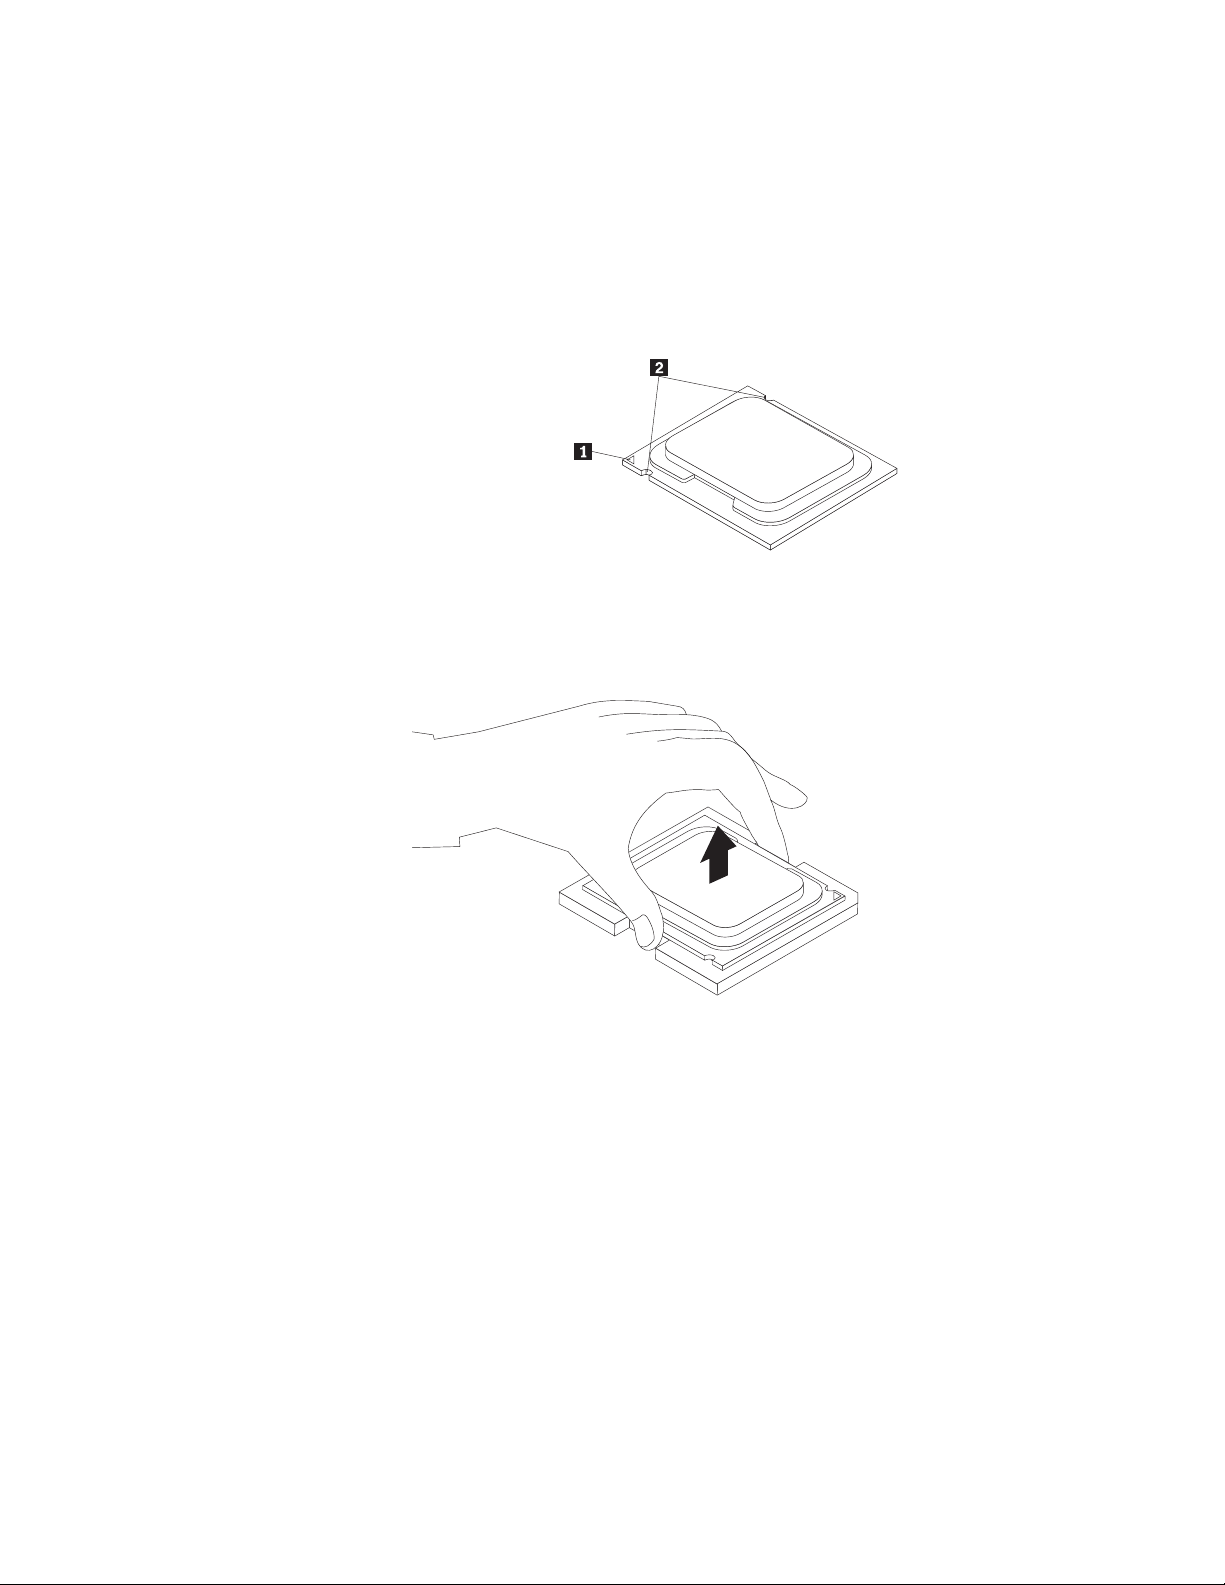
8. Lift the microprocessor straight up and out of the socket.
Notes:
a. Your microprocessor and socket might look different from the one
illustrated.
b. Note the orientation of the microprocessor in the socket. Yo u can either
look for the small triangle 1 on one corner of the microprocessor or note
the orientation of the notches 2 on the microprocessor. This is important
when installing the new microprocessor on the system board.
c. Touch only the sides of the microprocessor. Do not touch the gold contacts
on the bottom.
d. Do not drop anything onto the microprocessor socket while it is exposed.
The socket pins must be kept as clean as possible.
9. Make sure that the small handle is in the raised position.
32 User Guide
Page 41
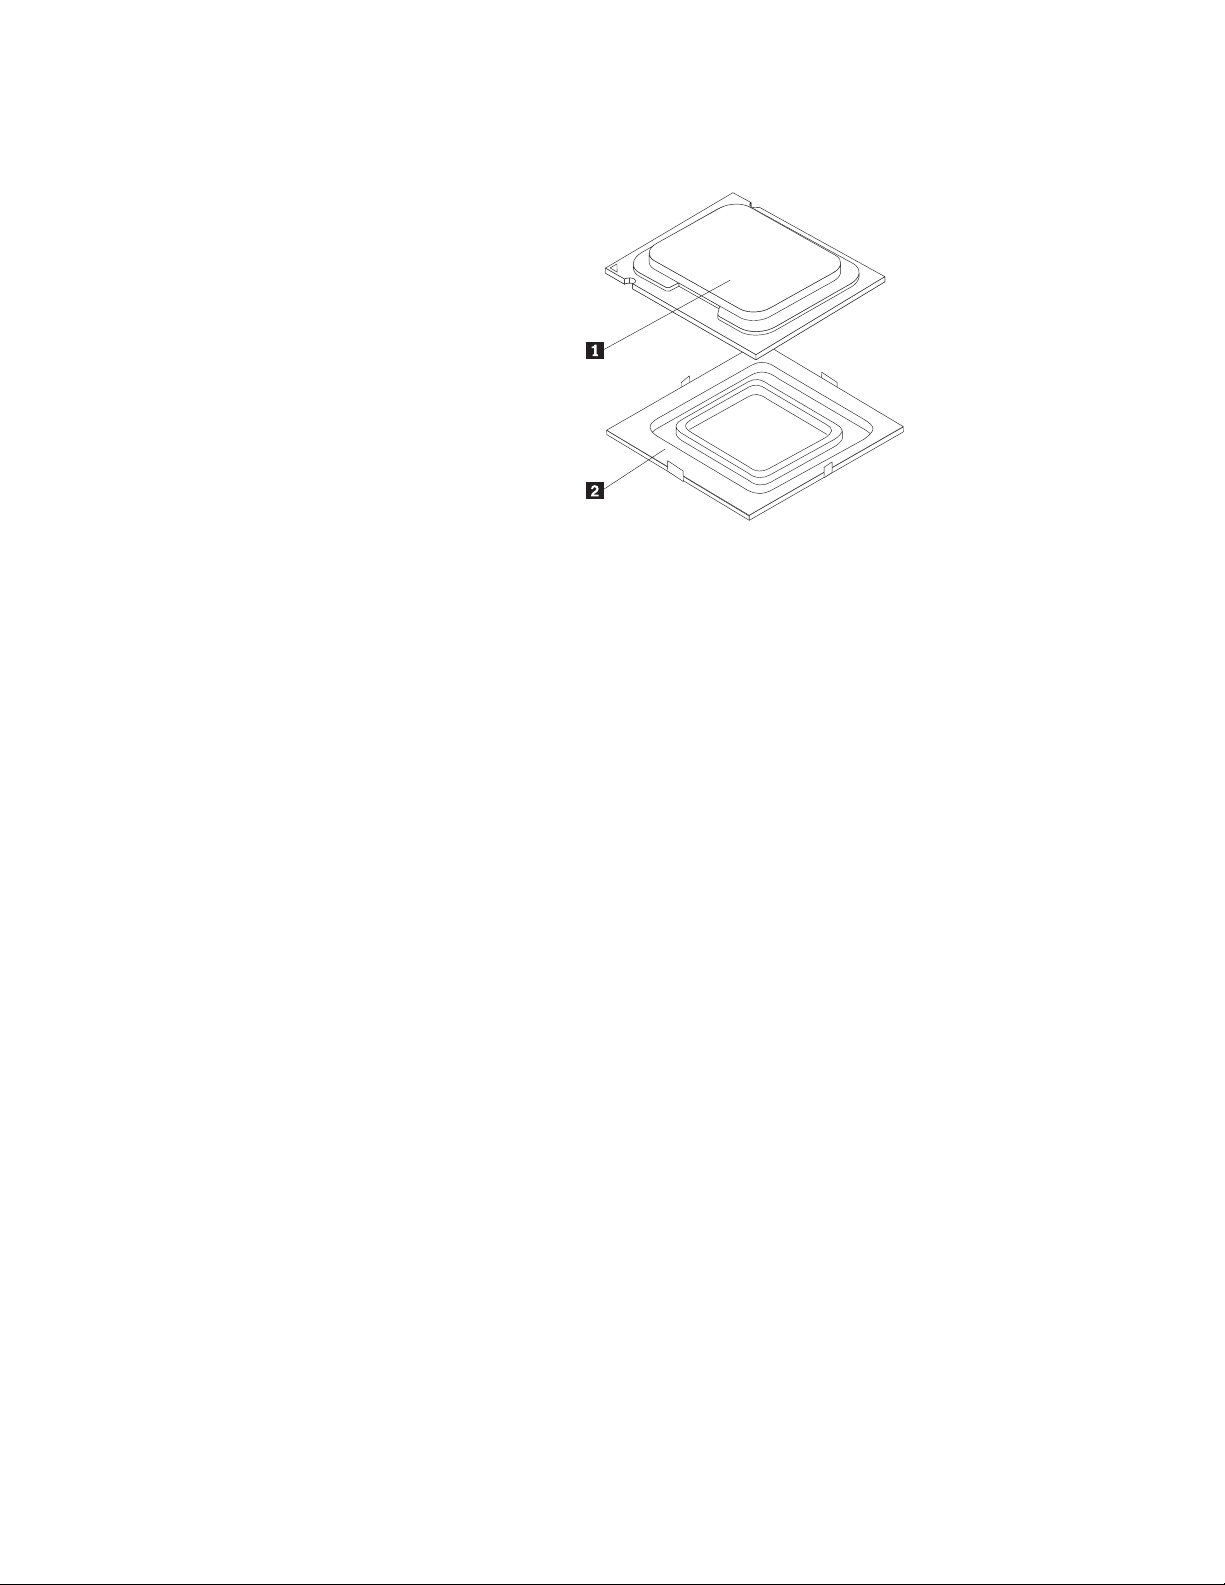
10. Remove the protective cover 2 that protects the gold contacts on the new
microprocessor 1.
11. Hold the new microprocessor and align the notches on it with the tabs in the
microprocessor socket, or align the small triangle on one corner with the
corresponding beveled corner of the microprocessor socket.
12. Lower the new microprocessor straight down into the microprocessor socket
on the system board.
13. Close the microprocessor retainer and lock it into position with the small
handle to secure the new microprocessor in the socket.
14. Reinstall the hard disk drive. See “Replacing the hard disk drive” on page 21.
15. Reinstall the heat sink and fan assembly. See “Replacing the heat sink and fan
assembly” on page 29.
16. Reconnect the heat sink and fan assembly cable to the microprocessor fan
connector on the system board.
17. Go to “Completing the parts replacement” on page 35.
Chapter 2. Installing options and replacing hardware 33
Page 42
Replacing the keyboard
Attention
Do not open your computer or attempt any repair before reading and understanding the
“Important safety information” in the ThinkCentre Safety and Warranty Guide that came with
your computer. To obtain a copy of the ThinkCentre Safety and Warranty Guide, go to:
http://www.lenovo.com/support
This section provides instructions on how to replace the keyboard.
To replace the keyboard:
1. Remove any media from the drives, shut down your operating system, and
turn off all attached devices and the computer.
2. Unplug all power cords from electrical outlets.
3. Locate the keyboard connector.
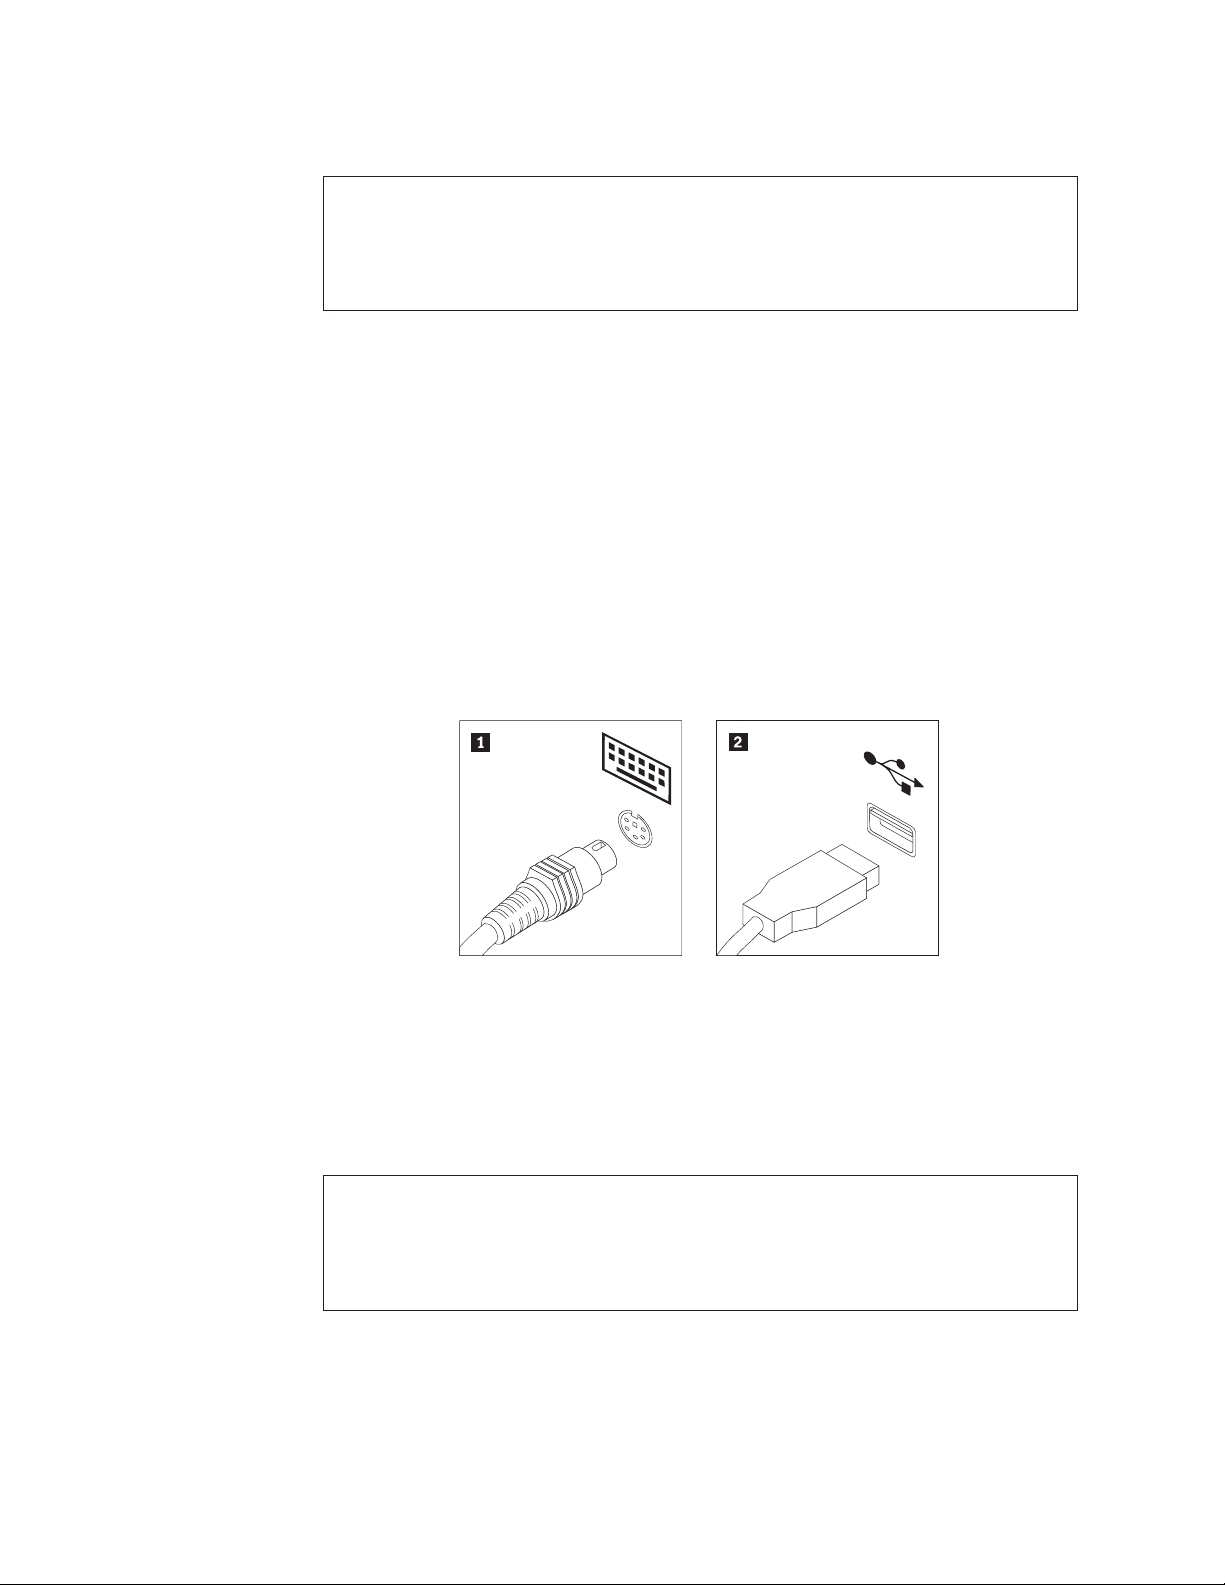
Note: Your keyboard might be connected to a standard keyboard connector 1
or a USB connector 2. Depending on where your keyboard is
connected, see “Locating connectors on the rear of your computer” on
page 7 or “Locating connectors on the front of your computer” on page
6.
34 User Guide
Figure 27. Keyboard connectors
4. Disconnect the failing keyboard cable from the computer.
5. Connect a new keyboard to the appropriate connector on the computer.
6. Go to “Completing the parts replacement” on page 35.
Replacing the mouse
Attention
Do not open your computer or attempt any repair before reading and understanding the
“Important safety information” in the ThinkCentre Safety and Warranty Guide that came with
your computer. To obtain a copy of the ThinkCentre Safety and Warranty Guide, go to:
http://www.lenovo.com/support
This section provides instructions on how to replace the mouse.
To replace the mouse:
1. Remove any media from the drives, shut down your operating system, and
turn off all attached devices and the computer.
Page 43
2. Unplug all power cords from electrical outlets.
3. Locate the connector for the mouse.
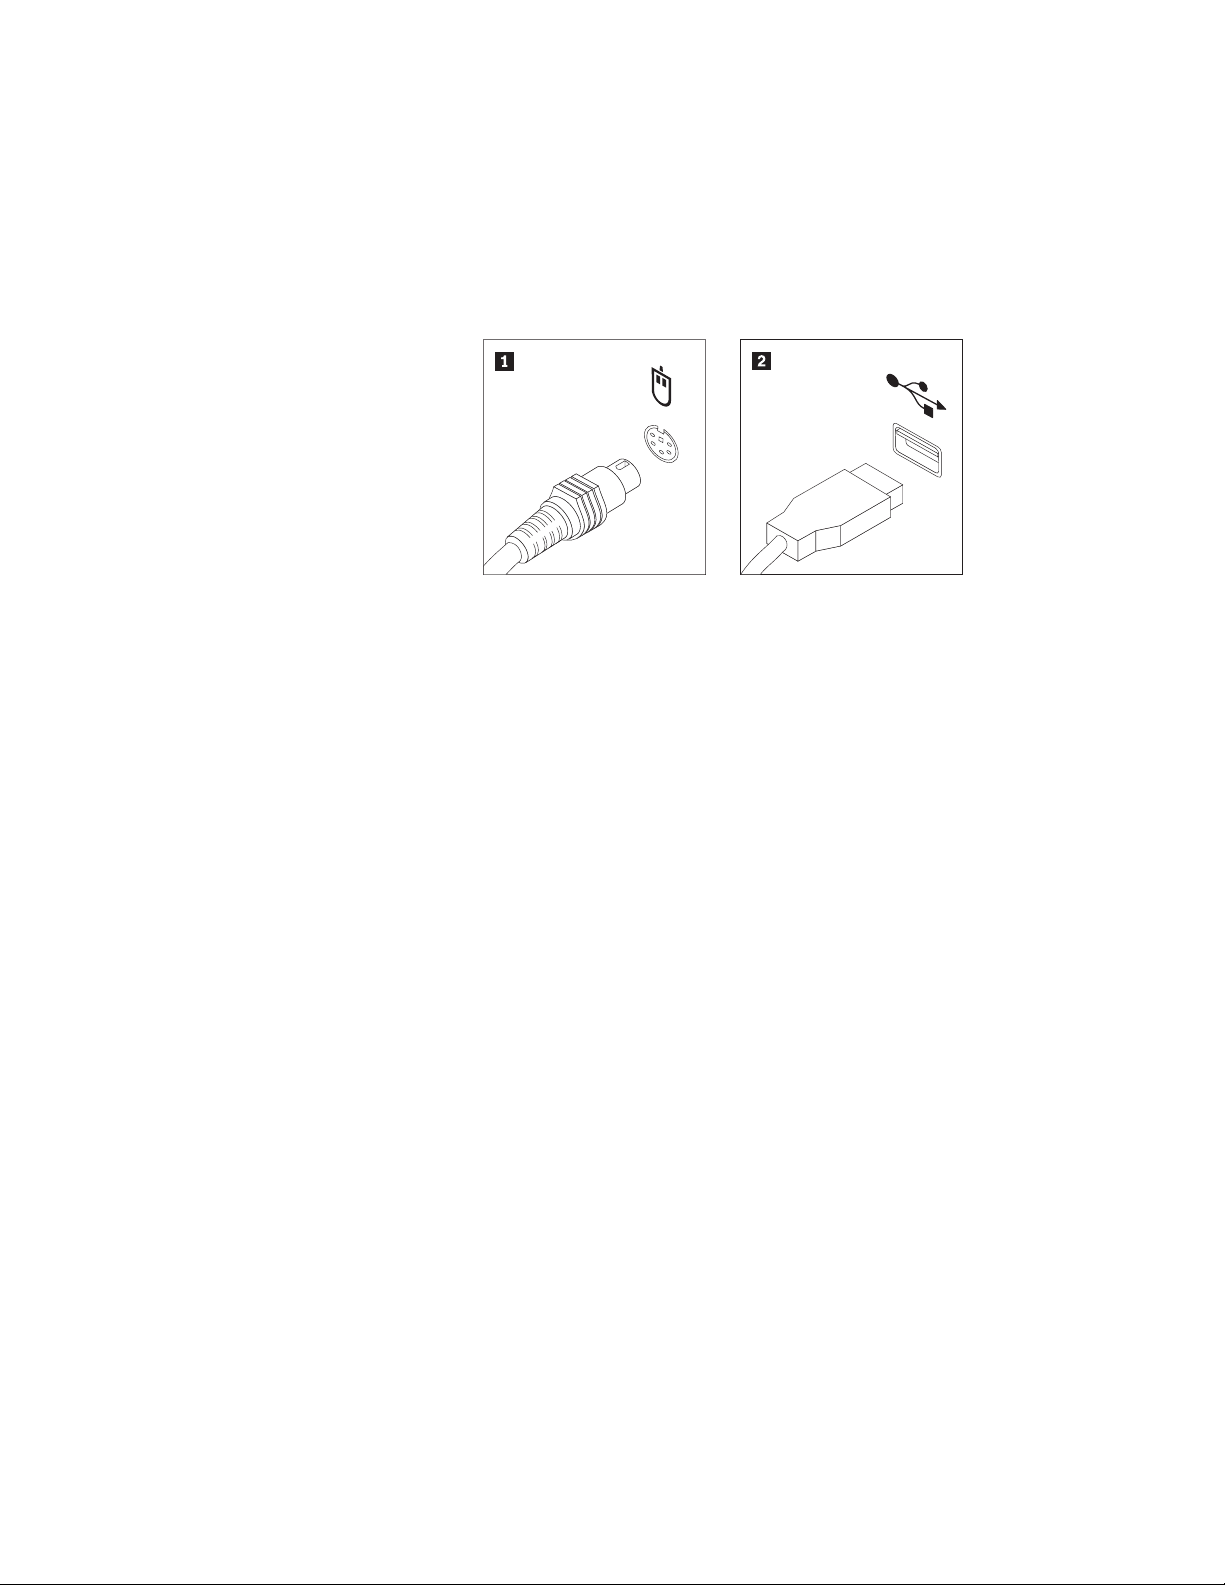
Note: Your mouse might be connected to a standard mouse connector 1 or a
USB connector 2. Depending on where your mouse is connected, see
“Locating connectors on the rear of your computer” on page 7 or
“Locating connectors on the front of your computer” on page 6.
Figure 28. Mouse connectors
4. Disconnect the failing mouse cable from the computer.
5. Connect a new mouse cable to the appropriate connector on the computer.
6. Go to “Completing the parts replacement.”
Completing the parts replacement
After completing all parts replacements, you need to reinstall the computer cover
and reconnect cables, including telephone lines and power cords. Depending on
the parts replaced, you might need to confirm the updated information in the
Setup Utility program. Refer to Chapter 4, “Using the Setup Utility,” on page 47.
To close the computer cover and reconnect cables to your computer:
1. Ensure that all components have been reassembled correctly and that no tools
or loose screws are left inside your computer. See “Locating components” on
page 9 for the location of various components.
Chapter 2. Installing options and replacing hardware 35
Page 44
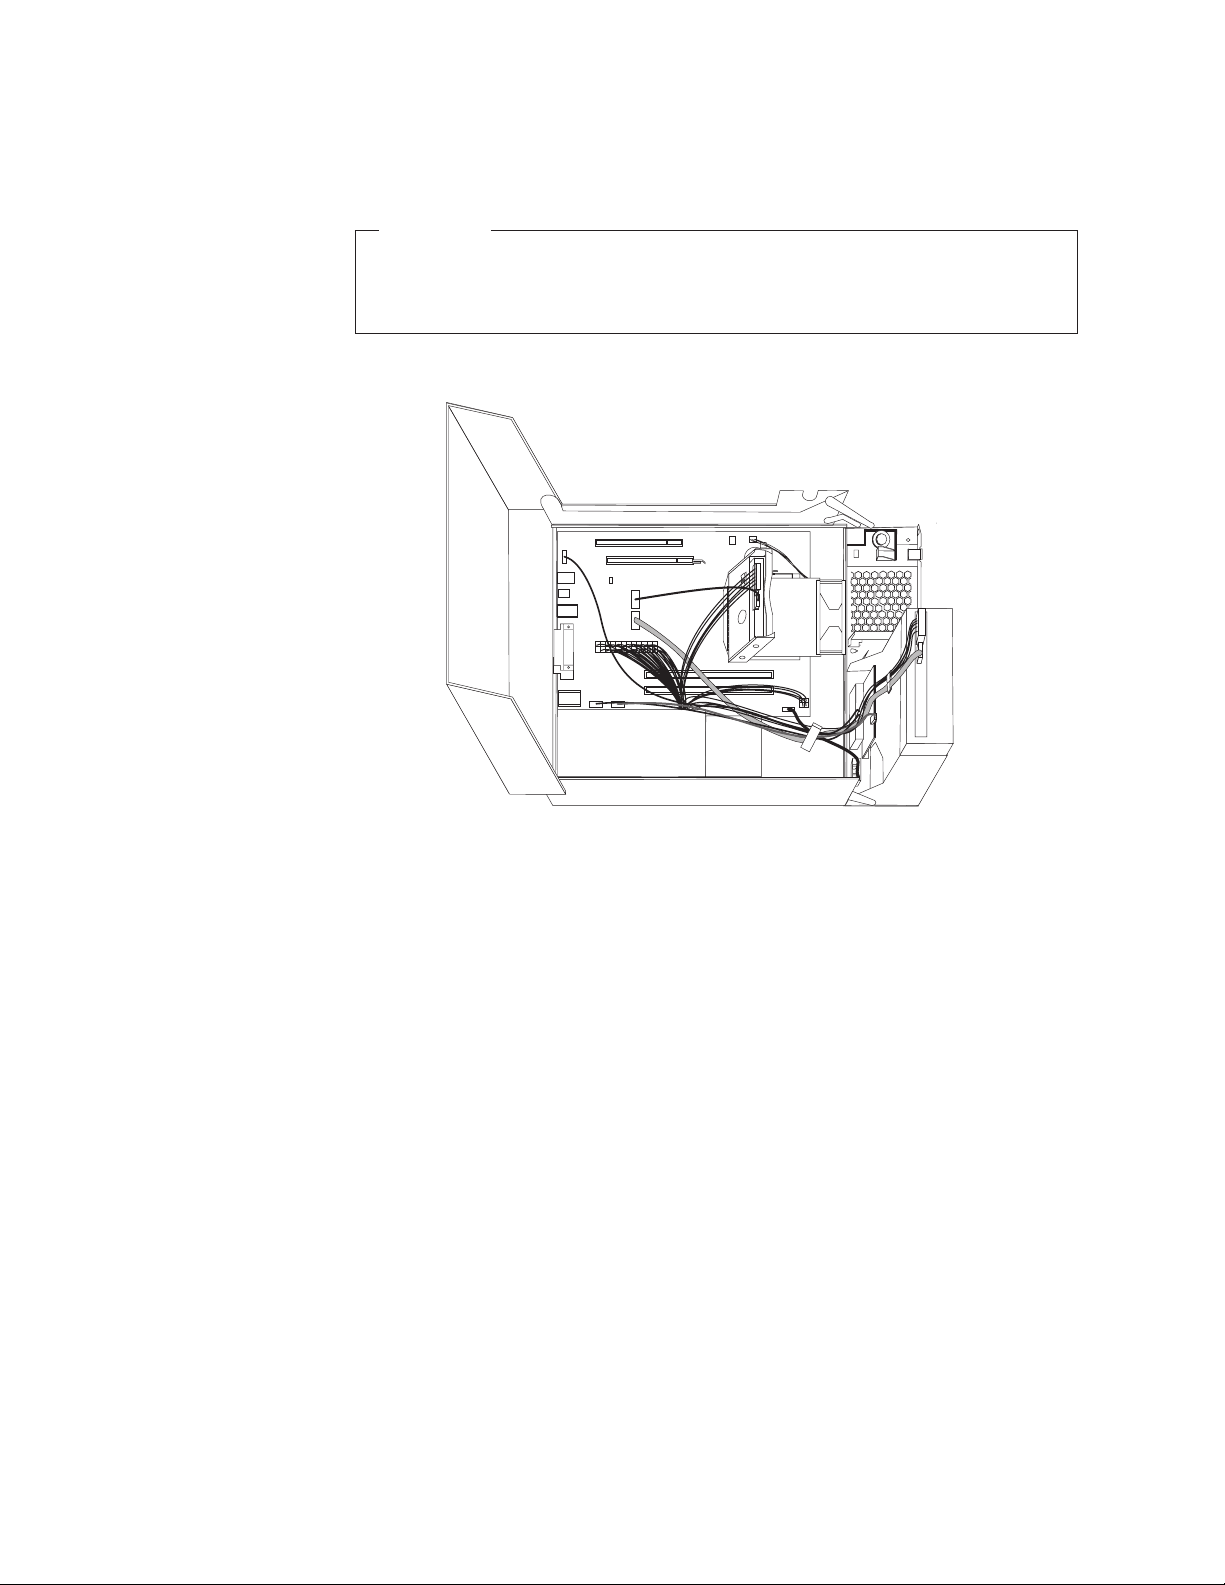
2. Ensure that the cables are routed correctly before lowering the drive bay
assembly.
Important
Correctly route all power supply cables to avoid interference with the
drive bay assembly. Keep cables clear of the hinges and sides of the
computer chassis.
Figure 29. Cable routing
3. Lower the drive bay assembly and place the drive locks to the locked position.
Otherwise, you cannot close the computer cover.
4. If you removed the front bezel, reinstall it by aligning the three tabs on the
front bezel with the corresponding holes on the chassis and pivoting the front
bezel inward until it snaps into position.
5. Close the computer cover.
6. If a computer cover lock is installed, lock the computer cover.
7. Reconnect the external cables and power cords to the computer. See “Locating
connectors on the rear of your computer” on page 7.
8. To update your configuration, see Chapter 4, “Using the Setup Utility,” on page
47.
In most areas of the world, Lenovo requires the return of the defective CRU.
Note:
Information about this will come with the CRU or will come a few days
after the CRU arrives.
Obtaining device drivers
You can obtain device drivers for operating systems that are not preinstalled at:
http://www.lenovo.com/support
Installation instructions are provided in readme files with the device-driver files.
36 User Guide
Page 45
Installing security features
To help prevent hardware theft and unauthorized access to your computer, several
security options are available. In addition to physical locks, unauthorized use of
your computer can be prevented by a software lock that locks the keyboard until a
correct password is typed in.
Make sure that any security cables you installed do not interfere with other
computer cables.
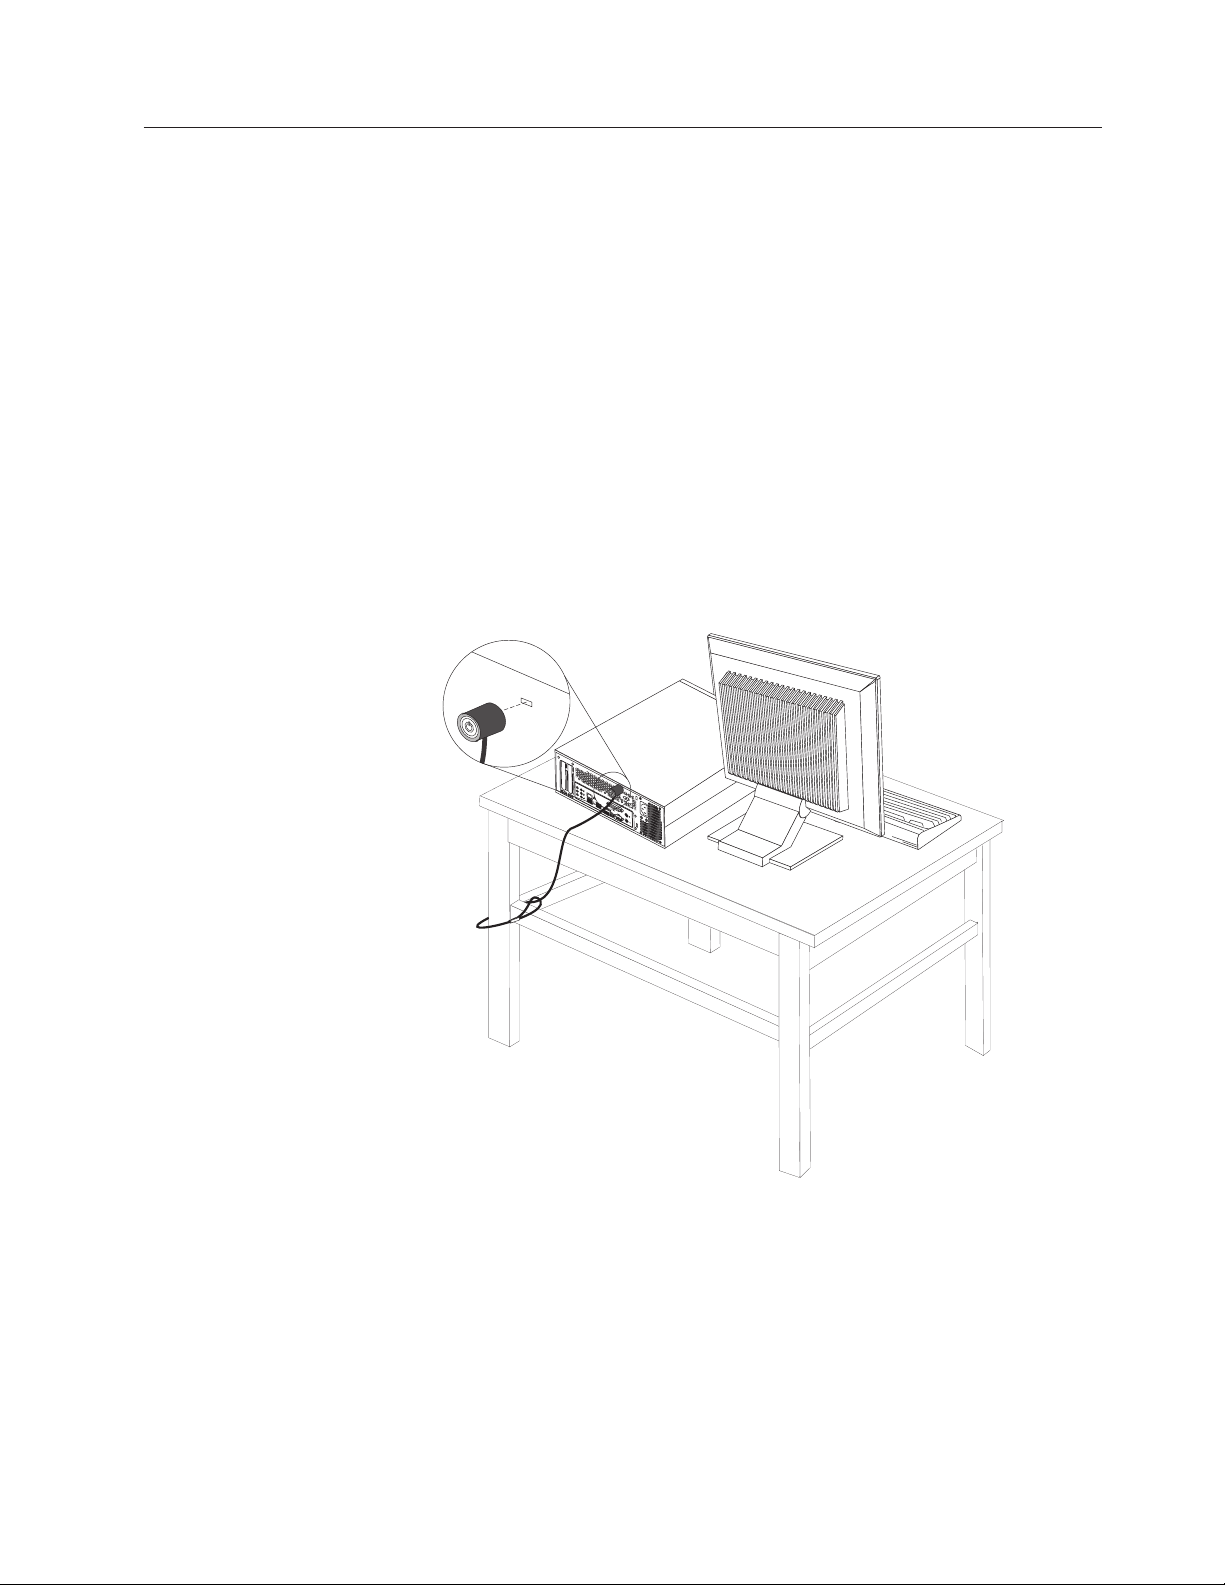
Integrated cable lock
An integrated cable lock (sometimes referred to as the Kensington lock), can be
used to secure your computer to a desk, table, or other non-permanent fixture. The
cable lock attaches to a security slot at the rear of your computer and is operated
with a key. See Figure 30. The cable lock also locks the buttons used to open the
computer cover. This is the same type of lock used with many notebook
computers. Yo u can order a security cable directly from Lenovo by searching on
Kensington at:
http://www.lenovo.com/support
Figure 30. Integrated cable lock
Password protection
To deter unauthorized use of your computer, you can use the Setup Utility
program to set a password. When you turn on your computer, you are prompted
to type the password to unlock the keyboard for normal use. Refer to Chapter 4,
“Using the Setup Utility,” on page 47 for more information.
Chapter 2. Installing options and replacing hardware 37
Page 46

What to do next:
v To work with another option, go to the appropriate section.
v To complete the installation, go to “Completing the parts replacement” on
page 35.
Erasing lost or forgotten passwords (clearing CMOS)
This section contains instructions on erasing lost or forgotten passwords, such as a
user password. For more information about lost or forgotten passwords, go to the
Lenovo Care program.
To access the Lenovo Care, click Start → All Programs → ThinkVantage → Lenovo
Care.
To erase lost or forgotten passwords:
1. Open the computer cover. See “Opening the computer cover” on page 12.
2. Locate the Clear CMOS/Recovery jumper on the system board. See “Locating
parts on the system board” on page 10.
3. Move the jumper from the standard position (pin 1 and pin 2) to the
maintenance or configure position (pins 2 and pin 3).
4. Close the computer cover and connect the power cord. See “Completing the
parts replacement” on page 35.
5. Restart the computer, leave it on for approximately 10 seconds, and then turn
off the computer by holding the power switch for approximately five seconds.
6. Repeat step 1 and step 2.
7. Move the Clear CMOS/Recovery jumper back to the standard position (pin 1
and pin 2).
8. Close the computer cover and connect the power cord. See “Completing the
parts replacement” on page 35.
38 User Guide
Page 47

Chapter 3. Recovery information
This chapter will help you get familiar with recovery solutions provided by
Lenovo. This chapter explains when and how to use the following recovery
methods:
v Creating and using Product Recovery discs
v Performing backup and recovery operations
v Using the Rescue and Recovery workspace
v Creating and using rescue media
v Creating and using a Recovery Repair diskette
v Recovering or installing device drivers
v Setting a rescue device in the startup sequence
v Solving recovery problems
There are a variety of methods to choose from when considering how to
Note:
recover software in the event of a software or hardware-related problem.
Some methods vary depending on the type of your operating system.
Creating and using Product Recovery discs
If your computer is equipped with a recordable CD or DVD drive, you can create a
set of Product Recovery discs that enable you to restore the contents of the hard
disk drive to the factory-installed state. Product Recovery discs are useful if you
transfer the computer to another area, sell the computer, recycle the computer, or
as a last resort to put the computer in an operational state after all other methods
of recovery have failed. As a precautionary measure, it is important to create a set
of Product Recovery discs as early as possible.
Note: The recovery operations you can perform using Product Recovery discs vary
depending on the operating system from which they were created. Your
Microsoft Windows license permits you to create only one set of Product
Recovery discs, so it is important that you store the discs in a safe place
after you have made them.
To create Product Recovery discs, do the following:
1. From the Windows desktop, click Start → All Programs → ThinkVantage →
Create Product Recovery Media.
2. Follow the instructions on the screen.
following list explains how to use Product Recovery discs on different
The
operating systems:
v Windows XP: use Product Recovery discs to restore your computer to the
factory-installed contents, perform a custom factory recovery, or perform other
rescue and recovery operations such as rescuing individual files.
v Windows Vista: use Product Recovery discs to restore your computer to the
factory-installed contents only.
using Product Recovery discs on Windows XP, you are given the option to
When
enter the Rescue and Recovery workspace and choose from a variety of recovery
operations. When using Product Recovery discs on Windows Vista, you are
© Copyright Lenovo 2009 39
Page 48

prompted to insert your Product Recovery discs and are guided through the
process of restoring to the factory-installed contents only.
To use Product Recovery discs on Windows XP, do the following:
Attention: When you restore the factory-installed contents from the Product
Recovery discs, all files currently on the hard disk drive will be deleted and
replaced by the factory-installed contents. During the restore process, you will be
given the opportunity to save one or more files currently on your hard disk drive
to other media before any data is removed.
1. Insert the Start Recovery disc into your optical drive.
2. Restart your computer.
3. After a short delay, the Rescue and Recovery workspace opens.
Note: If the Rescue and Recovery workspace fails to open, you might not have
your startup device (CD drive or DVD drive) set correctly in your BIOS
startup sequence. For more information, see “Setting a rescue device in
the startup sequence” on page 45.
4. In the Rescue and Recovery menu, click Restore your system.
5. Follow the instructions on the screen. Insert the appropriate Product Recovery
disc when prompted.
use Product Recovery discs on Windows Vista, do the following:
To
Attention: When you restore the factory-installed contents from the Product
Recovery discs, all files currently on the hard disk drive will be deleted and
replaced by the factory-installed contents.
1. Insert the Start Recovery disc into your optical drive.
2. Restart your computer. After a short delay, the Rescue and Recovery workspace
opens.
If the Rescue and Recovery workspace fails to open, you might not have
Note:
your startup device (CD drive or DVD drive) set correctly in your BIOS
startup sequence. For more information, see “Setting a rescue device in
the startup sequence” on page 45.
3. Follow the instructions on the screen. Insert the appropriate Product Recovery
disc when prompted.
After restoring your hard disk drive to the factory-installed contents, you
Note:
might have to reinstall some software or drivers. See “Using the Rescue and
Recovery workspace” on page 42 for details.
Performing backup and recovery operations
The Rescue and Recovery program enables you to back up all your hard disk drive
contents including the operating system, data files, application programs, and
personal settings. You can designate where the Rescue and Recovery program
stores the backup:
v On a protected area of your hard disk drive
v On a secondary hard disk drive installed in your computer
v On an externally attached USB hard disk drive
v On a network drive
40 User Guide
Page 49

v On recordable CDs or DVDs (a recordable CD or DVD drive is required for this
option)
you have backed up your hard disk drive, you can restore the complete
After
contents of the hard disk drive, restore selected files only, or restore only the
Windows operating system and applications.
To perform a backup operation using the Rescue and Recovery program, do the
following:
1. From the Windows desktop, click Start → All Programs → ThinkVantage →
Rescue and Recovery. The Rescue and Recovery program opens.
2. From the Rescue and Recovery main window, click Launch Advanced Rescue
and Recovery → Back up your hard drive to select backup operation options.
3. Follow the instructions on the screen.
perform a restore operation using the Rescue and Recovery program, do the
To
following:
1. From the Windows desktop, click Start → All Programs → ThinkVantage →
Rescue and Recovery. The Rescue and Recovery program opens.
2. From the Rescue and Recovery main window, click the Restore your system
from a backup icon.
3. Follow the instructions on the screen.
information about performing a restore operation from the Rescue and
For
Recovery workspace, see “Using the Rescue and Recovery workspace” on page 42.
Chapter 3. Recovery information 41
Page 50

Using the Rescue and Recovery workspace
The Rescue and Recovery workspace resides in a protected, hidden area of your
hard disk drive that operates independently from the Windows operating system.
This enables you to perform recovery operations even if the Windows operating
system cannot be started. You can perform the following recovery operations from
the Rescue and Recovery workspace:
v Rescue files from your hard disk drive or from a backup: The Rescue and
Recovery workspace enables you to locate files on your hard disk drive and
transfer them to a network drive or other recordable media, such as a USB hard
disk drive or a diskette. This solution is available, even if you did not back up
your files or if changes were made to the files since your last backup operation.
You can also rescue individual files from a Rescue and Recovery backup located
on your local hard disk drive, a USB device, or a network drive.
v Restore your hard disk drive from a Rescue and Recovery backup: When you
perform a backup operation using the Rescue and Recovery program, you can
perform restore operations from the Rescue and Recovery workspace, even if
you cannot start the Windows operating system.
v Restore your hard disk drive to the factory-installed contents: The Rescue and
Recovery workspace enables you to restore the complete contents of your hard
disk drive to the factory-installed state. If you have multiple partitions on your
hard disk drive, you have the option to restore the factory-installed contents to
the C: partition and leave the other partitions intact. Because the Rescue and
Recovery workspace operates independently from the Windows operating
system, you can restore the factory-installed contents even if you cannot start the
Windows operating system.
Attention: If you restore the hard disk drive from a Rescue and Recovery backup
or restore the hard disk drive to the factory-installed contents, all files on the
primary hard disk drive partition (usually drive C) will be deleted in the recovery
process. If possible, make copies of important files. If you are unable to start the
Windows operating system, you can use the Rescue files feature in the Rescue and
Recovery workspace to copy files from your hard disk drive to other media.
To start the Rescue and Recovery workspace, do the following:
1. Turn off your computer.
2. Restart your computer.
3. Repeatedly press and release the F11 key.
4. When you hear beeps or see a logo screen, release the F11 key.
5. If you set a Rescue and Recovery password, type your password when
prompted. The Rescue and Recovery workspace opens after a short delay.
Note: If the Rescue and Recovery workspace fails to open, see “Solving
recovery problems” on page 45.
6. Do one of the of the following:
v To rescue files from your hard disk drive or from a backup, click Rescue
files and follow the instructions on the screen.
v To restore your hard disk drive from a Rescue and Recovery backup or to
restore your hard disk drive to the factory-installed contents, click Restore
your system and follow the instructions on the screen.
v For information about other features of the Rescue and Recovery workspace,
click Help.
42 User Guide
Page 51

Notes:
1. After restoring a hard disk drive to the factory-installed contents, you might
have to reinstall device drivers for some devices. See “Recovering or installing
device drivers” on page 44.
2. Some computers come with Microsoft Office or Microsoft Works preinstalled. If
you need to recover or reinstall your Microsoft Office or Microsoft Works
applications, you must use the Microsoft Office CD or Microsoft Works CD. These
CDs are provided only with computers that come with Microsoft Office or
Microsoft Works preinstalled.
Creating and using rescue media
Rescue media such as a disc or a USB hard disk drive enables you to recover from
failures that prevent you from gaining access to the Rescue and Recovery
workspace on your hard disk drive.
Note: The recovery operations you can perform using rescue media vary
depending on the operating system. The rescue disc can be started in any
type of CD or DVD drive. Rescue media also contains a PC-Doctor
diagnostic program, which enables you to run diagnostics from the rescue
media.
To create rescue media, do the following:
1. From the Windows desktop, click Start → All Programs → ThinkVantage →
Create Rescue Media.
2. In the Rescue Media area, select the type of rescue media you want to create.
You can create rescue media using a disc, a USB hard disk drive, or a
secondary internal hard disk drive.
3. Click OK.
4. Follow the instructions on the screen.
For Windows Vista, use rescue media to restore to the factory-installed
Note:
contents only.
To use rescue media, do one of the following:
v If your rescue media is on discs, insert the rescue disc and restart your
computer.
v If your rescue media is on a USB hard disk drive, attach your USB hard disk
drive to one of the USB connectors on your computer, then restart your
computer.
v If you are using a secondary internal hard disk drive, set the startup sequence to
start from that drive.
the rescue media starts, the Rescue and Recovery workspace opens. Help for
When
each feature is available from the Rescue and Recovery workspace. If your rescue
media fails to start, you might not have your rescue device (CD drive, DVD drive,
or USB device) set correctly in the BIOS startup sequence. For more information,
see “Setting a rescue device in the startup sequence” on page 45.
Chapter 3. Recovery information 43
Page 52

Creating and using a Recovery Repair diskette
If you are unable to access the Rescue and Recovery workspace or the Windows
environment, use a Recovery Repair diskette to repair the Rescue and Recovery
workspace or repair a file needed to enter the Windows environment. It is
important to create a Recovery Repair diskette as soon as possible and store it in a
safe place as a precautionary measure.
To create a Recovery Repair diskette, do the following:
1. Start your computer and operating system.
2. Using an Internet browser, go to the following Web address:
http://www.lenovo.com/think/support/site.wss/document.do?lndocid=MIGR-54483
3. Insert a diskette into the diskette drive. Information on the diskette will be
erased and the diskette will be formatted appropriately.
4. Double-click on the appropriate file name. The diskette is created.
5. Take out the diskette and label it Recovery Repair diskette.
To use the Recovery Repair diskette, do the following:
1. Shut down the operating system and turn off the computer.
2. Insert the Recovery Repair diskette into the diskette drive.
3. Turn on the computer and follow the instructions on the screen.
If the repair operation finishes without error, you will be able to access the
Note:
Rescue and Recovery workspace by repeatedly pressing the F11 key while
you restart your computer. When you hear beeps or see a logo screen,
release the F11 key. Yo u will also be able to access the Windows
environment after the repair operation finishes.
If an error message appears during the repair operation and the repair operation
cannot be completed, you might have a problem with the partition that contains
the Rescue and Recovery workspace. Use your rescue media to access the Rescue
and Recovery workspace. For information about creating and using rescue media,
see “Creating and using rescue media” on page 43.
Recovering or installing device drivers
Before you can recover or install device drivers, make sure your operating system
is installed and you have the documentation and software media for the device.
Device drivers for factory-installed devices are located on the computer hard disk
drive (usually drive C) in the SWTOOLS\drivers folder. Other device drivers are
on the software media that come with individual devices.
The latest device drivers for factory-installed devices also are available at:
http://www.lenovo.com/think/support
To reinstall a device driver for a factory-installed device, do the following:
1. Start your computer and operating system.
2. Use Windows Explorer or My Computer to display the directory structure of
your hard disk drive.
3. Open the C:\SWTOOLS folder.
44 User Guide
Page 53

4. Open the DRIVERS folder. Within the DRIVERS folder are several subfolders
that are named for various devices installed in your computer (for example,
AUDIO or VIDEO).
5. Open the appropriate device subfolder.
6. Use one of the following methods to reinstall the device driver:
v In the device subfolder, look for a README.txt or other file with the .txt
extension. This file might be named after the operating system, such as
WIN98.txt. The TXT file has information on how to reinstall that device
driver.
v If the device subfolder contains a file with an .INF extension, you can use the
Add New Hardware program (located in the Windows Control Panel) to
reinstall the device driver. Not all device drivers can be reinstalled using this
program. In the Add New Hardware program, when prompted for the
device driver that you want to install, click Have Disk and Browse. Then
select the appropriate device driver file from the device subfolder.
v In the device subfolder, look for a SETUP.EXE file. Double-click SETUP.EXE
and follow the instructions on the screen.
Setting a rescue device in the startup sequence
Before you start the Rescue and Recovery program from a CD, DVD, USB hard
disk drive, or any external device, you must first change the startup sequence in
the Setup Utility.
To view or change the startup sequence, do the following:
1. With the computer turned off, repeatedly press and release the F1 key while
you turn on the computer.
2. When the logo screen appears, or you hear a series of beeps, release the F1 key.
3. If you are prompted for a password, type your current password.
4. From the Setup Utility main menu, use the right-arrow key to select Startup.
5. Arrange the startup sequence to meet your needs.
6. Press the Esc key twice to go to the Setup Utility exit menu.
7. Use the down-arrow key to select Save and exit the Setup Utility, then press
Enter.
8. When the Setup Confirmation window appears, press Enter.
9. The computer restarts.
Note: If you are using an external device, you first must turn off your computer
before connecting the external device.
For more information on Setup Utility, see Chapter 4, “Using the Setup Utility,” on
page 47.
Solving recovery problems
If you are unable to access the Rescue and Recovery workspace or the Windows
environment, you can:
v Use your rescue media (CD, DVD, or USB hard disk drive) to start the Rescue
and Recovery workspace. See “Creating and using rescue media” on page 43 for
details.
Chapter 3. Recovery information 45
Page 54

v Use a Recovery Repair diskette to repair the Rescue and Recovery workspace or
repair a file needed to enter the Windows environment. See “Creating and using
a Recovery Repair diskette” on page 44 for details.
v Use a set of Product Recovery discs if your intent is to restore the hard disk
drive to the factory-installed contents. See “Creating and using Product Recovery
discs” on page 39.
is important to create a Recovery Repair diskette, rescue media, and a set of
It
Product Recovery discs as soon as possible and store them in a safe place.
If you are unable to access the Rescue and Recovery workspace or the Windows
environment from rescue media, a Recovery Repair diskette, or a set of Product
Recovery discs, you might not have the rescue device, CD drive, DVD drive, or
USB hard disk drive defined as a startup device in the BIOS startup sequence. For
more information, see “Setting a rescue device in the startup sequence” on page 45.
46 User Guide
Page 55

Chapter 4. Using the Setup Utility
The Setup Utility program is stored in the electrically erasable programmable
read-only memory (EEPROM) of your computer. The Setup Utility program is used
to view and change the configuration settings of your computer, regardless of
which operating system you are using. However, the operating system settings
might override any similar settings in the Setup Utility program.
Starting the Setup Utility program
To start the Setup Utility program, do the following:
1. If your computer is already on when you start this procedure, shut down the
operating system and turn off the computer.
2. Press and hold the F1 key, and then turn on the computer. When you hear
multiple beeps, release the F1 key.
Notes:
a. If you are using a USB keyboard and the Setup Utility program does not
display using this method, repeatedly press and release the F1 key rather
than leaving it pressed when turning on the computer.
b. If a Power-On Password or a Privileged Access Password has been set, the
Setup Utility program menu is not displayed until you type your password.
For more information, see “Using passwords.”
Setup Utility might start automatically when POST detects that hardware has
The
been removed or new hardware has been installed in your computer.
Viewing and changing settings
The Setup Utility program menu lists items that identify system configuration
topics. To view or change settings, see “Starting the Setup Utility program.”
When working with the Setup Utility program menu, you must use the keyboard.
The keys used to perform various tasks are displayed at the bottom of each screen.
Using passwords
By using the Setup Utility program, you can set passwords to prevent
unauthorized access to your computer and data. The following types of passwords
are available:
v Power-On Password
v Privileged Access Password
do not have to set any passwords to use your computer. However, if you
You
decide to set any passwords, read the following sections.
© Copyright Lenovo 2009 47
Page 56

Password considerations
A password can be any combination of up to 16 (1 to 16) alphabetic and numeric
characters (a-z and 0-9). For security reasons, it is recommended to use a strong
password that cannot be easily compromised. A strong password should adhere to
the following rules:
v Have at least eight characters in length and contain at least one alphabetic
character and one numeric character
v Setup Utility program and hard disk drive passwords are not case sensitive
v Not be your name or your user name
v Not be a common word or a common name
v Be significantly different from your previous password
Power-On Password
When a Power-On Password is set, the user is prompted to type a valid password
each time the computer is turned on. The computer cannot be used until a valid
password is typed in.
Privileged Access Password
Setting a Privileged Access Password deters unauthorized people from changing
configuration settings. If you are responsible for maintaining the settings of several
computers, you might want to set a Privileged Access Password.
After you set a Privileged Access Password, a password prompt is displayed each
time you try to access the Setup Utility program.
If both the Power-On Password and Privileged Access Password are set, you can
type either password. However, to change any configuration settings, you must use
your Privileged Access Password.
Setting, changing, and deleting a password
To set, change, or delete a password, do the following:
Note: A password can be any combination of up to 16 (1 to 16) alphabetic and
numeric characters. For more information, see “Password considerations.”
1. Start the Setup Utility program (see Chapter 4, “Using the Setup Utility,” on
page 47).
2. From the Setup Utility program menu, select Set Power-On Password or Set
Privileged Access Password. Read the information displayed on the right side
of the screen.
48 User Guide
Page 57

Enabling or disabling a device
This section provides information on how to enable or disable user access to the
following devices:
SATA Controller When this feature is set to Disabled, all devices connected to the
SATA connectors (such as hard disk drives or the optical drive)
are disabled and will not be displayed in the system
configuration.
Floppy A When this feature is set to Disabled, the diskette drive cannot be
accessed.
To set the SATA Controller, do the following:
1. Start the Setup Utility program (see “Starting the Setup Utility program” on
page 47).
2. From the Setup Utility program menu, select Devices → ATA Drives Setup →
SATA Controller.
3. Select the desired settings and press Enter.
4. Return to the Setup Utility program menu and select Exit → Save Changes and
Exit.
Note: If you do not want to save the settings, select Discard Changes and Exit.
set the Floppy A, do the following:
To
1. Start the Setup Utility program (see “Starting the Setup Utility program” on
page 47).
2. From the Setup Utility program menu, select Devices → Floppy Drive Setup →
Floppy A.
3. Select the desired settings and press Enter.
4. Return to the Setup Utility program menu and select Exit → Save Changes and
Exit.
Note: If you do not want to save the settings, select Discard Changes and Exit.
Selecting a startup device
If your computer does not start up from a device such as the CD-ROM, diskette, or
hard disk drive as expected, use one of the following procedures to select a startup
device.
Selecting a temporary startup device
Use this procedure to startup from any start device.
Note: Not all CDs, hard disk drives, and diskettes are bootable.
1. Turn off your computer.
2. Press and hold the F12 key, and then turn on the computer. When the Startup
Device Menu appears, release the F12 key.
Note: If you are using a USB keyboard and the Startup Device Menu does not
display using this method, repeatedly press and release the F12 key
rather than leaving it pressed when turning on the computer.
Chapter 4. Using the Setup Utility 49
Page 58

3. Select the desired startup device from the Startup Device Menu and press
Enter to begin.
Selecting a startup device from the Startup Device menu does not
Note:
permanently change the startup sequence.
Selecting or changing the startup device sequence
To view or permanently change the configured startup device sequence, do the
following:
1. Start the Setup Utility program (see “Starting the Setup Utility program” on
page 47).
2. Select Startup → Startup Sequence.
3. See the information displayed on the right side of the screen.
4. Select the devices for the Primary Startup Sequence, the Automatic Startup
Sequence, and the Error Startup Sequence.
5. From the Setup Utility menu, select Exit → Save Changes and Exit.
If you have changed these settings and want to return to the default settings, select
Load Optimal Settings on the Exit menu.
Advanced settings
On some computer models, the Advanced settings menu includes a setting to
enable or disable HyperThreading. This feature works only with
HyperThreading-aware operating systems, such as Windows Vista. The default
setting for HyperThreading is Enabled. However, if you select Set Defaults and
are using an operating system other than Windows Vista, your computer
performance might be degraded. Therefore, you should always set
HyperThreading to Disabled unless you are sure your operating system supports
HyperThreading.
Exiting from the Setup Utility program
After you finish viewing or changing settings, press Esc to return to the Setup
Utility program menu (you might have to press Esc several times). If you want to
save the new settings, select Exit → Save Changes and Exit. Otherwise, your
changes will not be saved.
50 User Guide
Page 59

Chapter 5. Updating system programs
This chapter contains information about updating POST/BIOS and how to recover
from a POST/BIOS update failure.
Using system programs
System programs are the basic layer of software built into your computer. They
include the power-on self-test (POST), the basic input/output system (BIOS) code,
and the Setup Utility program. POST is a set of tests and procedures that are
performed each time you turn on your computer. BIOS is a layer of software that
translates instructions from other layers of software into electrical signals that the
computer hardware can execute. Yo u can use the Setup Utility program to view
and change the configuration and setup of your computer.
Your computer system board has a module called electrically erasable
programmable read-only memory (EEPROM, also referred to as flash memory).
You can easily update POST, BIOS, and the Setup Utility program by starting your
computer using a flash update disc or by running a special update program from
your operating system.
Lenovo might make changes and enhancements to the POST/BIOS. When updates
are released, they are available as downloadable files on the Lenovo Web site at
http://www.lenovo.com. Instructions for using the POST/BIOS updates are
available in a TXT file that is included with the update files. For most models, you
can download either an update program to create a system-program-update (flash)
disc or an update program that can be run from the operating system.
Note: You can download a self starting bootable CD/DVD image (known as an
.iso image) of the diagnostics program to support systems without a diskette
drive from:
http://www.lenovo.com
Updating (flashing) BIOS from a disc
This section describes how to update (flash) the BIOS using a disc. System BIOS
program updates are available at:
http://www.lenovo.com/support
1. To update (flash) the BIOS from a disc, turn on the computer and insert the
disc into the optical drive.
2. Turn the computer off and back on again. The update begins.
3. When you are prompted to select a language, press the number on your
keyboard that corresponds to the language and then press Enter.
4. When prompted to change the serial number, press Y.
5. Type in the seven character serial number of your computer and then press
Enter.
6. When prompted to change the machine type/model, press Y.
7. Type in the seven character machine type/model of your computer and then
press Enter.
8. Follow the instructions on the screen to complete the update.
© Copyright Lenovo 2009 51
Page 60

Updating (flashing) BIOS from your operating system
Note: Due to the constant improvements made to the We b site, Web page content
(including the links referenced in the following procedure) is subject to
change.
1. Go to:
http://www.lenovo.com/support
2. Locate the downloadable files for your machine type as follows:
a. In the Enter a product field, type your machine type and click Go →
Continue → Downloads and drivers.
b. Under the BIOS category, click Flash BIOS update.
c. Click the TXT file that contains the installation instructions for the flash
BIOS update (flash from the operating system version).
3. Print these instructions. This is very important since they are not on the screen
after the download begins.
4. Click Back to return to the list of files. Carefully follow the printed instructions
to download, extract, and install the update.
Recovering from a POST/BIOS update failure
If the power to your computer is interrupted while POST/BIOS is being updated
(flash update), your computer might not restart correctly. If this happens, perform
the following procedure which is commonly called Boot-block Recovery.
1. Turn off the computer and any attached devices, such as printers, monitors,
and external drives.
2. Unplug all power cords from electrical outlets, and open the computer cover.
Refer to “Opening the computer cover” on page 12.
3. Access the system board. Refer to “Accessing the system board components
and drives” on page 13.
4. Locate the Clear CMOS/Recovery jumper on the system board. Refer to
“Locating parts on the system board” on page 10.
5. Remove any cables that might prevent your access to the Clear
CMOS/Recovery jumper.
6. Move the jumper from the standard position (pin 1 and pin 2) to pin 2 and
pin 3.
7. Reconnect any cables that were disconnected. Refer to “Completing the parts
replacement” on page 35.
8. Close the computer cover and reconnect the power cords for the computer
and monitor to electrical outlets.
9. Turn on the computer and the monitor, and then insert the POST/BIOS
update (flash update) disc into the optical drive.
10. Turn the computer off and back on again.
11. The recovery session will take two to three minutes. During this time you will
hear a series of beeps. After the update session is completed, there will be no
video, the series of beeps will end, and the system will automatically turn off.
Remove the disc from the optical drive before the system completely turns off.
12. Repeat steps 2 through 5.
13. Move the jumper back to the standard position (pin 1 and pin 2).
14. Reconnect any cables that were disconnected. Refer to “Completing the parts
replacement” on page 35.
52 User Guide
Page 61

15. Close the computer cover and reconnect the power cords for the computer
and monitor to electrical outlets.
16. Turn on the computer to restart the operating system.
Chapter 5. Updating system programs 53
Page 62

54 User Guide
Page 63

Chapter 6. Troubleshooting and diagnostics
This chapter describes some basic troubleshooting and diagnostic programs. If your
computer problem is not described here, see Chapter 7, “Getting information, help,
and service,” on page 61 for additional troubleshooting resources.
Basic troubleshooting
The following table provides information to help you troubleshoot your computer
problem.
Symptom Action
The computer does not start
when you press the power
button.
Verify that:
v The power cord is plugged into the rear of the computer and into a working
electrical outlet.
v If your computer has a secondary power switch on the back of the computer,
make sure that it is switched on.
v The power indicator on the front of the computer is on.
v The voltage is set to the correct setting for your country.
If
you cannot correct the problem, have the computer serviced. Refer to the
safety and warranty information that is provided with your computer for a list of
service and support telephone numbers.
The monitor screen is blank. Verify that:
v The monitor cable is securely attached to the rear of the monitor and to the
rear of the computer.
v The monitor power cord is plugged into the monitor and into a working
electrical outlet.
v The monitor is turned on and the brightness and contrast controls are set
correctly.
v The voltage is set to the correct setting for your country.
v The monitor signal cable is securely connected to the monitor and to the
monitor connector on the computer.
If your computer has two monitor connectors, verify that your monitor is
Note:
connected to the option connector rather than the one in the rear of the system
board. For more information, see "Connecting your computer" in the ThinkCentre
Safety and Warranty Guide.
If you cannot correct the problem, have the computer serviced. Refer to the
safety and warranty information that is provided with your computer for a list of
service and support telephone numbers.
© Copyright Lenovo 2009 55
Page 64

Symptom Action
The keyboard does not work.
The computer does not respond
to the keyboard.
Verify that:
v The computer is turned on.
v The monitor is turned on and the brightness and contrast controls are set
correctly.
v The keyboard is securely connected to the keyboard connector on the
computer.
v No keys are stuck.
If you cannot correct the problem, have the computer serviced. Refer to the
safety and warranty information that is provided with your computer for a list of
service and support telephone numbers.
The USB Keyboard does not
work.
Verify that:
v The computer is turned on.
v The keyboard is securely connected to a USB connector on the front or rear of
the computer.
v No keys are stuck.
If
you cannot correct the problem, have the computer serviced. Refer to the
safety and warranty information that is provided with your computer for a list of
service and support telephone numbers.
The mouse does not work. The
computer does not respond to
the mouse.
Verify that:
v The computer is turned on.
v The mouse is securely connected to the mouse connector on the computer.
v The mouse is clean. Refer to “Cleaning the mouse” on page 58 for further
information.
The operating system will not
start.
The computer beeps multiple
times before the operating
system starts.
Diagnostic programs
Diagnostic programs are used to test hardware components of your computer and
report operating-system-controlled settings that can cause hardware failures. There
are two diagnostic programs preinstalled on your computer:
v Lenovo System Toolbox (used to diagnose problems while running the Windows
operating system)
v PC-Doctor for Windows PE (used when your Windows operating system does
not start)
If
you cannot correct the problem, have the computer serviced. Refer to the
safety and warranty information that is provided with your computer for a list of
service and support telephone numbers.
Verify that:
v There is no diskette in the diskette drive.
The startup sequence includes the device where the operating system resides.
v
Usually, the operating system is on the hard disk drive. For more information,
see “Selecting a startup device” on page 49.
If
you cannot correct the problem, have the computer serviced. Refer to the
safety and warranty information that is provided with your computer for a list of
service and support telephone numbers.
Verify that no keys are stuck down.
If you cannot correct the problem, have the computer serviced. Refer to the
safety and warranty information that is provided with your computer for a list of
service and support telephone numbers.
56 User Guide
Page 65

Notes:
1. You can also download the latest version of the Lenovo System Toolbox and
PC-Doctor for DOS diagnostic programs from:
http://www.lenovo.com/support
See “Lenovo System Toolbox” and “PC-Doctor for DOS” on page 58 for
detailed information.
2. If you are unable to isolate and repair the problem yourself after you run the
Lenovo System Toolbox and PC-Doctor for Windows PE, save and print the log
files created by both diagnostic programs. You will need the log files when you
speak to a Lenovo technical support representative.
Lenovo System Toolbox
The Lenovo System Toolbox is a diagnostic program that works through the
Windows operating system and enables you to view symptoms and solutions for
computer problems, access the Lenovo troubleshooting center, update system
drivers, and review system information.
To run the Lenovo System Toolbox, click Start → All Programs → Lenovo Services →
Lenovo System Toolbox. Follow the instructions on the screen. For additional
information about running the diagnostic program, refer to the Lenovo System
Toolbox help system.
If you still suspect a problem after the Lenovo System Toolbox runs successfully,
run the PC-Doctor for Windows PE to help you diagnose the computer problem.
The Lenovo System Toolbox also has problem determination aids that determine
software and usage problems.
PC-Doctor for Windows PE
The PC-Doctor for Windows PE diagnostic program is part of the Rescue and
Recovery workspace on each Lenovo computer. Use PC-Doctor for Windows PE if
you are unable to start the Windows operating system or if the Lenovo System
Toolbox has not been successful in isolating a possible problem.
Running diagnostics from the Rescue and Recovery workspace
You can run the PC-Doctor for Windows PE diagnostic program from the Rescue
and Recovery workspace. To run diagnostics from the Rescue and Recovery
workspace, use the following procedure:
1. Shut down the operating system and turn off the computer.
2. Repeatedly press and release the F11 key when you turn on the computer.
3. When you hear beeps or see a logo screen, stop pressing the F11 key. The
Rescue and Recovery workspace opens.
4. From the Rescue and Recovery workspace, select Launch Advanced Rescue
and Recovery → Diagnose hardware.
5. The diagnostic program opens automatically. Select the diagnostic test you
want to run. Press the F1 key for additional help.
6. Follow the instructions on the screen.
Rescue media includes PC-Doctor for Windows PE. For more information
Note:
about rescue media, see “Creating and using rescue media” on page 43.
Chapter 6. Troubleshooting and diagnostics 57
Page 66

PC-Doctor for DOS
You can also download the latest version of the PC-Doctor for DOS diagnostic
program from:
http://www.lenovo.com/support
The PC-Doctor for DOS diagnostic program runs independently of the Windows
operating system. Use PC-Doctor for DOS, if you are unable to start the Windows
operating system or if the Lenovo System Toolbox and PC-Doctor for Windows PE
have not been successful in isolating a possible problem. Yo u can run PC-Doctor
for DOS from a diagnostic CD/DVD image that you create.
Creating a diagnostic CD/DVD image
To create a diagnostic CD/DVD image, download a self-starting bootable
CD/DVD image (known as an ISO image) of the diagnostic program from
http://www.lenovo.com/support
After you download the image, you can create the CD/DVD using any CD/DVD
burning software.
Running diagnostics from the disc
To run diagnostics from the diagnostic CD/DVD image that you created, do the
following:
1. Make sure the computer is turned off.
2. Insert the disc into the optical drive.
3. Restart the computer.
Note: If the diagnostic program does not start, you might not have your optical
4. When the diagnostics program opens, follow the instructions on the screen.
5. When the program finishes, be sure to remove the disc from the drive.
6. Select the diagnostic test you want to run. Press the F1 key for additional help.
Cleaning the mouse
This section provides instructions on how to clean an optical or non-optical mouse.
Optical mouse
An optical mouse uses a light-emitting diode (LED) and an optical sensor to
navigate the pointer. If the pointer on the screen does not move smoothly with the
optical mouse, you might need to clean the mouse.
To clean the optical mouse:
1. Turn off your computer.
2. Disconnect the mouse cable from the computer.
3. Turn the mouse upside down to look at the lens.
a. If there is a smudge on the lens, gently clean the area with a plain
b. If there is debris in the lens, gently blow the debris away from the area.
Check the surface on which you are using the mouse. If you have a very
4.
intricate picture or pattern beneath the mouse it may be difficult for the digital
signal processor (DSP) to determine changes in the mouse position.
5. Reconnect the mouse cable to the computer.
6. Turn your computer back on.
drive set as a startable device. See “Selecting a startup device” on page
49 for instructions on how to change the startup device.
cotton-tipped swab.
58 User Guide
Page 67
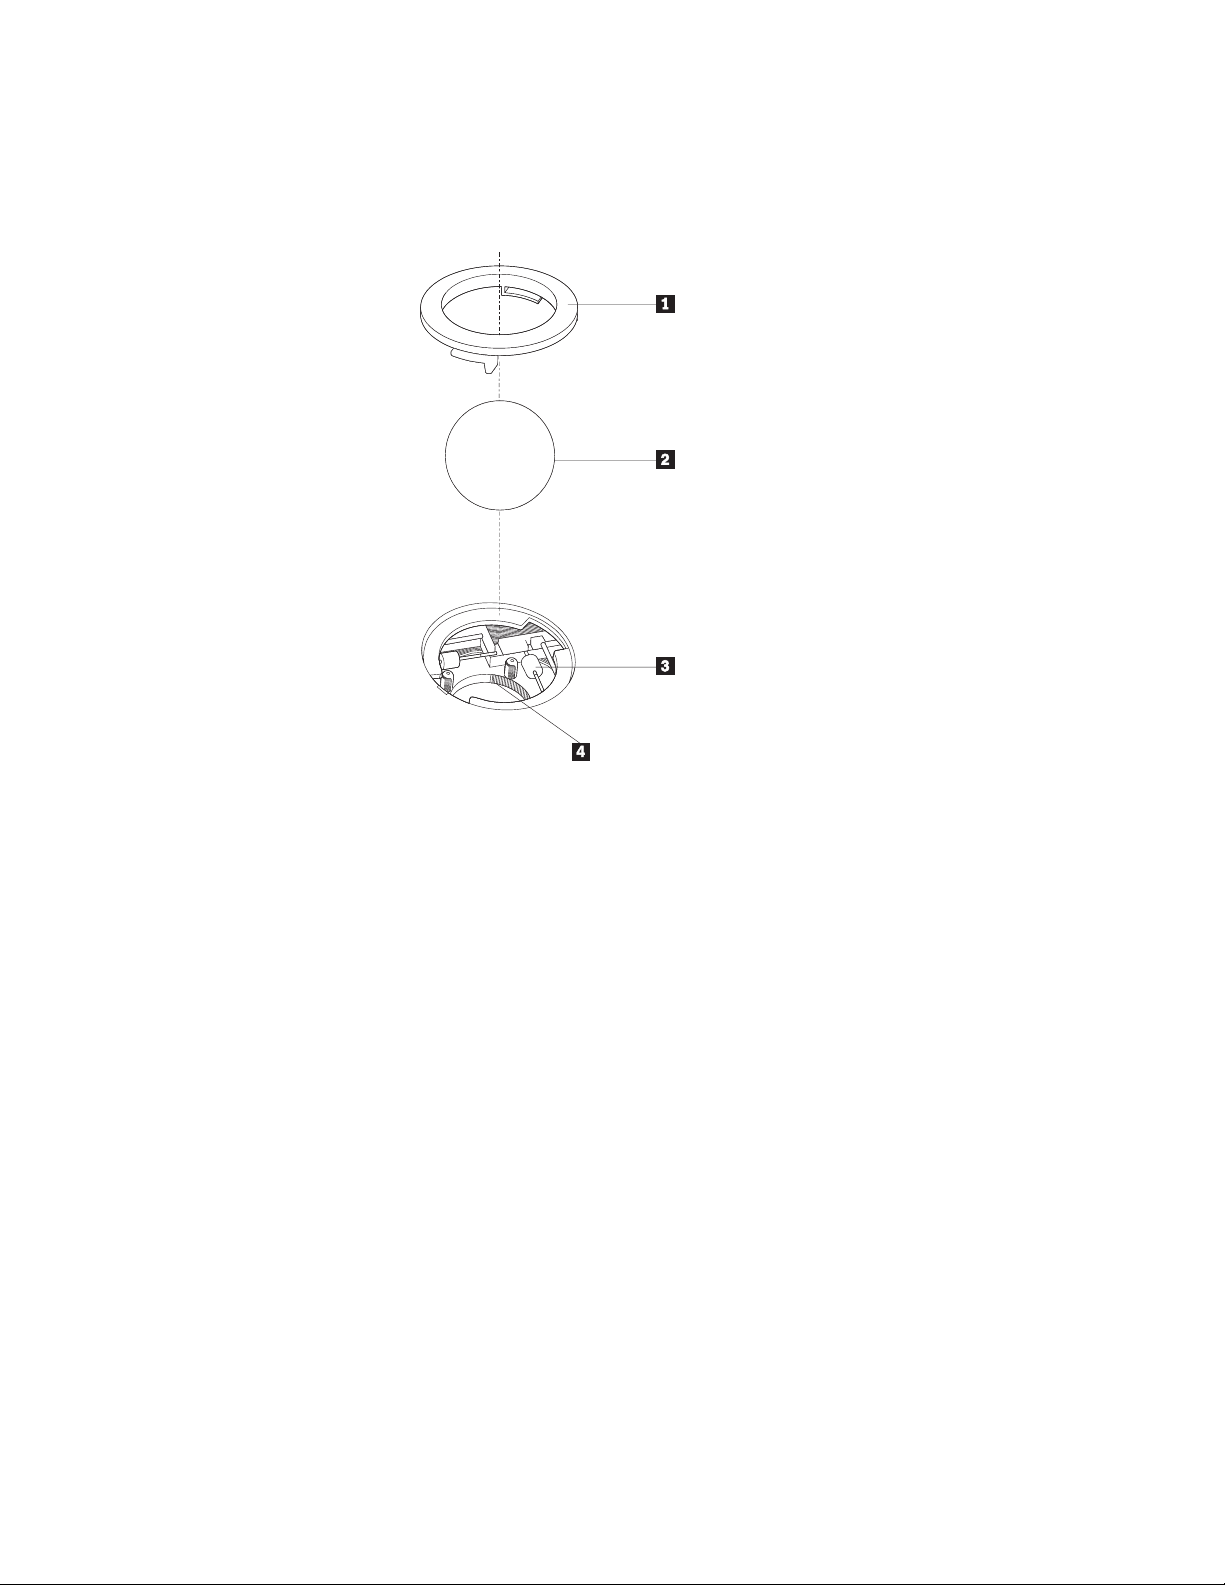
Non-optical mouse
The non-optical mouse uses a ball to navigate the pointer. If the pointer on the
screen does not move smoothly with the mouse, you might need to clean the
mouse.
1 Retainer ring
2 Ball
3 Plastic rollers
4 Ball cage
To clean the non-optical mouse, do the following:
The following illustration might be slightly different from your mouse.
Note:
1. Turn off your computer.
2. Disconnect the mouse cable from the computer.
3. Turn the mouse upside down. Twist the retainer ring 1 to the unlocked
position to remove the ball.
4. Place your hand over the retainer ring and ball 2, and then turn the mouse
right-side up, so that the retainer ring and ball fall out into your hand.
5. Wash the ball in warm, soapy water then dry it with a clean cloth.
6. Blow air carefully into the ball cage 4 to dislodge dust and lint.
7. Look for a buildup of dirt on the plastic rollers 3 inside the ball cage. This
buildup usually appears as a stripe running across the middle of the rollers.
8. If the rollers are dirty, clean them by using a cotton swab soaked in isopropyl
(rubbing) alcohol. Turn the rollers with your finger and continue swabbing
them until all the dirt is removed. Be sure the rollers are still centered in their
channels after you clean them.
9. Remove any fibers from the swab that might be remaining on the rollers.
10. Replace the ball and the retainer ring. Twist the retainer ring to the locked
position.
Chapter 6. Troubleshooting and diagnostics 59
Page 68

11. Reconnect the mouse cable to the computer.
12. Turn your computer back on.
60 User Guide
Page 69

Chapter 7. Getting information, help, and service
This chapter contains information about help, service, and technical assistance for
products manufactured by Lenovo.
Information resources
This section describes how to access useful resources relating to your computing
needs.
Online Books folder
The Online Books folder provides online ThinkCentre User Guide to help you set up
and use your computer. The Online Books folder is preinstalled on your computer
and requires no Internet access to view the publications.
To view a publication, click Start → All Programs → Online Books → Online Books.
Double-click on the appropriate publication for your computer. The publications
also are available on the Lenovo We b site at:
http://www.lenovo.com
Notes:
1. These publications are in Portable Document Format (PDF) format, which
requires Adobe Acrobat Reader to be installed. If Adobe Acrobat Reader has
not yet been installed on your computer, a message will appear when you
attempt to view the PDF file and you will be guided through the Adobe
Acrobat Reader installation.
2. The publications that are preinstalled on your computer are available in other
languages on the Lenovo Support We b site at:
http://www.lenovo.com/support
3. If you want to install a different language version of Adobe Acrobat Reader
than the version provided on your computer, download the version you want
to use from the Adobe We b site at:
http://www.adobe.com
Lenovo Care
The Lenovo Care program contains information sources and tools designed to
make computing easy and secure. It provides easy access to various technologies,
such as:
v Rescue and Recovery
v Factory Recovery
v System Update
The Lenovo Care technologies are only available on select Lenovo
Note:
computers.
To access the Lenovo Care, click Start → All Programs → ThinkVantage → Lenovo
Care.
© Copyright Lenovo 2009 61
Page 70

Lenovo Welcome
The Lenovo Welcome program introduces you to some innovative built-in features
of Lenovo and guides you through a few important setup tasks to help you make
the most of your computer.
Access Help
The Access Help online help system provides information about getting started,
doing basic tasks, customizing settings for your personal preference, protecting
data, expanding and upgrading, and troubleshooting.
To open Access Help, click Start → All Programs → ThinkVantage → Access Help.
After you have opened Access Help, use the left panel to make a selection from the
Contents or Index tab, or use the Search tab to find a particular word or phrase.
Safety and Warranty
The ThinkCentre Safety and Warranty Guide that is provided with your computer
contains information on safety, warranty, and notices. Read and understand all
safety information before using this product.
Lenovo Web site (http://www.lenovo.com)
The Lenovo Web site provides up-to-date information and services to help you
buy, upgrade, and maintain your computer. Yo u can also do the following:
v Shop for:
– Desktop and notebook computers,
– Monitors
– Projectors
– Upgrades and accessories
– Special offers.
Purchase additional services, such as support for hardware, operating systems,
v
application programs, network setup and configuration, and custom
installations.
v Purchase upgrades and extended hardware repair services.
v Download the latest device drivers and software updates for your computer
model.
v Access the online manuals.
v Access the Lenovo Statement of Limited Warranty.
v Access troubleshooting and support information for your computer model and
other supported products.
v Find the service and support phone number for your country or region.
v Find a service provider located near you.
62 User Guide
Page 71

Help and service
This section contains information about obtaining help and service.
Using the documentation and diagnostic programs
If you experience a problem with your computer, see Chapter 6, “Troubleshooting
and diagnostics,” on page 55. For information on additional resources to help you
troubleshoot your computer problem, see “Information resources” on page 61.
If you suspect a software problem, see the documentation, including readme files
and online help, that comes with the operating system or application program.
Most computers come with a set of diagnostic programs that you can use to help
you identify hardware problems. For instructions on using the diagnostic
programs, see “Diagnostic programs” on page 56.
Lenovo maintains pages on the World Wide We b where you can get the latest
technical information and download device drivers and updates. To access these
pages, follow the instructions at:
http://www.lenovo.com/support
Calling for service
During the warranty period, you can get help and information by telephone
through the Customer Support Center.
These services are available during the warranty period:
v Problem determination - Trained personnel are available to assist you with
determining a hardware problem and deciding what action is necessary to fix
the problem.
v Hardware repair - If the problem is caused by hardware under warranty, trained
service personnel are available to provide the applicable level of service.
v Engineering Change management - There might be changes that are required
after a product has been sold. Lenovo or your reseller will make selected
Engineering Changes (ECs) that apply to your hardware available.
following items are not covered by the warranty:
The
v Replacement or use of parts not manufactured for or by Lenovo or
non-warranted Lenovo parts
v Identification of software problem sources
v Configuration of BIOS as part of an installation or upgrade
v Changes, modifications, or upgrades to device drivers
v Installation and maintenance of network operating systems (NOS)
v Installation and maintenance of application programs
to the safety and warranty information that is provided with your computer
Refer
for a complete explanation of warranty terms. Yo u must retain your proof of
purchase to obtain warranty service.
For a list of service and support phone numbers for your country or region, go to
http://www.lenovo.com/support and click Support phone list or refer to the
safety and warranty information provided with your computer.
Chapter 7. Getting information, help, and service 63
Page 72

Note: Phone numbers are subject to change without notice. If the number for your
country or region is not provided, contact your Lenovo reseller or Lenovo
marketing representative.
If possible, be at your computer when you call. Have the following information
available:
v Machine type and model
v Serial numbers of your hardware products
v Description of the problem
v Exact wording of any error messages
v Hardware and software configuration information
Using other services
If you travel with your computer or relocate it to a country where your desktop or
notebook computer machine type is sold, your computer might be eligible for
International Warranty Service, which automatically entitles you to obtain warranty
service throughout the warranty period. Service will be performed by service
providers authorized to perform warranty service.
Service methods and procedures vary by country, and some services might not be
available in all countries. International Warranty Service is delivered through the
method of service (such as depot, carry-in, or on-site service) that is provided in
the servicing country. Service centers in certain countries might not be able to
service all models of a particular machine type. In some countries, fees and
restrictions might apply at the time of service.
To determine whether your computer is eligible for International Warranty Service
and to view a list of the countries where service is available, go to
http://www.lenovo.com/support, click Warranty, and follow the instructions on
the screen.
For technical assistance with the installation of or questions related to Service
Packs for your preinstalled Microsoft Windows product, refer to the Microsoft
Product Support Services Web site at http://support.microsoft.com/directory or
you can contact the Customer Support Center. Some fees might apply.
Purchasing additional services
During and after the warranty period, you can purchase additional services, such
as support for hardware, operating systems, and application programs; network
setup and configuration; upgraded or extended hardware repair services; and
custom installations. Service availability and service name might vary by country
or region. For more information about these services, go to the Lenovo Web site at:
http://www.lenovo.com
64 User Guide
Page 73

Appendix. Notices
Lenovo may not offer the products, services, or features discussed in this
document in all countries. Consult your local Lenovo representative for
information on the products and services currently available in your area. Any
reference to a Lenovo product, program, or service is not intended to state or
imply that only that Lenovo product, program, or service may be used. Any
functionally equivalent product, program, or service that does not infringe any
Lenovo intellectual property right may be used instead. However, it is the user’s
responsibility to evaluate and verify the operation of any other product, program,
or service.
Lenovo may have patents or pending patent applications covering subject matter
described in this document. The furnishing of this document does not give you
any license to these patents. You can send license inquiries, in writing, to:
Lenovo (United States), Inc.
1009 Think Place - Building One
Morrisville, NC 27560
U.S.A.
Attention: Lenovo Director of Licensing
LENOVO
PROVIDES THIS PUBLICATION “AS IS” WITHOUT WARRANTY OF
ANY KIND, EITHER EXPRESS OR IMPLIED, INCLUDING, BUT NOT LIMITED
TO, THE IMPLIED WARRANTIES OF NON-INFRINGEMENT,
MERCHANTABILITY OR FITNESS FOR A PARTICULAR PURPOSE. Some
jurisdictions do not allow disclaimer of express or implied warranties in certain
transactions, therefore, this statement may not apply to you.
This information could include technical inaccuracies or typographical errors.
Changes are periodically made to the information herein; these changes will be
incorporated in new editions of the publication. Lenovo may make improvements
and/or changes in the product(s) and/or the program(s) described in this
publication at any time without notice.
The products described in this document are not intended for use in implantation
or other life support applications where malfunction may result in injury or death
to persons. The information contained in this document does not affect or change
Lenovo product specifications or warranties. Nothing in this document shall
operate as an express or implied license or indemnity under the intellectual
property rights of Lenovo or third parties. All information contained in this
document was obtained in specific environments and is presented as an
illustration. The result obtained in other operating environments may vary.
Lenovo may use or distribute any of the information you supply in any way it
believes appropriate without incurring any obligation to you.
Any references in this publication to non-Lenovo Web sites are provided for
convenience only and do not in any manner serve as an endorsement of those We b
sites. The materials at those We b sites are not part of the materials for this Lenovo
product, and use of those Web sites is at your own risk.
Any performance data contained herein was determined in a controlled
environment. Therefore, the result obtained in other operating environments may
© Copyright Lenovo 2009 65
Page 74

vary significantly. Some measurements may have been made on development-level
systems and there is no guarantee that these measurements will be the same on
generally available systems. Furthermore, some measurements may have been
estimated through extrapolation. Actual results may vary. Users of this document
should verify the applicable data for their specific environment.
Television output notice
The following notice applies to models that have the factory-installed
television-output feature.
This product incorporates copyright protection technology that is protected by
method claims of certain U.S. patents and other intellectual property rights owned
by Macrovision Corporation and other rights owners. Use of this copyright
protection technology must be authorized by Macrovision Corporation, and is
intended for home and other limited viewing uses only unless otherwise
authorized by Macrovision Corporation. Reverse engineering or disassembly is
prohibited.
Trademarks
The following terms are trademarks or service mark of Lenovo in the United
States, other countries, or both:
Lenovo
Lenovo Care
Rescue and Recovery
The Lenovo logo
ThinkCentre
ThinkVantage
Wake on LAN is a trademark of International Business Machines Corporation in
the United States, other countries, or both.
Microsoft, Windows, and Windows Vista are trademarks of the Microsoft group of
companies.
Celeron, Intel, Intel Core, and Pentium are trademarks of Intel Corporation in the
United States, other countries, or both.
Linux is a trademark of Linus Torvalds in the United States, other countries, or
both.
Other company, product, or service names may be trademarks or service marks of
others.
66 User Guide
Page 75

Index
A
access help 62
adapter card 15
installing, replacing 15
advanced settings 50
antivirus software 6
audio line-in connector 8
audio line-out connector 8
audio subsystem 2
B
backup and recovery operations 40
basic troubleshooting 55
battery, replacing 25
bay 2, installing 19
BIOS, updating (flashing) 51, 52
books folder, online 61
boot-block recovery 52
C
cable lock, security 37
cables, connecting 35
changing
cleaning the mouse 58
CMOS, clearing 38
components, accessing system board 13
components, internal 9
computer cover
connecting drives 20
connector description 8
connectors
considerations, passwords 48
creating
creating and using
CRU
customer support center 63
device sequence 50
startup
12
opening
6
front
rear 7
using a Recovery Repair diskette 44
and
and using rescue media 43
Product Recovery discs 39
completing
the installation 35
D
device drivers 36
installing 44
recovering 44
devices, handling static-sensitive 11
diagnostics programs, using 63
diagnostics, troubleshooting 55
discs, creating and using Product Recovery discs 39
diskette, creating and using a Recovery Repair 44
documentation, using 63
drivers, device 36
drives
18
bays
internal 17
specifications 18
E
environment, operating 4
Ethernet 2
Ethernet connector 8
exiting, Setup Utility 50
expansion 2
external options, installing 11
F
failure, recovering from POST/BIOS 52
features 1
flashing BIOS 51
folder, books online 61
front connectors 6
G
getting
61
help
information 61
service 61
H
hard disk drive, replacing 21
heat sink and fan assembly, replacing 29
help
access 62
and service 63
getting 61
I
important safety information v
information
getting 61
important safety v
resources 61
safety 62
warranty 62
Input/Output (I/O) features 2
installing
2 19
bay
device drivers 44
installing options
adapter card 15
internal drives 17
memory module 13
security features 37
internal drives 1
© Copyright Lenovo 2009 67
Page 76

K
keyboard connector 8
keyboard, replacing 34
L
Lenovo Care 61
Lenovo System Toolbox 57
Lenovo Web site 62
Lenovo Welcome 62
locating components 9
M
media, creating and using rescue 43
memory module
installing
system board 13
Microphone connector 8
mouse
cleaning 58
non-optical 59
optical mouse 58
mouse connector 8
mouse, replacing 34
13
N
non-optical mouse 59
notice, television output 66
notices 65
O
online books folder 61
opening computer cover 12
operations, backup and recovery 40
optical drive, replacing 23
optical mouse 58
options, installing internal drives 17
P
parallel port 8
parts replacement, completing 35
password
considerations 48
setting, changing, deleting 48
supervisor 48
user 48
password protection 37
passwords
PC-Doctor for Windows PE 57
physical specifications 4
power
power supply assembly, replacing 27
power-on self-test (POST) 51
Product Recovery discs, creating and using 39
programs, updating system 51
38
erasing
lost or forgotten 38
Advanced Configuration and Power Interface (ACPI)
support 2
features 2
protection, password 37
purchasing additional services 64
R
rear connectors 7
recovering
device drivers 44
from a POST/BIOS update failure 52
software 39
recovery
boot-block
operations, backup and 40
problems, solving 45
Recovery Repair diskette, creating and using 44
replacing
battery
hard disk drive 21
heat sink and fan assembly 29
Rescue and Recovery 39
workspace, Rescue and Recovery 42
Rescue and Recovery workspace 42
rescue device, starting 45
rescue media, creating and using 43
resources, information 61
52
25
S
safety v
safety information 62
security
cable lock 37
enabling or disabling 49
features 3, 37
selecting
startup device 49
temporary startup device 49
serial port 8
service
help 63
and
customer support center 63
getting 61
services
other 64
purchasing additional 64
setting
rescue device 45
settings
advanced 50
changing 47
viewing 47
Setup Utility 47
Setup Utility program, starting 47
Setup Utility, exiting 50
software
recovering
software overview 5
solving recovery problems 45
starting the Setup Utility program 47
startup device 49
sequence, changing 50
temporary, selecting 49
static-sensitive devices, handling 11
system
management 2
programs 51
39
68 User Guide
Page 77

system board
components, accessing 13
connectors 10
locating parts 10
location 10
memory module 13
T
television output notice 66
temporary startup device 49
trademarks 66
troubleshooting, basic 55
troubleshooting, diagnostics 55
U
updating
(flashing) BIOS 51
system programs 51
updating (flashing) BIOS 52
USB connector 8
using
diagnostic programs 63
documentation 63
other services 64
passwords 47
Recovery Repair diskette, creating and using 44
rescue media, creating and 43
Setup Utility 47
V
VGA monitor connector 8
video subsystem 1
viewing and changing settings 47
W
warranty information 62
Web site, Lenovo 62
workspace, backup and recovery 42
Index 69
Page 78

70 User Guide
Page 79

Page 80

Part Number: 53Y6289
Printed in USA
(1P) P/N: 53Y6289
 Loading...