

Lenovo 6306 User Manual

ThinkCentre
User Guide
Machine Type 6306


ThinkCentre
User Guid e

Note
Before using this information and the product it supports, be sure to read the ThinkCentre Safety and Warranty Guide that
came with this product and Appendix B, “Notices,” on page 51.
First Edition (November 2008)
© Copyright Lenovo 2008. All rights reserved.
LENOVO products, data, computer software, and services have been developed exclusively at private expense and
are sold to governmental entities as commercial items as defined by 48 C.F.R. 2.101 with limited and restricted
rights to use, reproduction and disclosure.
LIMITED AND RESTRICTED RIGHTS NOTICE: If products, data, computer software, or services are delivered
pursuant a General Services Administration ″GSA″ contract, use, reproduction, or disclosure is subject to restrictions
set forth in Contract No. GS-35F-05925.

Contents
Introduction . . . . . . . . . . . . .v
Chapter 1. Important safety information 1
Chapter 2. Arranging your workspace . .3
Comfort . . . . . . . . . . . . . . . .3
Glare and lighting . . . . . . . . . . . .3
Air circulation . . . . . . . . . . . . . .4
Electrical outlets and cable lengths . . . . . . .4
Chapter 3. Setting up your computer . .5
Connecting your computer . . . . . . . . .5
Turning on computer power . . . . . . . . .10
Finishing the software installation . . . . . . .10
Completing important tasks . . . . . . . . .11
Updating your operating system . . . . . . .11
Installing other operating systems . . . . . . .11
Updating your antivirus software . . . . . . .11
Shutting down the computer . . . . . . . .11
Installing external options . . . . . . . . .12
Features . . . . . . . . . . . . . . .13
Specifications . . . . . . . . . . . . . .15
Chapter 4. Software overview . . . . .17
Software provided with your Windows operating
system . . . . . . . . . . . . . . . .17
Software provided by Lenovo . . . . . . .17
Chapter 5. Using the Setup Utility . . .19
Starting the Setup Utility program . . . . . . .19
Viewing and changing settings . . . . . . . .19
Using passwords . . . . . . . . . . . .19
Password considerations . . . . . . . . .19
User Password . . . . . . . . . . . .20
Administrator Password . . . . . . . . .20
Setting, changing, and deleting a password . . .20
Enabling or disabling a device . . . . . . . .20
Selecting a startup device . . . . . . . . . .21
Selecting a temporary startup device . . . . .21
Selecting or changing the startup device sequence 21
Advanced settings . . . . . . . . . . . .22
Exiting from the Setup Utility program . . . . .22
Basic troubleshooting . . . . . . . . . . .25
Diagnostic programs . . . . . . . . . . .26
PC-Doctor for Windows . . . . . . . . .27
PC-Doctor for DOS . . . . . . . . . . .27
PC-Doctor for Windows PE . . . . . . . .28
Cleaning the mouse . . . . . . . . . . .29
Optical mouse . . . . . . . . . . . .29
Non-optical mouse . . . . . . . . . . .29
Chapter 8. Recovering software . . . .31
Creating and using the Product Recovery disc . . .31
Performing backup and recovery operations . . .32
Using the Rescue and Recovery workspace . . . .33
Creating and using rescue media . . . . . . .34
Creating and using a Recovery Repair diskette . .35
Recovering or installing device drivers . . . . .36
Setting a rescue device in the startup sequence . .36
Solving recovery problems . . . . . . . . .37
Chapter 9. Getting information, help,
and service . . . . . . . . . . . . .39
Information resources . . . . . . . . . . .39
Online Books folder . . . . . . . . . .39
Lenovo Care . . . . . . . . . . . . .39
Access Help . . . . . . . . . . . . .40
Safety and Warranty . . . . . . . . . .40
www.lenovo.com . . . . . . . . . . .40
Help and service . . . . . . . . . . . .41
Using the documentation and diagnostic
programs . . . . . . . . . . . . . .41
Calling for service . . . . . . . . . . .41
Using other services . . . . . . . . . .42
Purchasing additional services . . . . . . .42
Appendix A. Manual modem
commands . . . . . . . . . . . . .43
Basic AT commands . . . . . . . . . . .43
Extended AT commands . . . . . . . . . .45
MNP/V.42/V.42bis/V.44 commands . . . . . .46
Fax Class 1 commands . . . . . . . . . .47
Fax Class 2 commands . . . . . . . . . .47
Voice commands . . . . . . . . . . . . .48
Chapter 6. Updating system programs 23
Using system programs . . . . . . . . . .23
Updating (flashing) BIOS from a diskette or a
CD/DVD-ROM . . . . . . . . . . . . .23
Updating (flashing) BIOS from your operating
system . . . . . . . . . . . . . . . .24
Recovering from a POST/BIOS update failure . . .24
Appendix B. Notices . . . . . . . . .51
Television output notice . . . . . . . . . .52
Trademarks . . . . . . . . . . . . . .52
Index . . . . . . . . . . . . . . .53
Chapter 7. Troubleshooting and
diagnostics . . . . . . . . . . . . .25
© Copyright Lenovo 2008 iii

iv User Guide

Introduction
This ThinkCentre User Guide contains the following information:
v Chapter 1, “Important safety information,” on page 1 provides information about
where to find safety information for this product.
v Chapter 2, “Arranging your workspace,” on page 3 provides information about
setting up your computer for comfort and the impact of light sources, air
circulation, and electrical outlets.
v Chapter 3, “Setting up your computer,” on page 5 provides information about
setting up your computer, and also installing the operating system and other
software.
v Chapter 4, “Software overview,” on page 17 provides information on the
operating system and software applications that may be preloaded on your
system.
v Chapter 5, “Using the Setup Utility,” on page 19 provides instructions on how to
view and change the configuration settings of your computer.
v Chapter 6, “Updating system programs,” on page 23 provides information about
updating POST/BIOS and how to recover from a POST/BIOS update failure.
v Chapter 7, “Troubleshooting and diagnostics,” on page 25 provides information
about basic troubleshooting and diagnostic tools for your computer.
v Chapter 8, “Recovering software,” on page 31 provides instructions on how to
use the Lenovo Care
SM
Rescue and Recovery® program to create product
recovery disks, back up data, recover software, and restore the entire contents of
your hard disk drive to a previously saved state.
v Chapter 9, “Getting information, help, and service,” on page 39 provides
information about the wide variety of helpful resources available from Lenovo®.
v Appendix A, “Manual modem commands,” on page 43 provides commands for
manually programming your modem.
v Appendix B, “Notices,” on page 51 provides notices and trademark information.
© Copyright Lenovo 2008 v

vi User Guide

Chapter 1. Important safety information
CAUTION:
Before using this manual, it is important that you read and understand all the
related safety information for this product. Refer to the ThinkCentre Safety and
Warranty Guide that you received with this product for the latest safety
information. Reading and understanding this safety information reduces the risk
of personal injury and or damage to your product.
© Copyright Lenovo 2008 1

2 User Guide

Chapter 2. Arranging your workspace
To get the most from your computer, arrange both the equipment you use and
your work area to suit your needs and the kind of work you do. Your comfort is of
foremost importance, but light sources, air circulation, and the location of electrical
outlets can also affect the way you arrange your workspace.
Comfort
Although no single working position is ideal for everyone, here are a few
guidelines to help you find a position that suits you best.
Sitting in the same position for a long time can cause fatigue. The backrest and
seat of your chair should adjust independently and provide good support. The seat
should have a curved front to relieve pressure on the thighs. Adjust the seat so
that your thighs are parallel to the floor and your feet are either flat on the floor or
on a footrest.
When using the keyboard, keep your forearms parallel to the floor and your wrists
in a comfortable position. Use a light touch on the keyboard and your hands and
fingers relaxed. Change the angle of the keyboard for maximum comfort by
adjusting the position of the keyboard feet.
Viewing Distance
Adjust the monitor so the top of the screen is at, or slightly below, eye level. Place
the monitor at a comfortable viewing distance, usually 51 to 61 cm (20 to 24 in.),
and position it so you can view it without having to twist your body. Also,
position other equipment you use regularly, such as the telephone or a mouse,
within easy reach.
Glare and lighting
Position the monitor to minimize glare and reflections from overhead lights,
windows, and other light sources. Reflected light from shiny surfaces can cause
annoying reflections on your monitor screen. Place the monitor at right angles to
windows and other light sources, when possible. Reduce overhead lighting, if
necessary, by turning off lights or using lower wattage bulbs. If you install the
monitor near a window, use curtains or blinds to block the sunlight. You can adjust
the brightness and contrast controls on the monitor as the room lighting changes
throughout the day.
Lower
Back
Support
Seat
Height
© Copyright Lenovo 2008 3

Where it is impossible to avoid reflections or to adjust the lighting, an antiglare
filter placed over the screen might be helpful. However, these filters might affect
the clarity of the image on the screen; try them only after you have exhausted
other methods of reducing glare.
Dust buildup compounds problems associated with glare. Remember to clean your
monitor screen periodically using a soft cloth as directed in your monitor
documentation.
Air circulation
Your computer and monitor produce heat. The computer has a fan that pulls in
fresh air and forces out hot air. The monitor lets hot air escape through vents.
Blocking the air vents can cause overheating, which might result in a malfunction
or damage. Place the computer and monitor so that nothing blocks the air vents;
usually, 51 mm (2 inches) of air space is sufficient. Also, make sure the vented air
is not blowing on someone else.
Electrical outlets and cable lengths
The location of electrical outlets, the length of power cords and cables that connect
to the monitor, printer, and other devices might determine the final placement of
your computer.
When arranging your workspace:
v Avoid the use of extension cords. When possible, plug the computer power cord
directly into an electrical outlet.
v Keep power cords and cables neatly routed away from walkways and other
areas where they might get kicked accidentally.
more information about power cords, refer to the ThinkCentre Safety and
For
Warranty Guide that was provided with your computer.
4 User Guide
Chapter 3. Setting up your computer
Read and understand the ThinkCentre Safety and Warranty Guide before you set up
your computer. Reading and understanding the safety information reduces the risk
of personal injury and or damage to your product.
Set up your computer in the best possible work area that suits your needs and
habits. For more information, see Chapter 2, “Arranging your workspace,” on page
3.
Connecting your computer
Use the following information when connecting your computer.
v Look for the small connector icons on the back of your computer. Match the
connectors to the icons.
v If your computer cables and connector panel have color-coded connectors, match
the color of the cable end with the color of the connector. For example, match a
blue cable end with a blue connector or a red cable end with a red connector.
Depending on your model type, your computer might not have all of the
Note:
connectors that are described in this section.
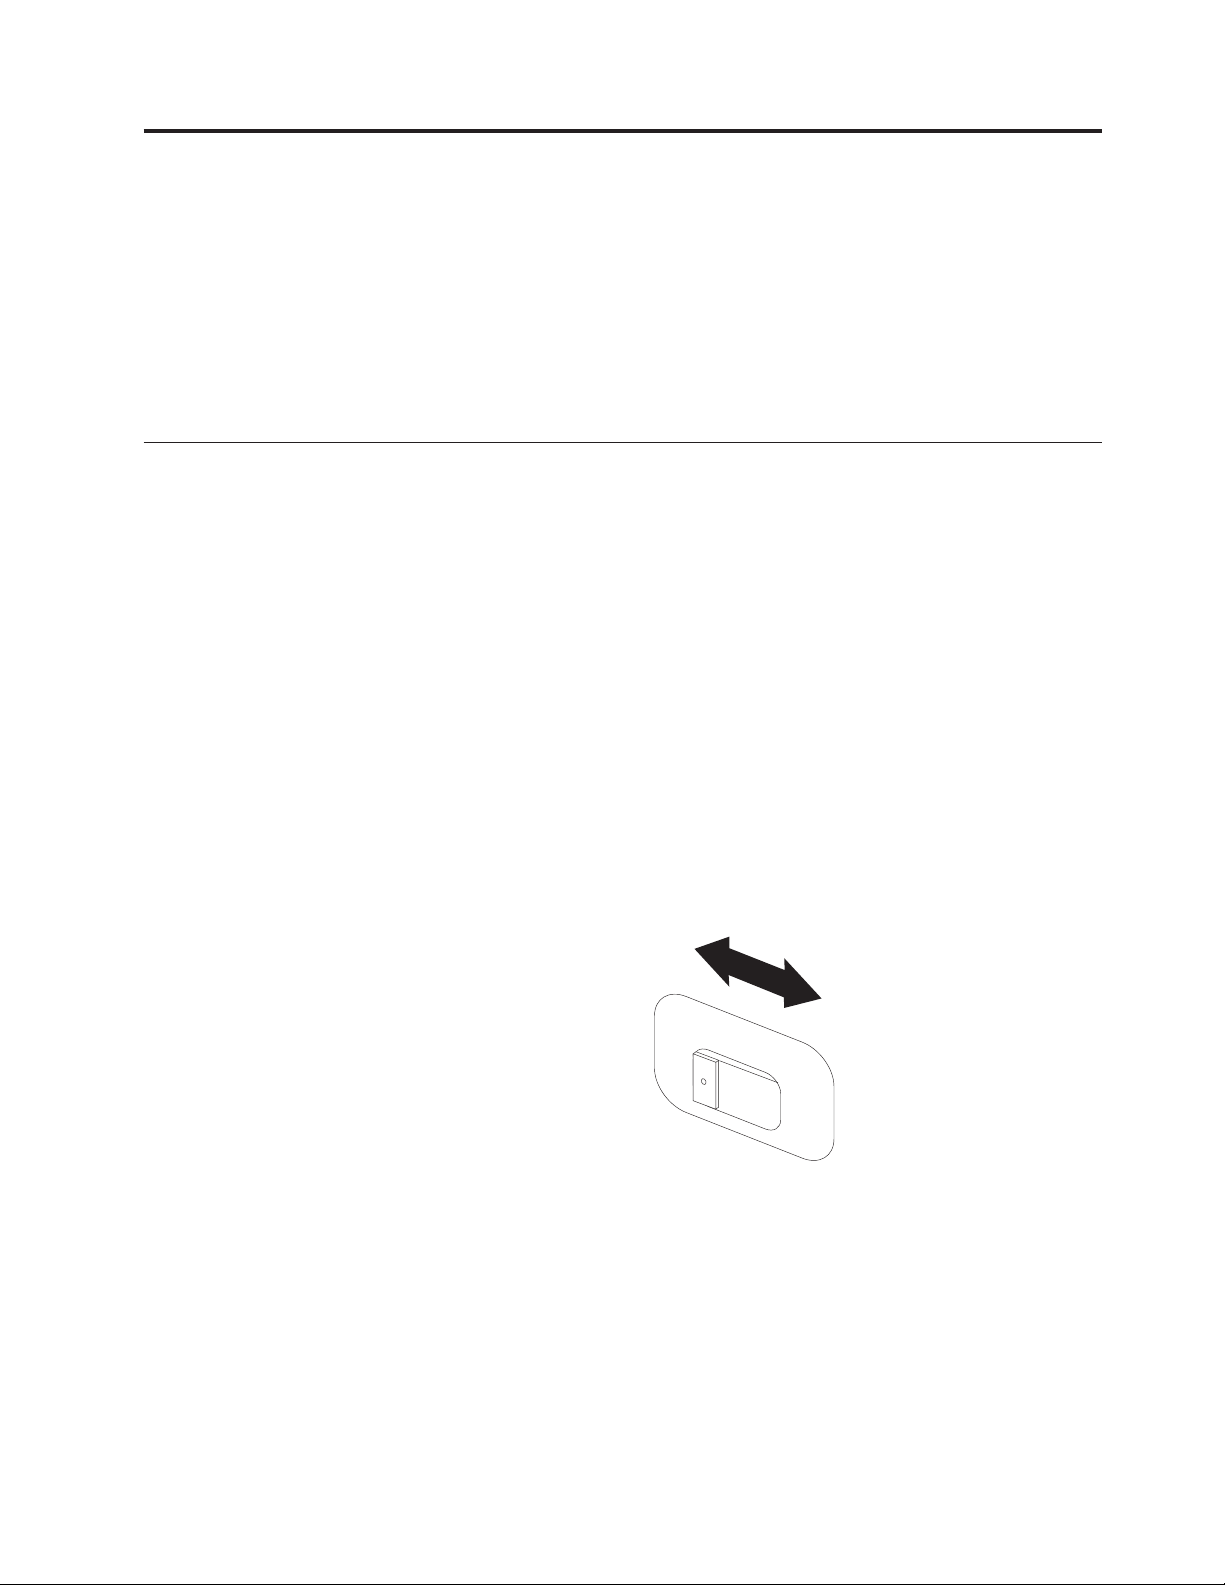
1. Check the position of the voltage-selection switch on the rear of the computer.
Use a ballpoint pen to slide the switch, if necessary.
Note: Some computers do not have a voltage-selection switch. These
computers automatically control the voltage.
v If the voltage supply range is 100–127 V AC, set the switch to 115 V.
v If the voltage supply range is 200–240 V AC, set the switch to 230 V.
115
© Copyright Lenovo 2008 5
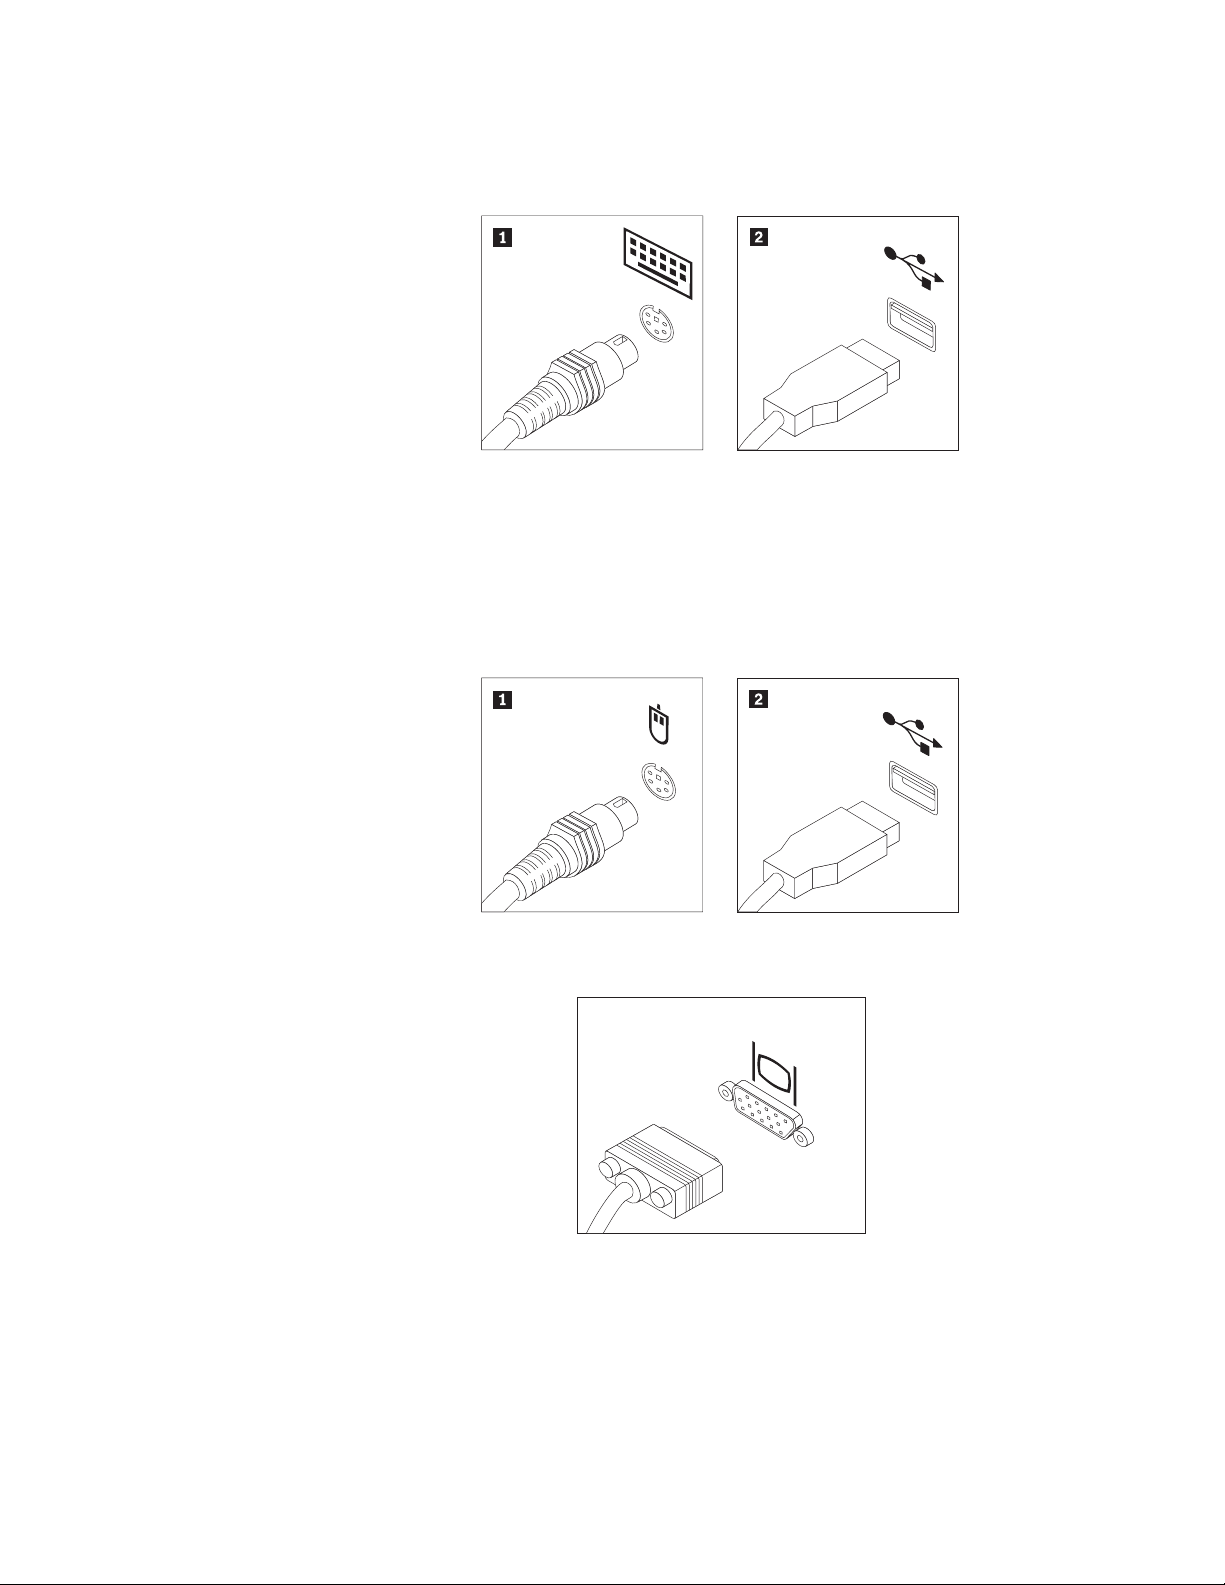
2. Connect the keyboard cable to the appropriate keyboard connector, either the
standard keyboard connector 1 or the Universal Serial Bus (USB) connector
2.
Note: Some models will have keyboards with a fingerprint reader. After you
setup and turn on your computer, refer to the Access Help online help
system for information about your fingerprint reader. See “Access
Help” on page 40 for instructions on how to open the online help
system.
3. Connect the mouse cable to the appropriate mouse connector, either the
standard mouse connector 1 or the USB connector 2.
4. Connect the monitor cable to the Video Graphics Array (VGA) standard
monitor connector on the computer.
6 User Guide
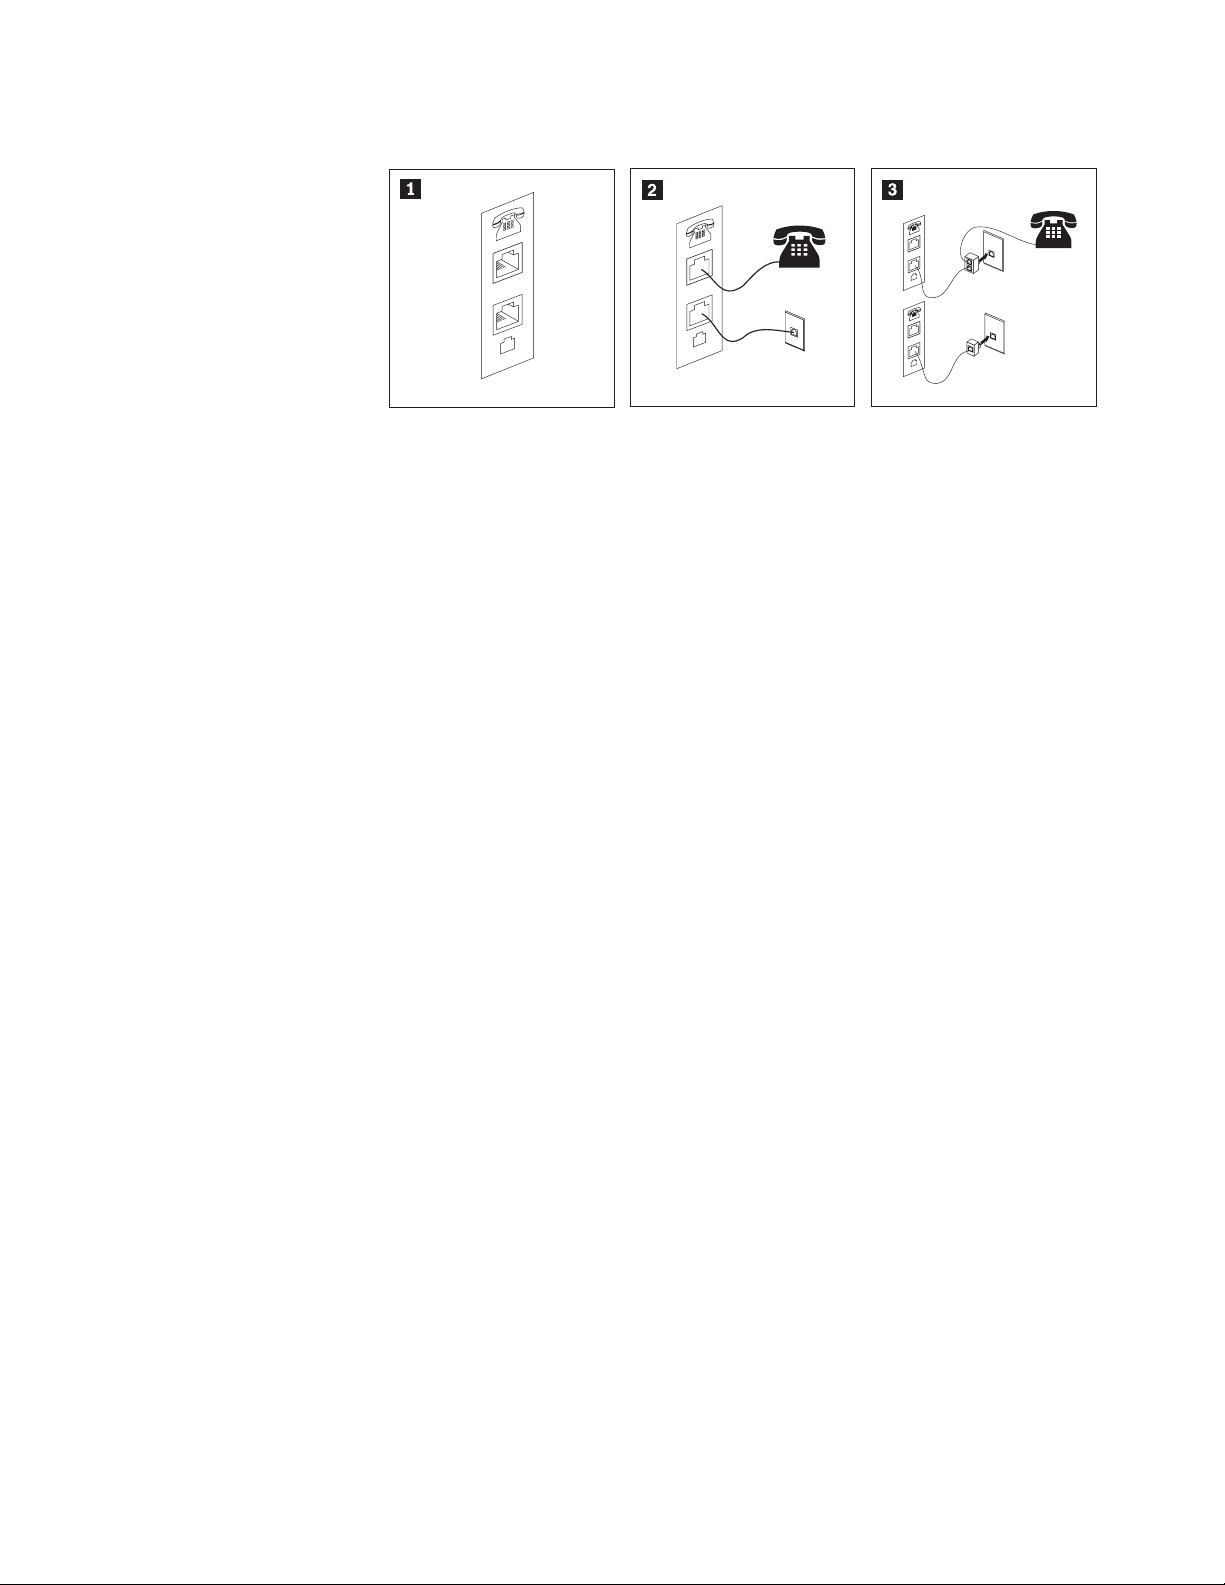
5. If you have a modem, connect the modem using the following information.
PHONE
LINE
1 This illustration shows the two connections on the back of the computer that are
PHONE
LINE
PHONE
LINE
E
N
O
H
P
E
IN
L
needed to set up your modem.
2 In the United States and other countries or regions that use the RJ-11 telephone
outlet, attach one end of the telephone cable to the telephone and the other end to
the telephone connector on the back of the computer. Attach one end of the modem
cable to the modem connector on the back of the computer and the other end to the
telephone outlet.
3 In countries or regions that do not use RJ-11 telephone outlets, a splitter or converter
is required to attach the cables to the telephone outlet, as shown at the top of the
illustration. You also can use the splitter or converter without the telephone, as
shown at the bottom of the illustration.
Chapter 3. Setting up your computer 7
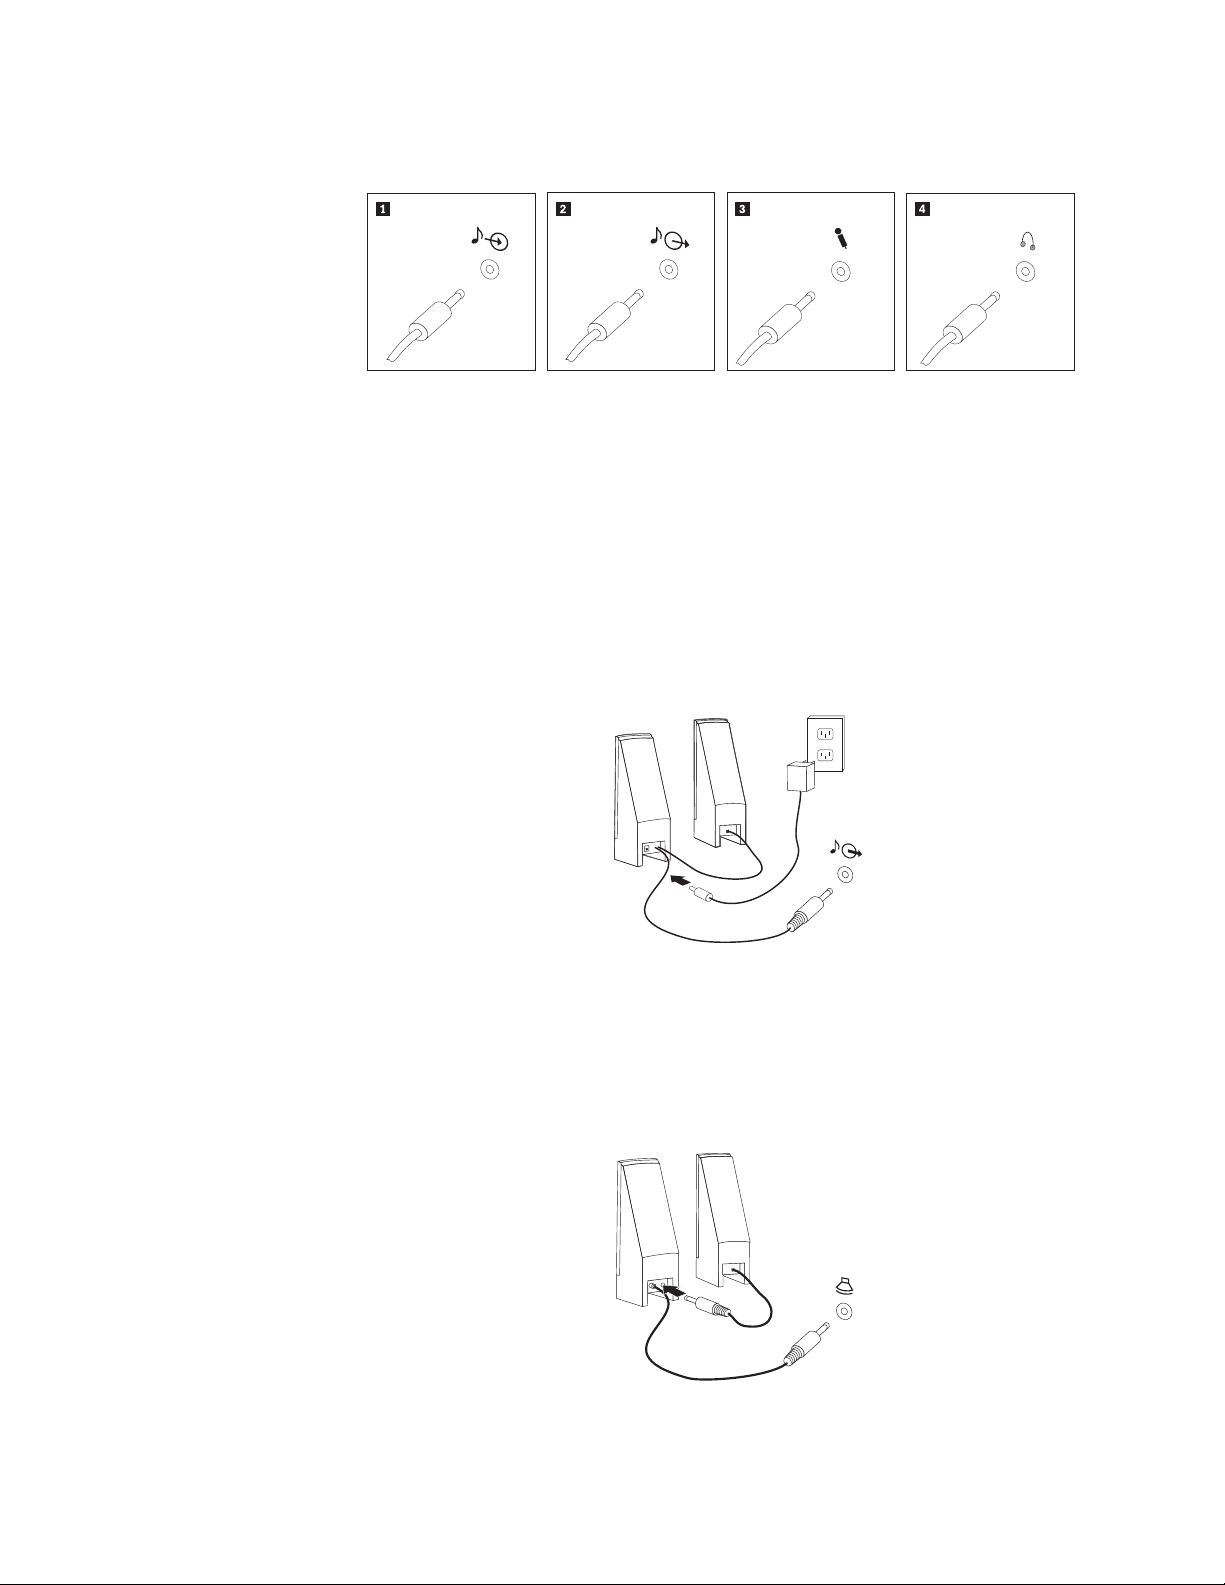
6. If you have audio devices, attach them using the following instructions. For
more information about speakers, see steps 7 and 8.
1 Audio line-in
connector
2 Audio line-out
connector
This connector receives audio signals from an external audio
device, such as a stereo system.
This connector sends audio signals from the computer to
external devices, such as powered stereo speakers.
3 Microphone connector Use this connector to attach a microphone to your computer
when you want to record sound or if you use
speech-recognition software.
4 Headphone connector Use this connector to attach headphones to your computer
when you want to listen to music or other sounds without
disturbing anyone. This connector might be located on the front
of the computer.
7. If you have powered speakers with an AC adapter:
a. Connect the cable that runs between the speakers, if necessary. On some
speakers, this cable is permanently attached.
b. Connect the AC adapter cable to the speaker.
c. Connect the speakers to the computer.
d. Connect the AC adapter to the AC power source.
8. If you have unpowered speakers with no AC adapter:
8 User Guide
a. Connect the cable that runs between the speakers, if necessary. On some
speakers, this cable is permanently attached.
b. Connect the speakers to the computer.
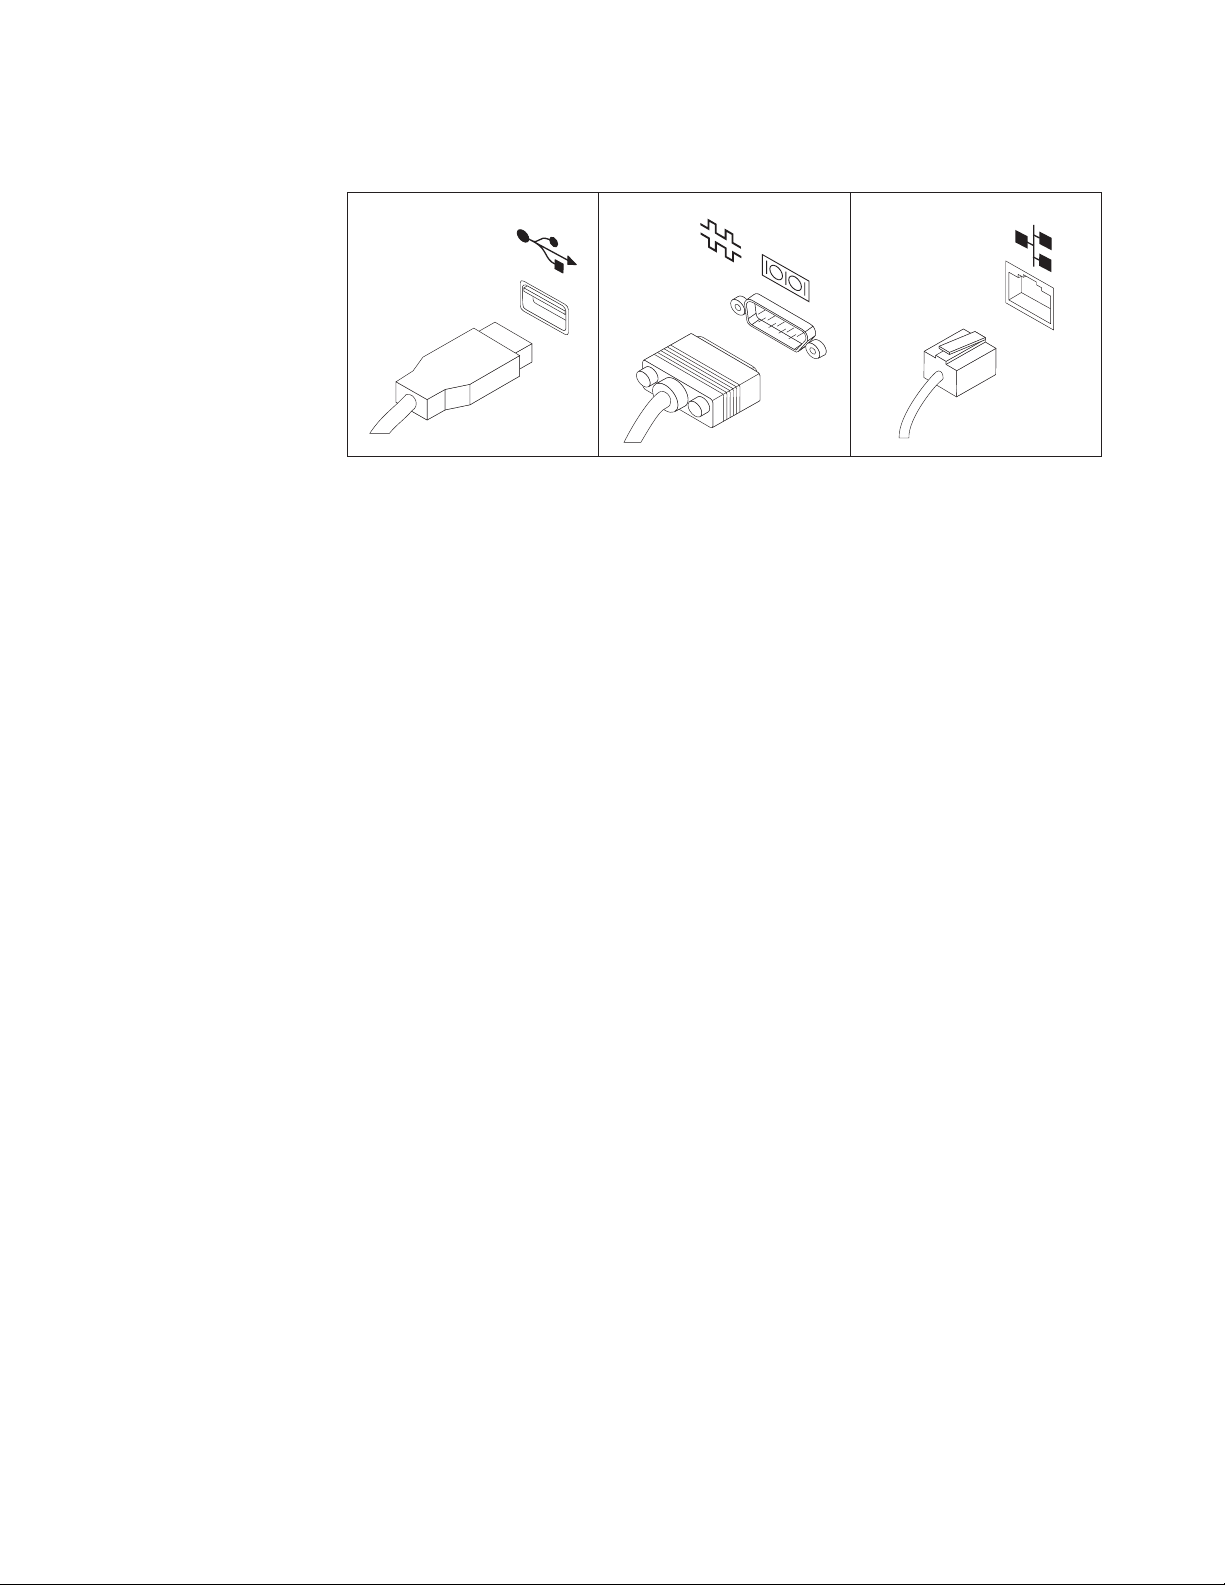
9. Connect any additional devices that you have. Your computer might not have
all connectors that are shown.
1
1 USB connector Use this connector to attach a device that requires a USB
2
3
connection, such as a keyboard, mouse, scanner, printer, or
personal digital assistant (PDA).
2 Serial port Use this connector to attach an external modem, a serial
printer, or other device that uses a 9-pin serial port.
3 Ethernet connector Use this connector to attach the computer to an
Ethernet-type local area network or to a cable modem.
Important: To operate the computer within FCC limits
when it is connected to an Ethernet network, use a
Category 5 Ethernet cable.
Chapter 3. Setting up your computer 9

10. Connect the power cords to properly grounded electrical outlets.
Note: For more information about connectors, refer to the Access Help online help
system. See “Access Help” on page 40 for instructions on how to open the
online help system.
Turning on computer power
Turn on the monitor and other external devices first, and then turn on the
computer. When the power-on self-test (POST) is finished, the logo window closes.
If your computer has preinstalled software, the software installation program
starts.
If you experience any problems during startup, see Chapter 7, “Troubleshooting
and diagnostics,” on page 25. For additional help, refer to Chapter 9, “Getting
information, help, and service,” on page 39. Yo u can get help and information by
telephone through the Customer Support Center. Refer to the safety and warranty
information that is provided with your computer for the Service and Support
worldwide telephone list.
Finishing the software installation
Important
Read the license agreements carefully before using the programs on this
computer. These agreements detail your rights, obligations, and warranties for
the software on this computer. By using these programs, you accept the terms
of the agreements. If you do not accept the agreements, do not use the
programs. Instead, promptly return the entire computer for a full refund.
The first time you start your computer, follow the instructions on the screen to
complete the software installation. If you do not complete the software installation
the first time the computer is turned on, unpredictable results might occur. When
the installation is complete, refer to the Access Help online help system to learn
more about your computer. See “Access Help” on page 40 for instructions on how
to open the online help system.
10 User Guide
Note: Some models might have a multilingual version of Microsoft® Windows
operating system preinstalled. If your computer has the multilingual
version, you will be prompted to choose a language during the installation
process. After installation, the language version can be changed through the
Windows Control Panel.
®

Completing important tasks
After you have set up your computer, perform the following tasks, which will save
you time and trouble later:
v Create a diagnostic CD/DVD image, diagnostic diskettes, or rescue media.
Diagnostic programs are used to test hardware components of your computer
and report operating-system-controlled settings that can cause hardware failures.
Making a diagnostic CD/DVD image, diagnostic diskettes, or rescue media
ahead of time assures that you will be able to run diagnostics if the Rescue and
Recovery workspace becomes inaccessible. For more information, see “PC-Doctor
for Windows PE” on page 28.
v Record your computer machine type, model, and serial number. If you need
service or technical support, you will probably be asked for this information. For
further information, refer to the safety and warranty information that is
provided with your computer.
Updating your operating system
Microsoft makes updates available for various operating systems through the
Microsoft Windows Update Web site. The We b site automatically determines what
Windows updates are available for your specific computer and lists those updates
only. Updates could include security fixes, new versions of Windows components
(such as media player), fixes to other portions of the Windows operating system,
or enhancements.
For more information about updating your operating system, refer to the Access
Help online help system. See “Access Help” on page 40 for instructions on how to
open the online help system.
Installing other operating systems
If you install your own operating system, follow the instructions that come with
your operating system discs. Remember to install all device drivers after you
install your operating system. Installation instructions are usually provided with
the device drivers.
Updating your antivirus software
Your computer comes with antivirus software that you can use to detect and
eliminate viruses. Lenovo provides a full version of antivirus software on your
hard disk drive with a free 30-day subscription. After 30 days, you must renew the
license to continue receiving the antivirus program updates.
For more information about updating your antivirus software, refer to the Access
Help online help system. See “Access Help” on page 40 for instructions on how to
open the online help system.
Shutting down the computer
When you turn off your computer, always follow the shutdown procedure for your
operating system. This prevents the loss of unsaved data or damage to your
software programs. To shut down the Microsoft Windows Vista® operating system,
open the start menu from the Windows desktop, move the cursor to the arrow next
to the lock workstation button, and select Shut Down. To shut down the Microsoft
Chapter 3. Setting up your computer 11

Windows XP operating system, open the Start menu from the Windows desktop,
click Shut down. Select Shut down from the drop down menu and click OK.
Installing external options
For information about installing external options for your computer, refer to
″Installing external options″ in the ThinkCentre Hardware Installation and Replacement
Guide.
12 User Guide
 Loading...