

Page 1

UserGuide
ThinkPadUSB3.0UltraDockandThinkPadUSB3.0ProDock
Page 2

Note:Beforeinstallingtheproduct,besuretoreadthewarrantyinformationinAppendixB“LenovoLimited
Warranty”onpage41.
FirstEdition(April2015)
©CopyrightLenovo2015.
LIMITEDANDRESTRICTEDRIGHTSNOTICE:IfdataorsoftwareisdeliveredpursuantaGeneralServicesAdministration
“GSA”contract,use,reproduction,ordisclosureissubjecttorestrictionssetforthinContractNo.GS-35F-05925.
Page 3

Contents
Chapter1.ThinkPadUSB3.0Ultra
Dock...................1
Abouttheultradock.............1
Productdescription............1
Mainfeatures..............1
Locatingthecontrols...........1
Systemrequirements...........3
Installingtheultradock............4
InstallingthedevicedriveronWindows
operatingsystems............4
Connectingtheultradocktoyournotebook
computer................4
UninstallingthedevicedriverfromWindows
operatingsystems............6
Hanginguptheultradock.........7
Usingtheultradock.............7
Usingtheheadsetandmicrophonecombo
connector................7
UsingtheGigabitEthernetconnector.....8
UsingtheUSBconnectors.........8
UsingtheDPoutputconnector.......8
UsingtheHDMIoutputconnector......8
Workingwiththeultradock...........9
Understandingthevideooutputmodes....9
Workingwiththeultradockutility.....10
Supportedresolutionsandrefreshrates...12
Troubleshooting..............15
Chapter2.ThinkPadUSB3.0Pro
Dock..................19
Abouttheprodock.............19
Productdescription...........19
Mainfeatures.............20
Locatingthecontrols..........21
Systemrequirements..........22
Installingtheprodock............23
InstallingthedevicedriveronWindows
operatingsystems...........23
Connectingtheprodocktoyournotebook
computer...............23
UninstallingthedevicedriverfromWindows
operatingsystems...........25
Hanginguptheprodock.........26
Usingtheprodock.............26
Usingtheheadsetandmicrophonecombo
connector...............26
UsingtheGigabitEthernetconnector....27
UsingtheUSBconnectors........27
UsingtheDPoutputconnector......27
UsingtheDVI-Ivideooutputconnectors...27
Workingwiththeprodock..........28
Understandingthevideooutputmodes...28
Workingwiththeprodockutility......30
Supportedresolutionsandrefreshrates...32
Troubleshooting..............34
AppendixA.ServiceandSupport...39
Onlinetechnicalsupport...........39
Telephonetechnicalsupport.........39
Accessibilityinformation...........39
AppendixB.LenovoLimited
Warranty................41
Part1-GeneralTerms...........41
Part2-Country-specificTerms........43
Part3-WarrantyServiceInformation......46
SuplementodeGarantíaparaMéxico......47
AppendixC.Electronicemission
notices................49
FederalCommunicationsCommissionDeclaration
ofConformity...............49
AppendixD.Notices..........53
Recyclinginformation............53
RecyclinginformationforChina........53
RecyclinginformationforBrazil........54
ImportantWEEEinformation.........54
ExportClassificationNotice.........54
Trademarks................54
AppendixE.RestrictionofHazardous
SubstancesDirective(RoHS).....57
EuropeanUnionRoHS...........57
ChinaRoHS................57
TurkishRoHS...............57
UkraineRoHS...............57
IndiaRoHS................57
©CopyrightLenovo2015
i
Page 4

iiUserGuide
Page 5

Chapter1.ThinkPadUSB3.0UltraDock
ThischaptercontainsproductinformationfortheThinkPad
®
USB3.0UltraDock(hereaftercalledultradock).
Abouttheultradock
Thissectioncontainsproductdescription,mainfeatures,locationsofcontrols,andsystemrequirements
fortheultradock.
Productdescription
Theultradockisaportableexpansionmodulethatenablesyoutoeasilyconnectyournotebookcomputer
totheEthernetandmultipledevices,suchasaheadset,amicrophone,andUSBdevices.
Youroptionpackageincludesthefollowing:
•ThinkPadUSB3.0UltraDock
•Poweradapter
•Powercord
•1-meter(39.37-inch)USB3.0cable
•Warrantyposter
Contactyourplaceofpurchaseifanyitemismissingordamaged.Besuretoretainyourproofofpurchase
andpackingmaterial.Theymightberequiredtoreceivewarrantyservice.
Mainfeatures
•USBconnectors:fourUSB3.0connectorsandtwoUSB2.0connectors
•Networkconnection:GigabitEthernetspeed
•Supportedexternalmonitors:DisplayPort®(DP)monitorandHighDefinitionMultimediaInterface
Maximumresolutionsandrefreshrates
1.DPoutputonly:3840x2160pixels(30Hz)
2.HDMIoutputonly:2560x1440pixels(50Hz)
3.DPandHDMIsimultaneousoutput:2048x1152pixels(60Hz)
Formoreinformation,goto“Supportedresolutionsandrefreshrates”onpage12.
Youcansetupyourworkareabyconnectingyournotebookcomputertotheultradockwiththeprovided
USB3.0cable,connectingmultipledevicestotheultradock,andsettingtheultradockonyournotebook
computer;then,youarereadytousethemultipledeviceseachtimeyouconnectyournotebookcomputer
totheultradock.
TM
(HDMI
)monitor
Locatingthecontrols
Thefollowingfigureshowsthelocationsofcontrolsontheultradock.
©CopyrightLenovo2015
1
Page 6

Figure1.Overviewoftheultradock
1PowerandconnectionindicatorUsedtoindicatewhethertheultradockispoweredonnormally.
2Security-lockslot
3PowerconnectorUsedtoconnectthepoweradapter.
4USB3.0upstreamconnector
5HDMIoutputconnectorUsedtoconnectanexternalmonitorwithanHDMIcable.
6DPoutputconnectorUsedtoconnectanexternalmonitorwithaDPcable.
7GigabitEthernetconnectorUsedtoconnectalocalareanetwork(LAN)cable.
8USB2.0connectorsUsedtoconnectUSB2.0devices,suchasaUSBkeyboard,aUSB
Usedtosecuretheultradockthroughasecuritycablelock.
Usedtoconnectanotebookcomputer.
mouse,aUSBspeaker,oraUSBprinter.
Notes:
1.ItisrecommendedthatyouconnectaUSBkeyboardanda
USBmousetotheconnectors.
2.IfyouareusingaUSB3.0device,itisrecommendedthat
youconnectittoaUSB3.0connectorratherthanUSB2.0
connectorforfasterUSBtransmissionspeed.
9USB3.0connectorUsedtoconnectUSB3.0devices,suchasaUSBscanner,aUSB
speaker,oraUSBprinter.
10AlwaysOnUSB3.0connector()UsedtoconnectUSB3.0devicesandchargesomemobiledigital
devicesandsmartphones.
11Powerbutton
12AlwaysOnUSB3.0connector()UsedtoconnectUSB3.0devicesandchargesomemobiledigital
Usedtoturnonorturnofftheultradock.
devicesandsmartphones.
13USB3.0connectorUsedtoconnectUSB3.0devices,suchasaUSBscanner,aUSB
speaker,oraUSBprinter.
2UserGuide
Page 7

14HeadsetandmicrophonecomboconnectorUsedtoconnectamicrophone,aheadset,oraspeaker.
15VESA
®
mountingholeUsedtofixtheultradockontheThinkCentre®TinyL-Bracket
MountingKitoronthewall.
Systemrequirements
Beforeusingtheultradock,ensurethatyournotebookcomputermeetsthefollowinggeneralrequirements:
•Microsoft
®
Windows
•MicrosoftWindows8.1(32bitor64bit)
•WindowsMediaPlayer(WMP),CyberLinkPowerDVD
•Highperformanceofthebatterypowerplan
•Adevicedriver
Formoreinformationaboutthedevicedriver,goto“InstallingthedevicedriveronWindowsoperating
systems”onpage4
ForDPoutputonly,HDMIoutputonly,andDP/HDMIsimultaneousoutput,ensurethatyournotebook
computeralsomeetsthefollowingrequirements:
•Thesystemrequirementsfora3840x2160resolutionwithDPsingleoutputareasfollows:
®
.
7(32bitor64bit)
TM
,andCorel
®
WinDVD
®
Minimumrequirements(forviewingdocumentsand
Websites)
®
Processor:Intel
Core
TM
i5ori72+GHz/AMD
orbetter
Memory:4GB
VideoCard:IntelHD4000,ATIRadeonHD7xxx,
®
NVIDIA
GeForcel
®
5xxMorbetter
USB:USB2.0butUSB3.0recommended
®
Trinity
Recommendedrequirements(forfull-screenvideo
playback)
Processor:IntelCorei72+GHz/AMDRichlandA
10–575x/AMDKaveriA10–7400Porbetter
Memory:8GB
VideoCard:IntelHD4000,ATIRadeonHD8650,
NVIDIAGeForce7xxMorbetter
USB:USB3.0
Disk:7200roundperminit(RPM)ofHardDiskDrive
(HDD)orSolid-StateDrive(SSD)
Note:Ifyouplaythevideofilewiththeresolutionof
3840x2160pixels,thesystemmustbecapableof
decodingthevideofileintheGraphicProcessingUnit
(GPU).
•Thesystemrequirementsfora2560x1440resolutionwithHDMIoutputonlyareasfollows:
Minimumrequirements(forviewingdocumentsand
Websites)
Processor:IntelCorei5ori72+GHz/AMDLlanoor
better
Memory:4GB
VideoCard:IntelGMAx4500/36x0,ATIRadeon
HD3xxx,NVIDIAGeForce9xxxxorbetter
USB:USB2.0butUSB3.0recommended
Recommendedrequirements(forfull-screenvideo
playback)
Processor:IntelCorei5ori72+GHz/AMDLlanoor
better
Memory:8GB
VideoCard:IntelGMAx4500/36x0,ATIRadeon
HD3xxx,NVIDIAGeForce9xxxxorbetter
USB:USB3.0
•Thesystemrequirementsfora2048x1152resolutionwithDPandHDMIsimultaneousoutputareas
follows:
Chapter1.ThinkPadUSB3.0UltraDock3
Page 8

Minimumrequirements(forviewingdocumentsand
Websites)
Processor:1.4GhzIntelCore2Duo/AMDTurion
x2orbetter*
Memory:2GB
VideoCard:AnysupportedGPUreleasedafter
September2009.
TM
Recommendedrequirements(forfull-screenvideo
playback)
64
Processor:2.4GhzIntelCore2Duo/AMDTurionIIor
better*
Memory:2GB
VideoCard:IntelHD3000,A TIRadeonHD3xxx,NVIDIA
GeForce9xxxorbetter.
*AnyIntelCore2Quad,i3,i5,i7,AMDPhenom,Fusion(Llano,Trinity&Richland),orJaguar(Temash&
Kabini)meetstheprocessorrequirements.
Installingtheultradock
Thissectionprovidesinformationonhowtoconnecttheultradocktoyournotebookcomputer,howtoinstall
anduninstallthedevicedriver,andhowtohanguptheultradock.
InstallingthedevicedriveronWindowsoperatingsystems
ToinstallthedevicedriverontheWindows7orWindows8.1operatingsystem,dothefollowing:
1.Gotohttp://www.lenovo.com/support/docksandselectThinkPadUSB3.0UltraDock.
2.Locateanddownloadtheinstallationfileforthedevicedriver.
3.Double-clicktheinstallationfile,andthenfollowtheinstructionsonthescreentocompletethe
installation.
4.Restartyourcomputerafterthecompletionmessageisdisplayed.
Afteryouhaveinstalledthedevicedriver,youcanconnecttheultradocktoyournotebookcomputer.
Connectingtheultradocktoyournotebookcomputer
Thissectionprovidesinformationonhowtoconnecttheultradocktoyournotebookcomputerwiththe
providedpoweradapter,powercord,andUSB3.0cable.
Note:Installthedevicedriverbeforeyouconnecttheultradocktoyournotebookcomputer.
Toconnecttheultradocktoyournotebookcomputer,dothefollowing:
1.Connectthepoweradaptertothepowercord.
2.Connectthepowerplugofthepowercordtoanelectricaloutlet.
4UserGuide
Page 9
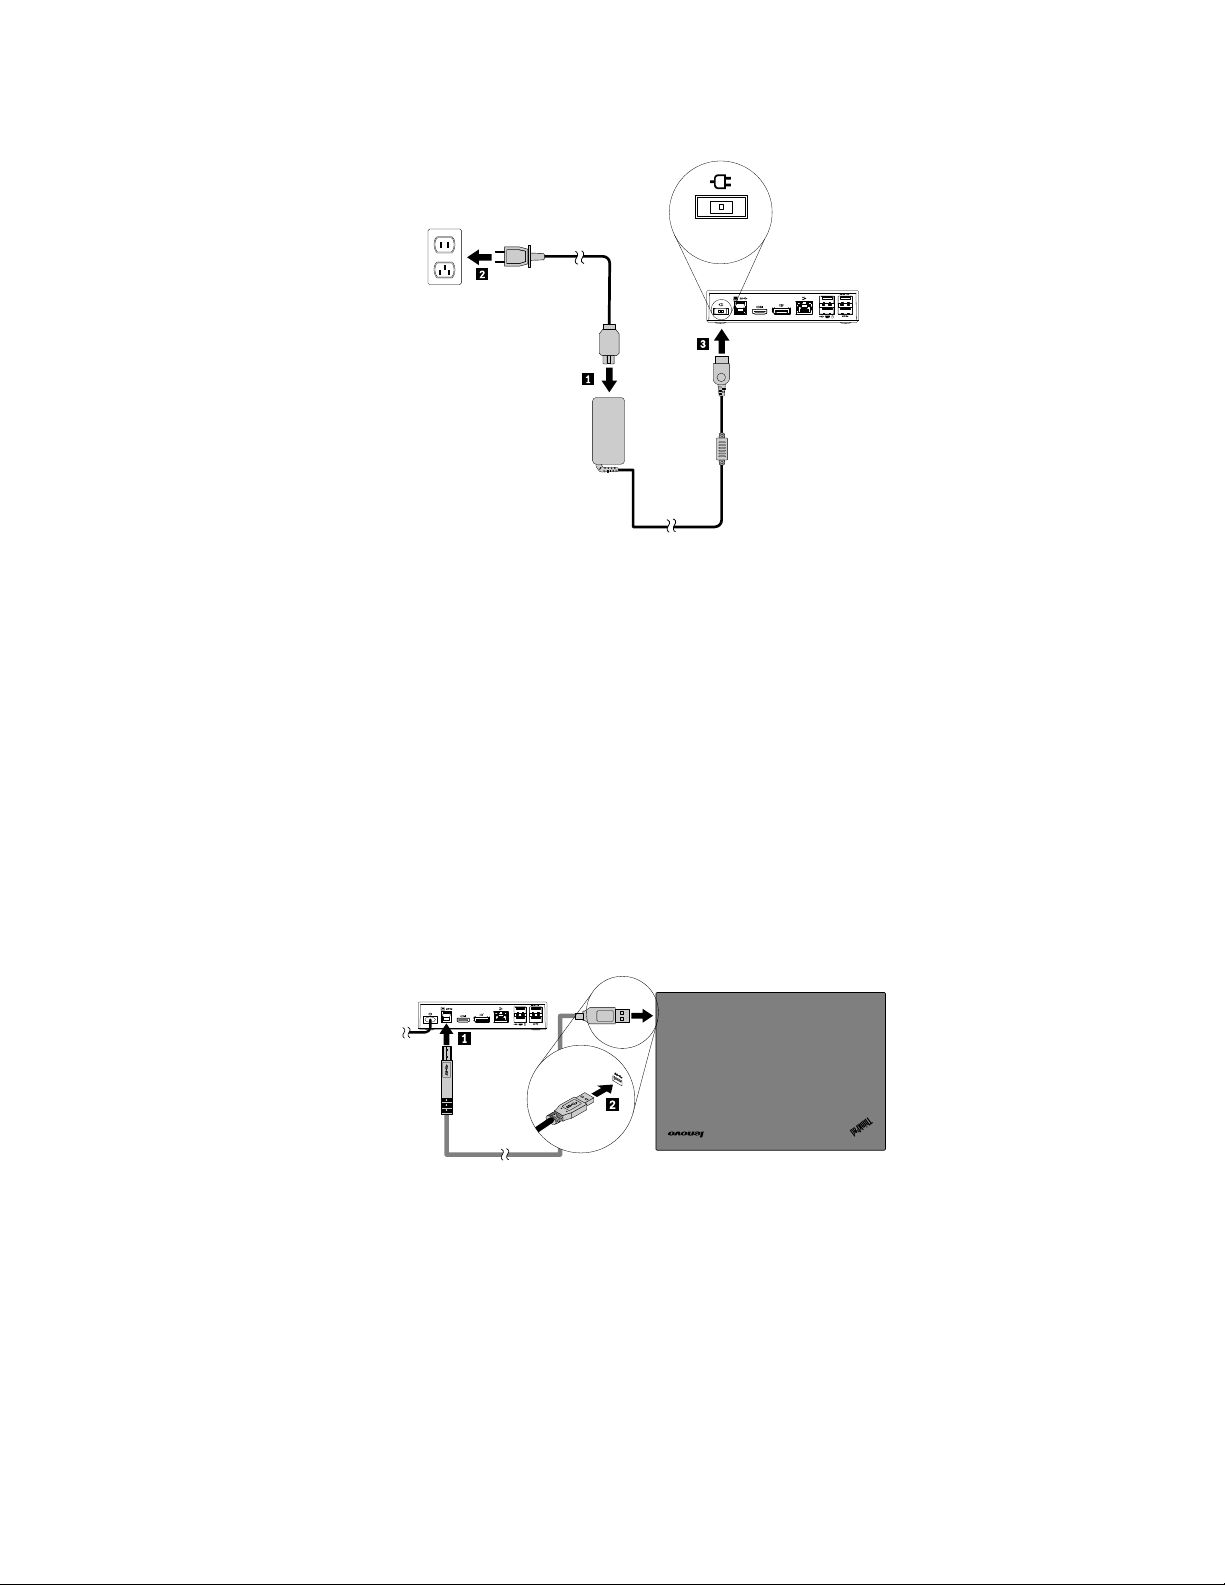
Figure2.Connectingthepoweradaptertothepowercord
3.Connectthedc-inconnectorofthepoweradaptertotheultradock.Theultradockispoweredon
automatically.T opowerofftheultradock,pressthepowerbuttonoftheultradock.
Notes:
a.Whentheultradockispowersupplied,theultradockispoweredonautomaticallyandthepower
andconnectionindicatorison.Pressthepowerbuttonoftheultradocktopowerofftheultradock.
b.Besuretocorrectlyconnecttheultradocktothepowersupply.Iftheultradockisnotpowered
on,youwillnotbeabletousetheultradock.
4.ConnecttheUSBplug1oftheUSB3.0cabletotheUSB3.0upstreamconnectorontheultradock.
5.ConnecttheUSBplug2oftheUSB3.0cabletoanavailableUSB3.0connectoronthenotebook
computer.Thesystemwillautomaticallyidentifyandconfiguretheultradock.Thevideooutputfunction
oftheultradockwillbeautomaticallyenabledaftertheconfigurationiscompleted.
Figure3.Connectingtheultradocktothepowersupplyandnotebookcomputer
Notes:
•Theultradockwillnotsupplypowertothenotebookcomputerduringthetimewhenitisconnectedto
thenotebookcomputer.
•ConnectingtheultradocktoanyconnectorotherthanaUSB3.0connectororusinganyUSBcableother
thanaUSB3.0cablemightimpactontheultradockperformance,especiallythevideoplayback,and
Ethernetperformance.However,thesupportedmaximumresolutionwillnotbereduced.
Chapter1.ThinkPadUSB3.0UltraDock5
Page 10

UninstallingthedevicedriverfromWindowsoperatingsystems
ThissectionprovidesinstructionsonhowtouninstallthedevicedriverfromWindowsoperatingsystems.
TouninstallthedevicedriverfromtheWindows7orWindows8.1operatingsystem,dothefollowing:
FortheWindows7operatingsystem:
1.Exitallapplicationsthatusetheprodock.
2.ClickStart➙AllPrograms➙LenovoUSBDisplay➙Uninstall.
3.Followtheinstructionsonthescreentouninstallthedevicedriver.
4.Ifnecessary,restartyourcomputer.
FortheWindows8.1operatingsystem:
1.GotoControlPanelbydoingoneofthefollowing:
•Fromthedesktop,movethepointertothetop-rightorbottom-rightcornerofthescreentodisplay
thecharms,andthenclickSettings➙ControlPanel.
•FromtheStartscreen,dothefollowing:
a.Clickthearrowiconinthebottom-leftcornerofthescreentogototheAppsscreen.
b.Scrolltotherightside,andclickControlPanelintheWindowsSystemsection.
2.DependingonyourControlPanelmode,dooneofthefollowing:
•ClicktheUninstallaprogramoptionundertheProgramsmenu.
•ClickProgramsandFeatures.
3.SelecttheLenovoUSBDisplayandthenright-clickyourmouse.TheUninstalloptionisdisplayed.
4.ClickUninstall.
5.Followtheinstructionsonthescreentouninstallthedevicedriver.
6UserGuide
Page 11
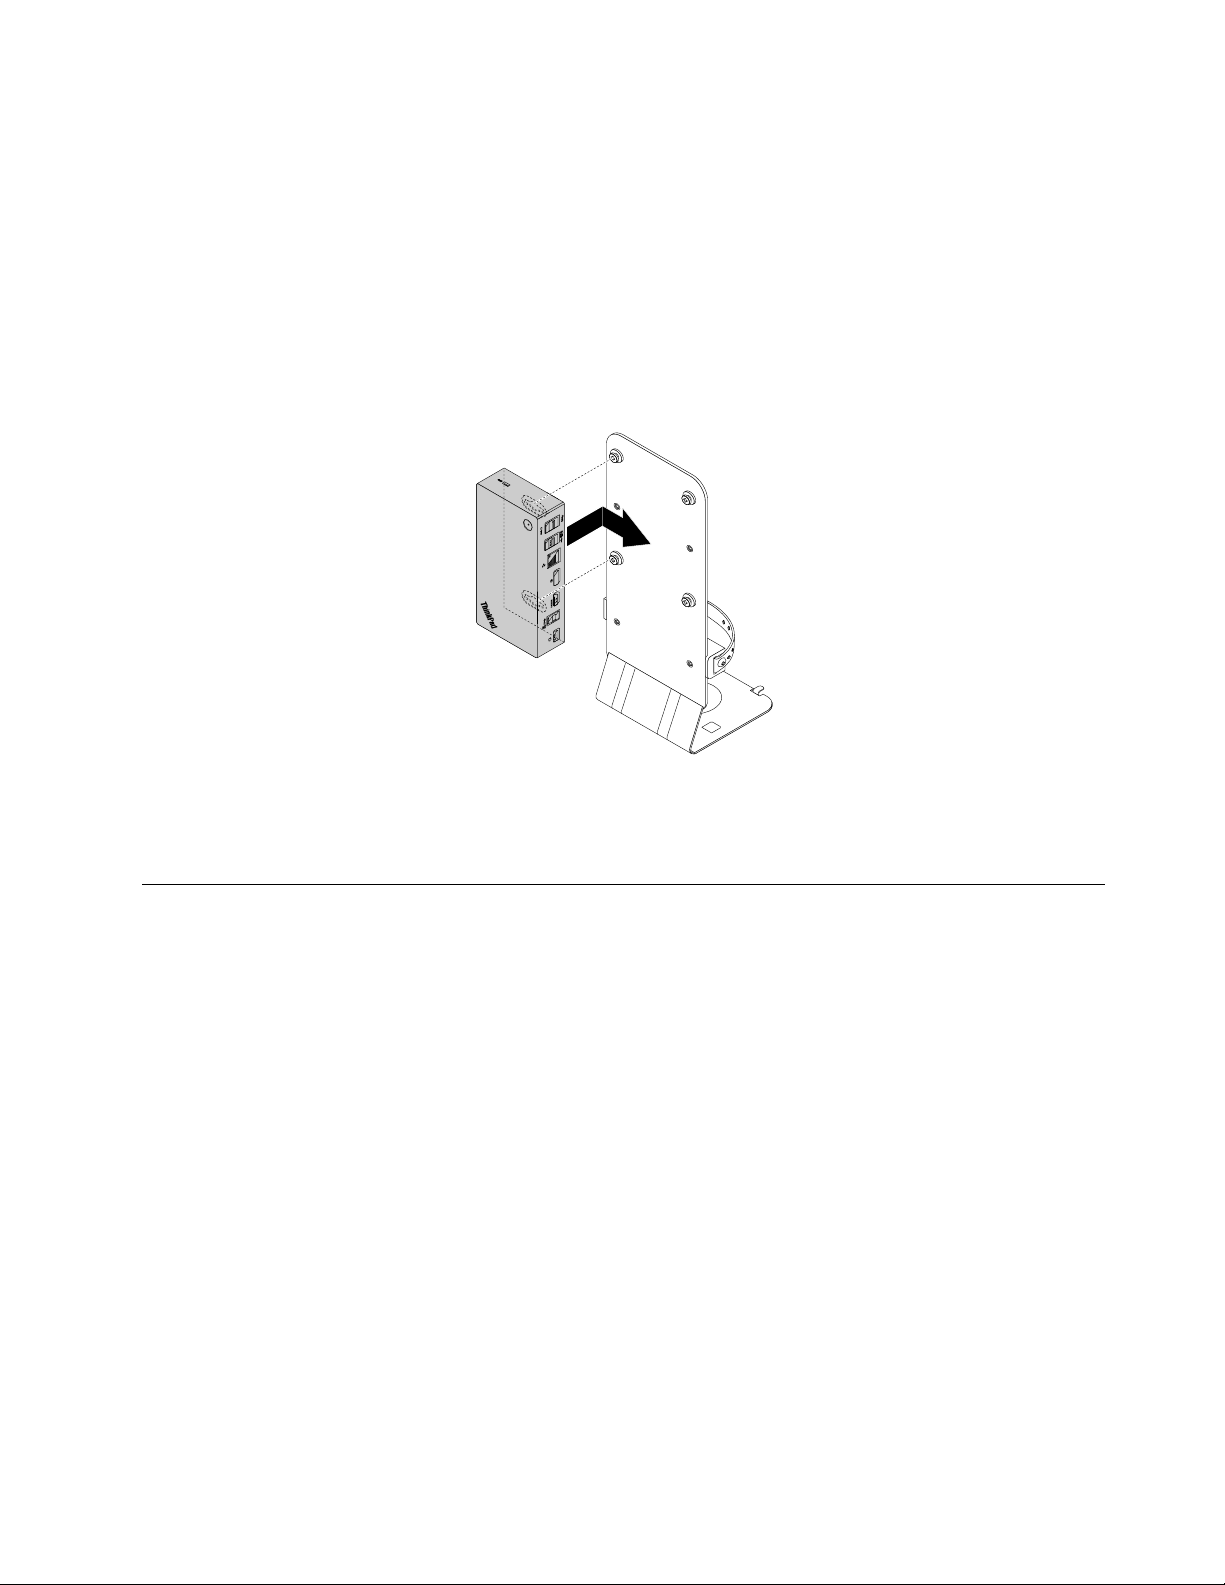
Hanginguptheultradock
WhenyouworkwithaThinkPadnotebookcomputer,anultradock,andanexternalmonitortogether,you
canchoosetohanguptheultradockontheThinkCentreTinyL-BracketMountingKit(hereaftercalledL
Bracket).Itsavesspacefromyourworkareainthisway.
FormoreinformationabouttheLBracketandthesupportedmonitor,gotowww.lenovo.com/support/stands.
AligntheVESAmountingholesintheultradockwiththecorrespondingtwoscrewsontheLbracket.Then
installtheultradockontotheLbracketverticallyasshown.
Figure4.HanginguptheultradockontheLBracket
YoucanalsoinstalltheultradockontheVESAscrewsonthewallinthesimilarway.
Usingtheultradock
Thissectionprovidesinformationonhowtousetheheadsetandmicrophonecombojack,GigabitEthernet
connector,DPoutputconnector,HDMIvideooutputconnector,USBconnectorsontheultradock
Theultradockexpandstheconnectioncapabilityofyournotebookcomputer.Youcanconnectdevicesto
theappropriateconnectorsontheultradockwhileyournotebookcomputerisstarted.Normallyitwilltake
severalsecondsforthenotebookcomputertorecognizenewdevices.
Theultradocksimplifiestheconnectionbetweenyournotebookcomputerandmultipledevices.For
example,youcanconnecttheUSBdevicesandexternalmonitorstotheultradockratherthanthenotebook
computer.Whenyouwanttotakeyournotebookcomputeraway,youcandisconnectthenotebook
computerfromtheultradockratherthanremovetheUSBdevicesandexternalmonitors.Whenyoucome
back,simplyconnectyournotebookcomputertotheultradocktoresumeallpreviousconnectionsand
startworkingatonce.
Usingtheheadsetandmicrophonecomboconnector
Theheadsetandmicrophonecomboconnectorontheultradockisa3.5mmmicrophonecombinedstereo
line-outconnector.Itworksforthestandard3.5mmheadset,microphone,orspeaker.
Tousetheheadsetandmicrophonecomboconnectorontheultradock,connectyourheadset,microphone,
orspeakertotheheadsetandmicrophonecomboconnector.
Chapter1.ThinkPadUSB3.0UltraDock7
Page 12
Note:Theheadsetandmicrophonecomboconnectorontheultradockareautomaticallyenabledwhen
youhavesuccessfullyconnectedtheultradocktoyournotebookcomputerandinstalledthedevicedriver.
However,ifyoucannothearanythingfromtheheadsetconnectedtotheheadsetandmicrophonecombo
connectorontheultradock,youcanmanuallyenabletheheadsetandmicrophonecomboconnectoronthe
ultradock.See“Manuallysettingtheplaybackdeviceandrecordingdevice”onpage11
formoreinformation.
UsingtheGigabitEthernetconnector
TousetheGigabitEthernetconnectorontheultradock,connecttheultradocktostandard10Mbps,100
Mbps,or1000Mbpsnetwork,andwaituntiltheultradockisfullyconfiguredbytheWindowsoperating
system.
TheGigabitEthernetconnectionontheultradockfullysupportstheThinkVantage
program.
TheGigabitEthernetconnectionontheultradocksupportsPrebootexecutionenvironment(PXE)booton
theselectedLenovonotebookcomputers.
TherearetwoindicatorsonthetopoftheGigabitEthernetconnector.
WorkingstatusIndicatoractivity
TheultradockconnectstotheEthernetsuccessfully.
Theultradockistransferringdata.Theleftindicatorkeepsflashinginamber.
Therightindicatorstaysoningreen.
®
AccessConnections
UsingtheUSBconnectors
TousetheUSB2.0connectors,connectaUSB2.0devicesuchasthemouseorkeyboardtotheUSB2.0
connectorsontheultradock.T ousetheUSB3.0connectors,connectaUSB3.0devicetotheUSB3.0
connectorontheultradock.
WhentheUSBdeviceiscorrectlyconnectedtoaUSBconnectorontheultradock,aninformationwindow
willbedisplayedintheWindowsnotificationarea,indicatingthattheUSBdevicehasbeenconnected
tothecomputer.
UsingtheAlwaysOnUSB3.0connectors
Bydefault,theAlwaysOnUSB3.0connector()enablesyoutochargesomemobiledigitaldevices
andsmartphoneswhenyourcomputerisinthefollowingsituation:
•Whenyourcomputerisonorinsleepmode
•Whenyourcomputerisinhibernationmodeoristurnedoff
•Whentheultradockisdisconnectedfromyourcomputer
Itcansupplypowerupto2.4Aduringthechargingprocess.Whenyoupressthepowerbuttontoturnoff
theultradock,theultradockstopspowersupply.
UsingtheDPoutputconnector
YoucanconnectoneexternalmonitortotheultradockbyusingtheDPoutputconnector.
UsingtheHDMIoutputconnector
YoucanconnectoneexternalmonitortotheultradockbyusingtheHDMIoutputconnector.
8UserGuide
Page 13

Workingwiththeultradock
Thissectionprovidesinformationaboutthevideooutputfunctionoftheultradockandinstructionsonhow
toworkwiththeultradockutility,whichenablesyoutoconfiguretheultradocktoyourneeds.
Understandingthevideooutputmodes
Theultradockworksinthefollowingthreevideooutputmodes:
•“Extendmode”onpage9
•“Mirrormode”onpage10
•“Single-displaymode”onpage10
Bydefault,theultradockworksinextendmode.Thefirsttimeyouconnecttheultradocktoyournotebook
computer,theresolutionofyournotebookcomputerandtheconnectedmonitorwillbechangedtothe
default.Y oucanconfigureyourresolutiontoyourneeds.
Extendmode
Whentheultradockisinextendmode,itsplitsyourdisplayacrosstwomonitors.
Therearethreeoptionswhenyouareusingextendmode:
•Extend:Whenyouselectthisoption,yournotebookcomputermonitorbecomestheprimarydisplayand
theexternalmonitorbecomesthesecondarydisplay.Bydefault,theexternalmonitordisplayisonthe
rightsideofthenotebookcomputermonitordisplay.
•ExtendTo:Whenyouselectthisoption,yournotebookcomputermonitorbecomestheprimarydisplay
andtheexternalmonitorbecomesthesecondarydisplay.Youcangivethemonitoritsownframebuffer
throughthesubmenuoptionsRight,Left,Above,andBeloworthroughdragoperations.Thedisplay
spaceisacontinuousarea;therefore,windowsandobjectscanbemovedbetweendifferentdisplays.
•SetasMainMonitor:Whenyouselectthisoption,theexternalmonitorbecomestheprimarydisplayand
thenotebookcomputermonitorbecomesthesecondarydisplay.
Inextendmode,youcandraganddropwindowsfromonedisplaytotheother.Y oualsocanincrease
yourproductivitybydoingthefollowing:
•Readinge-mailsononedisplayandopeningattachmentsontheother
•Expandingaspreadsheetacrosstwodisplays
•Increasingyourworkareabyputtingallthepaletteandtoolbarsontheotherdisplaywhenyouare
doinggraphicsediting
•Keepingthedesktopononedisplayandwatchingvideosontheother
Toenterextendmode,dothefollowing:
1.ClicktheThinkPadUSB3.0UltraDockiconintheWindowsnotificationarea.Apop-upwindow
opens.
2.SelectThinkPadUSB3.0UltraDock,andthenselectonefromthefollowing:
•Extend
•ExtendT o
•SetasMainMonitor
Chapter1.ThinkPadUSB3.0UltraDock9
Page 14

Toexitextendmode,dothefollowing:
1.ClicktheThinkPadUSB3.0UltraDockiconintheWindowsnotificationarea.Apop-upwindow
opens.
2.SelectThinkPadUSB3.0UltraDock➙Off.
Mirrormode
Whentheultradockisinmirrormode,itclonesyournotebookcomputerscreentotheexternalmonitor.the
ultradockautomaticallyselectsthesettings(screenresolution,colorquality,andrefreshrate)fortheexternal
monitor,whichachievesoptimalresolutionbasedonyournotebookcomputer.
Toentermirrormode,dothefollowing:
1.ClicktheThinkPadUSB3.0UltraDockiconintheWindowsnotificationarea.Apop-upwindow
opens.
2.SelectThinkPadUSB3.0UltraDock➙Mirror.
Toexitmirrormode,dothefollowing:
1.ClicktheThinkPadUSB3.0UltraDockiconintheWindowsnotificationarea.Apop-upwindow
opens.
2.SelectThinkPadUSB3.0UltraDock➙Off.
Single-displaymode
Whentheultradockisinsingle-displaymode,itenablesyoutoshowyourdesktopononlyonescreen.
Therearetwooptionswhenyouareusingsingle-displaymode:
•NotebookMonitorOff:Whenyouselectthisoption,thedisplayofyournotebookcomputermonitor
turnsoffandthedisplayoftheexternalmonitorturnson.
•Off:Whenyouselectthisoption,thedisplayoftheexternalmonitorturnsoffandthedisplayofyour
notebookcomputermonitorturnson.However,otherfunctionssuchasaudio,Ethernet,andUSB
connectioncanstillworkthoughthedisplayisoff.
Toentersingle-displaymode,dothefollowing:
1.ClicktheThinkPadUSB3.0UltraDockiconintheWindowsnotificationarea.Apop-upwindow
opens.
2.SelectThinkPadUSB3.0UltraDock➙NotebookMonitorOfforOff.
Toexitsingle-displaymode,dothefollowing:
1.ClicktheThinkPadUSB3.0UltraDockiconintheWindowsnotificationarea.Apop-upwindow
opens.
2.SelectThinkPadUSB3.0UltraDock,andthenselectanothermodeasyouwant.
Workingwiththeultradockutility
Theultradockutilityenablesyoutoconfigurethedisplaysettingsoftheultradock.
10UserGuide
Page 15

Note:Thesettingsyouhaveconfiguredfortheultradockwillberetainedeachtimewhenyouconnect
thenotebookcomputertotheultradock.Thisfeatureenablesyoutouseyournotebookcomputerwith
multipledocks.Forexample,ifyouuseanotebookcomputerbothathomeandatwork,youcansetup
bothworkareaswithdocks.Then,youjustconnectyournotebookcomputertotheultradockateither
location,andyouarereadytowork.
Manuallysettingtheplaybackdeviceandrecordingdevice
Bydefault,theLenovonotebookcomputersusetheheadsetandmicrophonecomboconnectorontheultra
dockanddisablebuilt-inaudioconnectorswhentheultradockisconnected.
Tomanuallysettheplaybackdeviceandrecordingdeviceontheultradock,dothefollowing:
FortheWindows7operatingsystem:
1.ClicktheThinkPadUSB3.0UltraDockiconintheWindowsnotificationarea.Apop-upwindow
opens.
2.SelectAudioSetup.TheSoundandAudioDevicesPropertieswindowopens.
3.ClicktheAudiotab.
4.SelectaLenovoUSBaudiodeviceorotheraudiodevicefromtheSoundplaybackpanel,andthen
selectaLenovoUSBaudiodeviceorotheraudiodevicefromtheSoundrecordingpanel.
5.ClickOK.
FortheWindows8.1operatingsystem:
1.ClicktheThinkPadUSB3.0UltraDockiconintheWindowsnotificationarea.Apop-upwindow
opens.
2.SelectAudioSetup.TheSoundwindowopens.
3.OnthePlaybacktab,selectaUSBaudioline-outdevice.OntheRecordingtab,selectaUSBaudio
line-indevice.
4.ClickOK.
Rotatingtheexternalmonitordisplay
Theultradockenablesyoutorotateonlyyourexternalmonitordisplayasyouwant.
Torotatetheexternalmonitordisplay,dothefollowing:
1.ClicktheThinkPadUSB3.0UltraDockiconintheWindowsnotificationarea.Apop-upwindow
opens.
2.SelectThinkPadUSB3.0UltraDock➙ScreenRotation,andthenselectoneofthefollowingoptions:
•Normal:Theexternalmonitordisplayremainsthesameasyournotebookcomputermonitordisplay.
•RotatedLeft:Theexternalmonitordisplayrotates90degreestotheleft.
•RotatedRight:Theexternalmonitordisplayrotates90degreestotheright.
•Upside-Down:Theexternalmonitordisplaybecomesupside-down.
Note:Foranormaldisplay,youcancontinuallyclickRotatedLeftorRotatedRightuntilthedisplay
becomesupside-down.
Chapter1.ThinkPadUSB3.0UltraDock11
Page 16
Settingtheresolutionoftheexternalmonitor
Theultradockenablesyoutosettheresolutionoftheexternalmonitor.
Inextendmodeandsingle-displaymode,youcansettheresolutionoftheexternalmonitorbydoingthe
following:
1.ClicktheThinkPadUSB3.0UltraDockiconintheWindowsnotificationarea.Apop-upwindow
opens.
2.SelectThinkPadUSB3.0UltraDock➙ScreenResolution,andthenselectthedesiredscreen
resolutionoptionfortheexternalmonitor.Forexample,“2048x1152”meansthatthevideooutput
resolutionwillbe2048by1152pixels.
Inmirrormode,youcansettheresolutionoftheexternalmonitorbydoingthefollowing:
1.ClicktheThinkPadUSB3.0UltraDockiconintheWindowsnotificationarea.Apop-upwindow
opens.
2.SelectVideoSetup.Awindowopens.
3.IntheResolutiondrop-downlistbox,movetheslideruptoincreaseordowntodecreasetheresolution
oftheexternalmonitor.
Switchingvideooutputmodes
Toswitchfromonevideooutputtoanother,dothefollowing:
1.ClicktheThinkPadUSB3.0UltraDockiconintheWindowsnotificationarea.Apop-upwindow
opens.
2.SelectThinkPadUSB3.0UltraDock,andthenselectthevideooutputmodeasyouwant.
Formoreinformationaboutthevideooutputmodes,referto“Understandingthevideooutputmodes”
onpage9
.
Supportedresolutionsandrefreshrates
Thefollowingtableslisttherefreshratessupportedatvariousresolutionsfortheultradockvideooutput.
Table1.Supportedresolutionsandrefreshrates:DPoutputonly
Resolution
640x48060,67,72,75,85
720x40070,85,88
720x48050,60
768x57650,60
800x60056,60,72,75,85
832x624
800x48060
848x48060
1024x60060
1024x76860,70,75,85
1152x864
1152x870
Refreshrate(Unit:Hz)
75
75
75
12UserGuide
Page 17

Table1.Supportedresolutionsandrefreshrates:DPoutputonly(continued)
Resolution
1280x72050,60
1280x76860,75,85
1280x80060
1280x96060,85
1280x102460,75
1360x76860
1366x76850,60
1368x76860
1400x105060,75,85
1440x90060
1600x90060
1600x120060
1680x105060
1920x108050,60
1920x120060
2048x108060
2048x115260
2048x128060
2048x153660
2560x144050,60
2560x160060
3840x216030
Refreshrate(Unit:Hz)
Notes:
1.Resolutionreferstothenumberofpixelshorizontallyandverticallydisplayedonthescreen.
2.Refreshrate(alsocalledverticalfrequency)measuresthespeedthattheentirescreenisrescanned.
Table2.Supportedresolutionsandrefreshrates:HDMIoutputonly
Resolution
640x48060,67,72,75,85
720x40070,85,88
720x48050,60
768x57650,60
800x60056,60,72,75,85
832x624
800x48060
848x48060
1024x60060
1024x76860,70,75,85
Refreshrate(Unit:Hz)
75
Chapter1.ThinkPadUSB3.0UltraDock13
Page 18

Table2.Supportedresolutionsandrefreshrates:HDMIoutputonly(continued)
Resolution
1152x864
1152x870
1280x72050,60
1280x76860,75,85
1280x80060
1280x96060,85
1280x102460,75
1360x76860
1366x76850,60
1368x76860
1400x105060,75,85
1440x90060
1600x90060
1600x120060
1680x105060
1920x108050,60
1920x120060
2048x108060
2048x115260
2048x128060
2048x153660
2560x144050
Refreshrate(Unit:Hz)
75
75
Table3.Supportedresolutionsandrefreshrates:DPandHDMIsimultaneousoutput
Resolution
640x48060,67,72,75,85
720x40070,85,88
720x48050,60
768x57650,60
800x60056,60,72,75,85
832x624
800x48060
848x48060
1024x60060
1024x76860,70,75,85
1152x864
1152x870
1280x72050,60
Refreshrate(Unit:Hz)
75
75
75
14UserGuide
Page 19

Table3.Supportedresolutionsandrefreshrates:DPandHDMIsimultaneousoutput(continued)
Resolution
1280x76860,75,85
1280x80060
1280x96060,85
1280x102460,75
1360x76860
1366x76850,60
1368x76860
1400x105060,75,85
1440x90060
1600x90060
1600x120060
1680x105060
1920x108050,60
1920x120060
2048x108060
2048x115260
Refreshrate(Unit:Hz)
Troubleshooting
Thischapterprovidessometroubleshootinghintsandtipstoassistyouifyouexperienceanyproblemswith
theultradock.Checkthefollowingitemsfirsttotrytosolvetheproblem.
General
1.TheThinkPadUSB3.0UltraDockiconisnotdisplayedonthescreen.
TheThinkPadUSB3.0UltraDockiconisdisplayedonlywhenanexternalmonitorisconnectedto
theultradock.Ifanexternalmonitorisconnected,ensurethatthevideocableisfullyinsertedintothe
ultradockandthemonitor.
2.Thepowerandconnectionindicatoroftheultradockisnoton.
Ensurethatyouhavecorrectlyconnectedthepoweradaptertotheultradockandaworkingelectrical
outlet,andthatyouhavepressedthepowerbutton.Donotuseanypoweradapterotherthantheone
providedwiththeultradock.
3.YouconnecttheultradocktoacomputerwiththeprovidedUSB3.0cable,buttheultradock
doesnotwork.
a.Ensurethattheultradockiswellpoweredbyitspoweradapter.theultradockalwaysneedsexternal
poweradapterforoperation,becauseitdoesnottakepowerfromtheUSBconnectorattached
toyournotebookcomputer.
b.Ensurethatthedevicedriveroftheultradockiswellinstalled;ifnot,installthedevicedriverand
restartthecomputer.
c.EnsurethattheUSBconnectoronyourcomputerworkswell;ifnot,replacewithotherUSB
connectors.
4.The2.4GHzwirelesskeyboardor2.4GHzwirelessmousefunctionisinterrupted.Themouse
pointerlagsoritcannotmove.Somecharactersarelostwhenyouinputbythekeyboard.
Chapter1.ThinkPadUSB3.0UltraDock15
Page 20

Itisrecommendedthatyouconnectyour2.4GHzdevicereceivertothefrontUSB3.0connectoron
theultradockandavoidconnectinganotherUSB3.0devicenexttotheconnectorwiththereceiver
attached.
5.Whenyouconnectyourdevice(suchasamobilephone)tothedockforcharging,thecharging
speedbecomesslow.
EnsurethatyouconnectyourmobilephonetotheAlwaysOnUSB3.0connector.Disconnecttheultra
dockfromthecomputer,thechargingspeedmaybecomefaster.
6.ThemobilephonesorotherUSBdevicescannotbechargedwhenconnectedtotheAlwaysOn
USB3.0connector.
Itisrecommendedthatyoucandisconnecttheultradockfromthenotebookcomputerandthenyou
canchargethemobilephonesorotherUSBdevices.
7.YourmouseandkeyboardcannotwakeupyourcomputersystemwhenconnectedtotheAlways
OnUSB3.0connector.
ItisrecommendedthatyourmouseorkeyboardisconnectedtotheotherUSBconnector.
Videooutput
1.Theexternalmonitordisplayisblank.
•Ensurethatthenotebookcomputerconnectedtotheultradockisrunningcorrectlyandisnotin
standbyorhibernationmode.Whenthenotebookcomputerisinstandbyorhibernationmode,
theexternalmonitordisplayisalwaysblank.
•Ensurethatthedevicedriverisinstalledfollowingtheinstallationinstructionsandtheiconforthe
ultradockisvisibleintheWindowsnotificationarea.
•Ensurethatthefollowingconnectionsarecorrect:
–TheconnectionbetweentheUSB3.0cableandyournotebookcomputer
–TheconnectionbetweentheUSB3.0cableandtheultradock
–Theconnectionamongthepoweradapter,theultradock,andtheelectricaloutlet
–Theconnectionbetweenyourvideocabletotheultradockandtheexternalmonitor.
•Iftheproblempersists,disconnectallconnectionsoftheultradock,anduninstalltheultradock
devicedriver.Then,reinstallthedevicedriverandtheultradock.
2.Youcannotplaybackvideosontheexternalmonitorbutcanplaythembackonthenotebook
computermonitor.
SomenotebookcomputersdonotsupporttheCertifiedOutputProtectionProtocol(COPP),andyou
willnotbeabletoplaybacktheprotectedvideosontheexternalmonitorconnectedtotheultra
dock.TheCorelWinDVD10programalsohaslimitationsonplayingbackvideosintheWindows
XPoperatingsystem.
Toplaybackvideosontheexternalmonitor,youcanconnecttheexternalmonitortotheHDMIor
DPconnectoronyournotebookcomputer,andextendthedisplaytotheexternalmonitor.Formore
informationaboutconfiguringthedisplaysettings,see“Workingwiththeultradockutility”onpage10
3.Theimagesontheexternalmonitorflutter.
Checkthedisplayresolutionsettingofthenotebookcomputerandensurethattheresolutionis
supportedbytheultradock.
4.Theimagesontheexternalmonitorisnotincorrectcolors.
Checkthedisplayresolutionsettingofthecomputerandensurethattheresolutionissupportedbythe
ultradock.
.
16UserGuide
Page 21

5.ThecomputercanplaybackWebflashes.However,whenyoudragthewindowtotheexternal
monitorandmaximizetheplaybackwindow,theplaybackstops.
Tosolvetheproblem,updateyourAdobeFlashPlayertothelatestversion.
6.Thevideofilescannotbeplayedsmoothlyontheexternalmonitorwithaconfiguredresolutionof
3840x2160pixels(30Hz).
Theultradocksupportsthevideoswithaframerateslowerthanorequalto24framespersecond(fps).
Itconsumesthenotebookcomputerresourcealotwhenyouplaythevideoontheexternalmonitorwith
aconfiguredresolutionof3840x2160pixels(30Hz).Formoreinformationabouttherecommended
systemrequirements,goto“Systemrequirements”onpage3
.Thevideowithaframeratefasterthan
24fpsmaynotbeabletobeplayedsmoothly.Y oucandowngradetheresolutionofyourexternal
monitortoachievebetterperformance.
Audio
Youcannothearanythingthroughyournotebookcomputerspeakersoryoucannotusetheaudio
connectorsonthenotebookcomputer.
Bydefault,ThinkPadandotherLenovonotebookcomputersusetheheadsetandmicrophonecombo
connectorontheultradockanddisablebuilt-inaudioconnectorswhentheultradockisconnected.
Toenablethebuilt-inaudioconnectorsonyournotebookcomputer,dothefollowing:
1.Right-clicktheVolumeiconintheWindowsnotificationarea.
2.SelectSounds,andtheSoundwindowisdisplayed.
3.ClickthePlaybacktabtoselectabuilt-inaudiodevice,andthenclicktheRecordingtabtoselect
anotherbuilt-inaudiodevice.
4.OnthePlaybacktab,selectabuilt-inaudiodevice.OntheRecordingtab,selectanotherbuilt-in
audiodevice.
See“Manuallysettingtheplaybackdeviceandrecordingdevice”onpage11formoreinformation.
Notes:
1.Toapplythenewsettings,restarttheapplicationsthatareusingtheaudiodevices.
2.Thesettingsyouhaveadjustedwillbesaveduntilyouchangethesettingsnexttime.
Chapter1.ThinkPadUSB3.0UltraDock17
Page 22

18UserGuide
Page 23

Chapter2.ThinkPadUSB3.0ProDock
ThischaptercontainstheproductinformationfortheThinkPadUSB3.0ProDock(hereaftercalledprodock).
Abouttheprodock
Thissectioncontainstheproductdescription,mainfeatures,locationsofcontrols,andsystemrequirements
fortheprodock
Productdescription
Theprodockisaportableexpansionmodulethatenablesyoutoeasilyconnectyournotebookcomputerto
theEthernetandmultipledevices,suchasaheadset,amicrophone,andUniversalSerialBus(USB)devices.
Youroptionpackageincludesthefollowing:
•ThinkPadUSB3.0ProDock
•Poweradapter
•Powercord
•1-meter(39.37-inch)USB3.0cable
•DVI-ItoVGAadapter
•Warrantyposter
Contactyourplaceofpurchaseifanyitemismissingordamaged.Besuretoretainyourproofofpurchase
andpackingmaterial.Theymightberequiredtoreceivewarrantyservice.
©CopyrightLenovo2015
19
Page 24

Mainfeatures
•USBconnectors:threeUSB3.0connectorsandtwoUSB2.0connectors
•Networkconnection:GigabitEthernetspeed
•Supportedexternalmonitors:DPmonitor,DigitalVisualInterface-Integrated(DVI-I)monitor,andVideo
GraphicsArray(VGA)monitor(requiresanadditionalDVI-ItoVGAadapter)
Maximumresolutionsandrefreshrates
1.DPoutputonly:2560x1600pixels(60Hz)
2.DVI-IoutputonlyorVGAoutputonly:2048x1152pixels(60Hz)
3.DVI-I/DPsimultaneousoutputorVGA/DPsimultaneousoutput:2048x1152pixels(60Hz)
Formoreinformation,goto“Supportedresolutionsandrefreshrates”onpage32.
Youcansetupyourworkareabyconnectingyournotebookcomputertotheprodockwiththeprovided
USB3.0cable,connectingmultipledevicestotheprodock,andsettingtheprodockonyournotebook
computer;then,youarereadytousethemultipledeviceseachtimeyouconnectyournotebookcomputer
totheprodock.
20UserGuide
Page 25

Locatingthecontrols
Thefollowingfigureshowsthelocationsofcontrolsontheprodock.
Figure5.Overviewoftheprodock
1PowerandconnectionindicatorUsedtoindicatewhethertheprodockispoweredonnormally.
2Security-lockslot
3PowerconnectorUsedtoconnectthepoweradapter.
4USB3.0upstreamconnector
5DVI-IvideooutputconnectorUsedtoconnectanexternalmonitorwithaDVIcable.Y oualsocan
Usedtosecuretheprodockthroughasecuritycablelock.
Usedtoconnectanotebookcomputer.
connectaDVI-ItoVGAadaptertotheDVI-Ivideooutputconnector,
andconnecttheexternalmonitorwithaVGAcabletotheDVI-Ito
VGAadapter.
6DPoutputconnectorUsedtoconnectanexternalmonitorwithaDPcable.
7USB3.0connectorUsedtoconnectUSB3.0devices,suchasaUSBscanner,aUSB
speaker,oraUSBprinter.
8GigabitEthernetconnectorUsedtoconnectalocalareanetwork(LAN)cable.
9USB2.0connectorsUsedtoconnectUSB2.0devices,suchasaUSBkeyboard,aUSB
mouse,aUSBspeaker,oraUSBprinter.
Notes:
1.ItisrecommendedthatyouconnectaUSBkeyboardandaUSB
mousetotheconnectors.
2.IfyouareusingaUSB3.0device,itisrecommendedthatyou
connectittoaUSB3.0connectorratherthanUSB2.0connector
forfasterUSBtransmissionspeed.
10Powerbutton
11AlwaysOnUSB3.0connector()UsedtoconnectUSB3.0devicesandchargesomemobiledigital
Usedtoturnonorturnofftheprodock.
devicesandsmartphones.
Chapter2.ThinkPadUSB3.0ProDock21
Page 26

12USB3.0connectorUsedtoconnectUSB3.0devices,suchasaUSBscanner,aUSB
speaker,oraUSBprinter.
13Headsetandmicrophonecombo
connector
14VESAmountinghole
Usedtoconnectamicrophone,aheadset,oraspeaker.
UsedtofixtheprodockontheLBracketoronthewall.
Systemrequirements
Beforeusingtheprodock,ensurethatyournotebookcomputermeetsthefollowinggeneralrequirements:
•MicrosoftWindows7(32bitor64bit)
•MicrosoftWindows8.1(32bitor64bit)
•WindowsMediaPlayer(WMP),CyberLinkPowerDVD,andCorelWinDVD
•Highperformanceofthebatterypowerplan
•Adevicedriver
Formoreinformationaboutthedevicedriver,goto“InstallingthedevicedriveronWindowsoperating
systems”onpage23
ForDPoutputonly,DVI-IorVGAoutputonly,DP/DVI-IsimultaneousoutputandDP/VGAsimultaneous
output,ensurethatyournotebookcomputeralsomeetsthefollowingrequirements:
•Thesystemrequirementsfora2048x1152resolutionwithDVI-IoutputonlyorVGAoutputonlyare
asfollows:
Minimumrequirements(forviewingdocumentsand
Websites)
Processor:1.4GhzIntelCore2Duo/AMDT urion64x2
orbetter*
Memory:2GB
VideoCard:AnysupportedGPUreleasedafter
September2009.
Recommendedrequirements(forfull-screenvideo
playback)
Processor:2.4GhzIntelCore2Duo/AMDTurionIIor
better*
Memory:2GB
VideoCard:IntelHD3000,ATIRadeonHD3xxx,NVIDIA
GeForce9xxxorbetter.
*AnyIntelCore2Quad,i3,i5,i7,AMDPhenom,Fusion(Llano,Trinity&Richland),orJaguar(Temash&
Kabini)meetstheprocessorrequirements.
•Thesystemrequirementsfora2560x1440or2560x1600resolutionwithDPoutputonlyareasfollows:
Minimumrequirements(forviewingdocumentsand
Websites)
Processor:IntelCorei5ori72+GHz/AMDLlanoor
better
Memory:4GB
VideoCard:IntelGMAx4500/36x0,ATIRadeon
HD3xxx,NVIDIAGeForce9xxxxorbetter
USB:USB2.0butUSB3.0recommended
Recommendedrequirements(forfull-screenvideo
playback)
Processor:IntelCorei5ori72+GHz/AMDLlanoor
better
Memory:8GB
VideoCard:IntelGMAx4500/36x0,A TIRadeon
HD3xxx,NVIDIAGeForce9xxxxorbetter
USB:USB3.0
•Thesystemrequirementsfora2048x1152resolutionwithDP/VGAsimultaneousoutputandDP/
DVI-Isimultaneousoutputareasfollows:
22UserGuide
Page 27

Minimumrequirements(forviewingdocumentsand
Websites)
OverallWEIScore:3.0orbetter
Processor:2.4GHzIntelCore2Guo/AMDTurionIIor
better*
Memory:2GB
VideoCard:IntelGMAx4500/36x0,ATIRadeon
HD3xxx,NVIDIAGeForce9xxxorbetter
Recommendedrequirements(forfull-screenvideo
playback)
OverallWEIScore:6.0orbetter
Processor:IntelCorei5ori72+GHz/AMDTurionIIor
better*
Memory:4GB
VideoCard:IntelHD4000,ATIRadeonHD5/6xxx,
NVIDIAGeForce4xxMorbetter
*AnyIntelCore2Quad,i3,i5,i7,AMDPhenom,Fusion(Llano,Trinity&Richland),orJaguar(Temash&
Kabini)meetstheprocessorrequirements.
Installingtheprodock
Thissectionprovidesinformationonhowtoconnecttheprodocktoyournotebookcomputer,howtoinstall
anduninstallthedevicedriver,andhowtohanguptheprodock.
InstallingthedevicedriveronWindowsoperatingsystems
ToinstallthedevicedriverontheWindows7orWindows8.1operatingsystem,dothefollowing:
1.Gotohttp://www.lenovo.com/support/docksandselectThinkPadUSB3.0ProDock.
2.Locateanddownloadtheinstallationfileforthedevicedriver.
3.Double-clicktheinstallationfile,andthenfollowtheinstructionsonthescreentocompletethe
installation.
4.Restartyourcomputerafterthecompletionmessageisdisplayed.Thesystemwillautomaticallyidentify
andconfiguretheprodock.Thevideooutputfunctionoftheprodockwillbeautomaticallyenabled
aftertheconfigurationiscompleted.
Afteryouhaveinstalledthedevicedriver,youcanconnecttheprodocktoyournotebookcomputer.
Connectingtheprodocktoyournotebookcomputer
Thissectionprovidesinformationonhowtoconnecttheprodocktoyournotebookcomputerwiththe
providedpoweradapter,powercord,andUSB3.0cable.
Note:Installthedevicedriverbeforeyouconnecttheprodocktoyournotebookcomputer.
Toconnecttheprodocktoyournotebookcomputer,dothefollowing:
1.Connectthepoweradaptertothepowercord.
2.Connectthepowerplugofthepowercordtoanelectricaloutlet.
Chapter2.ThinkPadUSB3.0ProDock23
Page 28

Figure6.Connectingthepoweradaptertothepowercord
3.Connectthedc-inconnectorofthepoweradaptertotheprodock.Theprodockispoweredon
automatically.T opowerofftheprodock,pressthepowerbuttonoftheprodock.
Notes:
a.Whentheprodockispowersupplied,theprodockispoweredonautomaticallyandthepowerand
connectionindicatorison.Pressthepowerbuttonoftheprodocktopowerofftheprodock.
b.Besuretocorrectlyconnecttheprodocktothepowersupply.Iftheprodockisnotpowered
on,youwillnotbeabletousetheprodock.
4.ConnecttheUSBplug1oftheUSB3.0cabletotheUSB3.0upstreamconnectorontheprodock.
5.ConnecttheUSBplug2oftheUSB3.0cabletoanavailableUSB3.0connectoronthenotebook
computer.Thesystemwillautomaticallyidentifyandconfiguretheprodock.Thevideooutputfunction
oftheprodockwillbeautomaticallyenabledaftertheconfigurationiscompleted.
Figure7.Connectingtheprodocktothepowersupplyandnotebookcomputer
Notes:
•Theprodockwillnotsupplypowertothenotebookcomputerduringthetimewhenitisconnectedto
thenotebookcomputer.
•ConnectingtheprodocktoanyconnectorotherthanaUSB3.0connectororusinganyUSBcableother
thanaUSB3.0cablemightimpactontheprodockperformance,especiallythevideoplaybackand
Ethernetperformance.However,thesupportedmaximumresolutionwillnotbereduced.
24UserGuide
Page 29

UninstallingthedevicedriverfromWindowsoperatingsystems
ThissectionprovidesinstructionsonhowtouninstallthedevicedriverfromWindowsoperatingsystems.
TouninstallthedevicedriverfromtheWindows7orWindows8.1operatingsystem,dothefollowing:
FortheWindows7operatingsystem:
1.Exitallapplicationsthatusetheprodock.
2.ClickStart➙AllPrograms➙LenovoUSBDisplay➙Uninstall.
3.Followtheinstructionsonthescreentouninstallthedevicedriver.
4.Ifnecessary,restartyourcomputer.
FortheWindows8.1operatingsystem:
1.GotoControlPanelbydoingoneofthefollowing:
•Fromthedesktop,movethepointertothetop-rightorbottom-rightcornerofthescreentodisplay
thecharms,andthenclickSettings➙ControlPanel.
•FromtheStartscreen,dothefollowing:
a.Clickthearrowiconinthebottom-leftcornerofthescreentogototheAppsscreen.
b.Scrolltotherightside,andclickControlPanelintheWindowsSystemsection.
2.DependingonyourControlPanelmode,dooneofthefollowing:
•ClicktheUninstallaprogramoptionundertheProgramsmenu.
•ClickProgramsandFeatures.
3.SelecttheLenovoUSBDisplayandthenright-clickyourmouse.TheUninstalloptionisdisplayed.
4.ClickUninstall.
5.Followtheinstructionsonthescreentouninstallthedevicedriver.
Chapter2.ThinkPadUSB3.0ProDock25
Page 30

Hanginguptheprodock
WhenyouworkwithaThinkPadnotebookcomputer,aprodock,andanexternalmonitortogether,youcan
choosetohanguptheprodockontheThinkCentreTinyL-BracketMountingKit(hereaftercalledLBracket).
Itsavesspacefromyourworkareainthisway.
FormoreinformationabouttheLBracketandthesupportedmonitor,gotowww.lenovo.com/support/stands.
AligntheVESAmountingholesintheprodockwiththecorrespondingtwoscrewsontheLbracket.Then
installtheprodockontotheLbracketverticallyasshown.
Figure8.HanginguptheprodockontheLBracket
YoucanalsoinstalltheprodockontheVESAscrewsonthewallinthesimilarway.
Usingtheprodock
Thissectionprovidesinformationonhowtousetheheadsetandmicrophonecombojack,GigabitEthernet
connector,DPoutputconnector,DVI-Ivideooutputconnector,USBconnectorsontheprodock.
Theprodockexpandstheconnectioncapabilityofyournotebookcomputer.Youcanconnectdevicesto
theappropriateconnectorsontheprodockwhileyournotebookcomputerisstarted.Normallyitwilltake
severalsecondsforthenotebookcomputertorecognizenewdevices.
TheprodocksimplifiestheconnectionbetweenyournotebookcomputerandtheUSBdevicesorthe
externalmonitors.Y oucanconnecttheUSBdevicesandexternalmonitorstotheprodockratherthan
thenotebookcomputer.Whenyouwanttotakeyournotebookcomputeraway,youcandisconnectthe
notebookcomputerfromtheprodockratherthanremovetheUSBdevicesandexternalmonitors.Whenyou
comeback,simplyconnectyournotebookcomputertotheprodocktoresumeallpreviousconnectionsand
startworkingatonce.
Usingtheheadsetandmicrophonecomboconnector
Theheadsetandmicrophonecomboconnectorontheprodockisa3.5mmmicrophonecombinedstereo
line-outconnector.Itworksforthestandard3.5mmheadset,microphone,orspeaker.
Tousetheheadsetandmicrophonecomboconnectorontheprodock,connectyourheadset,microphone,
orspeakertotheheadsetandmicrophonecomboconnector.
26UserGuide
Page 31

Note:Theheadsetandmicrophonecomboconnectorontheprodockareautomaticallyenabledwhen
youhavesuccessfullyconnectedtheprodocktoyournotebookcomputerandinstalledthedevicedriver.
However,ifyoucannothearanythingfromtheheadsetconnectedtotheheadsetandmicrophonecombo
connectorontheprodock,youcanmanuallyenabletheheadsetandmicrophonecomboconnectoronthe
prodock.See“Manuallysettingtheplaybackdeviceandrecordingdevice”onpage30
formoreinformation.
UsingtheGigabitEthernetconnector
TousetheGigabitEthernetconnectorontheprodock,connecttheprodocktostandard10Mbps,100
Mbps,or1000Mbpsnetwork,andwaituntiltheprodockisfullyconfiguredbytheWindowsoperating
system.
TheGigabitEthernetconnectionontheprodockfullysupportstheThinkVantageAccessConnections
program.
TheGigabitEthernetconnectionontheprodocksupportsPrebootexecutionenvironment(PXE)bootonthe
selectedLenovonotebookcomputers.
TherearetwoindicatorsonthetopoftheGigabitEthernetconnector.
WorkingstatusIndicatoractivity
TheprodockconnectstotheEthernetsuccessfully.
Theprodockistransferringdata.Theleftindicatorkeepsflashinginamber.
Therightindicatorstaysoningreen.
UsingtheUSBconnectors
TousetheUSB2.0connectors,connectaUSB2.0devicesuchasthemouseorkeyboardtotheUSB
2.0connectorsontheprodock.T ousetheUSB3.0connectors,connectaUSB3.0devicetotheUSB
3.0connectorontheprodock.
WhentheUSBdeviceiscorrectlyconnectedtoaUSBconnectorontheprodock,aninformationwindow
willbedisplayedintheWindowsnotificationarea,indicatingthattheUSBdevicehasbeenconnected
tothecomputer.
UsingtheAlwaysOnUSB3.0connectors
Bydefault,theAlwaysOnUSB3.0connector()enablesyoutochargesomemobiledigitaldevices
andsmartphoneswhenyourcomputerisinthefollowingsituation:
•Whenyourcomputerisonorinsleepmode
•Whenyourcomputerisinhibernationmodeoristurnedoff
•Whentheprodockisdisconnectedfromyourcomputer
Itcansupplypowerupto2.4Aduringthechargingprocess.Whenyoupressthepowerbuttontoturnoff
theprodock,theprodockstopspowersupply.
UsingtheDPoutputconnector
YoucanconnectoneexternalmonitortotheprodockbyusingtheDPoutputconnector.
UsingtheDVI-Ivideooutputconnectors
YoucanconnectoneexternalmonitortotheprodockbyusingtheDVI-Ivideooutputconnector.
Chapter2.ThinkPadUSB3.0ProDock27
Page 32

TousetheDVI-Ivideooutputconnector,connecttheDVIcableoftheexternalmonitortotheDVI-Ivideo
outputconnectorontheprodock.
YoualsocanconnectanexternalmonitorwithaVGAconnectortotheprodockusingaDVI-ItoVGA
adapter.TousetheDVI-ItoVGAadapter,dothefollowing:
1.ConnecttheDVI-ItoVGAadaptertotheDVI-Ivideooutputconnectorontheprodock.
2.TightenthetwoscrewsontheDVI-ItoVGAadapter.
Figure9.UsingtheDVI-ItoVGAadapter
3.ConnecttheVGAconnectoroftheexternalmonitortotheDVI-ItoVGAadapterusingaVGAcable.
Youcanadjustvideosettingstocustomizetheuseoftheprodock.Formoreinformation,see“Working
withtheprodockutility”onpage30
.
Note:Forbetterperformance,occasionallyadjusttheexternalmonitortorealignitssettingswiththevideo
outputoftheprodock.Formoreinformationabouttheadjustmentprocedure,refertothedocumentation
thatcomeswithyourexternalmonitor.
Workingwiththeprodock
Thissectionprovidesinformationaboutthevideooutputfunctionoftheprodockandinstructionsonhowto
workwiththeprodockutility,whichenablesyoutoconfiguretheprodocktoyourneeds.
Understandingthevideooutputmodes
Theprodockworksinthefollowingthreevideooutputmodes:
•“Extendmode”onpage28
•“Mirrormode”onpage29
•“Single-displaymode”onpage30
Bydefault,theprodockworksinextendmode.Thefirsttimeyouconnecttheprodocktoyournotebook
computer,theresolutionofyournotebookcomputerandtheconnectedmonitorwillbechangedtothe
default.Y oucanconfigureyourresolutiontoyourneeds
Extendmode
Whentheprodockisinextendmode,itsplitsyourdisplayacrosstwomonitors.
Therearethreeoptionswhenyouareusingextendmode:
28UserGuide
Page 33

•Extend:Whenyouselectthisoption,yournotebookcomputermonitorbecomestheprimarydisplayand
theexternalmonitorbecomesthesecondarydisplay.Bydefault,theexternalmonitordisplayisonthe
rightsideofthenotebookcomputermonitordisplay.
•ExtendTo:Whenyouselectthisoption,yournotebookcomputermonitorbecomestheprimarydisplay
andtheexternalmonitorbecomesthesecondarydisplay.Youcangivethemonitoritsownframebuffer
throughthesubmenuoptionsRight,Left,Above,andBeloworthroughdragoperations.Thedisplay
spaceisacontinuousarea;therefore,windowsandobjectscanbemovedbetweendifferentdisplays.
•SetasMainMonitor:Whenyouselectthisoption,theexternalmonitorbecomestheprimarydisplayand
thenotebookcomputermonitorbecomesthesecondarydisplay.
Inextendmode,youcandraganddropwindowsfromonedisplaytotheother.Y oualsocanincrease
yourproductivitybydoingthefollowing:
•Readinge-mailsononedisplayandopeningattachmentsontheother
•Expandingaspreadsheetacrosstwodisplays
•Increasingyourworkareabyputtingallthepaletteandtoolbarsontheotherdisplaywhenyouare
doinggraphicsediting
•Keepingthedesktopononedisplayandwatchingvideosontheother
Toenterextendmode,dothefollowing:
1.ClicktheThinkPadUSB3.0ProDockiconintheWindowsnotificationarea.Apop-upwindow
opens.
2.SelectThinkPadUSB3.0ProDock,andthenselectonefromthefollowing:
•Extend
•ExtendT o
•SetasMainMonitor
Toexitextendmode,dothefollowing:
1.ClicktheThinkPadUSB3.0ProDockiconintheWindowsnotificationarea.Apop-upwindow
opens.
2.SelectThinkPadUSB3.0ProDock➙Off.
Mirrormode
Whentheprodockisinmirrormode,itclonesyournotebookcomputerscreentotheexternalmonitor.the
prodockautomaticallyselectsthesettings(screenresolution,colorquality,andrefreshrate)fortheexternal
monitor,whichachievesoptimalresolutionbasedonyournotebookcomputer.
Toentermirrormode,dothefollowing:
1.ClicktheThinkPadUSB3.0ProDockiconintheWindowsnotificationarea.Apop-upwindow
opens.
2.SelectThinkPadUSB3.0ProDock➙Mirror.
Chapter2.ThinkPadUSB3.0ProDock29
Page 34

Toexitmirrormode,dothefollowing:
1.ClicktheThinkPadUSB3.0ProDockiconintheWindowsnotificationarea.Apop-upwindow
opens.
2.SelectThinkPadUSB3.0ProDock➙Off.
Single-displaymode
Whentheprodockisinsingle-displaymode,itenablesyoutoshowyourdesktopononlyonescreen.
Therearetwooptionswhenyouareusingsingle-displaymode:
•NotebookMonitorOff:Whenyouselectthisoption,thedisplayofyournotebookcomputermonitor
turnsoffandthedisplayoftheexternalmonitorturnson.
•Off:Whenyouselectthisoption,thedisplayoftheexternalmonitorturnsoffandthedisplayofyour
notebookcomputermonitorturnson.However,otherfunctionssuchasaudio,Ethernet,andUSB
connectioncanstillworkthoughthedisplayisoff.
Toentersingle-displaymode,dothefollowing:
1.ClicktheThinkPadUSB3.0ProDockiconintheWindowsnotificationarea.Apop-upwindow
opens.
2.SelectThinkPadUSB3.0ProDock➙NotebookMonitorOfforOff.
Toexitsingle-displaymode,dothefollowing:
1.ClicktheThinkPadUSB3.0ProDockiconintheWindowsnotificationarea.Apop-upwindow
opens.
2.SelectThinkPadUSB3.0ProDock,andthenselectanothermodeasyouwant.
Workingwiththeprodockutility
Theprodockutilityenablesyoutoconfigurethedisplaysettingsoftheprodock.
Note:Thesettingsyouhaveconfiguredfortheprodockwillberetainedeachtimewhenyouconnectthe
notebookcomputertotheprodock.Thisfeatureenablesyoutouseyournotebookcomputerwithmultiple
docks.Forexample,ifyouuseanotebookcomputerbothathomeandatwork,youcansetupbothwork
areaswithdocks.Then,youjustconnectyournotebookcomputertotheprodockateitherlocation,and
youarereadytowork.
Manuallysettingtheplaybackdeviceandrecordingdevice
Bydefault,theLenovonotebookcomputersusetheheadsetandmicrophonecomboconnectoronthepro
dockanddisablebuilt-inaudioconnectorswhentheprodockisconnected.
Tomanuallysettheplaybackdeviceandrecordingdeviceontheprodock,dothefollowing:
FortheWindows7operatingsystem:
1.ClicktheThinkPadUSB3.0ProDockiconintheWindowsnotificationarea.Apop-upwindow
opens.
2.SelectAudioSetup.TheSoundandAudioDevicesPropertieswindowopens.
3.ClicktheAudiotab.
30UserGuide
Page 35

4.SelectaLenovoUSBaudiodeviceorotheraudiodevicefromtheSoundplaybackpanel,andthen
selectaLenovoUSBaudiodeviceorotheraudiodevicefromtheSoundrecordingpanel.
5.ClickOK.
FortheWindows8.1operatingsystem:
1.ClicktheThinkPadUSB3.0ProDockiconintheWindowsnotificationarea.Apop-upwindow
opens.
2.SelectAudioSetup.TheSoundwindowopens.
3.OnthePlaybacktab,selectaUSBaudioline-outdevice.OntheRecordingtab,selectaUSBaudio
line-indevice.
4.ClickOK.
Rotatingtheexternalmonitordisplay
Theprodockenablesyoutorotateonlyyourexternalmonitordisplayasyouwant.
Torotatetheexternalmonitordisplay,dothefollowing:
1.ClicktheThinkPadUSB3.0ProDockiconintheWindowsnotificationarea.Apop-upwindow
opens.
2.SelectThinkPadUSB3.0ProDock➙ScreenRotation,andthenselectoneofthefollowingoptions:
•Normal:Theexternalmonitordisplayremainsthesameasyournotebookcomputermonitordisplay.
•RotatedLeft:Theexternalmonitordisplayrotates90degreestotheleft.
•RotatedRight:Theexternalmonitordisplayrotates90degreestotheright.
•Upside-Down:Theexternalmonitordisplaybecomesupside-down.
Note:Foranormaldisplay,youcancontinuallyclickRotatedLeftorRotatedRightuntilthedisplay
becomesupside-down.
Settingtheresolutionoftheexternalmonitor
Theprodockenablesyoutosettheresolutionoftheexternalmonitor.
Inextendmodeandsingle-displaymode,youcansettheresolutionoftheexternalmonitorbydoingthe
following:
1.ClicktheThinkPadUSB3.0ProDockiconintheWindowsnotificationarea.Apop-upwindow
opens.
2.SelectThinkPadUSB3.0ProDock➙ScreenResolution,andthenselectthedesiredscreen
resolutionoptionfortheexternalmonitor.Forexample,“2048x1152”meansthatthevideooutput
resolutionwillbe2048by1152pixels.
Inmirrormode,youcansettheresolutionoftheexternalmonitorbydoingthefollowing:
1.ClicktheThinkPadUSB3.0ProDockiconintheWindowsnotificationarea.Apop-upwindow
opens.
2.SelectVideoSetup.Awindowopens.
3.IntheResolutiondrop-downlistbox,movetheslideruptoincreaseordowntodecreasetheresolution
oftheexternalmonitor.
Chapter2.ThinkPadUSB3.0ProDock31
Page 36

Switchingvideooutputmodes
Toswitchfromonevideooutputtoanother,dothefollowing:
1.ClicktheThinkPadUSB3.0ProDockiconintheWindowsnotificationarea.Apop-upwindow
opens.
2.SelectThinkPadUSB3.0ProDock,andthenselectthevideooutputmodeasyouwant.
Formoreinformationaboutthevideooutputmodes,referto“Understandingthevideooutputmodes”
onpage28.
Supportedresolutionsandrefreshrates
Thefollowingtableliststherefreshratessupportedatvariousresolutionsfortheprodockvideooutput.
Table4.Supportedresolutionsandrefreshrates:DPoutputonly
Resolution
640x48060,67,72,75,85
720x40070,85,88
720x48050,60
768x57650,60
800x60056,60,72,75,85
832x624
800x48060
848x48060
1024x60060
1024x76860,70,75,85
1152x864
1152x870
1280x72050,60
1280x76860,75,85
1280x80060
1280x96060,85
1280x102460,75
1360x76860
1366x76850,60
1368x76860
1400x105060,75,85
1440x90060
1600x90060
1600x120060
1680x105060
1920x108050,60
1920x120060
Refreshrate(Unit:Hz)
75
75
75
32UserGuide
Page 37

Table4.Supportedresolutionsandrefreshrates:DPoutputonly(continued)
Resolution
2048x108060
2048x115260
2048x128060
2048x153660
2560x144050,60
2560x160060
Refreshrate(Unit:Hz)
Notes:
1.Resolutionreferstothenumberofpixelshorizontallyandverticallydisplayedonthescreen.
2.Refreshrate(alsocalledverticalfrequency)measuresthespeedthattheentirescreenisrescanned.
Table5.Supportedresolutionsandrefreshrates:DVI-IoutputonlyorVGAoutputonly
Resolution
640x48060,67,72,75,85
720x40070,85,88
720x48050,60
768x57650,60
800x60056,60,72,75,85
832x624
800x48060
848x48060
1024x60060
1024x76860,70,75,85
1152x864
1152x870
1280x72050,60
1280x76860,75,85
1280x80060
1280x96060,85
1280x102460,75
1360x76860
1366x76850,60
1368x76860
1400x105060,75,85
1440x90060
1600x90060
1600x120060
1680x105060
1920x108050,60
Refreshrate(Unit:Hz)
75
75
75
Chapter2.ThinkPadUSB3.0ProDock33
Page 38

Table5.Supportedresolutionsandrefreshrates:DVI-IoutputonlyorVGAoutputonly(continued)
Resolution
1920x120060
2048x108060
2048x115260
Table6.Supportedresolutionsandrefreshrates:DVI-I/DPsimultaneousoutputorVGA/DPsimultaneousoutput
Refreshrate(Unit:Hz)
Resolution
640x48060,67,72,75,85
720x40070,85,88
720x48050,60
768x57650,60
800x60056,60,72,75,85
832x624
800x48060
848x48060
1024x60060
1024x76860,70,75,85
1152x864
1152x870
1280x72050,60
1280x76860,75,85
1280x80060
1280x96060,85
1280x102460,75
1360x76860
1366x76850,60
1368x76860
1400x105060,75,85
1440x90060
1600x90060
1600x120060
1680x105060
1920x108050,60
1920x120060
2048x108060
2048x115260
Refreshrate(Unit:Hz)
75
75
75
Troubleshooting
Thischapterprovidessometroubleshootinghintsandtipstoassistyouifyouexperienceanyproblemswith
theprodock.Checkthefollowingitemsfirsttotrytosolvetheproblem.
34UserGuide
Page 39

General
1.TheThinkPadUSB3.0ProDockiconisnotdisplayedonthescreen.
TheThinkPadUSB3.0ProDockiconisdisplayedonlywhenanexternalmonitorisconnectedtothe
prodock.Ifanexternalmonitorisconnected,ensurethatthevideocableisfullyinsertedintothepro
dockandthemonitor.
2.Thepowerandconnectionindicatoroftheprodockisnoton.
Ensurethatyouhavecorrectlyconnectedthepoweradaptertotheprodockandaworkingelectrical
outlet,andthatyouhavepressedthepowerbutton.Donotuseanypoweradapterotherthantheone
providedwiththeprodock.
3.YouconnecttheprodocktoacomputerwiththeprovidedUSB3.0cable,buttheprodock
doesnotwork.
a.Ensurethattheprodockiswellpoweredbyitspoweradapter.theprodockalwaysneedsexternal
poweradapterforoperation,becauseitdoesnottakepowerfromtheUSBconnectorattached
toyournotebookcomputer.
b.Ensurethatthedevicedriveroftheprodockiswellinstalled;ifnot,installthedevicedriverand
restartthecomputer.
c.EnsurethattheUSBconnectoronyourcomputerworkswell;ifnot,replacewithotherUSB
connectors.
4.The2.4GHzwirelesskeyboardor2.4GHzwirelessmousefunctionisinterrupted.Themouse
pointerlagsoritcannotmove.Somecharactersarelostwhenyouinputbythekeyboard.
Itisrecommendedthatyouconnectyour2.4GHzdevicereceivertothefrontUSB3.0connectoronthe
prodockandavoidconnectinganotherUSB3.0devicenexttotheconnectorwiththereceiverattached.
5.Whenyouconnectyourdevice(suchasamobilephone)tothedockforcharging,thecharging
speedbecomesslow.
EnsurethatyouconnectyourmobilephonetotheAlwaysOnUSB3.0connector.Disconnectthepro
dockfromthecomputer,thechargingspeedmaybecomefaster.
6.ThemobilephonesorotherUSBdevicescannotbechargedwhenconnectedtotheAlwaysOn
USB3.0connector.
Itisrecommendedthatyoucandisconnecttheprodockfromthenotebookcomputerandthenyoucan
chargethemobilephonesorotherUSBdevices.
7.YourmouseandkeyboardcannotwakeupyourcomputersystemwhenconnectedtotheAlways
OnUSB3.0connector.
ItisrecommendedthatyourmouseorkeyboardisconnectedtotheotherUSBconnector.
Videooutput
1.Theexternalmonitordisplayisblank.
•Ensurethatthenotebookcomputerconnectedtotheprodockisrunningcorrectlyandisnotin
standbyorhibernationmode.Whenthenotebookcomputerisinstandbyorhibernationmode,
theexternalmonitordisplayisalwaysblank.
•Ensurethatthedevicedriverisinstalledfollowingtheinstallationinstructionsandtheiconforthepro
dockisvisibleintheWindowsnotificationarea.
•Ensurethatthefollowingconnectionsarecorrect:
–TheconnectionbetweentheUSB3.0cableandyournotebookcomputer
–TheconnectionbetweentheUSB3.0cableandtheprodock
–Theconnectionamongthepoweradapter,theprodock,andtheelectricaloutlet
–Theconnectionbetweenyourvideocabletotheprodockandtheexternalmonitor.
Chapter2.ThinkPadUSB3.0ProDock35
Page 40

–TheconnectionbetweenthevideocableandtheDVI-Ivideooutputconnector
Note:FortheconnectionoftheVGAconnector,ensurethattheDVI-ItoVGAadapteralsois
securedbythescrewsonbothsidesofit.
•Iftheproblempersists,disconnectallconnectionsoftheprodock,anduninstalltheprodockdevice
driver.Then,reinstallthedevicedriverandtheprodock.
2.Youcannotplaybackvideosontheexternalmonitorbutcanplaythembackonthenotebook
computermonitor.
SomenotebookcomputersdonotsupporttheCertifiedOutputProtectionProtocol(COPP),and
youwillnotbeabletoplaybacktheprotectedvideosontheexternalmonitorconnectedtothepro
dock.TheCorelWinDVD10programalsohaslimitationsonplayingbackvideosintheWindows
XPoperatingsystem.
Toplaybackvideosontheexternalmonitor,youcanconnecttheexternalmonitortotheVGAconnector
onyournotebookcomputer,andextendthedisplaytotheexternalmonitor.Formoreinformationabout
configuringthedisplaysettings,see“Workingwiththeprodockutility”onpage30
.
3.Theimagesontheexternalmonitorflutter.
Tosolvetheproblem,checkthefollowing:
•EnsurethattheexternalmonitoriswellconnectedtotheDVI-Ivideooutputconnectoroftheprodock.
•Checkthedisplayresolutionsettingofthenotebookcomputerandensurethattheresolutionis
supportedbytheprodock.
4.Theimagesontheexternalmonitorisnotincorrectcolors.
Tosolvetheproblem,dothefollowing:
a.EnsurethattheexternalmonitoriswellconnectedtotheDVI-Ivideooutputconnectorofthepro
dock.
b.Checkthedisplayresolutionsettingofthecomputerandensurethattheresolutionissupported
bytheprodock.
5.ThecomputercanplaybackWebflashes.However,whenyoudragthewindowtotheexternal
monitorandmaximizetheplaybackwindow,theplaybackstops.
Tosolvetheproblem,updateyourAdobeFlashPlayertothelatestversion.
6.Thevideofilescannotbeplayedsmoothlyonscreen.
EnsurethatyoustoprunningtheprogramwhichmayinfluencetheCPUperformanceduringvideo
playback.
Audio
Youcannothearanythingthroughyournotebookcomputerspeakersoryoucannotusetheaudio
connectorsonthenotebookcomputer.
Bydefault,ThinkPadandotherLenovo
®
notebookcomputersusetheheadsetandmicrophonecombo
connectorontheprodockanddisablebuilt-inaudioconnectorswhentheprodockisconnected.
36UserGuide
Page 41

Toenablethebuilt-inaudioconnectorsonyournotebookcomputer,dothefollowing:
1.Right-clicktheVolumeiconintheWindowsnotificationarea.
2.SelectSounds,andtheSoundwindowisdisplayed.
3.ClickthePlaybacktabtoselectabuilt-inaudiodevice,andthenclicktheRecordingtabtoselect
anotherbuilt-inaudiodevice.
4.OnthePlaybacktab,selectabuilt-inaudiodevice.OntheRecordingtab,selectanotherbuilt-in
audiodevice.
See“Manuallysettingtheplaybackdeviceandrecordingdevice”onpage30formoreinformation.
Notes:
1.Toapplythenewsettings,restarttheapplicationsthatareusingtheaudiodevices.
2.Thesettingsyouhaveadjustedwillbesaveduntilyouchangethesettingsnexttime.
Chapter2.ThinkPadUSB3.0ProDock37
Page 42

38UserGuide
Page 43

AppendixA.ServiceandSupport
Thefollowinginformationdescribesthetechnicalsupportthatisavailableforyourproduct,duringthe
warrantyperiodorthroughoutthelifeofyourproduct.RefertotheLenovoLimitedWarrantyforafull
explanationofLenovowarrantyterms.
Onlinetechnicalsupport
Onlinetechnicalsupportisavailableduringthelifetimeofaproductat:
http://www.lenovo.com/support
Productreplacementassistanceorexchangeofdefectivecomponentsalsoisavailableduringthewarranty
period.Inaddition,ifyouroptionisinstalledinaLenovocomputer,youmightbeentitledtoserviceatyour
location.ALenovotechnicalsupportrepresentativecanhelpyoudeterminethebestalternative.
Telephonetechnicalsupport
InstallationandconfigurationsupportthroughtheCustomerSupportCenterwillbeavailableuntil90days
aftertheoptionhasbeenwithdrawnfrommarketing.Afterthattime,thesupportiscancelled,ormade
availableforafee,atLenovo’sdiscretion.Additionalsupportisalsoavailableforanominalfee.
BeforecontactingaLenovotechnicalsupportrepresentative,pleasehavethefollowinginformationavailable:
optionnameandnumber,proofofpurchase,computermanufacturer,model,serialnumberandmanual,
theexactwordingofanyerrormessage,descriptionoftheproblem,andthehardwareandsoftware
configurationinformationforyoursystem.
Yourtechnicalsupportrepresentativemightwanttowalkyouthroughtheproblemwhileyouareatyour
computerduringthecall.
Telephonenumbersaresubjecttochangewithoutnotice.Themostup-to-datetelephonelistforLenovo
Supportisalwaysavailableathttp://www.lenovo.com/support/phone
countryorregionisnotlisted,contactyourLenovoresellerorLenovomarketingrepresentative.
.Ifthetelephonenumberforyour
Accessibilityinformation
Documentationinaccessibleformats
Lenovoprovideselectronicdocumentationinaccessibleformats,suchasproperlytaggedPDFfilesor
HyperTextMarkupLanguage(HTML)files.Lenovoelectronicdocumentationisdevelopedtoensure
thatvisuallyimpaireduserscanreadthedocumentationthroughascreenreader.Eachimageinthe
documentationalsoincludesadequatealternativetexttoexplaintheimagesothatvisuallyimpairedusers
canunderstandtheimagewhentheyuseascreenreader.
ToopenandviewPDFfiles,yourcomputermusthavetheAdobeReaderprograminstalled.TheAdobe
Readerprogramalsoisavailablefordownloadat:
http://www.adobe.com
©CopyrightLenovo2015
39
Page 44

40UserGuide
Page 45

AppendixB.LenovoLimitedWarranty
L505-0010-0208/2011
ThisLenovoLimitedWarrantyconsistsofthefollowingparts:
Part1-GeneralT erms
Part2-Country-specificT erms
Part3-WarrantyServiceInformation
ThetermsofPart2replaceormodifytermsofPart1asspecifiedforaparticularcountry.
Part1-GeneralTerms
ThisLenovoLimitedWarrantyappliesonlytoLenovohardwareproductsyoupurchasedforyourownuseand
notforresale.ThisLenovoLimitedWarrantyisavailableinotherlanguagesatwww.lenovo.com/warranty.
WhatthisWarrantyCovers
LenovowarrantsthateachLenovohardwareproductthatyoupurchaseisfreefromdefectsinmaterialsand
workmanshipundernormaluseduringthewarrantyperiod.Thewarrantyperiodfortheproductstartson
theoriginaldateofpurchaseasshownonyoursalesreceiptorinvoiceorasmaybeotherwisespecified
byLenovo.Thewarrantyperiodandtypeofwarrantyservicethatapplytoyourproductareasspecified
in“Part3-WarrantyServiceInformation”below.Thiswarrantyonlyappliestoproductsinthecountry
orregionofpurchase.
THISWARRANTYISYOUREXCLUSIVEWARRANTYANDREPLACESALLOTHERWARRANTIES
ORCONDITIONS,EXPRESSORIMPLIED,INCLUDING,BUTNOTLIMITEDTO,ANYIMPLIED
WARRANTIESORCONDITIONSOFMERCHANTABILITYORFITNESSFORAPARTICULARPURPOSE.
ASSOMESTA TESORJURISDICTIONSDONOTALLOWTHEEXCLUSIONOFEXPRESSOR
IMPLIEDWARRANTIES,THEABOVEEXCLUSIONMAYNOTAPPL YTOYOU.INTHATEVENT ,SUCH
WARRANTIESAPPLYONL YTOTHEEXTENTANDFORSUCHDURA TIONASREQUIREDBYLAWAND
ARELIMITEDINDURA TIONTOTHEWARRANTYPERIOD.ASSOMESTATESORJURISDICTIONSDO
NOTALLOWLIMITA TIONSONTHEDURATIONOFANIMPLIEDWARRANTY ,THEABOVELIMITATION
ONDURATIONMA YNOTAPPL YTOYOU.
HowtoObtainWarrantyService
Iftheproductdoesnotfunctionaswarrantedduringthewarrantyperiod,youmayobtainwarrantyserviceby
contactingLenovooraLenovoapprovedServiceProvider.AlistofapprovedServiceProvidersandtheir
telephonenumbersisavailableat:www.lenovo.com/support/phone.
Warrantyservicemaynotbeavailableinalllocationsandmaydifferfromlocationtolocation.Chargesmay
applyoutsideaServiceProvider’snormalservicearea.ContactalocalServiceProviderforinformation
specifictoyourlocation.
CustomerResponsibilitiesforWarrantyService
Beforewarrantyserviceisprovided,youmusttakethefollowingsteps:
•followtheservicerequestproceduresspecifiedbytheServiceProvider;
©CopyrightLenovo2015
41
Page 46

•backuporsecureallprogramsanddatacontainedintheproduct;
•providetheServiceProviderwithallsystemkeysorpasswords;
•providetheServiceProviderwithsufficient,free,andsafeaccesstoyourfacilitiestoperformservice;
•removealldata,includingconfidentialinformation,proprietaryinformationandpersonalinformation,from
theproductor,ifyouareunabletoremoveanysuchinformation,modifytheinformationtopreventits
accessbyanotherpartyorsothatitisnotpersonaldataunderapplicablelaw.TheServiceProvidershall
notberesponsibleforthelossordisclosureofanydata,includingconfidentialinformation,proprietary
information,orpersonalinformation,onaproductreturnedoraccessedforwarrantyservice;
•removeallfeatures,parts,options,alterations,andattachmentsnotcoveredbythewarranty;
•ensurethattheproductorpartisfreeofanylegalrestrictionsthatpreventitsreplacement;
•ifyouarenottheownerofaproductorpart,obtainauthorizationfromtheownerfortheServiceProvider
toprovidewarrantyservice.
WhatY ourServiceProviderWillDotoCorrectProblems
WhenyoucontactaServiceProvider,youmustfollowthespecifiedproblemdeterminationandresolution
procedures.
TheServiceProviderwillattempttodiagnoseandresolveyourproblembytelephone,e-mailorremote
assistance.TheServiceProvidermaydirectyoutodownloadandinstalldesignatedsoftwareupdates.
Someproblemsmayberesolvedwithareplacementpartthatyouinstallyourselfcalleda“Customer
ReplaceableUnit”or“CRU.”Ifso,theServiceProviderwillshiptheCRUtoyouforyoutoinstall.
Ifyourproblemcannotberesolvedoverthetelephone;throughtheapplicationofsoftwareupdatesor
theinstallationofaCRU,theServiceProviderwillarrangeforserviceunderthetypeofwarrantyservice
designatedfortheproductunder“Part3-WarrantyServiceInformation”below.
IftheServiceProviderdeterminesthatitisunabletorepairyourproduct,theServiceProviderwillreplace
itwithonethatisatleastfunctionallyequivalent.
IftheServiceProviderdeterminesthatitisunabletoeitherrepairorreplaceyourproduct,yoursole
remedyunderthisLimitedWarrantyistoreturntheproducttoyourplaceofpurchaseortoLenovofora
refundofyourpurchaseprice.
ReplacementProductsandParts
Whenwarrantyserviceinvolvesthereplacementofaproductorpart,thereplacedproductorpartbecomes
Lenovo’spropertyandthereplacementproductorpartbecomesyourproperty.OnlyunalteredLenovo
productsandpartsareeligibleforreplacement.ThereplacementproductorpartprovidedbyLenovomay
notbenew,butitwillbeingoodworkingorderandatleastfunctionallyequivalenttotheoriginalproductor
part.Thereplacementproductorpartshallbewarrantedforthebalanceoftheperiodremainingonthe
originalproduct.
UseofPersonalContactInformation
Ifyouobtainserviceunderthiswarranty,youauthorizeLenovotostore,useandprocessinformationabout
yourwarrantyserviceandyourcontactinformation,includingname,phonenumbers,address,ande-mail
address.Lenovomayusethisinformationtoperformserviceunderthiswarranty.Wemaycontactyouto
inquireaboutyoursatisfactionwithourwarrantyserviceortonotifyyouaboutanyproductrecallsorsafety
issues.Inaccomplishingthesepurposes,youauthorizeLenovototransferyourinformationtoanycountry
wherewedobusinessandtoprovideittoentitiesactingonourbehalf.Wemayalsodiscloseitwhere
requiredbylaw.Lenovo’sprivacypolicyisavailableatwww.lenovo.com/.
WhatthisWarrantyDoesnotCover
42UserGuide
Page 47

Thiswarrantydoesnotcoverthefollowing:
•uninterruptedorerror-freeoperationofaproduct;
•lossof,ordamageto,yourdatabyaproduct;
•anysoftwareprograms,whetherprovidedwiththeproductorinstalledsubsequently;
•failureordamageresultingfrommisuse,abuse,accident,modification,unsuitablephysicaloroperating
environment,naturaldisasters,powersurges,impropermaintenance,orusenotinaccordancewith
productinformationmaterials;
•damagecausedbyanon-authorizedserviceprovider;
•failureof,ordamagecausedby,anythirdpartyproducts,includingthosethatLenovomayprovideor
integrateintotheLenovoproductatyourrequest;
•anytechnicalorothersupport,suchasassistancewith“how-to”questionsandthoseregardingproduct
set-upandinstallation;
•productsorpartswithanalteredidentificationlabelorfromwhichtheidentificationlabelhasbeen
removed.
LimitationofLiability
LenovoisresponsibleforlossordamagetoyourproductonlywhileitisintheServiceProvider’spossession
orintransit,iftheServiceProviderisresponsibleforthetransportation.
NeitherLenovonortheServiceProviderisresponsibleforlossordisclosureofanydata,including
confidentialinformation,proprietaryinformation,orpersonalinformation,containedinaproduct.
UNDERNOCIRCUMSTANCES,ANDNOTWITHSTANDINGTHEFAILUREOFESSENTIALPURPOSE
OFANYREMEDYSETFORTHHEREIN,SHALLLENOVO,ITSAFFILIATES,SUPPLIERS,RESELLERS,
ORSERVICEPROVIDERSBELIABLEFORANYOFTHEFOLLOWINGEVENIFINFORMEDOFTHEIR
POSSIBILITYANDREGARDLESSOFWHETHERTHECLAIMISBASEDINCONTRACT ,WARRANTY,
NEGLIGENCE,STRICTLIABILITYOROTHERTHEORYOFLIABILITY:1)THIRDPARTYCLAIMS
AGAINSTYOUFORDAMAGES;2)LOSS,DAMAGEORDISCLOSUREOFYOURDATA;3)SPECIAL,
INCIDENTAL,PUNITIVE,INDIRECTORCONSEQUENTIALDAMAGES,INCLUDINGBUTNOTLIMITED
TOLOSTPROFITS,BUSINESSREVENUE,GOODWILLORANTICIPA TEDSAVINGS.INNOCASE
SHALLTHETOT ALLIABILITYOFLENOVO,ITSAFFILIA TESS,SUPPLIERS,RESELLERSORSERVICE
PROVIDERSFORDAMAGESFROMANYCAUSEEXCEEDTHEAMOUNTOFACTUALDIRECT
DAMAGES,NOTTOEXCEEDTHEAMOUNTPAIDFORTHEPRODUCT .
THEFOREGOINGLIMIT A TIONSDONOTAPPL YTODAMAGESFORBODIL YINJURY(INCLUDING
DEATH),DAMAGETOREALPROPERTYORDAMAGETOT ANGIBLEPERSONALPROPERTYFOR
WHICHLENOVOISLIABLEUNDERLAW.ASSOMESTATESORJURISDICTIONSDONOTALLOW
THEEXCLUSIONORLIMIT A TIONOFINCIDENT ALORCONSEQUENTIALDAMAGES,THEABOVE
LIMITATIONOREXCLUSIONMA YNOTAPPL YTOYOU.
YourOtherRights
THISWARRANTYGIVESYOUSPECIFICLEGALRIGHTS.YOUMA YHAVEOTHERRIGHTS
ACCORDINGTOTHEAPPLICABLELAWSOFYOURST A TEORJURISDICTION.YOUMAYALSO
HAVEOTHERRIGHTSUNDERAWRITTENAGREEMENTWITHLENOVO.NOTHINGINTHIS
WARRANTYAFFECTSST ATUTORYRIGHTS,INCLUDINGRIGHTSOFCONSUMERSUNDERLAWS
ORREGULATIONSGOVERNINGTHESALEOFCONSUMERGOODSTHATCANNOTBEWAIVED
ORLIMITEDBYCONTRACT .
Part2-Country-specificTerms
Australia
AppendixB.LenovoLimitedWarranty43
Page 48

“Lenovo”meansLenovo(Australia&NewZealand)PtyLimitedABN70112394411.Address:Level
10,NorthTower,1-5RailwayStreet,Chatswood,NSW,2067.Telephone:+61280038200.Email:
lensyd_au@lenovo.com
ThefollowingreplacesthesamesectioninPart1:
WhatthisWarrantyCovers:
Lenovowarrantsthateachhardwareproductthatyoupurchaseisfreefromdefectsinmaterialsand
workmanshipundernormaluseandconditionsduringthewarrantyperiod.Iftheproductfailsduetoa
covereddefectduringthewarrantyperiod,LenovowillprovideyouaremedyunderthisLimitedWarranty.
Thewarrantyperiodfortheproductstartsontheoriginaldateofpurchasespecifiedonyoursalesreceiptor
invoiceunlessLenovoinformsyouotherwiseinwriting.Thewarrantyperiodandtypeofwarrantyservice
thatapplytoyourproductaresetforthbelowinPart3-WarrantyServiceInformation.
THEBENEFITSGIVENBYTHISWARRANTYAREINADDITIONTOYOURRIGHTSANDREMEDIESA T
LAW,INCLUDINGTHOSEUNDERTHEAUSTRALIANCONSUMERLAW.
ThefollowingreplacesthesamesectioninPart1:
ReplacementProductsandParts:
Whenwarrantyserviceinvolvesthereplacementofaproductorpart,thereplacedproductorpartbecomes
Lenovo’spropertyandthereplacementproductorpartbecomesyourproperty.OnlyunalteredLenovo
productsandpartsareeligibleforreplacement.ThereplacementproductorpartprovidedbyLenovomay
notbenew,butitwillbeingoodworkingorderandatleastfunctionallyequivalenttotheoriginalproductor
part.Thereplacementproductorpartshallbewarrantedforthebalanceoftheperiodremainingonthe
originalproduct.Productsandpartspresentedforrepairmaybereplacedbyrefurbishedproductsorparts
ofthesametyperatherthanbeingrepaired.Refurbishedpartsmaybeusedtorepairtheproduct;andrepair
oftheproductmayresultinlossofdata,iftheproductiscapableofretaininguser-generateddata.
ThefollowingisaddedtothesamesectioninPart1:
UseofPersonalContactInformation:
Lenovowillnotbeabletoperformourserviceunderthiswarrantyifyourefusetoprovideyourinformation
ordonotwishustotransferyourinformationtoouragentorcontractor.Youhavetherighttoaccess
yourpersonalcontactinformationandrequestcorrectionofanyerrorsinitpursuanttothePrivacyAct
1988bycontactingLenovo.
ThefollowingreplacesthesamesectioninPart1:
LimitationofLiability:
LenovoisresponsibleforlossordamagetoyourproductonlywhileitisintheServiceProvider’spossession
orintransit,iftheServiceProviderisresponsibleforthetransportation.
NeitherLenovonortheServiceProviderisresponsibleforlossordisclosureofanydata,including
confidentialinformation,proprietaryinformation,orpersonalinformation,containedinaproduct.
TOTHEEXTENTPERMITTEDBYLAW,UNDERNOCIRCUMSTANCESANDNOTWITHST ANDING
THEFAILUREOFESSENTIALPURPOSEOFANYREMEDYSETFORTHHEREIN,SHALLLENOVO,
ITSAFFILIA TES,SUPPLIERS,RESELLERS,ORSERVICEPROVIDERSBELIABLEFORANYOFTHE
FOLLOWINGEVENIFINFORMEDOFTHEIRPOSSIBILITYANDREGARDLESSOFWHETHERTHE
CLAIMISBASEDINCONTRACT ,WARRANTY,NEGLIGENCE,STRICTLIABILITYOROTHERTHEORY
44UserGuide
Page 49

OFLIABILITY:1)THIRDPARTYCLAIMSAGAINSTYOUFORDAMAGES;2)LOSS,DAMAGEOR
DISCLOSUREOFYOURDA T A;3)SPECIAL,INCIDENT AL,PUNITIVE,INDIRECTORCONSEQUENTIAL
DAMAGES,INCLUDINGBUTNOTLIMITEDTOLOSTPROFITS,BUSINESSREVENUE,GOODWILLOR
ANTICIPA TEDSAVINGS.INNOCASESHALLTHETOTALLIABILITYOFLENOVO,ITSAFFILIATESS,
SUPPLIERS,RESELLERSORSERVICEPROVIDERSFORDAMAGESFROMANYCAUSEEXCEEDTHE
AMOUNTOFACTUALDIRECTDAMAGES,NOTTOEXCEEDTHEAMOUNTP AIDFORTHEPRODUCT.
THEFOREGOINGLIMIT A TIONSDONOTAPPL YTODAMAGESFORBODIL YINJURY(INCLUDING
DEATH),DAMAGETOREALPROPERTYORDAMAGETOT ANGIBLEPERSONALPROPERTYFOR
WHICHLENOVOISLIABLEUNDERLAW.
ThefollowingreplacesthesamesectioninPart1:
YourOtherRights:
THISWARRANTYGIVESYOUSPECIFICLEGALRIGHTS.YOUALSOHAVEOTHERRIGHTSATLAW ,
INCLUDINGUNDERTHEAUSTRALIANCONSUMERLAW.NOTHINGINTHISWARRANTYAFFECTS
STATUTORYRIGHTSORRIGHTSATLAW,INCLUDINGRIGHTSTHA TCANNOTBEWAIVEDOR
LIMITEDBYCONTRACT.
Forexample,ourproductscomewithguaranteesthatcannotbeexcludedundertheAustralianConsumer
Law.Youareentitledtoareplacementorrefundforamajorfailureandcompensationforanyother
reasonablyforeseeablelossordamage.Youarealsoentitledtohavetheproductsrepairedorreplacedifthe
productsfailtobeofacceptablequalityandthefailuredoesnotamounttoamajorfailure.
NewZealand
ThefollowingisaddedtothesamesectioninPart1:
UseofPersonalInformation:
Lenovowillnotbeabletoperformourserviceunderthiswarrantyifyourefusetoprovideyourinformationor
donotwishustotransferyourinformationtoouragentorcontractor.Youhavetherighttoaccessyour
personalinformationandrequestcorrectionofanyerrorsinitpursuanttothePrivacyAct1993bycontacting
Lenovo(Australia&NewZealand)PtyLimitedABN70112394411.Address:Level10,NorthTower,1-5
RailwayStreet,Chatswood,NSW,2067.Telephone:61280038200.Email:lensyd_au@lenovo.com
Bangladesh,Cambodia,India,Indonesia,Nepal,Philippines,VietnamandSriLanka
ThefollowingisaddedtoPart1:
DisputeResolution
Disputesarisingoutoforinconnectionwiththiswarrantyshallbefinallysettledbyarbitrationheldin
Singapore.Thiswarrantyshallbegoverned,construedandenforcedinaccordancewiththelawsof
Singapore,withoutregardtoconflictoflaws.IfyouacquiredtheproductinIndia,disputesarisingoutofor
inconnectionwiththiswarrantyshallbefinallysettledbyarbitrationheldinBangalore,India.Arbitration
inSingaporeshallbeheldinaccordancewiththeArbitrationRulesofSingaporeInternationalArbitration
Center(“SIACRules”)thenineffect.ArbitrationinIndiashallbeheldinaccordancewiththelawsofIndia
thenineffect.Thearbitrationawardshallbefinalandbindingonthepartieswithoutappeal.Anyaward
shallbeinwritingandsetforththefindingsoffactandtheconclusionsoflaw.Allarbitrationproceedings,
includingalldocumentspresentedinsuchproceedingsshallbeconductedintheEnglishlanguage.The
Englishlanguageversionofthiswarrantyprevailsoveranyotherlanguageversioninsuchproceedings.
EuropeanEconomicArea(EEA)
AppendixB.LenovoLimitedWarranty45
Page 50

ThefollowingisaddedtoPart1:
CustomersintheEEAmaycontactLenovoatthefollowingaddress:EMEAServiceOrganisation,Lenovo
(International)B.V.,Floor2,Einsteinova21,85101,Bratislava,Slovakia.Serviceunderthiswarrantyfor
LenovohardwareproductspurchasedinEEAcountriesmaybeobtainedinanyEEAcountryinwhichthe
producthasbeenannouncedandmadeavailablebyLenovo.
Russia
ThefollowingisaddedtoPart1:
ProductServiceLife
Theproductservicelifeisfour(4)yearsfromtheoriginaldateofpurchase.
Part3-WarrantyServiceInformation
ProductT ype
ThinkPadUSB3.0UltraDock
ThinkPadUSB3.0ProDock
CountryorRegionof
PurchaseWarrantyPeriod
Worldwide3year1,4
Worldwide3year1,4
TypeofWarranty
Service
Ifrequired,yourServiceProviderwillproviderepairorexchangeservicedependingonthetypeofwarranty
servicespecifiedforyourproductandtheavailableservice.Schedulingofservicewilldependuponthetime
ofyourcall,partsavailability,andotherfactors.
TypesofWarrantyService
1.CustomerReplaceableUnit(“CRU”)Service
UnderCRUService,theServiceProviderwillshipCRUstoyouatitscostforinstallationbyyou.CRU
informationandreplacementinstructionsareshippedwithyourproductandareavailablefromLenovoatany
timeuponrequest.CRUsthatareeasilyinstalledbyyouarecalled“Self-serviceCRUs”.“Optional-service
CRUs”areCRUsthatmayrequiresometechnicalskillandtools.InstallationofSelf-serviceCRUsisyour
responsibility.YoumayrequestthataServiceProviderinstallOptional-serviceCRUsunderoneoftheother
typesofwarrantyservicedesignatedforyourproduct.Anoptionalserviceofferingmaybeavailablefor
purchasefromaServiceProviderorLenovounderwhichSelf-serviceCRUswouldbeinstalledforyou.
YoumayfindalistofCRUsandtheirdesignationinthepublicationthatwasshippedwithyourproduct
oratwww.lenovo.com/CRUs.TherequirementtoreturnadefectiveCRU,ifany,willbespecifiedinthe
instructionsshippedwithareplacementCRU.Whenreturnisrequired:1)returninstructions,aprepaid
returnshippinglabel,andacontainerwillbeincludedwiththereplacementCRU;and2)youmaybecharged
forthereplacementCRUiftheServiceProviderdoesnotreceivethedefectiveCRUfromyouwithinthirty
(30)daysofyourreceiptofthereplacementCRU.
2.On-siteService
UnderOn-SiteService,aServiceProviderwilleitherrepairorexchangetheproductatyourlocation.Y ou
mustprovideasuitableworkingareatoallowdisassemblyandreassemblyoftheproduct.Somerepairs
mayneedtobecompletedataservicecenter.Ifso,theServiceProviderwillsendtheproducttothe
servicecenteratitsexpense.
3.CourierorDepotService
46UserGuide
Page 51

UnderCourierorDepotService,yourproductwillberepairedorexchangedatadesignatedservicecenter,
withshippingattheexpenseoftheServiceProvider.Y ouareresponsiblefordisconnectingtheproductand
packingitinashippingcontainerprovidedtoyoutoreturnyourproducttoadesignatedservicecenter.
Acourierwillpickupyourproductanddeliverittothedesignatedservicecenter.Theservicecenterwill
returntheproducttoyouatitsexpense.
4.CustomerCarry-InService
UnderCustomerCarry-InService,yourproductwillberepairedorexchangedafteryoudeliverittoa
designatedservicecenteratyourriskandexpense.Aftertheproducthasbeenrepairedorexchanged,itwill
bemadeavailabletoyouforcollection.Ifyoufailtocollecttheproduct,theServiceProvidermaydisposeof
theproductasitseesfit,withnoliabilitytoyou.
5.Mail-InService
UnderMail-InService,yourproductwillberepairedorexchangedatadesignatedservicecenterafteryou
deliveritatyourriskandexpense.Aftertheproducthasbeenrepairedorexchanged,itwillbereturnedto
youatLenovo’sriskandexpense,unlesstheServiceProviderspecifiesotherwise.
6.CustomerTwo-WayMail-InService
UnderCustomerTwo-WayMail-InService,yourproductwillberepairedorexchangedafteryoudeliveritto
adesignatedservicecenteratyourriskandexpense.Aftertheproducthasbeenrepairedorexchanged,
itwillbemadeavailabletoyouforreturnshippingatyourriskandexpense.Ifyoufailtoarrangereturn
shipment,theServiceProvidermaydisposeoftheproductasitseesfit,withnoliabilitytoyou.
7.ProductExchangeService
UnderProductExchangeService,Lenovowillshipareplacementproducttoyourlocation.Youare
responsibleforitsinstallationandverificationofitsoperation.Thereplacementproductbecomesyour
propertyinexchangeforthefailedproduct,whichbecomesthepropertyofLenovo.Y oumustpackthe
failedproductintheshippingcartoninwhichyoureceivedthereplacementproductandreturnittoLenovo.
Transportationcharges,bothways,shallbeatLenovo’sexpense.Ifyoufailtousethecartoninwhichthe
replacementproductwasreceived,youmayberesponsibleforanydamagetothefailedproductoccurring
duringshipment.YoumaybechargedforthereplacementproductifLenovodoesnotreceivethefailed
productwithinthirty(30)daysofyourreceiptofthereplacementproduct.
SuplementodeGarantíaparaMéxico
EsteSuplementoseconsideraparteintegrantedelaGarantíaLimitadadeLenovoyseráefectivoúnicay
exclusivamenteparalosproductosdistribuidosycomercializadosdentrodelTerritoriodelosEstados
UnidosMexicanos.Encasodeconflicto,seaplicaránlostérminosdeesteSuplemento.
Todoslosprogramasdesoftwareprecargadosenelequiposólotendránunagarantíadetreinta(30)díaspor
defectosdeinstalacióndesdelafechadecompra.Lenovonoesresponsabledelainformaciónincluida
endichosprogramasdesoftwarey/ocualquierprogramadesoftwareadicionalinstaladoporUstedo
instaladodespuésdelacompradelproducto.
Losserviciosnocubiertosporlagarantíasecargaránalusuariofinal,previaobtencióndeunaautorización.
Enelcasodequesepreciseunareparacióncubiertaporlagarantía,porfavor,llamealCentrodesoporte
alclienteal001-866-434-2080,dondeledirigiránalCentrodeservicioautorizadomáscercano.Sino
existieseningúnCentrodeservicioautorizadoensuciudad,poblaciónoenunradiode70kilómetros
desuciudadopoblación,lagarantíaincluirácualquiergastodeentregarazonablerelacionadoconel
transportedelproductoasuCentrodeservicioautorizadomáscercano.Porfavor,llamealCentrode
AppendixB.LenovoLimitedWarranty47
Page 52

servicioautorizadomáscercanoparaobtenerlasaprobacionesnecesariasolainformaciónrelacionada
conelenvíodelproductoyladireccióndeenvío.
ParaobtenerunalistadelosCentrosdeservicioautorizados,porfavor,visite:
http://www.lenovo.com/mx/es/servicios
Importadopor:
LenovoMéxicoS.deR.L.deC.V .
Av.SantaFe505,Piso15
Col.CruzManca
Cuajimalpa,D.F .,México
C.P .05349
Tel.(55)50008500
48UserGuide
Page 53

AppendixC.Electronicemissionnotices
ThefollowinginformationreferstotheThinkPadUSB3.0UltraDockandThinkPadUSB3.0ProDock.
FederalCommunicationsCommissionDeclarationofConformity
ThinkPadUSB3.0UltraDock-DK1523
ThinkPadUSB3.0ProDock-DK1522
ThisequipmenthasbeentestedandfoundtocomplywiththelimitsforaClassBdigitaldevice,pursuant
toPart15oftheFCCRules.Theselimitsaredesignedtoprovidereasonableprotectionagainstharmful
interferenceinaresidentialinstallation.Thisequipmentgenerates,uses,andcanradiateradiofrequency
energyand,ifnotinstalledandusedinaccordancewiththeinstructions,maycauseharmfulinterference
toradiocommunications.However,thereisnoguaranteethatinterferencewillnotoccurinaparticular
installation.Ifthisequipmentdoescauseharmfulinterferencetoradioortelevisionreception,whichcanbe
determinedbyturningtheequipmentoffandon,theuserisencouragedtotrytocorrecttheinterferenceby
oneormoreofthefollowingmeasures:
•Reorientorrelocatethereceivingantenna.
•Increasetheseparationbetweentheequipmentandreceiver.
•Connecttheequipmentintoanoutletonacircuitdifferentfromthattowhichthereceiverisconnected.
•Consultanauthorizeddealerorservicerepresentativeforhelp.
Lenovoisnotresponsibleforanyradioortelevisioninterferencecausedbyusingotherthanspecifiedor
recommendedcablesandconnectorsorbyunauthorizedchangesormodificationstothisequipment.
Unauthorizedchangesormodificationscouldvoidtheuser'sauthoritytooperatetheequipment.
ThisdevicecomplieswithPart15oftheFCCRules.Operationissubjecttothefollowingtwoconditions:(1)
thisdevicemaynotcauseharmfulinterference,and(2)thisdevicemustacceptanyinterferencereceived,
includinginterferencethatmaycauseundesiredoperation.
ResponsibleParty:
Lenovo(UnitedStates)Incorporated
1009ThinkPlace-BuildingOne
Morrisville,NC27560
PhoneNumber:919-294-5900
IndustryCanadaComplianceStatement
CANICES-3(B)/NMB-3(B)
EuropeanUnion-CompliancetotheElectromagneticCompatibilityDirective
ThisproductisinconformitywiththeprotectionrequirementsofEUCouncilDirective2004/108/EConthe
approximationofthelawsoftheMemberStatesrelatingtoelectromagneticcompatibility.Lenovocannot
acceptresponsibilityforanyfailuretosatisfytheprotectionrequirementsresultingfromanon-recommended
modificationoftheproduct,includingtheinstallationofoptioncardsfromothermanufacturers.
©CopyrightLenovo2015
49
Page 54

ThisproducthasbeentestedandfoundtocomplywiththelimitsforClassBInformationTechnology
EquipmentaccordingtoEuropeanStandardEN55022.ThelimitsforClassBequipmentwerederived
fortypicalresidentialenvironmentstoprovidereasonableprotectionagainstinterferencewithlicensed
communicationdevices.
Lenovo,Einsteinova21,85101Bratislava,Slovakia
GermanClassBcompliancestatement
DeutschsprachigerEUHinweis:
HinweisfürGerätederKlasseBEU-RichtliniezurElektromagnetischenVerträglichkeit
DiesesProduktentsprichtdenSchutzanforderungenderEU-Richtlinie2004/108/EG(früher89/336/EWG)zur
AngleichungderRechtsvorschriftenüberdieelektromagnetischeVerträglichkeitindenEU-Mitgliedsstaaten
undhältdieGrenzwertederEN55022KlasseBein.
Umdiesessicherzustellen,sinddieGerätewieindenHandbüchernbeschriebenzuinstallierenundzu
betreiben.DesWeiterendürfenauchnurvonderLenovoempfohleneKabelangeschlossenwerden.
LenovoübernimmtkeineVerantwortungfürdieEinhaltungderSchutzanforderungen,wenndasProdukt
ohneZustimmungderLenovoverändertbzw.wennErweiterungskomponentenvonFremdherstellernohne
EmpfehlungderLenovogesteckt/eingebautwerden.
Deutschland:
EinhaltungdesGesetzesüberdieelektromagnetischeVerträglichkeitvonBetriebsmitteln
DiesesProduktentsprichtdem„GesetzüberdieelektromagnetischeVerträglichkeitvonBetriebsmitteln“
EMVG(früher„GesetzüberdieelektromagnetischeVerträglichkeitvonGeräten“).DiesistdieUmsetzungder
EU-Richtlinie2004/108/EG(früher89/336/EWG)inderBundesrepublikDeutschland.
ZulassungsbescheinigunglautdemDeutschenGesetzüberdieelektromagnetischeVerträglichkeit
vonBetriebsmitteln,EMVGvom20.Juli2007(früherGesetzüberdieelektromagnetische
VerträglichkeitvonGeräten),bzw.derEMVEGRichtlinie2004/108/EC(früher89/336/EWG),für
GerätederKlasseB.
DiesesGerätistberechtigt,inÜbereinstimmungmitdemDeutschenEMVGdasEG-Konformitätszeichen
-CE-zuführen.VerantwortlichfürdieKonformitätserklärungnachParagraf5desEMVGistdieLenovo
(Deutschland)GmbH,Gropiusplatz10,D-70563Stuttgart.
InformationeninHinsichtEMVGParagraf4Abs.(1)4:
DasGeräterfülltdieSchutzanforderungennachEN55024undEN55022KlasseB.
KoreaClassBcompliancestatement
JapanVCCIClassBcompliancestatement
50UserGuide
Page 55

Japancompliancestatementforproductswhichconnecttothepowermainswithratedcurrent
lessthanorequalto20Aperphase
Japannoticeforacpowercord
Theacpowercordshippedwithyourproductcanbeusedonlyforthisspecificproduct.Donotusetheac
powercordforotherdevices.
LenovoproductserviceinformationforT aiwan
Ukrainecompliancemark
Eurasiancompliancemark
AppendixC.Electronicemissionnotices51
Page 56

52UserGuide
Page 57

AppendixD.Notices
Lenovomaynotoffertheproducts,services,orfeaturesdiscussedinthisdocumentinallcountries.Consult
yourlocalLenovorepresentativeforinformationontheproductsandservicescurrentlyavailableinyour
area.AnyreferencetoaLenovoproduct,program,orserviceisnotintendedtostateorimplythatonlythat
Lenovoproduct,program,orservicemaybeused.Anyfunctionallyequivalentproduct,program,orservice
thatdoesnotinfringeanyLenovointellectualpropertyrightmaybeusedinstead.However,itistheuser's
responsibilitytoevaluateandverifytheoperationofanyotherproduct,program,orservice.
Lenovomayhavepatentsorpendingpatentapplicationscoveringsubjectmatterdescribedinthis
document.Thefurnishingofthisdocumentdoesnotgiveyouanylicensetothesepatents.Y oucansend
licenseinquiries,inwriting,to:
Lenovo(UnitedStates),Inc.
1009ThinkPlace-BuildingOne
Morrisville,NC27560
U.S.A.
Attention:LenovoDirectorofLicensing
LENOVOPROVIDESTHISPUBLICATION“ASIS”WITHOUTWARRANTYOFANYKIND,EITHEREXPRESS
ORIMPLIED,INCLUDING,BUTNOTLIMITEDTO,THEIMPLIEDWARRANTIESOFNON-INFRINGEMENT,
MERCHANTABILITYORFITNESSFORAPARTICULARPURPOSE.Somejurisdictionsdonotallow
disclaimerofexpressorimpliedwarrantiesincertaintransactions,therefore,thisstatementmaynotapply
toyou.
Thisinformationcouldincludetechnicalinaccuraciesortypographicalerrors.Changesareperiodically
madetotheinformationherein;thesechangeswillbeincorporatedinneweditionsofthepublication.
Lenovomaymakeimprovementsand/orchangesintheproduct(s)and/ortheprogram(s)describedinthis
publicationatanytimewithoutnotice.
Recyclinginformation
Lenovoencouragesownersofinformationtechnology(IT)equipmenttoresponsiblyrecycletheirequipment
whenitisnolongerneeded.Lenovooffersavarietyofprogramsandservicestoassistequipmentownersin
recyclingtheirITproducts.ForinformationonrecyclingLenovoproducts,goto:
http://www.lenovo.com/recycling
RecyclinganddisposalinformationforJapanisavailableat:
http://www.lenovo.com/recycling/japan
RecyclinginformationforChina
©CopyrightLenovo2015
53
Page 58

RecyclinginformationforBrazil
DeclaraçõesdeReciclagemnoBrasil
DescartedeumProdutoLenovoForadeUso
Equipamentoselétricoseeletrônicosnãodevemserdescartadosemlixocomum,masenviadosàpontosde
coleta,autorizadospelofabricantedoprodutoparaquesejamencaminhadoseprocessadosporempresas
especializadasnomanuseioderesíduosindustriais,devidamentecertificadaspelosorgãosambientais,de
acordocomalegislaçãolocal.
ALenovopossuiumcanalespecíficoparaauxiliá-lonodescartedessesprodutos.Casovocêpossua
umprodutoLenovoemsituaçãodedescarte,ligueparaonossoSACouencaminheume-mailpara:
reciclar@lenovo.com,informandoomodelo,númerodesérieecidade,afimdeenviarmosasinstruções
paraocorretodescartedoseuprodutoLenovo.
ImportantWEEEinformation
TheWEEEmarkingonLenovoproductsappliestocountrieswithWEEEande-wasteregulations(for
example,theEuropeanWEEEDirective,IndiaE-WasteManagement&HandlingRules,2011).Appliancesare
labeledinaccordancewithlocalregulationsconcerningwasteelectricalandelectronicequipment(WEEE).
Theseregulationsdeterminetheframeworkforthereturnandrecyclingofusedappliancesasapplicable
withineachgeography.Thislabelisappliedtovariousproductstoindicatethattheproductisnottobe
thrownaway,butratherputintheestablishedcollectionsystemsforreclaimingtheseendoflifeproducts.
Usersofelectricalandelectronicequipment(EEE)withtheWEEEmarkingmustnotdisposeofendof
lifeEEEasunsortedmunicipalwaste,butusethecollectionframeworkavailabletothemforthereturn,
recycle,andrecoveryofWEEEandtominimizeanypotentialeffectsofEEEontheenvironmentand
humanhealthduetothepresenceofhazardoussubstances.ForadditionalWEEEinformationgoto:
http://www.lenovo.com/recycling
ExportClassificationNotice
ThisproductissubjecttotheUnitedStatesExportAdministrationregulations(EAR)andhasanExport
ClassificationControlNumber(ECCN)ofEAR99.Itcanbere-exportedexcepttoanyoftheembargoed
countriesintheEARE1countrylist.
Trademarks
ThefollowingtermsaretrademarksofLenovointheUnitedStates,othercountries,orboth:
Lenovo
TheLenovologo
54UserGuide
Page 59

ThinkPad
ThinkVantage
ThinkCentre
MicrosoftandWindowsaretrademarksoftheMicrosoftgroupofcompanies.
IntelisatrademarkofIntelCorporationintheUnitedStates,othercountries,orboth.
AMDisaregisteredtrademarkofAdvancedMicroDevices,Inc.
ThetermsHDMIandHDMIHigh-DefinitionMultimediaInterfacearetrademarksorregisteredtrademarksof
HDMILicensingLLCintheUnitedStatesandothercountries.
DisplayPortandVESAaretrademarksoftheVideoElectronicsStandardsAssociation.
Othercompany,product,orservicenamesmaybetrademarksorservicemarksofothers.
AppendixD.Notices55
Page 60

56UserGuide
Page 61

AppendixE.RestrictionofHazardousSubstancesDirective (RoHS)
EuropeanUnionRoHS
LenovoproductssoldintheEuropeanUnion,onorafter3January2013meettherequirementsofDirective
2011/65/EUontherestrictionoftheuseofcertainhazardoussubstancesinelectricalandelectronic
equipment(“RoHSrecast”or“RoHS2”).
FormoreinformationaboutLenovoprogressonRoHS,goto:
http://www.lenovo.com/social_responsibility/us/en/RoHS_Communication.pdf
ChinaRoHS
为满足中国电子电气产品有害物质限制相关的法律法规和其他要求,联想公司对本产品中有害物质,按
部件分类,声明如下。
TurkishRoHS
TheLenovoproductmeetstherequirementsoftheRepublicofTurkeyDirectiveontheRestrictionoftheUse
ofCertainHazardousSubstancesinElectricalandElectronicEquipment(EEE).
UkraineRoHS
IndiaRoHS
RoHScompliantasperE-Waste(Management&Handling)Rules,2011.
©CopyrightLenovo2015
57
Page 62

58UserGuide
Page 63

Page 64

 Loading...