

Page 1

ThinkCentre
UserGuide
MachineTypes:3029,3054,3139,3219,3246,3282,3349,3421,
3544,3652,5384,5450,5474,5498,5554,5852,6232,and6590
Page 2

Page 3

ThinkCentre
UserGuide
MachineTypes:3029,3054,3139,3219,3246,3282,3349,3421,
3544,3652,5384,5450,5474,5498,5554,5852,6232,and6590
Page 4

Note
Beforeusingthisinformationandtheproductitsupports,besuretoreadandunderstandtheThinkCentre
SafetyandWarrantyGuideandAppendixA“Notices”onpage63.
FirstEdition(October2010)
©CopyrightLenovo2010.
LENOVOproducts,data,computersoftware,andserviceshavebeendevelopedexclusivelyatprivateexpenseandare
soldtogovernmentalentitiesascommercialitemsasdenedby48C.F.R.2.101withlimitedandrestrictedrightsto
use,reproductionanddisclosure.
LIMITEDANDRESTRICTEDRIGHTSNOTICE:Ifproducts,data,computersoftware,orservicesaredeliveredpursuant
aGeneralServicesAdministration“GSA ”contract,use,reproduction,ordisclosureissubjecttorestrictionssetforth
inContractNo.GS-35F-05925.
Page 5

Contents
Importantsafetyinformation.....vii
Chapter1.Productoverview......1
Features..................1
Specications................3
Softwareoverview..............4
SoftwareprovidedbyLenovo........4
AdobeReader..............6
Antivirussoftware.............6
Locations..................6
Locatingconnectorsonthefrontofyour
computer................6
Locatingconnectorsontherearofyour
computer................7
Locatingcomponents...........9
Locatingpartsonthesystemboard....10
Locatinginternaldrives.........11
Chapter2.Installingorreplacing
hardware...............13
Handlingstatic-sensitivedevices.......13
Installingorreplacinghardware........13
Installingexternaloptions........13
Removingthecomputercover.......14
Removingandreinstallingthefrontbezel..15
InstallingorreplacingaPCIcard......15
Installingorreplacingamemorymodule...18
Installingorreplacingtheopticaldrive...20
Replacingthebattery..........22
Replacingthepowersupplyassembly...24
Replacingtheheatsinkandfanassembly..25
Replacingtheprimaryharddiskdrive....26
Replacingthesecondaryharddiskdrive...29
Replacingthefrontfanassembly.....31
Replacingtherearfanassembly......32
ReplacingthefrontaudioandUSB
assembly...............34
Replacingtheinternalspeaker.......35
Replacingthekeyboardormouse.....37
Completingthepartsreplacement.....38
Installingsecurityfeatures..........39
Integratedcablelock..........39
Padlock...............40
Passwordprotection..........41
Erasinglostorforgottenpasswords(clearing
CMOS)................41
Creatingandusingrecoverymedia......43
Creatingrecoverymedia.........43
Usingrecoverymedia..........44
Performingbackupandrecoveryoperations...44
Performingabackupoperation......44
Performingarecoveryoperation......45
UsingtheRescueandRecoveryworkspace...45
Creatingandusingarescuemedium......46
Creatingarescuemedium........46
Usingarescuemedium.........47
Installingorreinstallingdevicedrivers.....47
Solvingrecoveryproblems..........48
Chapter4.UsingtheSetupUtility
program................49
StartingtheSetupUtilityprogram.......49
Viewingandchangingsettings........49
Usingpasswords..............49
Passwordconsiderations.........49
Power-OnPassword..........50
AdministratorPassword.........50
HardDiskPassword...........50
Setting,changing,anddeletingapassword.50
Enablingordisablingadevice........50
Selectingastartupdevice..........51
Selectingatemporarystartupdevice....51
Selectingorchangingthestartupdevice
sequence...............51
ExitingfromtheSetupUtilityprogram.....51
Chapter5.Updatingsystem
programs...............53
Usingsystemprograms...........53
Updating(ashing)theBIOSfromadisc....53
Updating(ashing)theBIOSfromyouroperating
system..................54
RecoveringfromaPOST/BIOSupdatefailure..54
Chapter6.Troubleshootingand
diagnostics..............55
Basictroubleshooting............55
Diagnosticprograms............56
LenovoThinkVantageToolbox.......56
PC-DoctorforRescueandRecovery....57
PC-DoctorforDOS...........57
Cleaninganopticalmouse..........58
Chapter3.Recoveryinformation...43
©CopyrightLenovo2010
v
Page 6

Chapter7.Gettinginformation,help,
andservice..............59
Informationresources............59
OnlineBooksfolder...........59
LenovoThinkVantageTools........59
ThinkVantageProductivityCenter.....59
LenovoWelcome............60
AccessHelp..............60
SafetyandWarranty...........60
LenovoWebsite(http://www.lenovo.com)..60
Helpandservice..............61
Usingthedocumentationanddiagnostic
programs...............61
Callingforservice............61
Usingotherservices..........62
Purchasingadditionalservices......62
AppendixA.Notices.........63
Televisionoutputnotice...........64
EuropeanconformanceCEmark.......64
Trademarks................64
Index..................65
viThinkCentreUserGuide
Page 7

Importantsafetyinformation
CAUTION:
Beforeusingthismanual,besuretoreadandunderstandalltherelatedsafetyinformationforthis
product.RefertotheThinkCentreSafetyandWarrantyGuidethatyoureceivedwiththisproductfor
thelatestsafetyinformation.Readingandunderstandingthissafetyinformationreducestheriskof
personalinjuryandordamagetoyourproduct.
IfyounolongerhaveacopyoftheThinkCentreSafetyandWarrantyGuide,youcanobtainaPortable
DocumentFormat(PDF)versionfromtheLenovo
http://www.lenovo.com/support
®
SupportWebsiteat:
©CopyrightLenovo2010
vii
Page 8

viiiThinkCentreUserGuide
Page 9

Chapter1.Productoverview
Thischapterdescribesthecomputerfeatures,specications,preinstalledsoftwareprograms,andpart
andconnectorlocations.
Features
Thissectionprovidesinformationaboutthecomputerfeatures.
Systeminformation
Thefollowinginformationcoversavarietyofmodels.Forinformationaboutyourspecicmodel,usethe
SetupUtilityprogram.SeeChapter4“UsingtheSetupUtilityprogram”onpage49
Microprocessor
Yourcomputercomeswithoneofthefollowingmicroprocessors(internalcachesizevariesbymodeltype):
•Intel
•IntelCorei5microprocessor
•IntelCorei7microprocessor
•IntelPentium
Memory
®
Core™i3microprocessor
®
microprocessor
.
•Supportsuptofourdoubledatarate3dualinlinememorymodules(DDR3DIMMs)
Internaldrives
•Opticaldrive
•SerialAdvancedTechnologyAttachment(SATA)harddiskdrive(availableinsomemodels)
Videosubsystem
•IntegratedgraphicscardforaVideoGraphicsArray(VGA)connectorandaDisplayPortconnector(not
applicableonsomemodels)
•PeripheralComponentInterconnect(PCI)Expressx16graphicscardslotonthesystemboardfora
discretegraphicscard
Audiosubsystem
•Integratedhigh-denition(HD)audio
•Audioline-inconnector,audioline-outconnector,andmicrophoneconnectorontherearpanel
•Microphoneconnectorandheadphoneconnectoronthefrontpanel
•Internalspeaker(installedinsomemodels)
Connectivity
•100/1000MbpsintegratedEthernetcontroller
•PCIFaxmodem(somemodels)
Systemmanagementfeatures
©CopyrightLenovo2010
1
Page 10

•Abilitytostorepower-onself-test(POST)hardwaretestresults
•Automaticpower-onstartup
•DesktopManagementInterface(DMI)
•IntelActiveManagementTechnology(AMT)(availableonsomemodels)
•IntelMatrixStorageManager
•PrebootExecutionEnvironment(PXE)
•SecureManagedClient(SMC)(somemodels)
•SystemManagement(SM)BasicInput/OutputSystem(BIOS)andSMsoftware
•WakeonLAN
•WakeonRing
•WindowsManagementInstrumentation(WMI)
Input/Output(I/O)features
•9-pinserialport(onestandardandoneoptional)
•EightUniversalSerialBus(USB)connectors(twoonthefrontpanelandsixontherearpanel)
•OneEthernetconnector
•OneDisplayPortconnector(notapplicableonsomemodels)
•OneVGAmonitorconnector(notapplicableonsomemodels)
•OnePersonalSystem/2
®
(PS/2
®
)keyboardconnector(optional)
•OnePS/2mouseconnector(optional)
•Threeaudioconnectorsontherearpanel(audioline-inconnector,audioline-outconnector,and
microphoneconnector)
•T woaudioconnectorsonthefrontpanel(microphoneconnectorandheadphoneconnector)
Formoreinformation,see“Locatingconnectorsonthefrontofyourcomputer”onpage6
connectorsontherearofyourcomputer”onpage7.
Expansion
•T woharddiskdrivebays(onestandardandoneoptional)
•T woopticaldrivebays
•T woPCIcardslots
•OnePCIExpressx1cardslot
•OnePCIExpressx16graphicscardslot
Powersupply
Yourcomputercomeswithoneofthefollowingpowersupplies:
•280-wattpowersupplywithmanualvoltage-selectionswitch
•280-wattauto-sensingpowersupply
•320-wattauto-sensingpowersupply
Securityfeatures
•Computrace
•Coverpresenceswitch(alsocalledintrusionswitch)
and“Locating
2ThinkCentreUserGuide
Page 11

•Enablingordisablingadevice
•EnablingordisablingUSBconnectorsindividually
•Harddiskdrivepassword
•Keyboardwithngerprintreader(shippedwithsomemodels)
•Power-onpassword(POP),administratorpassword,andharddiskdrivepasswordtodeterunauthorized
useofyourcomputer
•Startupsequencecontrol
•Startupwithoutkeyboardormouse
•Supportforanintegratedcablelock(Kensingtonlock)
•Supportforapadlock
•T rustedPlatformModule(TPM)
Preinstalledsoftwareprograms
Yourcomputerispreinstalledwithsomesoftwareprogramstohelpyouworkmoreeasilyandsecurely.For
moreinformation,see“Softwareoverview”onpage4
.
Preinstalledoperatingsystem
Yourcomputerispreinstalledwithoneofthefollowingoperatingsystems:
•Microsoft
®
Windows
•MicrosoftWindowsVista
®
7
®
Operatingsystem(s),certiedortestedforcompatibility
•Linux
®
1
Specications
Thissectionliststhephysicalspecicationsforyourcomputer.
(variesbymodeltype)
1.Theoperatingsystem(s)listedherearebeingcertiedortestedforcompatibilityatthetimethispublicationgoesto
press.AdditionaloperatingsystemsmightbeidentiedbyLenovoascompatiblewithyourcomputerfollowingthe
publicationofthismanual.Thislistissubjecttochange.T odetermineifanoperatingsystemhasbeencertiedor
testedforcompatibility,checktheWebsiteoftheoperatingsystemvendor.
Chapter1.Productoverview3
Page 12

Dimensions
Width:175mm(6.89inches)
Height:402mm(15.83inches)
Depth:440mm(17.32inches)
Weight
Maximumcongurationasshipped:11kg(24.25lbs)
Environment
•Airtemperature:
Operating:10°Cto35°C(50°Fto95°F)
Non-operating:-40°Cto60°C(-40°Fto140°F)
Non-operating:-10°Cto60°C(14°Fto140°F)(withoutpackage)
•Humidity:
Operating:20%to80%(non-condensing)
Non-operating:20%to90%(non-condensing)
•Altitude:
Operating:-50to10000ft(-15.2to3048m)
Non-operating:-50to35000ft(-15.2to10668m)
Electricalinput
•Inputvoltage:
–Lowrange:
Minimum:100Vac
Maximum:127Vac
Inputfrequencyrange:50to60Hz
Voltage-selectionswitchsetting:115Vac
–Highrange:
Minimum:200Vac
Maximum:240Vac
Inputfrequencyrange:50to60Hz
Voltage-selectionswitchsetting:230Vac
Softwareoverview
Thissectiondescribesthesoftwarepreinstalledonthecomputersthathaveaninternalharddiskdrive
andanoperatingsystemfromLenovo.
SoftwareprovidedbyLenovo
ThefollowingsoftwareprogramsareprovidedbyLenovotohelpyouimproveproductivityandreducethe
costassociatedwithmaintainingyourcomputer.Softwareprogramsprovidedwithyourcomputermight
varydependingonyourcomputermodeltypeandpreinstalledoperatingsystem.
LenovoThinkVantageT ools
TheLenovoThinkVantage
accesstovarioustoolstohelpyouworkmoreeasilyandsecurely.Formoreinformation,see“Lenovo
ThinkVantageTools”onpage59
4ThinkCentreUserGuide
®
Toolsprogramguidesyoutoahostofinformationsourcesandprovideseasy
.
Page 13

Note:TheLenovoThinkVantageToolsprogramisonlyavailableoncomputerswiththeWindows7operating
systemfromLenovo.
ThinkVantageProductivityCenter
TheThinkVantageProductivityCenterprogramguidesyoutoahostofinformationandtoolstohelpyouset
up,understand,maintain,andenhanceyourcomputer.
Note:TheThinkVantageProductivityCenterprogramisonlyavailableoncomputerspreinstalledwith
theWindowsVistaoperatingsystemfromLenovo.
LenovoWelcome
TheLenovoWelcomeprogramintroducesyoutosomeinnovativebuilt-infeaturesofLenovoandguidesyou
throughafewimportantsetuptaskstohelpyoumakethemostofyourcomputer.
ThinkVantageRescueandRecovery
TheThinkVantageRescueandRecovery®programisaonebuttonrecoveryandrestoresolutionthat
includesasetofselfrecoverytoolstohelpusersdiagnosecomputerproblems,gethelp,andrecoverfrom
systemcrashesquickly,eveniftheprimaryoperatingsystemwillnotstart.
ThinkVantageClientSecuritySolution
TheThinkVantageClientSecuritySolutionprogramisavailableonselectLenovocomputers.Ithelpsprotect
yourinformation,includingvitalsecurityinformationlikepasswords,encryptionkeys,andelectronic
credentials,whileguardingagainstunauthorizeduseraccesstodata.
Note:TheThinkVantageClientSecuritySolutionprogramisonlyavailableoncomputerspreinstalledwith
theWindowsVistaoperatingsystemfromLenovo.
PasswordManager
ThePasswordManagerprogramhelpsyouautomaticallycaptureandllinauthenticationinformationfor
WindowsapplicationsandWebsites.
Note:ThePasswordManagerprogramisonlyavailableoncomputerspreinstalledwiththeWindows7
operatingsystemfromLenovo.
PowerManager
ThePowerManagerprogramprovidesconvenient,exible,andcompletepowermanagementforyour
ThinkCentre®computer.ByusingthePowerManagerprogram,youcanadjustyourpowersettingsto
achievethebestbalancebetweensystemperformanceandpowersaving.
ProductRecovery
TheProductRecoveryprogramenablesyoutorestorethecontentsoftheharddiskdrivetothefactory
defaultsettings.
FingerprintSoftware
Theintegratedngerprintreaderprovidedonsomekeyboardsenablesyoutoenrollyourngerprintand
associateitwithyourpower-onpassword,harddiskdrivepassword,andWindowspassword.Asaresult,
ngerprintauthenticationcanreplacepasswordsandenablesimpleandsecureuseraccess.Angerprint
readerkeyboardisavailablewithselectcomputersorcanbepurchasedforcomputersthatsupportthis
option.
Chapter1.Productoverview5
Page 14

LenovoThinkVantageT oolbox
TheLenovoThinkVantageT oolboxprogramhelpsyoumaintainyourcomputer,improvecomputingsecurity,
diagnosecomputerproblems,getfamiliarwiththeinnovativetechnologiesprovidedbyLenovo,andgetmore
informationaboutyourcomputer.See“LenovoThinkVantageToolbox”onpage56
fordetailedinformation.
PC-DoctorforRescueandRecovery
ThePC-DoctorforRescueandRecoverydiagnosticprogramispreinstalledonyourharddiskdrive.Itis
partoftheRescueandRecoveryworkspaceoneachLenovocomputertodiagnosehardwareproblems
andreportoperating-system-controlledsettingsthatcancausehardwarefailures.UsethePC-Doctorfor
RescueandRecoverydiagnosticprogramifyouareunabletostarttheWindowsoperatingsystem.See
“PC-DoctorforRescueandRecovery”onpage57
formoreinformation.
AdobeReader
TheAdobeReaderprogramisatoolusedtoview,print,andsearchPDFdocuments.
See“OnlineBooksfolder”onpage59formoreinformationaboutaccessingtheonlinebooksandthe
LenovoWebsite.
Antivirussoftware
Yourcomputercomeswithantivirussoftwarethatyoucanusetodetectandeliminateviruses.Lenovo
providesafullversionofantivirussoftwareonyourharddiskdrivewithafree30-daysubscription.After30
days,youmustrenewthelicensetocontinuereceivingtheantivirusprogramupdates.
Locations
Locatingconnectorsonthefrontofyourcomputer
Frontconnectorlocationsshowsthelocationsoftheconnectorsonthefrontofyourcomputer.
6ThinkCentreUserGuide
Page 15
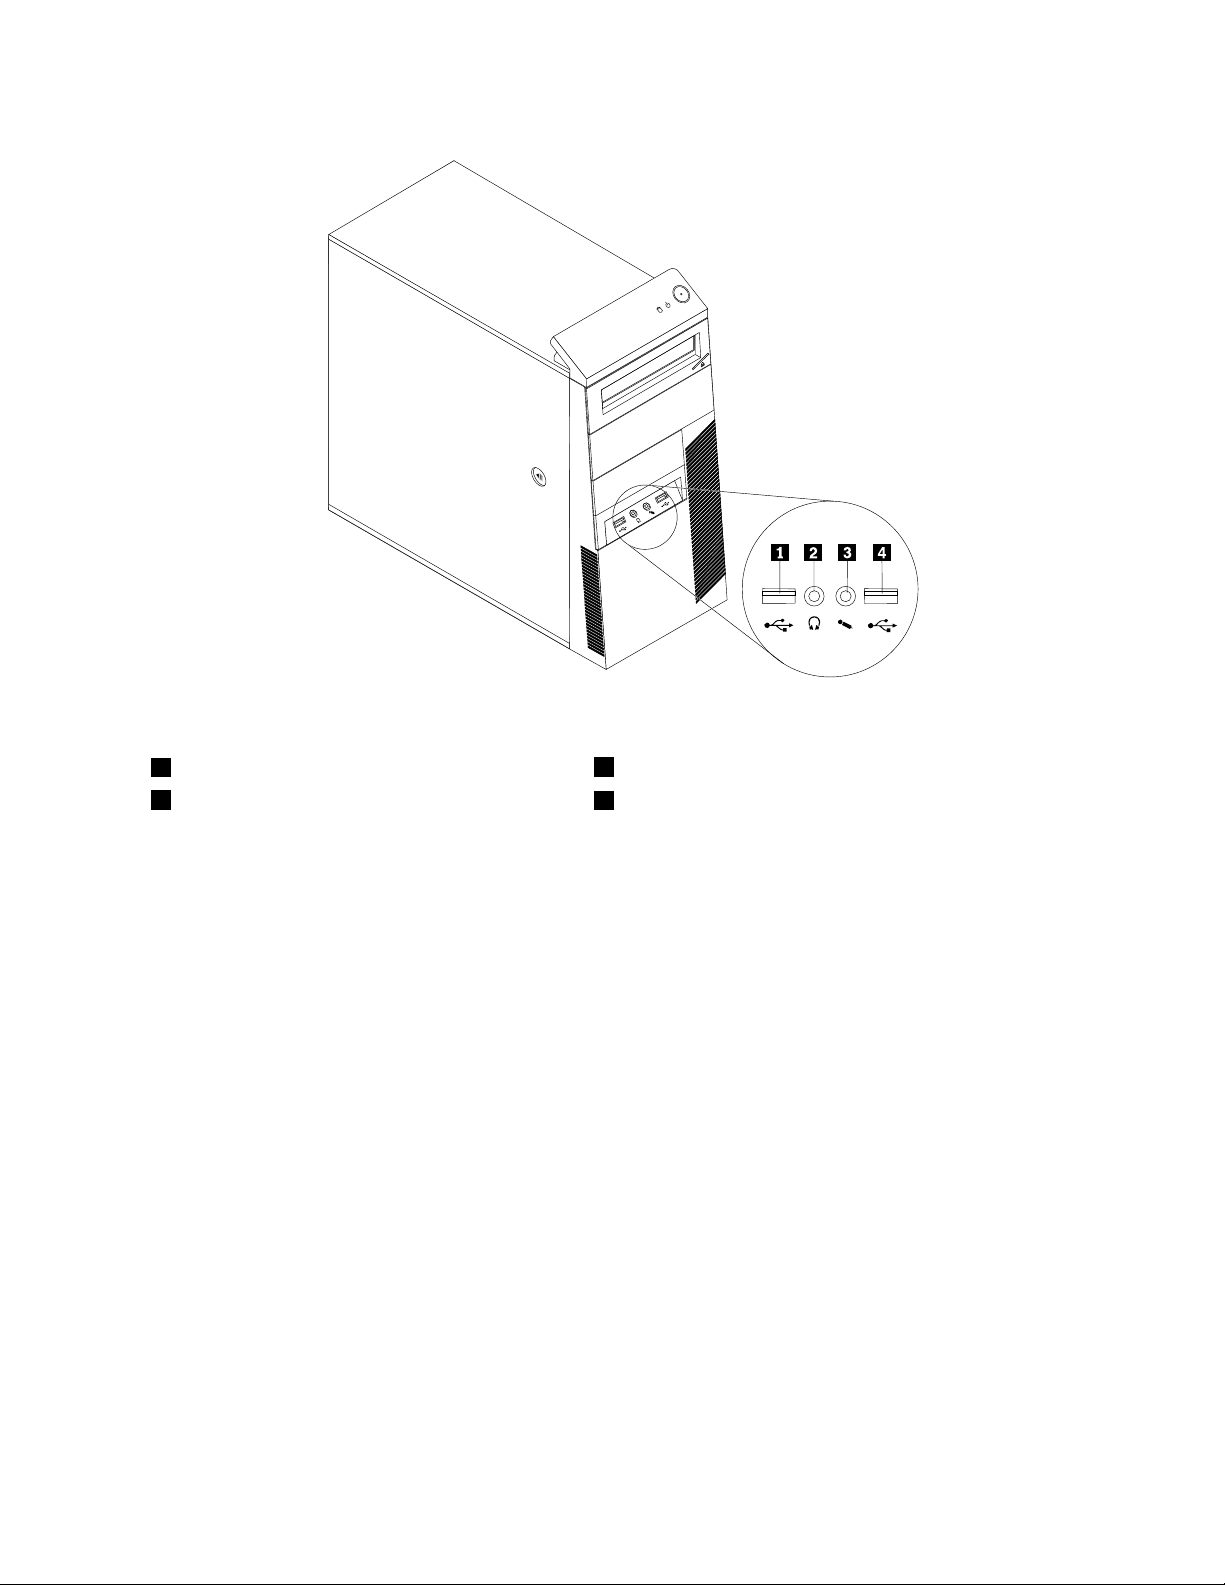
Figure1.Frontconnectorlocations
1USBconnector
2Headphoneconnector
3Microphoneconnector
4USBconnector
Locatingconnectorsontherearofyourcomputer
Rearconnectorlocationsshowsthelocationsoftheconnectorsontherearofyourcomputer.Some
connectorsontherearofyourcomputerarecolor-codedtohelpyoudeterminewheretoconnectthe
cablesonyourcomputer.
Chapter1.Productoverview7
Page 16
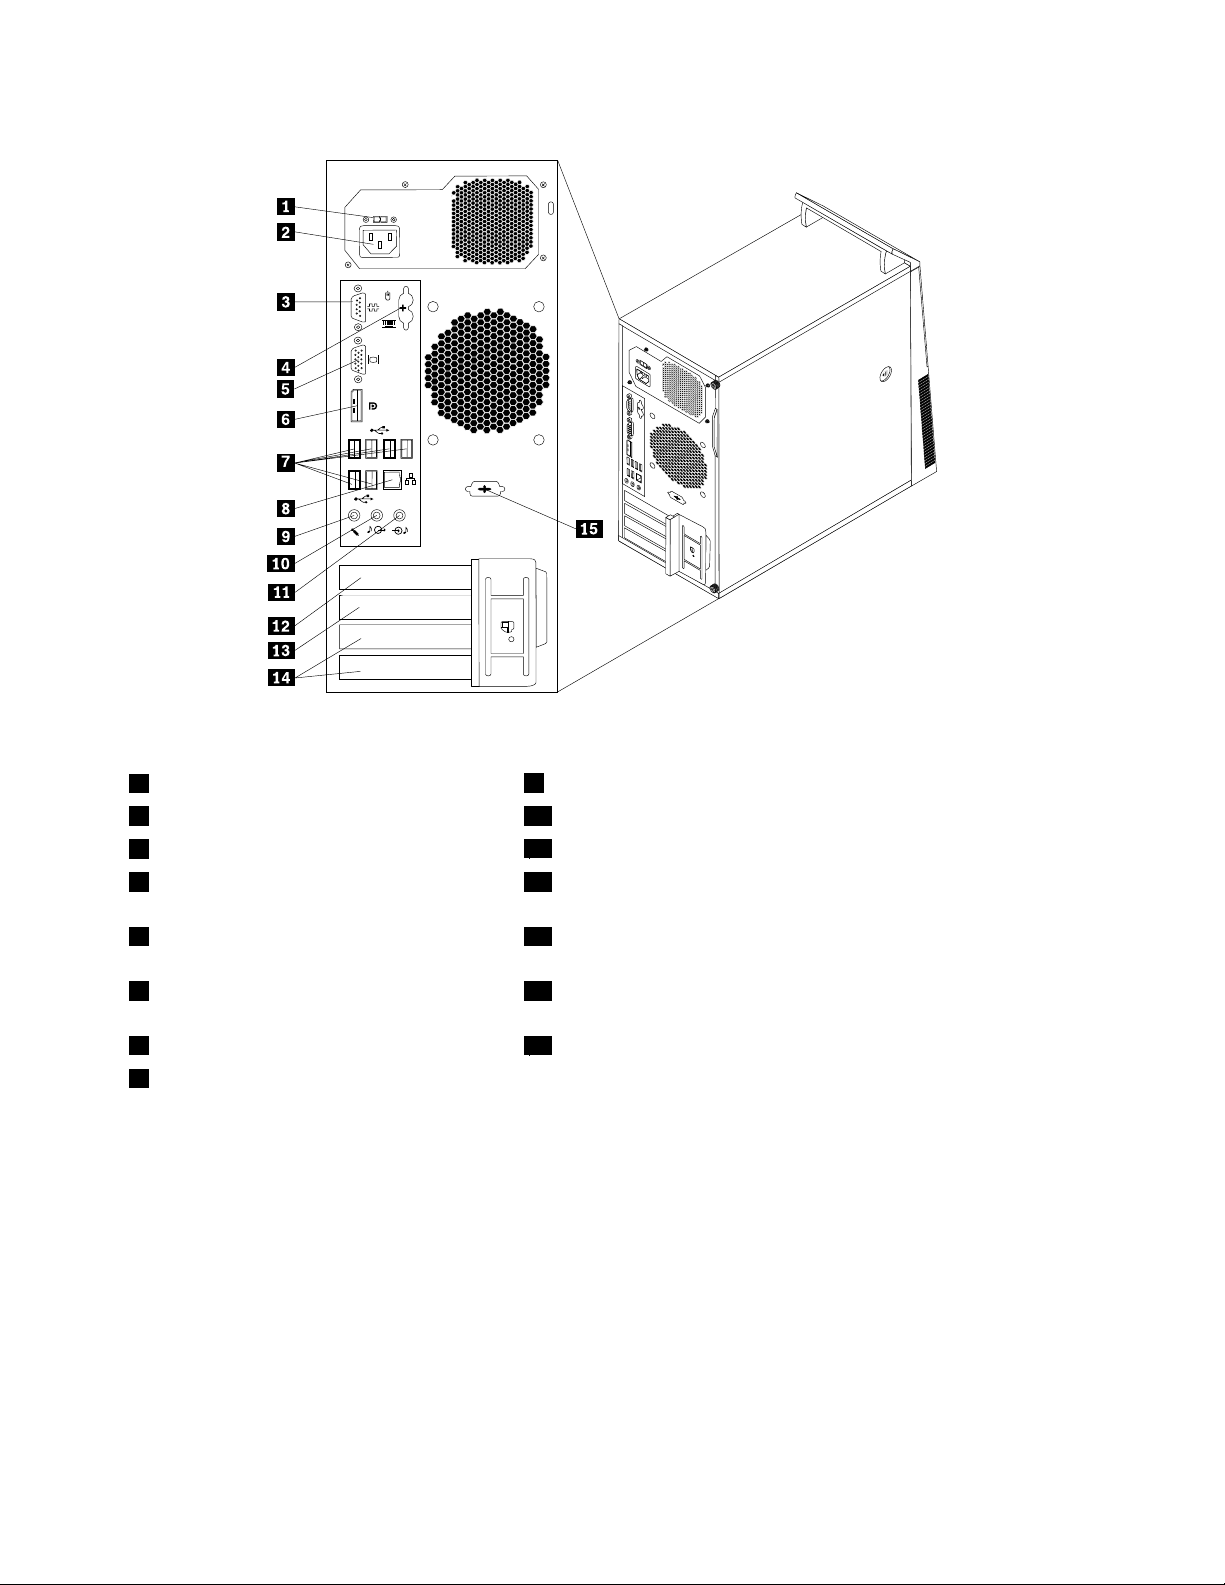
Figure2.Rearconnectorlocations
1Voltage-selectionswitch(somemodels)
2Powercordconnector10Audioline-outconnector
3Serialport
4PS/2keyboardandmouseconnectors
9Microphoneconnector
11Audioline-inconnector
12PCIExpressx16graphicscardslot
(optional)
5VGAmonitorconnector(notapplicableon
13PCIExpressx1cardslot
somemodels)
6DisplayPortconnector(notapplicableon
14PCIcardslots(2)
somemodels)
7USBconnectors(6)15Optionalserialport
8Ethernetconnector
ConnectorDescription
Audioline-inconnector
Usedtoreceiveaudiosignalsfromanexternalaudiodevice,suchasastereo
system.Whenyouattachanexternalaudiodevice,acableisconnectedbetween
theaudioline-outconnectorofthedeviceandtheaudioline-inconnectorofthe
computer.
Audioline-outconnector
Usedtosendaudiosignalsfromthecomputertoexternaldevices,suchaspowered
stereospeakers(speakerswithbuilt-inampliers),headphones,multimedia
keyboards,ortheaudioline-inconnectoronastereosystemorotherexternal
recordingdevice.
DisplayPortconnector
Usedtoattachahigh-performancemonitor,adirect-drivemonitor,orotherdevices
thatuseaDisplayPortconnector.
8ThinkCentreUserGuide
Page 17
ConnectorDescription
Ethernetconnector
Microphoneconnector
PS/2keyboardconnector
(optional)
PS/2mouseconnector
(optional)
Serialport
USBconnectorUsedtoattachadevicethatrequiresaUSBconnector,suchasaUSBkeyboard,a
VGAmonitorconnectorUsedtoattachaVGAmonitororotherdevicesthatuseaVGAmonitorconnector.
UsedtoattachanEthernetcableforalocalareanetwork(LAN).
Note:TooperatethecomputerwithinFCCClassBlimits,useaCategory5Ethernet
cable.
Usedtoattachamicrophonetoyourcomputerwhenyouwanttorecordsoundorif
youusespeech-recognitionsoftware.
UsedtoattachakeyboardthatusesaPS/2keyboardconnector.
Usedtoattachamouse,atrackball,orotherpointingdevicesthatuseaPS/2
mouseconnector.
Usedtoattachanexternalmodem,aserialprinter,orotherdevicesthatusea
9-pinserialport.
USBmouse,aUSBscanner,oraUSBprinter.IfyouhavemorethaneightUSB
devices,youcanpurchaseaUSBhub,whichyoucanusetoconnectadditional
USBdevices.
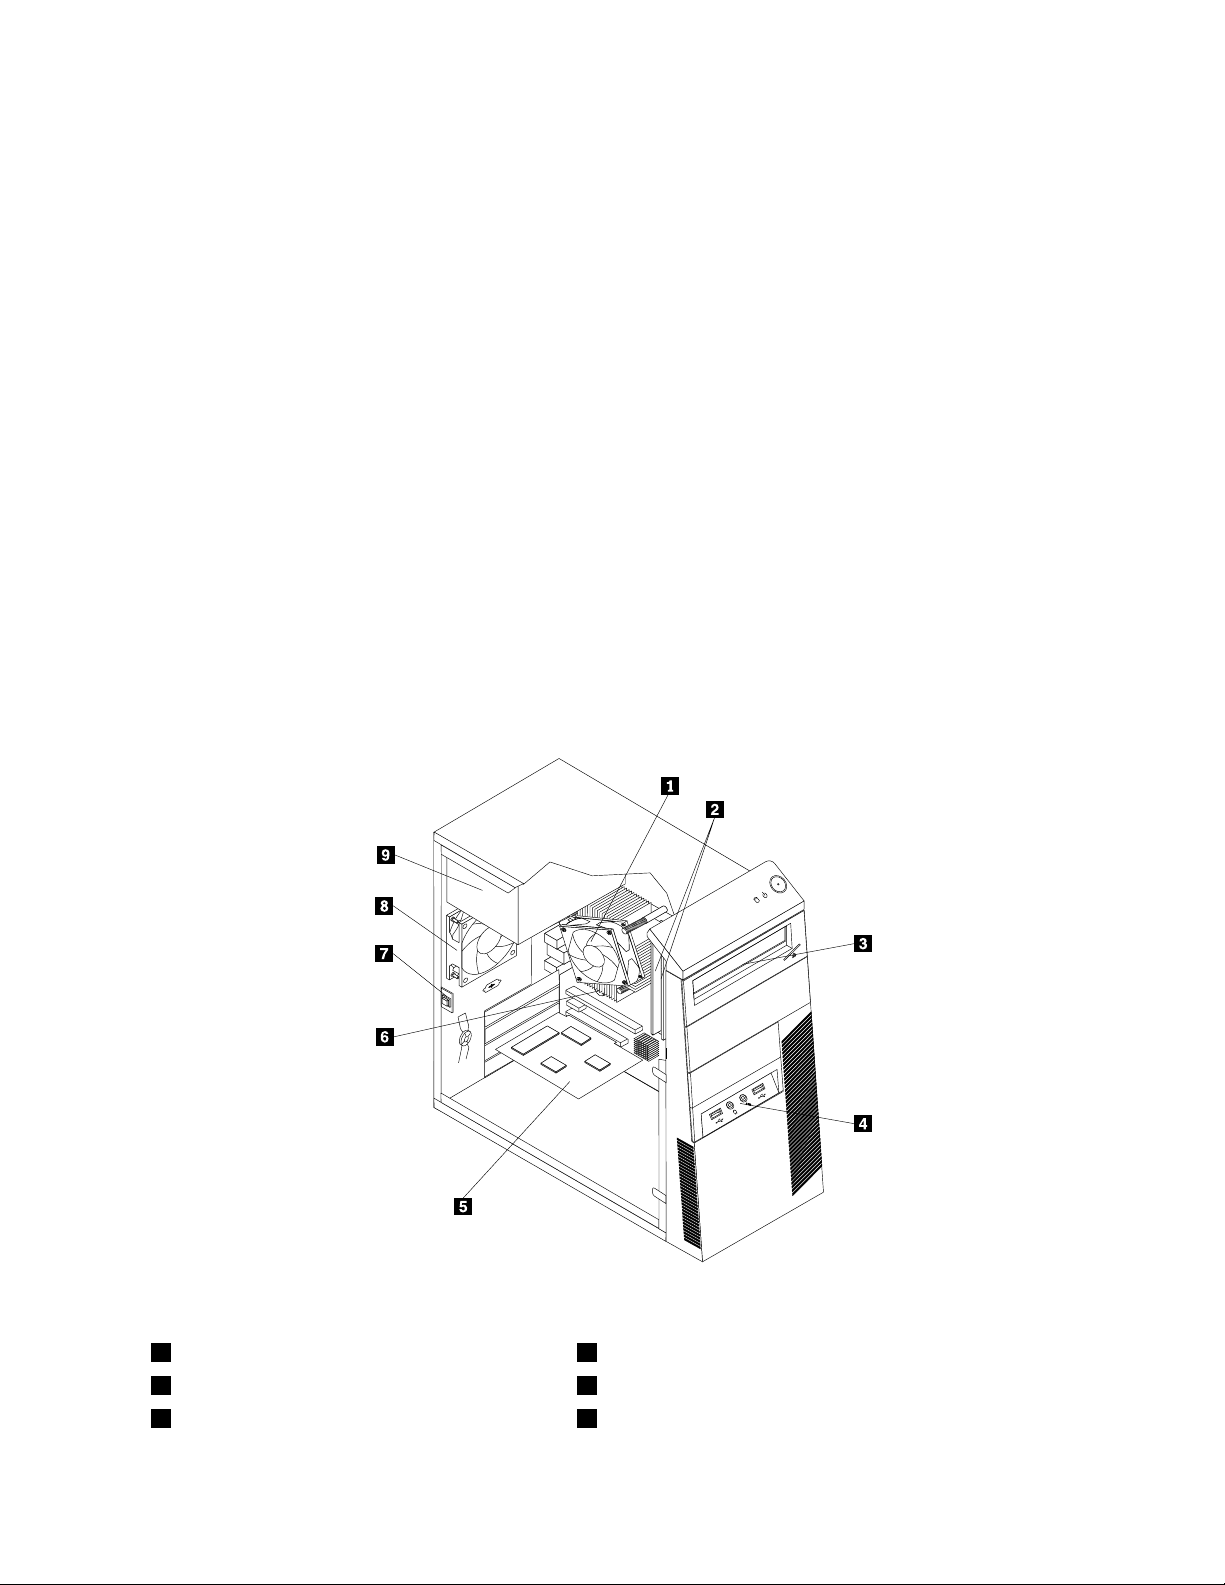
Locatingcomponents
Figure3“Componentlocations”onpage9showsthelocationsofthevariouscomponentsinyourcomputer.
Toremovethecomputercover,see“Removingthecomputercover”onpage14
.
Figure3.Componentlocations
1Heatsinkandfanassembly
2Memorymodules
3Opticaldrive
6Battery
7Coverpresenceswitch(alsocalledintrusionswitch)
8Rearfanassembly
Chapter1.Productoverview9
Page 18
4FrontaudioandUSBassembly
5PCIcard(installedinsomemodels)
9Powersupplyassembly
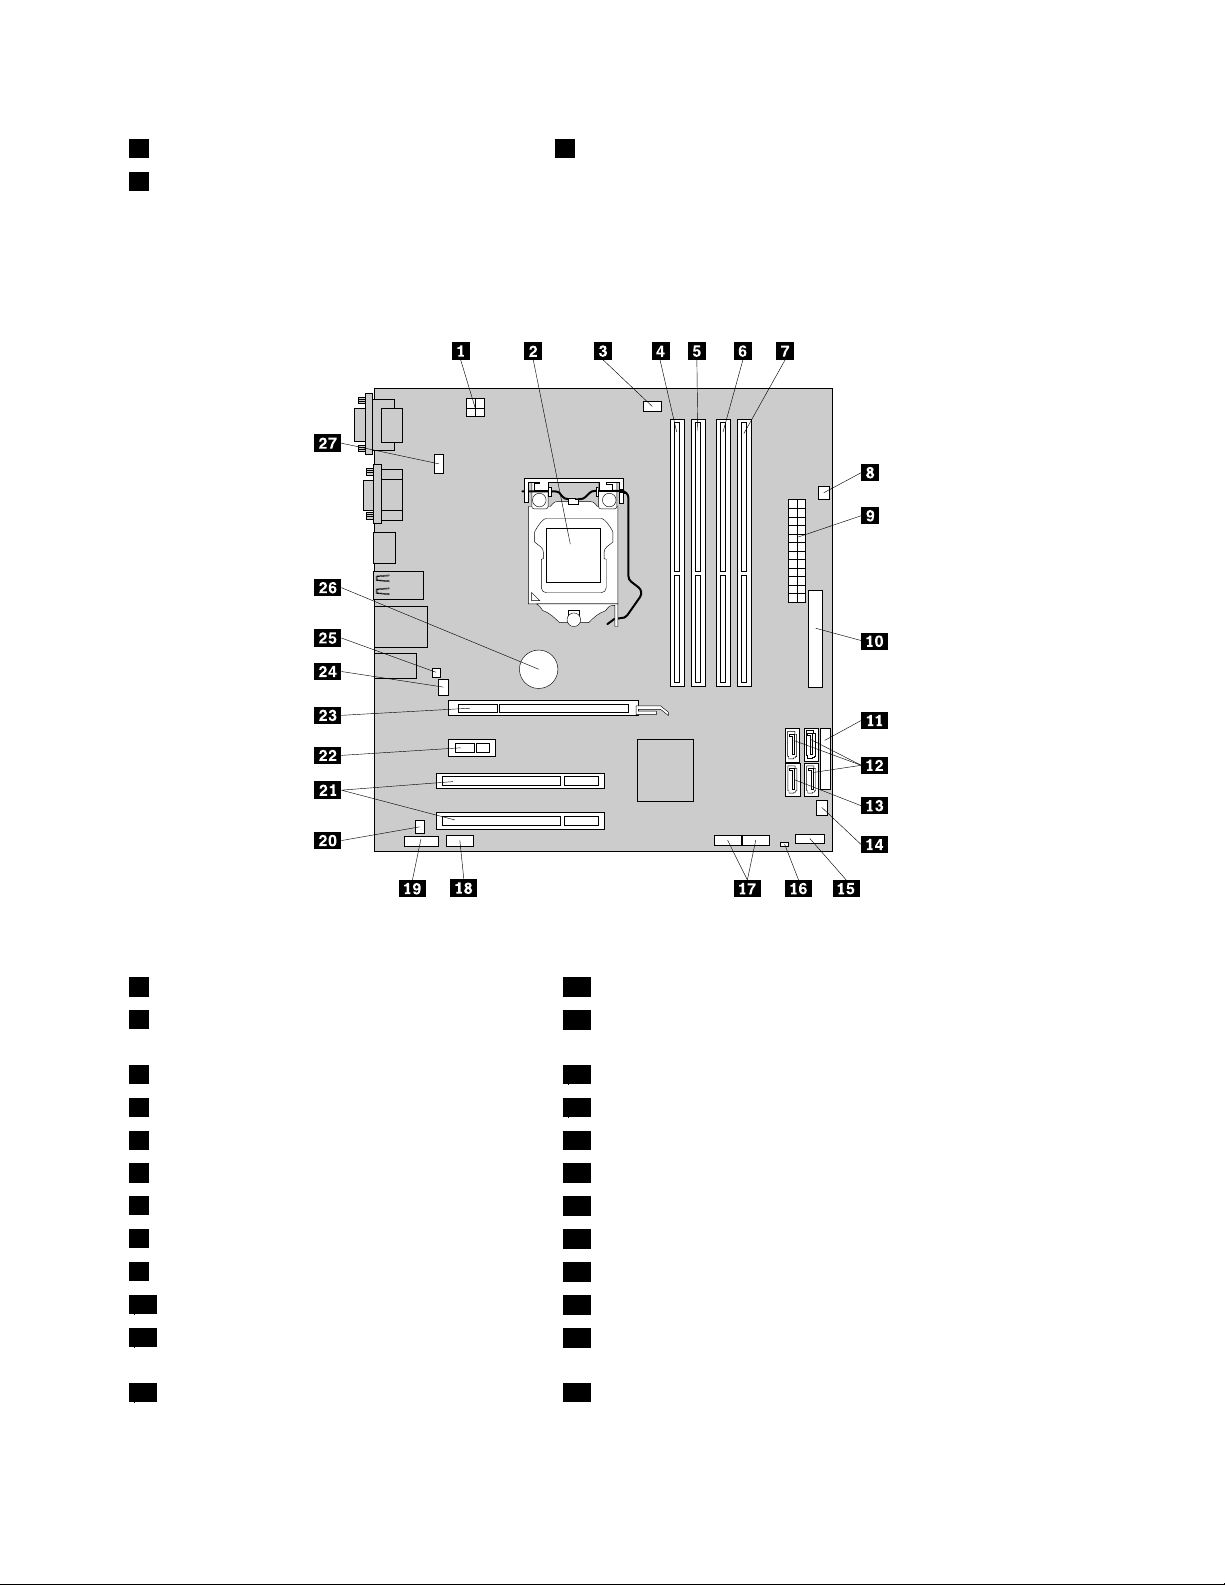
Locatingpartsonthesystemboard
Figure4“Systemboardpartslocations”onpage10showsthelocationsofthepartsonthesystemboard.
Figure4.Systemboardpartslocations
14-pinpowerconnector15Frontpanelconnector
2Microprocessor
16ClearCMOS(ComplementaryMetalOxideSemiconductor)
/Recoveryjumper
3Microprocessorfanconnector
4Memoryslot2
5Memoryslot119Frontaudioconnector
6Memoryslot420Internalspeakerconnector
7Memoryslot3
8Thermalsensorconnector
924-pinpowerconnector
10Diskettedriveconnector
11Parallelconnector
17FrontUSBconnectors(2)
18Serial(COM2)connector
21PCIcardslots(2)
22PCIExpressx1cardslot
23PCIExpressx16graphicscardslot
24Systemfanconnector
25Coverpresenceswitchconnector(Intrusionswitch
connector)
12SA TAconnectors(3)
26Battery
10ThinkCentreUserGuide
Page 19
13eSA TAconnector27PS/2keyboardandmouseconnector
14Powerfanconnector
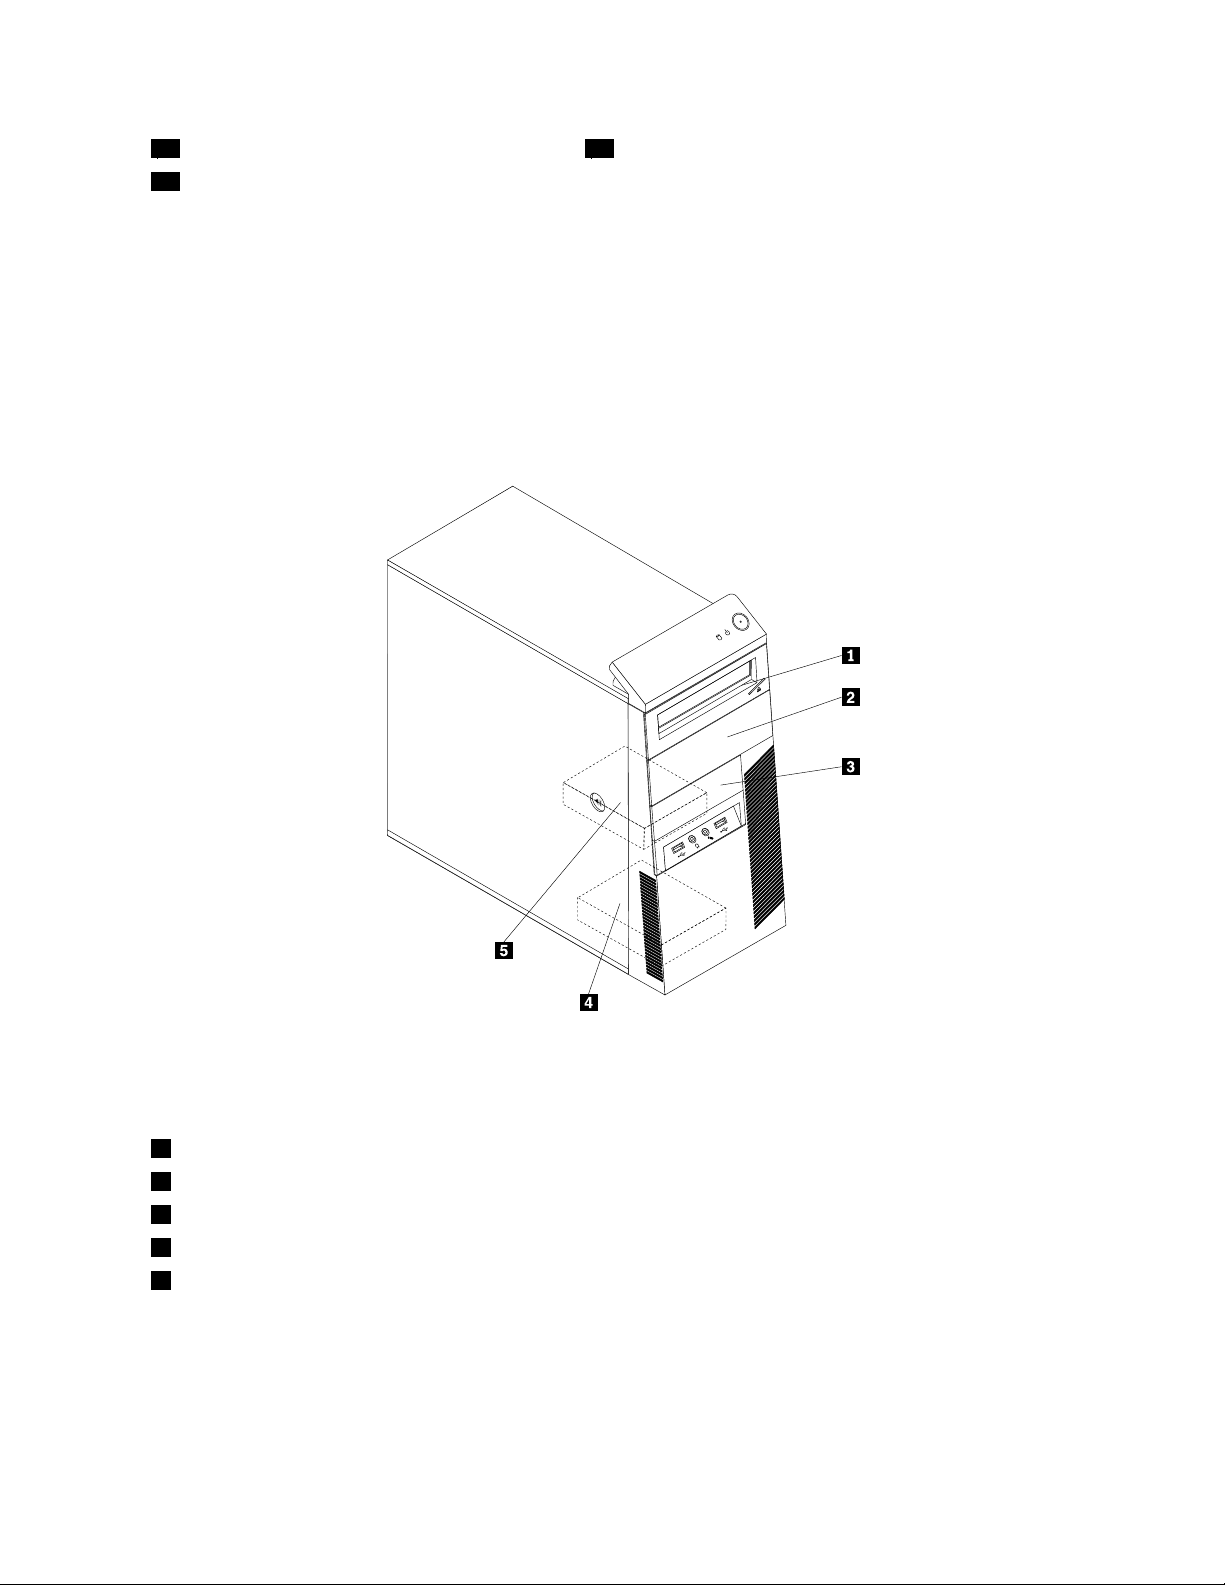
Locatinginternaldrives
Internaldrivesaredevicesthatyourcomputerusestoreadandstoredata.Youcanadddrivestoyour
computertoincreasestoragecapacityandenableyourcomputertoreadothertypesofmedia.Y our
computercomeswiththefollowingfactory-installeddrives:
•ASerialAdvancedTechnologyAttachmentopticaldriveinbay1
•A3.5-inchSAT Aharddiskdriveinbay5(installedinsomemodels)
Internaldrivesareinstalledinbays.Inthismanual,thebaysarereferredtoasbay1,bay2,andsoon.Figure
5“Drivebaylocations”onpage11
showsthelocationsofthedrivebays.
Figure5.Drivebaylocations
Thefollowinglistdescribesthetypeandsizeofthedrivethatyoucaninstallineachbay:
1Bay1-Maximumheight:43.0mm(1.7inches)Opticaldrive
2Bay2-Maximumheight:43.0mm(1.7inches)Opticaldrive
3Bay3-Maximumheight:25.8mm(1.0inch)
4Bay4-Maximumheight:25.8mm(1.0inch)3.5-inchsecondarySATAharddiskdrive
5Bay5-Maximumheight:25.8mm(1.0inch)3.5-inchprimarySATAharddiskdrive
3.5-inchcardreader
Chapter1.Productoverview11
Page 20

12ThinkCentreUserGuide
Page 21

Chapter2.Installingorreplacinghardware
Thischapterprovidesinstructionsonhowtoinstallorreplacehardwareforyourcomputer.
Handlingstatic-sensitivedevices
Donotopenthestatic-protectivepackagecontainingthenewpartuntilthedefectiveparthasbeenremoved
fromthecomputerandyouarereadytoinstallthenewpart.Staticelectricity,althoughharmlesstoyou,can
seriouslydamagecomputercomponentsandparts.
Whenyouhandlepartsandothercomputercomponents,taketheseprecautionstoavoidstatic-electricity
damage:
•Limityourmovement.Movementcancausestaticelectricitytobuilduparoundyou.
•Alwayshandlepartsandothercomputercomponentscarefully.HandlePCIcards,memorymodules,
systemboards,andmicroprocessorsbytheedges.Nevertouchanyexposedcircuitry.
•Preventothersfromtouchingthepartsandothercomputercomponents.
•Beforeyoureplaceanewpart,touchthestatic-protectivepackagecontainingtheparttoametal
expansion-slotcoverorotherunpaintedmetalsurfaceonthecomputerforatleasttwoseconds.This
reducesstaticelectricityinthepackageandyourbody.
•Whenpossible,removethenewpartfromthestatic-protectivepackaging,andinstallitdirectlyinthe
computerwithoutsettingthepartdown.Whenthisisnotpossible,placethestatic-protectivepackage
thatthepartcameinonasmooth,levelsurfaceandplacethepartonit.
•Donotplacethepartonthecomputercoverorothermetalsurface.
Installingorreplacinghardware
Thissectionprovidesinstructionsonhowtoinstallorreplacehardwareforyourcomputer.Youcanexpand
thecapabilitiesofyourcomputerandmaintainyourcomputerbyinstallingorreplacinghardware.
Attention:
Donotopenyourcomputerorattemptanyrepairbeforereadingandunderstandingthe“Importantsafetyinformation”
intheThinkCentreSafetyandWarrantyGuidethatcamewithyourcomputer.T oobtainacopyoftheThinkCentre
SafetyandWarrantyGuide,goto:
http://www.lenovo.com/support
Notes:
1.UseonlycomputerpartsprovidedbyLenovo.
2.Wheninstallingorreplacinganoption,usetheappropriateinstructionsinthissectionalongwiththe
instructionsthatcomewiththeoption.
Installingexternaloptions
Youcanconnectexternaloptionstoyourcomputer,suchasexternalspeakers,aprinter,orascanner.For
someexternaloptions,youmustinstalladditionalsoftwareinadditiontomakingthephysicalconnection.
Wheninstallinganexternaloption,see“Locatingconnectorsonthefrontofyourcomputer”onpage6and
“Locatingconnectorsontherearofyourcomputer”onpage7
usetheinstructionsthatcomewiththeoptiontohelpyoumaketheconnectionandinstallanysoftware
ordevicedriversthatarerequiredfortheoption.
toidentifytherequiredconnector.Then,
©CopyrightLenovo2010
13
Page 22
Removingthecomputercover
Attention:
Donotopenyourcomputerorattemptanyrepairbeforereadingandunderstandingthe“Importantsafetyinformation”
intheThinkCentreSafetyandWarrantyGuidethatcamewithyourcomputer.T oobtainacopyoftheThinkCentre
SafetyandWarrantyGuide,goto:
http://www.lenovo.com/support
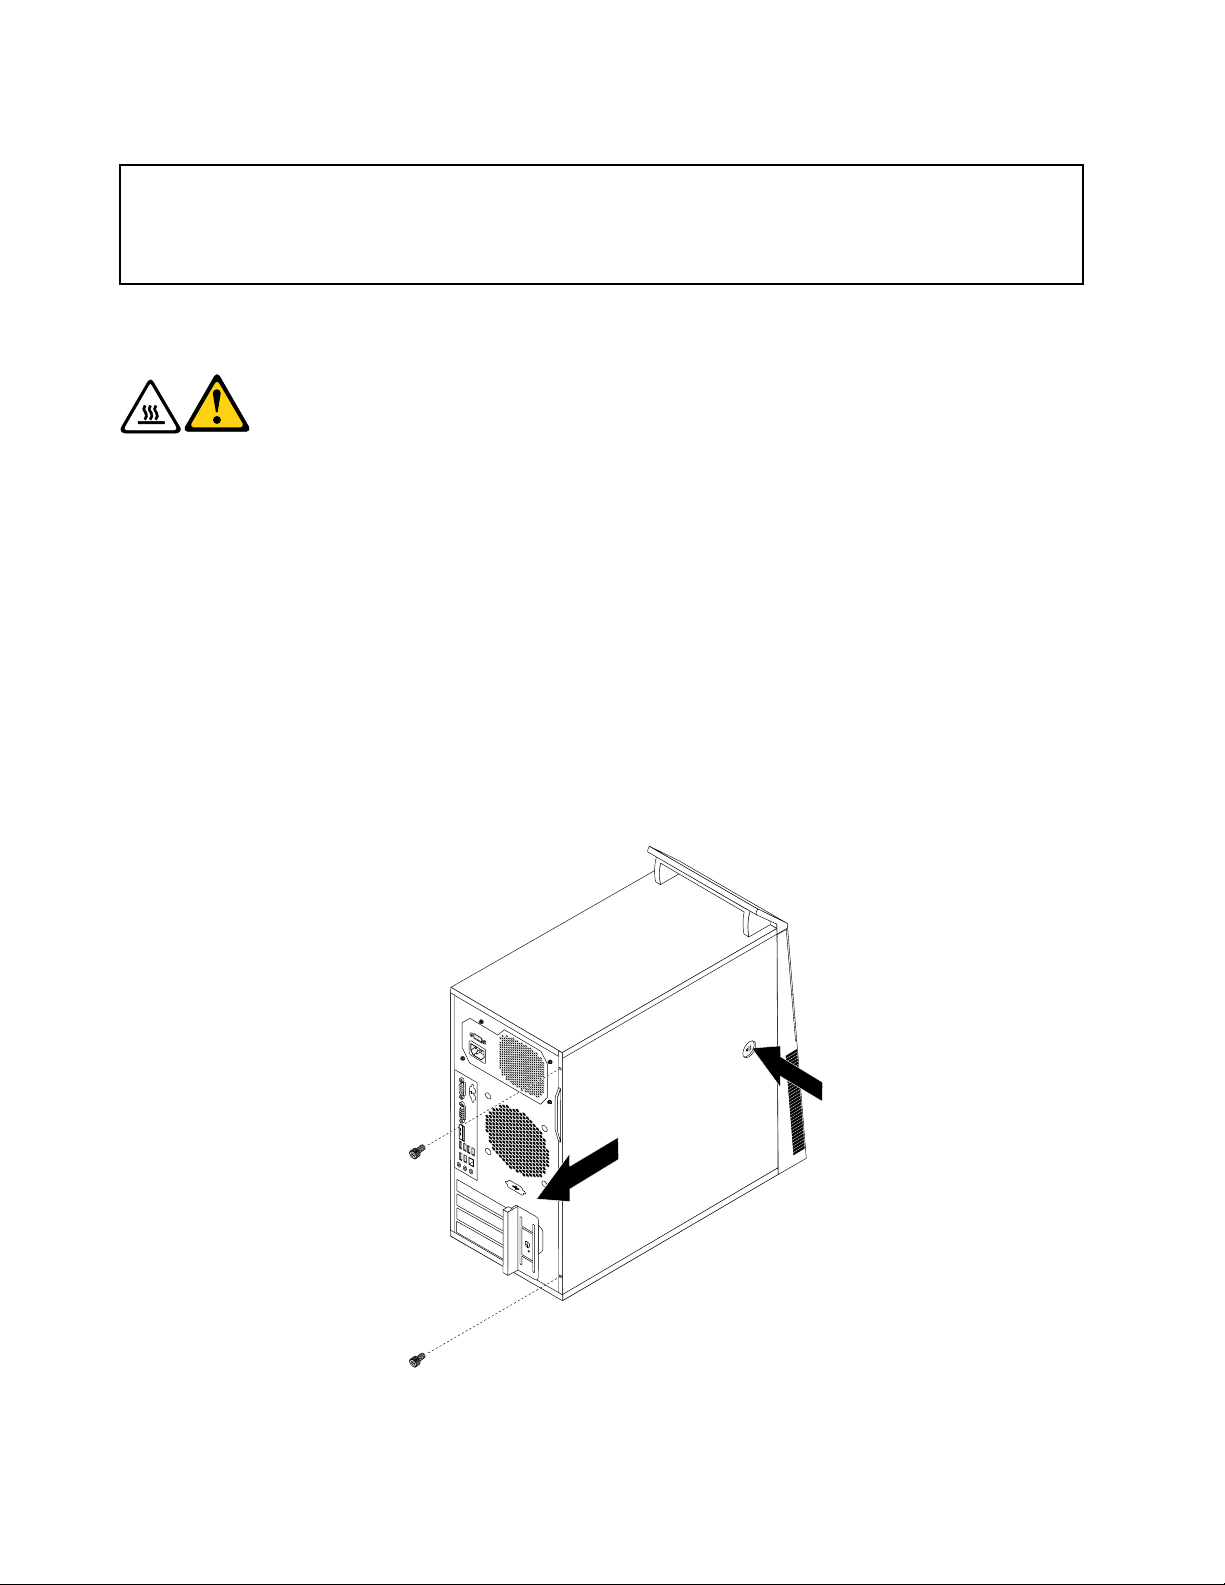
Thissectionprovidesinstructionsonhowtoremovethecomputercover.
CAUTION:
Turnoffthecomputerandwaitthreetoveminutestoletthecomputercoolbefore
removingthecomputercover.
Toremovethecomputercover,dothefollowing:
1.Removeanymediafromthedrivesandturnoffallattacheddevicesandthecomputer.
2.Disconnectallpowercordsfromelectricaloutlets.
3.Disconnectthepowercords,Input/Outputcables,andanyothercablesthatareconnectedtothe
computer.See“Locatingconnectorsonthefrontofyourcomputer”onpage6and“Locatingconnectors
ontherearofyourcomputer”onpage7.
4.Removeanylockingdevicethatsecuresthecomputercover,suchasapadlockoranintegratedcable
lock.See“Integratedcablelock”onpage39and“Padlock”onpage40.
5.Removeanythumbscrewsthatsecurethecomputercover.
6.Pressthecover-releasebuttononthesideofthecomputerandslidethecovertotherearofthe
computertoremovethecover.
Figure6.Removingthecomputercover
14ThinkCentreUserGuide
Page 23
Removingandreinstallingthefrontbezel
Attention:
Donotopenyourcomputerorattemptanyrepairbeforereadingandunderstandingthe“Importantsafetyinformation”
intheThinkCentreSafetyandWarrantyGuidethatcamewithyourcomputer.T oobtainacopyoftheThinkCentre
SafetyandWarrantyGuide,goto:
http://www.lenovo.com/support
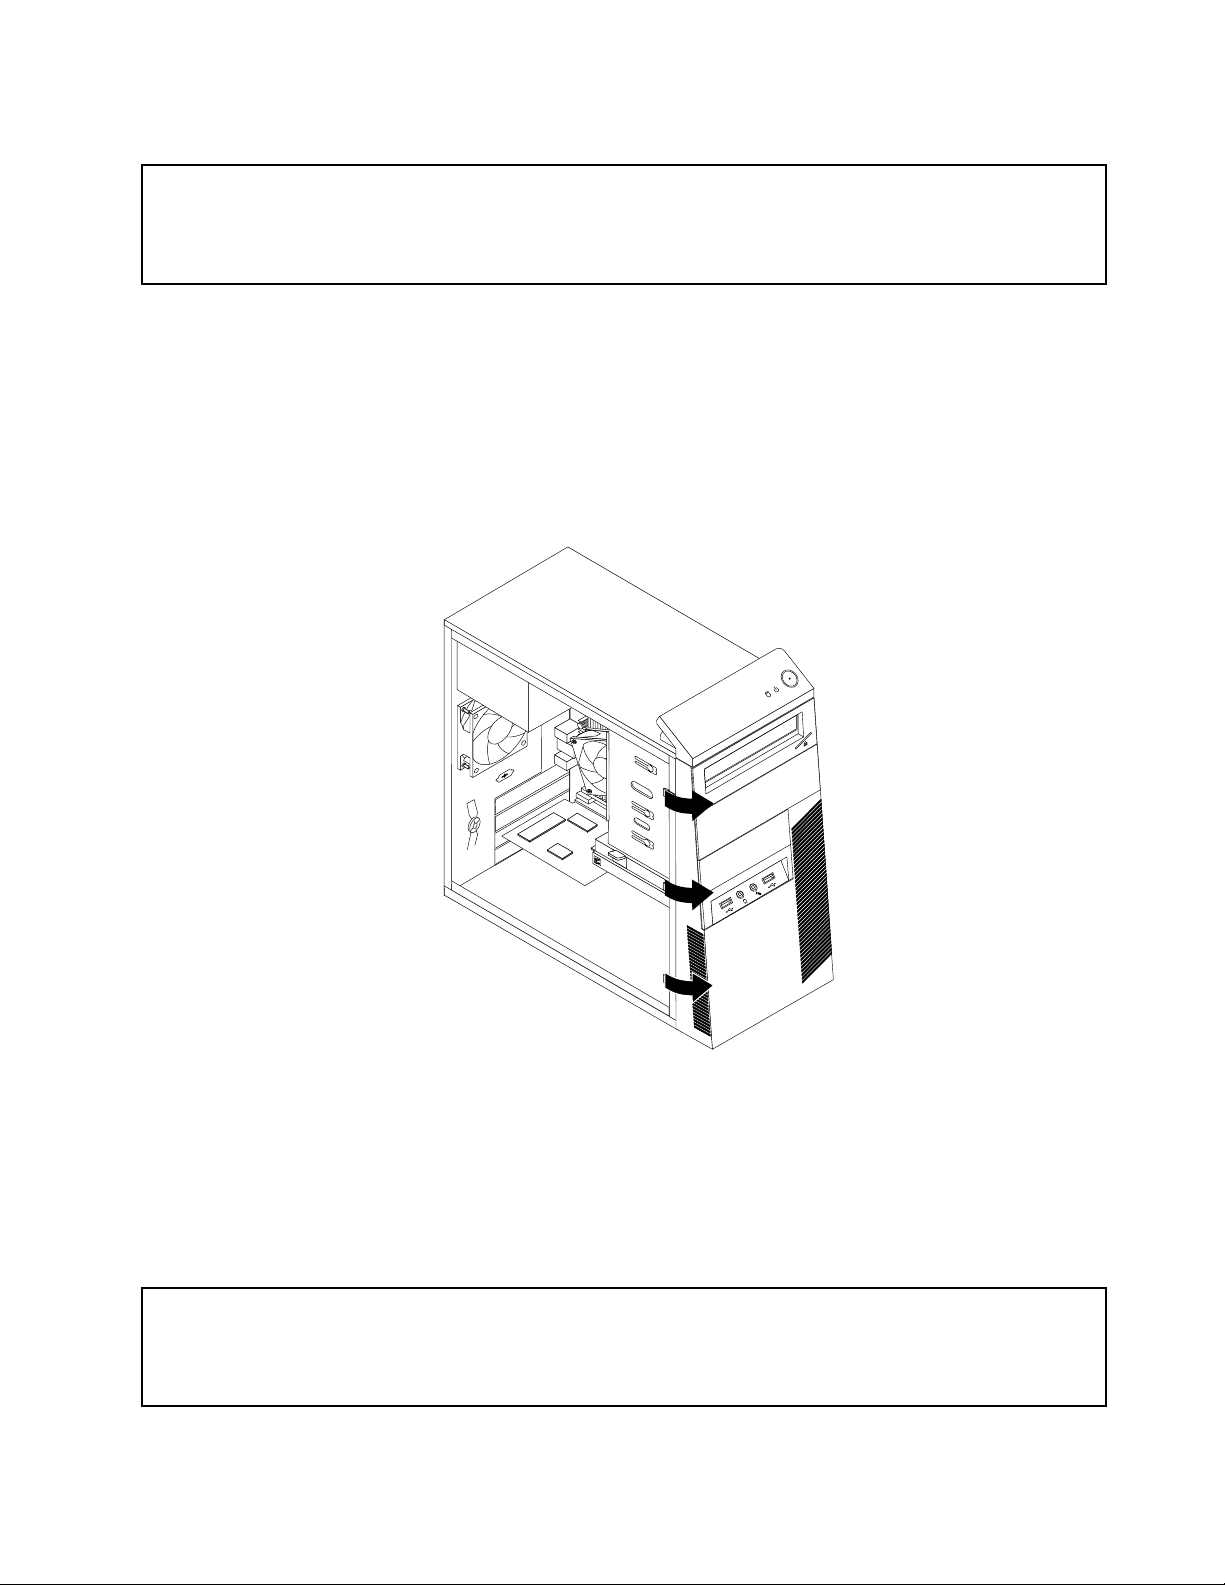
Thissectionprovidesinstructionsonhowtoremoveandreinstallthefrontbezel.
Toremoveandreinstallthefrontbezel,dothefollowing:
1.Turnoffthecomputeranddisconnectallpowercordsfromelectricaloutlets.
2.Removethecomputercover.See“Removingthecomputercover”onpage14.
3.Removethefrontbezelbyreleasingthethreeplastictabsontheleftsideandpivotingthefrontbezel
outward.
Figure7.Removingthefrontbezel
4.Toreinstallthefrontbezel,alignthethreeplastictabsontherightsideofthefrontbezelwiththe
correspondingholesinthechassis,thenpivotthefrontbezelinwardsuntilitsnapsintopositionon
theleftside.
5.Tocompletetheinstallation,goto“Completingthepartsreplacement”onpage38.
InstallingorreplacingaPCIcard
Attention:
Donotopenyourcomputerorattemptanyrepairbeforereadingandunderstandingthe“Importantsafetyinformation”
intheThinkCentreSafetyandWarrantyGuidethatcamewithyourcomputer.T oobtainacopyoftheThinkCentre
SafetyandWarrantyGuide,goto:
http://www.lenovo.com/support
Chapter2.Installingorreplacinghardware15
Page 24
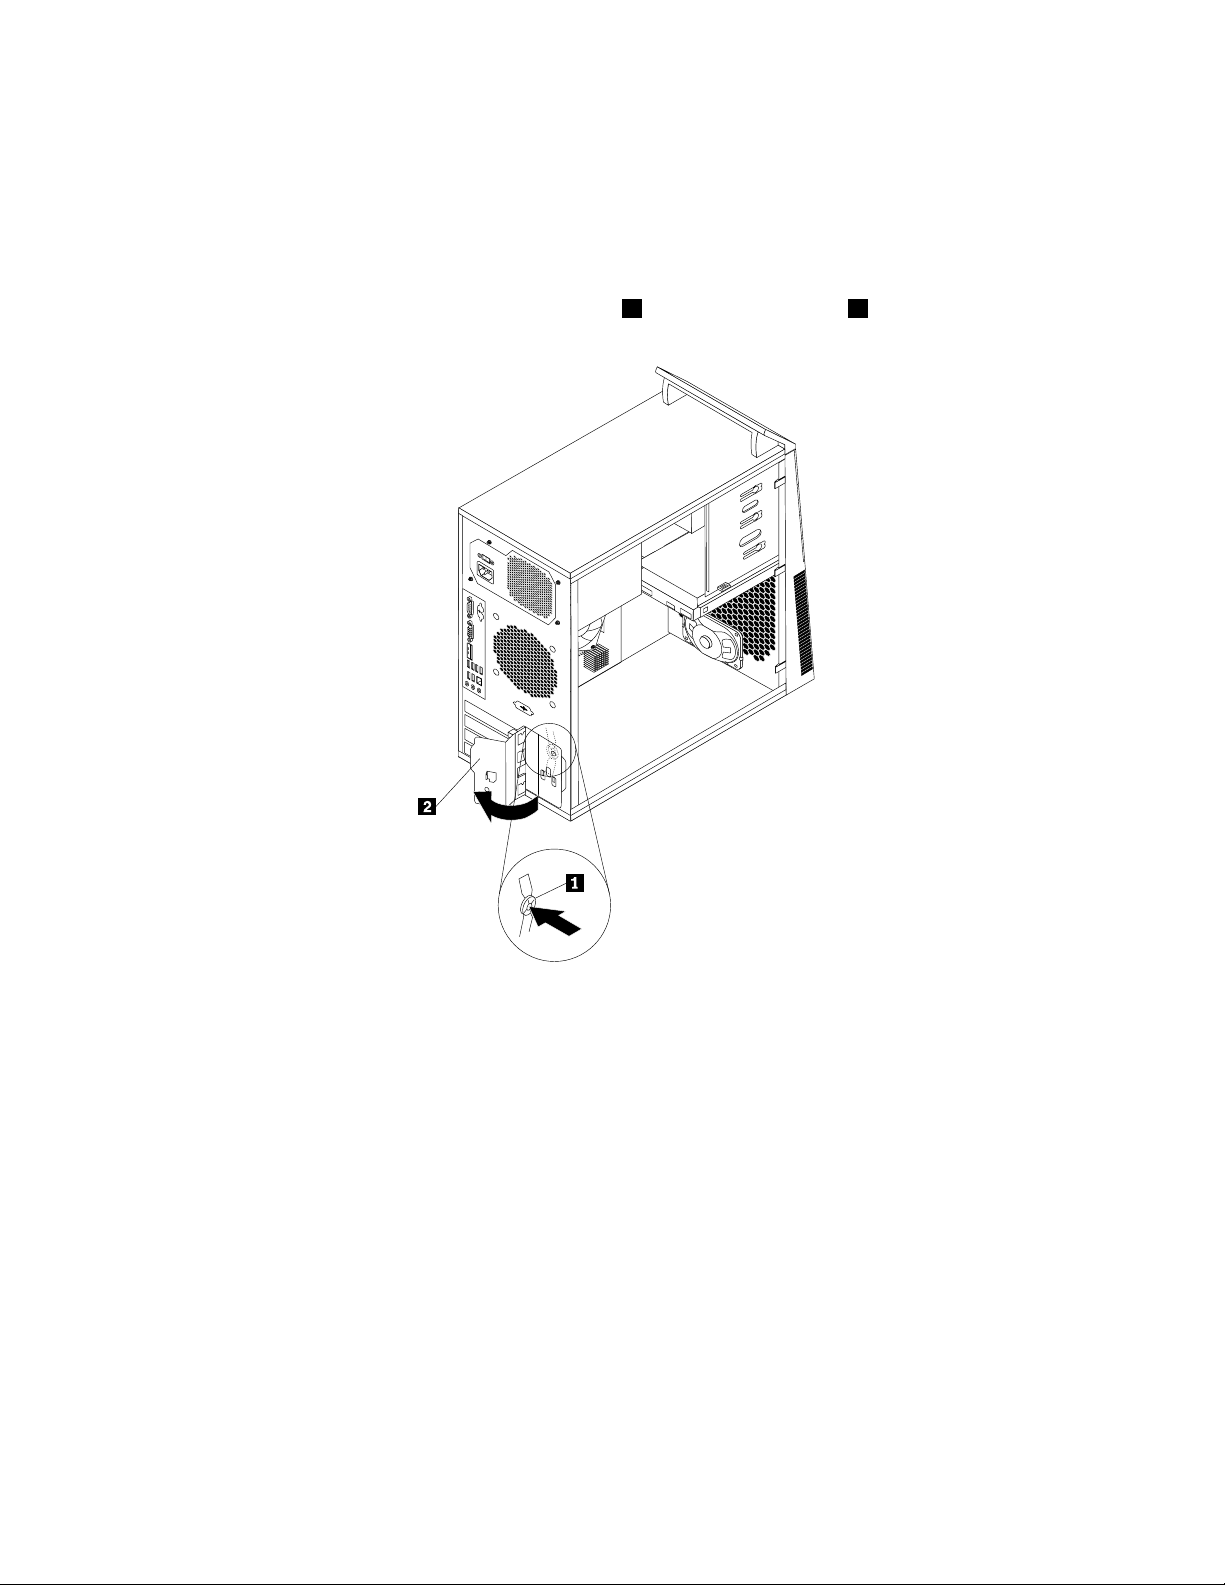
ThissectionprovidesinstructionsonhowtoinstallorreplaceaPCIcard.Y ourcomputerhastwostandard
PCIcardslots,onePCIExpressx1cardslot,andonePCIExpressx16graphicscardslot.
ToinstallorreplaceaPCIcard,dothefollowing:
1.Turnoffthecomputeranddisconnectallpowercordsfromelectricaloutlets.
2.Removethecomputercover.See“Removingthecomputercover”onpage14.
3.Attherearofthecomputer,pressthereleasebutton1toopenthecardlatch2.
Figure8.OpeningthePCIcardlatch
4.IfyouareinstallingaPCIcard,removetheappropriatemetalslotcover.IfyouarereplacinganoldPCI
card,grasptheoldcardthatiscurrentlyinstalledandgentlypullitoutoftheslot.
16ThinkCentreUserGuide
Page 25
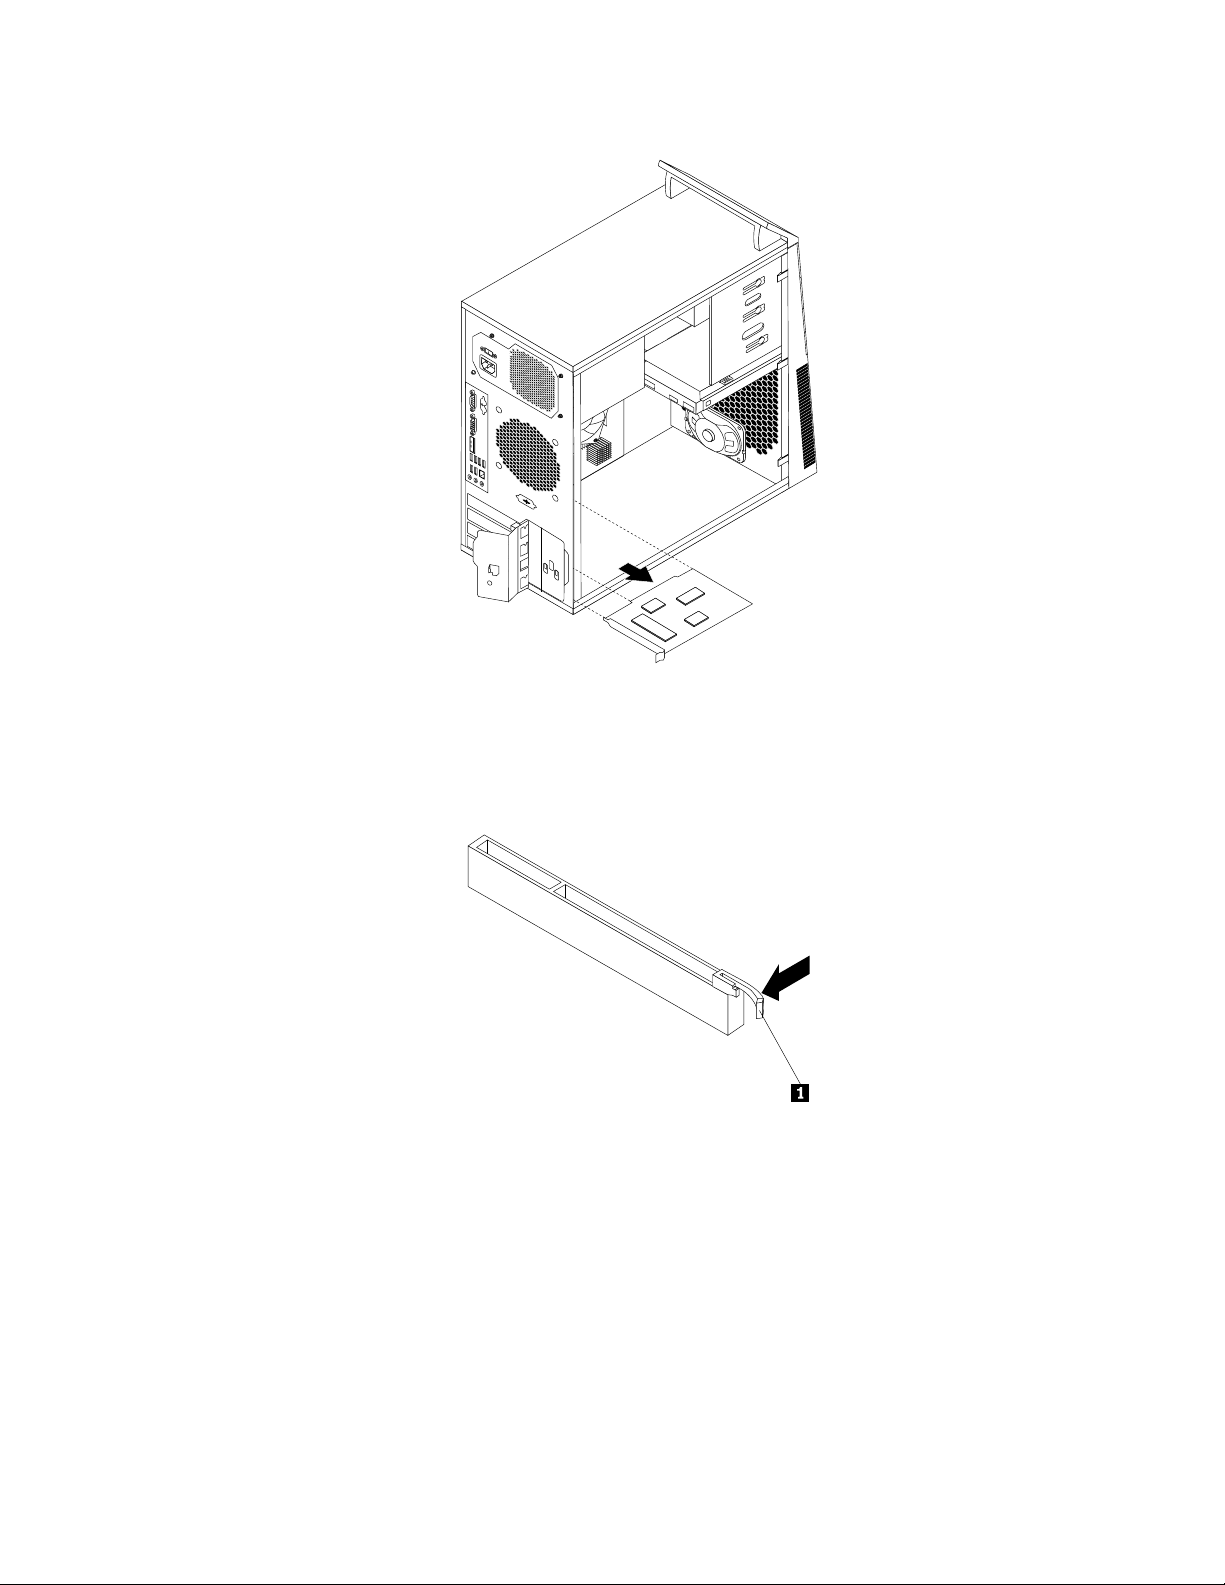
Figure9.RemovingaPCIcard
Notes:
a.Thecardtstightlyintothecardslot.Ifnecessary,alternatemovingeachsideofthecardasmall
amountuntilitisremovedfromthecardslot.
5.RemovethenewPCIcardfromitsstatic-protectivepackage.
6.Installthenewcardintotheappropriateslotonthesystemboard.See“Locatingpartsonthesystem
board”onpage10.
Note:IfyouareinstallingaPCIExpressx16graphicscard,makesurethememoryslotretainingclips
areclosedbeforeyouinstallthegraphicscard.
7.PivotthecardlatchtotheclosedpositiontosecurethePCIcard.
Chapter2.Installingorreplacinghardware17
Page 26
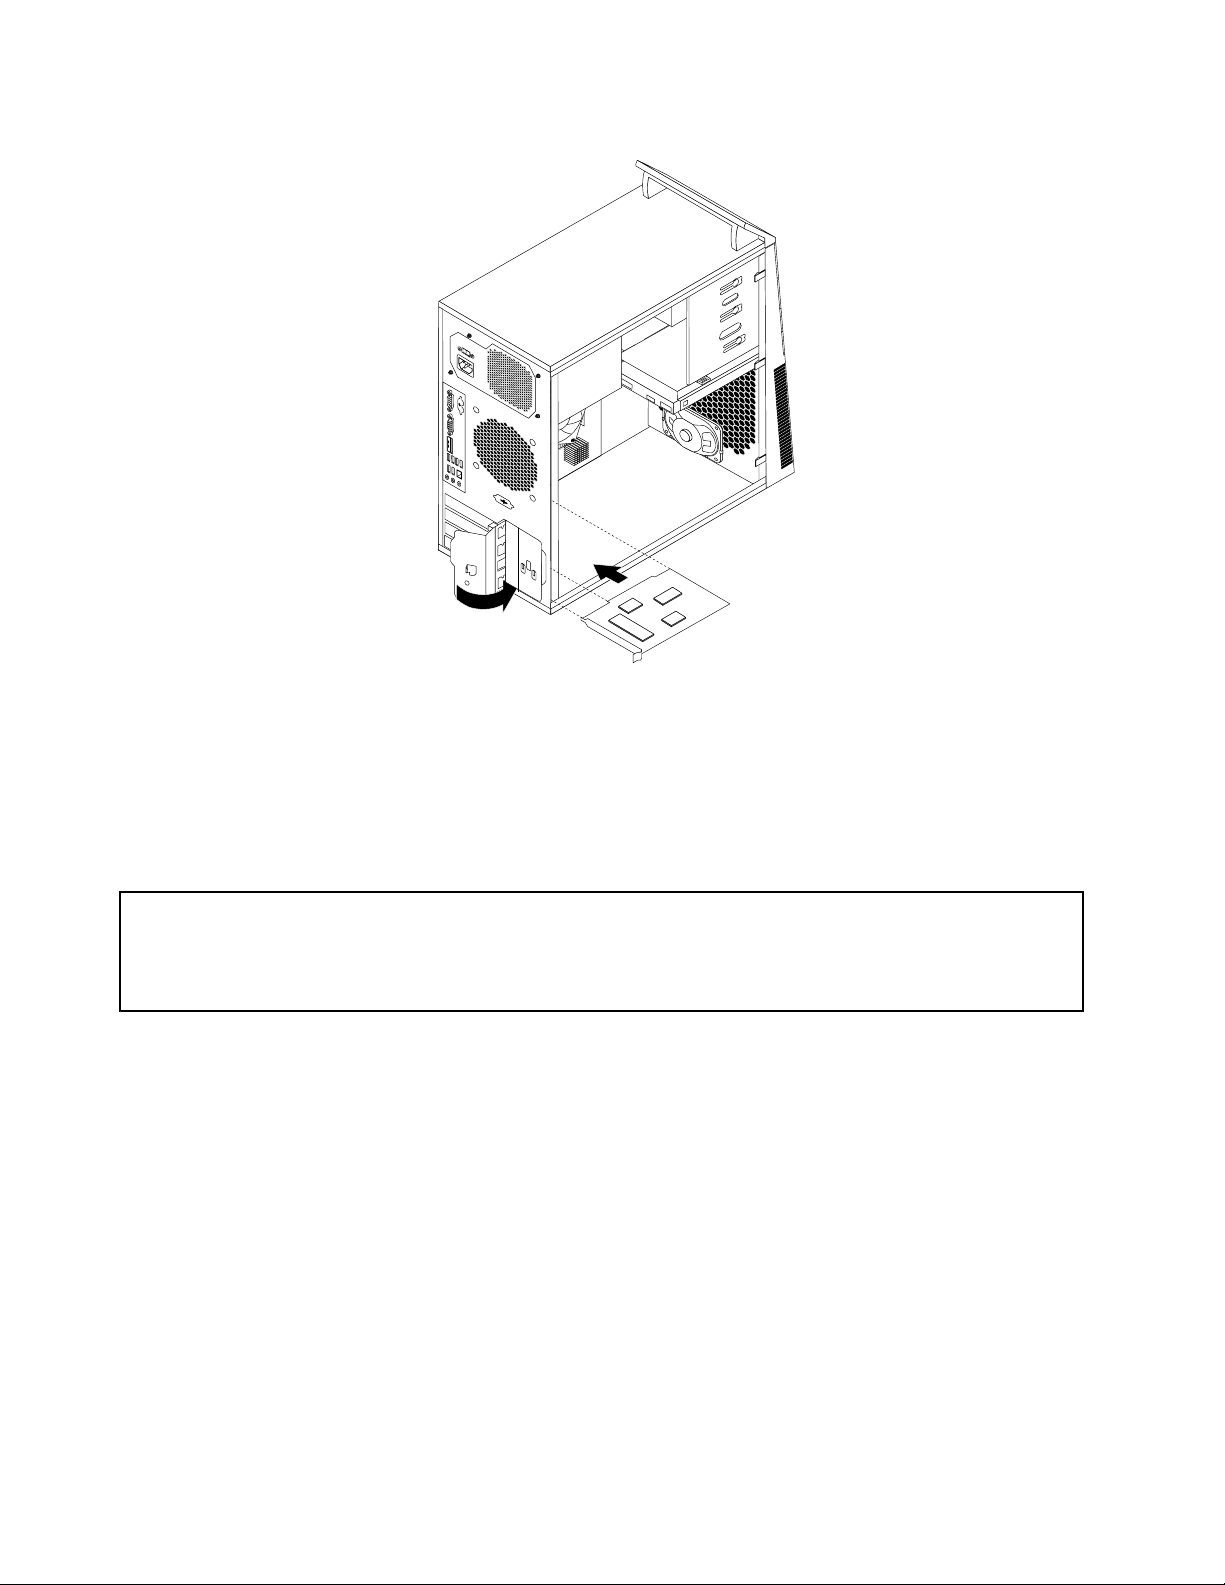
Figure10.InstallingaPCIcard
Whattodonext:
•T oworkwithanotherpieceofhardware,gototheappropriatesection.
•T ocompletetheinstallationorreplacement,goto“Completingthepartsreplacement”onpage38.
Installingorreplacingamemorymodule
Attention:
Donotopenyourcomputerorattemptanyrepairbeforereadingandunderstandingthe“Importantsafetyinformation”
intheThinkCentreSafetyandWarrantyGuidethatcamewithyourcomputer.T oobtainacopyoftheThinkCentre
SafetyandWarrantyGuide,goto:
http://www.lenovo.com/support
Thissectionprovidesinstructionsonhowtoinstallorreplaceamemorymodule.
YourcomputerhasfourslotsforinstallingorreplacingDDR3DIMMsthatprovideuptoamaximumof16GB
systemmemory.Wheninstallingorreplacingamemorymodule,usethefollowingguidelines:
•Use1GB,2GB,or4GBDDR3DIMMsinanycombinationuptoamaximumof16GB.
•InstallmemorymodulesinthesequenceofDIMM1,DIMM3,DIMM2,andDIMM4.See“Locating
partsonthesystemboard”onpage10
Toinstallorreplaceamemorymodule,dothefollowing:
1.Turnoffthecomputeranddisconnectallpowercordsfromelectricaloutlets.
2.Removethecomputercover.See“Removingthecomputercover”onpage14.
3.Locatethememoryslots.See“Locatingpartsonthesystemboard”onpage10.
4.Removeanypartsthatmightpreventyouraccesstothememoryslots.Dependingonyourcomputer
model,youmightneedtoremovethePCIExpressx16graphicscardforeasieraccesstothememory
slots.See“InstallingorreplacingaPCIcard”onpage15
.
.
18ThinkCentreUserGuide
Page 27
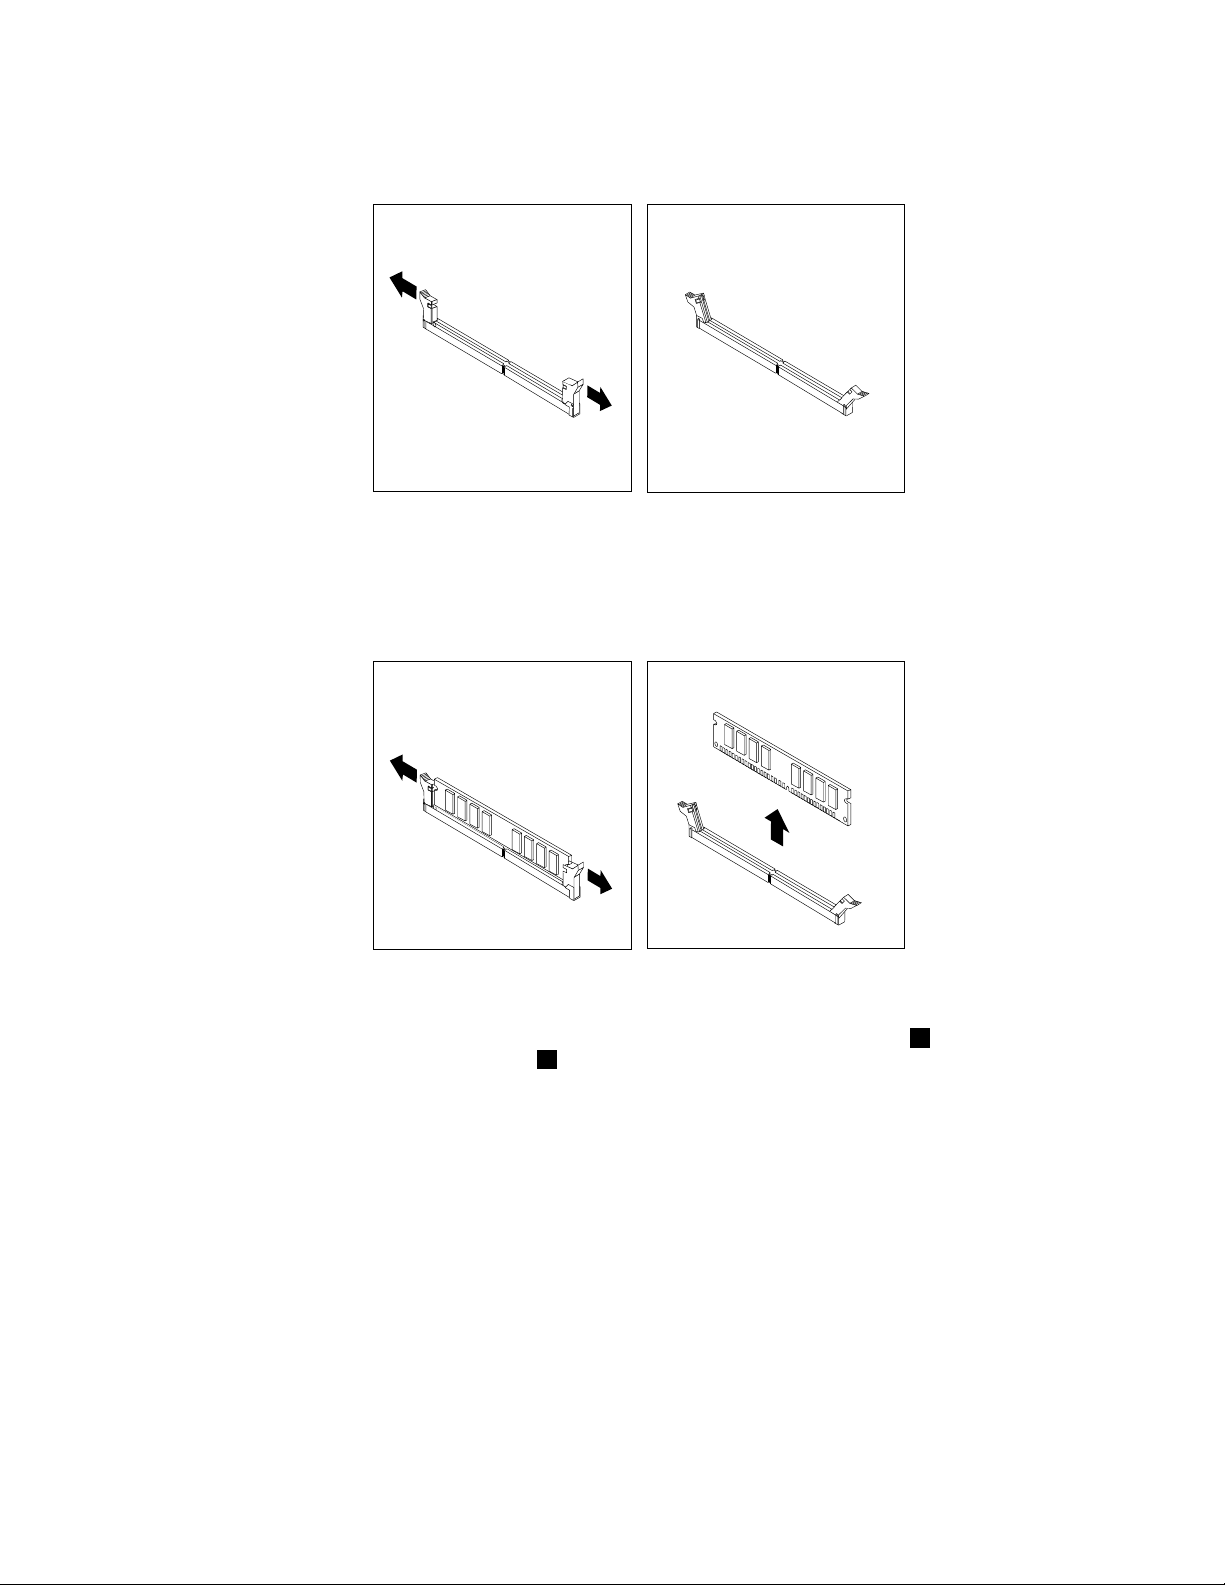
5.Opentheretainingclips.
Figure11.Openingtheretainingclips
Ifyouarereplacinganoldmemorymodule,opentheretainingclipsandgentlypullthememorymodule
outofthememoryslot.
Figure12.Removingamemorymodule
6.Positionthenewmemorymoduleoverthememoryslot.Makesurethatthenotch1onthememory
modulealignscorrectlywiththeslotkey2onthesystemboard.Pushthememorymodulestraight
downintotheslotuntiltheretainingclipsclose.
Chapter2.Installingorreplacinghardware19
Page 28
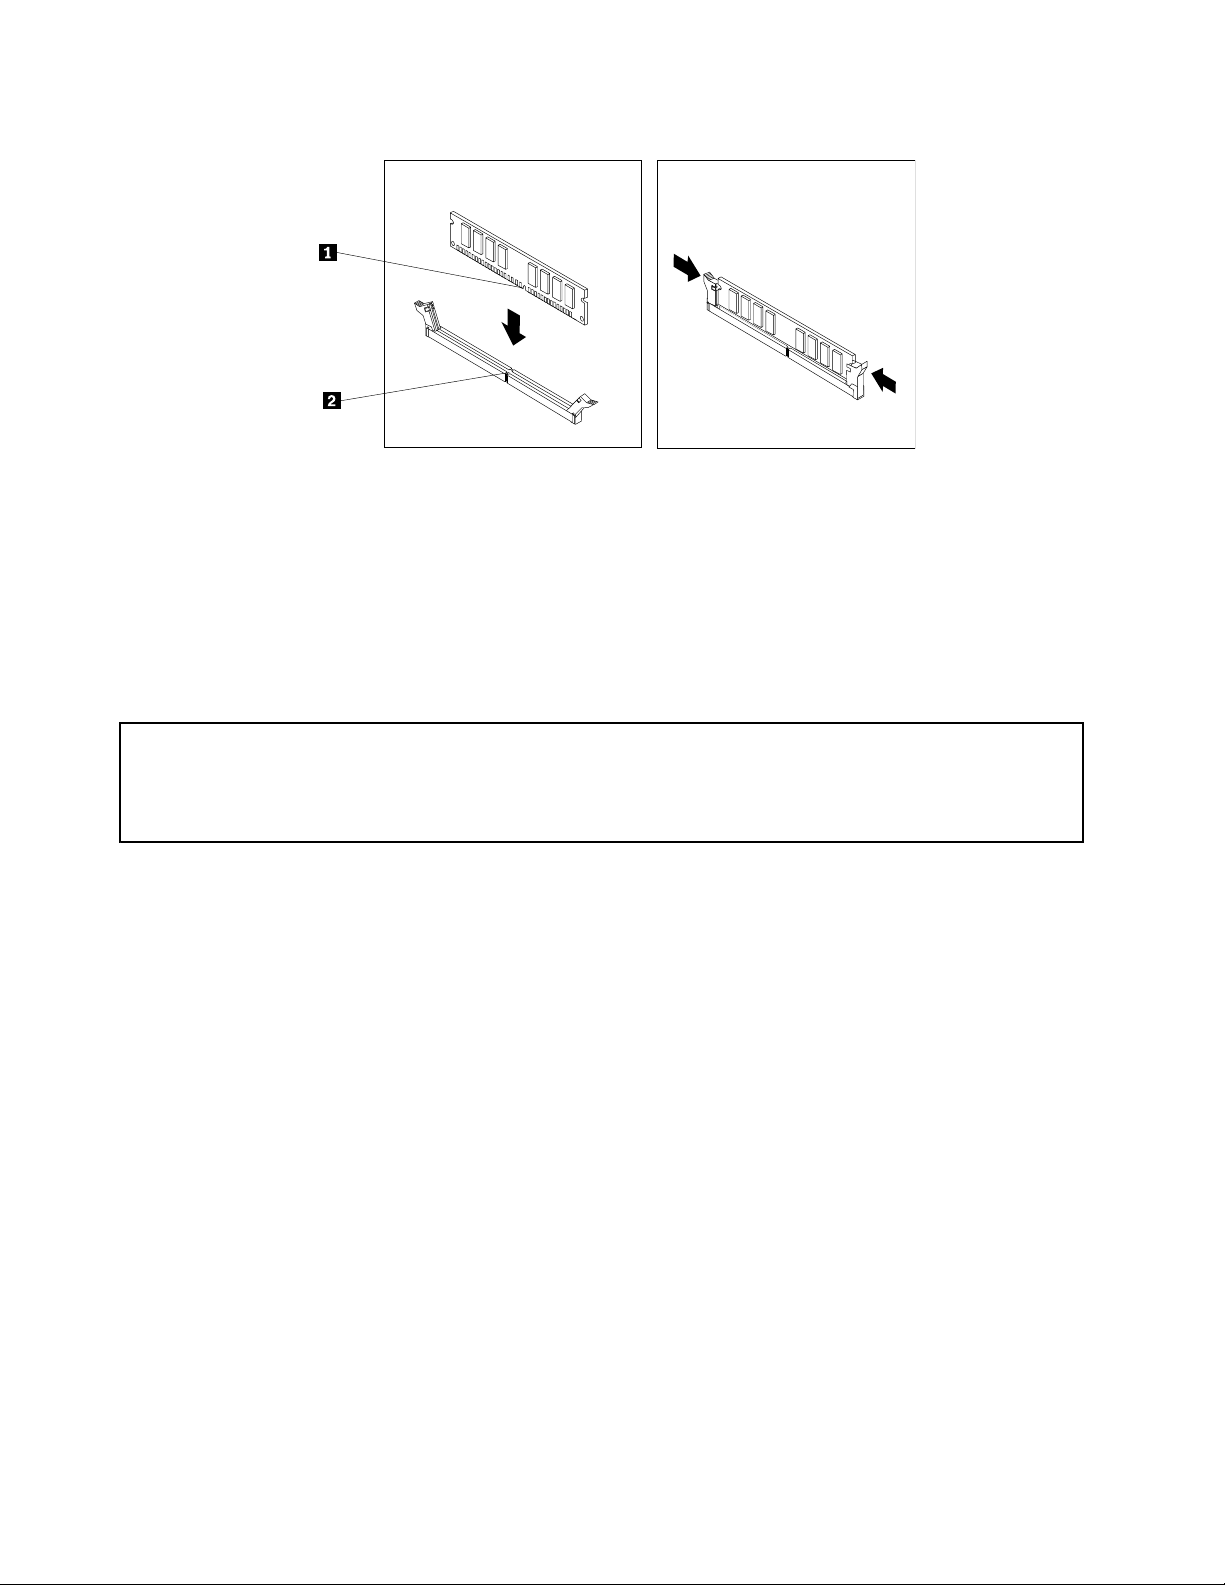
Figure13.Installingamemorymodule
7.ReinstallthePCIExpressx16graphicscardifyouhaveremovedit.
Whattodonext:
•T oworkwithanotherpieceofhardware,gototheappropriatesection.
•T ocompletetheinstallationorreplacement,goto“Completingthepartsreplacement”onpage38.
Installingorreplacingtheopticaldrive
Attention:
Donotopenyourcomputerorattemptanyrepairbeforereadingandunderstandingthe“Importantsafetyinformation”
intheThinkCentreSafetyandWarrantyGuidethatcamewithyourcomputer.T oobtainacopyoftheThinkCentre
SafetyandWarrantyGuide,goto:
http://www.lenovo.com/support
Thissectionprovidesinstructionsonhowtoinstallorreplacetheopticaldrive.
Toinstallorreplaceanopticaldrive,dothefollowing:
1.Turnoffthecomputeranddisconnectallpowercordsfromelectricaloutlets.
2.Removethecomputercover.See“Removingthecomputercover”onpage14.
3.Removethefrontbezel.See“Removingandreinstallingthefrontbezel”onpage15.
4.Dependingonwhetheryouareinstallingorreplacinganopticaldrive,dooneofthefollowing:
•Ifyouareinstallingasecondaryopticaldrive,removetheplasticpanelinthefrontbezelforthe
drivebayyouwanttouse.Ifthereisametalstaticshieldinstalledinthedrivebay,removethe
metalstaticshield.
•Ifyouarereplacinganopticaldrive,disconnectthesignalcableandthepowercablefromtherear
oftheopticaldrive,pressthebluereleasebutton,andthenslidetheopticaldriveoutofthefront
ofthecomputer.
20ThinkCentreUserGuide
Page 29
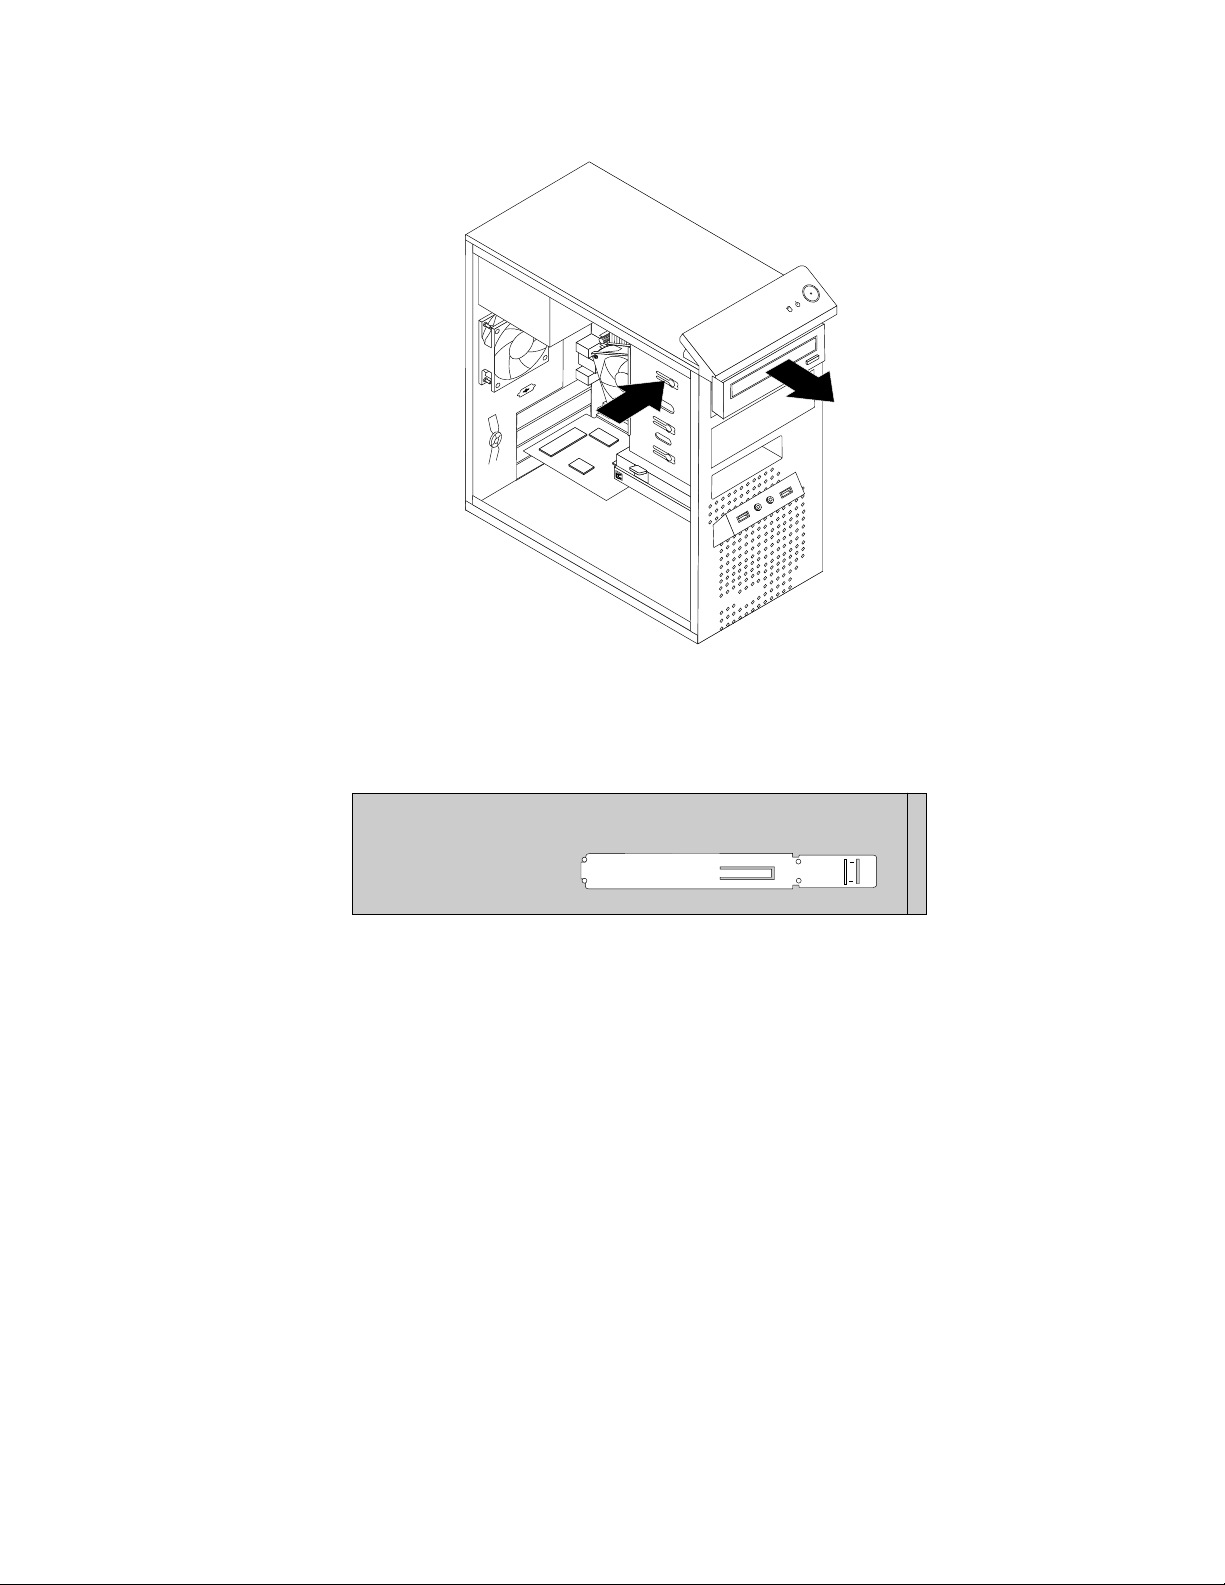
Figure14.Removingtheopticaldrive
5.Installtheopticaldriveretaineronthesideofthenewopticaldrive.
Figure15.Installingtheopticaldriveretainer
6.Slidethenewopticaldriveintothedrivebayfromthefrontofthecomputeruntiltheopticaldrivesnaps
intoposition.
Chapter2.Installingorreplacinghardware21
Page 30
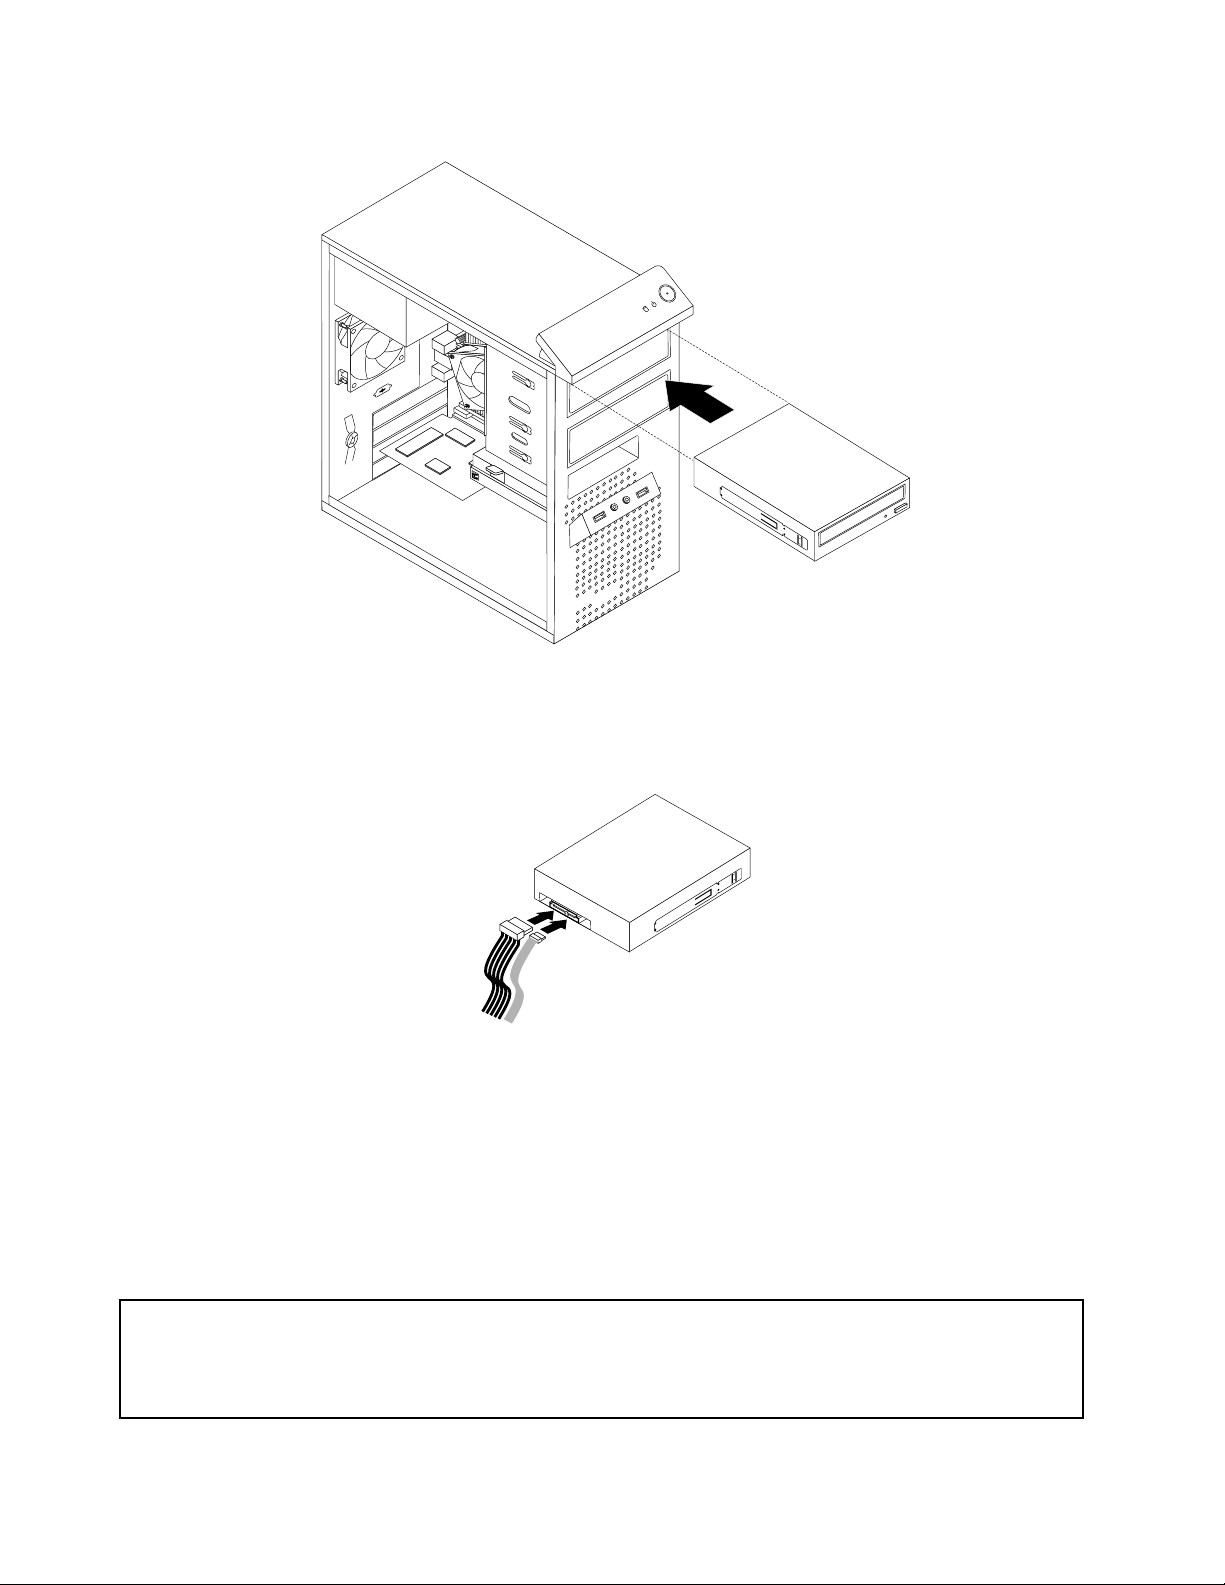
Figure16.Installingtheopticaldrive
7.Connectthesignalcableandthepowercabletothenewopticaldrive.
Figure17.Connectingtheopticaldrive
8.Reinstallthefrontbezel.See“Removingandreinstallingthefrontbezel”onpage15.
Whattodonext:
•T oworkwithanotherpieceofhardware,gototheappropriatesection.
•T ocompletetheinstallationorreplacement,goto“Completingthepartsreplacement”onpage38.
Replacingthebattery
Attention:
Donotopenyourcomputerorattemptanyrepairbeforereadingandunderstandingthe“Importantsafetyinformation”
intheThinkCentreSafetyandWarrantyGuidethatcamewithyourcomputer.T oobtainacopyoftheThinkCentre
SafetyandWarrantyGuide,goto:
http://www.lenovo.com/support
22ThinkCentreUserGuide
Page 31
Yourcomputerhasaspecialtypeofmemorythatmaintainsthedate,time,andsettingsforbuilt-infeatures,
suchasparallel-portassignments(conguration).Abatterykeepsthisinformationactivewhenyouturn
offthecomputer.
Thebatterynormallyrequiresnochargingormaintenancethroughoutitslife;however,nobatterylasts
forever.Ifthebatteryfails,thedate,time,andcongurationinformation(includingpasswords)arelost.An
errormessageisdisplayedwhenyouturnonthecomputer.
Refertothe“Lithiumbatterynotice”intheThinkCentreSafetyandWarrantyGuideforinformationabout
replacinganddisposingofthebattery.
Toreplacethebattery,dothefollowing:
1.Turnoffthecomputeranddisconnectallpowercordsfromelectricaloutlets.
2.Removethecomputercover.See“Removingthecomputercover”onpage14.
3.Locatethebattery.See“Locatingpartsonthesystemboard”onpage10.
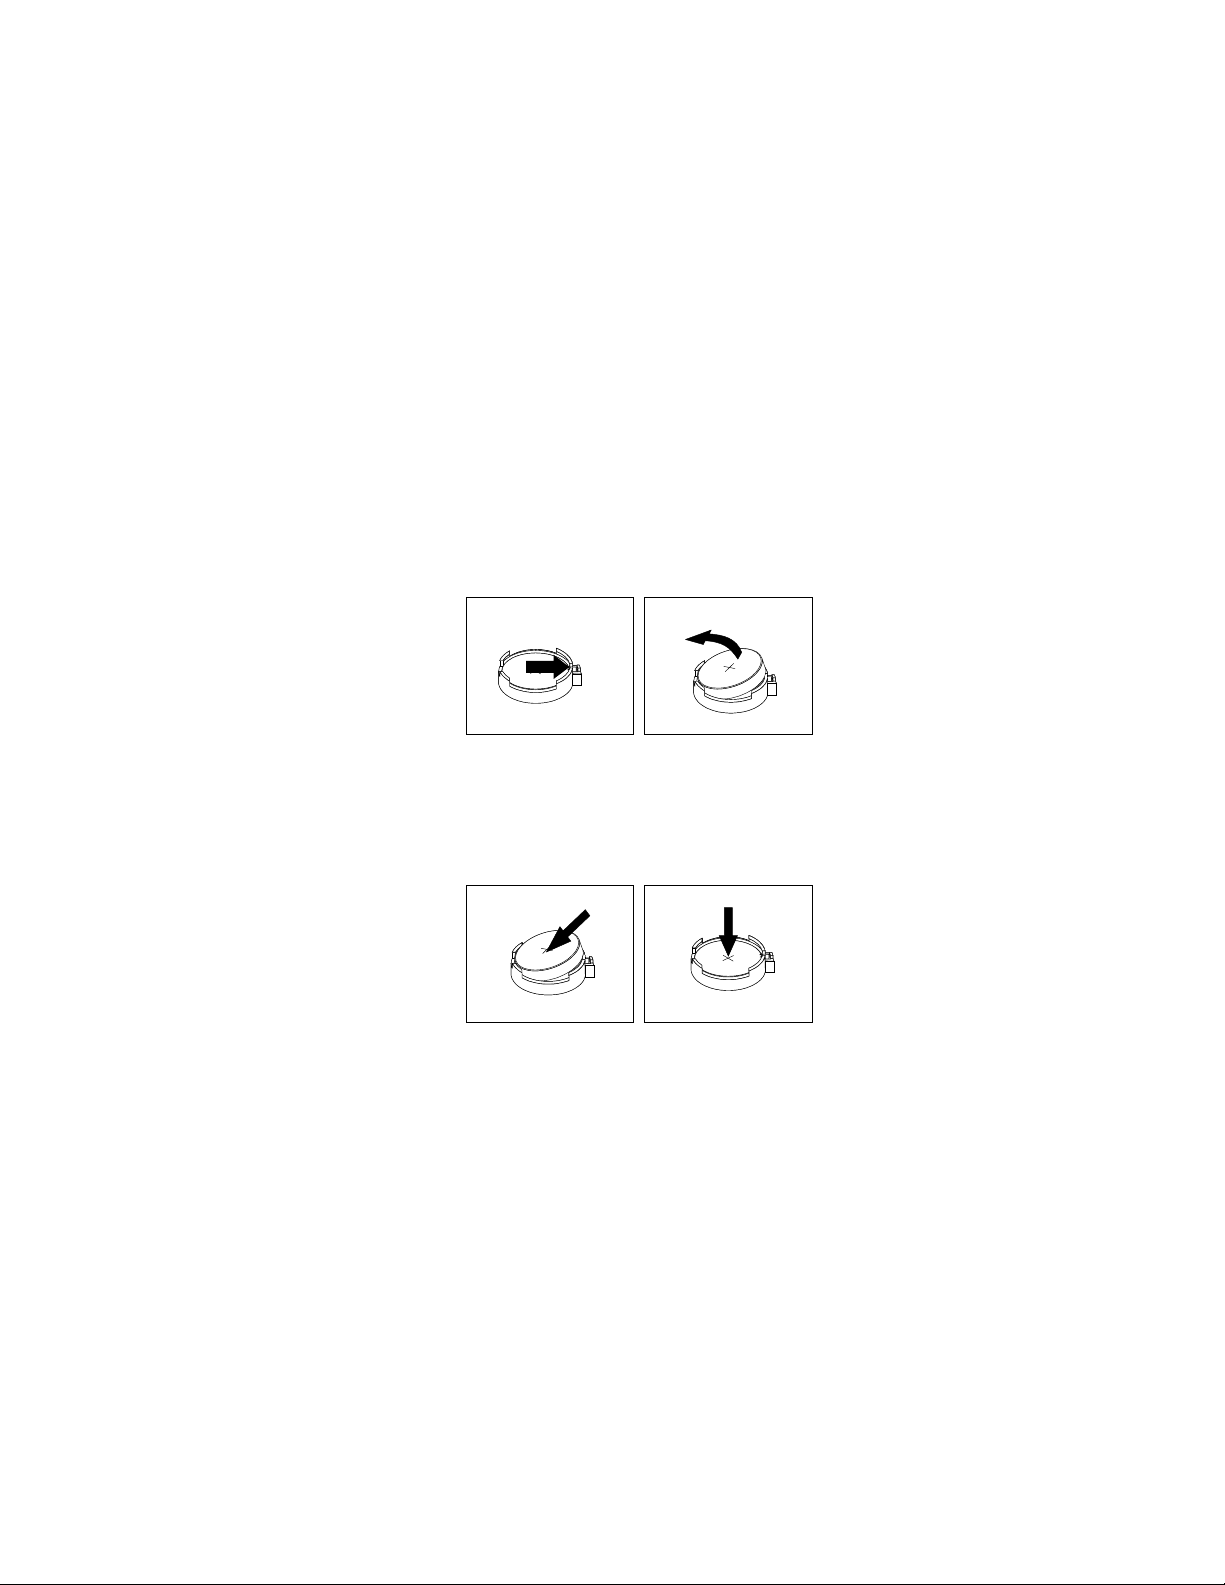
4.Removetheoldbattery.
Figure18.Removingtheoldbattery
5.Installanewbattery.
Figure19.Installinganewbattery
6.Reinstallthecomputercoverandconnectthecables.See“Completingthepartsreplacement”on
page38
.
Note:Whenthecomputeristurnedonforthersttimeafterreplacingthebattery,anerrormessage
mightbedisplayed.Thisisnormalafterreplacingthebattery.
7.Turnonthecomputerandallattacheddevices.
8.UsetheSetupUtilityprogramtosetthedate,time,andanypasswords.SeeChapter4“UsingtheSetup
Utilityprogram”onpage49.
Whattodonext:
•T oworkwithanotherpieceofhardware,gototheappropriatesection.
•T ocompletetheinstallationorreplacement,goto“Completingthepartsreplacement”onpage38.
Chapter2.Installingorreplacinghardware23
Page 32
Replacingthepowersupplyassembly
Attention:
Donotopenyourcomputerorattemptanyrepairbeforereadingandunderstandingthe“Importantsafetyinformation”
intheThinkCentreSafetyandWarrantyGuidethatcamewithyourcomputer.T oobtainacopyoftheThinkCentre
SafetyandWarrantyGuide,goto:
http://www.lenovo.com/support
Thissectionprovidesinstructionsonhowtoreplacethepowersupplyassembly.
Toreplacethepowersupplyassembly,dothefollowing:
1.Turnoffthecomputeranddisconnectallpowercordsfromelectricaloutlets.
2.Removethecomputercover.See“Removingthecomputercover”onpage14.
3.Disconnectthepowersupplyassemblycablesfromthesystemboardandalldrives.See“Locating
partsonthesystemboard”onpage10.
4.Releasethepowersupplyassemblycablesfromthecableclipsandtiesinthechassis.
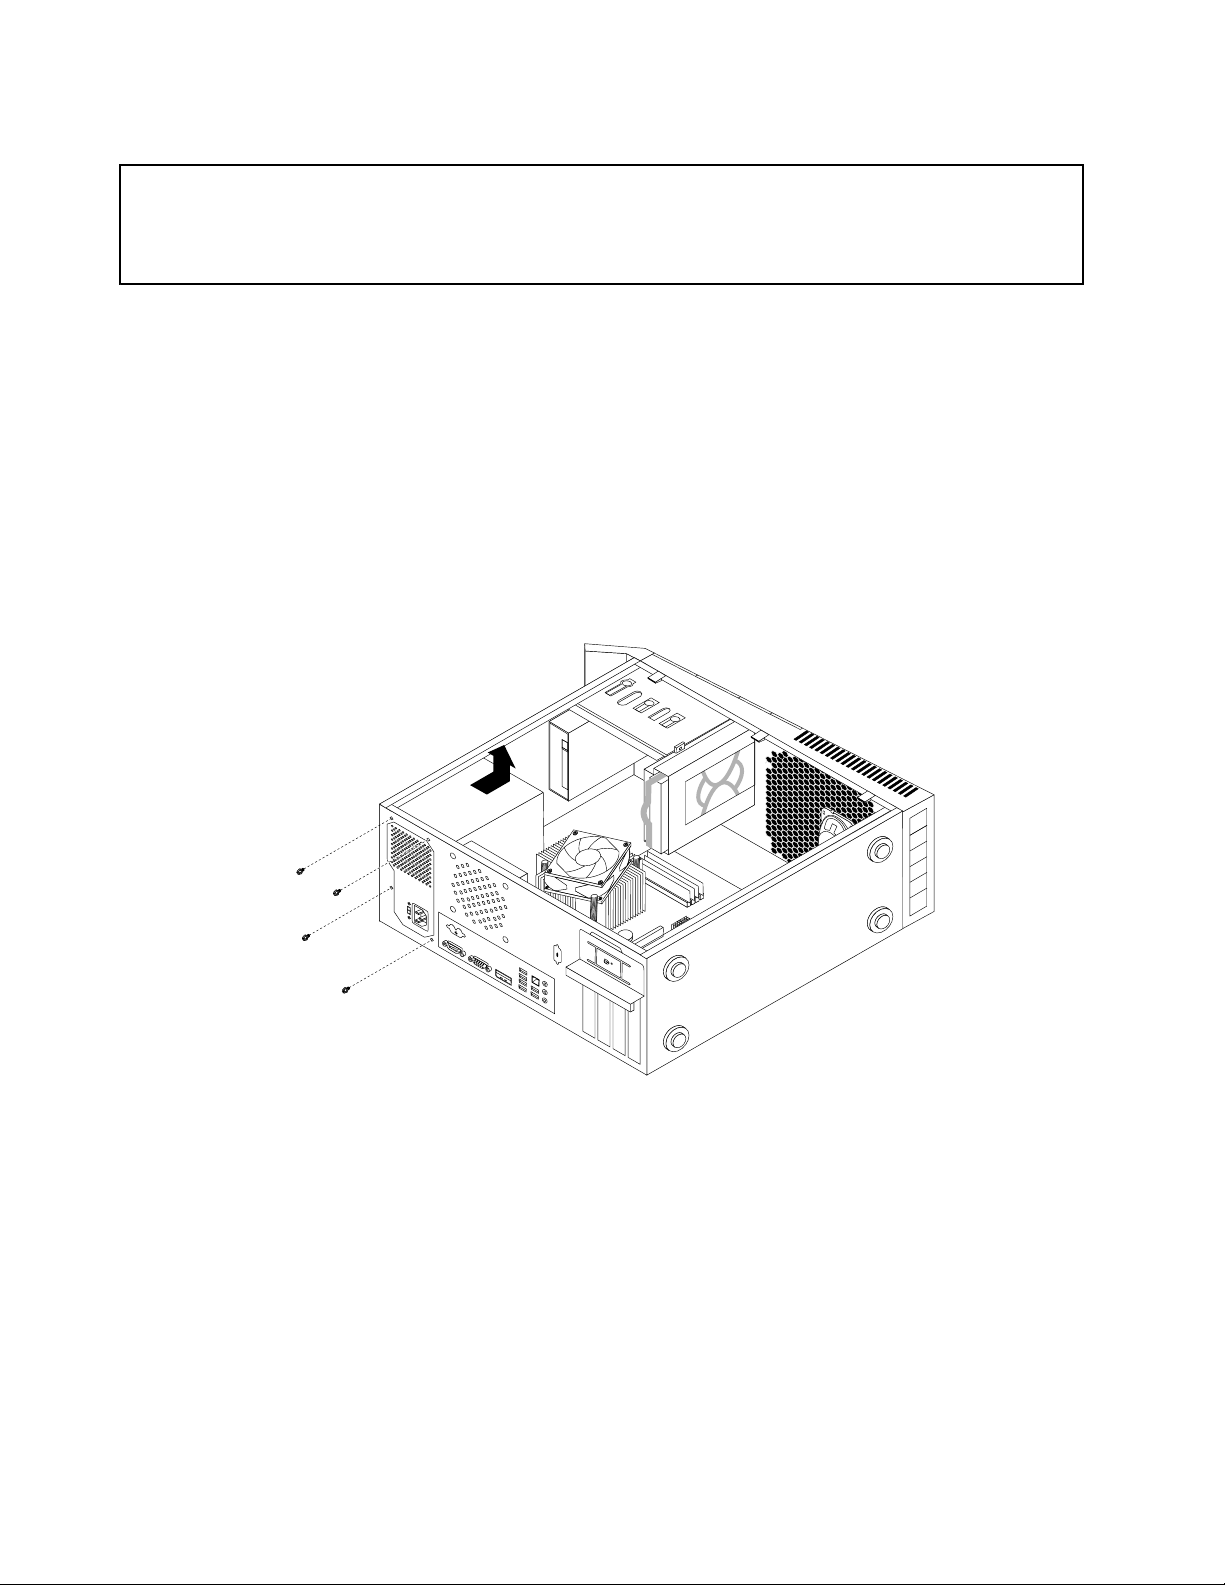
5.Laythecomputeronitssideandremovethefourscrewsattherearofthechassisthatsecurethe
powersupplyassembly.
Figure20.Removingthescrewsforthepowersupplyassembly
6.Slidethepowersupplyassemblytothefrontofthecomputerandthenliftitoutofthechassis.
7.Ensurethatthenewpowersupplyassemblyisthecorrectreplacement.Ifyournewpowersupply
assemblyhasavoltage-selectionswitch,ensurethatyousetthevoltage-selectionswitchtomatchthe
voltageavailableatyourelectricaloutlet.Ifnecessary,useaballpointpentoslidethevoltage-selection
switchtoadifferentposition.
•Ifthevoltagesupplyrangeinyourlocalcountryorregionis100–127Vac,settheswitchto115V.
•Ifthevoltagesupplyrangeinyourlocalcountryorregionis200–240Vac,settheswitchto230V.
8.Installthenewpowersupplyassemblyintothechassissothatthescrewholesinthepowersupply
assemblyalignwiththoseinthechassis.
9.Installandtightenthefourscrewstosecurethepowersupplyassembly.
24ThinkCentreUserGuide
Page 33
Note:UseonlyscrewsprovidedbyLenovo.
10.Reconnectthepowersupplyassemblycablestothesystemboardandeachofthedrives.
11.Securethepowersupplyassemblycableswiththecableclipsandtiesinthechassis.
Whattodonext:
•T oworkwithanotherpieceofhardware,gototheappropriatesection.
•T ocompletetheinstallationorreplacement,goto“Completingthepartsreplacement”onpage38.
Replacingtheheatsinkandfanassembly
Attention:
Donotopenyourcomputerorattemptanyrepairbeforereadingandunderstandingthe“Importantsafetyinformation”
intheThinkCentreSafetyandWarrantyGuidethatcamewithyourcomputer.T oobtainacopyoftheThinkCentre
SafetyandWarrantyGuide,goto:
http://www.lenovo.com/support
Thissectionprovidesinstructionsonhowtoreplacetheheatsinkandfanassembly.
CAUTION:
Theheatsinkandfanassemblymightbeveryhot.T urnoffthecomputerandwaitthree
toveminutestoletthecomputercoolbeforeremovingthecomputercover.
Toreplacetheheatsinkandfanassembly,dothefollowing:
1.Turnoffthecomputeranddisconnectallpowercordsfromelectricaloutlets.
2.Removethecomputercover.See“Removingthecomputercover”onpage14.
3.Laythecomputeronitssideforeasieraccesstothesystemboard.
4.Locatetheheatsinkandfanassembly.See“Locatingpartsonthesystemboard”onpage10.
5.Disconnecttheheatsinkandfanassemblycablefromthemicroprocessorfanconnectoronthesystem
board.See“Locatingpartsonthesystemboard”onpage10.
6.Carefullyremovethefourscrews1thatsecuretheheatsinkandfanassemblytothesystemboard.
Note:Carefullyremovethefourscrewsfromthesystemboardtoavoidanypossibledamagetothe
systemboard.Thefourscrewscannotberemovedfromtheheatsinkandfanassembly.
Chapter2.Installingorreplacinghardware25
Page 34
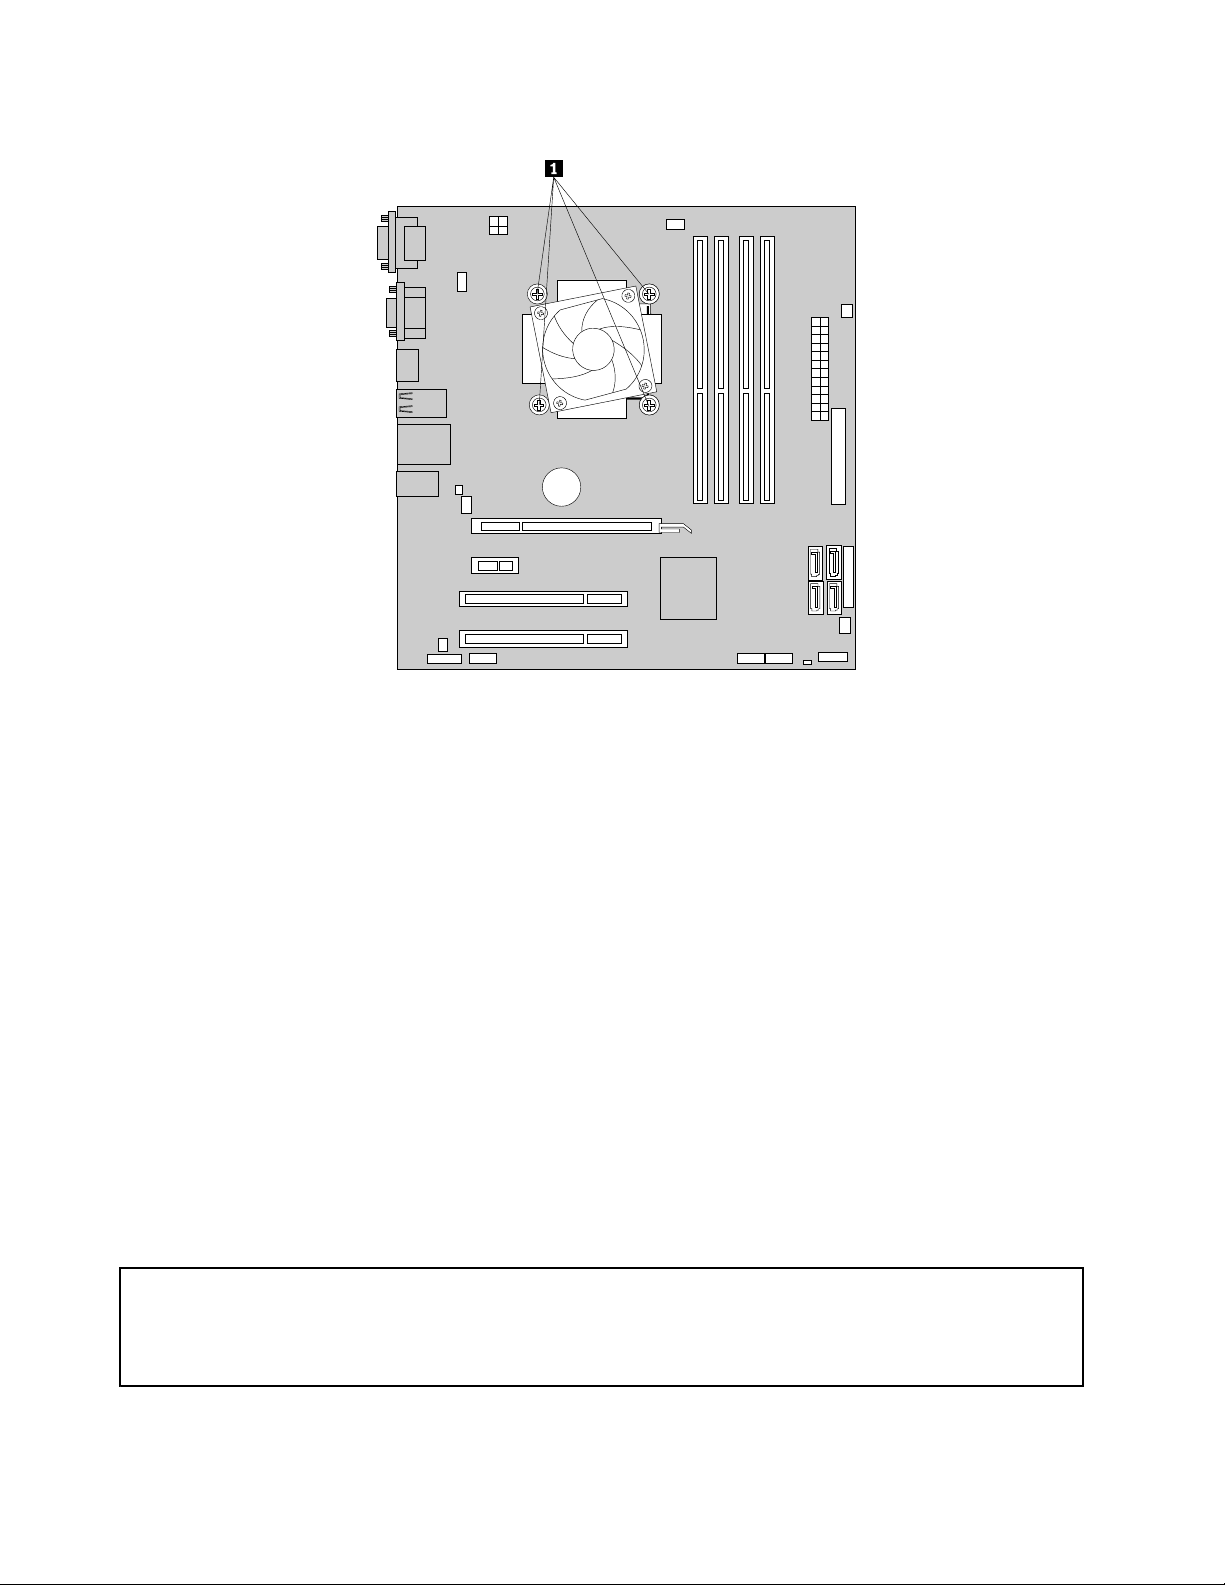
Figure21.Removingtheheatsinkandfanassembly
7.Liftthefailingheatsinkandfanassemblyoffthesystemboard.
Notes:
a.Youmighthavetogentlytwisttheheatsinkandfanassemblytofreeitfromthemicroprocessor.
b.Donottouchthethermalgreasewhilehandlingtheheatsinkandfanassembly.
8.Positionthenewheatsinkandfanassemblyonthesystemboardsothatthefourscrewsarealigned
withtheholesonthesystemboard.
Note:Positionthenewheatsinkandfanassemblysothattheheatsinkandfanassemblycableis
towardthemicroprocessorfanconnectoronthesystemboard.
9.Alternatetighteningeachscrewasmallandequalamountuntiltheheatsinkandfanassemblyissecured
tothesystemboard.Donotover-tightenthescrews.
10.Connecttheheatsinkandfanassemblycabletothemicroprocessorfanconnectoronthesystemboard.
See“Locatingpartsonthesystemboard”onpage10.
Whattodonext:
•T oworkwithanotherpieceofhardware,gototheappropriatesection.
•T ocompletetheinstallationorreplacement,goto“Completingthepartsreplacement”onpage38
.
Replacingtheprimaryharddiskdrive
Attention:
Donotopenyourcomputerorattemptanyrepairbeforereadingandunderstandingthe“Importantsafetyinformation”
intheThinkCentreSafetyandWarrantyGuidethatcamewithyourcomputer.T oobtainacopyoftheThinkCentre
SafetyandWarrantyGuide,goto:
http://www.lenovo.com/support
26ThinkCentreUserGuide
Page 35
Thissectionprovidesinstructionsonhowtoreplacetheprimaryharddiskdriveifyourcomputerhasone.
Forcomputermodelsthatdonothaveaninternalharddiskdriveandusearemoteharddiskdriveaccessed
throughtheSMC-StorageArray,contactyournetworkorstorageadministrator.
Toreplacetheprimaryharddiskdrive,dothefollowing:
1.Turnoffthecomputeranddisconnectallpowercordsfromelectricaloutlets.
2.Removethecomputercover.See“Removingthecomputercover”onpage14.
3.Locatetheprimaryharddiskdrive.See“Locatinginternaldrives”onpage11.
4.Disconnectthesignalcableandthepowercablefromtheharddiskdrive.
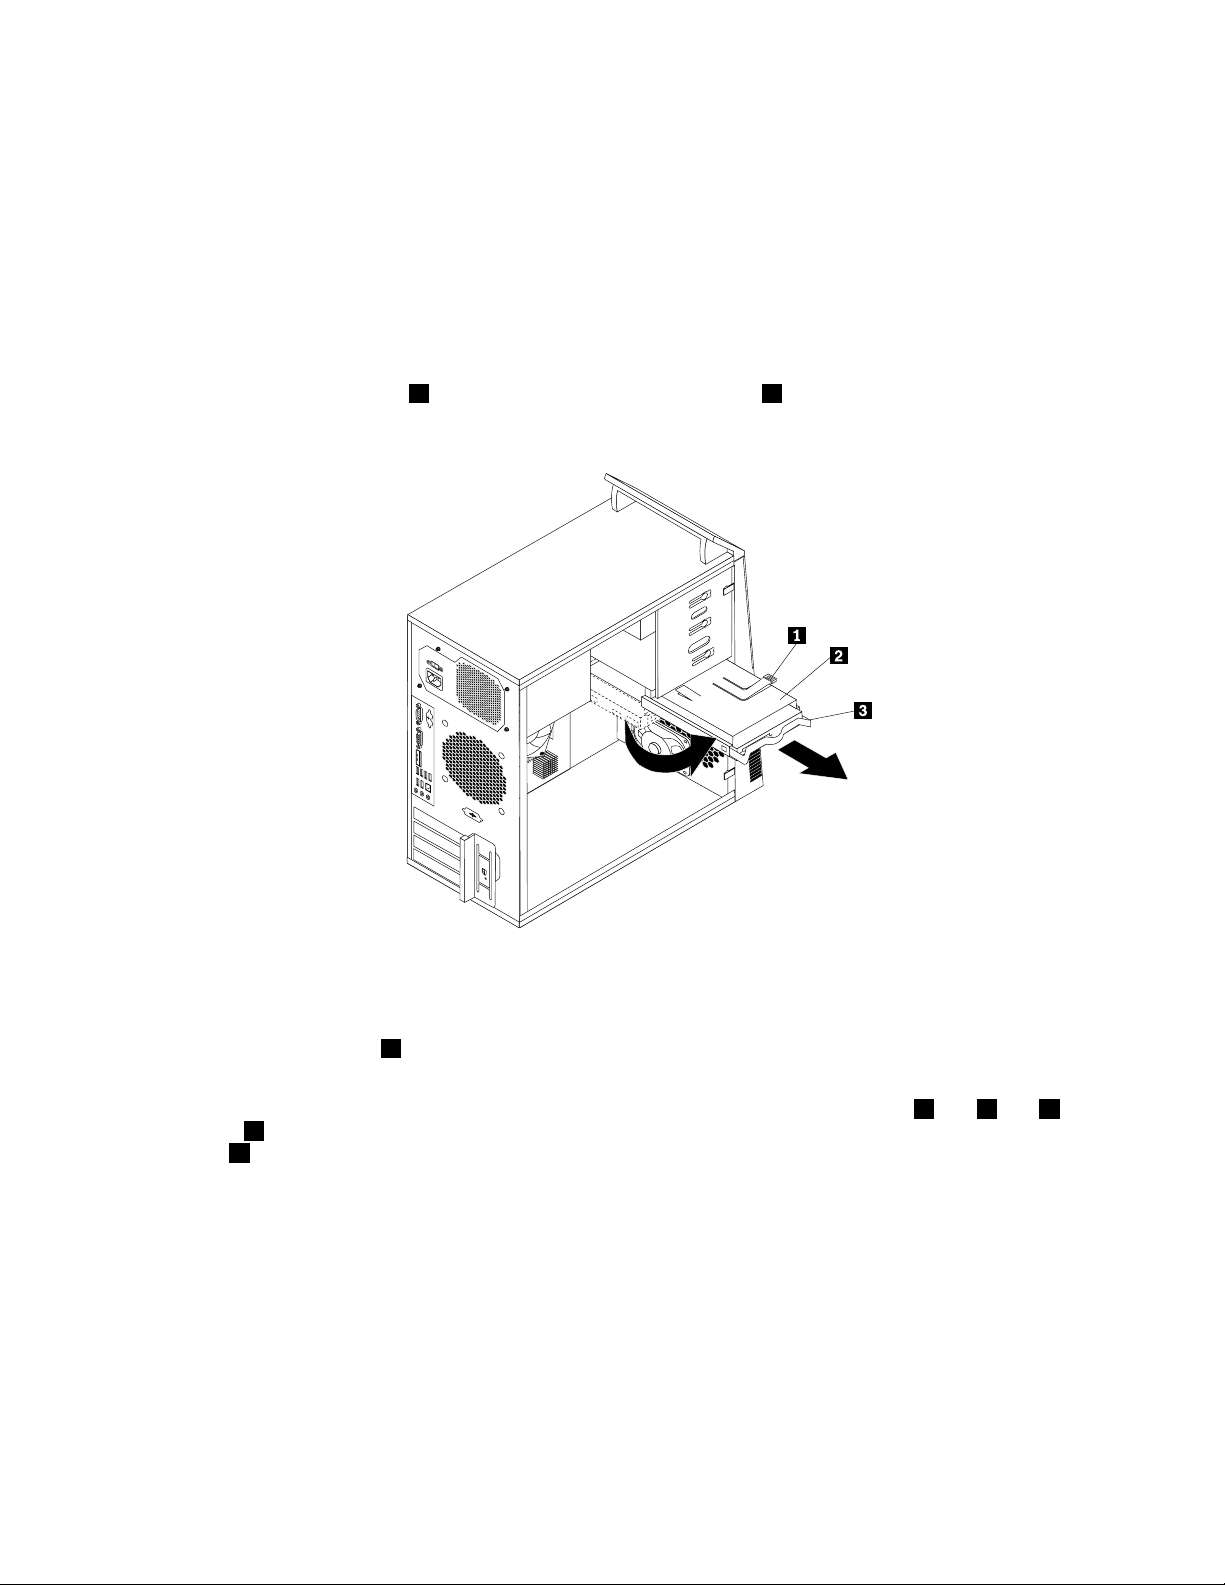
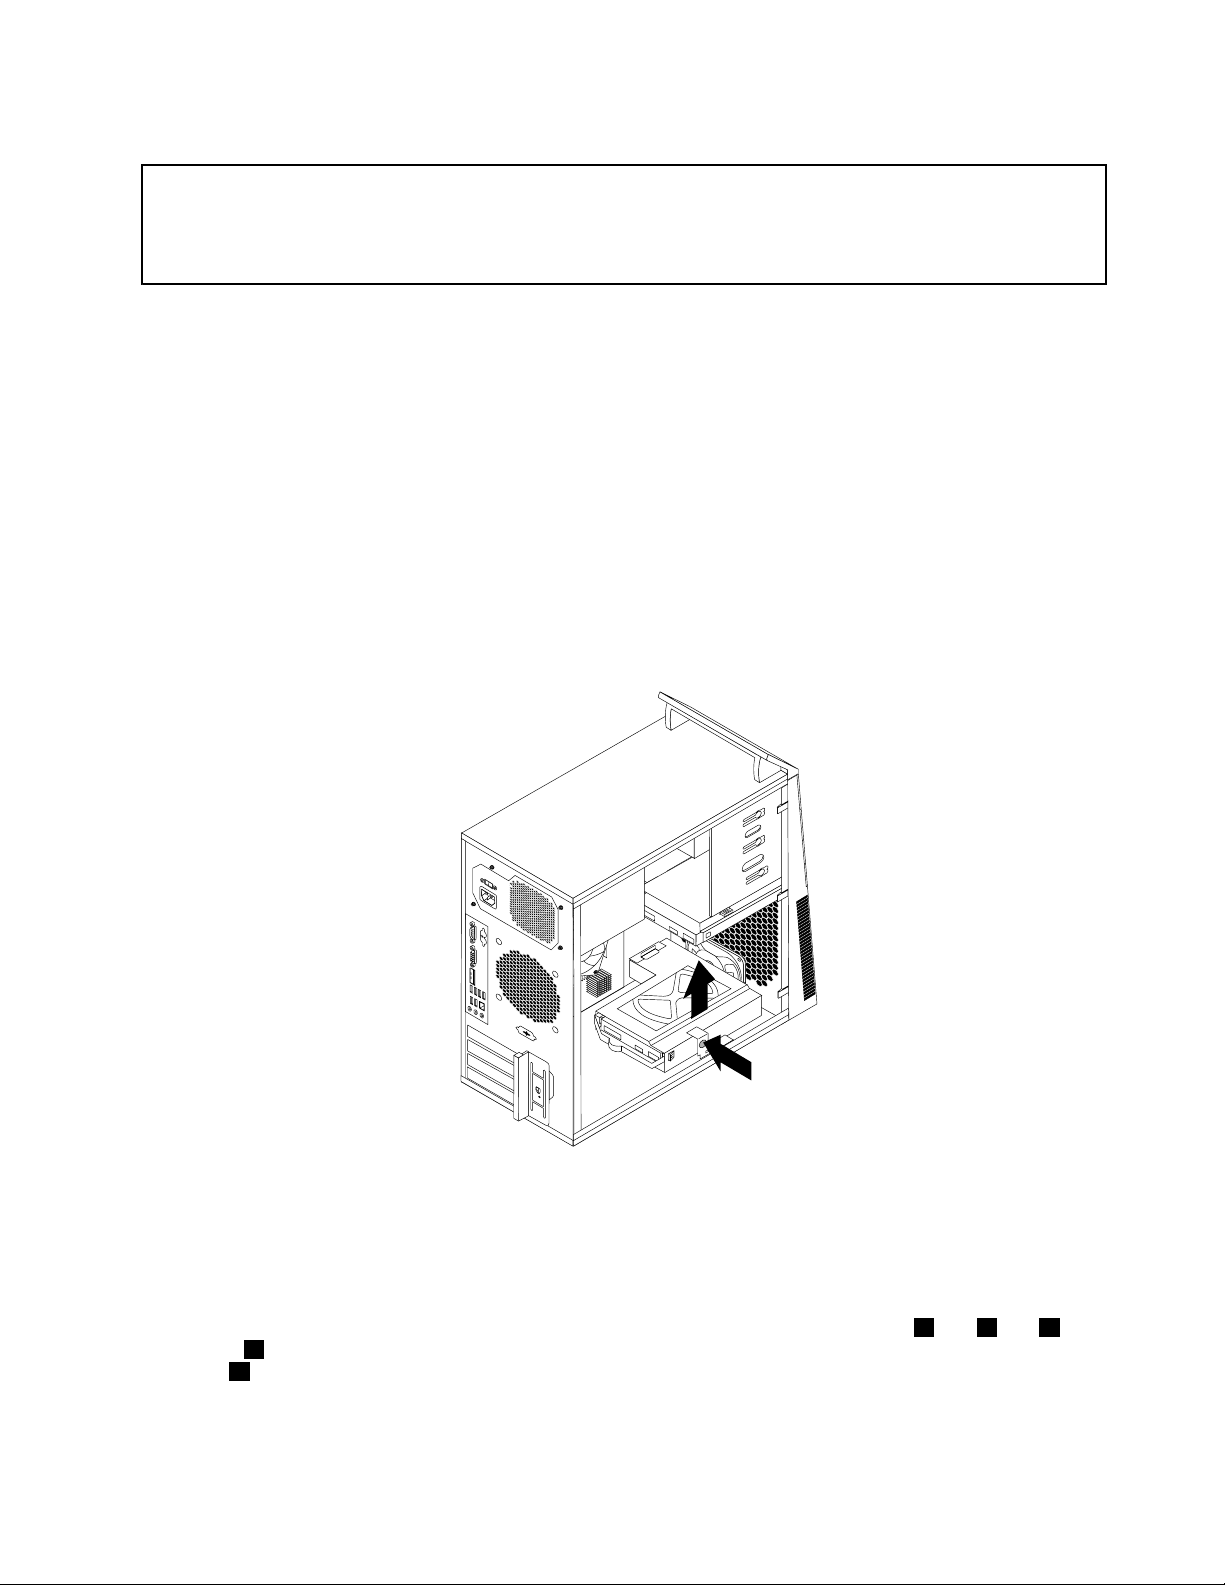
5.Pressthebluereleasetab1down,slidetheharddiskdrivecage2totherearofthecomputer,and
thenpivotitoutward.
Figure22.Removingtheprimaryharddiskdrive
6.Removetheharddiskdrivecagefromthechassisbyslidingitoutward.
7.Pullonthebluehandle3toreleaseandremovetheharddiskdrivefromthedrivecage.
8.Flexthesidesofthebluebrackettoremovetheharddiskdrivefromthebracket.
9.Toinstallanewharddiskdriveintothebluebracket,exthebracketandalignpin1,pin2,pin3,
andpin4onthebracketwiththecorrespondingholesintheharddiskdrive.Donottouchthecircuit
board5onthebottomoftheharddiskdrive.
Chapter2.Installingorreplacinghardware27
Page 36
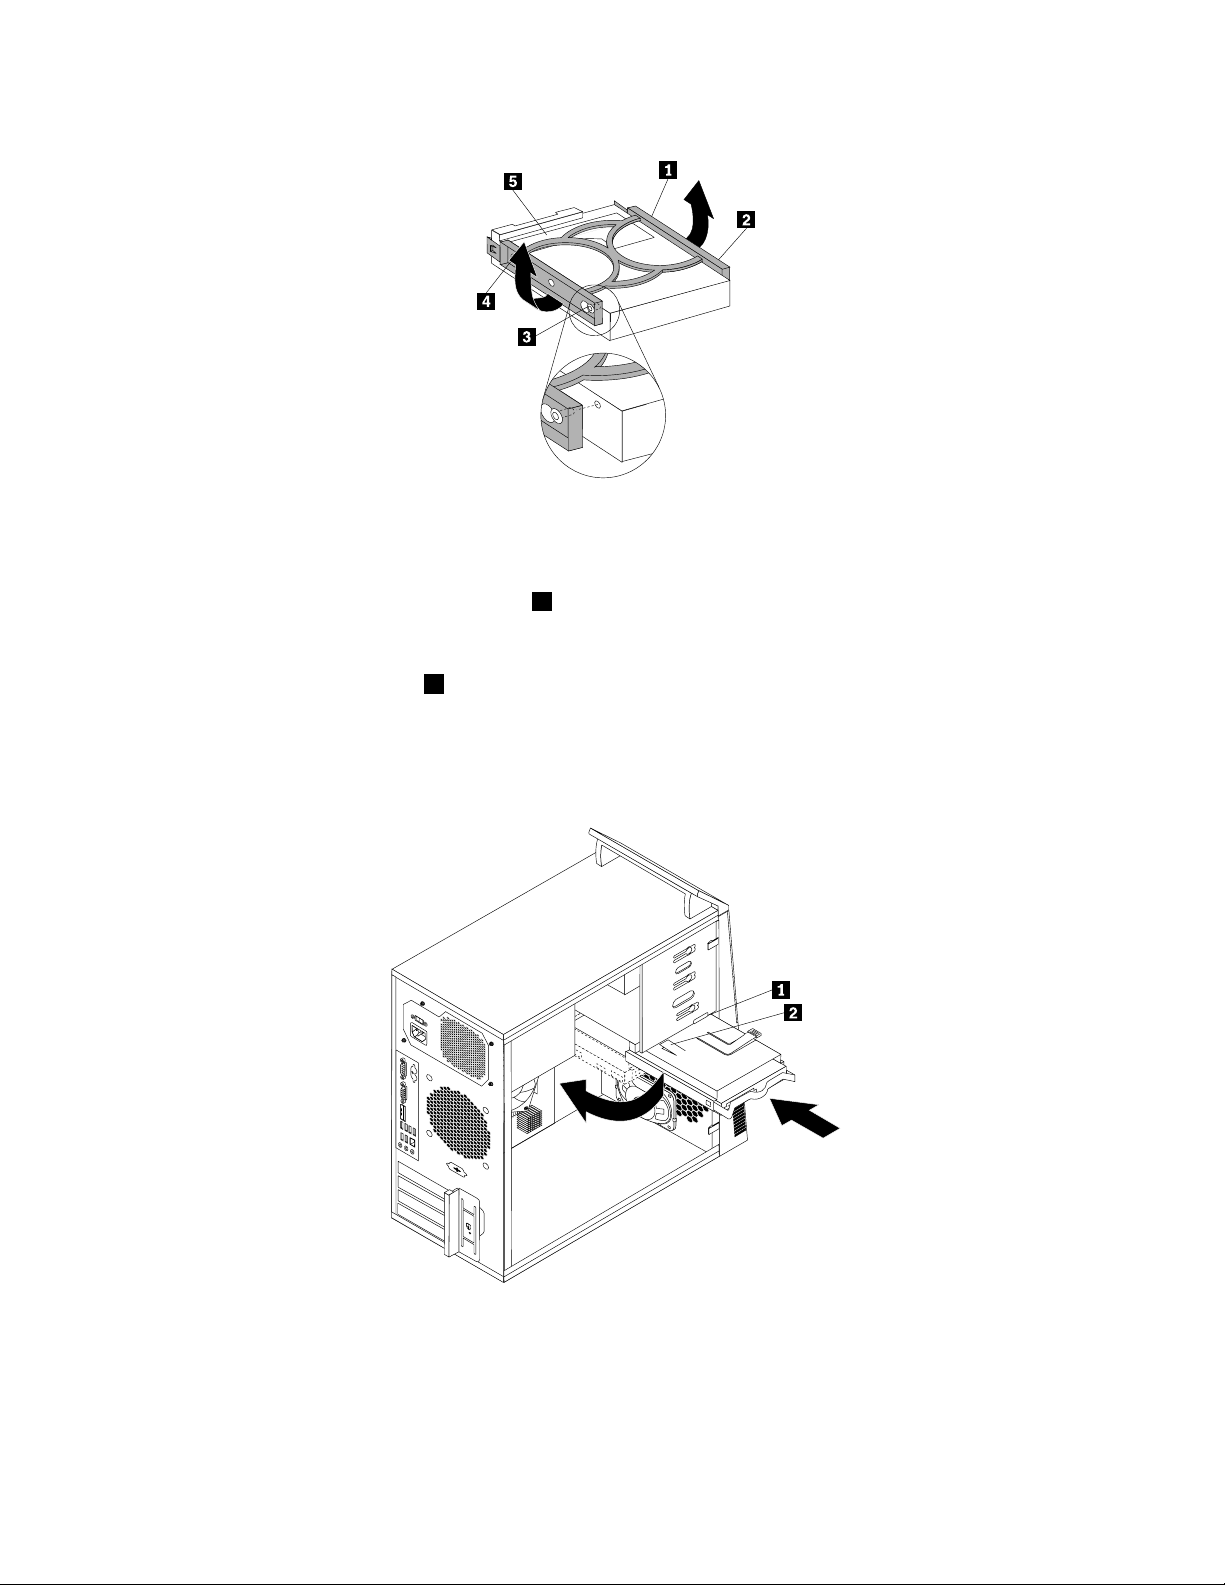
Figure23.Installingtheharddiskdriveintothebracket
10.Slidethenewharddiskdriveintothedrivecageuntilitsnapsintoposition.
11.Alignthedrivecagepivotpinwiththeslot1intheupperdrivecageandslidetheharddiskdrive
cageintothechassis.
12.Connectthesignalcableandthepowercabletothenewharddiskdrive.
13.Pressdownonthemetallatch2andpivotthedrivecageintoplace,andthenslideittothefrontofthe
computeruntilitsnapsintoposition.
Note:Therearetwoarrows,oneontheupperdrivecageandoneontheharddiskdrivecage.The
arrowsarealignedwhentheharddiskdriveisintheproperposition.
Figure24.Installingtheprimaryharddiskdrive
Whattodonext:
•T oworkwithanotherpieceofhardware,gototheappropriatesection.
•T ocompletetheinstallationorreplacement,goto“Completingthepartsreplacement”onpage38
28ThinkCentreUserGuide
.
Page 37
Replacingthesecondaryharddiskdrive
Attention:
Donotopenyourcomputerorattemptanyrepairbeforereadingandunderstandingthe“Importantsafetyinformation”
intheThinkCentreSafetyandWarrantyGuidethatcamewithyourcomputer.T oobtainacopyoftheThinkCentre
SafetyandWarrantyGuide,goto:
http://www.lenovo.com/support
Note:Dependingonyourmodeltype,yourcomputermightcomewithasecondaryharddiskdrivebay
forinstallingorreplacingasecondaryharddiskdrive.Forcomputermodelsthatdonothaveaninternal
harddiskdriveandusearemoteharddiskdriveaccessedthroughtheSMC-StorageArray,contact
yournetworkorstorageadministrator.
Thissectionprovidesinstructionsonhowtoreplacethesecondaryharddiskdrive.
Toreplacethesecondaryharddiskdrive,dothefollowing:
1.Turnoffthecomputeranddisconnectallpowercordsfromelectricaloutlets.
2.Removethecomputercover.See“Removingthecomputercover”onpage14.
3.Locatethesecondaryharddiskdrive.See“Locatinginternaldrives”onpage11.
4.Disconnectthesignalcableandthepowercablefromtheharddiskdrive.
5.Pressthebluereleasebuttontoreleasetheharddiskdrivecagefromthechassis.
Figure25.Removingthesecondaryharddiskdrive
6.Removetheharddiskdrivecagefromthechassisbysimplyslidingitoutward.
7.Pullonthebluehandletoreleaseandremovetheharddiskdrivefromtheharddiskdrivecage.
8.Flexthesidesofthebluebrackettoremovetheharddiskdrivefromthebracket.
9.Toinstallanewharddiskdriveintothebluebracket,exthebracketandalignpin1,pin2,pin3,
andpin4onthebracketwiththecorrespondingholesintheharddiskdrive.Donottouchthecircuit
board5onthebottomoftheharddiskdrive.
Chapter2.Installingorreplacinghardware29
Page 38
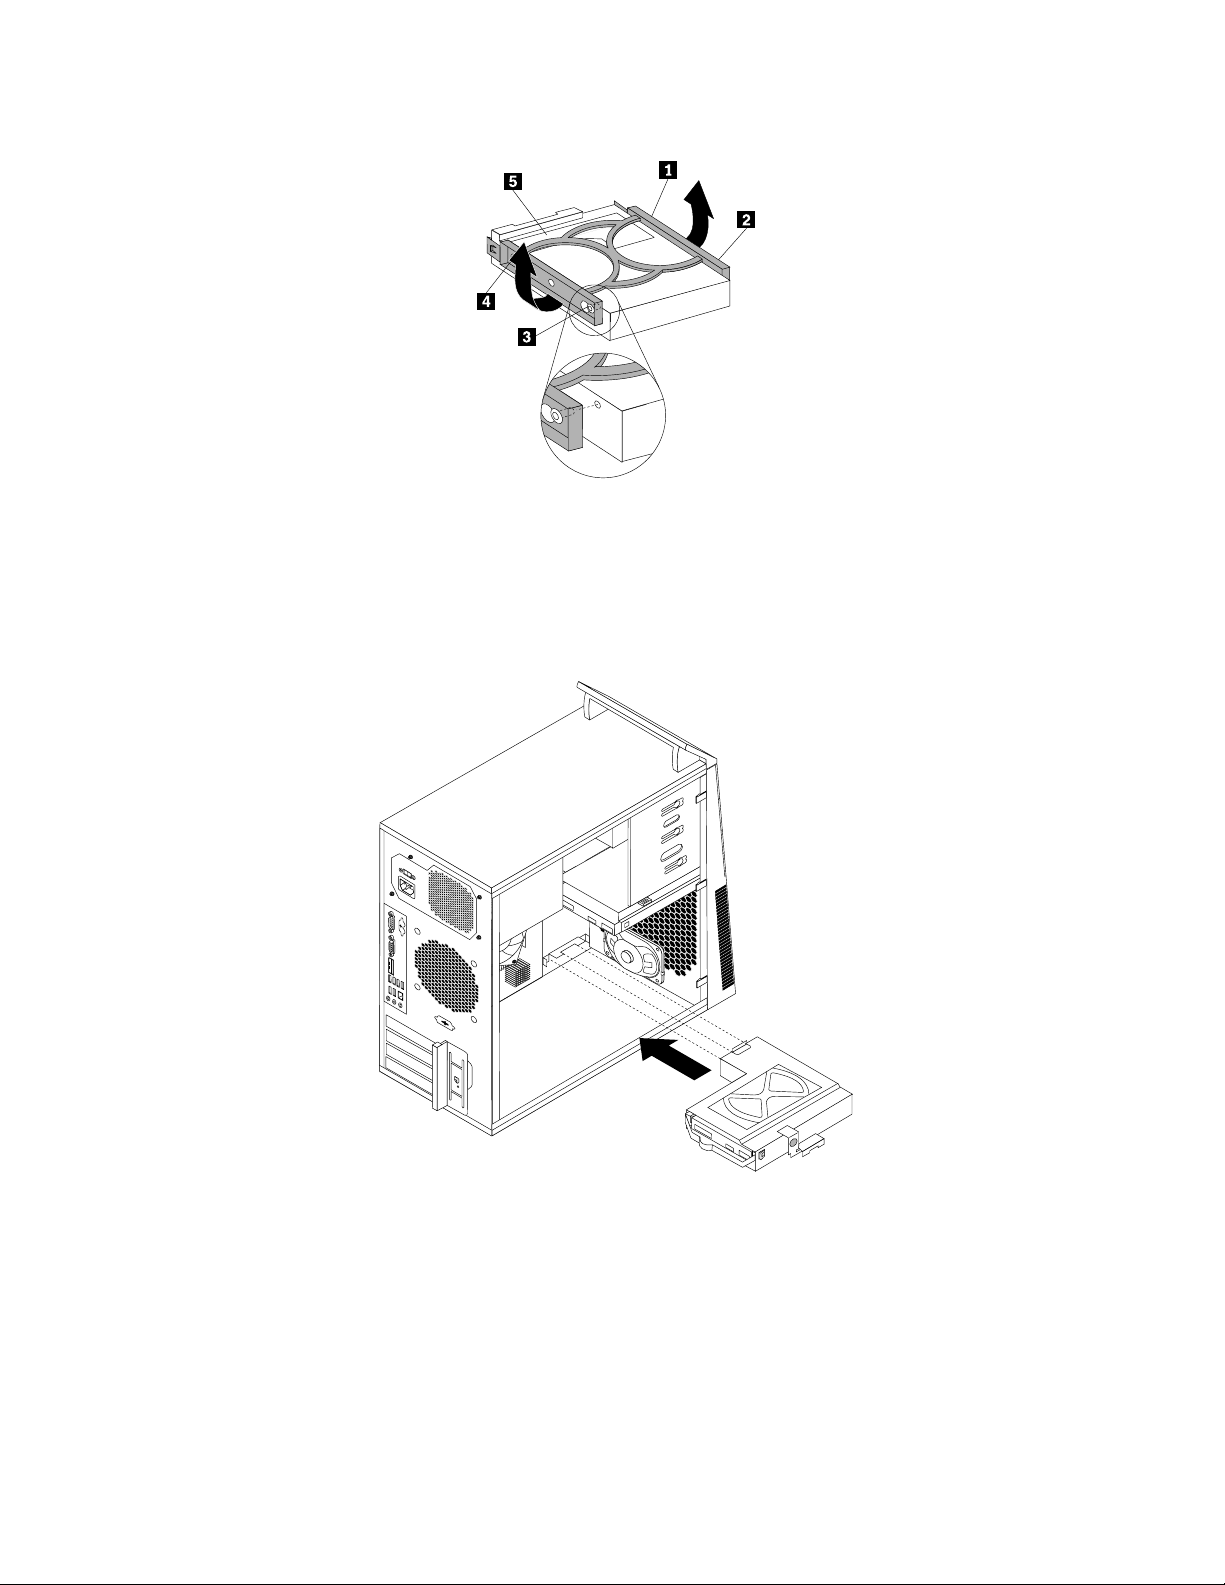
Figure26.Installingtheharddiskdriveintothebracket
10.Slidethenewharddiskdriveintotheharddiskdrivecageuntilitsnapsintoposition.
11.Installtheharddiskdrivecageintothechassisuntilitsnapsintopositionunderneaththemetaltab.Make
surethattheharddiskdrivecagereleasebuttonissecuredinthechassis.
Figure27.Installingthesecondaryharddiskdrive
12.Connectthesignalcableandthepowercabletothenewharddiskdrive.
Whattodonext:
•T oworkwithanotherpieceofhardware,gototheappropriatesection.
•T ocompletetheinstallationorreplacement,goto“Completingthepartsreplacement”onpage38.
30ThinkCentreUserGuide
Page 39
Replacingthefrontfanassembly
Attention:
Donotopenyourcomputerorattemptanyrepairbeforereadingandunderstandingthe“Importantsafetyinformation”
intheThinkCentreSafetyandWarrantyGuidethatcamewithyourcomputer.T oobtainacopyoftheThinkCentre
SafetyandWarrantyGuide,goto:
http://www.lenovo.com/support
Thissectionprovidesinstructionsonhowtoreplacethefrontfanassembly.
Note:Notallcomputershavethefrontfanassembly.
Toreplacethefrontfanassembly,dothefollowing:
1.Turnoffthecomputeranddisconnectallpowercordsfromelectricaloutlets.
2.Removethecomputercover.See“Removingthecomputercover”onpage14.
3.Removethefrontbezel.See“Removingandreinstallingthefrontbezel”onpage15.
4.Disconnectthefrontfanassemblycablefromthepowerfanconnectoronthesystemboard.See
“Locatingpartsonthesystemboard”onpage10.
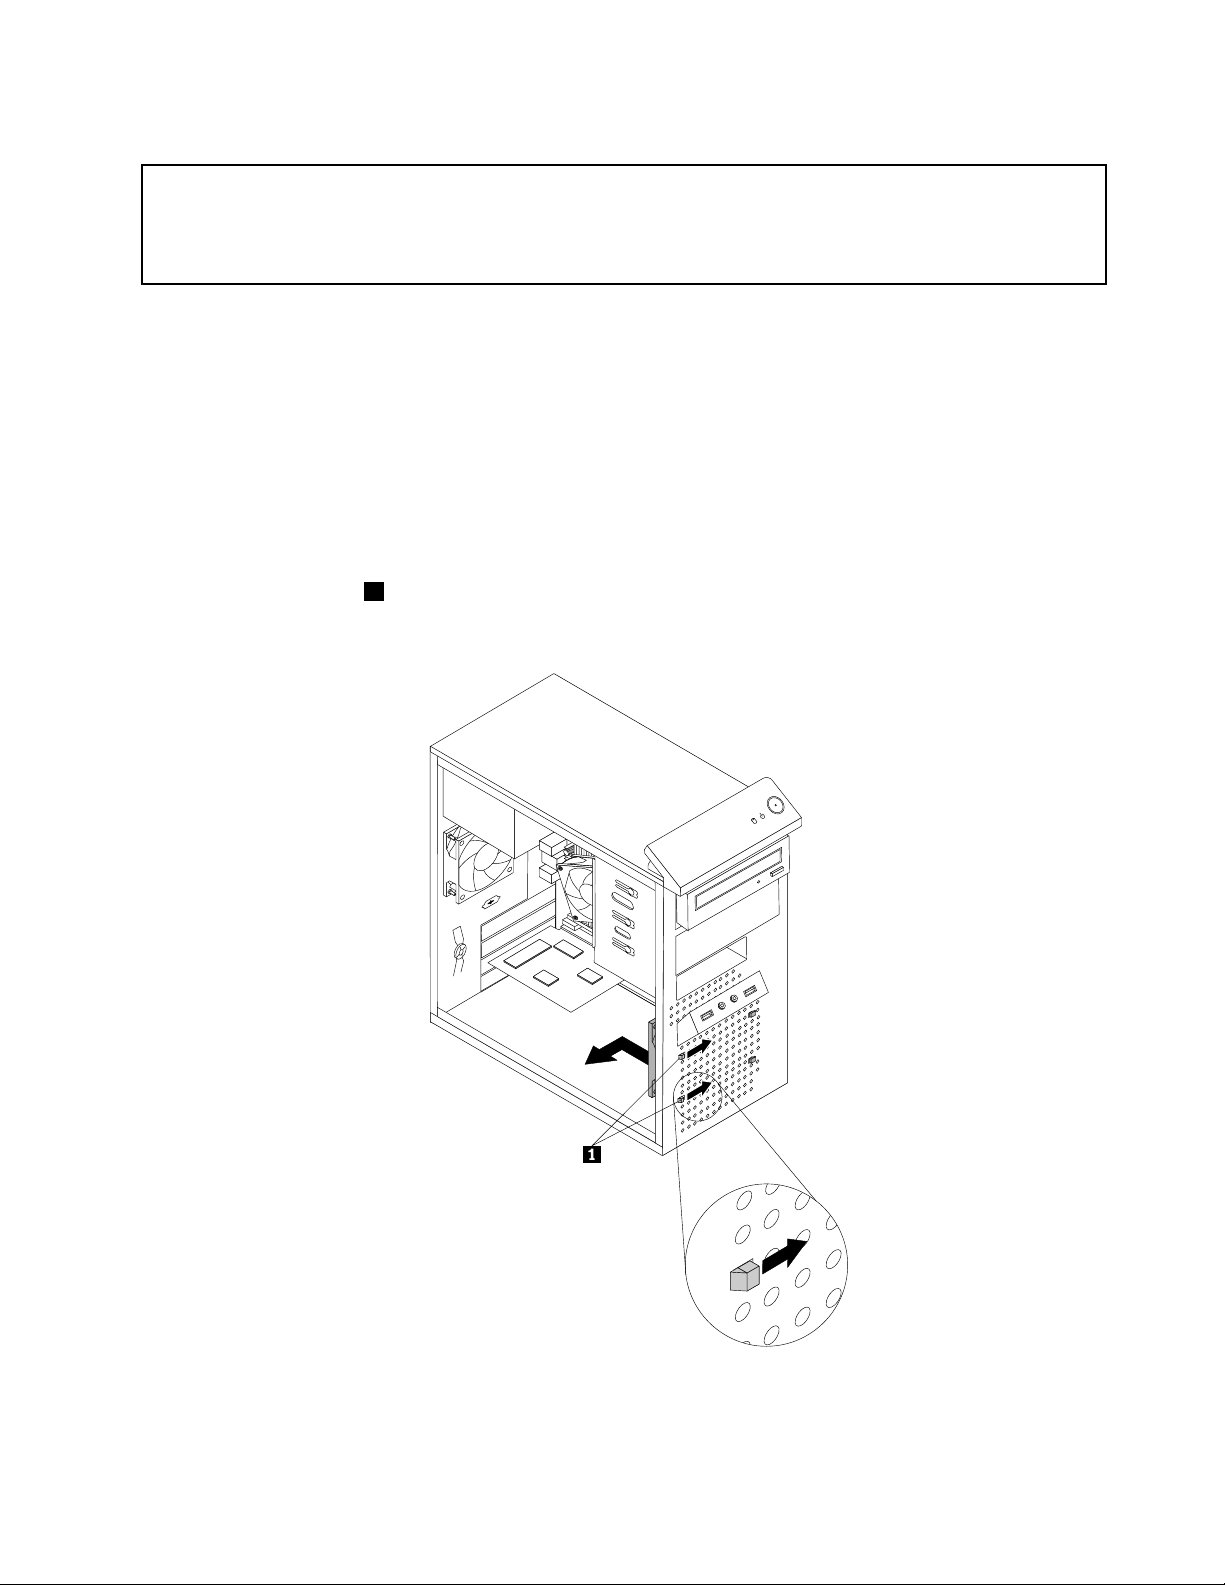
5.Releasethetwotabs1thatattachthefrontfanassemblytothechassisasshownandthencompletely
removethefrontfanfromthechassis.
Figure28.Removingthefrontfanassembly
Chapter2.Installingorreplacinghardware31
Page 40
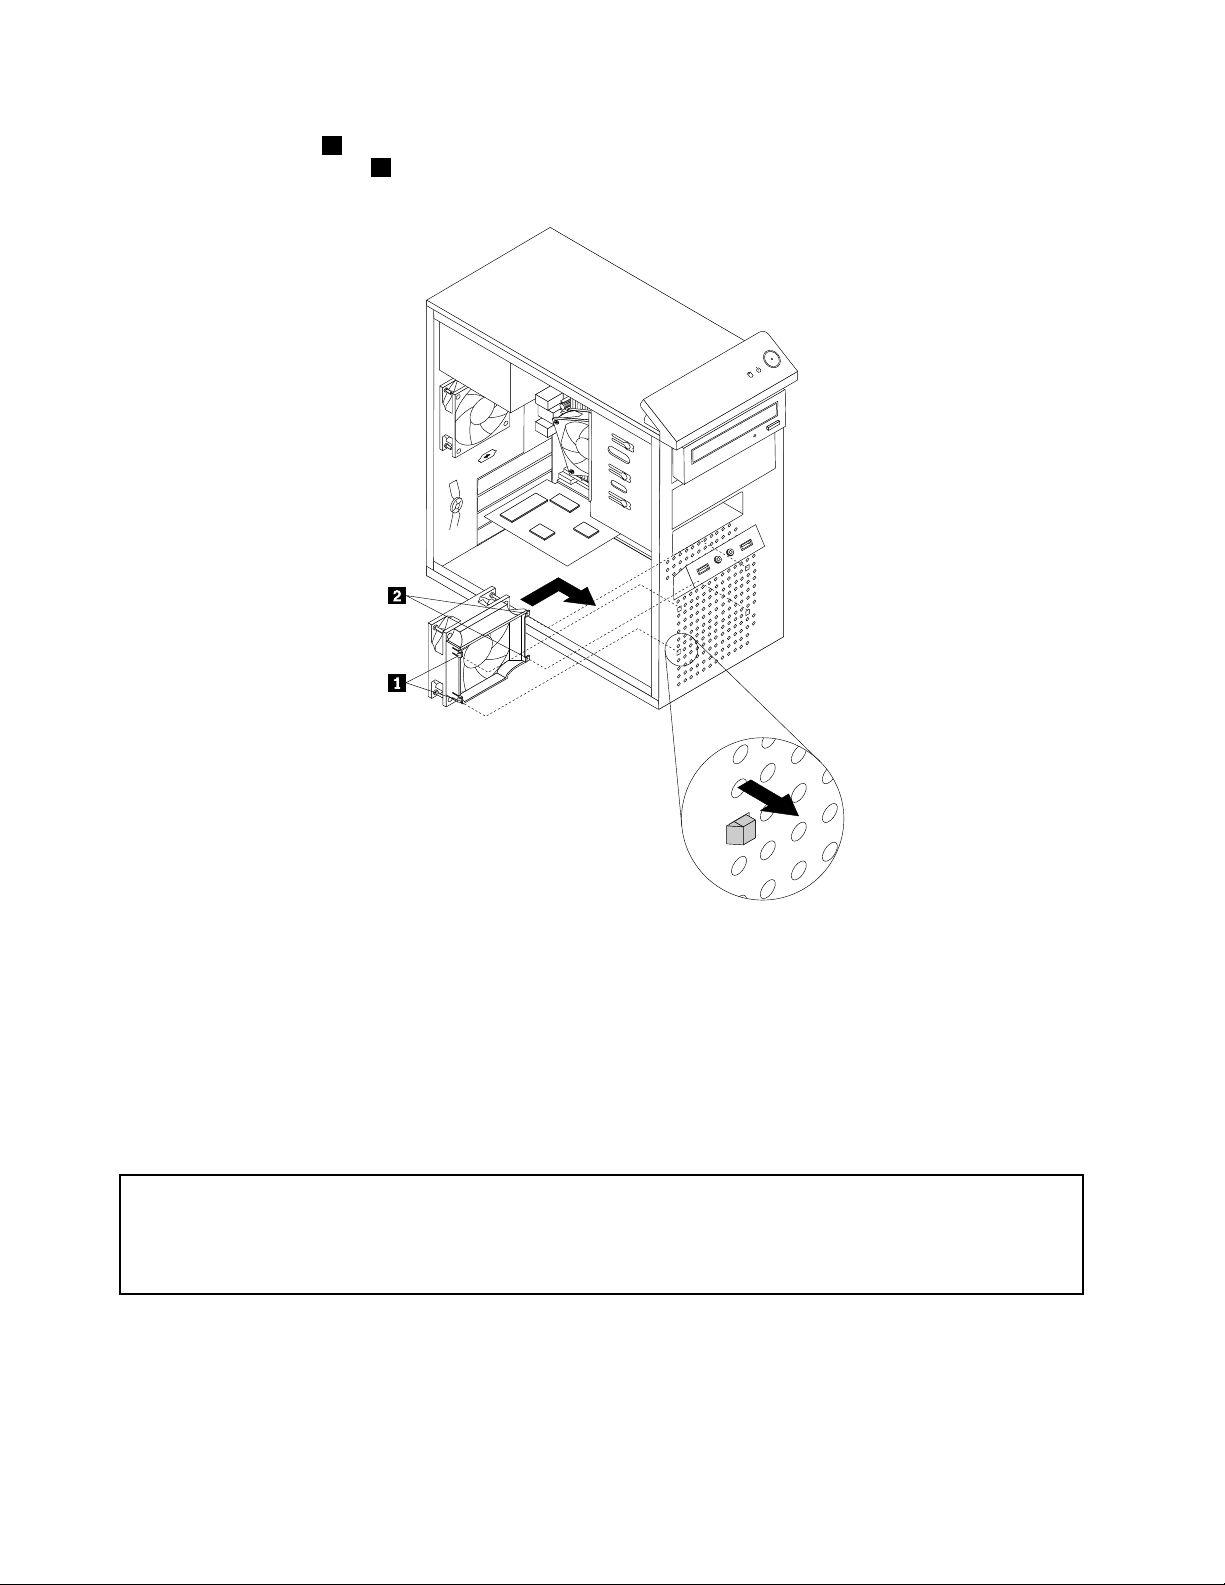
6.Insertthetwotabs2ofthenewfrontfanassemblyintothecorrespondingholesinthechassis,and
presstheothertwotabs1throughtheholesuntilthefrontfanassemblyissecuredinplace.
Figure29.Installingthefrontfanassembly
7.Connectthefrontfanassemblycabletothepowerfanconnectoronthesystemboard.
Whattodonext:
•T oworkwithanotherpieceofhardware,gototheappropriatesection.
•T ocompletetheinstallationorreplacement,goto“Completingthepartsreplacement”onpage38.
Replacingtherearfanassembly
Attention:
Donotopenyourcomputerorattemptanyrepairbeforereadingandunderstandingthe“Importantsafetyinformation”
intheThinkCentreSafetyandWarrantyGuidethatcamewithyourcomputer.T oobtainacopyoftheThinkCentre
SafetyandWarrantyGuide,goto:
http://www.lenovo.com/support
Thissectionprovidesinstructionsonhowtoreplacetherearfanassembly.
Toreplacetherearfanassembly,dothefollowing:
1.Turnoffthecomputeranddisconnectallpowercordsfromelectricaloutlets.
2.Removethecomputercover.See“Removingthecomputercover”onpage14.
32ThinkCentreUserGuide
Page 41
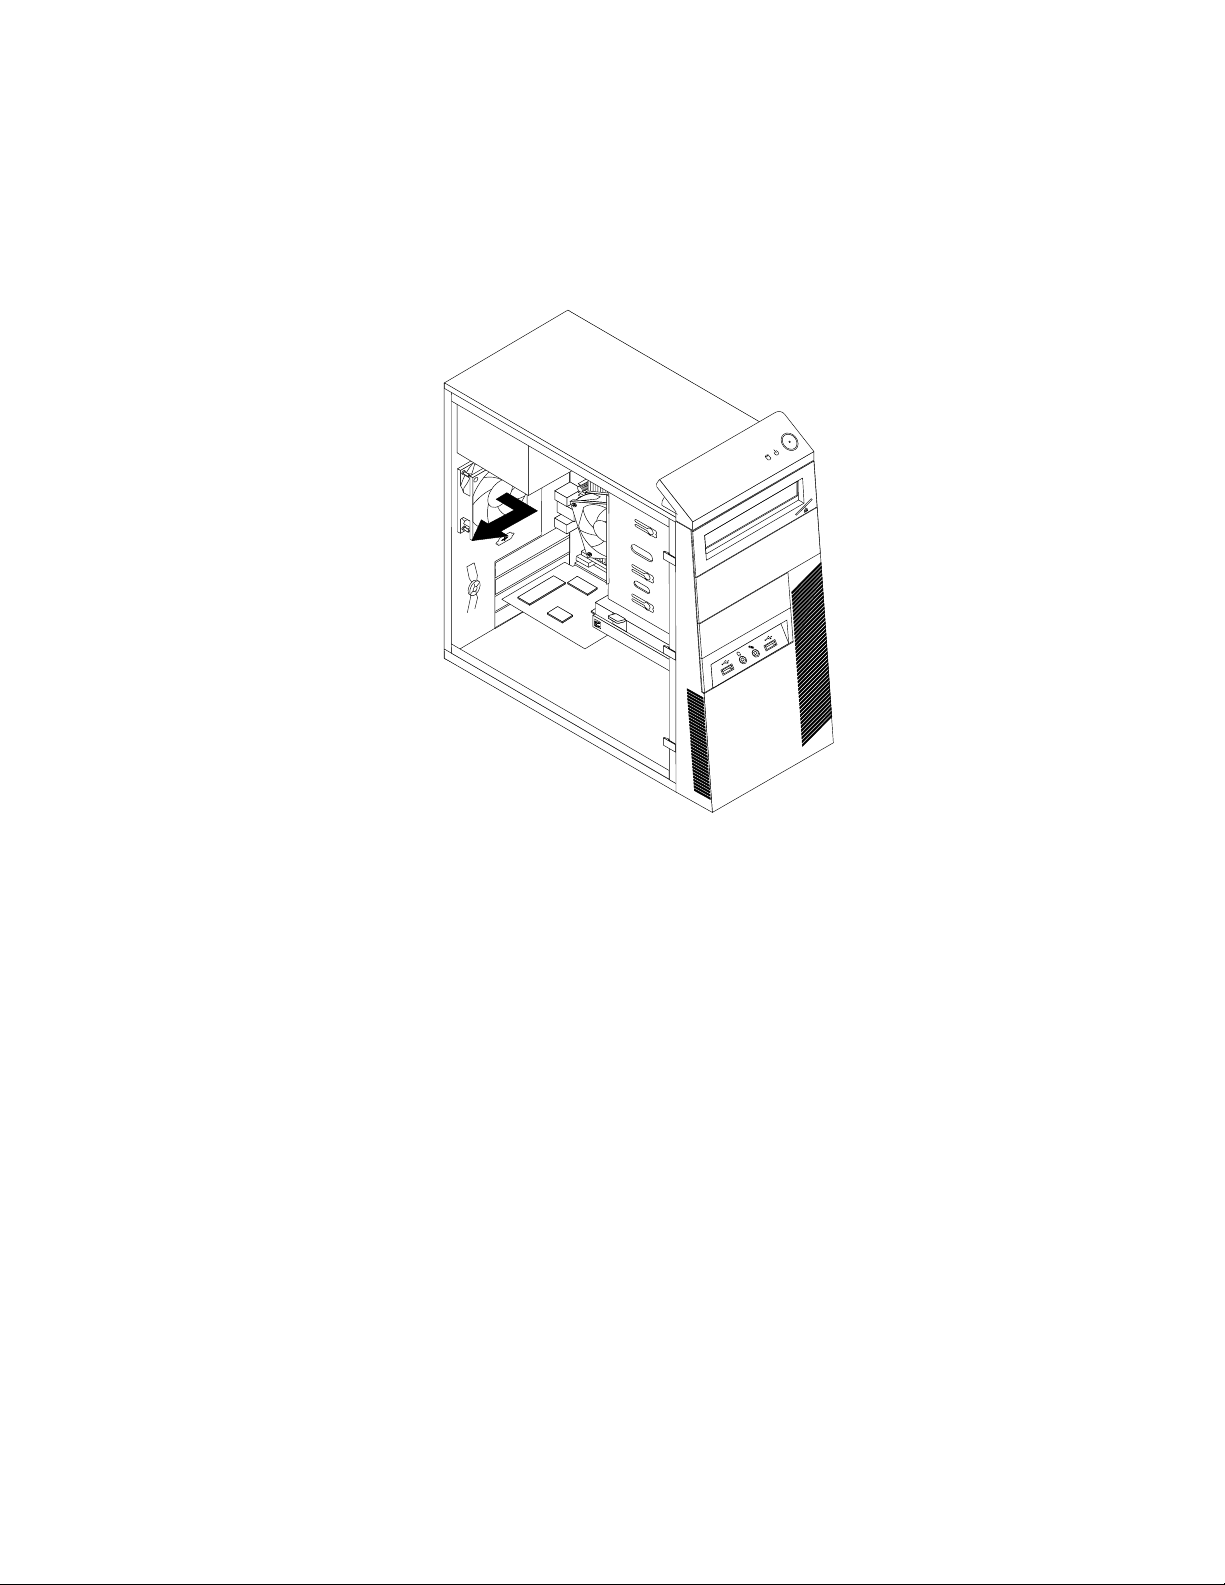
3.Locatetherearfanassembly.See“Locatingcomponents”onpage9.
4.Disconnecttherearfanassemblycablefromthesystemfanconnectoronthesystemboard.See
“Locatingpartsonthesystemboard”onpage10.
5.Therearfanassemblyisattachedtothechassisbyfourrubbermounts.Removetherearfanassembly
bybreakingorcuttingtherubbermountsandgentlypullingtherearfanassemblyoutofthechassis.
Figure30.Removingtherearfanassembly
6.Installthenewrearfanassemblybyaligningthenewrubbermountswiththecorrespondingholesinthe
chassisandpushtherubbermountsthroughtheholes.
Note:Thenewrearfanassemblyyoureceivedwillhavefournewrubbermountsattached.
7.Pullonthetipsoftherubbermountsuntiltherearfanassemblyissecuredinplace.
Chapter2.Installingorreplacinghardware33
Page 42
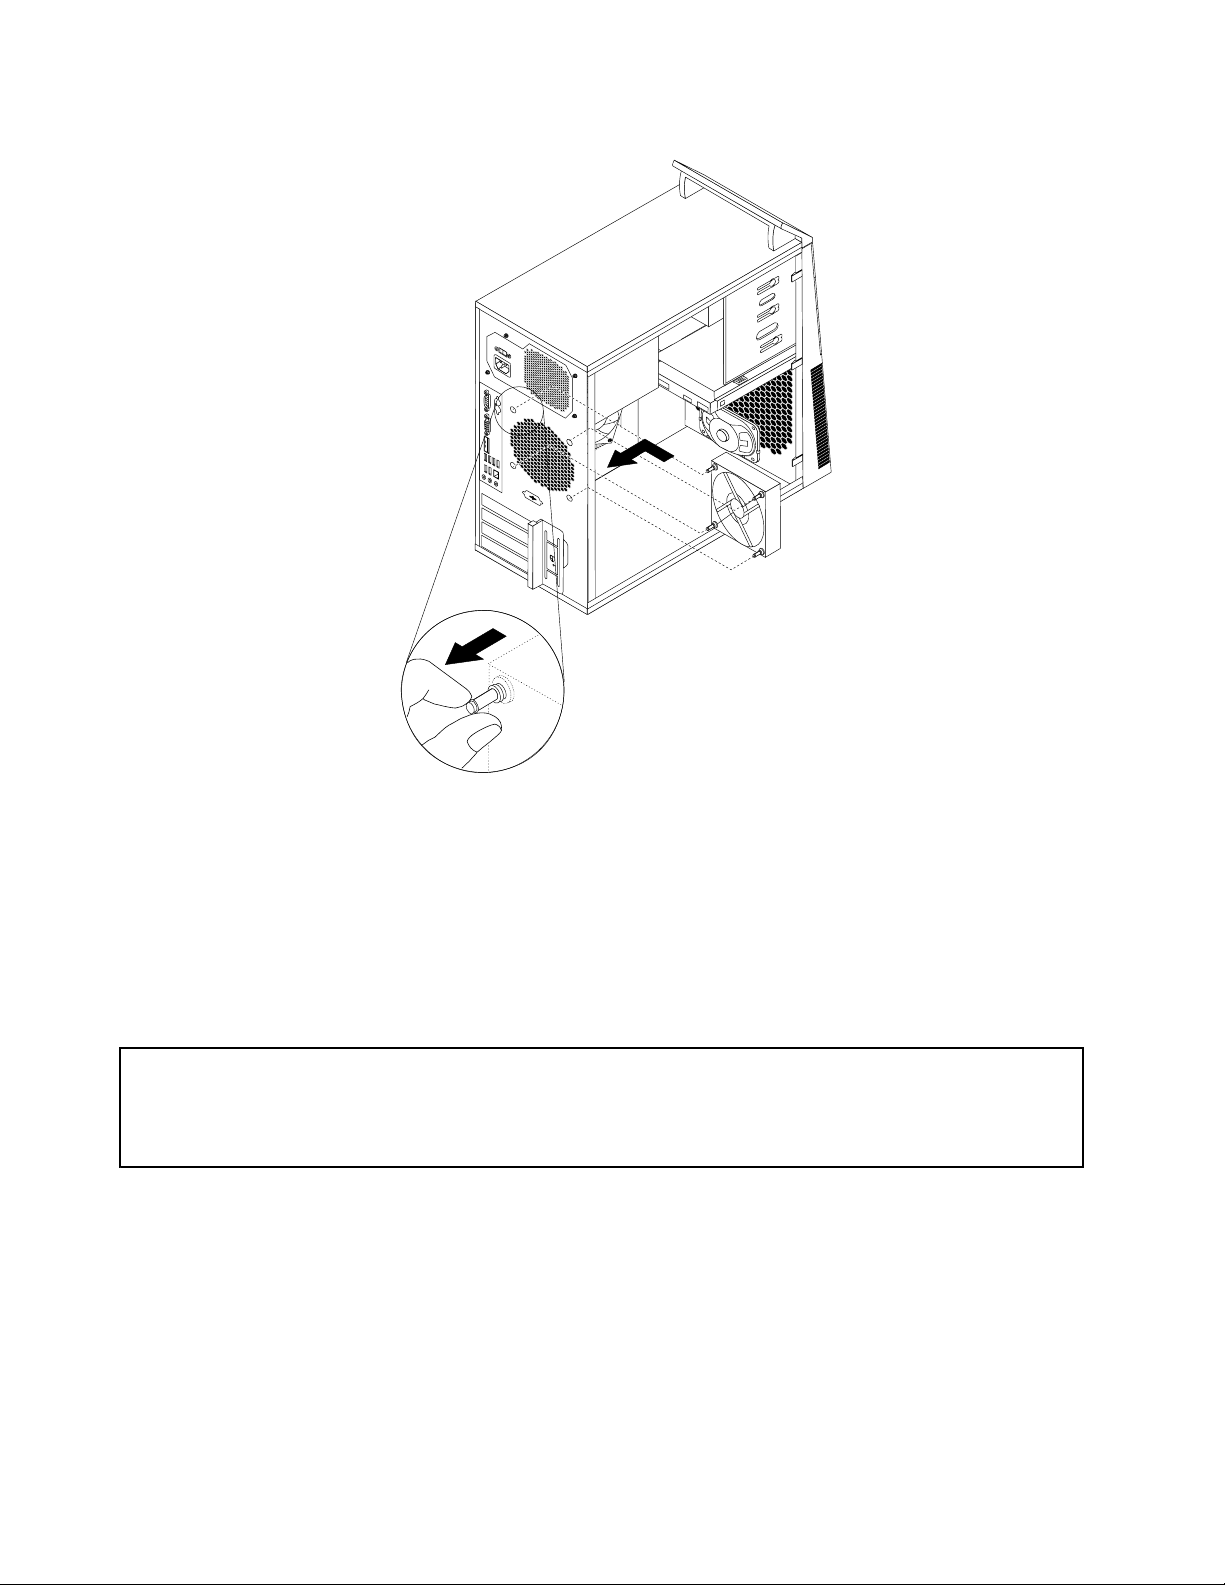
Figure31.Installingtherearfanassembly
8.Connecttherearfanassemblycabletothesystemfanconnectoronthesystemboard.
Whattodonext:
•T oworkwithanotherpieceofhardware,gototheappropriatesection.
•T ocompletetheinstallationorreplacement,goto“Completingthepartsreplacement”onpage38.
ReplacingthefrontaudioandUSBassembly
Attention:
Donotopenyourcomputerorattemptanyrepairbeforereadingandunderstandingthe“Importantsafetyinformation”
intheThinkCentreSafetyandWarrantyGuidethatcamewithyourcomputer.T oobtainacopyoftheThinkCentre
SafetyandWarrantyGuide,goto:
http://www.lenovo.com/support
ThissectionprovidesinstructionsonhowtoreplacethefrontaudioandUSBassembly.
ToreplacethefrontaudioandUSBassembly,dothefollowing:
1.Turnoffthecomputeranddisconnectallpowercordsfromelectricaloutlets.
2.Removethecomputercover.See“Removingthecomputercover”onpage14.
3.Removethefrontbezel.See“Removingandreinstallingthefrontbezel”onpage15.
4.LocatethefrontaudioandUSBassembly.See“Locatingcomponents”onpage9.
5.DisconnectthefrontaudioandUSBassemblycablesfromthesystemboard.See“Locatingpartsonthe
systemboard”onpage10.
34ThinkCentreUserGuide
Page 43
Note:Makesureyounotethelocationsofthecableswhenyoudisconnectthecablesfromthesystem
board.
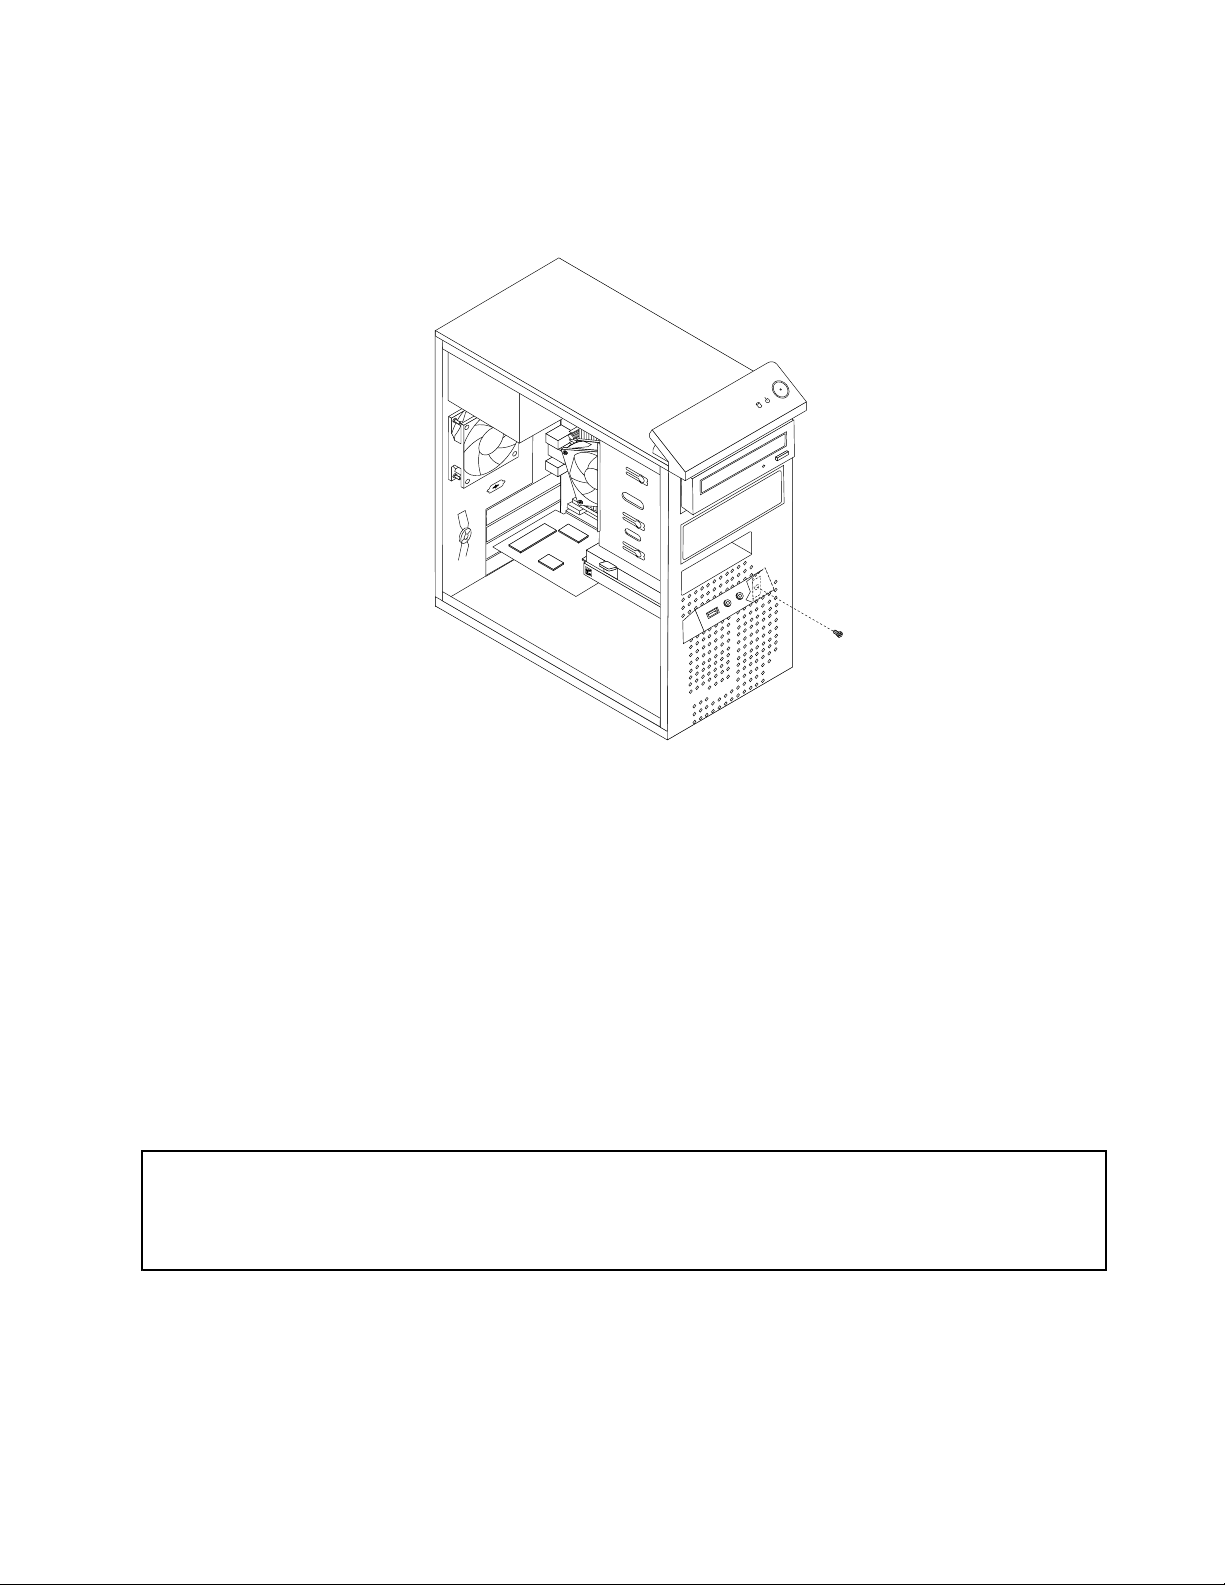
6.RemovethescrewthatsecuresthefrontaudioandUSBassemblytothechassis.
Figure32.RemovingthesecuringscrewofthefrontaudioandUSBassembly
7.RemovethefrontaudioandUSBassemblyfromthechassis.
8.InstallanewfrontaudioandUSBassemblyintothechassisandalignthescrewholeinthefrontaudio
andUSBassemblywiththeholeinthechassis.
9.InstallthescrewtosecurethenewfrontaudioandUSBassemblytothechassis.
10.ReconnectthefrontaudioandUSBassemblycablestothefrontaudioconnectorandthefrontUSB
connectoronthesystemboard.See“Locatingpartsonthesystemboard”onpage10.
Whattodonext:
•T oworkwithanotherpieceofhardware,gototheappropriatesection.
•T ocompletetheinstallationorreplacement,goto“Completingthepartsreplacement”onpage38.
Replacingtheinternalspeaker
Attention:
Donotopenyourcomputerorattemptanyrepairbeforereadingandunderstandingthe“Importantsafetyinformation”
intheThinkCentreSafetyandWarrantyGuidethatcamewithyourcomputer.T oobtainacopyoftheThinkCentre
SafetyandWarrantyGuide,goto:
http://www.lenovo.com/support
Thissectionprovidesinstructionsonhowtoreplacetheinternalspeaker.
Note:Notallcomputershavetheinternalspeaker.
Toreplacetheinternalspeaker,dothefollowing:
1.Turnoffthecomputeranddisconnectallpowercordsfromelectricaloutlets.
Chapter2.Installingorreplacinghardware35
Page 44
2.Removethecomputercover.See“Removingthecomputercover”onpage14.
3.Locatetheinternalspeakerconnectoronthesystemboard.See“Locatingpartsonthesystemboard”
onpage10.
4.Disconnecttheinternalspeakercablefromthesystemboard.
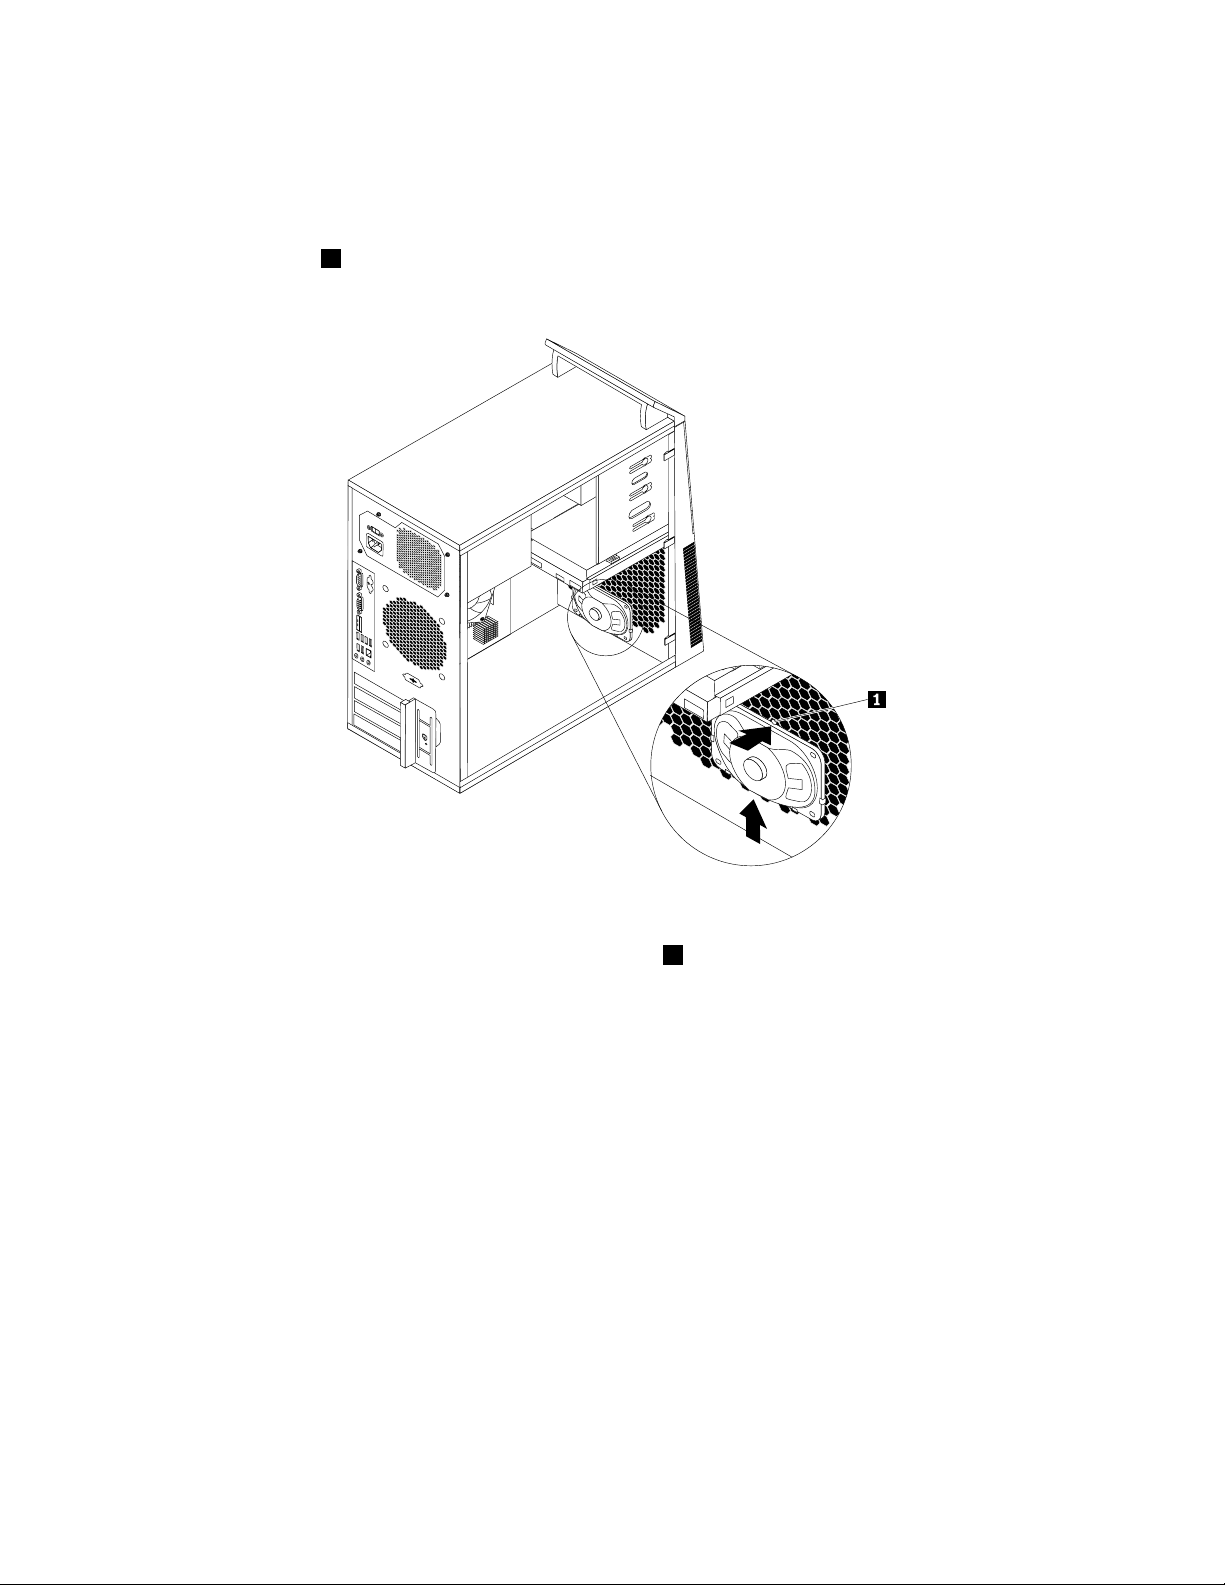
5.Pushthemetaltab1onthetopoftheinternalspeakeroutwardandslidetheinternalspeakerupwardto
completelyremoveitfromthechassis.
Figure33.Removingtheoldinternalspeaker
6.Positionthenewinternalspeakerintothefourmetalclips1andpushdownwardontheinternalspeaker
untilitissecuredinplace.
36ThinkCentreUserGuide
Page 45
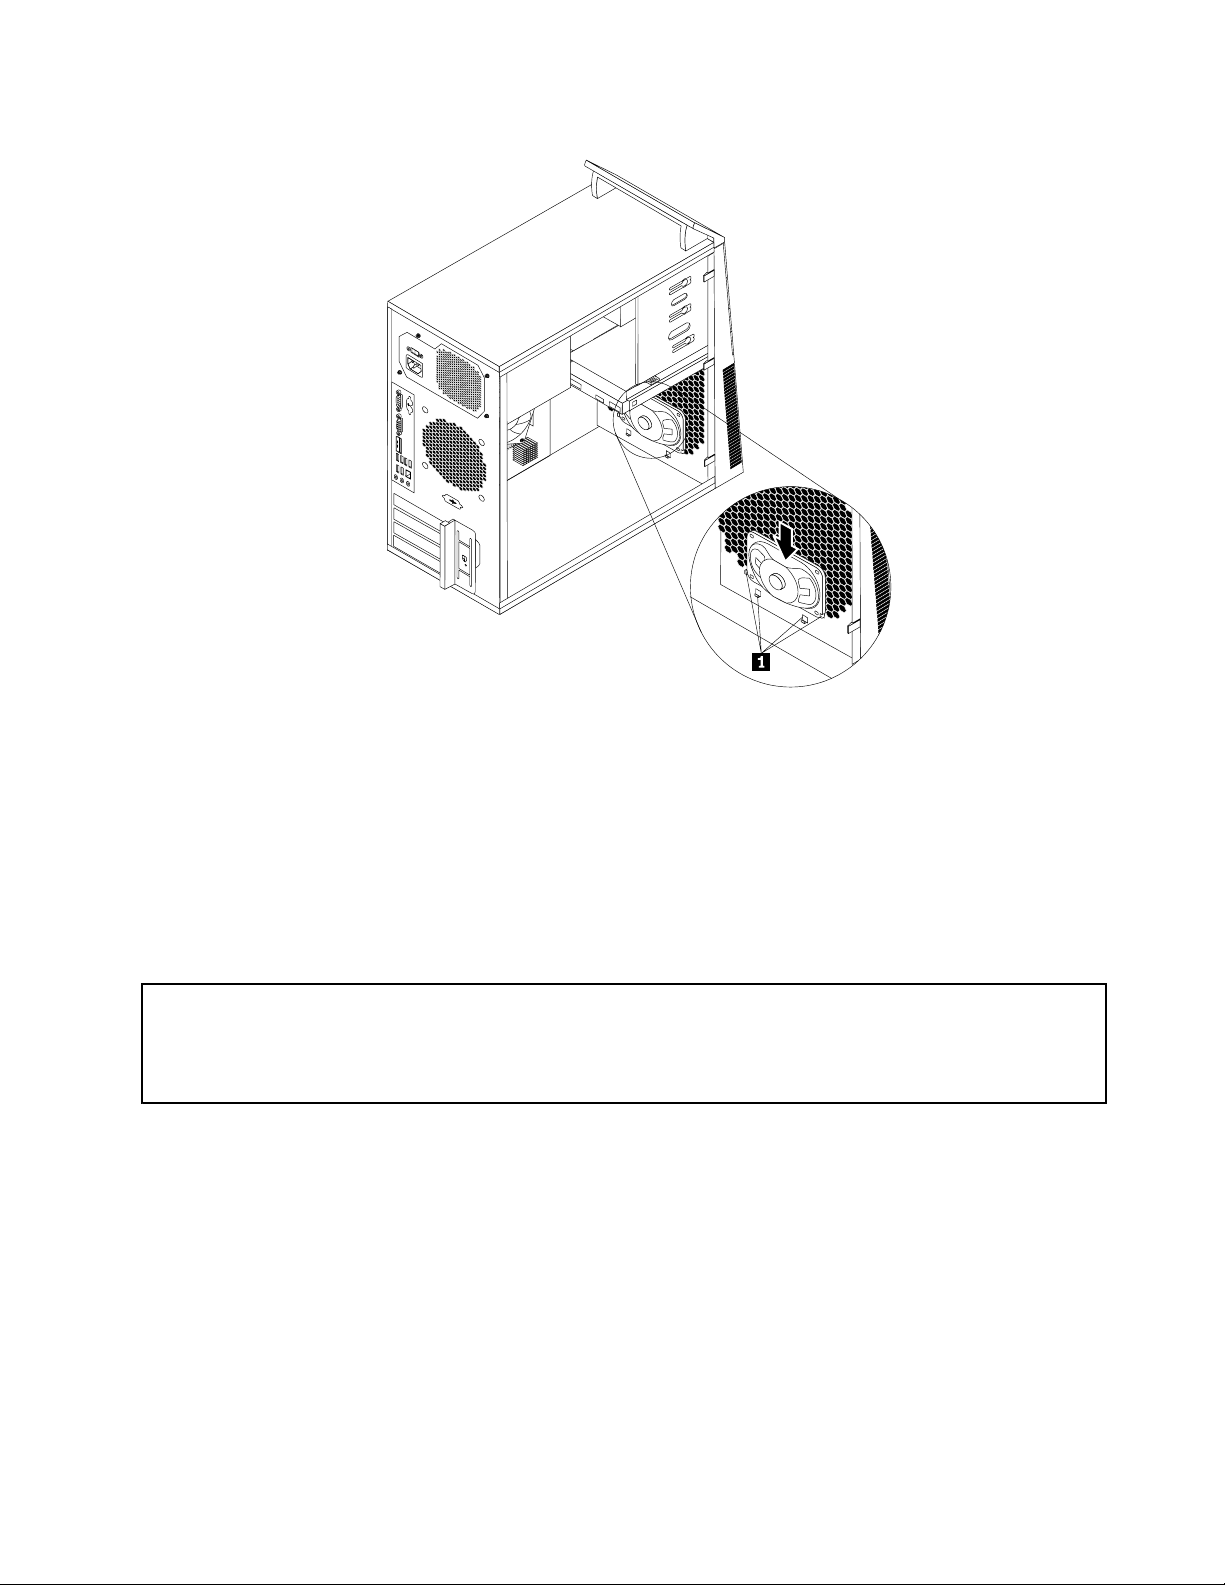
Figure34.Installinganewinternalspeaker
7.Connecttheinternalspeakercabletothesystemboard.See“Locatingpartsonthesystemboard”
onpage10.
Whattodonext:
•T oworkwithanotherpieceofhardware,gototheappropriatesection.
•T ocompletetheinstallationorreplacement,goto“Completingthepartsreplacement”onpage38.
Replacingthekeyboardormouse
Attention:
Donotopenyourcomputerorattemptanyrepairbeforereadingandunderstandingthe“Importantsafetyinformation”
intheThinkCentreSafetyandWarrantyGuidethatcamewithyourcomputer.T oobtainacopyoftheThinkCentre
SafetyandWarrantyGuide,goto:
http://www.lenovo.com/support
Thissectionprovidesinstructionsonhowtoreplacethekeyboardormouse.
Toreplacethekeyboardormouse,dothefollowing:
1.Removeanymediafromthedrives.Then,turnoffallattacheddevicesandthecomputer.
2.Disconnectallpowercordsfromelectricaloutlets.
3.Disconnecttheoldkeyboardcableormousecablefromthecomputer.
4.ConnectanewkeyboardormousetooneoftheUSBconnectorsonthecomputer.Dependingon
whereyouwanttoconnectthenewkeyboardormouse,see“Locatingconnectorsonthefrontofyour
computer”onpage6or“Locatingconnectorsontherearofyourcomputer”onpage7.
Chapter2.Installingorreplacinghardware37
Page 46

Figure35.ConnectingtheUSBkeyboardormouse
Whattodonext:
•T oworkwithanotherpieceofhardware,gototheappropriatesection.
•T ocompletetheinstallationorreplacement,goto“Completingthepartsreplacement”onpage38.
Completingthepartsreplacement
Aftercompletingtheinstallationorreplacementforallparts,youneedtoreinstallthecomputercoverand
reconnectcables.Dependingonthepartsyouinstalledorreplaced,youmightneedtoconrmtheupdated
informationintheSetupUtilityprogram.RefertoChapter4“UsingtheSetupUtilityprogram”onpage49.
Toreinstallthecomputercoverandreconnectcablestoyourcomputer,dothefollowing:
1.Makesurethatallcomponentshavebeenreassembledcorrectlyandthatnotoolsorloosescrewsare
leftinsideyourcomputer.See“Locatingcomponents”onpage9forthelocationsofvariouscomponents
inyourcomputer.
2.Ifyouhaveremovedthefrontbezel,reinstallit.See“Removingandreinstallingthefrontbezel”on
page15.
3.Makesurethatthecablesareroutedcorrectlybeforereinstallingthecomputercover.Keepcablesclear
ofthehingesandsidesofthecomputerchassistoavoidinterferencewithreinstallingthecomputercover.
4.Positionthecomputercoveronthechassissothattherailguidesonthebottomofthecomputer
coverengagetherailsonthechassis.Then,pushthecovertothefrontofthecomputeruntilitsnaps
intoposition.
38ThinkCentreUserGuide
Page 47
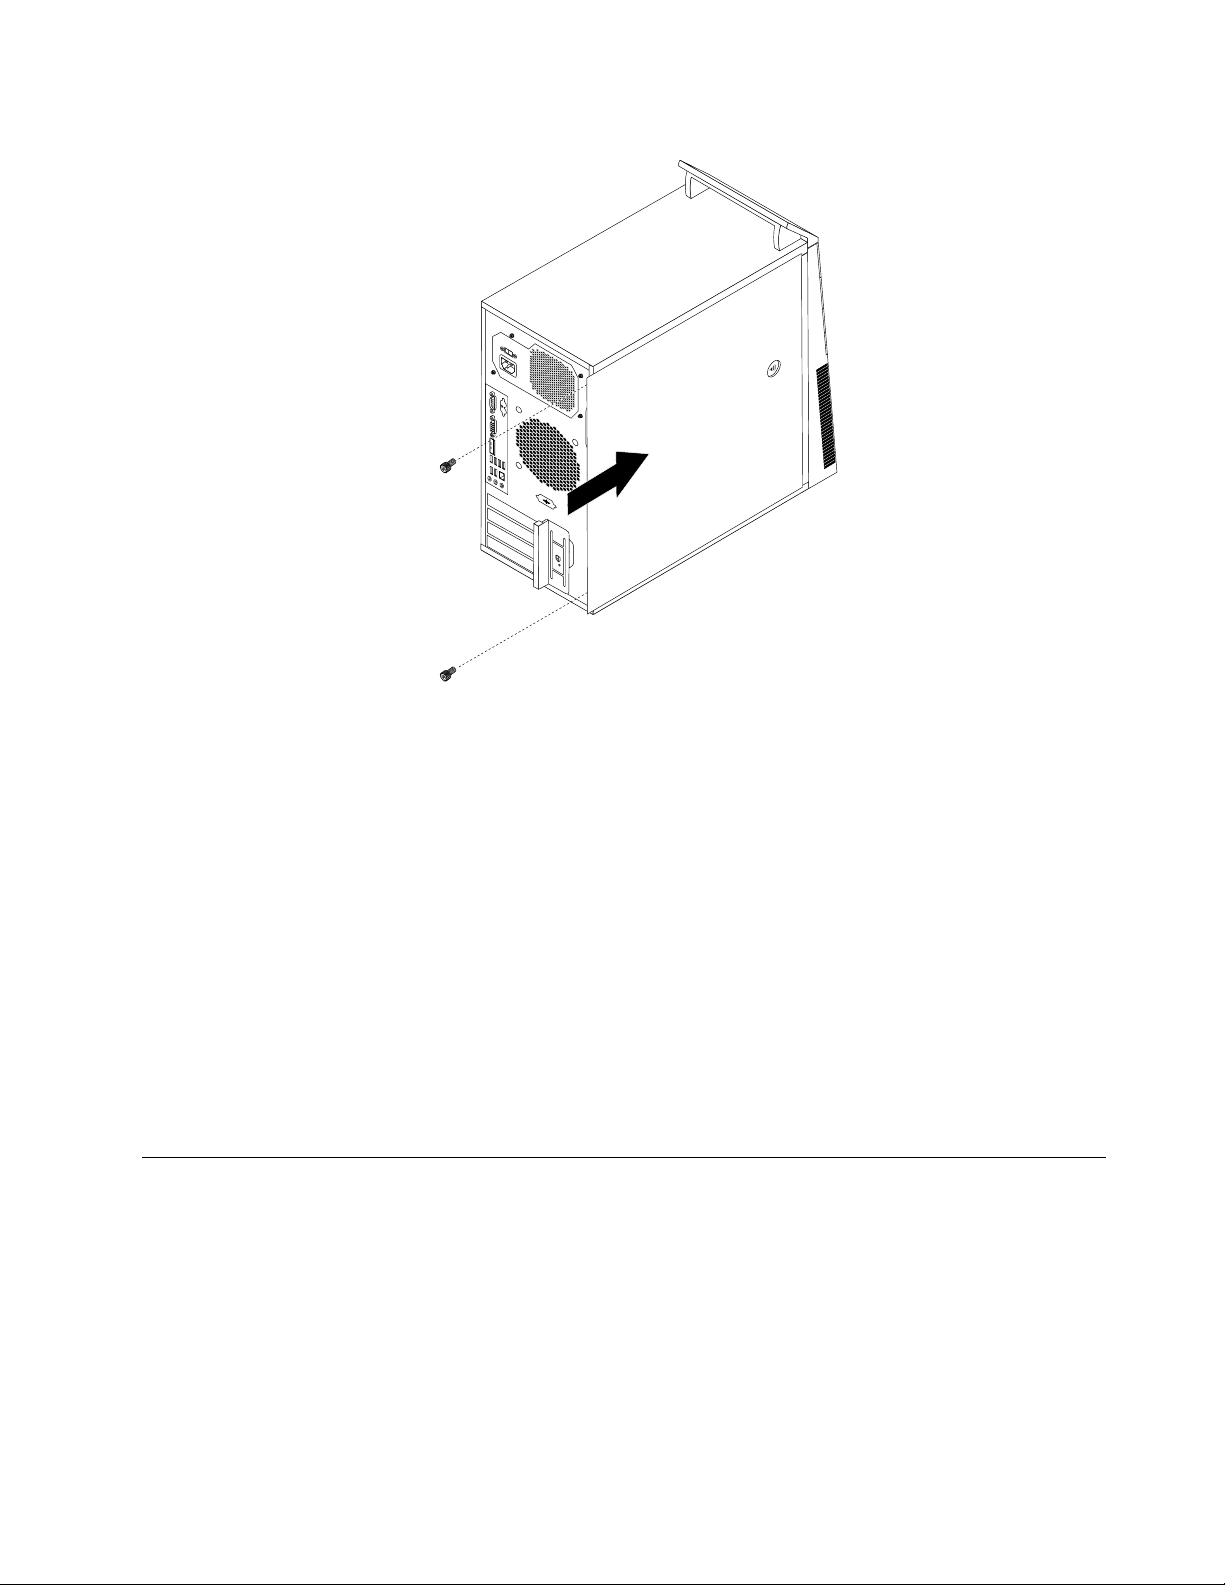
Figure36.Reinstallingthecomputercover
5.Ifthecomputercoverissecuredwiththumbscrews,installthem.
6.Ifthereisapadlockavailable,lockthecomputercover.See“Padlock”onpage40.
7.Ifthereisanintegratedcablelockavailable,lockthecomputer.
8.Reconnecttheexternalcablesandpowercordstothecomputer.See“Locatingconnectorsontherear
ofyourcomputer”onpage7.
9.Toupdateyourconguration,refertoChapter4“UsingtheSetupUtilityprogram”onpage49.
Note:Inmostareasoftheworld,LenovorequiresthereturnofthedefectiveCustomerReplaceableUnit
(CRU).InformationaboutthiswillcomewiththeCRUorwillcomeafewdaysaftertheCRUarrives.
Obtainingdevicedrivers
Youcanobtaindevicedriversforoperatingsystemsthatarenotpreinstalledat
http://www.lenovo.com/support.Installationinstructionsareprovidedinreadmeleswiththedevice-driver
les.
Installingsecurityfeatures
Thereareseveralsecurityoptionsavailabletohelpyoupreventhardwaretheftandunauthorizedaccessto
yourcomputer.Inadditiontophysicallocks,youcanalsopreventunauthorizeduseofyourcomputerbya
softwarelockthatlocksthekeyboarduntilacorrectpasswordistypedin.
Note:Makesurethatanysecuritycablesyouinstalleddonotinterferewithothercomputercables.
Integratedcablelock
Anintegratedcablelock,sometimesreferredtoastheKensingtonlock,canbeusedtosecureyour
computertoadesk,table,orothernon-permanentxture.Thecablelockattachestotheintegratedcable
Chapter2.Installingorreplacinghardware39
Page 48
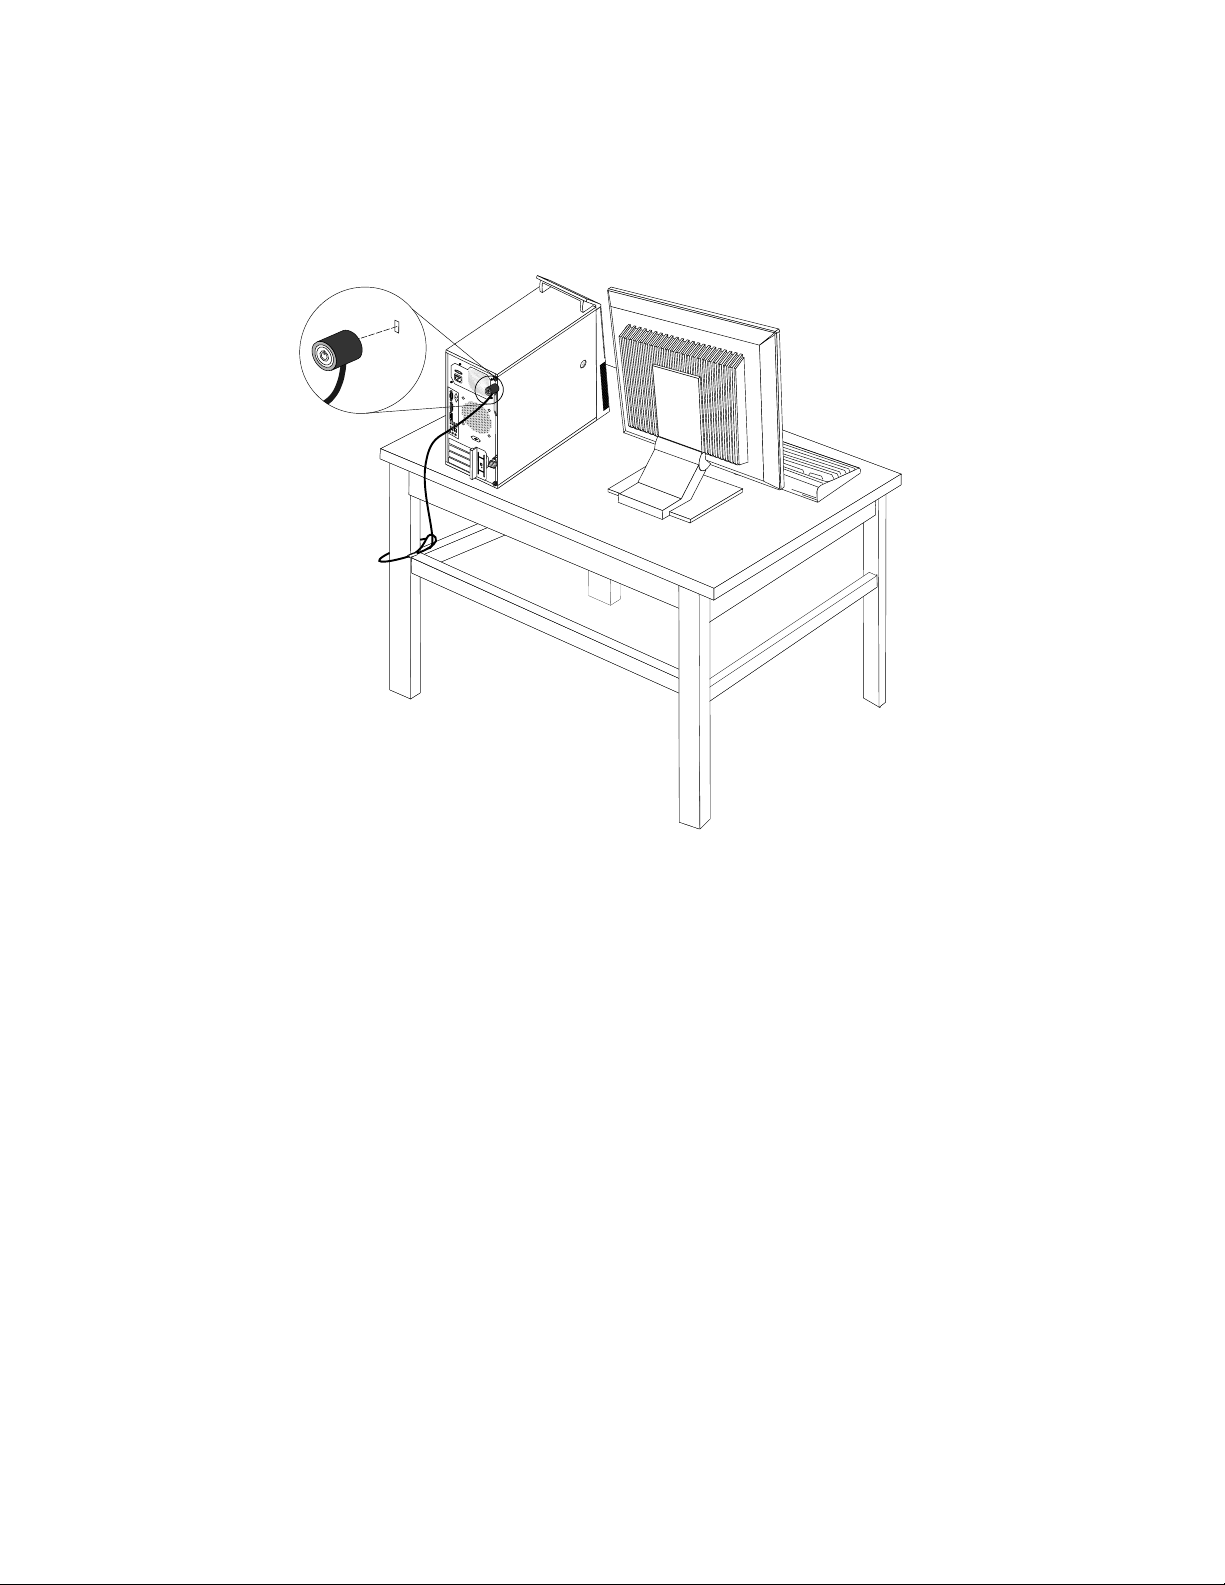
lockslotattherearofyourcomputerandisoperatedwithakey.Thecablelockalsolocksthebuttonsused
toremovethecomputercover.Thisisthesametypeoflockusedwithmanynotebookcomputers.Youcan
orderanintegratedcablelockdirectlyfromLenovobysearchingforKensingtonat:
http://www.lenovo.com/support
Figure37.Integratedcablelock
Padlock
Yourcomputerisequippedwithapadlockloopsothatthecovercannotberemovedwhenapadlock
isinstalled.
40ThinkCentreUserGuide
Page 49
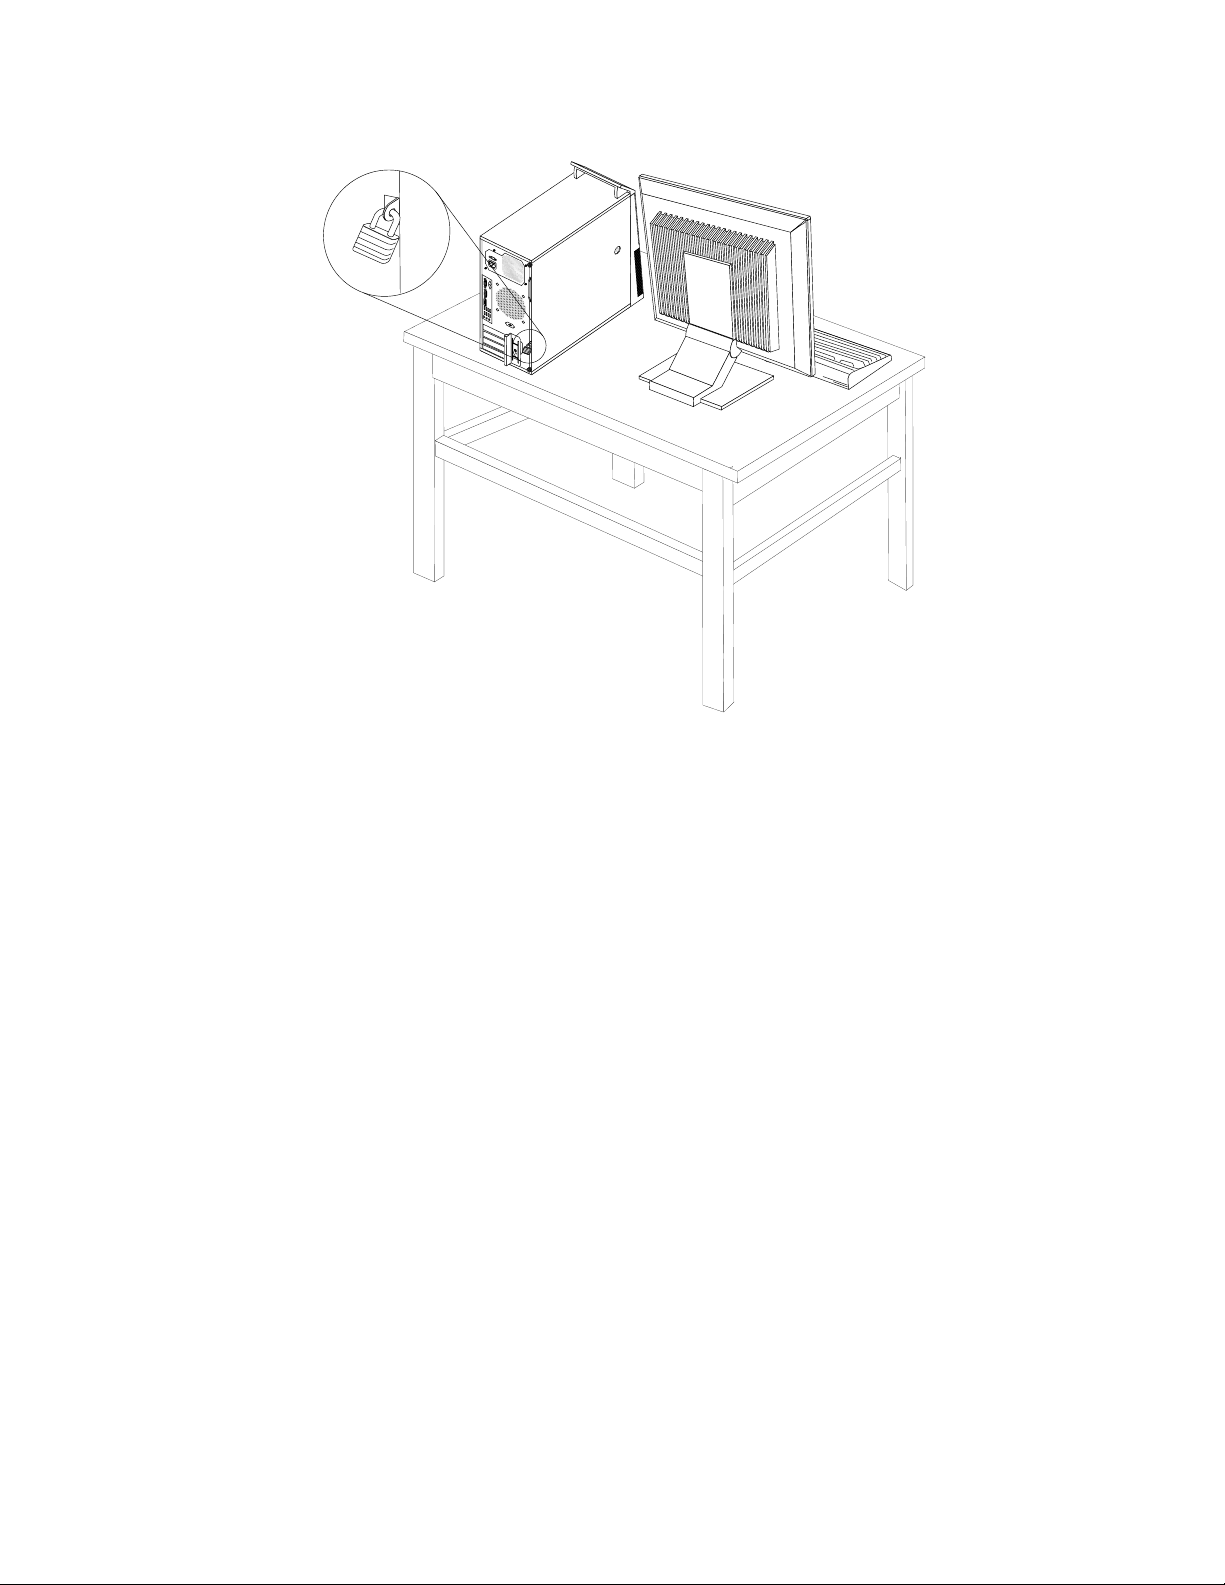
Figure38.Installingapadlock
Passwordprotection
Todeterunauthorizeduseofyourcomputer,youcanusetheSetupUtilityprogramtosetapassword.When
youturnonyourcomputer,youarepromptedtotypethepassword.Thecomputercannotbeuseduntil
avalidpasswordistypedin.RefertoChapter4“UsingtheSetupUtilityprogram”onpage49
information.
formore
Erasinglostorforgottenpasswords(clearingCMOS)
Thissectionprovidesinstructionsonhowtoeraselostorforgottenpasswords,suchasauserpassword.
Toerasealostorforgottenpassword,dothefollowing:
1.Removeallmediafromthedrivesandturnoffallattacheddevicesandthecomputer.Then,disconnect
allpowercordsfromelectricaloutletsanddisconnectallcablesthatareconnectedtothecomputer.
2.Removethecomputercover.See“Removingthecomputercover”onpage14.
3.LocatetheClearCMOS/Recoveryjumperonthesystemboard.See“Locatingpartsonthesystem
board”onpage10
4.Movethejumperfromthestandardposition(pin1andpin2)tothemaintenanceposition(pin2andpin3).
5.Reinstallthecomputercoverandconnectthepowercord.See“Completingthepartsreplacement”
onpage38
6.Turnonthecomputerandleaveitonforapproximately10seconds.Then,turnoffthecomputerby
holdingthepowerswitchforapproximatelyveseconds.
7.Repeatstep1throughstep2.
8.MovetheClearCMOS/Recoveryjumperbacktothestandardposition(pin1andpin2).
.
.
Chapter2.Installingorreplacinghardware41
Page 50

9.Reinstallthecomputercoverandconnectthepowercord.See“Completingthepartsreplacement”
onpage38.
42ThinkCentreUserGuide
Page 51

Chapter3.Recoveryinformation
ThischapterprovidesinformationabouttherecoverysolutionsprovidedbyLenovo.
Thischaptercontainsthefollowingtopics:
•Creatingandusingrecoverymedia
•Performingbackupandrecoveryoperations
•UsingtheRescueandRecoveryworkspace
•Creatingandusingarescuemedium
•Installingorreinstallingdevicedrivers
•Solvingrecoveryproblems
Notes:
1.Therecoveryinformationinthischapteronlyappliestothecomputersthathaveaharddiskdriveand
preinstalledsoftwarefromLenovo.
2.Thereareavarietyofmethodstochoosefromwhenconsideringhowtorecoverintheeventofasoftwareorhardware-relatedproblem.Somemethodsvarydependingonthetypeofyouroperatingsystem.
3.Theproductontherecoverymediamaybeusedonlyforthefollowingpurposes:
•Restoretheproductpreinstalledonyourcomputer
•Reinstalltheproduct
•ModifytheproductusingtheAdditionalFiles
Creatingandusingrecoverymedia
Youcanuserecoverymediatorestoretheharddiskdrivetothefactorydefaultsettings.Recoverymedia
areusefulifyoutransferthecomputertoanotherarea,sellthecomputer,recyclethecomputer,orputthe
computerinanoperationalstateafterallothermethodsofrecoveryhavefailed.Asaprecautionarymeasure,
itisimportanttocreaterecoverymediaasearlyaspossible.
Note:Therecoveryoperationsyoucanperformusingrecoverymediavarydependingontheoperating
systemfromwhichtherecoverymediawerecreated.Therecoverymediamightcontainabootmedium
andadatamedium.YourMicrosoftWindowslicensepermitsyoutocreateonlyonedatamedium,soitis
importantthatyoustoretherecoverymediainasafeplaceafteryouhavemadethem.
Creatingrecoverymedia
Thissectionprovidesinstructionsonhowtocreaterecoverymediaondifferentoperatingsystems.
Note:OntheWindows7operatingsystem,youcancreaterecoverymediausingdiscsorexternalUSB
storagedevices.OntheWindowsVistaoperatingsystems,youcancreaterecoverymediausingonlydiscs,
sothisoperationisalsocalled“creatingProductRecoverydiscs.”
•T ocreaterecoverymediaontheWindows7operatingsystem,clickStart➙AllPrograms➙Lenovo
ThinkVantageT ools➙FactoryRecoveryDisks.Then,followtheinstructionsonthescreen.
•T ocreateProductRecoverydiscsontheWindowsVistaoperatingsystem,clickStart➙AllPrograms➙
ThinkVantage➙CreateProductRecoveryMedia.Then,followtheinstructionsonthescreen.
©CopyrightLenovo2010
43
Page 52

Usingrecoverymedia
Thissectionprovidesinstructionsonhowtouserecoverymediaondifferentoperatingsystems.
OntheWindows7operatingsystemandtheWindowsVistaoperatingsystem,youcanuserecoverymedia
torestorethecomputertothefactorydefaultsettingsonly.Y oucanuserecoverymediatoputthecomputer
inanoperationalstateafterallothermethodsofrecoveryhavefailed.
Attention:Whenyouuserecoverymediatorestorethecomputertothefactorydefaultsettings,alltheles
currentlyontheharddiskdrivewillbedeletedandreplacedbythefactorydefaultsettings.
TouserecoverymediaontheWindows7operatingsystemortheWindowsVistaoperatingsystem,
dothefollowing:
1.Dependingonthetypeofyourrecoverymedia,connectthebootmedium(memorykeyorotherUSB
storagedevice)tothecomputer,orinsertthebootdiscintotheopticaldrive.
2.RepeatedlypressandreleasetheF12keywhenturningonthecomputer.WhenthePleaseselect
bootdevicewindowopens,releasetheF12key.
3.SelectthedesiredstartupdeviceandpressEnter.Therestoreprocessbegins.
4.Followtheinstructionsonthescreentocompletetheoperation.
Notes:
1.Afterrestoringyourcomputertothefactorydefaultsettings,youmighthavetoreinstalldevicedriversfor
somedevices.See“Installingorreinstallingdevicedrivers”onpage47.
2.SomecomputerscomewithMicrosoftOfceorMicrosoftWorkspreinstalled.Ifyouneedtorecover
orreinstallyourMicrosoftOfceorMicrosoftWorksapplications,youmustusetheMicrosoftOfce
CDorMicrosoftWorksCD.ThesediscsareprovidedonlywithcomputerspreinstalledwithMicrosoft
OfceorMicrosoftWorks.
Performingbackupandrecoveryoperations
TheRescueandRecoveryprogramenablesyoutobackupallyourharddiskdrivecontentsincludingthe
operatingsystem,datales,softwareprograms,andpersonalsettings.Y oucandesignatewherethe
RescueandRecoveryprogramstoresthebackup:
•Inaprotectedareaofyourharddiskdrive
•Onthesecondaryharddiskdriveifasecondaryharddiskdriveisinstalledinyourcomputer
•OnanattachedexternalUSBharddiskdrive
•Onanetworkdrive
•Onrecordablediscs(arecordableopticaldriveisrequiredforthisoption)
Afteryouhavebackedupthecontentsontheharddiskdrive,youcanrestorethecompletecontentsofthe
harddiskdrive,restoreonlytheselectedles,orrestoreonlytheWindowsoperatingsystemandapplications.
Performingabackupoperation
ThissectionprovidesinstructionsonhowtoperformabackupoperationusingtheRescueandRecovery
programondifferentoperatingsystems.
•T operformabackupoperationusingtheRescueandRecoveryprogramontheWindows7operating
system,dothefollowing:
1.FromtheWindowsdesktop,clickStart➙AllPrograms➙LenovoThinkVantageTools➙Enhanced
BackupandRestore.TheRescueandRecoveryprogramopens.
44ThinkCentreUserGuide
Page 53

2.IntheRescueandRecoverymainwindow,clicktheLaunchadvancedRescueandRecoveryarrow.
3.ClickBackupyourharddriveandselectbackupoperationoptions.Then,followtheinstructionson
thescreentocompletethebackupoperation.
•T operformabackupoperationusingtheRescueandRecoveryprogramontheWindowsVistaoperating
system,dothefollowing:
1.FromtheWindowsdesktop,clickStart➙AllPrograms➙ThinkVantage➙RescueandRecovery.
TheRescueandRecoveryprogramopens.
2.IntheRescueandRecoverymainwindow,clickLaunchadvancedRescueandRecovery➙Back
upyourharddrive,andselectbackupoperationoptions.
3.Followtheinstructionsonthescreentocompletethebackupoperation.
Performingarecoveryoperation
ThissectionprovidesinstructionsonhowtoperformarecoveryoperationusingtheRescueandRecovery
programondifferentoperatingsystems.
•T operformarecoveryoperationusingtheRescueandRecoveryprogramontheWindows7operating
system,dothefollowing:
1.FromtheWindowsdesktop,clickStart➙AllPrograms➙LenovoThinkVantageTools➙Enhanced
BackupandRestore.TheRescueandRecoveryprogramopens.
2.IntheRescueandRecoverymainwindow,clicktheLaunchadvancedRescueandRecoveryarrow.
3.ClicktheRestoreyoursystemfromabackupicon.
4.Followtheinstructionsonthescreentocompletetherecoveryoperation.
•T operformarecoveryoperationusingtheRescueandRecoveryprogramontheWindowsVistaoperating
system,dothefollowing:
1.FromtheWindowsdesktop,clickStart➙AllPrograms➙ThinkVantage➙RescueandRecovery.
TheRescueandRecoveryprogramopens.
2.IntheRescueandRecoverymainwindow,clickLaunchadvancedRescueandRecovery.
3.ClicktheRestoreyoursystemfromabackupicon.
4.Followtheinstructionsonthescreentocompletetherecoveryoperation.
FormoreinformationaboutperformingarecoveryoperationfromtheRescueandRecoveryworkspace,see
“UsingtheRescueandRecoveryworkspace”onpage45
.
UsingtheRescueandRecoveryworkspace
TheRescueandRecoveryworkspaceresidesinaprotected,hiddenareaofyourharddiskdrivethat
operatesindependentlyfromtheWindowsoperatingsystem.Thisenablesyoutoperformrecovery
operationsevenifyoucannotstarttheWindowsoperatingsystem.Y oucanperformthefollowingrecovery
operationsfromtheRescueandRecoveryworkspace:
•RescuelesfromyourharddiskdriveorfromabackupTheRescueandRecoveryworkspaceenables
youtolocatelesonyourharddiskdriveandtransferthemtoanetworkdriveorotherrecordablemedia,
suchasaUSBdeviceoradisc.Thissolutionisavailableevenifyoudidnotbackupyourlesorif
changesweremadetothelessinceyourlastbackupoperation.Y oucanalsorescueindividuallesfrom
aRescueandRecoverybackuplocatedonyourlocalharddiskdrive,aUSBdevice,oranetworkdrive.
•RestoreyourharddiskdrivefromaRescueandRecoverybackupIfyouhavebackedupyourharddisk
driveusingtheRescueandRecoveryprogram,youcanrestoretheharddiskdrivefromaRescueand
Recoverybackup,evenifyoucannotstarttheWindowsoperatingsystem.
Chapter3.Recoveryinformation45
Page 54

•RestoreyourharddiskdrivetothefactorydefaultsettingsTheRescueandRecoveryworkspaceenables
youtorestorethecompletecontentsofyourharddiskdrivetothefactorydefaultsettings.Ifyouhave
multiplepartitionsonyourharddiskdrive,youhavetheoptiontorestorethefactorydefaultsettingstothe
C:partitionandleavetheotherpartitionsintact.BecausetheRescueandRecoveryworkspaceoperates
independentlyfromtheWindowsoperatingsystem,youcanrestorethefactorydefaultsettingsevenif
youcannotstarttheWindowsoperatingsystem.
Attention:IfyourestoretheharddiskdrivefromaRescueandRecoverybackuporrestoretheharddisk
drivetothefactorydefaultsettings,alllesontheprimaryharddiskdrivepartition(usuallydriveC:)willbe
deletedintherecoveryprocess.Ifpossible,makecopiesofimportantles.Ifyouareunabletostartthe
Windowsoperatingsystem,youcanusetherescuelesfeatureoftheRescueandRecoveryworkspaceto
copylesfromyourharddiskdrivetoothermedia.
TostarttheRescueandRecoveryworkspace,dothefollowing:
1.Makesurethecomputeristurnedoff.
2.RepeatedlypressandreleasetheF11keywhenturningonthecomputer.Whenyouhearbeepsor
seealogoscreen,releasetheF11key.
3.IfyouhavesetaRescueandRecoverypassword,typeyourpasswordwhenprompted.TheRescueand
Recoveryworkspaceopensafterashortdelay.
Note:IftheRescueandRecoveryworkspacefailstoopen,see“Solvingrecoveryproblems”onpage48.
4.Dooneofthefollowing:
•T orescuelesfromyourharddiskdriveorfromabackup,clickRescuelesandfollowthe
instructionsonthescreen.
•T orestoreyourharddiskdrivefromaRescueandRecoverybackuportorestoreyourharddiskdrive
tothefactorydefaultsettings,clickRestoreyoursystemandfollowtheinstructionsonthescreen.
FormoreinformationaboutthefeaturesoftheRescueandRecoveryworkspace,clickHelp.
Notes:
1.Afterrestoringyourharddiskdrivetothefactorydefaultsettings,youmighthavetoreinstalldevice
driversforsomedevices.See“Installingorreinstallingdevicedrivers”onpage47.
2.SomecomputerscomewithMicrosoftOfceorMicrosoftWorkspreinstalled.Ifyouneedtorecover
orreinstallyourMicrosoftOfceorMicrosoftWorksapplications,youmustusetheMicrosoftOfce
CDorMicrosoftWorksCD.ThesediscsareprovidedonlywithcomputerspreinstalledwithMicrosoft
OfceorMicrosoftWorks.
Creatingandusingarescuemedium
Witharescuemedium,suchasadiscoraUSBharddiskdrive,youcanrecoverthecomputerfromfailures
thatpreventyoufromgainingaccesstotheRescueandRecoveryworkspaceonyourharddiskdrive.
Notes:
1.Therecoveryoperationsyoucanperformusingarescuemediumvarydependingontheoperatingsystem.
2.Therescuedisccanbestartedinalltypesofopticaldrives.
3.YoucanalsorunthePC-DoctorforRescueandRecoverydiagnosticprogram,afterusingarescue
mediumtorecoverthecomputerfromfailuresandgainingaccesstotheRescueandRecovery
workspace.
Creatingarescuemedium
Thissectionprovidesinstructionsonhowtocreatearescuemediumondifferentoperatingsystems.
46ThinkCentreUserGuide
Page 55

•T ocreatearescuemediumontheWindows7operatingsystem,dothefollowing:
1.FromtheWindowsdesktop,clickStart➙AllPrograms➙LenovoThinkVantageTools➙Enhanced
BackupandRestore.TheRescueandRecoveryprogramopens.
2.IntheRescueandRecoverymainwindow,clicktheLaunchadvancedRescueandRecoveryarrow.
3.ClicktheCreateRescueMediaicon.TheCreateRescueandRecoveryMediawindowopens.
4.IntheRescueMediaarea,selectthetypeoftherescuemediumyouwanttocreate.Youcancreatea
rescuemediumusingadisc,aUSBharddiskdrive,orasecondaryinternalharddiskdrive.
5.ClickOKandfollowtheinstructionsonthescreentocreatearescuemedium.
•T ocreatearescuemediumontheWindowsVistaoperatingsystem,dothefollowing:
1.FromtheWindowsdesktop,clickStart➙AllPrograms➙ThinkVantage➙CreateRecovery
Media.TheCreateRescueandRecoveryMediawindowopens.
2.IntheRescueMediaarea,selectthetypeoftherescuemediumyouwanttocreate.Youcancreatea
rescuemediumusingadisc,aUSBharddiskdrive,orasecondaryinternalharddiskdrive.
3.ClickOKandfollowtheinstructionsonthescreentocreatearescuemedium.
Usingarescuemedium
Thissectionprovidesinstructionsonhowtousetherescuemediumyouhavecreated.
•Ifyouhavecreatedarescuemediumusingadisc,usethefollowinginstructionstousetherescuemedium:
1.Turnoffyourcomputer.
2.RepeatedlypressandreleasetheF12keywhenturningonthecomputer.WhenthePleaseselect
bootdevicewindowopens,releasetheF12key.
3.InthePleaseselectbootdevicewindow,selectthedesiredopticaldriveastherstbootdevice.Then,
inserttherescuediscintotheopticaldriveandpressEnter.Therescuemediumstarts.
•IfyouhavecreatedarescuemediumusingaUSBharddiskdrive,usethefollowinginstructionsto
usetherescuemedium:
1.AttachtheUSBharddiskdrivetooneoftheUSBconnectorsonyourcomputer.
2.RepeatedlypressandreleasetheF12keywhenturningonthecomputer.WhenthePleaseselect
bootdevicewindowopens,releasetheF12key.
3.InthePleaseselectbootdevicewindow,selecttheUSBharddiskdriveastherstbootdeviceand
pressEnter.Therescuemediumstarts.
Whentherescuemediumstarts,theRescueandRecoveryworkspaceopens.Thehelpinformationfor
eachfeatureisavailablefromtheRescueandRecoveryworkspace.Followtheinstructionstocomplete
therecoveryprocess.
Installingorreinstallingdevicedrivers
Beforeinstallingorreinstallingdevicedrivers,makesurethatyouhaveapreinstalledoperatingsystemand
thedocumentationandsoftwaremediaforthedevice.
Devicedriversforfactory-installeddevicesarelocatedonthecomputerharddiskdrive(usuallydriveC:)
intheSWTOOLS\DRIVERSsubdirectory.Thelatestdevicedriversforfactory-installeddevicesarealso
availableathttp://www.lenovo.com/support.Otherdevicedriversareonthesoftwaremediathatcome
withindividualdevices.
Toinstallorreinstallthedevicedriverforafactory-installeddevice,dothefollowing:
1.Turnonthecomputer.
Chapter3.Recoveryinformation47
Page 56

2.UseWindowsExplorerorMyComputertodisplaythedirectorystructureofyourharddiskdrive.
3.GototheC:\SWTOOLSdirectory.
4.OpentheDRIVERSfolder.WithintheDRIVERSfolder,thereareseveralsubfoldersnamedforvarious
devicesinstalledinyourcomputer,suchasAUDIOorVIDEO.
5.Opentheappropriatedevicesubfolder.
6.Dooneofthefollowing:
•Inthedevicesubfolder,lookforaSETUP.exele.Double-clicktheleandfollowtheinstructionson
thescreentocompletetheinstallation.
•Inthedevicesubfolder,lookforaREADME.txtleoralewiththe.txtextension.Thislemightbe
namedaftertheoperatingsystem,suchasWIN98.txt.TheTXTlecontainsinformationabouthowto
installthedevicedriver.Followtheinstructionstocompletetheinstallation.
•Ifthedevicesubfoldercontainsalewiththe.infextensionandyouwanttoinstallthedevicedriver
usingtheINFle,refertoyourWindowsHelpandSupportinformationsystemfordetailedinformation
abouthowtoinstallthedevicedriver.
Solvingrecoveryproblems
IfyouareunabletoaccesstheRescueandRecoveryworkspaceortheWindowsenvironment,doone
ofthefollowing:
•UsearescuemediumtostarttheRescueandRecoveryworkspace.See“Creatingandusingarescue
medium”onpage46
•Userecoverymediaifallothermethodsofrecoveryhavefailedandyouneedtorestoretheharddisk
drivetothefactorydefaultsettings.See“Creatingandusingrecoverymedia”onpage43
.
.
Note:IfyouareunabletoaccesstheRescueandRecoveryworkspaceortheWindowsenvironmentfroma
rescuemedium,arecoveryrepairdiskette,orrecoverymedia,youmightnothavetherescuedevice(an
internalharddiskdrive,adisc,aUSBharddiskdrive,orotherexternaldevices)setastherstbootdevicein
thestartupdevicesequence.Youmustrstmakesurethatyourrescuedeviceissetastherstbootdevice
inthestartupdevicesequenceintheSetupUtilityprogram.See“Selectingastartupdevice”onpage51
detailedinformationabouttemporarilyorpermanentlychangingthestartupdevicesequence.Formore
informationabouttheSetupUtilityprogram,seeChapter4“UsingtheSetupUtilityprogram”onpage49.
Itisimportanttocreatearescuemedium,arecoveryrepairdiskette,andasetofrecoverymediaasearlyas
possibleandstoretheminasafeplaceforfutureuse.
for
48ThinkCentreUserGuide
Page 57

Chapter4.UsingtheSetupUtilityprogram
TheSetupUtilityprogramisusedtoviewandchangethecongurationsettingsofyourcomputer,regardless
ofwhichoperatingsystemyouareusing.However,theoperatingsystemsettingsmightoverrideanysimilar
settingsintheSetupUtilityprogram.
StartingtheSetupUtilityprogram
TostarttheSetupUtilityprogram,dothefollowing:
1.Makesureyourcomputeristurnedoff.
2.RepeatedlypressandreleasetheF1keywhenturningonthecomputer.Whenyouhearmultiplebeeps
orseealogoscreen,releasetheF1key.
Note:IfaPower-OnPasswordoranAdministratorPasswordhasbeenset,theSetupUtilityprogram
menuwillnotbedisplayeduntilyoutypethecorrectpassword.Formoreinformation,see“Using
passwords”onpage49
TheSetupUtilityprogrammightstartautomaticallywhenPOSTdetectsthathardwarehasbeenremovedor
newhardwarehasbeeninstalledinyourcomputer.
Viewingandchangingsettings
TheSetupUtilityprogrammenulistsvariousitemsaboutthesystemconguration.T ovieworchange
settings,starttheSetupUtilityprogram.See“StartingtheSetupUtilityprogram”onpage49.Then,follow
theinstructionsonthescreen.
.
WhenworkingwiththeSetupUtilityprogrammenu,youmustusethekeyboard.Thekeysusedtoperform
varioustasksaredisplayedatthebottomofeachscreen.
Usingpasswords
ByusingtheSetupUtilityprogram,youcansetpasswordstopreventunauthorizedaccesstoyourcomputer
anddata.Thefollowingtypesofpasswordsareavailable:
•Power-OnPassword
•AdministratorPassword
•HardDiskPassword
Youdonothavetosetanypasswordstouseyourcomputer.However,usingpasswordsimproves
computingsecurity.Ifyoudecidetosetanypasswords,readthefollowingsections.
Passwordconsiderations
Apasswordcanbeanycombinationofupto64alphabeticandnumericcharacters.Forsecurityreasons,it
isrecommendedtouseastrongpasswordthatcannotbeeasilycompromised.T osetastrongpassword,
usethefollowingguidelines:
•Haveatleasteightcharactersinlength
•Containatleastonealphabeticcharacterandonenumericcharacter
•SetupUtilityprogramandharddiskdrivepasswordsarenotcasesensitive
©CopyrightLenovo2010
49
Page 58

•Notbeyournameoryourusername
•Notbeacommonwordoracommonname
•Besignicantlydifferentfromyourpreviouspasswords
Power-OnPassword
WhenaPower-OnPasswordisset,youarepromptedtotypeavalidpasswordeachtimethecomputeris
turnedon.Thecomputercannotbeuseduntilthevalidpasswordistypedin.
AdministratorPassword
SettinganAdministratorPassworddetersunauthorizedusersfromchangingcongurationsettings.Ifyou
areresponsibleformaintainingthecongurationsettingsofseveralcomputers,youmightwanttosetan
AdministratorPassword.
WhenanAdministratorPasswordisset,youarepromptedtotypeavalidpasswordeachtimeyoutryto
accesstheSetupUtilityprogram.TheSetupUtilityprogramcannotbeaccesseduntilavalidpassword
istypedin.
IfboththePower-OnPasswordandAdministratorPasswordareset,youcantypeeitherpassword.However,
youmustuseyourAdministratorPasswordtochangeanycongurationsettings.
HardDiskPassword
SettingaHardDiskPasswordpreventsunauthorizedaccesstothedataontheharddiskdrive.Whena
HardDiskPasswordisset,youarepromptedtotypeavalidpasswordeachtimeyoutrytoaccessthe
harddiskdrive.
Setting,changing,anddeletingapassword
Toset,change,ordeleteapassword,dothefollowing:
1.StarttheSetupUtilityprogram.See“StartingtheSetupUtilityprogram”onpage49.
2.FromtheSetupUtilityprogrammainmenu,selectSecurity.
3.Dependingonthepasswordtype,selectSetPower-OnPassword,SetAdministratorPassword,or
HardDiskPassword.
4.Followtheinstructionsontherightsideofthescreentoset,change,ordeleteapassword.
Note:Apasswordcanbeanycombinationofupto64alphabeticandnumericcharacters.Formore
information,see“Passwordconsiderations”onpage49.
Enablingordisablingadevice
Thissectionprovidesinformationonhowtoenableordisableuseraccesstothefollowingdevices:
USBSetupUsethisoptiontoenableordisableaUSBconnector.WhenaUSBconnectoris
disabled,thedeviceconnectedtotheUSBconnectorcannotbeused.
SATAControllerWhenthisfeatureissettoDisable,alldevicesconnectedtotheSAT Aconnectors
(suchasharddiskdrivesortheopticaldrive)aredisabledandcannotbeaccessed.
ExternalSATAPortWhenthisoptionissettoDisable,thedeviceconnectedtotheExternalSATA
connectorcannotbeaccessed.
Toenableordisableadevice,dothefollowing:
1.StarttheSetupUtilityprogram.See“StartingtheSetupUtilityprogram”onpage49.
50ThinkCentreUserGuide
Page 59

2.FromtheSetupUtilityprogrammainmenu,selectDevices.
3.Dependingonthedeviceyouwanttoenableordisable,dooneofthefollowing:
•SelectUSBSetuptoenableordisableaUSBdevice.
•SelectATADriveSetuptoenableordisableaninternalorexternalSATAdevice.
4.SelectthedesiredsettingsandpressEnter.
5.PressF10tosaveandexittheSetupUtilityprogram.See“ExitingfromtheSetupUtilityprogram”
onpage51.
Selectingastartupdevice
Ifyourcomputerdoesnotstartupfromadevicesuchasthedisc,diskette,orharddiskdriveasexpected,
dooneofthefollowingtoselectthestartupdeviceyouwant.
Selectingatemporarystartupdevice
Usethisproceduretoselectatemporarystartupdevice.
Note:Notalldiscs,harddiskdrives,anddiskettesarebootable.
1.Turnoffyourcomputer.
2.RepeatedlypressandreleasetheF12keywhenturningonthecomputer.WhenthePleaseselect
bootdevicewindowdisplays,releasetheF12key.
3.SelectthedesiredstartupdeviceandpressEnter.Thecomputerwillstartupfromthedeviceyou
selected.
Note:SelectingastartupdevicefromthePleaseselectbootdevicewindowdoesnotpermanentlychange
thestartupsequence.
Selectingorchangingthestartupdevicesequence
Tovieworpermanentlychangetheconguredstartupdevicesequence,dothefollowing:
1.StarttheSetupUtilityprogram.See“StartingtheSetupUtilityprogram”onpage49.
2.FromtheSetupUtilityprogrammainmenu,selectStartup.
3.SelectthedevicesforthePrimaryStartupSequence,theAutomaticStartupSequence,andtheError
StartupSequence.Readtheinformationdisplayedontherightsideofthescreen.
4.PressF10tosaveandexittheSetupUtilityprogram.See“ExitingfromtheSetupUtilityprogram”
onpage51
.
ExitingfromtheSetupUtilityprogram
Afteryounishviewingorchangingsettings,pressEsctoreturntotheSetupUtilityprogrammainmenu.
YoumighthavetopressEscseveraltimes.Dooneofthefollowing:
•Ifyouwanttosavethenewsettings,pressF10tosaveandexittheSetupUtilityprogram.
•Ifyoudonotwanttosavethesettings,selectExit➙DiscardChangesandExit.
•Ifyouwanttoreturntothedefaultsettings,pressF9toloadthedefaultsettings.
Chapter4.UsingtheSetupUtilityprogram51
Page 60

52ThinkCentreUserGuide
Page 61

Chapter5.Updatingsystemprograms
ThischapterprovidesinformationaboutupdatingthePOSTandBIOS,andhowtorecoverfromaPOST
andBIOSupdatefailure.
Usingsystemprograms
Systemprogramsarethebasiclayerofsoftwarebuiltintoyourcomputer.Systemprogramsincludethe
POST,theBIOS,andtheSetupUtilityprogram.ThePOSTisasetoftestsandproceduresthatare
performedeachtimeyouturnonyourcomputer.TheBIOSisalayerofsoftwarethattranslatesinstructions
fromotherlayersofsoftwareintoelectricalsignalsthatthecomputerhardwarecanexecute.Youcanuse
theSetupUtilityprogramtovieworchangethecongurationsettingsofyourcomputer.SeeChapter4
“UsingtheSetupUtilityprogram”onpage49
Yourcomputersystemboardhasamodulecalledelectricallyerasableprogrammableread-onlymemory
(EEPROM,alsoreferredtoasashmemory).Y oucaneasilyupdatethePOST ,theBIOS,andtheSetup
Utilityprogrambystartingyourcomputerwithasystem-program-updatediscorrunningaspecialupdate
programfromyouroperatingsystem.
LenovomightmakechangesandenhancementstothePOSTandBIOS.Whenupdatesarereleased,they
areavailableasdownloadablelesontheLenovoWebsiteathttp://www.lenovo.com.Instructionsforusing
thePOSTandBIOSupdatesareavailableinaTXTlethatisincludedwiththeupdateles.Formost
models,youcandownloadeitheranupdateprogramtocreateasystem-program-updatediscoranupdate
programthatcanberunfromtheoperatingsystem.
fordetailedinformation.
Updating(ashing)theBIOSfromadisc
Thissectionprovidesinstructionsonhowtoupdate(ash)theBIOSfromadisc.
Note:Y oucandownloadaself-startingbootablediscimage(knownasanISOimage)withthesystem
programupdatestocreateasystem-program-updatedisc.Goto:
http://www.lenovo.com/support
Toupdate(ash)theBIOSfromadisc,dothefollowing:
1.Turnoffyourcomputer.
2.RepeatedlypressandreleasetheF12keywhenturningonthecomputer.WhentheStartupDevice
Menuopens,releasetheF12key.
3.OntheStartupDeviceMenu,selectthedesiredopticaldriveasthestartupdevice.Then,insertthedisc
intothisopticaldriveandpressEnter.Theupdatebegins.
4.Whenpromptedtochangetheserialnumber,itissuggestedthatyoudonotmakethischangeby
pressingN.However,ifyoudowanttochangetheserialnumber,pressY,thentypeintheserialnumber
andpressEnter.
5.Whenpromptedtochangethemachinetypeandmodel,itissuggestedthatyoudonotmakethis
changebypressingN.However,ifyoudowanttochangethemachinetypeandmodel,pressY,then
typeinthemachinetypeandmodelandpressEnter.
6.Followtheinstructionsonthescreentocompletetheupdate.Aftertheupdateiscompleted,remove
thediscfromtheopticaldrive.
©CopyrightLenovo2010
53
Page 62

Updating(ashing)theBIOSfromyouroperatingsystem
Note:BecauseLenovomakesconstantimprovementstoitsWebsites,theWebpagecontentsaresubject
tochangewithoutnotice,includingthecontentsreferencedinthefollowingprocedure.
Toupdate(ash)theBIOSfromyouroperatingsystem,dothefollowing:
1.Gotohttp://www.lenovo.com/support.
2.Dothefollowingtolocatethedownloadablelesforyourmachinetype:
a.IntheEnteraproductnumbereld,typeyourmachinetypeandclickGo.
b.ClickDownloadsanddrivers.
c.SelectBIOSfromtheReneresultsdrop-downlistboxtoeasilylocatealltheBIOSrelatedlinks.
d.ClicktheBIOSupdatelink.
3.ClicktheTXTlethatcontainstheinstructionsforupdating(ashing)theBIOSfromyouroperating
system.
4.Printtheseinstructions.Thisisveryimportantbecausetheseinstructionswillnotbedisplayedon
thescreenafterthedownloadbegins.
5.Followtheprintedinstructionstodownload,extract,andinstalltheupdate.
RecoveringfromaPOST/BIOSupdatefailure
IfthepowertoyourcomputerisinterruptedwhilethePOSTandBIOSisbeingupdated,yourcomputer
mightnotrestartcorrectly.Ifthishappens,performthefollowingproceduretorecoverfromthePOSTand
BIOSupdatefailure.ThisprocedureiscommonlycalledBoot-blockRecovery.
1.Removeallmediafromthedrivesandturnoffallattacheddevicesandthecomputer.Then,disconnect
allpowercordsfromelectricaloutletsanddisconnectallcablesthatareconnectedtothecomputer.
2.Removethecomputercover.See“Removingthecomputercover”onpage14.
3.LocatetheClearCMOS/Recoveryjumperonthesystemboard.See“Locatingpartsonthesystem
board”onpage10.
4.RemoveanycablesthatimpedeaccesstotheClearCMOS/Recoveryjumper.
5.Movethejumperfromthestandardposition(pin1andpin2)tothemaintenanceposition(pin2andpin3).
6.ReconnectanycablesthatweredisconnectedandreinstallthePCIcardifremoved.
7.Reinstallthecomputercoverandreconnectthepowercordsforthecomputerandmonitortoelectrical
outlets.See“Completingthepartsreplacement”onpage38.
8.TurnonthecomputerandtheninsertthePOSTandBIOSupdate(ashupdate)discintotheoptical
drive.Therecoverysessionbegins.Therecoverysessionwilltaketwotothreeminutes.Duringthis
time,youwillhearaseriesofbeeps.
9.Aftertherecoverysessioniscompleted,theseriesofbeepswillend,andthesystemwillautomatically
turnoff.Removethediscfromtheopticaldrivebeforethesystemcompletelyturnsoff.
10.Repeatstep1throughstep4.
11.MovetheClearCMOS/Recoveryjumperbacktothestandardposition(pin1andpin2).
12.ReconnectanycablesthatweredisconnectedandreinstallthePCIcardifremoved.
13.Reinstallthecomputercoverandreconnectanycablesthatweredisconnected.
14.Turnonthecomputertorestarttheoperatingsystem.
54ThinkCentreUserGuide
Page 63

Chapter6.Troubleshootinganddiagnostics
Thischapterdescribessomebasictroubleshootinganddiagnosticprograms.Ifyourcomputerproblem
isnotdescribedhere,seeChapter7“Gettinginformation,help,andservice”onpage59
troubleshootingresources.
Basictroubleshooting
Thefollowingtableprovidesinformationtohelpyoutroubleshootyourcomputerproblems.
Note:Ifyoucannotcorrecttheproblem,havethecomputerserviced.Foralistofserviceandsupport
telephonenumbers,refertotheThinkCentreSafetyandWarrantyGuidethatcomeswithyourcomputeror
gototheLenovoSupportWebsiteathttp://www.lenovo.com/support/phone.
SymptomAction
Thecomputerdoesnotstart
whenyoupressthepower
switch.
Themonitorscreenisblank.
Thekeyboarddoesnotwork.
Themousedoesnotwork.
Verifythat:
•Thepowercordiscorrectlyconnectedtotherearofthecomputerandtoa
workingelectricaloutlet.
•Ifyourcomputerhasasecondarypowerswitchontherearofthecomputer,
makesurethatitisswitchedon.
•Thepowerindicatoronthefrontofthecomputerison.
•Thecomputervoltagematchesthevoltageavailableattheelectricaloutletfor
yourcountryorregion.
Verifythat:
•Themonitorsignalcableiscorrectlyconnectedtothemonitorandtothe
appropriatemonitorconnectoronthecomputer.
•Themonitorpowercordiscorrectlyconnectedtothemonitorandtoaworking
electricaloutlet.
•Themonitoristurnedonandthebrightnessandcontrastcontrolsareset
correctly.
•Thecomputervoltagematchesthevoltageavailableattheelectricaloutletfor
yourcountryorregion.
•Ifyourcomputerhastwomonitorconnectors,besuretousetheconnector
onthegraphicscard.
Verifythat:
•Thecomputeristurnedon.
•ThekeyboardissecurelyconnectedtoaUSBconnectoronthecomputer.
•Nokeysarestuck.
Verifythat:
•Thecomputeristurnedon.
•ThemouseissecurelyconnectedtoaUSBconnectoronthecomputer.
•Themouseisclean.Referto“Cleaninganopticalmouse”onpage58
information.
foradditional
forfurther
©CopyrightLenovo2010
55
Page 64

SymptomAction
Theoperatingsystemdoesnot
start.
TheSMCloginprompt
disappearsbeforeyoulog
onandthenablackscreen
displays(forSMCcomputers
only).
Thecomputerbeepsmultiple
timesbeforetheoperating
systemstarts.
Verifythat:
•Thestartupsequenceincludesthedevicewheretheoperatingsystemresides.
Usually,theoperatingsystemisontheharddiskdrive.F ormoreinformation,
see“Selectingastartupdevice”onpage51
Note:ForSMCcomputers,youmightreceivetheerrormessage“Nooperating
systemfound.PressF1torepeatbootsequence. ”Inthiscase,press
Ctrl+Alt+DeleteinsteadofF1toestablishaconnectiontothestorageareanetwork
whereyouroperatingsystemisstored.Verifythattheusernameisnotlogged
oninanotherlocation.
Verifythatyourcomputerdoesnotturnoffduetoinactivity.SMCwillautomatically
turnoffaninactivecomputer.Ifyourcomputerturnsoffautomatically,turnonthe
computerandlogon.Contactyouradministratorifyoucannotcorrecttheproblem.
Verifythatnokeysarestuck.
.
Diagnosticprograms
Diagnosticprogramsareusedtotesthardwarecomponentsofyourcomputerandreport
operating-system-controlledsettingsthatcancausehardwarefailures.Therearetwoprogramspreinstalled
onyourcomputertohelpyoudiagnosecomputerproblems:
•LenovoThinkVantageToolbox(usedwhenyouarerunningtheWindowsoperatingsystem)
•PC-DoctorforRescueandRecovery(usedwhenyourWindowsoperatingsystemdoesnotstart)
Notes:
1.YoucanalsodownloadthePC-DoctorforDOSdiagnosticprogramfromhttp://www.lenovo.com/support.
See“PC-DoctorforDOS”onpage57fordetailedinformation.
2.Ifyouareunabletoisolateandrepairtheproblemyourselfafterrunningthediagnosticprograms,save
andprinttheloglescreatedbythediagnosticprograms.Youwillneedthelogleswhenyouspeaktoa
Lenovotechnicalsupportrepresentative.
LenovoThinkVantageT oolbox
TheLenovoThinkVantageT oolboxprogramhelpsyoumaintainyourcomputer,improvecomputingsecurity,
diagnosecomputerproblems,getfamiliarwiththeinnovativetechnologiesprovidedbyLenovo,andget
moreinformationaboutyourcomputer.Y oucanusethediagnosticsfeatureoftheLenovoThinkVantage
Toolboxprogramtotestdevices,diagnosecomputerproblems,createbootablediagnosticmedia,update
systemdrivers,andviewsysteminformation.
•T oruntheLenovoThinkVantageToolboxprogramontheWindows7operatingsystem,clickStart➙All
Programs➙LenovoThinkVantageT ools➙SystemHealthandDiagnostics.Followtheinstructions
onthescreen.
•T oruntheLenovoThinkVantageToolboxprogramontheWindowsVistaoperatingsystem,clickStart➙
AllPrograms➙ThinkVantage➙LenovoThinkVantageToolbox.Followtheinstructionsonthescreen.
Followtheinstructionsonthescreen.Foradditionalinformation,refertotheLenovoThinkVantageT oolbox
helpsystem.
56ThinkCentreUserGuide
Page 65

PC-DoctorforRescueandRecovery
ThePC-DoctorforRescueandRecoverydiagnosticprogramispartoftheRescueandRecoveryworkspace
oneachLenovocomputer.UsethePC-DoctorforRescueandRecoverydiagnosticprogramifyouare
unabletostarttheWindowsoperatingsystem.
TorunthePC-DoctorforRescueandRecoverydiagnosticprogramfromtheRescueandRecovery
workspace,dothefollowing:
1.Turnoffthecomputer.
2.RepeatedlypressandreleasetheF11keywhenturningonthecomputer.Whenyouhearbeepsorseea
logoscreen,stoppressingtheF11key.TheRescueandRecoveryworkspaceopensafterashortdelay.
3.FromtheRescueandRecoveryworkspace,selectLaunchadvancedRescueandRecovery➙
Diagnosehardware.ThePC-DoctorforRescueandRecoverydiagnosticprogramopens.
4.Selectthediagnostictestyouwanttorun.Then,followtheinstructionsonthescreen.
ForadditionalinformationaboutrunningthePC-DoctorforRescueandRecoverydiagnosticprogram,refer
tothePC-DoctorforRescueandRecoveryhelpsystem.
Note:IfyouencounterfailuresthatpreventyoufromgainingaccesstotheRescueandRecoveryworkspace,
youcanrunthePC-DoctorforRescueandRecoverydiagnosticprogramafterusingarescuemedium
torecoverthecomputerfromfailuresandgainingaccesstotheRescueandRecoveryworkspace.See
“Creatingandusingarescuemedium”onpage46.
PC-DoctorforDOS
YoucanalsodownloadthelatestversionofthePC-DoctorforDOSdiagnosticprogramfrom
http://www.lenovo.com/support.ThePC-DoctorforDOSdiagnosticprogramrunsindependentlyofthe
Windowsoperatingsystem.UsethePC-DoctorforDOSdiagnosticprogramifyouareunabletostartthe
Windowsoperatingsystemorifthetwodiagnosticprogramspreinstalledonyourcomputerhavenot
beensuccessfulinisolatingapossibleproblem.YoucanrunthePC-DoctorforDOSdiagnosticprogram
fromadiagnosticdiscthatyoucreated.
Creatingadiagnosticdisc
Thissectionprovidesinstructionsonhowtocreateadiagnosticdisc.
Tocreateadiagnosticdisc,dothefollowing:
1.Downloadaself-startingbootableCD/DVDimage(knownasanISOimage)ofthediagnosticprogram
from:
http://www.lenovo.com/support
2.UseanyCD/DVDburningsoftwaretocreateadiagnosticdiscwiththeISOimage.
Runningthediagnosticprogramfromadiagnosticdisc
Thissectionprovidesinstructionsonhowtorunthediagnosticprogramfromadiagnosticdiscthatyou
created.
Torunthediagnosticprogramfromadiagnosticdiscthatyoucreated,dothefollowing:
1.Makesuretheopticaldriveyouwanttouseissetastherstbootdeviceinthestartupdevicesequence.
See“Selectingastartupdevice”onpage51.
2.Makesurethecomputeristurnedonandtheninsertthediscintotheopticaldrive.Thediagnostic
programopens.
Chapter6.Troubleshootinganddiagnostics57
Page 66

Note:Youcaninsertthediscintotheopticaldrivewhenyouaresettingthestartupdevicesequence.
However,ifyouinsertthediscintotheopticaldrivewhenyouhavealreadyenteredtheoperatingsystem,
youneedtorestartthecomputertoaccessthediagnosticprogram.
3.Followtheinstructionsonthescreentoselectthediagnostictestyouwanttorun.
Note:Foradditionalhelp,presstheF1key.
4.Removethediagnosticdiscfromtheopticaldrivewhenyoucompletethediagnosticprocess.
Cleaninganopticalmouse
Thissectionprovidesinstructionsonhowtocleananopticalmouse.
Anopticalmouseusesalight-emittingdiode(LED)andanopticalsensortonavigatethepointer.Ifthe
pointeronthescreendoesnotmovesmoothlywiththeopticalmouse,youmightneedtocleanthemouse.
Tocleananopticalmouse,dothefollowing:
1.Turnoffyourcomputer.
2.Disconnectthemousecablefromthecomputer.
3.Turnthemouseupsidedowntocheckthelens.
a.Ifthereisasmudgeonthelens,gentlycleantheareawithaplaincotton-tippedswab.
b.Ifthereisdebrisinthelens,gentlyblowthedebrisawayfromthearea.
4.Checkthesurfaceonwhichyouareusingthemouse.Ifyouhaveaveryintricatepictureorpattern
beneaththemouse,itmaybedifcultforthedigitalsignalprocessor(DSP)todeterminechangesinthe
mouseposition.
5.Reconnectthemousecabletothecomputer.
6.Turnyourcomputerbackon.
58ThinkCentreUserGuide
Page 67

Chapter7.Gettinginformation,help,andservice
Thischaptercontainsinformationabouthelp,service,andtechnicalassistanceforproductsmanufactured
byLenovo.
Informationresources
Youcanusetheinformationinthissectiontoaccessusefulresourcesrelatingtoyourcomputingneeds.
OnlineBooksfolder
Note:TheOnlineBooksfolderisonlyavailableoncomputersthathaveaninternalharddiskdriveand
preinstalledsoftwarefromLenovo.
TheOnlineBooksfolderpreinstalledonyourcomputercontainstheThinkCentreUserGuide,whichprovides
informationaboutyourcomputertohelpyousetup,use,andmaintainyourcomputer.Itrequiresno
Internetaccesstoviewthepublication.
Toviewthepublication,clickStart➙AllPrograms➙OnlineBooks➙OnlineBooks,thendouble-click
thepublicationforyourcomputer.ThepublicationisalsoavailableontheLenovoSupportWebsiteat:
http://www.lenovo.com/support
Notes:
1.ThepublicationisinPDFversion.Toviewthepublication,youneedtohavetheAdobeReaderprogram
preinstalledonyourcomputer.IftheAdobeReaderprogramhasnotbeeninstalledonyourcomputer,
amessagewillbedisplayedwhenyouattempttoviewthePDFleandyouwillbeguidedthrough
theAdobeReaderinstallation.
2.ThepublicationisavailableinotherlanguagesontheLenovoSupportWebsiteat:
http://www.lenovo.com/support
3.IfyouwanttoinstalladifferentlanguageversionoftheAdobeReaderprogramratherthantheversion
preinstalledonyourcomputer,downloadthedesiredlanguageversionfromtheAdobeWebsiteat:
http://www.adobe.com
LenovoThinkVantageT ools
TheLenovoThinkVantageToolsprogramguidesyoutoahostofinformationsourcesandprovideseasy
accesstovarioustoolstohelpyouworkmoreeasilyandsecurely.
Note:TheLenovoThinkVantageToolsprogramisonlyavailableoncomputersthathaveaninternalhard
diskdrive,aWindows7operatingsystem,andpreinstalledsoftwareprogramsfromLenovo.
ToaccesstheLenovoThinkVantageToolsprogram,clickStart➙AllPrograms➙LenovoThinkVantage
Tools.
ThinkVantageProductivityCenter
TheThinkVantageProductivityCenterprogramcontainsinformationsourcesandtoolsdesignedtomake
computingeasyandsecure.Itprovideseasyaccesstovarioustechnologies,suchas:
•ClientSecuritySolution
•PowerManager
•ProductivityCenter
©CopyrightLenovo2010
59
Page 68

•ProductRecovery
•RescueandRecovery
•SystemUpdate
Note:TheThinkVantageProductivityCenterprogramisonlyavailableoncomputersthathaveaninternal
harddiskdrive,apreinstalledWindowsVistaoperatingsystem,andpreinstalledsoftwareprogramsfrom
Lenovo.
ToaccesstheThinkVantageProductivityCenterprogram,clickStart➙AllPrograms➙ThinkVantage
➙ProductivityCenter.
LenovoWelcome
TheLenovoWelcomeprogramintroducesyoutosomeinnovativebuilt-infeaturesofLenovoandguidesyou
throughafewimportantsetuptaskstohelpyoumakethemostofyourcomputer.
Note:TheLenovoWelcomeprogramisonlyavailableoncomputersthathaveaninternalharddiskdrive,a
preinstalledWindows7orWindowsVistaoperatingsystem,andpreinstalledsoftwareprogramsfromLenovo.
AccessHelp
TheAccessHelpinformationsystemprovidesinformationaboutgettingstarted,doingbasictasks,
customizingsettingsforyourpersonalpreference,protectingdata,expandingandupgrading,and
troubleshooting.
Note:TheAccessHelpinformationsystemisonlyavailableoncomputersthathaveaninternalharddisk
driveandpreinstalledsoftwarefromLenovo.
•T oopentheAccessHelpinformationsystemontheWindows7operatingsystem,clickStart➙Help
andSupport➙LenovoAccessHelp.
•T oopentheAccessHelpinformationsystemontheWindowsVistaoperatingsystem,clickStart➙
AllPrograms➙ThinkVantage➙AccessHelp.
AfteryouhaveopenedtheAccessHelpinformationsystem,usetheleftpaneltomakeaselectionfromthe
ContentstabortheIndextab,orusetheSearchtabtondaparticularwordorphrase.
SafetyandWarranty
TheThinkCentreSafetyandWarrantyGuidethatisprovidedwithyourcomputercontainsinformationon
safety,setup,warranty,andnotices.Readandunderstandallsafetyinformationbeforeusingthisproduct.
LenovoWebsite(http://www.lenovo.com)
TheLenovoWebsiteprovidesup-to-dateinformationandservicestohelpyoubuy,upgrade,andmaintain
yourcomputer.Y oucanalsodothefollowing:
•Shopfordesktopandnotebookcomputers,monitors,projectors,upgradesandaccessoriesforyour
computer,andspecialoffers.
•Purchaseadditionalservices,suchassupportforhardware,operatingsystems,applicationprograms,
networksetupandconguration,andcustominstallations.
•Purchaseupgradesandextendedhardwarerepairservices.
•Downloadthelatestdevicedriversandsoftwareupdatesforyourcomputermodel.
•Accesstheonlinemanualsforyourproducts.
•AccesstheLenovoLimitedWarranty.
60ThinkCentreUserGuide
Page 69

•Accesstroubleshootingandsupportinformationforyourcomputermodelandothersupportedproducts.
•Findtheserviceandsupportphonenumbersforyourcountryorregion.
•FindaServiceProviderlocatednearyou.
Helpandservice
Thissectioncontainsinformationaboutobtaininghelpandservice.
Usingthedocumentationanddiagnosticprograms
Ifyouexperienceaproblemwithyourcomputer,seeChapter6“Troubleshootinganddiagnostics”on
page55
“Informationresources”onpage59.
Ifyoususpectasoftwareproblem,seethedocumentationthatcomeswiththeoperatingsystemorsoftware
program,includingreadmelesandonlinehelp.
Mostcomputerscomewithasetofdiagnosticprogramsthathelpyouidentifyhardwareproblems.For
instructionsonusingthediagnosticprograms,see“Diagnosticprograms”onpage56.
YoucanalsogetthelatesttechnicalinformationanddownloaddevicedriversandupdatesfromLenovo
SupportWebsiteat:
http://www.lenovo.com/support
.Forinformationonadditionalresourcestohelpyoutroubleshootyourcomputerproblem,see
Callingforservice
Duringthewarrantyperiod,youcangethelpandinformationbytelephonethroughtheCustomerSupport
Center.
Thefollowingservicesareavailableduringthewarrantyperiod:
•Problemdetermination-T rainedservicepersonnelareavailabletoassistyouwithdetermininga
hardwareproblemanddecidingwhatactionisnecessarytoxtheproblem.
•Hardwarerepair-Iftheproblemiscausedbyhardwareunderwarranty,trainedservicepersonnelare
availabletoprovidetheapplicablelevelofservice.
•EngineeringChangemanagement-Theremightbechangesthatarerequiredafteraproducthas
beensold.LenovooryourresellerwillmakeselectedEngineeringChanges(ECs)thatapplytoyour
hardwareavailable.
Theseitemsarenotcoveredbythewarranty:
•ReplacementoruseofpartsnotmanufacturedfororbyLenovoornon-warrantedLenovoparts
•Identicationofsoftwareproblemsources
•CongurationofBIOSaspartofaninstallationorupgrade
•Changes,modications,orupgradestodevicedrivers
•Installationandmaintenanceofnetworkoperatingsystems(NOS)
•Installationandmaintenanceofapplicationprograms
RefertotheThinkCentreSafetyandWarrantyGuidethatcomeswithyourcomputerforacomplete
explanationofwarrantyterms.Y oumustretainyourproofofpurchasetoobtainwarrantyservice.
ForalistoftheLenovoSupportphonenumbersforyourcountryorregion,goto
http://www.lenovo.com/support/phoneorrefertotheThinkCentreSafetyandWarrantyGuidethatcomes
withyourcomputer.
Chapter7.Gettinginformation,help,andservice61
Page 70

Note:Phonenumbersaresubjecttochangewithoutnotice.Ifthenumberforyourcountryorregionisnot
provided,contactyourLenovoresellerorLenovomarketingrepresentative.
Ifpossible,beatyourcomputerwhenyoucall.Havethefollowinginformationavailable:
•Machinetypeandmodel
•Serialnumbersofyourhardwareproducts
•Descriptionoftheproblem
•Exactwordingofanyerrormessages
•Hardwareandsoftwarecongurationinformation
Usingotherservices
Ifyoutravelwithyourcomputerorrelocateittoacountrywhereyourdesktopornotebookcomputer
machinetypeissold,yourcomputermightbeeligibleforInternationalWarrantyService,whichautomatically
entitlesyoutoobtainwarrantyservicethroughoutthewarrantyperiod.Servicewillbeperformedbyservice
providersauthorizedtoperformwarrantyservice.
Servicemethodsandproceduresvarybycountry,andsomeservicesmightnotbeavailableinallcountries.
InternationalWarrantyServiceisdeliveredthroughthemethodofservice(suchasdepot,carry-in,or
on-siteservice)thatisprovidedintheservicingcountry.Servicecentersincertaincountriesmightnotbe
abletoserviceallmodelsofaparticularmachinetype.Insomecountries,feesandrestrictionsmight
applyatthetimeofservice.
TodeterminewhetheryourcomputeriseligibleforInternationalWarrantyServiceandtoviewalistofthe
countrieswhereserviceisavailable,gotohttp://www.lenovo.com/support,clickWarranty,andfollow
theinstructionsonthescreen.
FortechnicalassistancewiththeinstallationoforquestionsrelatedtoServicePacksforyour
preinstalledMicrosoftWindowsproduct,refertotheMicrosoftProductSupportServicesWebsiteat
http://support.microsoft.com/directoryoryoucancontacttheCustomerSupportCenter.Somefeesmight
apply.
Purchasingadditionalservices
Duringandafterthewarrantyperiod,youcanpurchaseadditionalservices,suchassupportforhardware,
operatingsystems,andapplicationprograms;networksetupandconguration;upgradedorextended
hardwarerepairservices;andcustominstallations.Serviceavailabilityandservicenamemightvaryby
countryorregion.Formoreinformationabouttheseservices,gototheLenovoWebsiteat:
http://www.lenovo.com
62ThinkCentreUserGuide
Page 71

AppendixA.Notices
Lenovomaynotoffertheproducts,services,orfeaturesdiscussedinthisdocumentinallcountries.Consult
yourlocalLenovorepresentativeforinformationontheproductsandservicescurrentlyavailableinyour
area.AnyreferencetoaLenovoproduct,program,orserviceisnotintendedtostateorimplythatonlythat
Lenovoproduct,program,orservicemaybeused.Anyfunctionallyequivalentproduct,program,orservice
thatdoesnotinfringeanyLenovointellectualpropertyrightmaybeusedinstead.However,itistheuser's
responsibilitytoevaluateandverifytheoperationofanyotherproduct,program,orservice.
Lenovomayhavepatentsorpendingpatentapplicationscoveringsubjectmatterdescribedinthis
document.Thefurnishingofthisdocumentdoesnotgiveyouanylicensetothesepatents.Y oucansend
licenseinquiries,inwriting,to:
Lenovo(UnitedStates),Inc.
1009ThinkPlace-BuildingOne
Morrisville,NC27560
U.S.A.
Attention:LenovoDirectorofLicensing
LENOVOPROVIDESTHISPUBLICATION“ASIS”WITHOUTWARRANTYOFANYKIND,EITHEREXPRESS
ORIMPLIED,INCLUDING,BUTNOTLIMITEDTO,THEIMPLIEDWARRANTIESOFNON-INFRINGEMENT,
MERCHANTABILITYORFITNESSFORAPARTICULARPURPOSE.Somejurisdictionsdonotallow
disclaimerofexpressorimpliedwarrantiesincertaintransactions,therefore,thisstatementmaynotapply
toyou.
Thisinformationcouldincludetechnicalinaccuraciesortypographicalerrors.Changesareperiodically
madetotheinformationherein;thesechangeswillbeincorporatedinneweditionsofthepublication.
Lenovomaymakeimprovementsand/orchangesintheproduct(s)and/ortheprogram(s)describedinthis
publicationatanytimewithoutnotice.
Theproductsdescribedinthisdocumentarenotintendedforuseinimplantationorotherlifesupport
applicationswheremalfunctionmayresultininjuryordeathtopersons.Theinformationcontainedinthis
documentdoesnotaffectorchangeLenovoproductspecicationsorwarranties.Nothinginthisdocument
shalloperateasanexpressorimpliedlicenseorindemnityundertheintellectualpropertyrightsofLenovo
orthirdparties.Allinformationcontainedinthisdocumentwasobtainedinspecicenvironmentsandis
presentedasanillustration.Theresultobtainedinotheroperatingenvironmentsmayvary.
Lenovomayuseordistributeanyoftheinformationyousupplyinanywayitbelievesappropriatewithout
incurringanyobligationtoyou.
Anyreferencesinthispublicationtonon-LenovoWebsitesareprovidedforconvenienceonlyanddonotin
anymannerserveasanendorsementofthoseWebsites.ThematerialsatthoseWebsitesarenotpartof
thematerialsforthisLenovoproduct,anduseofthoseWebsitesisatyourownrisk.
Anyperformancedatacontainedhereinwasdeterminedinacontrolledenvironment.Therefore,theresult
obtainedinotheroperatingenvironmentsmayvarysignicantly.Somemeasurementsmayhavebeen
madeondevelopment-levelsystemsandthereisnoguaranteethatthesemeasurementswillbethesame
ongenerallyavailablesystems.Furthermore,somemeasurementsmayhavebeenestimatedthrough
extrapolation.Actualresultsmayvary.Usersofthisdocumentshouldverifytheapplicabledatafortheir
specicenvironment.
©CopyrightLenovo2010
63
Page 72

Televisionoutputnotice
Thefollowingnoticeappliestomodelsthathavethefactory-installedtelevision-outputfeature.
ThisproductincorporatescopyrightprotectiontechnologythatisprotectedbymethodclaimsofcertainU.S.
patentsandotherintellectualpropertyrightsownedbyMacrovisionCorporationandotherrightsowners.
UseofthiscopyrightprotectiontechnologymustbeauthorizedbyMacrovisionCorporation,andisintended
forhomeandotherlimitedviewingusesonlyunlessotherwiseauthorizedbyMacrovisionCorporation.
Reverseengineeringordisassemblyisprohibited.
EuropeanconformanceCEmark
Trademarks
ThefollowingtermsaretrademarksofLenovointheUnitedStates,othercountries,orboth:
Lenovo
TheLenovologo
PersonalSystem/2
PS/2
RescueandRecovery
ThinkCentre
ThinkVantage
Microsoft,Windows,andWindowsVistaaretrademarksoftheMicrosoftgroupofcompanies.
Intel,IntelCore,andPentiumaretrademarksofIntelCorporationintheUnitedStates,othercountries,or
both.
LinuxisatrademarkofLinusT orvaldsintheUnitedStates,othercountries,orboth.
Othercompany,product,orservicenamesmaybetrademarksorservicemarksofothers.
64ThinkCentreUserGuide
Page 73

Index
A
arescuemedium,creatingandusing46
Administrator,password50
antivirussoftware6
audioline-inconnector8
audioline-outconnector8
audiosubsystem1
B
backupandrecoveryoperations44
basictroubleshooting55
battery,replacing22
boot-blockrecovery54
C
cablelock,security39
changing
password50
startupdevicesequence51
cleaninganopticalmouse58
CMOS,clearing41
components,internal9
computercover
removing14
computercover,reinstalling38
connector8
connectors
front6
rear7
considerations,passwords49
creating
andusingarescuemedium46
creatingandusing
recoverymedia43
CRU
completingtheinstallation38
customersupportcenter61
bays11
specications11
E
environment,operating4
Ethernet1
Ethernetconnector9
exiting,SetupUtility51
expansion2
externaloptions,installing13
F
failure,recoveringfromPOST/BIOS54
features1
ashingtheBIOS53
folder,booksonline59
frontaudioandUSBassembly,replacing34
frontbezel
frontbezel,removing15
frontbezel,reinstalling15
frontconnectors6
frontfanassembly,replacing31
G
getting
help59
information59
service59
H
harddiskdrive,replacing26
heatsinkandfanassembly,replacing25
help
andservice61
getting59
D
deletingapassword50
Description8
devicedrivers39
installing47
reinstalling47
devices,handlingstatic-sensitive13
diagnosticsprograms,using61
diagnostics,troubleshooting55
DisplayPortconnector8
documentation,using61
drivers,device39
drives
©CopyrightLenovo2010
I
importantsafetyinformationvii
information
getting59
importantsafetyvii
resources59
safety60
warranty60
Input/Output(I/O)features2
installing
devicedrivers47
installingoptions
65
Page 74

memorymodule18
PCIcard15
securityfeatures39
internaldrives1
internalspeaker,replacing35
K
keyboardconnector9
keyboard,replacing37
L
LenovoThinkVantageToolbox56
LenovoThinkVantageTools59
LenovoWebsite60
LenovoWelcome5,60
locatingcomponents9
M
media,creatingandusingrecoverymedia43
memorymodule
installing,replacing18
systemboard18
Microphoneconnector9
mouseconnector9
mouse,replacing37
N
notice,televisionoutput64
notices63
O
onlinebooksfolder59
operations,backupandrecovery44
opticaldrive,replacing20
opticalmouse
cleaning58
P
padlockloop40
partsreplacement,completing38
password
Administrator50
considerations49
Power-OnPassword50
setting,changing,deleting50
passwordprotection41
passwords
erasing41
lostorforgotten41
passwords,using49
PC-DoctorforRescueandRecovery57
PCIcard15
installing,replacing15
slots15
physicalspecications3
power
AdvancedCongurationandPowerInterface(ACPI)
support2
features2
powersupplyassembly,replacing24
power-onself-test(POST)53
Power-On,Password50
productivitycenter,ThinkVantage59
programs,updatingsystem53
protection,password41
purchasingadditionalservices62
R
rearconnectors7
rearfanassembly,replacing32
recovering
fromaPOST/BIOSupdatefailure54
software43
recovery
boot-block54
operations,backupand44
problems,solving48
recoverymedia,creatingandusing43
reinstalling
devicedrivers47
removingcomputercover14
replacing
battery22
harddiskdrive26
heatsinkandfanassembly25
RescueandRecovery43
workspace,RescueandRecovery45
RescueandRecoveryworkspace45
resources,information59
S
safetyvii
safetyinformation60
security
cablelock39
enablingordisabling50
features2,39
integratedcablelock40
padlockloop40
selecting
startupdevice51
temporarystartupdevice51
serialport9
service
andhelp61
customersupportcenter61
getting59
services
other62
purchasingadditional62
setting
password50
66ThinkCentreUserGuide
Page 75

settings
changing49
viewing49
SetupUtility49
SetupUtilityprogram,starting49
SetupUtility,exiting51
software
recovering43
solvingrecoveryproblems48
startingtheSetupUtilityprogram49
startupdevice51
sequence,changing51
temporary,selecting51
static-sensitivedevices,handling13
system
management1
programs53
systemboard
connectors10
locatingparts10
locations10
memorymodule18
T
televisionoutputnotice64
temporarystartupdevice51
theBIOS,updating(ashing)53–54
ThinkVantageproductivitycenter59
trademarks64
troubleshooting,basic55
troubleshooting,diagnostics55
U
updating
(ashing)theBIOS53
systemprograms53
updating(ashing)theBIOS54
USBconnector9
using
arescuemedium,creatingand46
diagnosticprograms61
documentation61
otherservices62
passwords49
SetupUtility49
V
VGAmonitorconnector9
videosubsystem1
viewingandchangingsettings49
W
warrantyinformation60
Website,Lenovo60
workspace,backupandrecovery45
©CopyrightLenovo2010
67
Page 76

68ThinkCentreUserGuide
Page 77

Page 78

PartNumber:71Y7146
PrintedinUSA
(1P)P/N:71Y7146
*71Y7146*
 Loading...