

Page 1

ThinkCentre
UserGuide
MachineTypes:3280,3281,3291,3292,3293,3294,3296,3297,
3298,3305,3309,3311,3312,3313,3314,3315,3316,3318,3320,
3322,3324,3325,3326,3327,3329,3341,and3342
Page 2

Note:Beforeusingthisinformationandtheproductitsupports,besuretoreadandunderstandthe
“Importantsafetyinformation”onpagevandAppendixA“Notices”onpage113.
FirstEdition(May2012)
©CopyrightLenovo2012.
LIMITEDANDRESTRICTEDRIGHTSNOTICE:IfdataorsoftwareisdeliveredpursuantaGeneralServicesAdministration
“GSA”contract,use,reproduction,ordisclosureissubjecttorestrictionssetforthinContractNo.GS-35F-05925.
Page 3

Contents
Importantsafetyinformation......v
Serviceandupgrades.............v
Staticelectricityprevention...........v
Powercordsandpoweradapters........vi
Extensioncordsandrelateddevices.......vi
Plugsandoutlets..............vii
Externaldevices..............vii
Heatandproductventilation.........vii
Operatingenvironment...........viii
Modemsafetyinformation..........viii
Lasercompliancestatement..........ix
Powersupplystatement............ix
Cleaningandmaintenance...........ix
Chapter1.Productoverview......1
Features..................1
Specications................4
Softwareoverview..............5
SoftwareprovidedbyLenovo........5
AdobeReader..............7
Antivirussoftware.............7
Locations..................7
Locatingconnectors,controls,andindicators
onthefrontofyourcomputer........8
Locatingconnectorsontherearofyour
computer...............10
Locatingcomponents..........12
Locatingpartsonthesystemboard....15
Adjustingtheframestand........17
Machinetypeandmodellabel.......18
Chapter2.Usingyourcomputer...19
Frequentlyaskedquestions.........19
Usingthekeyboard.............19
UsingWindowsshortcutkeys.......19
UsingtheblueThinkVantagebutton....20
Usingangerprintreader........20
Usingthewheelmouse...........20
Adjustingaudio..............20
Aboutyourcomputeraudio........21
Settingthevolumefromthedesktop....21
SettingthevolumefromControlPanel...21
UsingCDsandDVDs............21
HandlingandstoringCDandDVDmedia..22
PlayingaCDorDVD..........22
RecordingaCDorDVD.........22
Usingthesingle-touchandmulti-touchfeature..23
Chapter3.Y ouandyourcomputer..27
Accessibilityandcomfort..........27
Arrangingyourworkspace........27
Comfort...............27
Glareandlighting............28
Aircirculation.............28
Electricaloutletsandcablelengths.....28
RegisteryourcomputerwithLenovo......29
Movingyourcomputertoanothercountryor
region..................29
Voltage-selectionswitch.........29
Replacementpowercords........29
Chapter4.Security..........31
Securityfeatures..............31
Attachinganintegratedcablelock.......32
Usingpasswords..............32
BIOSpasswords............32
Windowspasswords..........33
Conguringthengerprintreader.......33
Usingandunderstandingrewalls.......33
Protectingdataagainstviruses........33
Chapter5.Installingorreplacing
hardware...............35
Handlingstatic-sensitivedevices.......35
Installingorreplacinghardware........35
Installingexternaloptions........35
Removingandreinstallingtheframestand..36
Removingthecomputercover.......36
Removingandreinstallingtheframefoot..37
Removingandreinstallingthehandlebar..38
RemovingandreinstallingtherearI/O
assembly...............39
Installingorreplacingamemorymodule...40
Replacingtheharddiskdrive.......41
Replacingtheopticaldrive........44
Replacingtheconverterboard.......45
Replacingtheheatsink.........46
Replacingthemicroprocessor.......48
Replacingtheinternalspeakers......51
Replacingthethermalsensor.......52
Replacingtheintegratedcamera......54
ReplacingtheWI-FIcard.........55
Replacingtheambientlightsensor.....57
ReplacingtheBluetoothmodule......58
Replacingthecardreader........59
©CopyrightLenovo2012
i
Page 4

ReplacingtheExpressCard........60
Replacingtheheatsinkandfanassemblyfor
GPU.................61
ReplacingtherearPS/2connectorsandserial
portassembly.............63
Replacingthemouse..........64
Replacingthekeyboard.........67
Completingthepartsreplacement.....68
Chapter6.Recoveryinformation...71
Creatingandusingrecoverymedia......71
Creatingrecoverymedia.........71
Usingrecoverymedia..........72
Performingbackupandrecoveryoperations...72
Performingabackupoperation......72
Performingarecoveryoperation......73
UsingtheRescueandRecoveryworkspace...73
Creatingandusingarescuemedium......74
Creatingarescuemedium........74
Usingarescuemedium.........74
Reinstallingpreinstalledapplicationsanddevice
drivers..................75
Reinstallingsoftwareprograms........76
Reinstallingdevicedrivers..........76
Solvingrecoveryproblems..........76
Chapter7.UsingtheSetupUtility
program................79
StartingtheSetupUtilityprogram.......79
Viewingandchangingsettings........79
Usingpasswords..............79
Passwordconsiderations.........80
Power-OnPassword..........80
AdministratorPassword.........80
HardDiskPassword...........80
Setting,changing,anddeletingapassword.80
Erasinglostorforgottenpasswords(clearing
CMOS)................81
Enablingordisablingadevice........81
Selectingastartupdevice..........82
Selectingatemporarystartupdevice....82
Selectingorchangingthestartupdevice
sequence...............82
EnablingErPcompliancemode........82
ICEperformancemode...........83
ICEthermalalert..............83
ExitingtheSetupUtilityprogram.......84
Chapter8.Updatingsystem
programs...............85
Usingsystemprograms...........85
Updating(ashing)theBIOSfromadisc....85
Updating(ashing)theBIOSfromyouroperating
system..................86
RecoveringfromaPOST/BIOSupdatefailure..86
Chapter9.Preventingproblems...87
Keepingyourcomputercurrent........87
Gettingthelatestdevicedriversforyour
computer...............87
Updatingyouroperatingsystem......87
UsingSystemUpdate..........88
Cleaningandmaintenance..........88
Basics................88
Cleaningyourcomputer.........89
Goodmaintenancepractices.......90
Movingyourcomputer...........90
Chapter10.Troubleshootingand
diagnostics..............91
Basictroubleshooting............91
Troubleshootingprocedure..........92
Troubleshooting..............92
Audioproblems............93
CDproblems.............94
DVDproblems.............95
Intermittentproblems..........97
Keyboard,mouse,orpointingdevice
problems...............97
Monitorproblems............98
Networkingproblems..........100
Optionproblems............103
Performanceandlockupproblems.....104
Printerproblems............105
Serialportproblems...........105
Softwareproblems...........106
USBproblems.............107
LenovoSolutionCenter...........107
Chapter11.Gettinginformation,help,
andservice.............109
Informationresources............109
LenovoThinkVantageTools........109
LenovoWelcome............109
HelpandSupport............109
SafetyandWarranty...........109
LenovoWebsite(http://www.lenovo.com)..109
LenovoSupportWebsite.........110
Helpandservice..............110
Usingthedocumentationanddiagnostic
program...............110
Callingforservice............110
Usingotherservices..........111
Purchasingadditionalservices......111
iiThinkCentreUserGuide
Page 5

AppendixA.Notices.........113
Trademarks................114
AppendixB.Regulatory
information.............115
Exportclassicationnotice..........115
Electronicemissionsnotices.........115
FederalCommunicationsCommission
DeclarationofConformity........115
Additionalregulatoryinformation.......117
Recyclinginformation............119
RecyclinginformationforBrazil........120
BatteryrecyclinginformationforT aiwan.....120
BatteryrecyclinginformationfortheEuropean
Union..................121
AppendixD.ENERGYST ARmodel
information.............123
AppendixE.EkBilgiler.......125
AppendixC.WEEEandrecycling
information.............119
ImportantinformationfortheEuropeanDirective
2002/96/EC................119
AppendixF .Servisistasyonlari...127
Index.................135
©CopyrightLenovo2012
iii
Page 6

ivThinkCentreUserGuide
Page 7
Importantsafetyinformation
CAUTION:
Beforeusingthismanual,besuretoreadandunderstandalltherelatedsafetyinformationforthis
product.RefertotheinformationinthissectionandthesafetyinformationintheThinkCentreSafety,
Warranty,andSetupGuidethatyoureceivedwiththisproduct.Readingandunderstandingthissafety
informationreducestheriskofpersonalinjuryanddamagetoyourproduct.
IfyounolongerhaveacopyoftheThinkCentreSafety,Warranty,andSetupGuide,youcanobtainaPortable
DocumentFormat(PDF)versionfromtheLenovo
TheLenovoSupportWebsitealsoprovidestheThinkCentreSafety,Warranty,andSetupGuideandthis
ThinkCentreUserGuideinadditionallanguages.
®
SupportWebsiteathttp://www.lenovo.com/support.
Serviceandupgrades
DonotattempttoserviceaproductyourselfunlessinstructedtodosobytheCustomerSupportCenteror
yourdocumentation.OnlyuseaServiceProviderwhoisapprovedtorepairyourparticularproduct.
Note:Somecomputerpartscanbeupgradedorreplacedbythecustomer.Upgradestypicallyare
referredtoasoptions.ReplacementpartsapprovedforcustomerinstallationarereferredtoasCustomer
ReplaceableUnits,orCRUs.Lenovoprovidesdocumentationwithinstructionswhenitisappropriatefor
customerstoinstalloptionsorreplaceCRUs.Youmustcloselyfollowallinstructionswheninstallingor
replacingparts.TheOffstateofapowerindicatordoesnotnecessarilymeanthatvoltagelevelsinsidea
productarezero.Beforeyouremovethecoversfromaproductequippedwithapowercord,alwaysmake
surethatthepoweristurnedoffandthattheproductisunpluggedfromanypowersource.Formore
informationonCRUs,refertoChapter5“Installingorreplacinghardware”onpage35
questionsorconcerns,contacttheCustomerSupportCenter.
Althoughtherearenomovingpartsinyourcomputerafterthepowercordhasbeendisconnected,the
followingwarningsarerequiredforyoursafety.
CAUTION:
.Ifyouhaveany
Hazardousmovingparts.Keepngersandotherbodypartsaway.
CAUTION:
BeforereplacinganyCRUs,turnoffthecomputerandwaitthreetoveminutestoletthecomputer
coolbeforeopeningthecover.
Staticelectricityprevention
Staticelectricity,althoughharmlesstoyou,canseriouslydamagecomputercomponentsandoptions.
Improperhandlingofstatic-sensitivepartscancausedamagetothepart.Whenyouunpackanoption
©CopyrightLenovo2012
v
Page 8

orCRU,donotopenthestatic-protectivepackagecontainingthepartuntiltheinstructionsdirectyou
toinstallit.
WhenyouhandleoptionsorCRUs,orperformanyworkinsidethecomputer,takethefollowingprecautions
toavoidstatic-electricitydamage:
•Limityourmovement.Movementcancausestaticelectricitytobuilduparoundyou.
•Alwayshandlecomponentscarefully.Handleadapters,memorymodules,andothercircuitboardsbythe
edges.Nevertouchexposedcircuitry.
•Preventothersfromtouchingcomponents.
•Whenyouinstallastatic-sensitiveoptionorCRU,touchthestatic-protectivepackagecontainingthe
parttoametalexpansion-slotcoverorotherunpaintedmetalsurfaceonthecomputerforatleasttwo
seconds.Thisreducesstaticelectricityinthepackageandyourbody.
•Whenpossible,removethestatic-sensitivepartfromthestatic-protectivepackagingandinstallthepart
withoutsettingitdown.Whenthisisnotpossible,placethestatic-protectivepackagingonasmooth,
levelsurfaceandplacethepartonit.
•Donotplacethepartonthecomputercoverorothermetalsurface.
Powercordsandpoweradapters
Useonlythepowercordsandpoweradapterssuppliedbytheproductmanufacturer.
Thepowercordsshallbesafetyapproved.ForGermany,itshallbeH05VV-F ,3G,0.75mm
othercountries,thesuitabletypesshallbeusedaccordingly.
Neverwrapapowercordaroundapoweradapterorotherobject.Doingsocanstressthecordinwaysthat
cancausethecordtofray,crack,orcrimp.Thiscanpresentasafetyhazard.
Alwaysroutepowercordssothattheywillnotbewalkedon,trippedover,orpinchedbyobjects.
Protectpowercordandpoweradaptersfromliquids.Forinstance,donotleaveyourpowercordorpower
adapternearsinks,tubs,toilets,oronoorsthatarecleanedwithliquidcleansers.Liquidscancausea
shortcircuit,particularlyifthepowercordorpoweradapterhasbeenstressedbymisuse.Liquidsalsocan
causegradualcorrosionofpowercordterminalsand/ortheconnectorterminalsonapoweradapter,
whichcaneventuallyresultinoverheating.
Alwaysconnectpowercordsandsignalcablesinthecorrectorderandensurethatallpowercord
connectorsaresecurelyandcompletelypluggedintoreceptacles.
Donotuseanypoweradapterthatshowscorrosionattheacinputpinsorshowssignsofoverheating(such
asdeformedplastic)attheacinputoranywhereonthepoweradapter.
Donotuseanypowercordswheretheelectricalcontactsoneitherendshowsignsofcorrosionor
overheatingorwherethepowercordappearstohavebeendamagedinanyway.
2
,orbetter.For
Extensioncordsandrelateddevices
Ensurethatextensioncords,surgeprotectors,uninterruptiblepowersupplies,andpowerstripsthatyouuse
areratedtohandletheelectricalrequirementsoftheproduct.Neveroverloadthesedevices.Ifpowerstrips
areused,theloadshouldnotexceedthepowerstripinputrating.Consultanelectricianformoreinformation
ifyouhavequestionsaboutpowerloads,powerrequirements,andinputratings.
viThinkCentreUserGuide
Page 9

Plugsandoutlets
Ifareceptacle(poweroutlet)thatyouintendtousewithyourcomputerequipmentappearstobedamaged
orcorroded,donotusetheoutletuntilitisreplacedbyaqualiedelectrician.
Donotbendormodifytheplug.Iftheplugisdamaged,contactthemanufacturertoobtainareplacement.
Donotshareanelectricaloutletwithotherhomeorcommercialappliancesthatdrawlargeamountsof
electricity;otherwise,unstablevoltagemightdamageyourcomputer,data,orattacheddevices.
Someproductsareequippedwithathree-prongedplug.Thisplugtsonlyintoagroundedelectricaloutlet.
Thisisasafetyfeature.Donotdefeatthissafetyfeaturebytryingtoinsertitintoanon-groundedoutlet.If
youcannotinserttheplugintotheoutlet,contactanelectricianforanapprovedoutletadapterortoreplace
theoutletwithonethatenablesthissafetyfeature.Neveroverloadanelectricaloutlet.Theoverallsystem
loadshouldnotexceed80percentofthebranchcircuitrating.Consultanelectricianformoreinformation
ifyouhavequestionsaboutpowerloadsandbranchcircuitratings.
Besurethatthepoweroutletyouareusingisproperlywired,easilyaccessible,andlocatedclosetothe
equipment.Donotfullyextendpowercordsinawaythatwillstressthecords.
Besurethatthepoweroutletprovidesthecorrectvoltageandcurrentfortheproductyouareinstalling.
Carefullyconnectanddisconnecttheequipmentfromtheelectricaloutlet.
Externaldevices
DonotconnectordisconnectanyexternaldevicecablesotherthanUniversalSerialBus(USB)and1394
cableswhilethecomputerpowerison;otherwise,youmightdamageyourcomputer.T oavoidpossible
damagetoattacheddevices,waitatleastvesecondsafterthecomputerisshutdowntodisconnect
externaldevices.
Heatandproductventilation
Computers,poweradapters,andmanyaccessoriescangenerateheatwhenturnedonandwhenbatteries
arecharging.Alwaysfollowthesebasicprecautions:
•Donotleaveyourcomputer,poweradapter,oraccessoriesincontactwithyourlaporanypartofyour
bodyforanextendedperiodwhentheproductsarefunctioningorwhenthebatteryischarging.Y our
computer,poweradapter,andmanyaccessoriesproducesomeheatduringnormaloperation.Extended
contactwiththebodycouldcausediscomfortor,potentially,askinburn.
•Donotchargethebatteryoroperateyourcomputer,poweradapter,oraccessoriesnearammable
materialsorinexplosiveenvironments.
•Ventilationslots,fans,andheatsinksareprovidedwiththeproductforsafety,comfort,andreliable
operation.Thesefeaturesmightinadvertentlybecomeblockedbyplacingtheproductonabed,sofa,
carpet,orotherexiblesurface.Neverblock,cover,ordisablethesefeatures.
Inspectyourdesktopcomputerfordustaccumulationatleastonceeverythreemonths.Beforeinspecting
yourcomputer,turnoffthepowerandunplugthecomputer'spowercordfromtheelectricaloutlet;then
removeanydustfromventsandperforationsinthebezel.Ifyounoticeexternaldustaccumulation,then
examineandremovedustfromtheinsideofthecomputerincludingheatsinkinletns,powersupplyvents,
andfans.Alwaysturnoffandunplugthecomputerbeforeopeningthecover.Ifpossible,avoidoperating
yourcomputerwithintwofeetofhigh-trafcareas.Ifyoumustoperateyourcomputerinornearahigh-trafc
area,inspectand,ifnecessary,cleanyourcomputermorefrequently.
©CopyrightLenovo2012
vii
Page 10

Foryoursafetyandtomaintainoptimumcomputerperformance,alwaysfollowthesebasicprecautions
withyourdesktopcomputer:
•Keepthecoverclosedwheneverthecomputerispluggedin.
•Regularlyinspecttheoutsideofthecomputerfordustaccumulation.
•Removedustfromventsandanyperforationsinthebezel.Morefrequentcleaningsmightberequiredfor
computersindustyorhigh-trafcareas.
•Donotrestrictorblockanyventilationopenings.
•Donotstoreoroperateyourcomputerinsidefurniture,asthismightincreasetheriskofoverheating.
•Airowtemperaturesintothecomputershouldnotexceed35°C(95°F).
•Donotinstallairltrationdevices.Theymayinterferewithpropercooling.
Operatingenvironment
Theoptimalenvironmentinwhichtouseyourcomputeris10°C-35°C(50°F-95°F)withhumidityranging
between35%and80%.Ifyourcomputerisstoredortransportedintemperatureslessthan10°C(50°F),
allowthecoldcomputertoriseslowlytoanoptimaloperatingtemperatureof10°C-35°C(50°F-95°F)before
use.Thisprocesscouldtaketwohoursinextremeconditions.Failuretoallowyourcomputertorisetoan
optimaloperatingtemperaturebeforeusecouldresultinirreparabledamagetoyourcomputer.
Ifpossible,placeyourcomputerinawell-ventilatedanddryareawithoutdirectexposuretosunshine.
Keepelectricalappliancessuchasanelectricfan,radio,high-poweredspeakers,airconditioner,and
microwaveovenawayfromyourcomputerbecausethestrongmagneticeldsgeneratedbythese
appliancescandamagethemonitoranddataontheharddiskdrive.
Donotplaceanybeveragesontopoforbesidethecomputerorotherattacheddevices.Ifliquidisspilledon
orinthecomputeroranattacheddevice,ashortcircuitorotherdamagemightoccur.
Donoteatorsmokeoveryourkeyboard.Particlesthatfallintoyourkeyboardcancausedamage.
Modemsafetyinformation
CAUTION:
Toreducetheriskofre,useonlyNo.26AWGorlarger(forexample,No.24AWG)telecommunication
linecordlistedbyUnderwritersLaboratories(UL)orcertiedbytheCanadianStandardsAssociation
(CSA).
Toreducetheriskofre,electricalshock,orinjurywhenusingtelephoneequipment,alwaysfollowbasic
safetyprecautions,suchas:
•Neverinstalltelephonewiringduringalightningstorm.
•Neverinstalltelephonejacksinwetlocationsunlessthejackisspecicallydesignedforwetlocations.
•Nevertouchuninsulatedtelephonewiresorterminalsunlessthetelephonelinehasbeendisconnectedat
thenetworkinterface.
•Usecautionwheninstallingormodifyingtelephonelines.
•Avoidusingatelephone(otherthanacordlesstype)duringanelectricalstorm.Theremaybearemote
riskofelectricshockfromlightning.
•Donotusethetelephonetoreportagasleakinthevicinityoftheleak.
viiiThinkCentreUserGuide
Page 11
Lasercompliancestatement
CAUTION:
Whenlaserproducts(suchasCD-ROMs,DVDdrives,beropticdevices,ortransmitters)are
installed,notethefollowing:
•Donotremovethecovers.Removingthecoversofthelaserproductcouldresultinexposureto
hazardouslaserradiation.Therearenoserviceablepartsinsidethedevice.
•Useofcontrolsoradjustmentsorperformanceofproceduresotherthanthosespeciedherein
mightresultinhazardousradiationexposure.
DANGER
SomelaserproductscontainanembeddedClass3AorClass3Blaserdiode.Notethefollowing.
Laserradiationwhenopen.Donotstareintothebeam,donotviewdirectlywithoptical
instruments,andavoiddirectexposuretothebeam.
Powersupplystatement
Neverremovethecoveronapowersupplyoranypartthathasthefollowinglabelattached.
Hazardousvoltage,current,andenergylevelsarepresentinsideanycomponentthathasthislabelattached.
Therearenoserviceablepartsinsidethesecomponents.Ifyoususpectaproblemwithoneoftheseparts,
contactaservicetechnician.
Cleaningandmaintenance
Keepyourcomputerandworkspaceclean.Shutdownthecomputerandthendisconnectthepower
cordbeforecleaningthecomputer.Donotsprayanyliquiddetergentdirectlyonthecomputeroruse
anydetergentcontainingammablematerialtocleanthecomputer.Spraythedetergentonasoftcloth
andthenwipethecomputersurfaces.
©CopyrightLenovo2012
ix
Page 12

xThinkCentreUserGuide
Page 13

Chapter1.Productoverview
Thischapterprovidesinformationaboutthecomputerfeatures,specications,softwareprogramsprovided
byLenovo,andlocationsofconnectors,components,partsonthesystemboard,andinternaldrives.
Features
Thissectionintroducesthecomputerfeatures.Theinformationcoversavarietyofmodels.
Toviewtheinformationaboutyourspecicmodel,dooneofthefollowing:
•GointotheSetupUtilityprogrambyfollowingtheinstructionsinChapter7“UsingtheSetupUtility
program”onpage79.Then,selectMain➙SystemSummarytoviewtheinformation.
•IntheWindowsenvironment,clickStart,right-clickComputer,andselectPropertiestoviewthe
information.
Microprocessor
Yourcomputercomeswithoneofthefollowingmicroprocessors(internalcachesizevariesbymodeltype):
•Intel
•IntelCorei5microprocessor
•IntelCorei7microprocessor
•IntelCeleron
•IntelPentium
®
Core™i3microprocessor
®
microprocessor
®
microprocessor
Memory
Yourcomputersupportsuptotwodoubledatarate3smalloutlinedualinlinememorymodules(DDR3
SODIMMs).
Internaldrives
•Opticaldrive:DVD-ROMorDVD-R(optional)
•SerialAdvancedTechnologyAttachment(SATA)harddiskdrive
Note:Y ourcomputersupportsSATA2.0andSATA3.0devices.Formoreinformation,see“Locating
partsonthesystemboard”onpage15.
Videosubsystem
•IntegratedgraphicsforaDisplayPortinconnectorandaDisplayPortoutconnector.
Audiosubsystem
•Integratedhigh-denition(HD)audio
•Microphoneconnectorandheadphoneconnector
•Internalspeaker
Connectivity
•100/1000MbpsintegratedEthernetcontroller
Systemmanagementfeatures
©CopyrightLenovo2012
1
Page 14

•Abilitytostorepower-onself-test(POST)hardwaretestresults
•DesktopManagementInterface(DMI)
DesktopManagementInterfaceprovidesacommonpathforuserstoaccessinformationaboutall
aspectsofacomputer,includingprocessortype,installationdate,attachedprintersandotherperipherals,
powersources,andmaintenancehistory.
•ErPcompliancemode
Theenergy-relatedproductsdirective(ErP)compliancemodereducestheconsumptionofelectricity
whenyourcomputerisinstandbyoroffmode.Formoreinformation,see“EnablingErPcompliance
mode”onpage82.
•IntelActiveManagementT echnology(AMT)(availableonsomemodels)
IntelActiveManagementTechnologyishardwareandrmwaretechnologythatbuildscertainfunctionality
intocomputersinordertomakethemeasierandlessexpensiveforbusinessestomonitor,maintain,
update,upgrade,andrepair.
•IntelligentCoolingEngine(ICE)
TheIntelligentCoolingEngineisasystemthermalmanagementsolutionthatenablesyourcomputer
torunwithbetterthermalandacousticperformance.TheICEfunctionalsomonitorsthethermal
performanceofyourcomputertoidentifythermalproblems.Formoreinformation,see“ICEperformance
mode”onpage83
and“ICEthermalalert”onpage83.
•PrebootExecutionEnvironment(PXE)
ThePrebootExecutionEnvironmentisanenvironmenttostartcomputersusinganetworkinterface
independentofdatastoragedevices(suchastheharddiskdrive)orinstalledoperatingsystems.
•SystemManagement(SM)BasicInput/OutputSystem(BIOS)andSMsoftware
TheSMBIOSspecicationdenesdatastructuresandaccessmethodsinaBIOSthatallowsauseror
applicationtostoreandretrieveinformationspecicaboutthecomputerinquestion.
•WakeonLAN
WakeonLANisanEthernetcomputernetworkingstandardthatallowsacomputertobeturnedon
orwokenupbyanetworkmessage.Themessageisusuallysentbyaprogramrunningonanother
computeronthesamelocalareanetwork.
•WakeonRing
WakeonRing,sometimesreferredtoasWakeonModem,isaspecicationthatallowssupported
computersanddevicestoresumefromsleeporhibernationmode.
•WindowsManagementInstrumentation(WMI)
WindowsManagementInstrumentationisasetofextensionstotheWindowsDriverModel.Itprovidesan
operatingsysteminterfacethroughwhichinstrumentedcomponentsprovideinformationandnotication.
2ThinkCentreUserGuide
Page 15

Input/Output(I/O)features
•9-pinserialport(optional)
•TwoUniversalSerialBus(USB)3.0connectors(USBports1and2)
•FourUSB2.0connectors(USBports3to6)
•OneEthernetconnector
•OneDisplayPortoutconnector
•OneDisplayPortinconnector
•OnePersonalSystem/2(PS/2)keyboardconnector(optional)
•OnePS/2mouseconnector(optional)
•Twoaudioconnectorsontheleftpanel(microphoneconnectorandheadphoneconnector)
Formoreinformation,see“Locatingconnectors,controls,andindicatorsonthefrontofyourcomputer”on
page8
and“Locatingconnectorsontherearofyourcomputer”onpage10.
Expansion
•Oneharddiskdrivebay
•Oneopticaldrivebay
•OneminiPCIExpressx1cardslot
Powersupply
Yourcomputercomeswitha150-wattautomaticvoltage-sensingpowersupply.
Securityfeatures
•ComputraceAgentsoftwareembeddedinrmware
•Coverpresenceswitch(alsocalledintrusionswitch)
•Abilitytoenableordisableadevice
•AbilitytoenableanddisableUSBconnectorsindividually
•Keyboardwithngerprintreader(shippedwithsomemodels)
•Power-onpassword(POP),administratorpassword,andharddiskdrivepasswordtodeterunauthorized
useofyourcomputer
•Startupsequencecontrol
•Startupwithoutkeyboardormouse
•Supportforanintegratedcablelock(Kensingtonlock)
•Supportforapadlock
•TrustedPlatformModule(TPM)
Formoreinformation,seeChapter4“Security”onpage31
.
Preinstalledsoftwareprograms
Yourcomputerispreinstalledwithsoftwareprogramstohelpyouworkmoreeasilyandsecurely.Formore
information,see“Softwareoverview”onpage5
.
Preinstalledoperatingsystem
YourcomputerispreinstalledwiththeMicrosoft
®
Windows
®
7operatingsystem.
Chapter1.Productoverview3
Page 16

Operatingsystem(s),certiedortestedforcompatibility
•Linux
®
1
•MicrosoftWindowsXPProfessionalSP3
Specications
Thissectionliststhephysicalspecicationsforyourcomputer.
Dimensions
Formodelswiththe20-inchdisplay
Width:502.8mm(19.8inches)
Height:363mm(14.29inches)
Depth:67mm(2.64inches)
Formodelswiththe23-inchdisplay
•Touchmodels:
Width:568mm(22.36inches)
Height:401mm(15.79inches)
Depth:74mm(2.91inches)
•Non-touchmodels:
Width:568mm(22.36inches)
Height:401mm(15.79inches)
Depth:67mm(2.64inches)
(variesbymodeltype)
Weight
Formodelswiththe20-inchdisplay
Maximumcongurationasshipped:8.4kg(18.52lb)
Formodelswiththe23-inchdisplay
•Touchmodels:
Maximumcongurationasshipped:10.6kg(23.37lb)
•Non-touchmodels:
Maximumcongurationasshipped:9.5kg(20.94lb)
Environment
•Airtemperature:
Operating:10°Cto35°C(50°Fto95°F)
Storage:-40°Cto60°C(-40°Fto140°F)inoriginalshippingpackage
Storage:-10°Cto60°C(14°Fto140°F)withoutpackage
•Humidity:
Operating:20%to80%(non-condensing)
1.Theoperatingsystem(s)listedherearebeingcertiedortestedforcompatibilityatthetimethispublicationgoesto
press.AdditionaloperatingsystemsmightbeidentiedbyLenovoascompatiblewithyourcomputerfollowingthe
publicationofthismanual.Thislistissubjecttochange.Todetermineifanoperatingsystemhasbeencertiedor
testedforcompatibility,checktheWebsiteoftheoperatingsystemvendor.
4ThinkCentreUserGuide
Page 17

Storage:20%to90%(non-condensing)
•Altitude:
Operating:-50to10000ft(-15.2to3048m)
Storage:-50to35000ft(-15.2to10668m)
Electricalinput
•Inputvoltage:
–Lowrange:
Minimum:100Vac
Maximum:127Vac
Inputfrequencyrange:50to60Hz
–Highrange:
Minimum:200Vac
Maximum:240Vac
Inputfrequencyrange:50to60Hz
Softwareoverview
Thecomputercomeswithapreinstalledoperatingsystemandseveralsoftwareprogramsprovidedby
Lenovo.
SoftwareprovidedbyLenovo
ThefollowingsoftwareprogramsareprovidedbyLenovotohelpyouimproveproductivityandreducethe
costassociatedwithmaintainingyourcomputer.Softwareprogramsprovidedwithyourcomputermight
varydependingonyourcomputermodeltypeandpreinstalledoperatingsystem.
LenovoThinkVantageT ools
TheLenovoThinkVantage
accesstovarioustoolstohelpyouworkmoreeasilyandsecurely.
ToaccesstheLenovoThinkVantageToolsprogram,clickStart➙AllPrograms➙LenovoThinkVantage
Tools.
ThefollowingtableliststheprogramsthatyoucanaccessfromtheLenovoThinkVantageToolsprogram.T o
accessaprogram,double-clickthecorrespondingicon.
Table1.ProgramiconnamesinLenovoThinkVantageT ools
CreateRecoveryMedia
FingerprintSoftware
LenovoSolutionCenterSystemHealthandDiagnostics
SimpleTapSimpleTap
ThinkVantagePasswordManagerPasswordVault
ThinkVantagePowerManager
ThinkVantageRescueandRecovery
ThinkVantageSystemUpdate
®
Toolsprogramguidesyoutoahostofinformationsourcesandprovideseasy
ProgramnameIconnameinLenovoThinkVantageTools
FactoryRecoveryDisks
FingerprintReader
PowerControls
®
EnhancedBackupandRestore
UpdateandDrivers
Chapter1.Productoverview5
Page 18

Table1.ProgramiconnamesinLenovoThinkVantageT ools(continued)
ProgramnameIconnameinLenovoThinkVantageTools
CommunicationsUtilityWebConferencing
ViewManager
ScreenLayout
LenovoWelcome
TheLenovoWelcomeprogramintroducesyoutosomeinnovativebuilt-infeaturesofLenovoandguidesyou
throughafewimportantsetuptaskstohelpyoumakethemostofyourcomputer.
FingerprintSoftware
Theintegratedngerprintreaderprovidedonsomekeyboardsenablesyoutoenrollyourngerprintand
associateitwithyourpower-onpassword,harddiskdrivepassword,andWindowspassword.Asaresult,
ngerprintauthenticationcanreplacepasswordsandenablesimpleandsecureuseraccess.Angerprint
readerkeyboardisavailablewithselectcomputersorcanbepurchasedforcomputersthatsupportthis
option.
ProductRecovery
TheProductRecoveryprogramenablesyoutorestorethecontentsoftheharddiskdrivetothefactory
defaultsettings.
SimpleTap
TheSimpleT approgramprovidesyouwithaquickwaytocustomizesomebasiccomputersettingssuchas
mutingthespeakers,adjustingthevolume,lockingthecomputeroperatingsystem,launchingaprogram,
openingaWebpage,openingale,andsoon.Y oualsocanusetheSimpleT approgramtoaccessthe
LenovoAppShop,fromwhichyoucandownloadvariousapplicationsandcomputersoftware.
TostarttheSimpleT apprograminaquickway,doanyofthefollowing:
•ClicktheredSimpleTaplaunchpointonthedesktop.Theredlaunchpointisavailableonthedesktop
afteryouhavelaunchedtheSimpleTapprogramforthersttime.
•PresstheblueThinkVantagebuttonifyourkeyboardhasone.
Note:TheSimpleTapprogramisonlyavailableoncertainmodelspreinstalledwiththeWindows7operating
system.IfyourWindows7modelisnotpreinstalledwiththeSimpleTapprogram,youcandownloadit
fromhttp://www.lenovo.com/support.
ThinkVantagePasswordManager
TheThinkVantagePasswordManagerprogramautomaticallycapturesandllsinauthenticationinformation
forWindowsapplicationsandWebsites.
Notes:IfthePasswordVaulticonintheLenovoThinkVantageToolsprogramisdimmed,itindicatesthat
youneedtoinstalltheThinkVantagePasswordManagerprogrammanuallybeforeenablingitsfeatures.To
installtheThinkVantagePasswordManagerprogram,dothefollowing:
1.ClickStart➙AllPrograms➙LenovoThinkVantageT ools,anddouble-clickPasswordVault.
2.Followtheinstructionsonthescreen.
3.Whentheinstallationprocesscompletes,thePasswordVaulticonisactivated.
ThinkVantagePowerManager
TheThinkVantagePowerManagerprogramprovidesconvenient,exible,andcompletepowermanagement
foryourThinkCentre®computer.ByusingtheThinkVantagePowerManagerprogram,youcanadjustyour
powersettingstoachievethebestbalancebetweensystemperformanceandpowersaving.
6ThinkCentreUserGuide
Page 19

ThinkVantageRescueandRecovery
TheThinkVantageRescueandRecoveryprogramisaonebuttonrecoveryandrestoresolutionthatincludes
asetofself-recoverytoolstohelpyoudiagnosecomputerproblems,gethelp,andrecoverfromsystem
crashes,evenifyoucannotstarttheWindowsoperatingsystem.
Note:IftheEnhancedBackupandRestoreiconintheLenovoThinkVantageToolsprogramisdimmed,it
indicatesthatyouneedtoinstalltheThinkVantageRescueandRecoveryprogrammanuallybeforeenabling
itsfeatures.T oinstalltheThinkVantageRescueandRecoveryprogram,dothefollowing:
1.ClickStart➙AllPrograms➙LenovoThinkVantageTools,anddouble-clickEnhancedBackup
andRestore.
2.Followtheinstructionsonthescreen.
3.Whentheinstallationprocesscompletes,theEnhancedBackupandRestoreiconisactivated.
ThinkVantageSystemUpdate
TheThinkVantageSystemUpdateprogramhelpsyoukeepthesoftwareonyourcomputerup-to-dateby
downloadingandinstallingsoftwarepackages(ThinkVantageapplications,devicedrivers,BIOSupdates,
andotherthirdpartyapplications).
CommunicationsUtility
TheCommunicationsUtilityprogramprovidesacentrallocationforintegratedcameraandmicrophone
settings.ItcontrolsadvancedsettingsfortheintegratedmicrophoneandcameratooptimizeWeb
conferencingandVoiceoverIP(VOIP)experience.
ViewManager
TheViewManagerprogramenablesyoutoautomatewindowlocations.Itenhancesproductivityby
providingtheabilitytomovewindowstohotcornersandquicklysnapthemtoapredeterminedsize.
Itenablesyoutoworkacrossmultiplemonitors.
LenovoSolutionCenter
TheLenovoSolutionCenterprogramenablesyoutotroubleshootandresolvecomputerproblems.It
combinesdiagnostictests,systeminformationcollection,securitystatus,andsupportinformation,along
withhintsandtipsformaximumsystemperformance.See“LenovoSolutionCenter”onpage107
detailedinformation.
for
AdobeReader
TheAdobeReaderprogramisatoolusedtoview,print,andsearchPDFdocuments.
Antivirussoftware
Yourcomputercomeswithantivirussoftwarethatyoucanusetodetectandeliminateviruses.Lenovo
providesafullversionofantivirussoftwareonyourharddiskdrivewithafree30-daysubscription.After30
days,youmustrenewthelicensetocontinuereceivingtheantivirusprogramupdates.
Locations
Thissectionprovidesinformationtohelpyoulocatetheconnectorsonthefrontandrearofyourcomputer,
partsonthesystemboard,andcomponentsandinternaldrivesinyourcomputer.
Note:Thecomponentsinyourcomputermightlookslightlydifferentfromtheillustrations.
Chapter1.Productoverview7
Page 20
Locatingconnectors,controls,andindicatorsonthefrontofyour computer
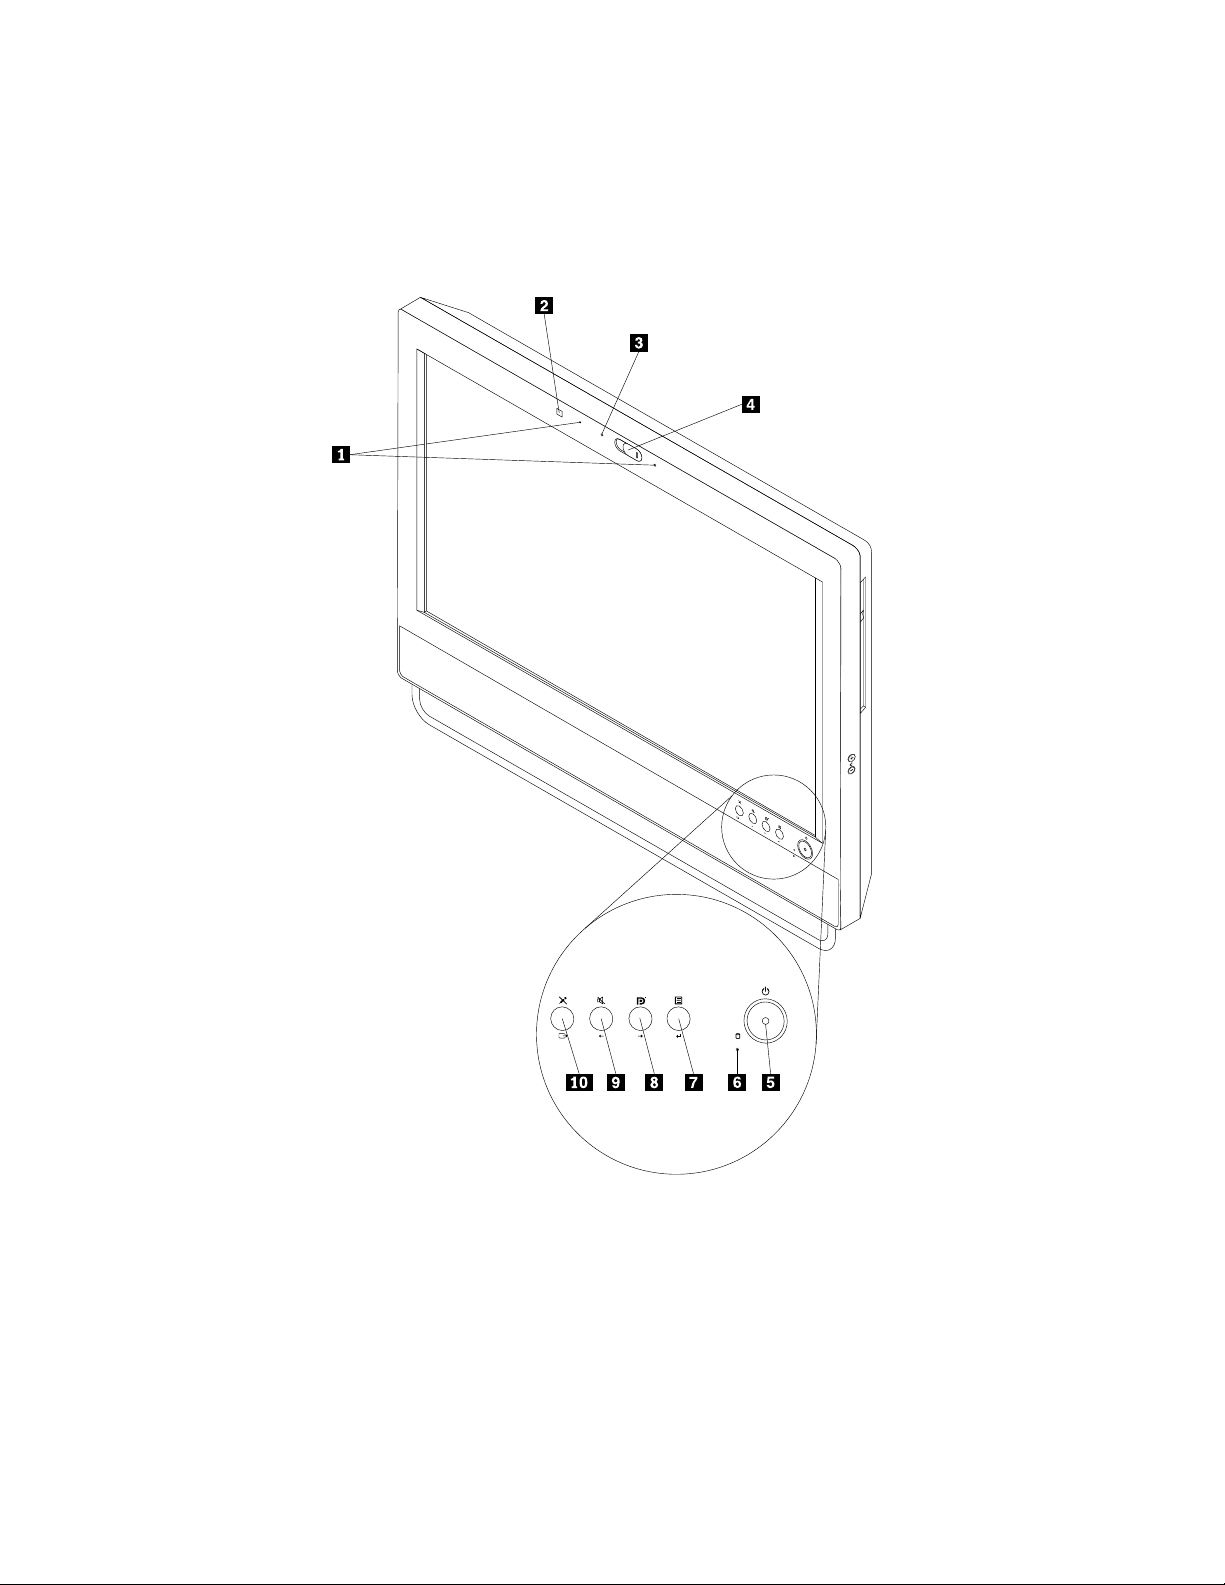
Figure1“Frontconnector,control,andindicatorlocations”onpage8showsthelocationsoftheconnectors,
controls,andindicatorsonthefrontofyourcomputer.
Figure1.Frontconnector,control,andindicatorlocations
8ThinkCentreUserGuide
Page 21
1Integratedmicrophones
2AmbientlightsensorRight
3Integratedcameraindicator
4Integratedcamerawithblockshield
5Powerswitch
6HarddiskdriveactivityindicatorExit
7On-ScreenDisplay(OSD)menu
Enter
8Monitor/Computermodeswitch
9Speakermute/unmutecontrol(computermode)
Left
10Microphonemute/unmutecontrol(computermode)
Formoreinformationaboutthefrontcontrols,see“Usingyourcomputerinmonitormode”onpage9.
Usingyourcomputerinmonitormode
Yourcomputercanworkintwomodes:computermodeormonitormode.Thissectionprovidesinstructions
onhowtouseyourcomputerinmonitormode.
Touseyourcomputerinmonitormode,youneedtohaveasecondcomputer.Connectoneendofthe
DisplayPortcabletotheDisplayPort-inconnectorontherearofyourcomputer,andtheotherendtothe
DisplayPortconnectoronthesecondcomputer.Usethemonitor/computermodeswitchonthefrontof
yourcomputertoswitchyourcomputerbetweencomputermodeandmonitormode.
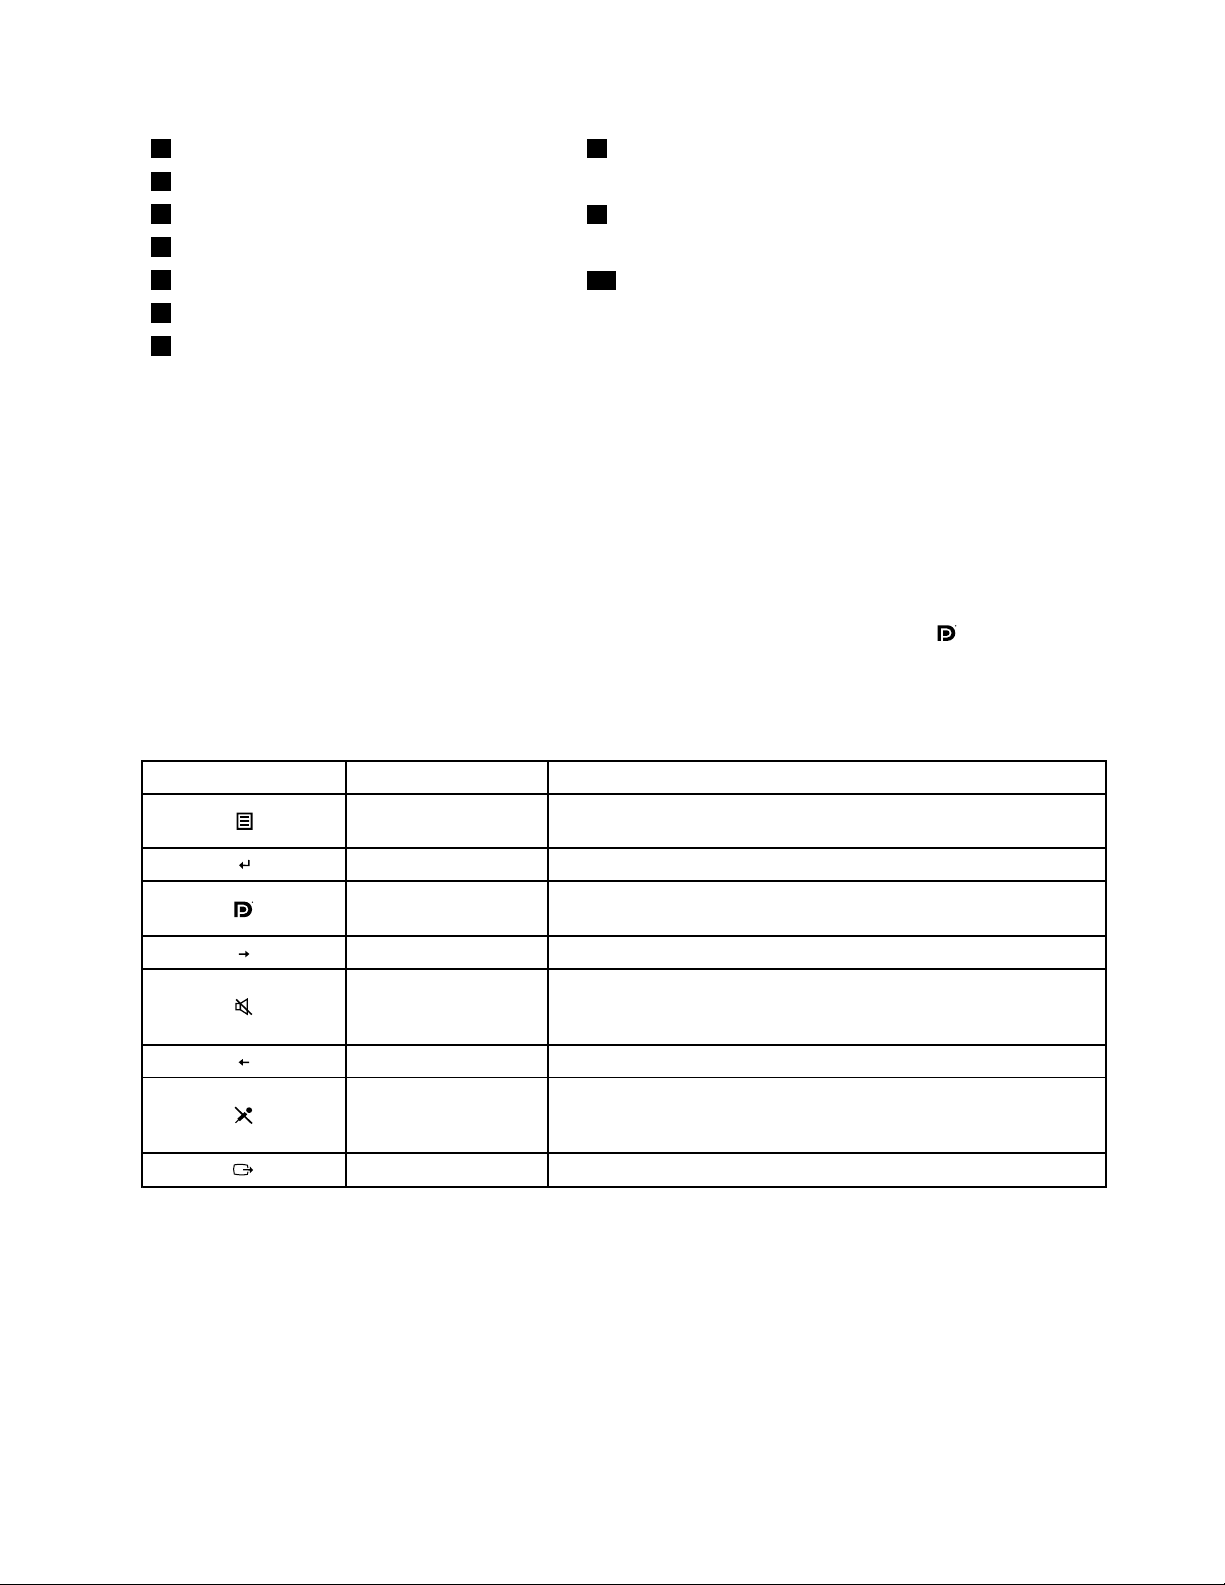
Thefollowingtableshowsthefunctionsofeachcontrolwhenyourcomputerworksincomputermode
ormonitormode.
IconControlDescription
On-ScreenDisplay
(OSD)menu
Enter
Monitor/Computer
modeswitch
RightMovetotheright.
Speakermute/unmute
control(computer
mode)
LeftMovetotheleft.
Microphone
mute/unmutecontrol
(computermode)
Exit
OpenthemainOSDmenu.
Conrmaselection.
Switchyourcomputerbetweencomputermodeandmonitormode.
Turnon/offtheinternalspeakers.
Turnon/offtheintegratedmicrophones.
ExitthemainOSDmenu.
Chapter1.Productoverview9
Page 22
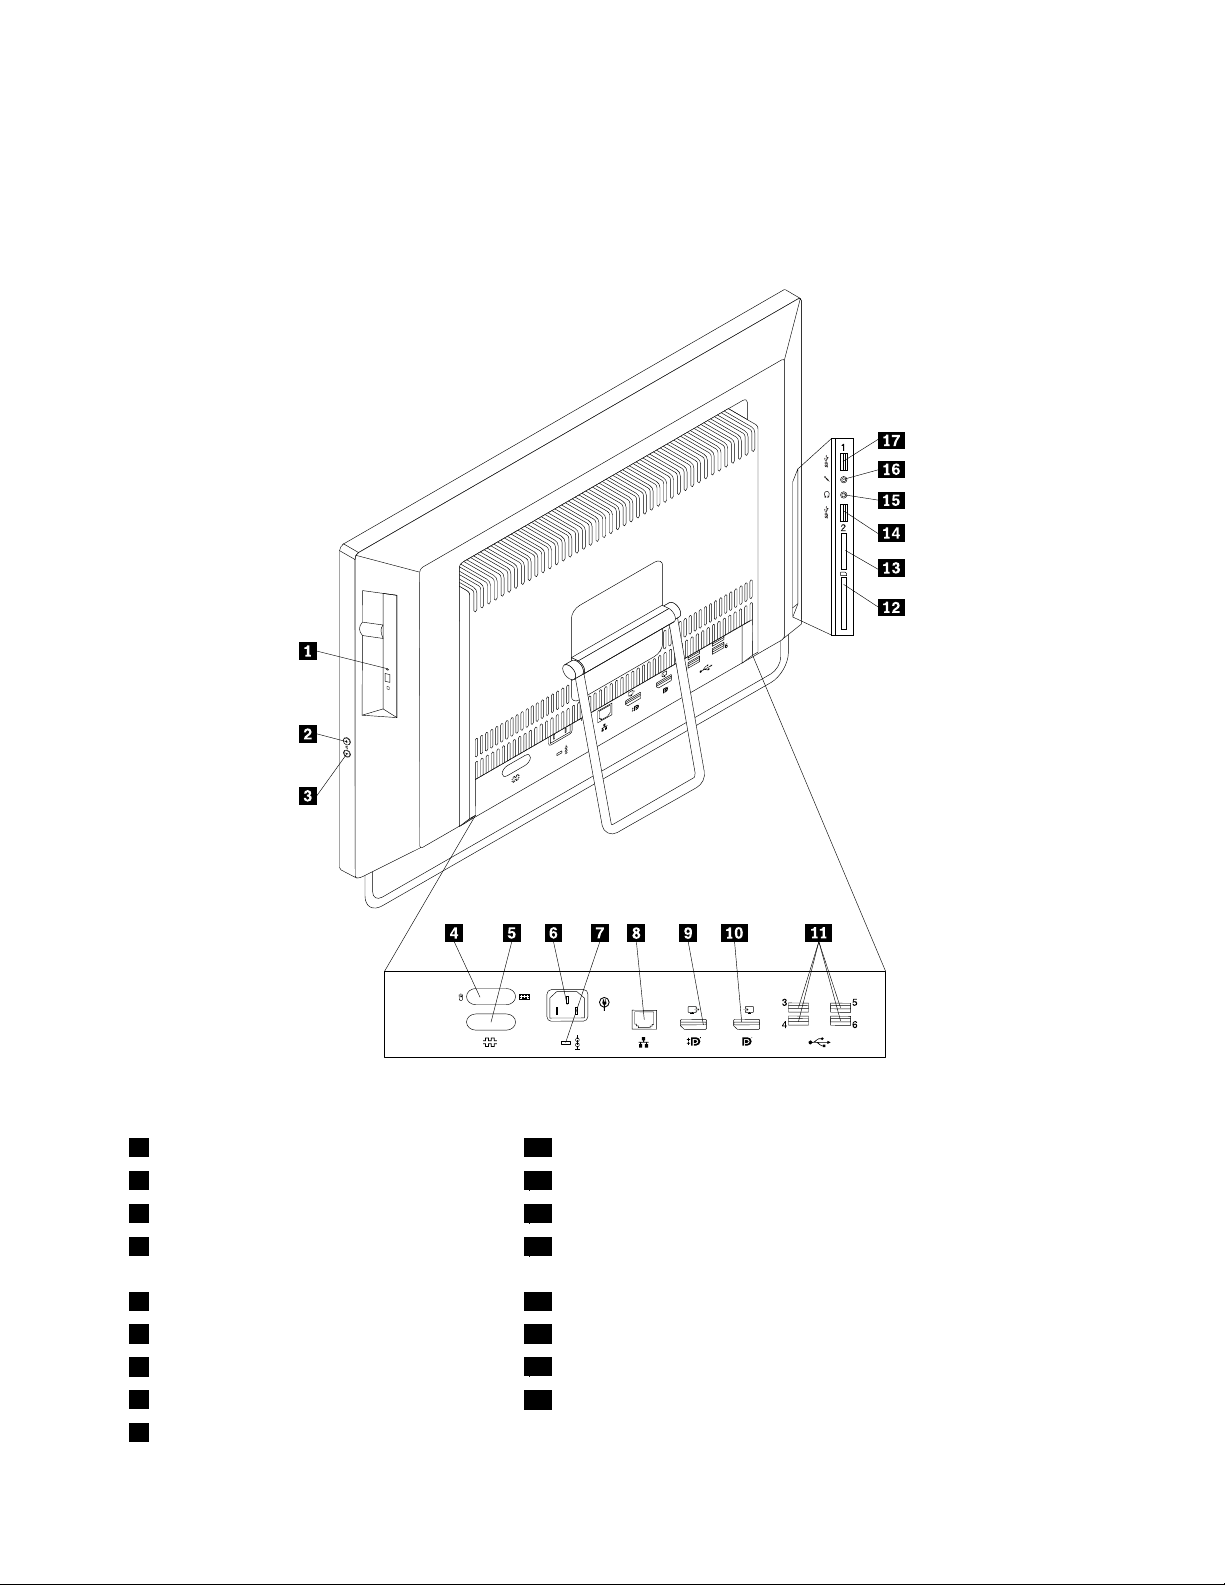
Locatingconnectorsontherearofyourcomputer
Figure2“Rearconnectorlocations”onpage10showsthelocationsoftheconnectorsontherearofyour
computer.Someconnectorsontherearofyourcomputerarecolor-codedtohelpyoudeterminewhereto
connectthecablesonyourcomputer.
Figure2.Rearconnectorlocations
1Opticaldriveeject/closebutton
2Volume-upcontrol(computermode)11USB2.0connectors(USBports3to6)
3Volume-downcontrol(computermode)12ExpressCardslot
4PS/2keyboardandmouseconnectors
10DisplayPort-inconnector
13Cardreaderslot*
(optional)
5Serialport(optional)14USB3.0connector(USBport2)
6Powercordconnector15Headphoneconnector
7Integratedcablelock(Kensingtonlock)slot
8Ethernetconnector
9DisplayPort-outconnector
16Microphoneconnector
17USB3.0connector(USBport1)
10ThinkCentreUserGuide
Page 23

Thecardreaderslotisfor11-in-1cardreaders,supportingthefollowingcards:
•MultiMediaCard(MMC)
•Reduced-SizeMultiMediaCard(RS-MMC)
•MultiMediaCard-mobile(MMC-mobile)
•MultiMediaCard-plus(MMC-plus)
•SecureDigital(SD)card
•SecureDigitalHigh-Capacity(SDHC)card
•SecureDigitaleXtended-Capacity(SDXC)card
•MemoryStick(MS)
•MemoryStick(MS)PRO
•ExtremeDigital(x-D)PictureCard(typeM)
•ExtremeDigital(x-D)PictureCard(typeH)
ConnectorDescription
DisplayPortoutconnector
DisplayPortinconnectorUsedtoattachyourcomputertoaDisplayPortmonitorconnectoronasecond
Ethernetconnector
Microphoneconnector
PS/2keyboardconnector
(optional)
PS/2mouseconnector
(optional)
Serialport(optional)
USB2.0connectorUsedtoattachadevicethatrequiresaUSB2.0connector,suchasaUSB
USB3.0connectorUsedtoattachadevicethatrequiresaUSB2.0or3.0connector,suchasa
Usedtoattachahigh-performancemonitor,adirect-drivemonitor,orotherdevices
thatuseaDisplayPortconnector.
computersothatyoucanuseyourcomputerinmonitormode.
UsedtoattachanEthernetcableforalocalareanetwork(LAN).
Note:TooperatethecomputerwithinFCCClassBlimits,useaCategory5Ethernet
cable.
Usedtoattachamicrophonetoyourcomputerwhenyouwanttorecordsoundorif
youusespeech-recognitionsoftware.
UsedtoattachakeyboardthatusesaPS/2keyboardconnector.
Usedtoattachamouse,atrackball,orotherpointingdevicesthatuseaPS/2
mouseconnector.
Usedtoattachanexternalmodem,aserialprinter,orotherdevicesthatusea
9-pinserialport.
keyboard,aUSBmouse,aUSBscanner,oraUSBprinter.Ifyouhavemorethan
sixUSBdevices,youcanpurchaseaUSBhub,whichyoucanusetoconnect
additionalUSBdevices.
keyboard,amouse,ascanner,aprinter,orapersonaldigitalassistant(PDA).A
USB3.0connectorprovideshightransmissionspeedstoreducethetimethatis
requiredfordatatransmission.
Chapter1.Productoverview11
Page 24

Locatingcomponents
Thissectionshowsthelocationsofthevariouscomponentsinyourcomputer.Toremovethecomputer
cover,see“Removingthecomputercover”onpage36.
Figure3.Componentlocationsformodelswiththe20-inchdisplay
12ThinkCentreUserGuide
Page 25
1Framestand(availableonsomemodels)
2Computercover
3Battery
4Heatsink
5Microprocessor19Harddiskdrive
6Memorymodule
7Heatsinkandfanassemblyforgraphicsprocessing
15Powersupplyassembly
16Internalspeaker
17RearPS/2connectorsandserialportassembly
18Microprocessorfan
20LCDbracket
21LCDpanel
unit(GPU)(availableinsomemodels)
8Cardreader(availableinsomemodels)22Converterboard
9ExpressCard(availableinsomemodels)23Opticaldrive(availableinsomemodels)
10WiFicard(availableinsomemodels)24VESA(VideoElectronicsStandardsAssociation)
mountbracket
11Framefoot(availableonsomemodels)
12Internalspeaker
25Handlebar
26Integratedcamerawithmicrophone(availableinsome
models)
13RearI/Oassembly27Lightsensor(availableinsomemodels)
14Bluetoothmodule(availableinsomemodels)
Chapter1.Productoverview13
Page 26
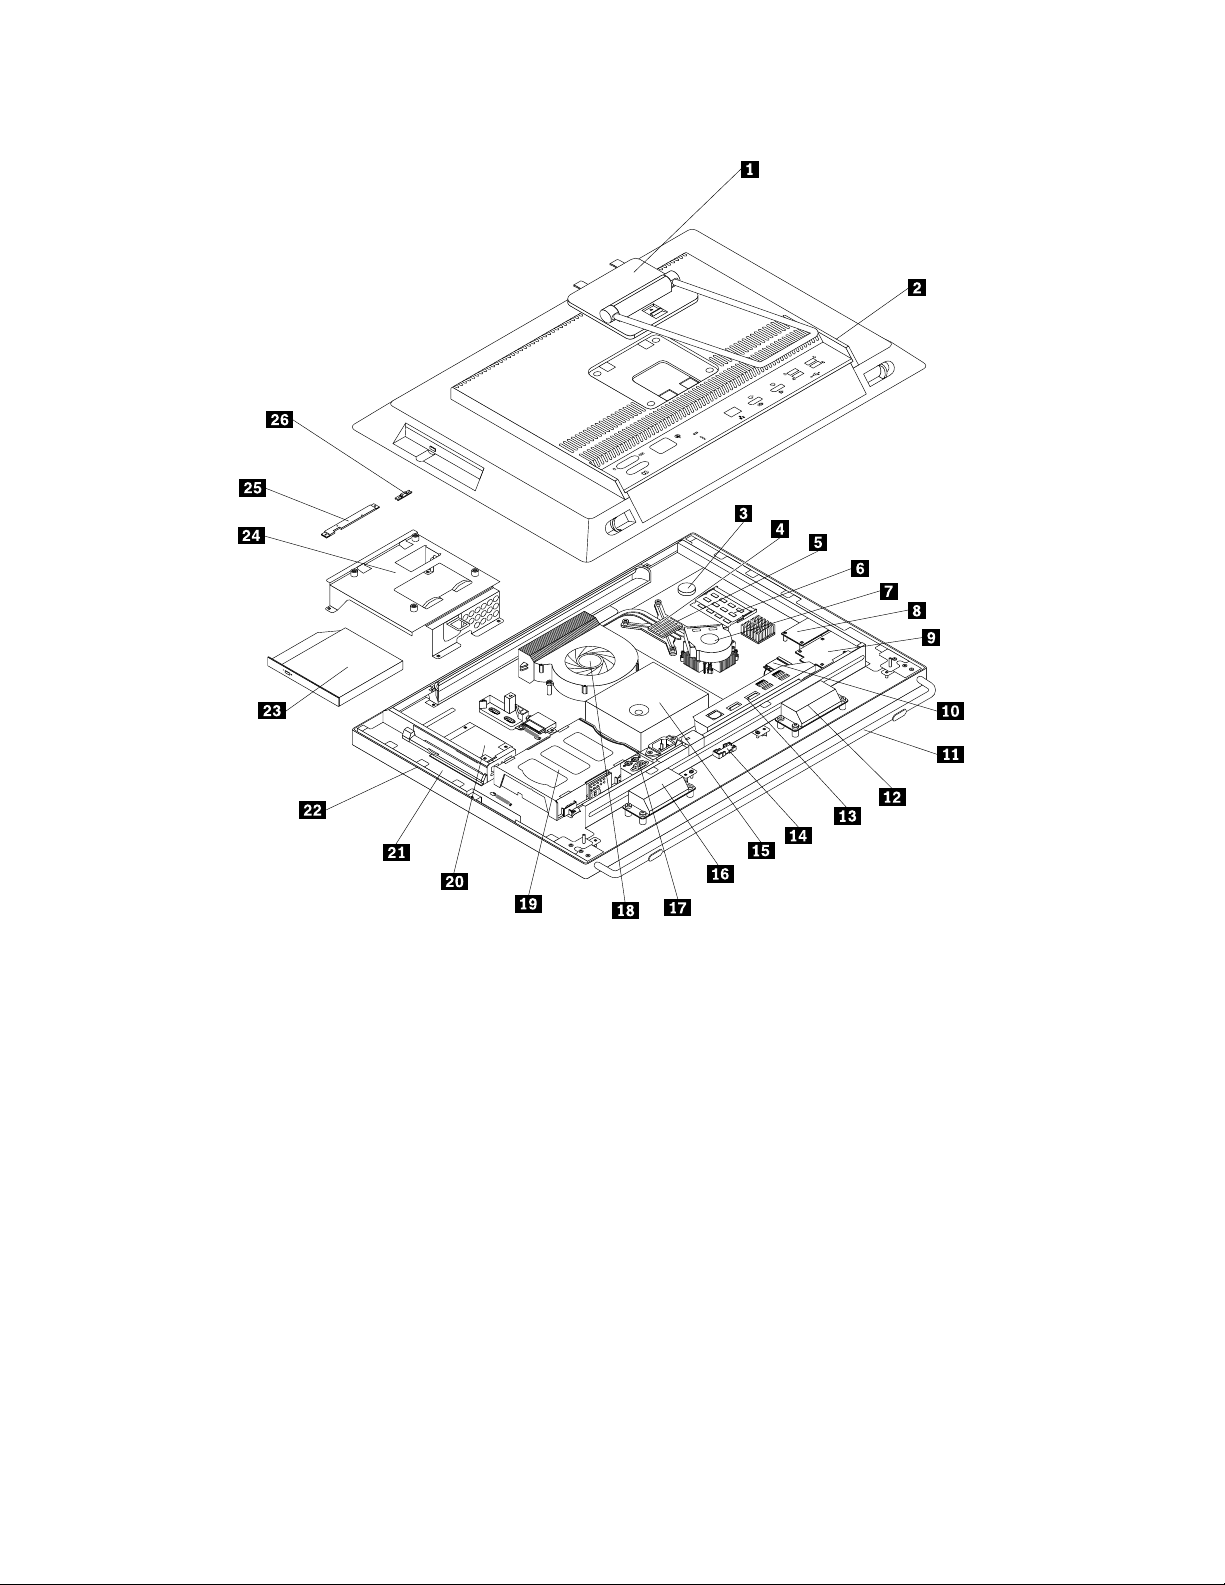
Figure4.Componentlocationsformodelswiththe23-inchdisplay
14ThinkCentreUserGuide
Page 27
1Framestand(availableonsomemodels)14Bluetoothmodule(availableinsomemodels)
2Computercover
3Battery16Internalspeaker
4Heatsink
5Microprocessor
6Memorymodule19Harddiskdrive
7Heatsinkandfanassemblyforgraphicsprocessing
15Powersupplyassembly
17RearPS/2connectorsandserialportassembly
18Microprocessorfan
20Converterboard
unit(GPU)(availableinsomemodels)
8Cardreader(availableinsomemodels)21LCDbracket
9ExpressCard(availableinsomemodels)22LCDpanel
10WiFicard(availableinsomemodels)23Opticaldrive(availableinsomemodels)
11Framefoot(availableonsomemodels)24VESAmountbracket
12Internalspeaker
25Integratedcamerawithmicrophone(availableinsome
models)
13RearI/Oassembly26Lightsensor(availableinsomemodels)
Locatingpartsonthesystemboard
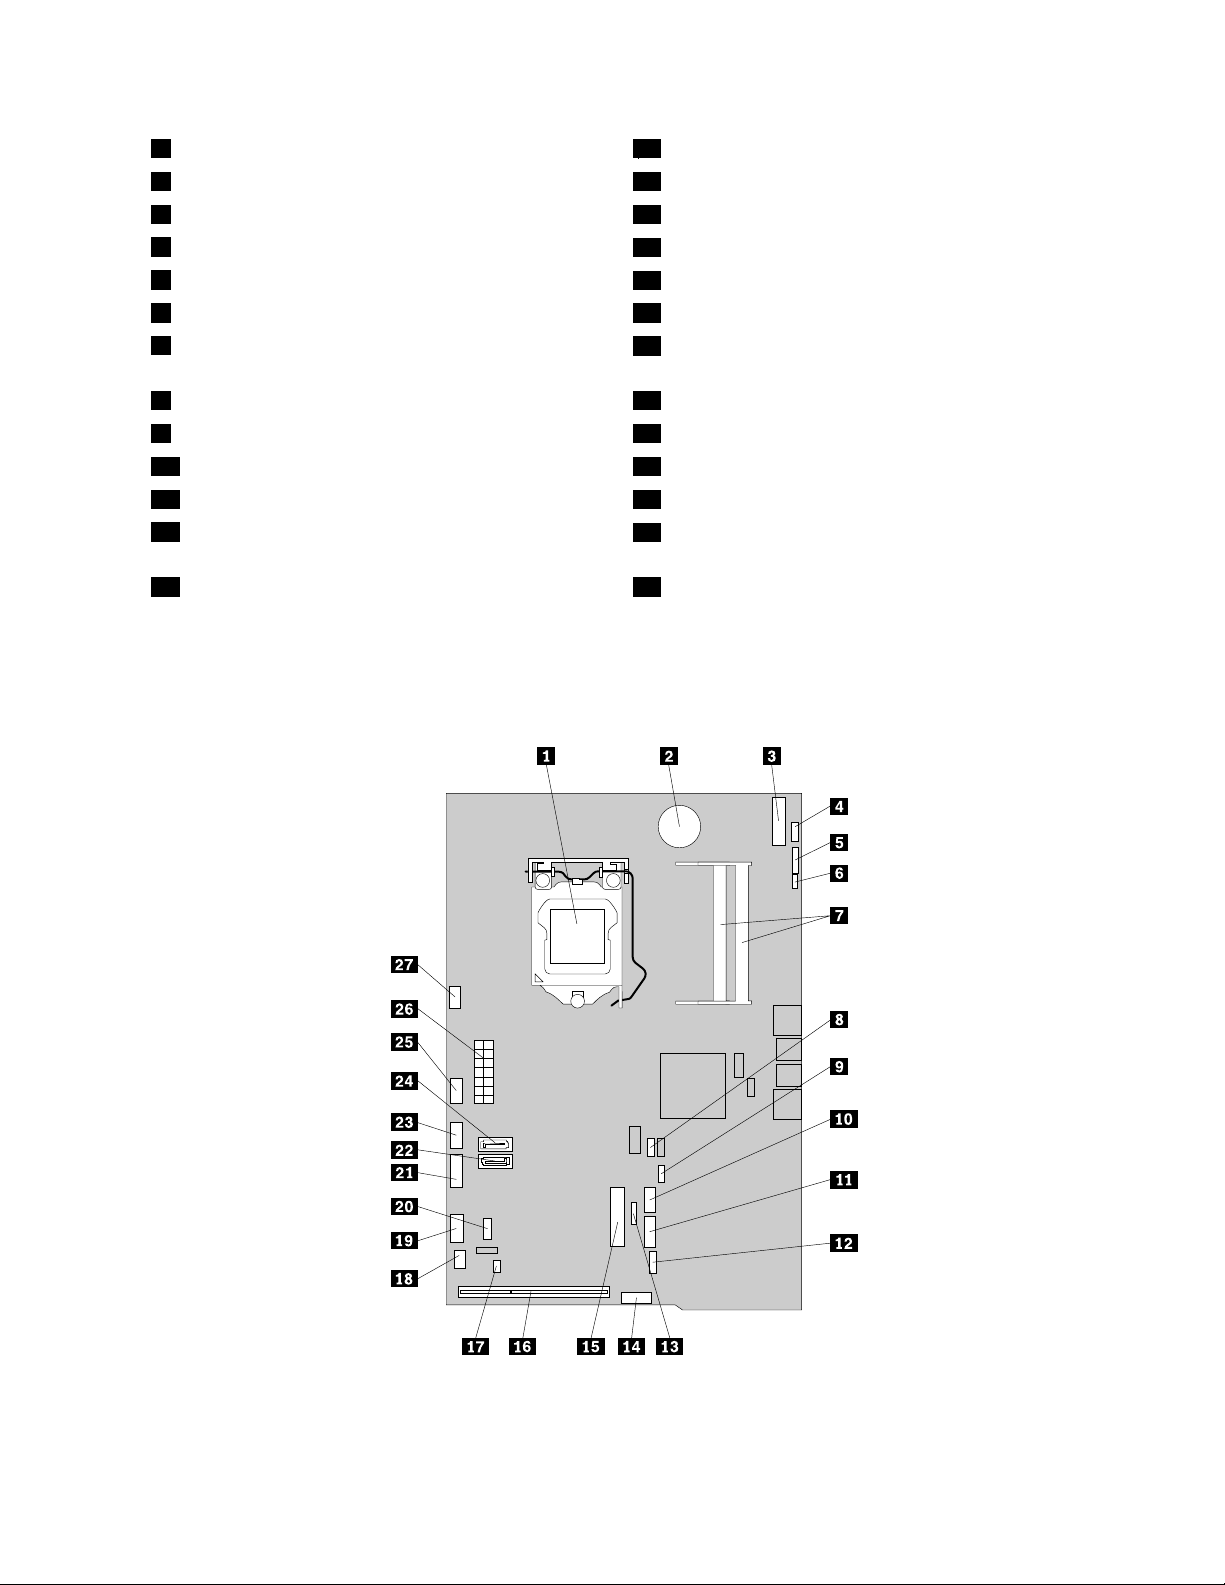
Figure5“Systemboardpartlocations”onpage15showsthelocationsofthepartsonthesystemboard.
Figure5.Systemboardpartlocations
Chapter1.Productoverview15
Page 28

1Microprocessor
2Battery
3mSATAconnector
4T ouchpanelcontrolboardconnector(fortouch
15MiniPCIExpressx1cardslot
16RearI/Oassemblyslot
17Volumecontrolpanelconnector
18PS/2keyboardandmouseconnector
modelonly)
5Integratedcameraconnector19Frontcontrolpanelconnector
6Lightsensorconnector
7Memoryslots(2)21SATApowerconnector
8ClearCMOS(ComplementaryMetalOxide
20Serial(COM2)connector
22SATA3.0connector(forconnectingtheharddiskdrive)
Semiconductor)/Recoveryjumper
9Thermalsensorconnector
10Internalspeakerconnector
11Cardreaderconnector25GPUfanconnector
12ExpressCardconnector
13Bluetoothmoduleconnector
14Displayconnector
23Converterboardpowerconnector
24SATA2.0connector(forconnectingtheopticaldrive)
2614-pinpowerconnector
27Microprocessorfanconnector
16ThinkCentreUserGuide
Page 29
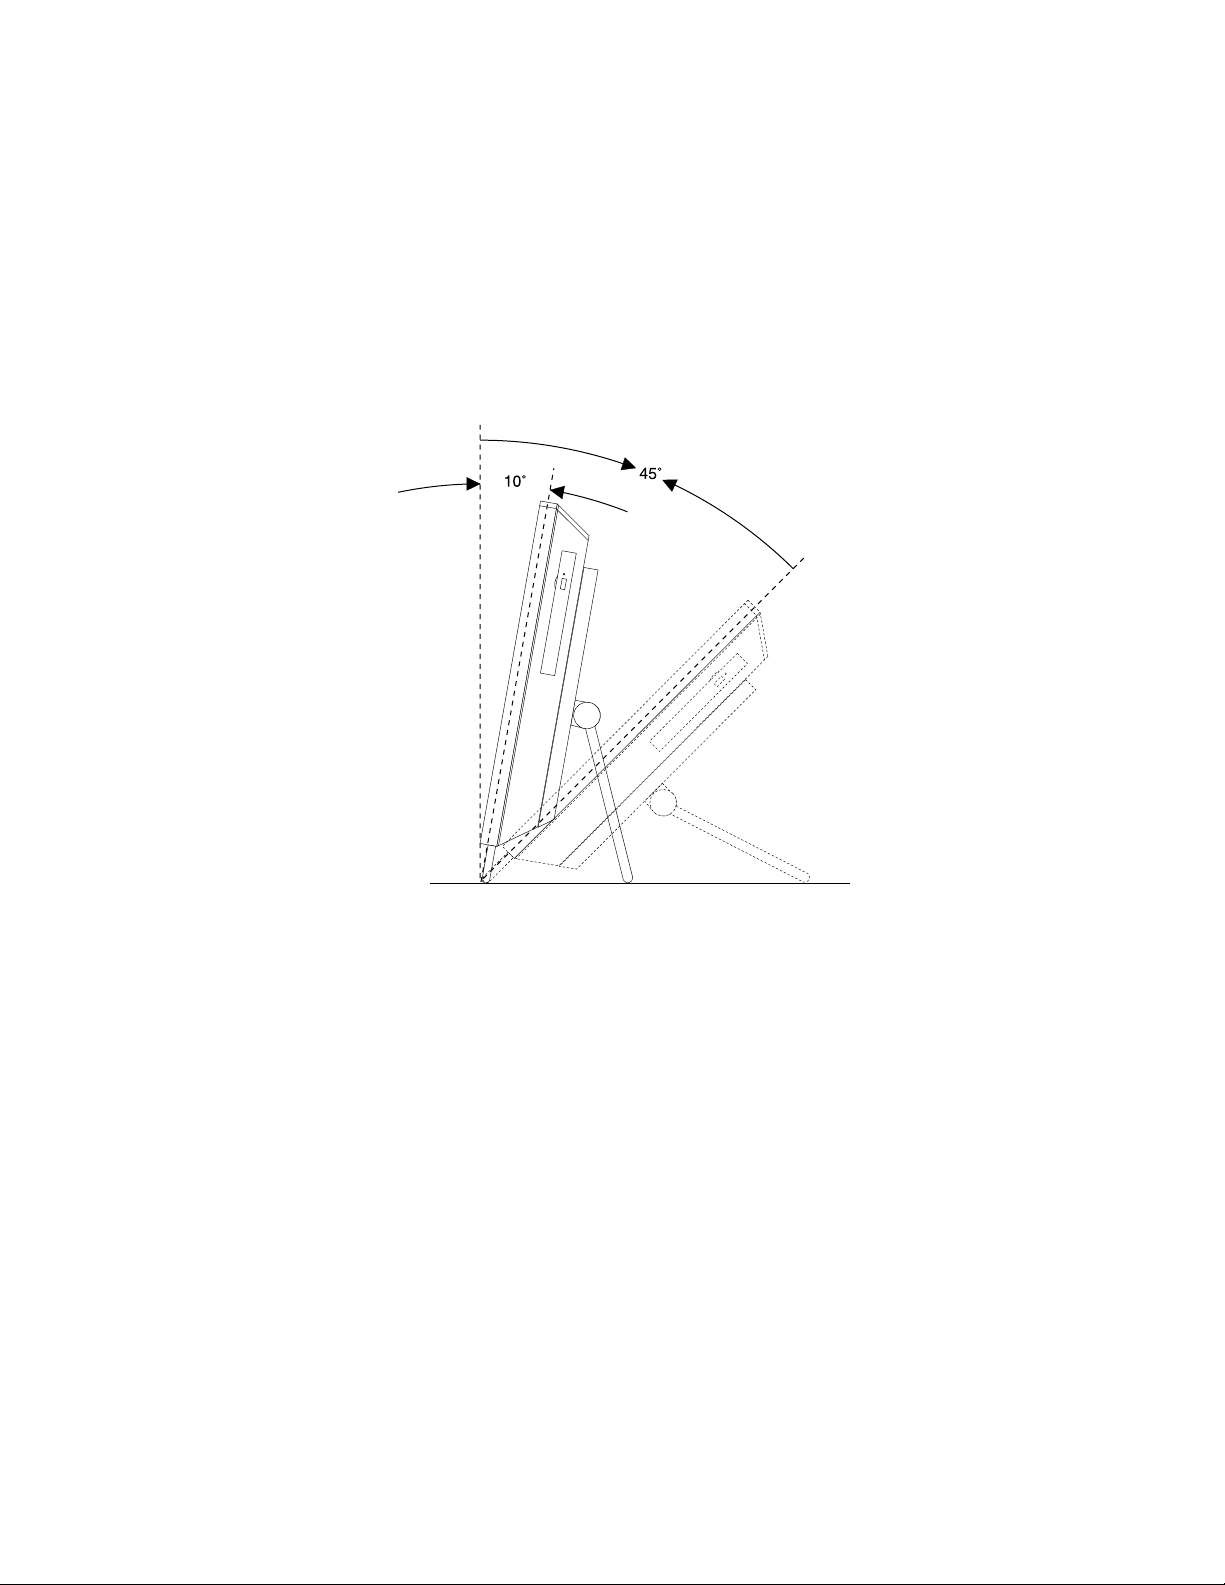
Adjustingtheframestand
Yourcomputermightcomewithaframestandthatyoucanusetoadjustthecomputertoyourcomfortable
position.Pullthestandopenandadjustthepositionofthecomputeratananglebetween10°to45°
asshowninthefollowingillustration.
Note:Theframestandisavailableonlyinsomemodels.
CAUTION:
Makesurethattheangleisatleast10°fromthevertical;otherwise,thecomputermightbeunstable
andfallover.
Figure6.Adjustingtheframestand
Chapter1.Productoverview17
Page 30
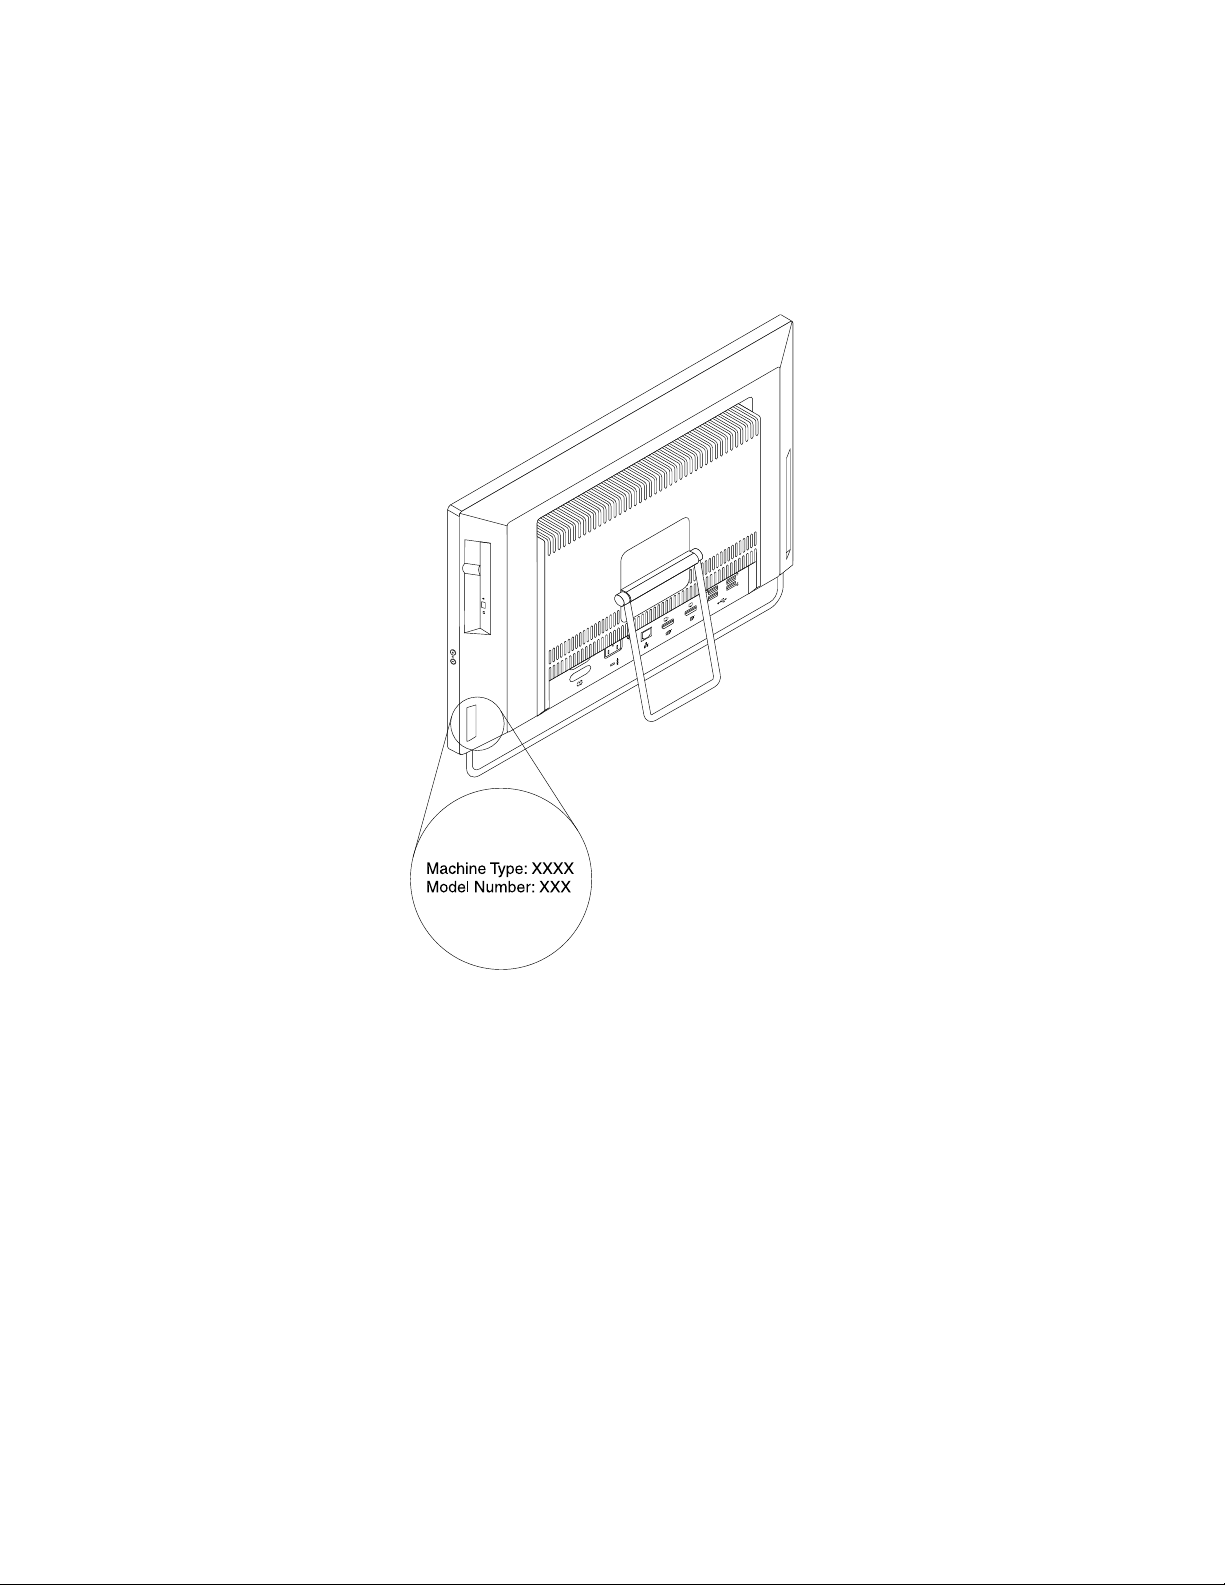
Machinetypeandmodellabel
Themachinetypeandmodellabelidentiesyourcomputer.WhenyoucontactLenovoforhelp,themachine
typeandmodelinformationhelpssupporttechnicianstoidentifyyourcomputerandprovidefasterservice.
Thefollowingisasampleofthemachinetypeandmodellabel.
Figure7.Machinetypeandmodellabel
18ThinkCentreUserGuide
Page 31

Chapter2.Usingyourcomputer
Thischapterprovidesinformationonusingsomeofthecomputercomponents.
Frequentlyaskedquestions
Thefollowingareafewtipsthatwillhelpyouoptimizetheuseofyourcomputer.
CanIgetmyuserguideinanotherlanguage?
TheuserguideisavailableinvariouslanguagesontheLenovoSupportWebsiteat:
http://www.lenovo.com/ThinkCentreUserGuides
Wherearemyrecoverydiscs?
Lenovoprovidesaprogramthatenablesyoutocreaterecoverydiscs.Fordetailsaboutcreatingrecovery
discs,see“Creatingrecoverymedia”onpage71.
Additionally,incaseofaharddiskfailure,youcanorderProductRecoverydiscsfromtheLenovoCustomer
SupportCenter.ForinformationaboutcontactingtheCustomerSupportCenter,seeChapter11“Getting
information,help,andservice”onpage109.BeforeusingtheProductRecoverydiscs,refertothe
documentationthatcomeswiththediscs.
Attention:AProductRecoverydiscpackagemightcontainmultiplediscs.Makesureyouhaveallofthe
discsreadybeforestartingtherecoveryprocess.Duringtherecoveryprocess,youmightbeprompted
tochangediscs.
WherecanIndhelpabouttheWindowsoperatingsystem?
TheWindowsHelpandSupportinformationsystemprovidesyoudetailedinformationaboutusingthe
Windowsoperatingsystemtohelpyougetthemostofyourcomputer.ToaccesstheWindowsHelpand
Supportinformationsystem,clickStart➙HelpandSupport.
Usingthekeyboard
Dependingonyourmodel,yourcomputercomeswitheitherastandardkeyboardorangerprintreader
keyboard.TheMicrosoftWindowsshortcutkeysareprovidedonbothkeyboardtypes.
Thissectionprovidesinformationaboutthefollowingtopics:
•“UsingWindowsshortcutkeys”onpage19
•“UsingtheblueThinkVantagebutton”onpage20
•“Usingangerprintreader”onpage20
UsingWindowsshortcutkeys
Boththestandardkeyboardandthengerprintreaderkeyboardprovidethreekeysyoucanusewithyour
MicrosoftWindowsoperatingsystem.
•ThetwoStartmenukeysarelocatedbesidetheAltkeyoneithersideofthespacebar.Theyfeaturethe
Windowslogo.Whenyoupresseither,theWindowsStartmenuopens.ThestyleoftheWindowslogo
variesdependingonthekeyboardtype.
•Thecontext-menukeyislocatednexttotheCtrlkeyontherightsideoftheSpacebar.Pressingthe
context-menukeyopensthecontextmenufortheactiveprogram,icon,orobject.
©CopyrightLenovo2012
19
Page 32
Note:YoucanusethemouseortheUpandDownarrowkeystohighlightmenuselections.Youcanclose
theStartmenuorthecontextmenubyclickingthemouseorpressingEsc.
UsingtheblueThinkVantagebutton
SomekeyboardshaveablueThinkVantagebuttonthatyoucanusetoopenacomprehensiveon-board
helpandinformationcenterfromLenovo.
OntheWindows7operatingsystem,pressingtheblueThinkVantagebuttonopenstheSimpleT approgram.
See“SimpleTap”onpage6formoreinformation.
Usingangerprintreader
Somecomputersmightcomewithakeyboardthathasangerprintreader.Formoreinformationaboutthe
ngerprintreader,see“FingerprintSoftware”onpage6
ToopentheThinkVantageFingerprintSoftwareprogramandusethengerprintreader,clickStart➙All
Programs➙LenovoThinkVantageTools➙FingerprintReader.
Followtheinstructionsonthescreen.Foradditionalinformation,refertotheThinkVantageFingerprint
Softwarehelpsystem.
.
Usingthewheelmouse
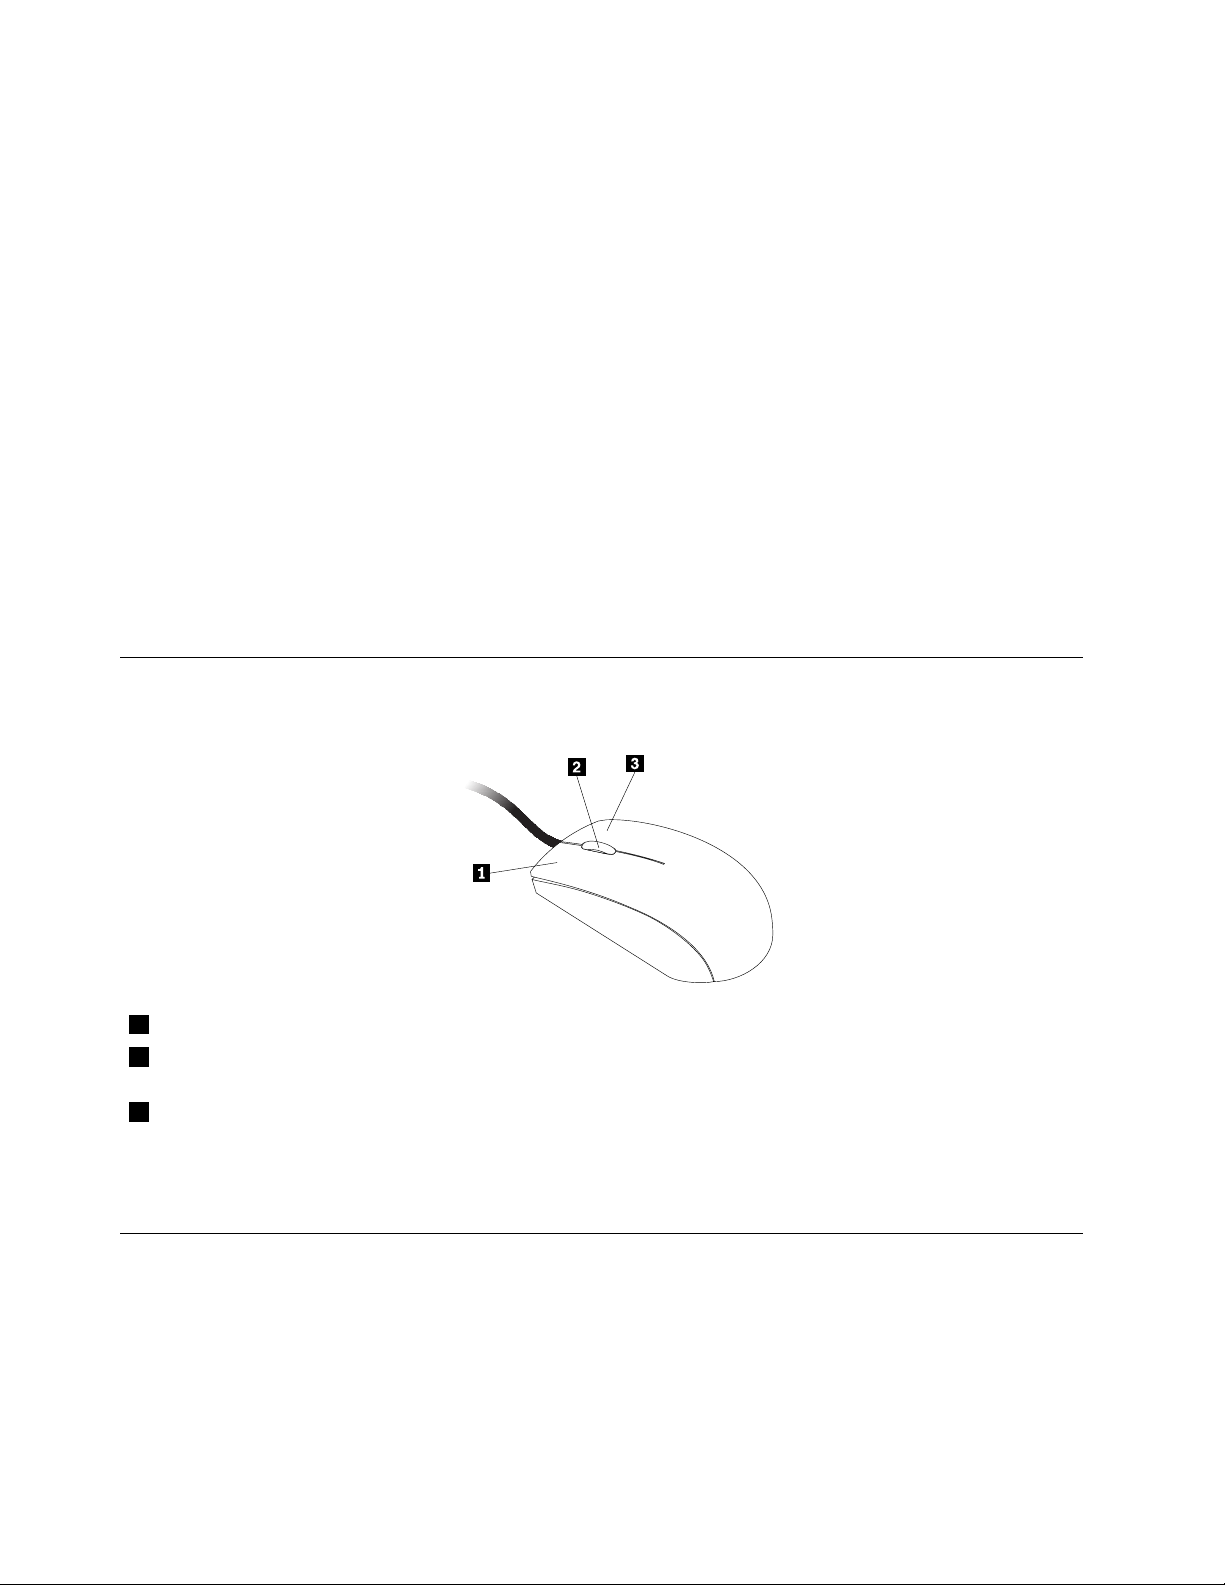
Thewheelmousehasthefollowingcontrols:
1PrimarymousebuttonUsethisbuttontoselectorstartaprogramormenuitem.
2Wheel
3Secondarymousebutton
Youcanswitchthefunctionoftheprimaryandsecondarymousebuttonsandchangeotherdefaultbehavior
throughthemousepropertiesfunctionintheWindowsControlPanel.
Usethewheeltocontrolthescrollingactionofthemouse.Thedirectioninwhichyou
rotatethewheelcontrolsthedirectionofthescrollingaction.
Usethisbuttontodisplayamenufortheactiveprogram,icon,orobject.
Adjustingaudio
Soundisanimportantpartofthecomputerexperience.Yourcomputerhasadigitalaudiocontrollerbuilt
intothesystemboard.
20ThinkCentreUserGuide
Page 33

Aboutyourcomputeraudio
Yourcomputercomeswithtwoaudioconnectors:astereoheadphoneconnectorandamicrophone
connector.Thebuilt-indigitalaudiocontrollerenablesyoutorecordandplaybacksoundandmusic,enjoy
soundwithmultimediaapplications,andworkwithspeech-recognitionsoftware.
Settingthevolumefromthedesktop
Thedesktopvolumecontrolisaccessiblethroughthevolumeiconinthetaskbar,whichislocatedatthe
bottom-rightcorneroftheWindowsdesktop.Clickthevolumeiconandmovethesliderupordownto
controlthevolume,orclicktheMuteicontoturntheaudiooff.Ifthevolumeiconisnotinthetaskbar,see
“Addingthevolumeicontothetaskbar”onpage21
Addingthevolumeicontothetaskbar
ToaddthevolumeicontothetaskbarontheWindows7operatingsystem,dothefollowing:
1.FromtheWindowsdesktop,clickStart➙ControlPanel➙AppearanceandPersonalization.
2.IntheT askbarandStartMenutopic,clickCustomizeiconsonthetaskbar.
3.ClickTurnsystemiconsonoroffandchangethevolumebehaviorsfromOfftoOn.
4.ClickOKtosavethenewsettings.
.
SettingthevolumefromControlPanel
YoucansetthecomputervolumefromControlPanel.TosetthecomputervolumefromControlPanel,
dothefollowing:
1.FromtheWindowsdesktop,clickStart➙ControlPanel➙HardwareandSound.
2.IntheSoundtopic,clickAdjustsystemvolume.
3.Movetheslidersupordowntoraiseorlowerthevolumeofyourcomputer.
UsingCDsandDVDs
YourcomputermighthaveaDVDROMdriveorrecordableDVDdriveinstalled.DVDdrivesuse
industry-standard,12cm(4.75-inch)CDmediaorDVDmedia.IfyourcomputercomeswithaDVDdrive,
thedrivecanreadDVD-ROMdiscs,DVD-Rdiscs,DVD-RAMdiscs,DVD-RWdiscs,andalltypesofCDs,
suchasCD-ROMdiscs,CD-RWdiscs,CD-Rdiscs,andaudioCDs.IfyouhavearecordableDVDdrive,
itcanalsorecordonDVD-Rdiscs,DVD-RWdiscs,typeIIDVD-RAMdiscs,CD-RWstandardandhigh
speeddiscs,andCD-Rdiscs.
FollowtheseguidelineswhenusingtheDVDdrive:
•Donotplacethecomputerinalocationwherethedriveisexposedtothefollowing:
–Hightemperature
–Highhumidity
–Excessivedust
–Excessivevibrationorsuddenshock
–Aninclinedsurface
–Directsunlight
•DonotinsertanyobjectotherthanaCDorDVDintothedrive.
•Beforemovingthecomputer,removetheCDorDVDfromthedrive.
Chapter2.Usingyourcomputer21
Page 34

HandlingandstoringCDandDVDmedia
CDandDVDmediaaredurableandreliable,buttheydorequiresomecareandspecialhandling.When
handlingandstoringaCDorDVD,followtheseguidelines:
•Holdthediscbyitsedges.Donottouchthesurfaceofthesidethatisnotlabeled.
•Toremovedustorngerprints,wipethediscwithaclean,softclothfromthecentertotheoutside.Wiping
thediscinacirculardirectionmightcauselossofdata.
•Donotwriteorstickpaperonthedisc.
•Donotscratchormarkthedisc.
•Donotplaceorstorethediscindirectsunlight.
•Donotusebenzene,thinners,orothercleanerstocleanthedisc.
•Donotdroporbendthedisc.
•Donotinsertdamageddiscsintothedrive.Warped,scratched,ordirtydiscscandamagethedrive.
PlayingaCDorDVD
IfyourcomputercomeswithaDVDdrive,youcanlistentoaudioCDsorwatchDVDmovies.T oplaya
CDorDVD,dothefollowing:
1.PresstheEject/LoadbuttonontheDVDdrivetoopenthetray.
2.Withthetrayfullyextended,inserttheCDorDVDintothetray.SomeDVDdriveshaveasnaphubinthe
centerofthetray.Ifyourdrivehasasnaphub,supportthetraywithonehandandthenpushonthe
centeroftheCDorDVDuntilitsnapsintoplace.
3.PresstheEject/Loadbuttonagainorgentlypushthetrayforwardtoclosethetray.TheCDorDVD
playerprogramstartsautomatically.Foradditionalinformation,refertotheCDorDVDplayerprogram
helpsystem.
ToremoveaCDorDVDfromtheDVDdrive,dothefollowing:
1.Withthecomputeron,presstheEject/Loadbutton.Whenthetrayslidesoutautomatically,carefully
removethedisc.
2.ClosethetraybypressingtheEject/Loadbuttonorbygentlypushingthetrayforward.
Note:IfthetraydoesnotslideoutofthedrivewhenyoupresstheEject/Loadbutton,insertastraightened
paperclipintotheemergency-ejectholelocatedonthefrontoftheDVDdrive.Besurethedriveispowered
offwhenusingtheemergencyeject.UsetheEject/Loadbuttoninsteadoftheemergencyejectexcept
inanemergency.
RecordingaCDorDVD
IfyourcomputercomeswitharecordableDVDdrive,youcanusethedrivetorecordCDsorDVDs.To
recordaCDorDVD,dothefollowing:
1.ClickStart➙AllPrograms➙CorelDVDMovieFactoryLenovoEdition.
2.Followtheinstructionsonthescreen.
FordetailedinformationaboutusingtheCorelDVDMovieFactoryprogram,seethehelpsystemforthe
program.
YoucanalsouseWindowsMediaPlayertorecordCDsanddataDVDs.Formoreinformation,see“Helpand
Support”onpage109
.
22ThinkCentreUserGuide
Page 35

Usingthesingle-touchandmulti-touchfeature
Note:Thesingle-touchfeatureormulti-touchfeatureisavailableonlyonsomemodels.
Yourcomputermightcomewiththesingle-touchfeatureormulti-touchfeaturedependingonyourmodel.
Ifthesingle-touchfeatureorthemulti-touchfeatureisavailableonyourcomputer,youcantapthetouch
screenoncewithyourngertomakeasingleclick.Tomakeadouble-click,taptwicewithoutpausing.
Tomakearight-click,tapthetouchscreenonceandthenholdyourngeronthetouchscreenuntila
roundcircleisdisplayed.Then,liftyourngeroffthetouchscreen.Acontextmenuwillbedisplayed,
whereyoucanmakeselections.
Usingthesingle-touchfeature
Thesingle-touchfeatureenablesyoutouseonlyonengeratatimetointeractwithyourcomputer.
Usingthemulti-touchfeature
Themulti-touchfeatureenablesyoutouseoneortwongerstointeractwithyourcomputer.Forexample,
youcanzoomin,zoomout,scroll,orrotateonthetouchscreenwithtwongerswhilebrowsingtheInternet
orreadingoreditingadocument.
Note:Dustbuildupmightcauseproblemsforthetouchfunction.Cleanyourmonitorscreenperiodically
bydoingthefollowing:
1.Wipethescreengentlywithasoft,drybrushorcloth.
Chapter2.Usingyourcomputer23
Page 36
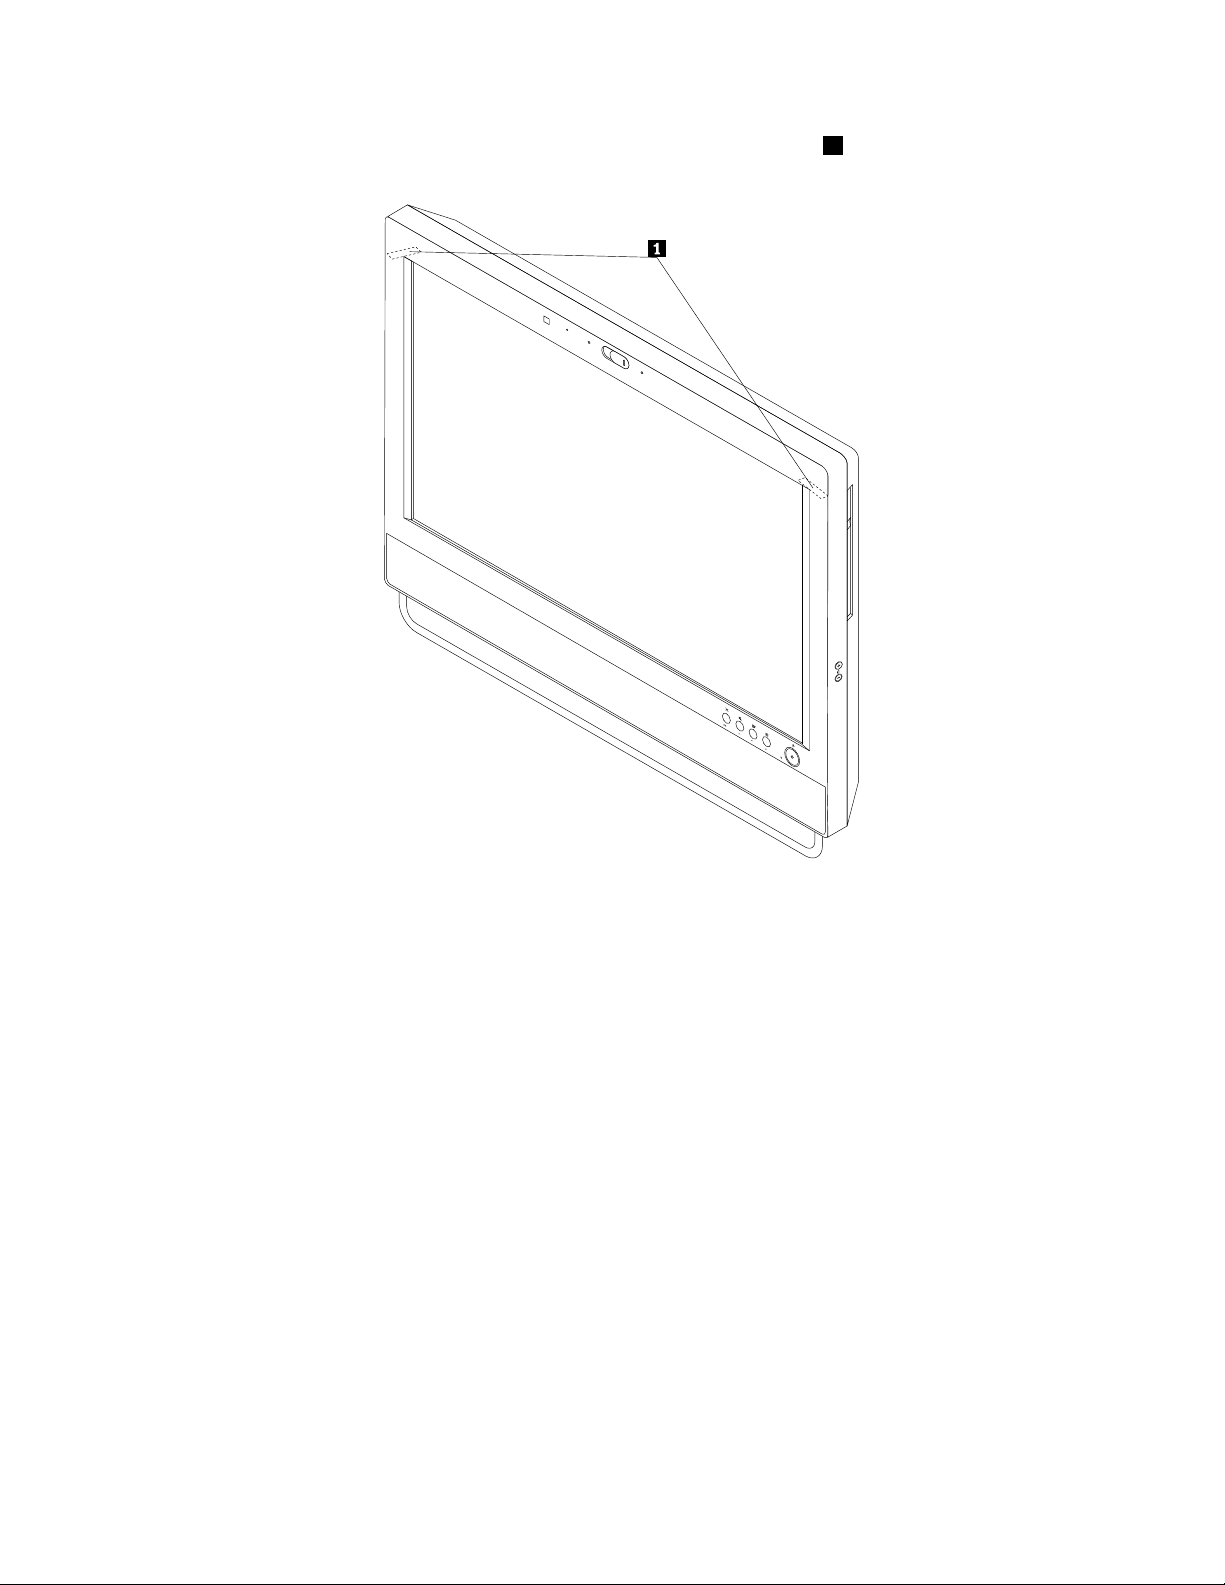
2.Blowonthetopleftcornerandtoprightcornertokeepthetouchsensors1clean.
Figure8.Blowingthedustoffthetouchsensors
24ThinkCentreUserGuide
Page 37
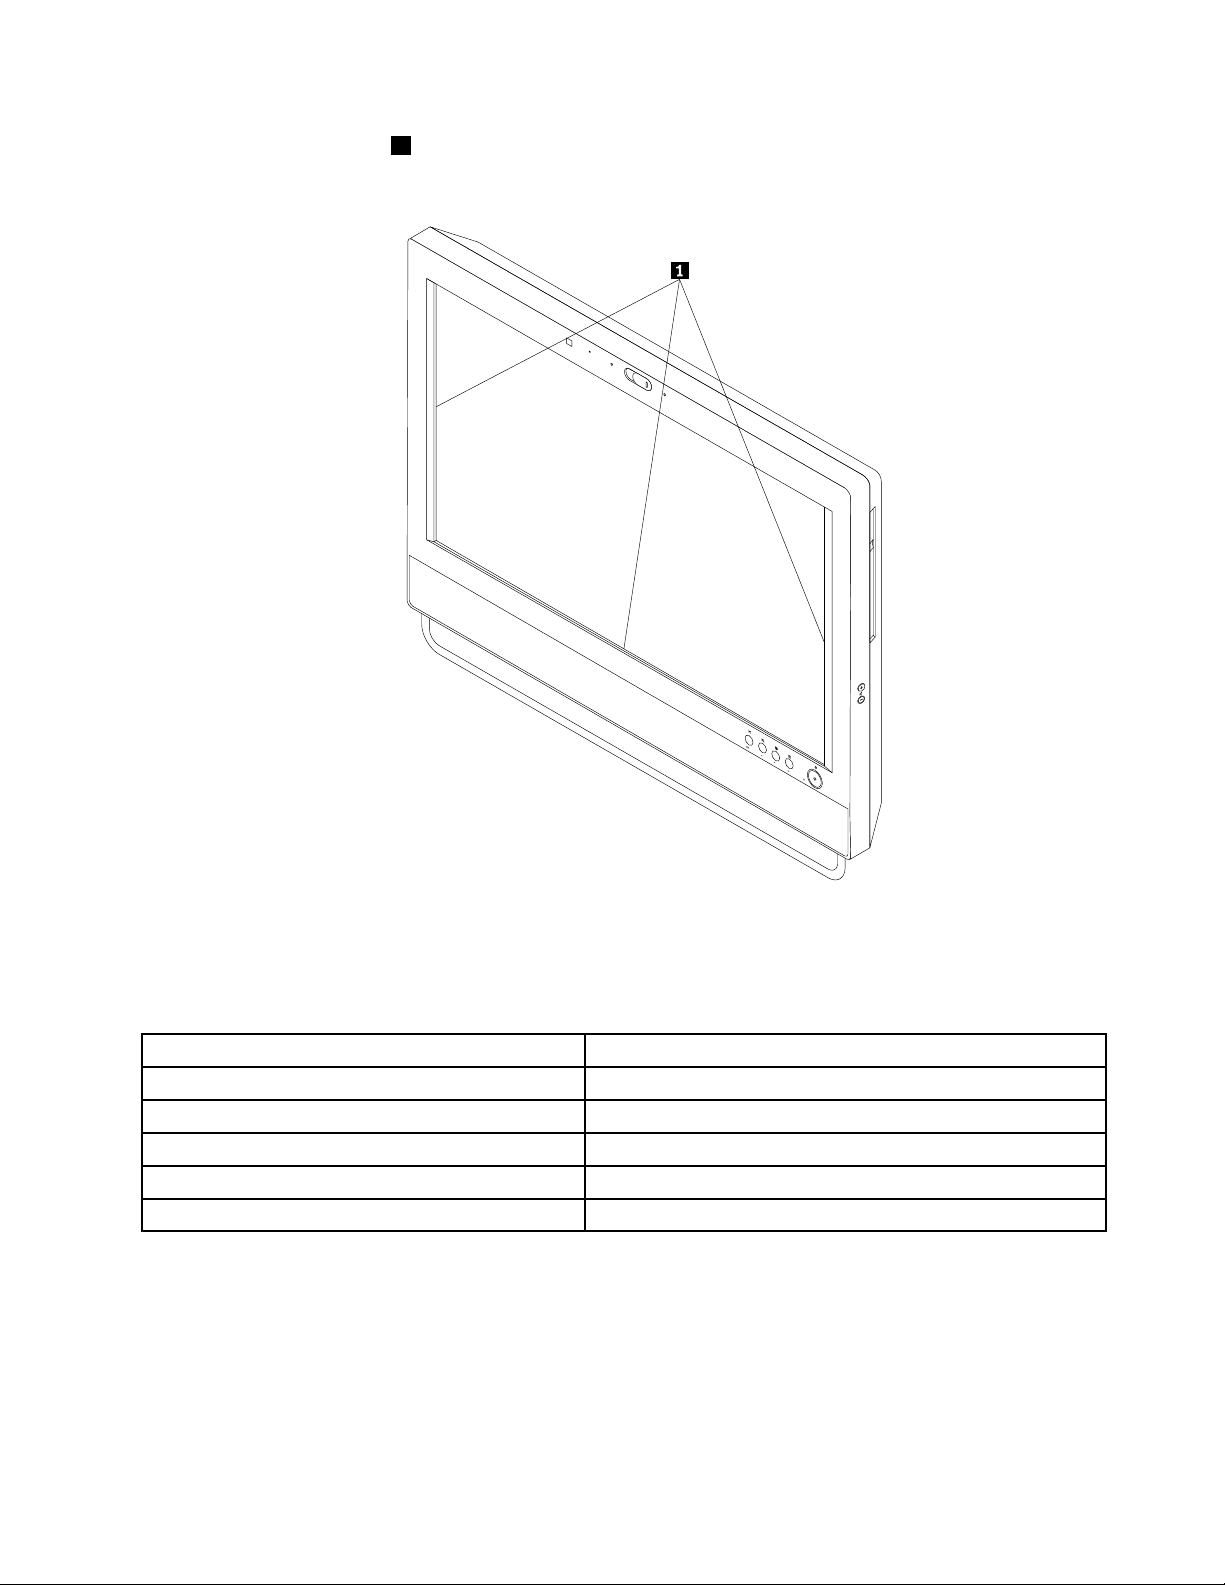
3.Cleantheinsideedges1ofthemonitorwithasoft,drybrush,andthenwithasoft,dry,andlint-free
cloth.Donotleaveanyscratchontheedges.
Figure9.Cleaningtheinsideedgesofthemonitor
Thefollowingtableshowsthesupportedtouchfeatureoneachoperatingsystemedition.
Table2.Operatingsystemeditionandsupportedtouchfeature
OperatingsystemeditionSupportedtouchfeature
Windows7StarterSingle-touch
Windows7HomeBasic
Windows7HomePremiumMulti-touch
Windows7Professional
Windows7UltimateMulti-touch
Single-touch
Multi-touch
Chapter2.Usingyourcomputer25
Page 38

26ThinkCentreUserGuide
Page 39

Chapter3.Youandyourcomputer
Thischapterprovidesinformationaboutaccessibility,comfort,andrelocatingyourcomputertoother
countriesorregions.
Accessibilityandcomfort
Goodergonomicpracticeisimportanttogetthemostfromyourpersonalcomputerandtoavoiddiscomfort.
Arrangeyourworkplaceandtheequipmentyouusetosuityourindividualneedsandthekindofwork
thatyouperform.Inaddition,usehealthyworkhabitstomaximizeyourperformanceandcomfortwhile
usingyourcomputer.
Thefollowingtopicsprovideinformationaboutarrangingyourworkarea,settingupyourcomputer
equipment,andestablishinghealthyworkhabits.
Lenovoiscommittedtoprovidingpeoplewithdisabilitiesgreateraccesstoinformationandtechnology.
Asaresult,thefollowinginformationprovideswaystohelpusersthathavehearing,vision,andmobility
limitationsgetthemostoutoftheircomputerexperience.
Assistivetechnologiesenableuserstoaccessinformationinthemostappropriateway.Someofthese
technologiesarealreadyprovidedinyouroperatingsystem,otherscanbepurchasedthroughvendors,or
accessedthroughtheWorldWideWeb:
http://www.lenovo.com/healthycomputing
Arrangingyourworkspace
Togetthemostfromyourcomputer,arrangeboththeequipmentyouuseandyourworkareatosuityour
needsandthekindofworkyoudo.Yourcomfortisofforemostimportance,butlightsources,aircirculation,
andthelocationofelectricaloutletscanalsoaffectthewayyouarrangeyourworkspace.
Comfort
Althoughnosingleworkingpositionisidealforeveryone,hereareafewguidelinestohelpyounda
positionthatsuitsyoubest.
Sittinginthesamepositionforalongtimecancausefatigue.Thebackrestandseatofyourchairshould
adjustindependentlyandprovidegoodsupport.Theseatshouldhaveacurvedfronttorelievepressureon
thethighs.Adjusttheseatsothatyourthighsareparalleltotheoorandyourfeetareeitheratonthe
oororonafootrest.
Whenusingthekeyboard,keepyourforearmsparalleltotheoorandyourwristsinacomfortableposition.
Usealighttouchonthekeyboardandyourhandsandngersrelaxed.Changetheangleofthekeyboard
formaximumcomfortbyadjustingthepositionofthekeyboardfeet.
©CopyrightLenovo2012
27
Page 40
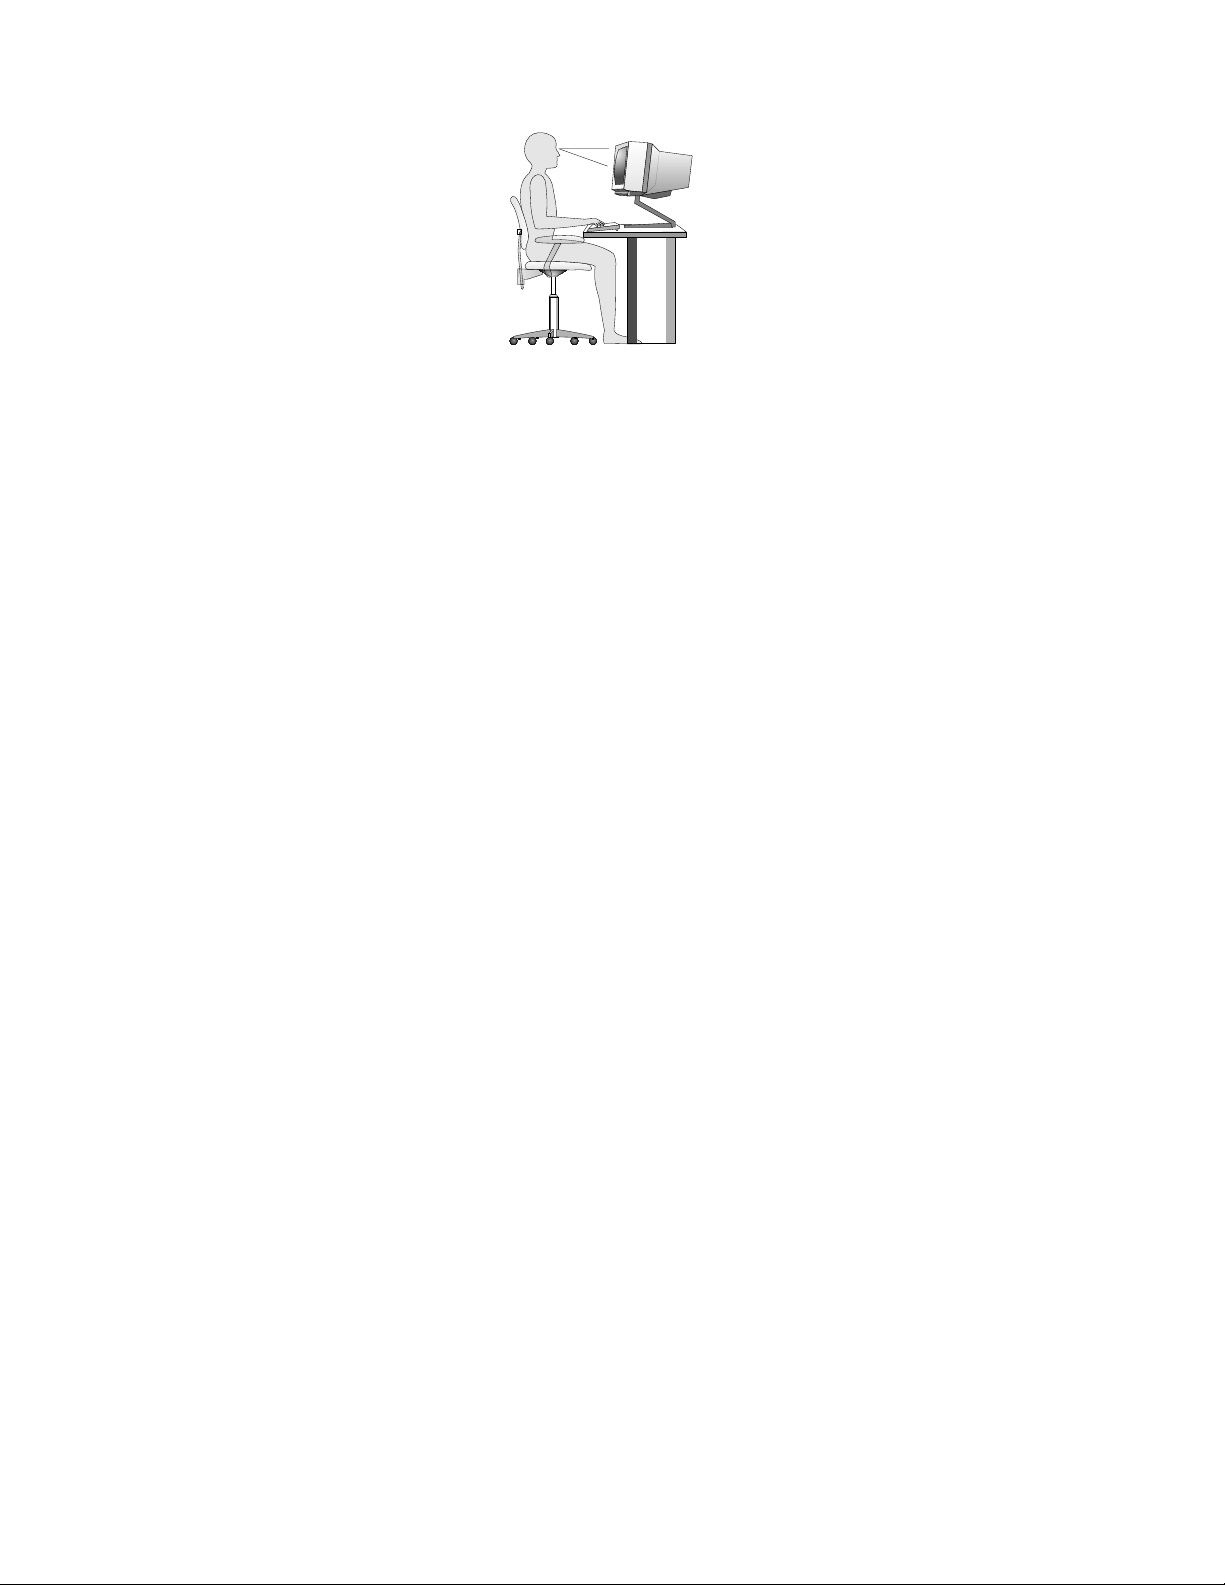
Adjustthemonitorsothetopofthescreenisat,orslightlybelow,eyelevel.Placethemonitorata
comfortableviewingdistance,usually51to61cm(20to24inches),andpositionitsoyoucanviewit
withouthavingtotwistyourbody.Also,positionotherequipmentyouuseregularly,suchasthetelephoneor
amouse,withineasyreach.
Glareandlighting
Positionthemonitortominimizeglareandreectionsfromoverheadlights,windows,andotherlightsources.
Reectedlightfromshinysurfacescancauseannoyingreectionsonyourmonitorscreen.Placethe
monitoratrightanglestowindowsandotherlightsources,whenpossible.Reduceoverheadlighting,if
necessary,byturningofflightsorusinglowerwattagebulbs.Ifyouinstallthemonitornearawindow,use
curtainsorblindstoblockthesunlight.Youcanadjustthebrightnessandcontrastcontrolsonthemonitor
astheroomlightingchangesthroughouttheday.
Whereitisimpossibletoavoidreectionsortoadjustthelighting,anantiglarelterplacedoverthescreen
mightbehelpful.However,theseltersmightaffecttheclarityoftheimageonthescreen;trythemonlyafter
youhaveexhaustedothermethodsofreducingglare.
Dustbuildupcompoundsproblemsassociatedwithglare.Remembertocleanyourmonitorscreen
periodicallyusingasoftclothasdirectedinyourmonitordocumentation.
Aircirculation
Yourcomputerandmonitorproduceheat.Thecomputerhasafanthatpullsinfreshairandforcesouthot
air.Themonitorletshotairescapethroughvents.Blockingtheairventscancauseoverheating,whichmight
resultinamalfunctionordamage.Placethecomputerandmonitorsothatnothingblockstheairvents;
usually,51mm(2inches)ofairspaceissufcient.Also,makesuretheventedairisnotblowingonpeople.
Electricaloutletsandcablelengths
Thelocationofelectricaloutlets,thelengthofpowercordsandcablesthatconnecttothemonitor,printer,
andotherdevicesmightdeterminethenalplacementofyourcomputer.
Whenarrangingyourworkspace:
•Avoidtheuseofextensioncords.Whenpossible,plugthecomputerpowercorddirectlyintoanelectrical
outlet.
•Keeppowercordsandcablesneatlyroutedawayfromwalkwaysandotherareaswheretheymight
getkickedaccidentally.
Formoreinformationaboutpowercords,see“Powercordsandpoweradapters”onpagevi
28ThinkCentreUserGuide
.
Page 41

RegisteryourcomputerwithLenovo
Toregisteryourcomputer,gotohttp://www.lenovo.com/register.Then,followtheinstructionsonthescreen
tocompletetheregistration.Thiscanhelpauthoritiesreturnyourcomputertoyouifitislostorstolen.
RegisteringyourcomputeralsoenablesLenovotonotifyyouaboutpossibletechnicalinformationand
upgrades.
Whenyouregisteryourcomputer,informationisenteredintoadatabase,whichenablesLenovotocontact
youincaseofarecallorothersevereproblem.Inaddition,somelocationsofferextendedprivilegesand
servicestoregisteredusers.
Movingyourcomputertoanothercountryorregion
Whenyoumoveyourcomputertoanothercountryorregion,youmusttakelocalelectricalstandardsinto
consideration.Thissectionprovidesinformationonthefollowing:
•“Voltage-selectionswitch”onpage29
•“Replacementpowercords”onpage29
Voltage-selectionswitch
Somecomputersareequippedwithavoltage-selectionswitchlocatednearthepower-cordconnection
pointonthecomputerandsomecomputersdonothaveavoltage-selectionswitch.Beforeyouinstall
yourcomputerorrelocateyourcomputertoanothercountryorregion,youmustbecertainthatyouhave
matchedyourcomputertothevoltageavailableatyourelectricaloutlet.
CAUTION:
Youmustknowthevoltageoftheelectricalconnection(outlet)whereyourcomputerwillbe
connected.Ifyoudonotknowthevoltage,contactyourlocalelectriccompanyorrefertoofcial
Websitesorotherliteraturefortravelerstothecountryorregionwhereyouarelocated.
Ifyourcomputerhasavoltage-selectionswitch,youmustsettheswitchtomatchthevoltageavailableat
yourelectricaloutlet.Settingthevoltage-selectionswitchincorrectlywillcausethecomputertomalfunction
andmightcausepermanentdamagetothecomputer.Donotconnectthecomputertoanelectrical
outletuntilyouhaveveriedthatthevoltage-selectionswitchsettingmatchesthevoltageavailableatthe
electricaloutlets.
Ifyourcomputerdoesnothaveavoltage-selectionswitch,inspectthevoltage-ratinglabelonthebottomof
thecomputerandnotethefollowing:
•Ifthevoltage-ratinglabelshowsarangeofeither“100-127V”or“200-240V,”youmustensurethatthe
voltageprovidedattheelectricaloutletmatchesthevoltageratingonthecomputerlabel.Ifitdoes
notmatch,donotattempttoconnectthecomputertotheelectricaloutlet,unlessanexternaldevice
suchasavoltage-convertingtransformerisused.
•Ifthevoltage-ratinglabelshowsadualrangeof“100-127V”and“200-240V,”thissigniesthatthe
computerissuitableforworldwideoperationandthecomputerwillautomaticallyadjusttothevoltageat
theelectricaloutletregardlessofthecountryorregionwherethecomputerisbeingconnected.
Replacementpowercords
Ifyourelocateyourcomputertoacountryorregionthatusesanelectricaloutletstyledifferentfromthe
typeyouarecurrentlyusing,youwillhavetopurchaseeitherelectricalplugadaptersornewpowercords.
YoucanorderpowercordsdirectlyfromLenovo.
Chapter3.Y ouandyourcomputer29
Page 42

Forpowercordinformationandpartnumbers,goto:
http://www.lenovo.com/powercordnotice
30ThinkCentreUserGuide
Page 43

Chapter4.Security
Thischapterprovidesinformationabouthowtoprotectyourcomputerfromtheftandunauthorizeduse.
Securityfeatures
Thefollowingsecurityfeaturesareavailableonyourcomputer:
•ComputraceAgentsoftwareembeddedinrmware
TheComputraceAgentsoftwareisanITassetmanagementandcomputertheftrecoverysolution.
Thesoftwaredetectsifchangeshavebeenmadeonthecomputer,suchashardware,software,or
thecomputercall-inlocation.
Note:YoumighthavetopurchaseasubscriptiontoactivatetheComputraceAgentsoftware.
•Coverpresenceswitch(alsocalledintrusionswitch)
Thecoverpresenceswitchpreventsyourcomputerfromloggingintotheoperatingsystemwhenthe
computercoverisnotproperlyinstalledorclosed.Toenablethecoverpresenceswitchconnector
onthesystemboard,tothefollowing:
1.StarttheSetupUtilityprogram.See“StartingtheSetupUtilityprogram”onpage79.
2.SettheAdministratorPassword.See“Setting,changing,anddeletingapassword”onpage80.
3.FromtheSecuritysubmenu,selectChassisIntrusionDetection➙Enabled.Thecoverpresence
switchconnectoronthesystemboardisenabled.
Whenthecoverpresenceswitchdetectsthatyourcomputercoverisnotproperlyinstalledorclosed
whenyouturnonthecomputer,anerrormessagewillbedisplayed.T obypasstheerrormessageand
logintotheoperatingsystem,dothefollowing:
1.Properlyinstallorcloseyourcomputercover.See“Completingthepartsreplacement”onpage68.
2.PressF1toentertheSetupUtilityprogram.ThenpressF10tosaveandexittheSetupUtility
program.Theerrormessagewillnotbedisplayedagain.
•AbilitytoenableanddisabledevicesandUSBconnectors
Formoreinformation,see“Enablingordisablingadevice”onpage81
•Integratedngerprintreader(availableonsomemodels)
Dependingonthemodelsofyourcomputer,thekeyboardmayhaveanintegratedngerprintreader.
ByenrollingyourngerprintandassociatingitwithaPower-onPassword,aHardDiskPassword,or
bothpasswordsbeforehand,youcanstartthecomputer,logontothesystem,andentertheSetup
Utilityprogrambyswipingyourngeroverthereader,withouttypingapassword.Thusngerprint
authenticationcanreplacepasswordsandenablesimpleandsecureuseraccess.
•Startupsequencecontrol
Formoreinformation,see“Selectingorchangingthestartupdevicesequence”onpage82
•Startupwithoutkeyboardormouse
Yourcomputerisabletologintotheoperatingsystemwithoutkeyboardormouseconnected.
•TrustedPlatformModule(TPM)
TrustedPlatformModuleisasecurecryptoprocessorthatcanstorecryptographickeysthatprotect
informationstoredinyourcomputer.
.
.
©CopyrightLenovo2012
31
Page 44
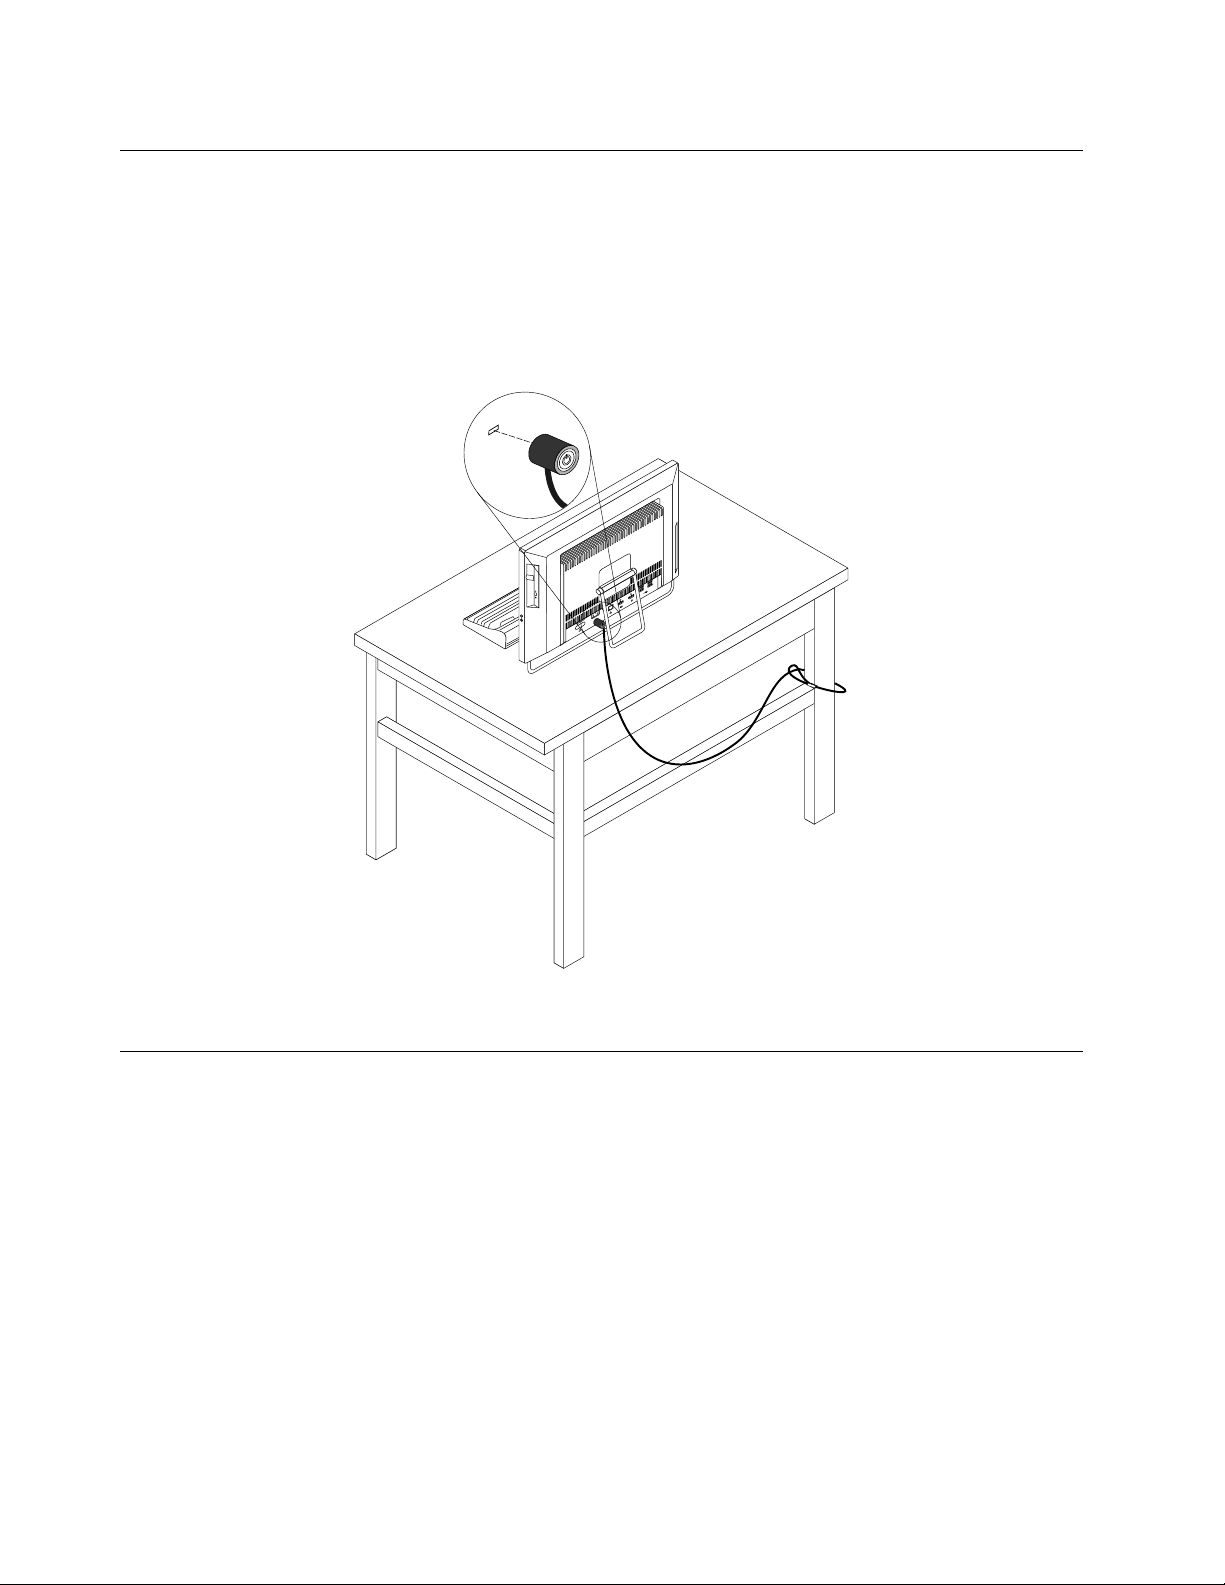
Attachinganintegratedcablelock
Anintegratedcablelock,sometimesreferredtoastheKensingtonlock,canbeusedtosecureyour
computertoadesk,table,orothernon-permanentxture.Thecablelockattachestotheintegratedcable
lockslotattherearofyourcomputerandisoperatedwithakey.Thecablelockalsolocksthebuttonsused
toopenthecomputercover.Thisisthesametypeoflockusedwithmanynotebookcomputers.Youcan
orderanintegratedcablelockdirectlyfromLenovobysearchingforKensingtonat:
http://www.lenovo.com/support
Figure10.Integratedcablelock
Usingpasswords
YoucansetavarietyofpasswordsthroughtheMicrosoftWindowsoperatingsystemandthroughtheBIOS
ofyourcomputertohelpdeterunauthorizeduseofyourcomputer.
BIOSpasswords
YoucanusetheBIOSSetupUtilityprogramtosetpasswordstopreventunauthorizedaccesstoyour
computeranddata.Thefollowingtypesofpasswordsareavailable:
•Power-OnPassword:WhenaPower-OnPasswordisset,youarepromptedtotypeavalidpassword
eachtimethecomputeristurnedon.Thecomputercannotbeuseduntilthevalidpasswordistyped
in.Formoreinformation,see“Power-OnPassword”onpage80.
•HardDiskPassword:SettingaHardDiskPasswordpreventsunauthorizedaccesstothedataonthehard
diskdrive.WhenaHardDiskPasswordisset,youarepromptedtotypeavalidpasswordeachtimeyou
trytoaccesstheharddiskdrive.Formoreinformation,see“HardDiskPassword”onpage80
32ThinkCentreUserGuide
.
Page 45

•AdministratorPassword:SettinganAdministratorPassworddetersunauthorizedusersfromchanging
congurationsettings.Ifyouareresponsibleformaintainingthecongurationsettingsofseveral
computers,youmightwanttosetanAdministratorPassword.Formoreinformation,see“Administrator
Password”onpage80
Youdonothavetosetanypasswordstouseyourcomputer.However,usingpasswordsimproves
computingsecurity.
.
Windowspasswords
DependingonyourversionoftheWindowsoperatingsystem,youcanusepasswordsforavarietyof
features,includingcontrollingloginaccess,accesstosharedresources,networkaccess,andindividualuser
settings.Formoreinformation,see“HelpandSupport”onpage109
.
Conguringthengerprintreader
Ifyourkeyboardhasangerprintreader,youcancongurethengerprintreaderintheSetupUtilityprogram.
TheFingerprintSetupsubmenuundertheSecuritymenuoftheSetupUtilityprogramprovidesthe
followingoptions:
•PrebootAuthentication:enablesordisablesthengerprintauthenticationforaccessingtheBIOS.
•EraseFingerprintData:clearsthengerprintdatastoredinangerprintreader.
Tocongurethengerprintreader,dothefollowing:
1.StarttheSetupUtilityprogram.See“StartingtheSetupUtilityprogram”onpage79.
2.FromtheSetupUtilityprogrammainmenu,selectSecurity➙FingerprintSetup,andpressEnter.
TheFingerprintSetupwindowopens.
3.SelectPrebootAuthenticationorEraseFingerprintDataasdesired,andpressEnter.
4.SelectthedesiredsettingsandpressEnter.
5.PressF10tosavechangesandexittheSetupUtilityprogram.PressEnterwhenpromptedtoconrm
theexit.
Usingandunderstandingrewalls
Arewallcanbehardware,software,oracombinationofbothdependingonthelevelofsecurityrequired.
Firewallsworkonasetofrulestodeterminewhichinboundandoutboundconnectionsareauthorized.If
yourcomputerispreintalledwitharewallprogram,ithelpsprotectagainstcomputerInternetsecurity
threats,unauthorizedaccess,intrusions,andInternetattacks.Italsoprotectsyourprivacy.Formore
informationabouthowtousetherewallprogram,refertothehelpsystemofyourrewallprogram.
TheWindowsoperatingsystempreinstalledonyourcomputerprovidestheWindowsFirewall.Fordetailson
usingtheWindowsFirewall,referto“HelpandSupport”onpage109.
Protectingdataagainstviruses
Yourcomputerispreinstalledwithanantivirusprogramtohelpyouguardagainst,detect,andeliminate
viruses.
Lenovoprovidesafullversionofantivirussoftwareonyourcomputerwithafree30-daysubscription.After
30days,youmustrenewthelicensetocontinuereceivingtheantivirussoftwareupdates.
Note:Virusdenitionlesmustbekeptup-to-datetoguardagainstnewviruses.
Chapter4.Security33
Page 46

Formoreinformationabouthowtouseyourantivirussoftware,refertothehelpsystemofyourantivirus
software.
34ThinkCentreUserGuide
Page 47

Chapter5.Installingorreplacinghardware
Thischapterprovidesinstructionsonhowtoinstallorreplacehardwareforyourcomputer.
Handlingstatic-sensitivedevices
Donotopenthestatic-protectivepackagecontainingthenewpartuntilthedefectiveparthasbeenremoved
fromthecomputerandyouarereadytoinstallthenewpart.Staticelectricity,althoughharmlesstoyou,can
seriouslydamagecomputercomponentsandparts.
Whenyouhandlepartsandothercomputercomponents,taketheseprecautionstoavoidstatic-electricity
damage:
•Limityourmovement.Movementcancausestaticelectricitytobuilduparoundyou.
•Alwayshandlepartsandothercomputercomponentscarefully.HandlePCIcards,memorymodules,
systemboards,andmicroprocessorsbytheedges.Nevertouchanyexposedcircuitry.
•Preventothersfromtouchingthepartsandothercomputercomponents.
•Beforeyoureplaceanewpart,touchthestatic-protectivepackagecontainingtheparttoametal
expansion-slotcoverorotherunpaintedmetalsurfaceonthecomputerforatleasttwoseconds.This
reducesstaticelectricityfromthepackageandyourbody.
•Whenpossible,removethenewpartfromthestatic-protectivepackaging,andinstallitdirectlyinthe
computerwithoutsettingthepartdown.Whenthisisnotpossible,placethestatic-protectivepackage
thatthepartcameinonasmooth,levelsurfaceandplacethepartonit.
•Donotplacethepartonthecomputercoverorothermetalsurface.
Installingorreplacinghardware
Thissectionprovidesinstructionsonhowtoinstallorreplacehardwareforyourcomputer.Youcanexpand
thecapabilitiesofyourcomputerandmaintainyourcomputerbyinstallingorreplacinghardware.
Attention:Donotopenyourcomputerorattemptanyrepairbeforereadingandunderstandingthe“Important
safetyinformation”onpagev.
Notes:
1.UseonlycomputerpartsprovidedbyLenovo.
2.Wheninstallingorreplacinganoption,usetheappropriateinstructionsinthissectionalongwiththe
instructionsthatcomewiththeoption.
Installingexternaloptions
Youcanconnectexternaloptionstoyourcomputer,suchasexternalspeakers,aprinter,orascanner.For
someexternaloptions,youmustinstalladditionalsoftwareinadditiontomakingthephysicalconnection.
Wheninstallinganexternaloption,see“Locatingconnectors,controls,andindicatorsonthefrontofyour
computer”onpage8and“Locatingconnectorsontherearofyourcomputer”onpage10toidentifythe
requiredconnector.Then,usetheinstructionsthatcomewiththeoptiontohelpyoumaketheconnection
andinstallanysoftwareordevicedriversthatarerequiredfortheoption.
©CopyrightLenovo2012
35
Page 48
Removingandreinstallingtheframestand
Attention:Donotopenyourcomputerorattemptanyrepairbeforereadingandunderstandingthe“Important
safetyinformation”onpagev.
Thissectionprovidesinstructionsonhowtoremoveandreinstalltheframestand.
Note:Theframestandisavailableonlyinsomemodels.
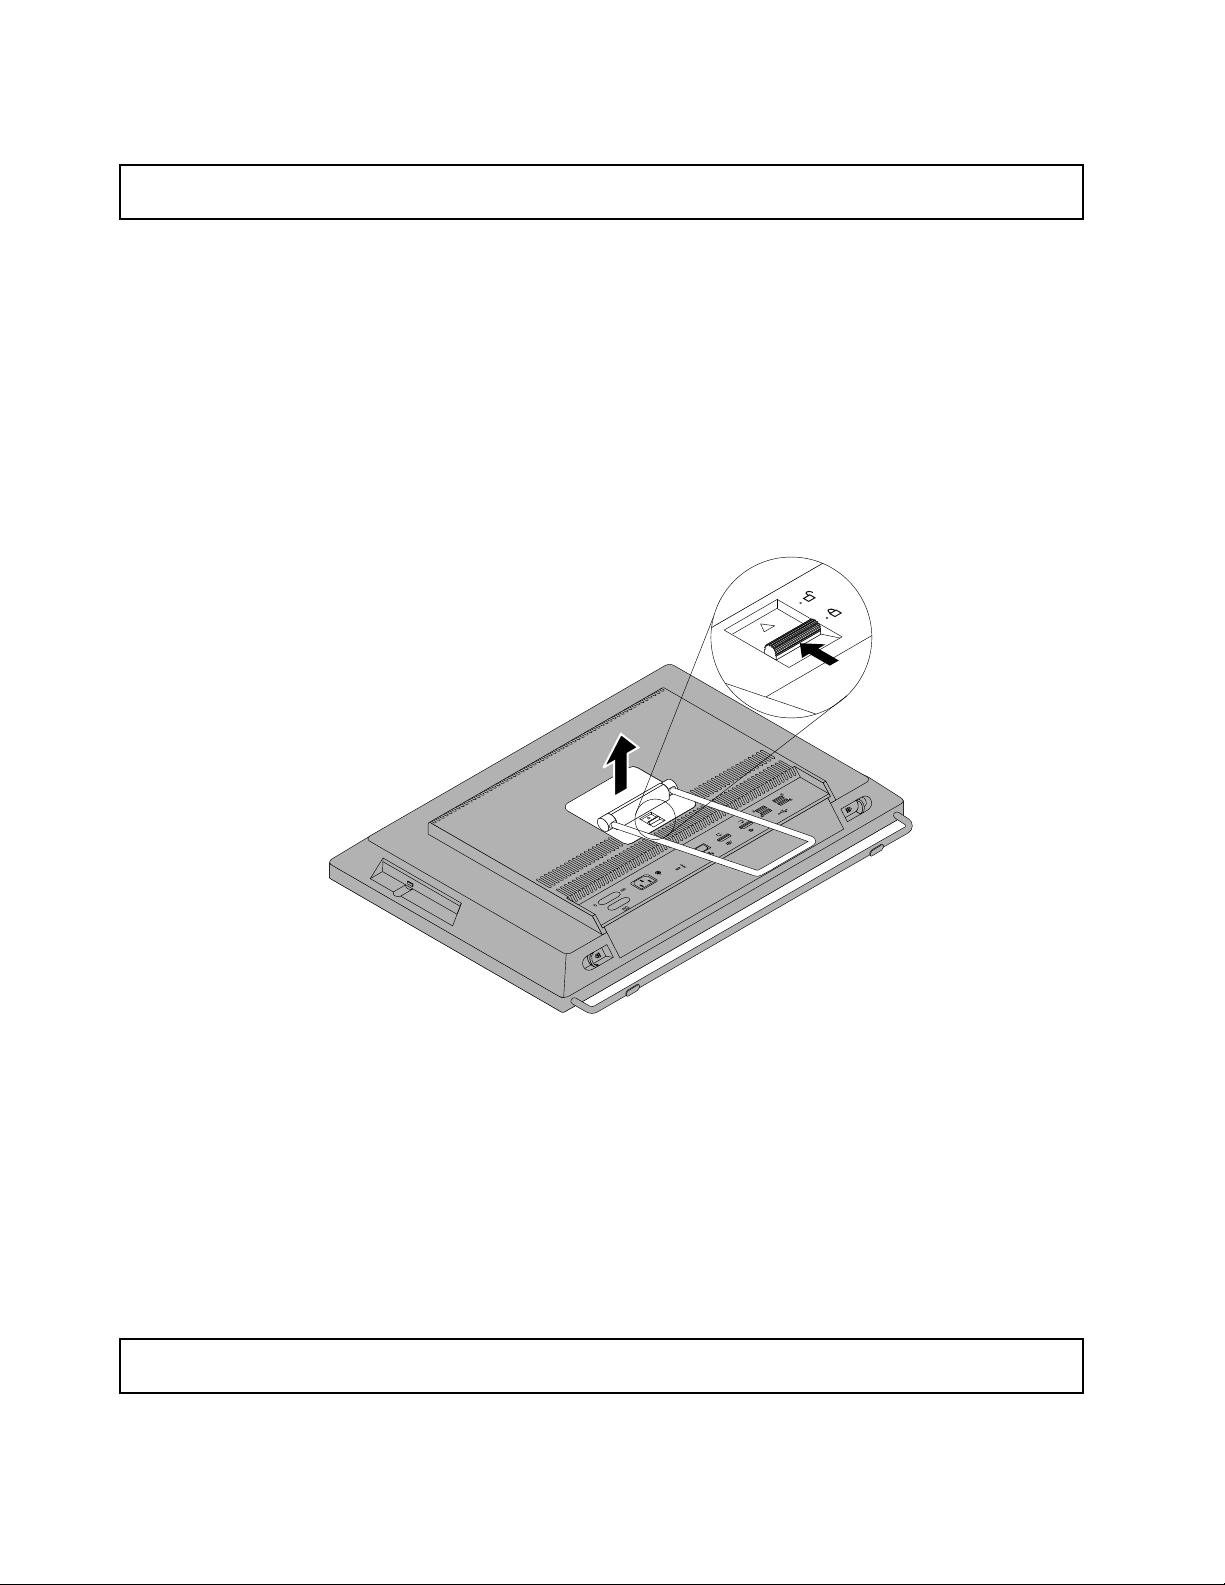
Toremoveandreinstalltheframestand,dothefollowing:
1.Removeallmediafromthedrivesandturnoffallattacheddevicesandthecomputer.Then,disconnect
allpowercordsfromelectricaloutletsanddisconnectallcablesthatareconnectedtothecomputer.
2.Placeasoft,cleantowelorclothonthedeskorsurface.Holdthesidesofyourcomputerandgentlylay
itdownsothatthescreenisagainstthesurfaceandthecoverisfacingup.
3.Pressthereleasebuttontowardthetopofthecomputerandlifttheframestandoffthecomputer.
Figure11.Removingtheframestand
4.T oreinstalltheframestand,alignthetwoclipsonthetopoftheframestandwiththetwoholeson
thechassis,andthenpressthereleasebuttontowardthetopofthecomputeruntiltheframestand
issecuredinposition.
Whattodonext:
•Toworkwithanotherpieceofhardware,gototheappropriatesection.
•Tocompletetheinstallationorreplacement,goto“Completingthepartsreplacement”onpage68.
Removingthecomputercover
Attention:Donotopenyourcomputerorattemptanyrepairbeforereadingandunderstandingthe“Important
safetyinformation”onpagev
Thissectionprovidesinstructionsonhowtoremovethecomputercover.
36ThinkCentreUserGuide
.
Page 49
CAUTION:
Turnoffthecomputerandwaitthreetoveminutestoletthecomputercoolbeforeremovingthe
computercover.
Toremovethecomputercover,dothefollowing:
1.Removeanymediafromthedrivesandturnoffallattacheddevicesandthecomputer.
2.Disconnectallpowercordsfromelectricaloutlets.
3.Disconnectthepowercords,Input/Outputcables,andanyothercablesthatareconnectedtothe
computer.See“Locatingconnectors,controls,andindicatorsonthefrontofyourcomputer”onpage8
and“Locatingconnectorsontherearofyourcomputer”onpage10.
4.Removeanylockingdevicethatsecuresthecomputercover,suchasanintegratedcablelock.See
“Attachinganintegratedcablelock”onpage32
.
5.Placeasoft,cleantowelorclothonthedeskorsurface.Holdthesidesofyourcomputerandgentlylay
itdownsothatthescreenisagainstthesurfaceandthecoverisfacingup.
6.Removetheframestand.See“Removingandreinstallingtheframestand”onpage36.
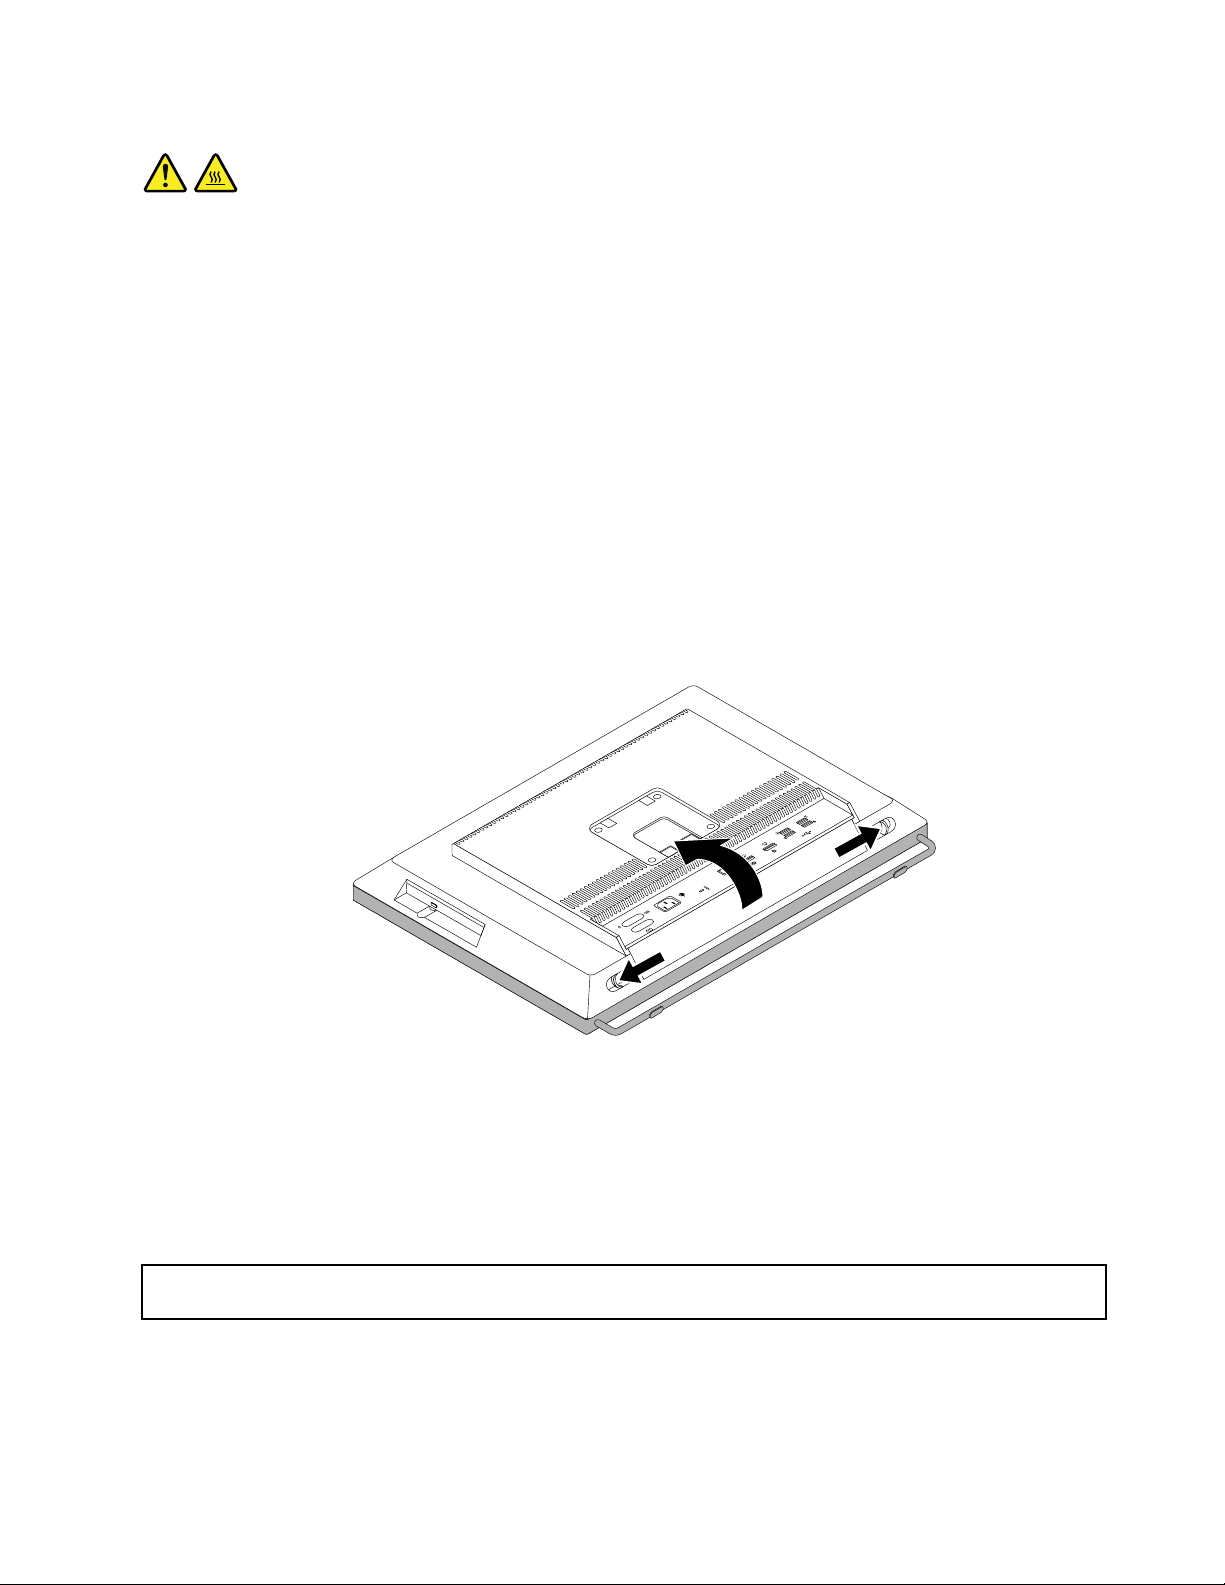
7.Pressthetwocover-releasebuttonsonthecomputercoverasshown,slidethecomputercovertoward
thetopofthecomputer,andthenliftthecomputercoveruptoremoveitfromthechassis.
Figure12.Removingthecomputercover
Whattodonext:
•Toworkwithanotherpieceofhardware,gototheappropriatesection.
•Tocompletetheinstallationorreplacement,goto“Completingthepartsreplacement”onpage68
Removingandreinstallingtheframefoot
Attention:Donotopenyourcomputerorattemptanyrepairbeforereadingandunderstandingthe“Important
safetyinformation”onpagev.
Thissectionprovidesinstructionsonhowtoremoveandreinstalltheframefoot.
Note:Theframefootisavailableonlyinsomemodels.
Chapter5.Installingorreplacinghardware37
.
Page 50
Toremoveandreinstalltheframefoot,dothefollowing:
1.Removeallmediafromthedrivesandturnoffallattacheddevicesandthecomputer.Then,disconnect
allpowercordsfromelectricaloutletsanddisconnectallcablesthatareconnectedtothecomputer.
2.Placeasoft,cleantowelorclothonthedeskorsurface.Holdthesidesofyourcomputerandgentlylay
itdownsothatthescreenisagainstthesurfaceandthecoverisfacingup.
3.Removetheframestand.See“Removingandreinstallingtheframestand”onpage36.
4.Removethecomputercover.See“Removingthecomputercover”onpage36.
5.Locatetheframefoot.See“Locatingcomponents”onpage12.
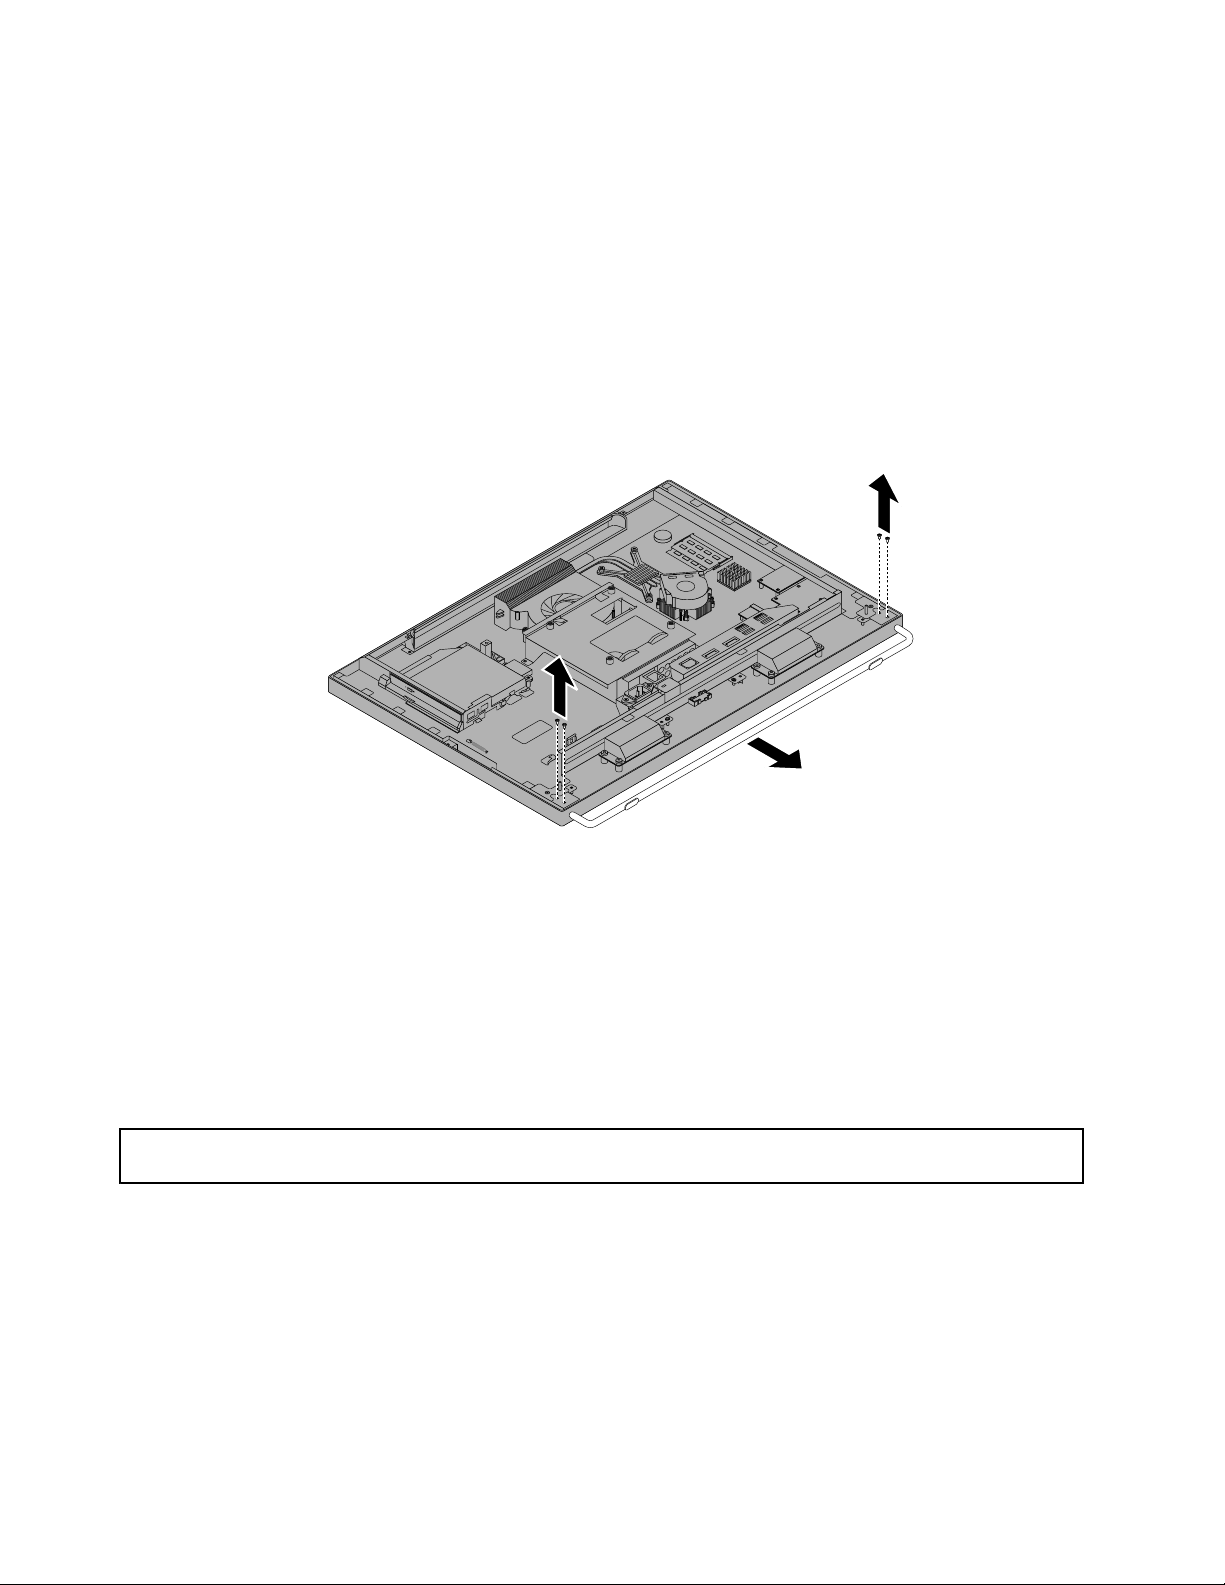
6.Removethefourscrewsthatsecuretheframefoottothechassis,andthenslidetheframefootoutof
thechassis.
Figure13.Removingtheframefoot
7.T oreinstalltheframefoot,alignthefourscrewholesintheframefootwiththoseinthechassis,andthen
installthescrewstosecuretheframefoottothechassis.
Whattodonext:
•Toworkwithanotherpieceofhardware,gototheappropriatesection.
•Tocompletetheinstallationorreplacement,goto“Completingthepartsreplacement”onpage68
Removingandreinstallingthehandlebar
Attention:Donotopenyourcomputerorattemptanyrepairbeforereadingandunderstandingthe“Important
safetyinformation”onpagev.
Thissectionprovidesinstructionsonhowtoremoveandreinstallthehandlebar.
Note:Thehandlebarisavailableonlyinmodelswiththe20-inchdisplay.
Toremoveandreinstallthehandlebar,dothefollowing:
1.Removeallmediafromthedrivesandturnoffallattacheddevicesandthecomputer.Then,disconnect
allpowercordsfromelectricaloutletsanddisconnectallcablesthatareconnectedtothecomputer.
2.Placeasoft,cleantowelorclothonthedeskorsurface.Holdthesidesofyourcomputerandgentlylay
itdownsothatthescreenisagainstthesurfaceandthecoverisfacingup.
.
38ThinkCentreUserGuide
Page 51
3.Removethecomputercover.See“Removingthecomputercover”onpage36.
4.Locatethehandlebar.See“Locatingcomponents”onpage12.
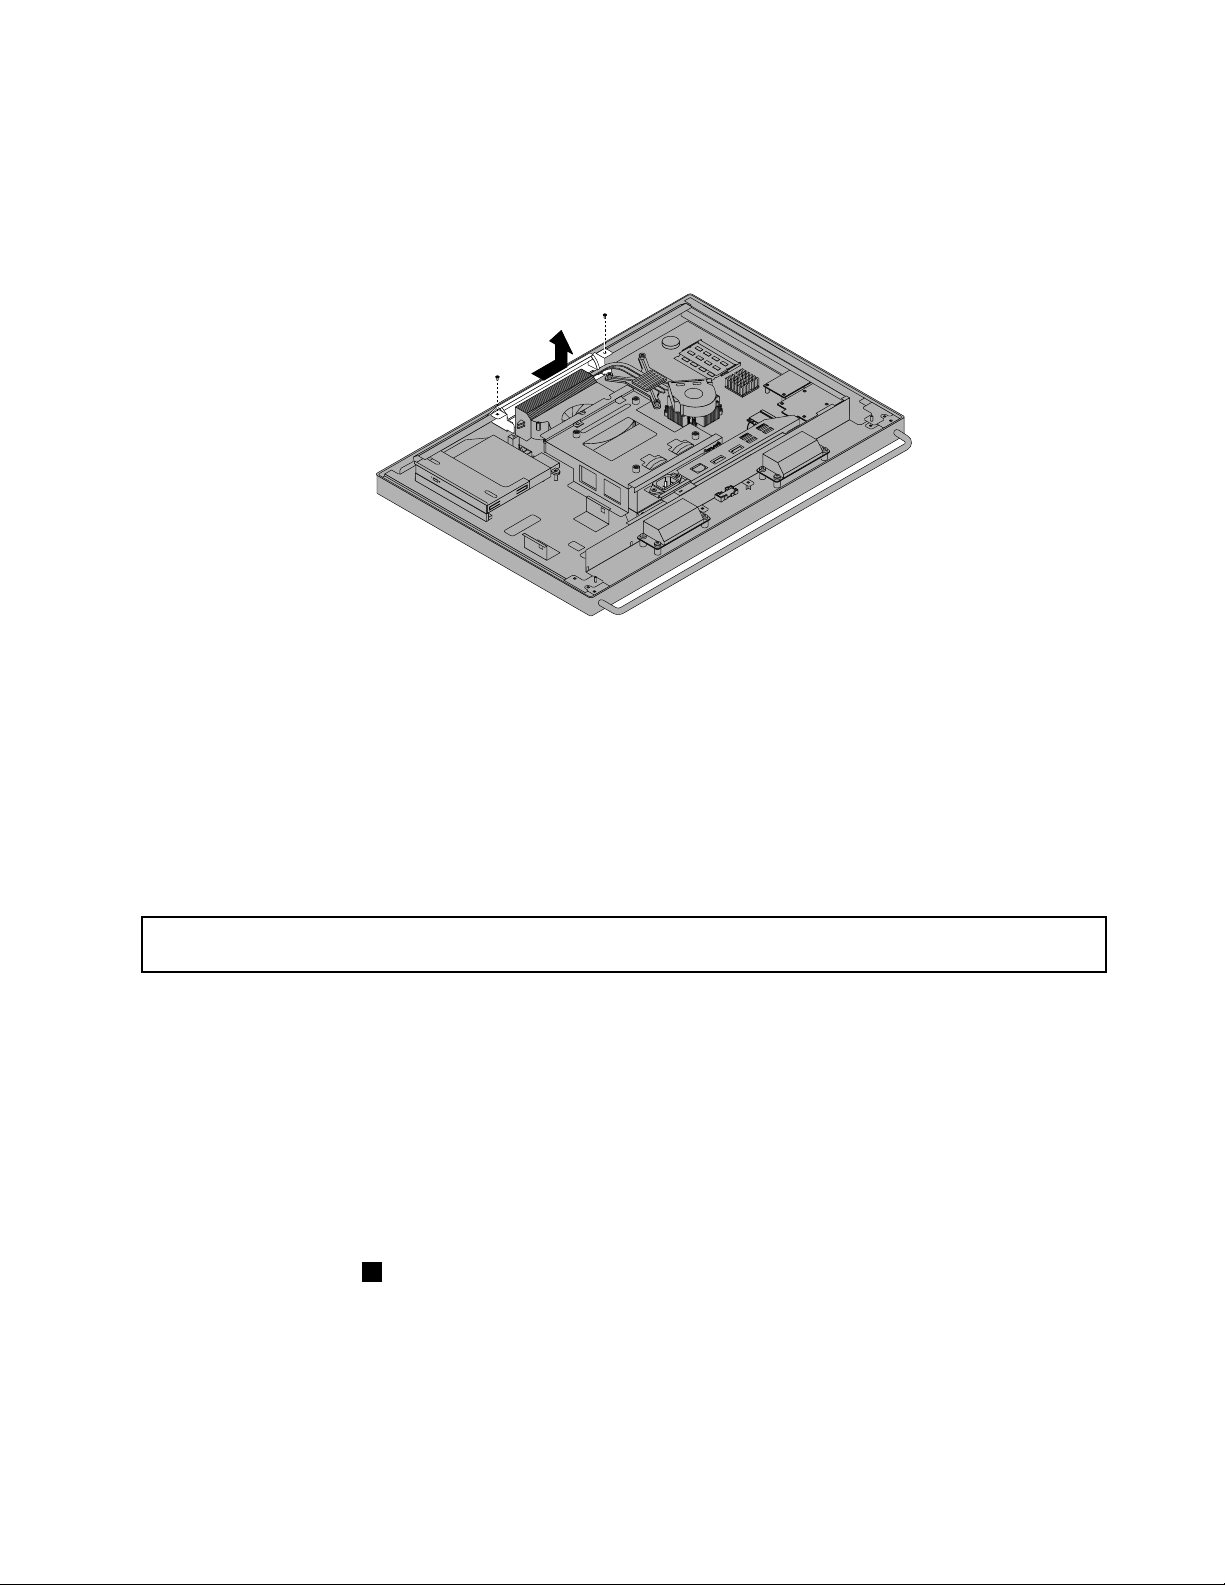
5.Removethetwoscrewsthatsecurethehandlebartothechassis,andthenslidethehandlebarto
disengageitfromthechassis.
Figure14.Removingthehandlebar
6.T oreinstallthehandlebar,alignthetwoscrewholesinthehandlebarwiththoseinthechassis,and
theninstallthescrewstosecurethehandlebartothechassis.
Whattodonext:
•Toworkwithanotherpieceofhardware,gototheappropriatesection.
•Tocompletetheinstallationorreplacement,goto“Completingthepartsreplacement”onpage68
RemovingandreinstallingtherearI/Oassembly
Attention:Donotopenyourcomputerorattemptanyrepairbeforereadingandunderstandingthe“Important
safetyinformation”onpagev.
ThissectionprovidesinstructionsonhowtoremoveandreinstalltherearI/Oassembly.
ToremoveandreinstalltherearI/Oassembly,dothefollowing:
1.Removeallmediafromthedrivesandturnoffallattacheddevicesandthecomputer.Then,disconnect
allpowercordsfromelectricaloutletsanddisconnectallcablesthatareconnectedtothecomputer.
2.Placeasoft,cleantowelorclothonthedeskorsurface.Holdthesidesofyourcomputerandgentlylay
itdownsothatthescreenisagainstthesurfaceandthecoverisfacingup.
3.Removethecomputercover.See“Removingthecomputercover”onpage36.
4.LocatetherearI/Oassembly.See“Locatingcomponents”onpage12.
5.Removethescrews1thatsecuretherearI/Oassemblytothechassis.Then,lifttherearI/Oassembly
upwardtoremoveitfromtherearI/Oassemblyslot.
.
Chapter5.Installingorreplacinghardware39
Page 52
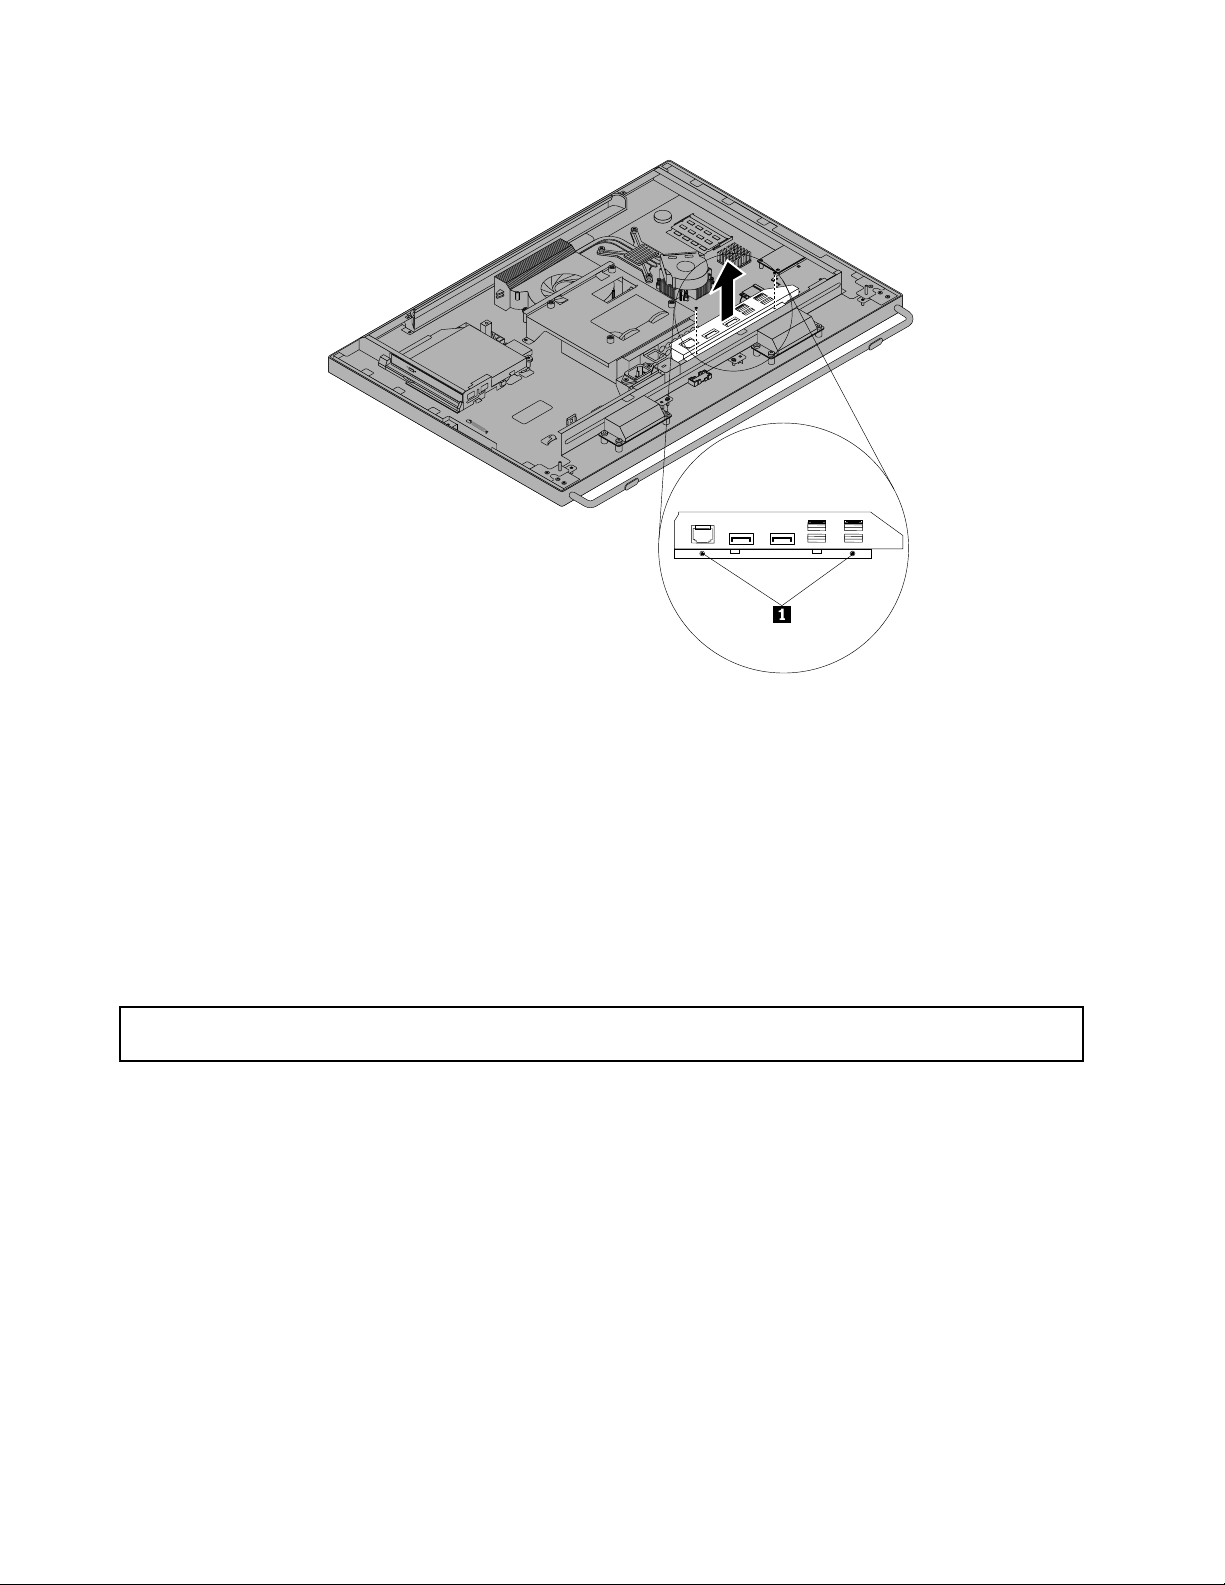
Figure15.RemovingtherearI/Oassembly
6.T oreinstalltherearI/Oassembly,alignthescrewholesintherearI/Oassemblywiththoseinthe
chassis.Then,pressthetopoftherearI/Oassemblydownwarduntilitsnapsintoplace.
7.InstallthescrewstosecuretherearI/Oassemblytothechassis.
Whattodonext:
•Toworkwithanotherpieceofhardware,gototheappropriatesection.
•Tocompletetheinstallationorreplacement,goto“Completingthepartsreplacement”onpage68.
Installingorreplacingamemorymodule
Attention:Donotopenyourcomputerorattemptanyrepairbeforereadingandunderstandingthe“Important
safetyinformation”onpagev.
Thissectionprovidesinstructionsonhowtoinstallorreplaceamemorymodule.
YourcomputerhastwoslotsforinstallingorreplacingDDR3SODIMMsthatprovideuptoamaximumof16
GBsystemmemory.Wheninstallingorreplacingamemorymodule,use2GB,4GBor8GBDDR3
SODIMMsinanycombinationuptoamaximumof16GB.
Toinstallorreplaceamemorymodule,dothefollowing:
1.Removeallmediafromthedrivesandturnoffallattacheddevicesandthecomputer.Then,disconnect
allpowercordsfromelectricaloutletsanddisconnectallcablesthatareconnectedtothecomputer.
2.Placeasoft,cleantowelorclothonthedeskorsurface.Holdthesidesofyourcomputerandgentlylay
itdownsothatthescreenisagainstthesurfaceandthecoverisfacingup.
3.Removetheframestand.See“Removingandreinstallingtheframestand”onpage36.
4.Removethecomputercover.See“Removingthecomputercover”onpage36.
5.Locatethememorymodules.See“Locatingcomponents”onpage12.
40ThinkCentreUserGuide
Page 53
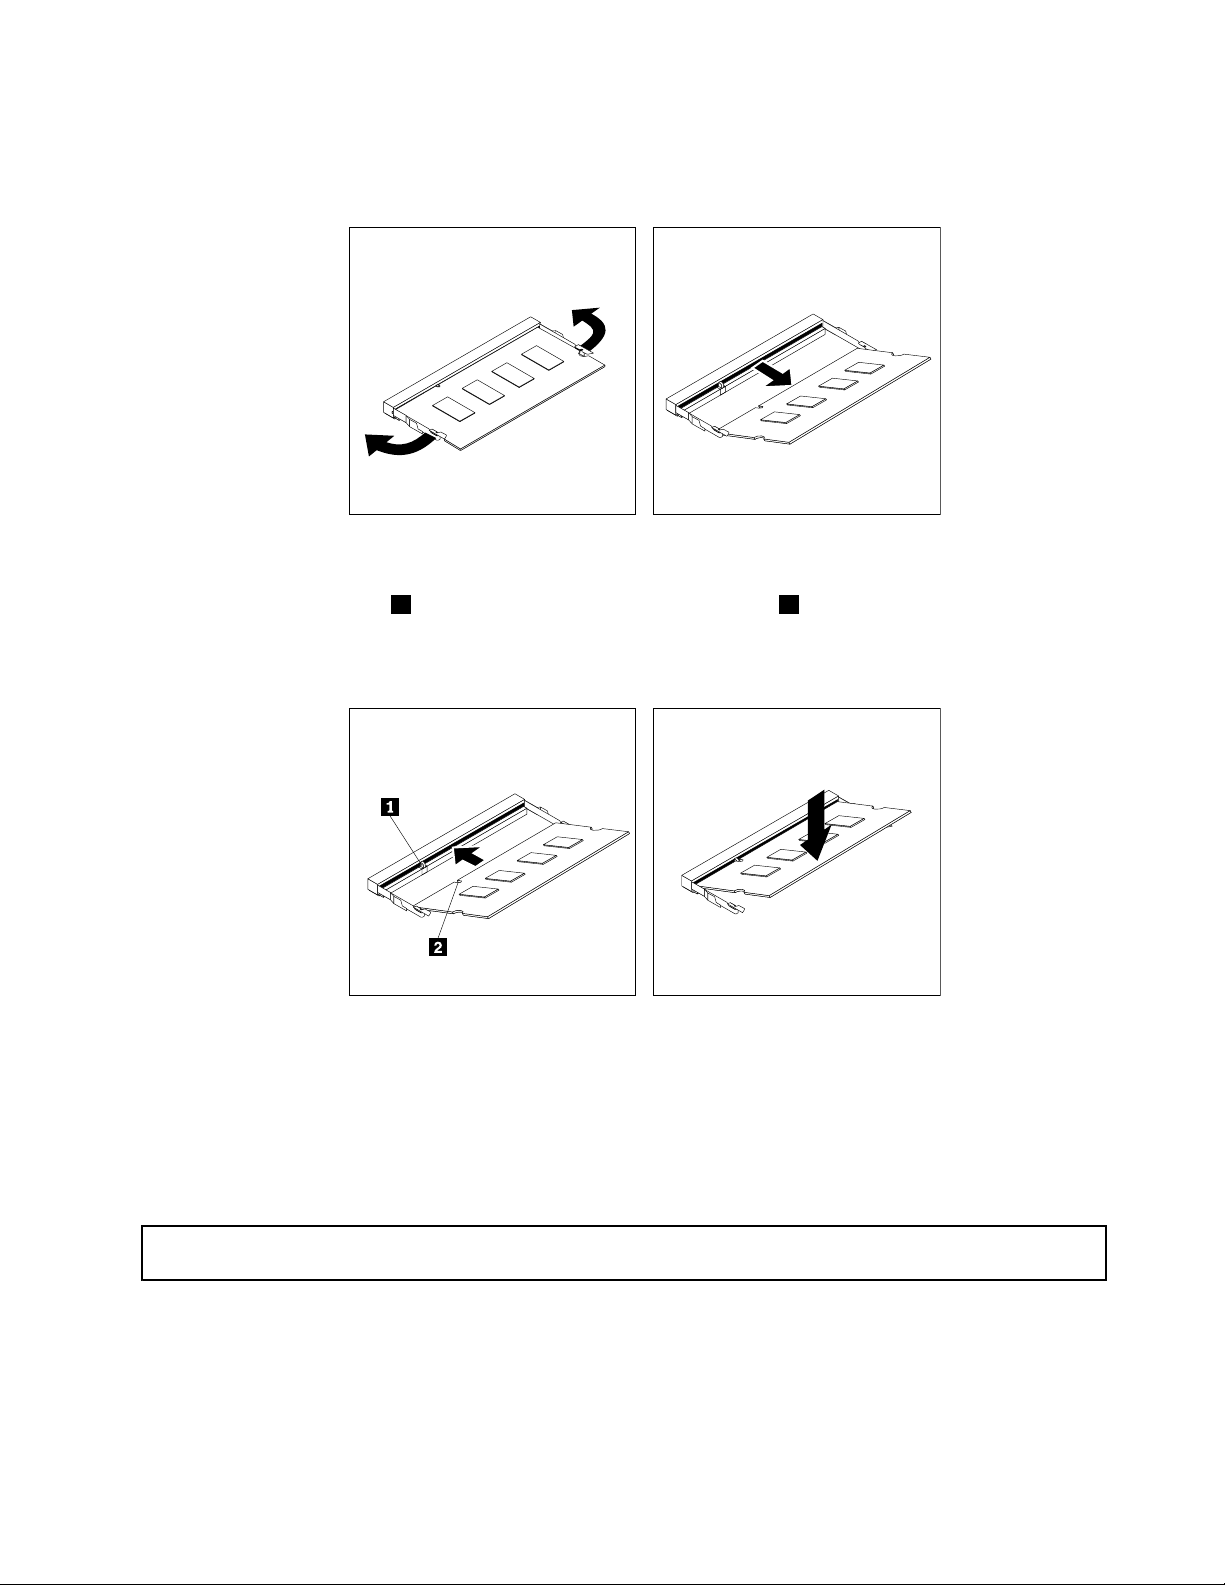
6.Opentheretainingclips.Ifyouarereplacinganoldmemorymodule,opentheretainingclipsand
removethememorymodulebeingreplacedasshown.
Figure16.Removingthememorymodule
7.Insertthenotchedend2ofthenewmemorymoduleintotheslot1.Pressthememorymodule
rmlyandpivotthememorymoduleuntilitsnapsintoplace.Makesurethatthememorymoduleis
securedintheslotanddoesnotmoveeasily.
Figure17.Installingamemorymodule
Whattodonext:
•Toworkwithanotherpieceofhardware,gototheappropriatesection.
•Tocompletetheinstallationorreplacement,goto“Completingthepartsreplacement”onpage68.
Replacingtheharddiskdrive
Attention:Donotopenyourcomputerorattemptanyrepairbeforereadingandunderstandingthe“Important
safetyinformation”onpagev.
Thissectionprovidesinstructionsonhowtoreplacetheharddiskdrive.
Toreplacetheharddiskdrive,dothefollowing:
1.Removeallmediafromthedrivesandturnoffallattacheddevicesandthecomputer.Then,disconnect
allpowercordsfromelectricaloutletsanddisconnectallcablesthatareconnectedtothecomputer.
Chapter5.Installingorreplacinghardware41
Page 54
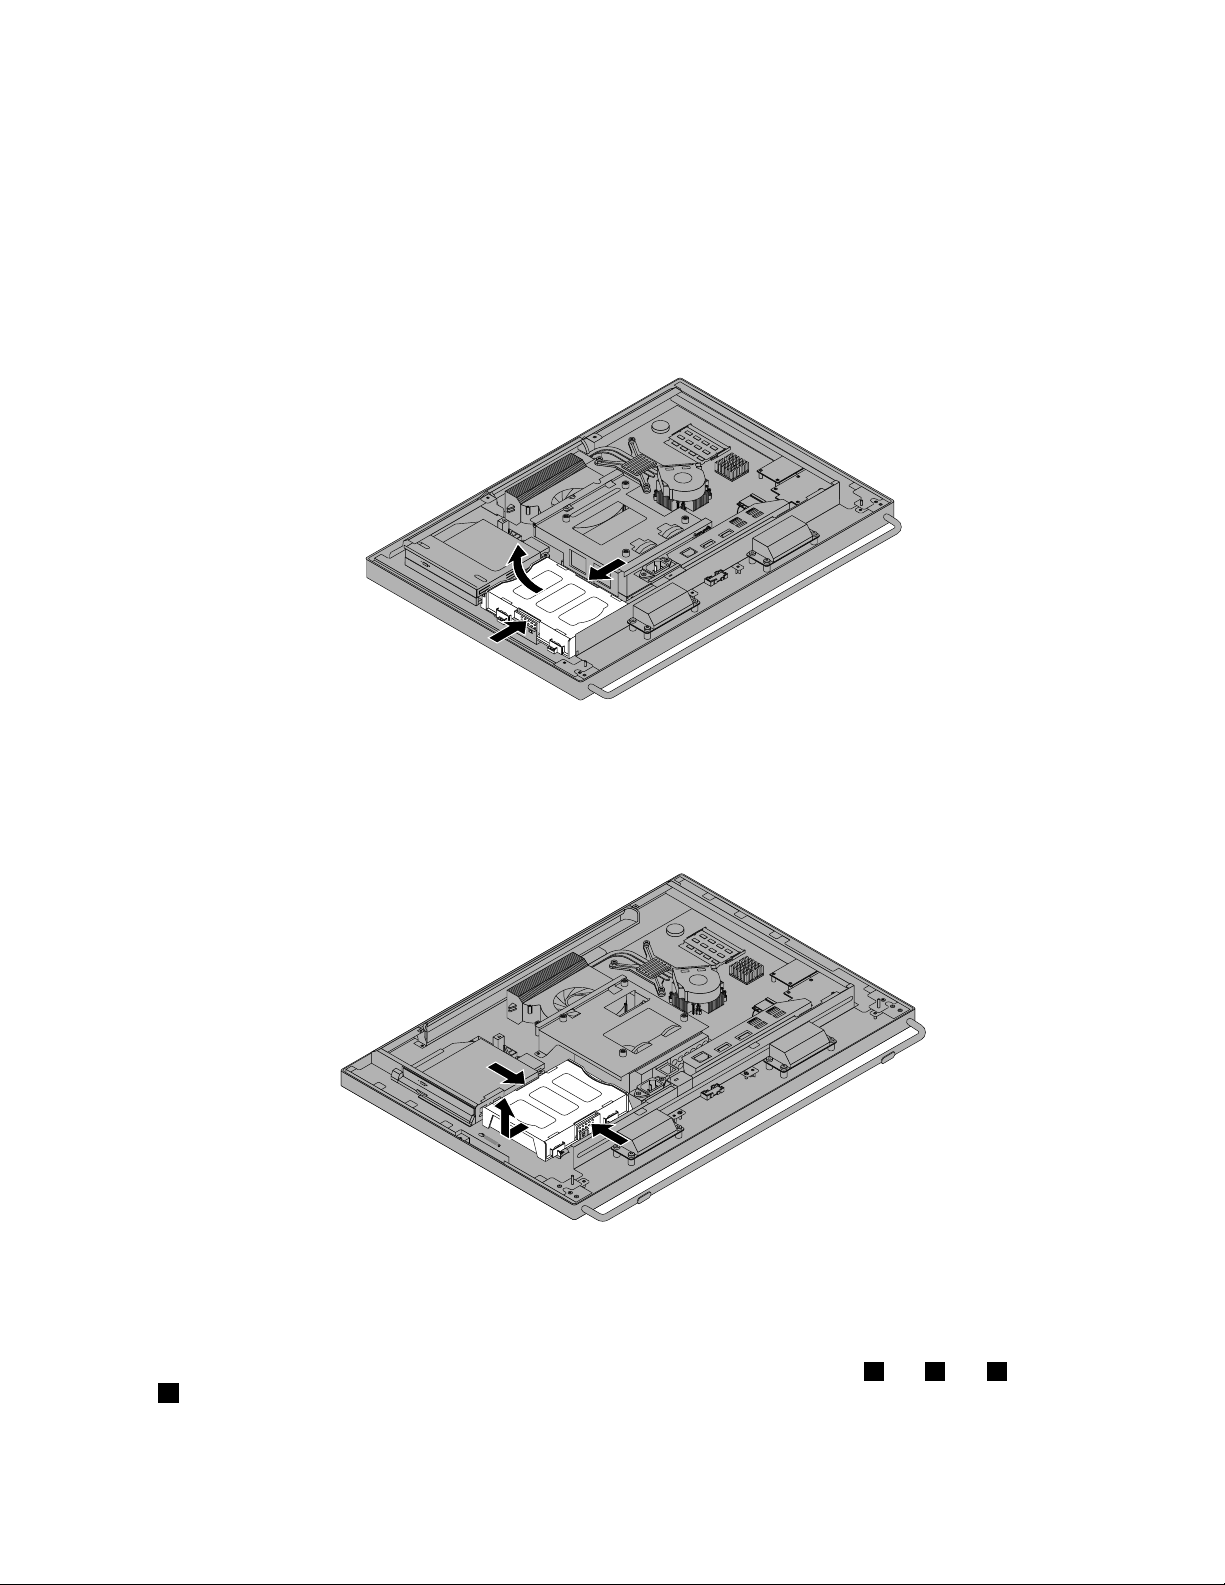
2.Placeasoft,cleantowelorclothonthedeskorsurface.Holdthesidesofyourcomputerandgentlylay
itdownsothatthescreenisagainstthesurfaceandthecoverisfacingup.
3.Removethecomputercover.See“Removingthecomputercover”onpage36.
4.Locatetheharddiskdriveinthecomputer.See“Locatingcomponents”onpage12.
5.Dooneofthefollowing:
•Ifyourcomputercomeswiththe20-inchdisplay,presstheclipsoftheharddiskdrivebracketinward
andthenslidetheharddiskdriveupwardtoremoveitfromthechassis.
Figure18.Removingtheharddiskdrive(20-inchdisplay)
•Ifyourcomputercomeswiththe23-inchdisplay,presstheclipsoftheharddiskdrivebracketinward
andthenslidetheharddiskdrivetothelefttoremoveitfromthechassis.
Figure19.Removingtheharddiskdrive(23-inchdisplay)
6.Disconnectthesignalcableandthepowercablefromtheharddiskdrive.
7.Flexthesidesoftheharddiskdrivebracketproperlytoremovetheharddiskdriveoutofthebracket.
8.T oinstallthenewharddiskdriveintothebracket,exthebracketandalignpin1,pin2,pin3,andpin
4onthebracketwiththecorrespondingholesintheharddiskdrive.
42ThinkCentreUserGuide
Page 55
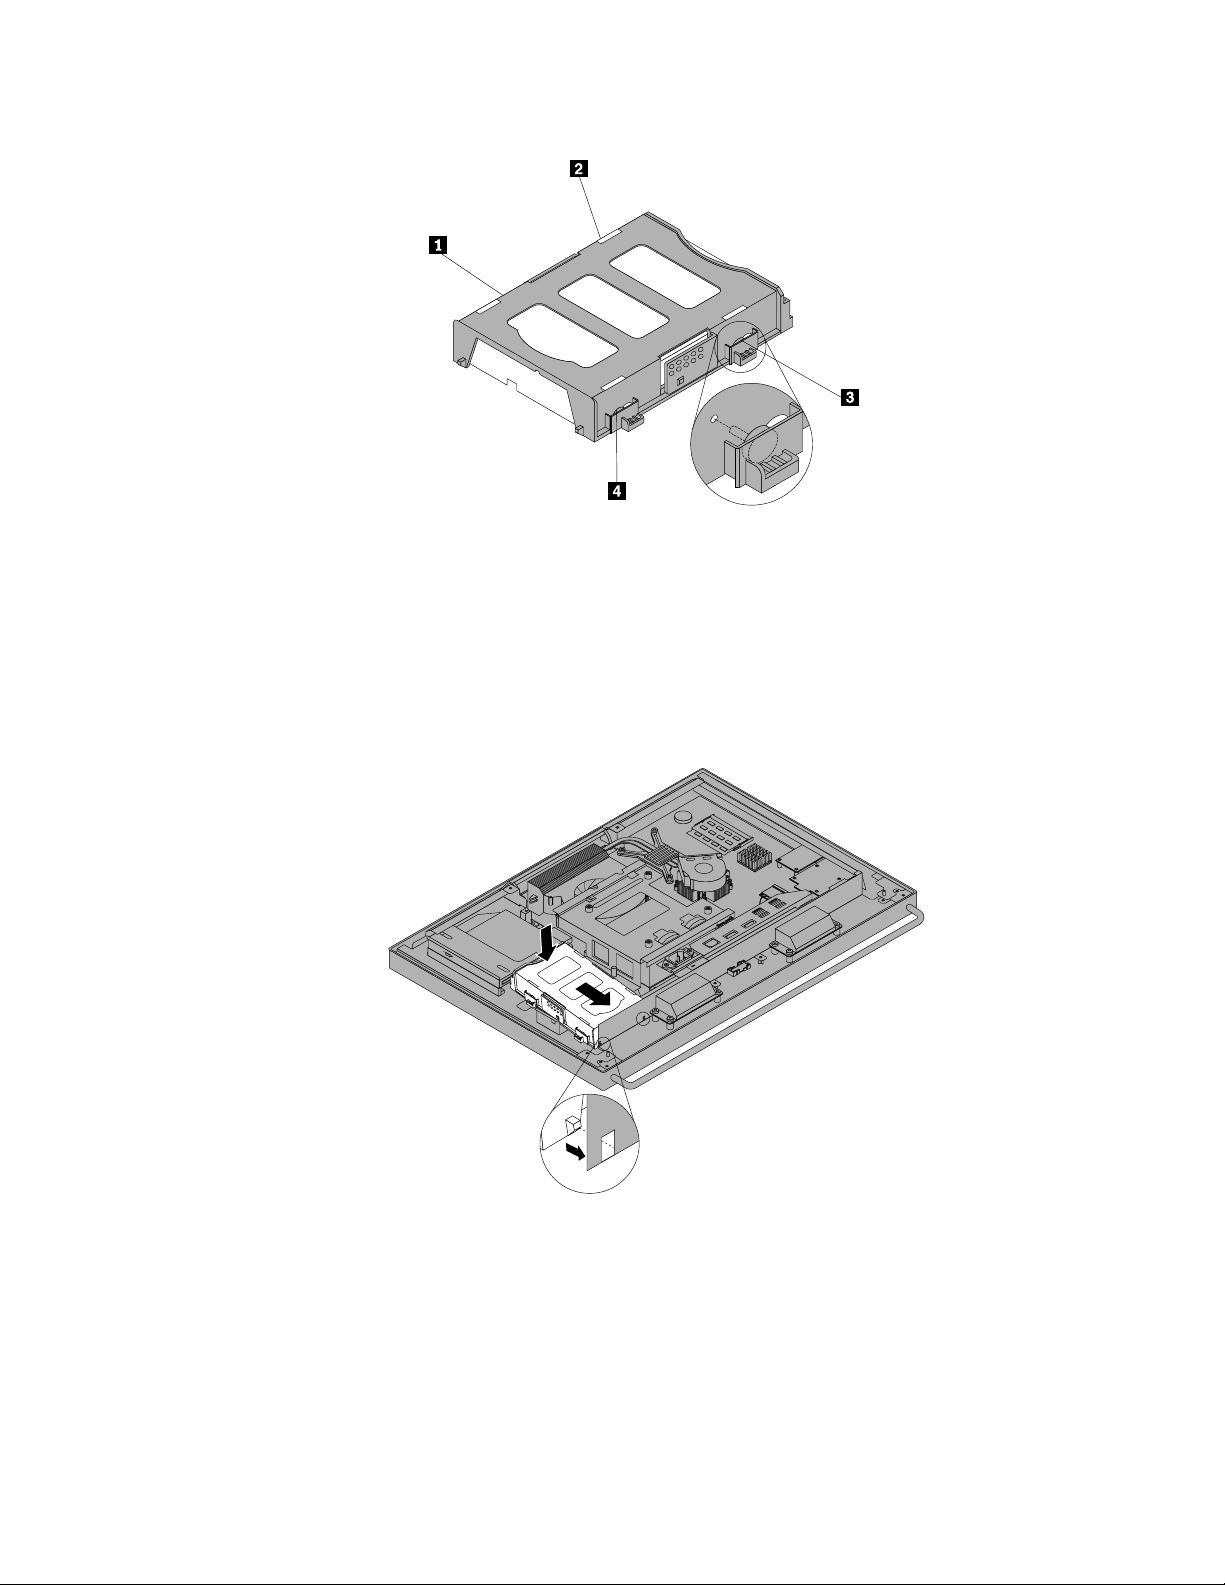
Figure20.Installingtheharddiskdriveintothebracket
9.Connectthesignalcableandthepowercabletothenewharddiskdrive.
10.T oinstalltheharddiskdrivetothechassis,dooneofthefollowing:
•Ifyourcomputercomeswiththe20-inchdisplay,alignthetwopinsontheharddiskdrivebracket
withthecorrespondingslotsinthechassisandpresstheharddiskdrivebracketdownwarduntil
itsnapsintoposition.
Figure21.Installingtheharddiskdrive(20-inchdisplay)
•Ifyourcomputercomeswiththe23-inchdisplay,alignthefourpinsontheharddiskdrivebracket
withthecorrespondingclipsinthechassisandslidetheharddiskdrivebrackettotherightuntil
itsnapsintoposition.
Chapter5.Installingorreplacinghardware43
Page 56
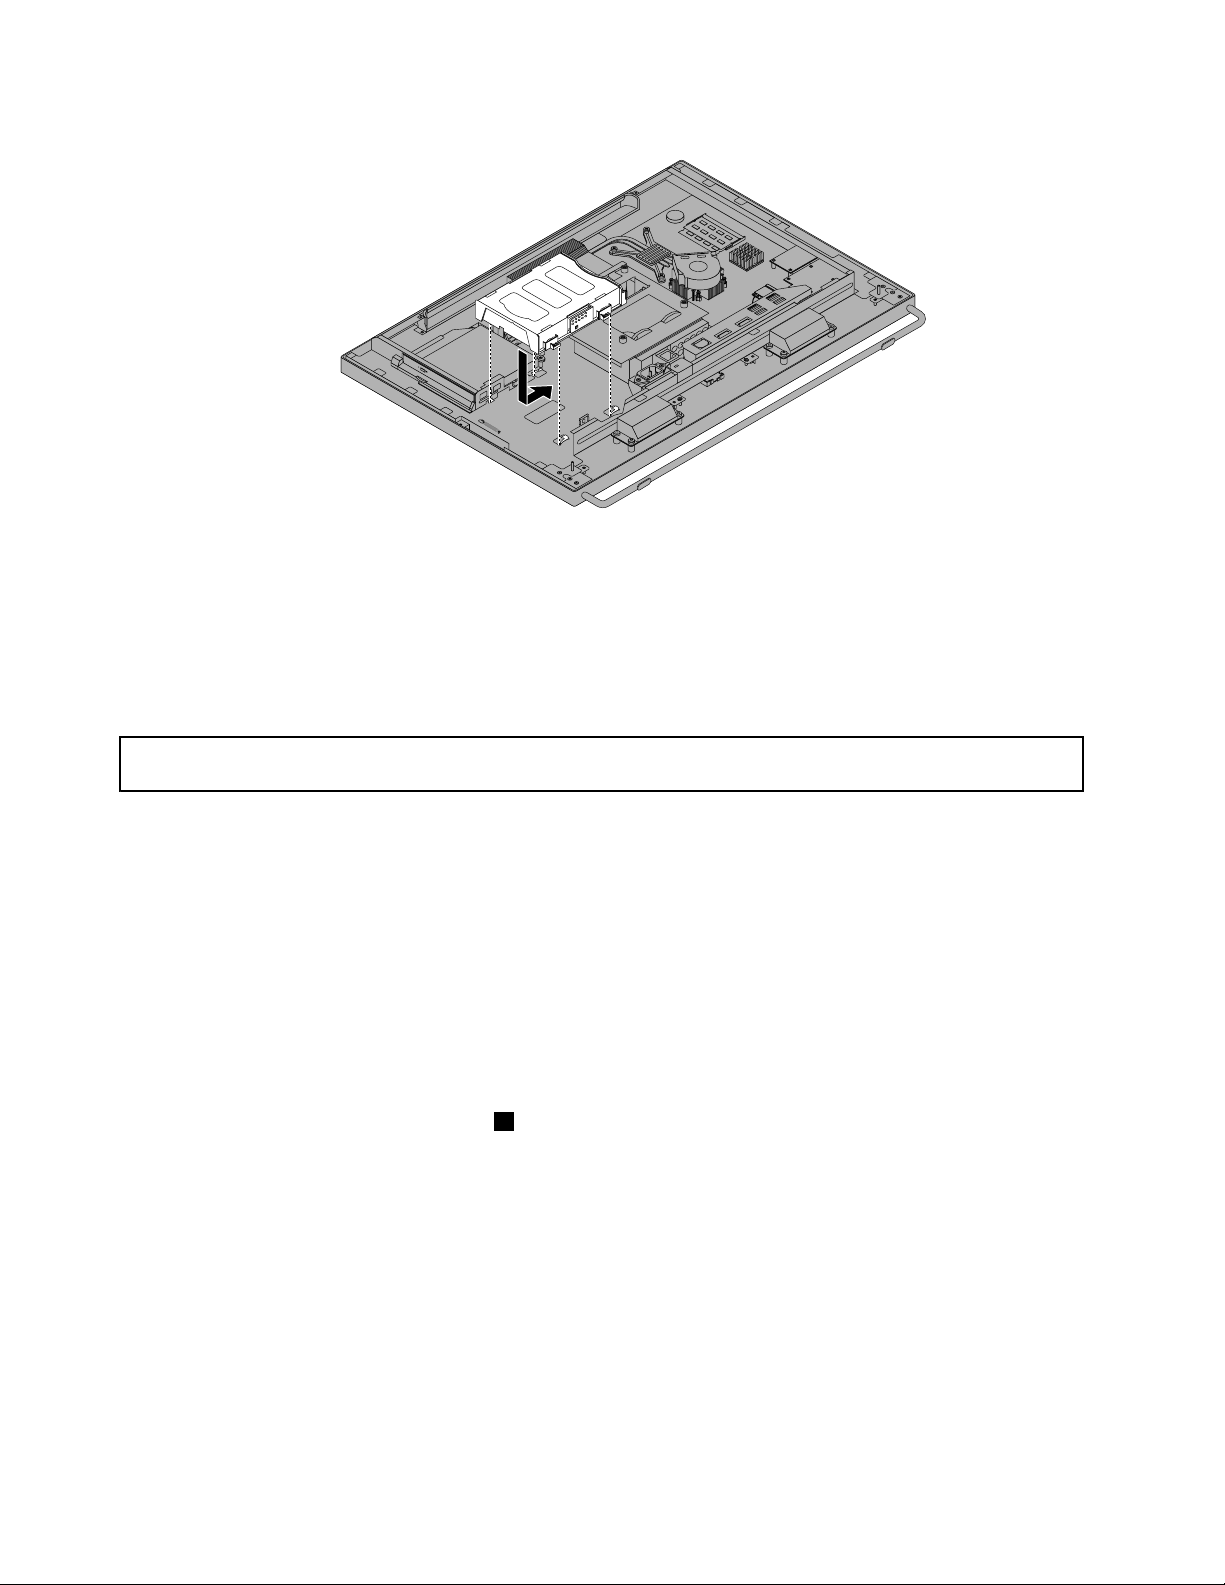
Figure22.Installingtheharddiskdrive(23-inchdisplay)
Whattodonext:
•Toworkwithanotherpieceofhardware,gototheappropriatesection.
•Tocompletetheinstallationorreplacement,goto“Completingthepartsreplacement”onpage68.
Replacingtheopticaldrive
Attention:Donotopenyourcomputerorattemptanyrepairbeforereadingandunderstandingthe“Important
safetyinformation”onpagev
Thissectionprovidesinstructionsonhowtoreplacetheopticaldrive.
Note:Theopticaldriveisavailableonlyinsomemodels.
Toreplacetheopticaldrive,dothefollowing:
1.Removeallmediafromthedrivesandturnoffallattacheddevicesandthecomputer.Then,disconnect
allpowercordsfromelectricaloutletsanddisconnectallcablesthatareconnectedtothecomputer.
2.Placeasoft,cleantowelorclothonthedeskorsurface.Holdthesidesofyourcomputerandgentlylay
itdownsothatthescreenisagainstthesurfaceandthecoverisfacingup.
3.Removethecomputercover.See“Removingthecomputercover”onpage36.
4.Locatetheopticaldrive.See“Locatingcomponents”onpage12.
5.Presstheopticaldrivereleasebutton1towardthetopofthecomputerandthenslidetheopticaldrive
outoftheopticaldrivebay.
.
44ThinkCentreUserGuide
Page 57
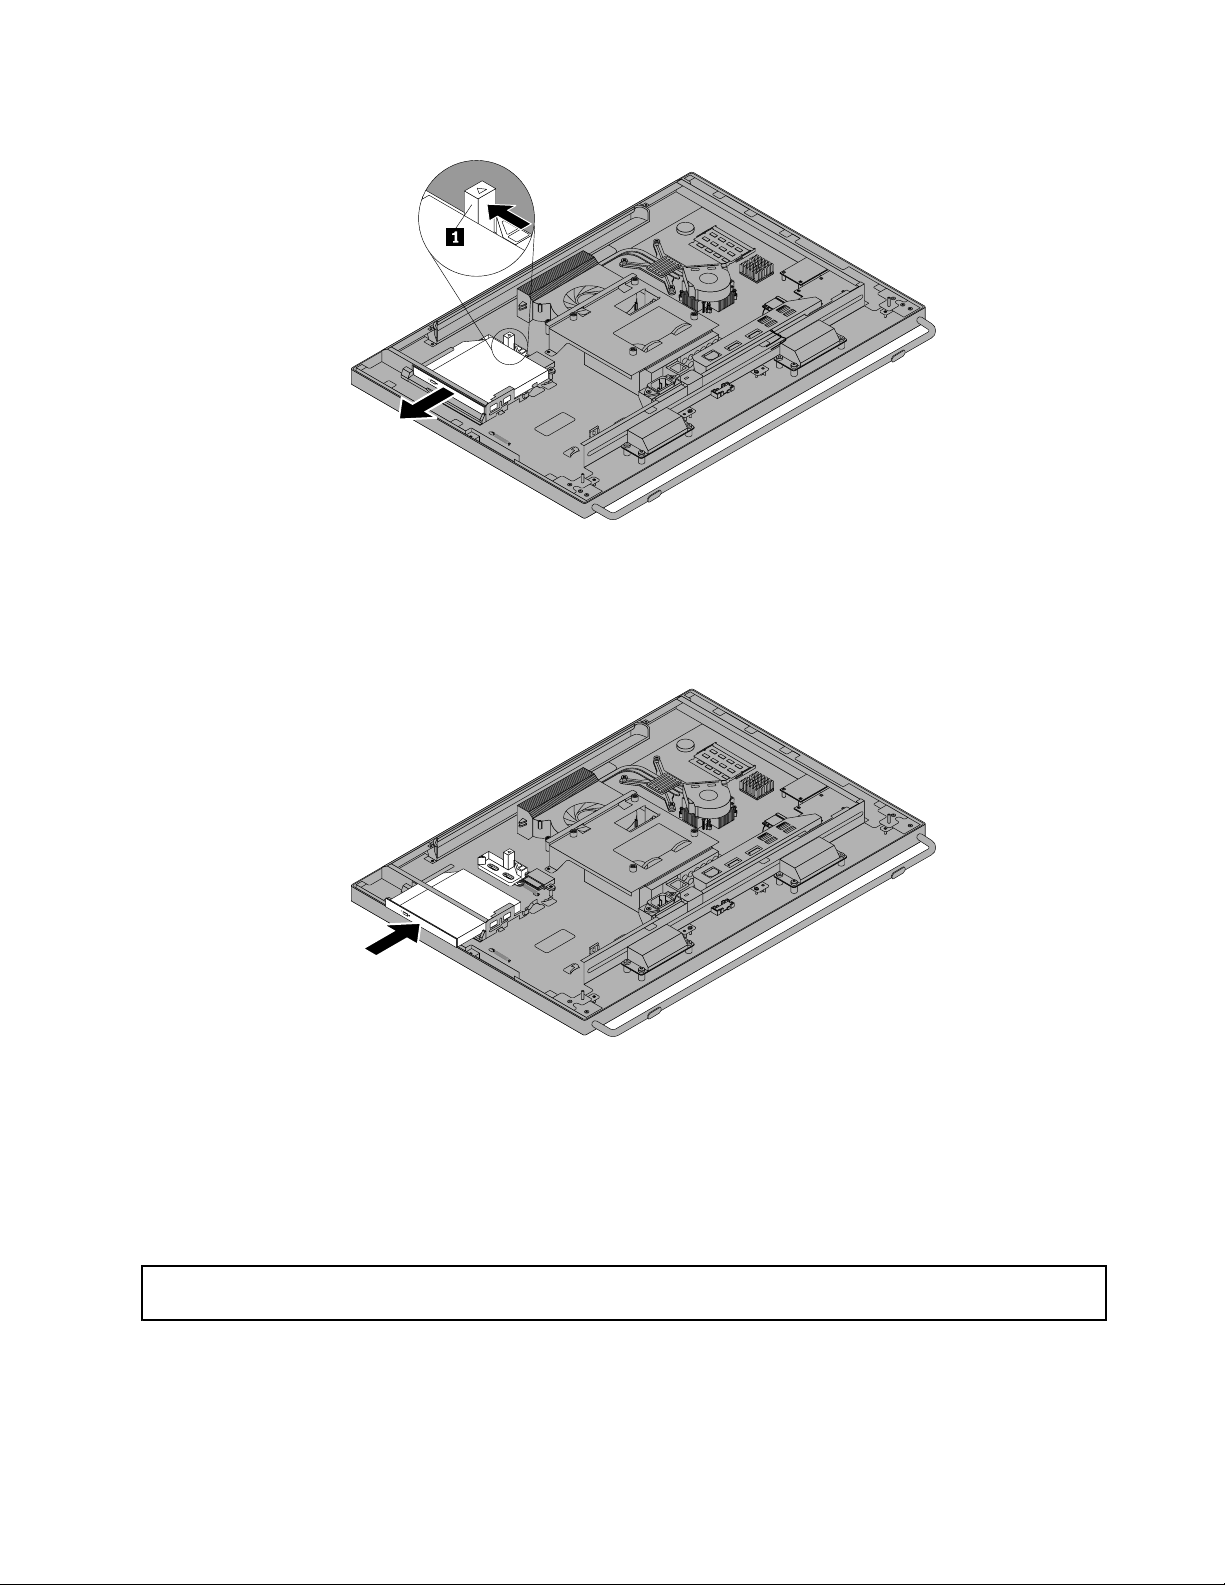
Figure23.Removingtheopticaldrive
6.T oinstallanewopticaldrive,slidethenewopticaldriveintotheopticaldrivebayuntilitsnapsinto
position.
Figure24.Installingtheopticaldrive
Whattodonext:
•Toworkwithanotherpieceofhardware,gototheappropriatesection.
•Tocompletetheinstallationorreplacement,goto“Completingthepartsreplacement”onpage68.
Replacingtheconverterboard
Attention:Donotopenyourcomputerorattemptanyrepairbeforereadingandunderstandingthe“Important
safetyinformation”onpagev
Thissectionprovidesinstructionsonhowtoreplacetheconverterboard.
Toreplacetheconverterboard,dothefollowing:
.
Chapter5.Installingorreplacinghardware45
Page 58
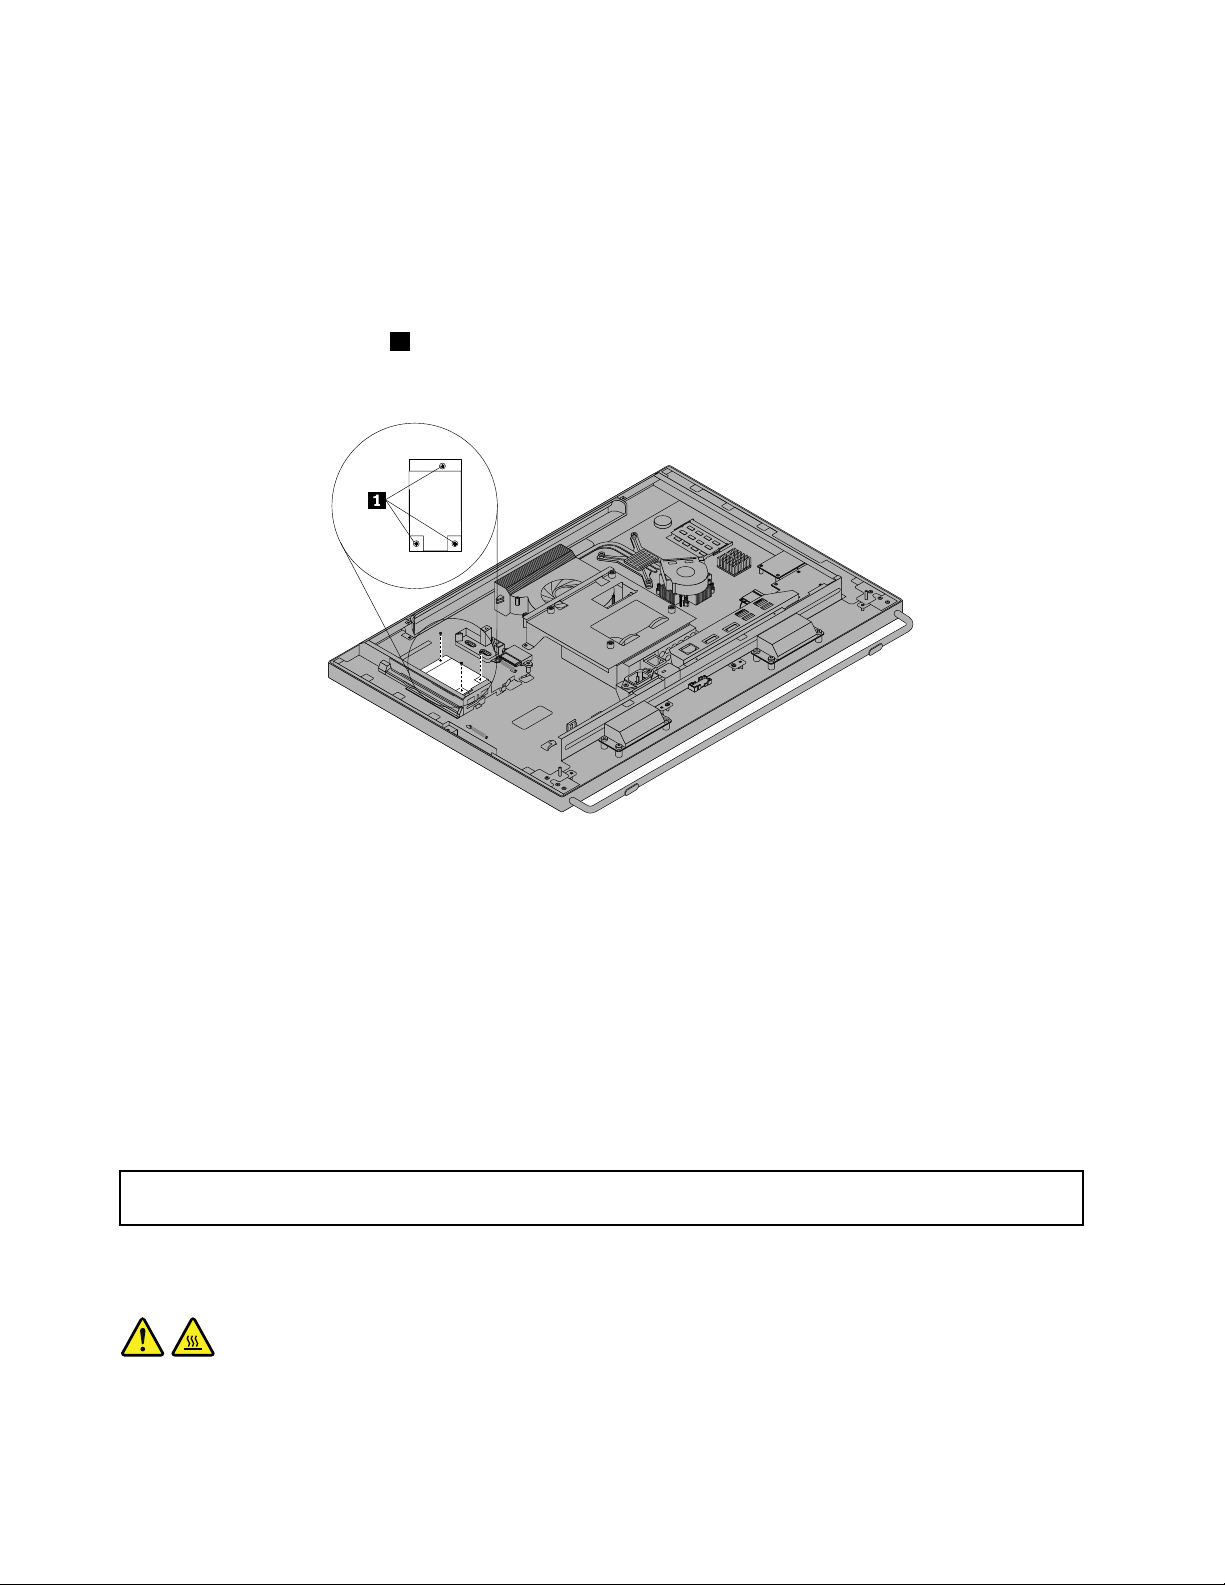
1.Removeallmediafromthedrivesandturnoffallattacheddevicesandthecomputer.Then,disconnect
allpowercordsfromelectricaloutletsanddisconnectallcablesthatareconnectedtothecomputer.
2.Placeasoft,cleantowelorclothonthedeskorsurface.Holdthesidesofyourcomputerandgentlylay
itdownsothatthescreenisagainstthesurfaceandthecoverisfacingup.
3.Removethecomputercover.See“Removingthecomputercover”onpage36.
4.Removetheopticaldrive.See“Replacingtheopticaldrive”onpage44.
5.Locatetheconverterboard.See“Locatingcomponents”onpage12.
6.Removethethreescrews1thatsecuretheconverterboardtothechassisanddisconnectthecables.
Then,lifttheconverterboardoffthechassis.
Figure25.Removingtheconverterboard
7.Connectthecablestothenewconverterboardandalignthethreescrewholesinthenewconverter
boardwiththoseinthechassis.
8.Installthethreescrewstosecurethenewconverterboardtothechassis.
9.Reinstalltheopticaldrive.See“Replacingtheopticaldrive”onpage44.
Whattodonext:
•Toworkwithanotherpieceofhardware,gototheappropriatesection.
•Tocompletetheinstallationorreplacement,goto“Completingthepartsreplacement”onpage68.
Replacingtheheatsink
Attention:Donotopenyourcomputerorattemptanyrepairbeforereadingandunderstandingthe“Important
safetyinformation”onpagev.
Thissectionprovidesinstructionsonhowtoreplacetheheatsink.
CAUTION:
Theheatsinkmightbeveryhot.T urnoffthecomputerandwaitthreetoveminutestoletthe
computercoolbeforeremovingthecomputercover.
Toreplacetheheatsink,dothefollowing:
46ThinkCentreUserGuide
Page 59
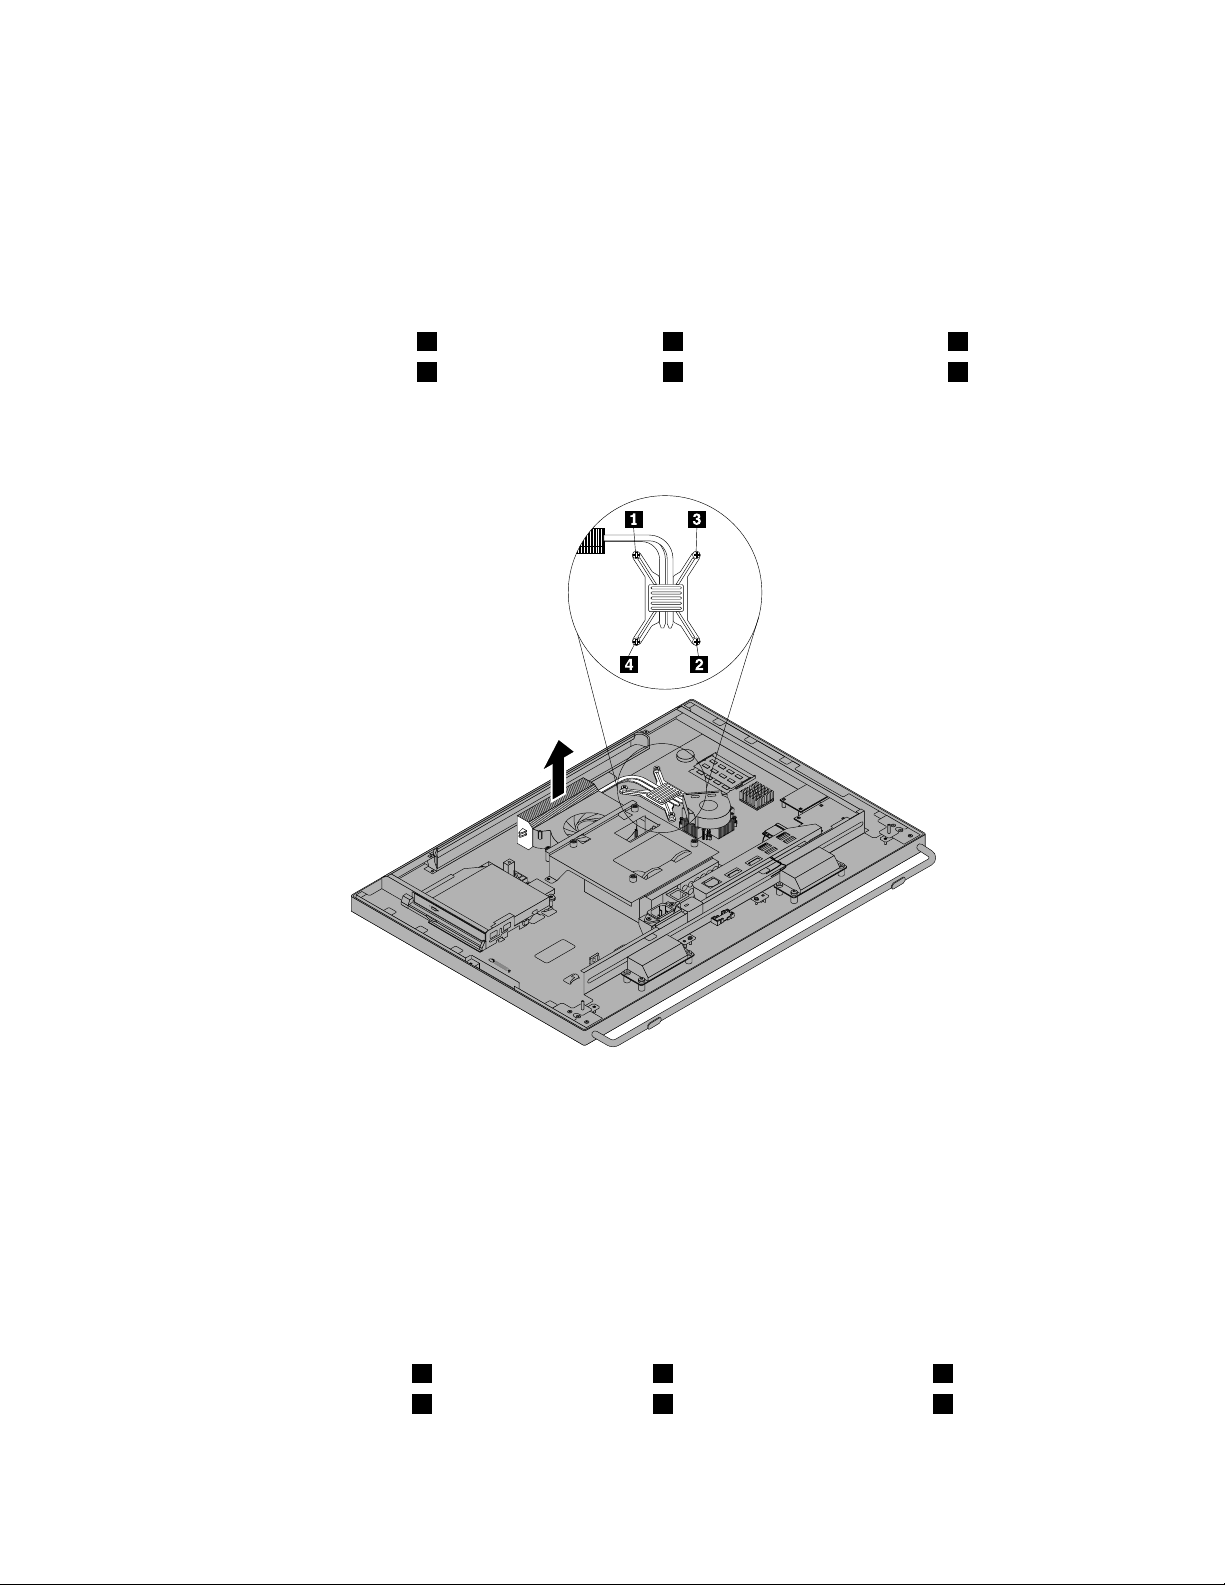
1.Removeallmediafromthedrivesandturnoffallattacheddevicesandthecomputer.Then,disconnect
allpowercordsfromelectricaloutletsanddisconnectallcablesthatareconnectedtothecomputer.
2.Placeasoft,cleantowelorclothonthedeskorsurface.Holdthesidesofyourcomputerandgentlylay
itdownsothatthescreenisagainstthesurfaceandthecoverisfacingup.
3.Removethecomputercover.See“Removingthecomputercover”onpage36.
4.Locatetheheatsink.See“Locatingcomponents”onpage12.
5.Followthissequencetoremovethefourscrewsthatsecuretheheatsinktothesystemboard:
a.Partiallyremovescrew1,thenfullyremovescrew2,andthenfullyremovescrew1.
b.Partiallyremovescrew3,thenfullyremovescrew4,andthenfullyremovescrew3.
Note:Carefullyremovethefourscrewsfromthesystemboardtoavoidanypossibledamagetothe
systemboard.Thefourscrewscannotberemovedfromtheheatsink.
Figure26.Removingtheheatsink
6.Removethefailingheatsinkoffthesystemboard.
Notes:
a.Youmighthavetogentlytwisttheheatsinktofreeitfromthemicroprocessor.
b.Donottouchthethermalgreasewhilehandlingtheheatsink.
7.Positionthenewheatsinkonthesystemboardsothatthefourscrewsarealignedwiththe
correspondingholesinthesystemboard.
8.Followthissequencetoinstallthefourscrewstosecuretheheatsink,asshowninFigure26“Removing
theheatsink”onpage47
.
a.Partiallytightenscrew1,thenfullytightenscrew2,andthenfullytightenscrew1.
b.Partiallytightenscrew3,thenfullytightenscrew4,andthenfullytightenscrew3.
Chapter5.Installingorreplacinghardware47
Page 60

Whattodonext:
•Toworkwithanotherpieceofhardware,gototheappropriatesection.
•Tocompletetheinstallationorreplacement,goto“Completingthepartsreplacement”onpage68.
Replacingthemicroprocessor
Attention:Donotopenyourcomputerorattemptanyrepairbeforereadingandunderstandingthe“Important
safetyinformation”onpagev.
Thissectionprovidesinstructionsonhowtoreplacethemicroprocessor.
CAUTION:
Theheatsinkandmicroprocessormightbeveryhot.T urnoffthecomputerandwaitthreetove
minutestoletthecomputercoolbeforeremovingthecomputercover.
Toreplacethemicroprocessor,dothefollowing:
1.Removeallmediafromthedrivesandturnoffallattacheddevicesandthecomputer.Then,disconnect
allpowercordsfromelectricaloutletsanddisconnectallcablesthatareconnectedtothecomputer.
2.Placeasoft,cleantowelorclothonthedeskorsurface.Holdthesidesofyourcomputerandgentlylay
itdownsothatthescreenisagainstthesurfaceandthecoverisfacingup.
3.Removethecomputercover.See“Removingthecomputercover”onpage36.
4.Locatethesystemboardanddisconnectallcablesconnectedtothesystemboard.See“Locating
partsonthesystemboard”onpage15.
5.Removetheheatsinktogainaccesstothemicroprocessor.See“Replacingtheheatsink”onpage46.
Note:Placetheheatsinkonitssidesothatthethermalgreaseonthebottomofitdoesnotgetin
contactwithanything.
48ThinkCentreUserGuide
Page 61
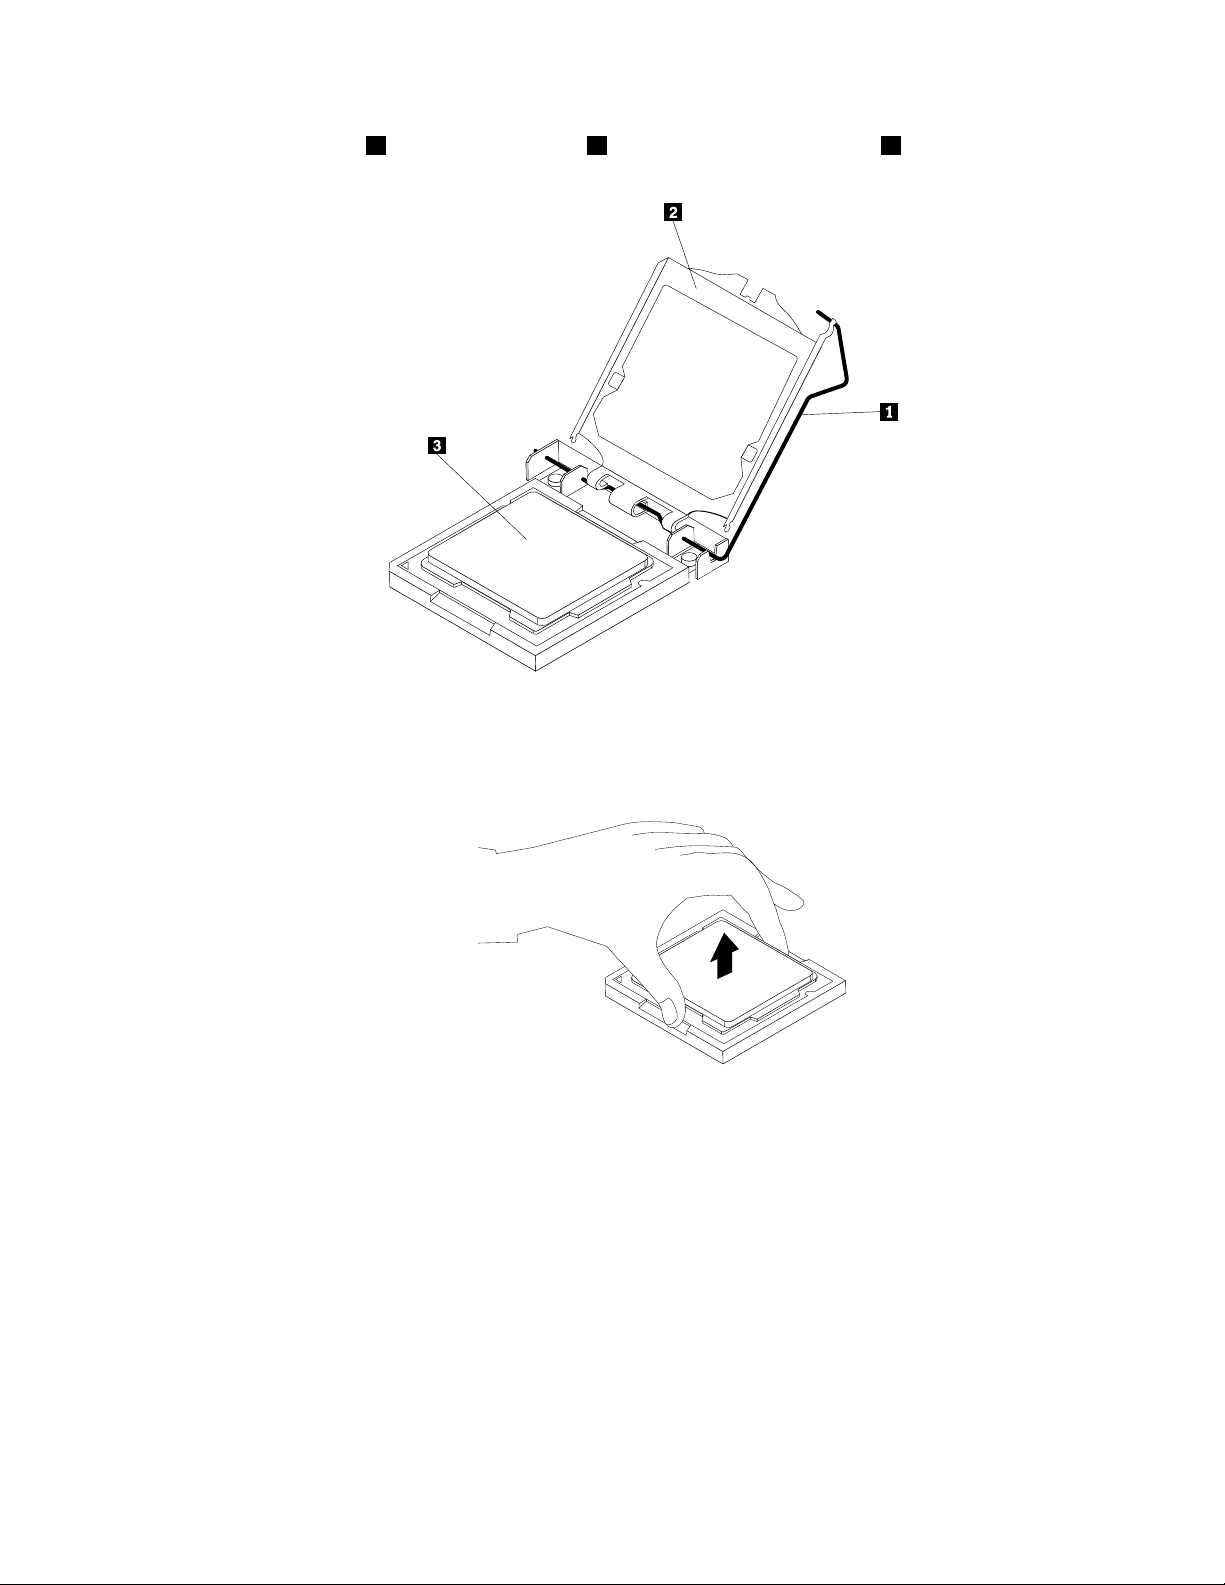
6.Liftthesmallhandle1andopentheretainer2toaccessthemicroprocessor3.
Figure27.Accessingthemicroprocessor
7.Liftthemicroprocessorstraightupandoutofthemicroprocessorsocket.
Figure28.Removingthemicroprocessor
Notes:
a.Yourmicroprocessorandsocketmightlookdifferentfromtheoneillustrated.
Chapter5.Installingorreplacinghardware49
Page 62
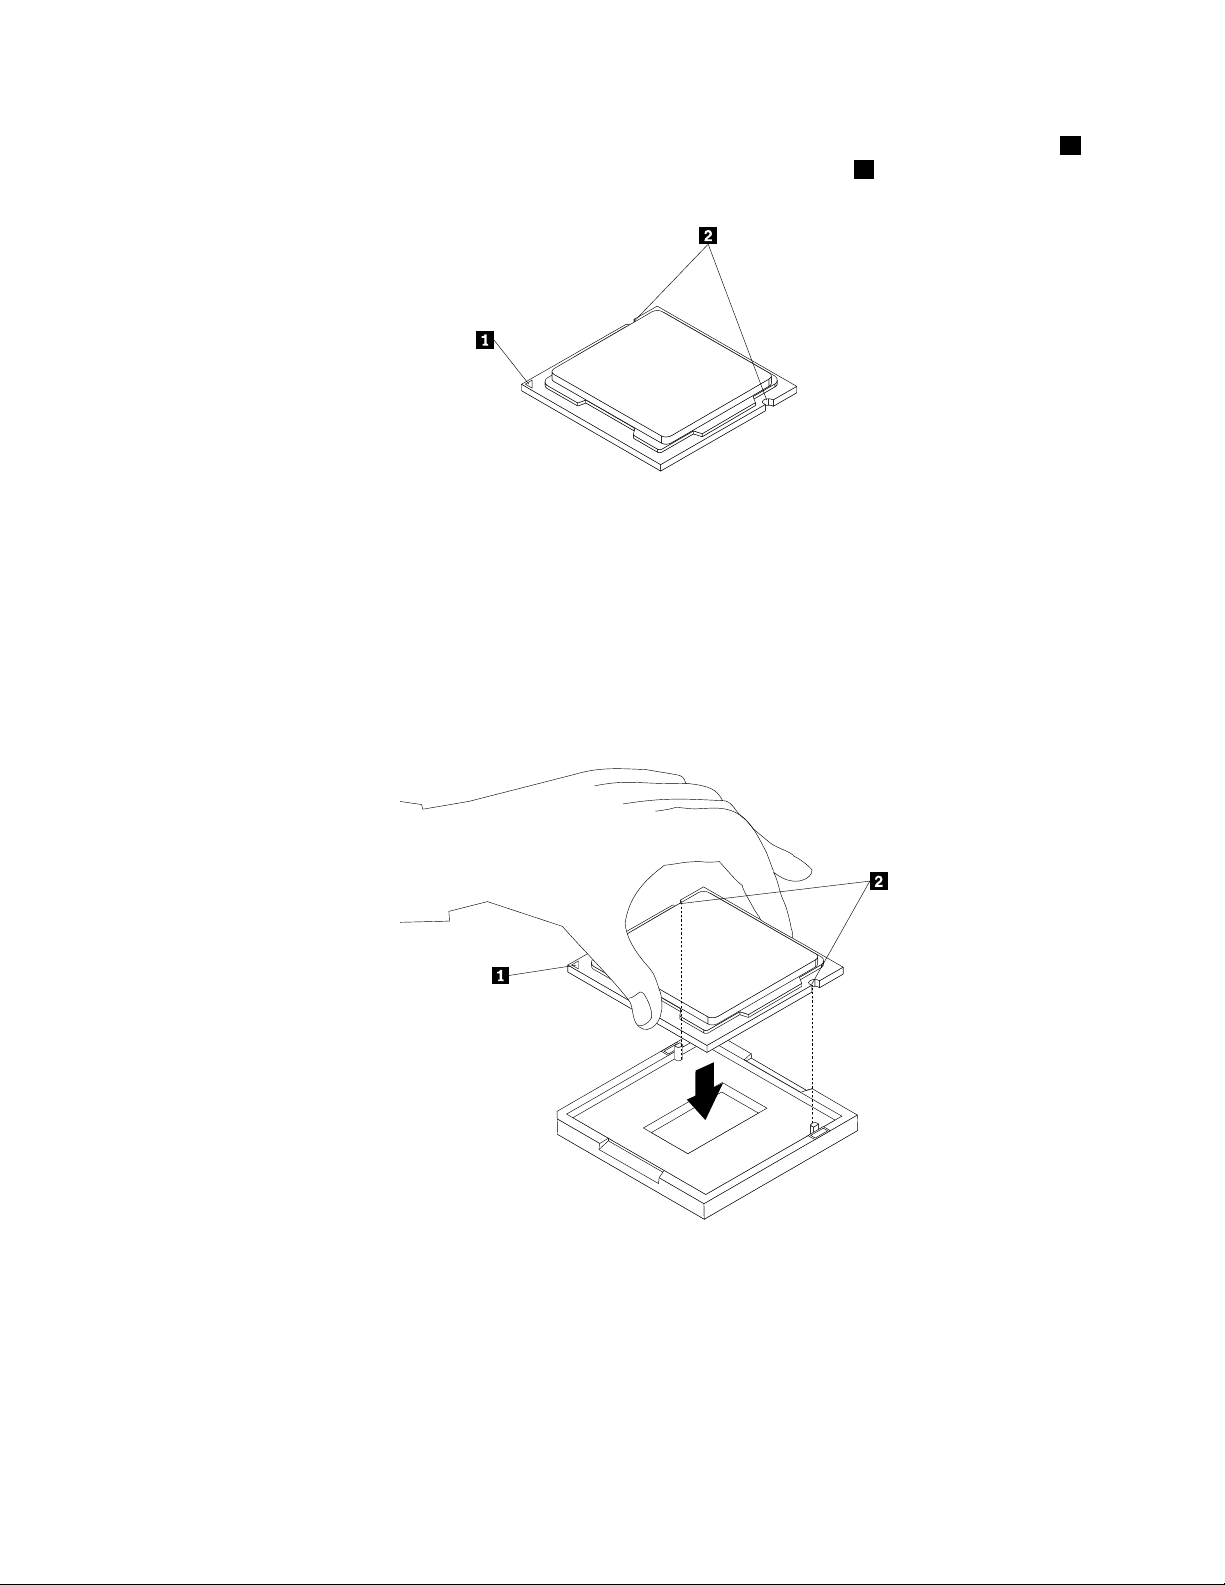
b.Notetheorientationofthemicroprocessorinthesocket.Youcaneitherlookforthesmalltriangle1
ononecornerofthemicroprocessorornotetheorientationofthenotches2onthemicroprocessor.
Thisisimportantwheninstallingthenewmicroprocessoronthesystemboard.
c.Touchonlytheedgesofthemicroprocessor.Donottouchthegoldcontactsonthebottom.
d.Donotdropanythingontothemicroprocessorsocketwhileitisexposed.Thesocketpinsmustbe
keptascleanaspossible.
8.Makesurethatthesmallhandleisintheraisedpositionandthemicroprocessorretainerisfullyopen.
9.Removetheprotectivecoverthatprotectsthegoldcontactsofthenewmicroprocessor.
10.Holdthenewmicroprocessorbyitssidesandalignthesmalltriangleononecornerofthenew
microprocessorwiththecorrespondingsmalltriangleononecornerofthemicroprocessorsocket.
11.Lowerthenewmicroprocessorstraightdownintothemicroprocessorsocketonthesystemboard.
Figure29.Installingthemicroprocessor
12.Closethemicroprocessorretainerandlockitintopositionwiththesmallhandletosecurethenew
microprocessorinthesocket.
13.Reinstalltheheatsink.See“Replacingtheheatsink”onpage46.
14.Reconnectallcablesthatweredisconnectedfromthesystemboard.
50ThinkCentreUserGuide
Page 63
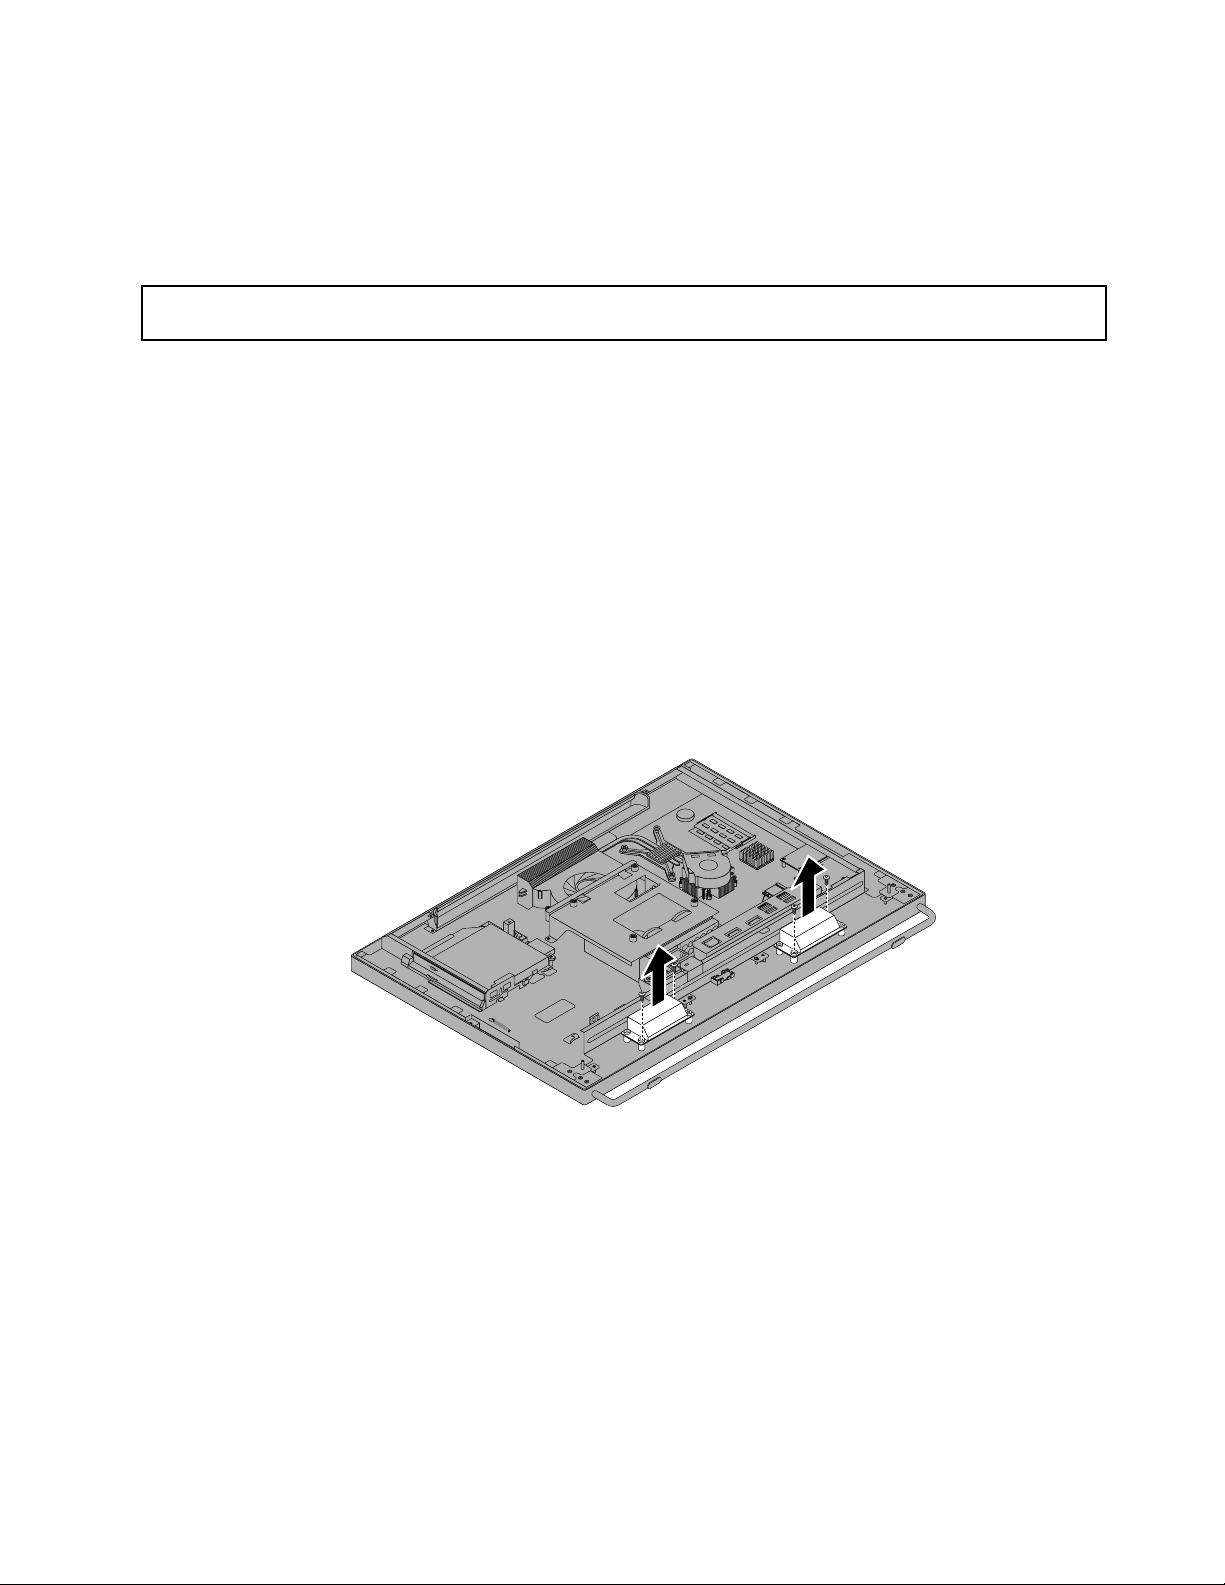
Whattodonext:
•Toworkwithanotherpieceofhardware,gototheappropriatesection.
•Tocompletethereplacement,goto“Completingthepartsreplacement”onpage68.
Replacingtheinternalspeakers
Attention:Donotopenyourcomputerorattemptanyrepairbeforereadingandunderstandingthe“Important
safetyinformation”onpagev.
Thissectionprovidesinstructionsonhowtoreplacetheinternalspeakers.
Toreplacetheinternalspeakers,dothefollowing:
1.Removeallmediafromthedrivesandturnoffallattacheddevicesandthecomputer.Then,disconnect
allpowercordsfromelectricaloutletsanddisconnectallcablesthatareconnectedtothecomputer.
2.Placeasoft,cleantowelorclothonthedeskorsurface.Holdthesidesofyourcomputerandgentlylay
itdownsothatthescreenisagainstthesurfaceandthecoverisfacingup.
3.Removethecomputercover.See“Removingthecomputercover”onpage36.
4.Locatetheinternalspeakers.See“Locatingcomponents”onpage12.
5.Notethelocationoftheinternalspeakercableconnection.Notetheroutingoftheinternalspeaker
cables.Disconnecttheinternalspeakercablesfromthesystemboard.
6.Removethetwoscrewsthatsecureeachinternalspeakertothefrontbezel,andthenremovethe
internalspeakersfromthecomputer.
Figure30.Removingtheinternalspeakers
7.Routethenewinternalspeakercablesandthenpositionthenewinternalspeakersonthefrontbezelso
thatthetwoscrewholesineachinternalspeakeralignwiththoseinthefrontbezel.
8.Reinstallthetwoscrewstosecureeachoftheinternalspeakerstothefrontbezel.
9.Reconnecttheinternalspeakercablestothesystemboard.See“Locatingpartsonthesystemboard”
onpage15.
Whattodonext:
•Toworkwithanotherpieceofhardware,gototheappropriatesection.
•Tocompletetheinstallationorreplacement,goto“Completingthepartsreplacement”onpage68.
Chapter5.Installingorreplacinghardware51
Page 64
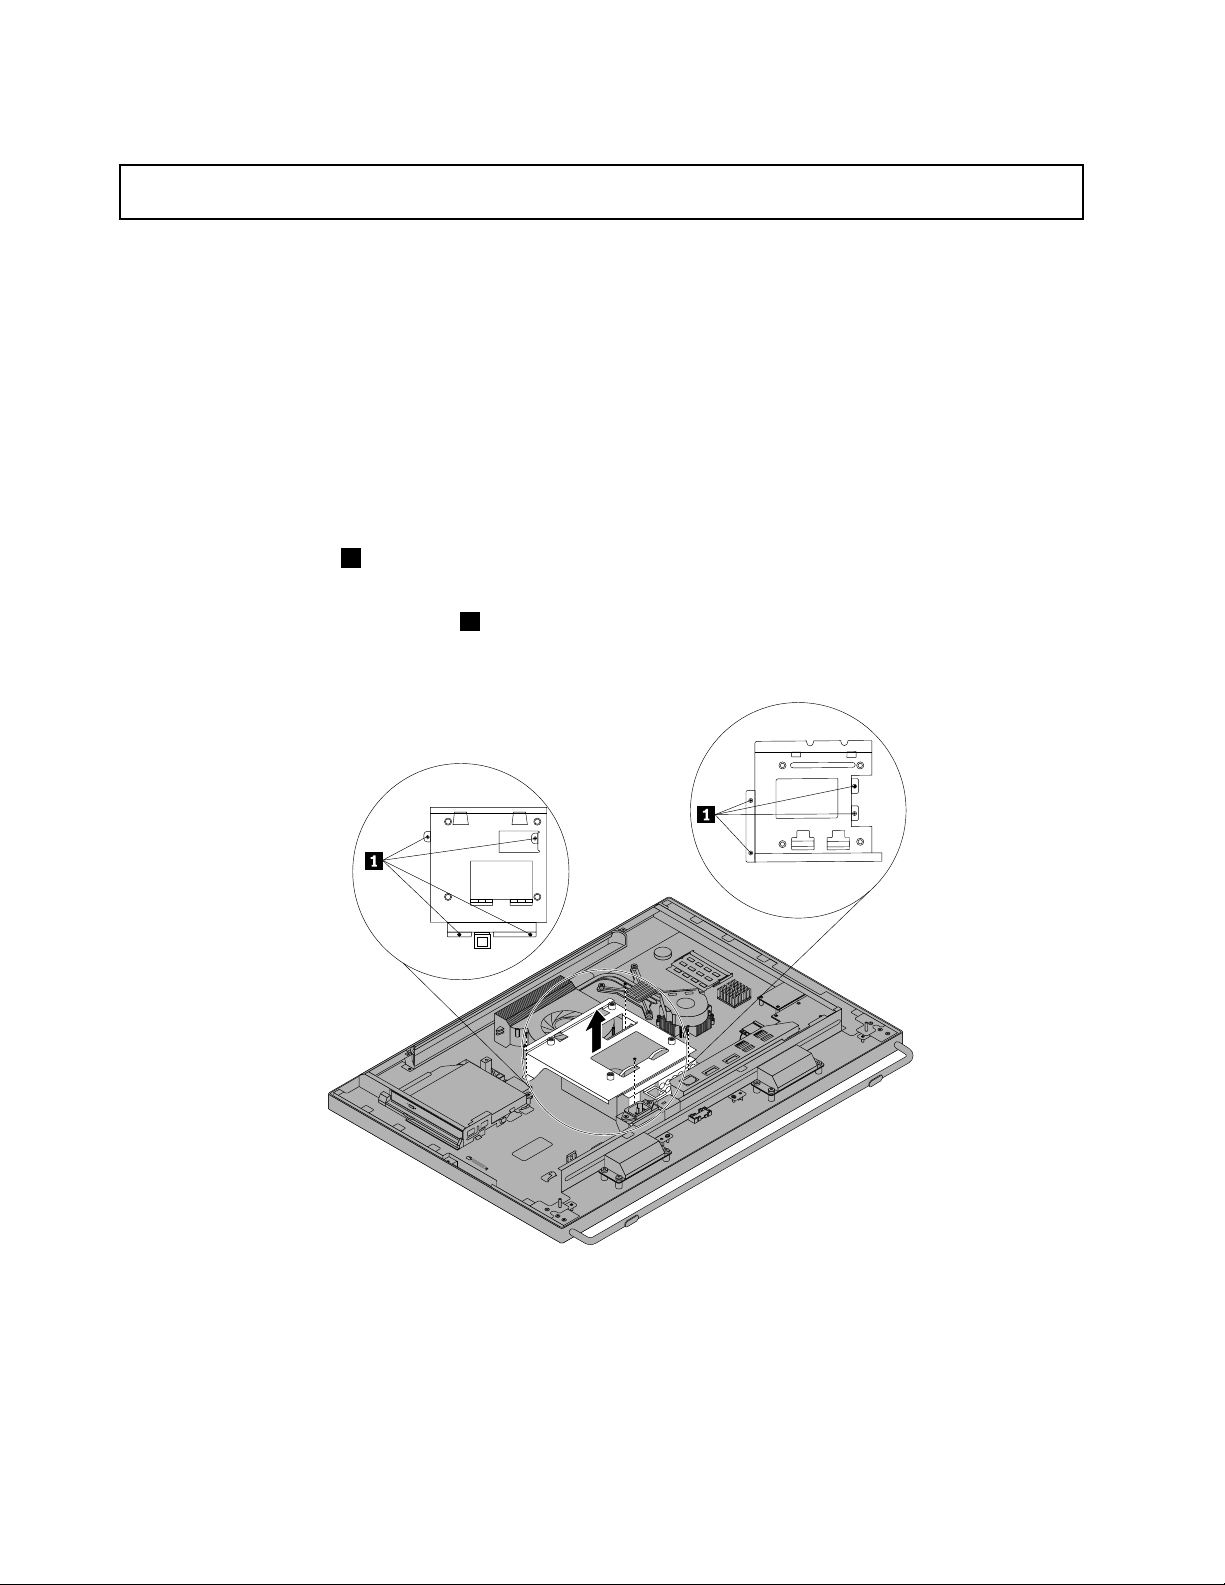
Replacingthethermalsensor
Attention:Donotopenyourcomputerorattemptanyrepairbeforereadingandunderstandingthe“Important
safetyinformation”onpagev.
Thissectionprovidesinstructionsonhowtoreplacethethermalsensor.
Toreplacethethermalsensor,dothefollowing:
1.Removeallmediafromthedrivesandturnoffallattacheddevicesandthecomputer.Then,disconnect
allpowercordsfromelectricaloutletsanddisconnectallcablesthatareconnectedtothecomputer.
2.Placeasoft,cleantowelorclothonthedeskorsurface.Holdthesidesofyourcomputerandgentlylay
itdownsothatthescreenisagainstthesurfaceandthecoverisfacingup.
3.Removethecomputercover.See“Removingthecomputercover”onpage36.
4.Locatethethermalsensor.See“Locatingcomponents”onpage12.
5.Notetheroutingofthethermalsensorcableandthendisconnectthethermalsensorcablefromthe
systemboard.
6.Removethescrews1thatsecuretheVESAmountbracketandthenlifttheVESAmountbracket
offthechassis.
Note:Thelocationofthescrews
1thatsecuretheVESAmountbrackettothechassisisdifferent
betweenmodelswiththe20-inchdisplayandmodelswiththe23-inchdisplay.
Figure31.RemovingtheVESAmountbracket
7.PressoneofthethermalsensorclipsinwardtodisengagethethermalsensorfromtheVESAmount
bracket.
Note:Thelocationofthethermalsensorinyourcomputermightbeslightlydifferentfromtheillustration.
52ThinkCentreUserGuide
Page 65
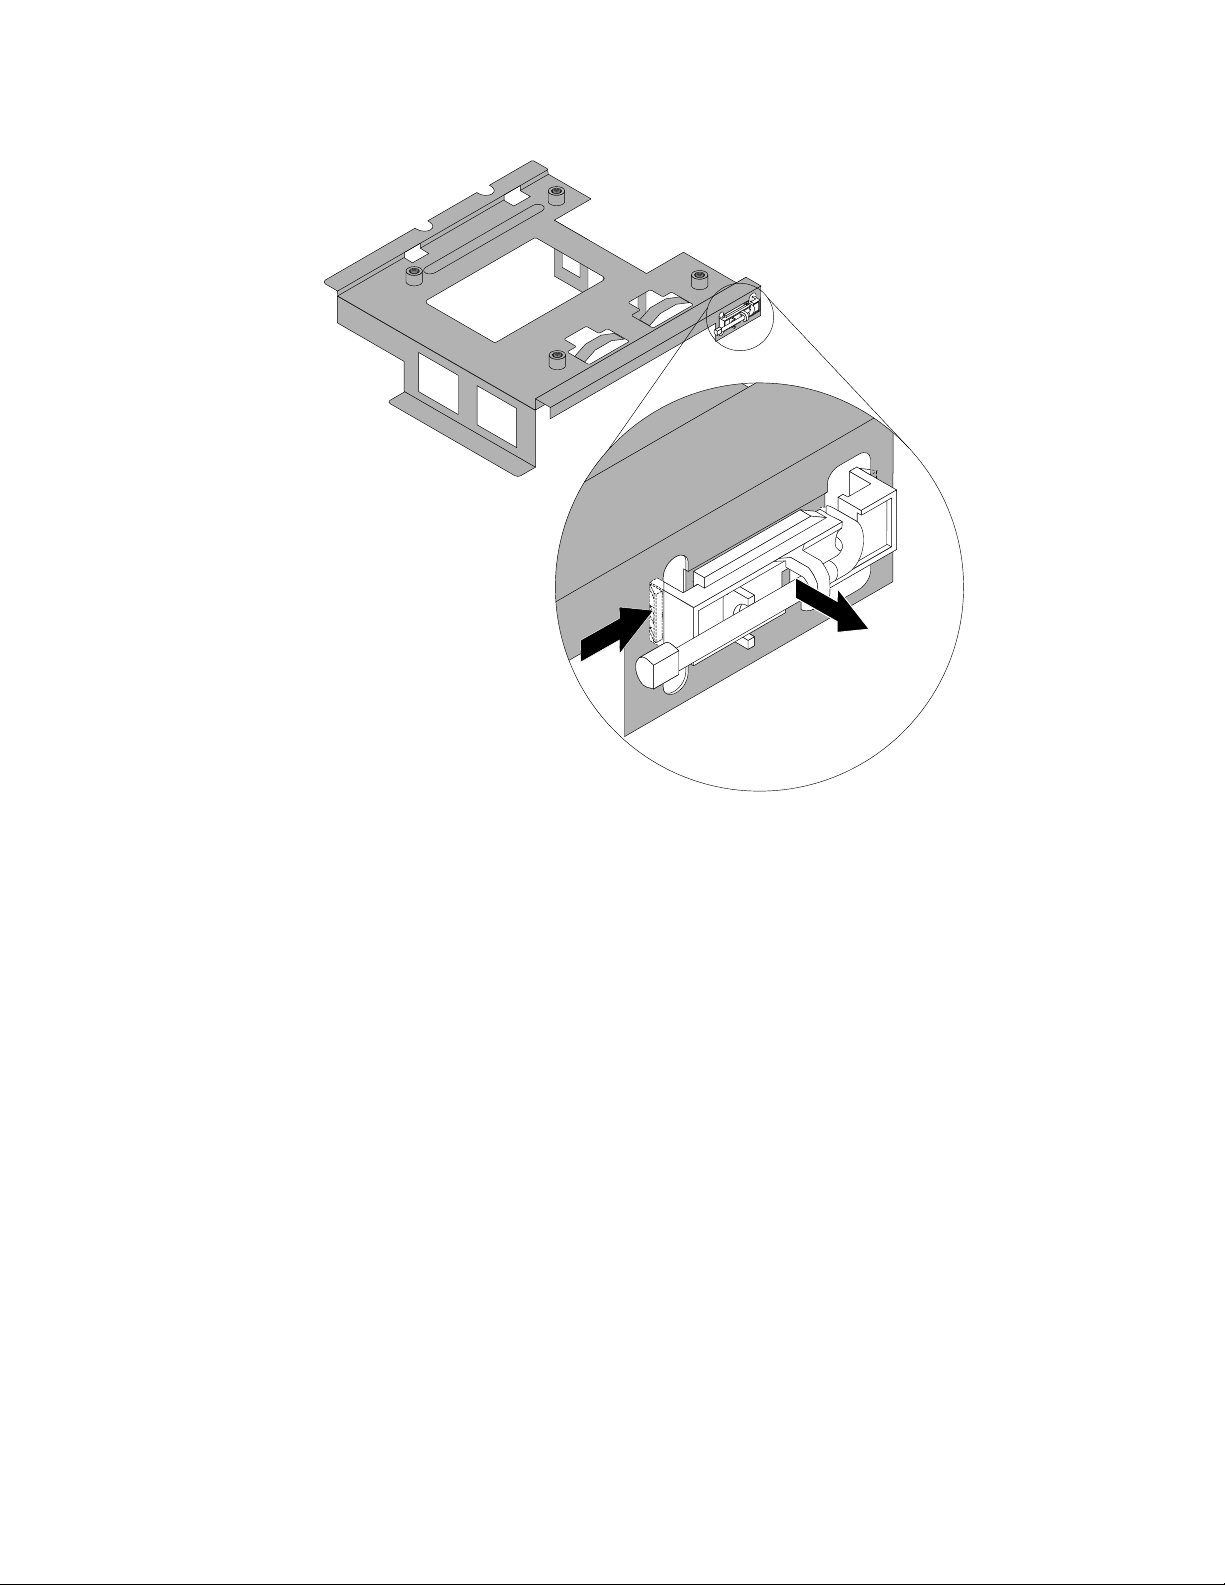
Figure32.Removingthethermalsensor
8.T oinstallanewthermalsensor,insertoneoftheclipsofthenewthermalsensortothecorresponding
holeintheVESAmountbracketandthenpressthethermalsensortowardstheVESAmountbracket
untilitsnapsintoposition.
Note:Thelocationofthethermalsensorinyourcomputermightbeslightlydifferentfromtheillustration.
Chapter5.Installingorreplacinghardware53
Page 66
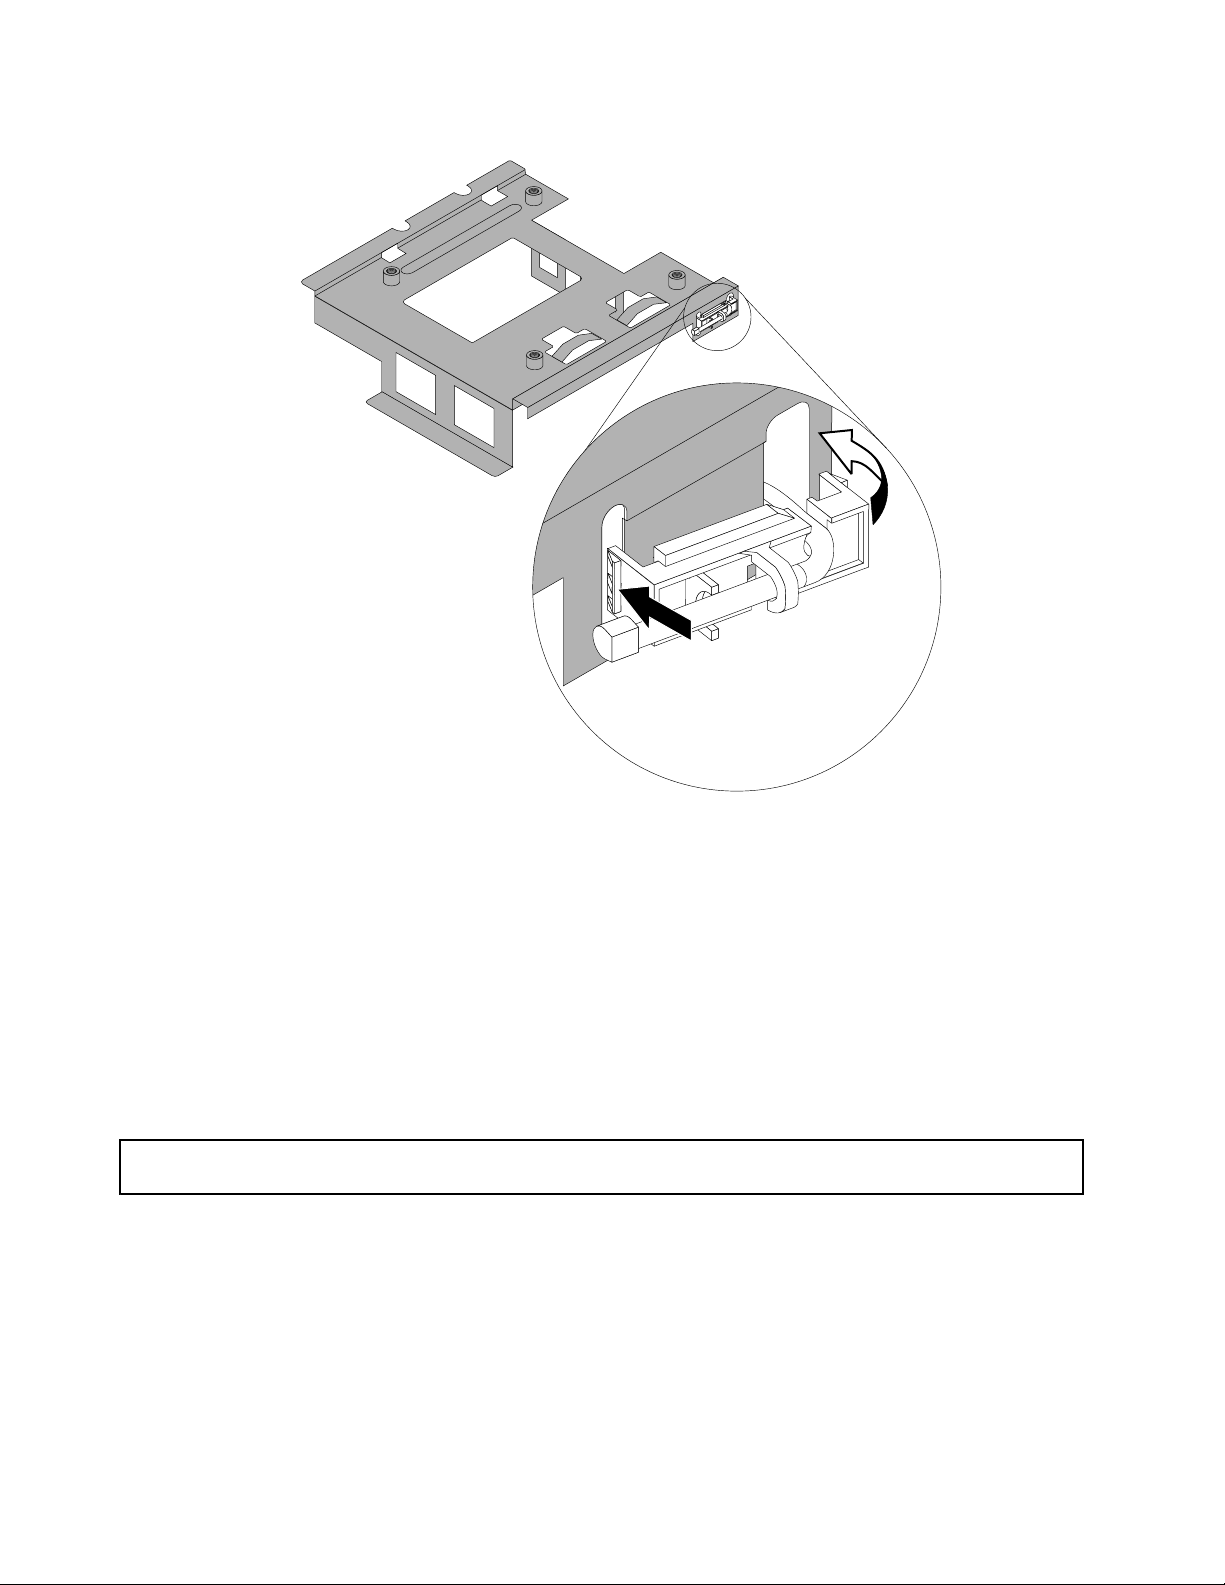
Figure33.Installingthethermalsensor
9.Connectthethermalsensorcabletothesystemboard.See“Locatingpartsonthesystemboard”
onpage15.
10.AlignthescrewholesintheVESAmountbracketwiththoseinthechassisandtheninstallthescrewsto
securetheVESAmountbrackettothechassis.
Whattodonext:
•Toworkwithanotherpieceofhardware,gototheappropriatesection.
•Tocompletetheinstallationorreplacement,goto“Completingthepartsreplacement”onpage68
.
Replacingtheintegratedcamera
Attention:Donotopenyourcomputerorattemptanyrepairbeforereadingandunderstandingthe“Important
safetyinformation”onpagev.
Thissectionprovidesinstructionsonhowtoreplacetheintegratedcamera.
Note:Theintegratedcameraisavailableonlyinsomemodels.
Toreplacetheintegratedcamera,dothefollowing:
1.Removeallmediafromthedrivesandturnoffallattacheddevicesandthecomputer.Then,disconnect
allpowercordsfromelectricaloutletsanddisconnectallcablesthatareconnectedtothecomputer.
2.Placeasoft,cleantowelorclothonthedeskorsurface.Holdthesidesofyourcomputerandgentlylay
itdownsothatthescreenisagainstthesurfaceandthecoverisfacingup.
54ThinkCentreUserGuide
Page 67
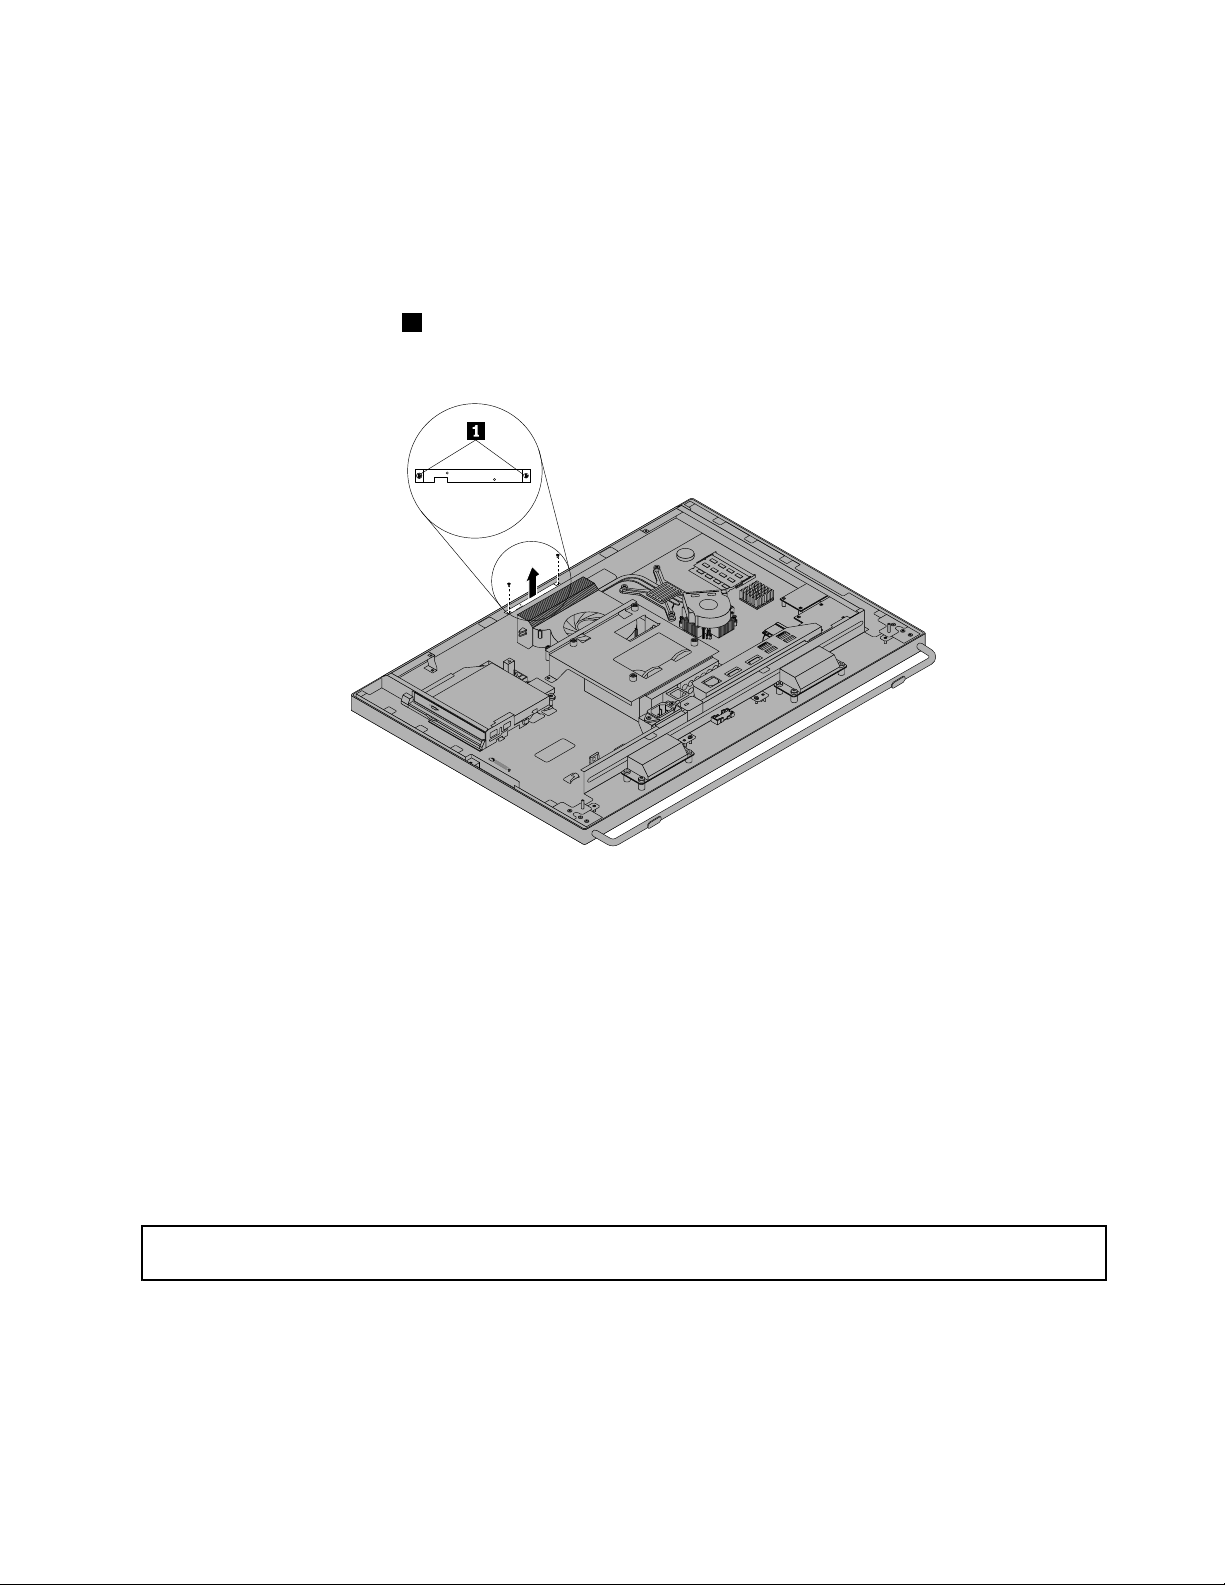
3.Removethecomputercover.See“Removingthecomputercover”onpage36.
4.Locatetheintegratedcamera.See“Locatingcomponents”onpage12.
Note:Y oumighthavetoremovethehandlebartoaccesstheintegratedcamera.T oremovethehandle
bar,see“Removingandreinstallingthehandlebar”onpage38.
5.Notetheroutingoftheintegratedcameracableandthendisconnecttheintegratedcameracablefrom
thesystemboard.See“Locatingpartsonthesystemboard”onpage15.
6.Removethetwoscrews1thatsecuretheintegratedcameratothefrontbezel,andthenremovethe
integratedcamerafromthecomputer.
Figure34.Removingtheintegratedcamera
7.Routethenewintegratedcameracableandthenpositionthenewintegratedcamerainplace.Alignthe
twoscrewholesinthenewintegratedcamerawiththoseinthefrontbezel.
8.Reinstallthetwoscrewstosecurethenewintegratedcameratothefrontbezel.
9.Connecttheintegratedcameracabletothesystemboard.See“Locatingpartsonthesystemboard”
onpage15.
Whattodonext:
•Toworkwithanotherpieceofhardware,gototheappropriatesection.
•Tocompletetheinstallationorreplacement,goto“Completingthepartsreplacement”onpage68.
ReplacingtheWI-FIcard
Attention:Donotopenyourcomputerorattemptanyrepairbeforereadingandunderstandingthe“Important
safetyinformation”onpagev
ThissectionprovidesinstructionsonhowtoreplacetheWI-FIcard.
Note:TheWI-FIcardisavailableonlyinsomemodels.
ToreplacetheWI-FIcard,dothefollowing:
.
Chapter5.Installingorreplacinghardware55
Page 68
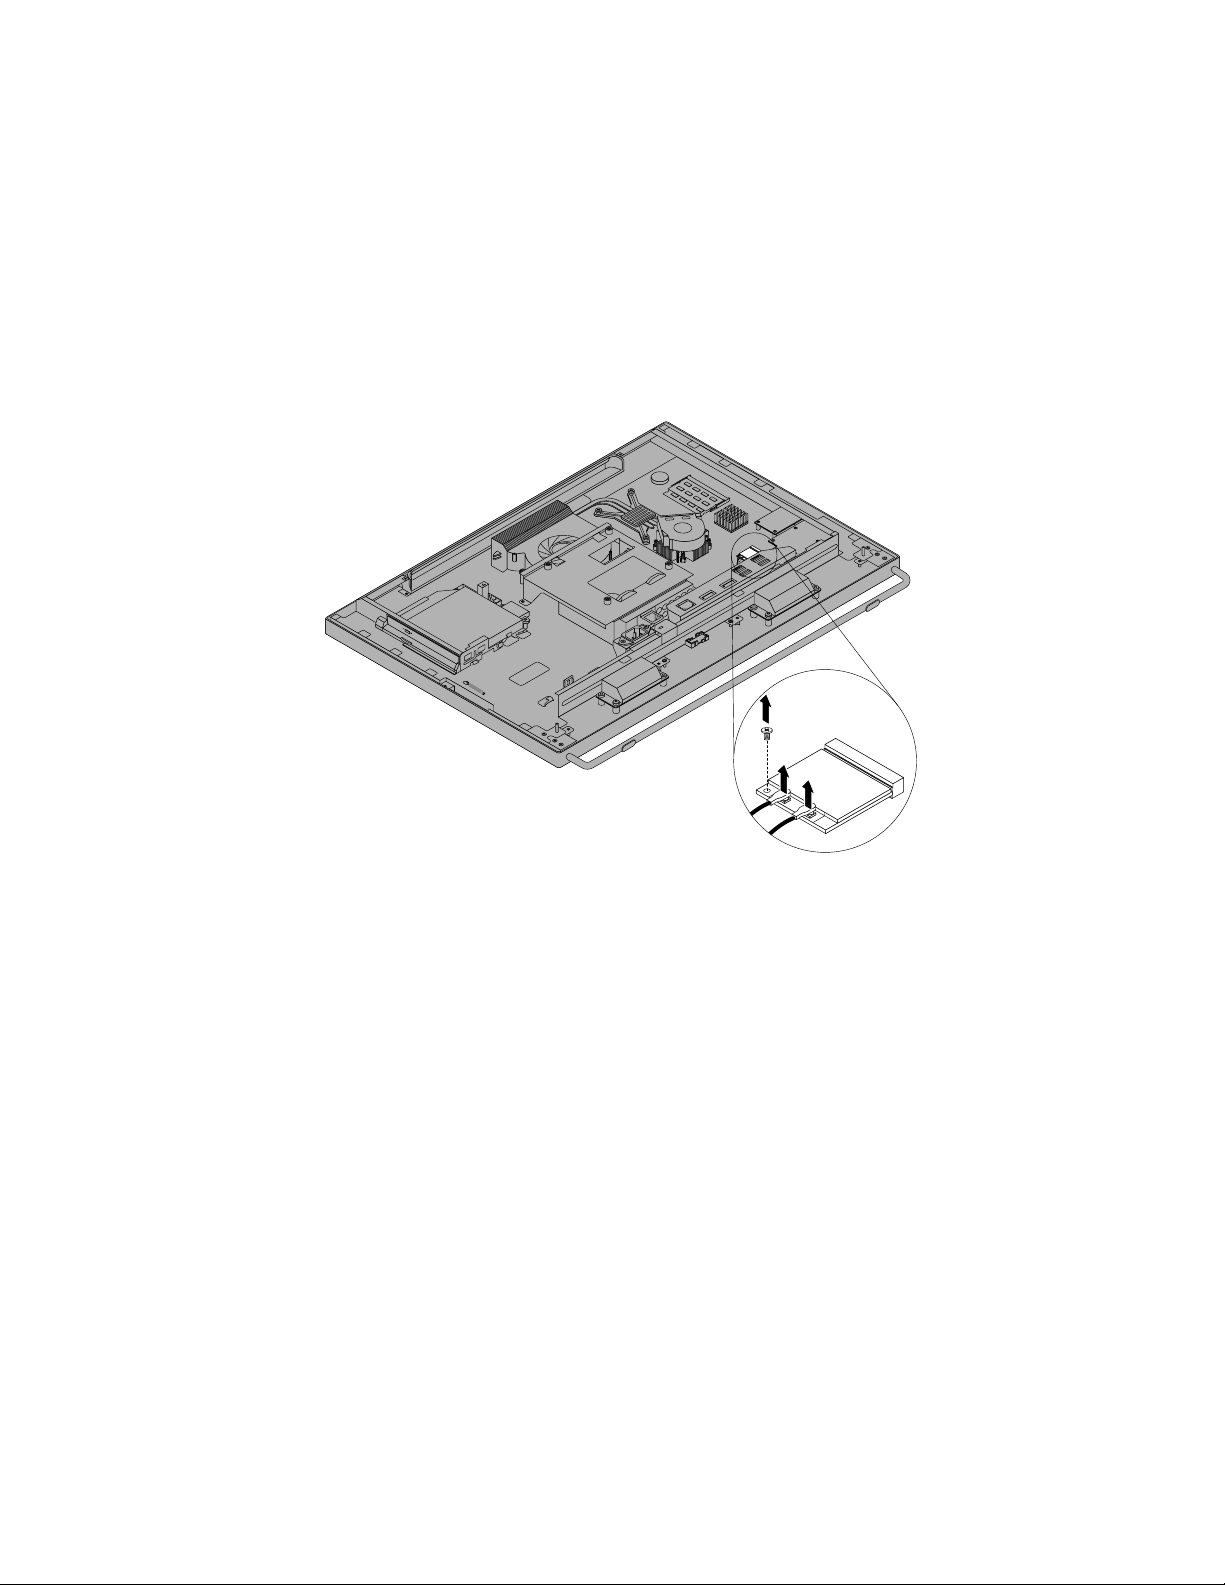
1.Removeallmediafromthedrivesandturnoffallattacheddevicesandthecomputer.Then,disconnect
allpowercordsfromelectricaloutletsanddisconnectallcablesthatareconnectedtothecomputer.
2.Placeasoft,cleantowelorclothonthedeskorsurface.Holdthesidesofyourcomputerandgentlylay
itdownsothatthescreenisagainstthesurfaceandthecoverisfacingup.
3.Removethecomputercover.See“Removingthecomputercover”onpage36.
4.RemovetherearI/Oassembly.See“RemovingandreinstallingtherearI/Oassembly”onpage39.
5.LocatetheWI-FIcardonthesystemboard.See“Locatingpartsonthesystemboard”onpage15.
6.DisconnectthetwocablesfromtheWI-FIcard,andthenremovethescrewthatsecurestheWI-FIcard
tothesystemboard.
Figure35.RemovingthecablesfromtheWI-FIcard
7.CarefullypivottheWI-FIcardupwardandlifttheWI-FIcardtoremoveitfromtheminiPCIExpress
x1cardslot.
56ThinkCentreUserGuide
Page 69
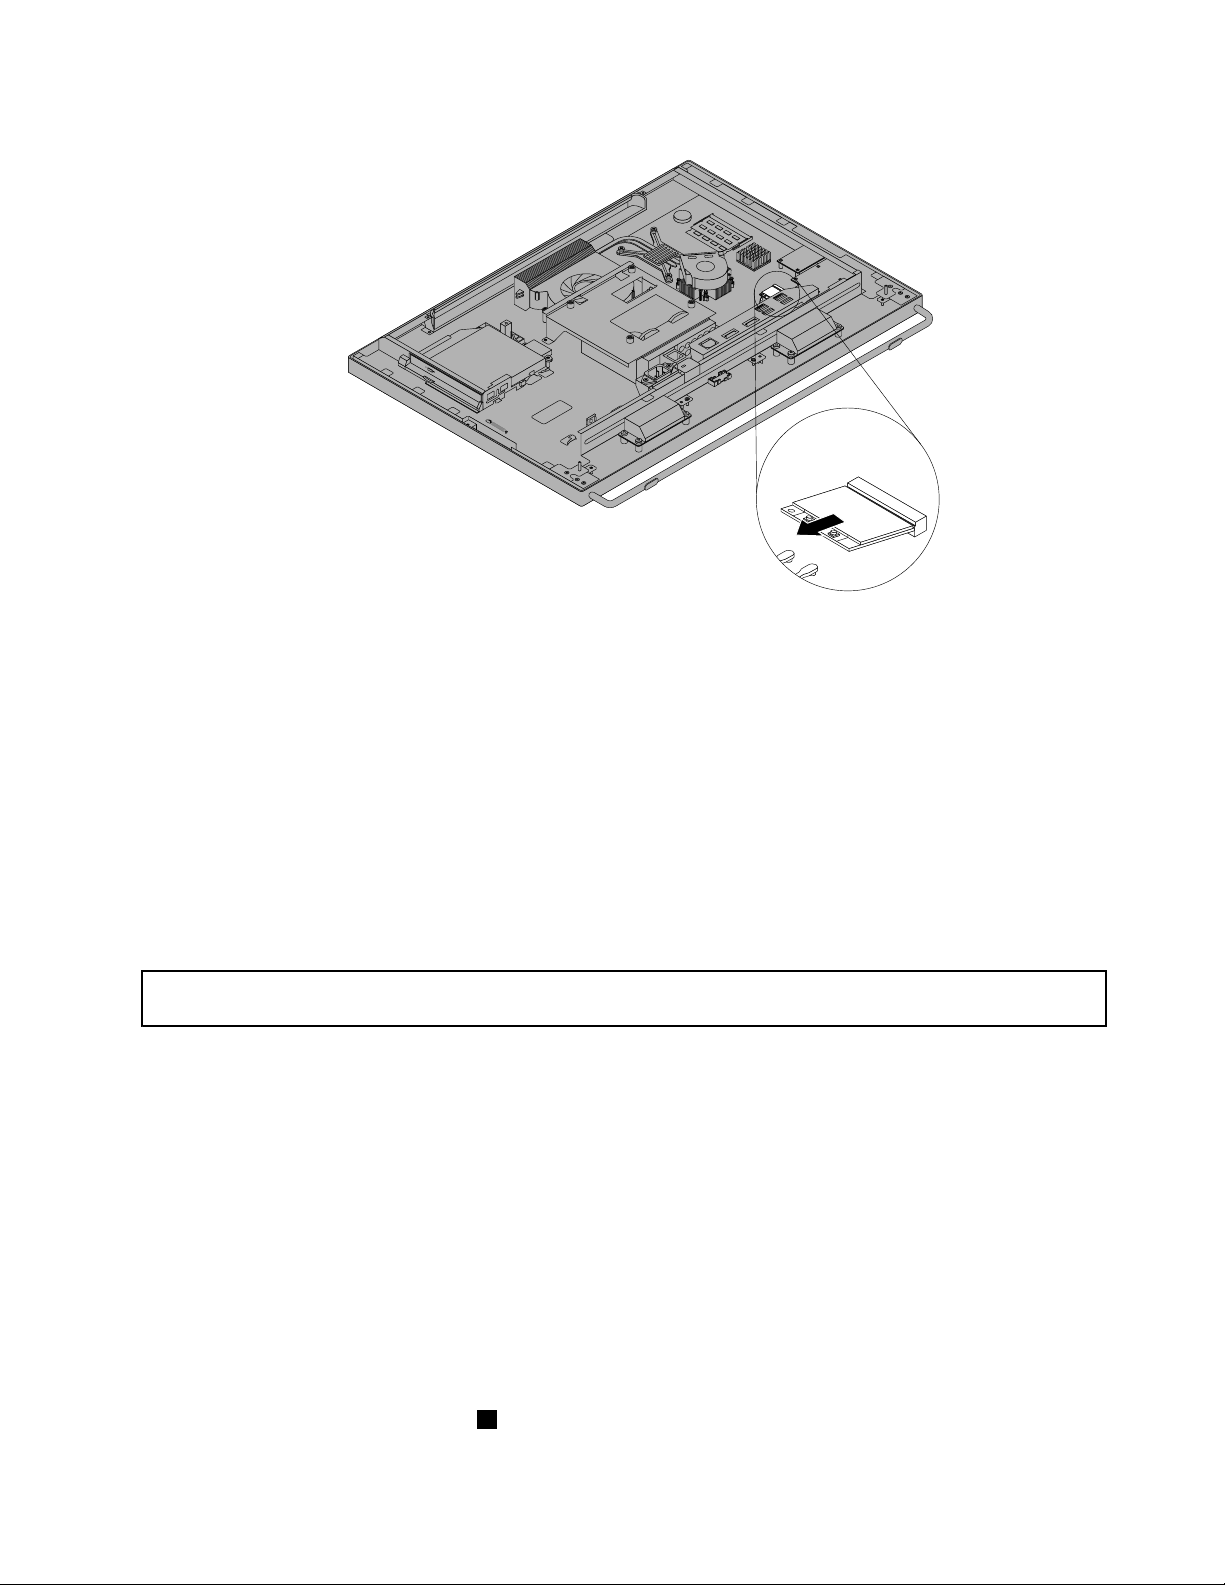
Figure36.RemovingtheWI-FIcard
8.InsertthenotchedendofthenewWI-FIcardintotheminiPCIExpressx1cardslot.Pressthenew
WI-FIcardrmlyandthenpivottheWI-FIcardtoalignthescrewholeinthenewWI-FIcardwith
theoneinthesystemboard.
9.InstallthescrewtosecurethenewWI-FIcardtothesystemboard.
10.ConnectthetwocablestothenewWI-FIcard.
Whattodonext:
•Toworkwithanotherpieceofhardware,gototheappropriatesection.
•Tocompletetheinstallationorreplacement,goto“Completingthepartsreplacement”onpage68.
Replacingtheambientlightsensor
Attention:Donotopenyourcomputerorattemptanyrepairbeforereadingandunderstandingthe“Important
safetyinformation”onpagev.
Thissectionprovidesinstructionsonhowtoreplacetheambientlightsensor.
Note:Theambientlightsensorisavailableonlyinsomemodels.
Toreplacetheambientlightsensor,dothefollowing:
1.Removeallmediafromthedrivesandturnoffallattacheddevicesandthecomputer.Then,disconnect
allpowercordsfromelectricaloutletsanddisconnectallcablesthatareconnectedtothecomputer.
2.Placeasoft,cleantowelorclothonthedeskorsurface.Holdthesidesofyourcomputerandgentlylay
itdownsothatthescreenisagainstthesurfaceandthecoverisfacingup.
3.Removethecomputercover.See“Removingthecomputercover”onpage36.
4.Locatetheambientlightsensor.See“Locatingcomponents”onpage12.
Note:Y oumighthavetoremovethehandlebartoaccesstheambientlightsensor.Toremovethe
handlebar,see“Removingandreinstallingthehandlebar”onpage38
.
5.Carefullyremovethetwoscrews1thatsecuretheambientlightsensorandthenlifttheambientlight
sensoroutofthecomputer.
Chapter5.Installingorreplacinghardware57
Page 70
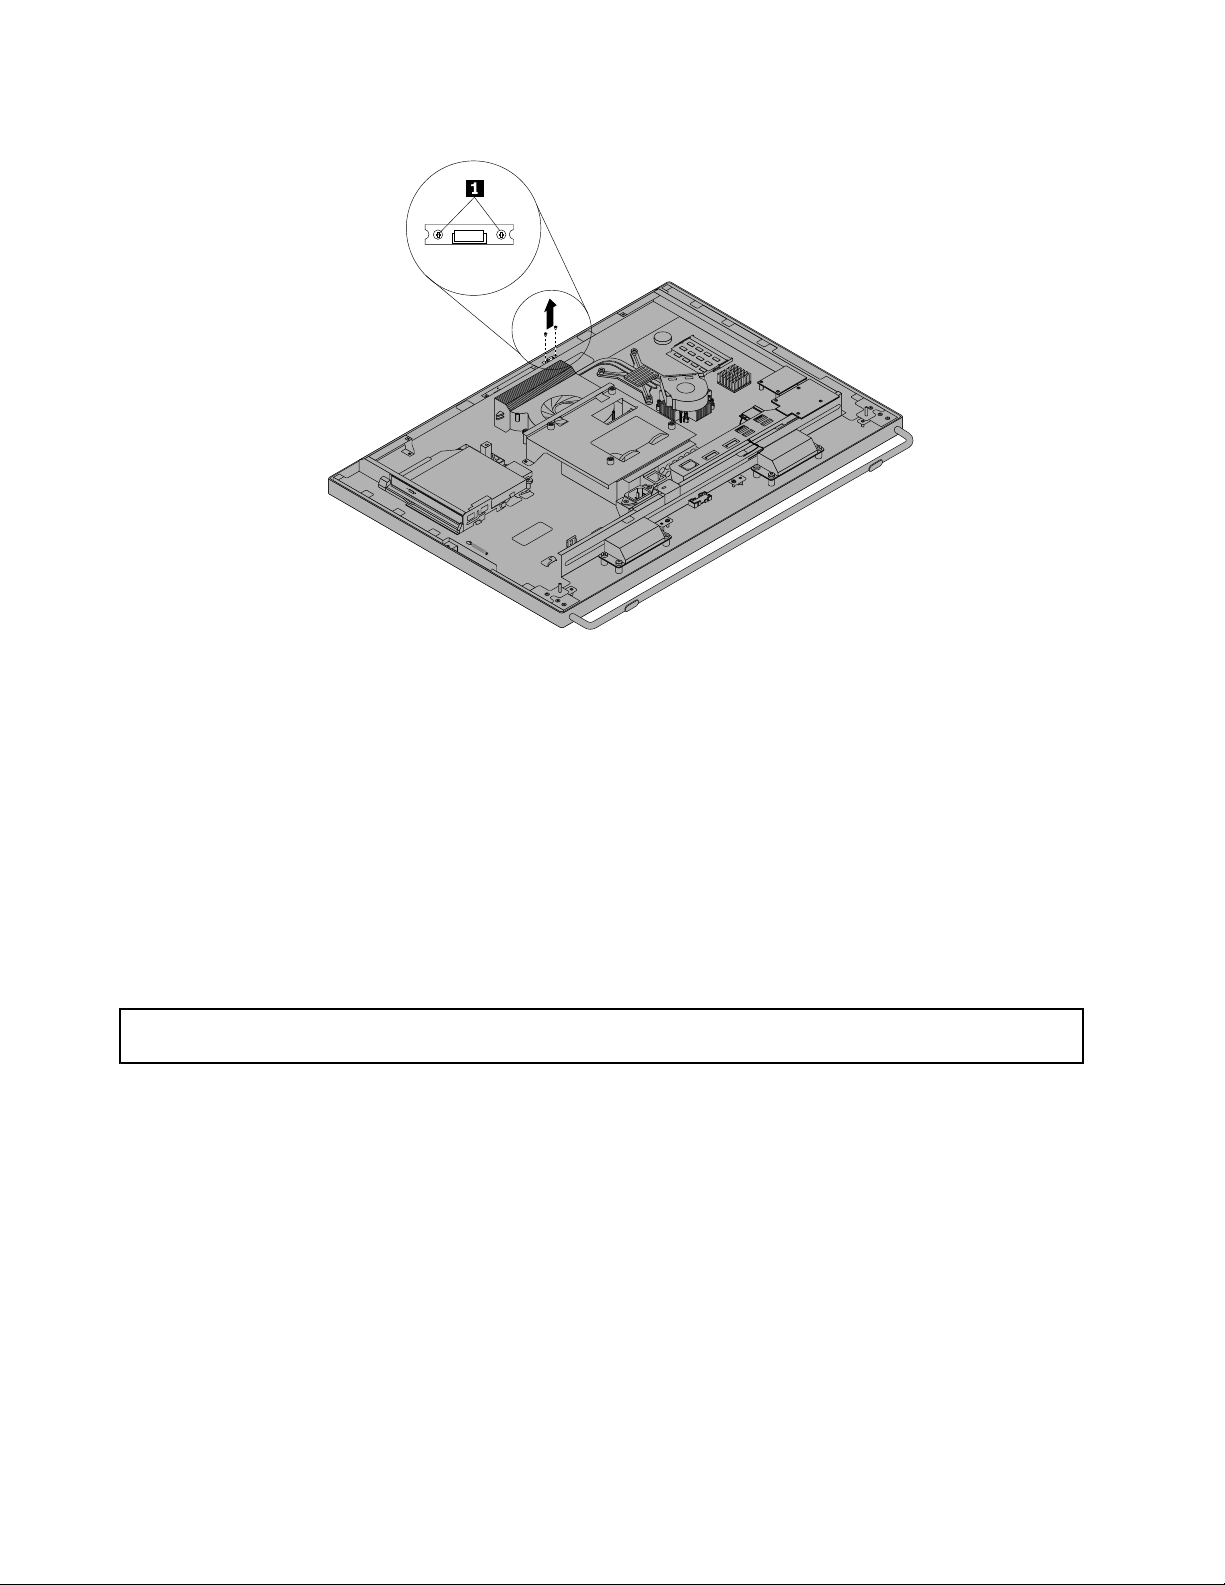
Figure37.Removingtheambientlightsensor
6.Disconnecttheambientlightsensorcablefromthesystemboard.
7.Alignthescrewholesinthenewambientlightsensorwiththecorrespondingholesinthefrontbezel
andtheninstallthetwoscrewstosecuretheambientlightsensor.
8.Connectthenewambientlightsensorcabletothesystemboard.See“Locatingpartsonthesystem
board”onpage15
Whattodonext:
•Toworkwithanotherpieceofhardware,gototheappropriatesection.
•Tocompletetheinstallationorreplacement,goto“Completingthepartsreplacement”onpage68.
.
ReplacingtheBluetoothmodule
Attention:Donotopenyourcomputerorattemptanyrepairbeforereadingandunderstandingthe“Important
safetyinformation”onpagev.
ThissectionprovidesinstructionsonhowtoreplacetheBluetoothmodule.
Note:TheBluetoothmoduleisavailableonlyinsomemodels.
ToreplacetheBluetoothmodule,dothefollowing:
1.Removeallmediafromthedrivesandturnoffallattacheddevicesandthecomputer.Then,disconnect
allpowercordsfromelectricaloutletsanddisconnectallcablesthatareconnectedtothecomputer.
2.Placeasoft,cleantowelorclothonthedeskorsurface.Holdthesidesofyourcomputerandgentlylay
itdownsothatthescreenisagainstthesurfaceandthecoverisfacingup.
3.Removethecomputercover.See“Removingthecomputercover”onpage36.
4.RemovetherearI/Oassembly.See“RemovingandreinstallingtherearI/Oassembly”onpage39.
5.LocatetheBluetoothmodule.See“Locatingcomponents”onpage12.
6.NotetheBluetoothmodulecableroutinganddisconnectthecablefromthesystemboard.
58ThinkCentreUserGuide
Page 71
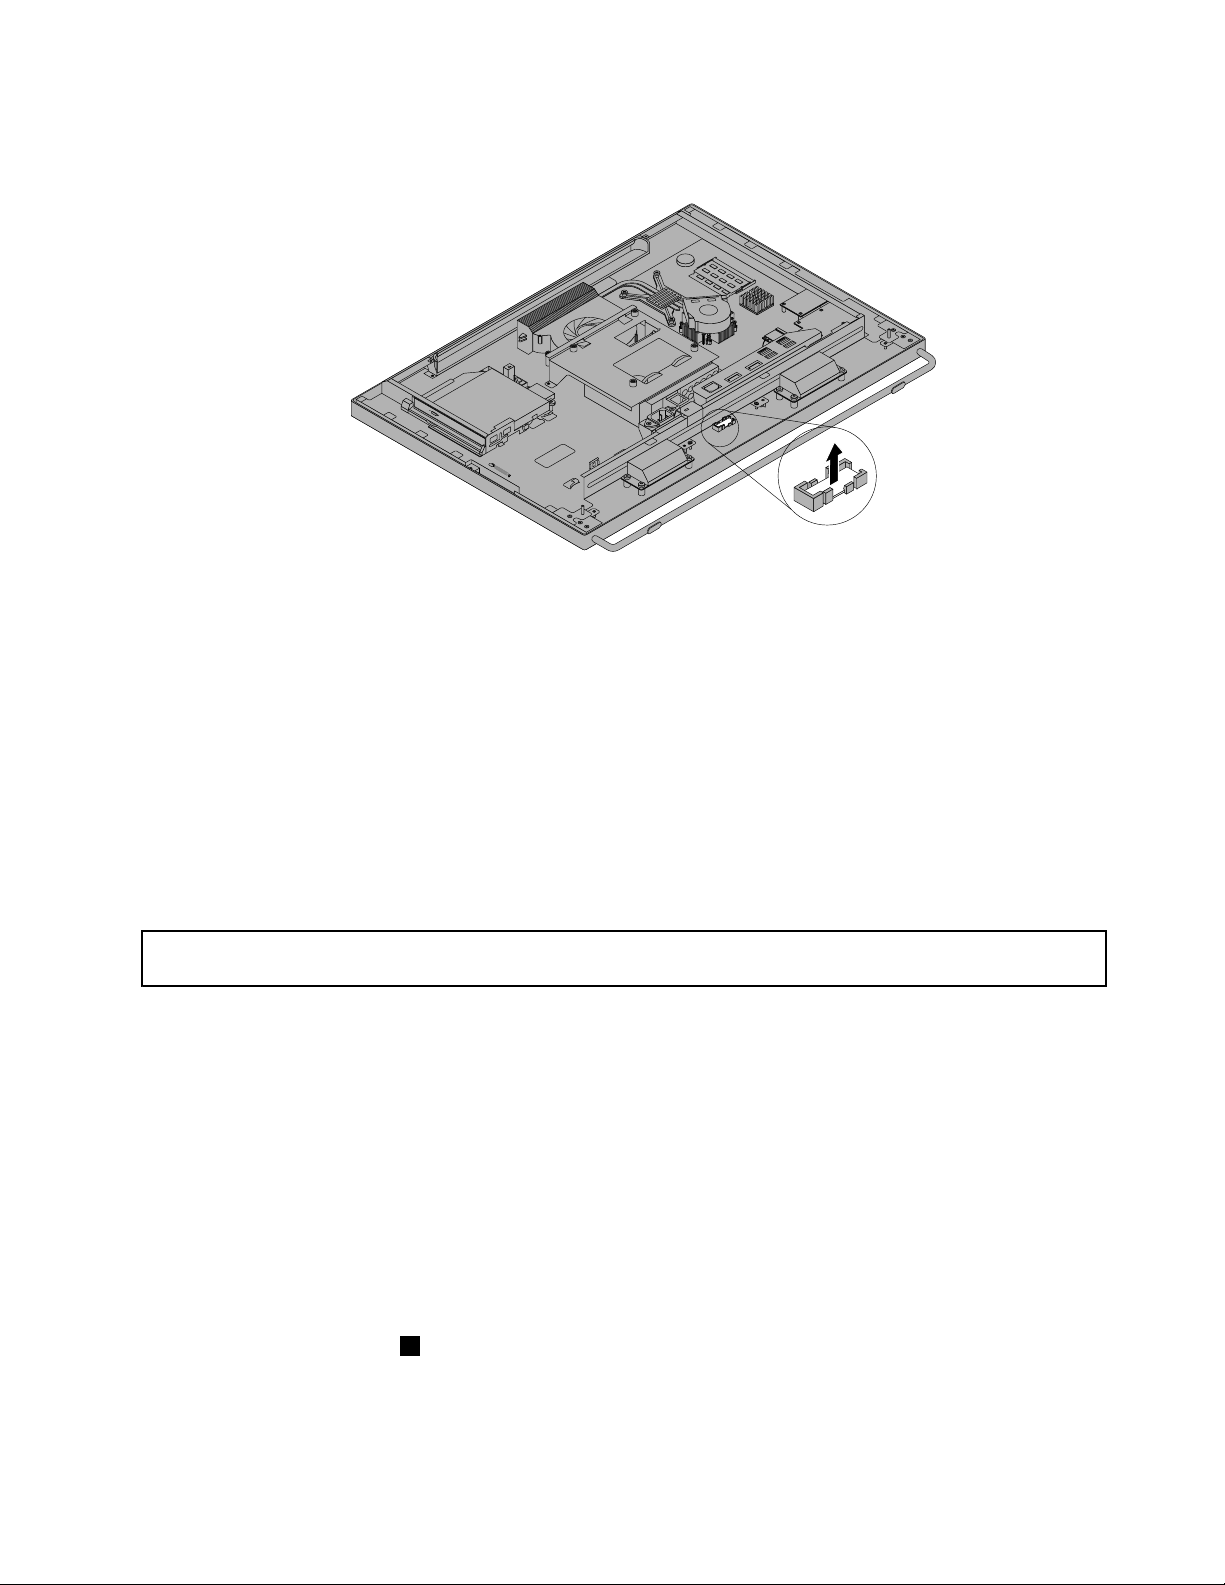
7.CarefullyreleasetheBluetoothmoduleandlifttheBluetoothmoduleoutofthecomputer.
Figure38.RemovingtheBluetoothmodule
8.PositionthenewBluetoothmoduleintothecomputerfrontbezelandthenpressthenewBluetooth
moduledownwarduntilitissecuredintoplace.
9.ConnectthenewBluetoothmodulecabletothesystemboard.See“Locatingpartsonthesystem
board”onpage15.
10.ReinstalltherearI/Oassembly.See“RemovingandreinstallingtherearI/Oassembly”onpage39.
Whattodonext:
•Toworkwithanotherpieceofhardware,gototheappropriatesection.
•Tocompletetheinstallationorreplacement,goto“Completingthepartsreplacement”onpage68.
Replacingthecardreader
Attention:Donotopenyourcomputerorattemptanyrepairbeforereadingandunderstandingthe“Important
safetyinformation”onpagev.
Thissectionprovidesinstructionsonhowtoreplacethecardreader.
Note:Thecardreaderisavailableonlyinsomemodels.
Toreplacethecardreader,dothefollowing:
1.Removeallmediafromthedrivesandturnoffallattacheddevicesandthecomputer.Then,disconnect
allpowercordsfromelectricaloutletsanddisconnectallcablesthatareconnectedtothecomputer.
2.Placeasoft,cleantowelorclothonthedeskorsurface.Holdthesidesofyourcomputerandgentlylay
itdownsothatthescreenisagainstthesurfaceandthecoverisfacingup.
3.Removethecomputercover.See“Removingthecomputercover”onpage36.
4.Locatethecardreader.See“Locatingcomponents”onpage12.
5.Disconnectthecardreadercablefromthecardreader.
6.Removethetwoscrews1thatsecurethecardreaderandthenliftthecardreaderoutofthecomputer.
Chapter5.Installingorreplacinghardware59
Page 72
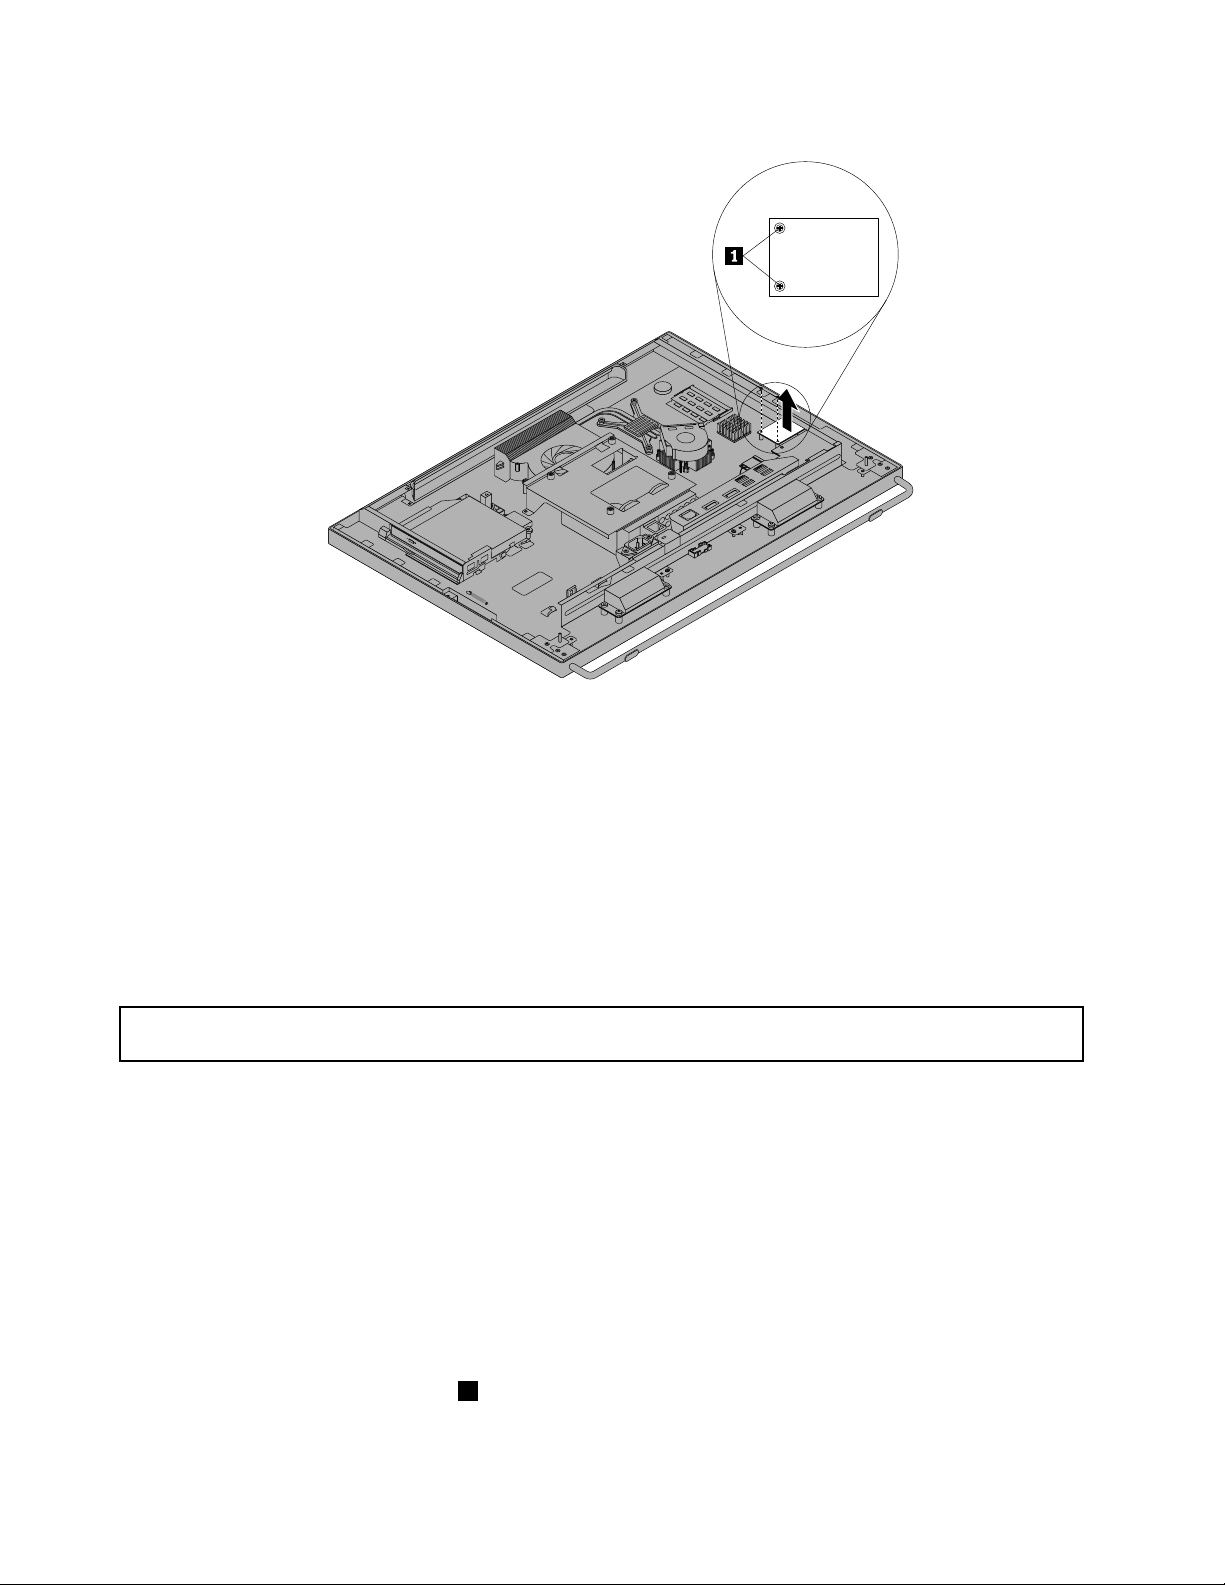
Figure39.Removingthecardreader
7.Alignthescrewholesinthenewcardreaderwiththoseonthesystemboardandtheninstallthe
twoscrewstosecurethecardreader.
8.Connectthecardreadercabletothenewcardreader.
Whattodonext:
•Toworkwithanotherpieceofhardware,gototheappropriatesection.
•Tocompletetheinstallationorreplacement,goto“Completingthepartsreplacement”onpage68
ReplacingtheExpressCard
Attention:Donotopenyourcomputerorattemptanyrepairbeforereadingandunderstandingthe“Important
safetyinformation”onpagev
ThissectionprovidesinstructionsonhowtoreplacetheExpressCard.
Note:TheExpressCardisavailableonlyinsomemodels.
ToreplacetheExpressCard,dothefollowing:
1.Removeallmediafromthedrivesandturnoffallattacheddevicesandthecomputer.Then,disconnect
allpowercordsfromelectricaloutletsanddisconnectallcablesthatareconnectedtothecomputer.
2.Placeasoft,cleantowelorclothonthedeskorsurface.Holdthesidesofyourcomputerandgentlylay
itdownsothatthescreenisagainstthesurfaceandthecoverisfacingup.
3.Removethecomputercover.See“Removingthecomputercover”onpage36.
4.LocatetheExpressCard.See“Locatingcomponents”onpage12.
5.Carefullyremovethefourscrews1thatsecuretheExpressCardtothesystemboardandthenliftit
offthesystemboard.
.
.
60ThinkCentreUserGuide
Page 73
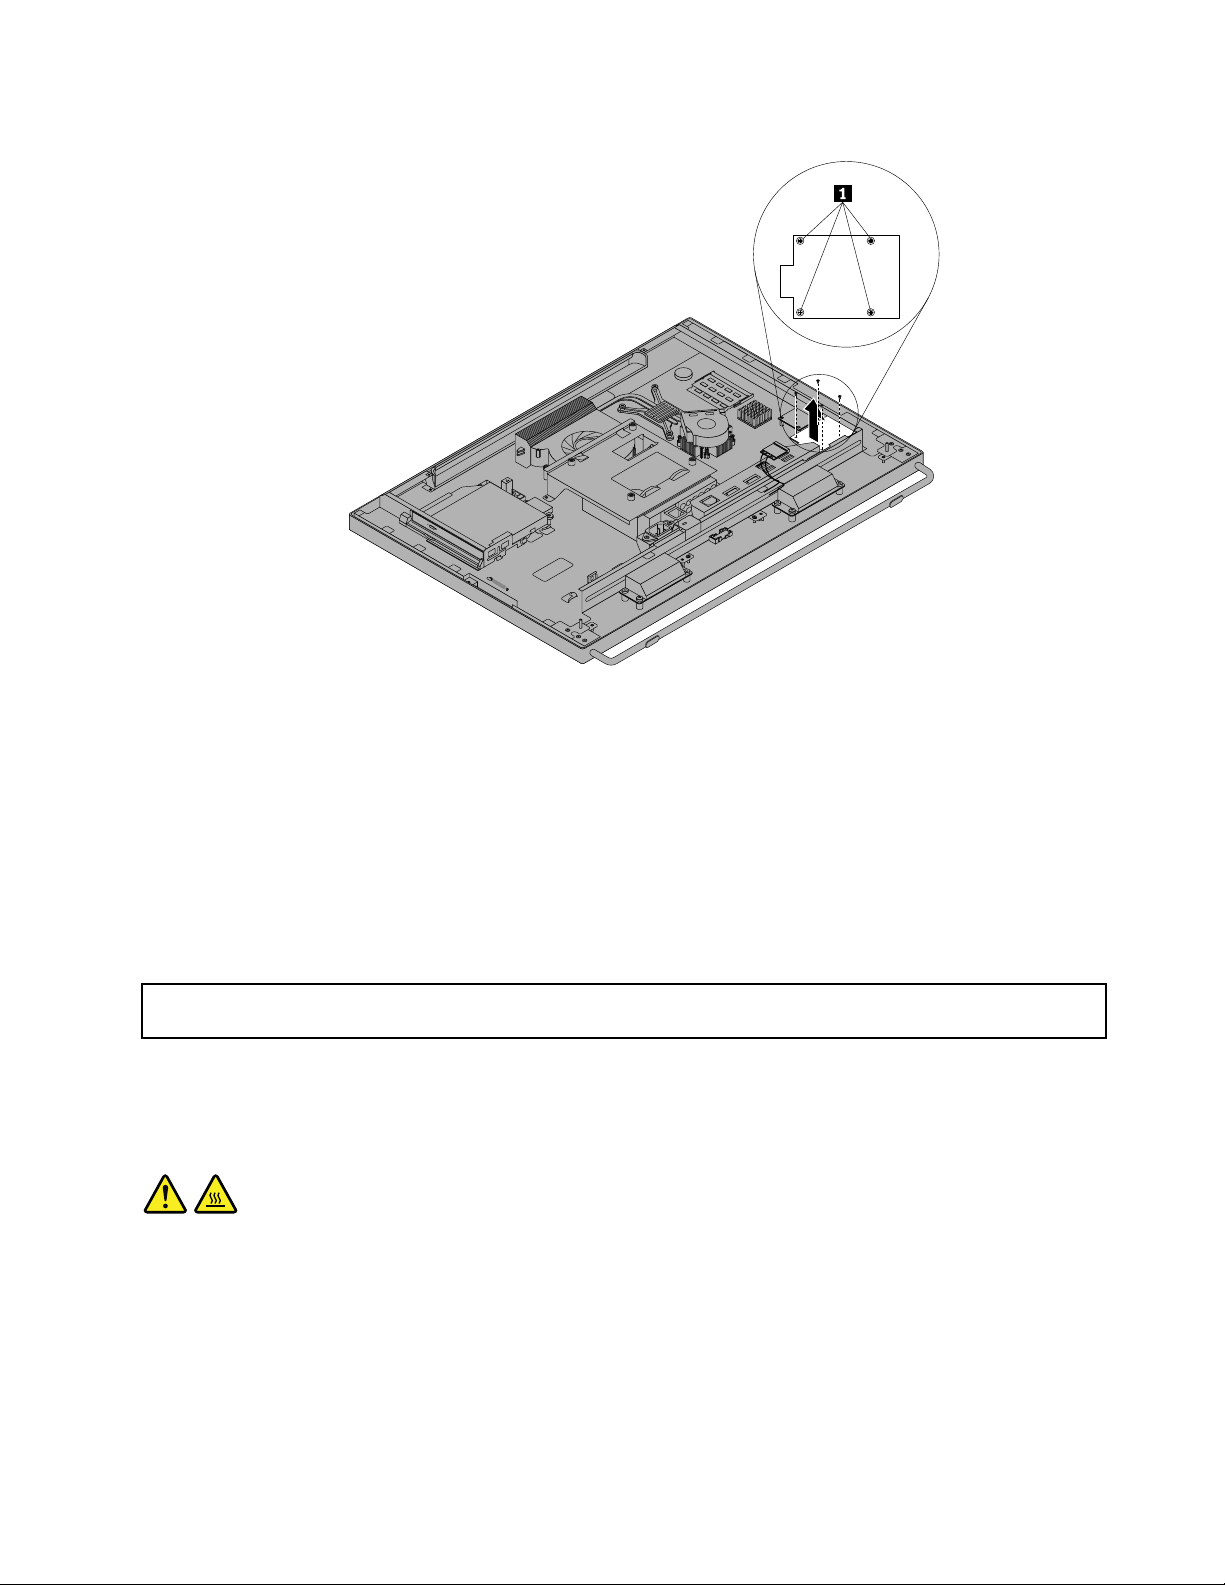
Figure40.RemovingtheExpressCard
6.ConnectthenewExpressCardtotheExpressCardconnectoronthesystemboard.Alignthescrew
holesinthenewExpressCardwiththecorrespondingholesinthesystemboardandtheninstallthe
fourscrewstosecurethenewExpressCardtothesystemboard.
Whattodonext:
•Toworkwithanotherpieceofhardware,gototheappropriatesection.
•Tocompletetheinstallationorreplacement,goto“Completingthepartsreplacement”onpage68.
ReplacingtheheatsinkandfanassemblyforGPU
Attention:Donotopenyourcomputerorattemptanyrepairbeforereadingandunderstandingthe“Important
safetyinformation”onpagev.
ThissectionprovidesinstructionsonhowtoreplacetheheatsinkandfanassemblyforGPU.
Note:TheheatsinkandfanassemblyforGPUisavailableonlyinmodelsinstalledwiththeGPU.
CAUTION:
TheheatsinkandfanassemblyforGPUmightbeveryhot.T urnoffthecomputerandwaitthreeto
veminutestoletthecomputercoolbeforeremovingthecomputercover.
ToreplacetheheatsinkandfanassemblyforGPU,dothefollowing:
1.Removeallmediafromthedrivesandturnoffallattacheddevicesandthecomputer.Then,disconnect
allpowercordsfromelectricaloutletsanddisconnectallcablesthatareconnectedtothecomputer.
2.Placeasoft,cleantowelorclothonthedeskorsurface.Holdthesidesofyourcomputerandgentlylay
itdownsothatthescreenisagainstthesurfaceandthecoverisfacingup.
3.Removethecomputercover.See“Removingthecomputercover”onpage36.
Chapter5.Installingorreplacinghardware61
Page 74
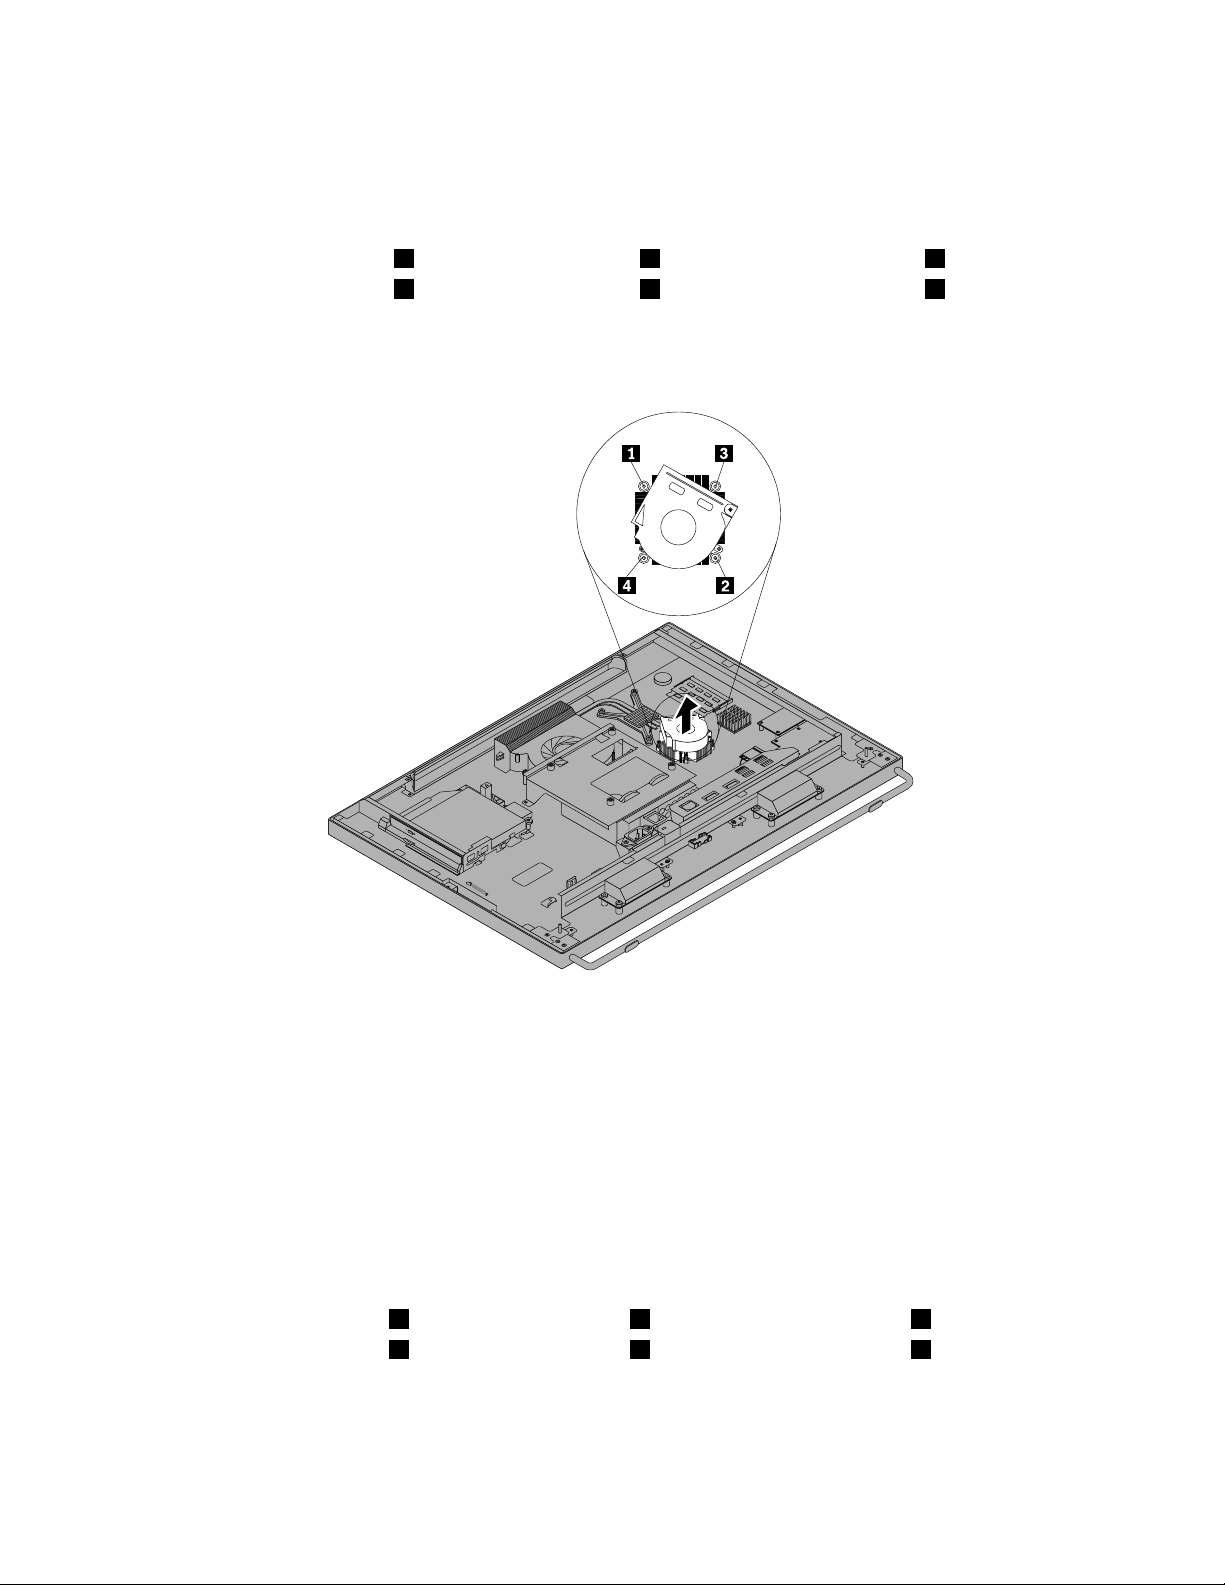
4.LocatetheheatsinkandfanassemblyforGPU.See“Locatingcomponents”onpage12.
5.NotetheroutingoftheGPUfancableandthendisconnecttheGPUfancablefromthesystemboard.
6.FollowthissequencetoremovethefourscrewsthatsecuretheheatsinkandfanassemblyforGPU
tothesystemboard:
a.Partiallyremovescrew1,thenfullyremovescrew2,andthenfullyremovescrew1.
b.Partiallyremovescrew3,thenfullyremovescrew4,andthenfullyremovescrew3.
Note:Carefullyremovethefourscrewsfromthesystemboardtoavoidanypossibledamagetothe
systemboard.ThefourscrewscannotberemovedfromtheheatsinkandfanassemblyforGPU.
Figure41.RemovingtheheatsinkandfanassemblyforGPU
7.LiftthefailingheatsinkandfanassemblyforGPUoffthesystemboard.
Notes:
a.YoumighthavetogentlytwisttheheatsinkandfanassemblyforGPUtofreeitfromthe
microprocessor.
b.DonottouchthethermalgreasewhilehandlingtheheatsinkandfanassemblyforGPU.
8.PositionthenewheatsinkandfanassemblyforGPUonthesystemboardsothatthefourscrewsare
alignedwiththecorrespondingholesinthesystemboard.
9.FollowthissequencetoinstallthefourscrewstosecuretheheatsinkandfanassemblyforGPU,as
showninFigure41“RemovingtheheatsinkandfanassemblyforGPU”onpage62
.
a.Partiallytightenscrew1,thenfullytightenscrew2,andthenfullytightenscrew1.
b.Partiallytightenscrew3,thenfullytightenscrew4,andthenfullytightenscrew3.
10.ConnecttheGPUfancabletothesystemboard.See“Locatingpartsonthesystemboard”onpage15.
62ThinkCentreUserGuide
Page 75

Whattodonext:
•Toworkwithanotherpieceofhardware,gototheappropriatesection.
•Tocompletetheinstallationorreplacement,goto“Completingthepartsreplacement”onpage68.
ReplacingtherearPS/2connectorsandserialportassembly
Attention:Donotopenyourcomputerorattemptanyrepairbeforereadingandunderstandingthe“Important
safetyinformation”onpagev.
ThissectionprovidesinstructionsonhowtoreplacetherearPS/2connectorsandserialportassembly.
Note:TherearPS/2connectorsandserialportassemblyisavailableonlyinsomemodels.
ToreplacetherearPS/2connectorsandserialportassembly,dothefollowing:
1.Removeallmediafromthedrivesandturnoffallattacheddevicesandthecomputer.Then,disconnect
allpowercordsfromelectricaloutletsanddisconnectallcablesthatareconnectedtothecomputer.
2.Placeasoft,cleantowelorclothonthedeskorsurface.Holdthesidesofyourcomputerandgentlylay
itdownsothatthescreenisagainstthesurfaceandthecoverisfacingup.
3.Removethecomputercover.See“Removingthecomputercover”onpage36.
4.LocatetherearPS/2connectorsandserialportassembly.See“Locatingcomponents”onpage12.
5.RemovetherearI/OassemblyanddisconnectthecablesoftherearPS/2connectorsandserialport
assemblyfromthesystemboard.See“RemovingandreinstallingtherearI/Oassembly”onpage39.
6.Removethescrew1todisengagetherearPS/2connectorsandserialportassemblyfromthechassis.
Note:Y oumighthavetoremovetwoscrewstodisengagetherearPS/2connectorsandserialport
assemblyfromthechassis.
Chapter5.Installingorreplacinghardware63
Page 76
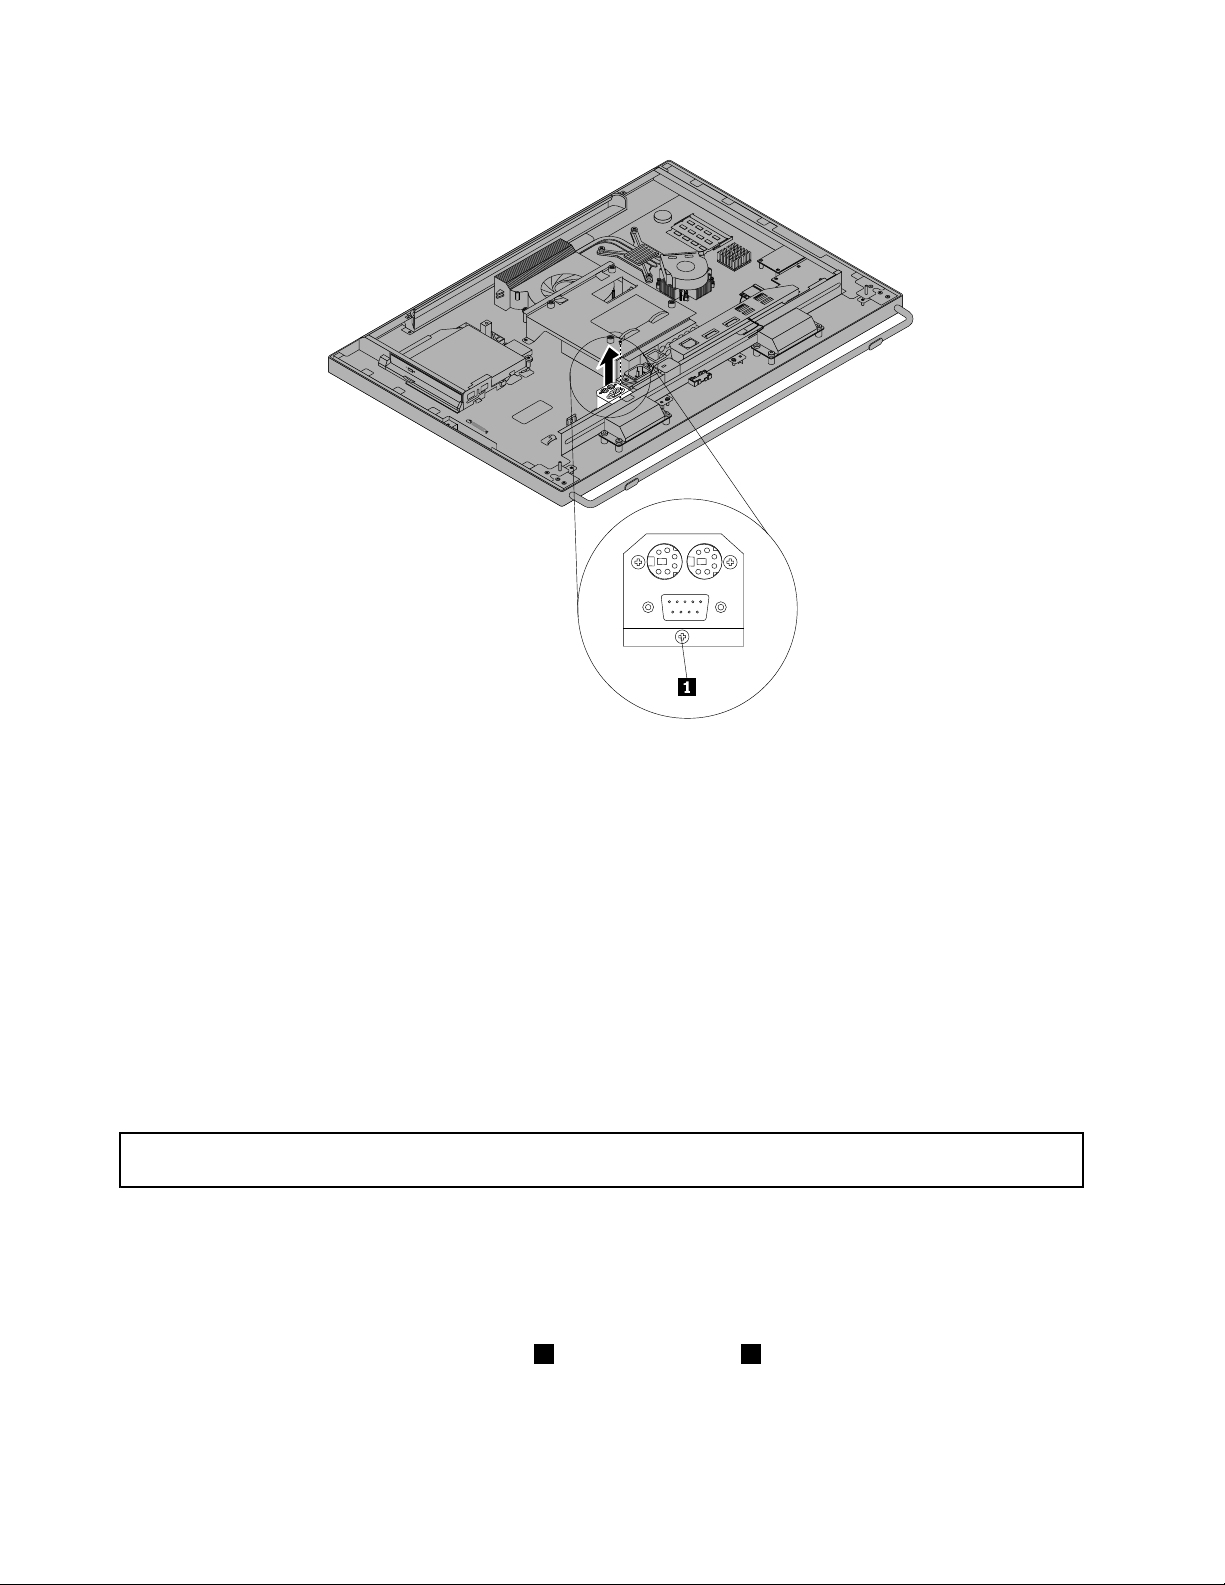
Figure42.RemovingtherearPS/2connectorsandserialportassembly
7.AlignthescrewholeinthenewrearPS/2connectorsandserialportassemblywiththecorresponding
screwholeinthechassis.Then,installthescrewtosecurethenewrearPS/2connectorsandserial
portassemblytothechassis.
8.ConnectthecablesofthenewrearPS/2connectorsandserialportassemblytothesystemboard.See
“Locatingpartsonthesystemboard”onpage15.
9.ReinstalltherearI/Oassembly.See“RemovingandreinstallingtherearI/Oassembly”onpage39.
Whattodonext:
•Toworkwithanotherpieceofhardware,gototheappropriatesection.
•Tocompletetheinstallationorreplacement,goto“Completingthepartsreplacement”onpage68.
Replacingthemouse
Attention:Donotopenyourcomputerorattemptanyrepairbeforereadingandunderstandingthe“Important
safetyinformation”onpagev.
Thissectionprovidesinstructionsonhowtoreplacethemouse.
•Ifyouareusingawiredmouse,dothefollowing:
1.Disconnecttheoldmousecablefromthecomputer.
2.Connectanewmousetotheappropriateconnectoronthecomputer.Y ourmousemightbe
connectedtoaPS/2mouseconnector1oraUSBconnector2.Dependingonwheretoconnect
yourmouse,see“Locatingconnectors,controls,andindicatorsonthefrontofyourcomputer”on
page8or“Locatingconnectorsontherearofyourcomputer”onpage10.
64ThinkCentreUserGuide
Page 77
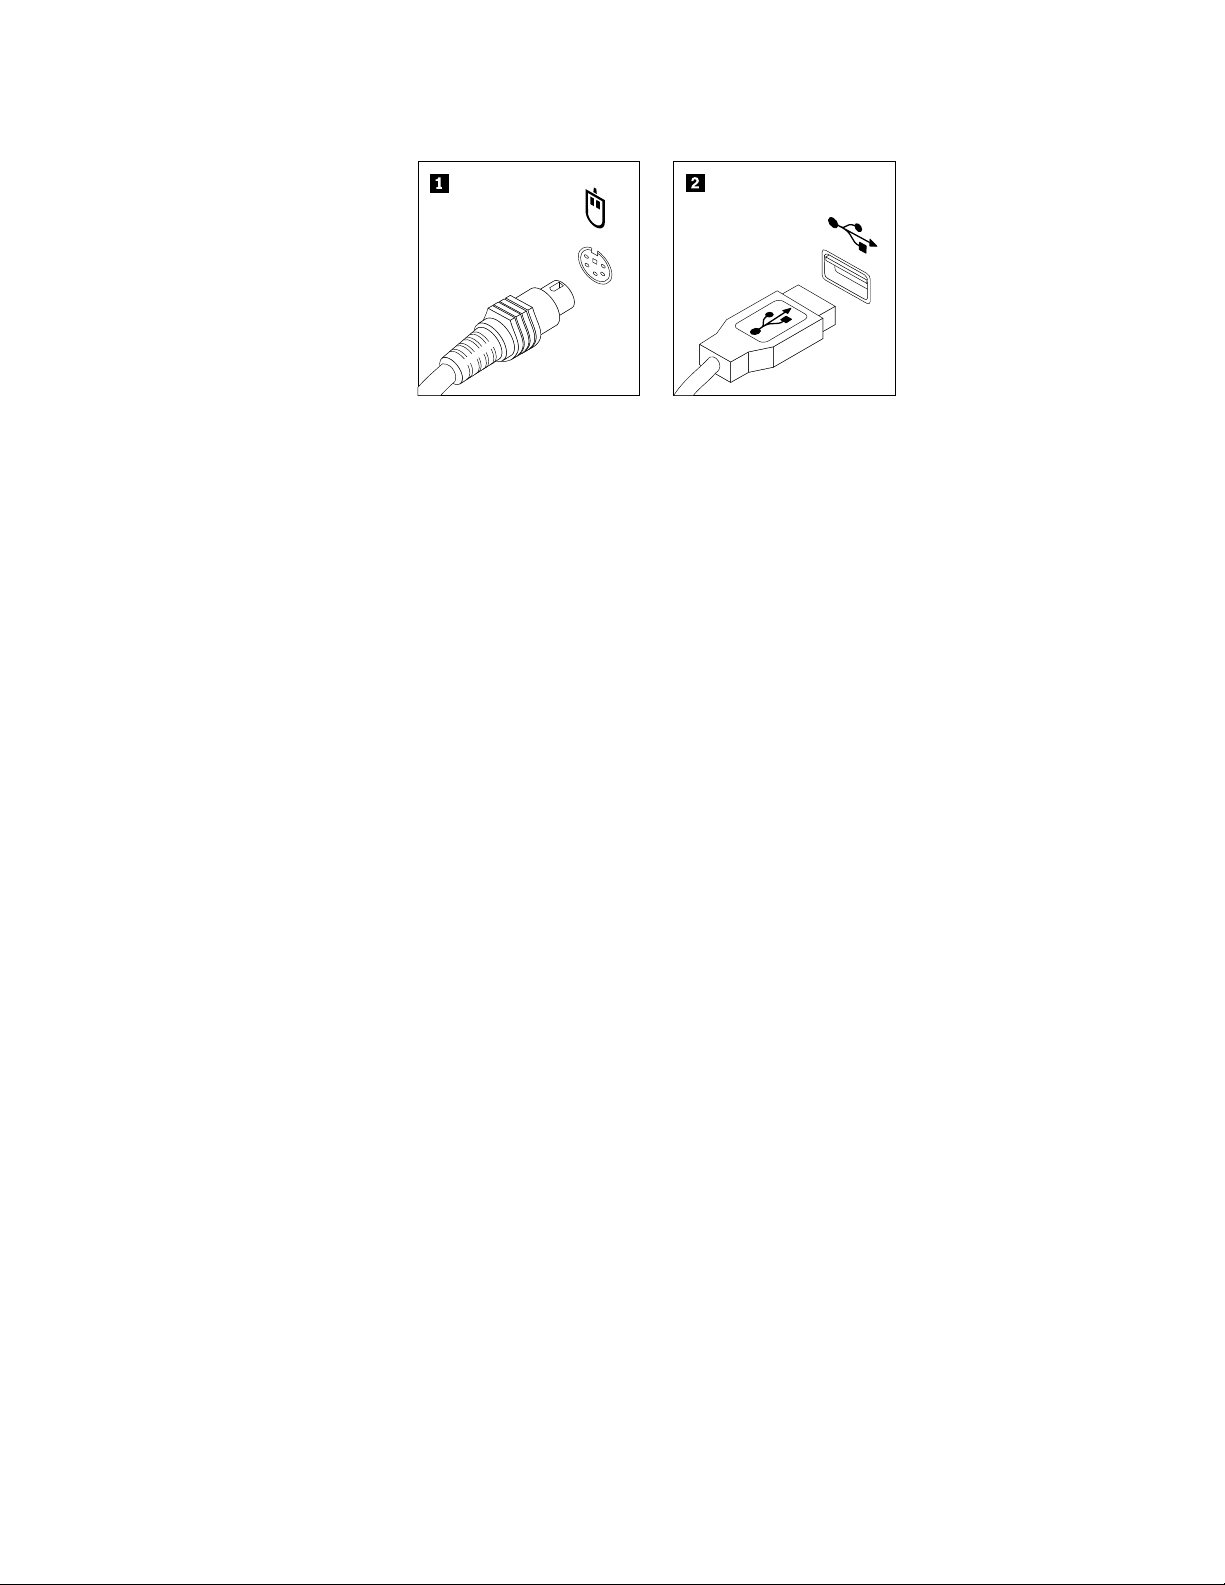
Figure43.Mouseconnectors
•Ifyouareusingawirelessmouse,dothefollowing:
1.DisconnecttheUSBdonglefromyourcomputer.Then,takeawayyourfailingwirelessmouse.
2.Removethenewwirelessmousefromthepackage.
3.RemovetheUSBdonglefromthecompartmentofthenewwirelessmouseorfromthecompartment
ofthenewwirelesskeyboard.
4.ConnecttheUSBdongletoanavailableUSBconnectoronyourcomputer.
5.Followtheinstructionsinthetablebelowtoinstallthebatteriesforthemouse.
6.Switchonthepowerbuttononthebottomofthewirelessmouse,andthenitisreadytouse.
Chapter5.Installingorreplacinghardware65
Page 78
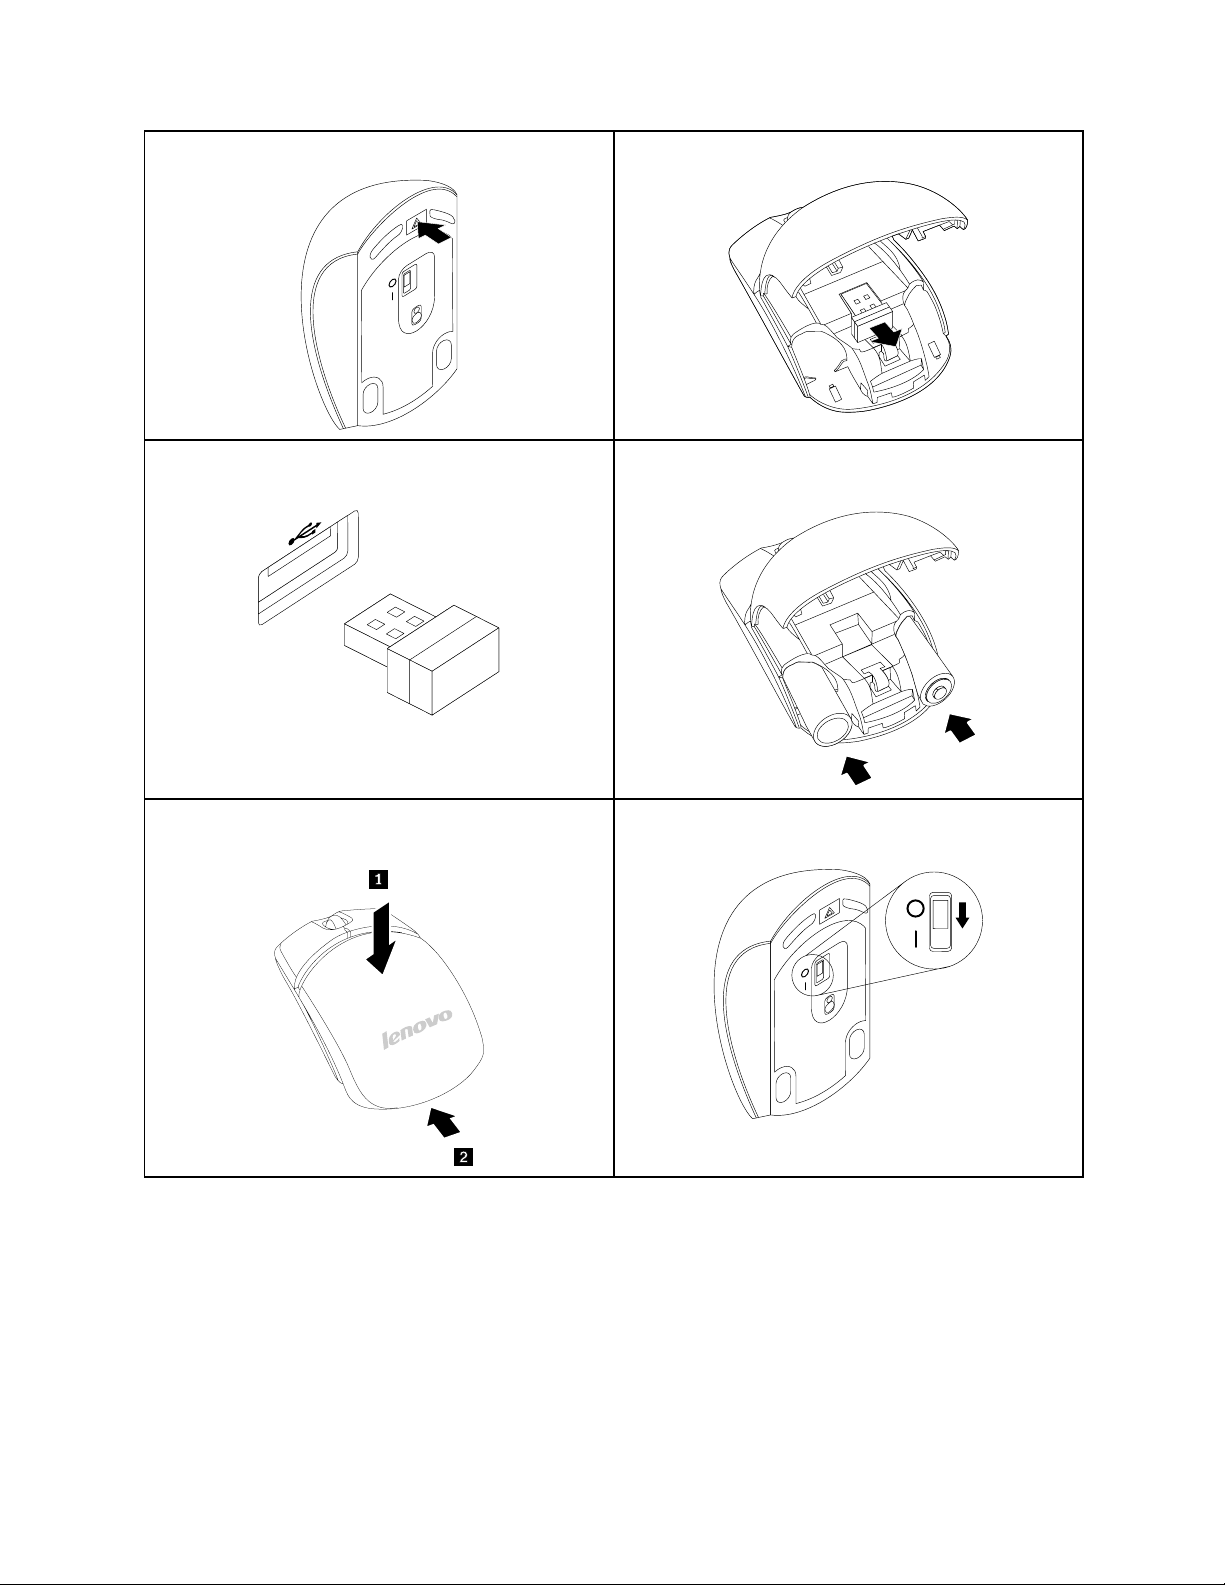
1.Openthemousebattery-compartmentcover.2.RemovetheUSBdonglefromthemouse.
3.ConnecttheUSBdongletoanyUSBconnectoron
thecomputer.
5.Closethemousebattery-compartmentcoverand
slideitforwarduntilitclicksintoplace.
4.InserttwoAAAbatteriesintothemouseaccording
tothepolarityindicators.
6.SlidethepowerswitchonthemousetotheOn
positionandtheLED(light-emittingdiode)ison.
Notes:
–ThegreenLEDindicatesthatthemouseisreadyforuse.
–TheashingamberLEDindicatesalowbatterypowerlevel.
–Pushthepowerswitchtotheoffpositionwhenyouarenotusingthemouse.Thisextendsthe
batterylife.
–DisconnecttheUSBdonglefromyourcomputerandstoreitinthewirelessmousecompartmentorin
thewirelesskeyboardcompartmentwhennotinuse.
66ThinkCentreUserGuide
Page 79
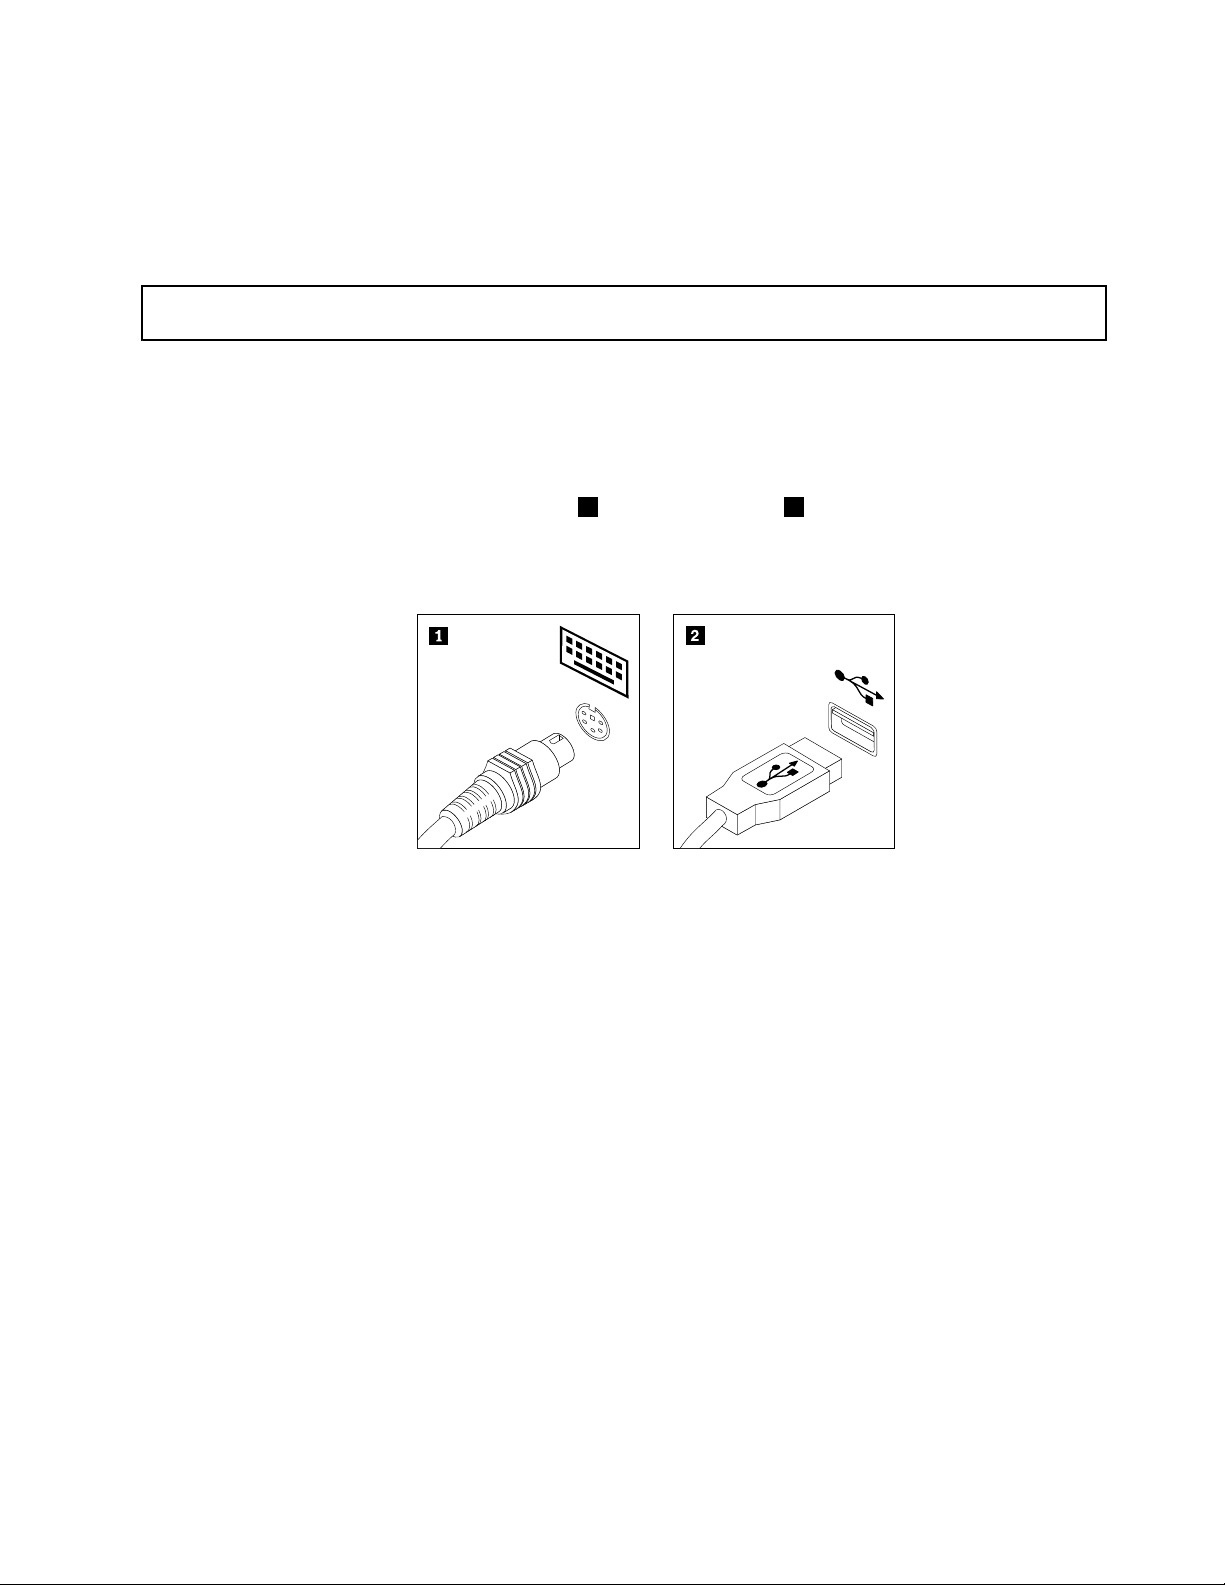
Whattodonext:
•Toworkwithanotherpieceofhardware,gototheappropriatesection.
•Tocompletethereplacement,goto“Completingthepartsreplacement”onpage68.
Replacingthekeyboard
Attention:Donotopenyourcomputerorattemptanyrepairbeforereadingandunderstandingthe“Important
safetyinformation”onpagev.
Thissectionprovidesinstructionsonhowtoreplacethekeyboard.
•Ifyouareusingawiredkeyboard,dothefollowing:
1.Disconnecttheoldkeyboardcablefromthecomputer.
2.Connectanewkeyboardtotheappropriateconnectoronthecomputer.Yourkeyboardmightbe
connectedtoaPS/2keyboardconnector1oraUSBconnector2.Dependingonwheretoconnect
yourkeyboard,see“Locatingconnectors,controls,andindicatorsonthefrontofyourcomputer”on
page8
or“Locatingconnectorsontherearofyourcomputer”onpage10.
Figure44.Keyboardconnectors
•Ifyouareusingawirelesskeyboard,dothefollowing:
1.T akeawayyourfailingwirelesskeyboard.
2.Removethenewwirelesskeyboardfromthepackage.
Chapter5.Installingorreplacinghardware67
Page 80
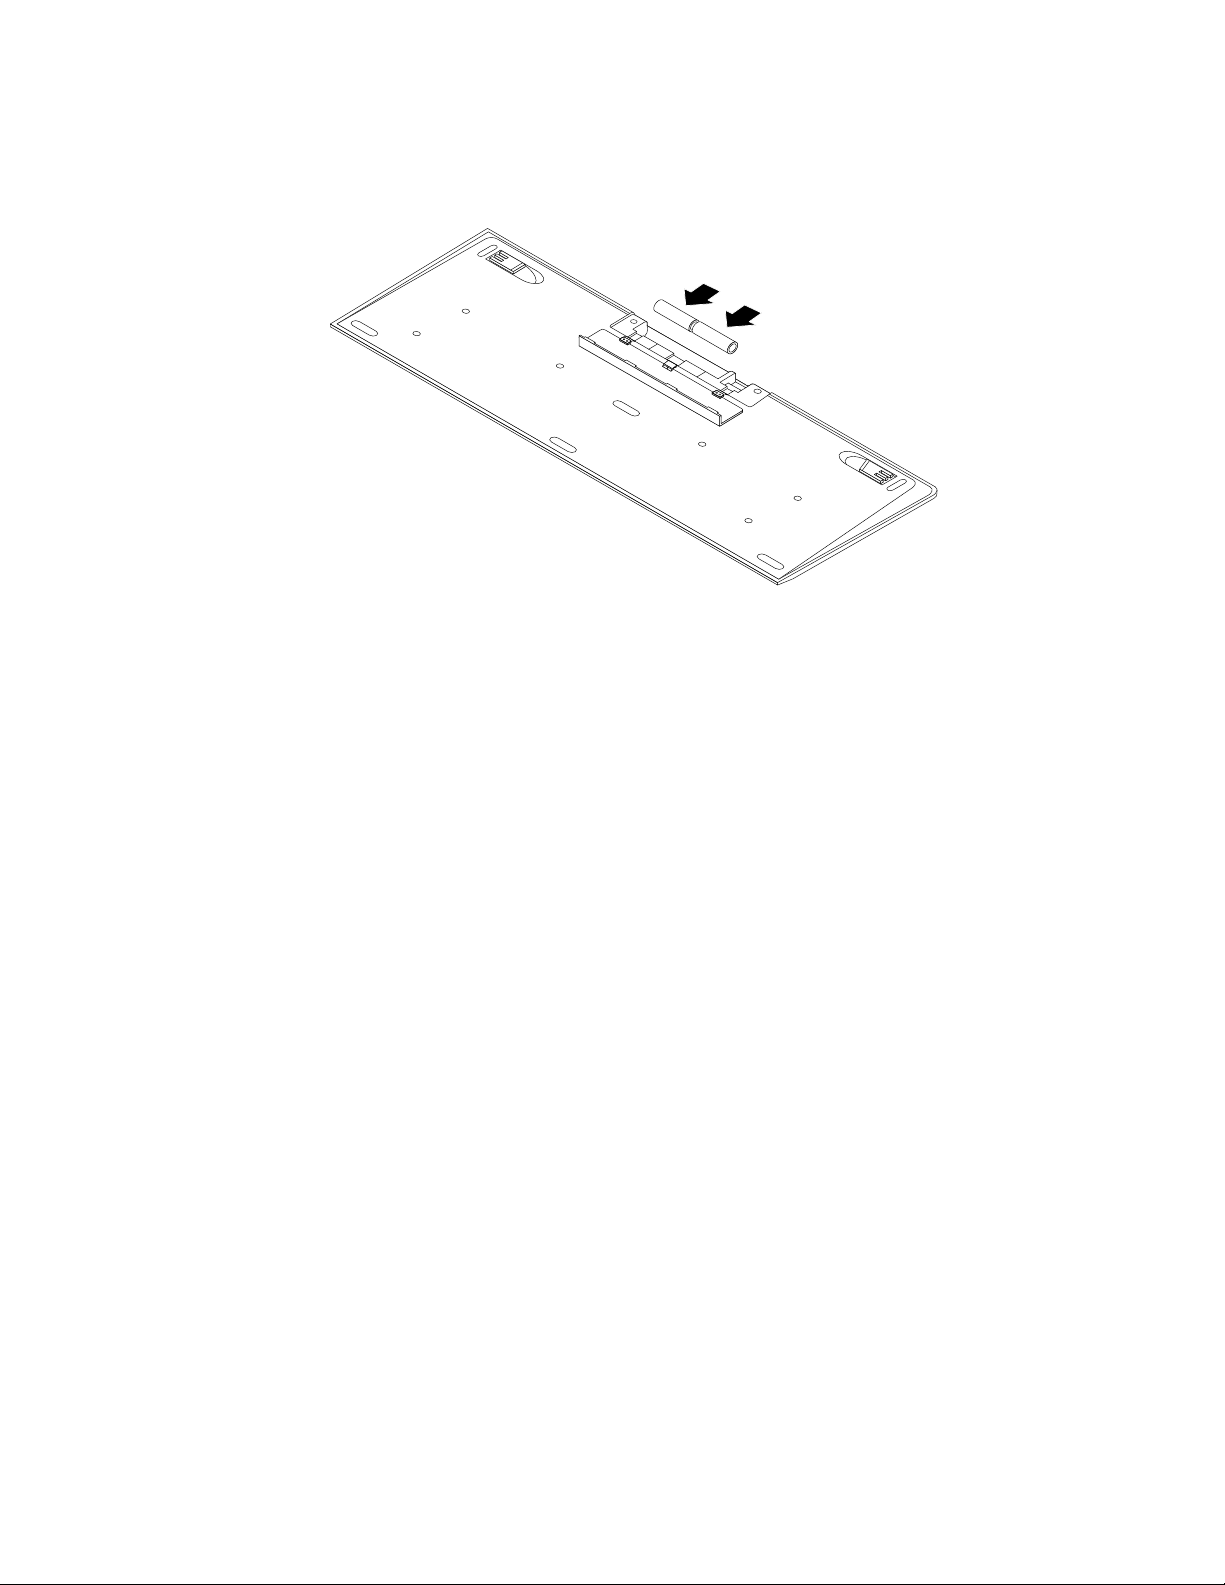
3.Installthekeyboardbyopeningthekeyboardbattery-compartmentcoverandinstallingtwoAAA
batteriesaccordingtothepolarityindicators.
Figure45.Installingthekeyboardbatteries
4.RemovetheUSBdonglefromthekeyboardbattery-compartmentorfromthewirelessmouse
battery-compartmentandconnectittoanavailableUSBconnectoronthecomputer.See“Replacing
themouse”onpage64.
5.Closethebattery-compartmentcover.Thekeyboardisreadyforuse.
Whattodonext:
•Toworkwithanotherpieceofhardware,gototheappropriatesection.
•Tocompletethereplacement,goto“Completingthepartsreplacement”onpage68.
Completingthepartsreplacement
Aftercompletingtheinstallationorreplacementforallparts,youneedtoreinstallthecomputercoverand
reconnectcables.Dependingonthepartsyouinstalledorreplaced,youmightneedtoconrmtheupdated
informationintheSetupUtilityprogram.RefertoChapter7“UsingtheSetupUtilityprogram”onpage79.
Toreinstallthecomputercoverandreconnectcablestoyourcomputer,dothefollowing:
1.Makesurethatallcomponentshavebeenreassembledcorrectlyandthatnotoolsorloosescrews
areleftinsideyourcomputer.See“Locatingcomponents”onpage12forthelocationsofvarious
componentsinyourcomputer.
2.Makesurethatthecablesareroutedcorrectlybeforereinstallingthecomputercover.Keepcablesclear
ofthehingesandsidesofthecomputerchassistoavoidinterferencewithreinstallingthecomputer
cover.
3.Alignthefourplastictabsonthetopofthecomputercoverwiththecorrespondingtabsinthefront
bezel.Then,pivotthecomputercoverdownwarduntilitsnapsintoposition.
68ThinkCentreUserGuide
Page 81
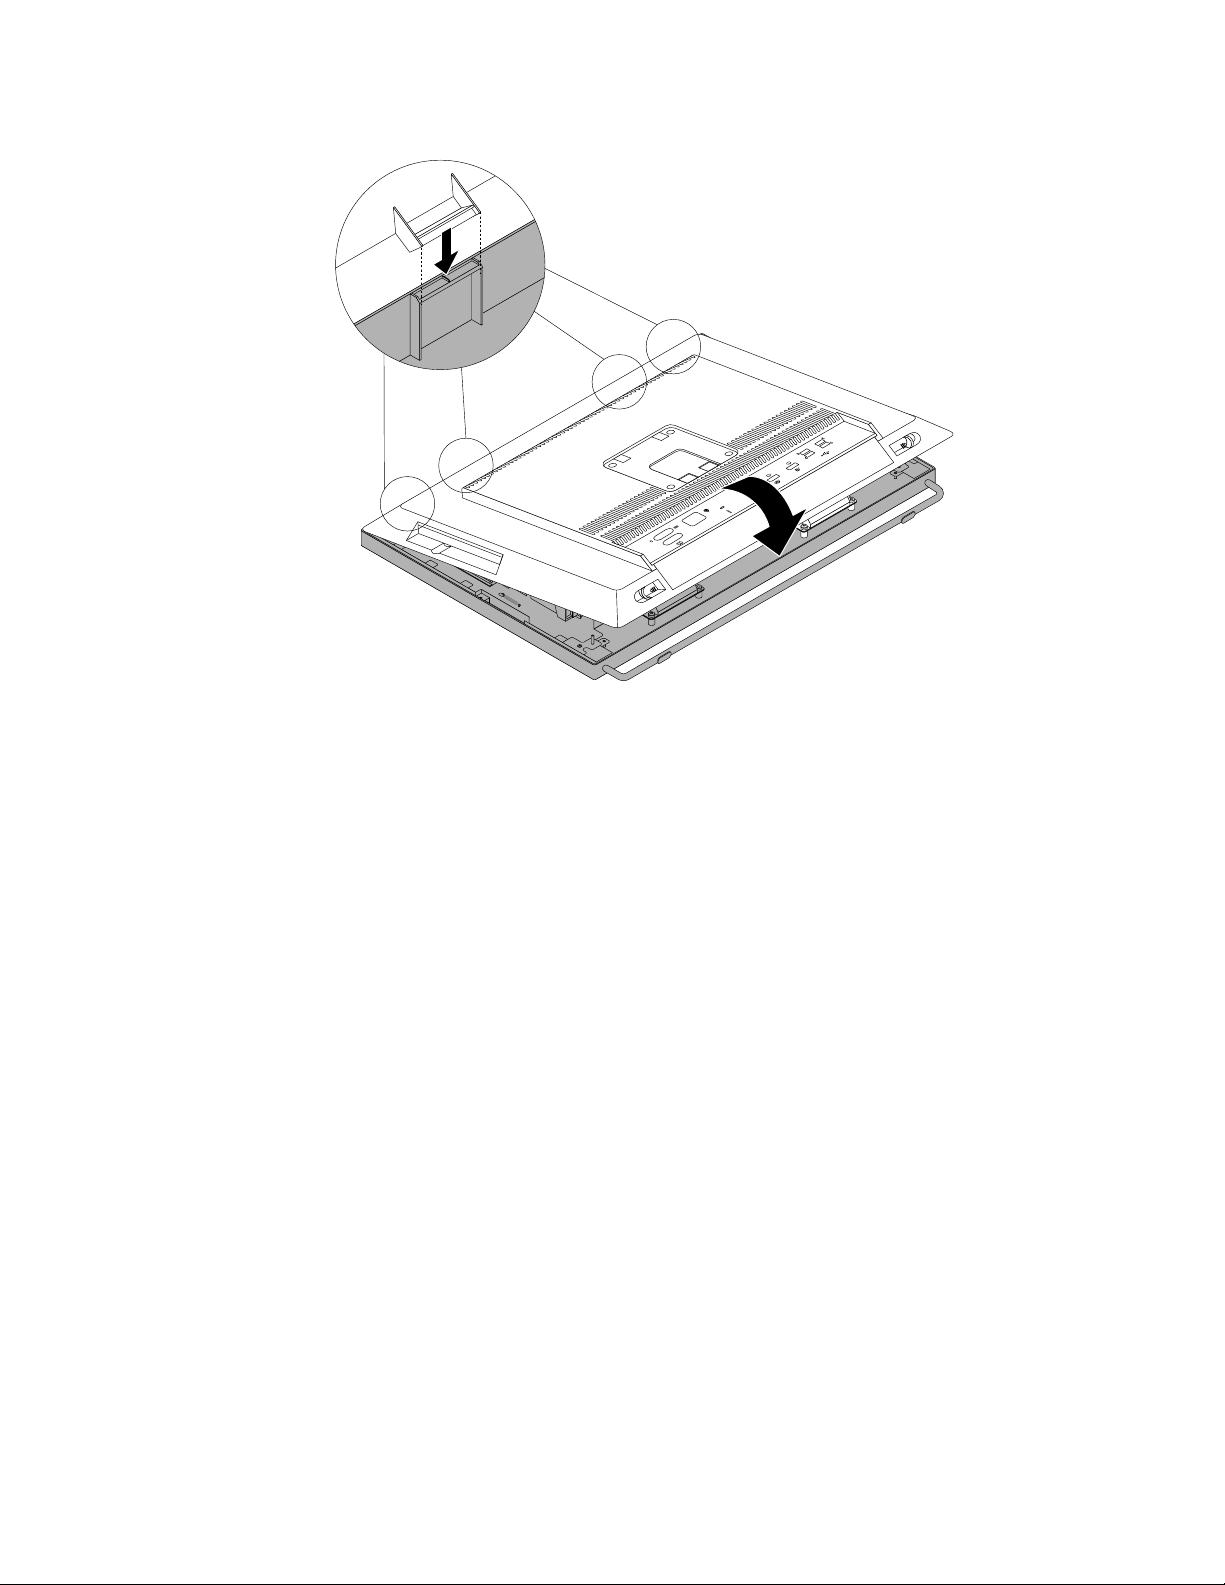
Figure46.Installingthecomputercover
4.Ifthereisanintegratedcablelockavailable,lockthecomputer.See“Attachinganintegratedcable
lock”onpage32
.
5.Ifthereisaframestand,reinstallit.See“Removingandreinstallingtheframestand”onpage36.
6.Reconnecttheexternalcablesandpowercordstothecomputer.See“Locatingconnectorsonthe
rearofyourcomputer”onpage10
.
7.T oupdateyourconguration,refertoChapter7“UsingtheSetupUtilityprogram”onpage79.
Note:Inmostareasoftheworld,LenovorequiresthereturnofthedefectiveCustomerReplaceableUnit
(CRU).InformationaboutthiswillcomewiththeCRUorwillcomeafewdaysaftertheCRUarrives.
Obtainingdevicedrivers
Youcanobtaindevicedriversforoperatingsystemsthatarenotpreinstalledat
http://www.lenovo.com/support.Installationinstructionsareprovidedinreadmeleswiththedevice-driver
les.
Chapter5.Installingorreplacinghardware69
Page 82

70ThinkCentreUserGuide
Page 83

Chapter6.Recoveryinformation
ThischapterprovidesinformationabouttherecoverysolutionsprovidedbyLenovo.
Thischaptercontainsthefollowingtopics:
•Creatingandusingrecoverymedia
•Performingbackupandrecoveryoperations
•UsingtheRescueandRecoveryworkspace
•Creatingandusingarescuemedium
•Installingorreinstallingdevicedrivers
•Solvingrecoveryproblems
Notes:
1.TherecoveryinformationinthischapteronlyappliestothecomputersthathavetheRescueand
RecoveryprogramortheProductRecoveryprograminstalled.IftheEnhancedBackupandRestore
iconintheLenovoThinkVantageT oolsprogramisdimmed,itindicatesthatyouneedtoinstall
theRescueandRecoveryprogrammanuallybeforeenablingitsfeatures.ToinstalltheRescueand
Recoveryprogram,dothefollowing:
a.ClickStart➙AllPrograms➙LenovoThinkVantageT ools,anddouble-clickEnhancedBackup
andRestore.
b.Followtheinstructionsonthescreen.
c.Whentheinstallationprocesscompletes,theEnhancedBackupandRestoreiconisactivated.
2.Thereareavarietyofmethodstochoosefromwhenconsideringhowtorecoverintheeventofa
software-orhardware-relatedproblem.Somemethodsvarydependingonthetypeofoperatingsystem
thatisinstalled.
3.Theproductontherecoverymediamaybeusedonlyforthefollowingpurposes:
•Restoretheproductpreinstalledonyourcomputer
•Reinstalltheproduct
•ModifytheproductusingtheAdditionalFiles
Creatingandusingrecoverymedia
Youcanuserecoverymediatorestoretheharddiskdrivetothefactorydefaultstate.Recoverymediaare
usefulifyoutransferthecomputertoanotherarea,sellthecomputer,recyclethecomputer,orputthe
computerinanoperationalstateafterallothermethodsofrecoveryhavefailed.Asaprecautionarymeasure,
itisimportanttocreaterecoverymediaasearlyaspossible.
Note:Therecoveryoperationsyoucanperformusingrecoverymediavarydependingontheoperating
systemfromwhichtherecoverymediawerecreated.Therecoverymediamightcontainabootmedium
andadatamedium.Y ourMicrosoftWindowslicensepermitsyoutocreateonlyonedatamedium,soitis
importantthatyoustoretherecoverymediainasafeplaceafteryouhavemadethem.
Creatingrecoverymedia
Thissectionprovidesinstructionsonhowtocreaterecoverymedia.
Note:OntheWindows7operatingsystem,youcancreaterecoverymediausingdiscsorexternalUSB
storagedevices.
©CopyrightLenovo2012
71
Page 84

TocreaterecoverymediaontheWindows7operatingsystem,clickStart➙AllPrograms➙Lenovo
ThinkVantageTools➙FactoryRecoveryDisks.Then,followtheinstructionsonthescreen.
Usingrecoverymedia
Thissectionprovidesinstructionsonhowtouserecoverymedia.
OntheWindows7operatingsystem,youcanuserecoverymediatorestorethecontentsoftheharddisk
drivetothefactorydefaultstate.Also,youcanuserecoverymediatoputthecomputerinanoperational
stateafterallothermethodsofharddiskdriverecoveryhavefailed.
Attention:Whenyouuserecoverymediatorestorethecontentsoftheharddisktothefactorydefaultstate,
allthelescurrentlyontheharddiskdrivewillbedeletedandreplacedbythefactorydefaultles.
TouserecoverymediaontheWindows7operatingsystem,dothefollowing:
1.Dependingonthetypeofyourrecoverymedia,connectthebootmedium(memorykeyorotherUSB
storagedevice)tothecomputer,orinsertthebootdiscintotheopticaldrive.
2.RepeatedlypressandreleasetheF12keywhenturningonthecomputer.WhenthePleaseselect
bootdevicewindowopens,releasetheF12key.
3.SelectthedesiredstartupdeviceandpressEnter.Therestoreprocessbegins.
4.Followtheinstructionsonthescreentocompletetheoperation.
Note:Afterrestoringyourcomputerharddiskdrivetothefactorydefaultstate,youmighthavetoreinstall
devicedriversforsomedevices.See“Reinstallingdevicedrivers”onpage76.
Performingbackupandrecoveryoperations
TheRescueandRecoveryprogramenablesyoutobackupallyourharddiskdrivecontentsincludingthe
operatingsystem,datales,softwareprograms,andpersonalsettings.Youcandesignatewherethe
RescueandRecoveryprogramstoresthebackup:
•Inaprotectedareaofyourharddiskdrive
•Onthesecondaryharddiskdriveifasecondaryharddiskdriveisinstalledinyourcomputer
•OnanattachedexternalUSBharddiskdrive
•Onanetworkdrive
•Onrecordablediscs(arecordableopticaldriveisrequiredforthisoption)
Afteryouhavebackedupthecontentsoftheharddiskdrive,youcanrestorethecompletecontentsofthe
harddiskdrive,restoreselectedlesonly,orrestoretheWindowsoperatingsystemandapplicationsonly
whilekeepingtheotherdataonyourharddiskdrive.
Performingabackupoperation
ThissectionprovidesinstructionsonhowtoperformabackupoperationusingtheRescueandRecovery
program.
ToperformabackupoperationusingtheRescueandRecoveryprogramontheWindows7operating
system,dothefollowing:
1.FromtheWindowsdesktop,clickStart➙AllPrograms➙LenovoThinkVantageTools➙Enhanced
BackupandRestore.TheRescueandRecoveryprogramopens.
2.IntheRescueandRecoverymainwindow,clicktheLaunchadvancedRescueandRecoveryarrow.
72ThinkCentreUserGuide
Page 85

3.ClickBackupyourharddriveandselectbackupoperationoptions.Then,followtheinstructionson
thescreentocompletethebackupoperation.
Performingarecoveryoperation
ThissectionprovidesinstructionsonhowtoperformarecoveryoperationusingtheRescueandRecovery
program.
ToperformarecoveryoperationusingtheRescueandRecoveryprogramontheWindows7operating
system,dothefollowing:
1.FromtheWindowsdesktop,clickStart➙AllPrograms➙LenovoThinkVantageTools➙Enhanced
BackupandRestore.TheRescueandRecoveryprogramopens.
2.IntheRescueandRecoverymainwindow,clicktheLaunchadvancedRescueandRecoveryarrow.
3.ClicktheRestoreyoursystemfromabackupicon.
4.Followtheinstructionsonthescreentocompletetherecoveryoperation.
FormoreinformationaboutperformingarecoveryoperationfromtheRescueandRecoveryworkspace,see
“UsingtheRescueandRecoveryworkspace”onpage73.
UsingtheRescueandRecoveryworkspace
TheRescueandRecoveryworkspaceresidesinaprotected,hiddenareaofyourharddiskdrivethat
operatesindependentlyfromtheWindowsoperatingsystem.Thisenablesyoutoperformrecovery
operationsevenifyoucannotstarttheWindowsoperatingsystem.Y oucanperformthefollowingrecovery
operationsfromtheRescueandRecoveryworkspace:
•Rescuelesfromyourharddiskdriveorfromabackup:TheRescueandRecoveryworkspaceenables
youtolocatelesonyourharddiskdriveandtransferthemtoanetworkdriveorotherrecordablemedia,
suchasaUSBdeviceoradisc.Thissolutionisavailableevenifyoudidnotbackupyourlesorif
changesweremadetothelessinceyourlastbackupoperation.Youcanalsorescueindividuallesfrom
aRescueandRecoverybackuplocatedonyourlocalharddiskdrive,aUSBdevice,oranetworkdrive.
•RestoreyourharddiskdrivefromaRescueandRecoverybackup:Ifyouhavebackedupyourharddisk
driveusingtheRescueandRecoveryprogram,youcanrestoretheharddiskdrivefromaRescueand
Recoverybackup,evenifyoucannotstarttheWindowsoperatingsystem.
•Restoreyourharddiskdrivetothefactorydefaultstate:TheRescueandRecoveryworkspaceenables
youtorestorethecompletecontentsofyourharddiskdrivetothefactorydefaultstate.Ifyouhave
multiplepartitionsonyourharddiskdrive,youhavetheoptiontorestoretheC:partitionandleavethe
otherpartitionsintact.BecausetheRescueandRecoveryworkspaceoperatesindependentlyfrom
theWindowsoperatingsystem,youcanrestoretheharddiskdrivetothefactorydefaultstateevenif
youcannotstarttheWindowsoperatingsystem.
Attention:IfyourestoretheharddiskdrivefromaRescueandRecoverybackuporrestoretheharddisk
drivetothefactorydefaultsettings,alllesontheprimaryharddiskdrivepartition(usuallydriveC:)willbe
deletedintherecoveryprocess.Ifpossible,makecopiesofimportantles.Ifyouareunabletostartthe
Windowsoperatingsystem,youcanusetherescuelesfeatureoftheRescueandRecoveryworkspaceto
copylesfromyourharddiskdrivetoothermedia.
TostarttheRescueandRecoveryworkspace,dothefollowing:
1.Makesurethecomputeristurnedoff.
2.T urnonyourcomputer.Whenyouseethelogoscreen,pressEnter,andthenpressF11toenterthe
RescueandRecoveryworkspace.
3.IfyouhavesetaRescueandRecoverypassword,typeyourpasswordwhenprompted.TheRescue
andRecoveryworkspaceopensafterashortdelay.
Chapter6.Recoveryinformation73
Page 86

Note:IftheRescueandRecoveryworkspacefailstoopen,see“Solvingrecoveryproblems”onpage76.
4.Dooneofthefollowing:
•Torescuelesfromyourharddiskdrive,clickRescuelesandfollowtheinstructionsonthescreen.
•TorestoreyourharddiskdrivefromaRescueandRecoverybackuportorestoreyourharddiskdrive
tothefactorydefaultsettings,clickFullRestoreandfollowtheinstructionsonthescreen.
FormoreinformationaboutthefeaturesoftheRescueandRecoveryworkspace,clickHelp.
Note:Afterrestoringyourharddiskdrivetothefactorydefaultstate,youmighthavetoreinstalldevice
driversforsomedevices.See“Reinstallingdevicedrivers”onpage76.
Creatingandusingarescuemedium
Witharescuemedium,suchasadiscoraUSBharddiskdrive,youcanrecoverthecomputerfromfailures
thatpreventyoufromgainingaccesstotheRescueandRecoveryworkspaceonyourharddiskdrive.
Notes:
1.Therecoveryoperationsyoucanperformusingarescuemediumvarydependingontheoperating
system.
2.Therescuedisccanbestartedinalltypesofopticaldrives.
Creatingarescuemedium
Thissectionprovidesinstructionsonhowtocreatearescuemedium.
TocreatearescuemediumontheWindows7operatingsystem,dothefollowing:
1.FromtheWindowsdesktop,clickStart➙AllPrograms➙LenovoThinkVantageTools➙Enhanced
BackupandRestore.TheRescueandRecoveryprogramopens.
2.IntheRescueandRecoverymainwindow,clicktheLaunchadvancedRescueandRecoveryarrow.
3.ClicktheCreateRescueMediaicon.TheCreateRescueandRecoveryMediawindowopens.
4.IntheRescueMediaarea,selectthetypeoftherescuemediumyouwanttocreate.Youcancreatea
rescuemediumusingadisc,aUSBharddiskdrive,orasecondaryinternalharddiskdrive.
5.ClickOKandfollowtheinstructionsonthescreentocreatearescuemedium.
Usingarescuemedium
Thissectionprovidesinstructionsonhowtousetherescuemediumyouhavecreated.
•Ifyouhavecreatedarescuemediumusingadisc,usethefollowinginstructionstousetherescuemedium:
1.T urnoffyourcomputer.
2.RepeatedlypressandreleasetheF12keywhenturningonthecomputer.WhenthePleaseselect
bootdevicewindowopens,releasetheF12key.
3.InthePleaseselectbootdevicewindow,selectthedesiredopticaldriveastherstbootdevice.
Then,inserttherescuediscintotheopticaldriveandpressEnter.Therescuemediumstarts.
•IfyouhavecreatedarescuemediumusingaUSBharddiskdrive,usethefollowinginstructionsto
usetherescuemedium:
1.AttachtheUSBharddiskdrivetooneoftheUSBconnectorsonyourcomputer.
2.RepeatedlypressandreleasetheF12keywhenturningonthecomputer.WhenthePleaseselect
bootdevicewindowopens,releasetheF12key.
74ThinkCentreUserGuide
Page 87

3.InthePleaseselectbootdevicewindow,selecttheUSBharddiskdriveastherstbootdeviceand
pressEnter.Therescuemediumstarts.
Whentherescuemediumstarts,theRescueandRecoveryworkspaceopens.Thehelpinformationfor
eachfeatureisavailablefromtheRescueandRecoveryworkspace.Followtheinstructionstocomplete
therecoveryprocess.
Reinstallingpreinstalledapplicationsanddevicedrivers
Yourcomputerhasprovisionsthatenableyoutoreinstallselectedfactory-installedapplicationsanddevice
drivers.
Reinstallingpreinstalledapplications
Thissectionprovidesinstructionsonhowtoreinstallpreinstalledapplications.
ToreinstalltheselectedapplicationspreinstalledonyourLenovocomputer,dothefollowing:
1.T urnonthecomputer.
2.GototheC:\SWTOOLSdirectory.
3.Opentheappsfolder.Withintheappsfolder,thereareseveralsubfoldersnamedforvariousapplications
installedinyourcomputer.
4.Opentheappropriateapplicationsubfolder.
5.Intheapplicationsubfolder,lookforaSETUP .EXEleorotherappropriateEXElesforsetup.
Double-clicktheleandfollowtheinstructionsonthescreentocompletetheinstallation.
Reinstallingpreinstalleddevicedrivers
Thissectionprovidesinstructionsonhowtoreinstallpreinstalleddevicedrivers.
Attention:Whenyoureinstalldevicedrivers,youarechangingthecurrentcongurationofyourcomputer.
Reinstalldevicedriversonlywhenitisnecessarytocorrectaproblemwithyourcomputer.
Toreinstallthedevicedriverforafactory-installeddevice,dothefollowing:
1.T urnonthecomputer.
2.GototheC:\SWTOOLSdirectory.
3.OpentheDRIVERSfolder.WithintheDRIVERSfolder,thereareseveralsubfoldersnamedforvarious
devicesinstalledinyourcomputer,suchasAUDIOorVIDEO.
4.Opentheappropriatedevicesubfolder.
5.Dooneofthefollowing:
•Inthedevicesubfolder,lookforaSETUP .exele.Double-clicktheleandfollowtheinstructionson
thescreentocompletetheinstallation.
•Inthedevicesubfolder,lookforaREADME.txtleoralewiththe.txtextension.Thislemightbe
namedaftertheoperatingsystem,suchasWIN98.txt.TheTXTlecontainsinformationabouthowto
installthedevicedriver.Followtheinstructionstocompletetheinstallation.
•Ifthedevicesubfoldercontainsalewiththe.infextensionandyouwanttoinstallthedevice
driverusingtheINFle,refertoyourWindowsHelpandSupportinformationsystemfordetailed
informationabouthowtoinstallthedevicedriver.
Note:Ifyouneedupdateddevicedrivers,see“Gettingthelatestdevicedriversforyourcomputer”on
page87
formoreinformation.
Chapter6.Recoveryinformation75
Page 88

Reinstallingsoftwareprograms
Ifasoftwareprogramyouinstalledonyourcomputerisnotworkingcorrectly,youmightneedtoremove
andreinstallit.Reinstallingoverwritestheexistingprogramslesandusuallyxesanyproblemsthat
youmighthavehadwiththatprogram.
Toremoveaprograminyoursystem,seeMicrosoftWindowshelpsystemfordetailedinformation.
Toreinstalltheprogram,dooneofthefollowing:
Note:Themethodofreinstallingaprogramvariesfromprogramtoprogram.Refertothedocumentation
providedwiththeprogramtoseeifyourprogramhasspecialinstallationinstructions.
•Toreinstallmostcommerciallyavailableprogramsinyoursystem,seeMicrosoftWindowshelpsystem
formoreinformation.
•ToreinstallselectedapplicationprogramsthatcamepreinstalledfromLenovo,dothefollowing:
1.T urnonthecomputer.
2.GototheC:\SWTOOLSdirectory.
3.OpentheAPPSfolder.WithintheAPPSfolder,thereareseveralsubfoldersnamedforvarious
applicationsinstalledinyourcomputer.
4.Opentheappropriateapplicationsubfolder.
5.Intheapplicationsubfolder,lookforaSETUP .EXEleorotherappropriateEXElesforsetup.
Double-clicktheleandfollowtheinstructionsonthescreentocompletetheinstallation.
Reinstallingdevicedrivers
Toreinstalladevicedriverforanoptionyouinstalled,refertothedocumentationthatcomeswiththeoption.
Whenyoureinstalldevicedrivers,youarechangingthecurrentcongurationofyourcomputer.Reinstall
devicedriversonlywhenitisnecessarytocorrectaproblemwithyourcomputer.
Formoreinformationaboutreinstallingdevicedriversthatcamewithyourcomputer,see“Reinstalling
preinstalledapplicationsanddevicedrivers”onpage75.
Solvingrecoveryproblems
IfyouareunabletoaccesstheRescueandRecoveryworkspaceortheWindowsenvironment,doone
ofthefollowing:
•UsearescuemediumtostarttheRescueandRecoveryworkspace.See“Creatingandusingarescue
medium”onpage74.
•Userecoverymediaifallothermethodsofrecoveryhavefailedandyouneedtorestoretheharddisk
drivetothefactorydefaultsettings.See“Creatingandusingrecoverymedia”onpage71.
Note:IfyouareunabletoaccesstheRescueandRecoveryworkspaceortheWindowsenvironmentfrom
arescuemediumorrecoverymedia,youmightnothavetherescuedevice(aninternalharddiskdrive,a
disc,aUSBharddiskdrive,orotherexternaldevices)setastherstbootdeviceinthestartupdevice
sequence.Y oumustrstmakesurethatyourrescuedeviceissetastherstbootdeviceinthestartup
devicesequenceintheSetupUtilityprogram.See“Selectingastartupdevice”onpage82fordetailed
informationabouttemporarilyorpermanentlychangingthestartupdevicesequence.Formoreinformation
abouttheSetupUtilityprogram,seeChapter7“UsingtheSetupUtilityprogram”onpage79.
76ThinkCentreUserGuide
Page 89

Itisimportanttocreatearescuemediumandasetofrecoverymediaasearlyaspossibleandstorethem
inasafeplaceforfutureuse.
Chapter6.Recoveryinformation77
Page 90

78ThinkCentreUserGuide
Page 91

Chapter7.UsingtheSetupUtilityprogram
TheSetupUtilityprogramisusedtoviewandchangethecongurationsettingsofyourcomputer,regardless
ofwhichoperatingsystemyouareusing.However,theoperatingsystemsettingsmightoverrideanysimilar
settingsintheSetupUtilityprogram.
StartingtheSetupUtilityprogram
TostarttheSetupUtilityprogram,dothefollowing:
1.Makesureyourcomputeristurnedoff.
2.RepeatedlypressandreleasetheF1keywhenturningonthecomputer.Whenyouhearmultiple
beepsorseealogoscreen,releasetheF1key.
Note:IfaPower-OnPasswordoranAdministratorPasswordhasbeenset,theSetupUtilityprogram
menuwillnotbedisplayeduntilyoutypethecorrectpassword.Formoreinformation,see“Using
passwords”onpage79
WhenthePOSTdetectsthattheharddiskdrivehasbeenremovedfromyourcomputerorthememory
modulesizehasdecreased,anerrormessagewillbedisplayedwhenyoustartthecomputerandyouwillbe
promptedtodooneofthefollowing:
•PressF1toentertheSetupUtilityprogram.
Note:AfteryouentertheSetupUtilityprogram,pressF10tosavechangesandexittheSetupUtility
program.PressEnterwhenpromptedtoconrmtheexit.Theerrormessagewillnotbedisplayedagain.
•PressF2tobypasstheerrormessageandlogintotheoperatingsystem.
.
Note:YouhavetoenablethecongurationchangedetectionfeatureforthePOSTtodetecttheremovalof
theharddiskdrive.Toenablethecongurationchangedetectionfeature,dothefollowing:
1.StarttheSetupUtilityprogram.
2.FromtheSetupUtilityprogrammainmenu,selectSecurity➙CongurationChangeDetection,
andpressEnter.
3.SelectEnabledandpressEnter.
4.PressF10tosavechangesandexittheSetupUtilityprogram.PressEnterwhenpromptedtoconrm
theexit.
Viewingandchangingsettings
TheSetupUtilityprogrammenulistsvariousitemsaboutthesystemconguration.Tovieworchange
settings,starttheSetupUtilityprogram.See“StartingtheSetupUtilityprogram”onpage79.Then,follow
theinstructionsonthescreen.
YoucanuseeitherthekeyboardorthemousetonavigatethroughBIOSmenuchoices.Thekeysusedto
performvarioustasksaredisplayedatthebottomofeachscreen.
Usingpasswords
ByusingtheSetupUtilityprogram,youcansetpasswordstopreventunauthorizedaccesstoyourcomputer
anddata.Thefollowingtypesofpasswordsareavailable:
•Power-OnPassword
©CopyrightLenovo2012
79
Page 92

•AdministratorPassword
•HardDiskPassword
Youdonothavetosetanypasswordstouseyourcomputer.However,usingpasswordsimproves
computingsecurity.Ifyoudecidetosetanypasswords,readthefollowingsections.
Passwordconsiderations
Apasswordcanbeanycombinationofupto64alphabeticandnumericcharacters.Forsecurityreasons,it
isrecommendedtouseastrongpasswordthatcannotbeeasilycompromised.T osetastrongpassword,
usethefollowingguidelines:
•Haveatleasteightcharactersinlength
•Containatleastonealphabeticcharacterandonenumericcharacter
•SetupUtilityprogramandharddiskdrivepasswordsarenotcasesensitive
•Notbeyournameoryourusername
•Notbeacommonwordoracommonname
•Besignicantlydifferentfromyourpreviouspasswords
Power-OnPassword
WhenaPower-OnPasswordisset,youarepromptedtotypeavalidpasswordeachtimethecomputeris
turnedon.Thecomputercannotbeuseduntilthevalidpasswordistypedin.
AdministratorPassword
SettinganAdministratorPassworddetersunauthorizedusersfromchangingcongurationsettings.Ifyou
areresponsibleformaintainingthecongurationsettingsofseveralcomputers,youmightwanttosetan
AdministratorPassword.
WhenanAdministratorPasswordisset,youarepromptedtotypeavalidpasswordeachtimeyoutryto
accesstheSetupUtilityprogram.TheSetupUtilityprogramcannotbeaccesseduntilavalidpassword
istypedin.
IfboththePower-OnPasswordandAdministratorPasswordareset,youcantypeeitherpassword.However,
youmustuseyourAdministratorPasswordtochangeanycongurationsettings.
HardDiskPassword
SettingaHardDiskPasswordpreventsunauthorizedaccesstothedataontheharddiskdrive.Whena
HardDiskPasswordisset,youarepromptedtotypeavalidpasswordeachtimeyoutrytoaccessthe
harddiskdrive.
Notes:
•AfteryousetaHardDiskPassword,yourdataontheharddiskdriveisprotectedeveniftheharddisk
driveisremovedfromonecomputerandinstalledinanother.
•IftheHardDiskPasswordisforgotten,thereisnowaytoresetthepasswordorrecoverdatafromthe
harddiskdrive.
Setting,changing,anddeletingapassword
Toset,change,ordeleteapassword,dothefollowing:
1.StarttheSetupUtilityprogram.See“StartingtheSetupUtilityprogram”onpage79.
80ThinkCentreUserGuide
Page 93

2.FromtheSetupUtilityprogrammainmenu,selectSecurity.
3.Dependingonthepasswordtype,selectSetPower-OnPassword,SetAdministratorPassword,or
HardDiskPassword.
4.Followtheinstructionsontherightsideofthescreentoset,change,ordeleteapassword.
Note:Apasswordcanbeanycombinationofupto64alphabeticandnumericcharacters.Formore
information,see“Passwordconsiderations”onpage80
.
Erasinglostorforgottenpasswords(clearingCMOS)
Thissectionprovidesinstructionsonhowtoeraselostorforgottenpasswords,suchasauserpassword.
Toerasealostorforgottenpassword,dothefollowing:
1.Removeallmediafromthedrivesandturnoffallattacheddevicesandthecomputer.Then,disconnect
allpowercordsfromelectricaloutletsanddisconnectallcablesthatareconnectedtothecomputer.
2.Removethecomputercover.See“Removingthecomputercover”onpage36.
3.LocatetheClearCMOS/Recoveryjumperonthesystemboard.See“Locatingpartsonthesystem
board”onpage15.
4.Movethejumperfromthestandardposition(pin1andpin2)tothemaintenanceposition(pin2and
pin3).
5.Reinstallthecomputercoverandconnectthepowercord.See“Completingthepartsreplacement”
onpage68
6.T urnonthecomputerandleaveitonforapproximately10seconds.Then,turnoffthecomputerby
holdingthepowerswitchforapproximatelyveseconds.
7.Repeatstep1throughstep2.
8.MovetheClearCMOS/Recoveryjumperbacktothestandardposition(pin1andpin2).
9.Reinstallthecomputercoverandconnectthepowercord.See“Completingthepartsreplacement”
onpage68.
.
Enablingordisablingadevice
Thissectionprovidesinformationonhowtoenableordisableuseraccesstothefollowingdevices:
USBSetupUsethisoptiontoenableordisableaUSBconnector.WhenaUSBconnectoris
disabled,thedeviceconnectedtotheUSBconnectorcannotbeused.
SATAControllerWhenthisfeatureissettoDisable,alldevicesconnectedtotheSA TAconnectors
(suchasharddiskdrivesortheopticaldrive)aredisabledandcannotbeaccessed.
Toenableordisableadevice,dothefollowing:
1.StarttheSetupUtilityprogram.See“StartingtheSetupUtilityprogram”onpage79.
2.FromtheSetupUtilityprogrammainmenu,selectDevices.
3.Dependingonthedeviceyouwanttoenableordisable,dooneofthefollowing:
•SelectUSBSetuptoenableordisableaUSBdevice.
•SelectA TADriveSetuptoenableordisableaSATAdevice.
4.SelectthedesiredsettingsandpressEnter.
5.PressF10tosavechangesandexittheSetupUtilityprogram.See“ExitingtheSetupUtilityprogram”
onpage84.
Chapter7.UsingtheSetupUtilityprogram81
Page 94

Selectingastartupdevice
Ifyourcomputerdoesnotstartupfromadevicesuchasthediscorharddiskdriveasexpected,dooneof
thefollowingtoselectthestartupdeviceyouwant.
Selectingatemporarystartupdevice
Usethisproceduretoselectatemporarystartupdevice.
Note:Notalldiscsandharddiskdrivesarebootable.
1.T urnoffyourcomputer.
2.RepeatedlypressandreleasetheF12keywhenturningonthecomputer.WhenthePleaseselect
bootdevicewindowdisplays,releasetheF12key.
3.SelectthedesiredstartupdeviceandpressEnter.Thecomputerwillstartupfromthedeviceyou
selected.
Note:SelectingastartupdevicefromthePleaseselectbootdevicewindowdoesnotpermanentlychange
thestartupsequence.
Selectingorchangingthestartupdevicesequence
Tovieworpermanentlychangetheconguredstartupdevicesequence,dothefollowing:
1.StarttheSetupUtilityprogram.See“StartingtheSetupUtilityprogram”onpage79.
2.FromtheSetupUtilityprogrammainmenu,selectStartup.
3.SelectthedevicesforthePrimaryStartupSequence,theAutomaticStartupSequence,andtheError
StartupSequence.Readtheinformationdisplayedontherightsideofthescreen.
4.PressF10tosavechangesandexittheSetupUtilityprogram.See“ExitingtheSetupUtilityprogram”
onpage84.
EnablingErPcompliancemode
Youcanenabletheenergy-relatedproductsdirective(ErP)compliancemodethroughthePowermenuinthe
SetupUtilityprogramtoreducetheconsumptionofelectricitywhenyourcomputerisinstandbyoroffmode.
ToenableErPcompliancemodeintheSetupUtilityprogram,dothefollowing:
1.StarttheSetupUtilityprogram.See“StartingtheSetupUtilityprogram”onpage79.
2.FromtheSetupUtilityprogrammainmenu,selectPower➙EnhancedPowerSavingMode,and
pressEnter.
3.SelectEnabledandpressEnter.
4.FromthePowermenu,selectAutomaticPowerOnandpressEnter.
5.SelectWakeonLanandpressEnter.
6.SelectDisabledandpressEnter.
7.PressF10tosavechangesandexittheSetupUtilityprogram.PressEnterwhenpromptedtoconrm
theexit.
Note:WhenErPcompliancemodeisenabled,youcanwakeupyourcomputerbydoingoneofthefollowing:
•Pressingthepowerswitch
•Enablingthewakeuponalarmfeature
Thewakeuponalarmfeatureenablesyourcomputertowakeupatasettime.Toenablethewake
uponalarmfeature,dothefollowing:
82ThinkCentreUserGuide
Page 95

1.StarttheSetupUtilityprogram.
2.FromtheSetupUtilityprogrammainmenu,selectPower➙AutomaticPowerOn,andpressEnter.
3.SelectWakeUponAlarmandpressEnter.Thenfollowtheinstructionsonthescreen.
4.PressF10tosavechangesandexittheSetupUtilityprogram.PressEnterwhenpromptedto
conrmtheexit.
•Enablingtheafterpowerlossfeature
Theafterpowerlossfeatureenablesyourcomputertowakeupwhenthepowersupplyresumesaftera
suddenlossofelectricity.Toenabletheafterpowerlossfeature,dothefollowing:
1.StarttheSetupUtilityprogram.
2.FromtheSetupUtilityprogrammainmenu,selectPower➙AfterPowerLoss,andpressEnter.
3.SelectPowerOnandpressEnter.
4.PressF10tosavechangesandexittheSetupUtilityprogram.PressEnterwhenpromptedto
conrmtheexit.
ICEperformancemode
YoucanadjusttheacousticandthermalperformanceofyourcomputerthroughtheICEPerformance
Modemenu.Twochoicesareavailable:
•BetterAcousticPerformance(defaultsetting)
•BetterThermalPerformance
ByenablingBetterAcousticPerformance,yourcomputerwillrunwithlessnoiseatanormalthermal
level.ByenablingBetterThermalPerformance,yourcomputerwillrunatabetterthermallevelwith
normalacousticperformance.
ToconguretheICEperformancemode,dothefollowing:
1.StarttheSetupUtilityprogram.See“StartingtheSetupUtilityprogram”onpage79.
2.FromtheSetupUtilityprogrammainmenu,selectPower.
3.SelectIntelligentCoolingEngine(ICE).TheIntelligentCoolingEngine(ICE)windowisdisplayed.
4.SelectICEPerformanceMode.TheICEPerformanceModewindowisdisplayed.
5.SelectBetterAcousticPerformanceorBetterThermalPerformanceasdesired.
6.PressF10tosavechangesandexittheSetupUtilityprogram.See“ExitingtheSetupUtilityprogram”
onpage84.
ICEthermalalert
YoucanmonitorthethermalfunctionofyourcomputerundercriticalthermalsituationsthroughtheICE
ThermalAlertmenu.Twochoicesareavailable:
•Enabled(defaultsetting)
•Disabled
AfterenablingtheICEthermalalertfunction,whencriticalthermalsituationsoccur,suchasmalfunctioning
fans,abnormallyhightemperature,andpoorcoolingperformances,analertlogwillbewrittenintothe
Windowssystemlog.Thealertlogcanhelpyouidentifythethermalproblems.
ToconguretheICEthermalalertfunction,dothefollowing:
1.StarttheSetupUtilityprogram.See“StartingtheSetupUtilityprogram”onpage79.
Chapter7.UsingtheSetupUtilityprogram83
Page 96

2.FromtheSetupUtilityprogrammainmenu,selectPower.
3.SelectIntelligentCoolingEngine(ICE).TheIntelligentCoolingEngine(ICE)windowisdisplayed.
4.SelectICEThermalAlert.TheICEThermalAlertwindowisdisplayed.
5.SelectEnabledorDisabledasdesired.
6.PressF10tosavechangesandexittheSetupUtilityprogram.See“ExitingtheSetupUtilityprogram”
onpage84.
ExitingtheSetupUtilityprogram
Afteryounishviewingorchangingsettings,pressEsctoreturntotheSetupUtilityprogrammainmenu.
YoumighthavetopressEscseveraltimes.Dooneofthefollowing:
•Ifyouwanttosavethenewsettings,pressF10tosavechangesandexittheSetupUtilityprogram.
•Ifyoudonotwanttosavethesettings,selectExit➙DiscardChangesandExit,andthenpressEnter.
WhentheResetWithoutSavingwindowshows,selectY es,andthenpressEntertoexittheSetup
Utilityprogram.
•Ifyouwanttoreturntothedefaultsettings,pressF9toloadthedefaultsettings,andthenpressF10to
saveandexittheSetupUtilityprogram.
84ThinkCentreUserGuide
Page 97

Chapter8.Updatingsystemprograms
ThischapterprovidesinformationaboutupdatingthePOSTandBIOS,andhowtorecoverfromaPOST
andBIOSupdatefailure.
Usingsystemprograms
Systemprogramsarethebasiclayerofsoftwarebuiltintoyourcomputer.Systemprogramsincludethe
POST,theBIOS,andtheSetupUtilityprogram.ThePOSTisasetoftestsandproceduresthatare
performedeachtimeyouturnonyourcomputer.TheBIOSisalayerofsoftwarethattranslatesinstructions
fromotherlayersofsoftwareintoelectricalsignalsthatthecomputerhardwarecanexecute.Youcanuse
theSetupUtilityprogramtovieworchangethecongurationsettingsofyourcomputer.SeeChapter7
“UsingtheSetupUtilityprogram”onpage79
Yourcomputersystemboardhasamodulecalledelectricallyerasableprogrammableread-onlymemory
(EEPROM,alsoreferredtoasashmemory).Y oucaneasilyupdatethePOST,theBIOS,andtheSetup
Utilityprogrambystartingyourcomputerwithasystem-program-updatediscorrunningaspecialupdate
programfromyouroperatingsystem.
LenovomightmakechangesandenhancementstothePOSTandBIOS.Whenupdatesarereleased,they
areavailableasdownloadablelesontheLenovoWebsiteathttp://www.lenovo.com.Instructionsforusing
thePOSTandBIOSupdatesareavailableinaTXTlethatisincludedwiththeupdateles.Formost
models,youcandownloadeitheranupdateprogramtocreateasystem-program-updatediscoranupdate
programthatcanberunfromtheoperatingsystem.
fordetailedinformation.
Updating(ashing)theBIOSfromadisc
Thissectionprovidesinstructionsonhowtoupdate(ash)theBIOSfromadisc.
Note:Y oucandownloadaself-startingbootablediscimage(knownasanISOimage)withthesystem
programupdatestocreateasystem-program-updatedisc.Goto:
http://www.lenovo.com/support
Toupdate(ash)theBIOSfromadisc,dothefollowing:
1.T urnoffyourcomputer.
2.RepeatedlypressandreleasetheF12keywhenturningonthecomputer.WhentheStartupDevice
Menuwindowopens,releasetheF12key.
3.FromtheStartupDeviceMenuwindow,selectthedesiredopticaldriveasthestartupdevice.Then,
insertthediscintothisopticaldriveandpressEnter.Theupdatebegins.
4.Whenpromptedtochangetheserialnumber,itissuggestedthatyoudonotmakethischangeby
pressingN.However,ifyoudowanttochangetheserialnumber,pressY,thentypeintheserialnumber
andpressEnter.
5.Whenpromptedtochangethemachinetypeandmodel,itissuggestedthatyoudonotmakethis
changebypressingN.However,ifyoudowanttochangethemachinetypeandmodel,pressY,then
typeinthemachinetypeandmodelandpressEnter.
6.Followtheinstructionsonthescreentocompletetheupdate.Aftertheupdateiscompleted,removethe
discfromtheopticaldrive.
©CopyrightLenovo2012
85
Page 98

Updating(ashing)theBIOSfromyouroperatingsystem
Note:BecauseLenovomakesconstantimprovementstoitsWebsites,theWebpagecontentsaresubject
tochangewithoutnotice,includingthecontentsreferencedinthefollowingprocedure.
Toupdate(ash)theBIOSfromyouroperatingsystem,dothefollowing:
1.Gotohttp://www.lenovo.com/support.
2.Dothefollowingtolocatethedownloadablelesforyourmachinetype:
a.IntheEnteraproductnumbereld,typeyourmachinetypeandclickGo.
b.ClickDownloadsanddrivers.
c.SelectBIOSfromtheReneresultsdrop-downlistboxtoeasilylocatealltheBIOSrelatedlinks.
d.ClicktheBIOSupdatelink.
3.ClicktheTXTlethatcontainstheinstructionsforupdating(ashing)theBIOSfromyouroperating
system.
4.Printtheseinstructions.Thisisveryimportantbecausetheseinstructionswillnotbedisplayedon
thescreenafterthedownloadbegins.
5.Followtheprintedinstructionstodownload,extract,andinstalltheupdate.
RecoveringfromaPOST/BIOSupdatefailure
IfthepowertoyourcomputerisinterruptedwhilethePOSTandBIOSisbeingupdated,yourcomputer
mightnotrestartcorrectly.Ifthishappens,performthefollowingproceduretorecoverfromthePOSTand
BIOSupdatefailure.ThisprocedureiscommonlycalledBoot-blockRecovery.
1.Removeallmediafromthedrivesandturnoffallattacheddevicesandthecomputer.Then,disconnect
allpowercordsfromelectricaloutletsanddisconnectallcablesthatareconnectedtothecomputer.
2.Removethecomputercover.See“Removingthecomputercover”onpage36.
3.LocatetheClearCMOS/Recoveryjumperonthesystemboard.See“Locatingpartsonthesystem
board”onpage15.
4.RemoveanycablesthatimpedeaccesstotheClearCMOS/Recoveryjumper.
5.Movethejumperfromthestandardposition(pin1andpin2)tothemaintenanceposition(pin2and
pin3).
6.Reconnectanycablesthatweredisconnected.
7.Reinstallthecomputercoverandreconnectthepowercordsforthecomputerandmonitortoelectrical
outlets.See“Completingthepartsreplacement”onpage68.
8.T urnonthecomputerandtheninsertthePOSTandBIOSupdate(ashupdate)discintotheoptical
drive.Waitafewminutes.Then,therecoverysessionbegins.Therecoverysessionwilltaketwoto
threeminutes.Duringthistime,awarningmessagewillbedisplayedandnoactionisneededfromyou.
9.Aftertherecoverysessioniscompleted,therewillbenovideo,andyourcomputerwillautomatically
turnoff.
10.Repeatstep1throughstep4.
11.MovetheClearCMOS/Recoveryjumperbacktothestandardposition(pin1andpin2).
12.Reconnectanycablesthatweredisconnected.
13.Reinstallthecomputercoverandreconnectanycablesthatweredisconnected.
14.T urnonthecomputertorestarttheoperatingsystem.
86ThinkCentreUserGuide
Page 99

Chapter9.Preventingproblems
Thischapterprovidesinformationthatcanhelpyouavoidcommonproblemsandkeepyourcomputer
runningsmoothly.
Keepingyourcomputercurrent
Insomesituationsyoumaynditnecessarytohavethemostcurrentsoftwareprograms,devicedrivers,or
operatingsystem.Thissectionexplainshowtogetthelatestupdatesforyourcomputer.
Selectanyofthefollowingtopics:
•“Gettingthelatestdevicedriversforyourcomputer”onpage87
•“Updatingyouroperatingsystem”onpage87
•“UsingSystemUpdate”onpage88
Gettingthelatestdevicedriversforyourcomputer
Note:BecauseLenovomakesconstantimprovementstoitsWebsites,theWebpagecontentsaresubject
tochangewithoutnotice,includingthecontentsreferencedinthefollowingprocedure.
YoucandownloadandinstallupdateddevicedriversfromtheLenovoWebsitebydoingthefollowing:
Attention:DonotdownloadupdateddevicedriversfromtheWindowsUpdateWebsite.Thedevice
driversprovidedontheWindowsWebsitehavenotbeentestedbyLenovoandusingthemmightcause
unexpectedproblems.ObtainupdateddevicedriversfromLenovo.
1.Gotohttp://www.lenovo.com/support.
2.ClickDownload&Drivers.
3.Selectthemachinetypeofyourcomputerfromthemachinetypelist.
4.Clickthecategoryofdeviceforwhichyouneedthedevicedriver.
5.Clicktheappropriatedevicedriver.
6.Downloadandinstallthedevicedriver.
Updatingyouroperatingsystem
MicrosoftmakesupdatesavailableforthevariousWindowsoperatingsystemsthroughtheMicrosoft
WindowsUpdateWebsite.TheWebsiteautomaticallydetermineswhatWindowsupdatesareavailablefor
yourspeciccomputerandliststhoseupdatesonly.Updatescouldincludesecurityxes,newversionsof
Windowscomponents(suchasMediaPlayer),xestootherportionsoftheWindowsoperatingsystem,
orenhancements.
Attention:DonotdownloadupdateddevicedriversfromtheWindowsWebsite.Thedevicedrivers
providedontheWindowsWebsitehavenotbeentestedbyLenovoandusingthemmightcauseunexpected
problems.ObtainupdateddevicedriversfromLenovo.See“Gettingthelatestdevicedriversforyour
computer”onpage87
ToaccesstheMicrosoftWindowsUpdatesite,dothefollowing:
1.Gotohttp://windowsupdate.microsoft.com/.
2.Followtheinstructionsonthescreen.
©CopyrightLenovo2012
formoreinformation.
87
Page 100

UsingSystemUpdate
TheSystemUpdateprogramhelpsyoukeepthesoftwareonyourcomputerup-to-date.Updatepackages
arestoredonLenovoserversandcanbedownloadedfromtheLenovoSupportWebsite.Updatepackages
cancontainapplications,devicedrivers,BIOSashes,orsoftwareupdates.WhentheSystemUpdate
programconnectstotheLenovoSupportWebsite,theSystemUpdateprogramautomaticallyrecognizes
themachinetypeandmodelofyourcomputer,theinstalledoperatingsystem,andthelanguageofthe
operatingsystemtodeterminewhatupdatesareavailableforyourcomputer.TheSystemUpdateprogram
thendisplaysalistofupdatepackagesandcategorizeseachupdateascritical,recommended,and
optionaltohelpyouunderstandtheimportance.Youhavecompletecontrolofwhichupdatestodownload
andinstall.Afteryouselecttheupdatepackagesyouwant,theSystemUpdateprogramautomatically
downloadsandinstallstheupdateswithoutanyfurtherinterventionfromyou.
TheSystemUpdateprogramispreinstalledonmostLenovocomputersandisreadytorun.Theonly
prerequisiteisanactiveInternetconnection.Youcanstarttheprogrammanually,oryoucanusethe
schedulefeaturetoenabletheprogramtosearchforupdatesautomaticallyatspeciedintervals.Youalso
canpredenescheduledupdatestosearchbyseverity(criticalupdates,criticalandrecommendedupdates,
orallupdates)sothelistyouchoosefromcontainsonlythoseupdatetypesthatareofinteresttoyou.
IftheSystemUpdateprogramcamewithyourcomputer,youcanopenitbycompletingthefollowing
procedure:
1.ClickStart➙LenovoThinkVantageTools.
2.Double-clickUpdateandDrivers.
IftheSystemUpdateprogramisnotcurrentlyinstalledonyourcomputer,youcandownloaditfromthe
LenovoSupportWebsiteathttp://www.lenovo.com/support.
Cleaningandmaintenance
Withappropriatecareandmaintenanceyourcomputerwillserveyoureliably.Thefollowingtopicsoffer
informationtohelpyoukeepyourcomputerintopworkingorder.
•“Basics”onpage88
•“Cleaningyourcomputer”onpage89
–“Computer”onpage89
–“Keyboard”onpage89
–“Opticalmouse”onpage89
–“Displayscreen”onpage89
•“Goodmaintenancepractices”onpage90
Basics
Herearesomebasicpointsaboutkeepingyourcomputerfunctioningproperly:
•Keepyourcomputerinaclean,dryenvironment.Makesureitrestsonaat,steadysurface.
•Donotplaceitemsontopofthemonitororcoveranyoftheventsinthemonitororcomputer.These
ventsprovideairowtokeepyourcomputerfromoverheating.
•Keepfoodanddrinksawayfromallpartsofyourcomputer.Foodparticlesandspillsmightmakethe
keyboardandmousestickandunusable.
•Donotgetthepowerswitchesorothercontrolswet.Moisturecandamagethesepartsandcausean
electricalhazard.
•Alwaysdisconnectapowercordbygraspingtheplug,butnotthecord.
88ThinkCentreUserGuide
 Loading...