

Page 1

ThinkCentre
UserGuide
MachineTypes:3132,3134,3140,3143,3147,3154,3157,3167,
3171,3176,5033,5039,and7339
Page 2

Note:Beforeusingthisinformationandtheproductitsupports,besuretoreadandunderstandthe
“Importantsafetyinformation”onpagevandAppendixA“Notices”onpage111.
FirstEdition(June2011)
©CopyrightLenovo2011.
LIMITEDANDRESTRICTEDRIGHTSNOTICE:IfdataorsoftwareisdeliveredpursuantaGeneralServicesAdministration
“GSA”contract,use,reproduction,ordisclosureissubjecttorestrictionssetforthinContractNo.GS-35F-05925.
Page 3

Contents
Importantsafetyinformation......v
Serviceandupgrades.............v
Staticelectricityprevention...........v
Powercordsandpoweradapters........vi
Extensioncordsandrelateddevices.......vi
Plugsandoutlets..............vii
Externaldevices..............vii
Heatandproductventilation.........vii
Operatingenvironment...........viii
Modemsafetyinformation..........viii
Lasercompliancestatement..........ix
Powersupplystatement............ix
Cleaningandmaintenance...........ix
Chapter1.Productoverview......1
Features..................1
Specications................4
Softwareoverview..............4
SoftwareprovidedbyLenovo........4
AdobeReader..............6
Antivirussoftware.............7
Locations..................7
Locatingconnectors,controls,andindicators
onthefrontofyourcomputer........7
Locatingconnectorsontherearofyour
computer................8
Locatingcomponents..........10
Locatingpartsonthesystemboard....11
Locatinginternaldrives.........12
Machinetypeandmodellabel.......13
Chapter2.Usingyourcomputer...15
Frequentlyaskedquestions.........15
Usingthekeyboard.............15
UsingWindowsshortcutkeys.......15
UsingtheblueThinkVantagebutton....16
Usingangerprintreader........16
Usingthewheelmouse...........16
Adjustingaudio..............17
Aboutyourcomputeraudio........17
Settingthevolumefromthedesktop....17
SettingthevolumefromControlPanel...17
UsingCDsandDVDs............18
HandlingandstoringCDandDVDmedia..18
PlayingaCDorDVD..........18
RecordingaCDorDVD.........19
Chapter3.Youandyourcomputer..21
Accessibilityandcomfort..........21
Arrangingyourworkspace........21
Comfort...............21
Glareandlighting............22
Aircirculation.............22
Electricaloutletsandcablelengths.....22
RegisteryourcomputerwithLenovo......23
Movingyourcomputertoanothercountryor
region..................23
Voltage-selectionswitch.........23
Replacementpowercords........24
Chapter4.Security..........25
Securityfeatures..............25
Lockingthecomputercover.........26
Attachinganintegratedcablelock.......27
Usingpasswords..............27
BIOSpasswords............27
Windowspasswords..........28
Conguringthengerprintreader.......28
Usingandunderstandingrewalls.......28
Protectingdataagainstviruses........28
Chapter5.Installingorreplacing
hardware...............31
Handlingstatic-sensitivedevices.......31
Installingorreplacinghardware........31
Installingexternaloptions........31
Removingthecomputercover.......32
Removingandreinstallingthefrontbezel..32
Accessingthesystemboardcomponentsand
drives................34
Installingorreplacingamemorymodule...35
InstallingorreplacingaPCIcard......37
Replacingthebattery..........39
Replacingtheharddiskdrive.......40
Installingorreplacingtheopticaldrive...42
Replacingtheheatsinkandfanassembly..46
Replacingthepowersupplyassembly...49
Replacingthemicroprocessor.......53
ReplacingthefrontaudioandUSB
assembly...............56
Replacingthesystemfanassembly....57
Replacingthekeyboard.........59
Replacingthemouse..........59
Completingthepartsreplacement.....60
©CopyrightLenovo2011
i
Page 4

Chapter6.Recoveryinformation...63
Creatingandusingrecoverymedia......63
Creatingrecoverymedia.........63
Usingrecoverymedia..........64
Performingbackupandrecoveryoperations...64
Performingabackupoperation......64
Performingarecoveryoperation......65
UsingtheRescueandRecoveryworkspace...65
Creatingandusingarescuemedium......66
Creatingarescuemedium........66
Usingarescuemedium.........67
Reinstallingpreinstalledapplicationsanddevice
drivers..................67
Reinstallingsoftwareprograms........68
Reinstallingdevicedrivers..........69
Solvingrecoveryproblems..........69
Chapter7.UsingtheSetupUtility
program................71
StartingtheSetupUtilityprogram.......71
Viewingandchangingsettings........71
Usingpasswords..............71
Passwordconsiderations.........72
Power-OnPassword..........72
AdministratorPassword.........72
HardDiskPassword...........72
Setting,changing,anddeletingapassword.72
Erasinglostorforgottenpasswords(clearing
CMOS)................73
Enablingordisablingadevice........73
Selectingastartupdevice..........74
Selectingatemporarystartupdevice....74
Selectingorchangingthestartupdevice
sequence...............74
EnablingErPcompliancemode........74
ExitingtheSetupUtilityprogram.......75
Chapter8.Updatingsystem
programs...............77
Usingsystemprograms...........77
Updating(ashing)theBIOSfromadisc....77
Updating(ashing)theBIOSfromyouroperating
system..................78
RecoveringfromaPOST/BIOSupdatefailure..78
Chapter9.Preventingproblems...81
Keepingyourcomputercurrent........81
Gettingthelatestdevicedriversforyour
computer...............81
Updatingyouroperatingsystem......81
UsingSystemUpdate..........81
Cleaningandmaintenance..........82
Basics................82
Cleaningyourcomputer.........83
Goodmaintenancepractices.......84
Movingyourcomputer...........84
Chapter10.Troubleshootingand
diagnostics..............87
Basictroubleshooting............87
Troubleshootingprocedure..........88
Troubleshooting..............88
Audioproblems............89
CDproblems.............90
DVDproblems.............91
Intermittentproblems..........93
Keyboard,mouse,orpointingdevice
problems...............93
Monitorproblems............95
Networkingproblems..........96
Optionproblems............99
Performanceandlockupproblems.....100
Printerproblems............102
Serialportproblems...........103
Softwareproblems...........103
USBproblems.............104
Diagnosticprograms............104
LenovoThinkVantageT oolbox.......105
PC-DoctorforDOS...........105
Chapter11.Gettinginformation,
help,andservice..........107
Informationresources............107
LenovoThinkVantageT ools........107
LenovoWelcome............107
HelpandSupport............107
SafetyandWarranty...........107
LenovoWebsite(http://www.lenovo.com)..107
LenovoSupportWebsite.........108
Helpandservice..............108
Usingthedocumentationanddiagnostic
programs...............108
Callingforservice............108
Usingotherservices..........109
Purchasingadditionalservices......109
AppendixA.Notices........111
Trademarks................112
AppendixB.Regulatory
information.............113
Exportclassicationnotice..........113
Televisionoutputnotice...........113
iiThinkCentreUserGuide
Page 5

Electronicemissionsnotices.........113
FederalCommunicationsCommission
DeclarationofConformity........113
Additionalregulatoryinformation.......115
AppendixC.WEEEandrecycling
statements.............117
ImportantinformationfortheEuropeanDirective
2002/96/EC................117
Recyclinginformation............117
Index.................119
©CopyrightLenovo2011
iii
Page 6

ivThinkCentreUserGuide
Page 7
Importantsafetyinformation
CAUTION:
Beforeusingthismanual,besuretoreadandunderstandalltherelatedsafetyinformationforthis
product.RefertotheinformationinthissectionandthesafetyinformationintheThinkCentreSafety
andWarrantyGuidethatyoureceivedwiththisproduct.Readingandunderstandingthissafety
informationreducestheriskofpersonalinjuryanddamagetoyourproduct.
IfyounolongerhaveacopyoftheThinkCentreSafetyandWarrantyGuide,youcanobtainaPortable
DocumentFormat(PDF)versionfromtheLenovo
LenovoSupportWebsitealsoprovidestheThinkCentreSafetyandWarrantyGuideandthisThinkCentre
UserGuideinadditionallanguages.
®
SupportWebsiteathttp://www.lenovo.com/support.The
Serviceandupgrades
DonotattempttoserviceaproductyourselfunlessinstructedtodosobytheCustomerSupportCenteror
yourdocumentation.OnlyuseaServiceProviderwhoisapprovedtorepairyourparticularproduct.
Note:Somecomputerpartscanbeupgradedorreplacedbythecustomer.Upgradestypicallyare
referredtoasoptions.ReplacementpartsapprovedforcustomerinstallationarereferredtoasCustomer
ReplaceableUnits,orCRUs.Lenovoprovidesdocumentationwithinstructionswhenitisappropriatefor
customerstoinstalloptionsorreplaceCRUs.Y oumustcloselyfollowallinstructionswheninstallingor
replacingparts.TheOffstateofapowerindicatordoesnotnecessarilymeanthatvoltagelevelsinsidea
productarezero.Beforeyouremovethecoversfromaproductequippedwithapowercord,alwaysmake
surethatthepoweristurnedoffandthattheproductisunpluggedfromanypowersource.Formore
informationonCRUs,refertoChapter5“Installingorreplacinghardware”onpage31
questionsorconcerns,contacttheCustomerSupportCenter.
Althoughtherearenomovingpartsinyourcomputerafterthepowercordhasbeendisconnected,the
followingwarningsarerequiredforyoursafety.
CAUTION:
.Ifyouhaveany
Hazardousmovingparts.Keepngersandotherbodypartsaway.
CAUTION:
BeforereplacinganyCRUs,turnoffthecomputerandwaitthreetoveminutestoletthecomputer
coolbeforeopeningthecover.
Staticelectricityprevention
Staticelectricity,althoughharmlesstoyou,canseriouslydamagecomputercomponentsandoptions.
Improperhandlingofstatic-sensitivepartscancausedamagetothepart.Whenyouunpackanoption
©CopyrightLenovo2011
v
Page 8

orCRU,donotopenthestatic-protectivepackagecontainingthepartuntiltheinstructionsdirectyou
toinstallit.
WhenyouhandleoptionsorCRUs,orperformanyworkinsidethecomputer,takethefollowingprecautions
toavoidstatic-electricitydamage:
•Limityourmovement.Movementcancausestaticelectricitytobuilduparoundyou.
•Alwayshandlecomponentscarefully.Handleadapters,memorymodules,andothercircuitboardsbythe
edges.Nevertouchexposedcircuitry.
•Preventothersfromtouchingcomponents.
•Whenyouinstallastatic-sensitiveoptionorCRU,touchthestatic-protectivepackagecontainingthe
parttoametalexpansion-slotcoverorotherunpaintedmetalsurfaceonthecomputerforatleasttwo
seconds.Thisreducesstaticelectricityinthepackageandyourbody.
•Whenpossible,removethestatic-sensitivepartfromthestatic-protectivepackagingandinstallthepart
withoutsettingitdown.Whenthisisnotpossible,placethestatic-protectivepackagingonasmooth,
levelsurfaceandplacethepartonit.
•Donotplacethepartonthecomputercoverorothermetalsurface.
Powercordsandpoweradapters
Useonlythepowercordsandpoweradapterssuppliedbytheproductmanufacturer.
Thepowercordsshallbesafetyapproved.ForGermany,itshallbeH05VV-F,3G,0.75mm
othercountries,thesuitabletypesshallbeusedaccordingly.
Neverwrapapowercordaroundapoweradapterorotherobject.Doingsocanstressthecordinwaysthat
cancausethecordtofray,crack,orcrimp.Thiscanpresentasafetyhazard.
Alwaysroutepowercordssothattheywillnotbewalkedon,trippedover,orpinchedbyobjects.
Protectpowercordandpoweradaptersfromliquids.Forinstance,donotleaveyourpowercordorpower
adapternearsinks,tubs,toilets,oronoorsthatarecleanedwithliquidcleansers.Liquidscancausea
shortcircuit,particularlyifthepowercordorpoweradapterhasbeenstressedbymisuse.Liquidsalsocan
causegradualcorrosionofpowercordterminalsand/ortheconnectorterminalsonapoweradapter,
whichcaneventuallyresultinoverheating.
Alwaysconnectpowercordsandsignalcablesinthecorrectorderandensurethatallpowercord
connectorsaresecurelyandcompletelypluggedintoreceptacles.
Donotuseanypoweradapterthatshowscorrosionattheacinputpinsorshowssignsofoverheating(such
asdeformedplastic)attheacinputoranywhereonthepoweradapter.
Donotuseanypowercordswheretheelectricalcontactsoneitherendshowsignsofcorrosionor
overheatingorwherethepowercordappearstohavebeendamagedinanyway.
2
,orbetter.For
Extensioncordsandrelateddevices
Ensurethatextensioncords,surgeprotectors,uninterruptiblepowersupplies,andpowerstripsthatyouuse
areratedtohandletheelectricalrequirementsoftheproduct.Neveroverloadthesedevices.Ifpowerstrips
areused,theloadshouldnotexceedthepowerstripinputrating.Consultanelectricianformoreinformation
ifyouhavequestionsaboutpowerloads,powerrequirements,andinputratings.
viThinkCentreUserGuide
Page 9

Plugsandoutlets
Ifareceptacle(poweroutlet)thatyouintendtousewithyourcomputerequipmentappearstobedamaged
orcorroded,donotusetheoutletuntilitisreplacedbyaqualiedelectrician.
Donotbendormodifytheplug.Iftheplugisdamaged,contactthemanufacturertoobtainareplacement.
Donotshareanelectricaloutletwithotherhomeorcommercialappliancesthatdrawlargeamountsof
electricity;otherwise,unstablevoltagemightdamageyourcomputer,data,orattacheddevices.
Someproductsareequippedwithathree-prongedplug.Thisplugtsonlyintoagroundedelectricaloutlet.
Thisisasafetyfeature.Donotdefeatthissafetyfeaturebytryingtoinsertitintoanon-groundedoutlet.If
youcannotinserttheplugintotheoutlet,contactanelectricianforanapprovedoutletadapterortoreplace
theoutletwithonethatenablesthissafetyfeature.Neveroverloadanelectricaloutlet.Theoverallsystem
loadshouldnotexceed80percentofthebranchcircuitrating.Consultanelectricianformoreinformation
ifyouhavequestionsaboutpowerloadsandbranchcircuitratings.
Besurethatthepoweroutletyouareusingisproperlywired,easilyaccessible,andlocatedclosetothe
equipment.Donotfullyextendpowercordsinawaythatwillstressthecords.
Besurethatthepoweroutletprovidesthecorrectvoltageandcurrentfortheproductyouareinstalling.
Carefullyconnectanddisconnecttheequipmentfromtheelectricaloutlet.
Externaldevices
DonotconnectordisconnectanyexternaldevicecablesotherthanUniversalSerialBus(USB)and1394
cableswhilethecomputerpowerison;otherwise,youmightdamageyourcomputer.Toavoidpossible
damagetoattacheddevices,waitatleastvesecondsafterthecomputerisshutdowntodisconnect
externaldevices.
Heatandproductventilation
Computers,poweradapters,andmanyaccessoriescangenerateheatwhenturnedonandwhenbatteries
arecharging.Alwaysfollowthesebasicprecautions:
•Donotleaveyourcomputer,poweradapter,oraccessoriesincontactwithyourlaporanypartofyour
bodyforanextendedperiodwhentheproductsarefunctioningorwhenthebatteryischarging.Your
computer,poweradapter,andmanyaccessoriesproducesomeheatduringnormaloperation.Extended
contactwiththebodycouldcausediscomfortor,potentially,askinburn.
•Donotchargethebatteryoroperateyourcomputer,poweradapter,oraccessoriesnearammable
materialsorinexplosiveenvironments.
•Ventilationslots,fans,andheatsinksareprovidedwiththeproductforsafety,comfort,andreliable
operation.Thesefeaturesmightinadvertentlybecomeblockedbyplacingtheproductonabed,sofa,
carpet,orotherexiblesurface.Neverblock,cover,ordisablethesefeatures.
Inspectyourdesktopcomputerfordustaccumulationatleastonceeverythreemonths.Beforeinspecting
yourcomputer,turnoffthepowerandunplugthecomputer'spowercordfromtheelectricaloutlet;then
removeanydustfromventsandperforationsinthebezel.Ifyounoticeexternaldustaccumulation,then
examineandremovedustfromtheinsideofthecomputerincludingheatsinkinletns,powersupplyvents,
andfans.Alwaysturnoffandunplugthecomputerbeforeopeningthecover.Ifpossible,avoidoperating
yourcomputerwithintwofeetofhigh-trafcareas.Ifyoumustoperateyourcomputerinornearahigh-trafc
area,inspectand,ifnecessary,cleanyourcomputermorefrequently.
©CopyrightLenovo2011
vii
Page 10

Foryoursafetyandtomaintainoptimumcomputerperformance,alwaysfollowthesebasicprecautions
withyourdesktopcomputer:
•Keepthecoverclosedwheneverthecomputerispluggedin.
•Regularlyinspecttheoutsideofthecomputerfordustaccumulation.
•Removedustfromventsandanyperforationsinthebezel.Morefrequentcleaningsmightberequiredfor
computersindustyorhigh-trafcareas.
•Donotrestrictorblockanyventilationopenings.
•Donotstoreoroperateyourcomputerinsidefurniture,asthismightincreasetheriskofoverheating.
•Airowtemperaturesintothecomputershouldnotexceed35°C(95°F).
•Donotinstallairltrationdevices.Theymayinterferewithpropercooling.
Operatingenvironment
Theoptimalenvironmentinwhichtouseyourcomputeris10°C-35°C(50°F-95°F)withhumidityranging
between35%and80%.Ifyourcomputerisstoredortransportedintemperatureslessthan10°C(50°F),
allowthecoldcomputertoriseslowlytoanoptimaloperatingtemperatureof10°C-35°C(50°F-95°F)before
use.Thisprocesscouldtaketwohoursinextremeconditions.Failuretoallowyourcomputertorisetoan
optimaloperatingtemperaturebeforeusecouldresultinirreparabledamagetoyourcomputer.
Ifpossible,placeyourcomputerinawell-ventilatedanddryareawithoutdirectexposuretosunshine.
Keepelectricalappliancessuchasanelectricfan,radio,high-poweredspeakers,airconditioner,and
microwaveovenawayfromyourcomputerbecausethestrongmagneticeldsgeneratedbythese
appliancescandamagethemonitoranddataontheharddiskdrive.
Donotplaceanybeveragesontopoforbesidethecomputerorotherattacheddevices.Ifliquidisspilledon
orinthecomputeroranattacheddevice,ashortcircuitorotherdamagemightoccur.
Donoteatorsmokeoveryourkeyboard.Particlesthatfallintoyourkeyboardcancausedamage.
Modemsafetyinformation
CAUTION:
Toreducetheriskofre,useonlyNo.26AWGorlarger(forexample,No.24AWG)telecommunication
linecordlistedbyUnderwritersLaboratories(UL)orcertiedbytheCanadianStandardsAssociation
(CSA).
Toreducetheriskofre,electricalshock,orinjurywhenusingtelephoneequipment,alwaysfollowbasic
safetyprecautions,suchas:
•Neverinstalltelephonewiringduringalightningstorm.
•Neverinstalltelephonejacksinwetlocationsunlessthejackisspecicallydesignedforwetlocations.
•Nevertouchuninsulatedtelephonewiresorterminalsunlessthetelephonelinehasbeendisconnectedat
thenetworkinterface.
•Usecautionwheninstallingormodifyingtelephonelines.
•Avoidusingatelephone(otherthanacordlesstype)duringanelectricalstorm.Theremaybearemote
riskofelectricshockfromlightning.
•Donotusethetelephonetoreportagasleakinthevicinityoftheleak.
viiiThinkCentreUserGuide
Page 11
Lasercompliancestatement
CAUTION:
Whenlaserproducts(suchasCD-ROMs,DVDdrives,beropticdevices,ortransmitters)are
installed,notethefollowing:
•Donotremovethecovers.Removingthecoversofthelaserproductcouldresultinexposureto
hazardouslaserradiation.Therearenoserviceablepartsinsidethedevice.
•Useofcontrolsoradjustmentsorperformanceofproceduresotherthanthosespeciedherein
mightresultinhazardousradiationexposure.
DANGER
SomelaserproductscontainanembeddedClass3AorClass3Blaserdiode.Notethefollowing.
Laserradiationwhenopen.Donotstareintothebeam,donotviewdirectlywithoptical
instruments,andavoiddirectexposuretothebeam.
Powersupplystatement
Neverremovethecoveronapowersupplyoranypartthathasthefollowinglabelattached.
Hazardousvoltage,current,andenergylevelsarepresentinsideanycomponentthathasthislabelattached.
Therearenoserviceablepartsinsidethesecomponents.Ifyoususpectaproblemwithoneoftheseparts,
contactaservicetechnician.
Cleaningandmaintenance
Keepyourcomputerandworkspaceclean.Shutdownthecomputerandthendisconnectthepower
cordbeforecleaningthecomputer.Donotsprayanyliquiddetergentdirectlyonthecomputeroruse
anydetergentcontainingammablematerialtocleanthecomputer.Spraythedetergentonasoftcloth
andthenwipethecomputersurfaces.
©CopyrightLenovo2011
ix
Page 12

xThinkCentreUserGuide
Page 13

Chapter1.Productoverview
Thischapterprovidesinformationaboutthecomputerfeatures,specications,softwareprogramsprovided
byLenovo,andlocationsofconnectors,components,partsonthesystemboard,andinternaldrives.
Features
Thissectionprovidesinformationaboutthecomputerfeatures.Thefollowinginformationcoversavarietyof
models.Forinformationaboutyourspecicmodel,usetheSetupUtilityprogram.SeeChapter7“Using
theSetupUtilityprogram”onpage71
Microprocessor
Yourcomputercomeswithoneofthefollowingmicroprocessors(internalcachesizevariesbymodeltype):
•Intel
®
Core™i3microprocessor
•IntelCorei5microprocessor
•IntelCorei7microprocessor
•IntelCeleron
•IntelPentium
®
microprocessor
®
microprocessor
Memory
.
Yourcomputersupportsupto2doubledatarate3dualinlinememorymodules(DDR3DIMMs).
Internaldrives
•Opticaldrive:DVD-ROMorDVD-R(availableinsomemodels)
•SerialAdvancedT echnologyAttachment(SATA)harddiskdrive
Videosubsystem
•IntegratedgraphicsforaVideoGraphicsArray(VGA)connectorandaDigitalVideoInterface(DVI)
connector
•PeripheralComponentInterconnect(PCI)Expressx16graphicscardslotonthesystemboardfora
discretegraphicscard
Audiosubsystem
•Integratedhigh-denition(HD)audio
•Audioline-inconnector,audioline-outconnector,andmicrophoneconnectorontherearpanel
•Microphoneconnectorandheadphoneconnectoronthefrontpanel
•Internalspeaker(availableonsomemodels)
Connectivity
•100/1000MbpsintegratedEthernetcontroller
•PCIEx1Faxmodem(somemodels)
Systemmanagementfeatures
•Abilitytostorepower-onself-test(POST)hardwaretestresults
©CopyrightLenovo2011
1
Page 14

•DesktopManagementInterface(DMI)
DesktopManagementInterfaceprovidesacommonpathforuserstoaccessinformationaboutall
aspectsofacomputer,includingprocessortype,installationdate,attachedprintersandotherperipherals,
powersources,andmaintenancehistory.
•ErPcompliancemode
Theenergy-relatedproductsdirective(ErP)compliancemodereducestheconsumptionofelectricity
whenyourcomputerisinstandbyoroffmode.Formoreinformation,see“EnablingErPcompliance
mode”onpage74.
•PrebootExecutionEnvironment(PXE)
ThePrebootExecutionEnvironmentisanenvironmenttostartcomputersusinganetworkinterface
independentofdatastoragedevices(suchastheharddiskdrive)orinstalledoperatingsystems.
•SystemManagement(SM)BasicInput/OutputSystem(BIOS)andSMsoftware
TheSMBIOSspecicationdenesdatastructuresandaccessmethodsinaBIOSthatallowsauseror
applicationtostoreandretrieveinformationspecicaboutthecomputerinquestion.
•WakeonLAN
WakeonLANisanEthernetcomputernetworkingstandardthatallowsacomputertobeturnedon
orwokenupbyanetworkmessage.Themessageisusuallysentbyaprogramrunningonanother
computeronthesamelocalareanetwork.
•WakeonRing
WakeonRing,sometimesreferredtoasWakeonModem,isaspecicationthatallowssupported
computersanddevicestoresumefromsleeporhibernationmode.
•WindowsManagementInstrumentation(WMI)
WindowsManagementInstrumentationisasetofextensionstotheWindowsDriverModel.Itprovidesan
operatingsysteminterfacethroughwhichinstrumentedcomponentsprovideinformationandnotication.
Input/Output(I/O)features
•9-pinserialport(onestandardandoneoptional)
•SixUniversalSerialBus(USB)connectors(twoonthefrontpanelandfourontherearpanel)
•OneEthernetconnector
•OneDVIconnector
•OneVGAmonitorconnector
•OnePersonalSystem/2(PS/2)keyboardconnector
•OnePS/2mouseconnector
•Threeaudioconnectorsontherearpanel(audioline-inconnector,audioline-outconnector,and
microphoneconnector)
•Twoaudioconnectorsonthefrontpanel(microphoneconnectorandheadphoneconnector)
Formoreinformation,see“Locatingconnectors,controls,andindicatorsonthefrontofyourcomputer”on
page7
and“Locatingconnectorsontherearofyourcomputer”onpage8.
Expansion
•Oneharddiskdrivebay
•Oneopticaldrivebay
•TwoPCIExpressx1cardslots
•OnePCIExpressx16graphicscardslot
2ThinkCentreUserGuide
Page 15

Powersupply
Yourcomputercomeswith240-wattautomaticvoltage-sensingpowersupply.
Securityfeatures
•ComputraceAgentsoftwareembeddedinrmware
•Coverpresenceswitch(alsocalledintrusionswitch)(availableinsomemodels)
•Abilitytoenableordisableadevice
•AbilitytoenableanddisableUSBconnectorsindividually
•Keyboardwithngerprintreader(shippedwithsomemodels)
•Power-onpassword(POP),administratorpassword,andharddiskpasswordtodeterunauthorized
useofyourcomputer
•Startupsequencecontrol
•Startupwithoutkeyboardormouse
•Supportforanintegratedcablelock(Kensingtonlock)
•Supportforapadlock
Formoreinformation,seeChapter4“Security”onpage25
.
Preinstalledsoftwareprograms
Yourcomputerispreinstalledwithsoftwareprogramstohelpyouworkmoreeasilyandsecurely.Formore
information,see“Softwareoverview”onpage4.
Preinstalledoperatingsystem
Yourcomputerispreinstalledwithoneofthefollowingoperatingsystems:
•Microsoft
®
Windows
•MicrosoftWindowsVista
Operatingsystem(s),certiedortestedforcompatibility
®
7
®
1
(variesbymodeltype)
•Linux
•MicrosoftWindowsXPProfessionalSP3
1.Theoperatingsystem(s)listedherearebeingcertiedortestedforcompatibilityatthetimethispublicationgoesto
press.AdditionaloperatingsystemsmightbeidentiedbyLenovoascompatiblewithyourcomputerfollowingthe
publicationofthismanual.Thislistissubjecttochange.Todetermineifanoperatingsystemhasbeencertiedor
testedforcompatibility,checktheWebsiteoftheoperatingsystemvendor.
Chapter1.Productoverview3
Page 16

Specications
Thissectionliststhephysicalspecicationsforyourcomputer.
Dimensions
Width:99mm(3.9inches)
Height:335mm(13.19inches)
Depth:382mm(15.04inches)
Weight
Maximumcongurationasshipped:6.86kg(15.12lb)(withoutpackage)
Maximumcongurationasshipped:9.56kg(21.08lb)(withpackage)
Environment
•Airtemperature:
Operating:10°Cto35°C(50°Fto95°F)
Non-operating:-40°Cto60°C(-40°Fto140°F)
Non-operating:-10°Cto60°C(14°Fto140°F)(withoutpackage)
•Humidity:
Operating:20%to80%(non-condensing)
Non-operating:20%to90%(non-condensing)
•Altitude:
Operating:-50to10000ft(-15.2to3048m)
Non-operating:-50to35000ft(-15.2to10668m)
Electricalinput
•Inputvoltage:
–Lowrange:
Minimum:100Vac
Maximum:127Vac
Inputfrequencyrange:50to60Hz
–Highrange:
Minimum:200Vac
Maximum:240Vac
Inputfrequencyrange:50to60Hz
Softwareoverview
Thecomputercomeswithapreinstalledoperatingsystemandseveralsoftwareprogramsprovidedby
Lenovo.
SoftwareprovidedbyLenovo
ThefollowingsoftwareprogramsareprovidedbyLenovotohelpyouimproveproductivityandreducethe
costassociatedwithmaintainingyourcomputer.Softwareprogramsprovidedwithyourcomputermight
varydependingonyourcomputermodeltypeandpreinstalledoperatingsystem.
4ThinkCentreUserGuide
Page 17

LenovoThinkVantageT ools
TheLenovoThinkVantage
accesstovarioustoolstohelpyouworkmoreeasilyandsecurely.
Note:TheLenovoThinkVantageT oolsprogramisonlyavailableoncomputerswiththeWindows7operating
systemfromLenovo.
ToaccesstheLenovoThinkVantageToolsprogram,clickStart➙AllPrograms➙LenovoThinkVantage
Tools.
ThefollowingtableliststheprogramsthatyoucanaccessfromtheLenovoThinkVantageToolsprogram.To
accessaprogram,double-clickthecorrespondingicon.
Table1.ProgramiconnamesinLenovoThinkVantageT ools
CreateRecoveryMedia
FingerprintSoftware(availableonsomemodels)FingerprintReader(availableonsomemodels)
LenovoThinkVantageToolbox
ThinkVantagePasswordManagerPasswordVault
ThinkVantagePowerManager
ThinkVantageRescueandRecovery
ThinkVantageSystemUpdate
ViewManagerViewManager
®
Toolsprogramguidesyoutoahostofinformationsourcesandprovideseasy
ProgramnameIconnameinLenovoThinkVantageTools
FactoryRecoveryDisks
SystemHealthandDiagnostics
PowerControls
®
EnhancedBackupandRestore
UpdateandDrives
LenovoWelcome
TheLenovoWelcomeprogramintroducesyoutosomeinnovativebuilt-infeaturesofLenovoandguidesyou
throughafewimportantsetuptaskstohelpyoumakethemostofyourcomputer.
FingerprintSoftware
Theintegratedngerprintreaderprovidedonsomekeyboardsenablesyoutoenrollyourngerprintand
associateitwithyourpower-onpassword,harddiskpassword,andWindowspassword.Asaresult,
ngerprintauthenticationcanreplacepasswordsandenablesimpleandsecureuseraccess.Angerprint
readerkeyboardisavailablewithselectcomputersorcanbepurchasedforcomputersthatsupportthis
option.
LenovoThinkVantageT oolbox
TheLenovoThinkVantageToolboxprogramhelpsyoumaintainyourcomputer,improvecomputingsecurity,
diagnosecomputerproblems,getfamiliarwiththeinnovativetechnologiesprovidedbyLenovo,andgetmore
informationaboutyourcomputer.See“LenovoThinkVantageToolbox”onpage105fordetailedinformation.
ProductRecovery
TheProductRecoveryprogramenablesyoutorestorethecontentsoftheharddiskdrivetothefactory
defaultsettings.
ThinkVantageClientSecuritySolution
TheThinkVantageClientSecuritySolutionprogramisavailableonselectLenovocomputers.Ithelpsprotect
yourinformation,includingvitalsecurityinformationlikepasswords,encryptionkeys,andelectronic
credentials,whileguardingagainstunauthorizeduseraccesstodata.
Chapter1.Productoverview5
Page 18

Note:TheThinkVantageClientSecuritySolutionprogramisonlyavailableoncomputerswiththeWindows
VistaoperatingsystemfromLenovo.
ThinkVantagePasswordManager
TheThinkVantagePasswordManagerprogramautomaticallycapturesandllsinauthenticationinformation
forWindowsapplicationsandWebsites.
Notes:
•TheThinkVantagePasswordManagerprogramisonlyavailableoncomputerswiththeWindows7
operatingsystemfromLenovo.
•IfthePasswordVaulticonintheLenovoThinkVantageToolsprogramisdimmed,itindicatesthatyou
needtoinstalltheThinkVantagePasswordManagerprogrammanuallybeforeenablingitsfeatures.To
installtheThinkVantagePasswordManagerprogram,dothefollowing:
1.ClickStart➙AllPrograms➙LenovoThinkVantageTools,anddouble-clickPasswordVault.
2.Followtheinstructionsonthescreen.
3.Whentheinstallationprocesscompletes,thePasswordVaulticonisactivated.
ThinkVantagePowerManager
TheThinkVantagePowerManagerprogramprovidesconvenient,exible,andcompletepowermanagement
foryourThinkCentre®computer.ByusingtheThinkVantagePowerManagerprogram,youcanadjustyour
powersettingstoachievethebestbalancebetweensystemperformanceandpowersaving.
ThinkVantageRescueandRecovery
TheThinkVantageRescueandRecoveryprogramisaonebuttonrecoveryandrestoresolutionthatincludes
asetofself-recoverytoolstohelpyoudiagnosecomputerproblems,gethelp,andrecoverfromsystem
crashes,evenifyoucannotstarttheWindowsoperatingsystem.
Note:IftheEnhancedBackupandRestoreiconintheLenovoThinkVantageToolsprogramisdimmed,it
indicatesthatyouneedtoinstalltheThinkVantageRescueandRecoveryprogrammanuallybeforeenabling
itsfeatures.T oinstalltheThinkVantageRescueandRecoveryprogram,dothefollowing:
1.ClickStart➙AllPrograms➙LenovoThinkVantageTools,anddouble-clickEnhancedBackup
andRestore.
2.Followtheinstructionsonthescreen.
3.Whentheinstallationprocesscompletes,theEnhancedBackupandRestoreiconisactivated.
ThinkVantageSystemUpdate
TheThinkVantageSystemUpdateprogramhelpsyoukeepthesoftwareonyourcomputerup-to-dateby
downloadingandinstallingsoftwarepackages(ThinkVantageapplications,devicedrivers,BIOSupdates,
andotherthirdpartyapplications).
ViewManager
TheViewManagerprogramenablesyoutoautomatewindowlocations.Itenhancesproductivityby
providingtheabilitytomovewindowstohotcornersandquicklysnapthemtoapredeterminedsize.
Itenablesyoutoworkacrossmultiplemonitors.
AdobeReader
TheAdobeReaderprogramisatoolusedtoview,print,andsearchPDFdocuments.
6ThinkCentreUserGuide
Page 19
Antivirussoftware
Yourcomputercomeswithantivirussoftwarethatyoucanusetodetectandeliminateviruses.Lenovo
providesafullversionofantivirussoftwareonyourharddiskdrivewithafree30-daysubscription.After30
days,youmustrenewthelicensetocontinuereceivingtheantivirusprogramupdates.
Locations
Thissectionprovidesinformationtohelpyoulocatetheconnectorsonthefrontandrearofyourcomputer,
partsonthesystemboard,andcomponentsandinternaldrivesinyourcomputer.
Locatingconnectors,controls,andindicatorsonthefrontofyour computer
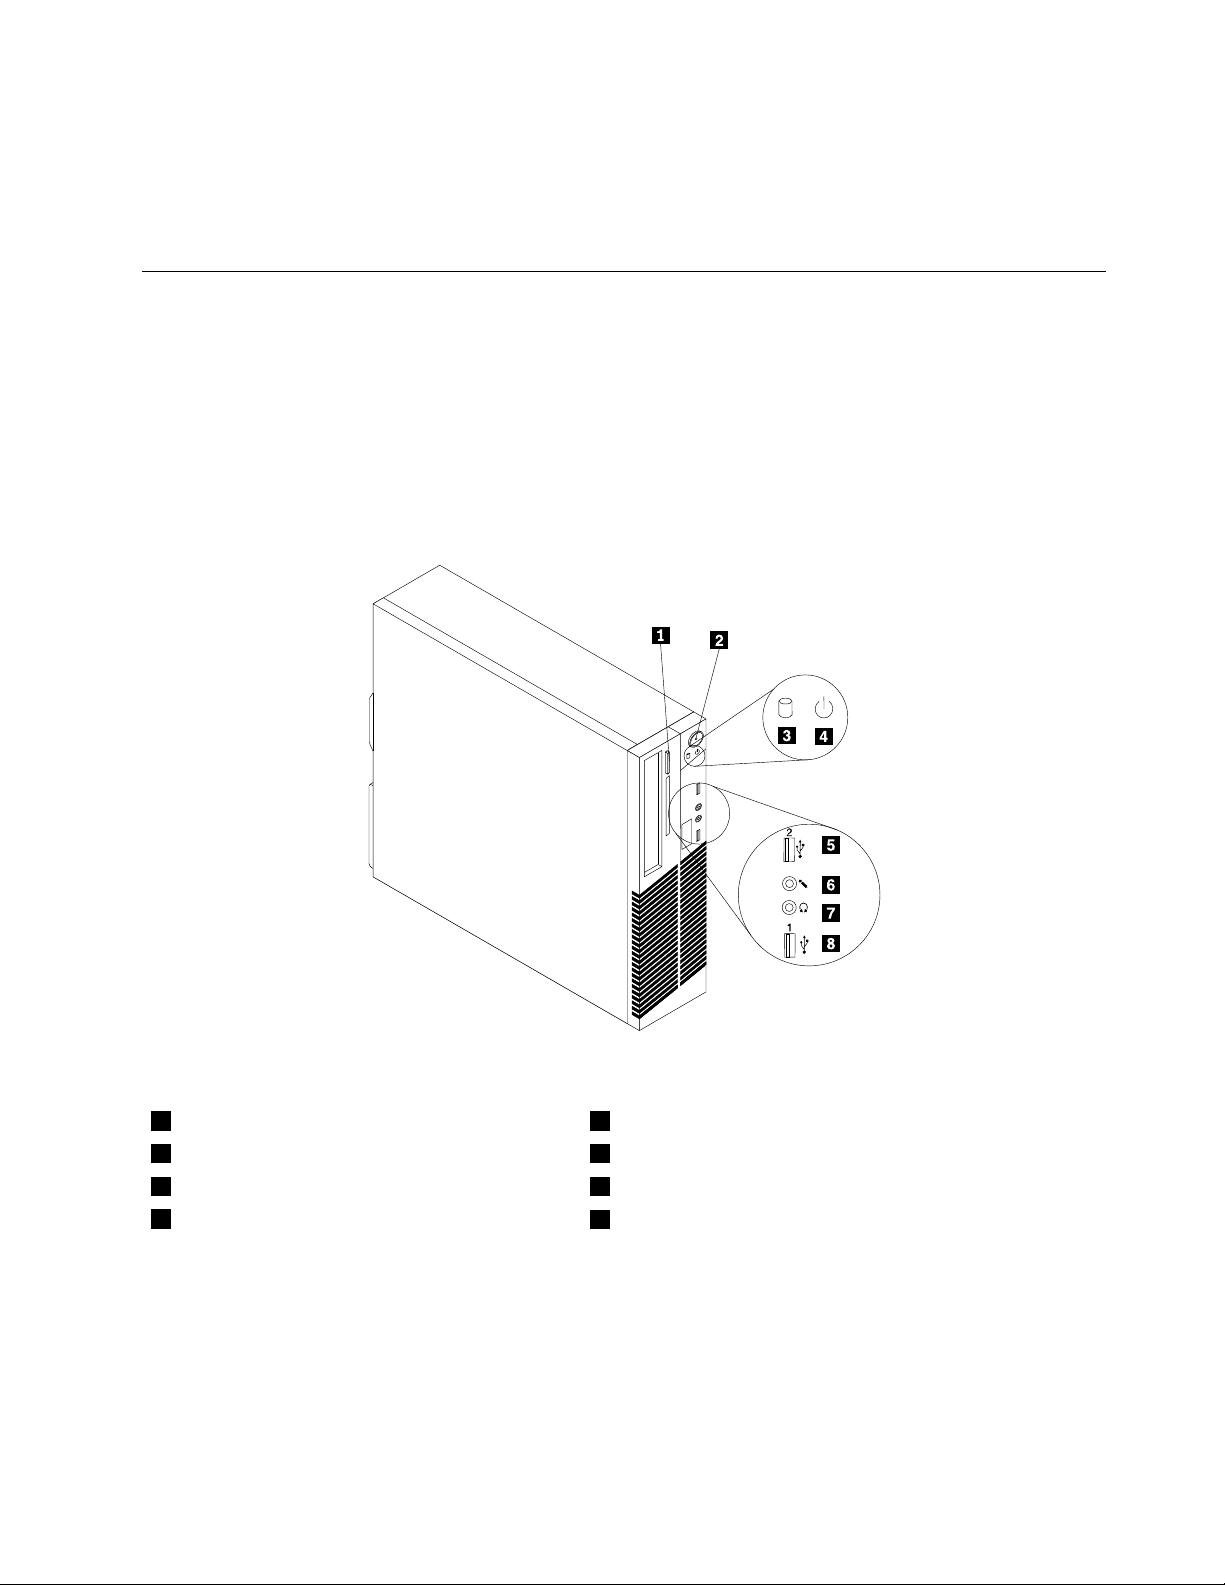
Figure1“Frontconnector,control,andindicatorlocations”onpage7showsthelocationsoftheconnectors,
controls,andindicatorsonthefrontofyourcomputer.
Figure1.Frontconnector,control,andindicatorlocations
1Opticaldriveeject/closebutton5USBconnector(USBport2)
2Powerswitch6Microphoneconnector
3Harddiskdriveactivityindicator7Headphoneconnector
4Powerindicator
8USBconnector(USBport1)
Chapter1.Productoverview7
Page 20
Locatingconnectorsontherearofyourcomputer
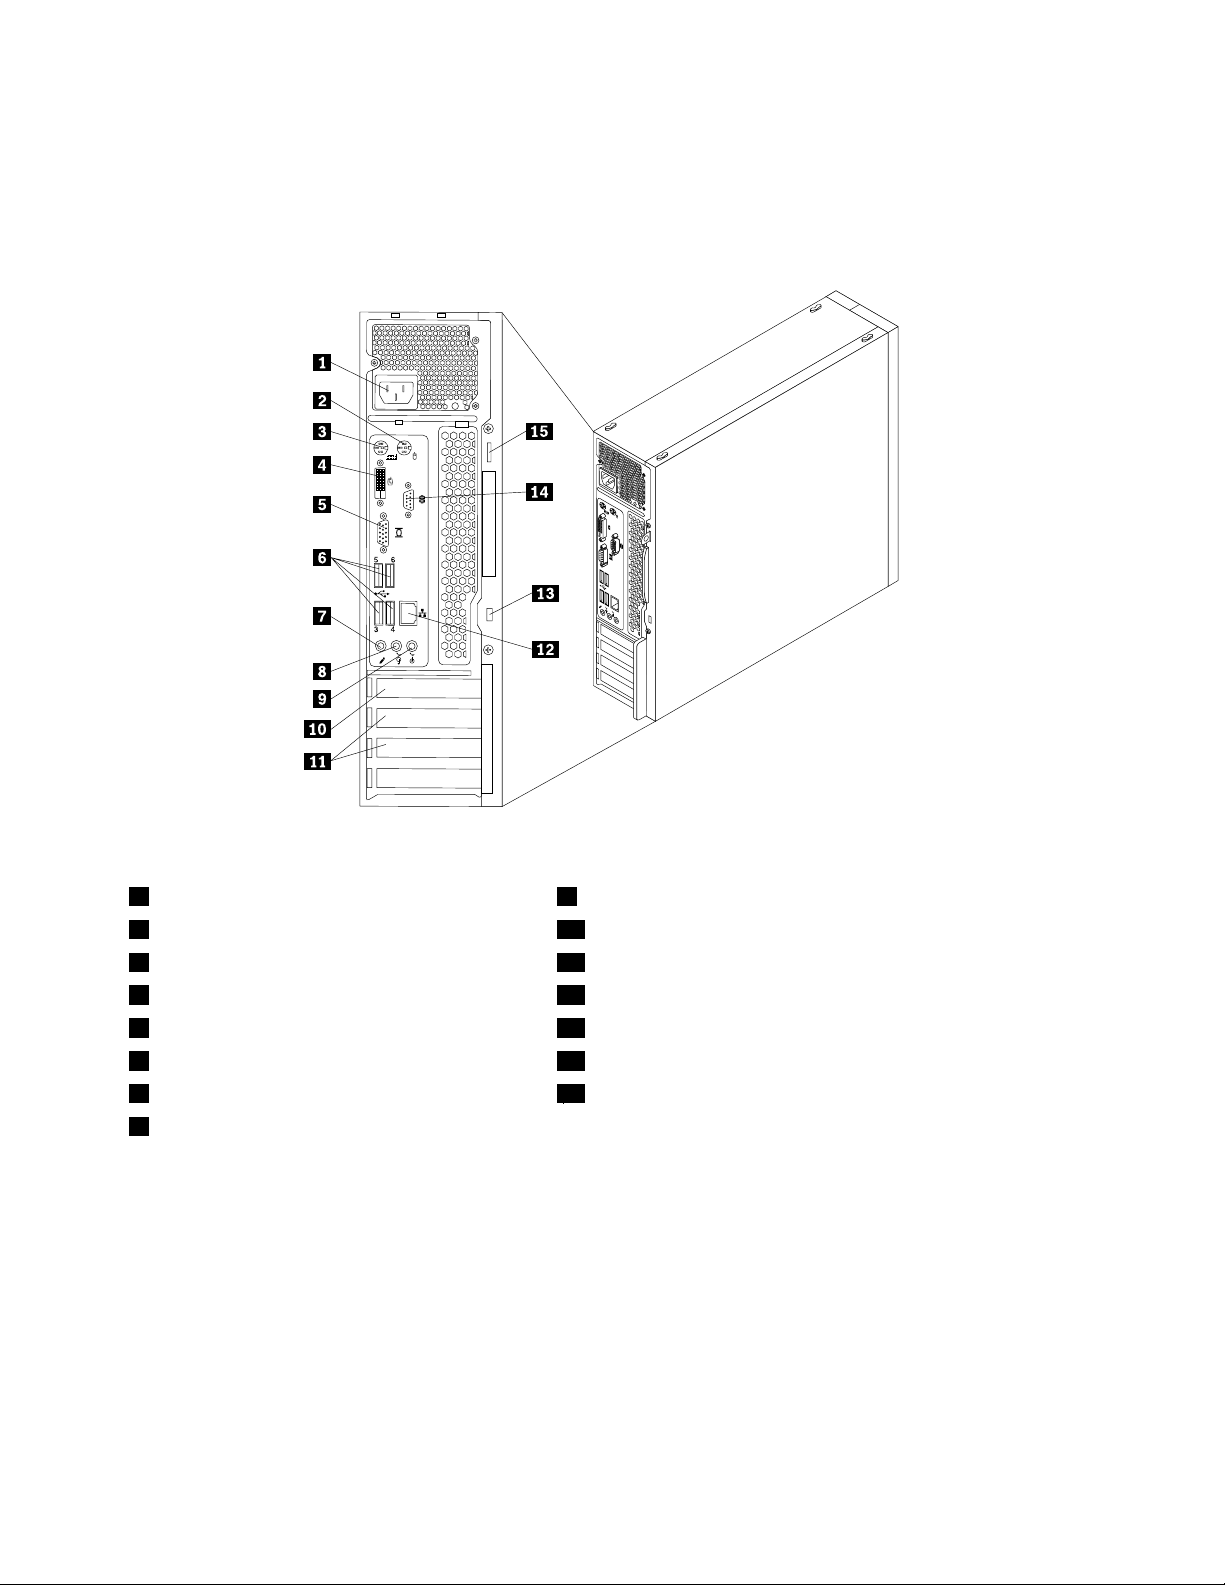
Figure2“Rearconnectorlocations”onpage8showsthelocationsoftheconnectorsontherearofyour
computer.Someconnectorsontherearofyourcomputerarecolor-codedtohelpyoudeterminewhereto
connectthecablesonyourcomputer.
Figure2.Rearconnectorlocations
1Powercordconnector9Audioline-inconnector
2PS/2mouseconnector10PCIExpressx16graphicscardslot
3PS/2keyboardconnector11PCIExpressx1cardslots(2)
4DVImonitorconnector12Ethernetconnector
5VGAmonitorconnector13Integratedcablelock(Kingstonlock)slot
6USBconnectors(USBports3to6)14Serialport
7Microphoneconnector15Padlockloop
8Audioline-outconnector
ConnectorDescription
Audioline-inconnector
Audioline-outconnector
DVImonitorconnectorUsedtoattachaDVImonitororotherdevicesthatuseaDVImonitorconnector.
Usedtoreceiveaudiosignalsfromanexternalaudiodevice,suchasastereo
system.Whenyouattachanexternalaudiodevice,acableisconnectedbetween
theaudioline-outconnectorofthedeviceandtheaudioline-inconnectorofthe
computer.
Usedtosendaudiosignalsfromthecomputertoexternaldevices,suchaspowered
stereospeakers(speakerswithbuilt-inampliers),headphones,multimedia
keyboards,ortheaudioline-inconnectoronastereosystemorotherexternal
recordingdevice.
8ThinkCentreUserGuide
Page 21

ConnectorDescription
Ethernetconnector
UsedtoattachanEthernetcableforalocalareanetwork(LAN).
Note:T ooperatethecomputerwithinFCCClassBlimits,useaCategory5Ethernet
cable.
Microphoneconnector
Usedtoattachamicrophonetoyourcomputerwhenyouwanttorecordsoundorif
youusespeech-recognitionsoftware.
PS/2keyboardconnector
UsedtoattachakeyboardthatusesaPS/2keyboardconnector.
(optional)
PS/2mouseconnector
(optional)
Serialport
Usedtoattachamouse,atrackball,orotherpointingdevicesthatuseaPS/2
mouseconnector.
Usedtoattachanexternalmodem,aserialprinter,orotherdevicesthatusea
9-pinserialport.
USBconnectorUsedtoattachadevicethatrequiresaUSBconnector,suchasaUSBkeyboard,a
USBmouse,aUSBscanner,oraUSBprinter.IfyouhavemorethaneightUSB
devices,youcanpurchaseaUSBhub,whichyoucanusetoconnectadditional
USBdevices.
VGAmonitorconnectorUsedtoattachaVGAmonitororotherdevicesthatuseaVGAmonitorconnector.
Chapter1.Productoverview9
Page 22
Locatingcomponents
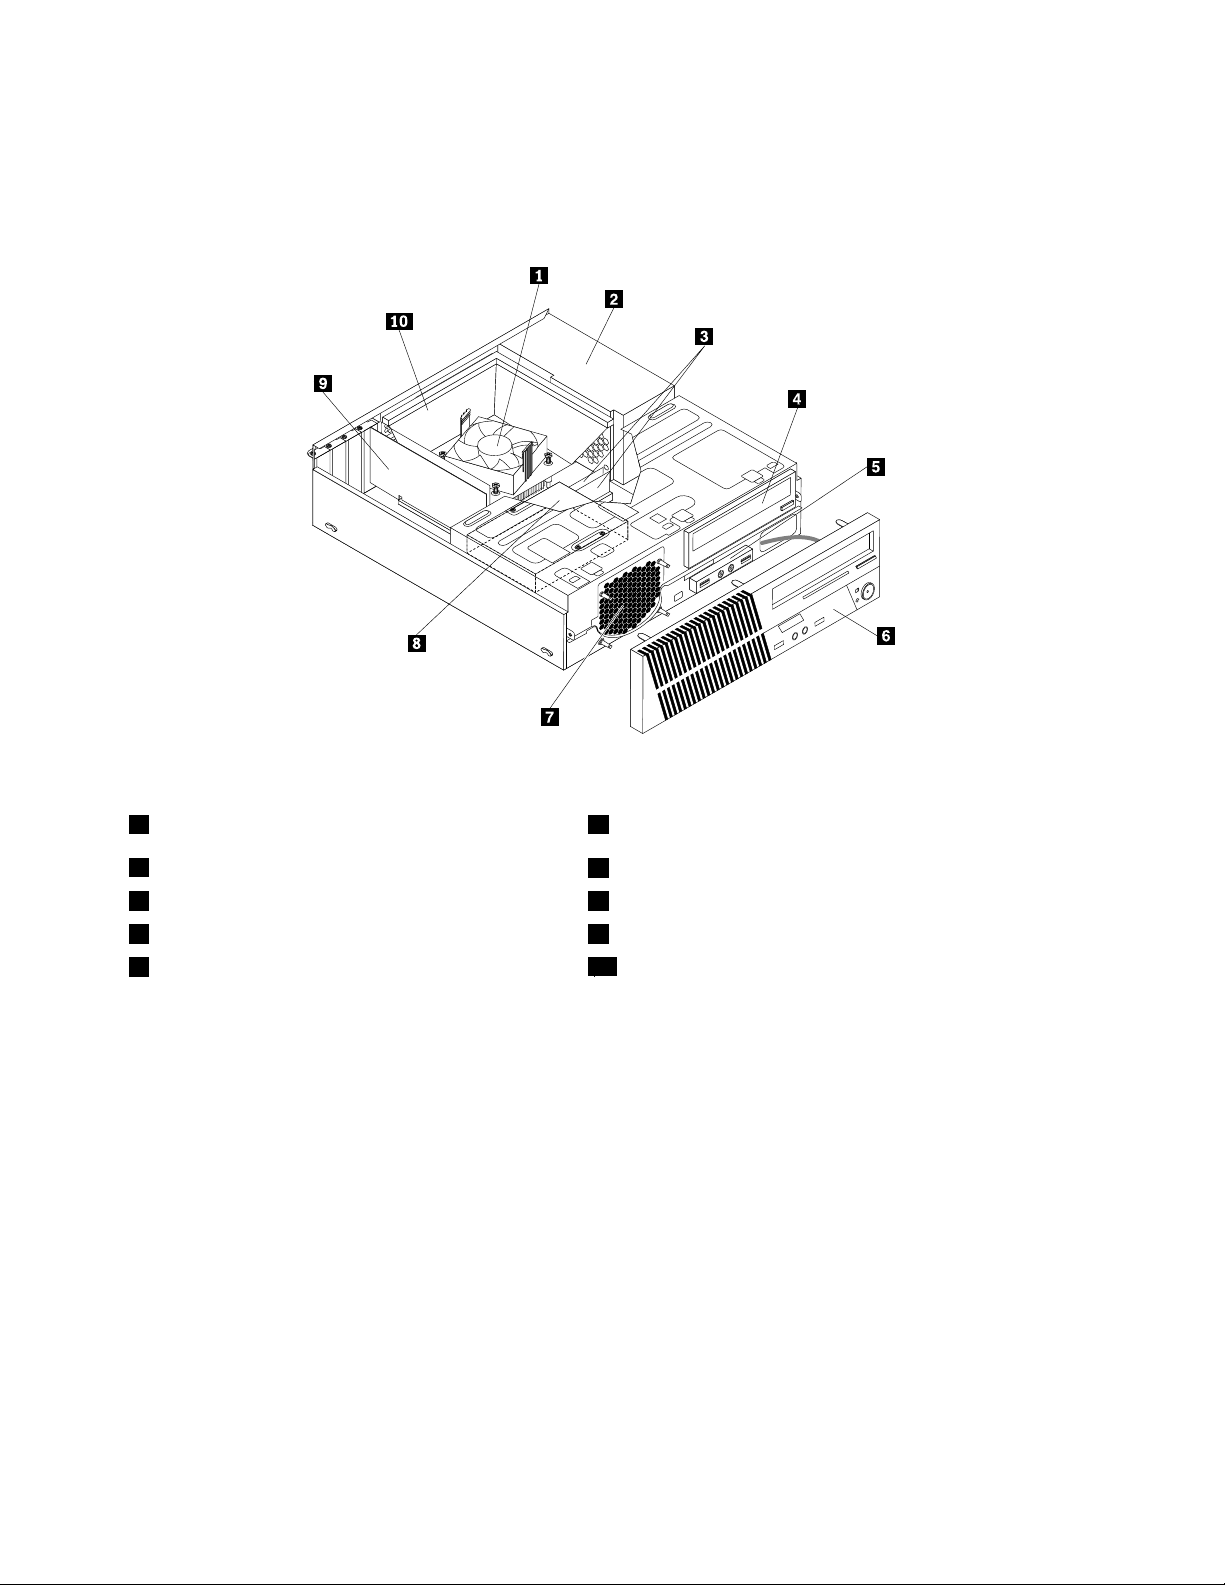
Figure3“Componentlocations”onpage10showsthelocationsofthevariouscomponentsinyour
computer.Toopenthecomputercover,see“Removingthecomputercover”onpage32.
Figure3.Componentlocations
1Heatsinkandfanassembly
2Powersupplyassembly
3Memorymodules8Harddiskdrive
4Opticaldrive9PCIcard(installedinsomemodels)
5FrontaudioandUSBassembly
6Frontbezel
7Frontfan(systemfan)assembly
10Heatsinkfanduct
10ThinkCentreUserGuide
Page 23
Locatingpartsonthesystemboard
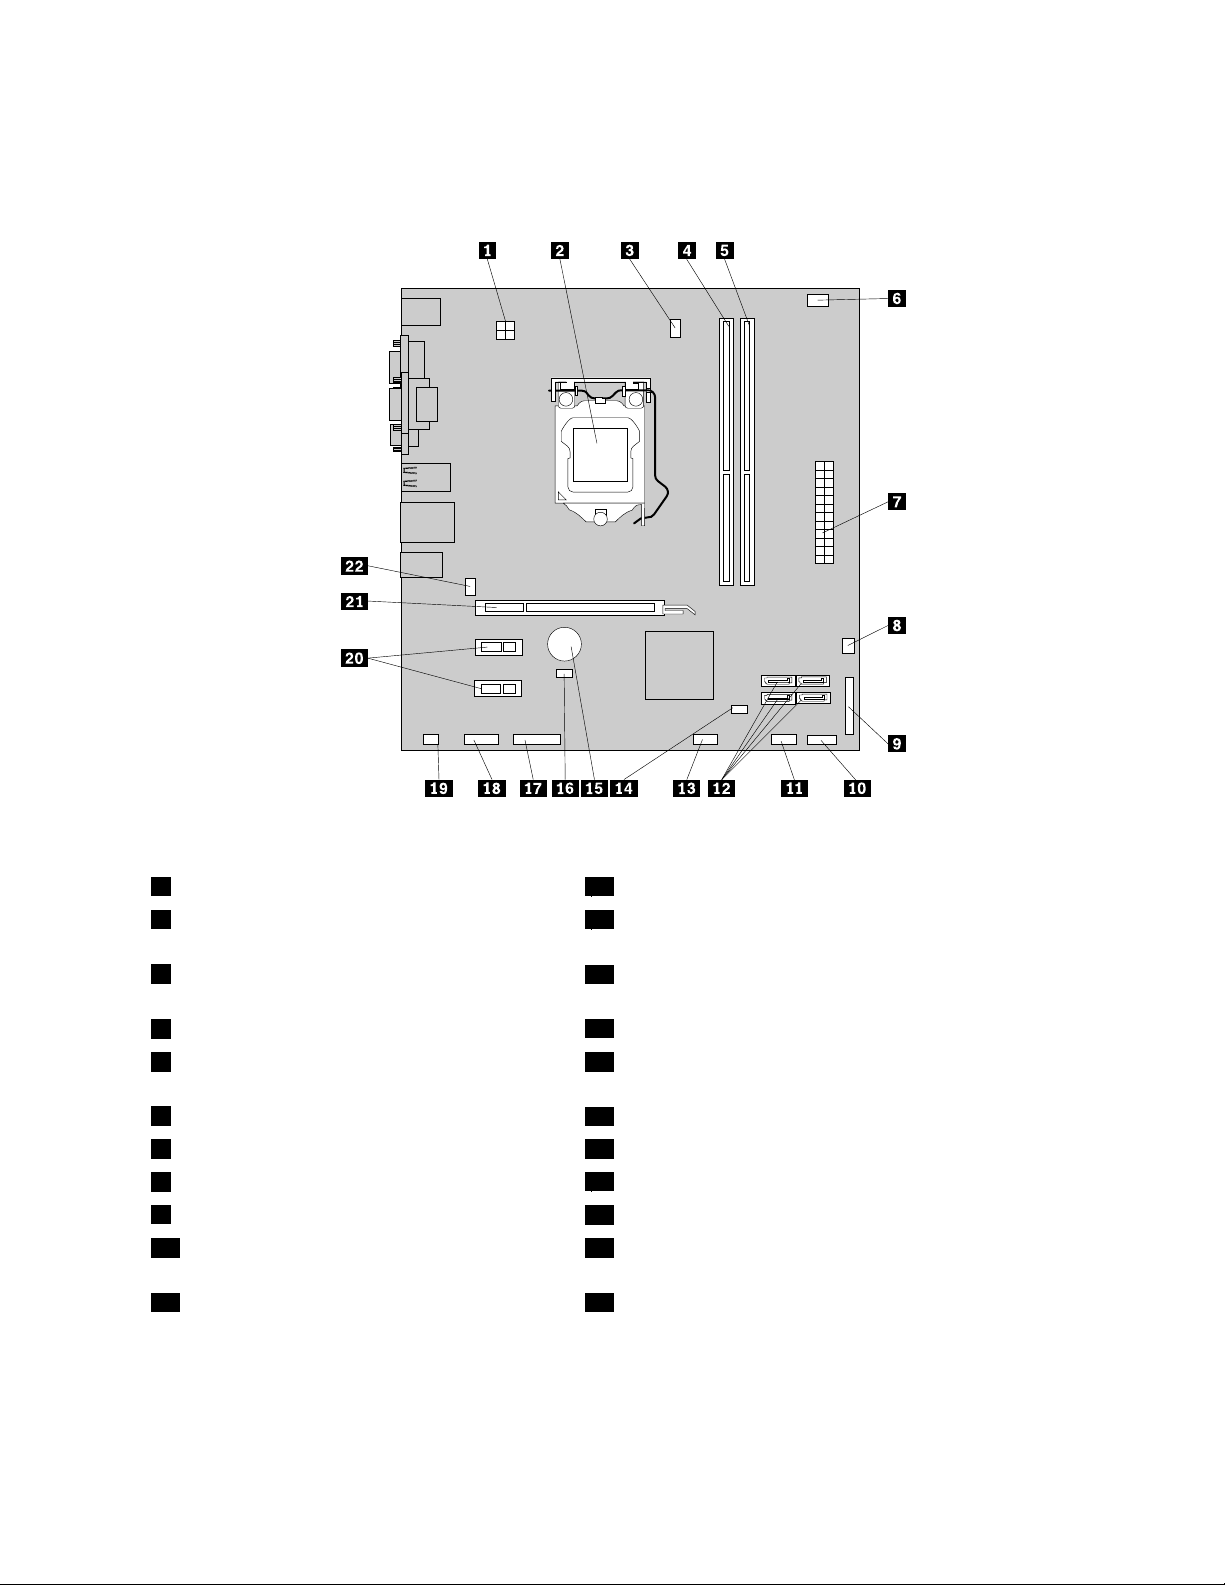
Figure4“Systemboardpartlocations”onpage11showsthelocationsofthepartsonthesystemboard.
Figure4.Systemboardpartlocations
14-pinpowerconnector
2Microprocessor
12SATAconnectors(4)
13FrontUSBconnector2(forconnectingadditionalUSB
devices)
3Microprocessorfanconnector
14ClearCMOS(ComplementaryMetalOxideSemiconductor)
/Recoveryjumper
4Memoryslot1(DIMM1)
5Memoryslot2(DIMM2)16Coverpresenceswitchconnector(Intrusionswitch
15Battery
connector)
6Thermalsensorconnector
724-pinpowerconnector18Frontaudioconnector
8Powerfanconnector
9Parallelconnector
10Frontpanelconnector(forconnectingLED
17Serial(COM2)connector
19Internalspeakerconnector
20PCIExpressx1cardslots(2)
21PCIExpressx16graphicscardslot
indicatorsandpowerswitch)
11FrontUSBconnector1(forconnectingUSB
22Systemfanconnector
ports1and2onthefrontbezel)
Chapter1.Productoverview11
Page 24
Locatinginternaldrives
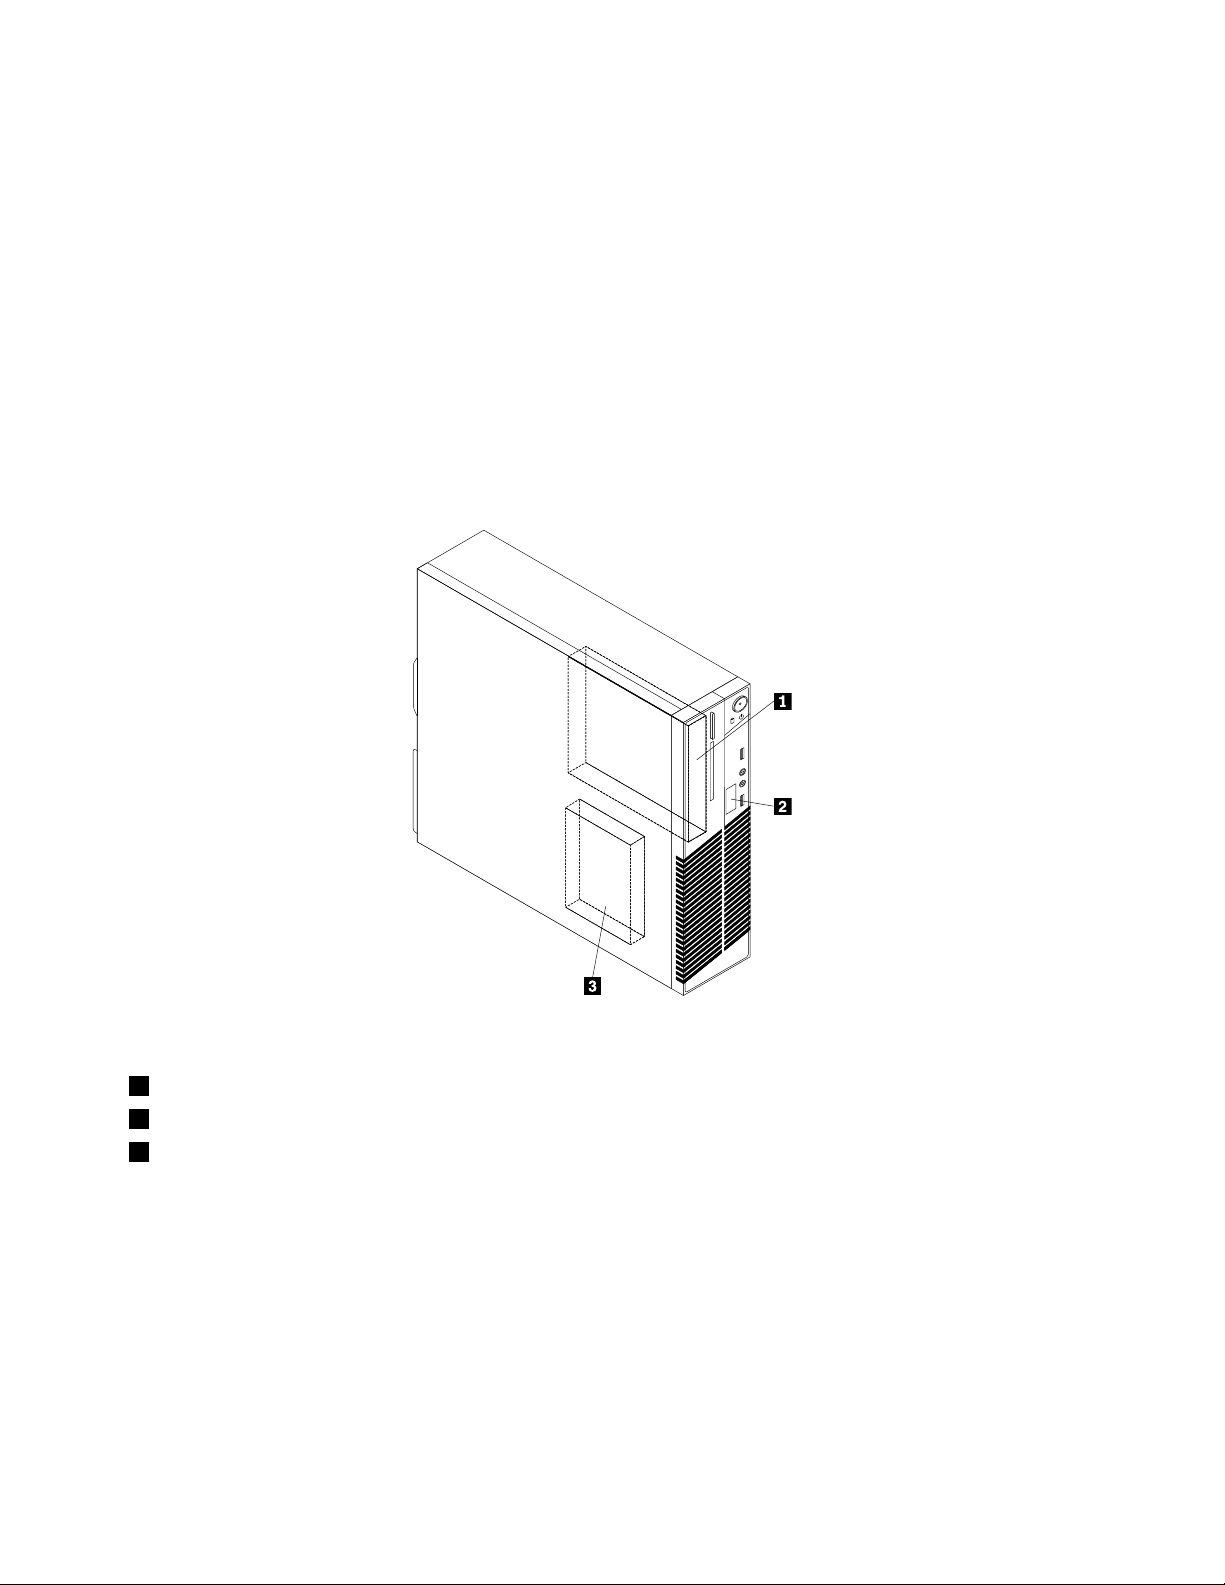
Internaldrivesaredevicesthatyourcomputerusestoreadandstoredata.Youcanadddrivestoyour
computertoincreasestoragecapacityandenableyourcomputertoreadothertypesofmedia.Internal
drivesareinstalledinbays.Inthismanual,thebaysarereferredtoasbay1,bay2,andsoon.Your
computercomeswiththefollowingfactory-installeddrives:
•Anopticaldriveinbay1(installedinsomemodels)
•A3.5-inchharddiskdriveinbay3
Wheninstallingorreplacinganinternaldrive,itisimportanttonotethetypeandsizeofthedrivethatyou
caninstallorreplaceineachbayandcorrectlyconnectthecablestothedriveinstalled.Refertothe
appropriatesectioninChapter5“Installingorreplacinghardware”onpage31
installorreplaceinternaldrivesforyourcomputer.
forinstructionsonhowto
Figure5“Drivebaylocations”onpage12
Figure5.Drivebaylocations
showsthelocationsofthedrivebays.
1Bay1-Opticaldrivebay
2Bay2-Cardreaderdrivebay
2Bay3-SATAharddiskdrivebay(witha3.5-inchharddiskdriveinstalled)
12ThinkCentreUserGuide
Page 25
Machinetypeandmodellabel
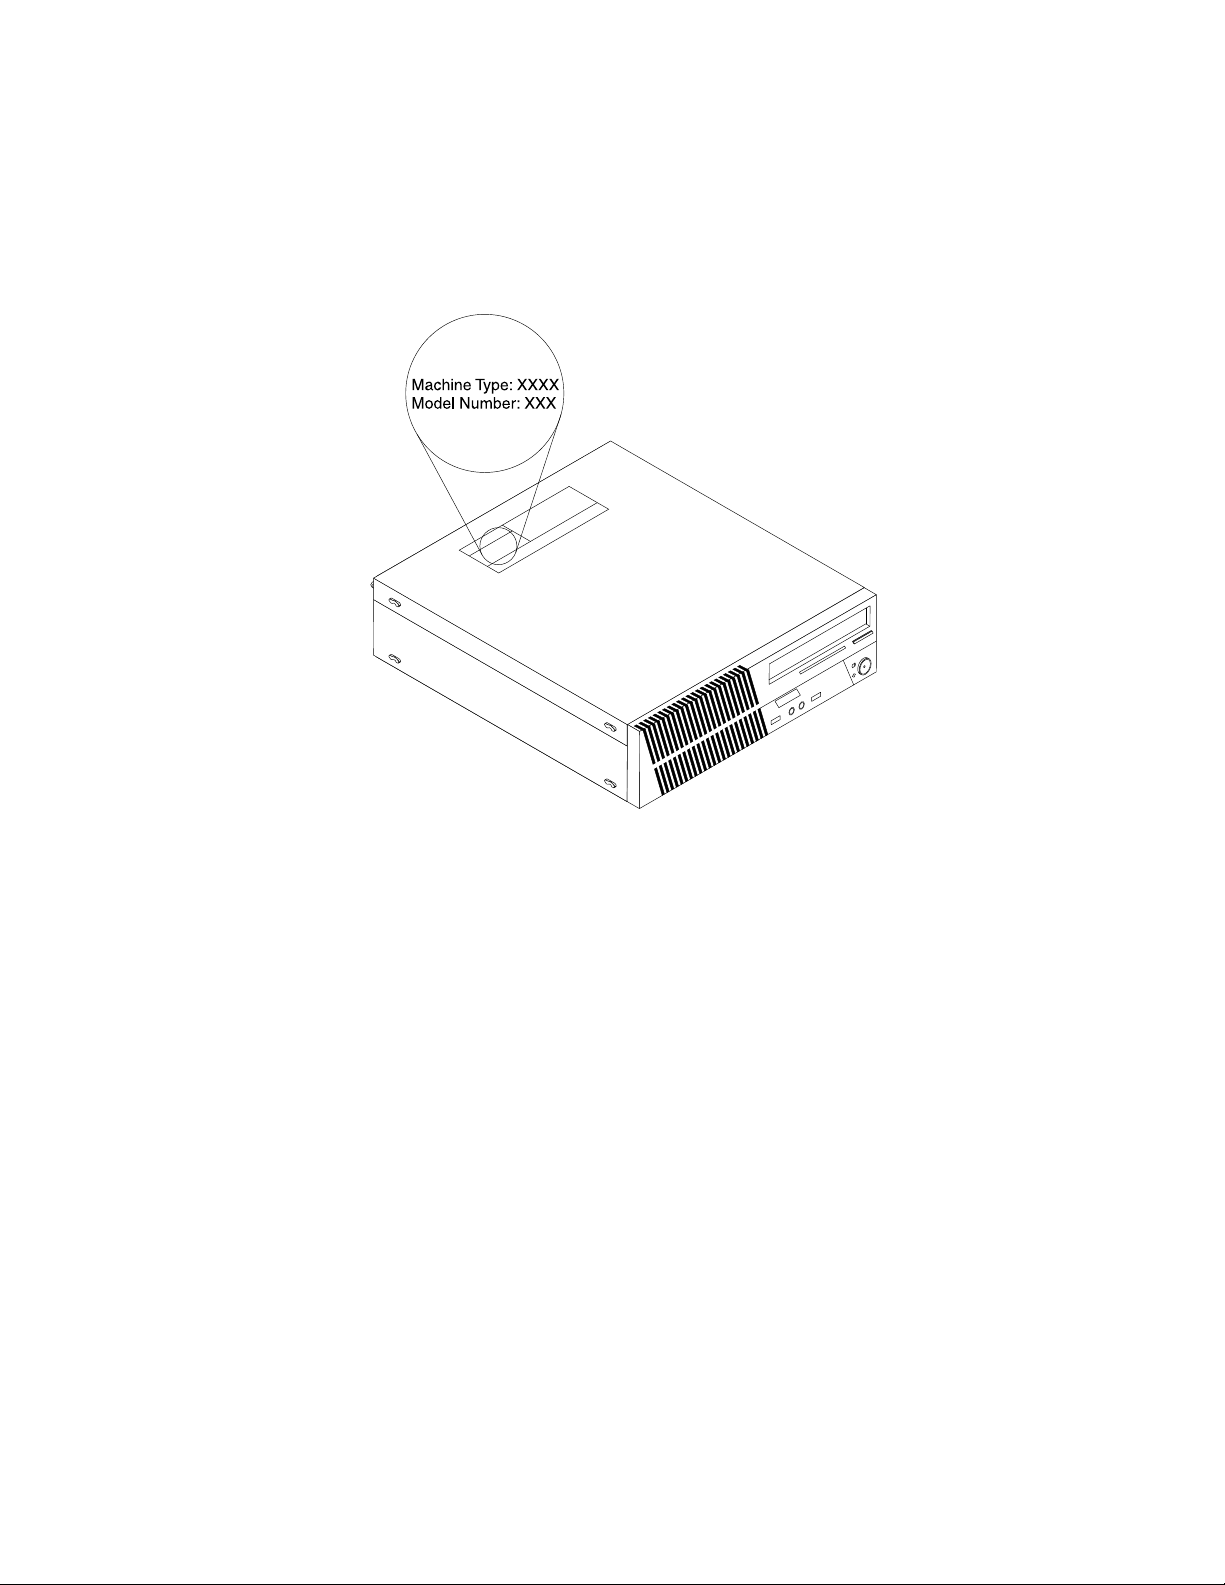
Themachinetypeandmodellabelidentiesyourcomputer.WhenyoucontactLenovoforhelp,themachine
typeandmodelinformationhelpssupporttechnicianstoidentifyyourcomputerandprovidefasterservice.
Thefollowingisasampleofthemachinetypeandmodellabel.
Figure6.Machinetypeandmodellabel
Chapter1.Productoverview13
Page 26

14ThinkCentreUserGuide
Page 27

Chapter2.Usingyourcomputer
Thischapterprovidesinformationonusingsomeofthecomputercomponents.
Frequentlyaskedquestions
Thefollowingareafewtipsthatwillhelpyouoptimizetheuseofyourcomputer.
CanIgetmyuserguideinanotherlanguage?
TheuserguideisavailableinvariouslanguagesontheLenovoSupportWebsiteat:
http://www.lenovo.com/ThinkCentreUserGuides
Wherearemyrecoverydiscs?
Lenovoprovidesaprogramthatenablesyoutocreaterecoverydiscs.Fordetailsaboutcreatingrecovery
discs,see“Creatingrecoverymedia”onpage63.
Additionally,incaseofaharddiskfailure,youcanorderProductRecoverydiscsfromtheLenovoCustomer
SupportCenter.ForinformationaboutcontactingtheCustomerSupportCenter,seeChapter11“Getting
information,help,andservice”onpage107.BeforeusingtheProductRecoverydiscs,refertothe
documentationthatcomeswiththediscs.
Attention:AProductRecoverydiscpackagemightcontainmultiplediscs.Makesureyouhaveallofthe
discsreadybeforestartingtherecoveryprocess.Duringtherecoveryprocess,youmightbeprompted
tochangediscs.
WherecanIndhelpabouttheWindowsoperatingsystem?
TheWindowsHelpandSupportinformationsystemprovidesyoudetailedinformationaboutusingthe
Windowsoperatingsystemtohelpyougetthemostofyourcomputer.ToaccesstheWindowsHelpand
Supportinformationsystem,clickStart➙HelpandSupport.
Usingthekeyboard
Dependingonyourmodel,yourcomputercomeswitheitherastandardkeyboardorangerprintreader
keyboard.TheMicrosoftWindowsshortcutkeysareprovidedonbothkeyboardtypes.
Thissectionprovidesinformationaboutthefollowingtopics:
•“UsingWindowsshortcutkeys”onpage15
•“UsingtheblueThinkVantagebutton”onpage16
•“Usingangerprintreader”onpage16
UsingWindowsshortcutkeys
Boththestandardkeyboardandthengerprintreaderkeyboardprovidethreekeysyoucanusewithyour
MicrosoftWindowsoperatingsystem.
•ThetwoStartmenukeysarelocatedbesidetheAltkeyoneithersideofthespacebar.Theyfeaturethe
Windowslogo.Whenyoupresseither,theWindowsStartmenuopens.ThestyleoftheWindowslogo
variesdependingonthekeyboardtype.
•Thecontext-menukeyislocatednexttotheCtrlkeyontherightsideoftheSpacebar.Pressingthe
context-menukeyopensthecontextmenufortheactiveprogram,icon,orobject.
©CopyrightLenovo2011
15
Page 28
Note:YoucanusethemouseortheUpandDownarrowkeystohighlightmenuselections.Youcanclose
theStartmenuorthecontextmenubyclickingthemouseorpressingEsc.
UsingtheblueThinkVantagebutton
SomekeyboardshaveablueThinkVantagebuttonthatyoucanusetoopenacomprehensiveon-boardhelp
andinformationcenterfromLenovo.IfyouareusingtheWindows7operatingsystem,pressingtheblue
ThinkVantagebuttonopenstheLenovoThinkVantageToolboxprogram.
FormoreinformationabouttheLenovoThinkVantageToolboxprogram,see“LenovoThinkVantageToolbox”
onpage105.
Usingangerprintreader
Somecomputersmightcomewithakeyboardthathasangerprintreader.Formoreinformationaboutthe
ngerprintreader,see“FingerprintSoftware”onpage5.
ToopentheThinkVantageFingerprintSoftwareprogramandusethengerprintreader,dooneofthe
following:
•OntheWindows7operatingsystem,clickStart➙AllPrograms➙LenovoThinkVantageTools➙
FingerprintReader.
•OntheWindowsVistaoperatingsystem,clickStart➙AllPrograms➙ThinkVantage➙ThinkVantage
FingerprintSoftware.
Followtheinstructionsonthescreen.Foradditionalinformation,refertotheThinkVantageFingerprint
Softwarehelpsystem.
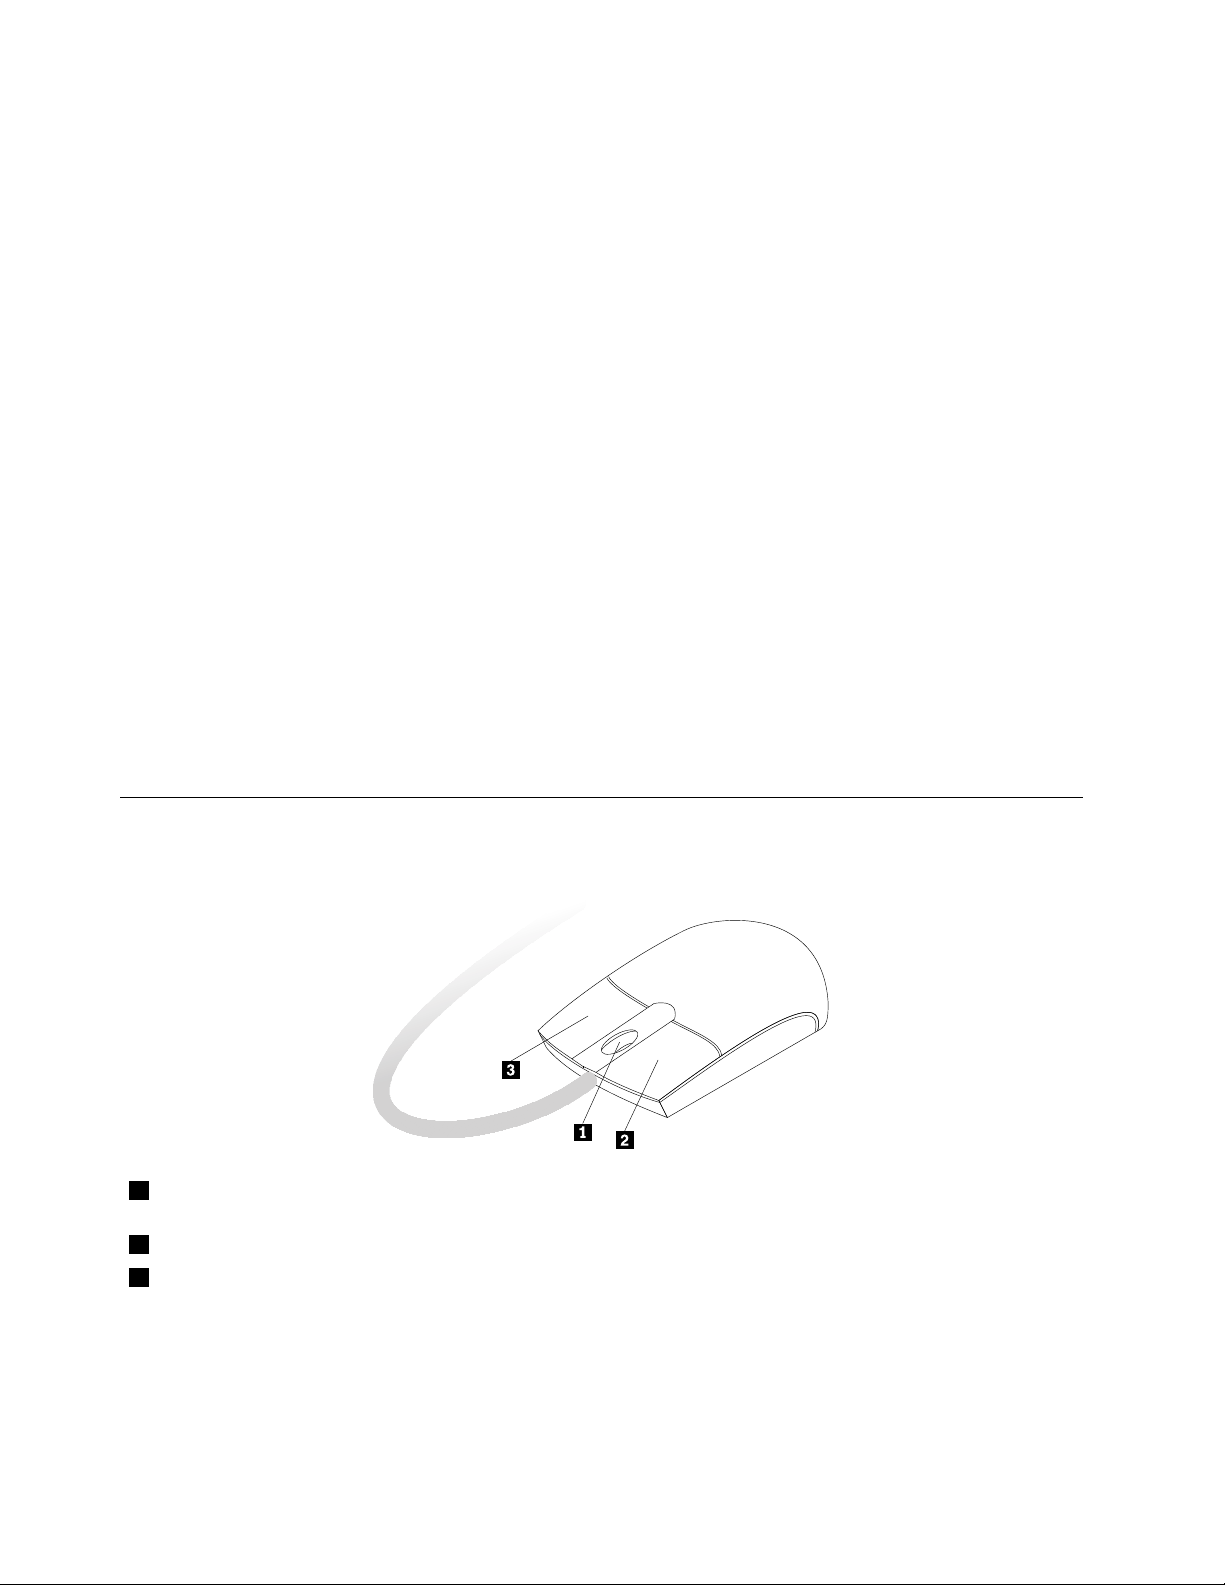
Usingthewheelmouse
Thewheelmousehasthefollowingcontrols:
1Wheel
2PrimarymousebuttonUsethisbuttontoselectorstartaprogramormenuitem.
3Secondarymousebutton
Usethewheeltocontrolthescrollingactionofthemouse.Thedirectioninwhichyou
rotatethewheelcontrolsthedirectionofthescrollingaction.
Usethisbuttontodisplayamenufortheactiveprogram,icon,orobject.
Youcanswitchthefunctionoftheprimaryandsecondarymousebuttonsandchangeotherdefaultbehavior
throughthemousepropertiesfunctionintheWindowsControlPanel.
16ThinkCentreUserGuide
Page 29

Adjustingaudio
Soundisanimportantpartofthecomputerexperience.Y ourcomputerhasadigitalaudiocontrollerbuilt
intothesystemboard.Somemodelsalsohaveahigh-performanceaudioadapterinstalledinoneofthePCI
cardslots.
Aboutyourcomputeraudio
Ifafactory-installed,high-performanceaudioadapterisinstalledinyourcomputer,thesystem-board
audioconnectorsontherearofthecomputeraretypicallydisabled;usetheconnectorsprovidedonthe
audioadapter.
Eachaudiosolutionprovidesatleastthreeaudioconnectors:audioline-inconnector,audioline-out
connector,andMicrophoneconnector.Onsomemodels,afourthconnectorisprovidedfortheattachment
ofunpoweredstereospeakers(speakersthatdonotrequireanacpowersource).Theaudioadapter
providesyouwiththeabilitytorecordandplaybacksoundandmusic,aswellastoenjoysoundwith
multimediaapplicationsandworkwithspeech-recognitionsoftware.
Optionally,youcanconnectasetofpoweredstereospeakerstotheaudioline-outconnectortoenjoy
bettersoundwithmultimediaapplications.
Settingthevolumefromthedesktop
Thedesktopvolumecontrolisaccessiblethroughthevolumeiconinthetaskbar,whichislocatedatthe
bottom-rightcorneroftheWindowsdesktop.Clickthevolumeiconandmovethesliderupordownto
controlthevolume,orclicktheMuteicontoturntheaudiooff.Ifthevolumeiconisnotinthetaskbar,see
“Addingthevolumeicontothetaskbar”onpage17.
Addingthevolumeicontothetaskbar
ToaddthevolumeicontothetaskbarontheWindows7operatingsystem,dothefollowing:
1.FromtheWindowsdesktop,clickStart➙ControlPanel➙AppearanceandPersonalization.
2.IntheTaskbarandStartMenutopic,clickCustomizeiconsonthetaskbar.
3.ClickT urnsystemiconsonoroffandchangethevolumebehaviorsfromOfftoOn.
4.ClickOKtosavethenewsettings.
ToaddthevolumeicontothetaskbarontheWindowsVistaoperatingsystem,dothefollowing:
1.FromtheWindowsdesktop,clickStart➙ControlPanel➙AppearanceandPersonalization.
2.IntheTaskbarandStartMenutopic,clickCustomizeiconsonthetaskbar.
3.OntheNoticationAreatab,selectVolumetoallowtheicontodisplay.
4.ClickApplytosavethenewsettings.
SettingthevolumefromControlPanel
YoucansetthecomputervolumefromControlPanel.TosetthecomputervolumefromControlPanel,
dothefollowing:
1.FromtheWindowsdesktop,clickStart➙ControlPanel➙HardwareandSound.
2.IntheSoundtopic,clickAdjustsystemvolume.
3.Movetheslidersupordowntoraiseorlowerthevolumeofyourcomputer.
Chapter2.Usingyourcomputer17
Page 30

UsingCDsandDVDs
YourcomputermighthaveaDVDROMdriveorrecordableDVDdriveinstalled.DVDdrivesuse
industry-standard,12cm(4.75-inch)CDmediaorDVDmedia.IfyourcomputercomeswithaDVDdrive,
thedrivecanreadDVD-ROMdiscs,DVD-Rdiscs,DVD-RAMdiscs,DVD-RWdiscs,andalltypesofCDs,
suchasCD-ROMdiscs,CD-RWdiscs,CD-Rdiscs,andaudioCDs.IfyouhavearecordableDVDdrive,
itcanalsorecordonDVD-Rdiscs,DVD-RWdiscs,typeIIDVD-RAMdiscs,CD-RWstandardandhigh
speeddiscs,andCD-Rdiscs.
FollowtheseguidelineswhenusingtheDVDdrive:
•Donotplacethecomputerinalocationwherethedriveisexposedtothefollowing:
–Hightemperature
–Highhumidity
–Excessivedust
–Excessivevibrationorsuddenshock
–Aninclinedsurface
–Directsunlight
•DonotinsertanyobjectotherthanaCDorDVDintothedrive.
•Beforemovingthecomputer,removetheCDorDVDfromthedrive.
HandlingandstoringCDandDVDmedia
CDandDVDmediaaredurableandreliable,buttheydorequiresomecareandspecialhandling.When
handlingandstoringaCDorDVD,followtheseguidelines:
•Holdthediscbyitsedges.Donottouchthesurfaceofthesidethatisnotlabeled.
•Toremovedustorngerprints,wipethediscwithaclean,softclothfromthecentertotheoutside.Wiping
thediscinacirculardirectionmightcauselossofdata.
•Donotwriteorstickpaperonthedisc.
•Donotscratchormarkthedisc.
•Donotplaceorstorethediscindirectsunlight.
•Donotusebenzene,thinners,orothercleanerstocleanthedisc.
•Donotdroporbendthedisc.
•Donotinsertdamageddiscsintothedrive.Warped,scratched,ordirtydiscscandamagethedrive.
PlayingaCDorDVD
IfyourcomputercomeswithaDVDdrive,youcanlistentoaudioCDsorwatchDVDmovies.Toplaya
CDorDVD,dothefollowing:
1.PresstheEject/LoadbuttonontheDVDdrivetoopenthetray.
2.Withthetrayfullyextended,inserttheCDorDVDintothetray.SomeDVDdriveshaveasnaphubinthe
centerofthetray.Ifyourdrivehasasnaphub,supportthetraywithonehandandthenpushonthe
centeroftheCDorDVDuntilitsnapsintoplace.
3.PresstheEject/Loadbuttonagainorgentlypushthetrayforwardtoclosethetray.TheCDorDVD
playerprogramstartsautomatically.Foradditionalinformation,refertotheCDorDVDplayerprogram
helpsystem.
ToremoveaCDorDVDfromtheDVDdrive,dothefollowing:
18ThinkCentreUserGuide
Page 31

1.Withthecomputeron,presstheEject/Loadbutton.Whenthetrayslidesoutautomatically,carefully
removethedisc.
2.ClosethetraybypressingtheEject/Loadbuttonorbygentlypushingthetrayforward.
Note:IfthetraydoesnotslideoutofthedrivewhenyoupresstheEject/Loadbutton,insertastraightened
paperclipintotheemergency-ejectholelocatedonthefrontoftheDVDdrive.Besurethedriveispowered
offwhenusingtheemergencyeject.UsetheEject/Loadbuttoninsteadoftheemergencyejectexcept
inanemergency.
RecordingaCDorDVD
IfyourcomputercomeswitharecordableDVDdrive,youcanusethedrivetorecordCDsorDVDs.To
recordaCDorDVD,dothefollowing:
1.ClickStart➙AllPrograms➙CorelDVDMovieFactoryLenovoEdition.
2.Followtheinstructionsonthescreen.
FordetailedinformationaboutusingtheCorelDVDMovieFactoryprogram,seethehelpsystemforthe
program.
YoucanalsouseWindowsMediaPlayertorecordCDsanddataDVDs.Formoreinformation,see“Helpand
Support”onpage107.
Chapter2.Usingyourcomputer19
Page 32

20ThinkCentreUserGuide
Page 33

Chapter3.Youandyourcomputer
Thischapterprovidesinformationaboutaccessibility,comfort,andrelocatingyourcomputertoother
countriesorregions.
Accessibilityandcomfort
Goodergonomicpracticeisimportanttogetthemostfromyourpersonalcomputerandtoavoiddiscomfort.
Arrangeyourworkplaceandtheequipmentyouusetosuityourindividualneedsandthekindofwork
thatyouperform.Inaddition,usehealthyworkhabitstomaximizeyourperformanceandcomfortwhile
usingyourcomputer.
Thefollowingtopicsprovideinformationaboutarrangingyourworkarea,settingupyourcomputer
equipment,andestablishinghealthyworkhabits.
Lenovoiscommittedtoprovidingpeoplewithdisabilitiesgreateraccesstoinformationandtechnology.
Asaresult,thefollowinginformationprovideswaystohelpusersthathavehearing,vision,andmobility
limitationsgetthemostoutoftheircomputerexperience.
Assistivetechnologiesenableuserstoaccessinformationinthemostappropriateway.Someofthese
technologiesarealreadyprovidedinyouroperatingsystem,otherscanbepurchasedthroughvendors,or
accessedthroughtheWorldWideWeb:
http://www.lenovo.com/healthycomputing
Arrangingyourworkspace
Togetthemostfromyourcomputer,arrangeboththeequipmentyouuseandyourworkareatosuityour
needsandthekindofworkyoudo.Yourcomfortisofforemostimportance,butlightsources,aircirculation,
andthelocationofelectricaloutletscanalsoaffectthewayyouarrangeyourworkspace.
Comfort
Althoughnosingleworkingpositionisidealforeveryone,hereareafewguidelinestohelpyounda
positionthatsuitsyoubest.
Sittinginthesamepositionforalongtimecancausefatigue.Thebackrestandseatofyourchairshould
adjustindependentlyandprovidegoodsupport.Theseatshouldhaveacurvedfronttorelievepressureon
thethighs.Adjusttheseatsothatyourthighsareparalleltotheoorandyourfeetareeitheratonthe
oororonafootrest.
Whenusingthekeyboard,keepyourforearmsparalleltotheoorandyourwristsinacomfortableposition.
Usealighttouchonthekeyboardandyourhandsandngersrelaxed.Changetheangleofthekeyboard
formaximumcomfortbyadjustingthepositionofthekeyboardfeet.
©CopyrightLenovo2011
21
Page 34

Adjustthemonitorsothetopofthescreenisat,orslightlybelow,eyelevel.Placethemonitorata
comfortableviewingdistance,usually51to61cm(20to24inches),andpositionitsoyoucanviewit
withouthavingtotwistyourbody.Also,positionotherequipmentyouuseregularly,suchasthetelephoneor
amouse,withineasyreach.
Glareandlighting
Positionthemonitortominimizeglareandreectionsfromoverheadlights,windows,andotherlightsources.
Reectedlightfromshinysurfacescancauseannoyingreectionsonyourmonitorscreen.Placethe
monitoratrightanglestowindowsandotherlightsources,whenpossible.Reduceoverheadlighting,if
necessary,byturningofflightsorusinglowerwattagebulbs.Ifyouinstallthemonitornearawindow,use
curtainsorblindstoblockthesunlight.Y oucanadjustthebrightnessandcontrastcontrolsonthemonitor
astheroomlightingchangesthroughouttheday.
Whereitisimpossibletoavoidreectionsortoadjustthelighting,anantiglarelterplacedoverthescreen
mightbehelpful.However,theseltersmightaffecttheclarityoftheimageonthescreen;trythemonlyafter
youhaveexhaustedothermethodsofreducingglare.
Dustbuildupcompoundsproblemsassociatedwithglare.Remembertocleanyourmonitorscreen
periodicallyusingasoftclothasdirectedinyourmonitordocumentation.
Aircirculation
Yourcomputerandmonitorproduceheat.Thecomputerhasafanthatpullsinfreshairandforcesouthot
air.Themonitorletshotairescapethroughvents.Blockingtheairventscancauseoverheating,whichmight
resultinamalfunctionordamage.Placethecomputerandmonitorsothatnothingblockstheairvents;
usually,51mm(2inches)ofairspaceissufcient.Also,makesuretheventedairisnotblowingonpeople.
Electricaloutletsandcablelengths
Thelocationofelectricaloutlets,thelengthofpowercordsandcablesthatconnecttothemonitor,printer,
andotherdevicesmightdeterminethenalplacementofyourcomputer.
Whenarrangingyourworkspace:
•Avoidtheuseofextensioncords.Whenpossible,plugthecomputerpowercorddirectlyintoanelectrical
outlet.
•Keeppowercordsandcablesneatlyroutedawayfromwalkwaysandotherareaswheretheymight
getkickedaccidentally.
Formoreinformationaboutpowercords,see“Powercordsandpoweradapters”onpagevi
22ThinkCentreUserGuide
.
Page 35

RegisteryourcomputerwithLenovo
Toregisteryourcomputer,gotohttp://www.lenovo.com/register.Then,followtheinstructionsonthescreen
tocompletetheregistration.Thiscanhelpauthoritiesreturnyourcomputertoyouifitislostorstolen.
RegisteringyourcomputeralsoenablesLenovotonotifyyouaboutpossibletechnicalinformationand
upgrades.
Whenyouregisteryourcomputer,informationisenteredintoadatabase,whichenablesLenovotocontact
youincaseofarecallorothersevereproblem.Inaddition,somelocationsofferextendedprivilegesand
servicestoregisteredusers.
Movingyourcomputertoanothercountryorregion
Whenyoumoveyourcomputertoanothercountryorregion,youmusttakelocalelectricalstandardsinto
consideration.Thissectionprovidesinformationonthefollowing:
•“Voltage-selectionswitch”onpage23
•“Replacementpowercords”onpage24
Voltage-selectionswitch
Somecomputersareequippedwithavoltage-selectionswitchlocatednearthepower-cordconnection
pointonthecomputerandsomecomputersdonothaveavoltage-selectionswitch.Beforeyouinstall
yourcomputerorrelocateyourcomputertoanothercountryorregion,youmustbecertainthatyouhave
matchedyourcomputertothevoltageavailableatyourelectricaloutlet.
CAUTION:
Youmustknowthevoltageoftheelectricalconnection(outlet)whereyourcomputerwillbe
connected.Ifyoudonotknowthevoltage,contactyourlocalelectriccompanyorrefertoofcial
Websitesorotherliteraturefortravelerstothecountryorregionwhereyouarelocated.
Ifyourcomputerhasavoltage-selectionswitch,youmustsettheswitchtomatchthevoltageavailableat
yourelectricaloutlet.Settingthevoltage-selectionswitchincorrectlywillcausethecomputertomalfunction
andmightcausepermanentdamagetothecomputer.Donotconnectthecomputertoanelectrical
outletuntilyouhaveveriedthatthevoltage-selectionswitchsettingmatchesthevoltageavailableatthe
electricaloutlets.
Ifyourcomputerdoesnothaveavoltage-selectionswitch,inspectthevoltage-ratinglabelonthebottomof
thecomputerandnotethefollowing:
•Ifthevoltage-ratinglabelshowsarangeofeither“100-127V”or“200-240V,”youmustensurethatthe
voltageprovidedattheelectricaloutletmatchesthevoltageratingonthecomputerlabel.Ifitdoes
notmatch,donotattempttoconnectthecomputertotheelectricaloutlet,unlessanexternaldevice
suchasavoltage-convertingtransformerisused.
•Ifthevoltage-ratinglabelshowsadualrangeof“100-127V”and“200-240V,”thissigniesthatthe
computerissuitableforworldwideoperationandthecomputerwillautomaticallyadjusttothevoltageat
theelectricaloutletregardlessofthecountryorregionwherethecomputerisbeingconnected.
Chapter3.Youandyourcomputer23
Page 36

Replacementpowercords
Ifyourelocateyourcomputertoacountryorregionthatusesanelectricaloutletstyledifferentfromthe
typeyouarecurrentlyusing,youwillhavetopurchaseeitherelectricalplugadaptersornewpowercords.
YoucanorderpowercordsdirectlyfromLenovo.
Forpowercordinformationandpartnumbers,goto:
http://www.lenovo.com/powercordnotice
24ThinkCentreUserGuide
Page 37

Chapter4.Security
Thischapterprovidesinformationabouthowtoprotectyourcomputerfromtheftandunauthorizeduse.
Securityfeatures
Thefollowingsecurityfeaturesareavailableonyourcomputer:
•ComputraceAgentsoftwareembeddedinrmware
TheComputraceAgentsoftwareisanITassetmanagementandcomputertheftrecoverysolution.
Thesoftwaredetectsifchangeshavebeenmadeonthecomputer,suchashardware,software,or
thecomputercall-inlocation.
Note:YoumighthavetopurchaseasubscriptiontoactivatetheComputraceAgentsoftware.
•Coverpresenceswitch(alsocalledintrusionswitch)
Thecoverpresenceswitchpreventsyourcomputerfromloggingintotheoperatingsystemwhenthe
computercoverisnotproperlyinstalledorclosed.Toenablethecoverpresenceswitchconnector
onthesystemboard,tothefollowing:
1.StarttheSetupUtilityprogram.See“StartingtheSetupUtilityprogram”onpage71.
2.SettheAdministratorPassword.See“Setting,changing,anddeletingapassword”onpage72.
3.FromtheSecuritysubmenu,selectChassisIntrusionDetection➙Enabled.Thecoverpresence
switchconnectoronthesystemboardisenabled.
Whenthecoverpresenceswitchdetectsthatyourcomputercoverisnotproperlyinstalledorclosed
whenyouturnonthecomputer,anerrormessagewillbedisplayed.Tobypasstheerrormessageand
logintotheoperatingsystem,dothefollowing:
1.Properlyinstallorcloseyourcomputercover.See“Completingthepartsreplacement”onpage60.
2.PressF1toentertheSetupUtilityprogram.ThenpressF10tosaveandexittheSetupUtility
program.Theerrormessagewillnotbedisplayedagain.
•AbilitytoenableanddisabledevicesandUSBconnectors
Formoreinformation,see“Enablingordisablingadevice”onpage73
•Integratedngerprintreader(availableonsomemodels)
Dependingonthemodelsofyourcomputer,thekeyboardmayhaveanintegratedngerprintreader.
ByenrollingyourngerprintandassociatingitwithaPower-onPassword,aHardDiskPassword,or
bothpasswordsbeforehand,youcanstartthecomputer,logontothesystem,andentertheSetup
Utilityprogrambyswipingyourngeroverthereader,withouttypingapassword.Thusngerprint
authenticationcanreplacepasswordsandenablesimpleandsecureuseraccess.
•Startupsequencecontrol
Formoreinformation,see“Selectingorchangingthestartupdevicesequence”onpage74
•Startupwithoutkeyboardormouse
Yourcomputerisabletologintotheoperatingsystemwithoutkeyboardormouseconnected.
•TrustedPlatformModule(TPM)
TrustedPlatformModuleisasecurecryptoprocessorthatcanstorecryptographickeysthatprotect
informationstoredinyourcomputer.
.
.
©CopyrightLenovo2011
25
Page 38

Lockingthecomputercover
Lockingthecomputercoverhelpspreventunauthorizedpeoplefromgainingaccesstotheinsideofyour
computer.Yourcomputercomeswithapadlockloopsothatthecomputercovercannotberemoved
whenapadlockisinstalled.
Figure7.Installingapadlock
26ThinkCentreUserGuide
Page 39

Attachinganintegratedcablelock
Anintegratedcablelock,sometimesreferredtoastheKensingtonlock,canbeusedtosecureyour
computertoadesk,table,orothernon-permanentxture.Thecablelockattachestotheintegratedcable
lockslotattherearofyourcomputerandisoperatedwithakey.Thecablelockalsolocksthebuttonsused
toopenthecomputercover.Thisisthesametypeoflockusedwithmanynotebookcomputers.Youcan
orderanintegratedcablelockdirectlyfromLenovobysearchingforKensingtonat:
http://www.lenovo.com/support
Figure8.Integratedcablelock
Usingpasswords
YoucansetavarietyofpasswordsthroughtheMicrosoftWindowsoperatingsystemandthroughtheBIOS
ofyourcomputertohelpdeterunauthorizeduseofyourcomputer.
BIOSpasswords
YoucanusetheBIOSSetupUtilityprogramtosetpasswordstopreventunauthorizedaccesstoyour
computeranddata.Thefollowingtypesofpasswordsareavailable:
•Power-OnPassword:WhenaPower-OnPasswordisset,youarepromptedtotypeavalidpassword
eachtimethecomputeristurnedon.Thecomputercannotbeuseduntilthevalidpasswordistyped
in.Formoreinformation,see“Power-OnPassword”onpage72.
•HardDiskPassword:SettingaHardDiskPasswordpreventsunauthorizedaccesstothedataonthehard
diskdrive.WhenaHardDiskPasswordisset,youarepromptedtotypeavalidpasswordeachtimeyou
trytoaccesstheharddiskdrive.Formoreinformation,see“HardDiskPassword”onpage72
Chapter4.Security27
.
Page 40

•AdministratorPassword:SettinganAdministratorPassworddetersunauthorizedusersfromchanging
congurationsettings.Ifyouareresponsibleformaintainingthecongurationsettingsofseveral
computers,youmightwanttosetanAdministratorPassword.Formoreinformation,see“Administrator
Password”onpage72
Youdonothavetosetanypasswordstouseyourcomputer.However,usingpasswordsimproves
computingsecurity.
.
Windowspasswords
DependingonyourversionoftheWindowsoperatingsystem,youcanusepasswordsforavarietyof
features,includingcontrollingloginaccess,accesstosharedresources,networkaccess,andindividualuser
settings.Formoreinformation,see“HelpandSupport”onpage107
.
Conguringthengerprintreader
Ifyourkeyboardhasangerprintreader,youcancongurethengerprintreaderintheSetupUtilityprogram.
TheFingerprintSetupsubmenuundertheSecuritymenuoftheSetupUtilityprogramprovidesthe
followingoptions:
•PrebootAuthentication:enablesordisablesthengerprintauthenticationforaccessingtheBIOS.
•ErasingFingerprintData:clearsthengerprintdatastoredinangerprintreader.
Tocongurethengerprintreader,dothefollowing:
1.StarttheSetupUtilityprogram.See“StartingtheSetupUtilityprogram”onpage71.
2.FromtheSetupUtilityprogrammainmenu,selectSecurity➙FingerprintSetup,andpressEnter.
TheFingerprintSetupwindowopens.
3.SelectPrebootAuthenticationorErasingFingerprintDateasdesired,andpressEnter.
4.SelectthedesiredsettingsandpressEnter.
5.PressF10tosavechangesandexittheSetupUtilityprogram.PressEnterwhenpromptedtoconrm
theexit.
Usingandunderstandingrewalls
Arewallcanbehardware,software,oracombinationofbothdependingonthelevelofsecurityrequired.
Firewallsworkonasetofrulestodeterminewhichinboundandoutboundconnectionsareauthorized.If
yourcomputerispreintalledwitharewallprogram,ithelpsprotectagainstcomputerInternetsecurity
threats,unauthorizedaccess,intrusions,andInternetattacks.Italsoprotectsyourprivacy.Formore
informationabouthowtousetherewallprogram,refertothehelpsystemofyourrewallprogram.
TheWindowsoperatingsystempreinstalledonyourcomputerprovidestheWindowsFirewall.Fordetailson
usingtheWindowsFirewall,referto“HelpandSupport”onpage107.
Protectingdataagainstviruses
Yourcomputerispreinstalledwithanantivirusprogramtohelpyouguardagainst,detect,andeliminate
viruses.
Lenovoprovidesafullversionofantivirussoftwareonyourcomputerwithafree30-daysubscription.After
30days,youmustrenewthelicensetocontinuereceivingtheantivirussoftwareupdates.
Note:Virusdenitionlesmustbekeptup-to-datetoguardagainstnewviruses.
28ThinkCentreUserGuide
Page 41

Formoreinformationabouthowtouseyourantivirussoftware,refertothehelpsystemofyourantivirus
software.
Chapter4.Security29
Page 42

30ThinkCentreUserGuide
Page 43

Chapter5.Installingorreplacinghardware
Thischapterprovidesinstructionsonhowtoinstallorreplacehardwareforyourcomputer.
Handlingstatic-sensitivedevices
Donotopenthestatic-protectivepackagecontainingthenewpartuntilthedefectiveparthasbeenremoved
fromthecomputerandyouarereadytoinstallthenewpart.Staticelectricity,althoughharmlesstoyou,can
seriouslydamagecomputercomponentsandparts.
Whenyouhandlepartsandothercomputercomponents,taketheseprecautionstoavoidstatic-electricity
damage:
•Limityourmovement.Movementcancausestaticelectricitytobuilduparoundyou.
•Alwayshandlepartsandothercomputercomponentscarefully.HandlePCIcards,memorymodules,
systemboards,andmicroprocessorsbytheedges.Nevertouchanyexposedcircuitry.
•Preventothersfromtouchingthepartsandothercomputercomponents.
•Beforeyoureplaceanewpart,touchthestatic-protectivepackagecontainingtheparttoametal
expansion-slotcoverorotherunpaintedmetalsurfaceonthecomputerforatleasttwoseconds.This
reducesstaticelectricityinthepackageandyourbody.
•Whenpossible,removethenewpartfromthestatic-protectivepackaging,andinstallitdirectlyinthe
computerwithoutsettingthepartdown.Whenthisisnotpossible,placethestatic-protectivepackage
thatthepartcameinonasmooth,levelsurfaceandplacethepartonit.
•Donotplacethepartonthecomputercoverorothermetalsurface.
Installingorreplacinghardware
Thissectionprovidesinstructionsonhowtoinstallorreplacehardwareforyourcomputer.Youcanexpand
thecapabilitiesofyourcomputerandmaintainyourcomputerbyinstallingorreplacinghardware.
Attention:Donotopenyourcomputerorattemptanyrepairbeforereadingandunderstandingthe“Important
safetyinformation”onpagev.
Notes:
1.UseonlycomputerpartsprovidedbyLenovo.
2.Wheninstallingorreplacinganoption,usetheappropriateinstructionsinthissectionalongwiththe
instructionsthatcomewiththeoption.
Installingexternaloptions
Youcanconnectexternaloptionstoyourcomputer,suchasexternalspeakers,aprinter,orascanner.For
someexternaloptions,youmustinstalladditionalsoftwareinadditiontomakingthephysicalconnection.
Wheninstallinganexternaloption,see“Locatingconnectors,controls,andindicatorsonthefrontofyour
computer”onpage7and“Locatingconnectorsontherearofyourcomputer”onpage8toidentifythe
requiredconnector.Then,usetheinstructionsthatcomewiththeoptiontohelpyoumaketheconnection
andinstallanysoftwareordevicedriversthatarerequiredfortheoption.
©CopyrightLenovo2011
31
Page 44

Removingthecomputercover
Attention:Donotopenyourcomputerorattemptanyrepairbeforereadingandunderstandingthe“Important
safetyinformation”onpagev.
Thissectionprovidesinstructionsonhowtoopenthecomputercover.
CAUTION:
Turnoffthecomputerandwaitthreetoveminutestoletthecomputercoolbeforeopeningthe
computercover.
Toopenthecomputercover,dothefollowing:
1.Removeanymediafromthedrivesandturnoffallattacheddevicesandthecomputer.
2.Disconnectallpowercordsfromelectricaloutlets.
3.Disconnectthepowercords,Input/Outputcables,andanyothercablesthatareconnectedtothe
computer.See“Locatingconnectors,controls,andindicatorsonthefrontofyourcomputer”onpage7
and“Locatingconnectorsontherearofyourcomputer”onpage8.
4.Removeanylockingdevicethatsecuresthecomputercover,suchasanintegratedcablelockor
apadlock.See“Attachinganintegratedcablelock”onpage27or“Lockingthecomputercover”
onpage26.
5.Removethetwoscrewsthatsecurethecomputercoverandslidethecomputercovertotherearto
removeit.
Figure9.Removingthecomputercover
Removingandreinstallingthefrontbezel
Attention:Donotopenyourcomputerorattemptanyrepairbeforereadingandunderstandingthe“Important
safetyinformation”onpagev
Thissectionprovidesinstructionsonhowtoremoveandreinstallthefrontbezel.
Toremoveandreinstallthefrontbezel,dothefollowing:
1.Removeallmediafromthedrivesandturnoffallattacheddevicesandthecomputer.Then,disconnect
allpowercordsfromelectricaloutletsanddisconnectallcablesthatareconnectedtothecomputer.
32ThinkCentreUserGuide
.
Page 45

2.Removethecomputercover.See“Removingthecomputercover”onpage32.
3.Removethefrontbezelbyreleasingthethreeplastictabsonthetopofthefrontbezelandpivoting
thefrontbezeloutwardtoremoveitfromthecomputer.Carefullylaythefrontbezelasidewithout
disconnectingthepowerswitchandlight-emittingdiode(LED)assemblycable.
Figure10.Removingthefrontbezel
4.T oreinstallthefrontbezel,aligntheotherthreeplastictabsonthebottomofthefrontbezelwiththe
correspondingholesinthechassis,thenpivotthefrontbezelinwarduntilitsnapsintoposition.
Figure11.Reinstallingthefrontbezel
Whattodonext:
•Toworkwithanotherpieceofhardware,gototheappropriatesection.
•Tocompletetheinstallationorreplacement,goto“Completingthepartsreplacement”onpage60
.
Chapter5.Installingorreplacinghardware33
Page 46

Accessingthesystemboardcomponentsanddrives
Attention:Donotopenyourcomputerorattemptanyrepairbeforereadingandunderstandingthe“Important
safetyinformation”onpagev.
Thissectionprovidesinstructionsonhowtoaccessthesystemboardcomponentsanddrives.
Toaccessthesystemboardcomponentsanddrives,dothefollowing:
1.Removeallmediafromthedrivesandturnoffallattacheddevicesandthecomputer.Then,disconnect
allpowercordsfromelectricaloutletsanddisconnectallcablesthatareconnectedtothecomputer.
2.Removethecomputercover.See“Removingthecomputercover”onpage32.
3.Removethefrontbezel.See“Removingandreinstallingthefrontbezel”onpage32.
4.Pivotthedrivebayassemblyupwardtoaccessalltheinternaldrives,cables,andothercomponents.
Figure12.Pivotingthedrivebayassemblyupward
34ThinkCentreUserGuide
Page 47

5.T olowerthedrivebayassembly,pressthedrivebayassemblyclip1inwardandpivotthedrivebay
assemblydownwardasshown.
Figure13.Loweringthedrivebayassembly
Installingorreplacingamemorymodule
Attention:Donotopenyourcomputerorattemptanyrepairbeforereadingandunderstandingthe“Important
safetyinformation”onpagev.
Thissectionprovidesinstructionsonhowtoinstallorreplaceamemorymodule.
YourcomputerhastwoslotsforinstallingorreplacingDDR3DIMMsthatprovideuptoamaximumof8GB
systemmemory.Wheninstallingorreplacingamemorymodule,use1GB,2GB,or4GBDDR3DIMMsin
anycombinationuptoamaximumof8GB.
Toinstallorreplaceamemorymodule,dothefollowing:
1.T urnoffthecomputeranddisconnectallpowercordsfromelectricaloutlets.
2.Removethecomputercover.See“Removingthecomputercover”onpage32.
3.Laythecomputeronitssideforeasieraccesstothesystemboard.
4.Removetheheatsinkfanduct.See“Replacingtheheatsinkandfanassembly”onpage46.
5.Locatethememoryslots.See“Locatingpartsonthesystemboard”onpage11.
6.Removeanypartsthatmightpreventaccesstothememoryslots.
7.Dependingonwhetheryouareinstallingorreplacingamemorymodule,dooneofthefollowing:
Chapter5.Installingorreplacinghardware35
Page 48

•Ifyouarereplacinganoldmemorymodule,opentheretainingclipsandgentlypullthememory
moduleoutofthememoryslot.
Figure14.Removingamemorymodule
•Ifyouareinstallingamemorymodule,opentheretainingclipsofthememoryslotintowhichyou
wanttoinstallthememorymodule.
Figure15.Openingtheretainingclips
36ThinkCentreUserGuide
Page 49

8.Positionthenewmemorymoduleoverthememoryslot.Makesurethatthenotch1onthememory
modulealignscorrectlywiththeslotkey2onthesystemboard.Pushthememorymodulestraight
downintotheslotuntiltheretainingclipsclose.
Figure16.Installingamemorymodule
Whattodonext:
•Toworkwithanotherpieceofhardware,gototheappropriatesection.
•Tocompletetheinstallationorreplacement,goto“Completingthepartsreplacement”onpage60.
InstallingorreplacingaPCIcard
Attention:Donotopenyourcomputerorattemptanyrepairbeforereadingandunderstandingthe“Important
safetyinformation”onpagev.
ThissectionprovidesinstructionsonhowtoinstallorreplaceaPCIcard.Y ourcomputerhastwoPCI
Expressx1cardslotandonePCIExpressx16graphicscardslot.
ToinstallorreplaceaPCIcard,dothefollowing:
1.T urnoffthecomputeranddisconnectallpowercordsfromelectricaloutlets.
2.Removethecomputercover.See“Removingthecomputercover”onpage32.
3.RotatethePCIcardretainertotheopenposition.
4.DependingonwhetheryouareinstallingorreplacingaPCIcard,dooneofthefollowing:
•IfyouarereplacinganoldPCIcard,removethescrewthatsecurestheoldPCIcardandreleasethe
oldPCIcardfromthePCIcardslot.
Chapter5.Installingorreplacinghardware37
Page 50

Figure17.RemovingaPCIcard
Notes:
a.Thecardtstightlyintothecardslot.Ifnecessary,alternatemovingeachsideofthecardasmall
amountuntilitisremovedfromthecardslot.
b.Ifthecardisheldinplacebyaretaininglatch,pressthecardretaininglatch1asshownto
disengagethelatch.Graspthecardandgentlypullitoutoftheslot.
•IfyouareinstallingaPCIcard,removethescrewthatsecurestheappropriatemetalslotcover.
Then,removethemetalslotcover.
5.RemovethenewPCIcardfromitsstatic-protectivepackage.
38ThinkCentreUserGuide
Page 51

6.InstallthenewPCIcardintotheappropriatePCIcardslotonthesystemboard.Then,installthescrew
tosecurethenewPCIcardinplace.
Figure18.InstallingaPCIcard
7.Ifnecessary,connectanycablesbetweenthePCIcardandthesystemboard.See“Locatingpartson
thesystemboard”onpage11
toidentifythevariousconnectorsonthesystemboard.
Whattodonext:
•Toworkwithanotherpieceofhardware,gototheappropriatesection.
•Tocompletetheinstallationorreplacement,goto“Completingthepartsreplacement”onpage60.
Replacingthebattery
Attention:Donotopenyourcomputerorattemptanyrepairbeforereadingandunderstandingthe“Important
safetyinformation”onpagev
Yourcomputerhasaspecialtypeofmemorythatmaintainsthedate,time,andsettingsforbuilt-infeatures,
suchasparallel-portassignments(conguration).Abatterykeepsthisinformationactivewhenyouturn
offthecomputer.
Thebatterynormallyrequiresnochargingormaintenancethroughoutitslife;however,nobatterylasts
forever.Ifthebatteryfails,thedate,time,andcongurationinformation(includingpasswords)arelost.An
errormessageisdisplayedwhenyouturnonthecomputer.
Refertothe“Lithiumbatterynotice”intheThinkCentreSafetyandWarrantyGuideforinformationabout
replacinganddisposingofthebattery.
.
Toreplacethebattery,dothefollowing:
1.T urnoffthecomputeranddisconnectallpowercordsfromelectricaloutlets.
2.Removethecomputercover.See“Removingthecomputercover”onpage32.
Chapter5.Installingorreplacinghardware39
Page 52

3.Locatethebattery.See“Locatingpartsonthesystemboard”onpage11.
4.Removetheoldbattery.
Figure19.Removingtheoldbattery
5.Installanewbattery.
Figure20.Installinganewbattery
6.Reinstallthecomputercoverandconnectthecables.See“Completingthepartsreplacement”on
page60.
Note:Whenthecomputeristurnedonforthersttimeafterreplacingthebattery,anerrormessage
mightbedisplayed.Thisisnormalafterreplacingthebattery.
7.T urnonthecomputerandallattacheddevices.
8.UsetheSetupUtilityprogramtosetthedate,time,andanypasswords.SeeChapter7“UsingtheSetup
Utilityprogram”onpage71
.
Whattodonext:
•Toworkwithanotherpieceofhardware,gototheappropriatesection.
•Tocompletetheinstallationorreplacement,goto“Completingthepartsreplacement”onpage60.
Replacingtheharddiskdrive
Attention:Donotopenyourcomputerorattemptanyrepairbeforereadingandunderstandingthe“Important
safetyinformation”onpagev
Thissectionprovidesinstructionsonhowtoreplacetheharddiskdrive.
Toreplacetheharddiskdrive,dothefollowing:
1.T urnoffthecomputeranddisconnectallpowercordsfromelectricaloutlets.
2.Removethecomputercover.See“Removingthecomputercover”onpage32.
3.Removethefrontbezel.See“Removingandreinstallingthefrontbezel”onpage32.
.
40ThinkCentreUserGuide
Page 53

4.Notethelocationofthefourscrews1thatsecuretheharddiskdrive.Then,pivotthedrivebay
assemblyupward.
Figure21.Pivotingthedrivebayassembly
5.Holdtheharddiskdriveandremovethefourscrewsthatsecuretheharddiskdrive.Then,remove
theharddiskdrivefromthedrivebayassembly.
Figure22.Removingtheharddiskdrive
6.Disconnectthesignalcableandthepowercablefromtheharddiskdrivetocompletelyremovethehard
diskdrivefromthechassis.
Chapter5.Installingorreplacinghardware41
Page 54

7.Connectoneendofthesignalcabletotherearofthenewharddiskdriveandtheotherendtoan
availableSATAconnectoronthesystemboard.See“Locatingpartsonthesystemboard”onpage11.
Then,locateanavailableve-wirepowerconnectorandconnectittotherearofthenewharddiskdrive.
Figure23.ConnectingaSATAharddiskdrive
8.Positionthenewharddiskdriveintotheharddiskdrivebayandalignthescrewholesinthenewhard
diskdrivewiththecorrespondingholesinthedrivebay.Then,installthefourscrewstosecurethe
newharddiskdriveinplace.
Figure24.Installingtheharddiskdrive
Whattodonext:
•Toworkwithanotherpieceofhardware,gototheappropriatesection.
•Tocompletetheinstallationorreplacement,goto“Completingthepartsreplacement”onpage60.
Installingorreplacingtheopticaldrive
Attention:Donotopenyourcomputerorattemptanyrepairbeforereadingandunderstandingthe“Important
safetyinformation”onpagev
Thissectionprovidesinstructionsonhowtoinstallorreplacetheopticaldrive.
42ThinkCentreUserGuide
.
Page 55

Note:Theopticaldriveisonlyavailableinsomemodels.
Toreplacetheopticaldrive,dothefollowing:
1.T urnoffthecomputeranddisconnectallpowercordsfromelectricaloutlets.
2.Removethecomputercover.See“Removingthecomputercover”onpage32.
3.Removethefrontbezel.See“Removingandreinstallingthefrontbezel”onpage32.
4.Pivotthedrivebayassemblyupward.See“Accessingthesystemboardcomponentsanddrives”
onpage34.
5.Disconnectthesignalcableandthepowercablefromtheopticaldrive.
6.Holdtheopticaldriveandremovethetwoscrewsthatsecuretheopticaldrive.
Figure25.Removingtheopticaldrivescrews
Chapter5.Installingorreplacinghardware43
Page 56

7.Pressthedrivebayassemblyclip1inwardandpivotthedrivebayassemblydownwardasshown.
Figure26.Loweringthedrivebayassembly
8.Slidetheopticaldriveoutofthefrontofthecomputer.
Figure27.Removingtheopticaldrive
44ThinkCentreUserGuide
Page 57

9.Slidethenewopticaldriveintotheopticaldrivebayfromthefrontofthecomputer.
Figure28.Installinganewopticaldrive
10.Holdthenewopticaldriveandpivotthedrivebayassemblyupward.Alignthescrewholesinthenew
opticaldrivewiththecorrespondingholesinthedrivebay.Then,installthetwoscrewstosecure
thenewopticaldriveinplace.
Figure29.Installingtheopticaldrive
Chapter5.Installingorreplacinghardware45
Page 58

11.Connectoneendofthesignalcabletotherearofthenewopticaldriveandtheotherendtoanavailable
SATAconnectoronthesystemboard.See“Locatingpartsonthesystemboard”onpage11.Then,
locateanavailableve-wirepowerconnectorandconnectittotherearofthenewopticaldrive.
Figure30.ConnectingaSATAopticaldrive
Whattodonext:
•Toworkwithanotherpieceofhardware,gototheappropriatesection.
•Tocompletetheinstallationorreplacement,goto“Completingthepartsreplacement”onpage60.
Replacingtheheatsinkandfanassembly
Attention:Donotopenyourcomputerorattemptanyrepairbeforereadingandunderstandingthe“Important
safetyinformation”onpagev
.
Thissectionprovidesinstructionsonhowtoreplacetheheatsinkandfanassembly.
CAUTION:
Theheatsinkandfanassemblymightbeveryhot.T urnoffthecomputerandwaitthreetove
minutestoletthecomputercoolbeforeremovingthecomputercover.
Toreplacetheheatsinkandfanassembly,dothefollowing:
1.Removeallmediafromthedrivesandturnoffallattacheddevicesandthecomputer.Then,disconnect
allpowercordsfromelectricaloutletsanddisconnectallcablesthatareconnectedtothecomputer.
2.Removethecomputercover.See“Removingthecomputercover”onpage32.
46ThinkCentreUserGuide
Page 59

3.Pivotthedrivebayassemblyupward.Then,pivotthetwoplasticretainingclipsoutwardtoremove
theheatsinkfanductfromthefailingheatsinkandfanassembly.
Figure31.Removingtheheatsinkfanduct
4.Disconnecttheheatsinkandfanassemblycablefromthemicroprocessorfanconnectoronthesystem
board.See“Locatingpartsonthesystemboard”onpage11.
Chapter5.Installingorreplacinghardware47
Page 60

5.Followthissequencetoremovethefourscrewsthatsecuretheheatsinkandfanassemblytothe
systemboard:
a.Partiallyremovescrew1,thenfullyremovescrew2,andthenfullyremovescrew1.
b.Partiallyremovescrew3,thenfullyremovescrew4,andthenfullyremovescrew3.
Note:Carefullyremovethefourscrewsfromthesystemboardtoavoidanypossibledamagetothe
systemboard.Thefourscrewscannotberemovedfromtheheatsinkandfanassembly.
Figure32.Removingtheheatsinkandfanassembly
6.Lifttheheatsinkandfanassemblyoffthesystemboard.
Notes:
a.Youmighthavetogentlytwisttheheatsinkandfanassemblytofreeitfromthemicroprocessor.
b.Whenhandlingtheheatsinkandfanassembly,donottouchthethermalgreaseonthebottom
oftheheatsinkandfanassembly.
7.Placethenewheatsinkandfanassemblyonthesystemboardsothatthefourscrewsarealigned
withthecorrespondingholesinthesystemboard.Makesurethatyouproperlyplacethenewheat
sinkandfanassemblysothatyoucaneasilyconnectthenewheatsinkandfanassemblycabletothe
microprocessorfanconnectoronthesystemboard.
8.Followthefollowingsequencetoinstallthefourscrewstosecurethenewheatsinkandfanassembly.
Donotover-tightenthescrews.
a.Partiallytightenscrew1,thenfullytightenscrew2,andthenfullytightenscrew1.
b.Partiallytightenscrew3,thenfullytightenscrew4,andthenfullytightenscrew3.
9.Connectthenewheatsinkandfanassemblycabletothemicroprocessorfanconnectoronthesystem
board.See“Locatingpartsonthesystemboard”onpage11
.
48ThinkCentreUserGuide
Page 61

10.Lowerandpositiontheheatsinkfanductonthetopoftheheatsinkandfanassemblyuntilitsnaps
intoposition.
Figure33.Installingtheheatsinkfanduct
Whattodonext:
•Toworkwithanotherpieceofhardware,gototheappropriatesection.
•Tocompletethereplacement,goto“Completingthepartsreplacement”onpage60.
Replacingthepowersupplyassembly
Attention:Donotopenyourcomputerorattemptanyrepairbeforereadingandunderstandingthe“Important
safetyinformation”onpagev
Thissectionprovidesinstructionsonhowtoreplacethepowersupplyassembly.
Althoughtherearenomovingpartsinyourcomputerafterthepowercordhasbeendisconnected,the
followingwarningsarerequiredforyoursafetyandproperUnderwritersLaboratories(UL)certication.
CAUTION:
.
Hazardousmovingparts.Keepngersandotherbodypartsaway.
Chapter5.Installingorreplacinghardware49
Page 62

CAUTION:
Neverremovethecoveronapowersupplyoranypartthathasthefollowinglabelattached.
Hazardousvoltage,current,andenergylevelsarepresentinsideanycomponentthathasthislabel
attached.Therearenoserviceablepartsinsidethesecomponents.Ifyoususpectaproblemwith
oneoftheseparts,contactaservicetechnician.
Toreplacethepowersupplyassembly,dothefollowing:
1.Removeallmediafromthedrivesandturnoffallattacheddevicesandthecomputer.Then,disconnect
allpowercordsfromelectricaloutletsanddisconnectallcablesthatareconnectedtothecomputer.
2.Removethecomputercover.See“Removingthecomputercover”onpage32.
3.Removethefrontbezel.See“Removingandreinstallingthefrontbezel”onpage32.
4.Pivotthedrivebayassemblyupward.Then,pivotthetwoplasticretainingclipsoutwardtoremove
theheatsinkfanductfromthefailingheatsinkandfanassembly.
Figure34.Removingtheheatsinkfanduct
5.Disconnectthepowersupplyassemblycablesfromalldrivesandfromthe24-pinpowerconnectorand
4-pinpowerconnectoronthesystemboard.See“Locatingpartsonthesystemboard”onpage11.
Note:Youmightalsoneedtoreleasethepowersupplyassemblycablesfromsomecableclipsorties
thatsecurethecablestothechassis.Makesurethatyounotethecableroutingbeforedisconnecting
thecables.
50ThinkCentreUserGuide
Page 63

6.Attherearofthecomputer,removethethreescrewsthatsecurethepowersupplyassembly.Pressthe
powersupplyclip1downwardtoreleasethepowersupplyassemblyandthenslidethepowersupply
assemblytothefrontofthecomputer.Liftthepowersupplyassemblyoutofthecomputer.
Figure35.Removingthepowersupplyassembly
7.Makesurethatthenewpowersupplyassemblyisthecorrectreplacement.
Chapter5.Installingorreplacinghardware51
Page 64

8.Installthenewpowersupplyassemblyintothechassissothatthescrewholesinthenewpowersupply
assemblyarealignedwiththecorrespondingholesintherearofthechassis.Then,installthethree
screwstosecurethenewpowersupplyassemblyinplace.
Note:UseonlyscrewsprovidedbyLenovo.
Figure36.Installingthepowersupplyassembly
9.Connectthenewpowersupplyassemblycablestoalldrivesandthesystemboard.See“Locating
partsonthesystemboard”onpage11.
52ThinkCentreUserGuide
Page 65

10.Lowerandpositiontheheatsinkfanductonthetopoftheheatsinkandfanassemblyuntilthetwo
screwholesintheheatsinkfanductarealignedwiththoseintheheatsinkandfanassembly.Install
thetwoscrewstosecuretheheatsinkfanduct.
Figure37.Installingtheheatsinkfanduct
Whattodonext:
•Toworkwithanotherpieceofhardware,gototheappropriatesection.
•Tocompletethereplacement,goto“Completingthepartsreplacement”onpage60.
Replacingthemicroprocessor
Attention:Donotopenyourcomputerorattemptanyrepairbeforereadingandunderstandingthe“Important
safetyinformation”onpagev.
Thissectionprovidesinstructionsonhowtoreplacethemicroprocessor.
CAUTION:
Theheatsinkandmicroprocessormightbeveryhot.T urnoffthecomputerandwaitthreetove
minutestoletthecomputercoolbeforeremovingthecomputercover.
Toreplacethemicroprocessor,dothefollowing:
1.Removeallmediafromthedrivesandturnoffallattacheddevicesandthecomputer.Then,disconnect
allpowercordsfromelectricaloutletsanddisconnectallcablesthatareconnectedtothecomputer.
2.Removethecomputercover.See“Removingthecomputercover”onpage32.
3.Locatethesystemboardanddisconnectallcablesconnectedtothesystemboard.See“Locating
partsonthesystemboard”onpage11.
4.Removetheheatsinkandfanassembly.See“Replacingtheheatsinkandfanassembly”onpage46.
Chapter5.Installingorreplacinghardware53
Page 66

Note:Donotletthethermalgreaseonthebottomoftheheatsinkandfanassemblygetincontact
withanything.
5.Liftthesmallhandle1andopentheretainer2toaccessthemicroprocessor3.
Figure38.Accessingthemicroprocessor
6.Liftthemicroprocessorstraightupandoutofthemicroprocessorsocket.
Figure39.Removingthemicroprocessor
Notes:
a.Yourmicroprocessorandsocketmightlookdifferentfromtheoneillustrated.
54ThinkCentreUserGuide
Page 67

b.Notetheorientationofthemicroprocessorinthesocket.Youcaneitherlookforthesmalltriangle1
ononecornerofthemicroprocessorornotetheorientationofthenotches2onthemicroprocessor.
Thisisimportantwheninstallingthenewmicroprocessoronthesystemboard.
c.Touchonlytheedgesofthemicroprocessor.Donottouchthegoldcontactsonthebottom.
d.Donotdropanythingontothemicroprocessorsocketwhileitisexposed.Thesocketpinsmustbe
keptascleanaspossible.
7.Makesurethatthesmallhandleisintheraisedpositionandthemicroprocessorretainerisfullyopen.
8.Removetheprotectivecoverthatprotectsthegoldcontactsofthenewmicroprocessor.
9.Holdthenewmicroprocessorbyitssidesandalignthesmalltriangleononecornerofthenew
microprocessorwiththecorrespondingsmalltriangleononecornerofthemicroprocessorsocket.
10.Lowerthenewmicroprocessorstraightdownintothemicroprocessorsocketonthesystemboard.
Figure40.Installingthemicroprocessor
11.Closethemicroprocessorretainerandlockitintopositionwiththesmallhandletosecurethenew
microprocessorinthesocket.
12.Reinstalltheheatsinkandfanassemblyandthefanduct.See“Replacingtheheatsinkandfan
assembly”onpage46
.
13.Reconnectallcablesthatweredisconnectedfromthesystemboard.
Chapter5.Installingorreplacinghardware55
Page 68

Whattodonext:
•Toworkwithanotherpieceofhardware,gototheappropriatesection.
•Tocompletethereplacement,goto“Completingthepartsreplacement”onpage60.
ReplacingthefrontaudioandUSBassembly
Attention:Donotopenyourcomputerorattemptanyrepairbeforereadingandunderstandingthe“Important
safetyinformation”onpagev.
ThissectionprovidesinstructionsonhowtoreplacethefrontaudioandUSBassembly.
ToreplacethefrontaudioandUSBassembly,dothefollowing:
1.Removeallmediafromthedrivesandturnoffallattacheddevicesandthecomputer.Then,disconnect
allpowercordsfromelectricaloutletsanddisconnectallcablesthatareconnectedtothecomputer.
2.Removethecomputercover.See“Removingthecomputercover”onpage32.
3.Removethefrontbezel.See“Removingandreinstallingthefrontbezel”onpage32.
4.PivotthedrivebayassemblyupwardanddisconnectthefrontaudioandUSBassemblycablesfromthe
systemboardandnotethecablesrouting.See“Locatingpartsonthesystemboard”onpage11.
5.RemovethescrewthatsecuresthefrontaudioandUSBassemblybracket.Thenremovethefront
audioandUSBassemblybracketfromthechassis.
Figure41.RemovingthefrontaudioandUSBassembly
6.RemovethetwoscrewsthatsecurethefrontaudioandUSBassemblytoitsbracket.Thenremovethe
failingfrontaudioandUSBassemblyfromthebracket.
7.InstallanewfrontaudioandUSBassemblyintothebracketandinstallthetwoscrewstosecurethe
frontaudioandUSBassemblytothebracket.
8.InstallthefrontaudioandUSBassemblybrackettothechassisandalignthescrewholeinthebracket
withthecorrespondingholeinthechassis.
9.InstallthescrewtosecurethefrontaudioandUSBassemblybrackettothechassis.
10.PivotthedrivebayassemblyupwardandreconnectthefrontUSBandfrontaudiocablestothesystem
board.See“Locatingpartsonthesystemboard”onpage11
56ThinkCentreUserGuide
.
Page 69

11.Lowerthedrivebayassembly.See“Accessingthesystemboardcomponentsanddrives”onpage34.
12.Reinstallthefrontbezel.See“Removingandreinstallingthefrontbezel”onpage32.
Whattodonext:
•Toworkwithanotherpieceofhardware,gototheappropriatesection.
•Tocompletetheinstallationorreplacement,goto“Completingthepartsreplacement”onpage60
.
Replacingthesystemfanassembly
Attention:Donotopenyourcomputerorattemptanyrepairbeforereadingandunderstandingthe“Important
safetyinformation”onpagev
Thissectionprovidesinstructionsonhowtoreplacethesystemfanassembly.
Toreplacethesystemfanassembly,dothefollowing:
1.Removeallmediafromthedrivesandturnoffallattacheddevicesandthecomputer.Then,disconnect
allpowercordsfromelectricaloutletsanddisconnectallcablesthatareconnectedtothecomputer.
2.Removethecomputercover.See“Removingthecomputercover”onpage32.
3.Removethefrontbezel.See“Removingandreinstallingthefrontbezel”onpage32.
4.Pivotthedrivebayassemblyupwardtogainaccesstothesystemfanassembly.See“Accessingthe
systemboardcomponentsanddrives”onpage34.
5.Removetheharddiskdriveforeasieraccesstothesystemfanassembly.See“Replacingthehard
diskdrive”onpage40.
6.Removetheheatsinkfanduct.See“Replacingtheheatsinkandfanassembly”onpage46.
7.Notethecableroutinganddisconnectthesystemfanassemblycablefromthesystemfanconnectoron
thesystemboard.See“Locatingpartsonthesystemboard”onpage11.
8.Thesystemfanassemblyisattachedtothechassisbyfourrubbermounts.Removethesystemfan
assemblybycuttingtherubbermountsandliftingthesystemfanassemblyoutofthechassis.
.
Note:Thenewsystemfanassemblywillhavefournewrubbermountsattached.
Chapter5.Installingorreplacinghardware57
Page 70

Figure42.Removingthesystemfanassembly
9.Installthenewsystemfanassemblybyaligningthenewrubbermountsthatcamewiththenewsystem
fanassemblywiththecorrespondingholesinthechassis,andthenpushtherubbermountsthroughthe
holes.Then,carefullypullonthetipsoftherubbermountsfromthebottomuntilthenewsystemfan
assemblyissecuredinplace.
Figure43.Installingthesystemfanassembly
58ThinkCentreUserGuide
Page 71

10.Connectthenewsystemfanassemblycabletothesystemfanconnectoronthesystemboard.See
“Locatingpartsonthesystemboard”onpage11.
11.Reinstalltheheatsinkfanduct.See“Replacingtheheatsinkandfanassembly”onpage46.
12.Reinstalltheharddiskdrive.See“Replacingtheharddiskdrive”onpage40.
Whattodonext:
•Toworkwithanotherpieceofhardware,gototheappropriatesection.
•Tocompletethereplacement,goto“Completingthepartsreplacement”onpage60.
Replacingthekeyboard
Attention:Donotopenyourcomputerorattemptanyrepairbeforereadingandunderstandingthe“Important
safetyinformation”onpagev
Thissectionprovidesinstructionsonhowtoreplacethekeyboard.
Toreplacethekeyboard,dothefollowing:
1.Removeallmediafromthedrives.Then,turnoffallattacheddevicesandthecomputer.
2.Disconnectallpowercordsfromelectricaloutlets.
3.Disconnecttheoldkeyboardcablefromthecomputer.
4.Connectanewkeyboardtotheappropriateconnectoronthecomputer.Yourkeyboardmightbe
connectedtoaPS/2keyboardconnector1oraUSBconnector2.Dependingonwhereyouwant
toconnectyourkeyboard,see“Locatingconnectors,controls,andindicatorsonthefrontofyour
computer”onpage7or“Locatingconnectorsontherearofyourcomputer”onpage8.
.
Figure44.Keyboardconnectors
Whattodonext:
•Toworkwithanotherpieceofhardware,gototheappropriatesection.
•Tocompletethereplacement,goto“Completingthepartsreplacement”onpage60
.
Replacingthemouse
Attention:Donotopenyourcomputerorattemptanyrepairbeforereadingandunderstandingthe“Important
safetyinformation”onpagev
Thissectionprovidesinstructionsonhowtoreplacethemouse.
Toreplacethemouse,dothefollowing:
.
Chapter5.Installingorreplacinghardware59
Page 72

1.Removeallmediafromthedrives.Then,turnoffallattacheddevicesandthecomputer.
2.Disconnectallpowercordsfromelectricaloutlets.
3.Disconnecttheoldmousecablefromthecomputer.
4.Connectanewmousetotheappropriateconnectoronthecomputer.Yourmousemightbeconnected
toaPS/2mouseconnector1oraUSBconnector2.Dependingonwhereyouwanttoconnectyour
mouse,see“Locatingconnectors,controls,andindicatorsonthefrontofyourcomputer”onpage7
or“Locatingconnectorsontherearofyourcomputer”onpage8.
Figure45.Mouseconnectors
Whattodonext:
•Toworkwithanotherpieceofhardware,gototheappropriatesection.
•Tocompletethereplacement,goto“Completingthepartsreplacement”onpage60.
Completingthepartsreplacement
Aftercompletingtheinstallationorreplacementforallparts,youneedtoclosethecomputercoverand
reconnectcables.Dependingonthepartsyouinstalledorreplaced,youmightneedtoconrmtheupdated
informationintheSetupUtilityprogram.RefertoChapter7“UsingtheSetupUtilityprogram”onpage71.
Toreinstallthecomputercoverandreconnectcablestoyourcomputer,dothefollowing:
1.Makesurethatallcomponentshavebeenreassembledcorrectlyandthatnotoolsorloosescrews
areleftinsideyourcomputer.See“Locatingcomponents”onpage10forthelocationsofvarious
componentsinyourcomputer.
2.Makesurethatthecablesareroutedcorrectly.Keepcablesclearofthehingesandsidesofthe
computerchassistoavoidinterferencewithclosingthecomputercover.
3.Lowerthedrivebayassembly.See“Accessingthesystemboardcomponentsanddrives”onpage34.
4.Ifyouhaveremovedthefrontbezel,reinstallit.T oreinstallthefrontbezel,alignthethreetabson
thefrontbezelwiththecorrespondingholesinthechassisandpivotthefrontbezelinwardsuntil
itsnapsintoposition.
60ThinkCentreUserGuide
Page 73

5.Positionthecomputercoveronthechassissothattherailguidesonthecomputercoverengagethe
railsonthechassis.Then,slidethecomputercovertothefrontofthecomputeruntilitsnapsinto
positionandisclosed.Then,installthetwoscrewstosecurethecomputercover.
Figure46.Reinstallingthecomputercover
6.Ifthereisapadlockavailable,lockthecomputercover.See“Lockingthecomputercover”onpage26.
7.Ifthereisanintegratedcablelockavailable,lockthecomputer.See“Attachinganintegratedcable
lock”onpage27.
8.Reconnecttheexternalcablesandpowercordstothecomputer.See“Locatingconnectorsontherear
ofyourcomputer”onpage8.
9.T oupdateyourconguration,seeChapter7“UsingtheSetupUtilityprogram”onpage71.
Note:Inmostareasoftheworld,LenovorequiresthereturnofthedefectiveCustomerReplaceableUnit
(CRU).InformationaboutthiswillcomewiththeCRUorwillcomeafewdaysaftertheCRUarrives.
Obtainingdevicedrivers
Youcanobtaindevicedriversforoperatingsystemsthatarenotpreinstalledat
http://www.lenovo.com/support.Installationinstructionsareprovidedinreadmeleswiththedevice-driver
les.
Chapter5.Installingorreplacinghardware61
Page 74

62ThinkCentreUserGuide
Page 75

Chapter6.Recoveryinformation
ThischapterprovidesinformationabouttherecoverysolutionsprovidedbyLenovo.
Thischaptercontainsthefollowingtopics:
•Creatingandusingrecoverymedia
•Performingbackupandrecoveryoperations
•UsingtheRescueandRecoveryworkspace
•Creatingandusingarescuemedium
•Installingorreinstallingdevicedrivers
•Solvingrecoveryproblems
Notes:
1.TherecoveryinformationinthischapteronlyappliestothecomputersthathavetheRescueand
RecoveryprogramortheProductRecoveryprograminstalled.IftheEnhancedBackupandRestore
iconintheLenovoThinkVantageToolsprogramisdimmed,itindicatesthatyouneedtoinstall
theRescueandRecoveryprogrammanuallybeforeenablingitsfeatures.T oinstalltheRescueand
Recoveryprogram,dothefollowing:
a.ClickStart➙AllPrograms➙LenovoThinkVantageT ools,anddouble-clickEnhancedBackup
andRestore.
b.Followtheinstructionsonthescreen.
c.Whentheinstallationprocesscompletes,theEnhancedBackupandRestoreiconisactivated.
2.Thereareavarietyofmethodstochoosefromwhenconsideringhowtorecoverintheeventofa
software-orhardware-relatedproblem.Somemethodsvarydependingonthetypeofoperatingsystem
thatisinstalled.
3.Theproductontherecoverymediamaybeusedonlyforthefollowingpurposes:
•Restoretheproductpreinstalledonyourcomputer
•Reinstalltheproduct
•ModifytheproductusingtheAdditionalFiles
Creatingandusingrecoverymedia
Youcanuserecoverymediatorestoretheharddiskdrivetothefactorydefaultstate.Recoverymediaare
usefulifyoutransferthecomputertoanotherarea,sellthecomputer,recyclethecomputer,orputthe
computerinanoperationalstateafterallothermethodsofrecoveryhavefailed.Asaprecautionarymeasure,
itisimportanttocreaterecoverymediaasearlyaspossible.
Note:Therecoveryoperationsyoucanperformusingrecoverymediavarydependingontheoperating
systemfromwhichtherecoverymediawerecreated.Therecoverymediamightcontainabootmedium
andadatamedium.YourMicrosoftWindowslicensepermitsyoutocreateonlyonedatamedium,soitis
importantthatyoustoretherecoverymediainasafeplaceafteryouhavemadethem.
Creatingrecoverymedia
Thissectionprovidesinstructionsonhowtocreaterecoverymediaondifferentoperatingsystems.
©CopyrightLenovo2011
63
Page 76

Note:OntheWindows7operatingsystem,youcancreaterecoverymediausingdiscsorexternalUSB
storagedevices.OntheWindowsVistaoperatingsystem,youcancreaterecoverymediausingonlydiscs,
sothisoperationisalsocalled“creatingProductRecoverydiscs.”
•TocreaterecoverymediaontheWindows7operatingsystem,clickStart➙AllPrograms➙Lenovo
ThinkVantageT ools➙FactoryRecoveryDisks.Then,followtheinstructionsonthescreen.
•TocreateProductRecoverydiscsontheWindowsVistaoperatingsystem,clickStart➙AllPrograms➙
ThinkVantage➙CreateProductRecoveryMedia.Then,followtheinstructionsonthescreen.
Usingrecoverymedia
Thissectionprovidesinstructionsonhowtouserecoverymediaondifferentoperatingsystems.
OntheWindows7operatingsystemandtheWindowsVistaoperatingsystem,youcanuserecoverymedia
torestorethecontentsoftheharddiskdrivetothefactorydefaultstate.Also,youcanuserecoverymediato
putthecomputerinanoperationalstateafterallothermethodsofharddiskdriverecoveryhavefailed.
Attention:Whenyouuserecoverymediatorestorethecontentsoftheharddisktothefactorydefaultstate,
allthelescurrentlyontheharddiskdrivewillbedeletedandreplacedbythefactorydefaultles.
TouserecoverymediaontheWindows7operatingsystemortheWindowsVistaoperatingsystem,
dothefollowing:
1.Dependingonthetypeofyourrecoverymedia,connectthebootmedium(memorykeyorotherUSB
storagedevice)tothecomputer,orinsertthebootdiscintotheopticaldrive.
2.RepeatedlypressandreleasetheF12keywhenturningonthecomputer.WhenthePleaseselect
bootdevicewindowopens,releasetheF12key.
3.SelectthedesiredstartupdeviceandpressEnter.Therestoreprocessbegins.
4.Followtheinstructionsonthescreentocompletetheoperation.
Note:Afterrestoringyourcomputerharddiskdrivetothefactorydefaultstate,youmighthavetoreinstall
devicedriversforsomedevices.See“Reinstallingdevicedrivers”onpage69.
Performingbackupandrecoveryoperations
TheRescueandRecoveryprogramenablesyoutobackupallyourharddiskdrivecontentsincludingthe
operatingsystem,datales,softwareprograms,andpersonalsettings.Youcandesignatewherethe
RescueandRecoveryprogramstoresthebackup:
•Inaprotectedareaofyourharddiskdrive
•Onthesecondaryharddiskdriveifasecondaryharddiskdriveisinstalledinyourcomputer
•OnanattachedexternalUSBharddiskdrive
•Onanetworkdrive
•Onrecordablediscs(arecordableopticaldriveisrequiredforthisoption)
Afteryouhavebackedupthecontentsoftheharddiskdrive,youcanrestorethecompletecontentsofthe
harddiskdrive,restoreselectedlesonly,orrestoretheWindowsoperatingsystemandapplicationsonly
whilekeepingtheotherdataonyourharddiskdrive.
Performingabackupoperation
ThissectionprovidesinstructionsonhowtoperformabackupoperationusingtheRescueandRecovery
programondifferentoperatingsystems.
64ThinkCentreUserGuide
Page 77

•ToperformabackupoperationusingtheRescueandRecoveryprogramontheWindows7operating
system,dothefollowing:
1.FromtheWindowsdesktop,clickStart➙AllPrograms➙LenovoThinkVantageTools➙
EnhancedBackupandRestore.TheRescueandRecoveryprogramopens.
2.IntheRescueandRecoverymainwindow,clicktheLaunchadvancedRescueandRecoveryarrow.
3.ClickBackupyourharddriveandselectbackupoperationoptions.Then,followtheinstructionson
thescreentocompletethebackupoperation.
•ToperformabackupoperationusingtheRescueandRecoveryprogramontheWindowsVistaoperating
system,dothefollowing:
1.FromtheWindowsdesktop,clickStart➙AllPrograms➙ThinkVantage➙RescueandRecovery.
TheRescueandRecoveryprogramopens.
2.IntheRescueandRecoverymainwindow,clickLaunchadvancedRescueandRecovery➙Back
upyourharddrive,andselectbackupoperationoptions.
3.Followtheinstructionsonthescreentocompletethebackupoperation.
Performingarecoveryoperation
ThissectionprovidesinstructionsonhowtoperformarecoveryoperationusingtheRescueandRecovery
programondifferentoperatingsystems.
•ToperformarecoveryoperationusingtheRescueandRecoveryprogramontheWindows7operating
system,dothefollowing:
1.FromtheWindowsdesktop,clickStart➙AllPrograms➙LenovoThinkVantageTools➙
EnhancedBackupandRestore.TheRescueandRecoveryprogramopens.
2.IntheRescueandRecoverymainwindow,clicktheLaunchadvancedRescueandRecoveryarrow.
3.ClicktheRestoreyoursystemfromabackupicon.
4.Followtheinstructionsonthescreentocompletetherecoveryoperation.
•ToperformarecoveryoperationusingtheRescueandRecoveryprogramontheWindowsVistaoperating
system,dothefollowing:
1.FromtheWindowsdesktop,clickStart➙AllPrograms➙ThinkVantage➙RescueandRecovery.
TheRescueandRecoveryprogramopens.
2.IntheRescueandRecoverymainwindow,clickLaunchadvancedRescueandRecovery.
3.ClicktheRestoreyoursystemfromabackupicon.
4.Followtheinstructionsonthescreentocompletetherecoveryoperation.
FormoreinformationaboutperformingarecoveryoperationfromtheRescueandRecoveryworkspace,see
“UsingtheRescueandRecoveryworkspace”onpage65.
UsingtheRescueandRecoveryworkspace
TheRescueandRecoveryworkspaceresidesinaprotected,hiddenareaofyourharddiskdrivethat
operatesindependentlyfromtheWindowsoperatingsystem.Thisenablesyoutoperformrecovery
operationsevenifyoucannotstarttheWindowsoperatingsystem.Youcanperformthefollowingrecovery
operationsfromtheRescueandRecoveryworkspace:
•Rescuelesfromyourharddiskdriveorfromabackup:TheRescueandRecoveryworkspaceenables
youtolocatelesonyourharddiskdriveandtransferthemtoanetworkdriveorotherrecordablemedia,
suchasaUSBdeviceoradisc.Thissolutionisavailableevenifyoudidnotbackupyourlesorif
changesweremadetothelessinceyourlastbackupoperation.Y oucanalsorescueindividuallesfrom
aRescueandRecoverybackuplocatedonyourlocalharddiskdrive,aUSBdevice,oranetworkdrive.
Chapter6.Recoveryinformation65
Page 78

•RestoreyourharddiskdrivefromaRescueandRecoverybackup:Ifyouhavebackedupyourharddisk
driveusingtheRescueandRecoveryprogram,youcanrestoretheharddiskdrivefromaRescueand
Recoverybackup,evenifyoucannotstarttheWindowsoperatingsystem.
•Restoreyourharddiskdrivetothefactorydefaultstate:TheRescueandRecoveryworkspaceenables
youtorestorethecompletecontentsofyourharddiskdrivetothefactorydefaultstate.Ifyouhave
multiplepartitionsonyourharddiskdrive,youhavetheoptiontorestoretheC:partitionandleavethe
otherpartitionsintact.BecausetheRescueandRecoveryworkspaceoperatesindependentlyfrom
theWindowsoperatingsystem,youcanrestoretheharddiskdrivetothefactorydefaultstateevenif
youcannotstarttheWindowsoperatingsystem.
Attention:IfyourestoretheharddiskdrivefromaRescueandRecoverybackuporrestoretheharddisk
drivetothefactorydefaultsettings,alllesontheprimaryharddiskdrivepartition(usuallydriveC:)willbe
deletedintherecoveryprocess.Ifpossible,makecopiesofimportantles.Ifyouareunabletostartthe
Windowsoperatingsystem,youcanusetherescuelesfeatureoftheRescueandRecoveryworkspaceto
copylesfromyourharddiskdrivetoothermedia.
TostarttheRescueandRecoveryworkspace,dothefollowing:
1.Makesurethecomputeristurnedoff.
2.T urnonyourcomputer.Whenyouseethelogoscreen,pressEnter,andthenpressF11toenterthe
RescueandRecoveryworkspace.
3.IfyouhavesetaRescueandRecoverypassword,typeyourpasswordwhenprompted.TheRescue
andRecoveryworkspaceopensafterashortdelay.
Note:IftheRescueandRecoveryworkspacefailstoopen,see“Solvingrecoveryproblems”onpage69.
4.Dooneofthefollowing:
•Torescuelesfromyourharddiskdrive,clickRescuelesandfollowtheinstructionsonthescreen.
•TorestoreyourharddiskdrivefromaRescueandRecoverybackuportorestoreyourharddiskdrive
tothefactorydefaultsettings,clickFullRestoreandfollowtheinstructionsonthescreen.
FormoreinformationaboutthefeaturesoftheRescueandRecoveryworkspace,clickHelp.
Note:Afterrestoringyourharddiskdrivetothefactorydefaultstate,youmighthavetoreinstalldevice
driversforsomedevices.See“Reinstallingdevicedrivers”onpage69.
Creatingandusingarescuemedium
Witharescuemedium,suchasadiscoraUSBharddiskdrive,youcanrecoverthecomputerfromfailures
thatpreventyoufromgainingaccesstotheRescueandRecoveryworkspaceonyourharddiskdrive.
Notes:
1.Therecoveryoperationsyoucanperformusingarescuemediumvarydependingontheoperating
system.
2.Therescuedisccanbestartedinalltypesofopticaldrives.
Creatingarescuemedium
Thissectionprovidesinstructionsonhowtocreatearescuemediumondifferentoperatingsystems.
•TocreatearescuemediumontheWindows7operatingsystem,dothefollowing:
1.FromtheWindowsdesktop,clickStart➙AllPrograms➙LenovoThinkVantageTools➙
EnhancedBackupandRestore.TheRescueandRecoveryprogramopens.
2.IntheRescueandRecoverymainwindow,clicktheLaunchadvancedRescueandRecoveryarrow.
66ThinkCentreUserGuide
Page 79

3.ClicktheCreateRescueMediaicon.TheCreateRescueandRecoveryMediawindowopens.
4.IntheRescueMediaarea,selectthetypeoftherescuemediumyouwanttocreate.Youcancreate
arescuemediumusingadisc,aUSBharddiskdrive,orasecondaryinternalharddiskdrive.
5.ClickOKandfollowtheinstructionsonthescreentocreatearescuemedium.
•TocreatearescuemediumontheWindowsVistaoperatingsystem,dothefollowing:
1.FromtheWindowsdesktop,clickStart➙AllPrograms➙ThinkVantage➙CreateRecovery
Media.TheCreateRescueandRecoveryMediawindowopens.
2.IntheRescueMediaarea,selectthetypeoftherescuemediumyouwanttocreate.Youcancreate
arescuemediumusingadisc,aUSBharddiskdrive,orasecondaryinternalharddiskdrive.
3.ClickOKandfollowtheinstructionsonthescreentocreatearescuemedium.
Usingarescuemedium
Thissectionprovidesinstructionsonhowtousetherescuemediumyouhavecreated.
•Ifyouhavecreatedarescuemediumusingadisc,usethefollowinginstructionstousetherescuemedium:
1.T urnoffyourcomputer.
2.RepeatedlypressandreleasetheF12keywhenturningonthecomputer.WhenthePleaseselect
bootdevicewindowopens,releasetheF12key.
3.InthePleaseselectbootdevicewindow,selectthedesiredopticaldriveastherstbootdevice.
Then,inserttherescuediscintotheopticaldriveandpressEnter.Therescuemediumstarts.
•IfyouhavecreatedarescuemediumusingaUSBharddiskdrive,usethefollowinginstructionsto
usetherescuemedium:
1.AttachtheUSBharddiskdrivetooneoftheUSBconnectorsonyourcomputer.
2.RepeatedlypressandreleasetheF12keywhenturningonthecomputer.WhenthePleaseselect
bootdevicewindowopens,releasetheF12key.
3.InthePleaseselectbootdevicewindow,selecttheUSBharddiskdriveastherstbootdeviceand
pressEnter.Therescuemediumstarts.
Whentherescuemediumstarts,theRescueandRecoveryworkspaceopens.Thehelpinformationfor
eachfeatureisavailablefromtheRescueandRecoveryworkspace.Followtheinstructionstocomplete
therecoveryprocess.
Reinstallingpreinstalledapplicationsanddevicedrivers
Yourcomputerhasprovisionsthatenableyoutoreinstallselectedfactory-installedapplicationsanddevice
drivers.
Reinstallingpreinstalledapplications
Thissectionprovidesinstructionsonhowtoreinstallpreinstalledapplications.
ToreinstalltheselectedapplicationspreinstalledonyourLenovocomputer,dothefollowing:
1.T urnonthecomputer.
2.GototheC:\SWTOOL Sdirectory.
3.Opentheappsfolder.Withintheappsfolder,thereareseveralsubfoldersnamedforvariousapplications
installedinyourcomputer.
4.Opentheappropriateapplicationsubfolder.
5.Intheapplicationsubfolder,lookforaSETUP.EXEleorotherappropriateEXElesforsetup.
Double-clicktheleandfollowtheinstructionsonthescreentocompletetheinstallation.
Chapter6.Recoveryinformation67
Page 80

Reinstallingpreinstalleddevicedrivers
Thissectionprovidesinstructionsonhowtoreinstallpreinstalleddevicedrivers.
Attention:Whenyoureinstalldevicedrivers,youarechangingthecurrentcongurationofyourcomputer.
Reinstalldevicedriversonlywhenitisnecessarytocorrectaproblemwithyourcomputer.
Toreinstallthedevicedriverforafactory-installeddevice,dothefollowing:
1.T urnonthecomputer.
2.GototheC:\SWTOOL Sdirectory.
3.OpentheDRIVERSfolder.WithintheDRIVERSfolder,thereareseveralsubfoldersnamedforvarious
devicesinstalledinyourcomputer,suchasAUDIOorVIDEO.
4.Opentheappropriatedevicesubfolder.
5.Dooneofthefollowing:
•Inthedevicesubfolder,lookforaSETUP .exele.Double-clicktheleandfollowtheinstructionson
thescreentocompletetheinstallation.
•Inthedevicesubfolder,lookforaREADME.txtleoralewiththe.txtextension.Thislemightbe
namedaftertheoperatingsystem,suchasWIN98.txt.TheTXTlecontainsinformationabouthowto
installthedevicedriver.Followtheinstructionstocompletetheinstallation.
•Ifthedevicesubfoldercontainsalewiththe.infextensionandyouwanttoinstallthedevice
driverusingtheINFle,refertoyourWindowsHelpandSupportinformationsystemfordetailed
informationabouthowtoinstallthedevicedriver.
Note:Ifyouneedupdateddevicedrivers,see“Gettingthelatestdevicedriversforyourcomputer”on
page81formoreinformation.
Reinstallingsoftwareprograms
Ifasoftwareprogramyouinstalledonyourcomputerisnotworkingcorrectly,youmightneedtoremove
andreinstallit.Reinstallingoverwritestheexistingprogramslesandusuallyxesanyproblemsthat
youmighthavehadwiththatprogram.
Toremoveaprograminyoursystem,seeMicrosoftWindowshelpsystemfordetailedinformation.
Toreinstalltheprogram,dooneofthefollowing:
Note:Themethodofreinstallingaprogramvariesfromprogramtoprogram.Refertothedocumentation
providedwiththeprogramtoseeifyourprogramhasspecialinstallationinstructions.
•Toreinstallmostcommerciallyavailableprogramsinyoursystem,seeMicrosoftWindowshelpsystem
formoreinformation.
•ToreinstallselectedapplicationprogramsthatcamepreinstalledfromLenovo,dothefollowing:
1.T urnonthecomputer.
2.GototheC:\SWTOOL Sdirectory.
3.OpentheAPPSfolder.WithintheAPPSfolder,thereareseveralsubfoldersnamedforvarious
applicationsinstalledinyourcomputer.
4.Opentheappropriateapplicationsubfolder.
5.Intheapplicationsubfolder,lookforaSETUP .EXEleorotherappropriateEXElesforsetup.
Double-clicktheleandfollowtheinstructionsonthescreentocompletetheinstallation.
68ThinkCentreUserGuide
Page 81

Reinstallingdevicedrivers
Toreinstalladevicedriverforanoptionyouinstalled,refertothedocumentationthatcomeswiththeoption.
Whenyoureinstalldevicedrivers,youarechangingthecurrentcongurationofyourcomputer.Reinstall
devicedriversonlywhenitisnecessarytocorrectaproblemwithyourcomputer.
Formoreinformationaboutreinstallingdevicedriversthatcamewithyourcomputer,see“Reinstalling
preinstalledapplicationsanddevicedrivers”onpage67.
Solvingrecoveryproblems
IfyouareunabletoaccesstheRescueandRecoveryworkspaceortheWindowsenvironment,doone
ofthefollowing:
•UsearescuemediumtostarttheRescueandRecoveryworkspace.See“Creatingandusingarescue
medium”onpage66
•Userecoverymediaifallothermethodsofrecoveryhavefailedandyouneedtorestoretheharddisk
drivetothefactorydefaultsettings.See“Creatingandusingrecoverymedia”onpage63
Note:IfyouareunabletoaccesstheRescueandRecoveryworkspaceortheWindowsenvironmentfrom
arescuemediumorrecoverymedia,youmightnothavetherescuedevice(aninternalharddiskdrive,a
disc,aUSBharddiskdrive,orotherexternaldevices)setastherstbootdeviceinthestartupdevice
sequence.Y oumustrstmakesurethatyourrescuedeviceissetastherstbootdeviceinthestartup
devicesequenceintheSetupUtilityprogram.See“Selectingastartupdevice”onpage74fordetailed
informationabouttemporarilyorpermanentlychangingthestartupdevicesequence.Formoreinformation
abouttheSetupUtilityprogram,seeChapter7“UsingtheSetupUtilityprogram”onpage71.
.
.
Itisimportanttocreatearescuemediumandasetofrecoverymediaasearlyaspossibleandstorethem
inasafeplaceforfutureuse.
Chapter6.Recoveryinformation69
Page 82

70ThinkCentreUserGuide
Page 83

Chapter7.UsingtheSetupUtilityprogram
TheSetupUtilityprogramisusedtoviewandchangethecongurationsettingsofyourcomputer,regardless
ofwhichoperatingsystemyouareusing.However,theoperatingsystemsettingsmightoverrideanysimilar
settingsintheSetupUtilityprogram.
StartingtheSetupUtilityprogram
TostarttheSetupUtilityprogram,dothefollowing:
1.Makesureyourcomputeristurnedoff.
2.RepeatedlypressandreleasetheF1keywhenturningonthecomputer.Whenyouhearmultiple
beepsorseealogoscreen,releasetheF1key.
Note:IfaPower-OnPasswordoranAdministratorPasswordhasbeenset,theSetupUtilityprogram
menuwillnotbedisplayeduntilyoutypethecorrectpassword.Formoreinformation,see“Using
passwords”onpage71
WhenthePOSTdetectsthattheharddiskdrivehasbeenremovedfromyourcomputerorthememory
modulesizehasdecreased,anerrormessagewillbedisplayedwhenyoustartthecomputerandyouwillbe
promptedtodooneofthefollowing:
•PressF1toentertheSetupUtilityprogram.
Note:AfteryouentertheSetupUtilityprogram,selectSaveChangesandExitatthebottomofthe
screen.Theerrormessagewillnotbedisplayedagain.
•PressF2tobypasstheerrormessageandlogintotheoperatingsystem.
.
Viewingandchangingsettings
TheSetupUtilityprogrammenulistsvariousitemsaboutthesystemconguration.Tovieworchange
settings,starttheSetupUtilityprogram.See“StartingtheSetupUtilityprogram”onpage71.Then,follow
theinstructionsonthescreen.
YoucanuseeitherthekeyboardorthemousetonavigatethroughBIOSmenuchoices.Thekeysusedto
performvarioustasksaredisplayedatthebottomofeachscreen.
Usingpasswords
ByusingtheSetupUtilityprogram,youcansetpasswordstopreventunauthorizedaccesstoyourcomputer
anddata.Thefollowingtypesofpasswordsareavailable:
•Power-OnPassword
•AdministratorPassword
•HardDiskPassword
Youdonothavetosetanypasswordstouseyourcomputer.However,usingpasswordsimproves
computingsecurity.Ifyoudecidetosetanypasswords,readthefollowingsections.
©CopyrightLenovo2011
71
Page 84

Passwordconsiderations
Apasswordcanbeanycombinationofupto64alphabeticandnumericcharacters.Forsecurityreasons,it
isrecommendedtouseastrongpasswordthatcannotbeeasilycompromised.T osetastrongpassword,
usethefollowingguidelines:
•Haveatleasteightcharactersinlength
•Containatleastonealphabeticcharacterandonenumericcharacter
•SetupUtilityprogramandharddiskpasswordsarenotcasesensitive
•Notbeyournameoryourusername
•Notbeacommonwordoracommonname
•Besignicantlydifferentfromyourpreviouspasswords
Power-OnPassword
WhenaPower-OnPasswordisset,youarepromptedtotypeavalidpasswordeachtimethecomputeris
turnedon.Thecomputercannotbeuseduntilthevalidpasswordistypedin.
AdministratorPassword
SettinganAdministratorPassworddetersunauthorizedusersfromchangingcongurationsettings.Ifyou
areresponsibleformaintainingthecongurationsettingsofseveralcomputers,youmightwanttosetan
AdministratorPassword.
WhenanAdministratorPasswordisset,youarepromptedtotypeavalidpasswordeachtimeyoutryto
accesstheSetupUtilityprogram.TheSetupUtilityprogramcannotbeaccesseduntilavalidpassword
istypedin.
IfboththePower-OnPasswordandAdministratorPasswordareset,youcantypeeitherpassword.However,
youmustuseyourAdministratorPasswordtochangeanycongurationsettings.
HardDiskPassword
SettingaHardDiskPasswordpreventsunauthorizedaccesstothedataontheharddiskdrive.Whena
HardDiskPasswordisset,youarepromptedtotypeavalidpasswordeachtimeyoutrytoaccessthe
harddiskdrive.
Notes:
•AfteryousetaHardDiskPassword,yourdataontheharddiskdriveisprotectedeveniftheharddisk
driveisremovedfromonecomputerandinstalledinanother.
•IftheHardDiskPasswordisforgotten,thereisnowaytoresetthepasswordorrecoverdatafromthe
harddiskdrive.
Setting,changing,anddeletingapassword
Toset,change,ordeleteapassword,dothefollowing:
1.StarttheSetupUtilityprogram.See“StartingtheSetupUtilityprogram”onpage71.
2.FromtheSetupUtilityprogrammainmenu,selectSecurity.
3.Dependingonthepasswordtype,selectSetPower-OnPassword,SetAdministratorPassword,or
HardDiskPassword.
4.Followtheinstructionsontherightsideofthescreentoset,change,ordeleteapassword.
72ThinkCentreUserGuide
Page 85

Note:Apasswordcanbeanycombinationofupto64alphabeticandnumericcharacters.Formore
information,see“Passwordconsiderations”onpage72.
Erasinglostorforgottenpasswords(clearingCMOS)
Thissectionprovidesinstructionsonhowtoeraselostorforgottenpasswords,suchasauserpassword.
Toerasealostorforgottenpassword,dothefollowing:
1.Removeallmediafromthedrivesandturnoffallattacheddevicesandthecomputer.Then,disconnect
allpowercordsfromelectricaloutletsanddisconnectallcablesthatareconnectedtothecomputer.
2.Openthecomputercover.See“Removingthecomputercover”onpage32.
3.LocatetheClearCMOS/Recoveryjumperonthesystemboard.See“Locatingpartsonthesystem
board”onpage11.
4.Movethejumperfromthestandardposition(pin1andpin2)tothemaintenanceposition(pin2and
pin3).
5.Closethecomputercoverandconnectthepowercord.See“Completingthepartsreplacement”
onpage60.
6.T urnonthecomputerandleaveitonforapproximately10seconds.Then,turnoffthecomputerby
holdingthepowerswitchforapproximatelyveseconds.
7.Repeatstep1throughstep3.
8.MovetheClearCMOS/Recoveryjumperbacktothestandardposition(pin1andpin2).
9.Closethecomputercoverandconnectthepowercord.See“Completingthepartsreplacement”
onpage60.
Enablingordisablingadevice
Thissectionprovidesinformationonhowtoenableordisableuseraccesstothefollowingdevices:
USBSetupUsethisoptiontoenableordisableaUSBconnector.WhenaUSBconnectoris
disabled,thedeviceconnectedtotheUSBconnectorcannotbeused.
SATAControllerWhenthisfeatureissettoDisable,alldevicesconnectedtotheSATAconnectors
(suchasharddiskdrivesortheopticaldrive)aredisabledandcannotbeaccessed.
ExternalSATAPortWhenthisoptionissettoDisable,thedeviceconnectedtotheExternalSAT A
connectorcannotbeaccessed.
Toenableordisableadevice,dothefollowing:
1.StarttheSetupUtilityprogram.See“StartingtheSetupUtilityprogram”onpage71.
2.FromtheSetupUtilityprogrammainmenu,selectDevices.
3.Dependingonthedeviceyouwanttoenableordisable,dooneofthefollowing:
•SelectUSBSetuptoenableordisableaUSBdevice.
•SelectATADriveSetuptoenableordisableaninternalorexternalSATAdevice.
4.SelectthedesiredsettingsandpressEnter.
5.PressF10tosavechangesandexittheSetupUtilityprogram.See“ExitingtheSetupUtilityprogram”
onpage75.
Chapter7.UsingtheSetupUtilityprogram73
Page 86

Selectingastartupdevice
Ifyourcomputerdoesnotstartupfromadevicesuchasthediscorharddiskdriveasexpected,dooneof
thefollowingtoselectthestartupdeviceyouwant.
Selectingatemporarystartupdevice
Usethisproceduretoselectatemporarystartupdevice.
Note:Notalldiscsandharddiskdrivesarebootable.
1.T urnoffyourcomputer.
2.RepeatedlypressandreleasetheF12keywhenturningonthecomputer.WhenthePleaseselect
bootdevicewindowdisplays,releasetheF12key.
3.SelectthedesiredstartupdeviceandpressEnter.Thecomputerwillstartupfromthedeviceyou
selected.
Note:SelectingastartupdevicefromthePleaseselectbootdevicewindowdoesnotpermanentlychange
thestartupsequence.
Selectingorchangingthestartupdevicesequence
Tovieworpermanentlychangetheconguredstartupdevicesequence,dothefollowing:
1.StarttheSetupUtilityprogram.See“StartingtheSetupUtilityprogram”onpage71.
2.FromtheSetupUtilityprogrammainmenu,selectStartup.
3.SelectthedevicesforthePrimaryStartupSequence,theAutomaticStartupSequence,andtheError
StartupSequence.Readtheinformationdisplayedontherightsideofthescreen.
4.PressF10tosavechangesandexittheSetupUtilityprogram.See“ExitingtheSetupUtilityprogram”
onpage75.
EnablingErPcompliancemode
Youcanenabletheenergy-relatedproductsdirective(ErP)compliancemodethroughthePowermenuinthe
SetupUtilityprogramtoreducetheconsumptionofelectricitywhenyourcomputerisinstandbyoroffmode.
ToenableErPcompliancemodeintheSetupUtilityprogram,dothefollowing:
1.StarttheSetupUtilityprogram.See“StartingtheSetupUtilityprogram”onpage71.
2.FromtheSetupUtilityprogrammainmenu,selectPower➙EnhancedPowerSavingMode,and
pressEnter.
3.SelectEnabledandpressEnter.
4.FromthePowermenu,selectAutomaticPowerOnandpressEnter.
5.SelectWakeonLanandpressEnter.
6.SelectDisabledandpressEnter.
7.PressF10tosavechangesandexittheSetupUtilityprogram.PressEnterwhenpromptedtoconrm
theexit.
Note:WhenErPcompliancemodeisenabled,youcanwakeupyourcomputerbydoingoneofthefollowing:
•Pressingthepowerswitch
•Enablingthewakeuponalarmfeature
Thewakeuponalarmfeatureenablesyourcomputertowakeupatasettime.Toenablethewake
uponalarmfeature,dothefollowing:
74ThinkCentreUserGuide
Page 87

1.StarttheSetupUtilityprogram.
2.FromtheSetupUtilityprogrammainmenu,selectPower➙AutomaticPowerOn,andpressEnter.
3.SelectWakeUponAlarmandpressEnter.Thenfollowtheinstructionsonthescreen.
4.PressF10tosavechangesandexittheSetupUtilityprogram.PressEnterwhenpromptedto
conrmtheexit.
•Enablingtheafterpowerlossfeature
Theafterpowerlossfeatureenablesyourcomputertowakeupwhenthepowersupplyresumesaftera
suddenlossofelectricity.Toenabletheafterpowerlossfeature,dothefollowing:
1.StarttheSetupUtilityprogram.
2.FromtheSetupUtilityprogrammainmenu,selectPower➙AfterPowerLoss,andpressEnter.
3.SelectPowerOnandpressEnter.
4.PressF10tosavechangesandexittheSetupUtilityprogram.PressEnterwhenpromptedto
conrmtheexit.
ExitingtheSetupUtilityprogram
Afteryounishviewingorchangingsettings,pressEsctoreturntotheSetupUtilityprogrammainmenu.
YoumighthavetopressEscseveraltimes.Dooneofthefollowing:
•Ifyouwanttosavethenewsettings,pressF10tosavechangesandexittheSetupUtilityprogram.
•Ifyoudonotwanttosavethesettings,selectExit➙DiscardChangesandExit,andthenpressEnter.
WhentheResetWithoutSavingwindowshows,selectYes,andthenpressEntertoexittheSetup
Utilityprogram.
•Ifyouwanttoreturntothedefaultsettings,pressF9toloadthedefaultsettings,andthenpressF10to
saveandexittheSetupUtilityprogram.
Chapter7.UsingtheSetupUtilityprogram75
Page 88

76ThinkCentreUserGuide
Page 89

Chapter8.Updatingsystemprograms
ThischapterprovidesinformationaboutupdatingthePOSTandBIOS,andhowtorecoverfromaPOST
andBIOSupdatefailure.
Usingsystemprograms
Systemprogramsarethebasiclayerofsoftwarebuiltintoyourcomputer.Systemprogramsincludethe
POST,theBIOS,andtheSetupUtilityprogram.ThePOSTisasetoftestsandproceduresthatare
performedeachtimeyouturnonyourcomputer.TheBIOSisalayerofsoftwarethattranslatesinstructions
fromotherlayersofsoftwareintoelectricalsignalsthatthecomputerhardwarecanexecute.Youcanuse
theSetupUtilityprogramtovieworchangethecongurationsettingsofyourcomputer.SeeChapter7
“UsingtheSetupUtilityprogram”onpage71
Yourcomputersystemboardhasamodulecalledelectricallyerasableprogrammableread-onlymemory
(EEPROM,alsoreferredtoasashmemory).Y oucaneasilyupdatethePOST,theBIOS,andtheSetup
Utilityprogrambystartingyourcomputerwithasystem-program-updatediscorrunningaspecialupdate
programfromyouroperatingsystem.
LenovomightmakechangesandenhancementstothePOSTandBIOS.Whenupdatesarereleased,they
areavailableasdownloadablelesontheLenovoWebsiteathttp://www.lenovo.com.Instructionsforusing
thePOSTandBIOSupdatesareavailableinaTXTlethatisincludedwiththeupdateles.Formost
models,youcandownloadeitheranupdateprogramtocreateasystem-program-updatediscoranupdate
programthatcanberunfromtheoperatingsystem.
fordetailedinformation.
Updating(ashing)theBIOSfromadisc
Thissectionprovidesinstructionsonhowtoupdate(ash)theBIOSfromadisc.
Note:Y oucandownloadaself-startingbootablediscimage(knownasanISOimage)withthesystem
programupdatestocreateasystem-program-updatedisc.Goto:
http://www.lenovo.com/support
Toupdate(ash)theBIOSfromadisc,dothefollowing:
1.T urnoffyourcomputer.
2.RepeatedlypressandreleasetheF12keywhenturningonthecomputer.WhentheStartupDevice
Menuopens,releasetheF12key.
3.OntheStartupDeviceMenu,selectthedesiredopticaldriveasthestartupdevice.Then,insertthe
discintothisopticaldriveandpressEnter.Theupdatebegins.
4.Whenpromptedtochangetheserialnumber,itissuggestedthatyoudonotmakethischangeby
pressingN.However,ifyoudowanttochangetheserialnumber,pressY,thentypeintheserialnumber
andpressEnter.
5.Whenpromptedtochangethemachinetypeandmodel,itissuggestedthatyoudonotmakethis
changebypressingN.However,ifyoudowanttochangethemachinetypeandmodel,pressY,then
typeinthemachinetypeandmodelandpressEnter.
6.Followtheinstructionsonthescreentocompletetheupdate.Aftertheupdateiscompleted,removethe
discfromtheopticaldrive.
©CopyrightLenovo2011
77
Page 90

Updating(ashing)theBIOSfromyouroperatingsystem
Note:BecauseLenovomakesconstantimprovementstoitsWebsites,theWebpagecontentsaresubject
tochangewithoutnotice,includingthecontentsreferencedinthefollowingprocedure.
Toupdate(ash)theBIOSfromyouroperatingsystem,dothefollowing:
1.Gotohttp://www.lenovo.com/support.
2.Dothefollowingtolocatethedownloadablelesforyourmachinetype:
a.ClickDownload&Drivers.
b.Intheleftpane,clickDownloadsanddrivers.
c.FromtheBranddrop-downlistbox,selectDesktops.
d.FromtheFamilydrop-downlistbox,selectthefamilyname.
e.ClickContinue.
f.FromtheReneresultsdrop-downlistbox,selectBIOS.
g.ClicktheBIOSupdatelink.
3.ClicktheTXTlethatcontainstheinstructionsforupdating(ashing)theBIOSfromyouroperating
system.
4.Printtheseinstructions.Thisisveryimportantbecausetheseinstructionswillnotbedisplayedon
thescreenafterthedownloadbegins.
5.Followtheprintedinstructionstodownload,extract,andinstalltheupdate.
RecoveringfromaPOST/BIOSupdatefailure
IfthepowertoyourcomputerisinterruptedwhilethePOSTandBIOSisbeingupdated,yourcomputer
mightnotrestartcorrectly.Ifthishappens,performthefollowingproceduretorecoverfromthePOSTand
BIOSupdatefailure.ThisprocedureiscommonlycalledBoot-blockRecovery.
1.Removeallmediafromthedrivesandturnoffallattacheddevicesandthecomputer.Then,disconnect
allpowercordsfromelectricaloutletsanddisconnectallcablesthatareconnectedtothecomputer.
2.Openthecomputercover.See“Removingthecomputercover”onpage32.
3.LocatetheClearCMOS/Recoveryjumperonthesystemboard.See“Locatingpartsonthesystem
board”onpage11.
4.RemoveanycablesthatimpedeaccesstotheClearCMOS/Recoveryjumper.
5.Movethejumperfromthestandardposition(pin1andpin2)tothemaintenanceposition(pin2and
pin3).
6.ReconnectanycablesthatweredisconnectedandreinstallthePCIcardifremoved.
7.Closethecomputercoverandreconnectthepowercordsforthecomputerandmonitortoelectrical
outlets.See“Completingthepartsreplacement”onpage60.
8.T urnonthecomputerandtheninsertthePOSTandBIOSupdate(ashupdate)discintotheoptical
drive.Waitafewminutes.Then,therecoverysessionbegins.Therecoverysessionwilltaketwoto
threeminutes.Duringthistime,awarningmessagewillbedisplayedandnoactionisneededfromyou.
9.Aftertherecoverysessioniscompleted,therewillbenovideo,andyourcomputerwillautomatically
turnoff.
10.Repeatstep1throughstep4.
11.MovetheClearCMOS/Recoveryjumperbacktothestandardposition(pin1andpin2).
12.ReconnectanycablesthatweredisconnectedandreinstallthePCIcardifremoved.
13.Closethecomputercoverandreconnectanycablesthatweredisconnected.
78ThinkCentreUserGuide
Page 91

14.T urnonthecomputertorestarttheoperatingsystem.
Chapter8.Updatingsystemprograms79
Page 92

80ThinkCentreUserGuide
Page 93

Chapter9.Preventingproblems
Thischapterprovidesinformationthatcanhelpyouavoidcommonproblemsandkeepyourcomputer
runningsmoothly.
Keepingyourcomputercurrent
Insomesituationsyoumaynditnecessarytohavethemostcurrentsoftwareprograms,devicedrivers,or
operatingsystem.Thissectionexplainshowtogetthelatestupdatesforyourcomputer.
Selectanyofthefollowingtopics:
•“Gettingthelatestdevicedriversforyourcomputer”onpage81
•“Updatingyouroperatingsystem”onpage81
•“UsingSystemUpdate”onpage81
Gettingthelatestdevicedriversforyourcomputer
YoucandownloadandinstallupdateddevicedriversfromtheLenovoWebsitebydoingthefollowing:
Attention:DonotdownloadupdateddevicedriversfromtheWindowsUpdateWebsite.Thedevice
driversprovidedontheWindowsWebsitehavenotbeentestedbyLenovoandusingthemmightcause
unexpectedproblems.ObtainupdateddevicedriversfromLenovo.
1.Gotohttp://www.lenovo.com/support.
2.ClickDownloadsanddrivers.
3.Selectthemachinetypeofyourcomputerfromthemachinetypelist.
4.Clickthecategoryofdeviceforwhichyouneedthedevicedriver.
5.Clicktheappropriatedevicedriver.
6.Downloadandinstallthedevicedriver.
Updatingyouroperatingsystem
MicrosoftmakesupdatesavailableforthevariousWindowsoperatingsystemsthroughtheMicrosoft
WindowsUpdateWebsite.TheWebsiteautomaticallydetermineswhatWindowsupdatesareavailablefor
yourspeciccomputerandliststhoseupdatesonly.Updatescouldincludesecurityxes,newversionsof
Windowscomponents(suchasMediaPlayer),xestootherportionsoftheWindowsoperatingsystem,
orenhancements.
Attention:DonotdownloadupdateddevicedriversfromtheWindowsWebsite.Thedevicedrivers
providedontheWindowsWebsitehavenotbeentestedbyLenovoandusingthemmightcauseunexpected
problems.ObtainupdateddevicedriversfromLenovo.See“Gettingthelatestdevicedriversforyour
computer”onpage81
ToaccesstheMicrosoftWindowsUpdatesite,dothefollowing:
1.Gotohttp://windowsupdate.microsoft.com/.
2.Followtheinstructionsonthescreen.
formoreinformation.
UsingSystemUpdate
TheSystemUpdateprogramhelpsyoukeepthesoftwareonyourcomputerup-to-date.Updatepackages
arestoredonLenovoserversandcanbedownloadedfromtheLenovoSupportWebsite.Updatepackages
©CopyrightLenovo2011
81
Page 94

cancontainapplications,devicedrivers,BIOSashes,orsoftwareupdates.WhentheSystemUpdate
programconnectstotheLenovoSupportWebsite,theSystemUpdateprogramautomaticallyrecognizes
themachinetypeandmodelofyourcomputer,theinstalledoperatingsystem,andthelanguageofthe
operatingsystemtodeterminewhatupdatesareavailableforyourcomputer.TheSystemUpdateprogram
thendisplaysalistofupdatepackagesandcategorizeseachupdateascritical,recommended,and
optionaltohelpyouunderstandtheimportance.Y ouhavecompletecontrolofwhichupdatestodownload
andinstall.Afteryouselecttheupdatepackagesyouwant,theSystemUpdateprogramautomatically
downloadsandinstallstheupdateswithoutanyfurtherinterventionfromyou.
TheSystemUpdateprogramispreinstalledonmostLenovocomputersandisreadytorun.Theonly
prerequisiteisanactiveInternetconnection.Youcanstarttheprogrammanually,oryoucanusethe
schedulefeaturetoenabletheprogramtosearchforupdatesautomaticallyatspeciedintervals.Y oualso
canpredenescheduledupdatestosearchbyseverity(criticalupdates,criticalandrecommendedupdates,
orallupdates)sothelistyouchoosefromcontainsonlythoseupdatetypesthatareofinteresttoyou.
IftheSystemUpdateprogramcamewithyourcomputer,youcanopenitbycompletingthefollowing
procedure:
OntheWindowsVistaoperatingsystem,dothefollowing:
1.ClickStart➙AllPrograms➙ThinkVantage.
2.ClickSystemUpdate.
OntheWindows7operatingsystem,dothefollowing:
1.ClickStart➙LenovoThinkVantageTools.
2.Double-clickUpdateandDrivers.
IftheSystemUpdateprogramisnotcurrentlyinstalledonyourcomputer,youcandownloaditfromthe
LenovoSupportWebsiteathttp://www.lenovo.com/support.
Cleaningandmaintenance
Withappropriatecareandmaintenanceyourcomputerwillserveyoureliably.Thefollowingtopicsoffer
informationtohelpyoukeepyourcomputerintopworkingorder.
•“Basics”onpage82
•“Cleaningyourcomputer”onpage83
–“Computer”onpage83
–“Keyboard”onpage83
–“Opticalmouse”onpage83
–“Displayscreen”onpage83
•“Goodmaintenancepractices”onpage84
Basics
Herearesomebasicpointsaboutkeepingyourcomputerfunctioningproperly:
•Keepyourcomputerinaclean,dryenvironment.Makesureitrestsonaat,steadysurface.
•Donotplaceitemsontopofthemonitororcoveranyoftheventsinthemonitororcomputer.These
ventsprovideairowtokeepyourcomputerfromoverheating.
•Keepfoodanddrinksawayfromallpartsofyourcomputer.Foodparticlesandspillsmightmakethe
keyboardandmousestickandunusable.
82ThinkCentreUserGuide
Page 95

•Donotgetthepowerswitchesorothercontrolswet.Moisturecandamagethesepartsandcausean
electricalhazard.
•Alwaysdisconnectapowercordbygraspingtheplug,butnotthecord.
Cleaningyourcomputer
Itisagoodpracticetocleanyourcomputerperiodicallytoprotectthesurfacesandensuretrouble-free
operation.
CAUTION:
Besuretoturnoffthecomputerandmonitorpowerswitchesbeforecleaningthecomputerand
monitorscreen.
Computer
Useonlymildcleaningsolutionsandadampclothtocleanthepaintedsurfacesofthecomputer.
Keyboard
Tocleanyourcomputerkeyboard,dothefollowing:
1.Applysomeisopropylrubbingalcoholtoasoft,dust-freecloth.
2.Wipeeachkeytopsurfacewiththecloth.Wipethekeysonebyone;ifyouwipeseveralkeysatatime,
theclothmayhookontoanadjacentkeyandpossiblydamageit.Makesurethatnoliquiddripsonto
orbetweenthekeys.
3.T oremoveanycrumbsordustfrombeneaththekeys,youcanuseacamerablowerwithabrush
orcoolairfromahairdryer.
Note:Avoidsprayingcleanerdirectlyontothedisplayorthekeyboard.
Opticalmouse
Thissectionprovidesinstructionsonhowtocleananopticalmouse.
Anopticalmouseusesalight-emittingdiode(LED)andanopticalsensortonavigatethepointer.Ifthe
pointeronthescreendoesnotmovesmoothlywiththeopticalmouse,youmightneedtocleanthemouse.
Tocleananopticalmouse,dothefollowing:
1.T urnoffyourcomputer.
2.Disconnectthemousecablefromthecomputer.
3.T urnthemouseupsidedowntocheckthelens.
a.Ifthereisasmudgeonthelens,gentlycleantheareawithaplaincotton-tippedswab.
b.Ifthereisdebrisinthelens,gentlyblowthedebrisawayfromthearea.
4.Checkthesurfaceonwhichyouareusingthemouse.Ifyouhaveaveryintricatepictureorpattern
beneaththemouse,itmaybedifcultforthedigitalsignalprocessor(DSP)todeterminechanges
inthemouseposition.
5.Reconnectthemousecabletothecomputer.
6.T urnyourcomputerbackon.
Displayscreen
Dustbuildupcompoundsproblemsassociatedwithglare.Remembertocleanyourmonitorscreen
periodically.See“Cleaningaat-panelmonitorsurface”onpage84
onpage84.
or“Cleaningaglass-screensurface”
Chapter9.Preventingproblems83
Page 96

Cleaningaat-panelmonitorsurface
Ifyouhaveaat-panelcomputerdisplaythathasaexiblelmsurface,dothefollowingtocleanthespecial
surface.Wipeitgentlywithasoft,drycloth,orblowonthescreentoremovegritandotherlooseparticles.
ThenmoistenaclothwithLCDcleanerandwipethescreensurface.
Manycomputersupplystorescarrythespecialcleaninguidsfordisplays.Usecleaninguidsdevelopedfor
LCDdisplaysonly.Firstapplytheuidtoalint-free,softcloth,thencleantheLCDdisplay.Somecomputer
supplystorescarrypre-moistenedtowelettesforLCDmaintenance.
Cleaningaglass-screensurface
Tocleanaglass-screensurface,wipeitgentlywithasoft,drycloth,orblowonthescreentoremovegritand
otherlooseparticles.Thenuseasoftclothmoistenedwithanonabrasiveliquidglasscleaner.
Goodmaintenancepractices
Byperformingafewgoodmaintenancepractices,youcanmaintaingoodcomputerperformance,protect
yourdata,andbepreparedincaseofacomputerfailure.
•Emptyyourrecyclebinonaregularbasis.
•RuntheWindowsDiskDefragmenterprogramoccasionallytopreventperformanceproblemscausedby
anexcessivenumberoffragmentedles.
•CleanoutyourInbox,SentItems,andDeletedItemsfoldersinyoure-mailapplicationonaregularbasis.
•Makebackupcopiesofcriticaldataonremovablemediamemoryatregularintervalsandstorethe
removablemediainasafelocation.Thefrequencyofmakingbackupcopiesdependsonhowcriticalthe
dataistoyouoryourbusiness.Lenovomakesanumberofremovable-mediastoragedevicesavailable
asoptions,suchasCD-RWdrivesandrecordableDVDdrives.
•Backupyourentireharddiskdriveonaregularbasis.
•IfyouareusingtheWindowsVistaoperatingsystem,useorscheduleSystemRestoretotakeasystem
snapshotperiodically.
Note:Alwaystakeasnapshotbeforeinstallingnewdevicedrivers,updatingsoftware,orinstalling
newsoftware.
•Keepyourcomputersoftwareup-to-date.See“Keepingyourcomputercurrent”onpage81
information.
•Keepalogbook.Entriesmightincludemajorsoftwareorhardwarechanges,device-driverupdates,
intermittentproblemsandwhatyoudidtoresolvethem,andanyminorissuesyoumighthave
experienced.AlogbookcanhelpyouoraLenovotechniciandetermineifaproblemisrelatedtochange
inhardware,changeinsoftware,orsomeotheractionthatmighthavetakenplace.
•CreateProductRecoverydiscs.See“Creatingandusingrecoverymedia”onpage63
aboutusingProductRecoverydiscstorestoretheharddiskdrivetothefactorydefaultsettings.
•Createrescuemedia.See“Creatingandusingarescuemedium”onpage66formoreinformationabout
usingaRescuemediumsuchasaCDorDVDtorecoverfromfailuresthatpreventyoufromgaining
accesstotheWindowsenvironmentortheRescueandRecoveryworkspaceonyourharddiskdrive.
formoreinformation
Movingyourcomputer
Takethefollowingprecautionsbeforemovingyourcomputer.
1.Backupalllesanddatafromtheharddiskdrive.Thereareavarietyofbackupprogramsavailable
commercially.Youroperatingsystemalsomighthaveabackupprogramthatyoucanuse.Lenovo
providestheRescueandRecoveryprogramtohelpyoubackupandrestoredata.See“Performing
backupandrecoveryoperations”onpage64formoreinformation.
2.Removeallmedia(diskettes,compactdiscs,tapes,andsoon)fromthedrives.
formore
84ThinkCentreUserGuide
Page 97

3.T urnoffthecomputerandallattacheddevices.Y ourharddiskdriveautomaticallyparkstheread/write
headinanondataarea.Thispreventsdamagetotheharddiskdrive.
4.Unplugthepowercordsfromelectricaloutlets.
5.Disconnectcommunicationcables,suchasmodemornetworkcables,fromtheoutletsrst,andthen
disconnecttheotherendsfromthecomputer.
6.Notewhereanyremainingcablesareattachedtothecomputer;then,removethem.
7.Ifyousavedtheoriginalshippingcartonsandpackingmaterials,usethemtopacktheunits.Ifyouare
usingdifferentcartons,cushiontheunitstoavoiddamage.
Chapter9.Preventingproblems85
Page 98

86ThinkCentreUserGuide
Page 99

Chapter10.Troubleshootinganddiagnostics
Thischapterdescribessomebasictroubleshootinganddiagnosticprograms.Ifyourcomputerproblem
isnotdescribedhere,seeChapter11“Gettinginformation,help,andservice”onpage107
troubleshootingresources.
Basictroubleshooting
Thefollowingtableprovidesinformationtohelpyoutroubleshootyourcomputerproblems.
Note:Ifyoucannotcorrecttheproblem,havethecomputerserviced.Foralistofserviceandsupport
telephonenumbers,refertotheThinkCentreSafetyandWarrantyGuidethatcomeswithyourcomputeror
gototheLenovoSupportWebsiteathttp://www.lenovo.com/support/phone.
SymptomAction
Thecomputerdoesnotstart
whenyoupressthepower
switch.
Themonitorscreenisblank.
Thekeyboarddoesnotwork.
Themousedoesnotwork.
Verifythat:
•Thepowercordiscorrectlyconnectedtotherearofthecomputerandtoa
workingelectricaloutlet.
•Ifyourcomputerhasasecondarypowerswitchontherearofthecomputer,
makesurethatitisswitchedon.
•Thepowerindicatoronthefrontofthecomputerison.
•Thecomputervoltagematchesthevoltageavailableattheelectricaloutletfor
yourcountryorregion.
Verifythat:
•Themonitorsignalcableiscorrectlyconnectedtothemonitorandtothe
appropriatemonitorconnectoronthecomputer.
•Themonitorpowercordiscorrectlyconnectedtothemonitorandtoaworking
electricaloutlet.
•Themonitoristurnedonandthebrightnessandcontrastcontrolsareset
correctly.
•Thecomputervoltagematchesthevoltageavailableattheelectricaloutletfor
yourcountryorregion.
•Ifyourcomputerhastwomonitorconnectors,besuretousetheconnector
onthegraphicscard.
Verifythat:
•Thecomputeristurnedon.
•ThekeyboardissecurelyconnectedtoaUSBconnectoronthecomputer.
•Nokeysarestuck.
Verifythat:
•Thecomputeristurnedon.
•ThemouseissecurelyconnectedtoaUSBconnectoronthecomputer.
•Themouseisclean.Referto“Opticalmouse”onpage83
foradditional
forfurtherinformation.
©CopyrightLenovo2011
87
Page 100

SymptomAction
Theoperatingsystemdoesnot
start.
Thecomputerbeepsmultiple
timesbeforetheoperating
systemstarts.
Verifythat:
•Thestartupsequenceincludesthedevicewheretheoperatingsystemresides.
Usually,theoperatingsystemisontheharddiskdrive.Formoreinformation,
see“Selectingastartupdevice”onpage74
Verifythatnokeysarestuck.
.
Troubleshootingprocedure
Usethefollowingprocedureasastartingpointfordiagnosingproblemsyouareexperiencingwithyour
computer:
1.Verifythatthecablesforallattacheddevicesareconnectedcorrectlyandsecurely.
2.Verifythatallattacheddevicesthatrequireacpowerareconnectedtoproperlygrounded,functioning
electricaloutlets.
3.VerifythatallattacheddevicesareenabledintheBIOSsettingsofyourcomputer.Formoreinformation
aboutaccessingandchangingtheBIOSsettings,refertoyourChapter7“UsingtheSetupUtility
program”onpage71.
4.Gotothe“T roubleshooting”onpage88andfollowtheinstructionsforthetypeofproblemyouare
experiencing.IftheTroubleshootinginformationdoesnothelpyouresolveaproblem,continuewiththe
nextstep.
5.T ryusingapreviouslycapturedcongurationtoseeifarecentchangetohardwareorsoftwaresettings
hascausedaproblem.Beforerestoringapreviousconguration,captureyourcurrentcongurationin
casetheoldercongurationsettingsdonotsolvetheproblemorhaveadverseaffects.Torestorea
capturedconguration,dothefollowing:
•OntheWindowsVistaoperatingsystem,clickStart➙ControlPanel➙SystemandMaintenance
➙System➙SystemProtection➙SystemRestore.
•OntheWindows7operatingsystem,clickStart➙ControlPanel➙SystemandSecurity➙
System➙SystemProtection➙SystemRestore.
Ifthisdoesnotcorrecttheproblem,continuewiththenextstep.
6.Runthediagnosticprograms.See“Diagnosticprograms”onpage104formoreinformation.
•Ifthediagnosticprogramsdetectahardwarefailure,contacttheLenovoCustomerSupportCenter.
SeeChapter11“Gettinginformation,help,andservice”onpage107formoreinformation.
•Ifyouareunabletorunthediagnosticprograms,contacttheLenovoCustomerSupportCenter.See
Chapter11“Gettinginformation,help,andservice”onpage107formoreinformation.
•Ifthediagnosticprogramsdonotdetectahardwarefailure,continuewiththenextstep.
7.Useanantivirusprogramtoseeifyourcomputerhasbeeninfectedbyavirus.Iftheprogramdetectsa
virus,removethevirus.
8.Ifnoneoftheseactionssolvetheproblem,seektechnicalassistance.SeeChapter11“Getting
information,help,andservice”onpage107formoreinformation.
Troubleshooting
Usethetroubleshootinginformationtondsolutionstoproblemsthathavedenitesymptoms.
Ifthesymptomyourcomputerisexperiencingoccurredimmediatelyafteryouinstalledanewhardware
optionornewsoftware,dothefollowingbeforereferringtothetroubleshootinginformation:
88ThinkCentreUserGuide
 Loading...