

Page 1
Service Literature
CBX32MV (HFC−410A) SERIES UNITS
TABLE OF CONTENTS
Introduction 1. . . . . . . . . . . . . . . . . . . . . . . . . . . . . . . . . . .
Model Number Identification.. 2. . . . . . . . . . . . . . . . . . .
Specifications / Electrical Data 2. . . . . . . . . . . . . . . . . .
Blower Performance 4. . . . . . . . . . . . . . . . . . . . . . . . . . .
Parts Arrangement 10. . . . . . . . . . . . . . . . . . . . . . . . . . . .
I− Application 11. . . . . . . . . . . . . . . . . . . . . . . . . . . . . . . . .
II− Unit Components 11. . . . . . . . . . . . . . . . . . . . . . . . . . .
III− Troubleshooting the Variable Speed Motor 15. . . . .
IV− Optional Electric Heat 17. . . . . . . . . . . . . . . . . . . . . . .
V− Optional Humidity Control 23. . . . . . . . . . . . . . . . . . . .
VI− Configuration Modifications 30. . . . . . . . . . . . . . . . . .
VII− Start Up Operation 34. . . . . . . . . . . . . . . . . . . . . . . . .
VIII− Operating Characteristics 35. . . . . . . . . . . . . . . . . .
XI− Maintenance 35. . . . . . . . . . . . . . . . . . . . . . . . . . . . . .
X− Wiring and Operation Sequence 36. . . . . . . . . . . . . .
Corp. 0206−L3
Revised 02−2010
CBX32MV
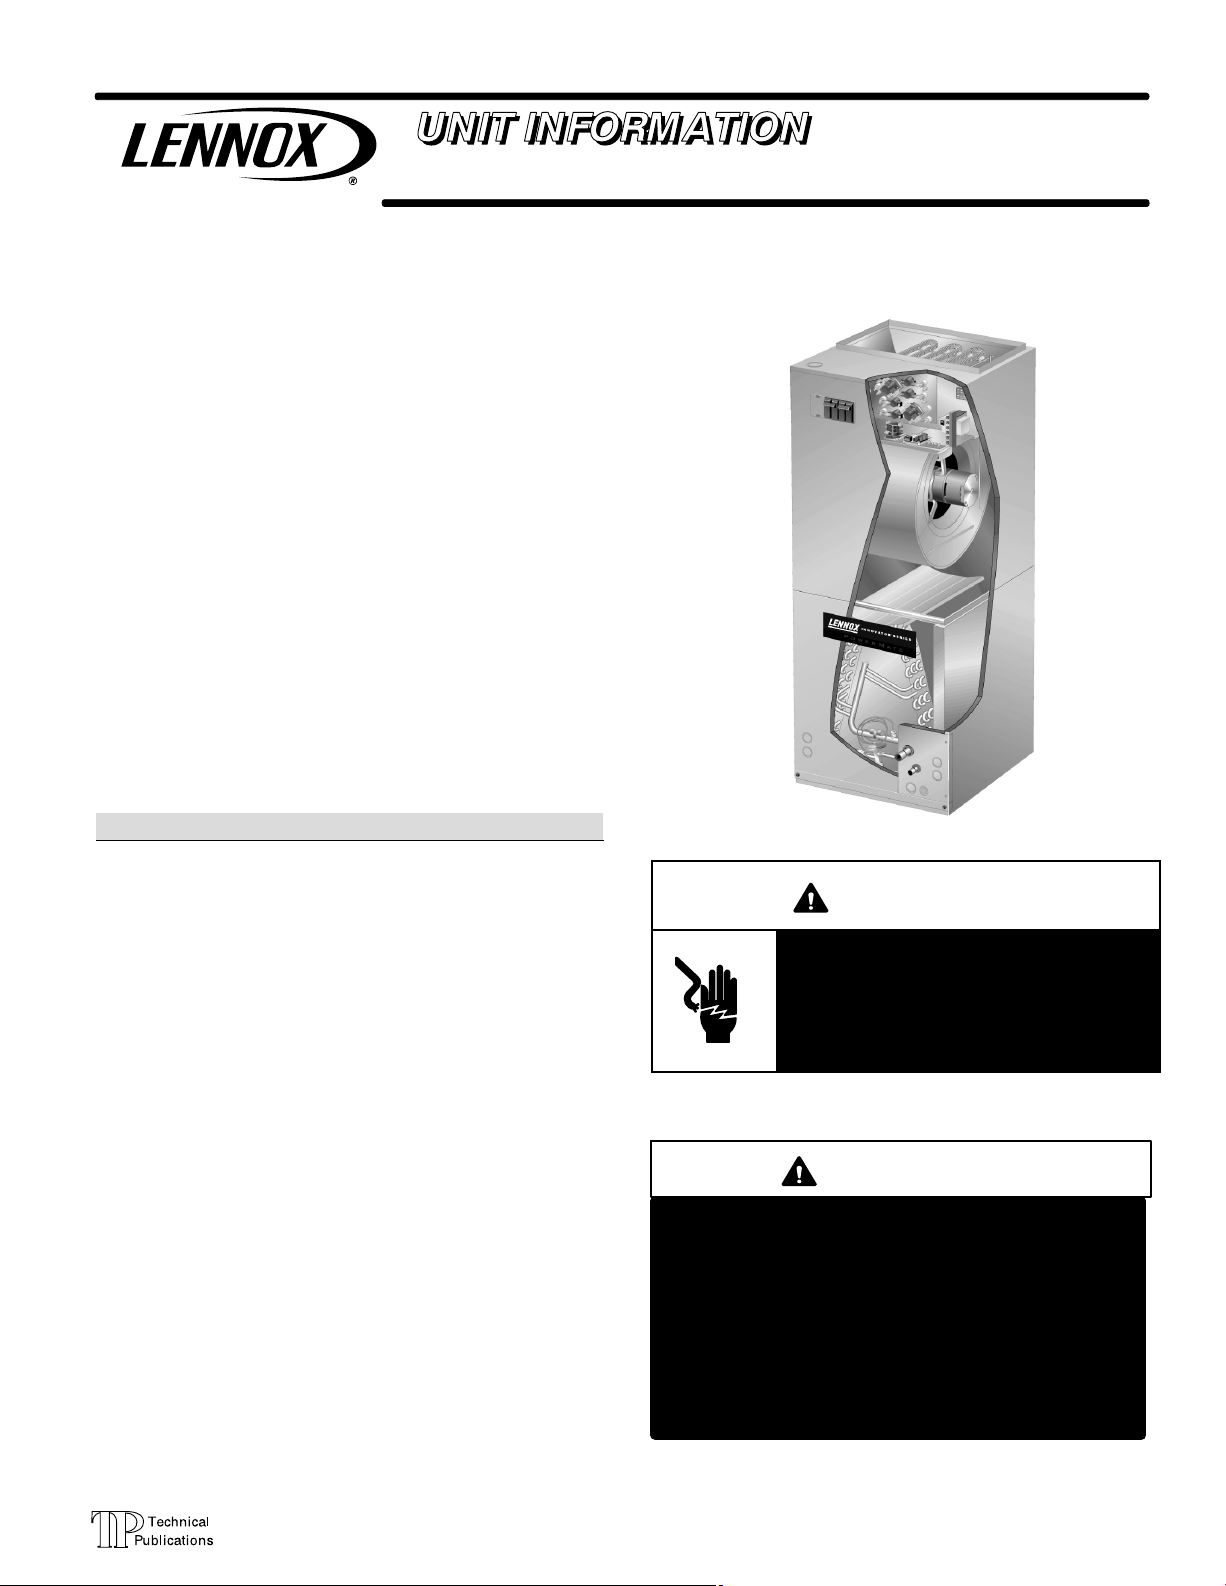
Introduction
The CBX32MV is a high efficiency residential split system
blower/coil featuring a variable speed motor controlled by an
electronic blower drive control (BDC).
CBX32MV series units are designed to be matched with
Lennox two-speed or single-speed HFC−410A condensing
units and heat pumps. Several models are available in sizes
ranging from 1.5 through 5 tons. All units are equipped with
factory installed check and expansion valve for cooling or heat
pump applications.
Electric heat is available in several voltages and KW sizes,
and can be field installed in the cabinet.
Some CBX32MV applications may include the optional
Lennox ComfortSense
Efficiency Plus Comfort Management Control (CCB1). The
purpose of both controls is to vary indoor blower speed in
response to indoor dehumidification demand. When a
two-speed outdoor unit is used, compressor speed can
also be controlled by the SignatureStat or CCB1 in
response to indoor dehumidification demand.
Information contained in this manual is intended for use by
experienced HVAC service technicians only. All
specifications are subject to change. Procedures outlined
in this manual are presented as a recommendation only
and do not supersede or replace local or state codes.
®
7000, SignatureStatt or
WARNING
Electric shock hazard. Can cause injury
or death. Before attempting to perform
any service or maintenance, turn the
electrical power to unit OFF at disconnect switch(es). Unit may have multiple
power supplies.
ELECTROSTATIC DISCHARGE (ESD)
Precautions and Procedures
CAUTION
Electrostatic discharge can affect electronic
components. Take precautions during unit installation and service to protect the unit’s electronic
controls. Precautions will help to avoid control
exposure to electrostatic discharge by putting
the unit, the control and the technician at the
same electrostatic potential. Neutralize electrostatic charge by touching hand and all tools on an
unpainted unit surface before performing any
service procedure.
Page 1
2002 Lennox Industries Inc.
Page 2
Model Number Identification
Unit Type
CB = Air Handler
Refrigerant Type
X = R−410A
Series
Configuration
MV = Multi−Position, Variable
speed blower motor
Nominal Cooling Capacity
018/024 = 1.5 to 2 tons (5.3 to 7 kW)
024/030 = 2 to 2.5 tons (7 to 8.8 kW)
036 = 3 tons (10.6 kW)
048 = 4 tons (14.1 kW)
060 = 5 tons (17.6 kW)
068 = 5+ tons (17.6+ kW)
X
MV
−
−
230CB 32 036
−−
05
6
Minor Revision Number
Refrigerant Metering Device
2 = Fixed Orifice
3 = TXV − Bleedport (indoor unit)
4 = TXV − Non−bleedport (indoor unit)
5 = TXV − Non−bleedport (outdoor unit)
6 = TXV − R−410A Non−bleedport (indoor unit)
Voltage
230 = 208/230V−60hz−1ph
Specifications
General Data Model Number CBX32MV-018/024 CBX32MV-024/030 CBX32MV-036
Connections
in. (mm)
Nominal cooling capacity − tons (kW)
Refrigerant
Suction (vapor) line − sweat
Liquid line − sweat
1.5 − 2 (5.3 − 7) 2 − 2.5 (7 − 8.8) 3 (10.6)
R−410A R−410A R−410A
5/8 (15.8) 3/4 (19) 3/4 (19)
3/8 (9.5) 3/8 (9.5) 3/8 (9.5)
Condensate drain (fpt)
Indoor
Coil
Blower Data
Filters
Shipping Data − 1 Package lbs. (kg) 126 (57) 152 (69) 183 (83)
ELECTRICAL DATA
Voltage − phase − 60hz 208/230V−1ph
2
Maximum overcurrent protection (unit only) 15 15 15
Minimum circuit ampacity (unit only) 5 5 5
Tube outside diameter − in. (mm)
Wheel nominal diameter x width − in. (mm)
Net face area − ft.2 (m2)
Number of rows
Fins per inch (fins per m)
Motor output − hp (W)
1
Number and size − in.
mm
(2) 3/4 (19) (2) 3/4 (19) (2) 3/4 (19)
3.56 (0.33) 4.44 (0.41) 5.0 (0.46)
3/8 (9.5) 3/8 (9.5) 3/8 (9.5)
3 3 3
12 (472) 12 (472) 12 (472)
10 x 7 (279 x 178) 10 x 8 (279 x 203) 10 x 8 (279 x 203)
1/2 (373) 1/2 (373) 1/2 (373)
(1) 15 x 20 x 1 (1) 20 x 20 x 1 (1) 20 x 22 x 1
381 x 508 x 25 508 x 508 x 25 508 x 559 x 25
208/230V−1ph 208/230V−1ph
Page 2
Page 3
Specifications
General Data Model Number CBX32MV-048 CBX32MV-060 CBX32MV-068
Nominal cooling capacity − tons (kW)
4 (14.1) 5 (17.6) 5+ (17.6+)
Connections
in. (mm)
Indoor
Coil
Blower Data
Filters
Refrigerant
Suction (vapor) line − sweat
Liquid line − sweat
Condensate drain (fpt)
Net face area − ft.2 (m2)
Tube outside diameter − in. (mm)
Number of rows
Fins per inch (fins per m)
Wheel nominal diameter x width − in. (mm)
Motor output − hp (W)
1
Number and size − in.
mm
R−410A R−410A R−410A
7/8 (22.2) 1-1/8 (28) 1-1/8 (28)
3/8 (9.5) 3/8 (9.5) 3/8 (9.5)
(2) 3/4 (19) (2) 3/4 (19) (2) 3/4 (19)
7.22 (0.67) 7.22 (0.67) 7.77 (0.72)
3/8 (9.5) 3/8 (9.5) 3/8 (9.5)
3 3 3
12 (472) 12 (472) 12 (472)
12 x 9 (305 x 229) 12 x 9 (305 x 229) 15 x 9 (381 x 229)
1 (746) 1 (746) 1 (746)
(1) 20 x 24 x 1 (1) 20 x 24 x 1 (1) 20 x 25 x 1
508 x 610 x 25 508 x 610 x 25 508 x 635 x 25
Shipping Data − 1 Package − lbs. (kg) 212 (96) 212 (96) 244 (111)
ELECTRICAL DATA
Voltage − phase − 60hz 208/230V−1ph
2
Maximum overcurrent protection (unit only) 20 20 20
208/230V−1ph 208/230V−1ph
Minimum circuit ampacity (unit only) 11 11 11
Optional CIRCUIT BREAKER KITS − Must Be Ordered Extra
Amperage 25 30 35 40 45 50 60
Single Phase 23M58 23M59 23M60 23M61 23M62 23M63 23M64
Three Phase − − − 23M65 − − − 23M66 23M67 23M68 23M69
Page 3
Page 4
Blower Data
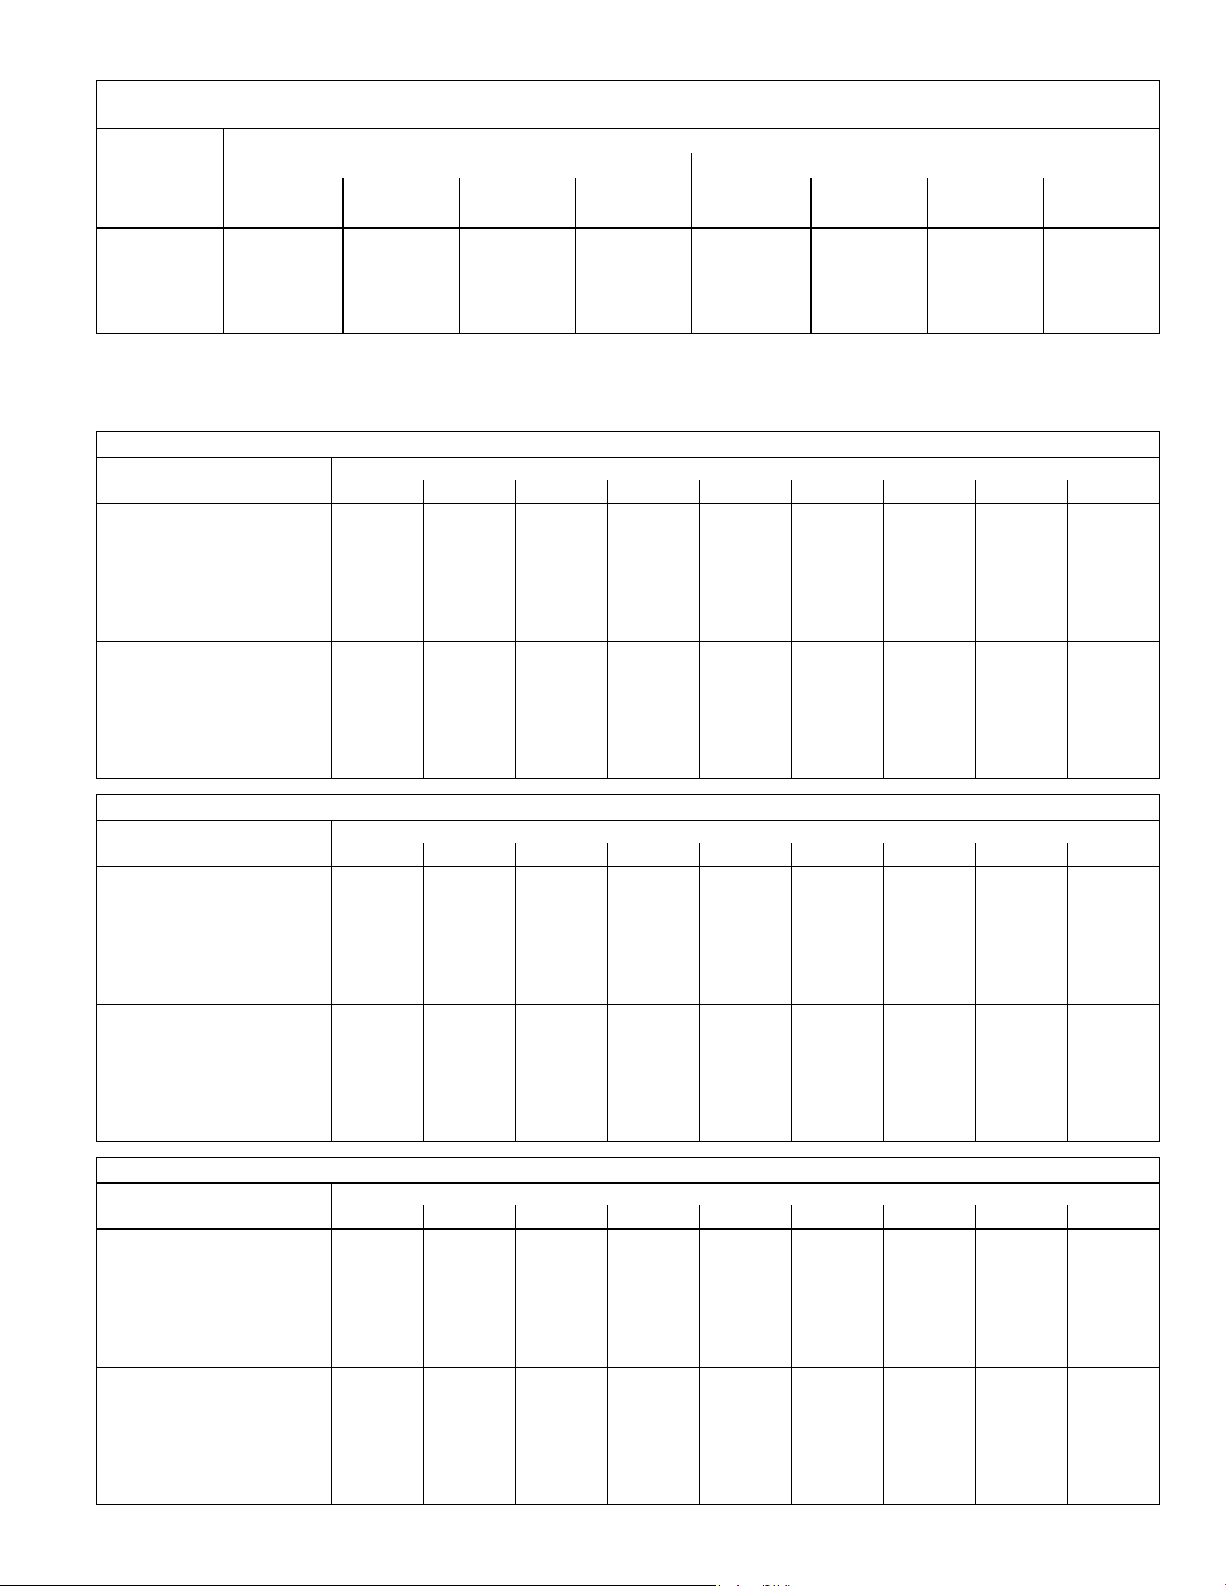
CBX32MV-018/024 BLOWER PERFORMANCE
0 through 0.80 in. w.g. (0 through 200 Pa) External Static Pressure Range
BDC3 Jumper Speed Positions
ADJUST"
Jumper
Setting
+ 715 337 855 405 1000 470 1130 535 465 220 690 325 900 425 1050 495
NORM 670 315 770 365 900 425 1035 490 425 200 620 290 825 390 950 450
− 580 275 700 330 800 375 930 440 385 180 560 265 735 345 850 400
NOTES − The effect of static pressure, filter and electric heater resistance is included in the air volumes listed.
Low speed cooling air volume is 70% of COOL speed setting. Production units September 2005 and later; continuous blower speed for is approximately 38% of
COOL speed setting. Earlier production units continuous blower speed is approximately 50% of COOL speed setting.
Harmony Zone Control applications − Low speed cooling is approximately 250 cfm (118 L/s).
Lennox Harmony IIIt Zone Control applications − Low speed cooling is 300 cfm (145 L/s)
1 2 3 4 1 2 3 4
cfm L/s cfm L/s cfm L/s cfm L/s cfm L/s cfm L/s cfm L/s cfm L/s
CBX32MV-018/024 BLOWER MOTOR WATTS AT +" (Plus) BDC3 SETTING (Adjust" Jumper at +" Setting)
BDC3 Jumper
Speed Positions
HEAT" Speed
COOL" Speed
Tap 1 100 113 126 142 154 172 190 206 230
Tap 2 155 176 197 221 237 260 278 295 310
Tap 3 237 260 289 305 314 337 356 373 390
Tap 4 338 361 379 409 433 457 447 426 406
Tap 1 36 47 61 71 81 95 106 118 135
Tap 2 89 103 11 8 129 143 163 177 197 207
Tap 3 183 198 229 248 266 290 307 327 343
Tap 4 266 294 315 330 349 373 390 411 401
HEAT" Speed COOL" Speed
Motor Watts @ Various External Static Pressures − in. wg. (Pa)
0 (0) 0.1 (25) 0.2 (50) 0.3 (75) 0.4 (100) 0.5 (125) 0.6 (150) 0.7 (175) 0.8 (200)
CBX32MV-018/024 BLOWER MOTOR WATTS AT NORM" BDC3 SETTING (Adjust" Jumper at NORM Setting)
Motor Watts @ Various External Static Pressures − in. wg. (Pa)
Speed Positions
HEAT" Speed
COOL" Speed
BDC3 Jumper
0 (0) 0.1 (25) 0.2 (50) 0.3 (75) 0.4 (100) 0.5 (125) 0.6 (150) 0.7 (175) 0.8 (200)
Tap 1 77 96 106 123 130 150 165 178 201
Tap 2 118 136 154 177 189 212 224 247 265
Tap 3 183 198 224 248 264 284 307 321 343
Tap 4 264 284 300 326 343 367 385 406 390
Tap 1 30 41 55 62 76 86 94 106 11 4
Tap 2 71 83 101 11 3 125 138 156 166 185
Tap 3 137 158 176 199 219 238 254 273 296
Tap 4 211 225 249 272 295 318 331 342 367
CBX32MV-018/024 BLOWER MOTOR WATTS AT −" (Minus) BDC3 SETTING (Adjust" Jumper at −" Setting)
Motor Watts @ Various External Static Pressures − in. wg. (Pa)
Speed Positions
HEAT" Speed
BDC3 Jumper
0 (0) 0.1 (25) 0.2 (50) 0.3 (75) 0.4 (100) 0.5 (125) 0.6 (150) 0.7 (175) 0.8 (200)
Tap 1 59 73 89 106 113 130 142 156 173
Tap 2 95 106 11 8 136 152 171 183 200 215
Tap 3 132 148 171 186 211 225 248 266 284
Tap 4 195 217 242 259 283 302 314 336 349
COOL" Speed
Tap 1 27 35 47 59 71 77 88 92 106
Tap 2 57 65 83 94 110 119 134 148 166
Tap 3 110 124 141 157 176 188 213 231 242
Tap 4 148 170 195 207 230 248 272 282 306
Page 4
Page 5
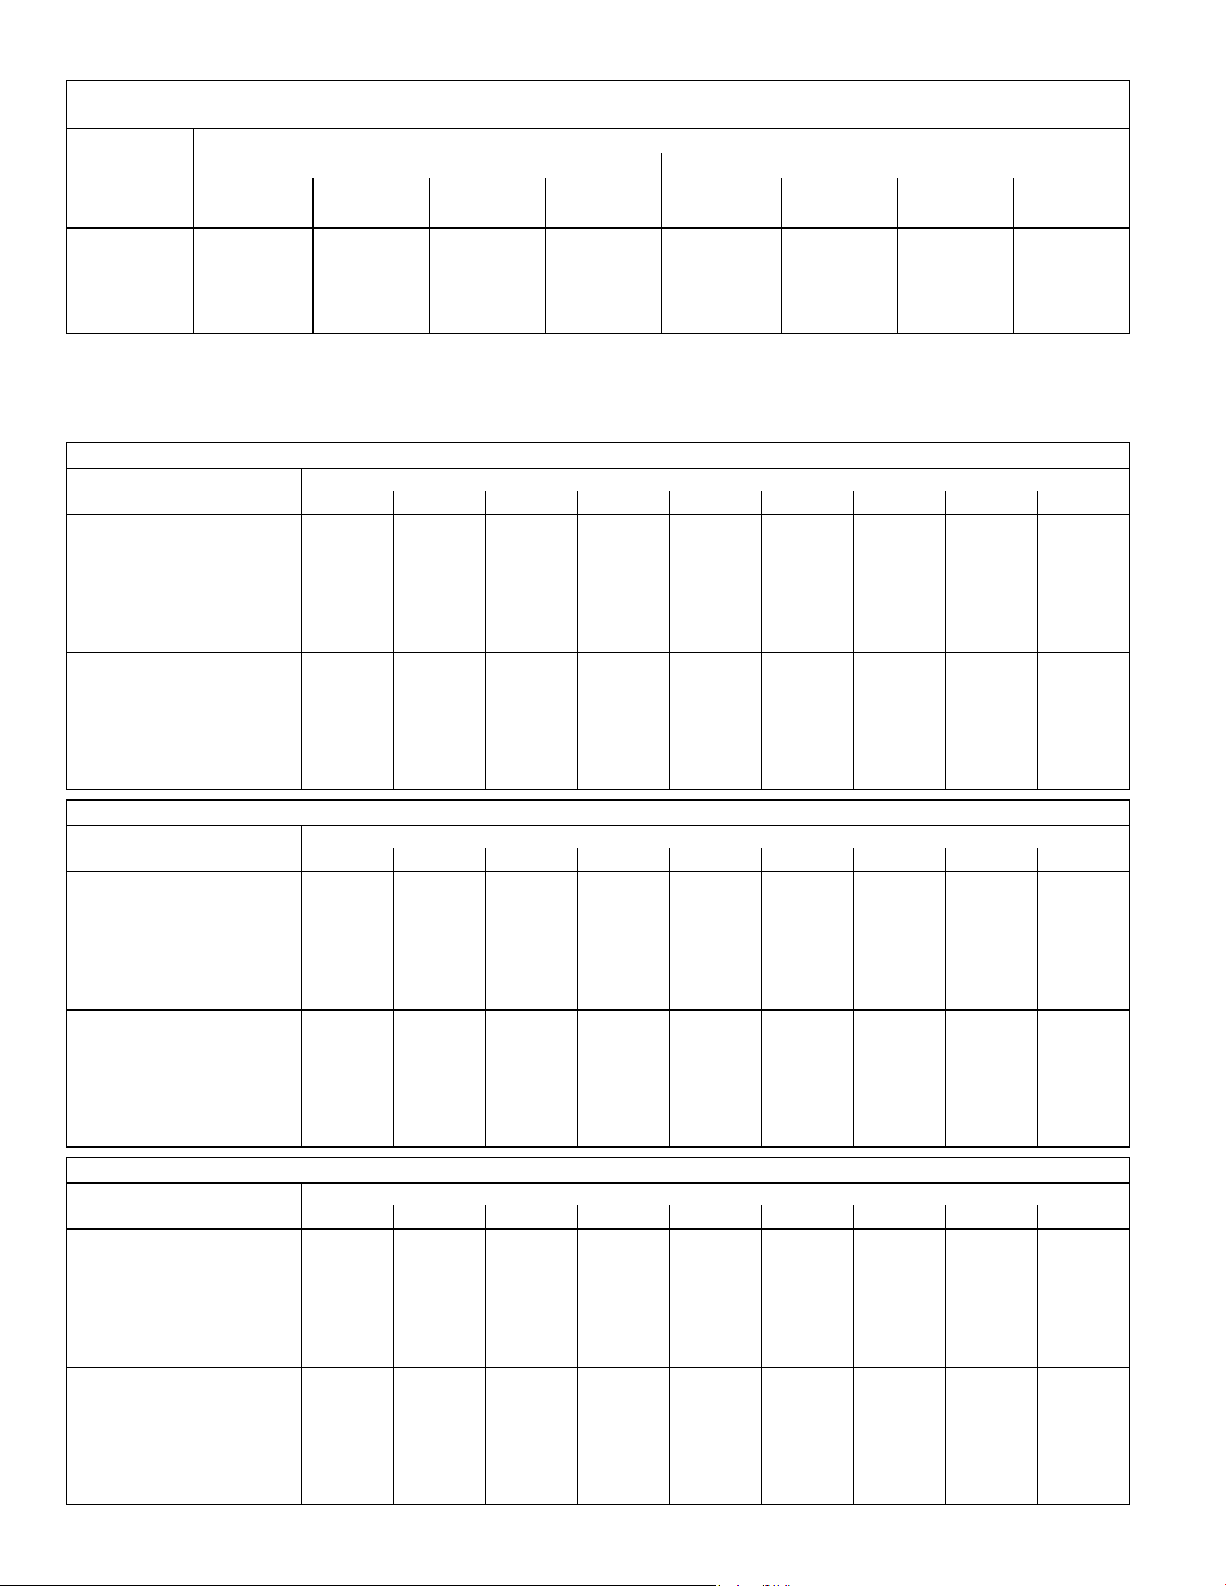
CBX32MV-024/030 BLOWER PERFORMANCE
0 through 0.80 in. w.g. (0 through 200 Pa) External Static Pressure Range
BDC3 Jumper Speed Positions
ADJUST"
Jumper
Setting
+ 800 380 935 440 1070 505 1210 570 660 310 880 415 1100 520 1320 625
NORM 725 340 850 400 975 460 1100 520 600 285 800 380 1000 470 1200 565
− 655 310 765 360 880 415 990 470 540 255 720 340 900 425 1080 510
NOTES − The effect of static pressure, filter and electric heater resistance is included in the air volumes listed.
Low speed cooling air volume is 70% of COOL speed setting. Production units September 2005 and later; continuous blower speed for is approximately 38% of
COOL speed setting. Earlier production units continuous blower speed is approximately 50% of COOL speed setting.
Harmony Zone III Control applications − Low speed cooling is approximately 300 cfm (145 L/s).
1 2 3 4 1 2 3 4
cfm L/s cfm L/s cfm L/s cfm L/s cfm L/s cfm L/s cfm L/s cfm L/s
HEAT" Speed COOL" Speed
CBX32MV-024/030 BLOWER MOTOR WATTS AT +" (Plus) BDC3 SETTING (Adjust" Jumper at +" Setting)
Motor Watts @ Various External Static Pressures − in. wg. (Pa)
Speed Positions
HEAT" Speed
BDC3 Jumper
0 (0) 0.1 (25) 0.2 (50) 0.3 (75) 0.4 (100) 0.5 (125) 0.6 (150) 0.7 (175) 0.8 (200)
Tap 1 65 90 120 145 185 210 240 250 275
Tap 2 95 125 150 185 230 265 310 345 365
Tap 3 140 190 225 250 290 320 350 405 450
Tap 4 215 250 285 315 350 390 440 480 505
COOL" Speed
Tap 1 45 60 90 120 140 155 165 185 200
Tap 2 80 110 135 165 205 250 285 315 335
Tap 3 150 195 225 260 295 320 370 425 465
Tap 4 265 315 350 400 440 485 525 555 605
CBX32MV-024/030 BLOWER MOTOR WATTS AT NORM" BDC3 SETTING (Adjust" Jumper at NORM Setting)
Motor Watts @ Various External Static Pressures − in. wg. (Pa)
Speed Positions
HEAT" Speed
COOL" Speed
BDC3 Jumper
0 (0) 0.1 (25) 0.2 (50) 0.3 (75) 0.4 (100) 0.5 (125) 0.6 (150) 0.7 (175) 0.8 (200)
Tap 1 50 75 100 135 155 180 195 215 230
Tap 2 80 105 130 155 200 245 265 295 310
Tap 3 110 150 175 200 235 275 320 350 390
Tap 4 155 205 230 270 290 325 360 405 460
Tap 1 40 55 80 105 120 130 150 165 180
Tap 2 65 90 120 145 190 210 240 260 285
Tap 3 105 145 175 220 250 285 335 370 405
Tap 4 200 245 275 300 335 385 420 470 515
CBX32MV-024/030 BLOWER MOTOR WATTS AT −" (Minus) BDC3 SETTING (Adjust" Jumper at −" Setting)
Motor Watts @ Various External Static Pressures − in. wg. (Pa)
Speed Positions
HEAT" Speed
BDC3 Jumper
0 (0) 0.1 (25) 0.2 (50) 0.3 (75) 0.4 (100) 0.5 (125) 0.6 (150) 0.7 (175) 0.8 (200)
Tap 1 45 65 90 110 130 150 165 190 195
COOL" Speed
Tap 2 60 85 110 145 175 200 215 235 240
Tap 3 85 105 130 165 210 245 280 305 330
Tap 4 115 145 175 205 230 280 325 370 390
Tap 1 30 50 70 90 100 115 125 140 165
Tap 2 55 75 100 135 155 185 190 210 225
Tap 3 85 115 135 175 210 255 295 320 345
Tap 4 145 175 215 245 280 325 355 410 450
Page 5
Page 6
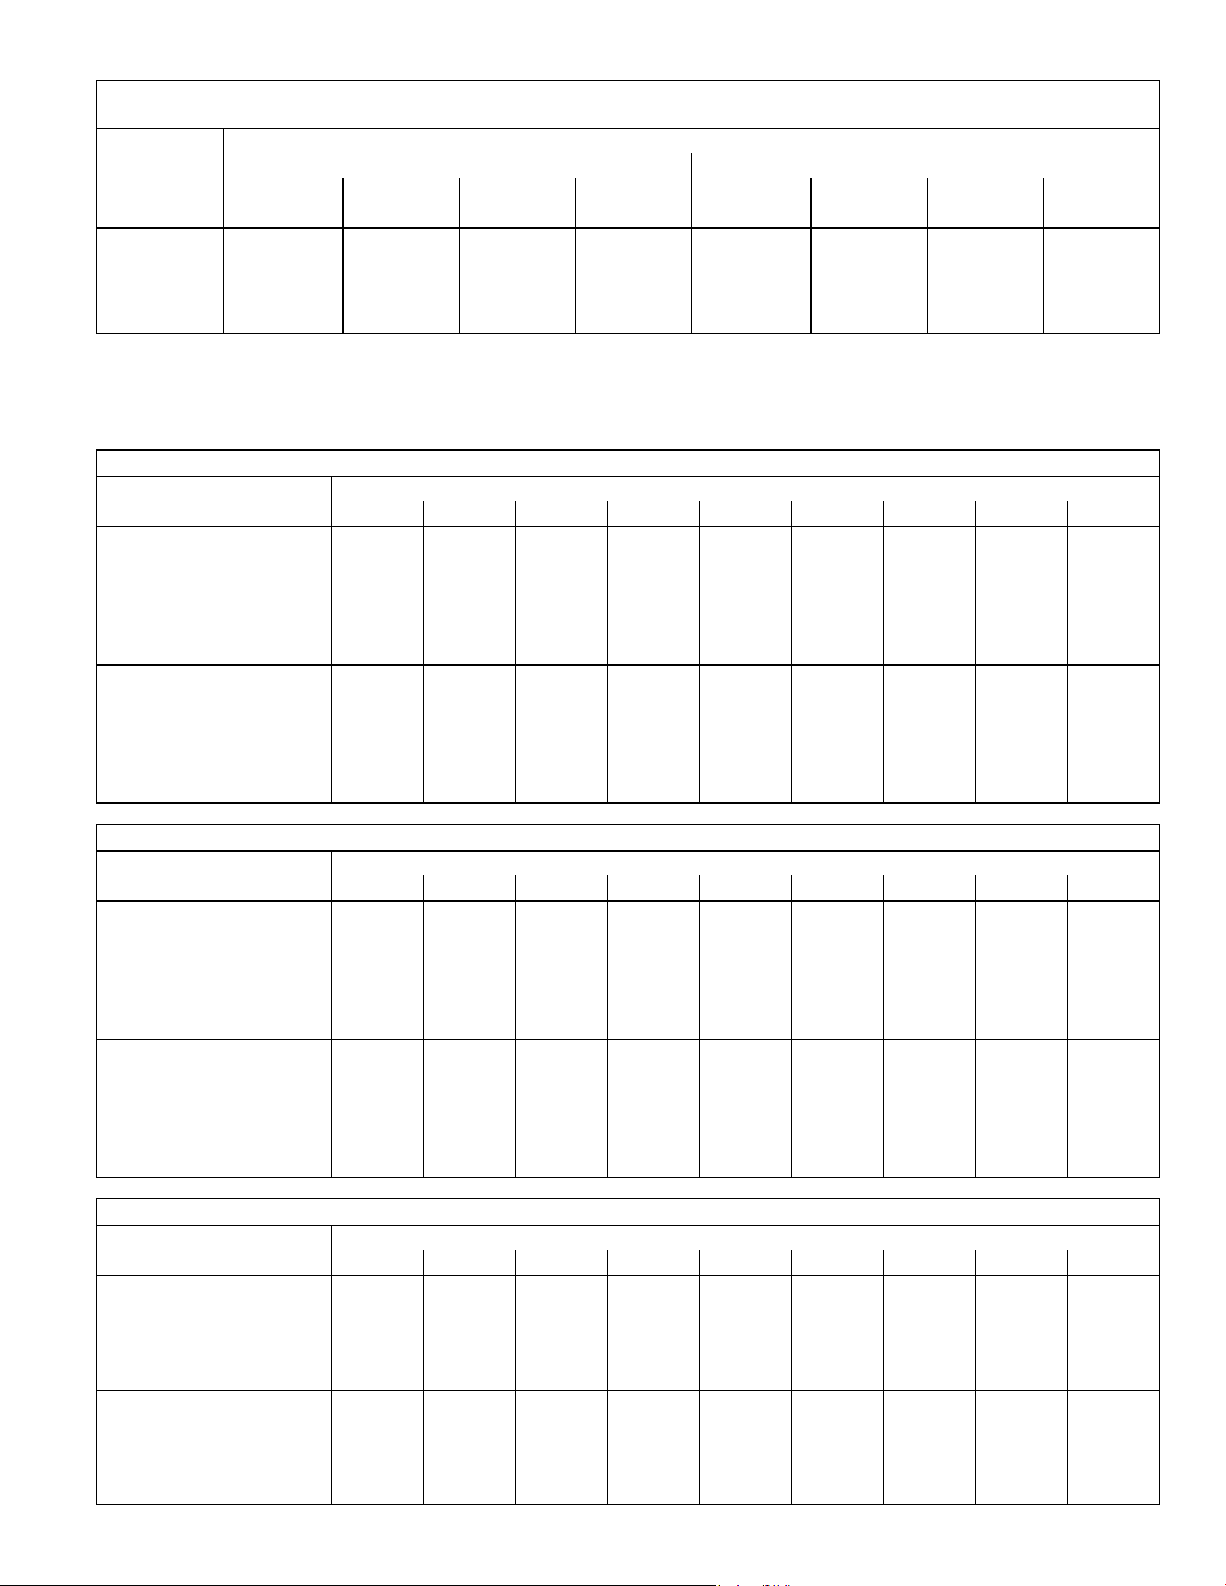
CBX32MV-036 BLOWER PERFORMANCE
0 through 0.80 in. w.g. (0 through 200 Pa) External Static Pressure Range
BDC3 Jumper Speed Positions
ADJUST"
Jumper
Setting
+ 1230 580 1335 630 1445 680 1545 730 1090 515 1225 580 1380 650 1545 730
NORM 1120 530 1215 575 1315 620 1400 660 975 460 1125 530 1275 600 1400 660
− 1010 475 1185 560 1200 565 1265 595 900 425 1000 470 1135 535 1265 595
NOTES − The effect of static pressure, filter and electric heater resistance is included in the air volumes listed.
Low speed cooling air volume is 70% of COOL speed setting (65% COOL speed for production prior to August 2002). Production units September 2005 and later;
continuous blower speed for is approximately 38% of COOL speed setting. Earlier production units continuous blower speed is approximately 50% of COOL
speed setting.
Harmony Zone Control applications − Low speed cooling is approximately 380 cfm (178 L/s).
Lennox Harmony IIIt Zone Control applications − minimum blower speed is 442 cfm (210 L/s).
1 2 3 4 1 2 3 4
cfm L/s cfm L/s cfm L/s cfm L/s cfm L/s cfm L/s cfm L/s cfm L/s
HEAT" Speed COOL" Speed
CBX32MV-036 BLOWER MOTOR WATTS AT +" (Plus) BDC3 SETTING (Adjust" Jumper at +" Setting)
Motor Watts @ Various External Static Pressures − in. wg. (Pa)
Speed Positions
HEAT" Speed
BDC3 Jumper
0 (0) 0.1 (25) 0.2 (50) 0.3 (75) 0.4 (100) 0.5 (125) 0.6 (150) 0.7 (175) 0.8 (200)
Tap 1 220 235 265 290 310 335 360 385 465
Tap 2 285 305 330 355 380 405 430 450 475
Tap 3 345 365 405 430 455 485 515 545 570
Tap 4 470 495 515 530 545 560 575 595 610
COOL" Speed
Tap 1 145 165 200 225 250 275 300 325 350
Tap 2 225 245 265 290 320 350 370 395 410
Tap 3 305 325 350 390 420 445 475 505 535
Tap 4 470 495 515 530 545 560 575 595 610
CBX32MV-036 BLOWER MOTOR WATTS AT NORM" BDC3 SETTING (Adjust" Jumper at NORM Setting)
Motor Watts @ Various External Static Pressures − in. wg. (Pa)
Speed Positions
HEAT" Speed
COOL" Speed
BDC3 Jumper
0 (0) 0.1 (25) 0.2 (50) 0.3 (75) 0.4 (100) 0.5 (125) 0.6 (150) 0.7 (175) 0.8 (200)
Tap 1 155 185 215 240 265 285 300 335 355
Tap 2 225 245 270 295 325 345 370 390 415
Tap 3 275 290 315 340 375 400 420 445 465
Tap 4 320 345 375 405 435 460 485 515 540
Tap 1 120 140 160 190 210 230 255 275 300
Tap 2 160 190 220 240 265 290 320 340 365
Tap 3 255 270 295 320 345 375 400 420 445
Tap 4 320 345 375 405 435 460 485 515 540
CBX32MV-036 BLOWER MOTOR WATTS AT −" (Minus) BDC3 SETTING (Adjust" Jumper at −" Setting)
Motor Watts @ Various External Static Pressures − in. wg. (Pa)
Speed Positions
HEAT" Speed
BDC3 Jumper
0 (0) 0.1 (25) 0.2 (50) 0.3 (75) 0.4 (100) 0.5 (125) 0.6 (150) 0.7 (175) 0.8 (200)
Tap 1 120 135 165 185 205 225 245 265 300
COOL" Speed
Tap 2 140 165 195 215 245 270 300 315 335
Tap 3 185 210 240 265 285 310 330 360 385
Tap 4 245 255 290 310 335 355 380 405 430
Tap 1 90 110 135 155 180 195 210 230 250
Tap 2 120 140 160 185 215 235 255 275 295
Tap 3 160 190 225 240 275 295 320 350 380
Tap 4 245 255 290 310 335 355 380 405 430
Page 6
Page 7
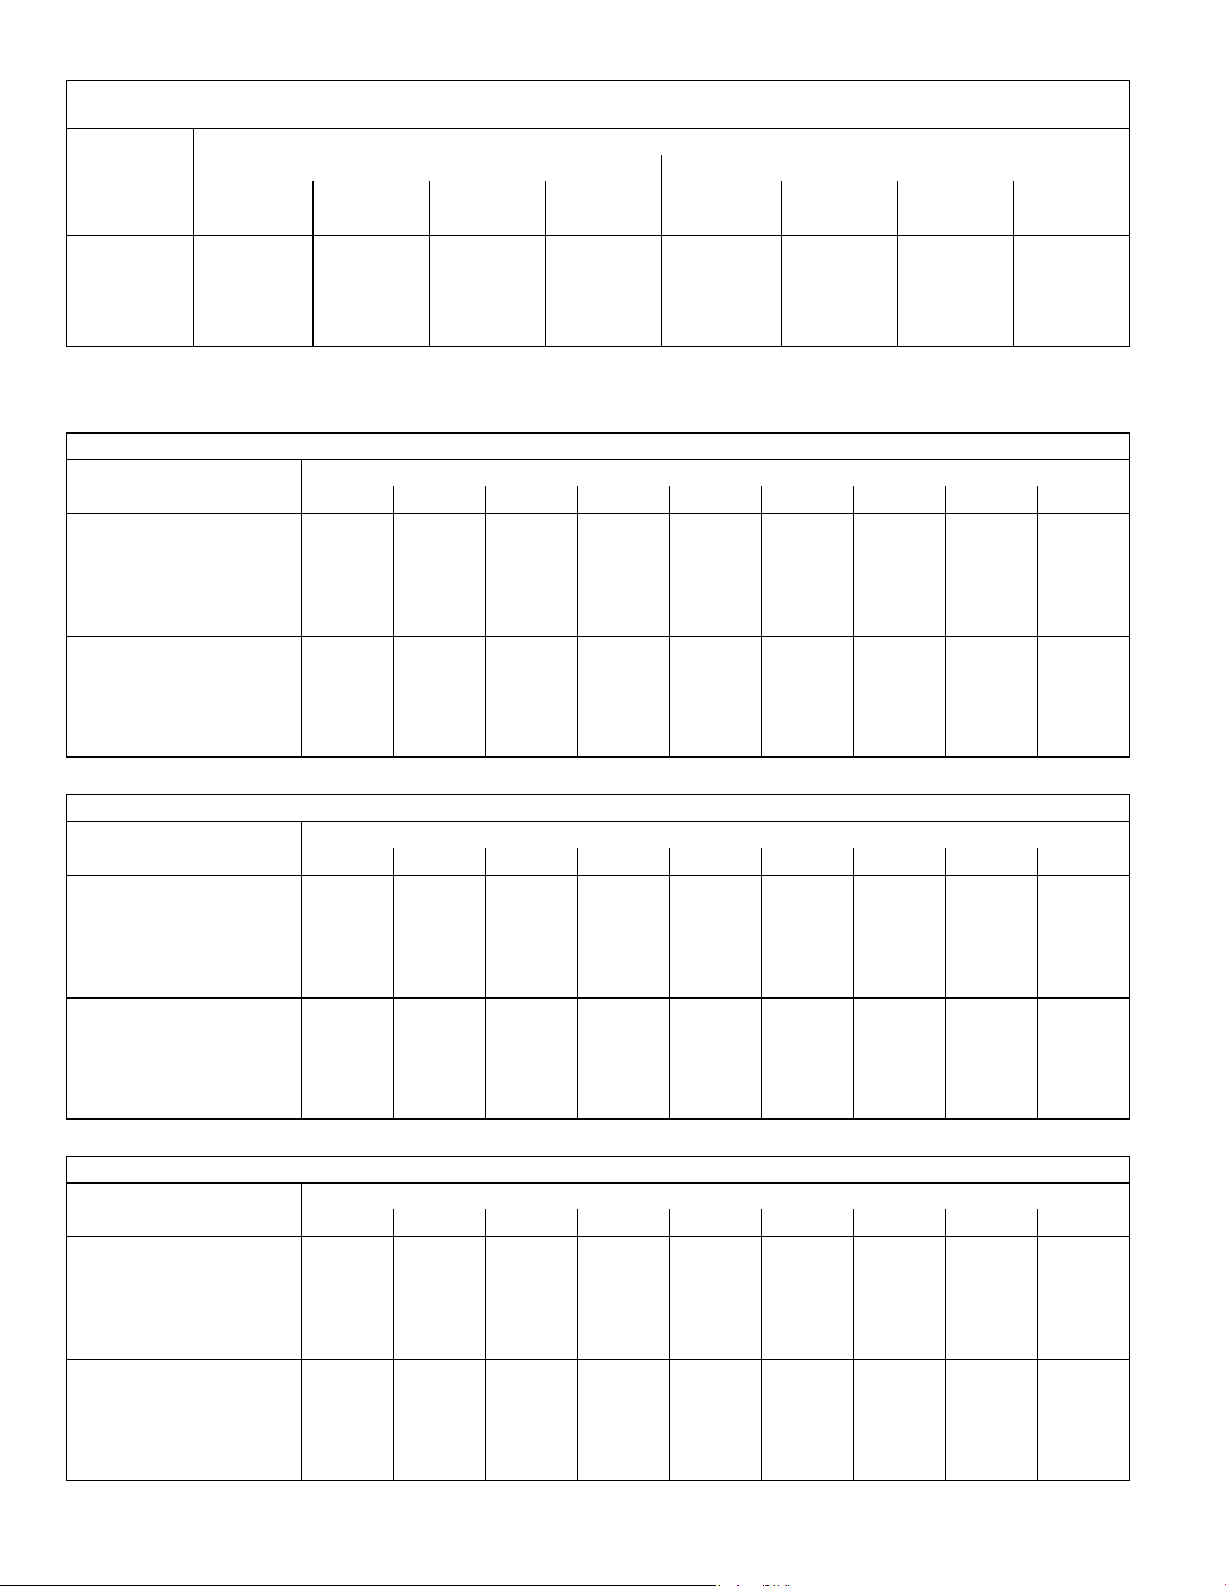
CBX32MV-048 AND CBX32MV-060 BLOWER PERFORMANCE
0 through 0.80 in. w.g. (0 Through 200 Pa) External Static Pressure Range
BDC3 Jumper Speed Positions
ADJUST"
Jumper
Setting
+ 1850 875 1960 925 2090 985 2150 1015 1625 765 1820 860 2055 970 2145 1010
NORM 1705 805 1800 850 1900 895 2005 945 1425 670 1625 765 1805 850 2005 945
− 1560 735 1625 765 1720 810 1770 835 1205 570 1375 650 1555 735 1725 815
NOTES − The effect of static pressure, filter and electric heater resistance is included in the air volumes listed.
Low speed cooling air volume is 70% of COOL speed setting (60% of COOL speed for production prior to August 2002). Production units September 2005 and
later;continuous blower speed for is approximately 38% of COOL speed setting. Earlier production units continuous blower speed is approximately 50% of COOL
speed setting.
Harmony Zone Control applications − Low speed cooling is approximately 400 cfm (190 L/s).
Lennox Harmony IIIt Zone Control applications − minimum blower speed is 442 cfm (210 L/s)
1 2 3 4 1 2 3 4
cfm L/s cfm L/s cfm L/s cfm L/s cfm L/s cfm L/s cfm L/s cfm L/s
HEAT" Speed COOL" Speed
CBX32MV-048 AND CBX32MV-060 BLOWER MOTOR WATTS AT +" (Plus) BDC3 SETTING (Adjust" Jumper at +" Setting)
BDC3 Jumper Speed
HEAT"
Speed
Positions
Tap 1 455 505 540 585 630 665 710 745 780
Tap 2 555 595 645 675 730 780 820 865 895
Tap 3 680 720 770 820 865 900 945 985 1030
Tap 4 730 780 825 870 920 970 1020 1055 1110
0 (0) 0.1 (25) 0.2 (50) 0.3 (75) 0.4 (100) 0.5 (125) 0.6 (150) 0.7 (175) 0.8 (200)
Motor Watts @ Various External Static Pressures − in. wg. (Pa)
COOL"
Speed
Tap 1 300 335 370 360 435 465 500 535 575
Tap 2 425 475 500 545 585 635 670 710 745
Tap 3 625 660 705 755 810 850 885 940 970
Tap 4 700 750 800 845 895 940 990 1030 1080
CBX32MV-048 AND CBX32MV-060 BLOWER MOTOR WATTS AT NORM" BDC3 SETTING (Adjust" Jumper at NORM Setting)
BDC3 Jumper Speed
Positions
HEAT"
Speed
COOL"
Speed
0 (0) 0.1 (25) 0.2 (50) 0.3 (75) 0.4 (100) 0.5 (125) 0.6 (150) 0.7 (175) 0.8 (200)
Tap 1 360 385 425 465 495 525 565 600 635
Tap 2 400 440 485 520 555 595 640 670 705
Tap 3 480 520 560 605 640 685 765 785 805
Tap 4 580 625 665 710 760 800 835 875 925
Tap 1 215 235 275 295 330 360 400 430 465
Tap 2 310 335 375 405 440 465 500 530 565
Tap 3 415 445 490 535 565 605 650 675 715
Tap 4 580 610 655 695 740 785 830 870 910
Motor Watts @ Various External Static Pressures − in. wg. (Pa)
CBX32MV-048 AND CBX32MV-060 BLOWER MOTOR WATTS AT −" (Minus) BDC3 SETTING (Adjust" Jumper at −" Setting)
BDC3 Jumper Speed
Positions
HEAT"
Speed
COOL"
Speed
0 (0) 0.1 (25) 0.2 (50) 0.3 (75) 0.4 (100) 0.5 (125) 0.6 (150) 0.7 (175) 0.8 (200)
Tap 1 265 305 340 370 410 440 460 505 540
Tap 2 320 350 395 420 450 475 515 545 580
Tap 3 375 410 435 470 515 545 575 610 645
Tap 4 400 435 480 525 555 595 640 670 700
Tap 1 140 170 195 215 250 275 300 335 360
Tap 2 200 230 260 285 315 355 385 415 450
Tap 3 280 315 340 380 415 445 465 505 540
Tap 4 375 420 440 475 515 550 575 610 645
Motor Watts @ Various External Static Pressures − in. wg. (Pa)
Page 7
Page 8
CBX32MV-068 BLOWER PERFORMANCE
0 through 0.80 in. w.g. (0 Through 200 Pa) External Static Pressure Range
BDC3 Jumper Speed Positions
HEAT" Speed COOL" Speed
ADJUST"
Jumper
Setting
1 2 3 4 1 2 3 4
cfm L/s cfm L/s cfm L/s cfm L/s cfm L/s cfm L/s cfm L/s cfm L/s
+ 1875 885 1975 930 2090 985 2150 1015 1640 775 1840 870 2075 980 2150 1015
NORM 1760 830 1825 860 1920 905 2030 960 1465 690 1625 765 1800 850 2000 945
− 1550 730 1650 780 1725 815 1800 850 1250 590 1390 655 1560 735 1720 810
NOTES − The effect of static pressure, filter and electric heater resistance is included in the air volumes listed.
First stage cooling air volume is 60% of COOL speed setting. Production units September 2005 and later;continuous blower speed for is approximately 38% of
COOL speed setting. Earlier production units continuous blower speed is approximately 50% of COOL speed setting.
Lennox Harmony IIIt Zone Control applications − minimum blower speed is 442 cfm (210 L/s).
CBX32MV-068 BLOWER MOTOR WATTS AT +" (Plus) BDC3 SETTING (Adjust" Jumper at +" Setting)
BDC3 Jumper Speed
Positions
HEAT"
Speed
Tap 1 365 410 455 495 545 610 660 725 790
Tap 2 430 485 540 590 640 690 765 835 865
0 (0) 0.1 (25) 0.2 (50) 0.3 (75) 0.4 (100) 0.5 (125) 0.6 (150) 0.7 (175) 0.8 (200)
Motor Watts @ Various External Static Pressures − in. wg. (Pa)
Tap 3 540 585 635 695 750 800 815 840 865
Tap 4 665 710 755 770 790 810 830 845 870
COOL"
Speed
Tap 1 255 290 320 365 415 455 505 550 590
Tap 2 355 390 425 475 515 580 630 695 750
Tap 3 505 565 610 70 715 790 815 845 865
Tap 4 725 745 755 770 790 810 830 850 870
CBX32MV-068 BLOWER MOTOR WATTS AT NORM" BDC3 SETTING (Adjust" Jumper at NORM Setting)
BDC3 Jumper Speed
Positions
HEAT"
Speed
Tap 1 310 345 385 425 465 510 560 610 665
Tap 2 345 385 420 460 500 620 615 680 735
0 (0) 0.1 (25) 0.2 (50) 0.3 (75) 0.4 (100) 0.5 (125) 0.6 (150) 0.7 (175) 0.8 (200)
Motor Watts @ Various External Static Pressures − in. wg. (Pa)
Tap 3 385 430 480 525 580 640 695 750 815
Tap 4 475 525 560 615 660 720 785 845 810
COOL"
Speed
Tap 1 180 205 240 285 325 365 405 435 480
Tap 2 250 285 320 355 410 455 505 535 585
Tap 3 345 375 415 460 505 560 610 670 735
Tap 4 445 510 560 595 665 725 790 845 865
CBX32MV-068 BLOWER MOTOR WATTS AT −" (Minus) BDC3 SETTING (Adjust" Jumper at −" Setting)
BDC3 Jumper Speed
Positions
HEAT"
Speed
Tap 1 215 245 285 325 375 415 460 495 540
Tap 2 255 295 325 370 410 460 510 545 580
0 (0) 0.1 (25) 0.2 (50) 0.3 (75) 0.4 (100) 0.5 (125) 0.6 (150) 0.7 (175) 0.8 (200)
Motor Watts @ Various External Static Pressures − in. wg. (Pa)
Tap 3 295 330 375 395 445 495 555 600 660
Tap 4 335 370 400 445 505 550 600 660 705
COOL"
Speed
Tap 1 125 150 170 210 245 270 300 340 370
Tap 2 160 185 225 255 300 335 365 415 450
Tap 3 225 245 280 320 370 420 460 510 545
Tap 4 290 325 355 400 445 490 545 595 650
Page 8
Page 9
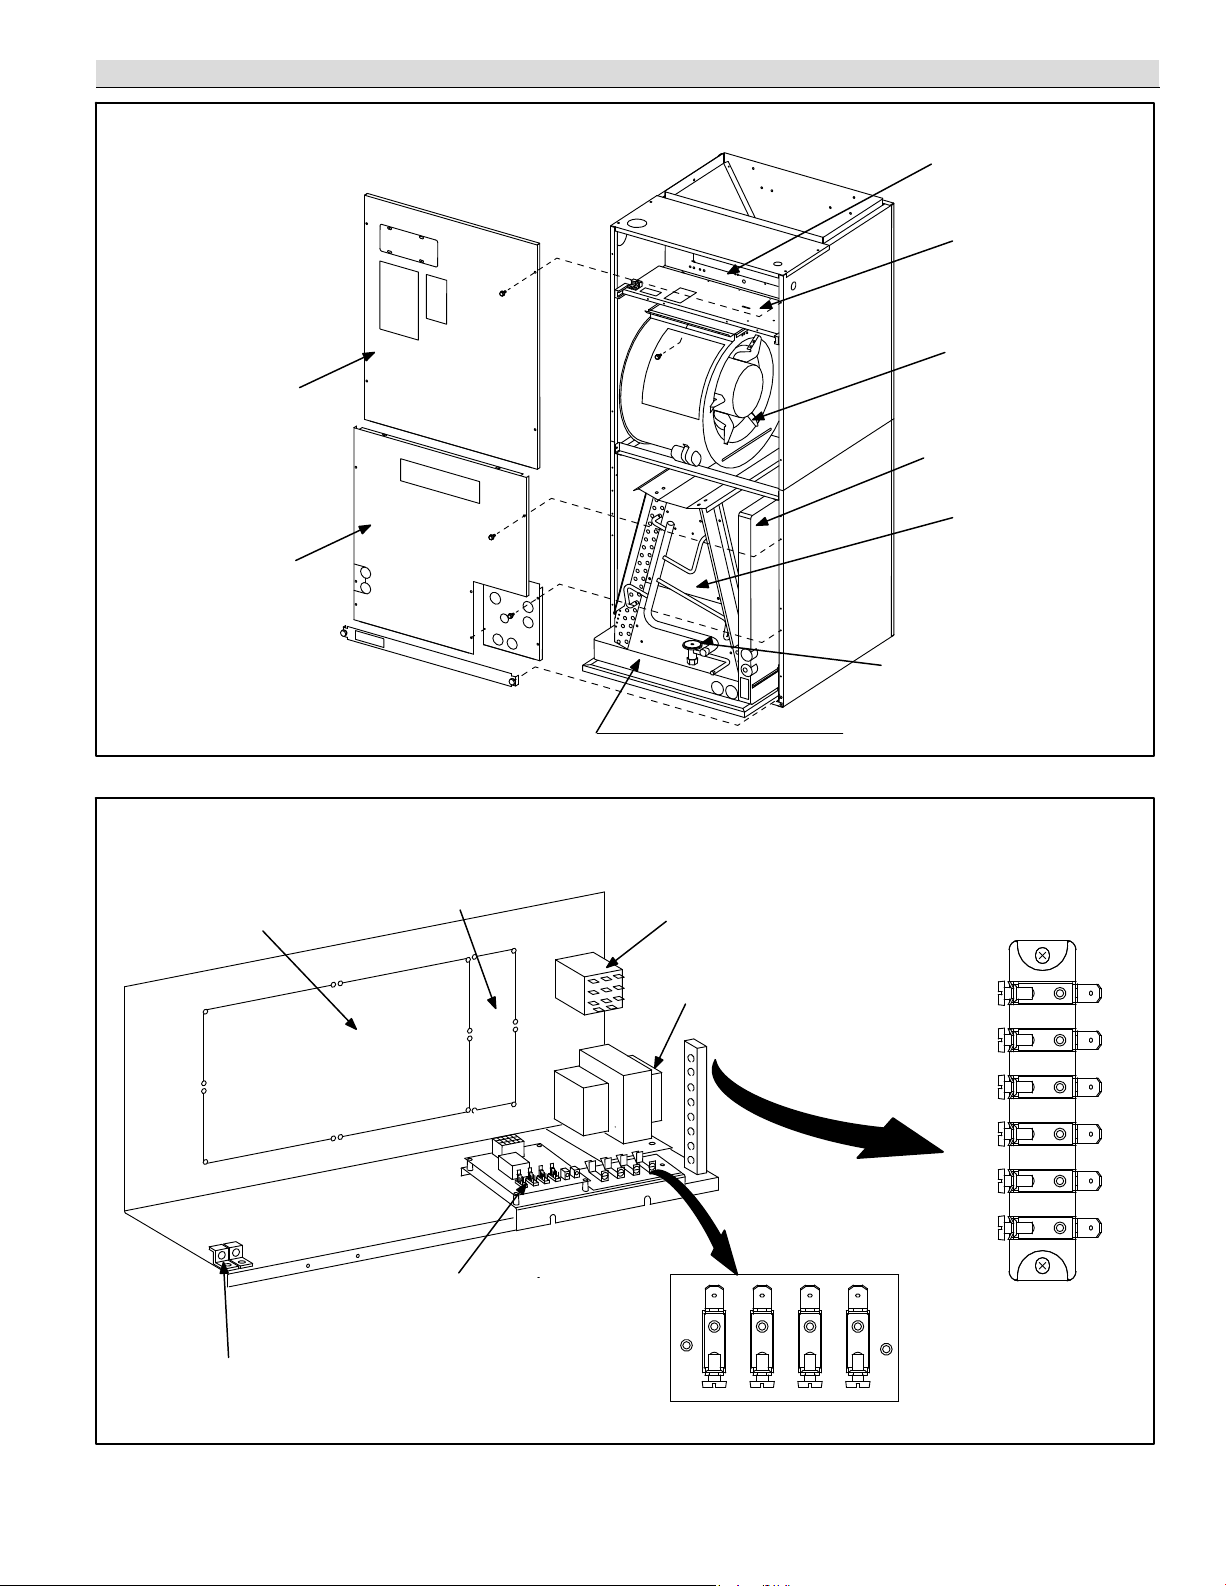
Parts Arrangement
ELECTRIC HEAT
SECTION
CBX32MV
BLOWER ACCESS
PANEL
COIL ACCESS
PANEL
CONTROL BOX
BLOWER
COMPARTMENT
HORIZONTAL
DRAIN PAN
COIL
CHECK AND EXPANSION VALVE
(COMPLETE WITH SCREEN)
UPFLOW/DOWNFLOW
DRAIN PAN
FIGURE 1
SMALL ELECTRIC HEAT
KNOCK OUT FOR
2.5 − 15 kW
GROUNDING
LUGS
CBX32MV CONTROL BOX
LARGE ELECTRIC HEAT
ADDITIONAL KNOCK
OUT FOR
20 − 30 kW
BDC3 BLOWER
CONTROL (A15)
TERMINAL
STRIP
(TB2)
BLOWER
RELAY (K20)
TRANSFORMER
(T1)
TERMINAL
STRIP (TB1)
R
W3
W2
W1
G
C
0Y1Y2DS
FIGURE 2
Page 9
Page 10

I−APPLICATION
CBX32MV blower coils are designed for R410A
applications only. All major blower coil components
must be matched according to Lennox
recomme n d ations fo r the unit to be covered under
warranty. Refer to the Engineering Handbook for approved
system matchups. A misapplied system will cause erratic
operation and can result in early unit failure. The units come
with factory installed check and expansion valve for all
applications. It has been installed internally and is accessible if
required.
II−UNIT COMPONENTS
A−Control Box
The CBX32MV control box is shown in figure 2. Line voltage
and electric heat connections are made in the control box.
Optional electric heat fits through an opening located in the
center of the control box. When electric heat is not used,
knockout plates cover the opening. The electric heat control
arrangement is detailed in the electric heat section of this
manual.
B−Terminal Strips (TB1 and TB2)
All CBX32MV units are equipped with two low voltage
terminal strips (TB1 and TB2) located in the control box.
See figure 2. The strips are used for making up all indoor
thermostat wires.
All CBX32MV units have factory installed jumpers
connecting DS to Y1, R to O and Y1 to Y2. These jumpers
will have to be removed in certain unit application. See table
1.
TABLE 1
Application
Harmony II, CCB1,
SignatureStatt
Remove Jumpers
DS to Y1
Heat Pump R to O
Two−Stage Cooling Y1 to Y2
C−Transformer (T1)
All CBX32MV series units use a single line voltage to
24VAC transformer mounted in the control box. The
transformer supplies power to the control circuits in the
indoor and outdoor unit.
D−Blower Relay (K20)
All units use SPDT relay to energize the blower motor in
response to heating demand. The relay coil is energized
when the 1st stage electric heat relay closes. When K20 is
energized, its N.O. contacts close to energize jack plug
JP46 pin 2 (located on blower drive control A15). When
JP46−2 is energized, the blower drive control immediately
energizes the blower on heating speed. Heating speed will
override cooling speed. K20−2 will energize the
economizer if used ( refer to wiring diagram.)
208 / 240 VOLT TRANSFORMER
PRIMARY
ORANGE
240 VOLTS
RED
208 VOLTS
BLACK
FIGURE 3
E−Circuit Breaker (CB8)−1 units & Fuse (F1)
All transformers used in the CBX32MV−1 series units are
equipped with internal secondary voltage overcurrent
protection. Each transformer uses a manual re−set circuit
breaker (CB8) located on the transformer. The circuit
breaker is connected in series with the blue secondary
voltage wire and is rated at 3.5 Amps. CBX23MV−2 units
and later are equipped with a fuse (F1) rated at 3 amps. F1
is connected in series with the blue secondary voltage wire
and like CB8 provides overcurrent protection.
SECONDARY
BLUE
YELLOW
CB8
F−Plastic Drain Pans
Both upflow/downflow and horizontal drain pans are
provided and installed on the CBX32MV units. The drain
pans are made from fiberglass-filled plastic. The drain hole
is used for right-hand air discharge only, and must be
plugged when the unit is configured for left-hand air
discharge (see page 24 for horizontal left-hand
application). Each pan has a set of connections, one for a
primary drain and one for an auxiliary drain.
G−Coil
All CBX32MV series units have dual slab coils arranged in
an "A" configuration. Each coil has two or three rows of
copper tubes fitted with ripple-edge aluminum fins. A check
and expansion valve complete with screen feeds multiple
parallel circuits through the coils. The coil is designed to
easily slide out of the unit cabinet.
Optional electric heating elements are sequenced so
blower relay K20 operates on a first on/last off basis.
H−Variable Speed Blower Motor (B3)
CBX32MV series units use a single-phase variable-speed
motor. See figure 4. A solid-state controller is attached to
the motor.
Page 10
Page 11

CBX32MV MOTOR BLOWER HOUSING
ARROW MUST
BE UP
MOTOR
BLOWER HOUSING
CBX32MV BLOWER MOTOR
B3
SHAFT
MOTOR
CONTROLLER
J48
J49
CBX32MV BLOWER MOTOR COMPONENTS
STATOR
(WINDINGS)
BEARING
OUTPUT
SHAFT
ROTOR
FIGURE 4
I−BDC3 Blower Control Board (A15)
CFM on the CBX32MV unit is controlled by the BDC3 board
(A15) located in the control box. CFM can be obtained by
positioning jumpers (COOL, HEAT and ADJUST) on the
BDC3 board. The jumpers are labeled 1,2,3, and 4. Each
enables a different air volume. Diagnostic LEDs are
provided as an aid in identifying the unit’s mode of
operation. The LEDs are labeled RUN and CFM. See
figure 5.
BLOWER SPEED ADJUSTMENTS
Diagnostic LEDs
RUN"
RUN indicates there is a demand for the blower motor to
run.
CFM"
CFM LED indicates the CFM the unit is operating according to
the jumper settings. The light flashes once for approximately
every 100 CFM. For example, if the unit is operating at 1000
CFM, CFM LED will flash 10 times. If the CFM is 1150, CFM
LED will flash 11 full times plus one fast or half flash.
At times the light may appear to flicker or glow. This takes
place when the control is communicating with the motor
between cycles. This is normal operation.
The appropriate speed according to application and CFM
need is selected by moving jumper pins.
Jumper Settings
IMPORTANT
Before changing jumper setting, make sure the
motor has completely stopped. Any jumper setting change will not take place while the motor is
running.
Table 2 shows the recommended factory blower speed tap
selections for CBX32MV series units. These settings are
for nominal tonnage match−ups with the CBX32MV. When
matched with other sizes, it is recommended that the CFM
be adjusted to approximately 400 CFM per ton.
FACTORY BLOWER SPEED TAP SELECTION
UNIT
−018/
024
−024/
−030
−036
−048
−060
−068
*Minimum setting for heat.
COOL" HEAT"
Condensing
Unit
COOL
PIN #3
COOL
PIN #3
COOL
PIN #3
COOL
PIN #2
COOL
PIN #3
COOL
PIN #3
To change jumper positions, gently pull the jumper off the pins
and place it on the desired set of pins. The following section
outlines the different jumper selections available and
conditions associated with each one. Refer to figure 5 for
identification.
After the CFM for each application has been determined,
the jumper settings must be adjusted to reflect those given
in the blower data tables at the front of this manual. From
the tables determine which row of CFM volumes most
closely matches the desired CFM. Once a specific row has
been chosen (+, NORMAL, or −), CFM volumes from other
rows cannot be used. Below are the descriptions of each of
the jumper selections.
TABLE 2
SPEED TAP SELECTION
*Condensing Unit
Heat
PIN
#3
PIN
#3
PIN
#3
PIN
#2
PIN
#3
PIN
#3
with Electric Heat
Only
HEAT
PIN #4
HEAT
PIN #4
HEAT
PIN #4
HEAT
PIN #1
HEAT
PIN #1
HEAT
PIN #4
Pump
COOL
COOL
COOL
COOL
COOL
COOL
*Heat Pump
with Electric
Heat
HEAT
PIN #4
HEAT
PIN #4
HEAT
PIN #4
HEAT
PIN #1
HEAT
PIN #1
HEAT
PIN #4
Page 11
Page 12
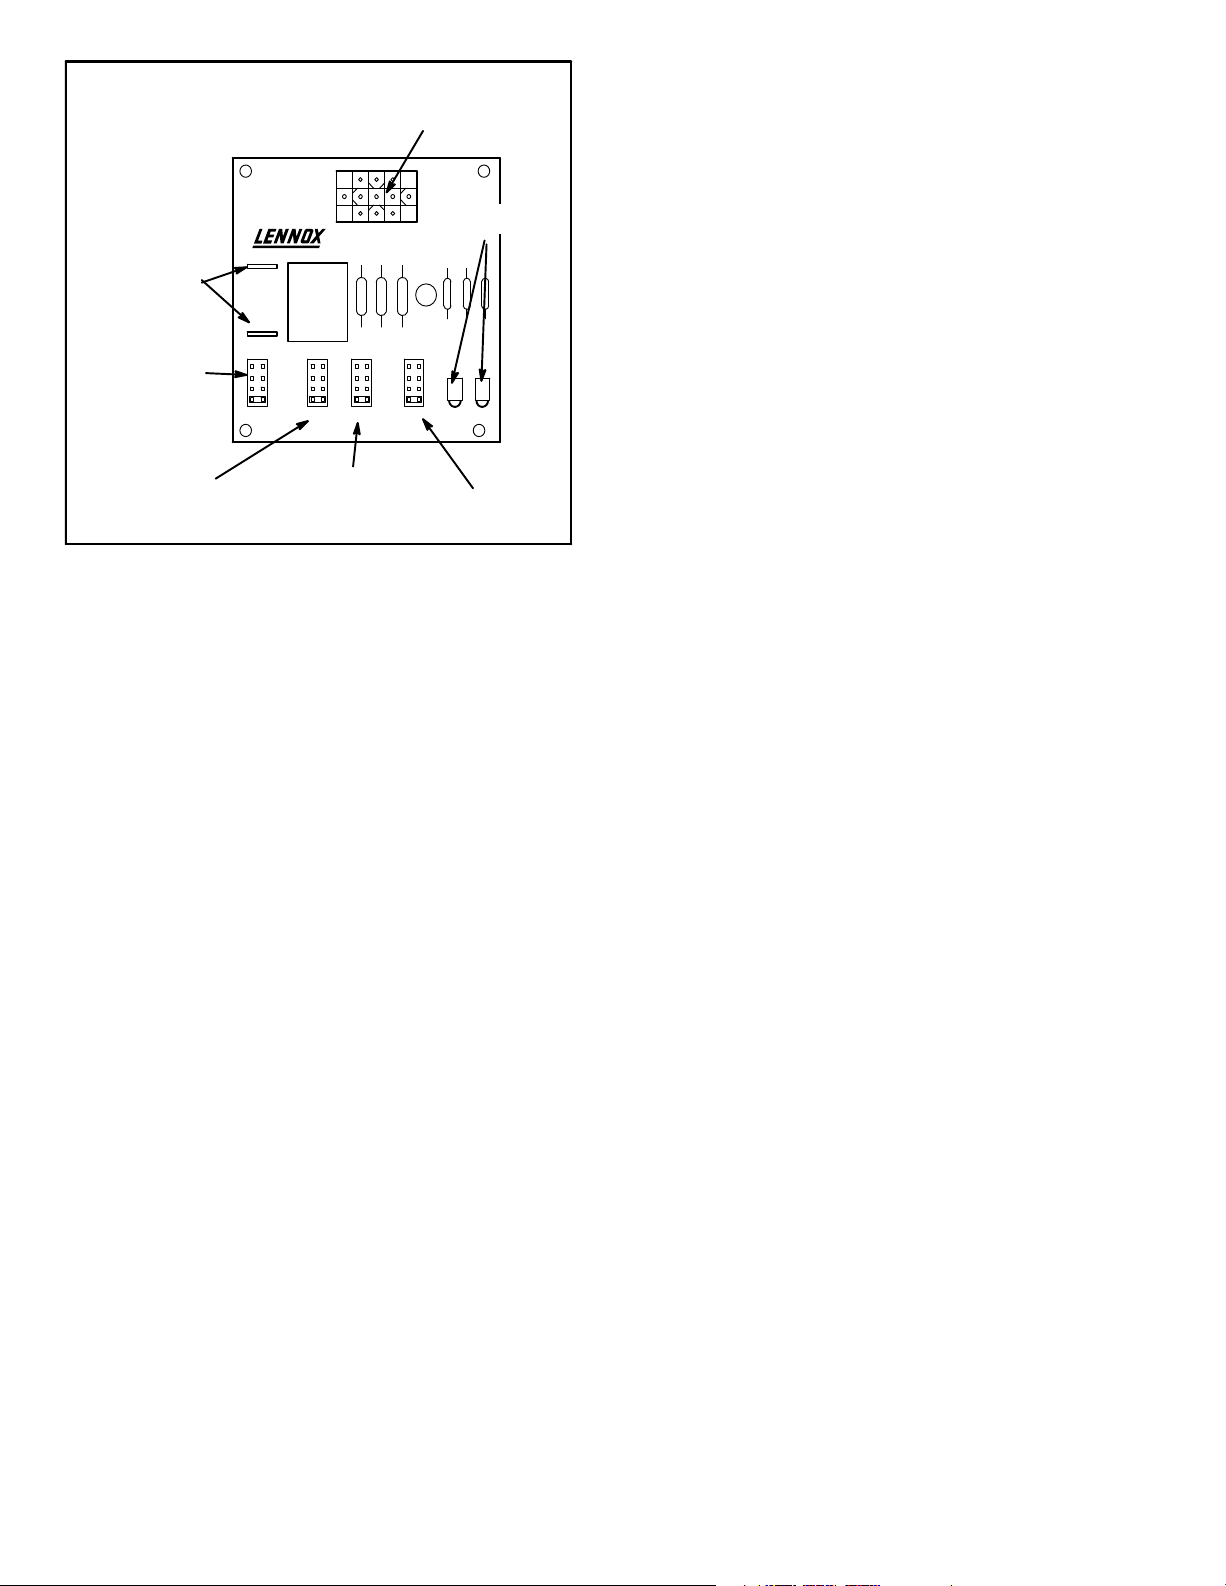
BDC3 VARIABLE SPEED CONTROL SELECTIONS
JP1 15 PIN PLUG
(BOARD TO MOTOR)
15
15
4
3
2
1
DIAGNOSTIC
4
3
2
1
CFM RUN
DS LEDS
ACCESSORY RELAY
CONTACTS
(DRIVES OPTIONAL
ACCESSORY
RELAY)
OPERATIONAL
SELECTOR PINS
(Affects both heating
and cooling modes)
11
JP1
ACC
24V/1A
NORM
4
+
3
−
2
TEST
ADJUST HEAT COOL DELAY
1
NOTE − For two speed heat pump units blower will operate at
60%, 65% or 70% of COOL CFM. For single speed heat pump
units blower will operate at 100% COOL CFM until
supplemental electric heat is demanded. At that time, the
blower will operate at HEAT speed selected. This arrangement
provides for warmer supply air during heat pump operation
only.
HEAT"
The HEAT jumper is used to determine CFM during a W1
demand for electric heat operation. These jumper
selections are activated when W1 is energized with or
without a Y1 demand for heat pump compressor.
DELAY"
HEATING SPEED
SELECTOR PINS
COOLING SPEED
SELECTOR PINS
FAN DELAY
SELECTOR PINS
FIGURE 5
ADJUST"
The ADJUST pins allow the motor to run at normal speed,
approximately 10% higher, or approximately 10% lower than
normal speed. The blower tables give three rows (+,
NORMAL, and −) with their respective CFM volumes. Notice
that the normal adjustment setting for heat speed position #3
is 1315 CFM. The + adjustment setting for that position is
1445 CFM and for the − adjustment setting is 1185 CFM.
After the adjustment setting has been determined, chose the
remainder speed jumper settings from those offered in the
table in that row.
The TEST pin is available to bypass the BDC3 control and
run the motor at approximately 70% to test that the motor is
operational. This is beneficial primarily in troubleshooting.
G must be energized for motor to run.
COOL"
The COOL jumper is used to determine the CFM during
either 1) cooling or 2) heat pump operation without a call for
electric heat. These jumper selections are activated for
cooling when Y2 and DS terminals in the CBX32MV are
energized and for heating when Y2 is energized.
Applications without the Lennox SignatureStatt or
TM
EfficiencyPlus
CCB1 humidity control will provide 70% of
the COOL CFM during first−stage cooling for two−speed
outdoor units. Units built prior to August 2002, will provide
either 60% (−048, −060 series units) or 65% (−036 series
units) of the COOL CFM during first stage cooling for two
stage outdoor units. 100% of COOL speed is provided for
systems with a single−speed outdoor units.
The DELAY jumper is used to set the specific motor fan
mode of operation during cooling. Depending on the
application, one of four fan options may be chosen by
moving the jumper pins to the appropriate set of pins.
Options 1, 2, 3, or 4 will have an increased dehumidification
effect on the system. Option 1 will have the least effect and
option 4 will have the greatest effect.
Applications with the EfficiencyPlus CCB1 humidity
control create different CFM volumes. For example,
during a first−stage cooling call (two−speed outdoor unit)
with no demand from the CCB1, the air volume is 40% of
the COOL jumper selection. For a normal COOL (Pin #2
setting for CBX32MV−036), the CFM is 1125; the reduced
speed is 450 CFM (1125 x 40% = 450). This arrangement
provides for additional dehumidification during standard
first stage cooling. See tables 10 and 11 for various
scenarios concerning use of the CCB1 humidity control
and the CBX32MV series unit.
Applications with the Lennox SignatureStat but no
demand for de−humidification will operate as follows:
during a first−stage cooling call (two−stage outdoor unit),
the air volume is 70% of the COOL jumper selection. For a
normal COOL (Pin #2 setting for CBX32MV−036), the
CFM is 1125; the reduced speed is 788 CFM (1125 x 70% =
788). This arrangement provides for additional
dehumidification during standard first stage cooling. See
tables 12 and 13 for various scenarios concerning use of
the SignatureStat and the CBX32MV series unit.
For applications with Harmonyr zone control, the blower
CFM volume is determined by the Harmony control center.
This speed is not adjustable. See footnotes in the blower
tables (table of contents).
Page 12
Page 13

CBX32MV units built prior to February 2003
#1 PIN JUMPERED
A−Motor runs at 100% until demand is satisfied.
B− Once demand is met, motor ramps down to off.
A B
OFF
A
100% CFM
COOLING DEMAND
* CB32XMV units date coded prior to 2−2006 will delay 60 seconds
B
100% CFM
(*45 seconds)
C
OFF
100% CFM
COOLING
DEMAND
OFFOFF
#2 PIN JUMPERED
A−Motor runs at 82% for approximately 7−1/2 minutes. If
demand has not been satisfied after 7−1/2 minutes,
B−motor runs at 100% until demand is satisfied.
C− Once demand is met, motor ramps down to off.
C
OFF
OFF
A
7 1/2 MIN
82%CFM
B
100% CFM
COOLING DEMAND
#3 PIN JUMPERED
A−Motor runs at 50% for 1/2 minute. B−Motor then runs at
82% for approximately 7−1/2 minutes. If demand has not
been satisfied after 7−1/2 minutes. C−Motor runs at 100%
until demand is satisfied. D− Once demand is met, motor
ramps down to off.
C D
100% CFM
OFF
OFF
A
1/2 MIN
50% CFM
B
7 1/2 MIN
82% CFM
COOLING DEMAND
#4 PIN JUMPERED
A−Motor runs at 50% for 1/2 minute. B−Motor then runs at
82% for approximately 7−1/2 minutes. If demand has not
been satisfied after 7−1/2 minutes. C−Motor runs at 100%
until demand is satisfied. D− Once demand is met, motor
runs at 50% for 1/2 minute then E− Motor ramps down to off.
C D
100%
CFM
1/2 MIN
50% CFM
E
OFF
OFF
A
1/2 MIN
50% CFM
B
7 1/2 MIN
82% CFM
COOLING DEMAND
CBX32MV units built February 2003 and later
#1 Pins Jumpered
A− Motor runs at 100% until demand is satisfied.
B− Once demand is met, motor ramps down to stop.
A B
100% CFM
COOLING
DEMAND
#2 Pins Jumpered
A− Motor runs at 100% until demand is satisfied.
B− Once demand is met, motor runs at 100% for 45*
seconds.
C− Motor ramps down to stop.
OFFOFF
#3 Pins Jumpered
A− Motor runs at 82% for approximately 7−1/2 minutes. If
demand has not been satisfied after 7−1/2 minutes −
B− Motor runs at 100% until demand is satisfied.
C− Once demand is met, motor ramps down to stop.
C
OFF
OFF
A
7 1/2 MIN
82%CFM
B
100% CFM
COOLING DEMAND
#4 Pins Jumpered
A− Motor runs at 50% for 30 seconds.
B− Motor then runs at 82% for approximately 7−1/2
minutes. If demand has not been satisfied after 7−1/2
minutes,
C− Motor runs at 100% until demand is satisfied.
D− Once demand is met, motor runs at 50% for 30
seconds.
E− Motor ramps down to stop.
C D
100%
CFM
1/2 MIN
50% CFM
E
OFF
OFF
A
1/2 MIN
50% CFM
B
7 1/2 MIN
82% CFM
COOLING DEMAND
III−VARIABLE SPEED MOTOR
TROUBLESHOOTING
DO
• Check motor, controls, wiring and connections
thoroughly before replacing.
• Use proper replacement parts for motor and control
model numbers.
• Keep duct static to a minimum.
• Size equipment properly.
• Check orientation before inserting motor connector.
DON’T
• Automatically assume the motor is bad.
• Locate connectors above 7 and 4 o’clock positions.
• Replace a control or motor number with an
unauthorized replacement.
• Use high pressure drop filters.
• Use restricted returns.
• Oversize systems then compensate with low airflow.
MOISTURE CHECK
• Connectors should point downward.
• Arrange harness with drip loop under motor.
• Check condensate drain plug.
• Check for airflow (too much latent capacity).
• Check for undercharged condition.
• Check for plug leaks in return ducts, cabinet.
Page 13
Page 14

MOTOR CHECK
Kit #70J11 can be used to check the motor. The kit is
available at the Lennox parts center. If not using the kit,
follow the procedure below. These settings and jumper
placements will bypass the BDC3 control board and
confirm correct motor operation.
Symptom Cause/Procedure
Motor rocks slightly
when starting
Motor will not start,
no movement
Motor rocks, but
won’t start
Motor starts, but
varies up and down
or intermittent
Motor "Hunts" or
"Puffs" at high CFM
Stays at low CFM
despite system call
for cool or heat CFM
Stays at high CFM
Blower will not shut
off
Air noise
Noisy Blower or
cabinet
Motor failure has
occurred and
moisture is present
• Disconnect power to the unit.
• Change delay pin setting on the BDC3 board to #1
• Remove wires from terminal strips in control box.
• Install jumpers between "R" and "Y1" and "R
and "G"
• Turn on power to unit. Blower should operate on
60%, 65% or 70% of cool speed.
• When check is complete disconnect power and
replace delay setting to original position.
This is normal start−up for the variable speed
motor
• Check power at motor
• Check low voltage (24vac R to C) at motor
• Check low voltage connection (G, Y, R, C) at
motor.
• Check for unseated pins on motor harness.
• Test with temporary jumper between R−G.
• Check motor for tight shaft.
• Run moisture check.
• Check for loose or compliant motor mount.
• Make sure blower wheel is tight on shaft.
• Check line voltage for variation or "sag."
• Check low voltage connections (G, Y, R, C)
at motor
• Check for unseated pins in motor harness.
• Check "DS" on terminal strip for CFM
command
• Check system controls thermostat.
• Perform moisture check.
If removing panel or filter reduces "Puffing"
reduce restriction or reduce max airflow.
• Check low voltage thermostat wires and
connections.
• Verify fan is not in delay mode.
• Check "R" missing/not connected to motor.
• Perform motor check.
• Check "R" connection at motor.
• Check fan delay, wait until complete.
• Perform motor check.
• Current leakage from controls into G, Y or
W?
• Check for Triac switched thermostat or solid
state relay.
• Check for proper airflow setting.
• Check/replace filter.
• Use low pressure drop filter.
• Check/correct duct restrictions.
• Check for loose blower housing, panels, etc
• If high static causing noise, check for air
whistling through seams in ducts, cabinets or
panels.
• Check cabinet/duct for deformation.
Replace motor and perform moisture check.
*60/65/70% OF COOL SPEED
*Reduced blower speed for production August 2002 and later
is 70% of COOL speed for ALL model units. Reduced blower
speed for production prior to August 2002 is 65% of COOL for
the −036 units and 60% of COOL for −048 and −060 series
units.
COOL SPEED
• Disconnect power to unit.
• Change delay pin setting on the BDC3 board to #1
• Remove wires from terminal strips in control box.
• Install jumpers between "R" and "Y1", "R" and
"Y2","R" and "DS"and "R" and "G".
• Turn on power to unit. Blower should operate on
cool speed.
• When check is complete disconnect power and
replace delay setting to original position.
HEAT SPEED
• Disconnect power to the unit.
• Change delay pin setting on the BDC3 board to #1
• Remove wires from terminal strips in control box.
• Install jumper between "R" and "W1".
• Turn on power to unit. Blower should operate on
heat speed.
• When check is complete disconnect power and
replace delay setting to original position.
Notes on 5 Pin AC Line Connection
• The motor connects directly to the line.
• Pins 1 & 2 are jumpered in the harness for 115V
operation.
• Make sure power is off before inserting power
connector.
• Plug is polarized.
Notes on 16 Pin Control Connection
• Control functions (G, Y1, Y2) may be active at greater
than .5 x control transformer voltage.
• Do not apply 24vac to either "Out" pin (8 or16).
• High voltage on control pins will destroy motor.
• Make sure pins are fully seated in connector and
housing.
• Verify common connection from transformer (C or B)
to C1, C2 (Pin 1 and Pin 3).
• Once common is verified, test motor by applying
24vac (R) to control pins.
(See Figure 6)
(See Figure 6)
Motor Connectors
(Cable Half)
5 Pin Power
connector
16 Pin Control
Connector
Out −
Adjust
Y1
Cool
Delay
Common 2
W/W1
Common 1
AC Line
AC Line
Gnd
Line 1 and 2 will be
connected for 120 Vac
applications only
Out+
G (fan)
Y/Y2
EM ht/W2
24Vac (R)
Heat
DS/Pwn (Speed)
O (Rev Valve)
FIGURE 6
Page 14
Page 15

IV−OPTIONAL ECB29/31 ELECTRIC HEAT
A−Matchups and Ratings
Tables 4, 5 and 6 show all approved CBX32MV to ECB29
matchups and electrical ratings.
B−Electric Heat Components
ECB29 parts arrangement is shown in figures 7 through 10. All
electric heat sections consist of components mounted to the
electric heat vestibule panel and electric heating elements
exposed directly to the air stream. 208/230V electric heat
sections may be equipped with circuit breakers. The circuit
breakers are designated by CB in the model number.
1−Primary(S15) & Secondary(S20) Temperature Limits
Both the primary (S15) and secondary (S20) limits are
located on the electric heat vestibule panel and are
exposed directly to the air stream through an opening in
the panel. The high temperature limits are SPST N.C.
limits with the primary limit being an auto-reset limit and the
secondary limit being a one-time" limit. One-time limits
must be replaced when opened. The limits are factory set
and are not adjustable.
208/230 Volt Electric Heat Sections
Each stage of the 208/230 electric heat is protected
by a primary (S15) and secondary (S20) high
temperature limit. Both S15 and S20 are located in the
same housing. Each stage uses the same style of limits.
Both the primary and secondary limits are wired in series
with a heat element. When either S15 or S20 opens, the
corresponding heat element is de-energized. All
other heating elements remain energized. The primary
high temperature limit opens at 150_F +
2.8_C) on a temperature rise and automatically resets
at 110_F +
fall. The secondary high temperature limit opens at
333_F +
rise. If the secondary limit opens it must be replaced.
2−Electric Heat Sequencer Relays
(K32, K33, K34, K35, and K116) (208/230 volt only)
Relays K32, K33, K34, K35 and K116 are N.O.
sequencer relays with a resistive element for a coil
and a bi-metal disk which actuates the contacts. The
relays are located on the electric heat vestibule panel and
are energized by a 24V heating demand (W1, W2, and
W3) via jack/plug 2 (J2), which is used to connect electric
heat to the blower coil control circuit. When energized, the
internal resistance heats the bi-metal disk causing the
9_F (43.3_C + 5.0_C) on a temperature
10_F (167.2_C + 5.6_C) on a temperature
5_F (65.5_C +
contacts to close. When the relay is de-energized, t h e
disk cools and the contacts open. The relays
energize different stages of heat, as well as the
blower. The blower is always first on and last off.
3−Circuit Breaker (CB1, CB2, and CB3)
(208/230 volt only)
Line voltage connections are made to circuit breakers
CB1, CB2, and CB3 in the electric heat sections with
circuit breakers (designated by CB in the model numbers).
Table 3 shows the amperage rating for each circuit
breaker used. Single-phase electric heat uses two pole
circuit breakers; while three-phase electric heat uses three
pole circuit breakers.
TABLE 3
ECB29 CIRCUIT BREAKERS
UNIT
ECB29-5CB-1 (P) 30 AMP −−− −−−
ECB29-8CB-1 (P) 50 AMP −−− −−−
ECB29-12.5CB-1 (P) 25 AMP 50 AMP −−−
ECB29-15CB-1 (P) 30 AMP 60 AMP −−−
ECB29-25CB-1 (P) 50 AMP 50 AMP 50 AMP
ECB29-30CB-1 (P) 60 AMP 60 AMP 60 AMP
ECB29-15CB-1 (Y) 60 AMP −−− −−−
ECB29-20CB-1 (Y) 40 AMP 35 AMP −−−
ECB29-25CB-1 (Y) 50 AMP 35 AMP −−−
Note: Do not remove patch plate or insulation on units
without circuit breakers!!
4−Terminal Strip (TB2) 208/230 volt only)
For the electric heat sections without circuit breakers or
fuses, line voltage connections are made to terminal strip
TB2. The terminal strip is located in the lower left corner of
the electric heat vestibule panel. Single-phase electric
heat uses two pole terminal strips; while three-phase
electric heat uses three pole terminal strips.
5−Heating Elements (HE1 through HE6)
Heating elements are composed of helix wound bare
nichrome wire exposed directly to the air stream. The
elements are supported by insulators mounted to th e wire
frame. For single phase applications, one element is
used per stage. Each stage is energized
independently by the corresponding relay located
on the electric heat vestibule arranged in a three
phase delta. Once energized, heat transfer is
instantaneous. High temperature protection is
provided by primary and secondary high
temperature limits.
CB1
AMPS
CB2
AMPS
CB3
AMPS
Page 15
Page 16

TABLE 4 − ELECTRIC HEAT DATA
SINGLE PHASE ELECTRIC HEAT
Model Number
2.5 kW
4 lbs.
ECB29-2.5 (28K30)
Terminal Block
1
No. of
Vol ts
Steps
InputkWInput
1
208 1.9 6,400 4.3 17 15 − − − − − − − − − − − − − − −
Btuh
Input
220 2.1 7,200 4.3 17 20 − − − − − − − − − − − − − − −
CBX32MV−018/024 CBX32MV−024/030
3
2
Blower
Motor
Full
Load
Amps
3
Minimum
Circuit
Ampacity
5
Maximum
Overcurrent
Protection
2
Blower
Motor
Full
Load
Amps
Minimum
Circuit
Ampacity
Circuit Circuit
1 21 2
230 2.3 7,800 4.3 18 20 − − − − − − − − − − − − − − −
240 2.5 8,500 4.3 18 20 − − − − − − − − − − − − − − −
5 kW
4 lbs.
ECB29-5 (28K31)
Terminal Block
ECB29-5CB (28K32)
30A Circuit breaker
1
208 3.8 12,800 4.3 28 30 4.3 28 − − − 30 − − −
220 4.2 14,300 4.3 31 35 4.3 31 − − − 35 − − −
230 4.6 15,700 4.3 31 35 4.3 31 − − − 35 − − −
240 5.0 17,100 4.3 31 35 4.3 31 − − − 35 − − −
6 kW
4 lbs.
ECB29-6 (47L22)
Terminal Block
ECB29-6CB (47L23)
35A Circuit breaker
1
208 4.5 15,400 4.3 32 35 4.3 32 − − − 35 − − −
220 5.0 17,100 4.3 37 40 4.3 37 − − − 40 − − −
230 5.5 18,800 4.3 37 40 4.3 37 − − − 40 − − −
240 6.0 20,500 4.3 37 40 4.3 37 − − − 40 − − −
8 kW
5 lbs.
ECB29-8 (28K33)
Terminal Block
ECB29-8CB (28K34)
45A Circuit breaker
2
208 6.0 20,500 4.3 41 45 4.3 41 − − − 45 − − −
220 6.7 22,900 4.3 47 50 4.3 47 − − − 50 − − −
230 7.3 25,100 4.3 47 50 4.3 47 − − − 50 − − −
240 8.0 27,300 4.3 47 50 4.3 47 − − − 50 − − −
9 kW
5 lbs.
ECB29−9CB (10L11)
50A Circuit breaker
ECB29EH-9CB (91K67)
50A Circuit breaker
2
208 6.8 23,100 4.3 46 50 4.3 46 − − − 50 − − −
220 7.6 25,800 4.3 52 60 4.3 52 − − − 60 − − −
230 8.3 28,200 4.3 52 60 4.3 52 − − − 60 − − −
240 9.0 30,700 4.3 52 60 4.3 52 − − − 60 − − −
10 kW
6 lbs.
ECB29−10 (28K35)
Terminal Block
ECB29-10CB (28K36)
60A Circuit breaker
2
208 7.5 25,600 4.3 51 60 − − − − − − − − − − − − − − −
220 8.4 28,700 4.3 53 60 − − − − − − − − − − − − − − −
230 9.2 31,400 4.3 55 60 − − − − − − − − − − − − − − −
240 10.0 34,100 4.3 58 60 − − − − − − − − − − − − − − −
12.5 kW
10 lbs.
ECB29-12.5CB (28K37)
(1) 25A & (1) 50A Circuitbreaker
ECB29EH-12.5CB (91K68)
(1) 25A & (1) 50A Circuitbreaker
3
208 9.4 32,000 − − − − − − − − − 4.3 24 31 25
220 10.5 35,800 − − − − − − − − − 4.3 27 35 30 50
230 11. 5 39,200 − − − − − − − − − 4.3 27 35 30 50
240 12.5 42,600 − − − − − − − − − 4.3 27 35 30 50
15 kW
12 lbs.
(1) 30A & (1) 60A Circuit breaker
(1) 30A & (1) 60A Circuit breaker
ECB29-15CB (28K38)
ECB29EH-15CB (91K69)
3
208 11. 3 38,400 − − − − − − − − − 4.3 28 37 30
220 12.6 43,000 − − − − − − − − − 4.3 31 42 35 60
230 13.8 47,000 − − − − − − − − − 4.3 31 42 35 60
240 15.0 51,200 − − − − − − − − − 4.3 31 42 35 60
NOTE − Circuit 1 Minimum Circuit Ampacity includes the Blower Motor Full Load Amps.
1
Electric heater capacity only does not include additional blower motor heat capacity.
2
Amps shown are for blower motor only.
3
Refer to National or Canadian Electrical Code manual to determine wire, fuse and disconnect size requirements. Use wires suitable for at least 167°F (75_C).
4
Bold text indicates that the circuit breaker on CB" circuit breaker models must be replaced with size noted.
5
HACR type circuit breaker or fuse.
5
Maximum
Overcurrent
Protection
4
45
4
50
Page 16
Page 17

TABLE 5 − ELECTRIC HEAT DATA
SINGLE PHASE ELECTRIC HEAT
Model Number
5 kW
4 lbs.
6 kW
4 lbs.
8 kW
5 lbs.
9 kW
5 lbs.
12.5 kW
10 lbs.
15 kW
12 lbs.
20 kW
19 lbs.
(1) 25A & (1) 50A Circuitbreaker
ECB29EH-12.5CB (91K68)
(1) 25A & (1) 50A Circuitbreaker
(1) 30A & (1) 60A Circuit breaker
(1) 30A & (1) 60A Circuit breaker
(1) 50A & (1) 60A Circuit breaker
(1) 50A & (1) 60A Circuit breaker
ECB29-5 (28K31)
Terminal Block
ECB29-5CB (28K32)
30A Circuit breaker
ECB29-6 (47L22)
Terminal Block
ECB29-6CB (47L23)
35A Circuit breaker
ECB29-8 (28K33)
Terminal Block
ECB29-8CB (28K34)
45A Circuit breaker
ECB299CB (10L11)
50A Circuit breaker
ECB29EH-9CB (91K67)
50A Circuit breaker
ECB29-12.5CB (28K37)
ECB29-15CB (28K38)
ECB29EH-15CB (91K69)
ECB29-20CB (11L31)
ECB29EH-20CB (91K70)
CBX32MV−036
3
Minimum
No.
Vol ts
of
InputkWInput
Steps
1
208 3.8 12,800 4.3 28 − − − 30 − − −
1
Input
Btuh
2
Blower
Motor Full
Load Amps
220 4.2 14,300 4.3 31 − − − 35 − − −
230 4.6 15,700 4.3 31 − − − 35 − − −
240 5.0 17,100 4.3 31 − − − 35 − − −
1
208 4.5 15,400 4.3 32 − − − 35 − − −
220 5.0 17,100 4.3 37 − − − 40 − − −
230 5.5 18,800 4.3 37 − − − 40 − − −
240 6.0 20,500 4.3 37 − − − 40 − − −
2
208 6.0 20,500 4.3 41 − − − 45 − − −
220 6.7 22,900 4.3 47 − − − 50 − − −
230 7.3 25,100 4.3 47 − − − 50 − − −
240 8.0 27,300 4.3 47 − − − 50 − − −
2
208 6.8 23,100 4.3 46 − − − 50 − − −
220 7.6 25,800 4.3 52 − − − 60 − − −
230 8.3 28,200 4.3 52 − − − 60 − − −
240 9.0 30,700 4.3 52 − − − 60 − − −
3
208 9.4 32,000 4.3 24 31 25
220 10.5 35,800 4.3 27 35 30 50
230 11 .5 39,200 4.3 27 35 30 50
240 12.5 42,600 4.3 27 35 30 50
3
208 11 .3 38,400 4.3 28 37 30
220 12.6 43,000 4.3 31 42 35 60
230 13.8 47,000 4.3 31 42 35 60
240 15.0 51,200 4.3 31 42 35 60
4
208 15.0 51,200 4.3 47 41 50 60
220 16.8 57,300 4.3 52 46 60 60
230 18.4 62,700 4.3 52 46 60 60
240 20.0 68,200 4.3 52 46 60 60
Circuit
Ampacity
Overcurrent Protection
Circuit Circuit
1 212
5
Maximum
4
45
4
50
THREE PHASE ELECTRIC HEAT
8 kW
5 lbs.
10 kW
6 lbs.
15 kW
12 lbs.
20 kW
19 lbs.
NOTE − Circuit 1 Minimum Circuit Ampacity includes the Blower Motor Full Load Amps.
1
Electric heater capacity only does not include additional blower motor heat capacity.
2
Amps shown are for blower motor only.
3
Refer to National or Canadian Electrical Code manual to determine wire, fuse and disconnect size requirements. Use wires suitable for at least 167°F (75_C).
4
Bold text indicates that the circuit breaker on CB" circuit breaker models must be replaced with size noted.
5
HACR type circuit breaker or fuse.
ECB29-8 (28K42)
Terminal Block
ECB29-10 (28K43)
Terminal Block
ECB29-15CB (28K44)
50A Circuit breaker
ECB29-20CB (28K45)
(2) 35A Circuit breaker
3
208 6.0 20,500 4.3 26 − − − 30 − − −
220 6.7 22,900 4.3 29 − − − 30 − − −
230 7.3 25,100 4.3 29 − − − 30 − − −
240 8.0 27,300 4.3 29 − − − 30 − − −
3
208 7.5 25,600 4.3 31 − − − 35 − − −
220 8.4 28,700 4.3 35 − − − 35 − − −
230 9.2 31,400 4.3 35 − − − 35 − − −
240 10.0 34,100 4.3 35 − − − 35 − − −
3
208 11 .3 38,400 4.3 44 − − −
4
45 − − −
220 12.6 43,000 4.3 50 − − − 50 − − −
230 13.5 47,000 4.3 50 − − − 50 − − −
240 15.0 51,200 4.3 50 − − − 50 − − −
6
208 15.0 51,200 4.3 31 21 35
220 16.8 57,300 4.3 35 24 35 35
230 18.4 62,700 4.3 35 24 35 35
240 20.0 68,200 4.3 35 24 35 35
4
30
Page 17
Page 18

TABLE 6 − ELECTRIC HEAT DATA
SINGLE PHASE ELECTRIC HEAT CBX32MV−048, CBX32MV−060 and CBX32MV−068
2
Blower
Motor
Full Load
Amps
5 kW
4 lbs.
Model Number
ECB29-5 (28K31)
ECB29-5CB (28K32)
30A Circuit breaker
Terminal Block
No.
of
Steps
1
1
Volts
InputkWInput
Btuh
Input
208 3.8 12,800 9.1 34 − − − − − − 40 − − − − − −
220 4.2 14,300 9.1 37 − − − − − − 45 − − − − − −
230 4.6 15,700 9.1 37 − − − − − − 45 − − − − − −
240 5.0 17,100 9.1 37 − − − − − − 45 − − − − − −
6 kW
4 lbs.
ECB29-6 (47L22)
Terminal Block
ECB29-6CB (47L23)
35A Circuit breaker
208 4.5 15,400 9.1 36 − − − − − − 45 − − − − − −
1
220 5.0 17,100 9.1 43 − − − − − − 50 − − − − − −
230 5.5 18,800 9.1 43 − − − − − − 50 − − − − − −
240 6.0 20,500 9.1 43 − − − − − − 50 − − − − − −
8 kW
5 lbs.
ECB29-8 (28K33)
Terminal Block
ECB29-8CB (28K34)
45A Circuit breaker
208 6.0 20,500 9.1 47 − − − − − − 50 − − − − − −
2
220 6.7 22,900 9.1 53 − − − − − − 60 − − − − − −
230 7.3 25,100 9.1 53 − − − − − − 60 − − − − − −
240 8.0 27,300 9.1 53 − − − − − − 60 − − − − − −
9 kW
5 lbs.
ECB29-9CB (10L11)
50A Circuit breaker
ECB29EH-9CB (91K67)
50A Circuit breaker
208 6.8 23,100 9.1 52 − − − − − − 60 − − − − − −
2
220 7.6 25,800 9.1 58 − − − − − − 60 − − − − − −
230 8.3 28,200 9.1 58 − − − − − − 60 − − − − − −
240 9.0 30,700 9.1 58 − − − − − − 60 − − − − − −
12.5 kW
10 lbs.
ECB29-12.5CB (28K37)
(1) 25A & (1) 50A Circuit breaker
ECB29EH-12.5CB (91K68)
(1) 25A & (1) 50A Circuit breaker
208 9.4 32,000 9.1 30 31 − − −
3
220 10.5 35,800 9.1 33 35 − − −
230 11.5 39,200 9.1 33 35 − − −
240 12.5 42,600 9.1 33 35 − − −
15 kW
12 lbs.
(1) 30A & (1) 60A Circuit breaker
(1) 30A & (1) 60A Circuit breaker
ECB29-15CB (28K38)
ECB29EH-15CB (91K69)
208 11.3 38,400 9.1 34 37 − − −
3
220 12.6 43,000 9.1 37 42 − − −
230 13.5 47,000 9.1 37 42 − − −
240 15.0 51,200 9.1 37 42 − − −
20 kW
19 lbs.
(1) 50A & (1) 60A Circuit breaker
(1) 50A & (1) 60A Circuit breaker
ECB29-20CB (11L31)
ECB29EH-20CB (91K70)
208 15.0 51,200 9.1 53 41 − − − 60 60 − − −
4
220 16.8 57,300 9.1 58 46 − − − 60 60 − − −
230 18.4 62,700 9.1 58 46 − − − 60 60 − − −
240 20.0 68,200 9.1 58 46 − − − 60 60 − − −
25 kW
19 lbs.
ECB29-25CB (28K40)
(3) 50A Breakers
208 18.8 64,100 9.1 49 31 31 50
6
220 21.0 71,700 9.1 54 35 35 60 50 50
230 23.0 78,300 9.1 54 35 35 60 50 50
240 25.0 85,300 9.1 54 35 35 60 50 50
THREE PHASE ELECTRIC HEAT
8 kW
5 lbs.
10 kW
6 lbs.
15 kW
12 lbs.
20 kW
19 lbs.
25 kW
19 lbs.
NOTE − Circuit 1 Minimum Circuit Ampacity includes the Blower Motor Full Load Amps.
1
Electric heater capacity only does not include additional blower motor heat capacity.
2
Amps shown are for blower motor only.
3
Refer to National or Canadian Electrical Code manual to determine wire, fuse and disconnect size requirements. Use wires suitable for at least 167°F (75_C).
4
Bold text indicates that the circuit breaker on CB" circuit breaker models must be replaced with size noted.
5
HACR type circuit breaker or fuse.
ECB29-8 (28K42)
Terminal block
ECB29-10 (28K43)
Terminal block
ECB29-15CB (28K44)
50A Circuit breaker
ECB29-20CB (28K45)
(2) 35A Circuit breakers
ECB29-25CB (28K46)
(2) 45A Circuit breakers
208 6.0 20,500 9.1 32 − − − − − − 40 − − − − − −
3
220 6.7 22,900 9.1 35 − − − − − − 40 − − − − − −
230 7.3 25,100 9.1 35 − − − − − − 40 − − − − − −
240 8.0 27,300 9.1 35 − − − − − − 40 − − − − − −
208 7.5 25,600 9.1 37 − − − − − − 45 − − − − − −
3
220 8.4 28,700 9.1 41 − − − − − − 50 − − − − − −
230 9.2 31,400 9.1 41 − − − − − − 50 − − − − − −
240 10.0 34,100 9.1 41 − − − − − − 50 − − − − − −
208 11.3 38,400 9.1 50 − − − − − − 60 − − − − − −
3
220 12.6 43,000 9.1 56 − − − − − − 60 − − − − − −
230 13.5 47,000 9.1 56 − − − − − − 60 − − − − − −
240 15.0 51,200 9.1 56 − − − − − − 60 − − − − − −
208 15.0 51,200 9.1 37 21 − − −
6
220 16.8 57,300 9.1 41 24 − − −
230 18.4 62,700 9.1 41 24 − − −
240 20.0 68,200 9.1 41 24 − − −
208 18.8 64,100 9.1 44 27 − − − 50
6
220 21.0 71,700 9.1 49 30 − − −
230 23.0 78,300 9.1 49 30 − − −
240 25.0 85,300 9.1 49 30 − − −
3
Minimum
Circuit Ampacity
5
Maximum
Overcurrent Protection
Circuit1Circuit2Circuit3Circuit1Circuit2Circuit
4
40
4
45 50 − − −
4
45 50 − − −
4
4
40
4
4
45 60 − − −
4
45 60 − − −
4
45
4
50 35 − − −
4
50 35 − − −
4
50 35 − − −
4
60 45 − − −
4
4
60 45 − − −
4
45 − − −
45 50 − − −
4
50 − − −
45 60 − − −
4
45
4
30 − − −
4
40 − − −
60 45 − − −
3
4
45
Page 18
Page 19

ECB29-5, -5CB 208/230 SINGLE−PHASE
ELECTRIC HEAT VESTIBULE PARTS ARRANGEMENT
ELECTRIC HEAT
VESTIBULE PANEL
TERMINAL BLOCK
(TB2)
ELECTRIC HEAT
CIRCUIT BREAKER
(CB1)
SEQUENCER RELAY (K32)
ELECTRIC HEAT
ELEMENT (HE1)
PRIMARY LIMIT (S15)
& SECONDARY LIMIT (S20)
ECB29−8 CIRCUIT
BREAKER (CB1)
FIGURE 7
ECB29-8 AND -8CB 208/230 SINGLE−PHASE
ELECTRIC HEAT VESTIBULE PARTS ARRANGEMENT
ELECTRIC HEAT
VESTIBULE PANEL
ELECTRIC HEAT
ELEMENT (HE1)
PRIMARY LIMIT (S15)
& SECONDARY LIMIT (S20)
TERMINAL BLOCK
(TB2)
ELECTRIC HEAT
SEQUENCER RELAY (K33)
ELECTRIC HEAT
SEQUENCER RELAY (K32)
ELECTRIC HEAT
ELEMENT (HE2)
FIGURE 8
Page 19
Page 20

CIRCUIT BREAKER
(CB1)
ECB29-8,−10 208/230 THREE−PHASE
ECB29-12.5CB, -15CB 208/230 SINGLE & THREE−PHASE
ELECTRIC HEAT VESTIBULE PARTS ARRANGEMENT
ELECTRIC HEAT
ELEMENT (HE3)
ELECTRIC HEAT
SEQUENCER RELAY (K32)
ELECTRIC HEAT
VESTIBULE PANEL
ELECTRIC HEAT
SEQUENCER RELAY (K33)
TERMINAL BLOCK
(TB2)
PRIMARY LIMIT (S15)
& SECONDARY LIMIT (S20)
ELECTRIC HEAT
ELEMENT (HE2)
ELECTRIC HEAT
ELEMENT (HE1)
PRIMARY LIMIT (S15)
& SECONDARY LIMIT (S20)
ELECTRIC HEAT
VESTIBULE PANEL
PRIMARY LIMIT (S15)
& SECONDARY LIMIT (S20)
CIRCUIT BREAKER
CIRCUIT BREAKER
(CB1)
CIRCUIT BREAKER
(CB2)
ECB29−20CB,−25CB 208/230 THREE−PHASE
ELECTRIC HEAT VESTIBULE PARTS ARRANGEMENT
ELECTRIC HEAT
SEQUENCER RELAY (K33)
(CB2)
FIGURE 9
ECB29-25CB, -208/230 SINGLE−PHASE
ELECTRIC HEAT
ELEMENT (HE6)
ELECTRIC HEAT
ELEMENT (HE1 & HE2)
(not shown)
ELECTRIC HEAT
ELEMENT (HE4)
ELECTRIC HEAT
ELEMENT (HE3)
ELECTRIC HEAT
ELEMENT (HE5)
PRIMARY LIMIT (S15)
& SECONDARY LIMIT (S20)
ELECTRIC HEAT
SEQUENCER RELAY (K32)
ELECTRIC HEAT
SEQUENCER RELAY (K116)
CIRCUIT BREAKER
(CB3)
ELECTRIC HEAT
SEQUENCER RELAY (K35)
ELECTRIC HEAT
SEQUENCER RELAY (K34)
FIGURE 10
Page 20
Page 21

V− OPTIONAL HUMIDITY CONTROL (A20)
EfficiencyPlus PARTS IDENTIFICATION
HINGES
SLIDE
(ON CIRCUIT BOARD)
COVER
VERTICAL SLIDE CONTROL
(control setpoint)
NOTE−TO REMOVE COVER, HOLD BASE SECTION
AND GENTLY PULL THE COVER OUT AT THE BOTTOM AND PIVOT IT UP AND AWAY FROM BASE.
BASE SECTION
CONTROL WIRE ENTRY
TERMINAL BLOCK
INDICATING LIGHTS
HUMIDITY SENSOR
FIGURE 11
A−CCB1
Optional Comfort Control Board (CCB1) A20 may be
installed adjacent to the indoor thermostat (figure 11). The
control monitors indoor humidity conditions and creates a
dehumidification demand in response to indoor humidity
just as the thermostat creates a cooling demand in
response to indoor temperature. The CCB1 works in
combination with the indoor thermostat to adjust
compressor speed and indoor blower speed. Although the
control provides a dehumidification demand, only the
thermostat can directly control compressor operation. The
CCB1 cannot call for a compressor cycle by itself.
Principles of Cooling with Drier Air
The humidity comfort range for humans is between 40%
and 60% relative humidity (RH). A vertical slide on the
control allows the humidity setpoint to be adjusted within
that comfort range. 50% RH is the recommended initial
setpoint until personal comfort level is established. The
personal comfort level will vary with humidity as with
temperature. For example, if air at 75°F and 50% RH is
changed to 60% RH, the air will feel" much warmer.
Likewise, if the air is reduced to 40% RH, it will feel" much
cooler.
Even when inactive, the body evaporates a large amount of
moisture away from the skin. This evaporation produces a
cooling effect (during wintertime this phenomenon is called
wind-chill"). Dry air is capable of absorbing more moisture
away from the skin thereby increasing the cooling effect.
When the CCB1 senses that the indoor humidity level is
above the control setpoint, the control places the
CBX32MV and outdoor unit in a dehumidification mode .
To produce drier air, the CBX32MV will slow down the
speed of the air crossing the indoor coil. Because the air is
moving much slower than normal, the indoor coil is allowed
more time to remove moisture from the air (a higher
percentage of the air passing over the coil is cooled to its
dew point removing more moisture). At the same time the
two-speed outdoor unit will switch to high-speed to produce
a colder indoor coil. The colder indoor coil and slower
moving air combine to produce drier supply air.
NOTE−The indoor blower speed is reduced in order to
slow the air speed across the indoor coil. The supply air
exiting the unit may not feel as forceful. This is normal.
Remember that when the unit is in dehumidification
mode, the comfort level is increased because the unit is
producing cooler, drier air.
The exact sequence of operation to produce cooler, drier air
is described in the following section.
Operation
The CCB1 operates only during cooling mode. During
normal cooling operation, when there is no indoor humidity
demand, the unit operates as a straight two-speed cooling
system. First stage thermostat demand energizes the
compressor and indoor blower on low speed. Increased
cooling demand energizes the compressor and indoor
blower on high speed.
The control is equipped with a row of orange LED lights on
its face which indicate the amount of relative humidity
demand present. When one or more LEDs are lit, the
control signals the CBX32MV to begin dehumidification
mode. Tables 10 and 11 shows system response to
thermostat and CCB1 demand.
Calibration Precautions
Extreme care should be taken to avoid exposing the CCB1
to fumes from household chemicals. The humidity sensing
element in the CCB1 is a precise component which can be
damaged or the calibration changed by household
chemicals and cleaning agents. Make sure all household
chemicals are stored in a different room in the building.
Also, use only mild diluted soapy water when cleaning the
CCB1 cover or the area surrounding the CCB1. The
sensing element cannot be field calibrated. The CCB1
contains no field repairable parts and must be replaced
when damaged in this manner.
Agents which can damage the CCB1 include alcohol,
benzene, chlorine and chlorine based solutions, acetone
(nail polish remover), bug sprays and other household
cleaners.
Calibration can also be adversely affected by the
placement of the CCB1 with respect to the indoor
thermostat, exterior doors and windows and supply air
registers. Most thermostats have anticipation resistors
Page 21
Page 22

which give off heat. If the CCB1 is installed directly above
the indoor thermostat, the humidity sensor calibration will
be thrown off. If the CCB1 is installed directly above the
indoor thermostat, it should be relocated to the side of the
thermostat. Refer to CCB1 installation instructions.
Other Conditions Which Adversely Affect
CCB1 Performance
Blower speed selection can adversely affect CCB1
performance. Higher blower speeds should be selected to
provide maximum sensible cooling, while lower blower
speeds should be selected to provide maximum humidity
removal. Refer to CBX32MV and CCB1 installation
instructions.
It is recommended that the indoor blower be left in AUTO
mode at all times. During dehumidification mode, the
indoor coil and drain pan may become saturated with
moisture. If the indoor blower is left in ON mode, much of
that moisture can be re-evaporated into the living space
between thermostat demands. This can create a constant
demand for humidity removal and may cause extended
compressor run times. Refer to table 7 for jumpers per
application. CBX32MV units manufactured January 2002
and later, will have factory installed jumpers. Remove
jumpers not used.
TABLE 7
JUMPERS REQUIRED
DS to Y1 and
Y1 to Y2
DS to Y1 and
Y1 to Y2 and
O to R
DS to Y1 and
O to R
Y1 to Y2 and
O to R
Without CCB1
Humidity
Control
With CCB1 Hu-
midity
Control
Heat Pump
Condensing
Unit
Heat Pump
Condensing
Unit
Single Speed
Two Speed DS to Y1
Single Speed
Two Speed
Single Speed Y1 to Y2
Two Speed None
Single Speed
Two Speed O to R
The CCB1 may become indefinitely latched in the
dehumidification mode when power to the unit is turned off.
This condition can be caused by turning off power while
dehumidification demand is present, then turning on power
when dehumidification demand is satisfied. If the CCB1
becomes stuck in this manner, it can be reset by removing
thermostat demand then moving the CCB1 slide switch all
the way down and back up to its setpoint.
How to unlatch CCB1
1− Force a cooling demand by setting thermostat to COOL
mode and by moving thermostat lever to lowest
position.
2− Move CCB1 slide control down to 40% relative
humidity. CCB1 lights should come on.
3− Now, move CCB1 slide control back up to 60% relative
humidity. The lights should go off.
4− Remove thermostat demand by moving thermostat
lever to cycle unit off.
Applications with the EfficiencyPlus CCB1 humidity control
create different CFM volumes. For example, during a
first−stage cooling call (two−speed outdoor unit) with no
demand from the CCB1, the air volume is 40% of the COOL
jumper selection. For a normal COOL (Pin #2 setting for
CBX32MV−036), the CFM is 1125; the reduced speed is
450 CFM (1125 x 40% = 450). This arrangement provides
for additional dehumidification during first stage cooling.
See tables 10 and 11 for various scenarios concerning use
of the CCB1 humidity control and the CBX32MV series unit.
B−SignatureStatt or ComfortSense® 7000
The reference thermostats can be installed in place of the
indoor thermostat. The thermostat monitors indoor
humidity conditions and creates a dehumidification
demand in response to indoor humidity just as it creates a
cooling demand in response to indoor temperature. The
SignatureStat adjusts compressor speed and indoor
blower speed to maintain humidity at a comfortable level.
Principles of Cooling with Drier Air
The humidity comfort range for humans is between 40%
and 60% relative humidity (RH). 50% RH is the
recommended initial setpoint until personal comfort level is
established. The personal comfort level will vary with
humidity as with temperature. For example, if air at 75°F
and 50% RH is changed to 60% RH, the air will feel" much
warmer. Likewise, if the air is reduced to 40% RH, it will
feel" much cooler.
Even when inactive, the body evaporates a large amount of
moisture away from the skin. This evaporation produces a
cooling effect (during wintertime this phenomenon is called
wind-chill"). Dry air is capable of absorbing more moisture
away from the skin thereby increasing the cooling effect.
When the thermostat senses that the indoor humidity level
is above the control setpoint, the control places the
CBX32MV and outdoor unit in a dehumidification mode.
To produce drier air, the CBX32MV will slow down the
speed of the air crossing the indoor coil. Because the air is
moving much slower than normal, the indoor coil is allowed
more time to remove moisture from the air (a higher
percentage of the air passing over the coil is cooled to its
dew point removing more moisture). At the same time the
two-stage outdoor unit will switch to high-speed to produce
a colder indoor coil. The colder indoor coil and slower
moving air combine to produce drier supply air.
Page 22
Page 23

NOTE−The indoor blower speed is reduced in order to
slow the air speed across the indoor coil. The supply air
exiting the unit may not feel as forceful. This is normal.
Remember that when the unit is in dehumidification
mode, the comfort level is increased because the unit is
producing cooler, drier air.
The exact sequence of operation to produce cooler, drier air
is described in the following section.
Other Conditions Which Adversely Affect
Thermostat Performance
Blower speed selection can adversely affect thermostat
performance. Higher blower speeds should be selected to
provide maximum sensible cooling, while lower blower
speeds should be selected to provide maximum humidity
removal. Refer to CBX32MV and applicable thermostat
installation instructions.
It is recommended that the indoor blower be left in AUTO
mode at all times. During dehumidification mode, the
indoor coil and drain pan may become saturated with
moisture. If the indoor blower is left in ON mode, much of
that moisture can be re-evaporated into the living space
between thermostat demands. This can create a constant
demand for humidity removal and may cause extended
compressor run times. Refer to table 8 for jumpers per
application.
TABLE 8
JUMPERS REQUIRED
DS to Y1 and
Y1 to Y2
DS to Y1 and
Y1 to Y2 and
O to R
DS to Y1 and
O to R
Y1 to Y2 and
O to R
Humidity
Control
OFF
Humidity
Control
ON
Heat Pump
Condensing
Unit
Heat Pump
Condensing
Unit
Single Speed
Two Speed DS to Y1
Single Speed
Two Speed
Single Speed Y1 to Y2
Two Speed None
Single Speed
Two Speed O to R
Operation
Dehumidification is provided only when the thermostat is in
cool mode. Dehumidification D terminal wires to
variable−speed blower (reverse logic/active on low signal
24VAC). When the unit is in heating mode, the
dehumidification function is off. The default mode for
dehumidification is OFF and needs to be activated during
installation.
The D terminal is active whenever the thermostat is
powered, EXCEPT when there is a dehumidification
demand. This means that the D terminal has 24V on it even
in HEAT and OFF modes.
Basic Mode: Dehumidification only with a cooling demand.
COOL is on, then D is active (reverse logic, off), and G is on
(if not already on), Y1 and Y2 (if available) is on.
Precision Mode: Dehumidification with or without Cooling
demand. D is active (reverse logic, off), and G, Y1, and Y2 (if
available) are on. Note that H is inactive (off) during
dehumidification. The D terminal controls dehumidification.
When a dehumidification demand is present, the D terminal
becomes de−energized. Otherwise, 24VAC is present in off
mode and heating mode unless there is a call for
dehumidification. Tables 12 and 13 show system response
to thermostat demand.
Dehumidify Mode Screen (SignatureStat Only)
NOTE − See the ComfortSense 7000 user guide for
interface instructions for dehumidify mode operations.
NOTE − Basic or Precision mode must be turned on before
you can adjust the dehumidify level on the thermostat .
1 − From the home screen press MENU.
2 − Use the UP or DOWN button to highlight DEHUMIDIFY.
See figure 12.
Setting Humidity Levels
MAIN MENU
PROGRAM
HEAT / COOL
HUMIDIFY
DEHUMIDIFY
HOME
SELECT
FIGURE 12
3 − Press SELECT to choose MODE.
Setting Humidity Levels
HUMIDIFY MENU
MODE
DEHUMIDIFY
MAIN MENU
OFF
45%
SELECT
FIGURE 13
4 − To turn off dehumidification control entirely, select OFF.
(The default setting for dehumidification is OFF.)
To turn on basic dehumidification mode, select BASIC.
To turn on precision dehumidification mode, select
PRECISION.
See figure 14.
Setting Dehumidify Mode
HUMIDIFY MODE
OFF
BASIC
PRECISION
HUM MENU
SELECT
FIGURE 14
5 − The Humidity Menu appears. Basic (BAS) is displayed
on the right hand of the screen. Now you can program
the dehumidity percentage that you want.
Page 23
Page 24

Setting Dehumidity Levels
HUMIDIFY MENU
MODE
DEHUMIDIFY
BAS
45%
Setting Dehumidity Levels
DEHUMIDIFY MENU
MODE
DEHUMIDIFY
OFF
45%
MAIN MENU
SELECT
FIGURE 15
Dehumidity Sensor Settings
The dehumidity sensor settings have minimum and
maximum settings. The sensor settings can be adjusted in
1% increments. See table 9.
TABLE 9
Dehumidity Setpoint
Range
Minimum setting 45%
Maximum setting 60%
1 − On the humidity menu press the up or down button to
again highlight DEHUMIDIFY. See figure 16.
MAIN MENU
SELECT
Figure 16
2 − Use the up and down button to adjust the humidity level.
See figure 17.
Setting Dehumidity Levels
DEHUMIDIFY
CONTROL
%
45
MAIN MENU
Figure 17
SELECT
Page 24
Page 25

TABLE 10
TYPICAL CBX32MV, CCB1 and TWO−SPEED OUTDOOR UNIT OPERATING SEQUENCE
OPERATING SEQUENCE
System
Condition
Normal operation
Call for humidity re-
moval during 1st
stage thermostat
demand.
Significant increase
in humidity
during thermostat
demand.
Humidity demand
satisfied during
thermostat
demand.
Call for humidity re-
moval during 2nd
stage thermostat de-
mand.
*Call for 1st stage
cooling after call for
humidity removal.
Call for 2nd stage
cooling after call for
humidity removal.
Call for cooling after
significant increase in
humidity.
Humidity demand sat-
isfied between thermo-
stat demands (unit off
cycle).
Note−When changing unit mode of operation from cooling to heating, indicating lights that are on will stay on until the first thermostat heating
demand.
*IMPORTANT-If power to unit is turned on with CCB1 calling for humidity removal, outdoor unit may be locked into high speed indefinitely. To
reset, move humidity slide switch all the way down then back up to desired setpoint (with unit running)
** Reduced blower speed is 70% of cool for 018/024 and 024/030 units, 65% of COOL for the −036 units; 60% of COOL for −048 and −060 units.
***If the two−speed control on a two−speed outdoor unit is set for LATCH 2 (15 minutes) or LATCH 3 (30 minutes), the compressor will latch into
high speed after a Y1 demand has occurred for that period of time.
Step
1
2
1
2
3
4
1
2
1
2
3
4
1
2
3
1
2
1
2
1
2
1
2
SYSTEM DEMAND
Thermostat
Demand
Y1
Y2
Y1 Acceptable (None)
Y1
Demand
Satisfied
Y1 Slightly over setpoint (1) High
Y1 Acceptable (None) Low
Y1
Y1
Y1
None Acceptable (None) Off Off
Y1 Acceptable (None) Low 40% of COOL
Y2 Acceptable (None) High
Y2
Y2 Acceptable (None) High
None Slightly over setpoint (1) Off Off
Y1 Slightly over setpoint (1) Low
None
Y2
None
Y1 or Y2 High
None
Y1 or Y2 High
*Relative Humidity
(EfficiencyPlus
Lights)
Acceptable (None)
Acceptable (None)
Change to
Slightly over setpoint (1)
Slightly over
setpoint (1)
Change to
Significantly over
setpoint (2 or more)
Over Setpoint
Change to
Acceptable (None)
Change to
Slightly over setpoint (1)
Slightly over setpoint (1)
Slightly over setpoint (1)
Significantly over
setpoint (2 or more)
Significantly over
setpoint (2 or more)
Over setpoint
(1 or more)
Change to
Acceptable (None)
***
Compres-
sor Speed
Low 40% of COOL
High
Low 40% of COOL
Low 40% of COOL
Off Off
High
High
High COOL
High
Off Off
High
Off Off
Off Off
Blower CFM
(COOL)
**60%/65%/70%
of COOL
40% of COOL
**60%/65%/70%
of COOL
**60%/65%/70%
of COOL
**60%/65%/70%
of COOL
40% of COOL
**60%/65%/70%
of COOL
**60%/65%/70%
of COOL
COOL
COOL
COOL
COOL
SYSTEM RESPONSE
Comments
Compressor demand and indoor blower
speed follow thermostat demand.
Dehumidification mode begins with next
thermostat demand after initial thermo-
stat demand is satisfied.
If humidity increases significantly over setpoint or if slide switch is moved significant-
ly, unit will immediately go into dehumidifi-
cation mode (in presence of thermostat de-
mand).
When humidity demand is satisfied,
blower immediately shifts to the COOL
CFM in order to hasten the end of the
cycle. Unit can only shift out of high
speed compressor operation at begin-
ning of next cycle.
Blower immediately changes speed in
response to thermostat demand.
Dehumidification mode (high speed com-
pressor) begins with next thermostat de-
mand after initial demand is satisfied.
Reduced blower speed
(dehumidification speed) begins imme-
diately with thermostat demand.
If humidity increases significantly over
setpoint or if slide switch is moved, unit
immediately goes into dehumidification
mode (in presence of thermostat de-
mand).
While unit is not operating (no thermo-
stat demand) slide switch is moved
down and back up. Blower and com-
pressor operate at high speed until next
thermostat demand.
Page 25
Page 26

TYPICAL CBX32MV, CCB1 and SINGLE SPEED OUTDOOR UNIT OPERATING SEQUENCE
TABLE 11
OPERATING SEQUENCE
System
Condition
Normal operation
Call for humidity re-
moval during call
for cooling.
Humidity demand
satisfied during ther-
mostat demand.
*Call for cooling
after call for
humidity removal.
Humidity demand sat-
isfied between thermo-
stat demands (unit off
cycle).
Note−When changing unit mode of operation from cooling to heating, indicating lights that are on will stay on until the first thermostat heating
demand.
* Reduced blower speed is 70% of COOL for 018/024 and 024/030, 65% of COOL for the −036 units; 60% of COOL for −048 and −060 series units.
Thermostat
Step
Demand
1 Y1 Acceptable (None)
1
2
1
2
1
2
1
2
SYSTEM DEMAND
Relative Humidity
(EfficiencyPlus Lights)
Y1 Acceptable (None)
Y1
Y1
Y1
None Over setpoint Off
Y1 Over setpoint
None
Y1
Change
over setpoint
Over Setpoint
Change to
Acceptable (None)
Over setpoint
(1 or more)
Change to
Acceptable (None)
Blower CFM
(COOL)
COOL
COOL
*60%/65%/70%
of COOL
*60%/65%/70%
of COOL
COOL
*60%/65%/70%
of COOL
Off
COOL
SYSTEM RESPONSE
Comments
Compressor demand and indoor blower
speed follow thermostat demand.
Dehumidification mode begins
when relative humidity is
greater than setpoint.
When humidity demand is satisfied,
blower immediately shifts to the
COOL CFM in order to hasten the end
of the cycle.
Dehumidification mode begins
when relative humidity is
greater than setpoint.
While unit is not operating (no thermo-
stat demand) slide switch is moved
down and back up. Blower operates at
COOL CFM.
TABLE 12
CBX32MV, SignatureStat or ComfortSense 7000 and SINGLE STAGE OUTDOOR UNIT
OPERATING
SEQUENCE
Thermostat Demand Relative Humidity
System
Condition
Step
Y1 O G
NO CALL FOR DEHUMIDIFICATION
Normal Operation 1 On On On Acceptable
BASIC MODE (only active on a Y1 thermostat demand)
Normal Operation 1 On On On Acceptable
Dehumidification
Call
2 On On On Demand
PRECISION MODE (operates independent of a Y1 thermostat demand)
Normal Operation 1 On On On Acceptable
Dehumidification
call
Dehumidification
call ONLY
2 On On On Demand
1 On On On Demand
Jumpers at indoor unit with a single stage outdoor unit
With Condensing unit − Y1 to Y2 and R to O
With Heat Pump − Y1 to Y2
SYSTEM DEMAND SYSTEM RESPONSE
W
1
Status D
24
VAC
24
VAC
0
VAC
24
VAC
0
VAC
0
VAC
Compres-
sor
High 100%
High 100%
High
High 100%
High
High
60%/65%
60%/65%
Blower
CFM
(COOL)
60%/65
70%*
70%*
70%*
Comments
Compressor and indoor
blower follow thermostat
demand
SignatureStat energizes
Y1 and de−energizes D on
a call for dehumidification
Dehumidification mode
begins when humidity is
greater than set point
SignatureStat will try to
maintain room humidity
setpoint by allowing the
room space to maintain a
cooler room thermostat
setpoint**
*During dehumidification, cooling blower speed is as follows: 70% of COOL cfm for 018/024, 024/030 & 068 65% for 036,
60% for 048 & 060 units.
** In Precision mode, Signature thermostat built BEFORE October 2003 will maintain the room temperature up to 3°F (1.8°C)
cooler than room thermostat setting. Precision thermostat built AFTER October 2003 will maintain the room temperature up
to 2°F (1.2°C) cooler than the room thermostat setting.
Page 26
Page 27

TABLE 13
CBX32MV, SignatureStat or ComfortSense 7000 and TWO STAGE OUTDOOR UNIT
OPERATING
SEQUENCE
System
Condition
NO CALL FOR DEHUMIDIFICATION
Normal Operation −
Y1
Normal Operation −
Y2
ROOM THERMOSTAT CALLS FOR FIRST STAGE COOLING
BASIC MODE (only active on a Y1 thermostat demand)
Normal Operation 1 On On On Acceptable
Dehumidification
Call
PRECISION MODE (operates independent of a Y1 thermostat demand)
Normal Operation 1 On On On Acceptable
Dehumidification
call
Dehumidification
call ONLY
ROOM THERMOSTAT CALLS FOR FIRST AND SECOND STAGE COOLING
BASIC MODE (only active on a Y1 thermostat demand)
Normal Operation 1 On On On On Acceptable
Dehumidification
Call
PRECISION MODE (operates independent of a Y1 thermostat demand)
Normal Operation 1 On On On On Acceptable
Dehumidification
call
Step
1 On On On Acceptable
2 On On On On Acceptable
2 On On On On Demand
2 On On On On Demand
1 On On On On Demand
2 On On On On Demand
2 On On On On Demand
Thermostat Demand Relative Humidity
Y1 Y2 O G
SYSTEM DEMAND SYSTEM RESPONSE
W1W
2
Status D
24
VAC
24
VAC
24
VAC
24
VAC
24
VAC
VAC
VAC
24
VAC
VAC
24
VAC
VAC
0
0
0
0
Compressor
Low 70%
High 100%
Low 70%
High
Low 70%
High
High
High 100%
High
High 100%
High
Blower
CFM
(COOL)
60%/65%
70%*
60%/65%
70%*
60%/65%
70%*
60%/65%
70%*
60%/65%
70%*
Comments
Compressor and indoor
blower follow thermostat
demand
SignatureStat energizes
Y2 and de−energizes D on
a call for dehumidification
Dehumidification mode begins when humidity is
greater than set point
SignatureStat will try to
maintain room humidity
setpoint by allowing the
room space to maintain a
cooler room thermostat
setpoint**
SignatureStat energizes
Y2 and de−energizes D on
a call for dehumidification
Dehumidification mode begins when humidity is
greater than set point
Dehumidification
call ONLY
1 On On On On Demand
Jumpers at indoor unit with a two stage outdoor unit
With Condensing unit − Y2 and R to O
With Heat Pump − none
0
VAC
High
60%/65%
70%*
SignatureStat will try to
maintain room humidity
setpoint by allowing the
room space to maintain a
cooler room thermostat
setpoint**
*During dehumidification, cooling blower speed is as follows: 70% of COOL cfm for 018/024, 024/030 & 068 65% for 036,
60% for 048 & 060 units.
** In Precision mode, Signature thermostat built BEFORE October 2003 will maintain the room temperature up to 3°F (1.8°C)
cooler than room thermostat setting. Precision thermostats built AFTER October 2003 will maintain the room temperature up
to 2°F (1.2°C) cooler than the room thermostat setting.
Page 27
Page 28

VI−CONFIGURATION MODIFICATIONS
CBX32MV unit may be installed in the upflow, downflow,
horizontal right-hand discharge or horizontal left-hand
discharge orientation.
The units come from the factory ready for upflow or
horizontal right-hand discharge installation. If the unit
needs to be modified from its original configuration, use the
following procedures. All procedures assume the unit has
not been modified from the factory.
A−Disassembly of CBX32MV Cabinet
For tight applications where a modular design is an
advantage, the CBX32MV unit can be easily disassembled
and reassembled. By removing four screws, the top blower
section lifts off so the unit is in two parts. To disassemble the
CBX32MV, use the following procedure.
1− Remove the two black screws located just above the
seam in the top half of the unit.
2− Remove the front access panel and remove the two
screws on the inside of the top half of the cabinet on
both sides.
3− Lift the top section apart from the bottom section.
4− To lighten the cabinet for lifting, the blower and coil
assemblies can also be removed.
5− Reassemble once the cabinet is in place.
B−Upflow Application
1− Discard drip shields, if applicable. The shields are used
for downflow applications only and are located with the
foam pads on top of unit.
2− For best efficiency and air flow, the horizontal drain
pan should be removed from units in upflow
configurations.
3− After removing horizontal drain pan, place unit in
desired location. Set unit so that it is level. Connect
return and supply air plenums as required using sheet
metal screws. See figure 18.
UPFLOW CONFIGURATION
HORIZONTAL
DRAIN PAN*
UPFLOW/
DOWNFLOW
DRAIN PAN
*FOR OPTIMUM PERFORMANCE,
REMOVE HORIZONTAL DRAIN PAN.
FIGURE 18
C−Downflow Application
WARNING
If electric heat section with circuit breakers
(ECB29) is applied to downflow CBX32MV unit, the
circuit breakers must be rotated 180_ to the UP
position. See ECB29 installation instructions for
more details.
1− Remove drip shields shipped with the foam pads from
top of unit. The shields are used for downflow
applications only and may need to be field fabricated if no
longer with unit. See table 14 for drip shields used.
2− Remove coil assembly from unit.
3− Remove horizontal drain pan. See figure 19.
TABLE 14
Unit
CBX32MV−018/024
CBX32MV−024/030 LB−74274 15.875 4.6718
CBX32MV−036 LB−74272 17.875 4.6718
CBX32MV−048, −060,
−068
Part No. Length Width
Not
Required
LB−89864 19.875 4.6718
N/A N/A
Page 28
Page 29

DOWNFLOW DISCHARGE CONFIGURATION
HORIZONTAL
DRAIN PAN*
DOWNFLOW DRIP SHIELDS
UPFLOW/
DOWNFLOW
DRAIN PAN
*FOR OPTIMUM
PERFORMANCE,
REMOVE
HORIZONTAL
DRAIN PAN.
FIGURE 19
4− Rotate cabinet 180_ from upright. It may be
necessary to first remove the blower assembly to
lighten the cabinet for lifting.
5− Install downflow drip shield firmly in place on inside of coil
slab from under drain pan. See figures 20 and 21.
1
Coil
Drip Shield
Drip Pan
FIGURE 21
6− Replace coil assembly and blower if removed.
Replace coil access panel. If horizontal drain pan is not
removed, depress tab in cabinet support rail to hold
horizontal drain pan in place. See figure 19.
7− Set unit so that it is level. Connect return and supply air
plenums as required using sheet metal screws.
NOTE−For downflow application, metal or class I supply
and return air plenums must be used.
For downflow installation on combustible flooring, an
additive base must be used. See figure 22.
BLOWER
COIL UNIT
side view
1− Apply two pieces of foam tape (provided)
down both ends of each shield. The tape
should measure 4 3/4" X 2" (120 X 25 mm).
Ensure that the tape covers both sides of the
shield equally.
2
2− Apply the longer piece of foam tape between
the pieces on each end. This piece of tape is
1" wide.
FIGURE 20
COMBUSTIBLE
FLOOR
ADDITIVE BASE
PROPERLY SIZE
FLOOR OPENING
FIGURE 22
Cut an opening appropriately sized for combustible base. Base
dimensions are shown in figure 23. After opening has been cut,
set the additive base into opening. Connect outlet air plenum to
the additive base. Set the unit on the additive base so flanges
of the unit drop into the base opening and seal against the
insulation strips. Seal around the insulation strips with
permagum. The unit is now locked in place. Install return air
plenum and secure with sheet metal screws.
Page 29
Page 30

DOWNFLOW COMBUSTIBLE BASE DIMENSIONS
Inches
(mm)
1-5/8
(41)
5/8
(16)
1-5/8
(41)
1-5/8
(41)
TOP VIEW
11-3/8
(289)
SUPPLY
AIR
OPENING
20 (508)
22-1/8
13-3/8 (340)
Opening
SIDE VIEW
(562)
23−1/4
(591)
2 (51)
FIGURE 23
D−Horizontal Right−Hand
Discharge Application
NOTE−For horizontal applications, a secondary drain pan is
recommended. Refer to local codes.
1− Before operating the unit, remove access panels and
the horizontal drip shield (−068 model) and the
corrugated padding between the blower and coil
assembly. Discard the corrugated padding and the
downflow drip shields from the foam pads on top of the
unit.
2− Install the horizontal shield on the front edge of the
horizontal drain pan as shown in figure 24.
3− No further adjustment is necessary. Set unit so it is
sloped toward the drain pan (1/4" [6mm]). See figure
24.
4− If hanging the unit, it must be supported along the entire
length of the cabinet. If using chain or strap, use a piece
of angle iron or sheet metal attached to the unit (either
above or below) so that the full length of the cabinet is
supported. Use securing screws no longer than 1/2"
(13mm) to avoid damage to coil or filter. See figure
25. Connect return and supply air plenums as
required using sheet metal screws.
NOTE−For horizontal applications in high humidity
areas, remove the downflow rail closest to the drain pan.
Removal of downflow rail will prevent sweating in high
humidity areas. To remove rail, remove screw from rail at
back of unit and at cabinet support rail. Remove downflow
rail then replace screws. Also, seal around the exiting
drain pipe, liquid and suction lines to prevent infiltration of
humid air.
RIGHT−HAND DISCHARGE CONFIGURATION
UPFLOW / DOWNFLOW DRAIN PAN
HORIZONTAL
DRAIN PAN
HORIZONTAL DRIP
SHIELD (−068 MODELS)
DOWNFLOW
RAIL
No Adjustment Is Necessary
FIGURE 24
HANGING HORIZONTAL UNIT
1/2" (13mm) Screws max.
ANGLE IRON
OR
SHEET METAL
FRONT VIEW END VIEW
Electrical Inlet
Clearance
4 in. (102 mm)
FIGURE 25
CAUTION
Danger of equipment damage and personal injury.
Take care when removing coil assembly from unit
installed in right or left−hand applications. Coil
may tip into drain pan once clear of cabinet. Support coil when removing.
Page 30
Page 31

E−Horizontal Left−Hand
Discharge Application
NOTE−For horizontal applications above the ceiling, a
secondary drain pan is recommended. Refer to local
codes.
1− Remove access panels and horizontal drip shield (−068
model) from the corrugated padding between the
blower and coil assembly. Discard the corrugated
padding and the downflow drip shields from the foam
pads on top of the unit. (The shields are used for
downflow applications only.)
2− Pull the coil assembly from unit. Pull off the horizontal
drain pan.
3− Remove drain plugs from back drain holes on
horizontal drain pan and re-install them on front holes.
4− Rotate drain pan 180_ front to back and install it on the
opposite side of coil.
5− Remove screws from top cap. Remove horizontal drip
shield screw located in the center of the back coil end
seal. See figure 26.
6− Rotate horizontal drip shield 180_ front to back.
7− Remove plastic plug from left hole on coil front end
seal and re-install plug in back hole. Re-install
horizontal drip shield screw in front coil end seal. Drip
shield should drain downward into horizontal drain
pan inside coil.
8− Rotate top cap 180_ front to back and align with
unused screw holes. Holes must align with front and
back coil end plates. Note that top cap has a 45_ bend
on one side and 90_ bend on the other. The 90_ bend
must be on the same side as the horizontal drain pan.
See figures 26 and 27.
NOTE−Use extreme care when re-installing screws into coil
end plate engaging holes. Coil damage could result by
misalignment.
8
90_ BEND
8
TOP CAP
8
BACK COIL END
SEAL
FIGURE 27
9− From the upflow position, replace coil assembly.
Then flip cabinet 90_ to the left and set into place.
Replace coil assembly. Secure coil in place by
bending down tab on cabinet support rail. See
figures 26 and 28.
LEFT−HAND DISCHARGE CONFIGURATION
SECURING TAB ON CABINET
SUPPORT RAIL
DOWNFLOW RAIL
HORIZONTAL
DRIP SHIELD
HORIZONTAL
DRAIN PAN
FIGURE 28
10− Install the horizontal shield (−068 model) on the front
edge of the horizontal drain pan as shown in figure 29.
LEFT−HAND DISCHARGE CONFIGURATION
HORIZONTAL DRIP SHIELD (−068 MODEL)
CABINET
SUPPORT
90_
BEND
4
FIELD MODIFICATION FOR
LEFT−HAND DISCHARGE
5
9
8
8
5
6
COIL SHOWN IN UP-FLOW POSITION
FOR EASY CONVERSION
FIGURE 26
7
DOWNFLOW
RAIL
2
FIGURE 29
FRONT EDGE OF HORIZONTAL
DRAIN PAN
NOTE−For horizontal applications in high humidity
areas, remove the downflow rail closest to the drain pan.
To remove rail, remove screw from rail at back of unit and
3
at cabinet support rail. Remove downflow rail then replace
screws. Also, seal around the exiting drain pipe, liquid and
suction lines to prevent infiltration of humid air.
11− Flip access door. Knock out the portion of door for the
drain pipes and attach to the cabinet with screw
provided. Replace access door on the unit.
Page 31
Page 32

12− Set unit so it is sloped toward the drain pan (1/4"
[6mm]). Connect return and supply air plenums as
required using sheet metal screws.
13− If hanging the unit, it must be supported along the entire
length of the cabinet. If using chain or strap, use a piece
of angle iron or sheet metal attached to the unit (either
above or below) so that the full length of the cabinet is
supported. Use securing screws no longer than 1/2"
(13mm) to avoid damage to coil or filter. S e e fi g u r e 25.
Connect return and supply air plenums as required
using sheet metal screws.
F−Condensate Drain
A 5" (127mm) section of PVC pipe is provided with the unit. Cut
the pipe in half and use to route the auxiliary and main drains.
Connect main condensate drain and route downward to an
open drain or sump. Do not connect dr a i n to a cl o s e d waste
system. Refer to figure 30 for typical condensate trap
configuration.
TYPICAL CONDENSATE DRAIN CONNECTION
MINIMUM 1 INCH (25 mm)
PITCH PER 10 FEET
(3048 mm) OF LINE
Trap must be deep enough to offset maximum static
difference (Generally, 2 inches [51mm] minimum).
FIGURE 30
It is recommended that the auxiliary drain be connected to a
drain line for all units. If auxiliary drain is not connected,
it must be plugged with provided cap. For downflow
units, the auxiliary drain MUST be connected and
routed to a drain. See figure 31 for auxiliary and main
drain locations.
LEFT−HAND
DISCHARGE
UPFLOW OR
DOWNFLOW
PIPE DIAMETER
DIFFERENCE
COIL
DRAIN
PAN
RIGHT−HAND
DISCHARGE
4− Horizontal runs must be sloped 1" (25mm) per 10 feet
(3.1m) of drain line to offset friction.
5− An open vent in drain line will sometimes be required due
to line length, friction and static pressure.
6− Drains should be constructed in a manner to facilitate
future cleaning and not to interfere with filter access. See
figure 30.
7− Auxiliary drain should run to an area where homeowner
will notice it draining. Refer to local codes.
VII−START-UP − OPERATION
A−Preliminary and Seasonal Checks
1− Make sure the unit is installed in accordance with the
installation instructions.
2− Inspect electrical wiring, both field and factory installed for
loose connections. Tighten as required.
3− Check voltage at disconnect switch. Voltage must be
within range listed on the nameplate. If not, consult t h e
power company and have voltage condition
corrected before starting unit.
4− Check to ensure that refrigerant lines are in good
condition and pipe insulation is intact.
5− Inspect condition of condensate drain pan and piping
assembly. Disassemble and clean seasonally.
B−Cooling Start-Up
NOTE−The following is a generalized procedure and
does not apply to all thermostat control systems. Electronic
thermostat control systems may operate differently.
1− Set fan switch to AUTO or ON and move the system
selection switch to COOL. Adjust the thermostat to a
setting far enough below room temperature to bring on the
compressor. Compressor will start and cycle on demand
from the thermostat.
2− The refrigerant circuit is charged with R410A
refrigerant. See condensing unit rating plate for
correct charge amount.
3− Refer to the correct condensing unit service manual for
more information.
C−Heating Start-Up
AUXILIARY DRAIN ON LEFT
MAIN DRAIN ON RIGHT
FIGURE 31
The following practices are recommended to ensure
condensate removal:
1− Drain piping should not be smaller than the drain
connections at drain pan.
2− A trap must be installed in the main drain line.
3− The trap must be deep enough to offset the difference in
static pressure between drain pan and atmosphere.
Generally, two inches is satisfactory for medium static
applications.
1− Set the fan switch to AUTO or ON and move the
system selection switch to HEAT. Adjust the
thermostat setting above room temperature.
2− The indoor blower immediately starts and the electric heat
will stage on based on sequence timing.
D−Safety or Emergency Shutdown
Turn off unit power at circuit breaker.
E−Extended Period Shutdown
Turn off thermostat or set to UNOCCUPIED" mode. Turn
off power to unit. All access panels and covers must be in
place and secured. The condensate assembly should be
clean and dry for extended period shutdown.
Page 32
Page 33

VIII−TYPICAL OPERATING CHARACTERISTICS
IX−MAINTENANCE
A−Blower Operation and Adjustment
NOTE− The following is a generalized procedure and
does not apply to all thermostat controls.
1− Blower operation is dependent on thermostat
control system.
2− Generally, blower operation is set at thermostat
subbase fan switch. With fan switch in ON position,
blower operates continuously. With fan switch in AUTO
position, blower cycles with demand.
3− In all cases, blower and entire unit will be off when the
system switch is in OFF position.
B−External Static Pressure
1. Measure tap locations as shown in figure 32.
STATIC PRESSURE TEST
SUPPLY
+
MANOMETER
_
RETURN
FIGURE 32
2. Punch a 1/4" (6mm) diameter hole in supply and return
air plenums. Insert manometer hose flush with inside
edge of hole or insulation in the supply plenum only. Seal
around the hose with permagum. Connect the other end
of the hose to the zero end of the manometer. Leave the
other end of the manometer open to the atmosphere.
3. With only the blower motor running and the
evaporator coil dry, observe and take note of the
manometer reading.
4. Repeat step 2 for the return air plenum. Insert
manometer hose to the opposite end of the zero side
of the manometer. Leave the zero side of the
manometer open to atmosphere.
5. Repeat step 3.
6− Add the absolute values of the supply air reading and the
return air reading to get the external static pressure of the
unit. For example −.20 in.wg. on the return and +.30 in.wg.
on the supply result in external static pressure of .50 in.wg.
External static should not exceed .80" w.g. (200Pa)
Adjust blower motor speed to deliver the air desired
according to job requirements.
7− Seal around the holes when the check is complete.
UNIT SHOWN IN
UPFLOW POSITION
WARNING
Electric shock hazard. Can cause injury
or death. Before attempting to perform
any service or maintenance, turn the
electrical power to unit OFF at disconnect switch(es). Unit may have multiple
power supplies.
At the beginning of each heating/cooling season, the
system should be checked as follows:
A−Filters
IMPORTANT
Filter access panel must be in place during unit
operation. Excessive warm air entering the unit
may result in water blow−off problems.
To remove filter, loosen the thumb screws holding the
filter panel in place. Slide filter out of the guides on either
side of cabinet, insert new filter and replace panel. Some
models come with a spacer so standard size filters can
be used. Filters should be inspected monthly and must
be replaced when dirty to ensure proper blower coil
operation. See table 15 for replacement filter sizes or
see the sticker located on the filter access door
specifying the size of the standard throw-away filter
which is used with the unit.
TABLE 15
CBX32MV FILTER SIZES
Unit Filter Size
CBX32MV018/024 15" X 20" (381mm X 508mm)
CBX32MV−024/030 20" X 20" (508mm X 508mm)
CBX32MV−036 20" X 22" (508mm X 599mm)
CBX32MV−048, −060 20" X 24" (508mm X 610mm)
CBX32MV−068 20" X 25" (508mm X 635mm)
B−Supply Air Blower
1- Check and clean blower wheel.
2- Motors are pre−lubricated for extended life; no further
lubrication is required.
C−Electrical
1- Check all wiring for loose connections.
2- Check circuit breaker located in unit control box.
3- Check for correct voltage at unit (unit operating).
4- Check amp-draw using a True root mean square
(RMS) amperage meter. Typical clamp−on ammeters
do not read current accurately.
5- Check to see that heat (if applicable) is operating.
D−Insulation
Outdoor piping insulation should be inspected yearly for
deterioration. If necessary, replace with same materials.
Page 33
Page 34

X−WIRING SCHEMATIC AND OPERATION SEQUENCE
A−CBX32MV − 208/230V SINGLE PHASE − SEQUENCE OF OPERATION
1. Line voltage is routed to transformer T1 and blower
motor B3.
2. T1 supplies 24VAC to terminal strip TB1, which
supplies 24VAC to the indoor thermostat and electric heat,
if used.
HEATING
3. When there is a call for heat, W1 of the thermostat
energizes the electric heat relay K32 (covered in the
electric heat section). After K32 closes, blower relay
K20−1 is energized.
4. Blower motor B3 is energized on heating speed after
K20−1 closes (see electric heat).
5. Economizer relay K20−2 (if used) is energized after K32-1
closes (see electric heat section).
6. K20−2 closes energizing the economizer with 24VAC.
COOLING
7. See Table 16 for cooling sequence of operation.
Page 34
Page 35

TABLE 16
CBX32MV COOLING OPERATION AND JUMPER SUMMARY (OPTIONAL ACCESSORIES) WITHOUT
SignatureStat OR CCB1 WITHOUT HARMONY
UNIT JUMPERS
Single Speed
Condensing Unit
Two Speed
Condensing Unit
Single Speed Heat Pump
Two Speed Heat Pump DS to Y1
CBX32MV COOLING OPERATION AND JUMPER SUMMARY (OPTIONAL ACCESSORIES)
UNIT JUMPERS THERMOSTAT DEMAND & BLOWER SPEED
Single Speed
Condensing Unit
Two Speed
Condensing Unit
Single Speed Heat Pump Y1 to Y2 See table 11
Two Speed Heat Pump NONE See table 10
CBX32MV COOLING OPERATION AND JUMPER SUMMARY (OPTIONAL ACCESSORIES)
WITH SignatureStat WITHOUT HARMONY
UNIT JUMPERS THERMOSTAT DEMAND & BLOWER SPEED
Single Speed
Condensing Unit
Two Speed
Condensing Unit
Single Speed Heat Pump Y1 to Y2 See table 12
Two Speed Heat Pump NONE See table 13
CBX32MV COOLING OPERATION AND JUMPER SUMMARY (OPTIONAL ACCESSORIES)
WITHOUT SignatureStat OR CCB1 WITH HARMONY
UNIT JUMPERS SEQUENCE OF OPERATION
Single or Two Speed
Condensing Unit
Single or Two Speed
Heat Pump
DS to Y1
Y1 to Y2
O to R
DS to Y1
O to R
DS to Y1
Y1 to Y2
WITH CCB1 WITHOUT HARMONY
Y1 to Y2
O to R
O to R See table 10
Y1 to Y2
O to R
O to R See table 13
O to R
NONE
THERMOSTAT
DEMAND
Y1 COOL
Y1 *60%/65%/70% of COOL
Y2 COOL
Y1 COOL
Y1 *60%/65%/70% of COOL
Y2 COOL
See table 12
Harmony controls blower speed according to size
of demand, through pulse width modulated signal
Harmony controls blower speed according to size
of demand, through pulse width modulated signal
BLOWER SPEED
See table 11
to DS
to DS
NOTE: CAUTION HIGH VOLTAGE If using Harmony kit, locate blower relay K20 and remove and tape off any one of four
wires.
NOTE: Continuous fan CFM will be 50% of COOL speed. Blower will run on HEAT speed during Heat operation.
*Production August 2002 and later − Reduced blower speed is 70% of COOL for ALL model units. Production prior to August 2002
− Reduced blower speed is 65% of COOL for the −036 units and 60% of COOL for −048 and −060 units.
Page 35
Page 36

1
2
3
4
B−ECB29-5, -5CB, -8, -8CB − 208/230V SINGLE PHASE − SEQUENCE OF OPERATION
1. When there is a call for heat, W1 of the thermostat
energizes the electric heat relay K32 with 24VAC.
2. When K32-1 closes, the blower is energized on
heating speed and economizer heat relay (K20-2) is
energized (see unit schematic, figure 26).
3. Assuming the N.C. primary (S15) and secondary (S20)
limit switches are closed, electric heat element HE1 is
energized.
4. When K32-2 closes, assuming the N.C. primary (S15)
and secondary (S20) limit switches are closed, electric
heat element HE2 is energized.
Page 36
Page 37

1
4
2
5
3
D−ECB29-12.5CB, -15CB − 208/230V SINGLE PHASE − SEQUENCE OF OPERATION
FIRST−STAGE HEAT
1. When there is a call for heat, W1 of the thermostat
energizes the electric heat relay K32 with 24VAC.
2. When K32-1 closes, the blower is energized on
heating speed and economizer heat relay (K20-2) is
energized (see unit schematic figure 26).
3. Assuming the N.C. primary (S15) and secondary (S20)
limit switches are closed, electric heat element HE1 is
energized.
SECOND−STAGE HEAT
(remove jumper between W2 and R)
4. When K32-2 closes, the unit is ready for a second stage
heat demand. W2 of the thermostat sends a second
stage heat demand, energizing the electric heat relay
K33 with 24VAC.
5. When K33-1 and K33-2 close, assuming the N.C.
primary (S15) and secondary (S20) limit switches
are closed, electric heat elements HE2 and HE3 are
energized.
Page 37
Page 38

1
4
7
8
6
6
3
F−ECB29-25CB − 208/230V SINGLE PHASE − SEQUENCE OF OPERATION
FIRST−STAGE HEAT
1. When there is a call for heat, W1 of the thermostat
energizes the electric heat relays K32 and K34 with
24VAC.
2. When K32-1 closes, the blower is energized on
heating speed and economizer heat relay (K20-2) is
energized (see unit schematic 26).
3. When K32-1 and K32-2 closes, assuming the N.C.
primary (S15) and secondary (S20) limit switches
are closed, electric heat elements HE1 and HE2 are
energized.
SECOND−STAGE HEAT
(remove jumper between W2 and R)
4. When K34-1 closes, the unit is ready for a second stage
heat demand. W2 of the thermostat sends a second stage
heat demand, energizing the electric heat relays K33 and
K116 with 24VAC.
5. When K33-1 closes, the blower (if not energized) is
energized on heating speed and economizer heat relay
K43 is energized (see 208/230VAC CB schematic).
6. When K33-2 and K116-1 close, assuming the N.C.
primary (S15) and secondary (S20) limit switches
are closed, electric heat elements HE3 and HE6 are
energized.
THIRD− STAGE HEAT
(remove jumper between W3 and R, if using third stage)
7. When K34-2 closes, the unit is ready for a third stage heat
demand. W3, if available, of the thermostat sends a third
stage heat demand, energizing the electric heat relay K35
with 24VAC.
8. When K35-1 and K35-2 close, assuming the N.C.
primary (S15) and secondary (S20) limit switches
are closed, electric heat elements HE4 and HE5 are
energized.
5
2
Page 38
Page 39

1
2
3
G−ECB29-8, -10,−15CB − 208/230V THREE PHASE − SEQUENCE OF OPERATION
1. When there is a call for heat, W1 of the thermostat
energizes the electric heat relays K32 and K33 with
24VAC.
2. When K32-1 and/or K33-1 closes, the blower is energized
on heating speed and economizer heat relay (K20-2) is
energized (see unit schematic figure 26).
3. When K32-1, K32-2, and K33-2 closes, assuming the
N.C. primary (S15) and secondary (S20) limit switches
are closed, electric heat elements HE1, HE2, and HE3
are energized.
Page 39
Page 40

1
5
2
6
7
4
3
H−ECB29-20CB, -25CB − 208/230V THREE PHASE − SEQUENCE OF OPERATION
FIRST−STAGE HEAT
1. When there is a call for heat, W1 of the thermostat
energizes the electric heat relays K32 and K34 with
24VAC.
2. When K32-1 closes, the blower is energized on
heating speed and economizer heat relay (K20-2) is
energized (see unit schematic figure 26).
3. When K32-1 and K32-2 closes, assuming the N.C.
primary (S15) and secondary (S20) limit switches
are closed, electric heat elements HE1 and HE2 are
energized.
4. When K34-1 closes, assuming the N.C. primary (S15)
and secondary (S20) limit switches are closed, electric
heat element HE3 is energized.
SECOND−STAGE HEAT
(remove jumper between W2 and R)
5. When K34-2 closes, the unit is ready for a second stage
heat demand. W2 of the thermostat sends a second
stage heat demand, energizing the electric heat relays
K33 and K35 with 24VAC.
6. When K33-1 closes, the blower (if not energized) is
energized on heating speed and economizer heat
relay K43 is energized (see 208/230VAC CB
schematic).
7. When K33-1, K35-1, and K35-2 contacts close,
assuming the N.C. primary (S15) and secondary (S20)
limit switches are closed, electric heat elements HE4,
HE5, and HE6 are energized.
Page 40
 Loading...