

Page 1
PLEASE READ THIS USER MANUAL COMPLETELY BEFORE OPERATING
THIS UNIT AND RETAIN THIS BOOKLET FOR FUTURE REFERENCE.
SR-600 BT
USER MANUAL
www.lenco.com
Page 2

E-1
IMPORTANT INSTRUCTIONS
When used in the directed manner, this unit has been designed and manufactured to
ensure your personal safety. However, improper use can result in potential electrical
shock or fire hazards. Please read all safety and operating instructions carefully before
installation and use, and keep these instructions handy for future reference. Take
special note of all warnings listed in these instructions and on the unit.
1. Read these instructions – All the safety and operating instructions should be read
before the appliance is operated.
2. Keep these instructions – The safety and operating instructions should be kept for
future reference.
3. Heed all warnings – All warnings on the appliance and in the operating instructions
should be adhered to.
4. Follow all instructions – All operation and use instructions should be followed.
5. Do not use this apparatus near water – The appliance should not be used near
water; for example, near a bath tub, washbowl, kitchen sink, laundry tub, in a wet
basement, or near a swimming pool.
6. Clean only with dry cloth – The appliance should be cleaned only as
recommended by the manufacturer.
7. Do not block any ventilation openings. Install in accordance with the
manufacturer’s instructions. The appliance should be situated so that its location
or position does not interfere with its proper ventilation. For example, the appliance
should not be situated on a bed, sofa, rug, or similar surface that may block the
ventilation openings; or placed in a built-in installation, such as a bookcase or
cabinet that may impede the flow of air through the ventilation openings.
8. Do not install near any heat sources such as radiators, heat registers, stoves, or
other apparatus (including amplifiers) that produce heat.
9. AC adaptor is used as disconnect device and it should remain readily operable
during intended use. In order to disconnect the apparatus from the mains
completely, the AC adaptor should be disconnected form the mains socket outlet
completely.
10. Only use attachments / accessories specified by the manufacturer.
11. Use only with a cart, stand, tripod, bracket, or table specified by the
manufacturer, or sold with the apparatus. When a cart is used, use
caution when moving the cart/apparatus combination to avoid injury
from tip-over.
12. Unplug this apparatus during lightning storms or when unused for long periods of
time.
13. Refer all servicing to qualified service personnel. Servicing is required when the
apparatus has been damaged in any way, such as power-supply cord or plug is
damaged, liquid has been spilled or objects have fallen into the apparatus, the
apparatus has been exposed to rain or moisture, does not operate normally, or
has been dropped.
14. This appliance shall not be exposed to dripping or splashing water and that no
object filled with liquids such as vases shall be placed on the apparatus.
15. Power Sources – The appliance should be connected to a power supply only of
the type described in the operating instructions or as marked on the appliance. Do
not overload wall outlet.
16. Danger of explosion if battery is incorrectly replaced. Replace only with the same
or equivalent type.
Page 3

E-2
17. Do not attempt to dismantle, open or repair this product yourself. If a fault occurs,
seek advice from your local qualified service technician or contact the distributor
via the telephone number at the back of this instruction manual.
18. Caution marking and nameplate are located on bottom of product.
WARNING
DO NOT INGEST BATTERY, CHEMICAL BURN HAZARD
This product contains a coin/button cell battery. If the coin/button cell battery is
swallowed, it can cause severe internal burns in just 2 hours and can lead to death.
Keep new and used batteries away from children. If the battery compartment does not
close securely, stop using the product and keep it away from children.
If you think batteries might have been swallowed or placed inside any part of the body,
seek immediate medical attention.
IMPORTANT NOTES
Avoid installing the unit in locations described below:
Places exposed to direct sunlight or close to heat radiating appliances such as
electric heaters.
Dusty, humid or moist places.
Places subject to constant vibration.
CAUTION: Changes or modifications not expressly approved by the party
responsible for compliance could void the user’s authority to operate the
equipment.
PROTECT YOUR FURNITURE
This model is equipped with non-skid rubber 'feet' to prevent the product from moving
when you operate the controls. These 'feet' are made from non-migrating rubber
material specially formulated to avoid leaving any marks or stains on your furniture.
However certain types of oil based furniture polishes, wood preservatives, or cleaning
sprays may cause the rubber 'feet' to soften, and leave marks or a rubber residue on
the furniture. To prevent any damage to your furniture we strongly recommend that you
purchase small self-adhesive felt pads, available at hardware stores and home
improvement centers everywhere, and apply these pads to the bottom of the rubber
'feet' before you place the product on fine wooden furniture.
PRODUCT FEATURES
The SR-600 BT has the following features:
Auxiliary input jack to play music from your iPod or digital audio player
Wireless playback of music from your cell phone via the Bluetooth connection
Bluetooth Play/Pause, Skip Forward/Backward control buttons
Up to 33 feet (10 meters) operating range
Preset EQ control (Rock, Flat, Pop, Jazz & Classic)
Digital volume control
FM digital tuner with 30 presets
USB port for charging your smart phone
Page 4
E-3
PREPARATION FOR USE
ACCESSORIES
Unpack the unit carefully to remove all the accessories from the packing. Verify that the
following accessories are present before setting up the unit.
Accessories>
Main Unit X 1
AC adaptor X 1
User Manual X 1
Button cell X 2 (LR44/AG-13) (For Clock backup)
Energy Saving (Auto Power System-APS)
Unit will automatic turn to 'Standby' mode after 20 minutes
while unit at power on mode but not play and speaker no output.
This is APS for save energy efficiency.
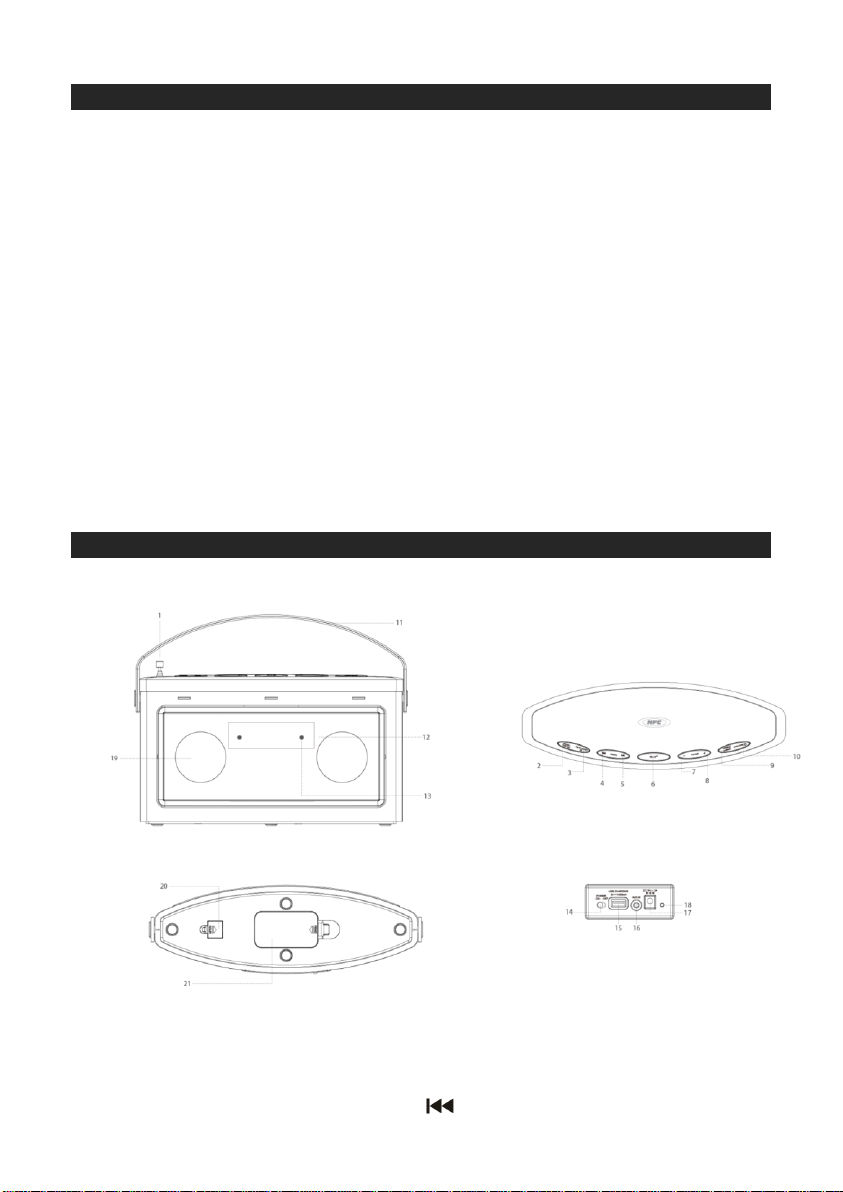
LOCATION OF CONTROLS
MAIN UNIT
1. TELESCOPIC ANTENNA
2. PRESET/TIME SET button
3. FM ST/MONO/EQ button
4. SKIP BACKWARD/TUNING button
Page 5

E-4
5. SKIP FORWARD/TUNING button
6. PLAY/PAUSE button
7. VOLUME - button
8. VOLUME + button
9. DIMMER/PAIRING button
10. FUNCTION/ button
11. CARRYING HANDLE
12. LED DISPLAY
13. BLUETOOTH INDICATOR
14. MAIN POWER ON/OFF SWITCH
15. USB CHARGING PORT
16. AUX IN JACK
17. DC IN JACK
18. POWER INDICATOR
19. SPEAKER
20. BATTERY BACK-UP COMPARTMENT
21. BATTERY COMPARTMENT (“C” batteries)
POWER SOURCE
The SR-600 BT operates using the supplied AC Adapter (Operate at 100-240 V ~
50/60 Hz) or 4 X ’C' size (UM-2) batteries (not included).
AC ADAPTOR OPERATION
NOTE: Only use the supplied adapter
1. Plug the AC adaptor into normal AC power outlet socket.
2. Insert the DC plug of the AC adaptor cord into the DC input jack (#18) at the back
of the unit.
3. When the unit is operated using AC adapter, the battery source
be
disconnected.
WARNING : Before connecting to the power supply, ensure that the supply
corresponds to the information on the rating label at the back of the apparatus.
BATTERY OPERATION
NOTE : Disconnect AC adapter before install batteries.
For best performance and longer operating time, we recommend the use of
alkaline
1. Remove the Battery Door of BATTERY COMPARTMENT (#22) on the bottom of
the unit.
2. Following the polarity diagram shown in the BATTERY COMPARTMENT (#22) to
insert 4 X `C' size (UM-2) batteries and close the door.
batteries.
will
automatically
Page 6

E-5
Backup Batteries
Batteries are preloaded in the unit. Remove the insulation tab from the battery
compartment to activate the battery back-up before first use.
To replace the batteries, carefully open the battery door of the BATTERY BACK-UP
COMPARTMENT (#21). Remove the old batteries and follow the polarity marking to
insert 2 x new LR44/AG13 button cells into the compartment and close the battery door.
BATTERY WARNING
1. Be sure that the batteries are installed correctly. Wrong polarity may damage the
unit.
2. Use only the size and type of batteries specified.
3. Do not mix old and new batteries.
4. Do not mix alkaline, standard (carbon-zinc) or rechargeable (nickel-cadmium)
batteries.
5. If the unit is not to be used for an extended period of time, remove the batteries.
Old or leaking batteries can cause damage to the unit and may void the warranty.
6. Do not try to recharge batteries not intended to be recharged; they can overheat
and rupture. (Follow battery manufacturer’s directions).
7. Do not dispose of batteries in fire, batteries may leak or explode.
NOTE: These speakers are not magnetically shielded and may cause color distortion
on the screen of some TVs or video monitors. To avoid this, you may need to move the
speakers further away from the TV or monitor if unnatural color shifts or image
distortion occurs.
TURN THE UNIT POWER ON/OFF
Power on/off the unit
When using either the AC adaptor or battery, first slide the MAIN POWER ON/OFF
SWITCH (#15) on the back of the unit to the ON position. The POWER INDICATOR
(#19) will turn on, LED DISPLAY (#12) will turn on and display the time.
Press and hold the FUNCTION/ button (#10) to turn the SR-600 BT to On or
Standby.
To switch off the unit, slide the MAIN POWER ON/OFF SWITCH (#15) to OFF position.
CLOCK SETTING
Note: When you turn the unit on for the first time, 12:00 will show on the LED display
and flashing.
1. In standby mode, press and hold the PRESET/TIME SET button (#2), the hour
digits will flash.
2. Tap the button (#4) or button (#5) to adjust hour. Press and hold the
button (#4) or button (#5) for fast reverse/advance setting.
3. Tap the PRESET/TIME SET button (#2) to confirm the hour setting, the minute
digits will flash to prompt for input.
4. Tap the button (#4) or button (#5) to adjust minute. Press and hold the
button (#4) or button (#5) for fast reverse/advance setting.
5. Tap the PRESET/TIME SET button (#2) to complete the setting.
Page 7

E-6
NOTE: The clock settings may be lost if the main power switch is turned off and the
battery drains after a period of time. If this occurs, you will need to reset the clock.
LI
STENING TO THE RADIO
1. Press and hold the button (#10) to turn on the unit.
2. Tap the button (#10) to select Radio mode, the radio frequency
will show on LED Display (#12).
3. Press and hold the button (#4) or button (#5) to search for the next /
previous available station. If the reception is poor, try Manual Tuning to fine-tune
the station.
4. Press the button (#4) or button (#5) briefly to manually tune through
the frequency band.
5. Adjust the volume control to the desired volume level.
6. If no button is pressed for 5 seconds in radio mode, the display will change to
show current time. You can tap the button (#4) or button (#5) to check
the tuned frequency.
7. Press and hold the button to turn the unit into Standby mode after
listening.
8. Always slide the Power switch to the OFF position when not in use to prevent
draining the internal battery.
FM Mono & FM-Stereo reception
- Press the FM ST/MONO button (#3) to select stereo mode, the LED Display (#12) will
show “St” a few seconds and then resume to show the frequency.
- It is preferable to receive the program in mono when you are receiving a weak station.
Press the FM ST/MONO button (#3) to select Mono mode, the LED Display (#12) will
show “St OF” a few seconds and then resume to show the frequency.
TIPS FOR BEST RADIO
To insure maximum FM tuner reception, fully extend the TELESCOPIC ANTENNA (#1)
for best FM radio reception.
Setting the Radio Station Presets
The SR-600 BT allows you to store up to 30 stations for easy recall at any time.
RECEPTION:
1. Press and hold the button (#10) to turn on the unit.
2. Tap the (#10) button to select radio mode.
3. Tune to the radio station either you want to store in memory.
4. Press and hold the PRESET/TIME SET button (#2). The preset channel number
“P01” will be flashing on display.
5. Tap the button (#4) or button (#5) to select the preset number (P01-P30).
6. Tap the PRESET/TIME SET button (#2) to confirm.
7. To store up to 30 station presets, repeat steps 3 to 6 above.
Page 8

E-7
Note :
In Radio Mode, press and hold the Button (#6). The SR-600 BT will scan the
whole band start from the lowest frequency and store all the available radio stations
start from lowest preset channel number. Those previous stored radio stations may be
overwritten.
RECALLING PRESET MEMORY CHANNELS
To recall a preset station,
1. In radio mode, tap the PRESET/TIME SET button (#2), the preset number will
appear on display.
2. Tap the PRESET/TIME SET button (#2) repeatedly to select the preset channel or
tap the button (#4) or button (#5) to recall the preset channel you want.
BLUETOOTH OPERATION
Pairing a Bluetooth enabled device with the SR-600 BT.
1. Turn on the SR-600 BT, tap the button (#10) to select Bluetooth
mode, “bt” will show on the LED Display (#12) and the BLUETOOTH INDICATOR
(#13) will flash.
2. Turn on the Bluetooth function for the device you want to link to, and enable the
search or scan function to find the SR-600 BT
3. Select ” SR-600 BT” from the device list when it appears on your device screen. If
required, enter the pass code ”0000” to pair (link) the unit with your device.
4. If you are pairing (linking) your computer to the speaker using Bluetooth, you may
need to set the SR-600 BT as your computer’s default sound device.
5. After successfully pairing (linking) the Bluetooth enable device, the BLUETOOTH
INDICATOR (#13) will stop flashing and remain lit and a short beep will be heard.
6. If you want to connect the SR-600 BT to another Bluetooth device, press and hold
the DIMMER/PAIRING button (#9) for 2 seconds, the Blue LED will change to
flashing again, repeat step 2-4 above.
Note :The SR-600 BT may automatically reconnected to a previously linked device
that is in range, so you may need to turn off the Bluetooth on any paired
device first before going through the above steps.
Now you can play music from your Bluetooth device wirelessly to the SR-600 BT.
1. Select your favorite song, press the
Bluetooth device or the
or pause the song from your Bluetooth device.
2. Press the Skip Backward button (#4) or Skip Forward button (#5) to select
the Next or Previous track.
(The SEARCH function does not apply to Bluetooth operation )
3. Slowly adjust both the volume controls of your SR-600 BT and your Bluetooth
device until you reach a comfortable listening level.
Note :
1. Refer to the manual of your cell phone, tablet PC, computer or other Bluetooth
enabled devices for Bluetooth operation since it may vary from model to model.
Play/Pause Button (#6)
Play/Pause Button (#6)
on the SR-600 BT to play
on your
Page 9

E-8
2. If your Bluetooth enabled device does not support A2DP profile, it will not play the
music through the speaker, even if paired (linked).
3. Remember to turn off the SR-600 BT when you have finished listening, slide
MAIN POWER ON/OFF SWITCH (#15) to OFF position.
4. Don't forget to switch off the power of your external audio device as well.
the
USING SR-600 BT AS A HANDS-FREE SPEAKERPHONE
To use your Bluetooth speaker as a speakerphone for receiving a phone call from a
Bluetooth enabled phone.
1. Follow the “BLUETOOTH OPERATION” section to set up the Bluetooth
connection with your smartphone.
2. When a call is received while music is playing, the music will be replaced by a
ringtone. Press the
3. Use the VOLUME +/- buttons (#2/#5) to adjust the desired volume level.
4. To ignore an incoming call, simply press and hold the
(#6)
for about 3 to 4 seconds, a beep sound will be heard and the call was
ignored.
5. When the call is completed, press the
the call. If you were playing music from the SR-600 BT before answering the call,
the music will automatically resume playing when you hang up.
6. Press and hold the
last number you dialed.
Play/Pause Button (#6)
Play/Pause Button (#6)
Play/Pause Button (#6)
once to answer the call.
Play/Pause Button
once to end
about 3 seconds to re-dial the
LINKING WITH THE NFC
The SR-600 BT features Near Field Communication (NFC), so you can
easily pair and connect the speaker with your compatible Bluetooth device
much easier.
If the compatible Bluetooth device you want to link supports NFC, activate
the NFC feature on the device, and touch the NFC Pairing Area of the
speaker with the NFC area on your device. The speaker connects to the
device automatically.
For details on NFC, see the user guide that came with the Bluetooth
device that you are trying to connect.
Note: This feature is compatible with Android 4.0 and up. Android 4.0
users will need to install an App called “tap-and-pair” that is available
on Google play.
Page 10

E-9
This feature is phone dependent and may not operate on all cell phones
or devices.
PRESET EQ
The SR-600 BT features 5 different EQ modes to enhance your listening experience.
You can select the desired effect by press and hold the “EQ” button repeatedly at
following sequence:
CLASSIC ROCK FLAT POP JAZZ
AUX IN OPERATION
You can play other music sources (iPod, MP3 or other digital audio players) through
the speakers of the SR-600 BT by connecting the AUX IN Jack (#17) to your external
player’s audio out jack or headphone jack.
1. Plug one end of an audio cable (not included) into the AUX IN Jack (#17) and the
other end of the cable to the headphone jack of your digital audio player.
2. Turn ON the unit and your external audio.
3. Tap the button (#10) to select AUX mode. AUX will appear on LED
Display (#12).
4. Start playing the device you plugged into the AUX IN Jack (#17)..
5. Slowly adjust both the volume controls of your SR-600 BT and the external device
until you reach a comfortable listening level.
Note :
• If you connect the SR-600 BT to the Line-Out Jack of your external device, you
only need to adjust the VOLUME CONTROL of the SR-600 BT. If you connect to
the Headphone Jack of your external device, you may need to adjust both the
volume controls of your external device and the SR-600 BT to obtain the desirable
listening level.
• Remember to turn off the SR-600 BT when you have finished listening. Don't
forget to switch off the power of your external audio device as well.
CHARGING YOUR SMART PHONE OR PORTABLE DEVICE
The SR-600 BT features a USB port for charging your portable device (iPod, iPhone,
Android phone, etc.).
Note : USB charging only works when unit operates in AC power mode via the AC
adaptor (included).
1. When the AC power is connected, switch the MAIN POWER ON/OFF SWITCH
(#15) on the back of the unit to ON position.
2. Plug the standard end of the USB cable (not included) into the USB CHARGING
PORT (#16) located on the back of the SR-600 BT. Plug the other end of the
Page 11

E-10
cable into the device you wish to charge.
3. Observe the battery charge indicator on your device to make sure the charging
process starts normally.
4. Unplug the cable when your device is fully charged.
CAUTION:
Before charging, please refer to the user manual of the device you wish to charge to
make sure the charging current requested does not exceed 1A (1000mA). Overloading
the charging circuit may damage the SR-600 BT permanently and void the warranty.
1. The USB charging port (#16) of the SR-600 BT supplies a DC 5V output at
1000mA maximum current to charge your smart phone or portable device battery
and it cannot support any other voltage range.
2. Make sure the device you want to charge has a battery charge rating of DC 5V
only.
3. The USB port of the SR-600 BT is designed for smart phone or portable device
battery charging only and it cannot support data transfer or connect to computer.
4. Do not connect the USB port of the SR-600 BT to other external power charger
USB ports, it may damage both units and void the warranty.
Note:
1. Some smart phones and portable devices use proprietary USB connections and
circuitry, so they may not charge when plugged into the USB port. Please refer to
your device user manual before you attempt to charge them.
2. It is normal if the unit gets warm while the USB CHARGING PORT (#16) is in use
and charging your smart phone or portable device.
3. Do not charge your smart phone over 12 hours continuously. Disconnect your
smart phone or other portable device from the USB cord once it is fully charged.
RESETTING THE UNIT
SYSTEM RESET
If the unit experiences a power surge or electric shock, it is possible that the internal
micro-controller may lock and the unit will not respond to any commands from the
panel control. In this event, Disconnect the AC power and remove all inserted batteries
and button cells for around one minute. Reinsert the batteries and reconnect the power
once the time has passed.
CARE AND MAINTENANCE
1. Avoid operating your unit under direct sunlight or in hot, humid or dusty places.
2. Keep your unit away from heating appliances and sources of electrical noise such as
fluorescent lamps or motors.
3. Unplug the unit from the electrical power outlet immediately in case of malfunction.
Page 12

E-11
CLEANING THE UNIT
Symptom
Possible Problem
Solution
No Charging
AC Adaptor is not plugged
into a wall outlet or the
connector is not plugged
into the power supply jack
on the back of the unit.
Plug the AC adaptor into a wall outlet
and plug the connector into the
supply jack on the unit.
Wall outlet is not
functioning.
Plug another device into the same
outlet to confirm the outlet is working.
Main power switch on the
back of the unit set to OFF
position.
Set the main power switch to ON
position.
No Sound
Bluetooth speaker is not
linked with the cell phone.
Go through “Bluetooth Operation”
process to link the speakers.
Speaker placement out of
range.
Relocate the speaker within
Bluetooth operating range.
Volume set too low.
Press the Volume+ button to turn the
sound level up.
Cell phone will
not charge
The unit is in battery
operated mode.
Connect the AC adaptor to the unit
and set main power switch to the ON
position.
Cell phone is not
installed properly.
Remove your cell phone from
the
charging cord and check
for
obstruction on the
connectors.
Cell phone is locked up or
frozen.
Cell phone battery has
problem.
Please make sure your cell
phone
is
working properly
before
plugging
into the unit. Please
refer
to your
cell phone manual
for details.
To prevent fire or shock hazard, disconnect your unit from the AC power source
when cleaning.
If the cabinet becomes dusty wipe it with a soft dry dust cloth. Do not use any wax
or polish sprays on the cabinet.
If the front panel becomes dirty or smudged with fingerprints it may be cleaned
with a soft cloth slightly dampened with a mild soap and water solution. Never use
abrasive cloths or polishes as these will damage the finish of your unit.
CAUTION: Never allow any water or other liquids to get inside the unit while cleaning.
TROUBLESHOOTING GUIDE
Page 13

E-12
Sound is
distorted.
Volume level is set too
high.
Decrease the volume.
Sound source is distorted.
If the cell-phone original sound
source is of poor quality, distortion
and noise are easily noticed with
high-power speakers. Try a different
audio source such as a music CD.
If you are using an external sound
source like older generation of iPod,
try reducing the output volume on the
device itself. Also try turning bass
boost OFF or change the EQ setting.
Unit gets warm
after extended
play at high
volume.
This is normal.
Turn the unit off for a period of time
or lower volume.
SPECIFICATIONS
AC-DC adaptor: Input : AC 100-240 V ~ 50/60 Hz
Output : DC 5V 2000mA
Main Unit : DC input : DC 5V 2000mA or
Battery input : 4 X 1.5V DC C size/UM2
(not included)
Battery for Clock backup : 2 x 1.5V DC LR44/AG-13 (included)
USB Charging port : DC 5V 1000mA output
( For Mobile Battery Charging only )
FM Radio : FM 87.5 ~ 108 MHz
Bluetooth® is a registered trademark of Bluetooth SIG, Inc.
Power supply adaptor information -
Manufacturer: GUANGDONG KEERDA ELECTRONIC CO., LTD
Model number: DZ010LL050200V
Use only the power supply listed in the user instructions
Page 14

E-13
This product operates at 2400 - 2483.5 MHz and is designated only to be used inside a
normal household environment. This product is suited for this purpose within all EU
counties.
Hereby, STL Group BV, Ankerkade 20 NL 5928 PL Venlo, declares that this product is
in compliance with the essential requirements and other relevant provisions of Directive
1999/5/EC.
The declaration of conformity may be consulted at
https://lencosupport.zendesk.com/forums/22413161-CE-Documents
Service and support
For information: www.lenco.com
For support: http://lencosupport.zendesk.com
Lenco helpdesk:
Germany 0900-1520530 (Local charges)
The Netherlands 0900-23553626 (Local charges + 1ct p/min)
Belgium 02-6200115 (Local charges)
France 03-81484280 (Local charges)
The helpdesk is accessible from Monday till Friday from 9 AM till 6 PM.
When contacting Lenco, you will always be asked for the model and serial number of
your product. The serial number can be found on the back of the device. Please write
down the serial number below:
Model: SR-600BT
Serial number:_________________________________
Page 15

E-14
Lenco offers service and warranty in accordance to European law, which means that in
case of repairs (both during and after the warranty period) you should contact your
local dealer.
Important note: It is not possible to send products that need repairs to Lenco directly.
Important note: If this unit is opened or accessed by a non-official service center in
any way, the warranty expires.
This device is not suitable for professional use. In case of professional use, all warranty
obligations of the manufacturer will be voided.
Products with the CE marking comply with the EMC Directive
(2004/108/EC) and the Low Voltage Directive (2006/95/EC) issued
by the Commission of the European Community.
The declaration of conformity may be consulted at
https://lencosupport.zendesk.com/forums/22413161-CE-Documents
This symbol indicates that the relevant electrical product or
battery should not be disposed of as general household waste in
Europe. To ensure the correct waste treatment of the product
and battery, please dispose them in accordance to any
applicable local laws of requirement for disposal of electrical
equipment or batteries. In so doing, you will help to conserve
natural resources and improve standards of environmental
protection in treatment and disposal of electrical waste (Waste Electrical and Electronic
Equipment Directive).
® All rights reserved
 Loading...