

LENCO SR-05 BT User Manual

SR-05 BT
w w w . l e nco.com
®
User's Guide
Retro Radio with Bluetooth

Warning ........................................... ...................................... ...............................1
Panels ......................... ...................................... ...................................................4
Remote control
FM operation .........................................................................................................8
Bluetoo th op eration ........ ...................................... ................................................. 9
Aux in /USB operation ..........................................................................................10
Trou ble shooting /S pecification ............................................................................ .11
.................................. ...................................... ...............................6
Content
Please read and understand all the warnings provided below, as well as and those mar edk
on the unit. This unit has been designed and manufactured to assure personal safety.
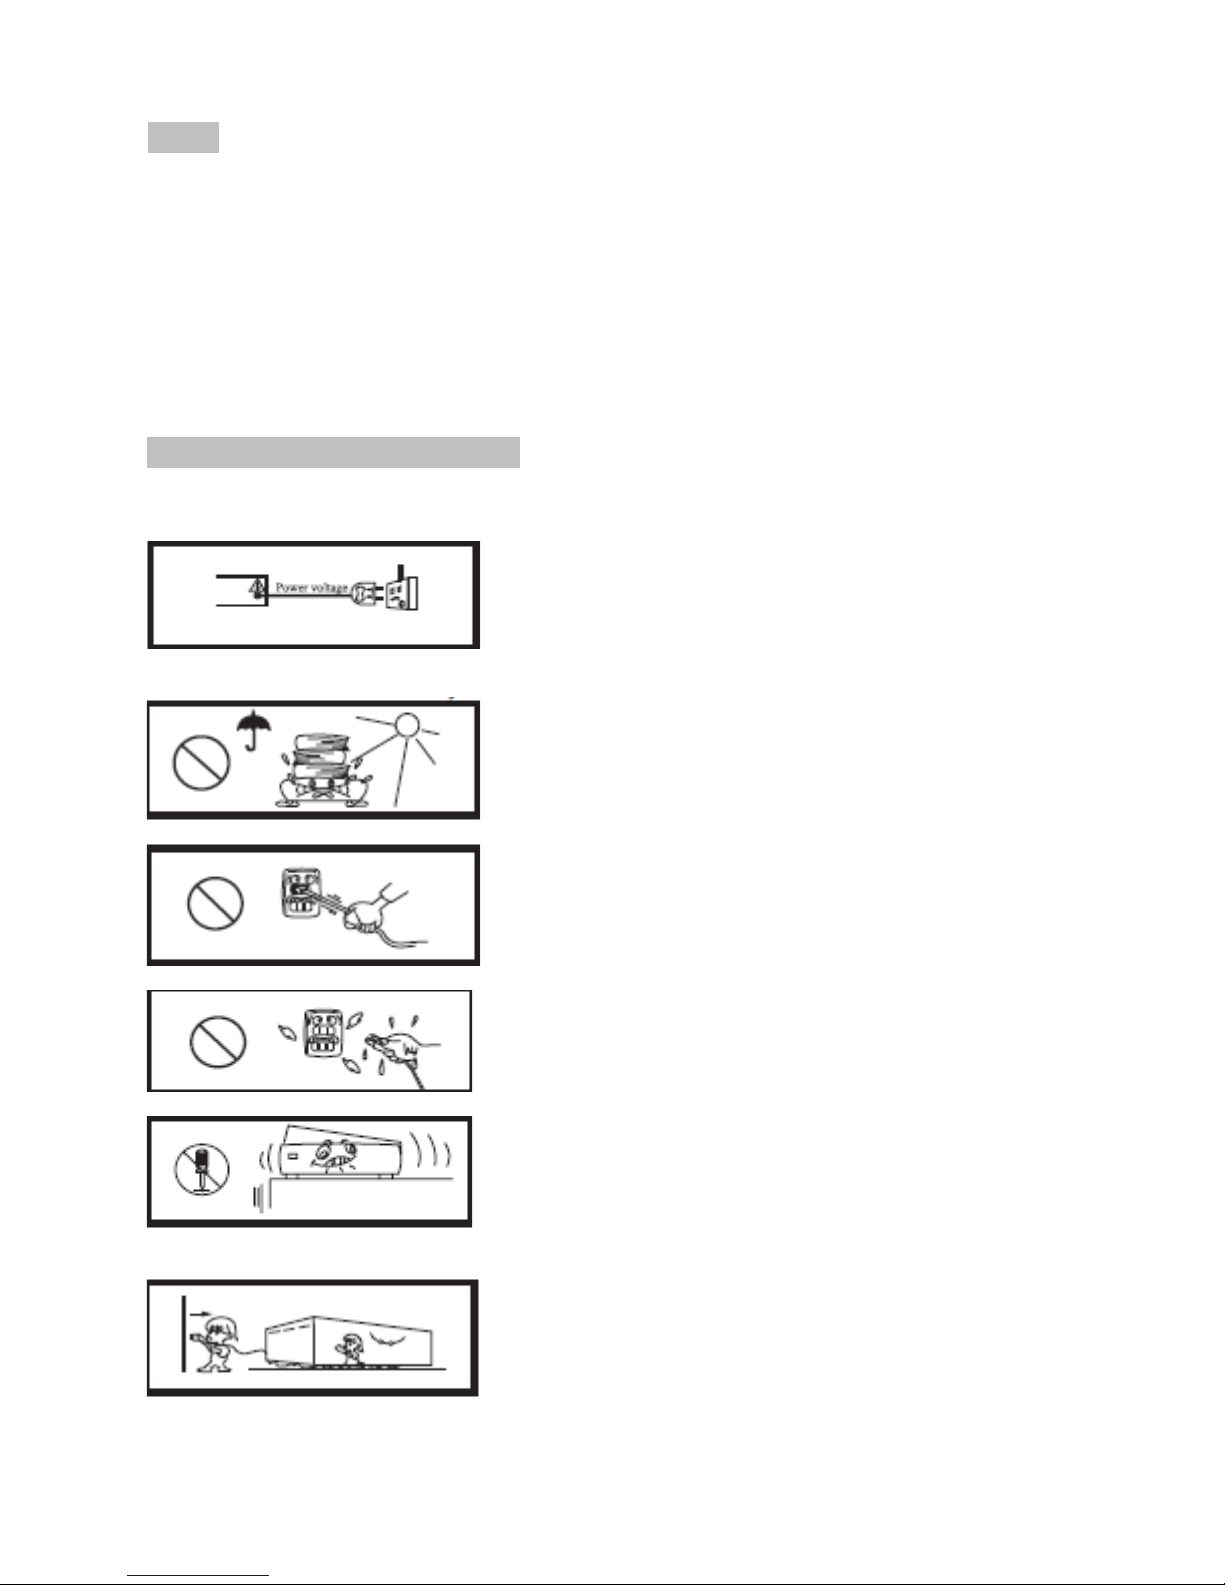
Only use power source that is specified
in the User Manual or on the system.
Keep the unit and power plug
away from water.
Avoid placing the unit in direct
or sunshine or near a heat source.
Never open the cover and avoid dropping
anything into the unit, such as coins,
hairpins and needles for example.
Do not bend or pull the power cable
excessively, and do not apply pressure
to it by standing on it.
Unplug the unit from the main power
outlet when you do not use it for a long
time.
Important safety instructions
1

1. Read these Instructions - All the safety and operating instructions should be read before the
product is operated.
2. Keep these Instructions - The safety and operating instructions should be retained for future
reference.
3. Heed all Warnings-All warnings on the appliance and in the operating instructions should be
adhered to.
4. Follow all instructions - All operating and use instructions should be followed.
5. Do not use this apparatus near water- The appliance should not be used near water or
moisture - for example, in a wet basement or near a swimming pool, and the like.
6. Clean only with a damp cloth.
7. Do not block any of the ventilation openings. Install in accordance with the instructions.
8. Do not install near any heat sources such as radiators, heat Registers, stoves, or other
apparatus (including amplifiers)that produce heat.
9. Protect the power cord from being walked on or pinched particularly at plugs, convenience
receptacles, and the point where they exit from the apparatus.
10. Only use attachments/accessories specified by the manufacturer.
11. Unplug the apparatus during lightning storms or when unused for long time.
12. Refer all serving to qualified service personnel. Servicing is required when the apparatus
has been damaged in any way, such as power-supply cord or plug is damaged, liquid has
been spilled or objects have fallen into the apparatus, the apparatus has been exposed to
rain or moisture.
13. Please keep the unit in a good ventilation environment.
14. These servicing instructions are for use by qualified service personnel only. To reduce the
risk of electric shock, do not perform any servicing other than that contained in the operating
instructions unless you are qualified to do so.
15. The MAINS PLUG is used as disconnect device, the disconnect device shall remain readily
operable.
16. This equipment is a Class II or double insulated electrical appliance. It has been
designed in such a way that it does not require a safety connection to electrical earth.
Warnings
2
17. The batteries or battery pack shall not be exposed to excessive heat such as fire, sunshine
or the like.
18. The apparatus shall not be exposed to dripping or slashing and that no objects filled with
liquids, such as vases, shall be placed on the apparatus.
19. To reduce the risk of fire or electric shock, do not expose this apparatus to rain or moisture.
20. Correct disposal of this product. This marking indicates that this product should not be
disposed with other household wastes throughout the EU. To prevent possible harm to the
environment or human health from uncontrolled waste disposal, recycle it responsibly to
promote the sustainable reuse of material resources. To return your used device, please use
the return and collection systems or contact the retailer where the product is purchased.
They can take this product for environmental safe recycling.

Explanation of Graphical Symbols:
The lightning flash within an equilateral triangle is intended to alert you to the
presence of uninsulated dangerous voltage with the product’s enclosure that
may be of sufficient magnitude to constitute an electric shock to a person.
The exclamation point within an equilateral triangle is intended to alert you to
the presence of important operating and maintenance (servicing) instructions
in the literature accompanying the product.
3
To achieve the utmost in enjoyment and performance, and in order to become familiar with
its features, please read this manual carefully before attempting to operate this products,
this will assure you years of trouble fress performance and listening pleasure.
Caution:
To reduce the risk of electric shock, do not dismantle the product and do not expose the
apparatus to rain or moisture, No user-serviceable parts in side. Please refer servicing
to qualified personnel only.
ERP II NOTE:
Energy re lated products- This product complies with the European Commission on the
Eco-des ign Directive and its implementing Regulations. 15 minutes (approx.) later
without a ny input (except in FM mode), the sy stem will automatically enter the standby
mode. Fol low the instruc tions to assume the operations.
Power supply adaptor
Manufacturer: Dong Guan Gao Yi Electronic Co,. Ltd.
Model number: RSS1006-200120-W2E-B
Use only the power supply listed in the user instructions.
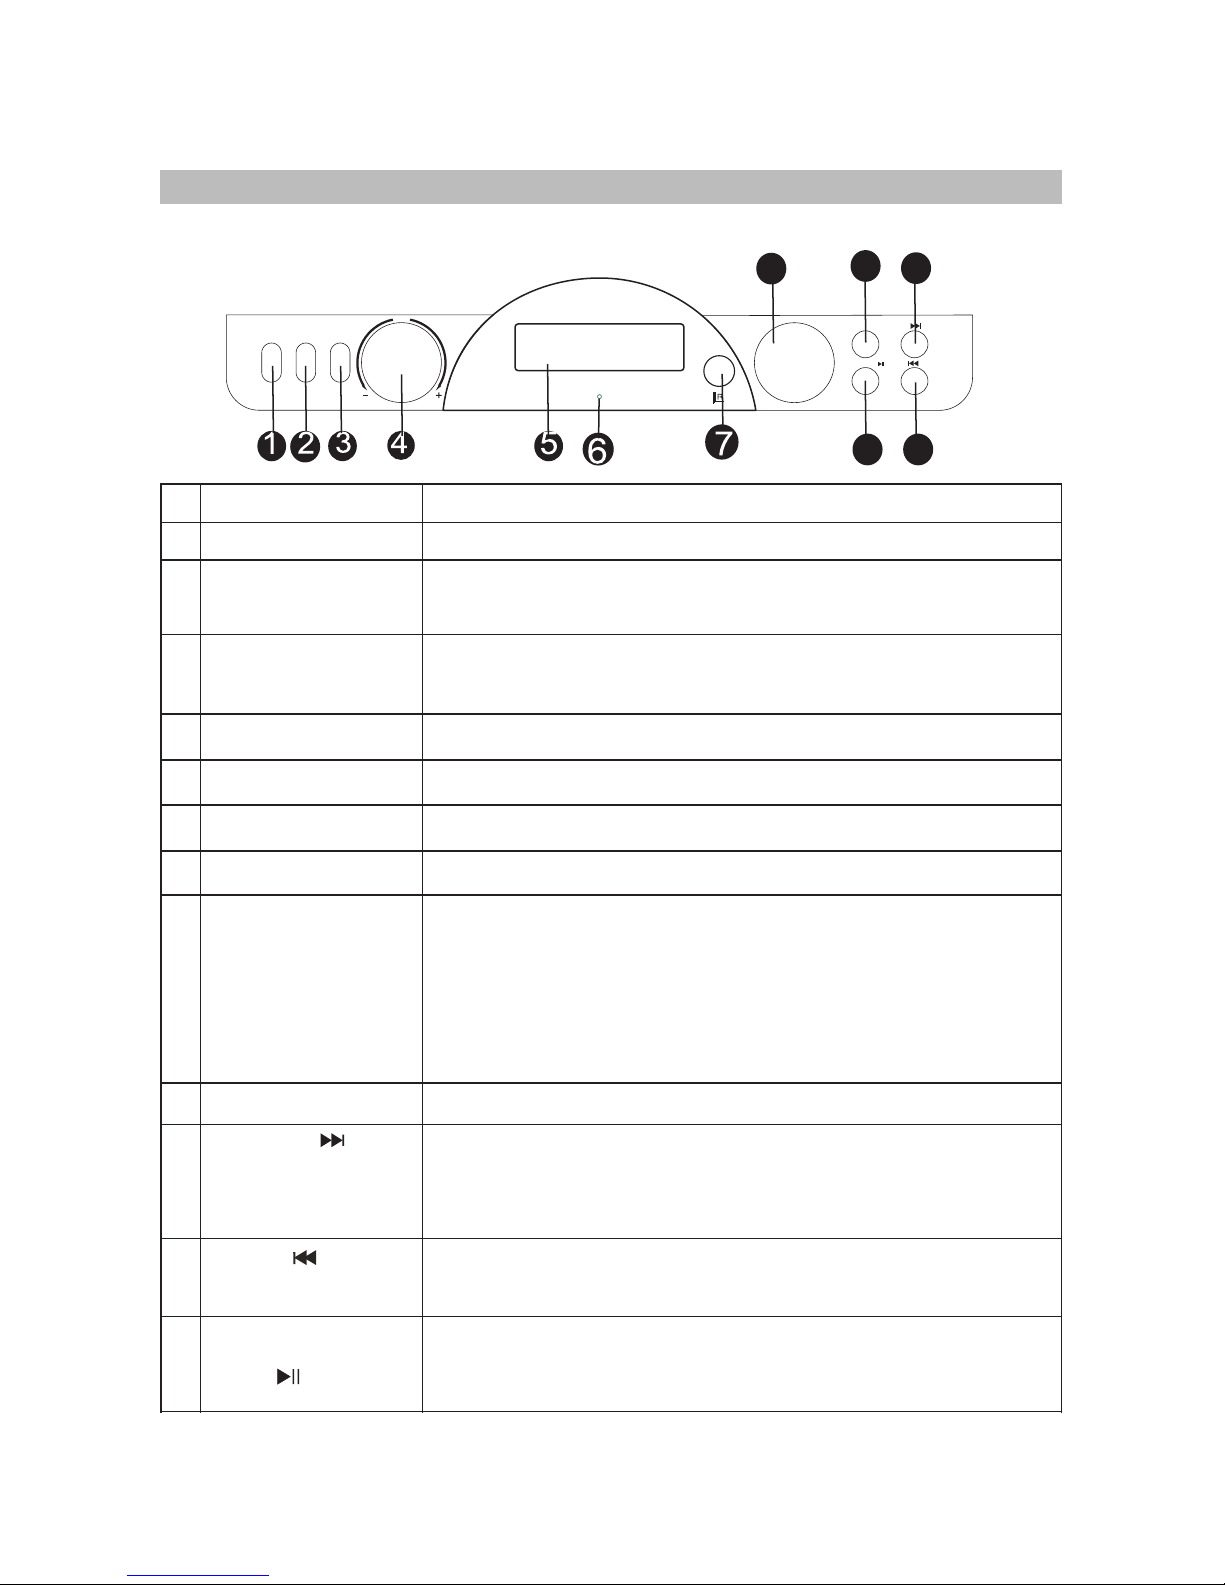
Stand by
Remot e control s ensor
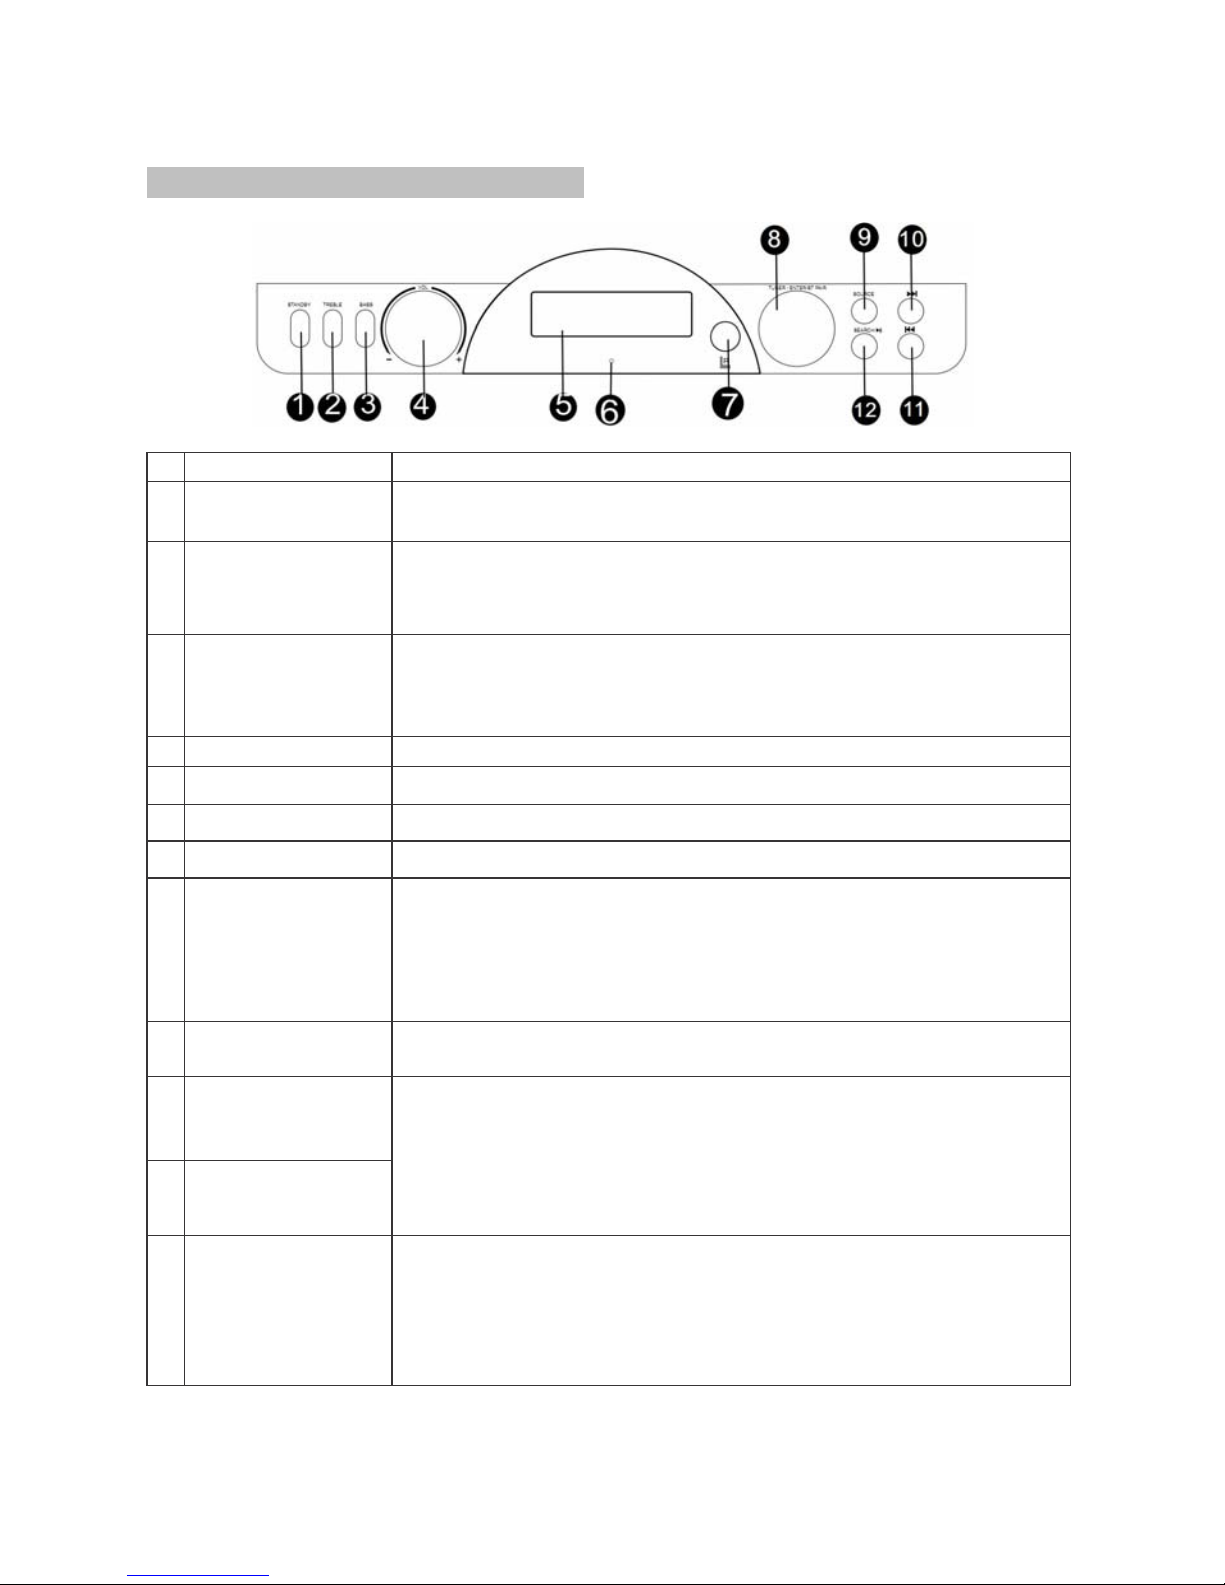
Compo nents
Tap this bu tton up or do wn to turn on t he unit or to s tandby mode.
Tap the Treb le button u p or down to en ter the tre ble setting
inter face and th en use the vo lume knob w ithin 3 seconds t o
adjus t the trebl e level to ge t a vivid sou nd effect.
Tap the Bas s button up o r down to ent er the bass s etting interface
and the n use the vol ume knob wi thin 3 seco nds to adjust the b ass
level t o get a vivid s ound effect.
Front View
8
9
11
STANDBY
TREBLE
BASS
TUNER / ENTER/BT PAIR
SOURCE
SEARCH/
VOL
10
12
Treble
Bass
Volume k nob
Displ ay screen
Bluet ooth indi cator
No. Descr iption
1
2
3
4
5
6
Adjus t the volum e to a comfor table lev el.
Displ ay source f requenc y, and p layback i nformat ion.
Indic ates the mo de status .
Tuner kno b
Enter
BT Pai r
Point t he remote c ontrol to t his senso r.
In FM mod e,tune th e frequen cy up or down b y steps of 0. 05MHz.
When th e buzzer al arm goes on , press ENT ER button t o stop the
alarm , rotate th e tuner kno b to enter th e nap mode, the alarm will
goes on a gain 5 minu tes later.
In BT mo de, press the BT PAIR butto n to discon nect the pa ired
devic es. The unit wil l enter the p airing st atus. Th en use the ph one
devic e to make con nection .
Press t o select on e of the mode s: FM, USB, B luetoot h, Aux in.
7
8
9
10
11
Searc h
Play/ Pause
Next
Sourc e
Previ ous
12
In STAN DBY mode, pres s NEXT but ton to ente r the time/ alarm
setti ng status . (Please r efer to the AL ARM funct ions).
In BT mo de, press NEXT button to sk ip to the nex t track.
In FM mod e, press NE XT button to ski p to the next s tation; p ress
and hol d these but tons to the n ext avail able frequenc y.
In FM mod e, press SE ARCH butt on to auto- search al l the available
stati ons. It sto ps search ing after i t searche s all stations.
In BT mo de, press PLAY/ PAUSE but ton to paus e the playb ack,
press a gain to res ume.
4
Description of parts
In BT mo de, press PREVIOUS butto n to skip to th e previou s track.
In FM mod e, press PR EVIOUS bu tton to ski p to the prev ious stat ion;
press a nd hold the se button s to the prev ious availabl e frequen cy.
AUX IN
USB
SR-05 BT Black
Retro it®Radio w h Bluetooth
12
1.67A
Power Consumption: 20W
Date:
Made in China
Production
S/N:
AUX IN
USB
SR-05 BT Whtei
Retro it®Radio w h Bluetooth
12
1.67A
Power Consumption: 20W
Date:
Made in China
Production
S/N:
13
14
15
16
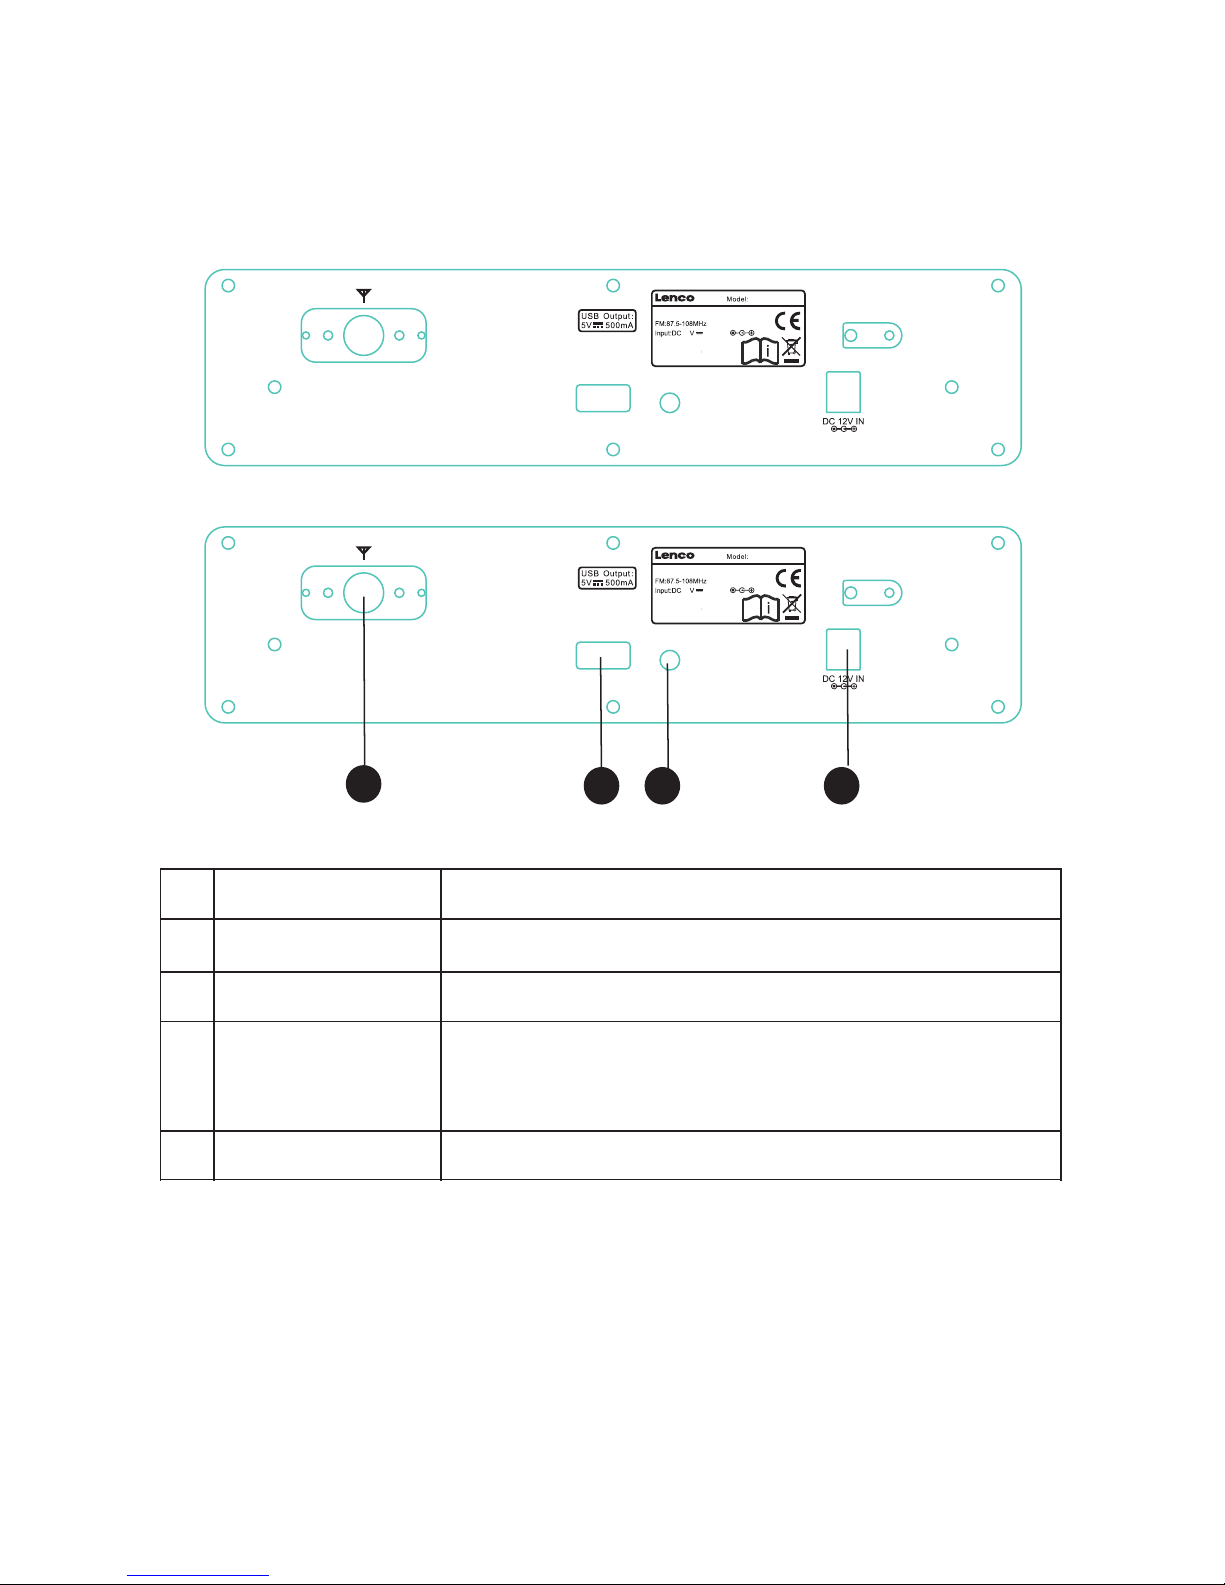
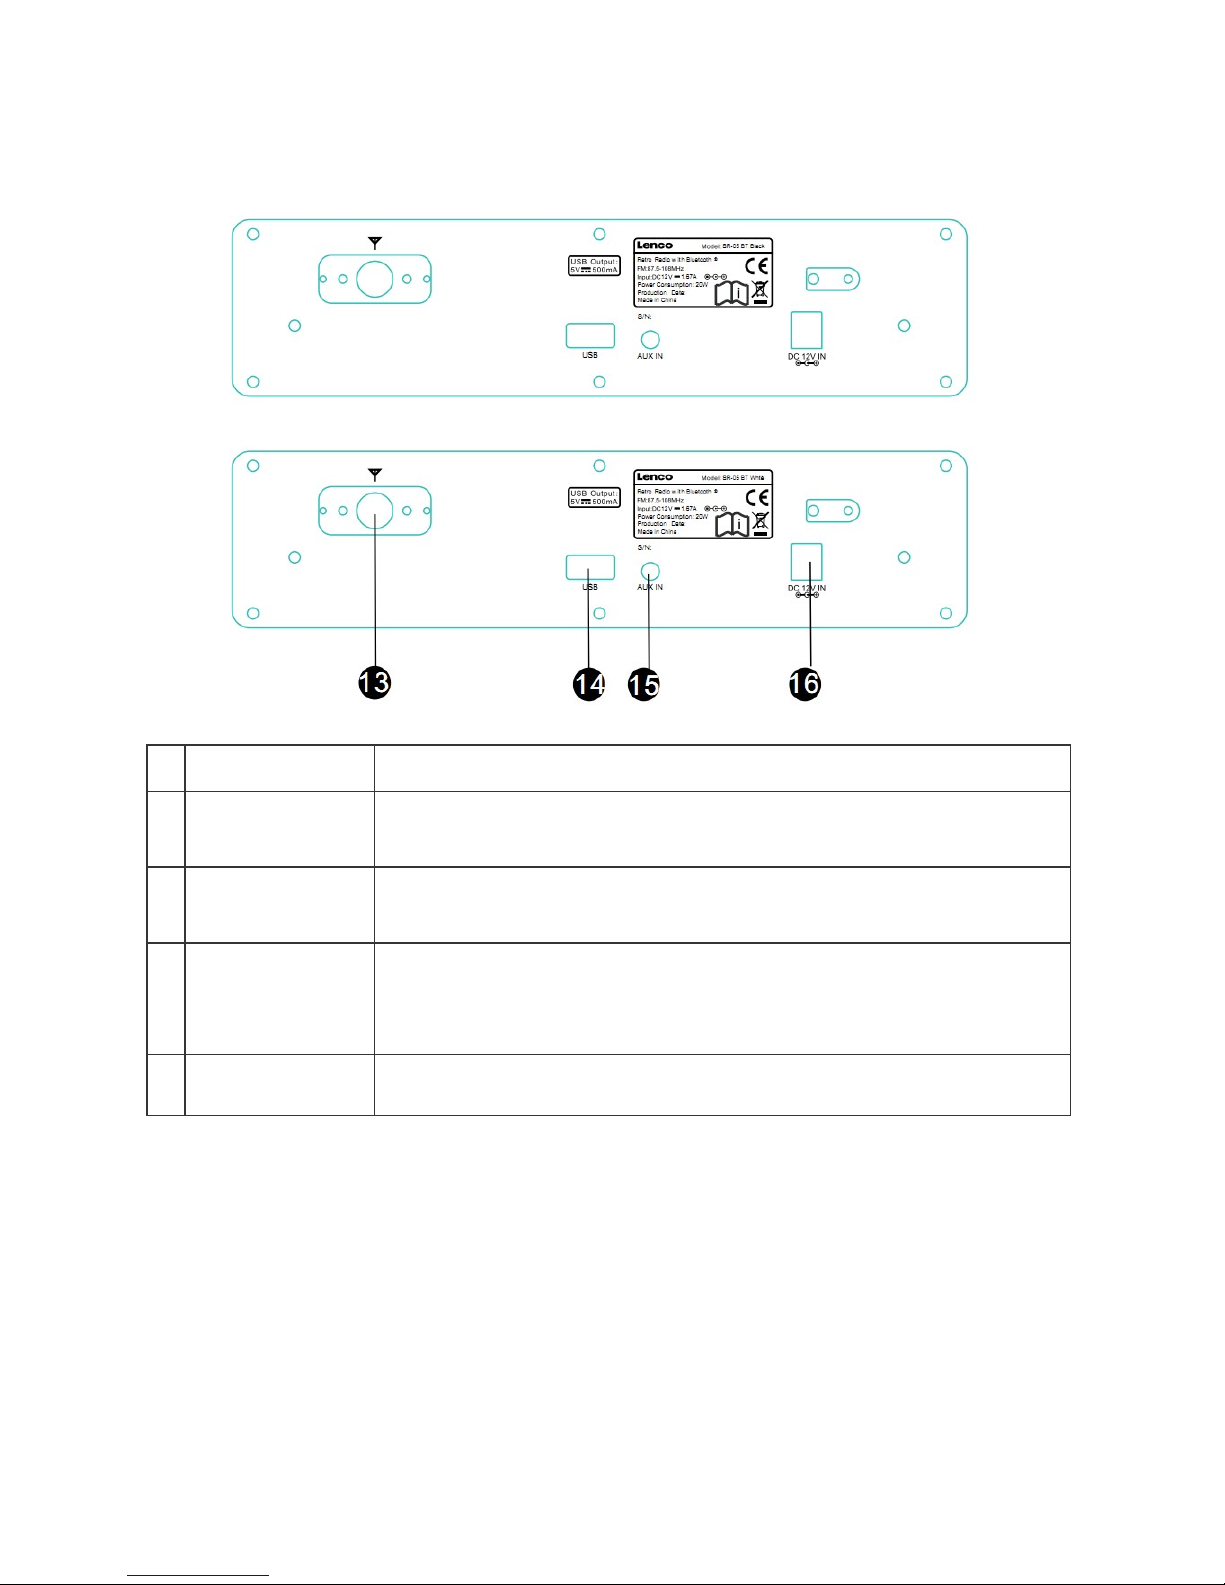
Rear View
USB por t
Aux in so cket
Power s upply soc ket
No. Descr iption
13
14
15
16
Adjus t the volum e to a comfor table lev el.
FM ante nna
Compo nents
Exten d the FM ante nna to get a go od radio re ception.
The USB p ort charg es the USB de vice if it’s in lo w batteri es level.
Use the AU X IN 3.5mm au dio cable t o connect w ith the extra
music d evices (D VD player, c omputer, p hones, etc). In AU X IN
mode, t he unit wor ks as a louds peaker, yo u can only contro l the
volum e of the unit .
5
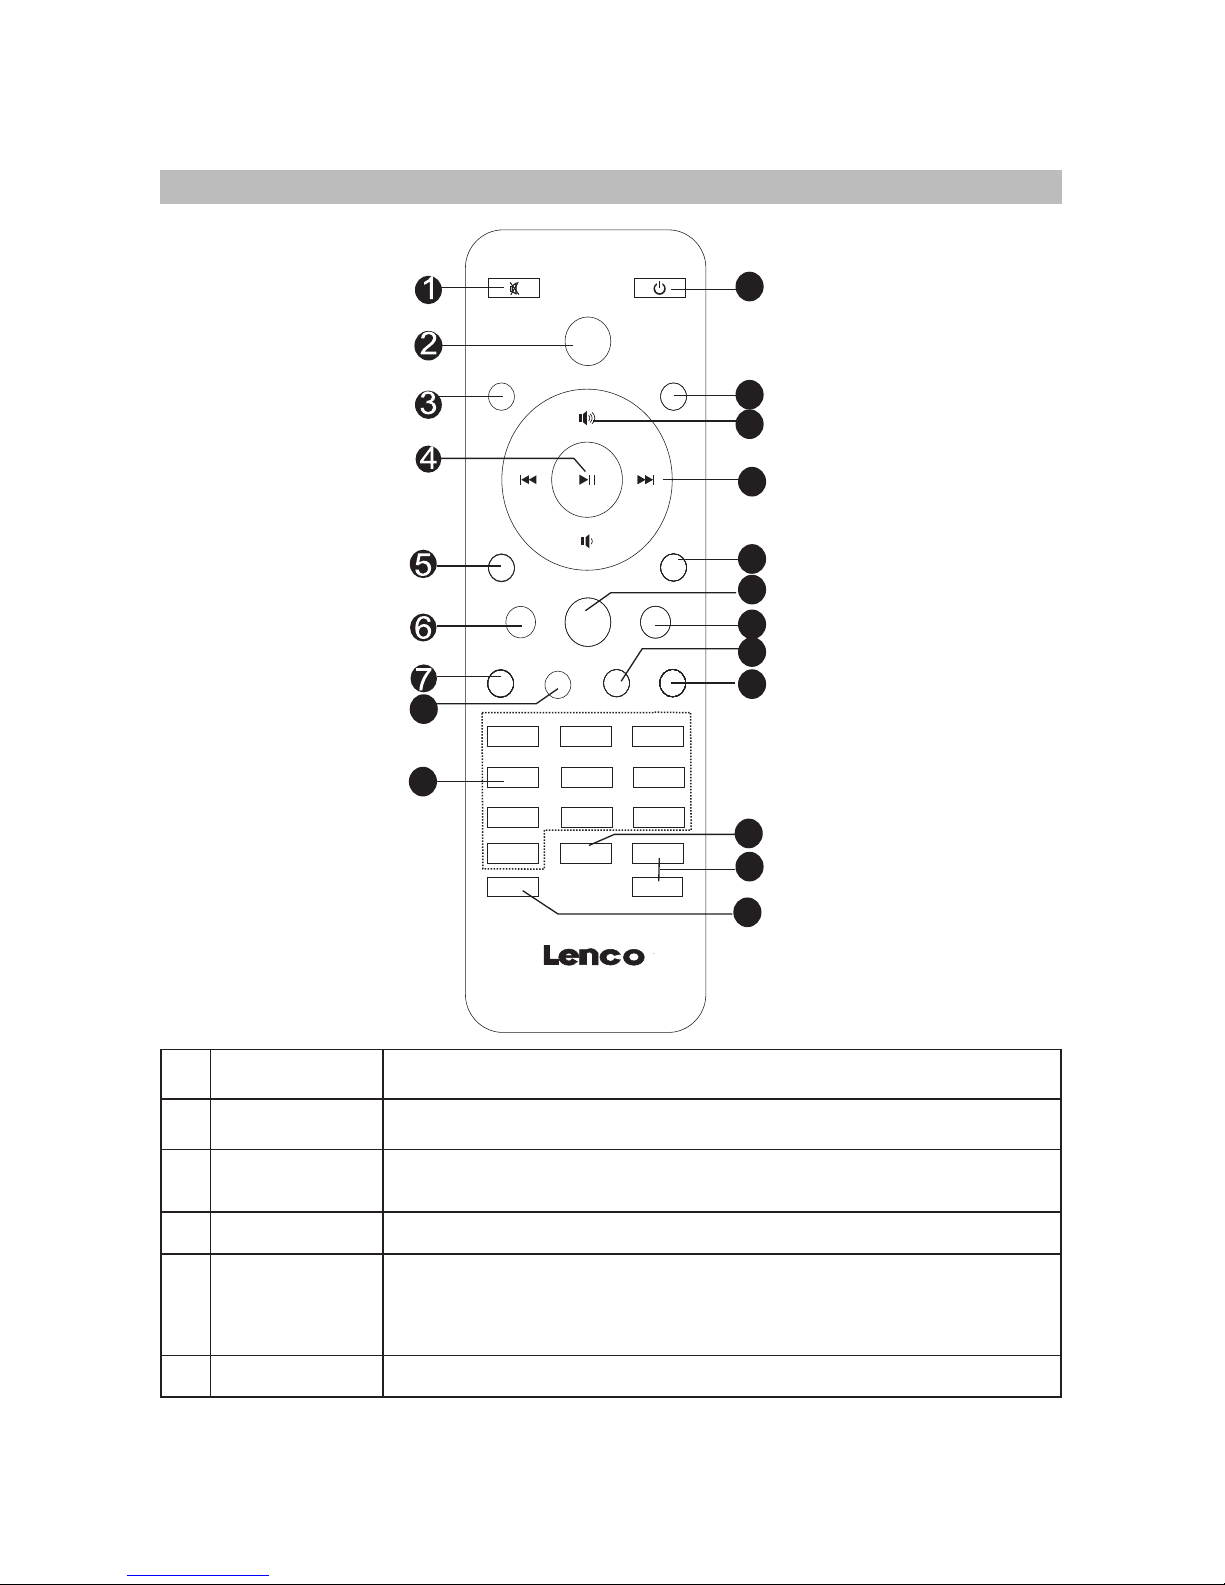
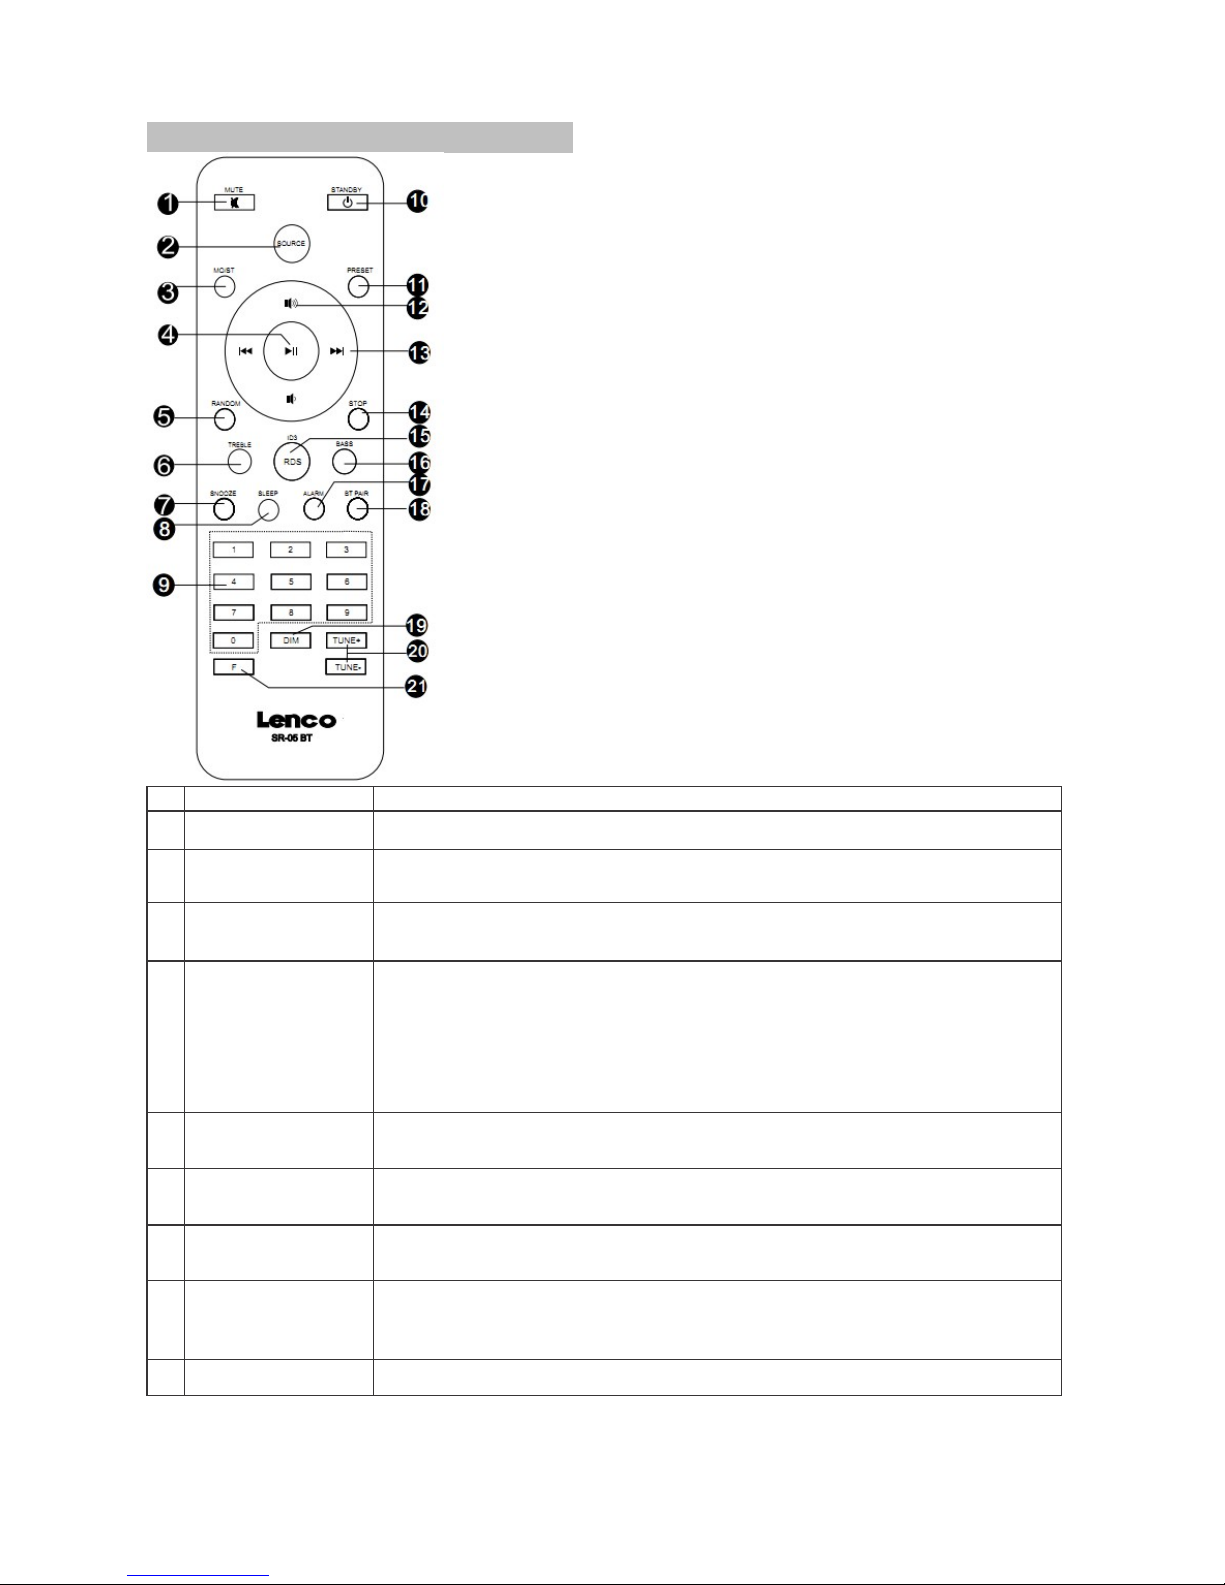
MUTE
SOURCE
MO/ST
RANDOM
STOP
TREBLE
ID3
BASS
SLEEP
1 2
3
4
5
6
7
8 9
STANDBY
BT PAIR
SNOOZE
ALARM
PRESET
3
5
In BT mo de, press to pause the playb ack, pres s again to re sume.
When th e buzzer al arm goes on , press thi s button to s top the alarm.
In FM mod e, press to s earch rad io statio ns. It stop s searchi ng after
finis h searchi ng all the st ations.
0
TUNE-
TUNE+
F
DIM
RDS
SR-05 BT
10
11
9
13
8
12
14
15
16
17
No. Descr iption
1
2
4
Butto ns
Mute
Source
Mono/Stereo
Play/Pause
Press t o mute the so und.
Press r epeated ly to selec t the sourc e you want: FM, USB,
BLUETOOTH(BT), AUX.
In FM mod e, press to s witch bet ween mono a nd stereo .
6
18
19
20
21
Random
In USB mode, press to play tracks in a random order, press again to cancel.
Description of remote control
Previ ous
No. Descr iption
6
7
9
Butto ns
8
10
Snooze
Sleep
Standby
Preset
ID3
Alarm
Number buttons
Volume+/-
Stop
Press t o set the sle ep time: sl eep off/10/1 5/30/45 /60/90/ 120 minut es.
When th e time out, t he unit wil l enter sle ep mode automat ically.
Use number buttons to select tracks/stations/frequency.
Press t o turn on the u nit; or tur n to standb y mode.
11
12
13
14
15
16
17
In FM mod e, press Pr eset butt on to store s tations .
Press t o adjust th e volume to a c omforta ble level.
In BT mo de, press to skip to next or pre vious tra ck.
In FM mod e, press to s kip to next o r previou s station s; press and hold
these b uttons to s kip to next o r previou s available frequency.
In BT mo de, press STOP button to s top playb ack, press PLAY/PAUSE
butto n to re-sta rt.
While p laying MP 3 trac ks, press I D3 button t o display i nformat ion about
the cur rent trac k: album, a rtist, et c. If there i s no ID3,it s how “NO ID3 ".
In FM mod e, press re peatedl y to displa y the stati on’s RDS infor mation.
7
Treble
Press Tr eble butt on and use th e Volume+/- button to adjus t the trebl e.
18
19
20
BT Pair
Tune+/-
Dim
In FM mode, press to tune the frequency by step of 0.05MHz.
Press to activate the BT function of the unit to pairing status if unpaired.
In paired status, press to disconnect the devices.
Frequency
21
In FM mode, press F and then press Number buttons to select frequency.
Press to select the 3 levels of display screen.brightness of
Bass
Press B ass butto n and use the Vo lume+/- b utton to adjust the bass.
Next
RDS
If the al arm is set to b uzzer mod e, when the a larm goes o n, press the
SNOOZ E button to e nter the na p mode, the a larm will g o on again 5
minut es later.
In STAN DBY mode, pres s ALARM butt on on remot e control o nce to ente r
Time sett ing statu s, press tw ice to ente r the Alarm 1 se tting sta tus. Pres s
the thi rd time to en ter Alarm 2 se tting sta tus.
In STAN DBY mode, pres s NEXT but ton on the fr ont panel to enter the time
and ala rm settin g interfa ce, use the t uner knob to select YES/N O, press
ENTER b utton to co nfirm sel ection. I n the time se tting status, rotate the
tuner k nob to sele ct the digi ts, press E NTER butt on to confirm and the
syste m will auto s kip to the ne xt digits s etting in terface. Whil e finish al l
the set tings, pr ess ENTER b utton to co nfirm.
In Time or Al arm
When in t ime setti ng interf ace, the sc reen display the YYYY/M M/DD.
Use the t o select th e digits of t he date, pr ess and the n select
the 24/ 12 hour, nex t to set the Ho ur/Minu te, press t o finish.
When in a larm sett ing inter face, the w ords “0:0 0" flash, press or
to sele ct the digi ts of the ala rm time, pr ess to conf irm. Then sele ct
the ala rm option s: Daily, Week days, We ekends, Once. N ext to sele ct
the ala rm mode: Bu zzer/ FM/ USB mode. At l ast to set th e Alarm volume
level . When fini sh settin g Alarm 1, you c an set Alarm 2.
To cancel t he alarm, p ress ALARM b utton, th en select OFF to cancel.
setti ng status , use or to sel ect conte nts, then
press t o confirm , and the sys tem will au tomatic ally skip to the next
setti ng status .
/

Please ma ke sure the aerial on the back of the radio is fully extended and adjusted before
you attem pt to tune to an FM station (a vertica l position is rec ommended). This will ensure
that the maximum signal st rength is available, get the best possible sound quality.
Enter FM mode
Press the SOURCE button on t he front panel or r emote control to enter FM mode.
(Freque ncy: 87.5-108 .0MHz)
Mono/Stereo
Press MO/ST button on remote control or pre ss TUNER KNOB on th e front panel to sw itch
stereo on , if the radio rece ption is weak, it can not turn stere o on.
Search st ation
Press SEA RCH button on the f ront panel or on re mote control to s earch all the available
station s. It stops searching after sear ching all the sta tions. (Pressing this button will
automat ically clear th e stored stations.)
Stations tuning
Briefly r otate the TUNER K ONB on the front pa nel or press TUNE+/- buttons on remote
control t o tune the radio up o r down by frequency step of 0.05MHz.
Select st ations
2. Long pre ss or on the front panel or remote control to the next or previous station
of strong reception.
3. Use NUMB ER buttons to sel ect stations .
E.g. to listen to station 15, press 1, then 5 to select 15th station.
Select fr equency
If you know the frequency of the wanted stati ons, you can press F button then NUMBER
buttons to select freque ncy.
E.g. to listen to FM 103.50MHz, press F button, then press Number buttons 1,0 , 3, 5, 0,
to enter 10 3.50MHz. (The Z ero must input to e nable the frequency.)
Store sta tions (you may store 60 stations as presets)
1. Enter the station you wan t to save ,refer to the above method s.
2. Press PRESET button on the remote contro l to enter preset s tatus.
3. Use NUMB ER buttons to sel ect presets num ber.
4. Press PRESET button aga in to confirm and s ave.
E.g. to store 105.30MHz in to station 9, fir st enter the station 105.30MHz , press PRESET
button then press NUMBER buttons to select 9, at last press PRESET button to save
the station.
There are d efault statio ns whenever you turn on the unit with good radio signal reception.
1. Briefl y press or on the remote control or on the front panel to sequentially s elect
the previous or next station.
directl y
8
FM operation
RDS mode
Each time y ou press RDS butt on on the remote co ntrol to display the radio information:
<Progra m service>, <Pr ogram type>, <R adio text>, <Cl ock Ti me>. The display
informa tion is provided by the radio broadcasting stations. Some stations may not
provide .

This unit h as included Bluetooth function. So we can enjoy the music with your Bluetooth
device li ke mobile phone, etc.
Pair Operation
1. Press the SOURCE button to enter Bluetoo th mode. The indicator light flashes blue.
2. Turn on the B luetooth func tion on your device (e.g. mobile phone).
3. Place th e device in Bluetooth search mode and enter the Bluetooth searched list.
4. Select LENCO SR-05 BT from the list of found devices.
5. Select OK or YES to pair the unit with your Blue tooth device.
6. If prompted, enter 0000 f or passkey (for s ome devices).
7. When suc cessfully pai red with your device, the Bluetooth indicator lights steadily.
Playbac k operation
1. Press button to play or pause the playback .
2. Press or button to skip to the previous or next track/song.
3. Press VOL+/- buttons to control the volume level.
4. If you want to disconnect the paired devices, press BT PAIR button t o disconnect.
5. If the connection is paus ed, press BT PAIR button t o activate the BT funct ion, and the
unit enters the BT pairing statu s. The n use the phone device to make connection.
To disconnect and pair with another device
a) Turn off the Blue tooth function on your device to disconnect. Then the unit will enter
Bluetooth pairing stat us automatica lly.
b) In this pa ired status, fo llow the steps 2- 5 of PAIR O PERATION section to pa ir with the
other device.
Phone call while playing music
1. When pla ying music thro ugh a phone, and a call is coming, music stops automatically.
2. When the call ends, it depe nds on the setting of your phone whether the current track
will resu me playback or no t.
Important notice
1. Some dev ices, such as an iP hone, connect immediately after pairing, some may take
long to connect.
2. The unit can onl y be connected and playing content from one device at a time.
3. To connect to a different paired device, you have to turn off Bluetooth or unpair from
the currently paired dev ice and manually connect to the other device.
4. When the d evices are paired, converting modes and turning on again to the Bluetooth
mode, the unit will auto-c onnect with the l ast paired device. (Bluetooth function on the
other device is always on. )
5. For certain smart phone n ot auto-connect, users need to go to the BT inside smart
phone and s elect LENCO SR- 05 BT to m ake connection.
9
Bluetooth operation
®

USB port ca n be used to charge t he phone/USB devices. When inserting an USB device,
the system will charge the d evice if the batt ery power is low in the phone/USB device.
10
USB operation
You can connect an external device with the unit to play music as a speaker.
1. Connec t the external au dio player ’s audio output with AUX IN socket on the rear panel
of the unit.
2. Press SOURCE button to en ter AUX IN mode.
3. Start playback on the ext ernal device.
4. You can only adjust the volume by the unit.
5. Turn off both dev ices before disconnecting them.
Note:
The unit ca nnot be control led by buttons on it. You can just use the VOL+/- buttons to
adjust th e volume level. If you can not hear any sound from the speaker, please check
the volum e on the external device.
Aux in operation
For you con venience, we have list some methods to solve some common problems you
may encou nter when you use the system. If the p roblem occurs repeatedly, contact the
nearest m aintenance center.
Problems
Causes
Solutions
Power sup ply doesn’t work.
No sound fr om the speaker.
Power plu g is not fully inserted
into the po wer socket.
Check the c onnection and
full inse rt the power plug
into the po wer socket.
Weak signal reception;
Volume is not turned up;
No pairing with Bluetooth
device.
Adjust th e radio recepti on
positio n;
Turn u p the volume;
Pair the Bl uetooth device.
The scree n is blank.
This may oc cur if the audio
broadca ster changes the label
of a service or remote a label
while tun ing the stations.
The radio w ill try to retune
perform ance a scan.
The sound i s weak or of
poor qual ity; I can hear a
burblin g noise on some
station s.
Other dev ices such as TV may
interfe re the radio rece ption;
The radio r eception is too weak.
Move the un it away from
other dev ice and try to repositio n the unit to get a
strong ra dio signal.
11
Trouble shooting
Power sou rce
Power con sumption
Standby p ower consumption
FM freque ncy
FM presets
Bluetoo th range
Bluetoo th version
Input jac ks
Operati on condition
DC12V
20W
<1W
87.5-10 8.0MHz
60
33 ft. (10m)
CSR V2.1+ EDR
USB/3.5 mm Aux in
5 -35°/level status°
Specifications
For infor mation: www.lenco.com
Lenco offers se rvice and warranty in accordance to European law, which means that in
case of rep airs (both duri ng and after the warranty period) you should contact your local
dealer.
Important note: It is not possible to send products that nee d repairs to Lenco directly.
Important note: If this unit is opened or accessed by a non-official service center in any
way, the warrant y expires.
This devi ce is not suitabl e for professional use. In case of professional use, all warranty
obligat ions of the manufacturer will be voided.
12
Hereby, STL Group BV, Ankerkade 20 NL 5928 PL Venlo, decla res that this pro duct is in
complia nce with the essential requirements and other relevant provisions of Directive
1999/5/ EC. The declaration of conformity may be consulted at
https://lencosupport.zendesk.com/forums/22413161-CE-Documents
This prod uct operates at 2400-2483.5MHz and is designated only to be used inside a
normal ho usehold environment. This product is suited for this purpose within all EU
countie s.
Service and support
Notice, statements and information
Lenco is not liable for printing errors in the manual.
The spec ifications a nd external appearance of the set are subject to change without
prior no tice.
Declara tion of Conformity
Product s with the CE marki ng comply with th e EMC Directive
(2004/1 08/EC) and the Low Voltage Directive (2006/95/EC)
issued by t he Commission of the European Community.
This symb ol indicates th at the relevant electrical product or battery
should no t be disposed of as general household waste in Europe.
To ensure the c orrect waste tr eatment of the pr oduct and battery,
please di spose them in accordance to any applicable local laws of
require ment for disposal of electrical equipment or batteries.
In doing so , you will help to conserve natural resources and improve
standar ds of environmental protection in treatment and disposal of
electri cal waste (Waste Electric al and Electronic Equipment Directive).
All right r eserved.
R

SR-05 BT
Retro-Radio mit Bluetooth
®
Benutzerhandbuch
www.lenco.com
Inhalt
Warnung ............................................................................................................................................1
Bedienelemente ................................................................................................................................4
Fernbedienung .......................................................................................................... ........................6
Radiobetrieb ......................................................................................................................................8
Bluetooth-Betrieb ......................................................................................................... ......................9
Aux/USB-Betrieb .............................................................................................................................10
Fehlersuche / Technische Daten ......................................................................................................11
Wichtige Sicherheitshinweise
Bitte lesen und verstehen Sie alle weiter unten sowie auf dem Gerät angegebenen Warnhinweise.
Dieses Gerät wurde so konzipiert und gefertigt, dass die Sicherheit von Personen gewährleistet
werden kann.
Benutzen Sie nur eine Stromversorgung, die den Angaben in der Bedienungsanleitung oder auf
dem Gerät entspricht
Vermeiden Sie es, direkte Sonnenstrahlung oder die Nähe von Wärmequellen.
Biegen oder ziehen Sie nicht am Netzkabel übermäßig und treten Sie nicht darauf.
Halten Sie das Gerät und den Netzstecker fern von Wasser.
Öffnen Sie niemals das Gehäuse und achten Sie darauf, dass keine Fremdgegenstände, wie z. B.
Münzen, Nadeln etc., in das Gerät gelangen.
Ziehen Sie den Netzstecker aus der Steckdose heraus, wenn Sie das Gerät über einen längeren
Zeitraum nicht verwenden.
1

Um ein Höchstmaß an Freude und Leistung von dem Produkt zu erhalten, und um sich mit allen
Funktionen vertraut zu machen, lesen Sie sich bitte diese Anleitung sorgfältig durch, bevor Sie das
Gerät in Betrieb nehmen. Dadurch wird gewährleistet, dass Sie Jahre störungsfreier Leistung und
Hörgenuss genießen können.
ACHTUNG STROMSCHLAGGEFAHR NICHT ÖFFNEN!
Achtung:
Um das Risiko eines Stromschlags zu verringern, zerlegen das Produkt nicht und setzen Sie es
niemals Regen oder Feuchtigkeit aus. Im Inneren des Geräts sind keine Teile vorhanden die vom
Benutzer gewartet werden können. Überlassen Sie Wartungsarbeiten immer qualifiziertem
Fachpersonal.
Bedeutung der Symbole:
Das Dreieckszeichen mit Blitzsymbol verweist auf gefährliche Spannungen im Gerätegehäuse, die
so hoch sein können, dass sie für Personen eine Gefahr von Stromschlägen bilden.
Das Dreieckszeichen mit Ausrufungszeichen verweist auf wichtige Funktions- und
Wartungshinweise (Reparatur) in der dem Gerät beigelegten Bedienungsanleitung.
Warnhinweise
1. Alle Sicherheits- und Bedienungshinweise müssen vor der Inbetriebnahme des Geräts
durchgelesen werden.
2. Anleitung aufbewahren - Die Sicherheitshinweise und die Bedienungsanleitung müssen für
den späteren Gebrauch aufbewahrt werden.
3. Warnhinweise beachten - Alle Warnungen auf dem Gerät und in der Bedienungsanleitung
müssen beachtet werden.
4. Befolgen Sie die Anweisungen - Alle Bedienungsanweisungen müssen befolgt werden.
5. Benutzen Sie dieses Gerät nicht in der Nähe von Wasser - Das Gerät darf nicht in der Nähe von
Wasser oder Feuchtigkeit verwendet werden - zum Beispiel, in einem feuchten Keller oder in der
Nähe eines Schwimmbeckens.
6. Nur mit einem leicht angefeuchteten Tuch reinigen.
7. Blockieren Sie keine der Lüftungsöffnungen. Stellen Sie das Gerät entsprechend den
Anweisungen des Herstellers auf.
8. Stellen Sie das Gerät nicht in der Nähe von Hitzequellen, wie z. B. Heizungen, Herden oder
anderen Geräten die Hitze produzieren (z. B. Verstärker) auf.
9. Schützen Sie das Netzkabel vor Druckeinwirkung, insbesondere am Stecker, Steckdosen oder
am Ausgangspunkts des Geräts.
10. Verwenden Sie lediglich vom Hersteller angegebenes Zubehör.
11. Ziehen Sie bei Gewittern oder bei längerer Nic htbenutzung de n Netzstecker aus der Steckdose.
12. Wenden Sie sich im Wartungsfall nur an ausgebildetes Wartungspersonal. Das Gerät sollte in
Wartung gegeben werden, nachdem es in irgendeiner Weise beschädigt wurde, wie z.B. bei
Beschädigung des Netzkabels, nachdem Flüssigkeit über das Gerät gegossen wurde oder
Gegenstände in das Gerät gelangt sind, oder Regen bzw. Feuchtigkeit ausgesetzt wurde.
13. Bitte stellen Sie das Gerät an einem gut belüfteten Ort auf.
14. Die enthaltenen Wartungsanweisungen sind nur für ausgebildetes Fachpersonal gedacht. Um
das Risiko eines Stromschlags zu verringern, führen Sie keine Reparaturen eigenhändig aus,
es sei denn, sie sind in der Bedienungsanleitung angegeben, und Sie sind dafür qualifiziert.
15. Der NETZSTECKER dient dazu das Gerät vom Strom zu trennen und muss deshalb jederzeit
leicht zugänglich bleiben.
16. Dieses Gerät ist ein Gerät der Klasse II bzw. ein doppelt isoliertes Elektrogerät. Es wurde in
einer solchen Weise konzipiert, dass eine Sicherheitsverbindung zur elektrischen Erde nicht
erforderlich ist.
2

17. Unsichtbare Laserstrahlung bei Öffnung des Geräts oder entsichertem Gehäuseverschluss.
Vermeiden Sie kontakt mit dem laserstrahl.
18. Dieses Gerät darf keinen Wassertropfen und -spritzern ausgesetzt werden. Gegenstände, die
mit Flüssigkeiten gefüllt sind, sollten nicht auf das Gerät gestellt werden.
19. Um Feuer und elektrischen Schlägen vorzubeugen, vermeiden Sie es das Gerät Regen oder
Feuchtigkeit auszusetzen.
20. Sachgemäße Entsorgung dieses Produkts: Dieses Zeichen gibt an, dass dieses Produkt in der
gesamten EU nicht mit dem Hausmüll entsorgt werden darf. Um mögliche Schäden für die
Umwelt oder die menschliche Gesundheit durch unkontrollierte Abfallentsorgung zu vermeiden,
ist es wichtig verantwortungsbewusst zu recyceln, um eine nachhaltige Wiederverwertung von
Rohstoffressourcen zu fördern. Geben Sie Altgeräte bei Sammelstellen ab oder wenden Sie
sich an den Händler bei dem das Gerät gekauft wurde. Dort wird das Gerät dann auf
umweltverträgliche Weise entsorgt.
ERP II-Hinweis
Energieverbrauch - Dieses Produkt entspricht der Richtlinie für ökologisches Design der
Europäischen Kommission und ihren Durchführungsverordnungen. Nach ca.15 Minuten ohne
jegliche Eingabe (außer im Radiomodus), geht das System automatisch in den
Bereitschaftsmodus. Gehen Sie entsprechend den Angaben in der Bedienungsanleitung vor, um
den Betrieb wieder aufzunehmen.
3
Netzstromadapter
Hersteller: Dong Guan Gao Yi Electronic Co,. Ltd.
Modellnummer: RSS1006-200120-W2E-B
Gerät nur an eine Stromversorgung gemäß den Angaben in der Bedienungsanleitung anschließen
Beschreibung der Bedienelemente
Vorderansicht
Nr. Bedienelement
Beschreibung
1 Bereitschaft
Tippen Sie auf diese Taste nach oben oder unten, um ein-oder ausschalten
das Gerät einzuschalten.
2 Höhen
Benutzen Sie die Tasten OBEN oder UNTEN, um die Höheneinstellung
aufzurufen und verwenden Sie den Lautstärkeregler innerhalb von 3
Sekunden zum Einstellen der Höhen, um einen lebendigen Klangeffekt zu
erhalten.
3 Bässe
Benutzen Sie Tasten OBEN und UNTEN, um die Tiefeneinstellung
aufzurufen und verwenden Sie dann den Lautstärkeregler innerhalb von 3
Sekunden, um die Bässe einzustellen und einen lebendigen Klangeffekt zu
erhalten.
4 Lautstärkeregler Stellen Sie die Lautstärke auf ein angemessenes Maß.
5 Bildschirm Anzeige der Eingangsfrequenz und Informationen zur Wiedergabe.
6 Bluetooth-Anzeige Zeigt den Status an.
7 Fernbedienungs sensorRichten Si e die Fernbedienung auf diesen Sensor.
8
Frequenz-einstellknopf
Eingabe
Bluetooth-Verbindung
Einstellen der Frequenz nach oben oder unten in 0,05-MHz-Schritten.
Betätigen Sie im Menü ENTER, um die Auswahl zu bestätigen.
Wenn der Alarm geht, drücken Sie ENTER, um den Alarm zu stoppen.
Betätigen Sie diese Taste, um die Bluetooth-Funktion des Geräts zu
aktivieren. Wenn eine Verbindung steht, können Sie diese Taste benutzen,
um die Geräte wieder zu trennen.
9 Eingangssignal
Benutzen Sie diese Taste, um das Eingangssignal zu wählen: Radio, USB,
Bluetooth (BT), AUX.
10 Vor
11 Zurück
Zu den Standby-Modus, drücken Sie NEXT-Taste , um Zeit und geben Alarm
Einstellung Status. (Bitte beachten Sie Taste Funktionen Alarm.)
Betätigen Sie diese Tasten im BT-Modus, um zum nächsten oder vorigen
Titel zu springen.
Benutzen Sie die Tasten im Radiomodus, um zum nächsten bzw. vorigen
Sender zu springen. Halten Sie die Tasten gedrückt, um zur nächsten bzw.
vorigen verfügbaren Frequenz zu springen.
12
Suchen/
Wiedergabe /Pause
Betätigen Sie die SEARCH-Taste im Radiomodus, um eine automatische
Suche nach allen verfügbaren Sendern zu starten.
Der Suchvorgang wird gestoppt, nachdem alle Sender gefunden wurden.
Betätigen Sie die Taste im Bluetooth-Modus, um die Wiedergabe
vorübergehend anzuhalten. Betätigen Sie die Taste erneut, um die
Wiedergabe fortzusetzen.
4
Rückseitenansicht
Nr
. Bedienelemente Beschreibung
13 UKW-Antenne
Ziehen Sie die UKW-Antenne für einen optimalen Radioempfang
vollständig heraus.
14 USB-Anschluss
Dieser Anschluss lädt auch Ihr USB-Gerät auf, wenn es über einen
geringen Batteriestand verfügt.
15 Aux-Eingang
Mit dem 3,5-mm-AUX-Audiokabel können Sie externe Audiogeräte (DVDPlayer, Computer, Telefone etc.) anschließen.
Im AUX-Modus funktioniert das Gerät als Lautsprecher, und Sie können
nur die Lautstärke des Geräts verändern.
16 Stromanschluss Stecken Sie das Netzteil in die Steckdose.
5
Beschreibung der Fernbedienung
Nr. Tasten Beschreibung
1 Ton aus Betätigen Sie diese Taste, um den Ton auszuschalten.
2 Eingangssignal
Benutzen Sie diese Taste zur Auswahl des Eingangssignals: Radio, USB
Bluetooth (BT), AUX.
3 Mono/Stereo
Benutzen Sie diese Taste im Radiomodus, um zwischen Mono und Stereo zu
wechseln.
4 Wiedergabe/Pause
Benutzen Sie diese Taste im Bluetooth-Modus, um die Wiedergabe
vorübergehend anzuhalten. Betätigen Sie die Taste erneut, um die
Wiedergabe fortzusetzen.
Wenn der Alarm geht, drücken Sie ENTER, um den Alarm zu stoppen.
Benutzen Sie die Taste im Radiomodus, um nach Radiosendern zu suchen.
Der Suchvorgang wird gestoppt, nachdem alle Sender gefunden wurden.
5 Zufallswiedergabe
Um die Titel in zufälliger Reihenfolge abzuspielen. Betätigen Sie die Taste
erneut, um die Zufallswiedergabe abzubrechen..
6 Höhen
Betätigen Sie die TREBLE-Taste und verwenden Sie dann die Tasten
VOLUME +/-, um die Höhen einzustellen.
7 Schlummermodus
Wenn der Alarm aktiviert wird, können Sie die SNOOZE-Taste betätige, um
den Alarm vorübergehend zu stoppen.
8 Einschlafmodus
Benutzen Sie diese Taste, um den Einschlafmodus einzustellen:
Aus / 10 / 15 / 30 / 45 / 60 / 90 / 120 Minuten.
Wenn die Zeit abgelaufen ist, wird das Gerät au tomatisch ausgeschaltet.
9 Zifferntasten Benutzen Sie die Zifferntasten zur Auswahl von Titeln/ Sendern/ Frequenzen.
6
Nr. Tasten Beschreibung
10 Bereitschaft
Betätigen Sie diese Taste, um das Gerät einzuschalten bzw. wieder in den
Bereitschaftsmodus zu schalten.
11 Senderspeicher Benutzen Sie diese Taste im Radiomodus, um bestimmte Sender zu speichern.
12 Lautstärke +/- Benutzen Sie diese Tasten, um die Lautstärke auf ein angenehmes Niveau zu stellen.
13
Vor
Zurück
Sie diese Tasten im BT-Modus, um zum nä ch ste n bz w. vorigen Titel zu springen.
Benutzen Sie die Tasten im Radiomodus, um zum nächsten bzw. vorigen Sender zu
springen. Halten Sie die Tasten gedrückt, um zur nächsten bzw. vorigen verfügbaren
Frequenz zu springen.
14 Stopp
Sie diese Taste im Bluetooth-Modus, um die Wiedergabe zu beenden. Betätigen Sie
die Wiedergabe/Pause- Taste, um die Wiedergabe vom Anfang des aktuelle n Titels
erneut zu starten.
15
ID3
RDS
Während der Wiedergabe von MP3, um Informationen über den aktuellen Titel
anzuzeigen: Album, Interpret, etc. Wenn es keine ID 3-I nformationen vorhanden sind,
erscheint die Meldung "NO ID3".
Benutzen Sie diese Taste im Radiomodus zur Anzeige der RDS-Informationen des
j
eweiligen Senders.
16 Bass
Betätigen Sie die BASS-Taste und verwenden Sie die Tasten VOLUME +/-, um die
Bässe einzustellen.
17 Alarm
Betätigen Sie diese Taste im Bereitschaftsmodus, um die Uhrzeit und Alarm 1, 2
einzustellen. Betätigen Sie die Taste einmal, um die Uhrzeit einzust ellen. Betätigen
Sie die Taste ein zweites Mal, um Alarm 1 einzustellen. Betätigen Sie sie ein drittes
Mal, um Alarm 2 einzustellen. Sobald Sie sich im Einstellungmodus befinden können
Sie die Tasten und benutzen, um Inhalte zu wählen und dann mit
bestätigen. Das System geht dann automatisch zur nächsten Einstellung.
Im Einstellungsmodus wird das Datum im Format JJJJ/MM/TT angezeigt. Verwenden
Sie die Tasten und , um das Datum einzustellen und betätigen Sie . Sie
können dann den 24/12-Stundenmodus einstellen. Danach können Sie die
Stunden/Minuten einstellen. Betätigen Sie , um Ihre Einstellung zu bestätigen und
zu beenden. Zur Einstellung des Alarms erscheint "0:00" blinkend in der Anzeige.
Benutzen Sie die Tasten und , um die Weckzeit einzustellen. Betätigen Sie
zur Bestätigung. Wählen Sie dann die Alarmoptio n:T äglich, Wochentage,
Wochenenden, einmalig. Danach können Sie den Alarmmodus wählen: Summer,
Radio, USB. Zuletzt können Sie die Alarmlautstärke einstellen. Wenn Sie mit der
Einstellung des Weckalarms 1 fertig sind, können Sie mit der Einstellung des
Weckalarms 2 fortfahren. Um den Einstellungsmodus zu beenden, betätigen Sie die
ALARM-Taste und wählen Sie OFF.
(Operationen an der Stirn-Panel) Im Standby-Modus, drücken Sie NEXT-Taste auf
der Frontplatte,um die Zeiteinstellung und Alarm-Status geben, verwenden Sie den
TUNER-Knopf, um JA oder NEIN auszuwahlen, drücken Sie ENTER, um die
Auswahl zu bestatigen. Wenn in Zeiteinstellung Status, drehen Sie den Knopf, um
die TUNER ZAHLEN auszuwahlen, drücken Sie ENTER, um zu bestatigen und zum
nachsten System auto Anzahl Einstellungsstatus überspringen. Wahrend Finish
Einstellungen, mit ENTER bestatigen.
18
BluetoothVerbindung
Betätigen Sie diese Taste, um die Bluetooth-Funktion des Geräts zu aktivieren.
Benutzen Sie die Taste im Verbindungsmodus, um die Geräte wieder zu trennen.
19 Dim
Benutzen Sie diese Taste, um eine von 3 Helligkeitsstufen des Bildschirms
auszuwählen.
20 Frequenz +/-
Benutzen Sie diese Tasten im Radiomodus, um die Frequenz in 0,05MHz- Schritten
einzustellen.
21 Frequenz
Betätigen Sie die F-Taste im Radiomodus und benutzen Sie dann die Zifferntasten
zur Auswahl der Frequenz.
7
 Loading...