

Page 1
39” Ultra High Denition 4K2K LED TV
Installation & Operating Instructions - Please keep for future reference
LED-3901-4K
Important - Please read these instructions fully before installing or operating
These instrucitons contain important information which will help you get the best from your
television and ensure safe and correct installation and operation.
Page 2

Page 3

EN 3
CONTENTS
Important Safety Instructions 4
Safety Information 5
Preparation 6
What is Included 6
Front View 7
Rear View 8
Installing the Base Stand 9
Removing the Stand for Wall-Mounting 9
Remote Control 10
Connecting External Devices 11
General Operation 12
Initial Setup 12
Selecting the Input Source 14
Channel Selection 14
Display Channel Information 14
Volume Adjustment 14
Customizing TV Settings 15
Channel Settings 15
Picture Settings 23
Sound Settings 24
Time Settings 25
Option Settings 26
Lock Settings 27
Using the Features 29
EPG (Electronic Programme Guide) (DTV Mode) 29
Teletext (ATV Mode) 31
Digital Teletext (DTV Mode) 32
PVR (Personal Video Recorder) 33
Time Shift Function (DTV Mode) 33
Recording DTV Programme onto a USB Storage Device 34
Timer Programming 35
Play Recorded Programme 36
Entertainment 38
Connecting a USB Storage Device 38
Viewing Photos 38
Listening to Music 40
Viewing Movies 41
My Text 42
Specications 43
Page 4
EN 4
IMPORTANT SAFETY INSTRUCTIONS
• Read these instructions – All the safety and operating instructions should be read before this product is
operated.
• Keep these instructions – The safety and operating instructions should be retained for future reference.
• Heed all warnings – All warnings on the appliance and in the operating instructions should be adhered to.
• Follow all instructions – All operating and use instructions should be followed.
• Do not use this apparatus near water – The appliance should not be used near water or moisture – for
example, in a wet basement or near a swimming pool.
• Clean only with dry cloth.
• Do not block any ventilation openings. Install in accordance with the manufacturer’s instructions.
• Do not install near any heat sources such as radiators, heat registers, stoves, or other apparatus (including
ampliers) that produce heat.
• Do not defeat the safety purpose of the polarized or grounding plug. A polarized plug has two blades with
one wider than the other. A grounding plug has two blades and a third grounding prong. The wide blade
or the third prong is provided for your safety. If the provided plug does not t into your outlet, consult an
electrician for replacement of the obsolete outlet.
• Protect the power cord from being walked on or pinched particularly at the plugs, convenience receptacles,
and at the point where they exit from the apparatus.
• Only use attachments/accessories specied by the manufacturer.
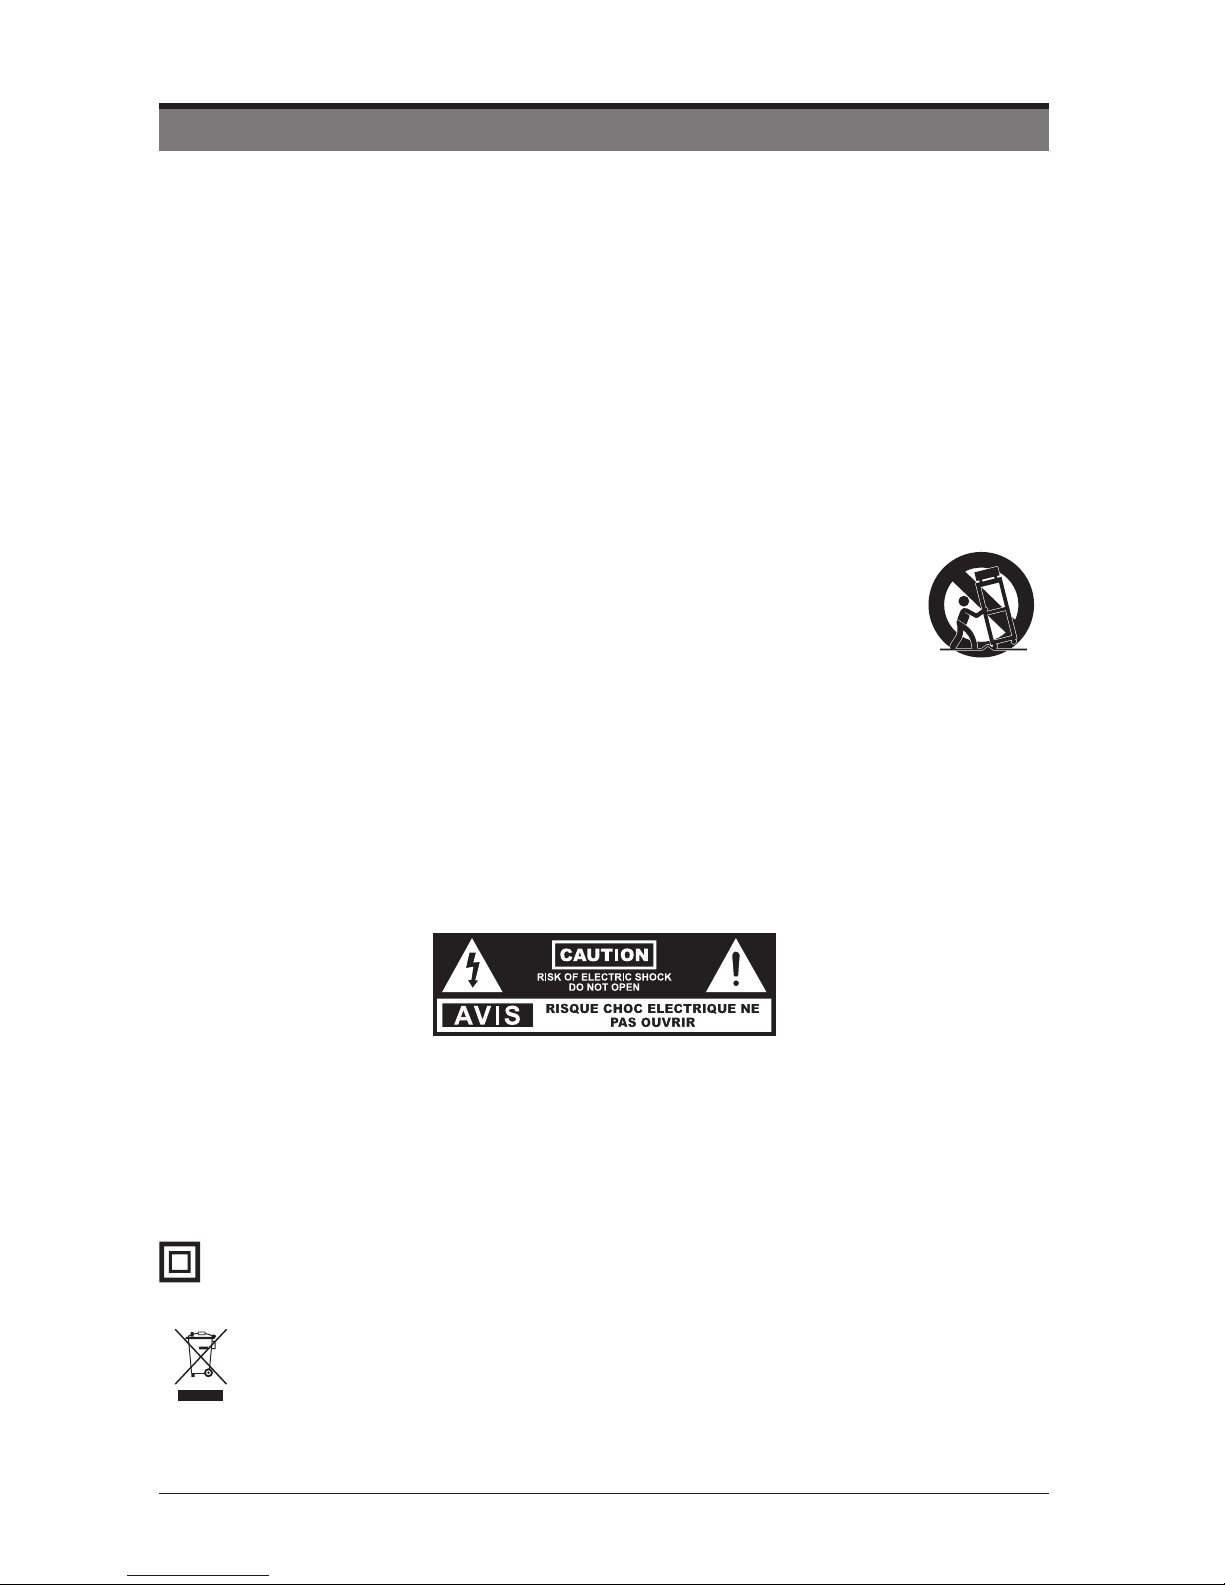
• Use only with the cart, stand, tripod, bracket, or table specied by the manufacturer, or
sold with the apparatus. When a cart or rack is used, use caution when moving the cart/
apparatus combination to avoid injury from tip-over.
• Unplug the apparatus during lightning storms or when unused for long periods of time.
• Refer all servicing to qualied personnel. Servicing is required when the apparatus has been damaged in
any way, such as the power supply cord or plug is damaged, liquid has been spilled, or objects have fallen
into the apparatus, or the apparatus has been exposed to rain or moisture, does not operate normally, or
has been dropped.
• Please keep the unit in a well-ventilated environment.
• WARNING: To reduce the risk of fire or electric shock, do not expose this apparatus to rain or
moisture. The apparatus should not be exposed to dripping or splashing. Objects lled with liquids,
such as vases should not be placed on the apparatus.
• WARNING: The batteries shall not be exposed to excessive heat such as sunshine, re or the like.
• WARNING: The wall socket plug is used as disconnect device, the disconnect device shall remain
readily operable.
• This lightning ash with arrowhead symbol within an equilateral triangle is intended to
alert the user to the presence of non-insulated “dangerous voltage” within the product’s
enclosure that may be of sufcient magnitude to constitute a risk of electric shock.
• Warning: To reduce the risk of electric shock, do not remove cover (or back) as there
are no user-serviceable parts inside. Refer servicing to qualied personnel.
• The exclamation point within an equilateral triangle is intended to alert the user to
the presence of important operating and maintenance instructions in the literature
accompanying the appliance.
This equipment is a Class II or double insulated electrical appliance. It has been designed in such a way
that it does not require a safety connection to electrical earth.
This product contains electrical or electronic materials. The presence of these materials may, if not disposed of
properly, have potential adverse effects on the environment and human health.
Presence of this label on the product means it should not be disposed of as unsorted waste and must be collected
separately. As a consumer, you are responsible for ensuring that this product is disposed of properly.
HDMI:
This TV incorporates High-Denition Multimedia Interface (HDMI™) technology. HDMI, the HDMI logo and High-
Denition Multimedia Interface are trademarks or registered trademarks of HDMI Licensing LLC.
Page 5

EN 5
SAFETY INFORMATION
To ensure reliable and safe operation of this equipment, please carefully read all the instructions in
this user guide, especially the safety information below.
Electrical Safety
• The TV set should only be connected to a main power supply with voltage that matches the label
at the rear of the product.
• To prevent overload, do not share the same power supply socket with too many other electronic
components.
• Do not place any connecting wires where they may be stepped on or tripped over.
• Do not place heavy items on any connecting wire, which may damage the wire.
• Hold the main plug, not the wires, when removing from a socket.
• During a thunderstorm, or when not using the television for extended period of time, turn off the
power switch on the back of the television.
• Do not allow water or moisture to enter the TV or power adapter. Do NOT use in wet, moist areas,
such as bathrooms, steamy kitchens or near swimming pools.
• Pull the plug out immediately, and seek professional help if the main plug or cable is damaged,
liquid is spilled onto the set, if the TV set accidentally exposed to water or moisture, if anything
accidentally penetrates the ventilation slots or if the TV set does not work normally.
• Do not remove the safety covers. There are no user-serviceable parts inside. Trying to service the
unit yourself is dangerous and may invalidate the product’s warranty. Qualied personnel must
only service this apparatus.
• To avoid a battery leakage, remove batteries from the remote control, when the remote is not use
for long period, or when the batteries are exhausted.
• Do not break open or throw exhausted batteries into a re.
Physical Safety
• Do not block ventilation slots in the back cover. You may place the TV in a cabinet, but ensure at
least 5cm (2’’) clearance all around.
• Do not tap or shake the TV screen, or you may damage the internal circuits. Take good care of the
remote control.
• To clean the TV use a soft dry cloth. Do not use solvents or petroleum based uids.
• Do not install near any heat sources such as radiators, heat registers, stoves or other apparatus
(including ampliers) that produce heat.
• Do not defeat the safety purpose of the polarized or grounding-type plug. A polarized plug has
two blades with one wider than the other. A grounding plug has two blades and a third grounding
prong. The wide blade, or the third prong is provided for your safety. If the provided plug does not
t into your outlet, consult an electrician for replacement of the obsolete outlet.
• Protect the power cord from being walked on or pinched particularly at plugs.
• Unplug the apparatus during lightning storms or when unused for long periods.
• Refer all servicing to a qualied service personnel. Servicing is required if the apparatus does not
operate normally or if the apparatus, including the power supply cord or plug, has been damaged
in any way.
• Servicing is also required if liquid has been spilled, or objects have fallen into the apparatus; when
the apparatus has been exposed to rain or moisture; or if the apparatus has been dropped.
• Always connect your television to a power outlet with protective ground connection.
Page 6
EN 6
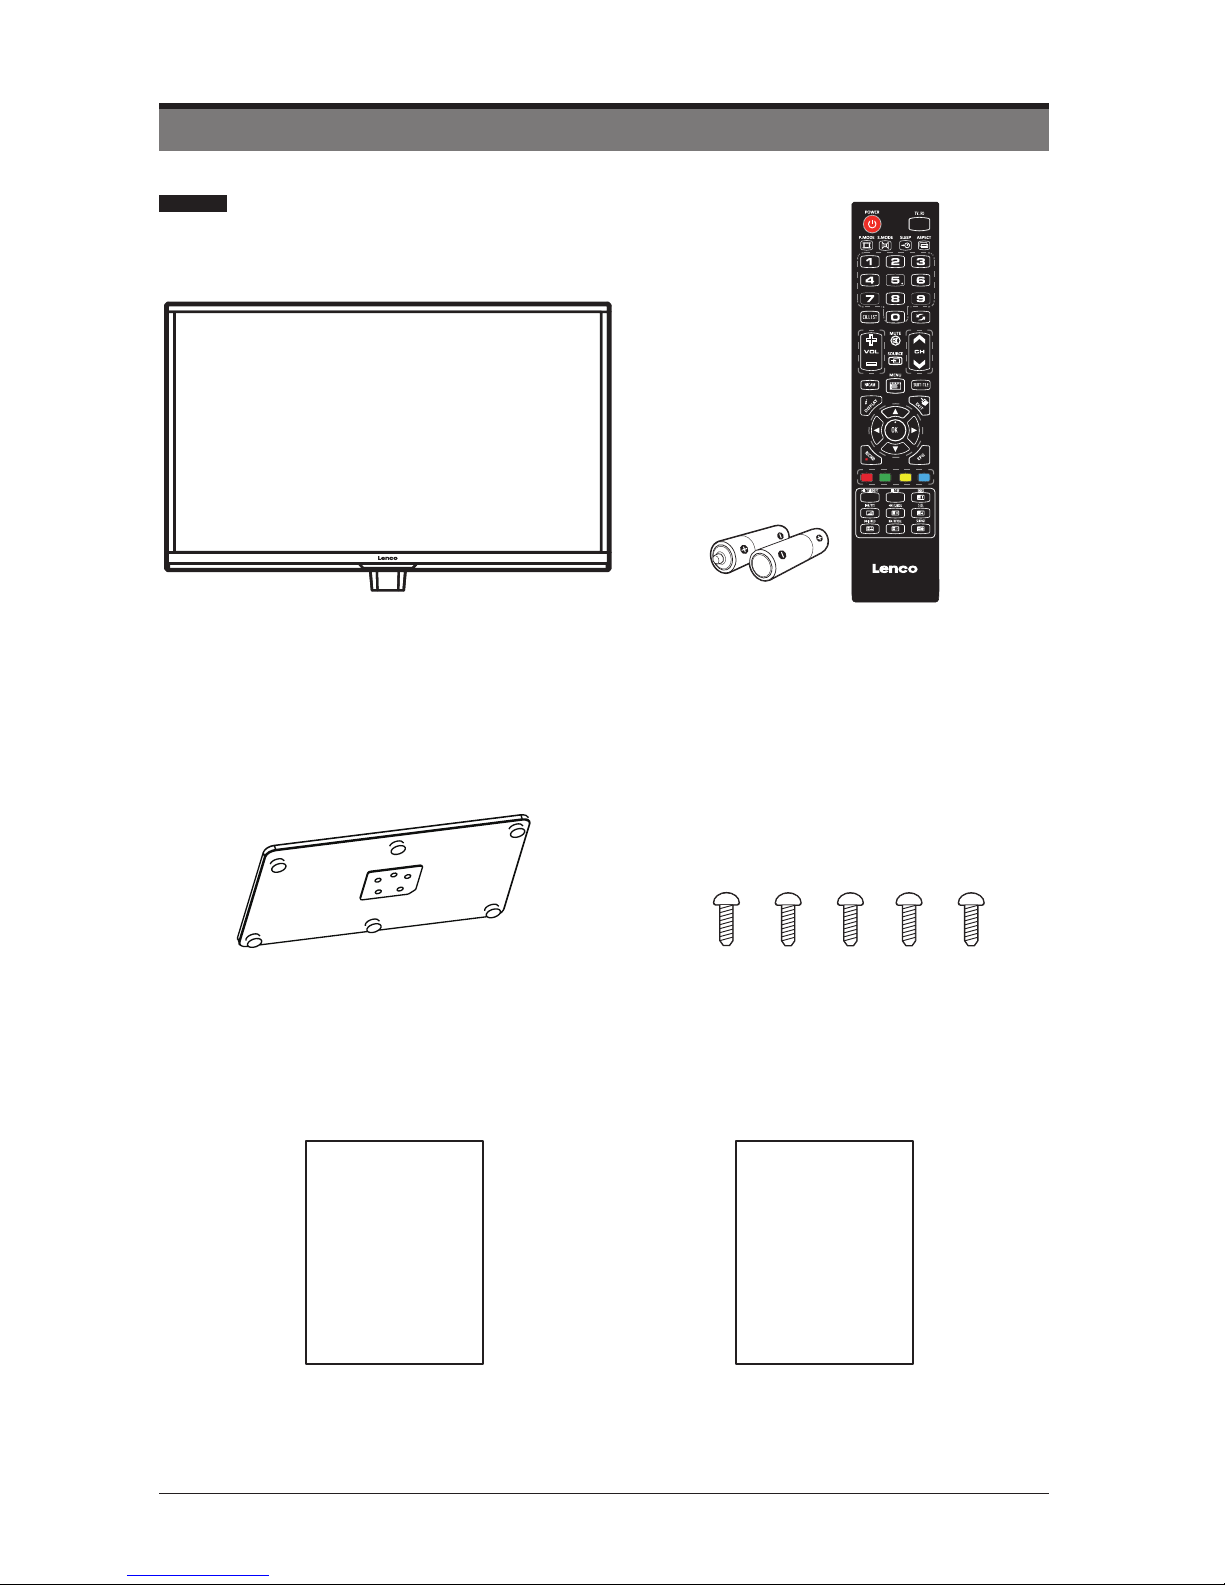
Remote Control with Batteries
TV Set
User Manual
User Manual
Base Stand
Five Screws
PREPARATION
What is Included
Quick
Start Guide
Quick Start Guide
Page 7

EN 7
1. POWER Indicator
Illuminates blue when the TV is turned on. Illuminates red when the TV is in standby mode.
2. IR (Infrared Receiver)
Receive IR signals from the remote control.
PREPARATION
Front View
Page 8
EN 8
PREPARATION
Rear View
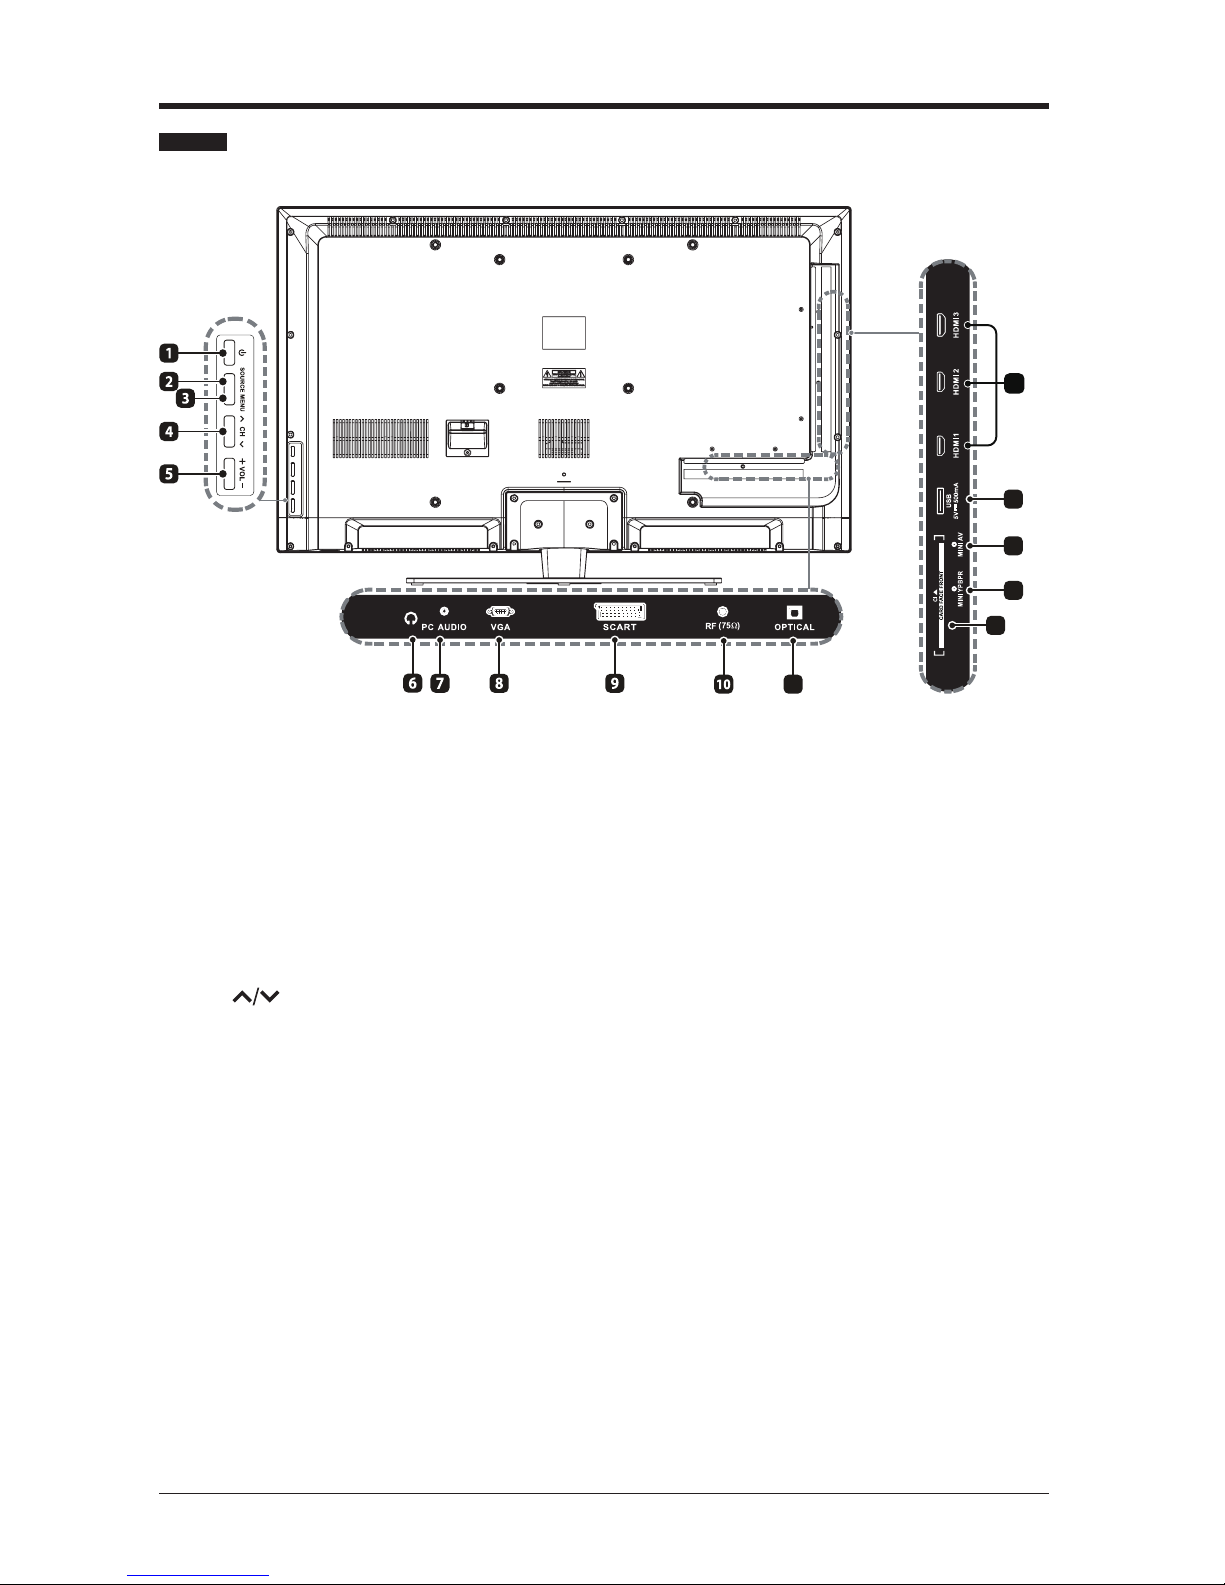
1. POWER
Switch the TV between On/Standby
mode.
2. SOURCE
Press to select among different input
signal sources.
3. MENU
Display the OSD (on screen display)
menu.
4. CH
Press to select a channel.
5. VOL +/-
Press to adjust the volume.
6. Headphone Socket
Connect to the Headphones.
7. PC AUDIO Input
Connect to a computer audio output.
8. VGA Input
Connect to a computer or other devices
with a VGA interface.
9. SCART socket
Inputs or outputs for external devices.
Connect the SCART cable between the
SCART socket on the TV and the SCART
socket on the external device (decoder,
VCR or DVD player).
10. RF(75Ω) Input
Connect to the antenna (75Ω VHF/UHF)
socket with the RF coaxial cable.
11. OPTICAL Digital Audio Output
Connect to the audio socket on the digital
audio system.
12. CI Slot
Used to insert a CI card. A CI card allows
you to view all the channels that you
subscribe to.
13. MINI YPBPR
Connect to AV devices with component
(Y/Pb/Pr) video and audio output sockets.
COMPONENT&VIDEO share with AUDIO
IN(L/R).
14. MINI AV
Connect to the composite VIDEO and
AUDIO (L/R) output sockets on external
video devices.
15. USB Port
Connect to a USB storage device to play
compatible audio and photo files. (USB
mode)
16. HDMI Inputs
Connect to a High-Denition (HD) signal
output device.
13
14
15
16
11
12
Page 9

EN 9
PREPARATION
Installing the Base Stand
WARNING: This apparatus is intended to be supported by UL Listed wall mount bracket.
• 1. Lay the TV face-down on a flat,
cushioned surface to avoid damaging
or scratching.
• 2. Fix the Base Stand to the Base
Support using 5pcs provided screws.
• 1. Lay the TV face-down on a flat,
cushioned surface to avoid damaging
or scratching.
• 2. Untighten the 6pcs screws holding
the stand assembly and remove them.
• 3. Attach the wall-mount bracket to
the TV using the mounting holes on
the back of the TV. Mount this TV
according to the instructions included
in the wall-mount bracket.
Removing the Stand for Wall-Mounting
Page 10

EN 10
PREPARATION
Remote Control
Page 11
EN 11
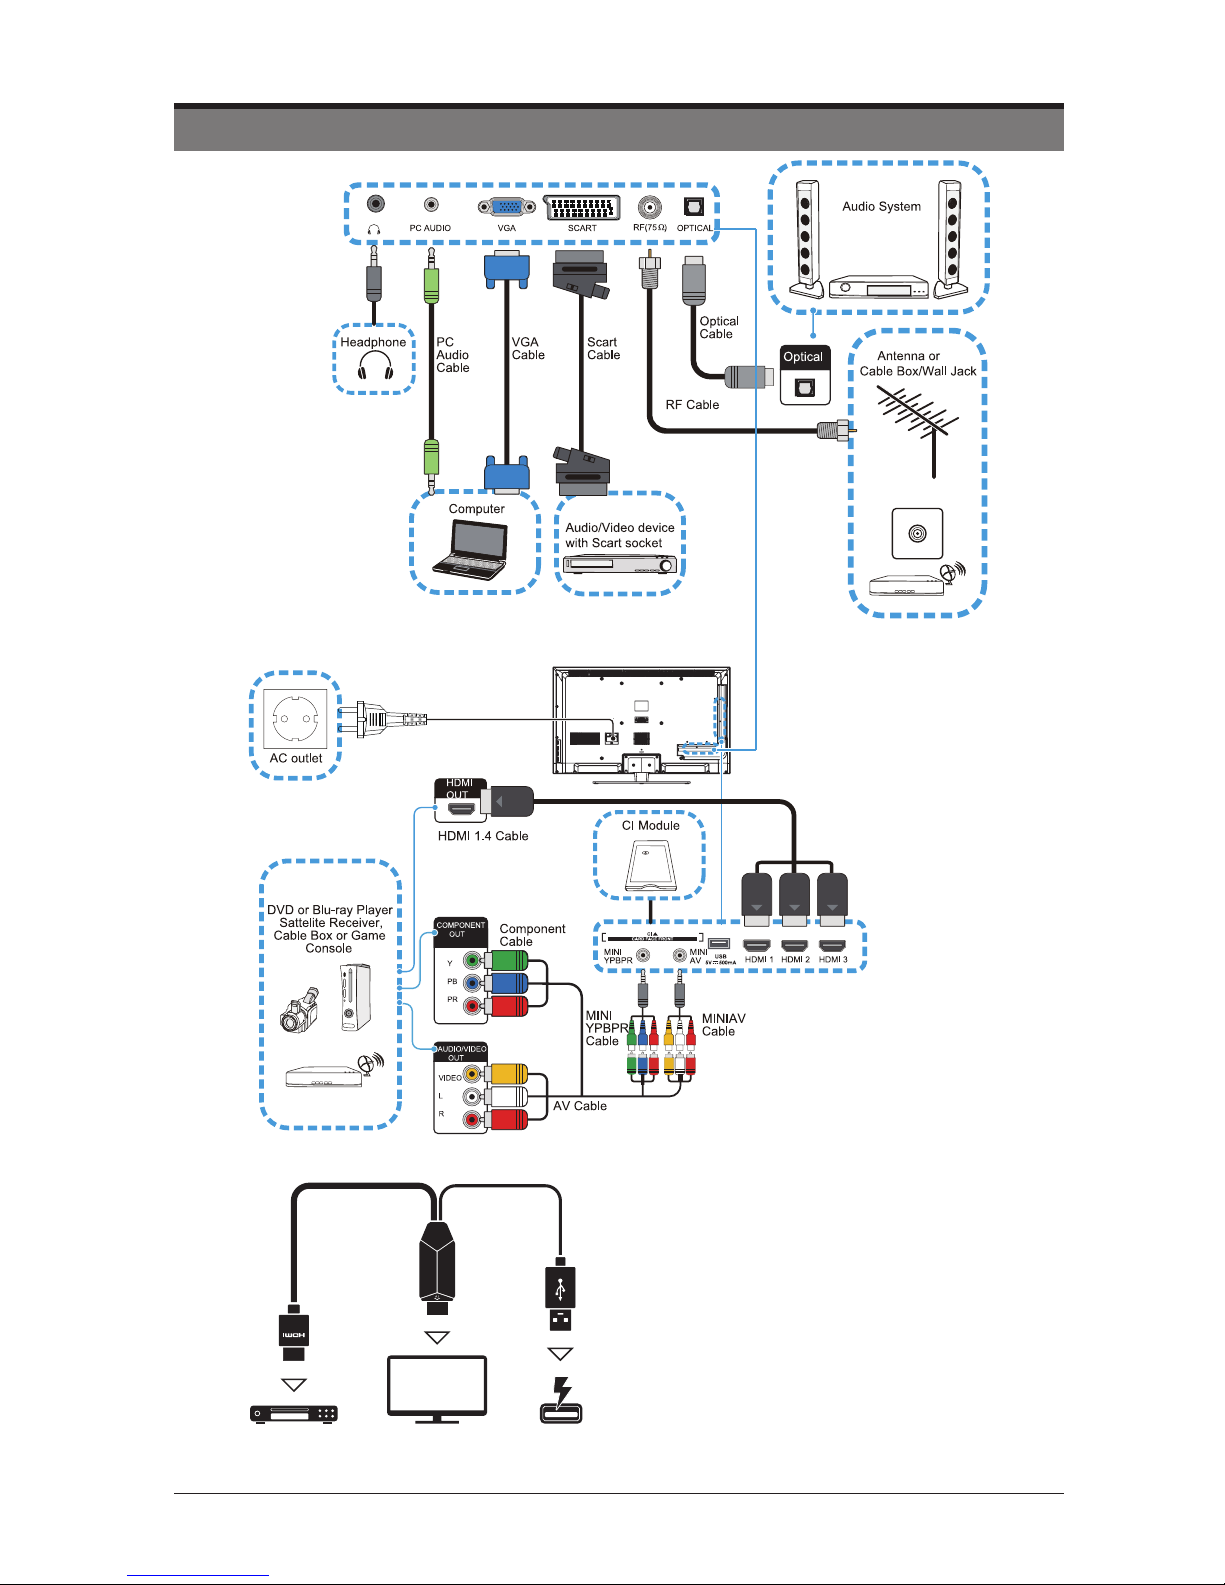
CONNECTING EXTERNAL DEVICES
U-Vision Cable:
HD Video Source
with HDMI output
(cable,DVD,Blu-ray,set-top-box)
4K Ultra HDTV
with HDMI input
USB Port
on TV
1.Designed for use with 4K Ultra HDTVs
2.Up-convert Full HD content into high-quality
4K Ultra HD
3.Improves picture quality of HD video content
4.Perfoms real-time detail enhancement,edge
restoration and noise reduction
Page 12
EN 12
CUSTOMIZING TV SETTINGS
Initial Setup
• Connect one end of the RF coaxial cable (not included) to the aerial socket on the
wall and the other end of the cable to the RF (75) socket at the rear right bottom
view of your TV.
• Connect the mains cable to the mains socket after you have completed all the
connections.
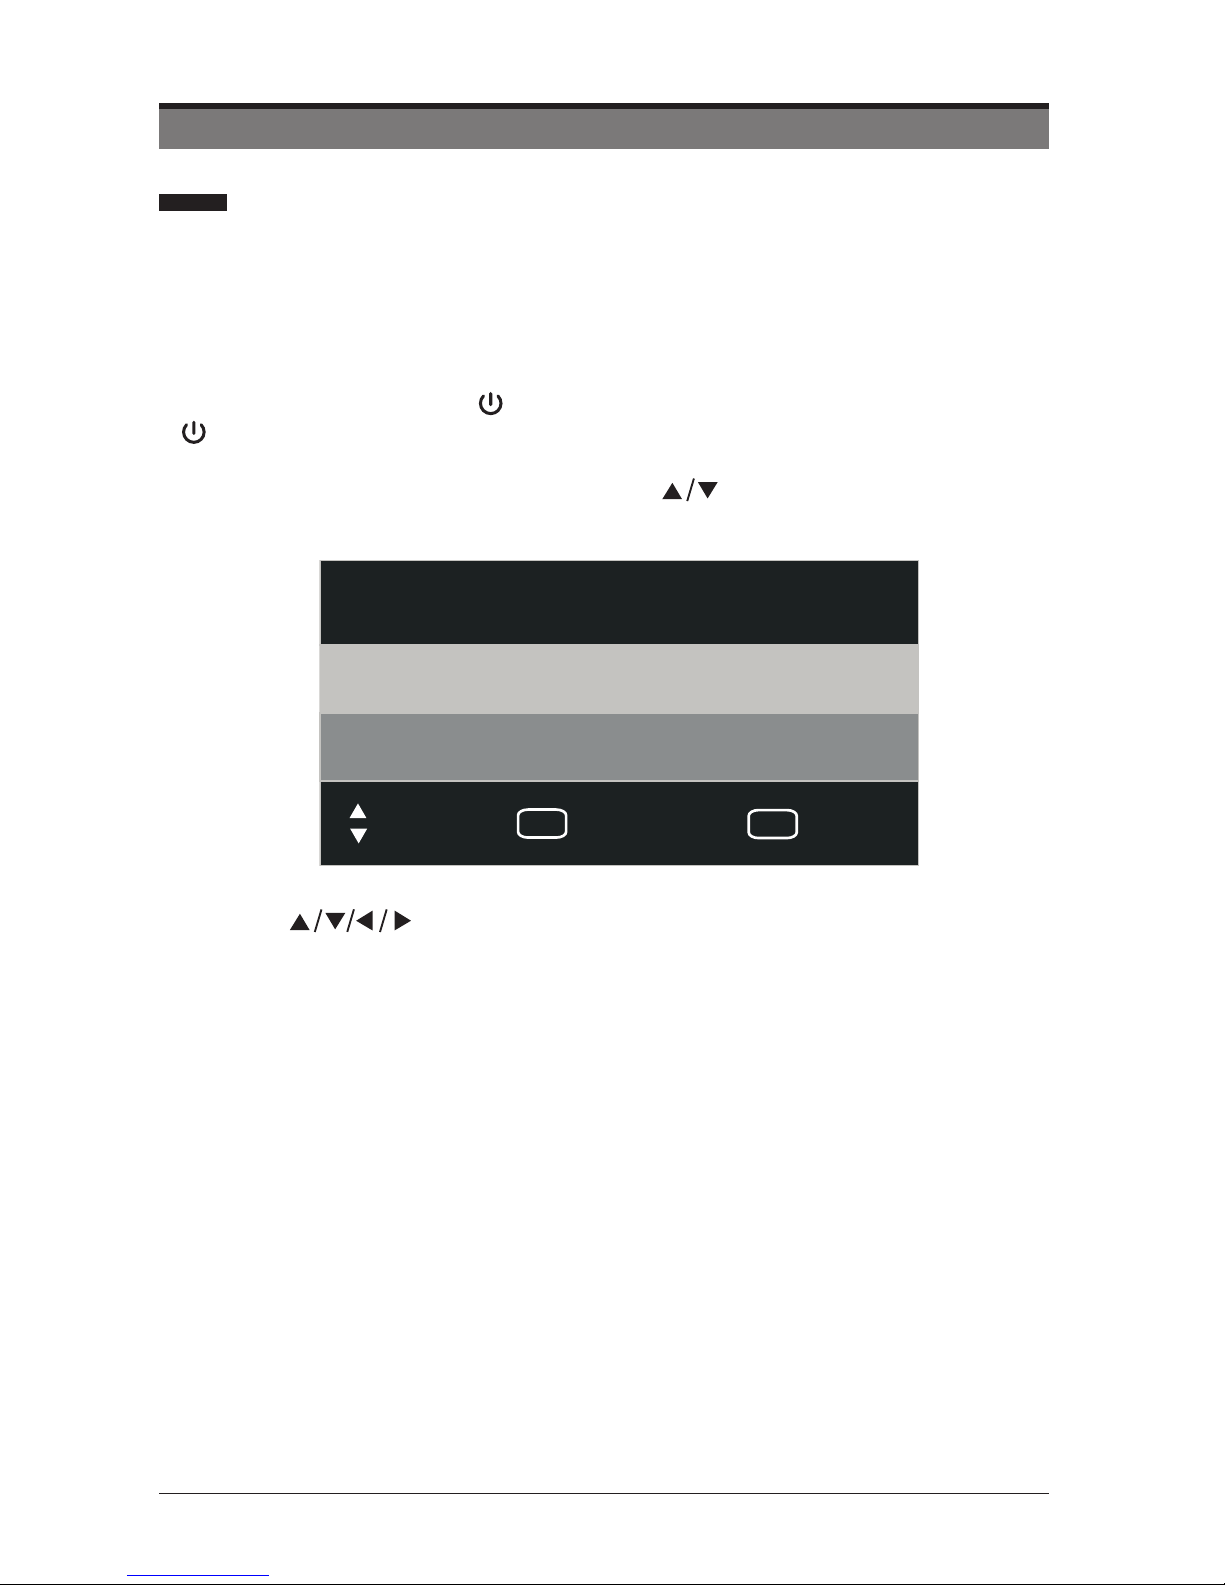
• In standby mode, press the button on the front right side panel of the TV or the
button on the remote control to turn the TV on. The red LED indicator will turn
blue.
• The rst time you turn the TV on, press the
buttons to select your desired
mode setting.
• Press the buttons to navigate the menu and change the settings.
General Operation
EXIT
OK
First Time Installation
Home Mode
Store Mode
Move
Select
Quit
Page 13
EN 13
General Operation
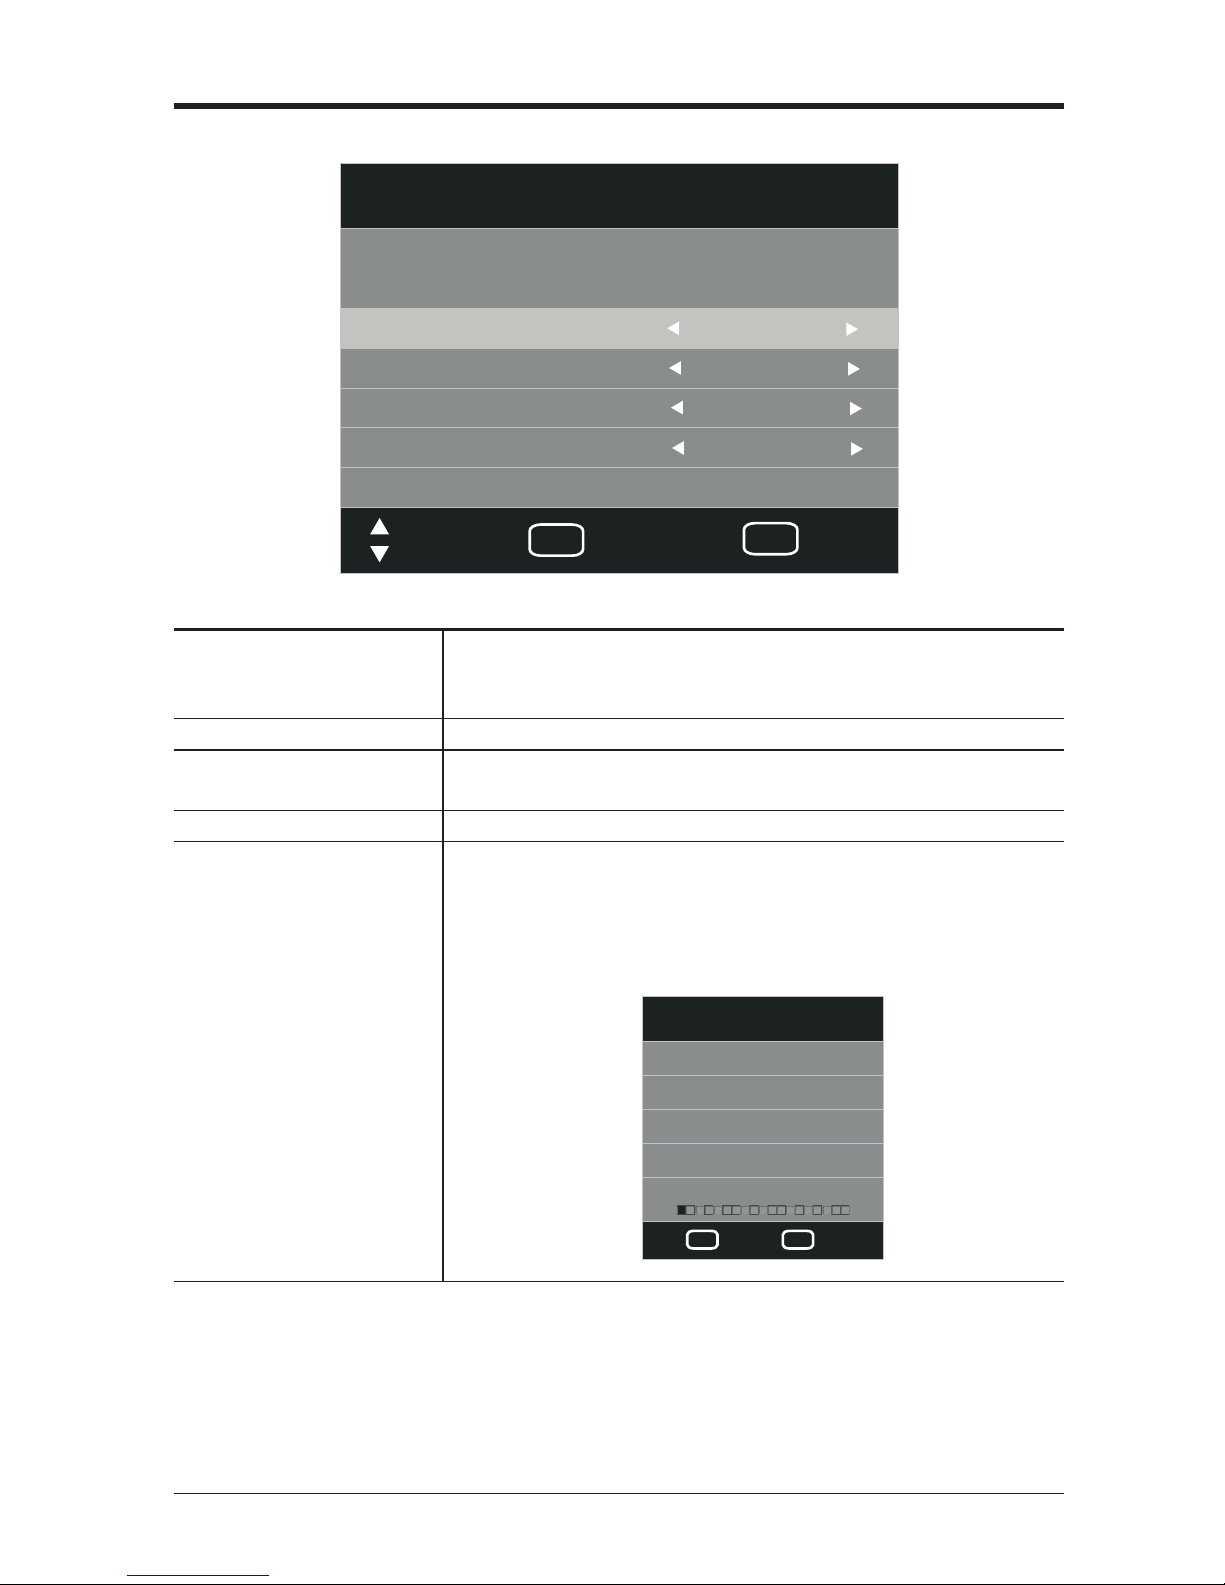
OSD
Language
Selects your desired language to be displayed on the
menu. The default on-screen menu language is set as
English.
DVB Select Type Selects the DVB type: DVB-T/DVB-C.
Country
Selects the country where you will operate the TV. The
default country is set as France.
Tune Type Selects the tune type: ATV+DTV/DTV/ATV.
OK
Press the OK button to start auto tuning. Channel
Tuning will commence. This operation may take up to
several minutes. The display will show the progress of
the tuning and the number of channels found.
EXITMENU
Channel Tuning
Skip
Quit
TV : 0 Programme(s)
DTV : 0 Programme(s)
Radio : 0 Programme(s)
Data : 0 Programme(s)
5%
134.25 MHz
(TV)
France
Installation Guide
Please set the following options,then
press OK button to begin auto tuning.
Move
OK
Select
EXIT
Quit
OSD Language
English
DVB Select type
DVB-T
Country
Tune Type
ATV+DTV
Mode
Home Mode
Page 14
EN 14
• Press the DISPLAY button to view the current information.
Selecting Input Source
Channel Selection
General Operation
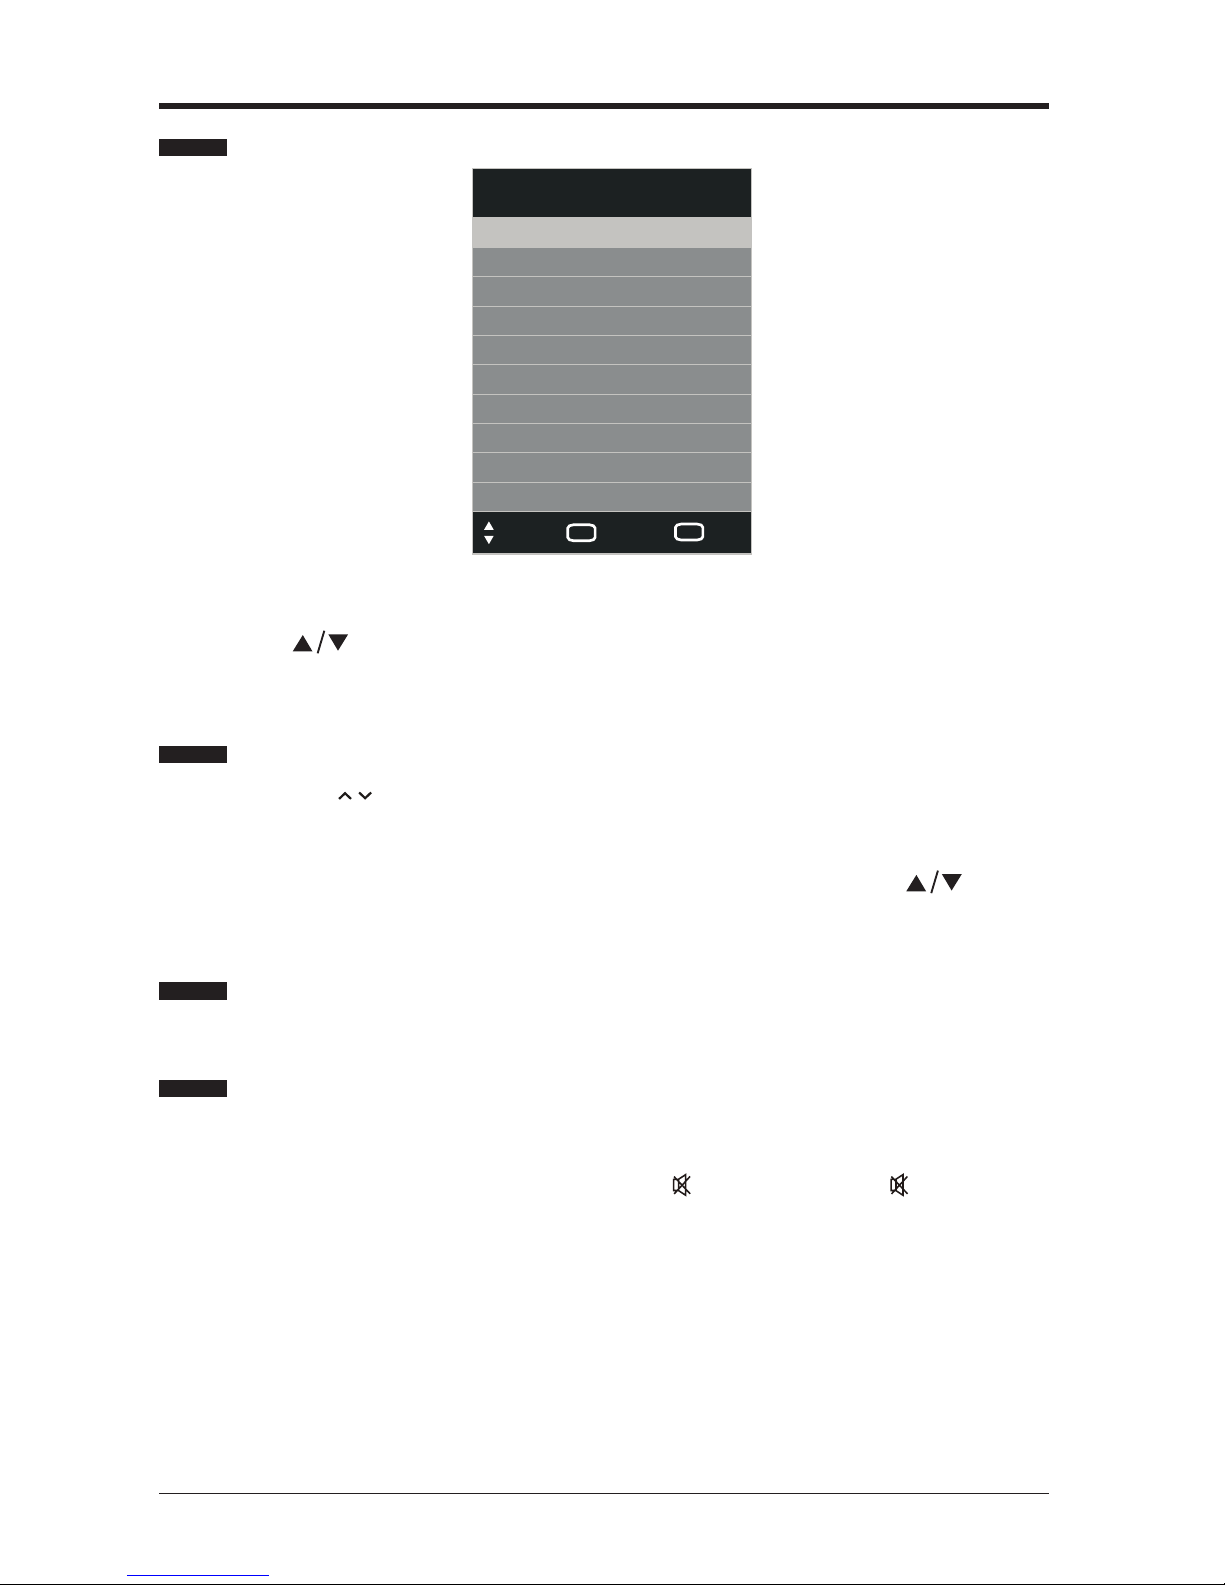
• Press the SOURCE button on the front right side panel of the TV or the SOURCE
button on the remote control to display the Input Source list.
• Press the
buttons to select the input source that you want: DTV / ATV / AV /
SCART / YPBPR / HDMI1 / HDMI2 / HDMI3 / PC/ USB.
• Press the OK button to conrm your selection.
• Press the CH
/ buttons on the remote control repeatedly or the 0-9 buttons to
select the channel.
Alternative:
Press the CH.LIST button to enter the Channel List. Then use the
buttons
to highlight and select the channel. Press the OK button to view the selected
channel.
Display Channel Information
• Press the VOL + / - buttons on the side panel of the TV or on the remote control
to adjust the volume.
• If you wish to switch the sound off, press the
button. Press the button again
or the VOL + buttons to resume audio listening.
Volume Adjustment
Move
OK
Select
EXIT
Quit
Input Source
DTV
ATV
AV
SCART
YPBPR
HDMI1
HDMI2
HDMI3
PC
USB
Page 15
EN 15
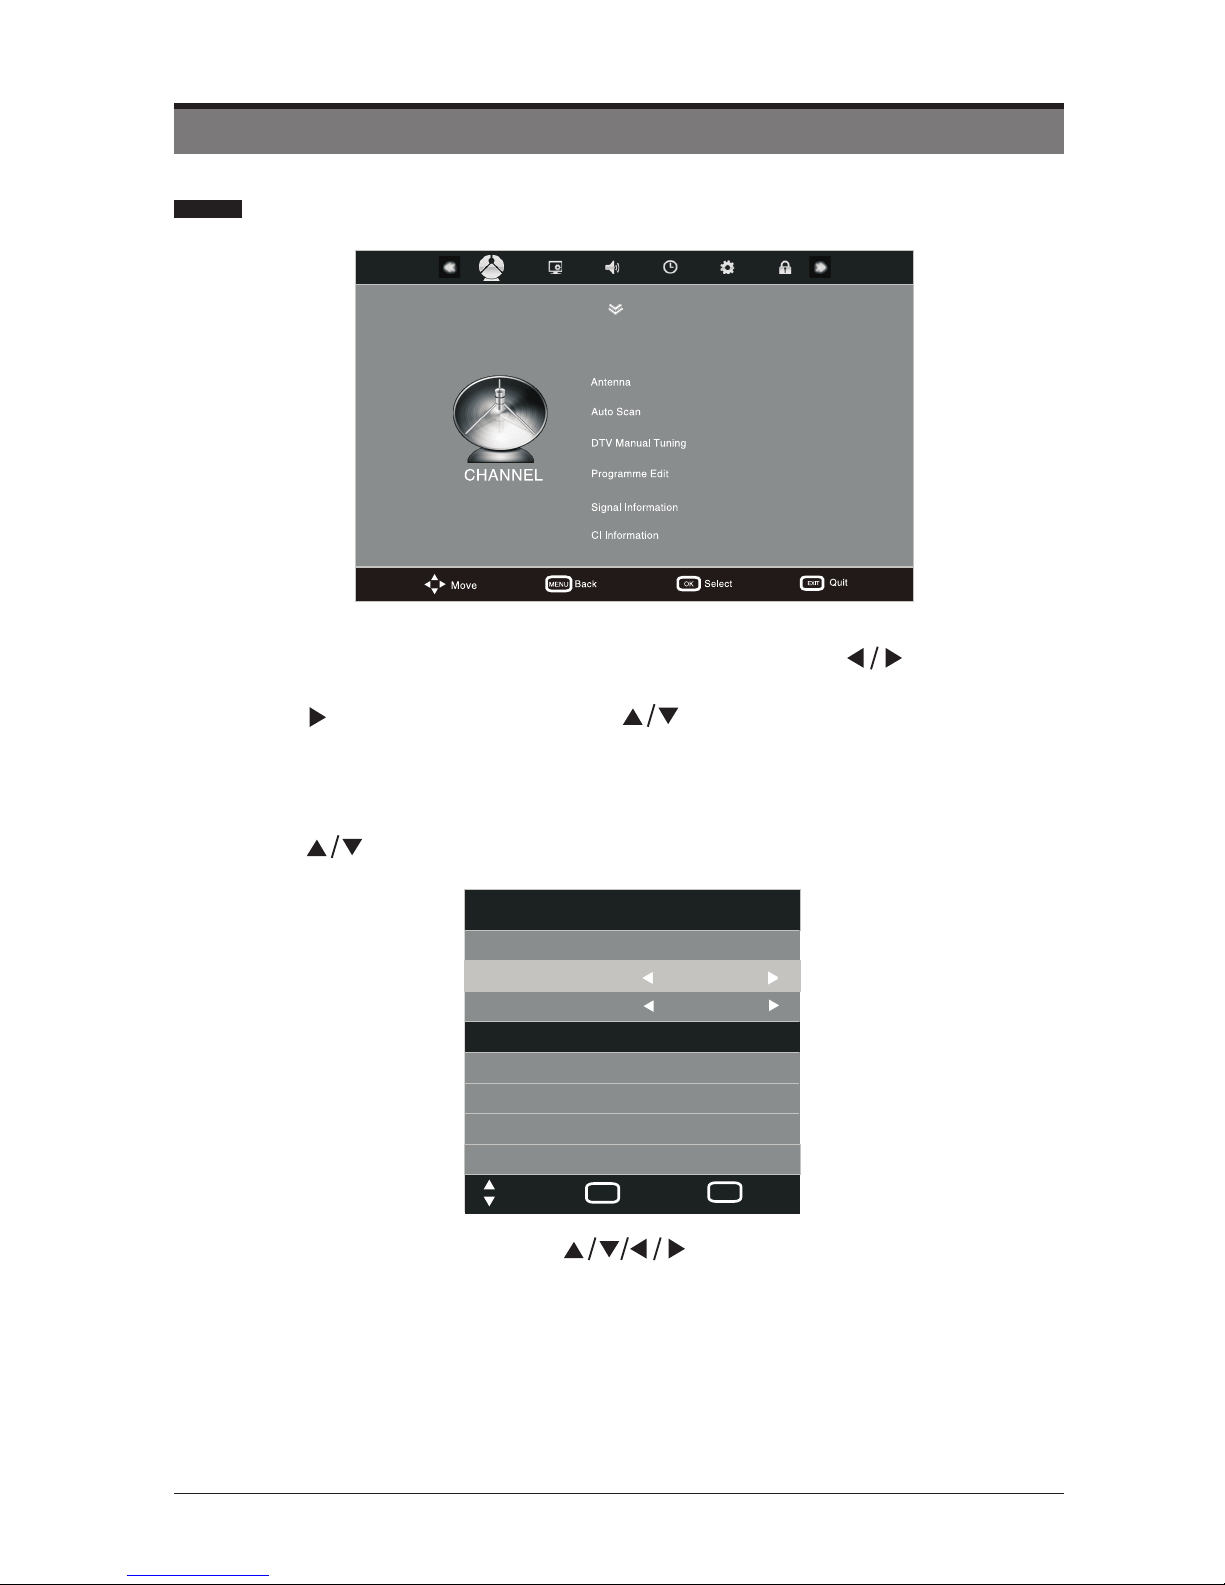
• Press the MENU button to display the main menu. Press the buttons to
select CHANNEL and then press the OK button .
• Press the buttons and then press the buttons to select Air or Cable,then
press OK.
Channel Settings
• Press the
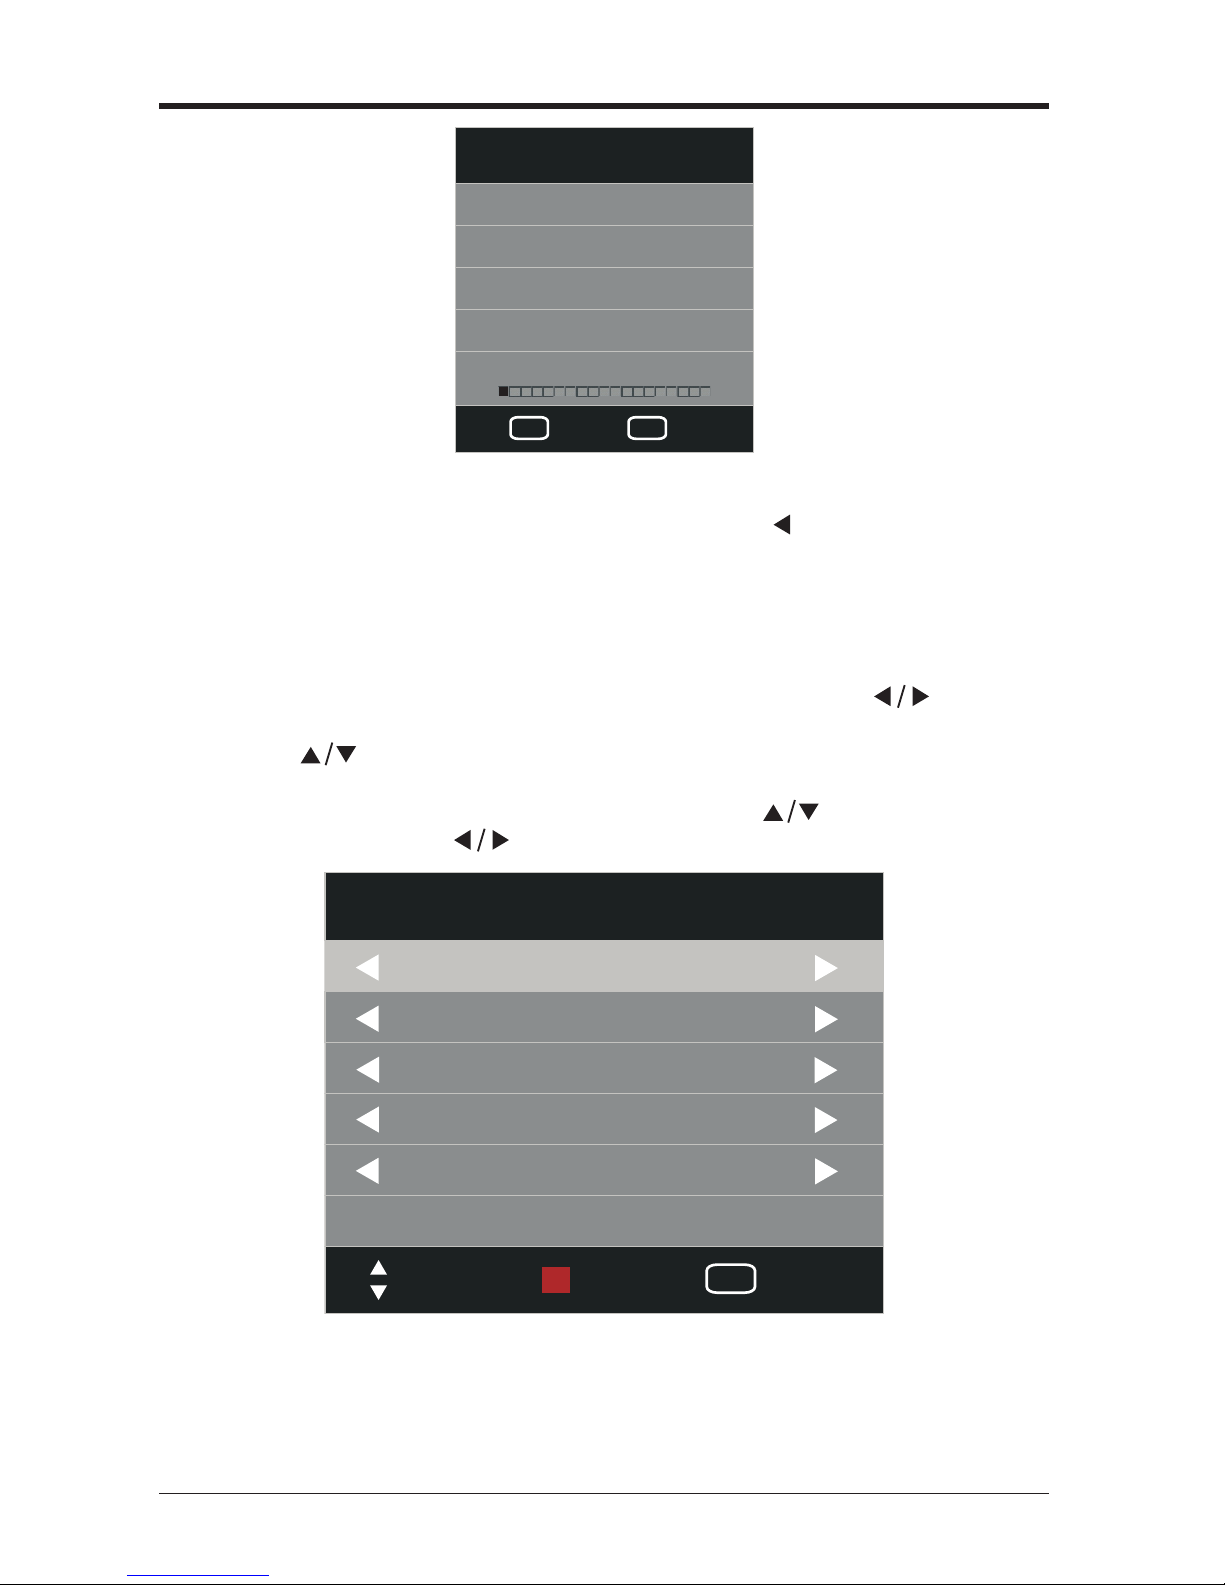
buttons to select Auto Scan and then press the OK button.
• In the Auto Scan menu. Press the
buttons to select the country where
you will operate the TV and the Tune Type: ATV+DTV/DTV/ATV. Press the OK
button to start auto tuning.
(Note: If you select DVB-C in the Installation Guide Menu,you can select
the option below:scan type/Frequency/Network Symbolks)
• Channel tuning will commence. This operation may take up to several minutes.
The display will show the progress of the tuning and the number of channels
found.
Auto Scan
CUSTOMIZING TV SETTINGS
Antenna
France
Full
Move
OK
OK
EXIT
EXIT
Auto Scan
DVB Select type
DVB-T
ATV+DTV
Tune Type
Country
DVB-C Scan Menu
Auto
Auto
Auto
Scan type
Frequency
Network ID
Symbol(ks/s)
Page 16
EN 16
ATV Manual Tuning (ATV Mode)
• Press the MENU button to display the main menu. Press the buttons to
select CHANNEL and then press the OK button.
• Press the buttons to select ATV Manual Tuning and then press the OK
button.
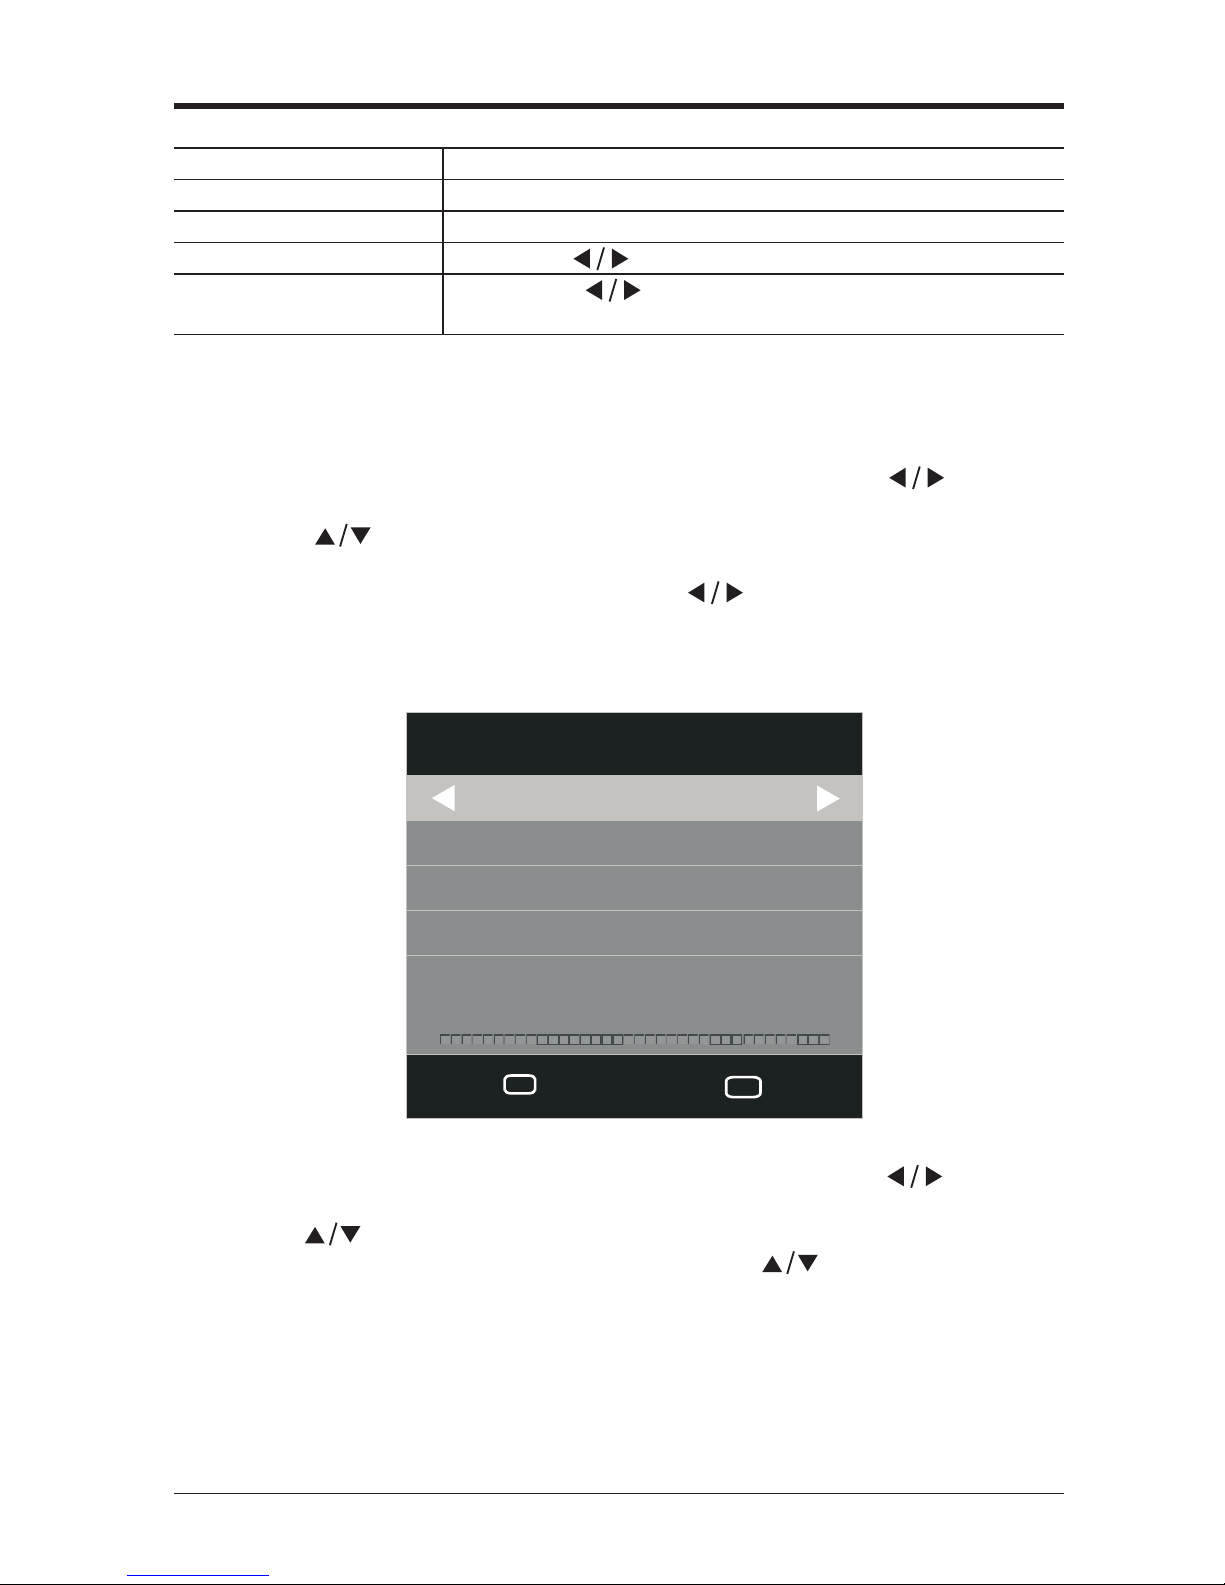
• The ATV Manual Tuning screen will pop up. Use the
buttons to select the
following options and the buttons to adjust the setting.
CUSTOMIZING TV SETTINGS
• If you want to skip the ATV tuning, press the MENU button to interrupt the tuning
half way. A pop-up screen will be displayed, press the
button to select YES to
conrm. You will then go straight to DTV tuning. You may repeat the above step if
you also want to skip the DTV tuning. An installation reminder will appear the next
time you turn on the TV.
EXITMENU
Channel Tuning
Skip
Quit
TV : 0 Programme(s)
DTV : 0 Programme(s)
Radio : 0 Programme(s)
Data : 0 Programme(s)
5%
134.25 MHz
(TV)
Move
Save
EXIT
Quit
ATV Manual Tuning
Storage To 1
System I
Current CH 1
Search
Fine-Tune
Frequency 866.50 MHZ
Page 17
EN 17
CUSTOMIZING TV SETTINGS
Storage To 1
Selects a channel number.
System I Selects the sound system: I / DK / L / BG.
Current CH 1 Displays the current channel number.
Search Press the
buttons to start the manual tuning.
Fine-Tune
Press the
buttons to make manual fine tuning
adjustments.
• After nishing the manual tuning adjustment of a channel, press the RED button
to save your channel before tuning the next channel.
DTV Manual Tuning
• Press the MENU button to display the main menu. Press the
buttons to
select CHANNEL and then press the OK button.
• Press the buttons to select DTV Manual Tuning and then press the OK
button.
• In the DTV Manual Tuning menu. Press the
buttons to select the desired
UHF channel and then press the OK button to commence the search of that
channel. When the signal has been tuned, the picture and signal strength will be
displayed on the screen.
Programme Edit
• Press the MENU button to display the main menu. Press the
buttons to
select CHANNEL and then press the OK button.
• Press the
buttons to select Programme Edit and then press the OK button.
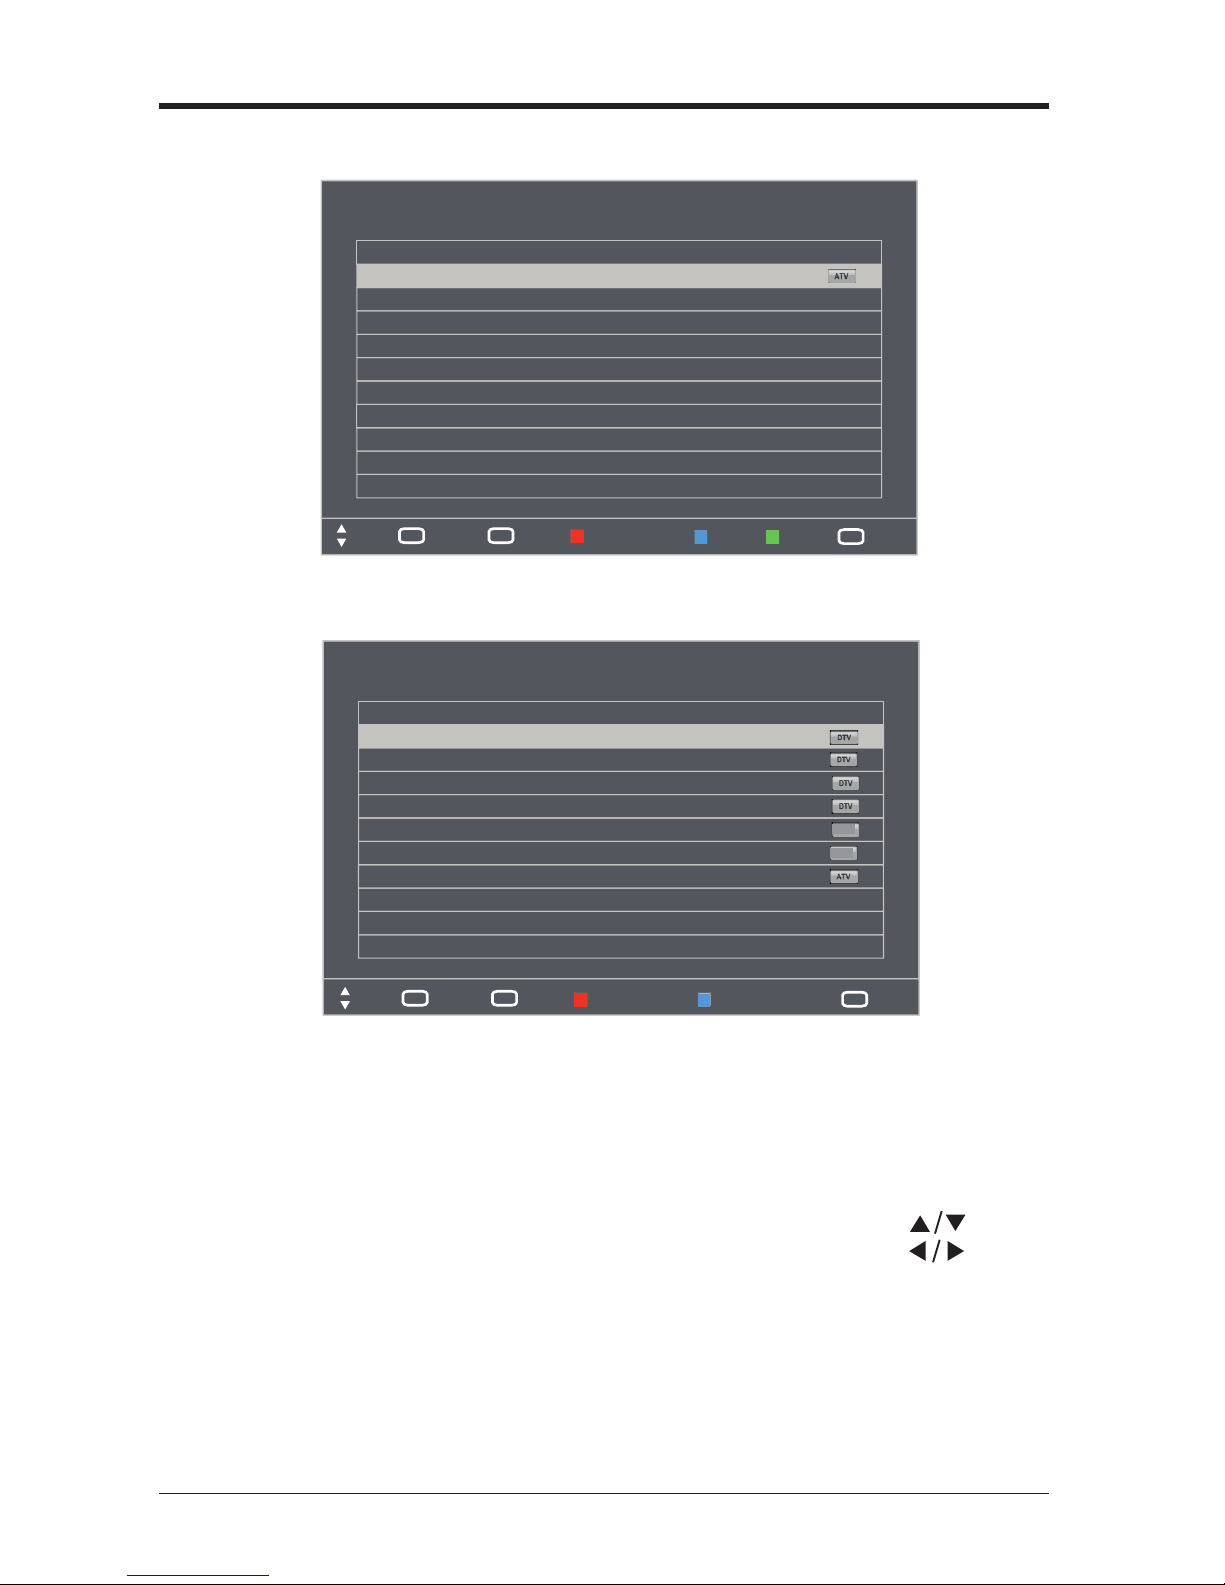
• A Programme Edit screen will pop up. Press the buttons to select the
programme you want to edit.
DTV Manual Tuning
UHF CH 21 474.00 MHZ
Quit
EXIT
Back
MENU
No Signal
Bad
Normal
Good
Page 18
EN 18
ATV Mode
CUSTOMIZING TV SETTINGS
DTV Mode
• Delete
Press the RED button to delete the selected channel.
• Skip
Press the BLUE button to select the channels that you want to skip when you are
selecting channels. Press the BLUE button again to undo it.
• Rename (For ATV mode only)
Press the GREEN button to rename the selected channel. Press the
buttons
to select the characters to represent the station name. Press the
buttons
to move to the next character and then press the OK button again to conrm the
new name.
• FAV (Favorite)
Press the FAV button to set the selected channel as one of the favorite
programmes. Press the FAV button again to undo it.
1 C-02
Programme Edit
CH.Name
Skip
Lock
FAV
Type
Move
OK
Select
MENU
Back
Delete
Skip
Rename
FAV
FAV
1 ABC HDTV
2 ABC TV Melbour
3 ABC2
4 ABC TV
1 ABC DIG Radio
2 ABC DIG Jazz
1 C-02
Radio
Radio
Programme Edit
CH.Name
Skip
Lock
FAV
Type
Move
OK
Select
MENU
Back
Delete
Skip
FAV
FAV
Page 19

EN 19
The common interface allows the use of a Common Access Module to enable you
to view scrambled (pay to view) service. These services are provided by TopUp
TV and others. The Common Access Module and viewing card can be obtained
from the service provider.
Note: Do not repeatedly insert or remove the Common Access Module as this
may damage the interface and cause a malfunction.
This feature is not available in all countries.
To insert the Common Access Module
• Before you insert the Common Access Module, ensure that the TV is switched
off and the viewing card is inserted in accordance with the Service Provider’s
Instructions.
• Insert the Common Access Module into the slot. Flip the Common Access Module
to another side and try again if you feel resistance.
• Switch the TV on.
To remove the Common Access Module
• Before you remove the Common Access Module, ensure that the TV is switched
off.
• Pull the Common Access Module from the slot.
• Switch the TV on.
To view the module information
• Press the MENU button to display the main menu. Press the
buttons to
select CHANNEL and then press the OK button.
• Press the
buttons to select CI Information and then press the OK button.
• A CI Information main menu will pop up. Press the
buttons to select the
options and then press the OK button to view.
Signal Information (DTV Mode)
CUSTOMIZING TV SETTINGS
• Press the MENU button to display the main menu. Press the
buttons to
select CHANNEL and then press the OK button.
• Press the
buttons to select Signal Information and then press the OK button
to view the signal information.
CI(Common Interface) Information (DTV Mode )
Page 20
EN 20
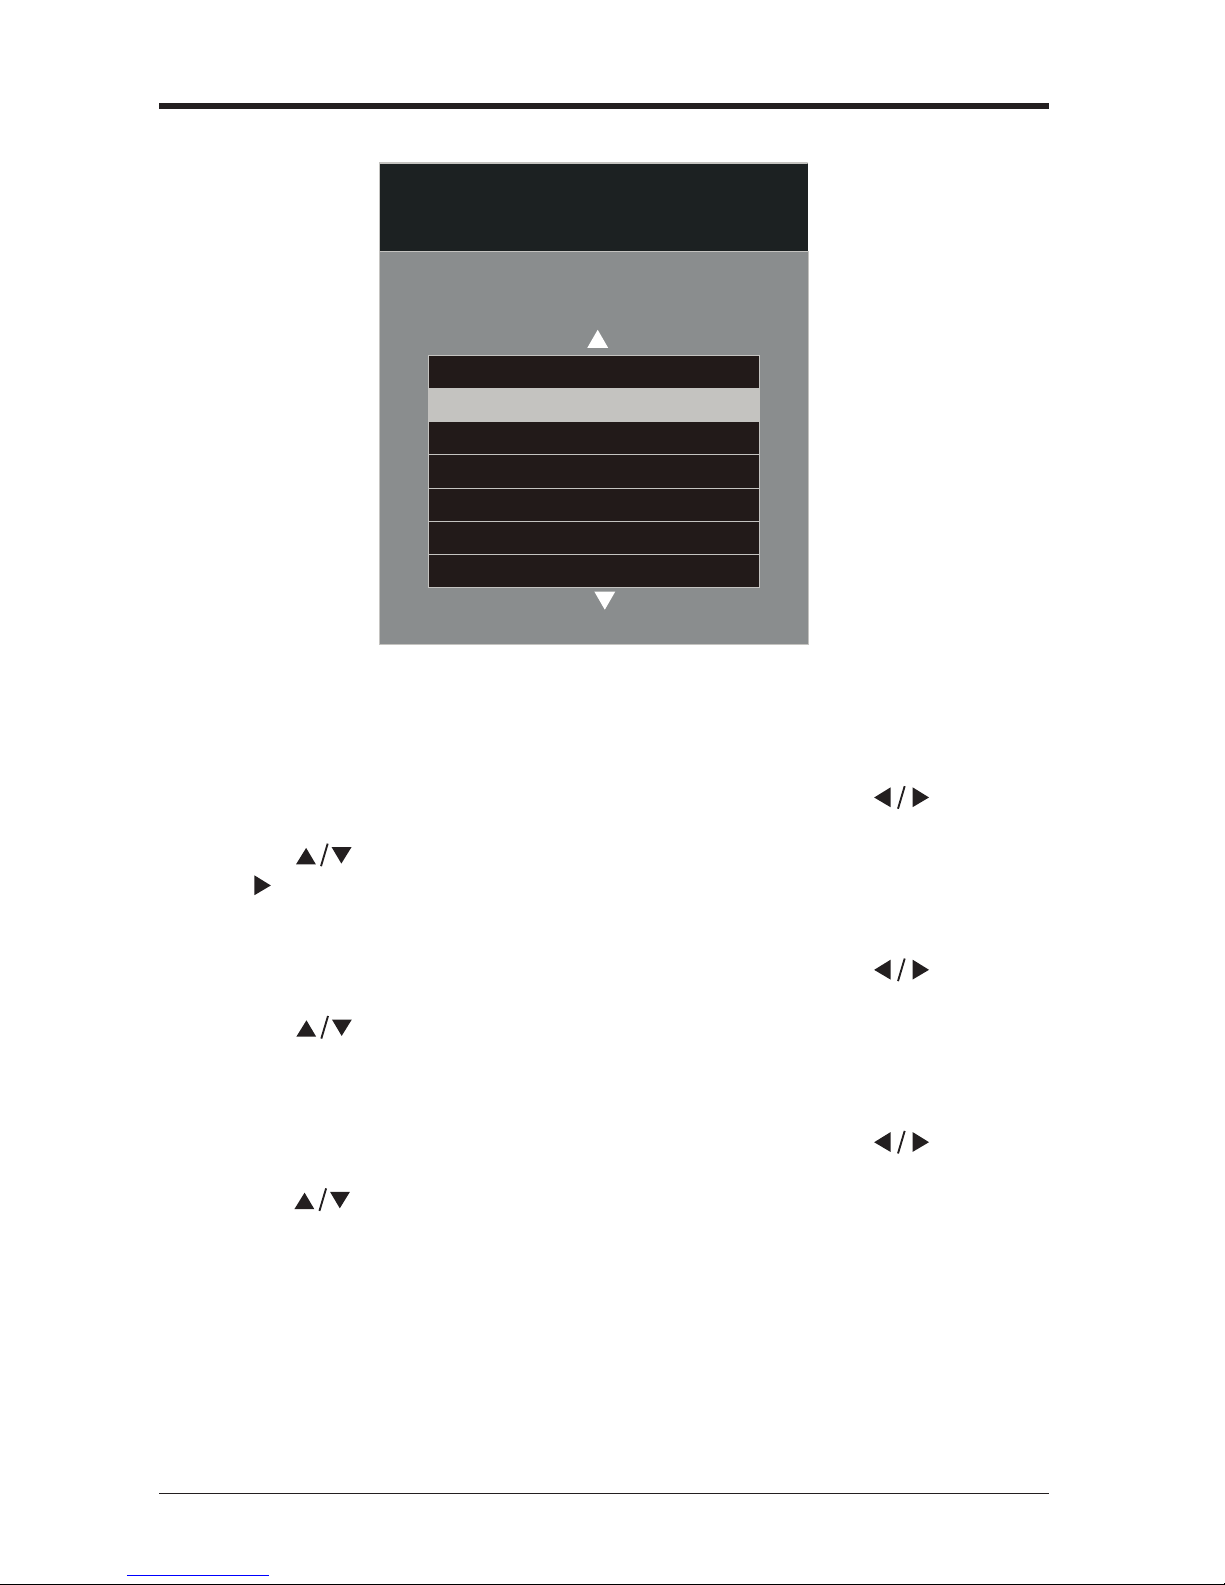
Note: This screen is for illustration only.
Software Update (USB)
• Press the MENU button to display the main menu. Press the buttons to
select CHANNEL and then press the OK button.
• Press the
buttons to select the Software Update (USB)and then press the
OK or button to update the software.
Record Start (DTV)
• Press the MENU button to display the main menu. Press the buttons to
select CHANNEL and then press the OK button.
• Press the buttons to select Record Start and then press the OK button to
start record.
Recorded List
• Press the MENU button to display the main menu. Press the buttons to
select CHANNEL and then press the OK button.
• Press the buttons to select Recorded List and then press the OK button to
view the recorded list.
CUSTOMIZING TV SETTINGS
CI Information
Conax Conditional Access
Product Ordering
Event Status
Change CA PIN
Maturity Rating
Subscription Status
Page 21
EN 21
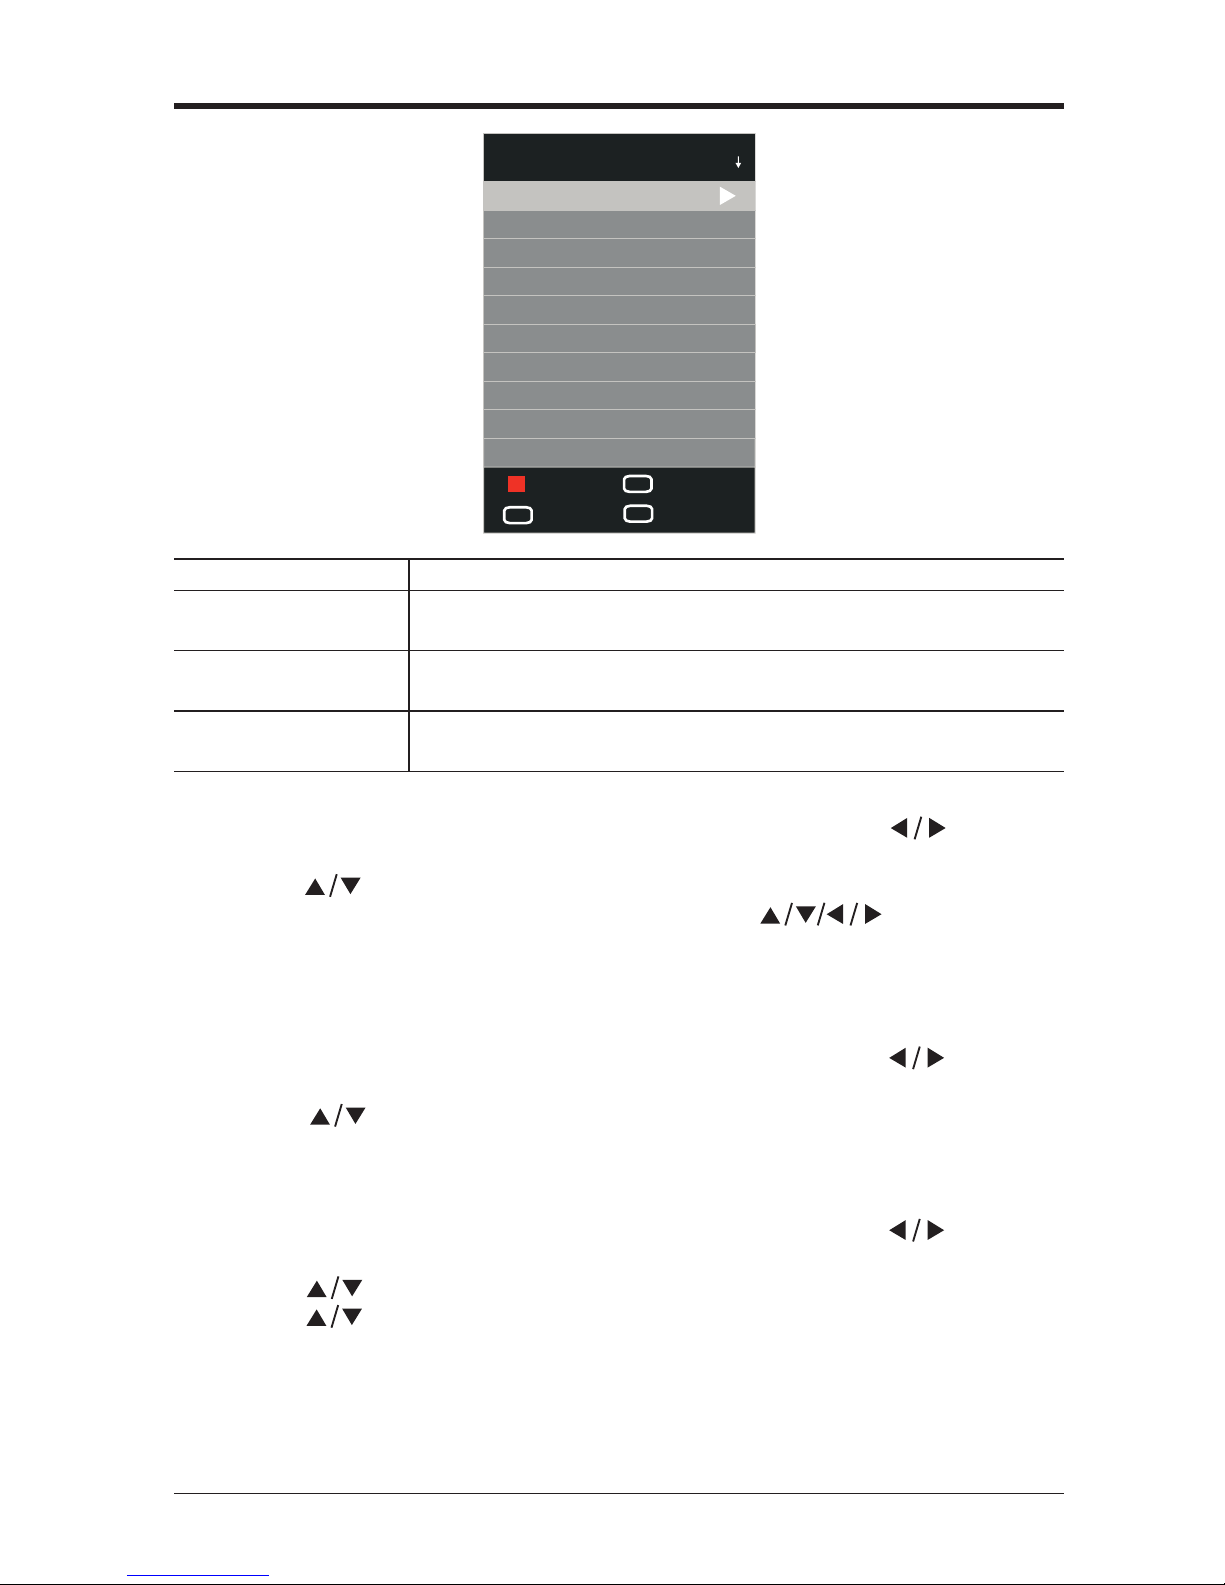
Delete
Press the RED button to delete the selected programme.
Info.
Press the DISPLAY button to display detailed information
of the selected programme. (If available)
Select
Press the OK or PLAY button to play the selected
programme.
Index
Press the INDEX button to select the category type:
Programme / Channel / Time.
Recorded Mode
• Press the MENU button to display the main menu. Press the
buttons to
select CHANNEL and then press the OK button.
• Press the
buttons to select Recorded Mode and then press the OK button.
• A Programme Schedule menu will pop up. Press the
buttons to adjust
the settings and then press the OK button to save. (See “Timer Programming” for
details)
Schedule List
• Press the MENU button to display the main menu. Press the buttons to
select CHANNEL and then press the OK button.
• Press the buttons to select Schedule List and then press the OK button to
view the preset reminders or scheduled recordings in the schedule list.
PVR File System
• Press the MENU button to display the main menu. Press the buttons to
select CHANNEL and then press the OK button.
• Press the buttons to select PVR File System and then press the OK button.
• Press the buttons to select the following PVR File System options and press
the OK button.
CUSTOMIZING TV SETTINGS
Recorded List Programme
Delete
OK
Select
INDEX
Index
DISPLAY
Info.
No Information*
No Information*
No Information*
Midday Report
Midday Report
Salut dem Kardinal
Viruskriget
Viruskriget
(14)
Page 22
EN 22
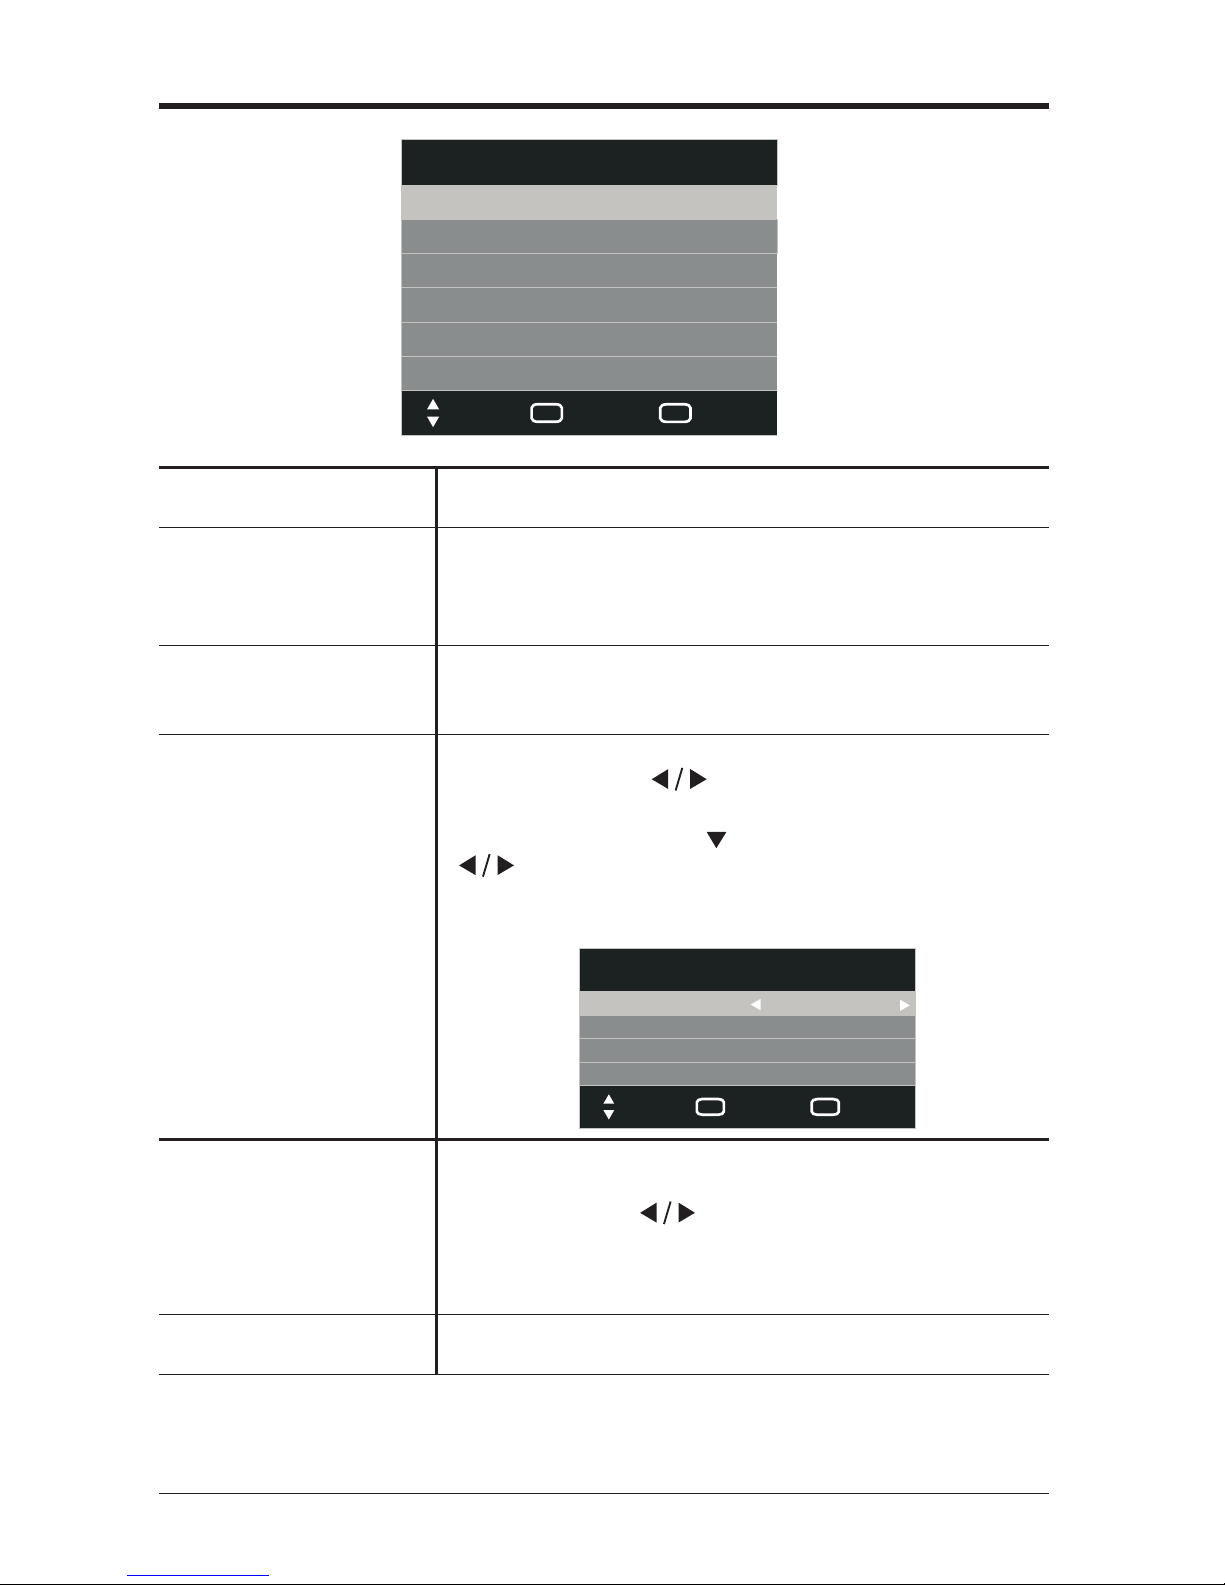
Select Disk
Select the disk where you want to store your recorded
content.
Check PVR File System
Press the OK button, the system will now check your
USB device’s suitability for PVR. The system will show
“Checking”. Upon the completion the system will show
either “Success” or “Fail”.
USB Disk
If no USB storage device is connected, it will show
“No USB Disk”. If the Check PVR File System has a
“Success” it will show “Pass”.
Format
Press the OK button, a File System Size menu will
pop-up. Press the buttons to select your preferred
le type between FAT32 and HiSpeed FS. If you select
HiSpeed FS, press the
button and then press the
buttons to select your preferred file size. Press
the OK button to conrm and then press the button to
start formatting.
Time Shift Size
After formatting the Time Shift Size menu will appear
if you have selected HiSpeed FS in PVR File System
Type. Press the
buttons to select your preferred
file size. Press the OK button to confirm. This option
cannot be chosen if you have selected FAT32 in PVR
File System Type.
Speed
This shows you the transfer rate of your USB storage
device.
CUSTOMIZING TV SETTINGS
PVR File System
Select Disk
C:
Check PVR File System
Start
USB Disk
Format
Time Shift Size
Speed
Move
OK
Select
MENU
Back
File System Size
Move
OK
Select
MENU
Back
PVR File System Type
PVR File System Type
ALL
FAT32
SD 208 Mins
HD 59 Mins
Page 23
EN 23
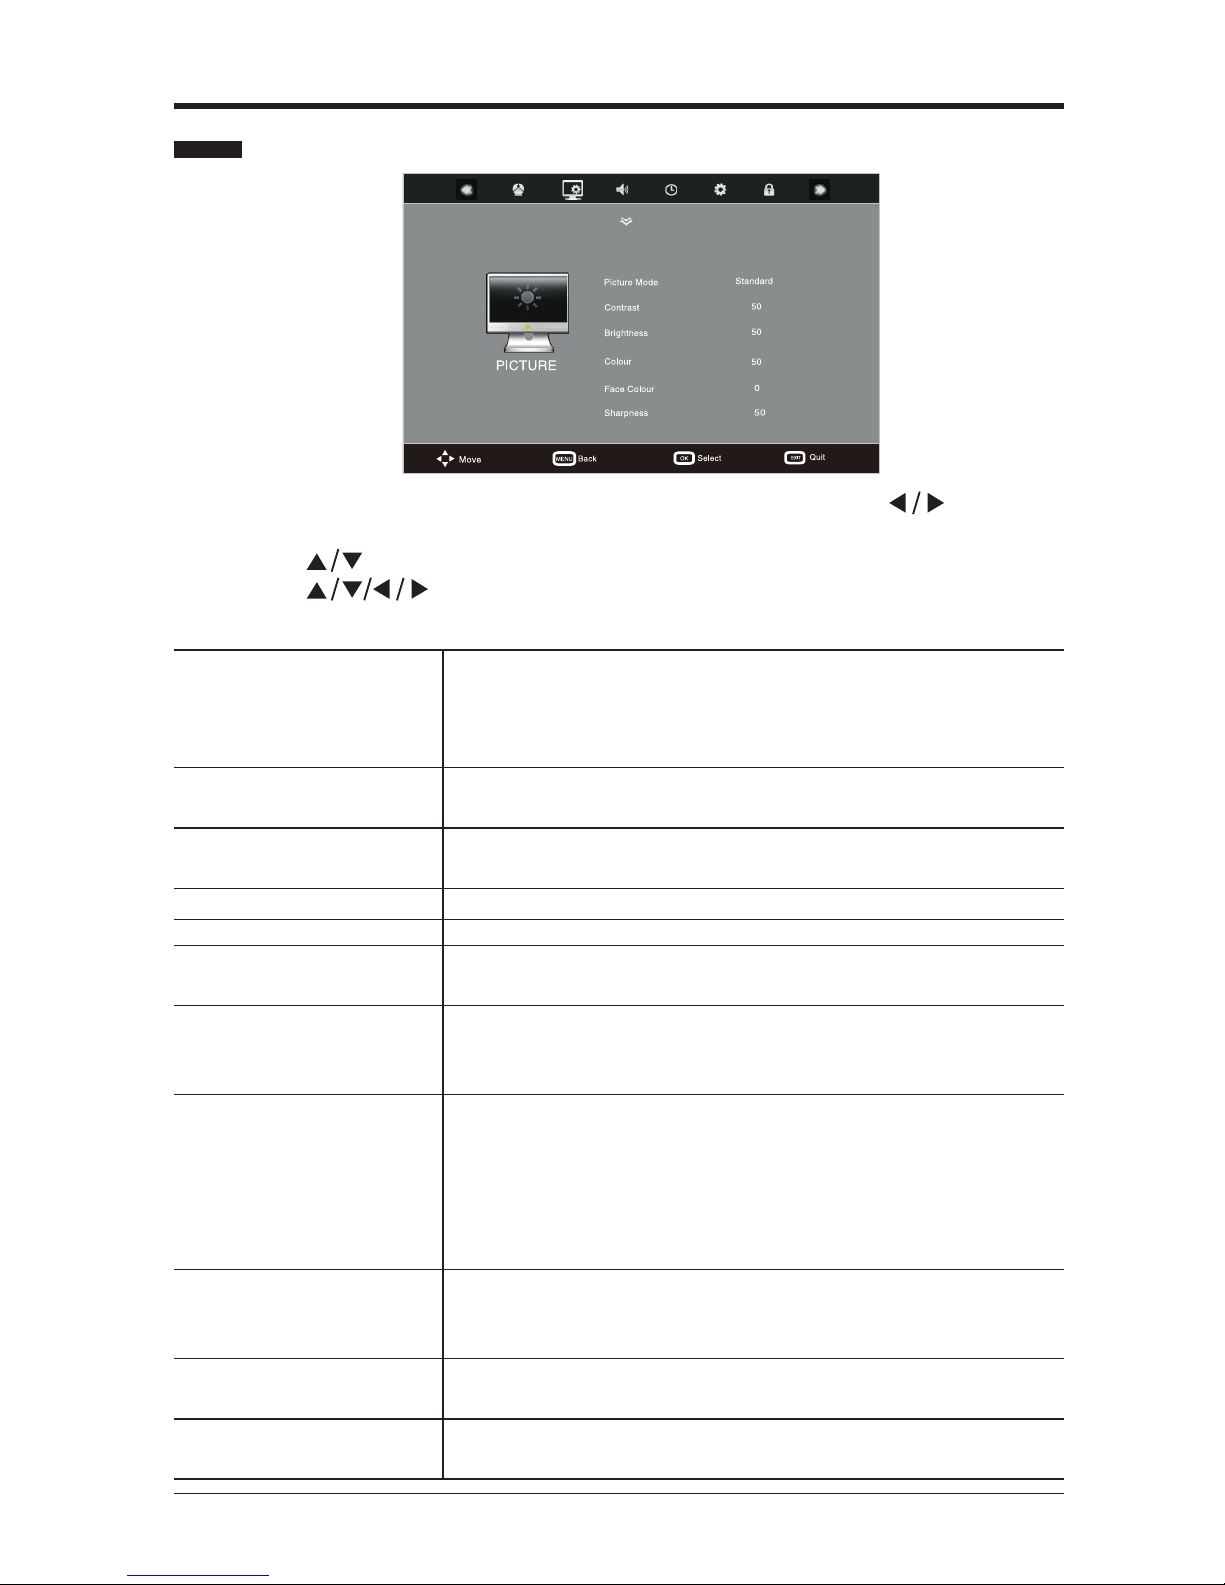
• Press the MENU button to display the main menu. Press the buttons to
select PICTURE and then press the OK button.
• Press the
buttons to select the option you want to adjust in PICTURE menu.
• Press the buttons to adjust each option’s setting.
• Press the EXIT button to exit the menu.
Picture Settings
Picture Mode
Cycles among picture mode: Standard / Mild / User /
Dynamic.
Alternative: you may press the P.MODE button to select
the picture mode directly.
Contrast
Adjusts the difference between light and dark levels in
the picture. (For User mode)
Brightness
Increases or decreases the amount of white in the
picture. (For User mode)
Color Controls the color intensity. (For User mode)
Face Color
You can adjust the face color to your preference
Sharpness
Adjusts the level of crispness in the edges between light
and dark areas of the picture. (For User mode)
Tint
(For NTSC format)
Adjust the balance between red and green levels.
(Tint is only available for NTSC signal input via the
SCART or AV IN.)
Color Temperature
Cycles among color temperature: Medium / Warm /
Cool.Adjusts the color components independently to
achieve a warm or cool. (For User mode)
• Warm: increase red tint
• Medium
• Cool: increase blue tint
Aspect Ratio
Allows you to watch the screen in various picture
formats: 16:9/ Zoom1 / Zoom2 / Just Scan(Only HDMI
Mode) / Auto / 4:3.
Noise Reduction
Reduces the noise level of the connected device:
Middle/ High/ Off/ Low.
PC Setup Adjusts the PC desktop content.
CUSTOMIZING TV SETTINGS
Page 24
EN 24
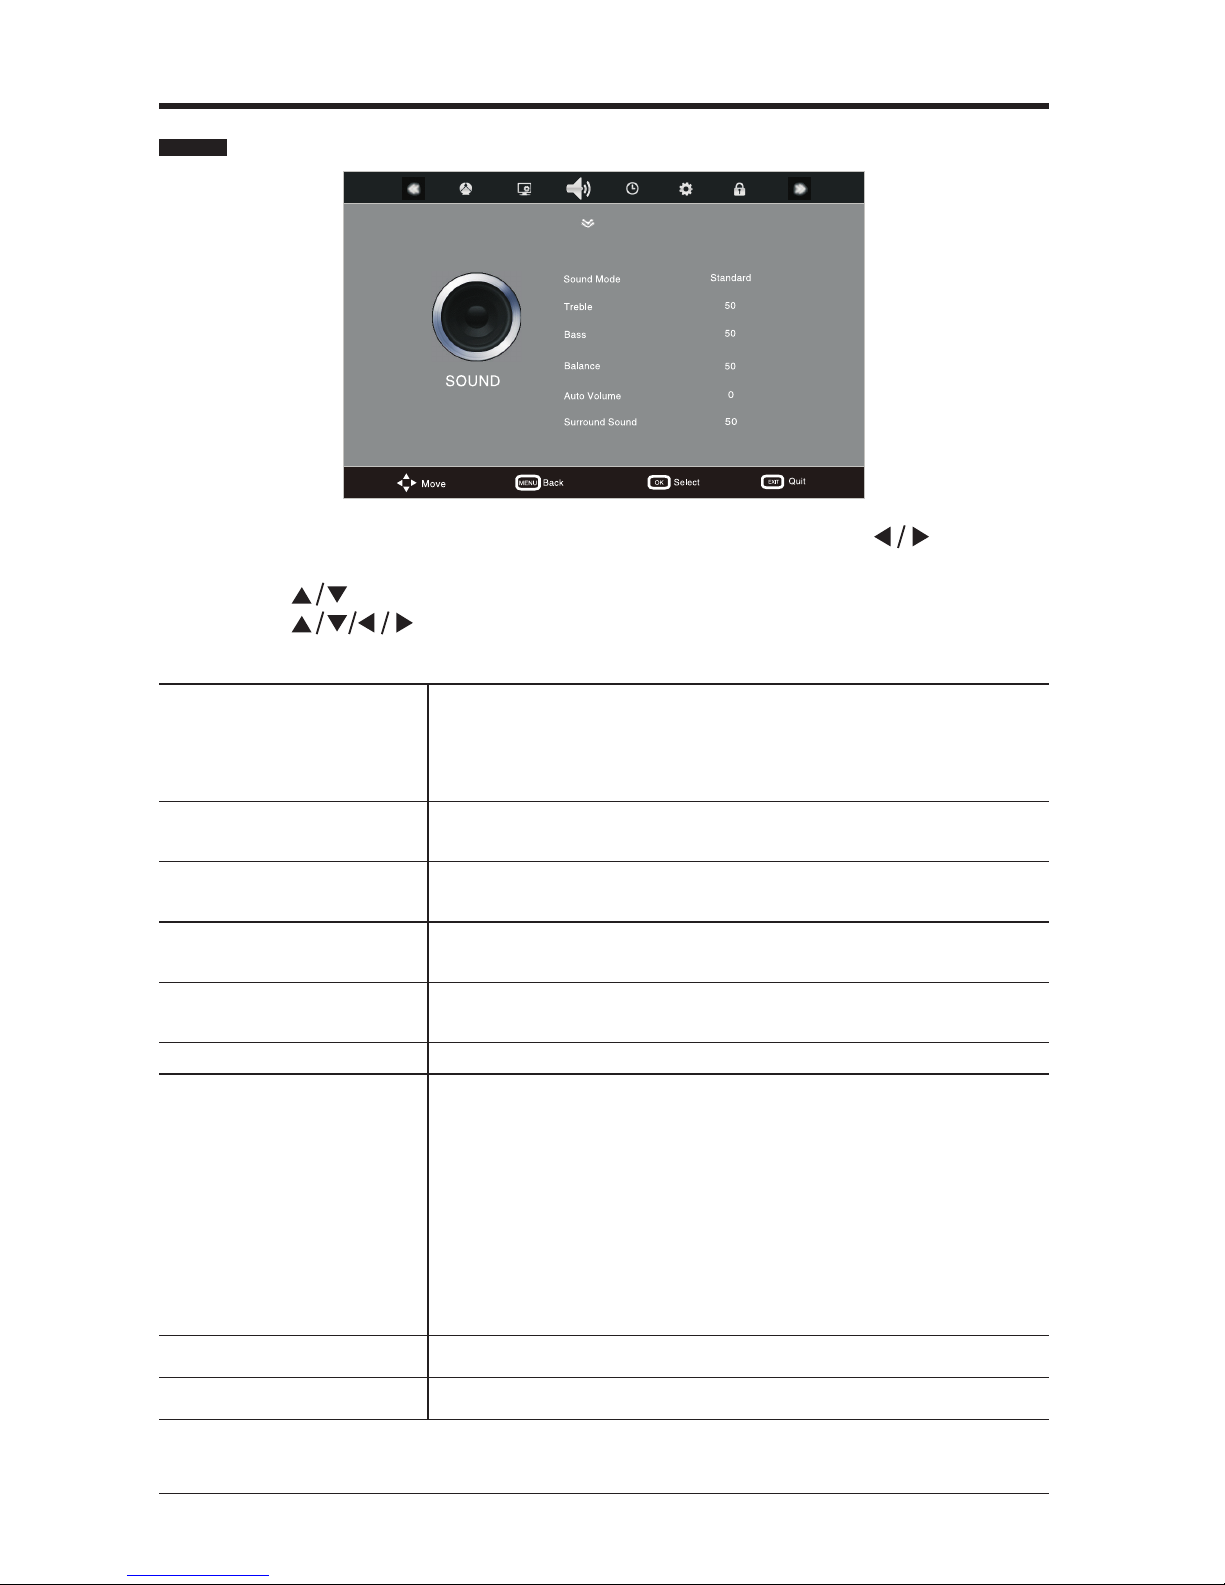
• Press the MENU button to display the main menu. Press the buttons to
select SOUND and then press the OK button.
• Press the buttons to select the option you want to adjust in SOUND menu.
• Press the
buttons to adjust each option’s setting.
• Press the EXIT button to exit the menu.
Sound Settings
Sound Mode
Allows the selection of an audio-enhancement
technique: Standard / Music / Movie / Sports / User.
Alternative: you may press the S.MODE button to select
the sound mode directly.
Treble
Controls the relative intensity of higher-pitched sounds.
(For User mode)
Bass
Controls the relative intensity of lower-pitched sounds.
(For User mode)
Balance
Adjusts the relative volume of the speaker in a multiple
speaker system.
Auto Volume
Volume levels are automatically controlled (e.g.,
advertisements tend to be louder than the programmes).
Surround Sound Selects the surround sound mode: On/Off.
AD Switch
(For DTV mode)
Audio Description is an auxiliary audio function that
provides an additional audio track for visually challenged
persons.This function handles the Audio Stream for the
AD(Audio Description),when it is sent along with the
main audio from the broadcaster.
• set to "Off"for normal broadcasting sound coming
out from speakers.
• set to "On"to activate the description sound track if
available.
AD Volume Set the volume of the description sound track.
SPDIF Mode Selects the digital audio output mode: PCM/Auto/Off.
CUSTOMIZING TV SETTINGS
Page 25
EN 25
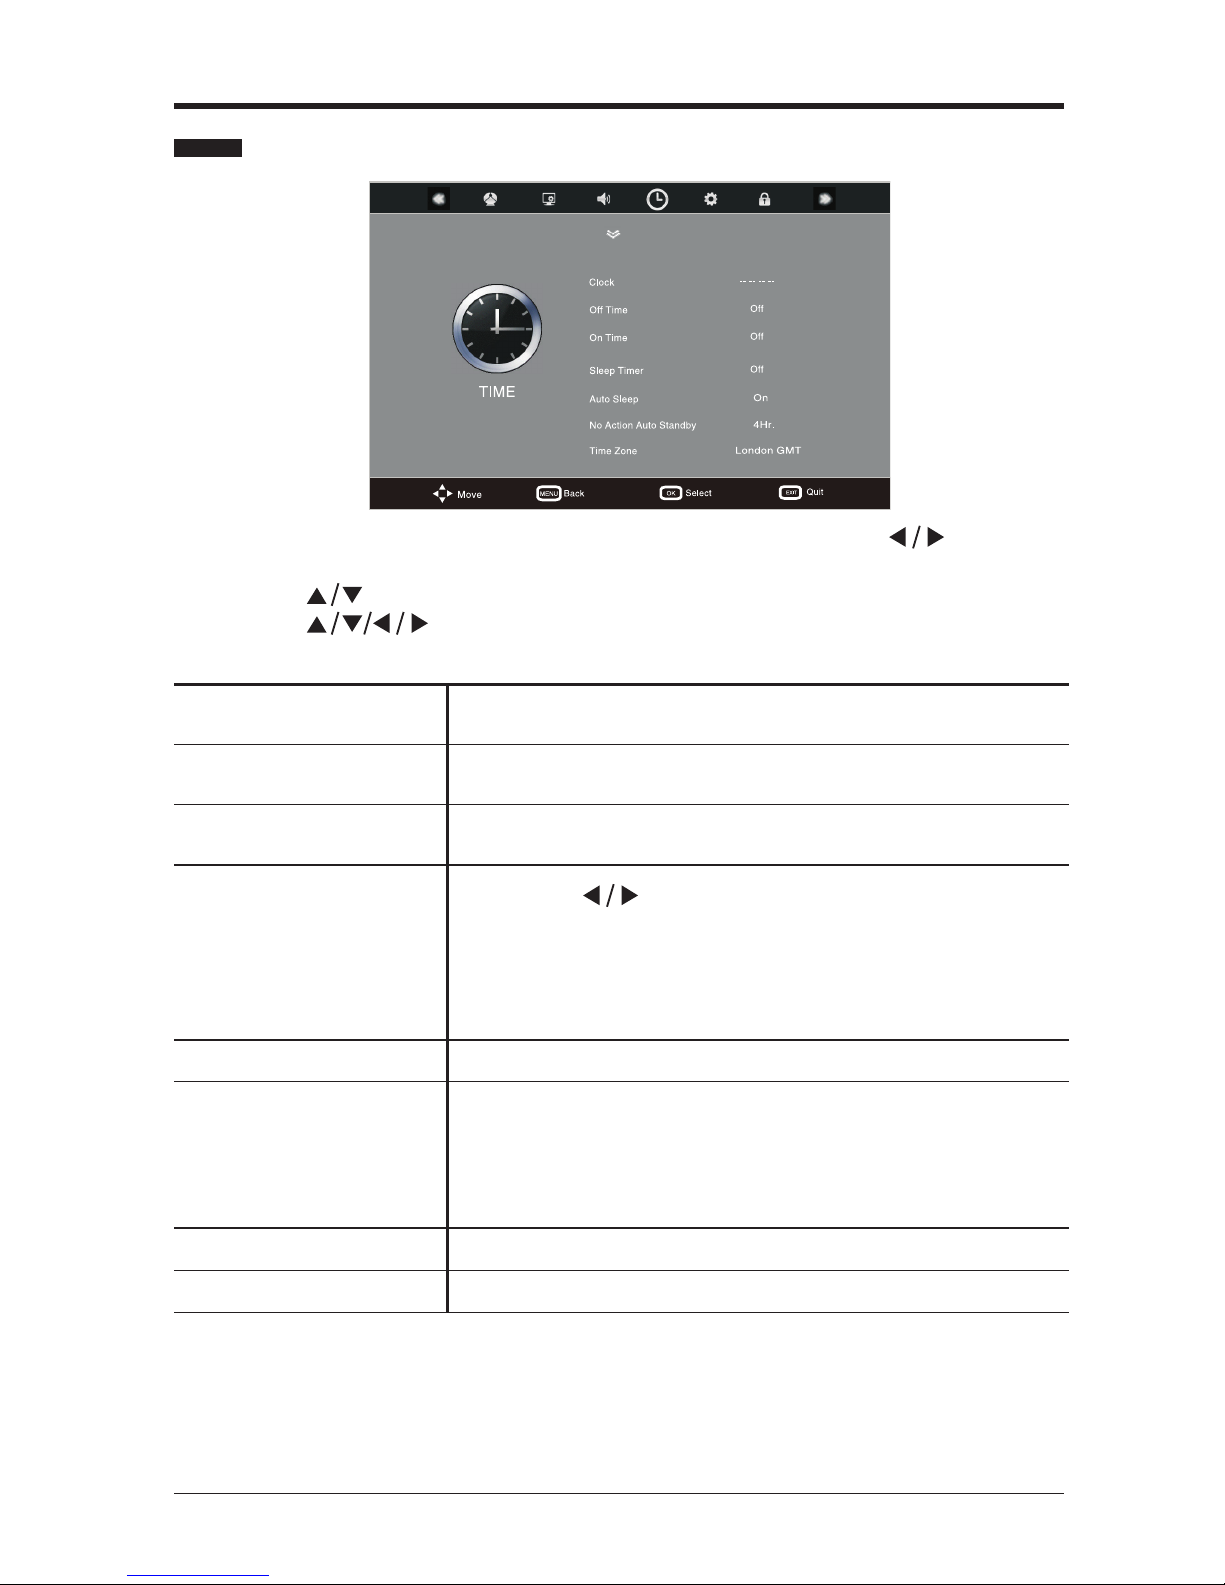
• Press the MENU button to display the main menu. Press the buttons to
select TIME and then press the OK button.
• Press the buttons to select the option you want to adjust in TIME menu.
• Press the
buttons to adjust each option’s setting.
• Press the EXIT button to exit the menu.
Time Settings
Clock (DTV mode)
The clock is set automatically when receiving a digital
signal.
Off Time
The unit will turn off automatically at specied time that
you have set.
On Time
The unit will turn on automatically at specied time that
you have set.
Sleep Timer
Press the
buttons to select a period of time after
which the TV automatically switches to standby mode:
Off / 10 / 20 / 30 / 60 / 90 / 120 / 180 / 240 min.
Alternative: You may press the SLEEP button repeatedly
to select the number of minutes directly.
Auto Sleep Selects to turn On/Off Auto Sleep function.
No Action Auto Standby
The unit will automatically switch to standby mode
2/3/4/5/6 hours after the last time the remote control
was used. If you want to operate the TV for a long
period of time, turn off the auto standby function.
(default setting:4 hours)
Time Zone (DTV mode) Selects your desired Time Zone city.
Daylight saving Selects to turn on/off the Daylight saving function.
CUSTOMIZING TV SETTINGS
Page 26
EN 26
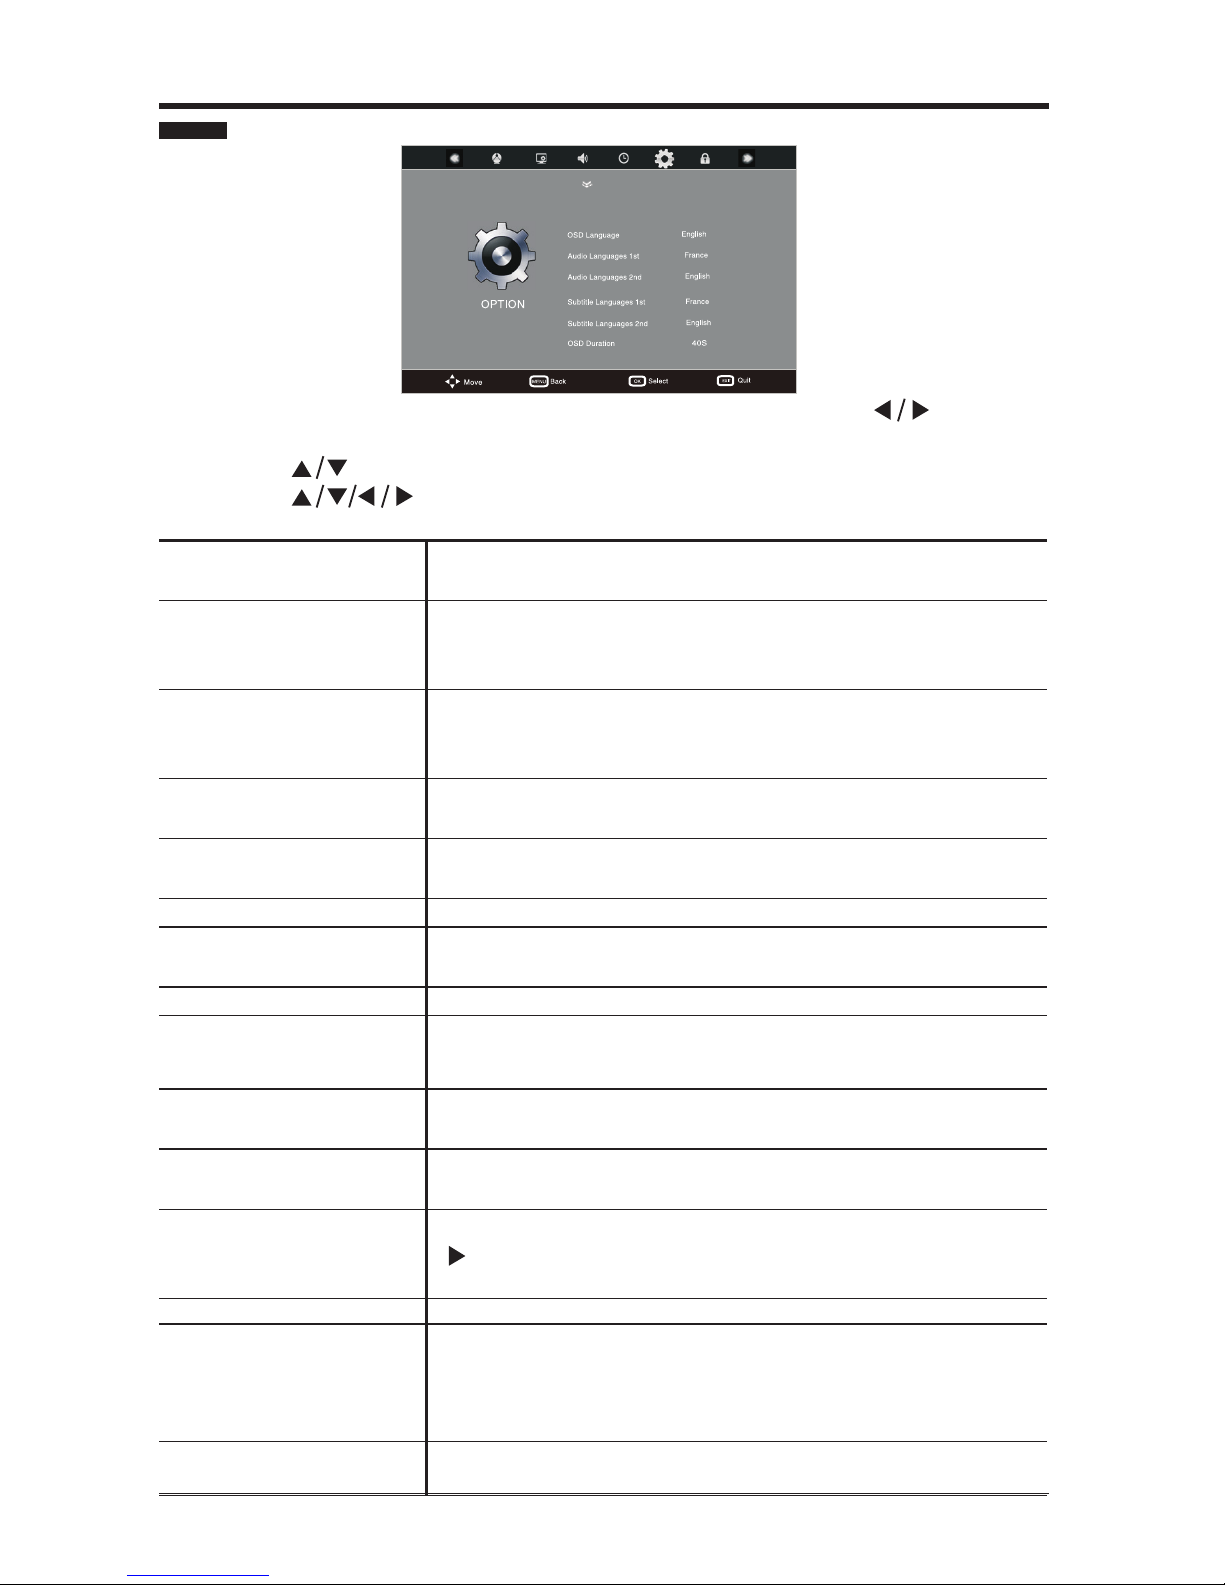
• Press the MENU button to display the main menu. Press the buttons to
select OPTION and then press the OK button.
• Press the
buttons to select the option you want to adjust in OPTION menu.
• Press the buttons to adjust each option’s setting.
• Press the EXIT button to exit the menu.
Option Settings
OSD Language
Allows you to select your desired on-screen menu
language.
Audio Languages 1st /
2nd
Allows you to select your desired primary or secondary
audio language. (Available for digital channels if multiple
audio languages are broadcast.)
Subtitle Language 1st /
2nd
Allows you to select your desired primary or secondary
subtitle language. (Available for digital channels if
multiple subtitle languages are broadcast.)
OSD Duration
Displays time of the on-screen menu: 5s / 10s / 15s / …
/ 35s / 40s.
Blue Screen
Allow the blue background to turn on/off during weak or
no signal conditions.
Back Light
Adjust brighness of the back light
Country Selects the country where you will operate the TV. The
default country is set as Sweden.
HDMI CEC
control DVD through TV remote control
CEC Device Auto Turn
Off
“Select ON mode of this option, the CEC devices connect to the
TV will also turn o automatically when the TV
is o “
TV Auto Power On
Select ON mode of this option, the TV will turn on automatically
when the CEC devices are on
Root Menu
The DVD will show it’s root menu,when select this
option(this option can only be selected in HDMI source)
MEMC
The function control the MEMC of the picture, press the
button to select the MEMC mode: Off/Low/Middle/
High.
Dynamic CR
Dynamic luminance control ON or OFF
Energy Mode
Selects your desired mode setting.
Home Mode: Viewing at home.
Store Mode: For store demo, the brightness is higher
than home mode.
Restore Factory
Default
Resets all settings to the factory defaults.
CUSTOMIZING TV SETTINGS
Page 27
EN 27
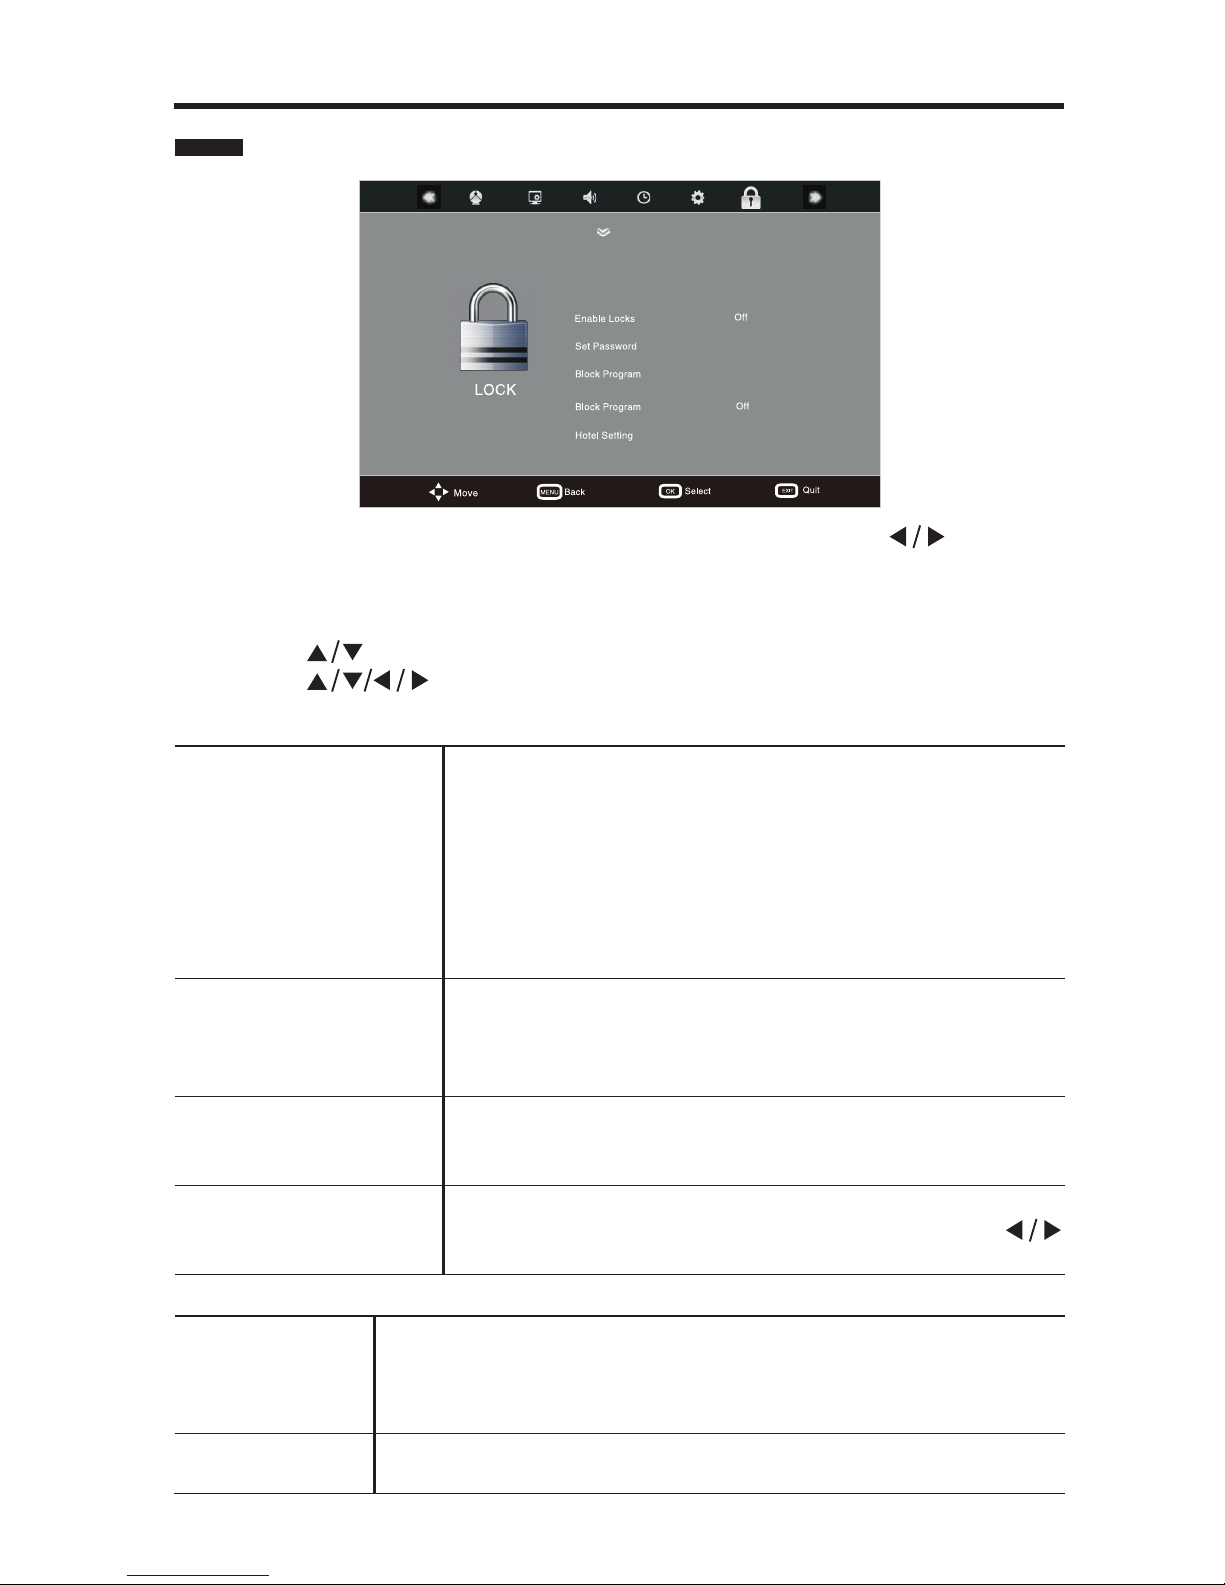
• Press the MENU button to display the main menu. Press the buttons to
select LOCK and then press the OK button.
• Use the 0-9 buttons to input a 4-digit password to enter the LOCK menu. Enter
the default password “0000” for the rst time use.
• Press the
buttons to select the option you want to adjust in LOCK menu.
• Press the
buttons to adjust each option’s setting.
• Press the EXIT button to exit the menu.
Lock Settings
Enable Locks
The Enable Locks is designed to prevent accidental
returning of the TV / losing channels and prevent
children watching unsuitable programme.
The Enable Locks must be set to On for this function
to operate. If the Enable Locks is set to On, a valid
password must be entered when you access Auto Scan
/ Manual Tuning / Programme Edit / Restore Factory
Default.
Set Password
Use the 0-9 buttons to input the old password and then
input the new 4-digit password. Re-enter new password
for conrmation.
Note: the default password is “0000”.
Block Program
Block Program is designed to prevent children watching
unsuitable programmes. When a channel is blocked, a
valid password must be entered.
Parental Guidance
This function allows you to set up blocking schemes
to block specic channels and ratings. Press the
buttons to select an age rating: Off, 4-18.
CUSTOMIZING TV SETTINGS
Hotel Setting
Hotel Lock
Hotel Lock On will cause all the following settings to be
enabled.
Hotel Lock Off will cause all the following settings to be
disabled.
Channel Lock
The CHANNEL in the main meun can't be selected,when set it
to on
Page 28
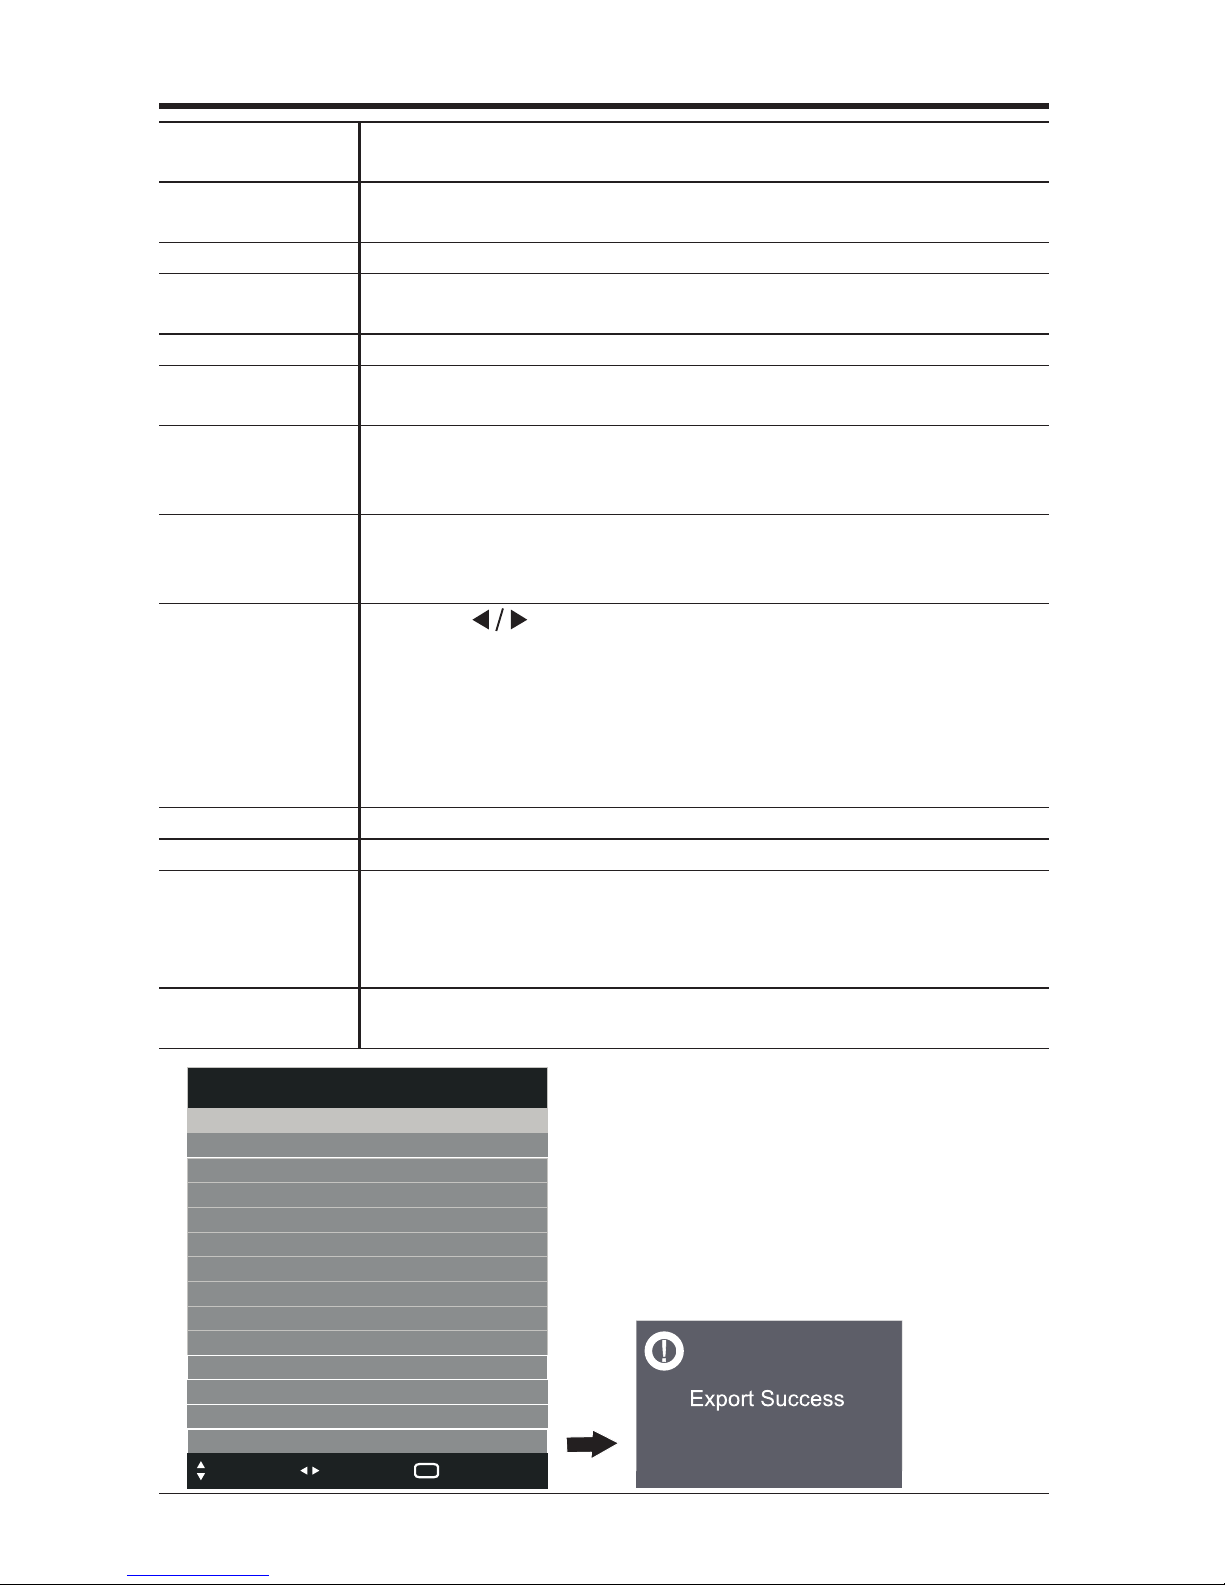
EN 28
CUSTOMIZING TV SETTINGS
Picture Lock
The PICTURE in the main menu can't be selected,when set it
to on
Sound Lock
The SOUND in the main menu can't be selected,when set it to
on
Time Lock The TIME in the main menu can't be selected,when set it to on
Option Lock
The OPTION in the main menu can't be selected,when set it to
on
Key Lock The button of the TV will be locked,when set it to on
Source Lock
Setting one of the sources on will be hidden in the Input
Source
Set Source
Setting one of the sources will force the TV to always turn to
the same station,
when the power is rst switched on
Channel Number
Use the 0~9 buttons to set a station number, then the TV will
turn to this station,
when the power is switched on.
Max Volume
Use the
buttons to adjust the max. available volume and
press OK to
con rm. (The function serves to regulate the max. available
volume in order not
to disturb other guests by loud listening. Select according to
your preferences. If 100 selected, it means the max volume
will not be limited.)
Default Volume Setting the default volume when the TV is switched on.
Clear Lock Clear all the setting of the Hotel Mode.
DataBase Export
Export all the hotel setting to the USB and the le's name is
"DATABASE.bin",
when export the database successfully a menu"Export
Success" will show on the screen.
DataBase Import
Import the "DATABASE.bin"in the USB to the TV,and the TV
will go to Standby mode,when importing successfully
Move
Adjust
EXIT
Quit
Hotel Setting
Hotel Lock
Channel Lock
Picture Lock
Sound Lock
Time Lock
Option Lock
Key Lock
Source Lock
Set Source
Channel Number
MAX Volume
Default Volume
Clear Lock
DataBase Export
On
Off
Off
Off
Off
Off
Off
DTV
0
100
30
Page 29
EN 29
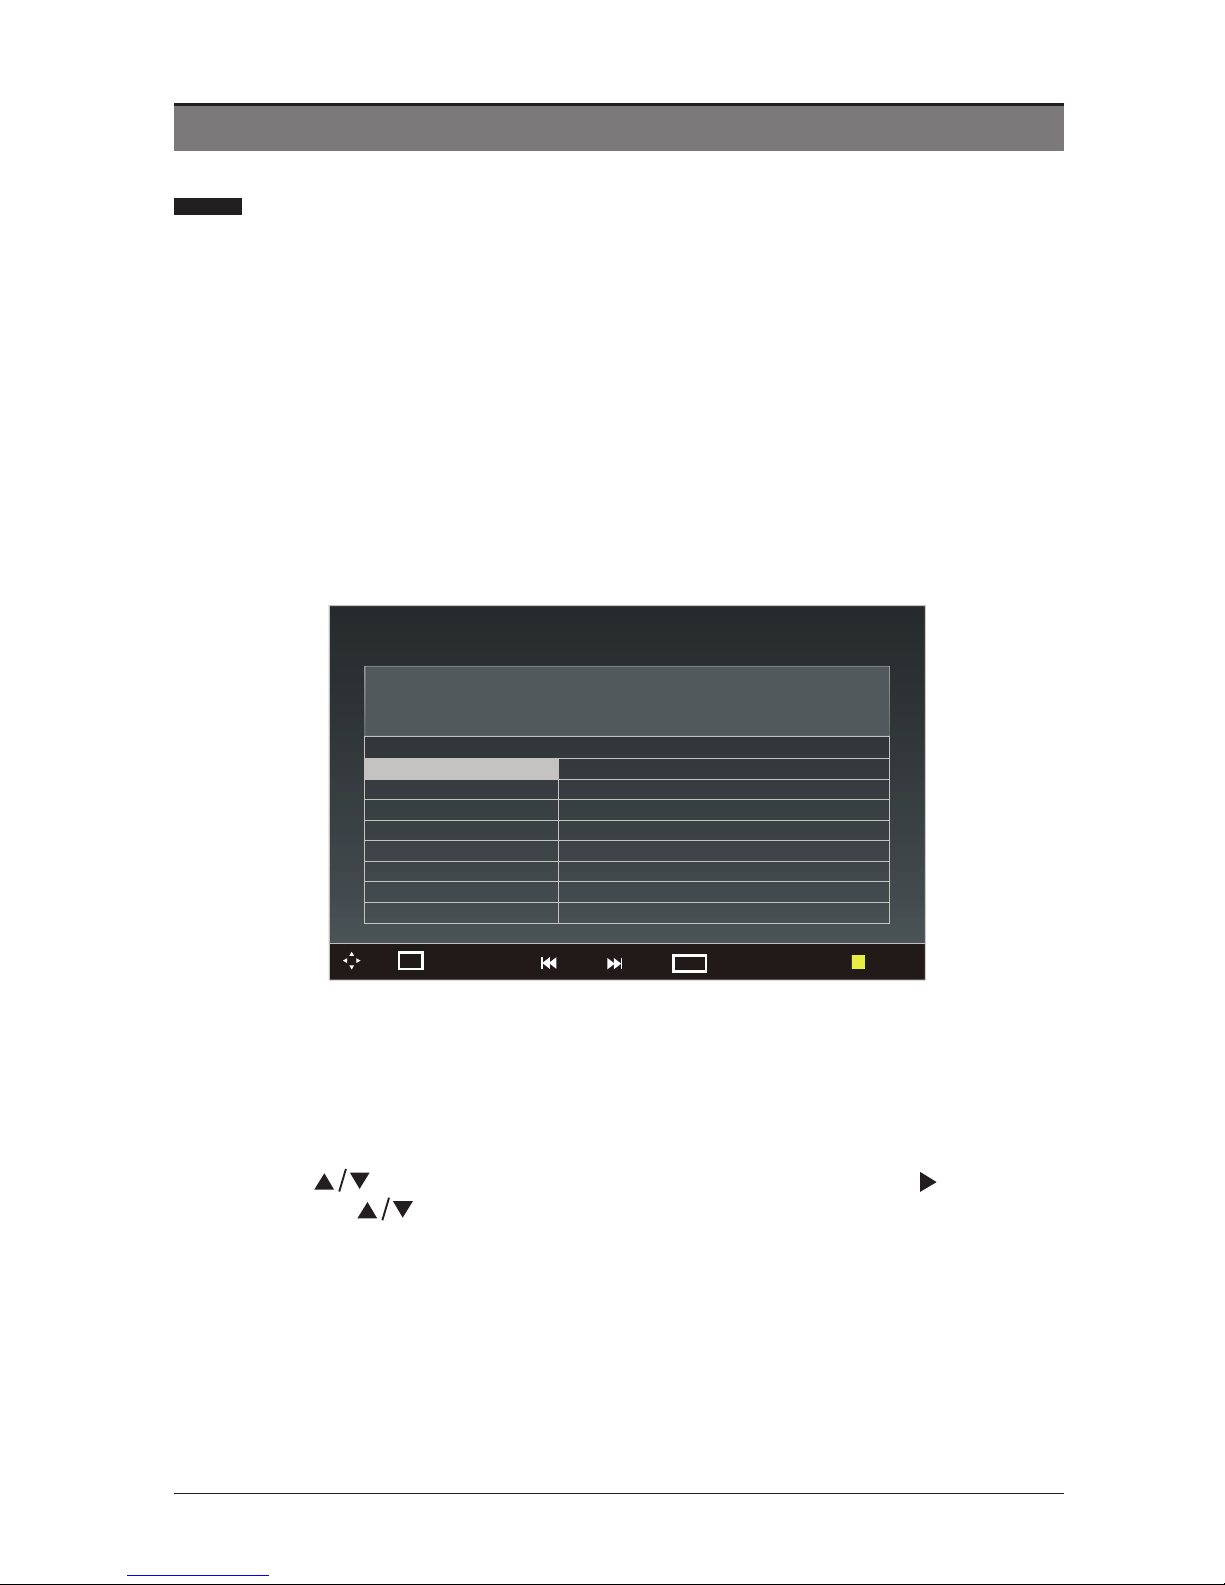
This system has an Electronic Programme Guide (EPG) to help you navigate
through all the possible viewing options.
The EPG supplies information such as programme listings, start and end times for
all available services. In addition, detailed information about the programme is
often available in the EPG (the availability and amount of programme information
will vary, depending on the particular broadcaster).
This function can be used only when the EPG information is broadcast by
broadcasting companies.
The EPG displays the programme details for the next 7 days.
EPG (Electronic Programme Guide) (DTV Mode)
Using the Features
Switch On/Off EPG
• Press the EPG button to switch on EPG.
• Press the EPG button or the EXIT button again to switch off EPG and return to
normal TV viewing.
Select a Programme
• Press the buttons to select the desired channel, press the button and
then press the buttons to select the desired programme.
Programme Guide
Move
OK
DISPLAY
Info.
Watch
Prev Day
Next Day
Schedule
16 Jul 2013 03:02-04:55
PK
16 Jul 04:16
2
3
4
5
6
1
03:02-04:55
04:55-05:35 30
05:35-06:55 (67)
06:55-07:15 (25)
07:15-08:05 (26)
08:05-08:22 (27)
09:22-09:54 (28)
09:54-10:55 (29)
Page 30
EN 30
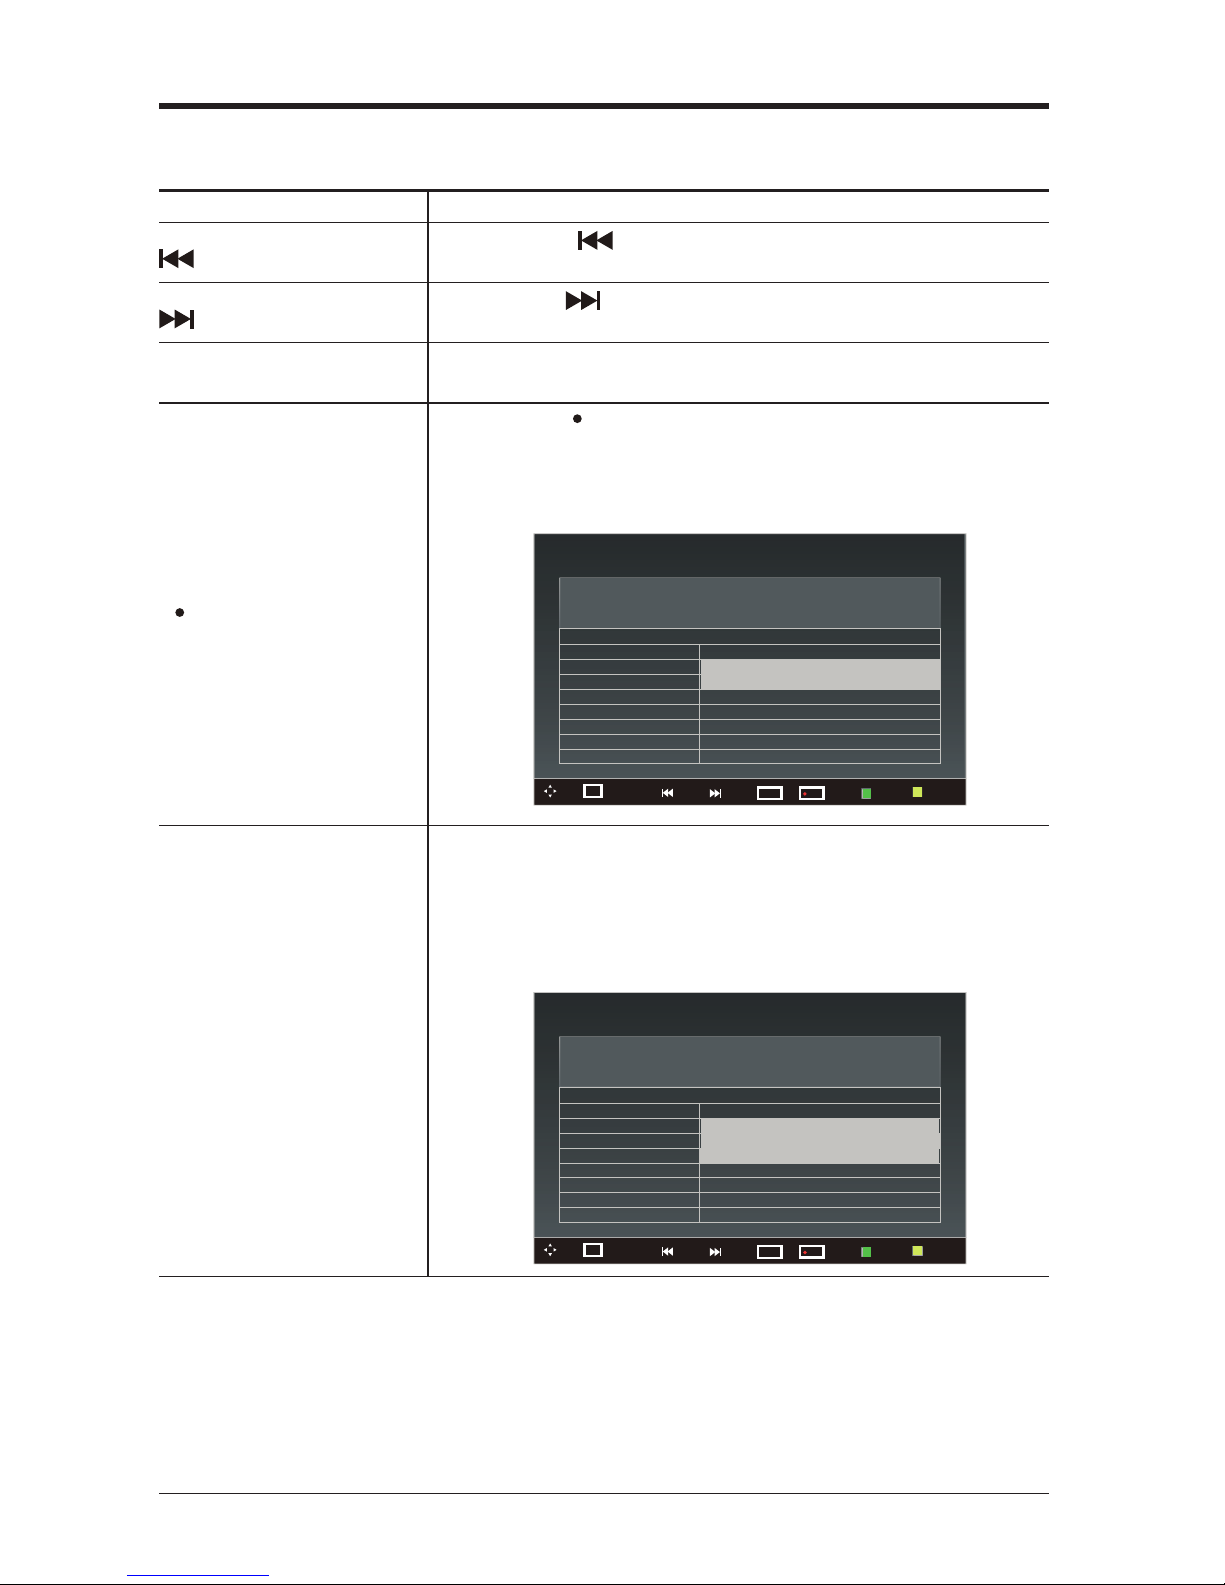
Button Functions in a 7 Days Guide
Remote Control Button
Function
Press the button to view the schedule of the
previous day.
Press the button to view the schedule of the next
day.
DISPLAY
Press to display detailed information of the selected
programme (if available).
RECORD
Press the
RECORD button while on the selected
programme to set the scheduled recording. The TV will
automatically record the selected programme when it
starts.
GREEN (Remind)
Press the GREEN button while on the selected
programme to set the reminder. Press the GREEN
button again to turn off reminder.
The TV will automatically tune to the selected
programme when it starts.
Using the Features
Programme Guide
Move
OK
DISPLAY
Info.
Remind
Prev Day
Next Day
Schedule
16 Jul 2013 04:55-05:36
30
16 Jul 04:16
2
3
4
5
6
1
06:55-07:15 (25)
07:15-08:05 (26)
08:05-08:22 (27)
09:22-09:54 (28)
09:54-10:55 (29)
03:02-04:55
04:55-05:35 30
Remind
REC
Record
05:35-06:55 (67)
Programme Guide
Move
OK
Info
Remind
Prev Day
Next Day
Schedule
16 Jul 2013 04:55-05:36
30
16 Jul 04:16
2
3
4
5
6
1
07:15-08:05 (26)
08:05-08:22 (27)
09:22-09:54 (28)
09:54-10:55 (29)
03:02-04:55
04:55-05:35 30
Remind
Record
05:35-06:55 (67)
06:55-07:15 (25)
DISPLAY
REC
Page 31
EN 31
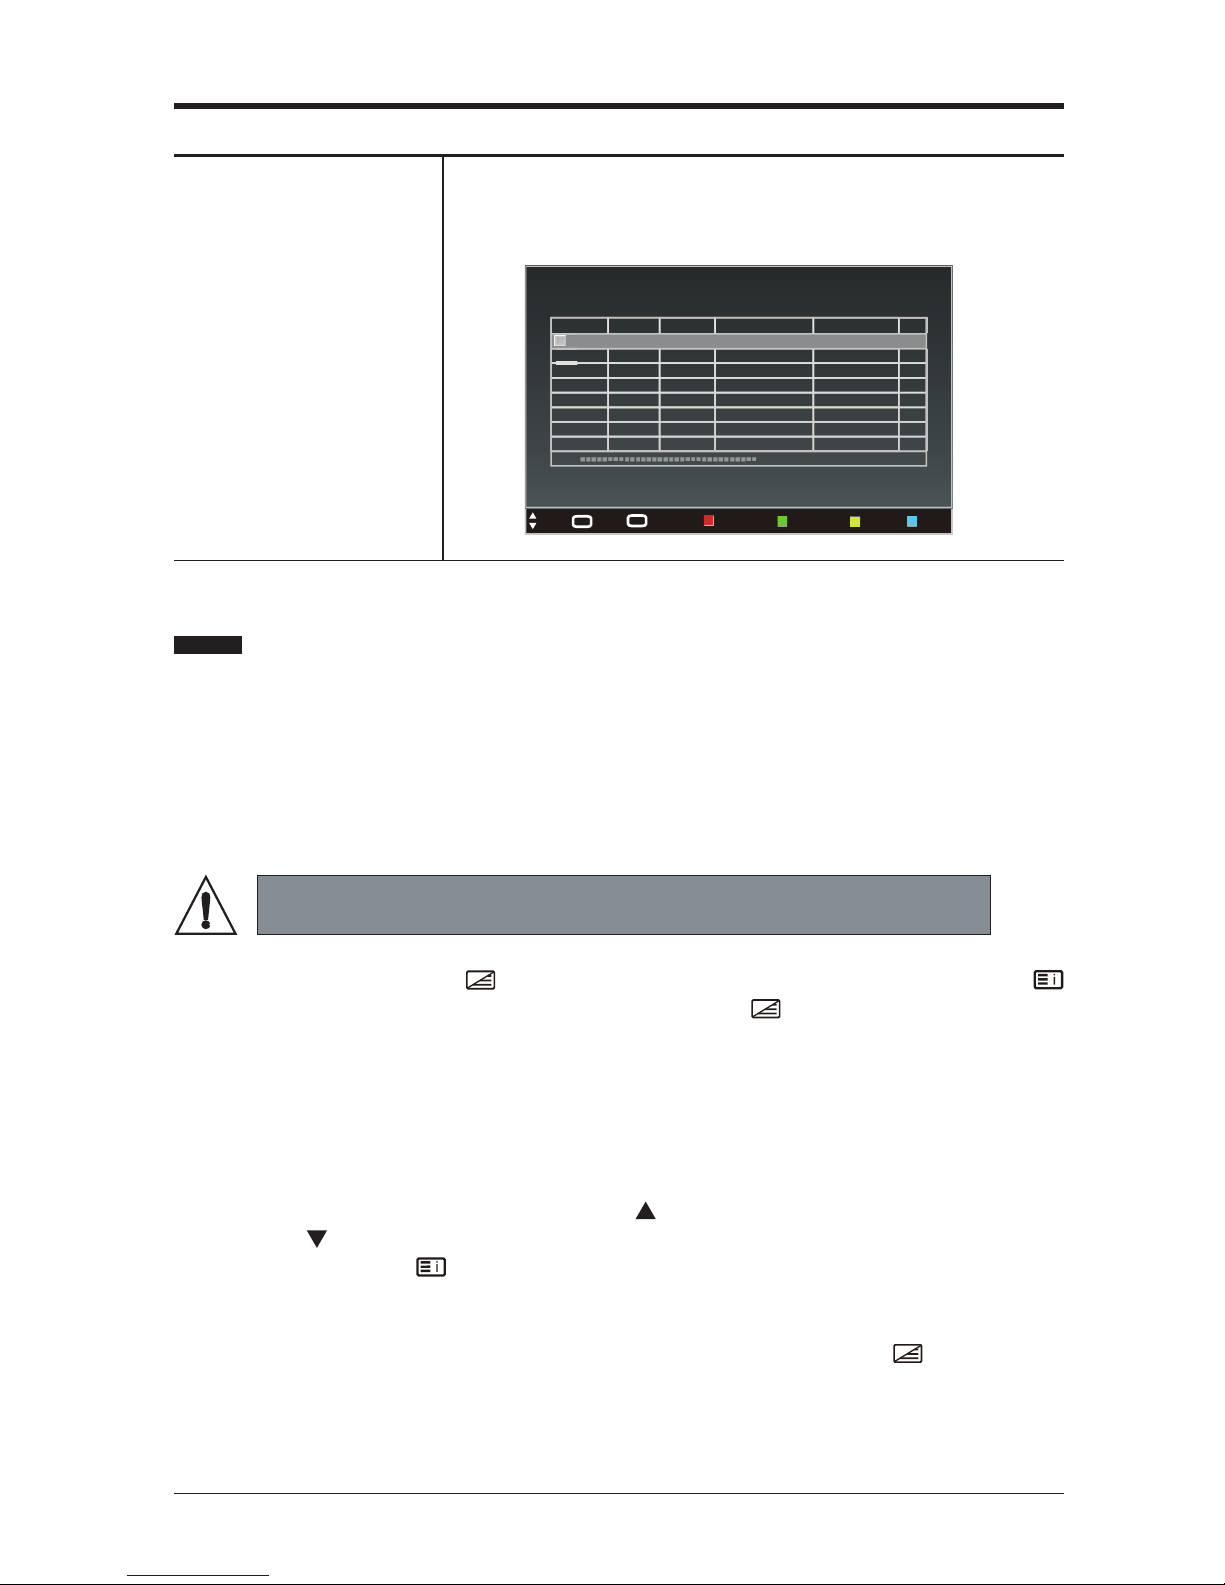
YELLOW (Schedule)
Press the YELLOW button to view the preset reminders
or scheduled recordings in the schedule list. Press the
MENU button to return to the EPG.
Teletext (ATV Mode)
Using the Features
0% (Used) 09:04 13th Jul
Mode
Time
Date
Programme Title
Channel Name
Result
Once 09:07 Fri.13 Jul The Secret Show 1 ABC HDTV
Schedule List
Move
EXIT
Quit
MENU
Back
Delete
Delete All
Add
Edit
In ATV mode, press the TEXT button to enter Teletext mode. Press the
INDEX button to display the index page.Press the TEXT button once to exit
and the TV will return to the channel you were watching.
To select a page of text
Find the number of the page in the index and enter it using the 0-9 buttons. The
number of the page will appear on the top left corner of the screen.The page
counter will search for your page. When it nds it, the page will be displayed.To
move to the next page of text, press the button.To move to the previous page,
press the button.To return to the index page, enter the "100" by using the 0-9
buttons or press the INDEX button.
Mix
To view a page of text while watching a TV programme, press the TEXT button
twice. The text will be superimposed over the TV programme.
Teletext is a free service broadcast by some TV stations which gives up-to-theminute information on news, weather, television programmes, share prices and
many other topics. Using the Teletext control buttons you can view pages of
information that are listed in the teletext index.
To Turn on Teletext Function
Make sure the TV channel you are watching transmits teletext.“No
Teletext” sign will show on the screen if teletext is not available.
Page 32

EN 32
Using the Features
Double height text
If you have difculty reading the text on the TV you can double the height of the
text.Press the
SIZE button. The top half of the page will be displayed in double
height text.Press the SIZE button again. The bottom half of the page will be
displayed in double height text.Press the SIZE button again to return to the full
page.
Page HOLD
If the page of text you have selected contains subpages, these subpages will
automatically be displayed in order with a delay to allow you to have enough time
to read the page.To stop the movie to the next sub page, press the
HOLD
button.To continue moving through the sub pages, press the HOLD button
again.
Alternative
Press the SUBPAGE button, and then use the 0-9 buttons to enter a 4-digit
page number.
To Reveal Information
Press the REVEAL button to reveal concealed information (quiz answers
etc.).Press the REVEAL button again to conceal the information again.
Fasttext
At the bottom of the teletext screen is a row of subject headings in red, green,
yellow and blue.The remote control has a row of colour buttons corresponding to
the row of coloured subjects on the screen.Pressing one of the colour buttons will
take you directly to the page corresponding to the subject heading.
Digital Teletext (DTV Mode)
Digital teletext can access special digital teletext services and specific services
which broadcast digital teletext. You will need to turn off Subtitle Function before
using teletext .
Teletext within Digital Service
1. In DTV mode, press the LIST button to display the Channel List.
2. Press the
TEXT button to display the teletext page.
3. Press the 0-9 buttons to select a page number.
4. Follow the instructions on digital teletext and move onto the next step by pressing
OK, , RED, GREEN, YELLOW, BLUE or 0-9 buttons etc.
5. To change digital teletext service, select a different service by pressing the 0-9
buttons or the buttons.
Alternative
You may press the RED button to the TEXT button to display the teletext
information when you see a red logo displayed on the screen (e.g. BBC).
6. Press the TEXT button to exit.
Page 33
EN 33
Notes:
• Time Shift Mode and Recording functions may not work if the signal strength is
weak.
• Stop the time-shift function before switching to another input source.
• If the transfer rate of the USB storage device is too slow for recording or time shift
function, a warning statement will be shown on the screen. If this happens, please
upgrade your USB storage device.
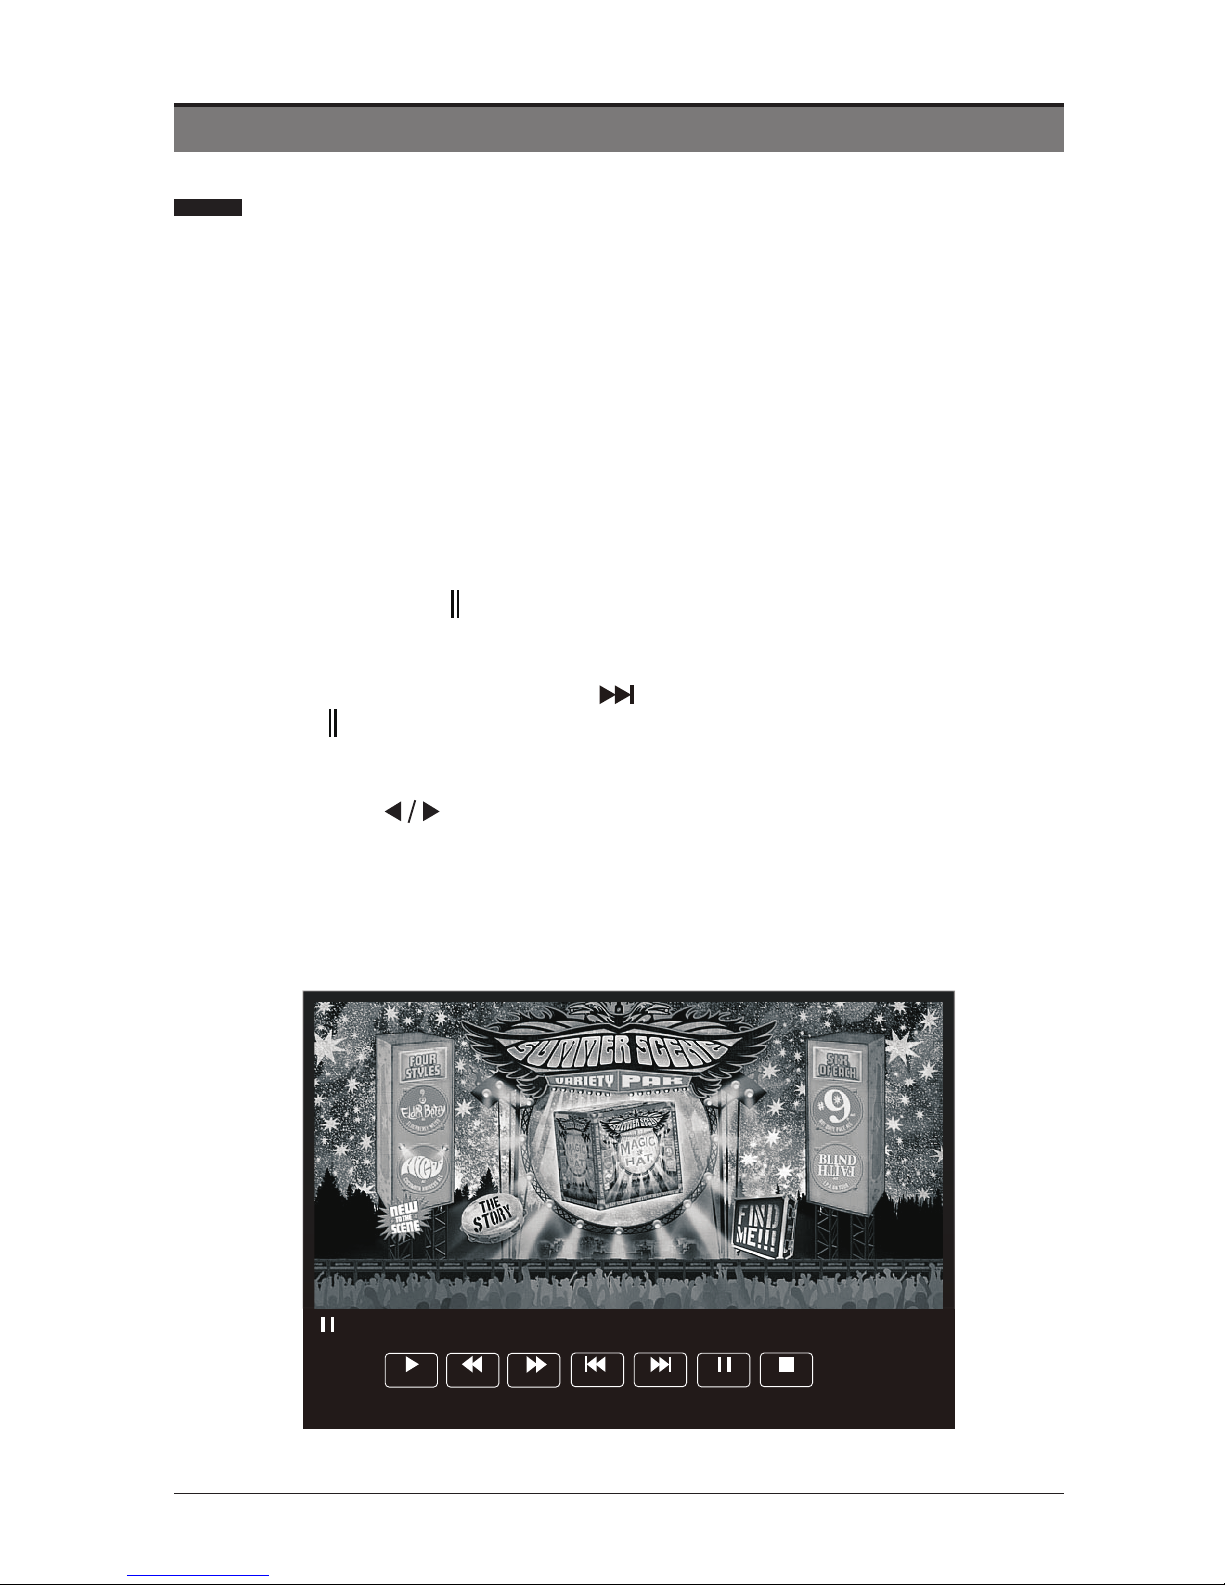
This function allows the TV to virtually record the live viewing broadcast programme.
Before using Time Shift fuction, please make sure the USB device is inserted.
Time Shift Function (DTV Mode)
PVR (Personal Video Recorder)
During normal TV viewing, you may press the TIMESHIFT button to virtually pause
the live viewing broadcast programme if you want to go out for a while (e.g. going to
the bathroom / kitchen). “
” will show on the screen and the LED indicator ash red
and blue alternately.
When you have returned, press the
button to play the missed broadcast
programme. “
”will show on the screen.
Alternative: Press the TIMESHIFT button to display the PVR Time Shift progress bar
and then press the
buttons to select “Play” on the bar. Press the OK button to
conrm.
The video and sound may have a little bit of delay or be out-of-sync for a few
seconds when the unit starts to playback the missed broadcast programme. It will
soon switch to normal.
04:20
Shift Time/Max Shift Time (-00:00:09/01:20:00)
Play FB
FF
Prev.
Next
Pause
Stop
Page 34
EN 34
Using the Remote Control
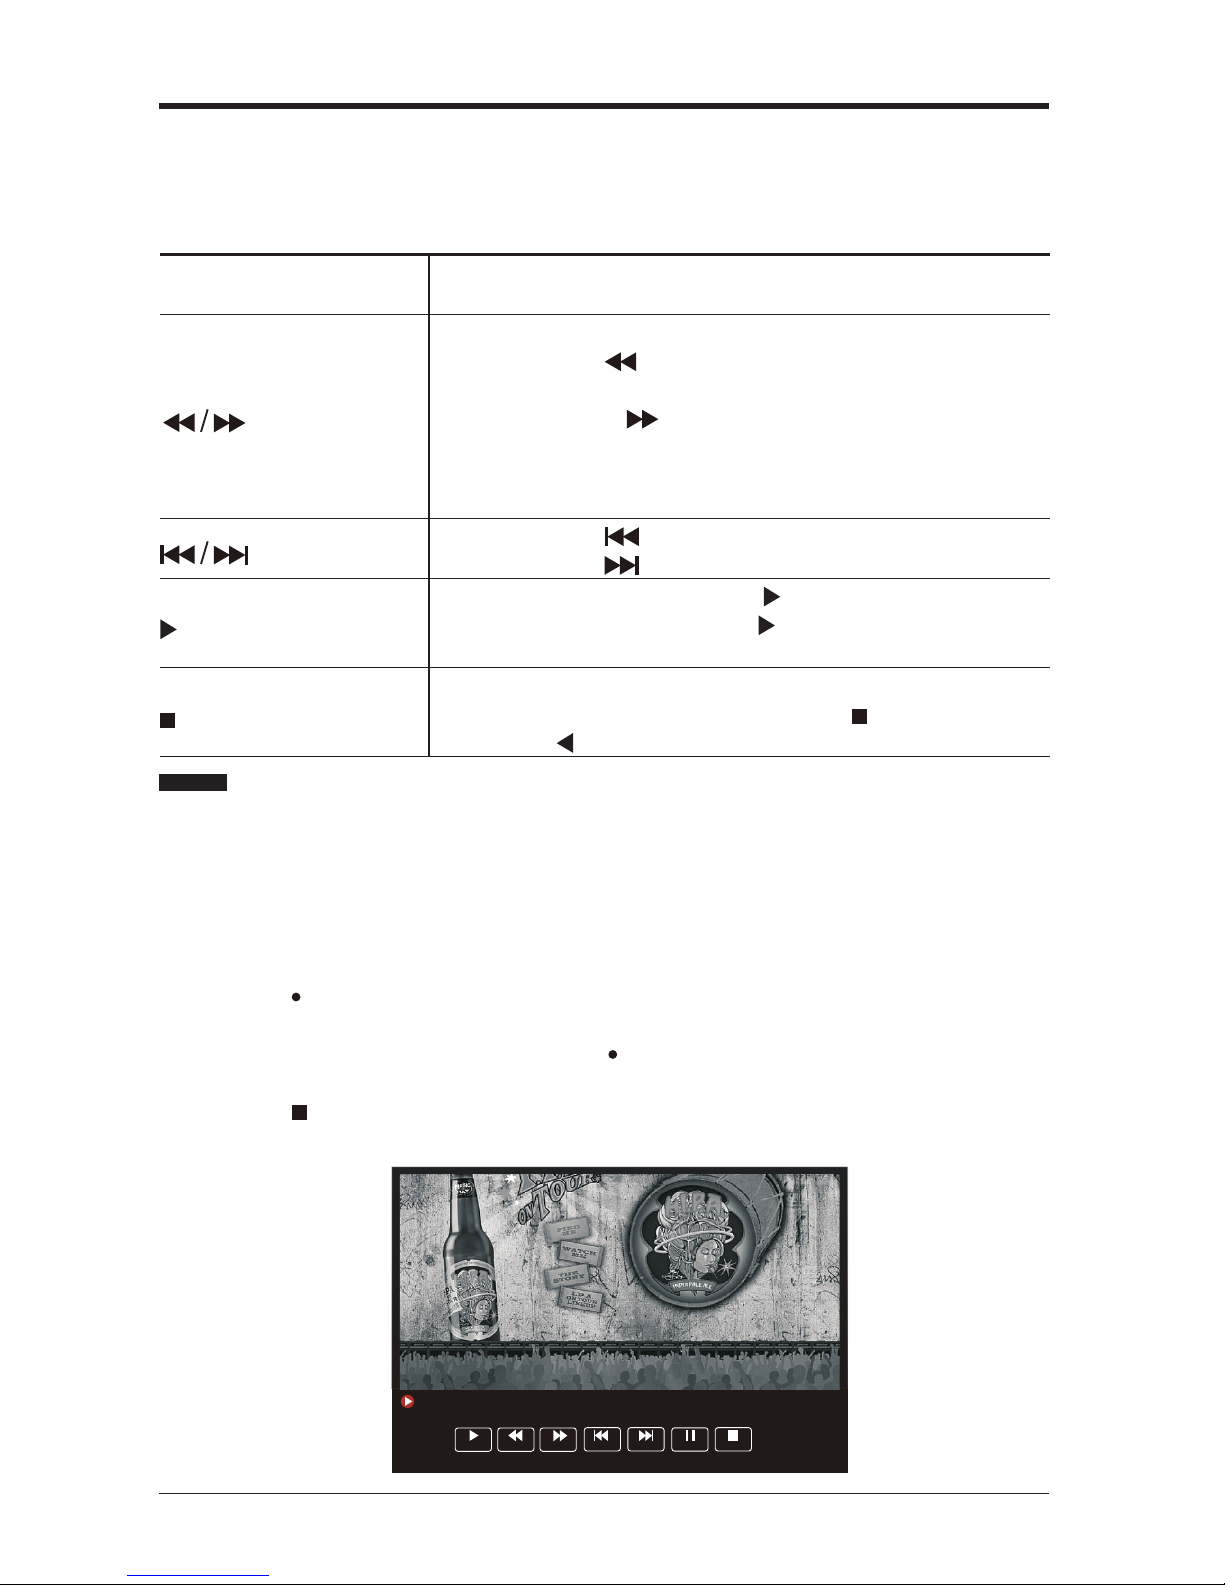
You can shift playback to any point of the virtually recorded programme. The PVR
Time Shift progress bar will be displayed on the screen for 5 seconds. Press the
TIMESHIFT button to display the PVR Time Shift progress bar again.
TIMESHIFT
During playback, press the TIMESHIFT button to display
a still screen.
When playing,
• Press the button repeatedly to speed up forward
x 2 / x 4 / x 8 / x 16.
• Press the button repeatedly to speed up
backward x 2 / x 4 / x 8 / x 16.
• During fast forward / fast backward state, press the
PLAY button to return to normal playback.
• Press the button to jump about 10% forward.
• Press the button to jump about 10% back.
During playback, press the button to display a still
screen and then press the button again to resume
playback.
If you want to exit the PVR Time Shift and return to
the current live broadcast, press the button and then
press the
button to conrm.
PVR (Personal Video Recorder)
• Press the
button to record the programme that you are currently watching.
Note: The recoding progress bar will disappear after 5 seconds. To display the
recording progress bar again, press the button.
The LED indicator will ash red and blue alternately when recording.
• Press the button to stop recording.
Note: Recording will stop automatically when the disk is full.
Use this function to record the DTV programme you are watching on the main
screen and save it for future viewing.
The recording from timer programme or direct recording may have a little bit of
delay when it starts to record the broadcast programme.
Please make sure the USB device is inserted. If not, a warning message will pop
up.
Recording DTV Programme onto a USB Storage Device
04:20
Recording Time:(00:00:09) Max Recording Time:(0011:19:50)
Play FB
FF
Prev.
Next
Pause
Stop
Page 35
EN 35
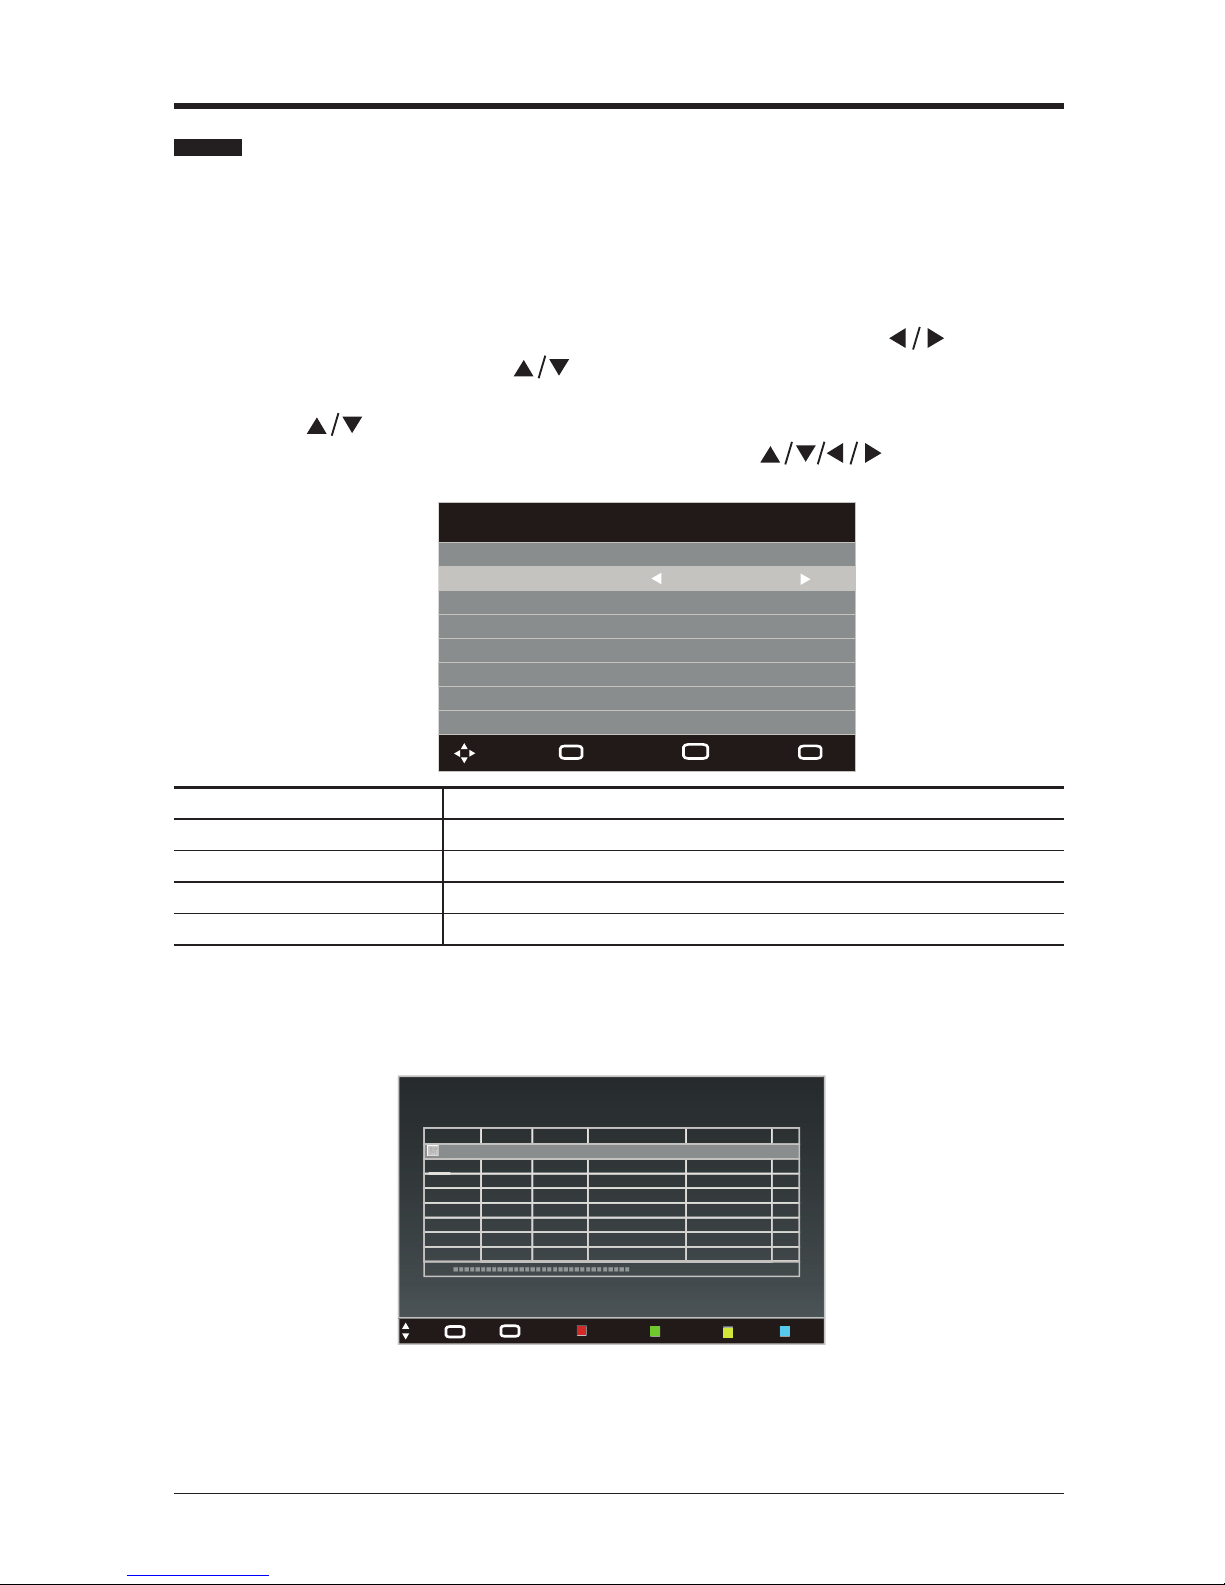
Timer Programming
PVR (Personal Video Recorder)
• Press the MENU button to display the main menu. Press the
buttons to
select CHANNEL then press buttons to select Schedule list and then press
Yellow button entering into add programme Schedule.
• Press the
buttons to select Recorded Mode and then press the OK button.
• A Programme Schedule menu will pop up. Press the
buttons to adjust
the settings and then press the OK button to save.
This function is used for scheduled recording.
The recording from timer programme or direct recording may have a little bit delay
when it starts to record the broadcast programme.
Please make sure the USB device is inserted. If not, a warning message will pop
up.
Channel
Selects the channel that you wanted to record.
Start Time/ Start Date Adjusts the start time and start date.
End Time/ End Date Adjusts the end time and end date.
Repeat Selects the frequency: Once / Weekly / Every Day.
Mode Selects the mode: Recorder / Reminder.
• After nishing all the adjustment, press the OK button to conrm your settings. A
Timer Save Success/Reminder was saved Successfully screen will display.
• The Schedule List will then be displayed with your preset recorders and reminders
shown.
• Press the EXIT button to exit EPG.
Notes: • When the preset time is reached, the TV will start recording automatically.
• If a programme recording starts when the TV is in standby mode, the LED
indicator will ash red and blue alternately.
Add Programme Schedule
16/07/2013 04 :21
Channel
1
Start Time
03:02
Start Date
16/07/2013
End Time
04:55
End Date
16/07/2013
Repeat
Once
Mode
Recorder
Move
Back
MENU
Save
OK
Quit
EXIT
0% (Used) 09:04 13th Jul
Mode
Time
Date
Programme Title
Channel Name
Result
Once 09:07 Fri.13 Jul The Secret Show 1 ABC HDTV
Schedule List
Move
EXIT
Quit
MENU
Back
Delete
Delete All
Add
Edit
Page 36
EN 36
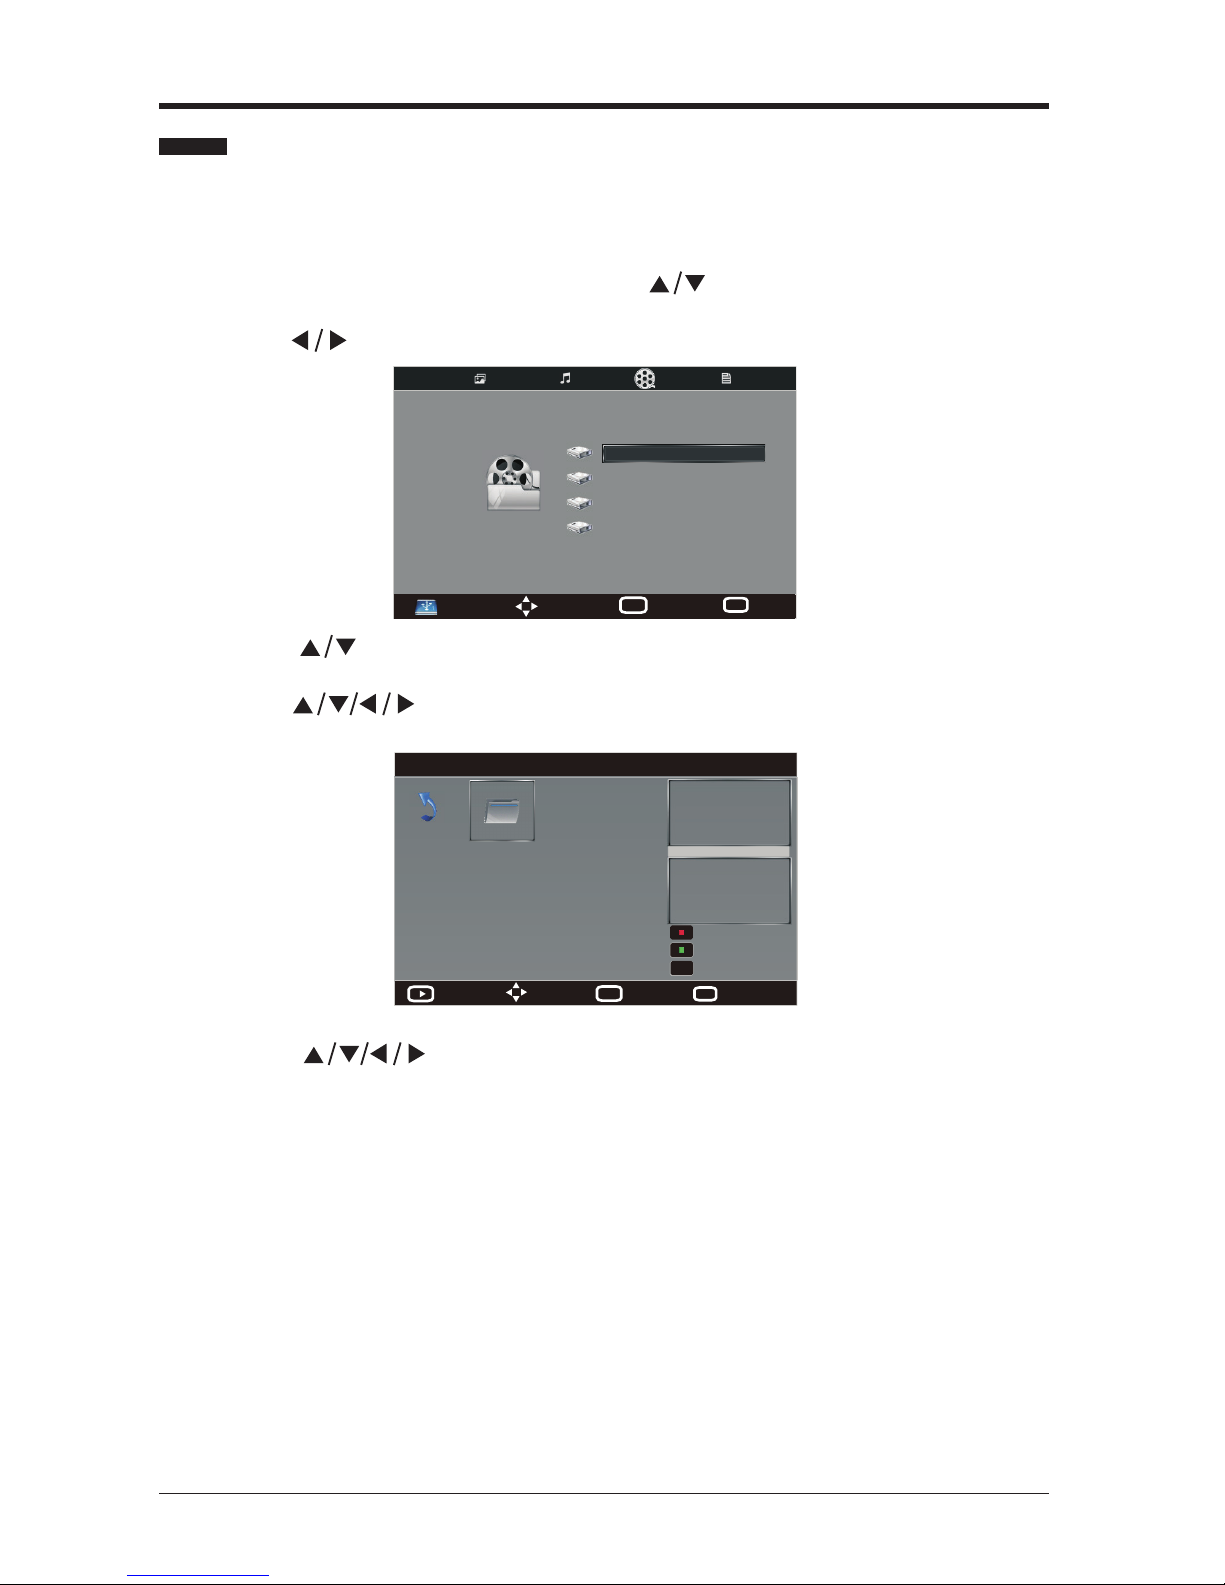
• Press the
buttons to select your storage device and then press the OK
button.
• Press the
buttons to select the “_MSTPVR” folder and then press the
OK button.
Play Recorded Programme
PVR (Personal Video Recorder)
• Press the SOURCE button on the front right side panel of the TV or the SOURCE
button on the remote control then press the
buttons to select the USB mode
and then press the OK button.
• Press the buttons to select MOVIE.
You can play a recorded programme from the recorded list or from a USB Storage
Device.
• Press the
buttons to select the recorded programme, a preview
window will pop up.
Move
Menu
MENU
Select
OK
USB 2. 0
MOVIE
Disk C:
Disk D:
Disk E:
Disk F:
Move
Menu
MENU
Quit
EXIT
Full screen
C:\
1/1
Return
_MSTPVR
Resolution:
Size:
Date:
Time:
Delete Current File
Add/Remove all
Add/Remove to playlist
OK
Page 37
EN 37
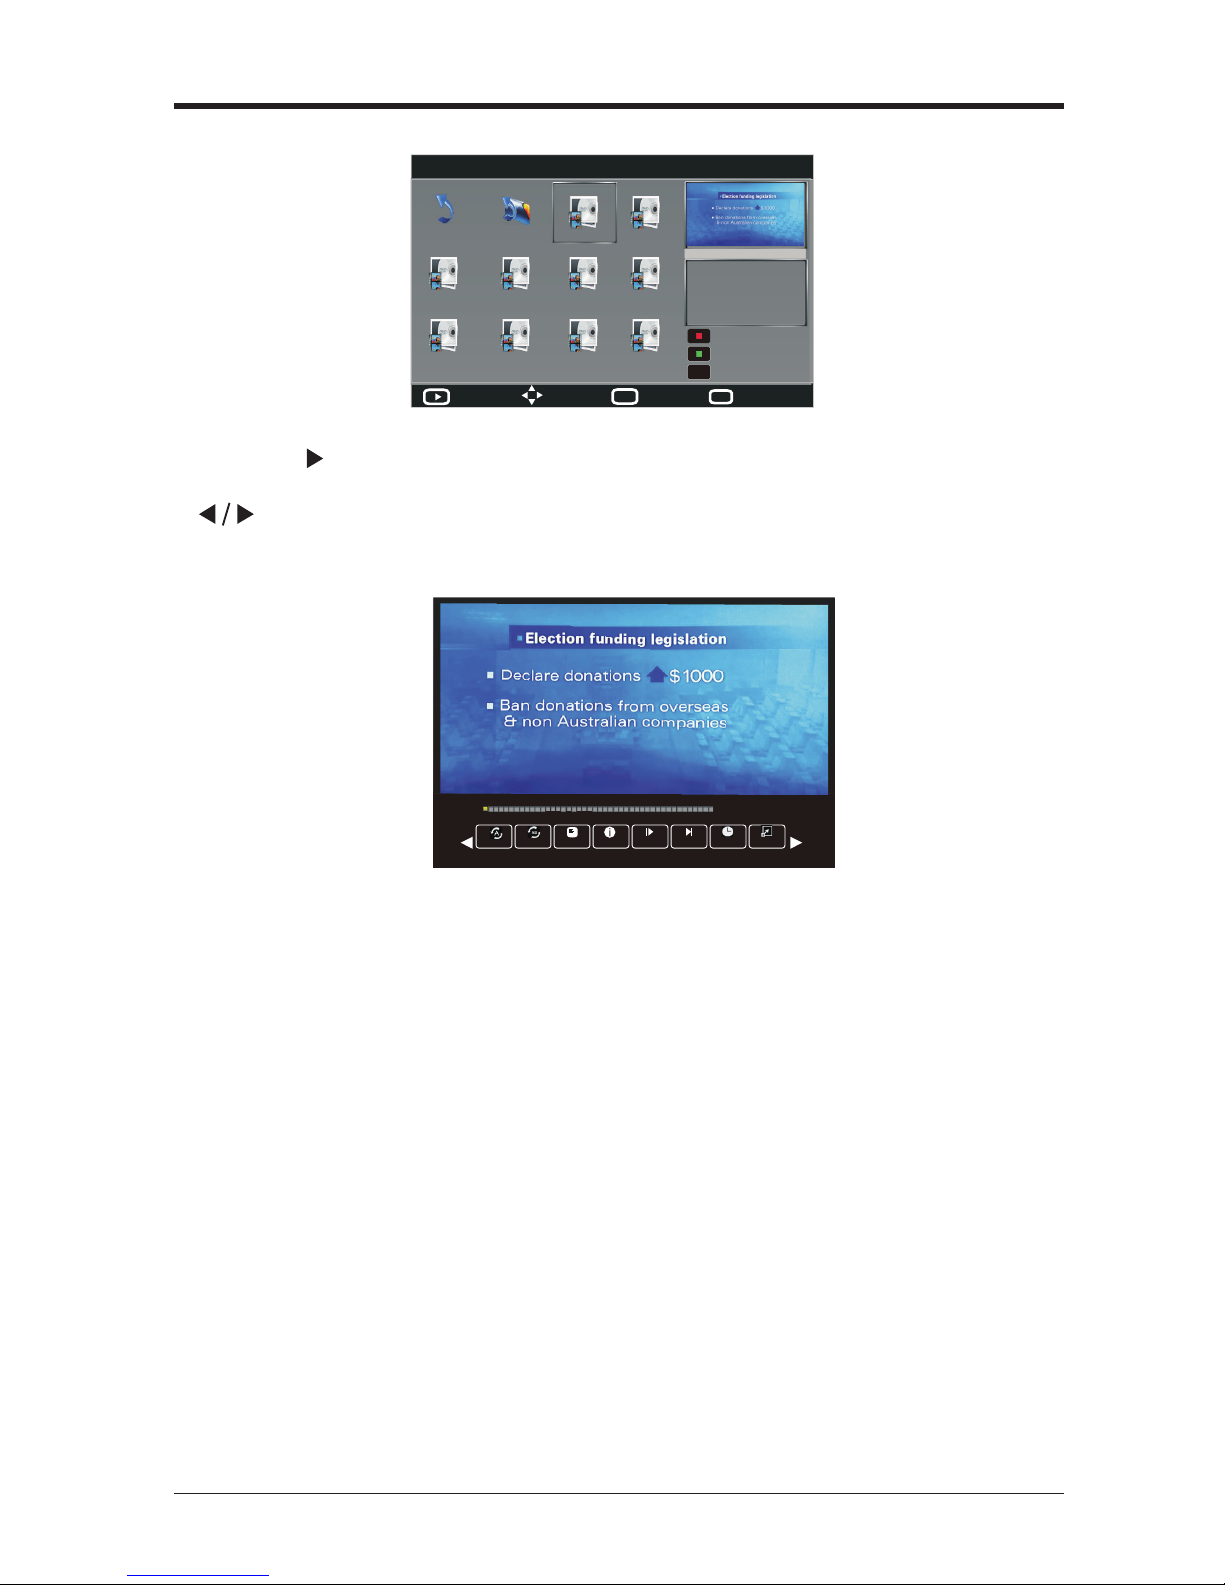
• Press the button to view the movie in full screen.
• Press the OK button or the DISPLAY button to display the function bar. Press the
buttons and then press the OK button to select the function: Repeat / Set
A / Playlist /Info. / Slow / Step / Goto Time / Zoom In / Zoom Out / Aspect Ratio /
Move View.
• Press the EXIT button to return to the previous menu.
PVR (Personal Video Recorder)
00:00:04/00:05:02
Set A
Info.
Playlist
RepeatAll
Slow
Step
Goto Time Zoom In
Move
Menu
MENU
Quit
EXIT
Full screen
C:\_MSTPVR
1/2
Delete Current File
Add/Remove all
Add/Remove to playlist
Resolution: 720 x 576
Audio Track: 1/2
Subtitle: --/0
Program: 1/1
Size: 236876 KBytes
307_(2 ABC1)_(Midday Report).ts
Return
Up Folder
20130709_011
20130709_012
20130709_013
20130709_014 20130709_015
20130709_016
20130709_017
20130709_018 20130709_019 20130709_020
OK
Page 38
EN 38
• Connect your USB storage device to the USB port of your TV.
• Press the
button on the front right side panel of the TV or the button on the
remote control to turn on your TV and your USB storage device.
• Press the SOURCE button on the front right side panel of the TV or the SOURCE
button on the remote control to display the Source List. Use the
buttons to
select USB and then press the OK button to conrm.
Note:
• Some versions of portable hard disk may require more power than the TV USB
socket can provide. To ensure correct operation please use power adapter for that
device.
• If a USB hub is used make sure its mains adapter is connected to the mains
supply as the total current consumption exceed 500mA.
• The maximum supported storage space of the hard disk is 1 TB.
• The le system only support FAT32 format.
• If you want to store the video streaming of a DTV programme, the transfer rate of
the USB storage device must not be less than 5MB/s, otherwise the picture and
sound of the programme will be affected and a warning statement will be shown
on the screen. If this happens, please upgrade your USB storage device.
• The TV screen will be blank temporarily as it will take time to start up and stabilize
the connected hard disk. This is normal and the starting time may vary depending
on the brand and the memory size of the connected hard disk.
• Disconnect the USB storage device if it is not in use.
Connecting a USB Storage Device
Entertainment
Viewing Photos
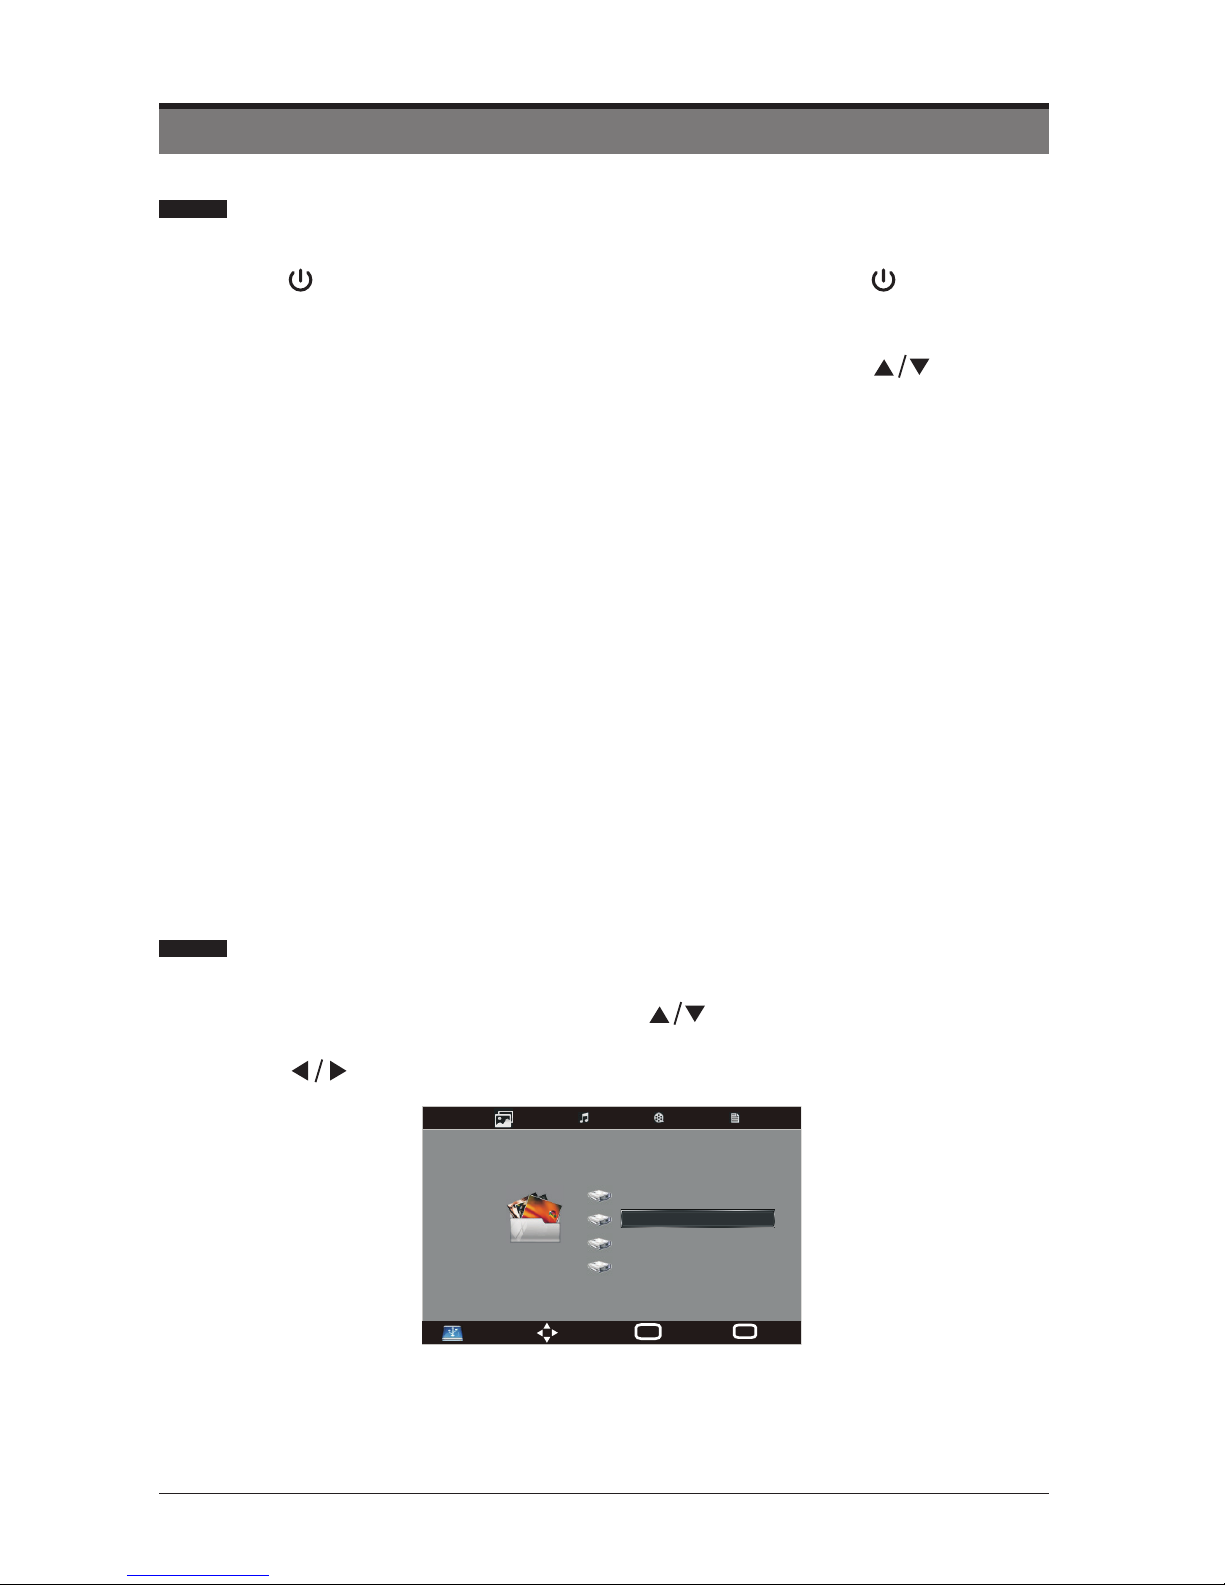
• Press the SOURCE button on the front right side panel of the TV or the SOURCE
button on the remote control then press the
buttons to select the USB mode
and then press the OK button.
• Press the buttons to select PHOTO.
PHOTO
Disk C:
Disk D:
Disk E:
Disk F:
Move
Menu
MENU
Select
OK
USB 2. 0
Page 39
EN 39
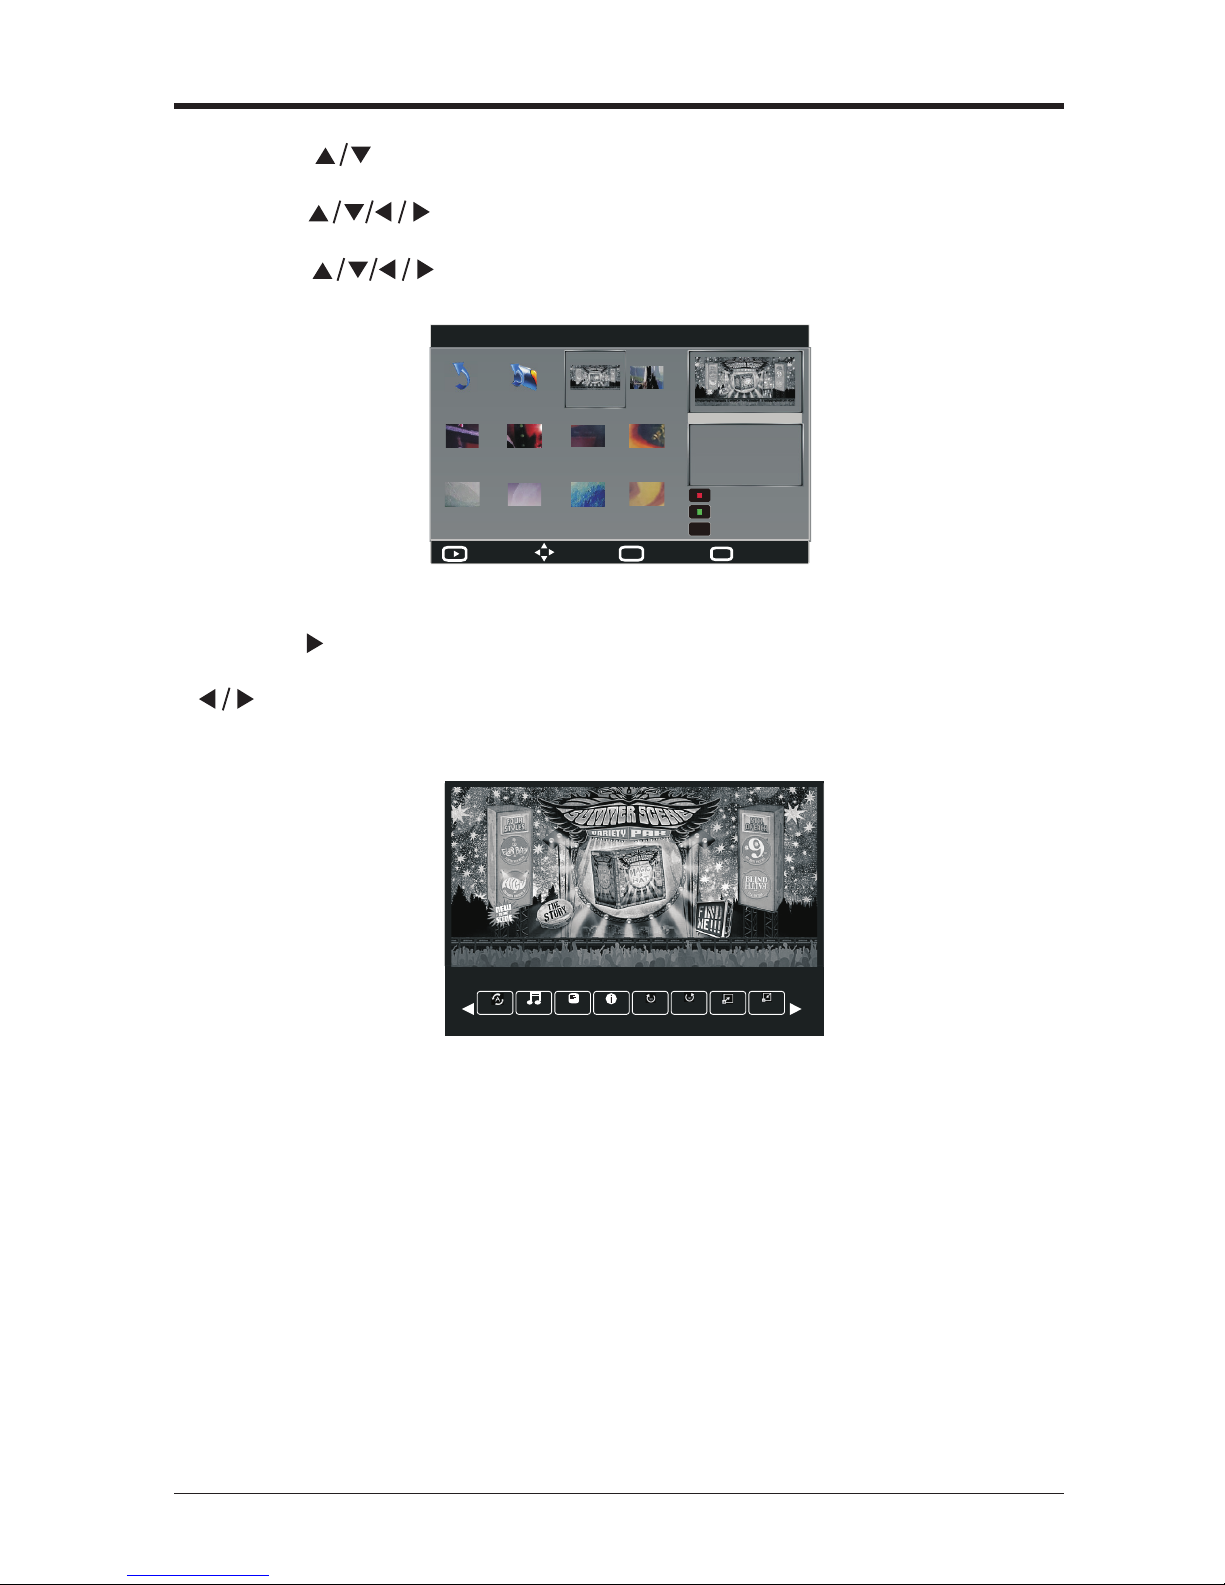
Note: File format supported: JPG.
• Press the
button to view the picture in full screen.
• Press the OK button or the DISPLAY button to display the function bar. Press the
buttons and then press the OK button to select the function: Repeat / Music
/ Playlist / Info. / Rotate Clockwise / Rotate Anticlockwise / Zoom In / Zoom Out /
Move View.
• Press the
buttons to select your storage device and then press the OK
button.
• Press the buttons to navigate in the picture folder and then press the
OK button.
• Press the buttons to select the specied picture, a preview window
will pop up.
Note: If this folder also contains music les, you can select a music track to
play at the same time you view your photos.
• Press the EXIT button to return to the previous menu.
Entertainment
RepeatAll
Playlist
Info.
Zoom In
Music
Zoom Out
Rotato
Rotato
Move
Menu
MENU
Quit
EXIT
Full scree n
D:\Picture\JPEG
1/15
Return
Up Folder
-F_ReadMe.jpg
005.jpg
00.jpg
01.jpg
02.jpg
03.jpg
04.jpg
05.jpg
06.jpg
07.jpg
Delete Current File
Add/Remove all
Add/Remove to playlist
-F_ReadMe.jpg
Resolution: 720 x 576
Size: 101 KBytes
Date: ----/--/-Time: --:--:--
OK
Page 40
EN 40
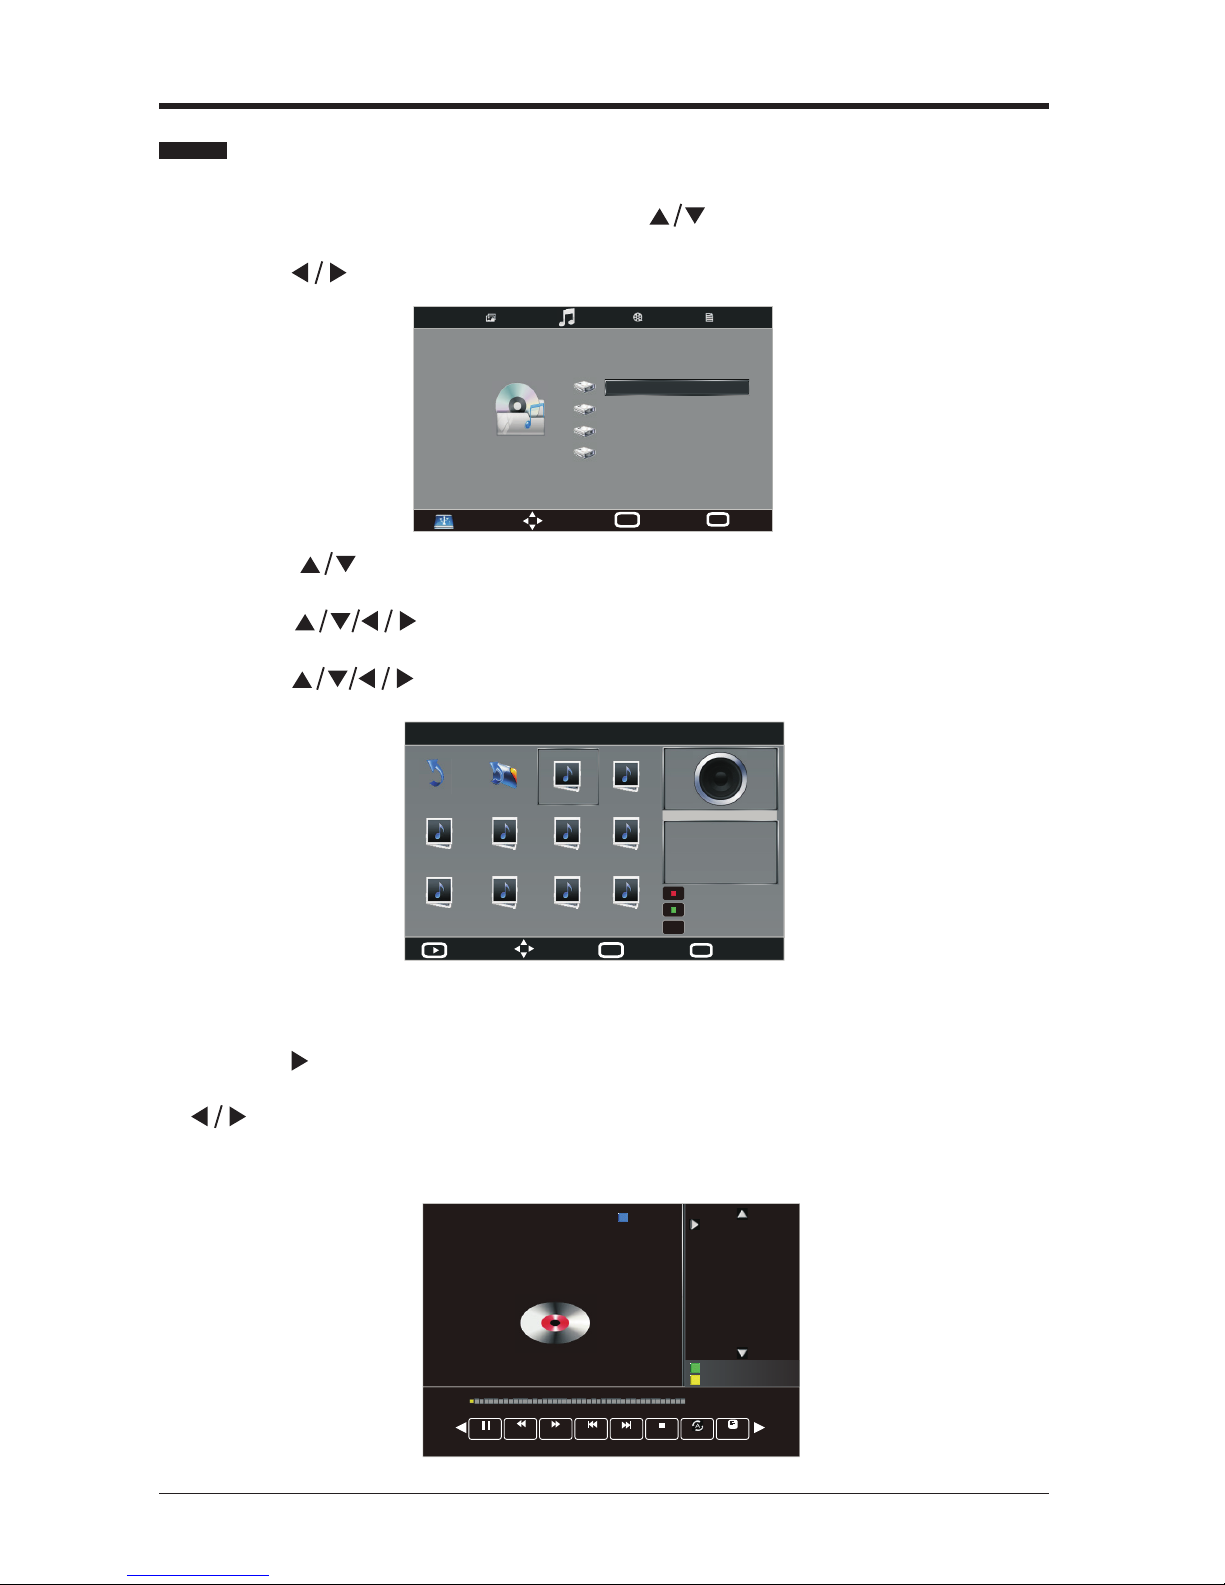
Note: Some audio le formats will not be supported.
Supported File format: MP3
• Press the button to play the music in full screen.
• Press the OK button or the DISPLAY b u t t o n t o d i s p l a y t h e f u n c t i o n b a r . P r e s s t h e
buttons and then press the OK button to select the function: Pause/FB/FF/
Prev./Next/Stop/Repeat ALL/Playlist/Goto Time.
• Press the EXIT button to return to the previous menu.
• Press the SOURCE button on the front right side panel of the TV or the SOURCE
button on the remote control then press the
buttons to select the USB mode
and then press the OK button.
• Press the buttons to select MUSIC.
Listening to Music
• Press the
buttons to select your storage device and then press the OK
button.
• Press the
buttons to navigate in the music folder and then press the
OK button.
• Press the
buttons to select the specied music, a preview window will
pop up.
Entertainment
MUSIC
Move
Menu
MENU
Select
OK
USB 2.0
Disk C:
Disk D:
Disk E:
Disk F:
Dj.mp3
00:00:07 / 00:04:21
FB FF Prev.
RepeatAll
Next
Stop
Playlist
Dj.mp3
Album:
Title:
Artist:
Bit Rate: 320K Sampling: 44K
Year Size: 10196 KBytes
Remove
Remove all from playlist
Screen Saver
Pause
D:\Audio\MP3
1/9
Move
Menu
MENU
Quit
EXIT
Full screen
Return
Up Folder
Delete Current File
Add/Remove all
Add/Remove to playlist
Album:
Title:
Bit Rate: 80K
Artist: -Yisell.com
Sampling: 22K
Year: 2010
Size: 67 KBytes
01.mp3 02.mp3
03.mp3
04.mp3
05.mp3
06.mp3
07.mp3 08.mp3 09.mp3
10.mp3
OK
Page 41
EN 41
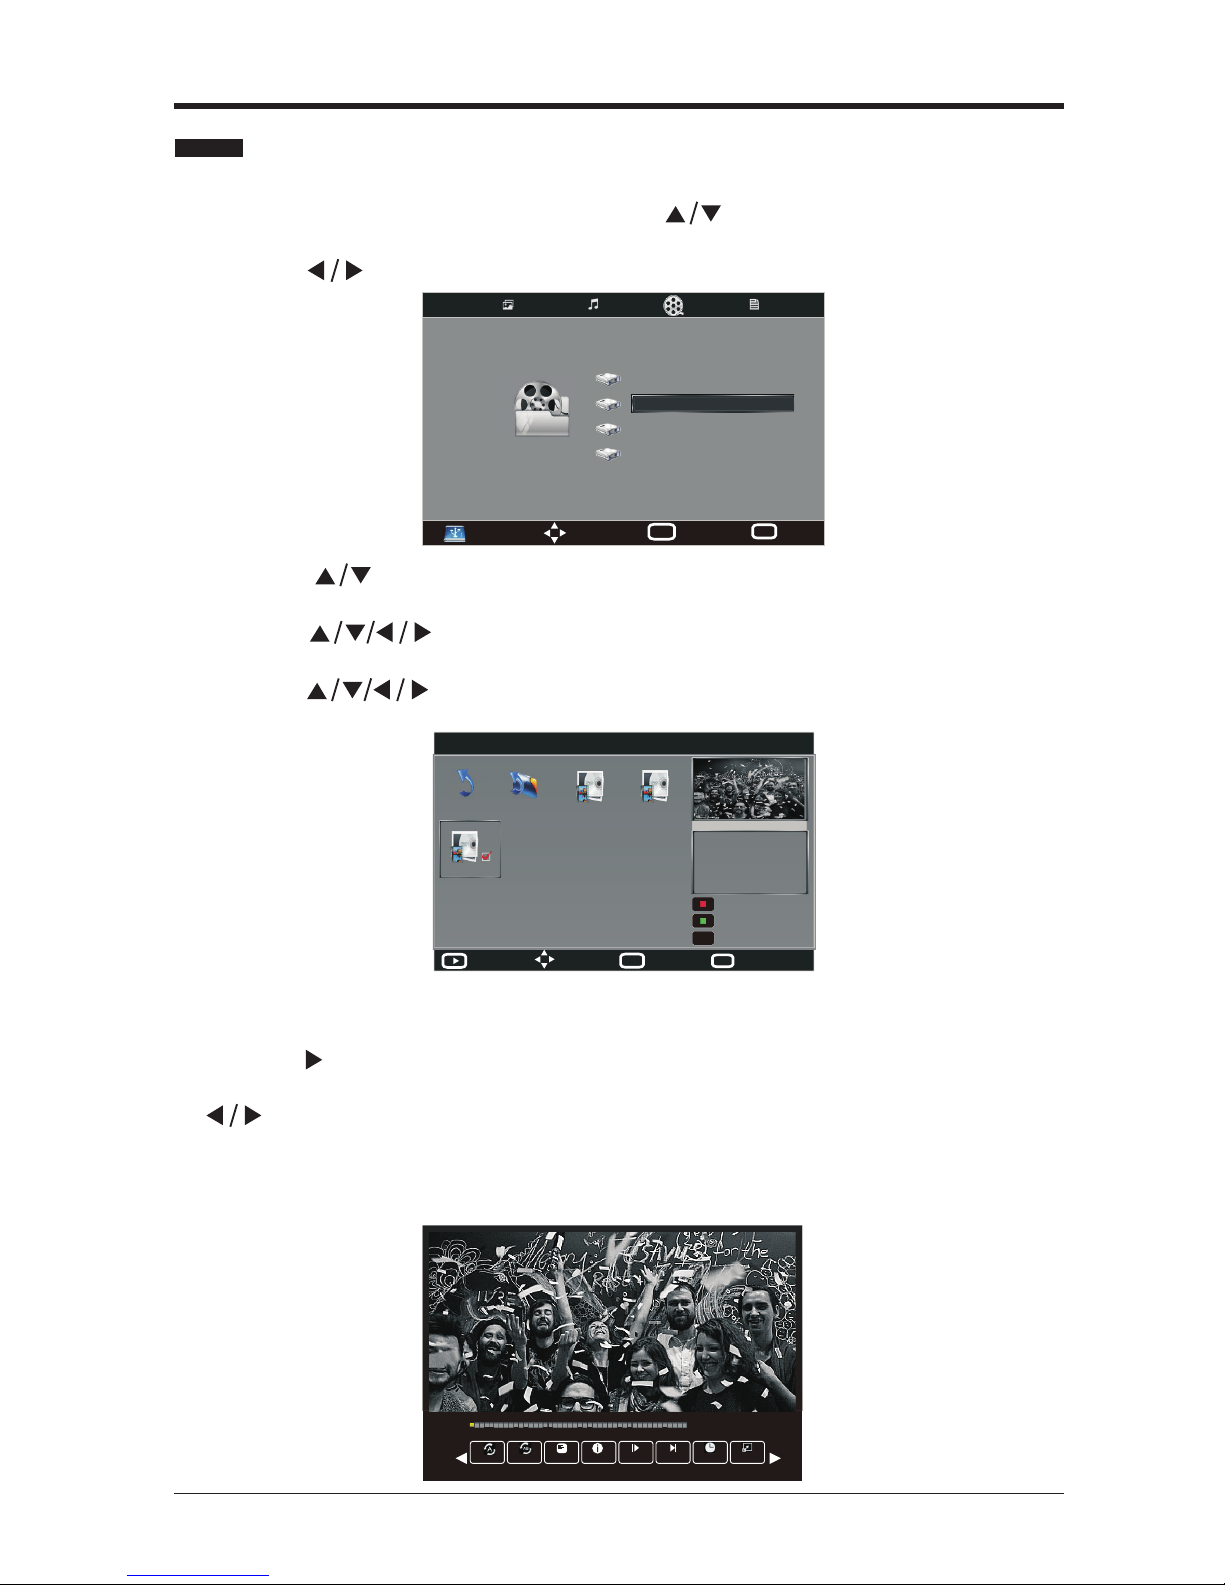
• Press the SOURCE button on the front right side panel of the TV or the SOURCE
button on the remote control then press the buttons to select the USB mode
and then press the OK button.
• Press the buttons to select MOVIE.
Viewing Movies
• Press the
buttons to select your storage device and then press the OK
button.
• Press the buttons to navigate in the movie folder and then press the
OK button.
• Press the buttons to select the specied movie, a preview window will
pop up.
Note: Some video le formats will not be supported.
Supported File format: MPEG 1/2/4.
• Press the
button to view the movie in full screen.
• Press the OK button or the DISPLAY b u t t o n t o d i s p l a y t h e f u n c t i o n b a r . P r e s s t h e
buttons and then press the OK button to select the function: Repeat / Set
A / Playlist / Info. / Slow / Step / Goto Time / Zoom In / Zoom Out / Aspect Ratio /
Move View.
• Press the EXIT button to return to the previous menu.
Entertainment
Move
Menu
MENU
Select
OK
USB 2. 0
MOVIE
Disk C:
Disk D:
Disk E:
Disk F:
00:00:03/00:04:41
Set A
Info.
Playlist
RepeatAll
Slow
Step
Goto Time Zoom In
D:\Video\MPEG-2\mp4
1/1
Move
Menu
MENU
Quit
EXIT
Full screen
Delete Current File
Add/Remove all
Add/Remove to playlist
Resolution: 1920x 1088
Audio Track: 1/2
Subtitle: --/0
Program: 1/1
Size: 665614 KBytes
V1920x1080 16x9.mp4
Return
Up Folder
MPEG-2 Mp4 AAC-audi...
MPEG-2 Mp4 AAC-audi...
MPEG-2 Mp4 Ac3 CH...
OK
Page 42
EN 42
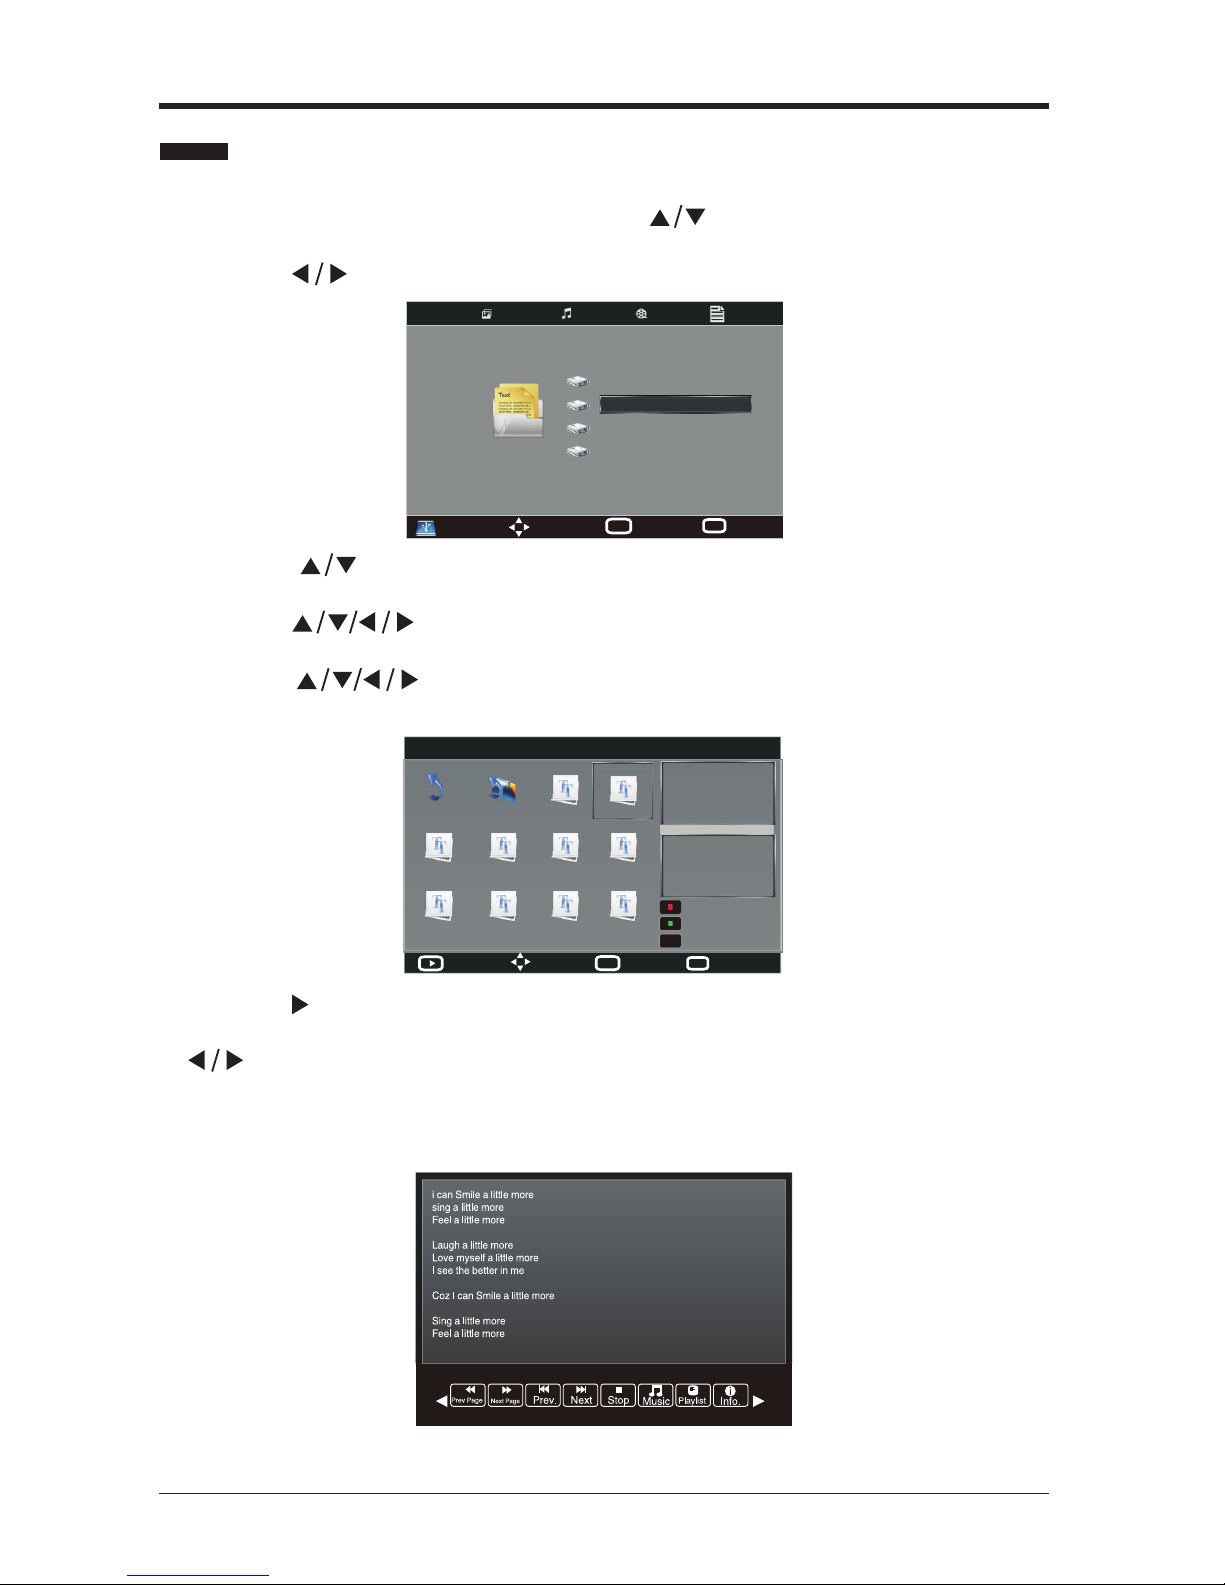
• Press the button to view the text in full screen.
• Press the OK button or the DISPLAY
button to display the function bar. Press the
buttons and then press the OK button to select the function: Prev. page /
Next page / Prev. / Next / Stop / Music / Playlist / Info.
Note: If this folder also contains music les, you can select a music track to
play at the same time you view your texts.
• Press the SOURCE button on the front right side panel of the TV or the SOURCE
button on the remote control then press the
buttons to select the USB mode
and then press the OK button.
• Press the buttons to select TEXT.
My Text
• Press the
buttons to select your storage device and then press the OK
button.
• Press the buttons to navigate in the text folder and then press the OK
button.
• Press the buttons to select the specied text le, a preview window
will pop up.
Entertainment
• Press the EXIT button to return to the previous menu.
Move
Menu
MENU
Select
OK
USB 2.0
TEXT
Disk C:
Disk D:
Disk E:
Disk F:
D:\TXT
1/1
Move
Menu
MENU
Quit
EXIT
Full screen
Return
Up Folder
Size: 4 KBytes
Delete Current File
Add/Remove all
Add/Remove to playlist
English Music.txt
i can Smile a little more
sing a little more
Feel a little more
Laugh a little more
Love myself a little more
I see the better in me
Coz I can Smile a little more
Sing a little more
Feel a little more
01.txt
02.txt
03.txt0 4.txt 05.txt
06.txt
07.txt
08.txt
09.txt
10.txt
OK
Page 43
EN 43
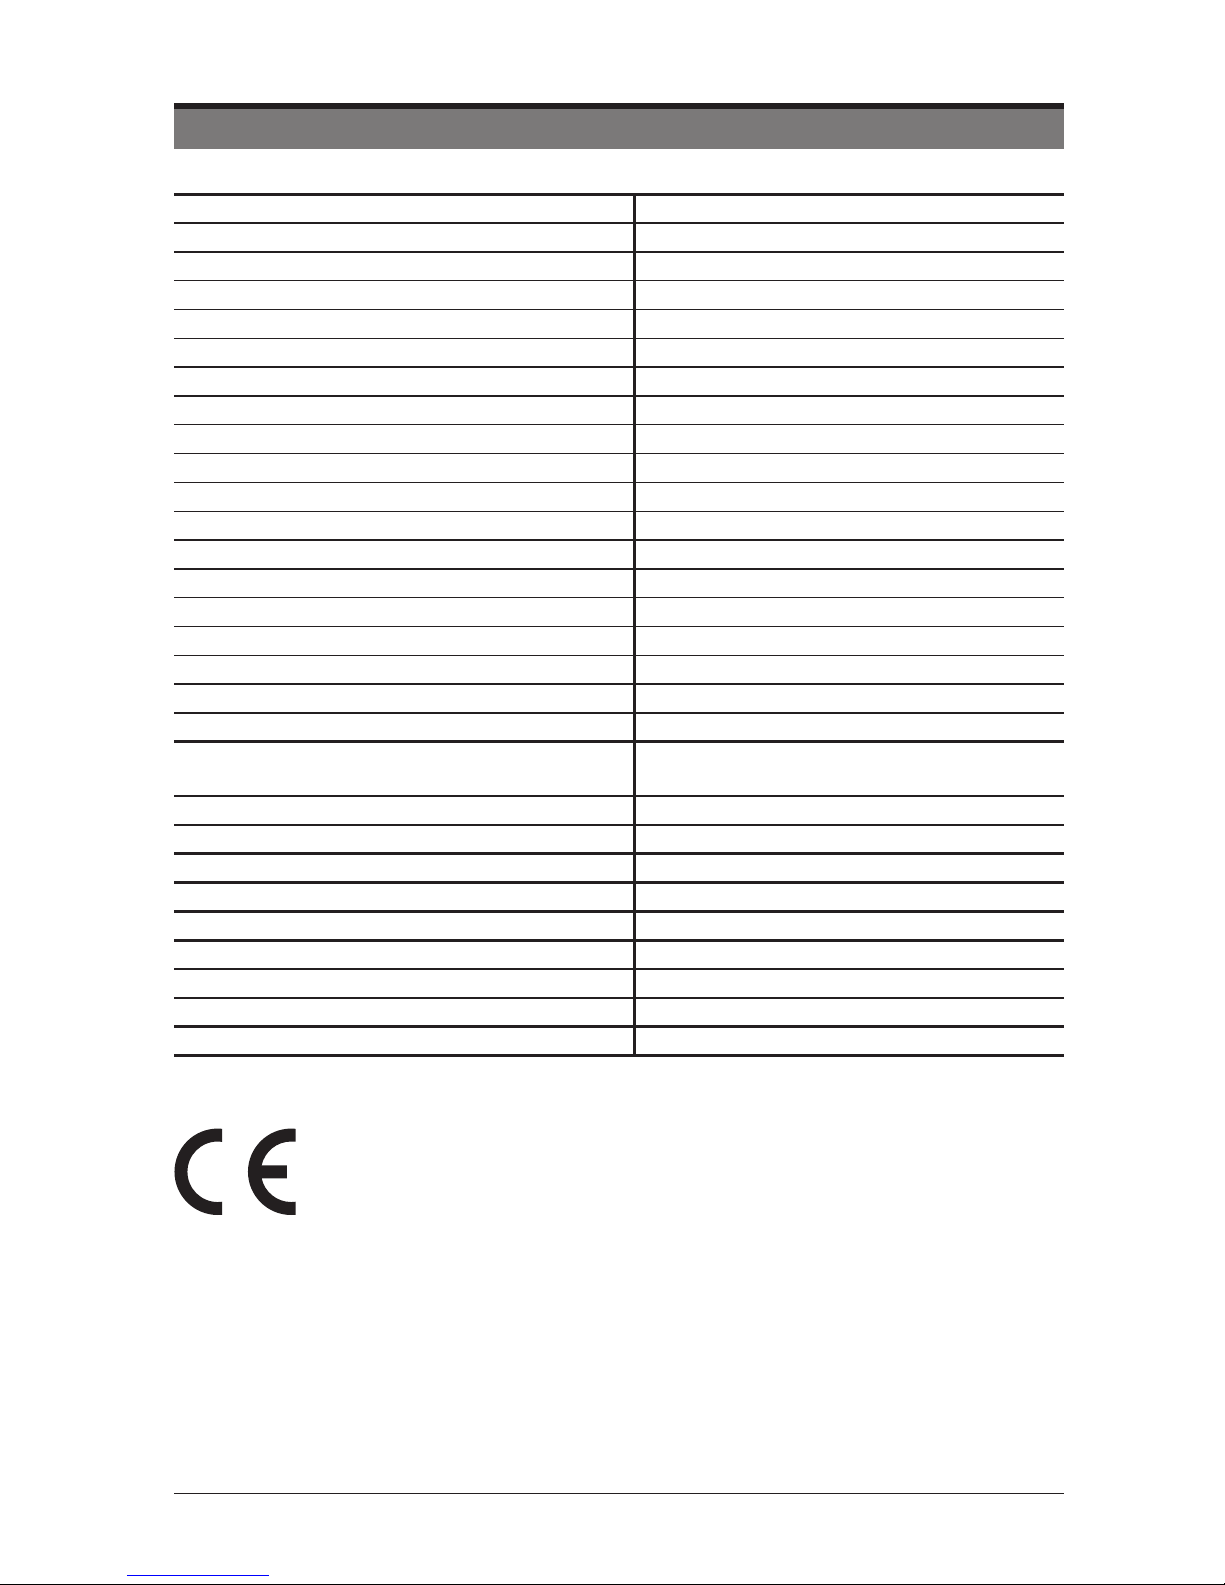
SPECIFICATIONS
Panel Size
39 inch diagonally
Display Type LED
Panel Technology TFT
Panel 60 Hz Vs. 120 Hz 120 Hz
Display Resolution 3840 x 2160
Panel Resolution 3840 x 2160
Aspect Ratio 16:9
Dynamic Contrast Ratio-Panel 3500:1
Brightness (Centre Typ.) Cd/M² 220
Dimensions DxLxH (with foot) 250 x 893 x 593 mm
Weight (with foot) 15.3 kg
Weight (without foot) 12.5 kg
Dimensions DxLxH (without foot) 72 x 893 x 539 mm
Response Time (G To G) 6.5 ms
Lamp Life (Typ. Hours) 30.000 hours
Horizontal Viewing Angle (At CR>10) 176
Vertical Viewing Angle (At CR>10)
176
Wall-mount(LxW-inches) 7.87*7.87 VESA(inches)
TV Broadcasting PAL, B/G, D/K, I, SECAM, L/L’
Receiving Channels
VHF (BAND I/III) - UHF (BAND U)
- HYPERBAND
Number of Preset Channels 299
Channel Indicator On Screen Display
RF Aerial Input 75 Ohm (unbalanced)
Operating Voltage AC 100-240V~ 50/60Hz
Energy Consumption Data EEI B
On Mode Power Consumption (W) 72W
Standby Mode (W) <0.5W
Maximum Power (W) 95W
Standby Mode After 4 Hours
Products with the CE marking comply with the EMC Directive
(2004/108/EC) and the Low Voltage Directive (2006/95/EC) issued by
the Commission of the European Community.
The declaration of conformity may be consulted at
http://www.lenco.eu/supportles/CE/3jd3n5[422nwms.pdf
Page 44

EN 44
Service and support
For information: www.lenco.com
For support: http://lencosupport.zendesk.com
Lenco helpdesk:
Germany 0900-1520530 (Local charges)
The Netherlands 0900-23553626 (Local charges + 1ct p/min)
Belgium 02-6200115 (Local charges)
France 03-81484280 (Local charges)
The helpdesk is accessible from Monday till Friday from 9 AM till 6 PM.
When contacting Lenco, you will always be asked for the model and serial number
of your product. The serial number can be found on the back of the device. Please
write down the serial number below:
Model: LED-3901-4K
Serial number:_________________________________
Lenco offers service and warranty in accordance to European law, which means
that in case of repairs (both during and after the warranty period) you should contact
your local dealer.
Important note: It is not possible to send products that need repairs to Lenco
directly.
Important note: If this unit is opened or accessed by a non-ofcial service center in
any way, the warranty expires.
This device is not suitable for professional use. In case of professional use, all
warranty obligations of the manufacturer will be voided.
®All rights reserved
www.lenco.com
 Loading...