

Page 1
User Manual
Internet Radio Tuner
IR-3000
For information and support, www.lenco.eu
Please read this user manual carefully before using the receiver
Page 2
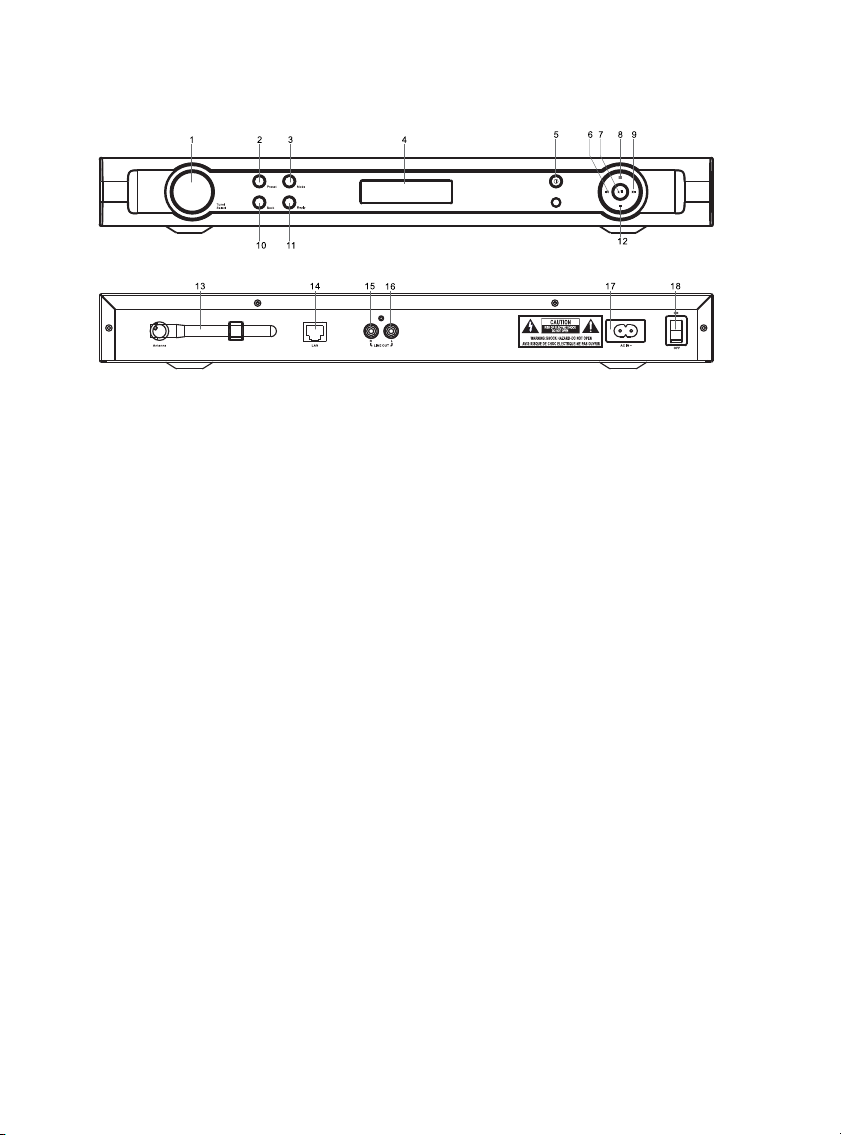
1. Tune/Select
2. Preset
3. Mode
4. LCD Display
5. Standby
6. Previous
7. Play/Pause
8. Browse
9. Next
10. Back
11. Reply
12. Stop
13. Antenna
14. LAN
15. Right Audio
16. Left Audio
17. AC Power Socket
18. Power ON/OFF
- 1 -
Page 3

SETTING UP
Please follow these steps to connect the radio to your network.
Step 1- Switching on the radio:
Plug the AC power lead into the socket at the back of the radio (17) then switch on at the main
switch to power-on the unit.
Caution: Connecting a power supply with a different rating will cause permanent damage to the
radio and may be hazardous.
The display on the front of the radio will light up and say:
Reciva Enabled
Followed by:
Note: The receiver will start in whatever mode it was last used in (Internet Radio/Media Player).
After a few seconds, this will change to show:
Step 2- Connect to network connection:
Note: If you make a mistake at any point, press the BACK button to go back to the
previous screen.
(1) Press the SELECT button;
(2) Rotate the dial until the display says “Configure”;
ARM Powered
Initializing
Network
Connecting to
SSID
Configure
(3) Press the SELECT button;
(4) Rotate the dial until the display says “Network Config”;
Network Config
(5) Press the SELECT button;
(6) Rotate the dial until the display says “Wired/Wireless”;
- 2 -
Page 4

Wired/Wireless
(7) Press the SELECT button;
(8) Rotate the dial to select the option that best describes your set up (Auto, Wired Only, Wireless
Only).
Auto
Wired Only
If you select Auto, the system will automatically detect your settings.
If you select Wired Only, it will only connect via Wired Ethernet.
Ethernet lead is plugged into the RJ45 socket.
Note: There are 2 LEDs in the RJ45 Wired Ethernet socket (green for the network link, orange
indicates network traffic);
If you select Wireless Only, the radio will connect using a Wi-Fi connection.
With a wi-fi connection, the system will search for all available networks. When the wireless
network name (ESSID) for the access point you want to connect to is displayed on the screen,
press the SELECT button. You may need to enter the correct WEP (Wired Equivalent Privacy) or
WPA (Wi-Fi Protected Access) code depending on your network security settings.
If your network is not configured to request a WEP or a WPA code, the following display will
show:
You should make sure the Wired
Connecting to
WiFi
Then the network is using one of the encryption systems:
WEP or WPA. You therefore need to enter the correct WEP or WPA code into the radio for it to
communicate with your network.
After 3 seconds the display will go into the code entry mode, if not, press SELECT.
To enter the code, rotate the dial to select each character of the code in turn, pressing the
SELECT button after each character.
WEP and WPA codes are case sensitive to upper and lower case characters so you must enter
them exactly as provided.
After the final character, rotate the dial to select END and press the SELECT key.
The display shows “Connecting to WiFi” as the radio connects to the network:
<{}~ END < >0
Connecting to
WiFi
- 3 -
Page 5

You may see the following message <Station Update From Reciva>. This indicates that a new list
of available stations is being downloaded.
USING THE EQUIPMENT
Choosing a radio station to listen to
1. Press the SELECT button when <Stations> appears in the highlighted menu.
< Stations >
If the screen does not display <Stations>, rotate the dial until it does and then press the
SELECT button.
2. Rotate the dial to choose from <Location> or <Genre>.
<Location>enables you to choose a station from a particular country.
<Genre> enables you to choose radio stations according to their content, for example
90s, Classical, Dance or Rock.
< Location >
Or
< Genre >
3. Press the SELECT button to choose the option you want:
The display will show the number of stations that are loading. The 1st station name will be
displayed – stations are listed alphanumerically.
4. Press the SELECT button for the stations you would like to listen to.
The display will show <Station Selected Buffering x%> as the station is buffered into
memory. When you are listening to a particular station, the following information will show
on the display:
For example:
BBC Radio 1: Station Name
32 kbps WMA: Transmission Information
Real Enabled: Media player capabilities
- 4 -
Page 6

Storing a radio station in a preset via the panel control:
To store the current radio station to one of the 12 available presets:
(1) Press the “preset” button.
(2) Select which preset number to store the station to by turning the dial to highlight the desired
location, then holding the "select" button for a few seconds.
For example, to store to preset 1:
(1) press the” preset” button. The following will show on the LCD display:
<preset 1>
<preset 2 >
(2) Turn the dial until Preset 1 is showing.
(3) Hold the “Select” button for about 3 seconds, until the screen displays:
Assigned to preset 1
To select a preset station while the radio is playing, press the “preset” button, turn the dial until
the desired preset number is displayed, and then press “select."
For example: to play Radio A from Preset 1, press “preset” button, turn the dial until the unit
displays”<1:A>”, then press the “select” button.
Note: some presets are stored with default content and you can overwrite them with your
favourite station.
Storing a radio station in a preset via the front remote control:
To store a preset, while listening to the desired station press the STORE button and
then the number of the preset you would like to save it to. Allow 2 seconds for the
selection to register. The LCD will then show <Assigned to preset #>.
To tune to a preset station, press the RECALL button and the preset number for the desired
station. Once you have saved a station to one of the presets, you can tune to it by pressing
RECALL button and then the number where the station is stored.
Setting the CLOCK
Note: If you make a mistake at any point, press BACK button to go back to the previous screen
1. Press the BACK button.
2. Rotate the dial until the display says<Configure>.
Configure
- 5 -
Page 7

3. Press the SELECT button.
4. Press Tune up or down until the display says<Clock>.
< Clock >
5. Press the SELECT button. Rotate the dial until the display says<Set Time>.
< Set time >
6. Press the SELECT button
Set time
00:00
7. Rotate the dial until the hour setting is correct, then press the SELECT button.
Set time
05:08
8. Rotate the dial until the minute setting is correct, then press the SELECT button.
Set time
05:12
The display will then read “Time Set” with the new time shown beneath for 3 seconds, then the
system returns to the radio station display.
Setting the ‘Sleep Timer’
Note: If you make a mistake at any point, press BACK button to go back to the previous screen
1. Press the Back button.
2. Rotate the dial until the display says<Configure>.
Configure
3. Press the SELECT button.
4. Rotate the dial until the display says<Sleep Timer>.
- 6 -
Page 8

Sleep Timer
5. Rotate the dial to change to sleep timer value and then press SELECT to begin the sleep
timer. You can select OFF from 00:15 to 03:15 (in 15 minute steps) as the sleep timeout
setting.
Note: When you set the sleep timer, the radio will continue to play as normal, but it will go into
standby mode once the sleep timer period is reached. To turn the radio back on again, simply
press the ON/OFF button.
GETTING STARTED WITH THE MEDIA PLAYER
In order to play music files on your PC using the Media player you must ensure the following:
1. Your PC has the correct type of music files (detailed below).
2. The music files on your PC are not 'protected'.
3. The music files are stored in the correct location on your PC.
4. The PC has file sharing turned on.
5. The music files can be 'shared' on the network.
6. You know the name of your PC.
MUSIC CONTENT
The Internet radio plays the most popular music types:
3pm. 3PM
amw. aideM swodniW
aR. laeR
caa. senutI
ggo. sibroV ggO
(These are the letters that appear after the file name. e.g. MUSIC.mp3)
CP NO NWOHS NOISNETXE ELIF EPYT ELIF
Instructions for streaming
1. Select Media Player on the radio. Switch on the Internet radio and press BACK until you are
at the top level menu. Rotate the dial until Media Player is displayed and press the SELECT
button.
2. You will be able to choose from 2 playback options:
< Media Player >
< Windows Shares >
UPNP Servers
- 7 -
Page 9

A. If you select ‘Windows Shares’ menu
(1) Scan for PCs is displayed, press the SELECT button. The system will scan your network and
a list of all available PCs will be displayed.
Note: If a PC does not have global file sharing turned on, or a third party firewall is protecting the
PC it will not be visible when you scan for it.
(2) Rotate the dial to highlight the PC you want to play music from and press the SELECT
button.
Note: You may be asked to enter a username and password to access the PC you have selected.
This is the same username and password you would enter to log into that machine.
(3) The Internet radio will now scan the PC you have selected and display a list of folders for
which 'file sharing' is enabled.
Note: The Internet radio will search your PC and find all folders with file sharing enabled,
regardless of content (i.e. folders with and without music files). Rotate the dial to select the folder
that contains the saved music, and press the select button.
(4) The radio will display ‘File Scan…’ as it scans through the media files in the shared folder.
The text on the bottom row of the display will change to indicate that the file scan is in
progress. If you have a large number of audio files this could take several minutes to
complete.
(5) You can now view the content of the shared folder by Album or Artist. Rotate the dial to
move through the list.
(6) When you select music to be played, it is added to the playlist and played sequentially.
Note: The first time a file scan is performed, a file called ‘.reciva_media_cache’ is written to the
folder where the audio files are stored. This is in order to speed up subsequent file scans.
Listening to a single shared track
1. Rotate the dial until ‘By Artist’ is displayed.
2. Press the SELECT button.
3. Rotate the dial until the required artist is displayed.
4. Press the SELECT button.
5. Rotate the dial until the required album name is displayed.
6. Press the SELECT button. ’[Add to Queue]’ will be displayed.
7. Rotate the dial until the required tack is displayed.
8. Press the SELECT button. The track will begin playing.
Listening to a complete shared album
1. Rotate the dial until ‘By Artist’ is displayed.
2. Press the SELECT button.
3. Rotate the dial until the required artist is displayed.
4. Press the SELECT button.
5. Rotate the dial until the required album name is displayed.
6. Press the SELECT button. ‘[Add to Queue]‘ will be displayed.
7. Press the SELECT button. The album will begin playing.
- 8 -
Page 10

Queuing up tracks for playback later
1. Highlight the required track.
2. Press the SELECT button. ‘Track Added To Queue’ will be displayed.
Queuing up albums for playback later.
1. Highlight the required album.
2. Press the SELECT button. ’Tracks Added to Queue’ will be displayed.
Controlling playback
1. Use the STOP button to stop playback.
2. Use the PLAY/PAUSE/STOP button to either pause a currently playing track or to restart a
currently paused track or to restart a stopped track.
3. Press the PLAY/PAUSE/STOP button for 2 seconds to stop a currently playing track.
4. Use the PREVIOUS button to start playback of the previous track in the queue.
5. Use the NEXT button to start playback of the next track in the queue.
6. Use BROWSE button to browse the media source e.g. playing track name
Browsing the list of tracks currently queued up for playback
1. Press the BROWSE button from the remote control. The currently playing track name will be
displayed.
2. Rotate the dial to see which tracks are queued up for playback.
3. If you want to jump to a particular place in the queue the SELECT button when the required
track is displayed.
Playing tracks in random order
1. Select the individual tracks as described previously.
2. Navigate to top-level menu item ‘Media Player’ using the SELECT and BACK buttons.
3. Press the SELECT button.
4. Rotate the dial until ‘Playback Mode’ is displayed.
5. Press the SELECT button.
6. Rotate the dial until ‘SHUFFLE’ is displayed.
7. Press the SELECT button.
8. Rotate the dial to select YES/NO to confirm that Shuffle mode should be enabled.
Playing tracks in the queue repeatedly
1. Select the individual tracks as described previously.
2. Navigate to top-level menu item ‘Media Player’ using the SELECT and BACK buttons.
3. Press the SELECT button.
4. Rotate the dial until ‘Playback Mode’ is displayed.
5. Press the SELECT button.
6. Rotate the dial until ‘Repeat’ is displayed.
7. Press the SELECT button.
8. Rotate the dial select YES/NO to confirm that Repeat mode should be enabled.
Clearing the Queue
To clear the current Queue:
1. Navigate to the top-level menu item ‘Media Player’ by using the SELECT and BACK buttons.
2. Press the SELECT button.
3. Rotate the dial until ‘Clear Queue’ is displayed.
4. Press the SELECT button. ’Queue Cleared’ will be displayed.
B. If you select ‘UPnP Severs’ menu
- 9 -
Page 11

Locating and playing media files using the radio and universal plug ‘n’ play (UPnP)
1. Once the UPnP server is configured to share media files with the Internet radio, you can play
the files by performing the following actions on the radio.
2. Keep pressing BACK to get to the top-level menu and then rotate the dial to select ‘Media
Player’.
3. Press SELECT and then rotate the dial to highlight ‘UPnP Severs’.
4. Press SELECT and the radio will scan for all available UPnP servers.
Note: This may take a few seconds for the radio to complete its scan and before the scan has
completed, the radio will display ‘[Empty]’. The radio will continue to display ‘[Empty] if no UPnP
servers are found.
5. After a successful scan, select your UPnP server by rotating the dial and press SELECT.
6. The radio will now list the media categories available from the UPnP server, e.g. ‘Music’,
‘Playlists’, etc. Rotate the dial to select which category you wish to browse, press SELECT
and rotate the dial to highlight a sub category and press SELECT again. For example, you
could select ‘Music’ and then ‘Album’.
7. Rotate the dial to highlight the media files you wish to play and press SELECT.
8. The radio will display ‘[Add to Queue]’, press SELECT and the radio will add the tracks to its
queue and begin playing them automatically.
Set up a Windows PC to allow the radio to access your audio files via a UPnP server
1. If your PC is running Microsoft Windows XP, you can use Windows Media Player 11 (WMP11)
to act as your UPnP media server. WMP11 can be downloaded and installed from the
Microsoft website.
2. Once installed, WMP11 will create a library from all the media files available from your PC. To
add new media files to the library, select ’File > Add to Library…> Advanced Options’, click
‘Add’ and choose the files you wish to add and click’ OK’.
3. You will now need to connect your Internet radio to WMP11 and configure it to allow the radio
to access your media library. In order to this , you will need to do the following:
a. Keep pressing BACK to get to the top-level menu and then rotate the dial to select
‘Media Player’.
b. Press SELECT and then rotate the dial to highlight ‘UPnP Servers’.
c. Press SELECT and the radio will scan for all available UPnP servers.
Note: This may take a few seconds for the radio to complete its scan. While the scan is being
performed, the radio will display ‘[Empty]’. The radio will continue to display ‘[Empty]’ if no UPnP
servers can be found.
d. After a successful scan. Select your UPnP server by rotating the dial and then press
SELECT.
4. Your PC will now prompt you that a device has attempted to connect to your UPnP server. In
order to allow the radio to have access to the media files, you will need to click the ‘Library’
tab on WMP11 and select ‘Media Sharing…’.
- 10 -
Page 12

Selecting ‘Media Sharing…’ for Windows Media Player11 :
5. From the ‘Media Sharing’ windows, the radio will be listed as an unknown device. Click on the
unknown device listed, then click the ‘Allow’ button and then click ‘OK’.
Allowing the Radio to Connect:
Note: When the media is playing, you are able to change the mode of playback via selecting
Media Player/Playback Mode.
- 11 -
Page 13

Configure Menu
1. Press the SELECT button.
Note: If you make a mistake at any point, press the BACK button to go back to the previous
screen.
2. Rotate the dial until ‘Configure’ is displayed
3. Press the SELECT button.
4. Rotate the dial until the display shows the option you want.
5. Press the SELECT button to choose the option shown on the display. The options are
explained below.
<Network Config>
Enables you to configure your radio network settings, scan again for a connection to another
wireless network, or to manually configure the network parameters. This is useful if you take the
Internet radio to another building to use.
Once the radio has established a certain type of connection to the network, then this type of
connection will remain in use while the radio is on.
You can enable or disable the WIFI low signal warning under the Signal Warning Menu.
<Version>
Displays the version numbers of the Internet radio software and hardware.
<Upgrade Firmware>
Use this option to download new firmware for the radio from the Reciva portal on the Internet. If
there is new firmware available, the radio will prompt you whether or not you want to download it.
Note, at this stage, you can press the BACK button to cancel the firmware upgrade. A firmware
upgrade may take several minutes. The radio may be permanently damaged if you switch off the
power while the upgrade is taking place.
<Language>
Allows you to change the display language.
<Factory Reset>
Puts all the settings back to their default as they were when the radio left the factory. If you
perform a factory reset on your radio you will lose all your presets and your wireless network
connection.
<Register>
This will display a key that can be used to register the radio on the Reciva Customer portal.
<Clock>
Use this option to set the time, see ’”Setting the clock’’.
<Sleep Timer>
Use this option to set the sleep timer
<Backlight>
Selecting this option will alter the Internet radio’s backlight values.
1. After select the ‘Backlight’ menu item, three menu modes are available: ‘Inactive’, ‘Active’ and
‘Standby’. These three states are explained below:
The ‘Active’ state is when there is user activity.
‘Standby’ is the state when the radio has been turned off
The radio sets to ‘Inactive’ when there is no user activity for 30 seconds.
- 12 -
Page 14

2. Rotate the dial to highlight the desired menu mode and press SELECT.
3. The radio will now display the current backlight value for the menu mode. You can alter this
value by rotating the dial to increase or decrease it.
<Deemphasis>
In this menu you can enable or disable the Deemphasis (default is OFF)
Menu list: Configure > Deemphasis > 1, OFF; 2, ON
<WiFi Strength>
Selecting this option will show the WiFi strength of the receiver as a percentage.
Configuring ‘My Stuff’
Registering an account on Reciva’s website
1. Open the website http://www.reciva.com
2. Click on the ‘My Account’ link and follow the on-screen instructions to register an account.
Please note, during the registration process, a validation code will be sent to you via email.
Please enter this code when prompted to do so.
3. After logging into your account, you will be able to edit your information for ‘My Stations’,’My
streams’, ’My Detail’ and ‘My Radios’ from the ‘My Account’ section.
4. You can now add your Internet Radio to your account on the website by accessing the ‘My
radios’ link. From the ‘My Radios’ section, you will need to enter the eight-digit serial number
of the radio, which can be found on the ‘Configure > Version’ menu on the radio, and you will
also need to enter in your registration code – which can be found from the ‘Configure >
Register’ menu on the radio.
Configuring ‘My stations’
1. It is possible to search for radio stations that are available in Reciva’s stations’ database from
Reciva’s website. Whenever stations are searched for on the website, they will be displayed
in a list of search results together with a link to ‘Add to my stations’.
2. Clicking on the ‘Add to my stations’ link, will add the station to your ‘My stations’ list. This list
can be edited by clicking on ‘My stations’ under the ‘My account’ section on the website.
3. Once you have Internet station available in your ‘My stations’ list, you may play these stations
from your Internet Radio. These stations will be available on your radio from the menu
item: ’Stations > My Stuff > My stations’. Please note the stations will only be available to your
radio once your radio has downloaded a new stations list. To download a refreshed list of
stations, you will need to switch your radio off and on again.
To add desired stations or streams
1. Once logged into your Reciva account, you can add your own Internet radio streams to the
‘My streams’ section, which is listed under the ‘My account’ section.
2. Clicking on’ My streams’ will prompt you to enter the station’s name and its media stream
URL. The media stream URL should be a link to a website’s actual audio stream. If you have
any doubt about locating the media stream URL from a webpage, then please refer to the
FAQs section on Reciva’s website, http://www.reciva.com
3. Once you have Internet radio streams available in your ‘My streams’ list, you may play these
stations from your Internet radio. These stations will be available on your radio from the menu
item: ‘Stations > My stuff > My streams’. Please note the streams will only be available to
your radio once a new station list has been downloaded. To download a new stations list,
please switch the unit off and on again.
from your Internet browser.
- 13 -
Page 15

TROUBLESHOOTING
1. If you have trouble connecting the radio to your wireless network, these steps may
help to resolve the problem:
Confirm that another Wi-Fi or Ethernet Wired-connected PC can access the Internet (i.e. can
browse the web) using the same network.
Check that a DHCP server is available, or that you have configured a static IP address on the
radio.
Check that your firewall is not blocking any outgoing ports. As a minimum, the radio needs access
to UDP and TCP ports 80, 554, 1755, 5000, and 7070.
Some access points may be set so that only equipment with registered MAC addresses can
connect to them. This is one possible cause of the Internet Radio being unable to connect to the
Wi-Fi network, and the Internet Radio display will show Bad ESSID or key. To overcome this
problem you will need to add the Internet Radio’s MAC address to the list of allowed equipment in
your access point. The Internet Radio’s MAC address can be found using the menu item
Configure > Network Config > View Config > MAC address. You will need to refer to the guide for
your Access Point in order to enter the Internet Radio as an allowed piece of equipment.
If you have an encrypted network, check that you have entered the correct key or passphrase into
the radio. Remember that text format keys are case sensitive.
If your wireless network name (ESSID) is ‘Hidden’ (a setting on the wireless access point), then
you can either unhide it, or manually enter the name into the Internet radio and media player:
Select Configure, Select network, Enter ESSID. Confirm if the Network is encrypted, e.g. requires
a WEP or WPA key, then enter the network name.
2. If your radio can connect to the network successfully, but is unable to play particular
stations, it may be due to one of the following reasons:
The station is not broadcasting at this time of the day (remember it may be located in a different
time zone).
The station has too many people trying to connect to the radio station server and the server
capacity is not great enough.
The station has reached the maximum allowed number of simultaneous listeners.
The station is no longer broadcasting.
The link on the radio is out of date. This is updated automatically every day, so the next time you
turn on the radio, the link will be recognized.
The Internet connection between the server (often located in a different country) and you is slow.
Some Internet service providers may fail to stream in certain geographical areas. Try using a PC
to play back the stream via the broadcaster’s web site. If you can play back the station with a PC,
use the form at http://www.reciva.com/station/add_station.asp to notify us so that we can change
the station data that is used by the radio.
If you have a laptop, try connecting to the radio station using that.
3. When you scan for PCs none can be found, or the PC you are looking for does not
appear in the list:
Global File sharing is not enabled on the PC.
The PC you are looking for is in another part of the network separated by a router. (This may
happen if you have two access points on the same network, and the Media source is on one
Access Point and the Internet radio is on another).
The PC with the media content may not have the same workgroup as the server managing the
network. The easiest solution is to change the PC workgroup name to the same as that being
supported by the server.
You have not connected to the wireless Access point. On the Internet radio, select ‘Configure’,
‘Network Configure’, ‘Select Network’, ‘Scan’ and then select your Wireless network. (You may
need to enter a security key to access the network wirelessly.)
You have not enabled simple file sharing on Windows 2000. In Windows 2000 simple file sharing
- 14 -
Page 16

can be selected in Control Panel, by selecting Folder options, view Tab. The safest way for users
to enable the service is to run the ‘Set up a home or small office network’ wizard from Control
Panel, Network Connections.
You have a firewall set on your PC which is stopping you accessing shared files.
Windows 2000 doesn’t come with a real firewall so unless you have installed one this should not
be a problem.
You have a third party firewall in your network, which is preventing file sharing.
If you have a third party firewall (Like Norton, or Zone Alarm) that will have its own control panel
and you will need to consult the manual for your firewall.
If your PC is connected to a managed network with a server, the PC being searched for needs to
be in the server workgroup.
4. You can see the PC you want to play music from, but cannot find any folders on the
PC:
The folder which has your music in it is not shared. You will need to locate the file you want to
share, right click on the folder, and select ‘Properties’, Then tick share this file.
The folder is not in an accessible place, i.e. it is in, My music, My documents or on the Desktop.
You will need to move the folder to the root directory.
You have entered the wrong user name or password for the PC account you are trying to access.
Check and re-enter the user name and password, note the password is case sensitive.
You have a firewall running which is preventing the Internet radio from seeing the shared folder.
As a quick check, you can disable firewalls like Norton to see if this overcomes the problem, if this
resolves the issue then you can either leave the firewall off, or allow file sharing through the
firewall.
Note: If you firewall is required to provide security for your system, it should not be left off.
Note: Although you can share a CD drive, you cannot stream music directly from the drive.
5. Whenever I enter my media folder , the Internet radio rescans the content of the
folder:
Although the folder with your music in it is shared , it is ‘write protected’, so the Internet Radio
cannot save a list of the folder’s content back onto the PC, as it needs to rescan each time.
Tick the box that allows the Folder to be modified across the network.
6. Although I can see my music files in the folder, I cannot play them and the Internet
Radio says they are ‘Protected’:
When you copied the music files to the hard drive you had ‘Personal Rights management’ turned
on, this protects the files from being played by a third party device like the Internet Radio. You will
need to copy the music files again, but with the protection turned off.
You are trying to play iTune files which have been purchased from the iTunes online store, these
are protected and can only be played on an iPod. Locally created or ‘ripped’ files for iPods can be
played as they do not carry the extra layer of Media Protection.
7. I can access the PC with my Media, but when I change to the Use Account, I cannot
see the folder , although it is shared when I check my PC:
The Alternative account on the machine may be Private. If when the account was created the
‘Make this account Private’ option was selected, the contents of this account cannot be seen over
the network. You will need to move the music to an accessible account.
8. I can’t share a folder , as the option is not highlighted:
The share folder option will not be available until you have turned simple file sharing on. Run the
wizard.
Scan Error:
When the Internet radio is scanning the content of the folders on a PC, the windows file sharing
application may time out. This is most likely to occur if both the PC with the media content and
the Internet Radio are connected wirelessly.
- 16 -
Page 17

Try re-connecting the PC with the media content into the network via cable. This will dramatically
increase the speed at which the Internet Radio is able to scan the content of the Media PC.
Playlists:
Some media ripping applications allow ‘Playlists’ to be created. The Internet Radio is able to
detect and stream these playlists, but they must be stored in the folder with the rest of the Media
content and they must have the file extension.m3u.
Windows Media player can create suitable playlist, just select ‘create new playlist’, drag and drop
the tracks you want into the playlist, then use ‘Save as’ to ensure the file type is .m3u. (Existing
play lists can be opened and re-saved in this format.) When the Internet Radio detects playlists, it
will enable a new menu option allowing the playlist to be selected and added to the queue.
If you re-connect to another PC of folder, which does not have any Playlists in the .m3u. format,
the playlist option will not be presented in the menu.
9. If the Internet Radio keeps re-buffering radio station:
The Internet Radio streams data from the radio station via your broadband connection. If there is
a high error rate on your broadband connection, or the connection is intermittent, then it will
cause the Internet Radio to pause until the connection is re-established and it has received
enough data to start playing again.
If your Internet Radio keeps stopping, please check the DSL modem to ensure that the
Broadband line is not suffering a high error rate or disconnections. If you are experiencing these
problems, you will need to contact your broadband supplier.
10. What is Buffering?
When playing a stream, the Internet Radio/Media player, downloads a small amount of the stream
before it starts playing. This is used to fill in any gaps in the stream that may occur if the Internet
or the wireless network is busy.
The Internet Radio streams music data from the PC while you are listening. If a stream gets
blocked or experiences Internet congestion while transferring, it may stop/interfere with the quality
of play. If this happens, check your Internet connection speed – it must be faster than the speed
of the streams.
Software Licence information
This product contains software licensed under version 2 of the GNU public licence and version
2.1 of the GNU Lesser Public Licence, The source code for this software is available from:
http://www.reciva.com/gpl/
This product includes technology owned by Microsoft Corporation and under a licence from
Microsoft Licensing GP. Use or distribution of such technology outside of this product is
prohibited without a licence from Microsoft Corporation and/or Microsoft Licensing, GP as
applicable.
Warning
Any changes or modifications not expressly approved by the manufacturer may make this system
unusable.
The apparatus should be kept away from liquids, including drips and splashes and should be kept
away from objects filled with liquids, such as vases.
Excessive volume levels from earphones and headphones can cause hearing loss.
An appliance coupler is used as the disconnect device leaving the system in standby mode. To
be completely disconnected the power input, the appliance must be disconnected from the mains
completely.
Batteries should not be exposed to excessive heat such as sunshine, fire or the like; there is a
danger of explosion if a battery is incorrectly replaced, and batteries should only be replaced with
the same or equivalent type.
Power input information
AC 100~240V 50-60Hz 6W
- 17 -
Page 18

Remote control:
1. POWER: Press to switch the Internet radio ON/OFF.
2. MUTE: Press to mute the sound.
3. REPLY: Reserved for future services.
4. 0---9: Numeric buttons for Store and Recall functions.
5. STORE: Use to store 100 (0–99) radio stations.
6. RECALL: Use to play the preset stations.
7. --/-: Select the numeric bits.
8. MODE: Press to switch from Internet Radio to Media Player mode.
9. BACK: Press to go back to the previous display.
10. UP/DOWN: Use to search for stations, and fro navigating the menus.
11. PLAY/PAUSE: Press to play/pause playback.
12. SELECT: Press to select a displayed option.
13. BROWSE: Press to view the name of the track currently playing and then press up or
down to see the list of tracks waiting in the play queue.
14. STOP: Press to stop playback, with a track name displayed, press and hold to delete
the track.
15. PREV: Press to start playback at the previous track.
16. NEXT: Press to start playback at the next track.
17. REPEAT: Press to switch repeat playback on/off.
18. SHUFFLE: Press to switch random playback on/off
If at any time in the future you should need to dispose of this product please
note that: Waste electrical products should not be disposed of with household
waste.Please recycle where facilities exist. Check with your Local Authority or retailer
for recycling advice.
(Waste Electrical and Electronic Equipment Directive)
- 17 -
 Loading...