

Page 1
film4200ib20091009001
Eng
2.1 HIGH POWER SPEAKER
WITH iPod DOCKING STATION
Speakerball for iPod
80gms paper // folded size: 105(W)x146(H)mm
68PP
For information and support www.lenco.eu
IPD4200_lencoIB
2010/3/23 VER 03
Page 2

Table of content
EngEng
Important Safety Instructions........................................................................................
Features......................................................................................................................
Installation ..................................................................................................................
Description of Parts ....................................................................................................
Listening to iPod..........................................................................................................
iTunes Operation .....................................................................................................
EQ preset, Treble and Bass setting..........................................................................
Listening to External Audio Source...........................................................................
Care and Maintenance................................................................................................
Warranty......................................................................................................................
Specifications..............................................................................................................
3
4
5
6-8
9
10
10
11
12
13
13
2
Page 3

EngEng
Important Safety Instructions
When used in the directed manner, this unit has been designed and manufactured to
ensure your personal safety. However, improper use can result in potential electrical
shock or fire hazards. Please read all safety and operating instructions carefully before
installation and use, and keep these instructions handy for future reference. Take
special note of all warnings listed in these instructions and on the unit.
1. Water and Moisture
The unit should not be used near water. For example: near a bathtub, washbowl,
kitchen sink, laundry tub, swimming pool or in a set basement.
2. Ventilation
The unit should be situated so that its location or position does not interfere with its
proper ventilation. For example, it should not be situated on a bed, sofa, rug or similar
surface that may block the ventilation openings. The ventilation should not be impeded
by covering the ventilation openings with items, such as newspapers, table-cloths,
curtains, etc. Also, it should not be placed in a built-in installation, such as a bookcase
or cabinet, which may impede the flow of air through the ventilation openings.
3. Heat & Flame
The unit should be situated away from heat sources such as radiators, heat registers,
stoves or other appliances (including amplifiers) that produce heat.
No naked flame sources, such as lighted candles, should be placed on the apparatus.
4. Power Source
The unit should be connected to a power supply only of the type described in the
operating instructions or as marked on the appliance.
Where the AC/DC Adaptor is used as the disconnect device, the disconnect device
shall remain readily operable.
5. Power Cord Protection
Power supply cords should be routed so that they are not likely to be walked on or
pinched by items placed upon or against them. It is always best to have a clear area
from where the cord exits the unit to where it is plugged into an AC outlet.
6. Cleaning
The unit should be cleaned only as recommended. See the section "Care and
Maintenance" of this manual for cleaning instructions.
7. Object and Liquid Entry
Care should be taken so that objects do not fall and liquids are not spilled into any
openings or vents located on the product. It shall not be exposed to dripping or
splashing and that no objects filled with liquids, such as vases, shall be placed on
the apparatus.
8. Attachments
Do not use attachments no recommended by the product manufacturer.
9. Lightning and Power Surge Protection
Unplug the unit from the wall outlet and disconnect the periods of time. This will
prevent damage to the product due to lightning and power-line surges.
10. Overloading
Do not overload wall outlets, extension cords, or integral convenience receptacles
as this can result in a risk of fire of electric shock.
3
11. Damage Requiring Service
This unit should be serviced by qualified service personnel when:
A.The power supply cord or plug has been damaged.
B.Objects have fallen into or liquid has been spilled into the enclosure.
C.The unit has been exposed to rain.
D.The unit has been dropped or the enclosure damaged.
E.The unit exhibits a marked change in performance or does not operate normally.
12. Periods of Nonuse
If the unit is to be left unused for an extended period of time, such as a month or
longer, the power cord should be unplugged from the unit to prevent damage or
corrosion.
13. Servicing
The user should not attempt to service the unit beyond those methods described
in the user's operating instructions. Service methods not covered in the operating
instructions should be referred to qualified service personnel.
Features
Thank you for purchasing the SPHERIC iPod DOCKING SPEAKER.
This model incorporates following features :
Different iPod models Player / Re-charger
iTunes function by connecting a USB cable to a computer / network
Audio LINE-IN for connecting other digital audio player
Built-in 2 High Fidelity Speakers
Built-in Sub-woofer for heavy bass effect
Remote Control operation
Preset EQ effect
iPod, iPod mini, iPod nano, iPod touch, iPod classic and iPod shuffle are trademarks
of Apple Computer Inc., registered in the U.S. and other countries.
iPod is not included.
4
Page 4
EngEng
Installation
AC-DC Adaptor Connection
The unit can be powered by an external AC-DC Adaptor, required the output DC 24V
1000mA (included).
(1) Connect the adaptor's DC output plug to the DC-in jack of the unit.
(2) Firmly and securely plug the adaptor's AC plug into AC main outlet.
Remote Control
The remote control operates on one CR2032 battery (included).
To activate the remote control, remove the insulation tab inserted in the battery
compartment.
Warnings:
Batteries (battery pack or batteries installed) shall not be exposed to excessive heat
such as sunshine, fire or the like.
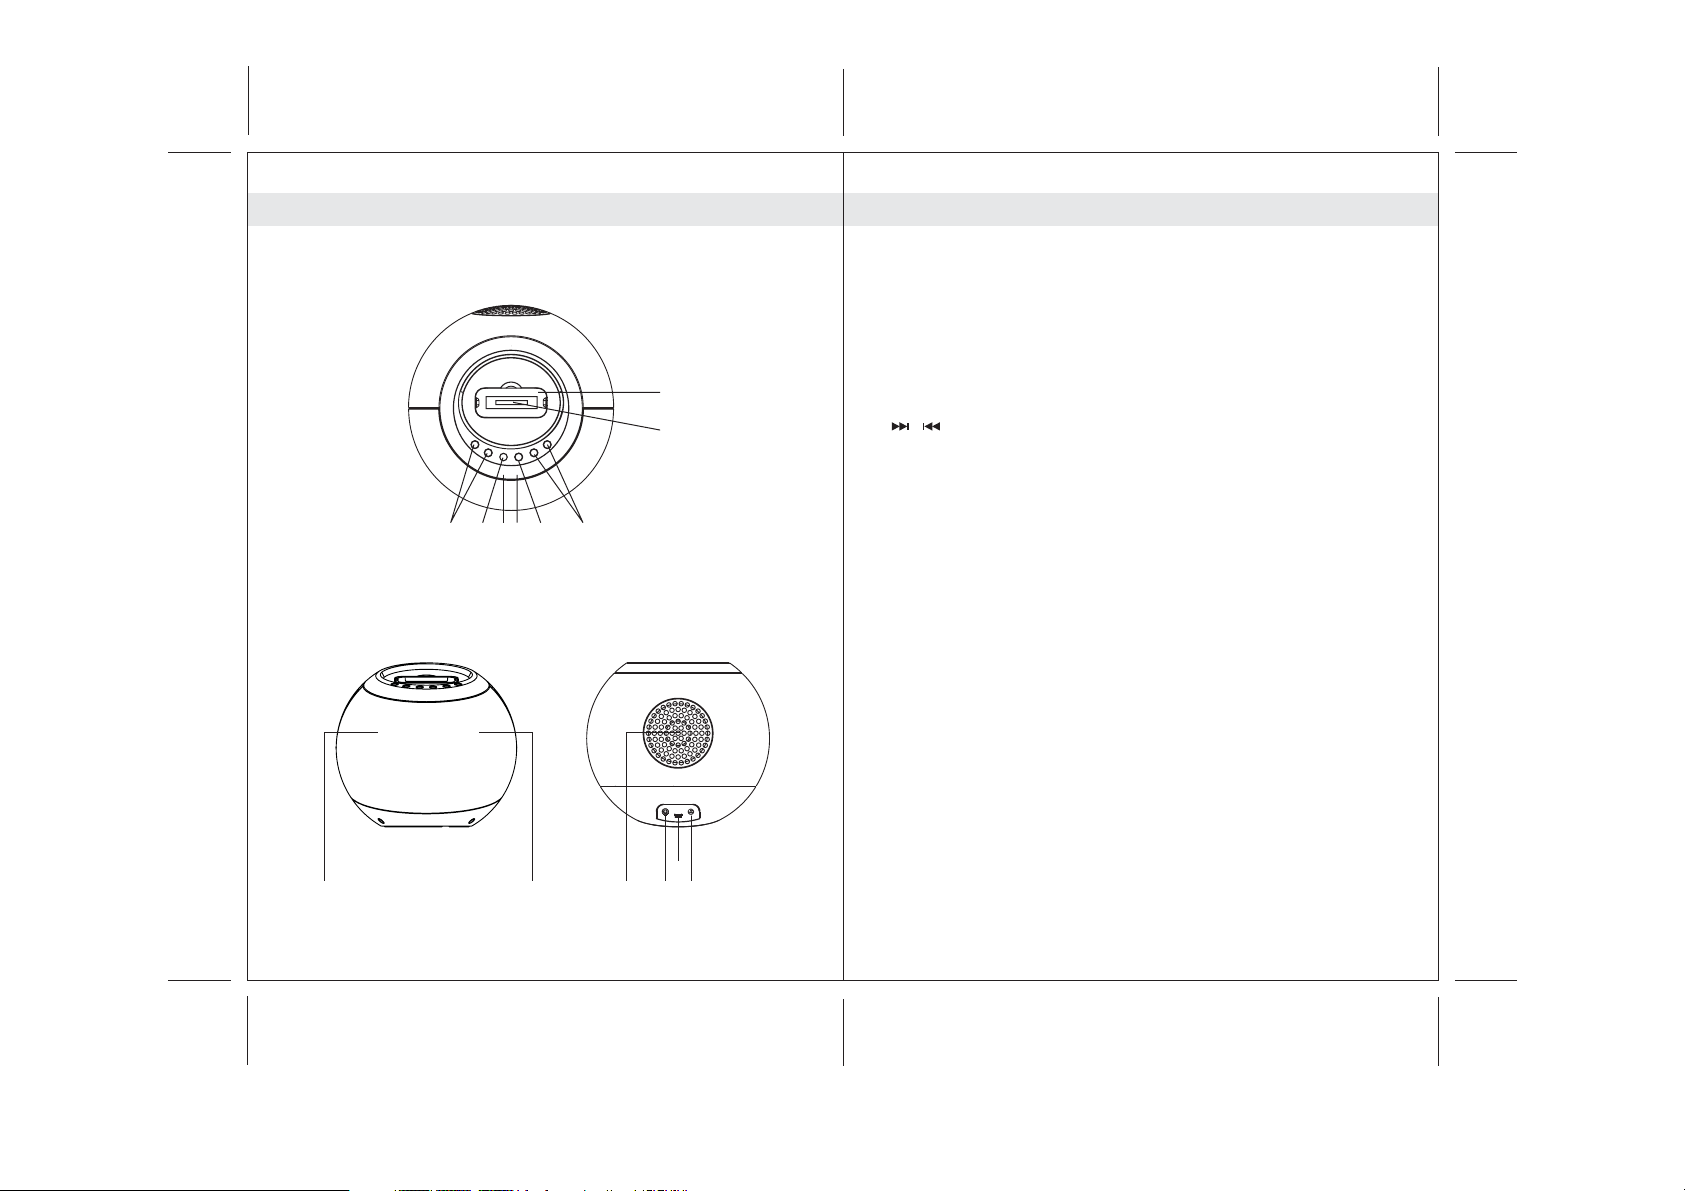
Main Unit
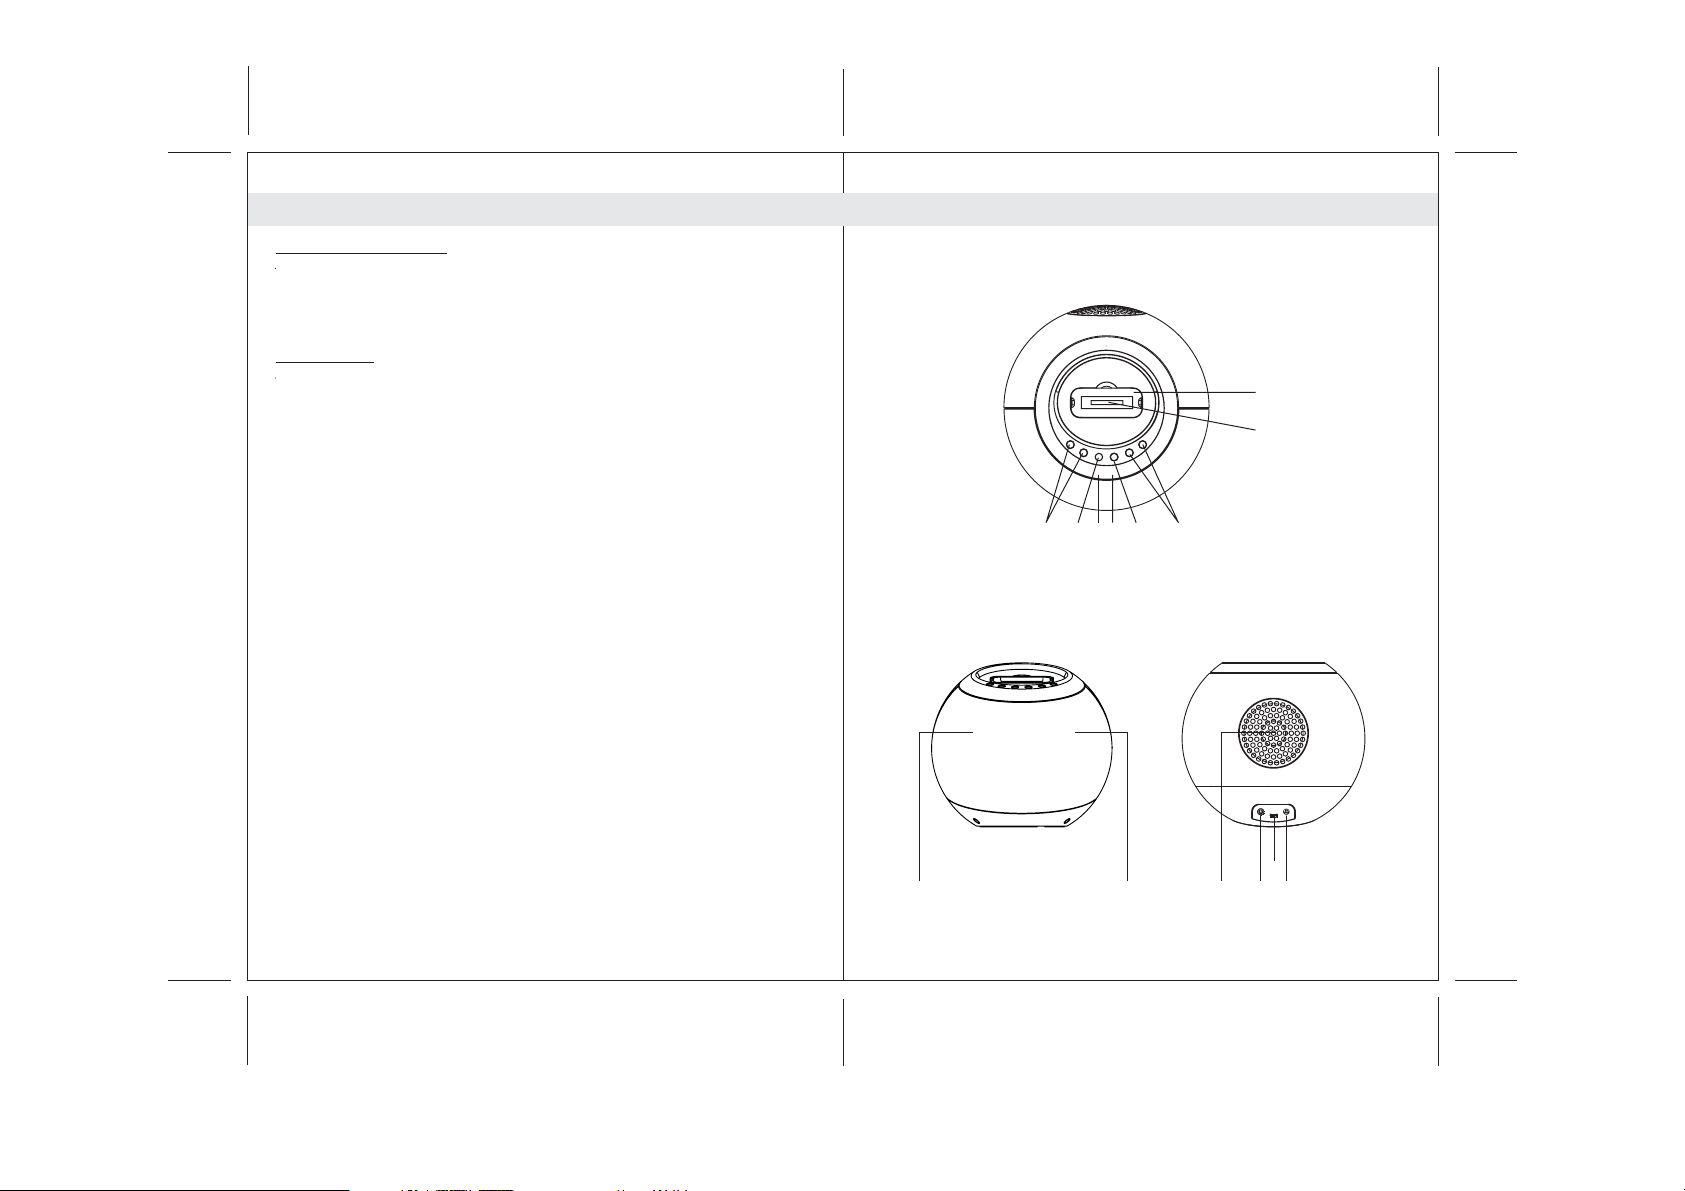
Description of Parts
Top View
1
2
6378 45
Rear ViewFront View
131211109 9
5
6
Page 5
EngEng
Description of Parts
Main Unit
1. iPod docking station
2. iPod docking connector
3. POWER button ----- To turn the unit on and off ; select iPod or
AUX-IN mode
4. Power Status indicator: LED
5. Remote Control Sensor
6. VOL + / - button ----- Adjust volume level up or down
7. iPod PLAY / PAUSE button
8. / button ------- Skip tracks Forward / Backward ;
perform high-speed search
9. Speakers
10. Subwoofer
11. DC-in jack ----- For the connection of external DC power supply
12. iTunes mini USB connector
13. LINE IN jack ----- Auxiliary audio signal input
Description of Parts
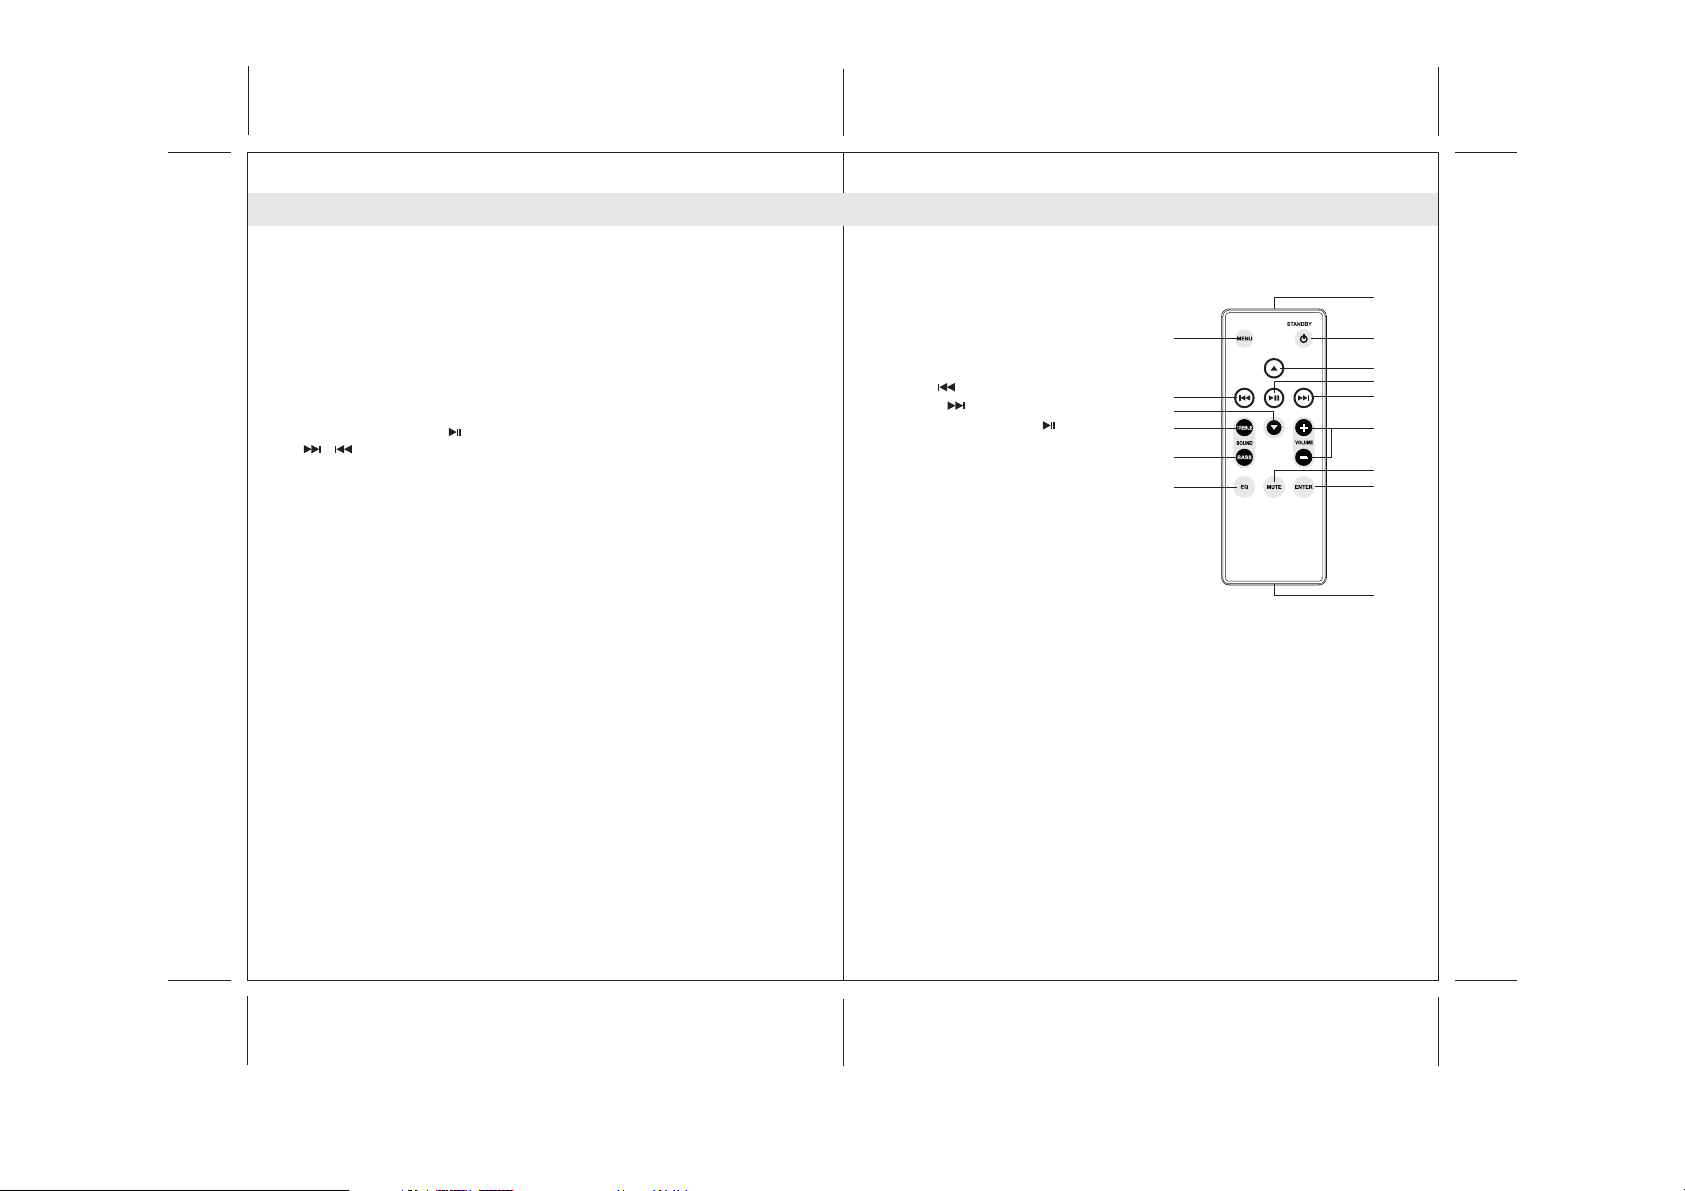
Remote Control
1. Infrared Transmitter
2. STANDBY button
3. Up button
4. Down button
5. Left / button
6. Right / button
7. iPod PLAY / PAUSE button
8. MENU button
9. VOL + / - button
-----
Adjust volume level up or down
10. TREBLE button ---Adjust treble level
11. BASS button ----- Adjust bass level
12. ENTER button
13. MUTE button ----- Mute the volume
14. EQ button ----- Select preset EQ effect
15. Battery Compartment
Accessories
- iTunes USB cable x 1
- Auxiliary audio line in cable with 3.5mm stereo plugs ;
Length = 1 Meter x 1
- Auxiliary audio line in cable with 3.5mm stereo plugs ;
Length = 1.5 Meter x 1
- iPod docking station cover x 1
- AC / DC power adaptor x 1
8
5
4
10
11
14
1
2
3
7
6
9
13
12
15
7
8
Page 6

EngEng
Listening to iPod
This model adopts different iPod models. If the docking port will not be used
for an extended period of time, it is recommended to cover the docking port
by using the "Dock Cover " insert (included).
1. Select a suitable adaptor for your iPod (the one with your iPod at the time
of purchase) and insert it into the docking area.
Your iPod can now be inserted into the docking port by placing the
connector on the bottom of the iPod onto connector in the docking bay.
Caution
2. When the unit is at power off mode, the Red colour power status
indicator is on. Press the POWER (STANDBY) button once to turn on the
unit and the power status indicator turns Blue.
Note
3. In iPod mode :
- To start playback music, press the PLAY/PAUSE button once.
-
-
-
-
-/
From the remote control, it can implement following operation as well:
-
-
-
4. To turn off the unit, press and hold the POWER (STANDBY) button until the
power status indicator turns Red.
When the unit is in standby mode and the iPod is connected the unit will
automatically charge the iPod's battery.
: Please be careful when seating the iPod into the docking to
avoid damaging the 30-pin connector on the iPod or in the
docking system.
: Press the POWER button will toggle between iPod and AUX-IN
mode, the Blue power indicator on.
To pause the music , press the PLAY/PAUSE button.
To resume music , press the PLAY/PAUSE button again.
You may press the VOL + / - button to adjust the volume to a desired level.
When a song playback, press and hold the / button to perform high
speed search forward / backward.
To skip to next or previous song, prese the button.
To access iPod menu, press the MENU button.
You may press the navigation buttons ( Up / Down / Left / Right / Enter
buttons) as from you iPod to highlight and select desired items.
To mute the volume, press the MUTE button and the Blue status indicator
blinks.
9
The unit provides an iTunes connector located at rear of the unit and let
you implement the iTunes function without unplug the iPod from the
docking station.
1. Connect the mini USB connector of the USB cable to the mini USB
connector located at rear of the unit.
2. Connect the USB connector at the other end of USB cable to the USB
port of a computer.
3. An iPod is docked at the docking station and iPod mode is selected.
4. Operate iTunes feature from the computer (internet) as usual.
(note: below functions can only be set with the remote control.)
Treble setting :
Press the TREBLE button once entering Treble setting mode, the status
-
indicator blinks between Pink and Blue light.
During the status indicator blinks (Pink/Blue), press VOLUME button to
-
adjust to the desired Treble level.
The unit will auto-exit Treble setting mode after few seconds and the Blue
-
status indicator stay on.
Bass setting :
Press the BASS button once entering Bass setting mode, the status
-
indicator blinks between Pink and Blue light.
During the status indicator blinks (Pink/Blue), press VOLUME button to
-
adjust to the desired Bass level.
The unit will auto-exit Bass setting mode after few seconds and the Blue
-
status indicator stay on.
EQ setting :
The unit is designed to have four EQ presets for your selection , the
-
ROCK , POP , CLASSIC and JAZZ.
Press EQ button to select your desired preset EQ effect.
-
Press and hold the EQ button around 2 seconds to disable the EQ.
-
Note : When EQ effect is selected , it will override the previous Treble and Bass setting.
iTunes operation
EQ preset , Treble and Bass Setting
10
Page 7

Eng
Listening to an External Audio Source
The model comes with two Auxiliary audio line-in cables with 3.5mm stereo
plugs (length 1M and 1.5M) to suit your application.
When the unit is at power off mode, where the Red colour power status
indicator is on.
Press the POWER (STANDBY) button once to turn on the unit and the
power status indicator turns Blue.
: Press the POWER button will toggle between iPod and AUX-IN mode,
Note
the Blue power indicator on.
1. Connect the audio cable with 3.5mm stereo plug to the LINE IN Jack
located at rear of the unit.
2. Connect the other end of the cable to a Line Out Jack or Headphone Jack
of your external audio device.
3. Turn on the external audio device.
4. Press the POWER button to select AUX-IN mode. Listen to the speaker
output that the music is input from the external audio source which is to
certain current AUX-IN mode.
5. The volume level can now be controlled through the main unit. Operate
all other functions on the auxiliary device as usual.
Note
:
(1) If you connected the Line Out Jack of your external device then you only
need to adjust the volume control of this unit. If you connected the
Headphone Jack of your external device then you may need to adjust both
the volume control of your external device and the volume control of this
unit to find the most desirable volume setting.
(2) Press and hold the POWER button turning off the unit (the power status
indicator turns red) when you finish listening.
Don't forget to switch off power of your external device as well.
Care and Maintenance
•
Do not subject the unit to excessive force, shock, dust or extreme temperature.
•
Do not tamper with the unit's internal components.
•
Clean your unit with a damp (never wet) cloth. Solvent or detergent should
never be used.
•
Avoid leaving your unit in direct sunlight or in hot, humid or dusty places.
•
Keep your unit away from heating appliances and sources of electrical noise
such as fluorescent lamps or motors.
Warranty
If you have questions regarding the warranty, the length of warranty and the
working method of it, you can find the information on our site www.lenco.eu or
you can directly contact your retailer.
11
12
Page 8
Specifications
Power Supply
Power Adaptor Input AC 230V ~ 50Hz(For EU)
Speaker Output 6W+6W
Woofer Output 20W
Power consumption 1W
Dimensions 200 x 200 x 182mm
Weight 1286g
Operating Temperature -10~+45 C
Humidity 70%
Remote Control Operation Range 6.5m (max)
THE SPECIFICATION AND EXTERNAL APPEARANCE OF THE SET ARE
SUBJECT TO CHANGE WITHOUT PRIOR NOTICE.
Output DC 24V 1000mA
(Standby)
24W
(Max.)
o
A +/- 15 degree from normal
ngle
DE
2.1 HIGH POWER LAUTSPRECHER
MIT iPod DOCKING STATION
Speakerball for iPod
For information and support www.lenco.eu
13
80gms paper // folded size: 105(W)x146(H)mm
Für weitere Informationen und Support: www.lenco.eu
IPD4200_lencoIB
2010/3/23 VER 03
Page 9

DE
DE
Inhalt
Wichtige Sicherheitshinweise..............................................................................................
Eigenschaften und Funktionen............................................................................................
Aufstellung ..........................................................................................................................
Beschreibung der Bedienelemente ....................................................................................
iPod-Musik hören.................................................................................................................
iTunes-Betrieb .....................................................................................................................
EQ-Einstellung, Höhen und Bässe......................................................................................
Benutzung externer Audiogeräte.........................................................................................
Handhabung und Wartung...................................................................................................
Garantie................................................................................................................................
Technische Daten.................................................................................................................
3
4
5
6-8
9
10
10
11
12
12
13
Wichtige Sicherheitshinweise
Dieses Gerät wurde so konzipiert und gefertigt, dass die Sicherheit von Personen
gewährleistet werden kann, wenn es in der vorgeschriebenen Weise benutzt wird.
Bedenken Sie, dass eine unsachgemäße Benutzung Stromschlag- und Feuergefahren
zur Folge hat. Bitte lesen Sie sich alle Sicherheitshinweise und diese
Bedienungsanleitung vor der Benutzung des Geräts sorgfältig durch und bewahren Sie
sie für den späteren Gebrauch auf. Achten Sie insbesondere auf alle Warnhinweise in
dieser Anleitung und auf dem Gerät.
1. Wasser und Feuchtigkeit
Das Gerät sollte nicht in der Nähe von Wasser benutzt werden. Beispiel: in der Nähe
von Badewannen, Spülen, Waschbecken. Swimmingpools oder feuchten
Kellerräumen.
2. Belüftung
Das Gerät sollte so aufgestellt werden, dass die Luftzirkulation nicht beeinträchtigt
wird. Das Gerät sollte z. B. nicht auf ein Bett, Sofa, Bettvorleger oder eine andere
weiche Unterlage gestellt werden, bei der die Ventilationsöffnungen blockiert werden
könnten. Vergewissern Sie sich, dass keine der Ventilationsöffnungen durch
Gegenstände wie z.B. Zeitungen, Tischtücher, Vorhänge o. Ä. abgedeckt ist. Das
Gerät sollte nicht an Orten, wie z. B. Schränke oder Bücherregale, aufgestellt werden,
an denen die Luftzufuhr zu den Ventilationsöffnungen beeinträchtigt werden könnte.
3. Hitze und offene Flammen
Installieren Sie das Gerät nicht in der Nähe von Hitzequellen, wie z. B. Heizungen,
Herden oder anderen Geräten die Hitze produzieren (z. B. Verstärker) auf.
Gegenstände mit offenen Flammen wie z.B. Kerzen sollten niemals auf das Gerät
gestellt werden.
4. Stromversorgung
Das Gerät sollte nur mit der in der Anleitung oder auf dem Gerät angegebenen
Netzspannung betrieben werden.
Wenn das Netzteil zum Ein- und Ausschalten des Geräts benutzt wird, achten Sie
bitte immer darauf, dass die Steckdose immer durch den Benutzer erreichbar bleibt.
5. Schutz des Netzkabels
Das Netzkabel sollte so verlegt werden, dass es nicht möglich ist darauf zu treten und
keine Gegenstände darauf liegen. Es ist immer sinnvoll den Bereich, an dem das
Kabel aus dem Gerät austritt und den Bereich um die Steckdose herum, frei zu halten.
6. Reinigung
Das Gerät sollte nur den Anweisungen entsprechend gereinigt werden. Lesen Sie
dazu den Abschnitt „Pflege und Wartung“ in der Bedienungsanleitung für detaillierte
Reinigungsanweisungen.
7. Gegenstände und Flüssigkeiten im Gerät
Achten Sie darauf, dass keine Gegenstände oder Flüssigkeiten durch die Öffnungen
in das Gehäuse gelangen. Dieses Gerät sollte keinen Wassertropfen und -spritzern
ausgesetzt werden. Gegenstände die mit Flüssigkeiten gefüllt sind sollten nicht
auf das Gerät gestellt werden.
2
3
Page 10

DE
DE
8. Zubehör
Verwenden Sie keine Aufsätze, die nicht vom Hersteller angegeben wurden.
9. Gewitter und Spannungsschwankungen
Ziehen Sie den Stecker aus der Steckdose, wenn Sie das Gerät über einen längeren
Zeitraum nicht benutzen. Damit wird verhindert, dass das Gerät bei
Spannungsunterschieden oder Blitzeinschlägen beschädigt wird.
10. Überlastung
Überlasten Sie niemals Steckdosen, Verlängerungskabel oder Geräteanschlüsse, da
dies zu Feuer- oder Stromschlaggefahr führen kann.
11. Bei Reparaturbedarf
Lassen Sie das Gerät durch ausgebildetes Wartungspersonal reparieren, wenn...:
A.Das Netzkabel oder der Netzstecker beschädigt sind.
B.Gegenstände oder Flüssigkeiten in das Gerät gelangt sind.
C.Wenn das Gerät Regen oder Wasser ausgesetzt wurde.
D.Das Gerät ist heruntergefallen oder das Gehäuse beschädigt.
E.Das Gerät nicht wie gewohnt funktioniert oder einen starken Leistungsabfall zeigt.
12. Nichtbenutzung
Wenn das Gerät über einen längeren Zeitraum nicht benutzt wird (z. B. ein Monat
oder länger), sollten Sie den Netzstecker des Geräts aus der Steckdose ziehen, um
Schäden und Korrosion zu vermeiden.
13. Wartung
Der Benutzer sollte keine Versuche anstellen das Gerät eigenhändig zu warten, es
sei denn es wurde entsprechend in der Bedienungsanleitung beschrieben. Wenden
Sie sich bei weiterem Wartungsbedarf immer an ausgebildetes Wartungspersonal.
Eigenschaften und Funktionen
Vielen Dank fürden Kauf unseres iPod-Kugellautsprechers.
Dieses Modell verfügt über die folgendenLeistungsmerkmale:
- Wiedergabe mit verschiedenen iPod-Modellen/ Ladegerät
- iTunes-Funktion über USB-Kabelanschluss am Computer / Netzwerk
- Line-Audioeingang zum Anschluss anderer Audiogeräte
- 2 eingebaute HiFi-Lautsprecher
- Eingebauter Subwoofer für extrastarke Bässe
- Fernbedienung
- Equalizer-Effekte
iPod, iPod mini, iPod nano, iPodtouch, iPod classic und iPod shuffle sind
eingetragene Markenzeichen der Firma Apple Computer, Inc. und registriert in
den USA und anderen Ländern.
Ein iPod ist nicht im Lieferumfanginbegriffen.
Aufstellung
Anschluss des Netzteils
Dieses Gerät kann über ein externes Netzteil mit DC 24V, 1.000mAAusgangsleistung
(im Lieferumfang), mit Strom versorgt werden.
(1)Schließen Sie den DC-Ausgangsstecker des Netzteils am DC-Anschluss des Geräts
an.
(2)Stecken Sie den Stecker des Netzteils fest in eine Steckdose.
Fernbedienung
Die Fernbedienung wird mit einer CR2032-Batterie (im Lieferumfang) betrieben.
Um die Fernbedienung benutzen zu können, entfernen Sie einfach den Isolationsfilm im
Batteriefach.
Warnung:
Die Batterien (Batteriepack oder eingelegte Batterien) dürfen niemals starker Hitze, wie
z. B. Sonnenlicht, Feuer o. Ä. ausgesetzt werden.
4 5
Page 11
DE
DE
Beschreibung der Bedienelemente
Hauptgerät Oberseitenansicht
Vorderseitenansicht Rückseitenansicht
Top View
6378 45
Beschreibung der Bedienelemente
Hauptgerät
1. iPod-Docking-Station
2. iPod-Docking-Anschluss
3. POWER-Taste ---- Ein-/Ausschalten des Geräts, Modusauswahl
(iPod/AUX-IN)
4. Kontrolllampe: LED
5. Fernbedienungssensor
1
2
6. VOL +/- ----- Stellen Sie die Lautstärke mithilfe dieser Tasten ein.
7. iPod-WIEDERGABE/PAUSE-Taste
8. -------- Vor /Zurüc, Schnellsuchlauf
/
9. Lautsprecher
10. Subwoofer
11. DC-IN-Anschluss Zum Anschluss einer externen Stromversorgung
12. iTunes-Mini-USB-Anschluss
13. LINE-IN-Eingang ---- AUX-Audiosignaleingang
131211109 9
6
7
Page 12

DE
DE
Beschreibung der Bedienelemente
Fernbedienung
1. Infrarotsender
2. Bereitschaftstaste (STANDBY)
3. Navigationstaste Oben
4. Navigationstaste Unten
5. Navigationstaste Links /
6. Navigationstaste Rechts /
7. iPod-WIEDERGABE/PAUSE-Taste
8. MENU-Taste
9. VOL+/- Tasten
Erhöhen oder Verringern der Lautstärke
10. TREBLE-Taste ----
Einstellen der Höhen
11. BASS-Taste ----- Einstellen der Bässe
12. ENTER-Taste (Eingabe)
13. MUTE-Taste ----- Ton aus
14. EQ-Taste ----- Auswahl eines EQ-Effekts
15. Batteriefach
Zubehör
- iTunes-USB-Kabel x 1
- Aux-Kabel mit 3,5-mm-Stereostecker, Länge = 1 Meterx 1
- Aux-Kabel mit 3,5-mm-Stereostecker, Länge = 1,5 Meterx 1
- iPod-Docking-Station-Verschluss x 1
- Netzteil x 1
8
5
4
10
11
14
iPod-Musik hören
Dieses Gerät is geeignet für dieBenutzung mit verschiedenen iPod-Modellen.
Wenn der Docking-Anschlussdes Geräts für längere Zeit nicht benutztwird, wird
1
2
3
7
6
9
13
12
15
empfohlen die ihn mit dem Docking-Verschluss (im Lieferumfang) gegen
Staubeinwirkung zu schützen.
1. Wählen Sie den geeigneten Adapter für Ihren iPod (der Adapter, den Sie
zusammen mit Ihrem iPod erhalten haben)und schließen Sie ihn am Docking-
Anschluss an.
Die können nun Ihren iPod amDocking-Anschluss anschließen, indem Sie den
Anschluss an der Unterseite des iPodauf dem Docking-Anschluss aufsetzen.
Achtung:
2. Wenn dasGerät sich im Bereitschaftsbetrieb befindet, leuchtet dierote
Kontrolllampe auf. Betätigen Sie die POWER-Taste (STANDBY), um das
Gerät einzuschalten und die Kontrolllampe leuchtetblau auf.
Hinweis:
benutzen, um zwischen dem iPod- undAUX-IN-Modus umherzuschalten.
3. Im iPod-Modus:
-Betätigen Sie die WIEDERGABE/PAUSE-Taste zum Starten der
Wiedergabe.
-Betätigen Sie die WIEDERGABE/PAUSE-Taste , um die Wiedergabe
vorübergehend anzuhalten.
-Zum Fortfahren der Wiedergabe betätigen Siedie WIEDERGABE/PAUSE -
Taste bitte erneut.
-Sie können die Lautsprechertasten VOL+/-zumEinstellen dergewünschten
Lautstärke benutzen.
-Während der Wiedergabe können Sie durchGedrückthalten der Tasten /
den Schnellsuchlauf aktivieren.
-Mit einer einfachen Betätigung der Tasten / können Sie um zumnächste
bzw. vorigen Musiktitel springen.
Mit der Fernbedienung erhalten Sie zusätzlichZugriff auf die folgend
Funktionen:
-Greifen Sie auf das iPod-Menü mithilfeder MENU-Taste zu.
-Sie können dann die Navigationstasten (Oben/ Unten / Links / Rechts /
Eingabe) benutzen, um Funktionen auf IhremiPod auszuwählen.
-Um den Ton auszustellen, betätigen Siedie MUTE-Taste unddie blaue
Kontrolllampe fängt an zu blinken.
4. Betätigen Sie die POWER-Taste(STANDBY), umdas Gerät auszuschalten.
Die Kontrolllampe leuchtet daraufhin wieder rotauf.
Wenn das Gerätausgeschaltet und gleichzeitig ein iPod angeschlossen ist,
wird er automatisch aufgeladen.
Gehen Sie bitte äußerst vorsichtig vor, wenn Sie den iPod in den
Docking-Anschluss setzen, um zu vermeiden, dassder 30-PinAnschluss des iPods oder des Docking-Systemsnicht beschädigt
wird.
Wenn die Kontrolllampeblau leuchtet, können Sie die POWER
-Taste
8
9
Page 13

DE
DE
iTunes-Betrieb
Dieses Gerät verfügt über einen iTunes-Anschluss an der Rückseite des Geräts, mit
dem Sie iTunes benutzen können, ohne den iPod von der Docking-Station zu entfernen.
1.Schließen Sie den Mini-USB-Stecker des USB-Kabels am Mini-USB-Anschluss an der
Rückseite des Geräts an.
2.Verbinden Sie das andere Ende des USB-Kabels mit dem USB-Port Ihres Computers.
3.Achten Sie darauf, dass ein iPod angeschlossen ist und der iPod-Modus aktiviert ist.
4.Benutzen Sie iTunes auf Ihrem Computer wie gewohnt.
EQ-Einstellung, Höhen und Bässe
(Hinweis: die folgenden Funktionen können nur über die Fernbedienung benutzt werden.)
Höhen-Einstellung:
-Betätigen Sie die TREBLE-Taste und Sie aktivieren den Höhen-Einstellungsmodus.
Die Kontrolllampe blinkt abwechselnd in rosa und blau.
-Während die Kontrolllampe blinkt (rosa/blau), benutzen Sie die VOL-Tasten, um die
Höhen auf den gewünschten Pegel zu stellen.
-Das Gerät verlässt den Höhen-Einstellungsmodus nach ein paar Sekunden
automatisch und die Kontrolllampe leuchtet wieder blau.
Bass-Einstellung:
-Betätigen Sie die BASS-Taste und Sie aktivieren den Bass-Einstellungsmodus. Die
Kontrolllampe blinkt abwechselnd in rosa und blau.
-Während die Kontrolllampe blinkt (rosa/blau), benutzen Sie die VOL-Tasten, um die
Bässe auf den gewünschten Pegel zu stellen.
-Das Gerät verlässt den Bass-Einstellungsmodus nach ein paar Sekunden
automatisch und die Kontrolllampe leuchtet wieder blau.
Equalizer-Einstellung:
-Das Gerät bietet Ihnen vier verschiedene EQ-Einstellungen zur Auswahl: Rock, Pop,
Klassik, und Jazz.
-Betätigen Sie die EQ-Taste, um den von Ihnen gewünschten EQ-Effekt zu wählen.
-Halten Sie die EQ-Taste für ca. 2 Sekunden gedrückt, um die EQ-Funktion zu
deaktivieren.
Hinweis: Wenn ein EQ-Effekt aktiviert ist, werden die Höhen- und Bass-Einstellungen
deaktiviert.
Benutzung eines externen Audiosignals
Dieses Modell wird mit zwei Aux-Audiokabeln mit 3,5-mm-Steckern ausgeliefert (jeweils
mit 1 und 1,5 m Länge).
Wenn das Gerät sich im Bereitschaftsbetrieb befindet, leuchtet die rote Kontrolllampe
auf.
Betätigen Sie die POWER-Taste (STANDBY), um das Gerät einzuschalten und die
Kontrolllampe leuchtet blau auf.
Hinweis:
1.Schließen Sie das externe Audiogerät mit einem 3,5mm Audiokabel am LINE IN -
2.Schließen Sie das andere Ende des Kabels am LINE-Ausgang oder
3.Schalten Sie das externe Audiogerät an.
4.Betätigen Sie die POWER-Taste zur Auswahl des AUX-IN-Modus. Überprüfen Sie, ob
5.Sie können das Lautstärkeniveau nun über die Lautstärketasten des Geräts einstellen.
Hinweis:
(1)Wenn Sie den LINE OUT-Ausgang des externen Geräts verwenden, können Sie die
(2)Betätigen Sie die POWER-Taste, um das Gerät nach der Benutzung auszuschalten
Wenn die Kontrolllampe blau leuchtet, können Sie die POWER-Taste
benutzen, um zwischen dem iPod- und AUX-IN-Modus umherzuschalten.
Eingang an der Rückseite des Geräts an.
Kopfhöreranschluss des externen Audiogeräts an.
die Lautsprecherausgabe das Eingangssignal Ihres externen Audiogeräts wiedergibt
und ob Sie den AUX-IN-Modus aktiviert haben.
Alle anderen Funktionen können am externen Gerät wie gewohnt gesteuert werden.
Lautstärke nur an diesem Audiosystem einstellen. Wenn Sie den Kopfhöreranschluss
des externen Geräts verwenden, können Sie die Lautstärke sowohl am externen
Gerät als auch am Audiosystem einstellen.
(die Kontrolllampe leuchtet rot auf).
Vergessen Sie dabei nicht das externe Gerät ebenfalls auszuschalten.
10
11
Page 14

DE
DE
Handhabung und Wartung
* Vermeiden Sie Gewalt- oder Stoßeinwirkung und Staub bzw.
Extremtemperaturen.
* Versuchen Sie nicht die innere Bauelemente des Geräts zu manipulieren.
* Reinigen Sie das Gerät mit einem feuchten (niemals mit einem nassen)
Tuch.
Benutzen Sie zur Reinigung niemals Lösungsmittel oder Spülmittel.
* Vermeiden Sie es das Gerät direkter Sonnenstrahlung auszusetzen und
lassen Sie es niemals an besonders heißen, feuchten oder staubigen
Orten.
* Halten Sie das Gerät fern von Heizkörpern oder elektromagnetischer
Strahlung, wie z. B. von Leuchtstoffröhren oder Elektromotoren.
Garantie
Wenn Sie bezüglich der Garantie und der Garantiedauer Fragen haben,
lesen Sie bitte die entsprechenden Informationen auf unserer Webseite
www.lenco.eu oder wenden Sie sich an Ihren Händler.
Technische Daten
Stromversorgung
Netzteil
Lautsprecherausgang
Woofer-Ausgang
Stromverbrauch
Abmessungen
Gewicht
Betriebstemperatur
Luftfeuchtigkeit
Fernbedienung
ÄNDERUNGEN AM ÄUSSEREN AUSSEHEN UND DEN TECHNISCHEN
DATEN VORBEHALTEN.
Eingangsstrom: AC 230V ~ 50Hz (EU)
Ausgangsstrom: DC 24V / 1000 mA
6W+6W
20 W
1 W (Bereitsschaft)
24 W (Max.)
200 x 200 x 182 mm
1286 g
-10 ~ +45°C
70%
6.5 m Reichweite (Max)
+/- 15° vom normalen Winkel
12
For information and support www.lenco.eu
13
Page 15

Inhoudsopgave
NL
2.1 HIGH POWER LUIDSPREKER
MET iPod DOCKING STATION
Speakerball for iPod
Belangrijke Veiligheidsinstructies……….............................................................................
Kenmerken..........................................................................................................................
Installatie .............................................................................................................................
Beschrijving van de Onderdelen..........................................................................................
Naar iPod luisteren ..............................................................................................................
iTunes Bediening................................... ..............................................................................
EQ preset, Treble en Bass instelling....................................................................................
Luisteren naar Externe Audiobron........................................................................................
Zorg en Onderhoud..............................................................................................................
Garantie................................................................................................................................
Specificaties.........................................................................................................................
3
4
5
6-8
9
10
10
11
12
12
13
Voor informatie en ondersteuning www.lenco.eu
80gms paper // folded size: 105(W)x146(H)mm
2
IPD4200_lencoIB
2010/3/23 VER 03
Page 16

NL NL
Belangrijke Veiligheidsinstructies
Dit apparaat is, bij gebruik volgens de instructies, ontworpen en vervaardigd om uw
persoonlijke veiligheid te waarborgen. Echter, oneigenlijk gebruik kan resulteren in
potentiële elektrische schokken of brandgevaar. Lees voor de installatie en het gebruik
de veiligheids- en bedieningsinstructies zorgvuldig door en bewaar deze instructies op
een geschikte plaats voor toekomstige referentie. Let ook goed op alle waarschuwingen
die in deze handleiding en op het apparaat staan.
1. Water en Vocht
Het apparaat moet niet worden gebruikt in de buurt van water. Bijvoorbeeld: in de
buurt van een badkuip, wasbak, aanrecht, zwembad of een natte kelder.
2. Ventilatie
Het apparaat moet zo worden geplaatst, dat de plaats of positie de eigen ventilatie
niet in de weg staat. Zo moet het niet geplaatst worden op een bed, sofa, tapijt of
soortgelijk oppervlak, dat de ventilatieopeningen kan blokkeren. De ventilatie mag niet
worden belemmerd door de ventilatieopeningen te bedekken met voorwerpen, zoals
kranten, tafelkleden, gordijnen, etc. Ook moet het apparaat niet worden geplaatst in
een ingebouwde installatie, zoals een boekenkast of kast, die de doorstroming van
lucht door de ventilatieopeningen belemmeren.
3. Warmte & Vlammen
Het apparaat moet uit de buurt van warmtebronnen, zoals radiotoren, warmte-uitlaten,
kachels of andere apparaten (inclusief versterkers) die warmte produceren, geplaatst
worden.
Plaats geen voorwerpen met naakte vlam, zoals kaarsen, op het apparaat.
4. Stroombron
Het apparaat moet alleen worden aangesloten op een voeding van het type dat
beschreven is in de bedieningsinstructies of zoals aangegeven op het apparaat.
Wanneer de AC/DCAdapter wordt gebruikt als het ontkoppelapparaat, moet deze
eenvoudig bedienbaar blijven.
5. Stroomsnoer Bescherming
Voedingskabels moeten zo worden gelegd, dat het niet waarschijnlijk is dat er op
gestapt wordt of dat ze bekneld raken door andere voorwerpen. Het is altijd het beste
om een schoon gebied te hebben van waar de kabel het apparaat verlaat naar waar
het in het stopcontact zit.
6. Reinigen
Het apparaat dient alleen zoals aangeraden te worden gereinigd. Kijk in de “Zorg en
Onderhoud” sectie van deze handleiding voor reiniginstructies.
7. Voorwerpen en Vloeistoffen
Zorg ervoor dat er geen voorwerpen en vloeistoffen in de ventilatieopeningen van het
product vallen. Het moet niet worden blootgesteld aan druppend of spattend water en
er mogen geen voorwerpen gevuld met vloeistof, zoals vazen, op het apparaat gezet
worden.
8. Hulpstukken
Gebruik alleen hulpstukken die worden aangeraden door de fabrikant.
9. Bliksem en Stroompiek Bescherming
Neem de stekker uit het stopcontact en verbreek de verbinding in deze perioden. Dit
voorkomt schade aan het product als gevolg van blikseminslag en stroompieken.
10. Overbelasten
Voorkom overbelasting van stopcontacten, verlengsnoeren of stekkerdozen, omdat
dit kan leiden tot risico van brand of elektrische schok.
11. Schade die Onderhoud Vereist
Dit apparaat dient door gekwalificeerd onderhoudspersoneel onderhouden te worden
als:
A.De voedingskabel of stekker beschadigd is.
B.Voorwerpen of vloeistof in de behuizing zijn gevallen.
C.Het apparaat is blootgesteld aan regen.
D.Het apparaat is gevallen of de behuizing is beschadigd.
E.Het apparaat vertoont een duidelijke verandering in prestaties of functioneert niet
normaal.
12. Perioden van Niet Gebruik
Als het apparaat voor een langere periode niet gebruikt wordt, zoals een maand of
langer, haal het stroomsnoer uit het apparaat om schade of corrosie te voorkomen.
13. Onderhoud
De gebruiker moet niet proberen het apparaat te onderhouden op methoden die
verder gaan dan de methoden die beschreven worden in de gebruikers
bedieningsinstructies. Onderhoudsmethoden die niet worden besproken in de
bedieningsinstructies moeten worden overgedragen aan gekwalificeerd
onderhoudspersoneel.
Kenmerken
Dank u voor de aanschaf van de BOLVORMIGE iPod DOCK LUIDSPREKER.
Dit model omvat de volgende functies:
Verschillende iPod modellen Speler / Oplader
iTunes functie door een USB-kabel te verbinden met een computer / netwerk
Audio LINE-IN voor het verbinden van andere digitale audiospelers
Ingebouwde 2 High Fidelity Luidsprekers
Ingebouwde Sub-woofer voor heavy bass effect
Afstandsbediening
Vooraf Ingesteld (Preset) EQ effect
iPod, iPod mini, iPod nano, iPod touch, iPod classic en iPod shuffle zijn handelsmerken
van Apple Computer Inc., geregistreerd in de V.S. en andere landen.
iPod is niet bijgeleverd.
3
4
Page 17

NL NL
Installatie
AC-DC Adapteraansluiting
Het apparaat kan van stroom worden voorzien door een externe AC-DC adapter, met
een vereiste uitvoer van DC 24V 1000mA (bijgeleverd).
(1) Verbind de DC uitvoerstekker van de adapter met de DC-in stekkeringang van het
apparaat.
(2) Steek de AC stekker van de adapter stevig en veilig in het stopcontact.
Afstandsbediening
De afstandsbediening werkt op één CR2032 batterij (bijgeleverd).
Om de afstandsbediening te activeren, verwijder de isolatietab die in het
batterijcompartiment geplaatst is.
Waarschuwingen:
Batterijen (accu of geplaatste batterijen) mogen niet worden blootgesteld aan
overmatige hitte, zoals zonlicht, vuur of dergelijke.
Beschrijving van de onderdelen
Hoofdapparaat Bovenaanzicht
Top View
1
2
6378 45
achteraanzichtvooraanzicht
131211109 9
5
6
Page 18

NL NL
Beschrijving van de onderdelen
Hoofdapparaat
1. iPod dockstation
2. iPod dock connector
3. POWER knop ----- Om het apparaat aan en uit te zetten; selecteer iPod of
AUX-IN modus
4. Power Statusindicator: LED
5. Afstandsbedieningssensor
6. VOL + / - knop ----- Verhoog of verlaag het volumeniveau
7. iPod AFSPEEL / PAUZEER knop
8. knop ------- Ga naar de Volgende/Vorige track ; Maak gebruik van
/
snel zoeken
9. Luidsprekers
10. Subwoofer
11. DC-in stekkeringang ----- Voor de verbinding van externe DC
stroomvoorziening
12. iTunes mini-USB connector
13. LINE IN stekkeringang ----- Auxiliary audio signaalinvoer
Beschrijving van de Onderdelen
Afstandsbediening
1. Infrarood Zender
2. STANDBY knop
3. Omhoog knop
4. Omlaag knop
5. Links / knop
6. Rechts / knop
7. iPod AFSPEEL / PAUZE knop
8. MENU knop
9. VOL + / - knop ----Verhoog of verlaag het volumeniveau
10. TREBLE knop ----
Pas het treble-niveau aan
11. BASS knop -----
Pas het bass-niveau aan
12. ENTER knop
13. MUTE knop ----- Demp het volume
14. EQ knop ----- Selecteer vooraf
ingesteld EQ effect
15. Batterijcompartiment
Accessoires
- iTunes USB kabel x 1
- Auxiliary audio line in kabel met 3.5mm stereo stekkers
Lengte 1 Meter x 1
- Auxiliary audio line in cable met 3.5mm stereo stekkers
Lengte 1.5 Meter x 1
- iPod dockstation hoes x 1
- AC / DC stroomadapter x 1
8
5
4
10
11
14
1
2
3
7
6
9
13
12
15
7
8
Page 19

NL NL
Naar iPod luisteren
Dit model kan overweg met verschillende iPod modellen. Als de dockpoort gedurende
langere periode niet gebruikt wordt, dan wordt aangeraden de dockpoort te bedekken
door de “Dock hoes” (bijgeleverd) te plaatsen.
1. Selecteer een geschikte adapter voor uw iPod (die u bij aanschaf van uw iPod heeft
gekregen) en steek hem in de dock.
Uw iPod kan nu in de dockpoort geplaatst worden door de connector aan de
onderkant van uw iPod in de connector van de dock te plaatsen.
Wees voorzichtig wanneer u de iPod in het dockstation plaatst, om schade
Let op:
aan de 30-pin connector op de iPod of in het docksysteem te voorkomen.
2. Als het apparaat uit staat, dan zal de power statusindicator Rood zijn. Druk één keer
op de POWER (STANDBY) knop om het apparaat aan te zetten, de power
statusindicator wordt Blauw.
Opmerking:
3. In iPod modus:
- Om het afspelen van muziek te beginnen, drukt u één keer op de
AFSPEEL/PAUZEER knop.
- Om muziek te pauzeren, drukt u op de AFSPEEL/PAUZEER knop.
- Om het afspelen van muziek te hervatten, drukt u nogmaals op de PLAY/PAUSE
- U kunt op de VOL + / - knop drukken om het volume aan te passen naar een
gewenst niveau.
- Wanneer een liedje afspeelt, drukt en houdt u de / knop ingedrukt om snel
vooruit/achteruit te spoelen.
- Om naar het volgende of vorige liedje te gaan, drukt u op de / knop.
Vanaf de afstandsbediening kunt u ook gebruik maken van de volgende bediening:
- Om het iPod menu te openen, drukt u op de MENU knop.
- U kunt op de navigatieknoppen drukken (Omhoog/Omlaag/Links/Rechts/Enter
knoppen), zoals op uw iPod om items te selecteren en te openen.
- Om het volume te dempen, drukt u op de MUTE knop, de Blauwe statusindicator
zal knipperen.
4. Om het apparaat uit te zetten, druk en houd de POWER (STANDBY) knop ingedrukt
tot de power statusindicator Rood wordt.
Wanneer het apparaat in standby modus staat, en de iPod verbonden is, dan zal het
apparaat automatisch de batterij van de iPod opladen.
Druk op de POWER knop om te schakelen tussen iPod en AUX-IN
modus, de power indicator is blauw.
knop.
iTunes bediening
Het apparaat is voorzien van een iTunes connector, welke op de achterkant van het
apparaat zit. Hiermee kunt u de iTunes functie gebruiken zonder de iPod uit het
dockstation te halen.
1. Verbind de mini-USB connector van de USB-kabel met de mini-USB connector op de
achterkant van het apparaat.
2. Verbind de USB connector aan het andere uiteinde van de USB-kabel met de USB
-poort van een computer.
3. Er is een iPod gedockt in het dockstation en iPod modus is geselecteerd.
4. Bedien de iTunes optie vanaf de computer (internet), zoals gebruikelijk.
EQ preset , Treble en Bass Instelling
(opmerking: de onderstaande functies kunnen alleen met de afstandsbediening worden
ingesteld.)
Treble instelling:
- Druk één keer op de TREBLE knop om de Treble instelmodus te betreden, de
statusindicator zal Paars/Blauw knipperen.
- Tijdens het instellen zal de statusindicator knipperen (Paars/Blauw), druk op de
VOLUME knop om het Treble-niveau naar wens aan te passen.
- Het apparaat zal automatisch de Treble instelmodus verlaten na een paar seconden
en de Blauwe statusindicator blijft constant aan.
Bass instelling:
- Druk één keer op de BASS knop om de Bass instelmodus te betreden, de
statusindicator zal Paars/Blauw knipperen.
- Tijdens het instellen knippert de statusindicator (Paars/Blauw), druk op de VOLUME
knop om het Bass-niveau naar wens aan te passen.
- Het apparaat zal automatisch de Bass Instelmodus verlaten na een paar
seconden en de Blauwe statusindicator blijft constant aan.
EQ instelling:
- Het apparaat is ontworpen, zodat u kunt kiezen uit vier vooraf ingesteld EQ
instellingen, ROCK , POP , CLASSIC en JAZZ.
- Druk op de EQ knop om uw gewenst EQ effect te selecteren.
- Druk en houd de EQ knop ongeveer 2 seconden ingedrukt om de EQ uit te
schakelen.
Opmerking : Wanneer EQ effect geselecteerd is, dan zal dit voorrang hebben op de
vorige Treble en Bass instellingen.
9
10
Page 20

NL NL
Luisteren naar een Externe Audiobron
Dit model komt met twee Auxiliary audio line-in kabels met 3.5mm stereo stekkers
(lengte 1M en 1.5M), om bij het gewenste gebruik te passen.
Wanneer het apparaat is uitgeschakeld, dan zal de rood gekleurde power
statusindicator aan zijn.
Druk één keer op de POWER (STANDBY) knop om het apparaat aan te zetten en de
power statusindicator zal blauw worden.
Opmerking:
de power indicator blijft Blauw.
1. Verbind de audiokabel, met 3.5mm stereo stekker, met de LINE IN Stekkeringang die
op de achterkant van het apparaat zit.
2. Verbind het andere uiteinde van de kabel met een Line Out Stekkeringang of
Hoofdtelefoon Stekkeringang van uw extern audio-apparaat.
4. Druk op de POWER knop om AUX-IN modus te selecteren. Luister naar de
luidsprekers om te horen of de invoer vanaf de externe audiobron komt, dit is om er
zeker van te zijn dat u gebruik maakt van de AUX-IN modus.
5. Het volumeniveau kan nu worden bediend met het hoofdapparaat. Bedien alle andere
functies op het hulpapparaat, zoals gebruikelijk.
Opmerking:
(1) Als u de Line Out Stekkeringang van uw extern apparaat heeft verbonden dan hoeft
u alleen het volume van dit apparaat aan te passen. Als u de Hoofdtelefoon
Stekkeringang van uw extern apparaat heeft verbonden dan is het mogelijk dat u
zowel het volume van het extern apparaat als het volume van dit apparaat moet
aanpassen voor de meest gewenste volume-instelling.
(2) Druk en houd de POWER knop ingedrukt om het apparaat uit te zetten (de power
statusindicator wordt rood) na het luisteren.
Vergeet niet ook het extern apparaat uit te zetten.
Druk op de POWER knop om te schakelen tussen iPod- en AUX-IN modus,
Zorg en Onderhoud
* Stel het apparaat niet bloot aan overmatige krachten, schokken, stof en
extreme temperaturen.
* Knoei niet met de interne componenten van het apparaat.
* Reinig uw apparaat met een vochtig (nooit nat) doekje. Gebruik nooit
oplosmiddel of afwasmiddel.
* Vermijd het achterlaten van uw apparaat in direct zonlicht of op hete,
vochtige of stoffige plaatsen.
* Houd uw apparaat uit de buurt van verwarmingstoestellen en bronnen van
elektrische ruis, zoals fluoresceerde lampen of motoren.
Garantie
Als u vragen heeft met betrekking tot de garantie, de lengte van de garantie
of de werkwijze hiervan, kijk dan op onze website of neem
rechtstreeks contact op met uw dealer.
www.lenco.eu
11
12
Page 21

NL
Specificaties
Voeding
Stroom Adapter
Luidspreker Vermogen
Woofer Vermogen
Stroomverbruik
Afmetingen
Gewicht
Bedrijfstemperatuur
Vochtigheid
Afstandsbediening
DE SPECIFICATIE EN HET EXTERN UITERLIJK VAN HET APPARAAT
ZIJN ONDERHEVEN AAN VERANDERING ZONDER VOORAFGAANDE
BERICHTGEVING.
Invoer AC 230V ~ 50Hz(Voor EU)
Uitvoer DC 24V 1000mA
6W+6W
20W
1W (Standby)
24W (Max.)
200 x 200 x 182mm
1286g
-10 ~ + 45C
70%
Bereik 6.5m (max)
Hoek +/- 15 graden van normaal
FR
iPod DOCKING STATION 2.1
HAUTE PUISSANCE
Speakerball for iPod
For information and support www.lenco.eu
13
Pour plus d'informations ou si vous avez besoin d'aide : www.lenco.eu
IPD4200_lencoIB
2010/3/23 VER 03
Page 22

FR
FR
Table des matières
Consignes de sécurité importantes......................................................................................
Caractéristiques...................................................................................................................
Installation ...........................................................................................................................
Description des éléments ...................................................................................................
Pour écouter l'iPod...............................................................................................................
Fonctionnement d'iTunes ....................................................................................................
Préréglages EQ, réglage des aigus et des graves...............................................................
Utilisation d'une source audio externe.................................................................................
Nettoyage et entretien..........................................................................................................
Garantie................................................................................................................................
Caractéristiques techniques.................................................................................................
..
2
3
4
5
6-8
9
10
10
11
12
12
13
Consignes de sécurité importantes
Lorsqu'il est utilisé de la façon indiquée, cet appareil a été conçu et fabriqué de manière
à assurer votre sécurité personnelle. Une mauvaise manipulation de l'appareil peut
cependant provoquer un risque d'électrocution ou d'incendie. Veuillez lire attentivement
toutes les consignes de sécurité et de fonctionnement avant d'installer et d'utiliser
l'appareil, et conserver ces instructions à portée de main pour pouvoir vous y référer
ultérieurement. Faites particulièrement attention aux avertissements indiqués dans ce
document ou sur l'appareil.
1. Eau et humidité
Cet appareil ne doit pas être utilisé près d'une source d'eau. Par exemple : près d'une
baignoire, d'un lavabo, d'un évier, d'une machine à laver, d'une piscine ou dans une
cave.
2. Ventilation
Cet appareil doit être placé de manière à ce que son emplacement ou son
positionnement ne gêne pas sa ventilation. Il ne doit, par exemple, jamais être posé
sur un lit, un canapé, un tapis ou toute autre surface similaire qui pourrait bloquer les
ouvertures de ventilation. Il ne faut pas entraver le système de ventilation : ne
recouvrez pas les ouvertures d'aération d'articles tels que des journaux, une nappe,
des rideaux, etc.
Il ne doit pas non plus être installé dans un endroit confiné, tel que des étagères ou
un placard, car cela pourrait gêner le flux de l'air à travers les ouvertures d'aération.
3. Chaleur et flammes
N'installez pas l'appareil à proximité de sources de chaleur, telles que des radiateurs,
une grille de chauffage, une cuisinière ou tout autre appareil produisant de la chaleur
(y compris des amplificateurs).
Ne placez jamais une source de flamme vive, telle qu'une bougie allumée, sur
l'appareil.
4. Source d'alimentation
Cet appareil doit être branché uniquement sur une source d'alimentation
correspondant au type décrit dans ce mode d'emploi ou selon les indications inscrites
sur l'appareil.
Si l'adaptateur secteur sert à de système de déconnexion de l'appareil, il doit être
facilement accessible en permanence.
5. Protection du cordon d'alimentation
Les cordons d'alimentation doivent être installés de manière à ce qu'il ne soit pas
possible de marcher dessus ou de placer des articles susceptibles de les écraser. Il
est conseillé de dégager l'espace entre la prise de sortie de l'appareil et la prise
secteur.
6. Nettoyage
Le nettoyage de l'appareil ne doit se faire que de la façon conseillée. Veuillez
consulter la section "Nettoyage et entretien" de ce mode d'emploi pour obtenir les
instructions de nettoyage.
7. Objets ou liquide à l'intérieur de l'appareil
Il faut faire attention à ne jamais renverser de liquide ou faire tomber des objets à
travers les ouvertures d'aération de l'appareil. Protégez cet appareil des gouttes ou
3
Page 23

FR
FR
des éclaboussures. Ne placez jamais un objet rempli de liquide, tel qu'un vase, sur
l'appareil.
8. Accessoires
N'utilisez pas d'accessoires autres que les accessoires recommandés par le fabricant
de l'appareil.
9. Protection contre les orages et surtensions
Débranchez l'appareil de la prise murale lorsque vous n'utilisez pas l'appareil sur une
période prolongée. Cela permet d'éviter d'endommager l'appareil en cas d'orage ou
de surtensions.
10. Surcharges
Ne surchargez pas les prises murales, les rallonges ou prises multiples, car cela
pourrait provoquer un risque d'incendie ou d'électrocution.
11. Réparations nécessaires
Cet appareil doit être réparé par un technicien qualifié lorsque :
A.Le cordon d'alimentation a été endommagé.
B.Des objets sont tombés ou un liquide a été renversé à l'intérieur de l'appareil.
C.L'appareil a été exposé à la pluie.
D.L'appareil est tombé ou le boitier a été endommagé.
E.L'appareil présente un changement notable dans son fonctionnement ou ne
fonctionne pas normalement.
12. Période d'inutilisation
Si vous n'avez pas l'intention d'utiliser l'appareil sur une longue période, un mois ou
plus, il est conseillé de débrancher le cordon d'alimentation pour éviter que l'appareil
ne s'abime ou ne rouille.
13. Réparations
L'utilisateur ne doit pas essayer de réparer l'appareil en dehors des méthodes
décrites dans ce mode d'emploi. Les réparations qui ne sont pas traitées dans c
mode d'emploi doivent être confiées à un technicien qualifié.
Caractéristiques
Nous vous remercions d'avoir fait l'achat de ce HAUT-PARLEUR SPHERIQUE
AVEC ACCUEIL D'iPod.
Ce modèle comprend les caractéristiques suivantes :
- Lecteur / chargeur de divers modèles d'iPod
- Fonctionnalité iTunes grâce au câble USB branché sur un ordinateur / réseau
- LINE-IN audio permettant la connexion d'autres lecteurs audionumériques
- 2 haut-parleurs haute fidélité intégrés
- Caisson des graves intégré pour un effet de résonnances des graves
- Fonctionnement de la télécommande
- Préréglage d'effets égaliseur
iPod, iPod mini, iPod nano, iPod touch, iPod classic et iPod shuffle sont des marques
déposées d'Apple Computer Inc., enregistrées aux Etats-Unis et dans d'autres pays.
Livré sans iPod.
4 5
Installation
Adaptateur secteur AC / DC
L'alimentation électrique de cet appareil se fait à l'aide d'un adaptateur secteur avec une
sortie DC 24 V 1000 mA (fourni)
(1) Branchez l'autre extrémité de l'adaptateur sur la prise DC-in de l'appareil.
(2) Insérez fermement et correctement la fiche de l'adaptateur secteur sur une prise
secteur.
Télécommande
La télécommande fonctionne sur pile CR2032 (fournie).
Pour mettre la télécommande en marche, retirez la languette d'isolation à l'intérieur du
compartiment de la pile.
Avertissements :
Protégez les piles (le pack batterie ou les piles installées) de toute chaleur excessive,
telle que les rayons du soleil, des flammes, etc.
Page 24

FR
FR
Description des éléments
Top View
Vue du hautUnité principale
1
2
6378 45
Vue de la face avant Vue de la face arrière
Description des éléments
Unité principale
1. Station d'accueil iPod
2. Connecteur pour l'accueil iPod
3. INTERRUPTEUR --- Pour allumer et éteindre l'appareil ; pour sélectionner
le mode iPod ou AUX-IN
4. Témoin alimentation : DEL
5. Capteur de la télécommande
6. Touche VOL + / ------ Pour augmenter ou baisser le volume.
7. Touche LECTURE / PAUSE pour iPod
8. Touche - -----Pour passer aux pistes suivantes / revenir aux pistes
précédentes ; pour effectuer une recherche rapide
9. Enceintes
10. Caisson des graves
11. Prise DC-in ----- Pour brancher une source d'alimentation externe
12. Connecteur mini USB iTunes
13. Prise LINE IN ----- Entrée de signal audio auxiliaire
/
131211109 9
6
7
Page 25

FR
FR
Description des éléments
Télécommande
1. Transmetteur infrarouge
2. Touche VEILLE
3. Touche vers le haut
4. Touche vers le bas
5. Touche gauche /
6. Touche droite /
7. Touche
LECTURE / PAUSE pour iPod
8. Touche MENU
9. Touche VOL+ ---- Pour aug
menter ou
baisser le volume
10. Touche AIGUS ---- Pour régler le
niveau des aigus
11. Touche GRAVES --- Pour régler le
niveau des graves
12. Touche ENTRER
13. Touche MUTE ----- Pour couper le son
14. Touche EQ ---- Pour sélectionner
l'effet égaliseur préréglé
15. Compartiment des piles
Accessoires
- Câble USB iTunes x 1
- Câble line in audio auxiliaire avec fiches stéréo 3,5 mm ;
Longueur = 1 mètre x 1
- Câble line in audio auxiliaire avec fiches stéréo 3,5 mm ;
Longueur = 1.5 mètres x 1
- Couvercle de station d'accueil iPod x 1
- Adaptateur secteur x 1
8
5
4
10
11
14
Pour écouter l'iPod
Cet appareil prend en charge divers modèles d'iPod. Si le port d'accueil ne doit pas être
utilisé sur une période prolongée, il est conseillé de recouvrir le port d'accueil à l'aide du
"Couvercle de station d'accueil" (fourni).
1. Sélectionnez un adaptateur correspondant à votre iPod (celui qui vous a été fourni
1
2
3
7
6
9
13
12
15
lors de l'achat de votre iPod) et insérez-le dans la zone d'accueil.
Vous pouvez maintenant insérer votre iPod sur le port d'accueil en plaçant le
connecteur situé sous l'iPod sur le connecteur de la baie d'accueil.
Avertissement :
2. Lorsque l'appareil n'est pas en marche, le témoin alimentation est rouge. Appuyez
une fois sur l'INTERRUPTEUR (touche VEILLE) pour allumer l'appareil. Le témoin
alimentation devient bleu.
Remarque :
3. En mode iPod :
- Pour commencer à écouter de la musique, appuyez une fois sur la touche
LECTURE/PAUSE .
- Pour mettre la musique sur pause, appuyez sur la touche LECTURE/PAUSE .
- Pour reprendre la lecture, appuyez de nouveau sur la touche LECTURE/PAUS .
- Vous pouvez utiliser la touche VOL + / - pour régler le volume.
- Lors de la lecture d'un morceau, maintenez la touche / enfoncée pour
effectuer une avance / un retour rapide sur ce morceau.
- Pour passer au morceau suivant ou revenir au morceau précédent, appuyez sur
la touche .
La télécommande permet également d'effectuer les opérations suivantes :
- Pour accéder au menu iPod, appuyez sur la touche MENU.
- Vous pouvez utiliser les touches de navigation (Haut / Bas / Gauche / Droite /
Entrer) comme sur votre iPod pour mettre en surbrillance et sélectionner les
options de votre choix.
- Pour couper le son, appuyez sur la touche MUTE : le témoin alimentation bleu
clignote.
4. Pour éteindre l'appareil, maintenez la touche INTERRUPTEUR (VEILLE) enfoncée
jusqu'à ce que le témoin alimentation devienne rouge.
Lorsque l'appareil est en mode veille et que l'iPod est branché, l'appareil mettra
automatiquement l'iPod en charge.
lorsque vous installez l'iPod sur le port d'accueil, veillez à ne pas
endommager le connecteur à 30 broches de l'iPod ou du système
d'accueil.
une pression supplémentaire sur l'INTERRUPTEUR permet de permuter
entre les modes iPod et AUX-IN. Le témoin alimentation reste bleu.
8
9
Page 26

FR
FR
Fonctionnement iTunes
Cet appareil dispose d'un connecteur iTunes situé sur la face arrière, ce qui vous
permet d'utiliser la fonctionnalité iTunes sans avoir à débrancher l'iPod de la station
d'accueil.
1. Branchez le connecteur mini USB du câble USB sur le connecteur mini USB situé à
l'arrière de l'appareil.
2. Branchez le connecteur USB à l'autre extrémité du câble USB sur le port USB d'un
ordinateur.
3. Un iPod est installé sur la station d'accueil et le mode iPod est sélectionné.
4. Utilisez la fonctionnalité iTunes à partir de l'ordinateur (internet) comme d'habitude.
Préréglages EQ, réglage des aigus et des graves
(Remarque : le réglage des fonctionnalités ci-dessous ne peut être effectué qu'à partir
de la télécommande.)
Réglage des aigus :
- Appuyez une fois sur la touche AIGUS pour accéder au mode de réglage des
aigus, le témoin alimentation clignote en rose et bleu.
- Lorsque le témoin alimentation clignote (rose/bleu), appuyez sur la touche
VOLUME pour régler le niveau des aigus.
- L'appareil quittera automatiquement le mode de réglage des aigus au bout de
quelques secondes et le témoin bleu cessera de clignoter.
Réglage des graves :
- Appuyez une fois sur la touche GRAVES pour accéder au mode de réglage des
graves, le témoin alimentation clignote en rose et bleu.
- Lorsque le témoin alimentation clignote (rose/bleu), appuyez sur la touche
VOLUME pour régler le niveau des graves.
- L'appareil quittera automatiquement le mode de réglage des graves au bout de
quelques secondes et le témoin bleu cessera de clignoter.
Réglage égaliseur :
- La conception de cet appareil comprend quatre préréglages EQ que vous
pouvez sélectionner : ROCK, POP, CLASSIQUE et JAZZ.
- Appuyez sur la touche EQ pour sélectionner le préréglage égaliseur de votre
choix.
- Maintenez la touche EQ enfoncée pendant environ 2 secondes pour désactiver
l'égaliseur.
Remarque : lorsqu'un effet EQ est sélectionné, ce réglage se substitue aux réglages des
aigus et des graves précédents.
Utilisation d'une source audio externe
Ce modèle est livré avec deux câbles line-in audio auxiliaire avec fiches stéréo 3,5 mm
(longueur1met1,5m)pour s'adapter à votre application.
Lorsque l'appareil n'est pas en marche, le témoin alimentation est rouge.
Appuyez une fois sur l'INTERRUPTEUR (touche VEILLE) pour allumer l'appareil. Le
témoin alimentation devient bleu.
Remarque :
1. Branchez le câble audio avec fiche stéréo 3,5 mm sur la prise LINE IN située à
l'arrière de l'appareil.
2. Branchez l'autre extrémité du câble sur une prise Line Out ou la prise casque de
votre appareil audio externe.
3. Allumez l'appareil audio externe.
4. Appuyez sur l'INTERRUPTEUR pour sélectionner le mode AUX-IN. Assurez-vous que
la musique retransmise par le haut-parleur provient bien de la source audio externe
en mode AUX-IN.
5. Le niveau de volume peut alors être contrôlé à partir de l'unité principale. Toutes les
autres fonctionnalités peuvent être réglées à partir de l'appareil auxiliaire comme
d'habitude.
Remarque :
(1) Si vous avez utilisé la prise Line Out de votre périphérique externe, il vous suffira de
régler le volume sur ce périphérique uniquement. Si vous avez utilisé la prise casque
de votre périphérique externe, il vous faudra alors régler le volume à la fois sur ce
périphérique externe et sur cet appareil pour obtenir le volume qui convient le mieux.
(2)Maintenez l'INTERRUPTEUR enfoncé pour éteindre l'appareil (le témoin alimentation
devient rouge) lorsque vous avez terminé.
N'oubliez pas d'éteindre également le périphérique externe.
une pression supplémentaire sur l'INTERRUPTEUR permet de permuter
entre les modes iPod et AUX-IN. Le témoin alimentation reste bleu.
10
11
Page 27

FR
FR
Nettoyage et entretien
* Ne soumettez pas l'appareil à une force excessive, à des chocs, de la
poussière ou des températures extrêmes.
* Ne touchez pas aux composants internes de l'appareil.
* Nettoyez votre appareil à l'aide d'un chiffon humide (jamais mouillé).
N'utilisez jamais de produits solvants ou détergents.
* Evitez d'exposer l'appareil directement aux rayons du soleil ou de le laisser
dans un endroit chaud, humide ou poussiéreux.
* Ne placez pas l'appareil à proximité de tout matériel de chauffage ou de
source de bruit électrique, tel que des néons ou des moteurs.
Garantie
Pour obtenir des informations sur la garantie, la durée de garantie et son
fonctionnement, veuillez consulter notre site www.lenco.eu ou prendre
contact avec votre revendeur.
Caractéristiques techniques
Alimentation requise
Adaptateur secteur
Sortie haut-parleur
Sortie caisson des graves
Consommation électrique
Dimensions
Poids
Température ambiante de
fonctionnement
Humidité
Fonctionnement de la
télécommande
LES CARACTERISTIQUES TECHNIQUES ET L'APPARENCE EXTERNE
DE L'APPAREIL PEUVENT ETRE MODIFIEES SANS PREAVIS.
Entrée CA 230V~50Hz(Pour l'UE)
Sortie CC 24 V 1000 mA
6 W+6 W
20 W
1 W (Veille)
24 W (Max.)
200 x 200 x 182mm
1 286g
-10 ~ + 45°C
70%
Amplitude 6.5 m (max)
Angle +/- 15 degrés par rapport à la normale
12
For information and support www.lenco.eu
13
Page 28

Índice de contenido
Es
2.1 ALTAVOZ DE ALTA POTENCIA
PARA iPod
Speakerball for iPod
Importantes instrucciones de seguridad..............................................................................
Características....................................................................................................................
Instalación...........................................................................................................................
Descripción de partes.........................................................................................................
Oír un iPod..........................................................................................................................
Uso de iTunes......................................................................................................................
Preecualizaciones y ajuste de agudos y graves..................................................................
Oír una fuente de audio externa..........................................................................................
Cuidado y mantenimiento....................................................................................................
Garantía...............................................................................................................................
Especificaciones..................................................................................................................
3
4
5
6-8
9
10
10
11
12
12
13
Para información y ayuda, www.lenco.eu
80gms paper // folded size: 105(W)x146(H)mm
2
IPD4200_lencoIB
2010/3/23 VER 03
Page 29

Es
Es
Importantes instrucciones de seguridad
Cuando se use en la forma indicada, esta unidad ha sido diseñada y fabricada para
garantizar su seguridad personal. Sin embargo, un uso indebido podría resultar en
descargas eléctricas potenciales o peligros de incendio. Por favor lea todas las
instrucciones de seguridad y de uso con detenimiento antes de instalar y usar, y
conserve estas instrucciones a mano para futuras consultas. Preste atención particular
a todas las advertencias incluidas en las instrucciones y en la unidad.
1. Agua y humedad
La unidad no debe usarse cerca de agua. Por ejemplo: cerca de una bañera,
lavamanos, fregadero, pila para lavar, piscina o en un sótano.
2. Ventilación
La unidad debe ubicarse de modo que su ubicación o posición no interfiera con
una buena ventilación. Por ejemplo, no debe colocarse sobre una cama, sofá,
alfombra u otra superficie similar que pueda bloquear las aberturas de ventilación.
La ventilación no debe impedirse al cubrir las aberturas de ventilación con artículos
Como periódicos, manteles, cortinas, etc. Tampoco deberá colocarse en una
instalación empotrada, como un estante o un armario,que pueda impedir el flujo de
aire por las aberturas de ventilación.
3. Calor y llamas
La unidad debe colocarse alejada de fuentes de calor como radiadores,
rendijas de calefacción, hornos y otros aparatos (incluyendo amplificadores)
que generen calor.
Ninguna fuente de llama descubierta, como una vela encendida, debe
colocarse encima del aparato.
4. Suministro eléctrico
La unidad debe conectarse únicamente a un suministro eléctrico del tipo
descrito en las instrucciones de uso o marcado en el aparato.
Donde se utilice el adaptador AC/DC como mecanismo de desconexión, el
mecanismo de desconexión deberá permanecer fácilmente accesible.
5. Protección del cable de alimentación
Los cables de alimentación deben guiarse de modo que no puedan ser pisados
o pinchados por objetos puestos sobre o contra ellos. Lo mejor siempre es
tener un área libre desde donde el cable sale de la unidad hasta donde se
Conecta a la toma AC.
6. Limpieza
La unidad debe limpiarse únicamente de la manera recomendada. Véase la
sección “Cuidado y mantenimiento” de este manual para las instrucciones de
limpieza.
7. Entrada de objetos y líquidos
Debe cuidarse que no entren objetos ni líquidos por las aberturas o ranuras del
producto. No debe exponerse a goteos ni salpicaduras y ningún objeto con
líquido, como un jarrón, debe colocarse sobre el aparato.
8. Accesorios
No utilice accesorios no recomendados por el fabricante del producto.
9. Protección contra tormentas eléctricas y subidas de tensión
Desenchufe la unidad de la toma de pared cuando haya tormentas eléctricas.
Esto prevendrá daños debido a tormentas eléctricas y subidas de tensión.
10. Sobrecarga
No sobrecargue las tomas de pared, alargadores u otras tomas ya que podría
resultar en riesgo de Incendio o descarga eléctrica.
11. Da ños que requieren servicio
Esta unidad debe recibir servicio de parte de personal de servicio calificado
cuando:
A. El cable o la clavija de alimentación se haya dañado.
B. Objetos o líquidos hayan caído dentro de la carcasa.
C. La unidad se haya expuesto a lluvia.
D. La unidad se haya caído o la carcasa se haya dañado.
E. La unidad muestre un cambio notable en su rendimiento o no funcione con
normalidad.
12. Periodos sin usar
Si la unidad dejará de usarse durante un periodo de tiempo extendido, como
Un mes o más, el cable de alimentación debe desenchufarse de la unidad para
prevenir daños o corrosión.
13. Servicio
El usuario no deberá intentar dar servicio a la unidad fuera de los métodos
descritos en el manual de instrucciones del usuario. Los métodos de servicio
no cubiertos por las instrucciones de uso deberán referirse a personal de
servicio calificado.
Características
Gracias por comprar el ALTAVOZ ESFÉRICO CON DOCK PARA IPOD.
Este modelo incluye las siguientes características:
-Reproductor/recargador de diferentes modelos iPod
-Función iTunes al conectar un cable USB a un ordenador/red
-Entrada de audio LINE-IN para conectar otros reproductores de audio digital
-2 altavoces de alta fidelidad integrados
-Subwoofer integrado para un efecto de graves intensos
-Funcionamiento por mando a distancia
-Efectos de preecualización
iPod, iPod mini, iPod nano, iPod touch, iPod classic y iPod shuffle son marcas de Apple
Computer Inc., registradas en EE. UU. y otros países.
IPod no incluido.
3
4
Page 30

EsEs
Instalación
Conexión del adaptador AC/DC
La unidad puede alimentarse con un adaptador AC/DC externo, con salida DC de 24V
1000mA (incluido).
(1) Conecte la clavija de salida DC del adaptador a la toma de entrada DC de la unidad.
(2) Enchufe de manera segura y firme la clavija AC en la toma de corriente AC.
Mando a distancia
El mando a distancia se alimenta con una batería CR2032 (incluida).
Para activar el mando a distancia, quite la pieza aislante insertada en el compartimiento
de baterías.
Advertencias:
Las baterías (baterías o pilas) no deben exponerse a calor excesivo como el de la luz
solar, fuego u otros elementos semejantes.
Descripción de partes
Unidad principa lVista superior
Top View
1
2
6378 45
Vista traseraVista frontal
131211109 9
5
6
Page 31

EsEs
Descripción de partes
Unidad principal
1. Estación dock para iPod
2. Conector dock de iPod
3. Botón POWER ----- Para apagar y encender la unidad; para
seleccionar el modo iPod o el modo AUX-IN
4. Indicador de estado: LED
5. Sensor del mando a distancia
6. Botón VOL + / - ----- Para aumentar y disminuir el volumen
7. Botón iPod PLAY / PAUSE
8. Botón ------- Para saltar pistas hacia adelante/atrás; para
realizar exploraciones rápidas
9. Altavoces
10. Subwoofer
11. Entrada DC-in ----- Para conectar el suministro de corriente DC
12. Conector iTunes mini USB
13. Entrada LINE IN ----- Entrada de señal de audio auxiliar
/
externo
Descripción de partes
Mando a distancia
1. Transmisor infrarrojo
2. Botón STANDBY
3. Botón Arriba
4. Botón Abajo
5. Botón Izquierda /
6. Botón Derecha /
7. Botón iPod PLAY / PAUSE
8. Botón MENU
9. Botón VOL + / - ----Aumentar y disminuir el volumen
10. Botón TREBLE ----
Ajustar el nivel de agudos
11. Botón BASS ----- Ajustar el nivel
de graves
12. Botón ENTER
13. Botón MUTE ----- Silenciar el volumen
14. Botón EQ ----- Selección de efecto
De preecualización
15. Compartimiento de baterías
Accesorios
- Cable USB iTunes x 1
- Cable de entrada de audio auxiliar con clavijas estéreos de 3.5 mm;
Largo = 1 metro x 1
- Cable de entrada de audio auxiliar con clavijas estéreos de 3.5 mm;
Largo = 1.5 metros x 1
- Cubierta de estación dock para iPod x 1
- Adaptador de corriente AC/DC x 1
8
5
4
10
11
14
1
2
3
7
6
9
13
12
15
7
8
Page 32

EsEs
Oír un iPod
Este modelo se adapta a diferentes modelos iPod. Si el puerto dock dejará de usarse
durante un periodo extendido de tiempo, se recomienda taparlo utilizando la “cubierta
dock” (incluida).
1. Elija el adaptador adecuado para su iPod (el de su iPod al comprarlo) e insértelo en
el área dock.
Ahora podrá insertar su iPod en el puerto dock colocando el conector de la parte
inferior del iPod en el conector de la estación dock.
Precaución:
2. Cuando la unidad esté apagada, el indicador de estado color rojo estará encendido.
Pulse el botón POWER (STANDBY) una vez para encender la unidad y el indicador
de estado se pondrá azul.
Nota:
3. En el modo iPod:
- Para empezar a reproducir música, pulse el botón PLAY/PAUSE una vez.
- Para pausar la música, pulse el botón PLAY/PAUSE .
- Para reanudar la música, pulse el botón PLAY/PAUSE de nuevo.
- Podrá pulsar el botón VOL + / - para ajustar el volumen al nivel deseado.
- Cuando esté reproduciendo una canción, pulse y sostenga el botón /
para adelantar/retroceder rápidamente.
- Para saltar a la canción siguiente o anterior, pulse el botón / .
Usando el mando a distancia también podrá realizar las siguientes operaciones:
- Pulse el botón MENU para acceder al menú del iPod.
- Podrá pulsar los botones de navegación (Arriba/Abajo/Izquierda/Derecha/Enter)
como los del iPod para resaltar y seleccionar opciones.
- Para silenciar el volumen, pulse el botón MUTE y el indicador de estado azul
parpadeará.
4. Para apagar la unidad, pulse y sostenga el botón POWER (STANDBY) hasta que
el indicador de estado se ponga rojo.
Cuando la unidad esté en suspensión y haya un iPod conectado, la batería del iPod
será cargada automáticamente por la unidad.
Por favor tenga cuidado al conectar el iPod a la estación dock para
evitar dañar el conector de 30 pines del iPod o del sistema dock.
Al pulsar el botón POWER cambiará entre los modos iPod y AUX-IN, el
indicador de estado azul encendido.
Uso de iTunes
La unidad ofrece un conector iTunes en la parte trasera de la unidad y le permite utilizar
la función iTunes sin desconectar el iPod de la estación dock.
1. Conecte el conector mini USB del cable USB al conector mini USB de la parte trasera
de la unidad.
2. Conecte el conector USB del otro extremo del cable USB al puerto USB de un
ordenador.
3. La estación dock tiene un iPod conectado y se seleccionó el modo iPod.
4. Use la función iTunes del ordenador (internet) como siempre.
Preecualizaciones y ajuste de agudos y graves
(Nota: Las funciones siguientes sólo podrán ajustarse con el mando a distancia.)
Ajuste de agudos:
- Pulse el botón TREBLE una vez para entrar al modo de ajuste de agudos; el
indicador de estado parpadeará rosa y azul de forma alterna.
- Durante el parpadeo del indicador de estado (rosa/azul), pulse los botones
VOLUME para ajustar los agudos al nivel deseado.
- La unidad saldrá automáticamente del modo de ajuste de agudos después de unos
segundos y el indicador de estado azul permanecerá encendido.
Ajuste de graves:
- Pulse el botón BASS una vez para entrar al modo de ajuste de graves; el indicador
de estado parpadeará rosa y azul de forma alterna.
- Durante el parpadeo del indicador de estado (rosa/azul), pulse los botones
VOLUME para ajustar los graves al nivel deseado.
- La unidad saldrá automáticamente del modo de ajuste de graves después de unos
segundos y el indicador de estado azul permanecerá encendido
Ajuste de preecualización :
- La unidad está diseñada para elegir cuatro preecualizaciones ROCK, POP,
CLASSIC y JAZZ.
- Pulse el botón EQ para seleccionar el efecto EQ deseado.
- Pulse y sostenga el botón EQ alrededor de 2 segundos para deshabilitar el EQ.
Nota: Cuando se seleccione un efecto de EQ, los ajustes de agudos y graves serán
ignorados.
9
10
Page 33

EsEs
Oír una fuente de audio externa
El modelo viene con dos cables de entrada de audio auxiliar con clavijas estéreos de
3.5 mm (largo: 1 y 1.5 metros) para adaptarse al aparato.
Cuando la unidad esté apagada y el indicador de estado esté rojo.
Pulse el botón POWER (STANDBY) una vez para encender la unidad y el indicador de
estado se pondrá azul.
Pulse el botón POWER para cambiar entre los modos iPod y AUX-IN; el indicador
Nota:
de estado azul.
1. Conecte el cable de audio de clavija estéreo de 3.5 mm en la entrada LINE IN de la
parte trasera de la unidad.
2. Conecte el otro extremo del cable en la salida de línea o para auriculares de su
dispositivo de audio externo.
3. Encienda el dispositivo de audio externo.
4. Pulse el botón POWER para seleccionar el modo AUX-IN. Entonces podrá oír la
música emitida por la fuente de audio externa en el altavoz.
5. El nivel de volumen podrá controlarse a través de la unidad principal. Realice todas
las demás operaciones en el dispositivo auxiliar como siempre.
Nota:
(1) Si conectó la salida de línea de su dispositivo externo entonces sólo necesitará
ajustar el control de volumen de la unidad. Si realizó la conexión a través de la salida
para auriculares de su dispositivo externo entonces quizá tenga que ajustar ambos
controles de volumen, el del dispositivo externo y el de la unidad, para obtener el
ajuste de volumen deseado.
(2) Pulse y sostenga el botón POWER para apagar la unidad (el indicador de estado se
pondrá rojo) cuando termine de oír.
No olvide apagar el dispositivo externo también.
Cuidado y mantenimiento
* No someta la unidad a fuerza, golpes o polvo excesivos ni a temperaturas
extremas.
* No interfiera con los componentes internos de la unidad.
* Limpie su unidad con un paño húmedo (nunca mojado). Nunca deberá usar
disolvente ni detergente.
* Evite dejar su unidad directamente bajo la luz del sol o en lugares calientes,
húmedos o polvorientos.
* Mantenga la unidad alejada de aparatos de calefacción y de fuentes de
ruido eléctrico como lámparas fluorescentes y motores.
Garantía
Si tiene preguntas respecto a la duración y las condiciones de la garantía,
podrá encontrar la información en nuestra página o podrá
contactar directamente al minorista
www.lenco.eu
11
12
Page 34

Es
Es
Especificaciones
Suministro eléctrico
Adaptador de corriente
Potencia de altavoz
Potencia de woofer
Consumo eléctrico
Dimensiones
Peso
Temperatura de
funcionamiento
Humedad
Campo del mando a
distancia
LAS ESPECIFICACIONES Y EL ASPECTO DE LA UNIDAD ESTÁN
SUJETOS A CAMBIO SIN PREVIO AVISO.
Entrada AC 230V ~ 50Hz (Para la U.
E.)Salida DC 24V 1000mA
6W+6W
20W
1W (suspensión)
24W (máx.)
200 x 200 x 182mm
1286g
-10 ~ + 45C
70%
Alcance: 6.5m (máx.)
Ángulo: +/- 15 grados de lo normal
For information and support www.lenco.eu
13
 Loading...