

Page 1
1. INTRODUCTION & WARNINGS
Thank you for purchasing this radio frequency wireless headphone. The
result of our advanced using state-of-the-art electronic design. To achieve
the best results from this product, please read this manual carefully before
operating this product.
In no circumstances attempt to open this product. The presence of high
voltages or radio frequency emissions means that maintenance should
only be carried out by the appointed service centers.
2. ATTENTION
To avoid risk of electric shock, DO NOT expose this product to water or
dampness.
The technical assistance service manual contains important maintenance
instructions for the safety of the product.
3. PRECAUTIONS
DO NOT Place this product on a very hot or very cold surface & keep
out of direct sunlight.
Avoid using or storing the product in a dusty or damp area, in any unstable
location or in any magnetic zone.
Always keep & operate this product in a well-ventilated environment.
DO NOT use petrol, gasoline, thinner or any solvent to clean the product.
Remove dust or stains with a damp cloth only.
Do not use oil or grease any mechanical parts. All moving parts in this
produce were thoroughly lubricated & sealed in the factory & require no
further lubrication.
HP-2000
INSTRUCTION MANUAL
7. POWER SUPPLY & CONNECTIONS
TRANSMITTER
1. Connect the plug of the provided power adapter to the 12V DC socket
of the transmitter.
2. Connect the appropriate audio input to the transmitter using the provided
audio cable to AUX OUT or LINE OUT of the audio source. If not
available, connect to the headphone outlet & adjust the volume to
lowered position.
3. Connect the power adapter to electric outlet.
4. Turn on the transmitter (ensure the audio source is operating)
NOTE: Always remember to remove the power adapter form the electric
outlet when the product is not in use.
STEREO HEADPHONE (RECEIVER)
1. Open the battery compartment by gently turning the cushion of the
headphone anti-clockwise.
2. Insert 2 UM4 "AAA" 1.5V batteries & ensure the polarities are correct.
3. Replace the battery cover by aligning the cushion to the original position
& turning clock-wire until the cushion is locked.
Warning: Please pull out the head strap before wearing, otherwise
it will break the headphones
NOTE: FOR RECHARGEABLE VERSION ONLY
Please ensure the batteries are fully charged before operating.
DO NOT REPLACE RECHARGEABLE BATTERIES WITH ALKALINE
OR ANY OTHER BATTERIES TO AVOID RISK OF ELECTRIC SHOCK
OR EXPLOSION BY CHARGING BATTERIES THAT ARE NOT
RECHARGEABLE.
Always remember to remove batteries from the headphone when the
product is not in use for a long time to prevent any leakage of electrolyte
liquid from exhausted batteries & avoiding any damage to the product.
Replace exhausted batteries immediately.
Help protect your environment, dispose of exhausted batteries in special
recycle containers (where provided)
ANY DAMAGE CAUSED BY LEAKAGE OF ELECTROLYTE LIQUID
WILL NOT BE COVERED BY WARRANTY.
8. OPERATION
1. Switch on the audio source connected to the transmitter (stereo
system/TV etc). If connected to the headphone outlet, adjust the volume
to a low setting or to about 5-10% of the total volume setting.
2. Switch On the transmitter by pressing the power button. (The power
indicator will illuminate)
3. Select the channel on the transmitter.
4. Switch on the headphone by pressing the power button. (The power
indicator will illuminate)
5. Press the AUTOSCAN button to scan for the reception from the
transmitter. (The AUTOSCAN INDICATOR will flash during scanning
mode & illuminate when a stereo signal is detected).
6. Adjust the volume control to a suitable level.
7. To switch off the system, Press the power button on both the transmitter
& headphone. The power indicators on both transmitter & headphone
will go off.
NOTE: Always remember to remove the power adapter from electric outlet
when the product is not in use for a long time.
9. RECHARGING BATTERIES (applicable for rechargeable
version only)
1. Turn off the headphone & retain the provided Ni-MH batteries in the
headphone.
2. Insert the headphone in to the recharge slot on the transmitter.
3. Ensure the recharge contact points face the transmitter.
4. When the contact points connect, the recharge indicator will illuminate.
5. The preset recharge cycle will charge the provided Ni-Mh batteries
for 8-12 hours & will cease when the charge cycle is complete.
6. The recharge indicator will go off when the recharge cycle is complete.
If any liquids should accidentally fall on or get in to the product, immediately
switch off the power &contact an authorized service center or a qualified
& registered electrician for assistance. Before using the product with the
approved power adapter provided, ensure the electric power supply in
your country is compatible with the voltage rating of the provided power
adapter.
Use ONLY the provided power adapter. Never use other power adapters
even if they have the same specifications or rating.
Do not insert or remove the power adapter for the electric outlet with wet
or damp hands.
Remove the power adapter from the electric outlet if the product is not
in use for a long time.
When inserting or removing the power adapter from any electric outlet,
pull the plug only.
Never pull or jerk the cable to avoid the risk of electric shock due to
damage to the cable.
4. FOR EUROPEAN VERSION: 863-865 MHz
This product confirms to CE R&TTE 1999/ 5/ EC (for EU countries)
regarding radio appliances and telecommunications terminals and the
recognition of their conformity (R&TTE) & subsequent modifications EEC/
92/ 31 & EEC/ 93/ 68 regarding observance of the essential electromagnetic
compatibility (EMC) & radio frequency spectrum (RF Spectrum)
requirements.
NOTE: Due to continuing development of the products, the specifications
and design of this product is subject to change without prior notice.
10. TROUBLE SHOOTING
P81-0AF12-00M02
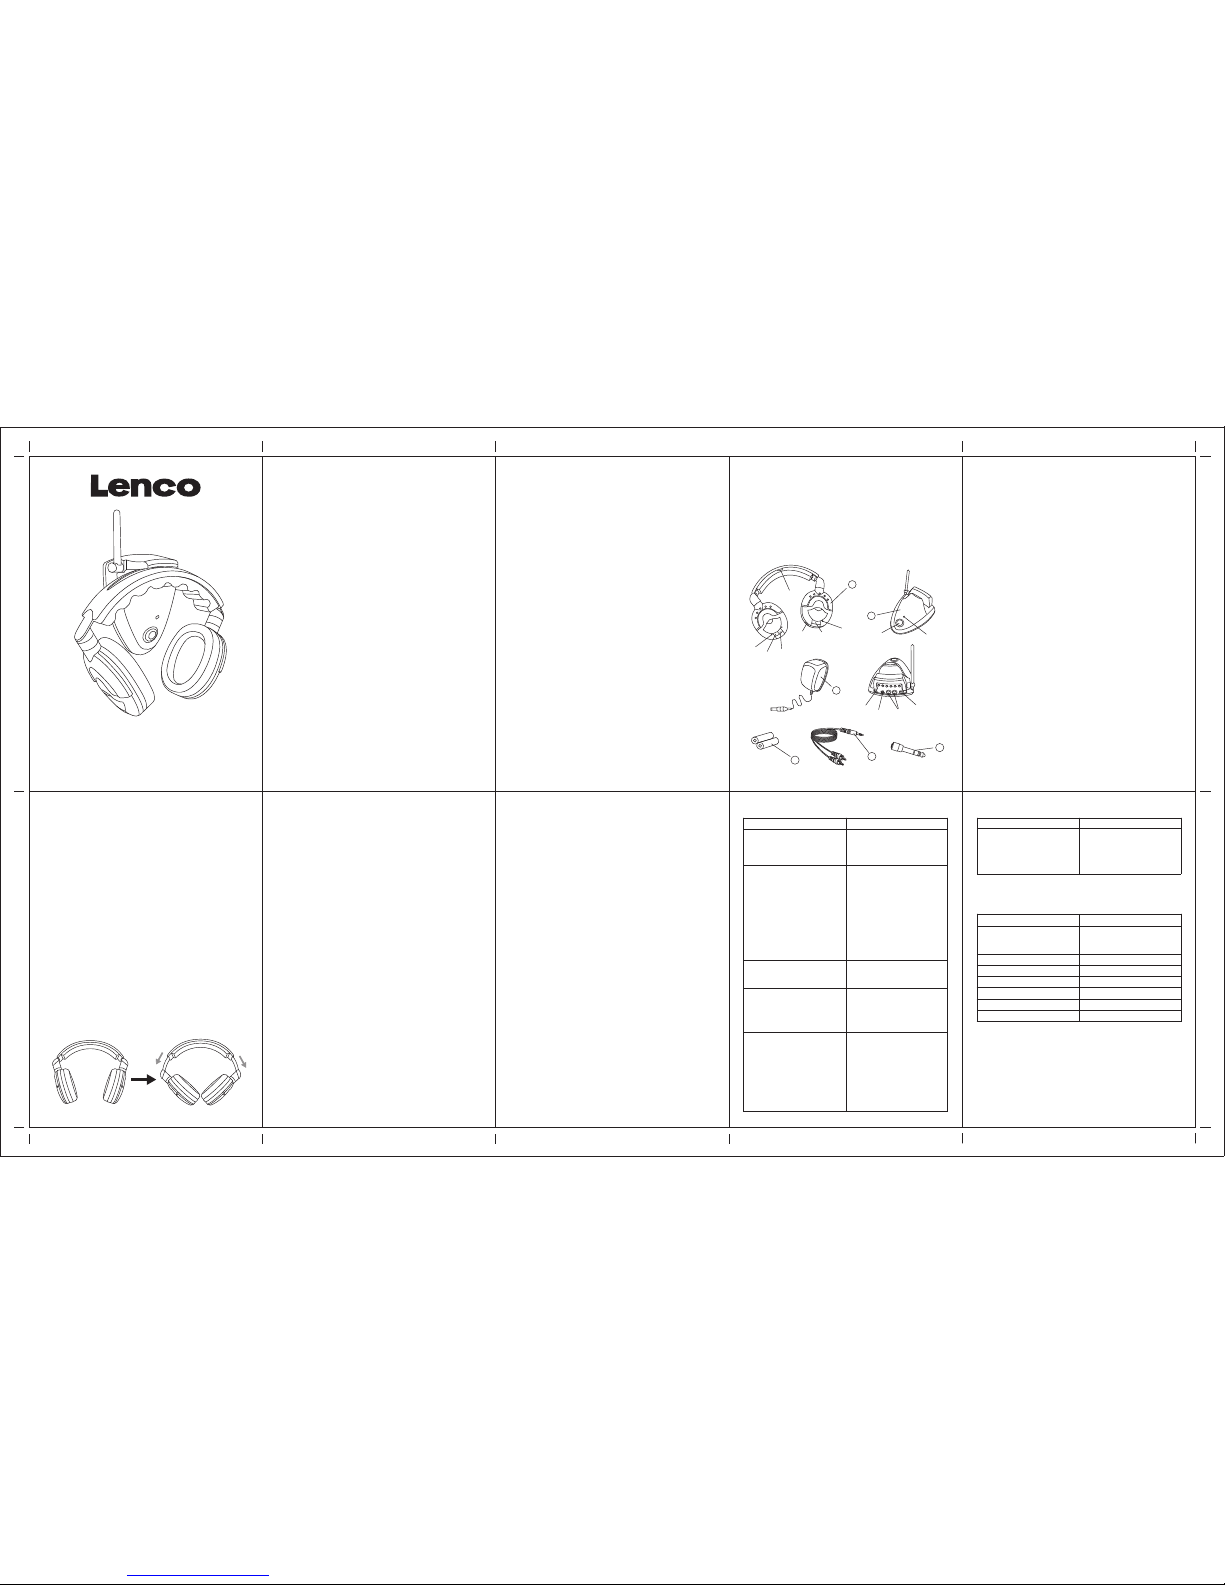
5. SYSTEM COMPONENTS
1. Transmitter
2. Stereo Headphone (RECEIVER)
3. 12V AC/Dc Power Adapter (FOR TRANSMITTER)
4. Ni-MH Rechargeable Battery (2 x AAA Applicable for rechargeable
version only)
5. 3.5mm-2RCA audio connection cable
6. 3.5mm-6.3mm audio connection plug
PROBLEM
CANNOT CONNECT
TRANSMITTER TO TV BECAUSE
TV HAS NO HEADPHONE OUTLET
OR AUDIO OUT
POOR SOUND QUALITY /
DISTORTION / INTERFERENCE
TRANSMITTER CANNOT POWER
ON
HEADPHONE DOES NOT TURN
ON
HEADPHONE HAS NO SOUND
TRY THIS
Connect the transmitter to the
AUDIO OUT or LINE OUT or AUX
OUT on the audio sources
You may be out of operating range
& too far from the transmitter. Move
closer to the transmitter until the
AUTOSCAN indicator can lock on
to the transmitter.
Your Batteries may be running weak
& require replacement.
Audio signal to the transmitter from
the audio source is too loud. Reduce
the volume setting on your audio
source.
Check the connections of the
provided power adapter are
connected correctly & securely.
Batteries may be inserted to the
incorrect polarity; Remove batteries
& insert to the correct polarity.
Battery power may be insufficient.
Replace new battery
The Volume control may be set at
the lowest position. Increase the
volume control to the desired level.
Check power adapter connections
on transmitter.
Check audio connections on
transmitter.
Check if audio source is sending
audio signal to the transmitter.
TRY THIS
Select another channel setting from
the channel selector on the
transmitter & press AUTOSCAN
button to scan the new channel
setting.
PROBLEM
INTERFERENCE
MAXIMUM RECEPTION RANGE
SIGNAL TO NOISE RATIO
FREQUENCY RESPONSE
TRANSMISSION FREQUENCY
TRANSMITTER Dimension (LxHxD)
RECEIVER Dimension (LxHxD)
POWER SUPPLY
100 METERS (300 FEET)
IN IDEAL CONDITIONS WITHOUT
OBSTACLES AND
INTERFERENCES)
55 dB
50Hz-18000Hz
863-865MHz
95mm x113 x 170mm
205 x 175 x 75mm
DC12v 150Ma (central positive)
11. TECHNICAL DATA
6. POSITION OF CONTROLS
HEADPHONE
A1. RECHARGE CYCLE INDICATOR
A2. POWER ON/OFF BUTTON
A3. POWER ON INDICATOR
A4. VOLUME CONTROL
A5. AUTOSCAN BUTTON
A6. AUTOSCAN INDICATOR
A7. RECHARGE CONTACT POINT*
TRANSMITTER
B1. POWER ON/OFF BUTTON
B2. POWER ON INDICATOR
B3. 12V DC SOCKET FOR POWER ADAPTER
B4. AUDIO INPUT " A " 3.5MM AUDIO INPUT PORT
B5. AUDIO INPUT " B " 2-RCA AUDIO INPUT PORT
B6. CHANNEL SELECT SWITCH
3
4
5
6
B5
B4
B3
B6
B2
1
A1
A2
A3
A4
A7
A5
A6
2
B1
 Loading...