

Page 1
GR-02
GR-02
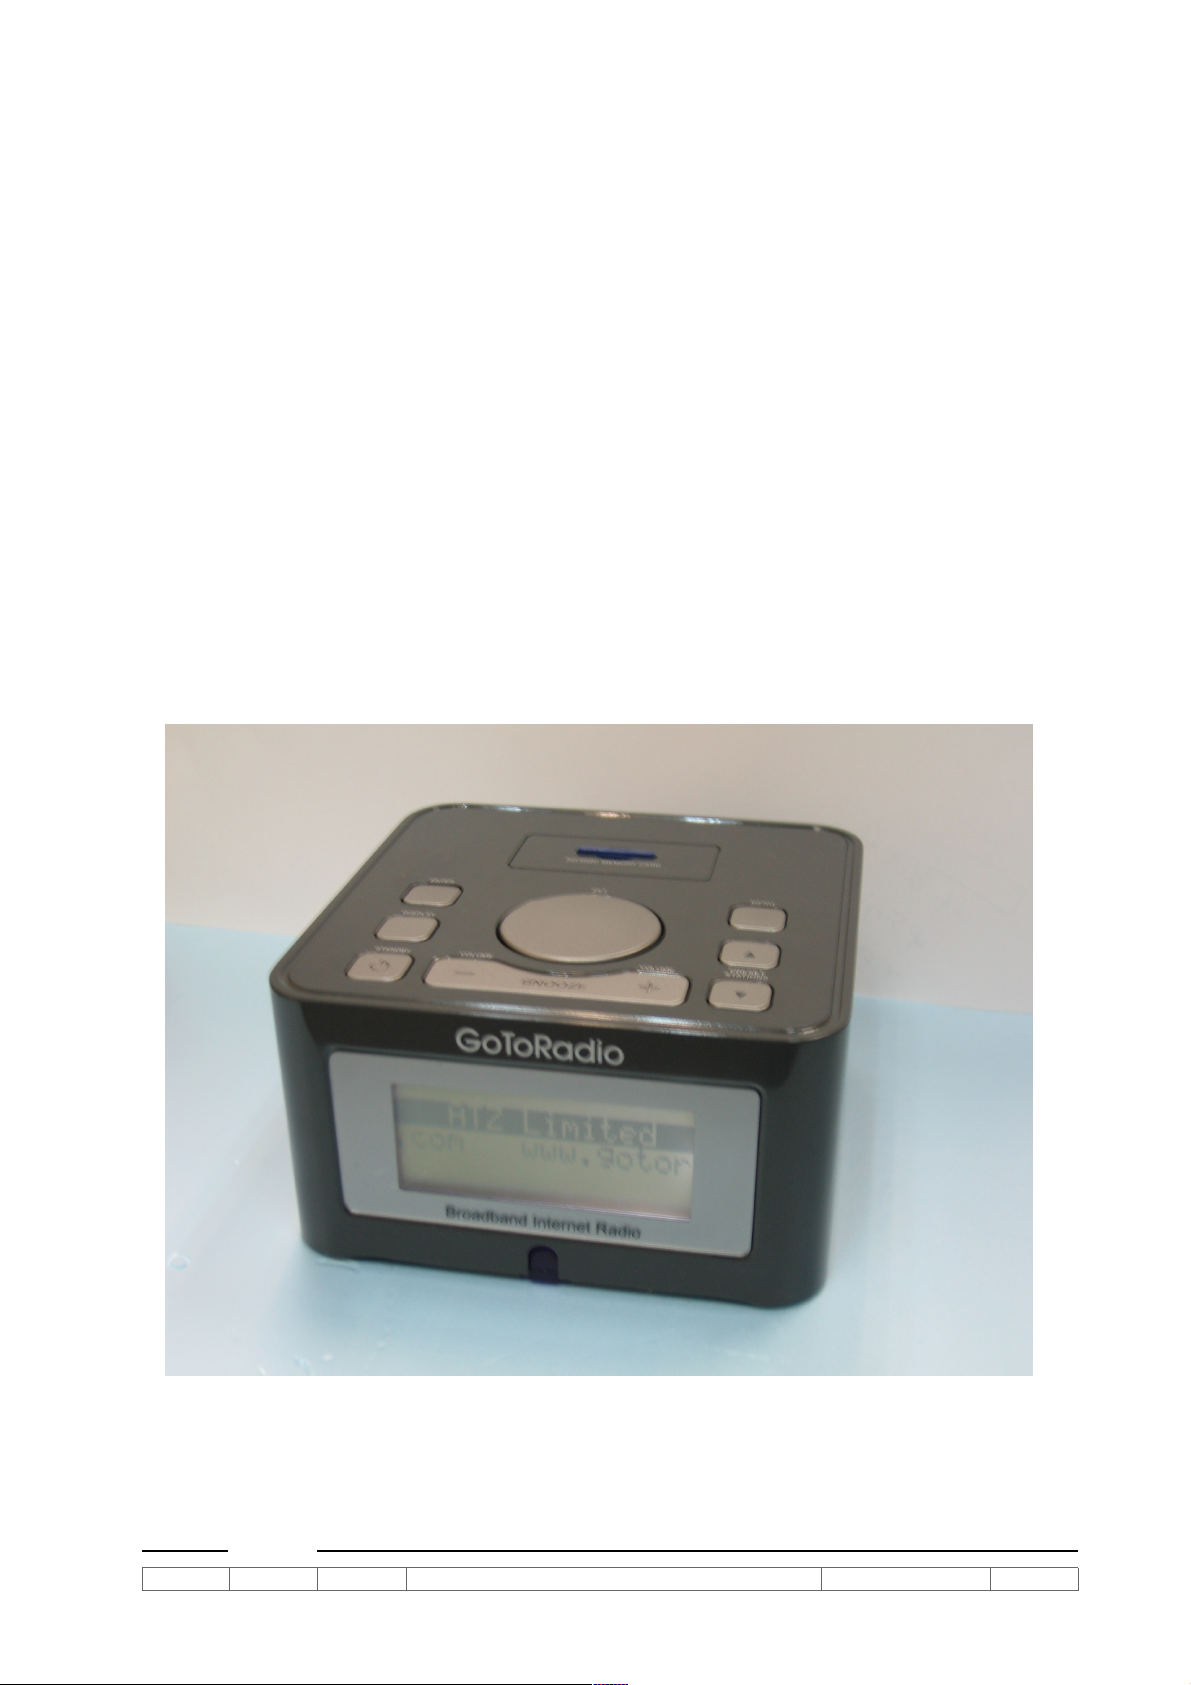
GotoRadio Streaming Audio Player
GotoRadio Streaming Audio Player
GR-02
ATZ
Ver 0.4 28 AUG 2006
PROPRIETARY AND CONFIDENTIAL
© ATZ LTD
Page 1 of 8
Page 2
GENERAL SPECIFICATION
ATZ
Physical
Case Plastic
Speaker Two 2 inch full range speakers
Dimension 150mm(W)x80mm(H)x150mm(D)
Weight 0.7 kg
Electrical
Power Supply External Adaptor
Input : AC120V/60Hz or AC 240V/50Hz ; Output : 7.5VDC
Amplifier 2 x 2W (stereo) Class D
Display
LCD Backlit ; 95 x 23 pixels
Software
Firmware Upgradable over the internet
Network TCP/IP, PPPoE, DHCP for connection to the internet
Streaming Protocols HTTP
Audio Decoders Microsoft® Windows MediaTM Audio, MP3
Radio Stations Direct Internet Radio Station Access from Presets
SD card Play back MP3 / non DRM protected WMA files
Controls
Volume Control Electronic Volume Up / Down keys
ON/Off Turns on/off the radio
Presets 50 stations
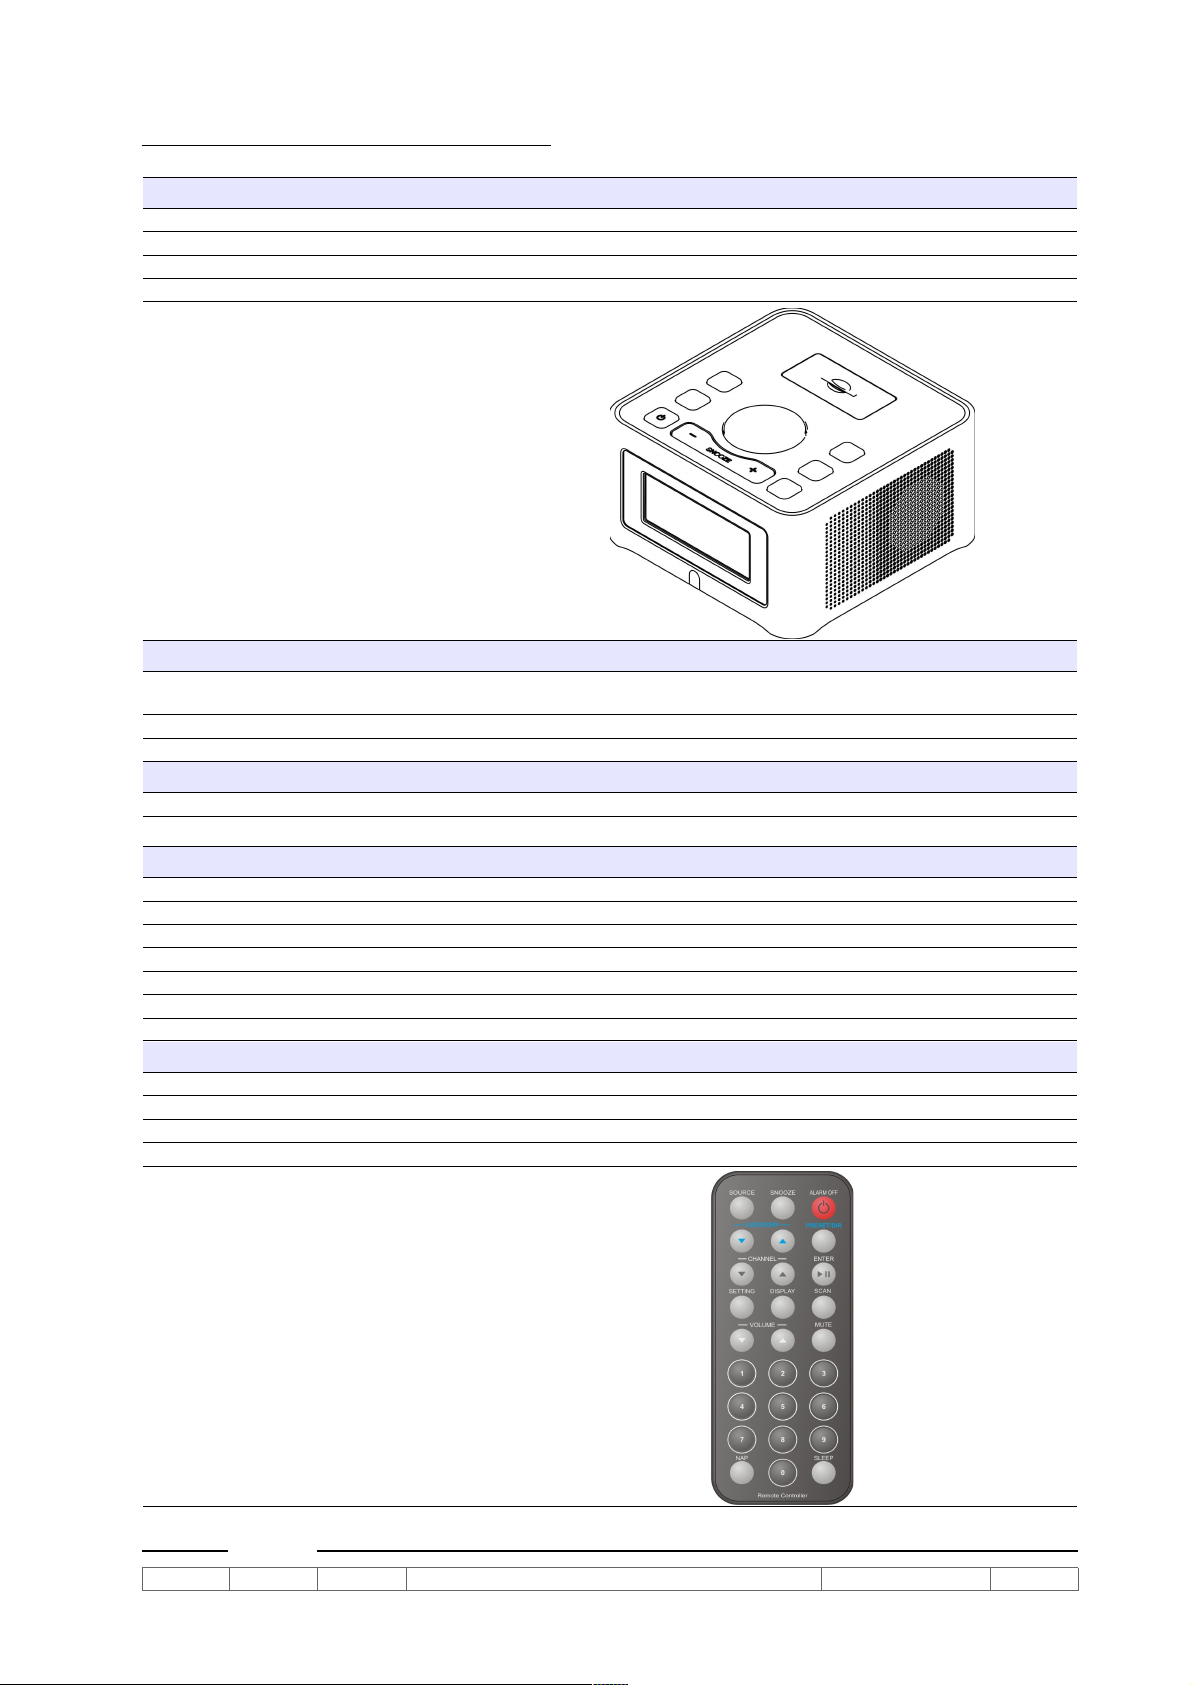
Rotary Knob Navigation and Character input
Remote Control 27 function hand held device
GR-02
Ver 0.4 28 AUG 2006
PROPRIETARY AND CONFIDENTIAL
© ATZ LTD
Page 2 of 8
Page 3

Clock
ATZ
Clock Time Support Network Time Protocol synchronize with Internet time
Time Zone International
Time Format 12/24 hr selectable
Day Format Week days
Day Saving Time Enable/Disable selectable
Alarm Function Gentle alarm to GotoRadio / SD Audio / Buzzer
Sleep Function Sleep to GotoRadio / SD Audio with Gentle Sleep Off
Snooze Function 9 minute Snooze repeatable
Connectors
Internet connection RJ-45 10/100 Base-T
L / R Channel Out RCA
DC In 7.5V
Portal
Station List Free worldwide Internet Radio Station list from www.gotoradio.com
Updates 1. Automatic firmware upgrade from www.gotoradio.com
Stock Index Free worldwide Stock Index broadcast
2. Automatic invalid station recover from www.gotoradio.com
GR-02
Ver 0.4 28 AUG 2006
PROPRIETARY AND CONFIDENTIAL
© ATZ LTD
Page 3 of 8
Page 4

Operations
ATZ
System Settings:
In Standby mode, Press 'MENU' key enter/exit system setup screen.
To choose menu from panel options, press +/- keys or use 'TRACK/CHANNEL' knob. To
choose menu from remote handset, press channel +/-.
Press 'Enter' key from both front panel/remote handset select menu option.
Menu items 1. Network
2. Time Mode
3. Time Zone
4. Alarm 1 Setting
5, Alarm 2 Setting
6. Snooze Time
7. DST mode (Daylight Saving Time Setting)
1. Network Before setting using the network option, please check and ensure the system
is connected to network. The connect icon with be appear at the upper
left corner of LCD display. Three network options can be selected.
● Manual – Select this item for networks using fix IP address to connect to internet.
The following items to be entered.
IP Address: The IP address to be entered must be in the following format. You
cannot use the net audio function with an IP address that is not in the following
format.
CLASS A: 10.0.0.0 - 10.255.255.255
CLASS B: 172.16.0.0 - 172.31.255.255
CLASS C: 192.168.0.0 – 192.168.255.255
NetMask: Enter the subnet mask provided by your ISP. The subnet mask is
usually 255.255.255.0.
Default Gateway: Enter the Gateway provided by your ISP.
Primary DNS: Enter the Domain Name System (DNS) address provided by your
ISP. If connected to a gateway (router), enter the IP address of the gateway.
Secondary DNS: Enter the secondary DNS address provided by your ISP.
● Automatic – Select this item when connect internet via Broadband router with
DHCP (Dynamic Host Configuration Protocol) server enabled.
● Connect to ISP – Select this item when the unit connect to ADSL/cable modem
directly. User need to enter “username' and 'password' provided by their ISP.
Line 1:
The entry screen is look like this:
Line 2:
Line 1 display all characters can be input by users.
Line 2 display entered user name.
'.' is the cursor position mark.
[ ] mark the selected character.
To select character: Turn 'Track/Channel' knob or press 'Channel +/-' keys.
To confirm the character: Press 'Volume +/-' keys. Press 'Volume +' the cursor
will advance to next position. Press 'Volume -' the cursor will move back to
previous position.
To DELETE character, press 'NAP' key.
To INSERT character from current position, press 'SLEEP' key.
To EXIT the user name entry, press 'Play'/'Enter' key. A confirmation screen will
be displayed to save modified user name. User the turning knob to selection the
'YES/NO' option.
A password entry screen display afterward. The input procedures are same as
user name entry screen.
Finally, the system restart automatically.
GR-02
Ver 0.4 28 AUG 2006
PROPRIETARY AND CONFIDENTIAL
© ATZ LTD
Page 4 of 8
Page 5

2. Time Mode
ATZ
Time Mode: 12
Select Clock 12/24 hour display mode. Default is 24 hour mode.
3. Time Zone
Time Zone: (GMT +08:00)
The network time is reference to GMT time. To adjust the network time
correctly, select the location time zone for correct network time adjustment.
The range is from (GMT -12:00) to (GMT+12:00) For example, HKT is GMT
+8 hours, select (GMT +08:00) for correct HK Time. The adjusted time
display at line of the screen.
4. Alarm 1 setting
> Enable: Yes
Hour : 06 AM
Minute: 15
Source: G.Radio
Preset: 13
Period: SMTWTFS
Volume: 15
● Enable - To enable/disable Alarm
● Hour – Alarm time hour setting
● Minute – Alarm time minute setting
● Source – Choose the “Wake to” source: G.Radio (GotoRadio), SD
Audio, Buzzer
● Preset – Choose preset memory (station/track) for GotoRadio, this
option is not available for SD Audio, Buzzer source.
● Period - Choose Alarm Period
SMTWTFS (Monday to Sunday)
S _ _ _ _ _ S (Saturday and Sunday)
_MTWTF_ (Monday to Friday)
● Volume – Alarm volume from level 10 to level 30 (Max)
5. Alarm 2 setting (same as item 3: Alarm 1 setting)
> Enable: Yes
Hour : 06 AM
Minute: 15
Source: i.Radio
Preset: 13
Period: SMTWTFS
Volume: 15
6. Snooze Time
Minute(s) : 9
Snooze time can be adjusted from 1min to 30mins. Default is 9 minutes.
7. DST mode (Daylight Saving Time Setting)
DST mode: On
For locations observe Daylight Saving Time like USA and Europe, during
DST period, user turn on DST option for automatic DST time adjustment.
GR-02
Ver 0.4 28 AUG 2006
PROPRIETARY AND CONFIDENTIAL
© ATZ LTD
Page 5 of 8
Page 6

GotoRadio Mode: In standby mode, press 'STANBY/SOURCE” button to turn on the system. Press
ATZ
'STANDBY/SOURCE' button again until 'GotoRadio' appear from the screen. The
GotoRadio support following audio streaming formats.
1. MP3 streaming audio
2. WMA V1, V2, V8, and V9 streaming audio
3. ASF streaming streaming audio
The default is listening in 'PRESET' station mode. Total 50 preset station available. Use
TRACK/CHANNEL knob or Channel +/- keys from remote handset to select preset station.
Press 'PLAY/ENTER' key to connect to select Internet station. When link to station
successfully, 'streaming' icon appear at the lower middle of LCD display.
To SCAN all preset stations, press 'SCAN' key from remote or press 'SETTING' key from
front panel and select 'SCAN' option. 'SCAN' icon appear at the top of LCD display.
Press 'PLAY/ENTER' key to exit scan mode and listen to station in the last scan position.
Apart from listen stations from preset memories. Users can connect to GotoRadio server to
listen stations from server or update preset station from GotoRadio server. When connect
to server, the system is listening in 'DIRECT' station mode. To enter 'DIRECT' mode, press
'PRESET/DIRECT' key from remote handset or press 'MENU' key from from panel and
select 'DIRECT' mode option. 'Connecting ......' advisory message from display and
'DIRECT' icon appear at the top right corner if LCD display.
Once enter 'DIRECT' mode, user can navigate stations by category. Category icon
appear at the top middle of LCD screen. The category name display at the
first line of screen. Total number of station under this category display at second line of
screen. The station name appear on third line of screen.
Press category +/- key to change category. From front panel, press 'Display' keys to
change category. To select station under category, press Channel +/- keys or turn the
Track/Channel knob.
To listen to the select station, press 'PLAY/ENTER' key.
To SCAN all stations under this category, press 'SCAN' key from remote or press
'SETTING' key from front panel and select 'SCAN' option. 'SCAN' icon appear at
the top of LCD display. Press 'PLAY' key to exit scan mode and listen to station in the last
scan position.
To ADD/STORE station to local preset memory, press and hold 'PLAY/ENTER' key. Preset
memory selection screen appear on the display. The first line is the station name to be
stored to preset memory. Second line display the preset memory id (Preset xx). The third
line display the station name of the preset memory station. Memory entry without any
station will display 'Free Memory' advisory message. Otherwise, station name display on
the screen. Select desire preset memory id by turning Track/Channel knob or press
Channel +/- keys from remote handset. Press 'PLAY/ENTER' key to store to the preset
memory id.
After finish preset memories update and/or DIRECT station listening, press
'PRESET/DIRECT' key from remote handset to change back to 'PRESET' station mode.
From front panel, press 'MENU' key and select 'PRESET' option to change back to
'PRESET' station mode.
GR-02
Ver 0.4 28 AUG 2006
PROPRIETARY AND CONFIDENTIAL
© ATZ LTD
Page 6 of 8
Page 7

SD Audio Mode: In standby mode, press 'STANBY/SOURCE” button to turn on the system. Press
ATZ
'STANDBY/SOURCE' button again until 'SD Audio' appear from the screen. The SD Audio
mode support following audio format files.
1. MP3 audio files
2. non-DRM protected WMA audio files
3. ASF audio files
4. WAV audio files
The default is listening in 'DIRECT' track mode. 'DIRECT' icon appear at the top
right corner if LCD display. Use TRACK/CHANNEL knob or Channel +/- keys from remote
handset to select audio track. Press 'PLAY/ENTER' key to play audio files from select track
position.
To SCAN all tracks, press 'SCAN' key from remote or press 'SETTING' key from front panel
and select 'SCAN' option. 'SCAN' icon appear at the top of LCD display. Press
'PLAY/ENTER' key to exit scan mode and listen to track in the last scan position.
To ADD/STORE track to local preset memory, press and hold 'PLAY/ENTER' key. Preset
memory selection screen appear on the display. The first line is the track name to be
stored to preset memory. Second line display the preset memory id (Preset xx). The third
line display the track name of the preset memory location. Memory entry without any track
will display 'Free Memory' advisory message. Otherwise, track name display on the screen.
Select desire preset memory id by turning Track/Channel knob or press Channel +/- keys
from remote handset. Press 'PLAY/ENTER' key to store to the preset memory id.
Apart from listen stations from 'DIRECT' mode. Users can listen audio tracks in PRESET
mode. To enter 'PRESET' mode, press 'PRESET/DIRECT' key from remote handset or
press 'MENU' key from from panel and select 'PRESET' mode option. 'DIRECT' icon
disappear at the top right corner if LCD display.
Once enter 'PRESET' mode, user can navigate tracks press Channel +/- keys or turn the
Track/Channel knob.
To listen to the 'PRESET' tracks, press 'PLAY/ENTER' key.
To SCAN all PRESET tracks sequence, press 'SCAN' key from remote or press 'SETTING'
key from front panel and select 'SCAN' option. 'SCAN' icon appear at the top of
LCD display. Press 'PLAY' key to exit scan mode and listen to track in the last scan
position.
Stock Info mode: In standby mode, press 'STANBY/SOURCE” button to turn on the system. Press
'STANDBY/SOURCE' button again until 'Stock Info' appear from the screen.
Stock Info
(Delayed Quote)
In this mode, users can view “delayed quote data” from Internet.
Note: All information provided "as is" for informational purposes only, not intended for
trading purposes or advice. Neither ATZ Limited nor any of independent providers is liable
for any informational errors, incompleteness, or delays, or for any actions taken in reliance
on information contained herein.
Use TRACK/CHANNEL knob or Channel +/- keys from remote handset to select stock
symbol quote in preset memory. Press 'PLAY/ENTER' key to view quote data.
GR-02
Ver 0.4 28 AUG 2006
PROPRIETARY AND CONFIDENTIAL
© ATZ LTD
Page 7 of 8
Page 8

To SCAN all PRESET stock quote, press 'SCAN' key from remote or press 'SETTING' key
ATZ
from front panel and select 'SCAN' option. 'SCAN' icon appear at the top of LCD
display. Press 'PLAY' key to exit scan mode and view to the stock quote in the last scan
position.
To ADD/STORE stock index to local preset memory, press and hold 'PLAY/ENTER' key.
Preset memory selection screen appear on the display. The first line is the stock symbol
stored in preset memory. Second line display the preset memory id (Preset xx). The third
line display the stock name of the preset memory location. Memory entry without any track
will display 'Free Memory' advisory message. Otherwise, track name display on the screen.
Select desire preset memory id by turning Track/Channel knob or press Channel +/- keys
from remote handset. Press 'PLAY/ENTER' key to enter the stock symbol editing screen.
The entry screen is look like this:
Line 1:
Line 2:
Line 1 display all characters can be input by users.
Line 2 display entered stock symbol.
'.' is the cursor position mark.
[ ] mark the selected character.
To select character: Turn 'Track/Channel' knob or press 'Channel +/-' keys.
To confirm the character: Press 'Volume +/-' keys. Press 'Volume +' the cursor
will advance to next position. Press 'Volume -' the cursor will move back to
previous position.
To DELETE character, press 'NAP' key.
To INSERT character from current position, press 'SLEEP' key.
To EXIT the user name entry, press 'Play'/'Enter' key. A confirmation screen will
be displayed to save modified stock symbol to the selected preset memory id.
User the turning knob to selection the 'YES/NO' option.
GR-02
Ver 0.4 28 AUG 2006
PROPRIETARY AND CONFIDENTIAL
© ATZ LTD
Page 8 of 8
 Loading...