

Page 1

DSP
VOL
SEL
_
+
MOD
RPTINT RDMTOP
AUX
CD/USB/SD/MMC /MP3 PLAYER
REL
/PTY
MUTE
BND
APS
32
5
4
6
1
-10
+10
COMPA CT
DIGI TAL AUD IO
CS-455 BT
INSTRUCTION MANUAL
5 IN 1 CAR AUDIO SYSTEM WITH
AM/FM-RDS DIGITAL PLL TUNING RADIO
SD/USB/CD(ESP)/MP3 PLAYER
BLUE TOOTH HANDFREE SYSTEM
www.lenco.eu
Page 2

1
PRECAUTIONS AND MAINTENANCE
1. If the car interior is extremely hot, as after being parked in the sun, do not use the player until the car has
been driven for a while to cool off the interior.
2. The protective case is to safely keep the front panel.
3. The unit is designed for negative terminal of the battery which is connected to the vehicle
metal. Please confirm it before installation.
4. Do not allow the speaker wires to be shorted together when the unit is switched on. Otherwise
it may overload or burn out the power amplifier.
5. Do not install the detachable panel before connecting the wire.
Page 3

2
S
D
13
14
171816
1
2
3
5
7
8
10
15
4
6
9 11
12
DSP
VOL
SEL
_
+
MOD
RPTINT RDMTOP
AUX
CD/USB/SD/MMC/MP3 PLAYER
REL
/PTY
MUTE
BND
APS
32 54
6
1
-10 +10
COMPACT
DIGITAL AUD IO
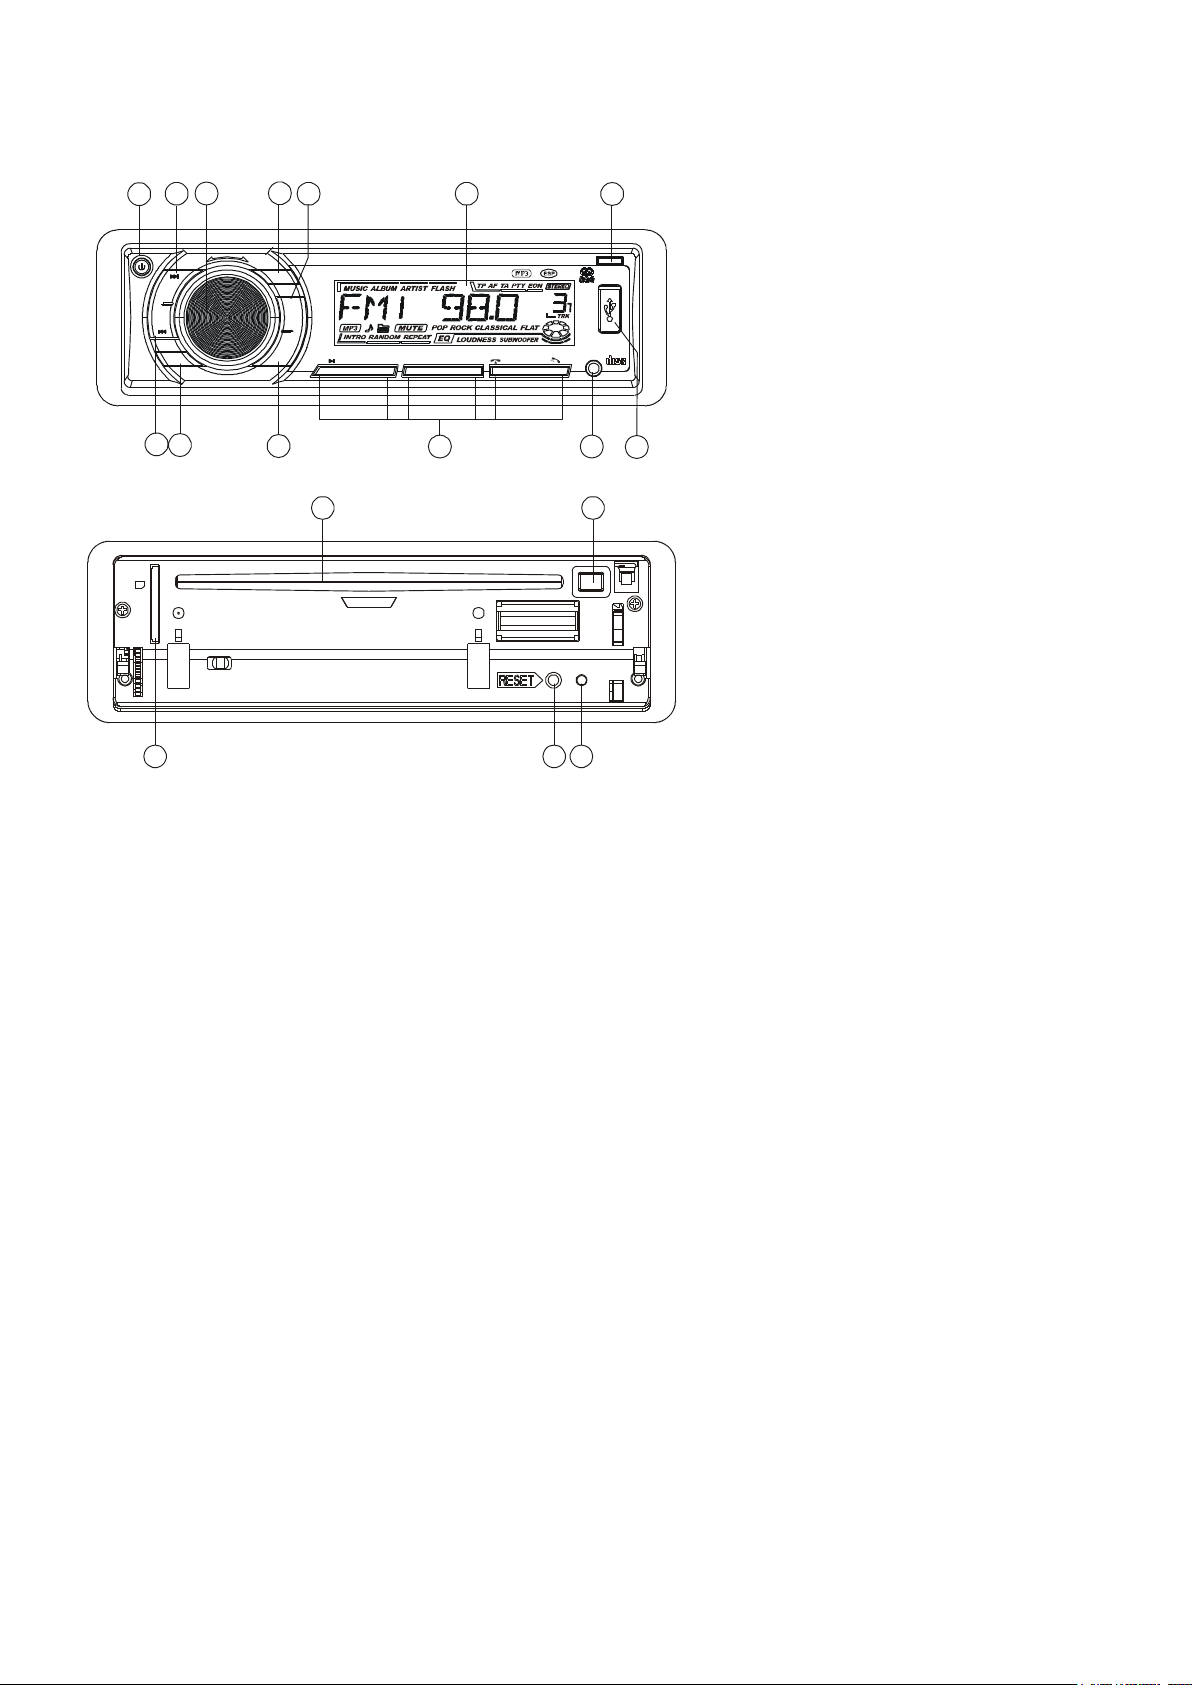
10. MODE/PTY button
11. DSP button
12. AUX button
13. EJECT button
14. CD slot
15. USB port
16. SD slot
17. Anti-theft LED indicator
18. RESET button
LOCATION AND FUNCTION OF CONTROLS
1.REL button
2.SEL button and VOL dial
3. LCD
4&5. I<< and >>I button
6. BAND button
7. POWER/MUTE button
8. APS button
9. TOP/PLAY/PAUSE,INT,RPT
RDM and 1-6 Number buttons
Page 4

3
Basic Operation
1. REL BUTTON
Press the REL button to fold down the front control panel.
Then a disc can be inserted into the disc slot or ejected by pressing the EJ button.
After flipping down the front panel, push it leftwards, then pull the right side of the panel outwards to
remove it from the unit chassis.
2. SEL BUTTON (Select) AND VOL KNOB
A) Press the SEL button briefly, it is activated as selecting each mode of E. VOL.
-> VOLUME ->BASS ->TREBLE -> BALANCE -> FADER ->
When selecting a desired audio mode, rotate the VOL knob to adjust the audio effect.
In each mode, the waiting time is about 5 seconds, and the time waiting time is over, it returns to the
last display mode of tuner or CD mode.
The control mode of E.VOL is operated with following numeric display.
- VOL: (MIN)00, 01,......46, 47(MAX).
- BASS/TRE: -07, -06,...,00,...+06,+07
- BAL: 0LR9, 1LR9, ..., 9LR9,..., 9LR1, 9LR0
- FAD: 0FR9,1FR9, ..., 9FR9,..., 9FR1, 9FR0
B) When pressed longer 2 seconds, it is activated as cyclical mode of following functions for
user’s selection.
->TA (ON/OFF) ->AF (ON/OFF) ->TA (ALARM/SEEK) ->PI (SOUND/MUTE) ->
RETURN (LONG/SHORT) ->MASK(DPI/ALL) ->BEEP (ON/OFF) -> USER SET
(FLAT/CLASSIC/ROCK/POP)->VOL(LAST/DEFA) ->MONO/STEREO(only for
FM mode) ->LOUD(ON/OFF)->LOCAL/DX(only for FM mode)->CLK(ON/OFF)
->CLK(12/24)mode.
After selecting the desired mode, rotate the VOL knob to select one setup item of the desired mode.
1)TA ON/OFF
When TA mode is on(TA is displayed on LCD), it will begin to seek TA station and TA SEEK will be
displayed on LCD for a while.
When traffic announcement is transmitted:
a) If the unit is in SD, USB or disc mode, it will switch to radio mode temporarily.
b) Temporarily switch over to an EON linked station when EON detects a traffic announcement on that
other program, and TP will be displayed on LCD.
c) If volume level is below 20, volume level is raised to 20, and returns to its previous mode and volume
level when the traffic announcement is over.
If volume is adjusted during traffic announcement, only the traffic announcement volume is valid.
* TA interruption function:
The current traffic announcement is cancelled by pressing this key. But the TA mode will not be off.
* When TA is on, SEEK, (SCAN), AUTO MEMORY function can be received or saved only when traffic
program identification code has been received. When TA is ON, traffic program identification code is
not received during specified time.
Page 5

4
2)AF (ON/OFF)
When AF switching mode is selected and the state of AF switching mode is displayed by AF segment
in display.
Segment off: AF switching mode off.
Segment on: AF switching mode on, and has RDS information.
Segment flashing: AF switching mode on, but RDS information is not received yet.
When AF switching mode is selected, the radio checks the signal strength of AF all the time.
The interval of checking time of each AFs depends on the signal strength of current station,
from a few minute for strong station to a few seconds for weak station. Every time that
new AF is stronger than current station, it switches over to that frequency for very short time,
and NEW FREQUENCY is displayed for 1-2 second. Because the mute time of AF
switching or checking time is very short, it is almost inaudible in case of normal program.
During FM mode, when AF is on, SEEK, (SCAN), AUTO-MEMORY function can only receive
and save RDS program.
3) TA SEEK/TA ALARM:
TA SEEK mode: when newly tuned station does not receive TP information for 5 seconds,
the radio retunes to next station which has a different PI to the last station, but has the TP information.
When TP information gets lost at the current station for retune time which is set by RETUNE SHORT(90
seconds) or RETUNE LONG(150 seconds), the radio starts to retune to next same PI station. When
same PI station does not receive in 1 cyclic search, the radio retunes to next station with TP information.
TA ALARM mode: when this mode is selected, any automatic retune mode is not activated.
Only double beep sound(ALARM) will be heard.
When newly tuned station does not have TP information for 5 seconds, beeps are sounded.
When TP information gets lost at the current station for retune time, the beep sound will be heard.
When newly tuned station has no RDS signal, PI SEEK is suppressed .
4) PI SOUND/ PI MUTE:
PI SOUND mode: if a car cruises between buildings that could cause reflecting signals, a phenomenon
may occur, due to different PI codes being received from the same AF source. when different PI sounds
(DIP) are heard occassionally, this will happen for less than 1 second.
PI MUTE mode: under above same situation, a mute sound will be heard for less than1second.
5) RETURN L / RETURN S:
The initial time of automatic TA search or PI SEARCH mode is selected.
When PI information is not received for retune interval , the radio starts to retune to next same PI
station.
When same PI station does not receive 1 cyclic search, the radio goes to last station and waits for 4-5
minutes until PI code is received.
RETURN L mode: selected as 150 seconds.
RETURN S mode: selected as 90 seconds.
6) MASK DPI/MASK ALL:
MASK DPI mode: masks only the AF which has different PI.
MASK ALL mode: masks the AF which has different PI and NO RDS signal with high field strength.
Page 6

5
7)BEEP ON/BEEP OFF
BEEP ON mode: The beep is generated when any key is pressed.
BEEP OFF mode: The beep sound is disabled..
8)VOL LAST/VOL DEFA
VOL LAST: The radio switches on at the actual volume it had when it was last switched off.
VOL DEFA: After pressing SEL button, AVOL will be displayed. Then you can pre-select a
constant switch-on volume by using the VOL knob.
9)CLK ON/OFF
CLK ON: Clock will always show on the display when power off.
CLK OFF: Clock will disappear on the display when power off.
3. LCD Display
4&5. TUNE, SEEK, TRACK, SKIP UP / DOWN BUTTONS
Press the >>| or |<< button shortly to manual tune up/down for the desired radio station frequency
step by step.
Press and hold the >>| or |<< button for longer 0.5 seconds, to automatically tune up/down for the
radio station frequency of strong signal.
6. BAND BUTTON
Press the BND button briefly to select the radio broadcasting band you would like to hear.
The AM/FM band is toggled cyclically through the tuning bands:
->FM 1-> FM 2 -> FM 3 -> MW 1->MW 2 ->.
7. POWER ON/OFF,MUTE BUTTON
When the unit is power off, the unit comes to ON by pressing any button on the front panel (except the
OPEN key ). It also can turn on the unit to insert a disc, SD card or USB stick into their slots or socket.
When the unit is power on, press and hold the power button, the unit goes into power off mode.
This button serves to switch the MUTED state on/off.
Press this button to suppress the loudspeaker temporarily, and press again to resume listening.
The muted state will be also released when the MODE, SEL button is pressed and VOL knob
on the front panel is used.
8. APS BUTTON (Auto-storage /Preset scan)
1) when long pressing for more than 1 seconds, the radio searches from the current frequency and
checks the signal strength level until 6 station are found. And then the 6 stations frequency are
preset to the corresponding preset memory numbered bank. The auto-storage operation is
implemented in the each selected band.
When the auto-storage operation is finished, the radio execute the Preset Scan.
2) when short pressing, the radio searches for each preset station in the current band and holds
at that preset number for 5 seconds with releasing mute, and then search again.
Page 7

6
9. PRESET STATION MEMORY AND TOP/>||, INT, RPT, RDM BUTTONS
Go to any preset station by pressing one of the 6 preset station buttons (1-6).
If one of these buttons is pressed for more than 2 seconds, the station currently being listened to will be
memorized into the selected preset button.
10. MODE AND PTY (PROGRAM TYPE) BUTTON
Press the MODE/PTY button to change among tuner (radio), disc (when a disc is loaded), SD card (when
an SD card is inserted) , USB (when an USB stick is inserted) and AUX mode.
In Radio mode, Press MODE/PTY button longer to select one of the following mode:
POP M- - NEWS
While selecting PTY TYPE, its selection is implemented by preset buttons as described in preset key.
(press one of the 6 preset buttons shortly and repeatedly to select the PTY TYPE in the preset button)
When POP M or NEWS is on, theprevious PTY program and PTY word is displayed on LCD.
If there are no keys entered for 2 seconds, previously selected PTY is searched. During 1 loop, if desired
PTY is not found, NO PTY is flashed, then return to previous normal radioand PTY icon goes off.
11. DISP BUTTON
Press the DISP button briefly to display time for 5 seconds on the display, and then returns to its previous
display unless the button is pressed again.
Press the DISP button l more than 1 second until the clock time flashes, then rotate the VOL knob
to adjust time.
12. AUX INPUT JACK
For connection of other audio device.
13. EJECT KEY
n the power on state, the loaded disc can be ejected by pressing the EJ key.
14. CD SLOT
15. USB SOCKET
When needing to play the file in the USB stick, open the plastic cover cap and insert the USB stick into
the socket. It will switch to the USB mode automatically, and then play the first file in the USB.
When no need to use USB socket, please cover the plastic cover cap.
16. SD CARD SLOT
When you need to play the file in the SD card, insert the SD card into the card slot. It will change into the
SD mode automatically, and then play the first file in the SD.
Note:
When SD card and USB stick are both inserted into their slot or socket, the system will change into
the USB mode automatically.
17. FLASHING LED
18. RESET BUTTON
Before operating the unit for the first time, or after replacing the car battery or changing the connections.
You must reset the unit.
Press this button with a cuspidal object. This operation will erase the clock setting and some stored
contents.
Page 8

7
CD/MP3/USB/SD Operation
1. Skip up/down buttons
Press the >>| button briefly to play next track.
Press the |<< button briefly to play the current track from the beginning of it if the playing time is more
than 2 seconds.
Press the |<< button briefly to play the previous track if the playing time is less than 2 seconds.
Press the >>| or |<< button and hold to skip forwards or backwards, release to resume normal playback.
2. APS button
Press APS button repeatedly to select TRACK SEARCH, DIRECTORY SEARCH o r
FIRST CHARACTER SEARCH mode.
In TRACK SEARCH mode, the LCD will display TRK T 000 and flash the biggest digit0 that the MMC/SD
card, USB or MP3 disc contain. Rotate the knob to select the number of the flashing digit from 0 ~ 9. Then
press SEL button to confirm the number and flash next smaller digit 0.With the same means, select
the number of the flashing digit. After finishing selecting the number of all flashing digit, press SEL button
to play the track of the selected serial number.
In DIRECTORY SEARCH mode, the LCD will display the root folder(if there is not the root folder, it will find
a root folder named ROOT). Then rotate the knob to select your desired folder, Finally press SEL button to
play the first track of the folder.
In FIRST CHARACTER SEARCH mode, the LCD will display A- rotate the knob to select file's first
character by the order of A~Z and 0~9. Then press >>| or |<< button to select one file its first characters is
the selected one. Finally press SEL button to play the selected file.
3. PLAY/PAUSE, INT, RPT, RDM buttons
1) Press the TOP/ >|| button briefly to interrupt the playback of the disc, SD or USB.
Press again to resume normal playback of the disc, SD or USB.
Press the TOP/>|| button and hold for approximately 0.5 seconds to play the first track of the disc,
SD or USB.
2) Press the INT button to sample the first 10 seconds part of each track, and the INT ON will be visible on
the LCD display.
In the process of INT, press INT button again to stop sampling and to continue playing the current track,
and the LCD will display INT OFF.
3) Press the RPT button once to play the current track repeatedly, and the RPT ONE will be visible on the
LCD display.
During MP3 disc, SD or USB mode, press the RPT button twice continuously to playthe current folder
repeatedly, and the RPT DIR will be visible on the LCD display.In the process of RPT, press RPT
button again to stop playing repeatedly mode and the LCD will display RPT OFF.
4) Press the RDM button to play all tracks on disc in random order, and the RDM ON will be visible on the
LCD display.
In the process of RDM, press RDM button again to stop playing in random order and the LCD will
display RDM OFF.
5) During the normal playback of MP3 disc, SD, USB:
Press the radio preset button 6 and 5 to move up and down10 tracks at a time.
Page 9

8
Blue Tooth Handfree System
1. Pair
To pair your mobile phone with a Bluetooth device, simply activate the Bluetooth function on your mobile
phone and search for devices. When the stereo has been found it should show as Car Kit, when you try to
connect, it will ask for a password.
The default password is 0000. When you have successfully paired your phone the message BT READY will
be displayed followed by the mobile number. When the phone has successfully connected you will see a
blue led on the display flashing.
This LED will turn to solid when you are on a call or disappear when you disconnect from the stereo.
2. Connection or disconnection
A) Use the mobile phone to do connection or disconnection
1) In the connection status, find the paired and connected Bluetooth Device, then press the
disconnection button to do disconnection.
2) In the disconnection status, find the paired and disconnected Bluetooth Device, then
press the connection button to do connection.
B) When turn on the power again(after Acc off ), the front panel can search the phone have pair
automatically and be connection. And it will take you about 20 seconds.
3. Accept/Reject/Hold/End Call
Accept - Press the 5(-10,HAND UP) button
Reject - Press the 6(+10,HOLD)button
4. Talking volume level setting
At talking status, use the VOL knob to adjust the sound output, but this volume level can not be reserved.
Note: the default volume level is 25.
5. To transfer the audio of a file played by Mobile Phone to the Car Audio Player
If the mobile phone supports A2DP and could play audio, when the Mobile Phone plays an audio file(For
some Mobile Phones, you must select Play by BT firstly), the playing will be transferred to the Car Audio
Player.
In A2DP mode, if the Bluetooth device of the Mobile Phone support AVRCP, the functions of the >>|, |<<
and PLAY/PAUSE buttons are the same as one in disc mode(no fast forward /backward functions for
the >>|/|<< buttons). The other buttons available in disc mode are not available.
In A2DP mode, if the Bluetooth device of the Mobile Phone support AVRCP, pressing the MODE button can
switch on between the radio, disc, USB, CARD and A2DP. But after entered the A2DP mode again, to
resume the playback and transfer to the Car Audio Player by the Mobile Phone, you must press the
PLAY/PAUSE button.
In A2DP mode ,if the phone music play mode turn to the radio mode, you need to wait about 10 seconds.
Page 10

9
WIRES CONNECTION
CONNECTOR B
1. Rear Right Speaker (+)
2. Rear Right Speaker (-)
3. Front Right Speaker (+)
4. Front Right Speaker (-)
5. Front Left Speaker (+)
6. Front Left Speaker (-)
7. Rear Left Speaker (+)
8. Rear Left Speaker (-)
CONNECTOR A
1.
2.
3.
4. Memory +12V
5. Auto Antenna Output
6.
7. ACC
8. GROUND
Notice: Some cars have special wires connection(the Memory and the ACC connection have changed), so
here support the both sides ISO socket.
Page 11

10
CARE FOR USING CD'S:
About CD-R/CD-R/W discs:
In addition to commercially-recorded audio CD's, this unit can play CD-R and CD-R/W discs.
In come cases, particularly when recorded on older CD burners, some CD-R and CD-R/W
discs may not play. Also, whenever you are recording a CD for playback in this receiver,
it is recommended that you record at 24x or slower speed for CD-R and 4x or slower
for CD-R/W to achieve higher signal quality and better playback performance.
1. To keep the disc clean:
Do not attach any sticker or adhesive tape on the disc.
Handle the disc by its edge to keep the disc clean and do not touch the surface.
Before playing a disc, wipe it off with a clean, dust-free cleaning cloth.
Wipe the disc outwards from the disc center.
2. When one has already been inserted. Doing so may damage the unit. Insert a disc with labeled surface up,
or it will damage the unit.
3. Do not expose the disc to direct sunlight or nearby heat sources such as heating vents, caliduct which can
cause the disc to warp.
Do not leave disc in a car if it is parked in direct sunlight as that will lead to a considerable rise in
the temperature inside the car.
4. Do not use any secondhand or rented disc, usually, there is glue on the surface of those discs, it will stop
the unit working and damage it.
5. Always store the disc in its case for protection. Scratched up discs will produce poor sound performance and
cause CD player to skip.
6. In raining day or wet area, the moisture may form on the disc or the optical parts, the playback may
not be possible. If moisture forms on the disc, wipe it off with a soft cloth.
If moisture forms on the optical parts of the unit, allow the unit to sit for about one hour with
power on..
7. Do not use solvents such as benzine or thinners. Commercially available cleaners or anti-static
spray will damage the unit.
Page 12

11
TROUBLE SHOOTING
Before using the check list please make all the connections first.
If you still have questions after going through the checklist, please consult your local
customer service representative.
Page 13

12
INSTALLATION
Page 14

13
SPECIFICATION
GENERAL
Power requirement........................................................................................DC 12V.
Current consumption..................................................................................10A MAX.
POWER OUTPUT...................................................................................... 25W X 4.
.
Number of channels...................................................................................2 STEREO.
Chassis dimensions.............................................................178[W] X 50[H] X 165[D].
FM SECTION
Frequency range.............................................................................87.5MHz -108MHz
Usable sensitivity...................................................................................................3uV.
I.F Frequency................................................................................................10.7MHz.
AM SECTION
Frequency range............................................................................522KHz - 1620KHz
I.F Frequency...................................................................................................450KHz
Usable Sensitivity.................................................................................................40dB
LINE - OUT
Output.................................................................................................... MAX 1200mv
CD/SD or USB PLAYBACK
System...........................................................................................MP3 audio system.
Usable disc....................................................................CD/CD-R/CD-RW/MP3/WMA
Frequency characteristics..................................................................20-100Hz ≤ 5dB
10-20KHz ≤ 5dB.
Signal to noise ........................................................................................50dB [1KHz]
If at any time in the future you should need to dispose of this product please note that: Waste electrical
products should not be disposed of with household waste. Please recycle where facilities exist. Check
with your local authority or retailer for recycling advice. (Waste Electrical and Electronic Equipment
Directive)
Page 15

14
DSP
VOL
SEL
_
+
MOD
RPTINT RDMTOP
AUX
CD/USB/SD/MMC /MP3 PLAYER
REL
/PTY
MUTE
BND
APS
32
5
4
6
1
-10
+10
COMPA CT
DIGI TAL AUD IO
CS-455BT
BEDIENUNGSANLEITUNG
5-IN-1 KFZ-RADIO MIT MW/UKW-RDS-DIGITAL-PLL-RADIO
& SD/USB/CD (ESP)/MP3-PLAYER
BLUETOOTH-FREIHANDSYSTEM
www.lenco.eu
Page 16

15
SICHERHEITSHINWEISE UND WARTUNG
1. Wenn es im Auto besonders heiß ist, z. B. nach längerer Parkzeit in der Sonne, benutzen Sie den Player
bitte erst nach dem sich das Auto verhältnismäßig abgekühlt hat.
2. Eine Schutztasche dient dem Schutz des Bedientafel.
SCHUTZHÜLLE
BEDIENTAFEL
3. Das Gerät wurde so konzipiert, dass der negative Anschluss der Batterie an die Karosserie angeschlossen
wird. Überprüfen Sie dies bitte vor dem Einbau.
4. Schließen Sie niemals die Lautsprecherdrähte im eingeschalteten Zustand des Geräts kurz. Dies könnte zu
Überlastung und Verbrennungen führen.
5. Installieren Sie die abnehmbaren Bedientafel vor dem Anschluss der Kabel.
Page 17
16
S
D
13
14
171816
1
2
3
5
7
8
10
15
4
6
9 11
12
DSP
VOL
SEL
_
+
MOD
RPTINT RDMTOP
AUX
CD/USB/SD/MMC/MP3 PLAYER
REL
/PTY
MUTE
BND
APS
32 54
6
1
-10 +10
COMPACT
DIGITAL AUDIO
10. MODE/PTY-Taste
11. DSP-Taste
12. AUX-Taste
13. EJECT-Taste
14. CD-Ladefach
15. USB-Anschluss
16. SD-Kartensteckplatz
17. Anti-Diebstahl-LED
18. RESET-Taste
ANORDUNG UND FUNKTIONEN DER BEDIENELEMENTE
1. REL-Taste
2. SEL-Taste und VOL-Regler
3. LCD-Anzeige
4 & 5. und
6. BAND-Taste
7. POWER/MUTE-Taste
8. APS-Taste
9. TOP/WIEDERGABE/PAUSE, INT,
RPT RDM und Zifferntasten 1 - 6
Page 18

17
Grundlegende Bedienung
1. REL-TASTE
2. SEL-TASTE (Auswahl) UND VOL-DREHKNOPF (Lautstärke)
Betätigen Sie die REL-Taste, um die Bedientafel aufzuklappen.
Sie können dann eine Disc in das Disc-Ladefach einlegen bzw. durch Betätigung der EJ-Taste auswerfen.
Nach dem Umklappen der Bedientafel nach unten, drücken Sie sie nach links und ziehen sie dann die rechte
Seite nach außen, um sie aus dem Gerätegehäuse zu entfernen.
A) Betätigen Sie die SEL-Taste zur Auswahl des E.VOL.-Modus.
→ VOLUME (Lautstärke) → BASS (Bässe) → TREBLE (Höhen) → BALANCE → FADER →
Nachdem Sie den gewünschten Audiomodus gewählt haben, benutzen Sie den VOL-Drehknopf, um den
jeweiligen Audioeffekt einzustellen.
In jedem Modus beträgt die maximale Wartezeit etwa 5 Sekunden. Wenn diese Zeit abgelaufen ist, kehrt die
Anzeige zum Radiobetrieb oder CD-Modus zurück.
Der E.VOL-Modus wird über die folgenden numerischen Anzeigen bedient.
- VOL: (MIN) 00, 01, ......46, 47 (MAX).
- BASS/TRE: -07, -06, ..., 00, ...+06, +07
- BAL: 0LR9, 1LR9, ..., 9LR9, ..., 9LR1, 9LR0
- FAD: 0FR9, 1FR9, ..., 9FR9, ..., 9FR1, 9FR0
b) Wenn Sie die Taste länger als 2 Sekunden gedrückt halten, können Sie auf eine der folgenden Funktionen
zugreifen.
→ TA (ON / OFF) → AF (ON / OFF) → TA (ALARM / SEEK) → PI (SOUND / MUTE) → RETURN (LONG /
SHORT) → MASK (DPI / ALL) → BEEP (ON / OFF) → USER SET (FLAT / CLASSIC / ROCK / POP) → VOL
(LAST / DEFA) → MONO / STEREO (nur für UKW-Modus) → LOUD (ON / OFF) → LOCAL / DX (nur für
UKW-Modus) → CLK (ON / OFF) → CLK (12 / 24).
Nach der Auswahl des gewünschten Modus, drehen Sie bitte den VOL-Drehknopf zur Auswahl der
gewünschten Einstellungsoption.
1) TA ON / OFF
Wenn der TA-Modus eingeschaltet ist (TA wird in LCD-Anzeige) beginnt eine TA-Sendersuche und in der
LCD-Anzeige erscheint TA SEEK.
Wenn Verkehrsnachrichten übertragen werden:
a) Wenn das Gerät sich im SD-, USB- oder Disc-Modus befindet, geht es vorübergehend in den Radiomodus.
b) Das Gerät schaltet vorübergehend zu einem anderen Sender im EON-Netz, wenn EON auf anderen
Verkehrsnachrichten erkennt. TP wird entsprechend auf dem LCD-Bildschirm angezeigt.
c) Wenn die Lautstärke unter 20 liegt, wird das Lautstärkeniveau auf 20 angehoben und geht wieder zum
ursprünglichen Niveau zurück, wenn die Verkehrsnachrichten zu Ende sind.
Wenn die Lautstärke automatisch angehoben wird, dann ist diese Einstellung nur für die Dauer der
Verkehrsnachrichten gültig.
* TA-Unterbrechungsfunktion:
Die aktuelle Verkehrsansage wird durch Betätigung dieser Taste abgebrochen. Der TA-Modus wird dadurch
nicht deaktiviert.
* Bei eingeschaltetem TA-Modus, können die SEEK, (SCAN), AUTO MEMORY-Funktionen nur wenn der
Verkehrsprogrammerkennungscode empfangen, benutzt und gespeichert wurde.
Wenn der TA-Modus eingeschaltet ist, wird der Verkehrsprogrammerkennungscode im angegebenen Zeitraum
nicht empfangen.
2) AF (ON / OFF)
Durch Betätigung dieser Taste wird der AF-Umschaltmodus aktiviert und der Status des AF-Modus im
Page 19

18
AF-Segment der Anzeige angezeigt.
Segment aus: AF-Umschaltmodus aus
Segment an: AF-Umschaltmodus ein + verfügbare RDS-Informationen
Segment blinkt: AF-Umschaltmodus ein, RDS-Informationen werden aber noch nicht empfangen.
Nachdem der AF-Modus aktiviert ist, überprüft das Radio ständig die AF-Signalstärke. Der Intervall zwischen
den AFs, hängt von der Signalstärke des momentanen Sender. Das Gerät braucht dafür wenige Sekunden
oder mehrere Minuten. Jedes Mal wenn der neue AF-Sender starker ist als der momentane Sender, kann er
innerhalb von kürzester Zeit zur neuen Frequenz gehen und NEWFREQUENCY wird für 1-2 Sekunden
angezeigt. Weil die Stummschaltung der Tonausgabe während der AF-Umschaltung äußerst kurz ist, kann die
Umschaltung bei normalen Radioprogrammen in der Regel nicht wahrgenommen werden.
Bei eingeschalteter AF-Funktion können die Such- und Autospeicher-Funktionen im UKW-Modus nur für
RDS-Programme benutzt werden.
3) TA SEEK / TA ALARM:
TA SEEK-Modus: Wenn der neu eingestellte Sender für 5 Sekunden keine TP-Information empfangen kann,
geht das Radio zum nächsten Sender, der identisch mit dem letzten Sender (PI) ist, aber über TP-Information
verfügt.
Wenn TP-Informationen für den aktuellen Sender verlorengehen und damit eine Neuabstimmung
entsprechend der Einstellungszeit RETUNE SHORT (90 Sekunden) oder RETUNE LONG (150 Sekunden)
nicht möglich ist, startet das Radio mit dem nächsten gleichen PI-Sender. Wenn der gleiche PI-Sender nicht
nach der ersten Suche gefunden wird, sucht das Radio nach dem nächsten Sender mit TP-Informationen.
TA ALARM-Modus: Wenn dieser Modus gewählt wird, bleibt die automatische Neuabstimmung deaktiviert. Nur
ein Alarmsignal (doppelter Piepton) wird ausgegeben.
Wenn ein neu eingestellter Sender für 5 Sekunden keine TP-Information zur Verfügung stellt, ertönt ein
Signalton.
Wenn die TP-Informationen beim aktuellen Sender verloren gingen, wird ein Alarmsignal ausgegeben.
Wenn ein neu eingestellter Sender über kein RDS-Signal verfügt, wird die PI SEEK-Funktion unterdrückt.
4) PI SOUND / PI MUTE:
PI SOUND-Modus: Bei der Autofahrt zwischen Gebäuden, kann es dazu kommen, das Signale reflektiert und
unterschiedliche PI-Codes vom gleichen AF empfangen werden.Wenn verschiedene PI-Töne (DIP) zu hören
sind, geschieht dies für weniger als 1 Sekunde.
PI MUTE-Modus: In der gleichen Situation, kann es zu einer Stummschaltung für weniger als 1 Sekunde
kommen.
5) RETURN L / RETURN S:
Die Ersteinstellung der automatischen TA- oder PI-Suche ist eingestellt.
Wenn PI-Informationen nicht bei der Sendersuche gefunden wurden, startet das Radio eine erneute Suche,
um einen Sender mit dem gleichen PI zu finden.
Wenn der gleiche PI-Sender nicht beim ersten Suchvorgang gefunden wurde, geht das Radio zum letzten
Sender und wartet 4 - 5 Minuten, bis ein PI-Code empfangen wird.
RETURN L-Modus: Eingestellt auf 150 Sekunden.
RETURN S-Modus: Eingestellt auf 90 Sekunden.
6) MASK DPI / MASK ALL:
MASK DPI-Modus: Maskiert wird nur der AF mit abweichender PI.
MASK ALL-Modus: Maskiert den AF, der unterschiedliche PI- und NO RDS-Signale mit hoher Sendekraft
besitzt.
Page 20

19
7) BEEP ON / BEEP OFF
BEEP ON-Modus: Ein Signalton wird erzeugt, wenn eine Taste betätigt wird.
BEEP OFF-Modus: Die Signalton-Funktion wird deaktiviert.
8) VOL LAST / VOL DEFA
VOL LAST: Das Radio wird mit der gleichen Lautstärke eingeschaltet, mit der es ausgeschaltet wurde.
VOL DEFA: Nach Betätigung der SEL-Taste, wird AVOL angezeigt. Sie können dann eine konstante
Einschaltlautstärke einstellen, indem Sie den VOL-Drehknopf benutzen.
9) CLK ON / OFF
CLK ON: Die Uhrzeit wird immer in der Anzeige angezeigt, selbst wenn das Gerät ausgeschaltet ist.
CLK OFF: Die Uhrzeitanzeige verschwindet von der Anzeige, wenn das Gerät ausgeschaltet wird.
3. LCD-Anzeige
4 & 5. TUNE, SEEK, TRACK, SKIP UP / DOWN
Betätigen Sie >>| oder |<<, um in Einzelschritten nach den gewünschten Radiosendern zu suchen.
Halten Sie die Tasten >>| oder |<< für länger als 0,5 Sekunden gedrückt, um automatisch nach Radiosendern
mit einem starken Signal zu suchen.
6. BAND
Betätigen Sie die BND-Taste zur Auswahl des gewünschten Frequenzbands.
Die MW/UKW-Frequenzbandeinstellung wird in der folgenden Reihenfolge umgeschaltet:
→ UKW1 → UKW2 → UKW3 → MW1 → MW2 →.
7. POWER ON / OFF, MUTE
Wenn das Gerät ausgeschaltet wird, können Sie es durch Betätigung einer beliebigen Taste der Bedientafel
(mit Ausnahme der OPEN-Taste) einschalten. Das Gerät wird ebenfalls eingeschaltet, wenn Sie eine Disc oder
SD-Karte einlegen bzw. ein USB-Speichermedium anschließen. Wenn das Gerät eingeschaltet, halten Sie die
EIN/AUS-Taste gedrückt und das Gerät wird ausgeschaltet.
Diese Taste dient dazu, die Stummschaltung ein- bzw. auszuschalten.
Betätigen Sie diese Taste, um vorübergehend die Lautsprecherausgabe zu unterdrücken. Betätigen Sie die
Taste erneut, um die Audioausgabe wieder einzuschalten. Die Audioausgabe wird auch dann wieder
freigegeben, wenn Sie die MODE- oder SEL-Taste betätigen oder den VOL-Knopf auf der Vorderseite
verwenden.
8. APS-TASTE (Auto-Speicherung / Sender speichern)
1) Bei Gedrückthalten der APS-Taste für mehr als eine Sekunde, sucht das Radio von der aktuellen Frequenz
aus und überprüft die Signalstärke, bis 6 Sender gefunden werden. Diese 6 Sender werden dann unter der
entsprechenden Speichernummer gespeichert. Dies wird für das jeweilige Frequenzband ausgeführt.
Wenn die automatische Speicherung abgeschlossen ist, führt das Radio eine Sendersuche durch.
2) Bei der Betätigung der Taste, sucht das Radio nach jedem voreingestellten Sender im aktuellen
Frequenzband und stoppt bei gespeicherten Sendern für 5 Sekunden während die Tonausgabe eingeschaltet
wird. Danach fährt das Gerät die Suche fort.
9. SENDERSPEICHER UND TOP / >||, INT, RPT, RDM
Gehen Sie zu dem jeweiligen gespeicherten Sender, indem Sie eine der Sendertasten (1-6) betätigen.
Wenn Sie eine dieser Tasten länger als 2 Sekunden gedrückt gehalten wird, wird der derzeit gehörte Sender
Page 21

20
unter der ausgewählten Sendertaste gespeichert.
10. MODE UND PTY (PROGRAMMART)
Betätigen Sie die MODE/PTY-Taste, um eine Betriebsart zu wählen. Die zur Verfügung stehenden
Betriebsarten sind Tuner (Radio), Disc (wenn eine CD eingelegt ist), SD card (wenn eine SD-Karte eingelegt
wird), USB (bei angeschlossenem USB-Medium) und AUX.
Halten Sie die MODE/PTY-Taste im Radiomodus gedrückt, um einen der folgenden Betriebsarten zu wählen:
POP M -- NACHRICHTEN
Zur Auswahl einer Programmart (PTY TYPE), können Sie die Sendertasten benutzen. (Betätigen Sie eine der
6 Sendertasten mehrfach, um eine Programmart zu wählen.) Wenn die Programmart POP M oder NEWS
gewählt wurde, erscheint die vorige Programmart in der Anzeige.
Wenn für mehr als 2 Sekunden keine Schüssel eingegeben wurde, wird nach eingestellten PTY-Sendern
gespielt. Wenn während einer Schleife der gewünschte PTY nicht gefunden wird, erscheint NO PTY in der
Anzeige und das Gerät geht zurück zum Radiobetrieb. Das PTY-Symbol verschwindet.
11. DISP
Betätigen Sie die DISP-Taste, um die Uhrzeit für 5 Sekunden in der Anzeige anzuzeigen. Danach geht das
Gerät wieder zurück zu seiner vorherigen Anzeige, es sei denn Sie betätigen die Taste erneut.
Halten Sie die DISP-Taste für länger als 1 Sekunde gedrückt, bis die Uhrzeit blinkt und drehen Sie dann am
VOL-Drehknopf, um die Uhrzeit einzustellen.
12. AUX-EINGANG
Für den Anschluss externer Audiogeräte.
13. EJECT-TASTE
Im eingeschalteten Zustand kann eine eingelegte Disc durch Betätigung der EJ-Taste wieder ausgeworfen
werden.
14. CD-LADEFACH
15. USB-ANSCHLUSS
Wenn Sie eine Datei auf einem USB-Medium wiedergeben wollen, öffnen Sie die Schutzabdeckung und
stecken Sie Ihren USB-Speicher in den USB-Anschluss. Das System geht automatisch in den USB-Modus und
startet die Wiedergabe der ersten Datei auf dem USB-Medium.
Wenn die USB-Funktion nicht weiter benutzt wird, schließen Sie die Schutzabdeckung bitte wieder.
16. SD-KARTENSTECKPLATZ
Wenn Sie eine Datei auf der SD-Karte wiedergeben wollen, legen Sie die SD-Karte in den Kartenslot ein. Das
Gerät geht automatisch in den SD-Modus und spielt dann die erste Datei auf der SD-Karte ab.
Hinweis:
Wenn die SD-Karte und das USB-Speichermedium gleichzeitig angeschlossen werden, geht das System
automatisch in den USB-Modus.
17. BLINKENDE LED-ANZEIGE
18. RESET-TASTE
Wenn Sie das Gerät das erste Mal benutzen oder nach dem Auswechseln der Autobatterie, müssen Sie einen
Systemreset durchführen. Sie müssen das Gerät zurücksetzen.
Betätigen Sie diese Taste mit einem spitzen Gegenstand. Durch diesen Vorgang werden die Einstellung der
Uhrzeit und einige weitere Speicherinhalte gelöscht.
Page 22

21
CD/MP3/USB/SD-Betrieb
1. Auswahltasten
Betätigen Sie die >>|-Taste zur Wiedergabe des nächsten Titels.
Betätigen Sie die Taste |<<, um den aktuellen Titel erneut von Anfang an abzuspielen (wenn die Abspielzeit
über 2 Sekunden liegt).
Betätigen Sie die Taste |<<, um zum vorherigen Titel zu springen (wenn die Abspielzeit unter 2 Sekunden
liegt).
Halten Sie die Taste >>| oder |<< gedrückt, um den Schnellsuchlauf zu aktivieren. Lassen Sie die Taste los, um
die normale Wiedergabe fortzusetzen.
2. APS-Taste
Betätigen Sie die APS-Taste wiederholt zur Auswahl von Titelsuche (TRACK SEARCH), Verzeichnissuche
(DIRECTORY SEARCH) oder alphabetischer Suche (FIRST CHARACTER SEARCH).
Im TRACK SEARCH-Modus für MMC/SD-, USB- oder MP3-Discs wird im LCD-Display MP3 T 000 angezeigt.
Die höchste Ziffer, die auf dem Medium vorhanden ist, blinkt. Drehen Sie dann am Drehknopf, um eine Ziffern
von 0 ~ 9 auszuwählen. Betätigen Sie dann SEL-Taste, um die Ziffer zu bestätigen und die nächste Ziffer fängt
an zu blinken. Gehen Sie zum Einstellen dieser Ziffer auf die gleiche Weise vor. Nachdem Sie fertig mit der
Eingabe der Nummer sind, betätigen Sie ein weiteres Mal die SEL-Taste und die Wiedergabe beginnt, an dem
von Ihnen gewählten Punkt.
Im DIRECTORY SEARCH-Modus wird in der LCD-Anzeige das Hauptverzeichnis angezeigt (wenn kein
Hauptverzeichnis vorhanden ist, wird das Verzeichnis ROOT benutzt). Drehen Sie dann am Drehknopf, um
den gewünschten Ordner auszuwählen. Betätigen Sie zur Bestätigung und Wiedergabe dann die SEL-Taste.
IIm FIRST CHARACTER SEARCH-Modus wird im LCD-Display A- angezeigt. Drehen am Drehknopf, um den
Anfangsbuchstaben der Datei zu wählen. Angezeigt wird in der Reihenfolge A~Z und 0~9. Benutzen Sie dann
die Tasten >>| und |<< zur Auswahl der gewünschten Datei. Betätigen Sie zur Bestätigung und Wiedergabe
dann die SEL-Taste.
3. WIEDERGABE/PAUSE, INT, RPT, RDM-Tasten
1) Betätigen Sie die Taste TOP/>||, um die Disc, SD- oder USB-Wiedergabe zu unterbrechen.
Betätigen Sie die Taste erneut, um mit der Wiedergabe fortzufahren.
Halten Sie die Taste TOP/>|| für etwa 0,5 Sekunden lang gedrückt, um den ersten Titel des
Wiedergabemediums abzuspielen.
2) Betätigen Sie die INT-Taste, um die jeweils ersten 10 Sekunden jedes Titels wiederzugeben. INT ON
erscheint dabei in der LCD-Anzeige.
Während der Intro-Wiedergabe können Sie die INT-Taste erneut betätigen, um die Intro-Wiedergabe zu
stoppen und mit dem jeweiligen Titel fortzufahren. In der Anzeige erscheint dann LCD-INT OFF.
3) Betätigen Sie die RPT-Taste, um den aktuellen Titel wiederholt abzuspielen. RPT ONE erscheint dabei in
der LCD-Anzeige.
Betätigen Sie die RPT-Taste zweimal im MP3-CD-, SD- oder USB-Modus, um die Wiedergabe des aktuellen
Verzeichnisses endlos zu wiederholen. RPT DIR erscheint dabei auf der LCD-Anzeige. Betätigen Sie die
RPT-Taste erneut, um den Wiederholungsmodus zu stoppen und in der Anzeige erscheint RPT OFF.
4) Betätigen Sie die RDM-Taste, um alle Titel auf der Disc in zufälliger Reihenfolge abzuspielen und RDM ON
erscheint in der LCD-Anzeige.
Betätigen Sie die RDM-Taste erneut, um die Zufallswiedergabe abzubrechen und in der LCD-Anzeige
erscheint RDM OFF.
5) Während der normalen Wiedergabe von MP3-Disc-, SD- und USB-Speichermedien:
Benutzen Sie die Speichertaste 5 und 6, um jeweils 10 Titel zurück oder vor zu gehen.
Page 23

22
Bluetooth-Freisprecheinrichtung
1. Pairing
Um Ihr Mobiltelefon mit einem Bluetooth-Gerät koppeln, aktivieren Sie einfach die Bluetooth-Funktion auf
Ihrem Mobiltelefon und starten Sie eine Suche nach Bluetooth-Geräten. Wenn die Anlage gefunden wurde,
wird es als "Car Kit" angezeigt. Wenn Sie dann versuchen eine Verbindung aufzubauen, werden Sie nach dem
Passwort gefragt.
Das werksmäßig eingestellte Passwort ist 0000. Wenn die Verbindung mit Ihrem Mobiltelefon erfolgreich
aufgebaut wurde, erscheint die Meldung BT READY, gefolgt von der Mobiltelefonnummer. Wenn das
Mobiltelefon erfolgreich verbunden ist, blinkt eine blaue LED auf.
Die LED hört auf zu blinken und leuchtet weiter, wenn Sie ein Gespräch führen und geht aus, wenn Sie die
Verbindung abbrechen.
2. Verbindsaufbau / -abbruch
A) Benutzen Sie Ihr Mobiltelefon, um die Verbindung aufzubauen bzw. abzubrechen.
1) Suchen Sie nach dem gekoppelten und verbunden Bluetooth-Gerät im Verbindungsmodus und betätigen
Sie die Trenn-Taste, um die Verbindung abzubrechen.
2) Suchen Sie nach dem gekoppelten Bluetooth-Gerät, wenn keine Verbindung aufgebaut ist und betätigen
Sie die Verbindungstaste, um eine Verbindung aufzubauen tun.
B) Wenn Sie das Gerät wieder einschalten (nach Acc off), kann die Anlage das Mobiltelefon automatisch
finden und eine Verbindung aufbauen. Dieser Vorgang dauert etwa 20 Sekunden.
3. Annehmen / Ablehnen / Warten / Anruf beenden
Anruf annehmen - Betätigen Sie die Taste 5 (-10, HAND UP)
Anruf Ablehnen - Betätigen Sie die Taste 6 (10, HOLD)
4. Lautstärkeeinstellung während eines Gesprächs
Verwenden Sie während eines Gesprächs den VOL-Drehknopf, um die Lautstärke einzustellen.
Hinweis: Die Standard-Lautstärke ist 25.
5. Übertragung der Dateiwiedergabe vom Mobiltelefon auf das KFZ-Audiosystem
Wenn das Mobiltelefon A2DP unterstützt und Audiodateien wiedergeben kann, wird die Wiedergabe auf das
KFZ-Audiosystem übertragen (bei bestimmten Mobiltelefonen müssen Sie zunächst "Play by BT" auswählen).
Wenn das Mobiltelefon zusätzlich AVRCP unterstützt, sind die Funktionen >>|, |<< und die
WIEDERGABE/PAUSE-Tasten die gleichen wie im Disc-Modus (ohne die Schnellsuchfunktionen für die
Tasten >>| / |<<). Die anderen Tasten im Disc-Modus sind nicht verfügbar.
Wenn das Mobiltelefon zusätzlich AVRCP unterstützt, können Sie die MODE-Taste betätigen, um zwischen
Radio, CD, USB, CARD und A2DP umzuschalten. Wenn das Gerät aber erneut in den A2DP-Modus geht,
müssen die WIEDERGABE/PAUSE-Taste, um die Wiedergabe fortzusetzen und auf das KFZ-Audiosystem zu
übertragen.
Wenn das Mobiltelefon im A2DP-Modus vom Musikwiedergabemodus in den Radiomodus geht, müssen Sie
etwa 10 Sekunden warten.
Page 24

23
ANSCHLUSS B
1. Rechter Lautsprecher Hinten (+)
2. Rechter Lautsprecher Hinten (-)
3. Rechter Lautsprecher Vorne (+)
4. Rechter Lautsprecher Vorne (-)
5. Linker Lautsprecher Vorne (+)
6. Linker Lautsprecher Vorne (-)
7. Linker Lautsprecher Hinten (+)
8. Linker Lautsprecher Hinten (-)
ANSCHLUSSBELEGUNG
ANSCHLUSS A
1.
2.
3.
4. Speicher +12 V
5. KFZ-Antennenausgang
6.
7. ACC
8. MASSE
Hinweis: Einige Fahrzeuge verfügen über spezielle Kabelanschlüsse (der Speicher- und
ACC-Anschluss wurden geändert), so dass die ISO-Buchse auf beiden Seiten unterstützt wird.
Page 25

24
KORREKTE HANDHABUNG VON CDs:
Über CD-R/CD-R/W-Discs:
Neben kommerziell aufgezeichneten Audio-CDs, kann dieses Gerät auch CD-R- und CD-RW-Discs abspielen.
In bestimmten Fällen, insbesondere wenn die jeweilige Disc auf älteren CD-Brennern aufgezeichnet wurde,
kann es dazu kommen, dass Ihre CD-R- oder CD-RW-Disc nicht abgespielt werden kann. Es wird des
Weiteren empfohlen, wenn Sie eine CD für die Wiedergabe in diesem Gerät aufnehmen, die Aufnahme mit
einer Geschwindigkeit von 24x oder langsamer für CD-Rs und 4x oder langsamer für CD-RWs zu machen, um
eine höhere Signalqualität und eine bessere Wiedergabe zu erzielen.
1. Sauberhalten der Discs:
Bevor Sie eine Disc abspielen, wischen Sie sie mit einem sauberen, staubfreien Reinigungstuch ab.
Wischen Sie immer von der Innenseite nach Außen.
2. Wenn bereits eine Disc eingelegt wurde, darf keine weitere Disc eingelegt werden. Andernfalls kann das
Gerät beschädigt werden. Befestigen Sie keine Aufkleber oder Klebeband auf der Disc.
Halten Sie die Disc an den Kanten fest, um sie sauber zu halten und berühren Sie niemals die Oberfläche.
Legen Sie eine Disc
mit der beschrifteten Fläche nach oben ein, um zu vermeiden, dass das Gerät beschädigt wird.
3. Schützen Sie die Disc vor direktem Sonnenlicht oder Wärmequellen wie Heizlüftern, um zu vermeiden, dass
sie sich verformen.
Lassen Sie keine Disc im Fahrzeug liegen, wenn es in direktem Sonnenlicht geparkt wurde, da dadurch ein
erheblicher Anstieg der Temperatur im Inneren des Fahrzeugs entsteht.
4. Verwenden Sie keine gebrauchten oder vermieteten Discs, die mit Aufklebern versehen sind. Dadurch kann
das Gerät aufhören zu funktionieren und beschädigt werden.
5. Bewahren Sie die Disc in ihrer Schutzhülle auf. Zerkratzte Discs haben eine schlechte Klangqualität und
Sprünge während der Wiedergabe.
6. Bei Regen oder Nässe, kann sich Feuchtigkeit auf der Disc oder der optischen Teile des Geräts bilden. In
diesem Fall ist eine Wiedergabe nicht möglich. Wenn sich Feuchtigkeit auf der Disc bildet, wischen Sie sie mit
einem weichen Tuch ab.
Wenn sich Feuchtigkeit auf den optischen Teilen des Geräts bildet, lassen Sie es für ca. 1 ruhen.
7. Benutzen Sie keine Verdünnungsmittel, wie z. B. Benzin oder Verdünner. Im Handel erhältliche
Reinigungsmittel oder Antistatiksprays können das Gerät beschädigen.
Page 26

25
FEHLERBEHEBUNG
Erscheinungsbild
Ursache
Behebung
Das Gerät schaltet nicht
ein.
Die Zündung ist
ausgeschaltet.
Wenn der Strom richtig angeschlossen ist, stellen Sie
den Zündschlüssel bitte auf "ON" oder "ACC".
Die Sicherung ist
durchgebrannt.
Ersetzen Sie die Sicherung entsprechend dem
Schaltplan.
Die CDs können nicht
eingelesen werden.
Es befindet sich bereits
eine Disc im Player.
Nehmen Sie die Disc heraus aus dem Player und
legen Sie dann die neue ein.
Die CDs werden nur zur
Hälfte in das
CD-Ladefach
eingezogen.
Die Transportschrauben
wurden nicht entfernt.
Entfernen Sie die Transportsicherungsschrauben vor
der Inbetriebnahme.
Das Gerät funktioniert
nicht richtig (Auswurf,
Einlesen,Wiedergabe)
Die Disc wurde falsch
herum eingelegt.
Legen Sie die CD mit der beschrifteten Seite nach
oben ein.
Die Temperatur im
Fahrzeug ist zu hoch.
Warten Sie bis die Umgebungstemperatur im
Fahrzeug gesunken ist.
Kein Ton.
Die Lautstärke ist zu
niedrig.
Erhöhen Sie die Lautstärke.
Das Gerät ist nicht richtig
angeschlossen.
Überprüfen Sie die Stromversorgung und Masse
entsprechend dem Schaltplan.
Funktionstasten bleiben
ohne Wirkung.
1. Der eingebaute
Mikrocomputer arbeitet
aufgrund von Störsignalen
nicht richtig.
2. Die Bedientafel ist nicht
richtig aufgesetzt.
1. Schalten Sie das Gerät aus und wieder ein. Oder
betätigen Sie die RESET-Taste, um das Programm
fortzusetzen.
2. Setzen Sie die Bedientafel wieder auf.
Es treten Sprünge bei der
CD-Wiedergabe auf.
Der Einbauwinkel liegt
über 30°.
Bauen Sie das Gerät so ein, dass es eine Neigung
von weniger als 30° hat.
Die Oberfläche der Straße
ist uneben.
Warten Sie, bis Sie zu einem ebenen Abschnitt der
Straße kommen, bevor Sie mit der Wiedergabe der
CD fortfahren.
Die Oberfläche der CD ist
sehr verschmutzt oder
beschädigt.
Reinigen Sie die CD oder versuchen Sie es mit einer
anderen CD. Wenn diese einwandfrei funktioniert, ist
die erste CD beschädigt.
Kein Radioempfang.
Die Oberfläche der CD ist
sehr verschmutzt oder
beschädigt.
Reinigen Sie die CD oder versuchen Sie es mit einer
anderen CD. Wenn diese einwandfrei funktioniert, ist
die erste CD beschädigt.
Das Antennenkabel ist
nicht angeschlossen.
Stecken Sie das Antennenkabel fest in die
Antennenbuchse des Geräts.
Im automatischen
Suchmodus stoppt das
Radio nicht bei allen
Sendern.
Die Sendesignale sind zu
schwach.
Stellen Sie den Radiosender manuell ein.
Bevor Sie diese Fehlerbehebungstabelle benutzen, überprüfen Sie bitte alle Anschlüsse.
Wenn Sie nach der Benutzung der Tabelle noch Fragen haben, wenden Sie sich bitte an Ihren örtlichen
Kundendienst.
Page 27

26
Um einen störungsfreien Betrieb zu
gewährleisten, vergewissern Sie
sich bitte, dass der
Metallstützstreifen fest mit dem
Fahrzeuggehäuse verbunden wird.
Biegen Sie die Laschen des
Metalleinbaurahmens mit
einem Schraubendreher gegen
das Armaturenbrett.
Um das Gerät aus dem Metalleinbaurahmen zu
entfernen, stecken Sie die beiden mitgelieferten
Schlüssel zur gleichen Zeit in die Schlitzen auf der
linken und rechten Seite des Gehäuses. Ziehen Sie
dann das Gehäuse aus dem Metalleinbaurahmen
wie in der rechten Abbildung gezeigt, heraus.
Bevor Sie den CD-Player
installieren und in Betrieb
setzen, entfernen Sie die
Montagemetallmuffe
entsprechend der
Pfeilzeichnungen.
Entfernen Sie die beiden Schrauben,
die den CD-Mechanismus für den
Transport fixieren, bevor Sie den
Player einbauen.
Betätigen Sie die Resettaste mit
einem spitzen Gegenstand, um
Programmfehler zu beseitigen.
AUSWURF
RESET
EINBAUMETHODE
Es handelt sich hierbei, um eine Anti-Diebstahl-Einbaumethode.
Das Gerät verfügt über einen Metalleinbaurahmen.
Verbinden Sie die Kabel, z. B. der Stromversorgung, Lautsprecher und Antenne,
nach den Anweisungen in dieser Bedienungsanleitung. Installieren Sie dann den
Metalleinbaurahmen entsprechend der Abbildung unten in den Wagen.
METALLSTÜTZSTREIFEN
ARMATURENBRETT PLASTIKRAHMEN
METALLEINBAURAHMEN
BEDIENTAFEL
HINWEIS
GEHÄUSE
Page 28

27
TECHNISCHE DATEN
ALLGEMEIN
Stromversorgung ....................................................................................... DC 12 V
Stromverbrauch ...................................................................................... 10 A MAX.
AUSGANGSLEISTUNG .......................................................................... 4 X 25 W
Anzahl der Kanäle ................................................................................ 2 STEREO
Gehäuseabmessungen ................................................. 178 (B) x 50 (H) x 165 (T)
RADIO (UKW)
Frequenzbereich ................................................................... 87,5 MHz - 108 MHz
Benutzbare Empfindlichkeit .................................................. ....................... 3 µV.
I.F Frequenz ......................................................................................... 10,7 MHz.
RADIO (MW)
Frequenzbereich ................................................................... 522 kHz - 1620 kHz
I.F Frequenz ........................................................................................... 450 kHz
Benutzbare Empfindlichkeit ....................................................................... 40 dB
LINE-OUT-AUSGANG
Ausgabe ............................................................. ....................... MAX. 1200 mV
CD/SD- oder USB-WIEDERGABE
System .................................................. .............................. MP3-Audiosystem
Benutzbare Discs ..................................................... CD, CD-R/RW, MP3/WMA
Frequenzeigenschaften ......................................................... 20 - 100 Hz 5 dB
10 - 20 kHz 5dB.
Rauschabstand ............................................................... ............ 50 dB [1 KHz]
Page 29

28
CS-455BT
MANUEL D’INSTRUCTION
SYSTÈME AUDIO DE VOITURE 5 EN 1
RADIO A REGLAGE PLL NUMERIQUE AM/FM-RDS
LECTEUR SD/ USB/CD(ESP)/MP3
SYSTEME MAINS LIBRES BLUETOOTH
www.lenco.eu
Page 30

29
PRÉCAUTIONS ET ENTRETIEN
1. Si la température a l'intérieur de la voiture est très élevée du fait d’être resté garé au soleil,
n’utilisez pas le lecteur avant d’avoir conduit un moment et que la température intérieure soit
redescendue.
2. Le boitier de protection permet de garder le panneau frontal en toute sécurité.
BOITIER DE PROTECTION
PANNEAU FRONTAL
3. L’unité est conçue pour un terminal négatif de la batterie à connecter au métal de la voiture.
Confirmez cela avant l’installation.
4. Ne laissez pas les fils des haut-parleurs être court-circuités en même temps lorsque l’unité est
allumée. Autrement, cela peut surcharger ou faire griller l’amplificateur de puissance.
5. N’installez pas le panneau détachable avant de connecter les fils.
Page 31

30
EMPLACEMENT ET FONCTION DES BOUTONS
10. TOUCHE MODE/PTY
11. Touche DSP
12. Touche AUX
13. Touche EJECT
14. Fente CD
15. Port USB
16. Fente SD
17. Indicateur DEL antivol
18. Touche RESET (réinitialisation)
1.Touche REL
2.Touche SEL et molette de VOL
3. LCD
4&5. Touche et
6. Touche BAND
7. Touche POWER/MUTE (M/A, Muet)
8. Touche APS
9. Touches numeriques 1-6 TOP/PLAY/
PAUSE,INT,RPT RDmand
Page 32

31
Fonctionnement basique
1. BOUTON REL
2. BOUTON SEL (Sélectionner) ET MOLETTE DE VOLUME
Appuyez sur le bouton REL pour rabattre le panneau de commande.
Alors, vous pouvez insérer un disque dans la fente disque ou éjecter un disque grâce au bouton
EJ. Après avoir rabattu le panneau frontal, poussez-le vers la gauche, puis tirez le coté droit du
panneau vers l’extérieur pour l’enlever du châssis de l’unité
A) Appuyez brièvement sur le bouton SEL, il est activé comme sélecteur de mode de volume
d’encodage.
-> VOLUME ->BASS ->TREBLE -> BALANCE -> FADER ->
Lorsque vous sélectionnez le mode audio de votre choix, tournez la molette de volume pour
régler l’effet audio. Dans chaque mode, le temps d’attente est d’environ 5 secondes, une fois
que le temps d’attente et terminé, l’écran retourne à l’affichage précédent du mode radio ou
lecteur CD. Le mode de contrôle du volume fonctionne avec l’affichage numérique suivant.
- VOL: (MIN)00, 01,......46, 47(MAX).
- BASS/TRE: -07, -06,...,00,...+06,+07
- BAL: 0LR9, 1LR9, ..., 9LR9,..., 9LR1, 9LR0
- FAD: 0FR9,1FR9, ..., 9FR9,..., 9FR1, 9FR0
B) lorsque vous appuyez plus de 2 secondes, il est activé en mode cyclique entre les fonctions
suivantes sélectionnables par l’utilisateur.
->mode TA(ON/OFF) ->AF (ON/OFF) ->TA(ALARM/SEEK) ->PI (SOUND/MUTE) -> RETURN
(LONG/SHORT) ->MASK(DPI/ALL) ->BEEP (ON/OFF) -> USER SET
(FLAT/CLASSIC/ROCK/POP)->VOL(LAST/DEFA) ->MONO/STEREO(only for FM mode)
->LOUD(ON/OFF)->LOCAL/DX(only for FM mode)->CLK(ON/OFF) ->CLK(12/24).
Après avoir choisi le mode désiré, tournez la molette de Volume pour sélectionner un élément de
réglage du mode de votre choix.
1)TA Marche/Arrêt
Lorsque le mode TA (Trafic announcement= annonce de trafic) est activé (TA s’affiche sur
l’écran LCD), il commencera une recherche de stations TA et TA SEEK s’affichera sur l’écran
pendant un moment. Lorsqu’une annonce concernant le trafic est transmise :
a) Si l’unité est en mode SD, USB ou disque, elle passera temporairement en mode radio.
b) Passez temporairement a une station avec lien EON (autres réseaux renforcés) lorsque EON
détecte une annonce de trafic sur cet autre programme, et TP s’affichera sur l’écran LCD
c) Si le niveau du volume est en dessous de 20, le niveau de volume sera monté à 20 et
retournera à son mode et son niveau de volume lorsque l’annonce de trafic sera terminée.
Si vous réglez le volume au cours de l’annonce de trafic, seulement le volume de l’annonce de
trafic est valide.
* Fonction interruption de TA :
L’annonce de trafic en cours est annulée si vous appuyez sur cette touche. Mais le mode TA ne
sera pas désactivé.
* Lorsque TA est active, les fonctions SEEK, (SCAN), AUTO MEMORY peuvent être reçues ou
enregistrées seulement lorsque le code d’identification du programme de trafic a été reçu.
Lorsque le mode TA est activé, le code d’identification du programme de trafic n’est pas reçu
avant un certain délai.
Page 33

32
2) AF (Marche/Arrêt)
Lorsque vous appuyez brièvement, le mode de commutation AF est sélectionné et le mode de
commutation AF s’affiche sur l’écran par un segment AF.
Segment éteint : Mode de commutation AF éteint.
Segment allumé : Mode de commutation AF allumé avec information RDS.
Segment clignotant : Mode de commutation AF allumé, mais l’information RDS n'est pas encore
reçue. Lorsque le mode de commutation AF est sélectionné, la radio inspecte la force du signal
AF en permanence. L’intervalle entre les moments de vérification de chaque AF dépend de la
force du signal de la station en cours, entre quelques minutes pour une station forte et quelques
secondes pour une station faible. À chaque fois qu’une nouvelle AF est plus forte que la station
en cours, elle passé a cette nouvelle fréquence pendant un très court laps de temps, et
NEWFREQUENCY s’affiche pendant 1-2 secondes. Etant donné que la durée muette de la
commutation AF ou du temps d’inspection est très courte, elle est quasiment inaudible en cas de
programme normal.
Lors du mode FM, lorsque AF est activé, les fonctions SEEK, (SCAN), AUTO-MEMORY peuvent
seulement recevoir et enregistrer des programmes RDS.
3) TA SEEK / TA ALARM :
Mode TA SEEK : Lorsque des stations récemment réglées ne reçoivent pas d’information TP
pendant 5 secondes, la radio se réoriente vers la station suivante qui n’a pas la même station (PI)
que la précédente, mais dispose d’information TP.
Lorsque l’information TP se perd sur la station en cours pour le temps de nouveau réglage
déterminé par RETUNE SHORT (90 Secondes) ou RETUNE LONG (150 secondes), la radio
commence à régler de nouveau la station PI suivante identique. Lorsque la station PI n’est pas
perçue dans un cycle de recherche, la radio règle à nouveau la station suivante disposant
d’information TP.
Mode TA ALARM : Lorsque ce mode est sélectionné, tous les modes de réglage automatique
sont désactivés. Seulement un double bip sonore (ALARME) peut sortir.
Lorsqu’une station récemment réglée n’a pas d’information TP pendant 5 secondes, un bip se
fait entendre. Lorsque l’information TP se perd sur la station en cours pour le temps de nouveau
réglage, un bip sonore est émis. Lorsqu’une station récemment réglée n’a pas de signal RDS, PI
SEEK est supprimé.
4) PI SOUND/PI MUTE :
Mode PI SOUND: Si une voiture circule entre deux bâtiments qui peuvent provoquer une
réflexion des signaux, un phénomène peut se produire du fait de différents codes PI reçu depuis
la même source AF. Lorsque différents sons PI (DIP) sont entendus occasionnellement, cela
arrivera pendant moins d’une seconde.
Mode PI MUTE : Dans la situation décrite ci-dessus, aucun son ne sera émis pendant moins
d’une seconde.
5) RETURN L/ RETURN S :
Le temps initial de la recherche TA automatique ou de mode PI SEARCH est sélectionné.
Lorsque l’information PI n’est pas reçue pendant l’intervalle du nouveau réglage, la radio
commence à régler la station PI similaire suivante.
Lorsque la même station PI n'est pas reçue durant un cycle de recherche, la radio retourne à la
station précédente et attend 4-5 minutes jusqu'à ce que le code PI soit reçu.
Page 34

33
Mode RETURN L : Sélectionné comme 150 secondes.
Mode RETURN S : Sélectionné comme 90 secondes.
6) MASK DPI / MASK ALL:
Mode MASK DPI : Seules les AF avec une PI différente sont masquées.
Mode MASK ALL : Les AF avec une PI différente et pas de signal RDS avec une force de champ
élevée sont masquées.
7)BEEP ON/BEEP OFF
Mode BEEP ON : Un bip sonore est émis dès lors que vous appuyez sur une touche.
Mode BEEPOFF : Les bip sonores sont désactivés.
8) VOL LAST/VOL DEFA
VOL LAST: La radio passe au volume sur lequel elle était réglée lorsqu’elle a été éteinte.
VOL DEFA: Après avoir appuyé sur le bouton SEL, AVOL s’affichera. Vous pouvez alors
présélectionner un volume constant à l’allumage de l’appareil avec la molette de Volume.
9) CLK (Marche/Arrêt)
CLK ON: L’horloge sera toujours affichée sur l’écran lorsque l’appareil est éteint.
CLK OFF: L’horloge n’apparaitra pas sur l’écran lorsque l’appareil est éteint.
3. Écran LCD
4 et 5. BOUTONS TUNE, SEEK, TRACK, SKIP UP / DOWN
Appuyez brièvement sur la touche >>| ou |<< pour régler manuellement vers le haut ou vers le
bas la station de radio de votre choix étape par étape.
Maintenez appuyez le bouton >>| ou |<< pendant plus de 5 secondes pour régler
automatiquement vers le haut ou vers le bas les stations de radio avec un signal fort.
6. TOUCHE BAND
En mode radio, appuyez sur le bouton BND brièvement pour sélectionner la bande de diffusion
de programme radio que vous souhaitez écouter. La bande AM/FM est inversée de manière
cyclique entre les bandes de syntonisation :
->FM1-> FM 2 -> FM 3 -> MW1->MW2 ->.
7. BOUTON ALIMENTATION M/A, MUTE
Lorsque l’unité est éteinte, elle peut être allumée en appuyant sur n’importe quel bouton du
panneau frontal (sauf la touche OPEN). L'unité peut également être allumée en insérant un
allumée, maintenez le bouton M/A appuyée, l’unité passe en mode éteint. Lorsque l’unité est
allumée, maintenez le bouton M/A appuyée, l’unité passe en mode éteint.
Ce bouton sert a activer/désactiver l’état MUTED (muet).
Appuyez sur ce bouton pour couper le haut-parleur temporairement, et appuyez de nouveau
pour reprendre l’écoute. L’état muet sera également désactivé lorsque le bouton MODE, SEL est
appuyé et que la molette de Volume sur le panneau frontal est utilisée.
Page 35

34
8. BOUTON APS (Auto-storage / preset scan = enregistrement auto / Scan de
présélection)
1) Avec une pression longue de plus d’une seconde, la radio recherchera sur la fréquence en
cours et inspectera le niveau de force de signal jusqu'à ce que 6 stations soient trouvées. Alors,
les fréquences des 6 stations sont présélectionnées sur leur emplacement de numéro de
présélection correspondant. L’enregistrement automatique est appliqué dans chaque bande
sélectionnée. Lorsque l'opération d’enregistrement automatique est terminée, la radio exécute
un scan des présélections.
2) Avec une pression courte, la radio recherche chaque station présélectionnée dans la bande
actuelle et reste sur le numéro de présélection pendant 5 secondes en désactivant l’état muet,
puis continue la recherche.
9. BOUTONS PRESET STATION MEMORY ET TOP/>||, INT, RPT, RDM
Allez sur une station présélectionnée en appuyant sur l’un des 6 boutons de présélection de
station (1-6). Si vous appuyez sur l’un de ces boutons pendant plus de 2 secondes, la station
que vous êtes en train d’écouter sera enregistrée dans le bouton de présélection.
10. BOUTON MODE ET PTY (PROGRAM TYPE=TYPE DE PROGRAMME)
Appuyez sur le bouton MODE/PTY pour changer entre les modes tuner (radio), disc (lorsqu’un
disque est chargé), carte SD/MMC (lorsqu’une carte SD/MMC est insérée), USB (lorsqu’une clé
USB est insérée) et AUX.
En mode radio, appuyez sur le bouton MODE/PTY pour sélectionner l’un des modes suivants :
POP M- - NEWS
Lorsque vous sélectionnez PTY TYPE, sa sélection est exécutée par les boutons de
présélection comme décrit sur la touche de présélection. (appuyez sur l’un des 6 boutons de
présélection et sélectionnez de manière répétée le type de programme (PTY TYPE) dans le
bouton de présélection). Lorsque POPM ou NEWS est activé, le programme PTY précédent et le
mot PTY s’affiche sur l’écran LCD.
Si aucune valeur n’est entrée pendant 2 secondes, le type de programme sélectionné
précédemment sera recherché. Durant une boucle, si le type de programme désiré n’est pas
trouvé, NO PTY s’affichera en clignotant, puis retournera à la radio normale précédente et
l’icône PTY disparaitra.
11. BOUTON DISP
Appuyez brièvement sur le bouton DISP pour afficher l'heure pendant 5 secondes sur l’écran,
puis l’écran retournera à l’affichage précédent a moins que le bouton ne soit appuyé à nouveau.
Appuyez sur la touche DISP plus d’une seconde jusqu'à ce que l’heure de l’horloge clignote,
puis tournez la molette de VOL pour régler l’heure
12. PRISE ENTRÉE AUXILIAIRE
Pour la connexion des autres appareils audio.
13. TOUCHE EJECT
Lorsque l’unité est allumée, le disque chargé peut être éjecté en appuyant sur la touche EJ.
14. FENTE CD
Page 36

35
15. PRISE USB
Lorsque vous souhaitez jouer un fichier sur une clé USB, ouvrez le couvercle de protection en
plastique et insérez la clé USB dans la fente. L’unité passera en mode USB automatiquement, et
jouera la première piste de la clé USB.
Lorsque vous n’utilisez pas la fente USB, veuillez fermer le couvercle de protection en plastique.
16. FENTE CARTE SD
Lorsque vous désirez jouer des pistes sur une carte SD, insérez la carte SD dans la fente pour
carte. L’unité passera en mode SD automatiquement, et jouera la première piste de la carte SD.
Remarque:
Lorsqu’une carte SD et une clé USB sont toutes le deux insérées dans leur fente ou port, le
système passera automatiquement en mode USB.
17. LED CLIGNOTANT
18. BOUTON DE RÉINITIALISATION
Avant d’utiliser cette unité pour la première fois, ou après avoir remplacé la batterie de la voiture
ou d’avoir changé les connexions. Vous devez réinitialiser l’unité.
Appuyez sur ce bouton avec un objet pointu. Cette opération effacera le réglage de l’horloge et
certains contenus enregistrés.
Page 37

36
Fonctionnement CD/MP3/USB/SD
1. Bouton avance/retour rapide
Appuyez brièvement sur le bouton >>| pour jouer la piste suivante
Appuyez brièvement sur le bouton |<< pour jouer la piste en cours depuis le début si le temps de
lecture est supérieur à 2 secondes.
Appuyez brièvement sur le bouton |<< pour jouer la piste précédente si le temps de lecture est
inférieur à 2 secondes.
Maintenez appuyé le bouton >>| ou |<< pour revenir en avant ou en arrière dans les piste,
relâchez pour reprendre la lecture normale.
2. Touche APS
Appuyez sur la touche APS a plusieurs reprise pour sélectionner TRACK SEARCH (recherche
de piste), DIRECTORY SEARCH (recherche de répertoire) ou FIRST CHARACTER SEARCH
(recherche du premier caractère).
En mode TRACK SEARCH, l’écran LCD affichera TRK T 000 et fera apparaitre le chiffre 0 le
plus élevé contenu dans la carte MMC/SD, la clé USB, ou le disque MP3 Tournez la molette
pour sélectionner la valeur du chiffre clignotant entre 0 et 9. Puis appuyez sur le bouton SEL
pour confirmer la valeur et le numéro 0 suivant se mettra à clignoter. Avec la même méthode,
sélectionnez la valeur du chiffre clignotant. Apres avoir terminé de sélectionner les valeurs de
tous les chiffres clignotant, appuyez sur le bouton SEL pour jouer le numéro de piste
sélectionné.
En mode DIRECTORY SEARCH, l’écran LCD affichera le dossier racine (s'il n’y a pas de
dossier racine, il trouvera un dossier racine nommé ROOT). Puis tournez la molette pour
sélectionner le dossier de votre choix, enfin, appuyez sur le bouton SEL pour jouer la première
piste du dossier.
En mode FIRST CHARACTER SEARCH, l’écran LCD affichera A- tournez la molette pour
sélectionner le premier caractère du fichier dans l’ordre de A-Z et 0-9. Puis appuyez sur le
bouton >>| ou |<< pour sélectionner un fichier dont le premier caractère est celui de votre choix.
Appuyez enfin sur le bouton SEL pour jouer le fichier sélectionné.
3. touches PLAY/PAUSE, INT, RPT, RDM
1) Appuyez brièvement sur le bouton TOP/>|| pour interrompre la lecture du disque de la carte
SD/MMC ou de la clé USB.
Appuyez à nouveau pour reprendre la lecture normale du disque, de la carte SD ou de la clé
USB. Appuyez sur le bouton TOP/>|| et maintenez-le pendant une demi seconde pour jouer la
première piste du disque, de la carte SD ou de la clé USB.
2) Appuyez sur le bouton INT pour échantillonner les 10 premières secondes de chaque piste, et
le symbole INT ON apparaitra sur l’écran.
Durant le mode INT (introduction), appuyez de nouveau sur le bouton INT pour arrêter
l’échantillonnage et reprendre la lecture de la piste en cours, et l’écran LCD affichera INT OFF.
3) Appuyez sur le bouton RPT une fois pour lire la piste en cours de manière répétée, et le
symbole RPT ONE apparaitra sur l’écran LCD.
En mode disque MP3, carte SD/MMC ou clé USB, appuyez sur le bouton RPT deux fois de suite
pour répéter le dossier en cours, le symbole RPT DIR apparaitra alors sur l’écran LCD. Durant le
Page 38

37
mode RPT, appuyez sur le bouton RPT à nouveau pour arrêter le mode de lecture répétée et
l’écran LCD affichera RPT OFF.
4) Appuyez sur le bouton RDM pour jouer toutes le pistes du disque dans le désordre, et RDM
ON apparaitra sur l’écran LCD.
Dans le mode RDM, appuyez de nouveau sur le bouton RDM pour arrêter la lecture aléatoire et
l’écran LCD affichera RDM OFF.
5) Durant la lecture normale d’un disque MP3, d’une carte SD/MMC ou d’une clé USB :
Appuyez sur le bouton de présélection de radio 6 et 5 pour monter ou descendre de 10 pistes
d’un coup.
Page 39

38
Système Bluetooth main libre
1. Coupler
Pour coupler votre téléphone à un appareil Bluetooth, activez simplement la fonction Bluetooth
sur votre téléphone mobile et recherchez les appareils. Lorsque la stéréo a été détectée, elle
devrait s’indiquer comme Car Kit, lorsque vous essayez de connecter, il demandera un mot de
passe.
Le mot de passe par défaut est 0000. Lorsque vous avez correctement couplé votre téléphone,
le message BT READY s’affichera suivi du numéro du téléphone mobile. Lorsque le téléphone a
été connecté correctement, vous verrez une del bleue sur l'écran.
Cette DEL passera en allumage continu lorsque vous avez un appel ou disparaitra lorsque vous
déconnecterez de la stéréo.
2. Connexion ou déconnexion
A) Utilisez votre téléphone mobile pour effectuer la connexion ou la déconnexion.
1) En statut de connexion, trouvez les dispositifs Bluetooth connectés, puis appuyez sur la
touche de déconnexion pour déconnecter ;
2) En statut de déconnexion, trouvez les dispositifs Bluetooth déconnectés, puis appuyez sur la
touche de connexion pour connecter ;
B) Lorsque vous rallumez l’appareil (après Acc off), le panneau frontal peut rechercher
automatiquement les téléphones et effectuer la connexion. Cela vous prendra environ 20
secondes.
3. Accepter/rejeter/terminer l’appel
Accepter – Appuyez sur la touche 5 (-10 HAND UP)
Rejeter – Appuyez sur la touche 6 (+10, HOLD)
4. Réglage du niveau de volume de parole
En statut de dialogue, utilisez la molette VOL pour régler l’émission de son, mais le niveau de
volume peut être réservé.
Remarque: Le niveau de volume par défaut est 25.
5. Pour transférer le son d’un fichier joué sur un téléphone mobile sur le lecteur
Si le téléphone portable est compatible A2DP et peut diffuser de l’audio, lorsque le téléphone
joue un fichier audio (pour certains téléphone, vous devez d’abord sélectionner la lecture par BT),
la lecture sera transféré sur le lecteur audio de voiture.
En mode A2DP, si l’appareil Bluetooth du téléphone est compatible AVRCP, les fonctions >>|,
|<< et LECTURE/PAUSE sont les mêmes qu'en mode disque (pas de fonction avance/retour
rapide pour les touches >>|, |<<). Les autres touches disponibles en mode disque ne sont pas
disponibles.
En mode A2DP, si le dispositif Bluetooth du téléphone est compatible AVRCP, appuyer sur la
touche MODE peut faire circuler entre les modes radio, disque, USB, CARTE et A2DP. Mais
après être entré de nouveau dans le mode A2DP, pour reprendre la lecture et transférer sur le
lecteur audio de voiture par le téléphone, vous devez appuyez sur la touche LECTURE/PAUSE.
En mode A2DP, si le mode de lecture de musique du téléphone passe au mode radio, vous
devez attendre 10 secondes.
Page 40

39
CONNEXION DES FILS
CONNECTEUR A
1.
2.
3.
4. Mémoire + 12V
5. Sortie antenne auto
6.
7. ACC
8. TERRE
Remarque: certaines voitures ont des fils de connexion (la mémoire et la connexion ACC ont des
changements), dans ce cas la les deux fiches ISO sont compatibles.
Page 41

40
PRÉCAUTIONS D’UTILISATION DES CD :
A propos des disques CD-R et CD-R/W :
En plus des CD audio enregistrés pour le commerce, cette unité peut également lire des disques
CD-R et CD-R/W.
Dans certains cas, particulièrement lorsqu’enregistrés sur des graveurs de CD peu récents, il
se peut que certains CD-R et CD-R/W ne se lisent pas. Par ailleurs, à chaque fois que vous
enregistrez un CD pour la lecture dans cet autoradio, il est recommandé d’enregistrer a une
vitesse de 24x ou plus lent pour les CD-R et à 4x ou plus lent pour les CD-R/W afin d’obtenir un
signal plus fort et une meilleure qualité de lecture.
1. Pour maintenir le disque propre:
Avant de lire un disque, nettoyez-le avec un tissu propre et sans poussière.
Nettoyez le disque vers l’extérieur depuis le centre.
2. Lorsqu’un disque a déjà été inséré. Ne collez pas d’autocollant ou de scotch sur le disque,
cela risque de l’abimer.
Manipulez le disque en le tenant par les bords afin de le garder propre et ne touchez pas la
surface.
. Insérez un disque avec la face imprimé vers le haut, ou cela endommagera l’unité.
3. N’exposez pas le disque à la lumière directe du soleil ou à proximité de sources de chaleur
telles que des conduits de chauffage, ou des radiateurs qui peuvent causer la surchauffe du
disque. Ne laissez pas le disque dans une voiture si elle est garée à la lumière directe du soleil
car cela entrainera une augmentation considérable de la température dans la voiture.
4. N’utilisez pas de disque d’occasion ou de disques loués, en général il y'a de la colle sur la
surface de ces disques, cela empêchera l’unité de fonctionner et l’endommagera.
5. Rangez toujours le disque dans son boitier pour le protéger. Les disques rayés produiront un
son de mauvaise qualité et fera sauter le lecteur CD.
6. Les jours de pluie ou dans les zones humides, de l'humidité peut se former sur le disque ou
sur les partie optiques, la lecture ne sera peut-être pas possible. Si de l’humidité se forme sur le
disque, nettoyez-la avec un tissu doux. Si de l’humidité se forme sur les parties optiques de
l’unité, laissez l’unité allumée pendant une heure environ sans lire de CD.
7. N’utilisez pas de solvants tels que de l’essence ou des diluants. Les produits de nettoyage ou
vaporisateurs antistatiques vendus dans le commerce endommageront l’unité.
Page 42

41
RÉSOLUTION DES PROBLÈMES
Problèmes courants
Cause
Solution
Il n’y a pas d’alimentation.
Le contact de la voiture est éteint.
Si l’alimentation est correctement connectée à
l’accessoire de voiture, tournez le contact sur ON
ou ACC.
Le fusible a grillé
Remplacez le fusible en suivant le schéma de
connexion
Les CD ne peuvent être
chargés.
Un disque est déjà présent dans
le lecteur.
Enlevez le disque du lecteur, puis mettez en un
autre à la place.
Les CD ne sont chargés
qu’à moitie dans le
réceptacle à CD.
Les vis de transport n’ont pas été
enlevées.
Enlevez les vis de transport avant d’utiliser.
Le disque est inséré du mauvais
coté.
Insérez le disque avec la face imprimée vers le haut
L’appareil ne fonctionne
pas correctement (EJECT,
LOAD, PLAY)
La surface du CD est
extrêmement sale ou
endommagée.
Nettoyez le CD ou essayez un autre CD, si cela
fonctionne correctement, cela signifie que le
premier CD est endommagé.
La température dans la voiture
est trop élevée.
Aérez jusqu'à ce que la température ambiante
redevienne normale.
Le volume est réglé trop bas
Augmentez le volume en conséquence
Il n’y a pas de son.
L’appareil n’a pas été
correctement connecté.
Vérifiez l’alimentation et le raccord à la terre en
suivant le diagramme de connexion.
Les touches de commande
ne fonctionnent pas
1. Le système microinformatique
intégré ne fonctionne pas
correctement du fait du bruit.
2. Le panneau frontal n’est pas
correctement installé à sa place.
1. Éteignez l’appareil et rallumez-le. Ou appuyez
sur le bouton RESET pour reprendre le
programme.
2. Réinstaller la façade.
Le son du lecteur CD saute
L’angle d’installation est
supérieur à 30 degrés.
Réglez l’angle d’installation à moins de 30 degrés.
La surface de la route n’est pas
régulière.
Attendez que la route devienne plus plate avant de
lire le CD
La surface du CD est
extrêmement sale ou
endommagée.
Nettoyez le CD ou essayez un autre CD, si cela
fonctionne correctement, cela signifie que le
premier CD est endommagé.
Pas de réception de radio
Le câble de l’antenne n’est pas
connecté
Insérez le câble de l’antenne fermement dans la
prise pour antenne de l’appareil.
En mode de recherche
automatique, la radio ne
s’arrête pas sur une station
de transmission.
Le signal de transmission est trop
faible.
Réglez sur une station manuellement
Avant d’utiliser cette liste, veuillez effectuer correctement toutes les connexions.
Si vous avez encore des questions après avoir lu cette liste, veuillez consulter votre représentant de
service-client local.
Page 43

42
Pour augmenter la capacité
anti coincement, veuillez vous
assurez de fixer fermement la
bride de support en métal
dans le joint de métal qui
connecte au châssis de la
voiture.
Pliez les pattes dans la
gaine de montage en métal
contre le tableau de bord
avec un tournevis.
Pour sortir l’unité de la gaine de montage
en métal, insérez les deux CLÉS fournies
dans les fentes gauche et droite du châssis
en même temps. Puis, tirez le châssis hors
de la gaine de montage en métal comme
indiqué sur l’illustration de droite.
Avant de monter et d’utiliser
le lecteur CD, enlevez la
gaine de montage en métal
illustrée par les flèches.
Enlevez les deux vis qui fixent
le plateau de mécanisme de
lecture de CD durant le
transport avant de monter le
lecteur.
Appuyez sur ce bouton de
réinitialisation avec un objet pointu
pour renouveler le programme
corrompu une fois qu’il ne fonctionne
plus correctement.
TOUCHE EJECT
BOUTON DE RÉINITIALISATION
MÉTHODE D’INSTALLATION
C’est une méthode d’installation antivol.
L’unité principale est dotée d’une GAINE DE MONTAGE EN MÉTAL.
Veuillez connectez les fils, par exemple, l’alimentation, les haut-parleurs et l’antenne en
Suivant les détails de ce manuel d’instruction, puis installez la gaine de montage en métal
dans la voiture comme sur le schéma ci-dessous.
BRIDE DE
SUPPORT EN MÉTAL
CHASSIS DE L’UNITÉ
GARNITURE EN PLASTIQUE
TABLEAU DE BORD
GAINE DE MONTAGE EN MÉTAL PANNEAU
NOTE
FRONTAL
Page 44

43
CARACTÉRISTIQUES
GÉNÉRALITÉS
Tension d'alimentation..........................................................DC 12V.
Consommation électrique………………………………… 10A MAX
PUISSANCE DE SORTIE………………………………. 4 x 25W
Nombre de canaux.........................................................2 STÉRÉO.
Dimensions du châssis...............................178[W] X 50[H] X 165[D]
Section FM
Gamme de fréquence...........................................87.5MHz -108MHz
Sensibilité utile….........................................................................3uV.
Fréquence I.F ....................................................................10.7MHz
Section AM
Gamme de fréquence...........................................522KHz - 1 620KHz
Fréquence I.F ....................................................................450 KHz
Sensibilité utile….........................................................................40 dB.
SORTIE LIGNE
Sortie……………………………………………….. 1200 mv MAX
LECTURE CD/SD ou USB
Système................................................................ Système audio MP3
Disques compatibles..........................CD/CD-R/CD-RW/MP3/WMA
Caractéristiques des fréquences............................20-100Hz 5dB
10-20KHz 5dB.
Signal sur bruit………………………………………50dB (1KHz)
Page 45

44
CS-450CD
MANUAL DE INSTRUCCIONES
SISTEMA DE AUDIO PARA COCHE 5 EN 1 CON
SINTONIZACIÓN DIGITAL PLL DE RADIO AM/FM-RDS
REPRODUCTOR DE SD/USB/CD(ESP)/MP3
SISTEMA BLUE TOOTH MANOS LIBRES
www.lenco.eu
Page 46

45
PRECAUCIONES Y MANTENIMIENTO
1. Si en el interior del coche hiciera un calor extremo, por haber estado aparcado al sol, no use
el reproductor hasta haber conducido el coche durante un rato para enfriar su interior.
2. El estuche protector se le proporciona para guardar el panel de forma segura.
ESTUCHE PROTECTOR
PANEL FRONTAL
3. La unidad ha sido diseñada para el terminal negativo de la batería que está conectado al
metal del vehículo. Por favor, confirme esto antes de la instalación.
4. No deje que los cables de los altavoces se mezclen cuando la unidad esté encendida, de lo
contrario, podría sobrecargarse o quemar el amplificador de corriente.
5. No instale el panel extraíble antes de conectar los cables.
Page 47

46
LOCALIZACIÓN Y FUNCIONES DE LOS CONTROLES
10. Botón MODE/PTY
11. Botón DSP
12. Botón AUX
13. Botón EJ
14. Ranura para CD
15. Puerto USB
16. Ranura para SD
17. Indicador LED antirrobo
18. Botón RESET
1.Botón REL
2.Botón SEL y dial VOL
3. LCD
4 y 5. Botón y
6. Botón BAND
7. Botón ENCENDIDO/MUTE
8. Botón APS
9. Botones TOP/REPR/PAUSA, INT,
RPT RD Mand 1-6
Page 48

47
Funcionamiento básico
1. Botón REL
2. Botón SEL (Seleccionar) y control de VOL
Pulse el botón REL para desplegar el panel frontal de control.
Entonces podrá introducir un disco en la ranura o expulsarlo pulsando el botón EJ.
Después de desplegar el panel frontal, muévalo hacia la izquierda, después tire de su lado
derecho hacia la fuera para separarlo de la unidad principal.
A) Pulse el botón SEL, y se activará la selección de modo de E. VOL.
-> VOLUMEN ->GRAVES ->AGUDOS -> BALANCE -> FADER ->
Cuando seleccione el modo de audio deseado, gire el control VOL para ajustar el efecto de
audio.
En cada modo, el tiempo de espera será de unos 5 segundos, tras el cual, regresará al último
modo de visualización de sintonizador o CD.
El modo de control de E.VOL funciona con la siguiente visualización numérica.
- VOL: (MÍN) 00, 01,......46, 47(MÁX).
- GRAVES/AGUDOS: -07, -06,...,00,...+06,+07
- BAL: 0LR9, 1LR9, ..., 9LR9,..., 9LR1, 9LR0
- FAD: 0FR9,1FR9, ..., 9FR9,..., 9FR1, 9FR0
B) Cuando lo pulse durante más de 2 segundos, se activará como modo cíclico de las siguientes
funciones para la selección del usuario.
->Modo TA(ON/OFF) ->AF (ON/OFF) ->TA(ALARM/SEEK) ->PI (SOUND/MUTE) -> RETURN
(LONG/SHORT) ->MASK(DPI/ALL) ->BEEP (ON/OFF) -> USER SET
(FLAT/CLASSIC/ROCK/POP)->VOL(LAST/DEFA) ->MONO/STEREO(solo para el modo FM)
->LOUD(ON/OFF)->LOCAL/DX(solo para el modo FM)->CLK(ON/OFF) ->CLK(12/24).
Después de seleccionar el modo que desee, gire el control VOL para seleccionar un elemento
de configuración del modo elegido.
1)TA ON/OFF
Cuando el modo TA (Anuncio de tráfico) esté encendido (TA se mostrará en la pantalla LCD),
comenzará a buscar una emisora TA, y TASEEK se mostrará en la pantalla LCD por unos
momentos.
Cuando se transmita un anuncio de tráfico:
a) Si la unidad se encuentra en el modo SD, USB o disco, pasará al modo radio temporalmente.
b) Pasará temporalmente a una emisora enlazada con EON cuando EON detecte un anuncio de
tráfico en ese otro programa, y TP se mostrará en la pantalla LCD
c) Si el volumen se encuentra por debajo de 20, este aumentará automáticamente hasta 20,
regresando al modo y nivel de volumen previo tras la finalización del anuncio de tráfico.
Si se ajusta el volumen durante el anuncio de tráfico, solo será válido el volumen del anuncio de
tráfico.
* Función de interrupción de TA:
El anuncio de tráfico se cancelará pulsando este botón. Pero el modo TA no estará apagado.
* Cuando TA esté encendido, SEEK, (SCAN), AUTO MEMORY podrán recibirse o guardarse
solo cuando se haya recibido el código de identificación del programa de tráfico.
Cuando TA esté encendido, el código de identificación del programa de tráfico no se recibirá
durante un tiempo determinado.
Page 49

48
2)AF (ON/OFF)
Cuando se haya seleccionado el modo de conmutación AF, su estado se mostrará por el
segmento AF.
Segmento desactivado: modo de conmutación AF desactivado.
Segmento activado: modo de conmutación AF activado, información RDS contenida.
Segmento parpadeante: modo de conmutación AF activado, aunque la información RDS no ha
sido recibida todavía.
Cuando el modo de conmutación AF haya sido seleccionado, la radio comprobará la intensidad
de la señal AF en todo momento. El intervalo de comprobación de AF dependerá de la
intensidad de la señal de la emisora actual, que puede ir de unos minutos para emisoras con
señales intensas, a unos pocos segundos para emisoras de señal débil.
Cada vez que una nueva AF sea de mayor intensidad que la emisora actual, cambiará a esa
frecuencia por unos momentos, y el mensaje NEWFREQUENCY se mostrará durante
1-2 segundos. Debido a que el tiempo de silenciado y de comprobación de conmutación AF es
muy breve, será casi inaudible en caso de tratarse de un programa normal.
En el modo FM, cuando AF esté activado, la función SEEK, (SCAN), AUTO-MEMORY solo
podrá recibir y guardar programas RDS.
3) TASEEK/TAALARM:
Modo TASEEK: cuando una emisora recién sintonizada no reciba información TP durante 5
segundos, la radio sintonizará la siguiente emisora con una identificación de programa (PI)
diferente, pero que contiene la información TP.
Cuando la información TP se pierda en la emisora actual durante el tiempo de resintonización,
que se ajusta con RETUNE SHORT (90 segundos) o RETUNE LONG (150 segundos), la radio
procederá a resintonizar la siguiente emisora con la misma PI. Cuando la emisora PI no se
capte en un ciclo de búsqueda, la radio sintonizará la siguiente emisora con información TP.
Modo TA ALARM: cuando se seleccione este modo, no habrá activado ningún modo de
resintonización automática. Solo podrá oírse un doble pitido (ALARMA). Cuando la emisora
recién sintonizada no reciba información TP durante 5 segundos, los pitidos serán audibles.
Cuando la información TP se pierda en la emisora actual durante el tiempo de resintonización, el
pitido podrá oírse.
Cuando una emisora recién sintonizada no reciba señal RSD, PI SEEK se suprimirá.
4) PI SOUND/ PI MUTE:
Modo PI SOUND: si un coche transitara por edificios que pudieran crear señales reflectantes,
podría darse un fenómeno de oscilación, debido a la recepción de códigos PI distintos de la
misma fuente AF. Cuando se oigan sonidos PI (DIP) ocasionalmente, esto ocurrirá durante
menos de1 segundo.
Modo PI MUTE: Bajos las mismas circunstancias, podrá oírse un sonido silenciado durante
menos de 1 segundo.
5) RETURN L / RETURN S:
El tiempo inicial de búsqueda automática TA o se ha seleccionado el modo PI SERACH.
Cuando no se reciba información PI durante el tiempo de resintonización, la radio comenzará la
sintonización de la siguiente emisora con la misma PI.
Cuando la emisora PI no se capte en un ciclo de búsqueda, la radio sintonizará la última emisora
y esperará unos 4-5 minutos hasta que se reciba el código PI.
Page 50

49
Modo RETURN L: seleccionado en 90 segundos.
Modo RETURN S: seleccionado en 60 segundos.
6) MASK DPI/MASKALL:
Modo MASK DPI: enmascara solo la AF con una PI diferente. Modo MASKALL: enmascara solo
la AF con una PI diferente y sin señal RDS con un campo de alta intensidad.
7)BEEP ON/BEEP OFF
Modo BEEP ON: El pitido podrá oírse cuando se pulse cualquier botón.
Modo BEEP OFF: El pitido estará desactivado.
8)VOL LAST/VOL DEFA
VOL LAST: La radio se encenderá con el mismo ajuste de volumen que había cuando se apagó
por última vez.
VOL DEFA: Después de pulsar el botón SEL, se mostrará AVOL. Entonces podrá
preseleccionar un volumen de encendido fijo usando el control VOL.
9)CLK ON/OFF
CLK ON: La hora siempre se mostrará en el display cuando la unidad esté apagada.
CLK OFF: La hora desaparecerá del display cuando la unidad esté apagada.
3. Display LCD
4 y 5. BOTONES DE SINTONIZACIÓN, BÚSQUEDA, PISTA, SALTO +/-
Pulse el botón >>| o |<< para sintonizar manualmente hacia arriba/abajo la emisora que desee.
Mantenga pulsado el botón >>| o |<< durante más de 0,5 segundos para sintonizar
automáticamente hacia arriba/abajo la frecuencia de emisora de radio de señal más intensa.
6. BOTÓN BND
Pulse el botón BND para seleccionar la banda de frecuencias de radio que desee escuchar. Las
bandas AM/FM cambian cíclicamente por las bandas de sintonización: ->FM1-> FM 2 -> FM 3 ->
MW1->MW2 ->.
7. BOTÓN DE ENCENDIDO/APAGADO, MUTE
Cuando la unidad esté apagada, podrá encenderla pulsando cualquier botón del panel frontal
(excepto OPEN). Podrá también encender la unidad introduciendo un disco, tarjeta SD o unidad
USB en la ranura o la toma. Cuando la unidad esté encendida, mantenga pulsado el botón de
encendido para apagarla
Este botón también sirve para activar/desactivar el estado de supresión del audio.
Pulse este botón para que no pueda emitirse sonido desde el altavoz temporalmente. Púlselo de
nuevo para restablecer el sonido. El estado de supresión del audio se desactivará también
cuando se pulse el botón MODE, SEL y se use el control VOL del panel frontal.
8. BOTÓN APS (Memorización automática /Búsqueda de presintonías)
1) Si mantiene pulsado este botón durante más de un segundo, la radio buscará desde la
frecuencia en la que se encuentre y comprobará el nivel de intensidad de frecuencia hasta que
se encuentren 6 emisoras. Las frecuencias de estas 6 emisoras quedarán guardadas en el
Page 51

50
número de presintonía que le corresponda. La función de memorización automática se llevará a
cabo en cada banda de frecuencias seleccionada.
Cuando finalice la operación de memorización automática, la radio realizará la búsqueda de
presintonías.
9. BOTONES DE MEMORIA DE PRESINTONÍAS Y TOP />||, INT, RPT, RDM
Vaya a cualquier emisora presintonizada pulsando uno de los 6 botones de emisoras
presintonizadas (1-6).
Si se pulsa uno de estos botones durante más de 2 segundos, la emisora que se esté
escuchando quedará memorizada en el botón de presintonía seleccionado.
10. BOTÓN MODE Y PTY (TIPO DE PROGRAMA)
Puse el botón MODE/PTY para seleccionar entre el modo sintonizador (radio), disco (cuando se
haya cargado un disco), tarjeta SD (cuando se haya introducido una tarjeta SD) , USB (cuando
se haya insertado una unidad de memoria USB) y AUX.
En el modo Radio, haga una pulsación larga del botón MODE/PTY para seleccionar uno de los
modos siguientes:
POP M (MÚSICA POP)- - NEWS (NOTICIAS)
Cuando elija PTY TYPE, su selección se efectuará con los botones de presintonía según lo
descrito anteriormente (pulse uno de los 6 botones de presintonía repetidamente para
seleccionar PTY TYPE en el botón de presintonía). Cuando POPM o NEWS estén activados, el
programa PTY anterior y la palabra PTY se mostrarán en el display LCD.
Si no se pulsa ningún botón durante 2 segundos, se buscará el PTY previamente seleccionado.
Si después de un ciclo de búsqueda no se hubiera encontrado el PTY deseado, NO PTY
parpadeará, y después regresará al modo normal de radio y el icono PTY desaparecerá.
11. BOTÓN DISP
Pulse el botón DIP para mostrar la hora durante5 segundos en el display, para después regresar
a la visualización anterior, a menos que se vuelva a pulsar de nuevo el botón.
Mantenga pulsado el botón DISP durante más de 1 un segundo hasta que la hora del reloj
parpadee, después gire el control VOL para ajustar la hora.
12. TOMA DE ENTRADA AUX
Para la conexión de otro dispositivo de audio.
13. BOTÓN EJ
Cuando la unidad esté encendida, el disco cargado podrá expulsarse pulsando el botón EJ.
14. RANURA PARA CD
15. TOMA USB
Cuando necesite reproducir archivos almacenados en una unidad USB, abra la tapa de
cobertura de plástico e inserte una unidad de memoria USB en la toma. La unidad pasará al
modo USB automáticamente, y después reproducirá el primer archivo contenido en la USB.
Cuando no necesite usar la toma USB, por favor, coloque la tapa de plástico en su sitio.
Page 52

51
16. RANURA PARA TARJETAS SD
Cuando necesite reproducir archivos almacenados en una tarjeta SD, introduzca la tarjeta SD
en la ranura. La unidad pasará al modo SD, y después reproducirá el primer archivo contenido
en la tarjeta SD.
Nota:
Cuando tanto la tarjeta SD como la unidad USB han sido introducidos en la ranura y en la toma,
el modo elegido automáticamente por el sistema será USB.
17. LED PARPADEANTE
18. BOTÓN RESET
Antes de usar la unidad por primera vez, o después de haber sustituido la batería del coche o
cambiar las conexiones, será preciso hacer un reseteado de la unidad.
Presione este botón con un objeto punzante pero no afilado. Esta operación eliminará la hora de
la unidad y algunos de los contenidos almacenados.
Page 53

52
Uso de CD/MP3/USB/SD
1.Salto +/-
Pulse el botón >>| para reproducir la pista siguiente.
Pulse el botón |<< para reproducir la pista actual desde el comienzo si el tiempo de reproducción
transcurrido es superior a 2 segundos.
Pulse el botón |<< para reproducir la pista anterior si el tiempo de reproducción transcurrido es
inferior a 2 segundos.
Mantenga pulsado el botón >>| o |<< para avanzar hacia delante o hacia atrás, soltándolo para
reanudar la reproducción normal.
2.Botón APS
Pulse el botón APS repetidamente para seleccionar el modo BÚSQUEDA DE PISTA,
BÚSQUEDA DE DIRECTORIO o BÚSQUEDA DEL PRIMER CARÁCTER.
En el modo de BÚSQUEDA DE PISTA (TRACK SEARCH), la pantalla LCD mostrará TRK T 000
y parpadeará el dígito 0 más grande contenido en la tarjeta SD, USB o MP3. Gire el control para
seleccionar el número del dígito parpadeante de 0 a 9, Pulse entonces el botón SEL para
confirmar el número, y el siguiente dígito 0 más pequeño parpadeará. Realizando la misma
operación, seleccione el número del dígito parpadeante. Después de seleccionar el número de
todos los dígitos parpadeantes, pulse el botón SEL para reproducir la pista del número de serie
seleccionado.
En el modo BÚSQUEDA DE DIRECTORIO (DIRECTORY SEARCH), la pantalla LCD mostrará
la carpeta raíz (si no hubiera ninguna, encontrará una carpeta raíz llamada ROOT). Gire
después el control para seleccionar la carpeta que desee. Finalmente, pulse el botón SEL para
reproducir la primera pista de la carpeta.
En el modo BÚSQUEDA DEL PRIMER CARÁCTER (FIRST CHARACTER SEARCH), la
pantalla LCD mostrará A- gire el control para seleccionar el primer carácter del archivo según el
orden A~Z y 0~9. Después pulse el botón >>| o |<< para seleccionar un archivo cuyo primer
carácter es el seleccionado. Finalmente pulse el botón SEL para reproducir el archivo
seleccionado.
3.Botones REPRODUCCIÓN/PAUSA, INT, RPT, RDM
1) Pulse el botón TOP/ >|| para interrumpir la reproducción del disco, SD o USB.
Púlselo de nuevo para reanudar la reproducción normal del disco, SD o USB.
Mantenga pulsado el botón TOP/>|| durante aproximadamente 0,5 segundos para reproducir
la primera pista del disco, SD o USB.
2) Pulse el botón INT para reproducir los 10 primeros segundos de cada pista, e INT ON será
visible en el display LCD.
En el proceso de INT, pulse el botón INT de nuevo para detener la reproducción introductoria
de 10 segundos y proseguir con la reproducción de la pista actual, entonces el display LCD
mostrará INT OFF.
3) Pulse el botón RPT para reproducir la pista actual repetidamente, RPT ONE será visible
en el display LCD.
En los modos disco MP3, SD o USB, pulse el botón RPT dos veces seguidas para reproducir
la carpeta actual repetidamente, entonces RPT DIR se mostrará en el display LCD. En el
Page 54

53
proceso de RPT, pulse el botón RPT de nuevo para detener el modo de reproducción
repetida, entonces el display LCD mostrará RPT OFF.
4) Pulse el botón RDM para repetir todas las pistas del disco en orden aleatorio, RDM ON ser
mostrará en el display LCD.
En el proceso de RDM, pulse el botón RDM de nuevo para detener la reproducción en orden
aleatorio, entonces el display LCD mostrará RDM OFF.
5) Durante la reproducción normal del disco MP3, SD, USB:
Pulse los botones de presintonías de radio 6 y 5 para saltar hacia arriba y hacia abajo 10
pistas.
Page 55

54
Sistema Bluetooth manos libres
2. Emparejamiento
Para emparejar su teléfono móvil con un dispositivo Bluetooth, bastará con activar la función
Bluetooth de su teléfono móvil y buscar dispositivos. Cuando se encuentre el estéreo, se
mostrará como Car Kit. Cuando intente realizar la conexión, le pedirá una contraseña.
La contraseña predeterminada es 0000. Cuando haya emparejado su teléfono
satisfactoriamente, se mostrará el mensaje BT READY seguido del número del teléfono móvil.
Cuando el teléfono haya logrado la conexión, verá un led de color azul parpadeando en el
display.
Este LED se encenderá de forma permanente cuando esté realizando una llamada o
desaparezca cuando lo desconecte del estéreo.
2. Conexión o desconexión
A) Utilice el teléfono móvil para la conexión o la desconexión.
1) En el estado de conectado, busque el dispositivo Bluetooth emparejado y conectado,
después pulse el botón de desconexión para realizar la desconexión.
2) En el estado de desconectado, busque el dispositivo Bluetooth emparejado y desconectado,
después pulse el botón de conexión para realizar la conexión.
B) Cuando vuelva a encender el aparato (después de desactivar Acc), el panel frontal podrá
buscar el teléfono para su emparejamiento y conexión automáticos. Serán necesarios unos 20
segundos.
3. Aceptar/Rechazar/Mantener en espera/Finalizar una llamada
Aceptar - Pulse el botón 5(-10, HAND UP)
Rechazar - Pulse el botón 6(+10, HOLD)
5. Ajuste del volumen de conversación
En el estado de conversación, use el control VOL para ajustar el sonido de salida. Este ajuste de
volumen podrá guardarse.
Nota: el nivel de volumen predeterminado es 25.
5. Transferencia de audio de un archivo reproducido con el teléfono móvil en el
reproductor de audio del coche
Si el teléfono móvil acepta A2DP y puede reproducir audio, cuando el teléfono móvil reproduzca
un archivo de audio (para algunos de ellos, deberá seleccionar primero reproducción por BT), la
reproducción será transferida al reproductor de audio de coche.
En el modo A2DP, si el dispositivo Bluetooth del teléfono móvil acepta AVRCP, las funciones de
los botones >>|, |<< y REPRODUCCIÓN/PAUSA serán las mismas que en el modo disco (no
habrá función de avance/retroceso rápido para los botones >>|/|<<). El resto de botones
disponibles en el modo disco no estarán disponibles.
En el modo A2DP, si el dispositivo Bluetooth del teléfono móvil acepta AVRCP, si pulsa el botón
MODE podrá seleccionar entre el modo radio, disco, USB, TARJETA y A2DP. Pero después de
haber entrado de nuevo en el modo A2DP, para reanudar la reproducción y transferirla al
reproductor de audio de coche por el teléfono móvil, deberá pulsar el botón
REPRODUCCIÓN/PAUSA. En el modo A2DP, para pasar del modo de reproducción de música
del teléfono pasa al modo de radio, deberá esperar unos 10 segundos.
Page 56

55
CONECTOR B
1. Altavoz posterior derecho (+)
2. Altavoz posterior derecho (-)
3. Altavoz frontal derecho (+)
4. Altavoz frontal derecho (-)
5 Altavoz frontal izquierdo (+)
6. Altavoz frontal izquierdo (-)
7. Altavoz posterior izquierdo (+)
8. Altavoz posterior izquierdo (-)
CONEXIÓN DE CABLES
CONECTOR A
1.
2.
3.
4. Memoria +12V
5. Salida de antena auto
6.
7. ACC
8. TOMA A TIERRA
Nota: Algunos coches tienen conexiones de cables especiales (la Memoria y la conexión ACC
han cambiado), así que aquí se acepta la toma ISO de dos lados.
Page 57

56
CUIDADO EN EL USO DE CDs:
Sobre los discos CD-R/CD-R/W:
Además de los discos CD de audio grabados para su explotación comercial, esta unidad podrá
reproducir discos CD-R y CD-R/W. En algunos casos, en especial cuando se haya grabado en
grabadores de CD antiguos, algunos discos CD-R y CD-R/W podrían no reproducirse. Además,
siempre que grabe un CD para reproducirlo en este receptor, le recomendamos que grabe a
24x o a una velocidad inferior para CD-R y a 4x o inferior para CD-R/W, para conseguir así una
mayor calidad de señal y unas mejores prestaciones en la reproducción.
1. Para mantener limpio este disco:
Antes de reproducir un disco, límpielo con un paño limpio y sin polvo.
Hágalo pasando el paño desde el centro hacia los bordes.
2. Cuando ya se hubiera introducido uno, el hacerlo podría estropear la unidad.
No pegue adhesivos ni cinta en el disco.
Maneje el disco por los bordes para mantenerlo limpio, y no toque su superficie.
. Introduzca el disco con la cara impresa mirando hacia arriba, de lo contrario podría estropear la
unidad.
3. No exponga el disco a la luz solar directa ni lo acerque a fuentes de calor, como rejillas de
ventilación, ya que el disco podría deformarse y combarse.
No deje el disco en el interior de un coche que haya sido aparcado al sol, ya que este hecho
hará que la temperatura en el interior del coche aumente considerablemente.
4. No use discos de segunda mano o alquilados, ya que normalmente hay pegamento en la
superficie de dichos discos, y el introducirlos haría que la unidad dejara de funcionar y acabaría
por estropearse.
5. Guarde siempre el disco en su estuche para su protección. Los discos rayados producen un
sonido de mala calidad y hacen que el reproductor salte.
6. En días de lluvia o en zonas húmedas, la humedad podría condensarse en el disco o en las
partes ópticas, impidiendo su reproducción. Si se formara humedad en el disco, elimínela con un
paño suave.
Si se formara humedad en las partes ópticas de la unidad, déjela reposar encendida durante
aproximadamente una hora.
7. No use disolventes como benceno o diluyentes. Los limpiadores disponibles en el mercado o
espráis antiestáticos podrían dañar la unidad.
Page 58

57
Síntomas comunes
Causa
Solución
La unidad no se enciende
El coche no está encendido
Si el suministro eléctrico ha sido
conectado de forma correcta al accesorio
del coche, gire la llave de contacto hasta
"ON" o "ACC"
Fusible fundido
Cambie el fusible según el diagrama de
conexiones
No puede cargarse el CD
Ya hay un CD en el reproductor
Saque el disco del reproductor e
introduzca el otro de forma correcta
Los CDs solo se cargan hasta la
mitad
No se han quitado los tornillos de
transporte
Retire los tornillos de transporte antes del
uso
El disco ha sido introducido al revés
Introduzca el disco con la cara impresa
mirando hacia arriba
El dispositivo no funciona
correctamente
(EXPULSIÓN, CARGA,
REPRODUCCIÓN)
La superficie del disco está
extremadamente sucia o dañada
Limpie el CD o pruebe con otro, si el
segundo Cd funcionara correctamente,
significa que el primero está dañado
La temperatura en el interior del
coche es demasiado alta
Refresque el interior del coche hasta un
nivel aceptable
El volumen está demasiado bajo
Suba el volumen
No hay sonido
El dispositivo no ha sido conectado
correctamente
Compruebe la alimentación y la conexión
a tierra según lo que figura en el
diagrama de conexiones
Los botones no responden
1.El micro ordenador integrado no
funciona adecuadamente debido al
ruido
2.El panel frontal no ha sido bien
fijado en su sitio
1. Apague la unidad y vuélvala a
encender. O pulse el botón RESET para
reanudar el programa
2. Reinstale el panel frontal
El sonido del reproductor de CD
salta
El ángulo de instalación es superior
a 30 grados
Ajuste el ángulo de instalación de modo
que sea inferior a 30 grados
La superficie del piso es irregular
Espere a que el piso sea más liso antes
de reproducir
La superficie del disco está
extremadamente sucia o dañada
Limpie el CD o pruebe con otro, si el segundo
No hay recepción de radio
La antena de cable no ha sido
conectada
Inserte la antena de cable firmemente en
la toma para antena de la unidad
LOCALIZACIÓN Y RESOLUCIÓN DE PROBLEMAS
Antes de pasar la lista de comprobaciones, deberá primero realizar todas las conexiones.
Si todavía tuviera preguntas después de haber leído todas la lista de comprobaciones, por favor, consulte a su
representante del servicio técnico local.
Page 59

58
Para evitar la posibilidad de que se
encalle, por favor, asegúrese de
fijar bien la correa metálica en la
junta metálica que se conecta al
chasis del coche.
Doble las lengüetas de la
manga de montaje metálica
contra el SALPICADERO
con un destornillador.
Para sacar la unidad de la manga de montaje
metálica, inserte a la vez las dos LLAVES que se le
suministran en las ranuras que hay a izquierda y
derecha del chasis. Después tire del chasis hacia
fuera de la manga de montaje metálica como se
muestra en la ilustración de la derecha.
Antes de montar y utilizar el
reproductor de CDs, retire la
manga metálica como muestran las
flechas.
Retire los dos tornillos que fijan el
cuerpo del mecanismo del reproductor
de CDs durante su transporte antes de
instalar el reproductor..
Presione el botón RESET con
un objeto puntiagudo para
renovar el programa cuando
este se haya distorsionado.
BOTÓN EJ
BOTÓN RESET
MÉTODO DE INSTALACIÓN
Este es un método de instalación antirrobo.
La unidad principal incluye una MANGA DE MONTAJE METÁLICA.
Por favor, realice las conexiones, por ejemplo, alimentación, altavoces, antena. Hágalo según lo
que se le pide en este Manual de Instrucciones, después instale la manga de montaje metálica en
el coche tal y como se muestra en el diagrama de debajo.
CORREA
METÁLICA DE SUJECIÓN
CHASIS DE LA UNIDAD
ARO EMBELLECEDOR DE PLÁSTICO
SALPICADERO
MANGA DE MONTAJE METÁLICA PANEL FRONTAL
NOTA
.
Page 60

59
ESPECIFICACIONES
GENERAL
Alimentación..................................................................................DC 12V.
Consumo....................................................................................10A MÁX.
POTENCIA DE SALIDA............................................................... 4 X 25W
Número de canales.................................................................2 ESTÉREO.
Dimensiones del chasis...................................178[AN] X 50[AL] X 165[PR].
SECCIÓN FM
Banda de frecuencias.....................................................87.5MHz -108MHz
Sensibilidad efectiva..............................................................................3uV.
Frecuencia I.F...............................................................................10.7MHz.
SECCIÓN AM
Banda de frecuencias...................................................522KHz - 1620KHz
Frecuencia I.F.................................................................................450KHz
Sensibilidad efectiva...........................................................................40dB
LINE - OUT
Salida................................................................................... MÁX. 1200mv
REPRODUCCIÓN DE CD/SD o USB
Sistema....................................................................sistema de audio MP3.
Discos reproducibles......................................CD/CD-R/CD-RW/MP3/WMA
Características de frecuencia............................................20-100Hz 5dB
10-20KHz 5dB.
Señal a ruido ...........................................................................50dB [1KHz]
Page 61

60
CS-450CD
HANDLEIDING
5 IN 1 AUDIOSYSTEEM VOOR IN AUTO MET
AM/FM-RDS DIGITALE PLL RADIO
SD/USB/CD(ESP)/MP3-SPELER
BLUETOOTH HANDFREESYSTEEM
www.lenco.eu
Page 62

61
VOORZORGSMAATREGELEN EN ONDERHOUD
1. Als het erg warm is in de auto, bijvoorbeeld als de auto is geparkeerd in de zon, gebruik de
speler dan niet tot de auto een tijdje heeft gereden om het interieur af te koelen.
2. Het beschermdoosje is bedoeld om het voorpaneel veilig te bewaren.
BESCHERMDOOSJE
VOORPANEEL
3. Het apparaat is ontworpen voor de negatieve pool van de accu die is aangesloten op het
metaal van het voertuig. Bevestig dit vóór de installatie.
4. Laat de draden van de luidsprekers geen kortsluiting met elkaar maken als het apparaat wordt
ingeschakeld. Anders kan dit de versterker overbelasten of laten doorbranden.
5. Installeer het afneembare paneel niet vóór het aansluiten van de bedrading.
Page 63

62
PLAATSING EN FUNCTIE BEDIENINGSELEMENTEN
10. MODE/PTY
11. DSP
12. AUX
13. EJECT
14. CD-sleuf
15. USB-poort
16. SD-sleuf
17. Anti-diefstal LED-indicator
18. RESET
1.REL
2.SEL en VOLUMEREGELING
3. LCD
4&5. en
6. BAND
7. POWER/MUTE
8. APS
9. TOP/PLAY/PAUSE,INT,RPT RDM
en 1-6 Numerieke toetsen
Page 64

63
Standaard bediening
1. REL
2. SEL (Select) EN VOLUMEREGELING
Druk op REL om het voorpaneel omlaag te klappen.
Daarna kan een disc in de sleuf worden geplaatst of uit worden geworpen door op EJ te drukken.
Nadat het voorpaneel omlaag is geklapt, kunt u het naar links drukken en vervolgens de
rechterkant van het paneel naar buiten trekken om het apparaat uit het chassis te halen.
A) Druk kort op SEL om een van de volgende volumemodi te selecteren: E. VOL.
-> VOLUME ->BASS ->TREBLE -> BALANCE -> FADER ->
Draai bij het selecteren van een gewenste audiomodus aan de VOLUMEREGELING om het
audio-effect in te stellen.
De wachttijd is in elke modus ongeveer 5 seconden. Als deze wachttijd voorbij is, dan zal er
worden teruggekeerd naar de vorige weergavemodus van de tuner of CD.
De bedieningsmodus van E.VOL wordt bediend met de volgende numerieke weergave.
- VOL: (MIN)00, 01,......46, 47(MAX).
- BASS/TRE: -07, -06,...,00,...+06,+07
- BAL: 0LR9, 1LR9, ..., 9LR9,..., 9LR1, 9LR0
- FAD: 0FR9,1FR9, ..., 9FR9,..., 9FR1, 9FR0
B) Als de knop voor meer dan 2 seconden wordt ingedrukt, dan kan een van de volgende
functies worden geselecteerd:
->TA(ON/OFF) ->AF (ON/OFF) ->TA(ALARM/SEEK) ->PI (SOUND/MUTE) -> RETURN
(LONG/SHORT) ->MASK(DPI/ALL) ->BEEP (ON/OFF) -> USER SET
(FLAT/CLASSIC/ROCK/POP)->VOL(LAST/DEFA) ->MONO/STEREO(alleen voor FM-modus)
->LOUD(ON/OFF)->LOCAL/DX(alleen voor FM-modus)->CLK(ON/OFF) ->CLK(12/24)-modus.
Draai na het selecteren van de gewenste modus aan de VOLUMEREGELING om een item van
de gewenste modus te selecteren.
1)TA ON/OFF
Als de TA-modus is ingeschakeld (TA wordt getoond op LCD), dan zal de radio naar een
TA-zender zoeken en TA SEEK wordt een tijdje op het display getoond.
Als verkeersinformatie wordt uitgezonden:
a) Als het apparaat in de SD, USB of disc-modus, dan zal het tijdelijk naar de radiomodus
schakelen.
b) Schakel tijdelijk over naar een EON-zender als EON verkeersinformatie detecteert op een
andere zender, TP zal op het LCD worden getoond.
c) Als het volumeniveau lager dan 20 is, dan zal het volumeniveau worden verhoogd tot 20. Het
apparaat zal terugkeren naar de oorspronkelijke modus met het oorspronkelijke volumeniveau
als de verkeersinformatie is afgelopen.
Als het volume wordt aangepast tijdens de verkeersinformatie, dan geldt dit alleen voor het
volume van de verkeersinformatie.
* TA-onderbrekingsfunctie:
De huidige verkeersinformatie kan worden beëindigd door op deze toets te drukken. Maar de
TA-modus zal niet worden uitgeschakeld.
* Als TA is ingeschakeld, kan de functie SEEK, (SCAN), AUTO MEMORY alleen worden
ontvangen of opgeslagen als de verkeersinformatie identificatiecode wordt ontvangen.
Als TA is ingeschakeld, dan wordt de verkeersinformatie identificatiecode niet ontvangen tijdens
de gespecificeerde tijd.
Page 65

64
2)AF (ON/OFF)
Als de AF-schakelmodus is geselecteerd en de staat van de AF-schakelmodus wordt getoond in
het AF-gedeelte van het display.
Segment uit: AF-schakelmodus uitgeschakeld.
Segment aan: AF-schakelmodus ingeschakeld en beschikt over RDS-informatie.
Segment knippert: AF-schakelmodus ingeschakeld, maar er is nog geen RDS-informatie
ontvangen.
Als de AF-schakelmodus is geselecteerd, dan zal de radio de signaalsterkte van AF constant
controleren. Het controle-interval van elke AF hangt af van de signaalsterkte van de huidige
zender, van een paar minuten voor zenders met sterke signalen tot een paar seconden voor
zenders met zwakke signalen. Elke keer dat een nieuwe AF sterker is dan de huidige zender, zal
de radio voor korte tijd overschakelen naar die frequentie, de melding NEWFREQUENCY wordt
voor 1-2 seconden getoond. Het geluid wordt tijdens het controleren en schakelen maar heel
kort uitgeschakeld, dus het is bij het beluisteren van zenders normaal gesproken niet hoorbaar.
In de FM-modus, als AF is ingeschakeld, dan kan de functie SEEK, (SCAN), AUTO-MEMORY
alleen RDS-zenders ontvangen en opslaan.
3) TASEEK/TAALARM:
TASEEK-modus: Als een nieuwe zender waarop u afstemt binnen 5 seconden geen
TP-informatie (verkeersinformatie), dan stemt de radio af op de volgende zender met een ander
programma (PI) die wel TP-informatie heeft.
Als de huidige zender langer dan de ingestelde periode (RETUNE SHORT of RETUNE LONG)
geen TP-informatie ontvangt, dan schakelt de radio over naar een volgende zender met dezelfde
PI. Als binnen één afstemcyclus geen zender met dezelfde PI gevonden wordt, dan stemt de
zender af op de volgende zender die wel TP-informatie levert.
TA ALARM-modus: In deze modus stemt de radio niet automatisch af op andere zenders. U
hoort alleen een dubbele piep (ALARM).
Als een nieuwe zender waar u op afstemt binnen 5 seconden geen TP-informatie heeft, dan
klinken er piepen.
Als de zender langer dan de ingestelde tijd geen TP-informatie heeft dan zal een piep klinken.
Als de nieuwe zender geen RDS-signaal verstuurt, dan wordt PI SEEK onderdrukt.
4) PI SOUND/ PI MUTE:
PI SOUND-modus: als een auto tussen gebouwen rijdt, dan kan dit reflecterende signalen
veroorzaken. Een fenomeen dat kan voorkomen doordat verschillende PI-codes worden
ontvangen vanaf dezelfde AF-bron. Als er af en toe verschillende PI-geluiden (DIP) worden
gehoord, dan zal dit voor minder dan 1 seconde zijn.
PI MUTE-modus: Onder de bovenstaande omstandigheden zal er voor minder dan een seconde
geen geluid worden weergegeven.
5) RETURN L / RETURN S:
De initiële tijd voor automatisch zoeken in de TA- of PI-modus kan hier worden geselecteerd.
Als PI-informatie niet wordt opgevangen binnen het afsteminterval, dan zal de radio opnieuw
afstemmen op de volgende zender met dezelfde PI.
Als er binnen 1 zoekcyclus geen zender met dezelfde PI-code wordt gevonden, dan zal de radio
naar de laatste zender gaan en 4-5 minuten wachten tot de PI-code wordt ontvangen.
RETURN L-modus: de duur is 150 seconden.
RETURN S-modus: de duur is 90 seconden.
Page 66

65
6) MASK DPI/MASKALL:
MASK DPI-modus: onderdruk alleen de AF’s met een verschillende PI.
MASKALL-modus: onderdruk de AF’s met een andere PI en krachtige NIET-RDS-signalen.
7)BEEP ON/BEEP OFF
BEEP ON-modus: Er klinkt na elke toetsdruk een pieptoon.
BEEP OFF-modus: De pieptoon wordt uitgeschakeld.
8)VOL LAST/VOL DEFA
VOL LAST: Het volumeniveau wordt onthouden bij het uitschakelen, de radio zal met ditzelfde
volumeniveau inschakelen.
VOL DEFA: De melding AVOL zal worden getoond na het drukken op de knop SEL. De radio
kan nu worden ingeschakeld met een vast volumeniveau. Gebruik de VOLUMEREGELING om
het volumeniveau in te stellen.
9)CLK ON/OFF
CLK ON: De klok zal altijd op het display worden getoond als het apparaat is uitgeschakeld.
CLK OFF: De klok zal niet worden getoond op het display als het apparaat is uitgeschakeld.
3. LCD-display
4&5. TUNE, SEEK, TRACK, SKIP UP / DOWN
Druk kort op >>| of |<< om stap voor stap handmatig op een hogere/lagere frequentie af te
stemmen totdat u de gewenste frequentie heeft bereikt.
Houd >>| of |<< voor langer dan 0,5 seconden ingedrukt om automatisch af te stemmen op
zenders met een hogere of lagere frequentie en een sterk signaal.
6. BAND
Druk kort op BND om de gewenste golfband te selecteren. Druk herhaaldelijk op de knop om in
een cyclus alle AM/FM-banden te doorlopen:
->FM 1-> FM 2 -> FM3 -> MW1->MW2 ->.
7. POWER ON/OFF,MUTE
Als het apparaat is uitgeschakeld, dan kan het apparaat worden ingeschakeld door op een
willekeurige knop op het voorpaneel te drukken(behalve de knop OPEN). U kunt het apparaat
ook inschakelen door een disc, SD/MMC-kaart of USB-stick in de juiste sleuf of aansluiting te
plaatsen. Als het apparaat is ingeschakeld, houd POWER ingedrukt om het apparaat uit te
schakelen.
Met deze knop kan de MUTE-functie aan of uit worden gezet
Druk op de knop om de luidspreker tijdelijk te dempen, druk nogmaals op de knop om de
geluidsweergave te hervatten. U kunt de MUTE-functie ook uitschakelen door op MODE of SEL
te drukken of de VOLUMEREGELING op het voorpaneel te gebruiken.
8. APS (Automatisch opslaan/scan naar voorkeurszenders)
1) Als de knop voor meer dan 1 seconde wordt ingedrukt, dan zal de radio vanaf de huidige
frequentie zoeken naar zenders met een sterk signaal, tot er 6 zenders zijn gevonden. De 6
zenders worden opgeslagen als voorkeurszender. Het automatische opslaan is
Page 67

66
geïmplementeerd op elke geselecteerde band.
Als het automatische opslaan is voltooid, dan zal de radio de voorkeurszenderscan uitvoeren.
2) Als u kort op de knop drukt, dan zal de radio naar elke voorkeurszender op de huidige band
zoeken, de zender 5 seconden afspelen en daarna opnieuw zoeken.
9. VOORKEURSZENDERS EN TOP/>||, INT, RPT, RDM
Ga naar een voorkeurszender door op een van de 6 knoppen van voorkeurszenders te drukken
(1-6).
Als een van de zes knoppen voor meer dan 2 seconden wordt ingedrukt, dan zal de zender die
op dat moment wordt beluisterd worden opgeslagen onder de knop die wordt ingedrukt.
10. MODE EN PTY (PROGRAMMATYPE)
Druk op MODE/PTY om te schakelen tussen tuner (radio), disc (als er een disc is geplaatst),
SD-kaart (als er een SD -kaart is geplaatst), USB (als er een USB-stick is geplaatst) en de
AUX-modus.
Druk in de radiomodus langer op MODE/PTY om een van de volgende modi te selecteren:
POP M- - NEWS
U kunt het PTY TYPE selecteren met behulp van de toetsen voor de voorkeurszenders. (druk
herhaaldelijk kort op een van de 6 toetsen voor voorkeurszender om het PTY TYPE te
selecteren). Als POPM of NEWS is ingeschakeld, dan zal de vorige PTY-zender en het woord
PTY worden getoond op het LCD.
Als er geen toetsen worden ingedrukt voor 2 seconden, dan zal er na de eerder geselecteerde
PTY worden gezocht. Als er binnen 1 zoekcyclus geen PTY wordt gevonden, dan zal de melding
NO PTY knipperen. Daarna zal het apparaat terugkeren naar de vorige zender en het
PTY-icoontje op het display verdwijnt.
11. DISP
Druk kort op DISP om de tijd voor 5 seconden op het display te tonen, het apparaat keert daarna
terug naar de vorige weergave, tenzij er nogmaals op de knop wordt gedrukt.
Houd DISP langer dan 1 seconde ingedrukt tot de tijd knippert en draai vervolgens aan de
volumeregeling om de tijd in te stellen.
12. AUX INGANG
Voor het aansluiten op andere audio-apparaten.
13. EJECT
Als het apparaat is ingeschakeld, dan kan de disc worden uitgeworpen door op EJ te drukken.
14. CD-SLEUF
15. USB-POORT
Als u bestanden op een USB-stick wilt afspelen, open de plastic bedekking en steek de
USB-stick in de USB-aansluiting. Het systeem zal automatisch naar de USB-modus schakelen
en het eerste bestand op de USB-stick afspelen.
Als u de USB-aansluiting niet meer gebruikt, bedek de USB-poort dan met de plastic bedekking.
Page 68

67
16. SD-KAARTSLEUF
Als u bestanden op de SD-kaart wilt afspelen, plaats de SD-kaart dan in de SD-kaartsleuf. Het
systeem zal automatisch naar de SD-modus schakelen en het eerste bestand op de SD-kaart
afspelen.
Opmerking:
Als de SD-kaart en USB-stick beide worden geplaatst in hun sleuf of aansluiting, dan zal het
systeem automatisch naar de USB-modus schakelen.
17. KNIPPEREND LAMPJE
18. RESET
U moet het apparaat resetten voordat u het apparaat voor het eerst gebruikt, of na het
vervangen van de accu van de auto of de aansluitingen veranderen. Druk op deze knop met een
spits voorwerp. Dit zal de klokinstellingen en bepaalde opgeslagen gegevens wissen.
Page 69

68
Bediening CD/MP3/USB/SD
1.Skip up/down
Druk kort op >>| om de volgende track af te spelen.
Druk kort op |<< om de huidige track vanaf het begin af te spelen als de track 2 seconden of
meer heeft gespeeld.
Druk kort op |<< om terug te gaan naar de vorige track als de track voor minder dan 2 seconden
heeft gespeeld.
Houd >>| of |<< ingedrukt om vooruit of terug te spoelen en laat de knop los om het normale
afspelen te hervatten.
2.APS
Druk herhaaldelijk op APS om de modus TRACK SEARCH, DIRECTORY SEARCH
of FIRST CHARACTER SEARCH te selecteren.
In de TRACK SEARCH-modus, zal het LCD de melding TRK T 000 tonen en het grootste getal 0
dat de SD/MMC-kaart, USB-stick of de MP3-disc bevat. Draai aan de volumeregeling om de
waarde van het knipperende cijfer te selecteren van 0 ~ 9. Druk daarna op SEL om het nummer
te bevestigen en het volgende kleinere cijfer 0 knippert. Stel de waarde van het knipperende
cijfer opnieuw in met behulp van volumeregeling. Als u de waarde van het knipperende cijfer
heeft ingesteld, druk dan op SEL om de geselecteerde track af te spelen.
In de DIRECTORY SEARCH-modus, zal het LCD de hoofdmap (root) tonen (als er geen
hoofdmap is, dan zal er een map met de naam ROOT worden gevonden). Draai vervolgens aan
de volumeregeling om de gewenste map te selecteren en druk ten slotte op SEL om de eerste
track van de map af te spelen.
In de FIRST CHARACTER SEARCH-modus, zal het LCD A- tonen en draai aan de
volumeregeling om het eerste karakter van het bestand in de volgorde A~Z en 0~9 te selecteren.
Druk daarna op >>| of |<< om een bestand te selecteren waarvan het eerste karakter het
geselecteerde karakter is. Druk ten slotte op SEL om het geselecteerde bestand af te spelen.
3.PLAY/PAUSE, INT, RPT, RDM
1) Druk kort op TOP/ >|| om het afspelen van de disc, SD-kaart of USB-stick te pauzeren.
Druk nogmaals op de knop om het normale afspelen te hervatten.
Houd TOP/>|| ongeveer 0,5 seconde ingedrukt om de eerste track van de disc, SD-kaart of
USB-stick af te spelen.
2) Druk op INT om de eerste 10 seconden van elke track af te spelen, het LCD zal de melding
INT ON tonen.
Druk tijdens het afspelen van de intro’s nogmaals op INT om door te gaan met het afspelen van
de huidige track, het LCD toont de melding INT OFF.
3) Druk één keer op RPT om de huidige track te herhalen, het LCD toont de melding RPT ONE.
Druk tijdens het afspelen van een MP3-disc, SD-kaart of in de USB-modus twee keer op RPT
om de huidige map te herhalen. De melding RPT DIR zal zichtbaar zijn op het LCD. Druk tijdens
het herhalen nogmaals op RPT om het herhalen te stoppen, het LCD toont de melding RPT
OFF.
4) Druk op RDM om alle tracks in willekeurige volgorde af te spelen, het LCD toont de melding
RDM ON.
Druk tijdens het afspelen in willekeurige volgorde nogmaals op de knop om de functie te
annuleren, het LCD toont RDM OFF.
5) Tijdens het normale afspelen van MP3-disc, SD-kaart, USB-stick:
Druk op de knoppen van de voorkeurszender 6 en 5 om 10 tracks omhoog of omlaag te gaan.
Page 70

69
Bluetooth handsfreesysteem
1.Koppelen
U kunt uw mobiele telefoon koppelen met een Bluetooth-apparaat door de Bluetooth-functie op
uw mobiele telefoon in te schakelen en te zoeken naar apparaten. Als de stereo wordt gevonden,
dan wordt deze getoond als Car Kit en er zal naar een wachtwoord worden gevraagd wanneer u
verbinding probeert te maken.
Het standaardwachtwoord is 0000. Als u uw telefoon succesvol hebt gekoppeld, dan zal de
melding BT READY en daarna uw mobiele telefoonnummer worden getoond. Als de telefoon
succesvol verbinding heeft gemaakt, dan ziet u een blauw lampje knipperen op het display.
Dit lampje zal blijvend oplichten als u een gesprek voert met de mobiele telefoon of uit gaan als u
de verbinding tussen de mobiele telefoon en de radio verbreekt
.
2. Verbinding maken of verbreken
A) Gebruik de mobiele telefoon om verbinding te maken of verbreken
1) Zoek als u de verbinding wilt verbreken naar een knop met de naam ‘verbinding verbreken’ in
de verbindingsstatus van het gekoppelde Bluetooth-apparaat.
2) Zoek als u verbinding wilt maken naar een knop voor het maken van een Bluetooth-verbinding
op het Bluetooth-apparaat.
B) Als u het apparaat weer inschakelt (nadat Acc was uitgeschakeld), dan kan het voorpaneel
automatisch opnieuw koppelen en verbinding maken met de telefoon. Dit duurt ongeveer 20
seconden.
3. Een oproep accepteren/weigeren/in de wacht zetten/beëindigen
Accepteren – Druk op 5(-10,HAND UP)
Weigeren – Druk op 6(+10,HOLD)
4.Instellen praatvolume
Maak tijdens het gesprek gebruik van de VOLUMEREGELING om het volume in te stellen. Het
volume kan worden opgeslagen.
Opmerking: het standaardvolume is ingesteld op 25.
5. Het geluid van een bestand dat wordt afgespeeld op de mobiele telefoon doorsturen
naar de autoradio
Als de mobiele telefoon ondersteuning biedt aan A2DP en audio kan afspelen, dan zal audio die
wordt afgespeeld op de telefoon worden doorgestuurd naar de autoradio (op sommige telefoons
moet eerst de optie voor het afspelen via BT worden geselecteerd).
Als het Bluetooth-apparaat van de mobiele telefoon in de A2DP-modus ondersteuning biedt aan
AVRCP, dan zullen de functies onder de >>|, |<< en PLAY/PAUSE toetsen hetzelfde zijn als in
de disc-modus (vooruitspoelen en terugspoelen werkt niet met >>|/|<<). De andere toetsen die
beschikbaar zijn in de disc-modus hebben geen functie.
Als het Bluetooth-apparaat van de mobiele telefoon in de A2DP-modus ondersteuning biedt aan
AVRCP, dan kan er met behulp van MODE worden geschakeld tussen de radio-, disc-, USB-,
KAART- en A2DP-modus. Er moet nu, om de audio opnieuw naar de radio te sturen, echter wel
eerst op PLAY/PAUSE worden gedrukt als er terug wordt geschakeld naar de A2DP-modus.
In de A2DP-modus kan het schakelen van geluid tussen de mobiele telefoon en de radio
ongeveer 10 seconden duren.
Page 71

70
CONNECTOR B
1. Luidspreker rechtsachter (+)
2. Luidspreker rechtsachter (-)
3. Luidspreker rechtsvoor (+)
4. Luidspreker rechtsvoor (-)
5. Luidspreker linksvoor (+)
6. Luidspreker linksvoor (-)
7. Luidspreker linksachter (+)
8. Luidspreker linksachter (-)
BEDRADING
CONNECTORA
1.
2.
3.
4. Geheugen +12V
5. Auto-antenne-uitvoer
6.
7. ACC
8. AARDE
Opmerking: Sommige wagens hebben speciale draadaansluitingen (De Geheugen en ACC
ingangen zijn verwisseld), dus zijn hier beide zijdes van de ISO-ingang ondersteund.
Page 72

71
ZORG BIJ HET GEBRUIK VAN CD'S:
Over CD-R/CD-R/W discs:
In aanvulling op commercieel opgenomen audio CD's, kan het apparaat ook CD-R en CD-R/W
discs afspelen. In bepaalde gevallen, vooral bij opnamen met oudere CD-branders, kunnen
sommige CD-R en CD-R/W discs niet afspelen. Als u een CD opneemt voor het afspelen in deze
radio, dan is aanbevolen om de disc voor de beste signaalkwaliteit en afspeelprestaties te
branden met een snelheid van 24x of lager voor CD-R en 4x of langzamer voor CD-R/W.
1. Om de disc schoon te maken:
Veeg een disc voor het afspelen af met een schoon, stofvrij schoonmaakdoekje.
Veeg de disc van het midden naar buiten schoon.
2. Plaats geen disc in de disclade als er al een disc is geplaatst. Dit kan het apparaat
beschadigen.
Plak geen stickers of plakband op de disc.
Houd de disc vast bij de randen en raak het oppervlak niet aan, zodat de disc schoon blijft.
. Een disc plaatsen
Zorg ervoor dat het label naar boven is gericht, anders kan dit het apparaat beschadigen.
3. Stel discs niet bloot aan direct zonlicht of warmtebronnen zoals verwarmingen of kachels.
Hierdoor kunnen discs kromtrekken.
Als u de auto in de zon heeft geparkeerd, laat dan geen discs in de auto liggen, omdat de
temperatuur in de auto flink kan stijgen.
4. Gebruik geen tweedehands of gehuurde discs. Deze discs kunnen vuil zijn en er kan lijm op
het oppervlak van de discs zitten, waardoor ze het apparaat kunnen beschadigen.
5. CD’s na gebruik altijd in hun doosje opbergen. Bekraste discs zullen minder goed klinken en
ze kunnen ervoor zorgen dat de CD-speler overslaat.
6. Op regenachtige dagen of in natte omgevingen kan condens op de disc of het optische
onderdeel van de speler komen, waardoor afspelen onmogelijk is. Als er condens op de CD zit,
veeg dit er dan af met een zacht doekje.
Als er condens op het optische deel van het apparaat vormt, laat het apparaat dan ongeveer een
uur ingeschakeld rusten.
7. Gebruik geen oplosmiddelen, zoals benzine of verdunners. Commercieel beschikbare
reinigingsmiddelen of antistatische sprays zullen het apparaat beschadigen.
Page 73

72
PROBLEMEN OPLOSSEN
Algemene symptomen
Oorzaak
Oplossing
Geen stroom.
Het contact van de auto is
uitgeschakeld.
Als de voeding is aangesloten op het
accessoirescircuit van de auto, maar de
motor niet draait, draai dan de stand
contactsleutel naar de “ON” of “ACC”.
De zekering is doorgebrand.
Vervang de zekering volgens het
bedradingsdiagram.
Er kan geen CD worden geplaatst
in de CD-speler
.
Er zit al een disc in de speler.
Verwijder de disc en plaats vervolgens
op de juiste manier de gewenste disc.
De CD gaan maar voor de helft in
de CD-lade.
De transportschroeven zijn
niet verwijderd.
Verwijder de transportschroeven vóór
gebruik.
De disc wordt ondersteboven
geplaatst.
Plaats de cd met het label naar boven
gericht.
Het apparaat werkt niet naar
behoren (EJECT, LOAD,
PLAY)
Het oppervlak van de CD is
extreem vuil of beschadigd.
Maak de CD schoon of gebruik een
andere CD, als het apparaat dan wel
werkt, dan is de eerste CD flink
beschadigd.
Temperatuur in de auto is te
hoog.
Laat de auto afkoelen tot de
omgevingstemperatuur weer normaal is.
Geen geluid.
Volume is te laag ingesteld.
Stel het volume naar wens in.
De bedrading is niet juist
aangesloten.
Controleer de aansluiting van stroom en
aarde volgens het bedradingsdiagram.
De bedieningstoetsen werken niet
1. De ingebouwde
microcomputer werkt niet door
ruis.
2.Voorpaneel is niet goed op
zijn plaats vastgezet
1. Zet het apparaat uit en weer aan of
druk op de RESET-knop.
2. Installeer het voorpaneel opnieuw
Het geluid van de CD-speler slaat
over.
De installatiehoek is groter
dan 30 graden.
Pas de installatiehoek aan naar een
hoek van minder dan 30 graden.
Het oppervlak van de weg is
ongelijk.
Wacht met het afspelen van de CD tot
de weg soepeler wordt.
Het oppervlak van de CD is
extreem vuil of beschadigd.
Maak de CD schoon of gebruik een
andere CD, als het apparaat dan wel
werkt, dan is de eerste CD flink
beschadigd.
Geen radio-ontvangst.
De antennekabel is niet
aangesloten.
Sluit de antennekabel stevig aan op de
antenne-aansluiting van het apparaat.
De radio stopt bij het automatisch
zoeken naar een radiozender niet
bij zenders
De ontvangen signalen zijn te
zwak.
Stem handmatig af op een radiozender.
Zorg ervoor dat alle aansluitingen zijn gemaakt vóór het gebruik van de checklist.
Als u na het doorlopen van deze checklist nog steeds vragen heeft, neem dan contact op met de
klantenservice van uw plaatselijke vertegenwoordiger.
Page 74

73
Zorg ervoor dat storingen tegen
worden gegaan door de metalen
ondersteuningsbeugel stevig
vast te zetten in de metalen
verbinding die verbinding maakt
met het chassis van de auto.
Plaats de twee meegeleverde SLEUTELS
tegelijkertijd in de linker- en rechtersleuf van
het chassis om het apparaat uit de metalen
montagehuls te verwijderen. Trek het chassis
vervolgens uit de metalen montagehuls, zoals
getoond in de afbeelding aan de rechterkant.
Verwijder de metalen montagehuls,
zoals aangegeven door de pijltjes,
voor het monteren en gebruik van de
speler.
Verwijder vóór het monteren van
de speler de twee schroeven die
de CD-speler beschermen
tijdens het transport.
Druk op deze knop met een
spits voorwerp als er problemen
zijn met het programma van de
speler.
EJECT-KNOP
RESET-KNOP
Bend the tabs on the metal
mounting sleeve against
the DASHBOARD with
a screwdriver.
INSTALLATIEMETHODE
Dit is een methode die diefstal tegengaat.
Het apparaat draagt een METALEN MONTAGEHULS.
Sluit de bedrading, bv. de voeding, luidsprekers en antenne aan volgens de aanwijzingen in deze
handleiding. Installeer vervolgens de metalen montagehuls in de auto volgens de
onderstaande afbeelding.
METALEN
ONDERSTEUNINGSBEUGEL
PLASTIC SIERRING
DASHBOARD
METALEN MONTAGEHULS VOORPANEEL
OPMERKING
CHASSIS APPARAAT
Page 75

74
SPECIFICATIES
ALGEMEEN
Voeding...............................................................................DC 12V.
Stroomverbruik..................................................................10A MAX.
VERMOGEN...................................................................... 4 X 25W
Aantal kanalen................................................................2 STEREO.
Afmetingen chassis...................................178[W] X 50[H] X 165[D].
FM GEDEELTE
Frequentiebereik...................................................87.5MHz -108MHz
Bruikbare gevoeligheid.................................................................3uV.
I.F Frequentie.......................................................................10.7MHz.
AM GEDEELTE
Frequentiebereik.................................................522KHz - 1620KHz
I.F Frequentie........................................................................450KHz
Bruikbare gevoeligheid...............................................................40dB
LINE - OUT
Vermogen..................................................................... MAX 1200mv
AFSPELEN CD/SD of USB
Systeem................................................................MP3 audio system.
Ondersteunde discs..............................CD/CD-R/CD-RW/MP3/WMA
Frequentie-eigenschappen......................................20-100Hz 5dB
10-20KHz 5dB.
Signaal/ruis......................................................................50dB [1KHz]
 Loading...