

Page 1

INSTRUCTION MANUAL
English--------------------------------------------------1-10
German------------------------------------------------11-20
Dutch---------------------------------------------------21-30
French-------------------------------------------------31-40
Spanish-----------------------------------------------41-50
polish -------------------------------------------------51-60
CS-322
Page 2
INSTRUCTION MANUAL
For information and support, www.lenco.eu
―PEASE READ THIS INSTRUCTION MANUAL CAREFULLY BEFORE OPERATION.-
CS-322
1
ATTENTIONS OF INSTALLATION
ATTENTIONS OF INSTALLATION
1.This player should be installed by professional technician.
2. please read the instruction and operation of equipment carefully before installing.
3. Make sure to connect other wires before power connection.
4. To avoid short circuit. Please make sure all the exposed wire are insulating.
5. please fix all the wires after installation.
6. please make connection to the player accordingly to this instruction manual. Wrong connection may cause
damage.
7. This player only fit for 12V DC device and please make sure your car belongs to this kind of cathode grounding
electrical system.
8. Please connect the wires rightly. Wrong connection will cause malfunction or damage the electrical system.
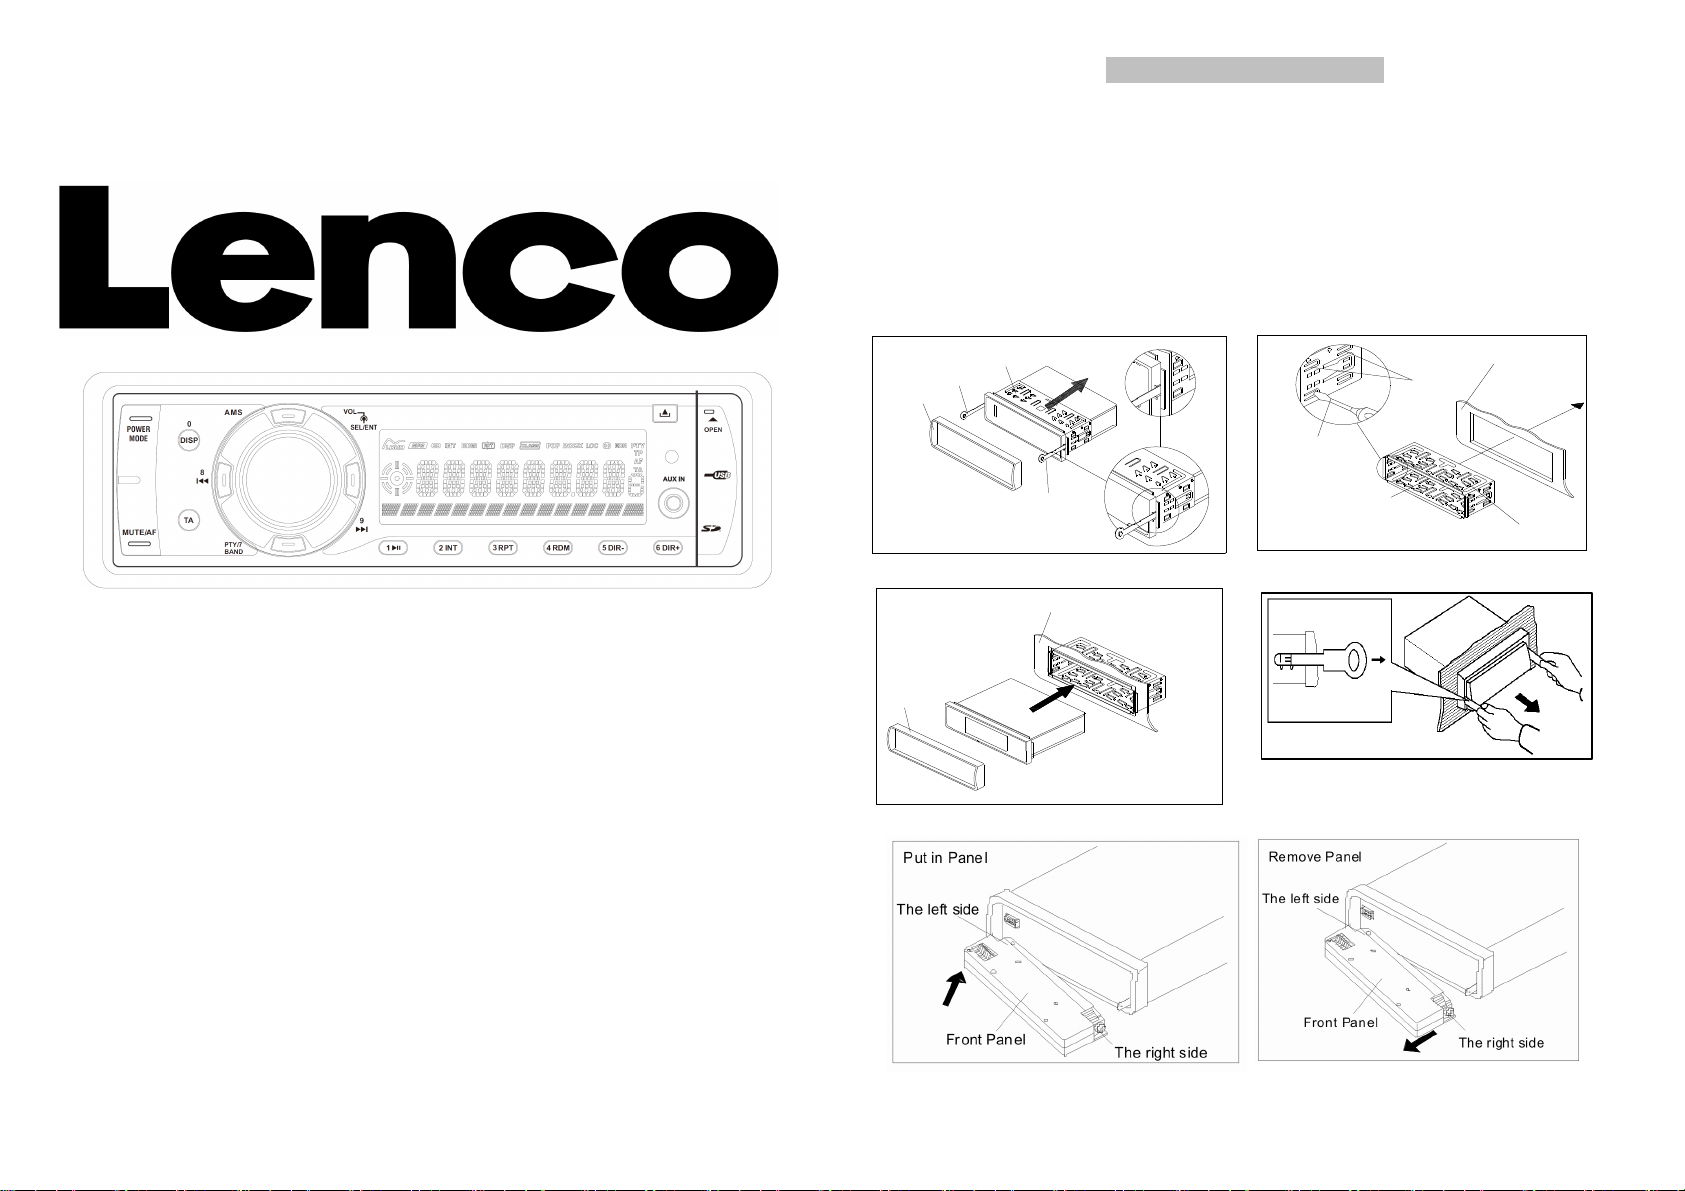
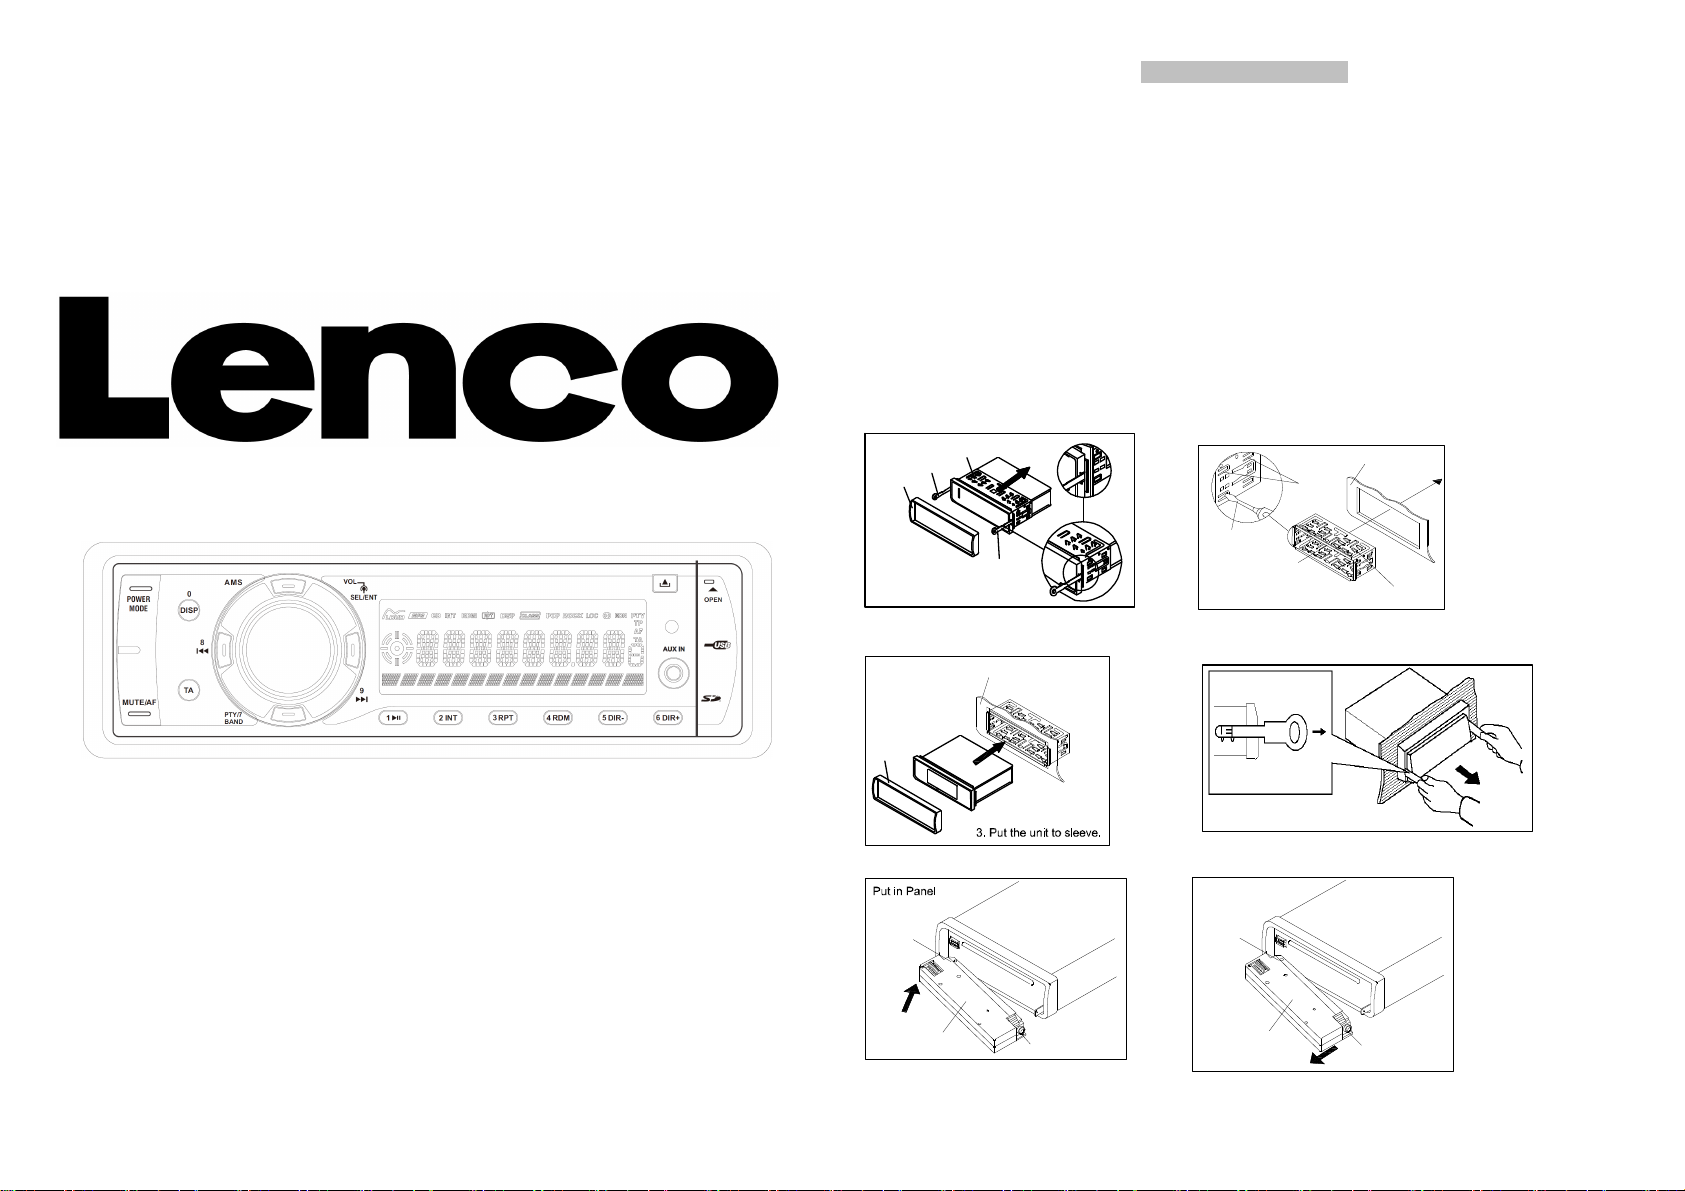
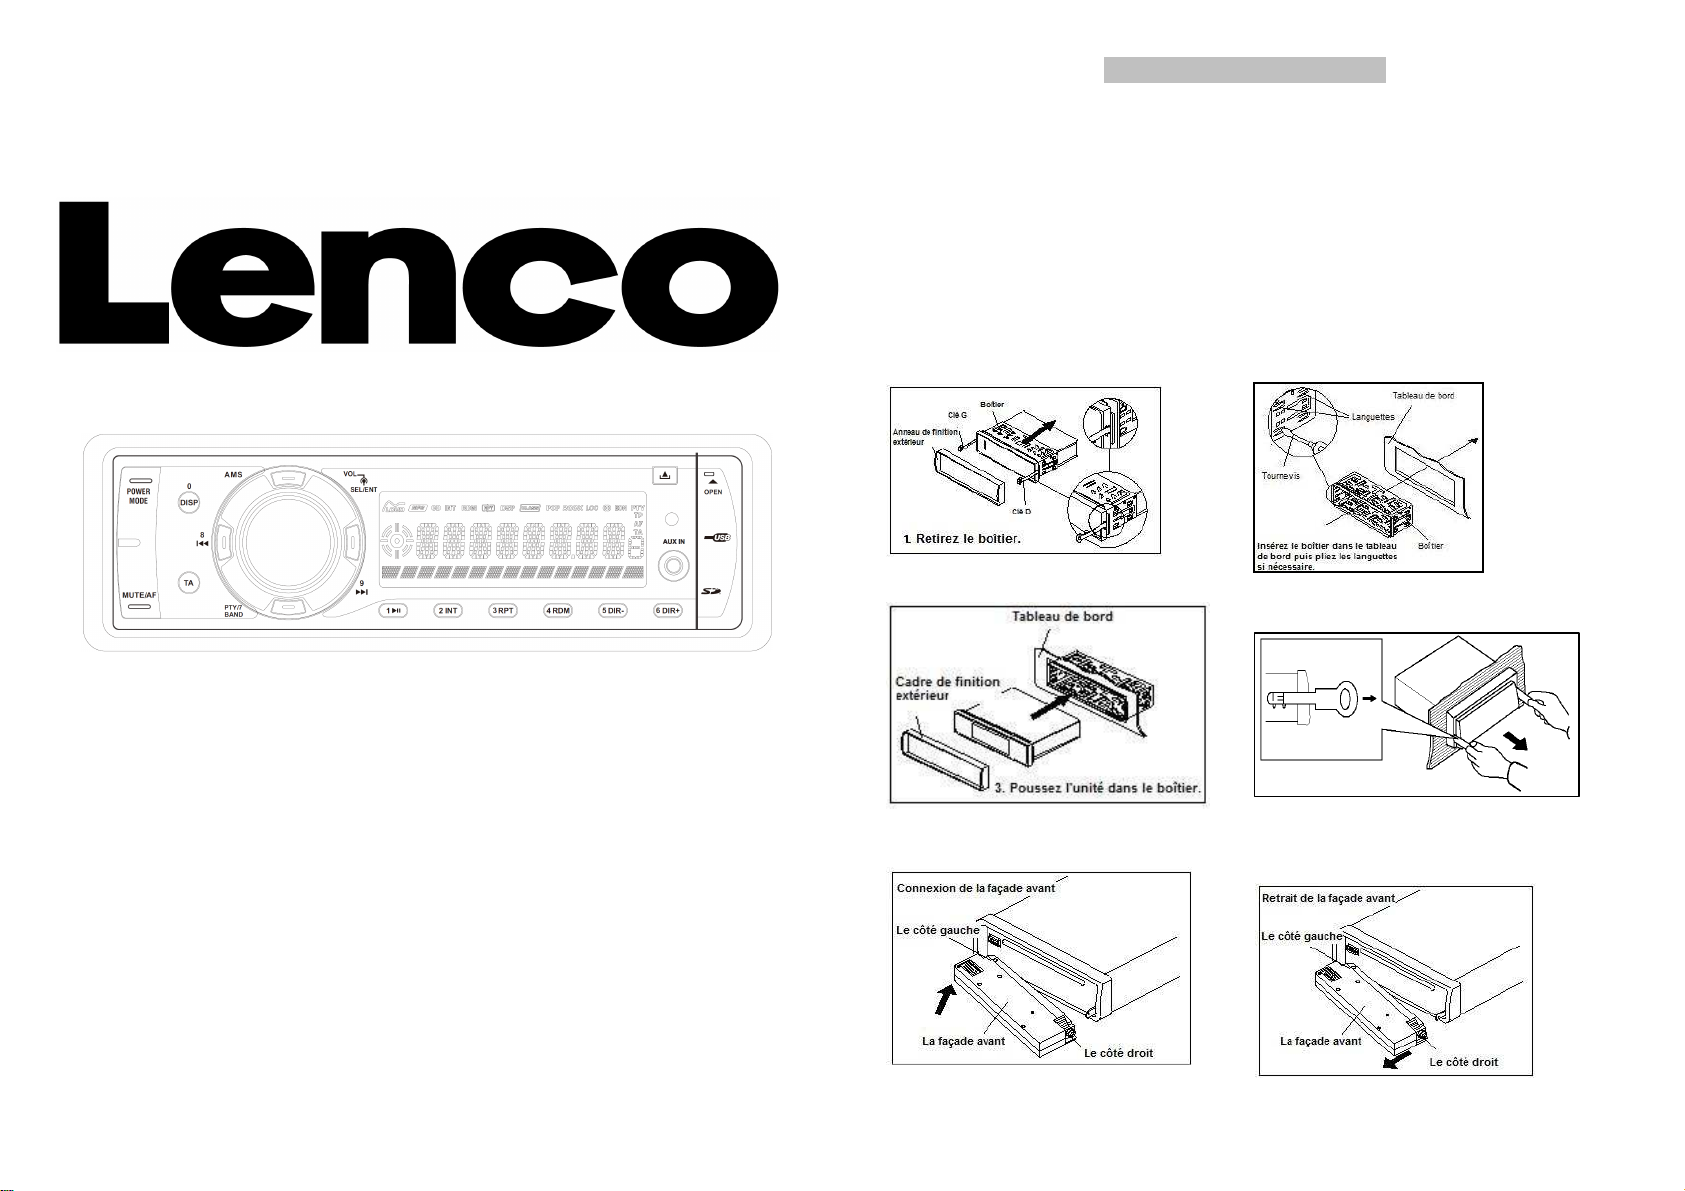
Outer Trim Ring
Sleeve
L Key
Dashboard
Tabs
1. take out the sleeve
R Key
Screw driver
2. Put the sleeve
to the dashboard.
an d bond the tabs if
ne cessary.
Sleeve
Dashb oard
Outer Trim Ring
4.Removing the unit
3. Put th e unit to sle e ve.
2
Page 3
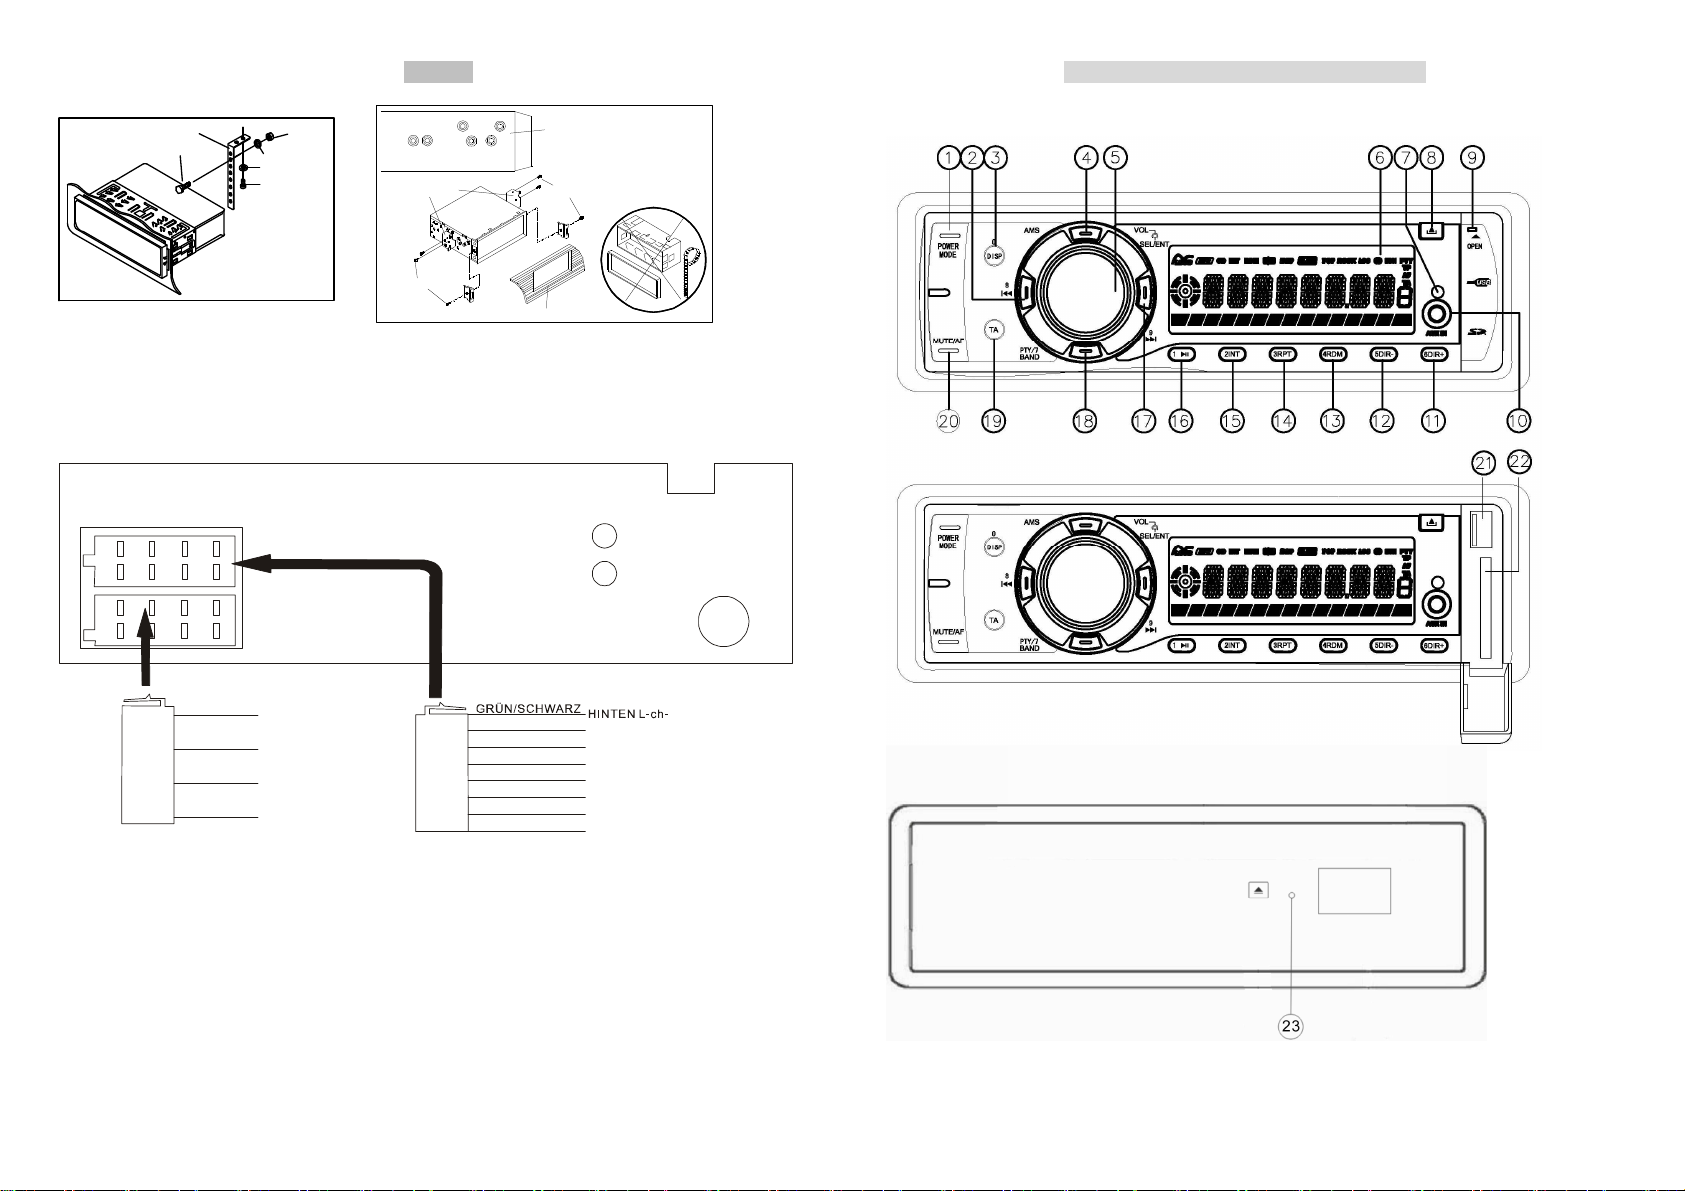
INSTALLING PROCESS
Metal Strap
Mounting Bolt
Hex Nut
Spring Washer
Plain W asher
Tapping Screw
Factory Radio
Mounting Bracket
Side View showing
Screw Holes marked
T, N
Nissan, Toyota's vehicle
can using this mounting
method.
Screw
ANOTHER MOUNTING
METHOD.
Screw
Hook
Dashboard or Console
WIRING DIAGRAM
LINEOUT-Rch
(RED)
LINEOUT-Lch
(WHITE)
AM/FM ANTENNA
ISO
BLACK
RED
YELLOW
PART A
BLUE
GROUND
ACC
B+
AUTO ANT
GREEN/BLK
WHITE/BLK
GREY/BLK
ISO
PART B
PURPLE/BLK
GREEN
WHITE
GREY
PURPLE
REAR L-chREAR L-ch+
FRONT L-chFRONT L-ch+
FRONT R-chFRONT R-ch+
REAR R-chREAR R-ch+
1. This player can only be used by the 12V DC cathode grounding electrical system.
2. Don’t connect the terminals of the car battery until the player is absolutely with well erection joint.
3. Please make sure to connect the yellow wire to the positive of the battery(+).
4. When change the fuse. Please make sure the specifications are same.
5. Using good quality speaker with 4-8 ohm can result in the best effect of the equipment.
3
CONTROL PANEL AND FUNCTIONS
CONTROL PANEL AND FUNCTIONS
4
Page 4

OPERATION
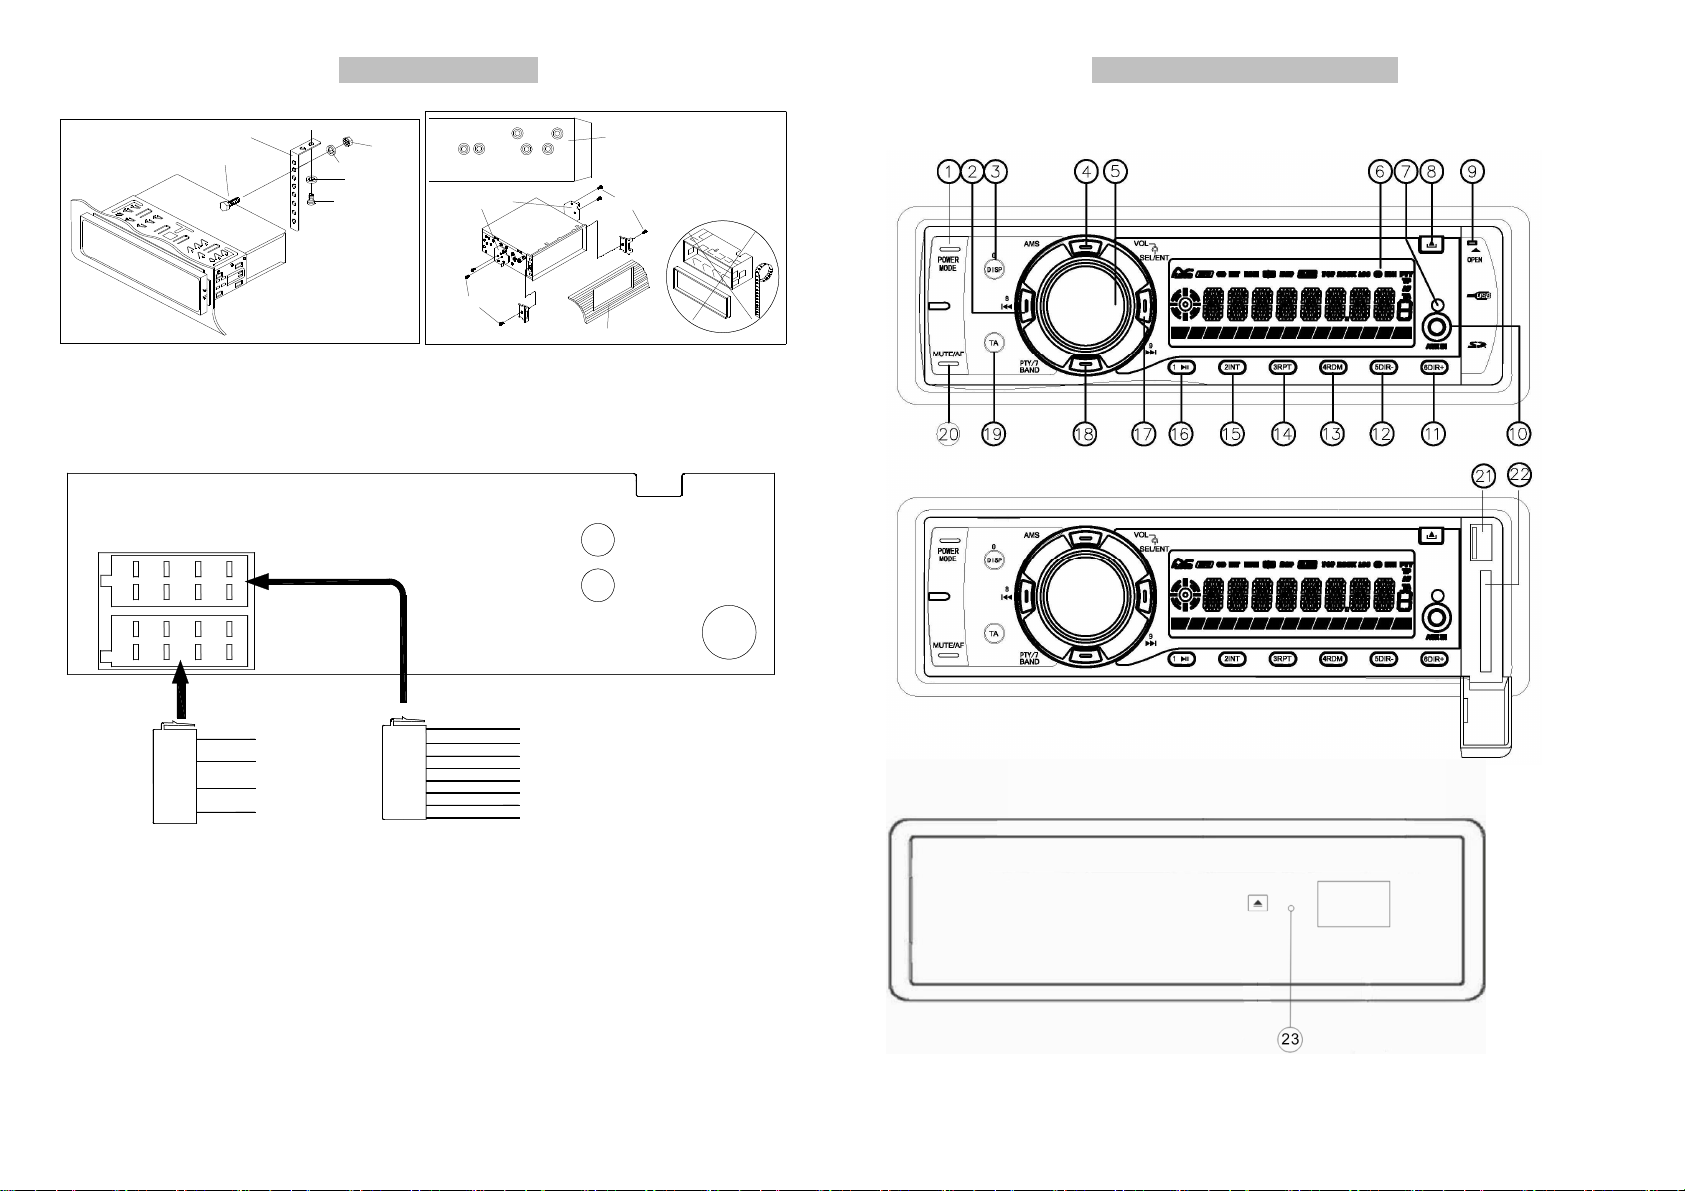
1. POWER/MODE 13. 4/RDM
2. 8┃ 14 3/RPT
3. DISP/0 15. 2/INT
4. AMS 16. 1 /
5. VOL/SEL/ ENT 17. 9/
6. LCD Display 18. BAND /PTY/7
7.
REMOTE SENSOR
8. (Release Button) 20. MUTE/AF
9. OPEN 21. USB
10. Auxiliary input 22. SD CARD SLOT
11. 6/DIR+ 23. Reset Button
12. 5/DIR-
19. TA
┃┃┃┃
GENERAL OPERATION
1. Switching on/off the unit
Press any button to turn on the unit. Long press “POWER” button to turn the unit off.
2. Remove the panel
Press button(8) to fold down and Remove the panel.
3. Sound adjusting
Press SEL button (5) shortly to select the desired adjustment mode. The adjustment mode will change in the
following order: VOL---BASS---TREBLE---BALANCE---FADER---LOUD---DSP OFF---DX---STEREO.
By rotating the audio knob (5) clockwise or counter-clockwise, it is possible to adjust the sound setting.
4. LOUDNESS on/off
In above menu. Keeping pressing SEL to enter LOUD setting. Then rotating VOL to turn it on/off.
5. SELECT EQ
In above menu. Keeping pressing SEL to enter DSP OFF setting. Then rotating VOL to select desired EQ function
as below: DSP OFF---CLASSIC---POP---ROCK
6. LOCAL/DISTANCE
In above menu. Keeping pressing SEL to enter DX setting. Then rotating VOL to select DX/LOC mode. In LOC
mode. During scanning. to reduce the sensitive of searcher and only receive the local stronger signals.
7. STEREO/MONO
In above menu. Keeping pressing SEL to enter STEREO setting. Then rotating VOL to select STEREO/MONO
mode. In STEREO mode. In stereo mode, when stereo broadcasting station is received, the “OO” icon will appear
upon the display.
8. LIQUID CRYSTAL DISPLAY
Exhibit current frequency and activated functions on the display.
9. AUXILIARY INPUT
The unit can be connected to a portable audio player through the AUX IN jack (10) on the front panel. After finishing
the connection, you can press MOD button (1) on the front panel to switch the mode to AUX IN mode.
10. RESET FUNCTION
RESET button (25) must be activated with either a ballpoint pen or thin metal object. The RESET button has to be
activated for the following reasons:
- Initial installation of the unit when all wiring is completed.
- All the function buttons do not operate.
- Error symbol on the display.
Note: if press RESET button, All the memory will be lost!
5
OPERATION
RADIO OPERATION
1. SWITCHING TO RADIO MODE
Keep pressing MOD button (1) shortly till the radio mode appears in the display.
2. SELECTING THE FREQUENCY BAND
In radio mode, press BANDbutton (18) shortly to select the desired band.
The reception band will change in the following order: FM1--FM2--FM3--AM1(MW1)--AM2(MW2).
3. SELECTING STATION
Press 9 ▎ button (17) or 8┃┃┃┃ button (2) shortly to to activate automatic seek function. It will search the station
automatically. Press for several seconds until “MANUAL” appears on the display, the manual tuning mode is
selected. Every time 9 ▎ or 8┃┃┃┃ is pressed the frequency will change with 0,05 MHz.
4. AUTOMATIC MEMORY STORING & PROGRAM SCANNING
- Automatic memory storing
Press AMS button (4) for 2 seconds, the radio searches the signal strength until one cycle search is finished.
And then the 6 strongest stations are stored into the corresponding preset number button.
- Program scanning
Press AMS button (4) shortly to preview all the preset stations.
5. MANUAL STORING A STATION
To receive a station and press one of the preset button(11/12/13/14/15/16) for several seconds, current station is
stored into the number button.
6. ANS (Announcement Name Station) OPERATION
- Setting AF mode
Long press AF button (20) to switch off or on AF mode.
Whenever AF is switch on, symbol “AF” appears on the display.
Program name is displayed on receiving a ANS station.
“AF” starts blinking if the broadcasting signal getting worse. And when the signal is too bad due a frequency
change. AF will automatically switch to the new frequency.
- Regional Program Operation
Press DISP/0 button (3) for several seconds to switch on or off region mode.
Some broadcasting stations change their program from normal broadcasting to regional broadcasting for a
certain time period. When region is on, the current listening program remains unchanged. When region is off, it
allows the reception moves to the regional station.
- Using PTY to Select Program
PTY button (20) 1 time.then press preset button(12/13/14/15/16/17). You can select the program type as below:
1# button: NEWS/AFFAIR/INFORM
2# button: EDUCATIO/DRAMA/SPORT
3# button: VARIED/CULTURE/SCIENCE
4# button: ECONOMY/CHILD PR/WEATHER
5# button: PHONE IN/SOCIAL/RELIGION
6# button: TRAVEL/LEISURE/DOCUMENT
PTY button (20) 2 time.then press preset button(12/13/14/15/16/17). You can select the program type as below:
1# button: ROCK MUS/POP MUSI
2# button: LIGHT MU/EASY MUS
3# button: OTHER MU/CLASSICS
4# button: COUNTRY/JAZZ MUS
5# button: NATIONAL/OLDIES
6# button: FOLK MUS
- Listening to Traffic Announcement
6
Page 5
OPERATION
TA button (19) is operated as follows:
When pressed, it is engaging whether TA mode on or off.
When TA mode, is on and a traffic announcement is transmitted:
When the unit was in CD (MP3) ESB/MEMORY CARD mode or AUX IN mode, it will switch temporarily to radio
mode.If the volume level was under the threshold point it will be raised to the threshold point. But when
changed the volume level, which was more than the threshold point (min. TA volume level), it will be set to the
last level.
When TA mode is on, TA of individual segment is turned on. When a TP station is received, TP of individual
segment is turned on. TA interruption function
The current traffic announcement is cancelled by pressing this key.
But the TA mode will not be off.
Broadcast station name data expressed in alphanumerically characters
AF: Alternative Frequencies
Frequency list of broadcasting stations transmitting the same program
TP: Traffic Program Identification
Identification data for traffic information-broadcasting station
TA: Traffic Announcement Identification
Identification data showing traffic information is being transmitted or not
PTY: Program Type Code
Contents of programs such as news, light music, sports etc
USB PLAY OPERATION
In the front panel of the unit, there is an USB interface (21). You can connect an USB driver through this interface.
When you connect an USB driver through the interface, the unit will search the MP3/WMA files in the USB driver
and start to play MP3/WMA files automatically.
If in other mode, you can also press MOD button (1) to select USB mode.
SELECTING FILE
Press ▎ button (2) or ▎button (17) to move to the previous file or the following file. file number shows on
display.
Hold ▎ button (2) or ▎button (17) to fast reverse or fast forward. USB play starts from when you release
the button.
PAUSING PLAYING
Press
1/>II
button (16) to pause USB player. Press it again to resume play.
PREVIEWING ALL FILES
Press 2/INT button (15) to play first 10 seconds of each file. Press again to stop intro and listen to file.
REPEATING THE SAME FILE
Press 3/RPT button (14) to continuously repeat the same track. Press it again to repeat all files.
PLAYING ALL TRACKS IN RANDOM
Press 4/RDM button (13) to play all files in random order. Press again to cancel the function.
SELECTING DIRECTORY UP/DOWN
Press 5/DIR- button (12) or 6/DIR+ button (11) to select directory downward or upward. If the USB/SD does not
contain any directory, there is no function of pressing 5/DIR- button (12) or 6/DIR+ button (11).
SELECTING FILE BY FILE NO.
Press “AMS”(4) button. It is track no searching. It will show “TRK ***” on LCD. Using 1/2/3/4/5/6/7(BAND) /8( )
7
OPERATION & PERFORMANCE
/9( )/0(DISP) button to enter the track number. After finished. Press SEL/ENT
button to start to play. Or use vol/sel (5) to scroll to the desired track number then press SEL/ENT button to play.
TAKARA’s auto radio RDU 310(TAKARA) can support USB drivers with a capacity up to 8GB.
MEMORY CARD PLAY OPERATION
In the front panel of the unit, there is an memory card interface (22). When you insert a memory card in the memory
card interface, the unit will search the MP3/WMA files in the card and start to play MP3/WMA files automatically. The
operation is the same with the MP3/WMA operation described above. If in other mode, you can also press MOD
button (1) to select memory card mode.
TAKARA’s auto radio RDU 310(TAKARA) can support memory cards with a capacity up to 8GB.
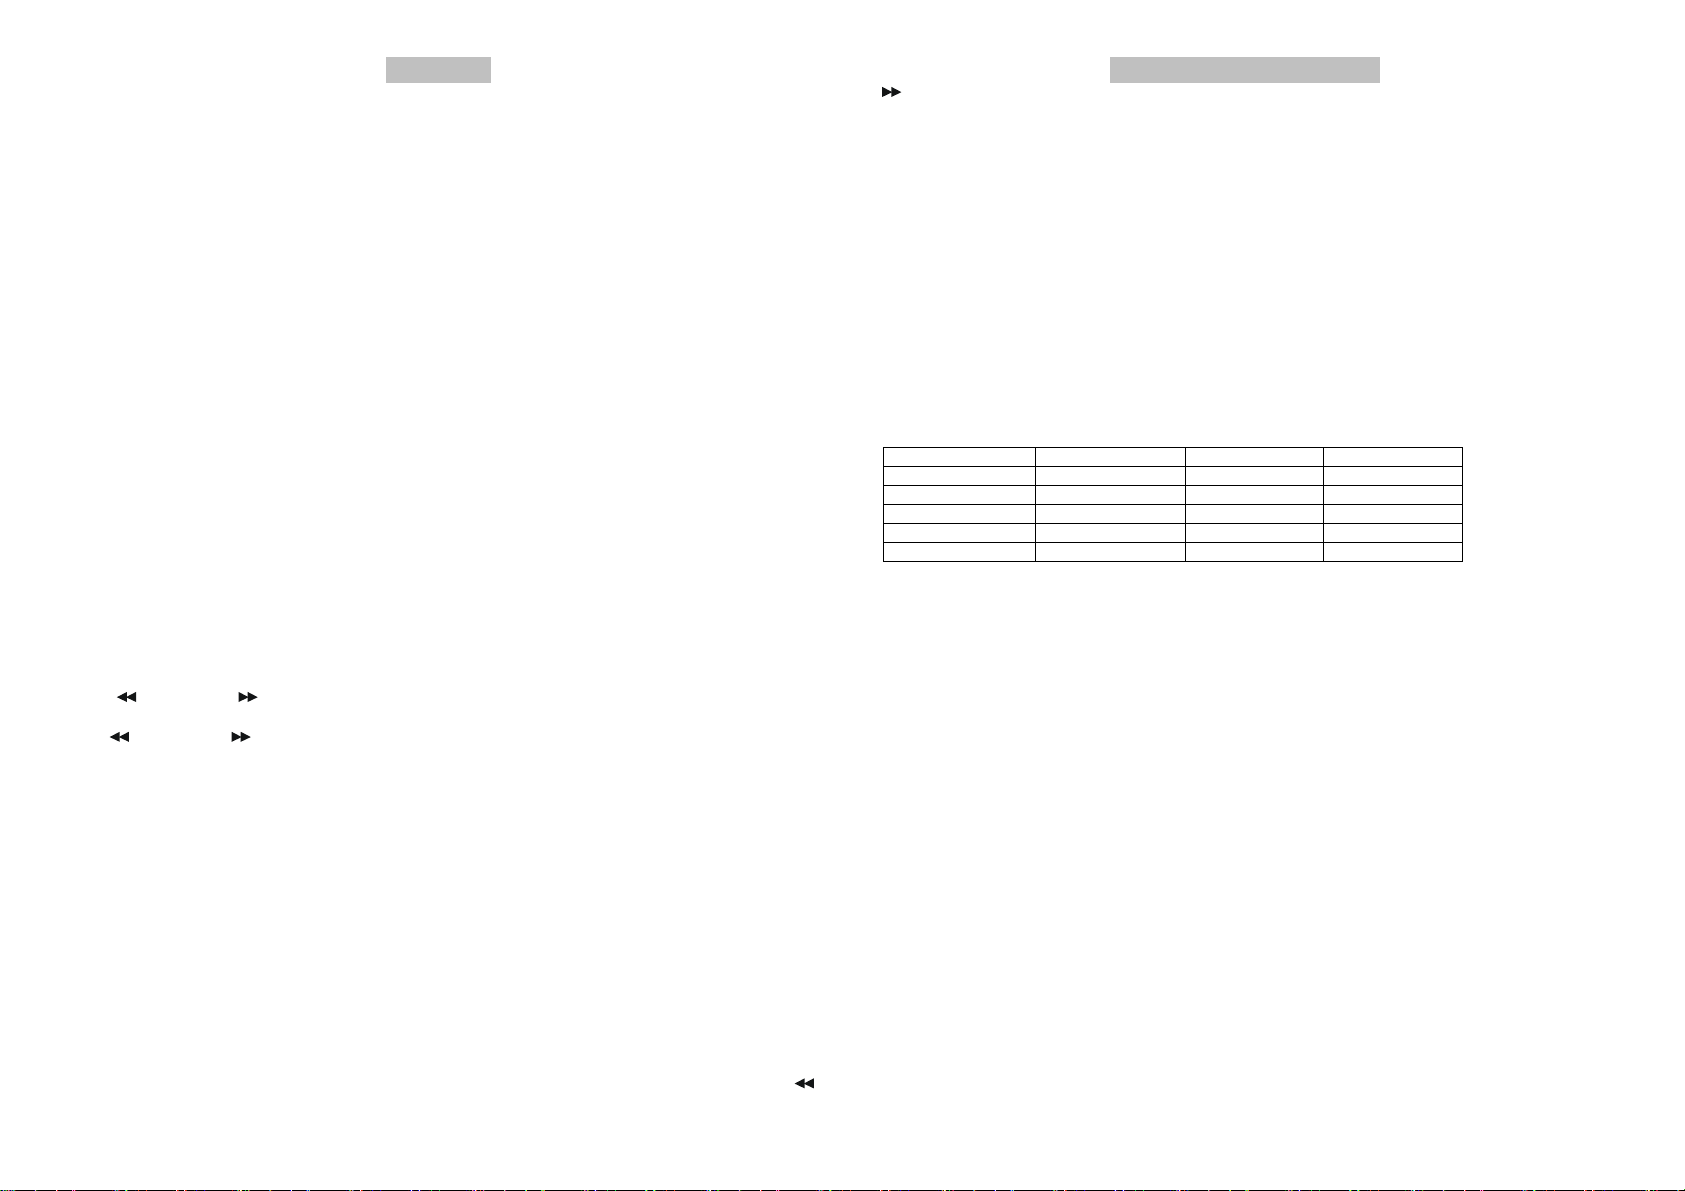
PERFORMANCE
Tuning range
Sensitivity
S/N ratio
Stereo separation
Freq. Response
FM
87.5~108.0 MHz
4uV(S/N=30dB)
50 dB
>25 dB
40Hz~12KHz
MW
522~1620KHz
80Hz~2.2KHz
---
50 dB
---
MP3/WMA
---
---
60 dB
50dB
20Hz~16KHz
8
Page 6
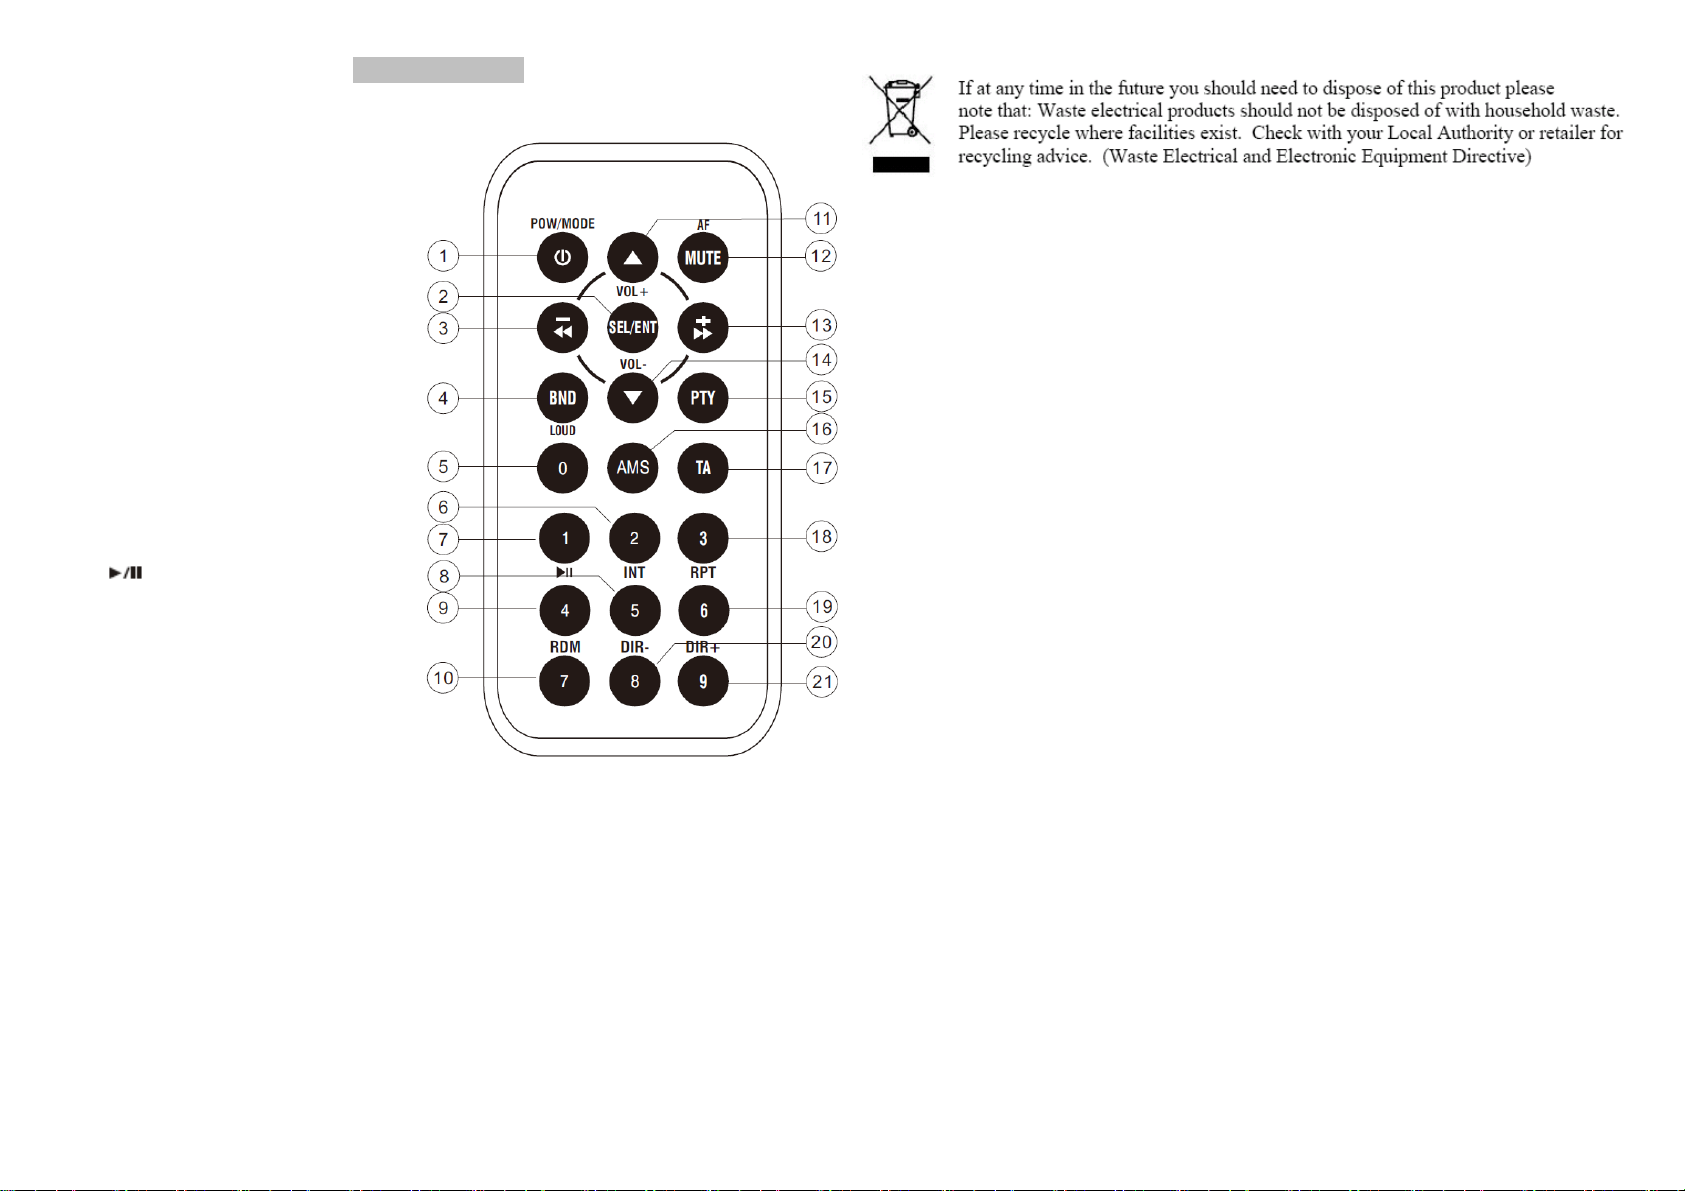
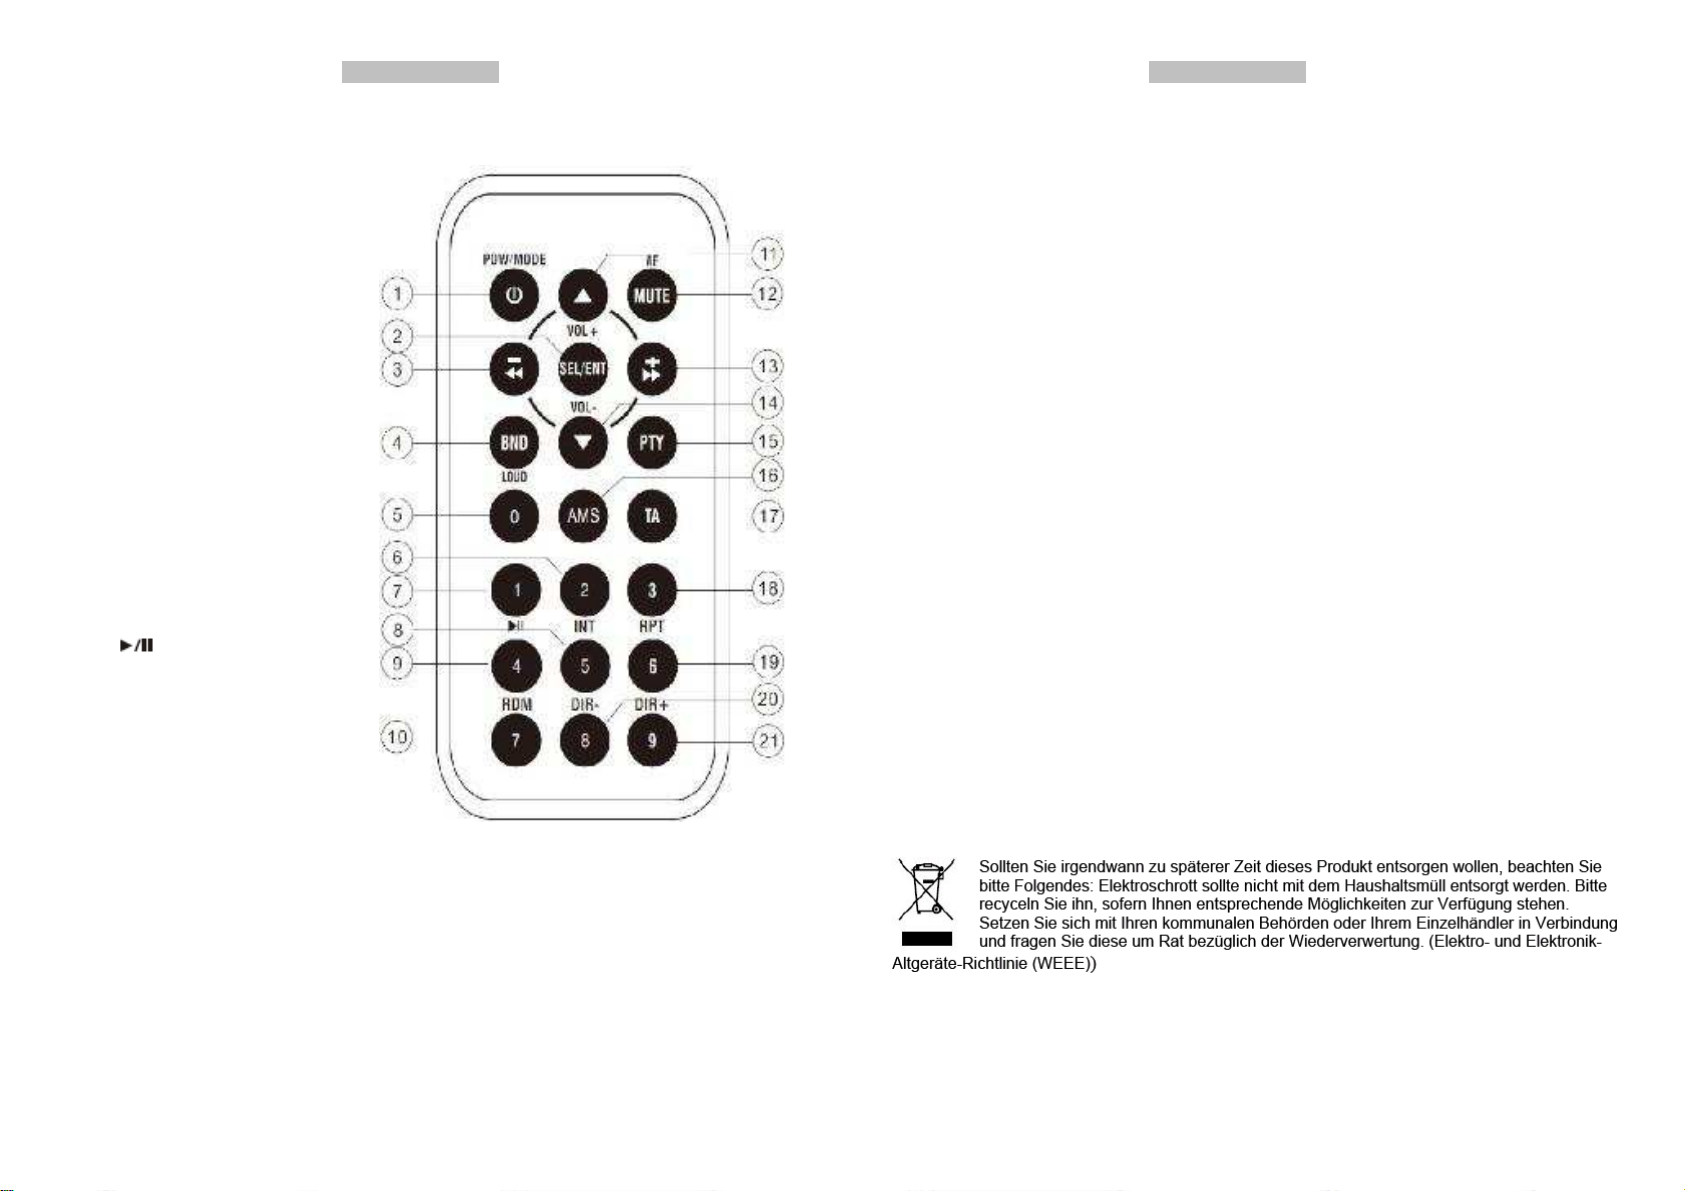
REMOTE CONTROL
REMOTE CONTROL
1. POWER/MODE: Short press for Power on/
MODE change. Long press for power off.
2. SEL/ENT : Short press for audio adjusting:
VOL / BASS / TREBLE / BALANCE / FADER
DSP OFF / DX / STEREO
In USB/SD searching mode. Short press it for
ENTER function.
3. – <<: Short press for PREVIOUS /
auto Searching searching down.
Long press for RF / manual searching down.
4. BND / LOU: Short press for band change.
Long press for LOUDNESS function.
5 0: Number 0 for MP3 searching.
6. 2 / INT: 2# preset station /intro playing/
number 2 for MP3 searching.
7. 1 / : 1# preset station /pause / play/
number 1 for MP3 searching.
8. 5 / DIR-: 5# preset station /enter previous
folder playing/number 5 for MP3 searching.
9. 4 / RDM: 4# preset station / random playing /
number 4 for MP3 searching.
10. 7: number 7 for MP3 searching.
11. VOLLLL△△△△: turn up volume.
12. MUTE/AF: Short press for mute on/off. Long press for AF on/off.
13. >>+: Short press for NEXT / auto Searching searching up. Long press for FF / manual searching up.
14. VOLLLL▽▽▽▽: turn down volume
15. PTY: turn on/off PTY function.
16. AMS: Short press for preset scan / MP3(WMA)file searching. Long press for auto store.
17. TA: turn on/off TA function.
18. 3 / RPT: 3# preset station / repeat playing/ number 3 for MP3 searching.
19. 6 / DIR+: 5# preset station / enter next folder playing / number 6 for MP3 searching.
20. 8:
number 8 for MP3 searching.
21. 9:
number 9 for MP3 searching.
9
10
Page 7
Armaturenbrett
BEDIENUNGSANLEITUNG
CS-322
Zur Information und Unterstützung, www.lenco.eu
―LESEN SIE SICH BITTE DIESE ANLEITUNG VOR DER INBETRIEBNAHME SORGFÄLTIG DURCH-
11
HINWEISE ZUM EINBAU
HINWEISE ZUM EINBAU
1. Dieses Wiedergabegerät sollte nur durch einen professionellen Techniker installiert werden.
2. Bitte lesen Sie die Anleitung und die Betriebshinweise vor dem Einbau genauestens durch.
3. Achten Sie darauf alle andere Drähte vor dem Stromanschluss zu verbinden.
4. Um Kurzschlüsse zu vermeiden, stellen Sie bitte sicher, dass alle die freigelegten Drähte isoliert werden.
5. Bitte binden Sie alle Drähte nach dem Einbau fest.
6. Verbinden Sie die Anschlüsse bitte genau so wie es in dieser Bedienungsanleitung beschrieben ist. Falsch
verbundene Anschlüsse können Schäden zur Folge haben.
7. Dieses Wiedergabegerät ist nur für den Betrieb mit einer 12VDC-Stromversorgung ausgelegt. Vergewissern Sie
sich, dass Ihr Fahrzeug über ein elektrisches System mit negativer Masse verfügt.
8. Bitte verbinden Sie alle Kabel richtig. Falsch angeschlossene Verbindungen führen zu Fehlfunktionen oder
Schäden am elektrischen System.
L-Schl黶sel
Au遝nring
Bedientafel
Einbaurahmen
R-Schl黶sel
Rechte Seite
Laschen
Schraubendreher
2. Setzen Sie den
Einbaurahmen in das
Armaturebrett und
befestigen Sie ihn ggf.
an den Laschen.
4. Herausnehmen des Geräts
Bedientafel entfernen
Linke Seite
Bedientafel
12
Armaturenbrett
Einbaurahmen
Rechte Seite
1. Entfernen Sie den Einbaurahmen
Au遝nring
Linke Seite
Page 8
EINBAUMETHODE
Blechschraube
Unterlegscheibe
Sechskantmutter
Arm atu renbrett oder Konsole
Ben utz en Sie diese Einbaum eth ode
LINEOUT-Rch
LINEOUT-Lch
MW/UKW-ANTENNE
躈
HINTEN L-ch+
FRONT L-ch-
FRONT R-ch-
HINTEN R-ch-
HINTEN R-ch+
EINBAU
Befestigungsschrau be
Metallstreifen
ALTERNATIVE
Feders cheibe
Werks- Einbaurah men
Schrau be
Hak en
Seitenansicht mit
Schrau bbohru nge n T, N
f黵 Nissan- und Toyota-Mode lle
Schrau be
VERKABELUNGSPLAN
1. Dieser Player kann nur mit einem elektrischen 12VDC-System mit negativer Masse verwendet werden.
2. Schließen Sie das Gerät erst an die Autobatterie, wenn alle andere Anschlüsse vollständig angeschlossen sind.
3. Vergewissern Sie sich, dass das gelbe Kabel an den Pluspol der Batterie (+) angeschlossen wird.
4. Wenn Sie die Sicherung wechseln, stellen Sie bitte sicher, dass sie über die gleichen Spezifikationen verfügt.
5. Das Gerät bietet eine optimale Leistung, wenn hochqualitative Lautsprecher mit 4 bis 8 Ω verwendet werden.
SCHWARZ
MASSE
ISO
TEIL A
ROT
ACC
GELB
B+
BLAU
AUTOANTENNE
WEISS/SCHWARZ
ISO
GRAU/SCHWARZ
TEIL B
VIOLETT/SCHWARZ
13
(ROT)
(WEISS)
GR
WEISS
FRONT L-ch+
GRAU
FRONT R-ch+
VIOLETT
TASTENFUNKTIONEN DER BEDIENTAFEL
CONTROL PANEL AND FUNCTIONS
14
Page 9

BEDIENUNG
1. POWER/MODE 13. 4/RDM
2. 8┃ 14 3/RPT
3. DISP/0 15. 2/INT
4. AMS 16. 1 /
5. VOL/SEL/ ENT 17. 9/
6. LCD Anzeige 18. BAND /PTY/7
7.
FERNBEDIENUNGSSENSOR
8. ( Auswurftaste) 20. MUTE/AF
9. OPEN 21. USB
10. AUX-Eingang 22. SD-Kartenslot
11. 6/DIR+ 23. Reset Button
12. 5/DIR-
19. TA
┃┃┃┃
GRUNDLEGENDE BEDIENUNG
1. Ein-/Ausschalten des Geräts
Betätigen Sie eine beliebige Taste, um das Gerät einzuschalten.Halten Sie die POWER-Taste gedrückt, um das Gerät
auszuschalten.
2. Entfernen der Bedientafel
Drücken Sie die Taste (8), um die Bedientafel nach unten zu drücken und zu entfernen.
3. Toneinstellung
Betätigen Sie die SEL-Taste (5) zur Auswahl der gewünschten Einstellung. Der Einstellmodus ändert den
Audiomodus in der folgenden Reihenfolge: VOL --- BASS --- TREBLE --- BALANCE --- FADER --- LOUD --- DSP
OFF --- DX --- STEREO.
Durch Drehen des Audio-Frehknopfs (5) können Sie dann die Einstellung ändern.
4. Loudness Ein/Aus
Betätigen Sie die SEL-Taste im obigen Menü solange, bis die LOUD-Funktion erscheint. Drehen Sie dann am
VOL-Regler, um die Funktion ein- bzw. auszuschalten.
5. EQUALIZER-AUSWAHL
Betätigen Sie die SEL-Taste im obigen Menü solange, bis die DSP OFF-Funktion erscheint. Drehen Sie dann am
VOL-Regler, um eine der folgenden EQ-Funktionen zu wählen: DSP OFF --- CLASSIC --- ROCK --- POP.
6. LOKALSENDER/REGIONALE SENDER
Betätigen Sie die SEL-Taste im obigen Menü solange, bis die DX-Funktion erscheint. Drehen Sie dann am
VOL-Regler, um den DX- oder LOC-Modus auszuwählen. Im LOC-Modus werden bei der Sendersuche nur starke
Signale von Lokalsendern berücksichtigt.
7. STEREO/MONO
Betätigen Sie die SEL-Taste im obigen Menü solange, bis die STEREO-Funktion erscheint. Drehen Sie dann am
VOL-Regler, um den STEREO- bzw. MONO-Modus auszuwählen. Im Stereo-Modus erscheint das 00-Symbol in der
Anzeige, wenn ein Stereo-Sender empfangen wird.
8. LCD-ANZEIGE
Zeigt die aktuelle Frequenz und aktivierte Funktionen an.
9. AUX-EINGANG
Das Gerät kann über den AUX-Eingang (AUX IN - 10) an einen externen Audio-Player angeschlossen werden.
Wenn Sie die Geräte miteinander verbunden haben, betätigen Sie die MOD-Taste (1) , um zum AUX-IN-Modus zu
schalten.
10.RESET-Funktion
Die RESET-Taste (25) muss mit einem spitzen Gegenstand, wie z. B. einem Kugelschreiber oder einem dünnen
Metallgegenstand, betätigt werden. Benutzen Sie die RESET-Taste unter folgenden Umständen:
15
BEDIENUNG
-
Erstinstallation des Geräts, wenn alle Kabel angeschlossen wurden.
-
Die Funktionstasten funktionieren nicht.
-
Eine Fehlermeldung erscheint in der Anzeige.
Hinweis: Wenn die RESET-Taste betätigt wird, werden alle Einstellungen gelöscht.
RADIOBETRIEB
1. UMSCHALTEN IN DEN RADIOBETRIEB
Betätigen Sie die MOD-Taste (1) solange, bis der Radiomodus in der Anzeige erscheint.
2. AUSWAHL DES FREQUENZBANDS
Betätigen Sie die BAND-Taste (18) im Radiomodus, um das gewünschte Band zu wählen.
Das Empfangsband wird in der folgenden Reihenfolge gewechselt: FM1---FM2---FM3---MW1.
3. SENDERAUSWAHL
Betätigen Sie die Tasten 9 ▎▎▎▎ (17) oder 8 ┃┃┃┃ (2) zum Aktivieren der automatischen Suchfunktion. Das
Gerät sucht daraufhin automatisch nach Sendern. Halten Sie die Tasten für mehrere Sekunden gedrückt, bis
"MANUAL" in der Anzeige erscheint, um den manuellen Suchmodus einzuschalten. Jedes Mal, wenn danach die
Tasten 9 ▎▎▎▎ oder 8 ┃┃┃┃ betätigt werden, verändert sich die Frequenz um 0,05 MHz.
4. AUTOMATISCHE SPEICHERUNG & PROGRAMMSUCHE
-
Automatische Speicherung
Halten Sie die AMS-Taste (4) für zwei Sekunden gedrückt und das Radio startet eine Sendersuche durch das
gesamte Frequenzband basierend auf der Signalstärke der Sender.Die jeweils 6 stärksten Sender werden
dann unter der entsprechenden Speichernummer gespeichert.
-
Programmsuche
Betätigen Sie dieAMS-Taste (4), um eine Vorschau aller gespeicherten Sender zu erhalten.
5. MANUELLES SPEICHERN VON SENDERN
Wählen Sie den gewünschten Sender und betätigen Sie eine der Sendertasten (11/12/13/14/15/16) für mehrere
Sekunden. Der jeweilige Sender wird dann
unter der entsprechenden Zifferntaste gespeichert.
6. ANS-BETRIEB
-
Aktivieren des AF-Modus
Halten Sie die DISP/0-Taste (20) gedrückt, um den AF-Modus ein- bzw. auszuschalten.
Wenn der AF-Modus aktiviert ist, erscheint entsprechend das AF-Symbol in der Anzeige.
Der Programmname wird bei Empfang eines ANS-Senders angezeigt.
AF blinkt in der Anzeige, wenn das Rundfunksignal schwächer wird. Wenn das Signal zu schwach für einen
einwandfreien Empfang ist, wird ein Frequenzwechsel nötig. Im AF-Modus wird automatisch auf die neue
Frequenz gewechselt.
-
Regionalprogramme
Betätigen Sie die AF-Taste (3) für mehrere Sekunden, um den Regionsmodus ein- bzw. auszuschalten.
Bestimmte Sender ändern ihr Programm in bestimmten Fällen vom normalen Programm zu
Regionalprogrammen. Wenn die Regionsfunktion angeschaltet ist, bleibt das momentane Programm
unverändert. Wenn die Regionsfunktion ausgeschaltet ist, schaltet das Programm zum regionalen Sender um.
- Benutzung von PTY zur Programmauswahl
Betätigen Sie die PTY-Taste (20) gefolgt von der Sendertaste (12/13/14/15/16/17). Wählen Sie damit eine der
folgenden Programmarten:
Taste 1: NEWS/AFFAIR/INFORM
Taste 2: EDUCATIO/DRAMA/SPORT
Taste 3: VARIED/CULTURE/SCIENCE
Taste 4: ECONOMY/CHILD PR/WEATHER
16
Page 10
BEDIENUNG
Taste 5: PHONE IN/SOCIAL/RELIGION
Taste 6: TRAVEL/LEISURE/DOCUMENT
Betätigen Sie die PTY-Taste (20) zweimal gefolgt von der Sendertaste (12/13/14/15/16/17). Wählen Sie damit
eine der folgenden Programmarten:
Taste 1: ROCK MUS/POP MUSI
Taste 2: LIGHT MU/EASY MUS
Taste 3: OTHER MU/CLASSICS
Taste 4: COUNTRY/JAZZ MUS
Taste 5: NATIONAL/OLDIES
Taste 6: FOLK MUS
-
Verkehransagen
Benutzung der TA-Taste (19):
Durch Betätigung wird der TA-Modus ein- bzw. ausgestellt.
Bei eingeschaltetem TA-Modus und Übertragung von Verkehransagen:
Wenn das Gerät sich im CD(MP3)/USB/SPEICHERKARTEN-Modus oder im AUX-Modus befindet, geht es
vorübergehend in den Radiomodus.Wenn die Lautstärke unter dem hörbaren liegt, wird sie durch diese
Funktion auf ein hörbares Niveau gestellt. Wenn allerdings die Lautstärke über dem Schwellenpunkt (min.
TA-Lautstärke) liegt, wird dieses Niveau benutzt.
Wenn der TA-Modus aktiviert wurde, wird der TA eines individuellen Segments eingeschaltet.Wenn ein
TP-Sender empfangen wird, wird der TP-Modus des einzelnen Segments eingeschaltet.
TA-Unterbrechungsfunktion
Die aktuelle Verkehrsansage wird durch Betätigung dieser Taste abgebrochen.
Der TA-Modus wird dadurch allerdings nicht ausgeschaltet.
Die Sendernamen werden in alphanumerischen Zeichen dargestellt
AF: Alternative Frequenzen
Frequenzliste von Sendern, die das gleiche Programm ausstrahlen
TP: Verkehrsprogramm-Identifikation
Identifikationsdaten für Verkehrssender
TA: Verkehrsansagen-Identifikation
Identifikationsdaten, die zeigen ob Verkehrsinformationen gesendet werden oder nicht
PTY: Programmart-Code
Inhalt von Programmen wie Nachrichten, leichte Musik, Sport usw.
USB-BETRIEB
In der Vorderseite des Gerätes befindet sich eine USB-Schnittstelle (21). Sie können ein USB-Laufwerk an dieser
Schnittstelle anschließen.
Wenn Sie ein USB-Laufwerk an die Schnittstelle anschließen, sucht das Gerät automatisch nach MP3- und
WMA-Dateien und startet die Wiedergabe automatisch.
Sie können ebenfalls die MOD-Taste (1) zur Auswahl des USB-Modus benutzen, wenn sich das Gerät in einem
anderen Modus befindet.
DATEIAUSWAHL
Betätigen Sie die Taste ▎ (2) oder die Taste ▎ (17) in eine Datei vor bzw. zurück zu springen. Die
entsprechende Dateinummer erscheint in der Anzeige.
Halten Sie die Taste ▎ (2) oder die Taste ▎ (17) gedrückt, um den Schnellrücklauf bzw. Schnellvorlauf zu
aktivieren. Die USB-Wiedergabe beginnt dann von dem Punkt, an dem Sie die Taste loslassen.
WIEDERGABEPAUSE
Betätigen Sie die Taste
1/>II
(16), um die USB-Wiedergabe vorübergehend anzuhalten. Betätigen Sie die Taste
17
BEDIENUNG / LEISTUNGSDATEN
erneut, um mit der Wiedergabe fortzufahren.
INTRO-WIEDERGABE
Betätigen Sie die Taste 2/INT (15), um jeweils die ersten 10 Sekunden jeder Datei abzuspielen. Betätigen Sie die
Taste erneut, um die Intro-Wiedergabe zu stoppen und die Wiedergabe der jeweiligen Datei zu starten.
WIEDERHOLUNG DES GLEICHEN TITELS
Betätigen Sie die Taste 3/RPT (14) zur Wiederholung des gleichen Titels. Betätigen Sie die Taste erneut, um alle
Dateien zu wiederholen.
ZUFALLSWIEDERGABE
Betätigen Sie die Taste 4/RDM (13), um alle Dateien in zufälliger wiederzugeben. Betätigen Sie die Taste erneut,
um diese Funktion wieder abzustellen.
VERZEICHNISAUSWAHL
Benutzen Sie die Taste 5/DIR- (12) und 6/DIR+ (11) zur Auswahl des nächsten bzw. vorigen Verzeichnisses.
Wenn Ihr USB/SD-Medium über keine Verzeichnisse verfügt, haben die Tasten 5/DIR- (12) und 6/DIR+ (11)
keine Funktion.
DIREKTAUSWAHL
Betätigen Sie die AMS-Taste (4). Mit dieser Funktion können Sie Dateien über ihre Dateinummer wählen. In der
Anzeige erscheint "T RK ***". Benutzen Sie dann die Tasten 1/2/3/4/5/6/7 (BAND) /8 ( ) zur Auswahl.
/ 9 ( ) / 0 (DISP) zur Eingabe der Titelmnummer betätigen. Betätigen Sie danach die SEL/ENT-Taste
zum Starten der Wiedergabe. Sie können ebenfalls die VOL/SEL-Taste (5) zur Auswahl der gewünschten
Titelnummer benutzen und dann die Auswahl mit der SEL/ENT-Taste bestätigen.
Das TAKARA Autoradio RDU 310 (TAKARA) unterstützt USB-Speichermedien mit einer Kapazität von bis zu 8 GB.
SPEICHERKARTENBETRIEB
In der Vorderseite des Gerätes befindet sich ein Kartenslot (22). Wenn Sie eine Speicherkarte einlegen, sucht das
Gerät automatisch nach MP3- und WMA-Dateien und startet die Wiedergabe automatisch.Die Bedienung entspricht
dem oben beschriebenem MP3/WMA-Betrieb. Sie können ebenfalls die MOD-Taste (1) zur Auswahl des
Speicherkartenmodus benutzen, wenn sich das Gerät in einem anderen Modus befindet.
Das TAKARA Autoradio RDU 310 (TAKARA) unterstützt Speicherkarten mit einer Kapazität von bis zu 8 GB.
LEISTUNGSDATEN
Empfangsbereich
Empfindlichkeit
Rauschabstand
Kanaltrennung
Frequenzbereich
4 µV (Rauschabstand = 30 dB) --- ---
UKW MW MP3/WMA
87,5 ~ 108 MHz 522 ~ 1620 KHz ---
50 dB 50 dB 60 dB
> 25 dB --- 50 dB
40 Hz ~ 12 KHz 80 Hz ~ 2,2 KHz 20 Hz ~ 16 KHz
18
Page 11
FERNBEDIENUNG
FERNBEDIENUNG
1.
POWER/MODE: Betätigen Sie diese Taste zum Einschalten oder
Wechseln der Betriebsart. Halten Sie die Taste
zum Ausschalten des Geräts gedrückt.
2. SEL/ENT : Benutzen Sie diese Taste zur
Auswahl des Audiomodus:
VOL / BASS / TREBLE / BALANCE / FADER
DSP OFF / DX / STEREO
Im USB/SD-Suchmodus betätigen Sie diese
Taste zur Bestätigung von Funktionen.
3. – <<: Betätigen Sie diese Taste zum
Zurückspringen / Autosuche zurück.
Halten Sie die Taste gedrückt für Schnellrücklauf
/ manuelle Suche zurück.
4. BND / LOU: Betätigen Sie diese Taste zm
Wechseln des Frequenzbands.
Halten Sie die Taste gedrückt, um die
LOUDNESS-Funktion zu aktivieren.
5. 0: Ziffer 0 für MP3-Suchen.
6. 2 / INT: Senderspreicher 2 /Intro-Wiedergabe/
Ziffer 2 für MP3-Suchen.
7. 1 / : Senderspreicher 1 /Pause /
Wiedergabe/ Ziffer 1 für MP3-Suchen.
8.
5 / DIR-: Senderspreicher 5 /zurück zum
vorigen Verzeichnis/Ziffer 5 für MP3-Suchen.
9. 4 / RDM: Senderspreicher 4 /
Zufallswiedergabe / Ziffer 4 für MP3-Suchen.
10. 7: Ziffer 7 für MP3-Suchen.
11. VOL△△△△: Lautstärke erhöhen.
12. MUTE/AF: Benutzen Sie diese Taste zum Ausstellen der Tonwiedergabe. Halten Sie die Taste gedrückt, um
die AF-Funktion ein- bzw. auszuschalten.
13. >>+: Betätigen Sie diese Taste zum Vorspringen / Autosuche vor. Halten Sie die Taste gedrückt zum
Schnellvorlauf / manuelle Suche vor.
14. VOL▽▽▽▽: Lautstärke verringern
15. PTY: Ein-/Ausschalten der PTY-Funktion.
16. AMS: Betätigen Sie diese Taste zur Speichersuche / MP3(WMA)-Dateisuche. Halten Sie die Taste gedrückt,
um die Sender automatisch zu speichern.
17. TA: Ein-/Ausschalten der TA-Funktion.
19
FERNBEDIENUNG
18.3 / RPT: Senderspeicher 3 / Wiederholung/ Ziffer 3 für MP3-Suchen.
19. 6 / DIR+: Senderspeicher 5 / nächstes Verzeichnis / Ziffer 6 für MP3-Suchen.
20. 8:
Ziffer 8 für MP3-Suchen.
21. 9:
Ziffer 9 für MP3-Suchen.
20
Page 12

HANDLEIDING
indien nodig de lipjes vast
Dashboard
3.Plaats het apparaat in de huls
De rechterkant
CS-322
Voor informatie en ondersteuning, www.lenco.eu
―LEES DEZE HANDLEIDING ZORVOLDIG DOOR VOOR GEBRUIK.-
21
AANDACHTSPUNTEN BIJ INSTALLATIE
AANDACHTSPUNTEN BIJ INSTALLATIE
1. Deze speler moet worden geïnstalleerd door een professioneel technicus.
2. Lees de handleiding vóór het installeren en gebruiken van de apparatuur.
3. Zorg ervoor dat u alle andere draden aansluit voor het aansluiten van de stroom.
4. Zorg ervoor dat alle blootgestelde draden zijn geïsoleerd, om kortsluiting te voorkomen.
5. Maak alle draden vast na de installatie.
6. Zorg ervoor dat de aansluiting van de speler is gemaakt zoals beschreven in deze handleiding. Verkeerd
aansluiten kan leiden tot schade.
7. Deze speler is alleen geschikt voor 12 DC-apparaat, zorg ervoor dat uw auto over zo’n kathode-aarde elektrisch
systeem beschikt.
8. Sluit de draden juist aan. Verkeerd aansluiten zal storing veroorzaken of het elektrisch systeem beschadigen.
L Sleutell
Voorpaneel
Huls
R Sleutel
De rechterkant
Schroevendraaier
2. .Plaats de huls in
het dashboard en maak
4.
Verwijder het apparaat
Verwijder paneel
De linkerkant
Voorpaneel
22
Dashboard
Lipjes
Huls
Sierrand
1.
Pak de huls
Sierrand
Plaats pane el
De linkerkant
Page 13

EEN ANDERE
Dashboard of paneel
Zijaanzicht met schroefgaatjes
LINEOUT-Rch
LINEOUT-Lch
AM/FM ANTENNE
GROEN
ACHTER L-ch+
VOOR L-ch-
VOOR R-ch-
ACHTER R-ch-
ACHTER R-ch+
INSTALLATIEPROCES
Metalen beugel
Montagebout
Zes kantige moer
Veerring
Vlakke Sluitring
Vlakke Sluitring
MONTEERMETHODE
Fabrieksradiomontagebeugel
Schroef
Haakje
gemarkeerd T, N
Nissan en Toyota voertuigen
kunnen deze montagemethode
gebruiken
Schroef
DIAGRAM BEDRADING
1. Deze speler kan alleen worden gebruikt door een 12V DC kathode-aarde elektrisch systeem.
2. Verbind de klemmen van de accu van de auto niet tot de speler helemaal goed is aangesloten en gemonteerd.
3. Zorg ervoor dat u de gele draad met de positieve (+) pool van de batterij verbindt.
4. Zorg er bij het vervangen van de zekering voor dat de specificaties hetzelfde zijn.
5. Het gebruik van luidsprekers van goede kwaliteit met 4-8 ohm geeft het beste resultaat.
I ISO
DEEL A
ZWART
ROOD
ACC
GEEL
B+
BLAUW
AARDE
AUTO ANT
23
WIT/ZWART
GRIJS/ZWART
ISO
DEEL B
PAARS/ZWART
(RED)
(WHTE)
WIT
VOOR L-ch+
GRIJS
VOOR R-ch+
PAARS
BEDIENINGSPANEEL EN FUNCTIES
BEDIENINGSPANEEL EN FUNCTIES
24
Page 14

1. POWER/MODE 13. 4/RDM
2. 8┃ 14 3/RPT
3. DISP/0 15. 2/INT
4. AMS 16. 1 /
5. VOL/SEL/ ENT 17. 9/
6. LCD-Display 18. BAND /PTY/7
7. AFSTANDSBEDIENINGSSENSOR 19. TA
8. (Ontgrendelknop) 20. MUTE/AF
9. OPEN 21. USB
10. Auxiliary invoer 22. SD-KAARTSLEUF
11. 6/DIR+ 23. Reset-knop
12. 5/DIR-
┃┃┃┃
ALGEMENE BEDIENING
1. Het apparaat aan-/uitzetten
BEDIENING
Druk op een knop om het apparaat aan te zetten. Druk lang op de “POWER” knop om het apparaat uit te zetten.
2. Het paneel verwijderen
Druk op de knop(8)om het paneel omlaag te klappen en te verwijderen.
3. Geluid instellen
Druk op de SEL-knop (5) om de gewenste instelmodus te selecteren. De instelmodus zal in de volgende volgorde
veranderen: VOL---BASS---TREBLE---BALANCE---FADER---LOUD---DSP OFF---DX---STEREO.
U kunt de geluidsinstelling veranderen door de audio-knop (5) met de klok mee of tegen de klok in te draaien.
4. LOUDNESS aan/uit
Druk in het bovenstaande menu op SEL tot u de LOUD-instelling kunt invoeren. Draai vervolgens aan VOL om de
instelling aan of uit te zetten.
5. EQ SELECTEREN
Druk in het bovenstaande menu op SEL tot DSP OFF op het display verschijnt en u de instelling kunt invoeren.
Draai vervolgens aan VOL om de gewenste EQ-functie in te stellen: DSP OFF---CLASSIC---POP---ROCK
6. LOCAL/DISTANCE (LOKAAL/VER)
Druk in het bovenstaande menu op SEL tot DX op het display verschijnt en u de instelling kunt invoeren. Draai
vervolgens aan VOL om DX/LOC te selecteren. Hiermee kunt u tijdens het scannen de gevoeligheid van de zoeker
te verminderen en alleen sterkere lokale signalen te ontvangen.
7. STEREO/MONO
Druk in het bovenstaande menu op SEL tot u de STEREO-instelling kunt invoeren. Draai vervolgens aan VOL om
STEREO/MONO te selecteren. Het “OO” icoontje zal op het display verschijnen wanneer in stereo-modus een
stereo-zender wordt ontvangen.
8. LIQUID CRYSTAL DISPLAY
Toont de huidige frequentie en geactiveerde functies op het display.
9. AUXILIARY INVOER
Het apparaat kan worden aangesloten op een draagbare audiospeler door middel van de AUX IN-stekkeringang (10)
op het voorpaneel. Na het maken van de aansluiting kunt u op de MOD-knop (1) op het voorpaneel drukken om
naar de AUX IN-modus te schakelen.
10. RESET FUNCTIE
De RESET-knop (25) moet worden geactiveerd met een balpen of een dun metalen voorwerp. De RESET-knop
moet worden gebruikt als:
- De eerste installatie van het apparaat en alle bedrading voltooid is.
- Alle functieknoppen niet werken.
- Fout symbool op het display verschijnt.
Opmerking: Al het geheugen zal verloren gaan wanneer u op de RESET-knop drukt!
25
BEDIENING
BEDIENING VAN RADIO
1. SCHAKELEN NAAR RADIOMODUS
Druk herhaaldelijk op de MOD-knop (1) tot de radiomodus op het display verschijnt.
2. DE FREQUENTIEBAND SELECTEREN
Druk in radiomodus op de BAND-knop (18) om de gewenste band te selecteren.
De ontvangstband zal in de volgende volgorde veranderen: FM1--FM2--FM3--AM1(MW1)--AM2(MW2).
3. EEN ZENDER SELECTEREN
Druk op de 9 ▎ knop (17) of 8┃┃┃┃ knop (2) om de automatische zoekfunctie te activeren. Deze functie zal
automatisch naar zenders zoeken. Druk om handmatig te zoeken enkele seconden tot “MANUAL” op het display
verschijnt. Elke keer dat er op 9 ▎ of 8┃┃┃┃ gedrukt wordt zal de frequentie met 0,05 MHz veranderen.
4. AUTOMATISCH OPSLAAN IN GEHEUGEN & ZENDERS SCANNEN
- Automatisch opslaan in geheugen
Druk 2 seconden op de AMS-knop (4), de radio zoekt naar sterke signalen tot één zoekcyclus is afgerond.
Vervolgens worden de 6 sterkste zenders opgeslagen onder de corresponderende presetknoppen.
- Zenders scannen
Druk op de AMS-knop (4) om alle presetstations te previewen.
5. HANDMATIG EEN ZENDER OPSLAAN
Stem af op de zender en druk enkele seconden op één van de presetknoppen (11/12/13/14/15/16), de huidige
zender wordt opgeslagen onder de nummerknop
.
6. GEBRUIK VAN ANS (Announcement Name Station)
- Instellen van de AF-modus
Druk lang op de AF-knop (20) om de AF-modus aan of uit te zetten.
Het “AF” symbool verschijnt op het display wanneer AF is ingeschakeld.
De zendernaam wordt getoond bij het ontvangen van een ANS-zender.
“AF” zal beginnen te knipperen als het signaal zwakker wordt. Wanneer het signaal te slecht is, door een
frequentieverandering, dan zal AF automatisch overschakelen naar een nieuwe frequentie.
- Gebruik regionale zenders
Druk enkele seconden op de DISP/0-knop (3) om de regiomodus aan of uit te zetten.
Sommige zenders veranderen tijdens het luisteren van normale uitzending naar regionale uitzending voor
bepaalde periode. Wanneer regionale modus is ingeschakeld, dan zal het huidige luisterprogramma
onveranderd blijven. Wanneer regionale modus is uitgeschakeld dan zal het regionale station ontvangen
worden.
- Met behulp van PTY een programma selecteren
Druk één keer op de PTY-knop (20) en druk vervolgens op een presetknop(12/13/14/15/16/17). U kunt het
programmatype selecteren zoals hieronder aangegeven:
1# knop: NIEUWS/ACTUALITEITEN/INFORMATIE
2# knop: EDUCATIE/DRAMA/SPORT
3# knop: GEVARIEERD/CULTUUR/WETENSCHAP
4# knop: ECONOMIE/KIND/WEER
5# knop: BELLEN/SOCIAAL/RELIGIE
6# knop: REIZEN/ONTSPANNEN/DOCUMENT
Druk twee keer op de PTY-knop (20) en vervolgens op een presetknop(12/13/14/15/16/17). U kunt het
programmatype selecteren zoals hieronder aangegeven:
1# knop: ROCK MUZ/POP MUZ
2# knop: LIGHT MU/EASY MUZ
3# knop: ANDERE MU/CLASSICS
4# knop: COUNTRY/JAZZ MUZ
5# knop: NATIONAAL/OLDIES
26
Page 15

6# knop: FOLK
- Naar verkeersinformatie luisteren
De TA-knop (19) werkt als volgt:
Door op de knop te drukken kunt u de TA-modus aan of uit zetten.
Wanneer TA-modus is ingeschakeld en er een verkeersinformatie bericht wordt verzonden:
Wanneer het apparaat in CD (MP3) USB/GEHEUGENKAART-modus of AUX IN-modus is, dan zal het tijdelijk
overschakelen naar radiomodus. Als het volumeniveau onder de drempelwaarde is dan zal het worden
opgehoogd tot op de drempelwaarde. Wanneer het volumeniveau hoger is dan de drempelwaarde, dan zal het
worden ingesteld op het laatst ingestelde niveau.
Als de TA-modus is ingeschakeld, dan is TA van het individuele segment ingeschakeld. Als een TP station
wordt ontvangen, dan is TP van het individuele segment ingeschakeld. TA Onderbrekingsfunctie
De huidige verkeersinformatie wordt geannuleerd door op deze toets te drukken.
Maar de TA-modus zal niet worden uitgeschakeld.
Zendernaam gegevens worden getoond in alfanumerieke karakters
AF: Alternative Frequencies
Frequentielijst van zenders die hetzelfde programma uitzenden
TP: Traffic Program Identification
Identificatiegegevens voor verkeersinformatie-zender
TA: Traffic Announcement Identification
Identificatiegegevens die aangeven of verkeersinformatie wordt uitgezonden of niet
PTY: Program Type Code
Inhoud van het programma, zoals nieuws, lichte muziek, sport etc
BEDIENING BIJ AFSPELEN USB
Op het voorpaneel van de radio zit een USB-interface (21). U kunt een USB-apparaat aansluiten met behulp van
deze interface.
Het apparaat zal, als u een USB-apparaat aansluit, alle MP3-/WMA-bestanden zoeken en automatisch beginnen
met het afspelen van MP3-/WMA-bestanden.
U kunt ook als u in een andere modus zit op de MOD-knop (1) drukken om de USB-modus te selecteren.
BESTAND SELECTEREN
Druk op de ▎ knop (2) of ▎knop (17) om naar het vorige of volgende bestand te gaan. Het
bestandsnummer wordt getoond op het display.
Houd de ▎ knop (2) of ▎knop (17) ingedrukt om vooruit of achteruit te spoelen. Het afspelen vanaf USB
gaat verder zodra u de knop loslaat.
AFSPELEN PAUZEREN
BEDIENING
Druk op de
ALLE BESTANDEN PREVIEWEN
Druk op de 2/INT-knop (15) om de eerste 10 seconden van elk bestand af te spelen. Druk nogmaals om de intro te
stoppen en naar het bestand te luisteren.
HETZELFDE BESTAND HERHALEN
Druk herhaaldelijk op de 3/RPT-knop (14) om dezelfde track te herhalen. Druk nogmaals op de knop om alle
bestanden te herhalen.
ALLE TRACKS IN WILLEKEURIGE VOLGORDE AFSPELEN
1/>II
knop (16) om het USB afspelen te pauzeren. Druk nogmaals om het afspelen te hervatten.
27
BEDIENING & PRESTATIES
Druk op de 4/RDM-knop (13) om alle bestanden in willekeurige volgorde af te spelen. Druk nogmaals op de knop
om de functie te annuleren.
MAP OMHOOG/OMLAAG SELECTEREN
Druk op de 5/DIR- knop (12) of 6/DIR+ knop (11) om een hogere of lagere map te selecteren. Als het
USB-/SD-apparaat geen mappen bevat, dan zal het drukken op de 5/DIR- knop (12) of 6/DIR+ knop (11) geen
effect hebben.
BESTAND SELECTEREN MET BESTANDSNUMMER
Druk op de “AMS”(4)knop. U kunt nu zoeken op tracknummer. Het display toont “TRK ***”. Gebruik
1/2/3/4/5/6/7(BAND) /8( )/9( )/0(DISP) om het tracknummer in te voeren.
Druk na het invoeren op de SEL/ENT-knop om het afspelen te starten. Of gebruik vol/sel (5) om naar het gewenste
tracknummer te scrollen en druk vervolgens op de SEL/ENT knop om af te spelen.
TAKARA’s autoradio RDU 310(TAKARA) ondersteunt USB-apparaten met een capaciteit tot 8GB.
BEDIENING BIJ AFSPELEN VAN GEHEUGENKAART
Op het voorpaneel van de radio zit een geheugenkaart-interface (22). Het apparaat zal, als u een geheugenkaart
plaatst, alle MP3-/WMA-bestanden zoeken en automatisch beginnen met het afspelen van MP3-/WMA-bestanden.
De bediening is hetzelfde als de bediening bij het gebruik van USB die hierboven is beschreven. Als u in een andere
modus zit kunt u ook op de MOD-knop (1) drukken om de geheugenkaartmodus te selecteren.
TAKARA’s autoradio RDU 310(TAKARA) ondersteunt geheugenkaarten met een capaciteit tot 8GB.
PRESTATIES
Afstembereik
Gevoeligheid
S/N ratio
Stereoscheiding
Freq. Respons
FM
87.5~108.0 MHz
4uV(S/N=30dB)
50 dB
>25 dB
40Hz~12KHz
MW
522~1620KHz
80Hz~2.2KHz
---
50 dB
---
MP3/WMA
---
---
60 dB
50dB
20Hz~16KHz
28
Page 16

REMOTE CONTROL
REMOTE CONTROL
1.POWER/MODE: Druk kort voor aanzetten/veranderen MODUS. Druk lang om uit te zetten.
2. SEL/ENT : Druk voor het instellen van audio:
VOL / BASS / TREBLE / BALANCE / FADER
DSP OFF / DX / STEREO
Druk in USB/SD zoekmodus kort voor de
invoerfuctie.
3. – <<: Druk kort voor VORIGE /
auto omlaag zoeken.
Druk lang om achteruit te spoelen /
handmatig omlaag zoeken.
4. BND / LOU: Druk kort om van band te veranderen.
Druk lang om de LOUDNESS-functie in te stellen.
5 0: Nummer 0 voor zoeken MP3’s.
6. 2 / INT: 2# presetzender /intro afspelen/
nummer 2 voor zoeken MP3’s.
7. 1 / : 1# presetzender /pauzeren /afspelen/
nummer 1 voor zoeken MP3’s.
9. 5 / DIR-: 5# presetzender /voorgaande map
openen/nummer 5 voor zoeken MP3’s.
9. 4 / RDM: 4# presetzender / willekeurig afspelen /
nummer 4 voor zoeken MP3’s.
10. 7: nummer 7 voor zoeken MP3’s.
11. VOLLLL△△△△: volume verhogen.
12. MUTE/AF: Druk kort om mute aan/uit te zetten. Druk lang om AF aan/uit te zetten.
13. >>+: Druk kort voor VOLGENDE / auto omhoog zoeken. Druk lang om vooruit te spoelen / handmatig
omhoog te zoeken.
14. VOLLLL▽▽▽▽: volume verlagen
15. PTY: zet de PTY-functie aan/uit.
16. AMS: Druk kort om een presetscan uit te voeren / MP3(WMA) bestand zoeken. Druk lang om automatisch op te
slaan.
17. TA: zet de TA-functie aan/uit.
18. 3 / RPT: 3# presetzender / herhalen/ nummer 3 voor zoeken MP3’s.
19. 6 / DIR+: 5# presetzender / enter next folder playing / nummer 6 voor zoeken MP3’s.
20. 8:
nummer 8 voor zoeken MP3’s.
21. 9:
nummer 9 voor zoeken MP3’s.
29
30
Page 17
MANUEL D'UTILISATION
Pour information & support technique, www.lenco.eu
―VEUILLEZ ATTENTIVEMENT LIRE CE MANUEL AVANT TOUTE UTILISATION.-
CS-322
31
PRECAUTIONS D'INSTALLATION
PRECAUTIONS D'INSTALLATION
1. Ce lecteur doit être installé par un technicien spécialisé.
2. Lisez les instructions d’utilisation de l’équipement avant toute installation.
3. Assurez-vous de raccorder l’ensemble des fils avant de mettre l’unité sous tension.
4. Afin de prévenir toute électrocution. Assurez-vous que tous les fils exposés sont isolés.
5. Fixez tous les fils une fois l’installation terminée.
6. Veuillez effectuer les raccordements du lecteur conformément aux instructions de ce manuel d’utilisation.
Tout raccordement incorrect peut endommager le lecteur.
7. Ce lecteur peut seulement être alimenté par une source d’alimentation 12 V CC, veuillez préalablement
vous assurer que votre véhicule dispose de ce type d’alimentation.
8. Veuillez correctement raccorder les fils. Tout raccordement incorrect peut causer des
dysfonctionnements ou endommager le système électrique.
4.Removing the unit
32
Page 18

INSTALLATION
DIAGRAMME DE CABLAGE
1. Cee lecteur peut seulement être alimenté par un système électrique 12 V CC mis à la terre.
2. Ne raccordez pas les terminaux de la batterie du véhicule avant d’avoir correctement installé le lecteur.
3. Raccordez le fil jaune à la borne positive de la batterie (+).
4. Lors du changement du fusible. Assurez-vous d’utiliser un fusible identique.
5. Utilisez des haut-parleurs 4 - 8 ohms de haute qualité pour garantir de meilleures performances.
33
PRESENTATION DES COMMANDES ET DE LEURS FONCTIONS
PRESENTATION DES COMMANDES ET DE LEURS FONCTIONS
34
Page 19

TIONNEMENT
1. ALIMENTATION/MODE 13. 4/ALEATOIRE
2. 8┃ 14 3/REPETITION
3. DISP/0 15. 2/INTRODUCTION
4. AMS 16. 1 /
5. VOL/SEL/ ENT 17. 9/
6. Ecran LCD 18. BANDE/PTY/7
7.
Capteur de la télécommande
8. (touche d’ouverture) 20. MUET/AF
9. OUVRIR 21. Connecteur USB
10. Connecteur d’entrée auxiliaire 22. Emplacement pour carte mémoire SD
11. 6/REP+ 23. Fente CD
12. 5/REP- 24. Touche réinitialisation
FONCTIONNEMENT BASIQUE
1. Mise en marche/arrêt de l’unité.
Appuyez sur une touche pour mettre en marche l’unité. Maintenez enfoncée la touche « ALIMENTATION » pour éteindre l’unité.
2. Retirez le panneau avant.
Appuyez sur la touche (8) pour ouvrir et retirer le panneau avant.
3. Réglage du son
Appuyez sur la touche SEL (5) pour sélectionner un mode de réglage. L’ordre de sélection du mode est le suivant :
VOLUME---BASSES---AIGUS---BALANCE---EQUILIBREUR---HAUT-P---DSP DESACTIVE---DX---STEREO.
Réglez la valeur de votre choix en tournant la commande de réglage Volume (5).
4. Activation/désactivation du haut-parleur
Dans le menu ci-dessus. Appuyez de manière répétée sur la touche SEL pour accéder à l’option Haut-parleur.
Tournez ensuite la commande VOL pour activer/désactiver cette option.
5. SELECTION D’UN EGALISEUR
Dans le menu ci-dessus. Appuyez de manière répétée sur la touche SEL pour accéder à l’option DSP
DESACTIVEE. Tournez ensuite la commande VOL pour sélectionner un des égaliseurs ci-dessous : DSP
DESACTIVE---CLASSIQUE--POP—ROCK.
6. LOCAL/DISTANT
Dans le menu ci-dessus. Appuyez de manière répétée sur la touche SEL pour accéder à l’option DX. Tournez
ensuite la commande VOL pour sélectionner parmi les modes DISTANT et LOCAL. En mode LOCAL. Permet de
seulement rechercher les stations radio locales à puissant signal.
7. STEREO/MONO
Dans le menu ci-dessus. Appuyez de manière répétée sur la touche SEL pour accéder à l’option Stéréo. Tournez
ensuite la commande VOL pour sélectionner parmi les modes STEREO et MONO. En mode Stéréo et en cours de
réception d'une station radio stéréo, l’indicateur « OO » s’affiche sur la partie supérieure de l’écran.
8. L’ECRAN A CRISTAUX LIQUIDES
Permet d’afficher la fréquence radio ainsi que les fonctions actives.
9. CONNECTEUR D’ENTREE AUDIO AUXILIAIRE
Vous pouvez raccorder l’unité à un lecteur audio via le connecteur d’entrée AUXILIAIRE (10) situé sur le panneau
avant. Une fois le raccordement terminé, appuyez sur la touche MODE (1) du panneau avant pour activer le mode
AUXILIAIRE.
10. FONCTION DE REINITIALISATION
Appuyez sur la touche Réinitialisation (25) en utilisant un stylo ou un objet pointu. Appuyez sur la touche
Réinitialisation dans les cas suivants :
- Après l’installation initiale, lorsque les raccordements sont effectués.
- Les commandes ne répondent pas.
- Un message d’erreur s’affiche.
19. TA
35
┃┃┃┃
MODE OPERATOIRE
Remarque : Appuyer sur la touche REINITIALISATION entraine l’effacement de toute la mémoire.
MODE OPERATOIRE DE LA RADIO
1. Activer le mode Radio
Maintenez enfoncée la touche MODE (1) jusqu’à l’activation du mode désiré.
2. SELECTION D’UNE BANDE DE FREQUENCES RADIO
En mode Radio, appuyez sur la touche BANDE (18) pour sélectionner la bande de fréquences radio désirée.
L’ordre de sélection de la bande de fréquences radio est le suivant : FM1 -- FM2 -- FM3 -- AM1 (MW1) -- AM2
(MW2).
3. SELECTION D’UNE STATION RADIO
Appuyez sur la touche 9 (17) ou 8┃┃┃┃ (2) pour activer la fonction de recherche automatique. La recherche des
stations radio s'effectue automatiquement. Maintenez la touche enfoncée pendant quelques secondes jusqu’à ce
que l’indicateur “MANUEL” s’affiche, le mode de recherche manuelle est désormais activé. Chaque pression de la
touche 9 ▎ ou 8┃┃┃┃ permet de modifier la fréquence radio de 0,05 MHz.
4. Recherche et mémorisation automatique de stations radio
- Mémorisation automatique des stations radio
Maintenez enfoncée la touche AMS (4) pendant 2 secondes, le cycle de recherche de stations radio démarre.
Les 6 stations radio possédant le signal de plus puissant sont automatiquement mémorisées sur les
emplacements de présélection.
- Recherche de présélections
Appuyez sur la touche AMS (4) pour écouter brièvement la totalité des présélections radio.
5. MEMORISATION MANUELLE DE STATIONS RADIO
Sélectionnez la station radio de votre choix puis maintenez enfoncée pendant quelques
secondes une des touches de présélection (11/12/13/14/15/16), la station radio sélectionnée
est mémorisée sur la touche.
6. MODE OPERATOIRE DE LA FONCTION ANS (affichage du nom de la station radio)
- Configuration du mode AF
Maintenez enfoncée la touche AF (20) pour activer/désactiver le mode AF.
Lorsque le mode AF est activé, l’indicateur « AF » s’affiche.
Lors de la réception d’une station radio ANS, le nom de la station radio s’affiche.
L’indicateur « AF » clignote lorsque le signal de diffusion s’affaiblit. Lorsque le signal radio devient faible suite à un
changement de fréquence. La fonction AF active automatiquement la nouvelle fréquence radio.
- Activation des stations radio régionales
Maintenez enfoncée la touche AF (3) pour activer/désactiver le mode Régional.
La diffusion de programme de certaines stations radio varie parfois entre une diffusion normale et une diffusion
régionale. Lorsque le mode Régional est activé, la diffusion du programme en cours d’écoute n’est pas
affectée. Lorsque le mode Régional est désactivé, la réception radio de stations locales est possible.
- Utilisation de la fonction PTY pour sélectionner un type de programme
Appuyez une fois sur la touche PTY (20). Appuyez ensuite sur une touche de présélection radio
(12/13/14/15/16/17). Vous pouvez sélectionner un type de programme de la manière suivante :
Touche 1 : ACTUALITES/AFFAIRES/INFORMATIONS
Touche 2 : EDUCATION/RIRE/SPORTS
Touche 3 : VARIETES/CULTURE/SCIENCE
Touche 4 : ECONOMIE/ENFANTS/METEO
Touche 5 : MODE/SOCIAL/RELIGION
Touche 6 : VOYAGES/DIVERTISSEMENT/DOCUMENTAIRES
Appuyez deux fois sur la touche PTY (20). Appuyez ensuite sur une touche de présélection radio
(12/13/14/15/16/17). Vous pouvez sélectionner un type de programme de la manière suivante :
Touche 1 : ROCK/POP
36
Page 20
Touche 2 : LEGERE/SIMPLE
Touche 3 : AUTRES/CLASSIQUE
Touche 4 : COUNTRY/JAZZ
Touche 5 : NATIONAL/VIEUX TUBES
Touche 6 : FOLKLORIQUE
- Ecouter les informations routières
Le mode opératoire de la touche TA (19) est le suivant :
Les informations routières sont diffusées lorsque vous appuyez sur cette touche, quel que soit l’état actuel du
mode TA.
Lorsque le mode TA est activé et que les informations routières sont transmises :
Le mode Radio est automatiquement l’unité lorsque le mode CD (MP3), USB/SD ou AUXILIAIRE est actif.
Lorsque le niveau de volume est inférieur au seuil, celui-ci est élevé au niveau du seuil. Lorsque le niveau de
volume défini par l’utilisateur est supérieur au seuil (un niveau de volume minimal de TA), le dernier niveau de
volume sélectionné est alors défini.
Lorsque le mode TA est activé, le mode TA du segment individuel est activé. En cours de réception d’une
station radio TP, le mode TP du segment individuel est actif. Fonction d’interruption TA
Cette touche permet d’interrompre le bulletin d’informations routières actuellement diffusé.
Le mode TA reste cependant actif.
Celui-ci permet de diffuser le nom de la station radio sous des caractères alphanumériques
AF : Fréquences alternatives
Il s’agit d’une liste de fréquences des stations radio transmettant le même programme
TP : Identification des informations routières
Il s’agit de l’identification des données des stations de diffusion des informations routières
TA : Identification des informations routières
Il s’agit de l’identification des données indiquant la transmission d’informations routières
PTY : Identifiant de type de programme.
Il s’agit du contenu des programmes tels que les actualités, les musiques légères, le sport, etc.
Mode opératoire USB
Un connecteur USB est présent sur le panneau avant de l’unité (21). Vous pouvez raccorder un périphérique USB à
MODE OPERATOIRE
ce connecteur.
Lorsque vous raccordez un périphérique USB à ce connecteur, l’unité identifie les fichiers MP3 et WMA contenus
dans le périphérique USB, la lecture démarre automatiquement.
Sous les autres modes, vous pouvez également appuyer sur la touche MODE (1) pour sélectionner le mode USB.
Sélectionner un fichier
Utilisez les touches ▎ (2) et ▎(17) pour sélectionner le fichier précédent/suivant. Le numéro de fichier
s’affiche à l’écran.
Maintenez enfoncée la touche ▎ (2) ou ▎(17) pour effectuer une avance rapide/rembobinage. La lecture
du fichier contenu dans le périphérique USB reprend lorsque vous relâchez la touche.
Mise en pause de la lecture
Appuyez sur la touche 1/>II (16) pour mettre en pause la lecture du fichier. Appuyez à nouveau sur cette touche
pour reprendre la lecture.
Aperçu de tous les fichiers
Appuyez sur la touche 2/INT (15) pour lire les 10 premières secondes de chaque fichier. Appuyez à nouveau sur
cette touche pour désactiver le mode Introduction et démarrer la lecture normale des fichiers.
Répétition d’un fichier
37
MODE OPERATOIRE ET FICHIE TECHNIQUE
Appuyez sur la touche 3/RPT (14) pour activer la lecture en boucle d’un fichier. Appuyez à nouveau sur cette touche
pour désactiver la répétition.
Lecture aléatoire de la totalité des pistes
Appuyez sur la touche 4/RDM (13) pour activer la lecture aléatoire des fichiers. Appuyez de nouveau sur cette
touche pour annuler la fonction.
Sélection du répertoire précédent/suivant
Utilisez les touches 5/REP+ (11) et 5/REP- (12) pour sélectionner le répertoire suivant/précédent. Lorsque le
périphérique USB/carte mémoire SD ne contient pas de répertoires, les touches 5/REP- (12) et 5/REP+ (11)
sont inactives.
Sélection de fichiers par le numéro de fichier.
Appuyez sur le la touche « AMS » (4). Cette fonction permet de rechercher une piste par son numéro. « TRK
*** » s’affiche. Utilisez les touches 1/2/3/4/5/6/7(BAND) /8( )/9( )/0(DISP) pour saisir le numéro de piste.
Une fois la saisie terminée. Appuyez sur la touche SEL/ENT pour démarrer la lecture. Vous pouvez également
utiliser la commande vol/sel (5) pour sélectionner le numéro de iste désiré, appuyez ensuite sur la touche
SEL/ENT pour démarrer la lecture.
L’autoradio RDU 310(TAKARA) de TAKARA supporte les disques amovibles USB d’une capacité maximale de 8
Go.
LECTURE DU CONTENU D’UNE CARTE MEMOIRE
Un emplacement pour carte mémoire est présent sur le panneau avant de l’unité (22). Lorsque vous insérez une
carte mémoire dans cette fente, l’unité identifie les fichiers MP3 et WMA contenus dans la carte mémoire, la lecture
démarre automatiquement. Le mode opératoire est identique à celui de la lecture de fichiers MP3/WMA décrit
ci-dessus. Sous les autres modes, vous pouvez également appuyer sur la touche MODE (1) pour sélectionner la
carte mémoire.
L’autoradio RDU 310(TAKARA) de TAKARA supporte les cartes mémoire d’une capacité maximale de 8 Go.
FICHE TECHNIQUE
Plage de fréquences
Sensibilité
Rapport S/B
Séparation stéréo
Réponse en fréquence
FM
87,5 ~ 108 MHz
4 uV (rapport s/b = 30
> 25 dB
40 Hz ~ 12 KHz
dB)
50 dB
MW
522 ~ 1620 KHz
---
50 dB
---
80 Hz ~ 2,2 KHz
MP3/WMA
---
---
60 dB
50 dB
20 Hz ~ 16 KHz
38
Page 21

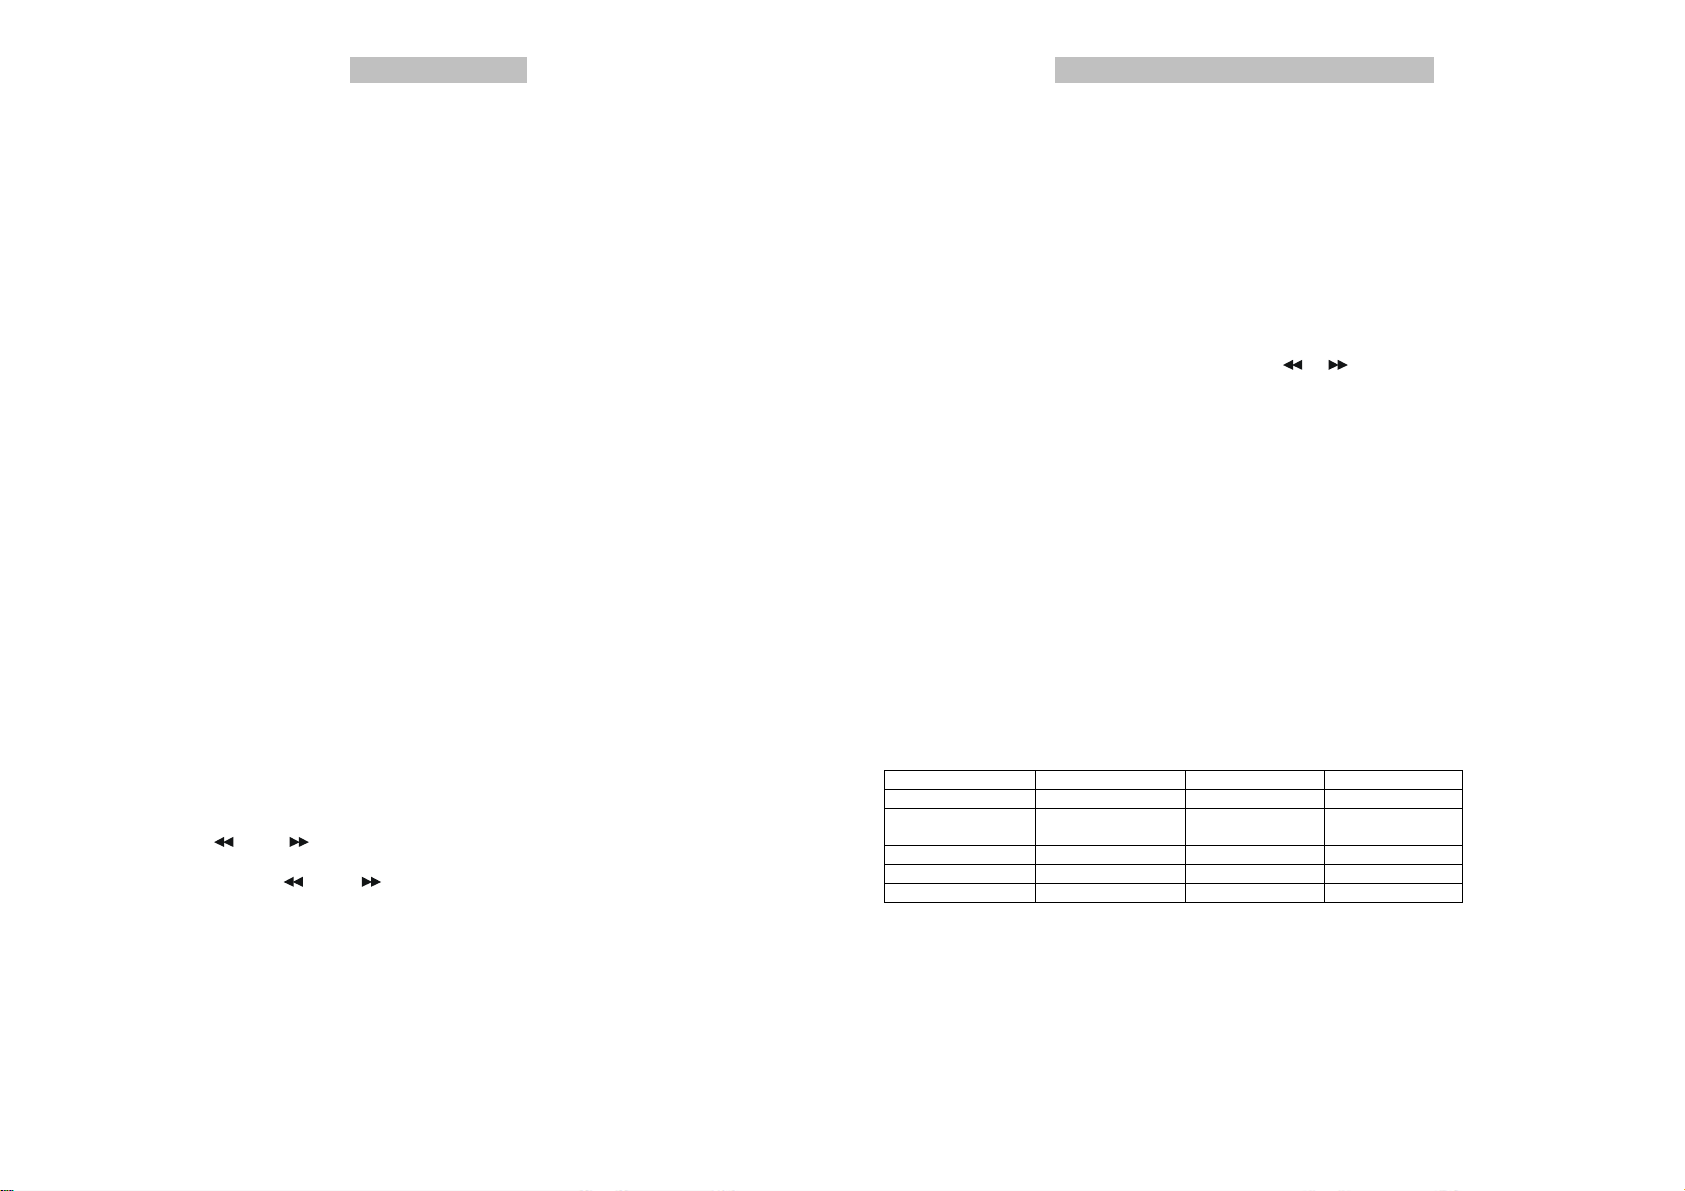
LA TELECOMMANDE
LA TELECOMMANDE
1.ALIMENTATION/MODE : Appuyez brièvement sur la touche pour mettre en marche l’unité/changer de mode.
Maintenez enfoncée cette touche pour éteindre l’unité.
2. SEL/ENT : Appuyez brièvement sur cette touche pour configurer le son :
VOLUME / BASSES / AIGUS / BALANCE /
EQUILIBREUR DSP DESACTIVE---DX--STEREO.
En mode de recherche d’un fichier contenu dans
le périphérique USB/carte mémoire SD. Appuyez
brièvement sur la touche pour valider votre choix.
.3.– <<: Appuyez brièvement sur cette touche
pour sélectionner le fichier précédent/effectuer une
recherche automatique vers les fréquences inférieures.
Maintenez enfoncée cette touche pour RF / effectuer
une recherche manuelle vers les fréquences inférieures.
4. BANDE / HP : Appuyez brièvement sur cette
touche pour modifier la bande de réquences radio.
Maintenez enfoncée cette touche pour activer le
haut-parleur.
5 0: Permet de saisir le chiffre 0 lors de
la recherche d’un fichier MP3.
6. 2 / INT : Permet de sélectionner la deuxième
présélection radio / activer le mode de lecture
Intro / en mode de recherche d’un fichier MP3,
permet de sélectionner la deuxième piste.
7. 1 / : Permet de sélectionner la première
présélection radio / activer le mode Pause / reprendre la Lecture / en mode de recherche d’un fichier MP3, permet
de sélectionner la première piste.
8.5 / REP- : Permet de sélectionner la cinquième présélection radio / sélectionner le répertoire précédent / en mode
de recherche d’un fichier MP3, permet de sélectionner la cinquième piste.
9. 4 / RDM : Permet de sélectionner la quatrième présélection radio / activer le mode de lecture Aléatoire / en
mode de recherche d’un fichier MP3, permet de sélectionner la quatrième piste.
10. 7: Permet de saisir le chiffre 7 lors de la recherche d’un fichier MP3.
11. Augmenter le volume : permet d’augmenter le volume.
12. MUET/AF : appuyez brièvement sur cette touche pour activer/désactiver le son. Maintenez enfoncée cette
touche pour activer/désactiver la fonction AF.
13. >>+: Appuyez brièvement sur cette touche pour sélectionner le fichier suivant/effectuer une recherche
39
LA TELECOMMANDE
automatique vers les fréquences supérieures. Maintenez enfoncée cette touche pour effectuer une avance rapide /
effectuer une recherche manuelle vers les fréquences supérieures.
14. Diminuer le volume : permet de diminuer le volume.
15. PTY : permet d’activer/désactiver la fonction PTY.
16. AMS : Appuyez brièvement sur cette touche pour effectuer une recherche de présélections/effectuer une
recherche de fichiers MP3(WMA). Maintenez enfoncée cette touche pour effectuer une mémorisation automatique
de présélections radio.
17. TA : permet d’activer/désactiver la fonction TA.
18. 3 / REPETITION : Permet de sélectionner la troisième présélection radio / activer le mode de lecture Aléatoire /
en mode de recherche d’un fichier MP3, permet de sélectionner la troisième piste.
19. 6 / REP+ : Permet de sélectionner la cinquième présélection radio / sélectionner le répertoire suivant / en mode
de recherche d’un fichier MP3, permet de sélectionner la sixième piste.
20. 8:
Permet de saisir le chiffre 8 lors de la recherche d’un fichier MP3.
21. 9:
Permet de saisir le chiffre 9 lors de la recherche d’un fichier MP3.
40
Page 22

MANUAL DE INSTRUCCIONES
el salpicadero y una
las salientes de ser necesario.
3. Ponga la unidad en la funda
El lado derecho
Para obtener información y apoyo, www.lenco.eu
―POR FAVOR LEA ESTE MANUAL DE INSTRUCCIONES CON ATENCIÓN ANTES DE USAR.-
CS-322
41
NOTAS PARA LA INSTALACIÓN
NOTAS PARA LA INSTALACIÓN
1. Este reproductor debe ser instalado por un técnico profesional.
2. Por favor lea detenidamente las instrucciones de funcionamiento del equipo antes de instalarlo.
3. Asegúrese de conectar los demás cables antes de conectar la alimentación.
4. Para evitar cortocircuitos, por favor asegúrese de aislar todos los cables expuestos.
5. Por favor fije todos los cables tras la instalación
6. Por favor realice las conexiones al reproductor según este manual de instrucciones. Una conexión incorrecta
podría ocasionar daños.
7. Este reproductor solo puede usarse con un dispositivo DC de 12V y por favor asegúrese de que su coche
pertenezca a este tipo de sistema eléctrico de tierra catódica.
8. Por favor conecte los cables de forma correcta. Una conexión incorrecta ocasionará fallos o dañará el sistema
eléctrico.
Llave L
Anillo exterior
1. Saque la funda
Anillo exterior
Colocar el panel
El la do izquierdo
Funda
Panel frontal
Llave R
Salpicadero
El lado derecho
Salpicadero
Salientes
Destornillador
2. Ponga la funda en
Funda
4. Sacar la unidad
Quitar el panel
El lado izquierdo
Panel frontal
42
Page 23

autorroscante
Arandela normal
Salpicadero o consola
Vista lateral con los orificios
PROCESO DE INSTALACIÓN
Tira met醠ica
Perno de montaje
Tuerca hexagonal
Arandela el醩tica
Tornillo
Soporte de montaje
para la radio de
f醔rica
para tornillos marcados T, N
Los coches Nissan y Toyota
pueden usar este m閠odo de
montaje.
Tornillo
OTRO M蒚ODO
DE MONTAJE
Tornillo
Gancho
DIAGRAMA ELÉCTRICO
LINEOUT-Rch
( )
ROJO
LINEOUT-Lch
BLANCO
( )
NEGRO
AMARILLO
PARTE A
B+
AARDE
ROJO
ACC
AZUL
AUTO ANT
VERDE/NGRO
VERDE
ACHTER L-ch+
BLANCO/NGRO
VOOR L-ch-
BLANCO
VOOR L-ch+
GRIS/NGRO
VOOR R-ch-
PARTE B
GRIS
VOOR R-ch+
MORADO/NGRO
ACHTER R-ch-
MORADO
ACHTER R-ch+
ACHTER L-ch-
1. Este reproductor solo puede usarse con un sistema eléctrico DC de 12V de tierra catódica.
2. No conecte los bornes de la batería del coche hasta que el reproductor esté completamente bien conectado.
3. Por favor asegúrese de conectar el cable amarillo al borne positivo de la batería (+).
4. Cuando cambie un fusible. Asegúrese de que tenga las mismas especificaciones.
5. El uso de un altavoz de buena calidad de 4-8 ohmios podrá resultar en el mejor efecto del equipo.
43
AM/FM ANTENNE
PANEL DE CONTROL Y FUNCIONES
44
Page 24

FUNCIONAMIENTO
1. POWER/MODE 13. 4/RDM
2. 8┃ 14 3/RPT
3. DISP/0 15. 2/INT
4. AMS 16. 1 /
5. VOL/SEL/ ENT 17. 9/
6. Pantalla LCD 18. BAND /PTY/7
7.
SENSOR DEL MANDO
8. (Botón liberador) 20. MUTE/AF
9. OPEN 21. USB
10. Entrada auxiliar 22. RANURA PARA TARJETAS SD
11. 6/DIR+ 23. Botón Reset
12. 5/DIR-
19. TA
┃┃┃┃
FUNCIONAMIENTO GENERAL
1. Encender/apagar la unidad
Pulse cualquier botón para encender la unidad. Pulse largamente el botón “POWER” para apagar la unidad.
2. Quitar el panel
Pulse el botón (8) para plegar y quitar el panel.
3. Ajuste de audio
Pulse el botón SEL (5) brevemente para seleccionar el modo de ajuste deseado. El modo de ajuste cambiará en el
siguiente orden: VOL---BASS---TREBLE---BALANCE---FADER---LOUD---DSP OFF---DX---STEREO.
Podrá ajustar el valor de audio girando el dial de audio (5) horaria o antihorariamente.
4. Encender/apagar LOUDNESS
En el menú de arriba. Continúe pulsando SEL para entrar al ajuste LOUD. Después gire VOL para
encenderlo/apagarlo.
5. SELECCIÓN DE EQ
En el menú de arriba, continúe pulsando SEL hasta entrar al ajuste DSP OFF. Entonces gire VOL para seleccionar
la función de EQ deseada entre: DSP OFF---CLASSIC---POP---ROCK
6. LOCAL/DISTANCIA
En el menú de arriba, continúe pulsando SEL hasta entrar al ajuste DX. Entonces gire VOL para seleccionar el
modo DX/LOC. En el modo LOC, durante la búsqueda, se reducirá la sensibilidad del buscador y solo se recibirán
las señales locales más fuertes.
7. ESTÉREO/MONO
En el menú de arriba, continúe pulsando SEL para entrar al ajuste STEREO. Entonces gire VOL para seleccionar el
modo STEREO/MONO. En el modo STEREO, cuando se reciba una estación transmisora estéreo, el icono “OO”
aparecerá en la pantalla.
8. PANTALLA DE CRISTAL LÍQUIDO
Muestra la frecuencia actual y las funciones activadas.
9. ENTRADA AUXILIAR
La unidad puede conectarse con un reproductor de audio portátil usando la toma AUX IN (10) del panel frontal.
Después de terminar la conexión podrá pulsar el botón MOD (1) del panel frontal para cambiar el modo al modo
AUX IN.
10. FUNCIÓN DE REINICIO
El botón RESET (25) deberá activarse ya sea con un bolígrafo o con un objeto metálico delgado. El botón RESET
debe activarse por los siguientes motivos:
- Instalación inicial de la unidad una vez completadas todas las conexiones eléctricas.
- Ningún botón de función sirve.
45
FUNCIONAMIENTO
- Símbolo de error en pantalla.
Nota: ¡Si pulsa el botón RESET se perderá toda la memoria!
FUNCIONAMIENTO DE LA RADIO
1. CAMBIAR AL MODO DE RADIO
Continúe pulsando el botón MOD (1) brevemente hasta que el modo de radio aparezca en la pantalla.
2. SELECCIÓN DE LA BANDA DE FRECUENCIAS
En el modo Radio, pulse el botón BAND (18) brevemente para seleccionar la banda deseada.
La banda de recepción cambiará en el siguiente orden: FM1--FM2--FM3--AM1(MW1)--AM2(MW2).
3. SELECCIÓN DE ESTACIÓN
Pulse el botón 9 (17) o el botón 8┃┃┃┃ (2) brevemente para activar la función de búsqueda automáticamente.
Buscará la estación automáticamente. Pulse el botón varios segundos hasta que aparezca “MANUAL” en la
pantalla; se habrá seleccionado el modo de sintonización manual. Cada vez que pulse 9 ▎o 8┃┃┃┃ , la
frecuencia cambiará 0,05 MHz.
4. ALMACENAMIENTO DE MEMORIA AUTOMÁTICO Y BÚSQUEDA DE PROGRAMAS
- Almacenamiento de memoria automático
Pulse el botón AMS (4) 2 segundos y la radio buscará intensidades de señal hasta terminar un ciclo de
búsqueda. Las 6 estaciones más fuertes se guardarán en los botones Preset correspondientes.
- Búsqueda de programas
Pulse el botón AMS (4) brevemente para preoír todas las estaciones preprogramadas.
5. ALMACENAMIENTO MANUAL DE UNA ESTACIÓN
Sintonice una estación y pulse uno de los botones Preset (11/12/13/14/15/16) durante varios segundos; la estación
actual se guardará en el botón numérico.
6. FUNCIONAMIENTO ANS (Anuncio de nombre de estación)
- Fijar el modo AF
Pulse largamente el botón AF (20) para activar y desactivar el modo AF.
Cuando AF esté activado, el símbolo “AF” aparecerá en pantalla.
El nombre del programa se mostrará cuando se reciba una estación ANS.
“AF” empezará a parpadear si la señal de transmisión empeora. Y cuando la señal sea demasiado mala
debido a un cambio de frecuencia, AF cambiará automáticamente a la frecuencia nueva.
- Función de programa regional
Pulse el botón AF (3) varios segundos para activar y desactivar el modo regional.
Algunas estaciones transmisoras cambian su programación de la transmisión normal a una transmisión
regional en ciertos periodos de tiempo. Cuando la región esté activada, el programa transmitido actual
permanece sin cambios. Cuando la región esté desactivada, permite que la recepción se cambie a la estación
regional.
- Uso de PTY para seleccionar programas
Pulse el botón PTY (20) una vez y después pulse un botón Preset (12/13/14/15/16/17). Podrá seleccionar el tipo
de programa como se muestra a continuación:
Botón 1#: NEWS/AFFAIR/INFORM
Botón 2#: EDUCATIO/DRAMA/SPORT
Botón 3#: VARIED/CULTURE/SCIENCE
Botón 4#: ECONOMY/CHILD PR/WEATHER
Botón 5#: PHONE IN/SOCIAL/RELIGION
Botón 6#: TRAVEL/LEISURE/DOCUMENT
Pulse el botón PTY (20) dos veces y después pulse un botón Preset (12/13/14/15/16/17). Podrá seleccionar el
tipo de programa como se muestra a continuación:
Botón 1#: ROCK MUS/POP MUSI
46
Page 25

Botón 2#: LIGHT MU/EASY MUS
Botón 3#: OTHER MU/CLASSICS
Botón 4#: COUNTRY/JAZZ MUS
Botón 5#: NATIONAL/OLDIES
Botón 6#: FOLK MUS
- Oír anuncios de tráfico
El botón TA (19) se usa así:
Cuando se pulse, se accionará sin importar que el modo TA esté activado o desactivado.
Cuando el modo TA esté encendido y se transmita un anuncio de tráfico:
Cuando la unidad esté en el modo CD (MP3) USB/TARJETA DE MEMORIA o en el modo AUX IN, cambiará
temporalmente al modo de radio. Si el nivel de volumen estaba debajo del umbral, se elevará hasta el umbral.
Pero cuando se cambie el nivel de volumen, mayor que el umbral (nivel mínimo de volumen TA), se pondrá al
último nivel.
Cuando el modo TA esté encendido, se encenderá el TA del segmento individual. Cuando se reciba una
estación TP, se encenderá el TP del segmento individual.
Función de interrupción TA
El anuncio de tráfico actual se cancela pulsando esta tecla.
Pero el modo TA no se desactivará.
Información de nombre de estación transmisora expresada en caracteres alfanuméricos
AF: Frecuencias alternativas
Lista de frecuencias que están transmitiendo el mismo programa.
TP: Identificación de programa de tráfico
Datos de identificación de una estación que esté transmitiendo información de tráfico.
TA: Identificación de anuncio de tráfico
Dato de identificación que muestra si se está o no transmitiendo información de tráfico.
PTY: Código de tipo de programa
El contenido del programa, como noticias, música ligera, deportes, etc.
FUNCIONAMIENTO DE REPRODUCCIÓN USB
Hay una interfaz USB (21) en el panel frontal del reproductor. Podrá conectar una unidad USB en esta interfaz.
Cuando conecte una unidad USB en la interfaz, la unidad buscará los archivos MP3/WMA dentro de ella y
empezará a reproducir archivos MP3/WMA automáticamente.
Si está en otro modo, también podrá pulsar el botón MOD (1) para seleccionar el modo USB.
SELECCIONAR UN ARCHIVO
Pulse el botón ▎ (2) ó ▎ (17) para ir al archivo anterior o siguiente. El número de archivo se mostrará en
pantalla.
Sostenga el botón ▎ (2) ó ▎(17) para retroceder o adelantar rápidamente. La reproducción USB empezará
desde donde suelte el botón.
PAUSAR LA REPRODUCCIÓN
FUNCIONAMIENTO
Pulse el botón
PREOÍR TODOS LOS ARCHIVOS
Pulse el botón 2/INT (15) para reproducir los primeros 10 segundos de cada archivo. Pulse el botón de nuevo para
detener el intro y oír el archivo.
REPETIR UN ARCHIVO
Pulse el botón 3/RPT (14) para repetir continuamente una pista. Púlselo de nuevo para repetir todos los archivos.
REPRODUCIR TODAS LAS PISTAS ALEATORIAMENTE
1/>II
(16) para pausar el reproductor USB. Pulse el botón de nuevo para reanudar la reproducción.
47
FUNCIONAMIENTO Y RENDIMIENTO
Pulse el botón 4/RDM (13) para reproducir todos los archivos en orden aleatorio. Pulse el botón de nuevo para
cancelar la función.
SELECCIONAR EL DIRECTORIO ARRIBA/ABAJO
Pulse el botón 5/DIR- (12) ó 6/DIR+ (11) para seleccionar el directorio hacia abajo o arriba. Si el USB/SD no
tiene directorios, no pasará nada al pulsar el botón 5/DIR- (12) ó 6/DIR+ (11).
SELECCIONAR UN ARCHIVO POR NÚM. DE PISTA
Pulse el botón “AMS” (4). Es para la búsqueda por número de pista. El LCD mostrará “TRK ***”. Use
1/2/3/4/5/6/7(BAND) /8( )./9( )/0(DISP) para introducir el número de pista. Cuando termine, pulse el botón
SEL/ENT para empezar a reproducir. O use vol/sel (5) para moverse hasta el número de pista deseado y
después pulse el botón SEL/ENT para reproducir.
La radio para coches de TAKARA, la RDU 310(TAKARA), admite memorias USB de hasta 8 GB.
FUNCIONAMIENTO DE LA REPRODUCCIÓN DE TARJETAS DE MEMORIA
En el panel frontal de la unidad, hay una interfaz para tarjetas (20). Cuando inserte una tarjeta de memoria en la
interfaz para tarjetas, la unidad buscará los archivos MP3/WMA de la tarjeta y empezará a reproducir archivos
MP3/WMA automáticamente. El funcionamiento es igual al funcionamiento MP3/WMA descrito anteriormente. Si
está en otro modo, también podrá pulsar el botón MOD (1) para seleccionar el modo de tarjetas de memoria.
La radio para coches de TAKARA, la RDU 310(TAKARA), admite tarjetas de memoria de hasta 8 GB.
RENDIMIENTO
Gama de sintonización
Sensibilidad
Relación S/N
Separación estéreo
Respuesta en
frecuencia
FM
87.5~108.0 MHz
4uV(S/N=30dB)
50 dB
>25 dB
40Hz~12KHz
MW
522~1620KHz
80Hz~2.2KHz
---
50 dB
---
MP3/WMA
---
---
60 dB
50dB
20Hz~16KHz
48
Page 26

MANDO A DISTANCIA
MANDO A DISTANCIA
1.POWER/MODE: Pulse brevemente el botón para encender/cambiar
de modo. Pulse largamente el botón para apagar.
2. SEL/ENT : Pulse brevemente el botón para ajustar el audio:
VOL / BASS / TREBLE / BALANCE / FADER
DSP OFF / DX / STEREO
En el modo de búsqueda USB/SD,
pulse brevemente el botón para la
función ENTER.
– <<: Pulse brevemente el botón para
ANTERIOR/autobuscar hacia atrás.
Pulse largamente el botón para retroceder
rápidamente/búsqueda manual hacia atrás.
4. BND / LOU: Pulse brevemente el botón
para cambiar de banda.
Pulse largamente el botón para la
función LOUDNESS.
5 0: N Número 0 para la búsqueda MP3.
6. 2 / INT: Estación preprogramada
2#/reproducción de intro/número 2 en
la búsqueda de MP3.
7. 1 / : Estación preprogramada
1#/pausar/reproducir/número 1 en la
búsqueda de MP3.
8.5 / DIR-: Estación preprogramada 5#/entrar a la carpeta anterior/número 5 en la búsqueda de MP3.
9. 4 / RDM: Estación preprogramada 4#/reproducción aleatoria/número 4 en la búsqueda de MP3.
10. 7: Número 7 en la búsqueda de MP3.
11. VOL△
L△: Aumentar el volumen.
L△L△
12. MUTE/AF: Pulse brevemente el botón para silenciar/activar sonido. Pulse largamente el botón para la
activación/desactivación AF.
13. >>+: Pulse brevemente el botón para SIGUIENTE/autobuscar adelante. Pulse largamente el botón para
adelantar rápidamente/buscar manualmente adelante.
14. VOL▽
15. PTY: Activar/desactivar la función PTY.
16. AMS: Pulse brevemente el botón para la búsqueda de preprogramaciones/búsqueda de archivos MP3(WMA).
L▽: Disminuir el volumen.
L▽L▽
49
MANDO A DISTANCIA
Pulse largamente el botón para autoalmacenar.
17. TA: Activar/desactivar la función TA.
18. 3 / RPT: Estación preprogramada 3#/reproducción repetida/número 3 en la búsqueda de MP3.
19. 6 / DIR+: Estación preprogramada 5#/entrar a la siguiente carpeta/número 6 en la búsqueda de MP3.
20. 8:
Número 8 en la búsqueda de MP3.
21. 9:
Número 9 en la búsqueda de MP3.
50
Page 27

Umieszczenie obudowy w desce
.
3. Włoż enie urzą dzenia do obudowy
Prawa strona
Przedni panel
Wyjmowanie panelu
INSTRUKCJA OBSŁUGI
CS-322
Para obtener información y apoyo, www.lenco.eu
―PRZED OBSŁUGĄ URZĄDZENIA PROSIMY DOKŁADNIE ZAPOZNAĆ SIĘ Z INSTRUKCJĄ OBSŁUGI.-
51
WSKAZÓWKI BEZPIECZEŃSTWA
WSKAZÓWKI BEZPIECZEŃSTWA
1. Urządzenie powinno być zainstalowane przez wykwalifikowanego specjalistę.
2. Przed użyciem urządzenia proszę zapoznać się z instrukcją obsługi.
3. Wykonaj wszystkie połączenia przed podłączeniem zasilania do urządzenia.
4. W celu uniknięcia spięcia, upewnij się, że wszystkie kable wychodzące na zewnątrz są zaizolowane.
5. Podłącz wszystkie kable po zakończeniu instalacji urządzenia.
6. Wykonaj wszystkie podłączenia oraz montaż zgodnie z tą instrukcją obsługi. Nieprawidłowe podłączenia
mogą uszkodzić urządzenie.
7. Urządzenie to może być podłączone wyłącznie do gniazda prądu stałego 12 V DC, upewnij się, że
pojazd posiada ten właśnie system zasilania.
8. Dokładnie sprawdź wszystkie połączenia. Nieprawidłowe podłączenia mogą uszkodzić urządzenie oraz
system elektryczny pojazdu.
Klucz L
Obudowa
Deska rozdzielcza
Zatrzaski
Zewnętrzna pokrywa
1.Wyję cie obudowy z
deski rozdzielczej
Klucz R
Śrubokrę t
2.
rozdzielczej oraz blokada zatrzask
Obudowa
體
Deska rozdzielcza
Zewnętrzna pokrywa
4.
Wyjmowanie urządzenia
Instalacja panelu
Lewa strona
Lewa strona
Przedni panel
Prawa strona
52
Page 28

INNA METODA MONTAŻU
Deska rozdzielcza lub konsola
.
ETAPY MONTAŻU
Śruba m ontaż owa
Metalowa listwa
nakrę tka
sześciokątna
odkładka
spręż ysta
podkładka płaska
śruba samo
gwintują ca
Wspornik do montażu
Śruba
Hak
Boczna strona z otworami
na śruby oznaczonymi T, N
Metoda ta jest przeznaczona
dla pojazd體 Nissan oraz Toyota
Śruba
DIAGRAM POŁĄCZEŃ ELEKTRYCZNYC
LINEOUT-Rch
(CZEROWNY)
LINEOUT-Lch
CZARNY
YELLOW
B+
ISO CZĘŚĆ A
UZIEMIENIE
RED
ACC
BLUE
AUTO ANT
(BIAŁY)
ZIELONY/CZR
ZIELONY
TYLNI L-ch+
BIAŁY/CZR
PRZEDNI L-ch-
BIAŁY
PRZEDNI L-ch+
SZARY/CZR
PRZEDNI R-ch-
SZARY
PRZEDNI R-ch+
FIOLETOWY/CZR
ISO CZĘŚĆ B
TYLNI R-ch-
FIOLETOWY
TYLNI R-ch+
TYLNI L-ch-
ANTENA AM/FM
1. Urządzenie może być podłączone wyłącznie do gniazda prądu stałego 12 V DC.
2. Nie podłączaj urządzenia do pojazdu, gdy akumulator nie jest prawidłowo podłączony.
3. Upewnij się, aby podłączyć żółty kabel do dodatniego gniazda akumulatora (+).
4. Podczas wymiany bezpiecznika, upewnij się, aby wymienić go na nowy o tych samych parametrach.
5. Korzystanie z wysokiej jakości głośników 4-8 ohm zapewnij lepszą jakość pracy urządzenia
53
LISTA ELEMENTÓW ORAZ FUNKCJI
LISTA ELEMENTÓW ORAZ FUNKCJI
54
Page 29

OBSŁUGA
1. POWER/MODE 13. Przycisk 4/RDM
2. Przycisk 8┃ 14. Przycisk 3/RPT
3. Przycisk DISP/0 15. Przycisk 2/INT
4. Przycisk AMS 16. Przycisk 1 /
5. Pokrętło VOL/SEL/ ENT 17. Przycisk 9/
6. Wyświetlacz LCD 18. Przycisk BAND /PTY/7
7. Czujnik pilota zdalnego sterowania
8. (przycisk zwolnienia panelu) 20. Przycisk MUTE/AF
9. Przycisk OPEN (otwórz) 21. Port USB
10. Gniazdo wejścia Auxiliary 22. Czytnik kart pamięci SD
11. Przycisk 6/DIR+ 23. Przycisk Reset
12. Przycisk 5/DIR-
19. Przycisk TA
┃┃┃┃
PODSTAWOWA OBSŁUGA
1. Włączanie / wyłączanie urządzenia
Naciśnij oraz przytrzymaj przycisk
2. Zdjęcie panelu przedniego
Naciśnij przycisk (8) w celu zdjęcia panelu przedniego.
3. Regulacja dźwięku
Naciśnij przycisk SEL (5) w celu wyboru pożądanego trybu dźwięku. Tryb dźwięku zmieni się w następującej
kolejności: VOL---BASS---TREBLE---BALANCE---FADER---LOUD---DSP OFF---DX---STEREO.
Ustaw pożądany poziom głośności za pomocą pokrętła głośności (5), przekręcając w kierunku zgodnym lub
przeciwnym do ruchu wskazówek zegara.
4. Wyciszenie dźwięku
W powyższym menu, naciśnij oraz przytrzymaj przycisk SEL (5) w celu wejścia do menu wyciszania dźwięku. Za
pomocą pokrętła głośności VOL (5) włącz lub wyłącz wyciszenie dźwięku.
5. Wybór EQ
W powyższym menu, naciskaj przycisk SEL (5) w celu wejścia do menu ustawień DSP OFF.
Za pomocą pokrętła głośności VOL (5) zmień ustawienia EQ w następującej kolejności: DSP
OFF---CLASSIC---POP---ROCK.
6. LOCAL/DISTANCE
W powyższym menu, naciskaj przycisk SEL (5) w celu wejścia do menu ustawień DX. Za pomocą pokrętła
głośności VOL (5) ustaw tryb DX lub LOC. W trybie lokalnym LOC, podczas wyszukiwania stacji radiowych,
akceptowane są wyłącznie lokalne stacje radiowe o silnym sygnale.
7. STEREO/MONO
W powyższym menu, naciskaj przycisk SEL (5) w celu wejścia do menu ustawień STEREO. Za pomocą pokrętła
głośności VOL (5) ustaw tryb STEREO lub MONO. W trybie STEREO, gdy obierana jest stacja radiowa na
wyświetlaczu pokaże się ikona “OO”.
8. WYŚWIETLACZ CIEKŁOKRYSTALICZNY (LCD)
Wyświetla bieżącą częstotliwość radiową oraz aktywne funkcje urządzenia.
9. GNIAZDO AUXILIARY
Urządzenie może zostać podłączone do przenośnego odtwarzacza audio poprzez gniazdo AUX IN (10) na
przednim panelu. Po podłączeniu przenośnego urządzenia, naciśnij przycisk MOD (1) na przednim panelu w celu
włączenia trybu AUX IN.
10. FUNKCJA RESETOWANIA URZĄDZENIA
Przycisk RESET (24) powinien być wciśnięty za pomocą długopisu kulkowego lub małego metalowego przedmiotu.
Użyj przycisku RESET wyłącznie w następujących sytuacjach:
- Pierwsze uruchomienie urządzenia po wykonaniu wszystkich podłączeń.
“POWER”
w celu włączenia / wyłączenia urządzenia.
55
OBSŁUGA
- Żadne przyciski funkcyjne nie działają.
- Błąd systemu „Error” został pojawił się na wyświetlaczu.
Informacja: Po naciśnięciu przycisku RESET (24), dane zapisane w pamięci zostaną utracone!
OBSŁUGA RADIA
1. PRZEŁACZENIE DO TRYBU RADIA
Naciśnij przycisk MOD (1) w celu wyboru trybu radia. Tryb radia zostanie pokazany na wyświetlaczu wraz z trybem
pasma oraz bieżącą częstotliwością.
2. WYBÓR TRYBU PASMA
W trybie radia naciśnij przycisk BAND (18) w celu wyboru pożądanego trybu pasma.
Pasmo będzie się zmieniać w następującej kolejności: FM1--FM2--FM3--AM1(MW1)--AM2(MW2).
3. WYBÓR STACJI RADIOWEJ
Naciśnij przycisk 9 ▎(17) lub 8┃┃┃┃ (2) w celu rozpoczęcia automatycznego wyszukiwania stacji radiowej.
Wyszukiwanie rozpocznie się automatycznie. W celu wyboru ręcznego wyszukiwania stacji radiowych naciśnij oraz
przytrzymaj powyższe przyciski do momentu pojawienia się na wyświetlaczu “MANUAL”. Przy każdym naciśnięciu
przycisku 9 ▎(17) lub 8┃┃┃┃ (2) częstotliwość zmieni się o 0,05 Mhz.
4. AUTOMATYCZNE ZAPISYWANIE & SKANOWANIE STACJI RADIOWYCH
- Automatyczne zapisywanie stacji radiowych
Przez 2 sekundy naciśnij przycisk AMS (4), urządzenie przeskanuje wszystkie stacje radiowe. 6
najsilniejszych stacji radiowych zostanie zapisanych z odpowiednim przypisanym numerem.
- Przesłuchiwanie stacji radiowych
Naciśnij przycisk AMS (4), w celu krótkiego przesłuchania wszystkich wyszukanych stacji radiowych.
5. RĘCZNE ZAPISYWANIE STACJI RADIOWYCH
Ustaw pożądaną stację radiową, następnie naciśnij przycisk zapisania stacji radiowych (11/12/13/14/15/16),
ustawiona stacja radiowa zostanie przypisana do wybranego numeru.
6. OBSŁUGA ANS (cyfrowe informacje stacji radiowych)
- Ustawienia trybu AF
Naciśnij oraz przytrzymaj przycisk AF (20) w celu włączenia / wyłączenia trybu AF.
Po włączeniu trybu AF, ikona “AF” pojawi się na wyświetlaczu.
Nazwa programu stacji radiowej zostanie wyświetlona podczas odbioru sygnału ANS.
Gdy ikona “AF” miga, oznacza to, że sygnał słabnie. Sygnał może słabnąć ze względu na słabą częstotliwość
radiową. AF automatycznie przełączy do nowej częstotliwości.
- Obsługa stacji regionalnych
Naciśnij przycisk AF (20) w celu włączenia / wyłączenia trybu stacji regionalnych.
Niektóre stacje radiowe, na określony czas zmieniają standardowy sygnał na sygnał stacji regionalnych. Po
włączeniu trybu regionalnego, bieżąca stacja radiowa nie ulegnie zmianie. Gdy trybu regionalny jest wyłączony,
sygnał zostanie zmieniony do odbioru trybu regionalnego.
- Korzystanie z PTY do wyboru programu
Naciśnij przycisk PTY (18) jeden raz, następnie przycisk zapisanej stacji radiowej (11/12/13/14/15/16). Do wyboru
możliwe są następujące rodzaje programów:
Przycisk #1: WIADOMOŚCI/WYDARZENIA/INFORMACJE
Przycisk #2: EDUKACJA/TEATR/SPORT
Przycisk #3: ROZMAITOŚCI/KULTURA/NAUKA
Przycisk #4: EKONOMIA/DLA DZIECI/POGODA
Przycisk #5: FORUM TELEFONICZNE/SPRAWY SPOŁECZNE/RELIGIA
Przycisk #6: PODRÓŻE/HOBBY/DOKUMENTALNY
Naciśnij przycisk PTY (18) dwa razy, następnie przycisk zapisanej stacji radiowej (11/12/13/14/15/16). Do wyboru
możliwe są następujące rodzaje programów:
Przycisk #1: MUZYKA ROCK/POP
56
Page 30

Przycisk #2: MUZYKA LEKKA/SPOKOJNA
OBSŁUGA
Przycisk #3: MUZYKA INNA/KLASYCZNA
Przycisk #4: MUZYKA COUNTRY/JAZZ
Przycisk #5: MUZYKA KRAJOWA/STARE PRZEBOJE
Przycisk #6: MUZYKA FOLKOWA
- Odsłuchiwanie informacji o ruchu drogowym
Przycisk TA (19) działa w następujący sposób:
Naciśnięcie przycisku spowoduje włączenie lub wyłączenie trybu TA.
Gdy urządzenie jest w trybie TA oraz gdy informacja o ruchu drogowym jest nadawana:
Jeżeli urządzenie znajdowało się w trybie CD (MP3) ESB/MEMORY CARD lub trybie AUX IN, przełączy się
ono do trybu radia.
Jeżeli poziom głośności znajdował się poniżej dolnego progu, głośność zostanie zwiększona powyżej dolnego
progu. Jeżeli poziom głośności ustawiony był do poziomu większego niż dolny prób (min. poziom głośności
TA), ustawiony zostanie ostatni zapamiętany poziom głośności.
Gdy urządzenie jest w trybie TA, funkcja TA poszczególnych segmentów zostanie aktywowana. Gdy obierana
jest stacja TP, funkcja TP poszczególnych segmentów zostanie aktywowana.
Przerywanie funkcji TA
Po naciśnięciu tego przycisku nadawanie informacji o ruchu drogowym zostanie wyłączone.
Jednakże tryb TA nie zostanie wyłączony.
Nazwa stacji radiowej wyrażona jest z pomocą alfanumerycznych znaków
AF: Częstotliwości alternatywne
Lista stacji radiowych nadających ten sam program
TP: Identyfikacja programu o ruchu drogowym
Identyfikacja stacji oraz programu o ruchu drogowym
TA: Informacje odnośnie ruchu drogowego
Informacje odnośnie czy dane o ruchu drogowym są przesyłane czy nie
PTY: Rodzaj kodu programu
Informacja o charakterze nadawanego programu, np. wiadomości, muzyka, sport, itp.
OBSŁUGA PORTU USB
Na przedniej stronie urządzenia znajduje się port USB (21). Podłącz urządzenie USB do tego portu.
Po podłączeniu urządzenia USB poprzez port USB, urządzenie wyszuka pliki MP3/WMA na nośniku danych USB
oraz automatycznie rozpocznie odtwarzanie plików MP3/WMA.
Gdy urządzenie znajduje się w innym trybie, naciśnij przycisk MOD (1) w celu aktywacji trybu USB.
SELECTING FILE
Naciśnij przycisk ▎ (2) lub ▎(17) w celu przeskoczenia do poprzedniego lub następnego utworu. Numer
utworu zostanie pokazany na wyświetlaczu.
Naciśnij oraz przytrzymaj przycisk ▎ (2) lub ▎(17) w celu przewinięcia utworu w przód lub w tył.
Odtwarzanie utworu rozpocznie się od momentu zwolnienia przycisku.
WSTRZYMYWANIE ODTWARZANIA
Naciśnij przycisk 1/ (16) w celu tymczasowego wstrzymania odtwarzania. Ponowne naciśnięcie przycisku
spowoduje wznowienie odtwarzania.
PRZESŁUCHIWANIE POCZĄTKÓW UTWORÓW
Naciśnij przycisk 2/INT (15) w celu odsłuchania pierwszych 10 sekund każdego utworu na płycie. Ponownie naciśnij
przycisk w celu anulowania oraz odsłuchania całego utworu.
POWTARZANIE ODTWARZANIA UTWORU
57
OBSŁUGA & DANE TECHNICZNE
Naciśnij przycisk 3/RPT (14) w celu nieprzerwanego odtwarzania tego samego utworu. Ponownie naciśnij ten
przycisk w celu anulowania powtarzania utworu.
ODTWARZANIE LOSOWE
Naciśnij przycisk 4/RDM (13) w celu losowego odtwarzania wszystkich zapisanych utworów. Ponownie naciśnij
przycisk w celu anulowania
ZMIANA FOLDERU GÓRA/DÓŁ
Naciśnij przycisk 5/DIR- (12) lub 6/DIR+ (11) w celu zmiany folderu w dół lub górę. Jeżeli czytnik USB/SD
nie posiada folderów, przyciski 5/DIR- (12) lub 6/DIR+ (11) nie posiadają żadnej funkcji.
WYBÓR UTWORU ZA POMOCĄ NUMERU
Naciśnij przycisk AMS (4). Funkcja ta służy do wyszukiwania numeru utworu. Na wyświetlaczu LCD pokaże się
ikona “TRK ***”. Za pomocą przycisków 1/2/3/4/5/6/7(BAND)/8( )/9( )/0(DISP) wybierz pożądany numer
utworu. Po dokonaniu wyboru naciśnij przycisk SEL/ENT (5) w celu rozpoczęcia odtwarzania.
Radio TAKARA - RDU 310 wspiera nośniki USB o wielkości do 8GB.
OBSŁUGA KART PAMIĘCI
Na przedniej stronie urządzenia znajduje się czytnik kart pamięci (22). Po podłączeniu karty pamięci SD do czytnika
kart pamięci SD, urządzenie wyszuka pliki MP3/WMA na karcie oraz automatycznie rozpocznie odtwarzanie plików
MP3/WMA. Obsługa trybu kart pamięci jest identyczna jak obsługa MP3/WMA dla portu USB. Gdy urządzenie
znajduje się w innym trybie, naciśnij przycisk MOD (1) w celu aktywacji trybu kart pamięci.
Radio TAKARA - RDU 310 wspiera karty pamięci o wielkości do 8GB.
DANE TECHNICZNE
Zakres częstotliwości
Czułość
Współczynnik
sygnału/szumu
Separacja stereo
Przenoszenie pasma
FM
87.5~108.0 MHz
4uV(S/N=30dB)
50 dB
>25 dB
40Hz~12KHz
MW
522~1620KHz
---
50 dB
---
80Hz~2.2KHz
MP3/WMA
---
---
60 dB
50dB
20Hz~16KHz
58
Page 31

PILOT ZDALNEGO STEROWANIA
1.POWER/MODE: krótkie naciśnięcie dla włączenia urządzenia oraz zmiany trybu pracy MODE.
Długie naciśnięcie dla wyłączenia urządzenia.
2. SEL/ENT: krótkie naciśnięcie dla ustawienia trybu audio:
VOL / BASS / TREBLE / BALANCE / FADER DSP OFF / DX / STEREO
W trybie wyszukiwania dla USB/SD – krótkie naciśnięcie
dla potwierdzenia operacji ENTER.
3. – <<: krótkie naciśnięcie dla funkcji POPRZEDNI /
automatycznego wyszukiwania wstecz
Długie naciśnięcie dla trybu RF / ręcznego wyszukiwania wstecz.
4. BND / LOU: krótkie naciśnięcie dla zmiany pasma.
Długie naciśnięcie dla funkcji podbicia basów.
5 0: numer 0 dla wyszukiwania MP3.
6. 2 / INT: 2# zapisana stacja radiowa / odtwarzanie intro /
numer 2 podczas wyszukiwania MP3.
7. 1 / : 1# zapisana stacja radiowa / pauza / odtwarzanie
/ numer 1 podczas wyszukiwania MP3.
10. 5 / DIR-: 5# zapisana stacja radiowa / przejście do poprzedniego
folderu / numer 5 podczas wyszukiwania MP3.
9. 4 / RDM: 4# zapisana stacja radiowa / losowe odtwarzanie /
numer 4 podczas wyszukiwania MP3.
10. 7: numer 7 podczas wyszukiwania MP3.
11. VOL△△△△: zwiększenie poziomu głośności.
12. MUTE/AF: krótkie naciśnięcie dla włączenia / wyłączenia wyciszenia. Długie naciśnięcie dla włączenia /
wyłączenia funkcji AF.
13. >>+: krótkie naciśnięcie dla funkcji NASTĘPNY / automatycznego wyszukiwania w przód. Długie naciśnięcie
dla FF / ręcznego wyszukiwania w przód.
14. VOL- zmniejszenie poziomu głośności.
15. PTY: włączenie / wyłączenie funkcji PTY.
16. AMS: krótkie naciśnięcie dla skanowania / wyszukiwania plików MP3 (WMA). Długie naciśnięcie dla
automatycznego zapisywania.
17. TA: włączenie / wyłączenie funkcji TA.
18. 3 / RPT: 3# zapisana stacja radiowa / powtarzanie odtwarzania / numer 3 podczas wyszukiwania MP3.
19. 6 / DIR+: 6# zapisana stacja radiowa / następny folder / numer 6 podczas wyszukiwania MP3.
20. 8: numer 8 podczas wyszukiwania MP3.
21. 9: numer 9 podczas wyszukiwania MP3..
PILOT ZDALNEGO STEROWANIA
59
60
 Loading...