

Page 1

BT-125
3D SOUND SPEAKER
WITH BLUETOOTH
User’s Guide
www.lenco.com
R
Page 2

Important safety instructions
When used in the directed manner, this unit has been designed and manufactured to ensure
your personal safety. However, improper use can result in potential electrical shock or re
hazards. Please read all safety and operating instructions carefully before installation and use,
and keep these instructions handy for future reference. Take special note of all warnings listed in
these instructions and on the unit.
1.
2.
3.
4.
5.
6.
7.
8.
9.
10.
11.
Water and Moisture
The unit should not be used near water. For example: near a bathtub, washbowl, kitchen
sink, laundry tub, swimming pool or in a set basement.
Ventilation
The unit should be situated so that its location or position does not interfere with its proper
ventilation. For example, it should not be situated on a bed, sofa, rug or similar surface that
may block the ventilation openings. The ventilation should not be impeded by covering the
ventilation openings with items, such as newspapers, table-cloths, curtains, etc. Also, it
should not be placed in a built-in installation, such as a bookcase or cabinet, which may
impede the ow of air through the ventilation openings; minimum distances 30 cm around
the apparatus for sufcient ventilations.
Heat & ame
The unit should be situated away from heat sources such as radiators, heat registers,
stoves or other appliances (including ampliers) that produce heat.
No naked ame sources, such as lighted candles, should be placed on the apparatus.
Power source
The unit should be connected to a power supply only of the type described in the operating
instructions or as marked on the appliance. Where the AC mains power cord is used as the
disconnect device, the disconnect device shall remain readily operable.
Power cord protection
Power supply cords should be routed so that they are not likely to be walked on or pinched
by items placed upon or against them. It is always best to have a clear area from where the
cord exits the unit to where it is plugged into an AC outlet.
Cleaning
The unit should be cleaned only as recommended. See the section “Care and Maintenance” of this manual for cleaning instructions.
Object and liquid entry
Care should be taken so that objects do not fall and liquids are not spilled into any openings or vents located on the unit. It shall not be exposed to dripping or splashing and that
no objects lled with liquids, such as vases, shall be placed on the apparatus.
Attachments
Do not use attachments no recommended by the product manufacturer.
Lightning and power surge protection
Unplug the unit from the wall outlet and disconnect the periods of time. This will prevent
damage to the product due to lightning and power-line surges.
Overloading
Do not overload wall outlets, extension cords, or integral convenience receptacles as this
can result in a risk of re of electric shock.
Damage requiring service
This unit should be serviced by qualied service personnel when:
A. Objects have fallen into or liquid has been spilled into the enclosure.
B. The unit has been exposed to rain.
C. The unit has been dropped or the enclosure damaged.
D. The unit exhibits a marked change in performance or does not operate normally.
GB 2
Page 3
Servicing
The user should not attempt to service the unit beyond those methods described in the
user’s operating instructions. Service methods not covered in the operating instructions
should be referred to qualied service personnel.
12.
Care and Maintenance
Do not subject the unit to excessive force, shock, dust or extreme temperature.
Do not tamper the internal components of the unit.
Clean your unit with a damp (never wet) cloth. Solvent or detergent should never be
used.
Avoid leaving your unit in direct sunlight or in hot, humid or dusty places.
Keep your unit away from heating appliances and sources of electrical noise such as
uorescent lamps or motors.
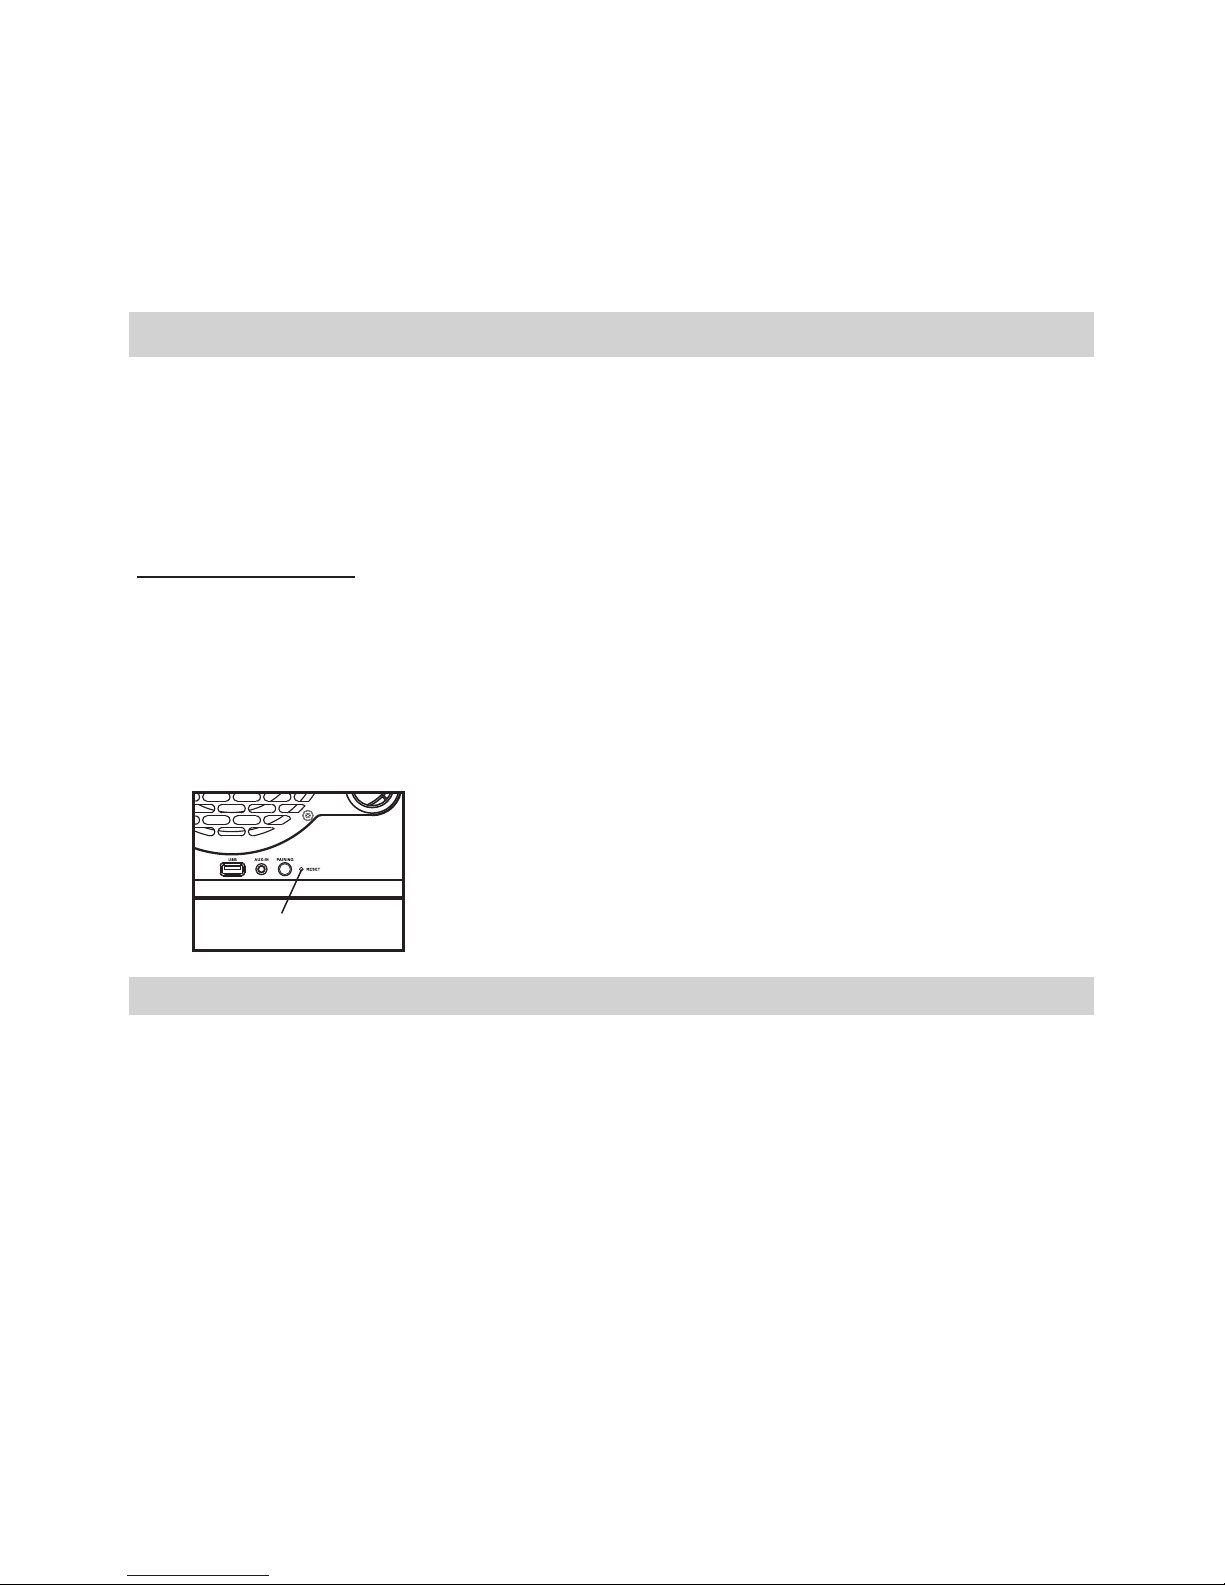
Resetting the unit
If the unit experiences a power surge or electric shock, it is possible that the internal micro-controller may lock up and the unit will not respond to any commands from the panel controls.
1. In this event, unplug and then reconnect the AC mains power plug into the wall outlet.
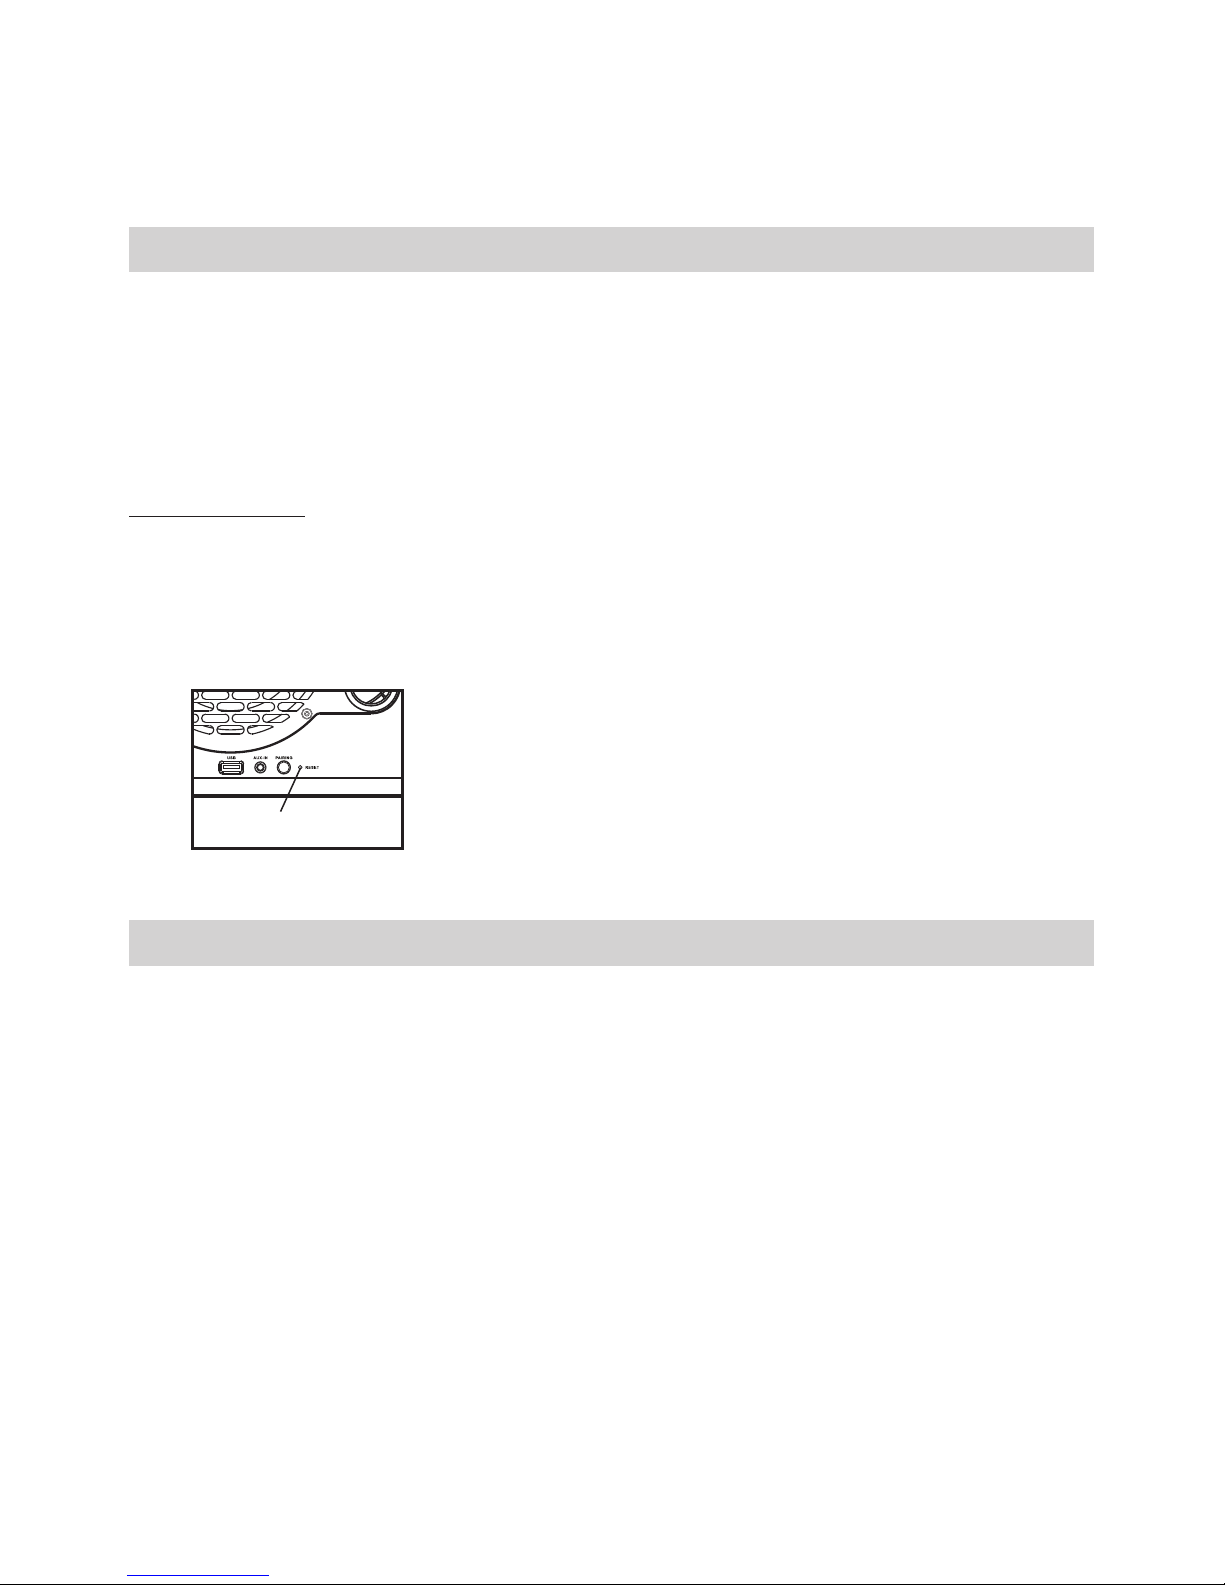
2. Use a straightened paper clip, toothpick or similar objects to press the RESET button
located at the rear of the main unit (see the below gure).
RESET button
Caution: Do not use a sharp, pointed object to press the
reset button. It may damage the reset switch
inside the unit.
Features
Thank you for purchasing the BT-125 - 3D sound speaker with Bluetooth®.
This model incorporates following features:
- Playback mobile device, like Apple devices, smart phones or tablet music through
Bluetooth® technology
- NFC (Near Field Communication) function for easy Bluetooth® connection
- Audio line-in (AUX) for connecting other digital audio player
- Built-in 6 High Fidelity Speakers and incorporated wave eld synthesis (WFS) technology to
produce 3D sound effect
- Built-in subwoofer for heavy bass effect
- USB connector for charging smart phone battery.
iPhone, iPod, iPod mini, iPod nano, iPod touch, iPod classic and iPod shufe are trademarks of
Apple Inc., registered in the U.S. and other countries.
Apple devices like iPad/iPhone/iPod, smart phones and/or tablet are not included.
GB 3
Page 4

GB 4
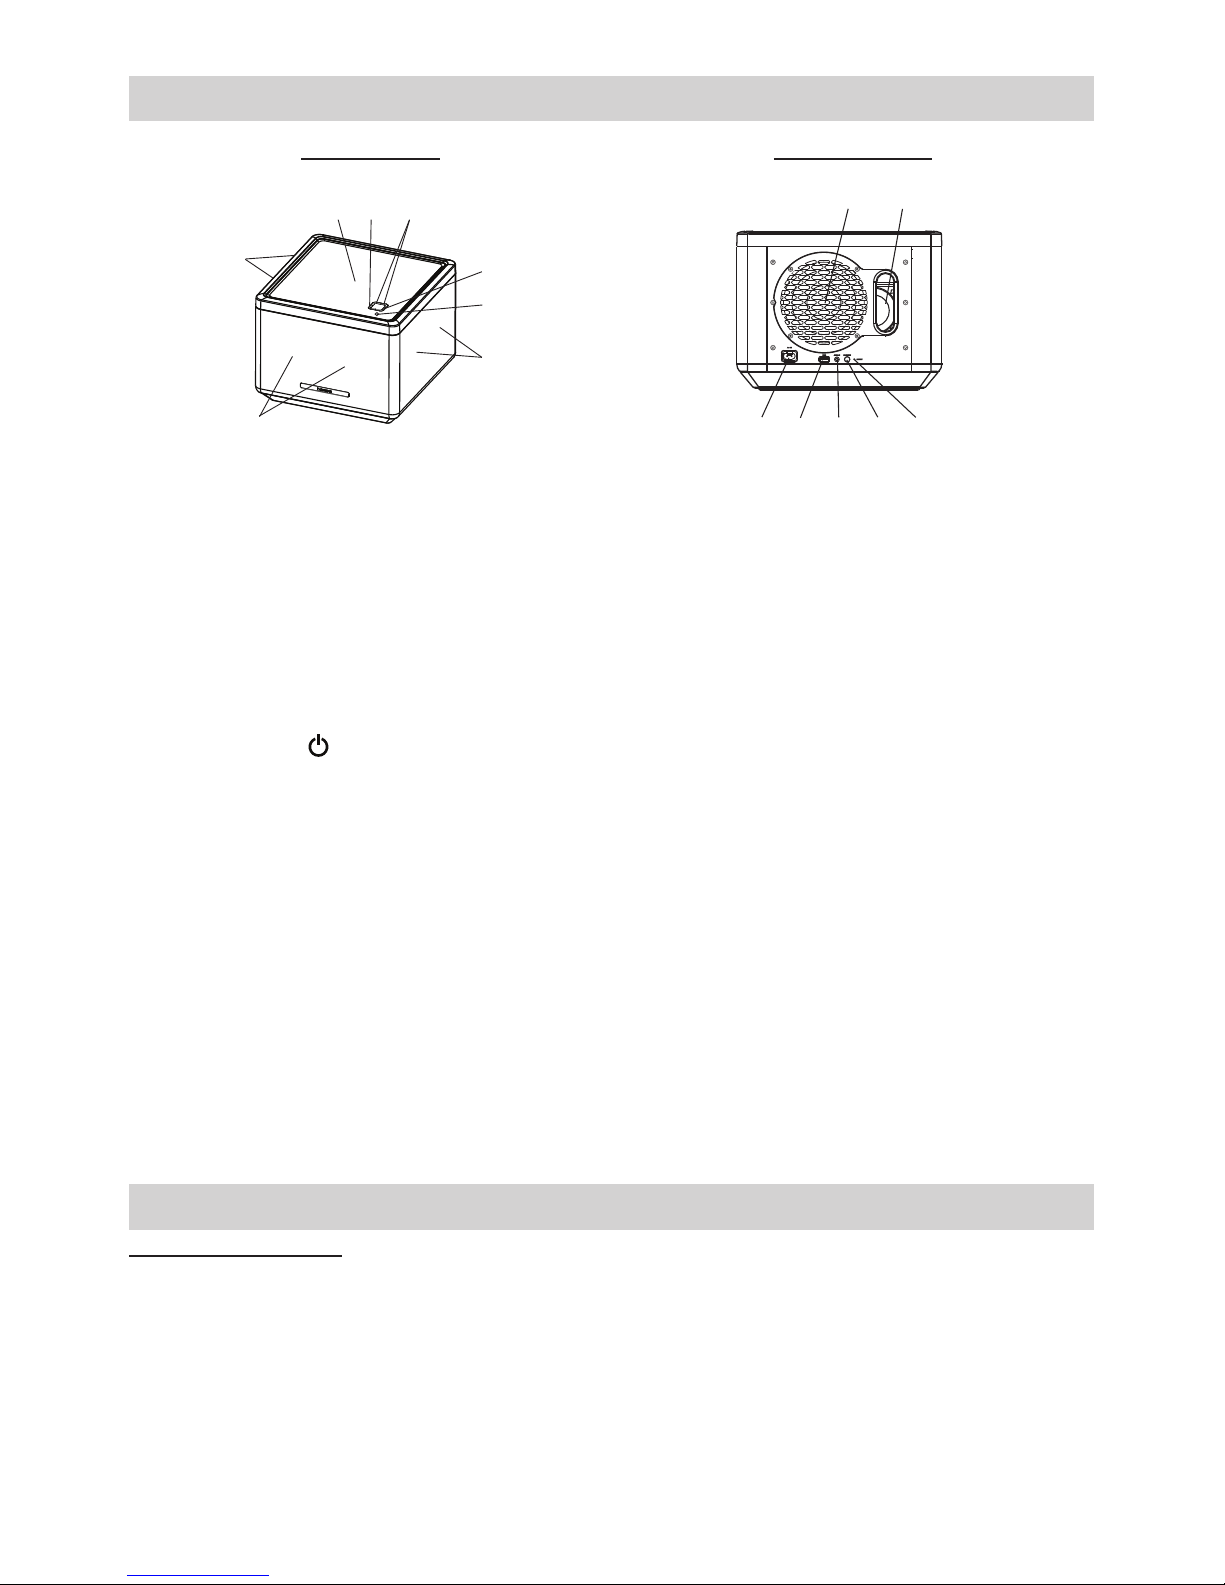
Description of parts
Front View Rear View
2
1
1
1
6
3 4
5
7 8 9
10 11
12 13
1. Six wave eld synthesis
(WFS) speakers
2. NFC sensor The NFC (Near Field Communication) sensor located
at middle top of the unit.
3. FUNC. button The function button, press to select Bluetooth® or
AUX-IN mode.
4. VOLUME + / - button Adjust volume level up or down.
5. POWER button Turn the unit on or off.
6. Status LED indicator
7. AC socket Power supply to the unit.
8. USB connector Power source DC 5V (1000mA) for charging mobile
device battery only.
9. AUX-IN jack Auxiliary audio signal input.
10. PAIRING button Press to enter Bluetooth® pairing mode.
11. RESET button For resetting the unit.
12. Subwoofer
13. Bass Reex Opening This opening should never be blocked otherwise the
bass effect will be reduced.
Installation
AC Power Connection
(1) Connect the power cord plug to the AC socket located at rear of the unit.
(2) Firmly and securely plug the AC mains plug into AC mains outlet.
Page 5
GB 5
Bluetooth® operation
The unit plays from mobile devices (like, iPad/iPhone/iPod Touch ,Smart phone and tablet)
music through Bluetooth® operation. It also incorporated NFC (Near Field Communication)
function for easy connection with a mobile device which also has the NFC function.
(A) NFC Bluetooth® pairing / connection
1. Press the POWER button to turn on the unit.
2. Press the FUNC (function) button to select Bluetooth® mode, where the blue Status LED
indicator blinks fast.
3. Unlock the mobile device then place it (incorporated NFC function) on top of the NFC sensor
area.
4. The mobile device will pair and connect with this model automatically.
Note: The Bluetooth® device name of this model: Lenco
5. After successful connection, the blue Status LED indicator will light steadily.
6. Now you can playback Bluetooth® music, see section “Playback Bluetooth® music” below.
(B) Manual Bluetooth® pairing/connection
1. Press the POWER button to turn on the unit.
2. Press the FUNC button to select Bluetooth® mode. The blue Status LED indicator will blink
fast whilst the unit is searching nearby Bluetooth® device.
3. From the mobile device, turn on its Bluetooth® function and it will also search for the nearby
Bluetooth® device as well.
4. From the Bluetooth® device list of your mobile device, tap on Bluetooth® device name
“Lenco” of this model for the connection.
5. Once the mobile device is connected with the unit, the blue Status LED indicator light
steadily.
6. Now you can playback Bluetooth® music, see section “Playback Bluetooth® music” below.
(C) Bluetooth® pair / connect other mobile device
In case you would like to pair/connect other mobile device:
1. Press the PAIRING button which located at rear of the unit and enter the pairing mode.
2. It will search nearby Bluetooth® device and the blue Status LED indicator blinks fast.
3. Turn on the mobile device’s Bluetooth® function and select the Bluetooth® device “Lenco”
for the connection.
4. After the successful connection, the blue Status LED indicator will light steadily.
5. Now you can playback Bluetooth® music, see section “Playback Bluetooth® music” below.
Playback Bluetooth® music
1. After Bluetooth® communication link is set up, run the music player App from the mobile
device then playback the mobile device music.
2. You may adjust both the volume control of your mobile device and the volume control of this
unit to nd the most desirable volume setting.
3. From the mobile device, you may press:
(a) the / button to Play / Pause Bluetooth® music.
(b) the / button to skip tracks forward / backward.
Note:
Whilst the blue Status LED indicator blinks (3 minutes) fast, the unit is searching mobile device
for pairing.
Page 6
GB 6
Whilst the blue Status LED indicator blinks slowly, it means that the Bluetooth® communication
disconnected or after the 1st three searching minutes. To establish the Bluetooth® connection,
implement the 3 approaches (A), (B) or (C) mentioned in above sections.
Energy Saving Note
In Bluetooth® mode, if the Bluetooth® communication link disconnected for around 30 minutes,
the unit will go into standby mode automatically.
Listening to an external audio source
1. Connect an audio cable with 3.5mm stereo plug from an auxiliary audio device to the AUX-IN
jack of the unit.
2. Press the POWER button to turn on the unit.
3. To select auxiliary audio input, press the FUNC button and the green status LED indicator will
blink for around 5 seconds then lights steadily.
4. Turn on the external auxiliary audio device.
5. The volume can now be controlled through the unit.
Operate all other functions on the external device as usual.
Notes: (a) Press the POWER button to turn off the unit when you nish listening.
Don’t forget to switch off the power of the external audio device as well.
(b) If there is without any music (signal) presented at the AUX-IN input jack for around
10 minutes, the unit will turn into standby mode automatically.
Charging smart phone/mobile device battery
The unit incorporated an USB port with DC 5V (1000mA Max.) output which provides a way for
you to charge mobile device’s battery.
You can connect a mobile device like Apple devices, smart phones or tablet to the USB connector of the unit. Once the AC mains power is connected and it will charge the mobile device
battery.
3D Sound effect
This model integrated sonic emotion 3D sound technology which uses (WFS) wave eld synthesis to create the illusion of sounds all around. Any input even stereo can be used including
the iPhone/iPad/iPod Touch/Smart phone Bluetooth® streaming music or Aux-in music being in
stereo; by using WFS from sonic emotion, the 3D sound effect can create a virtual sound eld
where you can enjoy the nest audio no matter where you are in the room from a single device.
Sonic emotion and Sonic Emotion 3D sound are registered trademarks of sonic emotion ag.
Page 7

GB 7
Technical Data
Power Supply for the unit AC 100 - 240V ~ 50/60Hz
USB connector USB power source, output DC 5V (Maximum 1000mA)
(for charging external appropriate mobile device battery)
Speaker Output Total 15W x 6 + 35W (Max.)
Operating temperature 0 ~ +35 degree C
and Humidity 70%
Service and support
For information: www.lenco.com
For support: http://lencosupport.zendesk.com
Lenco helpdesk:
Germany 0900-1520530 (Local charges)
The Netherlands 0900-23553626 (Local charges + 1ct p/min)
Belgium 02-6200115 (Local charges)
The helpdesk is accessible from Monday till Friday from 9 AM till 6 PM.
When contacting Lenco, you will always be asked for the model and serial number of your
product. The serial number can be found on the back of the device. Please write down the serial
number below:
Model: BT-125
Serial number:_________________________________
Lenco offers service and warranty in accordance to European law, which means that in case of
repairs (both during and after the warranty period) you should contact your local dealer.
Important note: It is not possible to send products that need repairs to Lenco directly.
Important note:
If this unit is opened or accessed by a non-ofcial service center in any way, the warranty
expires.
This device is not suitable for professional use. In case of professional use, all warranty
obligations of the manufacturer will be voided.
Page 8
GB 8
Notice, statements and information
Lenco is not liable for printing errors in the manual.
The specications and external appearance of the set are subject to change without prior notice.
Declaration of Conformity
Products with the CE marking comply with the EMC Directive (2004/108/EC)
and the Low Voltage Directive (2006/95/EC) issued by the Commission of
the European Community. Hereby, STL Group BV, Ankerkade 20 NL 5928 PL
Venlo, declares that this product is in compliance with the essential requirements and other relevant provisions of Directive 1999/5/EC.
The declaration of conformity may be consulted at
https://lencosupport.zendesk.com/forums/22413161-CE-Documents
This symbol indicates that the relevant electrical product or battery should not
be disposed of as general household waste in Europe. To ensure the correct
waste treatment of the product and battery, please dispose them in accordance
to any applicable local laws of requirement for disposal of electrical equipment or batteries. In so doing, you will help to conserve natural resources and
improve standards of environmental protection in treatment and disposal of
electrical waste (Waste Electrical and Electronic Equipment Directive).
This product operates at 2400 - 2483.5 MHz and is designated only to be used inside a normal
household environment. This product is suited for this purpose within all EU counties.
For information and support: www.lenco.com
®All rights reserved
0168
Page 9
BT-125
LUIDSPREKER MET
3D-GELUID EN BLUETOOTH
Handleiding
www.lenco.com
R
Page 10

NL 2
Belangrijke veiligheidsinstructies
Dit apparaat is, bij gebruik volgens de instructies, ontworpen en vervaardigd om uw persoonlijke veiligheid te waarborgen. Echter, oneigenlijk gebruik kan resulteren in potentiële elektrische schokken of brandgevaar. Lees vóór de installatie en het gebruik de veiligheids- en
bedieningsinstructies zorgvuldig door en bewaar deze instructies op een geschikte plaats voor
toekomstige referentie. Let ook goed op alle waarschuwingen die in deze handleiding en op het
apparaat staan.
1.
2.
3.
4.
5.
6.
7.
8.
9.
10.
11.
Water en vocht
Het apparaat mag niet worden gebruikt in de buurt van water. Bijvoorbeeld: in de buurt van
een badkuip, wasbak, aanrecht, zwembad of een natte kelder.
Ventilatie
Het apparaat moet zo worden geplaatst, dat de plaats of positie de eigen ventilatie niet
in de weg staat. Zo moet het niet geplaatst worden op een bed, sofa, tapijt of soortgelijk
oppervlak, dat de ventilatieopeningen kan blokkeren. De ventilatie mag niet worden belemmerd door de ventilatieopeningen te bedekken met voorwerpen, zoals kranten, tafelkleden,
gordijnen, etc. Ook moet het apparaat niet worden geplaatst in een ingebouwde installatie,
zoals een boekenkast of kast, die de doorstroming van lucht door de ventilatieopeningen
belemmeren; houd minimaal 30cm rond het apparaat vrij voor voldoende ventilatie.
Warmte & vlammen
Het apparaat moet uit de buurt van warmtebronnen, zoals radiotoren, warmte-uitlaten,
kachels of andere apparaten (inclusief versterkers) die warmte produceren, geplaatst
worden.
Plaats geen voorwerpen met open vlam, zoals kaarsen, op het apparaat.
Voeding
Het apparaat moet alleen worden aangesloten op een voeding van het type dat beschreven is in de bedieningsinstructies of zoals aangegeven op het apparaat. Wanneer het
netsnoer wordt gebruikt als het ontkoppelapparaat, moet het eenvoudig bereikbaar blijven.
Bescherming netsnoer
Voedingskabels moeten zo worden gelegd, dat het niet waarschijnlijk is dat er op gestapt
wordt of dat ze bekneld raken door andere voorwerpen. Het is altijd het beste om een
schoon gebied te hebben van waar de kabel het apparaat verlaat naar waar het in het
stopcontact zit.
Reinigen
Het apparaat dient alleen zoals aangeraden te worden gereinigd. Kijk in de “Zorg en Onderhoud” sectie van deze handleiding voor reiniginstructies.
Voorwerpen en vloeistoffen
Zorg ervoor dat er geen voorwerpen en vloeistoffen in de ventilatieopeningen van het product vallen. Het moet niet worden blootgesteld aan druppend of spattend water en er mogen
geen voorwerpen gevuld met vloeistof, zoals vazen, op het apparaat gezet worden.
Hulpstukken
Gebruik alleen hulpstukken die worden aangeraden door de fabrikant.
Bliksem en bescherming stroompieken
Haal de stekker uit het stopcontact en verbreek de verbinding in deze perioden. Dit
voorkomt schade aan het product als gevolg van blikseminslag en stroompieken.
Overbelasten
Voorkom overbelasting van stopcontacten en verlengsnoeren, omdat dit kan leiden tot
risico van brand of elektrische schok.
Schade die onderhoud vereist
Dit apparaat dient door gekwaliceerd onderhoudspersoneel onderhouden te worden als:
A. Voorwerpen of vloeistof in de behuizing zijn gevallen.
B. Het apparaat is blootgesteld aan regen.
Page 11
NL 3
C. Het apparaat is gevallen of de behuizing is beschadigd.
D. Het apparaat een duidelijke verandering in prestaties vertoont of niet normaal
functioneert.
Onderhoud
De gebruiker moet niet proberen het apparaat te onderhouden op methoden die verder
gaan dan de methoden die beschreven worden in de gebruiksaanwijzing. Onderhoudsmethoden die niet worden besproken in de gebruiksaanwijzing moeten worden overgedra-
gen aan gekwaliceerd onderhoudspersoneel.
12.
Zorg en onderhoud
Stel het apparaat niet bloot aan overmatige druk, schokken, stof of extreme temperaturen.
Knoei niet met de interne onderdelen van het apparaat.
Maak uw apparaat schoon met een vochtige (nooit natte) doek. Oplosmiddel of afwasmiddel
mag nooit worden gebruikt
Laat uw apparaat niet achter in direct zonlicht of op hete, vochtige of stofge plaatsen
Houd uw apparaat uit de buurt van verwarmingstoestellen en bronnen van elektrische ruis,
zoals uorescentielampen of motoren.
Het apparaat resetten
Als het apparaat is blootgesteld aan een stroomstoot of elektrische schok, dan is het mogelijk
dat de interne microcontroller vastloopt en het apparaat niet meer reageert op commando’s van
het bedieningspaneel.
1. In dit geval, haal de stekker uit het stopcontact en steek de stekker vervolgens weer terug in
het stopcontact
2. Gebruik een rechtgebogen paperclip, tandenstoker of soortgelijk voorwerp om op de Reset
knop op de achterkant van het hoofdapparaat te drukken (zie in de afbeelding hieronder).
Reset knop
Let op: gebruik geen scherp, spits voorwerp om de resetknop
in te drukken. Dit kan de resetschakelaar in het apparaat beschadigen.
Functies
Bedankt voor de aanschaf van de BT-125 - luidspreker met 3D-geluid en Bluetooth®.
Dit model beschikt over de volgende functies:
- Muziek afspelen vanaf mobiele apparaten, zoals Apple-apparaten, smartphones of tablets met
behulp van Bluetooth® technologie
- NFC (Near Field Communication) voor eenvoudig verbinden met Bluetooth®
- Audio line-in (AUX) voor het aansluiten van andere digitale audiospelers
- Zes ingebouwde High Fidelity luidsprekers met Wave Field Synthesis (WFS) technologie voor
de creatie van een 3D-geluidseffect
- Ingebouwde subwoofer voor zwaar basseffect
- USB-aansluiting om de accu van de smartphone op te laden.
iPhone, iPod, iPod mini, iPod nano, iPod touch, iPod classic and iPod shufe zijn handelsmerken van Apple Inc., geregistreerd in de VS en andere landen.
Apple-apparaten zoals de iPad/iPhone/iPod, smartphones en/of tablet zijn niet inbegrepen.
Page 12
NL 4
Beschrijving van de onderdelen
Vooraanzicht Achteraanzicht
2
1
1
1
6
3 4
5
7 8 9
10 11
12 13
1. Zes Wave Field Synthesis
(WFS) luidsprekers
2. NFC-sensor De NFC (Near Field Communication) sensor zit midden
bovenop het apparaat.
3. FUNC. De functietoets, druk om de Bluetooth® of AUX-modus
te selecteren.
4. VOLUME + / - Verhoog of verlaag het volumeniveau.
5. POWER Schakel het apparaat in of uit.
6. Status LED-indicator
7. Netaansluiting Om het apparaat van stroom te voorzien.
8. USB-aansluiting Stroombron DC 5V (1000mA), alleen voor het opladen
van de accu van het mobiele apparaat.
9. AUX-INGANG Aux-ingang voor het aansluiten van andere apparaten.
10. PAIRING Druk om naar de Bluetooth® koppelmodus te schakelen.
11. RESET Om het apparaat te resetten.
12. Subwoofer
13. Bass reex opening Deze opening mag nooit worden geblokkeerd. Als de
opening toch geblokkeerd wordt, dan zal het basseffect
worden gereduceerd.
Installatie
Aansluiten netstroom
(1) Sluit de stekker van het netsnoer aan op de netaansluiting op de achterkant van het
apparaat.
(2) Steek vervolgens de stekker stevig in het stopcontact.
Page 13
NL 5
Bluetooth® bediening
Het apparaat kan muziek vanaf andere mobiele apparaten (zoals iPad/iPhone/iPod Touch,
smartphone en tablet) afspelen via een Bluetooth® verbinding. Het apparaat is tevens voorzien
van NFC (Near Field Communication) waarmee eenvoudig verbinding kan worden gemaakt met
mobiele apparaten die ook over NFC beschikken.
(A) Koppelen / verbinden met NFC Bluetooth®
1. Druk op POWER om het apparaat in te schakelen.
2. Druk op FUNC (functie) om de Bluetooth® modus te selecteren, de blauwe LED-indicator
zal snel knipperen.
3. Ontgrendel het mobiele apparaat en plaats het (met NFC-functie) op het gebied met de
NFC-sensor.
4. Het mobiele apparaat zal automatisch koppelen en verbinding maken met de luidspreker.
Opmerking: De Bluetooth® naam van deze luidspreker is: Lenco
5. Nadat de verbinding succesvol is gemaakt, zal de blauwe LED-indicator constant oplichten.
6. U kunt nu Bluetooth® muziek afspelen, zie paragraaf “Bluetooth® muziek afspelen”
hieronder.
(B) Handmatig koppelen/verbinden met Bluetooth®
1. Druk op POWER om het apparaat in te schakelen.
2. Druk op FUNC om de Bluetooth® modus te selecteren, de blauwe LED-indicator zal snel
knipperen terwijl de luidspreker naar Bluetooth® apparaten in de buurt zoekt.
3. Schakel de Bluetooth® functie op het mobiele apparaat in, zodat ook het mobiele apparaat
zoekt naar Bluetooth® apparaten in de buurt.
4. Selecteer op het mobiele apparaat het Bluetooth® apparaat met de naam “Lenco” uit de lijst
met Bluetooth® apparaten om verbinding te maken met deze luidspreker.
5. Zodra het mobiele apparaat verbinding heeft gemaakt met de luidspreker zal de blauwe
LED-indicator constant oplichten.
6. U kunt nu Bluetooth® muziek afspelen, zie paragraaf “Bluetooth® muziek afspelen”
hieronder.
(C) Met andere mobiele apparaten koppelen / verbinden met Bluetooth®
Als u met andere mobiele apparaten wilt koppelen/verbinden:
1. Druk op PAIRING op de achterkant van het apparaat om naar de koppelmodus te schakelen.
2. De luidspreker zoekt naar Bluetooth® apparaten in de buurt en de blauwe LED-indicator
knippert snel.
3. Schakel de Bluetooth® functie in op het mobiele apparaat en selecteer het Bluetooth®
apparaat “Lenco” voor het maken van de verbinding.
4. Als de verbinding succesvol is gemaakt, dan zal de blauwe LED-indicator constant oplichten.
5. U kunt nu Bluetooth® muziek afspelen, zie paragraaf “Bluetooth® muziek afspelen”
hieronder.
Bluetooth® muziek afspelen
1. Als de verbinding via Bluetooth® succesvol is gemaakt, dan kunt u de muziekspeler-app op
het mobiele apparaat openen en muziek op het mobiele apparaat afspelen.
2. U kunt het volume op zowel het mobiele apparaat als de luidspreker aanpassen om een
gewenst volumeniveau in te stellen.
3. U kunt op het mobiele apparaat op de volgende toetsen drukken:
(a) de toetsen / voor het afspelen / pauzeren van Bluetooth® muziek.
(b) de toetsen / om naar de volgende / vorige track te gaan.
Page 14

NL 6
Opmerking:
Als de blauwe LED-indicator snel knippert (3 minuten), dan zoekt de luidspreker naar mobiele
apparaten om te koppelen.
Als de blauwe LED-indicator langzaam knippert, dan betekent dit dat de Bluetooth® verbinding
is verbroken of dat de 3 minuten waarin gezocht wordt naar Bluetooth® apparaten voorbij zijn.
Om via Bluetooth® verbinding te maken kunt u een van de methoden die hierboven zijn geno-
emd (A), (B) of (C) volgen.
Opmerking energiebesparing
De luidspreker zal in de Bluetooth® modus automatisch naar de standbymodus schakelen wanneer de Bluetooth® verbinding voor ongeveer 30 minuten is verbroken.
Naar externe audiobronnen luisteren
1. Sluit een audiokabel met 3,5mm stereo-stekker aan op het hulpaudioapparaat en de AUX
INGANG van het apparaat.
2. Druk op POWER om het apparaat in te schakelen.
3. Om de aux audio ingang te selecteren, druk op de FUNC knop en de groene LED status
indicator zal ongeveer 5 seconden knipperen en dan verlicht blijven.
4. Zet het externe hulpaudioapparaat aan.
5. Het volume kan nu worden ingesteld op dit apparaat.
Bedien alle andere functies op het externe apparaat, zoals gebruikelijk.
Opmerkingen: (a) Druk op POWER om het apparaat uit te zetten als u klaar bent met
luisteren. Vergeet niet om ook het externe audioapparaat uit te schakelen.
(b) De luidspreker schakelt in de aux-modus automatisch naar de standbymodus
wanneer er voor ongeveer 10 minuten geen signaal wordt ontvangen via de
AUX-INGANG.
De accu van een smartphone/mobiel apparaat opladen
De luidspreker is uitgerust met een USB-poort met een vermogen van DC 5V (1000mA Max.)
waarmee u eenvoudig de accu van uw mobiele apparaat kunt opladen.
U kunt mobiele apparaten zoals Apple-apparaten, smartphones of tablets aansluiten op de
USB-poort van de luidspreker. Zodra het netsnoer is aangesloten zal de accu van het mobiele
apparaat worden opgeladen.
3D-geluidseffect
Dit apparaat is voorzien van sonic emotion 3D-geluidstechnologie, die gebruikt maakt van Wave
Field Synthesis (WFS), zodat het geluid van alle kanten lijkt te komen. Alle invoer, zelfs stereo,
kan worden gebruikt, met inbegrip van gestreamde Bluetooth® stereomuziek vanaf iPhone/iPad/
iPod Touch/Smartphone of Aux-in stereomuziek; Met behulp van WFS van Sonic Emotion, zal
het 3D –geluidseffect een virtueel geluidsveld creëren waar u van de beste audio kunt genieten,
ongeacht waar u zich bevindt in de kamer.
Sonic Emotion en Sonic Emotion 3D sound zijn geregistreerde handelsmerken van
Sonic Emotion ag.
Page 15

NL 7
Technische gegevens
Voeding voor het apparaat AC 100 - 240V ~ 50/60Hz
USB-aansluiting USB-stroombron, uitvoer DC 5V (Maximaal 1000mA)
(voor opladen accu van geschikte externe mobiele apparaten)
Vermogen luidspreker Totaal 15W x 6 + 35W (Max.)
Bedrijfstemperatuur 0 ~ +35 graden C
en -vochtigheid 70%
Service en ondersteuning
Voor informatie: www.lenco.com
Voor ondersteuning: http://lencosupport.zendesk.com
Lenco helpdesk:
Duitsland 0900-1520530 (Lokaal tarief)
Nederland 0900-23553626 (Lokaal tarief + 1ct p/min)
België 02-6200115 (Lokaal tarief)
De helpdesk is bereikbaar van maandag tot en met vrijdag van 9:00 tot 18:00.
Wanneer u contact opneemt met Lenco, dan zal er altijd naar het model en het serienummer
van uw product worden gevraagd. Het serienummer kan op de achterkant van het apparaat
worden gevonden. Schrijf het serienummer hieronder op:
Model: BT-125
Serienummer:_________________________________
Lenco biedt service en garantie in overeenstemming met het Europese recht. Dit betekent dat u
in geval van reparatie(zowel tijdens als na de garantieperiode) contact op moet nemen met uw
lokale dealer. Belangrijke opmerking: Het is niet mogelijk om het apparaat rechtstreeks naar
Lenco te sturen voor reparatie.
Belangrijke opmerking:
Als het apparaat wordt geopend door een niet-ofcieel service center, dan vervalt de garantie..
Dit apparaat is niet geschikt voor professioneel gebruik. In geval van professioneel gebruik zullen alle garantieverplichtingen van de fabrikant worden geannuleerd.
Page 16

NL 8
Mededeling, verklaringen en informatie
Lenco is niet aansprakelijk voor drukfouten in de handleiding.
De specicaties en het extern uiterlijk van het apparaat kunnen zonder voorafgaande kennisgeving worden gewijzigd.
Verklaring van conformiteit
Producten met een CE keurmerk houden zich aan de EMC richtlijn (2004/108/
EC) en de Richtlijn voor Lage Voltage (2006/95/EC) uitgegeven door de
Europese Commissie. Hierbij verklaart de STL Group BV, Ankerkade 20 NL
5928 PL Venlo dat dit audioproduct voldoet aan de essentiële eisen en andere
relevante bepalingen van Richtlijn 1999/5/EC. De verklaring van conformiteit
kan worden geraadpleegd op
https://lencosupport.zendesk.com/forums/22413161-CE-Documents
Dit symbool geeft aan dat het betreffende elektrische product of de batterij niet
moet worden verwijderd als algemeen huishoudelijk afval in Europa. Zorg voor
een juiste afvalverwerking door het product en de batterij in overeenstemming
met alle van toepassing zijnde lokale wetten voor het verwijderen van elektrische apparatuur of batterijen te verwijderen. Als u dit doet, helpt u de natuurlijke hulpbronnen te behouden en de standaard van milieubescherming te
verbeteren bij de behandeling en verwijdering van elektrisch afval (Afgedankte
Elektrische en Elektronische Apparatuur).
Dit product werkt op 2400 - 2483,5 MHz en is aangewezen om alleen te worden gebruikt in een
normaal huishoudelijke omgeving. Dit product is geschikt voor dit doel binnen alle EU-landen.
Voor informatie en ondersteuning: www.lenco.com
® Alle rechten voorbehouden
0168
Page 17

BT-125
ENCEINTE 3D
AVEC BLUETOOTH
Guide de l’utilisateur
www.lenco.com
R
Page 18

FR 2
Instructions importantes sur la sécurité
Lorsqu’utilisée de la manière indiquée, cette unité a été conçue et fabriquée pour garantir votre
sécurité personnelle. Cependant une utilisation inappropriée peut entrainer un risque potentiel de choc électrique ou d’incendie. Veuillez lire soigneusement toutes les instructions sur la
sécurité et l’utilisation avant d’utiliser, et garder ces instructions à portée de main pour référence
ultérieure. Prenez spécialement en considération tous les avertissements listés dans ces instructions et sur l’unité.
1.
2.
3.
4.
5.
6.
7.
8.
9.
10.
11.
Eau et humidité
L’unité ne doit pas être utilisée à proximité de l’eau. Par exemple : près d’une baignoire,
d’un lavabo, d’un évier, d’un bac à linge, d’une piscine ou dans un sous-sol.
Ventilation
L’unité doit être placée dans un endroit ou une position qui n’entravera pas sa ventilation
correcte. Par exemple, elle ne doit pas être placée dans un lit, un sofa, une couverture ou
autre surface qui pourrait bloquer les ouvertures de ventilation. La ventilation ne doit pas
être empêchée par la couverture des ouvertures de ventilation avec des objets tels que
journaux, linges de table, rideaux, etc. En outre, elle ne doit pas être placée dans une installation intégrée telle qu’une bibliothèque ou un placard qui pourrait empêcher la circulation de l’air par les ouvertures de ventilation. Espace minimum autour de l’appareil : 30 cm.
Chaleur et Flamme
L’unité doit être placée loin des sources de chaleur telles que radiateurs, registre de chal-
eur, poêle ou autres appareils (y compris les amplicateurs) qui produisent de la chaleur.
Aucune source de amme telle que des bougies allumées ne devraient être placée près de
l’appareil.
Source d’alimentation
L’unité doit uniquement être connectée à une source d’alimentation du type décrit dans
les instructions d’utilisation ou indiquées sur l’appareil. Si le cordon d’alimentation sert de
sectionneur, le sectionneur doit toujours rester en état de marche.
Protection du cordon d’alimentation
Le cordon d’alimentation doit être dirigé de manière à ce qu’il ne risque pas d’être piétiné
ou pincé par des objets placés contre ou sur lui. Il est toujours préférable d’avoir une zone
dégagée entre la sortie du cordon depuis l’unité et l’endroit ou il est branché sur le secteur.
Nettoyage
L’unité doit seulement être nettoyée comme indiquée. Voir la section de ce manuel “Soin et
entretien” pour les instructions de nettoyage.
Entrée d’objets et de liquide
Prenez garde à ce qu’aucun objet ne tombe ou qu’aucun liquide ne se répande sur les
ouvertures de ventilation situées sur le produit. L’appareil ne doit pas être exposé aux
gouttes ou aux éclaboussements et les objets remplis de liquides, tels que des vases, ne
doivent pas être placés près de l’appareil.
Accessoire
N’utilisez pas d’accessoires non recommandés par le fabriquant du produit.
Protection contre les orages et les sautes de puissance
Débranchez l’unité du secteur et déconnectez-la durant ces moments. Cela empêchera la
survenue des dégâts sur le produit dus aux éclairs et aux sautes de courant.
Surcharge
Ne surchargez pas les prises secteur, les cordons de rallonge, ou les prises car ceci pourrait entrainer un risque d’incendie ou de choc électrique.
Dégât nécessitant un entretien
Cette unité doit être entretenue par un technicien qualié lorsque :
A. Des objets sont tombés ou du liquide s’est répandu dans le boitier.
B. L’unité a été exposée à la pluie.
Page 19

FR 3
Merci d’avoir acheté l’enceinte 3D avec Bluetooth® BT-125.
Ce modèle présente les caractéristiques suivantes :
- Lecture de musique depuis des appareils mobiles comme les appareils Apple, les
Smartphones ou les tablettes grâce à la technologie Bluetooth®
- Fonction NFC (Near Field Communication) pour une connexion Bluetooth® facile
- Entrée audio (AUX) pour connecter d’autres lecteur audio digitaux
- 6 Haut-parleurs haute délité intégrés et technologie Wave Field Synthesis (WFS) (synthèse
de champ sonore) pour produire un effet 3D
- Caisson de graves intégré pour un effet de basse profond
- Connecteur USB pour recharger une batterie de Smartphone.
iPhone, iPod, iPod mini, iPod nano, iPod touch, iPod classic et iPod shufe sont des marques
déposées d’Apple Inc, enregistrées aux Etats-Unis et dans d’autres pays.
Les appareils Apple ex: iPad/iPod:iPhone, les Smartphone et/ou les tablettes ne sont pas inclus.
C. L’unité a subi une chute ou si le boitier est endommagé.
D. La performance de l’unité a nettement changé ou si elle ne fonctionne pas
normalement.
Entretien
L’utilisateur ne doit pas tenter d’effectuer l’entretien de l’appareil outre les mesures décrites
dans ces instructions d’utilisation. Les mesures d’entretien non précisées dans les instruc-
tions d’utilisation doivent être conées à du personnel d’entretien qualié.
12.
Soins et entretien
Ne soumettez pas l’unité à une force excessive, un choc, de la poussière ou une température
extrême.
Ne modiez pas les composants internes de cette unité.
Nettoyez votre unité avec un linge (jamais humide) doux. N’utilisez jamais de solvants ou
détergents.
Evitez de laisser votre unité à la lumière directe du soleil, ou dans des endroits chauds,
humides ou poussiéreux.
Maintenez votre unité hors de portée des appareils de chauffage et des sources de bruit
électrique telles que lampes uorescentes ou moteurs.
Réinitialiser l’unité
Si l’unité a subi une surcharge ou un choc électrique, il est possible que les micro contrôleurs
internes se verrouillent et que l’unité ne réponde plus à aucune commande depuis le panneau
de commande.
1. Dans ce cas, débranchez l’unité du secteur, puis rebranchez-la.
2. Utilisez un trombone, un cure-dent ou un objet similaire pour appuyer sur le bouton RESET
situé à l’arrière de l’unité principale (voir le schéma ci-dessous).
Bouton reset
Attention: N’utilisez pas d’objets coupants ou pointus
pour appuyer sur le bouton de ré initialisation.
Cela pourrait endommager le commutateur à
l’intérieur de l’unité.
Caractéristiques
Page 20

FR 4
Description des éléments
Vue avant Vue arrière
2
1
1
1
6
3 4
5
7 8 9
10 11
12 13
1. Haut-parleurs à synthèse
de 6 champs d’ondulation
(WFS)
2. Capteur NFC Le capteur NFC (Near Field Communication) situé au
milieu en haut de l’unité.
3. Touche FUNC. Touche Fonction, appuyez pour choisir entre le mode®
ou entrée auxiliaire.
4. Touche VOL +/- Augmente ou diminue le volume.
5. Touche POWER Allume ou éteint l’unité.
6. Indicateur de statut DEL
7. Fente CA Alimente l’unité
8. Connecteur USB Source d’alimentation CC 5V (1000mA) pour le charge-
ment de batterie d’appareil mobiles uniquement.
9. Prise AUX-IN Entrée pour les signaux audio auxiliaires.
10. Touche PAIRING Appuyez pour passer en mode de couplage Bluetooth®.
11. Touche Réinitialisation Pour réinitialiser l’unité.
12. Caisson de grave
13. Ouverture Bass Reex Cette ouverture ne doit jamais être bloquée,autrement
l’effet des basses serait réduit.
Installation
Connexion d’alimentation AC
(1) Connectez la prise du cordon d’alimentation sur la fente CA située à l’arrière de l’unité.
(2) Branchez la prise CA de l’adaptateur fermement et solidement dans le secteur.
Page 21

FR 5
Fonctionnement Bluetooth®
L’unité peut lire de la musique depuis un appareil mobile (comme un iPad/iPhone/iPod Touch,
un Smartphone ou une tablette) grâce au fonctionnement Bluetooth®. Elle est également dotée
d’une fonction NFC (Near Field Communication) pour une connexion facilitée avec un appareil
mobile disposant également de la fonction NFC.
(A) Couplage / connexion NFC Bluetooth®
1. Appuyez sur la touche Alimentation pour mettre l’unité en marche.
2. Appuyez sur la touche FUNC (fonction) pour choisir le mode Bluetooth®, l’indicateur DEL de
statut se met à clignoter rapidement.
3. Débloquez l’appareil mobile, et placez-le (fonction NFC intégrée) sur la zone de capteur
NFC.
4. L’appareil mobile se connectera automatiquement avec ce modèle.
Remarque: Le nom du modèle de cet appareil Bluetooth® : Lenco
5. Une fois la connexion réussie, l’indicateur DEL de statut restera allumé en permanence.
6. À présent, vous pouvez lire de la musique Bluetooth®, voir la section « Lire de la musique
Bluetooth® » ci dessous.
(B) Couplage / connexion manuel NFC Bluetooth®
1. Appuyez sur la touche Alimentation pour mettre l’unité en marche.
2. Appuyez sur la touche Band pour sélectionner le mode Bluetooth®. L’indicateur DEL de
statut bleu clignotera rapidement pendant que l’unité recherche un appareil Bluetooth®.
3. Sur l’appareil mobile, activez la fonction Bluetooth® et il recherchera également les appareils
Bluetooth® dans les environs.
4. Dans la liste des appareil Bluetooth® de votre appareil mobile, tapez sur le nom d’appareil
Bluetooth® « Lenco » de ce modèle pour la connexion.
5. Une fois l’appareil mobile connecté avec l’unité, l’indicateur DEL bleu de statut restera allumé
en permanence.
6. À présent, vous pouvez lire de la musique Bluetooth®, voir la section « Lire de la musique
Bluetooth® » ci dessous.
(C) Couplage / connexion d’autre appareil mobile Bluetooth®
Si vous souhaitez coupler / connecter un autre appareil mobile :
1. Appuyez sur la touche Couplage située à l’arrière de l’unité et entrer dans le mode couplage.
2. L’unité recherchera un appareil Bluetooth® dans les environs et l’indicateur DEL bleu de
statut clignotera rapidement.
3. Activez la fonction Bluetooth® de l’appareil mobile et sélectionnez l’appareil Bluetooth®
« Lenco » pour la connexion.
4. Une fois la connexion réussie, l’indicateur DEL de statut restera allumé en permanence.
5. À présent, vous pouvez lire de la musique Bluetooth®, voir la section « Lire de la musique
Bluetooth® » ci dessous.
Lire de la musique Bluetooth®
1. Une fois qu’un lien de communication Bluetooth® est établi, exécutez l’application de lecteur
audio sur l’appareil mobile et jouez la musique sur l’appareil mobile.
2. Vous pouvez régler le volume aussi bien sur votre appareil mobile et le contrôle de volume
de cette unité pour obtenir le réglage de volume idéal.
3. Sur l’appareil mobile, vous pouvez appuyez sur:
(a) La touche / pour Lire / mettre en pause la musique Bluetooth®.
(b) La touche / pour avancer / reculer d’une piste.
Page 22

FR 6
Remarque:
Pendant que l’indicateur DEL bleu de statut clignote rapidement (3 minutes), l’unité recherche
un appareil mobile pour le couplage.
Pendant que l’indicateur DEL bleu de statut clignote lentement, cela signie que la communication Bluetooth® est déconnectée ou après les trois premières minutes de recherche. Pour établir
une connexion Bluetooth® vous pouvez réaliser les trois méthodes (A), (B) ou (C) mentionnée
dans les sections ci-dessus.
Mode d’économie d’énergie
En mode Bluetooth® si le lien de communication Bluetooth® est déconnecté pendant environ 30
minutes, l’unité passera automatiquement en mode veille.
Écouter une source audio externe
1. Connectez un câble audio avec une prise stéréo 3,5 mm depuis un appareil audio auxiliaire à
la prise AUX IN de l’unité.
2. Appuyez sur la touche Alimentation pour mettre l’unité en marche.
3. An de sélectionner le mode entrée auxiliaire, veuillez appuyer sur le bouton FUNC, à ce
moment-là l’indicateur LED vert clignotera pendant 5 secondes avant de rester allumer.
4. Allumez l’appareil audio auxiliaire externe.
5. Le volume peut à présent être contrôlé par l’unité.
Utilisez toutes les autres fonctions sur l’appareil externe comme d’habitude.
Remarques: (a) Appuyez sur la touche Alimentation lorsque vous avez ni d’écouter.
N’oubliez pas d’éteindre l’alimentation de l’appareil audio externe également.
(b) Si la prise d’entrée auxiliaire AUX IN ne présente aucune musique (signal)
pendant 10 minutes, l’unité passera en mode veille automatiquement.
Charger la batterie d’un Smartphone / appareil mobile
L’unité est équipée d’un port USB avec une sortie 5V CC (1000 mA max) qui vous permet de
recharger la batterie de votre appareil mobile.
Vous pouvez connecter un appareil mobile comme des appareils Apple, des Smartphones ou
une tablette sur le connecteur USB de l’unité. Une fois que l’alimentation CA est connectée, la
batterie de l’appareil mobile se rechargera.
Effet sonore 3D
La technologie Sonic Emotion synthétise un champ d’onde sonore pour créer l’illusion d’un son
tout autour de vous. N’importe quel type d’entrée, même stéréo, peut être utilisée, y compris les
iPhone/iPad/iPod Touch/Smart phone pour la lecture de musique en streaming Bluetooth® ou
la musique d’un appareil auxiliaire en stéréo; grâce à l’effet sonore 3D de Sonic Emotion, l’effet
sonore permet de créer un champ sonore virtuel au sein duquel vous pouvez apprécier le meilleur son, depuis un seul appareil, peut importe votre position dans la pièce.
Sonic Emotion et Sonic Emotion 3D sound sont des marques commerciales déposées de Sonic
Emotion ag.
Page 23

FR 7
Données techniques
Alimentation de l’unité 100 - 240V CA ~ 50/60Hz
Connecteur USB Source d’alimentation USB, sortie 5V CC (Maximum 1000mA)
(permet de charger la batterie d’un appareil mobile approprié)
Sortie haut-parleur Total 15W x 6 + 35W (Max.)
Température de fonctionnement 0 ~ +35 degrés C
Et humidité 70%
Service et support
Pour plus d’informations : www.lenco.com
Pour de l’aide : http://lencosupport.zendesk.com
Service d’assistance Lenco :
Allemagne 0900-1520530 (Prix d’un appel local)
Pays-Bas 0900-23553626 (Prix d’un appel local + 1ct P/min)
Belgique 02-6200115 (Prix d’un appel local)
Le centre d’assistance est joignable du lundi au vendredi entre 9 heures et 18 heures.
Lorsque vous contactez Lenco, on vous demandera systématiquement le modèle et le numéro
de série de votre produit. Le numéro de série se trouve à l’arrière de l’appareil. Écrivez le numéro de série ci-dessous:
Modèle : BT-125
Numéro de série :_______________________________
Lenco propose un service et une garantie conformément aux lois européenne, ce qui signie
qu’en besoin de réparation (aussi bien pendant et après la période de garantie), vous pouvez
contacter votre revendeur le plus proche.
Remarque importante : Il n’est pas possible de renvoyer l’appareil pour réparation directement
à Lenco.
Remarque importante :
Si l’unité est ouverte ou modiée de quelque manière par un centre de service non agréé, cela
mettra n à la garantie.
Cet appareil ne convient pas pour une utilisation professionnelle. En cas d’utilisation professionnelle, les obligations de garantie du fabricant seront annulées.
Page 24

FR 8
Remarque, déclarations et informations
Lenco n’est pas responsable pour toute erreur d’impression dans ce manuel de l’utilisateur.
Les spécications et l’apparence externe de cet appareil peuvent faire l’objet de modications
sans notications préalable.
Déclaration de conformité
Les produits avec la marque CE sont conformes à la directive CEM (2004/108/
CE) et à la directive basse tension (2006/95/EC) émises par la commission de
la communauté européenne. Par la présente, STL Group BV, Ankerkade 20
NL 5928 PL Venlo déclare que le ce produit audio est conforme aux exigences
essentielles et autres provisions appropriées de la Directive 1999/5/EC. La
déclaration de conformité peut être consultée sur
https://lencosupport.zendesk.com/forums/22413161-CE-Documents
Ce symbole indique que le produit électrique concerné ou la batterie ne doit
pas être jeté parmi les autres déchets ménagers en Europe. Pour garantir un
traitement correct du déchet de la batterie ou de l’appareil, veuillez vous en
débarrasser en vous conformant aux règlements en vigueur dans votre secteur
en ce qui concerne le des appareils électriques et autres batteries. En agissant
de la sorte, vous contribuerez à la préservation des ressources naturelles et à
l’amélioration des niveaux de protection environnementale concernant le traitement et la destruction des déchets électriques. (Directive sur les Déchets des
Equipements Electriques et Electroniques).
Ce produit fonctionne à 2400 à 2483,5 MHz et est destiné uniquement pour être utilisé dans un
environnement domestique normal. Ce produit convient à cet usage pour tous les pays de l’UE.
Pour des informations et de l’assistance : www.lenco.com
0168
®Tous droits réservés
Page 25

BT-125
3D-SOUND-LAUTSPRECHER
MIT BLUETOOTH
Benutzerhandbuch
www.lenco.com
R
Page 26

DE 2
Wichtige Sicherheitshinweise
Wenn das Gerät entsprechend der Anweisungen benutzt wird, kann aufgrund des Gerätedesigns Ihre persönliche Sicherheit gewährleistet werden. Bei unsachgemäßer Benutzung besteht
allerdings Stromschlag- und Brandgefahr. Bitte lesen Sie alle Sicherheits- und Bedienungshinweise sorgfältig vor der Inbetriebnahme durch und bewahren Sie diese Anleitung zum späteren
Nachschlagen auf. Beachten Sie insbesondere alle Warnhinweise in dieser Anleitung und auf
dem Gerät.
1.
2.
3.
4.
5.
6.
7.
8.
9.
10.
Wasser und Feuchtigkeit
Das Gerät darf nicht in der Nähe von Wasser benutzt werden. Beispiel: in der Nähe von
Badewannen, Spülen, Waschbecken, Schwimmbecken oder feuchten Kellerräumen.
Belüftung
Das Gerät muss so aufgestellt werden, dass die Luftzirkulation nicht beeinträchtigt wird.
Das Gerät darf z. B. nicht auf ein Bett, Sofa, Bettvorleger oder eine andere weiche
Unterlage gestellt werden, bei der die Ventilationsöffnungen blockiert werden könnten.
Vergewissern Sie sich, dass keine der Ventilationsöffnungen durch Gegenstände wie z.
B. Zeitungen, Tischtücher, Vorhänge o. Ä. abgedeckt ist. Das Gerät darf ebenfalls nicht
an geschlossenen Orten aufgestellt werden, an denen eine unzureichende Luftzirkulation
besteht, wie z. B. ein Schrank oder Bücherregal. Achten Sie darauf, dass mindestens ein
Abstand von 30 cm um das Gerät herum vorhanden ist.
Hitze und Flammen
Stellen Sie das Gerät nicht in der Nähe von Hitzequellen, wie z. B. Heizungen, Herden
oder anderen Geräten die Hitze produzieren (z. B. Verstärker) auf.
Gegenstände mit offenen Flammen, wie z. B. Kerzen, dürfen nicht auf das Gerät gestellt
werden.
Stromversorgung
Das Gerät darf nur mit der auf dem Gerät oder der Bedienungsanleitung angegebenen
Netzspannung betrieben werden. Wenn das Netzkabel als Trennvorrichtung verwendet
wird, muss es frei zugänglich bleiben.
Netzkabelschutz
Das Netzkabel muss so verlegt werden, dass es nicht durch Gegenstände eingeklemmt
werden kann bzw. diese darauf gestellt werden. Achten Sie außerdem darauf, dass niemand auf das Netzkabel treten kann. Es ist immer sinnvoll den Bereich, an dem das Kabel
aus dem Gerät austritt und den Bereich um die Steckdose herum, frei zu halten.
Reinigung
Das Gerät darf nur den Anweisungen nach gereinigt werden. Siehe Abschnitt “Pege und
Wartung” dieses Handbuchs für Anweisungen zur Reinigung des Geräts.
Fremdgegenstände und Flüssigkeiten im Gerät
Bitte achten Sie darauf, dass keine Gegenstände und Flüssigkeiten in die Ventilationsöffnungen des Geräts gelangen. Dieses Gerät darf keinen Wassertropfen und spritzern ausgesetzt werden. Gegenstände die mit Flüssigkeiten gefüllt sind dürfen nicht
auf das Gerät gestellt werden.
Zubehör
Verwenden Sie kein Zubehör, das nicht vom Hersteller empfohlen wurde.
Blitz- und Überspannungsschutz
Ziehen Sie den Stecker aus der Steckdose, wenn Sie das Gerät über einen längeren
Zeitraum nicht benutzen. Damit werden aufgrund von Blitzeinschlägen und Überspannung
entstehende Schäden am Gerät verhindert.
Überlastung
Überlasten Sie niemals Steckdosen, Verlängerungskabel oder Geräteanschlüsse, da dies
zu Feuer- oder Stromschlaggefahr führen kann.
Page 27

Schäden, die Reparaturen erfordern
Dieses Gerät muss durch entsprechend ausgebildetes Personal repariert werden, wenn:
A. Fremdgegenstände oder Flüssigkeiten in das Gehäuse gelangt sind.
B. Das Gerät Regenwasser ausgesetzt wurde.
C. Das Gerät heruntergefallen ist oder das Gehäuse beschädigt wurde.
D. Das Gerät nicht wie gewohnt funktioniert oder einen starken Leistungsabfall zeigt.
Wartung
Der Benutzer sollte jegliche Versuche das Gerät eigenhändig zu warten vermeiden, es
sei denn diese wurden entsprechend in der Bedienungsanleitung beschrieben.
Wartungsmethoden, die nicht in der Bedienungsanleitung beschrieben werden, dürfen nur
von entsprechend ausgebildetem Fachpersonal ausgeführt werden.
11.
12.
Pege und Wartung
• Setzen Sie das Gerät niemals übermäßiger Gewalt, Erschütterungen, Staub oder extremen
Temperaturen aus.
• Modizieren Sie nicht die internen Komponenten des Geräts.
• Reinigen Sie das Gerät mit einem feuchten (aber niemals nassen) Tuch. Lösungsmittel oder
Reinigungsmittel dürfen niemals verwendet werden.
• Vermeiden Sie es das Gerät direkter Sonnenstrahlung auszusetzen und lassen Sie es niemals
an besonders heißen, feuchten oder staubigen Orten.
• Halten Sie Ihr Gerät fern von Heizkörpern und elektrischen Störquellen, wie z. B.
Leuchtstofampen oder Motoren.
Reset des Geräts
Bei starken Spannungsspitzen oder elektrischen Entladungen kann es dazu kommen, dass der
interne Mikrokontroller aufhört zu funktionieren und das Gerät nicht mehr auf Tastenbetätigungen reagiert.
1. Ziehen Sie in diesem Fall den Netzstecker aus der Steckdose heraus und stecken Sie ihn
danach wieder zurück in die Steckdose.
2. Benutzen Sie einen dünnen Gegenstand, wie z. B. eine lang gezogene Büroklammer oder
einen Zahnstocher, und betätigen Sie den RESET-Knopf auf der Unterseite des Geräts
(siehe Abbildung unten).
Reset-Taste
Achtung: Benutzen Sie keine spitzen oder scharfen
Gegenstände zur Betätigung des Reset-Knopfes. Es kann dabei zu Schäden am Reset-Schalter im Inneren des Geräts kommen.
DE 3
Page 28

DE 4
Eigenschaften und Funktionen
Vielen Dank für den Kauf des BT-125 3D-Sound-Lautsprechers mit Bluetooth®-Funktion.
Dieses Modell verfügt über die folgenden Leistungsmerkmale:
- Wiedergabe mobiler Geräte, wie z. B. Apple-Geräte, Smartphones oder Tablets mit
Bluetooth®-Technologie
- NFC (Near Field Communication) für eine einfache Bluetooth®-Verbindungen
- Audioeingang (AUX) zum Anschluss externer Audiogeräte
- Eingebauter 6-HiFi-Lautsprecher mit Wellenfeldsynthese (WFS) für 3D-Sound-Effekte.
- Eingebauter Subwoofer für besonders tiefe Basseffekte.
- USB-Anschluss zum Auaden von Smartphones.
iPod, iPod mini, iPod nano, iPod touch, iPod classic und iPod shufe sind eingetragene Waren-
zeichen der Firma Apple Computer Inc. in den USA und anderen Ländern.
Apple-Geräte wie iPads / iPhones / iPods, Smartphones und / oder Tablets sind nicht im Lief-
erumfang enthalten.
Beschreibung der Bedienelemente
Vorderseitenansicht Rückseitenansicht
2
1
1
1
6
3 4
5
7 8 9
10 11
12 13
1. Sechs Wellenfeldsynthese-
Lautsprecher (WFS)
2. NFC-Sensor Der NFC-Sensor (Near Field Communication) bendet
sich in der Mitte auf der Oberseite des Geräts.
3. FUNC-Taste Die Funktionstaste - Betätigen Sie diese Taste zur Auswahl des Bluetooth®- oder AUX-Modus.
4. VOLUME + / - Einstellen der Lautstärke.
5. POWER Ein-/Ausschalten des Geräts.
6. Status-LED
7. Stromversorgungseingang Zur Stromversorgung des Geräts.
8. USB-Anschluss Stromversorgung DC 5 V (1000 mA) zum Auaden der
Akkus von Mobilgeräten.
9. AUX-Eingang Anschluss externer Audiosignale.
10. PAIRING-Taste Betätigen Sie diese Taste, um den Bluetooth®-PairingModus zu starten.
Page 29

DE 5
Anschluss
Netzanschluss
(1) Schließen Sie das Netzkabel am Stromversorgungsanschluss an der Rückseite des
Geräts an.
(2) Stecken Sie den Netzstecker fest in eine Steckdose.
Bluetooth®-Betrieb
Das Gerät kann Musik von mobilen Geräten (wie iPad / iPhone / iPod Touch, Smartphone und
Tablet) über Bluetooth® wiedergeben. Es verfügt auch über eine NFC-Funktion (Near Field
Communication) für einen einfachen Verbindungsaufbau mit mobilen Geräten, die ebenfalls über
die NFC-Funktion verfügen.
(A) NFC/Bluetooth®-Pairing
1. Betätigen Sie die POWER-Taste zum Einschalten des Geräts.
2. Betätigen Sie die FUNC-Taste (Funktion), um den Bluetooth®-Modus zu aktivieren. Die blaue
Status-LED blinkt daraufhin in kurzen Intervallen.
3. Schalte das mobile Gerät ein und legen Sie es auf die Oberseite der NFC-Sensoräche.
Achten Sie darauf, dass die NFC-Funktion des Geräts eingeschaltet ist.
4. Das mobile Gerät stellt dann eine Verbindung mit diesem Modell automatisch her.
Hinweis: Der Bluetooth®-Gerätename dieses Modells: Lenco
5. Nach erfolgreichem Verbindungsaufbau hört die blaue Status-LED auf zu blinken.
6. Sie können dann die Bluetooth®-Musikwiedergabe starten (siehe Abschnitt
“Bluetooth®-Musikwiedergabe” weiter unten.
(B) Manuelles Bluetooth®-Pairing / Verbindungsaufbau
1. Betätigen Sie die POWER-Taste zum Einschalten des Geräts.
2. Betätigen Sie die FUNC-Taste zur Auswahl des Bluetooth®-Modus. Die blaue Status-LED
blinkt in kurzen Intervallen während das Gerät nach Bluetooth®-Geräten in der Nähe sucht.
3. Schalten Sie die Bluetooth®-Funktion auf dem mobilen Gerät ein und es fängt an nach sich
in der Nähe bendlichen Bluetooth®-Gerät zu suchen.
4. Tippen Sie in der Bluetooth®-Geräteliste Ihres mobilen Geräts auf das Bluetooth®-Gerät mit
dem Namen “Lenco”, um die Verbindung aufzubauen.
5. Wenn das mobile Gerät verbunden ist, hört die blaue Statusanzeige auf zu blinken.
6. Sie können dann die Bluetooth®-Musikwiedergabe starten (siehe Abschnitt
“Bluetooth®-Musikwiedergabe” weiter unten.
11. RESET-Knopf Zurücksetzen des Geräts.
12. Subwoofer
13. Bassreexrohr Diese Öffnung sollte nicht blockiert werden, um sicherzustellen, dass der Basseffekt nicht beeinträchtigt wird.
Page 30

DE 6
(C) Bluetooth®-Pairing / Verbindung mit anderen mobilen Geräten
Wenn Sie andere mobile Geräte verbinden möchten:
1. Betätigen Sie die Pairing-Taste auf der Rückseite des Geräts, um in den Pairing-Modus zu
gelangen.
2. Das Gerät sucht dann nah Bluetooth®-Gerät, die sich in der Nähe benden und die blaue
Status-LED blinkt in kurzen Intervallen.
3. Schalten Sie die Bluetooth®-Funktion auf dem mobilen Gerät ein und wählen Sie das
Bluetooth®-Gerät “Lenco”, um eine Verbindung aufzubauen.
4. Nach erfolgreichem Verbindungsaufbau hört die blaue Status-LED auf zu blinken.
5. Sie können dann die Bluetooth®-Musikwiedergabe starten (siehe Abschnitt
“Bluetooth®-Musikwiedergabe” weiter unten.
Bluetooth®-Musikwiedergabe
1. Nachdem die Bluetooth®-Verbindung aufgebaut ist, starten Sie die Musikwiedergabe auf
dem mobilen Gerät.
2. Sie können sowohl die Lautstärke Ihres mobilen Geräts und als auch die Lautstärke des
Geräts einstellen, um das gewünschte Niveau zu erreichen.
3. Auf dem mobilen Gerät, können Sie die folgenden Funktionen verwenden:
(A) die / Taste für Wiedergabe / Pause der Bluetooth®-Musikwiedergabe.
(B) die Tasten / zur Titelauswahl.
Hinweis:
Während die blaue Status-LED in kurzen Intervallen blinkt (3 Minuten) sucht das Gerät nach
mobilen Geräten, um den Pairung-Vorgang zu starten.
Wenn die blaue Status-LED in langen Intervallen blinkt, bedeutet dies, dass die Bluetooth®Verbindung unterbrochen wurde oder nach 3 Minuten keine Verbindung aufbebaut werden
konnte. Um die Bluetooth®-Verbindung herzustellen, benutzen Sie eine der bereits erwähnten
Methoden (A), (B) oder (C).
Hinweis zum Energiesparmodus
Im Bluetooth®-Modus wird, bei einer Unterbrechung der Verbindung für mehr als 30 Minuten,
das Gerät automatisch in den Bereitschaftsbetrieb versetzt.
Page 31

DE 7
Wiedergabe eines externen Audiosignals
1. Schließen Sie das externe Audiogerät mit einem 3,5-mm-Audiokabel am AUX-Eingang des
Geräts an.
2. Betätigen Sie die POWER-Taste zum Anschalten des Geräts.
3. Um AUX als Audio-Eingangsquelle zu wählen, drücken Sie die FUNC Taste. Daraufhin blinkt
die grüne Status-LED zunächst für ca. 5 Sekunden und leuchtet anschließend permanent.
4. Schalten Sie das externe Audiogerät ein.
5. Sie können die Lautstärke nun über die Lautstärketasten des Geräts einstellen.
Alle anderen Funktionen können am externen Gerät wie gewohnt gesteuert werden.
Hinweis:
(a) Betätigen Sie die POWER-Taste , um das Gerät nach der Benutzung auszuschalten.
Vergessen Sie dabei nicht das externe Gerät ebenfalls auszuschalten.
(b) Wenn für ca. 10 Minuten auf dem AUX-Eingang keine Musik (Signal) vorhanden ist, geht
das Gerät automatisch in den Bereitschaftsbetrieb.
Smartphone / mobiles Gerät auaden
Das Gerät verfügt über einen USB-Anschluss mit 5 V DC (1000 mA max.), mit dem Sie den
Akku Ihres mobilen Geräts auaden können.
Sie können ein mobiles Gerät, wie z. B. Apple-Geräte, Smartphones oder Tablets an dem USBAnschluss des Geräts anschließen. Sobald das Gerät am Stromnetz angeschlossen ist, wird
das mobile Gerät aufgeladen.
3D-Sound-Effekt
Dieses Modell verwendet die sonic emotion 3D-Sound-Technologie, die mithilfe von Wellen-
feldsynthese (WFS) eine Klangillusion um den Zuhörer herum erzeugt. Alle Eingangssignale,
sogar Stereo, sind dazu geeignet, einschließlich Signale von Ihrem iPhone / iPad / iPod Touch
/ Smartphone / Bluetooth®-Musik-Streaming oder Aux-Eingang Musik in Stereo. Mithilfe von
sonic emotions WFS kann der 3D-Sound-Effekt ein virtuelles Klangfeld erschaffen, das Ihnen
hochwertigen Sound bringt, egal wo Sie sind im Raum benden.
Sonic Emotion und Sonic Emotion 3D Sound sind eingetragene Marken der Firma sonic emotion
ag.
Page 32

DE 8
Kundendienst
Für Informationen: www.lenco.com
Für Kundenunterstützung: http://lencosupport.zendesk.com
Lenco-Helpdesk:
Deutschland 0900-1520530 (Ortstarif)
Niederlande 0900-23553626 (Ortstarif + 1 ct / Min.)
Belgien 02-6200115 (Ortstarif)
Der Helpdesk ist von Montag bis Freitag von 9.00 Uhr bis 18.00 Uhr geöffnet.
Wenn Sie sich an Lenco wenden, werden Sie immer nach der Modell- und Seriennummer Ihres
Geräts gefragt. Die Seriennummer bendet sich auf der Rückseite des Geräts. Bitte notieren Sie
die Seriennummer an folgender Stelle:
Modell: BT-125
Seriennummer: _________________________________
Lenco bietet Dienst- und Garantieleistungen im Einklang mit europäischem Recht, sodass Sie
im Falle einer Reparatur (sowohl während als auch nach der Garantiezeit) Ihren Händler kontaktieren sollten.
Wichtiger Hinweis: Es ist nicht möglich Produkte für Reparaturen direkt an Lenco zu schicken.
Wichtiger Hinweis:
Wenn das Gerät durch eine nicht-autorisierte Reparaturwerkstatt geöffnet oder darauf zugegriffen wird, erlischt die Garantie umgehend.
Dieses Gerät ist nicht für kommerzielle Anwendungen geeignet. Im Fall eines professionellen
Einsatzes, werden alle Gewährleistungspichten des Herstellers nichtig.
Technische Daten
Stromversorgung für das Gerät AC 100 - 240 V ~ 50/60 Hz
USB-Anschluss USB-Stromversorgung,
Ausgangsleistung DC 5 V (max. 1000 mA)
(Zum Auaden externer mobiler Geräte)
Lautsprecher-Ausgangsleistung Gesamt15 W x 6 + 35 W (max.)
Betriebstemperatur 0 bis +35 °C
Luftfeuchtigkeit 70%
Page 33

DE 9
Hinweise, Stellungnahmen und Informationen
Lenco haftet nicht für Druckfehler in der Bedienungsanleitung.
Die Spezikationen und das äußere Erscheinungsbild des Geräts können sich ohne vorherige
Ankündigung ändern.
Konformitätserklärung
Produkte mit der CE Kennzeichnung entsprechen der EMC-Richtlinie
(2004/108/EC) und der Niederspannungsrichtlinie (2006/95/EC), herausgegeben von der Kommission der Europäischen Gemeinschaft.
Hiermit erklärt, STL Group BV, Ankerkade 20 NL 5928 PL Venlo, dass sich das
Gerät in Übereinstimmung mit den grundlegenden Anforderungen
und den übrigen einschlägigen Bestimmungen der Richtlinie 1999/5/EG
bendet.“.Die Konformitätserklärung kann unter folgender Adresse gefunden
werden:
https://lencosupport.zendesk.com/forums/22413161-CE-Documents
Dieses Symbol zeigt an, dass das entsprechende Produkt oder dessen Batterie in Europa nicht mit dem normalen Hausmüll entsorgt werden darf. Um
die ordnungsgemäße Abfallbehandlung des Produkts und dessen Batterie zu
gewährleisten, müssen diese im Einklang mit allen anwendbaren örtlichen
Vorschriften zur Entsorgung von Elektrogeräten und Batterien entsorgt werden.
Dabei helfen Sie natürliche Ressourcen zu schonen und Umweltschutzstandards zur Verwertung und Entsorgung von Altgeräten aufrecht zu halten
(Waste Electrical and Electronic Equipment Directive).
Dieses Produkt arbeitet im Frequenzbereich von 2400 bis 2483,5 MHz und sollte nur in einer
normalen häuslichen Umgebung verwendet werden. Es eignet sich zur Verwendung in allen EU
Ländern.
Für Informationen und Unterstützung: www.lenco.com
0168
®Alle Rechte vorbehalten
Page 34

Page 35

BT-125
ALTAVOZ DE SONIDO 3D
CON BLUETOOTH
Guía del Usuario
www.lenco.com
R
Page 36

ES 2
Importantes instrucciones de seguridad
Cuando la use directamente, esta unidad ha sido diseñada y fabricada para garantizar su
seguridad personal. Sin embargo, un uso inadecuado podría tener como consecuencia una descarga eléctrica o un posible incendio. Por favor, lea atentamente todas las instrucciones de uso
y seguridad antes del uso y la instalación, y conserve estas instrucciones a mano para futuras
referencias. Preste especial atención a todas las advertencias que aparecen en estas instrucciones y en la unidad.
1.
2.
3.
4.
5.
6.
7.
8.
9.
10.
Agua y humedad
No use la unidad cerca del agua. Por ejemplo, cerca de una bañera, barreño, fregadero de
cocina, palangana, piscina o en un sótano húmedo.
Ventilación
La unidad deberá ser instalada de modo que su ubicación o posición no intereran con
su adecuada ventilación, Por ejemplo, no deberá ser instalada sobre una cama, sofá,
alfombra o supercie similar que pudiera bloquear las aberturas de ventilación. La ventilación no deberá ser impedida cubriendo las aberturas de ventilación con elementos como
periódicos, manteles, cortinas, etc. Tampoco deberá ser instalada de forma que quede
empotrada, como una estantería o armario, ol que podría impedir el paso del aire por las
aberturas de ventilación. Deje una distancia mínima de 30cm alrededor del aparato para
una ventilación suciente.
Calor y llamas
Mantenga la unidad alejada de fuentes de calor, como radiadores, estufas, fuegos de
cocina u otros aparatos (incluyendo amplicadores) que produzcan calor.
No coloque llamas descubiertas, como velas encendidas, sobre el aparato.
Alimentación
La unidad deberá ser conectada a la fuente de alimentación descrita en las instrucciones
de uso o indicada en el aparato. El dispositivo de desconexión deberá permanecer operativo allá donde el cable de alimentación se usa como elemento de desconexión.
Protección del cable de alimentación.
Los cables de alimentación deberán ser guiados de modo que no sea probable tropezarse
con ellos o dejarlos pellizcados con elementos colocados sobre o contra ellos. Siempre es
aconsejable dejar un área despejada en el punto en que el cable de alimentación sale de
la unidad hasta donde se conecta a la toma de corriente.
Limpieza
La unidad deberá limpiarse solo como se haya recomendado. Vea la sección “Cuidado y
mantenimiento” de este manual para informarse sobre las instrucciones de limpieza.
Entrada de objetos y líquidos
Deberá procurar que no caigan objetos ni se derrame líquido por ninguna de las aberturas o respiraderos del aparato. Este no deberá ser expuesto a goteos ni salpicaduras, no
deberá colocar objetos que contengan líquidos, como jarrones, sobre él.
Accesorios
No use accesorios no recomendados por el fabricante del producto.
Protección contra los rayos y subidas de tensión
Desenchufe la unidad de la toma de pared cuando no vaya a usarla por un periodo
prolongado. Con ello evitará dañar el producto debido a rayos de tormenta o subidas de
tensión.
Sobrecarga
No sobrecargue las tomas de pared, cables extensores o ladrones, ya que, de hacerlo,
podría provocar una descarga eléctrica o un incendio.
Page 37

ES 3
Daños que precisen reparación
Esta unidad deberá ser reparada por personal de servicio cualicado cuando:
A. Hayan caído objetos o se haya derramado líquido en el interior del aparato.
B. La unidad ha sido expuesta a la lluvia.
C. La unidad se ha caído o su estructura ha resultado dañada.
D. La unidad muestra un marcado cambio en sus prestaciones o no funciona con
normalidad.
Reparación
El usuario no deberá intentar reparar la unidad yendo más allá de los métodos descritos
en la instrucciones de uso. Los métodos de reparación no cubiertos por las instrucciones
de uso deberán ser encomendados a personal cualicado.
11.
12.
Cuidado y mantenimiento
No someta la unidad a una fuerza excesiva, impactos, polvo o temperaturas extremas.
No manipule los componentes internos de la unidad.
Limpie su unidad con un paño húmedo (no mojado). No use nunca disolventes ni
detergentes.
Evite dejar su unidad expuesta a la luz solar directa o en lugares calurosos, húmedos o
polvorientos.
Mantenga su unidad alejada de aparatos que emitan calor y fuentes de ruido eléctrico,
como lámparas uorescentes o motores.
Reseteado de la unidad
Si la unidad experimenta una subida de tensión o una descarga eléctrica, es posible que el
microcontrolador interno se haya bloqueado, haciendo que la unidad no pueda responder a
ninguno de los comandos enviados desde los paneles de control.
1. En este caso, desenchufe la unidad y luego vuelva a conectarla a la toma de pared.
2. Utilice un clip sujetapapeles extendido, un palillo higiénico o un objeto similar para presionar
el botón RESET que se encuentra en la parte posterior de la unidad principal (vea la gura
de debajo).
Botón Reset
Precaución: No use ningún objeto alado ni puntiagudo
para presionar el botón Reset, de lo contrario, podría dañar el interruptor de reset del
interior de la unidad
Page 38

ES 4
Características
Le damos las gracias por la compra del BT-125 - altavoz de sonido 3D con Bluetooth ®.
Este modelo incorpora las siguientes funciones:
- Reproducción de música de dispositivos móviles, como dispositivos de Apple, smartphones o
tabletas mediante la tecnología Bluetooth®.
- Función NFC (Near Field Communication) para una fácil conexión con el Bluetooth®.
- Line-in de audio (AUX) para la conexión de otros reproductores de audio digitales
- 6 altavoces de alta delidad integrados y tecnología de síntesis de campo de ondas (WFS)
incorporada para producir los efectos de sonido 3D.
- Subwoofer incorporado para un efecto de graves profundo.
- Conector USB para la carga de la batería de un smartphone.
iPhone, iPod, iPod mini, iPod nano, iPod touch, iPod classic y iPod shufe son marcas de Apple
Inc., registradas en los EE.UU. y otros países.
Los dispositivos Apple, como iPad/iPhone/iPod, smartphones y/o tabletas no están incluidos.
Descripción de las partes
Vista frontal Vista posterior
2
1
1
1
6
3 4
5
7 8 9
10 11
12 13
1. Seis altavoces de síntesis
de campo de ondas (WFS)
2. Sensor NFC El sensor NFC (Near Field Communication) está situado
en mitad de la parte superior de la unidad.
3. Botón FUNC. El botón Function se pulsa para seleccionar el modo
Bluetooth® o AUX-IN.
4. Botón VOLUME + / - Ajústelo para subir o bajar el volumen.
5. Botón POWER Encienda o apague la unidad.
6. Indicador LED de estado
7. Toma AC Para la alimentación de la unidad.
8. Conector USB Fuente de alimentación DC 5V (1000mA) para la carga
de la batería de dispositivos móviles solamente.
9. Toma AUX-IN Entrada de señal de audio auxiliar.
10. Botón PAIRING Púlselo para entrar en el modo de emparejamiento de
Bluetooth®.
Page 39

ES 5
Instalación
Conexión del cable de alimentación
(1) Conecte el cable de alimentación a la toma AC de la parte posterior de la unidad.
(2) Enchufe de forma segura el cable de alimentación a una toma de alimentación.
Uso del Bluetooth®
La unidad reproduce música de dispositivos móviles (como iPad/iPhone/iPod Touch ,Smart-
phone y tableta) mediante el uso de Bluetooth®. También incorpora la función NFC (Near Field
Communication) para una conexión sencilla con un dispositivo móvil que también cuente con la
función NFC.
(A) Emparejamiento/conexión de Bluetooth® con NFC
1. Pulse el botón POWER para encender la unidad.
2. Pulse el botón FUNC (función) para seleccionar el modo Bluetooth®, entonces, el indicador
LED azul de estado parpadeará rápidamente.
3. Desbloquee el dispositivo móvil, después colóquelo (función NFC incorporada) sobre el área
del sensor NFC.
4. El dispositivo móvil se emparejará y conectará con este modelo automáticamente.
Nota: El nombre del dispositivo Bluetooth® de este modelo es Lenco
5. Tras conseguir la conexión, el LED azul indicador de estado estará iluminado de forma
continua.
6. Ya podrá reproducir música de Bluetooth®. Vea la sección “Reproducción de música
Bluetooth®” de debajo.
(B) Emparejamiento/conexión manual de Bluetooth®
1. Pulse el botón POWER para encender la unidad.
2. Pulse el botón FUNC para seleccionar el modo Bluetooth®. El indicador LED azul de estado
parpadeará rápidamente mientras la unidad está buscando dispositivos Bluetooth® en las
proximidades.
3. En el dispositivo móvil, encienda su función de Bluetooth®, entonces, este buscará también
un dispositivo Bluetooth® en las proximidades.
4. En la lista de dispositivos Bluetooth® de su dispositivo móvil, toque sobre el nombre del
dispositivo Bluetooth® de este modelo, “Lenco” para establecer la conexión.
5. Una vez se haya emparejado/conectado el dispositivo móvil con la unidad, el LED azul
indicador de estado estará iluminado de forma permanente.
6. Ya podrá reproducir música de Bluetooth®. Vea la sección “Reproducción de música
Bluetooth®” de debajo.
11. Botón RESET Para el restablecimiento de los parámetros predeterminados de la unidad.
12. Subwoofer
13. Apertura de la resonancia
de graves
No bloquee esta abertura, de lo contrario, el efecto
de los graves se verá reducido.
Page 40

ES 6
(C) Emparejamiento/conexión Bluetooth® de otro dispositivo móvil
En caso de querer emparejar/conectar otro dispositivo móvil:
1. Pulse el botón PAIRING, situado en la parte posterior de la unidad, después entrará en el
modo de emparejamiento.
2. Buscará dispositivos Bluetooth® en las cercanías y el LED azul indicador de estado
parpadeará rápidamente.
3. Encienda la función de Bluetooth® del dispositivo móvil y seleccione el dispositivo
Bluetooth® “Lenco” para la conexión.
4. Tras conseguir la conexión, el LED azul indicador de estado estará iluminado de forma
continua.
5. Ya podrá reproducir música de Bluetooth®. Vea la sección “Reproducción de música
Bluetooth®” de debajo.
Reproducción de música Bluetooth®
1. Una vez se haya establecido el enlace de comunicación Bluetooth®, usando el App de
reproducción de música del dispositivo móvil, reproduzca música del dispositivo móvil.
2. Podrá ajustar el volumen de su dispositivo móvil y de su unidad para dar con el ajuste que
más le convenga.
3. En su dispositivo móvil, pulse:
(a) El botón / para reproducir/dejar en pausa música de Bluetooth.
(b) El botón / para saltar pistas hacia delante/atrás.
Nota:
Siempre que el LED azul indicador de estado parpadee rápidamente (3 minutos), indicará que
la unidad está buscando un dispositivo móvil para el emparejamiento.
Siempre que el LED azul indicador de estado parpadee lentamente, indicará que la comunicación Bluetooth® se ha desconectado o después de los tres primeros minutos de búsqueda.
Para establecer la conexión Bluetooth®, implemente las 3 aproximaciones (A), (B) o (C) explicadas en las secciones anteriores.
Nota sobre el ahorro de energía
En el modo Bluetooth®, si el enlace de comunicación Bluetooth® se ha desconectado durante
alrededor de 30 minutos, la unidad pasará al modo en espera automáticamente.
Page 41

ES 7
Para escuchar una fuente de audio externa
1. Conecte un cable de audio con clavija de 3,5mm de un dispositivo de audio auxiliar a la toma
AUX-IN de la unidad.
2. Pulse el botón POWER para encender la unidad.
3. Para seleccionar la entrada de audio auxiliar, pulse el botón FUNC y el indicador LED verde
de estado parpadeará durante unos 5 segundos y después permanecerá encendido de
forma continua.
4. Encienda el dispositivo de audio auxiliar.
5. El volumen podrá ahora controlarse con la unidad.
El resto de funciones podrán operarse con el dispositivo externo.
Notas: (a) Pulse el botón POWER para apagar la unidad cuando haya terminado de
escuchar música. No olvide apagar también el aparato externo de audio.
(b) Si no se transmite música (señal) a la unidad a través de la entrada AUX-IN durante
al menos 10 minutos, esta pasará al modo en espera automáticamente.
Carga de la batería de smartphones/dispositivos móviles
La unidad incorpora un puerto USB con salida DC 5V (1000mA Máx.), lo que le proporciona un
modo de cargar la batería de su dispositivo móvil.
Podrá conectar dispositivos móviles como los de Apple, smartphones o tabletas al conector USB de la unidad. Una vez se haya realizado la conexión, el dispositivo móvil cargará su
batería.
Efecto de sonido 3D
Este modelo integra la tecnología de sonido sonic emotion 3D, que emplea la síntesis de campo
de ondas (WFS) para crear la ilusión de sonidos provenientes de todas partes. Cualquier
entrada, incluso la estéreo podrá usarse, incluyendo la transmisión de música Bluetooth® de un
iPhone/iPad/iPod Touch/Smart o música de Aux-in en estéreo; al usar el WFS de sonic emotion,
el efecto de sonido 3D puede crear un campo de sonido virtual en el que podrá disfrutar del
mejor audio con un solo dispositivo, sin importar el lugar de la habitación en el que se encuentre.
Sonic emotion y el sonido Sonic Emotion 3D son marcas registradas de Sonic Emotion ag.
Page 42

ES 8
Servicio y asistencia
Para información: www.lenco.com
Para asistencia: http://lencosupport.zendesk.com
Teléfono de asistencia Lenco:
Alemania 0900-1520530 (Tarifa local)
Países Bajos 0900-23553626 (Tarifa local + 1ct P/min)
Bélgica 02-6200115 (Tarifa local)
El teléfono de asistencia está disponible de lunes a viernes, de 9 de la mañana a 6 de la tarde.
Cuando se ponga en contacto con Lenco, se le pedirá el modelo y el número de serie de su
producto. El número de serie se encuentra en la parte posterior del aparato. Por favor, escriba
debajo el número de serie:
Modelo: BT-125
Número de serie:_________________________________
Lenco ofrece servicio y garantía en cumplimiento con la ley de la Unión Europea, lo cual implica
que, en caso de que su producto precise ser reparado (tanto durante como después del periodo
de garantía), deberá contactar directamente con su distribuidor.
Nota importante: No es posible enviar sus reparaciones directamente a Lenco.
Nota importante:
Si la unidad es abierta por un centro de servicio no ocial, la garantía quedará anulada.
Este aparato no es adecuado para el uso profesional. En caso de darle un uso profesional,
todas las obligaciones de garantía del fabricante quedarán anuladas.
Datos técnicos
Alimentación de la unidad AC 100 - 240V ~ 50/60Hz
Conector USB Fuente de alimentación USB,
salida DC 5V (Máximo 1000mA)
(para la carga de dispositivos móviles externos)
Salida de altavoz Total 15W x 6 + 35W (Máx.)
Temperatura operativa 0 ~ +35 grados C
y humedad 70%
Page 43

ES 9
Avisos, declaraciones e información
Lenco no se hace responsable de los errores que impresión presentes en el manual.
Las especicaciones y la apariencia externa del equipo están sujetas a cambios sin noticación
previa.
Declaración de conformidad
Los productos con la marca CE cumplen con la Directiva EMC (2004/108/EC)
y con la Directiva de Bajas Tensiones (2006/95/EC) emitida por la Comisión de
la Unión Europea. Por la presente, STL Group BV, Ankerkade 20 NL 5928 PL
Venlo, declara que este producto de audio cumple con los requisitos esenciales y otras provisiones correspondientes de la Directiva 1999/5/EC. Podrá
consultar la Declaración de Conformidad en
https://lencosupport.zendesk.com/forums/22413161-CE-Documents
Este símbolo indica que no deberá deshacerse del producto eléctrico o batería
en cuestión tratándolo como desecho del hogar en el ámbito de la UE. Para
garantizar un tratamiento residual correcto del producto y su batería, por favor,
elimínelos cumpliendo con las leyes locales aplicables sobre requisitos para el
desechado de equipos eléctricos y baterías. De hacerlo, ayudará a conservar
recursos naturales y mejorar los estándares de protección medioambiental en
el tratamiento y eliminación de residuos eléctricos (Directiva sobre la Elimi-
nación de Equipos Eléctricos y Electrónicos).
Este producto funciona a 2400 a 2483,5 MHz y está diseñada únicamente para ser utilizado
dentro de un entorno doméstico normal. Este producto es adecuado para este propósito dentro
de todo.
Para información y asistencia: www.lenco.com
0168
®Reservados todos los derechos
Page 44

 Loading...