

Leica BLK3D

Overview 2
Technical data 3
Instrument Set-up 7
Reality Capture 11
Laser 14
Sketch & Document 17
Organiser 21
Care 22
Warranty 23
Safety instructions 24
Leica BLK3D
1
Overview
Overview
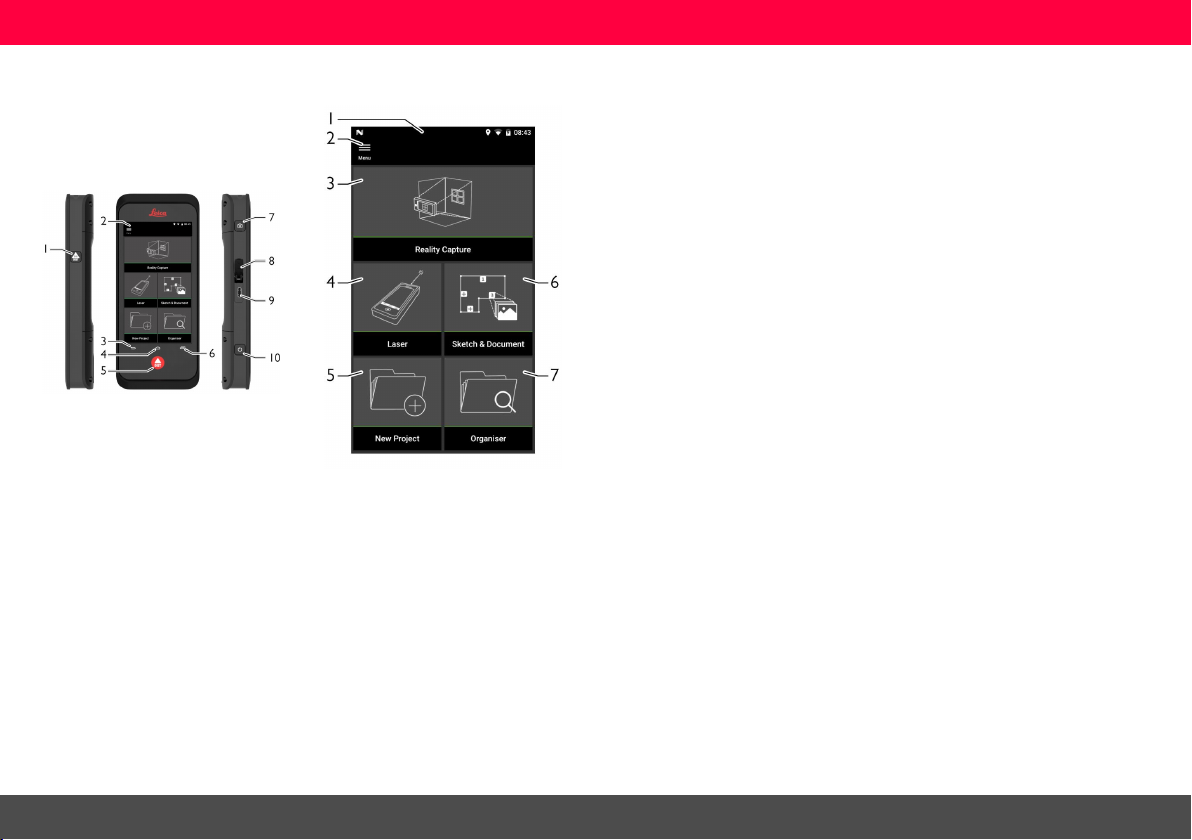
Components
The Leica BLK3D is a remote measurement t ool with a c lass 2 laser. It
enables to measure distances within a picture at any time. See c hapter Technical
data for scope of use.
1. Measure
2. Touch screen
3. Back
4. Home
5. Measure
6. Recents
7. Camera
8. USB port protect ion lid
9. USB port
10. ON/ OFF
Home screen
1. Status bar
2. Side menu
3. Reality Capture
4. Laser
5. Sketch & Document
6. New Project
7. Organiser
Leica BLK3D
2

Technical data
Tech nicaldata
Distance measurement (ISO 163331-1):
Accuracy with favourable conditions: * ± 1.0 mm / 0.04 in ***
Accuracy with unfavourable conditions: ** ± 2.0 mm / 0.08 in ***
Range wit h favourable conditions: * 250 m / 820 ft
Range wit h unfavourableconditions: **** 120 m / 394 ft
Smallest unit displayed: 0.1 mm / 1/32 in
X-Range Power Technology™: yes
Ø laser point at distances: 6 /30 / 60 mm (10 / 50 / 100 m)
Tilt measurement:
Measuring tolerance to laser beam: **** * ± 0.2°
Measuring tolerance to housing: **** * ± 0.2°
Range: 360°
* applies for 100 % target reflectivity (white painted wall), low background illumination, 25 ºC
** applies for 10 to 100% target reflectivity , high backgroundillumination, - 10 ºC t o + 50 ºC
*** Tolerances apply from 0.05 m to 10 m with a confidence level of 95%. The maximum tolerance may deteriorate to 0.1 mm/m between 10 m to 30 m, to 0.20 mm/m between 30 m to
100 m and to 0.30 mm/m for distances above 100 m
**** applies f or 100 % target reflectivity, background illumination of approximately 30'000 lux
***** after user calibration. Additional angle related deviation of +/- 0.01° per degree up to +/-45° in each quadrant.
Leica BLK3D
3

Technical data
P2P measurement with DST 360 (optional):
Working range vertical sensor: -64° to > 90°
Accuracy vertical sensor up to: +/- 0.1°
Working range horizontal sensor: 360°
Accuracy horizontal sensor up to: +/- 0.1°
Tolerance P2P function at distances
(combination of sensors and distance measuring) approx.:
Levellingrange: +/- 5°
General:
Dimensions (H x W x D): 180.6 x 77.6 x 27.1 mm (7.11 x 3.06 x 1.07 in)
Weight (with rechargeable battery): 480 g / 17 oz
Temperature range: Storage: -25 to 60 °C / -13 to 140 °F
Tripod adapter: supports 1/4-20 UNC sc rew adapters
+/- 2 mm / 2 m
+/- 5 mm / 5 m
+/- 10 mm / 10 m
Operation: -10 to 50 °C / 14 to 122 °F
Charging: 0 to 40 °C / 32 to 104 °F
Leica BLK3D
4

Technical data
Technology:
Operating system: Android 7 (Nougat)
Processor (with integrated GPU): Snapdragon 820 QuadCore (2.2 GHz)
RAM Memory: 4 GB
Real-time processor: STM32F446
Screen: 5.0" I PS, HD 720x1280 LCD capacitive multi-touch screen, chemically strengthened, brightness: 450 cd/m2
Stereo camera: Pixels: 2 x 10 MP (15.8 cm diagonal base line)
DISTO™ camera: Pixels: 2 MP
I/O: USB Type-C 1.0 for data t ransfer and charging(water-resistant), integrated speaker and microphone
Keyboard: Three physical buttons (Power, DIST, Camera), f our t ouch buttons (Back, Home, Recents, DIST)
Additional sensors: Compass, 3D accelerometer and 3D gyroscope
Laser class: 2
Laser t ype: 635 nm, < 1 mW
Storage:
Internal storage: 64 GB
Singleshots: 14000pictures
Multi shots: 5000 pictures
Field of v iew: 80°
Focal length: 4.0 mm (22 mm in 35 mm equiv. in 1:1)
Aperture: F3.0
Field of v iew: 14°
Leica BLK3D
5

Technical data
Communication:
Bluetooth® Smart: Bluetooth v4.1 and v2.1
WLAN:
GPS: A-GPSand GLONASS
Power Management:
Battery: Rechargeable battery pack Li-Ion (3.80 V, 3880 mAh, 14.7 Wh) (included)
Power Management: AC adaptor (input: 100-240V AC) (included)
Charge time: <3.5 h (with AC adaptor)
Operating time: Typical capture*: 4 h / 220 multi-shot captures
* Wi-Fi, Bluetooth® off, flash off, screen luminosity 50 %
Radiated power: 1.78 mW (BLE)
Radiated power: 10.00 mW (BT classic)
Frequency: 2402-2480 MHz
Standard: 802.11 b/g/n
Radiated power: 6.31 mW
Frequency: 2412-2462 MHz
External c harger (input: 100-240V AC) (optional)
< 5 h (with optional external charger)
Continuous c apture*: 2.5 h / 1000 single-shot captures
Laser measurements: 6.5 h / 9500 laser measurements
Auto power off: 3 h
Leica BLK3D
6
Instrument Set-up
InstrumentSet-up
Introduction
The safety inst ructions (see Safety
Instructions) and the user manual
should be read through carefully
before the product is used for the
first t ime.
The person responsible for the
product must ensure that all users
understand these directions and
adhereto them.
The symbols used have t he following
meanings:
WARNING
Indicates a potentially hazardous situation
or an unintendeduse which, if not avoided,
will result in death or s erious injury.
CAUTION
Indicates a potentially hazardous situation
or an unintendeduse which, if not avoided,
may result in minor injury and/or appreciable material, financial and environmental damage.
Important paragraphs which must
be adhered to in practice as they
enablethe product t o be used in a
technically correct and efficient manner.
Charging Li-Ion battery
Charge batteries w hen batt ery icon
in status bar is flashing and before
using it f or the first time. While charging, t he device may heat up. This is
normal and should not affect the
device’s lifespan or performance. If
the battery gets hotter t han 40°C /
104°F, the charger stops. At a
recommended st orage temperature
of -20°C to +30°C (-4°F to +86°F),
batteries containing a 50% to 100%
charge can be stored up to 1 year.
After this st orage period the batteries must be recharged. To save
energy, unplug t he charger when not
in use.
CAUTION
Connecting t he charger improperly may
cause serious damageto the device. Any
damage caused by misuse is not covered
by the warranty. Use only Leica-approved
chargers, batteries, and cables. Unapproved chargers or cables can cause the
battery to explode or damage t he device.
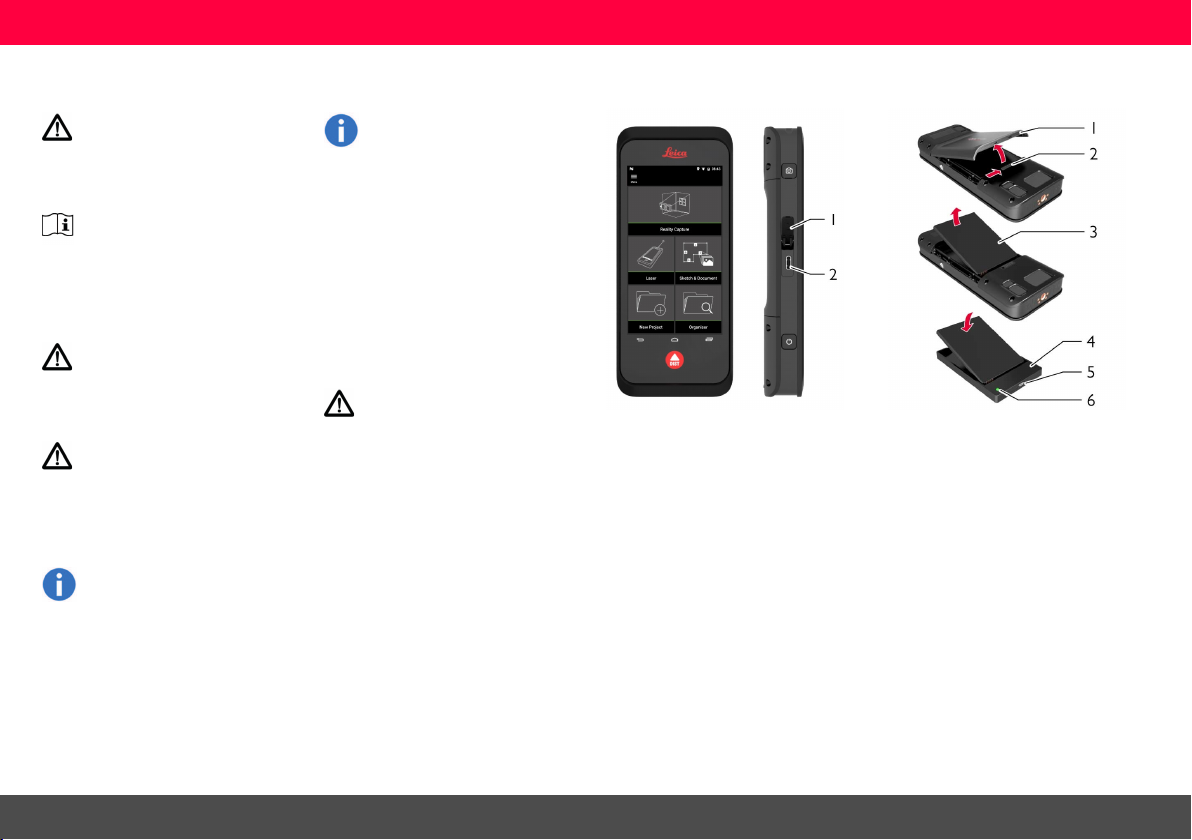
Charge Li-Ion battery by USB port
on the dev ice
Use the provided USB-C cable to charge
the BLK3D. Open the lid (1) and plug t he
cable into the port of the device (2). Plug
the end of the USB-C cable into one of t he
provided adaptors. Select the appropriate
one for y our country. The device can also
be chargedconnecting the USB-C c able t o
the computer, but this takes more time. If
the device is connected t o the computer
via USB c able, you c an download and
uploaddata. During charging, the device
cannot be used for measuring or acquiring
images.
Charge Li-Ion battery by USB charger (optional)
Remove battery cover (1) by openingthe
slider (2) from left t o right. Remove battery
(3) and place it into charger(4). Insert the
USB cable into the port (5). Plugthe charger into an electrical socket. Charging is
completed when indicator light (6) turns
green.
Leica BLK3D
7
Instrument Set-up
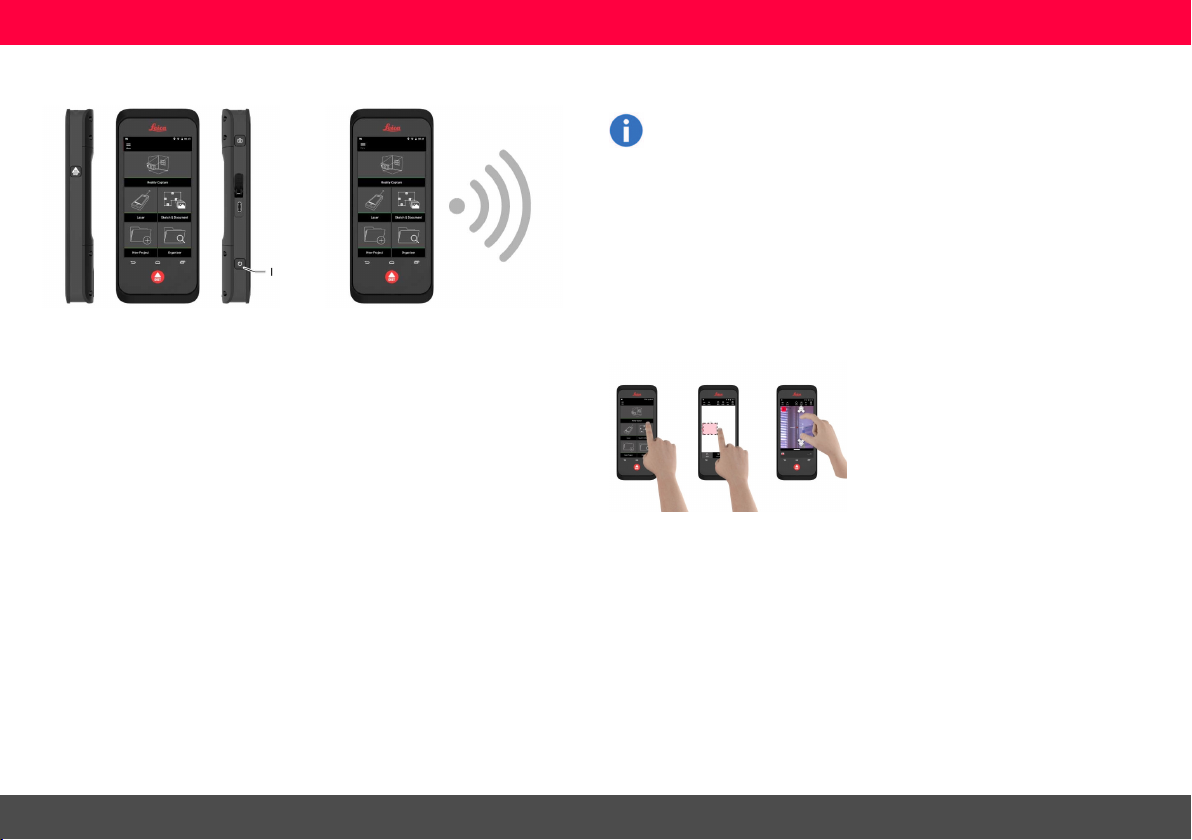
Switching ON/OFF
Switc hing ON
Press ON/OFF butt on (1) to switch device
ON.
Switc hing OFF
Press ON/OFF butt on (1) for at least 2
seconds to switch device OFF.
Update
Connect the BLK3D to the internet via WiFi
to get the latest updates.
Using the touch screen
It is recommended to use fingers on
the touchscreen. Do not allow the
touch screen to come into contact
with other electrical devices. Electrostatic discharges can cause the
touch screen to malfunction. Do not
allow t he touch screen t o get in contact with water. The t ouch screen
may malfunction in humid c onditions
or when exposed to water. T o avoid
damagingthe touch screen, do not
tap it with anything sharp or do not
apply exc essive pressure to it with
your fingertips.
Tap
Tap on the display to open an application or
to make a selection.
Drag
Touch and hold object and drag it to the target position.
Double tap
Double tap on image t o zoom it. Double tap
again to return.
Spread and pinch
Spread two fingers apart on image to
zoom. Pinch to zoom out.
Swipe
Swipe from left to right on t he screen t o
scroll side Menu. Swipe downwards to
scroll through options.
Leica BLK3D
8

Instrument Set-up
Activation
Select language for operating syst em.
Leica BLK3D
Copy your data f rom another device or set
up as new.
Connect to a WiFi network. Protect your device with a PIN or a pass-
word (optional).
9

Instrument Set-up
Settings
Select “Settings” menu.
Enter user data. Select measurement unit. Select language.
Leica BLK3D
10

Reality Capture
1
2
3
4
5
6
RealityCapture
1. Take photo
Select "Reality Capture" funct ion.
Choose between different settings:
Timer: set a time delay for the
photo acquisition.
Grid: s how grid lines on display for
better orientation.
Flash: set t he flash ON/OFF.
Cancel: cancel last operation and
go back t o home s creen.
Menu: show menu f or main navigation.
Take a photo of the objects you want
to measure.
New: Cancel and create new "Reality Capture" scene.
To increase measurement accuracy
take an additional photo from a slightly
other perspective.
Leica BLK3D
Review photos. Press "Remove" to
delete unwanted photos and "Keep"to
exit Review mode.
Go to Measure mode (see 2. Measure
distances in photo).
11

Reality Capture
1
2
3
4
5
6
7
8
2. Measure distances in photo
Select "Distance". Place fingers on the
edges of t he object you want to measure. Spread fingers apart to enlarge the
object.
Drag and spread t o precisely center
the point you w ant to measure in the
hair cross .
Done: confirm measuring point position.
Next: jump the next measuring
point f or precise point selection.
Leica BLK3D
Tap a point on photo to start measuring
process.
Snap: Automatic snap to edges in
photo (act ivated by default).
Delete: delete selected measuring
point/line.
Undo: erase last operation.
Select Tools to add Tags, Rename or
Delete scene, Move scene to a project
(see Organiser), measure dist ances
with Laser (see Laser).
Tap the second point. The measured
distance is automatically shown above
the line.
Select a line and measure the distance
with Laser. Laser measurement is
shown in brackets (see Laser).
Tap on any measured point again to
activate Precise mode.
Choose different options:
New: exits Measure mode to take
a new photo.
Export: export the scene in JPG or
PDF format.
12

Reality Capture
1
2
3
4
5
6
7
3. Measure areas in photo
Select "Area". Place fingers on the
edges of t he object you want to measure. Spread fingers apart to enlarge the
object.
Select Tools to add Tags, Rename or
Delete scene, Move scene to a project
(see Organiser), measure dist ances
with Laser (see Laser).
Leica BLK3D
Tap a point on photo to start measuring
process.
Snap: Automatic snap to edges in
photo (act ivated by default).
Delete: delete selected measuring
point/line.
Undo: erase last operation.
Select a line and measure the distance
with Laser. Laser measurement is
shown in brackets (see Laser).
Tap on next measuring points to complete t he area. Tap on any measured
point again to activate Precise mode.
Define more points to complete the
area. T ap on any point to activate Precise mode.
Choose different options:
New: exits Measure mode to take
a new photo.
Export: export the scene in JPG or
PDF format.
Drag and spread t o precisely center
the point you w ant to measure in the
hair cross .
Done: confirm measuring point position.
Next: jump the next measuring
point f or precise point selection.
13

Laser
1
2
3
4
5
6
7
Lase r
Distance
Select "Laser"function.
Select "Tools" to choose between different measurements (Distance,
Smart Horizontal, Area and Volume)
and export measurement into a PDF
report.
Leica BLK3D
Adjust measuring reference:
Back: Distance is measured f rom the bottom of the device (default setting).
Front: Distance is measured f rom the top
of the device.
Corner adaptor: Distance is measured
from the corner adapter (optional).
Select "Calc" and choose between
"Add" and "Subtract". Take another
Distance measurement to Add/Subtract t o/from the previous one.
Select "Distance" from "Tools". Aim
laser at the target.
Swipe right to left t o delete a single
measurement, or select "Clear" to cancel the measurement list.
Press "Measure" button (see
Overview). Measured dist ance is
shown at the bottom of the screen.
14

Laser
1
2
3
1
2
Smart Horizontal
Select "Smart Horizontal" from "Tools".
Adjust measure reference if needed.
Tracking
Press or "Measure" button for 2
seconds to activate tracking mode.
Leica BLK3D
Aim active laser at target. Measure
with "Measure" button.
Press or "Measure" button again to finish the measurement.
Vertical andhorizontal dist ances are
calculated.
15

Laser
1
2
3
1
2
3
Area
Select "Area" f rom "Tools". Adjust
measure reference if needed.
Volume
Select "Volue" from "Tools". Adjust
measure reference if needed.
Leica BLK3D
Measure t wo distances (length and
width) with "Measure" button.
Measure t hree dist ances (length, width
and height) with "Measure" button.
Circumference and Area are automatically calculated.
Area, Wall Area, Circumf erence and
Volume are automatically calculated.
16

Sketch & Document
1
2
3
4
5
6
7
8
Sketch &Documen t
Sketch Plan (Advanced)
Select "Sketch Plan"function from
"Sketch & Document" menu.
Alternatively select a line and press
“Enter” to add length.
Leica BLK3D
Select "Line" or "Area"and draw by
dragging or tapping.
Select a line and press "Opening" t o
add doors or w indows.
Select a line and press "Laser" t o measure the length.
Drag t he opening t o move it or select
the distance from the wall and measure it.
The sketch is automatically scaled.
Calculated values are in brackets.
Select opening and press "Modify" to
change type and enter width and
height.
17

Sketch & Document
9
10
11
12
Leica BLK3D
Switch to "3D" mode. A room height
can be entered.
Switch to "Document" and select an
empty placeholder to add Reality Capture scenes.
Select a placeholder to review t he
scenes. Press t he scene preview to
open it.
Select a placeholder to "Delete" or
"Add" Reality Capture scenes.
18

Sketch & Document
1
2
3
4
5
6
Smart Room (Advanced)
Select "Smart Room" f unction from
"Sketch & Document" menu.
All measured values are displayed.
After the last measurement press "Finish".
Leica BLK3D
Keep screen oriented away from the
wall while measuring.
The floorplan can be modified in
"Sketch" mode (see Sketch Plan).
Measure room clockwise/anti-clockwise. Reverse measurements can be
taken.
Room Height can be measured anytime.
19

Sketch & Document
1
2
3
1
2
3
Measure Plan (Advanced)
Connect BLK3D to Leica DST 360
adapter.
Measure Facade (Advanced)
Connect BLK3D to Leica DST 360
adapter.
Leica BLK3D
Select “Measure Plan” f unction from
“Sketch & Document” menu.
Select “Measure Facade” function
from “Sketch & Document” menu.
Measure lines, areas or points. Follow
on-screen instructions.
Measure lines, areas or points on a
facade. Follow on-screen inst ructions.
20

Organiser
1
2
3
4
5
6
7
8
Organiser
Select "Organiser" funct ion.
Open the category "Projects". Press
the "Project" button to create a new Project folder. Plans andscenes can be
moved in project folders.
Leica BLK3D
All the s ketc hes and scenes are stored
in f our categories:
1. All
2. Projects
3. Scenes
4. Plans
Open the category "Scenes". All the
Reality Capture scenes are s tored.
Press "RC" button to add a new scene.
Open the category "All". All the plans,
Reality Capture scenes and projects
are stored.
Open the category "Plans". All the
plans, includingplans with scenes
attached, are stored.
Use the "Select" butt on to select an
item. Dif ferent actions are available:
Export, Move to Project, Rename, Tag
and Delete.
Press "S&D" button to add a new plan.
21

Care
Care
l Clean the device with a damp, soft cloth.
l Never immerse the device in water.
l Never use aggressive cleaning agents or
solvents.
Leica BLK3D
22

Warranty
Warranty
Internati onal Li mited Warranty
The Leica BLK3D comes with a two year warranty from
Leica Geosystems AG. To receive an additionalyear warranty, the product must be registered on our website at
http:/ /myworld.leica-geosystems.c om within eight
weeks of the purchase date.
If the product is not registered, our t wo year warranty
applies.
More detailed information about the International Limited
Warranty can be found on the internet at: www .leica-geo-
systems. com/ internationalwarranty.
Leica BLK3D
23

Safety instructions
Safetyinstructions
The person responsible for the inst rument must
ensure that all users understand these directions
and adhere to them. The product is permitted to
use for skilled persons only.
Symbols used
The symbols used have t he following meanings:
WARNING
Indicates a potentially hazardous situation or an unintended use which, if not avoided, will result in death or
serious injury.
CAUTION
Indicates a potentially hazardous situation or an unintended use which, if not avoided, may result in minor
injury and/or appreciable material, financial and environmental damage.
Important paragraphs which must be adheredto in
practice as they enable the product to be used in a
technically correct and efficient manner.
Permitted use
l Captureinteractive images
l Measurein interactive images
l Measuredistances
l Tilt measurement
l Point to point measurement
l Data transfer with Bluetooth®/WLAN
l 2D/3D CAD export
Leica BLK3D
24

Safety instructions
Prohibited use
l Using the device for t he first time without read-
ing instructions
l Using the device outside the s tated limits of
use (see section Limits of use)
l Deactivating safety syst ems and removing
explanatory and hazard labels
l Openingof the equipment by using tools
(screwdrivers, etc.)
l Using not approved accessories from other
manufacturers
l Deliberate dazz ling of t hird parties; also in the
dark
l Using the device in surveying sites wit h inad-
equate safeguards
l Deliberate or irresponsible behaviour on scaf-
folding, when using ladders, when measuring
near machines which are running or near parts
of machines or inst allations which are unprotected
l Aiming directly in the s un
Hazards in use
WARNING
Watch out for erroneous measurements if the inst rument
is defective or if it has been dropped or has beenmisused
or modified. Carry out periodic test measurements. Particularly after the instrument has been subject to abnormal use, and before, during and after important
measurements.
CAUTION
Never attempt t o repairthe product yourself. In case of
damage, c ontact a local dealer.
WARNING
Changes or modifications not expressly approved could
void the user´s authority to operate the equipment.
CAUTION
Only use chargers recommended by the manufacturer t o
charge the batt eries.
Limits of use
Refer to section Technical data. The device is
designedfor use in areas permanently habitable by
humans. Do not use the product in explosion hazardous areas or in aggressive environments.
Leica BLK3D
25

Safety instructions
Areas of responsibility
Responsibi lities of the manufacturer of the original equipment:
Leica Geosystems AG
Heinrich-Wild-Strasse
CH-9435 Heerbrugg
Internet: www.leica-geosys tems.com
The company above is responsible f or supplying the
product, including the User Manual in a completely safe
condition.
The company above is not responsible f or third party
accessories.
Responsibi lities of the person in charge of the
ins trument:
l To understand the s afety instructions on t he
product and the instructions in the U ser
Manual.
l To be familiar w ith local safety regulations relat-
ing to accident prevention.
l Always prevent access to the product by unau-
thorised personnel.
Disposal
CAUTION
Flat batteries must not be disposed of with household
waste. Care for the environment and take them to the collection points provided in accordance with nationalor
local regulations.
The product must not be disposed with household
waste. Dispose of the product appropriately in
accordance w ith the national regulations in force in
your country. Adhere to the national and country
specific regulations.
Product s pecific treatment and waste management can
be downloaded from our homepage.
Electromagnetic Compatibility
(EMC)
WARNING
The device c onforms to the most st ringent requirements
of the relevant s tandards and regulations. However, the
possibility of causing interference in other devices cannot be totally excluded.
Leica BLK3D
26

Safety instructions
FCC statement (applicable in U.S.)
This equipment has been t ested and found t o comply
with the limits for a Class B digital instrument, pursuant
to part 15 of the FCC rules. These limits are designed to
provide reasonable protection against harmful interference in a residential installation. This equipment generates, uses and can radiate radio frequency energy and,
if not installed and used in accordance with the instructions, may cause harmful interference to radiocommunications.
However, there is no guarantee that interference will not
occur in a particular installation. If this equipment does
cause harmful interference to radio or television reception, which can be determined by turning the equipment
off and on, the user is encouraged to try to correct the
interference by one or more of the f ollowing measures:
l Reorient or relocate the receiving antenna
l Increase the s eparation between the equip-
ment and the receiver
l Connect the equipment into an outlet on a c ir-
cuit different from that to which the receiver is
connected
l Consult t he dealer or an experienced radio/TV
technician for help
This device complies with part 15 of t he FCC rules. Operation is s ubjected to the following two conditions:
l This device may not cause harmful inter-
ference, and
l this device must accept any interference
received, includinginterference t hat may
cause undesiredoperation.
FCC Radiati on Expos ure Statement
The radiated rf output power of t he instrument is below
the FCC radio frequency exposure limits for portable
devices according t o KDB 447498.
ISED Statement (applicable in
Canada)
This device complies with Industry C anada's licenseexempt RSSs. Operation is s ubject to the following t wo
conditions:
l This device may not cause harmful inter-
ference, and
l this device must accept any interference,
includinginterference that may cause
undesiredoperation of the device.
Le présent appareil est conforme aux CNR d’Industrie
Canada applicables aux appareils radio exempts de
licence. L’exploitation est autorisée aux deux conditions
suivantes :
l l’appareil ne doit pas produire de brouillage;
l l’appareil doit accepter tout brouillage radi-
oélectrique subi, même si le brouillage est susceptible d’en compromettre le fonctionnement.
Radio Frequency (RF) Expos ure Compli ance
Statement
The radiated rf output power of t he instrument is below
the Health Canada's Safety Code 6 exclusion limit for
portable devices (radiated element separation dist ance
between t he radiating element and user and/or bystander
is below 20 cm).
Japanese Radio Law and Japanese
Telecommunications Business Law
Compliance
This device is granted pursuant to the Japanese Radio
Law (電波法) and the Japanese Telecommunications
Business Law (電気通信 事 業法).
Leica BLK3D
27

Safety instructions
Regulatory
Regulatory information, certification, and compliance
marks are available on BLK3D. Go to Android Sett ings >
About phone > Regulatory labels.
Use of the product with Bluetooth®
WARNING
Electromagnetic radiation can cause disturbances in
other equipment, in installations (e.g. medical ones such
as pacemakers or hearing aids) and in aircraft. It can also
affect humans and animals.
Precautions:
Although this product conforms t o the most st ringent
standards and regulations, the possibility of harm to
peopleand animals cannot be t otally excluded.
l Do not use the product near petrol stations,
chemical plants, in areas wit h a potentially
explosive atmosphere and where blasting
takes place.
l Do not use the product near medical equip-
ment.
l Do not use the product in airplanes.
l Do not use the product near your body f or
extended periods.
Leica BLK3D
28

Safety instructions
Laser classification
The device produces visible laser beams, which are emitted from the instrument: It is a Class 2 laser product in
accordance w ith:
l IEC60825-1 : 2014 „Radiation safety of laser
products“
Laser Clas s 2 products :
Do not stare into the laser beam or direct it towards other
peopleunnecessarily. Eye protection is normally
afforded by aversion responses includingthe blink reflex.
WARNING
Looking directly into the beam with optical aids (e.g. binoculars, telescopes) can be hazardous.
CAUTION
Looking into the laser beam may be hazardous to the
eyes. Don't dazzle other individuals. Pay particular attention to the direction of the laser beam when remotely operating t he product via an app or software. A measurement
could be triggered at any time.
Wavelength
655 nm
Maximum radiant output power for classification
0.95 mW
Pulse duration
400 ps
Pulse repetition frequency
320 MHz
Beam divergence
0.16 x 0.6 mrad
Labelling
Subject t o change (drawings, descriptions and t echnical
data) without prior notice.
Leica BLK3D
29
 Loading...