

Page 1

ENTable of Contents
Instrument Set-up - - - - - - - - - - - - - - - - - - - - - - - - - - - - - - - 2
Introduction - - - - - - - - - - - - - - - - - - - - - - - - - - - - - - - - - - - - 2
Overview - - - - - - - - - - - - - - - - - - - - - - - - - - - - - - - - - - - - - 2
Basic measuring screen - - - - - - - - - - - - - - - - - - - - - - - - - - - - - 3
Selection screen - - - - - - - - - - - - - - - - - - - - - - - - - - - - - - - - - 3
Pointfinder (Viewscreen)- - - - - - - - - - - - - - - - - - - - - - - - - - - - 4
Icons on Status bar - - - - - - - - - - - - - - - - - - - - - - - - - - - - - - - 4
Charging the Li-Ion battery via USB - - - - - - - - - - - - - - - - - - - - - 5
Using the Smart Base - - - - - - - - - - - - - - - - - - - - - - - - - - - - - - 6
Using the Smart Base Extension - - - - - - - - - - - - - - - - - - - - - - - 6
Operations - - - - - - - - - - - - - - - - - - - - - - - - - - - - - - - - - - - - - 7
Using the Touch Screen - - - - - - - - - - - - - - - - - - - - - - - - - - - - 7
Switching ON/OFF - - - - - - - - - - - - - - - - - - - - - - - - - - - - - - - 8
Clear - - - - - - - - - - - - - - - - - - - - - - - - - - - - - - - - - - - - - - - - 8
Message Codes- - - - - - - - - - - - - - - - - - - - - - - - - - - - - - - - - - 8
Permanent / Minimum-Maximum measuring - - - - - - - - - - - - - - - 8
Add / Subtract - - - - - - - - - - - - - - - - - - - - - - - - - - - - - - - - - - 8
Pointfinder (Viewscreen)- - - - - - - - - - - - - - - - - - - - - - - - - - - - 9
Screenshot- - - - - - - - - - - - - - - - - - - - - - - - - - - - - - - - - - - - - 9
Settings - - - - - - - - - - - - - - - - - - - - - - - - - - - - - - - - - - - - - - - 10
Overview - - - - - - - - - - - - - - - - - - - - - - - - - - - - - - - - - - - - 10
Tilt units - - - - - - - - - - - - - - - - - - - - - - - - - - - - - - - - - - - - - 10
Distance units- - - - - - - - - - - - - - - - - - - - - - - - - - - - - - - - - - 11
Beep ON/OFF - - - - - - - - - - - - - - - - - - - - - - - - - - - - - - - - - 12
Digital level ON/OFF- - - - - - - - - - - - - - - - - - - - - - - - - - - - - 12
De-/Activate keylock - - - - - - - - - - - - - - - - - - - - - - - - - - - - - 12
Switch on with keylock - - - - - - - - - - - - - - - - - - - - - - - - - - - - 12
Bluetooth® /WIFI - - - - - - - - - - - - - - - - - - - - - - - - - - - - - - - 13
Calibration of tilt sensor (Tilt Calibration) - - - - - - - - - - - - - - - - 15
Personalized favorites- - - - - - - - - - - - - - - - - - - - - - - - - - - - - 16
Illumination - - - - - - - - - - - - - - - - - - - - - - - - - - - - - - - - - - - 16
Touch Screen ON/OFF - - - - - - - - - - - - - - - - - - - - - - - - - - - 16
Date and Time - - - - - - - - - - - - - - - - - - - - - - - - - - - - - - - - - 17
Compass Adjustment - - - - - - - - - - - - - - - - - - - - - - - - - - - - - 17
Offset - - - - - - - - - - - - - - - - - - - - - - - - - - - - - - - - - - - - - - - 18
Reset - - - - - - - - - - - - - - - - - - - - - - - - - - - - - - - - - - - - - - - 18
Functions - - - - - - - - - - - - - - - - - - - - - - - - - - - - - - - - - - - - - 19
Overview - - - - - - - - - - - - - - - - - - - - - - - - - - - - - - - - - - - - 19
Timer - - - - - - - - - - - - - - - - - - - - - - - - - - - - - - - - - - - - - - - 20
Calculator - - - - - - - - - - - - - - - - - - - - - - - - - - - - - - - - - - - - 20
Adjusting measuring reference - - - - - - - - - - - - - - - - - - - - - - - 21
Memory - - - - - - - - - - - - - - - - - - - - - - - - - - - - - - - - - - - - - 22
Measuring single distance - - - - - - - - - - - - - - - - - - - - - - - - - - - 22
Smart Horizontal Mode - - - - - - - - - - - - - - - - - - - - - - - - - - - - 22
Level - - - - - - - - - - - - - - - - - - - - - - - - - - - - - - - - - - - - - - - - 23
Area - - - - - - - - - - - - - - - - - - - - - - - - - - - - - - - - - - - - - - - - 23
Volume - - - - - - - - - - - - - - - - - - - - - - - - - - - - - - - - - - - - - - 24
Photo - - - - - - - - - - - - - - - - - - - - - - - - - - - - - - - - - - - - - - - 25
Compass - - - - - - - - - - - - - - - - - - - - - - - - - - - - - - - - - - - - - 26
Gallery - - - - - - - - - - - - - - - - - - - - - - - - - - - - - - - - - - - - - - - 27
Triangular area- - - - - - - - - - - - - - - - - - - - - - - - - - - - - - - - - - 28
Height-profile measurement - - - - - - - - - - - - - - - - - - - - - - - - - 29
Sloped objects - - - - - - - - - - - - - - - - - - - - - - - - - - - - - - - - - - 30
Height tracking- - - - - - - - - - - - - - - - - - - - - - - - - - - - - - - - - - 31
Trapezium - - - - - - - - - - - - - - - - - - - - - - - - - - - - - - - - - - - - 32
Stake out - - - - - - - - - - - - - - - - - - - - - - - - - - - - - - - - - - - - - 33
Pythagoras (2-point) - - - - - - - - - - - - - - - - - - - - - - - - - - - - - - 34
Pythagoras (3-point) - - - - - - - - - - - - - - - - - - - - - - - - - - - - - - 35
Width - - - - - - - - - - - - - - - - - - - - - - - - - - - - - - - - - - - - - - - 36
Diameter - - - - - - - - - - - - - - - - - - - - - - - - - - - - - - - - - - - - - 37
Area from Photo - - - - - - - - - - - - - - - - - - - - - - - - - - - - - - - - 38
Pointdata transmission- - - - - - - - - - - - - - - - - - - - - - - - - - - - - 39
Smart Angle measuring - - - - - - - - - - - - - - - - - - - - - - - - - - - - 40
Point to point function / distance- - - - - - - - - - - - - - - - - - - - - - 41
Smart Area measuring - - - - - - - - - - - - - - - - - - - - - - - - - - - - - 42
Data capture in DXF-file - - - - - - - - - - - - - - - - - - - - - - - - - - - 43
Technical Data- - - - - - - - - - - - - - - - - - - - - - - - - - - - - - - - - - 44
Message Codes - - - - - - - - - - - - - - - - - - - - - - - - - - - - - - - - - 45
Care - - - - - - - - - - - - - - - - - - - - - - - - - - - - - - - - - - - - - - - - - - 45
Warranty - - - - - - - - - - - - - - - - - - - - - - - - - - - - - - - - - - - - - - 46
Safety Instructions- - - - - - - - - - - - - - - - - - - - - - - - - - - - - - - 46
Areas of responsibility - - - - - - - - - - - - - - - - - - - - - - - - - - - - - 46
Prohibited use - - - - - - - - - - - - - - - - - - - - - - - - - - - - - - - - - - 47
Limits of use - - - - - - - - - - - - - - - - - - - - - - - - - - - - - - - - - - - 47
Disposal - - - - - - - - - - - - - - - - - - - - - - - - - - - - - - - - - - - - - - 47
Electromagnetic Compatibility (EMC) - - - - - - - - - - - - - - - - - - - 47
FCC statement (applicable in U.S.) - - - - - - - - - - - - - - - - - - - - - 48
Déclaration FCC, applicable aux Etats-Unis - - - - - - - - - - - - - - - 48
Normativa FCC (aplicable en EE UU) - - - - - - - - - - - - - - - - - - - 49
Use of the product with Bluetooth
Laser classification - - - - - - - - - - - - - - - - - - - - - - - - - - - - - - - 50
Labelling - - - - - - - - - - - - - - - - - - - - - - - - - - - - - - - - - - - - - - 50
®
- - - - - - - - - - - - - - - - - - - - 49
Leica DISTOTM S910 805080
1
Page 2
ENInstrument Set-up
Introduction
The safety instructions and the user manual should be read
through carefully before the product is used for the first time.
The person responsible for the product must ensure that all
users understand these directions and adhere to them.
The symbols used have the following meanings:
WARNING
Indicates a potentially hazardous situation or an unintended use
which, if not avoided, will result in death or serious injury.
CAUTION
Indicates a potentially hazardous situation or an unintended use
which, if not avoided, may result in minor injury and/or appreciable
material, financial and environmental damage.
Important paragraphs which must be adhered to in practice as
i
they enable the product to be used in a technically correct and
efficient manner.
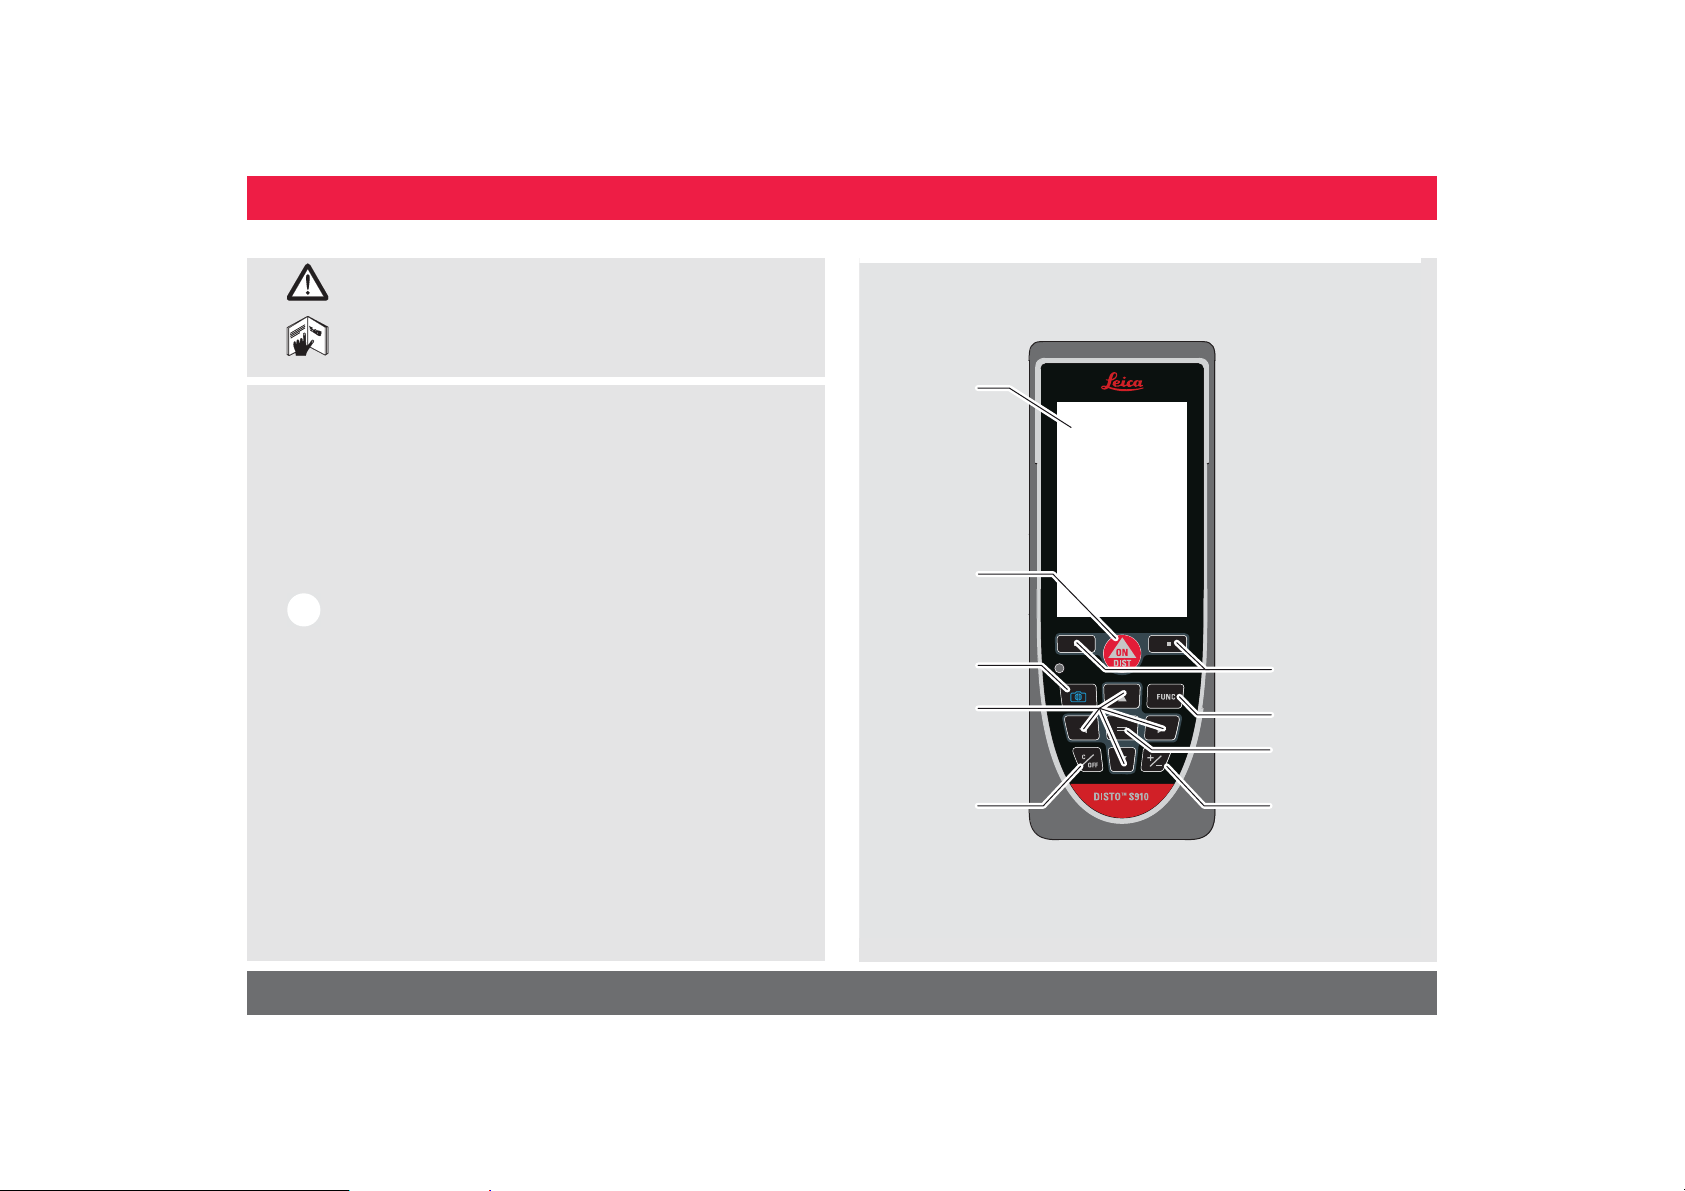
Overview
Display
On/Measure
Pointfinder
(Viewscreen)
Navigation
Clear / Off
Selection keys
linked to symbols
above
Function screen
Enter / Equal
Add / Subtract
Leica DISTOTM S910 805080
2
Page 3
ENInstrument Set-up
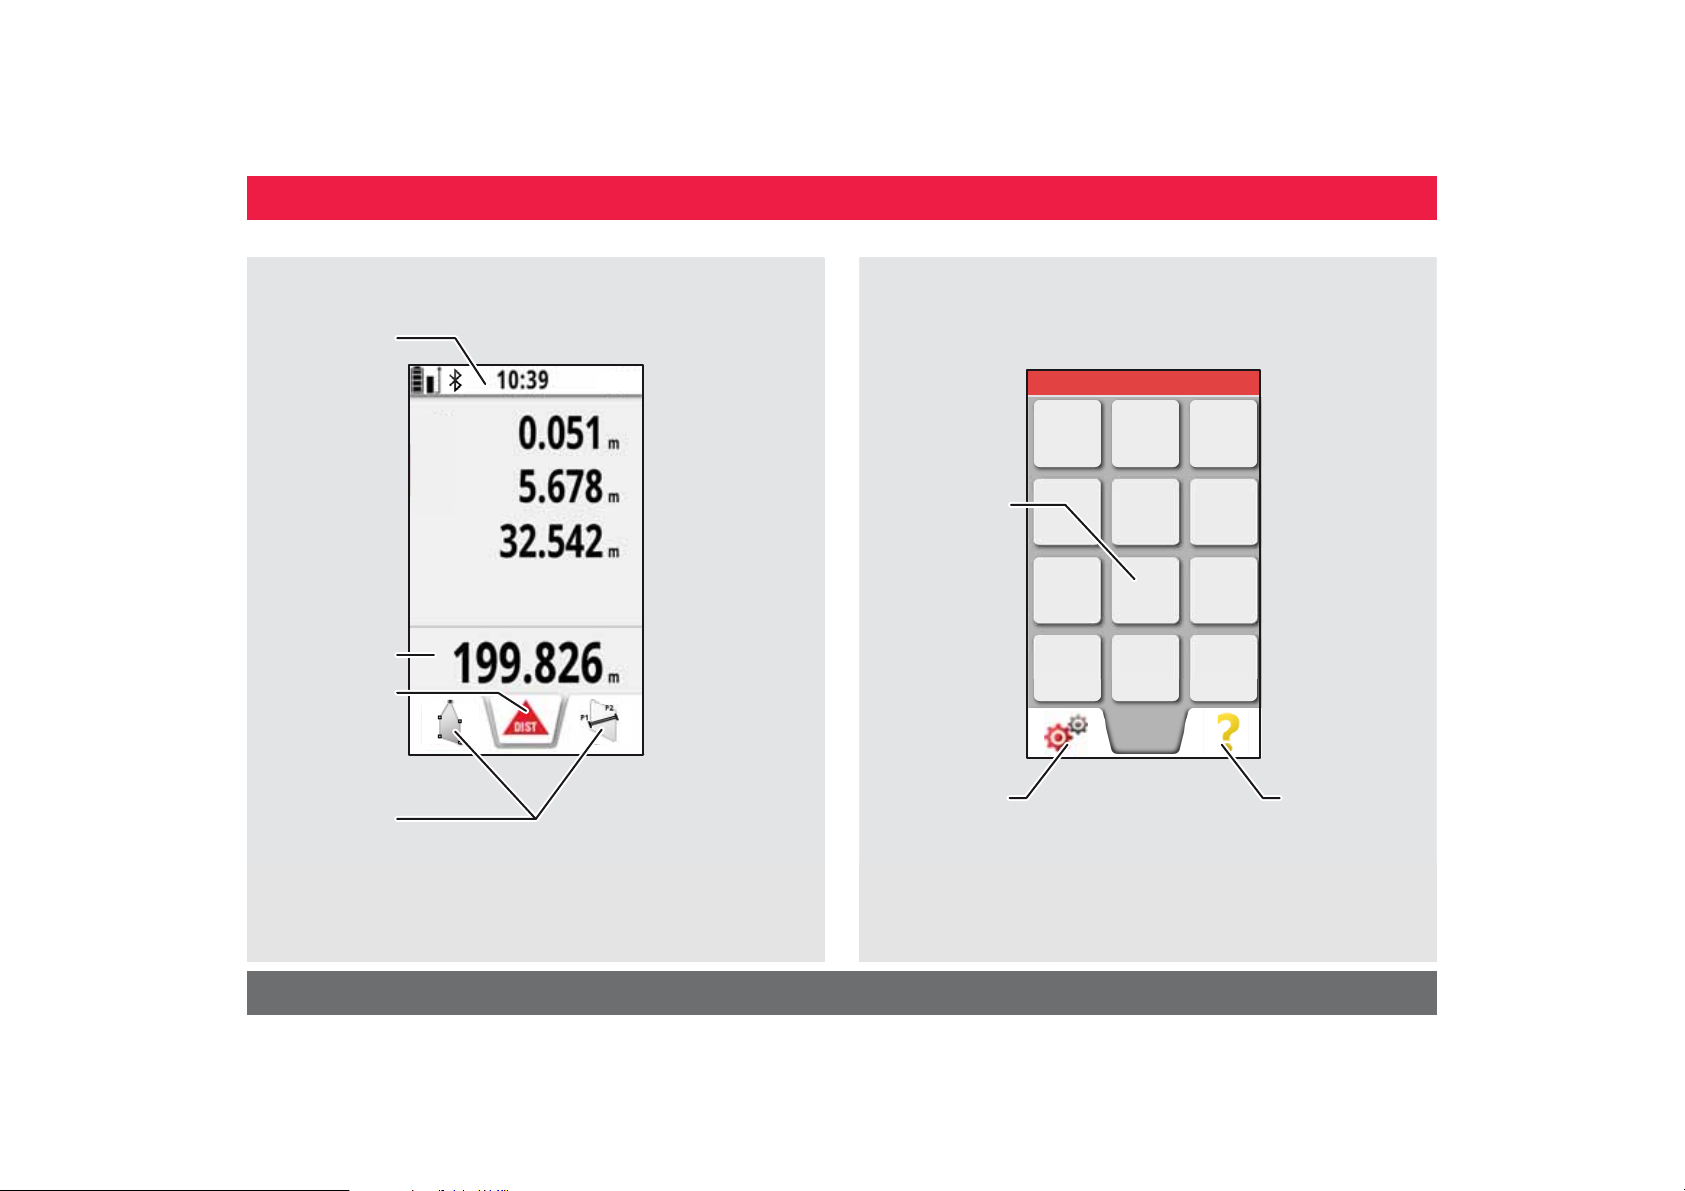
Basic measuring screen
Status bar
Main line
Active function
Tap here to start
ON/DIST in a dis-
tance function
Favorites
Selection screen
Function /
Settings
Settings
FUNC
Help function
Leica DISTOTM S910 805080
3
Page 4
ENInstrument Set-up
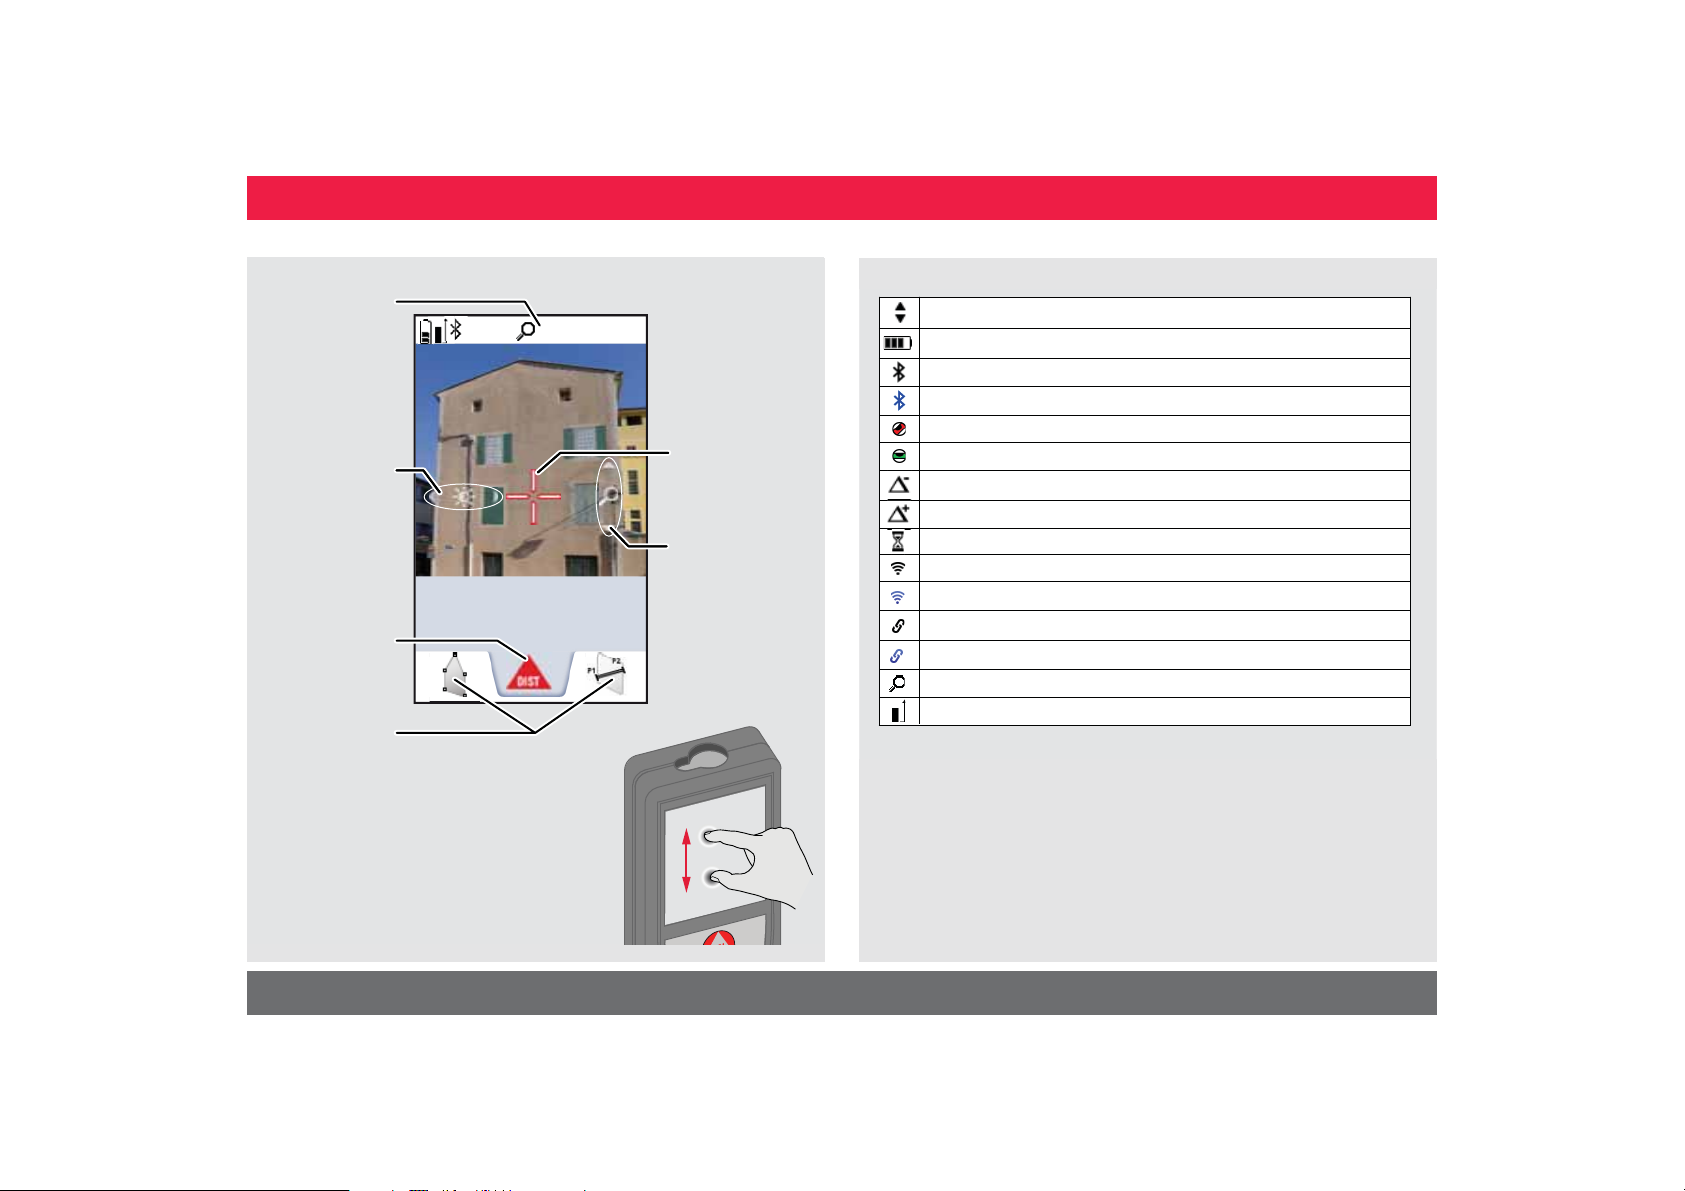
Pointfinder (Viewscreen)
Zoom stage
Illumination
adjustment
with navigation
keys left and
right
24.210
Active function
Favorites
1x
m
Crosshair
Zoom with
navigation keys
up and down
Icons on Status bar
Scroll up and down for further results
Battery power
Bluetooth
Bluetooth
Device is not leveled
Device is leveled
Offset is activated and subtracts the defined value from measured distance
Offset is activated and adds the defined value from measured distance
Device is measuring
DISTO WiFi hotspot activated
Other device connected to DISTO WiFi hotspot
WiFi client mode activated
DISTO connected as client to WiFi
Zoom
Measuring reference
®
is switched on
®
connection established
Spread 2 fingers apart to zoom
on the touch screen
Leica DISTOTM S910 805080
4
Page 5
Charging the Li-Ion battery via USB
i
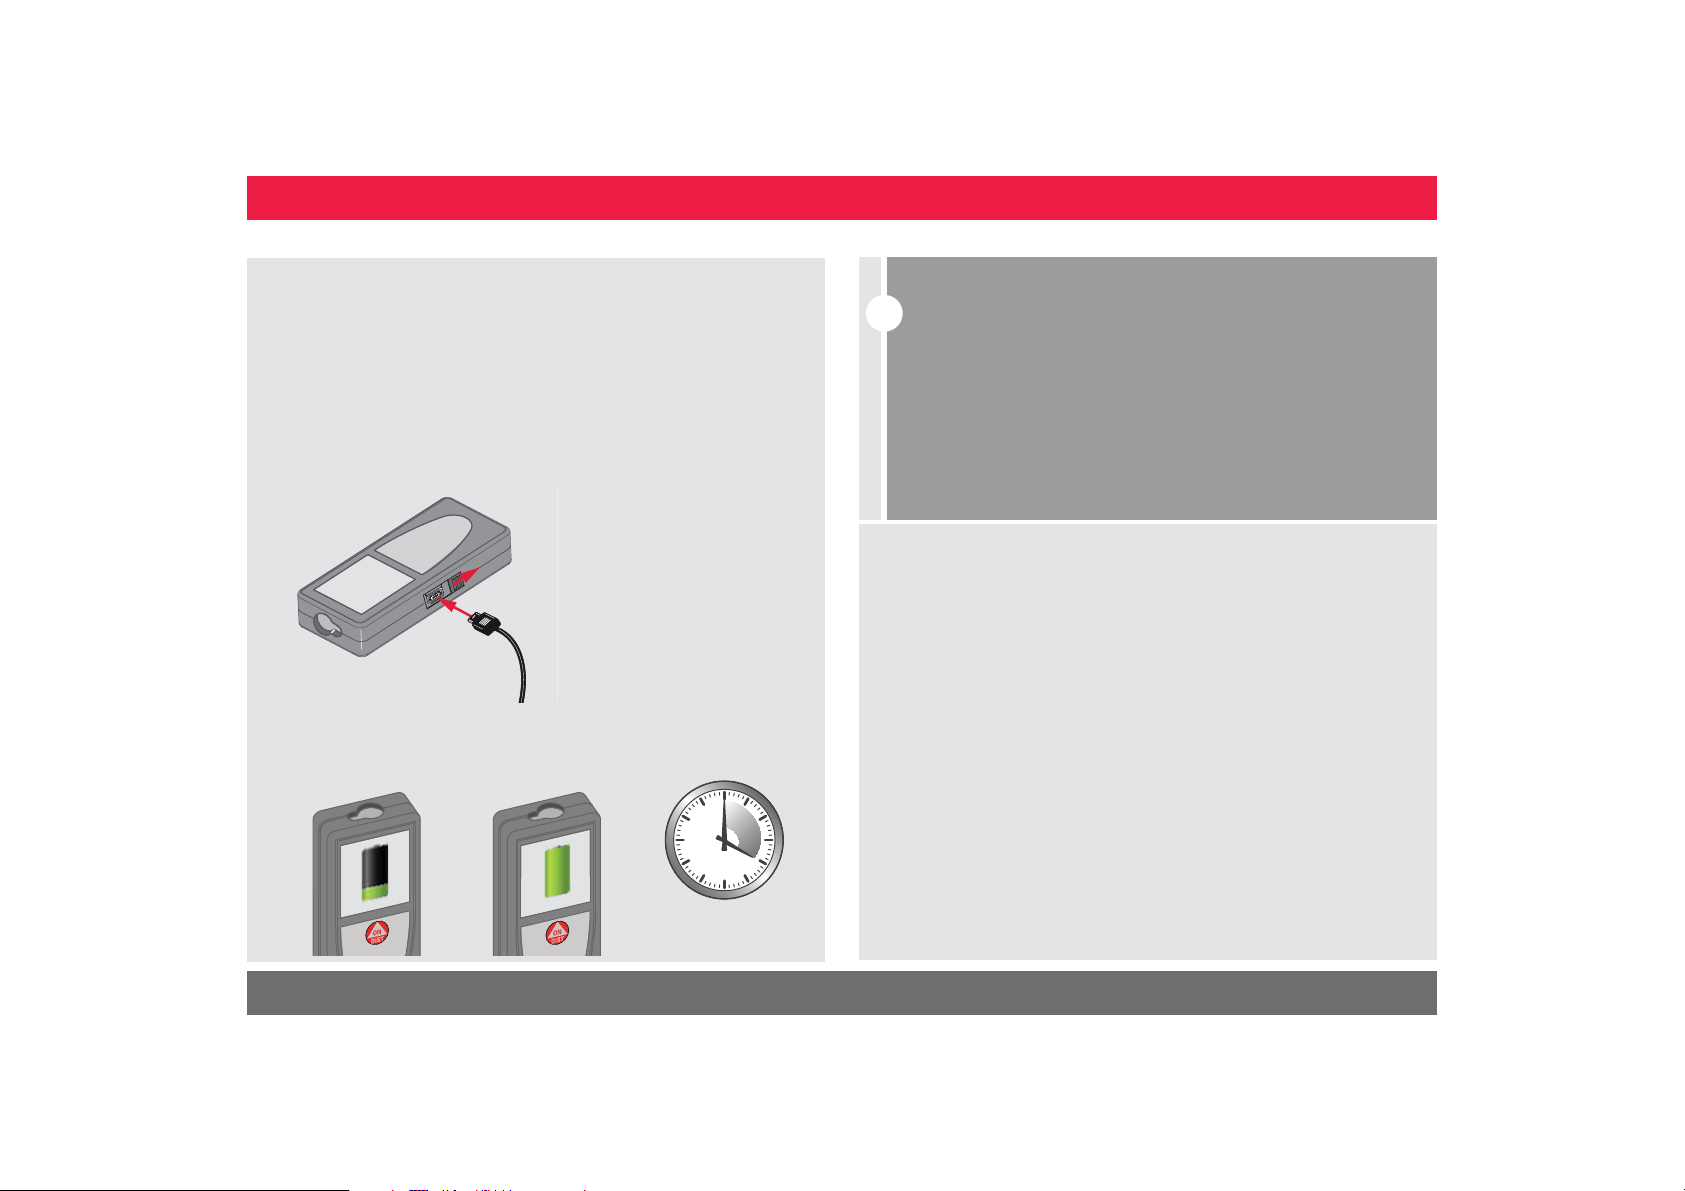
Charge the battery before using it for the first time. Use the
provided cable to charge the battery.
Plug the small end of the cable into the port of the device, and plug
the end of the charger into an electrical socket. Select the appropriate connector for your country. The device cannot be used while
it is charging.
The computer can also be used to charge the device, but this takes
more time. If the device is connected to the computer via USB
cable, you can download or delete the gallery. It is not possible
to upload any data.
When you charge the battery, the following icons show the status:
Charging Fully charged
ENInstrument Set-up
Charge batteries when battery symbol is flashing.
While charging, the device may heat up. This is normal and should
not affect the device’s lifespan or performance. If the battery gets
hotter than 40°C / 104°F, the charger stops.
At a recommended storage temperature of -20°C to +30°C
(-4°F to +86°F), batteries containing a 50% to 100% charge can
be stored up to 1 year. After this storage period the batteries
must be recharged.
To save energy, unplug the charger when not in use.
CAUTION
Connecting the charger improperly may cause serious damage
to the device. Any damage caused by misuse is not covered by
the warranty. Use only Leica-approved chargers, batteries, and
cables. Unapproved chargers or cables can cause the battery
to explode or damage the device.
If the device is connected to the computer via USB cable, you
can download or delete the gallery. It is not possible to upload
any data.
4
h
Leica DISTOTM S910 805080
5
Page 6

Using the Smart Base
i
ENInstrument Set-up
Fold out Smart Base.
Use it as mini tripod.
Unlock
Lock
Tripod or
Adapter thread
Using the Smart Base Extension
The Smart Base Extension
supports stable targeting
without tilting.
Do not move or tilt the Smartbase during measuring.
We recommend to use a tripod with the Leica FTA360-S
adapter.
Leica DISTOTM S910 805080
6
Page 7
Operations
i
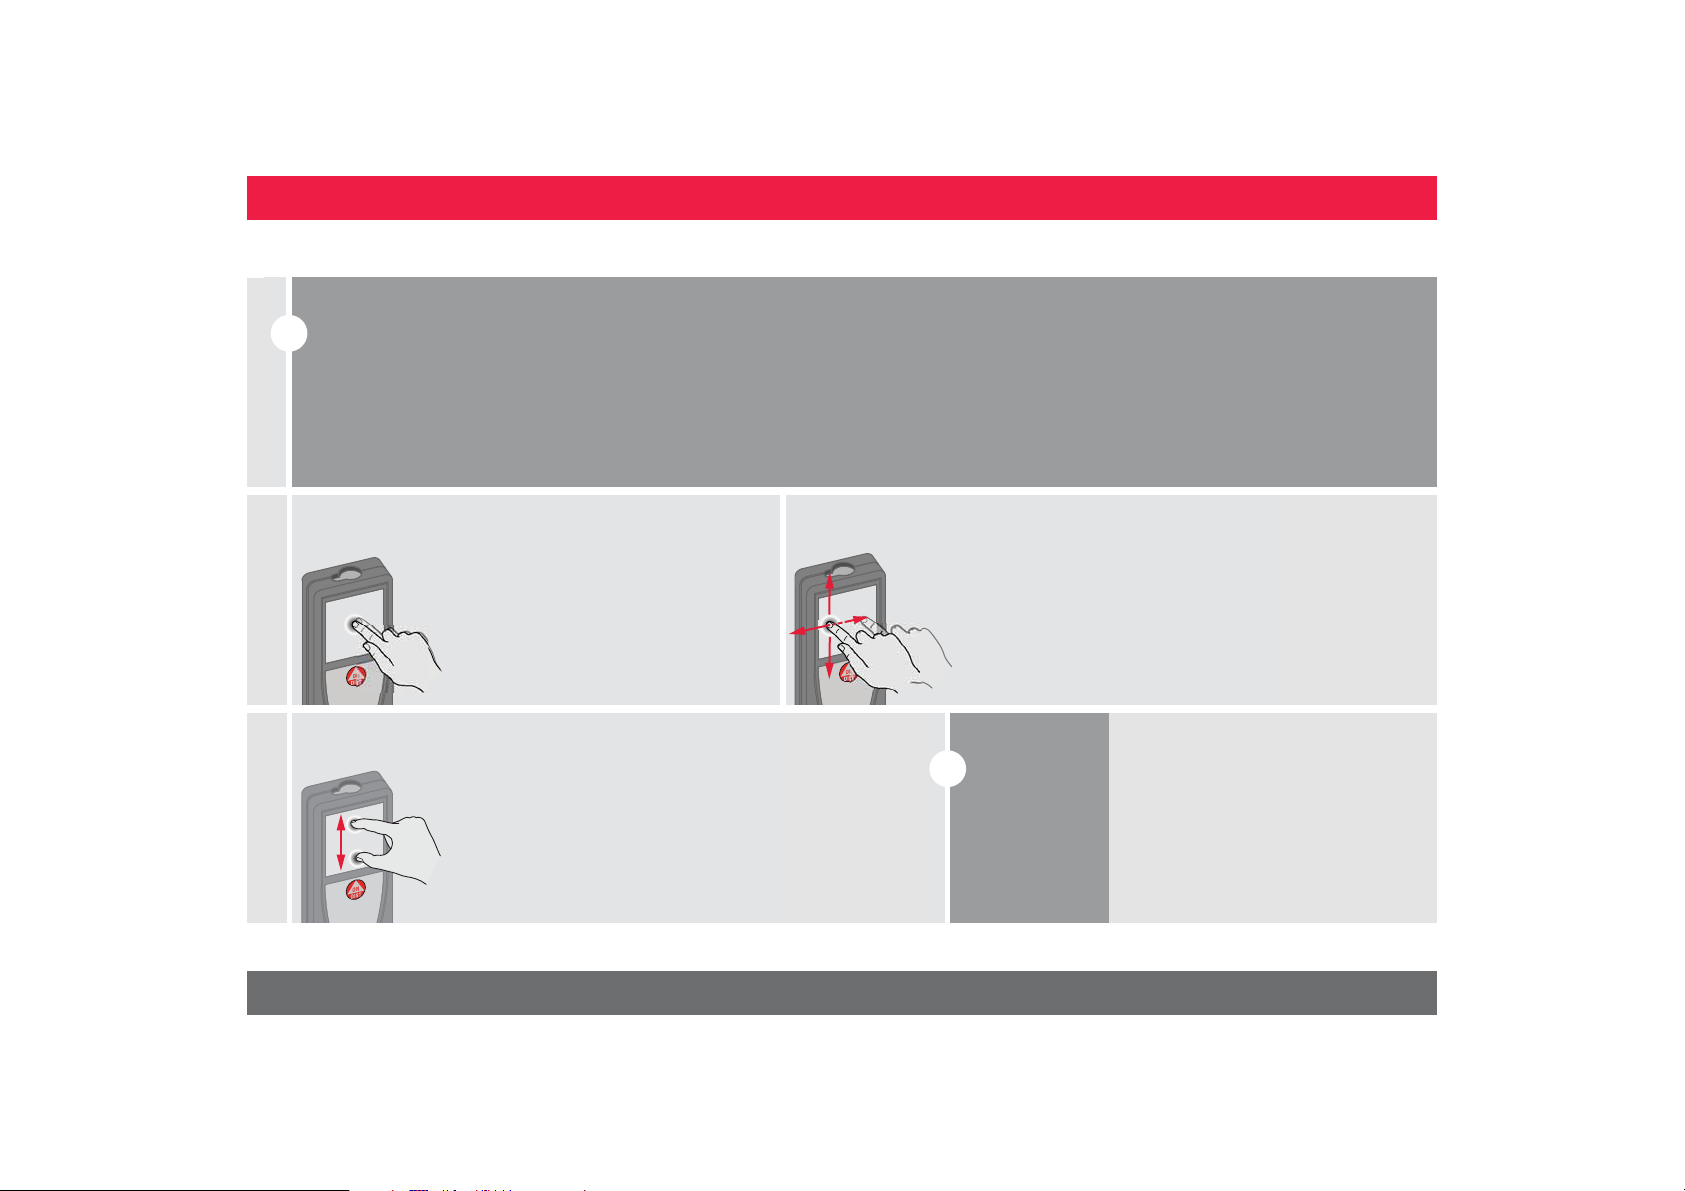
Dragging
Drag on the display to move to prior or
to next screen in the galerie function.
i
Instead of using
the touch
screen, the normal keypad buttons can be
used also.
Using the Touch Screen
Use only fingers to use the touch screen.
Do not allow the touch screen to come into contact with other electrical devices.
Electrostatic discharges can cause the touch screen to malfunction.
Do not allow the touch screen to contact water. The touch screen
may malfunction in humid conditions or when exposed to water.
To avoid damaging the touch screen, do not tap it with anything sharp
or do not apply excessive pressure to it with your fingertips.
Tapping
Pinching
ENOperations
Tap on the display to open an onscreen button or to make a selection.
Tapping on the icon in the middle of
the bottom line activates the distance
measurement or triggers the camera.
Spread 2 fingers apart to zoom if
pointfinder is activated
Leica DISTOTM S910 805080
.
7
Page 8
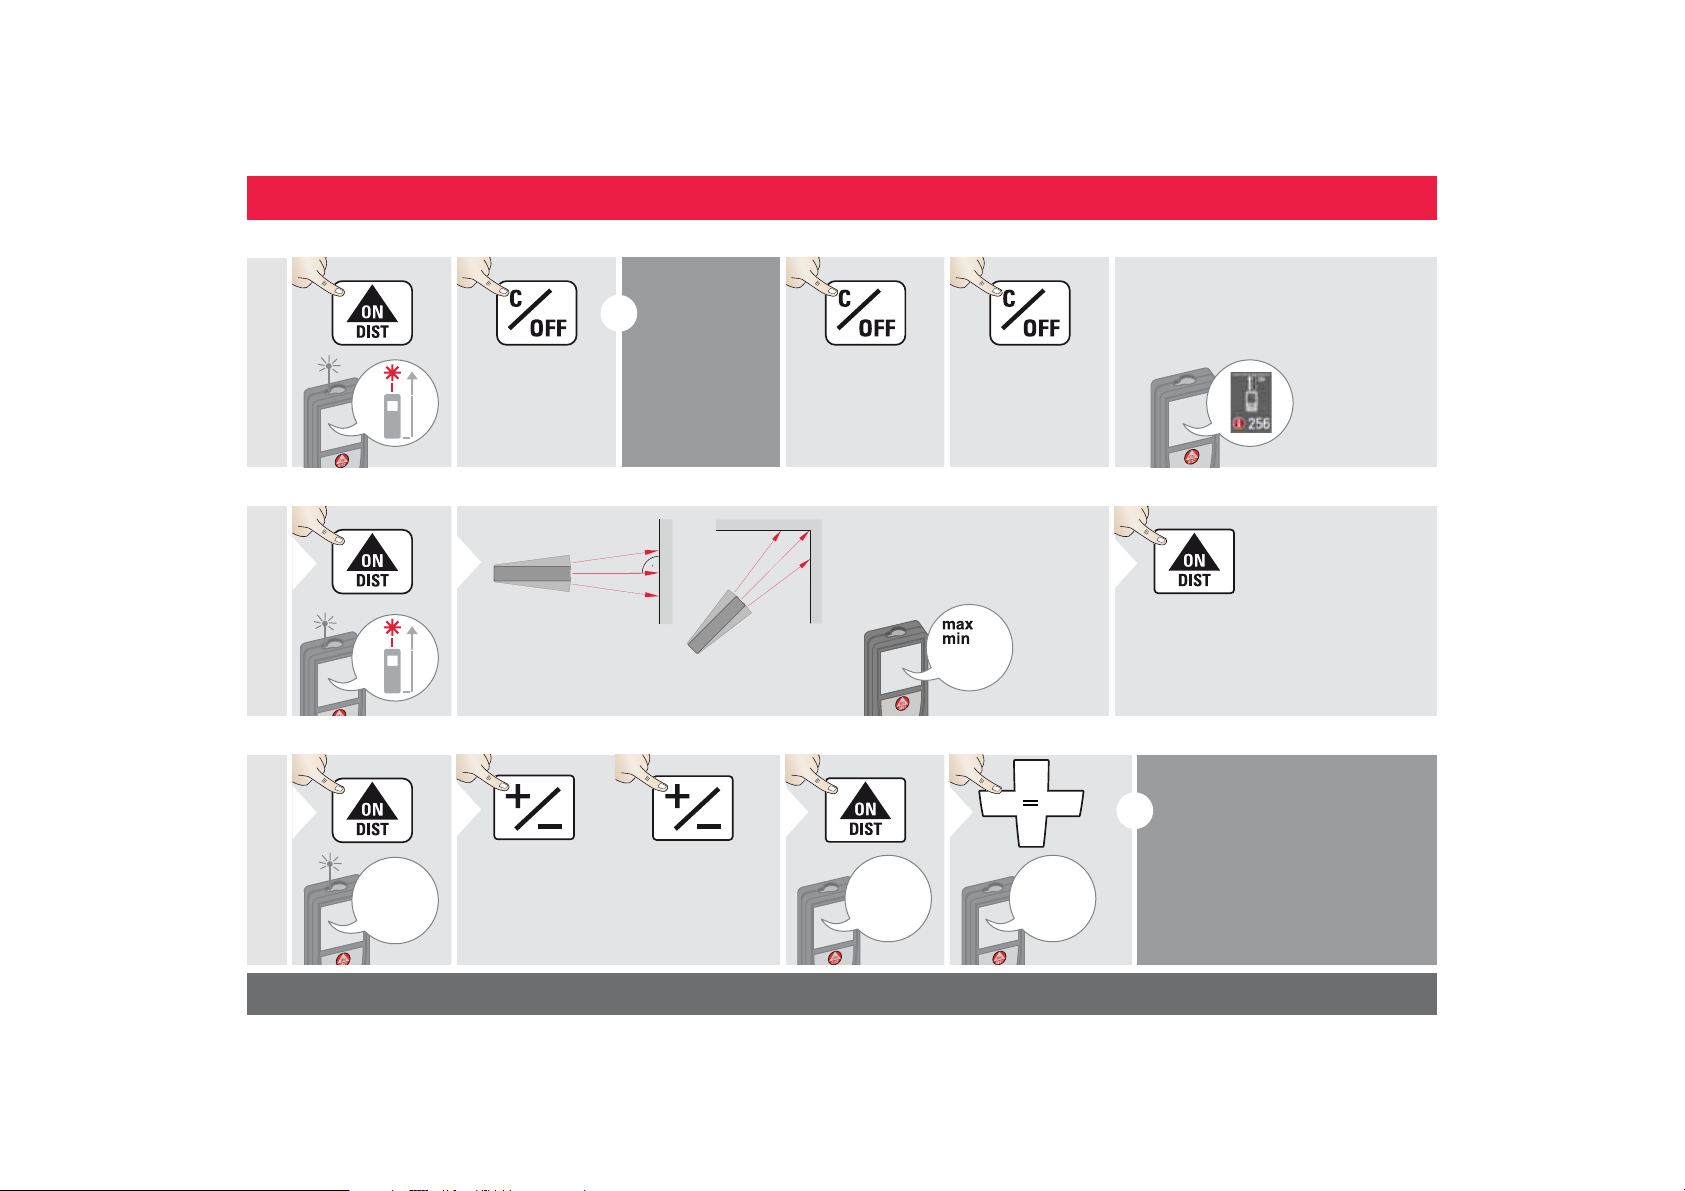
Switching ON/OFF Clear Message Codes
ON
OFF
2 sec
Device is turned
OFF.
i
If no key is
pressed for 180
sec, the device
switches off automatically.
1x
Undo last action.
2x
Leave actual function, go to default
operation mode.
1
2 sec
Used to measure room diagonals (maximum values) or horizontal distance (minimum values)
The minimum and maximum distance measured is displayed (min,
max.). The last value measured is
displayed in the main line.
min.
max.
2
Stops permanent / minimummaximum measuring.
3
1
The next measurement is added
to the previous
one.
2
The next measurement is sub-
tracted from the
previous one.
2x
3
20.179 m
4
i
If the info icon appears with a
number, observe the instructions in
section "Message Codes".
Example:
Permanent / Minimum-Maximum measuring
8.532 m
Add / Subtract
This process can be repeated as
required. The same process can
be used for adding or subtracting
areas or volumes.
ENOperations
Leica DISTOTM S910 805080
7.332 m
7.332 m
12.847 m
8
Page 9
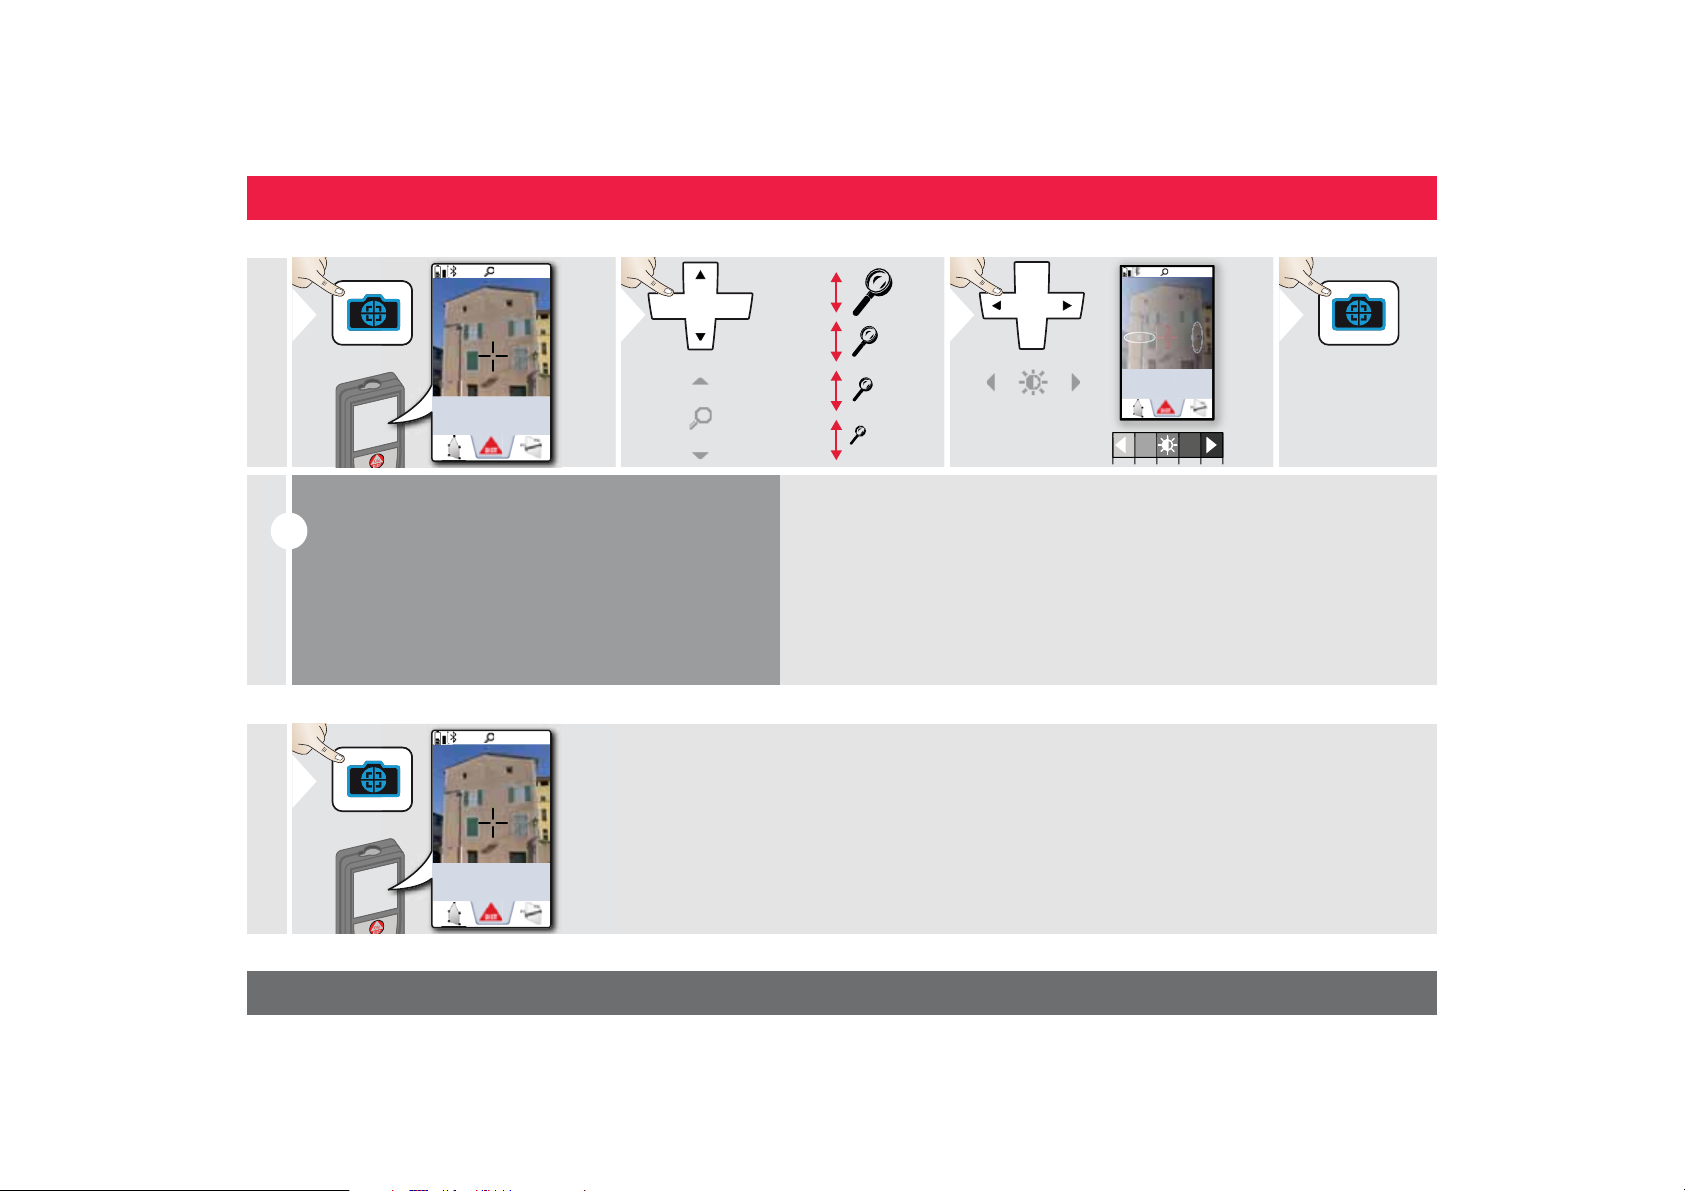
Pointfinder (Viewscreen)
1
2
3
Exit pointfinder
(viewscreen).
4
i
This is a great help for outdoor measuring. The integrated
pointfinder (viewscreen) shows the target on the display.
The device measures in the middle of the cross hair, even if
the laser dot is not visible.
Parallax errors occur when the pointfinder camera is used
on close targets, with the effect that the laser appears displaced in the crosshair. In this case rely on the real laser dot.
1
2 sec
Screenshot photo is saved in gallery.
1x
0.00
m
Screenshot
1x
4x
2x
1x
OV
ENOperations
1x
0.00
m
*
* OV = Overview
Leica DISTOTM S910 805080
0.00
m
9
Page 10
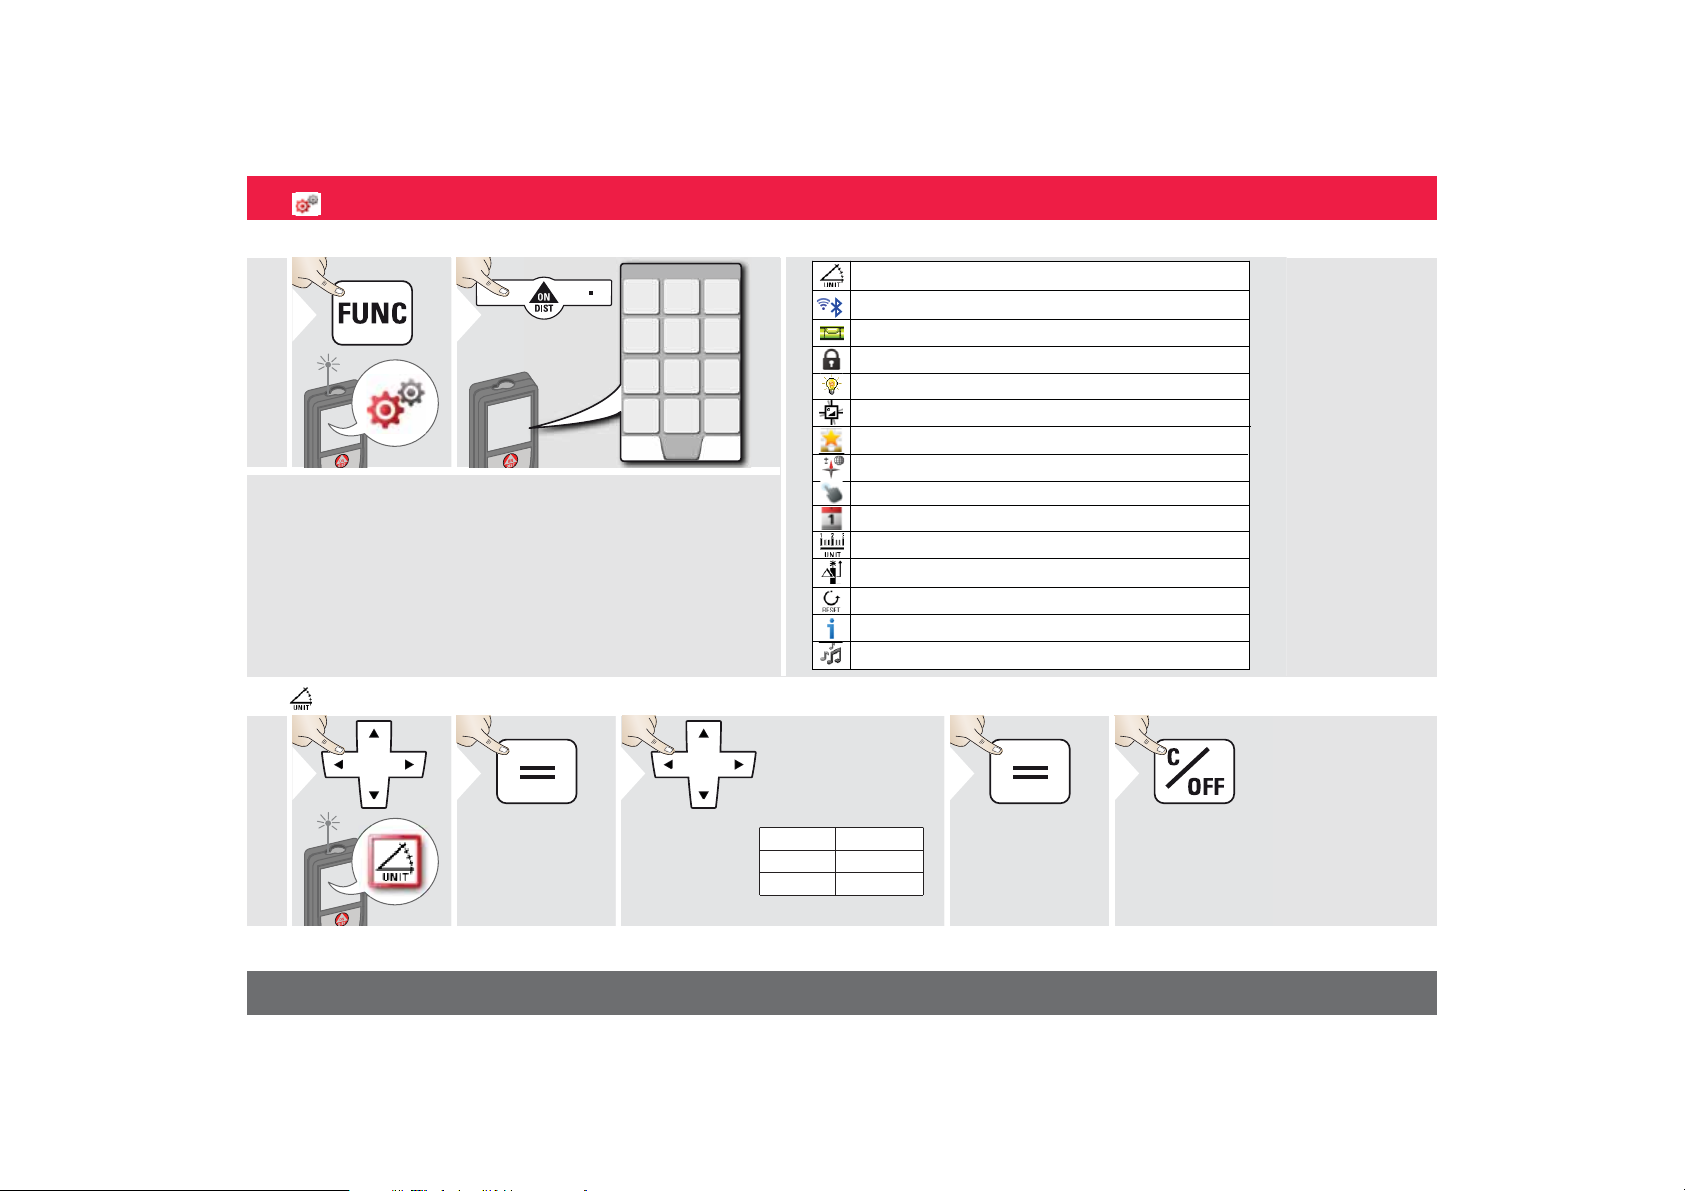
Overview
1
2
1
2
Switch between the
following units:
3
4
Confirm setting.
Exit settings.
5
Tilt units
Tilt units
WiFi / Bluetooth
Digital level
Keypad lock
Illumination
Tilt calibration
Favorites
Compass adjustment
Touch screen
Date and Time
Distance units
Offset
Reset
Information
Beep
®
ENSettings
Leica DISTOTM S910 805080
360.0°
± 180.0°
± 90.0°
0.00 %
0.0 mm/m
0.00 in/ft
10
Page 11
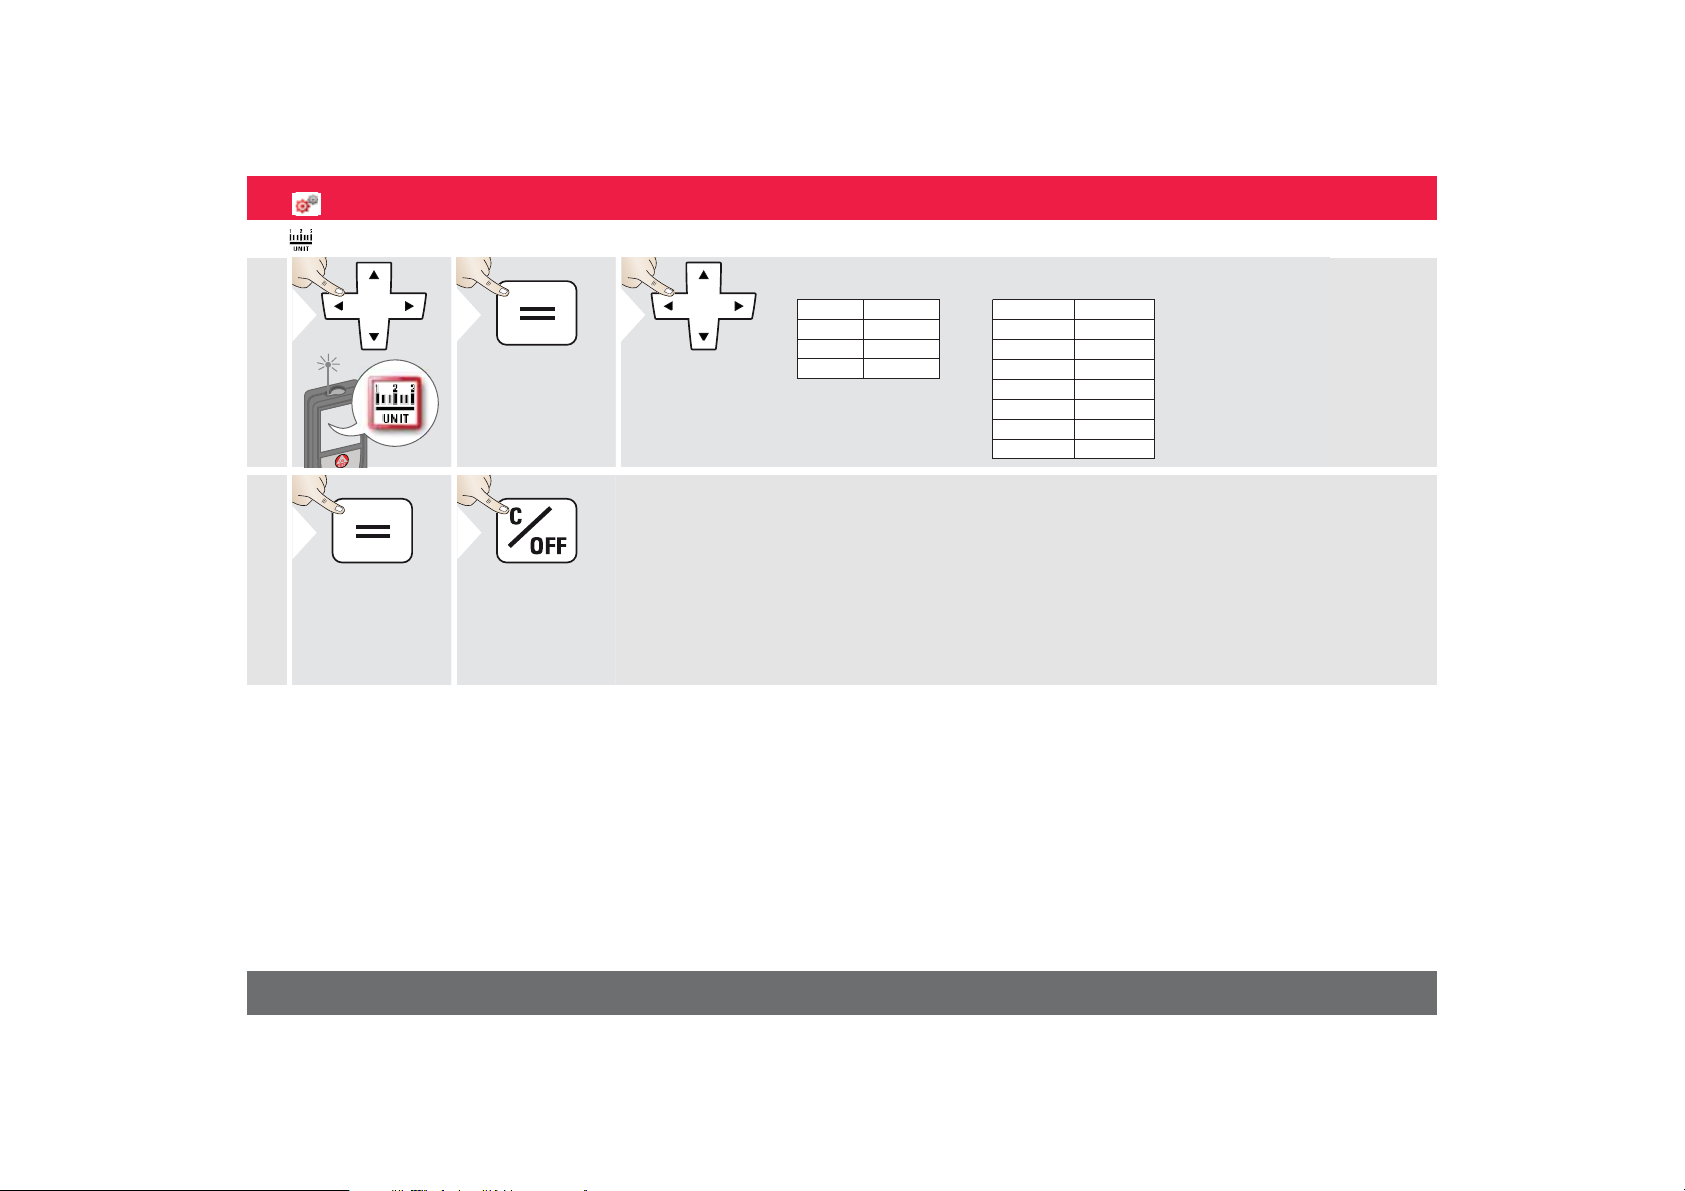
Distance units
1
2
Art. No. 805080:
3
US-Model Art. No. 808183:
Switch between
the following
units:
4
Confirm setting.
Exit settings.
5
0.00 m
0.000 m
0.0000 m
0.0 mm
0.00 ft
0.00 in
0 in 1/32
0'00" 1/32
0.00 m
0.000 m
0.0000 m
0.0 mm
0.00 ft
0.00 in
0 in 1/32
'00"
1/32
0
0 in 1/16
0
'00"
1/16
0 in 1/8
'00"
1/8
0
0 in 1/4
'00"
1/4
0
0.000 yd
ENSettings
Leica DISTOTM S910 805080
11
Page 12
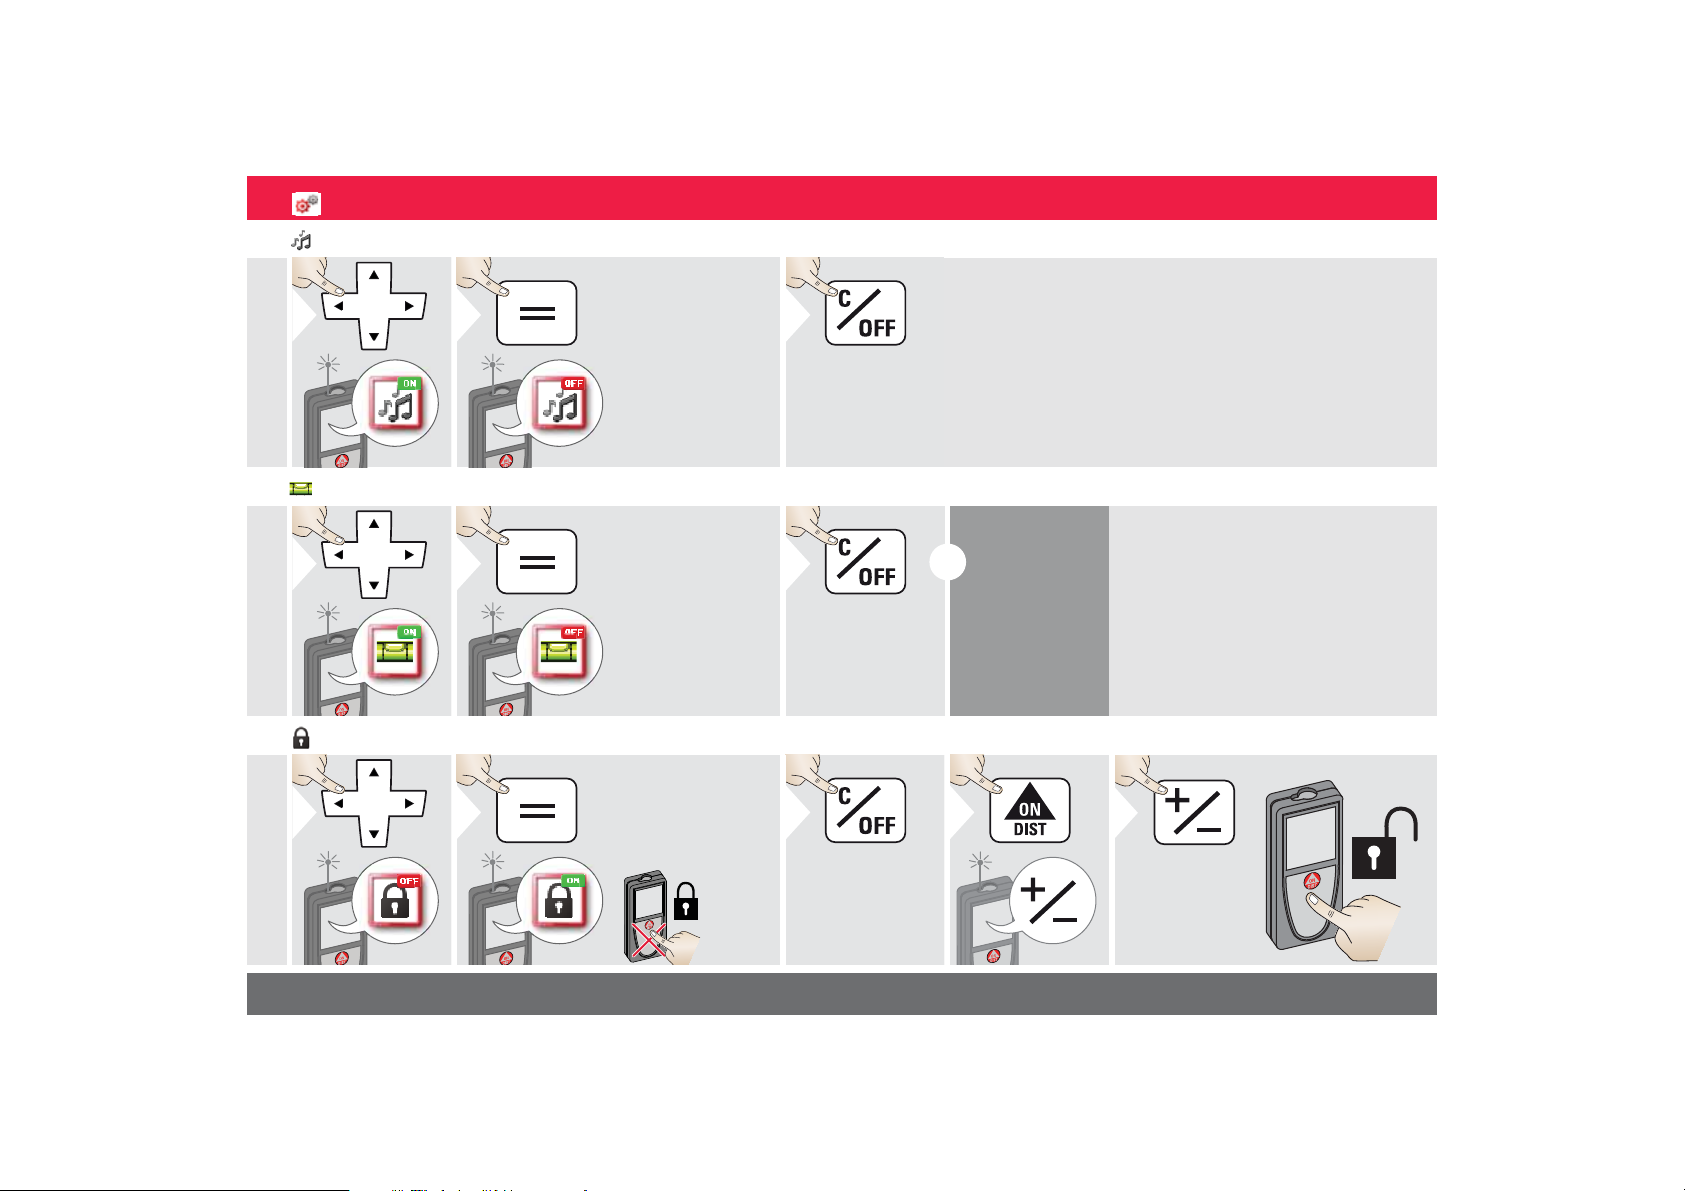
Beep ON/OFF
1ON2
To switch ON,
repeat procedure.
OFF
Exit settings.
3
1ON2
To switch ON,
repeat procedure.
OFF
Exit settings.
3
i
The digital level
is displayed in
the status bar.
1
OFF
2
To deactivate, repeat
procedure. The keylock
is active if device is
switched off.
ON
Exit settings.
3
1
within
2 sec
2
Digital level ON/OFF
De-/Activate keylock Switch on with keylock
ENSettings
Leica DISTOTM S910 805080
12
Page 13
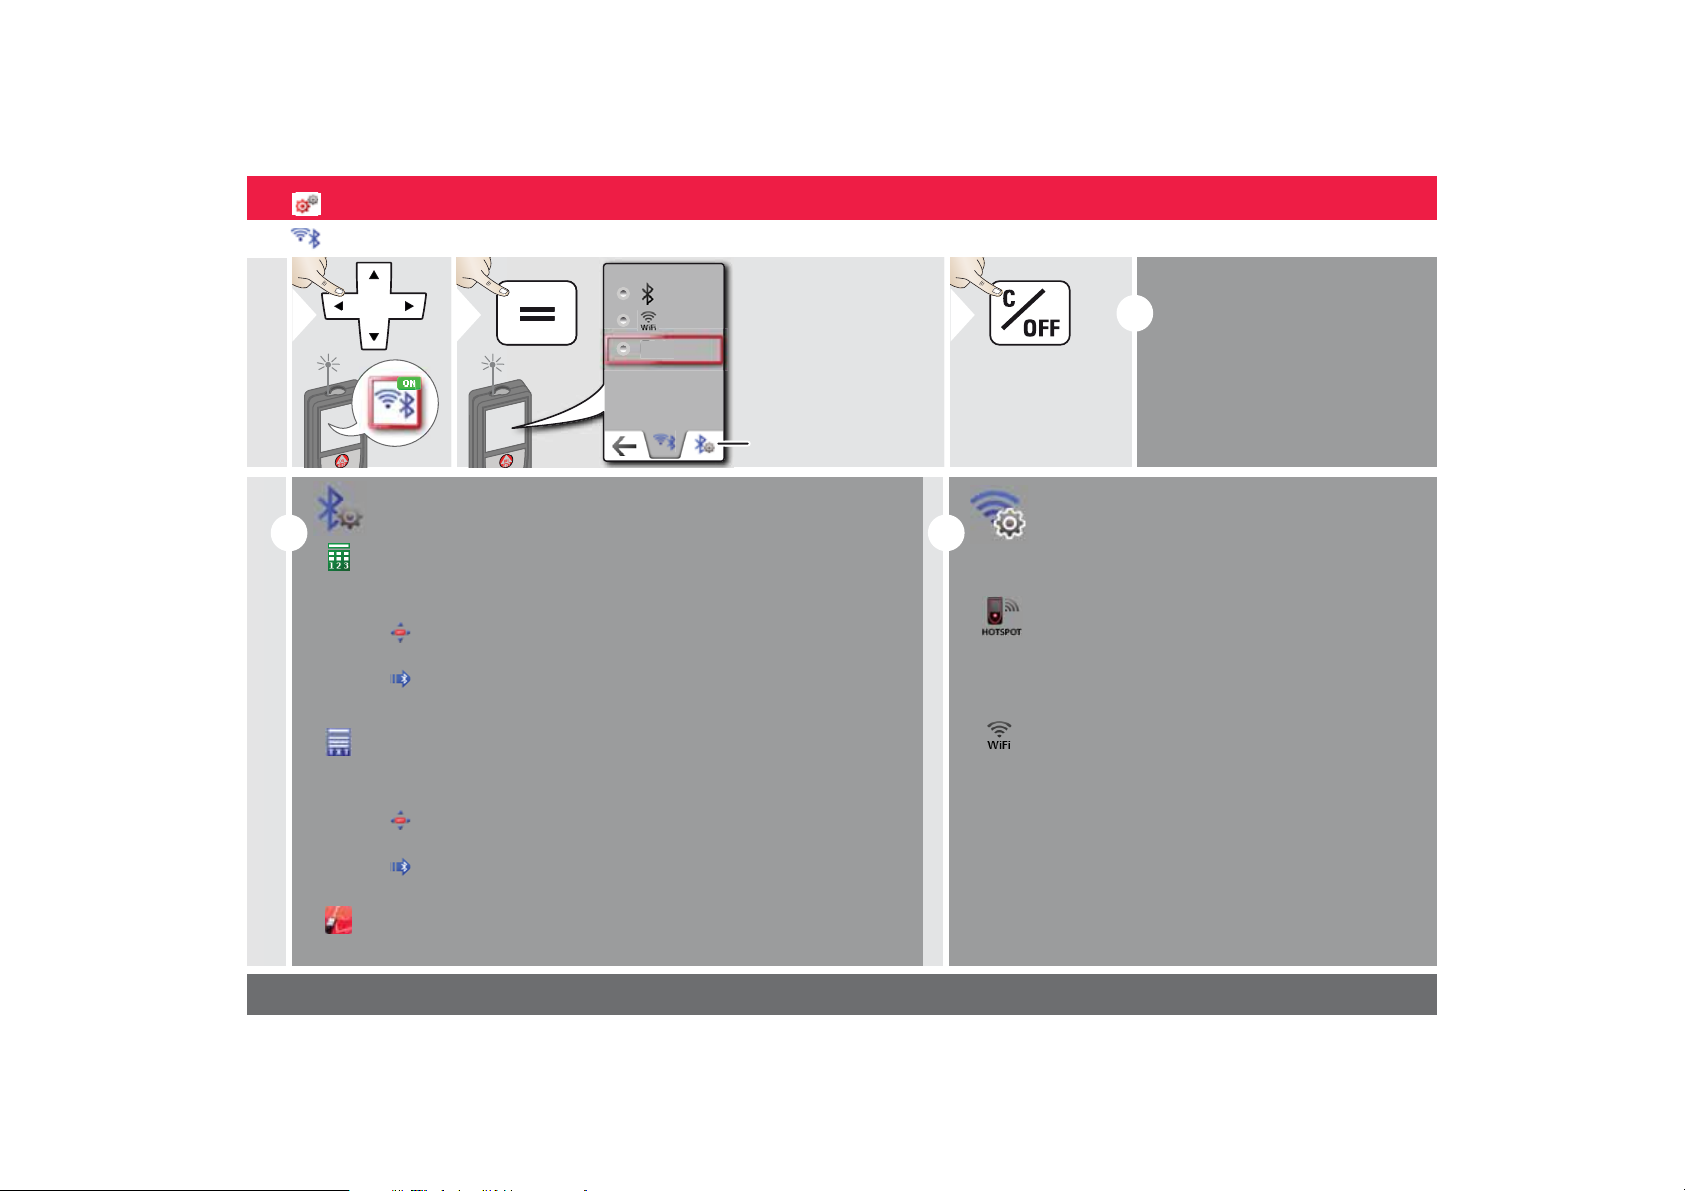
Bluetooth® /WIFI
1
ON
F
2
OFF
Explanation
see info box
below.
Special Settings for
data transfer.
Exit settings.
3
i
i
i
OFF
ENSettings
Default mode:
Bluetooth®/WIFI is switched on
and black Bluetooth®/WIFI icon
is displayed in status bar.
Blue Bluetooth
tus line is displayed if device is
connected with Blue-
®
tooth
/WIFI.
®
/WIFI icon in sta-
Special Bluetooth® Settings
Figure Mode: Use this mode if the data needs to be transferred in
figures, e.g. working with spread sheets. Ft/in fractional is converted
into ft/in decimal.
Device is connected. Favorites disappear and two softkeys appear:
Allows the arrow keys to move the cursor on your computer.
sends the value of the main line to the computer.
Text Mode: Use this mode if the data needs to be transferred as text,
e.g. working with word processing programs.
Device is connected. Favorites disappear and two softkeys appear:
Allows the arrow keys to move the cursor on your computer.
sends the value of the main line to the computer.
App Mode: Use this mode to transfer the data using an App.
Special properties: ENCRYPTED is the default setting. In case of trouble with data transfer, select mode UNENCRYPTED.
Leica DISTOTM S910 805080
Special WIFI Settings
WiFi: DISTO acts as hotspot.
Data transfer unsecured or secured with serial
number as password. Recommended for standard use.
WiFi: Another device acts as hotspot.
Recommended for GIS applications.
13
Page 14

ENSettings
i
Connect the device with your smart phone, tablet, laptop,…
The actual measurement is transferred automatically if Bluetooth
®
connection is established. To transfer a result from
the main line, press =. Bluetooth® switches off as soon as the
laser distance meter is switched off.
We provide no warranty for free DISTO
™
software and offer no support for it. We accept no liability whatsoever
arising from the use of the free software and we are not
obliged to provide corrections nor to develop upgrades. A
wide range of commercial software can be found on our
homepage. Apps for Android
®
or Mac iOS can be found in
special internet shops.
For more details, see our homepage.
The efficient and innovative Bluetooth
®
Smart module
(with the new Bluetooth® standard V4.0) works together
with all Bluetooth® Smart Ready devices. All other Bluetooth
®
devices do not support the energy saving Blue-
tooth® Smart Module, which is integrated in the device.
Bluetooth
®
data transfer
Leica DISTOTM S910 805080
14
Page 15
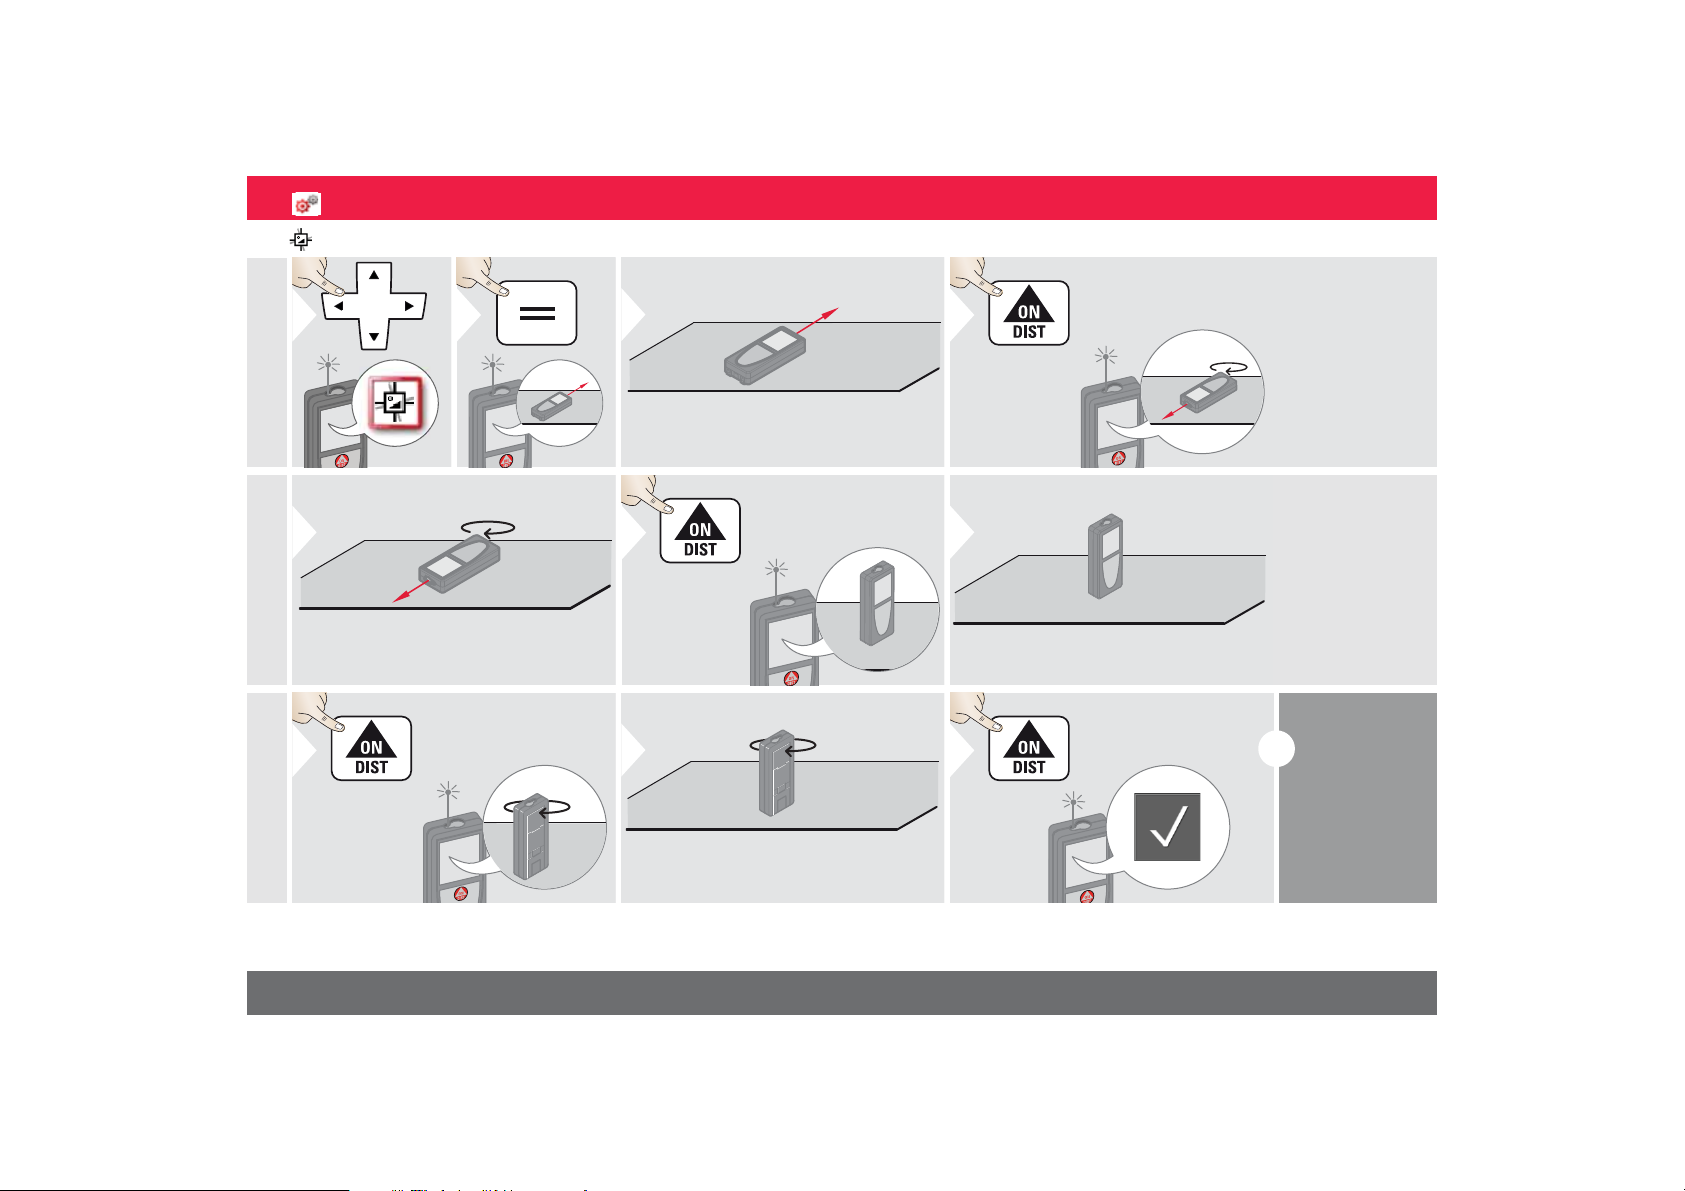
Calibration of tilt sensor (Tilt Calibration)
123
Place device on absolutely flat surface.
180°
4
180°
5
Turn the device horizontally by 180°
and place it again on absolutely flat
surface.
6
7
Place device on absolutely flat surface.
180°
8
180°
9
Turn the device horizontally by 180°
and place it again on absolutely flat
surface.
10
i
ENSettings
After 2 sec
the device
goes back to
the basic
mode.
Leica DISTOTM S910 805080
15
Page 16
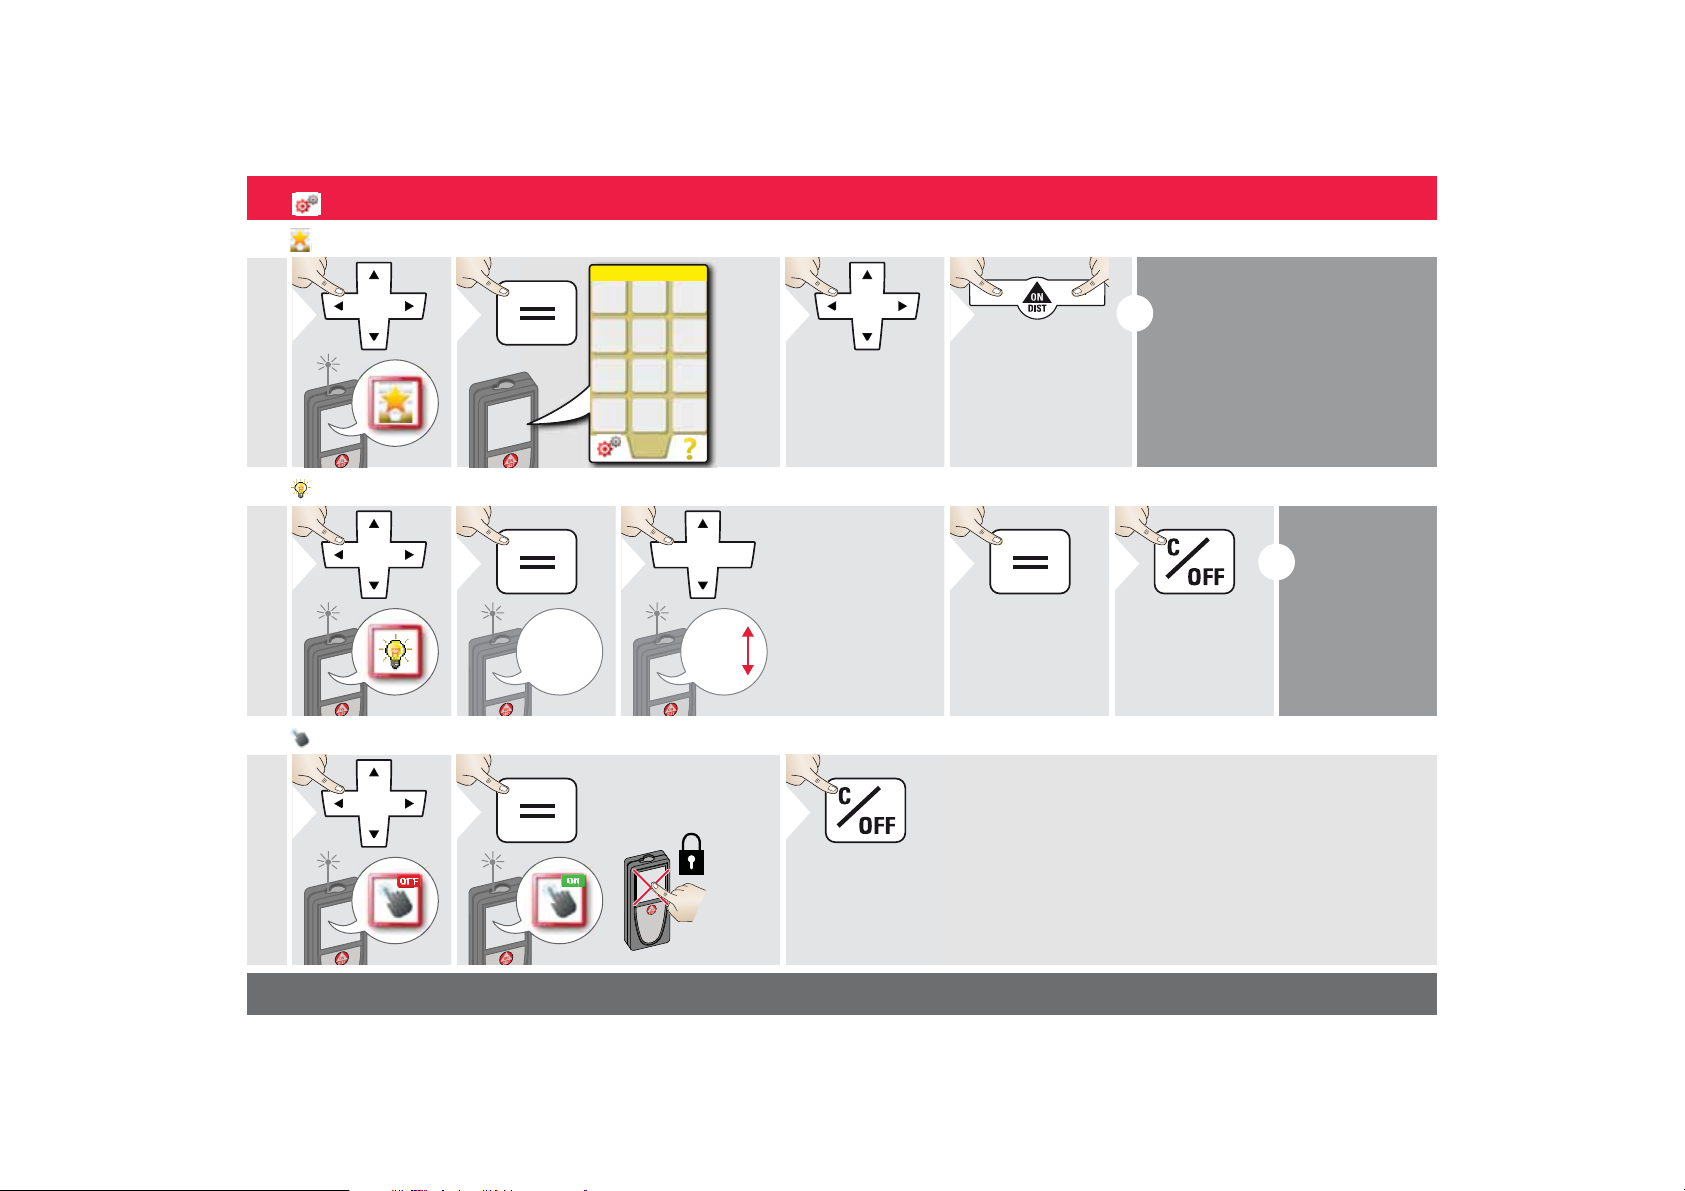
Personalized favorites
1
2
3
Select favorite
function.
4
Press selection
key left or right.
Function is set as
favorite above the
corresponding selection key.
i
1
2
3
Select brightness.
4
Confirm setting.
Exit settings.
5
i
1
OFF
2
To deactivate, repeat
procedure.
ON
Exit settings.
3
ENSettings
Illumination
1/6
Touch Screen ON/OFF
Favorite
1/6
2/6
3/6
4/6
5/6
6/6
Select your favorite functions for
quick access.
Short cut:
Press 2 sec on a selection-key in
the measuring mode. Select your
favorite function and press again
short on the corresponding selection key.
To save
power reduce brightness if not
necessary.
Leica DISTOTM S910 805080
16
Page 17
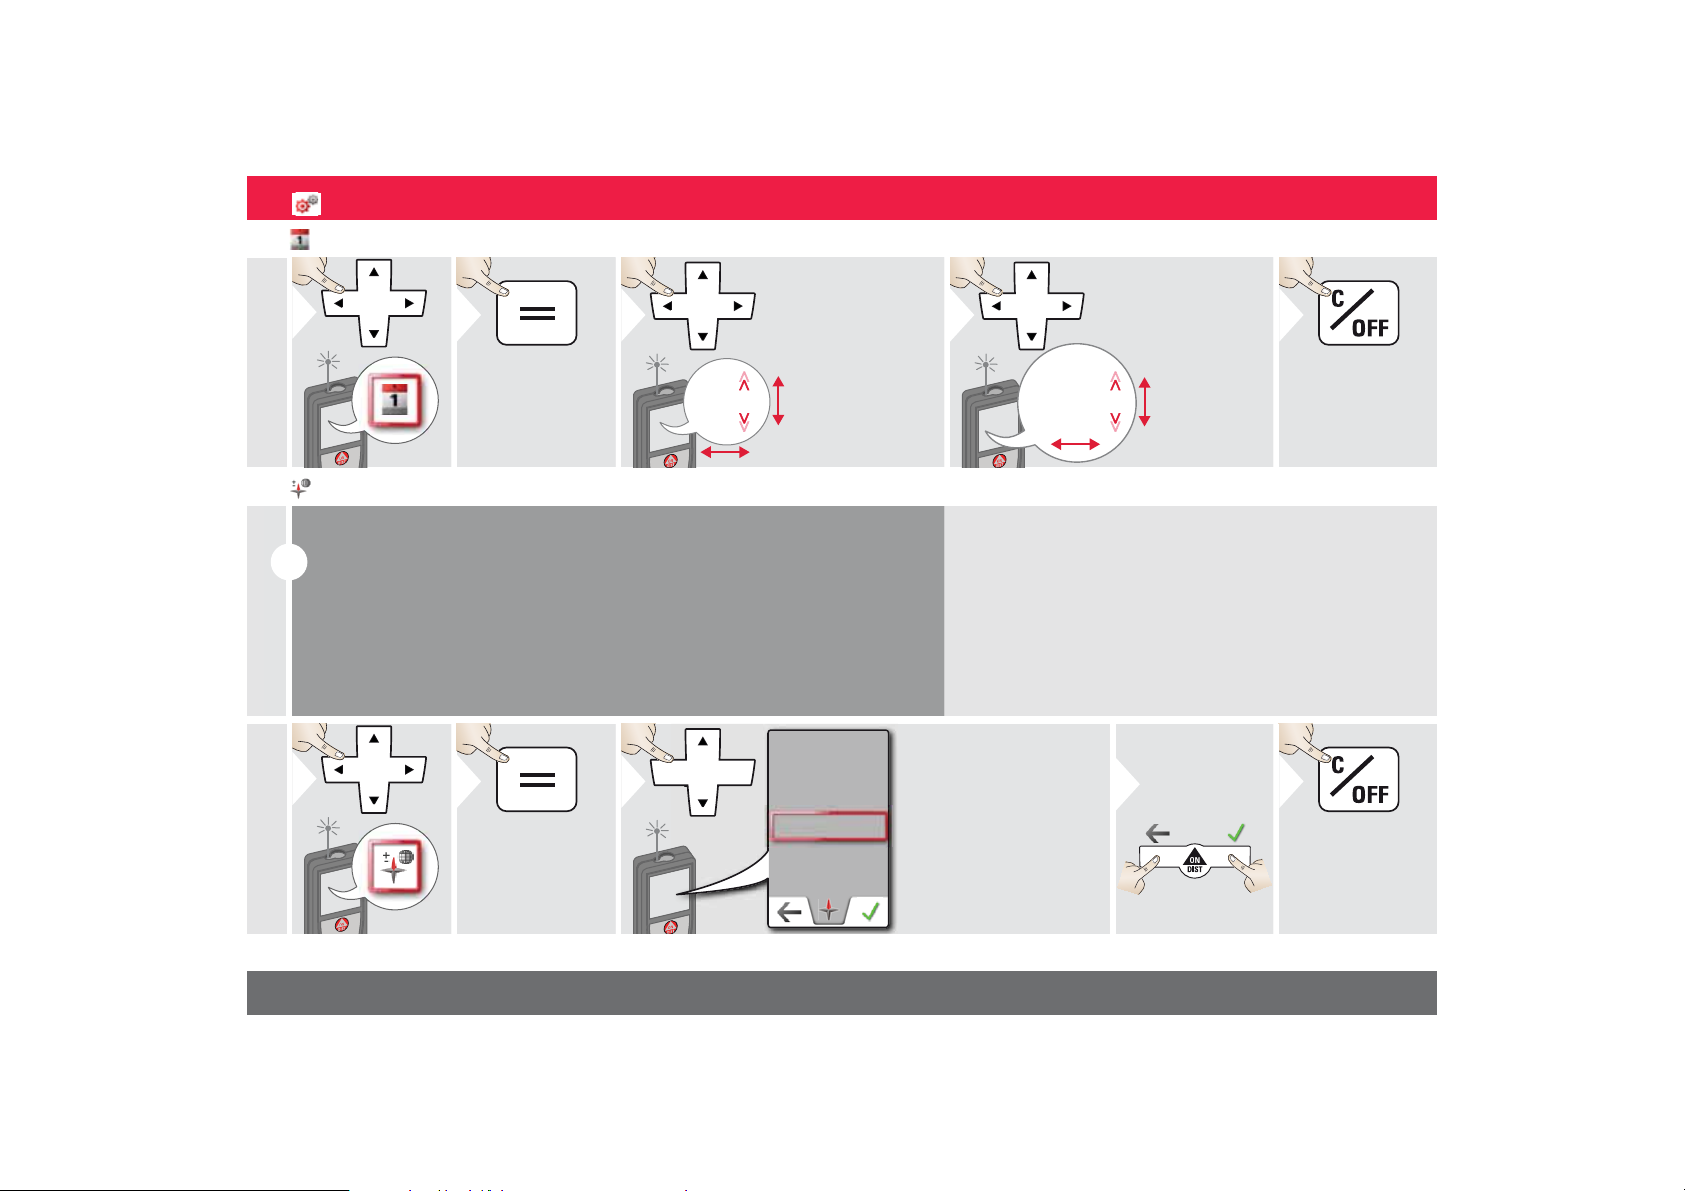
Date and Time
1
2
3
Set time
(hh:mm)
2013-04-08
4
Set date
(yyyy-mm-dd)
Exit settings.
5
i
Depending on your geographic location, the angle of declination may vary from
other locations, as the geographic and magnetic poles are aligned. However, if the
reference location is not selected, the difference in declination between the poles
can differ greatly. For best results, select the nearest geographic reference point
using the steps below.
Adjusting the magnetic declination
1
2
3
Select the nearest location and the device adjusts the declination
accordingly.
4
Confirm
Back
Exit settings.
5
Compass Adjustment
ENSettings
00 : 00
Leica DISTOTM S910 805080
CH-Zürich
17
Page 18
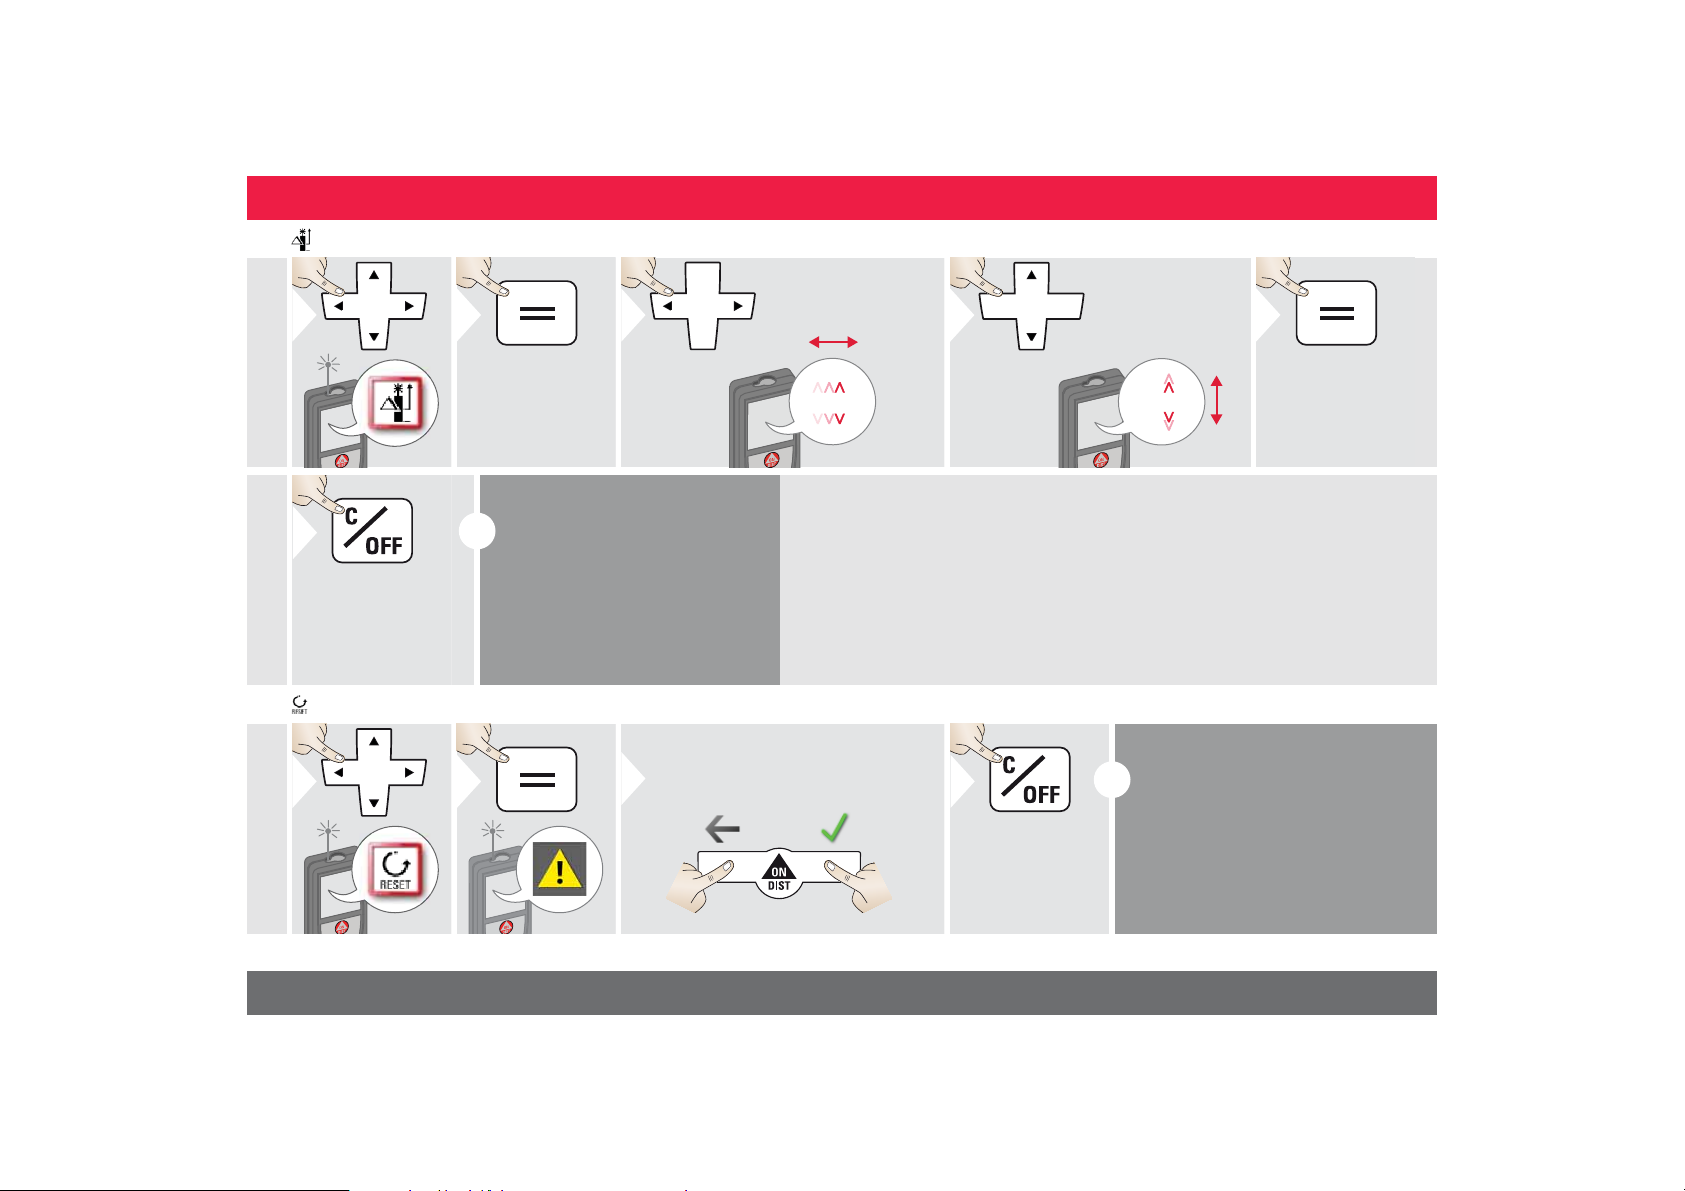
Offset
1
2
3
Select digit.
4
Adjust digit.
5
Approve
value.
Exit settings.
6
i
1
2
Second confirmation with selection
keys:
3
Refuse:
Confirm:
Exit settings.
4
i
ENSettings
Reset
An offset adds or subtracts a
specified value automatically to or
from all measurements. This function allows tolerances to be taken
into account. The offset icon is
displayed.
1.012 m
1.012 m
Reset returns the instrument to
the factory settings. All customized settings and memories are
lost.
A HARDWARE-RESET is
done by pressing 15 sec on
ON/DIST key.
Leica DISTOTM S910 805080
18
Page 19
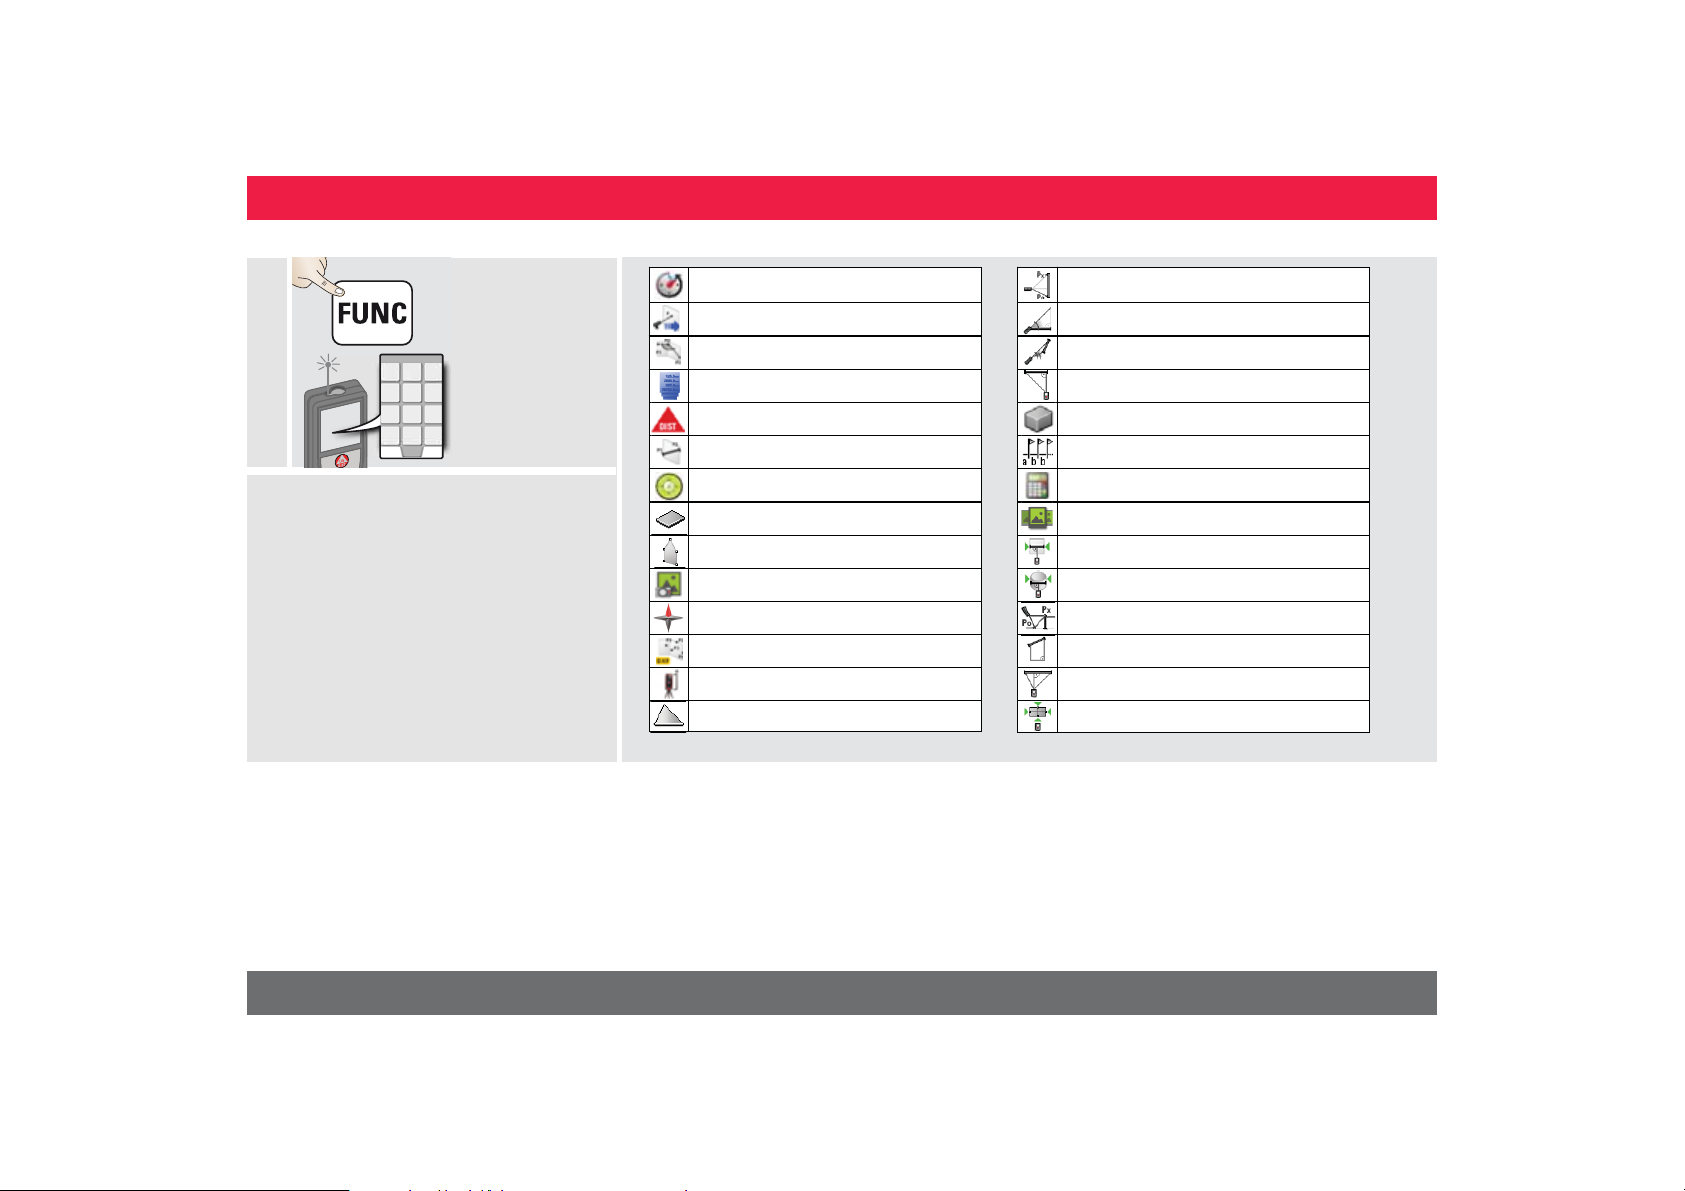
Overview
ENFunctions
Timer
Pointdata transmission
Smart Angle
Memory
Sinlge Distance Measurement
Point to point function / distance
Level
Area
Smart Area measuring function
Photo
Compass
Data capture in DXF-file
Adjusting measuring reference
Triangle Area
Height Tracking
Smart Horizontal Mode
Measuring on sloped objects
Pythagoras (2-point)
Volume
Stake out
Calculator
Gallery
Width
Diameter
Height-profile Measurement
Trapezium
Pythagoras (3-point)
Area from Photo
Leica DISTOTM S910 805080
19
Page 20
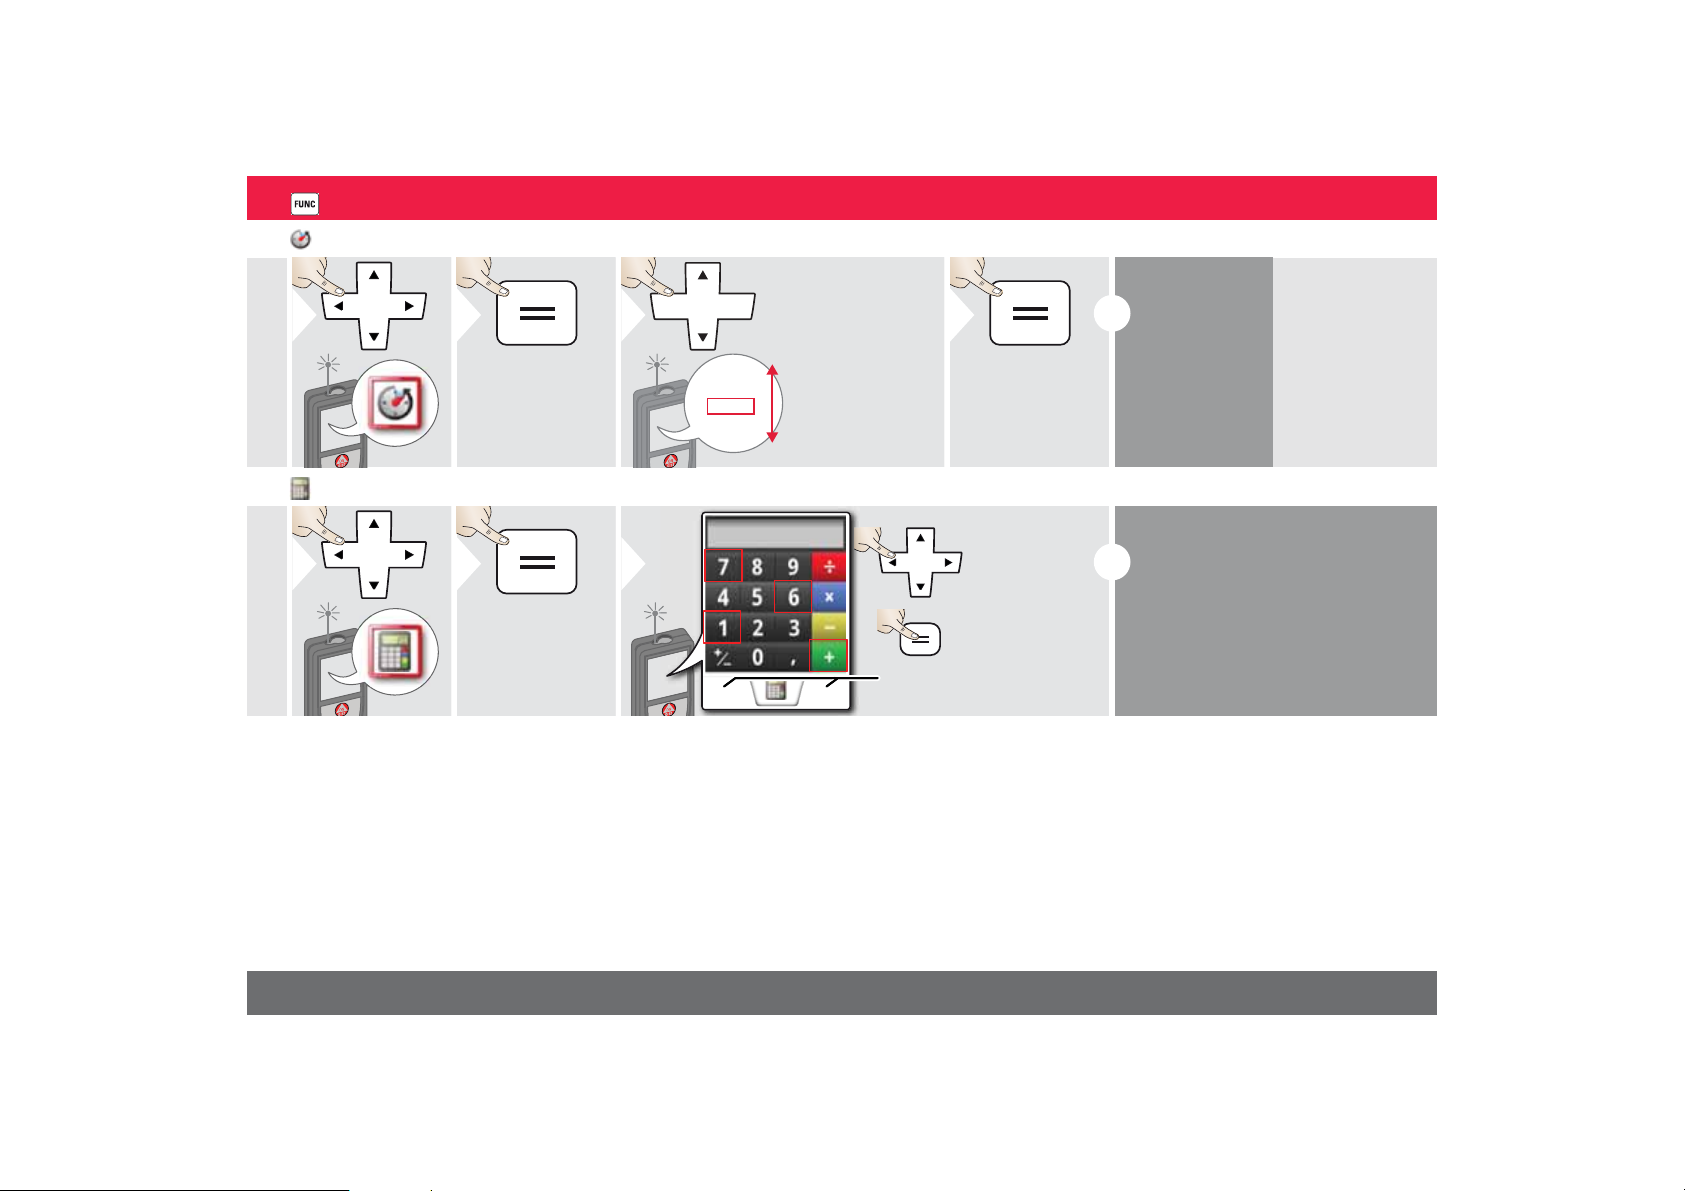
Timer
1
2
3
Select release
time.
4
Confirm setting.
i
The self release
starts if
ON/Measure
key is pressed.
1
2
3
Select key on
display.
Confirm every
key.
Use selection keys for
clear or result.
i
Calculator
30 sec
10 sec
5 sec
2 sec
Off
C/CE
ENFunctions
The measurement result from the
main line is taken over to the calculator and can be used for further calculations.
Ft/in fractions are converted into
ft/in decimal.
To take over a result from the calculator in the basic mode press DIST
before leaving the calculator function.
=
Leica DISTOTM S910 805080
20
Page 21
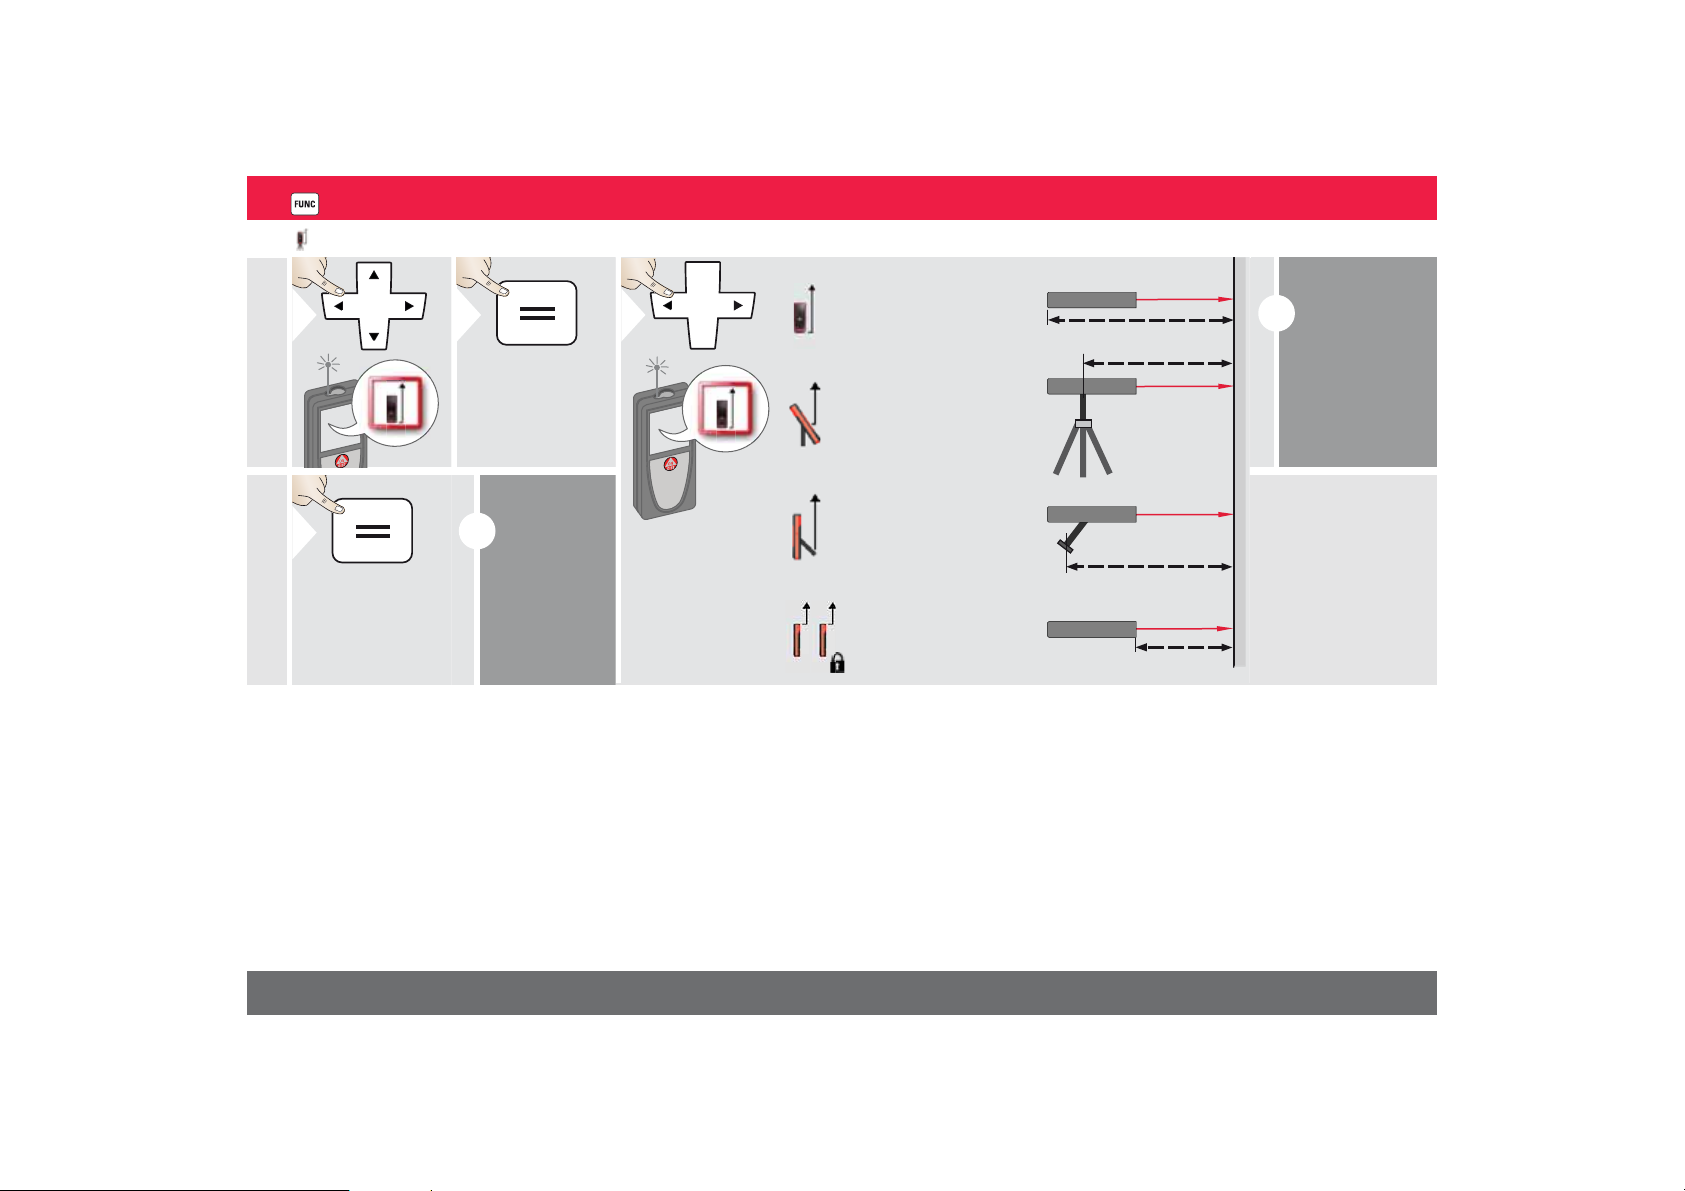
Adjusting measuring reference
1
2
3
Distance is measured
from the rear of the device (standard setting).
Distance is measured
from the front of the device (lock symbol = permanently).
Distance is measured
from Smart Base connection
Distance is measured
from Smart Base baseplate
i
4
Confirm setting.
i
If device is
switched off,
reference
goes back to
standard setting (rear of
the device).
ENFunctions
The orientation of the
Smart Base is
automatically
detected and
the zero point
is accordingly
adjusted.
Leica DISTOTM S910 805080
21
Page 22
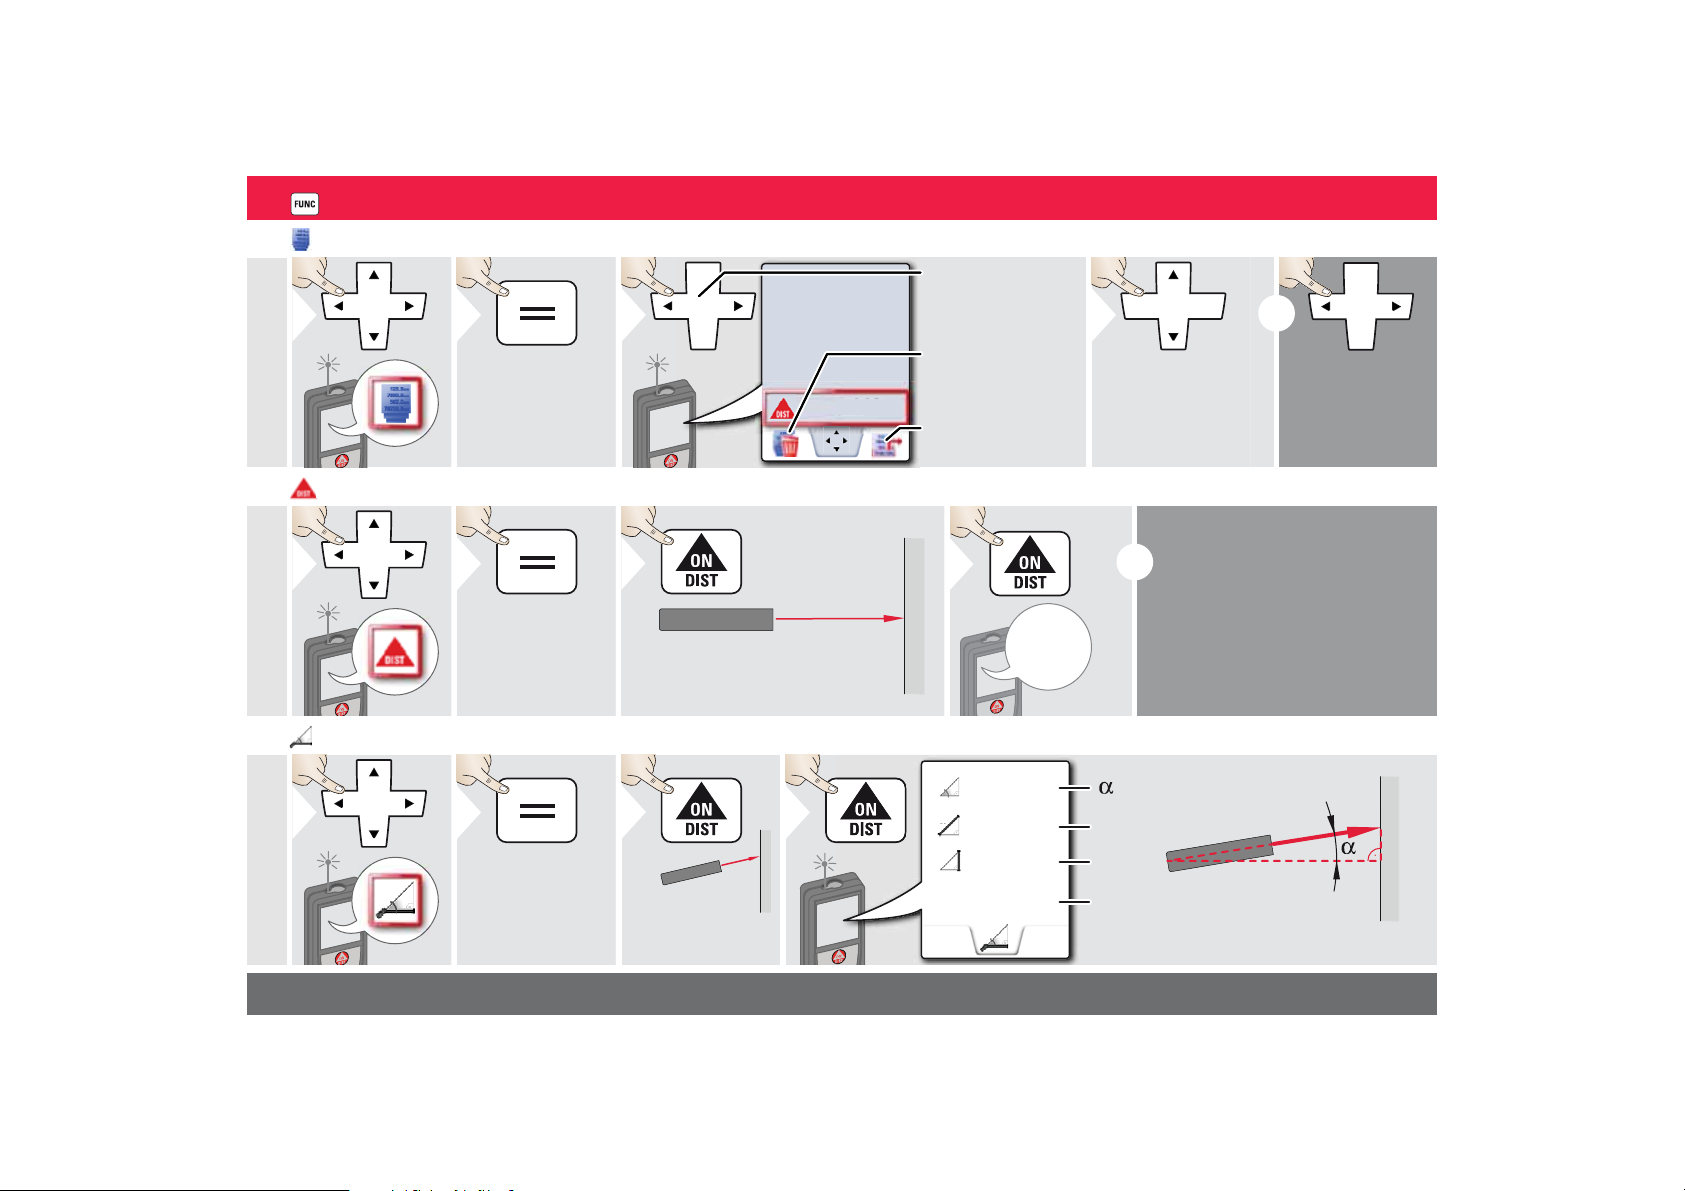
Memory
1
2
8.449 m
.4
4
9
m
3
Switch between
measurements.
Take over value for
further actions.
Delete memory.
4
Use Up/Down
navigation keys to
show more detailed
results of the specific measurement.
i
1
2
Aim active laser at target.
3
4
i
1
2
Aim laser at
target.
3
4
(up to 360° and a transverse
tilt of ±10°)
Measuring single distance
Smart Horizontal Mode
8.532 m
ENFunctions
Short cut
Target surfaces:
Measuring errors can occur when
measuring to colourless liquids,
glass, styrofoam or semi-permeable surfaces or when aiming at
high gloss surfaces. Against dark
surfaces the measuring time increases.
Leica DISTOTM S910 805080
40.8 °
5.204 m
0.032 m
4.827 m
x
x
y
y
z
z
22
Page 23
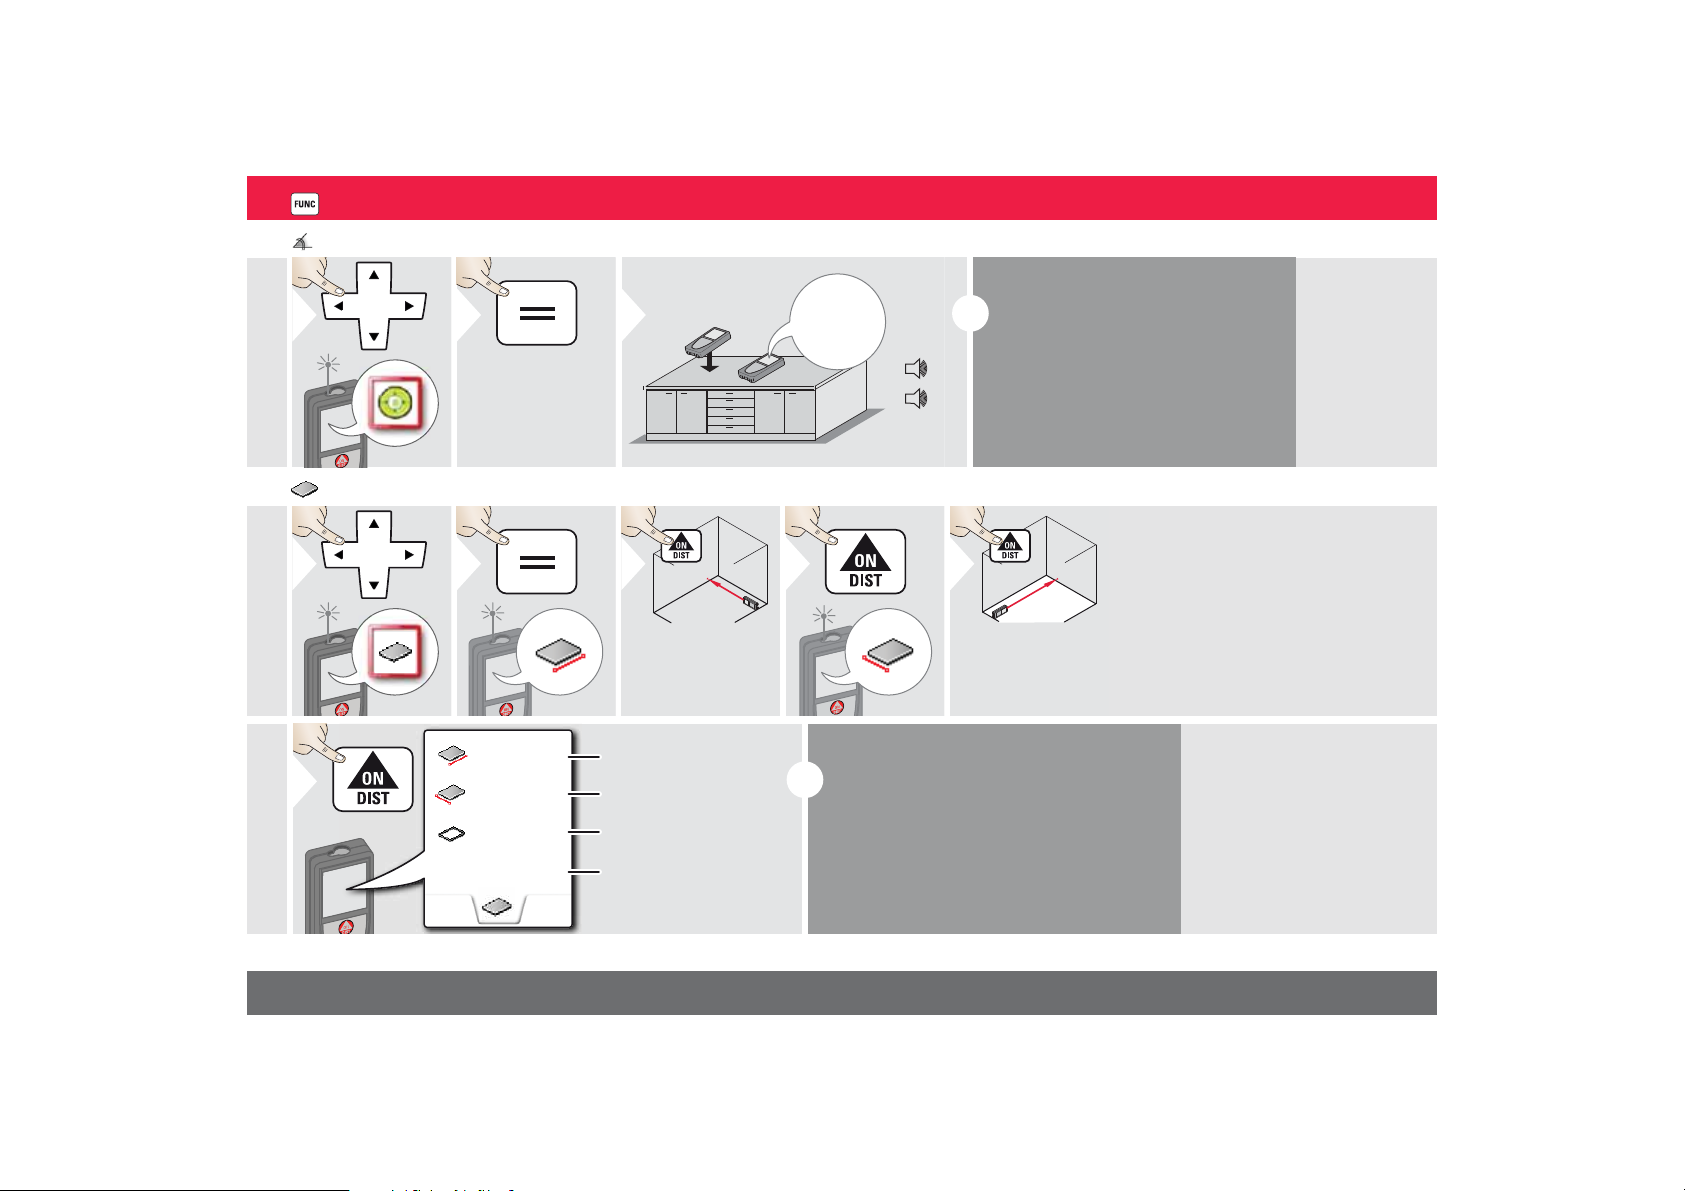
Level
1
2
0.3°
90°
0°
3
i
Displays inclinations of 360° with a
transverse inclination of +/- 10°. Instrument beeps at 0° and 90°. Ideal
for horizontal or vertical adjustments.
1
2
3
Aim laser at first
target point.
4
5
Aim laser at second target point.
First distance
Second distance
Circumference
Area
6
i
The result is shown in the main line and the
measured value above.
Partial Measurements / Painter function:
Press + or - before starting the first measurement. Measure and add or subtract distances. Finish with =. Measure 2nd length.
Area
ENFunctions
6.228 m
3.9I0 m
20.276 m
24.352 m
Leica DISTOTM S910 805080
2
23
Page 24
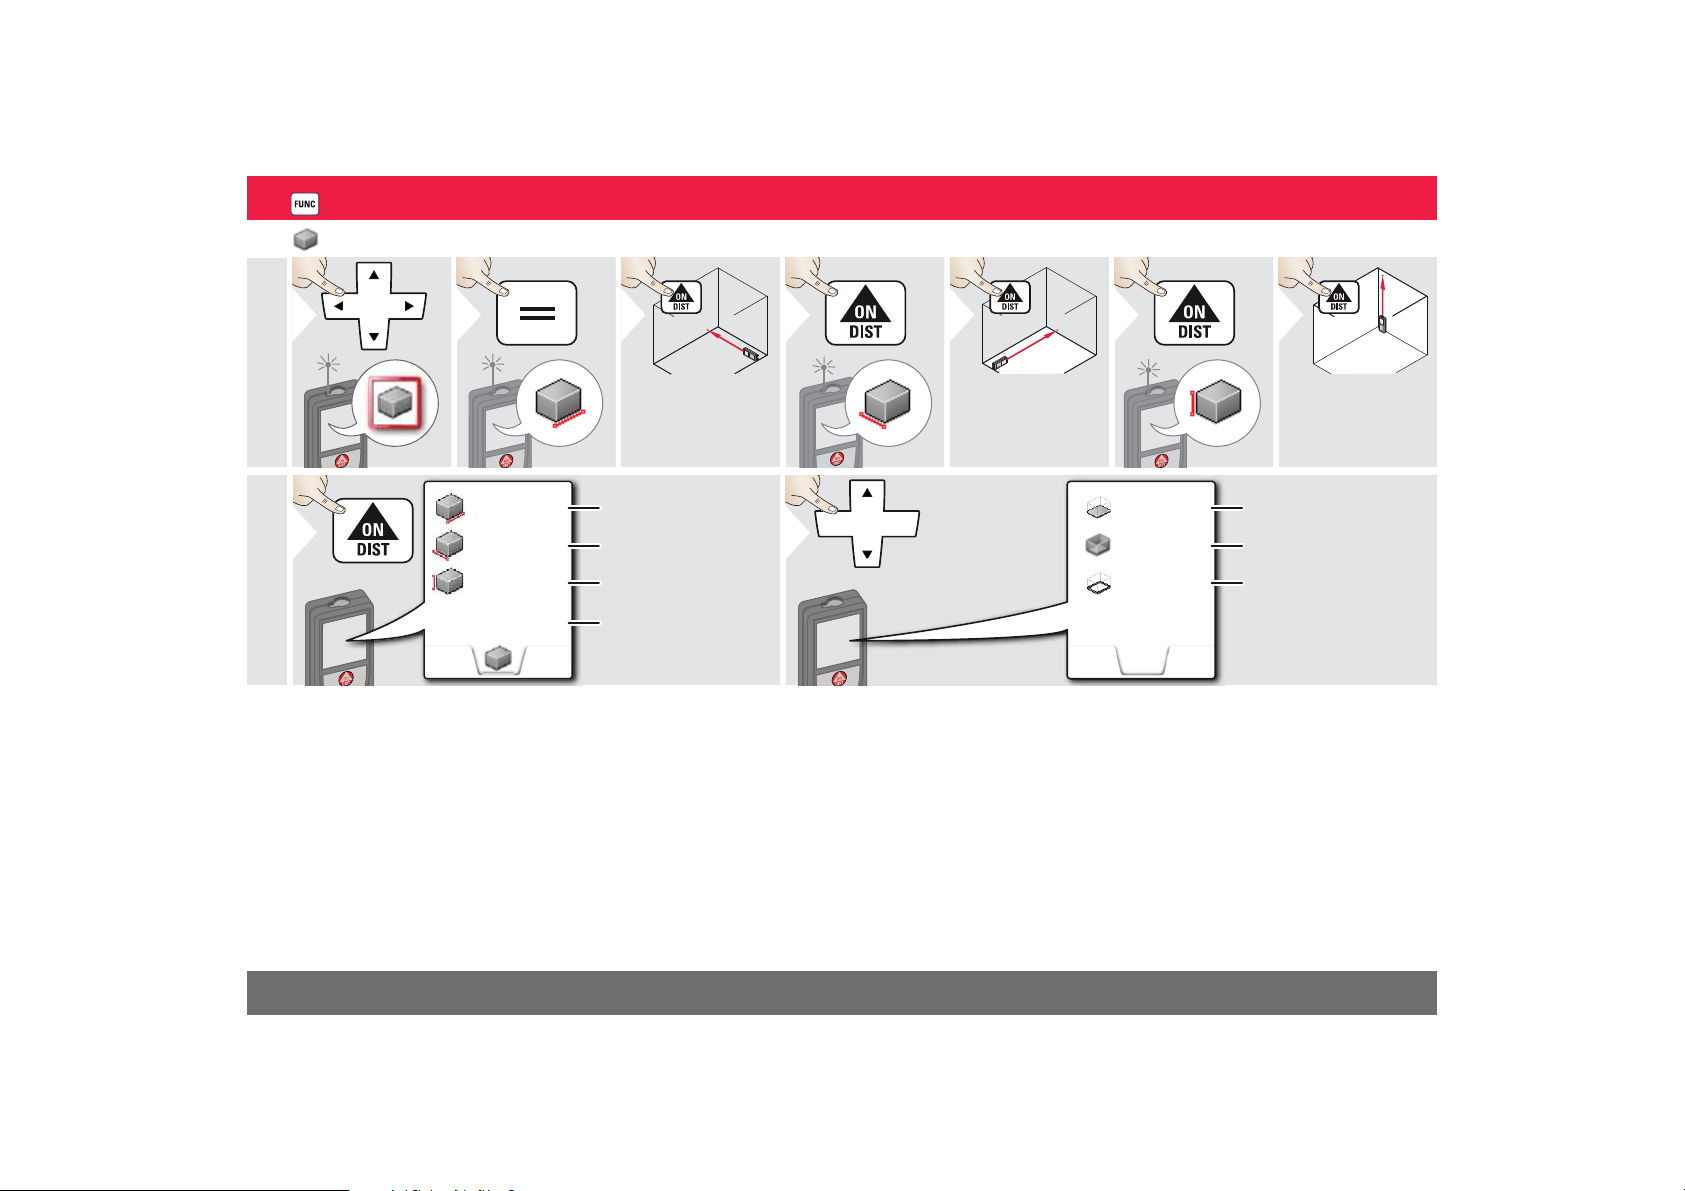
Volume
1
2
3
Aim laser at first
target point.
4
5
Aim laser at second target point.
6
7
Aim laser at third
target point.
First distance
Second distance
Third distance
Volume
8
16.164 m
39.300 m
2
13.430 m
2
9
Use Up/Down
navigation keys to
show more results.
Ceiling/floor area
Wall areas
Circumference
ENFunctions
5.744 m
2.338 m
2.431 m
3
32.653 m
Leica DISTOTM S910 805080
24
Page 25
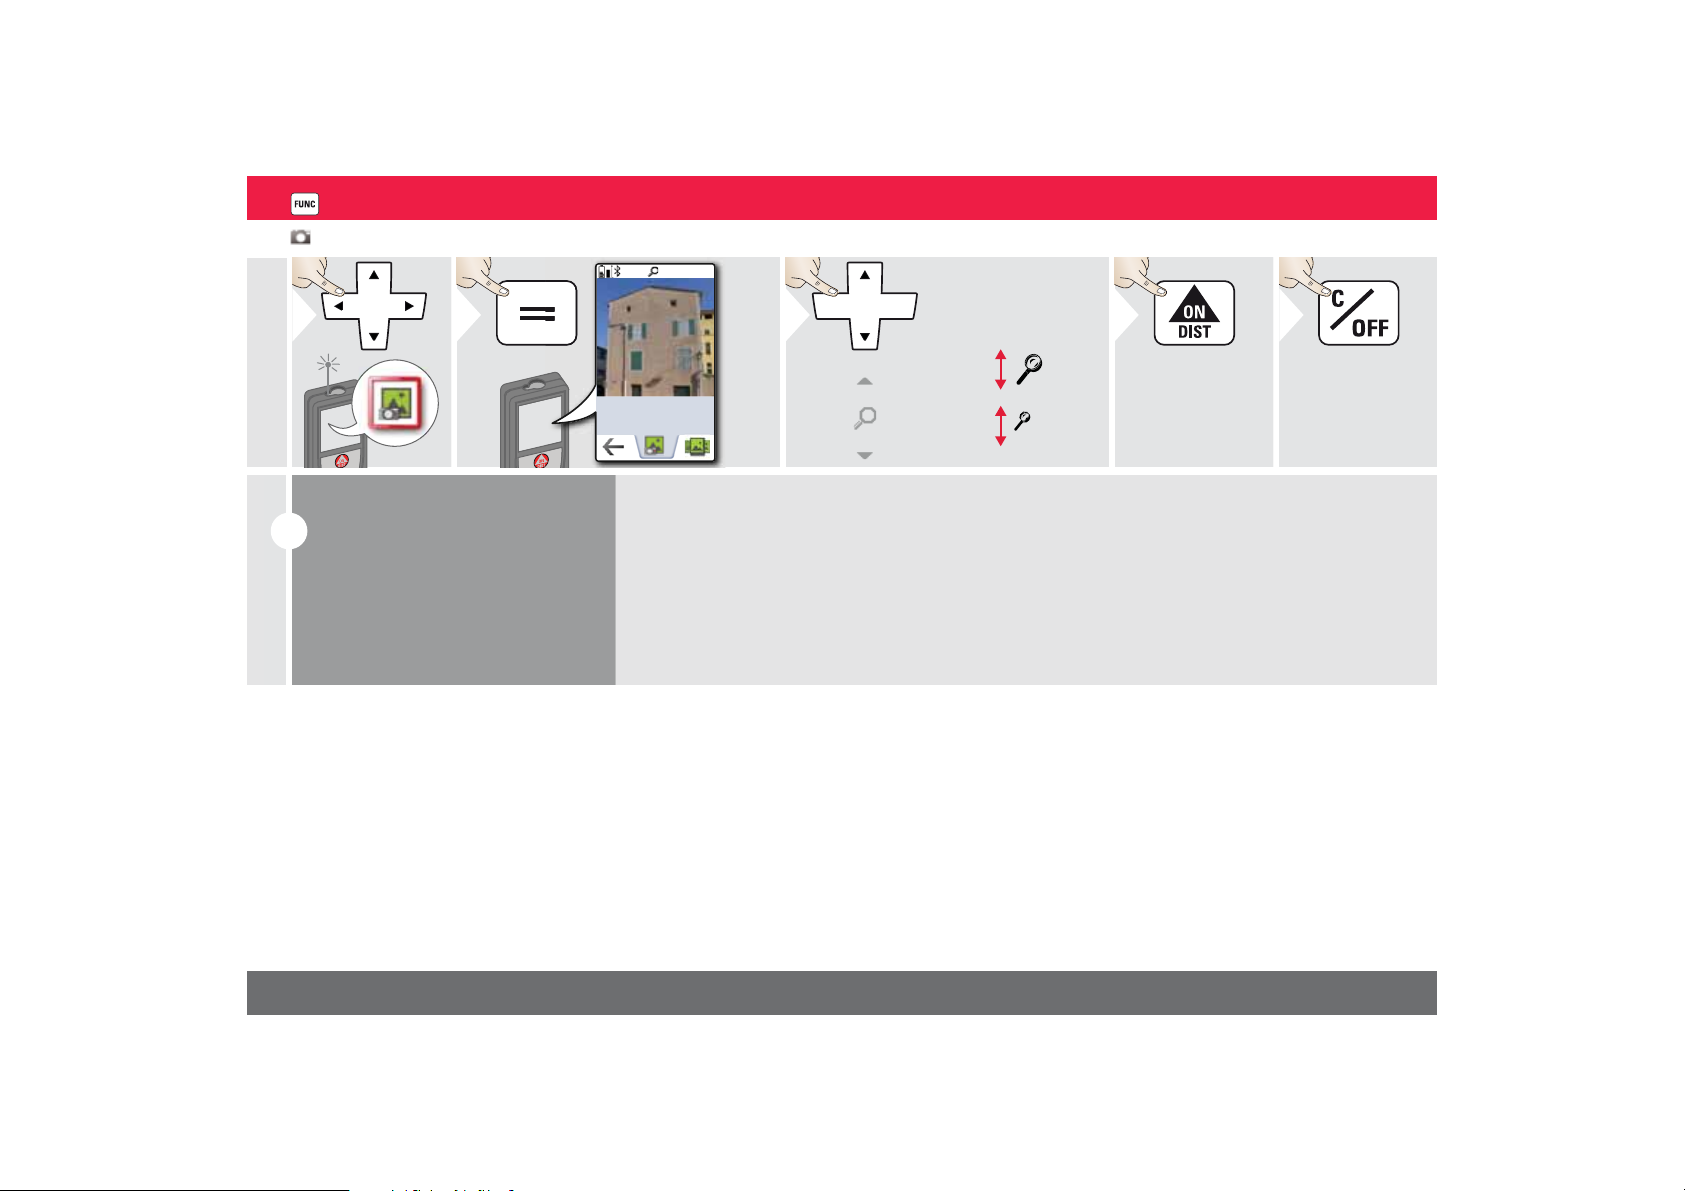
Photo
11x2
3
Take photo.
4
Exit.
5
i
Tap on the camera icon in the middle of the bottom line to take a photo.
For screenshots, press camera key
for 2 sec.
2x
OV
ENFunctions
*
* OV = Overview
Leica DISTOTM S910 805080
25
Page 26
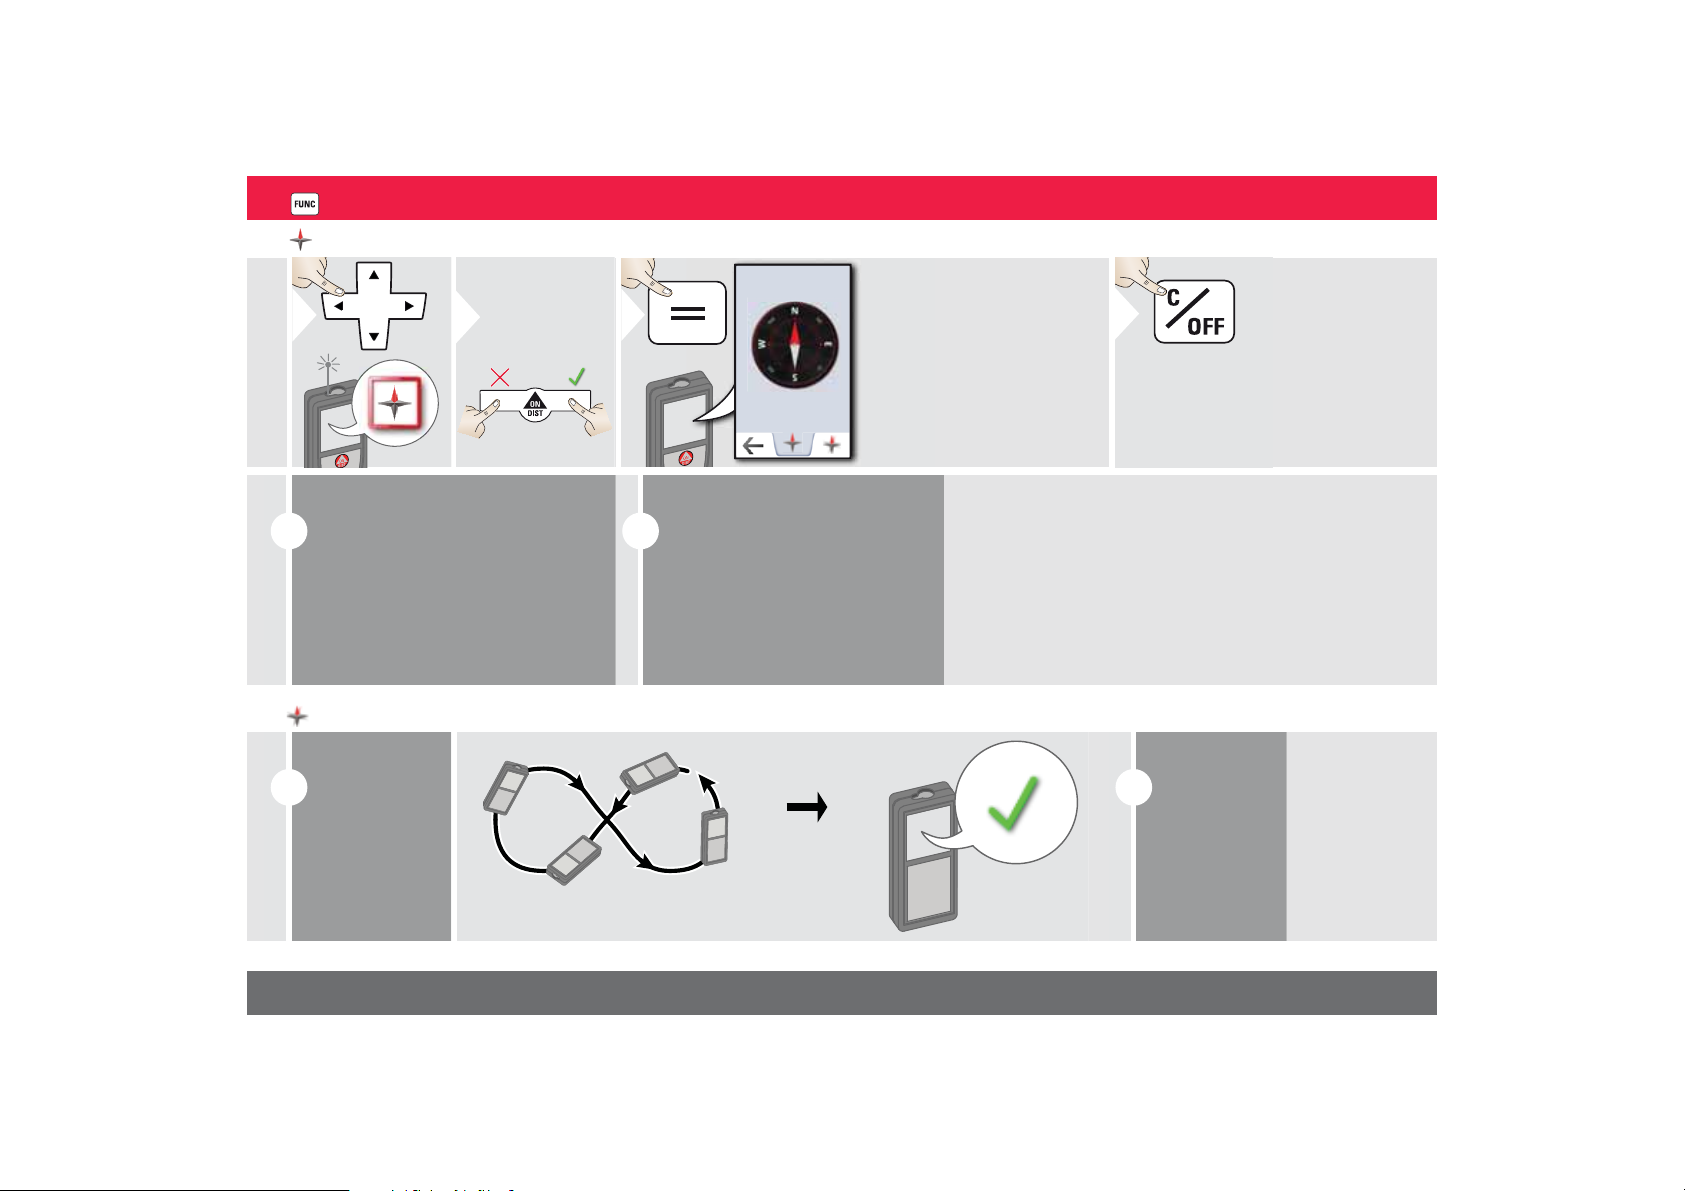
Compass
1
2
Calibrate
Compass?
Refuse Confirm
The arrow always
points to true north.
3
Exit.
4
i
At the following places the compass
probably does not work correctly:
• Inside of buildings
• Close to high voltage lines (e.g. on
train platforms)
• Close to magnets, metal objects or
electrical household appliances
i
If an error message occurs,
the device is tilted too much
(>20° over the front / > 10°
sidewise).
i
The compass
has to be calibrated before
every first
measurement
after switching
on the device.
i
After 2 sec the
device goes
back to the
compass mode.
Calibration of Compass:
ENFunctions
0.0°N
Leica DISTOTM S910 805080
Rotate the device slowly in a figure 8 motion until OK
icon appears on the display.
26
Page 27
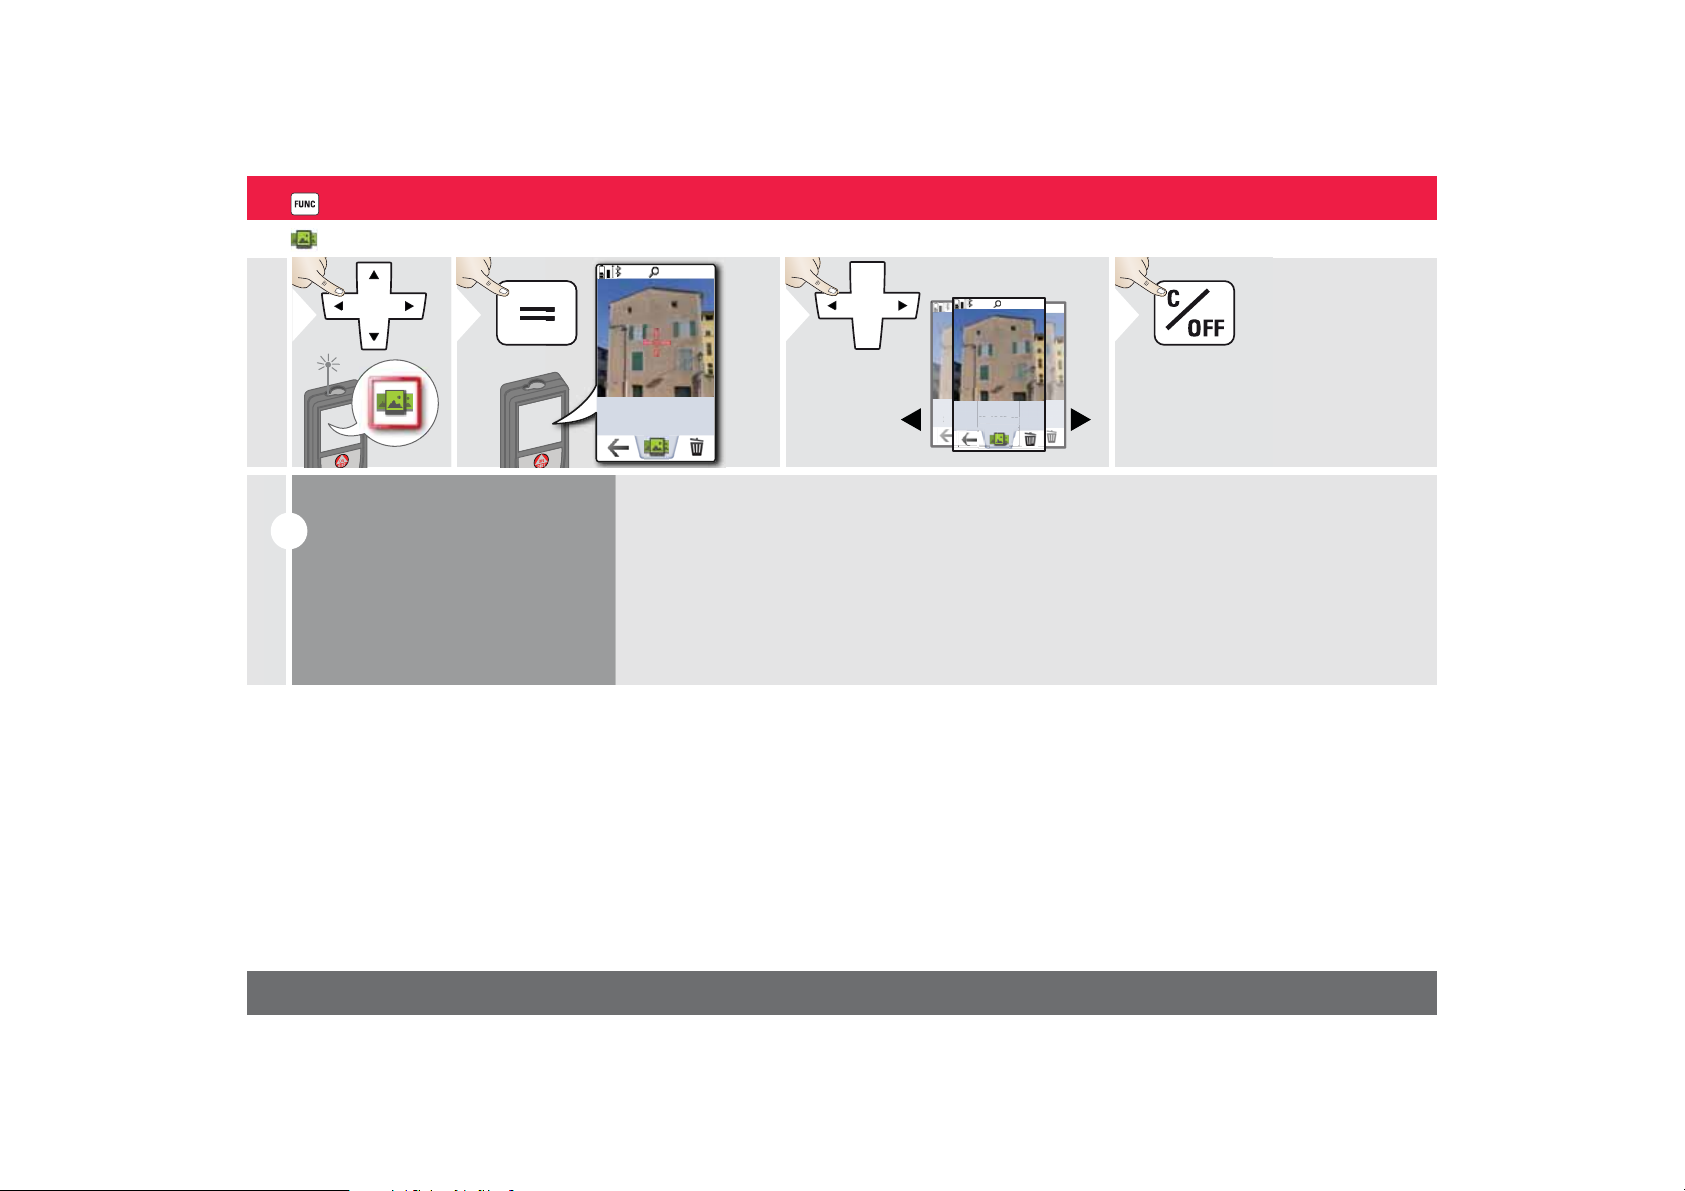
Gallery
11x2
201
03_13:25
- 03_
13:03- 07:25
3
Exit.
4
i
If the device is connected to the
computer via USB cable, you can
download or delete the gallery. It is
not possible to upload any data.
1x
2013 - 07 - 03_13:25
- 07 -
2013 - 07 - 03_13:25
2013 - 07 - 03_13:25
ENFunctions
1x
1x
Leica DISTOTM S910 805080
27
Page 28
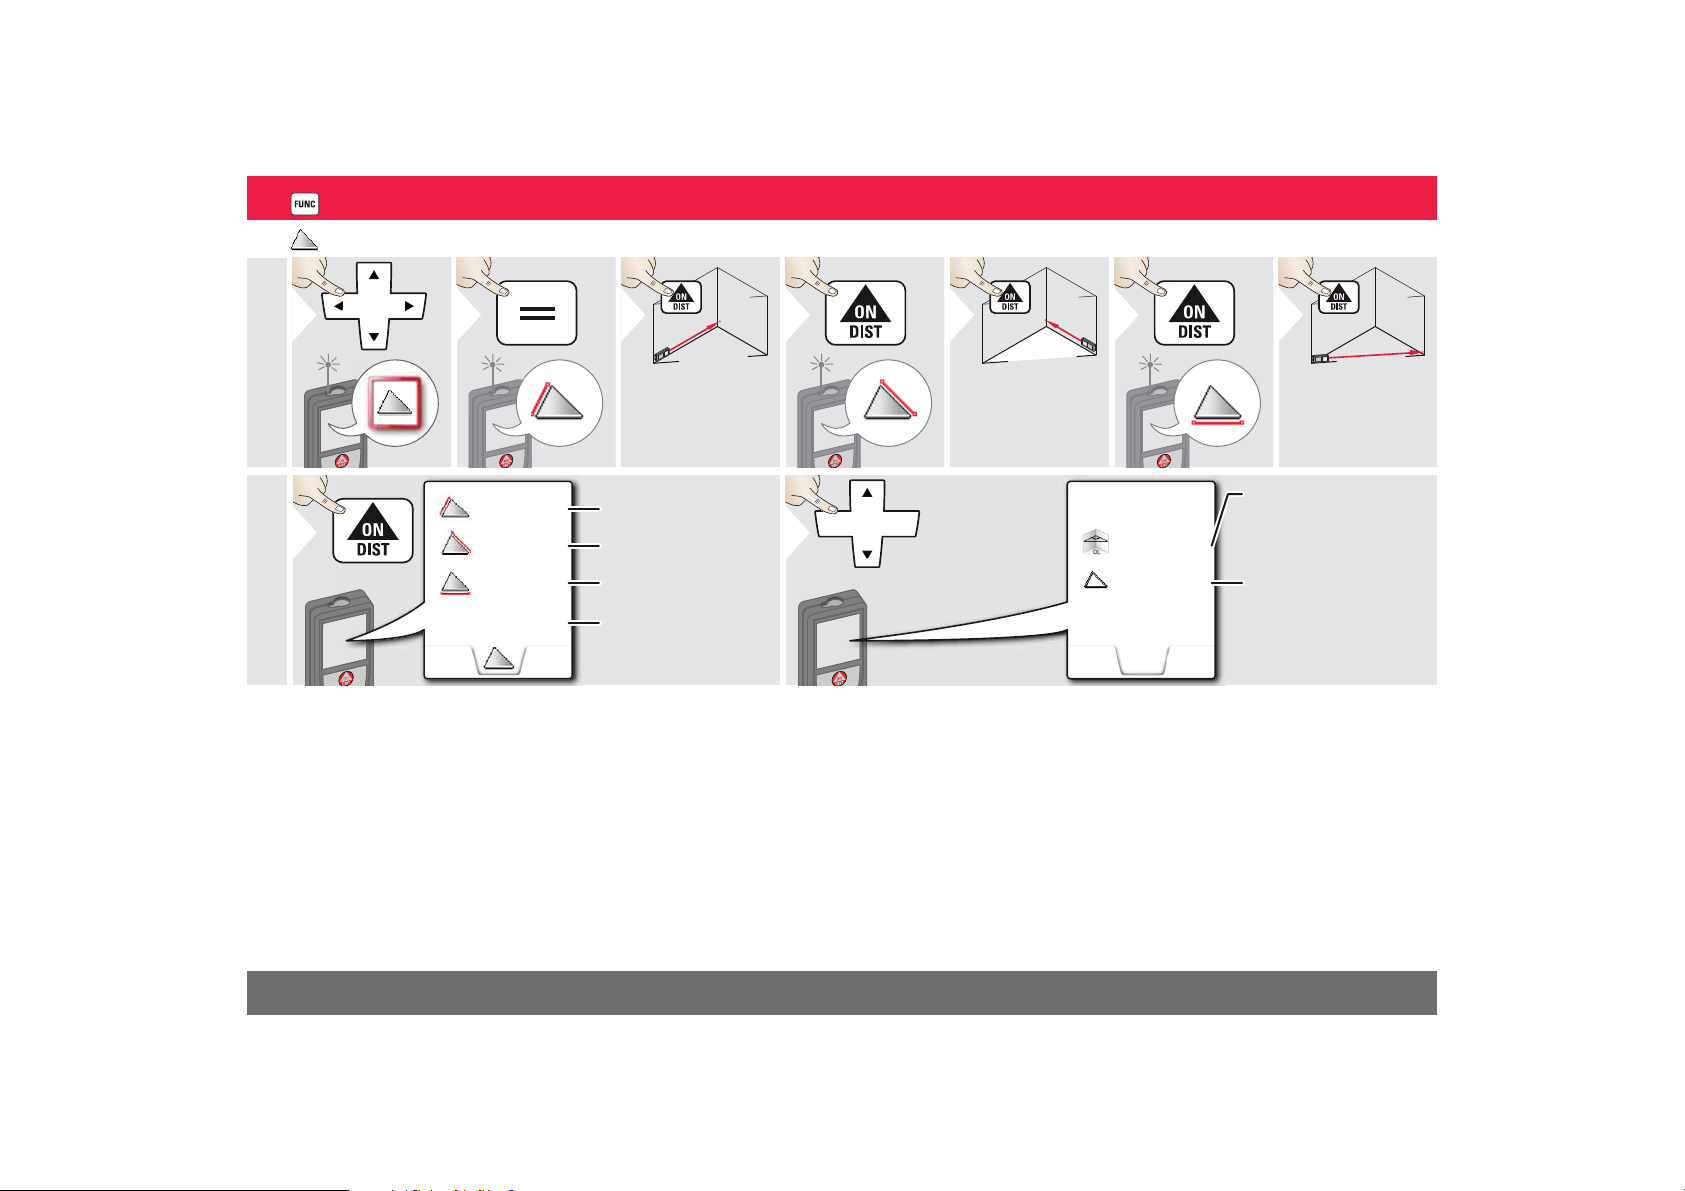
Triangular area
1
2
3
Aim laser at first
target point.
4
5
Aim laser at second target point.
6
7
Aim laser at third
target point.
Triangular area
8
First distance
Second distance
Third distance
33.60°
10.802 m
9
Use Up/Down
navigation keys to
show more results.
Circumference
Angle between first
and second
measurement
4.855 m
ENFunctions
4.248 m
4.129 m
2.425 m
2
Leica DISTOTM S910 805080
28
Page 29
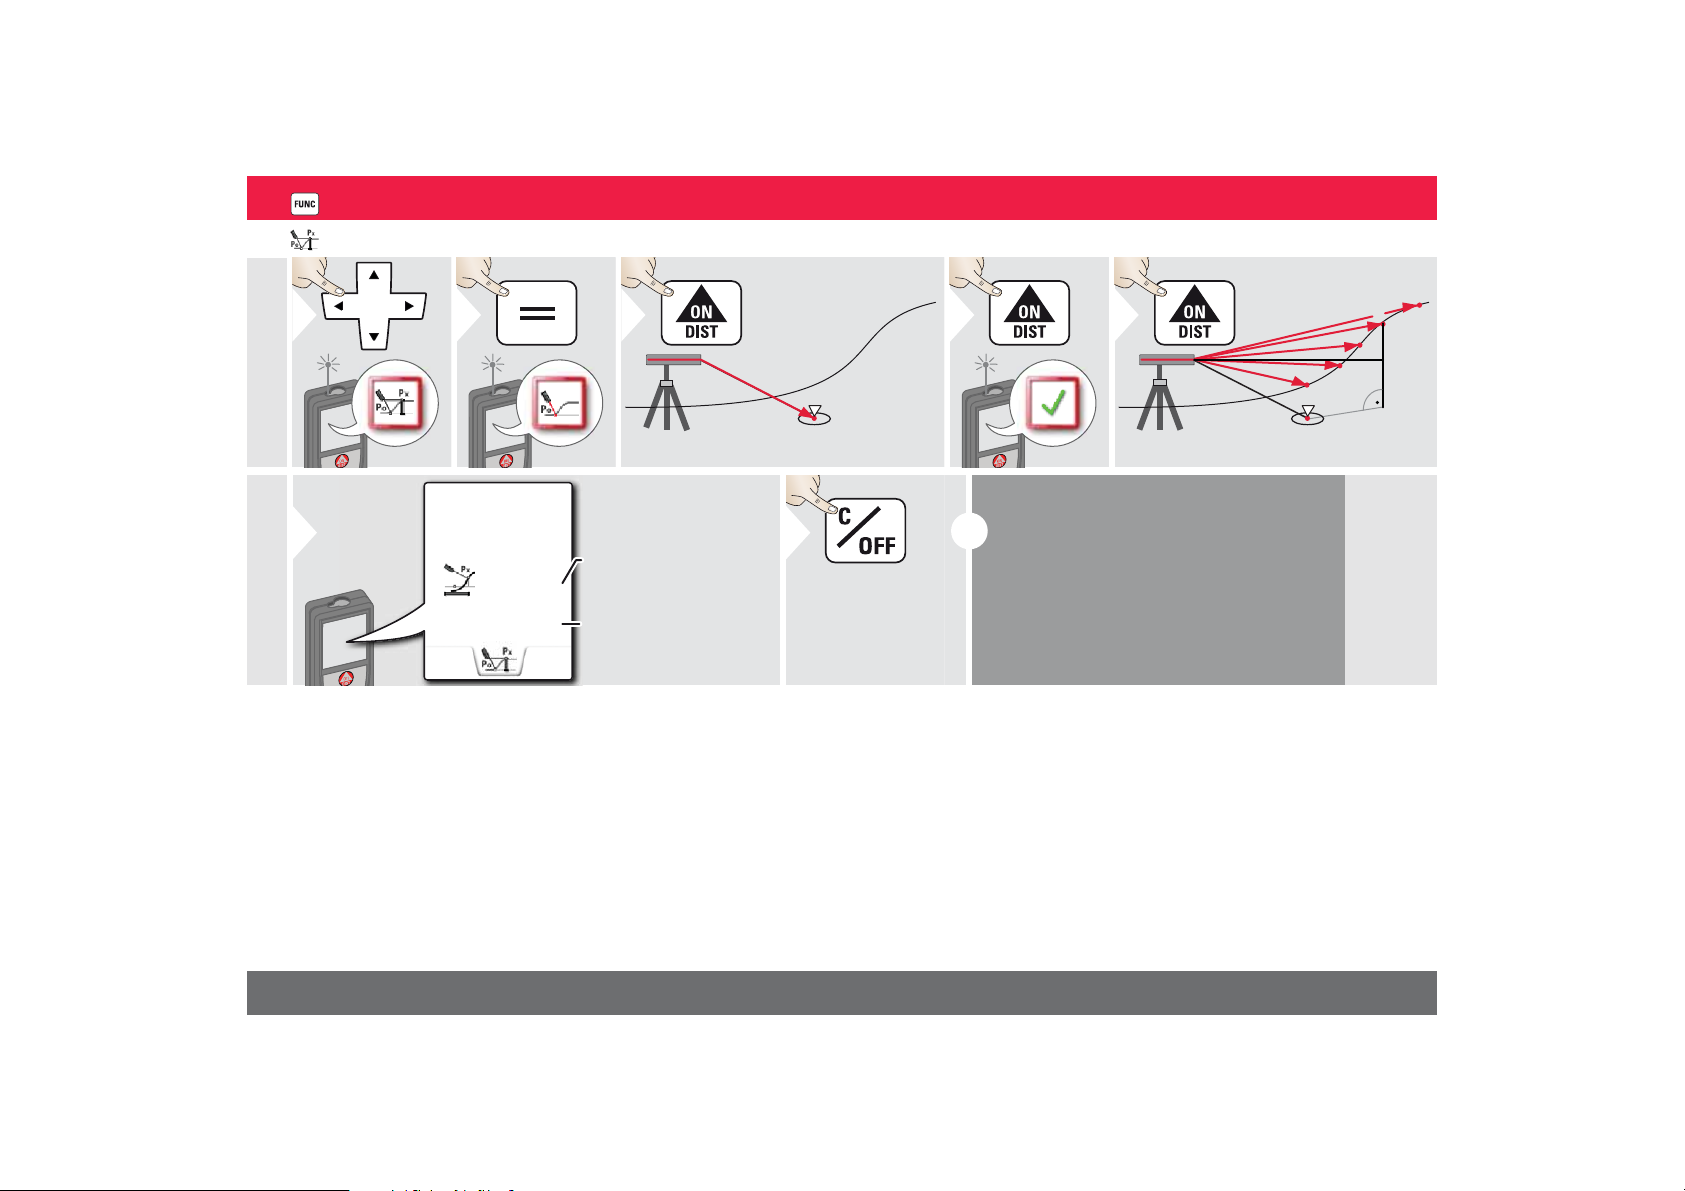
Height-profile measurement
1
2
REF
0
Aim at reference point (REF).
3
4
REF
1
0
2
3
4
5
h
d
Aim at additional points 1-x.
5
Horizontal distance to
device
Height difference to
reference point (REF).
6
Exit function.
7
2x
i
Ideal for measuring of height differences to a
reference point. Can be also used to measure profiles and terrain sections. After measuring the reference point, the horizontal
distance and height is displayed for each following point.
d
2.042 m
ENFunctions
0.054 m
Leica DISTOTM S910 805080
h
29
Page 30
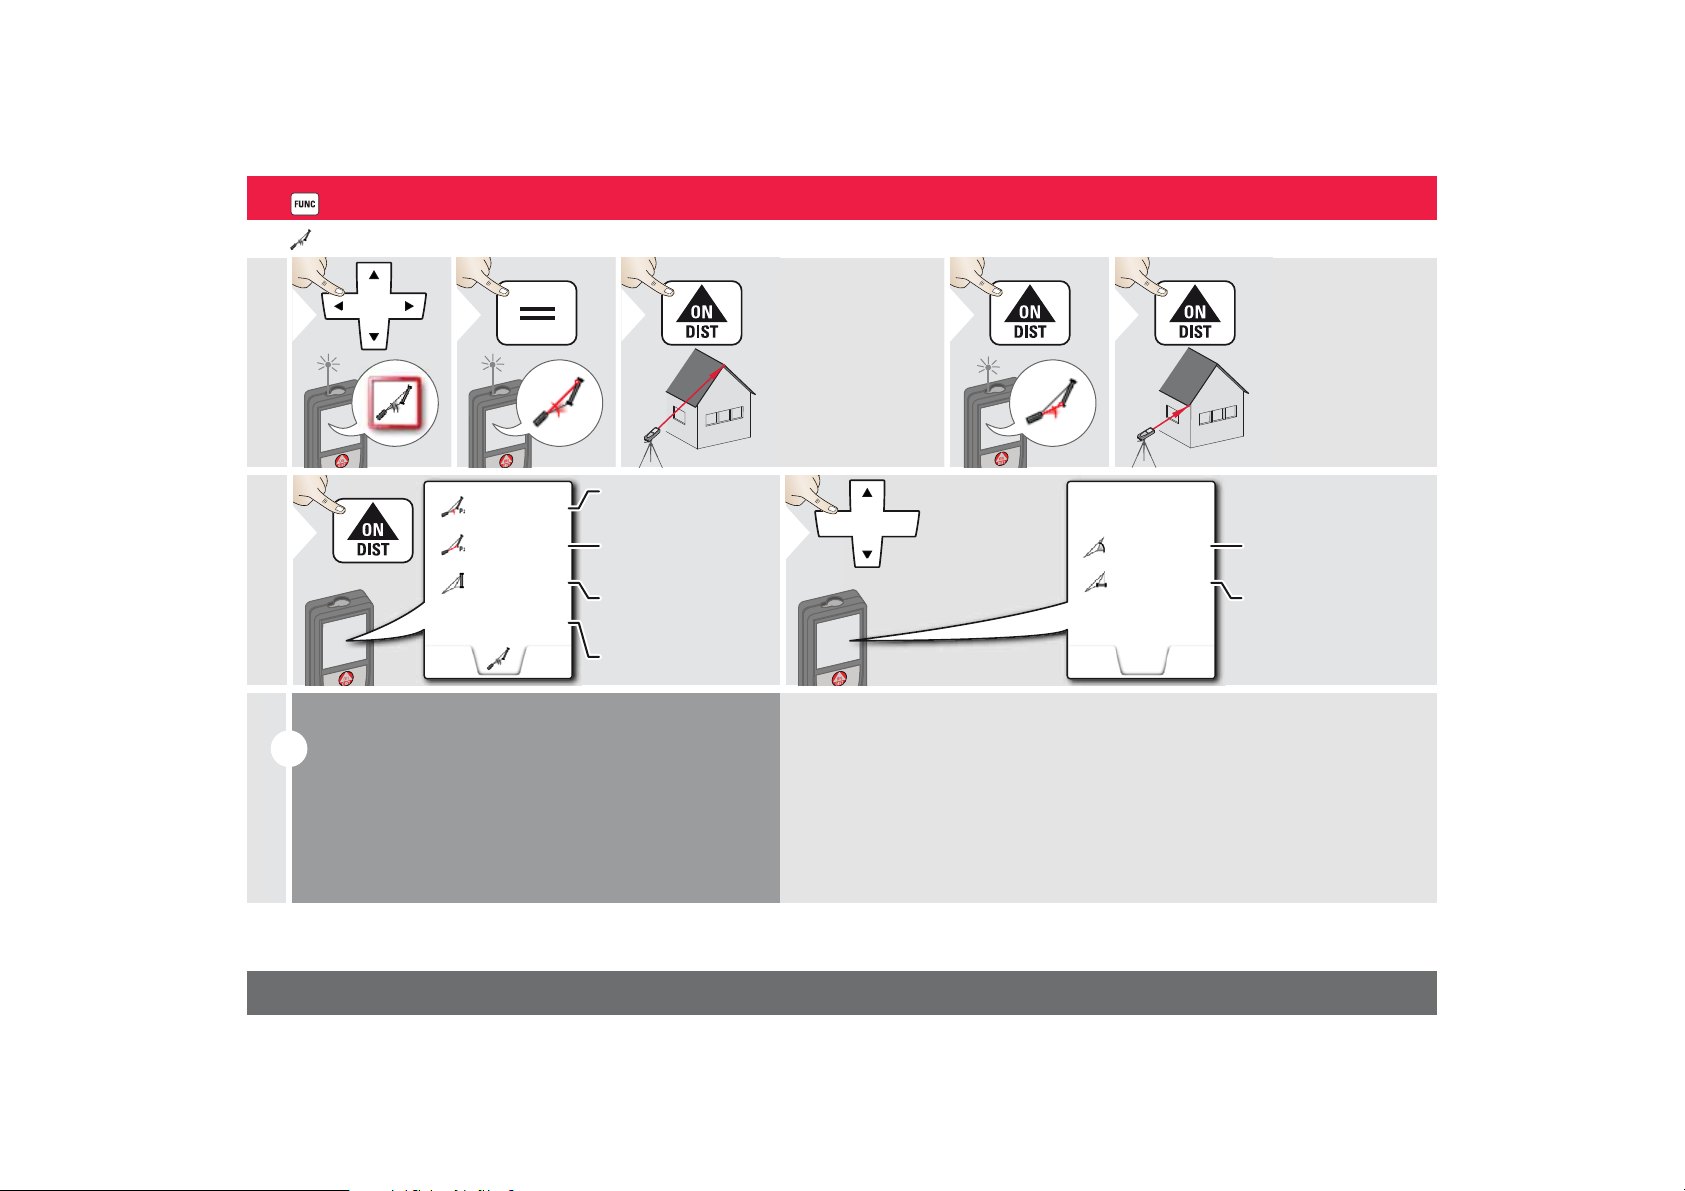
Sloped objects
123
Aim laser at upper
target point.
4
5
Aim laser at lower
target point.
P2 distance
Vertical height between both points
P2 angle
Distance between
both points
6
7
Use Up/Down
navigation keys to
show more results.
Horizontal distance
between both points
Included angle between both points
i
ENFunctions
11.00 °
30.367 m
-3.440 m
39.10 °
-4.230 m
5.452 m
Indirect distance measuring between 2 points with additional results. Ideal for applications such as length and slope
of roof, height of chimneys,…
It is important, that the instrument is positioned in the
same vertical plane as the 2 measured points. The plane is
defined of the line between the 2 points. This means, that
the device on the tripod is only moved vertically and not
turned horizontally to reach both points.
Leica DISTOTM S910 805080
30
Page 31
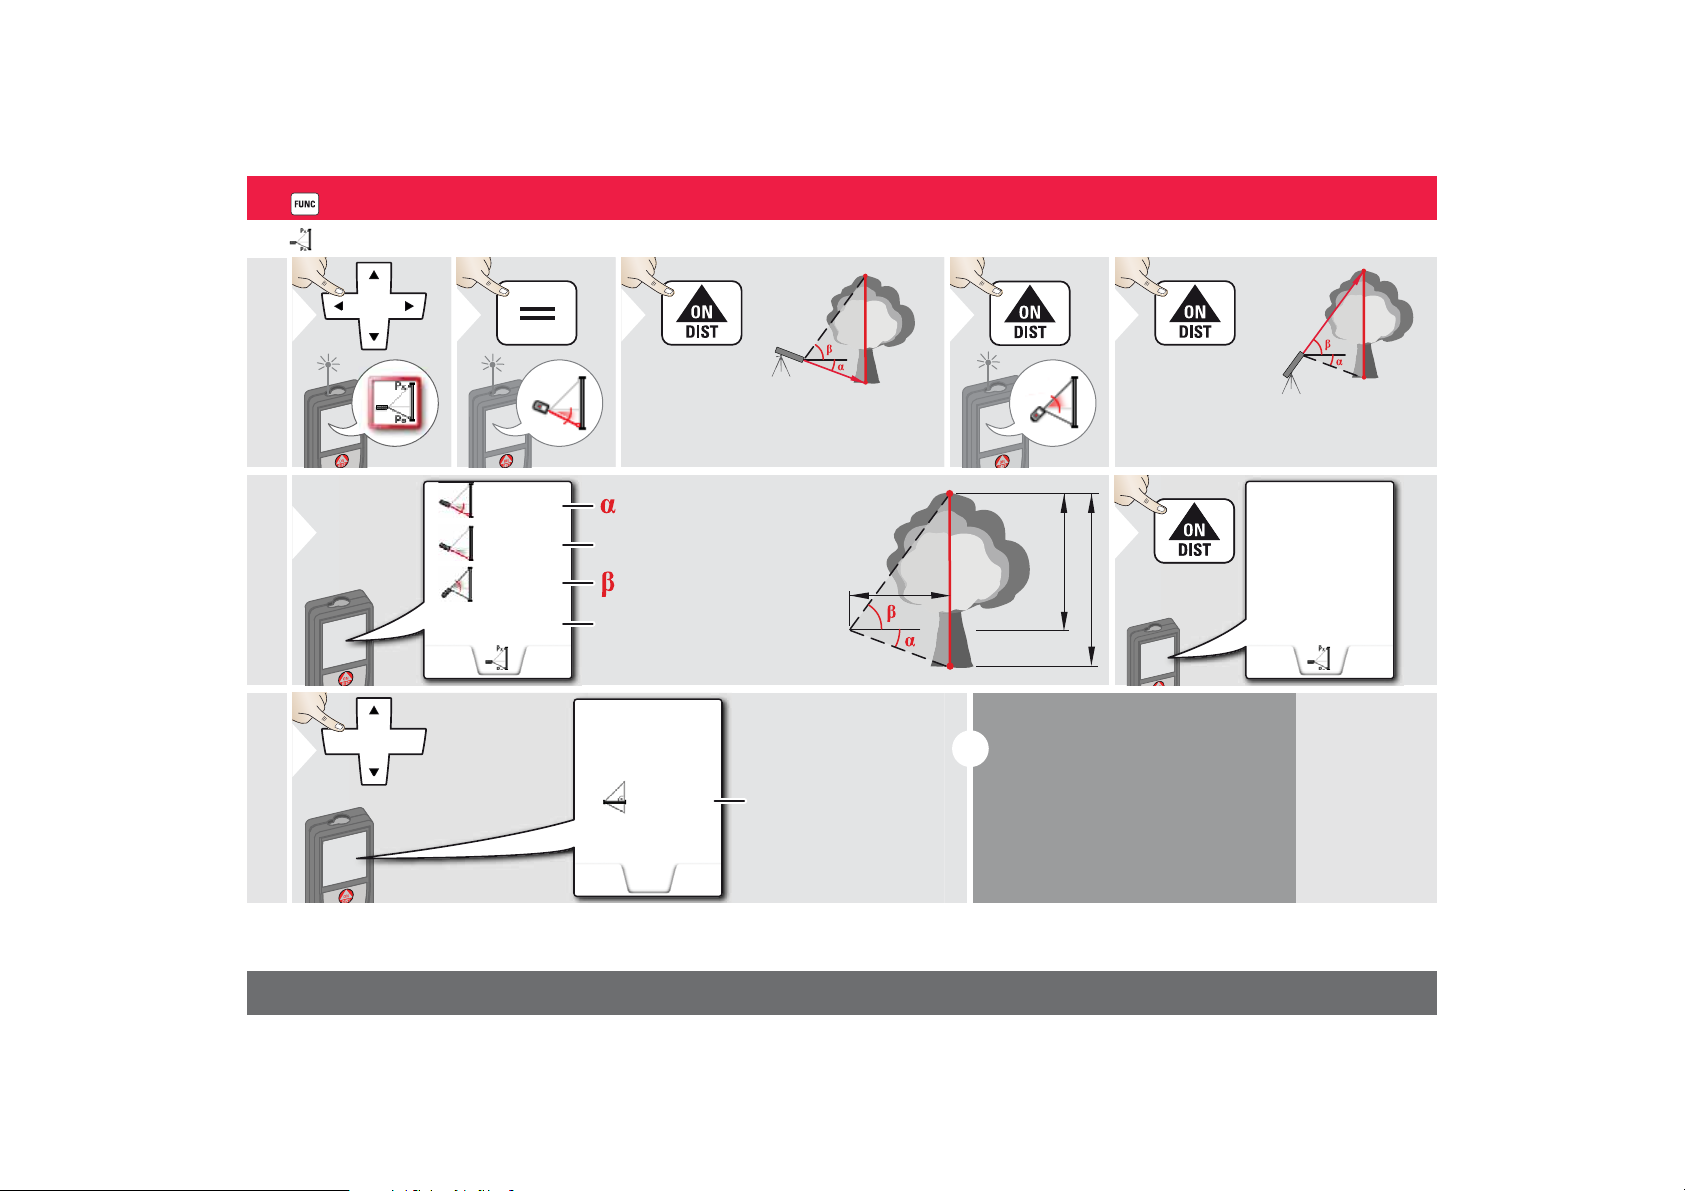
Height tracking
1
2
Aim laser at lower point.
3
4
P0
Px
Aim laser at upper points and angle/
height tracking starts automatically.
5
x
29.89 °
6.271 m
-10.55 °
3.475 m
P0
Px
6
= Tracking height if device is
turned on tripod
= Tracking angle if device is
turned on tripod
7
Stops height
tracking.
8
Use Up/Down
navigation keys to
show more results.
i
Heights of buildings or trees without
suitable reflective points can be determined. At the bottom point, distance
and tilt is measured - which needs a reflective laser target. The upper point
can be targeted with the pointfinder /
crosshair and does not need a reflective laser target as only the inclination is
measured.
ENFunctions
Px
P0
Leica DISTOTM S910 805080
P0
y
7.160 m
-10.55 °
6.271 m
z
y
44.80 °
8.478 m
z
31
Page 32
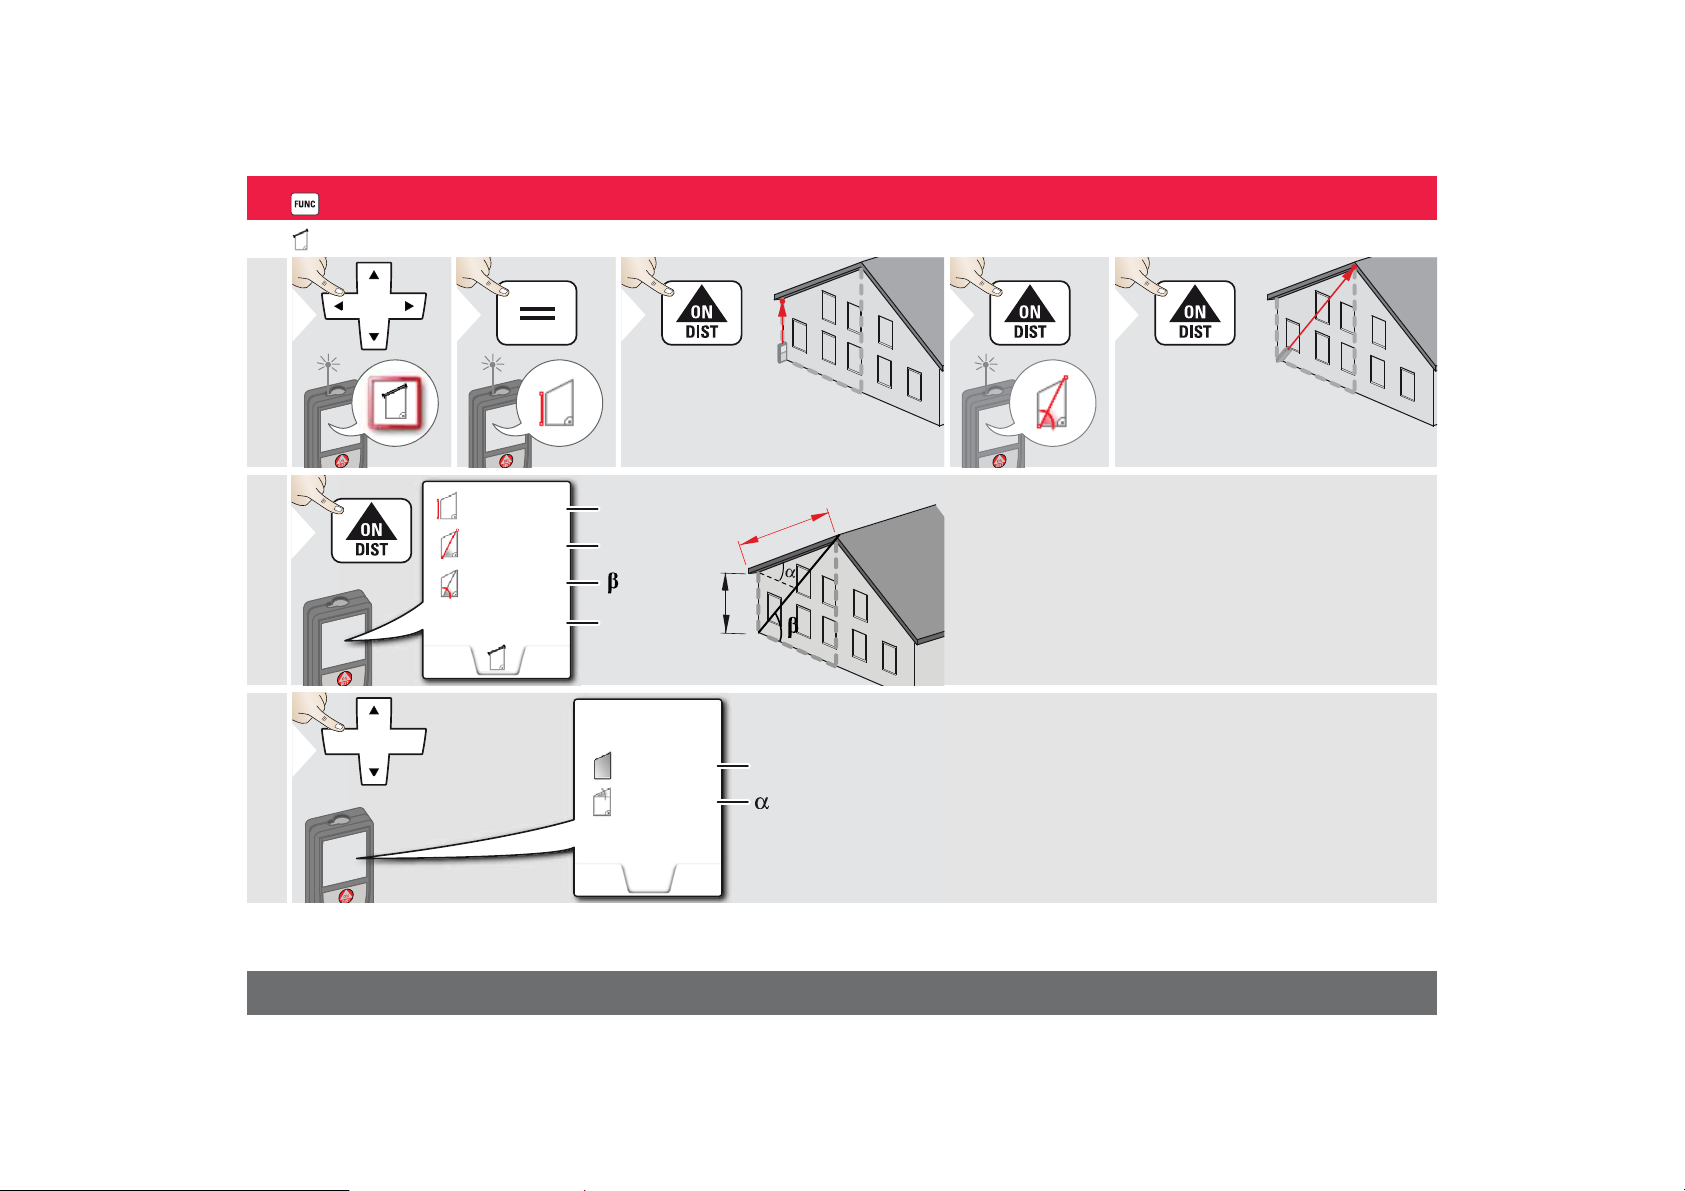
Trapezium
123
Aim laser at upper point.
4
5
Aim laser at 2nd point.
x
6
7
Use Up/Down
navigation keys to
show more results.
Trapezium area
ENFunctions
13.459 m
16.440 m
70.80
5.790 m
Leica DISTOTM S910 805080
h
y
°
h
y
x
20.9
2
°
78.383 m
32
Page 33
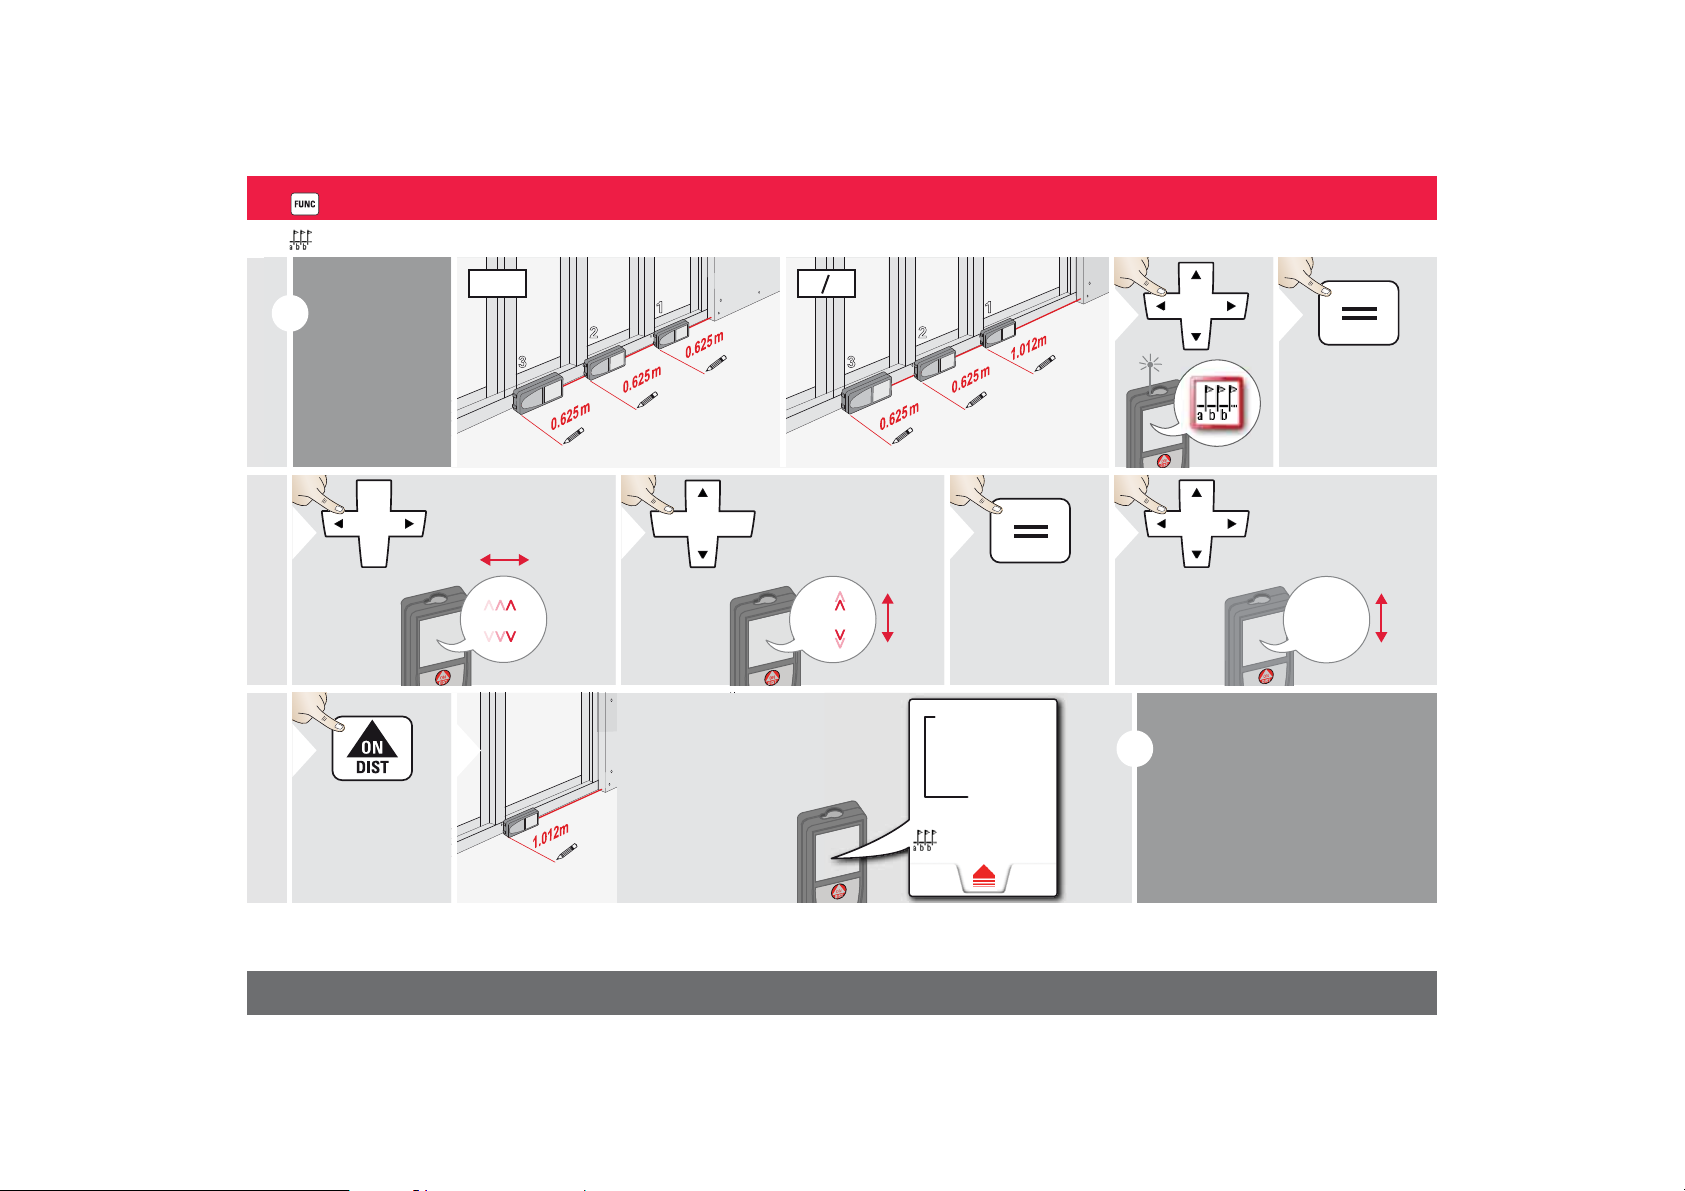
Stake out
i
Two different
distances (a
and b) can be
entered to
mark off defined measured
lengths.
1
2
3
a
b
b
a = b
1
2
3
a
b
b
a = b
1
2
3
Select digit.
4
Adjust digit.
5
Approve
value "a".
0.625 m
6
Adjust
value "b".
7
Approve value "b"
and start measurement.
8
Move device
slowly along the
stake-out line.
The distance to
the next stake out
point is displayed.
0.240 m is
missing up to
next 0.625 m
distance.
Next stake
out distance
i
ENFunctions
Leica DISTOTM S910 805080
1.012 m
1.012 m
0.625 m
0.240 m
When approaching a stake
out point to less than 0.1 m
the instrument starts to beep.
The function can be stopped
by pressing the CLEAR/OFF
button.
33
Page 34
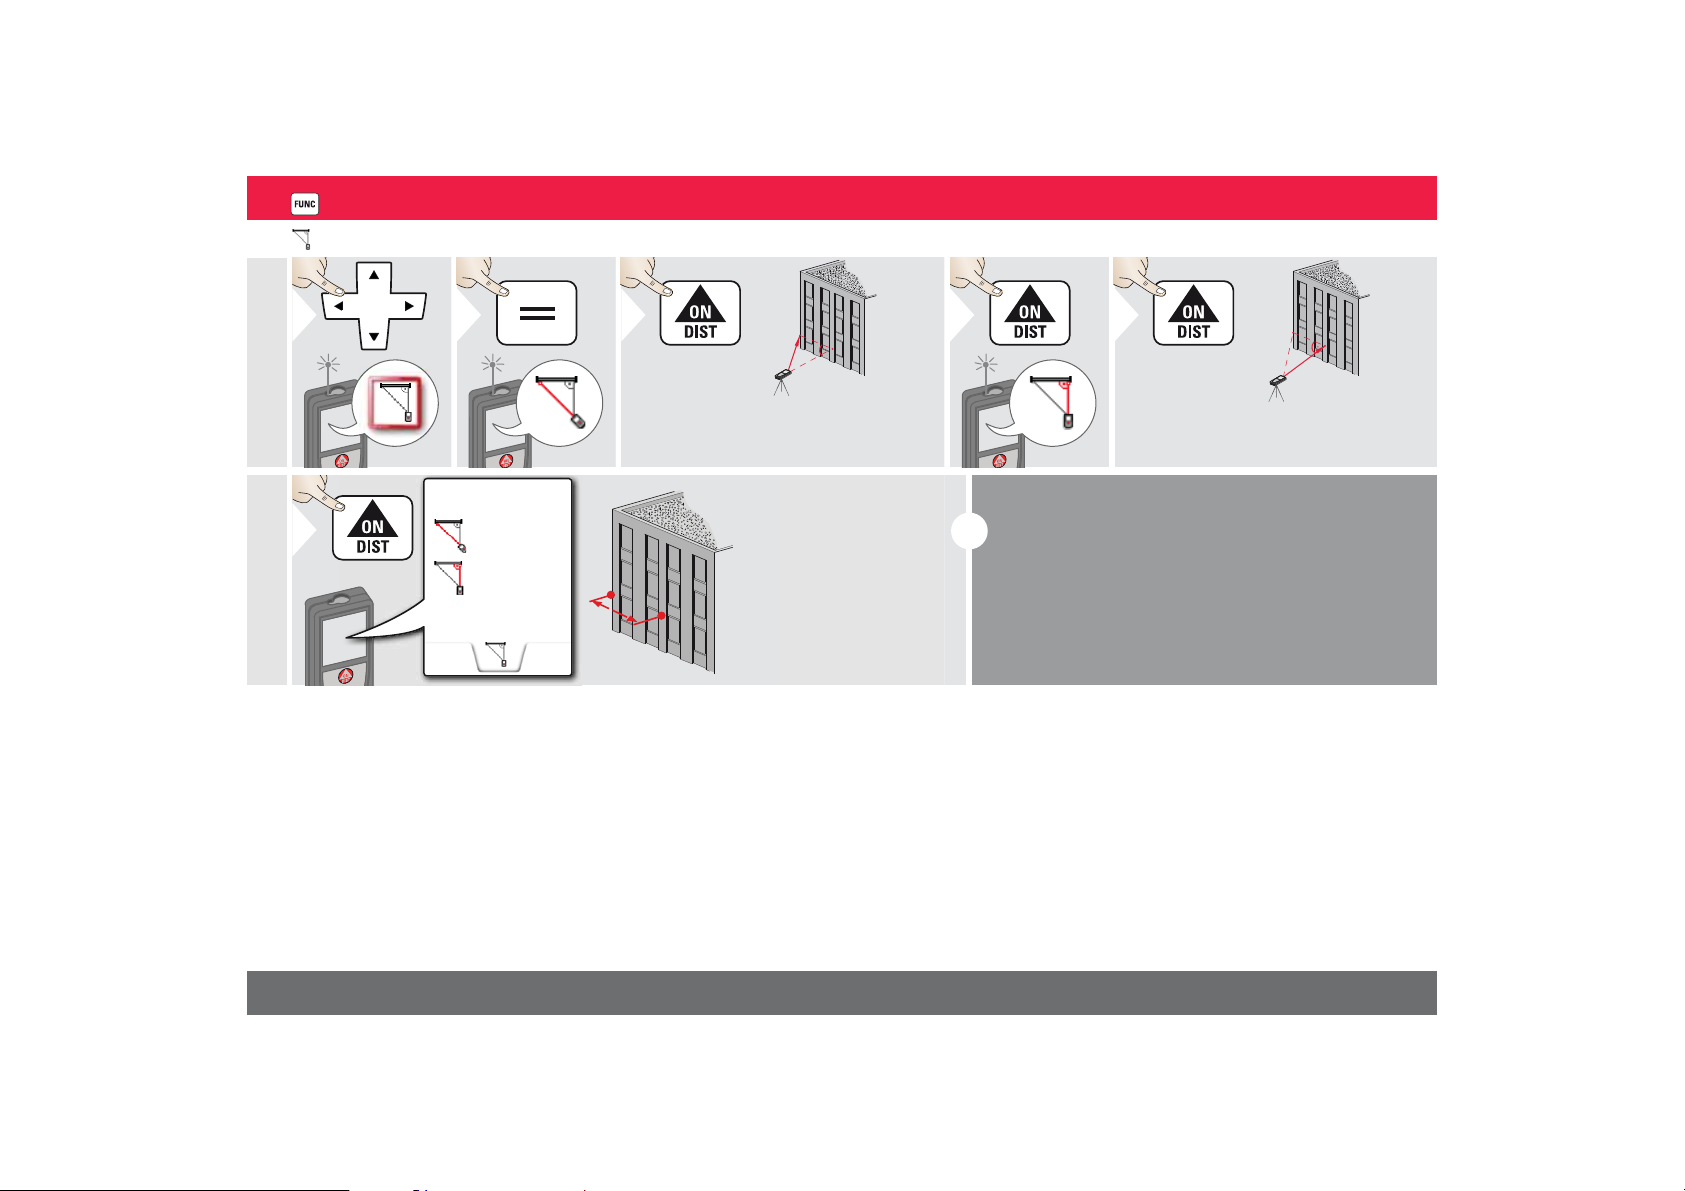
Pythagoras (2-point)
123
Aim laser at first
target.
4
5
Aim laser at second
target.
6
i
25.133 m
21.383 m
13.207 m
ENFunctions
The result is shown in the main line.
Pressing the measuring key for 2 sec in the function activates automatically Minimum or Maximum measurement.
We recommend to use the pythagoras only for indirect
horizontal measuring.
For height measuring (vertical) it is more precise to use
a function with the inclination measuring.
Leica DISTOTM S910 805080
34
Page 35
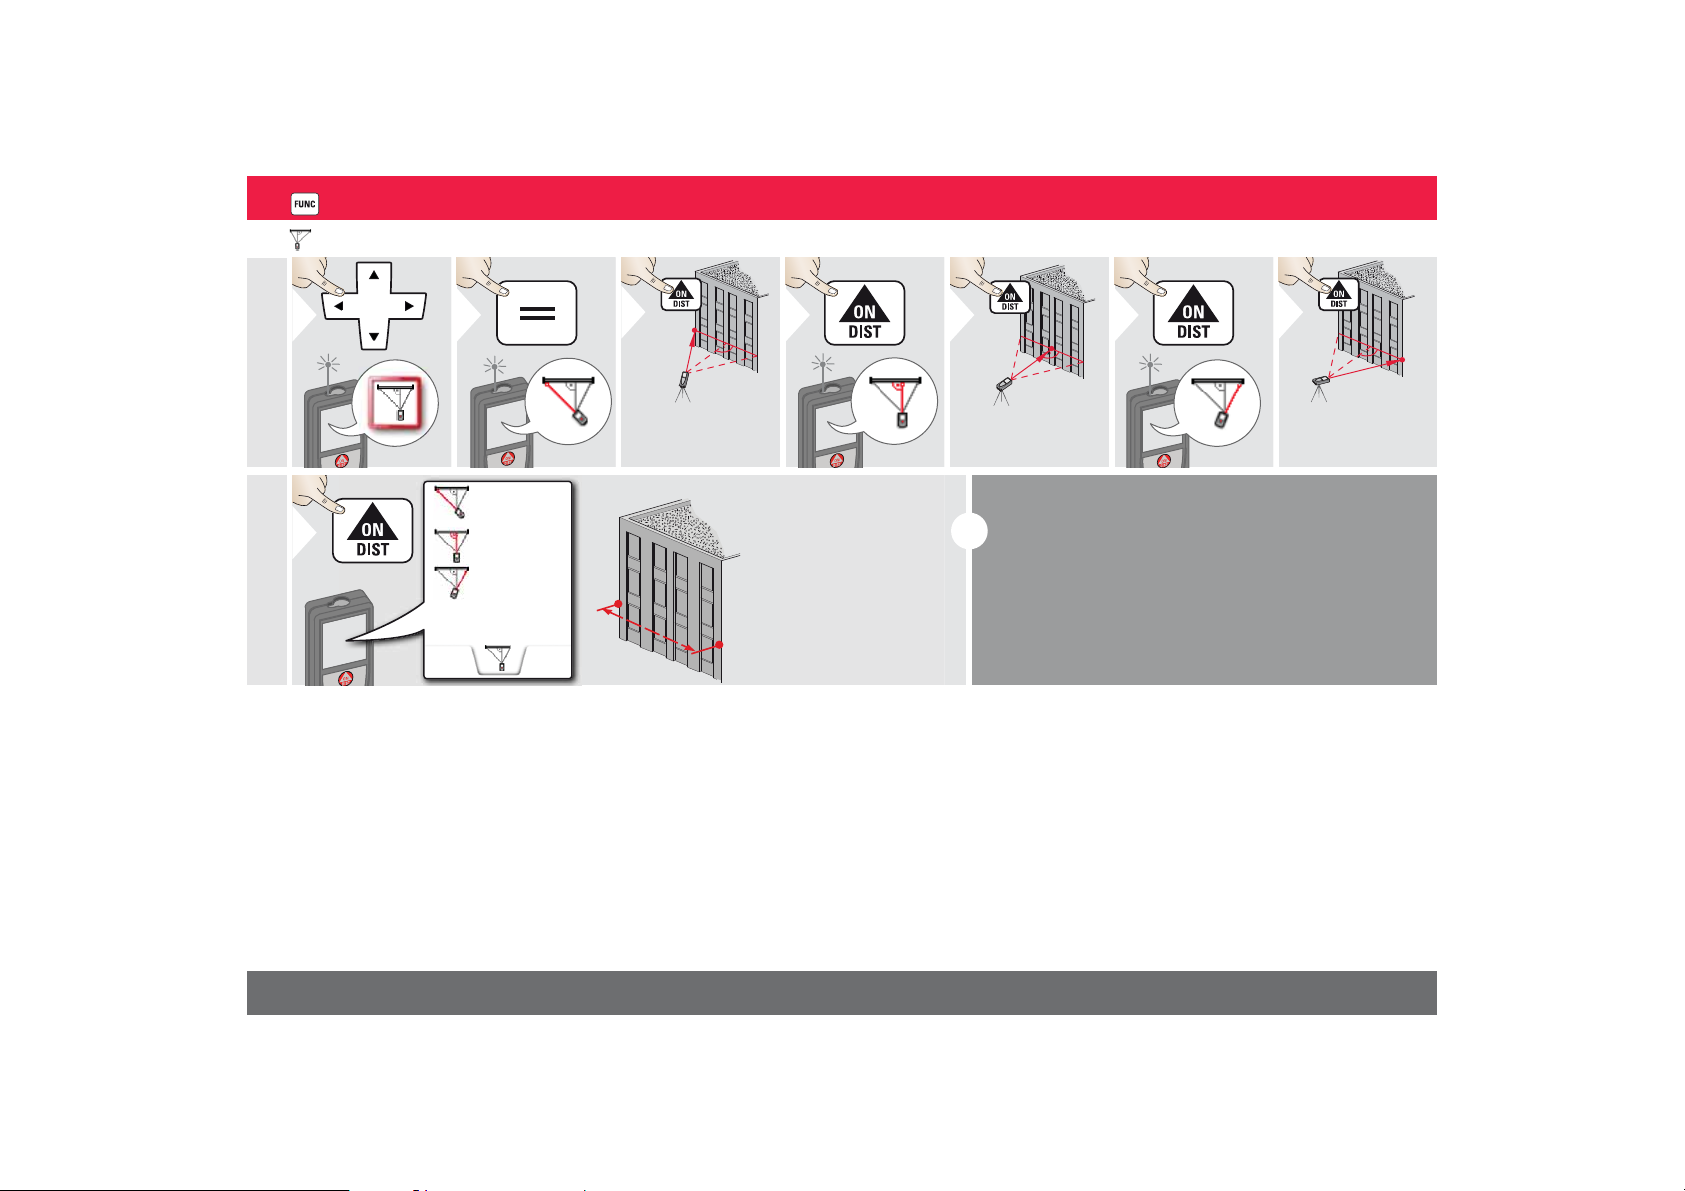
Pythagoras (3-point)
123
Aim laser at first
target.
4
5
Aim laser at second target.
6
7
Aim laser at
third target.
20.571 m
23.018 m
21.264 m
24.298 m
8
i
ENFunctions
The result is shown in the main line.
Pressing the measuring key for 2 sec in the function
activates automatically Minimum or Maximum measurement.
We recommend to use the pythagoras only for indirect horizontal measuring.
For height measuring (vertical) it is more precise to
use a function with inclination measurement.
Leica DISTOTM S910 805080
35
Page 36
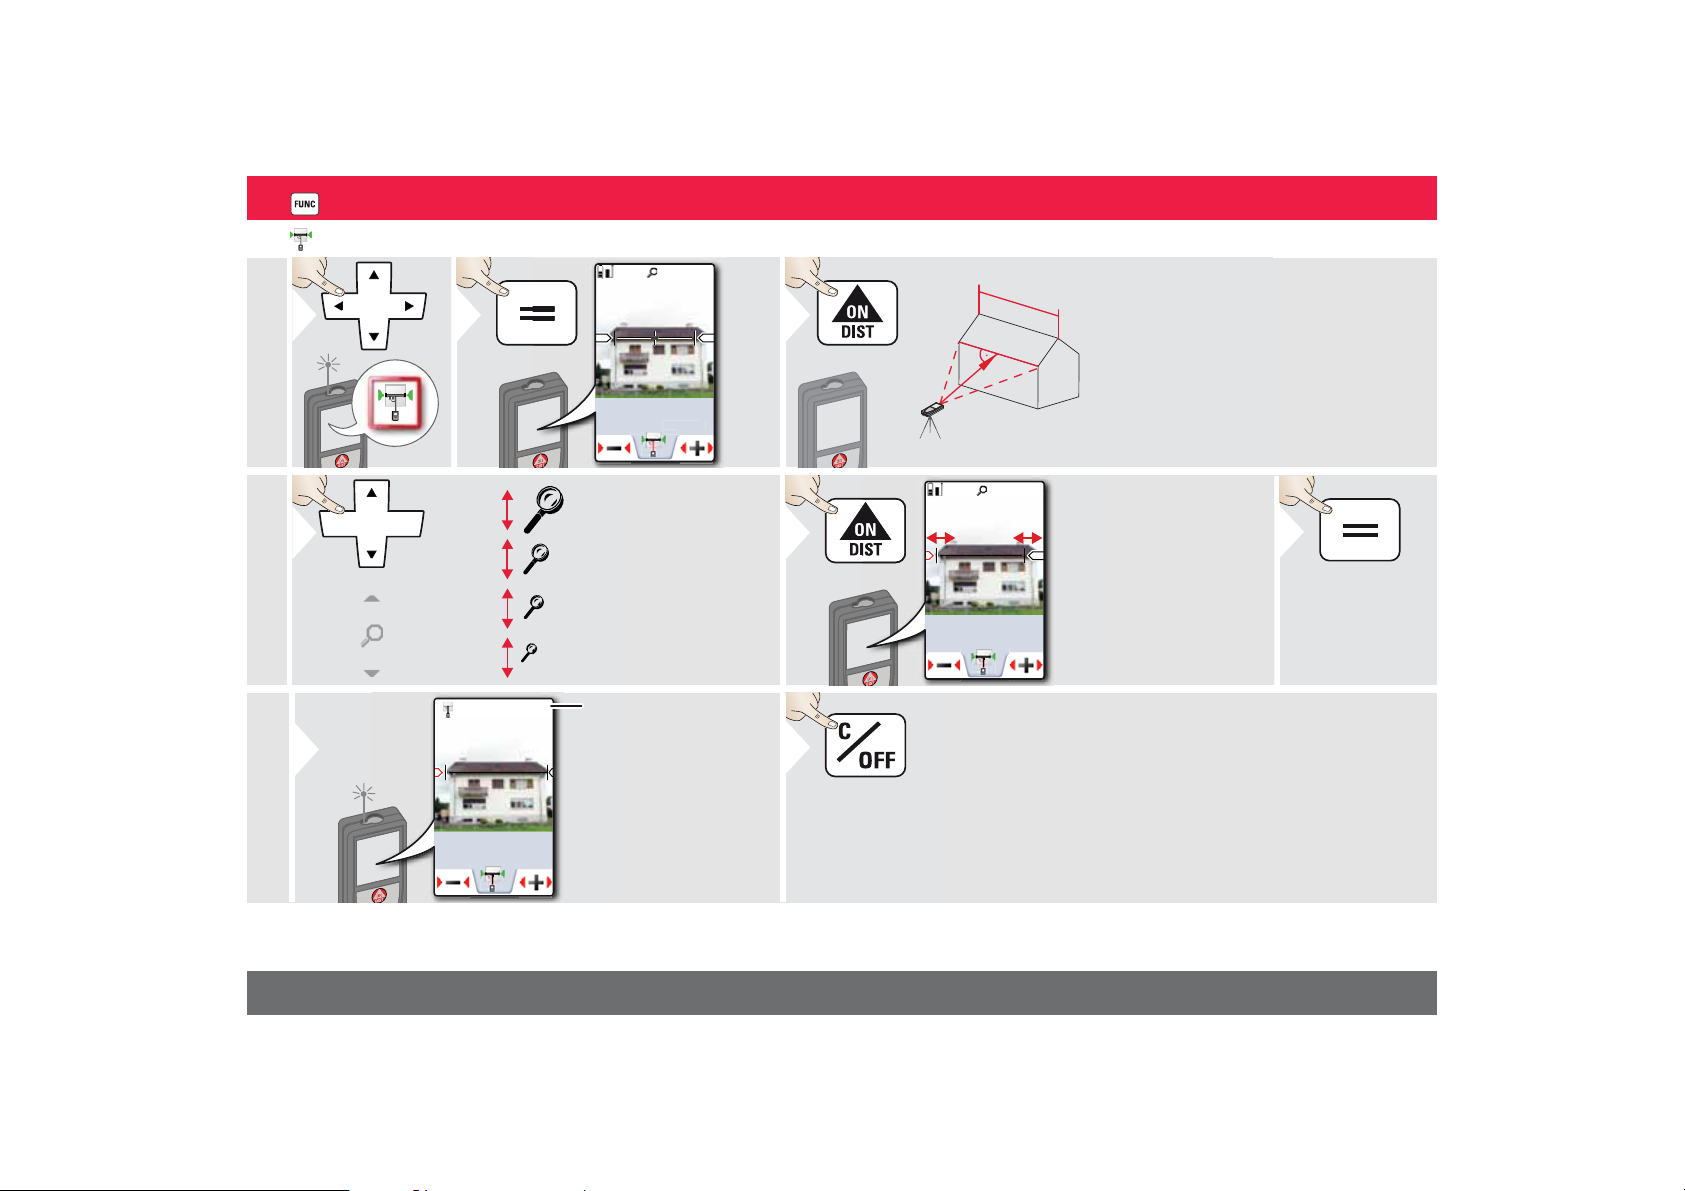
Width
1
2
3
It is absolutely
necessary to aim
with the laser perpendicular to the
object.
4
If necessary, use the
Zoom for precise
aiming.
* OV = Overview
5
Select arrows with the
cursor keys or by tapping
on the display and adjust
with softkeys. Corresponding width is calculated.
7
Distance to object
4x
2x
1x
OV
*
27.539 m
1x
-.--- m
ENFunctions
16.42m
1x
6
Confirm
measuremtent.
16.42 m
8
Exit.
16.42
m
Leica DISTOTM S910 805080
36
Page 37
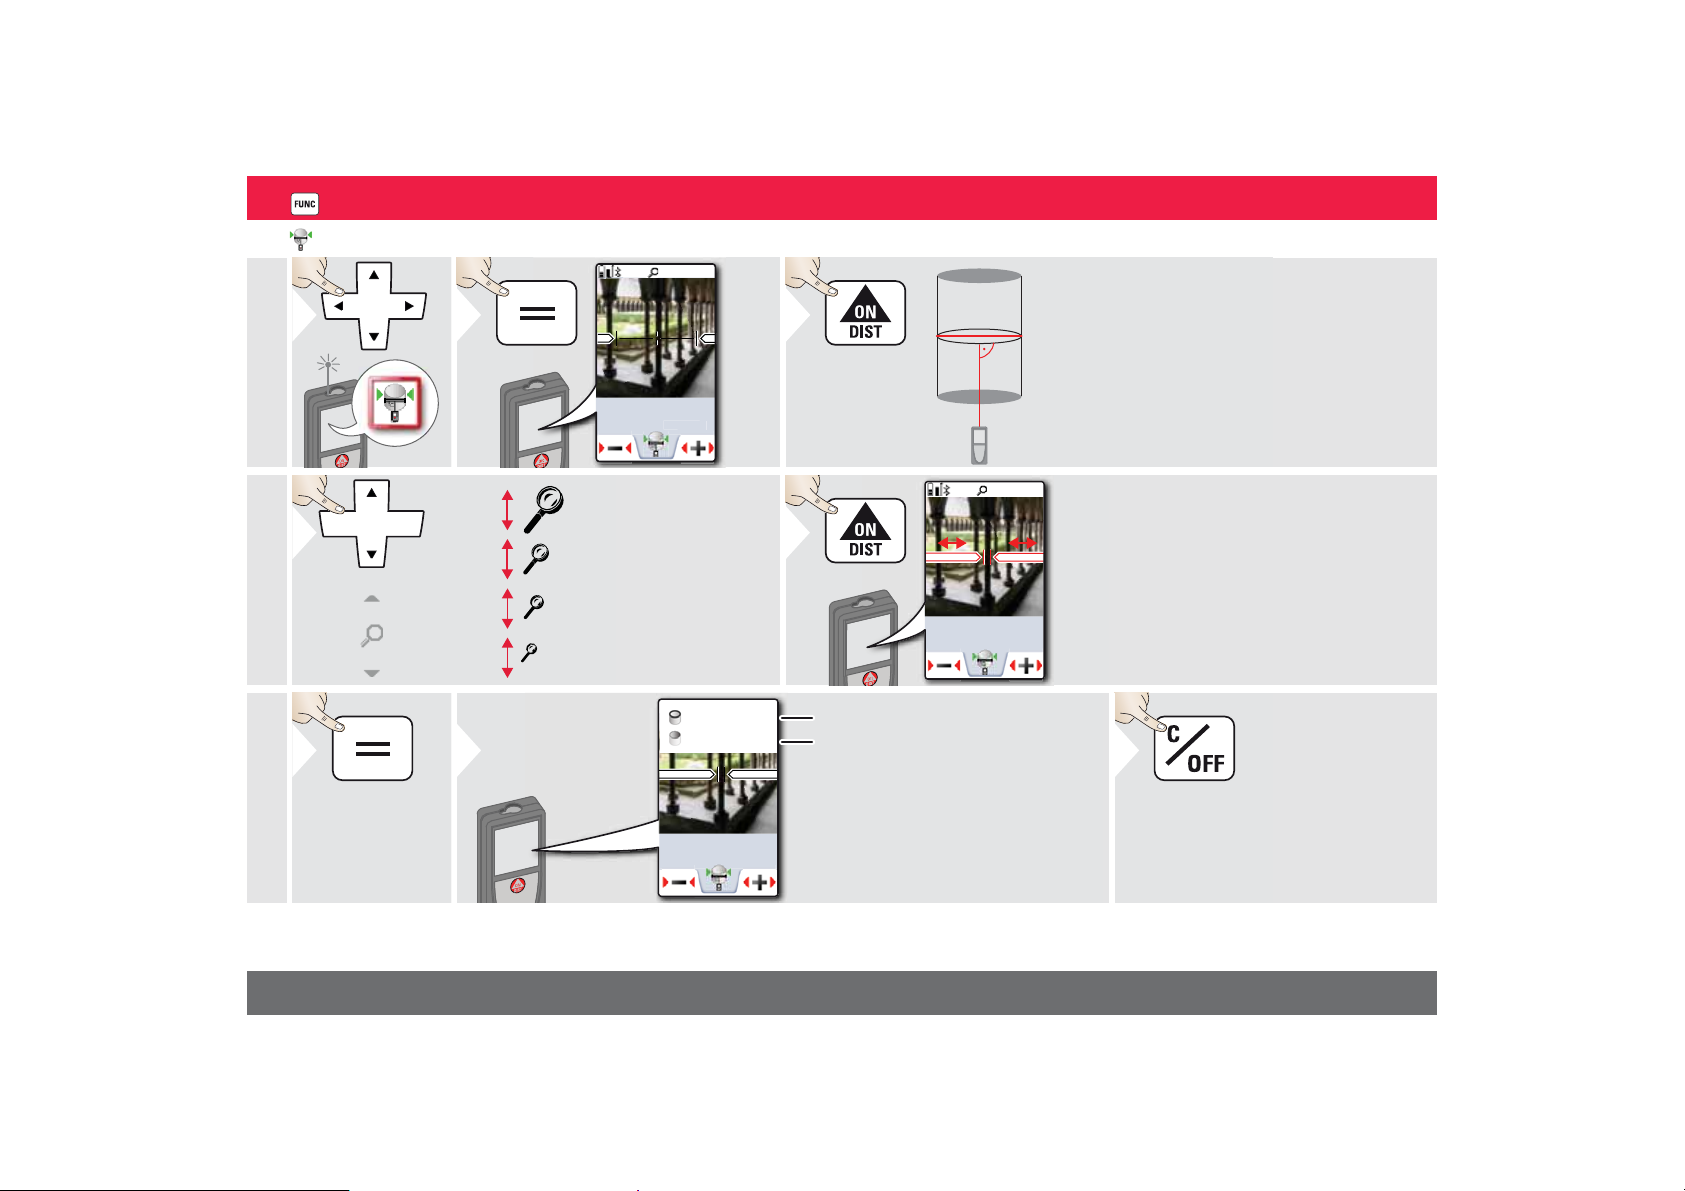
Diameter
1
2Ø3
Aim laser perpendicular
to the middle of the
round object.
4
If necessary, use the
Zoom for precise
aiming.
* OV = Overview
5
Select arrows with the
cursor keys or by tapping
on the display and adjust
with softkeys. Corresponding diameter is calculated.
6
Confirm measurement.
7
More results are
displayed.
Circumference
Circular area
Exit.
8
4x
2x
1x
OV
ENFunctions
1x
-.--- m
1x
0.237 m
*
Leica DISTOTM S910 805080
0.744 m
0.044 m
0.237 m
2
37
Page 38
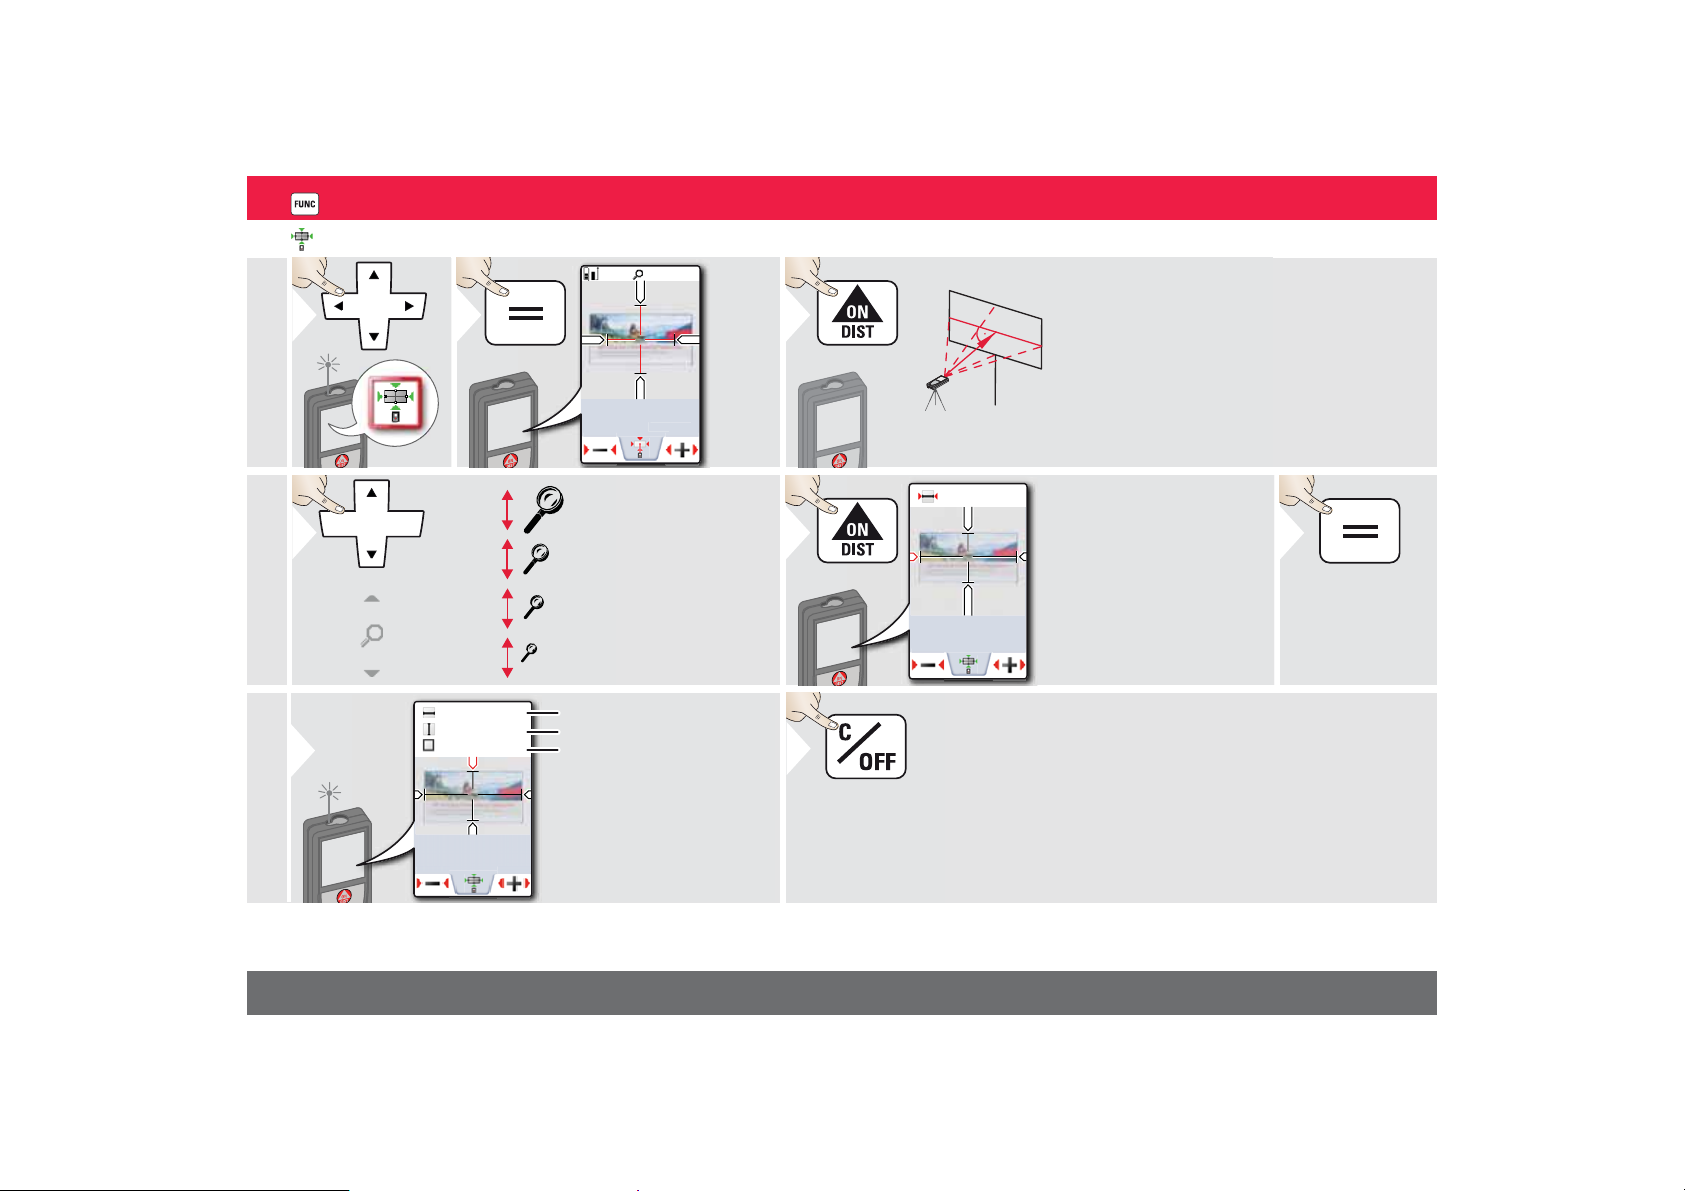
Area from Photo
1
2
3
Aim perpendicular
to the horizontal
center line of the area. This a rea mus t be
perfectly flat on the
vertical plane.
4
If necessary, use the
Zoom for precise
aiming.
* OV = Overview
5
Select arrows with the
cursor keys or by tapping
on the display and adjust
with softkeys. Corresponding area is calculated.
Confirm
measurement.
6
7
Width
Length
Circumference
8
Exit.
1x
-.--- m
ENFunctions
2
4x
2x
1x
OV
4.581
2.015
13.192
9.232m
Leica DISTOTM S910 805080
2.015m
2
*
m
m
m
2
9.232m
38
Page 39
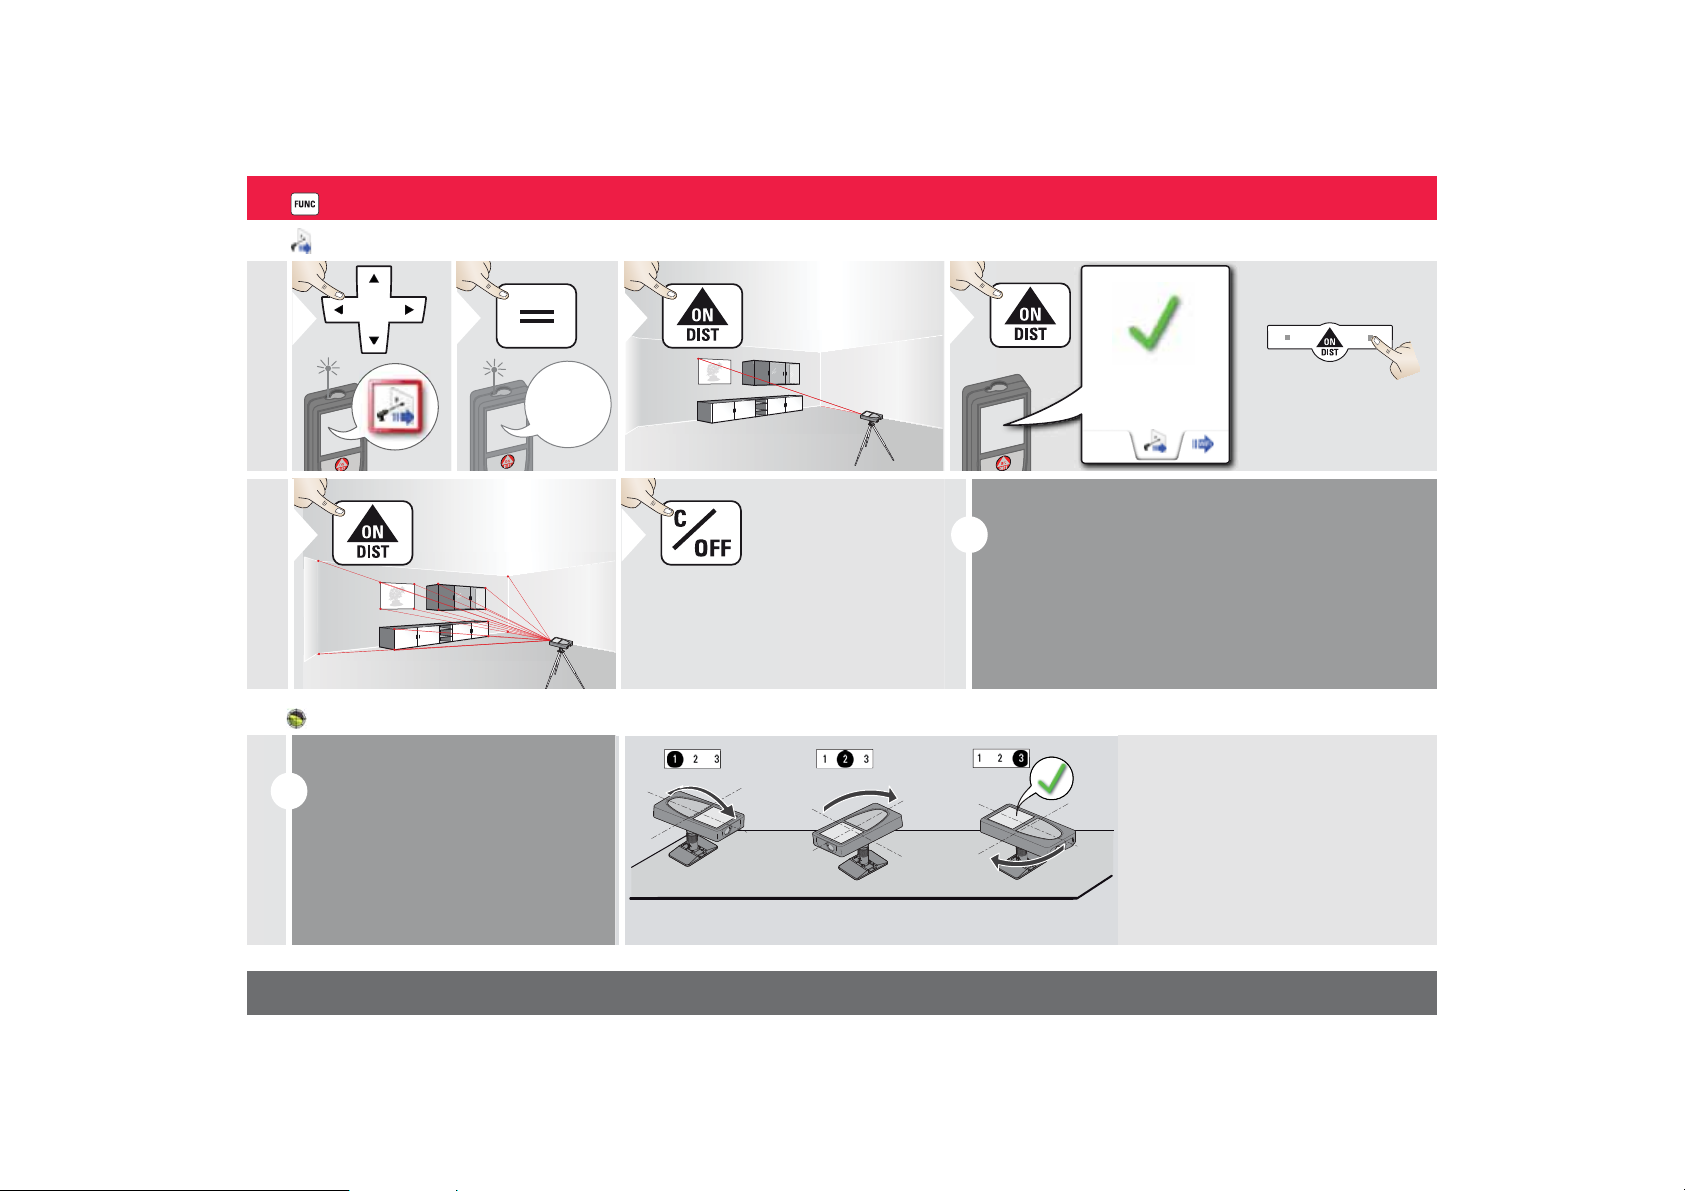
Pointdata transmission
1P2
3
Aim laser at first
point.
4
WiFi data transfer of
3 coordinates x, y, z
5
Aim at additional
points.
Leave actual function, go to
default operation mode.
6
2x
i
i
Level the device to get more accurate
measuring data.
Do not move device after leveling.
For leveling, Smart Base has to be
folded out and device needs to be in
an inclination range of +/-5°.
90°
90°
Levelling
ENFunctions
13.207 m
This function sends the x, y z coordinates of the
measured point. Used in combination with DISTO™
transfer or ??? Plugin.
Data transfer works only with WiFi.
Rotate the device two times clockwise 90°. Follow the instructions
on the display.
Levelling is finished when OK icon
appears on the display.
Leica DISTOTM S910 805080
39
Page 40
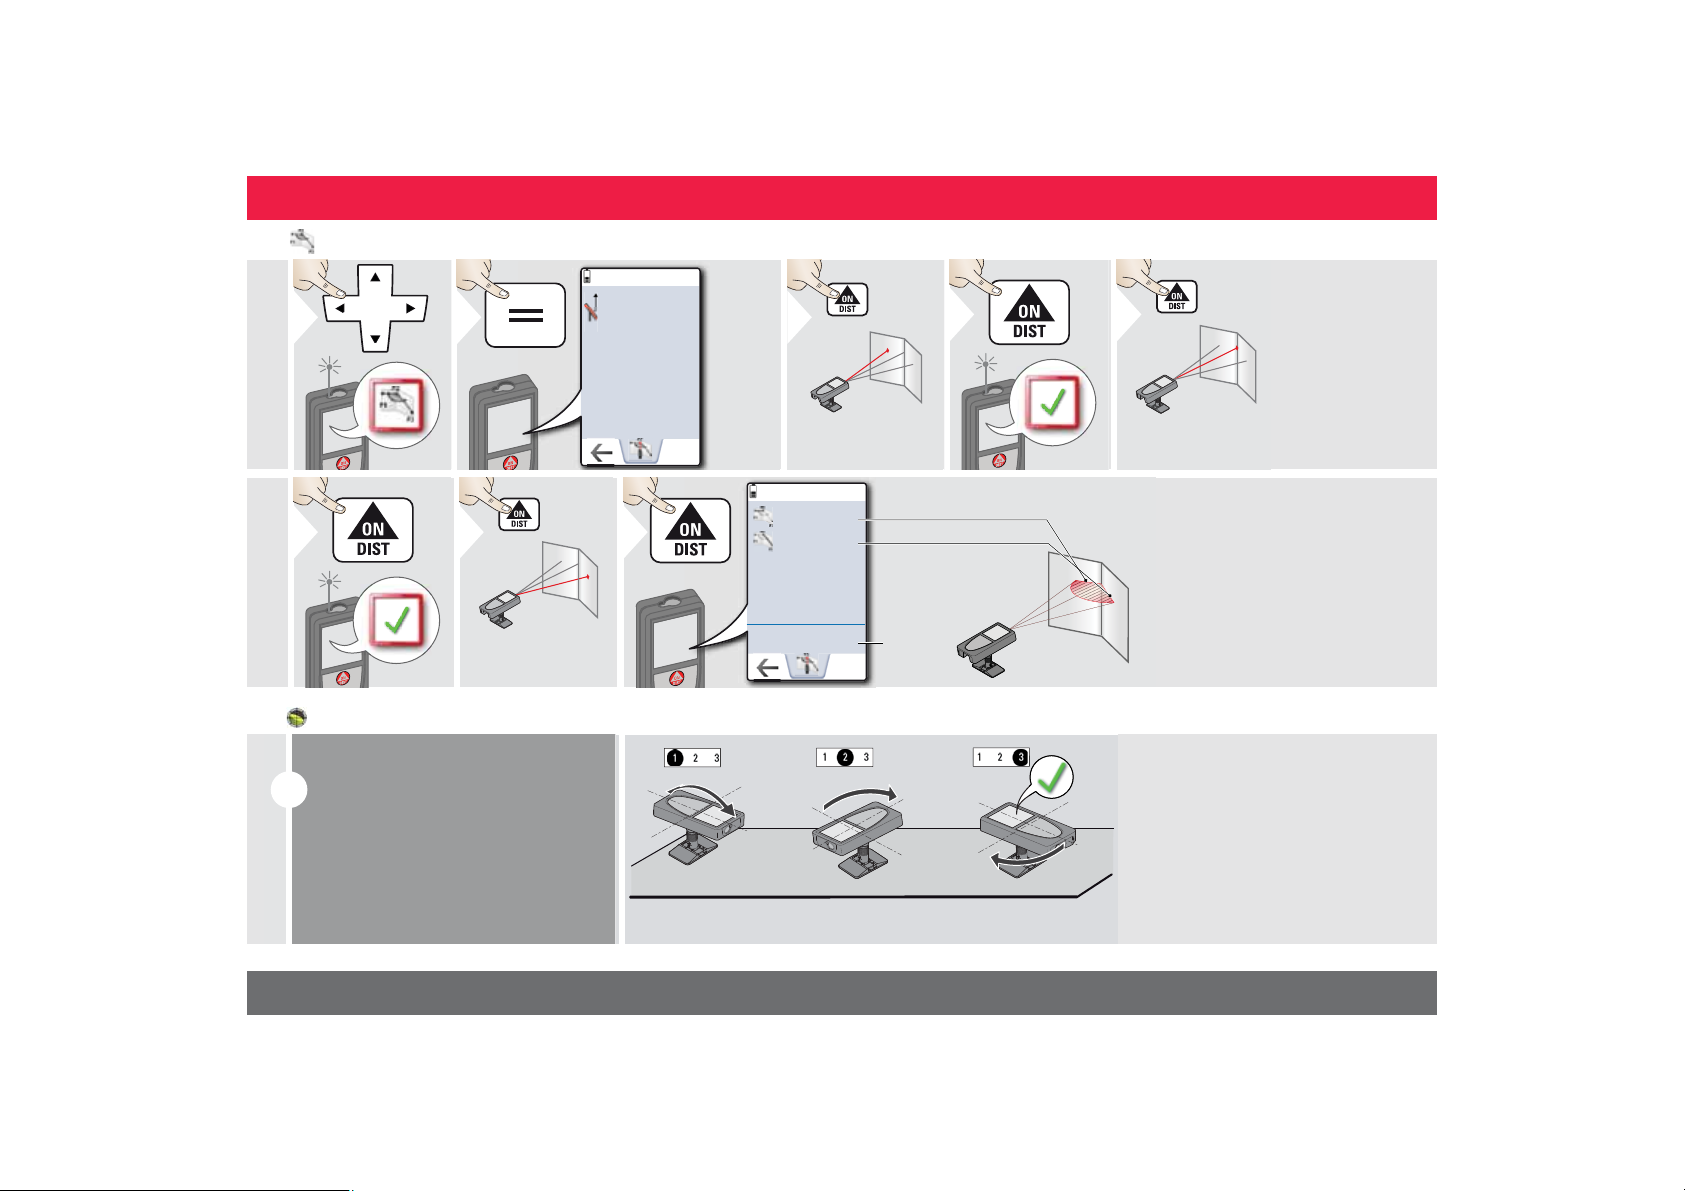
Smart Angle measuring
1
2
Initialize
device for
vertical
and horizontal values.
Details see
"Levelling".
3
Aim laser at point
on first wall.
4
5
Aim laser at corner.
6
3
7
Aim laser at point
on second wall.
8
i
Level the device to get more accurate
measuring data.
Do not move device after leveling.
For leveling, Smart Base has to be
folded out and device needs to be in
an inclination range of +/-5°.
90°
90°
ENFunctions
Levelling
1.246
m
5.269
m
89.56°
1
2
D
D
Rotate the device two times clockwise 90°. Follow the instructions
on the display.
Levelling is finished when OK icon
appears on the display.
Leica DISTOTM S910 805080
40
Page 41
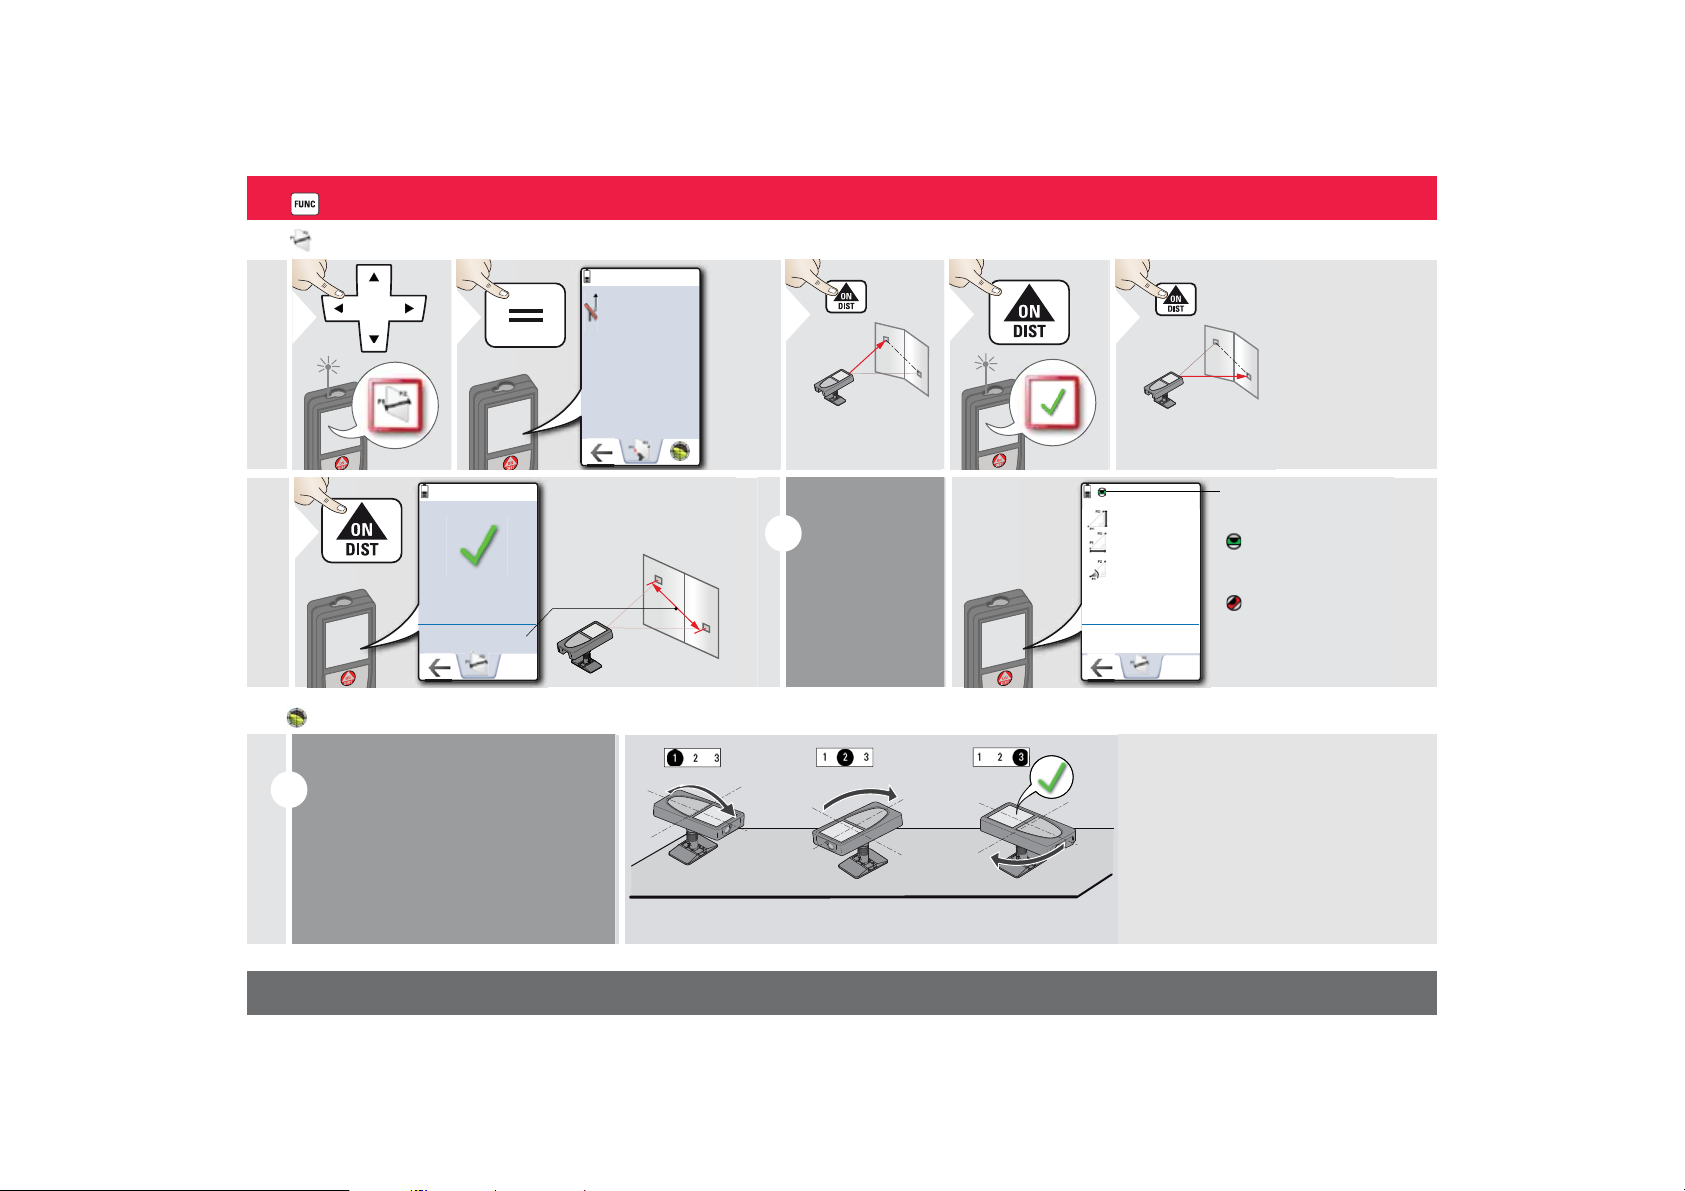
Point to point function / distance
1P12
Initialize
device for
vertical and
horizontal
values.
See "Levelling".
3
Aim laser at first
target.
4
5
Aim laser at second
target.
6
i
Level the device
and further
values can be
displayed (see
"Levelling"!
Do not move
Smart Base
after levelling!
Check status line:
indicates proper
leveling
indicates insufficient leveling
i
Level the device to get more accurate
measuring data.
Do not move device after leveling.
For leveling, Smart Base has to be
folded out and device needs to be in
an inclination range of +/-5°.
90°
90°
ENFunctions
1
2
-1.697
m
2.419
m
35.06°
Levelling
Leica DISTOTM S910 805080
13.207m
2.995m
Rotate the device two times clockwise 90°. Follow the instructions
on the display.
Levelling is finished when OK icon
appears on the display.
41
Page 42
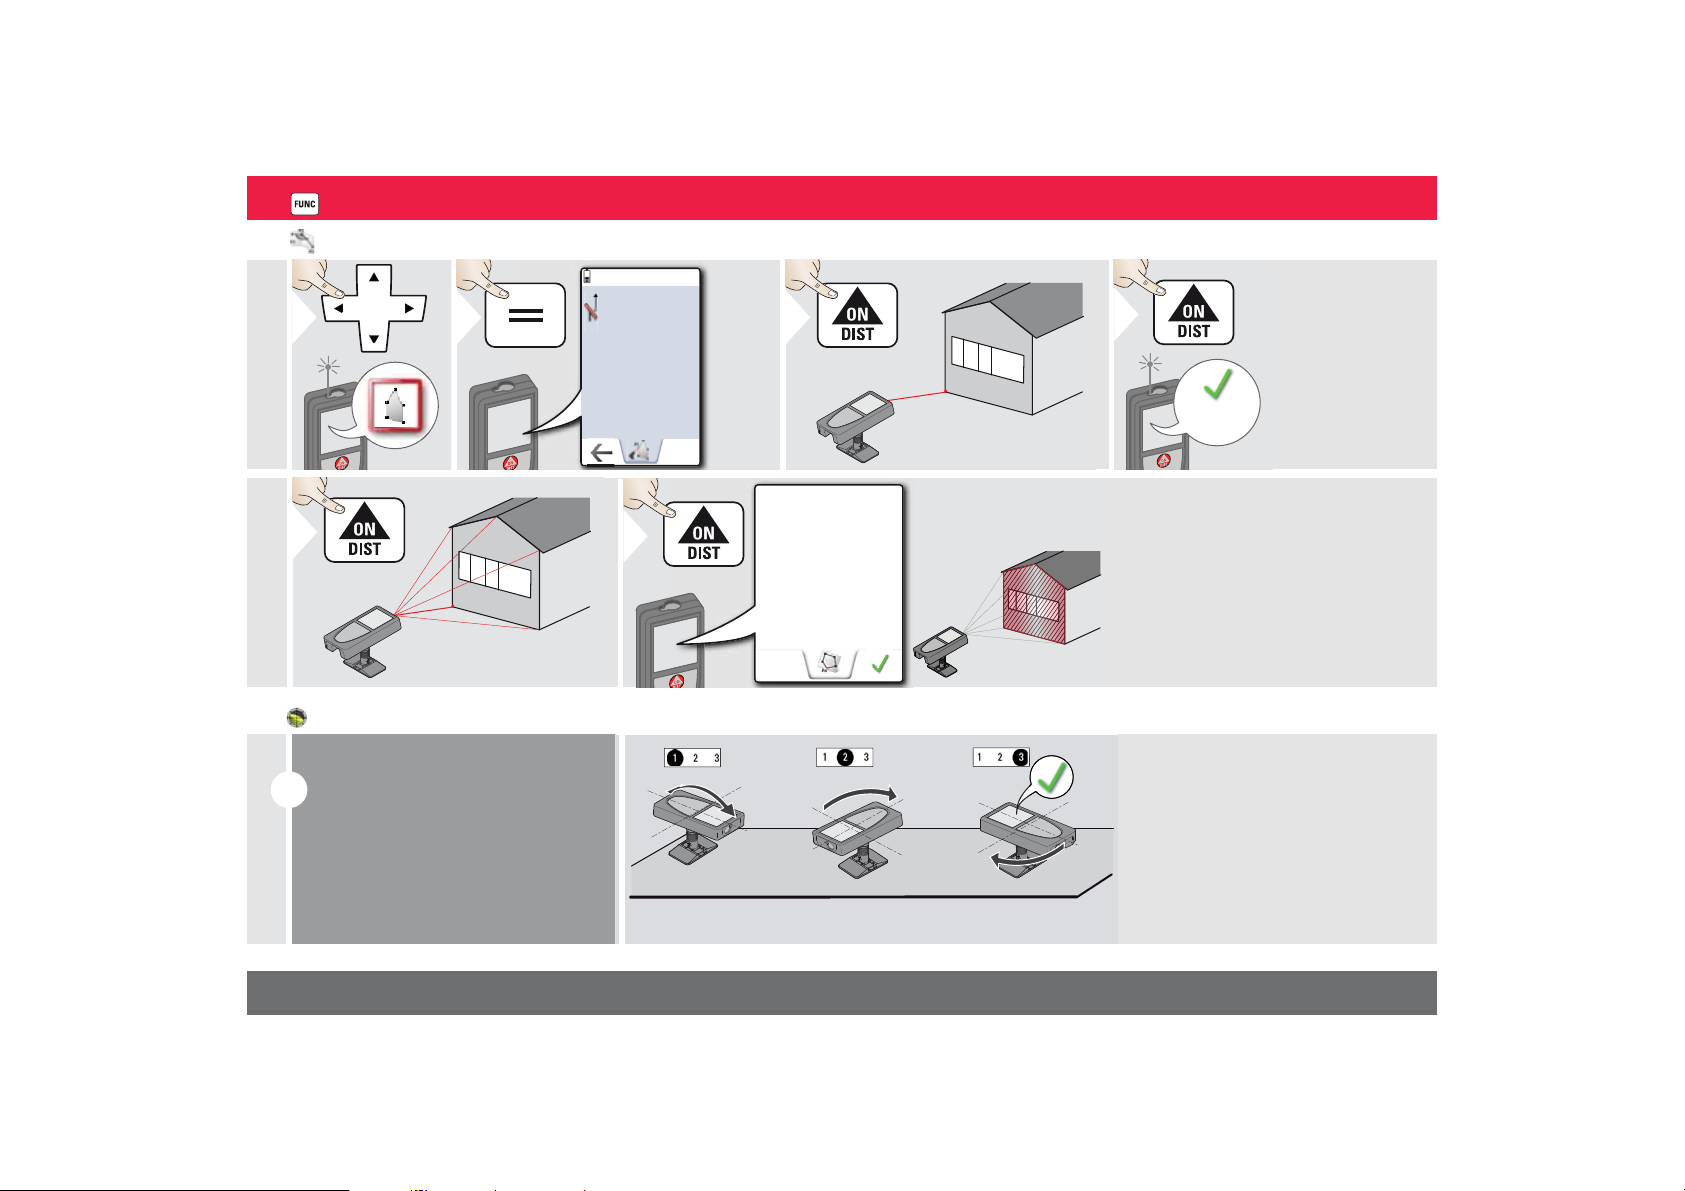
Smart Area measuring
1
2
Initialize
device for
vertical
and horizontal values.
Details
see "Levelling".
3
Aim at first target.
4
5
Aim at additional points
(max. 20)
6
i
Level the device to get more accurate
measuring data.
Do not move device after leveling.
For leveling, Smart Base has to be
folded out and device needs to be in
an inclination range of +/-5°.
90°
90°
3
2
4
1
1
Levelling
5
84.675
ENFunctions
1
5.873m
2
m
Rotate the device two times clockwise 90°. Follow the instructions
on the display.
Levelling is finished when OK icon
appears on the display.
Leica DISTOTM S910 805080
42
Page 43
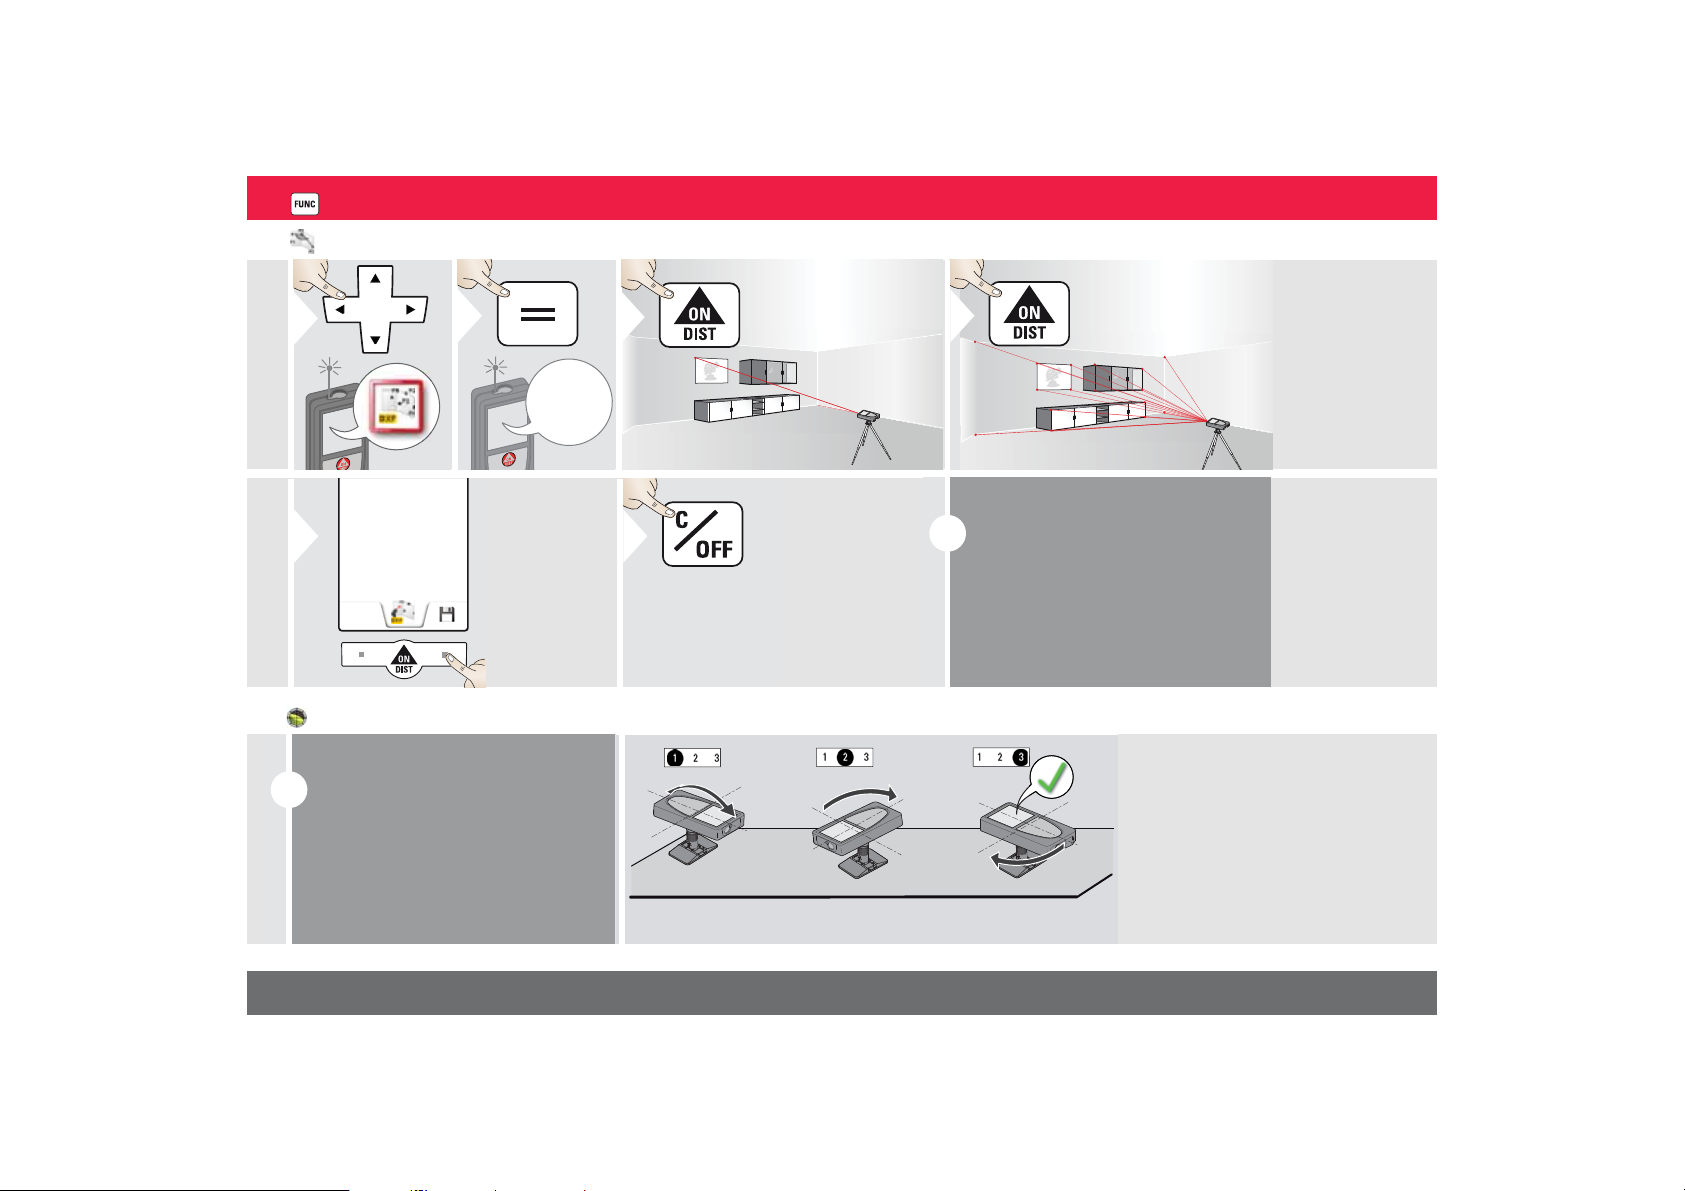
Data capture in DXF-file
1P2
3
Aim at first point.
4
Aim at additional
points (max. 30)
5
Stops DXF
capture and
saves data.
6
Leave actual
function, go to
default operation mode.
2x
i
i
Level the device to get more accurate
measuring data.
Do not move device after leveling.
For leveling, Smart Base has to be
folded out and device needs to be in
an inclination range of +/-5°.
90°
90°
Levelling
ENFunctions
Max. 20 DXF files can be
generated (with 30 measuring points/photos each).
Rotate the device two times clockwise 90°. Follow the instructions
on the display.
Levelling is finished when OK icon
appears on the display.
Leica DISTOTM S910 805080
43
Page 44
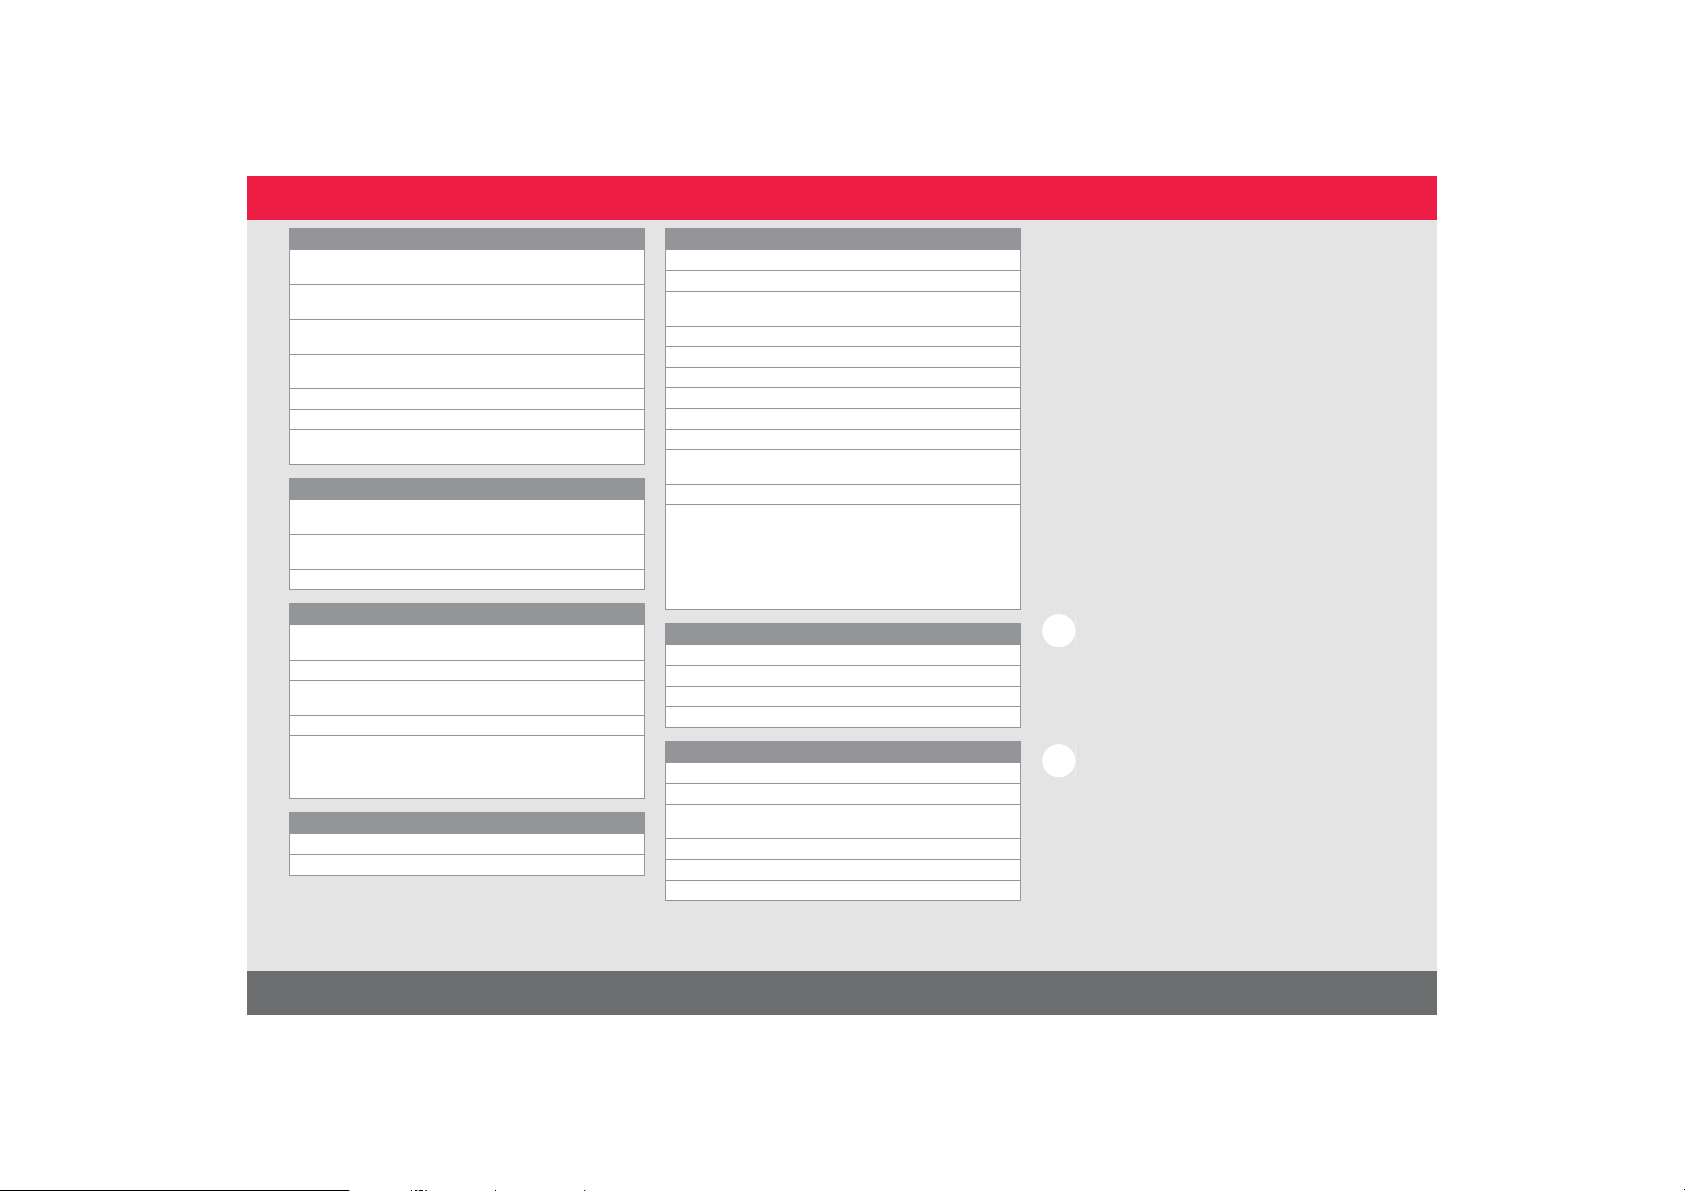
Distance measurement (ISO 163331-1)
Accuracy with favourable
conditions*
Accuracy with unfavourable
conditions**
Range with favourable conditions*
Range with unfavourable
condition**
Smallest unit displayed 0.1 mm / 1/32 in
X-Range Power Technology™yes
Ø laser point
at distances
Tilt measurement
Measuring tolerance to laser
beam****
Measuring tolerance to
housing****
Range 360°
Smart Base
Working range vertical
sensor
Tolerance vertical sensor up to +/- 0.1°
Working range horizontal
sensor
Tolerance Horizontal Sensor up to +/- 0.1°
Tolerance P2P function
at distances (combination of
sensors and distance measuring)
Device levelling
Levelling range +/- 5°
Levelling accuracy +/- 0.05°
± 1.0 mm / 0.04 in ***
± 3.0 mm / 0.12 in ***
0.05m - 300 m /
0.16 - 984 ft
0.05m - 150m
(0.16 – 492 ft)****
6 /30 / 60 mm
(10 / 50 / 100 m)
-0.1° / +0.2°
± 0.1°
-40° to 80°
360°
approx. :
+/- 2 mm / 2 m
+/- 5 mm / 5 m
+/- 10 mm /10 m
General
Laser class 2
Laser type 635 nm, < 1 mW
Protection class IP54 (dust- and splash
Autom. laser switch off after 90 s
Autom. power switch-off after 180 s
Bluethooth® Smart Bluethooth v4.0
Range of Bluethooth
WiFi yes
Range of WiFi 10 m
Dimension (H x D x W) 61 x 32 x 164 mm
Weight 291 g / ... oz
Temperature range:
-Storage
-Operation
-Charging
Photos / Screenshots
Resolution for photos 800 x 600 dpi
Resolution for screenshots 240 x 400 dpi
File format JPG
Download of gallery USB
Battery (Li-Ion)
Rated voltage 3.7 V
Capacity 2.6 Ah
Measurements per battery
charge
Charging time Approx. 4 h
Output voltage 5.0 V
Charging current 1 A
®
water protected)
<10 m
2.4 x 1.3 x 6.5 in
-25 to 60 °C
-13 to 140 °F
-10 to 50 °C
14 to 122 °F
-10 to 40 °C
14 to 104 °F
Approx. 4000
ENTechnical Data
* favourable conditions are: white and diffuse reflecting
target (white painted wall), low background illumination and
moderate temperatures.
** unfavourable conditions are: targets with lower or higher
reflectivity or high background illumination or temperatures
at the upper or lower end of the specified temperature
range.
*** Tolerances apply from 0.05 m to 10 m with a confidence
level of 95%. With favourable conditions the tolerance may
deteriorate by 0.05 mm/m for distances between 10 m to
30 m, by 0.10 mm/m between 30 m and 100 m and by 0.20
mm/m for distances above 100 m.
With unfavourable conditions the tolerance may deteriorate by 0.10 mm/m for distances between 10 m to 30 m, by
0.20 mm/m between 30 m and 100 m and by 0.30 mm/m
for distances above 100 m.
**** after user calibration. Additional angle related deviation
of +/- 0.01° per degree up to +/-45° in each quadrant.
Applies at room temperature. For the whole operating
temperature range the maximum deviation increases by
+/-0.1°.
At a recommended storage tempera-
i
ture of -20°C to +30°C (-4°F to
+86°F), batteries containing a 50% to 100%
charge can be stored up to 1 year. After this
storage period the batteries must be
recharged.
For accurate indirect results, the use of
i
a tripod is recommended. For accurate
tilt measurements a transverse tilt should be
avoided.
Leica DISTOTM S910 805080
44
Page 45
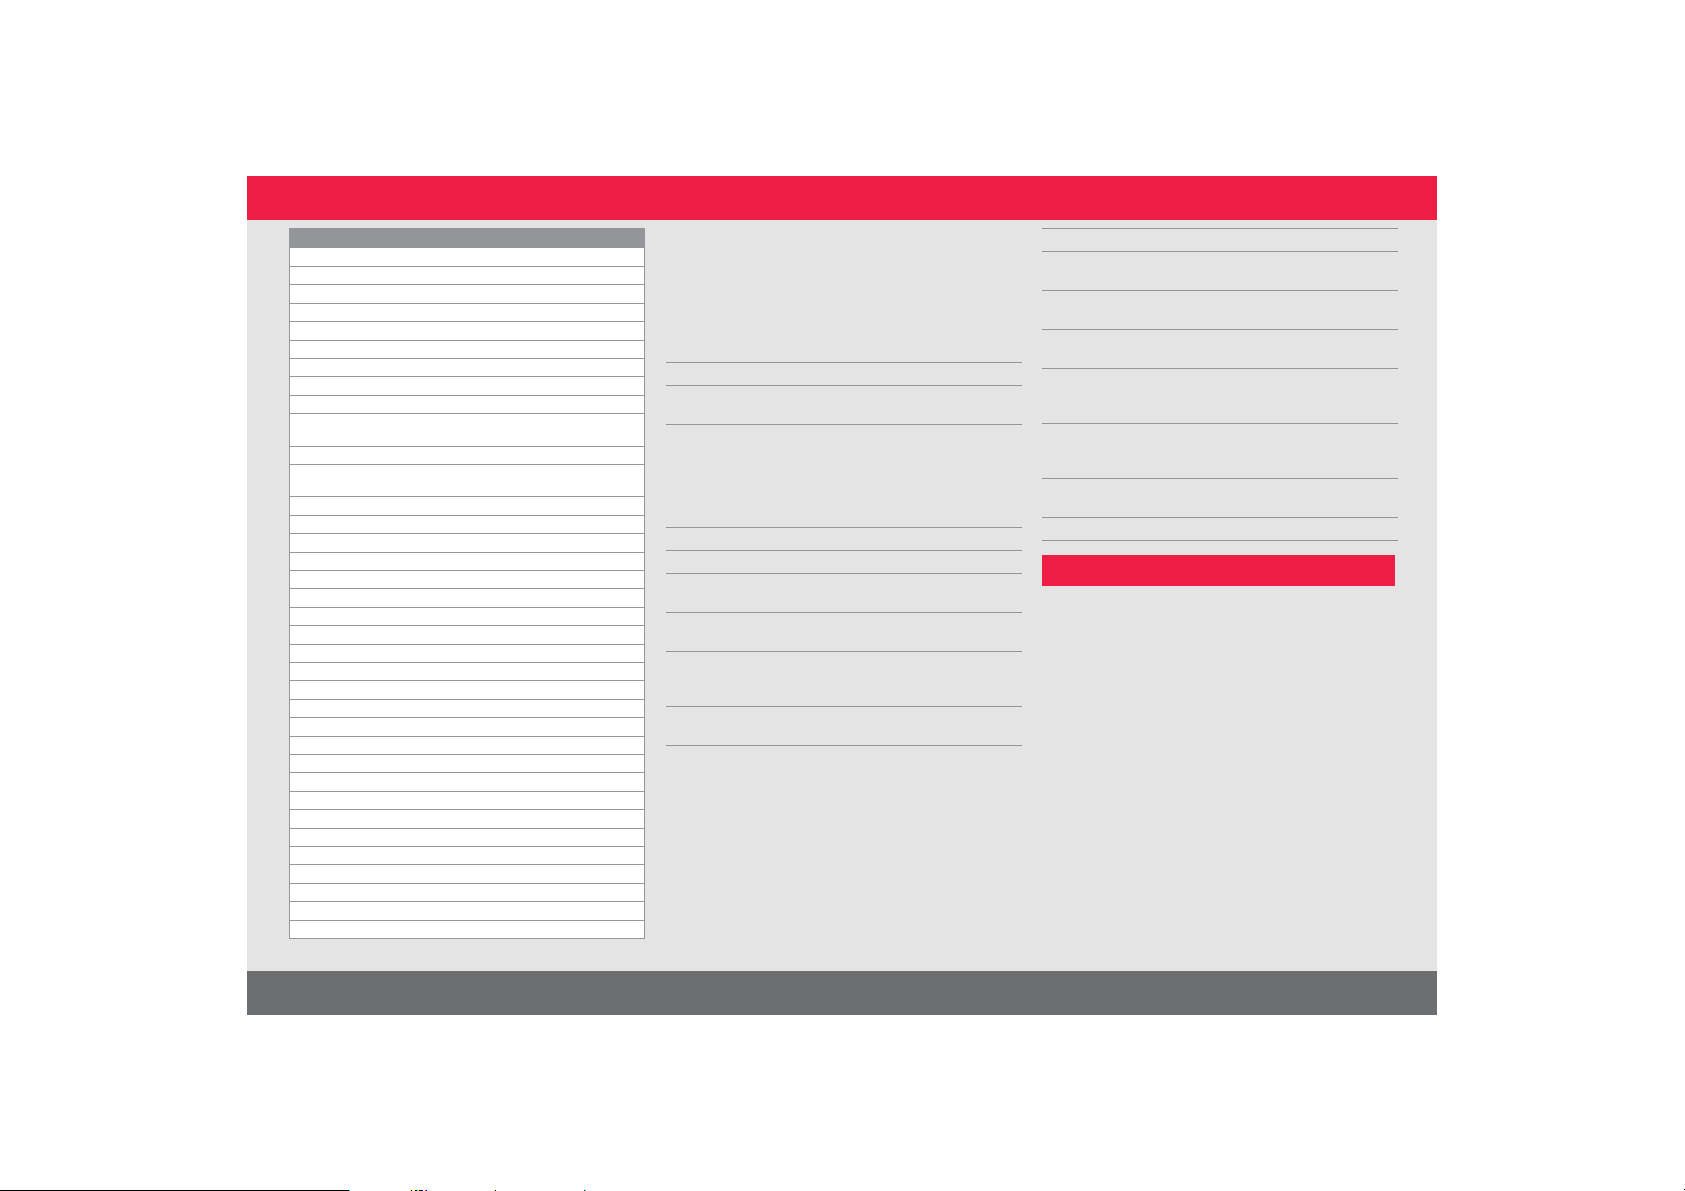
Functions
Distance measuring yes
Min/Max measuring yes
Permanent measuring yes
Stake-out yes
Addition/Subtraction yes
Area yes
Triangle area yes
Volume yes
Trapezium yes
Painter function (area with partial
measurem.)
Pythagoras 2-point, 3-point
Smart Horizontal Mode /
Indirect height
Height-profile measurement yes
Level yes
Sloped objects yes
Height tracking yes
Memory yes
Beep yes
Illuminated colour display yes
Pointfinder (Viewscreen) 4x zoom, OV
Bluetooth® Smart yes
Personalized Favorites yes
Timer yes
Calculator yes
Photo/Screenshot yes
Compass yes
Gallery with USB download yes
Diameter yes
Width yes
Area from Photo yes
Smart Base yes
Pointdata transmission yes
Point to point function /distance yes
Smart Angle yes
Smart Area yes
DXF Data capture yes
yes
yes
If the message Error does not disappear
after switching on the device repeatedly,
contact the dealer.
If the message InFo appears with a number,
press the Clear button and observe the
following instructions:
No. Cause Correction
156 Transverse tilt
greater than 10°
162 Calibration mistake Make sure, the device is
204 Calculation error Perform measurement again.
240 Data transfer error Repeat procedure.
252 Temperature too
high
253 Temperature too
low
255 Received signal too
weak, measuring
time too long
256 Received signal too
high
Hold the instrument without
any transverse tilt.
placed on a absolutely horizontal and flat surface.
Repeat the calibration
procedure. If the mistake still
occurs, contact your dealer.
Let device cool down.
Warm device up.
Change target surface (e.g.
white paper).
Change target surface (e.g.
white paper).
ENMessage Codes
No. Cause Correction
258 Measurement outside
of measuring range
260 Laser beam inter-
rupted
300 Smart Base not folded
out
301 Device was moved,
leveling not valid any
more
302 «Point data transmis-
sion» is selected, but
WiFi is off
340 WiFi: Data transfer
error
341 Authentication Error Use correct password
Correct range.
Repeat measurement.
Fold out Smart Base
Proceed leveling again
Switch on WiFi
Repeat procedure
Care
• Clean the device with a damp, soft cloth.
• Never immerse the device in water.
• Never use aggressive cleaning agents or
solvents.
Leica DISTOTM S910 805080
45
Page 46

Warranty under PROTECT by
Leica Geosystems
Lifetime Manufacturer's Warranty
Warranty coverage for the entire usage time
of the product under PROTECT according
to Leica Geosystems International Limited
Warranty and PROTECT General Terms &
Conditions set out under www.leica-geosystems.com/protect. Free of charge repair or
replacement of all products or any parts
under PROTECT that suffer defects as a
result of faults in materials or workmanship.
3 Years No Cost
Additional services should the product under
PROTECT become defective and require
servicing under normal conditions of use, as
described in the user manual, at no additional
charge.
To receive the "3 years No Cost" period, the
product under PROTECT must be registered at http://myworld.leica-geosystems.com within 8 weeks of the purchase
date. If the product under PROTECT is not
registered, a "2 years No Cost" period
applies.
Garantie unter PROTECT by
Leica Geosystems
Lebenslange Herstellergarantie
Gewährleistungsrechte während der gesamten Nutzungszeit des Produkts unter
PROTECT gemäß Leica Geosystems' Internationaler Herstellergarantie und den Allgemeinen Geschäftsbedingungen für
PROTECT, nachzulesen unter www.leicageosystems.com/protect. Kostenlose Reparatur oder Austausch aller defekter Produkte
aufgrund von Material- oder Verarbeitungsfehlern.
3 Jahre keine Zusatzkosten
Zusätzliche Services, ohne Zusatzkosten,
falls beim Produkt unter normaler Benutzung, wie in der Bedienungsanleitung
beschrieben, ein Defekt auftritt und
bestimmte Serviceleistungen notwendig
werden.
Für die "3 Jahre ohne Zusatzkosten" muss das
Produkt auf unserer Website
http://myworld.leica-geosystems.com
binnen acht Wochen nach Kaufdatum registriert werden. Für das nicht registrierte
Produkte unter PROTECT gilt ein Zeitraum
von "2 Jahren ohne Zusatzkosten".
Safety Instructions
The person responsible for the instrument
must ensure that all users understand these
directions and adhere to them.
ENWarranty
Areas of responsibility
Responsibilities of the manufacturer
of the original equipment:
Leica Geosystems AG
Heinrich-Wild-Strasse
CH-9435 Heerbrugg
Internet: www.disto.com
The company above is responsible for
supplying the product, including the User
Manual in a completely safe condition.
The company above is not responsible for
third party accessories.
Responsibilities of the person in
charge of the instrument:
• To understand the safety instructions on
the product and the instructions in the
User Manual.
• To be familiar with local safety regulations
relating to accident prevention.
• Always prevent access to the product by
unauthorised personnel.
Leica DISTOTM S910 805080
46
Page 47

• Measuring distances
• Tilt measurement
• Data transfer with Bluetooth
®
and WIFI
Prohibited use
• Using the product without instruction
• Using outside the stated limits
• Deactivation of safety systems and
removal of explanatory and hazard labels
• Opening of the equipment by using tools
(screwdrivers, etc.)
• Carrying out modification or conversion of
the product
• Use of accessories from other manufac-
turers without express approval
• Deliberate dazzling of third parties; also in
the dark
• Inadequate safeguards at the surveying site
(e.g. when measuring on roads, construction sites, etc.)
• Deliberate or irresponsible behaviour on
scaffolding, when using ladders, when
measuring near machines which are
running or near parts of machines or installations which are unprotected
• Aiming directly in the sun
WARNING
Watch out for erroneous measurements if
the instrument is defective or if it has been
dropped or has been misused or modified.
Carry out periodic test measurements.
Particularly after the instrument has been
subject to abnormal use, and before, during
and after important measurements.
CAUTION
Never attempt to repair the product yourself. In case of damage, contact a local dealer.
WARNING
Changes or modifications not expressly
approved could void the user’s authority to
operate the equipment.
Limits of use
Refer to section "Technical data".
i
The device is designed for use in areas
permanently habitable by humans. Do not
use the product in explosion hazardous areas
or in aggressive environments.
ENSafety Instructions
Disposal
CAUTION
Flat batteries must not be disposed of with
household waste. Care for the environment
and take them to the collection points
provided in accordance with national or local
regulations.
The product must not be disposed with
household waste.
Dispose of the product appropriately
in accordance with the national regulations in force in your country.
Adhere to the national and country specific
regulations.
Product specific treatment and waste
management can be downloaded from our
homepage.
Electromagnetic Compatibility
(EMC)
WARNING
The device conforms to the most stringent
requirements of the relevant standards and
regulations.
Yet, the possibility of causing interference in
other devices cannot be totally excluded.
Leica DISTOTM S910 805080
47
Page 48

ENSafety Instructions
FCC statement (applicable in
U.S.)
This equipment has been tested and found to
comply with the limits for a Class B digital
device, pursuant to part 15 of the FCC Rules.
These limits are designed to provide reasonable protection against harmful interference
in a residential installation.This equipment
generates, uses and can radiate radio
frequency energy and, if not installed and
used in accordance with the instructions,
may cause harmful interference to radio
communications.
However, there is no guarantee that interference will not occur in a particular installation.
If this equipment does cause harmful interference to radio or television reception, which
can be determined by turning the equipment
off and on, the user is encouraged to try to
correct the interference by one or more of
the following measures:
• Reorient or relocate the receiving antenna.
• Increase the separation between the
equipment and receiver.
• Connect the equipment into an outlet on a
circuit different from that to which the
receiver is connected.
• Consult the dealer or an experienced
radio/TV technician for help.
This device complies with part 15 of the FCC
Rules. Operation is subject to the following
two conditions:
• This device may not cause harmful interfer-
ence, and
• this device must accept any interference
received, including interference that may
cause undesired operation.
This device complies with Industry Canada
license-exempt RSS standard(s). Operation
is subject to the following two conditions:
• This device may not cause interference and
• this device must accept any interference,
including interference that may cause
undesired operation of the device.
Déclaration FCC, applicable aux
Etats-Unis
Ce produit a été testé et ses limites ont été
jugées conformes à celles prescrites pour les
dispositifs numériques de classe B, décrites
dans le paragraphe 15 des règles FCC. Ces
limites ont pour but de fournir une protection raisonnable contre des interférences
nocives dans une installation résidentielle.
Les appareils de ce type génèrent, utilisent et
peuvent rayonner de hautes fréquences. Ils
sont de ce fait susceptibles de perturber la
réception radiophonique en cas d'installation
non conforme aux instructions.
Même en cas de respect des instructions,
l'absence d'interférences dans une installation particulière ne peut cependant être
garantie. Si cet instrument perturbe la réception radiophonique ou télévisuelle, ce que
l'on constate en éteignant puis en rallumant
l'instrument, l'utilisateur peut tenter de
corriger ces interférences en appliquant les
mesures suivantes :
• Réorienter ou repositionner l'antenne de
réception.
• Augmenter la distance entre l'instrument
et le récepteur.
• Connecter l'instrument à un autre circuit
que celui du récepteur.
• Consulter le revendeur ou un technicien
expérimenté dans le domaine radio/TV.
Leica DISTOTM S910 805080
48
Page 49

ENSafety Instructions
Cet appareil est conforme à la section 15 des
règlements FCC. Son fonctionnement est
soumis aux deux conditions suivantes :
• cet appareil ne doit pas causer d'inter-
férences nuisibles, et
• cet appareil doit accepter toute autre
interférence reçue, y compris les interférences pouvant entraîner un fonctionnement non désiré.
Ce dispositif est conforme à la norme RSS210 d’Industrie Canada. L’utilisation est
sujette aux deux conditions suivantes :
• ce dispositif ne pas doit pas être la source
d’interférences nuisibles, et
• ce dispositif doit accepter toutes les inter-
férences, y compris les interférences
pouvant induire des opérations non
souhaitées.
Normativa FCC (aplicable en
EE UU)
Las pruebas efectuadas han puesto de manifiesto que este equipo se atiene a los valores
límite, determinados en la sección 15 de la
normativa FCC, para instrumentos digitales
de la clase B. Esto significa que el instrumento
puede emplearse en las proximidades de
lugares habitados, sin que su radiación
resulte molesta. Los equipos de este tipo
generan, utilizan y emiten una frecuencia de
radio alta y, en caso de no ser instalados
conforme a las instrucciones, pueden causar
perturbaciones en la recepción radiofónica.
En todo caso, no es posible excluir la posibilidad de que se produzcan perturbaciones en
determinadas instalaciones.
Si este equipo causa perturbaciones en la
recepción radiofónica o televisiva, lo que
puede determinarse al apagar y volver a
encender el equipo, el operador puede
intentar corregir estas interferencias de la
forma siguiente:
• cambiando la orientación o la ubicación de
la antena receptora.
• aumentando la distancia entre el instru-
mento y el receptor.
• conectando el instrumento a un circuito
distinto al del receptor.
• asesorándose por el vendedor o algún
técnico de radio-televisión.
Use of the product with Blue-
®
tooth
WARNING
Electromagnetic radiation can cause disturbances in other equipment, in installations
(e.g. medical ones such as pacemakers or
hearing aids) and in aircraft. It can also affect
humans and animals.
Precautions:
Athough this product conforms to the most
stringent standards and regulations, the
possibility of harm to people and animals
cannot totally excluded.
• Do not use the product near petrol
stations, chemical plants, in areas with a
potentially explosive atmosphere and
where blasting takes place.
• Do not use the product near medical
equipment.
• Do not use the product in airplanes.
• Do not use the product near your body for
extended periods.
Leica DISTOTM S910 805080
49
Page 50
ENSafety Instructions
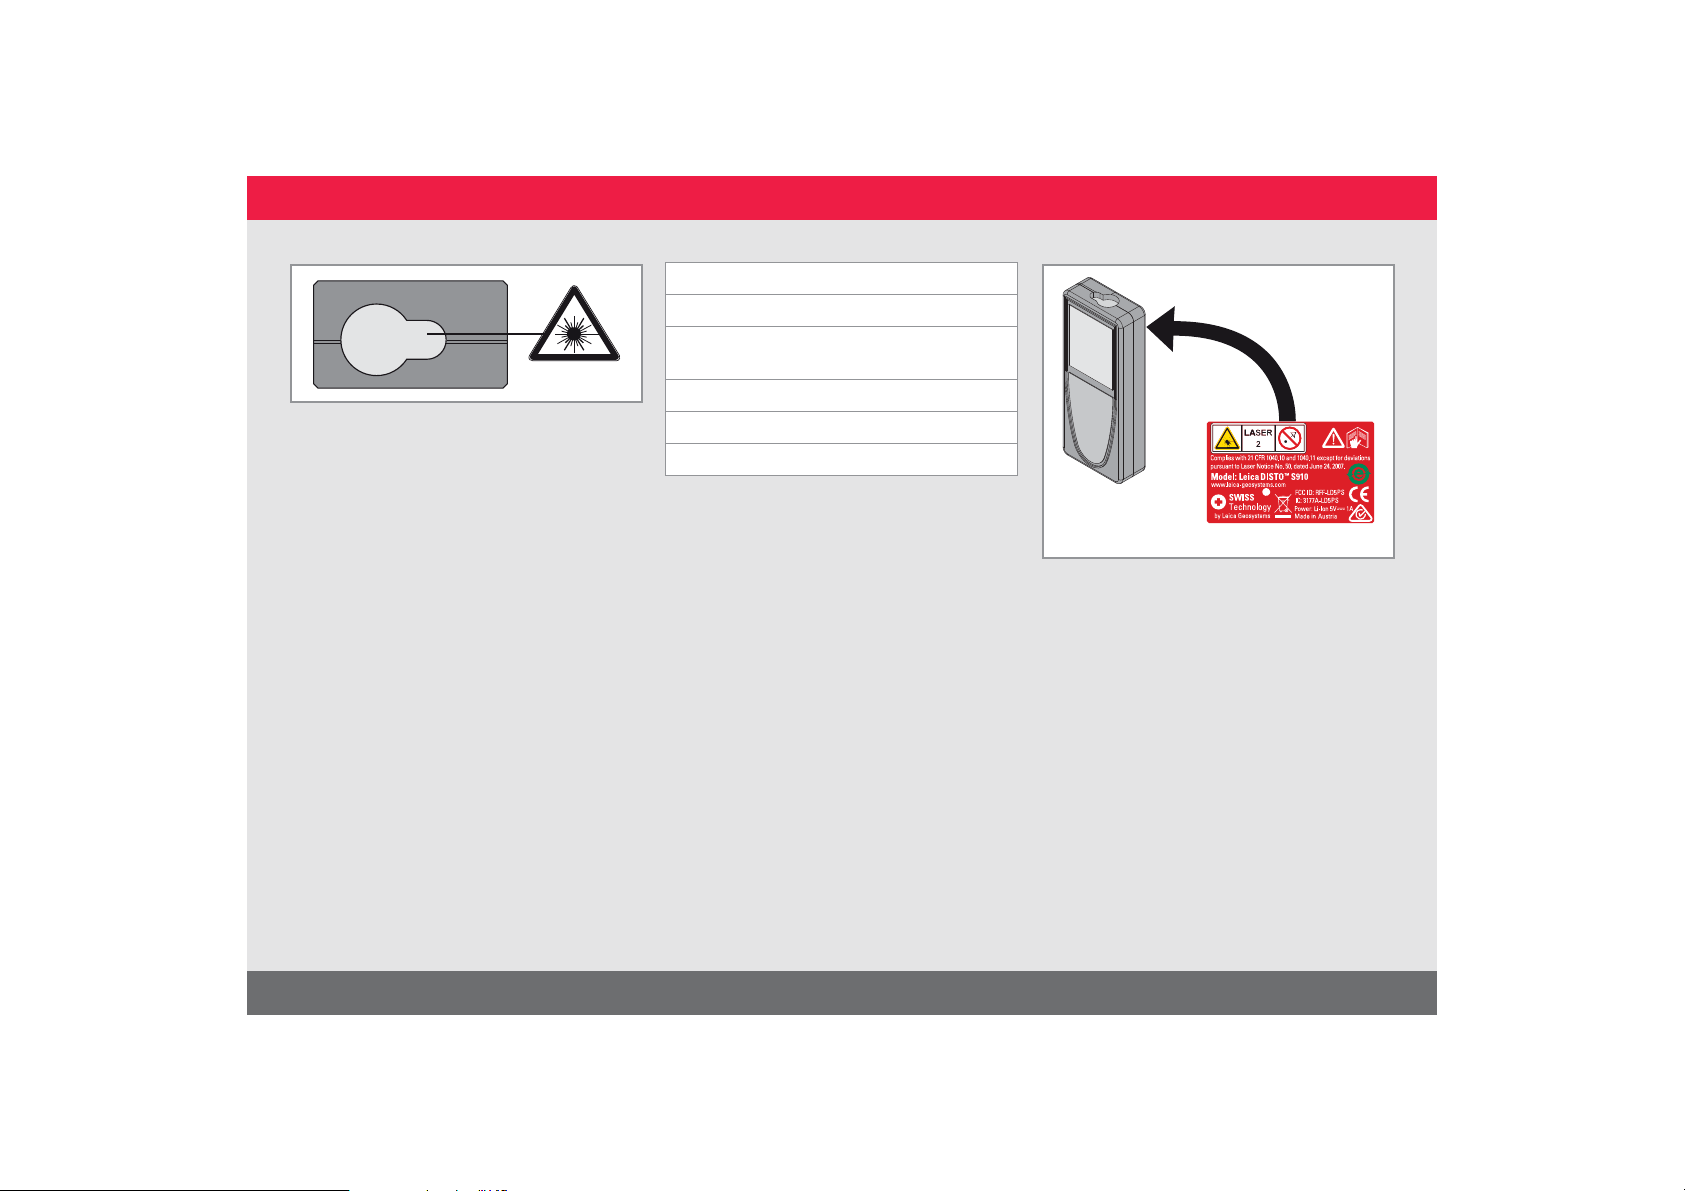
Laser classification
The device produces visible laser beams,
which are emitted from the instrument:
It is a Class 2 laser product in accordance
with:
• IEC60825-1 : 2014 „Radiation safety of
laser products“
Laser Class 2 products:
Do not stare into the laser beam or direct it
towards other people unnecessarily. Eye
protection is normally afforded by aversion
responses including the blink reflex.
WARNING
Looking directly into the beam with optical
aids (e.g. binoculars, telescopes) can be
hazardous.
CAUTION
Looking into the laser beam may be
hazardous to the eyes.
Description Value
Wavelength 620 - 690 nm
Maximum radiant output
power for classification
Pulse repetition frequency 320 MHz
Pulse duration > 400 ps
Beam divergence
0.95 mW
0.16 x 0.6 mrad
Labelling
Subject to change (drawings, descriptions
and technical data) without prior notice.
Leica DISTOTM S910 805080
50
 Loading...