

Aperio GT 450
User’s Guide
For research use only. Not for use in diagnostic procedures.
MAN-0391, Revision A | 22 May 2019

Aperio GT 450 User’s Guide
Copyright Notice
ÌÌ Copyright © 2019 Leica Biosystems Imaging, Inc. All Rights Reserved. LEICA and the Leica logo are registered trademarks of Leica Microsystems
IR GmbH. Aperio is a trademark of the Leica Biosystems group of companies in the USA and optionally in other countries. Other logos, product
and/or company names might be trademarks of their respective owners.
ÌÌ This product is protected by registered patents. For a list of patents, contact Leica Biosystems.
Customer Resources
ÌÌ For the latest information on Leica Biosystems Aperio products and services, please visit www.LeicaBiosystems.com/Aperio.
Disclaimers
ÌÌ This manual is not a substitute for the detailed operator training provided by Leica Biosystems Imaging or for other advanced instruction. Leica
Biosystems Imaging Field Representatives should be contacted immediately for assistance in the event of any instrument malfunction. Installation
of hardware should only be performed by a certified Leica Biosystems Imaging Service Engineer.
Contact Information – Leica Biosystems Imaging, Inc.
Headquarters Customer Support General Information
Leica Biosystems Imaging, Inc.
1360 Park Center Drive
Vista, CA 92081
USA
Tel: +1 (866) 478-4111 (toll free)
Direct International Tel: +1 (760) 539-1100
US/Canada Tel: +1 (844) 534-2262 (toll free)
Direct International Tel: +1 (760) 539-1150
US/Canada/Worldwide Email:
TechServices@LeicaBiosystems.com
US/Canada Tel: +1 (866) 478-4111 (toll free)
Direct International Tel: +1 (760) 539-1100
Email: ePathology@LeicaBiosystems.com
23GT450
Aperio GT 450 User’s Guide, Revision A © Leica Biosystems Imaging, Inc. 20192

Customer Service Contacts
Please contact the office for your country for technical assistance.
Australia:
96 Ricketts Road
Mount Waverly, VIC 3149
AUSTRALIA
Tel: 1800 625 286 (toll free)
Between 8:30 AM-5 PM, Monday-Friday, AEST
Email: lbs-anz-service@leicabiosystems.com
Austria:
Leica Biosystems Nussloch GmbH
Technical Assistance Center
Heidelberger Strasse 17
Nussloch 69226
GERMANY
Tel: 0080052700527 (toll free)
In-country Tel: +43 1 486 80 50 50
Email: support.at@leicabiosystems.com
België/Belgique:
Tel: 0080052700527 (toll free)
In-country Tel: +32 2 790 98 50
Email: support.be@leicabiosystems.com
Canada:
Tel: +1 844 534 2262 (toll free)
Direct International Tel: +1 760 539 1150
Email: TechServices@leicabiosystems.com
China:
17F, SML Center No. 610 Xu Jia Hui Road, Huangpu District
Shanghai, PRC PC:200025
CHINA
Tel: +86 4008208932
Fax: +86 21 6384 1389
Email: service.cn@leica-microsystems.com
Remote Care email: tac.cn@leica-microsystems.com
Danmark:
Tel: 0080052700527 (toll free)
In-country Tel: +45 44 54 01 01
Email: support.dk@leicabiosystems.com
Deutschland:
Leica Biosystems Nussloch GmbH
Technical Assistance Center
Heidelberger Strasse 17
Nussloch 69226
GERMANY
Tel: 0080052700527 (toll free)
In-country Tel: +49 6441 29 4555
Email: support.de@leicabiosystems.com
Eire:
Tel: 0080052700527 (toll free)
In-country Tel: +44 1908 577 650
Email: support.ie@leicabiosystems.com
España:
Tel: 0080052700527 (toll free)
In-country Tel: +34 902 119 094
Email: support.spain@leicabiosystems.com
France:
Tel: 0080052700527 (toll free)
In-country Tel: +33 811 000 664
Email: support.fr@leicabiosystems.com
Italia:
Tel: 0080052700527 (toll free)
In-country Tel: +39 0257 486 509
Email: support.italy@leicabiosystems.com
Japan:
1-29-9 Takadannobaba, Sinjuku-ku
Tokyo 169-0075
JAPAN
Nederland:
Tel: 0080052700527 (toll free)
In-country Tel: +31 70 413 21 00
Email: support.nl@leicabiosystems.com
Aperio GT 450 User’s Guide, Revision A © Leica Biosystems Imaging, Inc. 2019 3

New Zealand:
96 Ricketts Road
Mount Waverly, VIC 3149
AUSTRALIA
Tel: 0800 400 589 (toll free)
Between 8:30 AM-5 PM, Monday-Friday, AEST
Email: lbs-anz-service@leicabiosystems.com
Portugal:
Tel: 0080052700527 (toll free)
In-country Tel: +35 1 21 388 9112
Email: support.pt@leicabiosystems.com
The Russian Federation
BioLine LLC
Pinsky lane 3 letter A
Saint Petersburg 197101
THE RUSSIAN FEDERATION
Tel: 8-800-555-49-40 (toll free)
In-country Tel: +7 812 320 49 49
Email: main@bioline.ru
Sweden:
Tel: 0080052700527 (toll free)
In-country Tel: +46 8 625 45 45
Email: support.se@leicabiosystems.com
Switzerland:
Tel: 0080052700527 (toll free)
In-country Tel: +41 71 726 3434
Email: support.ch@leicabiosystems.com
United Kingdom:
Tel: 0080052700527 (toll free)
In-country Tel: +44 1908 577 650
Email: support.uk@leicabiosystems.com
USA:
Tel: +1 844 534 2262 (toll free)
Direct International Tel: +1 760 539 1150
Email: TechServices@leicabiosystems.com
Aperio GT 450 User’s Guide, Revision A © Leica Biosystems Imaging, Inc. 20194

Contents
1 Introduction ...................................................................................................................... 8
Intended Use ................................................................................................................................... 9
Resources .......................................................................................................................................9
Symbols and Warnings ......................................................................................................................9
Electromagnetic Warnings ..............................................................................................................9
Instrument Warnings ...................................................................................................................10
Component and Part Replacement Warnings .....................................................................................10
Compliance Specifications ................................................................................................................ 10
Installation ................................................................................................................................... 11
Scanner Safety Instructions .............................................................................................................. 11
2 Aperio GT 450 Overview ................................................................................................ 16
Scanner Overview ..........................................................................................................................16
Turn the Scanner On and Off ..........................................................................................................17
Touchscreen Interface Overview ........................................................................................................18
Home Screen .............................................................................................................................18
Help Videos and Guides ................................................................................................................... 20
Key Features .................................................................................................................................20
Continuous Load Workflow ...........................................................................................................20
Scan Magnification .....................................................................................................................20
Automatic Image Quality Check ...................................................................................................... 20
Image Types Supported ................................................................................................................20
Slide Types Supported .................................................................................................................21
Coverslips .................................................................................................................................21
Slide Racks Supported .................................................................................................................21
Slide Capacity ............................................................................................................................ 21
Barcodes Supported ....................................................................................................................21
Optional Aperio Viewing Station ........................................................................................................ 21
Aperio eSlide Viewers ..................................................................................................................... 21
3 Slide Preparation............................................................................................................ 22
Tissue Preparation ..........................................................................................................................22
Staining .......................................................................................................................................22
Aperio GT 450 User’s Guide, Revision A © Leica Biosystems Imaging, Inc. 2019 5

Contents
Slide Preparation ............................................................................................................................ 22
Tissue Placement ....................................................................................................................23
Fixing Slide Preparation Errors .................................................................................................... 23
Coverslips .....................................................................................................................................23
Labels .......................................................................................................................................... 24
Barcodes ...................................................................................................................................... 24
4 Scan Slides ..................................................................................................................... 25
Scanning Concepts .........................................................................................................................25
Scan Workflow ...........................................................................................................................25
Carousel Rotation .......................................................................................................................26
Log In and Log Out of the Scanner ...................................................................................................... 26
Load Slides in the Rack .................................................................................................................... 27
Load Racks in the Carousel ............................................................................................................... 28
Priority Scanning ............................................................................................................................ 30
Rotate a Rack to the Rack Loading Area ............................................................................................... 31
Unload Racks from the Carousel ........................................................................................................32
Check Scan Status .......................................................................................................................... 33
Check Rack Status ......................................................................................................................34
Rack Error on Current Scan ........................................................................................................34
View Slide Status for a Rack .........................................................................................................35
View Macro Images of Scanned Slides ............................................................................................36
View Rack Scan Order .................................................................................................................. 36
Rack Warnings ...........................................................................................................................37
Scan Statistics ...........................................................................................................................39
5 Maintenance ................................................................................................................... 40
Maintenance Schedule .................................................................................................................... 40
Serial Number and Firmware Version ..................................................................................................41
Shut Down the Scanner ...................................................................................................................41
Open the Scanner Cover and Access the Interior Components ................................................................... 42
Recommended Daily Maintenance .....................................................................................................43
Restart the Scanner ..................................................................................................................... 43
Six Month Maintenance ................................................................................................................... 44
Clean the Objective and Koehler ..................................................................................................... 44
Materials Needed ...................................................................................................................44
Clean the Stage Slide Tray ............................................................................................................47
Clean the Carousel ...................................................................................................................... 48
Clean the Fan Filter .....................................................................................................................49
Clean the Slide Racks ..................................................................................................................51
Aperio GT 450 User’s Guide, Revision A © Leica Biosystems Imaging, Inc. 20196

Contents
Clean the Scanner Cover ..............................................................................................................51
Clean the Touchscreen .................................................................................................................52
Restart the Scanner After Interior Maintenance .....................................................................................52
Transporting or Moving the Aperio GT 450 ...........................................................................................53
Long Term Storage ..........................................................................................................................53
6 Troubleshooting ............................................................................................................. 54
Personal Protective Equipment ..........................................................................................................54
Red Blinking Lights on Carousel ......................................................................................................... 54
How to Use the Troubleshooting Steps ................................................................................................54
Perform a Safe Restart After an Error .................................................................................................. 55
Error Codes and Solutions ................................................................................................................57
1000: Internal Error .....................................................................................................................57
1001: Scanner Cannot Initialize ......................................................................................................59
1002: Carousel cannot rotate ......................................................................................................... 61
1003: Carousel cannot rotate. Carousel pinch point obstructed. .............................................................63
1007: Internal storage full. Cannot send images to DICOM converter. ...................................................... 63
2000: Slide handling error at slide stage, rack, or pusher. .....................................................................63
2001: Slide handling error at rack gripper, lift, or carousel.....................................................................66
9000: Scanner cover is open .......................................................................................................... 68
Rack Warnings and Solutions ............................................................................................................68
1005: Cannot process rack. ...........................................................................................................68
1006: Cannot process one or more slides in rack. ...............................................................................69
Slide Errors and Solutions ............................................................................................................. 70
Tilted Slide(s) .........................................................................................................................70
No Barcode ............................................................................................................................ 70
No Tissue ..............................................................................................................................71
No Macro Focus ...................................................................................................................... 71
Image Quality ......................................................................................................................... 72
Image Transfer Error – Pending Retry ...........................................................................................72
Aborted ................................................................................................................................73
Aborted Message Appears on All Slides ....................................................................................... 73
Symptoms and Solutions .................................................................................................................. 74
Scanner Does Not Power On .........................................................................................................74
Touchscreen Does Not Respond to Touch ..........................................................................................75
Touchscreen is Black ...................................................................................................................75
Slides are broken inside the scanner ...............................................................................................75
Index ..................................................................................................................................... 76
Symbols................................................................................................................................ 79
Aperio GT 450 User’s Guide, Revision A © Leica Biosystems Imaging, Inc. 2019 7
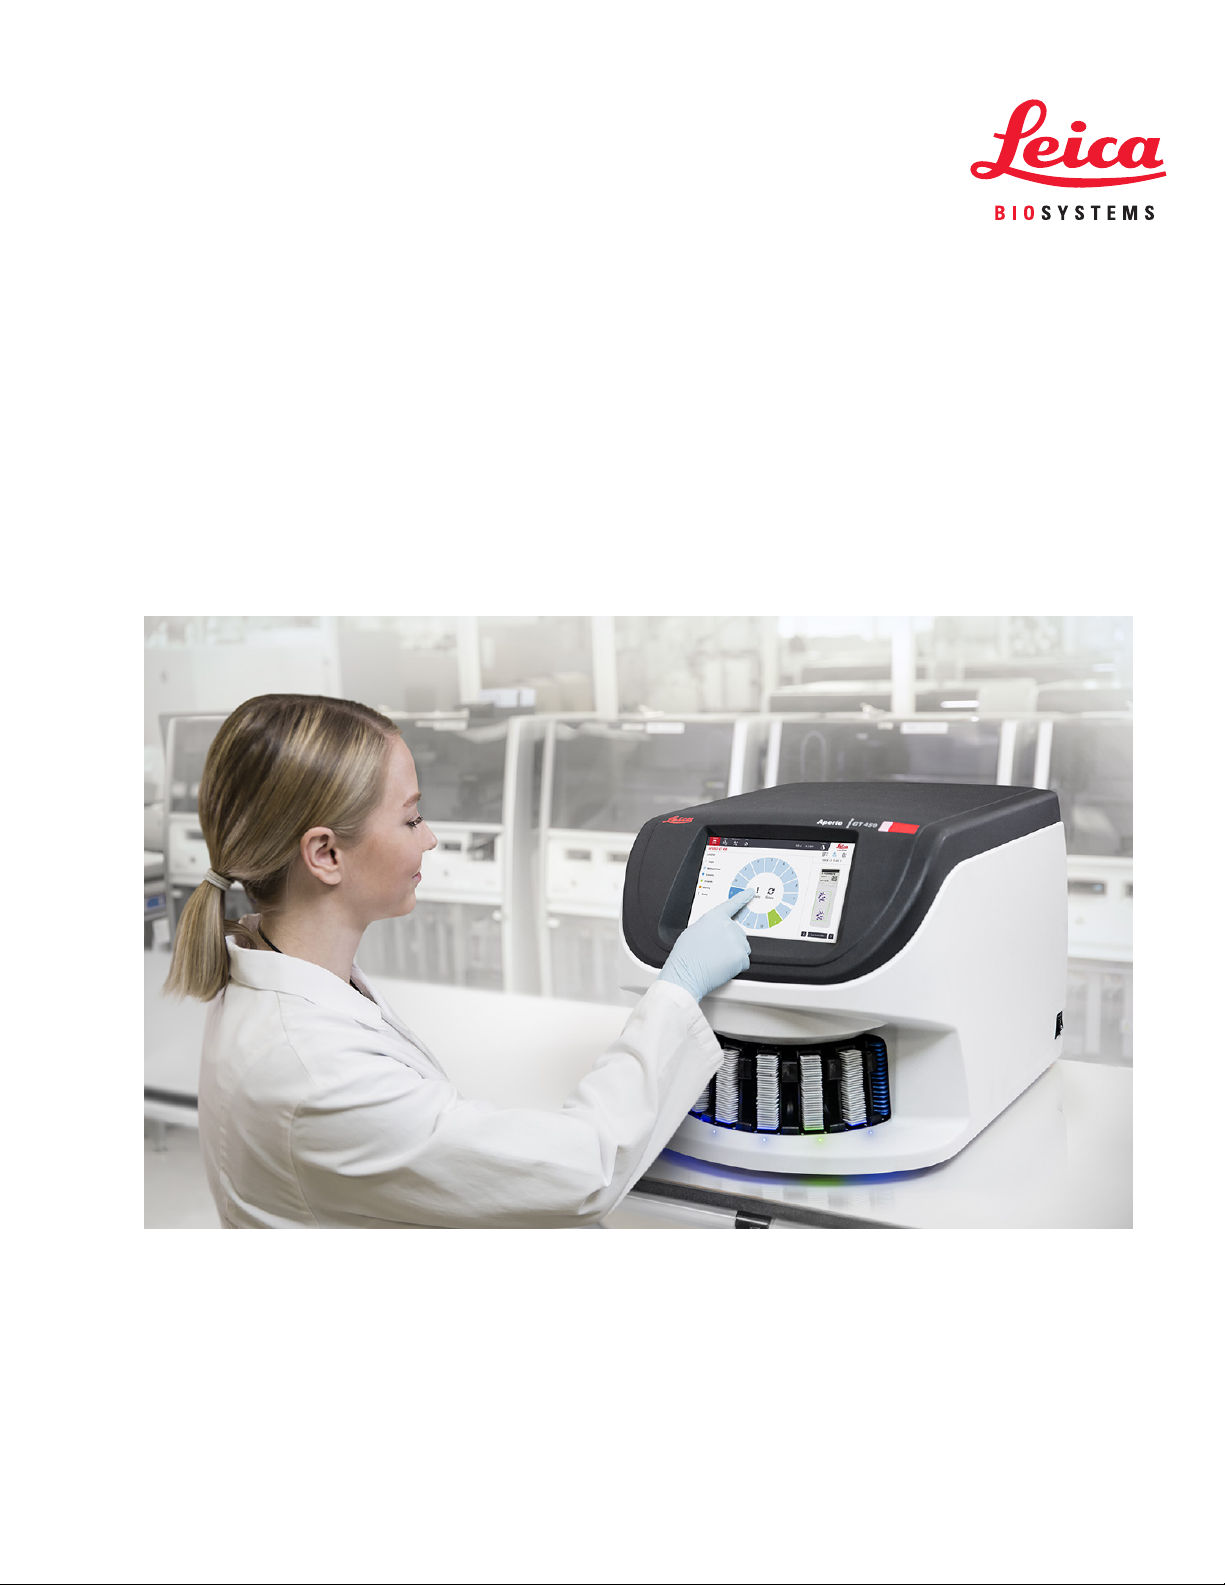
1
The Aperio GT 450 is a high performance, brightfield whole slide scanner that includes continuous loading with 450 slidecapacity across 15 racks, priority rack scanning, automated image quality check and a scan speed of ~32 seconds at 40x
scanning magnification for a 15 mm x 15 mm area.
This system is intended for use by trained histotechnicians, IT professionals, and pathologists.
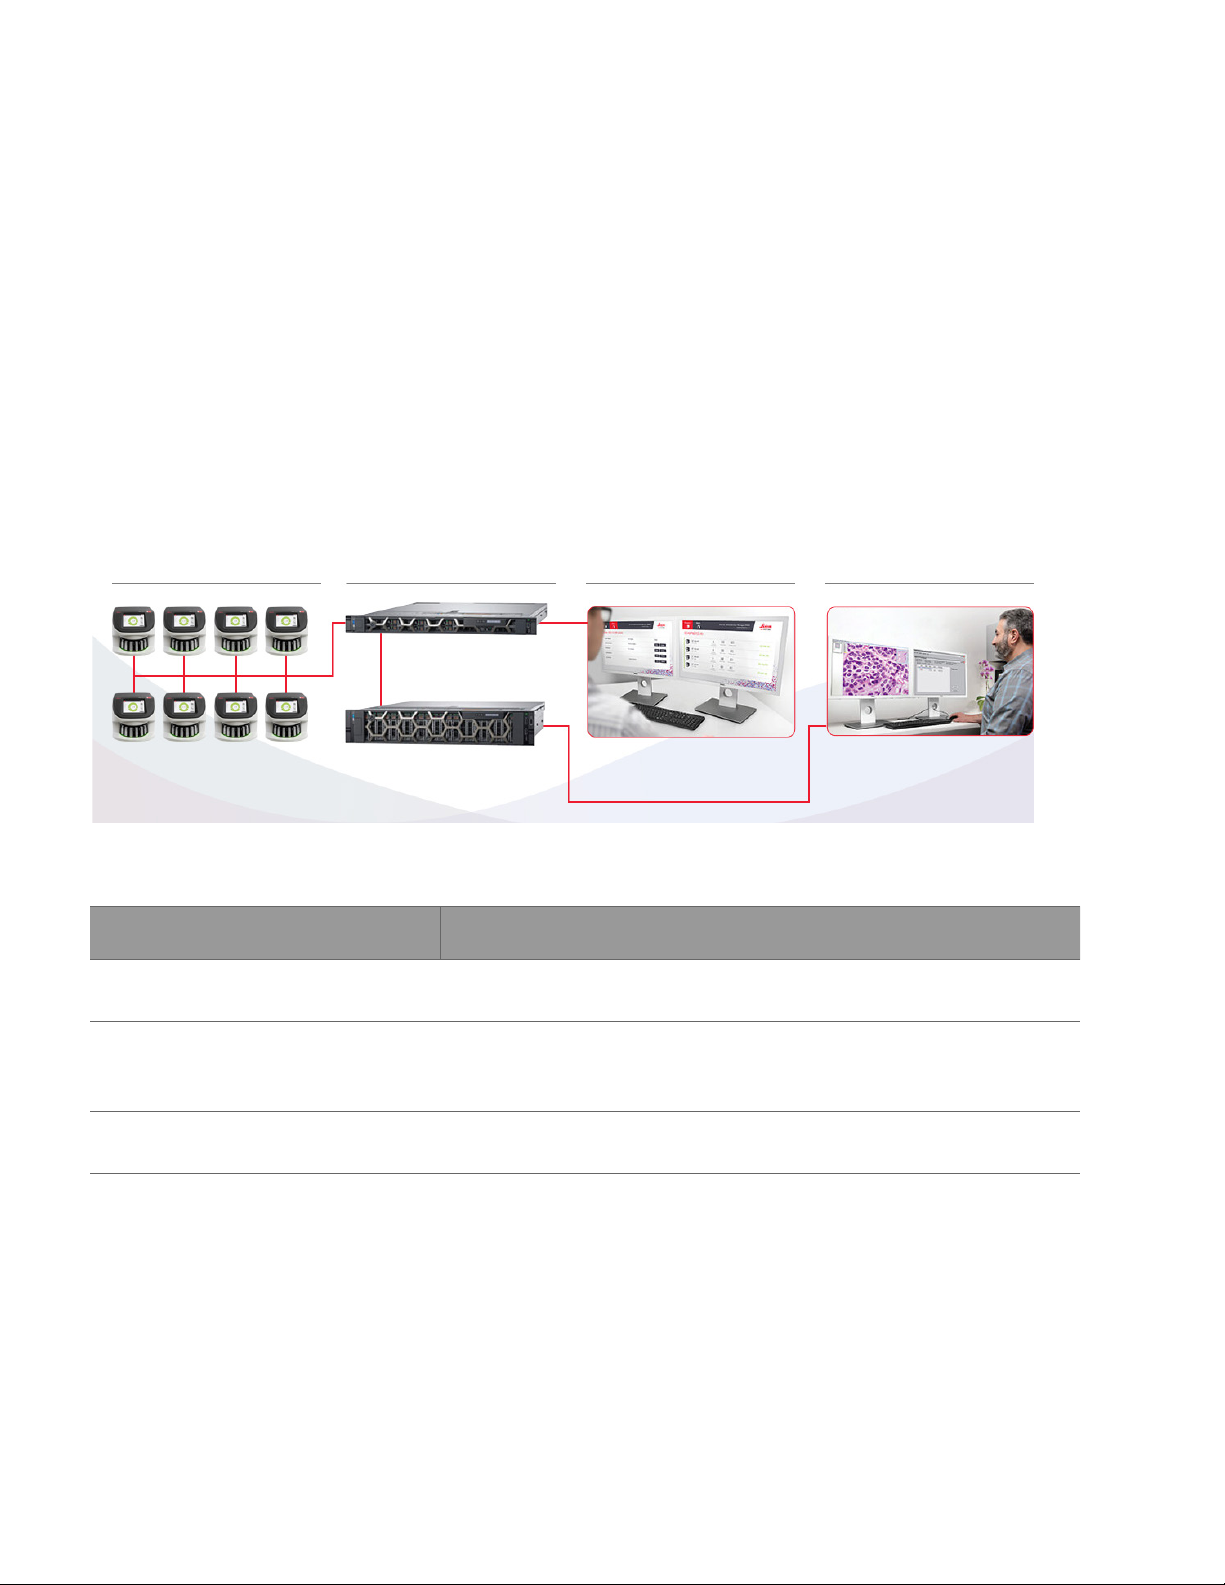
Pathology Lab IT Room IT Manager’s Offi ce Pathologist’s Offi ce
Introduction
SAM server
DSR server SAM Application Software Aperio Viewing StationAperio GT 450s
Use of the Aperio GT 450 scanner requires the following components.
Component Description
Scanner Administration Manager
(SAM) Server
SAM Application Software The Scanner Administration Manager (SAM) client application software
Aperio Viewing Station The viewing station includes two calibrated monitors and a workstation with
See the Aperio GT 450 Specifications for more information on these components.
Ensure you follow appropriate good laboratory practices and the policies and procedures required by your institution for
slide preparation, processing, storage, and disposal. Use this equipment only for this purpose and in the manner described
in this guide.
The SAM server connects to multiple Aperio GT 450 scanners and runs the
SAM Application Software.
enables IT implementation, PIN configuration, and service access of multiple
scanners from a single desktop client location for IT professionals.
Aperio ImageScope version 12.4 or higher.
Aperio GT 450 User’s Guide, Revision A © Leica Biosystems Imaging, Inc. 20198
Chapter 1: Introduction
Intended Use
For research use only. Not for use in diagnostic procedures.
Resources
Resource Description
Aperio GT 450 User’s Guide Provides reference information and instructions for scanning, troubleshooting,
and maintenance.
Aperio GT 450 Quick Reference Contains quick instructions for scanning, basic troubleshooting, and
maintenance. We recommend keeping this printed guide with your scanner.
An electronic version of the quick reference guide is available from the Help
area on the scanner’s touchscreen interface.
Aperio GT 450 IT Manager and Lab
Administrator Guide
Aperio GT 450 Specifications Provides detailed specifications for the scanner.
Instructional videos Provides video instruction on performing various tasks. You can view the videos
Customer Support If you have an issue with the scanner you cannot resolve, contact Leica
Training Leica Biosystems Imaging offers classroom and virtual training courses. Contact
Contains information and instructions regarding IT administration of the scanner,
including network administration and configuration.
from the Help area on the scanner’s touchscreen interface.
Biosystems Technical Services. See page 2 for contact information.
Leica Biosystems Imaging Customer Support for information about training
options.
Symbols and Warnings
The following symbols are used throughout the documentation to alert you to potential danger in operating the scanner.
Symbol Description
The exclamation point within an equilateral triangle is intended to alert you to the presence of important operating
and maintenance (servicing) instructions.
Le point d’exclamation dans un triangle équilatéral vise à avertir l’utilisateur qu’il s’agit d’instructions d’utilisation
et d’entretien importantes.
CLASS 1 LASER
EN 60825-1:2007
P<100uw, λ = 630-670nm
Electromagnetic Warnings
If the scanner is used in any manner not specified in this documentation, the protection provided by the equipment may be
impaired.
Aperio GT 450 User’s Guide, Revision A © Leica Biosystems Imaging, Inc. 2019 9
Chapter 1: Introduction
WARNING: This equipment generates, uses and can radiate radio frequency energy. If not installed and used in accordance
with the instructions in this manual it may cause interference to radio communications. It has been tested and found to
comply with the limits for a Class A computing device (pursuant to Subpart B of Part 15 FCC Rules), which are designed to
provide reasonable protection against such interference when operated in a commercial environment.
Si l’appareil est utilisé d’une autre manière que celle spécifiée dans cette documentation, la protection assurée par
l’appareil risque d’être altérée.
AVERTISSEMENT : Cet appareil génère, utilise et peut émettre une énergie de radiofréquences. S’il n’est pas installé et
utilisé conformément aux instructions de ce guide, il peut brouiller les communications radio. Cet appareil a été testé et
déclaré conforme aux limites des appareils numériques de Classe A (selon la sous-partie B de la section 15 des règlements
de la FCC), qui sont destinés assurer une protection raisonnable contre un brouillage préjudiciable lorsque l’appareil est
utilisé dans un milieu commercial.
Instrument Warnings
WARNING: TO REDUCE THE RISK OF FIRE OR ELECTRIC SHOCK, DO NOT EXPOSE THE
SCANNER TO RAIN OR MOISTURE.
MISUSE OF ELECTRICAL EQUIPMENT CAN CAUSE ELECTROCUTION, BURNS, FIRES,
AND OTHER HAZARDS.
AVERTISSEMENT : POUR RÉDUIRE LES RISQUES D’INCENDIE OU DE CHOC ÉLECTRIQUE,
NE PAS EXPOSER CET APPAREIL À LA PLUIE OU L’HUMIDITÉ.
UN MAUVAIS USAGE D’UN APPAREIL ÉLECTRIQUE PEUT PROVOQUER
L’ÉLECTROCUTION, DES BRÛLURES ET D’AUTRES DANGERS.
Component and Part Replacement Warnings
There are no user-replaceable parts or components in the Aperio GT 450 scanner. Replacement of parts or components
within the Aperio GT 450 scanner must be performed by qualified Leica Biosystems Technical Services personnel.
Compliance Specifications
This device complies with Part 15 of the FCC rules. Operation is subject to the following two conditions: (1) This device may
not cause harmful interference and (2) this device must accept any interference received, including interference that may
cause undesired operation.
This device has been evaluated against and conforms to the following standards:
Aperio GT 450 User’s Guide, Revision A © Leica Biosystems Imaging, Inc. 201910

Feature Details
Safety
IEC 61010-1: 2010 + AMD1:2016
EN 61010-1: 2010
CSA/CAN-C22.2 No. 61010-1:2012 + U1:2015-07 + U2:2016-04
UL 61010-1: 2012 + R:2015-07 + R:2016-04
IEC 61010-2-081: 2015.
CSA/CAN-C22.2 No. 61010-2-081:2015.
EN 61010-2-081:2015.
Supplemented by UL 61010-2-081:2015.
EMC EN 61326 (Emissions)
VCCI CISPR 32
KN 32
FCC/IC
Chapter 1: Introduction
Installation
WARNING: Two people are required for lifting the scanner.
AVERTISSEMENT: Il faut deux personnes pour soulever l’appareil.
Installation and setup of the scanner should only be performed by a trained Leica Biosystems Imaging Service
representative.
L’installation et le réglage du numériseur doivent être effectués uniquement par un représentant qualifié de service sur site
d’Leica Biosystems Imaging.
Scanner Safety Instructions
This section contains important safety information for the Aperio GT 450 scanner.
When using your scanner, always take basic safety precautions, including all of those listed below.
Read All Instructions – All safety and operating instructions must be read before operating the product.
Retain All Instructions – All safety and operating instructions must be retained for future reference.
Lisez toutes les instructions - Vous devez lire toutes les consignes de sécurité et d’utilisation avant d ‘utiliser
l’appareil.
Aperio GT 450 User’s Guide, Revision A © Leica Biosystems Imaging, Inc. 2019 11

Chapter 1: Introduction
Conservez toutes les instructions - Vous devez conserver toutes les instructions à des fins de consultation
ultérieure.
1. Heed All Warnings – All warnings on the scanner and those listed in the operating instructions must be adhered
to.
Tenez compte des avertissements – Vous devez respecter tous les avertissements à propos du numériseur ainsi
que de ceux indiqués dans les instructions d’utilisation.
2. Follow All Instructions – All operating and scanner usage instructions must be followed.
Suivez toutes les instructions – Vous devez suivre toutes les instructions d’utilisation du numériseur.
3. Heat – The scanner must be situated away from any heat sources such as radiators, heat registers, stoves, or
other products that produce heat.
Chaleur – L’appareil doit être placé loin de toutes sources de chaleur telles que les radiateurs, les bouches de
chaleur, les cuisinières ou autres appareils produisant de la chaleur.
4. Ventilation – Slots and openings in the scanner are provided for ventilation. They ensure reliable operation of
the product, keeping it from overheating. These openings must not be blocked nor covered during operation. Keep
air openings free of lint, hair, fluff, etc. This product should not be placed into a rack unless proper ventilation is
provided through following the manufacturer’s recommended installation procedures.
Ventilation – L’appareil est doté de fentes et d’ouvertures de ventilation. Elles assurent le fonctionnement
fiable de l’appareil, en l’empêchant de surchauffer. Ces ouvertures ne doivent pas être bloquées, ni couvertes
pendant l’utilisation. Gardez les ouvertures libres de charpie, de cheveux, de peluches, etc. Cet appareil ne doit
pas être placé dans un bâti à moins qu’une ventilation adéquate ne soit fournie en suivant le mode d’installation
recommandé par le fabricant.
5. Biosafety Procedures – Please refer to your institution’s biosafety policies and procedures regarding the proper
handling of tissue and other potentially hazardous materials in connection with the use of this device.
Procédure de biosécurité – Veuillez vous référer aux politiques et aux procédures de biosécurité de votre
établissement relativement à la manipulation adéquate de tissus et autres matières potentiellement dangereuses
en lien avec l’utilisation de cet appareil.
6. Water and Moisture – Do not use the scanner near water—for example, near a water bath, wash bowl, kitchen
sink, or laundry tub; in a wet basement; or near an open pool of water or the like. If the scanner becomes wet,
unplug it before touching it.
Eau et humidité – N’utilisez pas l’appareil près de l’eau, par exemple, un bain-marie, une cuvette, un évier, une
cuve de lessivage, dans un sous-sol humide ou près d’un bassin ouvert. Si l’appareil est mouillé, débranchez-le
avant de le toucher.
7. Attachments – Do not use any attachments not recommended by the product manufacturer as they may cause
hazards.
Accessoires – N’utilisez pas d’accessoires non recommandés par le fabricant de l’appareil, car ils peuvent causer
un risque.
8. Power Sources – The scanner must be operated from the type of power source indicated on the marking label
and in the installation instructions. If you are not sure of the type of power supplied to your facility, consult your
local power company. Check that the voltage setting matches the electrical supply voltage.
Aperio GT 450 User’s Guide, Revision A © Leica Biosystems Imaging, Inc. 201912

Chapter 1: Introduction
Alimentation – L’appareil ne doit être utilisé qu’avec la source d’alimentation spécifiée sur l’étiquette signalétique
et les instructions d’installation. En cas de doute sur le type de courant fourni à votre établissement, consultez
votre compagnie d’électricité locale. Vérifiez si le réglage de la tension correspond à la tension d’alimentation
électrique.
9. Grounding and Polarization – The scanner AC/DC adapter is equipped with a polarized AC plug with integral
safety ground pin. Do not defeat the safety ground in any manner.
Mise à la terre et polarisation – L’adaptateur c.a. du numériseur est muni d’une fiche c.a. polarisée à contact
intégré de mise à la terre de sécurité. En aucun cas, ne retirez la mise à la terre de sécurité.
10. Power Cord Protection – Power supply cords must be routed so that they are not likely to be walked on
nor pinched by items placed upon or against them. Pay particular attention to the cords at AC wall plugs and
convenience receptacles and at the point where the cord enters the AC/DC adapter.
Protection du cordon d’alimentation – Les cordons d’alimentation doivent être placés de manière à ce qu’il
y ait peu de risque qu’une personne marche dessus ou qu’ils soient coincés par un meuble ou un autre objet.
Veillez particulièrement à protéger le cordon près des prises murales c.a., des prises utilitaires et de sa sortie de
l’appareil.
11. Lightning – For added protection for this scanner during a lightning storm, or when it is left unattended and
unused for long periods of time, unplug it from the AC wall outlet. This will prevent damage to the product due to
lightning and power line surges.
Foudre – Pour protéger davantage l’appareil, débranchez le cordon du numériseur de la prise murale c.a. pendant
un orage ou s’il est laissé sans surveillance ou qu’il n’est pas utilisé pendant une longue période. Cette mesure
empêchera que la foudre ou qu’une surtension cause des dommages à l’appareil.
12. Power Overloading – Do not overload AC wall outlets, extension cords, or integral convenience outlets as this
can result in a fire or electric shock hazard.
Surcharge – Ne surchargez pas les prises murales c.a., les rallonges ou les prises utilitaires intégrées car ceci
risquerait de provoquer un incendie ou une électrocution.
13. Operating Environment – Observe these basic safety requirements:
Milieu de fonctionnement – Respectez ces consignes de sécurité de base:
Ì` Do not operate the scanner out of doors. N’utilisez pas l’appareil à l’extérieur.
Ì` Do not use where aerosol sprays are being used or where oxygen is being administered. Ne l’utilisez pas à
proximité d’aérosols ou d’endroits où de l’oxygène est administré.
Ì` Do not let the scanner or its cables or accessories come into contact with surfaces which are too hot to touch.
Ne laissez pas l’appareil ou ses câbles et ses accessoires entre en contact avec des surfaces qui sont trop
chaudes au toucher.
Ì` Do not place anything on top of the scanner. Ne placez rien sur l’appareil.
14. Object and Liquid Entry – Never push objects of any kind into the scanner through openings as they may touch
dangerous voltage points or short-out parts that could result in a fire or electric shock. Never spill liquid of any kind
on the scanner.
Pénétration d’objets et de liquides – N’introduisez jamais aucun objets par les orifices du numériseur. Ils pourraient
toucher des points sous tension dangereux et court-circuiter des pièces et provoquer ainsi un incendie ou une
Aperio GT 450 User’s Guide, Revision A © Leica Biosystems Imaging, Inc. 2019 13

Chapter 1: Introduction
électrocution. Veillez à ne jamais renverser de liquide dans l’appareil.
15. Accessories – Do not place the scanner on an unstable cart, stand, tripod, bracket, or table. The scanner may
fall, causing serious injury and damage to the product. Any mounting of the scanner needs to follow manufacturer’s
installation instructions. Do not place anything on top of the scanner.
Accessoires – Ne placez pas l’appareil sur un chariot, un socle, un trépied, un support ou une table qui n’est pas
stable. L’appareil pourrait tomber et provoquer une blessure grave ou être endommagé. Si l’appareil est fixé à un
support, assurez-vous que les instructions d’installation du fabricant sont respectées.
16. Moving – Use care if you must slide the scanner around the workbench. If you need to pick up the scanner to move
it off the workbench, contact Leica Biosystems Technical Services. Removal of the scanner may void the applicable
product warranty—contact Leica Biosystems Imaging for advice.
Déplacement – L’appareil doit être déplacé avec prudence. Un arrêt brusque, une force excessive ou une surface
inégale peuvent faire tomber l’appareil. Le déplacement d’un appareil peut annuler la garantie – communiquez
avec Leica Biosystems Imaging pour obtenir des conseils.
17. Servicing – Refer all servicing to qualified service personnel.
Entretien – Faites appel à un technicien qualifié pour tout entretien.
18. Damage Requiring Service – Unplug the scanner from the wall AC outlet and refer servicing to qualified service
personnel under the following conditions:
Dommage nécessitant un entretien – Débranchez l’appareil de la prise murale c.a. et faites appel à un
technicien qualifié dans les cas suivants:
Ì` When the AC cord or AC/DC adapter is damaged. Le cordon c.a. ou la fiche est endommagé.
Ì` If liquid has been spilled or objects have fallen into the scanner. Du liquide a été renversé sur l’appareil ou des
objets sont tombés dans l’appareil.
Ì` If the scanner has been exposed to rain or water. L’appareil a été exposé à la pluie ou à l’humidité.
Ì` If the scanner does not operate normally (when you are following operating instructions). L’appareil ne
fonctionne pas normalement (lorsque vous suivez les instructions d’utilisation).
Ì` If the scanner has been dropped or damaged in any way. L’appareil est tombé ou est endommagé de quelque
façon que ce soit.
Ì` When the scanner exhibits a distinct change in performance. This indicates a need for service. L’appareil
présente des changements visibles de performances. Cela indique la nécessité d’un entretien.
19. Replacement Parts – When replacement parts are required, be sure the service technician has used replacement
parts specified by the manufacturer. Unauthorized substitutions may result in fire, electric shock, or other hazards.
Pièces de rechange – Si des pièces doivent être remplacées, assurez-vous que le technicien utilise bien les
pièces de rechange prescrites par le fabricant. L’utilisation des pièces non autorisées peut entraîner un risque
d’incendie ou de choc électrique, ou d’autres dangers.
20. Operational Check – Upon completion of any repairs to this scanner, ask the service technician to perform
operation checks to determine that the product is in proper operating condition.
Vérification du fonctionnement – Après toute réparation d’un appareil, demandez au technicien d’effectuer les
vérifications nécessaires pour s’assurer que l’appareil est en bon état de fonctionnement.
Aperio GT 450 User’s Guide, Revision A © Leica Biosystems Imaging, Inc. 201914

Chapter 1: Introduction
21. Cleaning – Apply the recommended cleaning solution to a clean cloth to clean the equipment. Do not apply
cleaning solutions directly to the equipment.
Nettoyage – N’utilisez pas de nettoyants liquides ou aérosols. Utilisez seulement un chiffon humide pour le
nettoyage.
Aperio GT 450 User’s Guide, Revision A © Leica Biosystems Imaging, Inc. 2019 15
2
This chapter provides an overview of the Aperio GT 450 Scanner.
Aperio GT 450 Overview
Scanner Overview
This section describes the parts of your scanner used in daily operation.
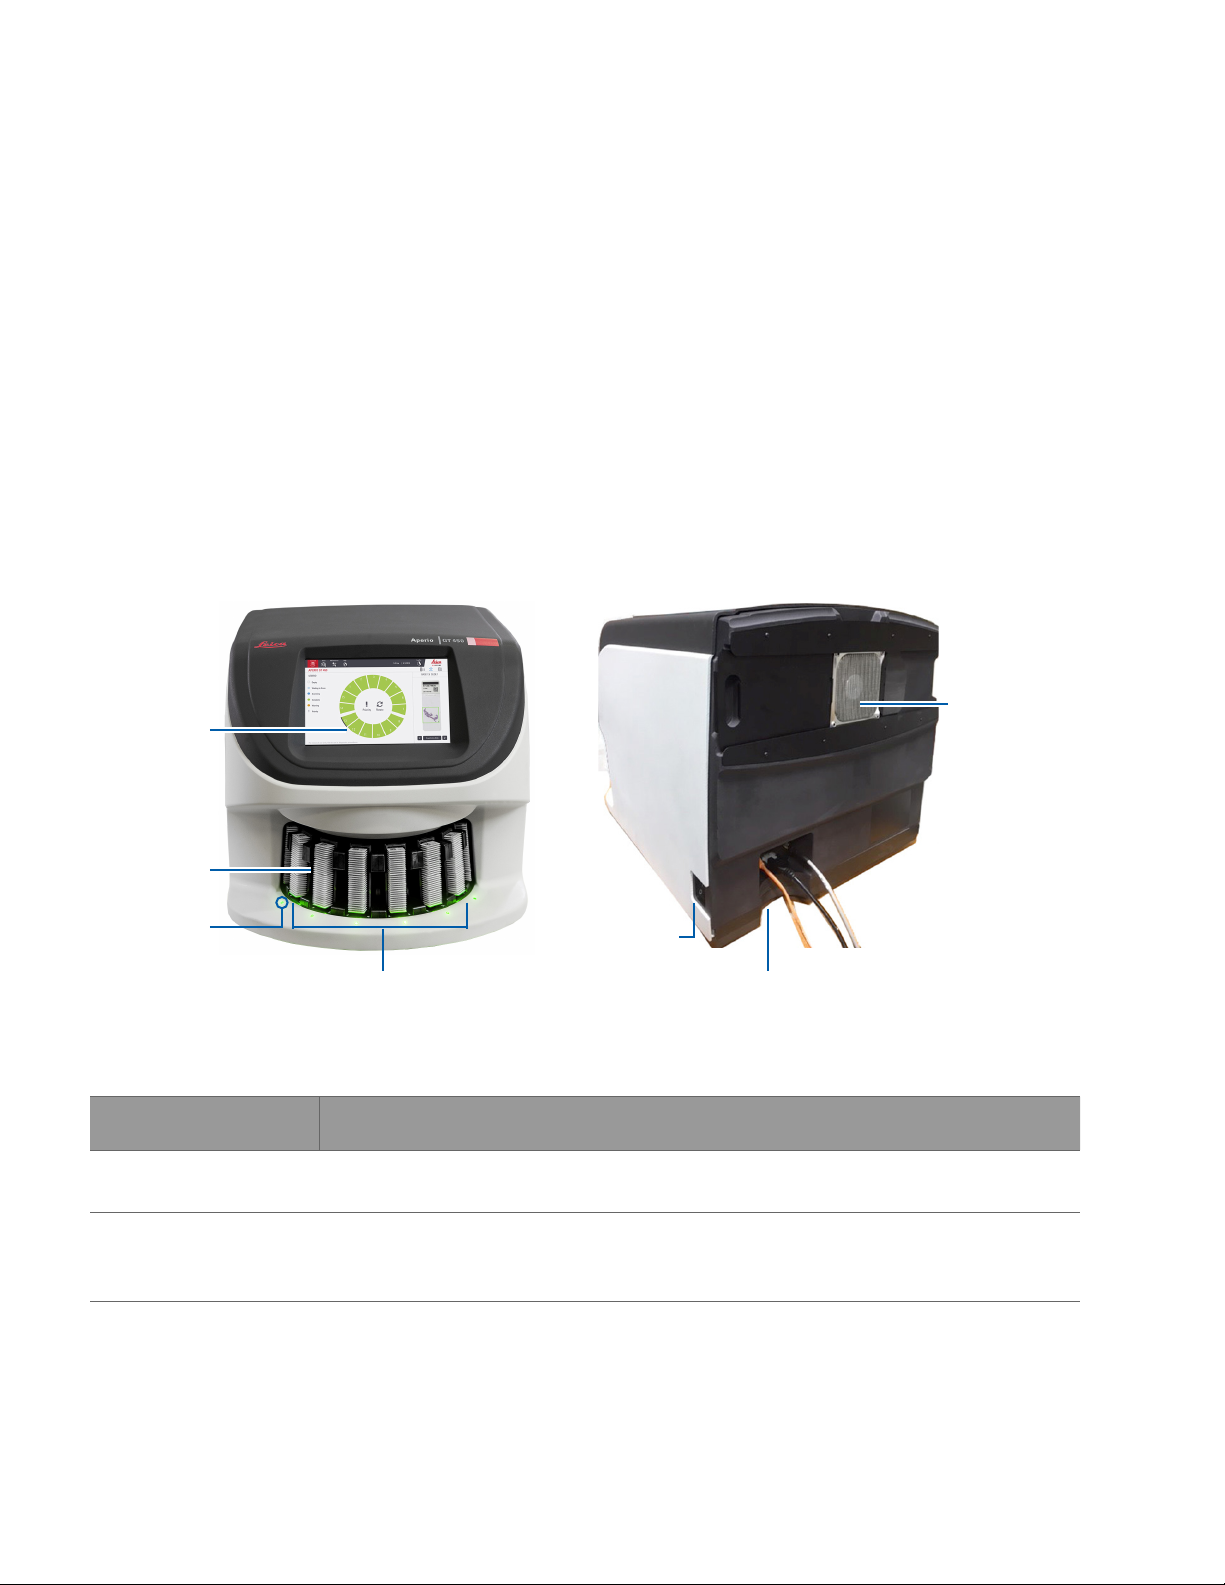
Aperio GT 450 Front Aperio GT 450 Back
Touchscreen
interface
Fan fi lter
Carousel
Status lights (6)
Rack loading area (front 6)
The following section describes the main scanner elements:
Element: Use: More details:
Touchscreen Interface View rack statuses, set rack options, and view other
information.
Carousel The carousel contains 15 rack slots. After you load
racks in the carousel, the carousel rotates the racks
to the scanning area and the rack loading area.
On/off switch
Power / network connections
See “Touchscreen Interface
Overview” on page 18.
See “Carousel Rotation” on page
26.
Aperio GT 450 User’s Guide, Revision A © Leica Biosystems Imaging, Inc. 201916
Chapter 2: Aperio GT 450 Overview
Element: Use: More details:
Rack loading area Provides access to the carousel to load and unload
slide racks. This area is also referred to as the “frontsix,” because the rack loading area gives you access
to six rack slots at a time.
Safety light curtain The infrared safety light curtain detects objects in the
rack loading area. The carousel only rotates when the
safety light curtain area is clear.
Status lights The status lights are located below the rack slots
in the rack loading area. They indicate the status
of the front-six racks and the scanner. The colors of
the status lights match the colors of the rack status
Legend on the touchscreen interface.
Fan filter The fan filter is located on the back of the scanner.
Clean the fan filter at least every six months. You can
insert the fan filter from the left side, the right side,
or the top (requires a different fan filter holder).
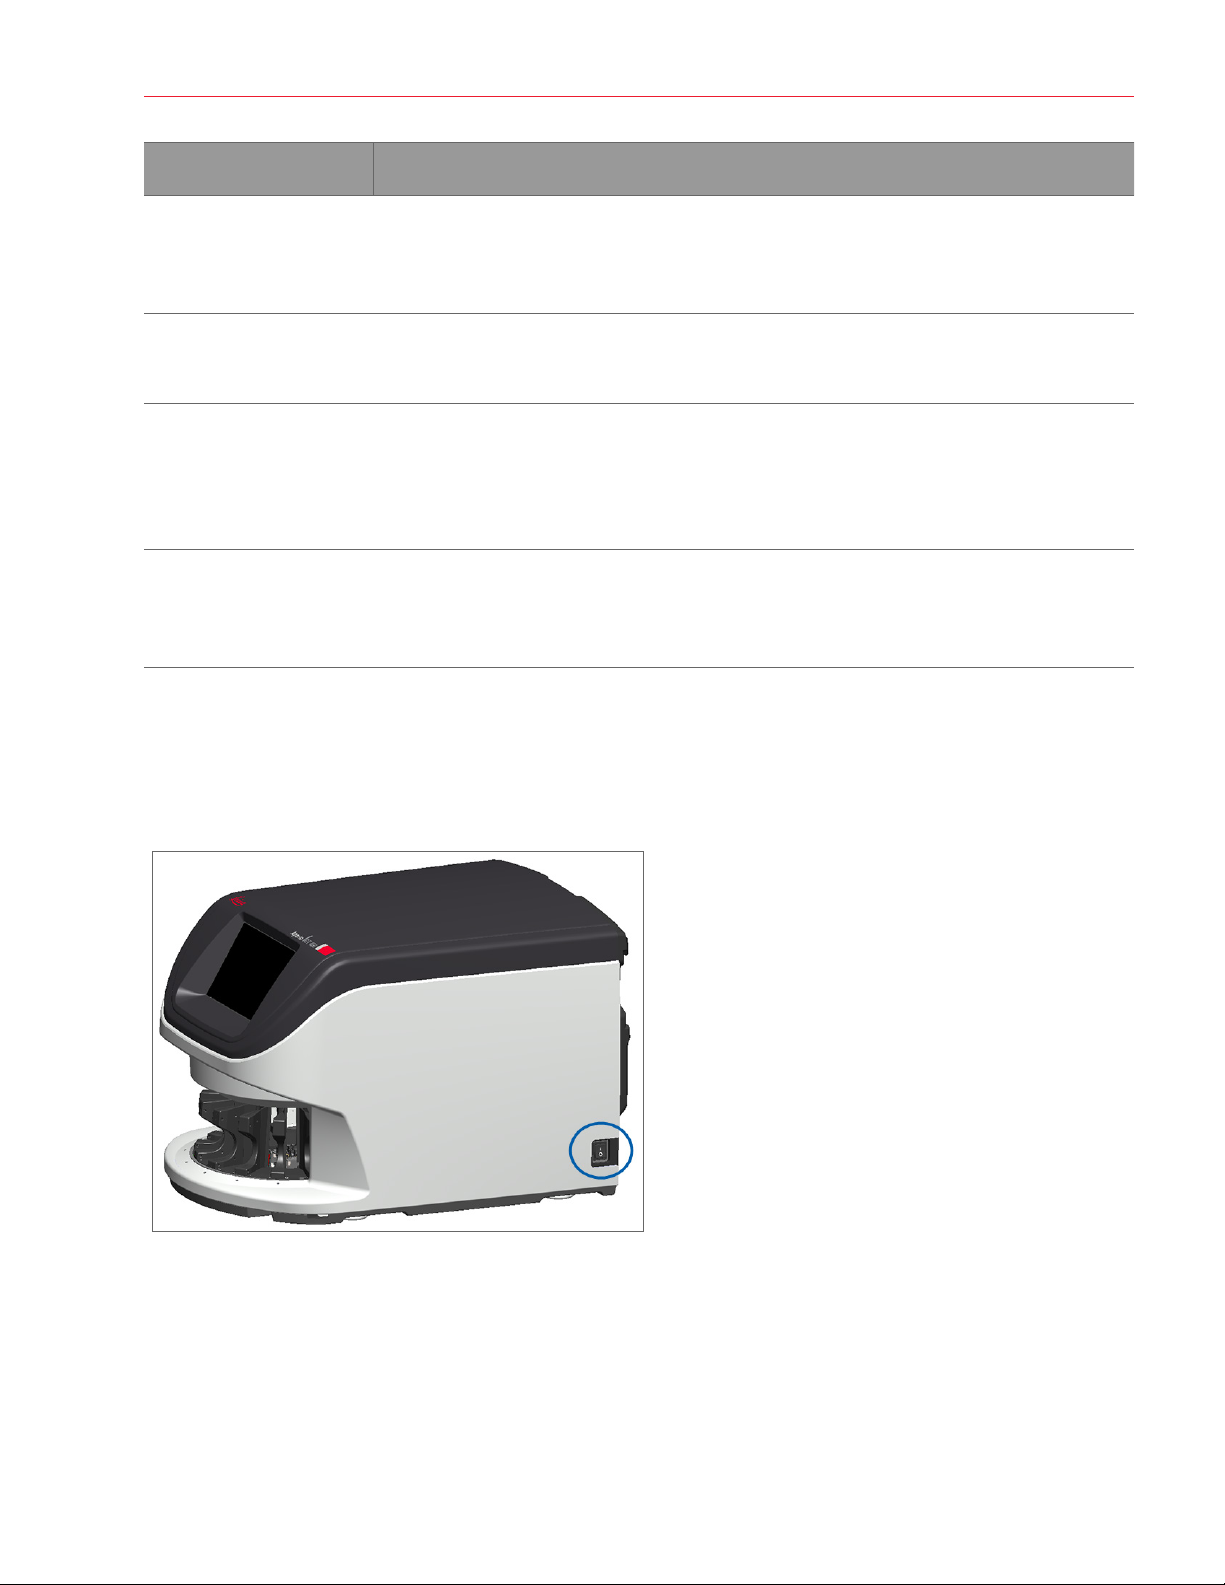
Turn the Scanner On and Off
The On/Off switch is located on the right side of the scanner near the back.
See “Load Racks in the Carousel” on
page 28.
See “Carousel Rotation” on page
26.
See “Check Scan Status” on page
33.
See “Red Blinking Lights on
Carousel” on page 54.
See “Clean the Fan Filter” on page
49.
Ì` On position = I; Off position = O.
When you are turning the scanner off and on, follow these procedures according to the situation:
Ì` “Shut Down the Scanner” on page 41.
Ì` “Restart the Scanner After Interior Maintenance” on page 52.
Ì` “Perform a Safe Restart After an Error” on page 55.
Aperio GT 450 User’s Guide, Revision A © Leica Biosystems Imaging, Inc. 2019 17
Chapter 2: Aperio GT 450 Overview
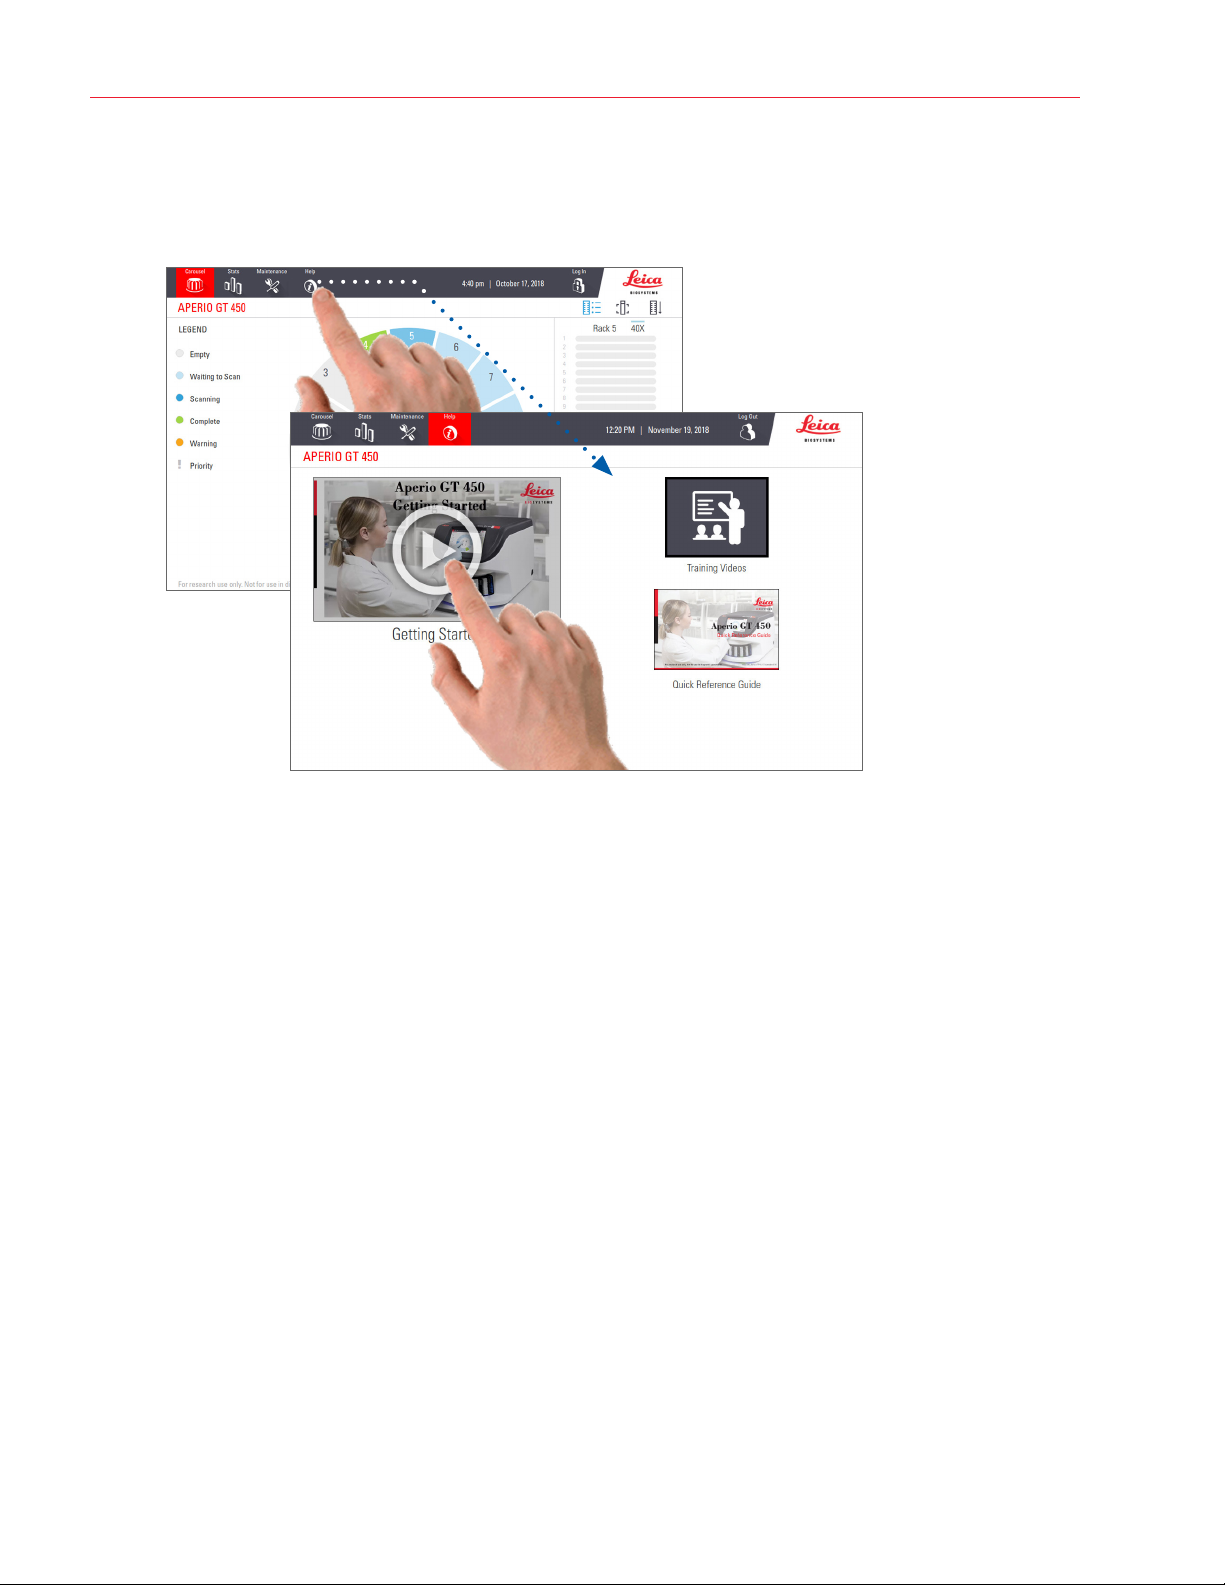
Touchscreen Interface Overview
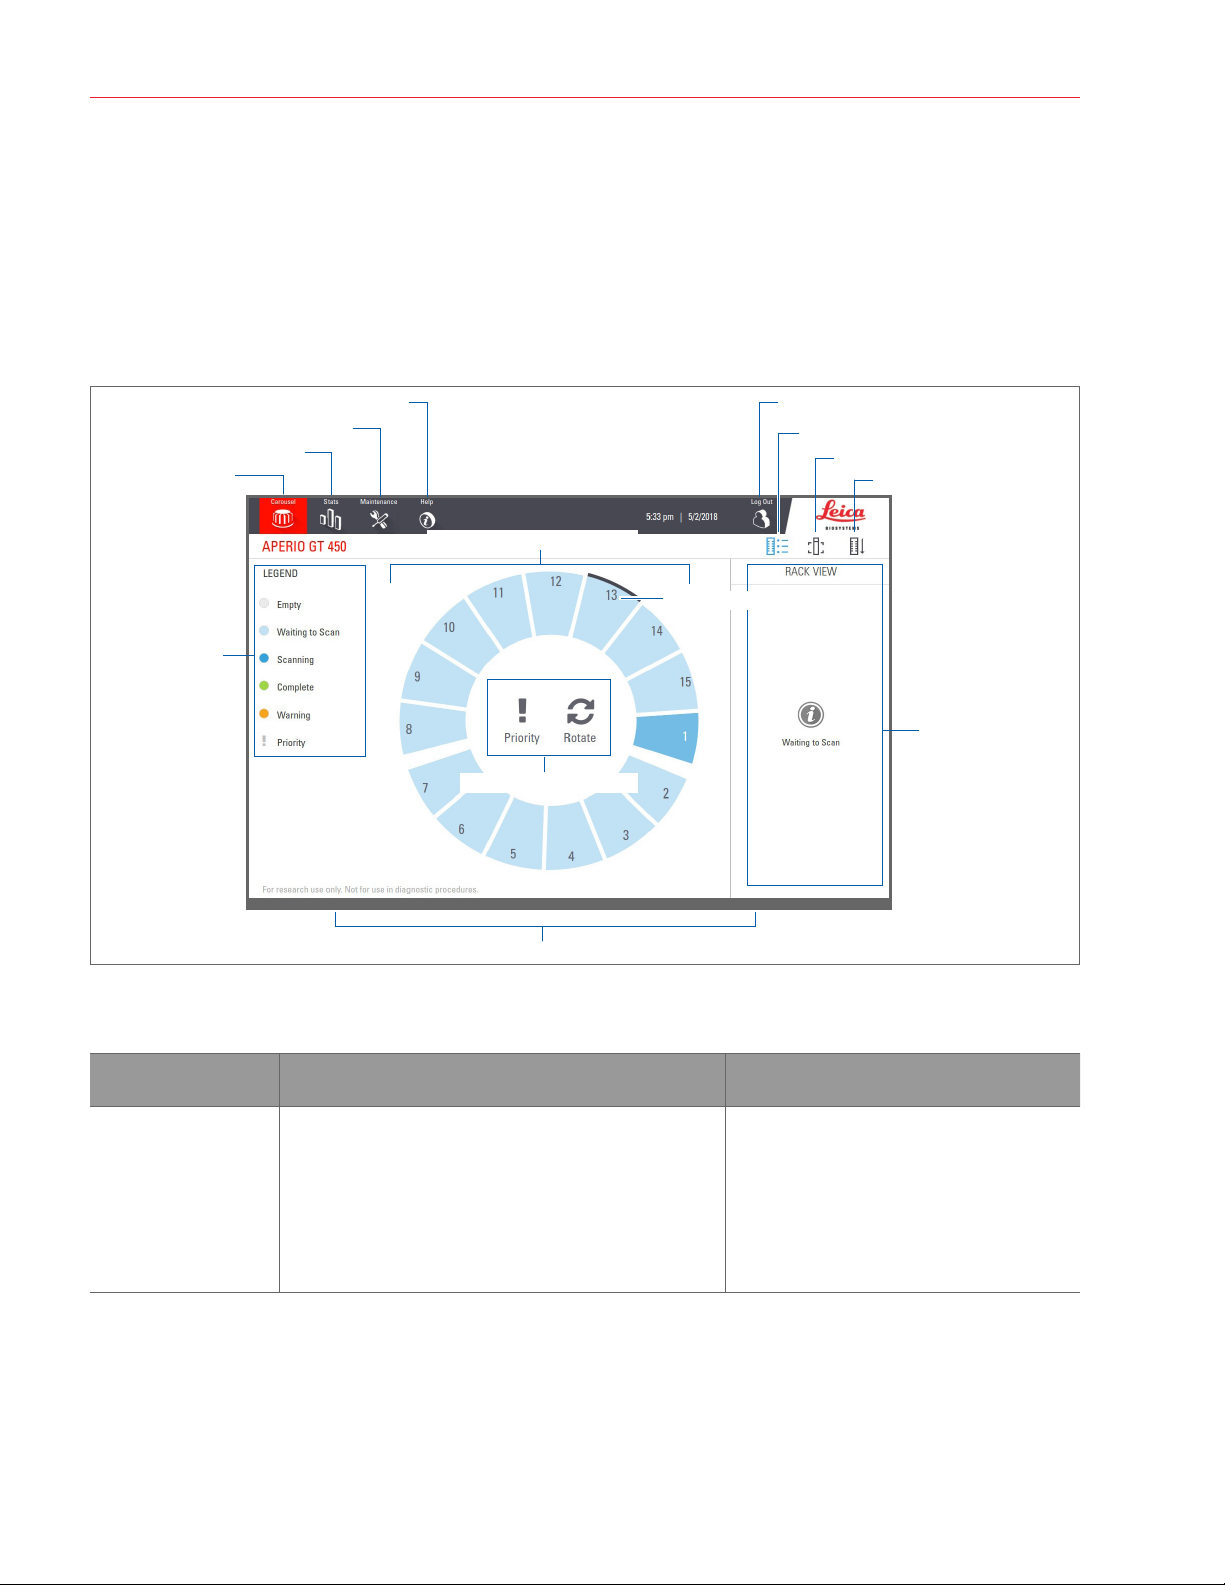
The touchscreen interface is where you view the scan status and interact with the scanner. Tap an area on the touchscreen
interface to view information or perform an action.
Home Screen
The Home screen (Carousel view) is where you view rack and slide status. The buttons along the top enable you to access
other areas, such as Help and Maintenance.
Scanner statistics
Home screen
(carousel view)
Rack status legend
Help videos and guides
Maintenance area
Carousel and rack status
Selected rack
Rack actions
Home screen (carousel view), scanner statistics, help videos and guides appear here
Log in to the scanner
Rack view
Slide view
Rack order
Slide view, rack order,
rack view appear here
The following section describes the Home screen elements.
Element: Use: More details see:
Rack status legend The Legend defines colors and icons that indicate
rack status. Status colors appear on the rack slot
positions on the touchscreen interface, and on the
status lights in front of the carousel.
Note: the Legend is for information only and is not
interactive.
Aperio GT 450 User’s Guide, Revision A © Leica Biosystems Imaging, Inc. 201918
“Check Scan Status” on page 33.
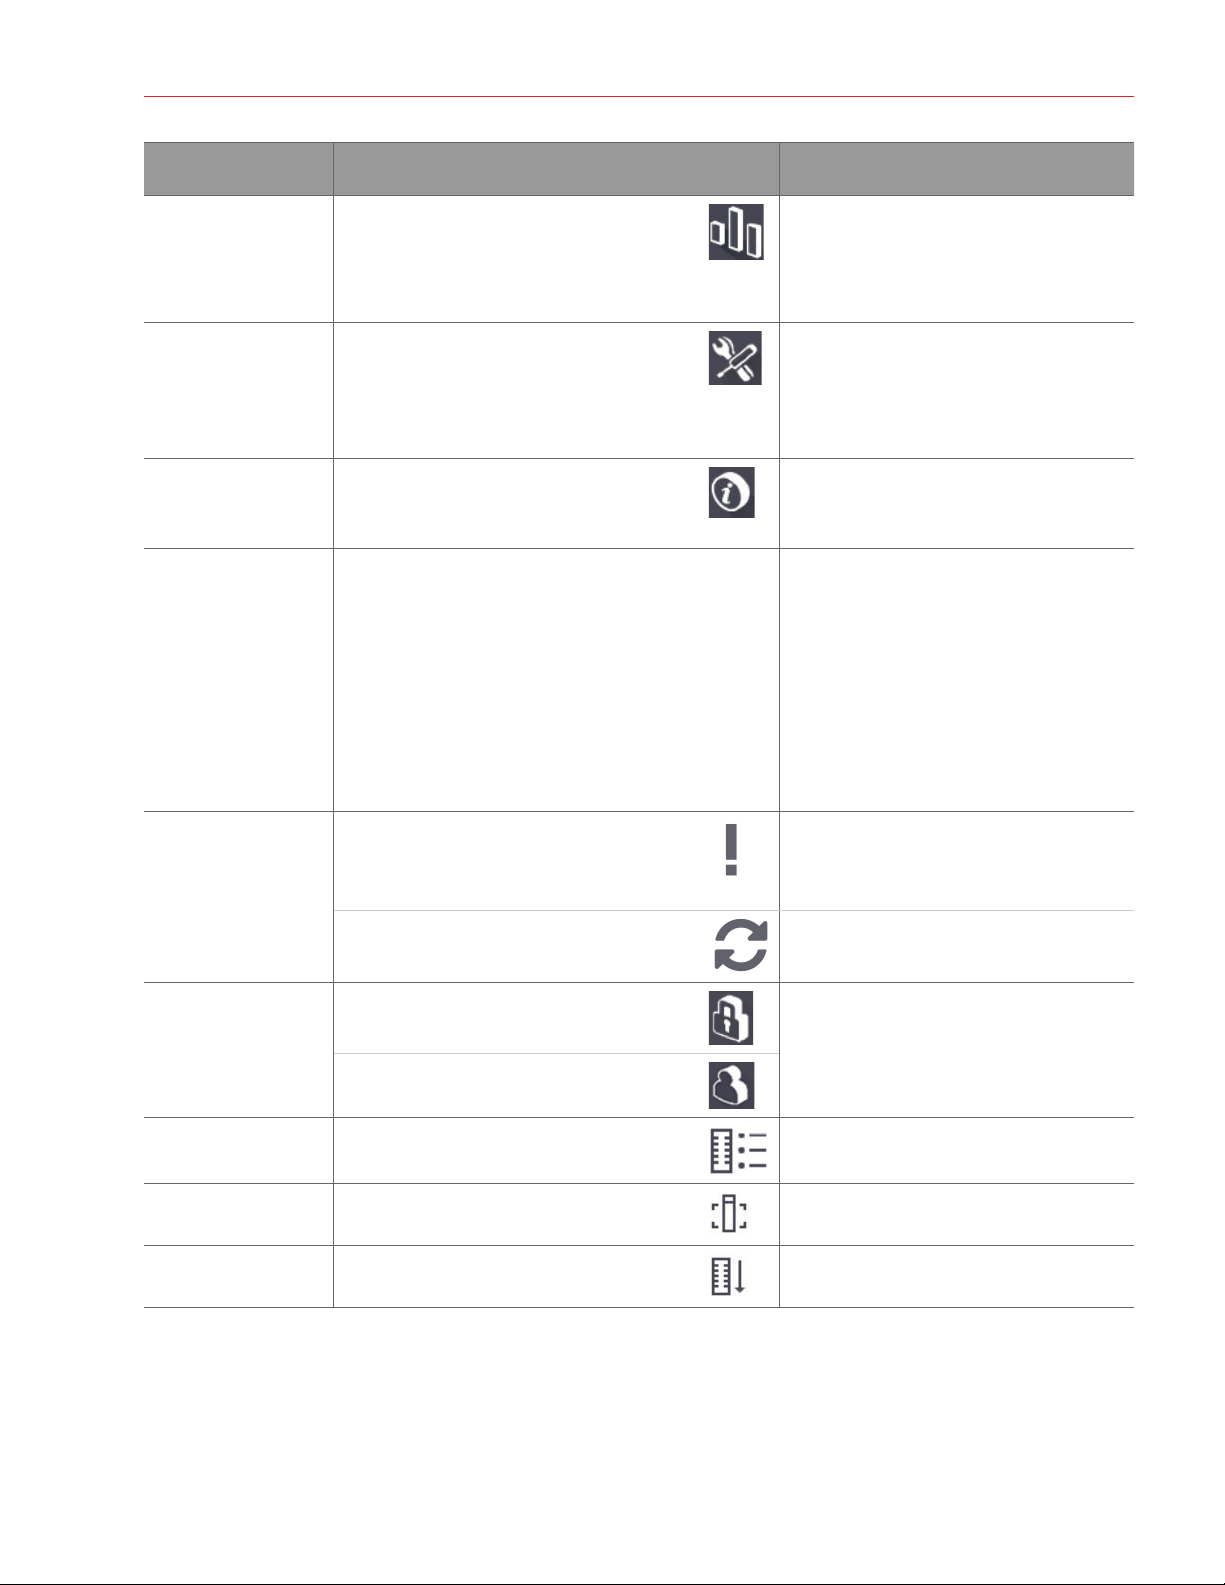
Chapter 2: Aperio GT 450 Overview
Element: Use: More details see:
Scanner statistics Tap Stats to view scan statistics, such as
the number of slides or racks scanned
within a certain time period.
Maintenance Tap Maintenance if you need to restart
the scanner, or view the serial number and
the hardware and firmware versions of your
scanner.
Help Tap Help to view training and maintenance
videos, or access an online version of the
quick reference guide.
Carousel and rack
status
Use the carousel and rack position on the
touchscreen interface to:
Ìy View the rack status, indicated by the
color of the rack position.
Ìy Tap a rack position to select the rack.
Ìy Apply an action to the selected rack,
such as Priority or Rotate (described
next).
Rack actions
Note: Rack actions
Select a rack and tap Priority to move the
rack to the top of the scan queue.
appear when you
select a rack.
Select a rack and tap Rotate to rotate the
rack to the rack loading area.
“Scan Statistics” on page 39.
“Serial Number and Firmware Version” on
page 41.
“Shut Down the Scanner” on page 41.
“Restart the Scanner” on page 43.
“Help Videos and Guides” on page 20.
“Carousel Rotation” on page 26.
“Check Scan Status” on page 33.
“Priority Scanning” on page 30.
“Rotate a Rack to the Rack Loading Area”
on page 31.
Login, Logout Tap Login to open a keypad and enter your
pass code to access the scanner.
“Log In and Log Out of the Scanner” on
page 26.
Tap Logout to lock access to the scanner
touchscreen interface.
Rack View Select a rack and tap Rack View to view
the scan status for each slide in the rack.
Slide View Select a rack and tap Slide View to view
macro images for each slide.
Rack Order Tap Rack Order to view scan order and
“View Slide Status for a Rack” on page
35.
“View Macro Images of Scanned Slides”
on page 36.
“View Rack Scan Order” on page 36.
status of the racks.
Aperio GT 450 User’s Guide, Revision A © Leica Biosystems Imaging, Inc. 2019 19
Chapter 2: Aperio GT 450 Overview
Help Videos and Guides
You can access training videos and the Aperio GT 450 Quick Reference Guide directly from the touchscreen interface.
1. Tap Help, and then tap a video or guide to view.
Key Features
This section describes some key features of your Aperio GT 450.
Continuous Load Workflow
You can continuously load new racks and unload completed racks without interruption.
Scan Magnification
Custom optics for native 40x scanning magnification.
Automatic Image Quality Check
The Auto-Image QC automatically checks scan quality. If the scan status is green for “complete,” the scan and Image QC
were successful. If there is a problem with the scan quality on a slide, the system alerts you.
Image Types Supported
The Aperio GT 450 creates DICOM compatible images and SVS files.
Aperio GT 450 User’s Guide, Revision A © Leica Biosystems Imaging, Inc. 201920

Chapter 2: Aperio GT 450 Overview
Slide Types Supported
The scanner supports 1 x 3 inch glass slides (per ISO 8037/1).
Coverslips
Fully-cured coverslips are required. The Aperio GT 450 supports common industry coverslips used for 1 x 3 inch slides.
Slide Racks Supported
Optimized and recommended for use with Leica HistoCore Spectra workstation racks (stainer and coverslipper), which
include the Leica Universal Rack 30-slide capacity (part number 23RACKGT450). Sakura Prisma Stainer and Coverslipper
Rack 20-slide capacity racks also accepted.
Slide Capacity
The maximum slide capacity depends on the racks used:
Ì` 20-slide racks – load up to 300 glass slides.
Ì` 30-slide racks – load up to 450 glass slides.
Barcodes Supported
The Aperio GT 450 supports the following barcodes:
Ìy NW7
Ìy QR Code
Ìy Data Matrix
Ìy Interleaved 2 of 5
Ìy Code 39
Ìy Code 128
Ìy PDF417
Ìy MicroPDF41
Optional Aperio Viewing Station
We recommend using the Aperio Viewing Station for slide image viewing. The Aperio Viewing Station is optional and is not
included in the Aperio GT 450 product. For more information, contact your Leica Biosystems representative.
If you do not purchase the viewing station, we recommend using a medical-grade monitor for optimal image viewing.
For detailed viewing station and monitor specifications and requirements, see the Aperio GT 450 Specifications.
Aperio eSlide Viewers
You can use the following viewers to view eSlides created on the Aperio GT 450 scanner:
Ì` Aperio ImageScope (version 12.4 or higher) – this viewer is installed on your viewing workstation. For the
latest version of Aperio ImageScope, contact your Lab Manager or download the installation file from the Leica
Biosystems website. You must have administrator privileges on your viewing station to install Aperio ImageScope.
Ì` Aperio WebViewer – this viewer is integrated with Aperio eSlide Manager. It is also available for LIS
integration.
Aperio GT 450 User’s Guide, Revision A © Leica Biosystems Imaging, Inc. 2019 21

3
When preparing slides for scanning, you must use the procedures required by the vendors of the stains and reagents
i
you are using.
Well prepared slides are crucial to a successful scan. After reading this section, if you have questions about whether
your slide preparation techniques will provide good scan quality, contact Leica Biosystems Technical Services.
Always consult the material safety data sheets for the stains and re-agents you are using, as well as your institution’s
biosafety policies and procedures regarding safely handling biological materials.
It is the responsibility of the lab to verify the quality of the tissue preparation, the physical characteristics of the slide, and
the staining quality.
Slide Preparation
Tissue Preparation
For optimal scanner performance, slides must be well-prepared.
Staining
Reproducibility of the slide staining is important for consistent and accurate diagnosis.
Ì` Make sure that the variations of the staining process are controlled and eliminated to the greatest extent possible.
Ì` Use appropriate morphological studies and controls as specified in the reagent manufacturer’s instructions.
Ì` Avoid excessive stain residue, as this may affect scanner performance.
Slide Preparation
Many scanning issues are avoided by checking slide quality. Ensure the following:
Ì` Slides are very clean and in good condition. Wipe them with a clean cotton cloth (don’t use chemical
cleaners). Make sure the slides have no dirt, no fingerprints, no markings, no writing, no extra mounting media, no
broken slides, no chips, no scratches, etc.
Ì` Slides are fully cured (not “wet”).
Ì` All slides have coverslips. Coverslips are required when using the Aperio GT 450 scanner.
Ì` There is no mounting adhesive around the edges of a slide. This can cause it to stick or catch in the scanner
stage area.
Aperio GT 450 User’s Guide, Revision A © Leica Biosystems Imaging, Inc. 201922
Chapter 3: Slide Preparation
CAUTION: Do not attempt to scan damaged slides, as doing so may damage the scanner.
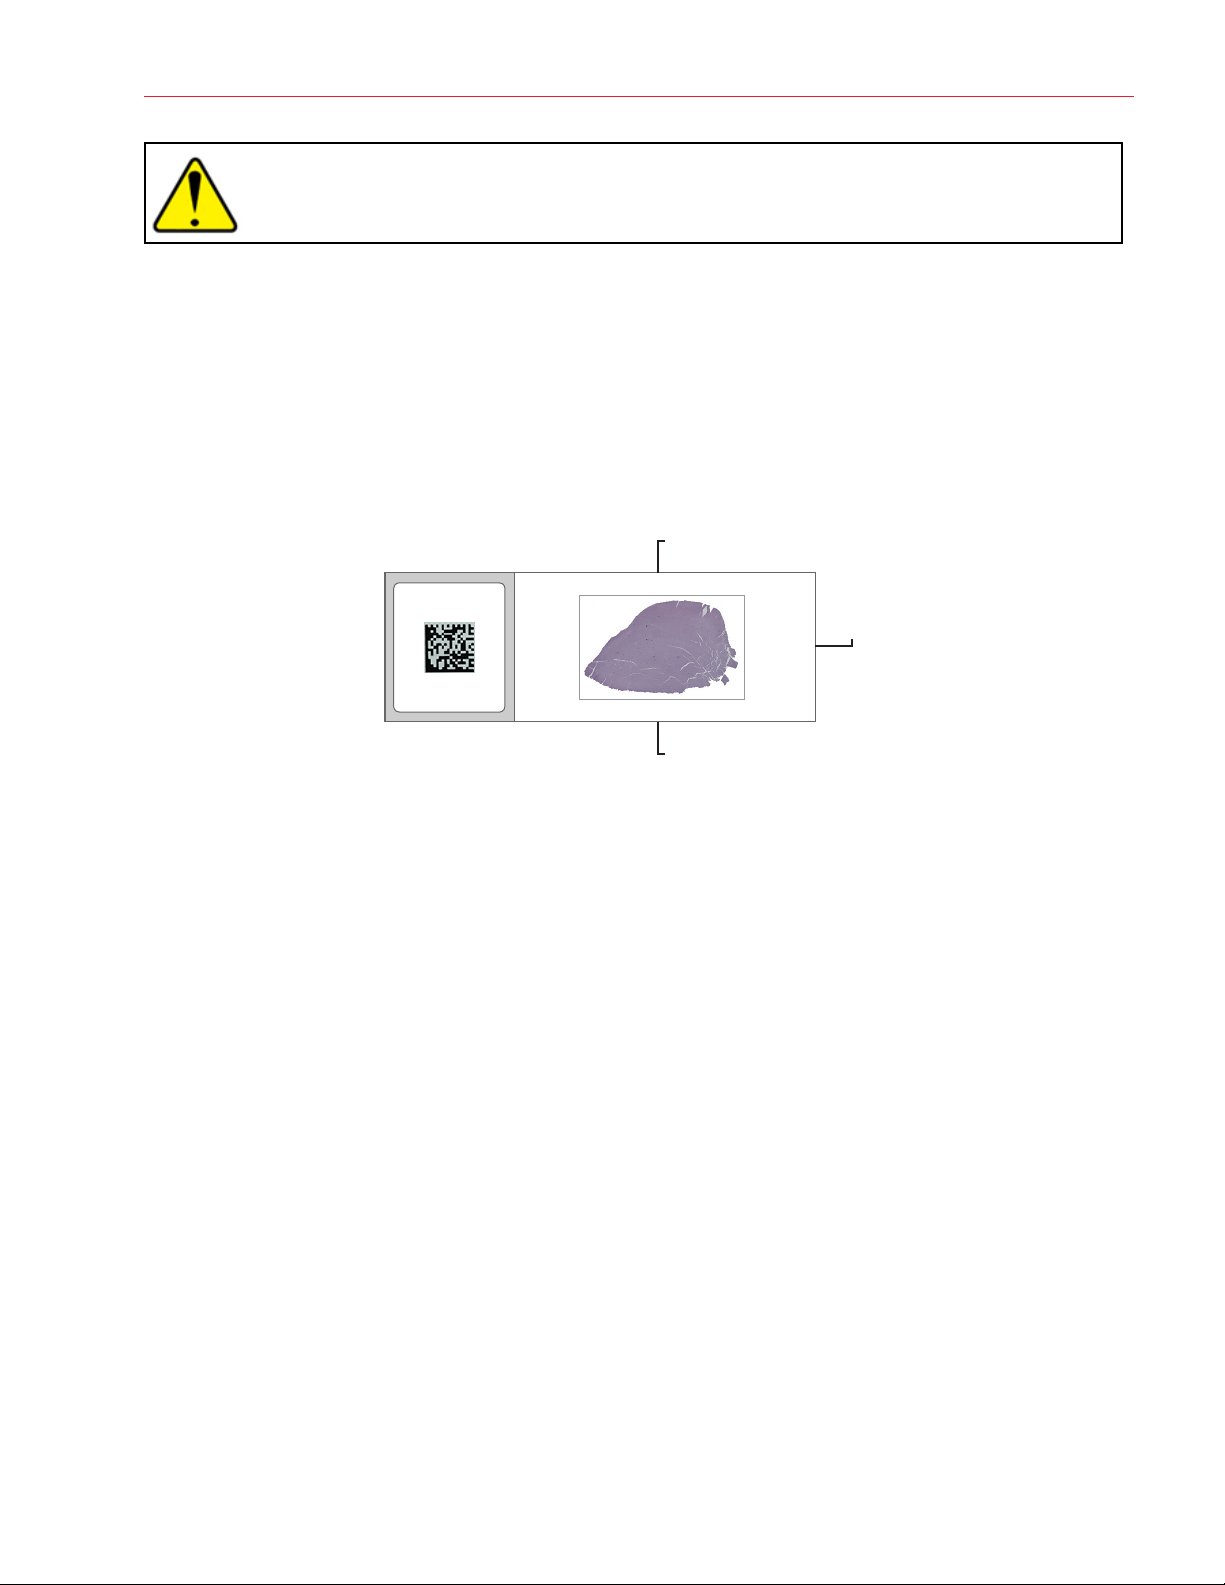
Tissue Placement
Place the tissue in the middle of the slide, a distance from the edges of the slide, the label, and any other markings. Ensure
the following:
Ì` The coverslip covers all the tissue.
Ì` The label does not cover any tissue.
The example below shows minimum distances from the side and bottom edges of a 26mm x 76mm slide.
≥ 0.77 mm
≥ 0.31 mm
≥ 1.61 mm
For more details on slide specifications, see “Slide Types Supported” on page 21. For
Fixing Slide Preparation Errors
Some physical problems of a slide can be resolved by cleaning the slide with a lint-free cloth or trimming the sides with a
razor blade. Permanent problems with a slide may require the preparation of a new slide.
Coverslips
Coverslips are required when using the Aperio GT 450. They must be fully-cured or have completed the on-board drying
process for an automated coverslipper, such as the Leica Biosystems HistoCore SPECTRA Coverslipper.
The Aperio GT 450 supports common industry glass or plastic coverslips used for 1-inch x 3-inch (2.54 cm x 7.62 cm) slides.
See the Aperio GT 450 Specifications for coverslip specifications. (Glass coverslips are recommended.)
The quality of the scan is affected by the condition of the coverslip.
Ì` Keep the mounting media that attaches the coverslip to the slide to a minimum. Excess mounting media makes it
hard for the tissue finder to distinguish between actual tissue and the mounting media.
Ì` Make sure there are no air pockets under the coverslip.
Ì` For best results, do not mark or write on the coverslip.
Ì` The coverslip must not hang over the side of the slide.
Ì` Make sure there is only one coverslip attached to the slide.
Aperio GT 450 User’s Guide, Revision A © Leica Biosystems Imaging, Inc. 2019 23

Chapter 3: Slide Preparation
Ì` Wipe the coverslip clean of dust and fingerprints before loading the slide in the scanner.
Labels
The Aperio GT 450 supports common industry labels used for 1 x 3 inch slides. Improperly applied slide labels can cause
slides to jam.
Ensure the following:
Ì` Do not apply multiple labels to the same slide—this can cause the slide to exceed the specification for slide
thickness. See the Aperio GT 450 Specifications for slide specifications.
Ì` Labels do not extend past the edges of the slide and that they do not cover any tissue.
Ì` Labels are not underneath coverslips.
Ì` Labels are firmly attached.
Ì` Do not apply labels to the bottom surface of the slide.
Ì` Always load slides into the rack with the label facing out and up, as “Load Slides in the Rack” on page 27.
The examples below show a slide with multiple labels that cause the slide to exceed the allowable maximum thickness, and
a slide with the label peeling away:
Barcodes
For a list of supported barcodes, see “Barcodes Supported” on page 21. For best performance, we recommend using
barcode labels that have a white background and black ink.
Improperly applied slide barcodes can cause slides to jam. Ensure the following:
Ì` Barcode labels meet the same application requirements as slide labels. See “Labels” on page 24.
Ì` Apply barcode labels to the slide label region.
Ì` Ensure a minimum of 0.5 mm between each side of the barcode and the edge of the label.
Ì` Apply only one barcode label per slide.
Ì` Use only supported barcode labels. (See “Barcodes Supported” on page 21.)
Ì` Use only high-quality printed barcode labels.
Aperio GT 450 User’s Guide, Revision A © Leica Biosystems Imaging, Inc. 201924
 Loading...