

LEGRAND Wattstopper LMDL-600 Installation Instructions Manual

Wattstopper
LMBR-650
For networking
and managing
rooms, floors,
and building
(optional
LMRC-61
e
on a mobile device
®
DLM Wireless Photosensor with IPv6/Bluetooth® Low Energy Technology
The DLM Wireless photo sensor is a wireless battery
powered light sensor intended for operation with Wireless
room controllers. It is an open loop photo sensor that
measures daylight in foot candles to automatically switch or
dim zones of lighting. The sensor sends light level signals to
LMRC-611MCC room controllers to adjust connected lighting
loads.
Sensor Installation and Conguration Overview
Application Note: Depending on external factors (such as
environment, fixture location and dimming curve of the load)
an adjustment factor may be needed to achieve the target
light level after calibration. If the calibrated LMDL and fixture
combination outputs less light than the target light level
(set in the LMRC parameter), adjust the ‘target light level’
parameter by increasing to an appropriate amount.
IMPORTANT: You must wake the device (press the Config
button) before commissioning. If the LMDL is paired to a
secure room with LMCS, LMCS is required to calibrate
the sensor. If the LMDL is paired to a secure room with
the DLM Configuration App, please calibrate with the DLM
Configuration App.
No: 27365 – 8/18 rev.4
Installation Instructions • Instructions d’Installation • Instrucciones de Instalación
Catalog Number • Numéro de Catalogue • Número de Catálogo: LMDL-600
Country of Origin: Made in China • Pays d’origine: Fabriqué en Chine • País de origen: Hecho en China
SPECIFICATIONS
Light sensor range .................................................................. 1 to 1,500 fc
Power Supply .......................... Battery powered, CR123A Lithium Ion, 3 VDC
Connection to DLM Network ... Wireless via LMRC-611MCC room controllers
Wireless Hardware
Radios: ................................................................ Two IEEE 802.15.4
Frequency: ............................................................................. 2.4Ghz
Antennas: ................................ IPv6 Mesh and Bluetooth low energy
Wireless Standards
Radio 1: ......................................................... IPv6 Mesh (6LoWPAN)
UNIT DESCRIPTION
1. Mount the photosensor so that the Daylight Viewing
Port directly views the daylight entering the space
through a window or a skylight. See Placement
Guidelines and Mounting the Photosensor.
2. Turn ON power to the room controller.
3. Use LMCS-100 or the DLM Configuration App software
to complete the configuration process. The LMDL-600
will not operate properly until the configuration and
calibration is successful.
4. Ensure there is a minimum 5fc of ambient light in the
space.
5. From LMCS or the App, select the room network
you’d like to calibrate and select the LMDL to start the
calibration process. You will need a light level meter in
order to record the fc data of the space for each prompt
in the software. Place the light meter at the task level.
6. After following the software prompts, once calibrated,
you can adjust switch overrides and other features by
selecting the LMRC that the LMDL is paired to.
Range: .......................................................................up to 60 ft.
Radio 2: ............................................................ Bluetooth low energy
Range: .......................................................................up to 30 ft.
Wireless Encryption
AES-128 bit symmetric key, randomly generated per PAN
Shared via secured DTLS only
Environment:
Operating Temperature .....................................32° to 104°F (0° to 40°C)
Storage Temperature .......................................23° to 140°F (-5° to 60°C)
Relative Humidity ...........................................5 to 95% (non condensing)
Other:
Plenum Rating ................................................................................ UL2043
Compliance/Regulatory
FCC, RoHS,
Bluetooth certified
UL and cUL listed (E101196)
Patent Pending
WIRELESS DLM CONNECTION
)
1MCC
Wireless
Dimmer and/or
Scene Switch
DLM Configuration App
Sensor Params
LMPX-600
LMPC-600
Mode Auto On
Blink On
Load Type Dim
IPv6 Mesh for secur
networking of DLM
rooms and devices
over 6LoWPAN
Secure Bluetooth
low energy
communication for
mobile App support
LMDL-600
Wireless
Photosensor
NOTE: The LMDL cannot be
used in a Hybrid DLM Room.
The LMDL must be used with
wireless room controllers.
PLACEMENT GUIDELINES
LMDL-600
Light Fixture
Skylight
WARNING: DO NOT USE THE DLM LOCAL NETWORK TO CONTROL LOADS OTHER THAN LIGHTING IF THE
LOAD IS NOT IN VIEW OF A PERSON AT ALL CONTROL LOCATIONS. DO NOT USE DLM TO CONTROL ANY
LOAD THAT MIGHT BE DANGEROUS OR CAUSE A HAZARDOUS SITUATION IF ACCIDENTALLY ACTIVATED.
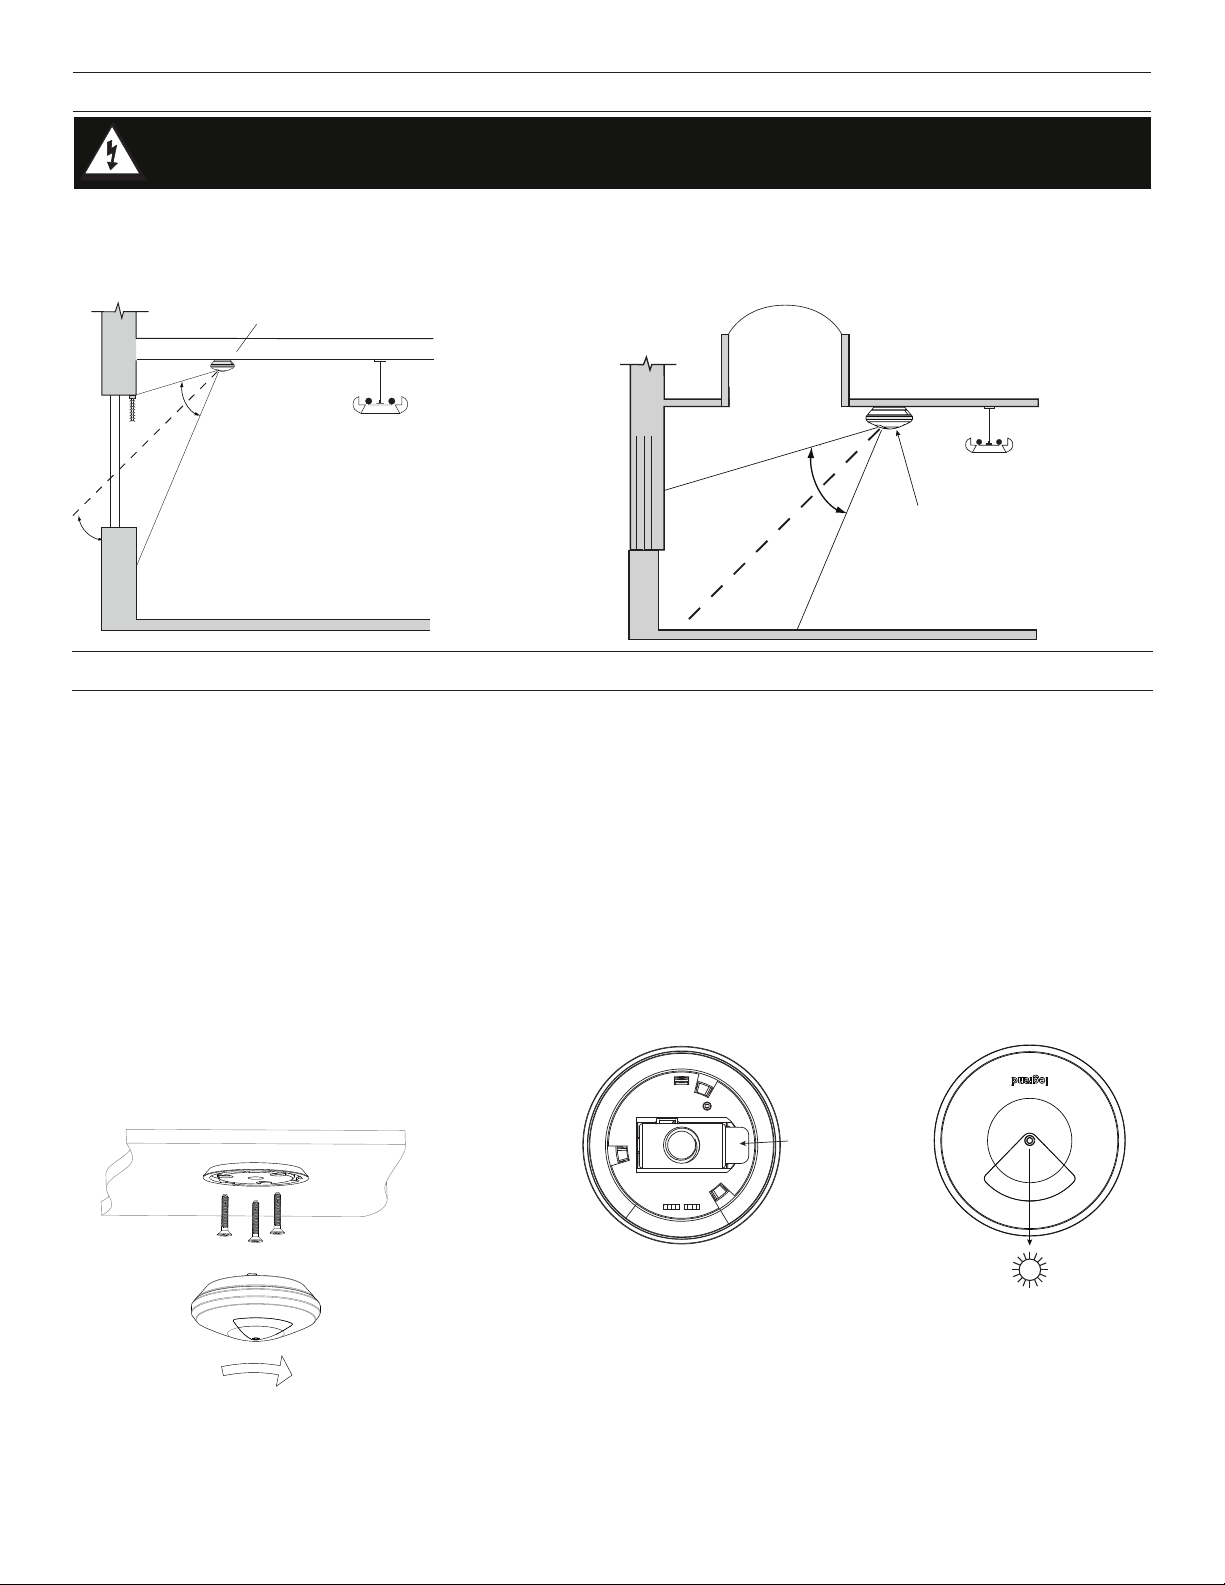
The LMDL-600 switches or dims electric light in response to daylight. It is important to select a location where the photosensor
measures daylight contribution only. For proper operation the photosensor should not see any electric light contribution.
When the primary source of daylight is a window (sidelighting), the LMDL-600 is typically ceiling mounted between one to three feet
away from the window. The figure below shows a typical placement location for a sidelit application.
60°
Window
Light Fixture
60°
45°
Mount photosensor close to window
to see only daylight contribution.
Sensor must not view
electric light output.
MOUNTING THE PHOTOSENSOR
The LMDL-600 in a ceiling or open ceiling environment so that the daylight view port directly views daylight entering the space through a
window or skylight.
NOTE: The LMDL-600 operates on an included CR123A battery providing a 10+ year lifespan. Before mounting, pull the battery tab on
the back of the unit to activate the battery and power the unit.
The photosensor can be mounted using one of thee possible methods:
• Mounted to the ceiling using the included plastic mounting plate
• Mounted to a hanging threaded rod, for open ceiling environments, using the included threaded rod adapter
• Recessed mounting, using the optional LMDL-600-RPM Recessed Plenum Mounting Kit
NOTE: The LMDL-600 has a rotating cover which allows the daylight port to be adjusted to point directly at the window or skylight. The
cover can be rotated approximately 170°, so mount the photosensor so it points in the general direction of the window/skylight
and then adjust the cover.
Ceiling Mount
1. Attach the mounting plate to the ceiling with the
three included 1” mounting screws.
2. Twist the LMDL-600 clockwise to lock it onto
the mounting plate.
NOTE: Pull protective battery tab
before installation to power
the sensor.
LMDL-600
Rotate sensor window
so that it points towards
window or skylight
Pull Tab
Twist to
Lock
2
 Loading...