

LEGRAND Wattstopper 225CWS Quick Start Manual

Wattstopper
Heart Beat
JST Sock
T O P V I E W
t
S I D E V I E W
Power Cord
®
Wireless Network Manager
Gestionnaire de Réseau Sans Fil
No: 24200 – 07/16 rev. 1
Administrador de Red Inalambrico
Quick Start Guide • Guide de démarrage • Guía de inicio rápido
Catalog Numbers • Les Numéros de Catalogue • Los Números de Catálogo: 225CWS
Country of Origin: Made in China • Pays d’origine: Fabriqué en Chine • País de origen: Hecho en China
INITIAL SETUP
1. Connect the back up battery to the printed circuit board. To do this, begin by pressing
down simultaneously on the release tabs (see Figure 3) on each side of the modem
to remove the plastic casing. Proceed by inserting the white JST connector at the end
of the red and black wiring into the JST socket. Refer to Figure 4 for location of socket
and Figure 5 for orientation.
CAUTION Danger of explosion if battery is incorrectly replaced. Replace only with
the same or equivalent type. Batteries should be recycled or disposed of
as per state and local guidelines.
NOTE: Please allow the 225CWS to charge the battery for 120 minutes before
performing upgrades.
2. Connect the power supply to the 225CWS. If required, connect optional 3G antenna
to the SMA connector, and the JenNet antenna to the RP-SMA connector.
IMPORTANT The 225CWS has a back-up battery in case of power interruptions to ensure the device shuts down properly. Allow the
225CWS to charge the battery for 120 minutes before removing power from the unit. If shutdown is required prior to this time,
use the manual shutdown function in the Host App. Please note the status of your unit, indicated by the amber LED heartbeat
indicator. InferStack starts automatically and indicates a ready state when the LED blinks once or twice per second. If the
status light does not enter this pattern, do not remove power as that could cause the device to corrupt. Please call Tech
support if the light does not enter that pattern after an extended period of time.
Figure/Figura 1
3. Once InferStack has started, the device will broadcast a WiFi network with an SSID
the same as the first 2 sections of your Host ID. The Host ID can be located on the
label of the device, or on the box the device came in.
Figure/Figura 2
5.3” / 135 cm
Example: 225CWS-C1234567890-ABCD1234
The default passphrase for this is the last 8 characters of your Host ID, and is case
sensitive. Connect to this network with your computer.
Example: 225CWS-C1234567890-ABCD1234
1.7” / 42 cm
4. Using the Web browser of the computer connected the to the WiFi network, navigate
to http://192.168.10.1. The InferStack login screen will appear.
5. The default username: su
3G
FUENTE DE ALIMENTACIÓN
Default Password: The last 8 characters of your host ID.
The ID is located on the label of the device or the label on the box.
Example: 225CWS-C1234567890-ABCD1234
6. Once you log in to the device, you will load the InferStack interface on the DB Builder app. See Figure 6 on page 2.
Figure/Figura 3 Figure/Figura 4
Push Tabs To Open
USB
ETH
RS-232
15VDC
et
Battery
SYS
Reset
Insert pins here
back wall back wall
Pins
Figure/Figura 5
cut out
Flip so cut out
is resting
against the
back wall of the
JST Socket.
JST Socket
ALIMENTATION
(15 V DC 1 amp)
Power Cord
1.3” / 33 cm
JENNETUSB LAN RS-232 POWER SUPPLY
Slide into place
JST Socke
NETWORK CONFIGURATION
The Networking configuration of the 225CWS can be changed from its default setup.
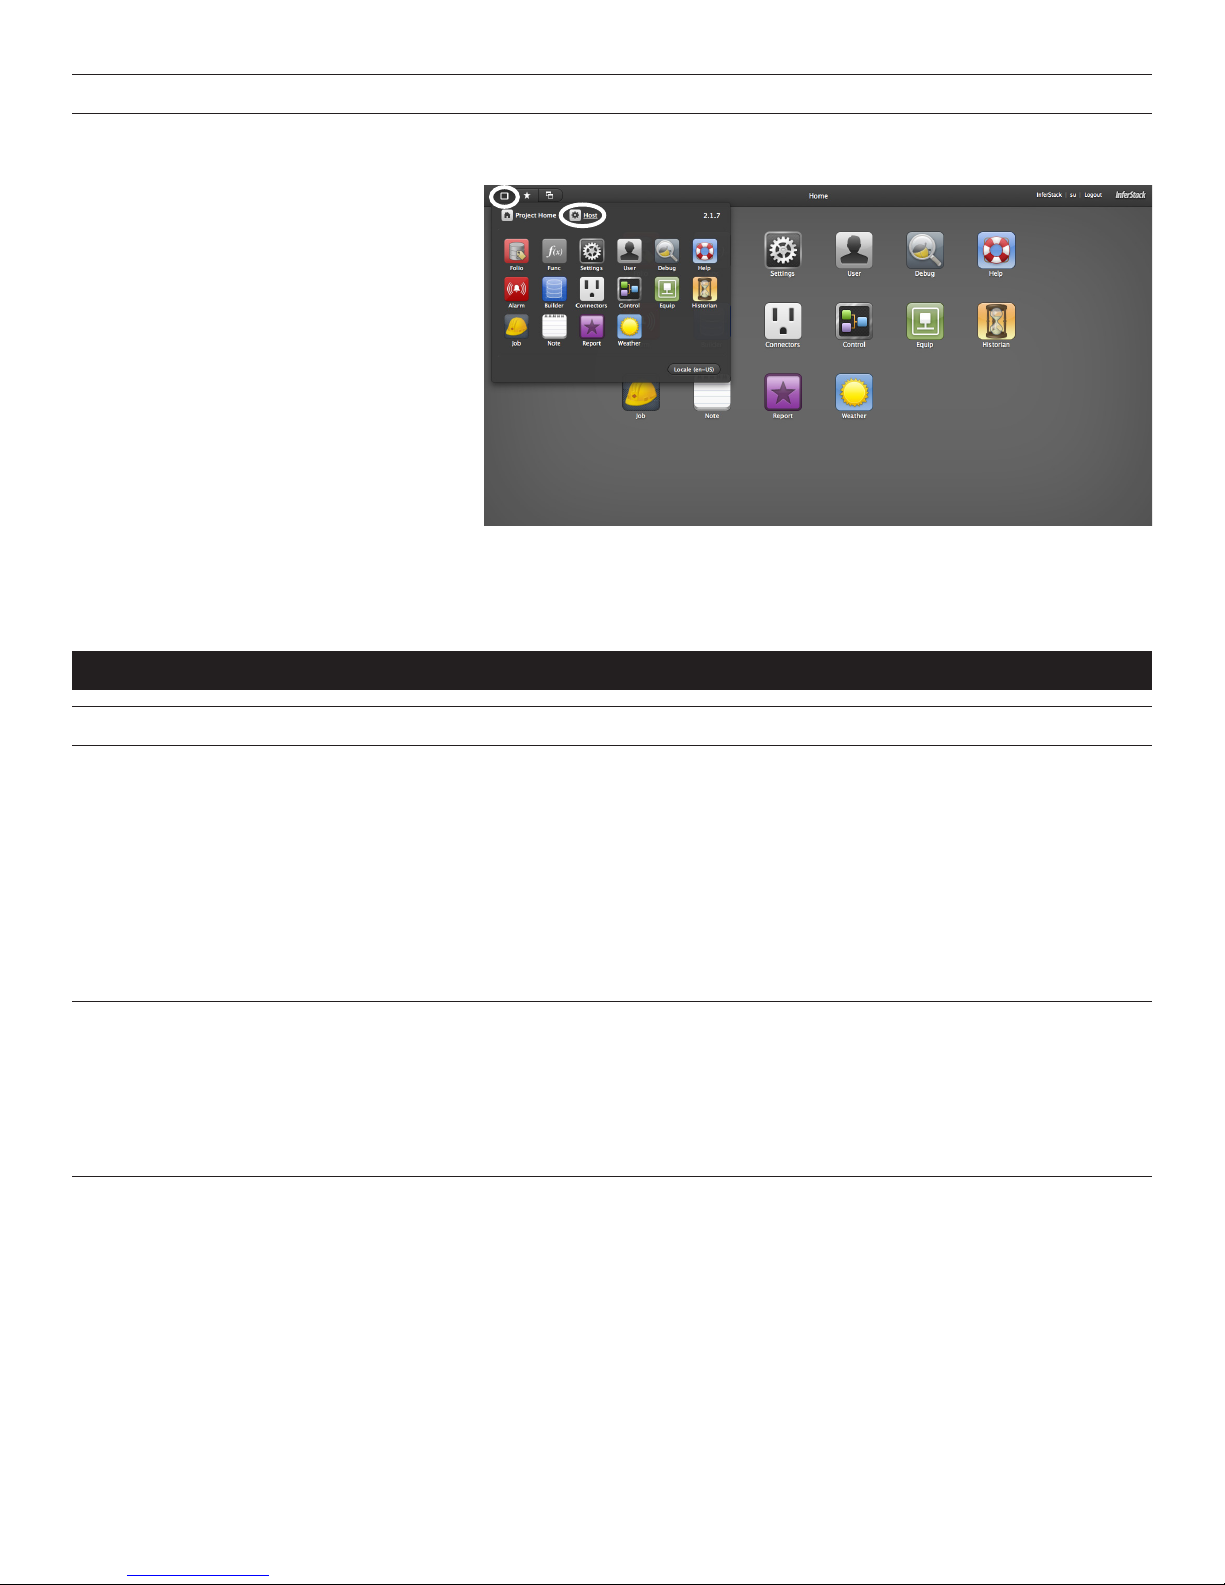
1. Log in to the device. Select the Host App by
clicking the box in the upper left hand corner,
as shown in the red circle in Figure 6. Then
click the Host icon.
2. Click the Network tab to display the network
settings, as shown in Figure 7 on page 4.
This fields displayed on the tab are
read-only. To make changes, click Network
(next to Edit) to open the network edit
window, as shown in Figure 8 on page 4.
3. The WAN mode can be changed from DHCP
to Static, and the parameters necessary can
be entered. The LAN network configuration
can also be configured on this page.
NOTE: The WAN and LAN configuration must be
on different subnets. Failure to comply with
this may result in loss of communication
with the unit.
4. If your 225CWS requires the use of the
optional 3G Modem, you must set the Uplink Mode to “Modem.” By default, this mode is set to “Modem” when the device is turned
on if the unit has completed provisioning.
5. Once all desired settings are configured, select OK at the bottom to apply the new settings.
For a full guide to the 225CWS, please visit www.legrand.us
Figure/Figura 6
INSTRUCTIONS EN FRANÇAIS
INSTALLATION
1. Branchez la batterie de réserve à la plaque de circuit imprimé. Pour ce faire, commencer en pesant simultanément vers le bas
sur les deux languettes de relâche de chaque côté du modem (voir Figure 3) afin de retirer le couvercle de plastique. Insérer
le connecteur blanc JST à l’extrémité de la ficher avec les fils rouge et noir. Reportez-vous à la figure 4 pour l’emplacement de
l’extrémité de la fiche et la figure 5 pour l’orientation .
MISE EN GARDE : Risque d’explosion si la batterie n’est pas remplacée correctement. Remplacez-la uniquement par un
type de batterie identique ou équivalent. Les batteries doivent être recyclées ou jetées conformément aux
recommandations locales et nationales.
REMARQUE: Le 225CWS dispose d’une batterie de secours en cas de coupure de courant, afin que le dispositif s’éteigne
correctement. Laissez la batterie du 225CWS se recharger pendant 120 minutes avant de le mettre à jour.
2. Branchez le 225CWS au bloc d’alimentation. Si nécessaire, branchez l’antenne 3G (en option) au connecteur SMA et l’antenne
JenNet au connecteur RP-SMA.
IMPORTANT Le 225CWS a une batterie de sauvegarde en cas d’interruption de courant et aussi pour s’assurer qu’il s’éteigne
adéquatement. Laisser le 225CWS branché pour une période d’au moins 120 minutes afin qu’il charge complètement
la batterie ensuite vous pouvez le débrancher. Si vous devez le débrancher avant cette période, utiliser la fonction
“Manual Shutdown” situé dans Application Hôte (Host App). L’état de votre dispositif est indiqué par le voyant DEL
clignotant de couleur ambre. InferStack démarre automatiquement et indique que le dispositif est prêt lorsque le
voyant DEL clignote une ou deux fois par seconde. Si le voyant clignote différemment, ne coupez pas l’alimentation,
car cela pourrait endommager le dispositif. Si le voyant continue à clignoter différemment après une période
prolongée, veuillez appeler le Support technique.
3. Lorsqu’InferStack est lancé, le dispositif diffusera un réseau Wi-Fi avec un SSID dont les 2 premières sections sont identiques à
votre Host ID. Vous trouverez votre Host ID sur l’étiquette ou sur la boîte du dispositif.
Exemple : 225CWS-C1234567890-ABCD1234
La phrase de passe par défaut correspond aux 8 derniers caractères de votre Host ID (attention aux majuscules et aux
minuscules). Connectez votre ordinateur à ce réseau.
Exemple : 225CWS-C1234567890-ABCD1234
4. Dans le navigateur Web de votre ordinateur connecté au réseau Wi-Fi, saisissez http://192.168.10.1. L’écran de connexion
d’InferStack s’affichera.
5. Nom d’utilisateur par défaut : su
Mot de passe par défaut : les 8 derniers caractères de votre Host ID
Vous trouverez votre ID sur l’étiquette ou sur la boîte du dispositif.
Exemple : 225CWS-C1234567890-ABCD1234
6. Lorsque vous vous connectez au dispositif, l’interface InferStack se chargera sur l’application DB Builder (voir Figure 6).
2
 Loading...