

Page 1
Unity System
Technical Manual
Software Version 2.2.x
P/N 1308112 Revision B
www.legrand.us/onq
Page 2
VI. Unity User’s Guide
This section describes the basic usage techniques to successfully navigate and enjoy a Unity System
along with specific walkthroughs of the individual Unity functions.
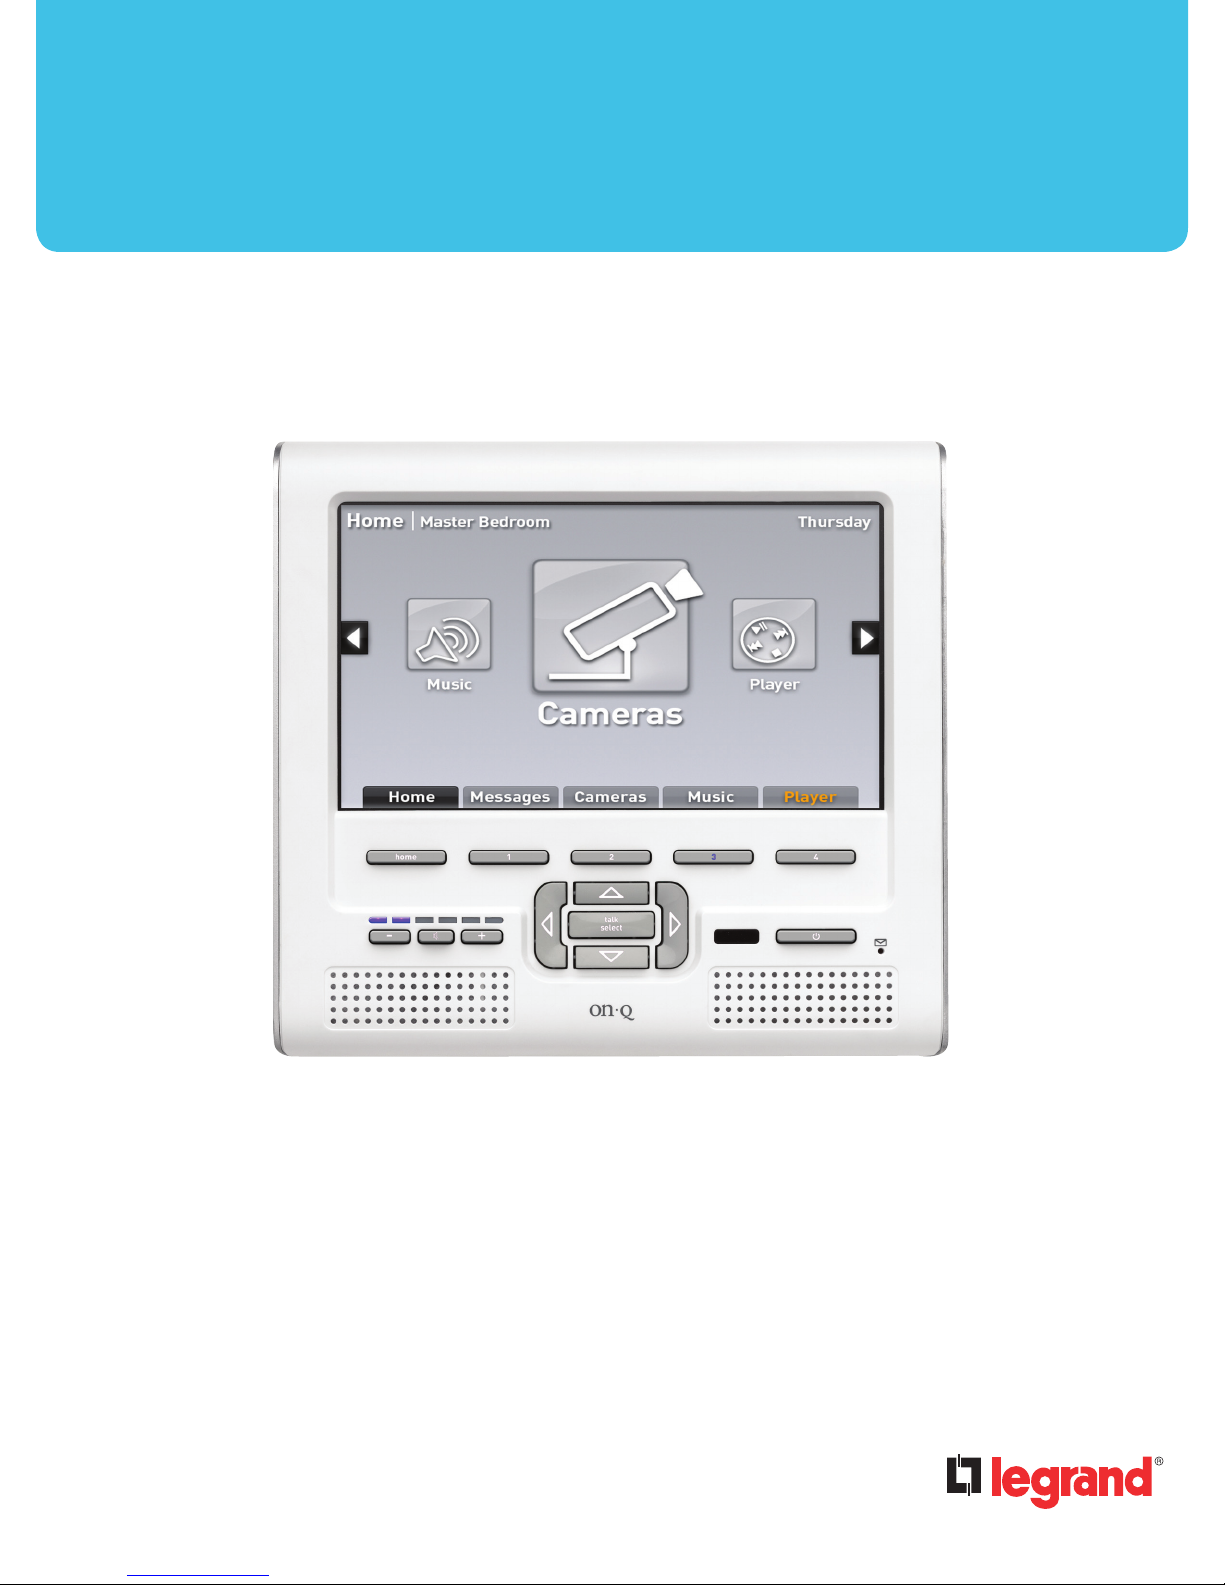
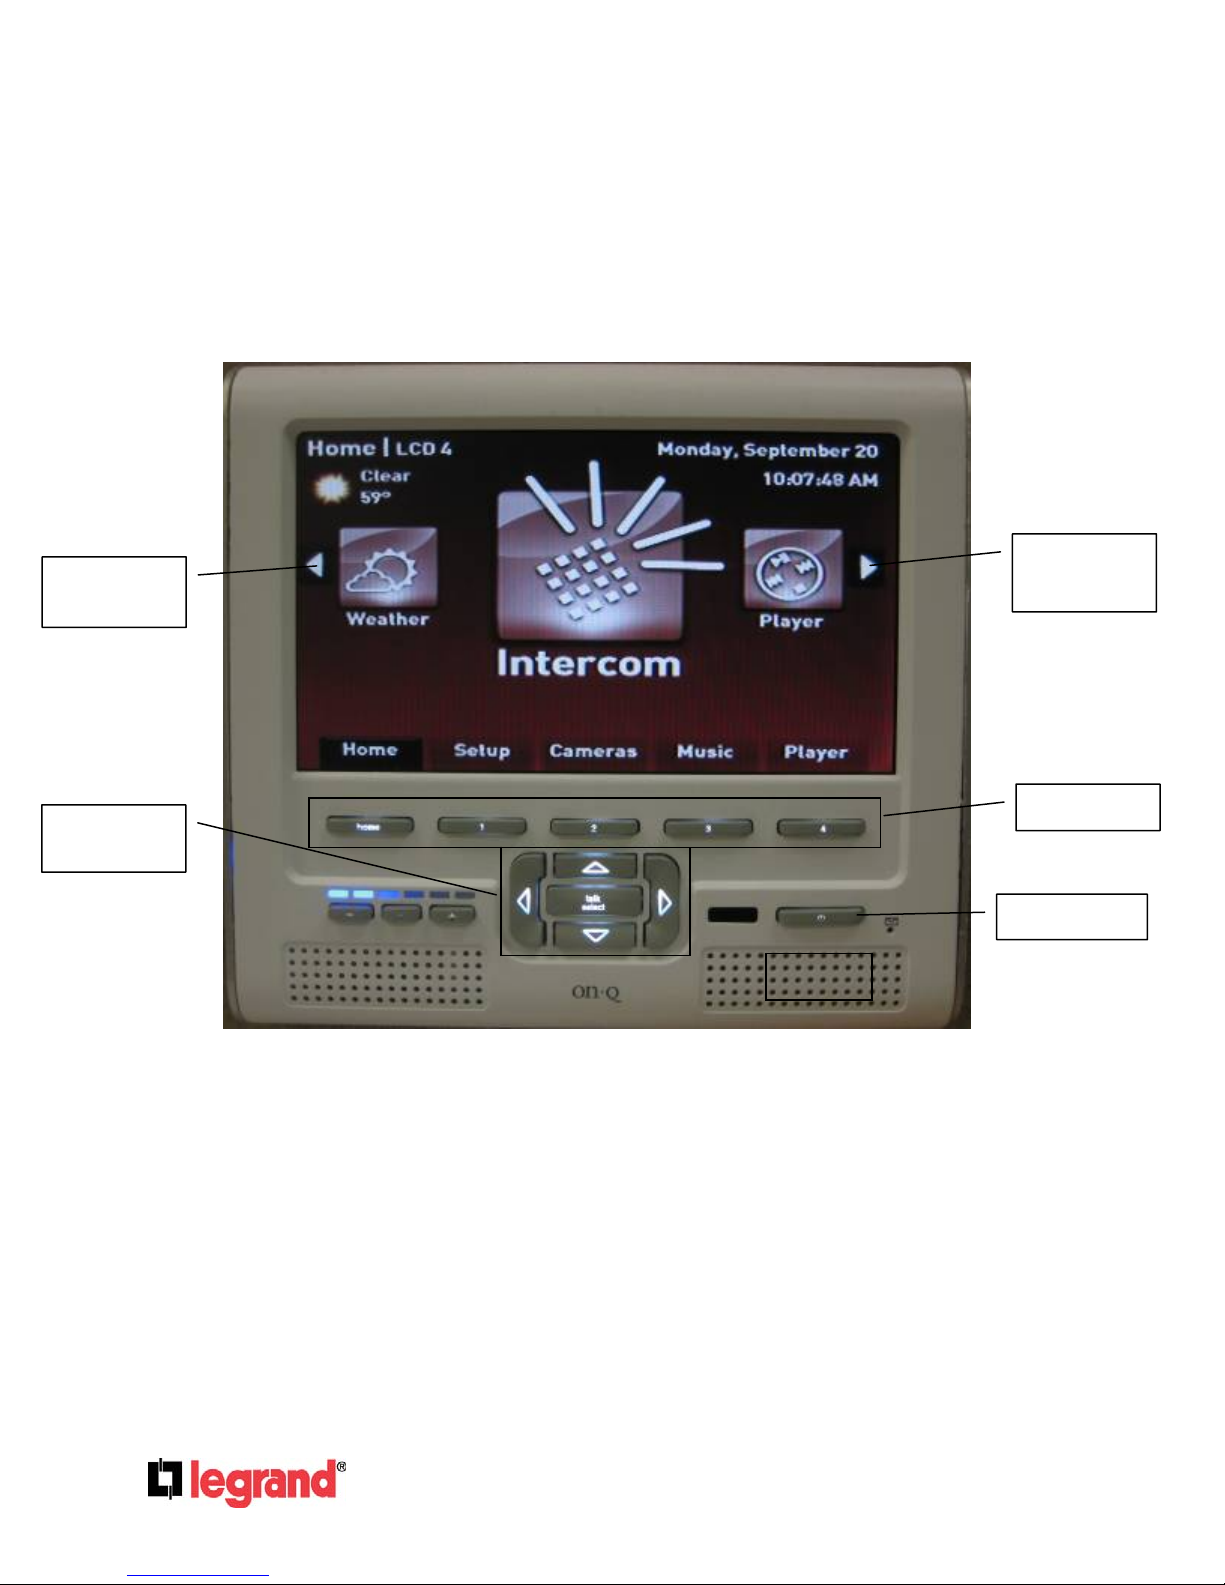
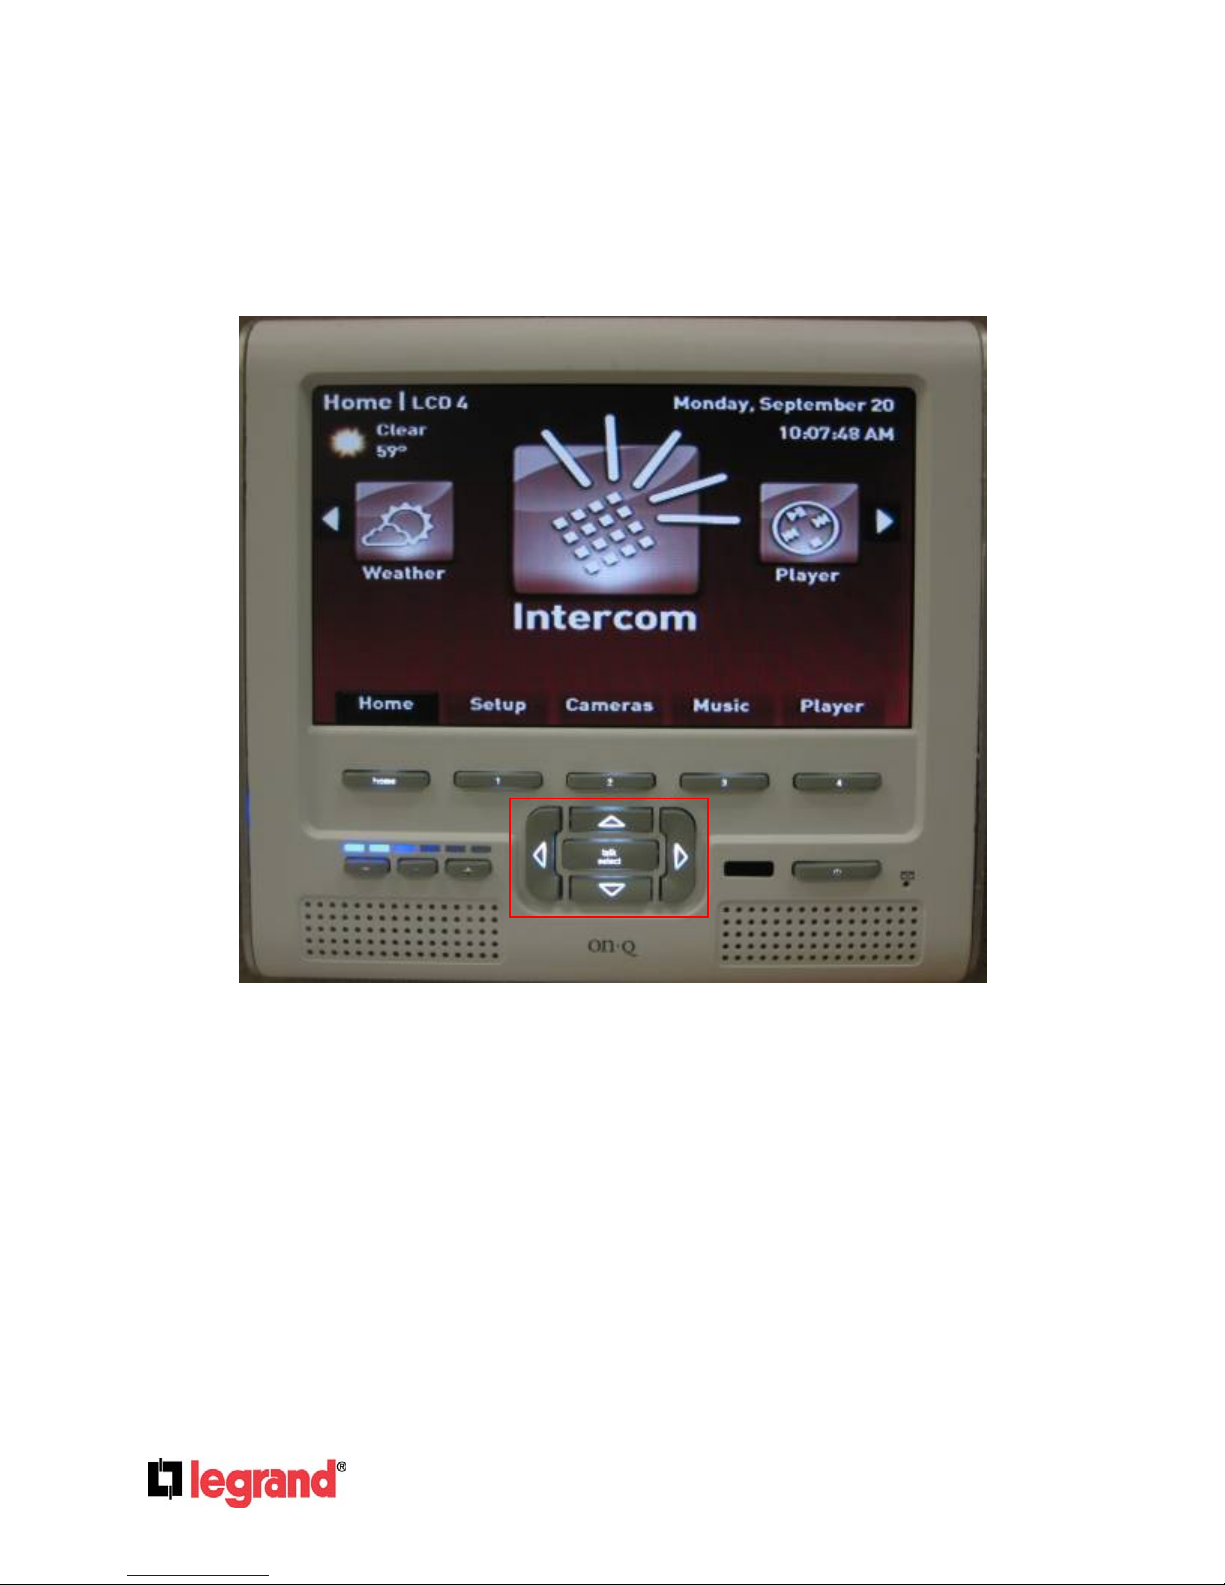
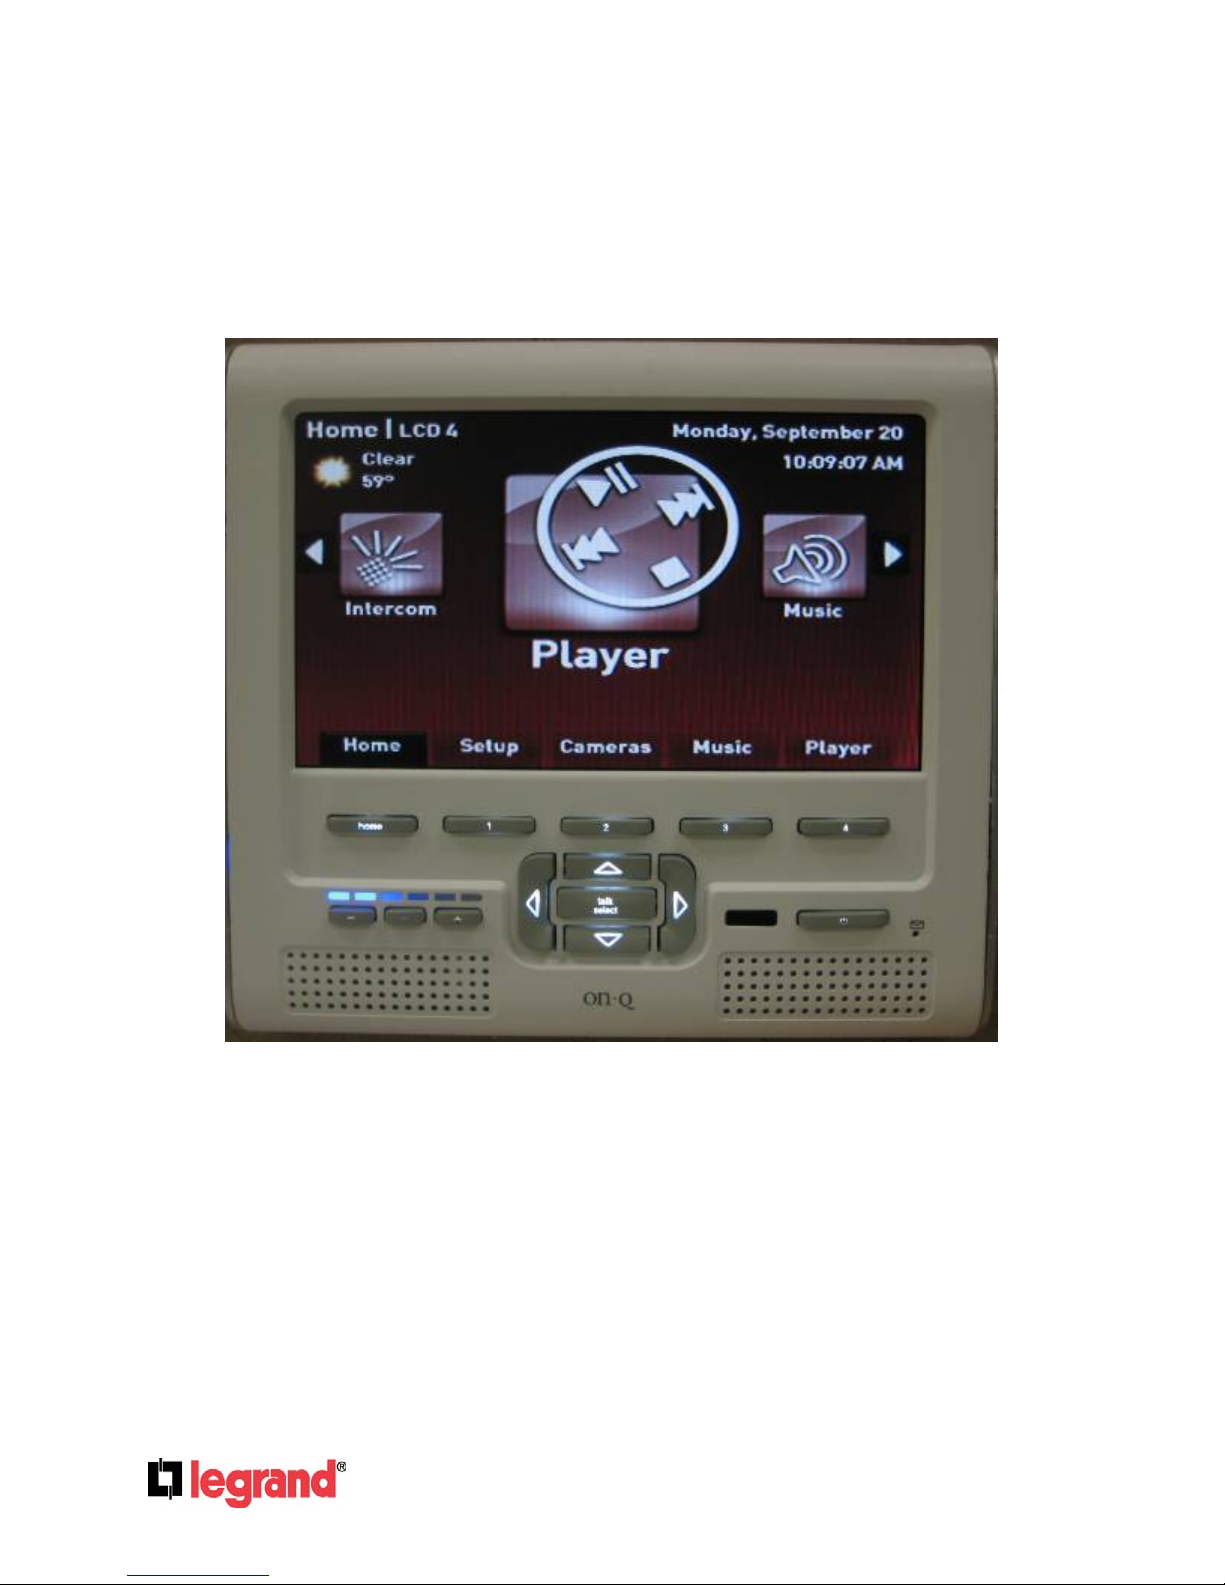
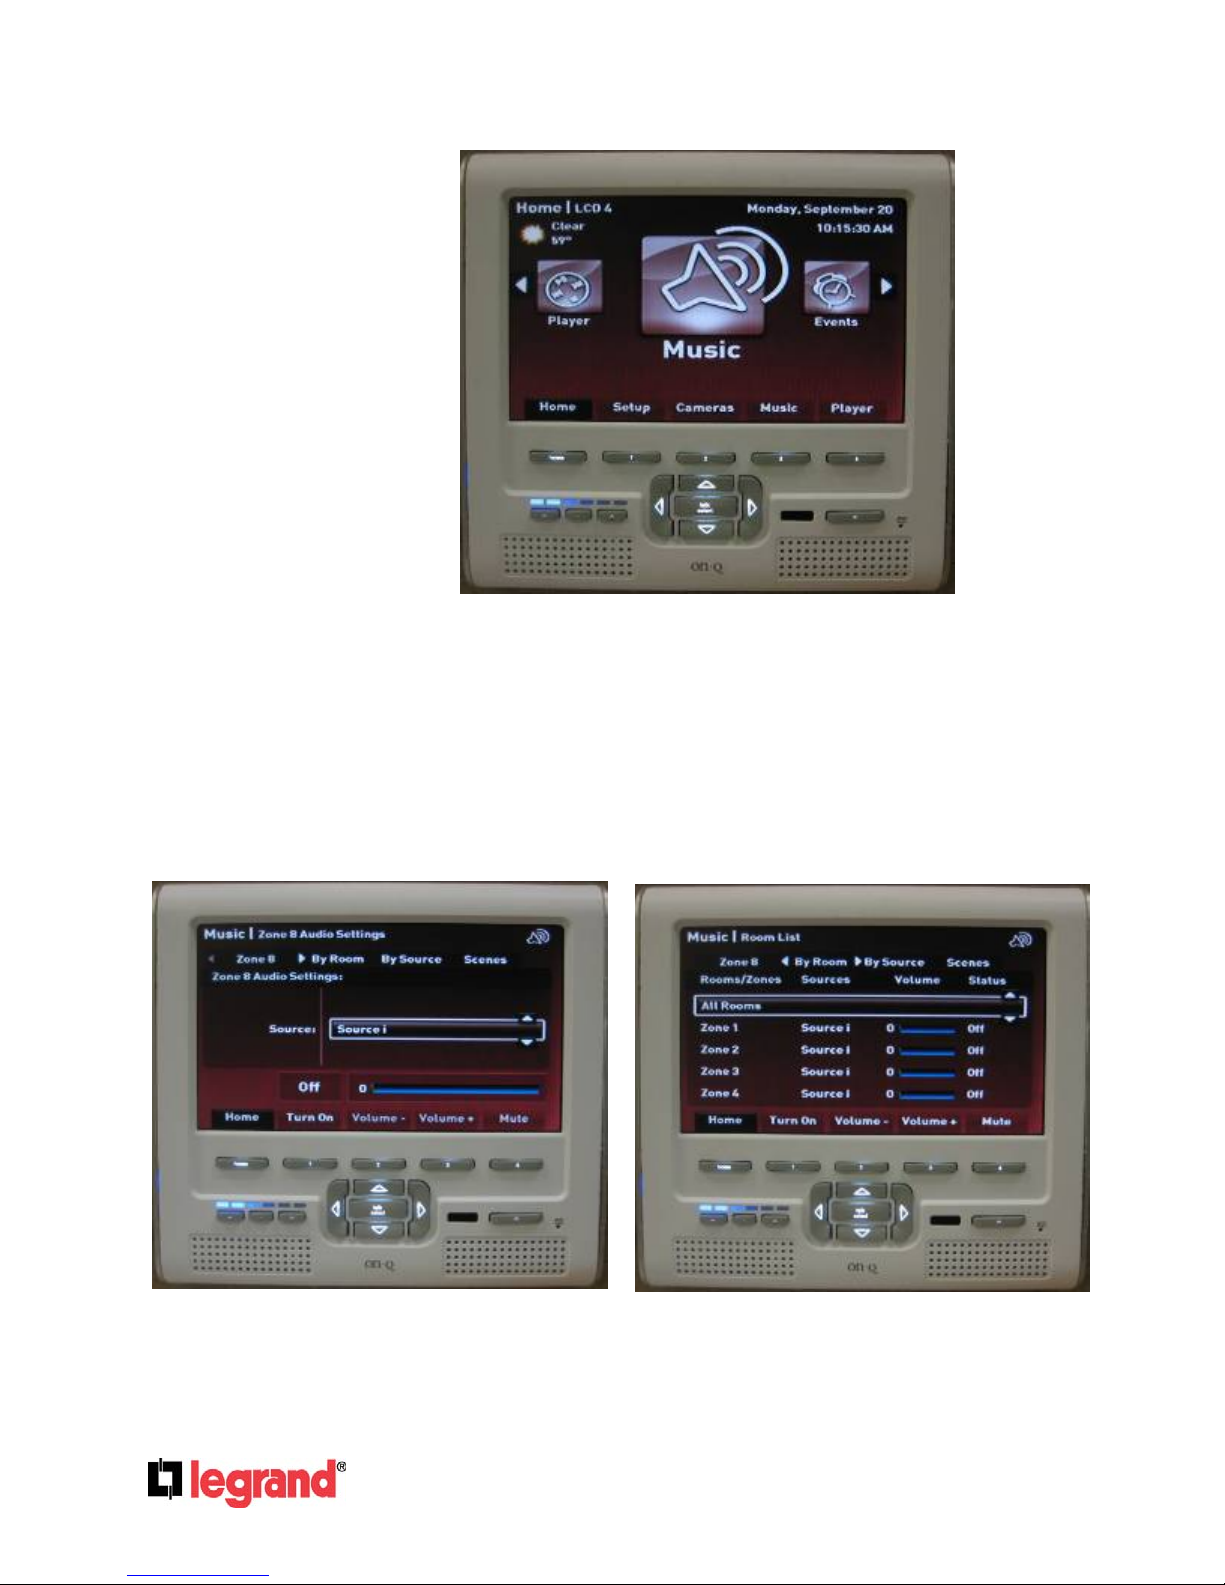
Left arrow
indicator
Compass
keys
Above is a description of the various buttons on the front of the Unity LCD Console. Each softkey
corresponds to the tab shown directly above it in the display. Similarly, the compass keys correspond to
the associated arrow indicators shown in the display. For instance, in this particular screen, the left and
right compass keys would move the Icon Wheel to the left or right accordingly.
To navigate throughout the Unity System, from the main screen shown above, use the Left and Right
compass keys to spin the icon wheel, and then use the Talk/Select button to choose the desired function.
Alternatively, use the softkeys to choose the shortcut to the desired function. The Home softkey will
always bring the Unity system back to this main screen. Pressing the Home key a second time will center
the Icon Wheel on the Intercom icon. The power button will put the current display into standby mode.
The display will be automatically activate if it is ever the target of an intercom call (including an ALL call
and/or Door Event). To prevent this, place the unit in standby then press the mute button.
A. Basic Navigation:
Right arrow
indicator
Softkeys
Power button
Page 99
301 Fulling Mill Road, Suite G ©Copyright 2010 by Legrand,
Middletown, PA 17057 Inc All Rights Reserved.
(800)-321-2343 www.onqlegrand.com
Page 3
B. Unity Functions:
The following is a list of walkthroughs on using each function of the Unity system.
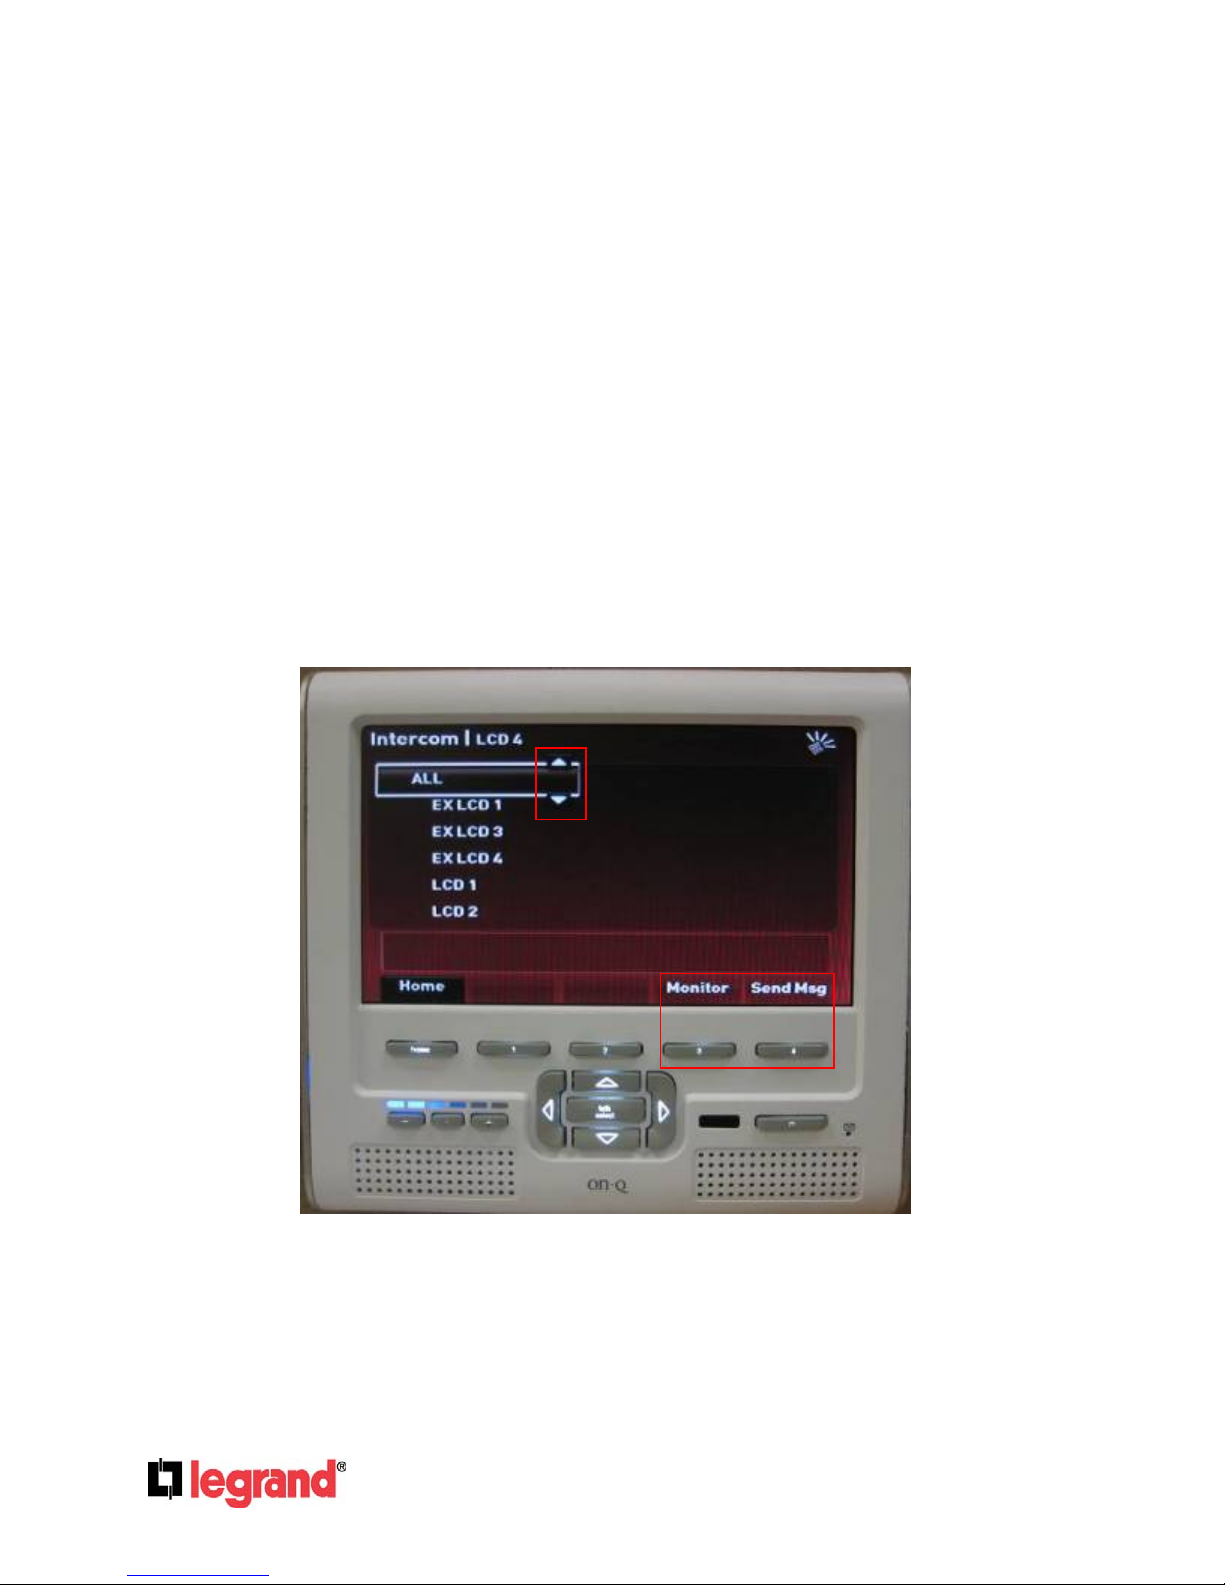
1. Using the Intercom
To enter the Intercom function, use the Left and Right compass keys until the Icon Wheel is
over the Intercom Icon, and then press Talk/Select . A list of intercom units should be
displayed.
Page 100
301 Fulling Mill Road, Suite G ©Copyright 2010 by Legrand,
Middletown, PA 17057 Inc All Rights Reserved.
(800)-321-2343 www.onqlegrand.com
Page 4
Basics
As indicated on the display, the Up and Down compass keys will move the highlight box. To
call an intercom unit, highlight that unit, then press and hold the Talk/Select button. The Unity
Intercom is a ‘press and hold’ intercom. This means to make an intercom call, the Talk/Select
button must be HELD when talking TO the highlighted unit. When the Talk/Select button is
released, the highlighted unit will have a number of seconds (15 seconds by default, but
adjustable in Settings -> Intercom) to respond in what is called ‘talk hands free’ mode. During
this mode, the unit being CALLED may respond to the CALLER without any specific intercom
interaction. After talk hands free mode times out, the intercom will return to the state it was in
upon entering the intercom screen. An audible tone will sound to indicate the transition
between the states mentioned above. A typical intercom conversation will go as follows:
• User presses (and holds) Talk/Select
• A tone sounds to indicate it is OK to start talking
• User talks TO selected unit
• User releases Talk/Select
• A tone sounds to indicate transition to ‘talk hands free’ mode
• Selected unit has some number of seconds (15 seconds default) to talk BACK to
caller
• A tone sounds to indicate end of conversation
Monitor
Pressing softkey 3 will place the unit into monitor mode. When a unit is in monitor all other
units on the system will be able to hear it.
Send Message
Pressing softkey 4 from the intercom menu will open the messaging menu.
Page 101
301 Fulling Mill Road, Suite G ©Copyright 2010 by Legrand,
Middletown, PA 17057 Inc All Rights Reserved.
(800)-321-2343 www.onqlegrand.com
Page 5
From this menu, messages may be sent to one, many, or all other intercom units. For full
information on sending messages, please refer to the Using Messages section of the Unity
Users Guide.
Page 102
301 Fulling Mill Road, Suite G ©Copyright 2010 by Legrand,
Middletown, PA 17057 Inc All Rights Reserved.
(800)-321-2343 www.onqlegrand.com
Page 6
2.Using the Player
To enter the Player function, use the Left and Right compass keys until the Icon Wheel is over the Player
Icon, and then press Talk/Select. The player menu should be displayed. The following section s de scribe
the individual player sub menus. In general, the Up and Down compass keys are used to navigate the
current menu, and Talk/Select is used to select the current menu item (either bringing up another sub
menu, or redirecting to Now Playing).
Page 103
301 Fulling Mill Road, Suite G ©Copyright 2010 by Legrand,
Middletown, PA 17057 Inc All Rights Reserved.
(800)-321-2343 www.onqlegrand.com
Page 7
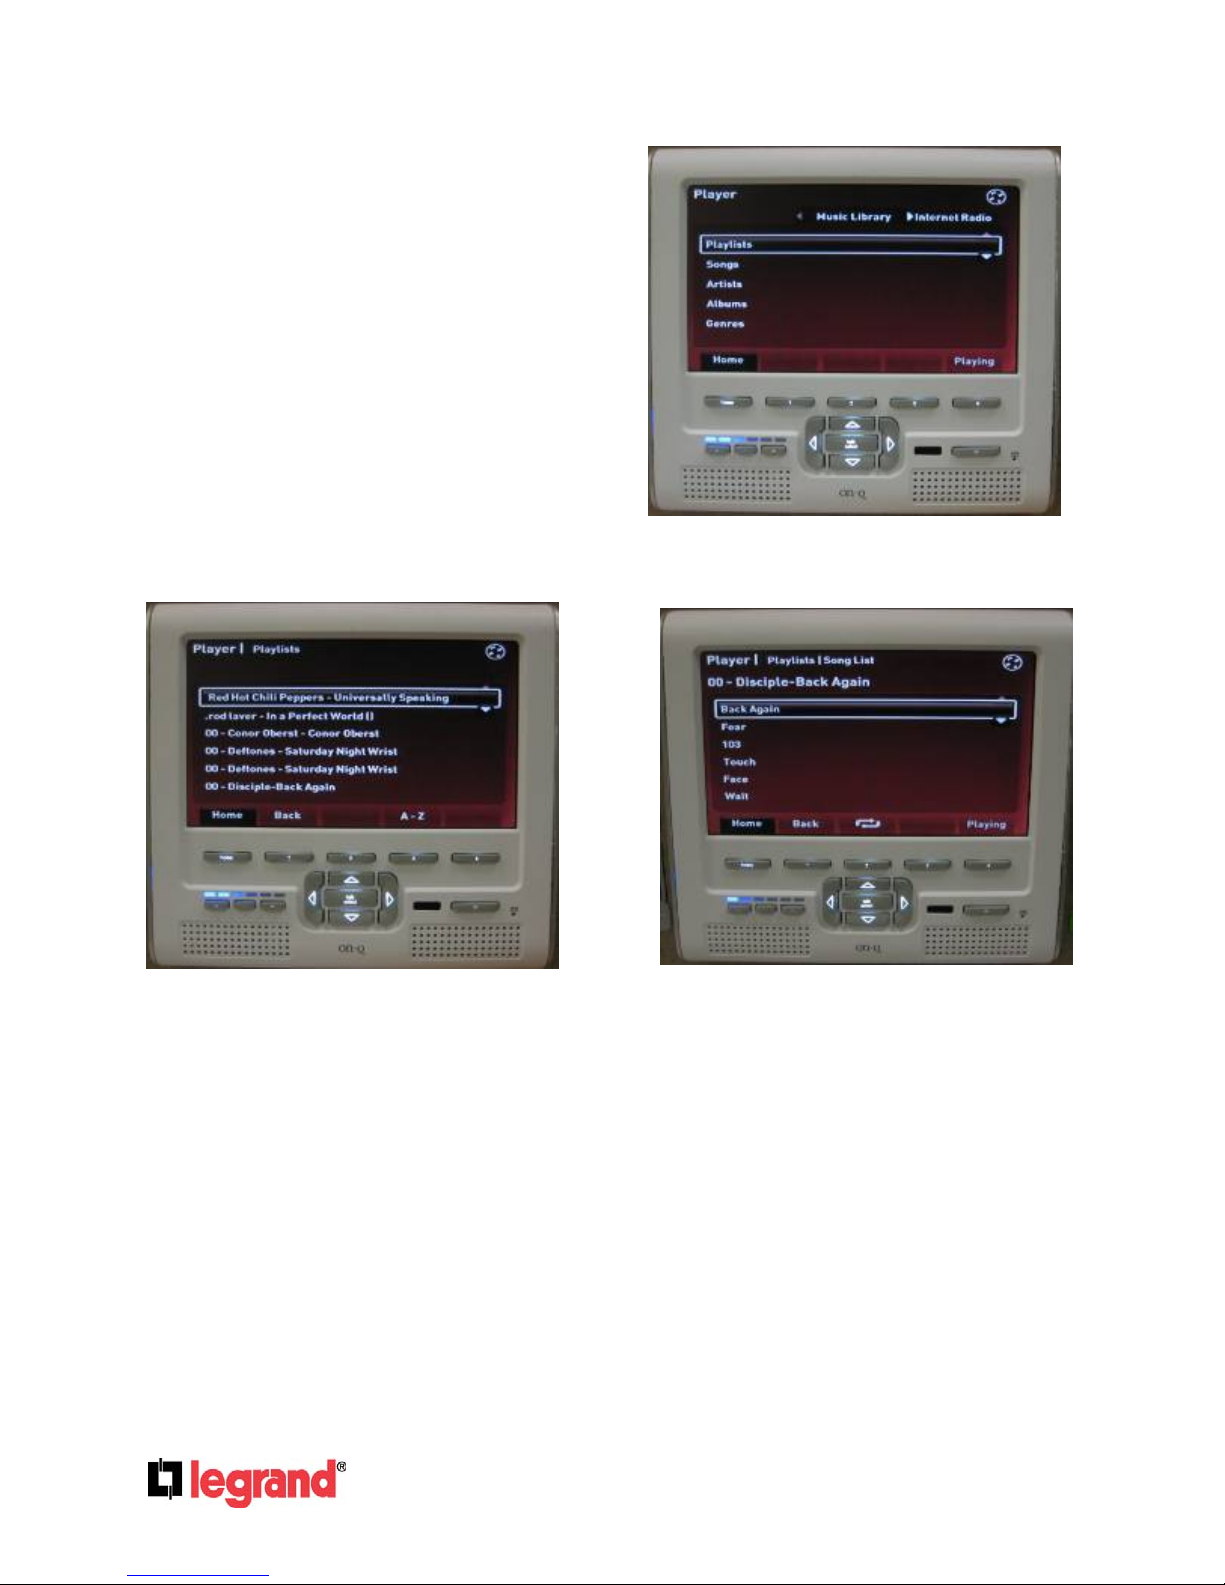
Playlists
Selection chain:
• Playlists – list of playlists.
• Specific playlist – list of songs on
Clicking Playlists will display all playlists that
have been cataloged by the Unity system.
Selecting a specific playlist from the list of
playlists will display all songs on that playlist.
Selecting a song from that playlist will play the
song and lead to the Now Playing screen.
playlists.
• Song – leads to Now Playing
List of playlists
Songs
Click Playlists
List of songs on playlist
Page 104
301 Fulling Mill Road, Suite G ©Copyright 2010 by Legrand,
Middletown, PA 17057 Inc All Rights Reserved.
(800)-321-2343 www.onqlegrand.com
Page 8
Selection chain:
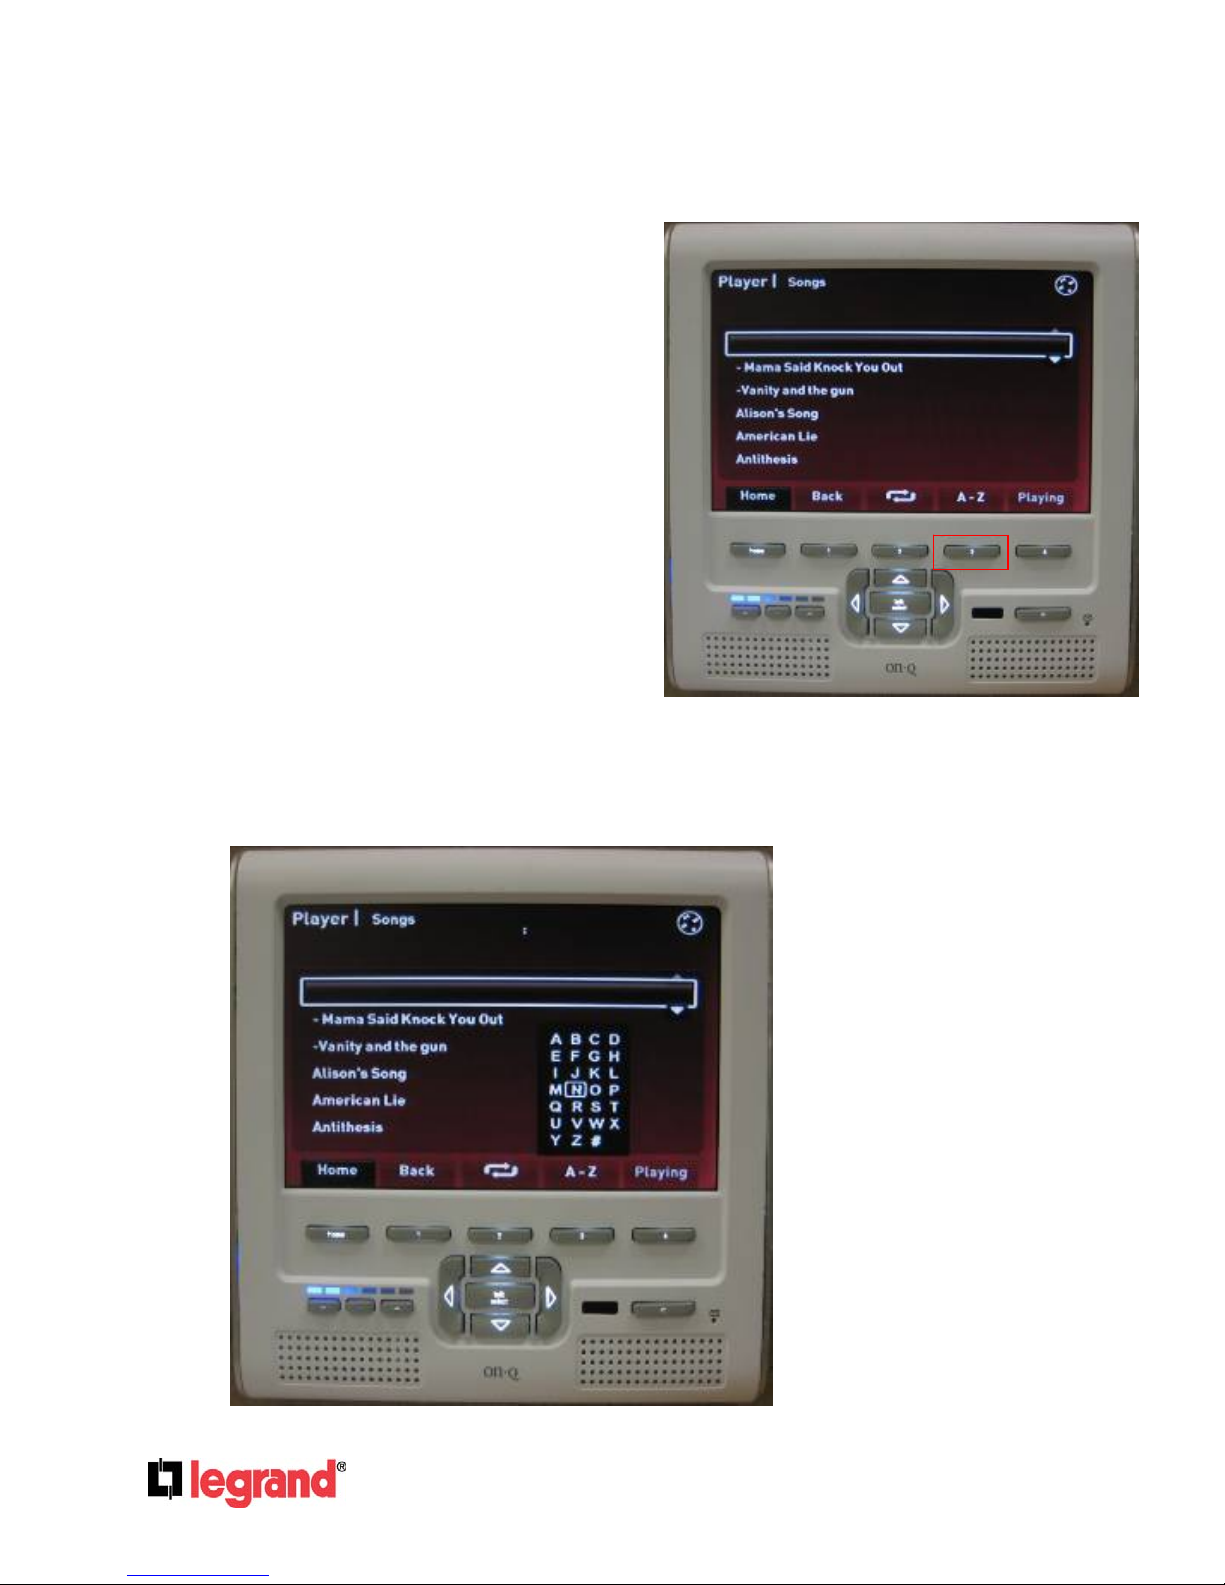
• Songs – list of songs.
• Specific song – leads to Now
Playing.
Clicking Songs will display a list of all songs
cataloged by the Unity system. Clicking on an
individual song will play that song and direct the
display to the Now Playing screen.
At any time (i.e. in any Player sub menu),
softkey 3 will open up an alphabetic search
window. The cursor keys and talk/select button
operate the mini keypad. The search is
incremental, meaning that any letter that is
input will further narrow the search. To close
the box, press softkey 3 again. The alphabetic
search box will ONLY search in the current sub
menu. For example, if the current sub menu is
Songs, the alphabetic search box will narrow
down the Songs list based on the characters
input. If the current sub menu is Artists, only
the Artist list will be narrowed down. It will still
be necessary to select an artist to view Albums
and Songs by that Artist.
Alphabetic search
Full Songs List
Page 105
301 Fulling Mill Road, Suite G ©Copyright 2010 by Legrand,
Middletown, PA 17057 Inc All Rights Reserved.
(800)-321-2343 www.onqlegrand.com
Page 9
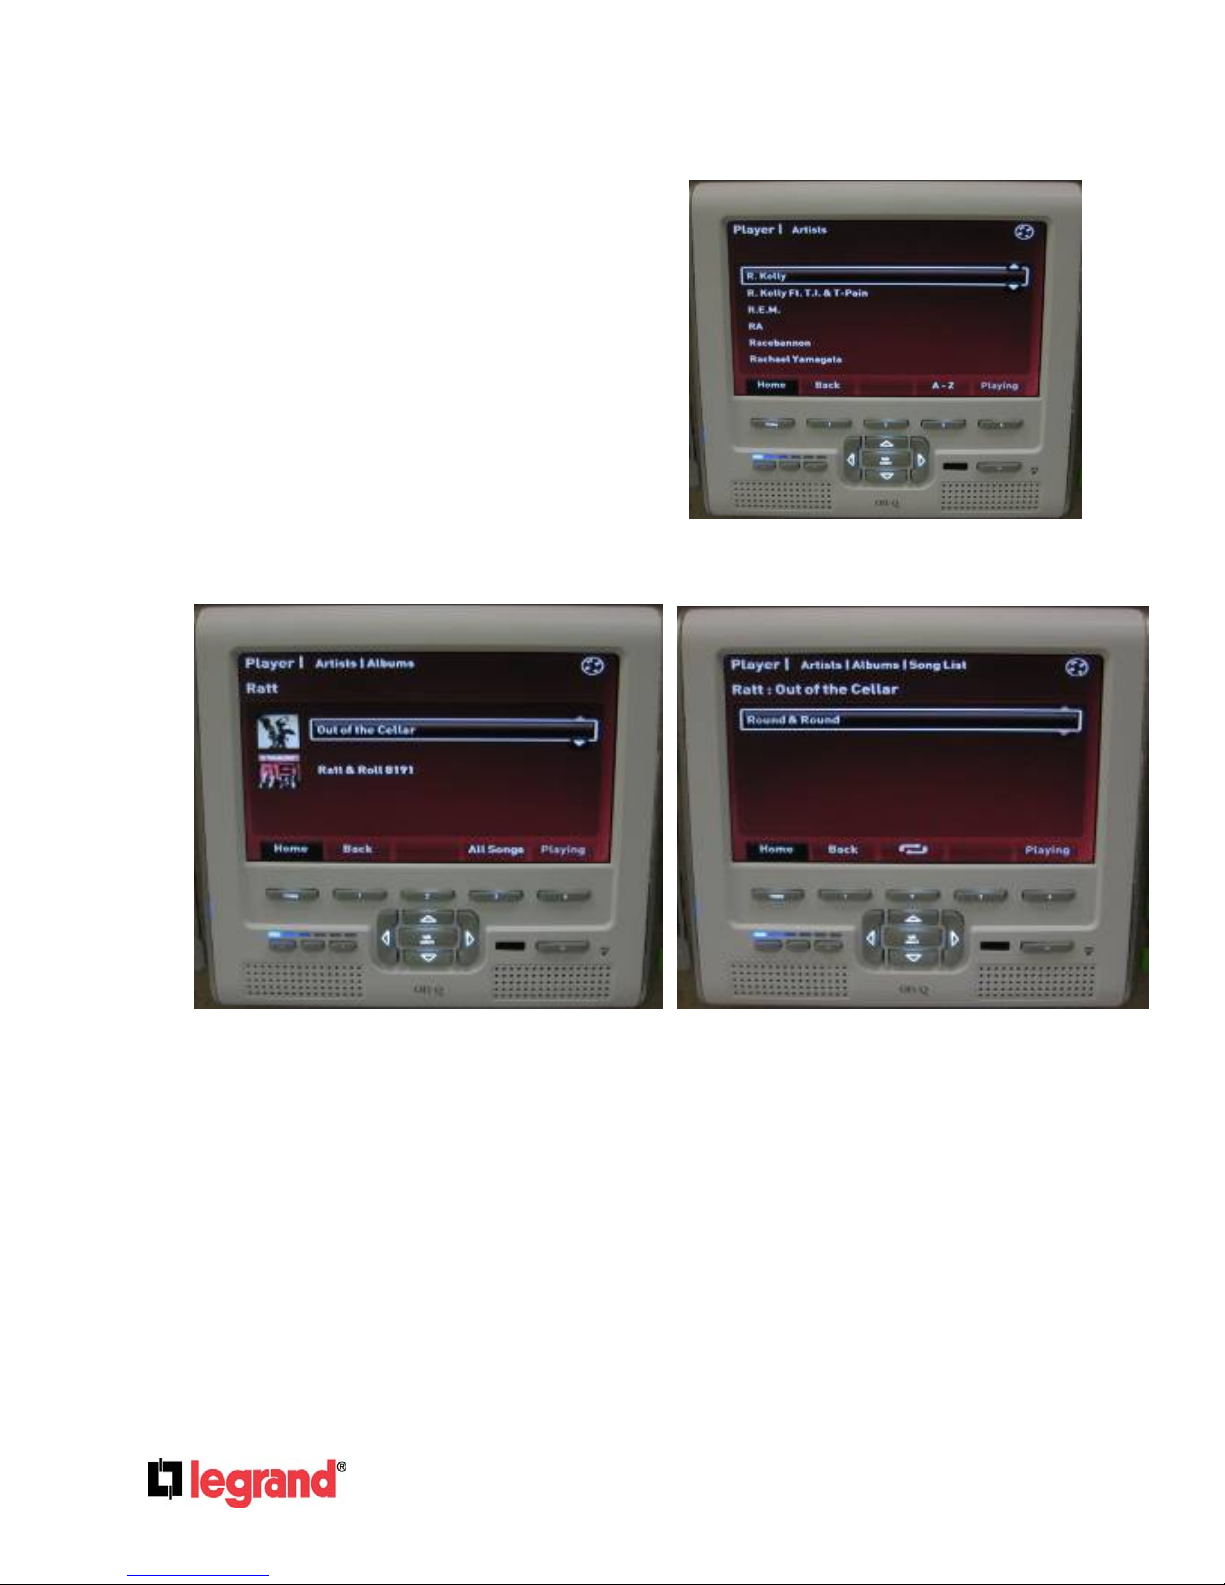
Artists
Selection chain:
• Artists – list of artists.
• Specific artist – albums by artist.
• Album – songs on album.
• Song – leads to Now Playing.
Clicking Artists will display a list of artists
currently cataloged. Clicking a specific artist will
display a list of Albums by that Artist. Clicking
an album will display songs on that album.
Clicking a song will lead to the Now Playing
screen.
Albums by artist
Artists
Songs on album
Page 106
301 Fulling Mill Road, Suite G ©Copyright 2010 by Legrand,
Middletown, PA 17057 Inc All Rights Reserved.
(800)-321-2343 www.onqlegrand.com
Page 10
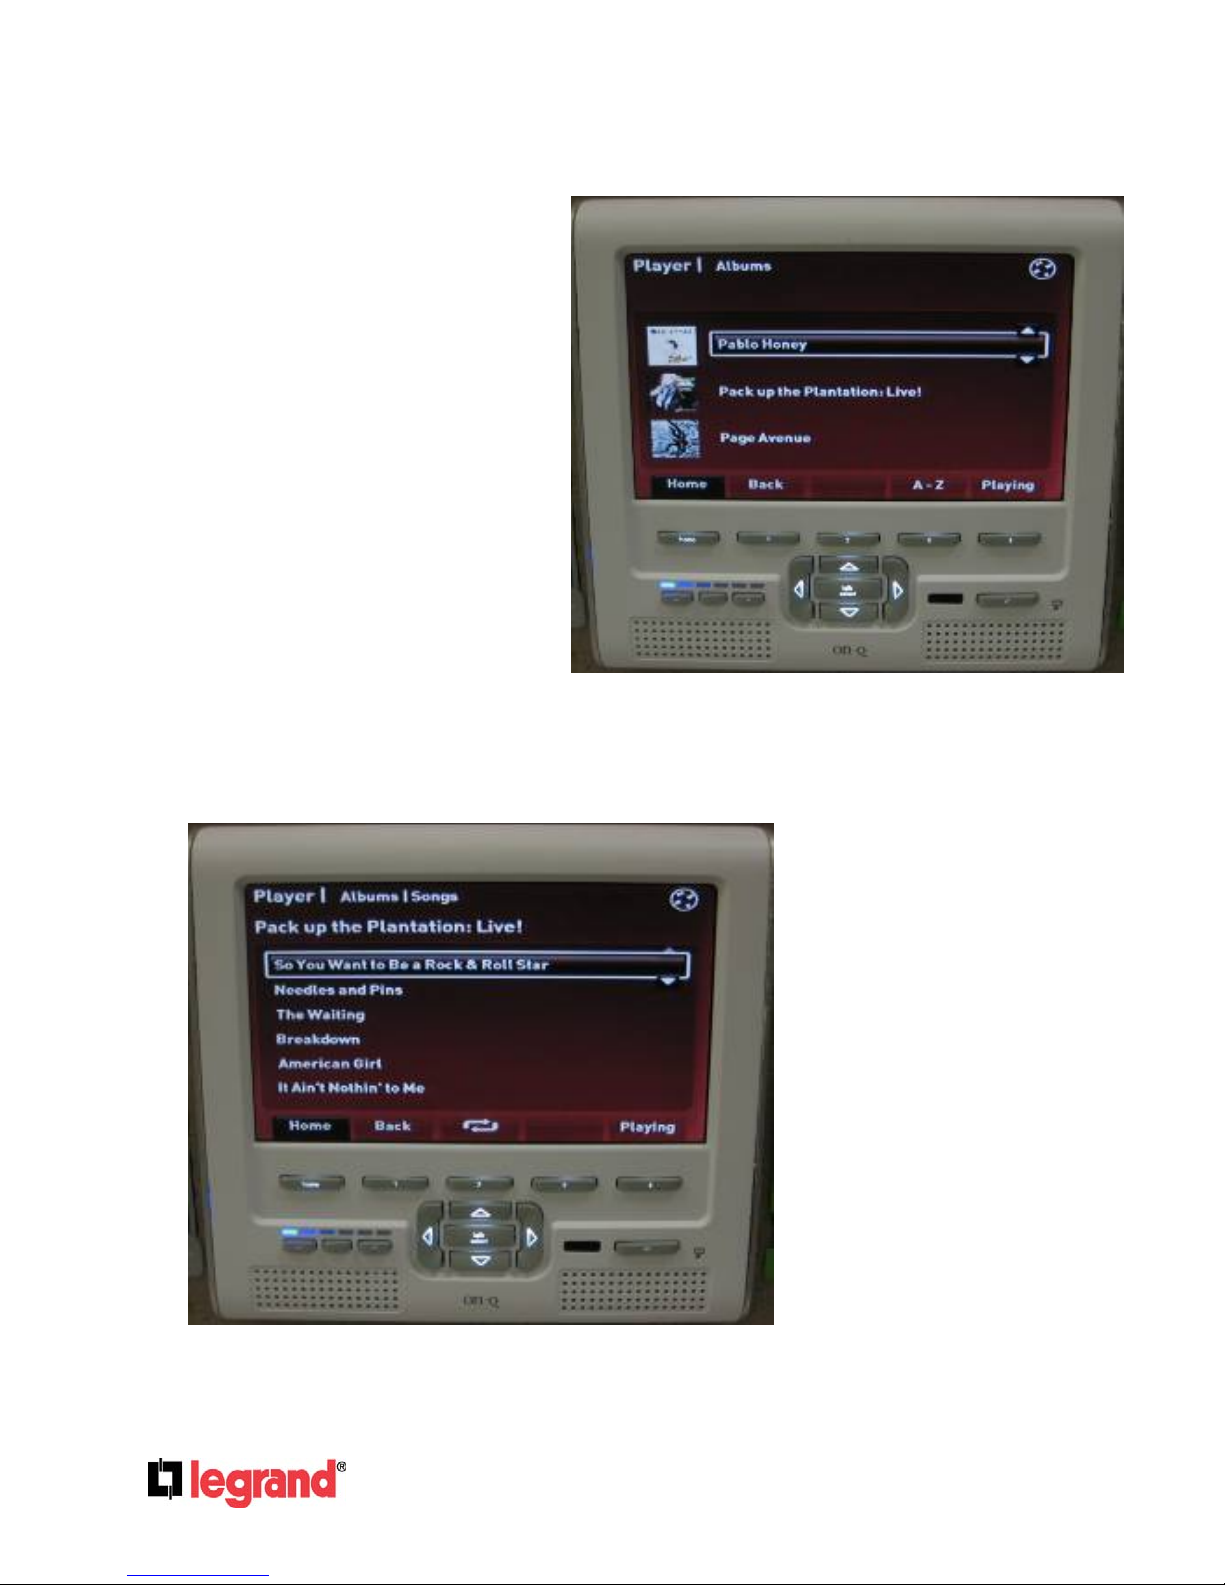
Albums
Selection chain:
• Albums – list of albums.
• Specific album– songs on album
• Song – leads to Now Playing.
Clicking albums will display the list of albums
currently cataloged by the Unity System.
Clicking a specific album will display the list of
songs on that album. Clicking a song will lead
to the Now Playing screen.
Songs on album
Albums
Page 107
301 Fulling Mill Road, Suite G ©Copyright 2010 by Legrand,
Middletown, PA 17057 Inc All Rights Reserved.
(800)-321-2343 www.onqlegrand.com
Page 11
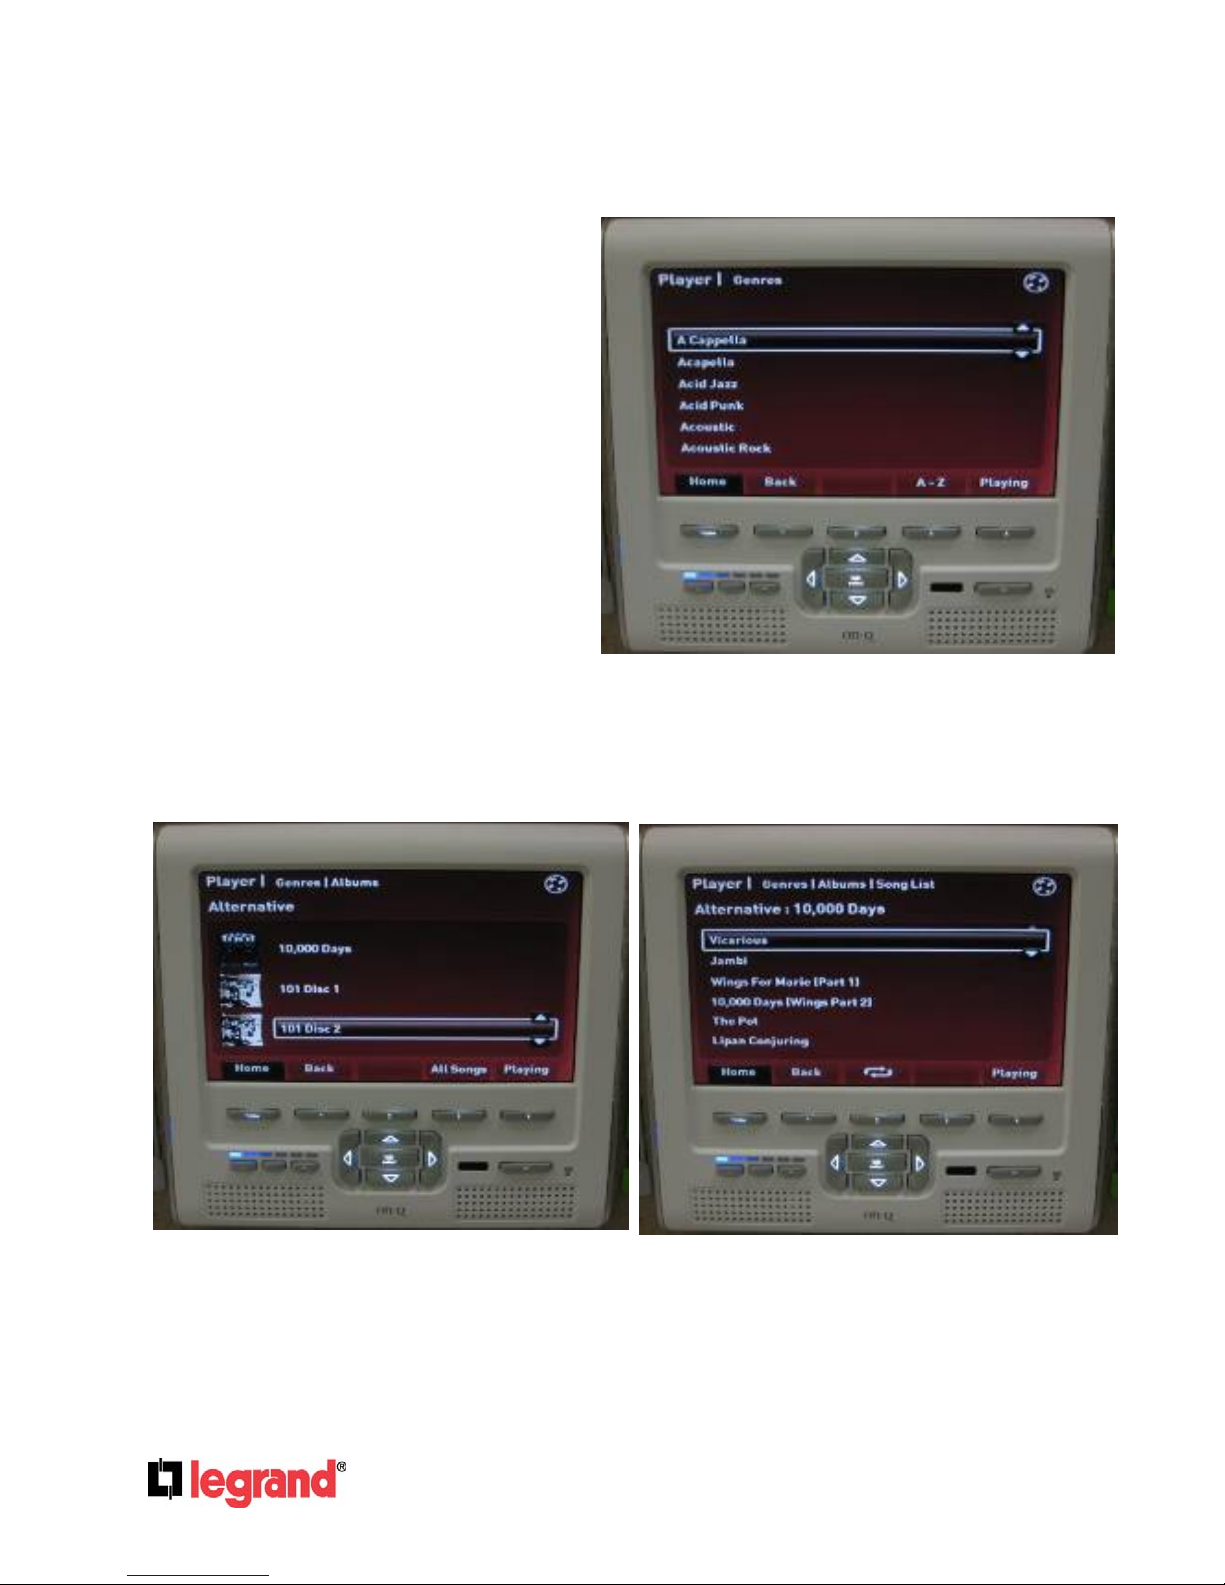
Genres
Selection chain:
• Genres – list of genres.
• Specific genre– albums in genre.
• Album – songs on album.
• Song – leads to Now Playing.
Clicking on Genres will display the list of
genres currently cataloged by the Unity
system. Clicking on a specific genre will
display a list of albums in that genre. Clicking
on an album will display a list of songs on that
album. Clicking on a song will lead to the Now
Playing screen.
Albums in genre
Genres
Songs on album
Page 108
301 Fulling Mill Road, Suite G ©Copyright 2010 by Legrand,
Middletown, PA 17057 Inc All Rights Reserved.
(800)-321-2343 www.onqlegrand.com
Page 12
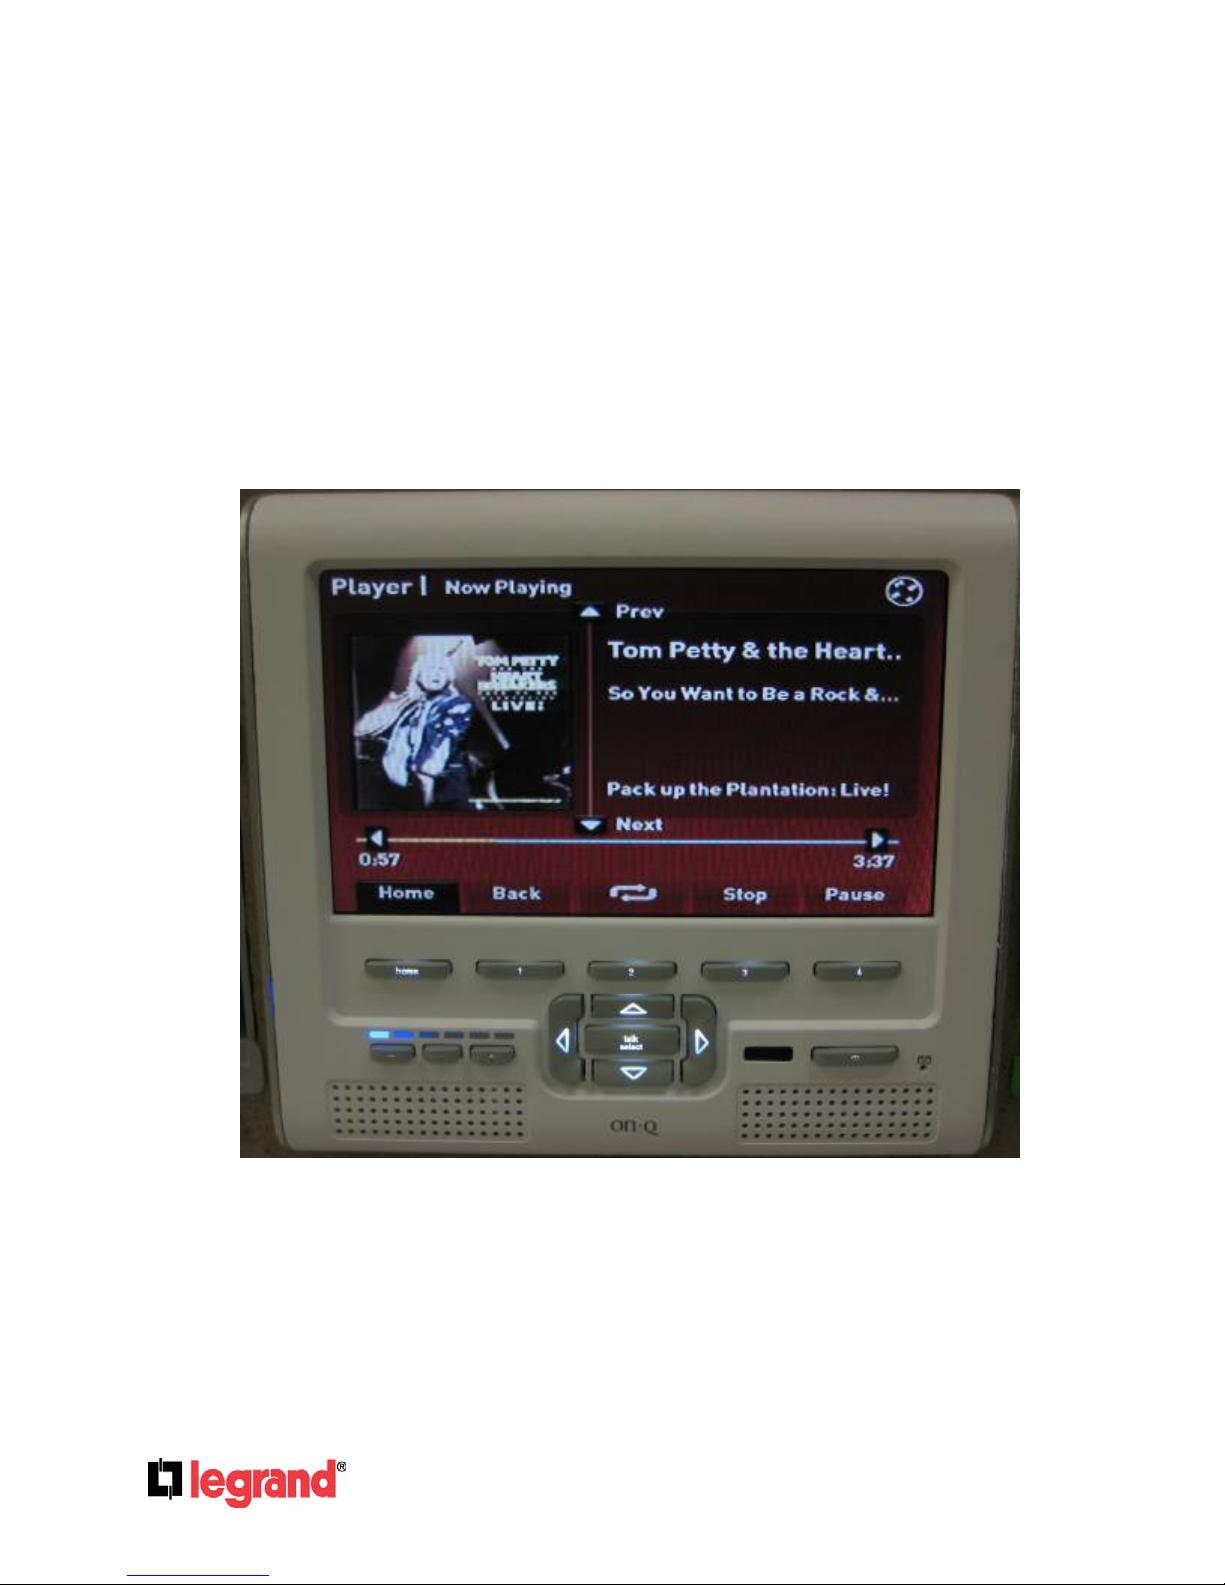
Now Playing
The Now Playing screen displays the information for the current track. This information includes arti st,
song, album, and a time progress bar. The Up and Down compass keys will go to the previous and next
song in the song list respectively (reference note below).
Softkey 1 will return to the screen the GUI was at immediately before entering the Now Playing screen.
Softkey 2 will cycle between Normal, Shuffle, and Loop modes for song order.
Softkey 3 will stop the player.
Softkey 4 will toggle pause/play for the player.
NOTE: The player will continue to play through songs from a LIST using some play MODE. The play
MODE is determined by softkey 2. The LIST is determined by where the song was selected from. For
instance, if the song was selected through Artist -> Album -> Song then the LIST would contain all songs
from that album by that artist. If the song was selected through Playlist -> Song then the LIST would
contain all songs on that playlist.
Page 109
301 Fulling Mill Road, Suite G ©Copyright 2010 by Legrand,
Middletown, PA 17057 Inc All Rights Reserved.
(800)-321-2343 www.onqlegrand.com
Page 13
3.Playing Music
Basics
Pressing Talk/Select on the Music icon will open the Unity Music menu. This menu is used to control all
lyriQ functionality connected to the Unity system. The Unity Music menu contains 3 tabs if the current
LCD Console has no add-on lyriQ capabilities or 4 tabs if the current LCD Console has add-on lyriQ
capabilities. The tabs are described below. (Note: To navigate between tabs, use the Left and Right
compass keys.)
IMPORTANT: To see the 4
First, the LCD Console must have add-on lyriQ support. This would be indicated by a small music
note to the left of the volume light indicators. Second, the lyriQ zone built into the LCD Console
must be associated with the Console in Setup -> Intercoms -> LCD Options. For more information
on this association, refer to the Unity Setup information regarding LCD Consoles.
The leftmost tab contains the add-on
Lyriq information. This tab will only
appear if the current LCD Console has
built in Lyriq.
tabs (i.e. the FIRST tab shown below), two conditions must be met.
The second tab contains a list of all
Lyriq audio zones in the system, along
with their status and control.
Page 110
301 Fulling Mill Road, Suite G ©Copyright 2010 by Legrand,
Middletown, PA 17057 Inc All Rights Reserved.
(800)-321-2343 www.onqlegrand.com
Page 14

y
o
e
-
a
u
e
k
a
o
h
c
u
g
p
o
n
w
y
e
d(80
b
w
u
d
l
o
e
m
s
u
o
A
o
o
s
t
m
b
a
o
w
d
Th
Add-on l
The addboard on
adjust th
local add
e third tab c
ttached to th
sed to switc
spe
riQ tab
n lyriQ scre
and off. Soft
volume up
on board.
ntains a list
e system. Th
individual u
ific source.
n gives the
ey 4 will tog
nd down res
f sources
is tab is
its to a
ser the follo
le the local l
ectively. Th
ing options.
riQ add-on
up and do
The right
lyriQ audio
scenes ma
existing
Softkey 1 wil
oards Mute
n compass k
ost tab con
scenes. Fro
y be created
cenes may
toggle the l
n and off. S
ys will adju
ains a list of
this tab, ne
or edited, an
e executed.
cal lyriQ add
ftkeys 2 and
t the source
-on
3 will
f the
Page
111
30
1 Fulling Mill Road, S
Mi
dletown, PA 17057
0)-321-2343
ite G ©C
Inc
www
pyright 2010 by Legr
ll Rights Reserved.
.onqlegrand.com
nd,
Page 15

By-Room tab
The By Room Tab is used as a main control/status screen for any lyriQ unit connected to the system.
Softkeys 1 and 4 control power and mute respectively, and the current status regarding these two buttons
may be found in the Status column of the zone list. Softkeys 2 and 3 control the volume of the highlighted
unit. The volume of a particular unit is indicated by both the number and colored bar in the Volume
column of the zone list. Selecting a specific zone will give the following screen:
From this screen the user can set a source, volume, and status for the selected unit. The Up and Down
compass keys will change the highlighted section while the Left and Right compass keys will adjust the
currently highlighted section.
Page 112
301 Fulling Mill Road, Suite G ©Copyright 2010 by Legrand,
Middletown, PA 17057 Inc All Rights Reserved.
(800)-321-2343 www.onqlegrand.com
Page 16

By Source tab
The By Source Tab lists all sources available for lyriQ source selection. Clicking on a particular source will
lead to a list of lyriQ zones connected to the system. From this screen the user may choose to switch one,
many, or all zones to the selected source.
Scenes tab
The Scenes tab contains a list of all lyriQ Scenes in the Unity system. A scene may be executed to
perform batch control operations for the lyriQ system. For instance, a scene named Party may contain the
following commands: Turn on every lyriQ zone in the house except for the baby’s room, set all zone
volumes to 35%, and set all zone sources to source 4 (which could be a CD Player, for instance). From
the main Scenes tab the user may Rename, Delete, Create, or Edit a scene using softkeys 1-4
respectively. To create a new lyriQ scene, follow the procedure below.
Page 113
301 Fulling Mill Road, Suite G ©Copyright 2010 by Legrand,
Middletown, PA 17057 Inc All Rights Reserved.
(800)-321-2343 www.onqlegrand.com
Page 17

Clicking softkey 3 above will lead to a virtual
keypad screen. Here the user may name the
scene. The compass direction keys control
the square highlight box while the Talk/Select
key enters a letter. Pressing softkey 2 will
delete a letter (backspace), while softkey 3
will toggle the keypad between upper and
lower case letters. Once the name is entered,
softkey 4 will accept the name and move on
to the zone selection screen. At any time
softkey 1 may be pressed to cancel the
scene creation.
Upon entering a name, the zone selection
screen appears. This screen should be set up
so that it reflects the exact desired state of
the Lyriq system when the scene is executed.
This means the user should do the following
for each zone:
• Press softkey 2 to include or
exclude the unit from the system.
If a check is shown in the box to
the right side of the highlight bar,
that means the unit will be
commanded to do something
upon scene execution.
• Press Talk/Select over each
included zone and set volume,
source, and status accordingly.
Once scene setup is completed, press
softkey 4 to save all changes.
Note: As an alternative to setting the state of
each zone individually during scene creating,
the user may put the Lyriq system in the
desired state for the scene before creating
the scene. When this screen appears, the
state of the system will already be correct.
The only necessary step in this case in the
inclusion/exclusion of zones.
Page 114
301 Fulling Mill Road, Suite G ©Copyright 2010 by Legrand,
Middletown, PA 17057 Inc All Rights Reserved.
(800)-321-2343 www.onqlegrand.com
Page 18

4.Creating Events
Basics
Pressing Talk/Select on the Events Icon will lead to the Unity Events menu. From this menu, Unity Events
can be created. A Unity Event is composed of a series of actions the Unity system will perform, at some
frequency, at some time in the future. For example, an event may be created to turn on the outside lights
every day at sunset. This is only one example of a Unity event. Unity events may be set up for the
following types of actions:
• Lighting Scene
• Music Scene
• Player Shuffle
• Player Function
• Play Message
• Send Message
Up to four actions of the types listed above may be set to activate for a single Unity event. To create an
event, follow the steps listed below.
Page 115
301 Fulling Mill Road, Suite G ©Copyright 2010 by Legrand,
Middletown, PA 17057 Inc All Rights Reserved.
(800)-321-2343 www.onqlegrand.com
Page 19

Press softkey 3 over an empty slot to
create a new event.
Select the first time this event will
happen. Use the compass Up/Down
keys to adjust each field and the
compass Left/Right keys to switch
between fields. Press softkey 3 (Next)
to continue.
In the virtual keypad screen, type the
name for the new event. Press softkey
4 to accept the name.
Choose the frequency this event will
occur. For instance, a reminder for a
specific task may only occur once,
whereas a reminder to pay a bill may
occur monthly. Press softkey 3 (Next)
to continue.
Page 116
301 Fulling Mill Road, Suite G ©Copyright 2010 by Legrand,
Middletown, PA 17057 Inc All Rights Reserved.
(800)-321-2343 www.onqlegrand.com
Page 20

From this screen, actions are added to events.
The Left and Right compass keys are used to
select the action type while the Up and Down
compass keys are used to move on to the next
action. Once an action type is chosen, press
softkey 3 (Next) to move on to the specific
setup for the associated action type. The action
types and their specific setup are described
below.
To choose the Audio Scene action type, use
the Left and Right compass keys to navigate
to ‘Audio Scene’ and press softkey 3 (Next). A
list of all Audio Scenes currently in the Unity
system will appear.
Note: To use an Audio Scene for an action in a
Unity Event, first the Audio Scene must be
created under the Unity Music function. For
instructions on how to do this, refer to the
section labeled Unity Music Scenes.
Choose the scene to associate with this
action. This scene will be performed whenever
the event triggers. Once selected, the action
selection screen will be displayed again, this
time with the appropriate audio scene listed to
the right of the Audio Scene action type
designator.
Page 117
301 Fulling Mill Road, Suite G ©Copyright 2010 by Legrand,
Middletown, PA 17057 Inc All Rights Reserved.
(800)-321-2343 www.onqlegrand.com
Page 21

(
y
To choose the player function action
type, use the Left and Right compass
keys until ‘Player Function’ shows in
the highlight box and press softkey 3
Next).
Pressing Talk/Select at the lowest
level of a Player menu, in this case,
will select the song for the event. The
event will start the song playing on
Source i in whichever play mode the
Unit
Player is currently in.
Next, choose the song which will begin
to play when this event triggers. For
instructions on how to navigate
through all Unity Player menus, refer
to the Unity Player section.
The song name will now appear to the
right of the Player Function action type
designator. NOTE: After the initial
song plays, all songs continue to play
in list order.
Page 118
301 Fulling Mill Road, Suite G ©Copyright 2010 by Legrand,
Middletown, PA 17057 Inc All Rights Reserved.
(800)-321-2343 www.onqlegrand.com
Page 22

To choose the Lighting Scene action type, use the
Left and Right compass keys until ‘Lighting Scene’
appears in the highlight box. Press softkey 3 (Next)
to continue. Next will be displayed a list of all Unity
Lighting Scenes currently in the system.
Note: To choose a lighting scene for a Unity Event
action, that scene must have already been created
under Unity Lighting. For instructions on how to do
so, refer to the Unity Lighting portion of the guide.
Press Talk/Select to choose a lighting scene to
associate with the action. Once a scene is chosen,
the Unity Event action screen will be displayed
again, this time with the chosen lighting scene
displayed to the right of the Lighting Scene action
type designator.
Page 119
301 Fulling Mill Road, Suite G ©Copyright 2010 by Legrand,
Middletown, PA 17057 Inc All Rights Reserved.
(800)-321-2343 www.onqlegrand.com
Page 23

To choose the Send Message action
type, use the Left and Right compass
keys until ‘Send Message’ appears in
the highlighted box.
Press the Talk/Select button to start
recording the message. Press
Talk/Select once more to finish
recording the message and save it to
the action.
A list of Unity Intercom units will
appear on the screen. Use the Up and
Down compass keys to select the
unit(s) the message should go out to
upon trigger of the event.
The action list will now appear again
with the destination of the send
message action listed to the right of
the Send Message action designator.
Page 120
301 Fulling Mill Road, Suite G ©Copyright 2010 by Legrand,
Middletown, PA 17057 Inc All Rights Reserved.
(800)-321-2343 www.onqlegrand.com
Page 24

Pressing softkey 1 (Done) from the Event Action list at any point in the above procedure will finalize the
event. The display will show the list of events with the newly created event at the end of the list. It is not
necessary to have all 4 action slots in an event filled. An even may contain 1-4 events. The two event
action types not discussed above are the Player Shuffle action type and the Play Message action type.
The Player Shuffle action type is almost identical to the Player Function action type. The difference
between the two comes when the event is triggered. When a Player Shuffle event is triggered, the Unity
Player will play the selected song on Source i and automatically put the Player into shuffle mode.
The Play Message action type is almost identical to the Send Message action type. The difference
between the two comes when the event is triggered. The Play Message action type will play the message
immediately, at the units designated during the event action setup. The Send Message action type will
send the message to the units designated during the event action setup, but the message will not be
played until the user initiates a play from one of those units.
Page 121
301 Fulling Mill Road, Suite G ©Copyright 2010 by Legrand,
Middletown, PA 17057 Inc All Rights Reserved.
(800)-321-2343 www.onqlegrand.com
Page 25

5.Using the Thermostat
Pressing Talk/Select while the icon wheel is over Thermostat will open the Unity Thermostat menu. This
menu displays current temperature conditions and allows control of Unity compatible thermostats.
Page 122
301 Fulling Mill Road, Suite G ©Copyright 2010 by Legrand,
Middletown, PA 17057 Inc All Rights Reserved.
(800)-321-2343 www.onqlegrand.com
Page 26
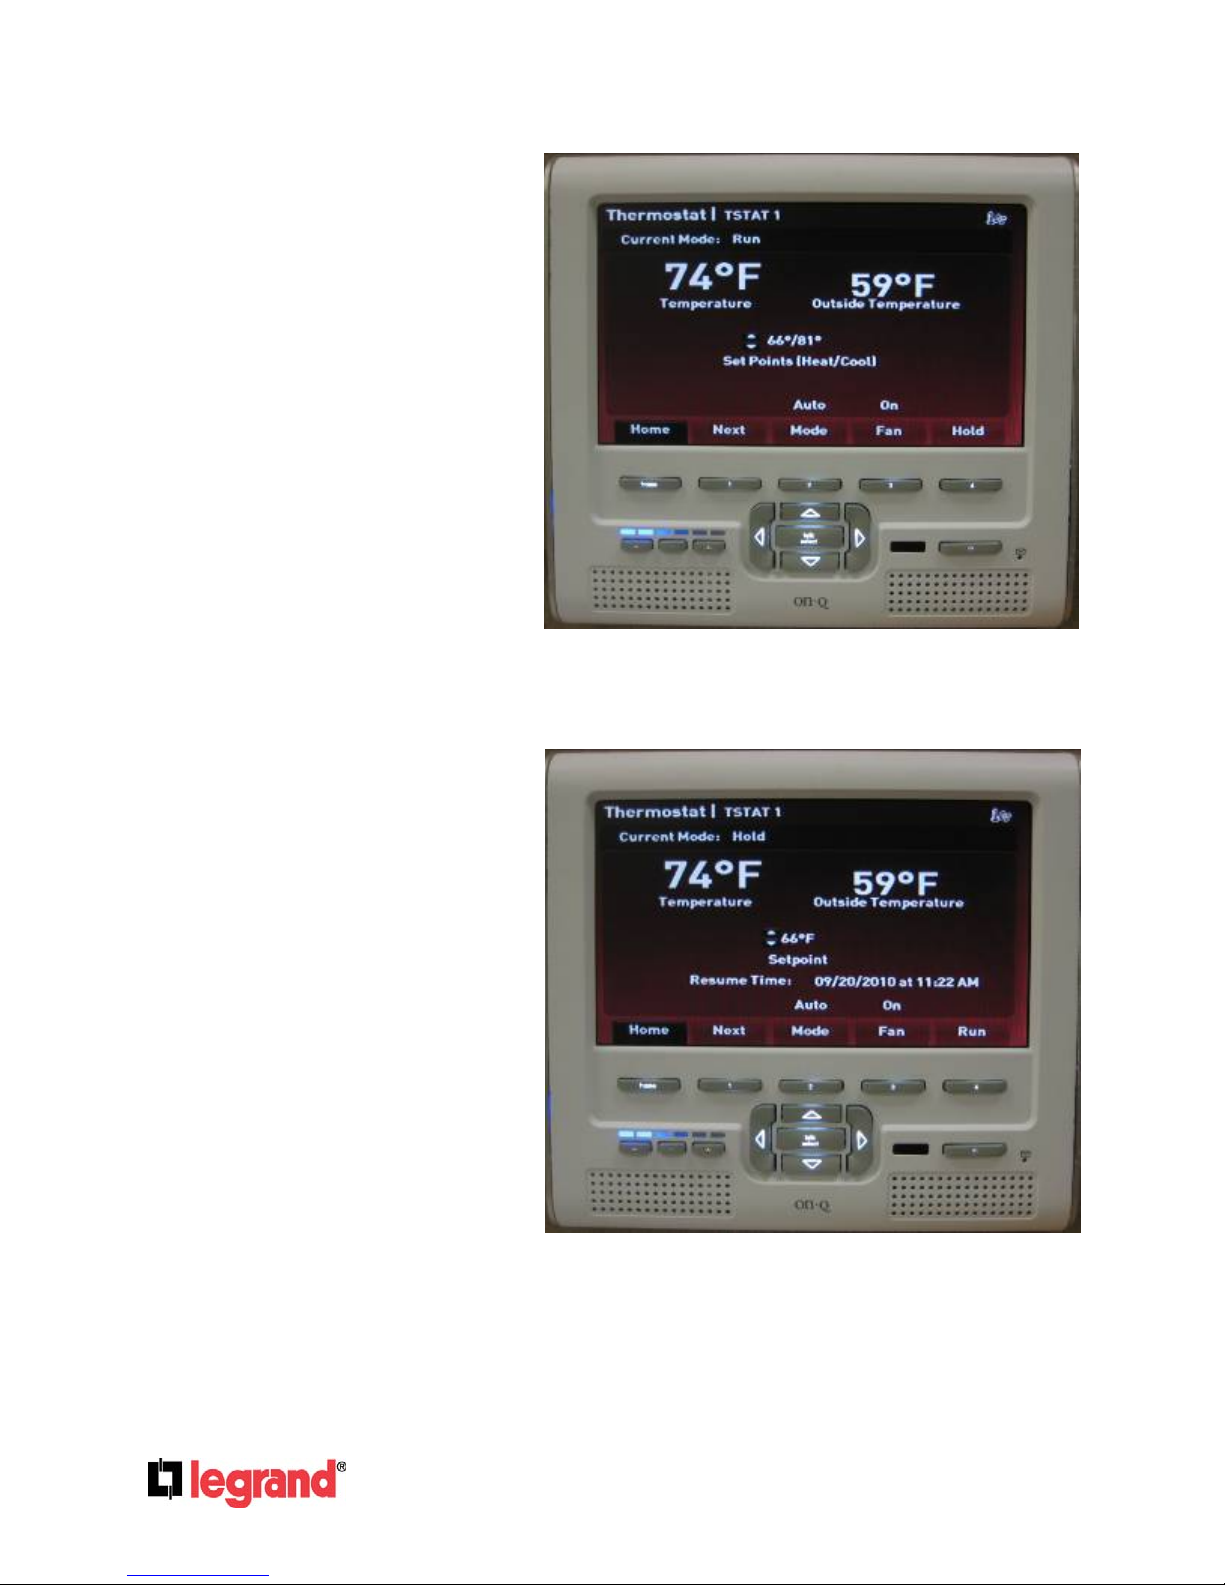
The Unity Thermostat screen has two
modes described below:
Run mode displays the current
temperature and outside temperature.
It allows the user to change the heat
and cool set points using the Up and
Down compass keys.
Softkey 1 will cycle between the
connected thermostats. (Unity may
have up to 3 connected thermostats.)
Softkey 2 will toggle between Heat,
Cool, and Auto.
Softkey 3 will toggle the fan On and
Off.
Softkey 4 will put the thermostat in
Hold mode.
Hold mode displays the temperature
and outside temperature like Run
Mode. It also displays a set point and
resume time. The Left and Right
compass keys will cycle between
regions in order: set point, month, day,
year, hour minute. The Up and Down
compass keys will adjust the current
region.
Softkeys 1-3 do the same as above.
Softkey 4 will toggle the current
thermostat back to Run Mode.
Page 123
301 Fulling Mill Road, Suite G ©Copyright 2010 by Legrand,
Middletown, PA 17057 Inc All Rights Reserved.
(800)-321-2343 www.onqlegrand.com
Page 27

6.Using Lighting
Pressing Talk/Select when the icon bar is over Lighting will open the Unity Lighting menu. From this
menu, the user may control any RF Lighting units connected to the Unity system. Also from this menu,
Lighting Scenes may be created and executed.
The Lighting zones screen displays a list of all
RF Lighting units and collections in the system.
The Up and Down compass keys are used to
navigate the list. The Left and Right compass
keys will switch between the Zones and Scenes
tabs at the top of the list.
Softkey 1 and 2 are used to adjust the
highlighted zone’s light level Down and Up
respectively.
Softkey 3 is used to toggle the highlighted zone
On and Off.
Softkey 4 is used to send the highlighted zone to
a 100% value.
Page 124
301 Fulling Mill Road, Suite G ©Copyright 2010 by Legrand,
Middletown, PA 17057 Inc All Rights Reserved.
(800)-321-2343 www.onqlegrand.com
Page 28

Lighting Scenes
The Lighting Scenes screen displays a list of scenes recorded in the Unity system. A Lighting Scene is a
simple way to group together RF Lighting commands so they may be performed with a singl e button
press. Pressing Talk/Select on any one of the scenes will execute the Lighting commands asso ciated
with that scene.
Softkey 1 (Rename) will display a virtual keyboard allowing the user to rename the highlighted scene.
Softkey 2 (Delete) will remove the highlighted scene from the system.
Softkey 3 (Create) will start the process for creating a new Lighting Scene. For details on creating a new
scene refer to the instructions below.
Softkey 4 (Edit) is very similar to create however instead of making a new scene, the scene modifications
will just be applied to the currently highlighted scene.
Page 125
301 Fulling Mill Road, Suite G ©Copyright 2010 by Legrand,
Middletown, PA 17057 Inc All Rights Reserved.
(800)-321-2343 www.onqlegrand.com
Page 29
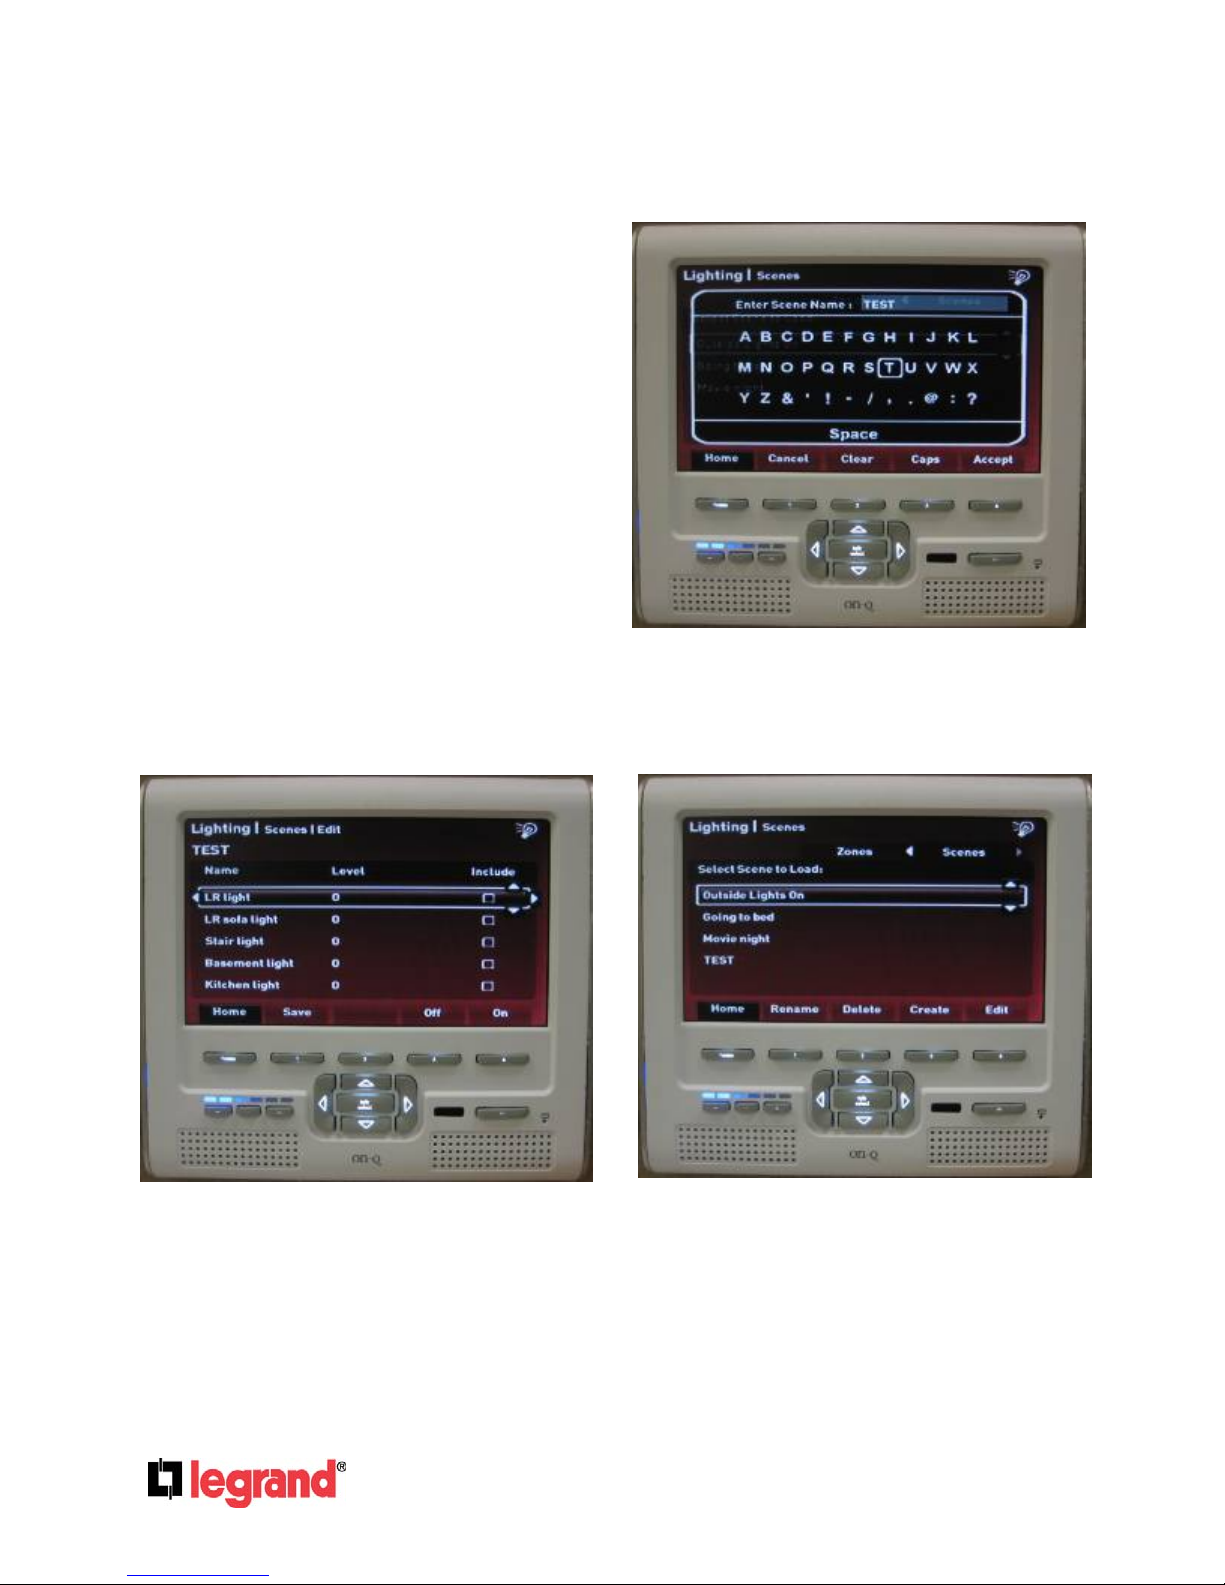
Creating a Lighting Scene
After pressing softkey 3 (Create) a virtual
keypad will be displayed. Use the compass
keys to enter a name for the scene. Softkey 4
will accept the name and advance to the zone
inclusion screen.
The next screen will show a list of Lighting
Zones currently in the system. The Up and
Down compass keys will navigate the zone list.
Pressing Talk/Select over any one unit will
toggle its inclusion in the scene. A check will
appear in the box under ‘Include’ if the unit is to
be included in the scene. The Left and Right
compass keys will adjust the level of the
highlighted unit for the scene. This will not
affect the zones level in real time, it will only set
the level to which the unit will ramp when the
scene is triggered. Softkeys 3 and 4 will set the
zone scene level to 0% and 100% respectively.
When the scene is configured properly,
pressing softkey 1 (Save) will save the scene to
the system. The new scene will now be
displayed in the Lighting Scenes list.
Page 126
301 Fulling Mill Road, Suite G ©Copyright 2010 by Legrand,
Middletown, PA 17057 Inc All Rights Reserved.
(800)-321-2343 www.onqlegrand.com
Page 30
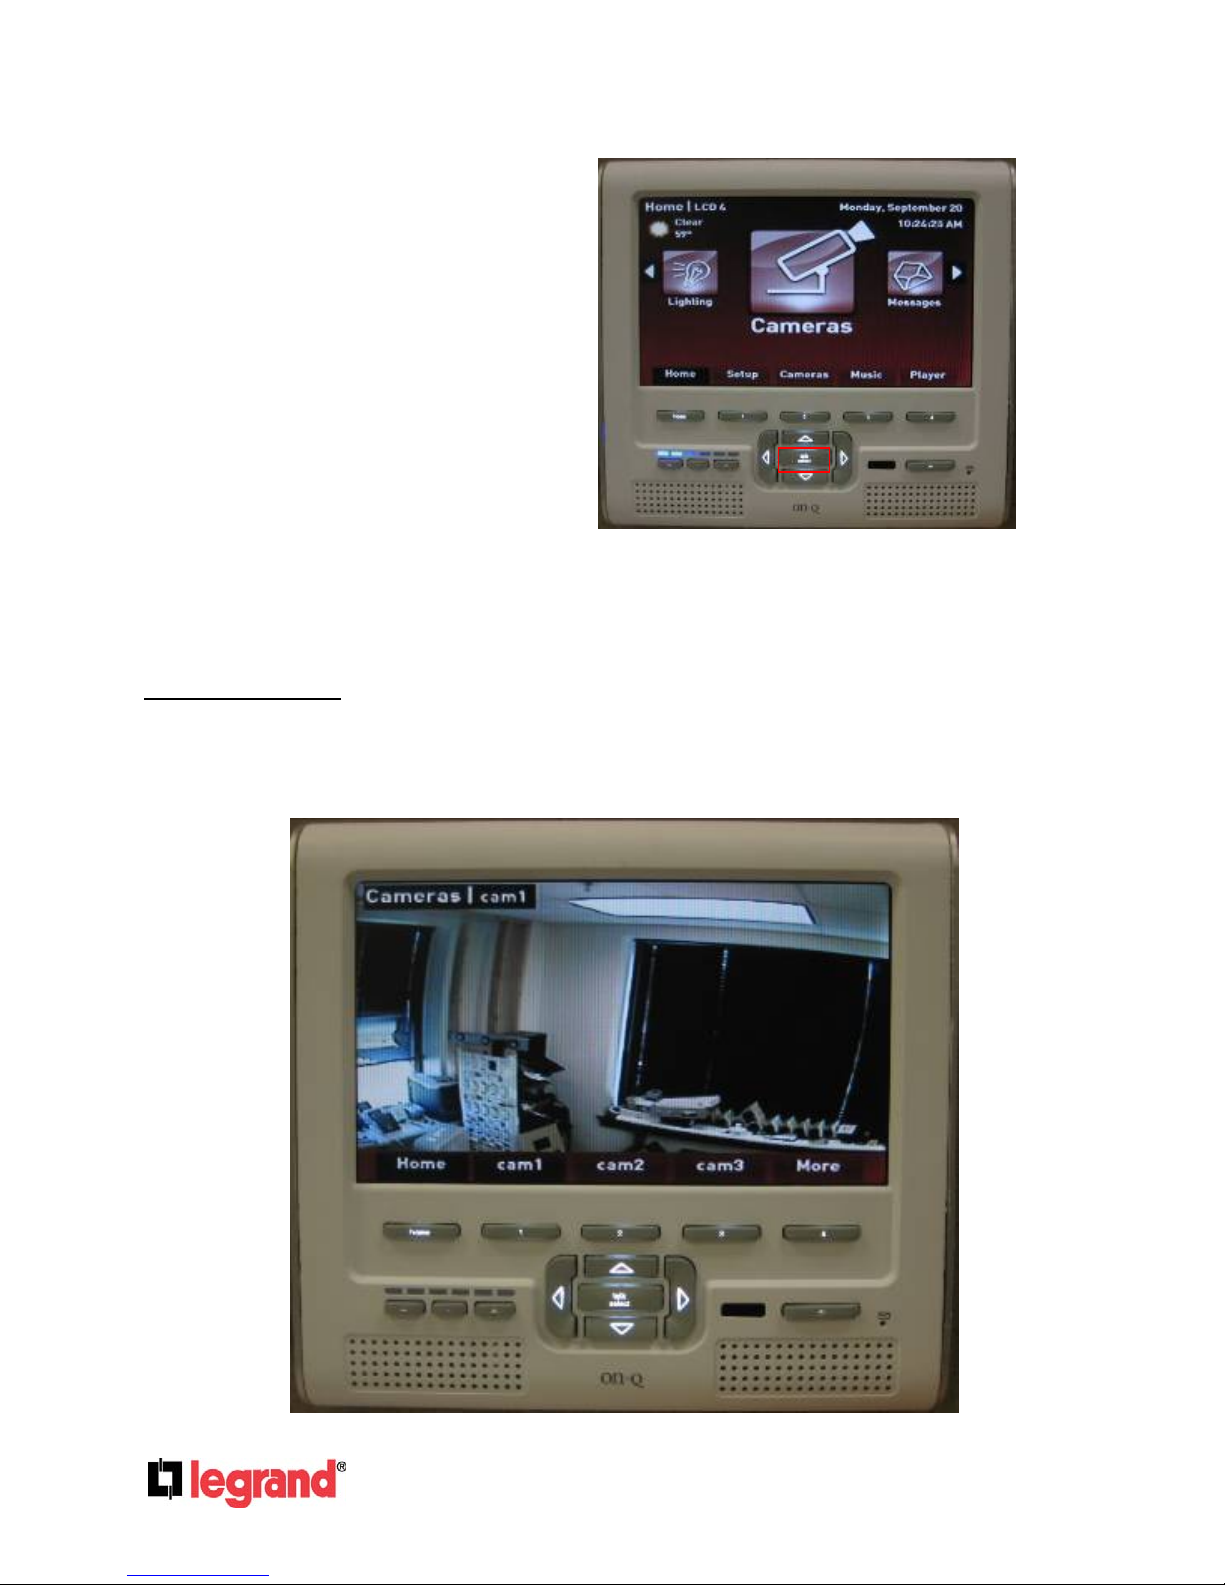
7.Using Cameras
Pressing Talk/Select when the icon wheel is
over Cameras will bring up the Unity Cameras
screen. This screen contains live feeds of all
cameras connected to the system (Note: The
feeds are displayed one at a time).
The softkeys in the camera screen switch between the camera feeds. If the Unity system is attached to
no more than 4 cameras, softkeys 1-4 will switch to each of these four cameras respectively. If the Unity
system is attached to more than 4 cameras the keys will be mapped as follows:
Softkeys 1-3 are mapped to cameras 1-3 OR cameras 4-6.
Softkey 4 is mapped to ‘More’ (as shown above) which toggles the mapping of softkeys 1-3.
Camera sequencing:
Pressing either the right or the left compass key will begin sequencing through the available cameras.
The dwell between camera switching can be adjusted by pressing the up or down compass keys.
To stop sequencing, the left or right keys may be pressed again, or any camera key may be pressed to
switch to that camera and end sequencing.
Page 127
301 Fulling Mill Road, Suite G ©Copyright 2010 by Legrand,
Middletown, PA 17057 Inc All Rights Reserved.
(800)-321-2343 www.onqlegrand.com
Page 31

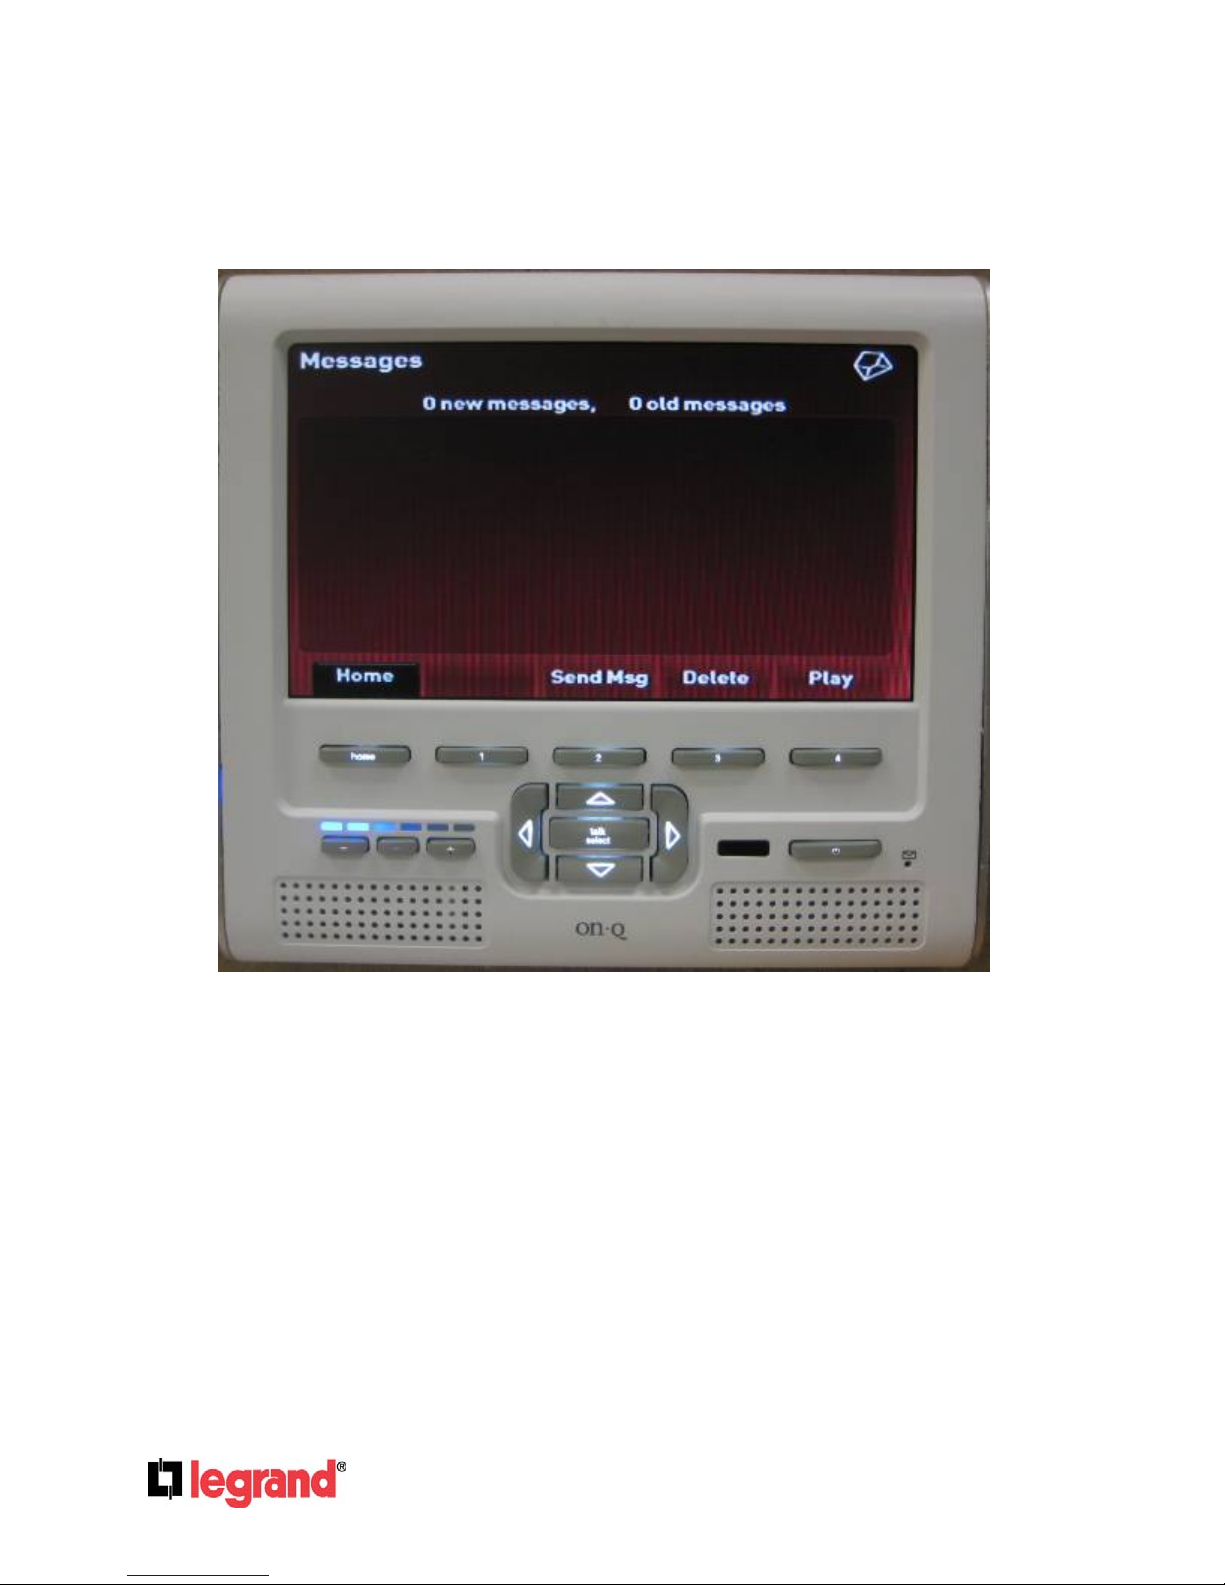
8.Using Messages
Pressing the Talk/Select button while the icon
wheel is over Messages will open the Unity
Messaging screen. This screen provides the
ability to send messages to Unity Intercom units.
To send a message, follow the procedure below.
The main Messaging screen will display
any messages the current unit has in its
mailbox (this unit currently has none).
Softkey 2 will send a new message.
To record the message, press
Talk/Select to start recording, begin
speaking, and press Talk/Select a
second time to stop recording.
Pressing Talk/Select a third time will
send the message.
A list of all possible destinations will appear. The
Up and Down compass keys can be used to
navigate this list. The Talk/Select button will
designate a destination for the message.
Once the message has been sent, it will appear in the
mailbox of all units that are part of the destination.
Softkey 4 will play the message (also removing the
NEW tag). Softkey 3 will delete the message. The
small message indicator light on bottom right of the
LCD Console will blink a pattern indicating the number
of NEW messages in its mailbox.
Page 128
301 Fulling Mill Road, Suite G ©Copyright 2010 by Legrand,
Middletown, PA 17057 Inc All Rights Reserved.
(800)-321-2343 www.onqlegrand.com
Page 32

9.Using Weather
Pressing Talk/Select while the icon wheel is over
Weather will bring up the Unity Weather screen.
This screen gives an overview of current
weather conditions and forecasts.
The left pane shows the outside temperature,
sky condition, daily low and high temperature,
current wind speed and direction, chance of
precipitation and daily sunrise and sunset
times. The right pane gives an abbreviated five
day forecast.
Softkey 3 can be used to switch between
Fahrenheit and Celsius.
Softkey 4 can be used to set the location for
which the weather will be reported. Refer to the
instructions below for setting the location.
Pressing softkey 4 (Location) will bring up a
virtual keyboard. The location may be entered at
this keyboard in one of two ways.
Option 1 – by US zip code: Using the compass
keys, enter the zip code for the desired region. If
the region can be found, the region name will be
displayed in the top right corner. If not, a
notification will pop up stating so.
Option 2 – by region name: Using the compass
keys, enter the name of the desired region in the
virtual keypad. For example, the current region
above would be found by typing ‘beverly hills,
ca’ into the virtual keyboard. Character case
does not matter when typing in region names.
(Note: for users located in Canada, names are
to be typed in as <city>, Canada. For instance,
for weather in Toronto, type in ‘toronto, canada’.)
Page 129
301 Fulling Mill Road, Suite G ©Copyright 2010 by Legrand,
Middletown, PA 17057 Inc All Rights Reserved.
(800)-321-2343 www.onqlegrand.com
 Loading...