

Page 1
Installation Instructions • Notice ďInstallation • Instrucciones de Instalación
Catalog Number(s) • Numéro(s) de Catalogue • Les Numéros de Catalogue:
Country of Origin: Made in China • Pays ďorigine: Fabriqué en Chine • Pais de origen: Hecho en China
Intuity Command Center
Intuity Command Center
El centro de comando Intuity
Doc. #1507235 10/22 Rev F
HA7110
INSTALLATION INSTRUCTIONS
Please read these instructions completely before you begin.
NOTICE D’INSTALLATION
Veuillez lire ces instructions dans leur intégralité avant de
commencer.
INSTRUCCIONES DE INSTALACIÓN
Lea estas instrucciones en su totalidad antes de comenzar.
1
2
3
4
Run two Cat 5 cables and one 16/2 speaker wire from enclosure location to
the three-gang electrical box in the wall at desired Command Center
mounting location, and terminate both ends of the Cat 5s to the TIA/EIA 568A
wiring standard with RJ45 plugs.
Exécuter deux Cat 5 câbles et un haut-parleur 16/2 fil d'emplacement de
l'enceinte à trois-gang boîtier électrique dans le mur au centre de la
commande désirée emplacement de montage et extrémités des Cat 5 au
câblage TIA/EIA 568 a standard avec RJ45 se branche.
Ejecutar dos Cat 5 cables y enchufes uno cable de ubicación del recinto a la
caja eléctrica de tres elementos en la pared en el centro de comando
deseado lugar de montaje del altavoz 16/2 y termine ambos extremos de los
Cat 5 para el cableado 568A TIA/EIA estándar con RJ45.
At the Command Center location, run an additional Cat 5 (optionally) to any intended audio
local input location and two 16/2 speaker wires to the speakers in the Command Center
room.
À l'emplacement du centre de commande, exécutez un supplémentaire Cat 5
(éventuellement) à tout destiné emplacement local d'entrée audio et deux haut-parleur 16/2
fils aux haut-parleurs dans la salle du centre de commande..
En la ubicación del centro de comando, ejecutar un adicional Cat 5 (opcionalmente) a
cualquier destinado Introduzca la ubicación del local audio y dos cables 16/2 altavoces a
los altavoces en la sala de comando central.
Cut a three-gang sized hole in the wall at the desired Command Center
mounting location, and install a three-gang electrical box or mud ring.
Découpez un trou de taille de trois groupes dans le mur à l'emplacement de
montage désiré Command Center et installer un anneau de boue ou de la
boîte électrique de trois groupes.
Corte un orificio de tamaño 3-gang en la pared a la ubicación de montaje
deseada de centro de comando e instalar un anillo tres-banda eléctrico caja o
barro.
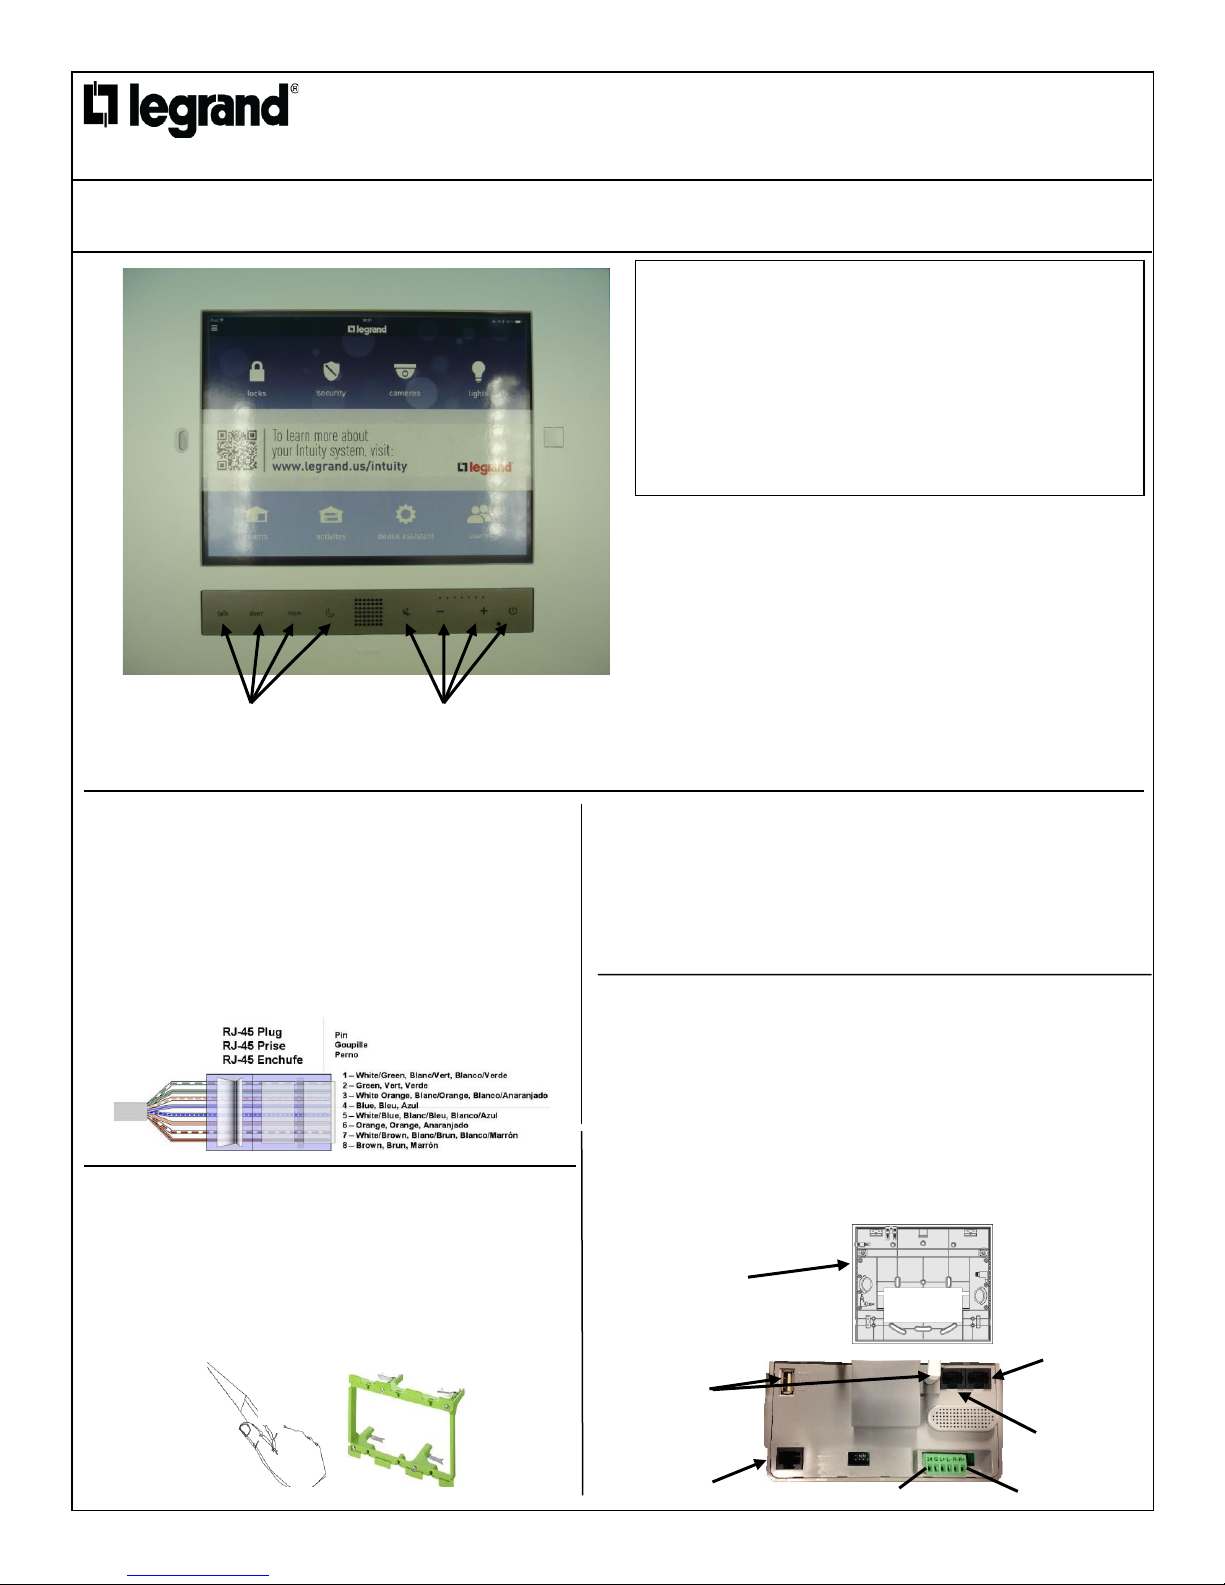
Local Input
Apport local
Entrada local
Intercom Buttons
Interphone boutons
Botones de intercomunicación
The HA7110 Intuity Command Center is the primary fixed user interface designed to provide
complete system control of the Intuity Home Automation Control System. It requires a three
gang electrical box or mud ring for its on-wall mounting, and is designed to house the
customer’s iPad Mini for operation with a downloaded iOS App.
Le centre de commandement Intuity HA7110 est l'interface de l'utilisateur principal fixe
conçu pour fournir un système complet contrôle Intuity Accueil contrôle du système
d'automatisation. Il nécessite une boîte électrique de trois gangs ou anneau de la boue pour
son montage sur le mur et est conçu pour abriter l'iPad Mini du client pour un
fonctionnement avec un iOS téléchargés App.
El centro de comando Intuity HA7110 es la interfaz de usuario principal fijo diseñada para
proporcionar un sistema completo control Intuity casa automatización de sistema de Control
de. Se requiere una caja eléctrica de tres unidades o anillo de barro para su montaje en la
pared y está diseñado para iPad del cliente Mini para la operación con un iOS descargado
la aplicación de la casa.
Audio Buttons
Boutons audio
Botones de audio
To ADM
Au ADM
Para ADM
Attach the Command Center backing plate to the three-gang box / mud ring with provided
screws. Next, attach the appropriate Cat 5 and speaker wires to the correct locations as
marked on the electronic assembly. Finally, attach the supplied custom USB cable and
Audio cable to the electronic assembly, and attach it to the plate with provided screws.
Fixez le centre de commande plaque de support à la boîte de trois-gang / vase rond avec
les vis fournies. Ensuite, attachez approprié Cat 5 et câbles vers les emplacements corrects
comme marqué sur l'assemblage électronique. Enfin, fixez le câble personnalisé à USB et
câble Audio à l'assemblage électronique et l'attacher à la plaque avec les vis fournies.
Coloque el centro de mando placa del forro para la caja de tres / anillo con tornillos del
fango. A continuación, coloque el Cat 5 apropiado y los cables de altavoz a las ubicaciones
correctas como se indica en el montaje electrónico. Finalmente, conecte el cable
suministrado de USB personalizado y cable de Audio para el montaje electrónico y fije a la
placa con tornillos.
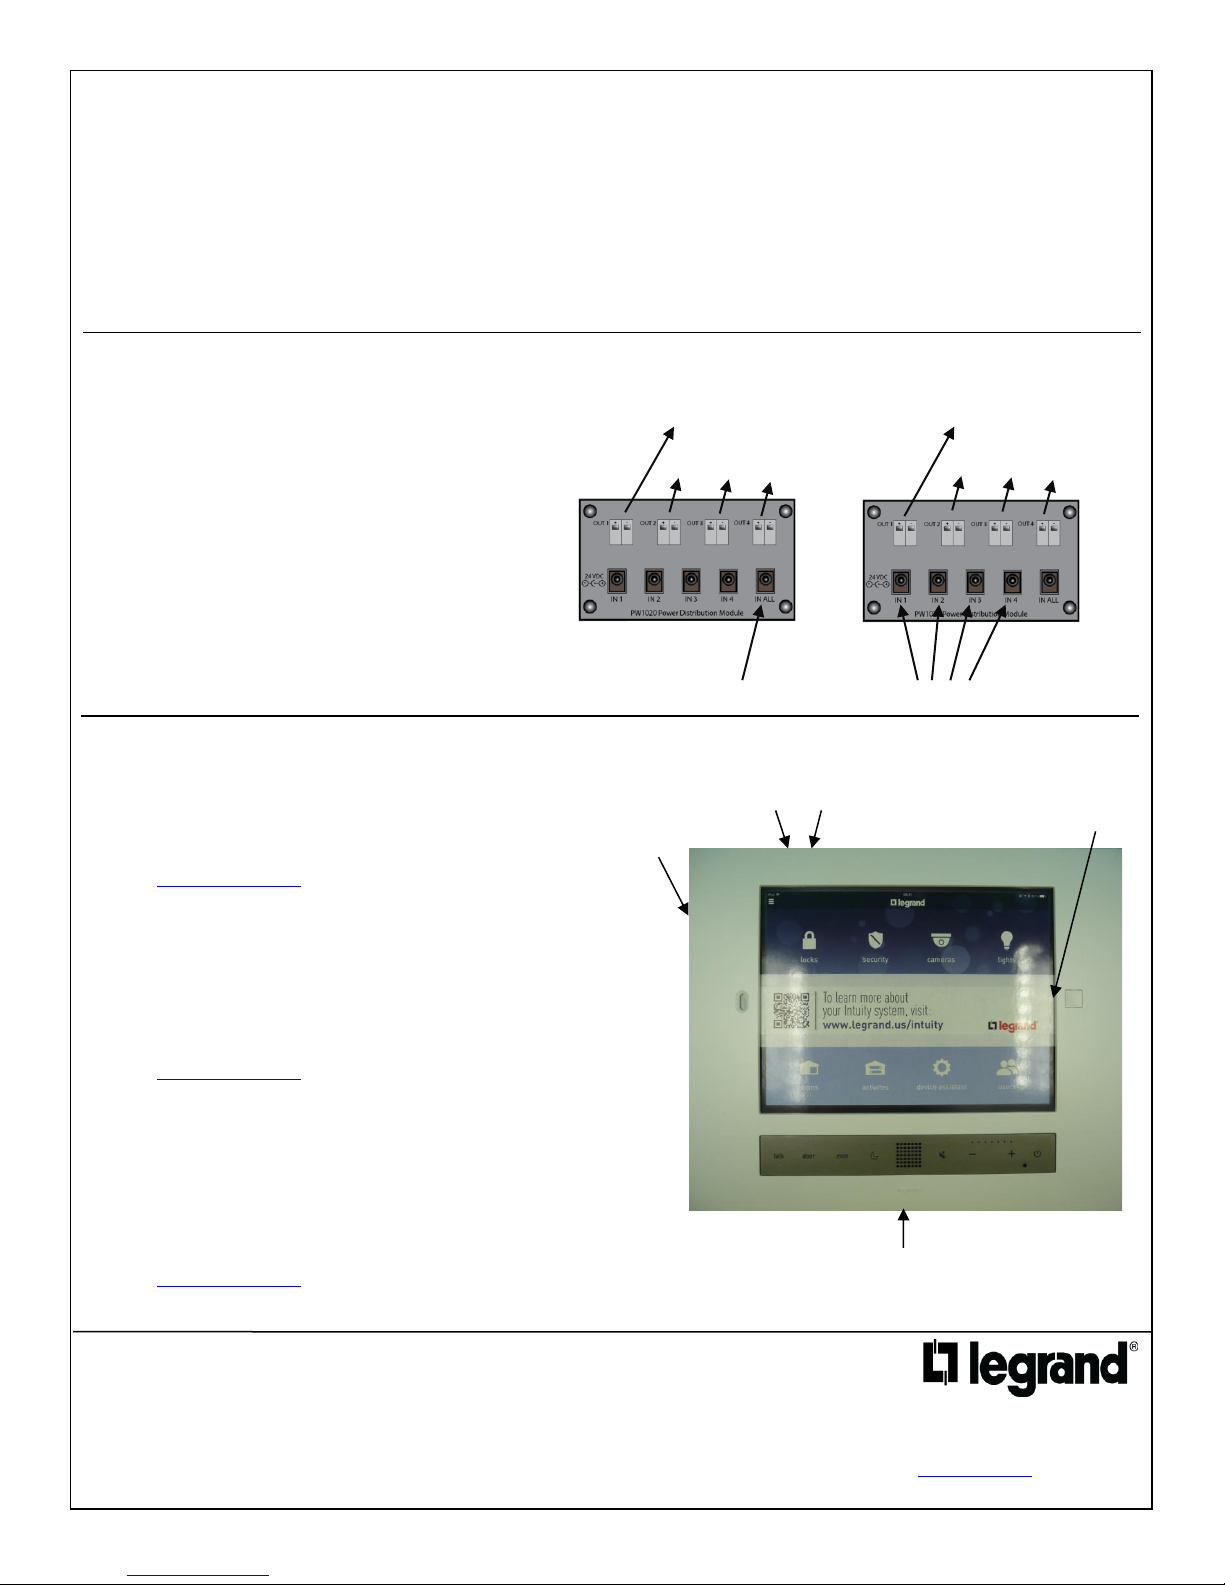
24VDC, GRD, L+, L-, R-, R+
To iPad Mini
IPad Mini
A iPad Mini
To Intercom
Interphone
Intercomunicador
Backing plate
Plaque de support
Placa de soporte
Page 2
800.223.4162
1.877.BY.LEGRAND
www.legrand.us
www.legrand.ca
© Copyright 2016 Legrand All Rights Reserved.
© Copyright 2016 Tous droits réservés Legrand.
© Copyright 2016 Legrand Todos los derechos reservados.
HA7110
Command
Center
PW1060 x1
PW1060 x4
Doc. #1507235 10/22 Rev F
5
7
At the low voltage enclosure, attach the intercom Cat 5 cable from the Command Center to any of the ports (1 thru 7) on the IC5010 Intercom
module.
Next connect the audio Cat 5 cable from the Command Center to one of the AU7000 Audio Distribution Module Zone Ports (1 thru 4).
Finally connect the 16/2 speaker wire from the Command Center to the Audio Power Distribution Module (PW1020) observing proper polarity (+/-).
À l'enceinte basse tension, branchez le câble d'interphone Cat 5 depuis le centre de commandement à l'un des ports (1 à 7) sur le module
interphone IC5010.
Ensuite, connectez le câble audio de la Cat 5 depuis le centre de commandement à l'un des AU7000 Audio Distribution Module Zone Ports (1 à 4).
Enfin, connectez le fil 16/2 du centre de commande pour le Module de Distribution de la puissance de l'Audio (PW1020) respectant la polarité (+/-).
En el gabinete de bajo voltaje, conecte el cable de intercom Cat 5 desde el centro de mando a cualquiera de los puertos (1 al 7) en el módulo de
portero IC5010.
A continuación, conecte el audio cable Cat 5 desde el centro de comando a uno de los AU7000 distribución módulo zona puertos Audio (1 a 4).
Finalmente Conecte el cable de altavoz de 16/2 desde el centro de comando para el módulo de distribución de la potencia de Audio (PW1020)
observando la polaridad correcta (+/-).
Connect the supplied custom power cable and headphone audio cable to the tablet
before placing it in the mounting assembly and securing it with the magnetically
attached front bezel. Be certain to pass these cables through the grooves in the
mounting plate or the tablet and front bezel will not sit flush to the assembly.
The physical installation of the Command Center is now complete.
For information on downloading Apps, provisioning other Intuity components, and
more detail on installation, refer to the Intuity Installation Manual (P/N 1308240) and
the Intuity User Guide (P/N 1308241) available on our website at
www.legrand.us/onq/intuity
Connectez le câble d'alimentation personnalisé fourni et le câble audio du casque à
la tablette avant de placer dans l'ensemble de montage et fixez-la avec la collerette
attachée magnétiquement. Assurez-vous de passer ces câbles dans les rainures de
la plaque de montage ou la lunette recto et la tablette ne siégera pas chasse d'eau à
l'Assemblée.
L'installation physique du centre de commande est maintenant terminée.
Pour plus d'informations sur le téléchargement d'applications, fourniture des autres
composants Intuity et plus de détails sur l'installation, consulter le manuel
d'Installation Intuity (P/N 1308240) et le Guide utilisateur Intuity (P/N 1308241)
disponible sur notre site Web à
www.legrand.us/onq/intuity.
Conecte el cable suministrado de serie personalizado y cable de audio para
auriculares a la tableta antes de colocarlo en el montaje y asegurándola con el bisel
delantero magnéticamente acoplado. Asegúrese de pasar los cables a través de las
ranuras en la placa de montaje o el bisel de la tableta y el frente no se va a quedar al
ras a la Asamblea.
La instalación física del centro de comando está ahora completa.
Para obtener información sobre la descarga de aplicaciones, aprovisionamiento otros
componentes Intuity y más detalle en la instalación, consulte el Manual de instalación
Intuity (P/N 1308240) y la guía usuario Intuity (P/N 1308241) disponible en nuestro
sitio web en
www.legrand.us/onq/intuity
PW1020
PW1020
HA7110
Command
Center
STD
HP
AU7010s
AU7050s
iPad Mini Volume
+ -
iPad Mini Power
On/Off
iPad Mini
Home
Standard/High Performance
Volume Control Switch
10W
30W
On the bottom of the HA7110 is a STD/HP switch (NOT accessible when
installed). If STD is selected (10W per channel), only one PW1060 power
supply is needed for all four PW1020 outputs (connect to IN ALL). If HP is
selected (30W per channel), a PW1060 power supply is needed for each
PW1020 input (IN1 – IN4).
Sur le fond de la HA7110 est un commutateur STD/HP (pas accessible
lorsqu'il est installé). Si STD est sélectionné (10 w par canal), qu'un seul
bloc d'alimentation PW1060 est nécessaire pour toutes les sorties de
PW1020 quatre (se connecter en tout). Si HP est sélectionné (30W par
canal), une alimentation PW1060 est nécessaire pour chaque entrée de
PW1020 (IN1 – IN4).
En la parte inferior de la HA7110 es un interruptor STD/HP (no accesible
cuando está instalado). Si STD es seleccionado (10W por canal), se
necesita sólo una fuente de alimentación PW1060 para PW1020 todas las
cuatro salidas (conectarse en todos). Si HP es seleccionado (30W por
canal), es necesario una fuente de alimentación PW1060 para cada entrada
de pw1020 (IN1-IN4).
6
 Loading...