

Page 1
Installation Instructions • Notice ďInstallation • Instrucciones de Instalación
Catalog Number(s) • Numéro(s) de Catalogue • Les Numéros de Catalogue:
Country of Origin: Made in China • Pays ďorigine: Fabriqué en Chine • Pais de origen: Hecho en China
Intuity Automation Controller
Contrôleur d'automatismes Intuity
Controlador de automatización Intuity
Doc. #1507205 04/15 Rev A
HA7000
INSTALLATION INSTRUCTIONS
Please read these instructions completely before you begin.
NOTICE D’INSTALLATION
Veuillez lire ces instructions dans leur intégralité avant de
commencer.
INSTRUCCIONES DE INSTALACIÓN
Lea estas instrucciones en su totalidad antes de comenzar.
1
2
3
4
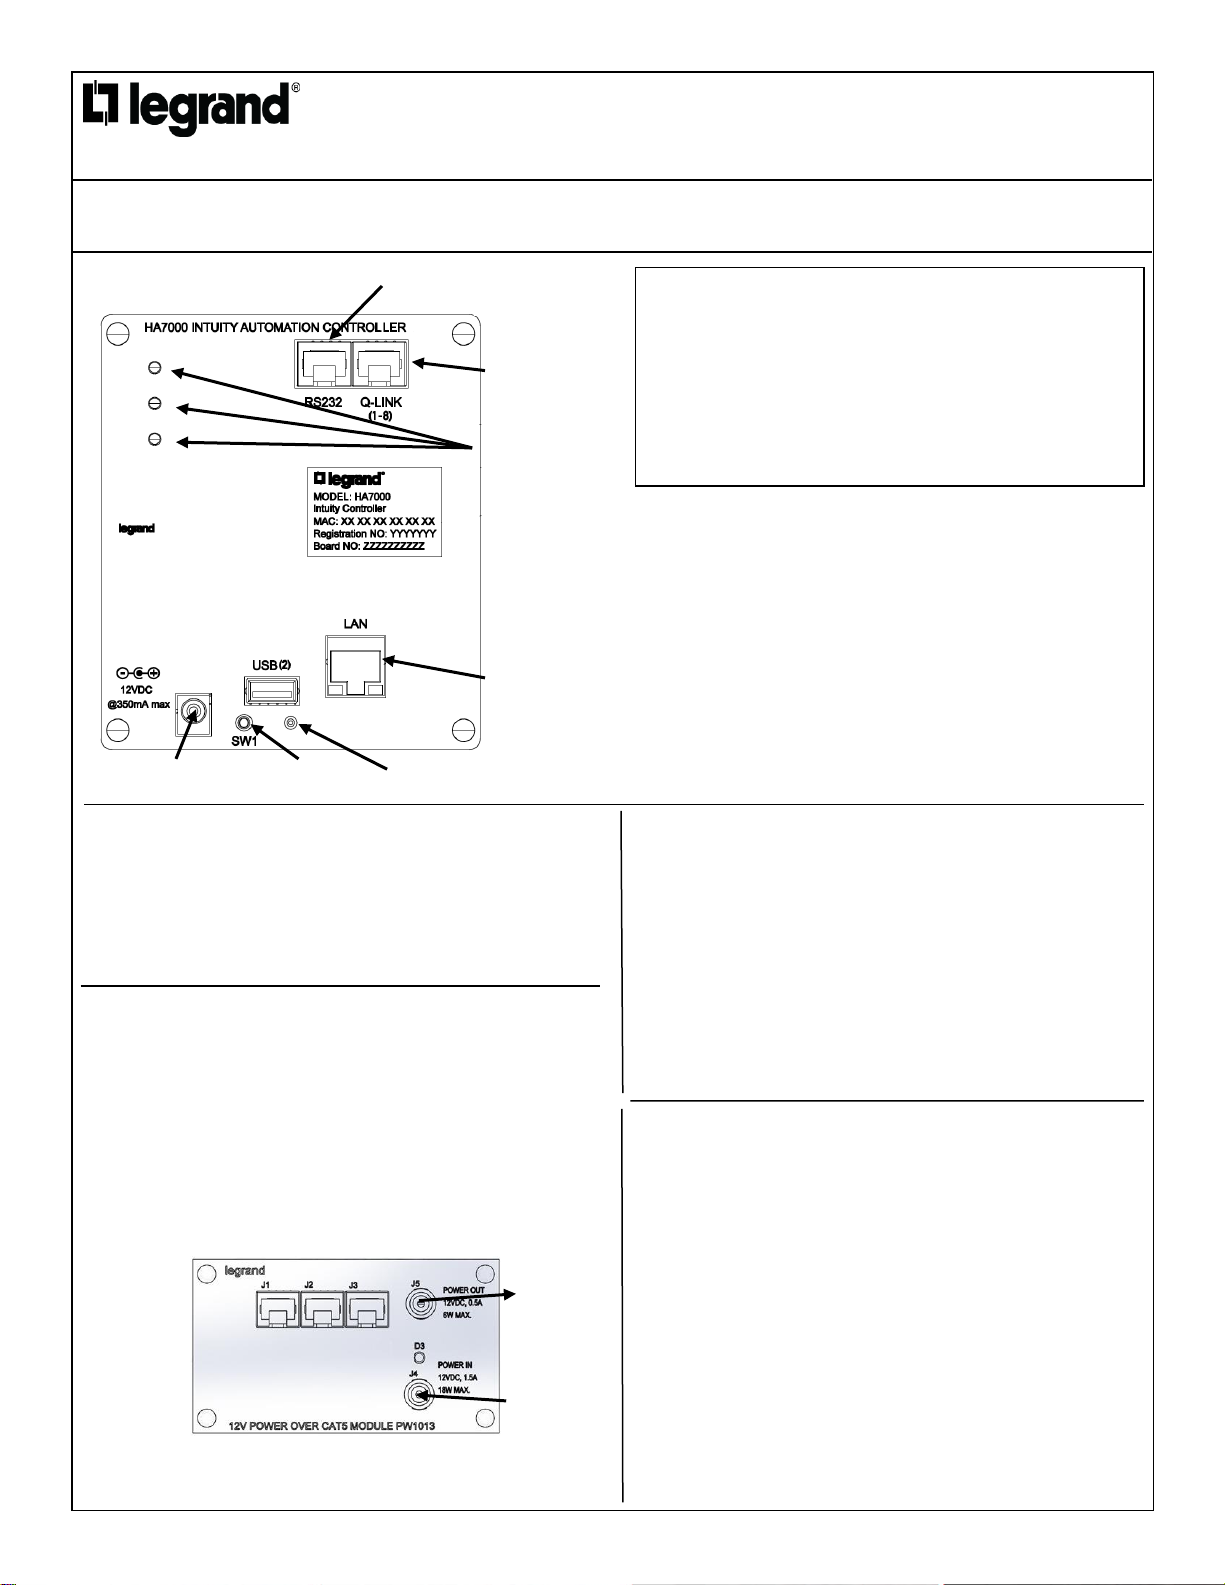
Install the Intuity Automation Controller on a two-bay plate which is then
mounted in the enclosure.
Installer le Module contrôleur Intuity sur une plaque de deux baies qui est
ensuite montée dans le boîtier..
Installez le contrôleur Automation Intuity sur une plaque de deux baies qui
est ensuite montée dans le boîtier..
Run a Cat 5 jumper from the LAN port to a network port on the switch or
router in the enclosure. Run an additional Cat 5 jumper from the Intercom
port to an available port on the Selective Call 8 Location Distribution
Module. Run the third Cat 5 jumper (or terminated cable if needed) to the
alarm system.
Exécuter un cavalier Cat 5 du port LAN à un port de réseau sur le
commutateur ou un routeur dans l'enceinte. Exécuter un cavalier de Cat 5
supplémentaire depuis le port de l'interphone à un port disponible sur le
sélectif appeler 8 emplacement Distribution Module. Exécuter le troisième
cavalier de Cat 5 (ou câbles si nécessaire) pour le système d'alarme.
Ejecutar un saltador de Cat 5 desde el puerto de LAN a un puerto de red
en el switch o router en el recinto. Ejecutar un puente Cat 5 adicional
desde el puerto de intercomunicación a un puerto disponible en el
selectivo llamar 8 Ubicación módulo de distribución. Ejecute el tercer
puente de Cat 5 (o el cable terminado si es necesario) para el sistema de
alarma.
12VDC from PW1013
12VDC de PW1013
12VDC de PW1013
Network Jack
Prise réseau
Red Jack
Reset Button
Bouton de réinitialisation
Botón RESET
The HA7000 Intuity Automation Controller is the heart of the Intuity Home Automation System.
It resides in the enclosure in a two-bay bracket, and is typically powered via the PW1013 Intuity
Bridge Power Module. It connects to the home alarm system via the RS232 jack, to the home
intercom system via the Q-Link jack and to the home network (Internet) via the LAN jack.
Status LEDs are provided, as is a reset switch to return the unit to factory defaults if needed.
El controlador de automatización Intuity HA7000 es el corazón de la Intuity Inicio sistema de
automatización. Reside en el recinto en un soporte de dos bahías y normalmente es
alimentado a través del módulo de potencia PW1013 Intuity puente. Se conecta al sistema de
alarma de su casa mediante el conector RS232, el sistema de intercom casa vía el jack Q-Link
y a la red doméstica (Internet) mediante el conector LAN. Indicadores LED de estado se
proveen, como es un interruptor de reset para devolver la unidad a valores predeterminados
de fábrica si es necesario..
El controlador de automatización Intuity HA7000 es el corazón de la Intuity Inicio sistema de
automatización. Reside en el recinto en un soporte de dos bahías y normalmente es
alimentado a través del módulo de potencia PW1013 Intuity puente. Se conecta al sistema de
alarma de su casa mediante el conector RS232, el sistema de intercom casa vía el jack Q-Link
y a la red doméstica (Internet) mediante el conector LAN. Indicadores LED de estado se
proveen, como es un interruptor de reset para devolver la unidad a valores predeterminados
de fábrica si es necesario.
Status LEDs
LED d'État
Indicadores LED de
estado
At the enclosure, plug the PW7760 power supply into an AC outlet, and its
other cable into the 12VDC 1.5A input jack (J4) on the PW1013. Connect the
Power Out (J5) to the 12VDC Input of the HA7000 using the supplied
jumper.
À l'enceinte, branchez le bloc d'alimentation PW7760 sur une prise secteur
et l'autre câble dans l'alimentation 12Vcc 1,5 a entrée jack (J4) sur le
PW1013. Raccorder l'alimentation de sortie (J5) à l'entrée 12VDC de la
HA7000 utilisant le cavalier fourni.
En el recinto, enchufe la fuente de alimentación PW7760 en un
tomacorriente de CA y su otro cable en el 12VDC 1.5A entrada jack (J4) en
el PW1013. Conectar el Power Out (J5) a la entrada de 12VDC de la
HA7000 con el jumper suministrado.
From PW7760
De PW7760
De PW7760
To HA7000
À HA7000
A HA7000
To Alarm System
Pour système d'alarme
A sistema de alarma
To Intercom System
Pour système
d'interphone
Sistema de Intercom
NOTE: The USB port on the Intuity Automation Controller is not used at
this time.
Remarque : Le port USB sur le contrôleur Automation Intuity n'est pas
utilisé en ce moment.
Nota: No se utiliza el puerto USB en el controlador de automatización
Intuity en este momento.
Future Use
Utilisation future
Uso futuro
Page 2
860.233.6251
1.877.BY.LEGRAND
www.legrand.us
www.legrand.ca
© Copyright 2015 Legrand All Rights Reserved.
© Copyright 2015 Tous droits réservés Legrand.
© Copyright 2015 Legrand Todos los derechos reservados.
Doc. #1507205 04/15 Rev A
5
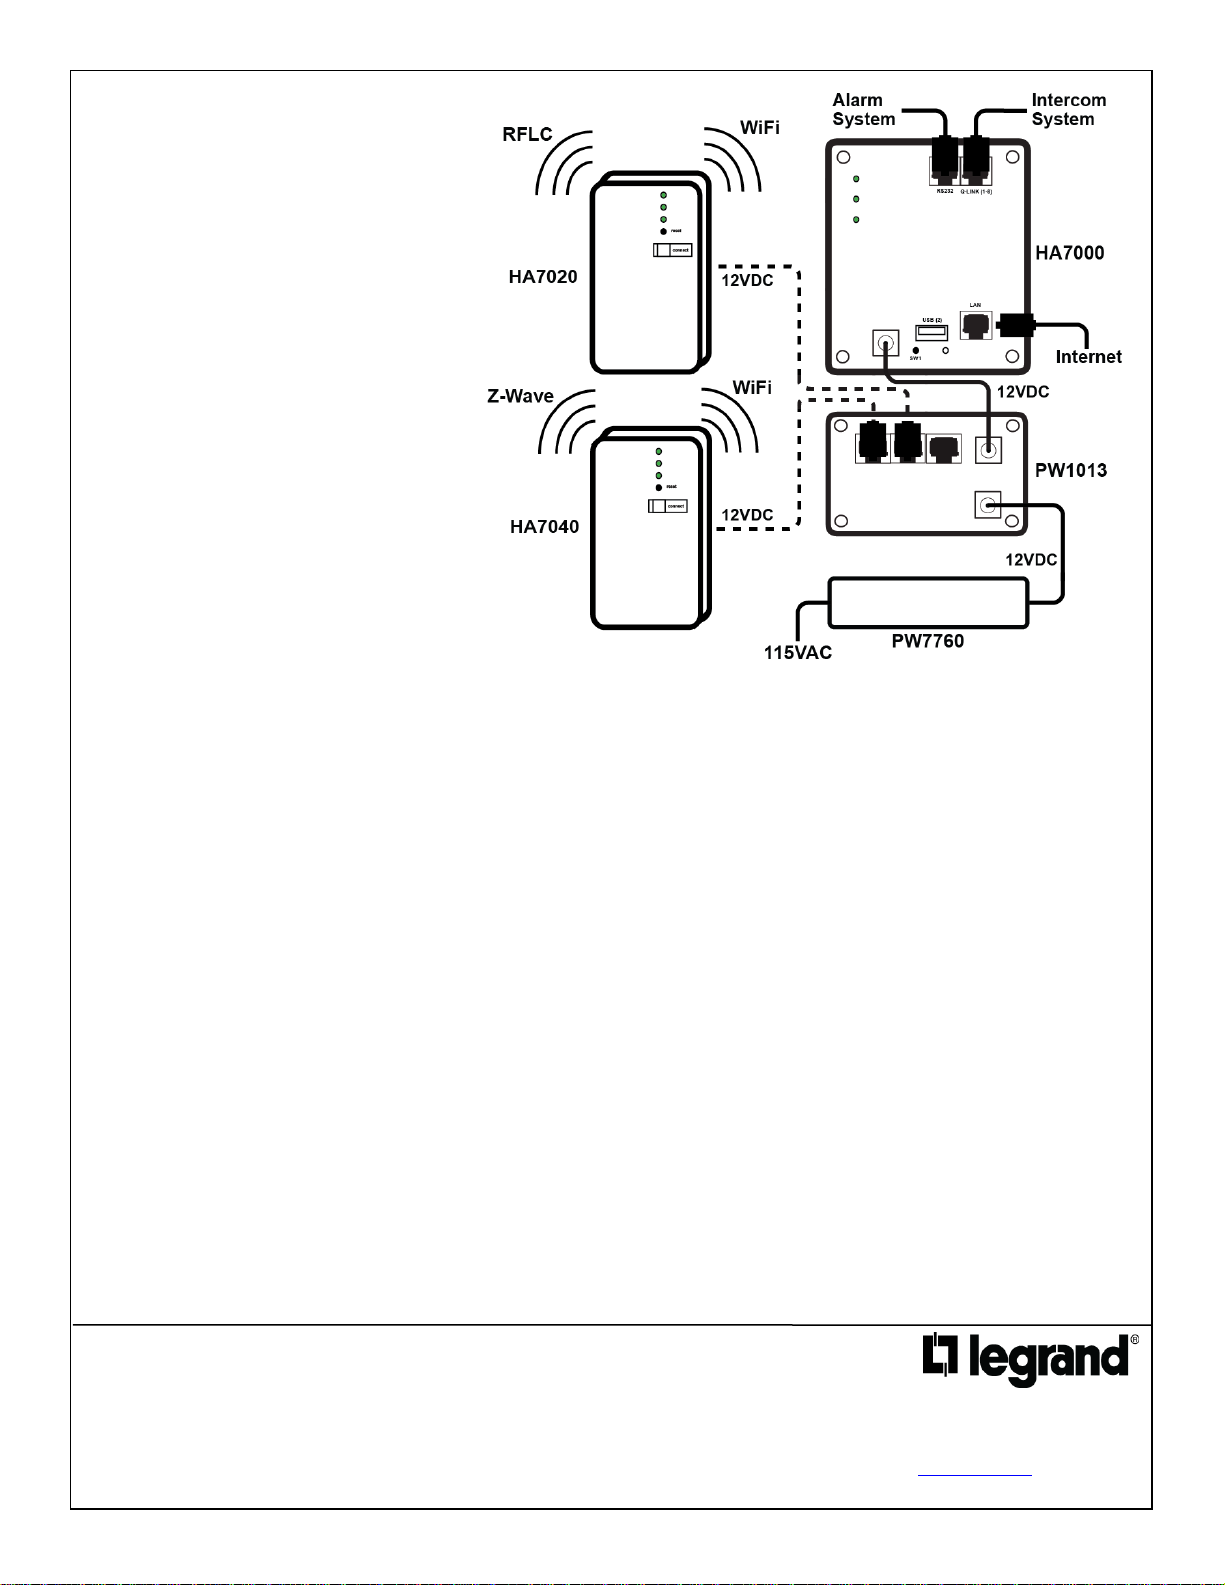
The physical installation of the Intuity Controller
is now complete. Your physical installation
should resemble this diagram.
L'installation physique du contrôleur Intuity est
maintenant terminée. Votre installation
physique doit ressembler à ce schéma.
La instalación física del controlador Intuity
ahora está completa. Su instalación física
debería parecerse a este diagrama.
 Loading...