

Page 1

301 Fulling Mill Road, Suite G ©Copyright 2014 by Legrand
Middletown, PA 17057 All Rights Reserved.
(800)-321-2343 www.legrand.us
CM7000 Outdoor Camera
User Manual
1308235 Rev.B
Page i
Page 2

301 Fulling Mill Road, Suite G ©Copyright 2014 by Legrand
Middletown, PA 17057 All Rights Reserved.
(800)-321-2343 www.legrand.us
Federal Communications Commission Statement
This device complies with Part 15 of the FCC Rules. Operation is subject to the following two conditions:
• This device may not cause harmful interference, and
• This device must accept any interference received, including interference that may cause undesired operation.
This equipment has been tested and found to comply with the limits for a class B digital device, pursuant to Part 15 of the Federal
Communications Commission (FCC) rules. These limits are designed to provide reasonable protection against harmful interference
in a residential installation. This equipment generates, uses, and can radiate radio frequency energy and, if not installed and used in
accordance with the instructions, may cause harmful interference to radio communications. However, there is no guarantee that
interference will not occur in a particular installation. If this equipment does cause harmful interference to radio or television
reception, which can be determined by turning the equipment off and on, the user is encouraged to try to correct the interference by
one or more of the following measures:
• Reorient or relocate the receiving antenna.
• Increase the separation between the equipment and receiver.
• Connect the equipment into an outlet on a circuit different from that to which the receiver is connected.
• Consult the dealer or an experienced radio/TV technician for help.
Reprinted from the Code of Federal Regulations #47, part 15.193, 1993. Washington DC: Office of the Federal Register, National
Archives and Records Administration, U.S. Government Printing Office.
WARNING: TO PREVENT FIRE OR SHOCK HAZARD, DO NOT EXPOSE THIS PRODUCT TO RAIN OR MOISTURE. THE UNIT
MUST NOT BE EXPOSED TO DRIPPING OR SPLASHING WATER.
CAUTION: DO NOT OPEN THE UNIT. DO NOT PERFORM ANY SERVICING OTHER THAN THAT CONTAINED IN THE
INSTALLATION AND TROUBLESHOOTING INSTRUCTIONS. REFER ALL SERVICING TO QUALIFIED SERVICE
PERSONNEL.
CAUTION: THIS DEVICE MUST BE INSTALLED AND USED IN STRICT ACCORDANCE WITH THE MANUFACTURER’S
INSTRUCTIONS AS DESCRIBED IN THE USER DOCUMENTATION THAT COMES WITH THE PRODUCT.
WARNING: POSTPONE INSTALLATION UNTIL THERE IS NO RISK OF THUNDERSTORM OR LIGHTNING ACTIVITY IN THE
AREA.
When using this device, basic safety precautions should always be followed to reduce the risk of fire, electric shock and injury to
persons, including the following:
Read all of the instructions {listed here and/or in the user manual} before you operate this equipment.
Give particular attention to all safety precautions.
Retain the instructions for future reference.
Comply with all warning and caution statements in the instructions.
Observe all warning and caution symbols that are affixed to this equipment.
Comply with all instructions that accompany this equipment.
Avoid using this product during an electrical storm. There may be a risk of electric shock from lightning. It is recommended that
the customer install an AC surge protector in the AC outlet to which this device is connected. This is to avoid damaging the
equipment by local lightning strikes and other electrical surges.
Operate this product only from the type of power source indicated on the product’s marking label.
If you are not sure of the type of power supplied to your home, consult your dealer or local power company.
Upon completion of any service or repairs to this product, ask the service technician to perform safety checks to determine that
the product is in safe operating condition.
Installation of this product must be in accordance with national wiring codes and conform to local regulations.
Wipe the unit with a clean, dry cloth. Never use cleaning fluid or similar chemicals. Do not spray cleaners directly on the unit or use
forced air to remove dust.
Keep the device away from excessive heat and humidity and keep the device free from vibration and dust.
Page 2
Page 3

301 Fulling Mill Road, Suite G ©Copyright 2014 by Legrand
Middletown, PA 17057 All Rights Reserved.
(800)-321-2343 www.legrand.us
TABLE OF CONTENTS
CM7000 User Manual
EQUIPMENT PACKAGE CONTENTS .................................................................................................................... 4
INSTALLING THE CM7000 ............................................................................................................................. 4
CM7000 SPECIFICATIONS ............................................................................................................................... 5
MINIMUM RECOMMENDED COMPUTER SYSTEM REQUIREMENT .......................................................................... 6
CONNECT THE CAMERA TO NETWORK WITH DHCP SERVER (RECOMMENDED) ................................................... 6
CM7000 HOME WEB PAGE ............................................................................................................................. 7
CONNECT TO THE CAMERA USING STATIC IP .................................................................................................... 8
BASIC SETTINGS EXPLANATION ............................................................................................................. 9
SYSTEM SETTINGS PAGE ........................................................................................................................ 10
VIDEO & AUDIO SETTINGS PAGE .............................................................................................................. 11
CMOS SETTINGS PAGE .......................................................................................................................... 13
NETWORKING SETTINGS PAGE ................................................................................................................ 14
DDNS SETTINGS PAGE........................................................................................................................... 15
SIP SETTINGS PAGE ............................................................................................................................... 16
STATUS PAGE ......................................................................................................................................... 18
ADVANCED SETTINGS EXPLANATION .................................................................................................. 19
USER MANAGEMENT PAGE ...................................................................................................................... 19
MAINTENANCE PAGE ............................................................................................................................... 20
SMTP SETTINGS PAGE (EMAIL ALARM) ................................................................................................... 21
FTP SETTINGS PAGE (UPLOAD ALARM) ................................................................................................... 22
ALARM SERVER SETTINGS PAGE (UPLOAD ALARM TO SUPPORTED VMS OR HTTP SERVER) ..................... 23
PERIODIC SNAPSHOT .............................................................................................................................. 24
MOTION DETECTION CONFIGURATION PAGE (SET ALARM) ........................................................................ 25
SYSLOG SETTINGS PAGE (TROUBLESHOOTING) ........................................................................................ 27
IP CAMERA FAQ ....................................................................................................................................... 28
Page 3
Page 4

301 Fulling Mill Road, Suite G ©Copyright 2014 by Legrand
Middletown, PA 17057 All Rights Reserved.
(800)-321-2343 www.legrand.us
Equipment Package Contents
Cat 5 cable
connection
The CM7000 package contains:
CM7000 IP Camera
Wall Plate
Installation Sheet
Installing the CM7000
Run Cat 5 cable from enclosure mounted device supplying power over Ethernet (PoE) to single gang box
at intended camera location. The Legrand DA2400 and DA1458 are suitable PoE products.
Attach Cat 5 cable with Ethernet PoE to Camera cable RJ45 jack and feed Camera cables through hole
in supplied Wallplate, and mount Wallplate to single gang box using rubber gasket.
Attach Camera to Wallplate using 3 provided screws and position camera for use.
Page 4
Page 5

301 Fulling Mill Road, Suite G ©Copyright 2014 by Legrand
Middletown, PA 17057 All Rights Reserved.
(800)-321-2343 www.legrand.us
CM7000 SPECIFICATIONS
Video Compression
H.264, MJPEG
Image Sensor Resolution
1/3”, 1.2 Megapixel Progressive Scan CMOS, 1280H x 960V
Image Sensor Sensitivity
Day/Night Mode (exceptional low noise level, low light sensitivity) Shutter:
1/10000 – 1/30 second
Focal Length
3.6mm
Aperture
F1.8
Field Angle (FOV)
100.2°(D) x 77°(H) x 54°(V)
IR Cut Filter
Yes, Mechanical
Day & Night Mode
IR LED covering up to 10 meter
Minimum Illumination
0.05 Lux; 0 Lux with IR LED On
Responsivity
5.48V/Lux-sec (550nm)
Supported Maximum Video
Resolution and Frame Rate
1280x960 (25fps)
1280x720 (30fps)
Video Bit Rate
32 Kbps ~ 8 Mbps, Multi-rate for Preview & Recording
Embedded Analytics
Motion Detection (up to 16 target areas)
Pre-/post-alarm Buffer
8MB
Snapshots
Triggered upon events, Send via email/FTP
Network Protocol
TCP/UDP/IP, RTP/RTCP, RTSP, DHCP, DDNS, HTTP, HTTPS, SMTP,
FTP, NTP, UPnP, Bonjour
SIP/VoIP Support
Yes
Power over Ethernet (PoE)
IEEE 802.3af, Class 0
External Cable Connection
Network: RJ45, 10M/100M Auto-Sensing
Audio In from external mic - 3.5mm
Audio Out to external amplified speaker – 3.5mm
Power Input
Dimensions (D x L)
94mm (D) x 230mm (L)
Weight
0.52kg
Temperature / Humidity
Operating: -20°C ~ 45°C (-4°F ~ 113°F)
10 ~ 90%, RH(non-condensing)
Storage: -30°C ~ 60°C (-22°F ~ 140°F)
Non-PoE Power Requirement
12VDC/1A; Input: 100–240VAC, 50–60Hz
Casing
IP66 Compliant Weather-Proof Metal Case
Compliance
FCC Part 15,Subpart B Class B; EN 55022 Class B, EN 61000-3-2, EN
61000-3-3, EN 55024, EN 60950-1; C-tick AS/NZS CISPR 22,
CISPR 24; IP66
Page 5
Page 6
301 Fulling Mill Road, Suite G ©Copyright 2014 by Legrand
Middletown, PA 17057 All Rights Reserved.
(800)-321-2343 www.legrand.us
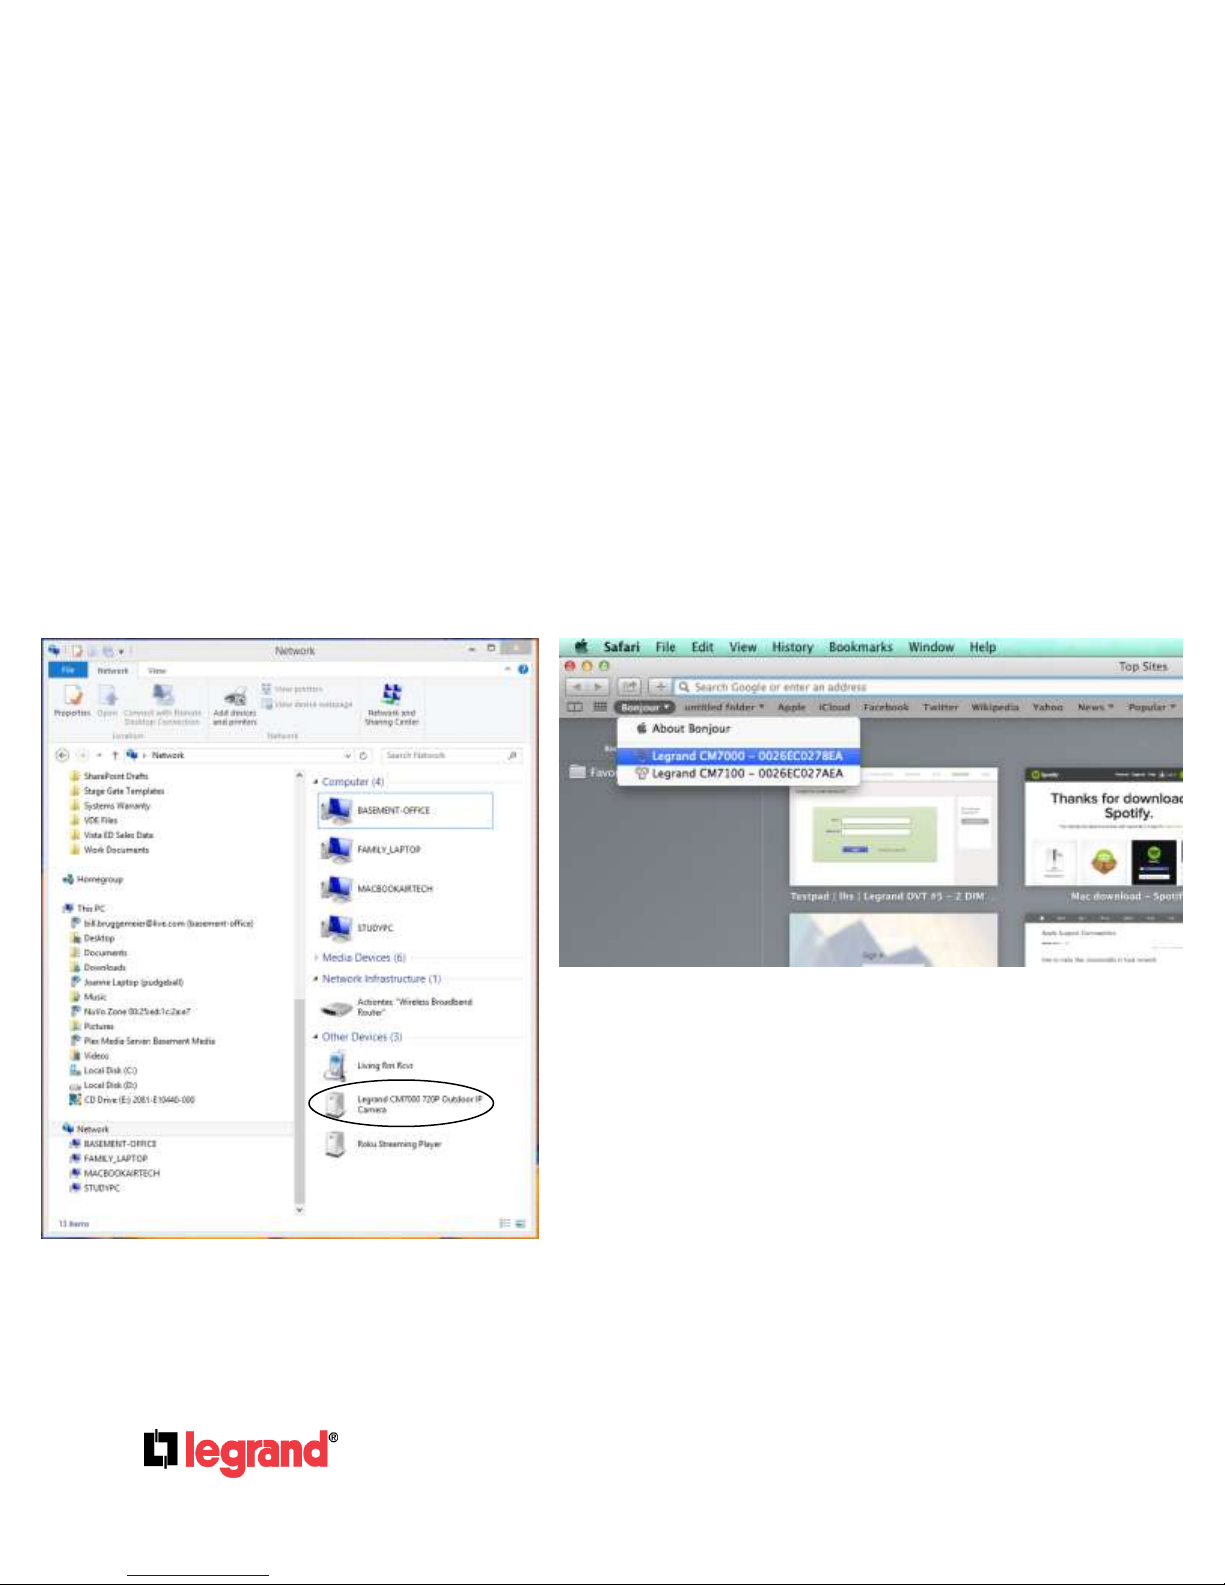
MINIMUM RECOMMENDED COMPUTER SYSTEM REQUIREMENT
PC: The Camera supports UPnP and the camera
can be found in the Network and Sharing Center
Mac: The Camera supports Bonjour and the camera can be
found in the Bonjour list in Safari
If you do not see Bonjour in your Safari folder list.
1. Select Safari:Preferences:Advanced
2. Check both boxes next to Bonjour setting
To configure the CM7000, you must have a computer, PC recommended. The minimum
recommended PC system requirement listed below:
Windows 2000, XP, Windows Vista, Windows 7 (32bit or 64bit)
CPU: Intel Pentium 4 or higher, 2 GHz
RAM: 1 GB (4 GB recommended for larger systems)
Support for DirectX 8.0 and above.
Connect the Camera to network with DHCP server (Recommended)
The CM7000 by default is enabled as a DHCP client, it will automatically get an IP address from
the network (router) with DHCP server running.
Alternately, the user can find the IP address assigned to the camera from the router’s DHCP
server log or client list or by using an IP sniffer.
Page 6
Page 7

301 Fulling Mill Road, Suite G ©Copyright 2014 by Legrand
Middletown, PA 17057 All Rights Reserved.
(800)-321-2343 www.legrand.us
The camera interface is defaulted to show the image on as many devices as possible (Mobile:
Internet Explorer Browser
Firefox Browser
Internet Explorer does not natively support viewing
mjpeg files.
1. If using Internet Explorer change the address to
((Camera IP Address)/index.html)
2. Internet Explorer may ask for plug-in if ActiveX is not
installed, otherwise it will go to Home page and start to
show the video captured by the camera (by default the
camera is enabled for anonymous access) see Figure 1.
3. Click the “Configuration” icon (middle one at lower
left, looks like tools) and the browser will ask for
credentials to authorize configuration.
4. Enter the administrator user name and password to
access the Web Configuration Interface, the default
user name and password are both set to admin.
5. Proceed to the Basic Settings explanation section.
Firefox, Chrome & Safari will give you an image similar to
above
1. Click the “CM7000 Setup” icon (lower left) and the browser
will ask for credentials to authorize configuration.
2. Enter the administrator user name and password to access the
Web Configuration Interface, the default user name and
password are both set to admin.
3. Proceed to the Basic Settings explanation section.
iOS, Android & Desktop: Windows & Mac) therefore what you see next depends on the device
you are viewing it on and the browser you use.
Click on the camera you wish to view and the default web browser will open.
Page 7
Page 8
301 Fulling Mill Road, Suite G ©Copyright 2014 by Legrand
Middletown, PA 17057 All Rights Reserved.
(800)-321-2343 www.legrand.us
1.
2.
3.
4.
5.
6.
7.
8.
9.
10.
11.
12.
13.
14.
15.
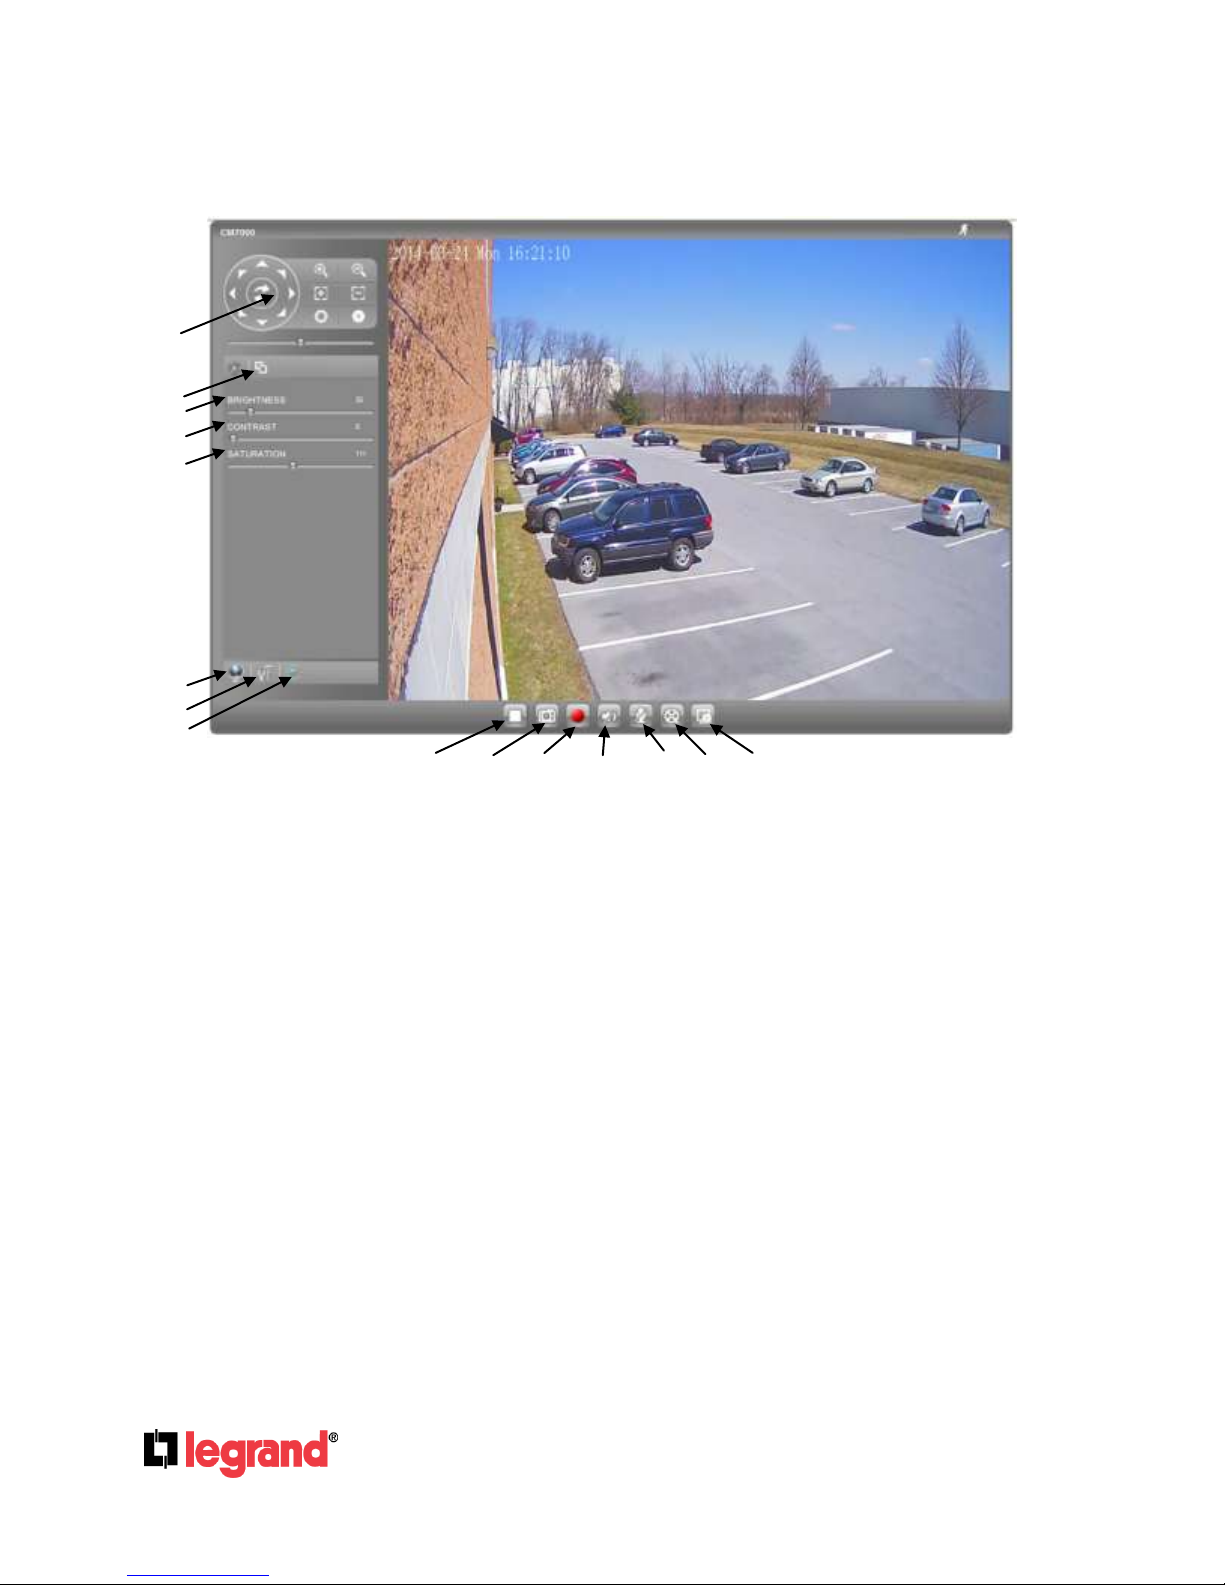
Internet Explorer: CM7000 Home Web Page (IP Address/index.html)
Figure 1: Home Page of the CM7000
1. Control Console (and other buttons): Not Applicable for this camera.
2. Real Size/Window Size: Click to change from real image size to window image size.
3. BRIGHTNESS: Slide to adjust the image or video brightness.
4. CONTRAST: Slide to adjust the image or video contrast.
5. SATURATION: Slide to adjust the image or video saturation.
6. Language: Click to switch webpage language.
7. Configuration: Click to enter “Configuration Page” to configure parameters
8. Default Video Parameters: Click to return to viewable video parameters.
9. Play/Stop: Start/Stop playing the video stream at embedded webpage.
10. Capture (Snapshot): Click to capture and save a snapshot of current video frame displayed.
11. Record: Click to Start/Stop record of current video stream into a file.
12. Sound On/Off: Toggle to listen/stop the sound from camera microphone.
13. Talk: Toggle to talk to camera speaker.
14. Playback: Playback recorded video files
15. Local Configuration: Click to configure the file path of snapshot and recorded video files.
NOTE:
If you click on the “Configuration” button (7. above), a pop up will ask you for a user name and password.
The default is admin for the user name and admin for the password. The following pages take you
through Configuration options.
(Currently supported: Chinese, English and Russian)
Default directory: C:\Capture
Default directory: C:\Record
Also adjust the video delay or smoothness.
Page 8
Page 9
301 Fulling Mill Road, Suite G ©Copyright 2014 by Legrand
Middletown, PA 17057 All Rights Reserved.
(800)-321-2343 www.legrand.us
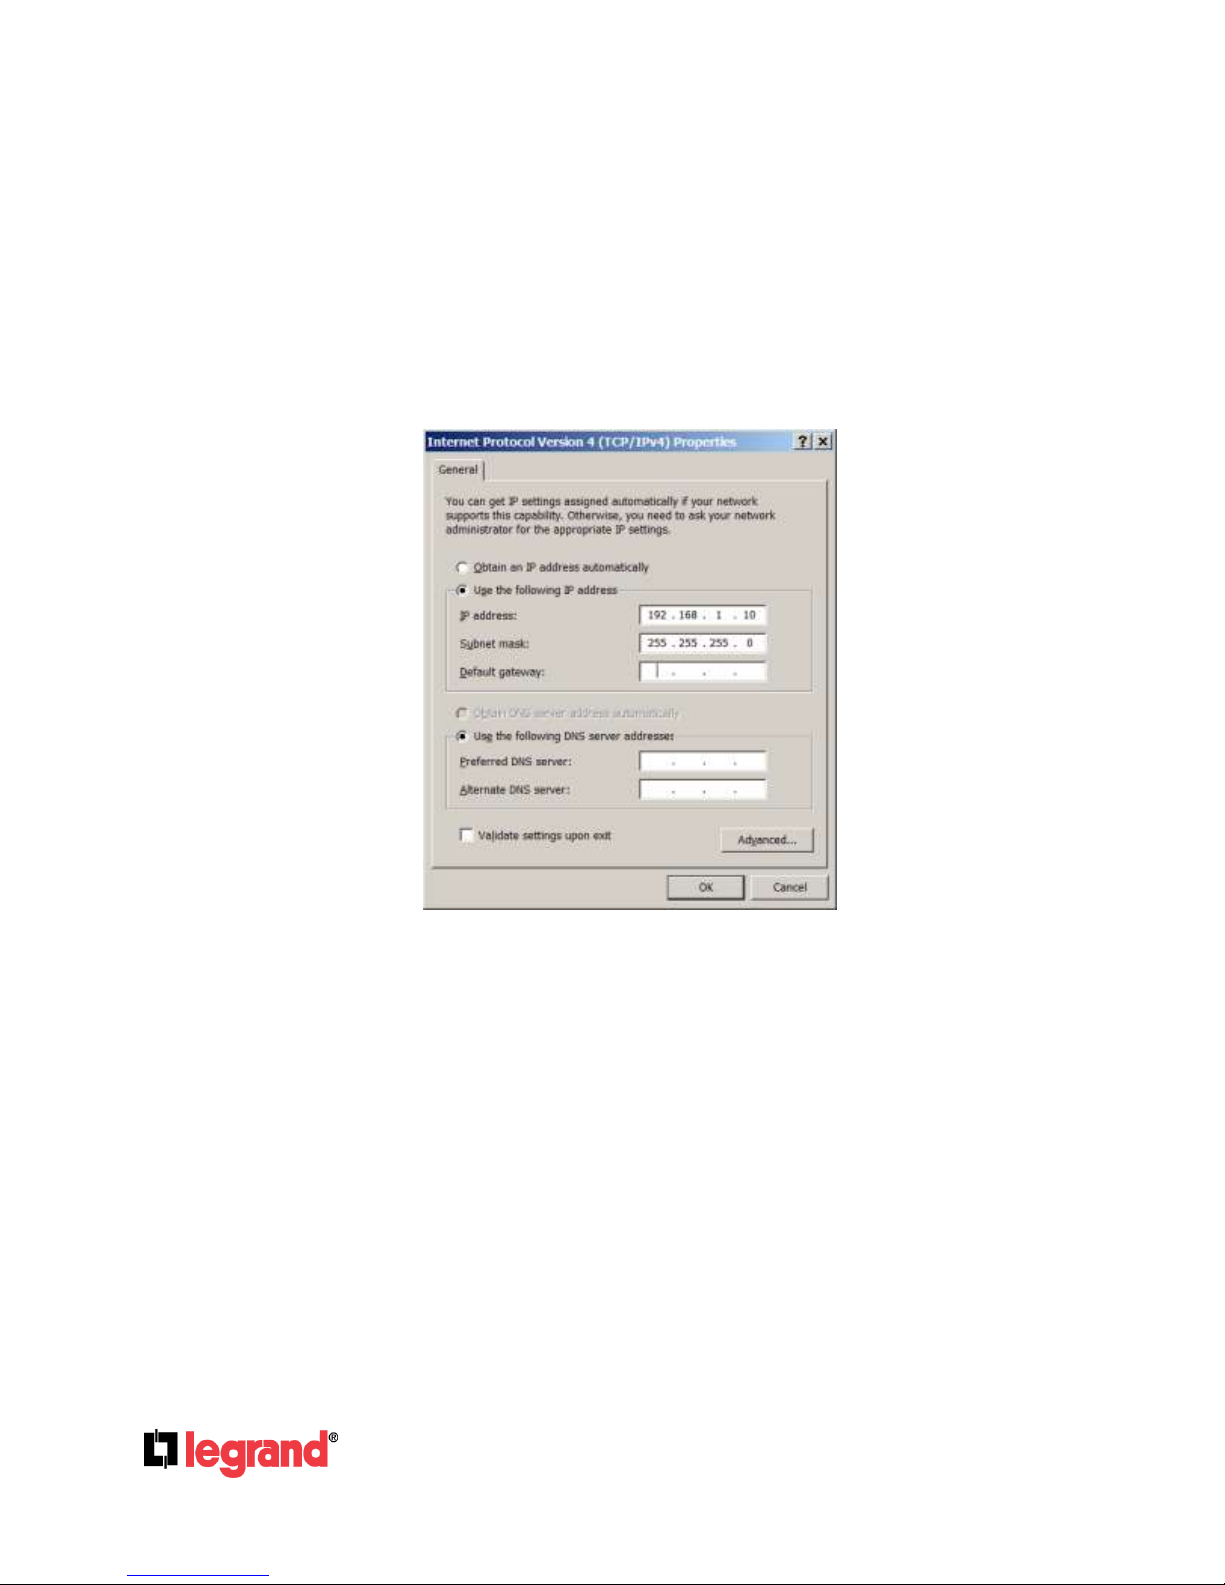
Connect to the Camera using Static IP
If no DHCP server is in the network, or the camera does not get IP from DHCP server (router), the user
can connect the camera to a computer directly, using static IP to configure the camera.
The default IP, if no DHCP server; or DHCP offer time out (3 minutes), is 192.168.1.168
1. Connect the computer via an Ethernet cable directly to the IP camera CM7000.
2. Configure the computer using Static IP: 192.168.1.XXX (1<XXX<255, but NOT 168) and configure
the “Subnet mask” to “255.255.255.0”. Leave the “Default Gateway” to “Blank” like below:
3. Power on the CM7000.
4. Start the IE or Firefox browser when the network connection is up.
5. Enter 192.168.1.168/index.html in the address bar of the browser.
6. The browser will ask for plug-in or ActiveX if not installed, otherwise it will get to Home page and
start to show the video captured by the camera (by default the camera enabled anonymous access),
see Figure 1.
7. Click the “Configuration” icon (middle one at lower left, looks like tools) and the browser will ask
credentials to authorize configuration.
8. Enter the administrator user name and password to access the Web Configuration Interface, the
default user name and password are both set to admin.
9. Proceed to the Basic Settings explanation section.
Page 9
Page 10

301 Fulling Mill Road, Suite G ©Copyright 2014 by Legrand
Middletown, PA 17057 All Rights Reserved.
(800)-321-2343 www.legrand.us
Basic Settings Explanation
System Settings Page
Current System Time: Displays current date and time of the system
Set the System Time: Configure the time of the system.
o Time Zone: Select your time zone from the pull down menu
o Update via NTP Server: Synchronize time using NTP protocol with a Time Server
o Synchronize with
Local Computer: Synchronize time with a local computer
o Set the Time Manually: Manually input the time
o Keep Current D/T: Select to use current displayed time
OSD Date Format: Pull down to select date format displayed on video screen
NOTE:
button has to be clicked to save all the changes made to the device.
Figure 2: System Settings Page
over the Internet cloud (*)
Page 10
Page 11

301 Fulling Mill Road, Suite G ©Copyright 2014 by Legrand
Middletown, PA 17057 All Rights Reserved.
(800)-321-2343 www.legrand.us
Video & Audio Settings Page
Figure 3: Video & Audio Settings Page
Page 11
Page 12

301 Fulling Mill Road, Suite G ©Copyright 2014 by Legrand
Middletown, PA 17057 All Rights Reserved.
(800)-321-2343 www.legrand.us
On Screen Display (OSD): Displays time stamp and text on the video screen.
o OSD Text screen: Input text (to identify the camera) shown on the screen.
o OSD Position: Show the OSD in either top or bottom position on screen.
o Display Time: When checked, time stamp will display on video screen
o Display Text: When checked, input text will display on video screen.
Primary Stream Settings:
o Preferred Video Codec: MJPEG and H.264 supported, H.264 recommended.
o Profile: H.264 profile selection. Default is “Main Profile.”
o Resolution: The video resolution in pixels used in video of camera
o Bit Rate: Video bit rate used
o Maximum Frame Rate: Maximum frame rate used.
o Bit Rate Control: Constant bit rate, or variable bit rate
o Image Quality: Image quality used when Variable Bit Rate used
o I-frame Interval: I-frame interval
Secondary Stream Settings: Same as primary steam.
Audio Settings:
o Preferred Audio Codec: PCMU, PCMA, AAC supported.
o Microphone Volume: Slide to adjust microphone gain.
o Speaker Volume: Slide to adjust the speaker volume.
o Light Condition: Select correct local power frequency to avoid video
flicking effect under fluorescence light condition. Default is
Outdoor.
NOTE:
H.264 is the high resolution Codec, while MJPEG is the Codec used automatically for
remote smartphone viewing.
If MJPEG selected, reduce max. frame rate to min. value to save bandwidth and get
better image
Page 12
Page 13

301 Fulling Mill Road, Suite G ©Copyright 2014 by Legrand
Middletown, PA 17057 All Rights Reserved.
(800)-321-2343 www.legrand.us
CMOS Settings Page
This page allows user to adjust the CMOS parameters:
Flip: Pull down to choose video flip: vertically or horizontal or both.
Shutter Speed: Camera Shutter Speed. There are 10 options, with Auto, 1/30,
IR CUT Setting: Manual or Automatic (IR Sensor controlled mechanical IR CUT)
IR CUT Sensitivity: Sensitivity of IR CUT to be triggered; 5 levels total.
Color Mode: Camera Color Mode: Color, Black/White, Auto (Default).
NOTE:
Auto option recommended for Shutter Speed, IR LED Setting, IR CUT Setting and Color
Mode.
Figure 4: CMOS Settings Page
1/60, 1/125, 1/250, 1/500, 1/1000, 1/2000, 1/5000 and 1/10000
Page 13
Page 14

301 Fulling Mill Road, Suite G ©Copyright 2014 by Legrand
Middletown, PA 17057 All Rights Reserved.
(800)-321-2343 www.legrand.us
Networking Settings Page
Figure 5: Networking Setting Page
IP Address Configuration:
o Dynamically Associated via DHCP: Default setting, DHCP server assigns IP to camera.
o Statically Configured as: Enter Static IP address manually
DNS Configuration: Obtained automatically or entered manually.
HTTP: Web access TCP port, default 80.
NOTE:
If the camera is behind a SOHO router with port forwarding configured for remote
access, static IP has to be used to avoid IP address changes after a router reboot.
TCP ports above 5000 are suggested if port forwarding HTTP remote access, as some
ISPs block port 80 inbound traffic. For example, change the default HTTP port from 80 to
8088, to make sure the port forwarding is not likely to be blocked.
In addition to the HTTP port, an RTSP port may also required for port forwarding, in
order for remote party viewing the H.264 video.
If changing the default port from TCP 80 to port “A”, then the RTSP port should be
“2000+A”. Both TCP port “A” and “2000+A” should be configured for port forwarding in
the router. For example, the HTTP port changed to 8088, the RTSP port should be
10088, both 8088 and 10088 should be configured for port forwarding in order for remote
camera video access.
Page 14
Page 15

301 Fulling Mill Road, Suite G ©Copyright 2014 by Legrand
Middletown, PA 17057 All Rights Reserved.
(800)-321-2343 www.legrand.us
DDNS Settings Page
DDNS Active: Click to enable DDNS.
DDNS ISP Type: Select DDSN service provider from the pull-down menu list
Self-Define DDNS Address: Input the self-defined DDNS address
Site Name: DDNS site name
DDNS Account: DDNS account name
DDNS Password: DDNS password
STUN Server: Stun server FQDN or IP. If the DDNS device is behind a
Figure 6: DDNS Setting Page
non-symmetric router, the STUN server can help to
penetrate & resolve NAT issue.
Page 15
Page 16

301 Fulling Mill Road, Suite G ©Copyright 2014 by Legrand
Middletown, PA 17057 All Rights Reserved.
(800)-321-2343 www.legrand.us
SIP Settings Page
The CM7000 be configured as SIP endpoint to call out when alarm triggered; or allow permitted
numbers to call in to check the video.
Figure 7: SIP Setting Page
Page 16
Page 17

301 Fulling Mill Road, Suite G ©Copyright 2014 by Legrand
Middletown, PA 17057 All Rights Reserved.
(800)-321-2343 www.legrand.us
Registered: SIP registration status.
Display “Online” in Green, “Offline” in Red.
Unregister on Reboot: If checked, camera reboot will unbind all
registration in same SIP account.
Account Name: SIP account name
SIP Server: FQDN or IP of SIP server from VoIP ISP
Outbound Proxy: IP or FQDN of Outbound proxy server, helps
penetrate NAT/Firewall
SIP User ID: SIP username, or telephone number from ITSP
Authenticate ID: Authenticate ID used by SIP proxy
Authenticate Password: Authenticate password used by SIP proxy
STUN Server: STUN server used to resolve NAT.
Stream: Which stream used for SIP call.
Preferred Vocoder: Audio codec used for SIP call.
Registration Expiration: Registration expiration time, default 3600 seconds
Local SIP Port: Local SIP port, default 5060
Local RTP Port: Local RTP port for media, default 5004
Auto On-hook Timer: Auto On Hook timer, default 300 seconds
Disable Audio in SIP Call: Checked to disable audio for SIP call.
Enable Keep Alive: Checked to enable, help NAT resolution
Accept Direct IP Call: Check to accept peer-to-peer IP call.
Enable White List Number Filter: Check to allow only white list number to call in
Enable two-way Audio Warning: Check to enable two-way audio warning.
SIP Proxy Compatibility Mode: Check to enable more proxy compatibility with cost
of bandwidth
Self-define Warning Audio: Upload self-defined warning message audio
(follow the format )
Phone List/Phone Number: Caller or call receiver number when alarm
call triggered.
White List/Phone Number: Phone numbers allowed to call into the camera.
Page 17
Page 18

301 Fulling Mill Road, Suite G ©Copyright 2014 by Legrand
Middletown, PA 17057 All Rights Reserved.
(800)-321-2343 www.legrand.us
Status Page
NOTE:
When SIP account registered, the status will display “Online” in Green.
When SIP account unregistered, the status will display “Offline” in Red, as shown.
Figure 8: Status Page
Page 18
Page 19

301 Fulling Mill Road, Suite G ©Copyright 2014 by Legrand
Middletown, PA 17057 All Rights Reserved.
(800)-321-2343 www.legrand.us
Advanced Settings Explanation
User Management Page
Figure 9: User Management Page
Existing User Name: Allows you to revise existing user or add new user
User Name: The name of user need to be revised
User Password: New password or revise password
Confirm User Password: Re-enter the new password for verification
Privilege: Choose user privilege
Allow Anonymous Viewing: When checked, no security is used. Any person can view
the camera if they know the IP or FQDN of the camera, but
can NOT change anything, view ONLY.
Page 19
Page 20

301 Fulling Mill Road, Suite G ©Copyright 2014 by Legrand
Middletown, PA 17057 All Rights Reserved.
(800)-321-2343 www.legrand.us
Maintenance Page
Restart: When clicked, the camera will reboot or restart
Restore: When clicked, will reset to factory default, wiping
Upgrade via: Upgrade firmware via TFTP, HTTP or HTTPS
Firmware Server Path: Server path holding the firmware
Config Server Path: Server path holding the configuration file (auto
XML ConfigFile Password: Password to encrypt XML based configuration file
Automatic Upgrade Interval (Min.): Time interval for automatic upgrade, default 10080
Automatic Upgrade: Check to enable automatic firmware upgrade and
Provisioning (XML based only).
Figure 10: Maintenance Page
out all configurations (except IP address)
provisioning)
Page 20
Page 21

301 Fulling Mill Road, Suite G ©Copyright 2014 by Legrand
Middletown, PA 17057 All Rights Reserved.
(800)-321-2343 www.legrand.us
SMTP Settings Page (Email Alarm)
Enable SMTP: When checked, email client is enabled.
SMTP Server: SMTP Email Server IP or Domain Name
SMTP Server Port: Port number used by server to send email
From Email address: The email address alarm is sending from, usually client email ID
To E-Mail address: The email address to receive the alarmed email, total 3 included.
User Name: Email client User ID
Password: Email client password
SSL: Check if the SMTP email server requires SSL
Email Subject: Customizable email subject for user convenience
Email Content: Customizable email body for user convenience
NOTE:
Click “Save” to save the email configuration information.
Click “Test” after configuration, if setting is correct, a test email will send out and “Test
successful!” yellow bar will display
Figure 11: SMTP Settings Page
Page 21
Page 22

301 Fulling Mill Road, Suite G ©Copyright 2014 by Legrand
Middletown, PA 17057 All Rights Reserved.
(800)-321-2343 www.legrand.us
FTP Settings Page (Upload Alarm)
Figure 12: FTP Settings Page
Enable FTP: When checked, built-in FTP client is enabled.
FTP Server: IP or Domain name of FTP site or server
FTP Server Port: TCP port for FTP server, default port number 21
User Name: FTP server User ID
Password: FTP server user password
Path: Path in the server where upload files are stored.
NOTE:
Click “Save” to save the FTP configuration information.
Click “Test” after configuration, if setting is correct, a test FTP operation will be
performed and “Test successful!” yellow bar will display if the operation is successful.
Page 22
Page 23

301 Fulling Mill Road, Suite G ©Copyright 2014 by Legrand
Middletown, PA 17057 All Rights Reserved.
(800)-321-2343 www.legrand.us
Alarm Server Settings Page (Upload Alarm to supported VMS or HTTP
Server)
Figure 13: Alarm HTTP Server Settings Page
Server Name: The name of HTTP server or VMS system
URL: URL of the Server
User Name: User ID from that Server
Password: Password for that User ID
Page 23
Page 24

301 Fulling Mill Road, Suite G ©Copyright 2014 by Legrand
Middletown, PA 17057 All Rights Reserved.
(800)-321-2343 www.legrand.us
Periodic Snapshot
Figure 14: Period Snapshots Page
Enable Periodic Snapshot: Enable and set trigger interval for snapshot
FTP Upload: If checked, enables FTP upload for periodic snapshot
SMTP Upload: If checked, enables SMTP upload for periodic snapshot
Page 24
Page 25

301 Fulling Mill Road, Suite G ©Copyright 2014 by Legrand
Middletown, PA 17057 All Rights Reserved.
(800)-321-2343 www.legrand.us
Motion Detection Configuration Page (Set Alarm)
Figure 15-1: Motion Detection Configuration Page
Page 25
Page 26

301 Fulling Mill Road, Suite G ©Copyright 2014 by Legrand
Middletown, PA 17057 All Rights Reserved.
(800)-321-2343 www.legrand.us
Enable Motion Detection: When checked, motion detection enabled.
Show Motion Detection Regions: When checked, motion detection region with
number will be displayed as a white rectangle in the
screen. When “Edit” clicked, the rectangle will
become Red.
Select a Region: Pull down to select and configure alarm region,
16 alarm regions available, from 0 to 15.
Sensitivity: Select configured alarm region number, input a
number for sensitivity to trigger the alarm, 100 is
the maximum sensitivity value.
Alarm Action:
Record Video From….. Allows user to configure how long pre/post alarm
trigger moment, the video will be captured.
Voice Alarm to SIP Phone: When checked and SIP proxy configured and
IPCam registered, SIP alarm call will be made to
pre-configured number.
Upload to Alarm Center: When checked, the alarm video will be transferred
to Alarm Center.
Upload to Alarm HTTP Server When checked, alarm sent to Alarm HTTP Server.
Third Party Server can be used via GS HTTP API
Record Video and Upload…: When checked and FTP server configured, the
recorded video sent to the configured FTP server.
Email and FTP upload JPEG: When checked, snapshots of trigger moment will be
emailed to pre-configured email account and also
uploaded to FTP server if configured.
Motion Detection Time Schedule:
This page allows user to configure Motion Detection Operation Schedule:
Figure 15-2: Motion Detection Schedule Configuration Page
As shown in Figure 15-2, user can configure the Motion Detection Region with related
Start and Stop time to control the motion detection operation.
Page 26
Page 27

301 Fulling Mill Road, Suite G ©Copyright 2014 by Legrand
Middletown, PA 17057 All Rights Reserved.
(800)-321-2343 www.legrand.us
Syslog Settings Page (Troubleshooting)
Figure 16: Syslog Settings Page
Syslog Server: Syslog server IP or Domain Name
Syslog Level: Level of syslog message sent to the syslog server:
None, Debug, Info, Warning, Error.
Page 27
Page 28

301 Fulling Mill Road, Suite G ©Copyright 2014 by Legrand
Middletown, PA 17057 All Rights Reserved.
(800)-321-2343 www.legrand.us
IP Camera FAQ
1. What is the default IP address of the CM7000 or CM7100
The default IP configuration is DHCP.
2. Why can’t I view the live video stream in Microsoft Internet Explorer?
Please double check whether the IE add-on was install ed correctly.
Once you log into the CM7xxx web interface, Internet Explorer will indicate that this website
wants to install an add-on. Please install this add-on when prompted by IE.
3. Why can’t I access the CM7xxx web configuration interface?
Q 1: Is your internet service down?
A 1: Connect a PC to the internet to test the connection.
Q 2: Are the PC and the camera in different subnets?
A 2: Check the subnet mask and default gateway of the camera and PC.
Q 3: Is there a conflict with another IP address? A 3: Try to change the IP address of the
camera.
Q 4: Has the HTTP port been changed?
A 4: Contact the administrator of the device for more information.
4. The CM7xxx web configuration page is not displayed correctly in IE8 ?
In IE8, Compatibility View might need to be enabled for the CM7xxx web configuration page
to load properly. To enable compatibility view, open IE8, click Tools, Compatibility View
Setting, and add the CM7xxx web configuration pages to the Compatibility View.
5. Why does IE indicate to install a new Video Viewer add-on after a firmware
upgrade? The add-on was properly installed before the firmware upgrade process.
New firmware will often upgrade the add-on as well. To watch the live video stream, you must
install the newest version of the add-on.
6. How do you watch secondary video stream?
Login to the home page of the CM7xxx web GUI, click Play to watch the video stream. To
watch a secondary video stream, right click on the video, and select Secondary Stream on the
pop-up menu. Try reinstalling the CM7xxx Viewer add-on for IE if you cannot see the video
stream.
7. Why is audio missing from the recorded video when an alarm triggered?
To confirm to outdoor standard of IP66, the CM7000 does NOT have a microphone installed
although it has the interface in its PCB board.
Page 28
Page 29

301 Fulling Mill Road, Suite G ©Copyright 2014 by Legrand
Middletown, PA 17057 All Rights Reserved.
(800)-321-2343 www.legrand.us
8. What is DDNS? Is it important for IP camera product to have DDN S support?
DDNS is an acronym for Dynamic Domain Name Service. It is important to choose an IP
network camera that has DDNS support for dynamic IP addresses. Chances are that the
network has a dynamic IP address (which changes with every log on). A DDNS service makes
sure that the camera‘s IP address always matches up to the current server address. DDNS
also allows a website to be linked to the IP camera that is constantly updated with the correct
information and has a reliable feed.
9. Why is Windows Media Player unable to play the recorded video files?
The CM7xxx uses the H.264 video codec. Windows Media Player may lack the proper
H.264 decoder to play the recorded video. Please download the Microsoft FFDShow H.264
decoder from http://sourceforge.net/projects/ffdshow-tryout/ and install it.
10. How to use a cell phone to watch the CM7xxx video stream?
You must set the video resolution to QCIF to watch the CM7xxx video stream from a cell
phone. Make sure to set the bit rate to 64kbps to ensure the best video quality.
11. What Smartphone application should I use to view the video?
There are free application and paid version application for this, like: IP Cam Viewer.
12. Port forwarding
Two ports must be forwarded on your router to watch video from a GXV3672HD_FHD that
is located on a private network from a PC in a public network. The web port (HTTP) and
the RTSP port. Please make note that the RTSP port number changes according to the web
port. If the web port is 80, then the RTSP port is 554. If the web port is not 80, then the
RTSP port equals the web port +2000. For example, if the web port is 88, then the RTSP
port will be 2088.
Page 29
 Loading...