

LEGRAND 882 15 User Manual
Interscénario mobile RF/IR
882 15
Radio Infra rouge
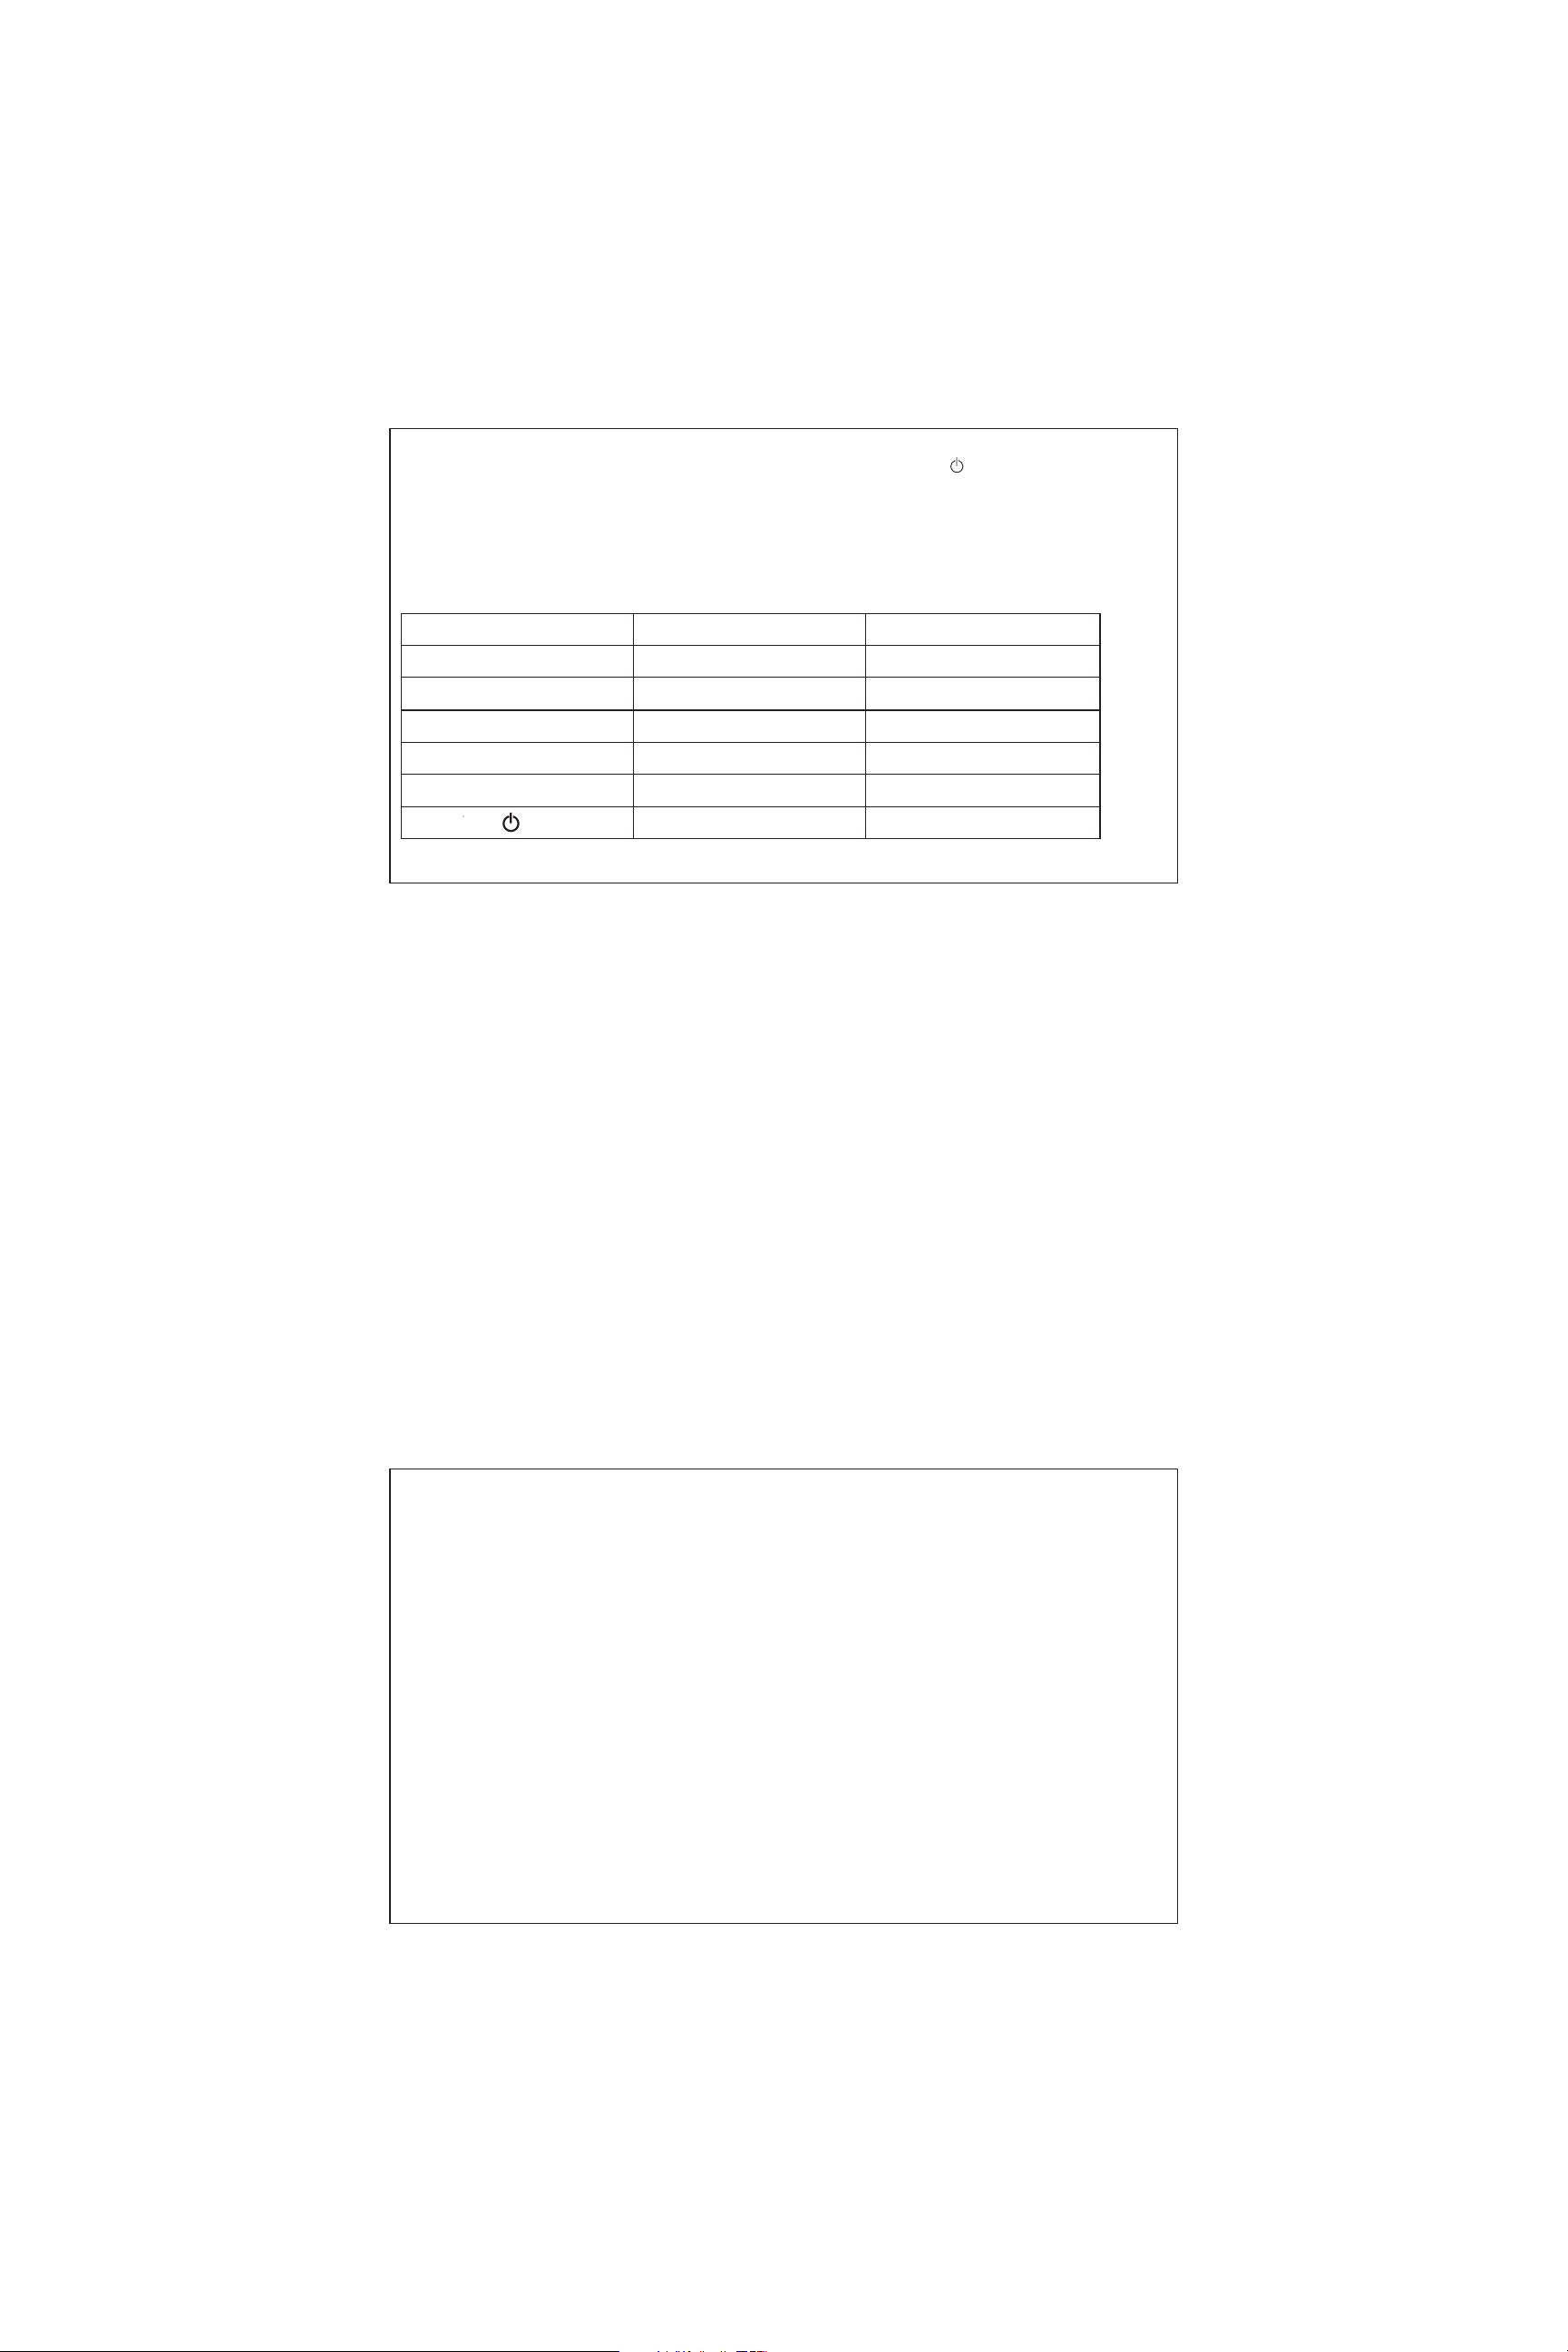
Caractéristiques
N0064KL7/01
2
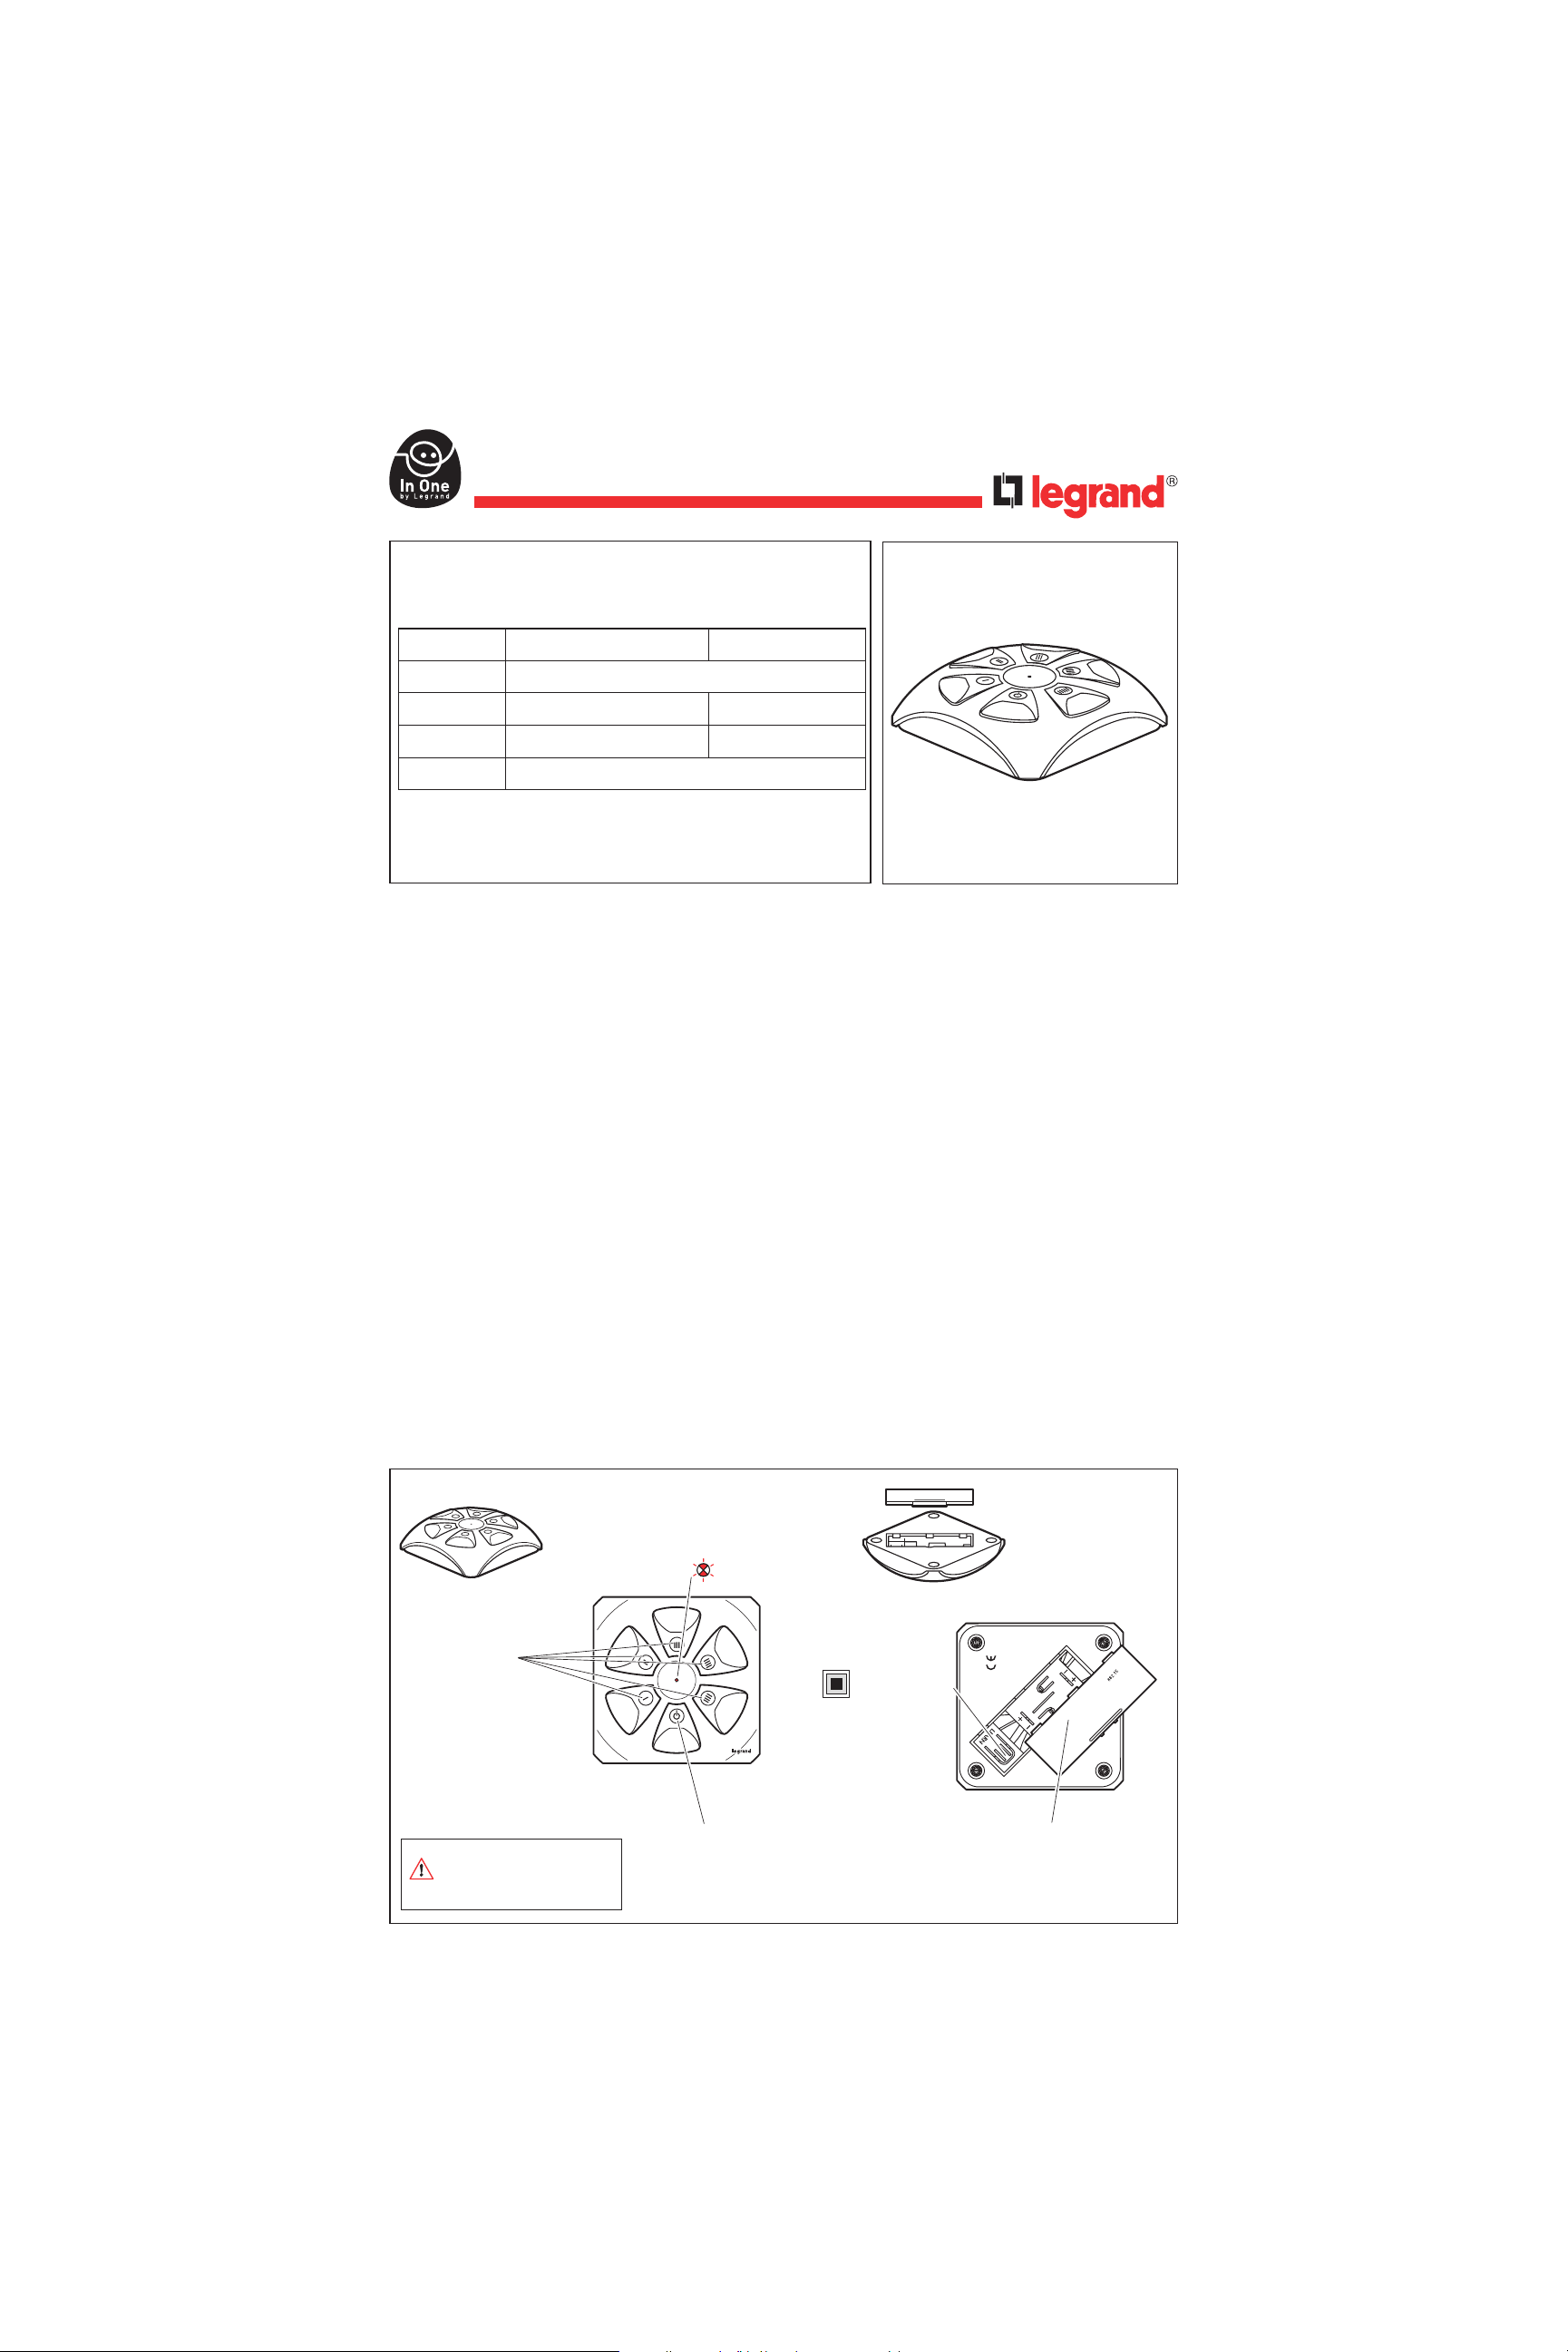
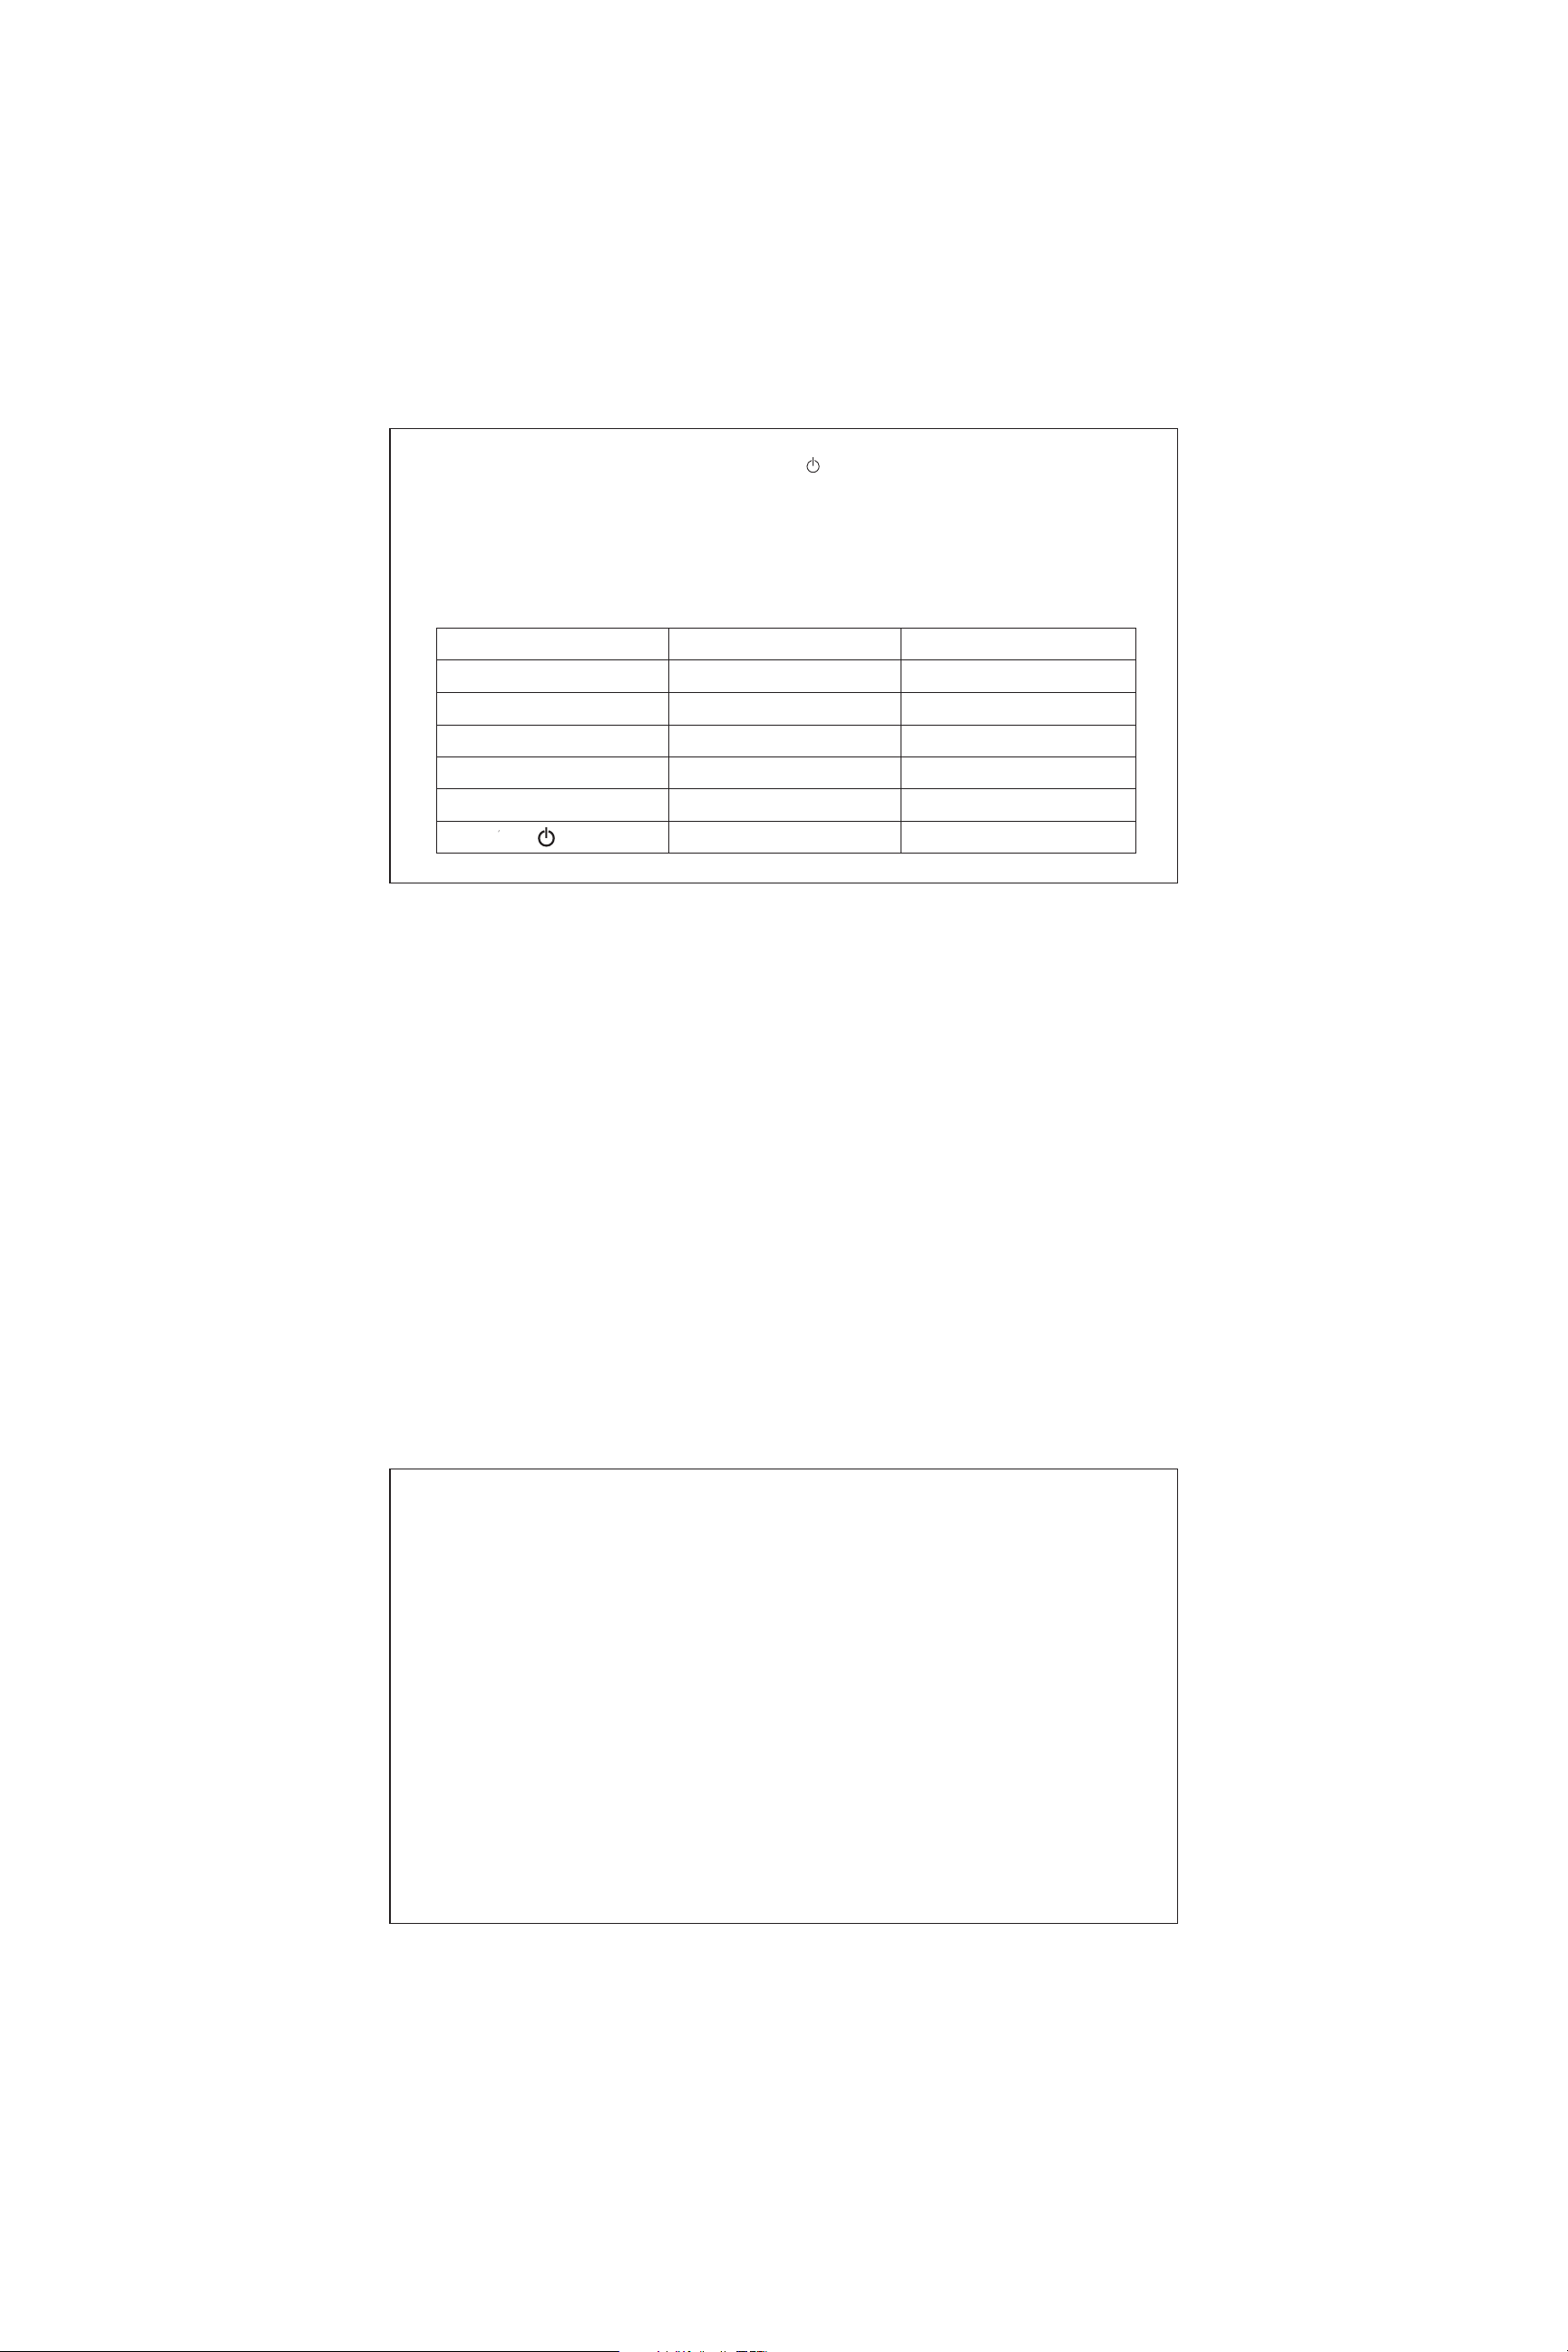
Description
Respecter strictement
les conditions d’installation
et d’utilisation.
Alimentation
Fréquence RF
2 x 1,5V Type AAA (LR03)
868,3 Mhz 36 kHz
Portée Environ 200 m. en champ libre 5 m.
Température
+ 5°C à + 45°C
Boutons scénarios
rétro éclairés par
une led bleu
Voyant LEARN
Boutons scénarios
rétro éclairés par
une led blanche
Touche LEARN
SA
A
X
X
X
X
30RL
XX
D
I
V5,1x
2
RI
N° d'identification
Z
S

3
Fonctionnement
La commande de table est un interscénario qui permet de piloter à partir de ses 6 touches, I, II, III, IIII, IIIII,
des ensembles de récepteurs qui leurs ont été associés lors de l’apprentissage
(1)
L’a pp ui sur une touche provoque son clignotement durant 5 secondes.
A chaque touche peut être associé un média Radio ou IR. Par défaut toutes les touches commandent uniquement des
produits Radio.
(1)
Apprentissage : procédure qui permet d’enregistrer et de définir un scénario.
Commande possibles à partir des touches :
*
L’a pp ui long s’applique uniquement lorsque les produits associés sont des variateurs.
Touches
4
Procédure du choix du média sur une touche de commande :
1- Appuyer puis relâcher la touche Learn
Le voyant Learn clignote lentement
2- Appuyer 10s sur la touche dont vous souhaitez changer le média
Le voyant Learn flashe 5s., relâcher la touche
3- Pendant les 5s ou le voyant Learn flashe appuyer successivement sur la touche de commande et vous passez
du média Radio (voyant Touche éteinte) au média Infra rouge (voyant de la Touche allumée)
Le média sauvegardé sera celui actif au moment où le voyant Learn arrête de flasher.
Procédure de visualisation des média associés aux différentes touches
Appuyer puis relâcher la touche Learn
- Le voy
ant Learn clignote lentement, durant 5s les touches sont :
a- éteintes si la touche est associée au media Radio
b- allumées si la touche est associée au media IR
Appui court
Appui long (*)
III
IIII
IIIII
I
II
Scénario
Scénario
Scénario
Scénario
Scénario
Scénario
Variation croissante
Variation croissante
Variation croissante
Variation décroissante
Variation décroissante
Variation décroissante
5
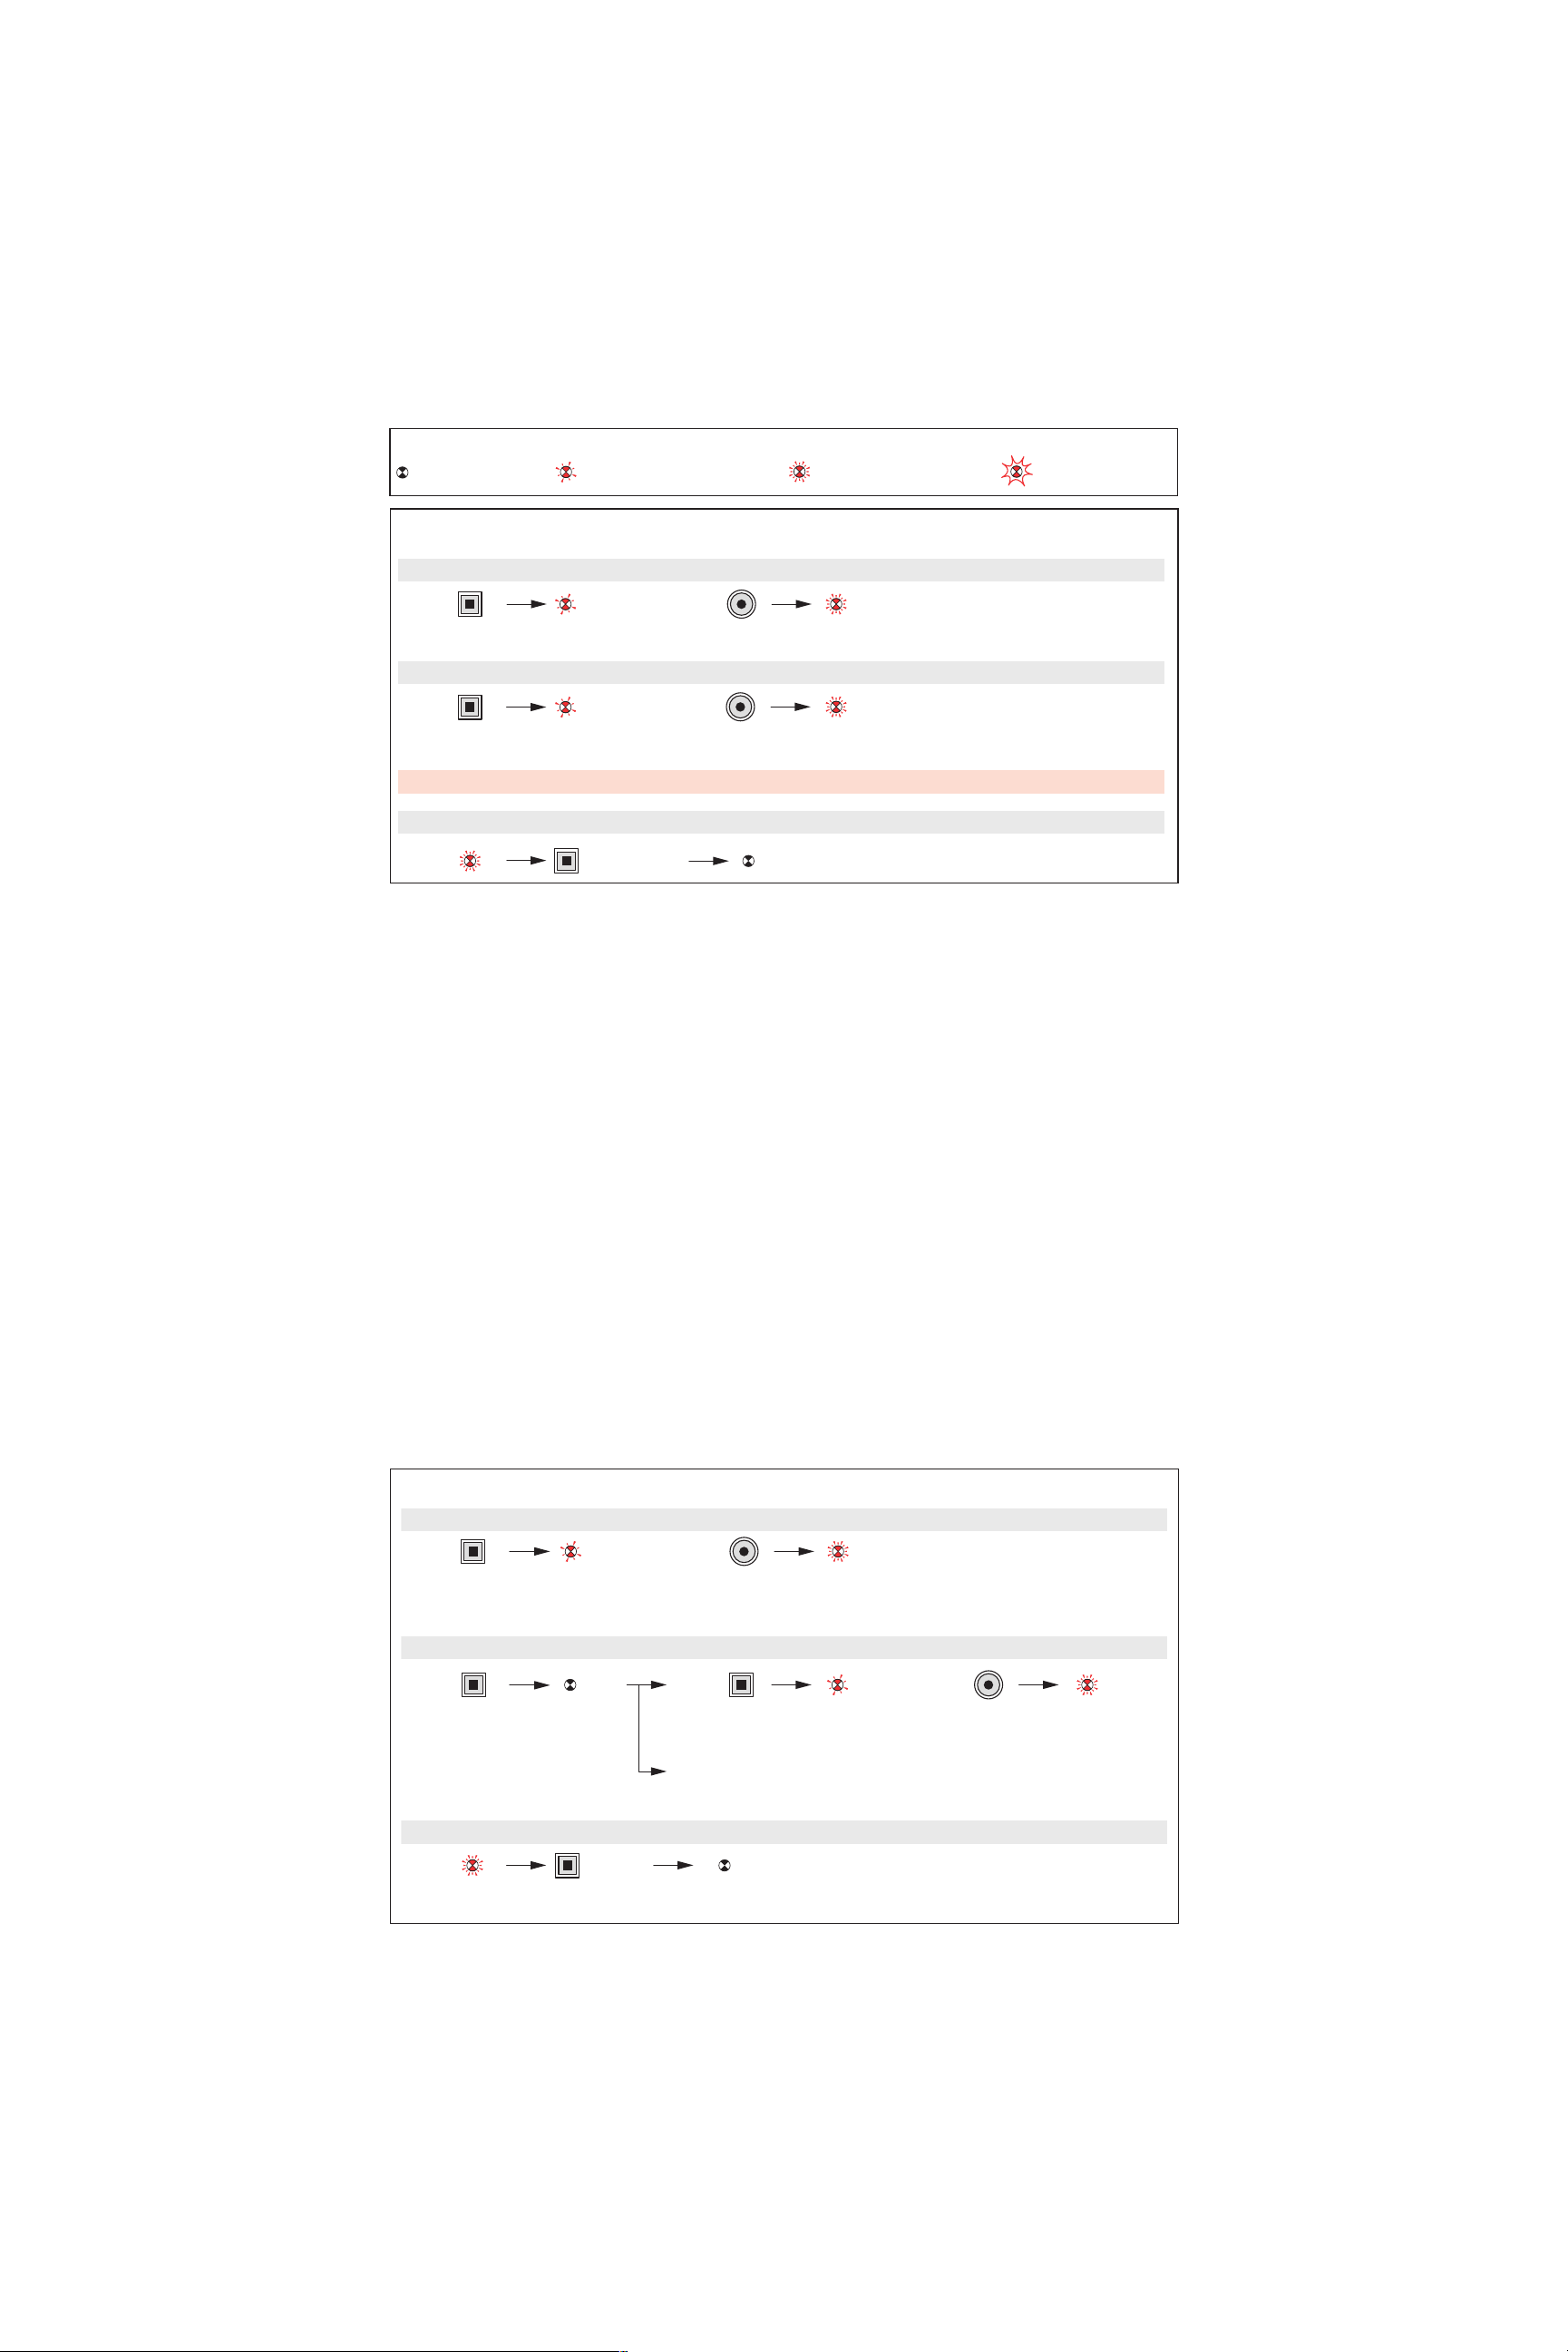
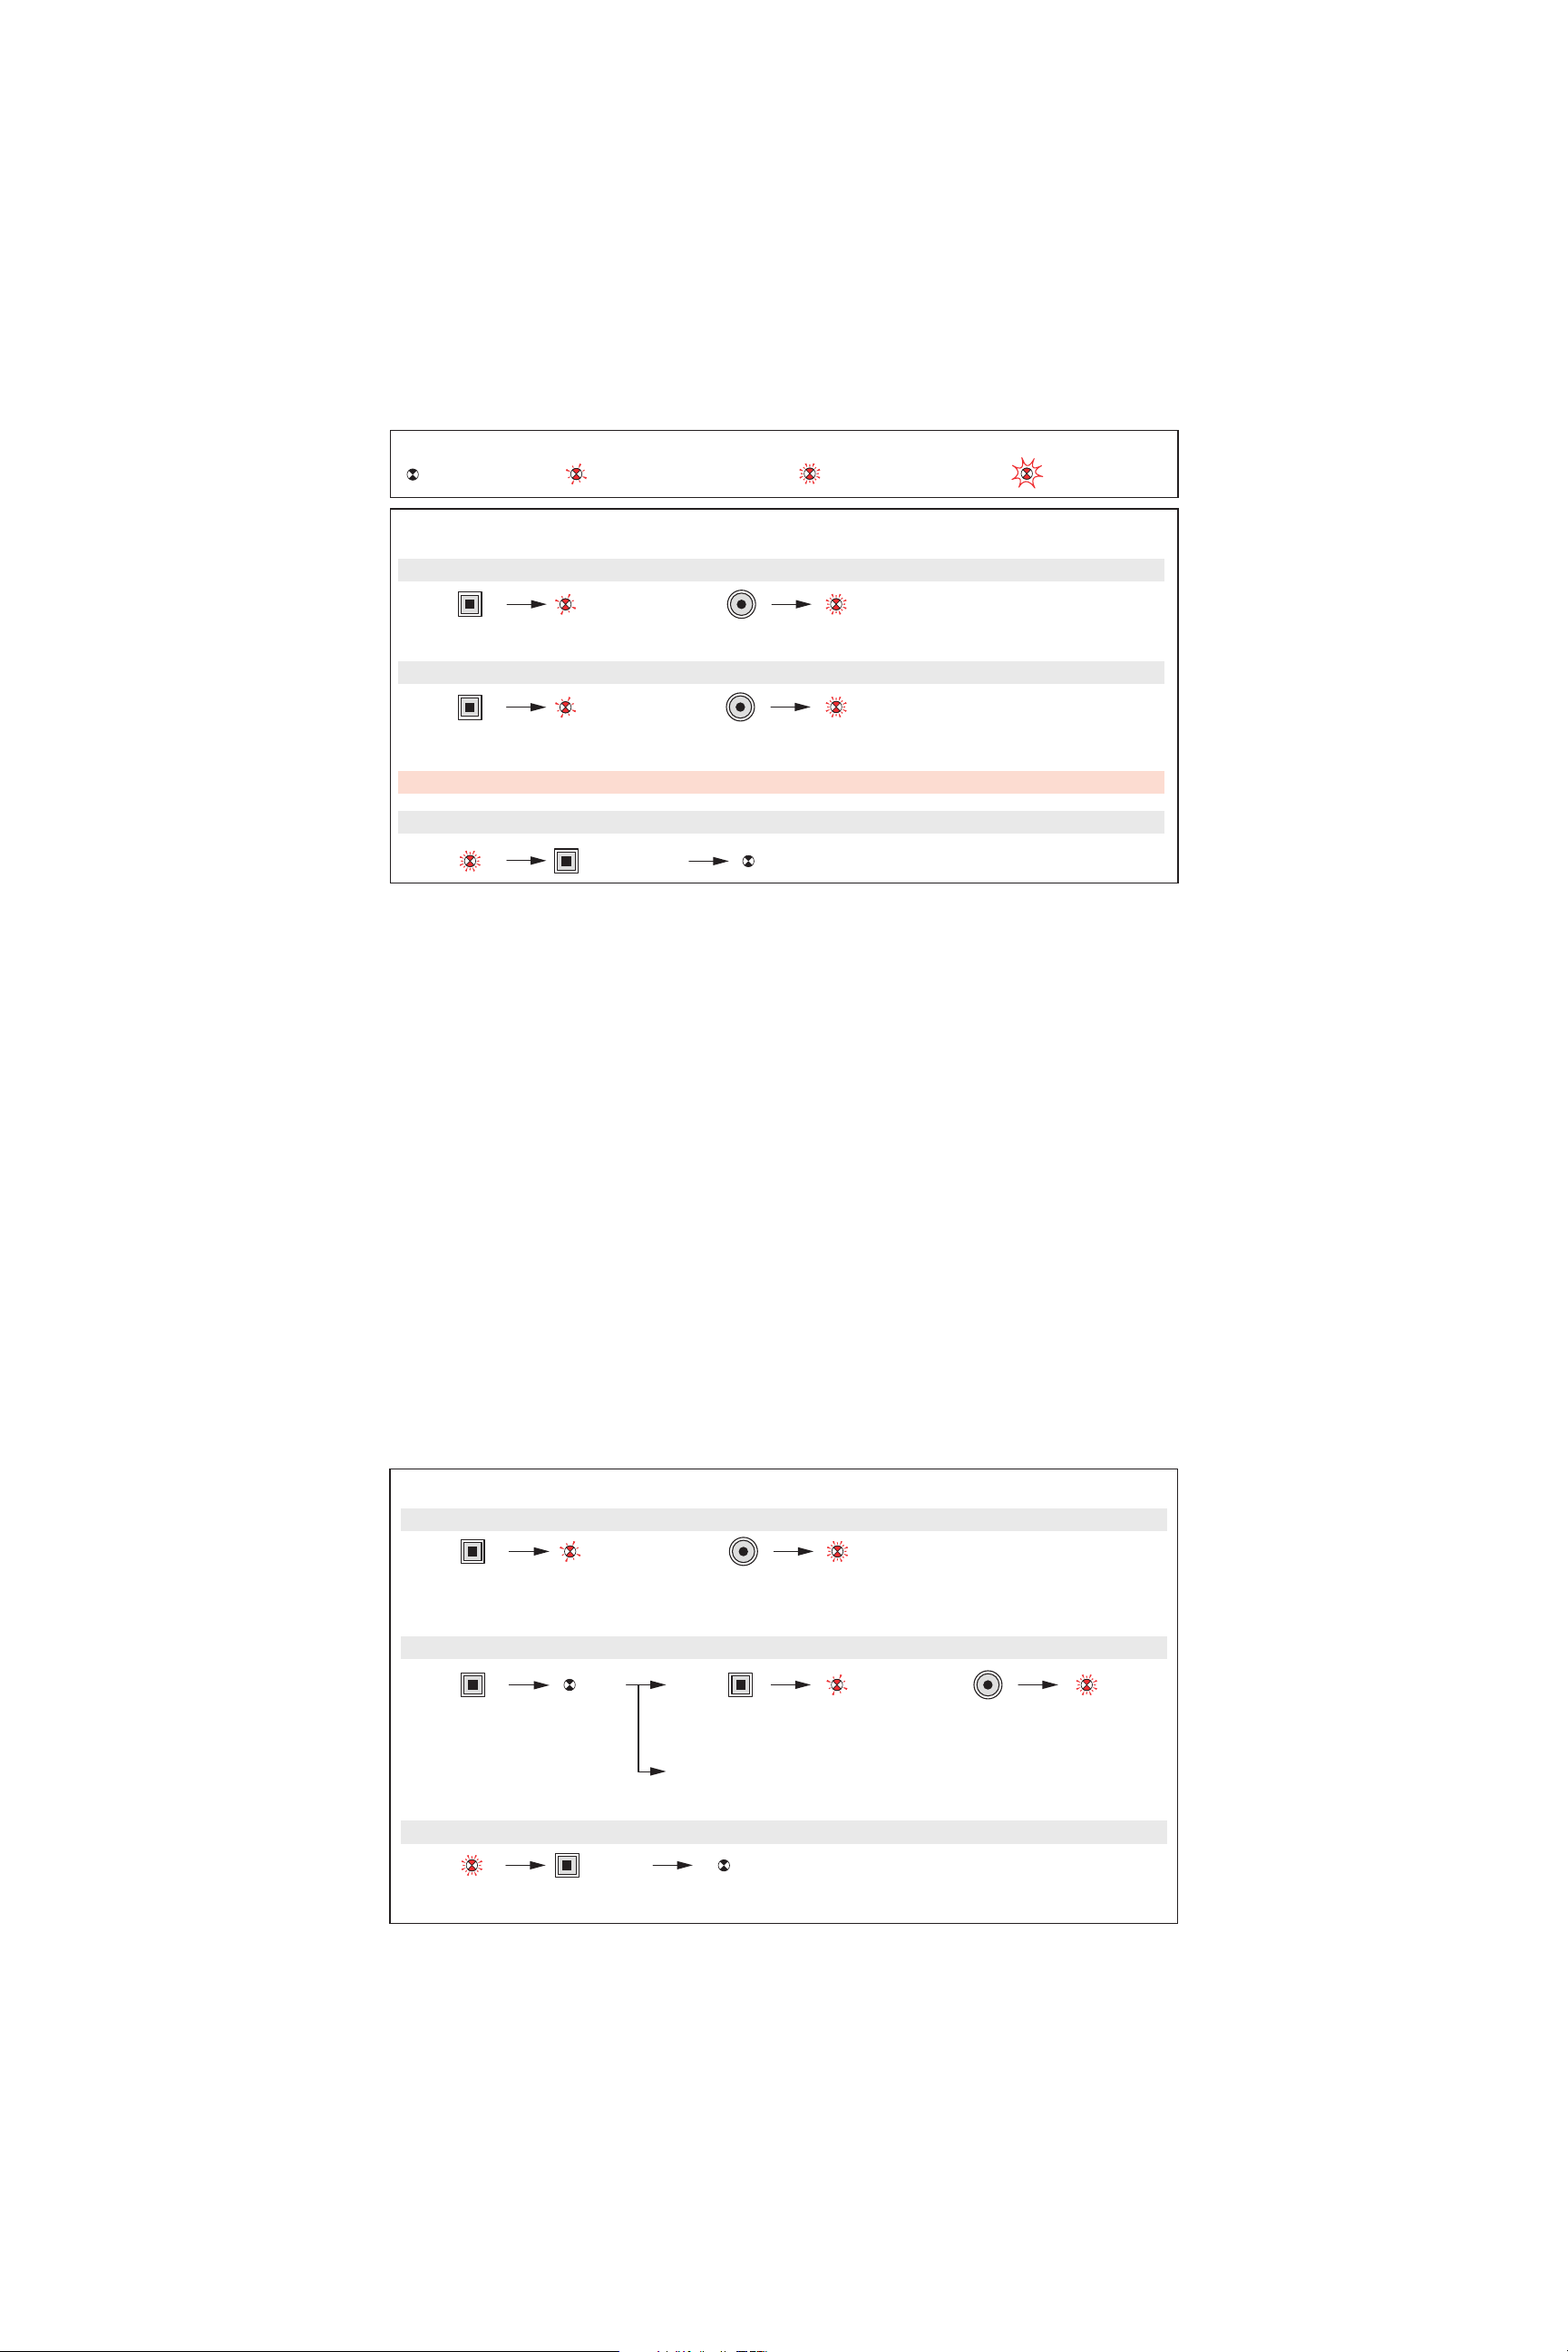
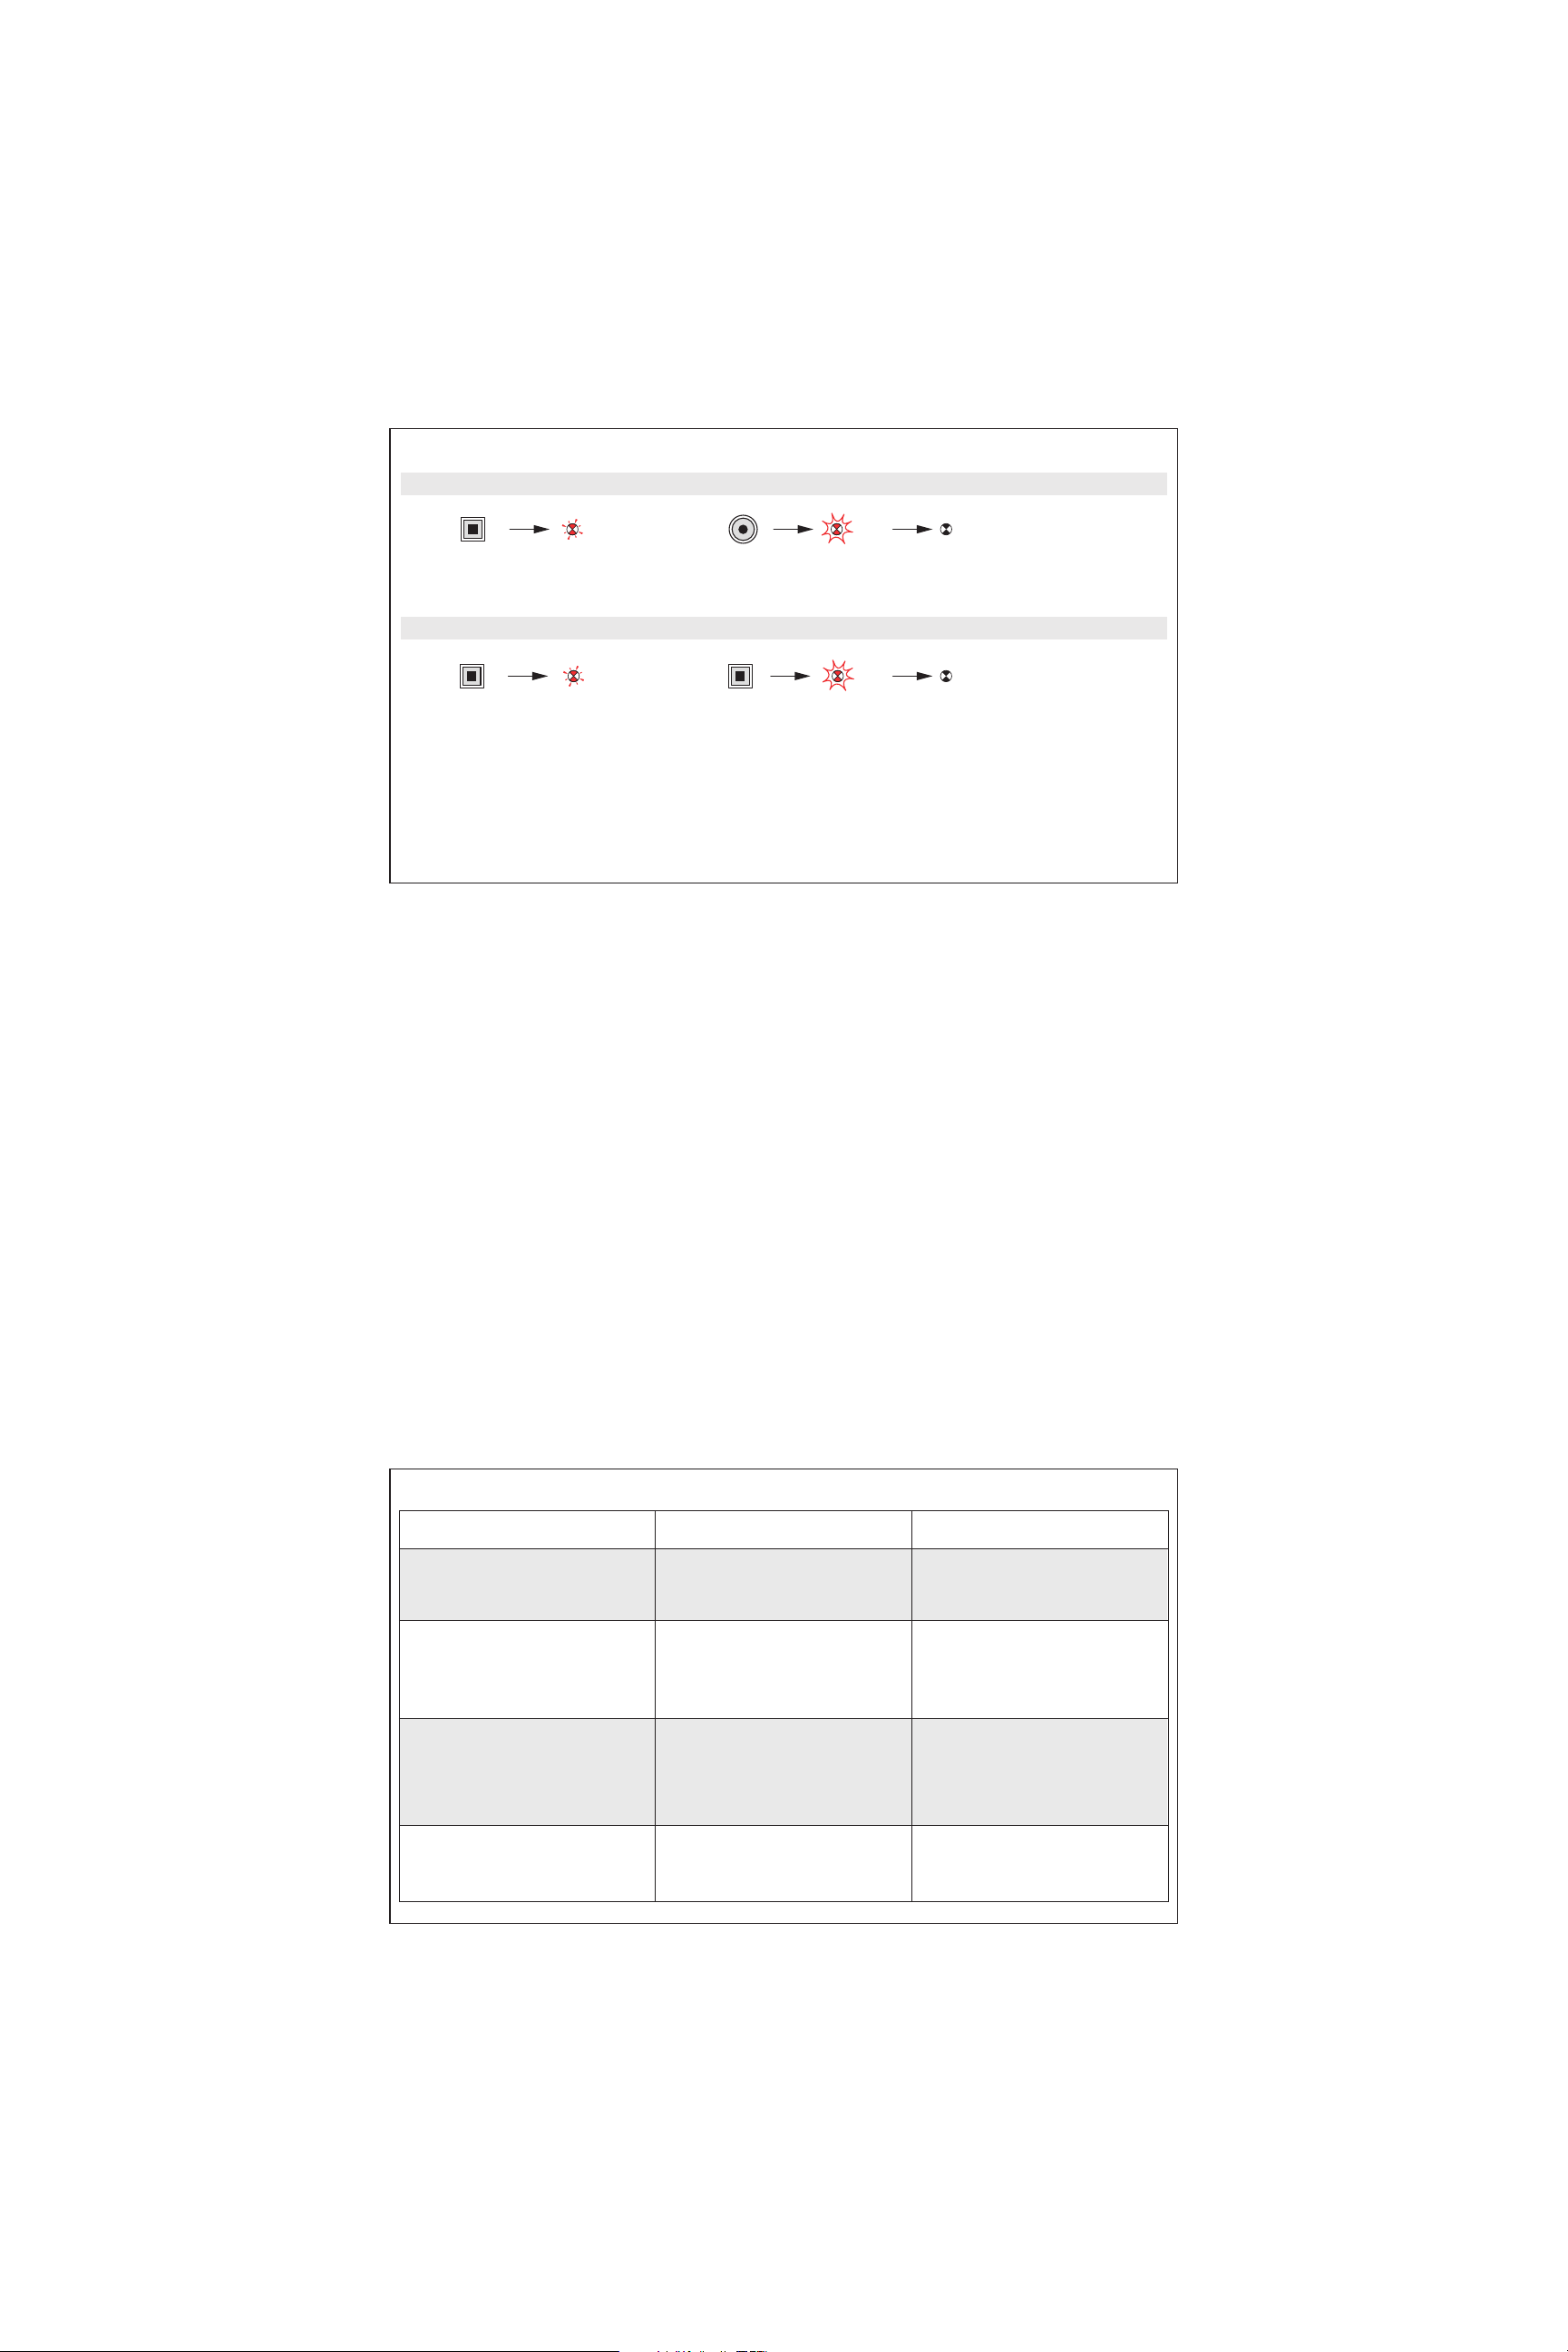
Apprentissage du scénario
Appuyer sur LEARN
Appuyer sur LEARN
Appuyer sur
LEARN
Appuyer sur la touche de commande qui doit être associée à l’émetteur
Appuyer sur la touche de commande qui pilote le scénario
Les voyants de tous les produits s'éteignent.
Le scénario est enregistré.
Etape 1 : débuter l'apprentissage (sur l’ÉMETTEUR)
Etape 2 : ajouter un récepteur au scénario (sur le RÉCEPTEUR)
Etape 3 : enregistrer le scénario (sur l’ÉMETTEUR)
Pour ajouter plusieurs produits au scénario, répéter pour chaque récepteur les opérations
et .
Légende
Le voyant s'éteint
Le voyant clignote
lentement
Le voyant clignote
rapidement
Le voyant flashe
6
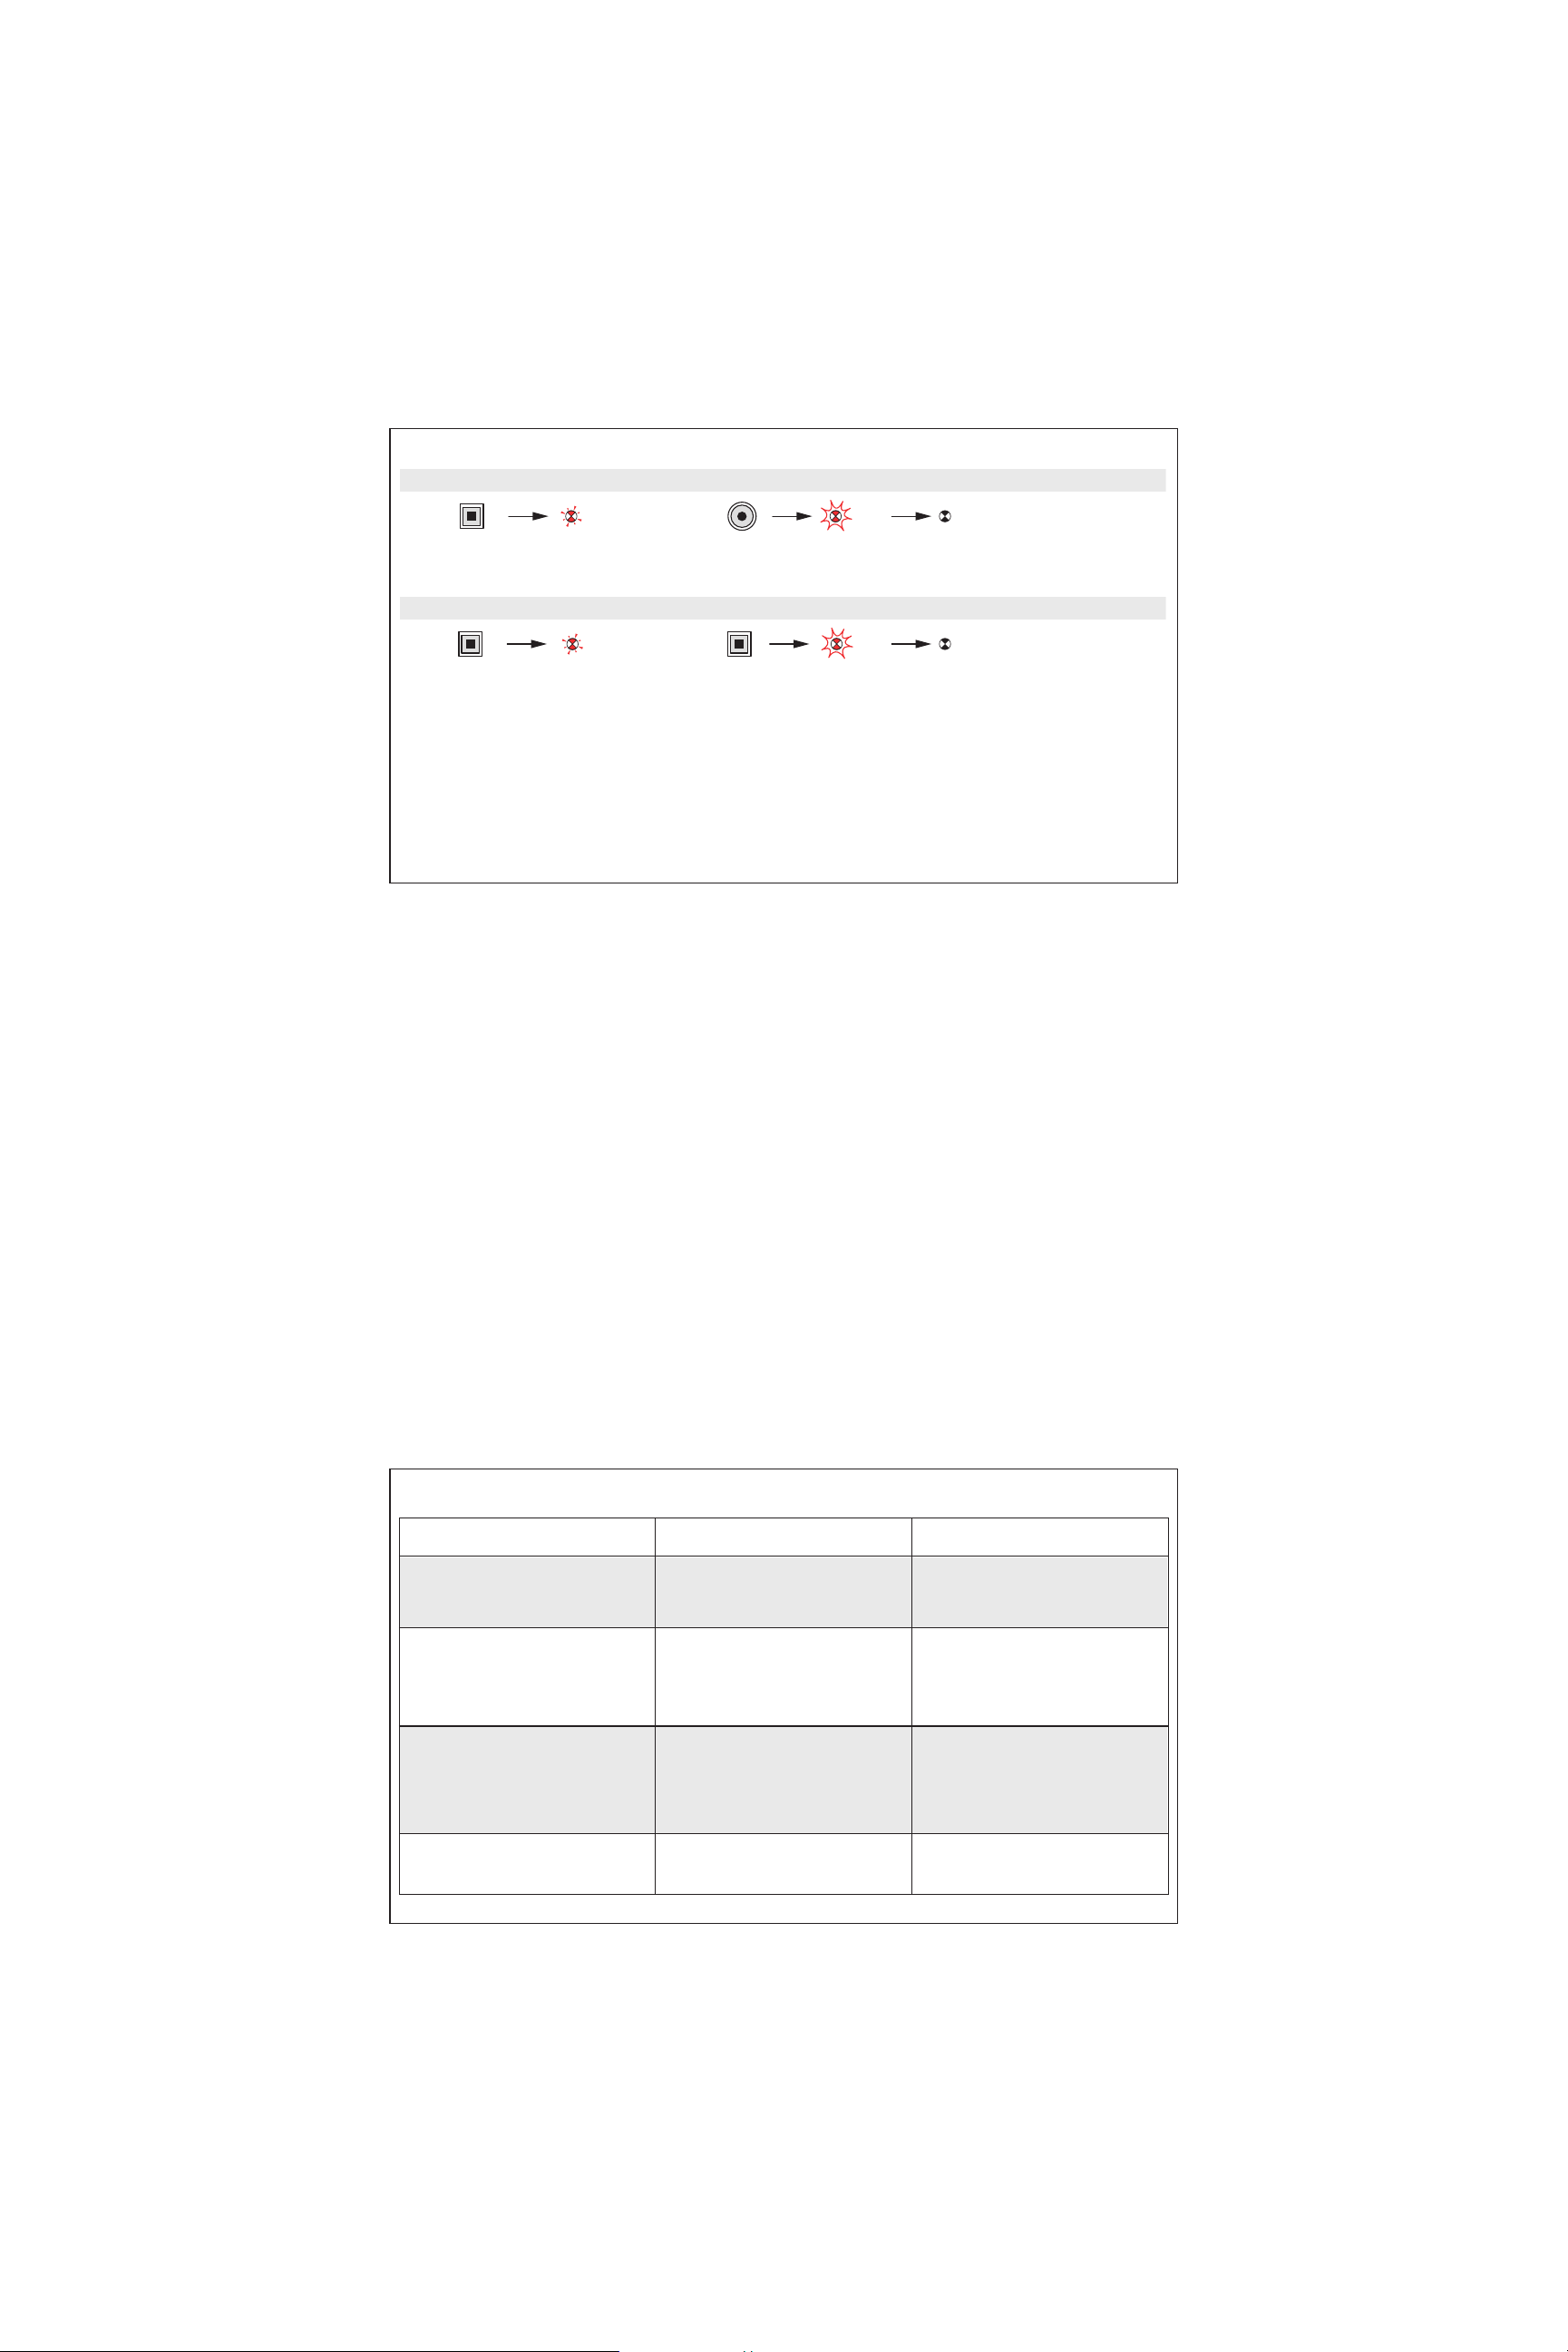
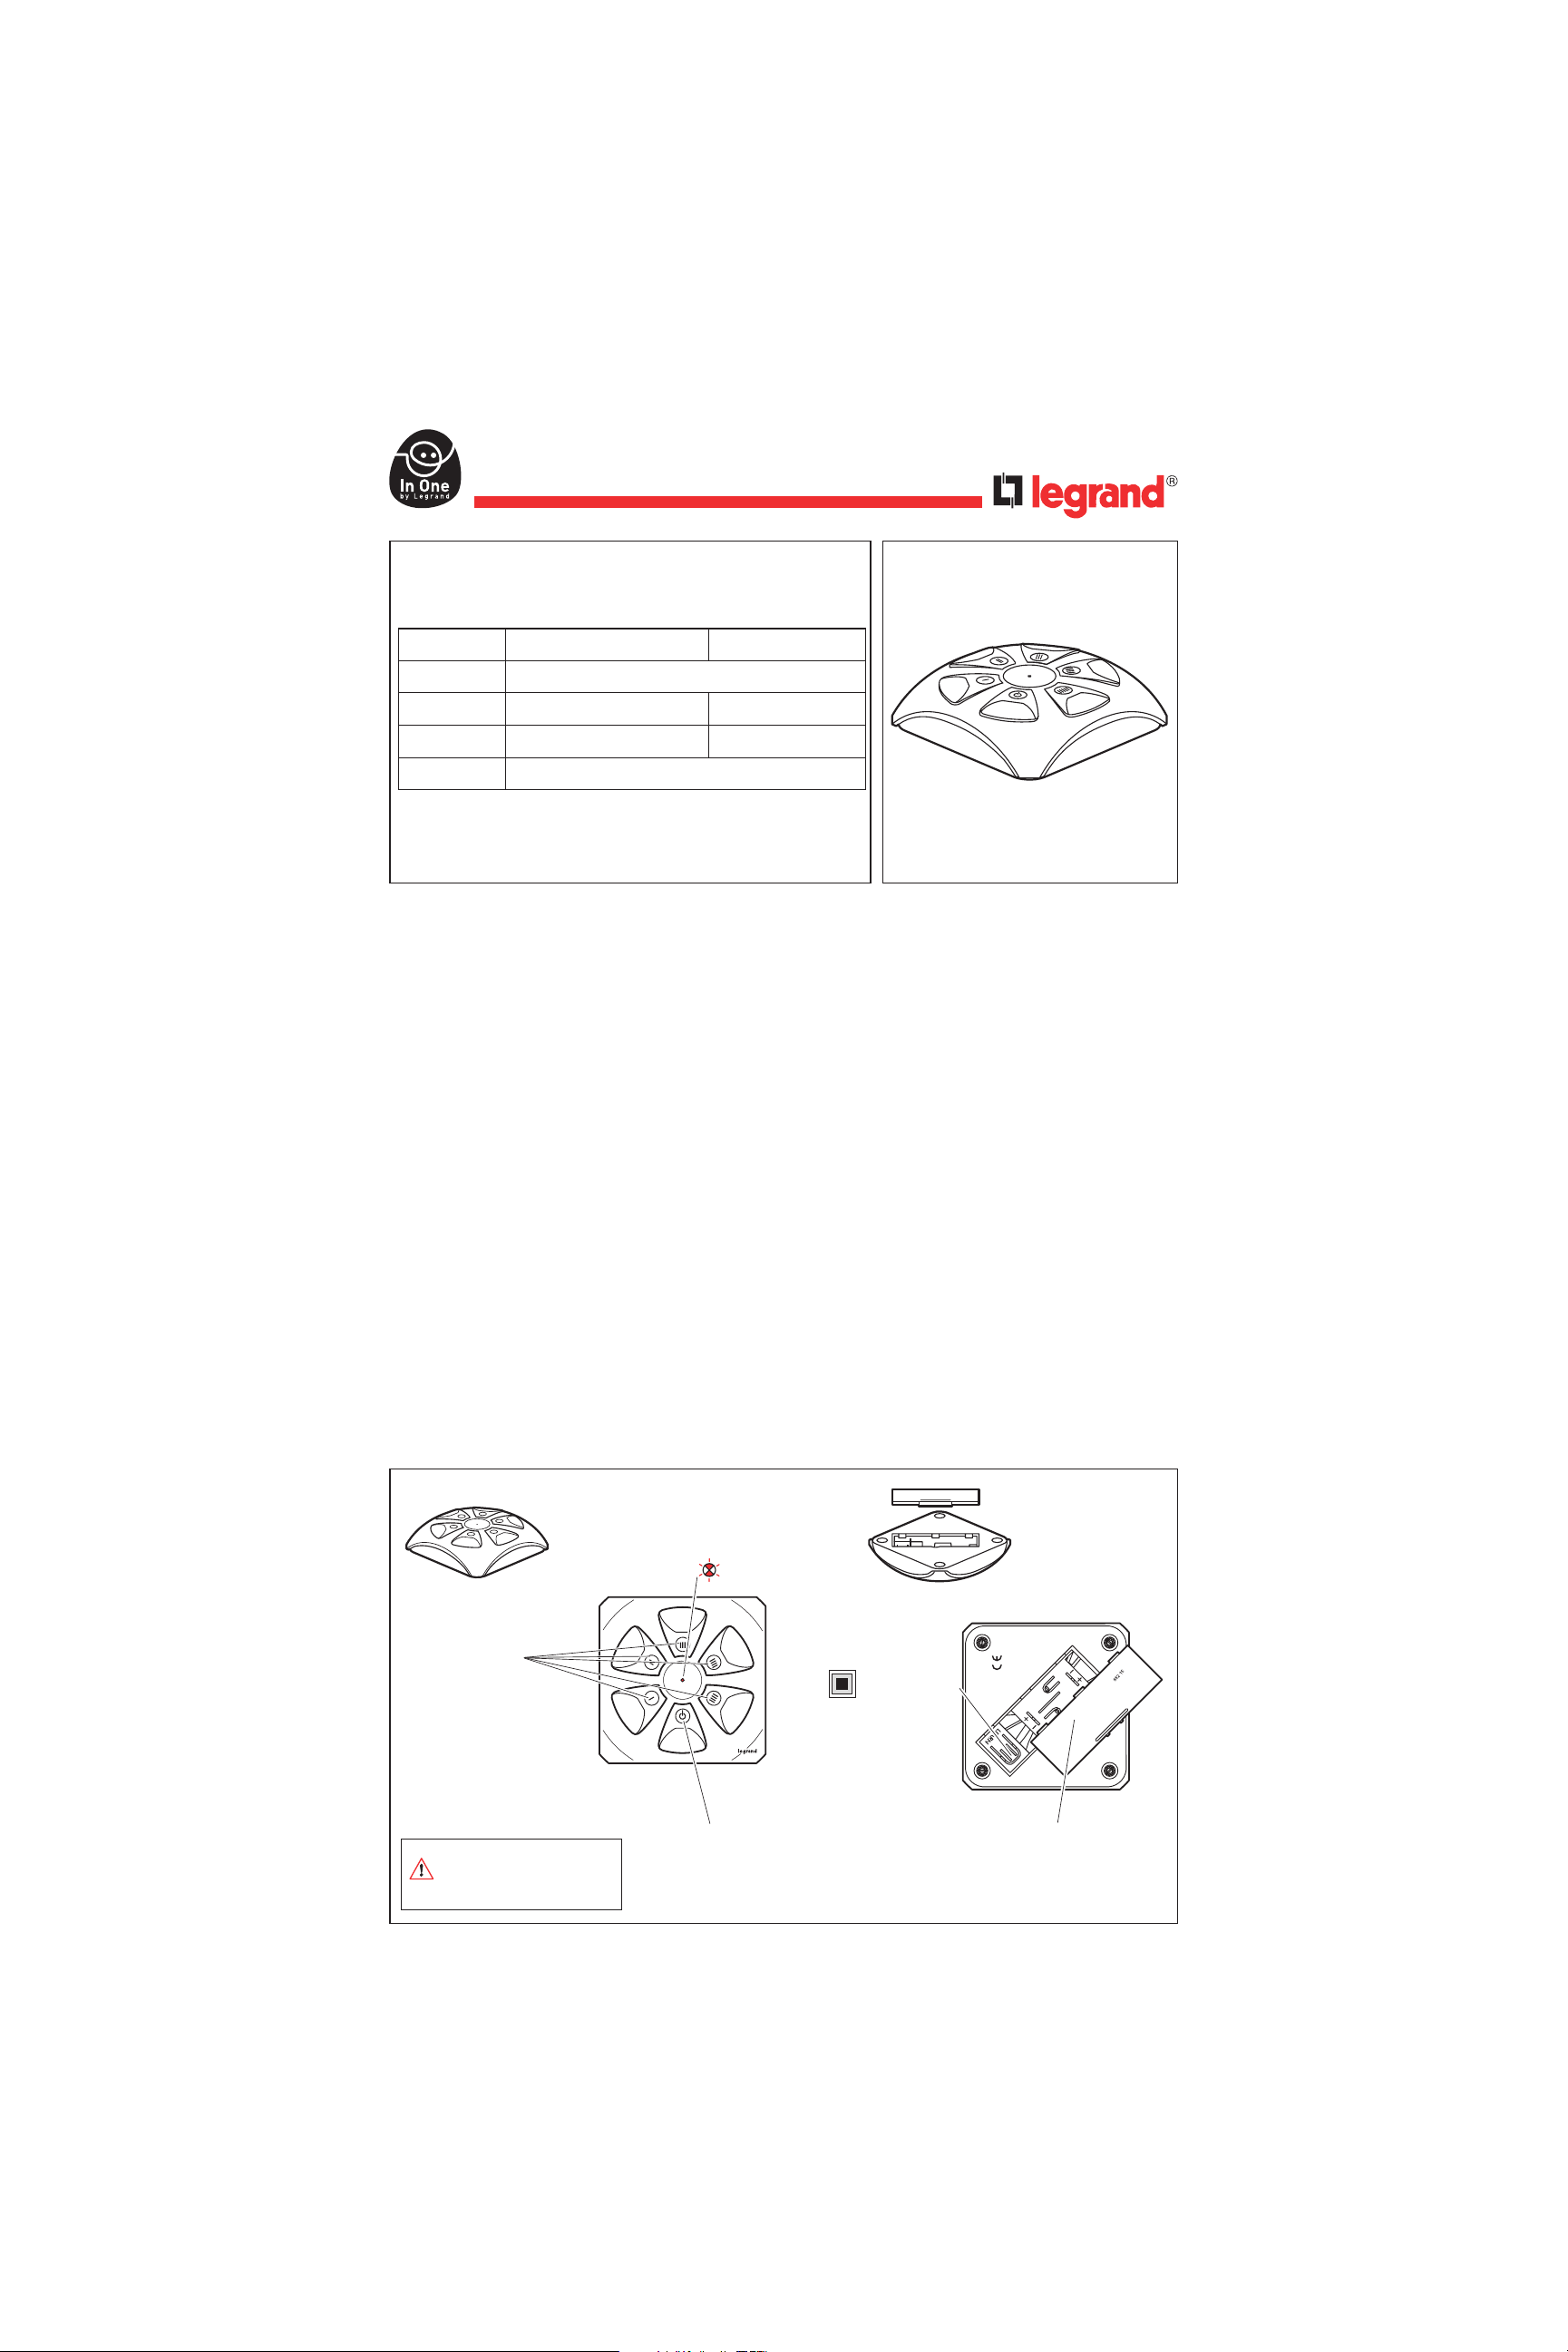
Modification d’un scénario
Appuyer sur
LEARN
Appuyer sur la touche de commande
qui doit piloter le scénario
Appuyer sur la touche de commande
que l’on souhaite associer
Les voyants de tous les scénarios clignotent
Appuyer sur
LEARN
Appuyer sur
LEARN
Appuyer sur LEARN
ou
pour supprimer le produit
du scénario passer à l’étape 3
Les voyants de tous les produits s'éteignent.
Le scénario est enregistré.
Etape 1 : ouvrir le scénario (sur l’ÉMETTEUR)
Etape 2 : modifier l’état d’un récepteur du scénario (s
ur le RÉCEPTEUR)
Etape 3 : enregistrer le scénario (sur l’ÉMETTEUR)
7
Effacement d’un scénario (sur l’EMETTEUR)
Appuyer sur
LEARN
Le scénario est effacé
Appuyer sur la touche de commande
et maintenir 10 s
Appuyer sur
LEARN
Attention
Lors de l’effacement d’une ou de toutes les touches de commandes, la ou les touches est/sont réinitialisée(s). Cela veut
dire que les touches ainsi remises à zéro sont de nouveau en média radio.
Penser à recommencer la “ Procédure du choix du média sur une touche de commande” décrite en page 4 pour
pouvoir commander des produits Infra rouges.
Appuyer sur LEARN
et maintenir 10 s
Retour du produit
en configuration d’usine
Effacer le scénario lié à la touche de commande
Effacer tous les scénarios
8
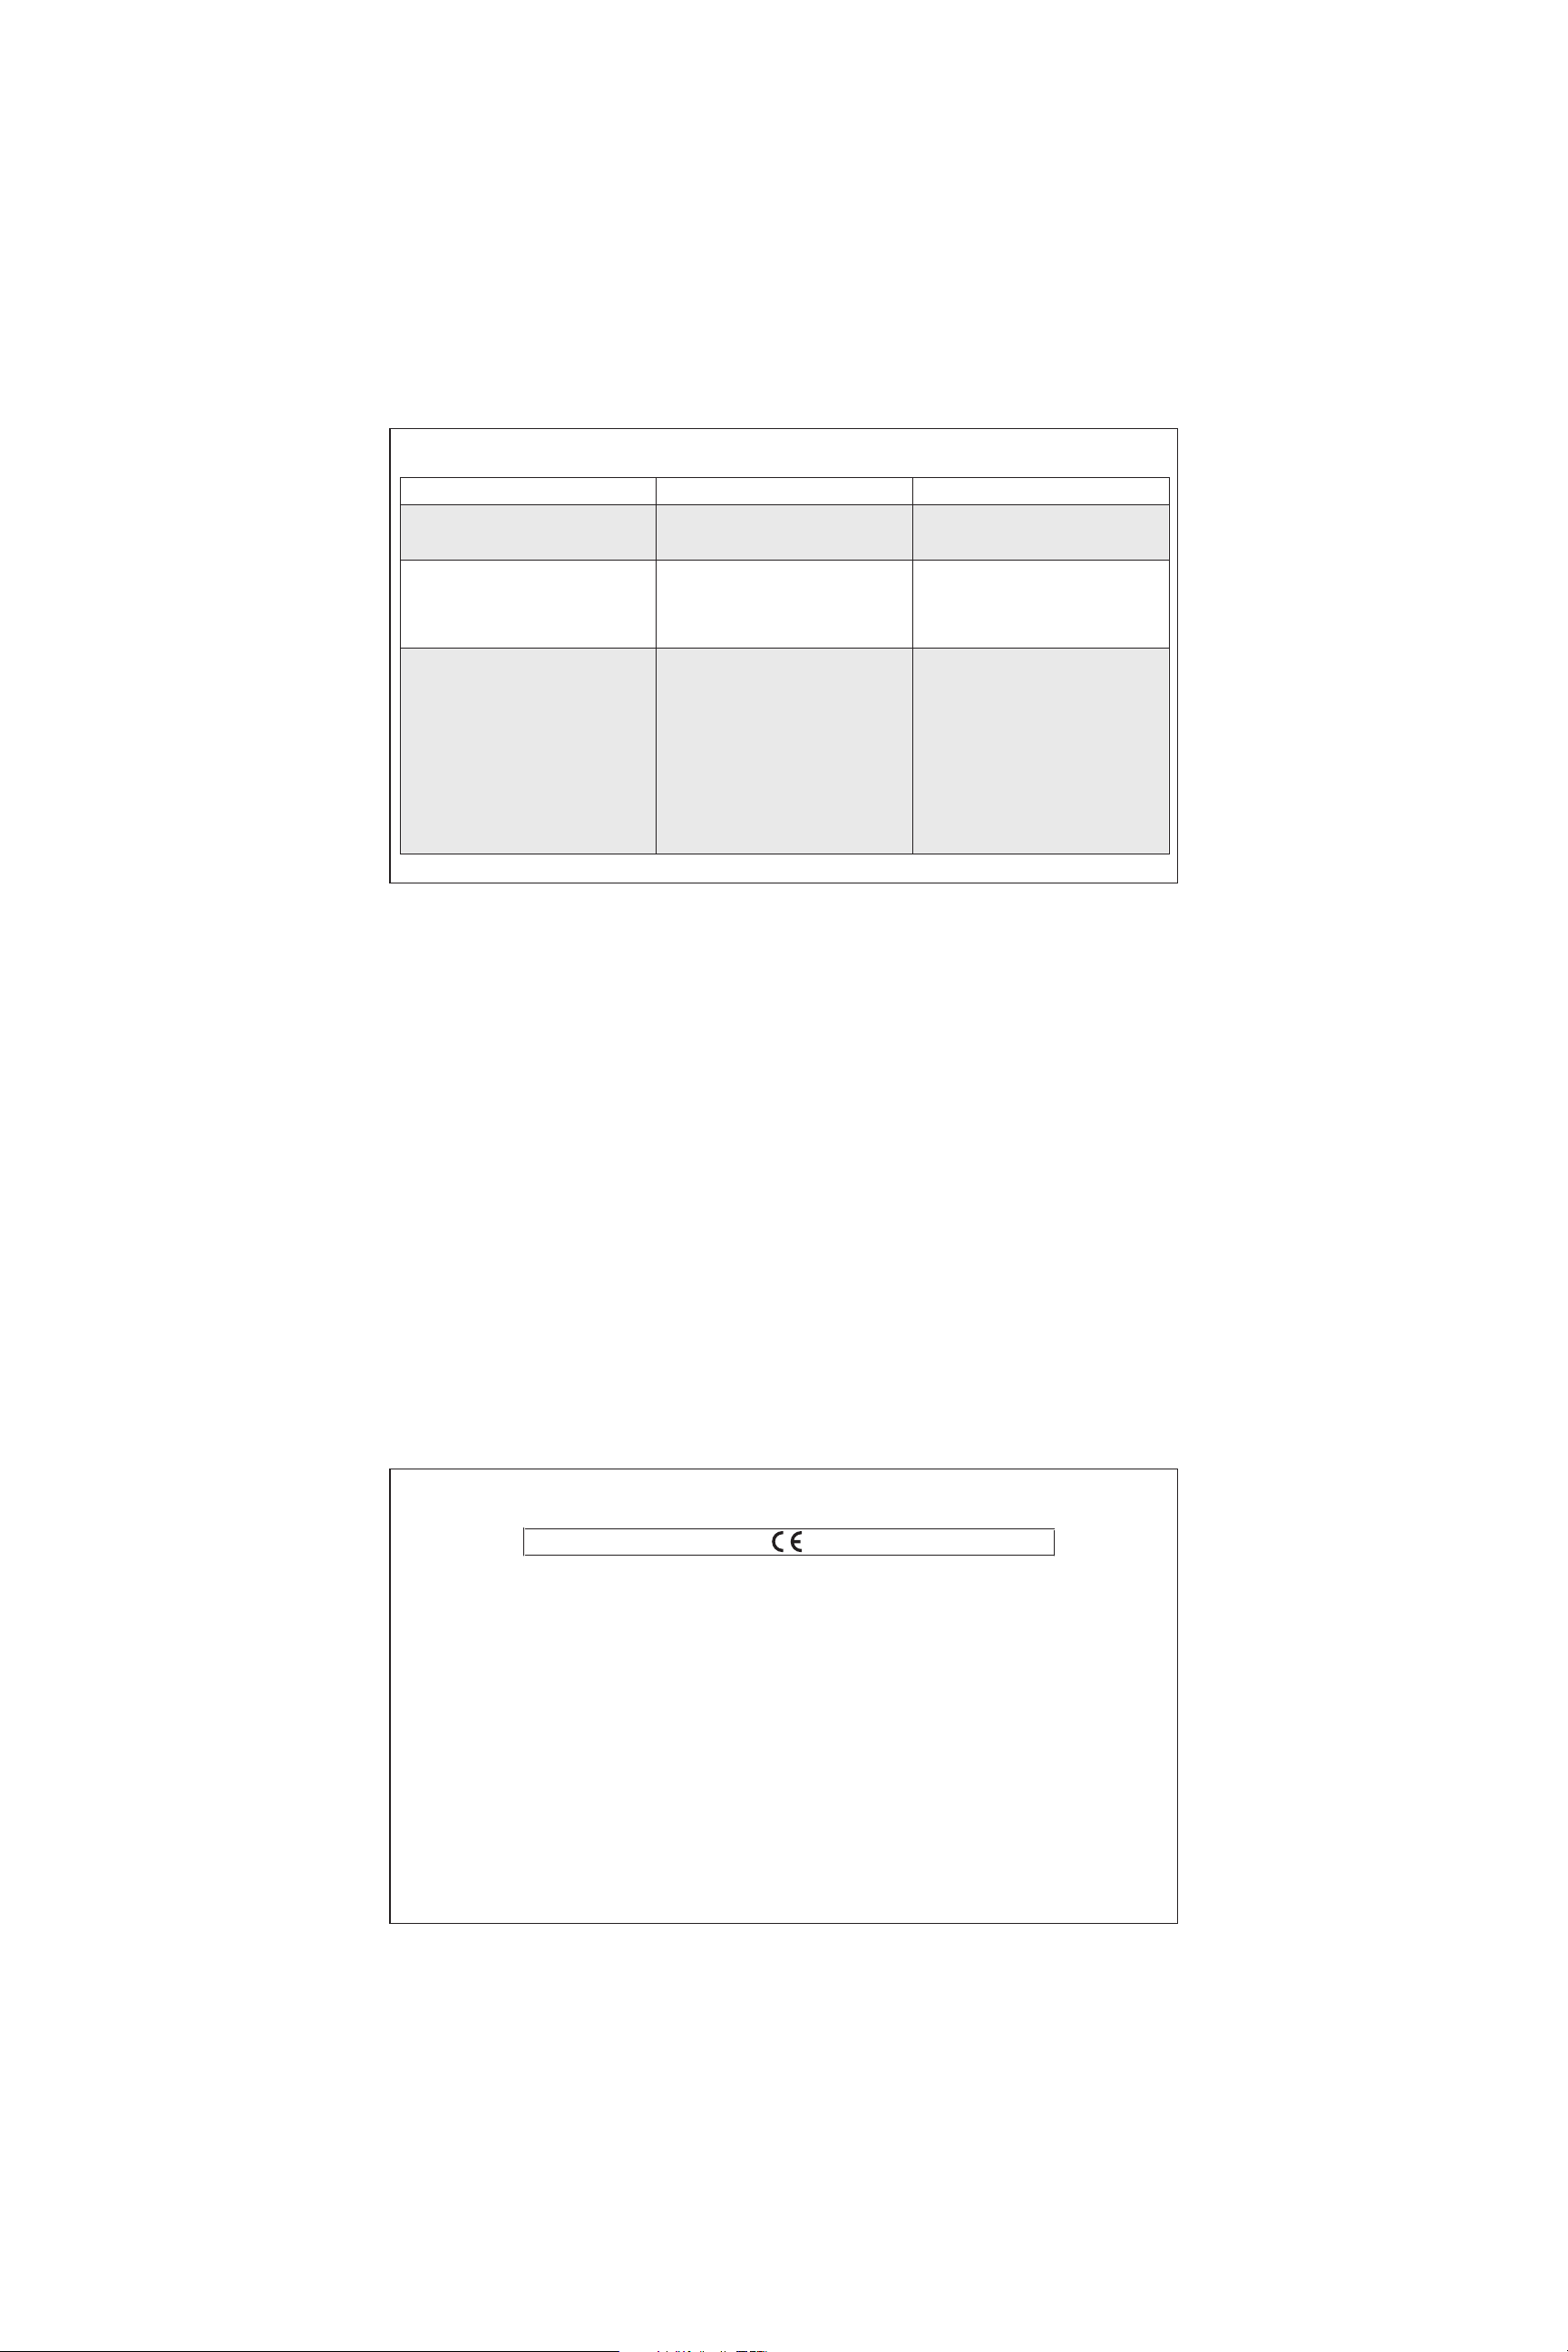
Problèmes et solutions
Problème Cause Solution
Pendant l'apprentissage le voyant
Learn s'éteint 10 minutes après le
début de l'apprentissage.
Le mode apprentissage se ferme
au bout de 10 minutes sans appui
sur une touche de commande.
Recommencer l'apprentissage.
Pendant l'apprentissage sur le
récepteur, le voyant Learn du récepteur
reste allumé fixement pendant 5s
L'émetteur qui a initié la procédure
d'apprentissage n'est pas compatible
avec le récepteur.
Réaliser l'apprentissage entre
produits compatibles
Pendant l'apprentissage le voyant
Learn du récepteur s'éteint alors qu'il
clignotait lentement et que le timeout
de 10 minutes n'est pas atteint.
L'appui sur la touche de commande
du récepteur se fait dans la minute
qui suit l'appui sur la touche Learn
du récepteur.
Appuyer sur la touche Learn et
poursuivre l'apprentissage par appui
sur la touche de commande en moins
d'une minute.
Après appui sur la touche Learn
l'appui sur la touche de commande
ne déclenche pas le clignotement
rapide sur l'émetteur.
Le voyant Learn est éteint.
Le mode apprentissage se ferme au
bout de 1 minute sans appui sur une
touche de commande de l'émetteur
après l'appui sur la touche Learn.
Recommencer l'apprentissage.
9
Problèmes et solutions
Problème Cause Solution
Pendant l'apprentissage sur le
récepteur, le voyant Learn du récepteur
reste allumé fixement pendant 10s.
Le récepteur ne peut plus être associé
à de nouvelles unités émettrice :
mémoire du récepteur pleine.
Effacer les scénarios inutiles.
L'appui sur la touche de commande
ne déclenche pas le clignotement
rapide sur le récepteur.
Le voyant Learn clignote toujours
lentement.
Distance entre le récepteur et
l'émetteur trop importante.
Déplacer l'un ou l'autre des produits.
A l'enregistrement du scénario,
les voyants Learn de certains
récepteurs ne s'éteignent pas.
1- Distance entre ces récepteurs et
l'émetteur trop importante.
2- Le media associé à la touche de
l'émetteur est Infrarouge et le récepteur
est RF
3- Le media associé à la touche de
l'émetteur est RF et le récepteur est
CP/IR et l'installation ne comporte
pas de passerelle RF/CPL
1- Déplacer l'un ou l'autre
des produits
2- Changer le media associé de la
touche concernée
3- Changer le media associé de la
touche concernée ou mettre en place
une passerelle RF/CPL
10
DECLARATION DE CONFORMITE
:
r
t
s
s
:
Nous déclarons que les produits satisfont aux dispositions de :
We declare that the products satisfy the provisions of
La Directive 1999/5/CE du Parlement européen
et du Conseil du 9 mars 1999 "R&TTE"
sous réserve d'une utilisation conforme à sa destination on condition that they are used in the manne
et/ou d'une installation conforme aux normes en vigueur intended and/or in accordance with the curren
et/ou aux recommandations du constructeur installation standards and/or with the manufacturer'
Ces dispositions sont assurées pour la directive 1999/5/CEE par la conformité aux normes suivantes :
These provisions are ensured for directive 1999/5/CEE by conformity to the following standards
recommandantion
EN 60669-2-1 EN 300220-3

Scenario control RF/IR
882 15
Radio Infrared
Characteristics
11
12
Description
Strictly comply with the
installation and use
instructions
Power supply
Frequency RF
2 x 1.5V Type AAA (LR03)
868.3 Mhz 36 kHz
Range About 200 m in a free field 5 m
Temperature
+ 5°C to + 45°C
Scenario keys
backlit
by a blue led
LEARN indicator
Scenario keys
backlit
by a white led
Z
S
LEARN key
RI
SA
A
X
X
X
X
30RL
XX
D
I
V5,1x
2
ID number
13
Operation
The tabletop control is a scenario switch that can control, via its 6 keys I, II, III, IIII, IIIII, all of the receivers which were
linked to it during learning
(1)
.
Pressing a key makes it blink for 5 seconds.
Each key can have either Radio or IR media linked to it. By default all keys control Radio products only.
(1)
Learning : procedure that enables to define and save a scenario.
Possible controls using the keys :
*
The long press applies only when the linked products are dimmers.
Key
14
Procedure for choice of media on a control key :
1 - Press, then release, the Learn key.
The Learn indicator blinks slowly.
2 - Press and hold down for 10 seconds the key whose media you wish to change.
The Learn indicator flashes for 5 seconds, then release the key.
3 - During the 5 seconds, where the Learn indicator flashes, successively press the control key and you will move
from Radio media (Key off) to InfraRed media (Key on).
The saved media will be the one that is active when the Learn indicator stops flashing.
Procedure for viewing the media associated with the different keys :
Press the Learn key, then release.
- The Learn indicator blinks slowly, for 5 seconds the keys are :
a - off if the key is associated with Radio media
b
- on if the key is associated with IR media.
Short press
Long press (*)
III
IIII
IIIII
I
II
Scenario
Scenario
Scenario
Scenario
Scenario
Scenario
Increasing light level
Increasing light level
Increasing light level
Decreasing light level
Decreasing light level
Decreasing light level
15
Key
The indicator light
switches off
The indicator light
flashes slowly
The indicator light
flashes quickly
The indicator light
flashes
Learning a scenario
Press LEARN Press the control button that is to
control the scenario
Press LEARN
Press LEARN
Press the control button to be linked
to the transmitter
The indicator lights of all products switch off.
The scenario has been saved.
Step 1 : Start the learning phase (on the TRANSMITTER)
Step 2 : Add an actor to the scenario (on the RECEIVER)
Step 3 : Save the scenario (on the TRANSMITTER)
To add several products to the scenario, repeat operations and for each receiver.
16
Modifying a scenario
Press LEARN
Press the control button
that pilots the scenario
The indicator lights of all products in
the scenario flash.
Press the control button
that is to be linked
Step 1: Open the scenario (on the TRANSMITTER)
Press LEARN
or
Press LEARN
To remove the product from the
scenario, go to step 3
Step 2 : Modify the state of an actor in the scenario (on the RECEIVER)
Step 3 : Save the scenario (on the TRANSMITTER)
Press LEARN
The indicator lights of all products switch off.
The scenario has been saved.

17
Caution
When clearing the settings of one or all the control keys, this key is (these keys are) reset. This means that keys reset in
this way move back to radio media.
Remember the restart the “Procedure for choice of media on a control key” described on page 14 if you want to
control infrared products.
Clearing a scenario (on the TRANSMITTER)
Press LEARN
The scenario is cleared
Press the control button
and hold down for 10 s
Clear all scenarios linked to the control button
Press LEARN
The product returns
to factory settings
Press LEARN and hold
down for 10 s
Clear all scenarios linked to this product
5 s
5 s
18
Troubleshooting
Problem Cause Solution
During learning, the Learn indicator
goes off 10 minutes after the start of
the learning procedure.
The learning procedure terminates
after 10 minutes if no control key is
pressed.
Restart learning.
During learning on the receiver, the
receiver's Learn indicator stays on
steadily for 5 seconds.
The transmitter which initiated the
learn procedure is not compatible
with the receiver.
Perform learning between mutually
compatible products.
During learning, the receiver's Learn
indicators goes off where if had been
blinking slowly, but the 10 minutes
deadline has not yet been reached.
Pressing the control key on the
receiver should be done within one
minute of pressing the Learn key
on the receiver.
Press the Learn key and continue the
learning procedure by pressing a
control key within less than one
minute.
After pressing the Learn key, pressing
the control key does not produce a
fast blink on the transmitter.
The learn key is off.
The learning procedure terminates
after 1 minute if no control key on
the transmitter is pressed after
pressing the Learn key.
Restart learning.

19
Troubleshouting
Problem Cause Solution
During learning on the receiver, the
receiver's Learn indicator stays on
steadily for 10 seconds.
The receiver can no longer be linked
to other transmitter units :
the receiver's memory is full.
Clear any unnecessary scenarios.
Pressing the control key does not
produce a fast blink on the receiver.
The Learn key still blinks slowly.
Distance is too great between
receiver and transmitter.
Move one of the products involved,
to bring them closer together.
When saving the scenario, the Learn
keys on some receivers do not go off.
1 - Distance is too great between
these receivers and the transmitter.
2 - The media linked to the
transmitter key is infrared but the
receiver is Radio.
3 - The media linked to the
transmitter key is Radio but the
receiver is PLC/IR and the
installation contains no RF/PLC
interface.
1 - Move one of the products involved,
to bring them closer together.
2 - Change the media linked to the
key in question.
3 - Change the media linked to the
key in question or set up an RF/PLC
interface.
20
DECLARATION DE CONFORMITE
:
r
t
s
s
:
Nous déclarons que les produits satisfont aux dispositions de :
We declare that the products satisfy the provisions of
La Directive 1999/5/CE du Parlement européen
et du Conseil du 9 mars 1999 "R&TTE"
sous réserve d'une utilisation conforme à sa destination on condition that they are used in the manne
et/ou d'une installation conforme aux normes en vigueur intended and/or in accordance with the curren
et/ou aux recommandations du constructeur installation standards and/or with the manufacturer'
Ces dispositions sont assurées pour la directive 1999/5/CEE par la conformité aux normes suivantes :
These provisions are ensured for directive 1999/5/CEE by conformity to the following standards
recommandantion
EN 60669-2-1 EN 300220-3
21
Mobiele scenario zender RF/ IR
882 15
Radio Infrarood
Eigenschappen
22
Beschrijving
Neem de installatie- en
gebruiksvoorwaarden
nauwgezet in acht.
Voeding
Frequentie RF
Bereik
Temperatuur
2 x 1,5V Type AAA (LR03)
868,3 Mhz 36 kHz
Ca. 200 m in geval van
onbelemmerde transmissie
+ 5°C tot + 45°C
5 m.
Scenarioknoppen
met verlichting
d.m.v. een blauwe led
Controlelampje LEARN
Scenarioknoppen
met verlichting
d.m.v. een witte led
Toets LEARN
XX
X
X
30RL
XX
DI
V5,1x
2
RI
Identificatienummer
Z
S
SA
A
23
Werking
Met de scenariozender kunnen d.m.v. de toetsen I, II, III, IIII, IIIII, verzamelingen ontvangers bestuurd kunnen worden
die hier tijdens het inlezen aan zijn toegewezen
(1)
Na een druk op een toets knippert deze gedurende 5 seconden.
Iedere toets kan gebruikt worden om een product te besturen welke functioneert met de techniek radio frequent (RF) of
infrarood (IR). Standaard bedienen alle toetsen uitsluitend radioproducten.
(1)
Aanleren Inlezen: procedure waarbij een scenario geregistreerd en bepaald kan worden.
Bediening mogelijk vanaf de toetsen:
*
Er wordt uitsluitend lang gedrukt wanneer de toegevoegde producten dimmers zijn.
Toetsen
24
Procedure voor instellen van de gebruikte techniek (IR / RF ) per toets.
1- De toets Learn indrukken en weer loslaten
Het controlelampje Learn knippert langzaam
2- Houdt de toets die u wilt wijzigen gedurende 10 sec. ingedrukt totdat het controle lampje “learn” snel knippert.
(na ongeveer 10 sec).
3- Gedurende de 5s dat het controlelampje Learn flitst, drukt u achtereenvolgens op de bedieningstoets en gaat u
over van het medium Radio (controlelampje Toets uit) naar het medium infrarood (controlelampje van de Toets
aan)
De ingestelde techniek is degene die actief is op het moment dat het learn lampje ophoudt met knipperen. (Na 5 sec.)
Procedure voor het bekijken van de ingestelde techniek per toets.
De toets Learn indrukken en weer loslaten
- Het controlelampje Learn knippert langzaam, gedurende 5s zijn de toetsen:
a- Uit. Indien de toets gebruik maakt van d
e techniek radio frequent (RF).
b- Aan. Indien de toets gebruik maakt van de techniek infrarood (IR).
Een korte druk
Een lange druk (*)
III
IIII
IIIII
I
II
Scenario
Scenario
Scenario
Scenario
Scenario
Scenario
Toenemende variatie
Toenemende variatie
Toenemende variatie
Afnemende variatie
Afnemende variatie
Afnemende variatie

Druk op LEARN
Druk op LEARN
Druk op LEARN
Druk nogmaals op LEARN
Druk op de bedieningstoets die aan de leider
moet zijn toegevoegd
Stap 2 : een actor toevoegen aan het scenario (op de ACTOR)
Aanleren van het scenario
De controlelampjes van alle producten gaan uit
Het scenario is geregistreerd
Stap 1 : beginnen met aanleren (op de LEIDER)
Stap 3 : het scenario registreren (op de LEIDER)
Herhaal voor het toevoegen van meerdere producten aan het scenario voor iedere actor de handelingen en
25
Legenda
Het controlelampje
gaat uit
Het controlelampje
knippert langzaam
Het controlelampje
knippert snel
Het controlelampje
flitst
26
Druk op LEARN
Druk op LEARN
Druk op LEARN
Druk op LEARN
Druk nogmaals op LEARN
Druk op de bedieningstoets
die u toe wilt voegen
Ga voor het wissen van het product uit
het scenario naar stap 3
De controlelampjes van alle producten
van het scenario knipperen
of
Stap 2 : de staat van een actor van het scenario wijzigen (op de ACTOR)
De controlelampjes van alle producten gaan uit
Het scenario is geregistreerd
Stap 3 : het scenario registreren (op de LEIDER)
Wijziging van een scenario
Stap 1 : het scenario openen (op de LEIDER)
27
Druk op LEARN
Druk op LEARN
Het scenario is gewist
Druk op de bedieningstoets
en houd deze
10s ingedrukt
Wis alle scenario’s die verbonden zijn met de bedieningstoets (op de LEIDER)
Terugkeer van het product
naar de standaardconfiguratie
Druk op LEARN en houd
deze 10s ingedrukt
Wis alle scenario’s die bij dit product horen (op de LEIDER)
5 s
5 s
Wissen van een scenario
Opmerking :
Als de toets of toetsen ge-reset word(en) gaat de gebruikte techniek terug naar de fabrieksstand.
In de fabriekstand wordt de techniek (RF) gebruikt.
Op bladzijde 24 staat beschreven hoe deze aangepast kan worden.
28
Problemen en oplossingen
Probleem Oorzaak Oplossing
Tijdens het inlezen gaat het
controlelampje Learn 10 minuten na
het beginnen van het inlezen uit.
De inleesmodus sluit indien er 10
minuten niet op een bedieningstoets
is gedrukt.
Begin opnieuw met inlezen.
Tijdens het inlezen op de ontvanger
blijft het controlelampje Learn van de
ontvanger gedurende 5s permanent
branden
De zender die de inleesprocedure
gestart is, is niet compatibel met de
ontvanger.
Het inlezen moet tussen compatibele
producten plaatsvinden
Tijdens het inlezen gaat het
controlelampje Learn van de
ontvanger uit, terwijl hij langzaam
knipperde en de time out van 10
minuten niet bereikt is.
Er wordt binnen een minuut na het
drukken op de toets learn van de
ontvanger op de bedieningstoets van
de ontvanger gedrukt.
Druk op de toets Learn en ga door
met inlezen door minder dan een
minuut op de bedieningstoets te
drukken.
Na op de toets Learn gedrukt te
hebben, leidt het drukken op de
bedieningstoets niet tot het snel
knipperen op de zender.
Het controlelampje Learn is uit.
De inleesmodus sluit indien er
gedurende 1 minuut niet op een
bedieningstoets van de zender is
gedrukt na een druk op de toets
Learn.
Begin opnieuw met inlezen
29
Problemen en oplossingen
Probleem Oorzaak Oplossing
Tijdens het inlezen op de ontvanger
blijft het controlelampje Learn van de
ontvanger gedurende 10s permanent
branden
De ontvanger kan niet meer aan
nieuwe zendeenheden worden
toegevoegd: geheugen van de
ontvanger vol.
Wis de nutteloze scenario’s.
Het drukken op de bedieningstoets
leidt niet tot snel knipperen op de
ontvanger.
Het controlelampje Learn knippert
nog steeds langzaam.
Te grote afstand tussen de
ontvanger en de zender.
Verplaats één van beide producten.
Bij het registreren van het scenario
doven de controlelampjes Learn van
sommige ontvangers niet.
1 - Te grote afstand tussen deze
ontvangers en de zender.
2- Het aan de toets van de zender
toegevoegde medium is Infrarood en
de ontvanger is RF
3- Het aan de toets van de zender is
RF en de ontvanger is CP/IR en de
installatie beschikt niet over een
gateway RF/CPL
1 - Verplaats één van beide
producten
2- Vervang het aan de betreffende
toets toegevoegde medium
3- Vervang het aan de betreffende
toets toegevoegde medium of plaats
een gateway RF/CPL
30
DECLARATION DE CONFORMITE
:
r
t
s
s
:
Nous déclarons que les produits satisfont aux dispositions de :
We declare that the products satisfy the provisions of
La Directive 1999/5/CE du Parlement européen
et du Conseil du 9 mars 1999 "R&TTE"
sous réserve d'une utilisation conforme à sa destination on condition that they are used in the manne
et/ou d'une installation conforme aux normes en vigueur intended and/or in accordance with the curren
et/ou aux recommandations du constructeur installation standards and/or with the manufacturer'
Ces dispositions sont assurées pour la directive 1999/5/CEE par la conformité aux normes suivantes :
These provisions are ensured for directive 1999/5/CEE by conformity to the following standards
EN 60669-2-1 EN 300220-3
recommandantion

31
Mobiler Funk/Infrarot-Szenarioschalter
882 15
Funk Infrarot
Technische Daten
32
Beschreibung
Die Einbau- und
Gebrauchsanleitungen sind
genau zu beachten.
Stromversorgung
Funkfrequenz
2 x 1,5V Typ AAA (LR03)
868,3 Mhz 36 kHz
Reichweite ca. 200 m im Freifeld 5 m.
Temperatur
+ 5°C bis + 45°C
Szenariotasten 1 - 5
hintergrundbeleuchtet
durch blaue LED
LEARN-LED
Szenariotaste
hintergrundbeleuchtet
durch weiße LED
LEARN-Taste
ID-Nr.
Z
S
SA
A
XX
X
X
30RL
XX
DI
V5,1x
2
RI
 Loading...