

Page 1
11/11-01 PC
Temperature central unit
User manual
674 56
Page 2

Page 3

Contents
1. Introduction 5
■■ The■Temperature■Control■Unit■ 6
■■ The■navigation■keypad■ 7
■■ The■display■ 7
2. Operation 9
■■ Access■the■Control■Unit■menu■ 10
■■ The■Mode■menu■ 10
■✔ Select■the■Weekly■mode■ 10
■✔ Select■the■Manual■mode■ 11
■✔ Select■the■Scenarios■mode■ 12
■✔ Select■the■Holiday■mode■ 12
■✔ Select■the■Holidays■mode■ 13
■✔ Select■the■OFF■mode■ 14
■✔ Select■Antifreeze■or■Heat■protection■ 15
■■ The■local■probe■ 16
3. Information 17
■■ Diagnostic■ 18
■■ Check■the■mode■of■operation■ 19
■■ Check■the■temperature■in■the■zones■ 20
4. Customisations 21
■■ Setting■ 22
■✔ Set■the■temperature■levels■ 22
■✔ Set■the■mode■of■operation■ 23
■✔ Set■the■date■and■time■ 23
■✔ Enable/disable■the■remote■control■ 24
■✔ Customise■the■User■code■ 24
■✔ Adjust■the■display■contrast■ 25
■✔ Contacts■manag.■ 26
5. Programming 27
■■ The■Programming■menu■ 28
■✔ Weekly■programming■ 28
■✔ Scenarios■programming■ 34
■✔ Holiday■programming■ 36
3
Page 4

Page 5

Introduction
■■ The■Temperature■Control■Unit
■■ The■navigation■keypad
■■ The■display
1
Page 6

1 - Introduction
The■ comfor t■ of■ a■ home■ is■ dire ctl y■ linked■ to■the■ air■ qua lity■ and■ t o■
being■ able■ to■ maintain■an■ideal■ temperature,■ whateve r■ the■weather■
outside.
With■ the■ My■ Hom e■Legrand■ temperature■control■ function,■ wh ether■
it■is■snowing■o utside■ or■the■ sun■is■shining,■ you■are■ always■the■per son■
who■decides■what■climate■to■have■in■the■home,■setting■the■heating■in■
winter■and■the■ cooling■in■summer■as■you■ want,■ w ith■maximum■f lexibility :■heating■or■cooling■only■the■rooms■ you■want■and■ changing■ the■
temperature■programming■when■you■want.
Thank s■ to■ the■ Temper ature■ Control■ Unit■ 674■ 56,■ with■management■
software■with■menus■and■grap hic■display,■you■c an■selec t■the■mode■of■
operation■(week ly■–■manual■–■scenarios■...),■display■ the■temperatures■
of■the■ various■ rooms,■ modif y■or■adjust■ the■ temperature■ at■ any■ time■
followin g■daily■rhythms■or■set■it■weekly,■simply■and■safel y.
Differentiating■the■ temper ature■depending■on■ the■type■ of■ room,■for■
exampl e■the■ night■ zone■ and■ the■ day■ zone,■ and■ the■ time■of■ day,■for■
example■ the■hours■of■ sleep■ and■ when■ the■ whole■family■ is■ out,■ from■
those■of■the■morning■and■the■evening■when■ever yone■is■at■home,■you■
can■achieve■a■saving■of■30%■over■traditional■consumption.
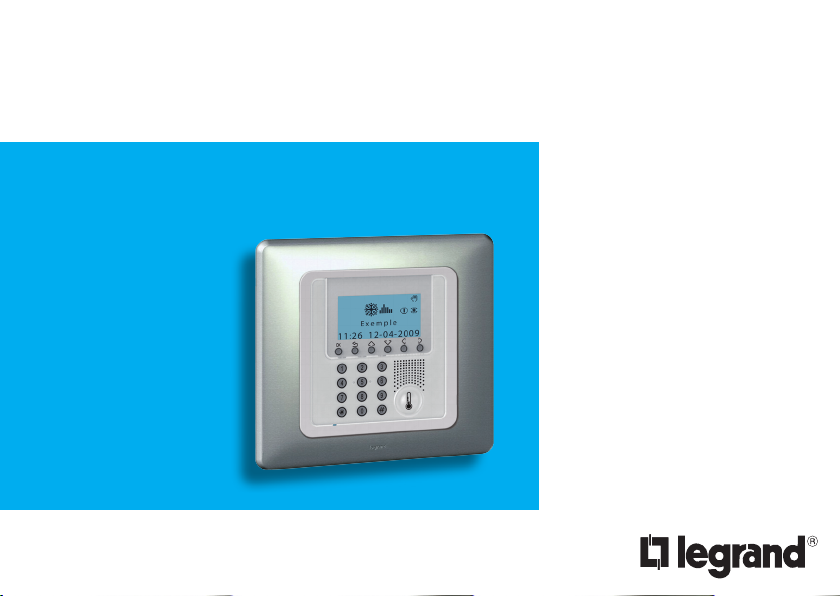
■■ The■Temperature■Control■Unit
1
2
3
1 -■Graphic■display■
2 -■Navigation■keypad■
3 -■Numeric■keypad
6
OK
1 2 3
5 6
4
0
987
Page 7
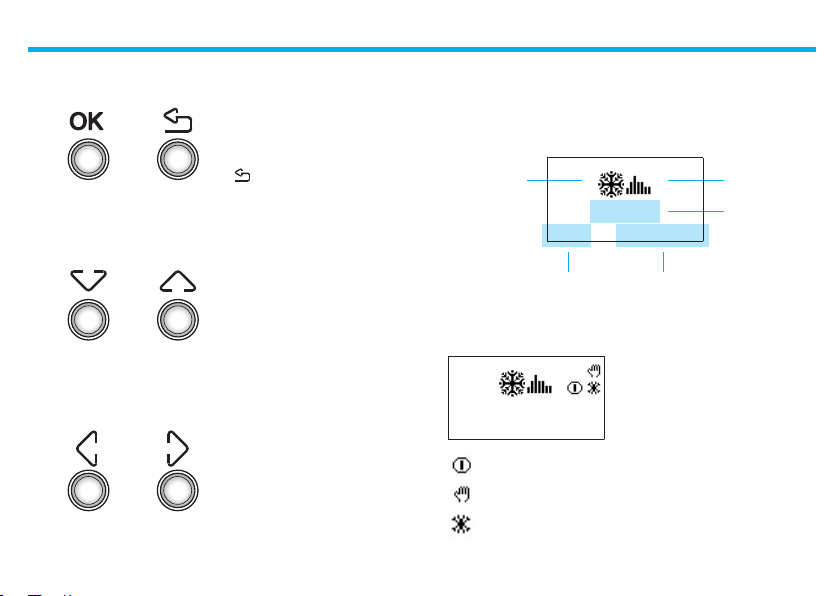
■■ The■navigation■keypad ■■ The■display
OK
Key■to■confirm■the■sel ection■di splayed■or■the■data■entere d
■
Key■to■ cancel■th e■selection■and■
return■to■the■previous■page;■keep■
pressed■t o■quit■the■Main■menu
During■ normal■ operation■ the■ d isplay■pres e nts■ th e■ foll owing■information:
State:
-■Winter■(heating)
-■Summer■(cooling)
Ex amp le
11 :26 01 -10 -20 08
1 - Introduction
Mode■of■
operation
Name■of■the■
program■
being
Scroll keys■
sc roll■ the■ li st■ of ■ it em s■ i n■ the■
menu
Selection keys
can ■ selec t■ f unc ti ons ■ whi ch■ in■
some■ menus■appear■ in■ the■ las t■
line
DateTime
Dep ending■ o n■ the■ mod e■ of■ operation■ set ,■ the■ display■show s■ the■
followin g■icons:
Ex amp le
11 :26 01 -10 -20 08
One■or■more■zones■in■OFF
One■or■more■zones■in■MANUAL
One■or■more■zones■in■ANTIFREEZE■or■HE AT■PROTECTION
7
Page 8
1 - Introduction
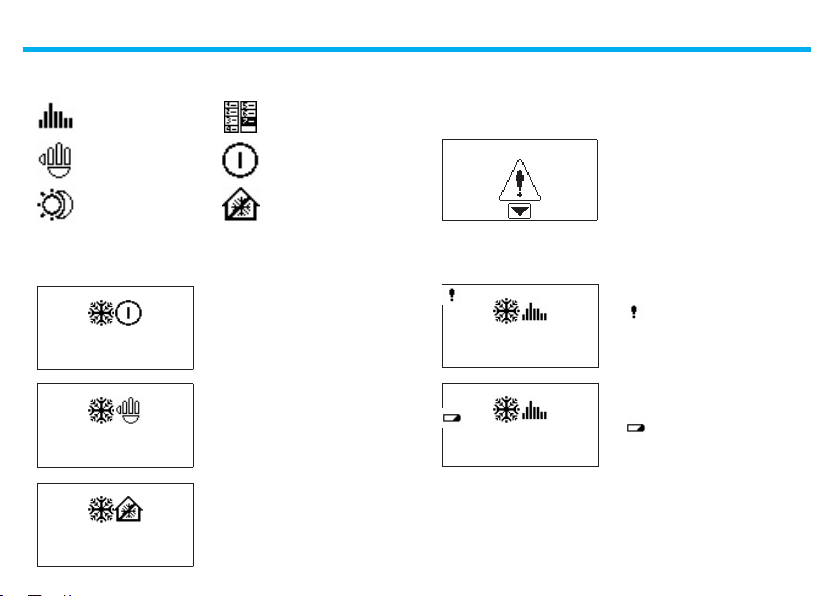
Mode■of■operation:
Weekly
Manual OFF
Scenarios
When■ the■mode■ of■operation■is■ the■ same■ for■ ALL■ZONES■the■d isplay■
shows■the■following■windows:
Holiday
Antifreeze■or■
Heatprotection
System OFF■-■all■the■zones■in■OFF
11 :26 01 -10 -20 08
22 .0
Manual■-■all■the■zones■in■manual
11 :26 01 -10 -20 08
Sys tem i n anti fre eze -■ all■ the■
zones■in■antifreeze
11 :26 01 -10 -20 08
If■there■is■a■f ault■an■exclamation■mark■appears■on■the■control■unit■display.■Press■any■key■to■access■the■diagnostic■menu■for■more■information■
(see■Diagnostic■sec tion).
There■is■a■problem■on■the■system
If■ the■ problem■pers ists■ the■ contro l■ uni t■ will■ continue■ to■ sign al■ by■
displaying■an■icon.
the■ i con■ indic a tes■ an■ o per a-
Ex amp le
11 :26 01 -10 -20 08
Ex amp le
tion■ fault■ in■ one■ or■ more■system■
zones.
■Flat■battery
11 :26 01 -10 -20 08
8
Page 9

Operation
■■ Access■the■Control■Unit■menu
■■ The■Mode■menu
■✔ Select■the■Weekly■mode
■✔ Select■the■Manual■mode
■✔ Select■the■Scenarios■mode
■✔ Select■the■Holiday■mode
■✔ Select■the■Holidays■mode
■✔ Select■the■OFF■mode
■✔ Select■Antifreeze■or■Heat■protection
■■ The■local■probe
2
Page 10

2 - Operation
■■ Access■the■Control■Unit■menu ■■ The■Mode■menu
Access■to■th e■ Main■ menu■ lets■you■ per form■ all■the■configuration■ and■
checki n g■operations■described■in■this■menu.
Ex amp le
11 :27 11 - 12 - 20 0 8
Pre ss■ any■ ke y■ t o■ ac ce s s■ t he■ Main■
menu
1 2 3
5 6
If■e nabled■ you■will■be■asked■for■ the■
base■User■code■0000 0
4
987
0
The■Mode■menu■lets■you■select■the■operation■of■your■system,■for■example■selecting■one■o f■the■weekly■programs■you■have■set■up■or■set ting■a■
fixed■temperature■for■all■the■zones.
✔ Select the Weekly mode
With■the■weekl y■mode■your■syste m■works■automatically■following■the■
programming■set.■You■can■choose■from■three■programs■which■you■can■
customise.■Inside■the■programs■the■temperature■can■be■differentiated■
over■24■hours■and■for■each■day■of■the■week■as■you■require.
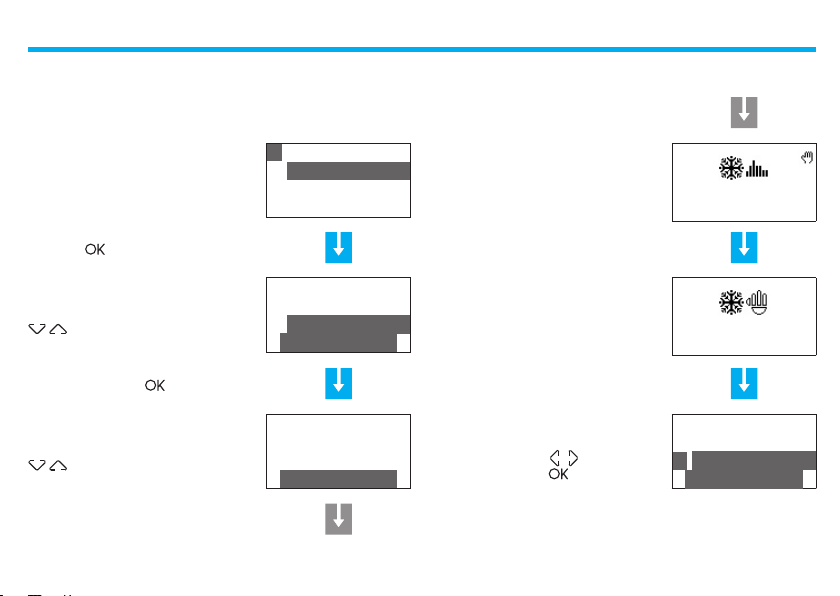
In■the■Mode■menu■select■Weekl y
Press■ ■key■to■confirm
With■the■ ■select■a■program
01 :
02 :
03 :
04 :
01 :
02 :
03 :
Week l y
Ma n ua l
Sc ena r io s
Ho lid ay
Ex amp le
Week ■ no . 2
Week ■ no . 3
Use■ the■ ■ key s■ to■ select■ t he■
menu■you■want
Press■ ■to■conf irm■and■access■the■
menu■sele cted
Mo d e
Zo ne■ sta te
Cu rre nt ■ pr o fi l es
Pr og ram min g
Confirm■by■pressing■
10
Page 11
✔ Select the Manual mode
In■Manual■ m ode■you■c an■set■a■fi xed■temperature■in■t h e■whole■system■
or■in■the■indi vidual■zon es■as■you■require.
01 :
Week l y
02 :
In■the■Mode■menu■select■Manua l
Press■the■ ■key■to■confirm
03 :
04 :
Ma n ua l
Sc ena r io s
Ho lid ay
The displ ay will show the hand signal
to in dica te that s ome zon es are in
manual
2 - Operation
Ex amp le
11 :27 11 - 12 - 20 0 8
In■manual■mode■the■zones■are■marked■by■the■highlighted■number.■You■
can ■ se le ct■ ALL ■ ZONES ■ or■ use■ th e■
■keys■ to■select■a■ single■ zone■
required■(e.g.■Zone■2)
Confirm■by■pressing■
You■will■ be■ asked■ to■ s et■a■ temperature;■ set■ it■ using■ the■ keypad■ or■ th e■
■keys
01 :
02 :
AL L■Z ON E S
Zo ne■ 1
Zo ne■ 2
Ma n ua l
Zo ne■ 2
Ma n ua l
07 .0
18 .0
NEXT
On selecting ALL ZONES the window to
the side app ears on the display
To■ ret ur n ■ the ■ zon e■ set■ in■ Ma nual■
to■ the■ previous■ co nd it io n■ s el ec t■
Automati c■with■ the■ ■keys■ and■
confirm■by■pressing■
11
18 .0
11 :28 11 - 12 - 20 0 8
AL L■Z ON E S
01 :
Zo ne■ 1
02 :
Zo ne■ 2
Au to m at i c
Page 12
2 - Operation
✔ Select the Scenarios mode ✔ Select the Holiday mode
The■Scenario■mode■lets■you■set■dif ferent■temperatures■in■various■zones■
of■the■system■with■a■single■command.■For■example,■if■when■cleaning■you■
intend■to■open■windows■in■some■rooms■you■can■set■a■lower■temperature■
(or■higher■for■cooling)■to■avoid■wasting■energy.
16■Winter■scenar ios■and■16■Summer■scenarios■can■be■programmed.
01 :
Week l y
02 :
In■the■Mode■menu■select■Scena rios
Press■the■ ■key■to■confirm
Sel ect ■ the ■ Scenar io■ required ■ with■
■keys■
03 :
04 :
01 :
02 :
03 :
04 :
Ma n ua l
Sc ena r io s
Ho lid ay
Sc ena r io ■ 1
Sc ena r io ■ 2
Sc ena r io ■ 3
Sc ena r io ■ 4
The■Holiday■mode■can■s e lect■a■particular■daily■prof ile■for■a■set■p eriod.■
The■pro gram■is■run■until■ the■programmed■date■and■time,■af ter■which■
the■weekly■program■chosen■will■b e■reset.
In■the■Mode■menu■select■Holid ay
Press■the■ ■key■to■confirm
Typ e the dat e and t ime usin g th e
number key s
Press■the■ ■key■to■confirm
With■the■ ■keys■select■the■ weekly■program■ to■be■ reset■at■the■end■
of■the■Holiday
01 :
Week l y
02 :
Ma n ua l
03 :
Sc ena r io s
04 :
Ho lid ay
up ■to
0■ 0■: ■0■ 0
of
2■ 4■/ ■1■ 2■/ ■2■ 0 ■0 ■ 8
01 :
Ex amp le
02 :
Week ■ no . 2
03 :
Week ■ no . 3
Confirm■by■pressing■
Sc ena r io ■ 2
11 :31 11 - 12 - 20 0 8
Confirm■by■pressing■
■
12 :30 ■■■ ■24 -12 - 08
11 :31 11 - 12 - 20 0 8
12
Page 13

✔ Select the Holidays mode
When■you■are■away■you■can■activate■the■Holidays■mode,■which■lets■you■
keep■the■system■in■Antifreeze■or■Heat■protection■until■the■date■and■time■
you■set,■af ter■which■the■weekly■program■chosen■will■be■reset.
2 - Operation
In■the■Mode■menu■select■Holid ays
Press■the■ ■key■to■confirm
Typ e the dat e and t ime usin g th e
number key s
Confirm■by■pressing■
02 :
Ma n ua l
03 :
Sc ena r io s
04 :
Ho lid ay
05 :
Ho lid ays
1 2 3
5 6
4
0
up ■to
0■ 0■: ■0■ 0
of
2■ 4■/ ■1■ 2■/ ■2■ 0 ■0 ■ 8
NEXT
01 :
With■the■ ■keys■select■the■ weekly■program■ to■be■ reset■at■the■end■
of■the■Holidays■perio d
Confirm■by■pressing■
987
02 :
03 :
Ex amp le
Week ■ no . 2
Week ■ no . 3
08 :30 ■■■ ■07 -01 - 09
08 :31 23 - 12 - 20 0 8
Once the days programmed has elapsed
the Control unit automatically returns
to the weekly mode programmed
Week ■ no . 2
11 :32 11 - 12 - 20 0 8
13
Page 14

2 - Operation
✔ Select the OFF mode
You■can■put■all■or■some■of■the■system■zones■in■the■OFF■state,■until■one■
of■the■other■modes■is■reset.
03 :
Sc ena r io s
04 :
In■the■Mode■menu■select■OFF
Press■the■ ■key■to■confirm
05 :
06 :
Ho lid ay
Ho lid ays
OF F
The display will show the OFF signal to
indicate that s ome zones are OFF
Ex amp le
11 :27 11 - 12 - 20 0 8
You■can■select■ALL■ZONES■or■use■the■
■keys■to■ select■ a■single■ Zone■
(e.g.■Zone■2)
Confirm■by■pressing■
The■OFF■ zone■can■be■r e cognised■by■
the■highlighted■numbe r
01 :
02 :
01 :
02 :
AL L■Z ON E S
Zo ne■ 1
Zo ne■ 2
OF F
AL L■Z ON E S
Zo ne■ 1
Zo ne■ 2
Au to m at i c
NEXT
On selecting ALL ZONES the window to
the side appea rs on the display
To■return■ the■ zone■s et■ in■ OFF■to■the■
previous■condition■select■the■zone■required■and■conf irm■by■pressing■
To■end■the■programming■and■return■
to■the■f irst■w indow■keep■the■ ■key■
pressed
14
11 :27 11 - 12 - 20 0 8
AL L■Z ON E S
01 :
Zo ne■ 1
02 :
Zo ne■ 2
Au to m at i c
Page 15

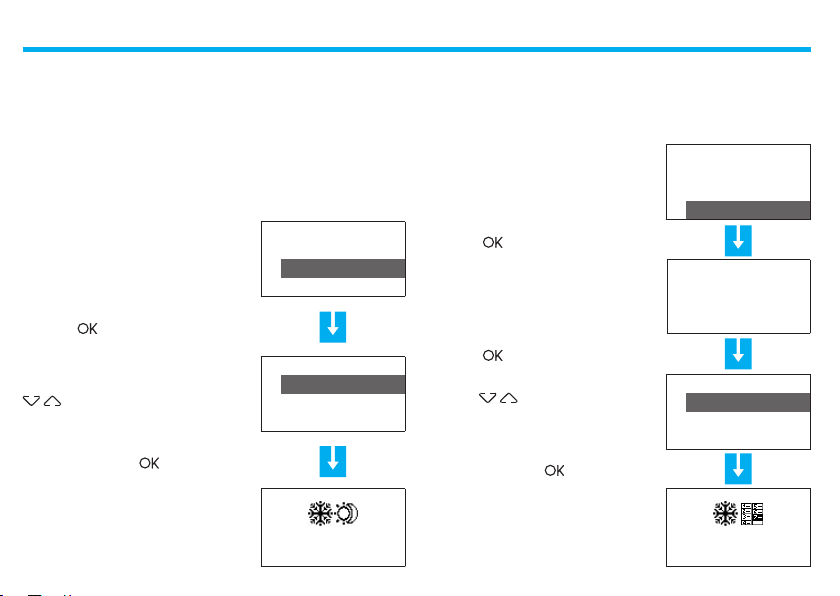
✔ Select Antifreeze or Heat protection
You■can■decide■to■set■one■or■more■zon es■or■the■whole■system■in■Antifreeze■mode■(or■heat■protection■in■summer).
In■Antifr eeze■a■minimum■temperature■of■7■°C■is■maintained.
In■Heat pro tection■a■maximum■temperature■of■35■°C■is■maintained.
04 :
Ho lid ay
05 :
In■the■Mode■menu■select■Antifre eze■
or■Heat protectio n■if■in■Summer
Press■the■ ■key■to■confirm
06 :
07 :
Ho lid ays
OF F
An tif ree ze
The display will show th e Anti freeze
signal to indi cate that some zones are
in Antifree ze or Heat protectio n
2 - Operation
Ex amp le
11 :27 01 - 10 - 20 0 8
You■can■select■ALL■ZONES■or■use■the■
■keys■to■ select■ a■single■ Zone■
(e.g.■Zone■1)
Confirm■by■pressing■
The■zone■in■Antifre e ze■can■ be■re cognised■by■the■highlight e d■number
01 :
02 :
01 :
02 :
AL L■Z ON E S
Zo ne■ 1
Zo ne■ 2
An tif ree ze
AL L■Z ON E S
Zo ne■ 1
Zo ne■ 2
Au to m at i c
NEXT
On selecting ALL ZONES the window to
the side appea rs on the display
To■return■ the■zone■set■in■ Antifre eze■
to■ the■ previous■ co nd it io n■ s el ec t■
the■ zone■ re quir ed■ an d■ conf irm■by■
pressing■
To■end■the■programming■and■return■
to■the■f irst■w indow■keep■the■ ■key■
pressed
15
11 :27 01 - 10 - 20 0 8
AL L■Z ON E S
01 :
Zo ne■ 1
02 :
Zo ne■ 2
Au to m at i c
Page 16

2 - Operation
■■ The■local■probe
Each■zone■of■your■system■has■a■probe■which■can■adjust■the■temperature■
locall y,■modifying■the■setting■on■the■Control■Unit.
In■par ticular■ you■can■vary■the■temp erature■ by■±■ 3■°C ,■select■antifree ze/heat■protection■or■switch■the■system■off■in■the■individual■zone.
+
+
2
3
+
1
OFF
1
-
2
3
-
-
Green■LED Yellow■LED
Fan-coil probe
Speed■signal■
LED
A
+
+
2
3
+
1
OFF
1
-
2
3
-
-
Green■LED
Knob
Key
Knob
Yellow■LED
Knob
• Can■set■the■temperature■manually■from■+3■to■-3■degrees■with■respect■
to■the■Control■Unit■setting.
• ■■Sets■the■Antifreeze/Heat■protection■mode■for■the■zone.
If■ the■ temperature■ con t rol■ system■ is■ working■as■heatin g,■ turning■
the■knob■to■ this■position■ sets■the■Antifreeze■ mode;■ if■the■ system■is■
working■as■cooling■it■sets■the■Heat■protection■mode.
To■return■to■normal■operation■turn■the■k nob■to■one■of■the■positions■
from■+3■to■-3.
• OFF■Turning■the■knob■to■this■position■turns■the■zone■OFF.■To■return■to■
normal■operation■turn■the■knob■to■one■of■the■positions■from■+3■to■-3.
Green LED
• When■it■is■shining■steadily■it■indicates■that■the■system■is■active.
• When■it■is■flashing■it■indicates■that■the■zone■is■in■■or■OFF■mode.
Yellow LED
• When■ it■is■ shining■steadily■it■ indicates■that■ the■system■is■ working■in■
the■zone.
• When■it■is■OFF■it■indicates■that■the■system■is■not■working■in■the■zone.
• When■it■is■flashing■it■signals■a■fault.
KEY (Fan-Coil probe)
• When■it■commands■the■Fan-Coil■it■can■select■the■speed
(MIN■-■MED■-■MAX■-■AUTO)
16
Page 17

Information
■■ Diagnostic
■■ Check■the■mode■of■operation
■■ Check■the■temperature■in■the■zones
3
Page 18

3 - Information
■■ Diagnostic
If■there■ is■ a■f ault■ on■the■ system,■the■display■shows■ the■ !■icon.■ In■ this■
case■ the■Diagnostic■ menu■ gives■you■ usef ul■ info rmation■ to■ identify■
the■problem.
Re mot e■c ont ro l
01 :
02 :
03 :
01 :
02 :
03 :
Us er■ cod e
Co ntr as t
Di agn ost ic
Zo ne■ 1
Zo ne■ 2
Zo ne■ 3
Vi sua liz e
Zo ne■ 1
Zo ne■ 2
Zo ne■ 3
Up dat e
NEXT
In■the■Setup■menu■select■Diagnostic■ with■the■
Press■the■ ■key■to■confirm
The lis t of zon es appea rs on t he d isplay
If■Climaveneta■Chillers■are■dete cted■
during■ the■ di ag no st ic ■ ph as e, ■ 0 0
Chil ler■w ill■ ap pear,■ thus■ making■ i t■
possible■to■verify■their■status
Select■the■zone■where■a■problem■has■
occurred■ (marked■by■the■ !■ symb ol)■
with■the■ ■keys
With■the■ ■keys■select■Upd ate
Press■the■ ■key■to■confirm
Th e C ontr ol un it che cks th e pro be
again
If■the■problem■is■solved■the■!■symbol■
disappears
If■the■problem■persists■select■the■Vi-
sualize■function■with■the■ ■keys
Press■the■ ■key■to■confirm
The di splay sh ows the cau se of the
fault
18
01 :
02 :
03 :
01 :
02 :
03 :
Ac tua tor ■KO
En qui r y
pr obe ■.■ .■.
Zo ne■ 1
Zo ne■ 2
Zo ne■ 3
Up dat e
Zo ne■ 1
Zo ne■ 2
Zo ne■ 3
Vi sua liz e
Page 19

■■ Check■the■mode■of■operation
This■menu■lets■you■check■the■current■mode■of■operation■for■each■zone■
and■for■weekly■operation■it■let s■you■find■out■the■prof ile■set.
3 - Information
In■ t he■ Main■ menu■ sel ec t■ C urren t
profi les
Press■the■ ■key■to■confirm
Select■the■zone■to■consult■with■ the■■
■keys■(e.g.:■Zone■1)
Conrm■by■pressing■
The■ info rm ation ■ on ■ th e■ m od e■ o f■
operation■is■displaye d■(see■previous■
section)
Mo d e
Zo ne■ sta te
Cu rre nt ■ pr o fi l es
Pr og ram min g
Zo ne■ 1
Zo ne■ 2
Zo ne■ 3
Zo ne■ 1
Ma n ua l
22 .0C
NEXT
Use■the■ ■keys■ to■ selec t■other■
zones■(e.g.:■Zone■2)
If the zone sele cted is in Weekly mode,
the window with the foll owing indication is displaye d: zon e nam e, da y,
program nam e and heat profile
Keep■ the■ ■ key■ pressed■ to■ en d■
the ■ qu er y■ a nd■ retur n■ t o■ the■ f irs t■
window
19
Zo ne■ 2
Ma n ua l
20 .0C
Ex amp le
. . . . . . . . . . . .
0 2 4 6 8 10 12 14 16 18 20 22 24
Ex amp le
11 :27 01 - 10 - 20 0 8
Page 20

3 - Information
■■ Check■the■temperature■in■the■zones
In■ this■ menu■you■ can■ find■ out■ th e■ measured■tempe ratu re,■ the■ set■
temperature■and■the■system■state■for■each■zone.
Mo d e
In■the■Main■menu■selec t■Zone sta te
Press■the■ ■key■to■conrm
Select■the■zone■to■consult■with■ the■■
■keys■(e.g.:■Zone■1)
Zo ne■ sta te
Cu rre nt ■ pr o fi l es
Pr og ram min g
Zo ne■ 1
Zo ne■ 2
Zo ne■ 3
Th e■ d is p la y■ s ho ws■ the■ foll ow in g■
information■on:
-■Temperature■measured■in■the■
zone
-■Temperature■set■in■the■zone
-■System■state■in■the■zone:
■ ON■=■sys tem■ON
■ OFF■=■sys tem■OFF
For■a■ system■ with■FAN-COIL■ the■fan■
speed■is■given■as■well
Use■the■ ■keys■ to■ selec t■other■
zones■(e.g.:■Zone2)
Zo ne■ 1
Me a su red : 18 .6C■
Ex pec t ed : 2 0. 0 C
St ate : ON
Zo ne■ 2
Me a su red : 18 .5C■
Ex pec t ed : 1 9. 0 C
St ate : ON
Conrm■by■pressing■
Th e C ontr ol un it che cks th e pro be
selected
Di agn ost ic
up dat e■. ■.■ .
NEXT
or■the■ ■key■pressed■to■return■to■the■
first■window
20
Ex amp le
11 :27 01 - 10 - 20 0 8
Page 21

Customisations
■■ Setting
■✔ Set■the■temperature■levels
■✔ Set■the■mode■of■operation
■✔ Set■the■date■and■time
■✔ Enable/disable■the■remote■control
■✔ Customise■the■User■code
■✔ Adjust■the■display■contrast
■✔ Contacts■manag.
4
Page 22

4 - Customisations
■■ Setting
The■Settings■menu■lets■you■customise■some■Control■unit■parameters■or■
modes■of■operation,■without■af fecting■its■correct■work ing.
✔ Set the temperature levels
For■each■zone■ you■can■ set■ the■Anti freeze■or■H eat protection■te mpera-
ture■ T*■ and■ the■ tempe r ature■ levels■
T1,■ T 2■ an d■ T3 ■ use d■ in■ the■ we ekly■
programs
In■the■Main■menu■selec t■Setup
TEMPERATURE■LEVEL■SET
T1 18.0 °C
T2 20.0 °C
T3 22.0 °C
Antifreeze 7.0 °C
Heat■protection 35.0 °C
Zo ne■ sta te
Cu rre nt ■ pr o fi l es
Pr og ram min g
Se t up
You■can■se lect■ ALL■ ZONES■ or■ using■
the■ ■keys■selec t■a■single■zone■
(e.g.■Zone■1)
Press■the■ ■key■to■confirm
Wi th ■ t he■ ■ key s■ sele ct■ t h e■
temperature■level■(e.g. :■T1)
AL L■Z ON E S
Zo ne■ 1
Zo ne■ 2
Zo ne■ 3
T* 07 .0C
T1 18.0 C
T2 20.0 C
T3 22.0 C
Press■the■ ■key■to■confirm
With■the■ ■keys■select■
Temperatur e
Conrm■by■pressing■
Tem per atu re
Su mme r/w int er
Da te/ tim e
Re mot e■c ont ro l
NEXT
Conrm■by■pressing■
Type ■ t he■ tem per atu re ■ r e qu ire d■
using■the■ ■keys■or■the■number■
keypad
Conrm■by■pressing■
To■end■the■ programming■and■ return■ to■the■first■ window■keep■the■ ■
key■pressed
T* 07 .0C
T1 17.5 C
T2 20.0 C
T3 22.0 C
22
Page 23

✔ Set the mode of operation ✔ Set the date and time
This■operation■sets■the■system■mode■of■operation:
• Summer■=■cooling;
• Winter■=■heating.
In ■ t he ■ S et up■ m e nu ■ s el e ct ■ S ummer/winte r with■the■ ■keys
Su mme r/w int er
Re mot e■c ont ro l
Tem per atu re
Da te/ tim e
For■ yo ur■ syste m■ to■ wo rk■ correc tly■ the■ date■ an d■ tim e■ set■must■be■
correct.
In■the■Setup■menu■selec t■Date/tim e■
with■the■ ■keys
4 - Customisations
Tem per atu re
Su mme r/w int er
Da te/ tim e
Re mot e■c ont ro l
Press■the■ ■key■to■confirm
The displ ay sh ows the window indicating the mode of operati on in use
(Operation: W inter)
Op era tio n:
Su mme r
To■change■the■system■mode■of■operation■press■
To■end■the■programming■and■return■
to■the■f irst■w indow■keep■the■ ■key■
pressed
Before switching, perform all the necessary operations on the
hydraulic system to ensure that it works correctly.
After the switching the system is set in Antifreeze/Heat protection mode.
Op era tio n:
Su mme r
Wi nt e r
Wi nt e r
Press■the■ ■key■to■confirm
Use■the■number■keypad■to■enter■the■
time■and■date:
-■the■ ■keys■let■you■change■to■the■
previous■or■next■f igure
-■the■ ■keys■let■you■change■line,■
from■time■to■date■and■vice■versa
Ti me
0■ 6■: ■2■ 7
Da te
0■ 1■/ ■1■ 0■/ ■0■ 8
Ti me
Confirm■by■pressing■ ■
1■ 1■: ■3■ 0
Da te
0■ 5■/ ■1■ 1■/ ■0■ 8
To■end■the■ programming■and■ return■ to■the■first■ window■keep■the■ ■
key■pressed
23
Page 24

4 - Customisations
✔ Enable/disable the remote control ✔ Customise the User code
This■setting■ lets■you■ enable/disable■ your■system’s■ remote■ control.■In■
particular■you■can■use■the■remote■control■to■find■out■th e■state■of■each■
zone■and■perform■the■main■commands■and■changes■of■mode.■For■more■
information■consult■your■installer.
Tem per atu re
In■the■Setup■menu■select■Remot e
control with■the■ ■keys
Su mme r/w int er
Da te/ tim e
Re mot e■c ont ro l
Press■the■ ■key■to■confirm Press■the■ ■key■to■confirm
The■Control■unit■is■protected■by■a■user cod e■which■prevents■unauthorised■people■from■accessing■the■Main■menu.
The■ b ase■ c ode■ i s■ 00 000,■ bu t■ you■ c an■ re place■ it■ with■ any■ 5-figure■
number.
In■the■Setup■menu■select■User co de■
with■the■ ■keys
Su mme r/w int er
Da te/ tim e
Re mot e■c ont ro l
Us er■ cod e
T h e d i s pl a y s h o w s t h e w i n do w in di cat in g th e cu rr ent sta te
(State: enabled)
To■change■the■state■press■ To■change■the■state■press■
To■end■the■programming■and■return■
to■the■f irst■w indow■keep■the■ ■key■
pressed
The remote control base setting is enabled.
St ate :
en abl ed
Di sab le
St ate :
di sab led
T h e d i s pl a y s h o w s t h e w i n do w in di cat in g th e cu rr ent sta te
(State: disabled)
The display sho ws the window indicating the curre nt code (00000)
En abl e 00 000
You■can■confirm■the■current■code■by■
pressing■ ■or
24
St ate :
di sab led
En abl e
Cu rre nt :
00 000
Ne w :
NEXT
Page 25

4 - Customisations
✔ Adjust the display contrast
The■contrast■ of■the■graphic■ display■ can■be■adjusted■ so■that■it■ is■ easy■
to■read
Cu rre nt :
en te r■ a■ new■ f iv e■ figu re ■ cod e■ as■
you■wish
00 000
Ne w :
67 890
Press■the■ ■key■to■confirm
From now on you m ust type the new
user code t o access the Main me nu
The follow ing functions are ava ilable:
–■Disabl e - can disable the User code
– Modif y - can modify the Use r code
Use■the■ ■keys■to■sele c t■the■func tion■required
To■end■the■ programming■and■ return■ to■the■first■ window■keep■the■ ■
key■pressed
St ate :
en abl ed
Di sab le
Mo d if y
NEW USER CODE
We recom mend you write the ne w
User code i n the boxes at the sid e
In■the■Setup■menu■select■Contrast
with■the■ ■keys
Press■the■ ■key■to■confirm
Adjust■the■contrast■with■the■ ■
keys■so■that■it■is■easy■to■read
To■confirm■press■ ■
To■end■the■programming■and■return■
to■the■f irst■w indow■keep■the■ ■key■
pressed
25
Da te/ tim e
Re mot e■c ont ro l
Us er■ cod e
Co ntr as t
■■ ■■■ ■In c re ase ■ by■
■■ ■■■ ■De c re ase ■by
Da te/ tim e
Re mot e■c ont ro l
Us er■ cod e
Co ntr as t
Page 26

4 - Customisations
✔ Contacts manag.
The■Unit■is■able■to■manage■additional■contacts■which■make■it■possible,■
for■instance■when■opening■the■windows■to■air■a■room,■to■switch■off■the■
heating■in■that■area■so■as■to■save■energy.■■In■this■menu■you■can■enable■
or■disable■this■function.■
Co ntr as t
Select■Contac ts manag . in■the■Setup■
menu■using■the■ ■keys
Press■the■ ■key■to■confirm
Di agn ost ic
Pr ob e s
Co nta cts ■ma nag .
A screen will be displayed show ing the
indicati on of the cu rrent stat e (State:
disabled)
Press■ ■to■change■the■st atus
Hold■ down■the■ ■ key■ to■ end■ progr am m in g■ and■ to■ r e tu rn■ to■ t h e■
main■screen
St ate :
di sab led
En abl e
St ate :
en abl ed
Di sab le
26
Page 27

5
Programming
■■ The■Programming■menu
■✔ Weekly■programming
■✔ Scenarios■programming
■✔ Holiday■programming
Page 28

5 - Programming
■■ The■Programming■menu
Using■the■Programming■menu■you■can■customise■the■following■modes■
of■operation■of■your■s ystem:
• Weekly
With■the■week ly■mode■your■system■works■automatically■following■the■
programming■set .■You■can■choose■from■three■programs■which■you■
can■customise.■Inside■the■programs■the■temperature■can■be■dif ferentiated■over■24■hours■and■for■each■day■of■the■week■as■you■require.
The■Exa mple■program■is■preset■but■can■be■modified.
• Scenarios
The■ Scena r io■ mode■ lets■ you■set■ diff erent■ temperatures■ in■ various■
zones■ of■the■sys tem■with■a■ single■ comma n d.■For■exa mple,■if■whe n■
cleaning■ you■intend■to■open■ windows■in■some■rooms■you■can■set■ a■
lower■temperature■(or■higher■for■cooling)■to■avoid■wasting■energy.
16■Winter■scenar ios■and■16■Summer■scenarios■can■be■programmed.
• Holiday
The■Holiday■mode■can■select■a■particular■daily■profile■for■a■set■perio d.■
The■program■is■run■until■the■programmed■date■and■time,■after■which■
the■weekly■program■chosen■will■b e■reset.
✔ Weekly programming
Up■to■3■weekly■programs■can■be■created■for■each■of■the■two■functions■
(heating■and■cooling).
To■select■the■weekly■pr o gram■to■be■cu s tomised:
Week l y
In■Programming■menu■select■ ■
Weekly
Press■the■ ■key■to■confirm
Select■ ■ the■ p ro gr am■ to■ be■
modified
The fo llowing fun ctions are available
for the prog ram selected:
Use■the■ ■keys■to■sele c t■the■func tion■required
28
Sc ena r io s
Ho lid ay
Ex amp le
Week ■ no . 2
Week ■ no . 3
Mo d if y
Mo d if y
Co py ■ fro m
Vi sua liz e
Er ase
Re nam e
Page 29

Modify a Weekly program
On■selecting■this■function■you■can■modif y■the■weekly■program■selected,■
associating■a■daily■profile■to■each■zone.
Select■ ■the■program■to■modify■
(e.g.:■Winter■week)
Select■ ■t h e■Modif y■function
Press■the■ ■key■to■confirm
Select■ ■the■day■(e.g.:■Sunday)
The Copy from functio n can also be
selected f or the day selected
Press■the■ ■key■to■confirm
Select■ ■the■zone■(e.g.:■Zone■1)
The C opy fro m and Vis ual ize fun ctions area a lso available for the zone
selected
Press■the■ ■key■to■confirm
Ex amp le
Wi nt e r■ wee k
Week ■ no . 3
Mo d if y
Fr id a y
Sa tur day
Su nda y
Mo d if y
Zo ne■ 1
Zo ne■ 2
Zo ne■ 3
Mo d if y
NEXT
5 - Programming
Th e pro fi le di spl aye d can n ow b e
modifi ed using the navigation key s as
shown in detai l in the pages below
Presettings of the “Example” weekly program
Note: The “ Example” progra m is preset but can be mod ified.
Monday■–■Friday
-■from■00: 00■to■06:00■-■18■°C■(T1)
-■from■06:00■to■09:0 0■-■22■°C■(T3)
-■from■09:00■to■16:00■-■18■°C■(T1)
-■from■16:00■to■17:00■-■20■°C■( T2)
-■from■17:00■to■22:00■-■22■°C■(T3)
-■from■22:0 0■to■24:00■-■20■°C■( T2)
Saturday
-■from■00: 00■to■06:30■-■18■°C■(T1)
-■from■06:30■to■07:00■-■20■°C■(T2)
-■from■07:00■to■23: 00■-■22■°C■(T 3)
-■from■23:0 0■to■24:00■-■20■°C■( T2)
Sunday
-■from■00: 00■to■06:30■-■18■°C■(T1)
-■from■06:30■to■07:00■-■20■°C■(T2)
-■from■07:00■to■22: 00■-■22■°C■(T3)
-■from■22:0 0■to■24:00■-■20■°C■( T2)
29
00 :00 T1 ■ ■■ ■ 18 . 0C
. . . . . . . . . . . .
0 2 4 6 8 10 12 14 16 18 20 22 24
. . . . . . . . . . . .
0 2 4 6 8 10 12 14 16 18 20 22 24
. . . . . . . . . . . .
0 2 4 6 8 10 12 14 16 18 20 22 24
. . . . . . . . . . . .
0 2 4 6 8 10 12 14 16 18 20 22 24
Mo n da y
Sa tur day
Su nda y
Page 30

5 - Programming
Modication tools
Information■shown■on■the■display:
SCROLL
time■corre spondin g■
to■the■curs or■positio n
00 :00 T1 ■ ■■ ■ 18 . 0C
cursor
. . . . . . . . . . . .
0 2 4 6 8 10 12 14 16 18 20 22 24
time■
axis
tempera ture■
levels
T3
T2
T1
There■are■t wo■modes■of■work:
• Scroll■–■Characterised■by■an■arrow-shaped■cursor,■lets■you,■using■the■
■keys,■move■the■cursor■along■the■time■axis■without■making■any■
modification■to■the■daily■prof ile.
• Modify■-■Characterised■by■a■“pencil”-shape d■cursor,■lets■ you,■ using■
the■ ■ ■ keys,■ move■ the■ cursor■ a long■ the ■ time■ ax is■ to■set■ t he■
temperature■level■selected .
30
MODIFY
cursor■
arrow
00 :00 T1 ■ ■■ ■ 18 . 0C
. . . . . . . . . . . .
0 2 4 6 8 10 12 14 16 18 20 22 24
pencil■■
cursor
00 :00 T1 ■ ■■ ■ 18 . 0C
. . . . . . . . . . . .
0 2 4 6 8 10 12 14 16 18 20 22 24
tempera ture■not■
highligh ted
tempera ture■
highligh ted
Page 31

5 - Programming
How to use the cursor keys:
OK – chan ge ■ fro m■ M ODI FY■ mode ■ t o■
SCROLL;■in■SCROLL■mode■confirms■quitting■
the■Modify■func tion
saving
Scroll keys■–■ change■ from■ SCROLL■ mode■
to■MODIFY;■in■the■MODIF Y■mode■scroll■the■
three■temp erature■levels
Sele ction keys■ –■ Move■the■ cur sor■ al ong■
the■time■axis
■–■returns■to■the■previo us■page■without■
Create a new daily profile:
We recommend you follow the proce dure described in this exampl e step by
step, as a useful instrum ent for becomin g familiar with the Modify/Sc roll
mode of work a nd the use of the cursor key s.
Exampl e:■creation■of■a■ new■temperature■profile■belonging■to■Zon e 1■
of■Monday■for■the■weekly■program■Week no.2,■with■the■following■time■
bands■and■temperature■levels:
1 –■from■00:00■to■06:00■-■18■°C■( T1)
2 –■from■06:00■to■09:00■-■22■°C■( T3)
3 –■from■09:00■to■16:30■-■20■°C■( T2)
4 –■from■16:30■to■22:00■-■22■°C■( T3)
5 –■from■22:00■to■24:00■-■20■°C■( T2)
Whe n■ th e■ pr oce dure■ has■ been■ per fo rmed,■using■ the■ Co py from■
function,■you■can:
-■copy Zone 1 to othe r zones;
-■copy Monda y to other days.
TEMPERATURE■LEVEL■SET
T1 18.0 °C
T2 20.0 °C
T3 22.0 °C
Antifreeze 7.0 °C
Heat■protection
31
35.0 °C
Page 32

5 - Programming
Procedure:
00 :00 T* ■■■ ■■7 .0C 00 :00 T1 ■ ■■ ■ 18 . 0C 06 :00 T 1 ■■ 1 8. 0 C 06: 00 T3■ ■■■ 22. 0C
1
. . . . . . . . . . . .
0 2 4 6 8 10 12 14 16 18 20 22 24
. . . . . . . . . . . .
0 2 4 6 8 10 12 14 16 18 20 22 24
22 :00 T 3 ■■ 2 2. 0 C
. . . . . . . . . . . .
0 2 4 6 8 10 12 14 16 18 20 22 24
. . . . . . . . . . . .
0 2 4 6 8 10 12 14 16 18 20 22 24
. . . . . . . . . . . .
0 2 4 6 8 10 12 14 16 18 20 22 24
0 2 4 6 8 10 12 14 16 18 20 22 24
2 3
09 :00 T2 ■ ■■ ■ 20 . 0C09 :00 T 3 ■■ 2 2. 0 C 16 :30 T 2 ■■ 2 0. 0 C 16: 30 T3■ ■■■ 22. 0C
. . . . . . . . . . . .
0 2 4 6 8 10 12 14 16 18 20 22 24
. . . . . . . . . . . .
0 2 4 6 8 10 12 14 16 18 20 22 24
0 2 4 6 8 10 12 14 16 18 20 22 24
4 5
23 :45 T 2 ■■ 2 0. 0 C 23: 45 T2■ ■■■ 20. 0C22 :00 T2 ■ ■■ ■ 20 . 0C
. . . . . . . . . . . .
0 2 4 6 8 10 12 14 16 18 20 22 24
. . . . . . . . . . . .
0 2 4 6 8 10 12 14 16 18 20 22 24
0 2 4 6 8 10 12 14 16 18 20 22 24
32
. . . . . . . . . . . .
. . . . . . . . . . . .
. . . . . . . . . . . .
Page 33

Copy a Weekly program Copy a zone
This■function■lets■you■copy■a■pr eviously■programmed■weekly■program■
into■another.■For■ex ample■ copy■the■E xample■program■(preset■ in■the■
factor y)■in■Week■no. 2.
Select■ ■ the■ p ro gr am■ to■ be■
copied■into■(e.g.:■Winter■we ek)
Ex amp le
Wi nt e r■ wee k
Week ■ no . 3
Co py ■ fro m Co py ■ fro m
Press■the■ ■key■to■confirm Press■the■ ■key■to■confirm
This■function■lets■you■copy■the■daily■profile■programmed■for■one■zone■
to■another■zone.
Select■ ■the■zone■to■copy■into■■
(e.g.:■Zone■1)
Select■ ■the■Copy from■functionSelect■ ■the■Copy from■function
5 - Programming
Zo ne■ 1
Zo ne■ 2
Zo ne■ 3
Ex amp le
Select■ ■the■ program■ to■ copy■
(e.g.:■Example)
Wi nt e r■ wee k
Week ■ no . 3
Select■ ■the■zon e■to■copy■
(e.g.:■Zone■2)
Co py ■ fro m
Press■the■ ■key■to■confirm Press■the■ ■key■to■confirm
Co py ■ fro m:
Ex amp le
to :
Wi nt e r■ wee k
33
Zo ne■ 1
Zo ne■ 2
Zo ne■ 3
Zo ne■ 1
Zo ne■ 2
Zo ne■ 3
Co py ■ fro m
Page 34

5 - Programming
Copy a day
This■function■ lets■you■copy■a■previously■programmed■daily■ profi l e■to■
another■day.
Selec t■ ■ the■d ay■ to■ copy■ into■■
(e.g.:■Tuesday)
Select■ ■the■Copy from■function
Press■the■ ■key■to■confirm
Select■ ■the■day■to■copy■
(e.g.:■Monday)
Press■the■ ■key■to■confirm
Mo n da y
Tues day
Wedn e sd ay
Co py ■ fro m
Mo n da y
Tues day
Wedn e sd ay
Th urs day
Co py ■ fro m:
Mo n da y
to :
Tues day
✔ Scenarios programming
Can■ c reate■ 16■ scenar ios■for■ W inte r■ op eration ■ and■ 16■for■ S ummer■
oper atio n■ and■ f or■ each■ of■ th ese■ s et■ dif ferent■ t e mperatu r es■ in■ the■
various■zones.
To■select■the■scenario■to■customise:
Week l y
In■ t he■ P rog ramming■ m enu■ sel ec t■
■Scenari os
Press■the■ ■key■to■confirm
Select■ ■the■scenario■you■want■
to■modif y
The fo llowing fun ctions are available
for the scenar io selected:
Use■the■ ■keys■to■sele c t■the■func tion■required
34
Sc ena r io s
Ho lid ay
Sc ena r io ■ 1
Sc ena r io ■ 2
Sc ena r io ■ 3
Mo d if y
Mo d if y
Co py ■ fro m
Vi sua liz e
Er ase
Re nam e
Page 35

Modify a Scenario Copy a Scenario
Selecting■this■function■you■can■modify■the■selected■scenario■associating■
a■temperature■level■to■each■zone.
Se le ct ■ ■ th e■ s ce na ri o■ t o■ b e■
modified■■(e.g.:■Night)
Sc ena r io ■ 1
Ni g ht
Sc ena r io ■ 3
Select■ ■t h e■Modif y■function
Press■the■ ■key■to■confirm
Mo d if y
Zo ne■ 1
Select■ ■the■zone■(e.g.:■Zone■1)
Press■the■ ■key■to■confirm
Se t■ t he ■ z on e■ t em pe rature■ u si ng■
th e ■ keyp a d■ o r ■ th e■ ■ k e y s■
(±■0.5■°C■increment)
Press■the■ ■key■to■confirm,■the■program■retur ns■to■the■previous■page
Zo ne■ 2
Zo ne■ 3
Sc ena r io ■ 2
Zo ne■ 1
Ma n ua l
22 .0
This■f unction■lets■ you■copy■one■previously■ p rogrammed■scenario■on■
another.
For■example■copy■Scenario■1■on■Night.
Selec t■ ■ the■ scenario■ to■ copy■
into■(e.g.:■Scenario■1)
Select■ ■t h e■Copy from■
function
Press■the■ ■key■to■confirm
Select■ ■t h e■scenario■ to■ copy■
(e.g.:■Night)
Press■the■ ■key■to■confirm
35
5 - Programming
Sc ena r io ■ 1
Ni g ht
Sc ena r io ■ 3
Co py ■ fro m
Sc ena r io ■ 1
Ni g ht
Sc ena r io ■ 3
Sc ena r io ■ 4
Sc ena r io ■ 1
Ni g ht
Sc ena r io ■ 3
Co py ■ fro m
Page 36

5 - Programming
✔ Holiday programming
Can■program■a■daily■profil e■for■each■zone■(as■base■the■Sunday■profile■
of■the■Exa mple■program■is■ass o ciated■with■each■zone).
To■select■the■H oliday■program■to■customise
Week l y
In■ t he■ P rog ramming■ m enu■ sel ec t■
■Holiday
Press■the■ ■key■to■confirm Press■the■ ■key■to■confirm
Select■ ■the■zon e
The fo llowing fun ctions are available
for the zone se lected:
Sc ena r io s
Ho lid ay
Zo ne■ 1
Zo ne■ 2
Zo ne■ 3
Mo d if y
Modify the Holiday program
On■selec ting■this■function■you■can■modif y■the■daily■profile■associated■
to■each■zone.
Sele ct■ ■■the■ zone■ to■ modify■
(e.g.:■Zone■1)
Select■ ■t h e■Modif y■function
Th e pro fi le di spl aye d can n ow b e
modifi ed using the navigation key s as
shown in detai l in the previous page s
Mo d if y
Co py ■ fro m
Vi sua liz e
Use■the■ ■keys■to■sele c t■the■func tion■required
36
Zo ne■ 1
Zo ne■ 2
Zo ne■ 3
Mo d if y
00 :00 T1 ■ ■■ ■ 18 . 0C
. . . . . . . . . . . .
0 2 4 6 8 10 12 14 16 18 20 22 24
Page 37

Copy a zone Display the Holiday program
This■function■lets■you■copy■the■daily■profile■programmed■for■one■zone■
to■another■zone.
This■func tion■ lets■ you■ display■ the ■ daily■ pr ofile■ ass ocia ted■ to■ each■
zone.
5 - Programming
Select■ ■the■zone■to■copy■into■
(e.g.:■Zone■1)
Se le ct ■ ■ th e■ C opy fr om■ f un ction Select■ ■t h e■Visuali ze■function
Press■the■ ■key■to■confirm Press■the■ ■key■to■confirm
Zo ne■ 1
Zo ne■ 2
Zo ne■ 3
Co py ■ fro m Vi sua liz e
Sel ec t■ ■ the■ zo ne■ to■ displ a y■
(e.g.:■Zone■1)
Zo ne■ 1
Se lec t■ ■ t he ■ z on e■ to■ cop y■
(e.g.:■Zone■2)
Press■the■ ■key■to■confirm
Zo ne■ 2
Zo ne■ 3
The display shows the profile programmed for the zon e selected
Zo ne■ 1
Zo ne■ 2
Zo ne■ 3
Co py ■ fro m
37
Zo ne■ 1
Zo ne■ 2
Zo ne■ 3
Zo ne■ 1
. . . . . . . . . . . .
0 2 4 6 8 10 12 14 16 18 20 22 24
Page 38

Notes
38
Page 39

Page 40

World Headquarters and
International Department
87045 LIMOGES CEDEX FRANCE
:■33■5■55■06■87■87
Fax:■33■5■55■06■74■55
www.legrandelectric.com
reserves at any time the right to modify the contents of this booklet and to communicate, in any form
Legrand
and modality, the changes brought to the same.
 Loading...