

Page 1
Burglar-alarm unit 3486
User manual
www.homesystems-legrandgroup.com
Page 2

Burglar-alarm unit 3486
User manual
Page 3

Burglar-alarm unit 3486
User manual
Contents
Introduction 4
The Burglar-alarm Unit 4
The keypad 5
The display 6
What is the display showing? 7
Operation 9
Enabling - disabling the burglar alarm 9
Activation scenarios 11
Activating - deactivating the zones 12
Stopping the siren sound 15
The radio remote control (348220) 17
What type of alarm occurred? 18
Enabling the automations 20
Enabling keys and numeric codes 21
Enabling the remote control 22
Editing 23
The Unit menu 23
Accessing the edit menu 23
Setting the date and hour 24
Sound signalling 25
Memorizing the Jolly number 26
Making your own list of telephone numbers 27
Visualizzazione gestione SMS 28
Setting up the calls 29
About your remaining credit 31
How many times should calls be made? 31
Editing vocal messages 33
Changing the user code 35
Changing the numeric codes 36
Using an answering machine 37
Remote use 39
The MyHOME_Web portal 39
MyHome Alarm 39
Answering a call from the Unit 40
Querying the Unit 40
Controlling your home from a distance 41
3
Page 4
Burglar-alarm unit 3486
User manual
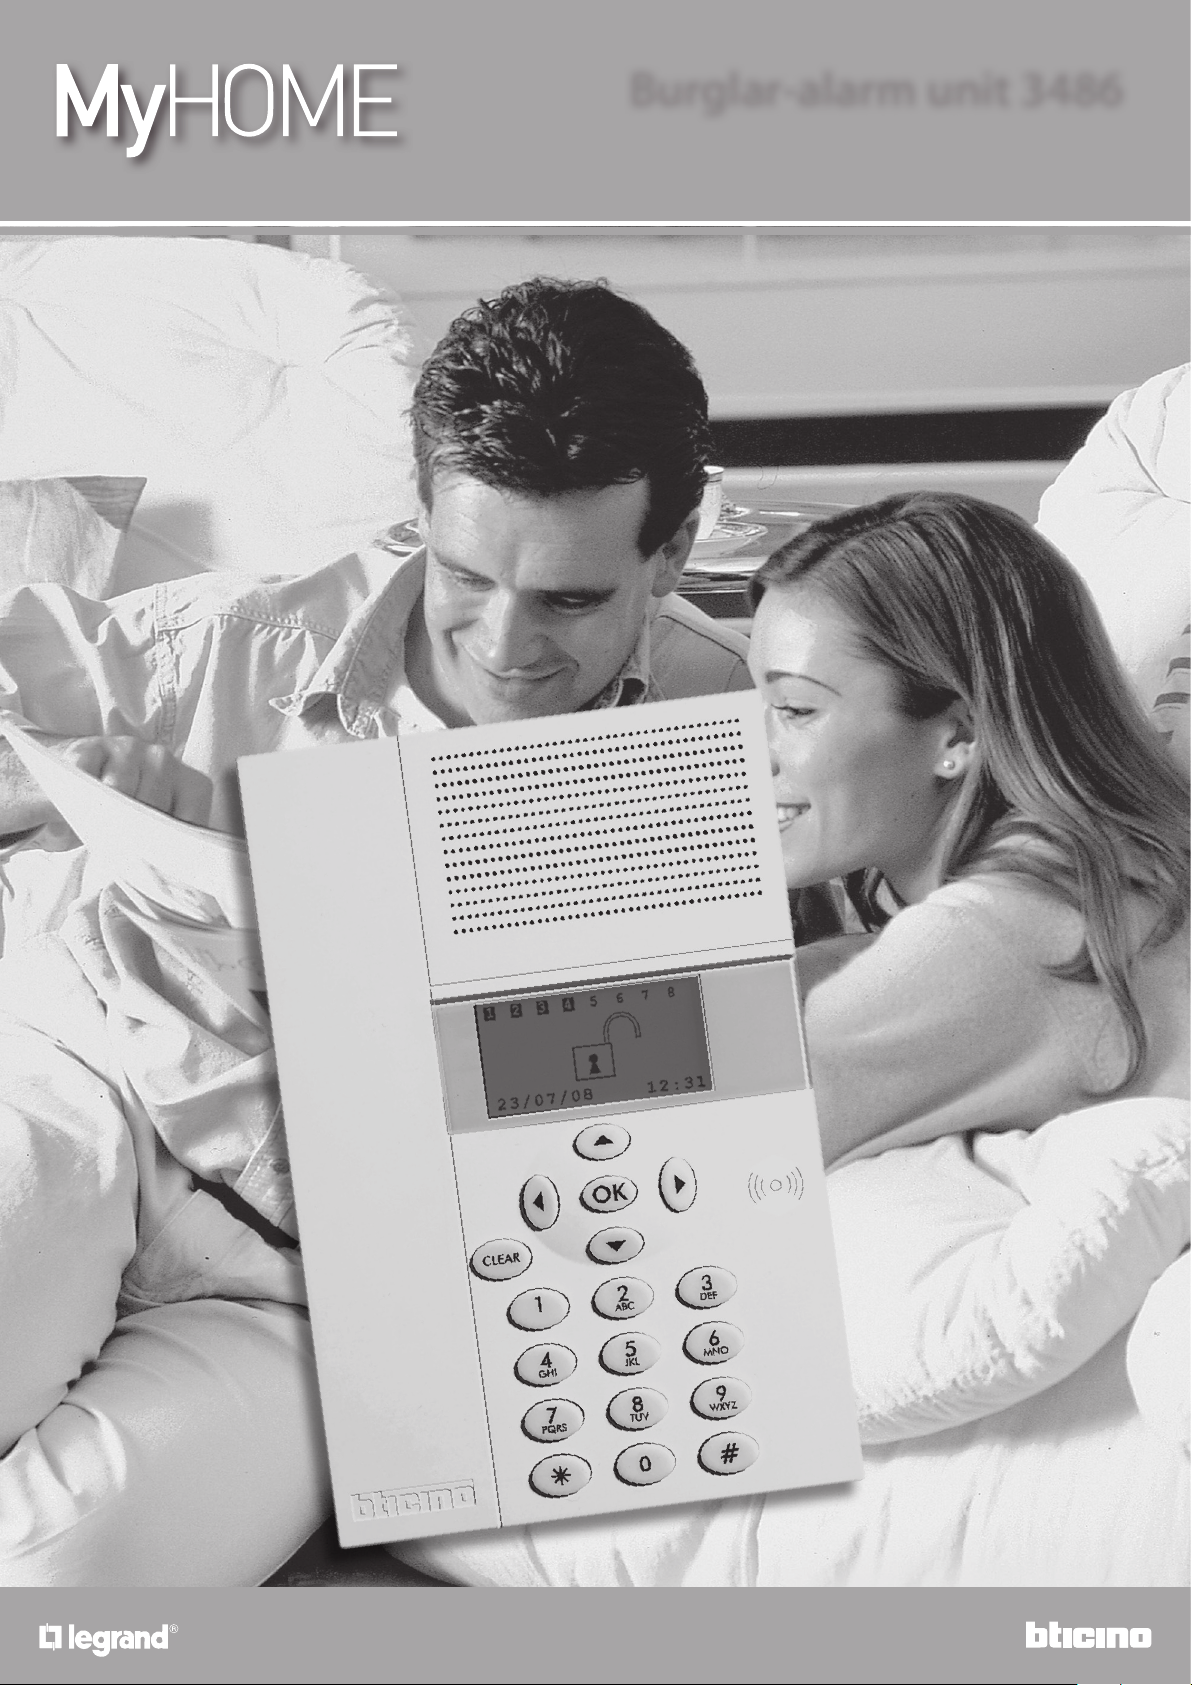
Introduction
The Burglar Alarm guards the safety of your house; the system is split into zones that can be
activated separately; for example, at night, you can have protection only in the day zone or only
around your house, so you can move around freely even when the system is on.
You can save up to 16 activation scenarios and use them as needed.
In case of an alarm, the Telephone dialling device (communicator) warns you with a message,
allowing you to have direct control on what is happening in your house even when you’re not
there.
You can check the status of the Unit and system from a fixed or mobile phone, listen to what is
happening at home from a distance or send a vocal message, which will be emitted through the
Unit loudspeaker or, if connected, through the sound system.
The combination of roller shutter movement devices and lights turning on lets you program the
roller shutters to go up in case of an alarm in order to confuse the burglar.
You can control the functions in your house (lights, roller shutters, etc.) remotely with just a
telephone call.
The Unit can also communicate with surveillance firms by means of a special protocol, further
increasing the protection of your property (to set this service consult your installer).
MyHOME_Web portal Services
It gives the possibility of connecting to the MyHOME_ Web portal, providing access to the
MyHOME_Web services; for more information see chapter “The MyHOME_Web portal”
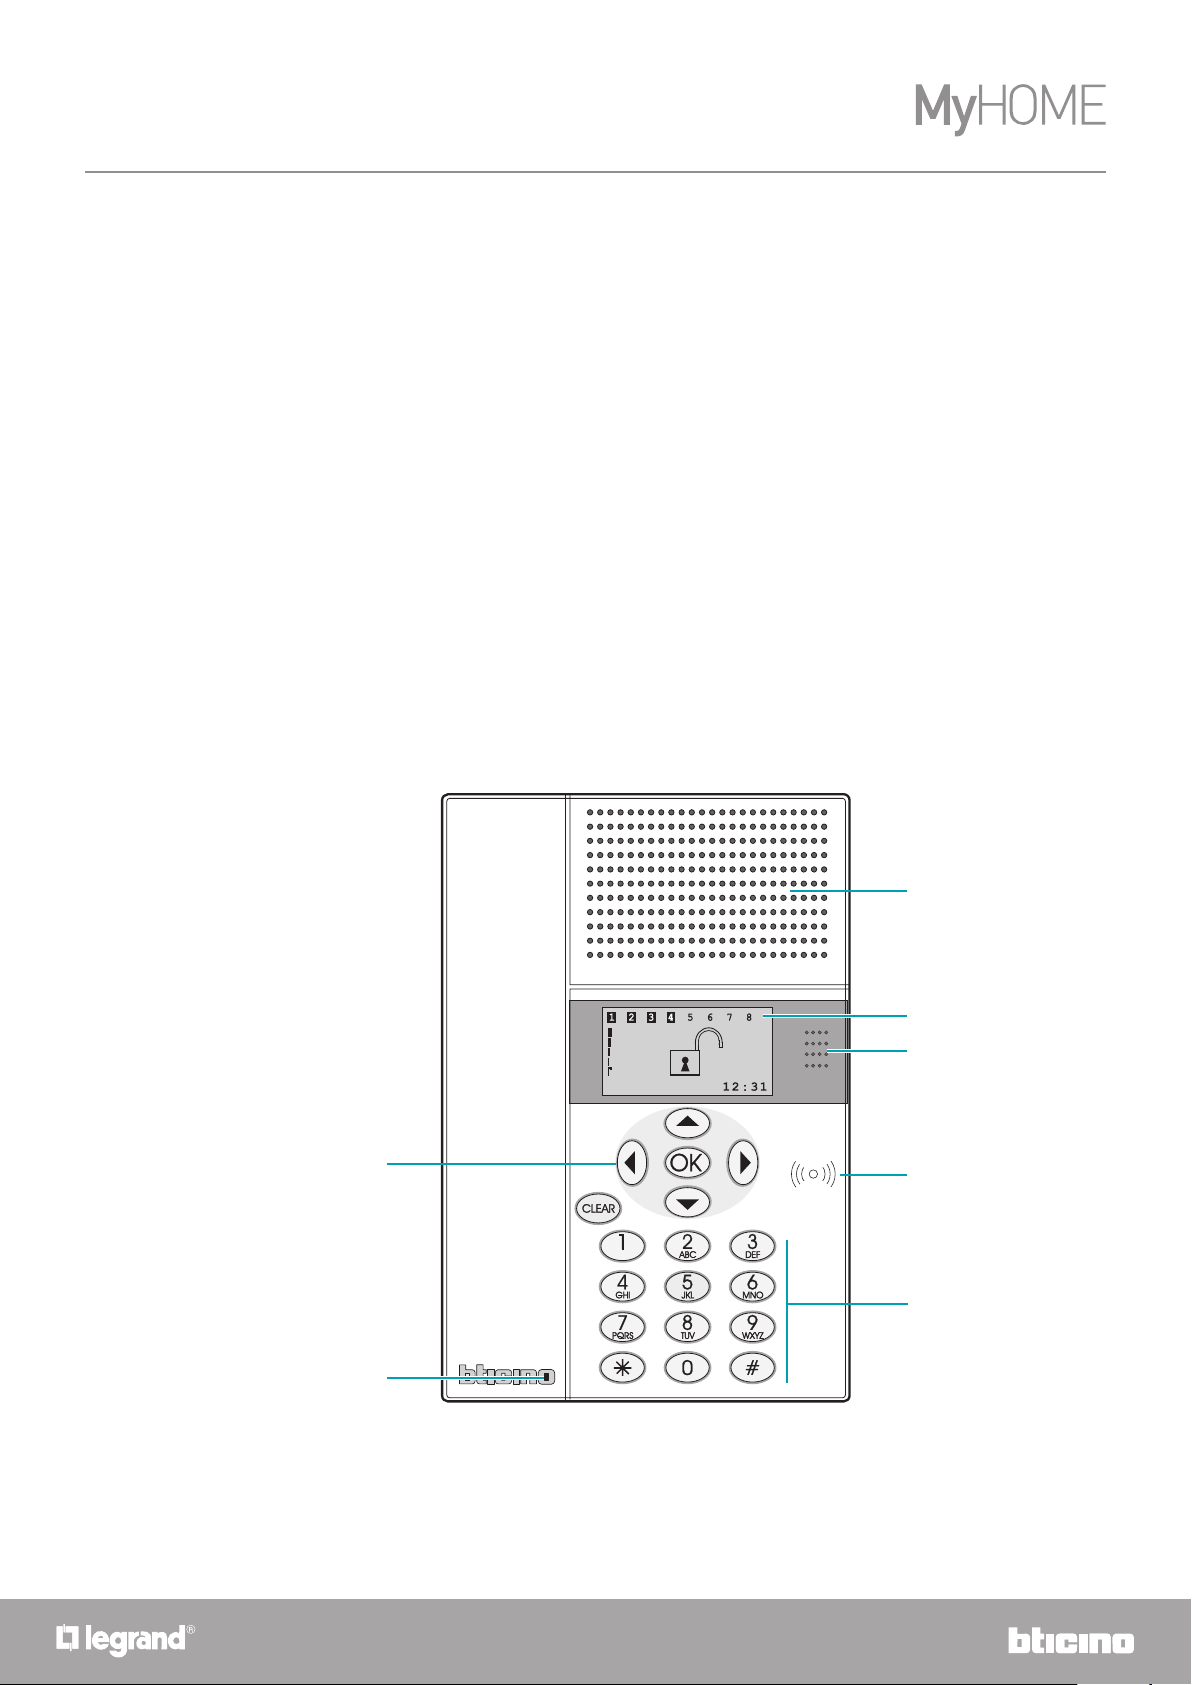
The Burglar-alarm Unit
7
23/07/
1
2
3
08
4
5
6
1 - Loudspeaker
2 - Graphic display
3 - IR infrared receiver
4 - Transponder keys reader
5 - Alphanumeric keypad
6 - Microphone
7 - Navigation keys
4
Page 5
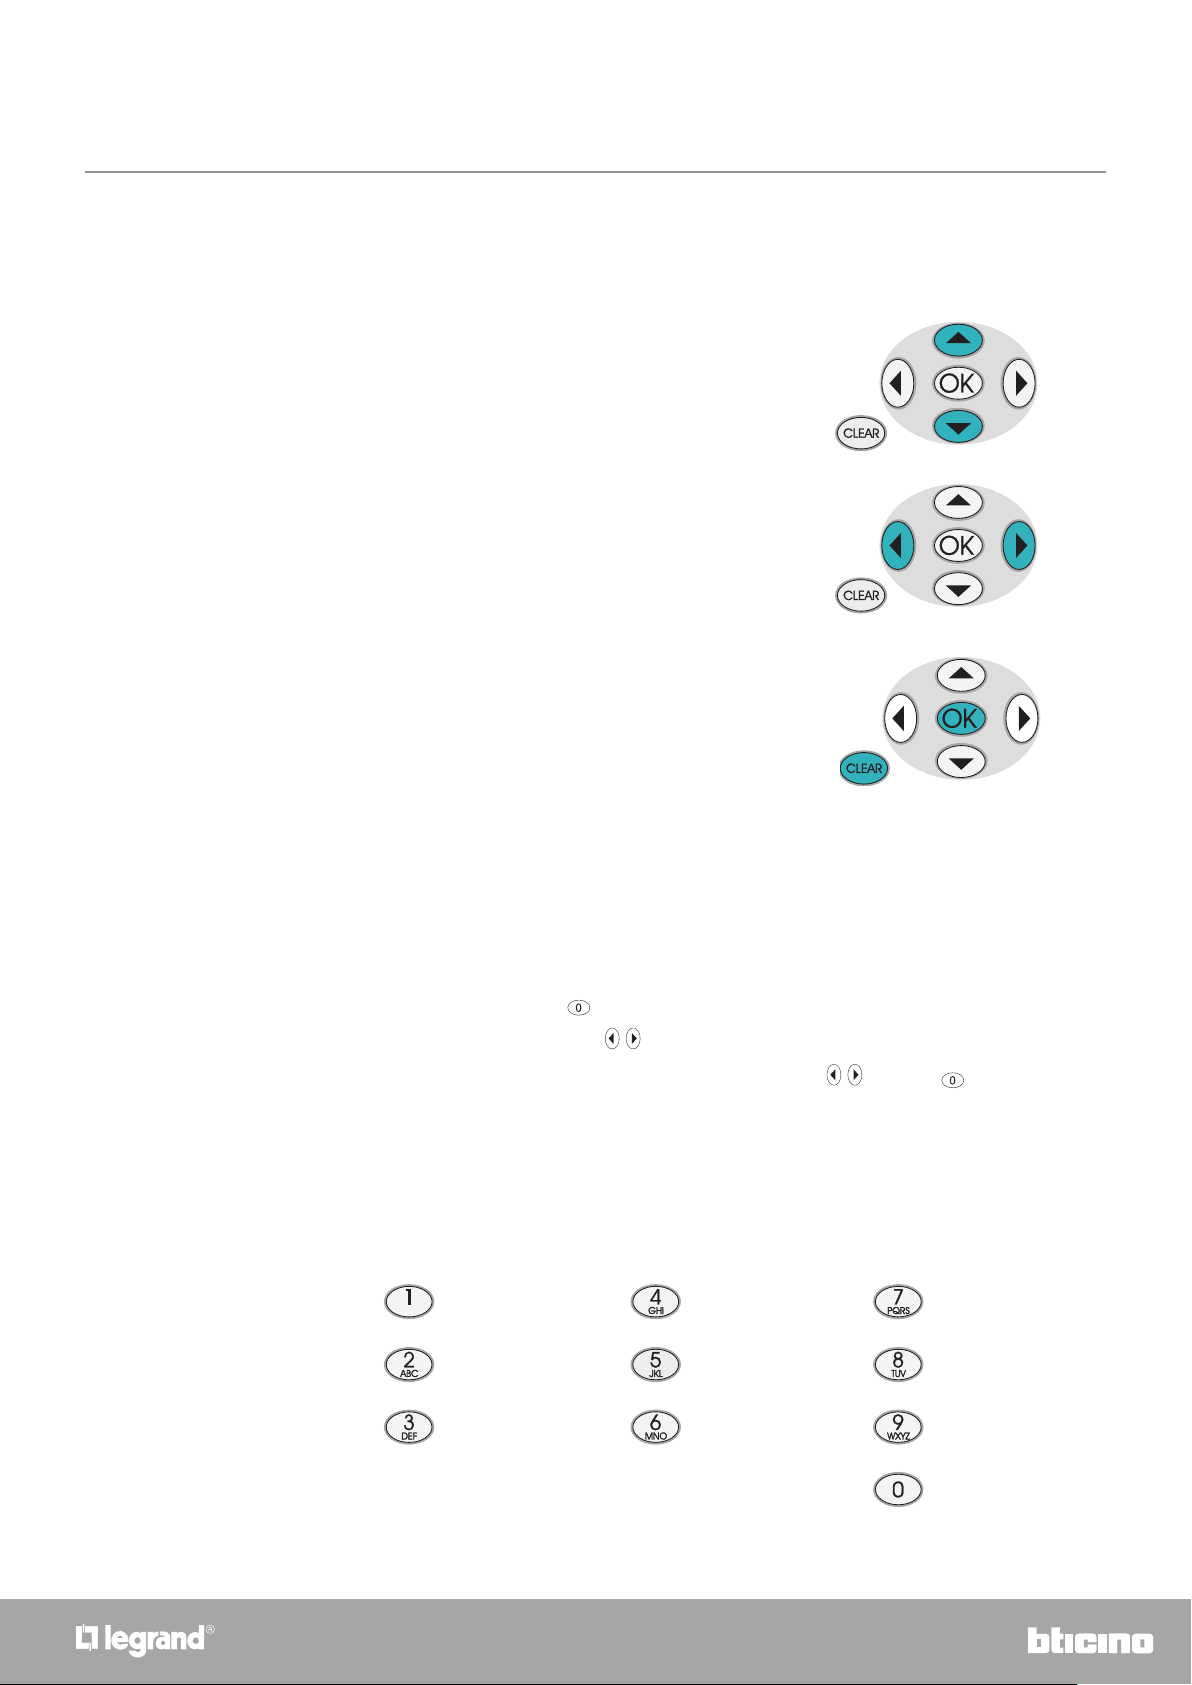
The keypad
Navigation keys
Scroll keys
allow you to scroll the list of items in the menu
Selection keys
allow you to select the functions, which in some
menus, may appear in the last line
OK - Key for entering the selection or data
CLEAR - Key for cancelling the selection and for
returning to the previous page – if it is held down,
you can escape from the programming menu
Burglar-alarm unit 3486
User manual
Alphanumeric keypad
Writing the text
• Press a numeric key several times until the required character is displayed; if the required letter
is near the same key as the present letter, wait until the cursor moves.
• To enter a space, press
• To move the cursor, use the
• To delete a letter, position the cursor over it with the keys
• To change from lower case to upper case, hold down the button when the required character
is displayed. The next characters will be upper case; the procedure is the same to go back to
lower case.
• The following characters correspond to the single keys:
. , - / : ‘ ? 1 g h i 4 í î p q r s 7
a b c 2 à á ä â ã ç j k l 5 t u v 8 ú ü
d e f 3 è é ê m n o 6 ó ö õ w x y z 9
.
keys.
and press .
spazio + = * # 0
5
Page 6

Burglar-alarm unit 3486
1 2 3 4 -- -- -- --
15/07/08 14:22
1 2 3 4 -- -- -- --
ZONES
Exclude
User manual
The display
Initial page
1. System zones (max. 8 zones)
2. GSM signal level
3. ON/OFF indication
4. Date and hour
1
2
3
4
WHAT MUST NOT BE DONE:
– Never unscrew the antenna connector!;
– Do not remove the SIM Card!
If you need help, call your installation technician!
In case of an alarm
1
2
1. Alarm signal zone
2. Technical indications
Edit menu
1:Entrance
2:Perimeter
3:Night
1. Active zones
2. Disabled zone
3. Functions
1
2
3
6
Page 7
Burglar-alarm unit 3486
15/07/08 14:22
1 2 3 4 -- -- -- --
1 2 3 4 -- -- -- --
1 2 3 4 -- -- -- --
scenario 2
15/07/08 14:22
1 2 3 4 -- -- -- --
1 2 3 4 -- -- -- --
15/07/08 14:22
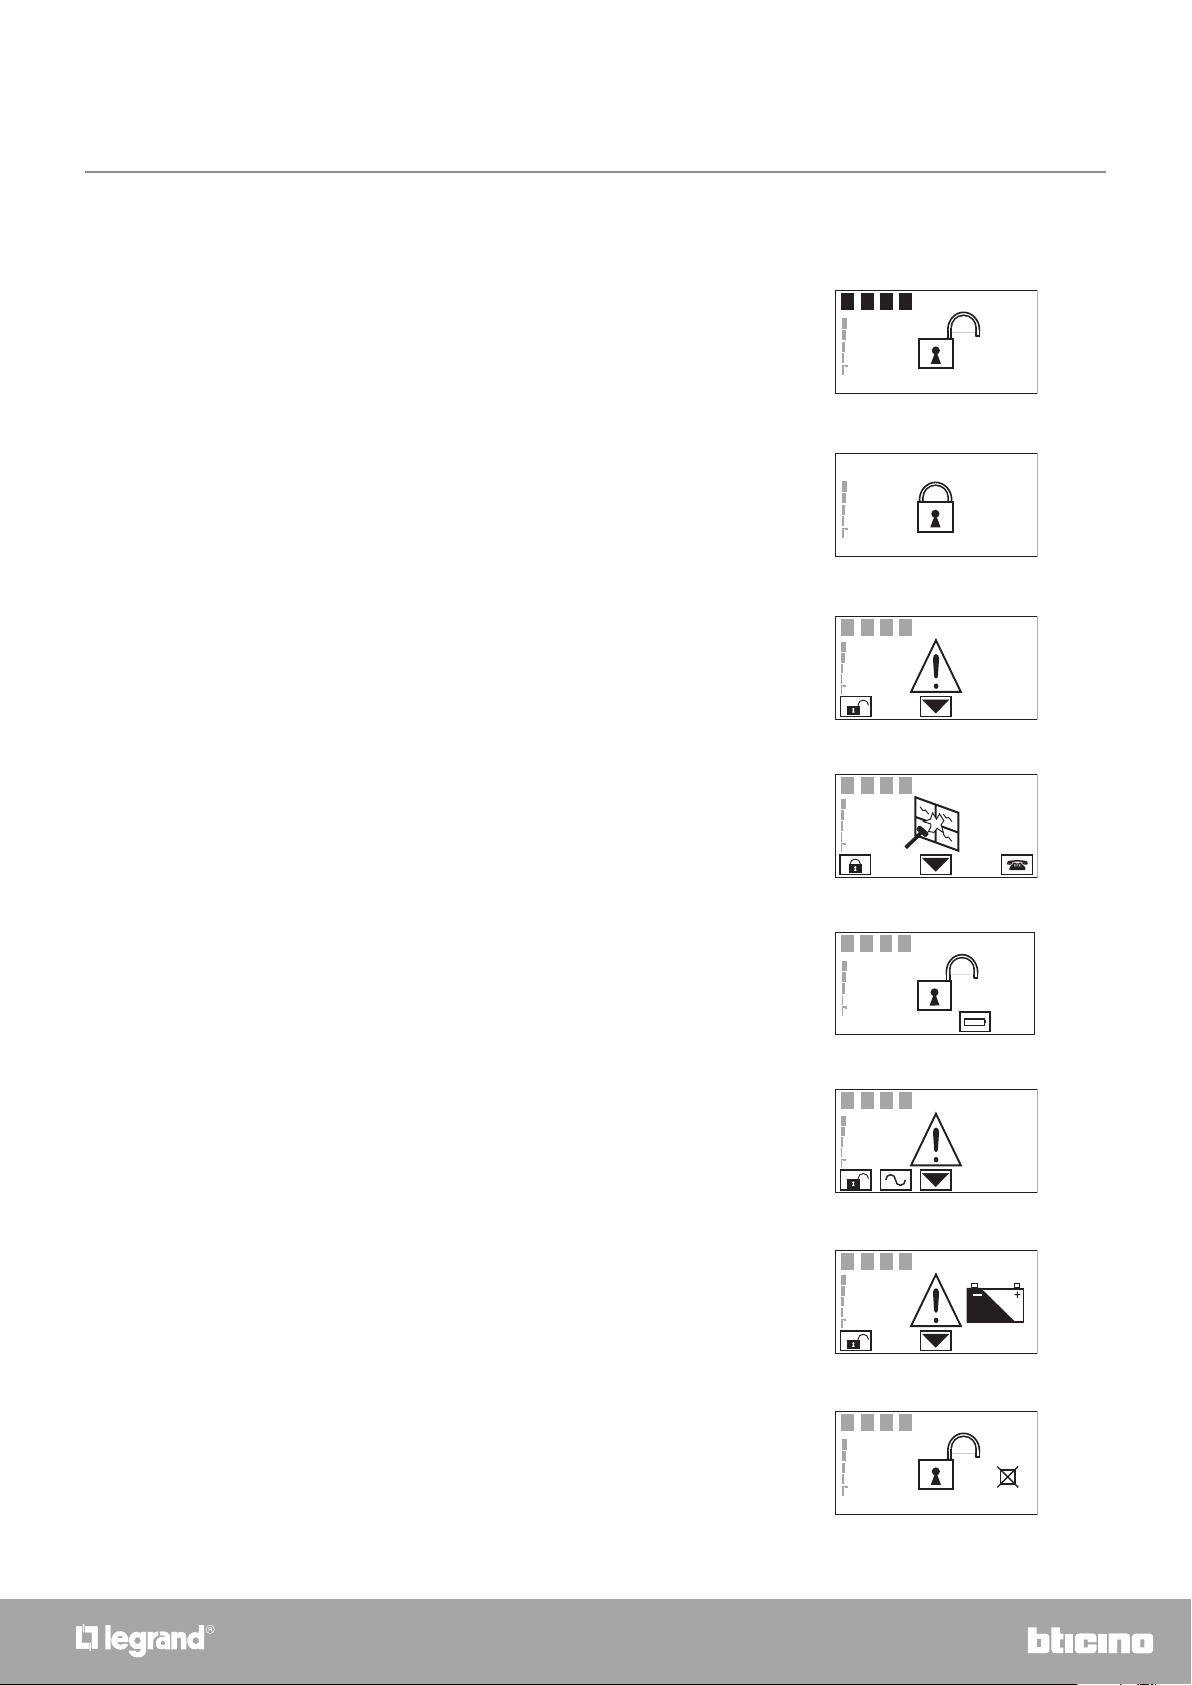
What is the display showing?
System off , e.g.: zones 1, 2, 3, 4 active
System on, e.g.: zone activation as in scenario 2
System off, general alarm signal, tamptest with
system switched OFF or a dead radio device battery
User manual
1 2 3 4 -- -- -- --
System on, intrusion alarm signal and PSTN
telephone call (on fixed telephone) in progress
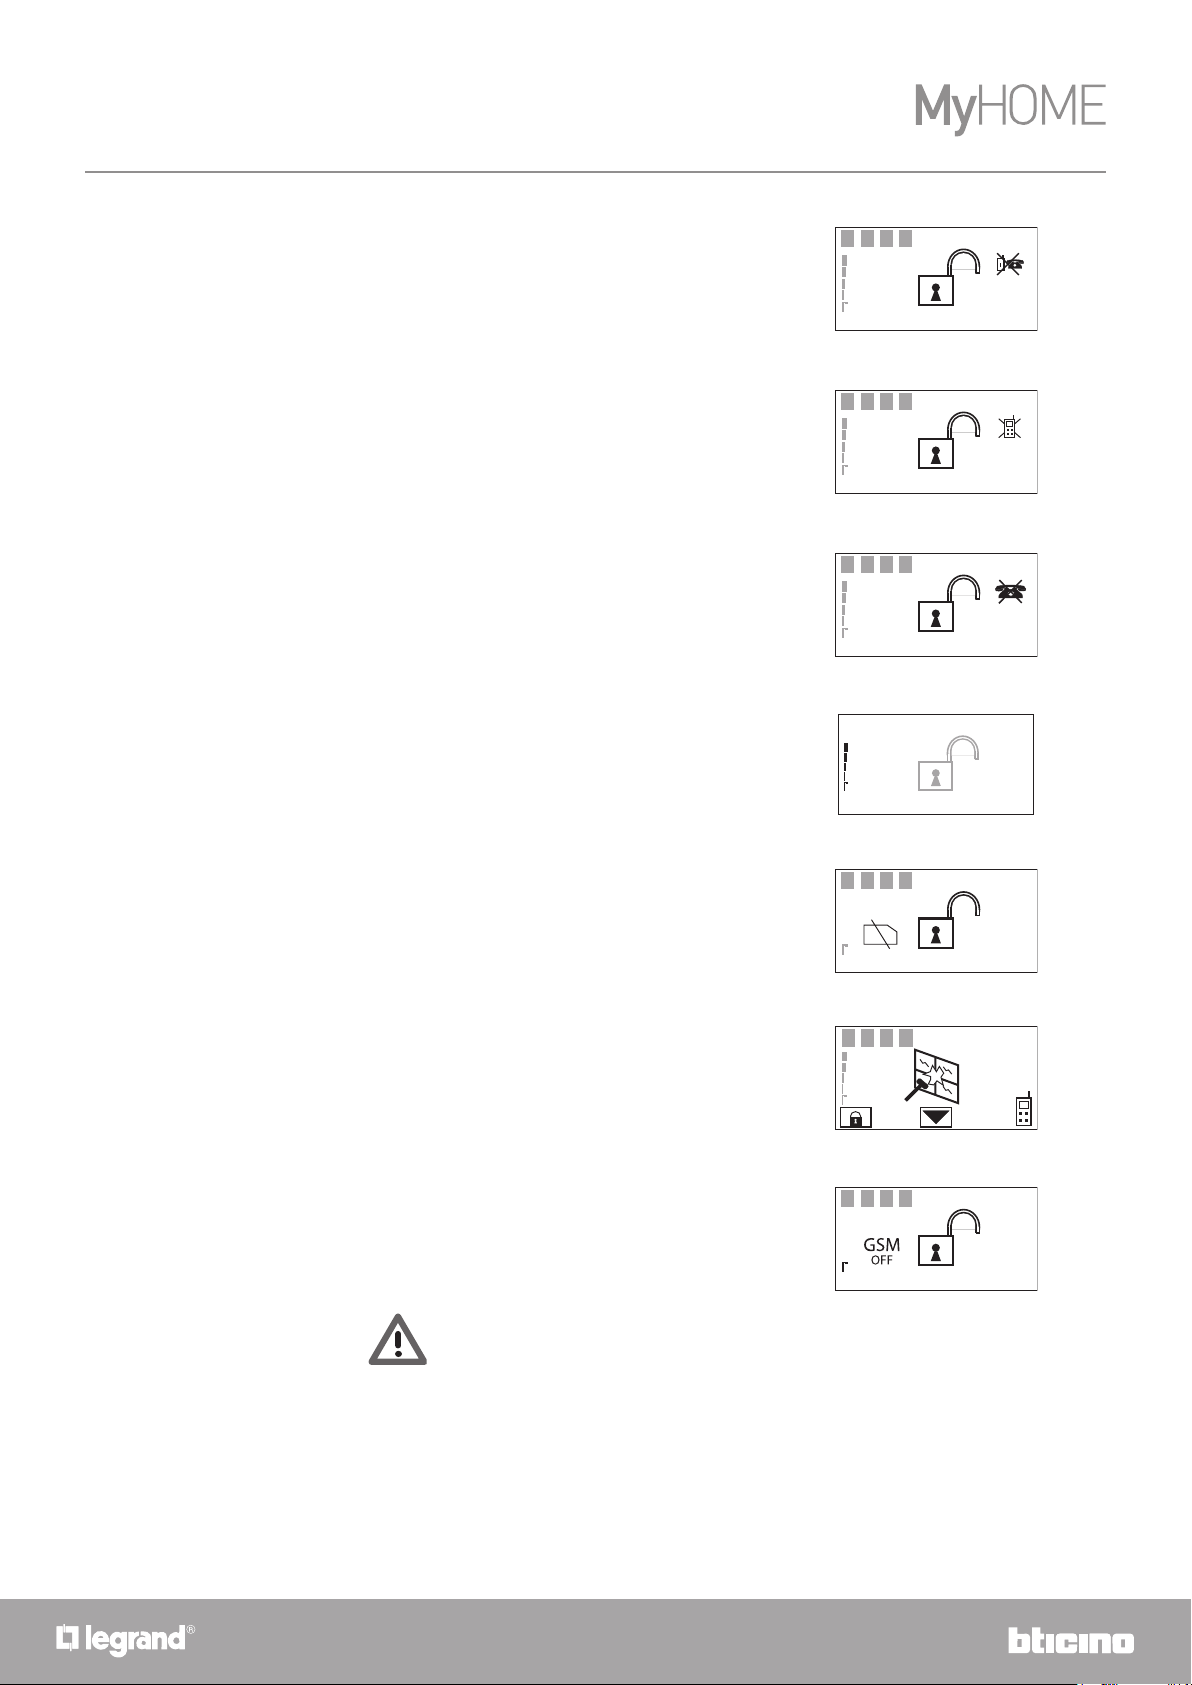
System off, Unit battery dead or damaged
System off , no power
System off , burglar-alarm (antitheft) battery dead or
damaged and technical alarm signal
1 2 3 4 -- -- -- --
System off, one or more sensors disabled (Important
Unit functions are disabled; disable only if extremely
necessary.)
7
Page 8
Burglar-alarm unit 3486
1 2 3 4 -- -- -- --
15/07/08 14:22
15/07/08 14:22
1 2 3 4 -- -- -- --
15/07/08 14:22
15/07/08 14:22
1 2 3 4 -- -- -- --
15/07/08 14:22
1 2 3 4 -- -- -- --
User manual
System off , all telephone calls disabled (Important
Unit functions are disabled; disable only if extremely
necessary.)
System off , only the GSM telephone calls disabled
(Important Unit functions are disabled; disable only
if extremely necessary.)
System off , only the PSTN telephone calls disabled
(Important Unit functions are disabled; disable only
if extremely necessary.)
Scenario 4 selected, good reception GSM signal
System on, SIM card missing or disabled (see
Installation manual)
System on, intrusion alarm signal and GSM call in
progress
System off , GSM module OFF due to problems on
the GSM network (no signal)
scenario 4
15/07/08 14:22
1 2 3 4 -- -- -- --
1 2 3 4 -- -- -- --
WHAT MUST NOT BE DONE:
– Never unscrew the antenna connector!;
– Do not remove the SIM Card!
If you need help, call your installation technician!
8
Page 9
Burglar-alarm unit 3486
1 2 3 4 -- -- -- --
25/05/08 12:23
SELEZIONARE
Antifurto
Comunicatore
1 2 3 4 -- -- -- --
25/05/08 12:23
SELEZIONARE
Antifurto
Comunicatore
1 2 3 4 -- -- -- --
25/05/08 12:23
1 2 3 4 -- -- -- --
25/05/08 12:23
25/05/08 12:23
1 2 3 4 -- -- -- --
25/05/08 12:23
SELEZIONARE
Antifurto
Comunicatore
1 2 3 4 -- -- -- --
25/05/08 12:23
SELEZIONARE
Antifurto
Comunicatore
1 2 3 4 -- -- -- --
25/05/08 12:23
25/05/08 12:23
1 2 3 4 -- -- -- --
25/05/08 12:23
Operation
Enabling - disabling the burglar alarm
With user code
User manual
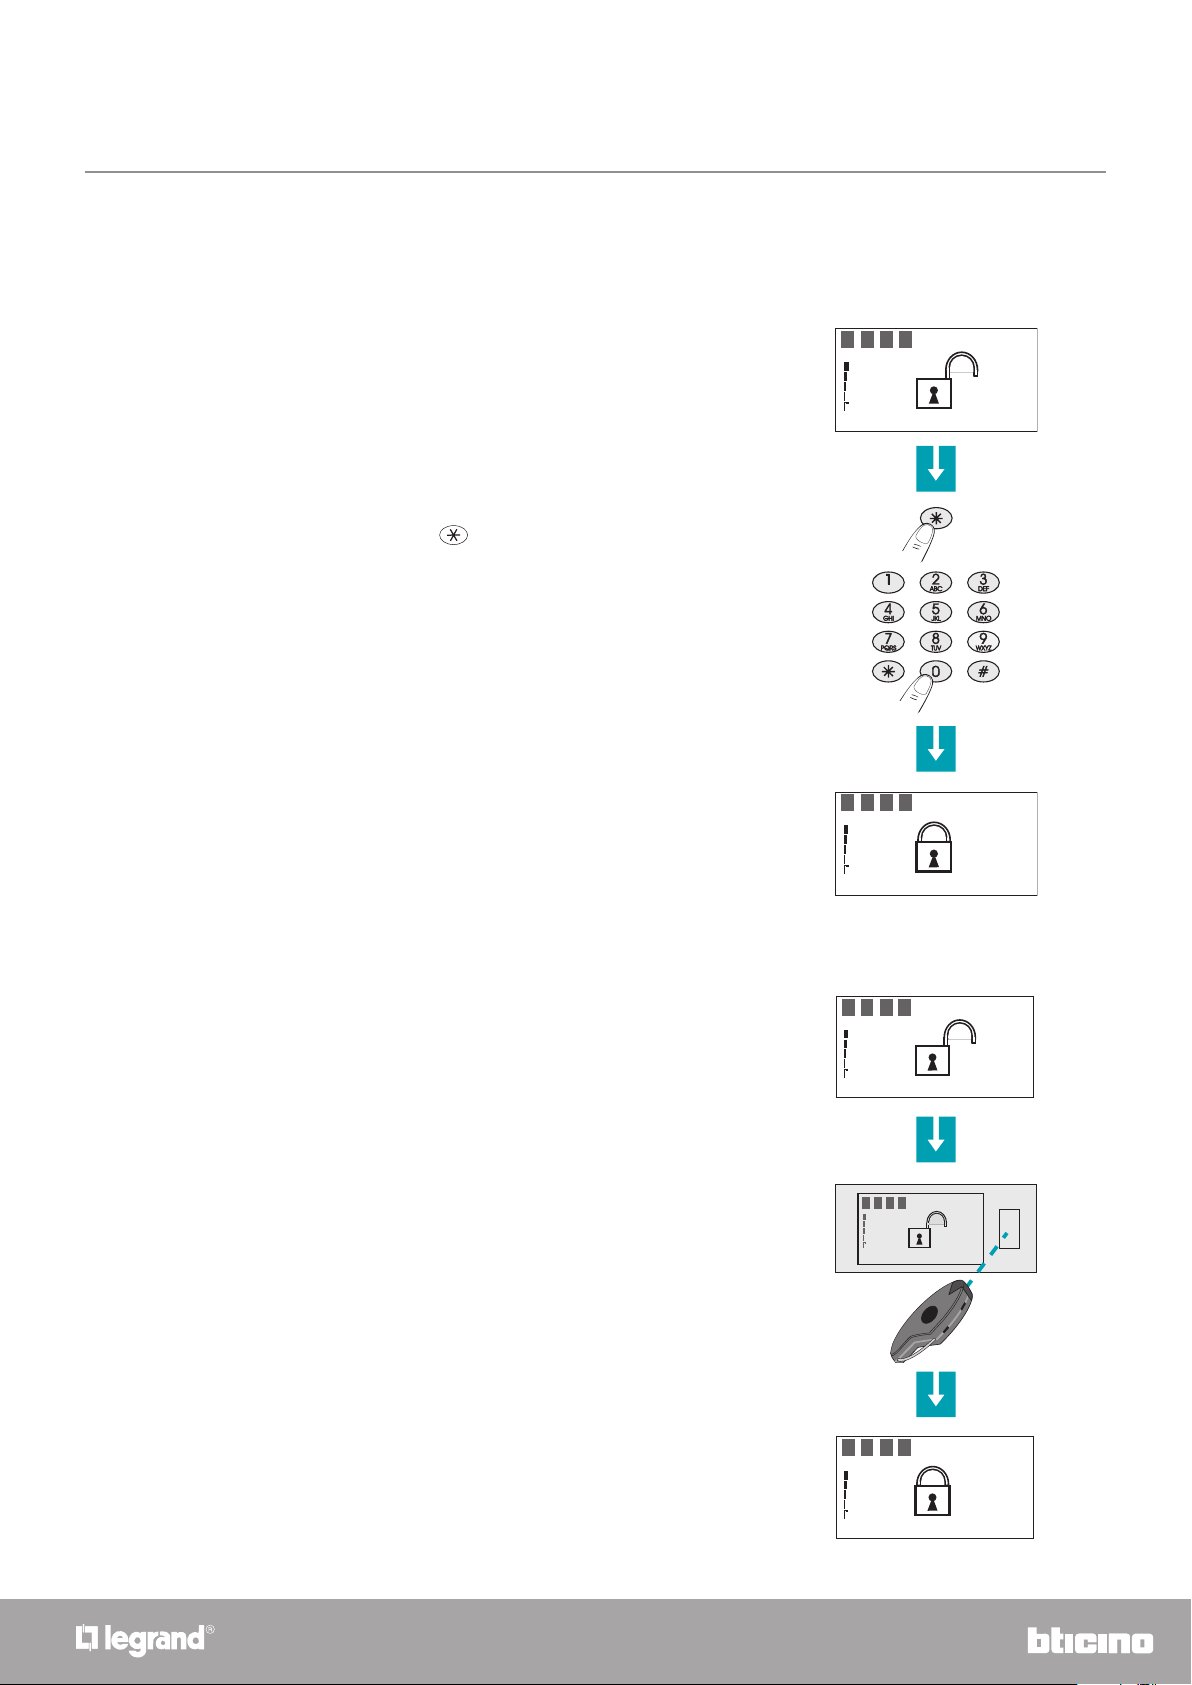
When the burglar alarm (antitheft) is disabled, an
open lock appears in the middle of the display
Press the key
Type in the user code (basic 00000) or an enabled
numeric code; typing an incorrect code, after the
third attempt the keypad blocks for about 1 minute
The display will show a closed lock; if the sound
system is enabled, you will hear an “enabled” vocal
message; execute the same operation to disable the
burglar alarm
1 2 3 4 -- -- -- --
With remote control
When the burglar alarm (antitheft) is disabled, an
open lock appears in the middle of the display
To enable the burglar alarm (antitheft), press the
remote control button after directing it towards the
Unit infrared receiver at a distance of 30 cm (max)
The display will show a closed lock; if the sound
system is enabled, you will hear an “enabled” vocal
message; execute the same operation to disable the
burglar alarm
1 2 3 4 -- -- -- --
25/05/08 12:23
1 2 3 4 -- -- -- --
9
Page 10

Burglar-alarm unit 3486
1 2 3 4 -- -- -- --
25/05/08 12:23
SELEZIONARE
Antifurto
Comunicatore
1 2 3 4 -- -- -- --
25/05/08 12:23
SELEZIONARE
Antifurto
Comunicatore
1 2 3 4 -- -- -- --
25/05/08 12:23
1 2 3 4 -- -- -- --
25/05/08 12:23
25/05/08 12:23
SELEZIONARE
Antifurto
Comunicatore
1 2 3 4 -- -- -- --
25/05/08 12:23
SELEZIONARE
Antifurto
Comunicatore
1 2 3 4 -- -- -- --
25/05/08 12:23
3 seconds
User manual
With transponder key
When the burglar alarm (antitheft) is disabled, an
open lock appears in the middle of the display
To enable the burglar alarm (antitheft), press the
or key on the Unit keypad and then bring the
key (less than one centimeter) near the reader for 2
seconds
The display will show a closed lock; if the sound
system is enabled, you will hear an “enabled” vocal
message; execute the same operation to disable the
burglar alarm
1 2 3 4 -- -- -- --
25/05/08 12:23
1 2 3 4 -- -- -- --
Rapid enabling
When the burglar alarm (antitheft) is disabled, an
open lock appears in the middle of the display
Keep the key pressed for 3 seconds for the rapid
enabling
The display will show a closed lock; if the sound
system is enabled, you will hear an “enabled” vocal
message; execute the same operation to disable the
burglar alarm
1 2 3 4 -- -- -- --
25/05/08 12:23
3 seconds
1 2 3 4 -- -- -- --
25/05/08 12:23
10
Page 11

Burglar-alarm unit 3486
25/05/08 12:23
SELEZIONARE
Antifurto
Comunicatore
1 2 3 4 -- -- -- --
25/05/08 12:23
SELEZIONARE
Antifurto
Comunicatore
1 2 3 4 -- -- -- --
25/05/08 12:23
25/05/08 12:23
1 2 3 4 -- -- -- --
25/05/08 12:23
Scenario notte
25/05/08 12:23
SELEZIONARE
Antifurto
Comunicatore
User manual
Activation scenarios
The Unit can save up to 16 activation scenarios and you can select the one you want as follows:
1 2 3 4 -- -- -- --
Use the keys to select the scenario you want
After the confirmation only the zones included in
the scenario will be activated.
To create or modify scenarios consult the installation
manual
Confirm the selection using the user code, a
transponder key or a numeric code
Scenario 3
11
Page 12
Burglar-alarm unit 3486
1 2 3 4 -- -- -- --
25/05/08 12:23
SELEZIONARE
Antifurto
Comunicatore
1 2 3 4 -- -- -- --
25/05/08 12:23
SELEZIONARE
Antifurto
Comunicatore
1 2 3 4 -- -- -- --
25/05/08 12:23
1 2 3 4 -- -- -- --
25/05/08 12:23
SELEZIONARE
Antifurto
Comunicatore
1 2 3 4 -- -- -- --
25/05/08 12:23
1 2 3 4 -- -- -- --
User manual
Activating - deactivating the zones
You can deactivate (reactivate) one or more zones at any time.
This will allow you to personalise the burglar-alarm operation according to your needs.
For instance, if you want to have protection even if you’re not at home, you can deactivate the
infrared detector zones, leaving the outer zones (entrance door and windows) active. This will
allow you to move around freely inside your house without making any alarms go on and without
giving up safety.
The zones in which your burglar alarm is split into appear in the first line of the display.
The active zones are shown in a dark box.
the following example shows the system made up of 4 zones, all active; zone 3 is deactivated
With user code
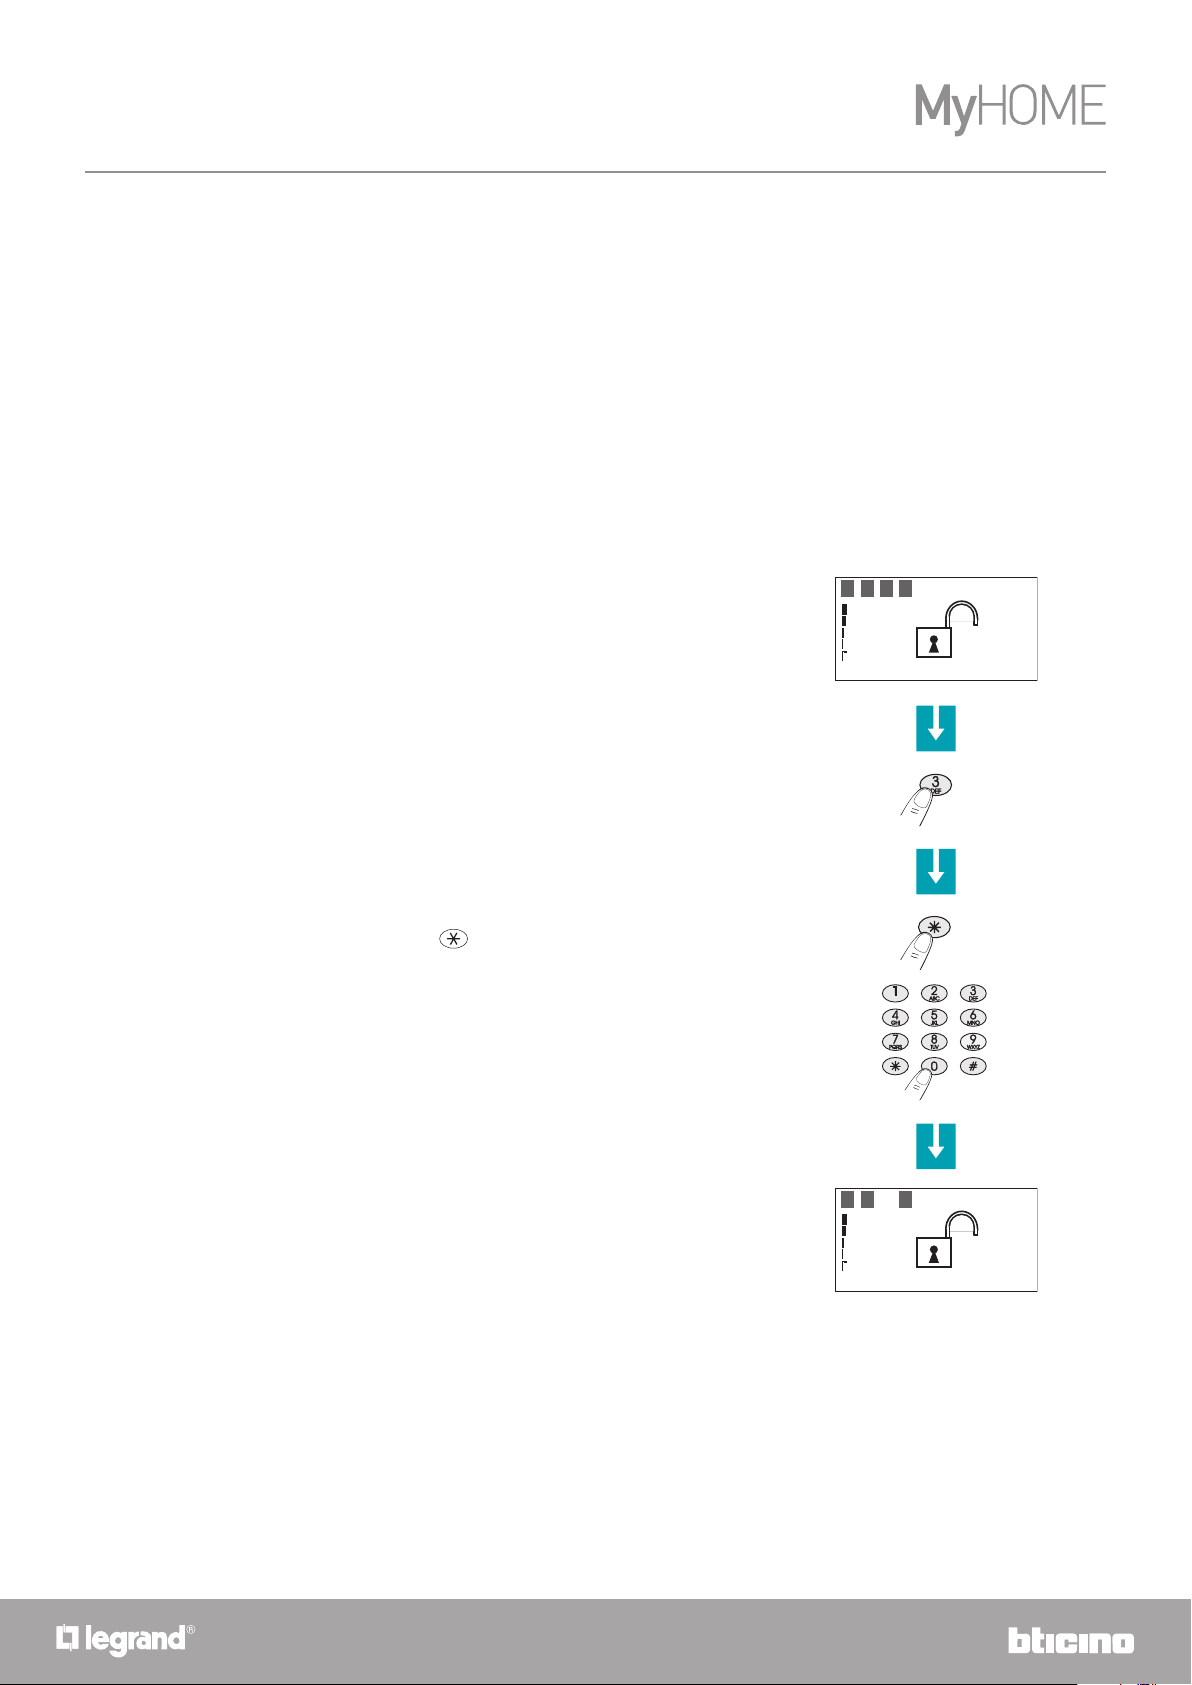
The zones (max. 8) of the system are all active (e.g.
1-2-3-4)
Press the corresponding key on the Unit keypad to
deactivate zone 3
Press the key
Type in the user code (base 00000) or an enabled
numeric code
The Unit confirms the operations with the vocal
message “executed”; the display shows zone 3
without the dark box (deactivated)
12
25/05/08 12:23
Page 13

With remote control
1 2 3 4 -- -- -- --
25/05/08 12:23
SELEZIONARE
Antifurto
Comunicatore
1 2 3 4 -- -- -- --
25/05/08 12:23
SELEZIONARE
Antifurto
Comunicatore
1 2 3 4 -- -- -- --
25/05/08 12:23
SELEZIONARE
Antifurto
Comunicatore
1 2 3 4 -- -- -- --
25/05/08 12:23
1 2 3 4 -- -- -- --
1 2 3 4 -- -- -- --
25/05/08 12:23
25/05/08 12:23
SELEZIONARE
Antifurto
Comunicatore
1 2 3 4 -- -- -- --
25/05/08 12:23
SELEZIONARE
Antifurto
Comunicatore
1 2 3 4 -- -- -- --
25/05/08 12:23
1 2 3 4 -- -- -- --
SELEZIONARE
Antifurto
Comunicatore
Burglar-alarm unit 3486
User manual
The zones (max. 8) of the system are all active (e.g.
1-2-3-4)
Press the corresponding key on the Unit keypad to
deactivate zone 3
Press the remote control button within 5 seconds to
enter operation
The Unit confirms the operations with the vocal
message “executed”; the display shows zone 3
without the dark box (deactivated)
1 2 3 4 -- -- -- --
25/05/08 12:23
25/05/08 12:23
With transponder key
The zones (max 8) of the system are all active (e.g.
1-2-3-4)
Press the corresponding key on the Unit keypad to
deactivate zone 3
Confirm the operation by bringing a transponder
near the reader within 5 seconds
1 2 3 4 -- -- -- --
1 2 3 4 -- -- -- --
25/05/08 12:23
The Unit confirms the operations with the vocal
message “executed”; the display shows zone 3
without the dark box (deactivated)
13
25/05/08 12:23
Page 14

Burglar-alarm unit 3486
SELEZIONARE
Antifurto
Comunicatore
1 2 3 4 -- -- -- --
25/05/08 12:23
1 2 3 4 -- -- -- --
SELEZIONARE
Antifurto
Comunicatore
SELECT
Antitheft
Communicator
ANTITHEFT
Zones
Devices
Event memory
Date and hour
Exclude
SELEZIONARE
Antifurto
Comunicatore
SELECT
Antitheft
Communicator
User manual
From the zone menu
After accessing the edit menu (next section)
Press to access the burglaralarm (antitheft) menu
Press to access the zone menu
SELECT
Antitheft
Communicator
ANTITHEFT
Zones
Devices
Event memory
Date and hour
Select the zone you want to activate or deactivate
with the
keys (e.g. 3)
Press to enter
Hold down the key to escape from menu
1:Entrance
ZONES
2:Perimeter
3:Night
25/05/08 12:23
14
Page 15

Burglar-alarm unit 3486
SELEZIONARE
Antifurto
Comunicatore
1 2 3 4 -- -- -- --
SELEZIONARE
Antifurto
Comunicatore
1 2 3 4 -- -- -- --
1 2 3 4 -- -- -- --
1 2 3 4 -- -- -- --
1 2 3 4 -- -- -- --
SELEZIONARE
Antifurto
Comunicatore
1 2 3 4 -- -- -- --
1 2 3 4 -- -- -- --
SELEZIONARE
Antifurto
Comunicatore
1 2 3 4 -- -- -- --
Stopping the siren sound
If the alarm goes on while you’re there, you can stop the siren as follows:
From the menu zone
1 2 3 4 -- -- -- --
Make sure there are no trespassers in the house
1 2 3 4 -- -- -- --
Press the remote control pushbutton after pointing
it towards the Unit infrared receiver at a maximum
distance of 30 cm
User manual
The siren stops; the Unit answers with the vocal
message “disabled”
With user code
Make sure there are no trespassers in the house
Press the key
Type in the user code (base 00000) or an enabled
numeric code
The siren stops; the Unit answers with the vocal
message “disabled”
15
Page 16

Burglar-alarm unit 3486
1 2 3 4 -- -- -- --
25/05/08 12:23
1 2 3 4 -- -- -- --
SELEZIONARE
Antifurto
Comunicatore
1 2 3 4 -- -- -- --
1 2 3 4 -- -- -- --
SELEZIONARE
Antifurto
Comunicatore
User manual
With transponder key
Make sure there are no trespassers in the house
Press the key on the Unit keypad and then bring
the key (less than one centimeter) near the reader for
2 seconds
1 2 3 4 -- -- -- --
1 2 3 4 -- -- -- --
The siren stops; the Unit answers with the vocal
message “disabled”
16
Page 17

Burglar-alarm unit 3486
25/05/08 12:23
1 2 3 4 -- -- -- --
25/05/08 12:23
1 2 3 4 -- -- -- --
25/05/08 12:23
25/05/08 12:23
User manual
The radio remote control (348220)
The actions described in this section can also be carried out using the correctly configured radio
remote control (with L/N/NT/HC/HS 4618). For more information consult your installer.
Enabling
1 2 3 4 -- -- -- --
25/05/08 12:23
1 2 3 4 -- -- -- --
Disabling
1 2 3 4 -- -- -- --
25/05/08 12:23
1 2 3 4 -- -- -- --
17
Page 18

Burglar-alarm unit 3486
SELEZIONARE
Antifurto
Comunicatore
1 2 3 4 -- -- -- --
SELEZIONARE
Antifurto
Comunicatore
1 2 3 4 -- -- -- --
inserted
SELEZIONARE
Antifurto
Comunicatore
MEMO ALLARMI
32: sensore IR
Finestra cucina
All. intrusione
Inserito
1 2 3 4 -- -- -- --
User manual
What type of alarm occurred?
When an alarm signal is displayed, you can find out what type it is (intrusion, technical, etc.)
and which detector has detected it; a name has been given to each detector (kitchen window,
entrance, etc.) by the installer for easier identification. Press just one key to get this information.
The Unit has detected an alarm...
To learn more, press the key
1 2 3 4 -- -- -- --
The display provides the following information:
– detector and its name (living room window)
– type of alarm (intrusion)
– burglar-alarm (antitheft) status when the alarm
goes on (ON-inserted)
The alarm signal is cancelled from the display the
next time you turn on the burglar alarm (antitheft),
but it remains memorised in the “Event memory”,
which can be consulted by selecting “Event memory”
in the Burglar-alarm (antitheft) menu.
MEMO ALARMS
32 : IR sensor
Living Room Window
Intrusion alarm
1 2 3 4 -- -- -- --
18
Page 19

Burglar-alarm unit 3486
SELEZIONARE
Antifurto
Comunicatore
1 2 3 4 -- -- -- --
MEMO ALARMS
Disconnected
1 2 3 4 -- -- -- --
SELEZIONARE
Antifurto
Comunicatore
SELEZIONARE
Antifurto
Comunicatore
MEMO ALARMS
42: receiver
remote assistance
start technical
Disconnected
1 2 3 4 -- -- -- --
User manual
In case of a technical alarm (its symbol appears), you can find out which device has produced the
alarm and reset it as well.
1 2 3 4 -- -- -- --
The Unit has detected a technical alarm
To learn more, press the key
The display provides the following information:
– device name (remote assistance)
– type of alarm (technical start)
– burglar-alarm (antitheft) status when the alarm
goes on (OFF-disconnected)
By pressing the key, a page appears, which lets
you reset a single alarm or execute a total reset
42: receiver
remote assistance
start technical
ATTYENZIONE
OK reset single
OK reset total
press:
19
Page 20

Burglar-alarm unit 3486
SELEZIONARE
Antifurto
Comunicatore
SELECT
Antitheft
Communicator
Event memory
SELEZIONARE
Antifurto
Comunicatore
SELECT
Antitheft
Communicator
ANTITHEFT
Scenarios
Zones
Devices
Event memory
SELEZIONARE
Antifurto
Comunicatore
ANTITHEFT
Event memory
Date and hour
Commands
Automations
SELECT
Antitheft
Communicator
ANTITHEFT
Scenarios
Zones
Devices
Event memory
SELEZIONARE
Antifurto
Comunicatore
ANTITHEFT
Event memory
Date and hour
Commands
Automations
AUTOMATIONS
1: Automation 1
2: Automation 2
3: Automation 3
Disable
SELECT
Antitheft
Communicator
ANTITHEFT
Scenarios
Zones
Devices
Event memory
SELEZIONARE
Antifurto
Comunicatore
ANTITHEFT
Event memory
Date and hour
Commands
Automations
AUTOMATIONS
1: Automation 1
2: Automation 2
3: Automation 3
Disable
AUTOMATIONS
1: Automation 1
2: Automation 2
3: Automation 3
Enable
Disable
SELECT
Antitheft
Communicator
ANTITHEFT
Scenarios
Zones
Devices
Event memory
User manual
Enabling the automations
The burglar-alarm unit can be programmed so that an automation is linked to a particular event.
For example the lights come on when the unit registers an intrusion alarm.
In this menu you can enable or disable the automations programmed by the installer.
Accessing the edit menu.
Press to access the Burglaralarm (antitheft) menu
Select Automations with the keys
SELECT
Antitheft
Communicator
ANTITHEFT
Scenarios
Zones
Devices
Press to access
With the keys select the automation which
you intend to enable or disable; if the automation
selected is enabled the wording Disable will appear
in the last line of the display and vice versa
Press to enter
The selected zone is enabled; the identification
number is shown by a black square.
Keep the key pressed to return to the initial page
ANTITHEFT
Event memory
Date and hour
Commands
Automations
AUTOMATIONS
1: Automation 1
2: Automation 2
3: Automation 3
Disable
AUTOMATIONS
1: Automation 1
2: Automation 2
3: Automation 3
Enable
AUTOMATIONS
1: Automation 1
2: Automation 2
3: Automation 3
20
Page 21

Burglar-alarm unit 3486
SELECT
Antitheft
Communicator
SELEZIONARE
Antifurto
Comunicatore
SELEZIONARE
Antifurto
Comunicatore
Settings
SELECT
Antitheft
Communicator
ANTITHEFT
Scenarios
Zones
Devices
Event memory
SELEZIONARE
Antifurto
Comunicatore
ANTITHEFT
Date and hour
Commands
Automations
Settings
SELECT
Antitheft
Communicator
ANTITHEFT
Scenarios
Zones
Devices
Event memory
SELEZIONARE
Antifurto
Comunicatore
SETTINGS
Alarm length
Tamper al. lenght
Entry delay
Short
ANTITHEFT
Date and hour
Commands
Automations
Settings
SELECT
Antitheft
Communicator
ANTITHEFT
Scenarios
Zones
Devices
Event memory
SELEZIONARE
Antifurto
Comunicatore
SETTINGS
Alarm length
Tamper al. lenght
Entry delay
Short
Enable
SETTINGS
Exit delay
User code
Code/key
Select
ANTITHEFT
Date and hour
Commands
Automations
Settings
SELECT
Antitheft
Communicator
ANTITHEFT
Scenarios
Zones
Devices
Event memory
SELEZIONARE
Antifurto
Comunicatore
SETTINGS
Alarm length
Tamper al. lenght
Entry delay
Short
SETTINGS
01: Code 01
02: Code 02
03: Code 03
04:
_____________
Enable
Disable
SETTINGS
Exit delay
User code
Code/key
Select
ANTITHEFT
Date and hour
Commands
Automations
Settings
SELECT
Antitheft
Communicator
ANTITHEFT
Scenarios
Zones
Devices
Event memory
User manual
Enabling keys and numeric codes
You can enable or disable remote controls, transponder keys and numeric codes as you require.
SELECT
Accessing the edit menu.
Press to access the Burglaralarm (antitheft) menu
Antitheft
Communicator
Select Settings with the keys
Press to access
Select Code/Keys with the keys
Press to enter
ANTITHEFT
Scenarios
Zones
Devices
Event memory
ANTITHEFT
Date and hour
Commands
Automations
SETTINGS
Alarm length
Tamper al. lenght
Entry delay
Short
SETTINGS
Exit delay
User code
Code/key
Select
With the keys select the key whose state you
intend to change.
If the key selected is enabled the wording Disable
will appear in the last line of the display and vice
versa
The key has been enabled; the identification number
is shown by a black square.
Keep the key pressed to return to the initial page
21
SETTINGS
01: Code 01
02: Code 02
03: Code 03
_____________
04:
SETTINGS
01: Code 01
02: Code 02
03: Code 03
_____________
04:
Page 22

Burglar-alarm unit 3486
SELECT
SELEZIONARE
Antifurto
Comunicatore
Tel functions
SELECT
Antitheft
Communicator
SELEZIONARE
Antifurto
Comunicatore
COMMUNICATOR
Index book
Set calls
Vocal messages
Tel functions
TEL. FUNCTIONS
SELECT
Antitheft
Communicator
SELEZIONARE
Antifurto
Comunicatore
COMMUNICATOR
Index book
Set calls
Vocal messages
Tel functions
TEL. FUNCTIONS
Call
Answer
Call cycles
ON
TEL. FUNCTIONS
Select
SELECT
Antitheft
Communicator
SELEZIONARE
Antifurto
Comunicatore
ANTITHEFT
Event memory
Date and hour
Commands
Automations
AUTOMATIONS
1: Automation 1
2: Automation 2
3: Automation 3
Disable
Enable
SELECT
Antitheft
Communicator
ANTITHEFT
Scenarios
Zones
Devices
Event memory
User manual
Enabling the remote control
You can enable/disable your unit for remote assistance or remote management of the alarms via
telephone line.
Consult your installer before modifying the settings of this menu.
Access the edit menu and select Telephone Dialling
device (Communicator).
Premi
per accedere al menù
Select Tel. functions with the keys
Press to access
Select Remote control with the keys
Antitheft
Communicator
COMMUNICATOR
Index book
Set calls
Vocal messages
Call
Answer
Call cycles
ON
DTMF / PULSE
Supply lack
Remote control
Press to enter
The indications for the settings and their meaning
can be found below.
When the setting is finished keep the key pressed
to return to the initial page
AUTOMATIONS
1: Automation 1
2: Automation 2
3: Automation 3
Remote assistance (Tele assistance)
If this setting is enabled the unit allows the entry of remote assistance calls from units which use
the Contact ID protocol.
Remote management (Telecontrol AI)
Allows management of the alarms via telephone line; the setting has the following options:
– ON: the user and the surveillance unit can perform the remote management.
– Manager: only the surveillance unit can perform the remote management.
– User: only the user can perform the remote management
– OFF: the remote management is disabled
22
Page 23

Burglar-alarm unit 3486
21/09/08 15:32
SELEZIONARE
Antifurto
Comunicatore
1 2 3 4 -- -- -- --
21/09/08 15:32
1 2 3 4 -- -- -- --
SELEZIONARE
Antifurto
Comunicatore
1 2 3 4 -- -- -- --
21/09/08 15:32
1 2 3 4 -- -- -- --
SELEZIONARE
Antifurto
Comunicatore
1 2 3 4 -- -- -- --
21/09/08 15:32
1 2 3 4 -- -- -- --
User manual
Editing
The Unit menu
This manual describes the editings that are considered to be helpful when using the Unit. You can
access these editings without jeopardizing the proper functioning of the Unit as well as the safety
of your house.
When you access the configuration menu, you will note that this is made up of many other pages
that let you configure the Unit in order to meet your needs.
Some of these pages cannot be accessed, as they are reserved for the installer and protected by a
special code.
We suggest that you always contact your installer before changing any configuration of the Unit
among those described in this manual.
Accessing the edit menu
This procedure is necessary to access the edit menu:
1 2 3 4 -- -- -- --
1 2 3 4 -- -- -- --
Make sure that the system is off
Press the key
Type in the user code or use the remote control or
the transponder key, as when turning on the burglar
alarm (antitheft)
SELECT
You can now start the editing of the Unit
A
C
To escape from the edit menu, wait 30 seconds without pressing any key or press the
pushbutton.
23
Page 24

Burglar-alarm unit 3486
SELEZIONARE
Antifurto
Comunicatore
SELEZIONARE
Antifurto
Comunicatore
SELEZIONARE
Antifurto
Comunicatore
SELEZIONARE
Antifurto
Comunicatore
1 2 3 4 -- -- -- --
DATE and HOUR
hour: 00:00
date: 01/01/00
tuesday
01/01/00 00:00
01/01/00 00:00
ANTITHEFT
Zones
Devices
Event memory
Date and hour
SELECT
Antitheft
Communicator
ANTITHEFT
Zones
Devices
Event memory
Date and hour
SELEZIONARE
Antifurto
Comunicatore
Date and hour
SELECT
Antitheft
Communicator
ANTITHEFT
Zones
Devices
Event memory
Date and hour
SELECT
Antitheft
Communicator
01/01/00 00:00
ANTITHEFT
Zones
Devices
Event memory
Date and hour
SELECT
Antitheft
Communicator
ANTITHEFT
Zones
Devices
Event memory
Date and hour
User manual
Setting the date and hour
In order for the system to constantly keep all memorised events under control, it is important to
set the correct date and hour.
Accessing the edit menu
Press to access the Burglaralarm (antitheft) menu
Select Date and hour with the key
SELECT
Antitheft
Communicator
ANTITHEFT
Zones
Devices
Event memory
Press to enter
Type in the current hour and date on the keypad;
you can move the cursor from the hour line to the
date line with the
keys.
When all data has been entered, press to confirm
ANTITHEFT
Zones
Devices
Event memory
Date and hour
DATE and HOUR
hour: 00:00
date: 01/01/00
tuesday
DATE and HOUR
hour: 14:22
date: 25/03/08
tuesday
24
Page 25

Burglar-alarm unit 3486
SELEZIONARE
Antifurto
Comunicatore
SELECT
Antitheft
Communicator
SELEZIONARE
Antifurto
Comunicatore
Settings
SELECT
Antitheft
Communicator
ANTITHEFT
Scenarios
Zones
Devices
Event memory
SELEZIONARE
Antifurto
Comunicatore
SETTINGS
ANTITHEFT
Date and hour
Commands
Automations
Settings
SELECT
Antitheft
Communicator
ANTITHEFT
Scenarios
Zones
Devices
Event memory
SELEZIONARE
Antifurto
Comunicatore
SETTINGS
Alarm length
Tamper al. lenght
Entry delay
Short
ANTITHEFT
Date and hour
Commands
Automations
Settings
SELECT
Antitheft
Communicator
ANTITHEFT
Scenarios
Zones
Devices
Event memory
SELEZIONARE
Antifurto
Comunicatore
SETTINGS
Codice / chiavi
Contrast
Sound signalling
IN/OUT disab
IN enable
SETTINGS
Alarm length
Tamper al. lenght
Entry delay
Short
ANTITHEFT
Date and hour
Commands
Automations
Settings
SELECT
Antitheft
Communicator
ANTITHEFT
Scenarios
Zones
Devices
Event memory
User manual
Sound signalling
If your system has sensors which are delayed in input and/or output you can enable an audible
signal for the time set for the delay.
SELECT
Accessing the edit menu.
Press to access the Burglaralarm (antitheft) menu
Select Settings with the keys
Antitheft
Communicator
ANTITHEFT
Scenarios
Zones
Devices
Event memory
Press to enter
Select Sound signalling with the keys
Select the setting with the key
Press to confirm the setting.
Keep the key pressed to return to the initial page
ANTITHEFT
Date and hour
Commands
Automations
Alarm length
Tamper al. lenght
Entry delay
Short
SETTINGS
Codice / chiavi
Contrast
Sound signalling
IN/OUT disab
SETTINGS
Code/key
Contrast
Sound signalling
25
Page 26

Burglar-alarm unit 3486
SELECT
Antitheft
Communicator
Vocal messages
Rename
SELECT
Antitheft
Communicator
COMMUNICATOR
Jolly number
Index book
Set calls
Vocal messages
Jolly number
00:
Inviare Open
Rename
Memorize
SELECT
Antitheft
Communicator
COMMUNICATOR
Jolly number
Index book
Set calls
Vocal messages
Jolly number
00:
Inviare Open
Rename
Jolly number
00:
My Mobile Phone
Inviare Open
Memorize
SELECT
Antitheft
Communicator
COMMUNICATOR
Jolly number
Index book
Set calls
Vocal messages
Jolly number
00:
Inviare Open
Rename
Jolly number
00:
My Mobile Phone
Inviare Open
Memorize
Jolly number
00:
My Mobile Phone
Tel. number
SELECT
Antitheft
Communicator
COMMUNICATOR
Jolly number
Index book
Set calls
Vocal messages
SELEZIONARE
Antifurto
Comunicatore
SELEZIONARE
Antifurto
Comunicatore
SELEZIONARE
Antifurto
Comunicatore
SELEZIONARE
Antifurto
Comunicatore
SELEZIONARE
Antifurto
Comunicatore
User manual
Memorizing the Jolly number
The Jolly number is the first telephone number dialled by the Unit when any type of alarm occurs
(intrusion or technical).
If the MyHOME_Web portal or the Ademco protocol are activated do not change the Jolly
number.
Accessing the edit menu
Select Dialling device (Communicator) and press
to enter
Press again to access the Jolly number menu
SELECT
Antitheft
Communicator
COMMUNICATOR
Jolly number
Index book
Set calls
Press and enter the name that identifies the
telephone to be called (e.g. my mobile phone) by
using the alphanumeric keypad
If you make a mistake, you can go back to the wrong
letter by pressing and retype it; press to enter
a space between two words
Press to enter the name
After entering the name, a space used for the
telephone number is shown
Press to enter and dial the telephone number
If required, it is possible to enter pauses (e.g.
between area code number and telephone number)
by using the , key; the pause will be displayed as
a comma.
Press to enter
Press to go back to the previous page
Jolly number
00:
Inviare Open
Jolly number
00:
My Mobile Phone
Inviare Open
Jolly number
00:
My Mobile Phone
Tel. number
Jolly number
00:
My Mobile Phone
332,1234567
Memorize
After storing the wild number, it is possible to select the “GSM Test” function via the keys
and
to make a call to the preset number in order to verify the exact setup of the wild number as well as
the correct operation of the GSM module.
WHAT MUST NOT BE DONE:
– Never unscrew the antenna connector!;
– Do not remove the SIM Card!
If you need help, call your installation technician!
26
Page 27

Burglar-alarm unit 3486
SELECT
SELEZIONARE
Antifurto
Comunicatore
SELECT
Antitheft
Communicator
Vocal messages
SELEZIONARE
Antifurto
Comunicatore
04: Name 4
SELECT
Antitheft
Communicator
COMMUNICATOR
Jolly number
Index book
Set calls
Vocal messages
SELEZIONARE
Antifurto
Comunicatore
INDEX BOOK
01: Name 1
02: Name 2
03: Name 3
04: Name 4
SELECT
Antitheft
Communicator
COMMUNICATOR
Jolly number
Index book
Set calls
Vocal messages
Memorize
SELEZIONARE
Antifurto
Comunicatore
INDEX BOOK
01: Name 1
02: Name 2
03: Name 3
04: Name 4
Tel. number
SELECT
Antitheft
Communicator
COMMUNICATOR
Jolly number
Index book
Set calls
Vocal messages
INDEX BOOK
01: Office
02:
03:
04:
Memorize
SELEZIONARE
Antifurto
Comunicatore
INDEX BOOK
01: Name 1
02: Name 2
03: Name 3
04: Name 4
Memorize
INDEX BOOK
01: Office
Tel. number
SELECT
Antitheft
Communicator
COMMUNICATOR
Jolly number
Index book
Set calls
Vocal messages
INDEX BOOK
01: Office
02:
03:
04:
Memorize
SELEZIONARE
Antifurto
Comunicatore
INDEX BOOK
01: Name 1
02: Name 2
03: Name 3
04: Name 4
INDEX BOOK
01: Office
031,1234567
Memorize
INDEX BOOK
01: Office
Tel. number
SELECT
Antitheft
Communicator
04: Name 4
COMMUNICATOR
Jolly number
Index book
Set calls
Vocal messages
INDEX BOOK
01: Office
02:
03:
04:
Memorize
User manual
Making your own list of telephone numbers
This menu lets you memorise up to 10 telephone numbers that can be used for your calls,
according to the type of alarm that has occurred (see Chapter “Setting up the calls”).
Accessing the edit menu
Select Dialling device (communicator) and press
to enter
Select Index book and press to access the menu
The page on the right appears; select an option from
the list (e.g. 01) and press to enter
Press to enter
Use the Unit keypad to type the name you want to
enter in the index book as if you were typing an SMS
message;
press to enter
If you make a mistake, you can go back to the wrong
letter by pressing
and re-type it; press to enter
a space between two words
Antitheft
Communicator
COMMUNICATOR
Jolly number
Index book
Set calls
INDEX BOOK
01: Name 1
02: Name 2
03: Name 3
INDEX BOOK
01: Office
02:
03:
04:
After entering the name, a space used for the
telephone number is shown
Press to enter
Dial the telephone number
If required, it is possible to enter pauses (e.g.
between area code number and telephone number)
by using the
, key, the pause will be displayed as
a comma
Press to enter
Press ; only once to enter another number in
the index book; instead, if you have completed the
editing, press it several times until the initial page
appears
27
INDEX BOOK
01: Office
INDEX BOOK
01: Office
031,1234567
INDEX BOOK
01: Office
02: Name 2
03: Name 3
Page 28

Burglar-alarm unit 3486
04:name
INDEX BOOK
01:Smith
02:name
03:name
04:name
SMS
INDEX BOOK
01:Smith
02:name
03:name
04:name
INDEX BOOK
01: Smith
02:
03:
04:
Rename
SMS
SELEZIONARE
Antifurto
Comunicatore
SELEZIONARE
Antifurto
Comunicatore
User manual
SMS management display
This menu can be used to display what types of functions are enabled and which are not, for a
name in the central unit address book (see the “SMS Management” chapter).
The functions that can be displayed are:
– notifications;
– activation notifications;
– activation forwarding;
– system status request
Select one item from the list using the keys
Press to confirm
Use the keys to select the SMS function
INDEX BOOK
01:Smith
02:name
03:name
INDEX BOOK
01: Smith
02:
03:
04:
Rename
Press to display the SMS status
The screen that appears shows only functions that
are enabled and disabled for the selected name.
The Jolly number entered in the central unit is the
number that can manage the activations for all the
other numbers.
Press
once to return to the address book list.
SMS MANAGEMENT
01:Rossi
Notifications
Act. Not.
Act. For.
Stat. Req.
1
:ON
:OFF
:ON
:ON
28
Page 29

Burglar-alarm unit 3486
User manual
Setting up the calls
In case of an alarm, the Unit calls the jolly number and then the numbers that you have
programmed among those that you have chosen in the index book according to the type of alarm
(max 4 for each type of alarm), for instance, in case of intrusion, you can decide whether to have
the Unit call the office or, in case of fl ooding, you can automatically call the plumber.
There are three types of alarms that can produce a telephone call: intrusion, breakdown and
technical.
Technical alarms are produced by devices that are not directly connected to the system (for
example, gas or fl ooding detectors); in this case, we suggest that you ask your installer who will
provide you with instructions for the correct programming of the calls thereof.
TYPE OF ALARM CAUSE
intrusion
antipanic
plant alarm
silent
Allarm
plant failure
technical
tampering
suplly lack
dead
battery
ask
installer
29
Page 30

Burglar-alarm unit 3486
SELEZIONARE
Antifurto
Comunicatore
SELECT
Antitheft
Communicator
Vocal messages
SELEZIONARE
Antifurto
Comunicatore
SET CALLS
Tel. number
SELECT
Antitheft
Communicator
COMMUNICATOR
Jolly number
Index book
Set calls
Vocal messages
SELEZIONARE
Antifurto
Comunicatore
SET CALLS
01: plant alarm
02: plant failure
03: technical 1
Tel. number
NUMBERS TO CALL
Modify
SELECT
Antitheft
Communicator
COMMUNICATOR
Jolly number
Index book
Set calls
Vocal messages
SELEZIONARE
Antifurto
Comunicatore
SET CALLS
01: plant alarm
02: plant failure
03: technical 1
Tel. number
NUMBERS TO CALL
01: number 1
02: number 2
03: number 3
Modify
04: name 4
SELECT
Antitheft
Communicator
COMMUNICATOR
Jolly number
Index book
Set calls
Vocal messages
SELEZIONARE
Antifurto
Comunicatore
SET CALLS
01: plant alarm
02: plant failure
03: technical 1
Tel. number
NUMBERS TO CALL
01: number 1
02: number 2
03: number 3
Modify
Modify
INDEX BOOK
01: office
02: Plumber
03: name 3
04: name 4
SELECT
Antitheft
Communicator
COMMUNICATOR
Jolly number
Index book
Set calls
Vocal messages
User manual
Accessing the edit menu
Select Dialling device (Communicator) and press
to enter
SELECT
Antitheft
Communicator
Select Set calls and press to access the menu
Select an option from the list (e.g. Plant alarm)
Select function Tel. Number with the keys (last
line on the display)
Press to enter
The list of the 4 telephone numbers linked to the
plant alarm appears on the display
Select one of the options and press to enter
A previously memorised telephone index book
appears; select a number you want to link to the type
of alarm (e.g. office)
Press to enter
COMMUNICATOR
Jolly number
Index book
Set calls
01: plant alarm
02: plant failure
03: technical 1
01: number 1
02: number 2
03: number 3
01: office
02: Plumber
03: name 3
INDEX BOOK
After entering it, you can select “number 2” and
match a second telephone number with the same
alarm or press to go back to the previous page of
NUMBERS TO CALL
01: office
02: number 2
03: number 3
the menu and set up calls for other types of alarms
The DISABLE function is only for the set numbers. The Jolly number will be called anyway.
30
Page 31

Burglar-alarm unit 3486
SELECT
Antitheft
Communicator
GSM management
SELEZIONARE
Antifurto
Comunicatore
GSM MANAGEMENT
SELECT
Antitheft
Communicator
COMMUNICATOR
Set calls
Vocal messages
Tel. functions
GSM management
SELEZIONARE
Antifurto
Comunicatore
GSM MANAGEMENT
PIN code
Check credit
SMS activation
call
SELECT
Antitheft
Communicator
COMMUNICATOR
Set calls
Vocal messages
Tel. functions
GSM management
User manual
About your remaining credit
If you use a prepaid SIM card, it is possible to know the remaining credit with the following
procedure:
COMMUNICATOR
Accessing the Dialling device (communicator) menu
and select GSM management
Press to enter
Set calls
Vocal messages
Tel. functions
Select Check credit
PIN code
Check credit
SMS activation
Press to enter
DIAL NUMBER
Dial the number given by the telephone carrier and
press to enter
How many times should calls be made?
Once the Unit starts making calls after an alarm, it starts operating as follows:
It calls the jolly number first;
then, it calls the set telephone numbers in the ordered sequence for that specific alarm (see
Chapter “Setting up the calls”); 20 seconds elapse between one call and the other.
When the first call cycle has been completed, it starts again with the second cycle (if set); the next
cycle will only call the telephone numbers that:
• Have not answered the first call.
• Were busy when the call was made.
• Have answered the call but the person who answered did not press a number when requested
by the Unit.
This will go on for the number of set cycles (max 4).
If the MyHOME_Web portal or the Ademco protocol are active, the jolly number will be that of the
portal or the surveillance unit.
Both PSTN (fixed line) and GSM channels are enabled in the basic configuration; calls will be made,
according to the number of set cycles, on one channel first and then on the other by following the
priority programmed by the installation technician.
WHAT MUST NOT BE DONE:
– Never unscrew the antenna connector!;
– Do not remove the SIM Card!
If you need help, call your installation technician!
31
Page 32

Burglar-alarm unit 3486
SELECT
SELEZIONARE
Antifurto
Comunicatore
SELECT
Antitheft
Communicator
COMMUNICATOR
Tel. functions
SELEZIONARE
Antifurto
Comunicatore
ON
SELECT
Antitheft
Communicator
COMMUNICATOR
Index book
Set calls
Vocal messages
Tel. functions
SELEZIONARE
Antifurto
Comunicatore
ON
SELECT
Antitheft
Communicator
COMMUNICATOR
Index book
Set calls
Vocal messages
Tel. functions
SELEZIONARE
Antifurto
Comunicatore
TEL. FUNCTIONS
Call
Answer
Call Cycles
ON
TEL. FUNCTIONS
Call
Answer
Call Cycles
Number 5
Number 2
SELECT
Antitheft
Communicator
COMMUNICATOR
Index book
Set calls
Vocal messages
Tel. functions
SELEZIONARE
Antifurto
Comunicatore
TEL. FUNCTIONS
Call
Answer
Call Cycles
ON
TEL. FUNCTIONS
Call
Answer
Call Cycles
Number 5
TEL. FUNCTIONS
Call
Answer
Call Cycles
Number 2
SELECT
Antitheft
Communicator
COMMUNICATOR
Index book
Set calls
Vocal messages
Tel. functions
User manual
Select Dialling device (Communicator) and press
to enter
Select Tel. functions and press to access the menu
Select Calls cycles with the keys
After the selection, the number of programmed
cycles appears in the last line of the display
Antitheft
Communicator
Index book
Set calls
Vocal messages
TEL. FUNCTIONS
Call
Answer
Call Cycles
TEL. FUNCTIONS
Call
Answer
Call Cycles
TEL. FUNCTIONS
Change the number according to your needs with
the
keys
Press to memorise the change; “in progress...”
appears for a few seconds on the display, the
Call
Answer
Call Cycles
NUM DA CHIAMARE
01: vigilanza
in progress...
operation will then be completed
The call cycles can be stopped in two ways:
Locally: typing the user code number or an enabled numeric code or using an enabled key
(remote control or transponder).
From a distance: (telephone line): after receiving the call from the Unit, type in the user code on
your own telephone keypad, when required.
If the direct call to the MyHOME_Web portal or to the surveillance unit has not been properly
completed, it will be repeated even if the cycle of calls has been stopped.
Note: if the code you have typed in is not correct, the Unit will cut the communication at the
third try and, during the next cycles, it will not call that number again.
32
Page 33

Burglar-alarm unit 3486
Press a
number to
listen
Part to be
recorded
Pre-recorded messages
Personalizable messages
Message
recorded by..
name and
address of
user
MyHome system, warning
+ type of alarm (e.g. intrusion)
MyHome system, warning
+ personalised message
MyHome system, warning + type
of alarm (e.g. supply lack)
System status
(e.g. ON)
+
type of alarm
+
enter code
Pre-recorded
part
Pre-recorded
part
User manual
Editing vocal messages
When you receive a call from the Unit, it notifies you on what is happening with a vocal message;
for example, you could receive a message such as:
System MyHOME. Warning gas alarm press a number after pressing a number you will hear:
Personalized message (address) + the system is on, warning gas alarm + enter code.
After typing in the correct password, you can send commands to the Unit.
A vocal message will be returned, e.g. executed.
The message has pre-recorded parts and other personalisable parts.
Personalisable parts are those referred to the address. That’s where you can record a message with
your personal data (name and address) and data referred to the technical alarms and telephone
commands; as for the latter, ask your installer, since the message to be used should be consistent
with the type of technical alarm or command related to it (e.g. “gas alarm” or “roller shutters”).
When recording the messages, watch the time available, which is set at 8 seconds for the address
and at 2 seconds for the other messages.
The time available to record the message is displayed by a number of asterisks that gradually go
off as the seconds go by.
The recordable messages are as follows: the first for the address, the next 4 for the technical alarms
and the last 4 for the first telephone commands (from 911 to 914).
For the correct link between the vocal message to be recorded and its technical alarm refer to the
table below, which has been compiled by the installer.
Vocal message Linked technical alarm
Technical 1
Technical 2
Technical 3
Technical 4
33
Page 34

Burglar-alarm unit 3486
SELECT
SELEZIONARE
Antifurto
Comunicatore
SELECT
Antitheft
Communicator
Vocal messages
SELEZIONARE
Antifurto
Comunicatore
VOCAL MESSAGES
Listen
SELECT
Antitheft
Communicator
COMMUNICATOR
Jolly number
Index book
Set calls
Vocal messages
SELEZIONARE
Antifurto
Comunicatore
VOCAL MESSAGES
01: address
02: technical 1
03: technical 2
Listen
SELECT
Antitheft
Communicator
COMMUNICATOR
Jolly number
Index book
Set calls
Vocal messages
VOCAL MESSAGES
SELEZIONARE
Antifurto
Comunicatore
VOCAL MESSAGES
01: address
02: technical 1
03: technical 2
Listen
COMMUNICATOR
Record
SELECT
Antitheft
Communicator
COMMUNICATOR
Jolly number
Index book
Set calls
Vocal messages
VOCAL MESSAGES
Chiamata
********
Listen
SELEZIONARE
Antifurto
Comunicatore
VOCAL MESSAGES
01: address
02: technical 1
03: technical 2
Listen
COMMUNICATOR
Record
SELECT
Antitheft
Communicator
COMMUNICATOR
Jolly number
Index book
Set calls
Vocal messages
VOCAL MESSAGES
Chiamata
********
Listen
SELEZIONARE
Antifurto
Comunicatore
VOCAL MESSAGES
01: address
02: technical 1
03: technical 2
Listen
COMMUNICATOR
Record
SELECT
Antitheft
Communicator
COMMUNICATOR
Jolly number
Index book
Set calls
Vocal messages
VOCAL MESSAGES
Chiamata
********
Listen
User manual
Accessing the edit menu
Select Dialling device (Communicator) and press
to enter
Select Vocal messages and press to access the
menu
Select an option from the list (e.g. Address) and press
to enter
You can now listen to the existing message by
pressing
, or
Antitheft
Communicator
COMMUNICATOR
Jolly number
Index book
Set calls
01: address
02: technical 1
03: technical 2
Chiamata
********
Listen
select the Record function to edit a new message
with the keys
By pressing the recording starts.
Record the message (with your name and address) in
a normal voice at a distance of 10 – 15 cm from the
Unit microphone (Bticino logo)
After recording, select the Listen function to make
sure the recording was executed properly; select
Memorize only when you are sure you want to
replace the existing message with one you have just
recorded; press to enter
01: address
02: technical 1
03: technical 2
01: address
02: technical 1
03: technical 2
01: address
02: technical 1
03: technical 2
34
Page 35

Burglar-alarm unit 3486
SELEZIONARE
Antifurto
Comunicatore
ANTITHEFT
Settings
SELECT
Antitheft
Communicator
SELEZIONARE
Antifurto
Comunicatore
ANTITHEFT
Date and hour
Commands
Automations
Settings
SETTINGS
Select
SELECT
Antitheft
Communicator
SELEZIONARE
Antifurto
Comunicatore
ANTITHEFT
Date and hour
Commands
Automations
Settings
SETTINGS
Entry delay
Exit delay
User code
Select
User code
SELECT
Antitheft
Communicator
SELEZIONARE
Antifurto
Comunicatore
ANTITHEFT
Date and hour
Commands
Automations
Settings
SETTINGS
Entry delay
Exit delay
User code
Select
User code
Present: 12345
New: 0 0000
SELECT
Antitheft
Communicator
User code
SELEZIONARE
Antifurto
Comunicatore
ANTITHEFT
Date and hour
Commands
Automations
Settings
SETTINGS
Entry delay
Exit delay
User code
Select
Select
User code
Present: 12345
New: 0 0000
SELECT
Antitheft
Communicator
User code
Present: 12345
New: 67890
User manual
Changing the user code
The Burglar-alarm Unit is protected by two codes which originally are identical (0000).
The maintenance code (for installation technician use only) allows access to all configuration
menus of the unit; however, for safety reasons, this code does not enable / disable the burglar
alarm but, if the burglar alarm is enabled it will not allow access to the menus.
The user code enables / disables the burglar alarm as well as the access to the configuration
menus (except those for the installation technician).
The user code cannot be modified if the installer code has not been modified.
The basic user code is: 00000 and it is the same for all manufactured units. It is therefore
recommended to change it with another one of your choice in order to give your system the
highest safety. The procedure for changing the user code is as follows:
SELECT
Accessing the edit menu
Select Burglar alarm (antitheft) and press to enter
Antitheft
Communicator
Select Settings with the keys and then press
Select User code with the keys and then press
The page on the right appears; the cursor is already
positioned on the first digit of the new code
Type in the new code you have chosen.
The new code must have 5 digits (e.g. 67890)
Date and hour
Commands
Automations
Entry delay
Exit delay
User code
Present: 12345
New: 0 0000
Present: 12345
New: 67890
Enter the new code with
SETTINGS
Entry delay
Exit delay
User code
35
Page 36

Burglar-alarm unit 3486
SELEZIONARE
Antifurto
Comunicatore
ANTITHEFT
Settings
SELECT
Antitheft
Communicator
SELEZIONARE
Antifurto
Comunicatore
ANTITHEFT
Date and hour
Commands
Automations
Settings
Select
SELECT
Antitheft
Communicator
SELEZIONARE
Antifurto
Comunicatore
ANTITHEFT
Date and hour
Commands
Automations
Settings
SETTINGS
Exit delay
User code
Code/key
Select
SELECT
Antitheft
Communicator
Disable
SELEZIONARE
Antifurto
Comunicatore
ANTITHEFT
Date and hour
Commands
Automations
Settings
SETTINGS
Exit delay
User code
Code/key
Select
SELECT
Antitheft
Communicator
SETTINGS
01: Transponder 1
02: Transponder 2
03: Code 1
04:
_____________
Disable
Update
SELEZIONARE
Antifurto
Comunicatore
ANTITHEFT
Date and hour
Commands
Automations
Settings
SETTINGS
Exit delay
User code
Code/key
Select
SELECT
Antitheft
Communicator
SETTINGS
01: Transponder 1
02: Transponder 2
03: Code 1
04:
_____________
Disable
SETTINGS
01: Transponder 1
02: Transponder 2
03: Code 1
04:
_____________
Update
SELEZIONARE
Antifurto
Comunicatore
ANTITHEFT
Date and hour
Commands
Automations
Settings
SETTINGS
Exit delay
User code
Code/key
Select
SELECT
Antitheft
Communicator
Key program
enter code
SETTINGS
01: Transponder 1
02: Transponder 2
03: Code 1
04:
_____________
Disable
SETTINGS
01: Transponder 1
02: Transponder 2
03: Code 1
04:
_____________
Update
User manual
Changing the numeric codes
It is possible to edit the numeric codes stored by the installer in the Unit
Accessing the edit menu
Select Burglar-alarm (antitheft) and press to enter
SELECT
Antitheft
Communicator
Select Settings with the keys and press
Select Code/Keys with the keys and press
The page on the side appears: select the code to be
modified with the keys
Select the Update function with the keys to
modify the code
Date and hour
Commands
Automations
SETTINGS
Exit delay
User code
Code/key
SETTINGS
01: Transponder 1
02: Transponder 2
03: Code 1
_____________
04:
SETTINGS
01: Transponder 1
02: Transponder 2
03: Code 1
_____________
04:
Type in the new code you have chosen.
The new code must have 5 digits
After typing the fifth digit, the check page on the
side appears
36
Key program
enter code
Key program
programming
performed
Page 37

Burglar-alarm unit 3486
SELEZIONARE
Antifurto
Comunicatore
SELECT
Antitheft
Communicator
COMMUNICATOR
Tel. functions
SELEZIONARE
Antifurto
Comunicatore
OFF
SELECT
Antitheft
Communicator
COMMUNICATOR
Index book
Set calls
Vocal messages
Tel. functions
SELEZIONARE
Antifurto
Comunicatore
TEL. FUNCTIONS
Supply lack
Remote control
Tel. answering
OFF
SELECT
Antitheft
Communicator
COMMUNICATOR
Index book
Set calls
Vocal messages
Tel. functions
TEL. FUNCTIONS
ON
SELEZIONARE
Antifurto
Comunicatore
TEL. FUNCTIONS
Supply lack
Remote control
Tel. answering
OFF
NUM DA CHIAMARE
SELECT
Antitheft
Communicator
COMMUNICATOR
Index book
Set calls
Vocal messages
Tel. functions
TEL. FUNCTIONS
Supply lack
Remote control
Tel. answering
ON
SELEZIONARE
Antifurto
Comunicatore
TEL. FUNCTIONS
Supply lack
Remote control
Tel. answering
OFF
NUM DA CHIAMARE
01: vigilanza
in progress...
SELECT
Antitheft
Communicator
COMMUNICATOR
Index book
Set calls
Vocal messages
Tel. functions
TEL. FUNCTIONS
Supply lack
Remote control
Tel. answering
ON
Using an answering machine
Setting up the answering machine
If an answering machine is used, it must be setup with the Unit as follows:
Accessing the edit menu
Select Dialling device (Communicator) and press
to enter
Antitheft
Communicator
User manual
SELECT
Select Tel. functions and press to access the menu
Select Tel. answering machine with the keys
Use the keys to change the setup from OFF
(basic setup) to ON
Press to memorise the change; in progress...
appears for a few seconds on the display
Index book
Set calls
Vocal messages
TEL. FUNCTIONS
Supply lack
Remote control
Tel. answering
Supply lack
Remote control
Tel. answering
01: vigilanza
in progress...
TEL. FUNCTIONS
Supply lack
The operation will be then completed
Remote control
Tel. answering
ON
If a call is made on the fixed line, the answering machine will answer after the set number of rings
(see Chapter “Programming the answer”).
Calls on the GSM channel do not activate the answering machine; there will always be an answer
after the first ring.
WHAT MUST NOT BE DONE:
– Never unscrew the antenna connector!;
– Do not remove the SIM Card!
If you need help, call your installation technician!
37
Page 38

Burglar-alarm unit 3486
SELECT
SELEZIONARE
Antifurto
Comunicatore
SELECT
Antitheft
Communicator
Tel. functions
SELEZIONARE
Antifurto
Comunicatore
ON
SELECT
Antitheft
Communicator
COMMUNICATOR
Index book
Set calls
Vocal messages
Tel. functions
SELEZIONARE
Antifurto
Comunicatore
TEL. FUNCTIONS
Call
Answer
Call Cycles
ON
5 rings
SELECT
Antitheft
Communicator
COMMUNICATOR
Index book
Set calls
Vocal messages
Tel. functions
SELEZIONARE
Antifurto
Comunicatore
TEL. FUNCTIONS
Call
Answer
Call Cycles
ON
TEL. FUNCTIONS
Call
Answer
Call Cycles
5 rings
7 rings
SELECT
Antitheft
Communicator
COMMUNICATOR
Index book
Set calls
Vocal messages
Tel. functions
SELEZIONARE
Antifurto
Comunicatore
TEL. FUNCTIONS
Call
Answer
Call Cycles
ON
TEL. FUNCTIONS
Call
Answer
Call Cycles
5 rings
TEL. FUNCTIONS
Call
Answer
Call Cycles
7 rings
SELECT
Antitheft
Communicator
COMMUNICATOR
Index book
Set calls
Vocal messages
Tel. functions
User manual
Programming the answer
If an answering machine is used, you will have to program it so that it will answer before the Unit
(it normally answers after 5 rings) If this is not possible, you can change the Unit setup with the
following procedure:
(the setup applies to the PSTN line only; the answer is fixed after 1 ring for the GSM channel):
WHAT MUST NOT BE DONE:
If you need help, call your installation technician!
– Never unscrew the antenna connector!;
– Do not remove the SIM Card!
Accessing the edit menu
Select Dialling device (Communicator) and press
to enter
Select Tel. functions and press to access the menu
Select Answer with the keys
After the selection, the existing programming (from
OFF to 8 rings) appears in the last line on the display
Antitheft
Communicator
COMMUNICATOR
Index book
Set calls
Vocal messages
TEL. FUNCTIONS
Call
Answer
Call Cycles
TEL. FUNCTIONS
Call
Answer
Call Cycles
Change the number according to your needs with
the
keys (if you select OFF, the Unit will not
answer any call)
Press to memorise the change; “in progress...”
appears for a few seconds on the display; the
TEL. FUNCTIONS
Call
Answer
Call Cycles
NUM DA CHIAMARE
01: vigilanza
in progress ...
operation will then be completed
How to communicate with the Unit?
When you call the Unit on the FIXED line, the answering machine will be the first to answer. Now,
press ## to communicate with the Unit.
You will then be requested to type in the User code.
38
Page 39

Burglar-alarm unit 3486
User manual
Remote use
The MyHOME_Web portal
MyHOME_Web is a service off ered by MyHOME that allows you to check and manage your home
remotely by using any means of communication: telephone (mobile or fixed), computer connected
to the Internet and any other future technological device.
All this is possible through the MyHOME_Web portal, which is able to transmit your orders, keep
you updated on what is happening in your house and on the alarms that went on. Also, it transmits
the images and sounds in your house.
Alarms
Through its safety solutions, the MyHOME_Web alarm service gives you the highest level of
protection against any danger. As a result, MyHOME is not limited to triggering an audible signal
when dangers occur but it warns you even when you’re not at home. It also manages danger
situations in order to avoid damages in your house.
When an alarm goes on (burglar alarm (antitheft), gas alarm, fl ooding alarm), your house timely
contacts the people you have decided to warn with a phone call, an SMS message and an email
through annexed audio and video files. At the same time, it independently responds with actions
that you have decided such as rolling down the roller shutters and turning on the lights in the
garden.
It is also possible to enable / disable the burglar alarm, obtain the status of the zones, completely
download the alarm memory and get remote assistance service.
Commands
Through your reserved MyHOME_Web Internet portal area or by telephone (through the
personalisable vocal menu), you can control all MyHOME elements in your house:
• switch lights on and off ;
• activate all control units such as curtains, roller shutters or automatic gates;
• turn on/off or change your heating system program;
• switch on and off your electrical home appliances;
• manage the priorities of the electrical loads in order to avoid the release of the general power
switch or contractual power overload limit allowed by the electric company.
Check
Through your reserved MyHOME_Web Internet portal area or with just a simple phone call
(through the personalisable vocal menu), you can check: which electrical appliances and which
lights are on, if the roller shutters are shut, if the burglar alarm is on as well as the status of every
other element in your house.
These are some of the services MyHOME_Web can off er you. For more details, visit this website:
www.myhome-bticino.it
and if you wish to have this service, contact your installer.
MyHome Alarm
BTicino makes available the free App MyHome Alarm ( and ), which enables
you to manage the GSM burglar alarm central unit.
You will now be able to manage your burglar alarm system locally and also remotely, by sending
SMS management commands like:
– arm/disarm system, including arming scenarios, zones;
– status check: armed/disarmed, active scenario or zones, network and battery status;
– Management of the enabling status for each telephone number configured in the central unit;
– Receive alarm notifications from the central unit (also without the App installed);
– Receive the configurations already set on your central unit.
Check with your installer if the version of the central unit installed in your home is compatible
with this App, and if it is already correctly configured.
39
Page 40

Burglar-alarm unit 3486
User manual
Answering a call from the Unit
It is recommended to photocopy and hand out this page to all those who will be called by the Unit
in case of an alarm.
Answer the call and wait for the alarm message
e.g.: MyHOME System, warning intrusion alarm, press a number to listen
Message
After pressing a number you will hear a message, for example: Message recorded
by (name and address of user), the burglar alarm is on, intrusion alarm; enter code
STOP CYCLE OF CALLS
INFORMATION REQUEST
FORWARD COMMAND
Pressing a key before
hanging up they will
not be called during
the next call cycles.
USER CODE
Entry of the user code blocks all the calls for the alarm in progress.
It is now possible to:
-
send commands (see chapter “Controlling your home from a distance”)
or interrogate the system (see chapter “Querying the Unit”).
- hang up to end the communication
HANG UP
END OF
COMMUNICATION
Querying the Unit
These simple commands let you know the status of the system at any time. They also allow you to
communicate vocally and listen to what is happening in your house.
Dial the telephone number (GSM or PSTN fixed telephone). The Unit will answer
after the programmed number of rings;
if you have an answering machine, press ## after it has started to operate (only
if you are calling on the FIXED line).
Enter
code
Type in the User code; if it is correct, you will get “executed” as an answer. If not,
the message will be “error”; after three errors, the Unit cuts the communication.
SEND COMMAND
Dial the command you want to send to the Unit
Query the burglar alarm to know if it is on or off as well as any other alarms
What you will say on the telephone will be emitted from the Unit loudspeaker
You can listen to what is happening through the Unit microphone
END
COMMUNICATION
WHAT MUST NOT BE DONE:
– Never unscrew the antenna connector!;
– Do not remove the SIM Card!
If you need help, call your installation technician!
40
Page 41

Burglar-alarm unit 3486
9
User manual
Controlling your home from a distance
The MyHOME system lets you control the functions in your house such as lights, heating and roller
shutters - even when you’re not there - through easy telephone commands
Dial the telephone number. The Unit will answer after the
programmed number of rings; if you have an answering
machine, press ## after it has started to operate
Enter
code
CHECK MEMO-CARD
(see facsimile on the right)
Code 99 Description
1
9911 Entrance light ON
2
9901 Entrance light OFF
3
9912 Room rolling shutters UP
4
9902 Room rolling shutters DOWN
5
6
COMMANDS
7
8
9
Type in the user code; if it is correct, you will get “executed” as an
answer. If not, the message will be “error”; after three errors, the
Unit cuts the communication
The memo-card is a memorandum to be filled out by the
installer. It contains the codes to be sent and a description that
identifies them
SEND COMMAND
Type in the command on the keypad (e.g. 9912); the Unit will
confirm it with a vocal END message (e.g. executed, roller
shutters up)
END
COMMUNICATION
Call your installer to decide which remote functions you wish to activate (lights turning on, heater
...); the installer will properly program the Unit and fill out the memo-card with a short description
of the function related to it.
BURGLAR-ALARM UNIT
Answer the call:
• answer the call;
• press a number;
• type the user code;
• listen to the message;
• send some commands or hang up.
Call the control unit:
• dial the telephone number;
• if an answering machine is connected
enter ##;
• type the user code;
• enter the controls;
• hang up.
Commands
SYSTEM STATUS
922
MESSAGE COMMUNICATION
921
ROOM LISTENING
920
*5*8##
*5*9##
*5*8#1...8#
Example - By entering the command:
ENABLING
DISABLING
SEPARATION
*5*8#1256#
zones 1, 2, 5 and 6 will be active
41
Page 42

Page 43

Legrand SNC
128, av. du Maréchal-de-Lattre-de-Tassigny
87045 Limoges Cedex - France
www.legrand.com
BTicino SpA
Viale Borri, 231
21100 Varese
www.bticino.it
Legrand SNC reserves at any time the right to modify the contents of this booklet and to communicate,
in any form and modality, the changes brought to the same..
 Loading...