

LeCroy WaveAce, WaveAce WA202, WaveAce WA212, WaveAce WA222, WaveAce WA232 Getting Started Manual
...Page 1

Getting Started
Manual
Page 2
WaveAce
Oscilloscope
Getting Started Manual
August, 2008
Page 3
Manufactured under an ISO
9000 Registered Quality
Management System.
Visit www.lecroy.com to
view the certificate.
This electronic product is subject to disposal
and recycling regulations that vary by country
and region. Many countries prohibit the disposal
of waste electronic equipment in standard
waste receptacles.
For more information about proper disposal and
recycling of your LeCroy product, please visit
www.lecroy.com/recycle.
LeCroy Corporation
700 Chestnut Ridge Road
Chestnut Ridge, NY, 10977-6499
Tel: (845) 578-6020, Fax: (845) 578 5985
Warranty
NOTE: THE WARRANTY BELOW REPLACES ALL OTHER WARRANTIES, EXPRESSED OR IMPLIED, INCLUDING BUT NOT
LIMITED TO ANY IMPLIED WARRANTY OF MERCHANTABILITY, FITNESS, OR ADEQUACY FOR ANY PARTICULAR PURPOSE
OR USE. LECROY SHALL NOT BE LIABLE FOR ANY SPECIAL, INCIDENTAL, OR CONSEQUENTIAL DAMAGES, WHETHER IN
CONTRACT OR OTHERWISE. THE CUSTOMER IS RESPONSIBLE FOR THE TRANSPORTATION AND INSURANCE CHARGES
FOR THE RETURN OF PRODUCTS TO THE SERVICE FACILITY. LECROY WILL RETURN ALL PRODUCTS UNDER WARRANTY
WITH TRANSPORT PREPAID.
The oscilloscope is warranted for normal use and operation, within specifications, for a period of three years from shipment. LeCroy will
either repair or, at our option, replace any product returned to one of our authorized service centers within this period. However, in order
to do this we must first examine the product and find that it is defective due to workmanship or materials and not due to misuse,
neglect, accident, or abnormal conditions or operation.
LeCroy shall not be responsible for any defect, damage, or failure caused by any of the following: a) attempted repairs or installations
by personnel other than LeCroy representatives or b) improper connection to incompatible equipment, or c) for any damage or
malfunction caused by the use of non-LeCroy supplies. Furthermore, LeCroy shall not be obligated to service a product that has been
modified or integrated where the modification or integration increases the task duration or difficulty of servicing the oscilloscope. Spare
and replacement parts, and repairs, all have a 90-day warranty.
The oscilloscope’s firmware has been thoroughly tested and is presumed to be functional. Nevertheless, it is supplied without warranty
of any kind covering detailed performance. Products not made by LeCroy are covered solely by the warranty of the original equipment
manufacturer.
Internet: www.lecroy.com
© 2008 by LeCroy Corporation. All rights reserved.
LeCroy, ActiveDSO, JitterTrack, WavePro, WaveMaster, WaveSurfer, WaveLink, WaveExpert,
Waverunner, and WaveAce are registered trademarks of LeCroy Corporation. Other product or brand
names are trademarks or requested trademarks of their respective holders. Information in this
publication supersedes all earlier versions. Specifications are subject to change without notice.
WA-GSM-E-RevA
916464-00
Page 4

Getting Started Manual
WA-GSM-E-RevA
i
TABLE OF CONTENTS
Welcome ............................................................................... 3
Support........................................................................... 3
Thank You ...................................................................... 3
Safety Requirements ..................................................... 4
Getting to Know WaveAce ................................................. 9
Hardware........................................................................ 9
Basic Controls .............................................................. 12
Probes .......................................................................... 20
Viewing Waveforms .......................................................... 22
Turning On Traces ....................................................... 22
Setting Up the Display ................................................. 23
Understanding Display Information .............................. 24
Auto Setup ................................................................... 26
Vertical Settings and Channel Controls ......................... 27
Choosing Coupling ....................................................... 28
Limiting Bandwidth ....................................................... 29
Adjusting Sensitivity ..................................................... 30
Setting Probe Attenuation ............................................ 31
Inverting Waveforms .................................................... 32
Using the Digital Filter .................................................. 33
Sampling Modes ................................................................ 34
Acquisition Sampling Modes ........................................ 34
Zooming Waveforms .................................................... 36
Triggering ........................................................................... 37
Trigger Types ............................................................... 37
Edge Triggering ........................................................... 37
Pulse Triggering ........................................................... 38
Video Triggering ........................................................... 39
Slope Triggering ........................................................... 40
Alternative Triggering ................................................... 41
Page 5

WaveAce
ii
WA-GSM-E-RevA
Analyzing Waveforms ....................................................... 42
Waveform Measurements ............................................ 42
Parameter Measurements ............................................ 45
Waveform Math ............................................................ 49
Save and Recall ................................................................. 52
Saving and Recalling Scope Setups ............................ 52
Saving and Recalling Waveforms ................................ 53
Saving and Recalling Reference Waveforms ............... 54
Saving Data (.CSV) ...................................................... 55
Saving and Printing Waveform Pictures ....................... 56
Recalling Factory Settings ............................................ 57
Utilities ................................................................................ 59
Utility Menu ................................................................... 59
System Status .............................................................. 61
Updating the System Software ..................................... 62
Reference ........................................................................... 63
Specifications ............................................................... 63
Technical Support ........................................................ 66
Page 6

Getting Started Manual
WA-GSM-E-RevA
3
Welcome
Thank you for purchasing a LeCroy WaveAce product. This Getting Started Manual includes
important safety and installation information for your WaveAce Series oscilloscope, along with
operating procedures to get you started capturing, viewing, and analyzing your waveforms.
This WaveAce Getting Started Manual provides information in the following manner:
Getting to Know WaveAce - First, we acquaint you with your new instrument.This
section contains information on the Hardware (explaining the physical features of your
new instrument), Basic Controls (demonstrating the relationship between some front
panel and screen layout controls), and Probes (explaining Probe connections).
Viewing Waveforms - Covers turning on traces and setting up your display. It also
provides information on using the Auto Setup feature.
Vertical Settings and Channel Controls - Provides step-by-step procedures for
defining you vertical settings and channel controls, such as limiting bandwidth,
adjusting sensitivity and inverting waveforms.
Sampling Modes - Covers setting acquisition sampling modes, acquiring waveforms,
and setting the timebase.
Triggering - Provides step-by-step procedures for the five trigger types - edge, pulse,
video, slope, and alternative.
Analyzing Waveforms - Lists waveform measurements and parameter
measurements. Also provides procedures for using Math functions.
Save and Recall - Provides step-by-step procedures for saving and recalling scope
setups, waveforms, and reference waveforms. Also provides procedures for saving
data, saving and printing pictures, and recalling factory settings.
Utilities - Covers the Utility functions, such as viewing system status.
Reference - This section includes important safety information and specifications for
the WaveAce Series Oscilloscopes.
Support
When your WaveAce Series Oscilloscope is delivered, verify that all items on the packing list
or invoice copy have been shipped to you. Contact your nearest LeCroy customer service
center or national distributor if anything is missing or damaged. If there is something missing or
damaged, and you do not contact us immediately, we cannot be responsible for replacement.If
you have any problems with your product, please refer to the Technical Support contacts at the
end of this Getting Started Manual. You can also refer to additional support materials at
www.lecroy.com, or the Online Help files in your instrument.
Thank You
We truly hope these materials provide increased comprehension when using LeCroy's fine
products.
Sincerely,
David C. Graef
LeCroy Corporation
Vice President and Chief Technology Officer
Page 7

WaveAce
4
WA-GSM-E-RevA
This symbol is used where caution is required. Refer to the
accompanying information or documents in order to protect
against personal injury or damage to the instrument.
This symbol is used to denote the measurement ground
connection.
This symbol is used to denote a safety ground connection.
This symbol shows that the switch is a Standby (power)
switch. When it is pressed, the oscilloscope’s state toggles
between operating and Standby mode. This switch is not a
disconnect device. The instrument can only be placed in a
complete Power Off state by unplugging the power cord from
the AC supply.
This symbol is used to denote Alternating Current.
CAUTION
The CAUTION sign indicates a potential hazard. It calls
attention to a procedure, practice or condition which, if not
followed, could possibly cause damage to equipment. If a
CAUTION is indicated, do not proceed until its conditions are
fully understood and met.
WARNING
The WARNING sign indicates a potential hazard. It calls
attention to a procedure, practice or condition which, if not
followed, could possibly cause bodily injury or death. If a
WARNING is indicated, do not proceed until its conditions are
Safety Requirements
This section contains information and warnings that must be observed to
keep the instrument operating in a correct and safe condition. You are
required to follow generally accepted safety procedures in addition to the
safety precautions specified in this section.
Safety Symbols
Where the following symbols appear on the instrument’s front or rear
panels, or in this manual, they alert you to important safety considerations.
Page 8
Getting Started Manual
WA-GSM-E-RevA
5
fully understood and met.
CAT I
Installation (Overvoltage) Category rating per EN 61010-1
safety standard and is applicable for the oscilloscope front
panel measuring terminals. CAT I rated terminals must only
be connected to source circuits in which measures are taken
to limit transient voltages to an appropriately low level.
Operating Environment
The instrument is intended for indoor use and should be operated in a
clean, dry environment with an ambient temperature within the range of +10
°C to 40 °C.
Note: Direct sunlight, radiators, and other heat sources should be taken
into account when assessing the ambient temperature.
WARNING
The oscilloscope must not be operated in explosive, dusty, or wet
atmospheres.
CAUTION
Do not exceed the maximum specified front panel terminal (CH1, CH2, EXT
TRIG) voltage levels. Refer to Specifications for more details.
Installation (Overvoltage) Category II refers to local distribution level, which
is applicable to equipment connected to the mains supply (AC power
source).
Installation (Overvoltage) Category I refers to signal level, which is
applicable to equipment measuring terminals that are connected to source
circuits in which measures are taken to limit transient voltages to an
appropriately low level.
Pollution Degree 2 refers to an operating environment where normally only
dry non-conductive pollution occurs. Occasionally a temporary conductivity
caused by condensation must be expected.
Protection Class 1 refers to a grounded equipment, in which protection
against electric shock is achieved by Basic Insulation and by means of a
connection to the protective ground conductor in the building wiring.
Page 9
WaveAce
6
WA-GSM-E-RevA
Voltage
Range:
90 to 264 VAC
Frequency
Range:
45 to 440 Hz
PLEASE NOTE THE FOLLOWING:
The design of the instrument has been verified to conform to EN 61010-1
safety standard per the following limits:
Installation (Overvoltage) Categories II (Mains Supply Connector) & I
(Measuring Terminals)
Pollution Degree 2
Protection Class I
Cooling
The instrument relies on forced air cooling with internal fans and ventilation
openings. Care must be taken to avoid restricting the airflow around the
apertures (fan holes) at the sides and rear of the oscilloscope. Ensure
adequate ventilation by leaving the required 10 cm (4 inch) minimum gap
around the sides and rear of the instrument.
CAUTION
Do not block the ventilation holes located on both sides and rear of the
oscilloscope.
CAUTION
Do not allow any foreign matter to enter the oscilloscope through the
ventilation holes, etc.
AC Power Source
100 to 240 Vrms (+/-10%) AC at 50/60/400 Hz; Installation Category: 300V
CAT II
No manual voltage selection is required because the instrument
automatically adapts to line voltage.
Maximum Power Consumption: 50 VA
Note: The instrument automatically adapts itself to the AC line input within
the following ranges:
Page 10
Getting Started Manual
WA-GSM-E-RevA
7
Power and Ground Connections
The instrument is provided with a grounded cord set containing a molded
three-terminal polarized plug and a standard IEC320 (Type C13) connector
for making line voltage and safety ground connection. The AC inlet ground
terminal is connected directly to the frame of the instrument. For adequate
protection against electrical shock hazard, the power cord plug must be
inserted into a mating AC outlet containing a safety ground contact.
WARNING - Electrical Shock Hazard
Any interruption of the protective conductor inside or outside of the
oscilloscope, or disconnection of the safety ground terminal creates a
hazardous situation.
Intentional interruption is prohibited.
The oscilloscope should be positioned to allow easy access to the socketoutlet. Disconnect the oscilloscope from the AC supply by unplugging the
instrument’s power cord from the AC outlet after the oscilloscope is placed
in Standby state.
CAUTION
The outer shells of the front panel BNC terminals (CH1, CH2, EXT TRIG)
are connected to the instrument’s chassis and therefore to the safety
ground.
Calibration
The recommended calibration interval is one year. Calibration should be
performed by qualified personnel only.
Cleaning
Clean only the exterior of the instrument, using a damp, soft cloth. Do not
use chemicals or abrasive elements. Under no circumstances allow
moisture to penetrate the instrument.
Avoid electrical shock hazard by unplugging the power cord from the AC
outlet before cleaning.
Page 11
WaveAce
8
WA-GSM-E-RevA
WARNING - Electrical Shock Hazard
No operator serviceable parts inside.
Do not remove covers.
Refer servicing to qualified personnel.
Abnormal Conditions
Operate the instrument only as intended by the manufacturer.
If you suspect the oscilloscope’s protection has been impaired, disconnect
the power cord and secure the instrument against any unintended
operation.
The oscilloscope’s protection is likely to be impaired if, for example, the
instrument shows visible damage or has been subjected to severe transport
stresses.
Proper use of the instrument depends on careful reading of all instructions
and labels.
WARNING
Any use of the oscilloscope in a manner not specified by the manufacturer
may impair the instrument’s safety protection. The instrument and related
accessories should not be directly connected to human subjects or used for
patient monitoring.
Page 12
Getting Started Manual
WA-GSM-E-RevA
9
Getting to Know WaveAce
Hardware
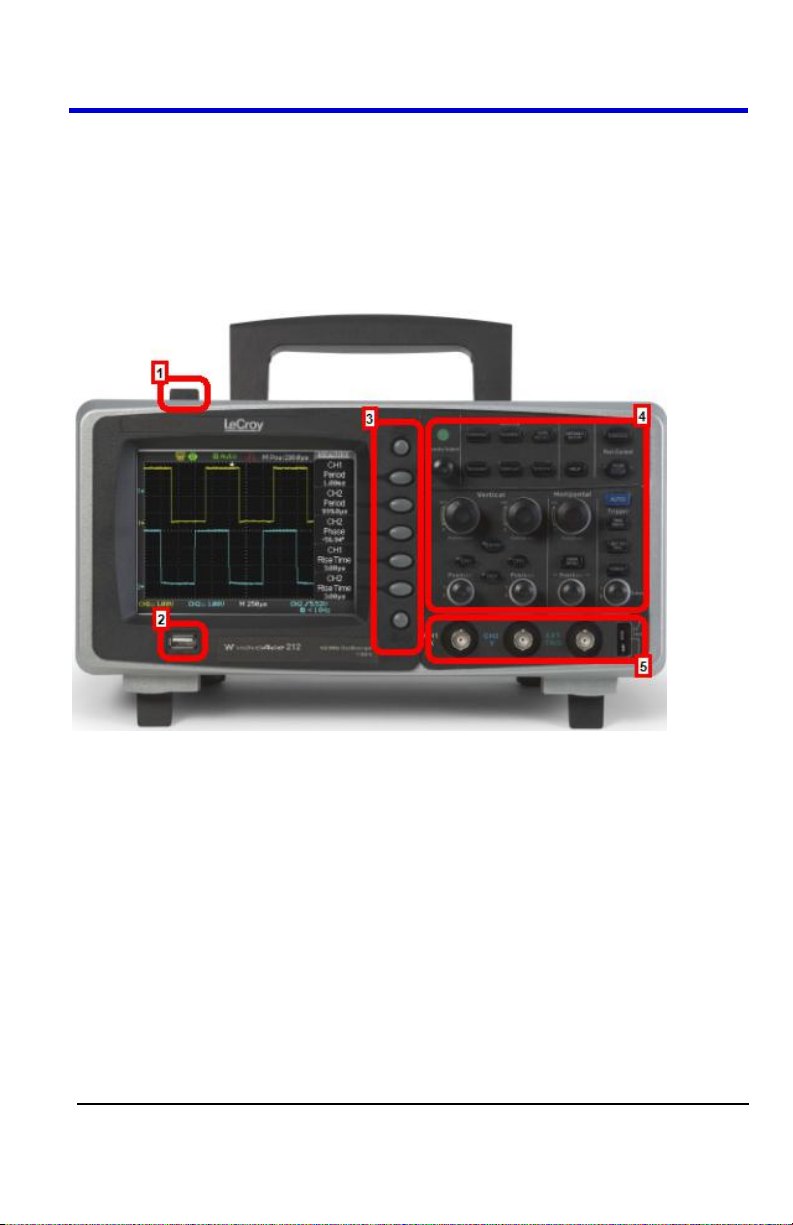
Front Panel
The WaveAce Series oscilloscopes provide an easy-to-use front panel.
The control buttons are logically grouped. The following provides an
explanation of the front panel buttons and knobs.
1. Power button
2. USB port
3. Menu On/Off, Menu Option buttons and Print button
4. Front Panel Controls
5. Channel inputs, External Trigger input, Probe connect
Page 13
WaveAce
10
WA-GSM-E-RevA
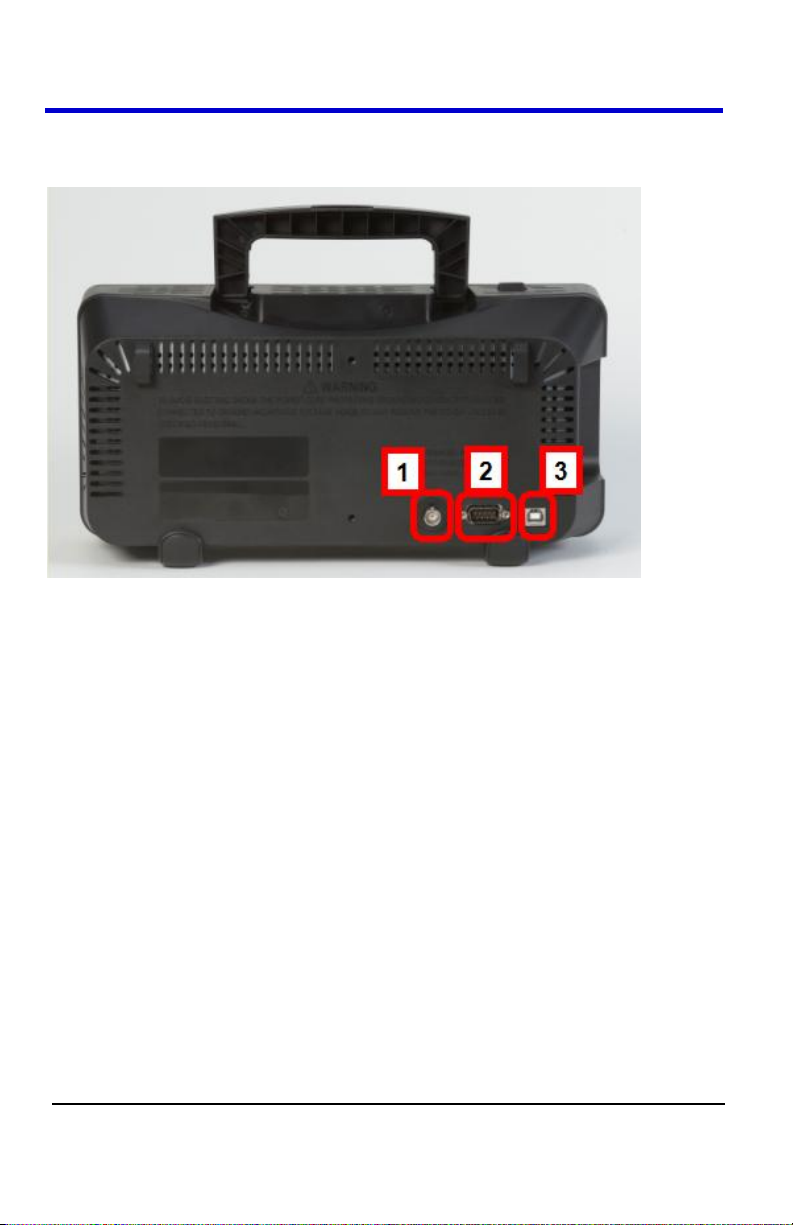
Back Panel
Numbered labels on this graphic correspond with descriptions in the table.
1. Pass/Fail Output
2. RS-232 Connector
3. Back USB Connector
Page 14
Getting Started Manual
WA-GSM-E-RevA
11
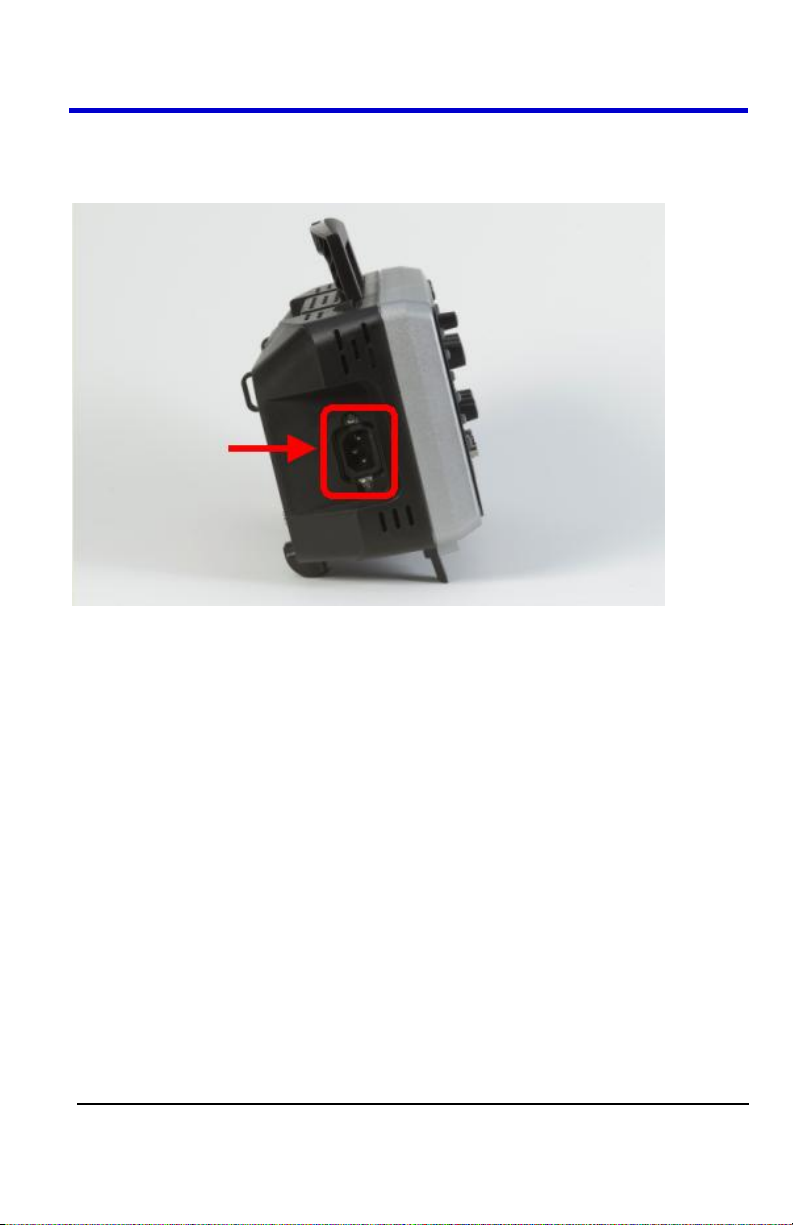
Side Panel
The WaveAce side panel is located on the left side (facing the front of the
instrument). The Power input is located on the side panel as follows:
Page 15
WaveAce
12
WA-GSM-E-RevA
Basic Controls
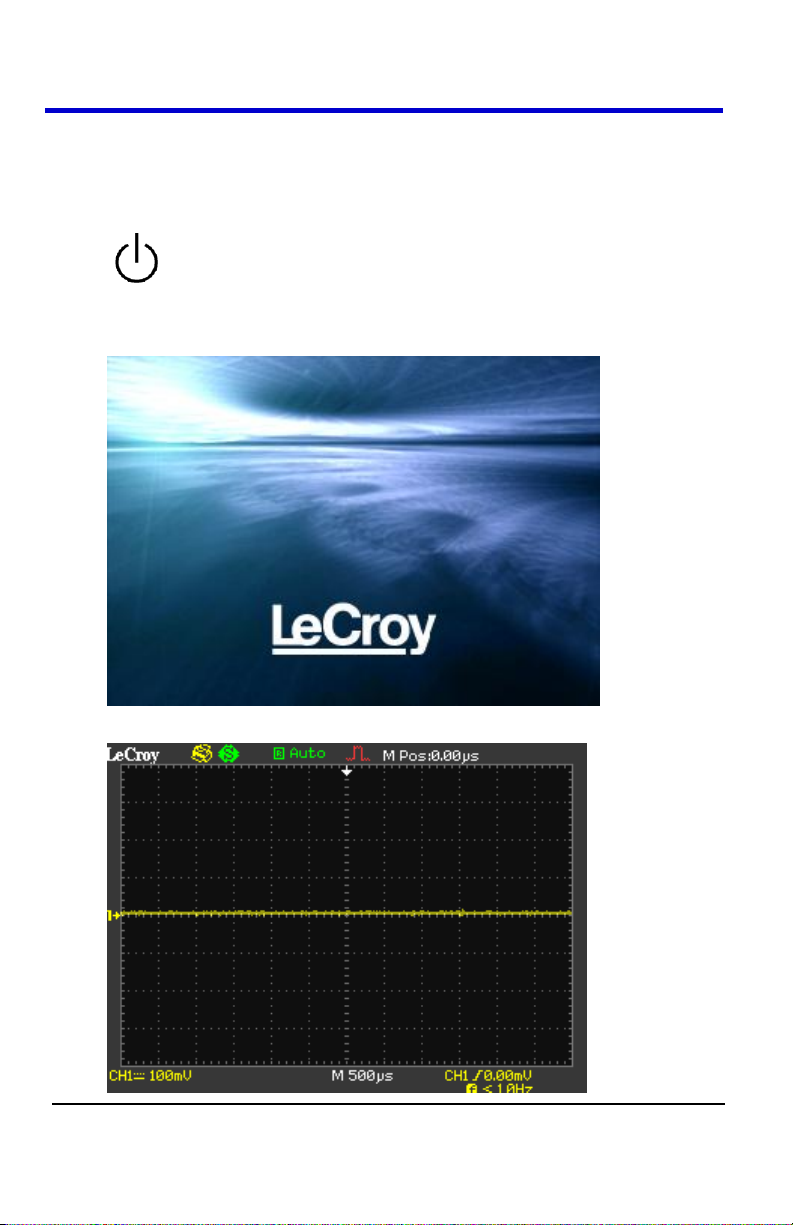
Powering Up Your WaveAce
1. Power On the oscilloscope by pressing the power button on the top
left (facing) the instrument.
2. The LeCroy Splash screen is shown. Press any key to continue (or,
after a brief period the grid display is shown).
3. The Grid Display is shown.
Page 16
Getting Started Manual
WA-GSM-E-RevA
13
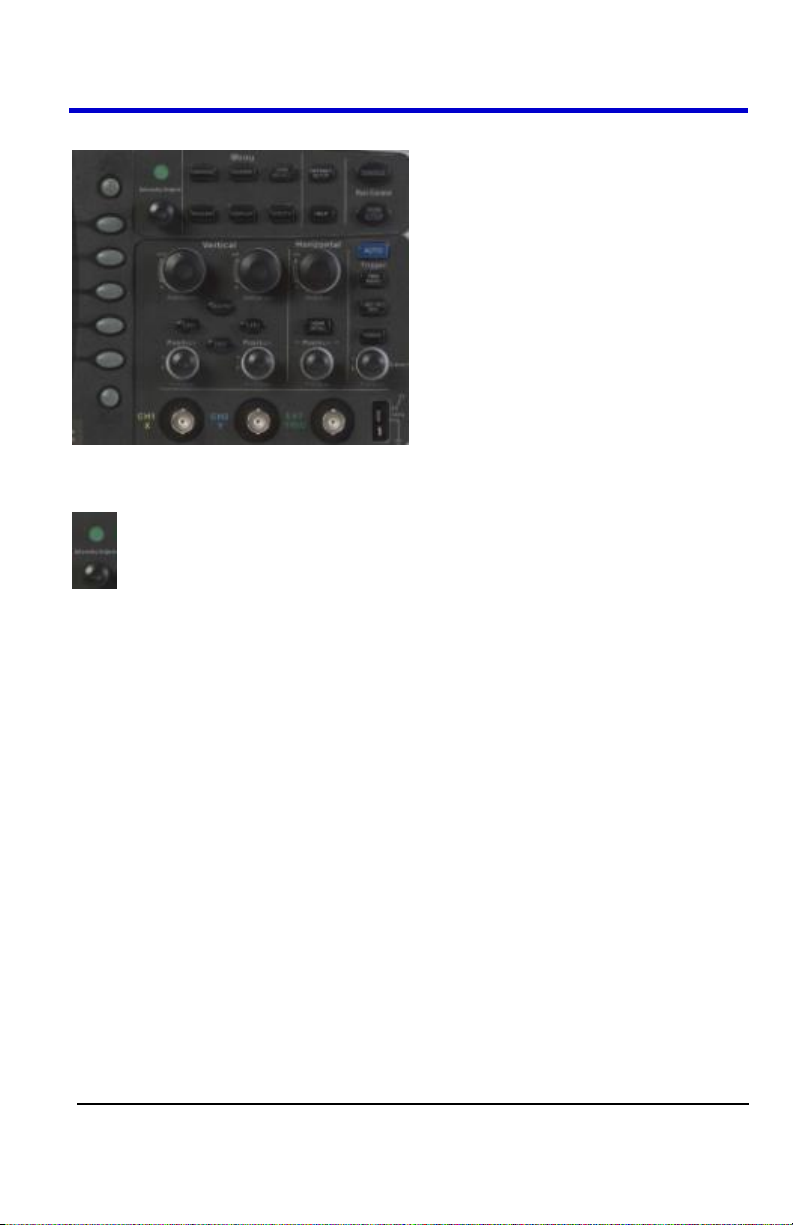
Front Panel Controls
INTENSITY/ADJUST KNOB
Intensity/Adjust knob - You can use the Adjust knob with many
functions, such as adjusting the holdoff time, moving cursors, setting
the pulse width, setting the video lineage adjusting the upper and
lower frequency limits, adjusting X and Y masks when using the
Pass/Fail function, etc. You can also turn the Adjust knob to adjust
the storage position of setups, waveforms, pictures when
saving/recalling and to select menu options.
Page 17

WaveAce
14
WA-GSM-E-RevA
MENU CONTROL BUTTONS
MENU ON/OFF - Press to toggle the last-displayed menu On/Off.
Menu Option buttons (1-5) - Press to choose menu options. Press
a menu option button adjacent to your selection.
Print - Press to save the current waveform to an attached USB
memory device or print a picture (screen shot) to a USB-connected
printer. You can set up the save/print options using the Save/Recall
→ Picture settings. For more information, refer to Saving and
Printing Waveform Pictures.
Page 18

Getting Started Manual
WA-GSM-E-RevA
15
MENU FUNCTION BUTTONS
CURSORS - Press to turn on the cursors and display the Cursor
menu. You can use the Cursor menu to set the Cursor Mode (Auto,
Off, Manual, Track). When Cursors are on (CURSORS button is lit),
turn the Adjust knob to position the cursors.
ACQUIRE - Press to display Acquire menu. You can use the
Acquire menu to set the acquisition Sampling Mode (Sampling,
Peak Detect, Average). For more information on sampling modes,
refer to Acquisition Sampling Modes.
SAVE/RECALL - Press to display the Save/Recall menu. You can
use the Save/Recall menu to save and recall up to 20 scope setups
or waveforms in internal memory (up to 20 waveforms) or on a USB
memory device (limited by memory capacity of USB device). You can
also use it to recall the default factory settings, to save waveform
data as a comma-delimited file (.CSV), and to save or print the
displayed waveform image.
MEASURE - Press to display a menu of measurement parameters.
The Display Type must be set to YT mode. For more information on
measurement parameters, refer to Parameter Measurements.
DISPLAY - Press to open the Display menu. You can use the
Display menu to set grid and waveform display styles, and
persistence.
UTILITY - Press to open the Utility menu. You can use the Utility
menu to configure WaveAce features, such as sound, language,
counter, etc. You can also view system status and update software.
Page 19
WaveAce
16
WA-GSM-E-RevA
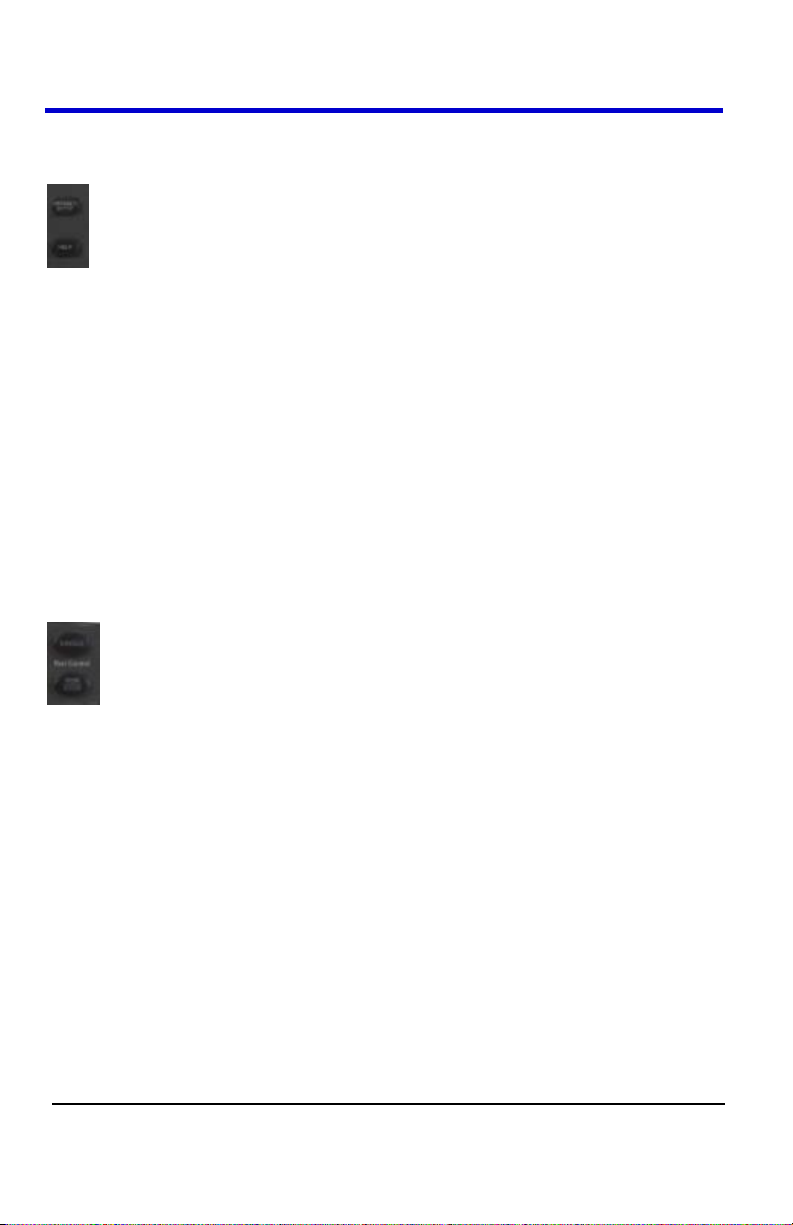
GENERAL CONTROL BUTTONS
HELP - Displays context-sensitive online help. Press Help than
another front panel button and information about that button will be
displayed.
DEFAULT SETUP - Press to reset the oscilloscope's settings to the
default factory configuration. For a list of default settings, see
Recalling Factory Settings.
AUTO - Press to have the oscilloscope automatically identify the type
of waveform and adjust the controls to produce a usable display of
the input signal. When you press the AUTO front panel button, the
Auto Set menu opens. You can use this menu to display multiplecycle signals, a single-cycle signal, the rising edge, the falling edge
or recall the previous setup.
RUN CONTROL BUTTONS
SINGLE - Press to acquire a single waveform. Each time you press
the SINGLE button, the oscilloscope acquires another waveform.
When the oscilloscope detects a trigger it completes the acquisition
and stops.
RUN/STOP - Press when you want the oscilloscope to acquire
waveforms continuously. Press RUN/STOP again to stop the
acquisition,
Page 20

Getting Started Manual
WA-GSM-E-RevA
17
VERTICAL CONTROLS
Volts/Div knobs (CH1/CH2)- Turn to adjust the volts/division setting
(vertical gain) of the corresponding channel (CH1 or CH2). Press the
knob to toggle between fine (variable) and coarse (fixed)
adjustments.
Channel buttons (CH1/CH2) - Press a channel button (CH1 or CH2)
to turn that channel ON or OFF and open the Channel menu for that
channel. You can use the Channel menu to set up a channel. When
the channel is ON, the channel button is lit.
Vertical Position knobs (CH1/CH2) - Turn to adjust the vertical
position of the corresponding channel (CH1 or CH2). Press to set the
vertical position to zero.
REF - Press to display the Ref Wave menu. You can use this menu
to save and recall two reference waveforms (REFA and REFB) in
internal memory.
MATH - Press to display the Math menu. You can use the Math
menu to use the oscilloscopes Math functions.
Page 21

WaveAce
18
WA-GSM-E-RevA
HORIZONTAL CONTROLS
Horizontal Position knob - Turn to adjust the horizontal position of
all channels and math waveforms (the position of the trigger relative
to the center of the screen). The resolution of this control varies
depending on the timebase setting. Press to set the horizontal
position to zero.
HORI MENU - Press to display the Horizontal menu. You can use
the Horizontal menu to display the waveform and to zoom a
segment of a waveform.
Time/Div knob - Turn to change the horizontal time scale to magnify
or compress the waveform. When Window Zone is enables, it
changes the width of the Window Zone by changing the window
timebase. WhenTime/Div control is set to 100 ms/div or slower and
the trigger mode is set to Auto, the oscilloscope enters the scan
acquisition mode. In this mode, the waveform display updates from
left to right. There is no trigger or horizontal position control of
waveforms during scan mode.
Page 22

Getting Started Manual
WA-GSM-E-RevA
19
TRIGGER CONTROLS
TRIG MENU - Press to display the Trigger menu. You can use the
Trigger menu to set the trigger type (Edge, Pulse, Video, Slope,
Alternative) and trigger settings.
SET TO 50% - Press to stabilize a waveform quickly. The
oscilloscope can set the Trigger Level to be halfway between the
minimum and maximum voltage levels automatically. This is useful
when you connect a signal to the EXT TRIG connector and set the
trigger source to Ext or Ext/5.
FORCE - Press to complete the current waveform acquisition
whether the oscilloscope detects a trigger or not. This is useful for
SINGLE acquisitions and Normal trigger mode.
LEVEL - Turn to select the trigger threshold level. Press the Level
front panel knob to set the trigger level to zero.
Page 23

WaveAce
20
WA-GSM-E-RevA
OverCompensated
Compensated
Correctly
UnderCompensated
Probes
LeCroy provides a passive probe for each WaveAce oscilloscope channel.
Probe Compensation
Passive probes must be compensated to flatten overshoot. This is
accomplished by means of a trimmer on the probe body.
1. Attach the connector end of your probe to any channel.
2. Connect the probe end to the CAL output connector at the front of
the scope.
3. Adjust the trim pot on the probe body until the square wave is as flat
as possible.
4. Set the Probe option attenuation to 10X by pressing the Channel
button and then the Probe menu button.
5. Set the switch to 10X on the probe.
6. Attach the probe tip to the PROBE COMP~3V connector and the
reference lead to the PROBE COMP Ground connector. Press the
corresponding channel button, and then push the AUTO button.
7. Check the shape of the displayed waveform as follows:
Page 24

Getting Started Manual
WA-GSM-E-RevA
21
Setting Probe Attenuation
Probes are available with various attenuation factors which affect the
vertical scale of the signal. Push the Channel button and then the Probe
menu option button. Attenuation options for 1X, 10X, 100X, and 1000X are
available as follows:
Select the attenuation that matches your probe.
PLEASE NOTE THE FOLLOWING:
The default setting for the Probe option is 1X.
Be sure that the Attenuation switch on the probe matches the Probe
option in the oscilloscope. Switch settings are 1X and 10X.
When the Attenuation switch on the probe is set to 1X, the system
bandwidth is limited to 6MHz. To use the full bandwidth of the
oscilloscope, be sure to set the switch to 10X.
Page 25

WaveAce
22
WA-GSM-E-RevA
Viewing Waveforms
Turning On Traces
To turn on a channel trace, simply press the channel front panel button
(CH1 or CH2). When you turn on a channel, the Channel flyout menu
opens. You can then set up the vertical settings and controls for the
channel. When the channel is ON, the channel button is lit.
Note: To turn a trace off, press the channel front panel button again.
Page 26

Getting Started Manual
WA-GSM-E-RevA
23
Option:
Description:
Type
Vectors fills the space between adjacent sample points in the
display. Dots displays sample points directly.
Persist
Sets the length of time (1 sec, 2 sec, 5 sec, Infinite) each
displayed sample point remains displayed.
Intensity
Turn the Universal front panel knob to set the Intensity.
Brightness
Turn the Universal front panel knob to set the screen
brightness.
Format
Choose between YT format and XY format.
Screen
Set to Normal mode or Inverted color display mode.
Grid
Display grids and axes, turn off grids, or turn off grids and
axes.
Menu
Display
Set the length of time the menus will be displayed on the
screen (2 seconds, 5 seconds, 10 seconds, 20 seconds, or
infinite).
Setting Up the Display
You can access the Display menu pressing the DISPLAY front panel
button.
Page 27

WaveAce
24
WA-GSM-E-RevA
1
Back USB - Indicates whether the Back USB option is set to
Computer or Printer.
Back USB option is set to Computer
Back USB option is set to Printer
2
Print Key - Indicates whether the Print Key option is set to Print
Picture or Save Picture.
Print Key option is set to Print Picture
Print Key option is set to Save Picture
3
USB Memory Device - Indicates whether the USB Memory Device is
inserted in the USB Port.
USB Memory Device is not inserted in the USB Port.
USB Memory Device is inserted in the USB Port.
4
Trigger Status
Armed - The oscilloscope is acquiring pre-trigger data. All triggers
are ignored in this state.
Ready - The oscilloscope is ready to trigger.
Understanding Display Information
The grid area contains several indicators to help you understand the
display. Indicators are coded to the channel colors).
Page 28

Getting Started Manual
WA-GSM-E-RevA
25
Trig'd - The oscilloscope has found a trigger and is acquiring the
post-trigger data.
Stop - The oscilloscope has stopped acquiring waveform data.
Acq. Complete - The oscilloscope has completed a Single
Sequence acquisition.
Auto - The oscilloscope is in Auto Mode and is acquiring waveforms
in the absence of triggers.
Scan - The oscilloscope is acquiring and displaying waveform data
continuously in Scan Mode.
5
Acquisition Sampling Mode
Sample Mode
Peak Detect Mode
Average Mode
6
Horizontal Trigger Position Readout - Displays the waveform's
horizontal position in time (seconds).
7
Horizontal Trigger Position Marker - Shows the horizontal trigger
position.
8
Display Markers (Zero Volts Level) - Show the ground reference points
of the displayed waveforms. If there is no marker, the channel is not
displayed.
9
Display Signal Source
10
Signal Coupling symbol
11
Volts/Division
12
Indicates whether the bandwidth limiting filter is On or Off. The "B" icon
indicates that the filter is On.
13
Main timebase setting (Note that a Window timebase setting is also
displayed if applicable)
14
Trigger Source
15
Frequency Counter of Trigger Signal
16
Trigger Type and level indicator
Page 29

WaveAce
26
WA-GSM-E-RevA
Option
Description
(Multi-cycle)
Auto set the screen and display several cycle signal.
(Single-cycle)
Set the screen and auto display single cycle signal.
(Rising edge)
Auto set and show the rising time.
(Falling edge)
Auto set and show the falling time.
(Undo Setup)
Causes the oscilloscope to recall the previous setup.
Auto Setup
The WaveAce Series Digital Storage Oscilloscopes has an Auto Setup
function that identifies the waveform type and automatically adjusts controls
to produce a usable display of the input signal. Four Auto Setup waveform
options are available: Multi-Cycle, Single-Cycle, Rising Edge, and
Falling Edge. Press the AUTO front panel button, and then press the menu
optoin button adjacent to the desired waveform as follows:
Note: Use the waveform menu button to Undo an applied Auto Setup.
Page 30

Getting Started Manual
WA-GSM-E-RevA
27
Vertical Settings and Channel
Controls
When you turn a channel trace ON, the Channel flyout menu opens. The
Channel menu page shown (1/2 or 2/2) will be the one that was displayed
when the trace was last turned on.
Page 31

WaveAce
28
WA-GSM-E-RevA
Choosing Coupling
You can choose one of these input coupling modes:
DC - Passes both AC and DC components of the input signal.
AC - Blocks the DC component of the input signal and attenuates
signals below 10 Hz.
GND - Disconnects the input signal. Use GND coupling to display a
zero-volt waveform. Internally, the channel input is connected to a
zero-volt reference level.
PLEASE NOTE THE FOLLOWING:
If the channel is set to DC coupling, you can quickly measure the DC
component of the signal by simply noting its distance from the
ground symbol.
If the channel is set to AC coupling, the DC component of the signal
is blocked allowing you to use greater sensitivity to display the AC
component of the symbol.
1. To choose an input coupling mode, turn on the channel whose
coupling you want to change by pressing the appropriate channel
button (CH1 or CH2).
2. Press the Coupling option button on page 1/2 of the channel menu,
then select a coupling mode from the menu.
Page 32

Getting Started Manual
WA-GSM-E-RevA
29
To turn the Bandwidth Limit ON, turn on the
channel by pressing the appropriate channel
button (CH1 or CH2).
Press the BW Limit option button on page 1/2
of the channel menu, then select On.
Limiting Bandwidth
You can limit the bandwidth to reduce display noise. When you turn
Bandwidth Limit ON, the Bandwidth Limit value is set to 20 MHz. It also
filters the signal to reduce noise and other unwanted high frequency
components.
Note: The oscilloscope vertical response rolls off slowly above its
bandwidth; or, above 20 MHz when the Bandwidth Limit is set to ON.
Therefore, the FFT spectrum can show valid frequency information higher
than the oscilloscope bandwidth. However, the magnitude information near
or above the bandwidth will not be accurate.
Page 33

WaveAce
30
WA-GSM-E-RevA
1. To set the sensitivity of the Volts/Div front
panel knob, turn on the channel by pressing
the appropriate channel button (CH1 or CH2).
2. Press the Volts/Div option button on page 1/2
of the channel menu, then select Coarse
(fixed) or Fine (variable).
Adjusting Sensitivity
You can set the sensitivity of the Volts/Div front panel knob. When you set
the sensitivity to Coarse (fixed - the default setting), the gain adjustment is
set to 1-2-5 increments from 2 mV/div, 5 mV/div, 10 mV/div to 5 V/div.
When you set the sensitivity to Fine (variable), it changes the resolution to
small steps between the coarse settings.
Note: The vertical scale readout displays the actual Volts/Div setting when
Fine (variable) is selected. Changing the setting to Coarse (fixed) does not
change the vertical scale until the Volts/Div control is adjusted.
Page 34

Getting Started Manual
WA-GSM-E-RevA
31
Setting Probe Attenuation
Probes are available with various attenuation factors which affect the
vertical scale of the signal. Select the attenuation that matches your probe.
Attenuation options are 1X, 10X, 100X, and 1000X.
PLEASE NOTE THE FOLLOWING:
The default setting for the Probe option is 1X.
Be sure that the Attenuation switch on the probe matches the Probe
option in the oscilloscope. Switch settings are 1X and 10X.
When the Attenuation switch is set to 1X, the probe limits the
bandwidth of the oscilloscope to 6MHz. To use the full bandwidth of
the oscilloscope, be sure to set the switch to 10X.
Page 35

WaveAce
32
WA-GSM-E-RevA
1. To invert the waveform, turn on the channel by
pressing the appropriate channel button (CH1 or
CH2).
2. On the channel menu, press the Next Page option
button to go to page 2/2.
3. Press the Invert option button on page 2/2, then
select On.
Inverting Waveforms
Page 36

Getting Started Manual
WA-GSM-E-RevA
33
1. To turn on the digital filter, press the appropriate
channel button (CH1 or CH2).
2. On the channel menu, press the Next Page
option button to go to page 2/2.
3. Press the Filter option button on page 2/2. The
Filter menu opens.
4. Press the Filter option button and select On.
5. Press the Type option button and select a
digital filter type.
6. Press the Upp. Limit option button and turn the
Adjust front panel knob to set the Upper limit.
7. Press the Low. Limit option button and turn the
Adjust front panel knob to set the Lower limit.
Using the Digital Filter
You can choose from the following digital filter types:
Low Pass Filter (LPF)
High Pass Filter (HPF)
Band Pass Filter (BPF)
Band Stop Filter
Note: If you select the Low Pass Filter (LPF) type, you can set an Upper
Limit only. If you select the High Pass Filter (HPF) type, you can set a
Lower Limit only. For both Band Pass Filter (BPF) and Band Stop Filter, you
can set both an Upper and Lower Limit.
Page 37

WaveAce
34
WA-GSM-E-RevA
Sampling Modes
Acquisition Sampling Modes
When you acquire a signal, the oscilloscope converts it into a digital form
and displays a waveform. The acquisition sampling mode defines how the
signal is digitized and the timebase setting affects the time span and level
of detail in the acquisition. You can change the Sampling modes by
pressing the ACQUIRE front panel button.
There are three basic sampling modes:
Sampling- samples the signal in evenly-spaced intervals to construct
the waveform.
Note: You can use this mode to reduce random noise. This mode
does not acquire rapid variation in the signal that may occur
between samples. This can result in narrow pulses being missed. In
this case, you can use Peak Detect mode to acquire data.
Peak Detect - captures the maximum and minimum values that
occur in a signal. It finds the highest and lowest record points over
many acquisitions.
Note: The oscilloscope can acquire and display narrow pulses,
which may otherwise have been missed in Sampling mode. Noise
will appear to be higher in this mode.
Average - acquires up to 256 waveforms, averages them, and
displays the resulting waveform.
Note: You can use this mode to reduce random noise.
In addition, you can also choose between Equivalent Time Sampling and
Real Time Sampling.
Equivalent Time Sampling can achieve up to 20 ps of horizontal
resolution (equivalent to 50 GS/s). This mode is good for observing
repetitive waveforms.
Real Time Sampling can be used for repetitive and non-repetitive
waveforms.
Page 38

Getting Started Manual
WA-GSM-E-RevA
35
To choose a sampling mode, press the ACQUIRE
front panel button. On the Acquire menu, press the
Acquisition option button and select a sampling
mode. If you select the Average sampling mode,
press the Averages option button and select the
number of waveforms (4, 16, 32, 64, 128, or 256).
Press the Mode option button and select Equ Time
or Real Time sampling.
Press the Sa Rate option button and turn the
Time/div front panel knob to display the sampling
rate at the corresponding timebase scale.
Acquiring Waveforms
You can choose to acquire a single waveform or to acquire waveforms
continuously. If you want to acquire a single waveform, press the SINGLE
front panel button. Each time you press the SINGLE front panel button, the
oscilloscope begins to acquire another waveform. After the oscilloscope
detects a trigger, it completes the acquisition and stops. If you want to
acquire waveforms continuously, press the RUN/STOP front panel button.
Press the button again to stop the acquisition.
When you start an acquisition, the oscilloscope goes through the following
steps:
1. Acquires enough data to fill the portion of the waveform record to the
left of the trigger point (pre-trigger).
2. Continues to acquire data while waiting for the trigger condition to
occur.
3. Detects the trigger condition.
4. Continues to acquire data until the waveform record is full.
5. Displays the waveform.
Changing the Timebase
The oscilloscope digitizes waveforms by acquiring the value of an input
signal at discrete points. The timebase allows you to control how often the
values are digitized. You can change the timebase using the Time/div front
panel knob in the Horizontal Control group. As you turn the Time/div front
panel knob, the value is displayed at the bottom of the screen.
Page 39

WaveAce
36
WA-GSM-E-RevA
1. Press the HORI MENU front panel button. The Horizon
menu opens.
2. Press the Win Zone option button.
3. Turn the Time/Div front panel knob to adjust the window
size.
4. Turn the Horizontal Position front panel knob to adjust the
window's position.
5. Press the Window option button. The waveform is
expanded.
Zooming Waveforms
You can use the Window Zone option on the Horizontal menu to define a
segment of a waveform to see more detail. The Window timebase setting
cannot be set slower than the Main timebase setting. You can turn the
Horizontal Position and Time/Div front panel knobs to zoom in/out in
Window Zone.
Page 40

Getting Started Manual
WA-GSM-E-RevA
37
1. Press the Type menu option button and select
Edge.
2. Press the Source option button to choose a
channel input or external input.
3. Use Slope to select a positive or negative edge for
Edge Triggering (rising edge, falling edge, or both).
4. Press the Mode option button to select Auto,
Normal, or Single mode. Use Auto mode to let
the acquisition automatically run in the absence of
a trigger. Use Normal mode when you want to see
only valid triggered waveforms (when you use this
mode the oscilloscope does not display a
waveform until after the first trigger). Use Single
mode when you want the oscilloscope to acquire a
single waveform.
5. Press the Setup option button to display the
Trigger Setup menu. You can use the Trigger
Setup menu to select a coupling mode and define
a Holdoff value. Coupling modes comprise DC,
AC, HF Reject, and LF Reject. Turn the Adjust
front panel knob to set the Holdoff value.
Triggering
Trigger Types
There are five trigger types: Edge, Video, Pulse, Slope, and Alternative.
You can access trigger modes by pressing the TRIG MENU front panel
button in the Trigger control group and selecting Type from the Trigger
menu.
Edge Triggering
Page 41

WaveAce
38
WA-GSM-E-RevA
1. Press the Type option button and select
Pulse.
2. Press the Source option button to choose a
channel input or external input.
3. Press the When option button to select how
to compare the trigger pulse relative to the
value selected in the Set Width option.
4. Press the Set Width option button and then
turn the Adjust front panel knob to set the
pulse width.
5. Press the Next Page option button.
6. Press the Mode option button to select Auto,
Normal, or Single mode. Use Auto mode to
let the acquisition automatically run in the
absence of a trigger. Use Normal mode when
you want to see only valid triggered
waveforms (when you use this mode the
oscilloscope does not display a waveform
until after the first trigger). Use Single mode
when you want the oscilloscope to acquire a
single waveform.
7. Press the Setup option button to display the
Trigger Setup menu.
Pulse Triggering
Use Pulse width triggering to trigger on aberrant pulses. You can select
how to compare the trigger pulse relative to the pulse width as follows:
Positive pulse width less than pulse width setting
Positive pulse width larger than pulse width setting
Positive pulse width equal to pulse width setting
Negative pulse width less than pulse width setting
Negative pulse width larger than pulse width setting
Negative pulse width equal to pulse width setting
Page 42

Getting Started Manual
WA-GSM-E-RevA
39
1. Press the Type option button and select Video.
2. Press the Source option button to choose a channel input
or external input.
3. Press the Polarity option button and select (Normal)
or ( Inverted). Normal triggers on the negative edge
of the sync pulse. Inverted triggers on the positive edge of
the sync pulse.
4. Press the Sync option button and select a video sync
(Line Num, All Lines, Odd Field, Even Field). If you
select Line Num, you can turn the Adjust front panel
knob to set the appointed line number.
5. Press the Next Page option button.
6. Press the Standard option button and select the video
standard for sync and line number count (NTSC or
Pal/Secam).
7. Press the Mode option button to select Auto, Normal, or
Single mode. Use Auto mode to let the acquisition
automatically run in the absence of a trigger. Use Normal
mode when you want to see only valid triggered
waveforms (when you use this mode the oscilloscope
does not display a waveform until after the first trigger).
Use Single mode when you want the oscilloscope to
acquire a single waveform.
8. Press the Setup option button to display the Trigger
Setup menu. You can use the Trigger Setup menu to
select a coupling mode and define a Holdoff value.
Coupling modes comprise DC, AC, HF Reject, and LF
Reject. Turn the Adjust front panel knob to set the
Holdoff value.
Video Triggering
Use Video Triggering to trigger on fields or lines of standard video signals.
Page 43

WaveAce
40
WA-GSM-E-RevA
1. Press the Type option button and select Slope.
2. Press the Source option button to choose a
channel input or external input.
3. Press the When option button to select the
trigger condition.
4. Press the Time option button and then turn the
Adjust front panel knob to set the slope time.
5. Press the Next Page option button.
6. Press the Vertical option button and select the
trigger level that can be adjusted using the
Level front panel knob. You can adjust Level A,
Level B, or adjust both at the same time.
7. Press the Mode option button to select Auto,
Normal, or Single mode. Use Auto mode to let
the acquisition automatically run in the absence
of a trigger. Use Normal mode when you want
to see only valid triggered waveforms (when
you use this mode the oscilloscope does not
display a waveform until after the first trigger).
Use Single mode when you want the
oscilloscope to acquire a single waveform.
8. Press the Setup option button to display the
Trigger Setup menu. You can use the Trigger
Setup menu to select a coupling mode and
define a Holdoff value. Coupling modes
comprise DC, AC, HF Reject, and LF Reject.
Turn the Adjust front panel knob to set the
Holdoff value.
Slope Triggering
Use Slope Triggering to trigger on the positive slope or negative slope
depending on the trigger conditions and time you set.
Page 44

Getting Started Manual
WA-GSM-E-RevA
41
Alternative Triggering
The trigger signal comes from two vertical channels when you use
Alternative Triggering. Using this type of trigger, you can observe two
unrelated signals at the same time. For each signal, you can select different
trigger types, such as Edge, Pulse, Slope, or Video. Trigger information for
the two channels is displayed at the bottom right side of the display.
1. Press the Type option button and select Alternative.
2. To set up both triggers, press the Source option button and select a
Source (CH1, CH2).
3. For the selected Source, press the Mode option button and select a
Trigger Type (Edge, Pulse, Slope, or Video).
4. For the selected trigger type, set the trigger options.
5. Press the Setup option button to display the Trigger Setup menu.
You can use the Trigger Setup menu to select a coupling mode and
define a Holdoff value. Coupling modes comprise DC, AC, HF
Reject, and LF Reject. Turn the Adjust front panel knob to set the
Holdoff value.
Page 45

WaveAce
42
WA-GSM-E-RevA
Analyzing Waveforms
Waveform Measurements
Measuring with Cursors
Cursors are important tools that aid you in measuring signal values.
Cursors are boundary markers that you can move across the grid. Use
cursors to make fast, accurate measurements and to eliminate guesswork.
There are three cursor measurement modes:
Manual - displays two horizontal parallel cursors or vertical parallel
cursors to measure voltage or time. Voltage cursors appear as
horizontal lines on the display and measure the vertical parameters.
Time cursors appear as vertical lines on the display and measure the
horizontal parameters. You can move the cursor by turning the
Adjust front panel knob. Before using cursors, you should make
sure that you have set the signal source as the channel for
measuring.
Track - displays two cross-cursors. The cross-cursors set the
position on the waveform automatically. You can adjust the cursor
position on the waveform by turning the Adjust front panel knob. The
values are displayed on the top of the grid display.
Auto - Automatically places markers of what is being measured on
the waveform. These markers clarify parameter measurements by
displaying cursors and a visual representation of what is being
measured. When in Auto cursor mode, as you select measurement
parameters the markers will be displayed for the measurements.
Page 46

Getting Started Manual
WA-GSM-E-RevA
43
CURSOR MEASUREMENT SELECTIONS
Time cursors are vertical lines that you move horizontally to measure
the difference in time or frequency values between the cursors.
Voltage cursors appear as horizontal lines on the display and
measure the vertical parameters.
The measurement values listed on the top of the grid display are as
follows:
A→T - the horizontal position of Cursor A (Time cursor centered
around the midpoint of the screen)
A→V - the vertical position of Cursor A (Voltage cursor centered
around the channel ground level)
B→T - the horizontal position of Cursor B (Time cursor centered
around the midpoint of the screen)
B→V - the vertical position of Cursor B (Voltage cursor centered
around the channel ground level)
▲T - Horizontal space between Cursor A and Cursor B (Time value
between the two cursors)
1/▲T - the reciprocal of the horizontal space between Cursor A and
Cursor B
▲V - the vertical space between Cursor A and Cursor B (Voltage
value between the two cursors)
Page 47

WaveAce
44
WA-GSM-E-RevA
1. Press the CURSORS front panel button. The Cursor
menu opens.
2. If you want to set the mode to Manual, press the Mode
option button and select Manual. Press the Type option
button and select Voltage or Time. Press the Source
option button and select a source (CH1, CH2, MATH,
REFA, or REFB). Press the CurA or CurB option button
and turn the Adjust front panel knob to adjust the cursors.
OR
If you want to set the mode to Track, press the Mode
option button and select Track. Press the Cursor A or
Cursor B option button and select a source. Press the
CurA or CurB option button and turn the Adjust front
panel knob to adjust the cursors. If Track is selected, both
cursors move in unison and both appear brighter in the
grid.
OR
If you want to set the mode to Auto, press the Mode option
button and select Auto. When you select measurement
parameters using the MEASURE front panel button, the
cursors are automatically displayed.
The measurement values are displayed on the top right corner.
The cursor selected for placement is indicated by a highlighted
fine grain icon in the menu and the cursor itself has a higher
brightness in the grid.
CURSOR PLACEMENT
Page 48

Getting Started Manual
WA-GSM-E-RevA
45
Parameter Measurements
Waveform analysis typically begins with the measurement of parameters.
Parameter measurement tools determine a wide range of waveform
properties. Use them to automatically calculate many attributes of your
waveform, like rise time, rms voltage, and peak-to-peak voltage, for
example.
You can access the parameter measurements by pressing the MEASURE
front panel button and then pressing an option button for Voltage, Time,
Delay or All Measurements for each channel. Parameter values are
displayed on the Measure flyout menu.
Page 49

WaveAce
46
WA-GSM-E-RevA
Vpp - Difference between highest and lowest
points in the waveform.
Vmax - Measures highest point in waveform.
Unlike top, it does not assume the waveform has two
levels.
Vmin - Measures the lowest point in a
waveform. Unlike base, it does not assume the
waveform has two levels.
Mean - Average of the data for a time domain
waveform. Computed as centroid of distribution for a
histogram.
Vrms - Root Mean Square of data between
the cursors -- about the same as sdev for a zero-mean
waveform.
Crms - Cyclic root mean square: Computes
the square root of the sum of squares of data values
divided by number of points. Contrary to rms,
calculation is performed over an integer number of
cycles, eliminating bias caused by fractional intervals.
Vtop - Higher of two most probable states, the
lower being base; it is characteristic of rectangular
waveforms and represents the higher most probable
state determined from the statistical distribution of data
point values in the waveform.
Vbase - Lower of two most probable states
(higher is top). Measures lower level in two-level
signals. Differs from min in that noise, overshoot,
undershoot, and ringing do not affect measurement.
Vavg - Arithmetic mean over the first cycle in
the waveform.
Vamp - Voltage between Vtop and Vbase of a
waveform.
ROVShoot - (Vmax-Vtop)/Vamp after the
waveform rising transition.
FOVShoot - (Vmin-Vbase)/Vamp after the
waveform falling transition.
RPREShoot - (Vmin-Vbase)/Vamp before the
waveform rising transition.
FPREShoot - (Vmax-Vtop)/Vamp before the
waveform falling transition.
VOLTAGE MEASUREMENT PARAMETERS
Page 50

WA-GSM-E-RevA
47
TIME MEASUREMENT PARAMETERS
Period - Period of a cyclic signal measured as
time between every other pair of 50% crossings. Starting
with first transition after left cursor, period is measured
for each transition pair, with values averaged to give
final result.
+Wid - Time between the first rising edge and
the next rising edge at the waveform 50% level.
-Wid - Time between the first falling edge and
the next rising edge at the waveform 50% level.
Rise Time - Duration of pulse waveform's rising
transition from 10% to 90%, averaged for all rising
transitions between the cursors.
Fall Time - Duration of pulse waveform's
falling transition from 90% to 10%, averaged for all
falling transitions between the cursors.
BWid - Duration of a burst measured over the
entire waveform.
+Dut - Ratio between positive pulse width and
period.
-Dut - Ratio between negative pulse width and
period.
Getting Started Manual
Page 51

WaveAce
48
WA-GSM-E-RevA
Phase - Amount one waveform leads or lags
another in time expressed in degrees, where 360
degrees comprise one waveform cycle.
FRR - Time between the first rising edge of
Source 1 and the first rising edge of Source 2.
FRF - Time between the first rising edge of
Source 1 and the first falling edge of Source 2.
FFR - Time between the first falling edge of
Source 1 and the first rising edge of Source 2.
FFF - Time between the first falling edge of
Source 1 and the first falling edge of Source 2.
LRR - Time between the first rising edge of
Source 1 and the last rising edge of Source 2.
LRF - Time between the first rising edge of
Source 1 and the last falling edge of Source 2.
LFR - Time between the first falling edge of
Source 1 and the last rising edge of Source 2.
LFF - Time between the first falling edge of
Source 1 and the last falling edge of Source 2.
DELAY MEASUREMENT PARAMETERS
Page 52

Getting Started Manual
WA-GSM-E-RevA
49
1. Press the Operation option button and select a math
operator +, -, *, /, or FFT.
2. The Source can be any channel, but not another math
trace. If you choose subtraction, you can choose CH1-
CH2 or CH2-CH1. If you choose division, you can choose
CH1/CH2 or CH2/CH1.
3. If you want to invert a waveform, press the CH1Invert or
CH2Invert option button and select On.
Waveform Math
Standard math functions include addition, subtraction, multiplication,
division, and FFT. For more information on FFT, see the FFT section. Press
the MATH front panel button in the Vertical Control group to display the
Math menu.
Page 53

WaveAce
50
WA-GSM-E-RevA
Window
Type
Description
Test Content
Rectangular
Best frequency resolution,
worst magnitude resolution.
This is essentially the same
as no window.
Symmetric transients or bursts.
Equal-amplitude sine waves with
fixed frequencies. Broadband
random noise with a relatively
slowly varying spectrum.
Hanning
Better frequency, poorer
magnitude accuracy than
Rectangular.
Sine, periodic, and narrow-band
random noise. Asymmetric
transients or bursts.
Hamming
Better frequency, poorer
magnitude accuracy than
Rectangular. Hamming has
slightly better frequency
resolution than Hanning.
Sine, periodic, and narrow-band
random noise. Asymmetric
transients or bursts.
Blackman
Best magnitude, worst
frequency resolution.
Single frequency waveforms to
find higher order harmonics.
FFT
The FFT process mathematically converts a time-domain signal into its
frequency components. You can display only one FFT waveform at a time.
You can choose to display the FFT waveform and the channel waveform on
the screen (split screen) or to display the FFT waveform full screen. You
can choose from four Window types:
Page 54

Getting Started Manual
WA-GSM-E-RevA
51
USING THE FFT MATH FUNCTION
1. To set up an FFT math function, press the MATH front panel button.
The Math menu is displayed.
2. Press the Operation menu option button and select FFT.
3. Press the Source menu option button and select a source (CH1,
CH2) for the FFT waveform.
4. Press the Window menu option button and select a type of window
(Rectangle, Hanning, Hamming, or Blackman).
5. Press the FFT Zoom menu option button and select a zoom factor
(1X, 2X, 5X, or 10X).
6. Press the Next Page menu option button to go to page 2/2.
7. Press the Scale menu option button and select Vrms or dBVrms.
8. Press the Display menu option button and select Split to display the
FFT waveform on the bottom half of the screen or Full screen to
display the FFT waveform on the full screen.
Page 55

WaveAce
52
WA-GSM-E-RevA
1. Press the Save/Recall front panel button. The SAVE/REC
flyout menu opens.
2. Press the Type option button and select Setups.
3. If you want to save the setup to internal memory, press the
Save To option button to select Device. Press the Setup
option button or turn the Adjust front panel knob to assign a
number (No. 1 - No. 20) to the setup.
OR
If you want to save the setup to a USB memory device,
insert the USB memory device and press the Save To
option button to select File. Press the Setup option button or
turn the Adjust front panel knob to select a file number (for
example, No.00002).
4. Press the Save option button to save the current setup.
Save and Recall
Saving and Recalling Scope Setups
You can quickly save and recall up to 20 scope panel settings and 20
waveforms in internal memory. Waveforms and panel settings can also be
save to a USB memory device.
Saving the Current Settings
Recalling Setups
1. Press the Save/Recall front panel button. The SAVE/REC flyout
menu opens.
2. Press the Type option button and select Setups.
3. If you want to recall the setup from internal memory, press the Save
To option button to select Device. Press the Setup option button or
turn the Adjust front panel knob to select the number assigned to
the setup you want to recall.
OR
If you want to recall the setup from a USB memory device, insert the
USB memory device and press the Save To option button to select
File. Press the Setup option button or turn the Adjust front panel
knob to select the number assigned to the file you want to recall.
4. Press the Recall option button to recall the setup.
Page 56

Getting Started Manual
WA-GSM-E-RevA
53
1. Display the waveform(s) you want to save and press the
Save/Recall front panel button. The SAVE/REC flyout menu
opens.
2. Press the Type option button and select Waveforms.
3. If you want to save the waveform to internal memory, press
the Save To option button to select Device. Press the
Waveform option button or turn the Universal front panel
knob to assign a number (No. 1 - No. 20) to the waveform.
OR
If you want to save the waveform to a USB memory device,
insert the USB memory device and press the Save To option
button to select File. Press the Waveform option button or
turn the Universal front panel knob to select a file number
(for example, No.00002).
4. Press the Save option button to save the waveform.
Saving and Recalling Waveforms
You can quickly save waveforms in internal memory (up to 20 waveforms)
or on a USB memory device (limited by memory capacity of USB device).
You can display up to three waveforms at the same time. You can easily
recall these saved waveforms later.
Saving Waveforms
Recalling Waveforms
1. Press the Save/Recall front panel button. The SAVE/REC flyout
menu opens.
2. Press the Type option button and select Waveforms.
3. If you want to recall the waveform from internal memory, press the
Save To option button to select Device. Press the Waveform option
button or turn the Universal front panel knob to select the number
assigned to the waveform you want to recall.
OR
If you want to recall the waveform from a USB memory device, insert
the USB memory device and press the Save To option button to
select File. Press the Waveform option button or turn the Universal
front panel knob to select the number assigned to the file you want to
recall.
4. Press the Recall option button to recall the waveform.
Page 57

WaveAce
54
WA-GSM-E-RevA
1. Press the REF front panel button. The REF WAV flyout
menu opens.
2. Press the Source option button to select the input signal
channel.
3. Press the REFA/REFB option button to set the storage
location (REFA or REFB).
4. Press the Save option button to save the reference
waveform. Once you have saved a reference waveform, it
becomes available for display.
Saving and Recalling Reference Waveforms
You can save two reference waveforms (REFA and REFB) in internal
memory. You can easily recall these saved reference waveforms later. You
cannot adjust the horizontal position and scale of the reference waveform,
but the oscilloscope does display the horizontal and vertical scales at the
bottom of the display.
Note: X-Y mode waveforms are not stored as reference waveforms.
Saving Reference Waveforms
Recalling Reference Waveforms
1. Press the REF front panel button. The REF WAV flyout menu opens.
2. Press the REFA/REFB option button to choose which reference
waveform (REFA or REFB) you want to recall.
3. Press the REFA/REFB On/Off option button to select REFA On or
REFB On.
Page 58

Getting Started Manual
WA-GSM-E-RevA
55
1. Press the Save/Recall front panel button. The SAVE/REC
flyout menu opens.
2. Press the Type option button and select CSV.
3. Press the Data Depth option button and select Maximum or
Displayed.
4. Press the Para Save option button and select On or Off.
5. Press the CSV option button or turn the Adjust front panel
knob to select the file number assigned to the .CSV file you
want to save.
6. Press the Save option button to save the current setup.
Saving Data (.CSV)
You can save waveform data as a comma-delimited (.CSV) file. You can
then use this information in other applications, such as Microsoft Excel. The
.CSV file contains the data points (horizontal and vertical information) of the
displayed waveform. You can also choose to save these parameters to the
.CSV file:
Record Length
Sample Interval
Trigger Point
Vertical Units
Vertical Scale
Vertical Offset
Horizontal Units
Horizontal Scale
Model Number
Serial Number
Software Version
Saving the .CSV file
Page 59

WaveAce
56
WA-GSM-E-RevA
1. Press the Save/Recall front panel button. The SAVE/REC
flyout menu opens.
2. Press the Type option button and select Picture.
3. If you want to print the displayed waveform, press the Print
Key option button and select Print Picture. Be sure a
printer is connected to your WaveAce.
OR
If you want to save the displayed waveform, press the Print
Key option button and select Save Picture. Be sure a USB
memory device is connected before saving the image.
Press the Picture option button or turn the Universal front
panel knob to select the number for the .BMP file you want
to save. Press the Save option button to save the displayed
waveform.
Saving and Printing Waveform Pictures
You can save a waveform image (.BMP) file to a USB memory device or
print a waveform image to a USB-connected printer. Once you have set up
your print options and connected the device to the USB port, you can press
the Print front panel button to save or print the image.
PLEASE NOTE THE FOLLOWING:
Once you have set up your save and/or print options, press the Print
front panel button to save or print the displayed waveform.
You have to set the Back USB option on the Utility menu to
Computer if you want to save bitmap pictures or Printer if you want
to print the pictures.
Page 60

Getting Started Manual
WA-GSM-E-RevA
57
Menu
Option
Default
CH1/CH2
Coupling
DC
BW Limit
Off
Volts/div adjust
Coarse (fixed)
Probe
1X
Invert
Off
Volts/div
1.00V
MATH
Operation
CH1-CH2
CH1 Invert
Off
CH2 Invert
Off
FFt operation:
Source
CH1
Window
Hanning
FFT Zoom
1X
Scale
dBVrms
HORIZONTAL
Window
Main
Position
0.00μs
Sec/div
500μs
Window Zone
50.0μs
Trigger Knob
level
CURSOR
Type
Off
Source
CH1
Horizontal
(voltage)
+/-3.2divs
Vertical (time)
+/-5divs
MEASURE
Source
CH1
Type
average
ACQUIRE
Mode
Sampling
Averages
16
DISPLAY
Type
Vectors
Persist
Off
Grid
Menu Display
2 secs
REF
Type
Waveform
Source
CH1
TRIGGER (Edge)
Type
Edge
Source
CH1
Slope
Rising
Recalling Factory Settings
The oscilloscope is set up for normal operation when it is shipped from the
factory. The default settings are as follows:
Page 61

WaveAce
58
WA-GSM-E-RevA
Menu
Option
Default
Mode
Auto
Coupling
DC Level
0.00V
TRIGGER (Pulse)
Type
Pulse
Source
CH1
When
= Set Pulse Width
1.00ms
Mode
Auto
Coupling
DC
TRIGGER (Video)
Type
Video
Source
CH1
Polarity
Normal
Sync
All Lines
Standard
NTSC
TRIGGER (Slope)
Type
Slope
Source
CH1
Mode
Auto
TRIGGER (Alternative)
Type
Alternative
Source
CH1
The DEFAULT SETUP button does not reset the following settings:
Language option
Saved reference waveform files
Saved setup files
Display contrast
Calibration data
There are two ways to recall the factory settings:
1. Press the Default Setup front panel button.
OR
2. Press the Save/Recall front panel button. The SAVE/REC flyout
menu opens. Press the Type option button and select Factory.
Page 62

Getting Started Manual
WA-GSM-E-RevA
59
Press the System Status option button to display a summary of
the oscilloscope settings. For more information, see the
System Status section.
Press the Sound to turn ON/OFF sound when you press a key.
Turn the Frequency Counter ON/OFF.
Language lets you choose a UI local language.
Press the Next Page option button to display page 2/3.
Press the Do Self Cal option button to perform a selfcalibration. When you start a self-calibration, you should
disconnect everything from all inputs.
Press the Do Self Test option button to perform a screen test,
keyboard test, and/or an LED test.
Press the Print Setup option button to set up your print options.
Press Back USB and select Computer if you are connecting to
a computer using the USB connector or Printer if you are
connecting to a printer using the USB connector.
Press the Next Page option button to display page 3/3.
Utilities
Utility Menu
You can use the Utility menu to configure your oscilloscope. Press the
UTILITY front panel button to display the Utility menu.
Utility Menu - Page 1/3
Utility Menu - Page 2/3
Page 63

WaveAce
60
WA-GSM-E-RevA
Press the Update Firmware option button to update the
oscilloscope using the USB memory device. For more
information, see the Updating the System Software section.
Press the Pass/Fail option button to monitor changes of signals
and output pass or fail signals by judging whether the input
signal is within the predefined mask.
Press the Record option button to record the input waveform
from CH1 and CH2, with a maximum record length of 2500
frames. You can record the pass/fail test output, which is
especially useful when capturing abnormal signals over a long
period of time without having to watch the signal. You set the
source, the time interval between record frames, and the
maximum number of record frames.
Press the IO Setting option button to set up the band rate (300,
2400, 4800, 9600, 19200, 38400).
Press the Next Page option button to display page 1/3.
Utility Menu- Page 3/3
Page 64

Getting Started Manual
WA-GSM-E-RevA
61
System Status
View the oscilloscope's hardware and software configuration as follows:
1. Press the Utility front panel button.
2. On the Utility flyout menu, press the System Status menu option
button as follows:
3. The System Status Information screen is then shown. Press the
SINGLE front panel button to exit the Status Information screen.
Page 65

WaveAce
62
WA-GSM-E-RevA
Updating the System Software
System software updates are downloaded through the USB memory port in
the front of the oscilloscope.
1. Insert the USB memory device containing the software update in the
USB port on the front of the scope.
2. Press the front panel Utility button.
3. Press the Next Page menu option button to navigate to menu page
3/3. Select the Update Firmware menu option button as follows:
Note: WaveAce reminds you to verify the firmware product type
matches the instrument. Also, to verify the firmware update file is
stored in the root directory of the USB memory device.
Now, press the SINGLE front panel button to begin updating the
firmware or the RUN/STOP front panel button to exit.
Page 66

WA-GSM-E-RevA
63
Reference
Vertical System
WA102
WA112
WA202
WA212
WA222
WA232
Bandwidth
60 MHz
100 MHz
60 MHz
100 MHz
200 MHz
300 MHz
Rise Time (Typical)
<5.8 ns
<3.5 ns
<5.8 ns
<3.5 ns
<1.7 ns
<1.1 ns
Input Channels
2
Bandwidth Limiters
20 MHz
Input Impedance
1 MΩ || 13 pF
50 Ω, 1 MΩ || 13 pF
Input Coupling
AC, DC, GND
Max Input Voltage
400 V Pk
1 MΩ - 400 V Pk,
50 Ω - ≤ 5 Vrms
Vertical Resolution
8 bits
Sensitivity
2 mV-5 V/div (1-2-5 order)
Offset Range
±2 V @ 2–100
mV/div
±40 V @ 200 mV–
5 V/div
±40 V @ 200 mV–5 V/div
±800 mV @ 2 mV–100 mV/div
Offset Accuracy
±3.0%
Horizontal System
WA102
WA112
WA202
WA212
WA222
WA232
Timebase Range
2.5 ns/div-50 s/div
( Roll mode: 100
ms/div ~50 s/div)
1.0 ns/div-50 s/div
( Roll mode: 100 ms/div ~50 s/div)
Acquisition
WA102
WA112
WA202
WA212
WA222
WA232
Acquisition Memory
4 kpts
9 kpts
Interleaved Memory
N/A
18 kpts
Averaging
4, 16, 32, 64, 128, 256
Peak Detect
10 ns
1 ns
Real Time
Sampling Rate
250 MS/s
1 GS/s
Interleaved
Sampling Rate
500 MS/s
N/A
2 GS/s
Equivalent
Sampling Rate
50 GS/s
Triggering
WA102
WA112
WA202
WA212
WA222
WA232
Trigger Modes
Auto, Normal, Single
Specifications
Getting Started Manual
Page 67

WaveAce
64
WA-GSM-E-RevA
Triggering
WA102
WA112
WA202
WA212
WA222
WA232
Trigger Types
Edge, Pulse, Video, Slope, Alternative
Trigger Coupling
AC, DC, LF Reject, HF Reject
Trigger Slope
Positive, Negative
Holdoff Range
100 ns - 1.5 s
External Trigger
Range
CH1, CH2, ±6 div
from center of
screen
EXT: ±1.2 V
EXT/5: ±6 V
CH1, CH2, ±5 div from center of
screen
EXT: ±0.6 V
EXT/5: ±3 V
Basic Triggers
Edge Trigger: Edge Types - Rising, Falling, Rising and Falling
Pulse Trigger: Trigger Modes - Positive Pulse Width (>, <, =), Negative Pulse
Width(<, >, =)
Video Trigger: Support Signal Formats: PAL/SECAM, NTSC; Trigger Condition odd field, even field, all lines, line Num
Slope Trigger: Positive Slope (>, <, =) ,Negative Slope (>, <, =) , Time: 20 ns - 10 s
Alternative Trigger: CH1/CH2 Trigger Types - Edge, Pulse, Video, Slope
Documentation and Connectivity
Waveform File Data: Save waveform data to internal reference traces or USB
memory. Waveforms saved to USB memory can be binary or CSV
Screen Images: Save screen images to USB memory in bitmap format
USB: 1 front panel mounted USB port, 1 rear panel USB port
RS-232: 1 rear panel RS-232 port
Display
Type: Color TFT 5.7 in diagonal Liquid Crystal Display
Resolution: 320 X 234 pixels
Grid Styles: XY, YT
Waveform Display Mode: Point, Vector
Persistence
Persistence Selections: Off, 1 s, 2 s, 5 s, Infinite
Setup Storage
Store up to 20 setups to internal memory or save to a USB memory device for recall
later
Page 68

Getting Started Manual
WA-GSM-E-RevA
65
Math Tools
1 Math Trace; choose between Sum, Difference, Product, Quotient, FFT
(Rectangular, Hamming, Hanning, Blackman with 1024 points)
General
POWER SUPPLY:
Input Voltage: 100-240 VAC, Automatic AC Voltage Selection
Frequency: 50/60/400 Hz
Power: 50 VA max.
Physical Dimensions (HxWxD): 154 mm (6.06") x 133 mm (5.23") x 305 mm (12")
Weight: 2.3 kg (approx.)
Warranty and Service: 3 year warranty, calibration recommended yearly
Environmental:
Temperature (operating): +10 °C to +40 °C
Temperature (non-operating): -20 °C to +60 °C
Humidity (operating): 5 to 80% RH (non-condensing)
Humidity (non-operating): 5 to 95% RH (non-condensing as tested per MIL-PRF-
28800F
Altitude (operating): up to 3000 m
Altitude (non-operating): up to 15,000 m
Page 69

WaveAce
66
WA-GSM-E-RevA
Contact Your Local LeCroy Technical Support Office for Help
United States and Canada
Phone Sales: 800-553-2769 or 845-425-
2000
Fax (Sales&Service): 845-578-5985
Email Sales: contact.corp@lecroy.com
Web Site: http://www.lecroy.com/
Europe
Phone Sales: + 41 22 719 2228
Fax Sales: + 41 22 719 2230
Email Sales: contact.sa@lecroy.com
Web Site:
http://www.lecroy.com/europe
China
Phone Sales: ++86 28- 86527180 / 7181 /
7182
Fax Sales: +86 28-8652 7183
Email Sales: george.ni@lecroy.com
Singapore
Phone Sales: ++ (65) 64424880
Fax Sales: ++ (65) 64427811
Email Sales: jimmy.ong@lecroy.com
TaiwanPhone Sales: (886) 2 8226 1366
Fax Sales: (886) 2 8226 1368
Email Sales: sales_twn@lecoln.com.tw
Web Site: http://www.lecoln.com.tw
Tokyo
Phone Sales: ++ 81 3 3376 9400
Fax Sales: ++ 81 3 3376 9587
Web Site:
http://www.lecroy.com/japan
Korea - Seoul
Phone Sales: ++ 82 2 3452 0400
Fax Sales: ++ 82 2 3452 0490
Web Site: http://www.lecroy.co.kr
Technical Support
For assistance with installation, calibration, and a full range of software
applications contact the customer service center nearest you. You can also
find contact information for the following offices on the LeCroy Web site at
http://www.lecroy.com/tm/ServiceSupport.
Page 70

 Loading...