

Leatherman Vista User Manual
Vista™
2
6
1
7
8
A
5
4
9
3
BC
USER’S GUIDE
SAFETY CONSIDERATIONS AND FEATURES
As with most hunting pruners, the blades on this tool have
sharp edges and points. Be extremely careful not to cut or
pinch yourself with the blades or handles when opening,
closing or using your pruning multi-tool. The features of
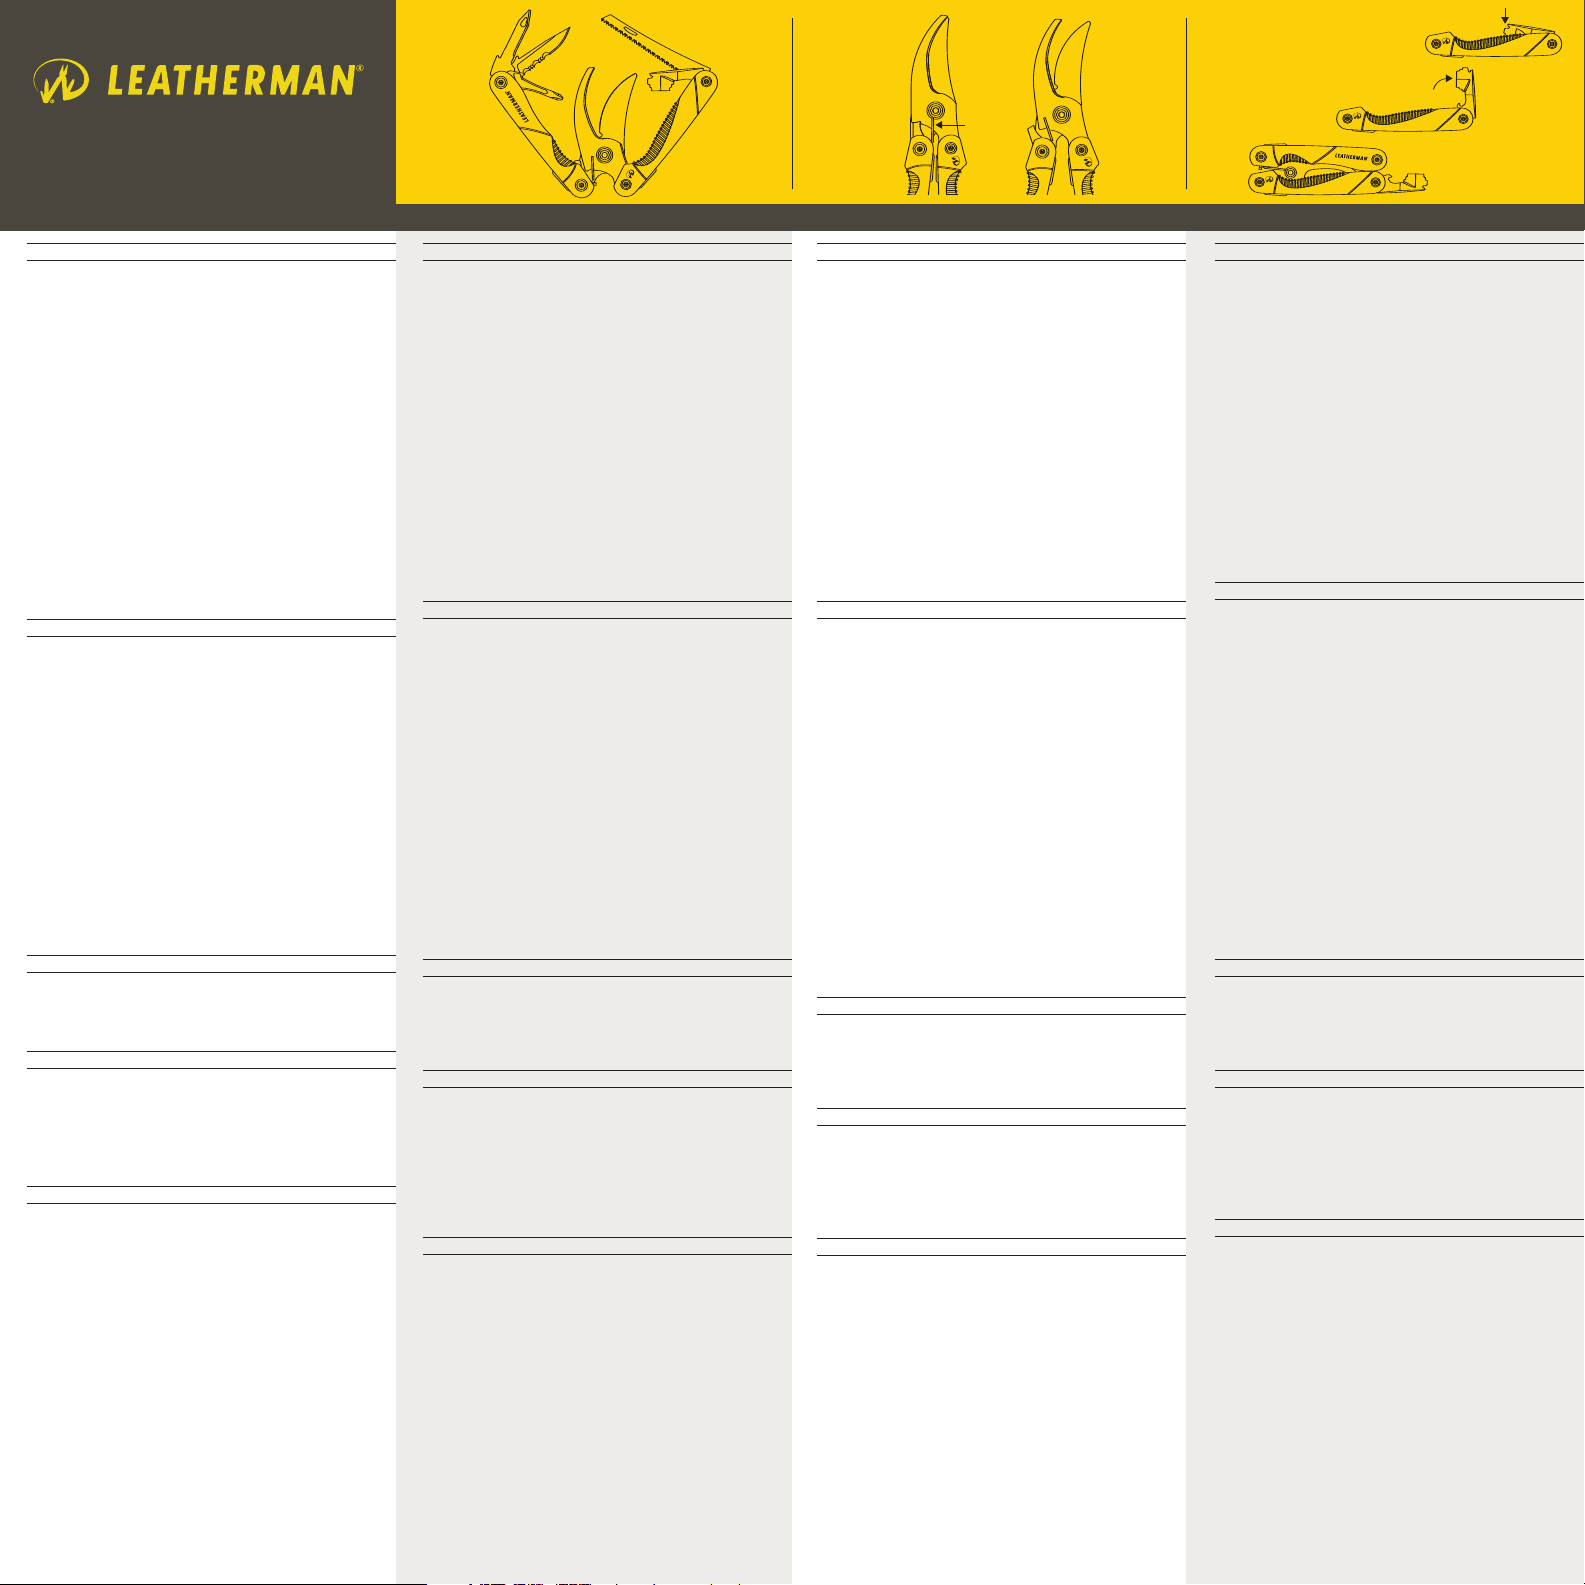
the Vista are as follows:
Vista (Drawing A):
1. Bypass Pruners
Awl
2.
3. Choke Tube Tool
Flat Screwdriver
4.
5. Saw
Straight & Serrated Edge Combo Knife
6.
Phillips Screwdriver
7.
Soft-Wire Cutters
8.
Bottle Opener
9.
OPENING & CLOSING THE PRUNERS & TOOLS
To open the pruner/multi-tool, first open the handles by
pulling them back and down from the center in opposite
directions. Once the handles are fixed in the open position,
unlock the pruner by pushing out on the pruner safety lock
(Drawing B). To close and lock the pruners squeeze handles
together from the open position and push pruner safety lock
back towards the center to the locked position.
To access the tools, partially open the handles and use
the nail nick to partially rotate out the tool you wish to use.
Then carefully grasp the tool and rotate it until it is in the
fully-extended position. Fold the handles back into the
closed position (the pruners must be locked to do this)
with the individual tool out. When using the tools, always
work with the handles in the closed position to avoid
potential injury (Drawing C).
USING THE WIRE CUTTERS
The wire cutters are located at the base of the pruning
shears (Drawing D). To prevent damage, the wire cutters
should be used on softer grade wire or mesh only.
USING THE CHOKE TUBE T
DANGER. Be sure gun is unloaded before adjusting or
changing choke. Be careful to correctly align threads and
tighten tube by hand. Secure tube notches onto Vista
wrench and finish tightening. Be careful not to over tighten
as damage to barrel may occur.
PRUNER SHARPENING
The pruner blade may be sharpened in the open/deployed
position. To sharpen a bypass pruner edge, sharpen the
blade on the outside edge only by pushing away from the
blade with a file or sharpening tool. It's important to maintain
the same bevel angle of the blade for best edge life.
The Vista features a combination straight and serrated
utility knife blade. The straight edge may be sharpened using
standard sharpening methods. When sharpening a serrated
knife blade, be sure to use a sharpening system designed to
accommodate serrations. This will ensure that proper
curvature of the serrations and the cutting effectiveness of
the blade are maintained.
OOL
SICHERHEITSHINWEISE UND FUNK
Wie die meisten Gartenscheren besitzt auch dieses T
spitze Kanten und scharfe Klingen. Seien Sie deshalb beim
Öffnen, Schließen und dem Gebrauch des Multitools äußerst
vorsichtig, damit Sie sich nicht an den Klingen schneiden
oder an den Griffen quetschen. Das Vista besitzt die
folgenden F
Vista (zeichnungen A):
A
Um die Gartenschere und W
klappen Sie die Griffe von der Mitte aus nach unten
auseinander. Wenn die Griffe in der offenen Stellung arretiert
sind, lösen Sie die Verriegelung (zeichnungen B). Um die
Gartenschere einzuklappen und zu sichern, drücken Sie die
Griffe wieder zusammen und schieben die Sicherung nach
hinten in die Arretierstellung
ein wenig und ziehen das gewünschte Werkzeug an der
Kerbe teilweise heraus. Nun fassen Sie das Werkzeug und
drehen es vorsichtig ganz heraus, bis es am Griffende
vollständig ausgeklappt ist. Klappen Sie nun die Griffe des
Tools vorsichtig zusammen (hierzu muss die Gartenschere
arretiert sein), sodass nur das gewünschte Werkzeug
geöffnet bleibt. Verwenden Sie Werkzeuge immer mit
zusammengeklapptem Griff, um Verletzungen zu vermeiden
(zeichnungen C).
VERWENDEN DES DRAHTSCHNEIDERS
Der Drahtschneider befindet sich an der Innenseite der
Gartenschere (zeichnungen D). Um den Drahtschneider nicht
zu beschädigen, sollte dieser nur zum Durchtrennen weicher
Drähte verwendet werden.
BENUTZEN DES CHOKE-SCHLÜSSELS
ACHTUNG GEFAHR! Bevor Sie den Choke wechseln, sollten
Sie sich vergewissern, dass das Gewehr nicht geladen ist.
Richten Sie das Gewinde vorsichtig von Hand aus und
schrauben Sie den Choke auf. Platzieren Sie die den ChokeSchlüssel in den K
Aufsatz fest. Choke-Aufsätze sollten nicht zu fest angezogen
werden, um den Gewehrlauf nicht zu beschädigen.
SCHÄRFEN DER GARTENSCHERE UND MESSER
Die Garten-/Astschere kann in der offenen Position geschärft
werden. Bei Bypass-Scheren sollte nur die Außenkante
geschärft werden. Bewegen Sie die Feile oder den
Schleifstein dabei von der Klinge weg
dass der Abkantwinkel der Klinge nicht verändert wird, um
die Klinge nicht zu beschädigen.
gezahnter Klinge. Glatte Messer können auf gewohnte Weise
geschärft werden. Schärfen Sie gezahnte Messer nur mit
speziell dafür geeigneten V
Zahnung der Messerschneide verändert und ihre F
beeinträchtigt werden kann.
unktionen:
1. Garten-/Astschere (Bypass)
2. Ahle
3. Choke-Schlüssel
Flacher Schraubendreher
4.
Säge
5.
Kombimesser mit glatter und gezahnter Klinge
6.
Kreuzschlitzschraubendreher
7.
Drahtschneider
8.
9. Flaschenöffner
US- UND EINKLAPPEN DER GARTENSCHERE UND DER WERKZEUGE
erkzeuge des Tools zu öffnen,
Um die Werkzeuge zu verwenden, öffnen Sie die Griffe
Das Vista verfügt über ein Kombimesser mit glatter und
.
erben am Choke und ziehen Sie den
erfahren, da andernfalls die
TIONEN
ool
. Achten Sie darauf
unktion
,
GUIDE DE L’UTILISATEURGEBRAUCHSANLEITUNG
MESURES DE SÉCURITÉ ET
Comme avec tout sécateur
chants coupants et des pointes. Soyez extrêmement
prudent(e) afin de ne pas vous couper ou vous pincer avec
les lames ou les poignées lorsque vous ouvrez, fermez ou
utilisez votre outil multifonctions/sécateur
Vista sont les suivantes :
Vista (schémas A):
Sécateur « Bypass »
1.
Alésoir
2.
Clé de choke
3.
Tournevis plat
4.
Scie
5.
6. Couteau mixte à chant droit et cranté
7. Tournevis cruciforme
8. Pinces coupantes pour fils souples
9. Décapsuleur
OUVERTURE/FERMETURE DU SÉCATEUR ET DES OUTILS
Pour ouvrir le sécateur/outil multifonctions, commencez par
ouvrir les poignées en les tirant vers l'arrière et le bas à partir
du centre dans des directions opposées. Une fois les
poignées fixées en position ouverte, déverrouillez le sécateur
en appuyant sur le dispositif de sécurité du sécateur
(schémas B). Pour fermer et verrouiller le sécateur, serrez les
poignées ensemble à partir de la position ouverte et appuyez
sur le dispositif de verrouillage du sécateur vers le centre en
position verrouillée.
Pour accéder aux outils, ouvrez partiellement les
poignées et utilisez l'entaille à ongle pour sortir l'outil à
utiliser en le faisant pivoter partiellement. Saisissez ensuite
soigneusement l'outil et faites-le tourner jusqu'à ce qu'il se
trouve en position complètement étendue en bout de
poignée. Repliez soigneusement les poignées en position
fermée (pour ce faire, le sécateur doit être verrouillé), l'outil
individuel étant sorti. Lors de l'utilisation des outils, travaillez
toujours avec les poignées en position fermée pour éviter
toute blessure (schémas C).
TION DES PINCES COUP
UTILISA
es pinces coupantes se trouvent à la base de la cisaille
L
(schémas D). P
coupantes ne doivent être utilisées qu'avec du fil ou du
grillage plus souple.
UTILISATION DE LA CLÉ DE CHOKE
DANGER. Veillez à décharger le fusil avant d'ajuster ou de
modifier le choke. Veillez à aligner correctement les filetages
et à serrer le choke à la main. Fixez les crans du choke sur la
clé Vista et finissez de serrer. Veillez à ne pas serrer de trop
et ce, pour ne pas endommager le canon.
AFFÛT
a lame du sécateur peut être affûtée en position
L
ouverte/déployée. Pour affûter un chant du sécateur « Bypass »,
affûtez la lame sur le chant extérieur uniquement en
repoussant la lame à l'aide d'une lime ou d'un outil d'affûtage.
Il est important de maintenir le même angle de biseau de la
lame pour une durabilité de chant optimale.
L
droite et crantée. Le chant droit peut être affûté à l'aide de
méthodes d'affûtage standard. L
du couteau cranté, veillez à utiliser un système d'affûtage
conçu pour les dentelures. Ceci permettra de conserver la
courbure adéquate des dentelures et l'efficacité de coupe de
la lame.
our éviter tout dommage, les pinces
GE DU SÉCA
A
e Vista comporte une lame de couteau universel mixte
CARACTÉRISTIQUES
, les lames de cet outil ont des
. Les fonctions du
ANTES
TEUR ET DU COUTEA
ors de l'affûtage de la lame
U
GUÍA DEL USUARIO
CONSIDERA
Al igual que la mayoría de las podadoras de jardín, las hojas
de esta herramienta poseen bordes y puntas filosos. T
sumo cuidado de no cortarse o pellizcarse con las hojas o las
empuñaduras al abrir
podadora. L
Vista (dibujos A):
1. Tijeras de podar
2. Punzón
3.
4.
5.
6.
7.
8. Cortadores de alambre blando
9.
APERTURA/CIERRE DE LA PODADORA Y LAS HERRAMIENTAS
Para abrir la podadora/multi-herramienta, primero abra las
empuñaduras jalándolas hacia atrás y hacia abajo desde el
centro en direcciones opuestas. Una vez que las
empuñaduras están fijas en la posición abierta, destrabe la
podadora empujando hacia afuera el bloqueador de
seguridad de la podadora (dibujos B). Para cerrar y trabar la
podadora, junte las empuñaduras desde la posición abierta y
empuje el bloqueador de seguridad de la podadora hacia el
centro, es decir hacia la posición de traba.
empuñaduras y utilice las ranuras para rotar parcialmente
hacia afuera la herramienta que desea usar. Luego, tome con
cuidado la herramienta y rótela hasta que quede totalmente
extendida al final de la empuñadura. Pliegue cuidadosamente
las empuñaduras a la posición cerrada (para hacer esto, la
podadora debe estar trabada) con la herramienta individual
afuera. Cuando utilice las herramientas, siempre trabaje con
las empuñaduras cerradas para evitar lesiones (dibujos C).
CÓMO USAR LOS CORTADORES DE ALAMBRE
Los cortadores de alambre están ubicados en la base de las
tijeras de la podadora (dibujos D). Para evitar daños, los
cortadores de alambre se deben utilizar sólo para alambres
más blandos o mallas.
UTILIZA
PELIGRO. Antes de cambiar o ajustar el obturador, asegúrese
de que el arma esté descargada. Asegúrese de alinear los
hilos y ajustar el tubo manualmente de forma correcta.
Asegure las hendiduras del tubo en la llave de la Vista y
termine de ajustar. Tenga cuidado de no ajustar demasiado
ya que el cañón puede dañarse.
AFILADO DE LA POD
La hoja de la podadora se puede afilar en la posición
abierta/desplegada. Para afilar el borde de las tijeras de
podar, afile la hoja sólo en el borde externo, empujando
desde la hoja con una herramienta para limar o afilar
importante mantener el mismo ángulo oblicuo de la hoja
para una mejor vida útil de la misma.
combinación de hojas lisas y dentadas. El borde recto puede
afilarse por medio de técnicas de afilado convencionales. Al
afilar una hoja de filo dentado, asegúrese de utilizar un
sistema de afilado para adaptarse a los bordes serrados. Esto
asegurará que se conserve tanto la curvatura adecuada de
los bordes serrados como el corte efectivo de la hoja.
CIONES Y CARACTERÍSTICAS DE SEGURIDAD
, cerrar o usar su multi-herramienta
as características de la Vista son las siguientes:
Herramienta para el tubo obturador
Destornillador plano
Sierra
Conjunto de navajas de filo liso y dentado
Destornillador Phillips
Abridor de botellas
Para acceder a las herramientas, abra parcialmente las
ARA EL TUBO OBTURADOR
CIÓN DE LA HERRAMIENT
a Vista presenta una navaja multiuso con una
L
A P
ADORA Y DE LA HOJA
. Es
enga

Register your product at
www.leatherman.com
Enregistrez votre produit
sur www.leatherman.com
Vista™
USER’S GUIDE
MAINTENANCE
The Vista is a 100% high-grade stainless steel. No steel is
truly “stainless.” It is actually “corrosion-resisting steel,” and
corrosion can occur if not properly maintained. Y
multi-tool should be cleaned, dried and re
especially after prolonged use in a damp environment. After
, re-oil pivoting area with a light machine or
cleaning
penetrating-type oil.
CCESSORIES
A
eatherman offers a number of accessories that can enhance
L
the usefulness of your pruner multi-tool, along with some
attractive promotional items. Visit www
for more information.
WARRANTY
The Vista multi-tool pruner comes with a 25-year limited
warranty. If anytime after the date of purchase you find any
defect in material or workmanship in your L
return it to Leatherman Tool Group, Inc. or an authorized
repair center
address shown below.
unauthorized, or unreasonable use of your Leatherman Vista.
This warranty does not cover sheaths, accessories or handle
materials.
below or contact us for the location of the closest authorized
repair center. At our option, we may replace your Vista rather
than repair it; and if discontinued replace it with a product of
equal or greater value.
consequential damages. Some jurisdictions do not allow the
exclusion or limitation of incidental or consequential
damages, so the above exclusion may not apply to you.
may also have other rights that may vary from jurisdiction to
jurisdiction.
Leatherman Tool Group, Inc.
.O
P
Portland, OR 97294-0595 USA
12106 N.E. Ainsworth Circle
Portland, OR 97220-9001 USA
Phone: (503) 253-7826
ax: (503) 253-7830
F
www.leatherman.com
. For repair centers in your area contact the
The warranty does not cover abuse, alteration,
To obtain service, return your tool to the address shown
Leatherman Tool Group, Inc. is not liable for incidental or
This warranty also gives you specific legal rights, and you
x 20595
. Bo
our pruner
-oiled periodically,
.leatherman.com/shop
eatherman Vista,
D
GEBRA
PFLEGE
Das Vista besteht aus hochwertigem Edelstahl. Allerdings ist
auch Edelstahl nicht vollkommen korrosionsfrei. Eigentlich ist
das Material “korrosionsträge” und kann bei unzureichender
Pflege rosten. Die Garten-/Astschere sollte nach jedem
Gebrauch abgewischt werden. Das gesamte Multitool sollte
regelmäßig gereinigt, getrocknet und geölt werden,
besonders dann, wenn es über längere Zeit F
ausgesetzt war
Gelenkte ein leichtes, rostlösendes Maschinenöl oder ein
feuchtigkeitsverdrängendes Öl auftragen.
ZUBEHÖR
Leatherman bietet eine Reihe von Zubehör an, mit dem Sie
Ihr Multitool um einige nützliche Funktionen erweitern
können. Weitere Informationen, auch zu MerchandiseArtikeln, erhalten Sie unter www.leatherman.com/shop.
GARANTIE
Auf das Vista gewähren wir eine eingeschränkte Garantie
von 25 Jahren. Sollten Sie an Ihrem L
irgendeinem Zeitpunkt einen Material- oder
Herstellungsfehler feststellen, senden Sie es an die
Leatherman Tool Group, Inc., oder an ein autorisiertes
Servicecenter
erhalten Sie unter der unten angegebenen Anschrift.
Diese Garantie erlischt bei unsachgemäßer Behandlung
und Modifikation des Leatherman Vista sowie seiner
unsachgemäßen oder unvernünftigen Verwendung. Diese
Garantie gilt nicht für Holster, Zubehör und Griffmaterialien.
Zur Inanspruchnahme der Garantie senden Sie das
Werkzeug an die unten angegebene Adresse oder fragen Sie
uns nach dem nächstgelegenen Servicecenter. Es liegt in
unserem Ermessen, das Vista an Stelle einer Reparatur zu
ersetzen. Sollte das entsprechende Modell nicht mehr
verfügbar sein, ersetzen wir es durch ein mindestens
gleichwertiges Produkt.
Die Leatherman Tool Group, Inc. haftet nicht für Nebenund Folgeschäden aus dem Gebrauch ihrer Werkzeuge. Der
Haftungsausschluss für Folgeschäden entfällt, wenn er nach
den Gesetzen Ihres Landes nicht zulässig ist.
eitere, Ihnen nach dem Gesetz zustehende Rechte
W
werden von dieser Garantie nicht berührt.
Leatherman Tool Group, Inc.
P.O. Box 20595
Portland, OR 97294-0595 USA
12106 N.E. Ainsworth Circle
ortland, OR 97220-9001 USA
P
Telefon: +1 503 253-7826
Fax: +1 503 253-7830
www.leatherman.com
UCHSANLEITUNG
euchtigkeit
. Nach der Reinigung auf die beweglichen
eatherman Vista zu
. Adressen von Servicecentern in Ihrer Nähe
Registrieren Sie Ihr Produkt
unter www.leatherman.com
GUIDE DE L’UTILISATEUR
ENTRETIEN
e sécateur Vista est fabriqué à 100 % en acier inoxydable
L
de haute qualité.
Il s'agit en fait d'un « acier résistant à la corrosion » et l'outil
peut être rongé par la corrosion s'il n'est pas bien entretenu.
Essuyez les lames du sécateur après chaque utilisation.
Nettoyez, séchez et huilez régulièrement l'outil
multifonctions entier
longtemps dans un environnement humide. Après l'avoir
nettoyé, huilez à nouveau la zone pivotante avec une huile
mouvement légère ou une huile pénétrante.
ACCESSOIRES
eatherman offre un certain nombre d'accessoires susceptibles
L
de rehausser l'utilité de votre outil multifonctions avec sécateur
ainsi que des articles promotionnels attrayants. Consultez le site
www.leatherman.com/shop pour de plus amples informations.
GARANTIE
L'outil multifonctions avec sécateur Vista est couvert par une
garantie limitée de 25 ans. Si, à n'importe quel moment
suivant la date d'achat, vous trouvez un défaut dans la
matière ou la fabrication de votre Vista Leatherman,
renvoyez-le à Leatherman T
réparation agréé. Pour obtenir une liste des centres de
réparation dans votre région, veuillez écrire à l'adresse
donnée ci-
La garantie ne s'applique pas en cas d'abus, de
modification ou d'utilisation non autorisée ou déraisonnable
de votre Vista Leatherman. La présente garantie ne
s'applique pas aux gaines, accessoires ou matériaux de
poignées.
Au cas où la réparation s'avérerait nécessaire, renvoyez
votre outil à l'adresse donnée ci-dessous ou contactez-nous
afin d'obtenir l'adresse du centre de réparation agréé le plus
proche. Nous procéderons, à notre discrétion, au
remplacement de votre Vista plutôt qu'à la réparation. Le cas
échéant, nous le remplacerons par un produit de valeur
équivalente ou supérieure.
eatherman Tool Group, Inc. n'est pas responsable en
L
cas de dommages fortuits ou indirects. Certaines juridictions
ne permettent pas l'exclusion ou la limitation des
dommages fortuits ou indirects, il est donc possible que
cette exclusion ou limitation ne s'applique pas à votre cas.
Cette garantie vous confère aussi certains droits
spécifiques auxquels peuvent s'ajouter d'autres droits qui
varient d'une juridiction à une autre.
Leatherman T
. Box 20595
.O
P
Portland, OR 97294-0595 USA
12106 N.E. Ainsworth Circle
Portland, OR 97220-9001 USA
Téléphone : +1 503 253-7826
Télécopieur +1 503 253-7830
www.leatherman.com
Aucun acier n'est réellement « inoxydable ».
, surtout après l'avoir utilisé pendant
ool Group, Inc. ou à un centre de
dessous.
ool Group, Inc.
Registre su producto
en www.leatherman.com
GUÍA DEL USU
MANTENIMIENT
Las podadoras Vista son 100% de acero inoxidable de
calidad superior
“inoxidable”. En realidad se trata de "acero resistente a la
corrosión" y la corrosión puede ocurrir si la herramienta no
recibe el mantenimiento apropiado. L
podadora se deben limpiar luego de cada uso. L
herramienta entera debe limpiarse, secarse y aceitarse
periódicamente, especialmente si se la usa durante mucho
tiempo en un ambiente húmedo. Después de limpiarla,
aceite el área giratoria con aceite liviano para máquinas o
aceite de tipo penetrante.
CCESORIOS
A
Leatherman ofrece varios accesorios que pueden mejorar la
utilidad de su multi-herramienta podadora, junto con
algunos artículos promocionales. P
información, visite www
GARANTÍA
La multi-herramienta podadora Vista posee una garantía
limitada de 25 años. Si en cualquier momento a partir de la
fecha de compra, usted descubre algún defecto en el
material o en la mano de obra de su Leatherman Vista,
devuélvala a Leatherman Tool Group, Inc. o a un centro
autorizado de reparaciones. Para localizar centros de
reparación en su área, póngase en contacto con la
dirección que se muestra más abajo.
La garantía no cubre maltrato, modificación, o uso no
autorizado o no razonable de su Leatherman Vista. Esta
garantía no cubre fundas, accesorios o materiales de las
empuñaduras.
Para obtener servicio, devuelva su herramienta a la
dirección que se indica más abajo o póngase en contacto
con nosotros para recibir la ubicación del centro autorizado
de reparaciones más cercano. A opción nuestra, podríamos
reemplazar su Vista en lugar de repararla; y de no
fabricarse más, reemplazarla con un producto de igual o
mayor valor.
Leatherman Tool Group, Inc. no se responsabiliza por
daños incidentales o consiguientes. Algunas jurisdicciones
no permiten la exclusión o la limitación de daños
incidentales o consiguientes, por lo que la exclusión
anterior pudiera no ser aplicable en su caso.
Esta garantía asimismo le otorga derechos jurídicos
específicos, y usted quizá tenga otros derechos que pueden
variar de jurisdicción en jurisdicción.
Leatherman Tool Group, Inc.
x 20595
. Bo
.O
P
ortland, OR 97294-0595 USA
P
12106 N.E. Ainsworth Circle
ortland, OR 97220-9001 USA
P
Teléfono: +1 503 253-7826
Fax: +1 503 253-7830
.leatherman.com
www
O
. Ningún acero es verdaderamente
ara obtener más
.leatherman.com/shop.
ARIO
as hojas de la
a multi-
The appearance of this product is proprietary to Leatherman Tool Group, Inc.
Patents pending.
© 2006 Leatherman Tool Group, Inc. 939724 0206
Das Produktdesign ist Eigentum der Leatherman Tool Group, Inc.
Patente angemeldef.
© 2006 Leatherman Tool Group, Inc. 939724 0206
L‚apparence de ce produit est la propriété exclusive de Leatherman Tool
Group, Inc. Brevete en instance.
© 2006 Leatherman Tool Group, Inc. 939724 0206
La apariencia de este producto es propiedad de LeathermanTool Group, Inc.
Patentes pendientes.
© 2006 Leatherman Tool Group, Inc. 939724 0206
 Loading...