

Page 1

Build a Bluetooth App using Swift 5
Created by Trevor Beaton
https://learn.adafruit.com/build-a-bluetooth-app-using-swift-5
Last updated on 2024-06-03 02:06:05 PM EDT
©Adafruit Industries Page 1 of 24
Page 2

Table of Contents
Overview
• Before starting...
• Parts
Code
• Download project from Github
• Understanding Core Bluetooth
• Getting Started
Scanning for Peripherals
• Scanning for Peripherals
• Discovering Peripherals
Connecting to a Peripheral
• Discovering Services
• Discovering Characteristics
• Disconnecting from Peripheral
Communication
• Setting up communication
• Reading the Value of a Characteristic
• Writing to a Characteristic
3
5
11
13
16
Communicating with the Arduino IDE
• Sending Data
• Congrats!
21
©Adafruit Industries Page 2 of 24
Page 3
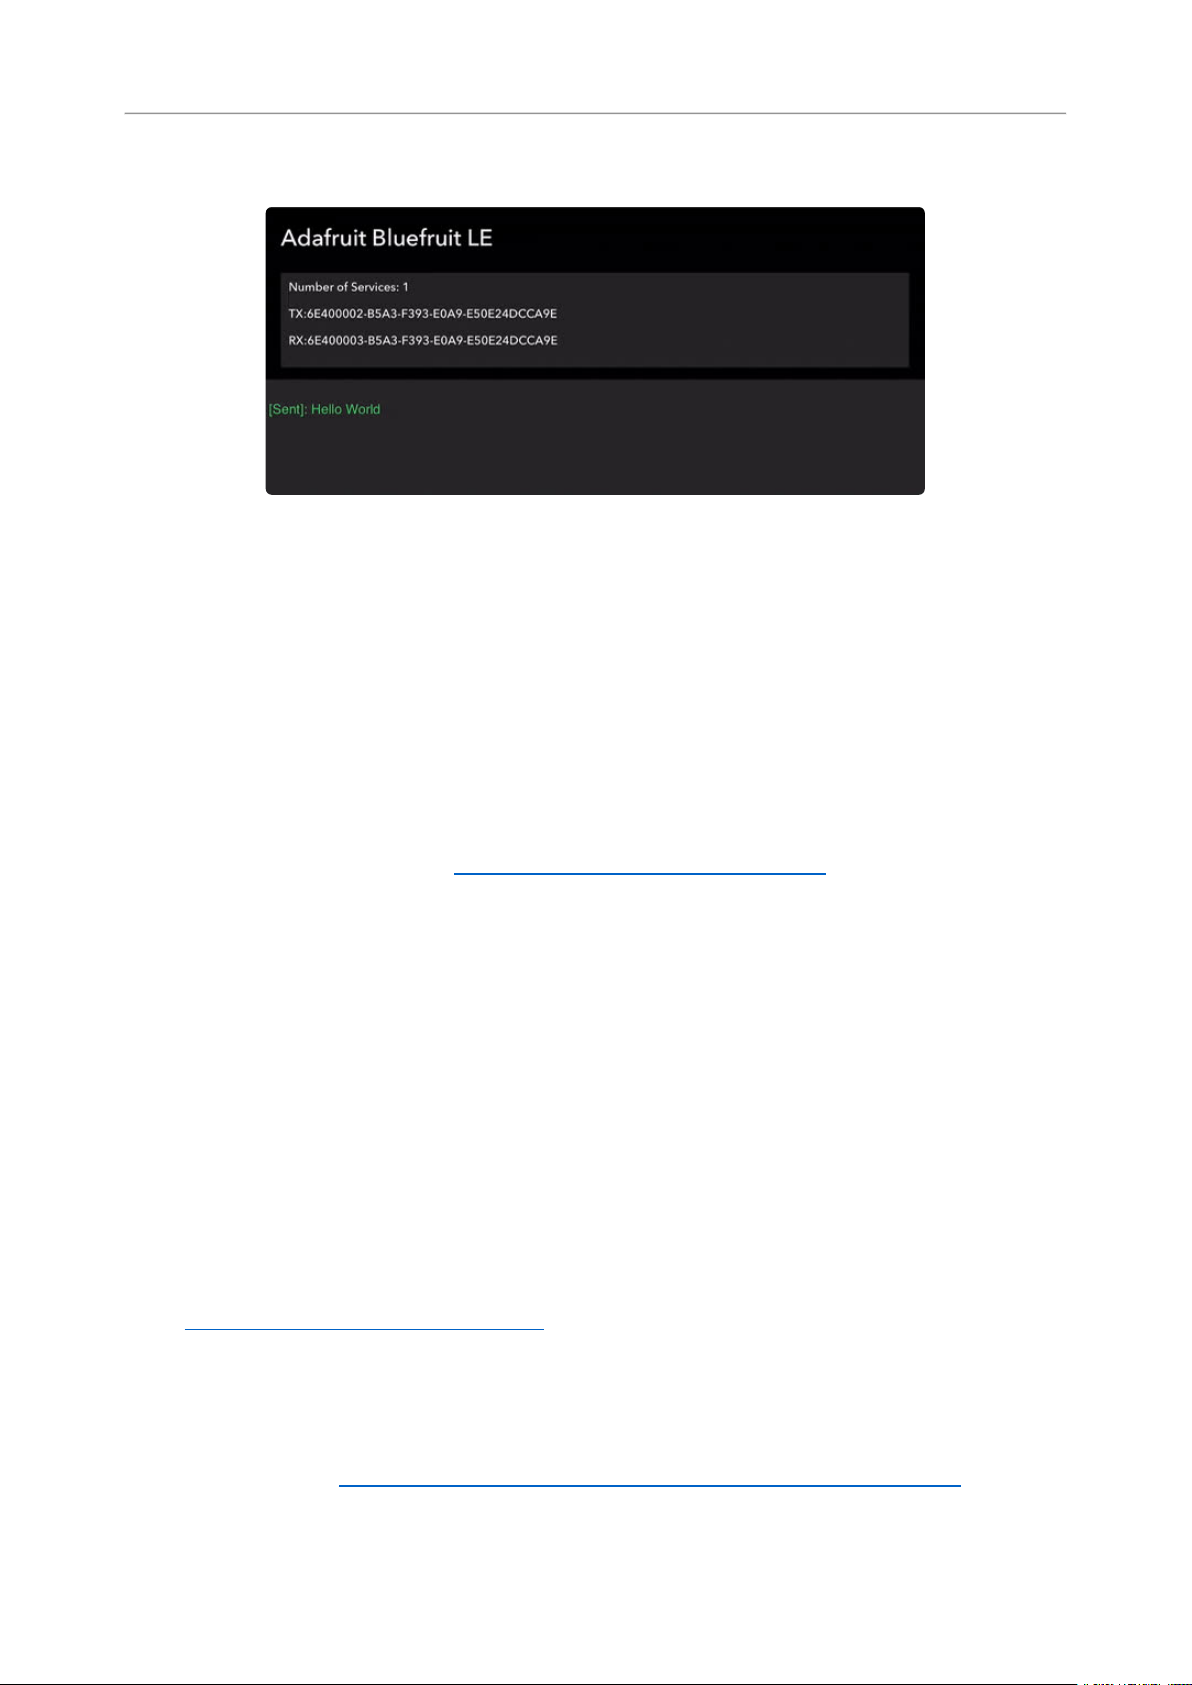
Overview
This guide will show you the basics of developing your own Bluetooth Low Energy
(BLE) app using the Core Bluetooth Framework inXcode.
You'll need a basic understanding of Swift, but no prior experience withBluetooth
Low Energy is required. The example code provided in this guide can be applied to
both iPhone and iPad users running the current version of iOS.
Note: We don't have equivalent code for Android users, sorry about that!
For this guide I'll be using the Adafruit Feather 32u4 Bluefruit LE(http://adafru.it/2829)
to sendand receive data.
Before you begin, know that the Simulator in Xcode isn't capable of using Bluetooth
LE services. You'll need to follow along using an iPhone or iPad running the most
current version of iOS (Version 14+).
Since you'll need to test your app using an iOS device, you'll also need an Apple
Developer membership (please note that free membership enrollment is fine for
following along with this guide).If you need help getting started as an iOS developer,
check out the Adafruit guide covering how to enroll to the Apple Developer program
and gain membership:
Introduction to iOS Development(https://adafru.it/xuF)
•
Before starting...
Install Xcode. Click here to download Xcode from the Apple App Store.(https://
•
adafru.it/QCM)
©Adafruit Industries Page 3 of 24
Page 4
Make sure yourversion of Xcode is up to date. I'm using Xcode Version 12.4at
•
the time of making this guide.
While in Xcode make sure the Development Target is 14.0 or higher.
•
Download the Arduino IDE from the main website here(https://adafru.it/fvm) if
•
you haven't already.
Parts
You don't need much to start this project, but you'll need these:
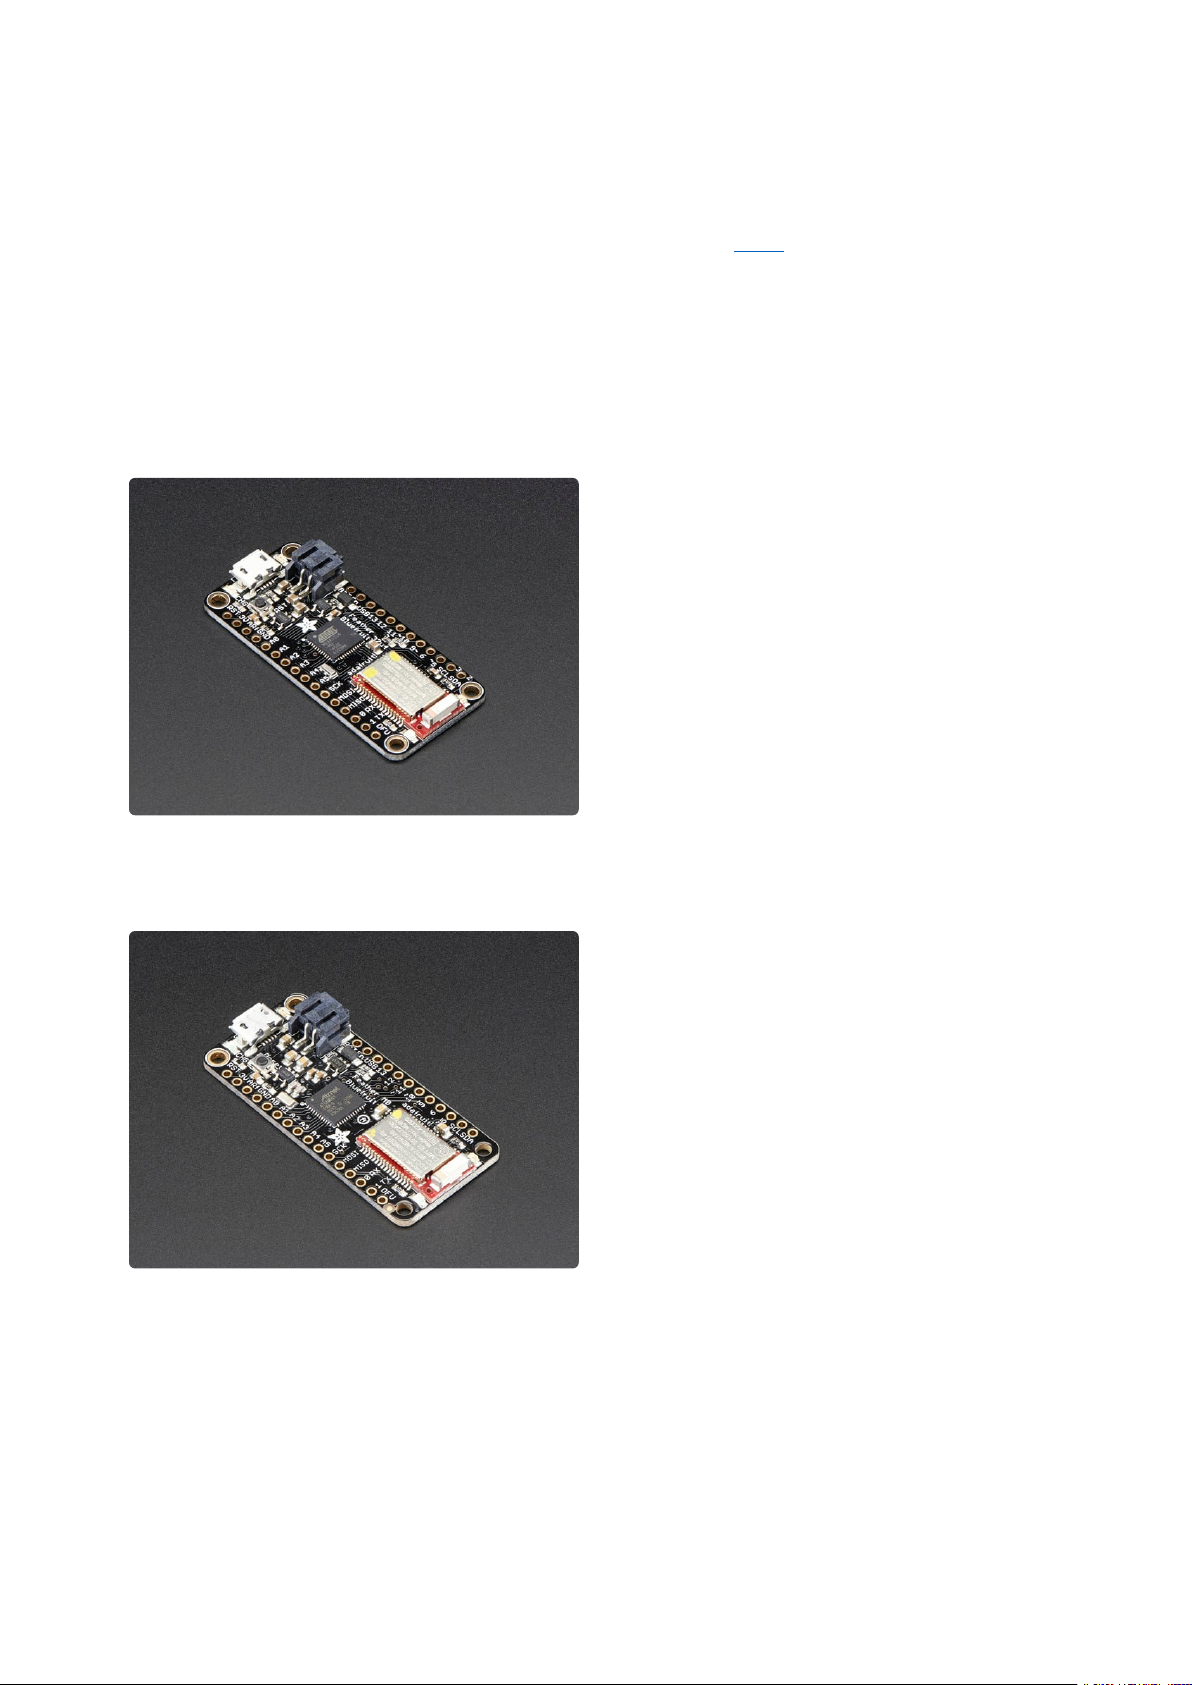
Adafruit Feather 32u4 Bluefruit LE
Feather is the new development board
from Adafruit, and like its namesake it is
thin, light, and lets you fly! We designed
Feather to be a new standard for portable
microcontroller...
https://www.adafruit.com/product/2829
Or
Adafruit Feather M0 Bluefruit LE
Feather is the new development board
from Adafruit, and like its namesake, it is
thin, light, and lets you fly! We designed
Feather to be a new standard for portable
microcontroller...
https://www.adafruit.com/product/2995
©Adafruit Industries Page 4 of 24
Page 5
And
Code
Download project from Github
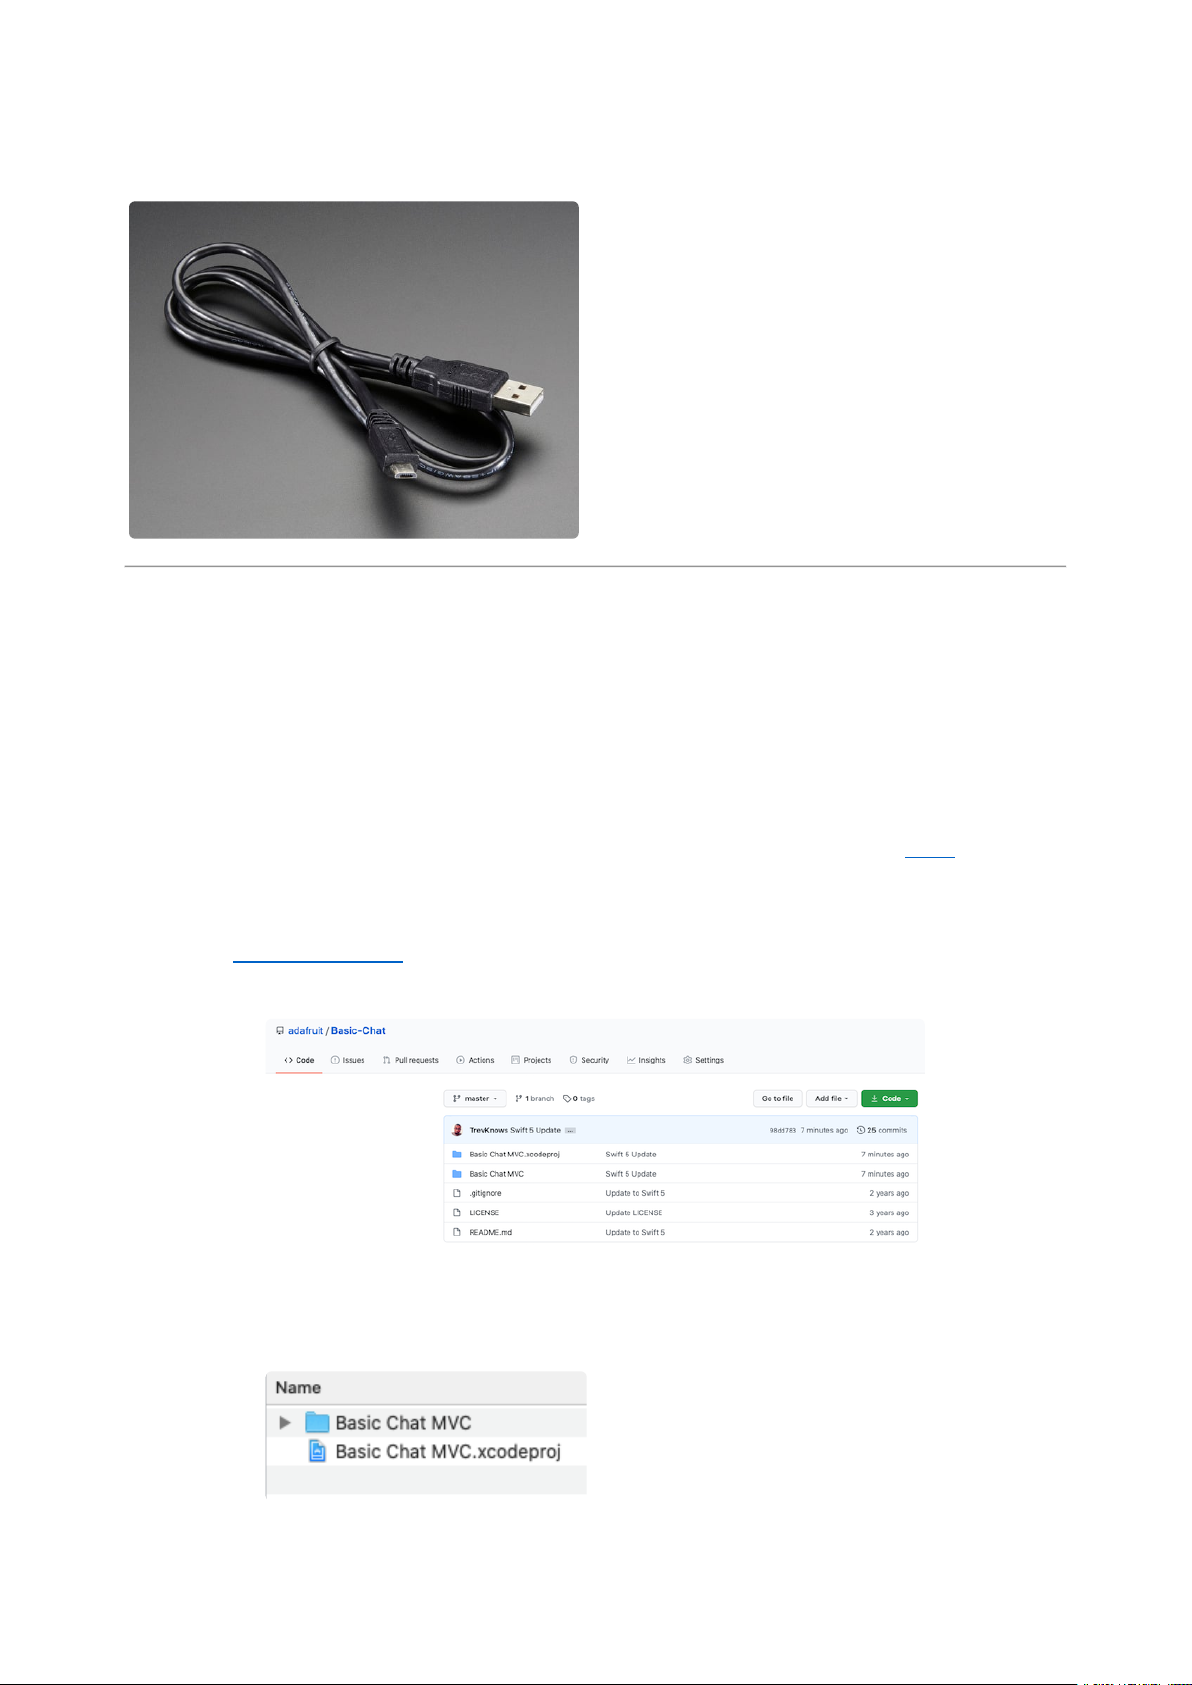
USB cable - USB A to Micro-B
This here is your standard A to micro-B
USB cable, for USB 1.1 or 2.0. Perfect for
connecting a PC to your Metro, Feather,
Raspberry Pi or other dev-board or...
https://www.adafruit.com/product/592
To best visualize how things work, I recommend that you should follow along with the
app provided in this guide. The Basic Chat app sends and receives data using the
Feather Bluefruit's UART connection. You can learn more about UARTs here(https://
adafru.it/19tf).
Goto the download page(https://adafru.it/xFx) for the project. Once on the page,
click on the "Clone or download" button.
Once the file is downloaded, click on the Basic Chat MVC.xcodeproj app and it will
open up the project in Xcode.
Once we have the project open, select your iOS device's schemein Xcode.
©Adafruit Industries Page 5 of 24
Page 6
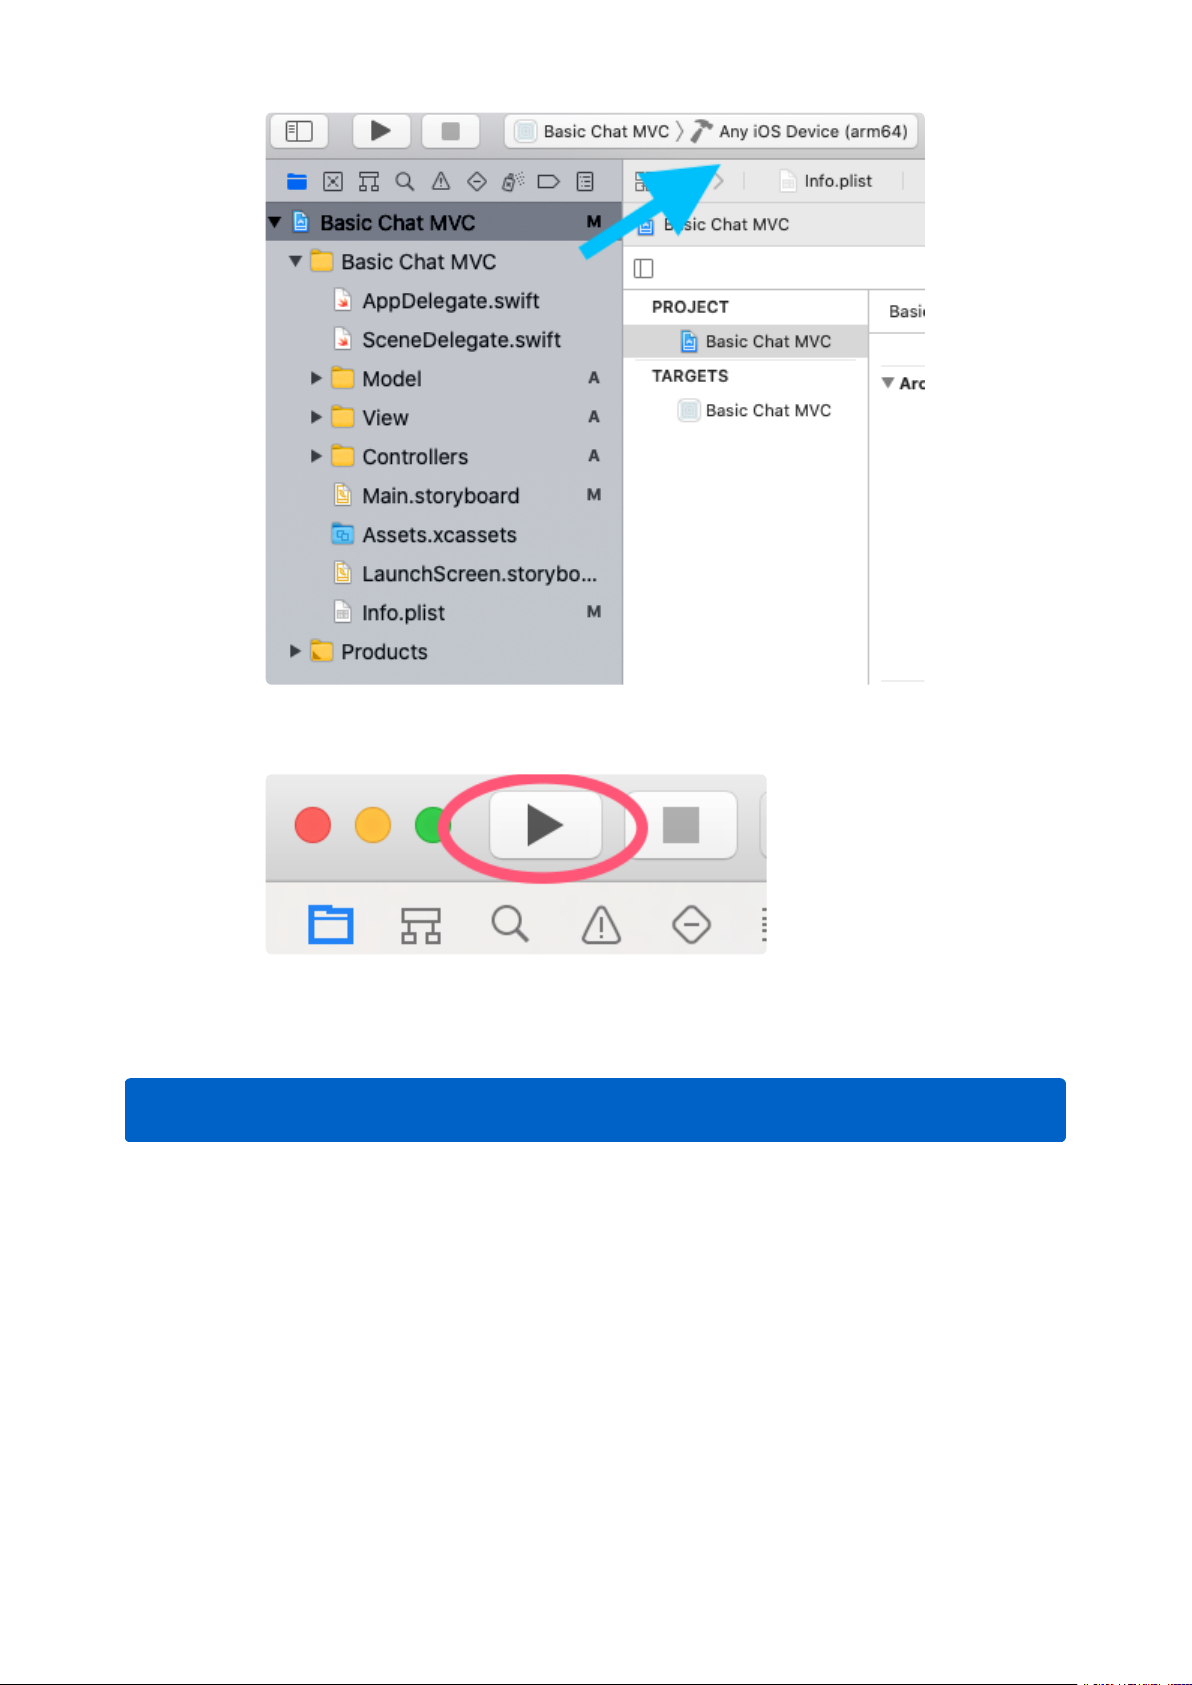
Now just press the Run button to test the app on your iOS device.
If all goes well, theBasic Chat MVCapp will run on your iOS device and you'll be able
to use the app as a reference while you explore the guide.
Make sure your Bluetooth is enabled while using Basic Chat
Understanding Core Bluetooth
The Core Bluetooth framework provides the classes needed for your apps to
communicate with Bluetooth-equipped low energy (LE) and Basic Rate / Enhanced
Data Rate (BR/EDR) wireless technology.
We need the CBCentralManagerobject that scans for, discovers, connects to, and
manages peripherals. We'll also need the CBPeripheral objectthatrepresents remote
peripheral devices that your app discovers with a central manager.
©Adafruit Industries Page 6 of 24
Page 7
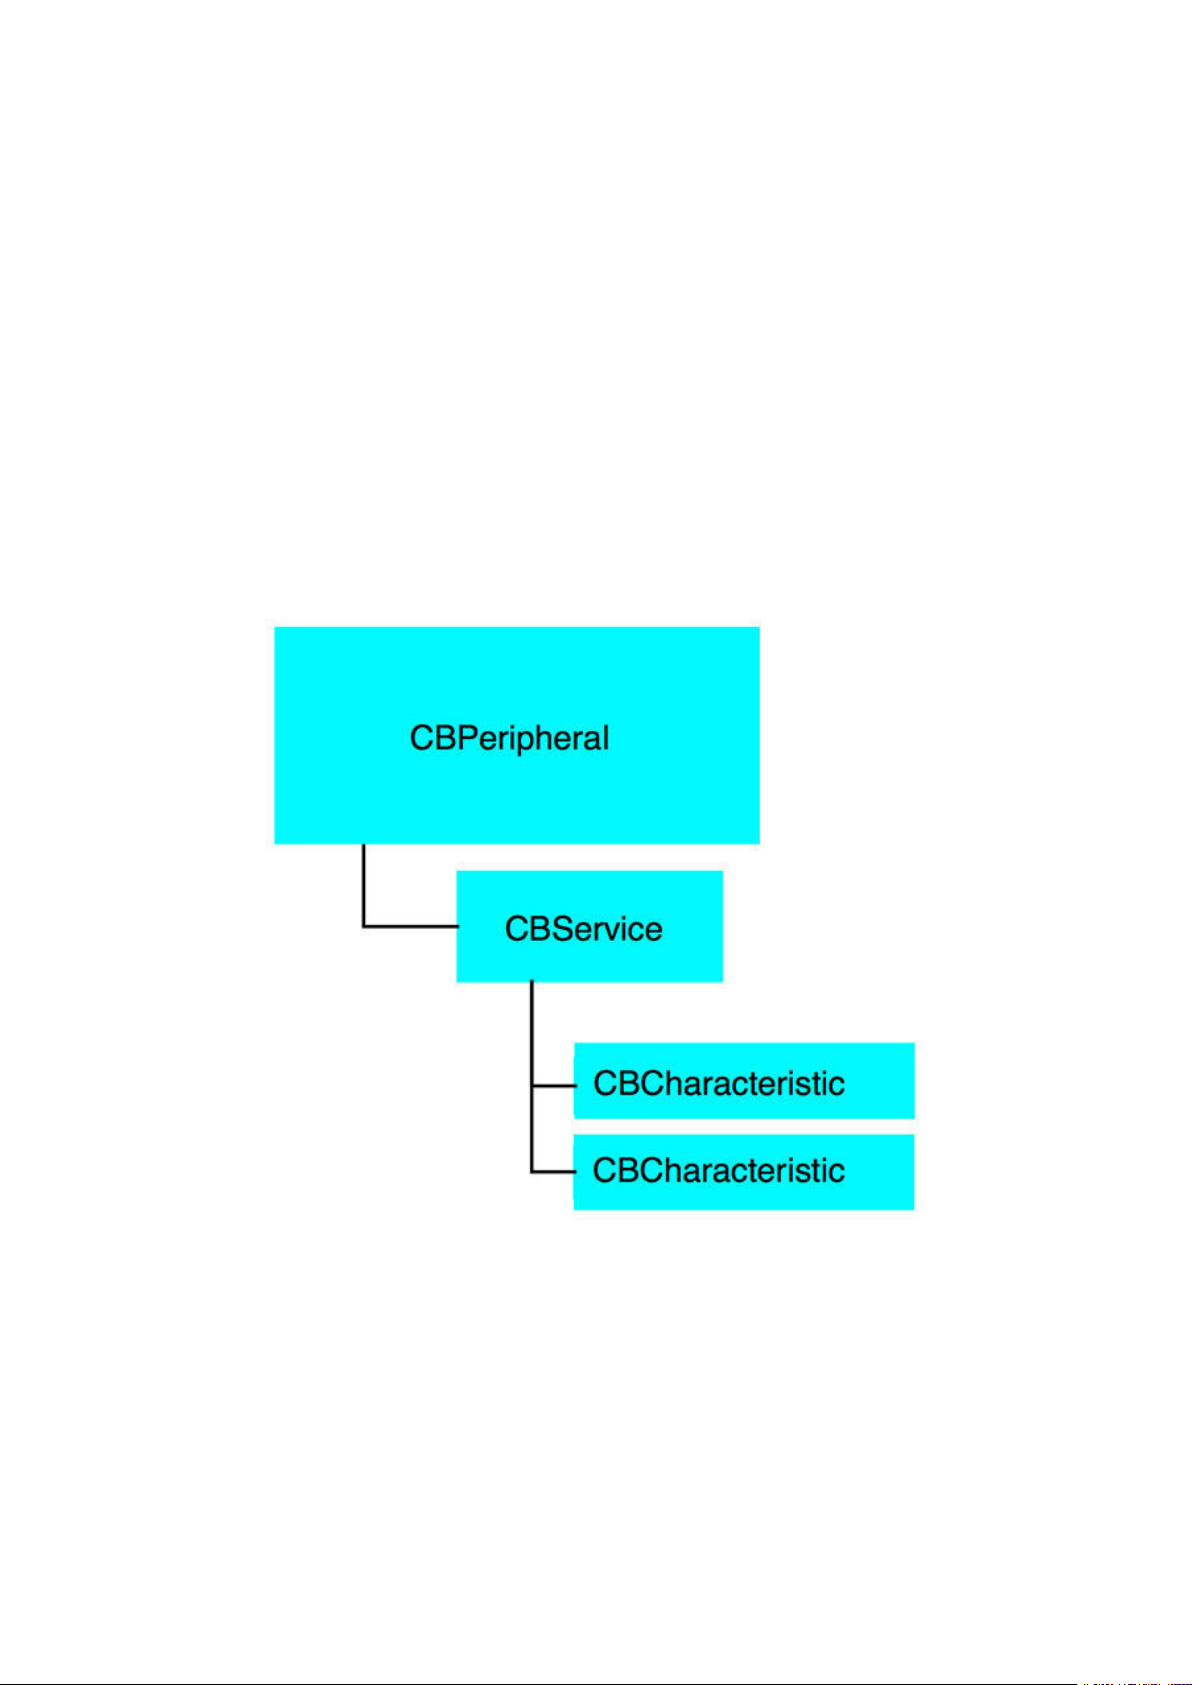
A CBPeripheral is usedto discover, explore, and interact with the services available
on a remote peripheral that supports Bluetooth low energy.
A service encapsulates the way part of the device behaves. For example, one service
of a heart rate monitor may be to expose heart rate data from a sensor.
Services themselves contain of characteristics or included services (references to
other services).
Characteristics provide further details about a peripheral’s service. For example, the
heart rate service may contain multiple characteristics.
The following diagram shows the hierarchy of the CBPeripheral:
Getting Started
Before starting to code, you need to create a prompt that asks for permission to use
the device's Bluetooth.
In your file hierarchy on the left, locate Info.plist.
©Adafruit Industries Page 7 of 24
Page 8
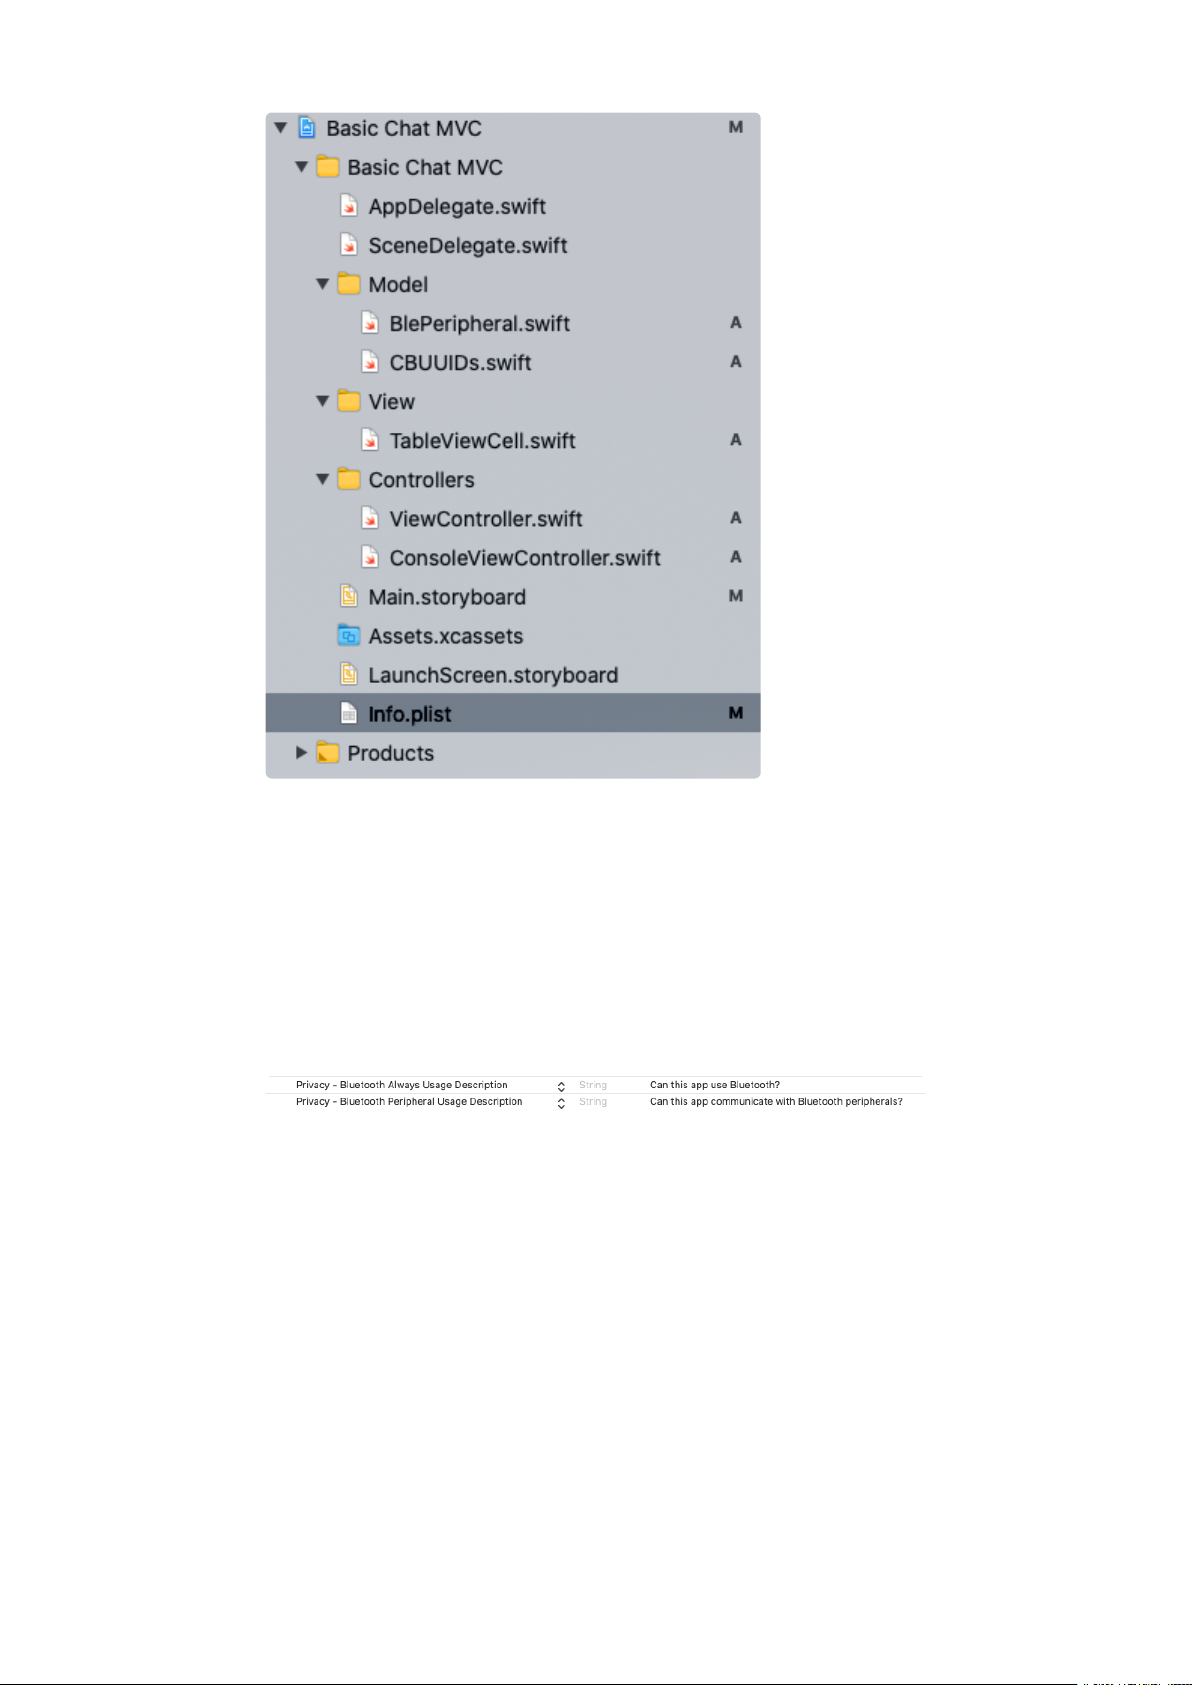
Add these to your info.plist:
• Privacy - Bluetooth Peripheral Usage Description
• Privacy - Bluetooth Always Usage Description
Add a description you see fit.
In this case, a messagetells the user why the app is requesting the ability to connect
to Bluetooth peripherals.
Now, to look at some code.
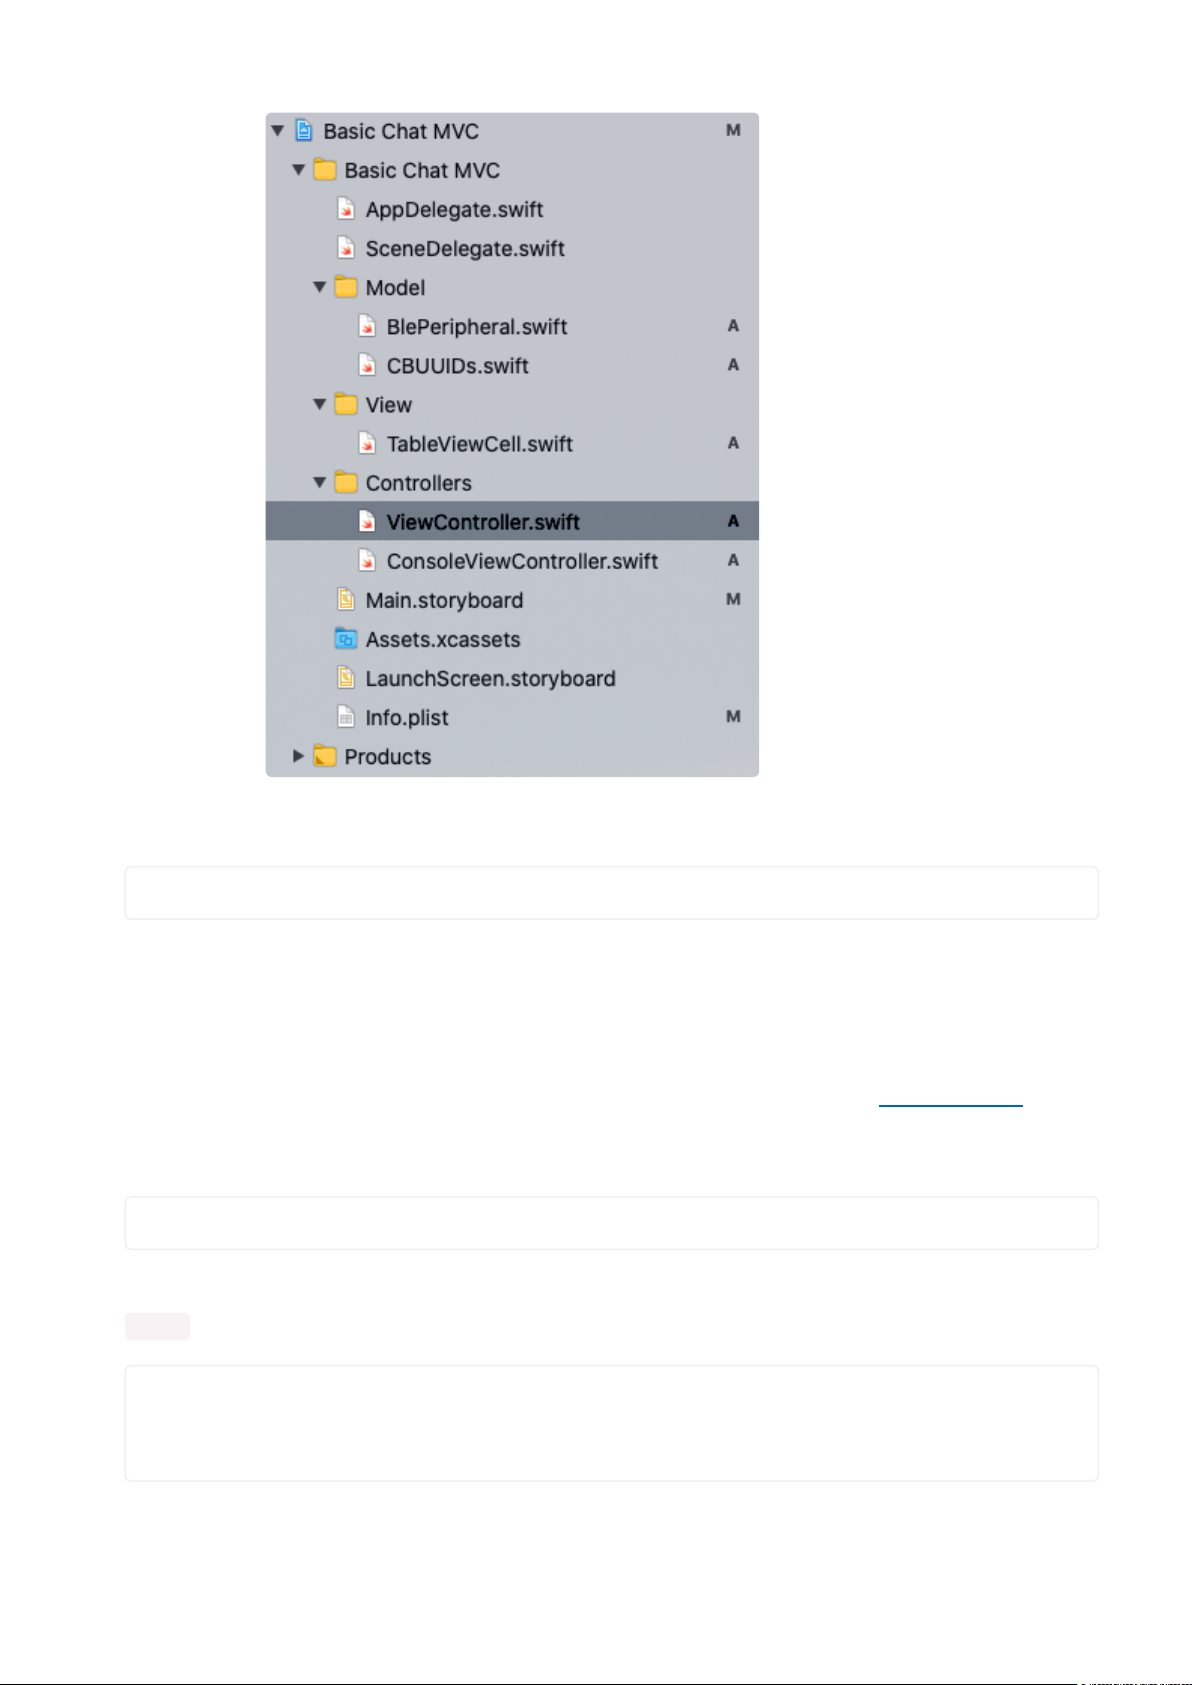
In your project's file hierarchy, locate "ViewController.swift". This file handles the
majority of the tasks which need to be performed to connect to a Bluetooth device.
©Adafruit Industries Page 8 of 24
Page 9
At the top of the file, import CoreBluetooth:
import CoreBluetooth
This line adds Core Bluetooth framework to the project and gives the ability to
communicate with Bluetooth devices.
Now create variable to store your central manager. The central managermanages
discovered or connected remote peripheral devices (represented by CBPeripheral
objects), including scanning for, discovering, and connecting to advertising
peripherals.
var centralManager: CBCentralManager!
Then in your viewDidLoad, initialize the central manager by setting the delegate to
self , otherwise the central state never changes on startup.
override func viewDidLoad() {
super.viewDidLoad()
centralManager = CBCentralManager(delegate: self, queue: nil)
}
©Adafruit Industries Page 9 of 24
Page 10

Now add a CBCentralManagerDelegate protocol to the ViewController in order to
scan, discover and connect a peripheral.
The CBCentralManagerDelegateprotocol defines the methods that a delegate of a
CBCentralManager object must adopt.
extension ViewController: CBCentralManagerDelegate {
func centralManagerDidUpdateState(_ central: CBCentralManager) {
switch central.state {
case .poweredOff:
print("Is Powered Off.")
case .poweredOn:
print("Is Powered On.")
startScanning()
case .unsupported:
print("Is Unsupported.")
case .unauthorized:
print("Is Unauthorized.")
case .unknown:
print("Unknown")
case .resetting:
print("Resetting")
@unknown default:
print("Error")
}
}
}
The onlymethodrequired forCBCentralManagerDelegatewould
becentralManagerDidUpdateState(_:); the central manager calls this when its state
updates, thereby indicating the availability of the central manager.
This required method is added to ensure that the central device (your iPhone or iPad)
supports Bluetooth low energy and that it’s available to use.
Also add a CBPeripheralDelegate protocol. The CBPeripheralDelegate provides
updates on the use of a peripheral’s services. This will be needed later.
extension ViewController: CBPeripheralDelegate {
}
Before going any farther, you need to store a list of unique identifiers to help look for
specific Bluetooth devices. Create a new file called CBUUIDs that stores the unique
identifiers.
import Foundation
import CoreBluetooth
struct CBUUIDs{
static let kBLEService_UUID = "6e400001-b5a3-f393-e0a9-e50e24dcca9e"
static let kBLE_Characteristic_uuid_Tx = "6e400002-b5a3-f393-e0a9-e50e24dcca9e"
©Adafruit Industries Page 10 of 24
Page 11

static let kBLE_Characteristic_uuid_Rx = "6e400003-b5a3-f393-e0a9-e50e24dcca9e"
static let BLEService_UUID = CBUUID(string: kBLEService_UUID)
static let BLE_Characteristic_uuid_Tx = CBUUID(string:
kBLE_Characteristic_uuid_Tx)//(Property = Write without response)
static let BLE_Characteristic_uuid_Rx = CBUUID(string:
kBLE_Characteristic_uuid_Rx)// (Property = Read/Notify)
}
CBUUID class represents universally unique identifiers (UUIDs) of attributes used in
Bluetooth low energy communication, such as a peripheral’s services, characteristics,
and descriptors.
By specifying what service to looking for, you tell the CBCentralManager to ignore all
peripherals which don't advertise that specific service, and return a list of only the
peripherals that offer this service.
Now to head back into the ViewController to start scanning for peripherals.
Scanning for Peripherals
Scanning for Peripherals
Once the CBCentralManager is up and powered on, you can create a function that
scan for peripherals around us.
Create a function called startScanning . Call the method
scanForPeripherals(withServices:) .
This method scans for peripherals that are advertising services. Now since the unique
identifier is set up, add that reference to the method.
func startScanning() -> Void {
// Start Scanning
centralManager?.scanForPeripherals(withServices: [CBUUIDs.BLEService_UUID])
}
Now add the startScanning() function to the centralManagerDidUpdateState
to scan as soon as the app opens.
extension ViewController: CBCentralManagerDelegate {
func centralManagerDidUpdateState(_ central: CBCentralManager) {
switch central.state {
case .poweredOff:
print("Is Powered Off.")
case .poweredOn:
©Adafruit Industries Page 11 of 24
Page 12

print("Is Powered On.")
startScanning()
case .unsupported:
print("Is Unsupported.")
case .unauthorized:
print("Is Unauthorized.")
case .unknown:
print("Unknown")
case .resetting:
print("Resetting")
@unknown default:
print("Error")
}
}
}
When you run your app, your device will start scanning for peripherals.
Discovering Peripherals
Now that scanning is started, what happens when a peripheral is discovered?
Every time a peripheral is discovered, theCBCentralManager will notify you by calling
the centralManager(_:didDiscover:advertisementData:rssi:) function on its
delegate.
This functionprovides the followinginformation about the newly discovered
peripheral:
The discovered peripheral is recognized and can be stored as a CBPeripheral.
•
The discovered peripheral has stored advertisement data.
•
The current received signal strength indicator (RSSI) of the peripheral, in
•
decibels.
Since you are interested in connecting to one peripheral, create an instance of a
peripheral.
private var bluefruitPeripheral: CBPeripheral!
Call the didDiscover function. This tells the delegate the central manager discovered
a peripheral while scanning for devices.
func centralManager(_ central: CBCentralManager, didDiscover peripheral:
CBPeripheral,advertisementData: [String : Any], rssi RSSI: NSNumber) {
bluefruitPeripheral = peripheral
bluefruitPeripheral.delegate = self
print("Peripheral Discovered: \(peripheral)")
©Adafruit Industries Page 12 of 24
Page 13

print("Peripheral name: \(peripheral.name)")
print ("Advertisement Data : \(advertisementData)" )
centralManager?.stopScan()
}
The implementation of this function performs the following actions:
Set the bluefruitPeripheral variable to the new peripheral found.
•
Set the peripheral's delegate to self (ViewController)
•
Printed the newly discovered peripheral's information in the console.
•
Stopped scanning for peripherals.
•
Next up - actually connect to that peripheral.
Connecting to a Peripheral
To connect to a peripheral, use this method to establish a local connection to the
desired peripheral.
centralManager?.connect(blePeripheral!, options: nil)
Add this to the didDiscover function.
func centralManager(_ central: CBCentralManager, didDiscover peripheral:
CBPeripheral,advertisementData: [String : Any], rssi RSSI: NSNumber) {
bluefruitPeripheral = peripheral
bluefruitPeripheral.delegate = self
print("Peripheral Discovered: \(peripheral)")
print("Peripheral name: \(peripheral.name)")
print ("Advertisement Data : \(advertisementData)" )
centralManager?.connect(bluefruitPeripheral!, options: nil)
}
Oncethe connection is made, the central manager calls
the centralManager(_:didConnect) delegate function to provideincoming
information aboutthe newly connected peripheral.
Once this function is called, you'll discover a service that the peripheral is holding.
func centralManager(_ central: CBCentralManager, didConnect peripheral:
CBPeripheral) {
bluefruitPeripheral.discoverServices([CBUUIDs.BLEService_UUID])
}
©Adafruit Industries Page 13 of 24
Page 14

Finishing the discovering services, you'll get a didDiscoverServices event. Iterate
through all the "available" services.
Discovering Services
Now that the peripheral's services are successfully discovered, the central manager
will call the didDiscoverServices() delegate function. didDiscoverService()
handles and filters services, so that you can use whichever service you are interested
in right away.
func peripheral(_ peripheral: CBPeripheral, didDiscoverServices error: Error?) {
print("*******************************************************")
if ((error) != nil) {
print("Error discovering services: \(error!.localizedDescription)")
return
}
guard let services = peripheral.services else {
return
}
//We need to discover the all characteristic
for service in services {
peripheral.discoverCharacteristics(nil, for: service)
}
print("Discovered Services: \(services)")
}
First, handle any possible errors returned by the central manager, then request
characteristics for each service returned by calling discoverCharacteristics(_:)
Discovering Characteristics
Create two characteristic variables to reference.
private var txCharacteristic: CBCharacteristic!
private var rxCharacteristic: CBCharacteristic!
Now call the discoverCharacteristics(_:) function, the central manager will call
the didDiscoverCharacteristicsFor() delegate functionand provide the
discovered characteristics of the specified service.
func peripheral(_ peripheral: CBPeripheral, didDiscoverCharacteristicsFor service:
CBService, error: Error?) {
guard let characteristics = service.characteristics else {
return
}
print("Found \(characteristics.count) characteristics." )
for characteristic in characteristics {
©Adafruit Industries Page 14 of 24
Page 15

if characteristic.uuid.isEqual(CBUUIDs.BLE_Characteristic_uuid_Rx) {
rxCharacteristic = characteristic
peripheral.setNotifyValue(true, for: rxCharacteristic!)
peripheral.readValue(for: characteristic)
print("RX Characteristic: \(rxCharacteristic.uuid)")
}
if characteristic.uuid.isEqual(CBUUIDs.BLE_Characteristic_uuid_Tx){
txCharacteristic = characteristic
print("TX Characteristic: \(txCharacteristic.uuid)")
}
}
}
A couple of things are happening in this function:
Handle errors and print characteristic info to the debug console
1.
Look through the array of characteristics for a match to desired UUIDs.
2.
Perform any necessary actions for the matching characteristics
3.
Discover descriptors for each characteristic
4.
In this case, the specific UUIDs we're looking for are stored in
the BLE_Characteristic_uuid_Rx and BLE_Characteristic_uuid_Tx variables.
When it finds the RX characteristic, it subscribe to updates to its value by calling
setNotifyValue() - this is how to receive data from the peripheral. Additionally,
read the current value from the characteristic and print its information to the console.
When it finds the TX characteristic, it saves a reference to it to write values to it later -
this is how to send data to the peripheral.
Disconnecting from Peripheral
To disconnect or cancels an active or pending local connection to a peripheral, use
the .cancelPeripheralConnection method.
func disconnectFromDevice () {
if blePeripheral != nil {
centralManager?.cancelPeripheralConnection(blePeripheral!)
}
}
This method is nonblocking, and any CBPeripheral class commands that are still
pending to peripheral may not complete.
©Adafruit Industries Page 15 of 24
Page 16

Because other apps may still have a connection to the peripheral, canceling a local
connection doesn’t guarantee that the underlying physical link is immediately
disconnected.
Now, that you've connected to our Bluetooth device, it's time to communicate send
and receive data.
Communication
Setting up communication
To start communicating with the Bluetooth device, you'll need to setup a protocol that
provides updates for local peripheral state and interactions with remote central
devices.
That protocol would beCBPeripheralManagerDelegate, so add an extension to the
ViewController and add CBPeripheralManagerDelegate.
extension ViewController: CBPeripheralManagerDelegate {
func peripheralManagerDidUpdateState(_ peripheral: CBPeripheralManager) {
switch peripheral.state {
case .poweredOn:
print("Peripheral Is Powered On.")
case .unsupported:
print("Peripheral Is Unsupported.")
case .unauthorized:
print("Peripheral Is Unauthorized.")
case .unknown:
print("Peripheral Unknown")
case .resetting:
print("Peripheral Resetting")
case .poweredOff:
print("Peripheral Is Powered Off.")
@unknown default:
print("Error")
}
}
}
The protocol’s requires one method, peripheralManagerDidUpdateState(_:) ,
which Core Bluetooth calls whenever the peripheral manager’s state updates to
indicate whether the peripheral manager is available.
©Adafruit Industries Page 16 of 24
Page 17

Reading the Value of a Characteristic
Since peripheral.setNotifyValue has been called previously in the
didDiscoverCharacteristicsFor method, you are able to set notifications or
indications for incoming values registered to the rxcharacteristic.
Once receiving incoming values from a Bluetooth device, Core Bluetooth
invokes didUpdateValueFor to handle that incoming data.
func peripheral(_ peripheral: CBPeripheral, didUpdateValueFor characteristic:
CBCharacteristic, error: Error?) {
var characteristicASCIIValue = NSString()
guard characteristic == rxCharacteristic,
let characteristicValue = characteristic.value,
let ASCIIstring = NSString(data: characteristicValue, encoding:
String.Encoding.utf8.rawValue) else { return }
characteristicASCIIValue = ASCIIstring
print("Value Recieved: \((characteristicASCIIValue as String))")
}
In didUpdateValueFor() , first create an instance of NSString , that will be the
characteristicASCIIValue variable to hold an incoming value, then convert it to
an ASCII string, then print the converted ASCII value to the console.
Writing to a Characteristic
Before writing data to an external peripheral, you need to know how we want to write
that data.
There are two types of CBCharacteristic write types. The CBCharacteristic write type
can be either .withResponse or .withoutResponse .
The .withResponse property type gets aresponse from the peripheral to indicate
whether the write was successful. The .withoutResponse doesn't send any
response back from the peripheral.
To write to a characteristic you’ll need to write a value with an instance of NSData and
do that by calling writeValue(for: , type:
CBCharacteristicWriteType.withResponse) method:
bluefruitPeripheral.writeValue(data!, for: txCharacteristic, type:
CBCharacteristicWriteType.withResponse)
©Adafruit Industries Page 17 of 24
Page 18
Create a new function that will communicate with the Bluetooth device. I've called this
function writeOutgoingValue() , but call it whatever you'd like.
First, format the outgoing string as NSData. Then, make sure bluefruitPeripheral
and txCharacteristic variables are not set to nil .
Then add the writeValue method into your function.
func writeOutgoingValue(data: String){
let valueString = (data as NSString).data(using: String.Encoding.utf8.rawValue)
if let bluefruitPeripheral = bluefruitPeripheral {
if let txCharacteristic = txCharacteristic {
bluefruitPeripheral.writeValue(valueString!, for: txCharacteristic, type:
CBCharacteristicWriteType.withResponse)
}
}
}
Awesome. Now that you've given the app the ability to communicate with a Bluetooth
device, hook up the device to the Arduino IDE.
Ok, now to hook up some quick UI to test out the app.
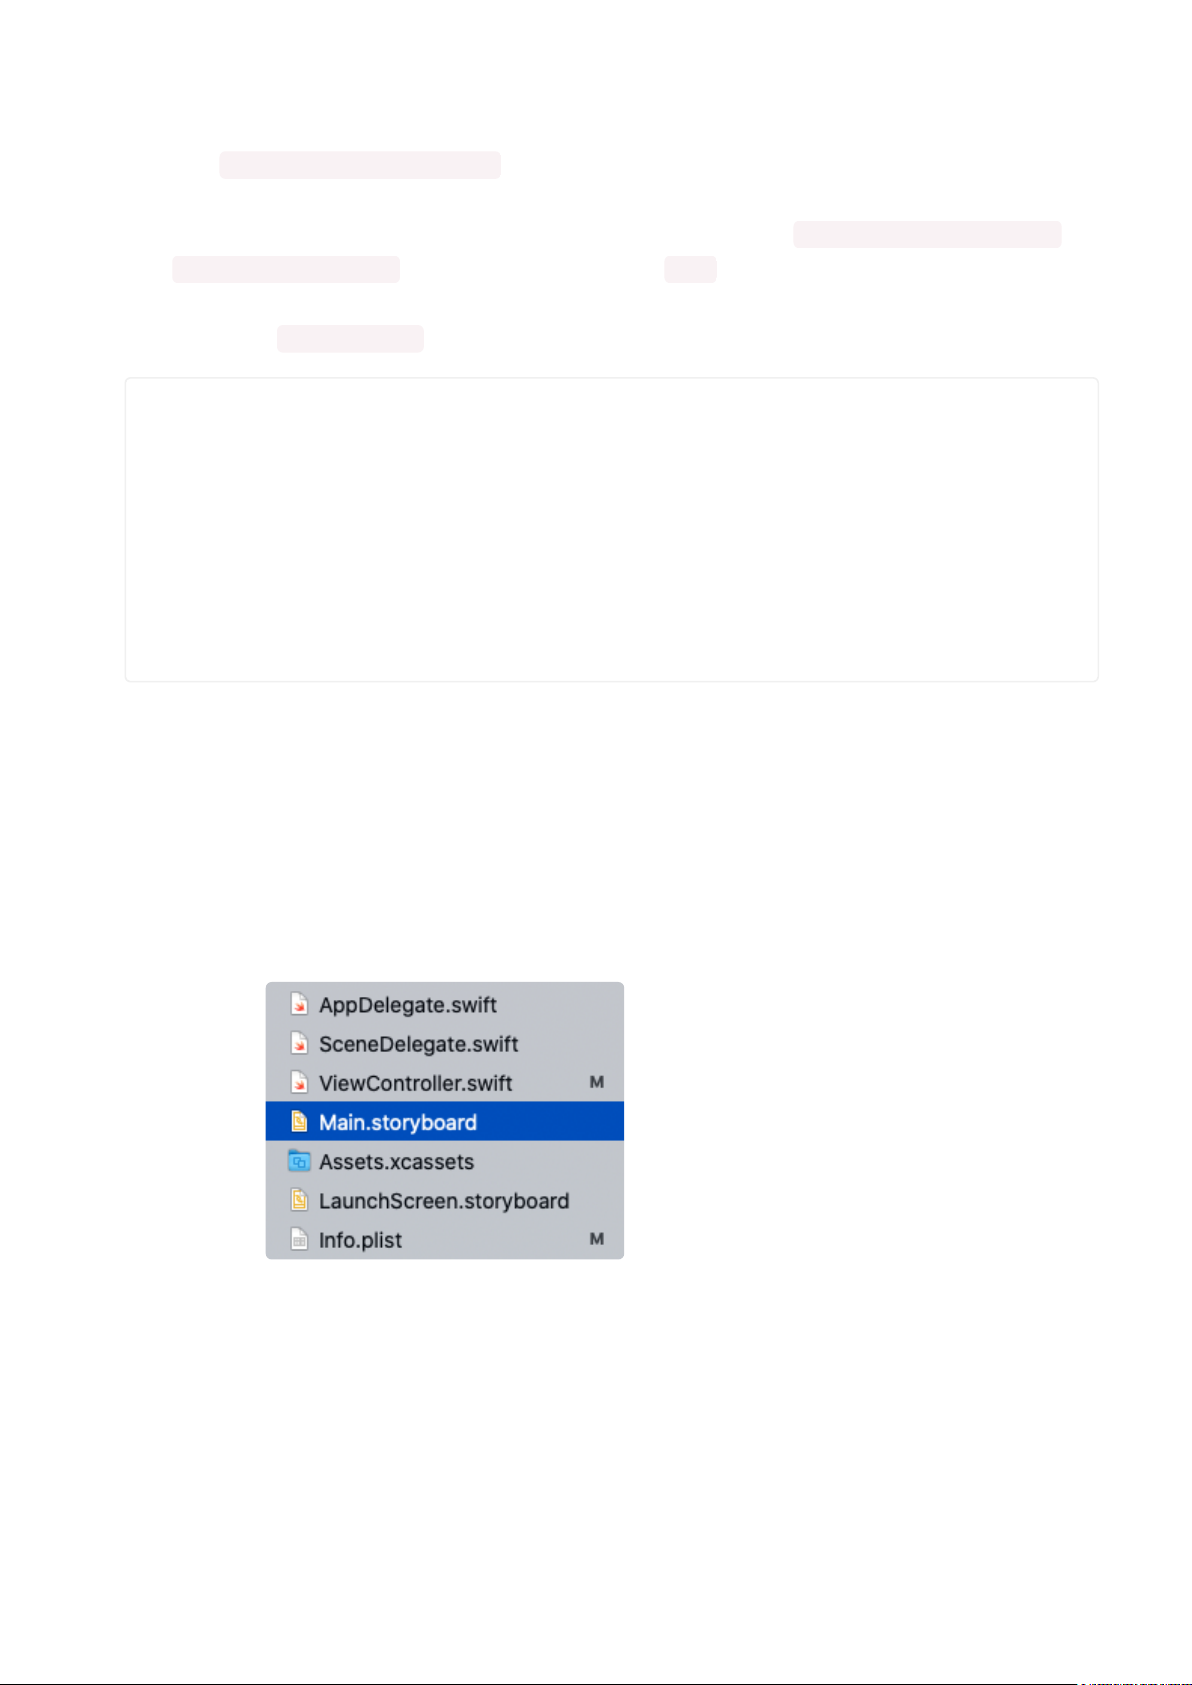
In your file hierarchy located on the left, locate and go to Main.storyboard. Here,
create a button that will trigger the function to transmit the data to the Bluetooth
device.
Above your navigation pane, select the "+" button to display a library of UI elements.
©Adafruit Industries Page 18 of 24
Page 19
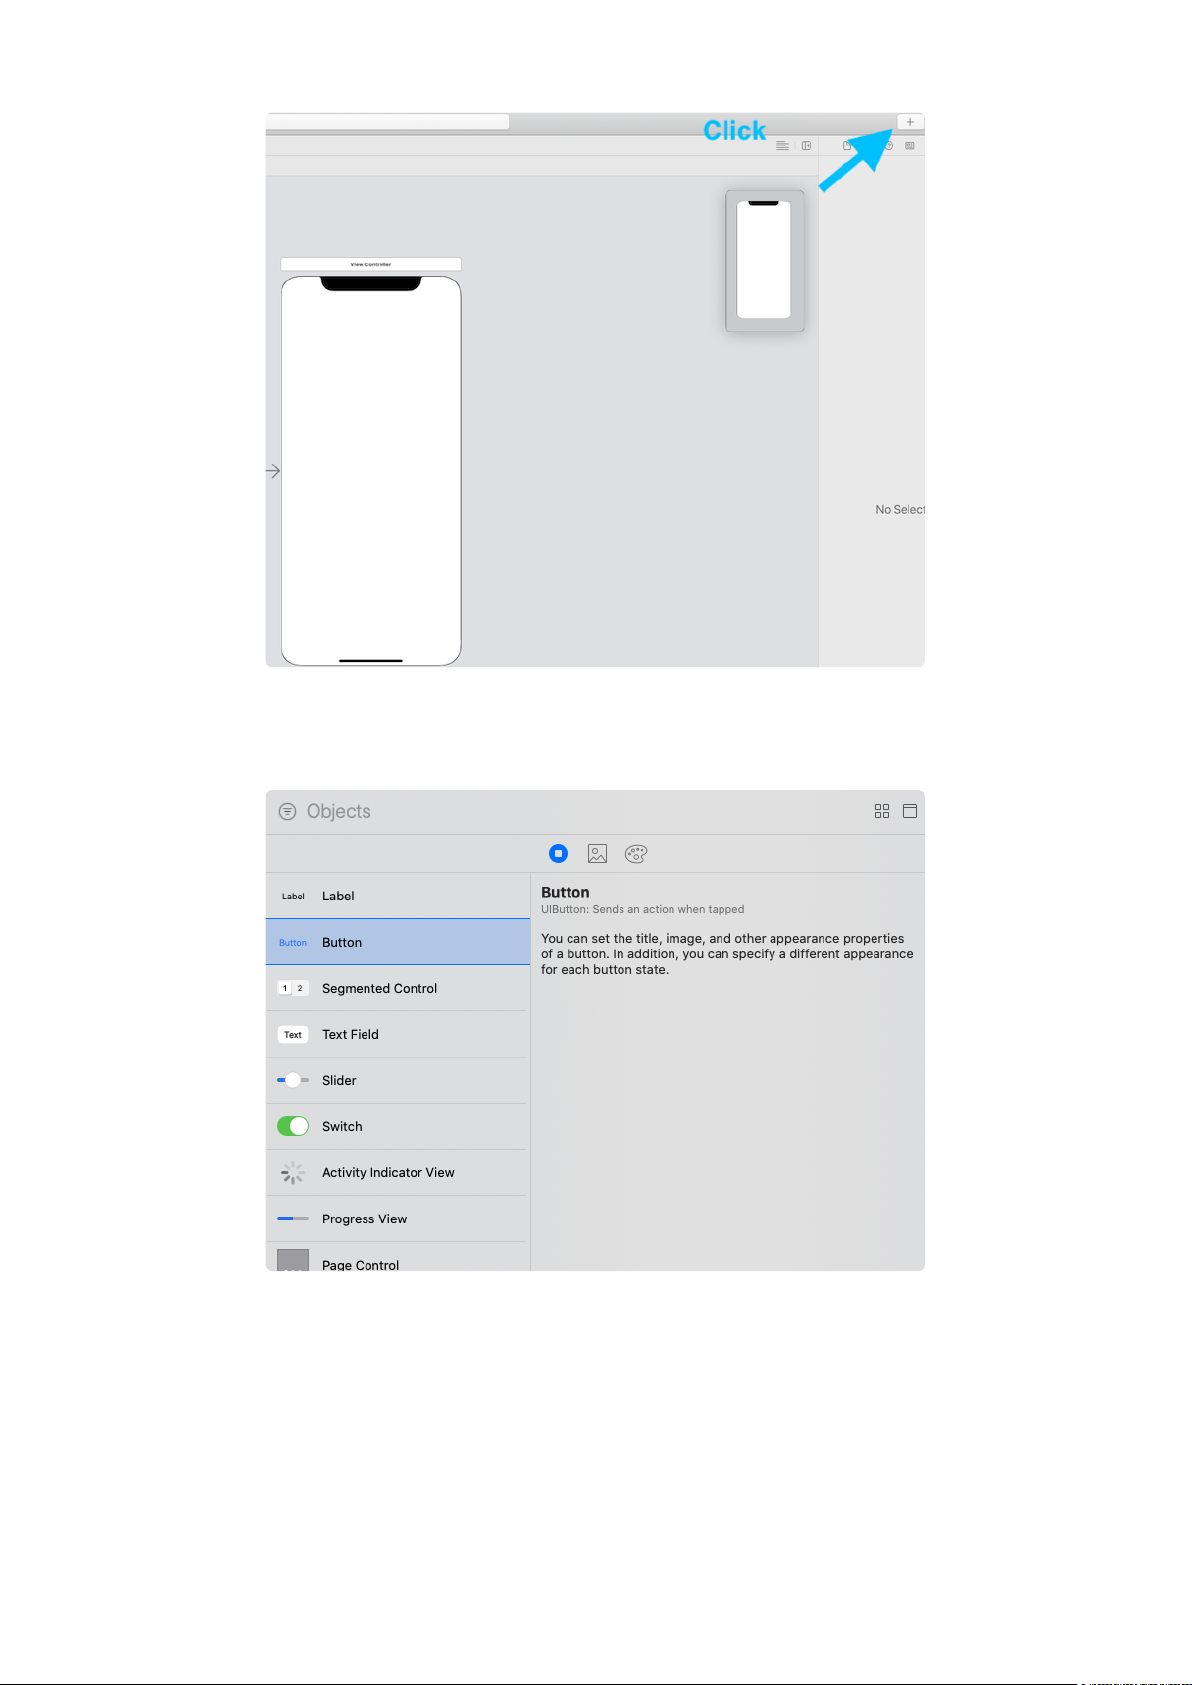
Now that you've opened up the UI library, press and slide "Button" onto you View
Controller.
Ok, I gave my changed my button label to "Send Hello World", you can change it to
your liking.
©Adafruit Industries Page 19 of 24
Page 20
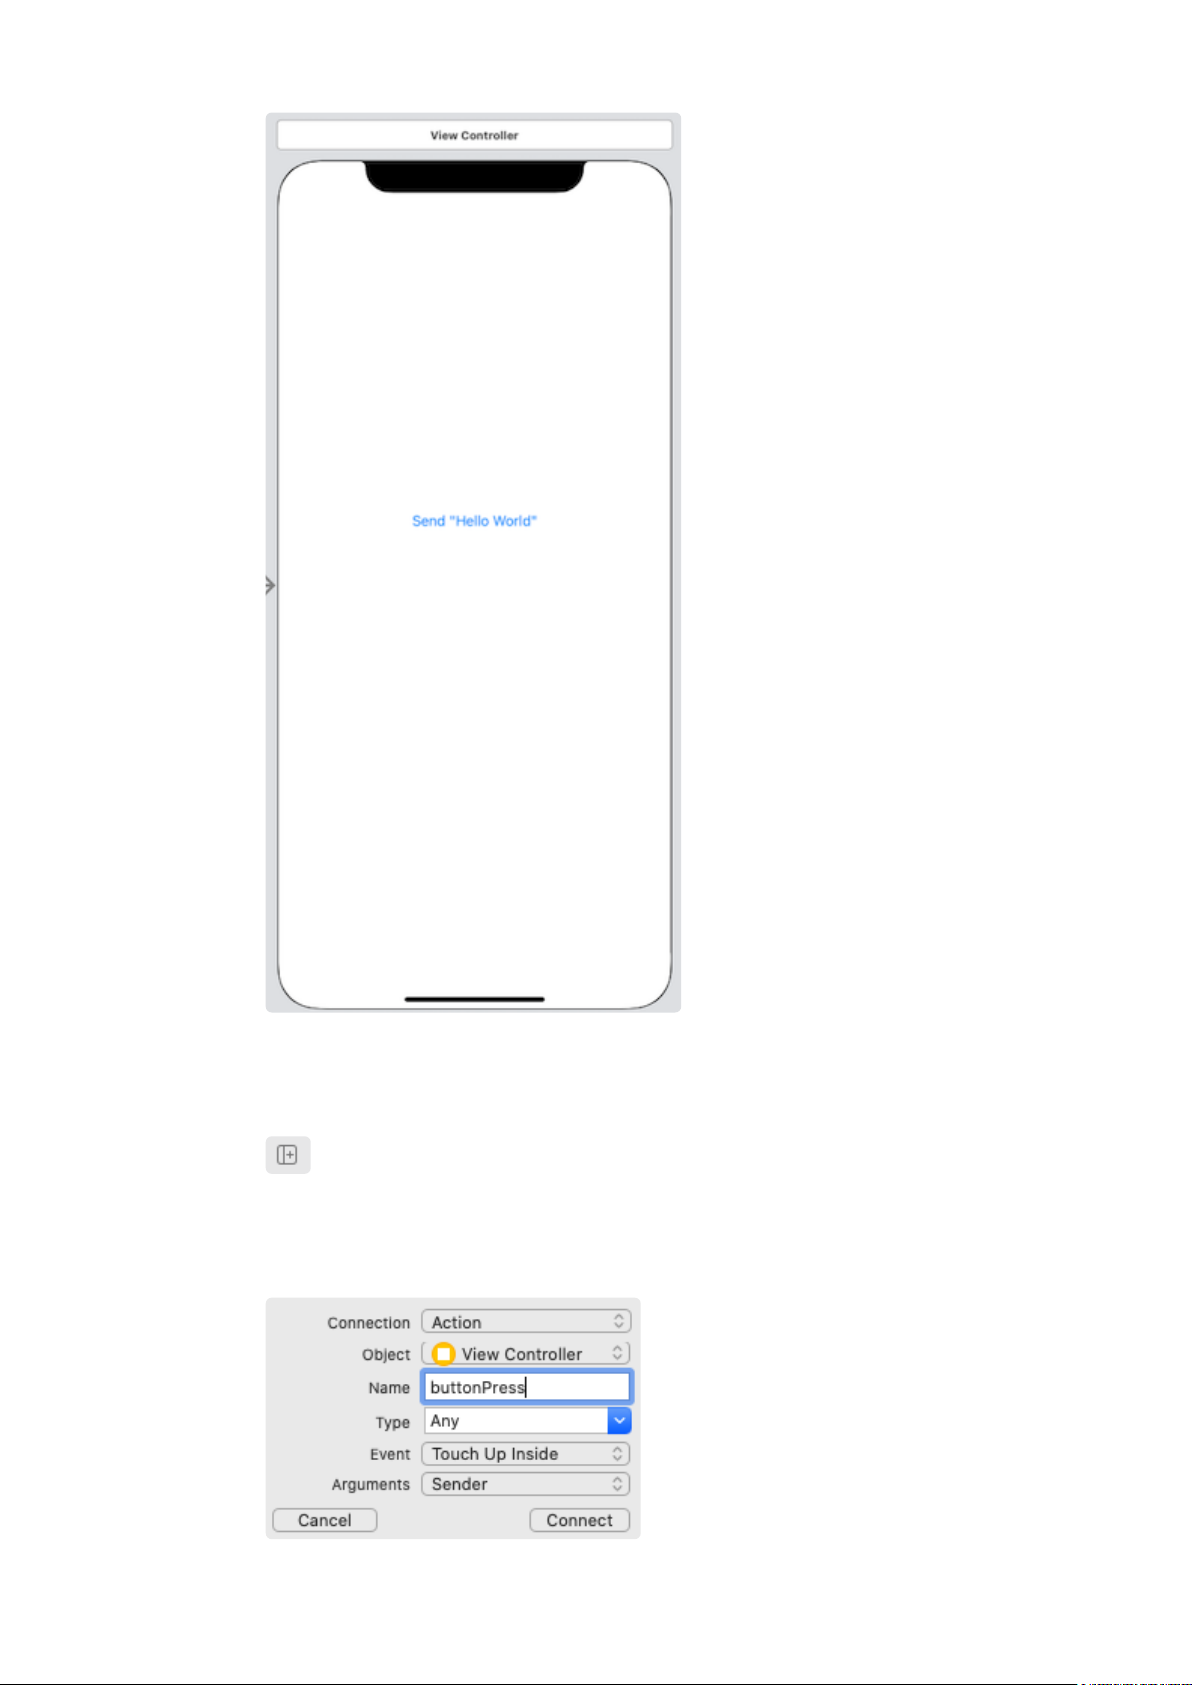
Now connect the UI to the code. Press this icon on the upper right corner of your
Navigation Pane, and locate your ViewController.swift file.
Once you've done that, Control drag and drop the button to the ViewController.swift
file. Instead if adding an Outlet, create an action and name it "buttonPress".
©Adafruit Industries Page 20 of 24
Page 21

Now head back into the ourViewController.swift file. Within the buttonPress method,
add the writeOutgoingValue() method and add a string into the parameter. I've
chosen to send "Hello Word".
@IBAction func buttonPress(_ sender: Any) {
writeOutgoingValue(data: "Hello World")
}
Great! Now to set up communications on the Bluetooth device.
Communicating with the Arduino IDE
Sending Data
To demonstrate the functionality of the app using an Adafruit Feather Bluefruit
32u4(http://adafru.it/3379) board, connect it to a computer running the Arduino IDE. If
you don't already have your Arduino IDE setup or if it's not recognizing your board,
take a look at this learn guide on how to do so:
Adafruit Feather 32u4 Bluefruit LE Learn Guide(https://adafru.it/ue0)
•
You can use the serial monitor to read and write messages back and forth with the
Basic Chat app.
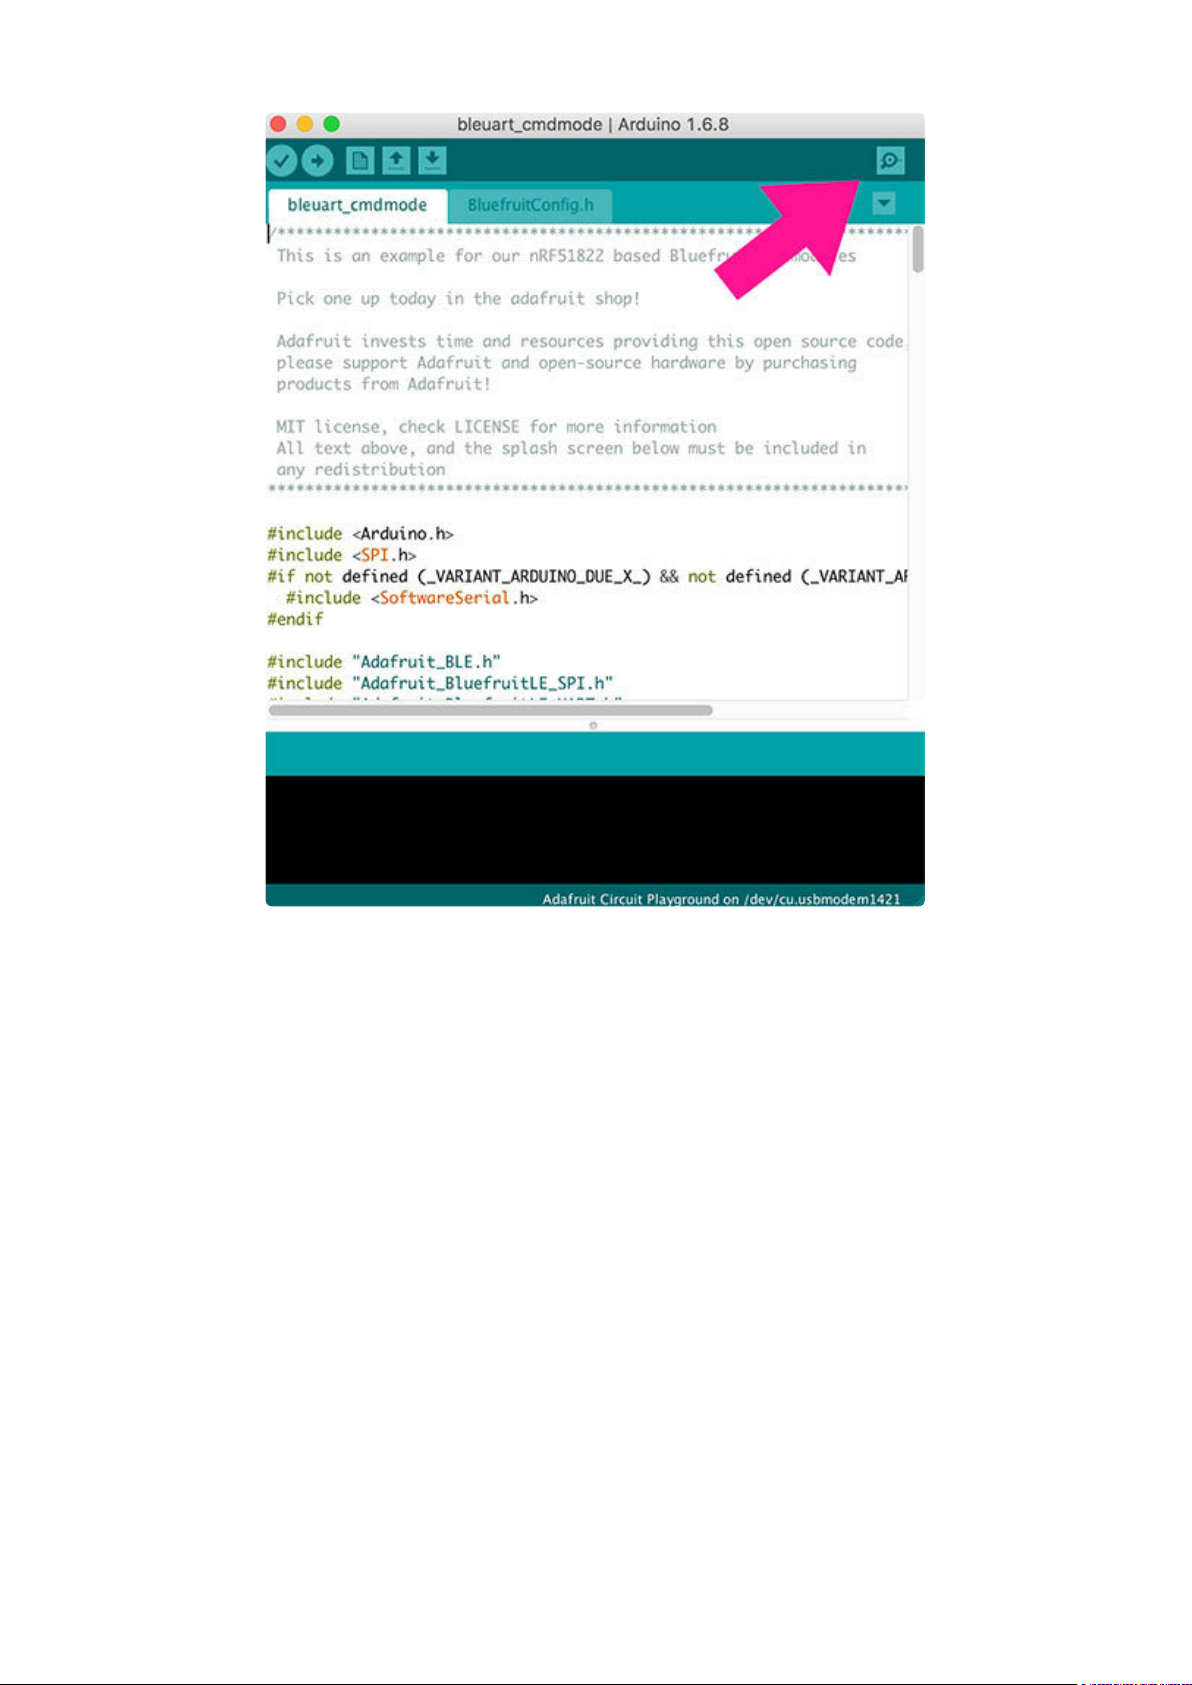
Within the Arduino IDE, go to File->Examples->Adafruit BluefruitLEnRF51then select
bleart_cmdmode. Once the sketch is opened, upload it to your Feather and click on
the Serial Monitor button in the upper right of the Arduino IDE window. A new serial
monitor window will open.
©Adafruit Industries Page 21 of 24
Page 22
©Adafruit Industries Page 22 of 24
Page 23
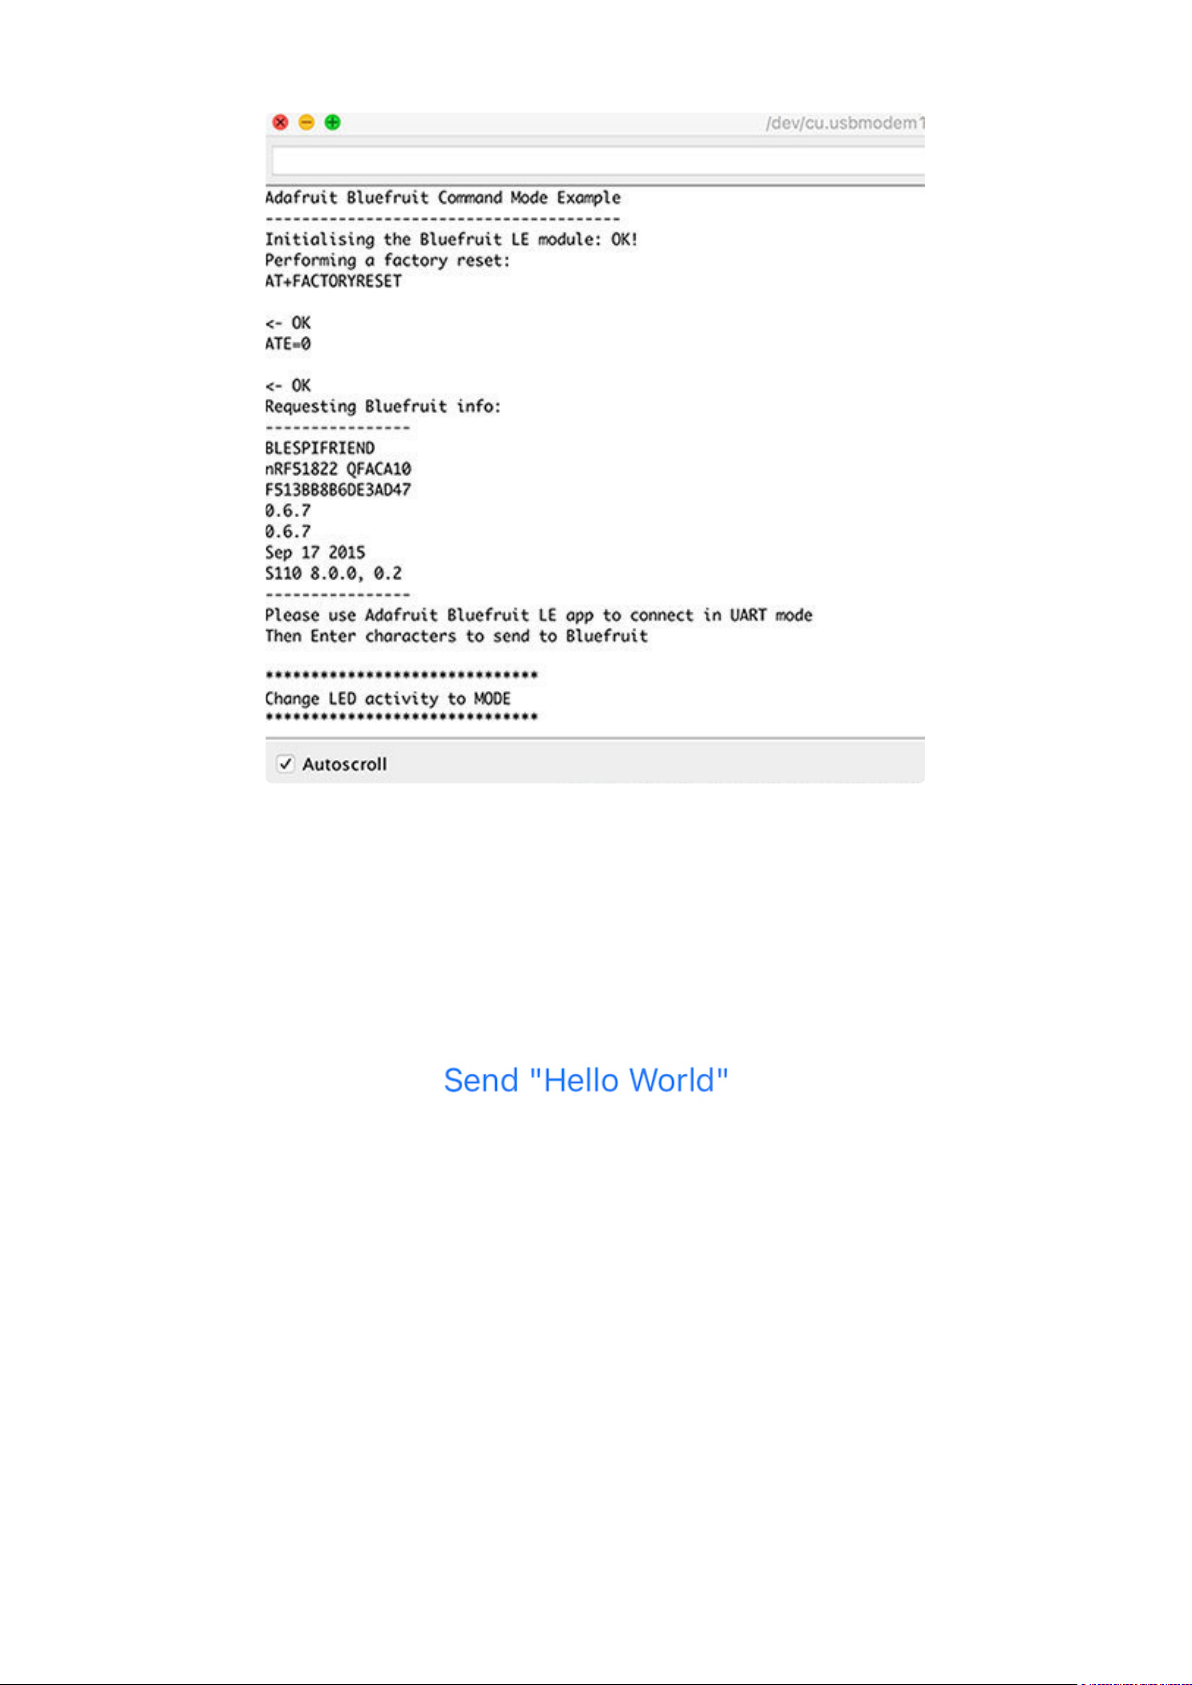
This new serial monitor window iswhere you'll be able to communicate between your
Bluetooth deviceand your app.
Open the app you've made and then hit your button.
When you tap the button, your message should pop up in the Arduino Serial monitor
view.
©Adafruit Industries Page 23 of 24
Page 24
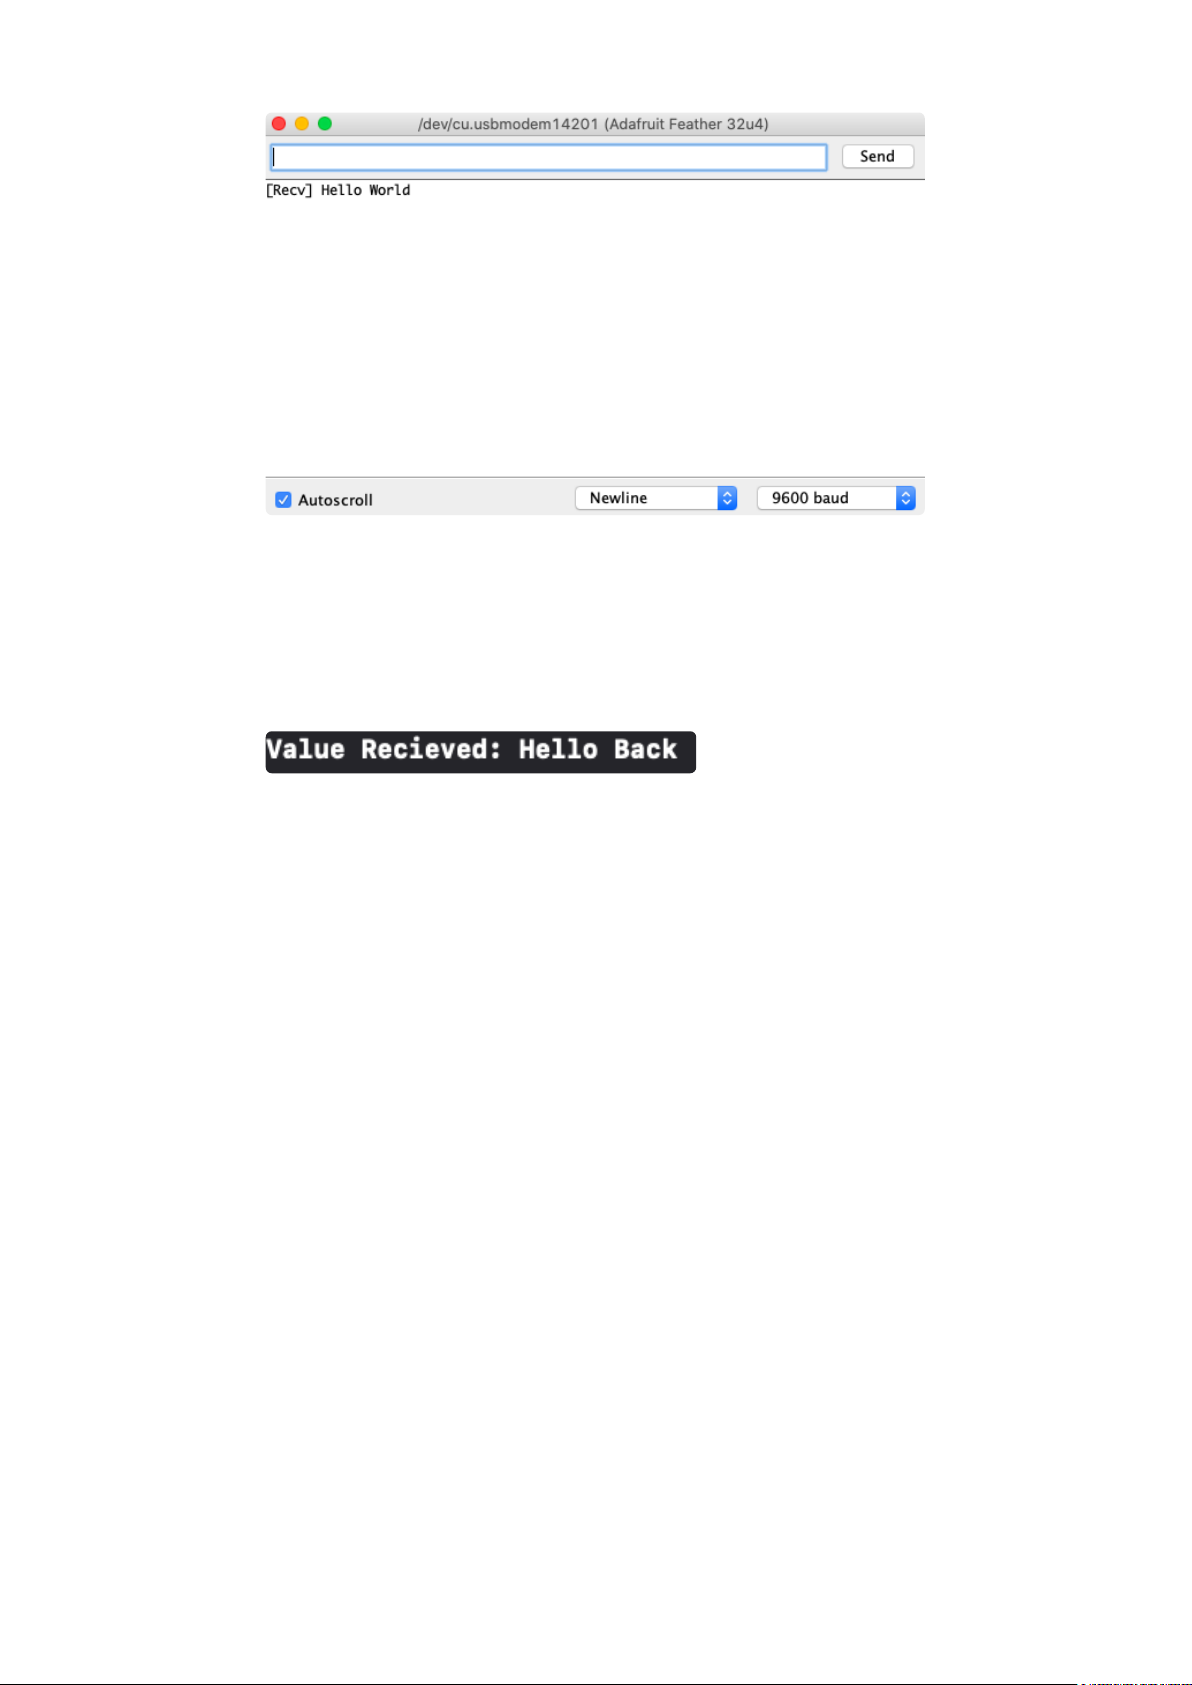
Now you've successfully sent the string "Hello World!" to the Feather and it displayed
in the Serial monitor view.
Now to send "Hello Back" to your app. Type "Hello World!" in the text field of the
Arduino IDE's serial monitor window and then hit Send.
You should receive a "Hello Back" in the console.
Congrats!
You've successfully demonstrated the Bluetooth app's functionality and learned the
basics of BLE communication usingCoreBluetooth. With this knowledge and the
Basic Chat MVC app as a reference, you can start building even more complex
Bluetooth apps!
©Adafruit Industries Page 24 of 24
 Loading...