

Page 1

Customizing My Own Leapto
p
App
gy pp
pp y p y
If
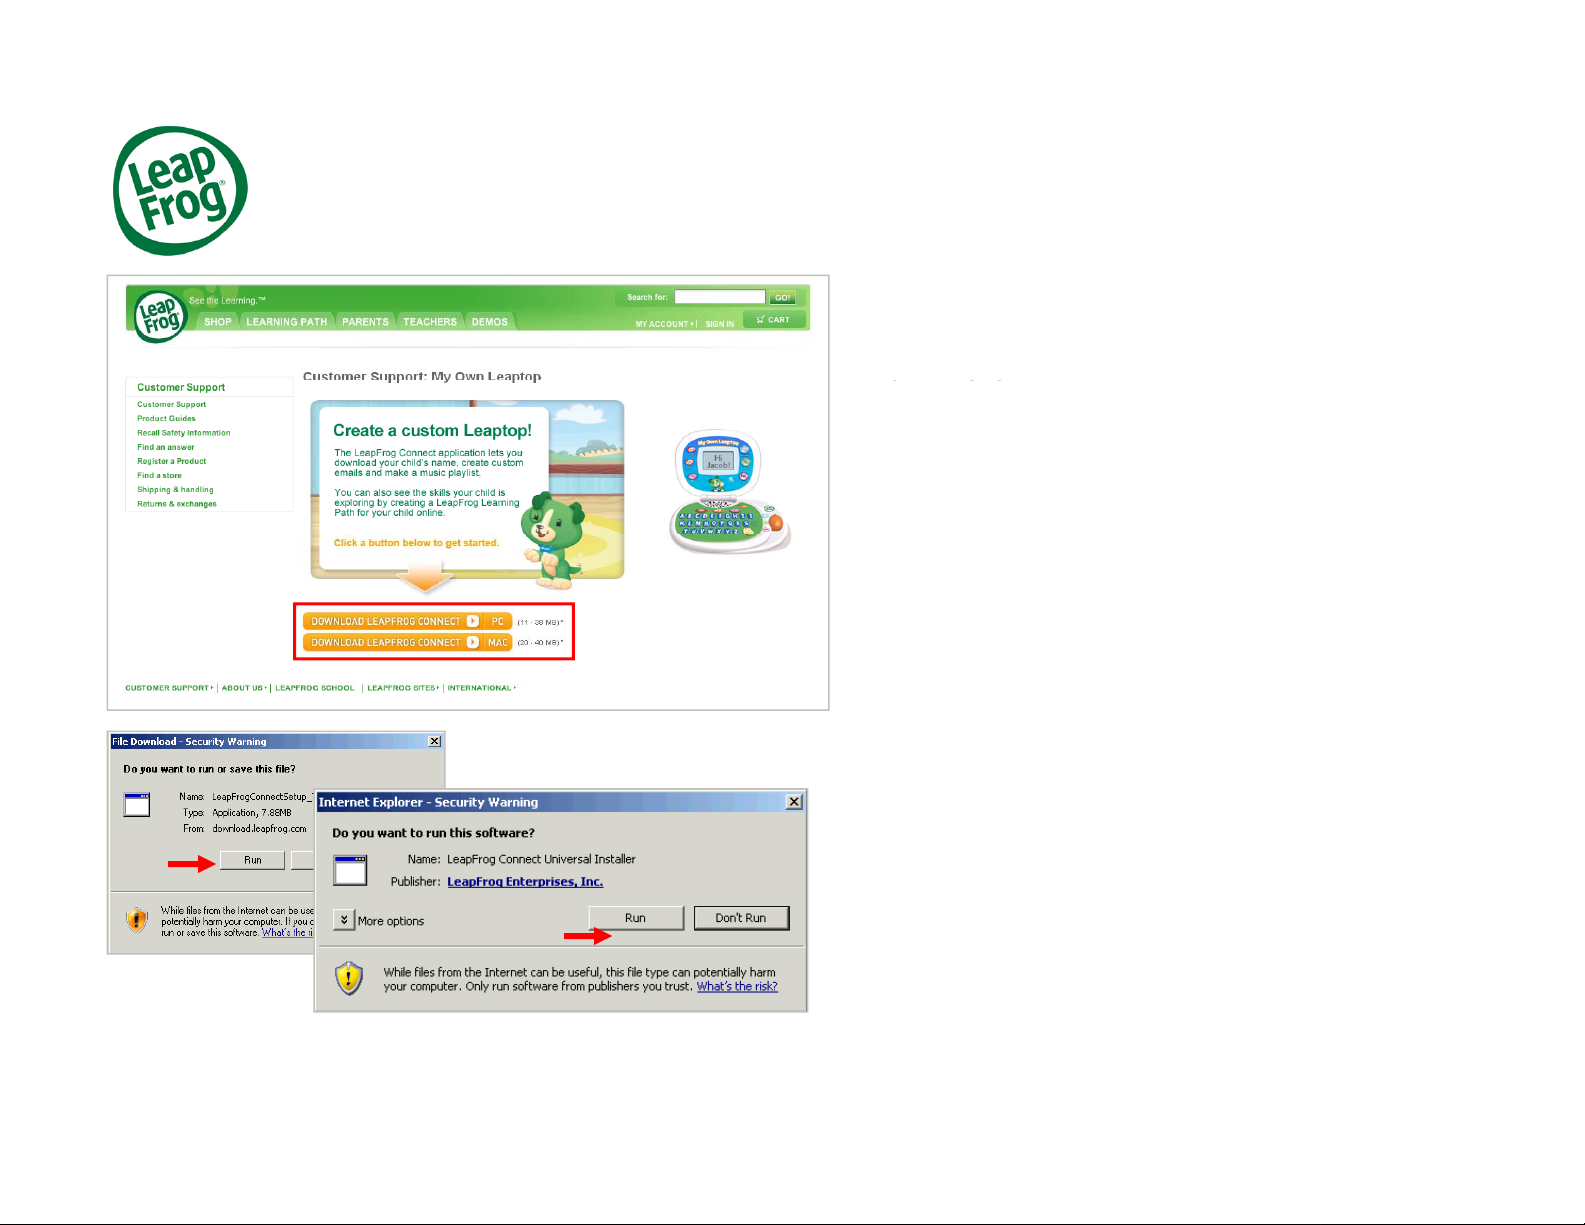
To customize My Own Leaptop, you first need to
download and install the LeapFrog®Connect
lication on your computer. You can then easily
download your child’s name, create custom emails
and make a music playlist. You will also be able to
set up your child’s LeapFrog Learning Path to see
the skills and activities your child is exploring.
you haven’t already downloaded the application,
click here to download LeapFrog Connect.
Important note: You must be connected to the
Internet to download LeapFrog Connect.
If you have already downloaded and installed
LeapFrog Connect on your computer, please
skip to page 4 of this tutorial.
™
LeapFrog Support TutorialMay 2010 1
Page 2
Download and Install
pgy( )
At the “D
thi
download is complete, find the LeapFrog Connect
On the My Own Leaptop Customer Support page,
select the LeapFrog Connect download for your
operating system (PC or MAC).
PC users:
At the “Do you want to run or save this file?” prompt,
click Run.
o you want to run
Click Run.
MAC users:
Download the installer to your computer. After the
installer on your computer and double-click to open.
LeapFrog Support TutorialMay 2010 2
s software?” prompt,
Page 3
Download and Install
pg y p
b
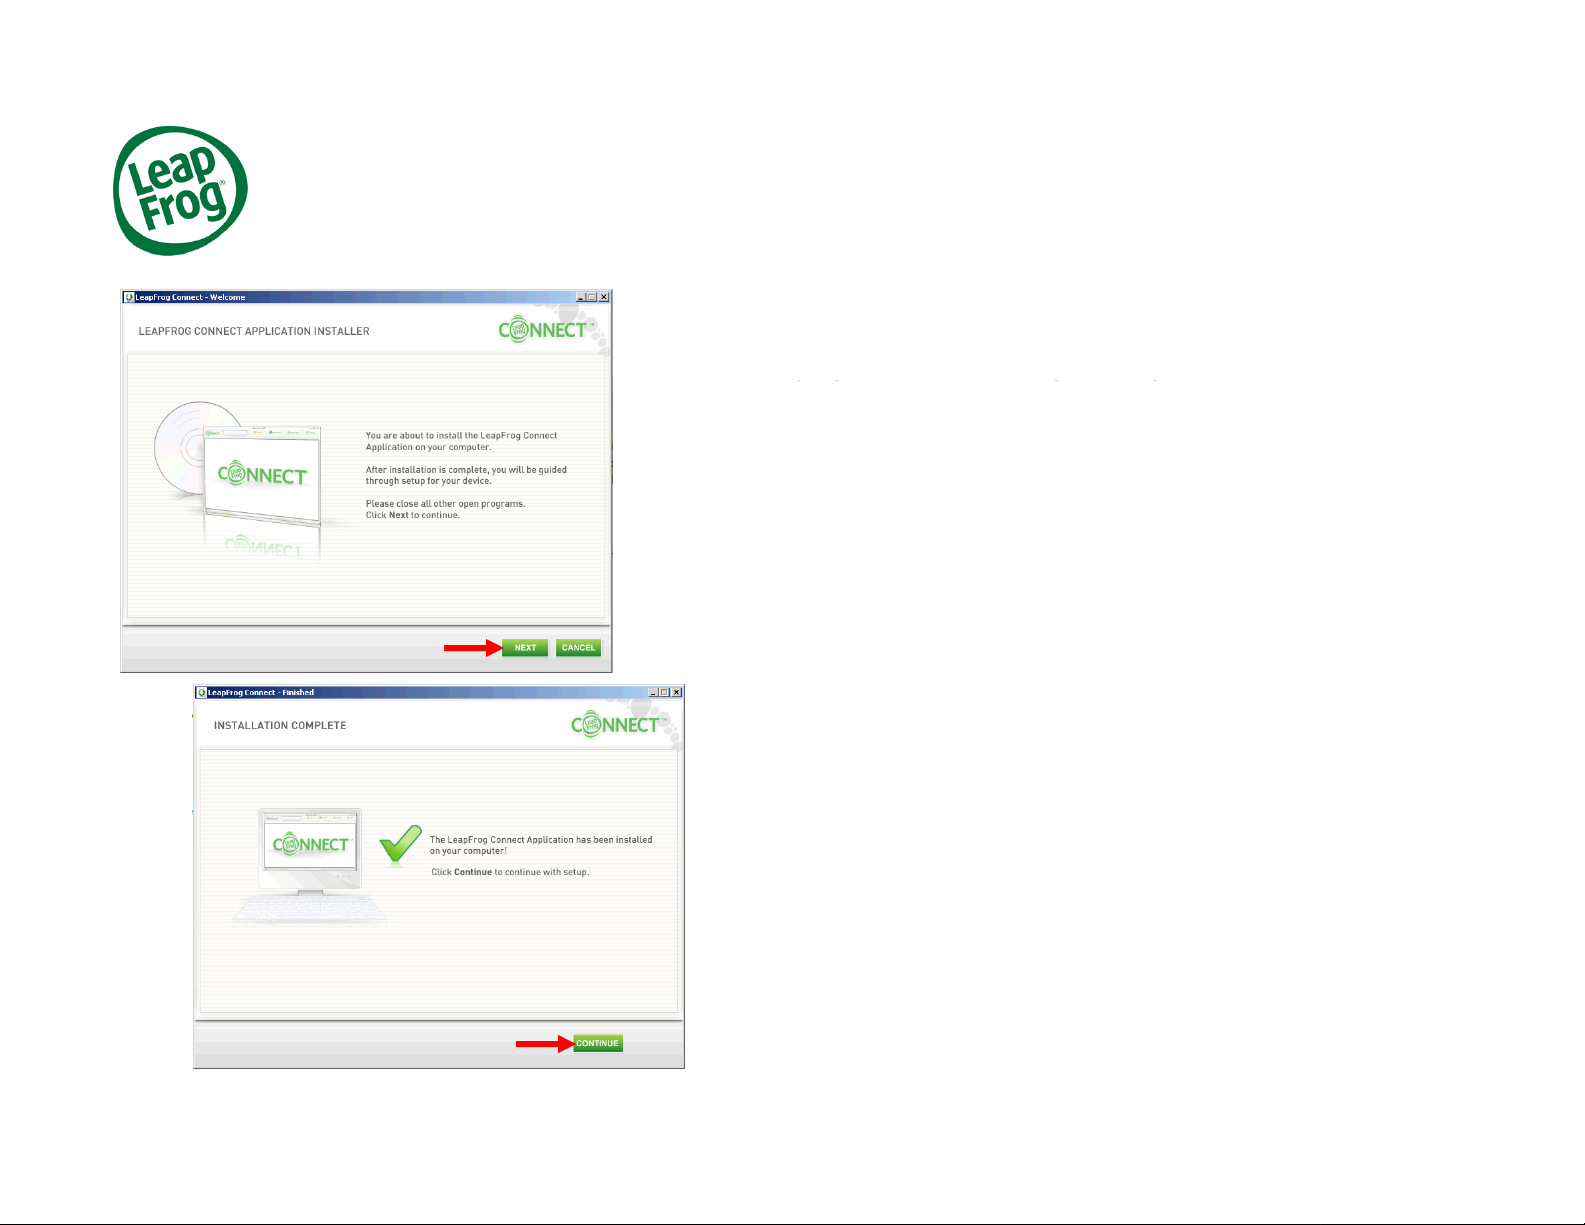
Click the
CONTINUE
button to set up your childs Leaptop
Once LeapFrog Connect is downloaded to your computer, you’ll
see a Welcome screen. You will be instructed to make sure that all
other programs are closed on your computer.
When all other programs are closed, click NEXT and follow the
prompts to complete the installation.
Installation can take several minutes and include pauses, so please
e patient.
When finished, you’ll see a screen confirming that the LeapFrog
Connect Application has successfully installed on your computer .
LeapFrog Support TutorialMay 2010 3
’
.
Page 4
Connect My Own Leapto
p
ypp
pg
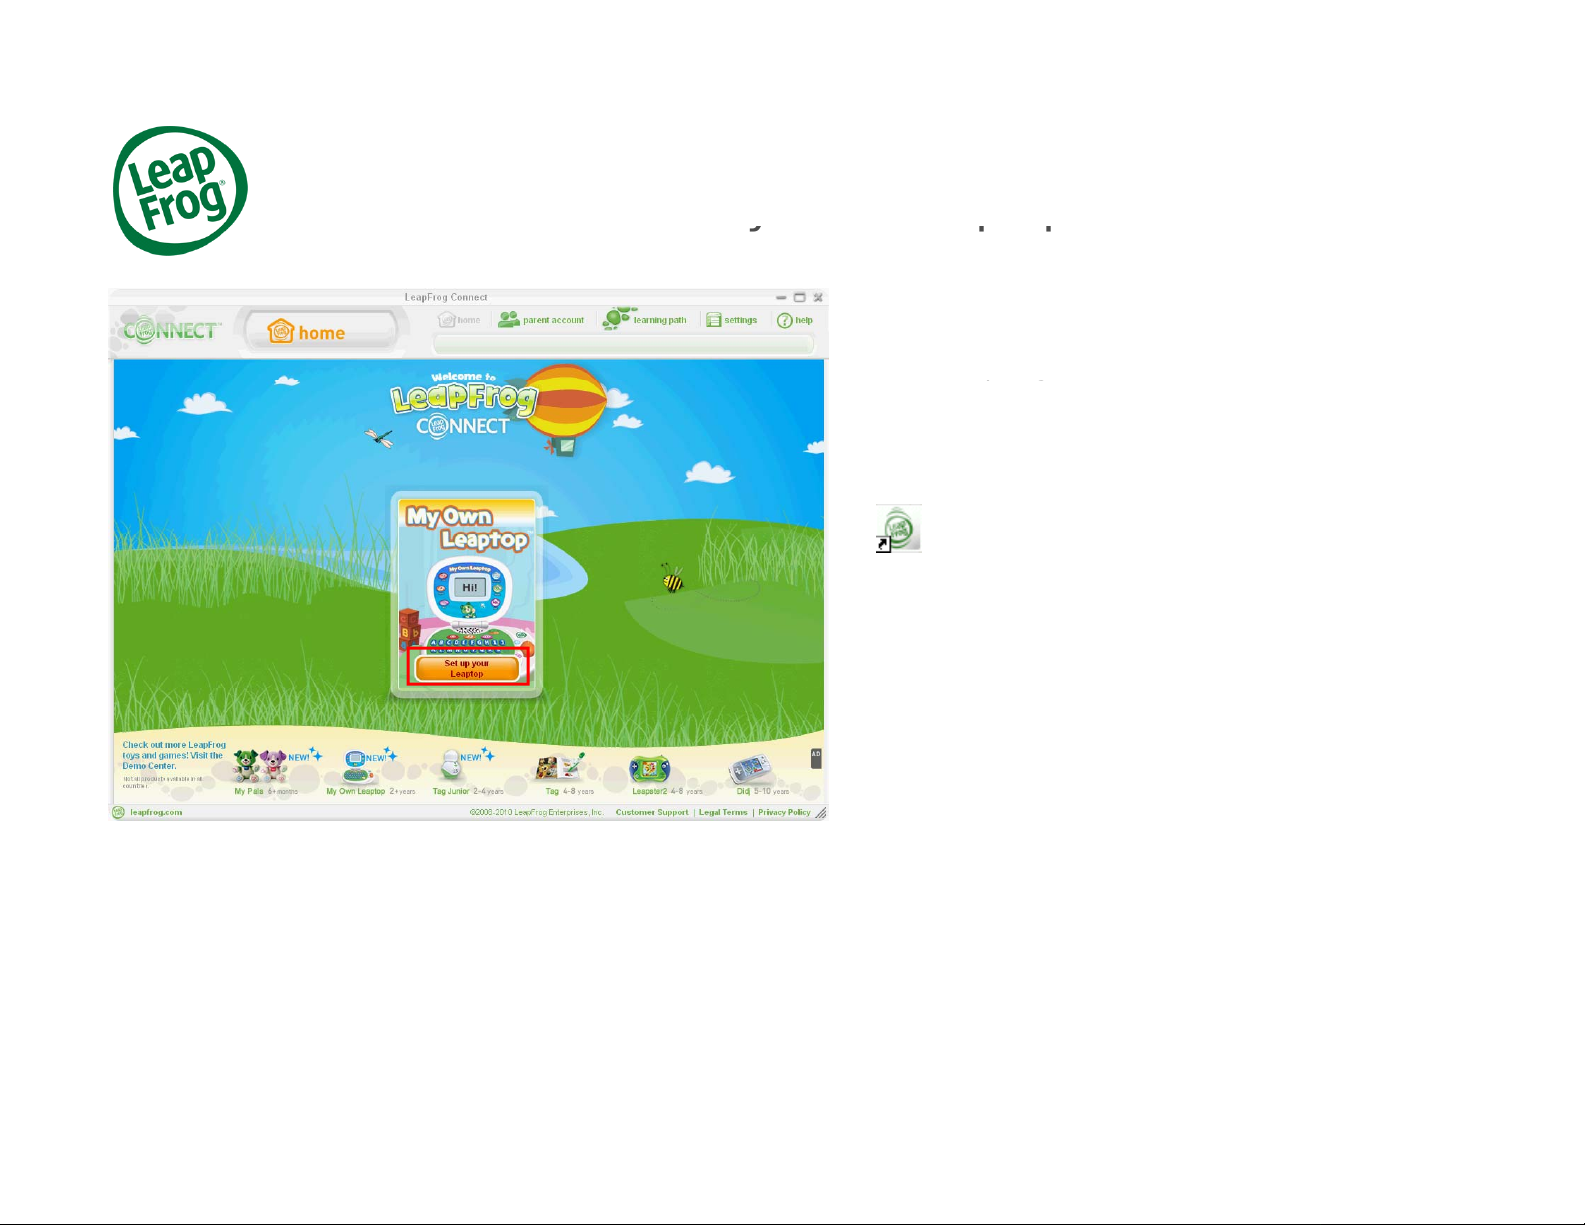
Click
Set up your Leaptop
and follow the on
If you just completed downloading and installing the
LeapFrog Connect application, you will be directed
to the LeapFrog Connect Home screen.
If you previously installed the Connect application,
open LeapFrog Connect by clicking the LeapFrog
Connect icon on your computer desktop.
You can also launch LeapFrog Connect from your
computer’s program files.
LeapFrog Support TutorialMay 2010 4
screen instructions to connect your child’s Leaptop
to your computer with the included USB cable.
If you have already set up your child’s Leaptop,
skip to page 7 of this tutorial.
-
Page 5
LeapFrog Parent Account
pg
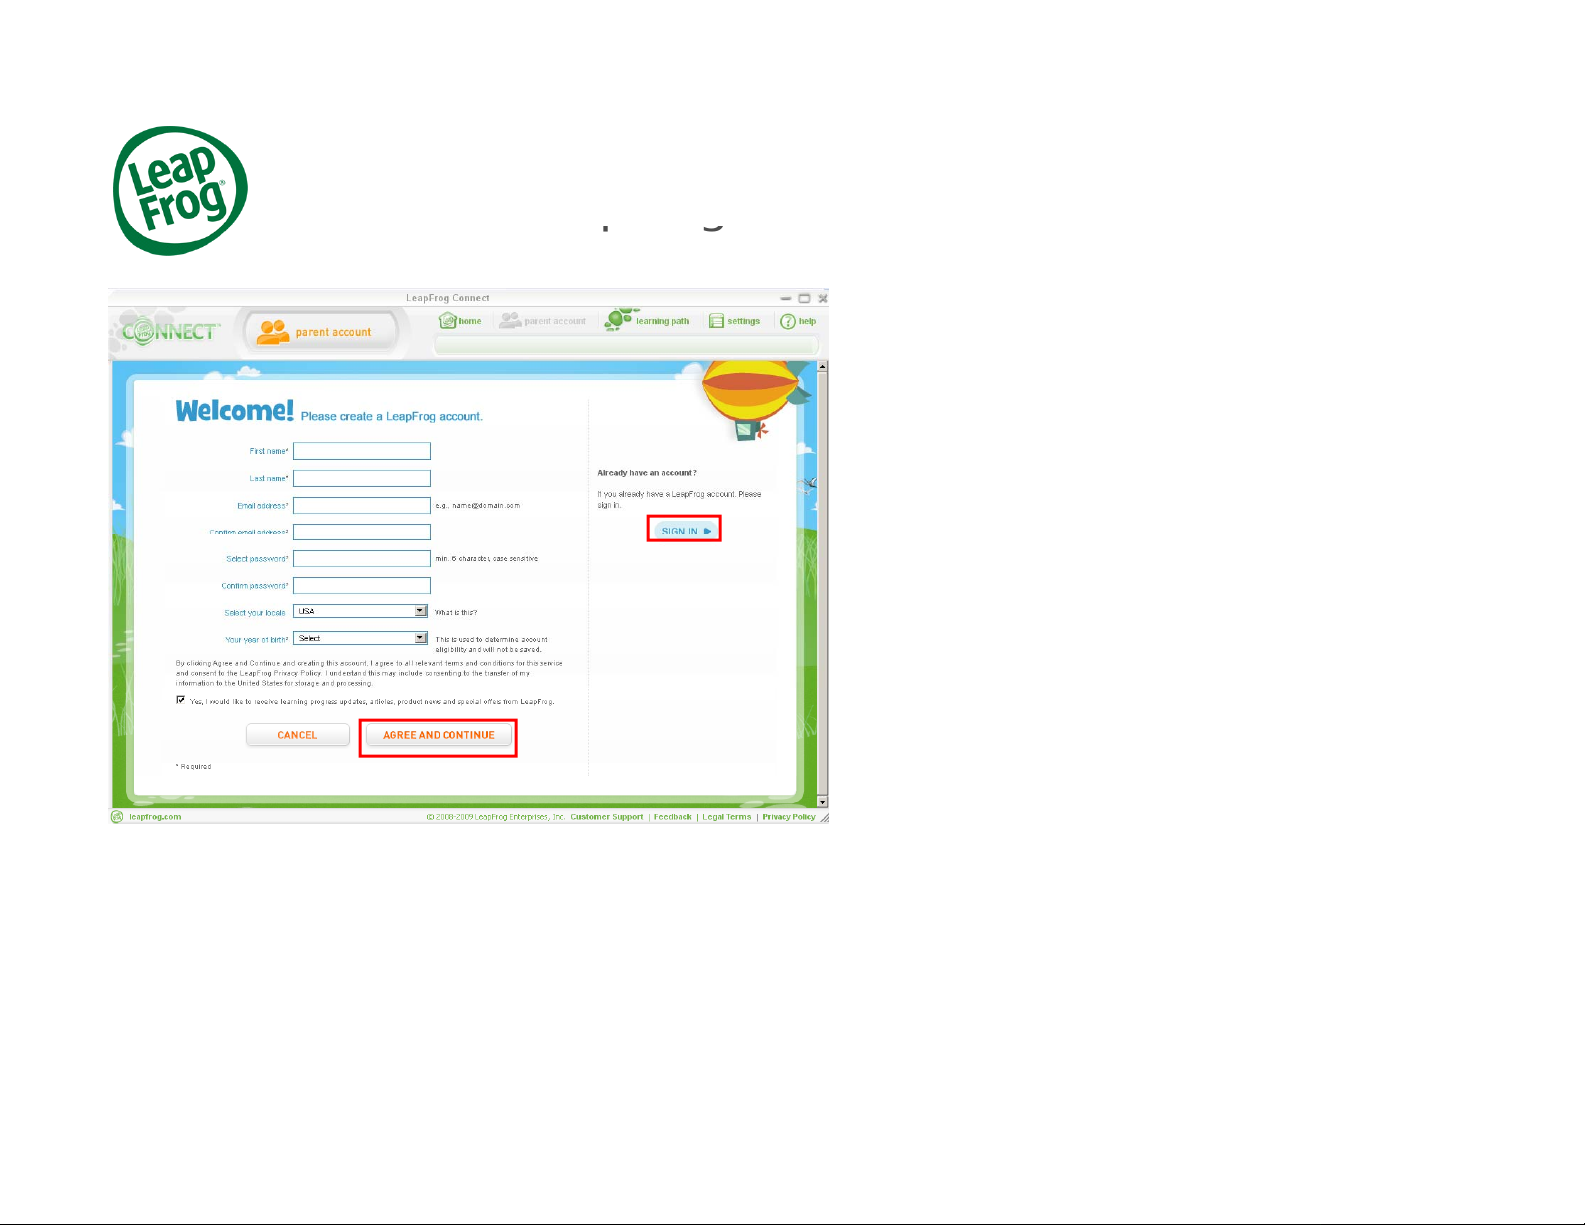
C
You’ll now need to create a LeapFrog Parent
account.
Your LeapFrog Parent account is the first step to
giving you access to the LeapFrog Learning Path,
which offers personalized insight into the skills your
child is exploring while playing with LeapFrog toys.
reating a LeapFrog Parent account is easy. Just
enter your name, email address, your year of birth
(year of birth is used to determine eligibility and will
not be saved) and choose a password. Then click
AGREE AND CONTINUE.
If you already have a LeapFrog account, click
Sign In to enter your email address and password
on the “Already have an account?” screen.
LeapFrog Support TutorialMay 2010 5
Page 6
LeapFrog Parent Account
pg
ppgg
birth
SAVE
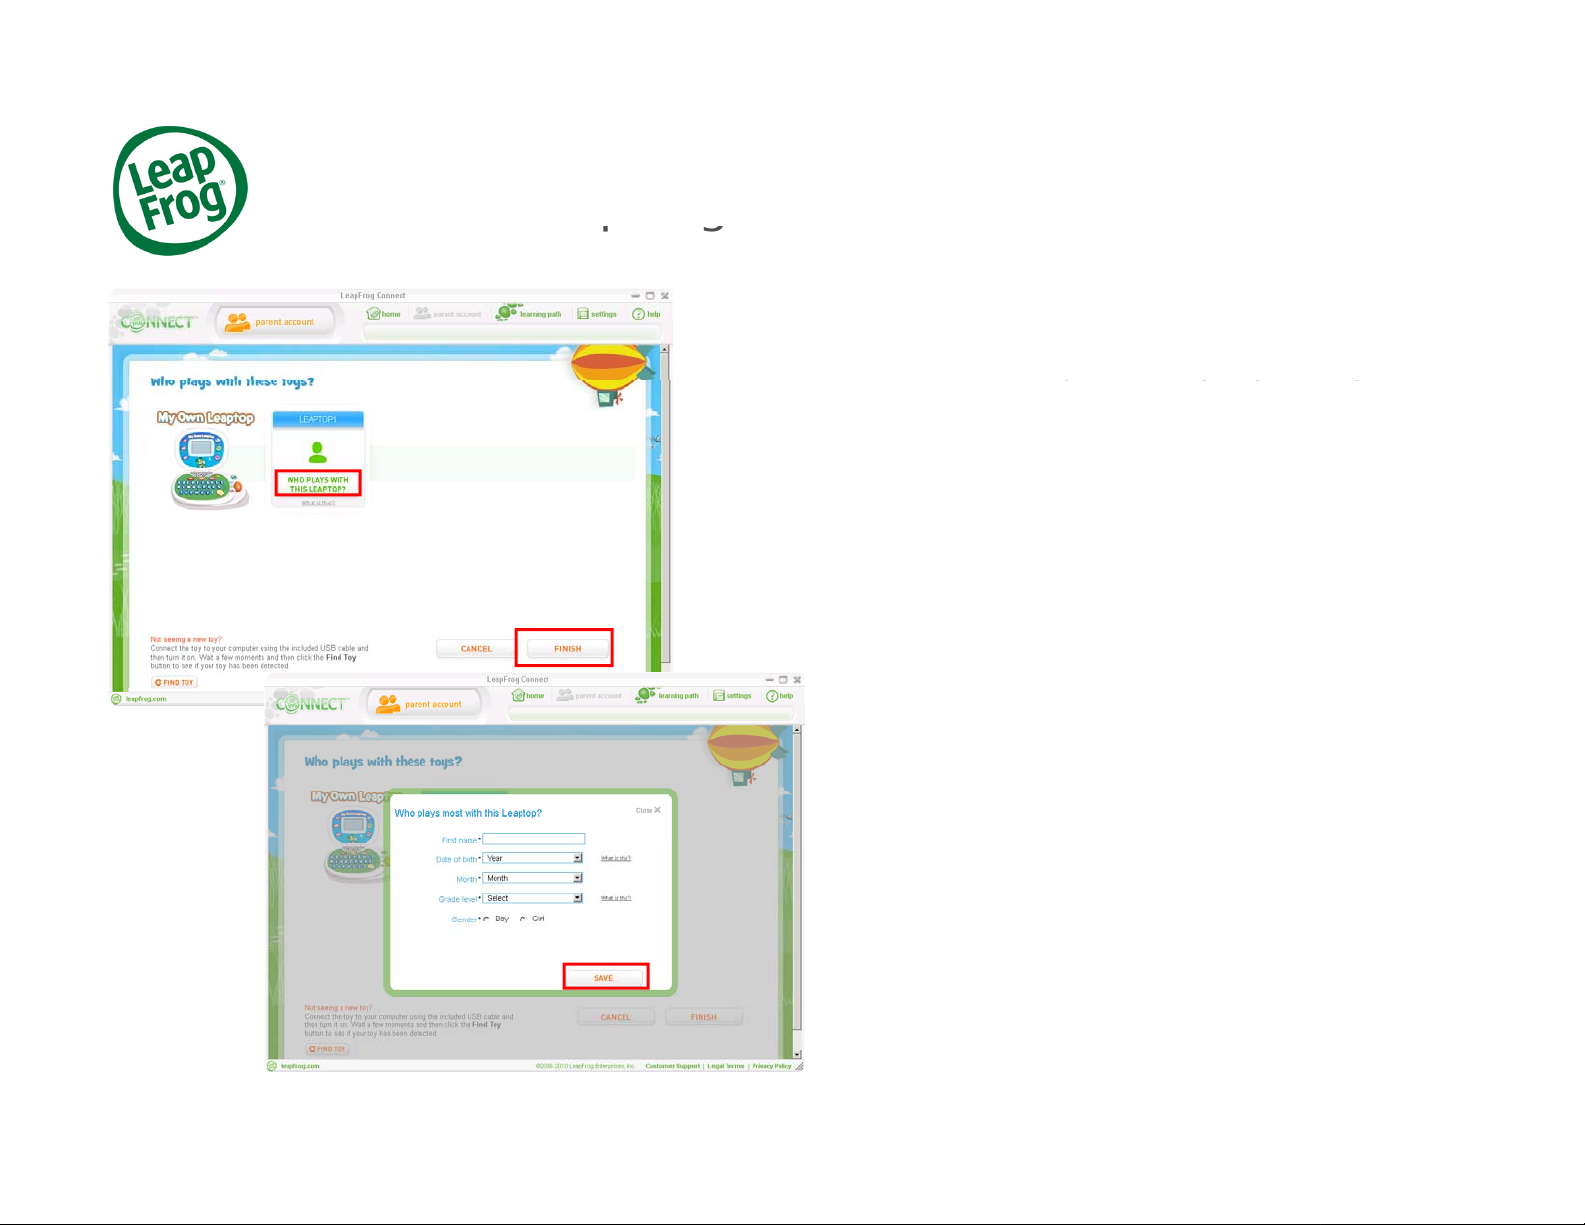
After creating your LeapFrog account, you’ll need
to provide information about who plays with the toy.
This will create a personal LeapFrog Learning Path
for your child and allows you to see the skills your
child is exploring while playing with their Leaptop.
Click WHO PLAYS WITH THIS LEAPTOP? and
enter your child’s first name, month and year of
, grade level and gender, then click
When you’re finished, click FINISH.
.
LeapFrog Support TutorialMay 2010 6
Page 7
LeapFrog Connect Home Page
pg g
Not
ith
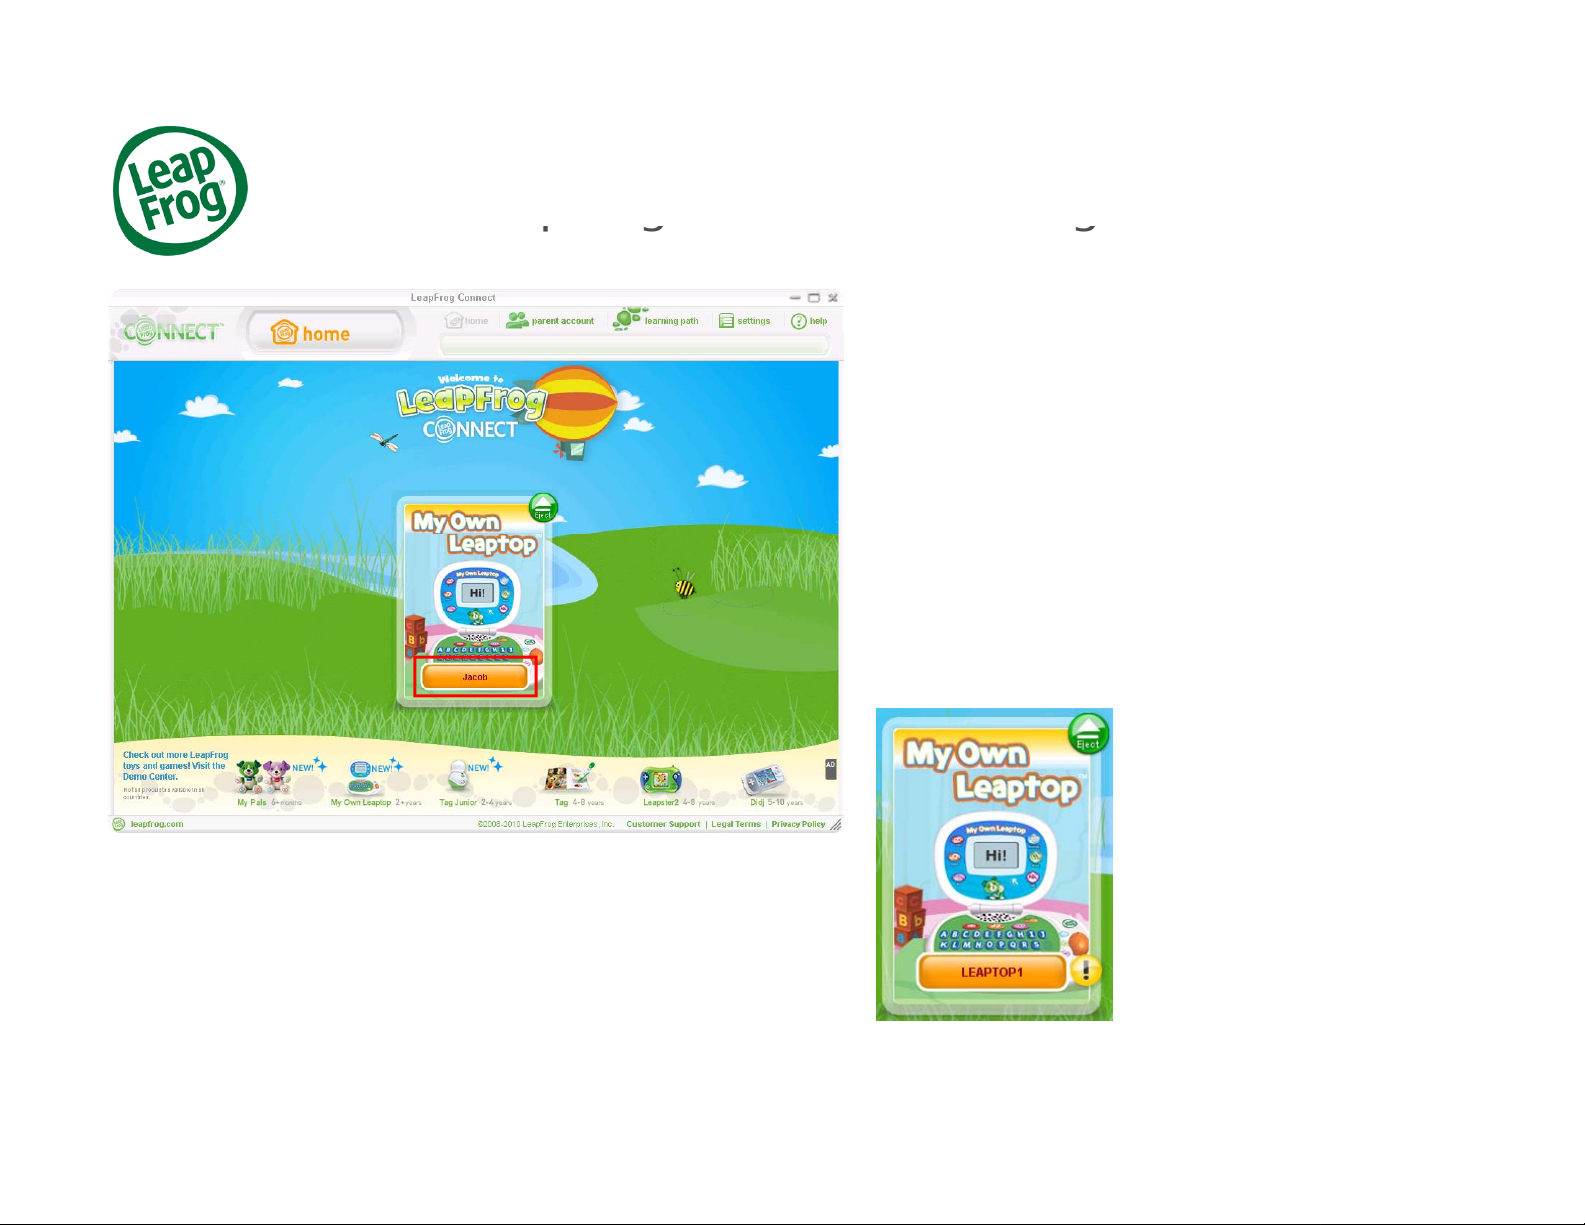
Now you’ll be directed to the LeapFrog Connect
home page.
All of the LeapFrog toys that you have connected
will be displayed in the center of the screen. Click
the name in the My Own Leaptop box to enter the
Leaptop view .
e: If you see a yellow button w
exclamation mark next to any name, that means
your child’s toy is not completely set up. Click the
yellow button and follow the on-screen instructions
to complete the setup.
LeapFrog Support TutorialMay 2010 7
an
Page 8

My Own Leaptop Home Page
yppg
pp
The first page you’ll see is the My Own Leaptop
home page. To begin customizing your child’s
Leaptop, click the Get Started button. You can also
click the My Names button on the left side of the
screen.
LeapFrog Support TutorialMay 2010 8
Page 9

My Name
y
On the My Name page enter your child’s first name,
then click Find Audio.
LeapFrog Support TutorialMay 2010 9
Page 10

My Name
p
y
p
instead of
thi
If your child’s name is available, click on the
speaker symbol to hear My Own Leaptop
If the pronunciation of your child’s name is correct,
click Save To Leaptop to continue.
Note: In some cases, you may see a Next button
ronounce the name.
Save to Leaptop. If you see
• Click Next
• Confirm the spelling of your child’s name
• Then click Save to Leaptop
s …
LeapFrog Support TutorialMay 2010 10
Page 11

My Name
y
y
If your child’s name is not available, try entering a
different spelling in the First Name box, or browse
the list for audio that sounds like your child’s name.
(For example, if you can’t find “Kristine,” try
“Christine.”)
If you find audio that sounds like your child’s name
but is not spelled the same, select the name, then
click Next.
Check the spelling of your child’s name in the
Spelling box, then click Save to Leaptop.
LeapFrog Support TutorialMay 2010 11
Page 12

My Name
y
From there, you have two choices:
child’s name in the
Spelling
bo
then click
If you still can’t find audio that sounds like your
child’s name, you can click the “CAN’T FIND your
child’s name?” link.
1) You can choose a nickname that will be played
on your child’s Leaptop.
2) Your child’s Leaptop can just display the
spelling of his or her name on screen.
Make your selection, then click NEXT.
You will be asked to enter the correct spelling of
your
Next.
LeapFrog Support TutorialMay 2010 12
x,
Page 13

Syncin
g
yg
Next, you can continue customizing your child’s
Leaptop by clicking CONTINUE TO MY EMAILS.
After you click CONTINUE TO MY EMAILS, the
application will display a “syncing” message at the
top of the window.
Do not disconnect or turn off your child’s Leaptop
while this message is displayed.
LeapFrog Support TutorialMay 2010 13
Page 14

My Emails
y
Next
“
Add Send
On the My Emails page you can create up to three
email messages to save to your child’s Leaptop.
Select a message for your email by using the
“Select a message” drop-down menu. You can
preview the message’s audio by clicking the
speaker icon.
, click the
This will let you add a sender’s name for each
email. For example, you may want the email to end
with “Love, Grandma.”
There are three options for choosing a sender
name:
1) Relation only (Grandma)
2) Relation + first name (Grandma Annie)
3) First name only (Annie)
We will walk through each of these options.
LeapFrog Support TutorialMay 2010 14
er” link.
Page 15

My Emails: Add Sender (Relation Onl
y)
y(y)
y
1) SENDING AN EMAIL WITH JUST A RELATION
You can create an email that is from a relation only,
such as Grandma or Uncle.
In the Relation screen, make a selection from the
many choices. You can preview audio by clicking any
of the blue speaker icons.
Then, click the Next button.
On the First Name screen, click the link that says, “Or
you can skip this step and just use the RELATION …”
LeapFrog Support TutorialMay 2010 15
Page 16

My Emails: Add Sender (Relation + First Name
)
y( )
On the First Name screen, enter a name and click
FIND
2) SENDING AN EMAIL WITH RELATION + FIRST NAME
You can also create an email that uses both a relation and a
first name, such as Grandma Annie or Uncle Joe.
In the Relation screen, make a selection from the many
choices, then click the Next button.
AUDIO.
LeapFrog Support TutorialMay 2010 16
Page 17

My Emails: Add Sender (Relation + First Name
)
y( )
My Own Leaptop pronounce the name.
2) SENDING AN EMAIL WITH RELATION + FIRST NAME
If the name is available, click on the speaker symbol to hear
If the name is correct, select the name and click Next.
If the name is not available, try entering a different spelling
in the First Name box. (For example, if you can’t find
“Kristine,” try “Christine.”)
If you find audio that sounds like the name but is not spelled
the same, select the name, then click Next. (You will have
the chance to check the spelling in the Spelling box.)
LeapFrog Support TutorialMay 2010 17
Page 18

My Emails: Add Sender (First Name Onl
y)
y(y)
such as
Annie
Joe
.
3) SENDING AN EMAIL WITH JUST A FIRST NAME
You can also create an email that uses just a first name,
In the Relation screen, click the “Don’t use a relation, just a
FIRST NAME” link.
On the First Name screen, enter a name and click FIND
AUDIO.
or
LeapFrog Support TutorialMay 2010 18
Page 19

My Emails: Add Sender (First Name Onl
y)
y(y)
My Own Leaptop pronounce the name.
3) SENDING AN EMAIL WITH JUST A FIRST NAME
If the name is available, click on the speaker symbol to hear
If the name is correct, select the name and click Next.
If the name is not available, try entering a different spelling
in the First Name box. (For example, if you can’t find
“Kristine,” try “Christine.”)
If you find audio that sounds like the name but is not spelled
the same, select the name, then click Next. (You will have
the chance to check the spelling in the Spelling box.)
LeapFrog Support TutorialMay 2010 19
Page 20

Emails: Save To Leapto
p
pp
When you have completed setting up your email
messages and senders, click the Save To Leaptop
button.
LeapFrog Support TutorialMay 2010 20
Page 21

My Music
y
On the My Music page you can add one sing-along
song and up to five melody songs.
To listen to a sample of a song, click one of the
speaker icons.
When you’ve made your music selections, click
Save To Leaptop.
LeapFrog Support TutorialMay 2010 21
Page 22

My Own Leapto
p
ypp
It may take a few minutes for all of your selections
to save to My Own Leaptop.
Do not disconnect or turn off your child’s Leaptop
until you see the “Sync complete” message at the
top of the application ...
… or as a popup message.
Congratulations! You’ve now customized My Own
Leaptop.
LeapFrog Support TutorialMay 2010 22
 Loading...