

Page 1
Installation Instructions for
980BLINGCH
Bling Chandelier
Fusion Jack™
GENERAL PRODUCT INFORMATION:
This product is suitable only for indoor dry locations
and approved for use at any height above the finished floor.
Read through all the instructions before attempting installation.
CAUTION - RISK OF FIRE
This product requires installation by a qualified
electrician. Before installing be sure to read all
instructions and DISCONNECT POWERTO THE
ELECTRICAL BOX.
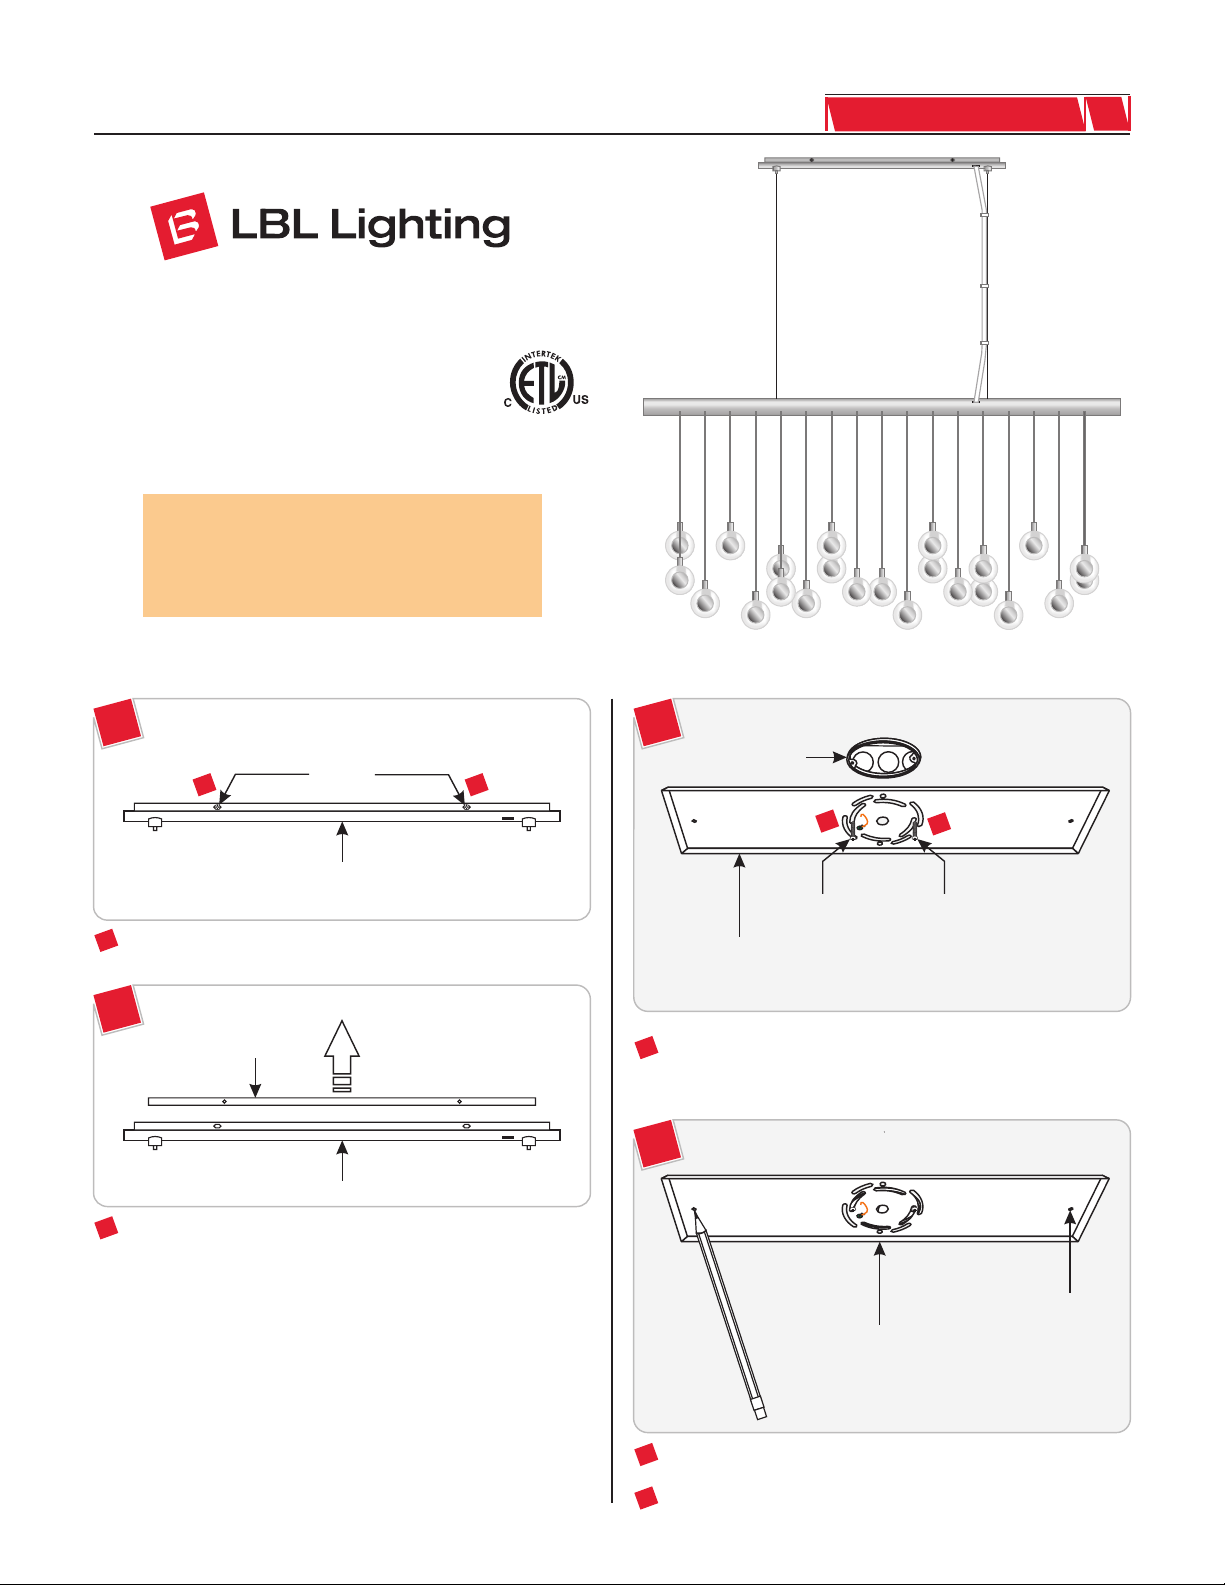
Mount the Backplate
HS524_
1.1
1A
1 1
1
Remove all four screws from the sides of the canopy.
SCREWS
CANOPY
1B
BACKPLATE
CANOPY
2
Lift the backplate out of the canopy.
1C
ELECTRICAL BOX
3
BACKPLATE
3
Line up the canopy as desired and mount the backplate to the
electrical box with the two #8-32 button-head screws provided.
3
SCREWSCREW
1D
END HOLE
BACKPLATE
4
Mark the ceiling in the center of the backplate end holes.
Remove the backplate from the ceiling.
5
1
Page 2
Attach the Canopy and Boom
1E
MARK
7
ANCHOR ANCHOR
6
Line up an anchor tip with one of the marks on the ceiling, and
push the anchor into the ceiling up to the threads.
Screw the anchor in the rest of the way with a screwdriver.
7
Repeat steps 6-7 for the other anchor.
8
1F
ELECTRICAL BOX
ANCHOR
2A
6
CABLE
CLUTCH
AIRCRAFT
CABLE
POWER
CORD
8
CANOPY
3
1
STRAIN
RELIEF
5
4
CANOPY
6
POWER
CORD
BOOM
4
3
1
AIRCRAFT
CABLE
SAFETY
COUPLER
CABLE
CLUTCH
3
CABLE
CLUTCH
AIRCRAFT
CABLE
11 11
SCREW SCREW
BACKPLATE
9
Feed the power line wires through the center backplate hole.
Mount the backplate to the electrical box with the two #8-32
10
10
9
10
SCREWSCREW
POWER LINEWIRES
button-head screws provided.
Secure the backplate to the anchors with the two
11
countersunk-head screws.
1
Feed the aircraft cables from the boom into the cable clutches
in the canopy.
Adjust the aircraft cable to the approximate length desired.
2
Attach the safety coupler to each aircraft cable. Leave some
3
extra length in the cable for later adjustment and cut off the
excess cable.
Feed the power cord from the boom into the canopy port.
4
Slide the strain relief onto the power cord and tighten the
5
screw. The power cord is not intended to
Leave some slack:
support the boom.
Leave at least 8" of the cord behind the canopy for power
6
connections and cut the excess cord.
Remove the last 4" of the power cord insulation.
7
Strip 1/4" of the insulation from the wire ends.
8
2
Page 3

Install the Lamp & Shade
2B
11
9
Connect the bare power cord wire and copper backplate wire
10
to a suitable ground according to local electrical codes.
Connect the power cord wire with the white strip to the
10
neutral power line wire with a wire nut.
Connect the other power cord wire to the hot power line
11
wire with a wire nut.
9
2C
13 13
3A
1
NOTE:Use only your fingers and a soft cloth to install
the lamp.
SOCKET
LAMP
SCREW SCREW
12
Place all wires, wire nuts, and cables inside the canopy.
Line up the canopy with the backplate and reinstall all four
13
screws.
2D
CABLE
CLUTCH
NIPPLE
14
AIRCRAFT
CABLE
Use Watt Bi-Pin Xelogen
MAX 10
(Xenon) Lamp.
1
Push the lamp pins completely into the socket holes.
3B
SOCKET
GLASS SHADE
Push the glass shade completely onto the spring clip.
2
SPRING CLIP
2
14
Adjust the aircraft cables until the boom is level.Feed the cable
into the cable clutch to raise the boom. Push in on the cable
clutch nipple to release the cable and lower the boom.
Repeat for all the lamps.
3
3
Page 4

SAVE THESE INSTRUCTIONS!
7400 Linder Ave, Skokie, IL 60077
800.323.3226 - 847.626.6300
www.lbllighting.com
© 2008 LBL Lighting.All rights reserved. The "LBL Lighting" graphic is a
registered trademark of LBL Lighting. LBL Lighting reserves the right to
change specifications for product improvements without notification.
4
A Generation Brands Company
 Loading...