

Page 1

La-Z-Touch
®
op er at in g in st ru ct io ns
__________
in st ru cc io ne s de o pe ra ci ón
__________
in st ru ct io ns
La-Z-Boy Incorporated
12 84 N. Telegraph Road
Monroe, MI 48162 -5138
la-z-boy.com
©2011 La-Z-Boy Incorporated
93000526-00 Rev. 11/11
Cooler Recliner with Massage & Heat
________
Sillón reclinable con masajes, calor y cámara
de refrigeración
________
Fauteuil inclinable massage chaleur
avec refroidisseur
Page 2

Congratulations!
You are now the proud owner of a
state-of-the-art Thermo-Electric Cooler
La-Z-Touch
®
Massage Recliner by La-Z-Boy.
®
You have just selected one of the
finest quality upholstered products
produced in the North American
furniture industry, backed by over
80 years of quality manufacturing
experience. La-Z-Boy
®
is proud of our
designs and craftsmanship and
know you will feel the same as
you enjoy your new furniture’s
comfort and style.
3
2
IMPORTANT
Read these instruction s thoroughly b efo re using
your Thermo-El ect ric C ool er La -Z- Touch
®
Massage
Recliner. Keep them for f utu re refere nce .
Table of Contents
Important Safety Instructions................................4-5
Thermo-Electric Cooler Recliner with 2-Motor
Massage & Heat Assembly Instructions.................6-9
2-Motor Massage & Heat Operating Instructions...1 0 - 11
Thermo-Electric Cooler Operating Instructions .........12
Thermo-Electric Cooler Care & Maintenance........13- 14
Thermo-Electric Cooler Recliner with 2-Motor
Massage & Heat Troubleshooting............................15
Reclining Tension Adjustment Instructions ...............16
3-Position Legrest Operating Instructions ................17
Furniture Placement Guide.....................................18
Furniture Placement Guide.....................................19
Page 3

5
4
– To reduce the risk of electric shock, serious injury or death:
• Di sconn ect the ele ctric al plug fro m the wall outlet before cle aning , mov ing,
ser vicing or when not in use for an ext ended pe riod of tim e.
• Do no t use this pro duct if it is wet , in wat er, aro und water or any liq uid. Do not handle
the pl ug or remote contr ol with wet ha nds.
• To prevent su ffoca tion kee p plasti c bags away from childre n.
• Plug directly into a w all outlet. Do not use an exte nsion cord , adapter, or surge prote ctor.
• Keep cord out of reach of small children, and do not u se where it may be a trip hazard.
–
To reduce the risk o f bur ns, fire , ele ctr ic sh ock ,
seriou s injury or death:
• Al ways keep open flame and li t cigare ttes away f rom upho lster ed furni ture.
Uph olste red furn iture ma y burn rapi dly with to xic gas and thick smoke.
• Cl osely su pervise chi ldren an d disabled pers ons using t his prod uct.
• Sit do wn in the uni t slowly. To a void tipover, do not thr ow your weight against the back
of the unit . Move the unit in to or out of the reclining positio n slowly, making sur e that
no children or pets are in clos e proximity.
• This product has many moving parts, serious inju ry can oc cur if not used properly. Ke ep
hands, finger s and body pa rts away from the mec hanism. To reduce the risk of hea d
entrapme nt and other injuries, keep children and pe ts away from the openings and
moving parts in and around furniture .
• Only the occupant should operate the unit. Never attempt to open the legrest by pulling on it.
• Do no t stand, sit or pl ace extr a weight on th e arms, back or op en legre st.
• To safely exi t the unit and preven t a trippin g hazard br ing the bac k uprigh t
and close the le grest .
• Do not use this product if it is damaged. Do not use attachments or substitute parts.
• Th is produ ct is intended for in door res ident ial use only.
• Provide a clear path for operation of the back and legrest. Place tables and area rugs at
a distance to allow the legrest to fully extend without rubbing or interference.
• Check the condition of the power transformers, electrical cords, plugs and connectors
monthly. Keep the power transformers and electrical cords away from heat sources. Never
operate the unit with a dama ged power transformer, electrical cord, plug or connector.
Contact your La-Z-Boy
®
dealer for service.
• Do no t use unit if pow er contr ol is damag ed or wet. Do not use un it if the hand wa nd
has be en dropp ed in water or an y liquid . Contact yo ur La-Z- Boy
®
dea ler for ser vice.
• Th is produ ct is not intended fo r use as a health ca re device.
• Users of medical devices should contact the ir health care provider be fore using this
product. Do not use this product if you have po or circula tion, are immobile or cannot
sense heat, except as directed by your health care provid er.
Important Safet y Instructions:
Impor tant: Read these ins truction s thoroughly before us in g .
• Do not use this product wh ere aerosol (s pray) prod ucts are being used or
where oxygen is being administered.
• Do not ope rate the unit until t he back is install ed and locked.
• Before moving the product, disco nnect the electrical p lug from the wall outlet and secure
the mechanism to prevent unexpected opening or movement. Never move the produc t by
the mechanism, legrest, ha ndle, reclining back or swivel base.
• This unit is e quipped with a tension adj ustment feature for the reclining m echanism that
is preset a t the factory. The t ension set ting can be changed for your personal preference.
To avoid tipo ver and insure stability, do not ope rate the unit with th e tension adjustment
wing nuts comple tely loose ned (see Reclining Tension Adjustment Instr uctions).
• Do not attempt to disassemble or service the pump or motor; n o serviceable part s
are inside. Contact your La-Z-Boy
®
dealer for service.
• The 01M/01N thermo-electric cooler chair is intended for a single occupant, not exceeding 250
pounds. Do not operate the chair with more than one occupant in or on any part of the chair.
• Do not all ow electrical cord to be pinched between moving parts or between the frame
and the floor. Do not place cord under carpet or in location wher e it could become worn.
• Do not use pillow, blanket, or other cover between occupant and chair surface when
heat is engaged.
• Always unplug the power cord b efore conn ecting or disconnecting the hand wand.
• Unplug the power cord immediately if you detect strange odors or fumes coming from the chair
• Burns may result from improper use and care of internal heating pads. To avoid risk of burns, do
not use pins, do not allow heating pad area to become wet, and do not remove upholstery cover.
• Do not attempt to disconnect the power plug by pulling the power cord. Always hold the power
plug and pull it out.
• If you give this product to someone else, include this Operating Instructions manual.
Important Safety Instructions:
Important: Read these instructions thoroughly before using.
DANGER
WARNING
Save These Instructions Save These Instructions
NOTICE: To reduce the risk of product damage:
• Damage will occur to the mechanism if the legrest is forced closed from the 1st or 2nd
position. The legrest must be extended to the 3rd position and then closed.
• The thermo-electric cooler is not a refrigerator. Do not use for long term stora ge
of food items.
• Excessi ve weight plac ed on the arm s of the chair ma y damage the thermo-electric
cooler. Never lean or sit on the arms of the chair.
• Never immerse the thermo-electric cooler in water, or any liquid; the thermo-electric
cooler will be dama ged.
• Prepare the thermo-electric cool er for storage when not in use for an extended
period of time (see Thermo-Electric C ooler Care and Maintenance).
• To prevent damage to the power transformer, do not plug in unt il instructed.
• Gently press the button s during opera tion and avoid hi tting the buttons with
pointed or hard objects.
Page 4

7
6
NOTICE: Do not plug the tr ansformer i n until instructed.
1. Install the back.
•
Lay th e back acro ss the chai r arms. Lift th e back at a sligh t angle and al ign
the br acket s on the back with the brac kets on the body (F
IGURE
1).
•
Lower the back onto the body, making sure the back and body brackets are
com plete ly engag ed.
-
To make sure the back is properly installed, with both sets of back and body brackets
engaged, stand behind the chair and twist the back from side to side. If one or both sides
move out of position, the brackets are not engaged (F
IGURE
2). Remove the back and
repeat the steps above.
-
If you are unable to install the back properly, contact your La-Z-Boy®dealer for assistance.
•
Lock the brackets by using a screwdriver to push down the locking levers (F
IGURE
3).
2. The thermo-electric cooler power transformer, 2-motor massage and heat power transformer
and rubber mat are stored inside the cooler during shipping. Remove the power transformers
from the cooler and unwind the cords.
–
To reduce the risk of product damage:
• Bef ore oper ating, remove the whit e packin g materi al locat ed under
the co oler, inside the arm ca vity.
3. Packing material is used under the thermo-electric cooler to protect and support the cooler
during shipping. The packing material must be removed before operating the cooler to prevent
damage. Lift the thermo-electric cooler from the chair arm and set in the seat (F
IGURE
4).
Remove the white packing material from inside the arm cavity (F
IGURE
5).
4. Carefully lower the thermo-electric cooler into the chair arm, making sure the power connector
is toward the back of the ch air (F
IGURE
6).
5. To access the massage connectors, stand at the side of the chair and push the back
rearward to recline the seat and back. Hold the top arm closed to prevent the cooler from
falling out, and gently tip the chair fo rward to rest on its arms and the top of the back.
NOTICE:
FIGURE 2
F
IGURE 4
FIGURE 3
FIGURE 1
FIGURE 6
F
IGURE 5
Whi te Packi ng
Mat erial
The rmo-E lectr ic Coole r
Pow er Conne ctor
Bod y
Bra cket
Bac k Bracke t
Back and body brackets on this side
are not engaged. Remove the back
and reinstall.
Back
Bracket
Locking
Lever
Locked
Position
Cha ir
Bac k
Thermo-Electric Cooler Recliner with 2-Motor
Massage & Heat Assembly Instructions
Thermo-Electric Cooler Recliner with 2-Motor
Massage & Heat Assembly Instructions
– To reduce the risk of injury:
• Do n ot operate the unit until the back is ins talled and locked.
WARNING
(Assembly Instructions Continued)
Page 5

–
To reduce the risk of serious injury:
• Check the condit ion of the po wer transformers, electrical cords, plugs and
connectors m onthly. Keep the power transformers and electrical cords away
from heat sources. Never operate the unit with a dam aged power transformer,
electrical c ord, plug or connector. Contac t your La-Z-Bo y
®
dealer for service.
• Do not allow electrical cord to be pinched between moving parts or between the
frame and the floor. Do not place cord under carpet or in location where it could
become worn.
9
8
10. Move the cords away from the base and hold the top arm closed to prevent the cooler from
falling out. Gently return the chair to the upright position. Make sure the cords are not pinched
in moving parts or under the base.
–
To reduce the risk of serious injury:
• Provide a clear path for operation of the back and legrest. Place tables and area
rugs at a distance to allow the legrest to fully extend without rubbing or interference.
11. Choose a location for the chair that is close to an electrical outlet. Proceed to the
Operating Instructions.
12. To remove the back, unplug the power tr ansformers from the electrical outl et and
reverse the Assembly Instructions steps.
Thermo-Electric Cooler Power
Transformer Connection
The rmo-E lectr ic
Coo ler Powe r
Transfor mer
Mas sage & Heat
Pow er Tran sformer
Thermo-Electric Cooler Recliner with 2-Motor
Massage & Heat Assembly Instructions
Thermo-Electric Cooler Recliner with 2-Motor
Massage & Heat Assembly Instructions
6
. Identify the f our electrical connecto rs at the back of the chair, under the seat (F
IGU RE
7
).
•
The two rec tangular connectors are for the hand wand connection (F
IGU RE
8).
•
The round connector is for the 2-motor massage and heat power transformer
connection ( F
IGU RE
8).
•
The black rectangular connector is for the t hermo-electric cooler p ower transformer
connection ( F
I
GUR E
9).
7. Align the two rectangular hand wand connectors (some of the connector pins are square,
others are round). Push the connectors together until they lock (F
IGURE
8).
8. Plug the 2-motor massage and heat po wer transf ormer into the round connector.
Make sure
the connectors are securely fast ened (F
IGU RE
8).
9. Plug the thermo-electric cooler power transformer into the black rectangular connector
clamped to the inside arm. Push the connectors together until they lock (F
IGURE
9).
WARNING
WARNING
NOTICE:
To prevent damage to the connectors and cords, it is important
to unfasten all connections prior to removing the back.
FIGURE 8
F
IGURE 9
FIGURE 7
F
IGURE 10
Thermo-Electric Cooler
PowerTransformer
Connector
Hand
Wand
Connectors
Massage & Heat
Power Transformer
Connectors
Massage & Heat
PowerTransformer
Connector
Hand Wand
Connectors
Page 6

11
10
–
To reduce the risk of serious injury:
• Plug directly into a wall out let. Do not use an ext ension cor d, adapter,
or surge protector.
–
To reduce the risk of serious injury:
• Sit down in the unit slowly. To avoid tip over, do not throw your weight against the
back of the unit. Move the unit into or out of the reclining position slowly, making
sure that no children or pets are in close proximity.
• The 01M/01N chair is intended for a single occupant, not exceeding 250 pounds.
Do not operate the chair with more than one occupant in or on any part of the chair.
• To safely exit the unit and prevent a tripping hazard, bring the back
upright and close the legrest.
Operat ing Instruc tio ns fo r 2-M oto r Mas sag e and Heat
Plug the 2-motor massage and heat power transformer directly into a wall outlet. Make sure
there i s en ough slack i n th e co rd r unning from the chai r to the outlet to allow fo r ro cking and
recl ining. Ne ver stretch or s train a cord .
Automa tic Timer Operat ion
The system has an automatic timer that will shut off the MASSAGE and HEAT functions after
approximately 15 to 30 minutes of operation.
• Pushing down on the POWER button or either zone button will restart the massage.
• Pushing down on the HEAT button will restart the heat. Push down once for Low Heat
and twice for High Heat.
• When you are finished, make sure to push the POWER button and the HEAT button
(if activated) to turn the system off. Press the HEAT button twice if in Low Heat setting.
• The timer will also reset if you unplug the 2-motor massage and heat power transformer or
if there is a power outage.
The massage and heat functions may start automatically when electrical power is restored after
a power outage. The timer should automatically shut down the massage and heat within 15 to
30 minutes. There should be no risk of injury or damage if this happens. However, we
recommend that you unplug the power transformers if you will be a way from your residence
for an extended period of time.
La-Z-Touch®2-Motor Massage & Heat Recliner
Operating Instructions
La-Z-Touch®2-Motor Massage & Heat Recliner
Operating Instructions
DANGER
WARNING
HHEEAAT
T
Activates heat. Press
once for low and
twice for high. Use
independently or with
massage feature.
NOTE: Heat will
deactivate in 30
minutes. To restart,
press the HEAT
button again.
MMOODDEES
S
ZONE - Choose either
or both zones for massage.
PULSE - Massage turns
on and off to simulate
a pulsing action.
WAVE - Massage moves
up and down or side to
side, depending on style,
in a wave-like action.
SSPPEEEED
D
Controls pulsing frequency
of massage in PULSE mode
and controls velocity as it
cycles through in WAVE mode.
Press (+) to increase and (-)
to decrease.
– To reduce the risk of serious injury:
• Do not use unit if power control is damaged or wet. Do not use unit if the hand wand has
been dropped in water or any liquid. Contact your La-Z-Boy
®
dealer for service.
WARNING
Transformer sp ecifications depend on p roduction date. Refer t o transformer
to determine which specifications apply to your product.
La-Z-Touch 2-Motor Mas sage and Heat Power Transformer Specifications:
Input: 120V AC 60Hz 30W, Output: 12V AC 1500mA
or
Input: 100-240V AC 50-60Hz 1.5A, Output: 13.8V DC 2.9A
PPOOWWEER
R
Activates massage
system when button
is backlit with LED.
Press once for 15-min.
timer. Press and hold
down for 30-min. timer.
NOTE: To restart unit
after timer shuts off,
press either ZONE or
PWR button.
ZZOONNEES
S
Activates any or all zones.
LED indicates which zone(s)
has been selected.
IINNTTEENNSSIITTY
Y
Will increase (+) or
decrease (-) intensity
during all modes.
Page 7

13
12
Thermo-Electric Cooler Operating Instructions
-
To reduce the risk of electric shock or serious injury:
• Discon nect the elect rical plug from the wall outlet before cle aning, moving ,
servicing or when not in use fo r an extended period of time.
• Plug directly into a wa ll outlet. Do not use an extension cor d, adapter,
or surge protec tor.
- To reduce th e risk of p roduct da mage:
• The thermo-electric cooler is not a refrigerator. Do not use f or long term
storage of fo od items.
• Never immerse the thermo-electric cooler in wa ter, or any liquid.
Thermo -El ect ric Coole r Operating Information
The Thermo-Electric Cooler is designed to keep pre-chilled food and beverages cold. For maximum
efficiency avoid placing warm or room temperature products in the cooler.
The Thermo-Electric Cooler will lower the temperature to approximately 40° below ambient room
temperature. In normal room temperatures the cooler operates as follows:
• The cooling cycle starts when the temperature inside the cooler reaches 46° to 50° F or higher.
• The cooling cycle stops when the temperature has reached 38° – 40° F.
In very warm room temperatures, the inside temperature of the cooler may be higher and the
cooling cycle will run continuously.
Operat ing Instruction s for the T her mo- Electric Coo ler
Plug the thermo-electric cooler power transformer directly into a wall outlet. Make sure ther e is
enoug h slack in the cor d runn ing from the chair to th e outl et to allow fo r rocking and reclining.
Never stretch or strain a cord.
1. To turn the thermo-electric cooler on, press the on/off switch located on the top of the cooler.
A red light on the switch indicates the cooler is on.
2. Place pre-chilled items in the cooler.
3. Do not use ice or water in the cooler. The cooler does not have a drain.
4. Do not leave the cooler top open when the cooler is on.
5. To turn the thermo-electric cooler off, press the on/off switch located on the top of the cooler.
The red light on the s witch will turn off.
6. Turn the thermo-electric cooler off and unplug the power transformer when not in use.
Thermo-Electric Cooler Care and Maintenance
-
To reduce the risk of electric shock
or serious injury:
• Disconnect the electrical plug from the wall outlet before cleaning, moving, servicing
or when not in use for an extended period of time.
• Plug directly into a wall outlet. Do not use an extension cord, adapter,
or surge protec tor.
- To reduce the risk of product damage:
• Never immerse the thermo-electric cooler in water, or any liquid.
• Prepare the thermo-electric cooler for storage when not in use for an
extended period of time.
Proper care and maintenance is necessary for maximum cooler performance.
Thermo-Electric Cooler Cleaning
1. Turn the thermo-electric cooler off and unplug both power transformers.
2. Remove the rubber mat from inside the cooler. Rinse mat with water and let dr y.
3. Use a soft damp cloth to clean the inside of the cooler. A mild dishwashing detergent may be used
when additional cleaning is necessary. Do not use harsh cleaning agents, solvents or other abrasive
products to clean the cooler.
4. Dry the inside of the cooler with a soft cloth or paper towel.
5. Place the rubber mat in the bottom of the cooler.
6. Plug both power transformers directly into a wall outlet.
Thermo-Electric Cooler Defrosting
It is possible for the thermo-electric cooler to accumulate frost when operated for an extended
period of time. Defrosting is necessar y to maintain the efficiency of the cooler.
1. Turn the thermo-electric cooler off and unplug both power transformers.
2. Open the cooler and let it sit at room temperature until the frost melts. To prevent damage, do
not chip the frost from the cooler.
3. Remove the rubber mat from inside the cooler and let dry.
4. Dry the inside of the cooler with a soft cloth or paper towel.
5. Place the rubber mat in the bottom of the cooler.
6. Plug both power transformers directly into a wall outlet.
DANGER
NOTICE:
DANGER
NOTICE:
(Cooler Care and Maintenance Continued)
Page 8

15
14
Thermo-Electric Cooler Care and Maintenance
Thermo -El ect ric Coole r Vent Cleaning
Vacuuming the vents once a y ear is recomme nded for maximum c ooler perfor mance.
Homes with multi ple pets shoul d vacuum the vents more frequently.
1. Turn the thermo-electric cooler off and unplug both power transformers.
2. C arefully lift the thermo-electric cooler from the arm of the chair and set in the seat.
3. D isconnect the power cord from the outle t on the backside of th e cooler.
4. U se a vacuum with a crevice tool, or similar attach ment, to vacuum the vents on the
lower sides and bottom of the cooler (F
IGU RE
1).
5. L ay the cooler in th e seat and connect the power cord to the outlet on t he cooler.
6. C arefully lower the thermo-electric cooler into the arm of t he chair, making sure the
power connector is to ward the back of the ch air (F
IGU RE
2).
7. P lug both power transformers directl y into a wall outlet.
FIGURE 2
FIGURE 1
The rmo-E lectr ic Coole r
Pow er Conne ctor
Vents
Thermo-Elec tric Cooler Storage
Proper stora ge of thermo-electric cooler is importa nt if the cooler will not be operat ed
for an extended p eriod of time.
1. Turn the thermo-electric cooler off and unplug both power transformers.
2. Follow the De frost ing and Cleani ng steps if necessary.
3. M ake sure the insid e of the cooler is c ompletely dry.
4. P lace crumpled newspa per inside the thermo-electric cooler to keep the cooler
fresh during storage.
- To reduce th e risk of s eri ous injury:
• Do not attempt to disassemble or ser vice the pump or motor; no serviceable
parts are inside . Contact your La-Z-Boy
®
dealer for service.
Troubleshooting for 2-Mo tor Massage and Heat Function
There are no user maintenance or rep air requirements. If the massage or hea t
function doe s not work:
1. M ake sure that the Automatic Time r Operatio n has not been activated. Press the
Power button to restart the massage. Press the Heat button to r estart the hea t.
2. M ake sure the power transfo rmer is plugge d into an electric al outlet.
3. M ake sure the electrical outlet is working. For example, mak e sure there are no
blown fuses or tripped circuit breakers.
4. M ake sure all the connectors are se cured; refer to th e Assembly Instructions.
5. M ake sure that the electric al cords are not crimped or pinched in any way.
Make sure the electrical cord or plug is not damaged.
If the massag e system still does not operate properly, contac t your dealer for instructions o n
returning th e unit for examina tion and repair. Except for replacement of the po wer transformer,
never a ttempt to ma ke a ny r epairs or adjustment s yo urself.
2-Motor Massage and Heat Pow er Transformer Replacement
If the power transforme r must be replaced :
1. U nplug both power transfo rmers from the electrical outlet.
2. L ocate the 2 -motor massage and hea t power transformer connection;
refer to the Assembly Instructions.
3. G ently pull the connectors apart to disengage.
4. P ush the replac ement 2-moto r massage and heat po wer transformer connect or
into the mating connector; r efer to the Assembly Instructions. Make sure the c onnectors
are securely fastened.
Troubleshooting for Ther mo-Electric Coo ler Functio n
There are no repair requirements. If the thermo -electric cooler does not work:
1. M ake sure the thermo-electri c cooler power transformer is plugged in to a working outlet.
2. M ake sure the thermo-electri c cooler switch is turned on.
3. Make sure the thermo-electric cooler connectors are secured; refer to the Assembly Instructions.
If the thermo-electric cooler still does not work, contact your dealer for instructions on returning
the unit for examination and repair. Never attempt to make any repairs or adjustments yourself.
Thermo-Electric Cooler Recliner with 2-Motor
Massage & Heat Troubleshooting Instructions:
Cha ir
Bac k
WARNING
Page 9
17
16
- To red uce th e risk of i nju ry:
• This unit is equipped with a tension adjustment feature for the reclining mechanism
that is preset at the factory. The tension setting can be changed for your personal
preference. To avoid tipover and assure stability, do not operate the unit with the
tension adjustment wing nuts completely loosened.
- To reduce risk of product damage:
• Make sure the legrest is closed before tilting forward and adjusting the tension.
• Do not completely tighten the wing nuts. The tension springs should not be completely
compressed after making adjustments. If this occurs, the wing nuts must be loosened
a minimum of
1
⁄2-turn to avoid damage to the spring tension assembly.
• Do not completely loosen the wing nuts. The spring should not slide on the bolt
after making adjustments. If the spring slides on the bolt, tighten the wing nut
clockwise a minimum of 1⁄2-turn, after the spring no longer slides on the bolt.
• Adjust both wing nuts equally.
Reclining Tension Adjustment Instructions
You can adjust the tension of the reclining mechanism to respond to your individual size.
1. Unplug both power transformers from the electrical outlet. Gently roll the reclining chair
forward to rest on its arms and top of the back. Locate the wing nuts, one on each side,
toward the back of the recliner under the reclining seat (only one side shown below).
2. Adjust the tension by turning the wing nuts in ¼-turn increments until the
desired setting is reached.
•
A taller or heavier person may choose to increase the reclining tension by tightening
the wing nuts clockwise.
•
A smaller person may choose to decrease the reclining tension by loosening the wing
nuts counterclockwise.
3. Return the reclining chair to the upright position and test the new setting. Make additional
adjustments if needed, repeating these steps. Plug both power transformers directly into
a wall outlet.
Reclining Tension Adjustment Instructions:
Tension Spring
Win g Nut
WARNING
NOTICE:
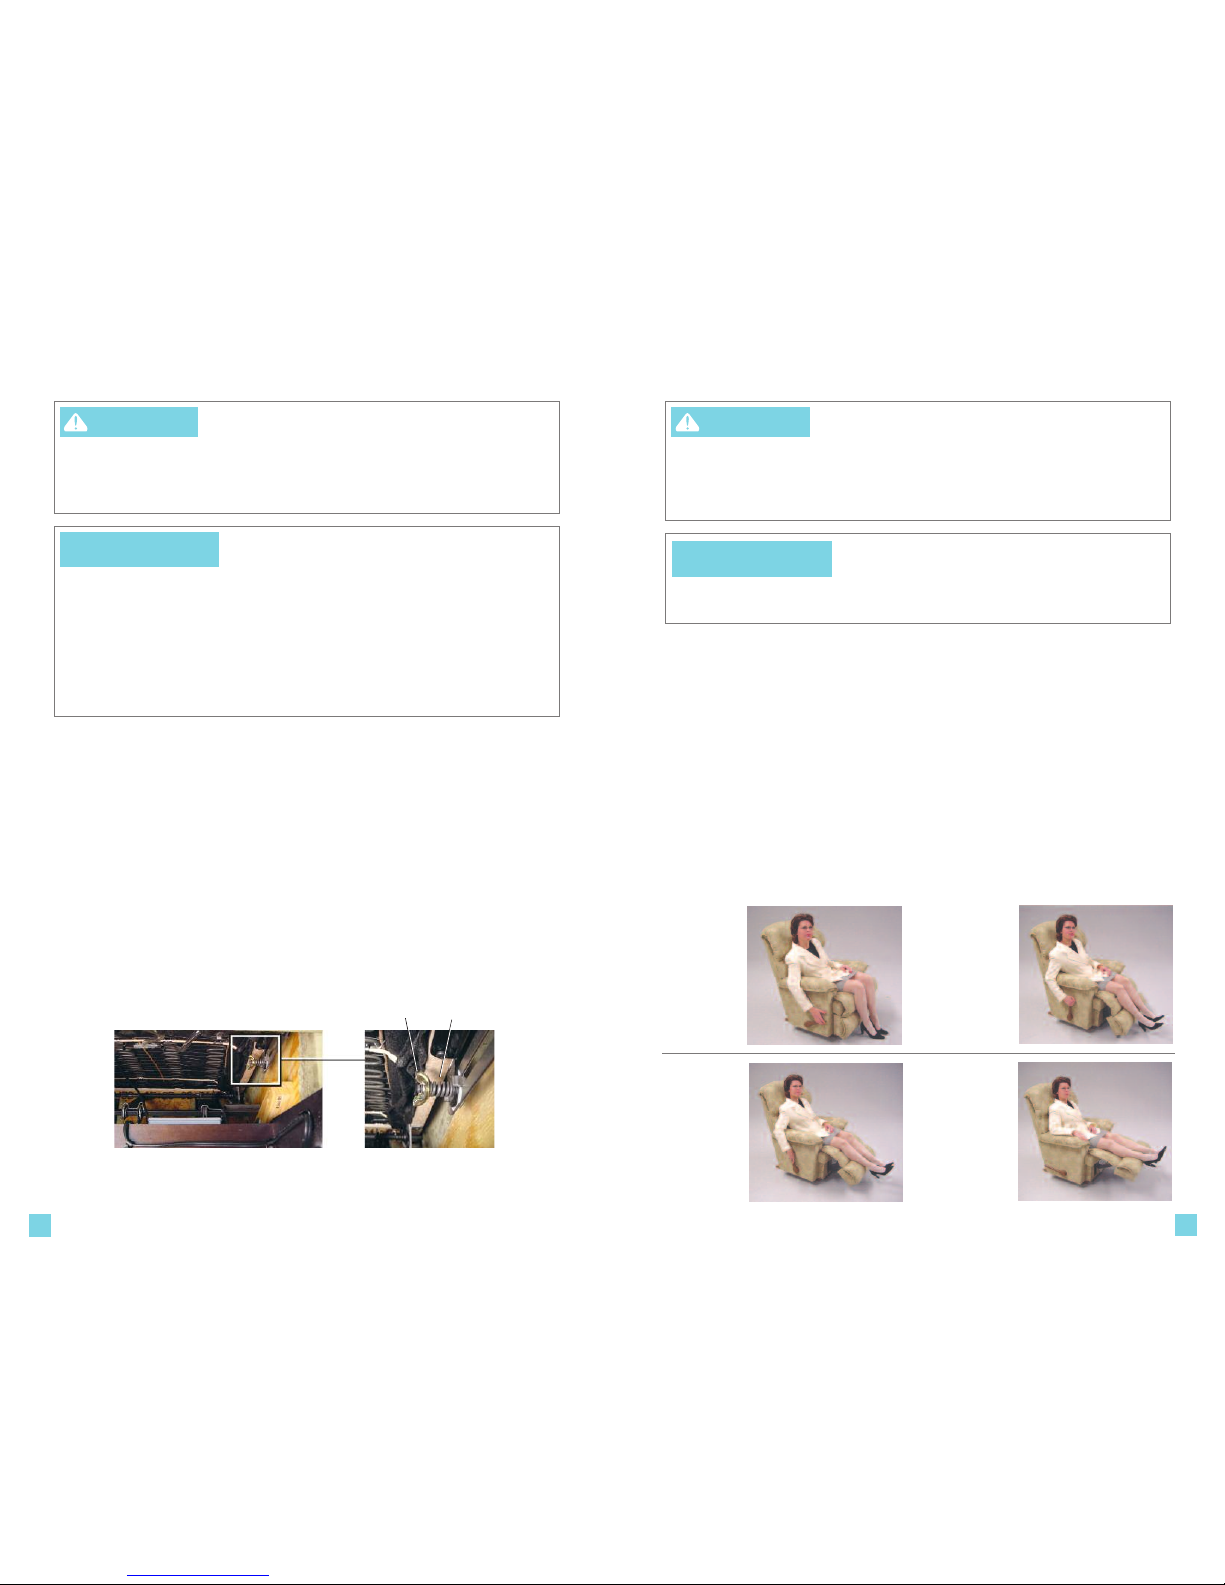
To Operate the Legrest
1. Your reclining chair is equipped with a three-position locking legrest for seating comfort.
Simply rotate the handle to operate the legrest (F
IGURE
1). You may stop in any one of three
ideal positions. The 1st position is slightly inclined for relaxed reading (F
IGURE
2). The 2nd
position is slightly more inclined for comfortable television viewing (F
IGURE
3). The 3rd
position is fully extended for complete relaxation (F
IGURE
4). To lower the legrest, rotate
the handle counterclockwise to the fully extended position, then rotate clockwise to the
fully closed position.
2. The chair back can be reclined with the legrest closed or extended. To recline,
apply pressure to the back. Sit upright to return the back to an upright position.
3. Bring the back upright and close the legrest before getting out of the chair.
Additional Feature on Selected Styles
The chair body can be tilted back when the legrest is in use. Shifting your body weight
rearward will cause the chair body to tilt backward offering a number of different positions.
3-Position Legrest Operating Instructions:
FIGURE 1
F
IGURE 3
F
IGURE 2
F
IGURE 4
CLO SED
POS ITION
1ST POSITIO N
2ND POSITIO N 3RD POSITIO N
-
To reduce the r isk of serious injury:
• Provide a clear path for operation of the back and legrest. Place tables and area
rugs at a distance to allow the legrest to fully extend without rubbing or interference.
• To safely exit the unit and prevent a tripping hazard, bring the back
upright and close the legrest.
- To reduce ri sk of p roduct damage:
• Damage will occur to the mechanism if the legrest is forced closed from the 1st
or 2nd position. The legrest must be extended to the 3rd position and then closed.
WARNING
NOTICE:
Page 10

19
18
Furniture Placement Guide:
Fur nitu re Plac emen t Gu ide
To pl ace your reclining chair the proper distance from the wall, fully recline the chair and
leave a minimum of 2" of space between the top of the back and t he wall (F
I
GUR E
1).
Make sure tables and other items are at a safe distance to avoid interference with the
operation of the legrest. Improper placement of a table could cause the occupant to become
trapped in the seat, as demonstrated in F
IGURE
2. There must be enough clearance for the
legrest to be fully extended before closing; see 3-Position Legrest Operating Instructions.
FIGURE 1
FIGURE 2
- To red uce th e risk of s eri ous injury:
• Provide a clear path for operation of the back and legrest. Place tables and area
rugs at a distance to allow the legrest to fully extend without rubbing or interference.
2” Min.
WARNING
Notes:
Page 11

¡Felicitaciones!
Usted es ahora el orgulloso propietario
de un moderno sillón reclinable con cámara de
refrigeración termoeléctrica y 2 motores para
masaje y calor La-Z-Touch
®
de La-Z-Boy®.
Acaba de seleccionar uno de los
productos tapizados de más alta calidad
originados en la industria mobiliaria de
Estados Unidos, con el respaldo de más
de 80 años de excelencia en fabricación.
En La-Z-Boy
®
estamos orgullosos de
nuestros diseños y nuestro trabajo,
y sabemos que usted sentirá lo mismo
cuando comience a disfrutar del confort
y el estilo de su nuevo mobiliario.
IMPORTANTE
Lea estas instrucciones cuidadosamente antes
de usar su Sillón reclinable con cámara de refrigeración
termoeléctrica para masaje y calor La-Z-Touch
®
.
Guárdelas para futura referencia.
Tabla de contenidos
Instrucciones importantes de seguridad.............. 22-23
Instrucciones de armado del sillón reclinable con
cámara de refrigeración termoeléctrica y 2 motores
para masaje y calor.............................................24-27
Instrucciones de operación para
calor y masaje con 2 motores...............................28-29
Instrucciones de operación de la cámara
de refrigeración termoeléctrica..................................30
Mantenimiento y cuidado de la cámara
de refrigeración termoeléctrica.................................31-32
Solución de problemas del sillón reclinable con cámara
de refrigeración termoeléctrica y 2 motores para
masaje y calor..........................................................33
Instrucciones de ajuste de la tensión de reclinación..........34
Instrucciones de utilización del apoyapiernas
de 3 posiciones........................................................35
Guía para la ubicación del mobiliario .......................36
Notas.................................................................... 37
21
20
Page 12

– Para reducir el riesgo de choque eléctrico,
lesiones graves o muerte:
• Desc onecte el enchufe eléctrico del tomacorriente antes de limpia r, mover o hacer un servicio
al sillón, o cuand o éste no se use por un período prolongado.
• No use este producto si está mojado, en agua, cerca de ag ua o de cualquier l íquido. No toque
el enchufe o el control remoto si sus ma nos están mojada s.
• Para evitar la asfixia, mantenga las bolsa s plásticas lejos de los niños.
• Enchufe directamente en un tomacorriente de pa red. No utilice un cable de extensión,
adaptado r o p rotector contra sobrete nsión.
• Mantenga el cordón alejado de los niños pequeños y no lo us e si puede implicar riesgo de tro piezos.
– Para reducir el riesgo de quemaduras, incendio,
choque eléctrico o lesiones graves:
• Siempre mante nga las llamas abiertas y los cigarrillos encend idos lejos del mobiliario tapizado ,
ya que éste puede arder rápidamente,produciendo gas tóxico y humo espeso.
• Supervise de cerca a los niños y a las personas incapacitadas cuando utilicen este produc to.
• Siéntese en la uni dad lentamente. Para evi tar que ésta se tumbe, no arroje su peso contra el respald o.
Recline o enderece la unidad lentamente, asegurándose de que no hay a niños ni mascota s cerca.
• Este producto tiene muchas partes móviles que pueden causar lesiones serias si no se utilizan
correctamente. Mantenga las manos, dedos y demás partes del cuerpo lejos del mecanismo. Para reducir
el riesgo de que la cabeza quede atrapada y de otras lesiones, mantenga a los niños y a las mascotas
lejos de las aberturas y piezas móviles del mobiliario.
• Sólo el ocupante d ebe operar la unidad. Nunca trate de abrir el ap oyapiernas jalándolo.
• No se pare, no se siente ni coloque peso adicional sobre los apoyabrazos, el respaldo o el apoyapiernas abierto.
• Para salir de la unidad sin problemas y evitar el riesgo de tropiez os, enderece el respaldo
y c ierre el ap oyapiernas.
• Si e l producto está da ñado, no lo use. No uti lice accesorios ni componen tes sustitutos.
• Este producto es s ólo para uso resid encial en interiores.
• Deje un espacio libre para el funcionamiento del respaldo y el apoyapiernas del sillón. Coloque las mesas y
alfombras sueltas a distancia para poder extender completamente el apoyapiernas sin roces ni interferencias.
• Verifique mensualmente el estado de los transformadores de energía, los cables eléctricos, los enchufes y
los conectores. Mantenga los transformadores de energía y los cables eléctricos alejados de fuentes de
calor. Nunca ponga la unidad en funcionamiento si un transformador de energía, un cable eléctrico,
un enchufe o un conector están dañados. Comuníquese con su representante de La-Z-Boy para realizar
el mantenimiento de la unidad.
• No use la unidad si el control de encendido está dañado o húmedo, o si la varilla de comando ha caído
al agua u otro líquido. Comuníquese con el representante de La-Z-Boy
®
para realizar un servicio a la unidad.
• Este producto no f ue diseñado como dispositivo de asistencia médica.
• Quienes utilicen dispositivos médicos, deben consultar a su profesional de la salud antes de usar este producto.
No lo utilice si sufre de mala circulación, está inmovilizado o es insensible al calor, salvo que así se lo indique
su profesional de la salud.
23
22
• No utilice este sillón donde se usen productos en aerosol (en atomizador) ni donde se administre oxígeno.
• No opere la unidad hasta que el respaldo esté i nstalado y fij o.
• Antes de m over el produc to, desconecte el enchufe elé ctrico del tomacorriente de pared y asegure
el mecanismo para evitar una abertura o movimiento inesperado. Nunca mueva el p roducto al jalando
el mecanismo, el a poyapiernas, la manija, el re spaldo reclinable o la b ase girato ria.
• Esta unidad está equipada con una función de ajuste de tensión para el mecanismo reclinable, la cual
viene preaju stada de fábrica pero puede cambiarse según su pr eferencia personal. Para evita r que
la unidad se tumbe y a segurar su estabilidad, no la ope re cuando las tuercas maripo sa de ajuste
de tensión estén completamente flojas (vea l as Instrucciones de ajuste de la tensión de reclinación ).
• No trate de desarmar o hacer un servicio a la bomba o al motor. Estos no contienen piezas que se
puedan reparar. Comuníquese con el distribuidor La-Z-Boy
®
para obtener información sobre el servicio.
• El sillón con cámara de refrigeración termoeléctrica 01M/01N está diseñado para un ocupante que no
supere las 250 libras. No opere el sillón con más de un ocupante en éste o en cualquier parte del sillón.
• Controle que el ca ble eléctrico no q uede atrapado entre las partes móv iles o entre la estructura
y e l piso. No coloque el cable debajo de al fombras o en lugares donde pueda desgastarse.
• No c oloque almohadas, mantas o co bertores entre el ocupante y la superficie del sillón
cuando se active la f unción térmica.
• Siempre desen chufe el cable de e nergía antes de co nectar o de descon ectar la varilla de comando.
• Desenchufe inmediatamente el cable de energía si detecta olores extraños o humo provenientes del sillón.
• Podría sufrir quemaduras a causa del uso y cuidado incorrecto de las almohadillas térmicas internas. Para
evitar el riesgo de quemaduras, no utilice alfileres, no permita que se moje el área de la almohadilla
térmica y no retire la funda de tapizado.
• No i ntente desenchufar la unidad tirando del cordón. Siempre sujete el enchufe y tí relo hacia fue ra.
• Si l e da este producto a otra persona, dél e también este manual de instruc ciones de operación.
PELIGRO
ADVERTENCIA
Instrucciones Importantes de seguridad:
Importante: Lea detenidamente estas instrucciones antes
de utilizar el producto.
Guarde estas instrucciones Guarde estas instrucciones
Instrucciones Importantes de seguridad:
Importante: Lea detenidamente estas instrucciones antes
de utilizar el producto.
AVISO: Para evitar que el producto se dañe –
• Si se fuerza el cierre del apoyapiernas desde la 1ra o 2da posición, el mecanismo se dañará.
El apoyapiernas debe extenderse a la 3ra posición y luego cerrarse.
• La cámara de refrigeración termoeléctrica no es un refrigerador. No la utilice para almacenar alimentos
durante períodos largos.
• El peso excesivo colocado sobre los brazos del sillón puede dañar la cámara de refrigeración
termoeléctrica. Nunca se recueste ni se siente sobre los brazos del sillón.
• Nunca sumerja la cámara de refrigeración termoeléctrica en agua o en cualquier líquido,
la cámara de refrigeración termoeléctrica se dañará.
• Prepare la cámara de refrigeración termoeléctrica para su almacenamiento cuando no esté en uso durante
un período prolongado (consulte Mantenimiento y cuidado de la cámara de refrigeración termoeléctrica).
• Para impedir daños al transformador eléctrico, no enchufe antes de lo indicado.
• Presio ne ligeramente los botones durante la operaci ón y no golpee los botones con objeto s
puntiagu dos o duros.
Page 13

25
24
–
Para re ducir el riesgo de lesiones:
• No opere la u nidad hasta que el respaldo esté instalado y fijo.
AVISO: No enchufe el transfor mado r hasta que se le indiqu e.
1. I nstale el respaldo.
• Colo que el respald o atravesado sobre los apoyabrazos del sillón. Levant e el respaldo
a u n ángulo leve y ali nee las ménsulas de so porte del respaldo con las ménsulas
del cuerpo (F
IGU RA 1).
• Baje el r espaldo sobre el cuerpo, asegur ándose de que las m énsulas de soporte se
enganchen co mpletamente.
• Para asegurar se de que el respal do esté correc tamente instalado
con ambos juegos de m énsulas de soporte (del respaldo y del cuerpo)
enganchadas, párese detrás del sillón y mueva el respaldo de lado a la do.
Si uno o ambos laterales se salen de su posición es porque las ménsula s
de soporte no est án enganchadas (F
IGU RA 2). Quite el respaldo y repita
los pasos anteri ores.
• Si no logra instalar correctamente el respaldo, comuníquese con el distribuidor
de La-Z-Boy®para solicit ar ayuda.
• Fije las ménsulas utilizando un destornillador para empujar hacia abajo las palancas
de inmovilización (F
IGU RA 3).
2. E l transformador de energía de la cámara de refrigeración termoeléctrica, el transformador
de energía del masajeador de 2 motores y de la unidad de calor, y la almohadilla de caucho
se almacenan dentro de la cámara de refrigeración durante el transporte. Retir e los
transformadores de energí a de la cámara de refrigeración y desenrolle lo s cables.
– Para reducir el riesgo de ocasio nar daños al produ cto:
• Antes de u sar, retire el material blanc o de empaque que se encuentra debajo de la cámara
de refrigeración, dentro de la c avidad del brazo.
3. S e utiliza material de empaque debajo de la cámara de refrigeración termo eléctrica para
proteger y dar soporte a la cámara de refrigeración durante el transp orte. Debe retirar el
material de e mpaque antes d e usar la cámara de refrigeración para evitar daños. Levante
la cámara de refrigeración termoeléctrica del brazo del silló n y c olóquela e n el asiento
(F
IGU RA 4). Retire el ma terial blanco de empaque de a dentro de la ca vidad del b razo (FIGU RA 5).
4. B aje cuidadosamente la cámara de refrigeración termoeléctrica sob re el brazo del sillón,
asegurándose de que el conecto r eléctrico quede hacia el respaldo del sillón (F
IGU RA 6).
5. Para acceder a los conecto res, mantenga e l brazo superi or cerrado par a impedir que se
caiga el enfriad or e incline levemente h acia delante el sillón para que quede apoyado
sobre los descan sabrazos y la parte superior del respaldo. Los c onectores se e ncuentran
en la parte trasera d el sillón debajo del asiento.
(Instruccio nes de ar mado, conti nuac ión)
Instrucciones de operación para
calor y masaje con 2 motores
AVISO:
FIGURA 2
F
IGURA 4
FIGURA 3
FIGURA 1
FIGURA 6
F
IGURA 5
Mat erial blanco
de empaque
Con ector eléctri co de la cá mara
de refriger ación termoeléctr ica
Mén sula
del cuerpo
Mén sula
del respald o
Las ménsula s del cuerpo y del respaldo
de este lado no e stán engancha das.
Qui te el respaldo y vu elva a in stala rlo.
Mén sula
del respald o
Pal anca de
inm ovili zació n
Pos ición
tra bada
Respaldo
del s ill ón
Instrucciones de operación para
calor y masaje con 2 motores
ADVERTENCIA
Page 14

– Para reducir el riesgo lesiones g raves:
• Verifique mensualmente el estado de los transformadores de energía, los cables eléctricos,
los enchufes y lo s conectores. Mantenga los trans formadores de energía y los c ables
eléctricos a lejados de fuentes de calor. Nunca ponga la unidad en funcionamiento si un
transformador de energía, un ca ble eléctrico, un enchufe o un conector están dañ ados.
Comuníquese con su representante de La-Z-Boy para realizar el mantenimiento de la unidad.
• No permi ta que el cable eléctrico quede comprimido entre las partes en mo vimiento
o e ntre el marco y el piso. No coloque el cable debajo de la alfombra o en una
ubicación en donde se puede desgas tar.
27
26
10. Mueva los cables lejos de la base y sostenga el brazo superior cerrado p ara evitar que la c ámara
de refrigeración se caiga. Regrese suavemente el sillón a la posición recta. A segúrese de qu e
los cordones no estén comprimi dos por partes en movimiento o de bajo de la base (F
IGU RA 12).
– Para reducir el riesgo de choque
eléctrico o lesiones graves:
• Deje un espacio libre para el funcionamiento del respaldo y el a poyapiernas del sillón .
Coloque las mesas y a lfombras sueltas a distanci a para poder extender comple tamente
el apoyapiernas sin roces ni interferencias.
11. Elija una ubicación para el sillón que esté cerca de un tomacorriente eléctric o. Continúe con
las Instrucc iones de operación.
12. Para retirar el respaldo, desenchufe los transformadores de energía del tomacorriente
eléctrico e invierta los pasos de las Instrucciones de armado.
Instrucciones de armado del sillón reclinable con
cámara de refrigeración termoeléctrica y 2 motores
para masaje y calor:
Instrucciones de armado del sillón reclinable con
cámara de refrigeración termoeléctrica y 2 motores
para masaje y calor:
FIGURA 8
F
IGURA 9
FIGURA 7
F
IGURA 10
ADVERTENCIA
ADVERTENCIA
AVISO:
Para evitar que se dañen los conectores y cables, es importante
desconectar todas las conexiones antes de quitar el respaldo.
6
. Identifique los cuatro conectores eléctr icos en el respaldo del sillón, deb ajo del asient o (F
IGU RE 7
).
• Los dos c onectores rectangulares son para la conexión de la varilla ma nual (F
IGU RE 8).
• El conec tor redond o es para la conexión d el transformador de energía de l os 2 motores para
calor y masaje (F
IGU RE 8).
• El conec tor rectan gular negro es pa ra la conexión del transform ador de energía de la c ámara
de refrigeración termoeléctrica (F
I
GUR E
9).
7. Alinee los dos conect ores rectangulares de la var illa manual (algunas de las clavija s del conector son
cuadradas, ot ras son redond as). Presione l os conectores juntos hasta que t raben (F
IGU RE 8).
8. Enchufe el transformador de energía de los 2 motores para calor y masaje en el conector re dondo.
Asegúrese de que los conectores estén afianz ados de manera seg ura (F
IGU RE 8).
9. Enchufe el transfo rmador de energía de la cámara de refrigeración termoeléctrica en el conector
rectangular negro que está asegurado a la parte interior del brazo . Presione los c onectores juntos
hasta que traben (FIG URE 9).
Conectores
del transformador
de energía para
masaje y calor
Conectores
de la varilla
manual
Conector
del transformador
de energía de
la cámara de
refrigeración
Conectores
de la varilla
manual
Conectores del transformador
de energía de la cámara
de refrigeración termoeléctrica
Transformador
de energía de la cámara
de refrigeración
Conector
del transformador
de energía para
masaje y calor
Transformador
de energía para
masaje y calor
Page 15

Instrucciones de operación del sillón reclinable
con 2 motores para masaje y calor La-Z-Touch
®
:
29
28
– Para reducir el riesgo de lesion es graves:
• Ench ufe directamente en un tomacorr iente de pared. No utilice un cable
de extensión, adaptador o protector contra sobretens ión.
– Para reducir el riesgo de lesion es graves:
• Sién tese en la unidad lentamente. Para evitar que ésta se tumbe, no ar roje
su peso contra el respaldo. Recline o enderece la unidad len tamente,
asegurándose de que no haya n iños ni mascotas c erca.
• El silló n 01M/01N está diseñado para un o cupante, que no supere las 250 libras.
No opere el sillón con más de un ocupant e en éste o en cualquie r parte del sillón.
• Para salir de la uni dad sin problemas y evitar el riesgo de t ropiezos, e nderece
el respaldo y cierre el apoyapiernas.
Instrucciones de operación para calor y masaje con 2 motores
Enchufe el transformador d e energía para calor y masaje con 2 motor es directamente en un
tomacorriente de pared. A segúrese de qu e el cab le q ue va del sil lón al t omacorrie nte esté lo sufici ente-
mente f lojo como para per mitir que el s illón se me za y se r ecline. Nunca t ense ni so meta un cable a
esfuerzo .
Operación del temporizador automático
El sistema tiene un temporizador automático que detendrá l as funciones de
MASAJE y TÉRMICA despué s de aproximadamente 15 a 30 minutos de funciona miento.
• Al presio nar el botón POWER (en cendido) o cualquier botón de zo na, se reinicia rá el masaje.
• Al presionar el botón HEAT (calor) se reiniciará la función térmica. Presiónelo una vez para seleccionar
calor bajo, o dos veces para calor alto.
• Cuando termine, asegúr ese de presion ar el botón POWER y el b otón HEAT (si está activado) para
apagar la unidad. Presione el botón HEAT dos veces si está en la posición de calor bajo.
• El temporizador también se restablecerá si desenchufa el transformador de energía para calor y masaje
con 2 motores o si hay un corte de energía.
Las funcione s de masaje y térmica p ueden iniciarse automá ticamente cuando se restabl ece la energía
luego de un corte. El te mporizador apagará automáticamente ambas funciones den tro de los siguien tes
15 a 30 minutos. Esto no presenta ningún riesgo de lesiones o daños. Sin embargo, recomendamos
que desenchufe los transformadores de energía si estará fuera de su casa durante un período prolongado.
– Para reducir el riesgo lesiones serias:
• No use la unidad si el control de encendido está dañado o húmedo, o si la
varilla de comando ha caído al ag ua u otro líquido. C omuníquese con el
representante de La-Z-Boy
®
para realiza r un servicio a la unidad.
PELIGRO
ADVERTENCIA
Instrucciones de operación del sillón reclinable
con 2 motores para masaje y calor La-Z-Touch
®
:
ADVERTENCIA
Las especifi caciones del t ransformador dependen de la fecha de producci ón. Consult e el transformador
para determi nar cuáles son las esp ecificaciones relev antes para su producto.
Especificaciones del transformador para masaje, térmico de 2 motores de La-Z-Touch:
Entrada: 120V AC 60Hz 30W, salida: 12V AC 1500mA.
O
Entrada: 100-240V AC 50-60Hz 1.5A, salida: 13.8V DC 2.9A.
POWER (encendido)
Activa el sistema de
masaje cuando el botón
se retroilumina con un
diodo luminoso. Presiónelo
una vez para iniciar
el temporizador de
15 minutos. Presiónelo
y sosténgalo unos segundos
para iniciar el temporizador
de 30 minutos.
NOTA: Para reiniciar
la unidad una vez apagado
el temporizador, presione
los botones ZONE o PWR.
ZONA S
Activa cualquiera de
las zonas o todas. El diodo
luminoso indica qué zona o
zonas se han seleccionado.
INTE NSITY (inten sidad)
Aumenta (+) o disminuye
(-) la intensidad en todos
los modos.
HEAT (cal or)
Activa la función térmica.
Presiónelo una vez para
seleccionar calor bajo,
o dos veces para
seleccionar calor alto.
Puede usarse en forma
independiente o con
la función de masajes.
NOTA: La función térmica
se desactivará en 30 minutos.
Para reiniciarla, presione
nuevamente el botón HEAT.
MODOS
ZONE ( zona)
- Elija una o ambas
zonas para el masaje
..
PULSE (pulsación) - El masaje se
activa y se desactiva para simular
una acción de pulsación.
WAVE (ol a) - El masaje se mueve
de arriba a abajo o de lado a lado,
según el modelo, en una acción
tipo ola.
SPEED (velocidad)
Controla la frecuencia de pulsación
del masaje en el modo PULSE
(pulsación) y la velocidad de
los ciclos en el modo WAVE (ola).
Presione (+) para aumentar y (-)
para disminuir.
Page 16

31
30
Instrucciones de operación de la cámara
de refrigeración termoeléctrica:
–
Para re ducir el riesgo de choque
eléctrico o lesiones graves:
• Descon ecte el enchuf e del tomacorriente de pared antes de limpiar, move r, dar se rvicio
o c uando no está en us o durante un período prolongado.
• Ench ufe directamente en un tomacorr iente de pared. No utilice un cable de extensión,
adaptado r o p rotector c ontra sobret ensión.
– Para reducir el riesgo de ocasionar daños al producto:
• La cámara de refrigeración termoeléctrica no es un refrigerador. No la utilice para almacenar
alimentos du rante períod os largos.
• Nunc a sumerja la cámara de refrigeración termoeléctrica en agua u otro líquido.
Información de operación de la cámara de refri gera ción termoe léctrica
La cámara de refrigeración termoeléctrica está diseñada p ara manten er la comida que se ha enfriado
previamente y las bebidas frías. Para obt ener la máxima eficiencia, ev ite colocar pr oductos calientes
o a temperatu ra ambiente en la c ámara de refrigeración.
La cámara de refrigeración termoeléctrica disminuirá la tempera tura a aproximadamente 40º debajo
de la tempera tura ambiente. En tempera turas ambiente normales, la cámara de refrigeración o pera
de la siguiente manera:
• El ciclo de enfriamiento se inicia cuando la temperatura dentro del refrigerador llega de 46 ºF a 50 ºF o más.
• El ciclo de enfriamiento se detiene cuando la temperatura ha ll egado de 38 ºF a 40 ºF.
En temperaturas ambien te muy calient es, la temperatura interior de la cámara de refrigeración p uede
ser mayor y el ciclo de enfriam iento funcio nará conti nuamente.
Instrucciones de operación de la cámara de ref rige ración term oeléctrica
Enchufe el transformador d e energía de la cámara de refrigeración termoe léctrica directamente
en un tomacorriente de pared. Asegúrese de que h aya sufici ente hol gura en el cable que va del sil lón
al tomaco rriente para permitir que el s illón se p ueda mecer y recli nar. Nu nca estire n i te nse el c able.
1. Para encender la cámara de refrigeración termoeléctrica, presione el interruptor de encendido/apagado
que se encuentra en l a parte superi or de la cámara de refrigeración. Una luz roja en el interruptor
indica que la cámara de refrigeración está encend ida.
2. Coloque produc tos enfriados previamente e n la cámara de refrigeración.
3. No utilice hielo o agua en la cámara de refrigeración. La cámara de refrigeración no tiene un drenaje.
4. No deje la cubierta de la cámara de refrigeración abierta cuando la cámara de refrigeración está encendida.
5. Para apagar la cámara de refrigeración termoeléctrica, presione el interruptor de encendido/apagado que
se encuentra en la parte superior de la cámara de refrigeración. La luz roja del interruptor se apagará.
6. Apague la cámara de refrigeración termo eléctrica y desenchufe el transformador
de energía cuando no estén en uso.
Mantenimiento y cuidado de la cámara
de refrigeración termoeléctrica:
– Para reducir la posibilidad de c hoque
eléctrico o heridas g raves:
• Descon ecte el enchuf e del tomacorr iente de pared antes de limpiar, mover, dar s ervicio
o c uando no está en us o durante un período prolongado.
• Ench ufe directamente en un tomacorriente de pared. N o utilice un cable de extensión,
adaptador o protector co ntra sobretensión.
– Para reducir el riesgo de ocasio nar daños al producto:
• Nunca sumerja la cámara de re frigeración termoeléctrica en agua u otro líquido .
• Prep are la cámara de re frigeración termoeléctrica para su almacenamiento
cuando no esté en uso d urante un período prolongado.
Se necesita un cu idado y mantenimiento adecuados para obtener el máximo rendimiento
de la cámara de refrigeración.
Limpieza de la cá mara de refrigeración termoeléctrica
1. Apague la cá mara de refrigeración termo eléctrica y de senchufe ambos transformadores de energí a.
2. Retire la almohadilla de caucho del i nterior de la cámara de refriger ación. Lave la almohad illa
con agua y permita que seque.
3. Utilice un paño suave y húmedo para limpiar la parte interior de la cámara de refrigeración. Puede utilizar
un detergente suave para lavar platos cuando sea necesaria una limpieza adicional. No utilice materiales
de limpieza duros, solventes ni otros productos abrasivos para limpiar la cámara de refrigeración.
4. Seque la parte interior de la cámara de re frigeración con un paño suave o una toalla de papel.
5. Coloque la almohadilla de caucho en l a parte inferi or de la cámara de refrigeración.
6. Enchufe ambos transformadores de energía directamente e n un tomacorriente de pared.
Descongelac ión de la cámara de refrige ración term oelé ctrica
Es posible que la cámara de refrige ración termoeléctrica a cumule escarcha cuando
se opera durant e un período pr olongado. Es necesario desco ngelarla para mantener
la eficiencia de la cámara de refrigeración.
1. Apague la cá mara de refrigeración termo eléctrica y de senchufe ambos transformadores de energí a.
2. Abra la cámara de refrigeración y déjela a t empera tura ambiente hasta que la escarcha se
derrita. Para evitar da ños, no pique la escarcha para desprenderla de la cámara de refrige ración.
3. Retire la almohadilla de caucho de ad entro de la cámara de refrigeración y deje que seque.
4. Seque el interior d e la cámara de refrigeriación con un paño suave o un a toalla de papel.
5. Coloque la almohadilla de caucho en l a parte inferi or de la cámara de refrigeración.
6. Enchufe ambos transformadores de energía directamente e n un tomacorriente de pared.
(Mantenimie nto y cui dado de la cámara de refrigeración, continuación)
PELIGRO
AVISO
PELIGRO
AVISO
Page 17

33
32
Mantenimiento y cuidado de la cámara
de refrigeración termoeléctrica:
Limpieza de la ve ntilación d e la cámara de refrigeración termoeléctrica
Se recomienda aspirar las ventilaciones una vez al año para obtener el máximo rendimiento de la cámara
de refrigeración. En hogares donde hay mascotas es necesario aspirar las ventilaciones con más frecuencia.
1. Apague la cámara de refrigeración termo eléctrica y desenchufe ambos transformadores de energí a.
2. Levante cuidadosamente la cámara de refrigeración termoeléctrica del brazo del sillón y colóquela
en el asiento.
3. Desconecte el cable eléctrico de l tomacorriente en la parte trasera de la cámara de refrigeración.
4. Utilice una aspira dora con una herra mienta con boquete, o un accesorio similar, para limpiar
las ventilaciones en los lados inferiores y en el fondo inferior de la cámara de refrigeración (F
IGU RA 1).
5. Coloque la cámara de re frigeración en el asiento y conecte el cable eléctrico al tomacorriente
de la cámara de refrigeración.
6. Baje cuidadosamente la cámara de refrigeración termoeléctrica sobre el brazo del sillón, asegurándose
de que el conector el éctrico quede hacia el respaldo del sillón (F
IGU RA 2).
7. Enchufe ambos transformadores de energía directamente e n un tomacorriente de pared.
FIGURA 2
FIGURA 1
Con ector eléctri co de la cá mara
de refriger ación termoeléctr ica
Ventila cione s
Almacenamiento de la cámara de refrigeración termoeléctrica
El almacenamiento correc to de la cámara de refrigeración termoeléctrica es importante si ésta
no se operará dur ante un períod o prolongado.
1. Apague la cámara de refrigeración termoeléctrica y desenchufe ambos transformadores de energía.
2. Siga los pasos de de scongelación y limpieza, si es necesario.
3. Asegúrese de que la parte interior de la cámara de refrige ración esté co mpletamente seca.
4. Coloque papel periódico arrugado adentro de la cámara de refrigeración termoeléctrica para mantener
la cámara de refrigeración fresca durante el almacenamiento.
– Para reducir el riesgo de lesion es:
• No trate de desarmar o hacer un servicio a la bomba o al motor. Estos no contienen piezas
que se puedan reparar. Comuníquese con el distribuidor La-Z-Boy
®
para obtener información
sobre el servicio.
Solución de proble mas para la función de calor y masaje con 2 motores
No hay requerimientos de reparación o mantenimiento del usuario. Si la función de calor o masaje no funciona:
1. Asegúrese de que la op eración del temporizador au tomático no se ha activado. Presi one el botón
Power (Encendido) para reinic iar el masaje. Presione el botón Heat (Calor ) para reinici ar el calor.
2. Asegúrese de que el transformador d e energía esté enchufado a un tomacorriente eléctrico.
3. Asegúrese de que el tomacorriente e léctrico está funcionando. Por eje mplo, asegúrese de que no
haya fusibles quemados o interruptores de circuitos desconectados.
4. Asegúrese de que todos los conector es están asegu rados, consul te las Instruc ciones de armado.
5. Asegúrese de que los cables eléctricos no estén doblados o comprimidos de ninguna manera. Asegúrese
de que el cable eléctrico o el enchufe no estén dañados.
Si el sistema de masaje aún no opera correctamente, comuníquese con su distribuidor para obtener
instrucciones sobre cómo devolver la unidad para una evaluación y reparación. Excepto por el reemplazo
del transformador de energía, nunca intente realizar ninguna reparación o ajuste usted mismo.
Reemplazo del transformador de e nergía para calor y masaje c on 2 motores
Si es necesario r eemplazar el transformador de energía:
1. Desenchufe amb os transformadores del tomacorriente eléctrico.
2. Localice la conexi ón del transfo rmador de energía para calor y ma saje con 2 motores ;
consulte las Instrucciones de armado.
3. Jale suavem ente los conec tores para desacoplarlos.
4. Inserte el conector de reemplazo d el transformador de energía para calor y masaje
con 2 m otores en su co nector, consulte las Instrucciones de armado . Asegúrese
de que los conect ores estén bien su jetos.
Solución de proble mas para la función de la cámara de refrigeración termoeléctrica
No hay requisitos de reparación. Si la cámara de refrigeración t ermoeléctrica no funciona:
1. Asegúrese de que el transformador d e energía de la cám ara de refrigeración
termoeléctrica esté enchu fado a un tomacorr iente funcional.
2. Asegúrese de que el in terruptor de la cá mara de refrig eración termoeléctrica esté encendid o.
3. Asegúrese de que los c onectores de la cá mara de refrig eración termoeléctrica estén
asegurados; consulte las I nstrucciones de armado.
Si la cámara de refrigeración termoeléctrica sigue sin funcionar, comuníquese con su distribuidor para
obtener instrucciones sobre cómo devolver la unidad para una evaluación y reparación. Nunca intente
realizar ninguna reparación o ajuste usted mismo.
Solución de problemas del sillón reclinable
con cámara de refrigeración termoeléctrica y
2 motores para masaje y calor:
Res paldo
del sil lón
ADVERTENCIA
Page 18

35
34
– Para reducir el r ies go de lesiones:
• E sta unidad está equipad a con una función de a juste de tensi ón para el m ecani smo
reclina ble, la cual viene preajust ada de fábr ica pero puede cambiars e según su
pre feren cia pers onal. Para evi tar que la u nidad se tumbe y a segur ar su estabilid ad,
no la o pere cuando las tuercas marip osa de ajus te de tensión esté n comple tamen te
flo jas (vea las Instruccio nes de ajus te).
– Para reducir el r ies go de ocasionar daños a l prod uct o:
• As egúre se que el descansapiernas es té plega do antes de inclinar el sillón h acia
del ante para ajustar la tensi ón.
• N o apriet e comple tamen te las tuercas mariposa . Los resort es de tensión o deben
com primi rse comp letam ente después de reali zar ajus tes. Si esto ocurrie ra, las
tue rcas mariposa deben aflojars e giránd olas en s entid o contrahora rio un míni mo
de 1/2 vuelt a para evitar que se d añe el mecanismo d e tensió n a resor te.
• N o afloje comple tamen te las tuer cas mariposa . El resorte no debe deslizar se
sob re el perno despué s de hacer los ajust es. Si esto ocurriera, a priet e la tuerca
mar iposa girándo la en sentido hora rio un mínimo de 1/2 vuelta una vez que
el resorte ya n o se deslic e sobre el perno .
• Aj uste ambas tuerc as mariposa por igual .
Instru cci one s de ajuste de la tensión de reclinación
Pue de ajust ar la tensión del mecanism o reclinable para que éste se ada pte al tamaño de su cuerpo.
1. Desenchufe ambos trans formadores d el tomac orrie nte eléc trico. Voltee sua vemente el silló
reclina ble haci a delante para que se apoye sobre sus brazos y la parte superior del respa ldo.
Loc alice las tuercas de marip osa, una de c ada lado , que se encuen tran hacia la pa rte
pos terio r del sillón debaj o del asiento reclinab le (sola mente se muest ra un lado a contin uació n).
2. A juste la tensi ón giran do las tuercas mariposa en aumen tos de 1/4 de vuelt a hasta
alc anzar el ajust e desead o.
• Una persona más alta o m ás pesad a puede elegir aumentar la tensi ón de reclinaci ón
apretando las tuerc as marip osa en sentido horario.
• Una persona de conte xtura más pequeñ a puede elegir disminui r la tensión
de recli nació n afloja ndo las tuercas mariposa en sentido contr ahora rio.
3. Regrese el sillón recl inabl e a la posición vertical y p ruebe la nueva configu ració n. Realic e ajuste s
adi ciona les si es necesari o, repiti endo estos pasos . Enchufe ambos tran sformadores de energ ía
dir ectam ente en u n tomaco rriente de pare d.
Instrucciones de ajuste de la tensión
de reclinación:
Resorte de tensión
Tuerca mariposa
– Para reducir el riesgo de lesiones:
• D eje un espacio libre para el f uncionamiento del respaldo y e l ap oyapiern as
del sillón. Coloque las mesas y a lfomb ras suel tas a distancia para poder extend er
com pleta mente el apoyapie rnas sin roces ni inter feren cias.
• Para salir de la un idad en f orma segura y evitar tropi ezos, mue va el respa ldo
a la posición vertica l y cierr e el apoyapier nas.
– Para reducir el r ies go de ocasionar daños a l prod uct o:
• S i se fuerza el cierre del apoyapier nas desde la 1ra o 2da posición , el mecanismo
pue de dañar se. El apoyapie rnas debe extend erse a la 3ra posición y luego cerrar se.
Para operar el apoya pie rnas
1. Su sillón reclinable está equipado con un apoyapiernas que puede fijarse en tres posiciones diferentes para
brindar máxima comodidad. Simplemente gire la manija para operar el apoyapiernas (F
IGURA 1). Puede
detenerlo en la posición que más le agrade de las tres. La 1ra posición permite una leve inclinación para
leer en forma relajada (F
IGURA 2). La 2da posición es un poco más inclinada, para ver televisión cómodamente
(F
IGURA 3). La 3ra posición se extiende completamente para lograr una relajación total (FIGURA 4). Para bajar
el apoyapiernas, gire la manija en sentido antihorario hasta la posición completamente extendida y luego,
gírela en sentido horario hasta la posición completamente cerrada.
2. El resp aldo del silló n se puede recli nar con el a poyapier nas cerrado o ex tendi do. Para recli narlo ,
emp uje el respaldo . Sié ntese derecho si desea que el respaldo se enderece nuevame nte.
3. A ntes de s alir de l a unidad, mu eva el respaldo a l a posici ón verti cal y cierre el apoyapie rnas.
Car acter ístic a ad icio nal en cier tos mode los
El cuerpo del sillón puede inclinarse hacia atrás cuando el apoyapiernas está en uso. Si pasa el peso de su
cuerpo hacia atrás, el cuerpo del sillón se inclinará hacia atrás, ofreciéndole una variedad de posiciones diferentes.
Instrucciones de utilización
del apoyapiernas de 3 posiciones:
FIGURA 1
F
IGURA 3
F
IGURA 2
F
IGURA 4
POS ICIÓN
CER RADA
1ra POSICIÓ N
2da POSICIÓ N 3ra POSICIÓ N
ADVERTENCIA
AVISO
ADVERTENCIA
AVISO
Page 19

37
36
– Para reducir el r ies go de lesiones graves:
• D eje un espacio libre para el f uncionamiento del respaldo y el a poya piern as
del sillón. Coloque las mesas y a lfomb ras suel tas a distancia para poder extend er
com pleta mente el apoyapie rnas sin roces ni inter feren cias.
Ubicación del mobiliario
Para coloc ar el sillón reclinabl e a una distancia a decua da de la pared, re clínela completa mente
dej ando un m ínimo de 5 cm (2") de e spaci o entre la p arte superior del respaldo y la pared (F
IGU RA 1).
Asegúrese de que las mesas y demás elementos estén a una distancia s egura para evitar interferencias
con el funci onami ento del apoyapie rnas. La ubi cació n inadec uada de u na mesa podría hacer que el
ocu pante del sillón quede atra pado en é ste (FIG URA 2). Debe h aber suficien te espac io libre para pode r
ext ender complet ament e el apoyapiernas ant es de cerra rlo.
Guía para la ubicac ión del mobiliario:
FIGURA 1
F
IGURA 2
Notas:
ADVERTENCIA
5 cm
(2" )
mín .
Page 20

39
38
Félicitations!
Vous êtes désormais fier propriétaire
d'un fauteuil inclinable masseur de pointe
avec refroidisseur thermoélectrique
La-Z-Touch
MD
de La-Z-Boy.
MD
Vous venez d’acheter un des meubles
rembourrés les plus perfectionnés
de l’industrie du meuble en Amérique du
Nord, fruit de plus de 80 ans d’expérience
dans la fabrication de meubles de qualité.
La-Z-Boy
MD
est fière de sa gamme de
produits et de son savoir-faire. Nous savons
que vous ressentirez la même fierté quand
vous profiterez du confort et de l’allure
de votre nouveau mobilier.
IMPORTANT
Bien lire toutes les instructions avant d'utiliser votre fauteuil
inclinable masseur avec refroidisseur thermoélectrique
La-Z-Touch.
MD
À conserver pour usage ultérieur.
Table des matières
Règles de sécurité importantes........................................40-41
Montage du fauteuil inclinable avec refroidisseur
thermoélectrique, massage 2 moteurs et chaleur............42-45
Fonctionnement du massage 2 moteurs chaleur.............46-47
Fonctionnement du refroidisseur thermoélectrique................48
Entretien du refroidisseur thermoélectrique......................49-50
Dépannage du fauteuil inclinable avec refroidisseur
thermoélectrique, massage 2 moteurs et chaleur..................51
Réglage de la tension d’inclinaison.......................................52
Fonctionnement du repose-jambes à 3 réglages..................53
Comment disposer vos meubles..........................................54
Notes ...................................................................................55
Page 21

41
40
– Pour réduire le risque de décharge él ectrique,
de blessures grave s ou de mort :
• Toujours débra ncher la prise du m ur avant de nettoyer, déplacer ou entrete nir ce meuble,
ou quand il n’est pas utilisé pour une l ongue périod e.
• Ne pas utiliser ce produit s’il est mouillé, dans l’eau, près de l’eau ou de tout autre liquide. Ne pas
manipuler la fiche ou la télécommande avec les mains mouill ées.
• Pour pré venir la suffocation, gar der les sacs de plastique loin des enfants.
• Brancher directement dans une prise de courant au mur. Ne pas utiliser de rallonge,
d’adaptateur ou de li miteur de surten sion.
• Garder le cordon hors de portée des jeunes enfants et ne pas utiliser là où il peut constituer un danger de chute.
– Pour réduire les risques de brûlure, d’incendie,
de décharge électrique ou de blessures graves :
• Garder vos meubl es rembourrés loin des flammes o u des cigarett es allumée s. Ils peuvent
brûler rapidement en pré sence de gaz toxique et de fumée épaiss e.
• Une supervision étroite est nécess aire quand ce produit est utilisé par des enfants
ou des personnes handicapées.
• Vous ass eoir lentement sur le meuble. Pour éviter qu’il bascule, ne pas lancer vot re poids contre
le dossier. Y aller lentement quand vous vous inclinez ou remett ez en position verticale, et vous
assurer qu’il n’y a p as d’enfant ou d’animal de compagnie à proximité.
• Ce produit compte plusieurs pièces mobiles et peut causer des blessures graves s’il n’est pas utilisé
correctement. Garder les mains, les doigts et toute autre partie du corps loin du mécanisme. Pour réduire
le risque de coincer la tête et autres blessures, garder les enfants et les animaux de compagnie loin
des ouvertures et des pièces mobiles dans le mobilier et autour de celui-ci.
• Seul l’occupant doit faire fonctionner le meuble. Ne jamais tenter d’ouvrir le repose-pieds en tirant dessus.
• Ne jamais se tenir debout, s’ass eoir ou mettre un poids excessif sur les bras, le dossier
ou le repose-jambes ouvert .
• Pour sor tir du meuble en to ute sécurité et po ur éviter de trébucher, remettr e le dossier
à l a verticale et refermer le repose-jambes.
• Ne pas utiliser ce produit s’il est endommagé. Ne pas utiliser d’accessoires ou d’éléments substituts.
• Ce produit est exclusivement réservé à un usage résident iel intérieur.
• Prévoir un parcours sans obstr uctions pour f aire fonctionner le dossier et l e repose-jambes.
Placer les table s et les carpettes assez loin pour que le repose-jambes puiss e s’ouvrir
complètement sans frottem ent ni obstruc tion.
• Vérifier tou s les mois l’état des transformateurs, cordo ns d’alimentat ion, fiches et connecteurs.
Garder les trans format eurs et cordon s d’alimentation loin des sources de chaleur. Ne jamais faire
fonctionner le meuble si le tra nsformateur, le cordon d’alimentat ion, la fiche ou le connecteur sont
endommagés. Communiquer avec votre détaillant La-Z-Boy
MD
pour le ser vice.
• Ne pas utiliser l e meuble si la commande électrique est endommagée ou mouill ée. Ne pas utiliser
le meuble si la commande manuelle est tombée dans l’eau ou dans tout autre liquide. Communiquer
avec votre détaillant La-Z-BoyMDpour le ser vice.
• Ce produit n’est pas conçu pour servir de dispositif de santé.
• Les personne s qui utilisen t des dispositifs médicaux doivent commun iquer avec leur fourniss eur
de soins de santé avant d’utiliser ce produit . Ne pas utiliser ce p roduit si vous avez une mauvaise
circulation, si vous êtes immobile ou si vous ne pouvez ressentir la chaleur, sauf sur les conseils
de votre profes sionnel de la santé.
Règles de sécurité importantes
Important : bien l ire les i nstru ctions avant l’u tilis ation .
Règles de sécurité importantes
Important : bien l ire les i nstru ctions avant l’u tilis ation .
• Ne pas utiliser c e produit dans des endroits où l’on u tilise des pro duits en aérosol ou si l’on
administre d e l’oxygène.
• Ne pas faire fonctionner le meuble avant d’avoir installé et bloqué le dossier.
• Avant de déplace r le produit, dé brancher la fiche électrique de la prise de couran t et bloquer
le mécanisme pour ne pas qu’il s’ouvre ou bouge soudainement. Ne jamais déplace r le produit
par le mécanisme, le repose-jambes, la poignée , le dossier inclinable ou la base pivotante.
• Ce meuble est dot é d’un réglage de tension pour le m écanisme d’inclinaison, préré glé en usine.
Vous pou vez personnaliser ce réglage. Po ur éviter de faire basculer le me uble et pour en assurer
la stabilité, ne j amais faire fonctionner le meuble quand l’écrou à ailettes qui règle la tension
est complète ment desserré (voir les instructions touchant le réglage de la tension) .
• Ne pas faire fonctionner le meuble quand les écrous à ailettes qui règlent la tension sont complètement
desserrés (voir les instructions pour régler la tension d'inclinaison, accessibles en ligne).
• Le fauteuil a vec refroi disseur thermoélectrique 01M/01N est conçu pour un seul occupant dont
le poids n’excè de pas 115 kg (250 lb ). Ne pas faire fonctionner le fauteuil avec plus d’un
occupant sur le f auteuil ni sur tou te partie de celui-ci.
• Ne pas laisser le cordon d’alim entation s e coincer entre les pièces mobil es ou entre la charpente
et le plancher. Ne pas le faire passer sous une carpette ou dans un endroit où il pourrait s’user.
• Ne pas mettre de coussin, de couvert ure ou autre revêtement entre l’occupant et le fauteuil
quand la chaleur est activée.
• Toujours débrancher le cordon d’alimentation avant de connecter ou déconnecter la commande manuelle.
• Débrancher le cordon d’alimentation immédiatement si des odeurs ou vapeurs étranges émanent du fauteuil.
• Une mauvaise utilisation et un mauvais entretien des coussins chauffants internes peuvent causer
des brûlures. Pour éviter les brûlures, ne pas utiliser d’épingles, ne pas mouiller l’endroit des coussins
chauffants et ne pas retirer le revêtement du rembourrage.
• Ne jamais tenter de débrancher la fiche électrique en tirant sur le c ordon d’alim entati on.
Toujours bien tenir la fiche et la ret irer.
• Ne jamais tenter de débrancher la fiche électrique en tirant sur le c ordon d’alim entati on. Toujours
bien tenir la fiche et la retirer.
• Si vous donnez ce produit à quelqu’ un d’autre, lui donner aussi ce ma nuel d’instructions.
– Pour réduire le risque d’endommager le produit :
• Forcer l e repose-jambes à se fermer à partir de la 1
re
ou 2eposition ris que d’endommager
le mécanisme. Tou jours ouvrir le r epose-jambes à la 3
e
position avant de le referme r.
• Le refroidisseur thermoélectrique n’est pas un réfrigérateur. Ne pas y ranger longtemps les aliments.
• Un poids excess if sur les bras du fauteuil peut endommager le refroidisseur thermoélectrique.
Ne jamais s’a ppuyer ni s’asseoir sur les b ras du fauteuil.
• Ne jamais plonger le refroidisseur thermoélectrique d ans l’eau ni dans t out autre liquide.
Cela va endommager le refroi disseur thermoélectrique.
• Préparer le refroidisseur thermoélectrique pour le ra ngement quand il n’est pas utili sé pour
une longue pério de (v oir la s ection Entret ien du r efroid isseur thermo électriqu e).
• Pour pré venir les dommages au transforma teur, ne pas le branch er tant que ce n’est pas
demandé dans les instructions.
• Appuyez doucement sur le s boutons pendant le fonctionnement et évitez de l es enfoncer avec
des objets point us ou durs.
Conserver ces instructions
DANGER
AVERTISSEMENT
Conserver ces instructions
AVIS
Page 22

AVIS : Attendr e l es instruction s avan t de branche r.
1. Inst aller le dossi er.
• D épose r le dossier sur les bras du fau teuil . Sou lever légèrement le d ossie r
et aligner les fixat ions du d ossie r avec les fixation s de la base (F
I
GUR E
1).
• R eplac er le dossier sur la b ase; s’assure r que les f ixations du dossie r
et de l a base sont entièr ement engagée s.
• Pour s’assurer que le doss ier est installé correc temen t, av ec les deux
jeu x de fixati ons du dossier et d e la base bien engagés, se tenir
deb out derr ière le f auteu il et faire bouger le dossi er d’un côté
à l’au tre. Si un côté ou deux sort ent de leur positi on, les fixa tions
ne sont pas engag ées (F
IGU RE 2). Retir er le dossier et reco mmenc er.
• S i vous n’arrive z pas à installer correcte ment le d ossie r, c ommun iquer
avec v otre détailla nt La-Z- Boy
MD
pou r obteni r de l’aide.
• B loque r les fixat ions à l’ aide d’un tournevis en p oussa nt les leviers
de fixation vers le bas (F
IGU RE 3).
2. Le tran sform ateur él ectri que, le tran sform ateur du massage ch aleur 2 m oteur s et le tapis
de caoutchouc sont rangés dans le r efroidisseu r pendant le tr ansport. Re tirer les transformateurs
éle ctriq ues du refroidi sseur et dérou ler les cordons.
– Pour réduire le r isq ue de dommages au produit :
• Av ant de le faire fonct ionne r, r etire r le matéri au d’emb allag e blanc
sou s le refroidiss eur, dans la cavité du b ras.
3. Le matériau d’emb allag e sous le refroidi sseur thermoé lectr ique sert à proté ger ce dernier
dur ant le transpor t. Le matéria u d’emba llage doit être retiré avant de faire fonctio nner
le refroidi sseur pour éviter les domm ages. Ret irer le r efroi disse ur therm oélec triqu e du bras
du fauteuil et le déposer sur le s iège (F
IGU RE 4). Retir er le matér iau d’em balla ge blanc
de la c avité du bras (F
IGU RE 5).
4. Dépo ser avec so in le refro idiss eur thermoél ectri que dans le bras du f auteu il en s’assuran t
que le conne cteur électri que est à l’arri ère du faut euil (F
IGU RE 6).
5. Pour accéde r aux connecteurs du massa ge, s e tenir debout à cô té du faute uil et pousser
le dossier vers l’arrière pour que le siège et le dossier s’incline nt. Garde r le bras du dessus
fer mé pour empêcher le refroi disse ur de sortir, et faire douce ment basculer le faute uil vers
l’a vant pou r qu’il repose sur ses bras et le dessu s du dossier.
43
42
–
Pour réduire le r isque
de blessures :
• At tendr e que le dossier soit install é et bloqué av ant de faire fonct ionne r le meuble.
Montage du fauteuil inclinable avec refroidisseur
thermoélectrique, massage 2 moteurs et chaleur
FIGURE 2
F
IGURE 4
FIGURE 3
FIGURE 1
FIGURE 6
F
IGURE 5
Mat ériau d’embal lage blanc
Con necte ur élect rique du refro idisseur
the rmoél ectri que
Fix ation
de la b ase
Fix ation
du dossier
Sur ce côté, les fixations du dossier
et de la base ne sont pas bl oquées.
Retirer le dossier et réinstal ler.
Fix ation
du dossier
Lev ier de
blo cage
Lev ier
blo qué
Dossier
du fauteuil
Montage du fauteuil inclinable avec refroidisseur
thermoélectrique, massage 2 moteurs et chaleur
AVERTISSEMENT
(Montage – suite)
AVIS
Page 23

45
44
– Pour r édu ire le risqu e de
blessu res gr ave s :
• Vérifier t ous les mois l’éta t des transformateurs, cordons d’alimentation, fiches et
connecteurs. Garder les transformate urs et les cordons d’alimentation loin des sources
de chaleur. Ne jamai s faire fonctionner le meuble si l e transformateur électrique,
le cordon d’alimentati on, la fiche ou un connecteur est endommagé. Com muniquer a vec
votre détail lant La-Z-Boy
M
D
pour le ser vice.
• N e pas laisser le cord on d’aliment ation se co incer entre des pièces mobiles ou e ntre
la charpent e et le sol . Ne pas place r le cordon sous la carpette ou dans un e ndroi t
où il p ourra it s’use r.
Montage du fauteuil inclinable avec refroidisseur
thermoélectrique, massage 2 moteurs et chaleur
10. Élo igner les cordon s de la bas e et tenir le b ras du dessus ferm é pour empêcher le refroid isseu r
de sortir. Re tourn er douce ment le f auteu il en position vertical e. S’assu rer que les cordo ns
ne sont pas coincés dans les pièces mobile s ou sous la base.
– Pour r édu ire le risque de
blessu res gr ave s :
• Pr évoir un parco urs sans obstruc tions pour faire foncti onner le dossi er et
le repose-j ambes . Placer les table s et les carpettes assez loin pour que
le repose-j ambes puisse s’ouvrir complè temen t sans frotteme nt ni obstr uctio n.
11. Cho isir pour le fauteuil un empl aceme nt près d’une prise de courant. Passe r aux instructi ons
pou r le fonctionne ment.
Il est i mpo rtant de débrancher toutes l es connex ion s avant
de retire r le dossier pour év ite r d’endom mag er les connecteurs
et les c ordons.
12. Pour retirer le dossier, débrancher les transformateurs électriques de la prise de courant et inverser
les étapes du montage.
Montage du fauteuil inclinable avec refroidisseur
thermoélectrique, massage 2 moteurs et chaleur
FIGURE 8FIGURE 7
AVERTISSEMENT
AVERTISSEMENT
AVIS :
6
. Repérer les quatre connecteurs électriques à l ’arrière du fa uteuil, sous le siège (F
IGU RE
7
).
• Les deux connecteurs rectangulaires servent à connecter la commande manuelle (F
IGURE
8).
• Le conne cteur rond sert à c onnecter le ma ssage 2 mot eurs et le transfo rmateu r
électrique d e la chaleur (F
IGU RE
8).
• Le conne cteur rectangulaire noir sert à connecter le transformateur électrique
du refroidisseur thermoélectrique (F
I
GUR E
9).
7. Aligner les deux connecteurs rectangulaires de la commande manuelle (certaines broches sont
carrées, d’autres rondes). Pousser les connecteurs ensemble jusqu’à ce qu’ils bloquent (F
IGU RE
8).
8. Br ancher le transforma teur électrique du massage 2 m oteurs et de la cha leur dans
le connecteur rond. S’assur er que les connect eurs sont solidement fixés ( F
IGU RE
8).
9. Brancher le transformateur électrique du refroidisseur thermoélectrique dans le connecteur
rectangulaire noir fixé à l’intérieur du bras. Pousser les connecteurs ensemble jusqu’à ce qu’ils
bloquent (F
IGU RE
9).
FIGURA 9 FIGURA 10
Connecteur du
transformateur
électrique du
refroidisseur
thermoélectrique
Connecteurs
de la commande
manuelle
Connecteurs du transformateur
électrique du refroidisseur
thermoélectrique
Transformateur
électrique du refroidisseur
thermoélectrique
Connecteurs
du transformateur
électrique massage
et chaleur
Transformateur
électrique massage
et chaleur
Connecteurs
de la commande
manuelle
Connecteurs du
transformateur électrique
massage et chaleur
Page 24

47
46
Foncti onn eme nt du massage 2 mote urs chaleur
Bra ncher le trans forma teur électriq ue du massa ge 2 moteurs chale ur direc temen t dans une prise
murale. S’assurer qu’il y a a ssez d e jeu dans le cordon du fauteuil à la prise de courant pour permettre
le berc emen t et l’inclinai son. Ne jama is étir er ou force r u n c ordo n.
Foncti onn eme nt de la mi nut erie a uto mat ique
Le système de m assag e chaleu r est doté d’une mi nuter ie autom atiqu e qui étein t
les fonctio ns MASSAGE et HEAT après envir on 15 ou 30 minutes de fonc tionn ement .
• Appuyer sur PWR ou tout b outon de zone fait redémarrer le massage.
• Appuyer sur le bouton chal eur HEAT fait red émarr er la chale ur. Appuyer une fois p our une
cha leur de f aible intensi té et deux fois pour une chaleur inte nse.
• Qua nd vous avez termin é, assure z-vou s d’appu yer sur POWE R et sur H EAT ( si ce dernier
bou ton est activé) pour éte indre le systè me. Appuyez deux fois sur HEAT si vous êtes en mod e
cha leur de f aible intensi té.
• La minuterie se r emet à zéro si on débranche le transformateur électrique du mas sage 2 moteurs
chaleur ou s’il y a une panne de courant.
Les fonction s massage et ch aleur peuven t démarrer automatiq uement qua nd le courant est rétabli
après une panne. La minuterie doit automatiquement ét eindre le massage et la cha leur après 15 o u
30 minutes. Si cel a se produit, il n’y a aucun r isque de blessures ou de dommages. Toutefois, nous
recommandons de débrancher les transformateurs électriques si vous vous absentez de la maison pendant
une longue période.
Fonctionnement du fauteuil inclinable
massage 2 moteurs et chaleur La-Z-Touch
MD
– Pour r édu ire le risqu e de blessures graves :
• B ranch er directeme nt dans une prise de coura nt au mur. Ne pas utiliser de rall onge,
d’a daptateur ou de limit eur de surtensi on.
Fonctionnement du fauteuil inclinable
massage 2 moteurs et chaleur La-Z-Touch
MD
-- Pou r rédu ire le risque
de blessures graves :
• N’utilisez pas ce produit si la commande électrique est endommagée ou mouillée.
N’utilisez pas le fauteuil si la commande manuelle est tombée dans l’eau ou tout
autre liquid e. Communiquez avec votre détaillant La -Z-Boy
MD
pour le ser vice.
– Pour r édu ire le risqu e
de blessures graves :
• Vous asseoir lentement sur le meuble. Pour éviter qu’il bascule, ne pas lancer votre poids
con tre le dossier. Y aller lentement quand vous vous incli nez ou remettez en posit ion
verticale, et vous assurer qu’il n’y a pas d’enfant ou d’animal de compagnie à proximité.
• Le fauteui l 01M/01 N est conçu pour un seul occupa nt dont le p oids n’excède pas
115 kg (250 lb). Ne pas faire fonctionner le fauteuil avec plus d’un occupant sur le fauteuil
ni sur toute partie de c elui- ci.
• Pour sort ir du meubl e en toute sécur ité et pour éviter de trébu cher, remettre le dossi er
en position verticale et refe rmer le r epose -jamb es.
DANGER
AVERTISSEMENT
AVERTISSEMENT
Les spécifications du transformateur dépendent de la date de production. Reportez-vous au transformateur
pour déterminer quelles spécifications s'appliquent à votre produit.
Spécifications de l' appareil de massage
La-Z-Touch à deux moteurs et du tr ansformateur d'alimentation de la chaleur :
Entrée : 120 volts CA, 60 hertz 30 watts. Sortie : 12 volts CA, 1 500 mA
ou
Entrée : 100 à 240 volts CA, 50 à 60 hertz, 1,5 ampère. Sortie : 13,8 volts CC 2,9 ampères.
POWER
Active le système
quand le voyant lumineux
est rétro-éclairé en DEL.
Appuyer une fois pour
la minuterie de 15 minutes
ou appuyer et tenir
enfoncé pour la minuterie
de 30 minutes.
REM ARQUE : Pour redémarrer
le système après l’arrêt de la
minuterie, appuyer soit sur
ZONE, soit sur PWR.
ZONE S
Active une ou toutes
les zones. Le voyant
DEL indique la ou
les zones choisies.
INTE NSITY
Augmente (+) ou diminue
(-) l’intensité dans tous
les modes.
HEAT
Active la chaleur. Appuyer une fois
pour faible et deux fois pour intense.
Peut fonctionner seul ou en même
temps que le massage.
REM ARQUE : La chaleur se désactive
après 30 minutes. Pour redémarrer,
appuyer de nouveau sur HEAT.
MODES
ZONE
- Vous permet de choisir
une ou deux zones de massage.
PULSE - Le massage se met en
marche et s’arrête pour simuler
une pulsation.
WAVE - Le massage se déplace de
haut en bas ou de gauche à droite,
selon le modèle, comme une vague.
SPEED
Commande la fréquence du
massage dans le mode PULSE
et la vélocité pendant le mode WAVE.
Appuyer sur (+) pour augmenter ou
sur (-) pour diminuer.
Page 25

49
48
Fonctionnement du refroidisseur thermoélectrique
– Pour réduire le r isq ue de décharge électrique
o
u de ble ssu res gr aves :
• D ébran cher la f iche électrique de la prise mural e avant de n ettoyer, d éplac er
ou entreten ir le meuble ou s’il n’est pas u tilis é pendan t une longue pério de.
• b ranch er directeme nt dans une prise de coura nt au mur. Ne pas utiliser de rall onge,
d’a daptateur ou de limit eur de surtensi on.
– Pour réduire le r isq ue de dommages au pr oduit :
• L e refroidiss eur ther moéle ctriq ue n’est pas un réfrigérat eur. Ne pas y ranger
lon gtemp s les aliments.
• Ne jamais plonger le refroidisseur thermoélectrique dans l’eau ni dans tout au tre liquide.
Renseigne men ts sur le f onc tionnement d u refroidisseur thermoélectriqu e
Le refroidisseur thermoélectrique est conçu pour garder au froid des aliments et boissons déjà refroidis.
Pour une efficacité maximum, éviter d’y déposer des produits chauds ou de température ambiante.
Le refroidisseur thermoélectrique abaisse la température à environ 4,4°C (40°F) sous la température
ambiante de la pièce. Dans les pièces de températures normales, le refroidisseur fonctionne comme suit :
• Le cycle d e refroidissement comme nce quand la température à l’ intérieur du r efroidisseur attein t
7,8° à 10°C (46° à 50° F) ou plus.
• Le cycle de refroidiss ement s’arrêt e quand la tempé rature atte int
de 3,3° à 4,4°C (de 38° à 40°F).
Dan s les pièces très chaudes, la températ ure inte rne du refroidisseur peut être plus élevé e et le cycle
de refroidi sseme nt fonctionn e de manièr e continue.
Foncti onn eme nt du refroi disseur t her moélectrique
Bra ncher le trans forma teur électriq ue du massa ge 2 moteurs chale ur direc temen t dans une prise
mur ale. S’ass urer qu’il y a asse z de jeu dans le cordo n du fauteu il à la pri se de coura nt pour
per mettr e le bercement et l ’inclinai son. Ne jama is étire r ou forcer un cordon .
1. Pour a llume r le refroi disse ur thermoéle ctriq ue, a ppuye r sur la touche march e/arr êt sur
le dessus du refroidi sseur. Un voyant rouge indiq ue que le refroidi sseur est en marche.
2. Dépose r des aliments pré refro idis dans le refroidiss eur.
3. Ne pas mettre de glace ni d’eau dans le refroidis seur. Il n ’est pas muni d’un drain.
4. Ne pas laisser le couv ercle ouvert quand le r efroi disse ur est en marche.
5. Pour é teind re le refro idiss eur thermoélectriqu e, ap puyer sur la tou che marc he/ar rêt
sur le dessu s du refroidiss eur. Le voyan t rouge s’éteint.
6. Arr êter le r efroi disse ur thermoéle ctriq ue et débra ncher le transformateur électr ique
qua nd le refroidis seur n’est pas util isé.
Entretien du refroidisseur thermoélectrique
– Pour réduire le r isq ue de décharge électrique
ou de bl ess ures g raves :
• D ébran cher la f iche électrique de la prise de coura nt mural e avant de n ettoy er,
dép lacer ou entre tenir le meubl e ou s’il n’est pas utilisé pen dant une longu e périod e.
• B ranch er directeme nt dans une prise de coura nt au mur. Ne pas utiliser
de rallonge , d’adaptateur ou de limi teur de s urten sion.
– Pour réduire le r isq ue de dommages au pr oduit :
• Ne jamais plonger le refroidisseur thermoélectrique dans l’eau ou dans tout au tre liquide.
• P répar er le refroidis seur thermoél ectri que pour le rangem ent quan d il n’est pas
uti lisé pour une longue pério de.
La performa nce maximum du r efroi disse ur exige un entre tien efficace .
Nettoy age du refro idi sseur the rmo éle ctrique
1. Éteind re le refroidisseur therm oélec triqu e et débrancher les deux transfor mateurs élect rique s.
2. Retirer le tapis en caoutchouc de l’intérieur du refroidisseur. Rincer le tapis à l’eau et le laisser sécher.
3. Utiliser un chiffon doux humide pour nettoyer l’intérieur du refroidisseur. Au besoin, utiliser un détergent
à vaisselle d oux. Ne pas utiliser d’agents nettoyants forts, de solvants ou autres produits abrasifs
pour nettoyer le refroidisseur.
4. Essuye r l’inté rieur du refro idiss eur avec un chiff on doux ou un essui e-tou t.
5. Remett re le tapis en caout chouc au fond du r efroi disse ur.
6. Branch er le transformateur élec triqu e direct ement dans un prise de courant mural e.
Dégivrage du refro idi sse ur the rmo éle ctrique
Il se p eut que le r efroi disse ur thermoéle ctriq ue accum ule du givre quand il fonct ionne longtem ps.
Il faut le dégivrer pour garder l’efficacité du refro idiss eur.
1. Éteind re le refroidisseur therm oélec triqu e et débrancher les deux transfor mateurs élect rique s.
2. Ouvrir le refro idiss eur et le laisser à la tempéra ture ambiante jusqu’à ce que le givre
fon de. Pour prévenir les domma ges, ne pas gratter le g ivre.
3. Retirer le tapis en c aoutc houc de l ’inté rieur du refro idiss eur et le laisser sécher.
4. Essuye r l’inté rieur du refro idiss eur avec un chiff on doux ou un essui e-tou t.
5. Remett re le tapis en caout chouc au fond du r efroi disse ur.
6. Brancher les deux transfo rmate urs élec triqu es directeme nt dans un p rise
(Entretie n du ref roi dis seu r - su ite )
DANGER
AVIS
DANGER
AVIS
Page 26

51
50
Entretien du refroidisseur thermoélectrique
Nettoy age des bouches d ’aé ration du re froidisseur thermoélectrique
Il est recommandé de passer l’a spirat eur une fois par année pour une performance
maximum du refroidisseur. Les ménages qui ont beaucoup d’animaux doivent passer
l’aspira teur dans les bouches d’aéra tion plus souvent.
1. Éteindre le refroidisseur thermoélectrique et débrancher les deux
transformateurs électriques.
2. Soulever avec soin le refroidi sseur thermoélectrique du bras du fauteui l
et le déposer sur le s iège.
3. Déconnecter le cordon d’alim entati on de l’arrière du refroidisseur.
4. Utiliser un aspirateur dot é d’un suceur plat pour netto yer les bouches
d’aération des côtés inférieurs et du fond du re froidisseur (F
IGU RE
1).
5. Déposer le refroidisseur sur le si ège et connecter l e cordon d’ali mentat ion dans
la prise du refroidisseur.
6. Déposer avec soin le refroidisseur therm oélectrique dans le bras du fauteuil en
s’assurant q ue le connecteur s e trouve vers l’arrière du fauteuil (F
IGU RE
2).
7. Brancher les deux transforma teurs électriques dans u ne prise de couran t murale.
FIGURE 2
FIGURE 1
Con necte ur élect rique
du refroidi sseur thermoélect rique
Rangement du refroidisseur thermoélectrique
Il est important de b ien ranger le refroidisseur thermoélectrique s’il n e fonctionne
pas pendant une l ongue périod e.
1. Éteindre le refroidisseur thermoélectrique et débrancher les deux transformateurs électriques.
2. Au besoin, suivre les étapes du dég ivrage et du ne ttoyage.
3. S’assurer que l’intérieur du refroidisseur est complète ment sec.
4. Déposer du papier journal froissé dans le refroidisseur thermoélectrique pour
le garder au frais pendant le rangement.
–
Pour réduire le risque de blessures :
• Ne pas faire fonctionner le meuble quand les écrous à ailettes qui règlent la tension
sont complètement desserrés (voir les instructions pour régler la tension d'inclinaison,
accessibles en ligne).
Dépannage de l a fonc tio n massage 2 mo teurs cha leu r
Il n’y a aucune exige nce d’entr etien ou de réparations pour l’utilisateur.
Si la fonction ma ssage ou ch aleur ne fonctionne pas :
1. S’assurer que la minuterie automatique n’est pas activée. Appuyer sur le bouton Power pour
redémarrer le massage. Appuyer sur le bouton Heat pour redémarrer la chaleur.
2. S’assurer que le tr ansformateur électr ique est branc hé dans une prise de courant.
3. S’assurer que la pr ise de courant fonctionne. Par exemple , s’assurer qu’aucun
fusible n’a sauté et qu’aucun d isjoncteur n’a déclenché.
4. S’assurer que tous les connecteurs sont bien engagés; se reporter à la sectio n Montage.
5. S’assurer que les c ordons d’alimentati on ne sont ni coincés ni pincés. S’assurer que
le cordon d’alimentati on et la fiche ne sont p as endomma gés.
Si le massage ne fonctionne toujours pas correctement, communiquer avec votre détaillant, qui
vous expliquera comment retourner le meuble pour examen et réparation. Sauf pour le remplacement
du transformateur électrique, ne jamais tenter de faire vous-même quelque réparation
ou ajustement que ce soit.
Remplacement du transformateur électrique du massage 2 moteurs chaleur
S’il faut rempla cer le transfo rmateu r électrique :
1. Débrancher les deux transfor mateur s électriques de l a prise de courant .
2. Repérer la connexion du transformateur électrique du massage 2 moteurs chaleur;
se reporter à la section Montage.
3. Tirer doucement sur les connecteurs pour les d éconnecter.
4. Enfoncer le connecteur du nouvea u transfor mateur éle ctrique du mas sage 2 moteurs
chaleur dans le c onnecteur correspondant; se reporter à la section Monta ge. S’assur er
que les connecte urs sont bien engagés.
Dépannage du refro idi sseur the rmo éle ctrique
Il n’y a aucune exigence de réparation. Si le refroidisseur thermoélectrique ne fonctionne pas :
1. S’assurer que le tr ansformateur électr ique du refroi disseur thermoélectrique
est branché dans une prise de courant qui fonctio nne.
2. S’assurer que l’interrupteur du refroidisseur thermoélectrique e st en position de m arche.
3. S’assurer que les c onnecteurs du refroidisseur thermoélectrique sont bien engag és;
se reporter à la section Montage.
Si le massage ne f onctionne toujours pas correctement, c ommuniquer avec votre détaillant,
qui vous expliqu era commen t retourner le meu ble pour exame n et répara tion. Ne jamais tenter
de faire vous-m ême quelqu e réparati on ou ajusteme nt que ce soit.
Dépannage du fauteuil inclinable avec refroidisseur
thermoélectrique, massage 2 moteurs et chaleur
Dossier
du fauteuil
Bou ches
d’a érati on
AVERTISSEMENT
Page 27

53
52
Res sort
de tension
– Pour réduire le risque de blessures :
•
Ce meuble est doté d’un réglage de tension pour le mécanisme d’inclinaison,
préréglé
en usine. Vous pouvez personnaliser ce réglage. Pour éviter de faire basculer
le meuble et pour en assurer la stabilité, ne jamais faire fonctionner le meuble
quand l’écrou à oreilles qui règle la tension est complètement desserré.
– Pour réduire le risque de dommages au produit :
• Vous assurer que le repose- jambes est fermé a vant de pencher le fauteui l
vers l’avant et régler la tension.
• Ne pas r esserrer complètement les é crous à oreilles, ce qui risque de causer des
dommages. Les ressorts ne doivent pas être complètement comprimés après le réglage.
Le cas échéant, tourner l’écrou à oreilles dans le sens anti-horaire au moins un
demi-tour pour éviter d’endommager le mécanisme de tension des ressorts.
• Ne pas desserrer complètement les écrous à oreilles. Le ressort ne doit pas glisser sur
le boulon après le réglage. Le cas échéant, tourner les écrous à oreilles dans le sens
horaire au moins un demi-tour après que le ressort cesse de glisser sur le boulon.
• Régler les deux écrou s à o reilles à égalité.
Réglag e de la tensio n d'inclinai son
Vous pou vez régler la tension du mécanis me d’inclinaison po ur convenir à votre taille.
1. Débrancher les deux transformateurs électriques de la prise de courant. Faire doucement
basculer le fauteuil vers l’avant pour qu’il repose sur ses bras et sur le dessus du dossier.
Repérer les écrous à ailettes, un de chaque côté, vers l’arrière du fauteuil sous le siège
inclinable (un seul côté illustré ci-après).
2. R égler la tension en tournant les écrous à oreilles par quarts de tour jusqu’à ce que
le réglag e voulu soit atteint.
• La personne plus grande ou plus lourde peut choisir d’a ugmenter la te nsion
d’inclinaison en resserrant les écr ous à oreilles dans le sens horai re.
• La personne plus courte peut choisi r de réduire la tension d’inclinaison
en desserrant les écrous à oreilles dans le sens anti-horaire.
3. R emettre le fau teuil en position debout et tester le nouveau réglage. Faire des réglages
supplémentaires au besoin , en r épétant ce s étapes. Brancher les deux transformateurs
électriques directement dans une prise de co urant au mur.
Réglage de l’inclinaison
Écrou à oreilles
Pour faire fonctionner le repose-jambes
1. Votre fauteuil est muni d’un repose-jambes verrouillable en 3 positions pour le confort de
l’assise. Tourner simplement la manette pour faire fonctionner le repose-jambes (F
IGURE
1).
Vous pouvez vous arrêter dans n’importe laquelle des
3 positions idéales. La 1reest légèrement
inclinée pour la lecture détendue (F
IGURE
2).
La 2eest un peu plus inclinée pour regarder la télé
(F
IGURE
3). La 3eest entièrement inclinée pour une détente complète (F
IGURE
4). Pour refermer
le repose-jambes, tourner la manette dans le sens anti-horaire jusqu’à l’ouverture complète,
puis la tourner dans le sens horaire jusqu’à la position entièrement fermée.
2. L’inclinaison du dossier du fauteuil est possible, que le repose-jambes soit ouvert ou fermé.
Pour vous incliner, exercer une pression sur le dossier. Pour que le dossier reprenne la position
verticale, transférer votre poids vers l’avant.
3. Remettre le dossier à la verticale et fermer le repose-jambes avant de vous lever.
Atout supplémentaire sur certains modèles
Le corps du fauteuil peut se déplacer vers l’arrière quand le repose-jambes est en usage. Transférer
votre poids vers l’arrière fait déplacer le corps du fauteuil vers l’arrière pour offrir plusieurs positions.
Fonctionnement
du repose-jambes à 3 réglages
FIGURE 1
F
IGURE 3
F
IGURE 2
FIGURE 4
POS ITION
FER MÉE
1rePOS ITION
2
e
POS ITION 3ePOS ITION
-
- Pour réduire le risque
de blessures graves :
• Prévoir un parcours sans obstructions pour faire fonctionner le dossier et
le repose-jambes. Placer les tables et les carpettes assez loin pour que
le repose-jambes puisse s’ouvrir complètement sans frottement ni obstruction.
• Pour sortir du meuble en toute sécurité et po ur éviter de trébucher,
remettre le dossier à la verticale et refermer le repose-jambes.
-- Pou r prév eni r les dommages au produit :
• Forcer le repose-jambes à se fermer à partir de la 1reou 2eposition risque
d’endommager le mécanisme. Toujours ouvrir le repose-jambes à la 3eposition
avant de le refermer.
AVERTISSEMENT
AVIS
AVERTISSEMENT
AVIS
Page 28

55
54
Comment disposer vos meubles
Pour place r votre fauteuil inclinable à u ne bonne distance du mur, in cliner entiè remen t
le fauteuil en laiss ant au moins 5 cm entre le dessu s du dossie r entièremen t incliné
et le m ur (F
IGU RE
1).
Vous assurer que les tables et autres articles sont assez loin pour ne pas gêner le repose-jambes.
Une table mal placée pourrait coincer l’occupant dans le fauteuil, tel qu'illustré à la F
IGURE
2.
Il faut qu’il y ait assez de jeu pour que le repose-jambes soit entièrement ouvert avant d’être
refermé. Voir Fonctionnement du repose-jambes à 3 réglages à la page précédente.
Comment disposer vos meubles
FIGURE 1
FIGURE 2
-- Pou r rédu ire le risque de
blessu res gr ave s :
• Prévoi r un parcou rs sans obstructions pour faire fonctionner le faute uil,
le dossier et l e repose-jam bes. Place r les tables et les carpette s assez
loi n pour que le repos e-jam bes puis se s’ouv rir complètement sans
fro tteme nt ni obstructi on.
min .
5 cm
Notes :
AVERTISSEMENT
 Loading...