


VBELL 1
QUICK GUIDE
EN Wire-free Battery Powered Video Doorbell
FR Sonnette vidéo à piles sans fil
NL Draadloze video-deurbel op batterijen
ES Timbre con video sin cables a batería
PT Campainha de vídeo alimentada por bateria sem fio
DE Kabellose batteriebetriebene Video-Türklingel
IT Campanello video alimentato a batteria senza fili
RU Беспроводной видеодомофон с питанием от батареи
TU Telsiz Akülü Video Kapı Zili
Compatible with Amazon Alexa & Google Assistant

Quick start guide
1. Packing list
2. Product description
3. Installation
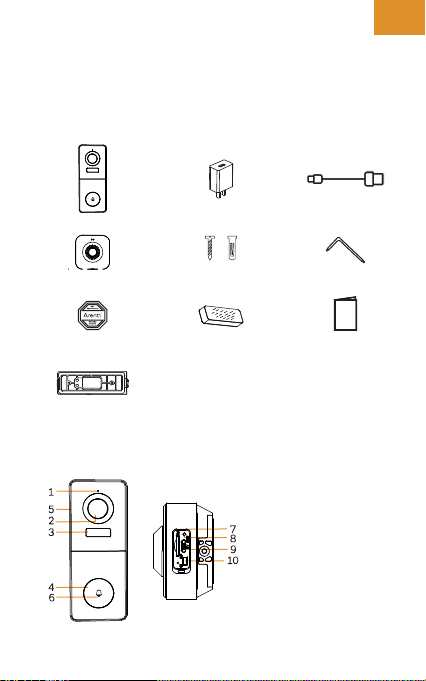
1. Packing list
4. Product configuration
5. Legal notice
EN
EN
Camera 1X
Chime 1X
Warning sticker 1X
Bracket 1X*
* The bracket is attached to the camera.
Power adaptor 1X
Screws 3X
3M sticker 2X
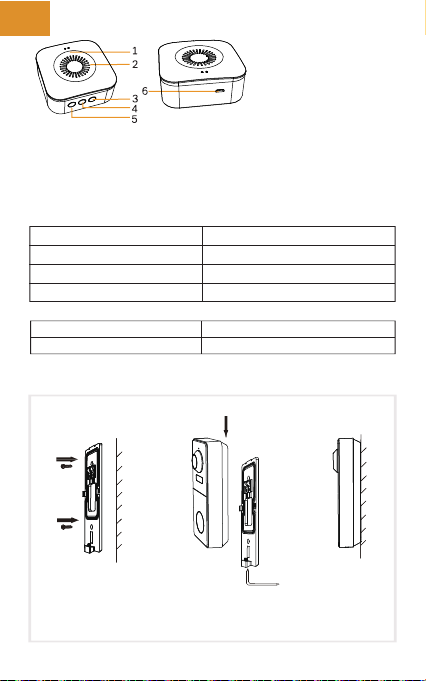
2. Product description
USB cable 1X
Screwdriver 1X
Quick guide 1X
1. Microphone
2. Lens
3. PIR
4. Doorbell button
5. Speaker
6. LED indicator
7. SD card slot
8. Reset
9. DC5V USB
10. Device ON/OFF
EN
EN
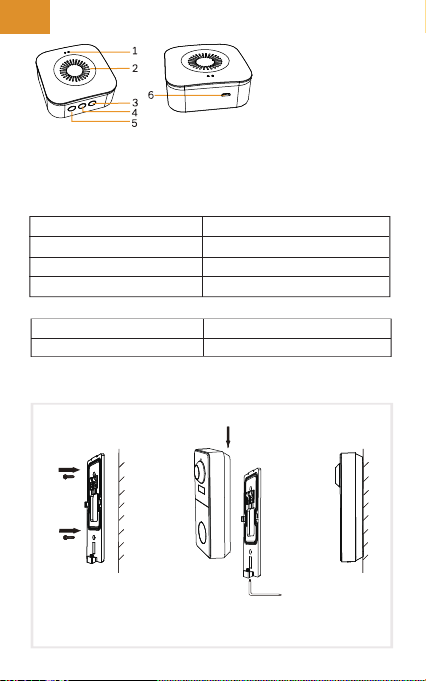
1. LED indicator
2. Speaker
3. Ringtone
4. Volume
5. Function button
6. Micro USB
Notice
To reset the device, press and hold the reset button for 5s.
The camera beeps when the operation is complete.
LED indicator of camera:
Flashing red light (slow)
Flashing red light (fast)
Fixed red light
Fixed blue light
LED indicator of chime:
Flashing red light
Fixed blue light
Wait for network config
Connecting the network
Network is malfunctional
Camera is working correctly
Wait for pairing
Succeed to pair
3. Installation
Installation with screws
1. Fix the bracket to the wall with the mounting screws.
2. Install the camera in the bracket and lock it with the screw.

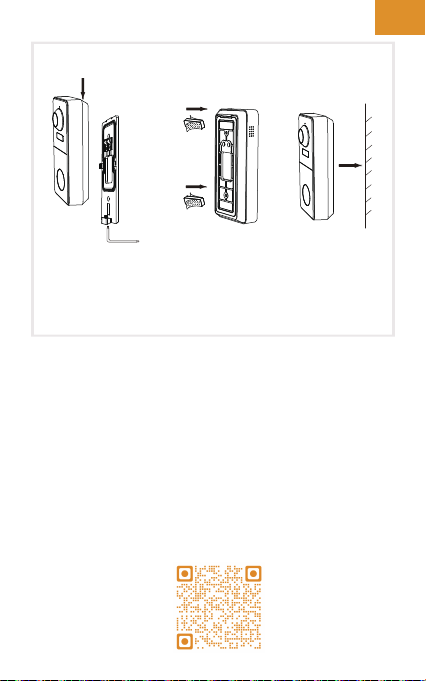
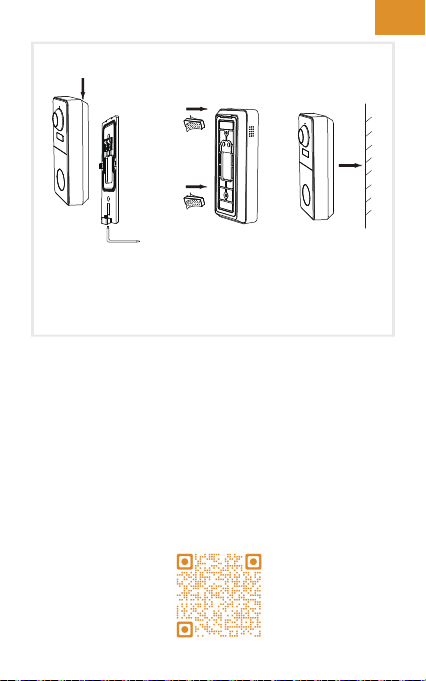
Installation with 3M stickers
1. Lock the bracket to camera with the screw at the bottom.
2. Stick the adhensive tapes to the barcket.
3. Stick the other side of adhensive tapes to the wall.
4. Product configuration
Step 1 Turn on your camera.
Step 2 Connect your smartphone to the Wi-Fi network.
Step 3 Download Arenti app from the App Store or
Google Play depending on your device.
Step 4 Launch the App and sign up for the first use.
Step 5 Follow the on-screen instructions to add your
camera.
For more information, scan the QR code.
EN
EN
EN
EN
Notice
If you have multiple cameras, please follow step 5 again
to add devices one by one.
To change Wi-Fi network, please restore the camera to
factory settings and follow step 5 to add the camera.
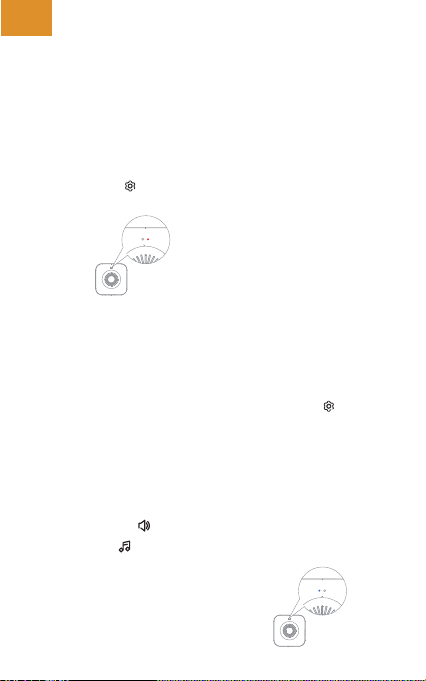
Chime Pairing
1. Short press " " (within 2 seconds), the status light flashes
red slowly and the chime will be in pairing mode.
During pairing mode, it will blink red
2. Press the doorbell button to pair, when the chime status
light turns off, and the song will play automatically, the
chime pairing is successful at this time.
Description:
1. The chime can connect to maximum eight doorbells.
2. When the chime is in pairing mode, press the " " again
(within 2 seconds), the chime will automatically exit the
pairing mode.
3. After adding the chime successfully, the volume will be
adjusted to the maximum automatically. When it is at the
minimum volume, it will return to the maximum volume
after pressing " ".
4. Each press " ", will play the next song along with blinking
blue light.
When playing ringtone,it will blink blue

Specifications
Sensor type
Min. brightness
Resolution
Lens
Shutter
Infrared
Infrared distance
FOV
Video compression
Bit rate
Max resolution
Framerate
Picture settings
Storage
Audio
Protocols
WiFi standard
Frequency
WiFi encryption
Security
Working temperature
Power
Consumption
Size(mm)
Battery
Standby consumption
Work consumption
Standby time
Working time
PIR Detection Rangle
PIR Detection Angle
1/2.8" CMOS
Color 0.1Lux@F2.0
Black and white 0.01Lux@F2.0
3 Mega pixels
3.2 mm F2.0
1/15-1/10,000 per second
High power LED with ICR
5 meters
130°
H.264
32Kbps - 2Mbps
2304 x 1296
1-25 per second
Support HD/SD; support flip
SD card (Max 256GB)
Two-way audio
HTTP, DHCP, DNS
IEEE802.11b/g/n
2.4 GHz - 2.4835 GHz
WPA-PSK/WPA2-PSK
AES128
-20℃~50℃
DC5V,1A
4.5W MAX
27.5x18x142
6700mAh
200µA (average)
220mA (IR off)
10 months
3 months
7m (Max.)
100°
(10 times wake up per day)
EN
EN
EN
EN
5. Legal notice
Support
www.arenti.com
Symbols
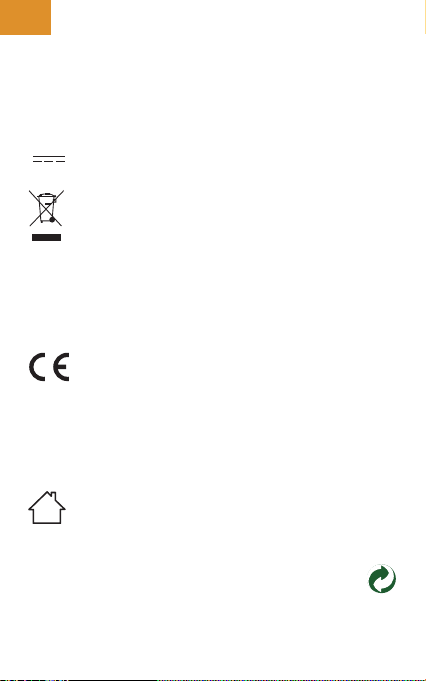
Direct current (DC)
Don't throw batteries or out of order products with
the household waste (garbage). The dangerous
substances that they are likely to include may harm
health or the environment. Make your retailer take
back these products or use the selective collect of
garbage proposed by your city.
Hereby, Arenti, declares that the radio equipment
type ‘VBell 1' is in compliance with the
Directive 2014/53/EU
The full test of the EU declaration of conformity is
available at the following Internet address:
www.arenti.com
For indoor use only

Guide de démarrage rapide
1. Liste de colisage
2. Description du produit
3. Installation
4. Configuration de l'appareil
5. Mention légale
1. Liste de colisag
FR
EN
Caméra 1X
Carillon 1X
Autocollant
d'avertissement 1X
Support 1X*
* Le support est fixé à la caméra.
Adaptateur secteur 1X
Vis 3X
Autocollant 3M 2X
Manuel d'utilisation 1X
2. Description du produit
1. Microphone
2. Lentille
3. PIR
4. Bouton de sonnette
5. Orateur
6. Indicateur LED
7. Fente pour carte SD
8. Réinitialisation
9. USB DC5V
10. Dispositif ON/OFF
Câble USB 1X
Tournevis 1X
FR
EN
1. Indicateur LED
2. Orateur
3. Sonnerie
4. Volume
5. Bouton de fonction
6. Micro USB
Remarquer
Pour réinitialiser l'appareil, maintenez le bouton de
réinitialisation enfoncé pendant 5 secondes.
Caméra émet un bip lorsque l'opération est terminée.
Indicateur LED de la caméra:
Lumière rouge clignotant (lent)
Lumière rouge clignotant (rapide)
Lumière rouge fixe
Lumière bleue fixe
Indicateur LED du carillon:
Lumière rouge clignotante
Lumière bleue fixe
Attendez la configuration du réseau
Connexion au réseau
Le réseau est défectueux
La caméra fonctionne correctement
Attendez l'appairage
Réussir à jumeler
3. Installation
Installation avec des vis
1. Fixez le support au mur avec les vis de montage.
2. Installez la caméra dans le support et verrouillez-la avec la vis.
Installation avec des autocollants 3M
1. Verrouillez le support sur la caméra avec la vis en bas.
2. Collez les bandes adhésives sur le support.
3. Collez l'autre côté des rubans adhésifs au mur.
4. Configuration de l'appareil
Étape 1 Allumez votre caméra.
Étape 2 Connectez votre smartphone au réseau Wi-Fi.
Étape 3 Téléchargez l'application Arenti depuis l'App Store ou
Google Play en fonction de votre smartphone.
Étape 4 Lancez l'application et inscrivez-vous pour la première
utilisation.
Étape 5 Suivez les instructions à l'écran pour ajouter la caméra.
Pour plus d'informations, scannez le code QR ci-dessous.
FR
EN

FR
EN
Remarquer
Si vous avez plusieurs caméras, veuillez suivre à nouveau
l'étape 5 pour ajouter des appareils un par un.
Pour modifier le réseau Wi-Fi, veuillez restaurer la caméra
aux paramètres d'usine et suivre l'étape 5 pour ajouter la
caméra.
Couplage du carillon
1. Appuyez brièvement sur " " (dans les 2 secondes), le
voyant d'état clignote lentement en rouge et le carillon
sera en mode d'appairage.
2. Appuyez sur le bouton de la sonnette pour coupler, lorsque
le voyant d'état du carillon s'éteint et que la chanson sera
jouée automatiquement, le couplage du carillon est réussi
à ce moment.
La description:
1. Le carillon peut se connecter à un maximum de huit
sonnettes.
2. Lorsque le carillon est en mode d'appairage, appuyez à
nouveau sur " " (dans les 2 secondes), le carillon quittera
automatiquement le mode d'appairage.
3. Après avoir ajouté le carillon avec succès, le volume sera
automatiquement ajusté au maximum. Lorsqu'il est au
volume minimum, il reviendra au volume maximum après
avoir appuyé sur " ".
4. Chaque pression sur " " jouera la chanson suivante avec
une lumière bleue clignotante.
Lors de la lecture de la sonnerie, elle clignotera en bleu
Pendant le mode de couplage, il clignotera en rouge

Caractéristiques
Type de capteur
Min. luminosité
Résolution
Lentille
Obturateur
Infrarouge
Distance infrarouge
FOV
Video compression
Débit binaire
Résolution max
Framerate
Paramètres d'image
Espace de rangement
Audio
Protocoles
Norme WiFi
La fréquence
Cryptage WiFi
Sécurité
Température de fonctionnement
Puissance
Consommation
Taille (mm)
Batterie
Consommation en veille
Consommation de travail
Temps d'attente
Temps de travail
Rangle de détection PIR
Angle de détection PIR
CMOS 1/2,8"
Couleur 0.1Lux@F2.0
Noir et blanc 0.01Lux@F2.0
3 mégapixels
3,2 mm F2.0
1/15-1/10 000 par seconde
LED haute puissance avec ICR
5 mètres
130°
H.264
32Kbps - 2Mbps
2304 x 1296
1-25 par seconde
Prise en charge HD/SD ; support flip
Carte SD (maximum 256 Go)
Audio bidirectionnel
HTTP, DHCP, DNS
IEEE802.11b/g/n
2,4 GHz - 2,4835 GHz
WPA-PSK/WPA2-PSK
AES128
-20℃~50℃
DC5V, 1A
4,5 W MAX
27.5x18x142
6700mAh
200µA (moyenne)
220mA (IR désactivé)
10 mois
3 mois (10 réveils par jour)
7m (Max.)
100°
FR
EN

FR
EN
5. Mention légale
Soutien
www.arenti.com
Symboles
Courant continu (DC)
Ne jetez pas les piles ou les produits en panne avec
les déchets ménagers ( g arba g e). Les substances
dangereuses qu'elles sont susceptibles d'inclure
peuvent nuire à la santé ou à l'environnement.
Faites reprendre ces produits à votre revendeur ou
utilisez la collecte sélective des déchets proposée
par votre ville.
Par la présente, Arenti, déclare que le type
d'équipement radio 'VBell 1' is in savoir
la conformité h la Directive 2014/53 / UE
Le test complet de la déclaration de conformité
UE est disponible à l'adresse Internet suivante :
www.arenti.com
Pour une utilisation en intérieur uniquement

Snelstartgids
1. Paklijst
2. Productbeschrijving
3. Installatie
1. Packing list
4. Productconfiguratie
5. Juridische kennisgeving
NL
EN
Camera 1X
Gong 1X
Waarschuwings-
sticker 1X
Beugel 1X*
* De beugel is aan de camera bevestigd.
Voedingsadapter 1X
Schroeven 3X
3M sticker 2X
2. Productbeschrijving
1. Microfoon
2. Lens
3. PIR
4. Deurbelknop
5. Spreker
6. LED-indicator
7. SD-kaartsleuf
8. Opnieuw instellen
9. DC5V USB
10. Apparaat AAN/UIT
USB-kabel 1X
Schroevendraaier 1X
Beknopte
handleiding 1X

NL
EN
1. LED-indicator
2. Spreker
3. Beltoon
4. Volume
5. Functieknop
6. Micro-USB
Merk op
Houd de resetknop 5 seconden ingedrukt om het
apparaat te resetten.
De camera piept wanneer de bewerking is voltooid.
LED-indicator van camera:
Knipperend rood licht (langzaam)
Knipperend rood licht (snel)
Vast rood licht
Vast blauw licht
Wacht op netwerkconfiguratie
Verbinding maken met het netwerk
Het netwerk is defect
Camera werkt correct
LED-indicator van gong:
Knipperend rood licht
Vast blauw licht
Wacht op het koppelen
Ga verder met koppelen
3. Installatie
Installatie met schroeven
1. Bevestig de beugel aan de muur met de montageschroeven.
2. Installeer de camera in de beugel en zet deze vast met de schroef.

Installatie met 3M stickers
1. Vergrendel de beugel aan de camera met de schroef aan de onderkant.
2. Plak de plakband op de beugel.
3. Plak de andere kant van plakband op de muur.
4. Productconfiguratie
Stap 1 Zet uw camera aan.
Stap 2 Verbind uw smartphone met het Wi-Fi-netwerk.
Stap 3 Download de Arenti-app vanuit de App Store of
Google Play, afhankelijk van uw apparaat.
Stap 4 Start de app en meld u aan voor het eerste gebruik.
Stap 5 Volg de instructies op het scherm om de camera
toe te voegen.
Scan de QR-code voor meer informatie.
NL
EN

NL
EN
Merk op
Als u meerdere camera's heeft, volgt u stap 5 opnieuw om
apparaten een voor een toe te voegen.
Om het Wi-Fi-netwerk te wijzigen, herstelt u de camera
naar de fabrieksinstellingen en volgt u stap 5 om de
camera toe te voegen.
Gong koppelen
1. Druk kort op " " (binnen 2 seconden), het statuslampje
knippert langzaam rood en de gong bevindt zich in de
koppelingsmodus.
Tijdens de koppelingsmodus knippert het rood
2. Druk op de deurbelknop om te koppelen. Wanneer het
statuslampje van de deurbel uitgaat en het nummer
automatisch wordt afgespeeld, is het koppelen van de
deurbel op dit moment gelukt.
Omschrijving:
1. De gong kan verbinding maken met maximaal acht
deurbellen.
2. Wanneer de gong in de koppelingsmodus staat, drukt u
nogmaals op " " (binnen 2 seconden), de gong zal
automatisch de koppelingsmodus verlaten.
3. Nadat de gong met succes is toegevoegd, wordt het
volume automatisch naar het maximum aangepast. Als het
op het minimale volume staat, keert het terug naar het
maximale volume nadat u op " " hebt gedrukt.
4. Elke keer dat u op " " drukt, wordt het volgende nummer
afgespeeld, samen met een knipperend blauw licht.
Tijdens het afspelen van een ringtone
knippert deze blauw

Specificaties
Sensortype
Min. helderheid
Resolutie
Lens
Luik
Infrarood
Infrarood afstand
FOV
Video compressie
Bitsnelheid
Max resolutie
Frame rate
Foto-instellingen
Opslag
Audio
Protocollen
WiFi standaard
Frequentie
WiFi-codering
Veiligheid
Werktemperatuur
Kracht
Consumptie
Grootte (mm)
Batterij
Stand-by verbruik
Werkconsumptie
Standby-tijd
Werktijd
PIR-detectiebereik
PIR-detectiehoek
1/2,8" CMOS
Kleur 0.1Lux@F2.0
Zwart en wit 0.01Lux@F2.0
3 megapixels
3,2 mm F2.0
1/15-1/10.000 per seconde
Krachtige LED met ICR
5 meter
130°
H.264
32 Kbps - 2 Mbps
2304 x 1296
1-25 per seconde
Ondersteuning HD/SD; ondersteuning flip
SD-kaart (Max 256GB)
Tweerichtingsaudio
HTTP, DHCP, DNS
IEEE802.11b/g/n
2,4 GHz - 2,4835 GHz
WPA-PSK/WPA2-PSK
AES128
-20℃~50℃
DC5V, 1A
4,5 W MAX
27,5x18x142
6700mAh
200 µA (gemiddeld)
220mA (IR uit)
10 maanden
3 maanden (10 keer per dag wakker worden)
7m (Max.)
100°
NL
EN

NL
EN
5. Juridische kennisgeving
Ondersteuning
www.arenti.com
Symbolen
Gelijkstroom (DC)
Gooi geen batterijen of niet-toegestane producten
bij het huisvuil (vuilnis). De gevaarlijke stoffen die
ze waarschijnlijk bevatten, kunnen de gezondheid
of het milieu schaden. Laat uw verkoper deze
producten terugnemen of gebruik de selectieve
inzameling van afval die door uw stad wordt
voorgesteld.
Hierbij verklaart Arenti dat het type
radioapparatuur ‘VBell 1 'in overeenstemming is
met de richtlijn 2014/53 / EU
De volledige test van de EU-conformiteitsverklaring
is beschikbaar op het volgende internetadres:
www.arenti.com
Alleen voor Gebruik binnenshuis

Guía de inicio rápido
1. Contenido de la caja
2. Descripción del producto
3. Instalación
4. Configuración del dispositivo
5. Avisos Legales
1. Contenido de la caja
ES
EN
Cámara 1X
Timbre 1X
Etiqueta de
advertencia 1X
Soporte 1X*
* El soporte está unido a la cámara.
Adaptador de
corriente 1X
Empulgueras 3X
Etiqueta engomada
de 3M 2X
Guía de inicio rápido 1X
2. Product description
1. Micrófono
2. Lente
3. PIR
4. Botón de timbre
5. Altavoz
6. Indicador LED
7. Ranura para tarjeta SD
8. Reinicialización
9. USB DC5V
10. Dispositivo
encendido/apagado
Cable USB 1X
Destornillador 1X

ES
EN
1. Indicador LED
2. Altavoz
3. Tono de llamada
4. Volumen
5. Botón de función
6. Micro USB
Nota
Para reinicializar el dispositivo, mantenga presionado el botón
de reinicialización durante 5 segundos.
La cámara emitirá un pitido cuando se complete la operación.
Indicador LED de cámara:
Luz roja intermitente (lenta)
Luz roja intermitente (rápida)
Luz roja fija
Luz azul fija
Indicador LED de timbre:
Luz roja intermitente
Luz azul fija
Espere la configuración de la red
Conectando la red
La red no funciona
La cámara funciona correctamente
Espere el emparejamiento
Lograr emparejar
3. Instalación
Instalación con empulgueras
1. Fije el soporte a la pared con los empulgueras de montaje.
2. Instale la cámara en el soporte y fíjela con el empulgueras.

Instalación con etiqueta engomada de 3M
1. Bloquee el soporte a la cámara con el empulgueras en
la parte inferior.
2. Pegue el 3M al soporte.
3. Pegue el otro lado de 3M a la pared.
4. Configuración del dispositivo
Paso 1 Encienda su cámara.
Paso 2 Conecte su teléfono inteligente a la red Wi-Fi.
Paso 3 Descargue la aplicación Arenti desde la App
Store o Google Play según el tipo de su dispositivo.
Paso 4 Abra la aplicación y regístrese para el primer uso.
Paso 5 Siga las instrucciones en pantalla para agregar su
cámara.
Para obtener más información, escanee el código QR a
continuación.
ES
EN

ES
EN
Nota
Si tiene varias cámaras, siga el paso 5 nuevamente para
agregar dispositivos uno por uno.
Para cambiar la red Wi-Fi, restaure la cámara a la
configuración de fábrica y siga el paso 5 para agregar la
cámara.
Emparejamiento de timbre
1. Presione brevemente " " (dentro de 2 segundos), la luz de
estado parpadea en rojo lentamente y el timbre estará en
modo de emparejamiento.
Durante el modo de emparejamiento,
parpadeará en rojo
2. Presione el botón del timbre para emparejar, cuando el
estado del timbre la luz se apaga y la canción se
reproducirá automáticamente, el emparejamiento del
timbre es exitoso en este momento.
Descripción:
1. El timbre se puede conectar a un máximo de ocho timbres.
2. Cuando el timbre esté en modo de emparejamiento,
presione " " nuevamente (dentro de 2 segundos), el timbre
saldrá automáticamente del modo de emparejamiento.
3. Después de agregar el timbre correctamente, el volumen
se ajustará al máximo automáticamente. Cuando esté en el
volumen mínimo, volverá al volumen máximo después de
presionar " ".
4. Cada vez que presione " ", se reproducirá la siguiente
canción junto con una luz azul parpadeante.
Al reproducir el tono de llamada,
parpadeará en azul

Especificaciones
Tipo de sensor
Brillo mín.
Resolución
Lente
Obturador
Infrarrojo
Distancia infrarroja
Gran angular
Compresión de video
Tasa de bits
Resolución máxima
Cuadros por segundo
Configuraciones de imagen
Almacenamiento
Audio
Protocolos
Estándar WiFi
Frecuencia
Cifrado WiFi
Seguridad
Temperatura de trabajo
Poder
Consumo
Tamaño (mm)
Batería
Consumo en espera
Consumo de trabajo
Tiempo de espera
Tiempo de trabajo
Rango de detección PIR
Ángulo de detección PIR
CMOS de 1 / 2,8 "
Color 0.1Lux@F2.0
Blanco y negro 0.01Lux@F2.0
3 megapíxeles
3,2 mm F2,0
1 / 15-1 / 10,000 por segundo
LED de alta potencia con ICR
5 metros
130 °
H.264
32 Kbps - 2 Mbps
2304 x 1296
1-25 por segundo
Soporta HD / SD; apoyo flip
Tarjeta SD (Max 256GB)
Audio bidireccional
HTTP, DHCP, DNS
IEEE802.11b / g / n
2,4 GHz - 2,4835 GHz
WPA-PSK / WPA2-PSK
AES128
-20 ℃ ~ 50 ℃
DC5V, 1A
4.5W MÁX.
27,5 x 18 x 142
6700 mAh
200µA (promedio)
220 mA (IR apagado)
10 meses
3 meses (10 veces al día se despierta)
7m (máx.)
100 °
ES
EN

ES
EN
5. Avisos Legales
Soporte
www.arenti.com
Símbolos
Corriente continua (DC)
No tire las pilas ni los productos fuera de servicio
con la basura doméstica (basura). Las sustancias
peligrosas que probablemente incluyan pueden
dañar la salud o el medio ambiente. Haga que su
minorista retire estos productos o utilice la
recogida selectiva de basura propuesta por su
ciudad.
Por la presente, Arenti, declara que el tipo de
equipo de radio 'VBell1' cumple con la
Directiva 2014/53/UE
La prueba completa de la declaración UE de
conformidad está disponible en la siguiente
dirección de Internet :
www.arenti.com
Sólo para uso en interiores

Guia rápido
1. Lista de embalagem
2. Descrição do produto
3. Instalação
4. Configuração do produto
5. Aviso legal
1. Lista de embalagem
PT
EN
Câmera 1X
Carrilhão 1X
Adesivo de aviso 1X
BSuporte 1X*
* O suporte é conectado à câmera.
Adaptador de energia 1X
Parafusos 3X
Adesivo 3M 2X
2. Descrição do produto
1. Microfone
2. Lente
3. PIR
4. Botão da campainha
5. Palestrante
6. LED indicador
7. Slot para cartão SD
8. Reiniciar
9. DC5V USB
10. Dispositivo
LIGADO/DESLIGADO
USB cable 1X
Chave de fenda 1X
Guia rápido 1X

PT
EN
1. Indicador LED
2. Palestrante
3. Toque
4. Volume
5. Botão de função
6. Micro USB
Aviso prévio
Para reiniciar o dispositivo, pressione e segure o botão
reiniciar por 5s.
A câmera emite um bipe quando a operação é concluída.
Indicador LED da câmera:
Luz vermelha piscando (lento)
Luz vermelha piscando (rápido)
Luz vermelha fixa
Luz azul fixa
Indicador LED de carrilhão:
Luz vermelha piscando
Luz azul fixa
Aguarde a configuração da rede
Conectando a rede
A rede não está funcionando bem
Câmera está funcionando
Espere pelo emparelhamento
Sucesso para emparelhar
3. Instalação
Instalação com parafusos
1. Fixe o suporte na parede com os parafusos de montagem.
2. Instale a câmera no suporte e trave-a com o parafuso.

Instalação com adesivos 3M stickers
1. Trave o suporte na câmera com o parafuso na parte inferior.
2. Cole as fitas adesivas no suporte.
3. Cole o outro lado das fitas adesivas na parede.
4. Configuração do produto
Etapa 1 Ligue sua câmera.
Etapa 2 Conecte seu smartphone à rede Wi-Fi.
Passo 3 Baixe o aplicativo Arenti da App Store ou Google
Play dependendo do seu dispositivo.
Etapa 4 Inicie o aplicativo e inscreva-se para o primeiro uso.
Etapa 5 Siga as instruções na tela para adicionar sua câmera.
Para obter mais informações, leia o código QR.
PT
EN

PT
EN
Aviso prévio
Se você tiver várias câmeras, siga a etapa 5 novamente
para adicionar dispositivos um por um.
Para alterar a rede Wi-Fi, restaure as configurações de
fábrica da câmera e siga a etapa 5 para adicionar a câmera.
Emparelhamento de sinos
1. Pressione rapidamente " " (dentro de 2 segundos), a luz
de status pisca em vermelho lentamente e o sinal sonoro
estará no modo de emparelhamento.
Durante o modo de pareamento,
ele piscará em vermelho
2. Pressione o botão da campainha para emparelhar, quando a
luz de status do carrilhão desligar e a música tocar
automaticamente, o emparelhamento do carrilhão foi
bem-sucedido neste momento.
Descrição:
1. O carrilhão pode se conectar a no máximo oito campainhas.
2. Quando o sinal sonoro estiver no modo de emparelhamento,
pressione " " novamente (dentro de 2 segundos), o sinal
sonoro sairá automaticamente do modo de emparelhamento.
3. Depois de adicionar o sinal sonoro com sucesso, o volume
será ajustado ao máximo automaticamente. Quando estiver
no volume mínimo, ele retornará ao volume máximo após
pressionar " ".
4. Cada vez que pressionar " ", a próxima música será
reproduzida junto com a luz azul piscando.
Ao reproduzir o toque,
ele piscará em azul

Especificações
Tipo de sensor
Min. brilho
Resolução
Lente
Obturador
Infravermelho
Distância infravermelha
FOV
Compressão de vídeo
Taxa de bits
Resolução máxima
Taxa de quadros
Configurações de imagem
Armazenamento
Áudio
Protocolos
Padrão WiFi
Frequência
Criptografia WiFi
Segurança
Temperatura de trabalho
Poder
Consumo
Tamanho (mm)
Bateria
Consumo em espera
Consumo de trabalho
Tempo de espera
Expediente
Rangle de detecção de PIR
Ângulo de Detecção PIR
1 / 2.8 "CMOS
Cor 0.1Lux@F2.0
Preto e branco 0.01Lux@F2.0
3 megapixels
3,2 mm F2,0
1 / 15-1 / 10.000 por segundo
LED de alta potência com ICR
5 metros
130 °
H.264
32 Kbps - 2 Mbps
2304 x 1296
1-25 por segundo
Suporte HD / SD; suporte flip
Cartão SD (máximo de 256 GB)
Áudio bidirecional
HTTP, DHCP, DNS
IEEE802.11b / g / n
2,4 GHz - 2,4835 GHz
WPA-PSK / WPA2-PSK
AES128
-20 ℃ ~ 50 ℃
DC5V, 1A
4,5 W MÁX
27,5x18x142
6700mAh
200µA (média)
220mA (IR desligado)
10 meses
3 meses (acordar 10 vezes por dia)
7m (máx.)
100 °
PT
EN

PT
EN
5. Aviso legal
Suporte
www.arenti.com
Símbolos
Corrente contínua (DC)
Não jogue baterias ou produtos estragados no lixo
doméstico (lixo). As substâncias perigosas que
podem incluir podem causar danos à saúde ou ao
meio ambiente. Faça com que o seu varejista retire
esses produtos ou utilize a coleta seletiva de lixo
proposta pela sua cidade.
Por meio deste, Arenti, declara que o tipo de
equipamento de rádio 'VBell 1' está em
conformidade com a Diretiva 2014/53 / UE
O teste completo da declaração de conformidade
da UE está disponível no seguinte endereço da
Internet:
www.arenti.com
Apenas para uso interno

Kurzanleitung
1. Lieferumfang
2. Produktbeschreibung
3. Installation
1. Lieferumfang
4. Gerätekonfiguration
5. Rechtlicher Hinweis
DE
EN
Kamera 1X
Glockenspiel 1X
Warnaufkleber 1X
Halterung 1X*
* Die Halterung ist an der Kamera befestigt.
Netzadapter 1X
Schrauben 3X
3M Aufkleber 2X
2. Product description
USB-Kabe 1X
Schraubendreher 1X
Benutzerhandbuch 1X
1. Mikrofon
2. Objektive
3. PIR
4. Türklingelknopf
5. Lautsprecher
6. LED-Anzeige
7. SD-Kartenslot
8. Zurücksetzen
9. DC5V USB
10. Gerät EIN/AUS

DE
EN
1. LED-Anzeige
2. Lautsprecher
3. Klingelton
4. Lautstärke
5. Funktionstaste
6. Micro USB
Hinweis
THalten Sie zum Zurücksetzen des Geräts die Reset-Taste
5 Sekunden lang gedrückt.
Die Kamera piept, wenn der Vorgang abgeschlossen ist.
LED-Anzeige der Kamera:
Blinkendes rotes Licht (langsam
Blinkendes rotes Licht (schnell)
Konstantes rotes Licht
Konstantes blaues Licht
Warten Sie auf das Netzwerk
Netzwerk verbinden
Netzwerk funktioniert nicht richtig
Kamera funktioniert
LED-Anzeige des Glockenspiels:
Blinkendes rotes Licht
Konstantes blaues Licht
Warten Sie auf das Pairing
Erfolgreich zu paaren
3. Installation
Installation mit Schrauben
1. Befestigen Sie die Halterung mit den Befestigungsschrauben an
der Wand.
2. Setzen Sie die Kamera in die Halterung ein und verriegeln Sie
sie mit der Schraube.

Installation mit 3M Aufklebern
1. Befestigen Sie die Halterung mit der Schraube unten an der Kamera.
2. Kleben Sie die Klebebänder auf die Halterung.
3. Kleben Sie die andere Seite der Klebebänder an die Wand.
4. Gerätekonfiguration
Schritt 1 Schalten Sie Ihre Kamera ein.
Schritt 2 Verbinden Sie Ihr Smartphone mit dem
WLAN-Netzwerk.
Schritt 3 Laden Sie die App “Arenti“ aus dem App Store oder
dem Google Play (je nach Ihrem Gerät) herunter.
Schritt 4 Starten Sie die App und melden Sie sich
für die erste Verwendung an.
Schritt 5 Folgen Sie den Anweisungen auf dem Bildschirm.
Für weitere Informationen scannen Sie den folgenden QR-Code.
DE
EN

DE
EN
Hinweis
Wenn Sie mehrere Kameras haben,folgen Sie bitte erneut
Schritt 5, um die Geräte nacheinander hinzufügen.
Um das WLan-Netzwerk zu ändern, stellen Sie die Kamera
auf die Werkseinstellungen zurück und führen Sie Schritt
5 aus, um die Kamera hinzuzufügen.
Glockenspiel-Paarung
1. Drücken Sie kurz " " (innerhalb von 2 Sekunden), die
Statusanzeige blinkt langsam rot und das Glockenspiel
befindet sich im Pairing-Modus.
2. Drücken Sie die Türklingeltaste, um das Pairing durchzuführen.
Wenn die Glockenspiel-Statusanzeige erlischt und der Titel
automatisch abgespielt wird, ist das Pairing zu diesem
Zeitpunkt erfolgreich.
Beschreibung:
1. Das Glockenspiel kann mit maximal acht Türklingeln
verbunden werden.
2. Wenn sich das Glockenspiel im Pairing-Modus befindet,
drücken Sie erneut " " (innerhalb von 2 Sekunden). Das
Glockenspiel verlässt automatisch den Pairing-Modus.
3. Nach erfolgreichem Hinzufügen des Glockenspiels wird die
Lautstärke automatisch auf das Maximum eingestellt. Wenn
die minimale Lautstärke erreicht ist, wird nach Drücken von
" " die maximale Lautstärke wiederhergestellt.
4. Bei jedem Drücken von " " wird das nächste Lied zusammen
mit einem blinkenden blauen Licht abgespielt.
Beim Abspielen des Klingeltons blinkt dieser blau
Im Pairing-Modus blinkt es rot

Spezifikationen
Sensortyp
Min.Helligkeit
Auflösung
Objektive
Verschluss
Infrarot
Infrarotabstand
Weitwinkel
Videokompression
Bitrate
Maximale Auflösun
Framerate
Bildeinstellungen
Speicherung
Audio
Protokolle
WLAN standard
Frequenz
WLAN-Verschlüsselung
Sicherheit
Arbeitstemperatur
Stromversorgung
Leistungsaufnahme
Größe (mm)
Batterie
Standby-Verbrauch
Arbeitsverbrauch
Standby-Zeit
Arbeitszeit
PIR-Erkennungsbereich
PIR-Erkennungswinkel
1/2,8" CMOS
Farbe 0.1Lux@F2.0
Schwarzweiß 0.01Lux@F2.0
3 Megapixel
3,2 mm F2,0
1/15-1/10.000 pro Sekunde
Hochleistungs-LED mit ICR
5 Meter
130°
H.264
32 Kbit/s - 2 Mbit/s
2304 x 1296
1-25 pro Sekunde
Unterstützt HD/SD; Unterstützung Flip
SD-Karte (max. 256 GB)
Zwei-Wege-Audio
HTTP, DHCP, DNS
IEEE802.11b/g/n
2,4 GHz - 2,4835 GHz
WPA-PSK/WPA2-PSK
AES128
-20℃~50℃
DC5V,1A
4,5 W MAX
27,5x18x142
6700mAh
200µA (Durchschnitt)
220mA (IR aus)
10 Monate
3 Monate (10-maliges Aufwachen pro Tag)
7m (max.)
100°
DE
EN

DE
EN
5. Rechtlicher Hinweis
Unterstützung
www.arenti.com
Symbole
Gleichstrom (DC)
atterien/Akkus oder defekte Produkte nicht im
Hausm Hausmüll entsorgen. Die möglicherweise
enthalten gefährlichen Substanzen können für
die Gesundheit oder die Umwelt schädigen sien.
Geben Sie die Produkte beim Händler zurück oder
genben Sie dei an einer Sammelstelle oder bei
einem Recyclinghof ab.
Arenti erklärt hiermit, dass der Funkgeräte Typ
„VBell 1“ mit der Richtlinie 2014/53/EG
konform ist.
Der vollständige Test der EU-Konformitätserklärung
steht unter der folgenden Internetadresse zur
Verfügung:
www.arenti.com
Nur für den Innenbereich

Guida Rapida
1. Lista di imballaggio
2. Descrizione del prodotto
3. Installazione
4. Configurazione del
prodotto
5. Avviso legale
1. Lista di imballaggio
IT
EN
telecamera 1X
Campanello 1X
Adesivo di avvertenza 1X
Staffa 1X *
* La staffa è fissata alla telecamera.
Adattatore di
alimentazione 1X
Viti 3X
Adesivo 3M 2X
Cavo USB 1X
Cacciavite 1X
Guida rapida 1X
2. Descrizione del prodotto
1. Microfono
2. Obiettivo
3. PIR
4. Pulsante campanello
5. Altoparlante
6. Indicatore LED
7. Slot per scheda SD
8. Reimposta
9. DC5V USB
10. Dispositivo ON/OFF

IT
EN
1. Indicatore LED
2. Altoparlante
3. Suoneria
4. Volume
5. Pulsante funzione
6. Micro USB
Avviso
Per ripristinare il dispositivo, tenere premuto il pulsante
di ripristino per 5 secondi.
La fotocamera emette un segnale acustico al termine
dell'operazione.
Indicatore LED della fotocamera:
Luce rossa lampeggiante (lenta)
Luce rossa lampeggiante (veloce)
Luce rossa fissa
Luce blu fissa
Indicatore LED della suoneria:
Luce rossa lampeggiante
Luce blu fissa
Attendi la configurazione della rete
Collegamento alla rete
La rete non funziona correttamente
La fotocamera funziona
Attendi l'accoppiamento
Riuscire ad accoppiare
3. Installazione
Installazione con viti
1. Fissare la staffa alla parete con le viti di montaggio.
2. Installare la telecamera nella staffa e bloccarla con la vite.

Installazione con adesivi 3M
1. Bloccare la staffa alla telecamera con la vite in basso.
2. Attaccare i nastri adesivi alla staffa.
3. Attaccare l'altro lato dei nastri adesivi alla parete.
4. Configurazione del prodotto
Passo 1 Accendi la videocamera.
Passo 2 Collega il tuo smartphone alla rete Wi-Fi.
Passo 3 Scarica l'app "Arenti" dall'App Store o da
Google Play, a seconda del dispositivo.
Passo 4 Avvia l'App e registrati per il primo utilizzo.
Passo 5 Segui le istruzioni sullo schermo per aggiungere
la videocamera.
Per ulteriori informazioni, scansiona il codice QR.
IT
EN

IT
EN
Avviso
Se hai più videocamere, segui di nuovo il passaggio 5 per
aggiungere i dispositivi uno per uno.
Per cambiare la rete Wi-Fi, ripristinare la telecamera alle
impostazioni di fabbrica e seguire il passaggio 5 per
aggiungere la telecamera.
Carillon Accoppiamento
1. Premere brevemente " " (entro 2 secondi), la spia di stato
lampeggia lentamente in rosso e la suoneria sarà in
modalità di accoppiamento.
Durante la modalità di associazione,
lampeggerà in rosso
2. Premere il pulsante del campanello per accoppiare, quando
la spia di stato del segnale acustico si spegne e la canzone
verrà riprodotta automaticamente, l'associazione del
segnale acustico è riuscita in questo momento.
Descrizione:
1. Il cicalino può connettersi a un massimo di otto campanelli.
2. Quando il segnale acustico è in modalità di accoppiamento,
premere nuovamente " " (entro 2 secondi), il segnale
acustico uscirà automaticamente dalla modalità di
accoppiamento.
3. Dopo aver aggiunto correttamente la suoneria, il volume
verrà regolato automaticamente al massimo. Quando è al
volume minimo, tornerà al volume massimo dopo aver
premuto " ".
4. Ogni volta che si preme " ", verrà riprodotta la canzone
successiva insieme alla luce blu lampeggiante.
Durante la riproduzione della suoneria,
lampeggerà in blu

Specifiche
Tipo di sensore
Min. luminosità
Risoluzione
Lens
Otturatore
Infrarossi
Distanza a infrarossi
FOV
Compressione video
Velocità in bit
Risoluzione massima
Frequenza dei fotogrammi
Impostazioni immagine
Conservazione
Audio
Protocolli
Standard WiFi
Frequenza
Crittografia WiFi
Sicurezza
Temperatura di lavoro
Energia
Consumo
Dimensioni (mm)
Batteria
Consumo in standby
Consumo di lavoro
Tempo di standby
Orario di lavoro
PIR Detection Rangle
Angolo di rilevamento PIR
CMOS da 1/2,8"
Colore 0.1Lux@F2.0
Bianco e nero 0.01Lux@F2.0
3 Mega pixel
3.2mm F2.0
1/15-1/10.000 al secondo
LED ad alta potenza con ICR
5 metri
130°
H.264
32 Kbps - 2 Mbps
2304 x 1296
1-25 al secondo
Supporta HD/SD; supporto flip
Scheda SD (massimo 256 GB)
Audio bidirezionale
HTTP, DHCP, DNS
IEEE802.11b/g/n
2,4 GHz - 2,4835 GHz
WPA-PSK/WPA2-PSK
AES128
-20 ~ 50
DC5V, 1A
4.5W MASSIMO
27.5x18x142
6700mAh
200µA (media)
220 mA (IR spento)
10 mesi
3 mesi (10 sveglie al giorno)
7 m (massimo)
100°
IT
EN

IT
EN
5. Avviso legali
Suporte
www.arenti.com
Símbolos
Corrente contínua (DC)
Non gettare batterie o prodotti fuori uso con i
rifiuti domestici (immondizia). Le sostanze
pericolose che possono includere possono
danneggiare la salute o l'ambiente. Fai in modo
che il tuo rivenditore ritiri questi prodotti o
utilizza la raccolta differenziata dei rifiuti proposta
dalla tua città.
Con la presente, Arenti, dichiara che il tipo di
apparecchiatura radio "VBell 1" è
conforme a Direttiva 2014/53 / UE
Il test completo della dichiarazione di conformità
UE è disponibile al seguente indirizzo Internet:
www.arenti.com
Solo per uso interno

Краткое руководство
1. Упаковочный лист
2. Описание
3. Установка
4. Конфигурация устройства
5. Правовое уведомление
1. Упаковочный лист
RU
EN
Камера 1X
Звонок 1X
Предупреждающая
наклейка 1X
Кронштейн 1X*
* Кронштейн прикреплен к камере.
Адаптер питания 1X
Винты 1X
Наклейка 3М 2X
2. Описание
Кабель USB 1X
Отвертка 1X
Руководство
пользовател 1X
1. Микрофон
2. Объектив
3. PIR
4. Кнопка дверного
звонка.
5. Спикер
6. Индикатор состояния
7. Слот для СД-карты
8. Сброс
9. DC5V USB
Включение/выключение
10.
устройства.

RU
EN
1. Индикатор
состояния
2. Спикер
3. Рингтон
4. Объем
5. Функциональная
кнопка
Заметка
6. Микро-USB
Чтобы перезагрузить устройство, нажмите и удерживайте
кнопку сброса в течение 5 секунд.
По завершении операции камера подает звуковой сигнал.
Светодиодный индикатор камеры:
Мигающий красный свет (медленно)
Мигающий красный свет (быстро)
Фиксированный красный свет
Фиксированный синий свет
Подождите, пока сеть
Подключение к сети
Сеть неисправна
Камера работает
Светодиодный индикатор звонка:
Мигающий красный свет
Фиксированный синий свет
Дождитесь сопряжения
Преуспеть в паре
3. Установка
Установка винтами
1. Прикрепите кронштейн к стене с помощью монтажных винтов.
2. Установите камеру в кронштейн и зафиксируйте винтом.

Установка с наклейками 3М
1. Закрепите кронштейн на камере винтом внизу.
2. Приклейте липкую ленту к кронштейну.
3. Приклейте другую сторону клейкой ленты к стене.
4. Конфигурация устройства
Шаг 1 Включите камеру.
Шаг 2 Подключите смартфон к сети Wi-Fi.
Шаг 3 Загрузите приложение Arenti из App Store или
Google Play в зависимости от вашего устройства.
Шаг 4 Запустите приложение и зарегистрируйтесь для
первого использования.
Шаг 5 Следуйте инструкциям на экране, чтобы
добавить камеру.
Для получения дополнительной информации отсканируйте
QR-код.
RU
EN

RU
EN
Заметка
Если у вас несколько камер, повторите шаг 5 еще раз,
чтобы добавлять устройства одно за другим.
Чтобы изменить сеть Wi-Fi, восстановите заводские
настройки камеры и выполните шаг 5, чтобы добавить
камеру.
Сопряжение звонков
1. Короткое нажатие « » (в течение 2 секунд), индикатор
состояния медленно мигает красным, и звуковой сигнал
перейдет в режим сопряжения.
В режиме сопряжения он
будет мигать красным
2. Нажмите кнопку дверного звонка для сопряжения. Когда
индикатор состояния звукового сигнала погаснет, и песня
будет воспроизводиться автоматически, сопряжение
звукового сигнала в это время выполнено успешно.
Описание:
1. Звонок может подключаться максимум к восьми дверным
звонкам.
2. Когда звуковой сигнал находится в режиме сопряжения,
снова нажмите « » (в течение 2 секунд), звуковой сигнал
автоматически выйдет из режима сопряжения.
3. После успешного добавления звонка громкость будет
автоматически установлена на максимум. Когда он
находится на минимальном уровне громкости, он вернется
к максимальному уровню после нажатия " ".
4. Каждое нажатие « » будет воспроизводить следующую
песню вместе с мигающим синим светом.
При воспроизведении рингтона
он будет мигать синим

Характеристики
Тип датчика
Мин. яркость
разрешение
Линза
Затвор
Инфракрасный
Инфракрасное расстояние
FOV
Сжатие видео
Битрейт
Максимальное разрешение
Частота кадров
Настройки изображения
Место хранения
Аудио
Протоколы
Стандарт Wi-Fi
Частота
Шифрование WiFi
Безопасность
Рабочая температура
Мощность
Потребление
Размер (мм)
Аккумулятор
Потребление в режиме ожидания
Расход работы
Время ожидания
Рабочее время
Диапазон обнаружения PIR
Угол обнаружения PIR
1 / 2,8 "CMOS
Цвет 0.1Lux@F2.0
Черно-белый 0.01Lux@F2.0
3 мегапикселя
3,2 мм F2.0
1 / 15–1 / 10 000 в секунду
Светодиод высокой мощности с ICR
5 метров
130 °
H.264
32 Кбит / с - 2 Мбит / с
2304 х 1296
1-25 в секунду
Поддержка HD / SD; поддержка флип
SD-карта (макс. 256 ГБ)
Двустороннее аудио
HTTP, DHCP, DNS
IEEE802.11b / g / n
2,4 ГГц - 2,4835 ГГц
WPA-PSK / WPA2-PSK
AES128
-20 ℃ ~ 50 ℃
DC5V, 1A
4,5 Вт макс.
27,5x18x142
6700 мАч
200 мкА (в среднем)
220 мА (ИК выключен)
10 месяцев
3 месяца (10 раз в день просыпаться)
7 м (макс.)
100 °
RU
EN

RU
EN
5. Правовое уведомление
Поддержка
www.arenti.com
Символы
Постоянный ток (DC)
Не выбрасывайте батарейки или вышедшую из
строя продукцию вместе с бытовыми отходами
(мусором). Опасные вещества, которые они могут
содержать, могут нанести вред здоровью или
окружающей среде. Заставьте вашего продавца
забрать эти товары или используйте выборочный
сбор мусора, предложенный вашим городом.
Настоящим Arenti заявляет, что
радиооборудование типа «VBell 1» соответствует
требованиям Директива 2014/53 / ЕС
Полный текст декларации соответствия ЕС
доступен по следующему адресу в Интернете:
www.arenti.com
Только для внутреннего использования

Hızlı başlangıç Kılavuzu
1. Paket listesi
2. Ürün açıklaması
3. Kurulum
4. Ürün yapılandırması
5. Yasal uyarı
1. Paket listesi
TU
EN
Kamera 1X
Çan 1X
Uyarı etiketi 1X
Parantez 1X*
* Parantez kameraya takılır.
Güç adaptörü 1X
Vidalar 3X
3M çıkartması 2X
2. Ürün açıklaması
USB kablosu 1X
Tornavida 1X
Hızlı kılavuz 1X
1. Mikrofon
2. Mercek
3. PIR
4. Kapı zili düğmesi
5. Konuşmacı
6. LED göstergesi
7. SD kart yuvası
8. Sıfırla
9. DC5V USB
10. Cihaz AÇIK/KAPALI

TU
EN
1. LED göstergesi
2. Hoparlör
3. Zil sesi
4. Hacim
5. İşlev düğmesi
6. Mikro USB
Farkına varmak
Cihazı sıfırlamak için sıfırlama düğmesini 5 saniye basılı tutun.
İşlem tamamlandığında kamera bip sesi çıkarır.
Kameranın LED göstergesi:
Yanıp sönen kırmızı ışık (yavaş)
Yanıp sönen kırmızı ışık (hızlı)
Sabit kırmızı ışık
Sabit mavi ışık
Çan LED göstergesi:
Yanıp sönen kırmızı ışık
Sabit mavi ışık
Ağ yapılandırmasını bekleyin
Ağı bağlama
Ağ arızalı
Kamera düzgün çalışıyor
Eşleşmeyi bekleyin
Eşlemeyi başarın
3. Kurulum
Vidalarla kurulum
1. Desteği, montaj vidalarıyla duvara sabitleyin.
2. Kamerayı brakete takın ve vidayla kilitleyin.
3M etiketlerle kurulum
1. Braketi kameraya alttaki vida ile kilitleyin.
2. Yapışkan bantları dirseğe yapıştırın.
3. Yapışkan bantların diğer tarafını duvara yapıştırın.
4. Ürün yapılandırması
Adım 1 Kameranızı açın.
Adım 2 Akıllı telefonunuzu Wi-Fi ağına bağlayın.
Adım 3 Cihazınıza bağlı olarak App Store veya Google
Play'den Arenti uygulamasını indirin.
Adım 4 Uygulamayı başlatın ve ilk kullanım için kaydolun.
Adım 5 Kameranızı eklemek için ekrandaki talimatları
izleyin.
Daha fazla bilgi için QR kodunu tarayın.
TU
EN

TU
EN
Farkına varmak
Birden fazla kameranız varsa, cihazları tek tek eklemek için
lütfen 5. adımı tekrar izleyin.
Wi-Fi ağını değiştirmek için, lütfen kamerayı fabrika
ayarlarına geri yükleyin ve kamerayı eklemek için 5. adımı
izleyin.
Çan Eşleştirme
1. Kısa basış " " (2 saniye içinde), durum ışığı yavaşça kırmızı
renkte yanıp söner ve çan eşleştirme modunda olacaktır.
Eşleştirme modu sırasında kırmızı yanıp söner
2. Zil durumu ışığı söndüğünde ve şarkı otomatik olarak
çalmaya başladığında eşleştirmek için kapı zili düğmesine
basın, zil eşleştirme şu anda başarılıdır.
Açıklama:
1. Çan, maksimum sekiz kapı ziline bağlanabilir.
2. Çan eşleştirme modundayken tekrar " " düğmesine basın
(2 saniye içinde), zil otomatik olarak eşleştirme modundan
çıkacaktır.
3. Zili başarıyla ekledikten sonra, ses otomatik olarak
maksimuma ayarlanacaktır. Minimum ses düzeyindeyken,
" " düğmesine bastıktan sonra maksimum ses düzeyine
dönecektir.
4. " " düğmesine her basıldığında, yanıp sönen mavi ışıkla
birlikte bir sonraki şarkı çalınır.
Zil sesi çalarken mavi renkte yanıp söner

Teknik Özellikler
Sensör tipi
Min. parlaklık
çözüm
Lens
Deklanşör
Kızılötesi
Kızılötesi mesafe
FOV
Video sıkıştırma
Bit hızı
Maksimum çözünürlük
Kare hızı
Görüntü ayarları
Depolama
Ses
Protokoller
WiFi standardı
Sıklık
WiFi şifreleme
Güvenlik
Çalışma sıcaklığı
Güç
Tüketim
Boyut (mm)
Batarya
Bekleme tüketimi
İş tüketimi
Bekleme süresi
Çalışma zamanı
PIR Algılama Dikdörtgen
PIR Algılama Açısı
1/2.8" CMOS
Renk 0.1Lux@F2.0
Siyah beyaz 0.01Lux@F2.0
3 Mega piksel
3,2 mm F2,0
1/15-1/10.000/saniye
ICR'li yüksek güçlü LED
5 metre
130°
H.264
32Kbps - 2Mbps
2304 x 1296
saniyede 1-25
HD/SD'yi destekleyin; destek çevirme
SD kart (Maks 256 GB)
İki yönlü ses
HTTP, DHCP, DNS
IEEE802.11b/g/n
2.4 GHz - 2.4835 GHz
WPA-PSK/WPA2-PSK
AES128
-20℃~50℃
DC5V,1A
4.5W MAKS
27.5x18x142
6700mAh
200µA (ortalama)
220mA (IR kapalı)
10 ay
3 ay (günde 10 kez uyanma)
7m (Maks.)
100°
TU
EN

TU
EN
5. Yasal uyarı
Destek
www.arenti.com
Semboller
Doğru akım (DC)
Pilleri veya bozuk ürünleri evsel atıklarla (çöp)
birlikte atmayın. İçerebilecekleri tehlikeli maddeler,
sağlığa veya çevreye zarar verebilir. Satıcınızın bu
ürünleri geri almasını sağlayın veya şehriniz
tarafından önerilen seçici çöp toplama hizmetini
kullanın.
İşbu belge ile Arenti, radyo ekipmanı tipi "VBell 1"
in 2014/53 / EU Direktifi ile uyumlu olduğunu
beyan eder.
AB uygunluk beyanının tam testi aşağıdaki İnternet
adresinde mevcuttur:
www.arenti.com
Sadece kapalı alanda kullanım için

FCC Statement
This equipment has been tested and found to comply with the limits for a
Class B digital device, pursuant to part 15 of the FCC Rules. These limits are
designed to provide reasonable protection against harmful interference in a
residential installation. This equipment generates, uses and can radiate radio
frequency energy and, if not installed and used in accordance with the
instructions, may cause harmful interference to radio communications.
However, there is no guarantee that interference will not occur in a particular
installation. If this equipment does cause harmful interference to radio or
television reception, which can be determined by turning the equipment off
and on, the user is encouraged to try to correct the interference by one or
more of the following measures:
—Reorient or relocate the receiving antenna.
—Increase the separation between the equipment and receiver.
—Connect the equipment into an outlet on a circuit different from that to
which the receiver is connected.
—Consult the dealer or an experienced radio/TV technician for help.
FCC Radiation Exposure Statement
This device complies with FCC radiation exposure limits set forth for an
uncontrolled environment and it also complies with Part 15 of the FCC RF
Rules. This equipment must be installed and operated in accordance with
provided instructions and the antenna(s) used for this transmitter must be
installed to provide a separation distance of at least 20 cm from all persons
and must not be co-located or operating in conjunction with any other
antenna or transmitter. End-users and installers must be provide with
antenna installation instructions and consider removing the no-collocation
statement.
This device complies with Part 15 of the FCC Rules. Operation is subject to
the following two conditions: (1) this device may not cause harmful
interference, and (2) this device must accept any interference received,
including interference that may cause undesired operation.
Caution!
Any changes or modifications not expressly approved by the party
responsible for compliance could void the user's authority to operate the
equipment.

V1.4 202108
© 2021 Arenti. All rights reserved. All trade names are
registered trademarks of respective companies Apple, the
Apple logo, iPhone are trademarks of Apple Inc. registered in
the U.S. and other countries. Google, the Google logo, Android
are trademarks of Google Inc. App Store is a service mark of
Apple Inc. Google Play is a service mark of Google Inc.
 Loading...