

Page 1

加工要求
印刷尺寸(单页):74x120mm
折叠方式:胶装
材质:内容80G双胶纸,封面128G
Page 2

B1
QUICK GUIDE
EN Smart Wi-Fi Video Doorbell
FR Sonnette vidéo Wi-Fi intelligente
DE Intelligente Wi-Fi Video Türklingel
IT Campanello video Wi-Fi intelligente
ES Timbre de video con Wi-Fi inteligente
Compatible with Amazon Alexa
powered by
Page 3

EN EN
Thank you for purchasing Laxihub smart home product.
Get started using your new devices by downloading
Laxihub, one convenient app that manages everything
straight from your phone or tablet. Easily connect to
your home WiFi and control multiple devices from the
touch of your fingertips.
1. Contents
B1
x
8
x
8
Screws package
1
1
Battery box
x
2
Pin
USB cable
Double sided tape
AC adaptor
Quick Guide
2. Description
B1 main body
Microphone
Doorbell button
Reset 1
External
power port
Battery box
Charging
indicator
Mini USB
Back of doorbell
Reset 2
Bayonet
lock
Status light
Speaker
SD card slot
2
2
Page 4

EN EN
3. Download the App 4. Register an account
Download the Arenti from App Store or Google Play.
Scan and download Arenti App for free
3
In order to receive notification in time, please click “Allow”.
Open the Arenti App. If you are a new user, tap create new
account and follow the prompts to complete registration.
Note: Please agree with the
Privacy Agreement.
4
Page 5

EN EN
5. Pair your device
Click to add a new device, and select “Doorbell”.
5
Pair your device
Power on your doorbell, you will hear a welcome sound.
If the status light is red
The doorbell is successfully powered on and ready for
pairing.
and blinking (once per second).
6
Page 6

EN EN
Pair your device
Enter the Wi-Fi password and tap Next to proceed.
If needed, you can tap Change WiFi to switch to
another suitable WiFi network for your doorbell.
Press “Next” to scan QR code using your doorbell.
Keep 5~8inches away from your mobile screen.
7
Pair your device
Scan
QR
Code
on screen
Press “Next” after hearing a sound from your doorbell.
The Arenti App will start to connect to the doorbell
automatically as indicated by the status light blinking
rapidly and then staying solid blue
.
8
Page 7

EN EN
Pair your device
9
Pair your device
Once the pairing process is complete, a page showing
“Device Found!” will appear.
You may choose to edit the device name or assign the
device to a dedicated room before tapping Done to
finish the pairing process.
Once your camera is paired, your camera can be viewed
at anytime from your smartphone as long as there is
Internet access.
If no device is found and the pairing process failed, please
check below instructions:
1) WiFi network is 2.4GHz
2) WiFi password entered is correct and the same WiFi
network is used for the mobile device.
3) Arenti device is in pairing mode.
4) Check your WiFi for network activity.
.
10
Page 8

EN EN
6. Live viewing 7. History
Tap to capture a photo/video
during live view or playback
Return
Setting menu
Battery status
Volume on/off
Full screen display
Stream bit rate
WiFi signal strength
Notification history
HD/SD switch Cloud storage service
Note: the photo and video
are saved to the internal
memory of your smartphone
Tap to enable talking
Tap to enable motion detection
Select a data to review your playback
from SD card
Tap to search video clips by date
11
12
Page 9

EN EN
8. Installation
Before choosing your preferred location, check the WiFi
strength/coverage to ensure the doorbell is fully functional.
Battery powered mode
Step 1 Remove the bracket from
B1.
Step 2 Fix the bracket on the wall
with screws and insert the
doorbell into the bracket.
Step 3 Insert the battery box into
the doorbell.
Bracket
Side
view
13
Installation
AC powered mode
Step 1 Remove the bracket from
B1.
Step 2 Connect AC power with
your wires.
12~24V AC
Step 3 Fix the bracket on the wall
with screws and insert the
doorbell into the bracket.
Bracket
Side
view
14
Page 10

EN EN
Installation
Double sided tape mode
Step 1 Attach the double sided tape to both sides of the
bracket
tape
Step 2 Stick the doorbell to a clean flat tightly.
15
9. Trouble shooting
Status Light
What can I
do if I fail to
pair my
Laxihub
device?
Does our
current
Laxihub
device
support 5GHz
wireless?
Blink
: Currently connecting
Solid on: Camera running correctly
: Awaiting WiFi connection and
Blink
Currently connecting (faster
blinking)
Solid on
: The camera or network is
abnormal
1. Check your mobile device is connected to
a 2.4GHz WiFi network.
2. Check WiFi password entered is correct and
the same WiFi network is used both for mobile
and pairing.
3. Check Laxihub device is in pairing mode,the
status light blinks red slowly.
No - Laxihub device currently does not support
5GHz
wireless connection.
(1 time/s)
16
Page 11

EN
Trouble shooting
How to
change the
camera
network to
First reset the device or remove it on the
Arenti
App, then configure the device again
by the App.
another
router?
Why doesn’t
the device
identify the
SD card?
It’s recommended to plug SD card after
power cut. Confirm whether the SD card is
normally available and the format is FAT32.
And the SD card can’t be identified when
the Internet environment is not good.
Please visit our official website for further assistance.
www.laxihub.com
17
Page 12

FR FR
Merci d'avoir acheté un produit pour maison intelligente
Laxihub. Commencez à utiliser vos nouveaux appareils en
téléchargeant Laxihub, une application pratique qui gère
tout directement depuis votre téléphone ou votre tablette.
Connectez-vous facilement à votre Wi-Fi domestique et
contrôlez plusieurs appareils depuis toucher du bout des
doigts.
1. Contenu
B1
Paquet de vis
1
18
x
x
Boîtier de batterie
x
8
2
8
cable USB
Ruban adhésif double face
adaptateur secteur
Guide rapideÉpingle
2. Description
B1 corps principal
Microfono
Bouton de
sonnette
Réinitialiser 1
Port
d'alimentation externe
Boîtier de batterie
Indicateur
de charge
Mini USB
Arrière de la sonnette
Réinitialiser 2
Serrure à
baïonnette
Voyant d'état
Orateur
Emplacement
pour carte SD
2
19
Page 13

FR FR
3. Téléchargez l'application 4. Enregistrez un compte
Téléchargez Arenti depuis l'App Store ou Google Play.
Scannez et téléchargez gratuitement l'application Arenti
20
Pour recevoir une notification à temps, veuillez cliquer sur
«Autoriser».
Ouvrez l'application Arenti. Si vous êtes un nouvel
utilisateur, appuyez sur créer un nouveau compte et s
uivez les invites pour terminer l'enregistrement.
Remarque: veuillez accepter l'accord de confidentialité.
21
Page 14

FR FR
5. Jumelez votre appareil Associez votre appareil
Allumez votre sonnette, vous entendrez un son de
Cliquez pour ajouter un nouvel appareil et sélectionnez
«Sonnette».
bienvenue. Si le voyant d'état est rouge et clignote (une
fois par seconde). La sonnette est allumée avec succès et
prête pour appariement.
22
23
Page 15

FR FR
Associez votre appareil
Saisissez le mot de passe Wi-Fi et appuyez sur Suivant
pour continuer. Si nécessaire, vous pouvez appuyer sur
Changer WiFi pour basculer sur un autre réseau WiFi
adapté à votre sonnette.
Appuyez sur "Suivant" pour scanner le code QR à l'aide
de votre sonnette. Gardez 5 ~ 8 pouces loin de votre
écran mobile.
24
Associez votre appareil
Scan
QR
Code
on screen
Appuyez sur "Suivant" après avoir entendu un son de
votre sonnette.
L'application Arenti commencera à se connecter à la
sonnette automatiquement comme indiqué par le
voyant d'état clignotant rapidement puis en restant
bleu fixe.
25
Page 16
FR FR
Associez votre appareil
26
Associez votre appareil
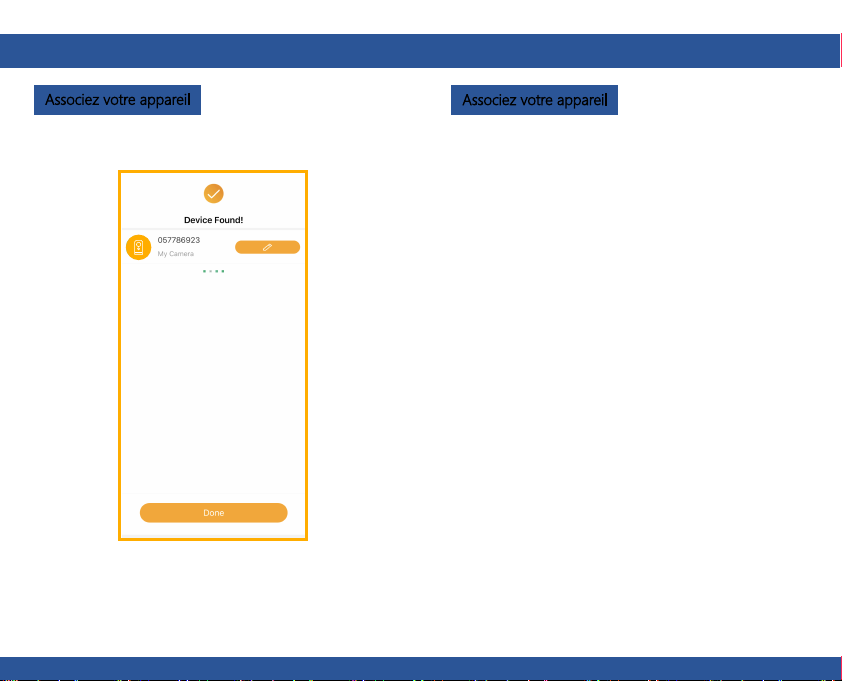
Une fois le processus de couplage terminé, une page
affichant «Device Found!» apparaîtra.
Vous pouvez choisir de modifier le nom de l'appareil ou
d'affecter l'appareil à une pièce dédiée avant de taper
sur Terminé pour terminer le processus d'appairage.
Une fois votre caméra couplée, votre caméra peut être
visualisée à tout moment depuis votre smartphone tant
qu'il y a Accès Internet.
Si aucun appareil n'est trouvé et que le processus de
jumelage a échoué, veuillez consultez les instructions
ci-dessous:
1) Le réseau WiFi est de 2,4 GHz.
2) Le mot de passe WiFi entré est correct et le même
WiFi réseau est utilisé pour l'appareil mobile.
3) L'appareil Arenti est en mode d'appairage.
4) Vérifiez votre WiFi pour l'activité du réseau.
27
Page 17
FR FR
6. Visualisation en direct
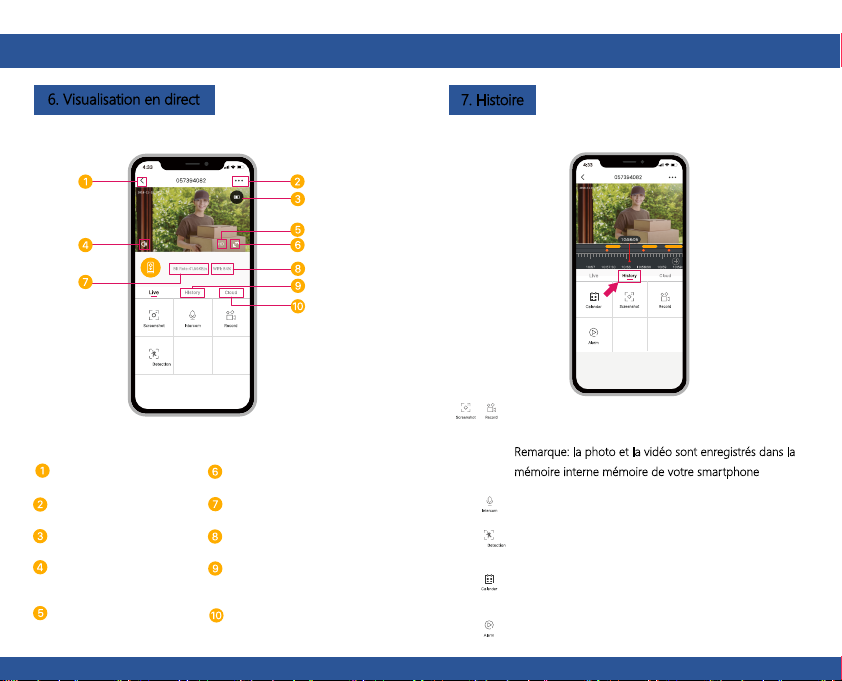
Retrun
Menu de réglage
État de la batterie
Activation/désactivation d
Affichage plein écran
Débit binaire
Puissance du signal WiFi
Historique des notifications
u volume
Commutateur HD/SD Service de stockage cloud
28
7. Histoire
Appuyez pour capturer une photo / vidéo
pendant la visualisation en direct ou la lecture
Remarque: la photo et la vidéo sont enregistrés dans la
mémoire interne mémoire de votre smartphone
Appuyez pour activer la conversation
Appuyez pour activer la détection de
mouvement
Sélectionnez une donnée pour revoir votre
lecture depuis la carte SD
Appuyez pour rechercher des clips vidéo par
date
29
Page 18
FR FR
8. Installation
Avant de choisir votre emplacement préféré, vérifiez la
puissance / couverture WiFi pour vous assurer que la
sonnette est entièrement fonctionnelle.
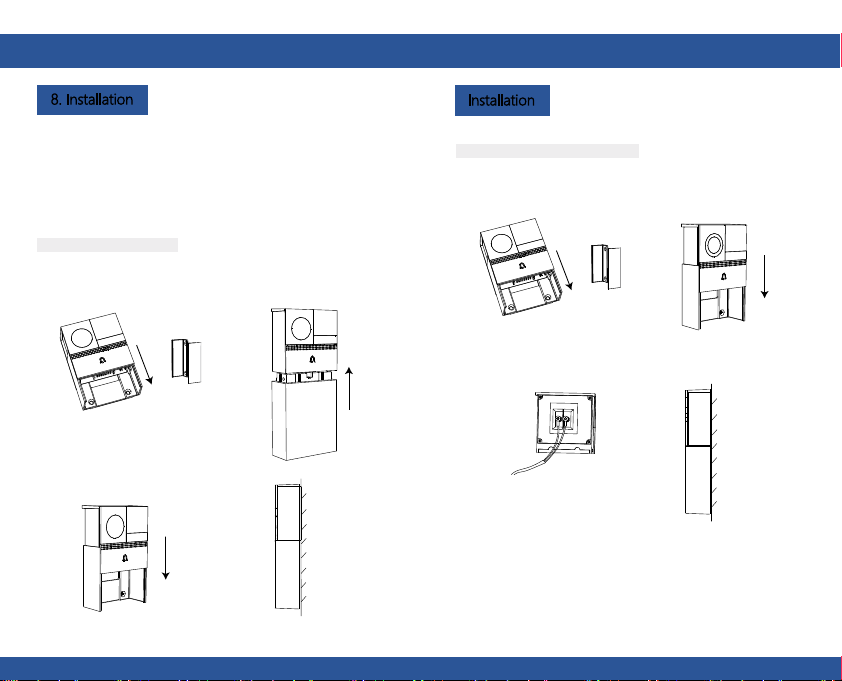
Mode alimenté par batterie
Step 1 Retirez le support de.
Step 2 Fixez le support au mur avec
des vis et insérez la sonnette
dans le support.
Step 3 Insérez le boîtier de la batterie
dans la sonnette.
Supporto
Vue de côté
30
Installation
Mode alimenté en courant alternatif
Step 1 Retirez le support de.
Supporto
Step 2 Connectez l'alimentation CA à
vos fils.
12~24V AC
Step 3 Fixez le support au mur avec des
vis et insérez la sonnette dans le
support.
Vue de côté
31
Page 19
FR FR
Installation
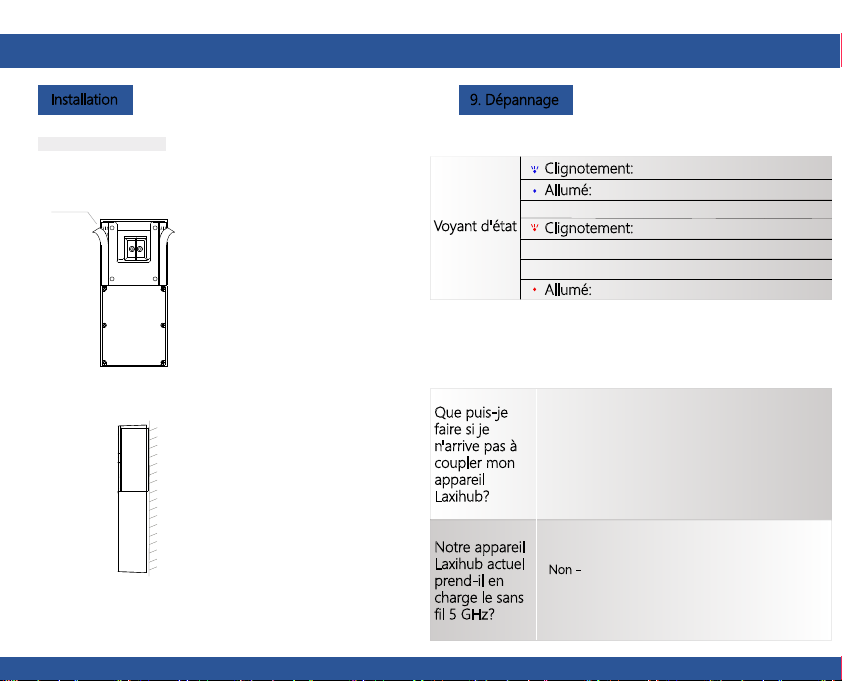
Mode ruban double face
Step 1 Fixez le ruban adhésif double face des deux côtés du support.
ruban
Step 2 Collez bien la sonnette sur un plat propre.
32
9. Dépannage
Voyant d'état
Que puis-je
faire si je
n'arrive pas à
coupler mon
appareil
Laxihub?
Notre appareil
Laxihub actuel
prend-il en
charge le sans
fil 5 GHz?
Clignotement:
connexion en cours
Allumé: l'appareil photo fonctionne
correctement
Clignotement: en attente de connexion WiFi
et en cours de connexion (plus rapide
clignotant)
Allumé: la caméra ou le réseau est anormal
1. Vérifiez que votre appareil mobile est connecté à
un réseau WiFi 2,4 GHz.
2. VVérifiez que le mot de passe WiFi entré est
correct et que le même réseau WiFi est utilisé à la
fois pour le mobile.
3. Vérifiez que l'appareil Laxihub est en mode
d'appairage, le voyant d'état clignote lentement en
rouge. (1 fois)
Non - Le périphérique Laxihub ne prend
actuellement pas en charge Connexion sans fil
5 GHz.
33
Page 20
FR
Dépannage
Comment
changer le
réseau de
caméras sur
un autre
routeur?
Réinitialisez d'abord l'appareil ou supprimez-le
sur l'application Arenti, puis configurez à
nouveau l'appareil par l'application.
Pourquoi l'
appareil
n'identifie-t-il
pas la carte
SD?
Il est recommandé de brancher la carte SD
après une coupure de courant. Vérifiez si la
carte SD est normalement disponible et si le
format est FAT32. Et la carte SD ne peut pas
être identifiée lorsque l'environnement Internet
n'est pas bon.
Veuillez visiter notre site officiel pour plus d'assistance.
www.laxihub.com
34
Page 21
DE DE
Vielen Dank, dass Sie sich für das Smart Home-Produkt
von Laxihub entschieden haben. Beginnen Sie mit dem
Verwenden Ihrer neuen Geräte, indem Sie sie
herunterladenLaxihub, eine praktische App, die alles
verwaltet direkt von Ihrem Telefon oder Tablet. Einfach
verbinden mit Ihr Heim-WLAN und steuern Sie mehrere
Geräte von der Berührung Ihrer Fingerspitzen.
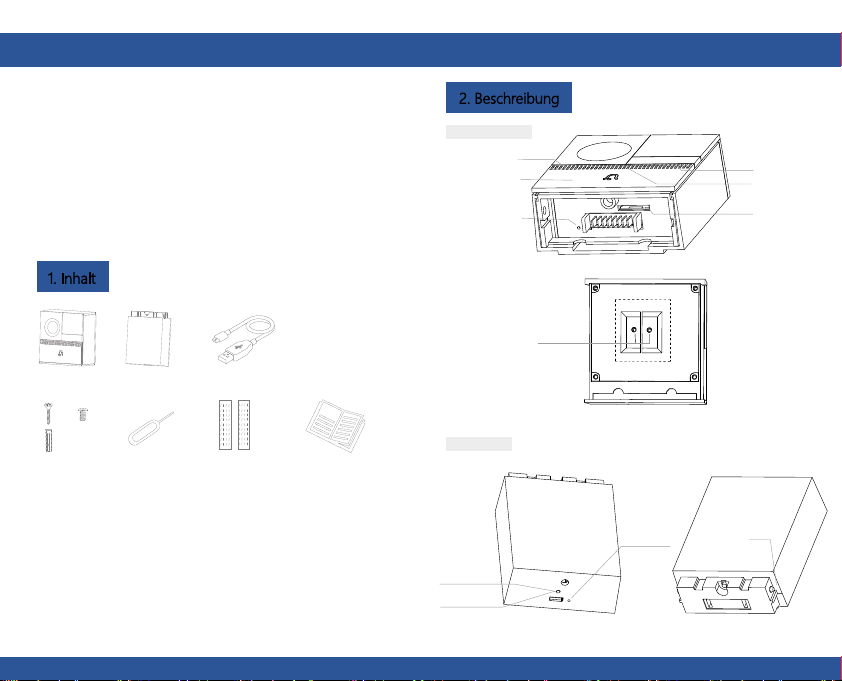
1. Inhalt
B1
x
8
x
8
Schraubenpaket
1
35
Batteriefach
x
2
Stift
USB-Kabel
Doppelseitiges Klebeband
Kurzanleitung
2. Beschreibung
B1 Hauptkörper
Mikrofon
Türklingelk
nopf
1 zurückset
zen
Externer
Stromanschluss
Batteriefach
Ladean
zeige
Mini USB
Rückseite der Türklingel
Zurückset
zen 2
Bajonettv
erschluss
Statusleuchte
Lautsprecher
SD-Kartenste
ckplatz
2
36
Page 22
DE DE
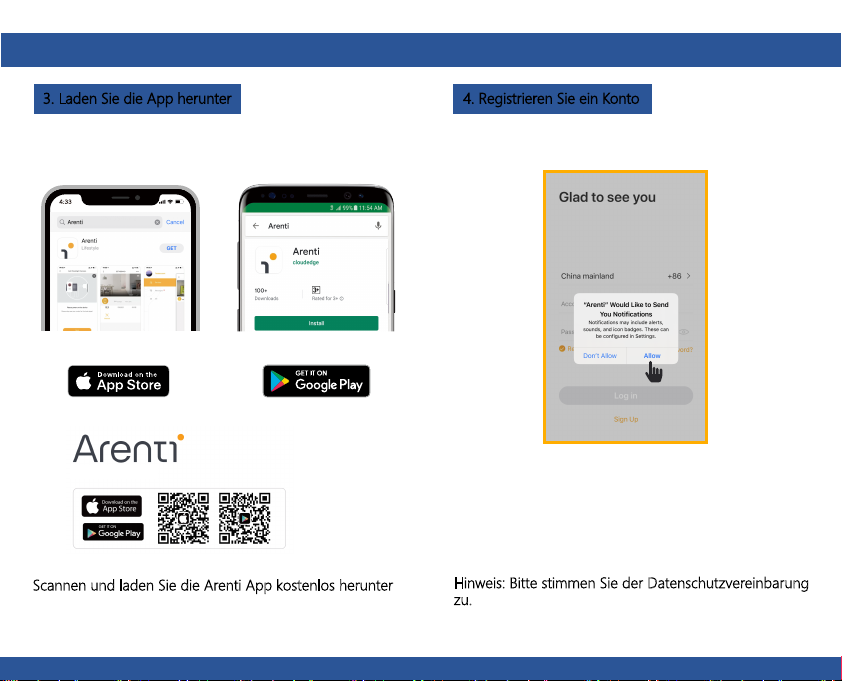
3. Laden Sie die App herunter
Laden Sie den Arenti aus dem App Store oder von
Google Play herunter.
Scannen und laden Sie die Arenti App kostenlos herunter
37
4. Registrieren Sie ein Konto
Um rechtzeitig benachrichtigt zu werden, klicken Sie bitte
auf "Zulassen".
Öffnen Sie die Arenti App. Wenn Sie ein neuer Benutzer
sind, tippen Sie auf Neu erstellen Konto und befolgen Sie
die Anweisungen, um die Registrierung abzuschließen.
Hinweis: Bitte stimmen Sie der Datenschutzvereinbarung
zu.
38
Page 23
DE DE
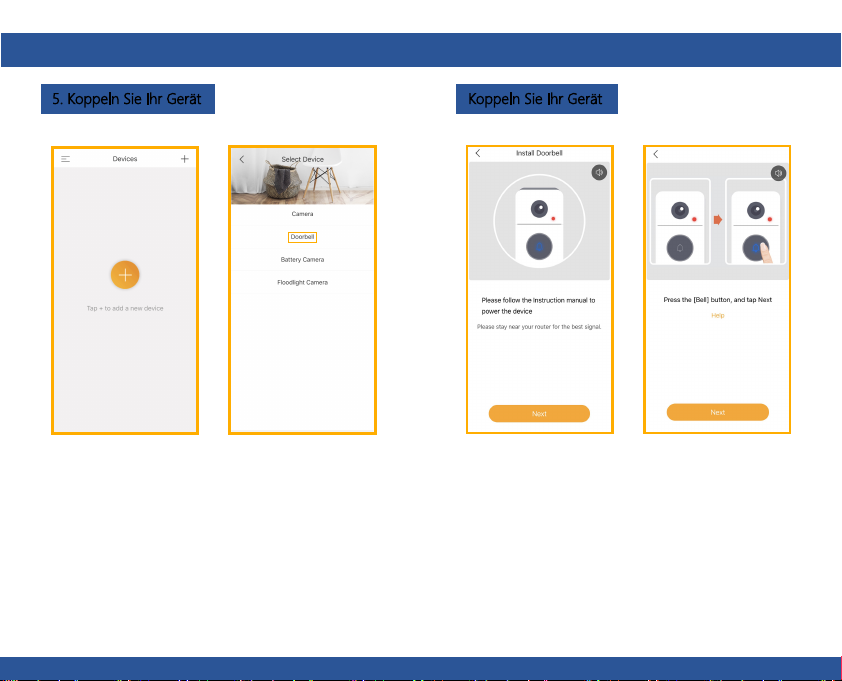
5. Koppeln Sie Ihr Gerät Koppeln Sie Ihr Gerät
Wenn Sie Ihre Türklingel einschalten, hören Sie ein
Klicken Sie, um ein neues Gerät hinzuzufügen, und
wählen Sie "Türklingel".
willkommenes Geräusch. Wenn die Statusanzeige rot ist
und blinkt (einmal pro Sekunde). Die Türklingel ist
erfolgreich eingeschaltet und bereit für Paarung.
39
40
Page 24
DE DE
Koppeln Sie Ihr Gerät Koppeln Sie Ihr Gerät
Scan
QR
Code
on screen
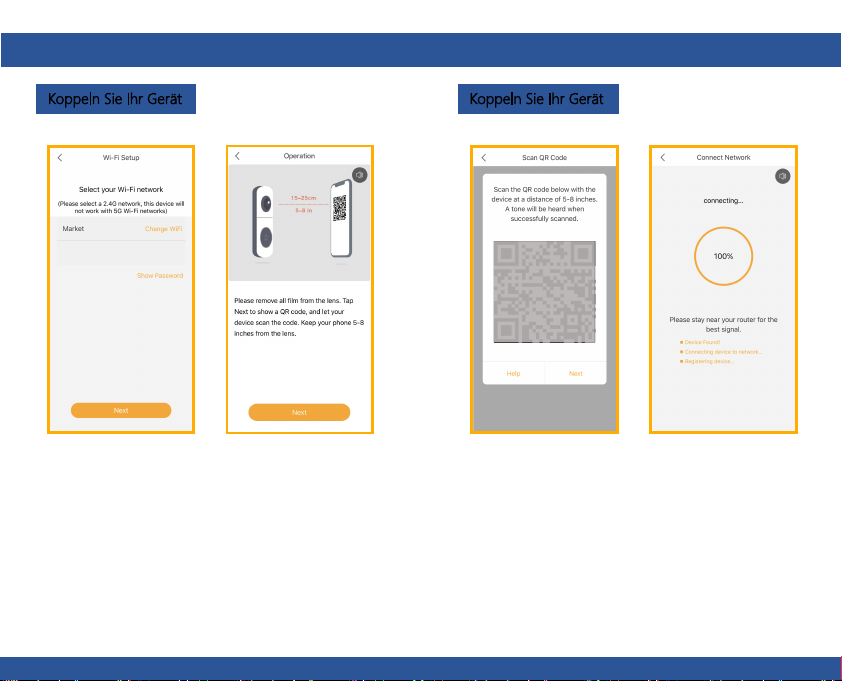
Geben Sie das WLAN-Passwort ein und tippen Sie auf
Weiter, um fortzufahren. Bei Bedarf können Sie auf
WLAN ändern tippen, um zu zu wechseln ein weiteres
geeignetes WiFi-Netzwerk für Ihre Türklingel.
Drücken Sie auf "Weiter", um den QR-Code mit Ihrer
Türklingel zu scannen. Halten Sie 5 bis 8 Zoll von Ihrem
mobilen Bildschirm entfernt.
41
Drücken Sie auf "Weiter", nachdem Sie ein Geräusch von
Ihrer Türklingel gehört haben.
Die Arenti App stellt eine Verbindung zur Türklingel her
automatisch, wie durch Blinken der Statusanzeige
angezeigt schnell und dann durchgehend blau.
42
Page 25
DE DE
Koppeln Sie Ihr Gerät
43
Koppeln Sie Ihr Gerät
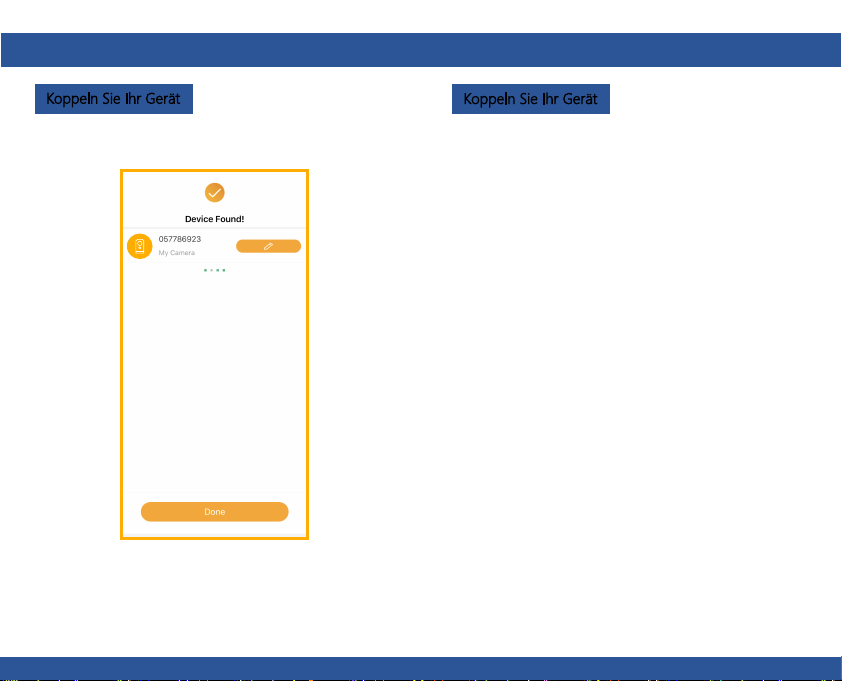
Sobald der Pairing-Vorgang abgeschlossen ist, wird eine
Seite mit der Meldung "Gerät gefunden!" Angezeigt. wird
auftauchen.
Sie können den Gerätenamen bearbeiten oder das Gerät
einem bestimmten Raum zuweisen, bevor Sie auf Fertig
tippen, um den Pairing-Vorgang abzuschließen.
Sobald Ihre Kamera gekoppelt ist, kann Ihre Kamera
angezeigt werden jederzeit von Ihrem Smartphone aus,
solange es gibt Internet Zugang.
Wenn kein Gerät gefunden wird und der Pairing-Vorgang
fehlgeschlagen ist, bitte Überprüfen Sie die folgenden
Anweisungen:
1) WiFi-Netzwerk ist 2,4 GHz.
2) Das eingegebene WLAN-Passwort ist korrekt und das
gleiche WLAN Netzwerk wird für das mobile Gerät
verwendet.
3) Das Arenti-Gerät befindet sich im Pairing-Modus.
4) Überprüfen Sie Ihr WLAN auf Netzwerkaktivität.
44
Page 26
DE DE
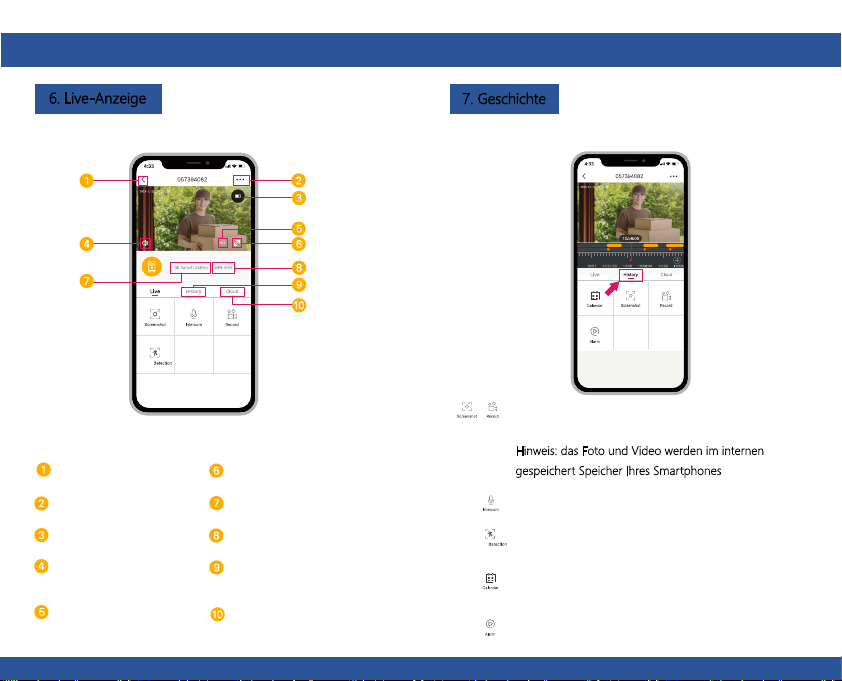
6. Live-Anzeige
Wiederholen
Menü einstellen
Batteriestatus
Lautstärke ein/aus
Vollbildanzeige
Stream-Bitrate
WiFi-Signalstärke
Benachrichtigungsverlauf
HD/SD-Schalter Cloud-Speicherdienst
45
7. Geschichte
Tippen Sie hier, um ein Foto / Video während
der Live-Ansicht oder Wiedergabe aufzunehmen
Hinweis: das Foto und Video werden im internen
gespeichert Speicher Ihres Smartphones
Tippen Sie auf, um das Sprechen zu aktivieren
Tippen Sie auf, um die Bewegungserkennung
zu aktivieren
Wählen Sie Daten aus, um Ihre Wiedergabe zu
überprüfen von der SD-Karte
Tippen Sie hier, um nach Videoclips nach Datum
zu suchen
46
Page 27
DE DE
8. Installation
Überprüfen Sie vor der Auswahl Ihres bevorzugten
Standorts die WLAN-Stärke / Abdeckung, um
sicherzustellen, dass die Türklingel voll funktionsfähig ist.
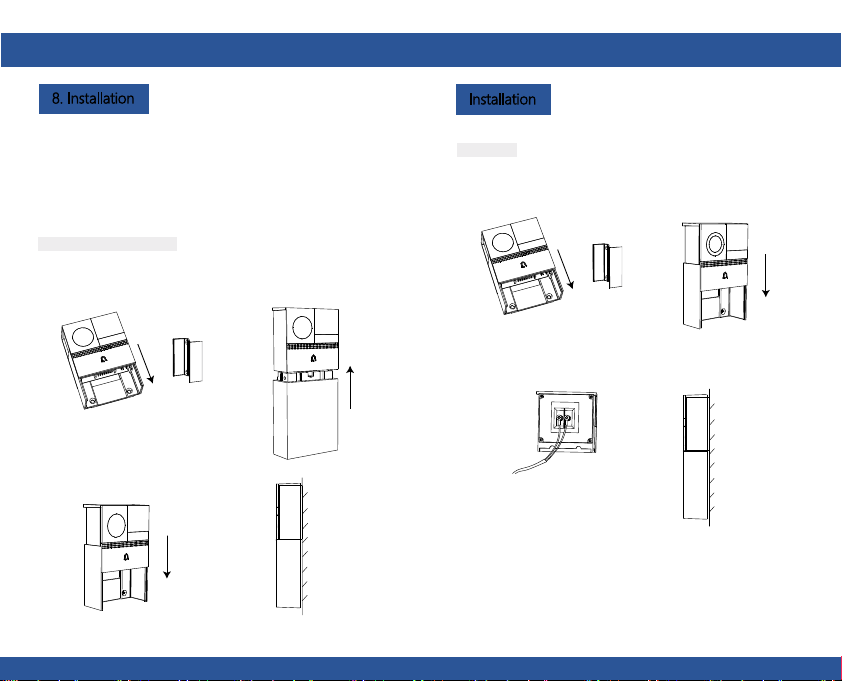
Batteriebetriebener Modus
Schritt 1 Entfernen Sie die Halterung
von
Schritt 2 Befestigen Sie die Halterung mit
Schrauben an der Wand und
setzen Sie die Türklingel in die
Halterung ein.
Schritt 3 Setzen Sie den Batteriekasten
in die Türklingel ein.
Halterung
Seitenansicht
47
Installation
AC-Modus
Schritt 1 Entfernen Sie die
Halterung von.
Halterung
Schritt 2 Schließen Sie die
Wechselstromversorgung an Ihre
Kabel an.
12~24V AC
Schritt 3 Befestigen Sie die Halterung mit
Schrauben an der Wand und
setzen Sie die Türklingel in die
Halterung ein.
Seitenansicht
48
Page 28
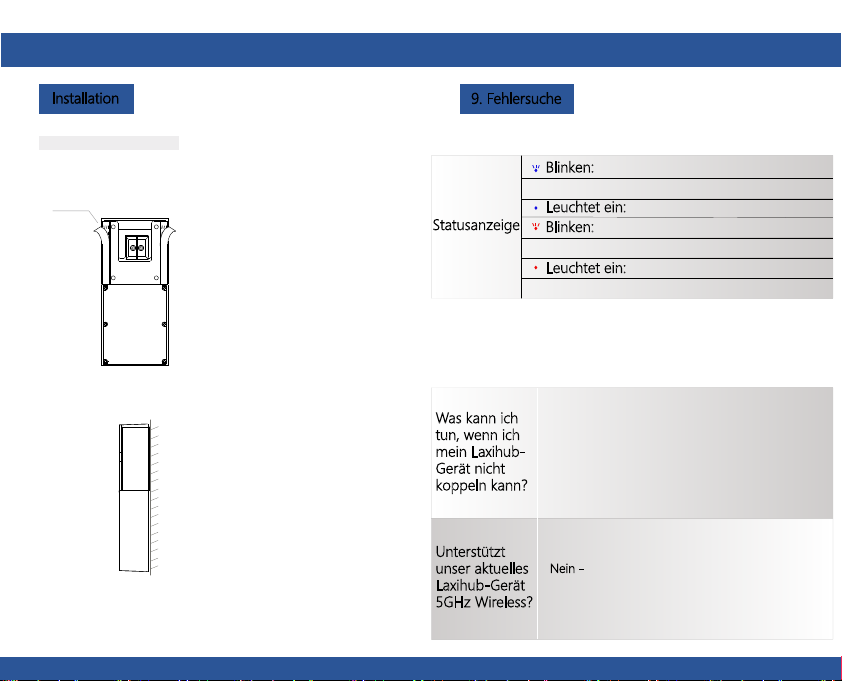
DE DE
Installation
Doppelseitiger Bandmodus
Schritt 1 Bringen Sie das doppelseitige Klebeband an beiden Seiten der
Halterung an
band
Schritt 2 Kleben Sie die Türklingel fest in eine saubere Wohnung
49
9. Fehlersuche
Statusanzeige
Was kann ich
tun, wenn ich
mein LaxihubGerät nicht
koppeln kann?
Unterstützt
unser aktuelles
Laxihub-Gerät
5GHz Wireless?
Derzeit wird eine Verbindung
Blinken:
hergestellt
Leuchtet ein: Kamera läuft korrekt
Blinken: Warten auf WiFi-Verbindung und
aktuelle Verbindung (schneller blinkend)
Leuchtet ein: Die Kamera oder das Netzwerk
ist abnormal
1. Überprüfen Sie, ob Ihr Mobilgerät mit einem 2,4-
GHz-WLAN-Netzwerk verbunden ist.
2. Überprüfen Sie, ob das eingegebene WLANPasswort korrekt ist und dasselbe WLAN-Netzwerk
für Mobilgeräte verwendet wird und Paarung.
3. Überprüfen Sie, ob sich das Laxihub-Gerät im
Pairing-Modus befindet. Die Statusanzeige blinkt
langsam rot. (1 mal)
Nein - Laxihub-Geräte werden derzeit nicht
unterstützt 5 GHz drahtlose Verbindung.
50
Page 29
DE
Fehlerbehebung
Wie ändere
ich das
Kameranetz
werk auf
einen anderen
Router?
Setzen Sie das Gerät zuerst zurück oder
entfernen Sie es in der Arenti-App.
Konfigurieren Sie das Gerät dann erneut über
die App.
Warum
identifiziert
das Gerät die
SD-Karte
nicht?
Es wird empfohlen, die SD-Karte nach dem
Stromausfall einzustecken. Überprüfen Sie, ob
die SD-Karte normalerweise verfügbar ist und
das Format FAT32 lautet. Und die SD-Karte
kann nicht identifiziert werden, wenn die
Internetumgebung nicht gut ist.
Bitte besuchen Sie unsere offizielle Website für weitere
Unterstützung.
www.laxihub.com
51
Page 30
IT IT
Grazie per aver acquistato il prodotto per la casa
intelligente Laxihub. Inizia a utilizzare i tuoi nuovi
dispositivi scaricando Laxihub, una comoda app che
gestisce tutto direttamente dal tuo telefono o tablet.
Connettiti facilmente a il tuo WiFi di casa e controlla
più dispositivi dal tocco delle dita.
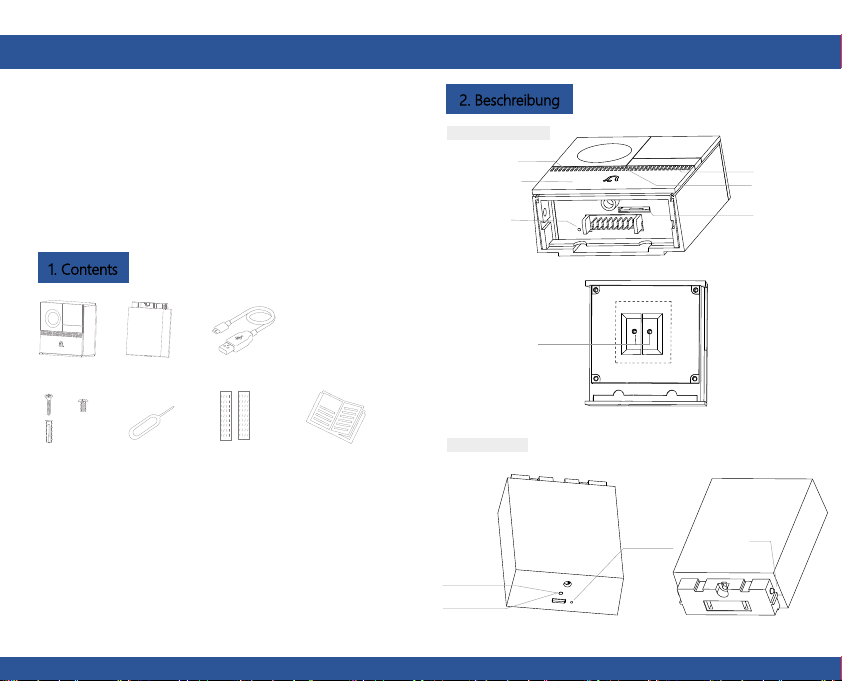
1. Contents
x
2
Scatola batteria
perno
cavo USB
Nastro biadesivo
Guida veloce
B1
x
8
x
8
Pacchetto di viti
1
52
2. Beschreibung
B1 corpo principale
Microfono
Pulsante del
campanello
Ripristina 1
Porta di
alimentazione esterna
Scatola batteria
Indicatore
di carica
Mini USB
Parte posteriore del campanello
Ripristina 2
Chiusura a
baionetta
Spia di stato
altoparlante
Slot per
scheda SD
2
53
Page 31
IT IT
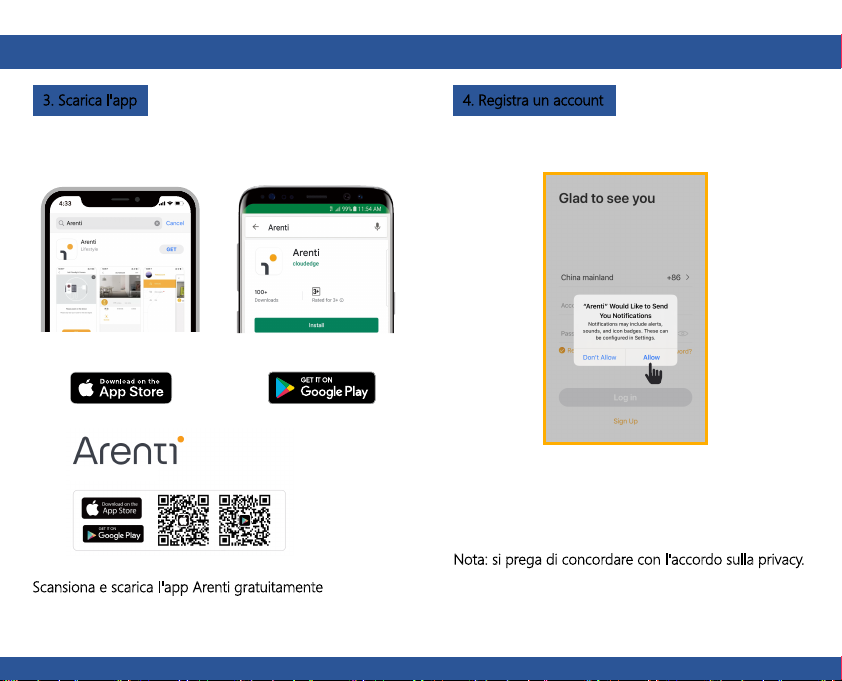
3. Scarica l'app
Scarica l'Arenti dall'App Store o Google Play.
Scansiona e scarica l'app Arenti gratuitamente
54
4. Registra un account
Per ricevere la notifica in tempo, fare clic su "Consenti".
Apri l'app Arenti. Se sei un nuovo utente, tocca crea nuovo
conto e seguire le istruzioni per completare la registrazione.
Nota: si prega di concordare con l'accordo sulla privacy.
55
Page 32
IT IT
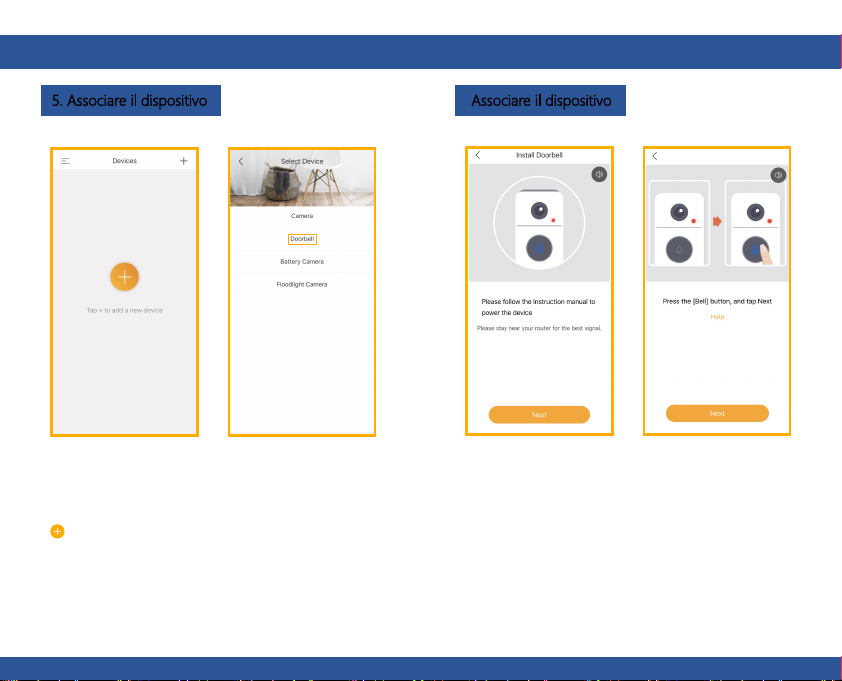
5. Associare il dispositivo Associare il dispositivo
Accendi il tuo campanello, sentirai un suono di benvenuto.
Fai clic per aggiungere un nuovo dispositivo e seleziona
" "
Se la spia di stato è rossa e lampeggiante (una volta al
secondo).Il campanello è acceso con successo e pronto
peraccoppiamento.
56
57
Page 33
IT IT
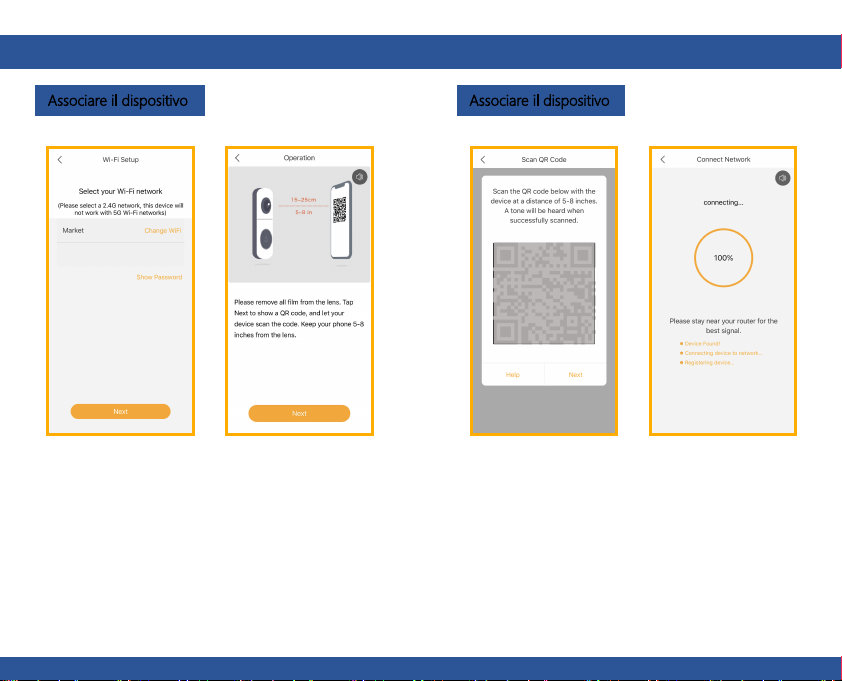
Associare il dispositivo Associare il dispositivo
Scan
QR
Code
on screen
Immettere la password Wi-Fi e toccare Avanti per
procedere. Se necessario, puoi toccare Cambia WiFi
per passare a un'altra rete WiFi adatta per il tuo
campanello.
Premi "Avanti" per scansionare il codice QR usando il tuo
campanello. Tieni 5 ~ 8 pollici di distanza dallo schermo
del tuo cellulare.
58
Premi "Next" dopo aver sentito il suono del tuo
campanello.
L'App Arenti inizierà a connettersi al campanello
automaticamente come indicato dalla spia di stato
lampeggiante rapidamente e quindi rimanere blu fisso.
59
Page 34
IT IT
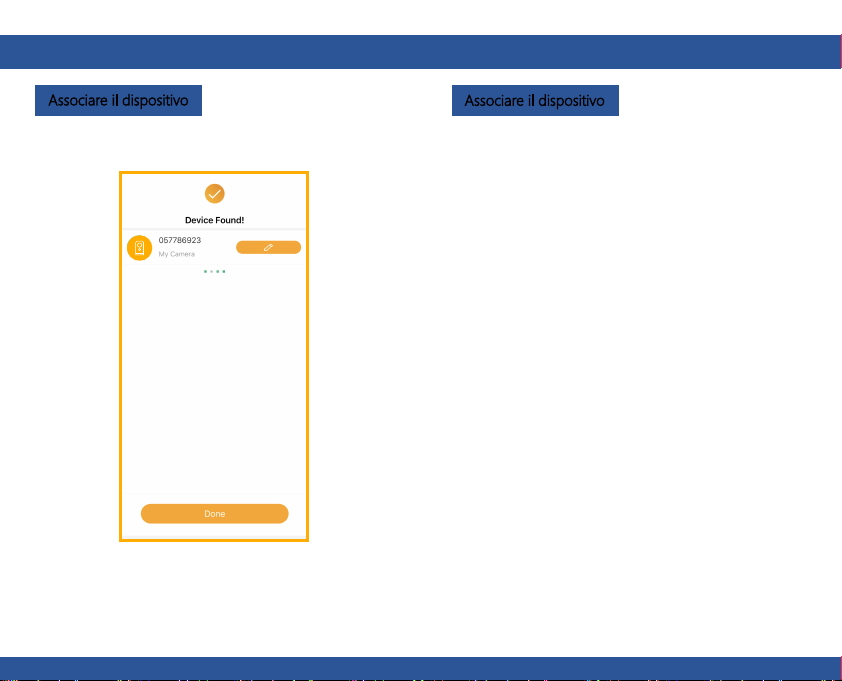
Associare il dispositivo
60
Associare il dispositivo
Una volta completato il processo di associazione, viene
visualizzata una pagina "Dispositivo trovato!" apparirà.
È possibile scegliere di modificare il nome del dispositivo
o assegnare il dispositivo in una stanza dedicata prima di
toccare Fine completare il processo di associazione.
Una volta che la fotocamera è accoppiata, è possibile
visualizzare la fotocamera in qualsiasi momento dal tuo
smartphone, purché ci sia accesso a Internet.
Se non viene trovato alcun dispositivo e il processo di
associazione non è riuscito, per favore controlla sotto le
istruzioni:
1) La rete WiFi è a 2,4 GHz.
2) La password WiFi inserita è corretta e lo stesso WiFi
la rete viene utilizzata per il dispositivo mobile.
3) Il dispositivo Arenti è in modalità di associazione.
4) Controlla il tuo WiFi per l'attività di rete.
61
Page 35
IT IT
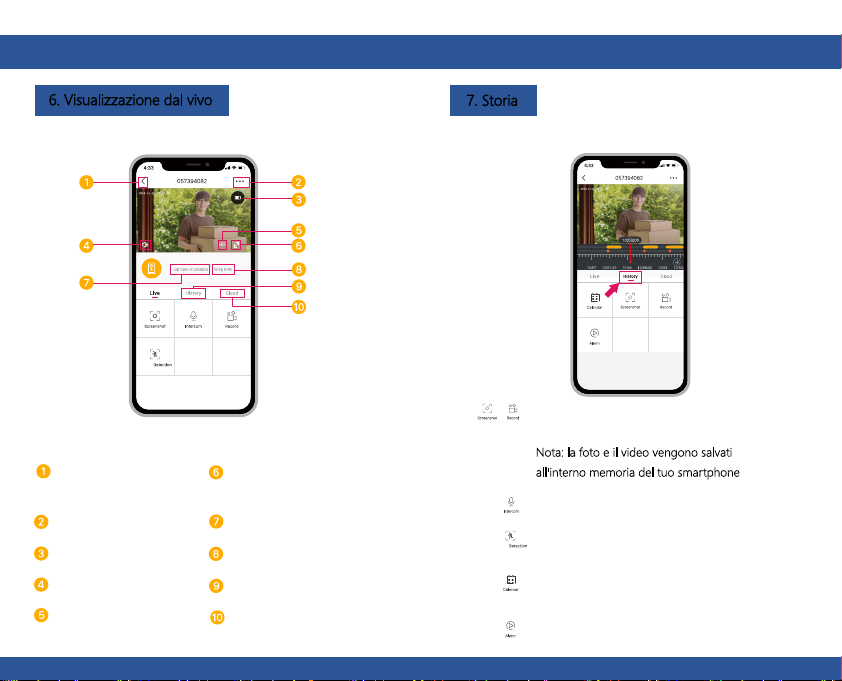
6. Visualizzazione dal vivo
Return
Visualizzazione a schermo
intero
Menu di impostazione
Stato della batteria
Volume acceso/spento
Stream bit rate
Potenza del segnale WiFi
Cronologia delle notifiche
Switch HD/SD Servizio di cloud storage
62
7. Storia
Tocca per catturare una foto / video
durante live view o riproduzione
Nota: la foto e il video vengono salvati
all'interno memoria del tuo smartphone
Tocca per abilitare la conversazione
Tocca per abilitare il rilevamento del
movimento
Seleziona un dato per rivedere la tua
riproduzione dalla scheda SD
Tocca per cercare video clip per data
63
Page 36
IT IT
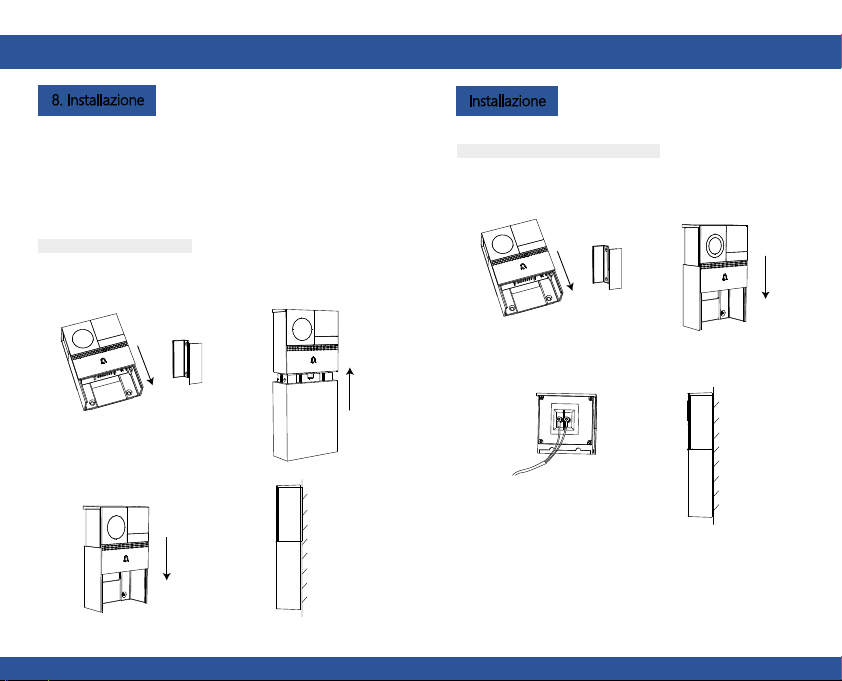
8. Installazione
Prima di scegliere la posizione preferita, controllare la
potenza / copertura WiFi per assicurarsi che il campanello
sia perfettamente funzionante.
Modalità alimentata a batteria
Step 1 Rimuovere la staffa da.
Step 2 Fissare la staffa sulla parete con
le viti e inserire il campanello
nella staffa.
Step 3 Inserire il vano batteria nel
campanello.
Supporto
Vista laterale
64
Installazione
Modalità alimentata a corrente alternata
Step 1 Rimuovere la staffa da.
Supporto
Step 2 Collegare l'alimentazione CA
con i cavi.
12~24V AC
Step 3 Fissare la staffa sulla parete con
le viti e inserire il campanello
nella staffa.
Vista laterale
65
Page 37
IT IT
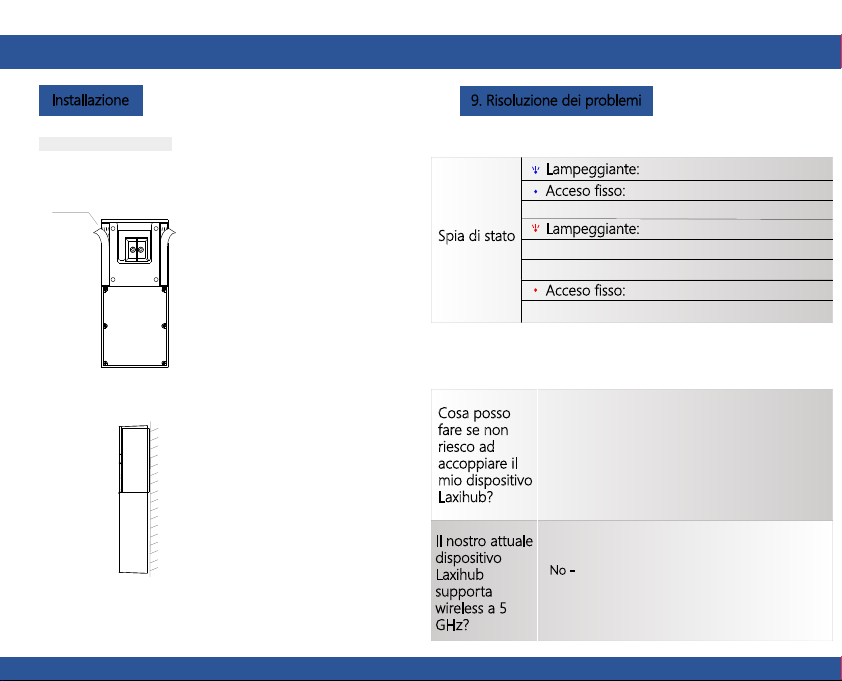
Installazione
Modalità nastro biadesivo
Step 1 Collegare il nastro biadesivo su entrambi i lati della staffa.
nastro
Step 2 Attaccare saldamente il campanello su un piano pulito.
66
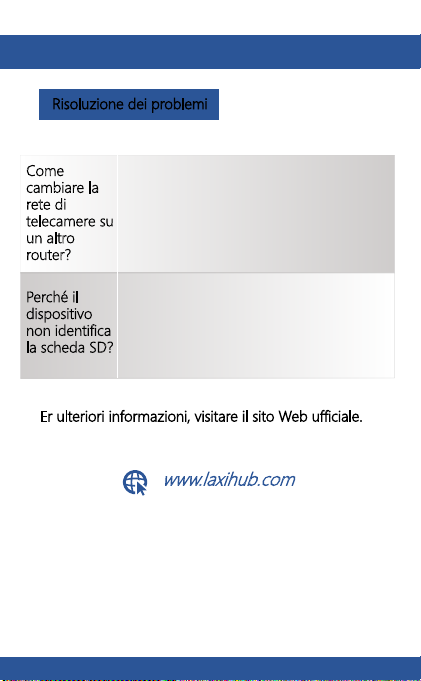
9. Risoluzione dei problemi
Lampeggiante:
Acceso fisso: la fotocamera funziona
correttamente
Spia di stato
Lampeggiante: in attesa di connessione
WiFi e connessione attualmente in corso (più
veloce lampeggiante)
Acceso fisso: la videocamera o la rete sono
anomale
Cosa posso
fare se non
riesco ad
accoppiare il
mio dispositivo
Laxihub?
1. Verifica che il tuo dispositivo mobile sia collegato
a una rete WiFi a 2,4 GHz.
2. Verifica che la password WiFi inserita sia corretta
e che la stessa rete WiFi sia utilizzata sia per i
dispositivi mobili e accoppiamento.
3. Verificare che il dispositivo Laxihub sia in modalità
di associazione, la spia di stato lampeggia
lentamente in rosso. (1 volta/e)
Il nostro attuale
dispositivo
Laxihub
supporta
No - Momento il dispositivo Laxihub non supporta
Connessione wireless a 5 GHz.
wireless a 5
GHz?
attualmente connesso
67
Page 38
IT
Risoluzione dei problemi
Come
cambiare la
rete di
telecamere su
un altro
router?
Prima ripristina il dispositivo o rimuovilo
dall'app Arenti, quindi configura nuovamente
il dispositivo dall'app.
Perché il
dispositivo
non identifica
la scheda SD?
Si consiglia di collegare la scheda SD dopo
l'interruzione dell'alimentazione. Verificare se la
scheda SD è normalmente disponibile e il
formato è FAT32. E la scheda SD non può
essere identificata quando l'ambiente Internet
non è buono.
Er ulteriori informazioni, visitare il sito Web ufficiale.
www.laxihub.com
68
Page 39
ES ES
Gracias por comprar el producto para el hogar
inteligente Laxihub. Comience a usar sus nuevos
dispositivos descargando Laxihub, una aplicación
conveniente que gestiona todo directamente desde
su teléfono o tableta. Conéctese fácilmente a WiFi de
su hogar y controle múltiples dispositivos desde
toque de sus dedos.
1. Contenido
x
2
Caja de bateria
Alfiler
Cable USB
Cinta de dos lados
Guía rápida
B1
x
8
x
8
Paquete de tornillos
1
69
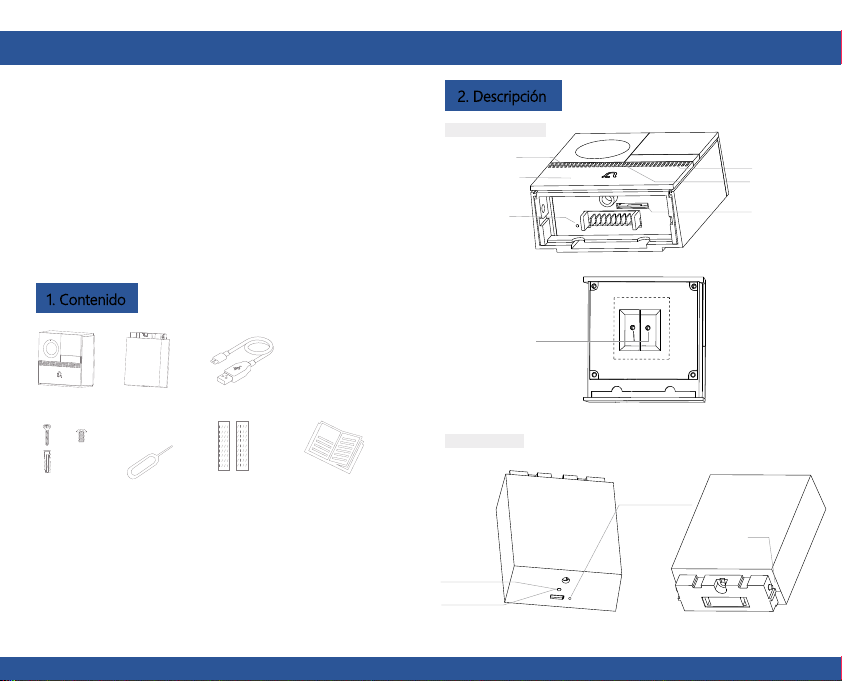
2. Descripción
Cuerpo principal B1
Micrófono
Botón de timbre
Rinicialización
Puerto de
alimentación externa
Caja de bateria
Indicador
de carga
Mini USB
Luz de estado
Altavoz
Cerradura de
bayoneta
Ranura para
tarjetas SD
2
70
1
Detrás del timbre
Rinicialización 2
Page 40
ES ES
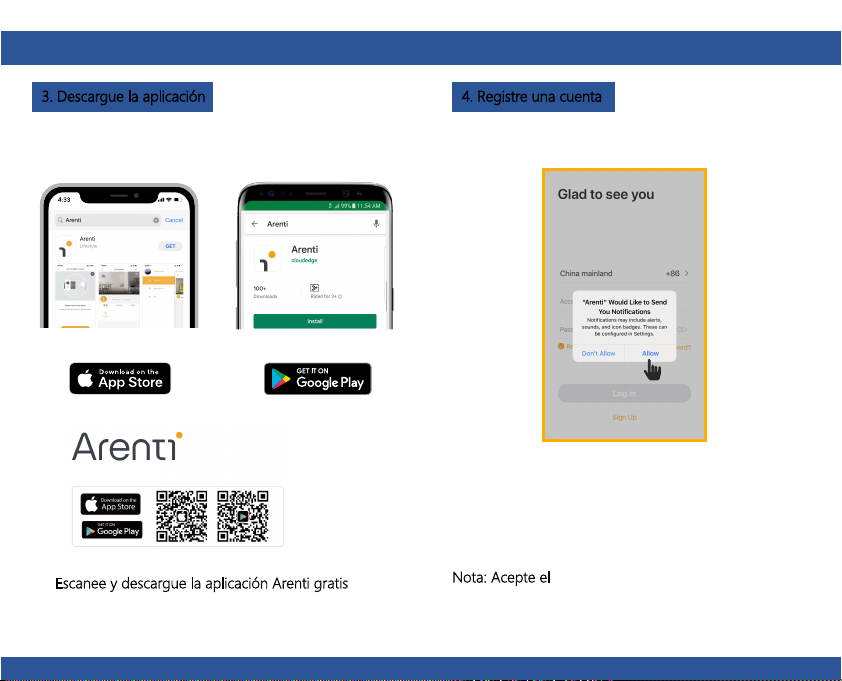
3. Descargue la aplicación
Descargue Arenti desde App Store o Google Play.
Escanee y descargue la aplicación Arenti gratis
71
4. Registre una cuenta
Para recibir notificaciones a tiempo, haga clic en "Permitir”.
Abra la aplicación Arenti. Si es un usuario nuevo, toque
"crear nuevo cuenta" y siga las instrucciones para completar
el registro.
Nota: Acepte el
Acuerdo de privacidad.
72
Page 41
ES ES
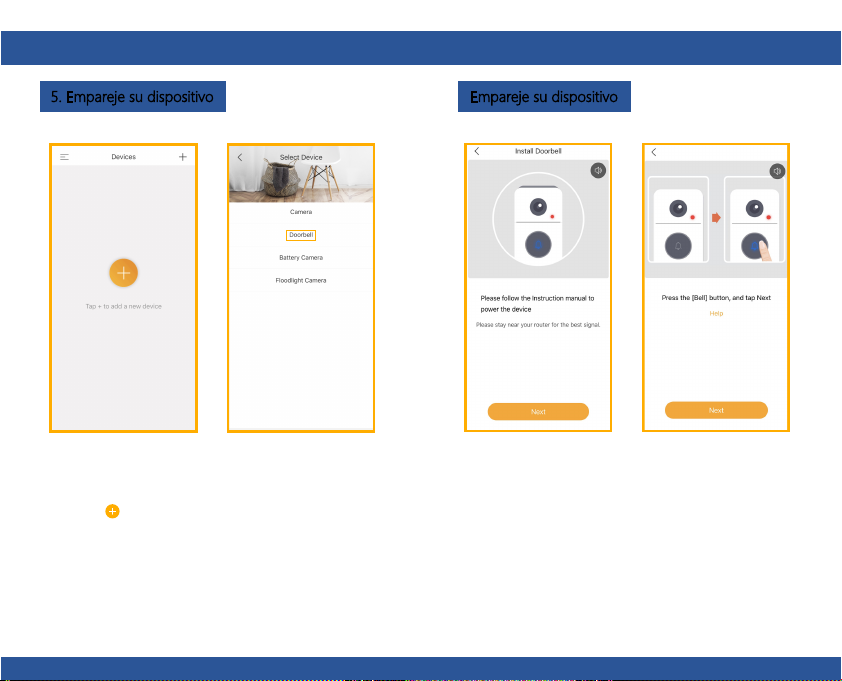
5. Empareje su dispositivo Empareje su dispositivo
Encienda el timbre, y escuchará un sonido de bienvenida.
Haga clic para agregar un nuevo dispositivo y
seleccione "Timbre".
Si la luz de estado está roja y parpadea (una vez por
segundo). El timbre se enciende con éxito y está listo para
emparejamiento.
73
74
Page 42
ES ES
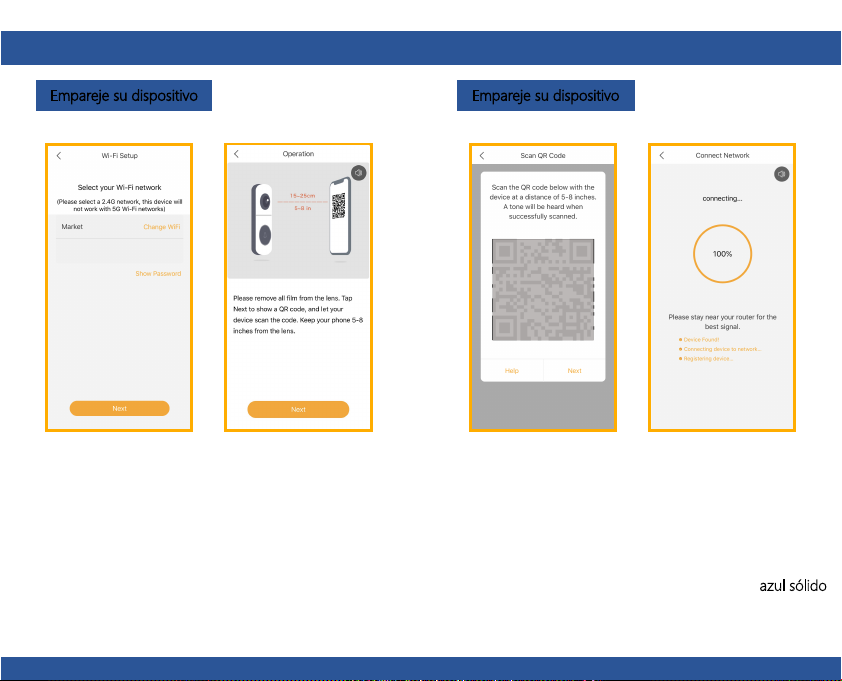
Empareje su dispositivo Empareje su dispositivo
Scan
QR
Code
on screen
Ingrese la contraseña de Wi-Fi y toque “Siguiente“ para
continuar.
Si es necesario, puede tocar “Cambiar WiFi“ para cambiar a
otra red WiFi adecuada para su timbre.
Presione “Siguiente” para escanear el código QR usando
su timbre.
Mantenga 5 ~ 8 pulgadas de distancia de su pantalla móvil.
75
Presione “Siguiente” después de escuchar un sonido
de su timbre.
La aplicación Arenti comenzará a conectarse al timbre
automáticamente como lo indica la luz de estado que
parpadea rápidamente y luego permaneciendo azul sólido
76
.
Page 43
ES ES
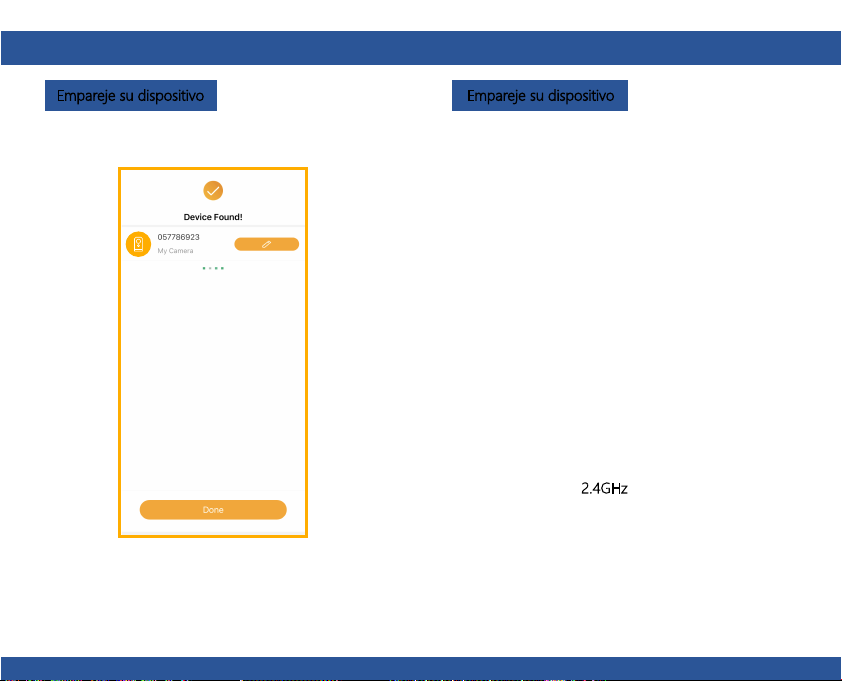
Empareje su dispositivo Empareje su dispositivo
Una vez que se complete el proceso de emparejamiento,
aparecerá una página que muestra
“Dispositivo encontrado!”.
Puede elegir para editar el nombre del dispositivo o
asignar el dispositivo a una sala dedicada antes de tocar
“Listo“ para finalizar el proceso de emparejamiento.
Una vez que su cámara esté emparejada, se puede ver su
cámara en cualquier momento desde su teléfono inteligente
siempre que haya acceso a Internet.
Si no se encuentra ningún dispositivo y el proceso de
emparejamiento falla, por favor verifique las instrucciones
a continuación:
1) La red WiFi es de 2.4GHz
2) La contraseña de WiFi ingresada es correcta y la misma
red WiFi se utiliza para el dispositivo móvil.
3) El dispositivo Arenti está en modo de emparejamiento.
4) Verifique su WiFi para la actividad de la red.
.
77
78
Page 44
ES ES
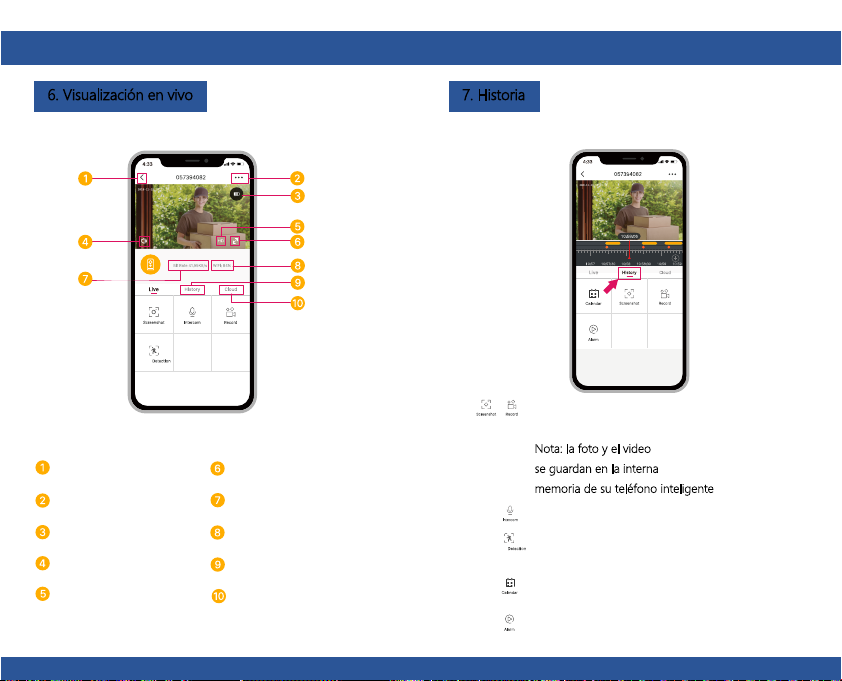
6. Visualización en vivo 7. Historia
Toque para capturar una foto / video durante
la visualización o reproducción en vivo
Atrás
Menú de configuración
Estado de la batería
Volumen encendido
/ apagado
Interruptor HD / SD Servicio de almacenamiento
Pantalla completa
Velocidad de bits de
transmisión
Intensidad de la señal WiFi
Historial de notificaciones
en la nube
Nota: la foto y el video
se guardan en la interna
memoria de su teléfono inteligente
Toque para habilitar la conversación
Toque para habilitar la detección de
movimiento
Seleccione un dato para revisar su
reproducción de la tarjeta SD
Toque para buscar videoclips por fecha
79
80
Page 45
ES ES
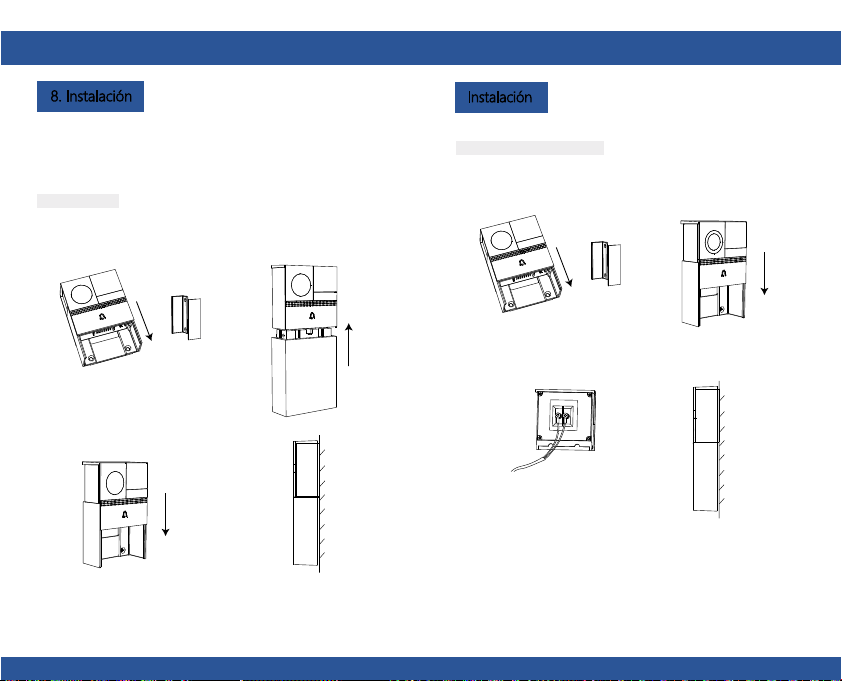
8. Instalación
Antes de elegir su ubicación preferida, verifique la fuerza
/ cobertura de WiFi para asegurarse de que el timbre sea
completamente funcional.
Modo con pilas
Paso 1 Retire el soporte de B1.
Paso 2 Fije el soporte en la pared con
tornillos e inserte el timbre en el soporte.
Paso 3 Inserte la caja de la batería en
el timbre de la puerta.
soporte
Vista
lateral
81
Instalación
Modo de alimentación de CA
Paso 1 Retire el soporte de B1.
Bracket
Paso 2 Conecte la alimentación de
CA con sus cables.
12~24V AC
Paso 3 Fije el soporte en la pared con
tornillos e inserte el timbre en el soporte.
Vista
lateral
82
Page 46
ES ES
Instalación
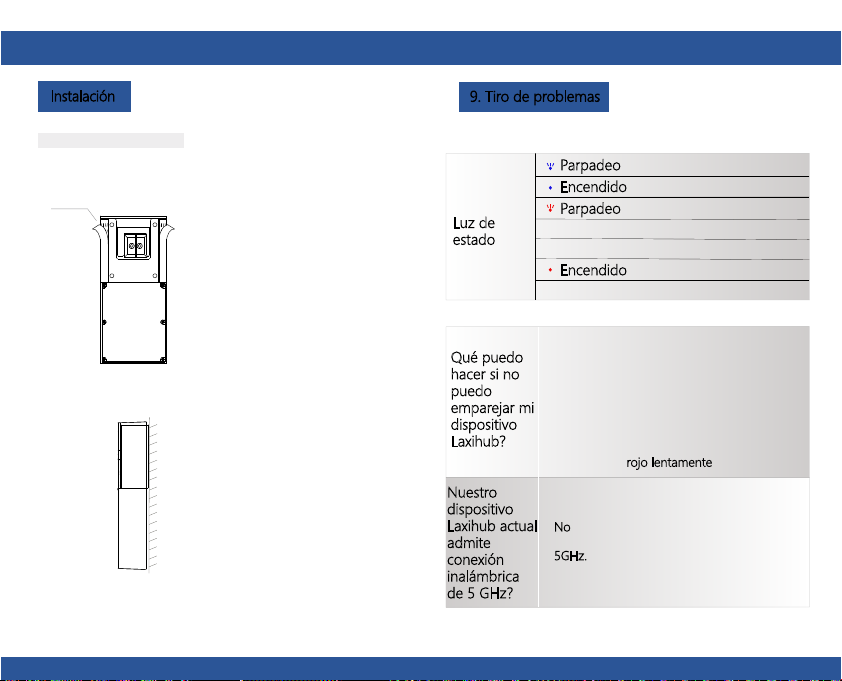
Modo de cinta de doble cara
Paso 1 Coloque la cinta de doble cara en ambos lados del soporte.
cinta
Paso 2 Pegue el timbre a un piso limpio y apretado.
83
9. Tiro de problemas
Luz de
estado
Qué puedo
hacer si no
puedo
emparejar mi
dispositivo
Laxihub?
Nuestro
dispositivo
Laxihub actual
admite
conexión
inalámbrica
de 5 GHz?
Parpadeo: actualmente conectando
Encendido: la cámara funciona correctamente
Parpadeo
: en espera de conexión WiFi
y conexión actual (más rápido
parpadeo)
Encendido
: la cámara o la red está
anormal
1. Verifique que su dispositivo móvil esté
conectado a una red WiFi de 2.4GHz.
2. Verifique que la contraseña de WiFi
ingresada sea correcta y la misma red WiFi se
usa tanto para dispositivos móviles y
emparejamiento.
3. Verifique que el dispositivo Laxihub esté en
modo de emparejamiento, la luz de estado
parpadea en rojo lentamente
No - El dispositivo Laxihub actualmente no está
compatible con conexión inalámbrica de
5GHz.
(1 vez).
84
Page 47
ES
Tiro de problemas
FCC NOTE
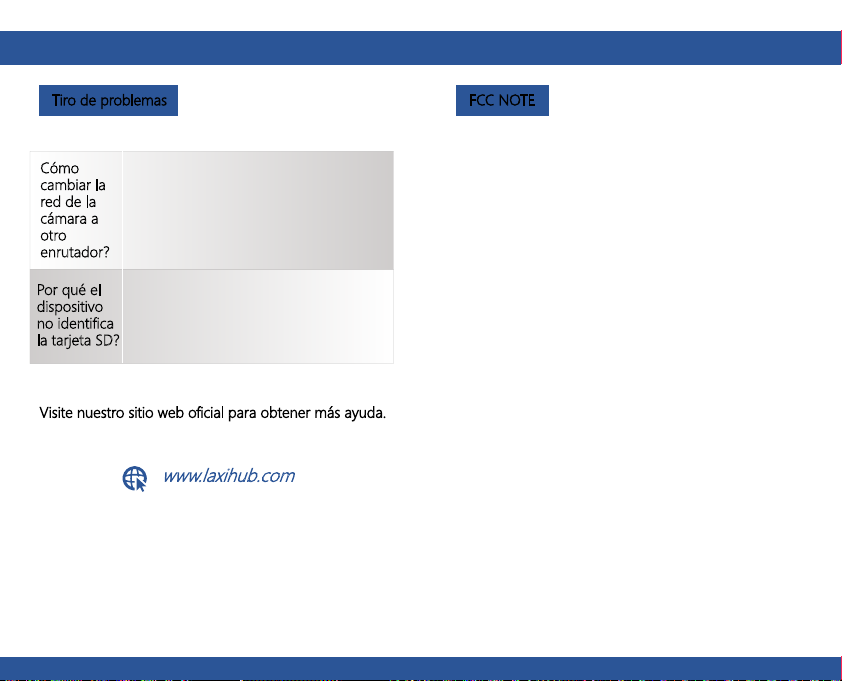
Cómo
cambiar la
red de la
cámara a
Primero reinicie el dispositivo o elimínelo en la
aplicación Laxihub App, luego configure el
dispositivo nuevamente por la aplicación.
otro
enrutador?
Por qué el
dispositivo
no identifica
la tarjeta SD?
Se recomienda enchufar la tarjeta SD después
del corte de energía. Confirme si la tarjeta SD
está normalmente disponible y el formato es
FAT32. Y la tarjeta SD no se puede identificar
cuando el entorno de Internet no es bueno.
Visite nuestro sitio web oficial para obtener más ayuda.
www.laxihub.com
85
85
This device complies with Part 15 of the FCC Rules. Operation is
subject to the following two conditions:
1- this device may not cause harmful interference,
2- this device must accept any interference received, including
interference that may cause undesired operation.
The manufacturer is not responsible for any radio or tv interference
caused by unauthorized modifications or change to this equipment.
Such modifications or change could void the user’s authority to
operate the equipment.
This equipment has been tested and found to comply with the limits
for a Class B digital device, pursuant to part 15 of the FCC Rules.
These limits are designed to provide reasonable protection against
harmful interference in a residential installation.
This equipment generates, uses and can radiate radio frequency
energy and, if not installed and used in accordance with the
instructions, may cause harmful interference to radio communications.
However, there is no guarantee that interference will not occur in a
particular installation. If this equipment does cause harmful
interference to radio or television reception, which can be determined
by turning the equipment off and on, the user is encouraged to try to
correct the interference by one or more of the following measures:
- Reorient or relocate the receiving antenna.
- Increase the separation between the equipment and receiver.
- Connect the equipment into an outl et on a circuit different from
that to which the receiver is connected.
86
86
Page 48

- Consult the dealer or an experienced radio/TV technician for help.
RF warning statement:
To maintain compliance with FCC’s RF exposure guidelines, this
equipment should be installed and operated with a minimum distance
of 20 cm between the radiator and your body.
© 2020 Laxihub. All rights reserved. All trade names are registered
trademarks of respective companies Apple, the Apple logo, iPhone
are trademarks of Apple Inc. registered in the U.S. and other
countries. Google, the Google logo, Android are trademarks of
Google Inc. App Store is a service mark of Apple Inc. Google Play
is a service mark of Google Inc.
Laxihub Europe
Zandsteen 50, 2132 MR Hoofddorp, The Netherlands
www.laxihub.com
87
 Loading...