


F1
powered by
QUICK GUIDE
EN Smart Wi-Fi Floodlight Camera
FR Caméra Floodlight Wi-Fi intelligente
NL Slimme Wi-Fi Floodlight-camera
DE Intelligente Wi-Fi-Flutlichtkamera
IT Videocamera smart Wi-Fi Floodlight
ES Cámara de reflector con Wi-Fi inteligente
PT Câmera inteligente com Wi-Fi Floodlight
RU Умная Wi-Fi прожекторная камера
TU Akıllı Wi-Fi Işıklandırmalı Kamera
Compatible with Amazon Alexa & Google Assistant

What’s in the box
Consult the checklist below for all components.
EN
F1
Pin
Disc bracket
Screws
Bracket
Wire nuts
Waterproof terminal
1
Bracket screws
Screwdriver
User manual

Introduction
EN
Lens
Light
MIC
PIR & Status light
Reset
SD card
slot
Description
Power
Status light
Microphone
SD card slot
Reset
Light Turn the light on/off manually or automatically
AC 100~240V
Red light solids on: the camera network is abnormal
Blinking red light: awaiting WiFi connecting
Blue light solids on: camera running correctly
Blinking blue light: currently connecting
Records sounds for your video
Supports local SD Card storage (Max.128G)
Press and hold the 'reset' for 5 seconds to reset the device(if
you have modified settings, they will return to factory defaults)
2

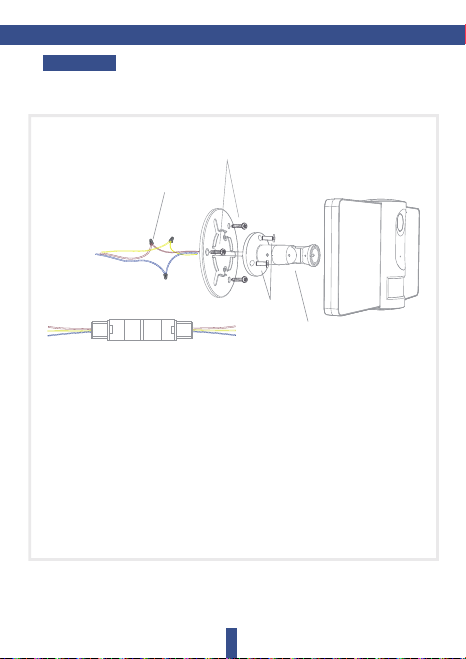
Installation
Bracket
Screws
Wire Nuts
100~240V AC
Screws
Bracket
If the wires are placed in an outdoor environment,
the included waterproof terminal is suggested to use.
For the Europe Region
NOTE: Different countries may have different colors for wiring. Please
connect the wires of the same color together.
EN
3

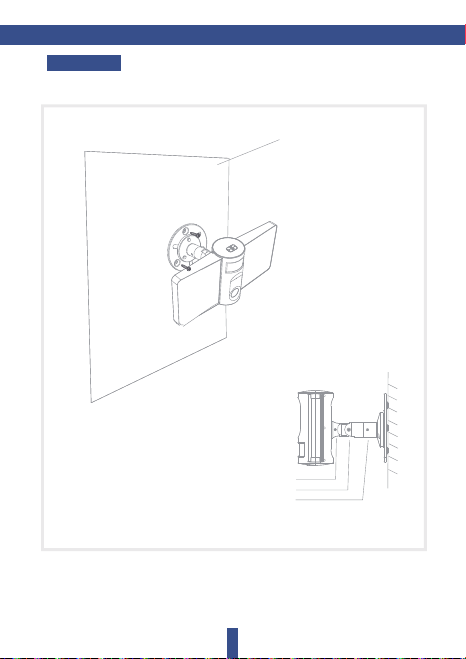
Installation
EN
The Wall
Fix the F1 to the bracket
** Note
A. Fix the camera
B. Adjust the angle
C. Adjust the direction and fix the camera.
4
A
B
C

EN
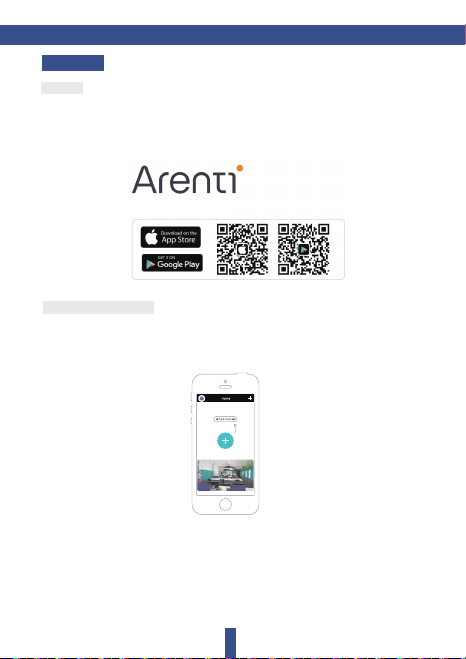
Connection
Download
Arenti is available for both iOS and Android OS. Search the name 'Arenti' in
App Store or Android Market, or scan below QR-Code to download the App.
Add device
Log in the Arenti, select "Add Device", and add the smart camera to the App
according to the screen tips(Make the smart camera close to the router
when configuring).
NOTE: If you need to re-select the WiFi network, please press and hold the "RESET"
button for 5 seconds, the device will restart, and the indicator will be flashing red.
5

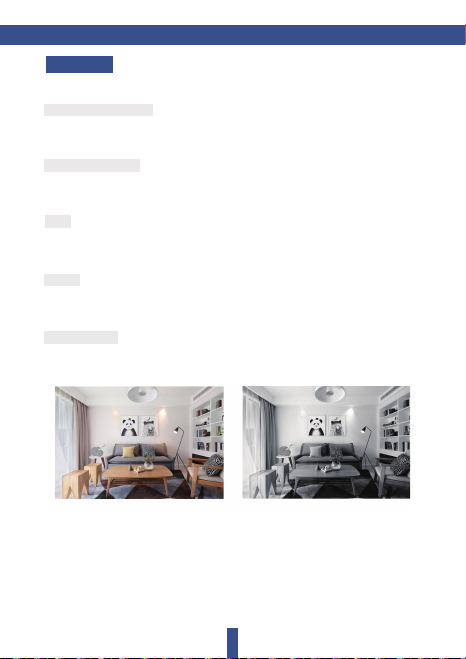
Function
Lighting Control
You can turn the light on or off with time setting or PIR.
Full-Duplex Audio
You can see and hear the vistor in your App from the camera.
PIR
When the camera detects someone stopping by, it sends an alarm message
to your cell phone.
Record
Using SD card or activating the Cloud-Storage Service to keep recording
for every moment.
Day & Night
Powerful night vision without any interruption, even in complete darkness.
Daytime Night
EN
6

Qu'y a-t-il dans la boite
Consultez la liste de contrôle ci-dessous pour tous les composants.
FR
F1
Aiguille
Support de disque
Des vis
Support
Écrous de fil
Terminal étanche
7
Vis de support
Tournevis
Manuel de l'Utilisateur

Introduction
FR
Lentille
Lumière
Carte SD
fente
PEU
Voyant PIR et d'état
La description
Puissance
Feux d’état
Microphone
Emplacement
pour carte SD
Réinitialiser
Lumière Turn the light on/off manually or automatically
AC 100~240V
Le voyant rouge reste allumé: le réseau de caméras est anormal
Voyant rouge clignotant: en attente de connexion WiFi
La lumière bleue reste allumée: la caméra fonctionne
correctement
Lumière bleue clignotante: connexion en cours
Enregistre des sons pour votre vidéo
Prend en charge le stockage local sur carte SD (Max.128G)
Appuyez et maintenez la «réinitialisation» pendant 5 secondes
pour réinitialiser l'appareil (si vous avez modifié les paramètres
ils reviendront aux paramètres d'usine)
8
Réinitialiser

Installation
Vis de
support
Écrous de fil
100~240V AC
Des vis
Support
Si les fils sont placés dans un environnement extérieu r, il est suggéré
d'utiliser la borne étanche incluse.
Pour la région Europe
REMARQUE: différents pays peuvent avoir des couleurs différentes pour le
câblage. Veuillez connecter les fils de la même couleur ensemble.
FR
9

Installation
FR
Le mur
Fixez le F1 au support
** Remarque
A. Réparer la caméra
B. Ajuster l'angle
C. Ajustez la direction et fixez la caméra.
10
A
B
C

Connexion
Télécharger
Arenti est disponible pour iOS et Android OS. Rechercher le nom 'Arenti' dans
App Store ou Android Market, ou scannez ci-dessous le QR-Code pour
télécharger l'application.
Ajouter un appareil
Connectez-vous à Arenti, sélectionnez "Ajouter un appareil" et ajoutez la
caméra intelligente à l'application selon les conseils à l'écran (Rendez la
caméra intelligente proche du routeur lors de la configuration).
REMARQUE: si vous devez resélectionner le réseau WiFi, appuyez et maintenez la
touche "RESET" pendant 5 secondes, l'appareil redémarre et le voyant clignote
en rouge.
FR
11

FR
Une fonction
Contrôle d'éclairage
Vous pouvez allumer ou éteindre la lumière avec le réglage de l'heure ou PIR.
Audio en duplex intégral
Vous pouvez voir et entendre le visiteur dans votre application depuis la caméra.
PIR
Lorsque la caméra détecte quelqu'un qui passe, elle envoie un message
d'alarme sur votre téléphone portable.
Record
Utilisation de la carte SD ou activation du service de stockage en nuage pour
continuer l'enregistrement pour chaque instant.
Day & Night
Vision nocturne puissante sans interruption, même dans l'obscurité totale.
Jour Nuit
12

Wat zit er in de doos
Raadpleeg de onderstaande checklist voor alle componenten.
NL
F1
Naald
Disc beugel
Schroeven
Haakje
Draadmoeren
Waterdichte terminal
13
Beugel schroeven
Schroevendraaier
Handleiding

Invoering
NL
Lens
Licht
MIC
PIR & statuslampje
Reset
SD-kaart
sleuf
Omschrijving
Kracht
Statuslampje
Microfoon
SD-kaartsleuf
Reset
Licht Schakel de verlichting handmatig of automatisch in / uit
AC 100~240V
Rood lampje brandt continu: het cameranetwerk is abnormaal
Knipperend rood lampje: wacht op wifi-verbinding
Blauw lampje brandt: camera werkt correct
Knipperend blauw lampje: momenteel bezig met verbinden
Neemt geluiden op voor uw video
Ondersteunt lokale SD-kaartopslag (max. 128G)
Houd de 'reset' gedurende 5 seconden ingedrukt om het
apparaat te resetten (als je instellingen hebt gewijzigd, keren
ze terug naar de fabrieksinstellingen)
14

Installatie
Beugel
schroeven
Draadmoeren
100~240V AC
Schroeven
Haakje
Als de draden in een buitenomgeving worden
geplaatst, wordt aangeraden de meegeleverde
waterdichte aansluiting te gebruiken.
OPMERKING: Verschillende landen hebben mogelijk verschillende
kleuren voor bedrading. Verbind de draden van dezelfde kleur met
elkaar.
Voor de regio Europa
NL
15

Installation
NL
De muur
Bevestig de F1 aan de beugel
** Notitie
A. Bevestig de camera
B. Pas de hoek aan
C. Pas de richting aan en zet de camera vast.
16
A
B
C

Verbinding
Downloaden
Arenti is beschikbaar voor zowel iOS- als Android-besturingssystemen. Zoek
de naam 'Arenti' in App Store of Android Market, of scan onderstaande
QR-code om de app te downloaden.
Voeg toestel toe
Log in op de Arenti, selecteer "Add Device" en voeg de slimme camera toe
aan de app volgens de schermtips (Plaats de slimme camera dicht bij de
router bij het configureren).
OPMERKING: Als u het WiFi-netwerk opnieuw moet selecteren, houdt u de
"RESET" ingedrukt knop gedurende 5 seconden, het apparaat zal opnieuw
opstarten en de indicator zal rood knipperen.
NL
17

Functie
Licht controle
Je kunt het licht aan- of uitzetten met tijdsinstelling of PIR.
Full-Duplex Audio
Je kunt de bezoeker in je app zien en horen vanaf de camera.
PIR
Wanneer de camera merkt dat er iemand langs komt, wordt er een
alarmbericht naar je mobiele telefoon gestuurd.
Record
Gebruik SD-kaart of activeer de Cloud-Storage Service om voor elk
moment te blijven opnemen.
Day & Night
Krachtig nachtzicht zonder onderbreking, zelfs in volledige duisternis.
Dag Nacht
NL
18

Was ist in der Box
Konsultieren Sie die Checkliste unten für alle Komponenten.
DE
F1
Nadel
Klammer der Disc
Schrauben
Klammer
Muttern von Draht
Wasserdichtes Terminal
19
Schrauben mit Klammern
Schraubendreher
Handbuch für Benutzer

Einführung
DE
Linse
Licht
MIC
PIR & Statusleuchte
Reset
SD-Karte
Slot
Beschreibung
Leistung
Statusleuchte
Mikrofon
SD-Kartenst
eckplatz
Zurücksetzen
Licht Turn the light on/off manually or automatically
AC 100~240V
Rotes Licht leuchtet: Das Kameranetzwerk ist abnormal
Blinkendes rotes Licht: Warten auf WiFi-Verbindung
Blaulicht leuchtet: Kamera läuft korrekt
Blinkendes blaues Licht: Derzeit wird eine Verbindung hergest
ellt Nimmt Sounds für Ihr Video auf
Unterstützt lokalen SD-Kartenspeicher (Max.128G)
Halten Sie die 'Reset'-Taste 5 Sekunden lang gedrückt, um das
Gerät zurückzusetzen (wenn Sie die Einstellungen geändert
haben, werden die Werkseinstellungen wiederhergestellt).
20

Installation
Schrauben mit
Klammern
Muttern von Draht
100~240V AC
Schrauben
Klammer
Wenn die Kabel im Freien verlegt werden, wird die
Verwendung des mitgelieferten wasserdichten
Anschlusses empfohlen.
Für die Region Europa
HINWEIS: Verschiedene Länder haben möglicherweise unterschiedlich
e Farben für die Verkabelung. Bitte verbinden Sie die Drähte der gleic
hen Farbe miteinander.
DE
21

Installation
Die Mauer
Befestigen Sie den F1 an
der Halterung
DE
** Hinweis
A. Repariere die Kamera
B. Stellen Sie den Wink
C. Passen Sie die Richtung an und befestigen Sie die Kamera.
el ein
22
A
B
C

Verbindung
Herunterladen
Arenti ist sowohl für iOS als auch für Android verfügbar. Suchen Sie den
Namen 'Arenti' in App Store oder Android Market oder scannen Sie unter
dem QR-Code, um die App herunterzuladen.
Gerät hinzufügen
Melden Sie sich bei Arenti an, wählen Sie "Gerät hinzufügen" und fügen Sie
die Smart-Kamera zur App hinzu gemäß den Bildschirmtipps (Stellen Sie die
Smart-Kamera bei der Konfiguration in die Nähe des Routers).
HINWEIS: Wenn Sie das WiFi-Netzwerk erneut auswählen müssen, halten Sie die
Taste "RESET" 5 Sekunden lang gedrückt. Das Gerät wird neu gestartet und die
Anzeige blinkt rot.
DE
23

Funktion
Lichtsteuerung
Sie können das Licht mit der Zeiteinstellung oder PIR ein- oder ausschalten.
Vollduplex-Audio
Sie können den Besucher in Ihrer App von der Kamera aus sehen und hören.
PIR
Wenn die Kamera jemanden erkennt, der vorbeikommt, sendet sie eine
Alarmmeldung an Ihr Mobiltelefon.
Aufzeichnung
Verwenden der SD-Karte oder Aktivieren des Cloud-Speicherdienstes, um
die Aufzeichnung für jeden Moment fortzusetzen.
Day & Night
Leistungsstarke Nachtsicht ohne Unterbrechung, auch bei völliger Dunkelheit.
Tagsüber Nacht
DE
24

Cosa c'è nella scatola
Consultare l'elenco di controllo di seguito per tutti i componenti.
IT
F1
Pin
Staffa disco
Viti
Staffa
Dadi filo
Terminale impermeabile
25
Viti della staffa
Cacciavite
Manuale d'uso

Introduzione
IT
lente
Light
MIC
PIR e spia di stato
Reset
Scheda SD
fessura
Description
Power
Status light
Microphone
SD card slot
Reset
Light Turn the light on/off manually or automatically
AC 100~240V
Red light solids on: the camera network is abnormal
Blinking red light: awaiting WiFi connecting
Blue light solids on: camera running correctly
Blinking blue light: currently connecting
Records sounds for your video
Supports local SD Card storage (Max.128G)
Press and hold the 'reset' for 5 seconds to reset the device(if
you have modified settings, they will return to factory defaults)
26

Installazione
Viti della
staffa
Dadi a filo
100~240V AC
Viti
Staffa
Se i cavi sono posizionati in un ambiente esterno, si
consiglia di utilizzare il terminale impermeabile
incluso.
Per la regione Europa
NOTA: Paesi diversi possono avere colori diversi per il cablaggio. Si
prega di collegare i fili dello stesso colore insieme.
IT
27

Installazione
IT
Il Muro
Fissare il F1 alla staffa
** Nota
A. Ripara la fotocamera
B. Regolare l'angolo
C. Regola la direzione e fissa la telecamera.
28
A
B
C

Connessione
Scarica
Arenti è disponibile per sistema operativo iOS e Android. Cerca il nome
"Arenti" inApp Store o Android Market oppure scansiona sotto il QR-Code
per scaricare l'app.
Aggiungi dispositivo
Accedi ad Arenti, seleziona "Aggiungi dispositivo" e aggiungi la smart camera
all'app in base ai suggerimenti sullo schermo (avvicinare la smart camera al
router durante la configurazione).
NOTA: se è necessario selezionare nuovamente la rete WiFi, tenere premuto
"RESET" per 5 secondi, il dispositivo si riavvierà e l'indicatore lampeggerà in
rosso.
IT
29

Funzione
Controllo dell'illuminazione
È possibile accendere o spegnere la luce con l'impostazione dell'ora o PIR.
Audio full duplex
Puoi vedere e ascoltare il visitatore nella tua app dalla fotocamera.
PIR
Quando la videocamera rileva qualcuno che si ferma, invia un messaggio di
allarme sul tuo cellulare.
Disco
Utilizzo della scheda SD o attivazione del servizio di archiviazione cloud per
continuare a registrare per ogni momento.
Giorno notte
Potente visione notturna senza interruzioni, anche nella completa oscurità.
Giorno Notturno
IT
30

Qué hay en la caja
Consulte la lista de verificación a continuación para todos los componentes.
ES
F1
Alfiler
Soporte de disco
Empulgueras
Soporte
Tuercas de alambre
Terminal impermeable
31
Tornillos de soporte
Destornillador
Manual de usuario

Introducción
ES
Lente
Ligera
MIC
PIR & Luz de estado
Reiniciar
ranura para
tarjetas SD
Descripción
Poder
Luz de estado
Micrófono
ranura para
tarjetas SD
Reiniciar
Ligera Enciende / apaga la luz de forma manual o automática
AC 100~240V
Luz roja encendida: la red de la cámara es anormal
Luz roja intermitente: esperando conexión WiFi
Luz azul sólida: cámara funcionando correctamente
Luz azul intermitente: actualmente conectando
Records sounds for your video
Admite almacenamiento local de tarjeta SD (Máx. 128G)
Mantenga presionado el botón 'restablecer' durante 5
segundos para restablecer el dispositivo (si ha modificado la
configuración, volverán a los valores predeterminados de
fábrica)s)
32

Instalación
Tornillos de
soporte
Tuercas de alambre
100~240V AC
Empulgueras
Soporte
Si los cables se colocan en un entorno exterior, se
sugiere utilizar el terminal impermeable incluido.
Para la región de Europa
NOTA: Los diferentes países pueden tener diferentes colores para el
cableado. Conecte los cables del mismo color juntos.
ES
33

Instalación
ES
La pared
Fije el F1 al soporte
** Nota
A. Arregle la cámara
B. Ajustar el ángulo
C. Ajuste la dirección y fije la cámara.
34
A
B
C

Conexión
Descargar
Arenti está disponible para iOS y Android OS. Buscar el nombre 'Arenti' en
App Store o Android Market, o escanee debajo del código QR para descargar
la aplicación.
Añadir dispositivo
Inicie sesión en Arenti, seleccione "Agregar dispositivo" y agregue la cámara
inteligente a la aplicación de acuerdo con los consejos de la pantalla (coloque
la cámara inteligente cerca del enrutador al configurar).
NOTE: Si necesita volver a seleccionar la red WiFi, mantenga presionado el botón
"RESTABLECER" durante 5 segundos, el dispositivo se reiniciará y el indicador
parpadeará en rojo.
ES
35

Función
Control de iluminación
Puede encender o apagar la luz con la configuración de hora o PIR
Audio dúplex completo
Puedes ver y escuchar al visitante en tu aplicación desde la cámara.
PIR
Cuando la cámara detecta que alguien se detiene, envía un mensaje de
alarma a tu celular.
Grabar
Usar una tarjeta SD o activar el Servicio de almacenamiento en la nube para
seguir grabando por cada momento.
Día y noche
Potente visión nocturna sin interrupción, incluso en completa oscuridad.
Tiempo de día Noche
ES
36

O que está na caixa
Consulte a lista de verificação abaixo para todos os componentes.
PT
F1
Pino
Suporte de disco
Parafusos
Suporte
Porcas de arame
Terminal impermeável
37
Parafusos de suporte
Chave de fenda
Manual do usuário

Introdução
PT
Lente
Leve
microfone
PIR e luz de status
Redefinir
Slot para
cartão SD
Descrição
Poder
Luz de estado
Micrófono
ranura para
tarjetas SD
Reiniciar
Ligera Enciende / apaga la luz de forma manual o automática
AC 100~240V
Luz roja encendida: la red de la cámara es anormal
Luz roja intermitente: esperando conexión WiFi
Luz azul sólida: cámara funcionando correctamente
Luz azul intermitente: actualmente conectando
Graba sonidos para tu video
Admite almacenamiento local de tarjeta SD (Máx. 128G)
Mantenga presionado el botón 'restablecer' durante 5
segundos para restablecer el dispositivo (si ha modificado la
configuración, volverán a los valores predeterminados de
fábrica)
38

Instalação
Parafusos
de suporte
Porcas de Arame
100~240V AC
Parafusos
Suporte
Se os fios forem colocados em um ambiente ao ar livre,
sugere-se o uso do terminal à prova d'água incluído.
Para a região da Europa
NOTA: Diferentes países podem ter cores diferentes para a fiação.
Conecte os fios da mesma cor juntos.
PT
39

Instalação
PT
A Parede
Fixe a F1 no suporte
** Nota
A. Fixe a câmera
B. Ajuste o ângulo
C. Ajuste a direção e fixe a câmera.
40
A
B
C
Conexão
Baixar
O Arenti está disponível para iOS e Android. Pesquise o nome 'Arenti' em
App Store ou Android Market, ou digitalize abaixo do QR-Code para fazer o
download do aplicativo.
Adicionar Dispositivo
Faça login no Arenti, selecione "Adicionar dispositivo" e adicione a câmera
inteligente ao aplicativo de acordo com as dicas da tela (aproxime a câmera
inteligente do roteador ao configurar).
NOTA: Se você precisar selecionar novamente a rede Wi-Fi, pressione e segure o
botão "RESET" por 5 segundos, o dispositivo será reiniciado e o indicador piscará
em vermelho.
PT
41

Função
Controle de luz
Você pode ligar ou desligar a luz com a configuração da hora ou com o PIR.
Áudio Full-Duplex
Você pode ver e ouvir o vistor no seu aplicativo a partir da câmera.
PIR
Quando a câmera detecta alguém que está passando, ela envia uma
mensagem de alarme para o seu celular.
Registro
Usando o cartão SD ou ativando o Serviço de Armazenamento em Nuvem
para continuar gravando para todo momento.
Dia noite
Visão noturna poderosa sem interrupção, mesmo na escuridão completa.
Dia Noite
PT
42

Что в коробке
Посмотрите контрольный список ниже для всех компонентов
RU
F1
Штырь
Кронштейн диска
Винты
скобка
Проволочные гайки
Водонепроницаемый
терминал
43
Крепежные винты
Отвертка
Руководство пользо
вателя

Введение
RU
объектив
Светлый
микрофон
PIR& Индикатор
состояния
Сброс
Слот для
SD-карты
Описание
Мощность
Индикатор
состояния
Микрофон
Слот для SDкарты
Сброс
Подсветка включение / выключение подсветки вручную или
AC 100 ~ 240 В
красный свет горит: сеть камеры ненормальная
Мигающий красный свет: в ожидании соединения WiFi
Горит синий свет: камера работает правильно
Мигающий синий свет: в данный момент подключается
записывает звуки для вашего видео
Поддержка локального хранения SD-карты (макс. 128G)
нажмите и удерживайте кнопку «Сброс» в течение 5
секунд, чтобы сбросить настройки устройства (если вы
изменили настройки, они вернутся к заводским настройкам
по умолчанию)
автоматически
44
Установка
Крепежные
винты
Проволочные гайки
100~240V AC
Винты
скобка
Если провода размещены вне помещения, рекомендуется ис
пользовать прилагаемый водонепроницаемый терминал.
Для региона Европы
ПРИМЕЧАНИЕ: В разных странах могут быть разные цвета провод
ки. Соедините провода одного цвета вместе.
RU
45
Установка
RU
Стена
Закрепите F1 на кронштейне
** Заметка
А. Починить камеру
Б. Отрегулируйте угол
C. Отрегулируйте направление и закрепите камеру.
46
A
B
C

соединение
Скачать
Arenti доступен для iOS и Android OS. Поиск по имени 'Arenti' в App Store
или Android Market, или отсканируйте ниже QR-код, чтобы загрузить
приложение.
Добавить устройство
Войдите в Arenti, выберите «Добавить устройство» и добавьте
интеллектуальную камеру в приложение. в соответствии с подсказками
на экране (сделайте интеллектуальную камеру ближе к маршрутизатору
при настройке).
NOTA: Se você precisar selecionar novamente a rede Wi-Fi, pressione e segure o
botão "RESET" por 5 segundos, o dispositivo será reiniciado e o indicador piscará
em vermelho.
RU
47

Função
Управление освещением
Вы можете включить или выключить свет с настройкой времени или
Full-Duplex Audio
Вы можете видеть и слышать Vist в вашем приложении с камеры
PIR
Когда камера обнаруживает, что кто-то заходит, она отправляет
тревожное сообщение на ваш мобильный телефон
запись
Использование SD-карты или активация Cloud-Storage Service для
продолжения записи на каждый момент
День Ночь
Мощное ночное видение без перерыва, даже в полной темноте
дневное время Ночь
RU
48

Kutuda ne var
Tüm bileşenler için aşağıdaki kontrol listesine bakın
TU
F1
Toplu iğne
Disk braketi
Vidalar
Parantez
Tel somunlar
Su geçirmez terminal
49
Braket vidaları
Tornavida
Kullanım kılavuzu

Giriş
TU
Lens
ışık
MIC
PIR& PIR ve Durum
ışığı
Sıfırla
SD kart
yuvası
Açıklama
Güç
Durum ışığı
Mikrofon
SD kart yuvası
Sıfırla
Işık Işığı manuel veya otomatik olarak açma / kapatma
AC 100~240V
Kırmızı ışıkta katı: kamera ağı anormal
Yanıp sönen kırmızı ışık: Kablosuz bağlantı bekleniyor
Mavi ışık katı: kamera düzgün çalışıyor
Yanıp sönen mavi ışık: şu anda bağlanıyor
Videonuz için ses kaydeder
Yerel SD Kart depolama alanını destekler (Maks. 128G)
Cihazı sıfırlamak için 'sıfırla' düğmesini 5 saniye basılı tutun
(ayarları değiştirdiyseniz, fabrika varsayılanlarına dönecektir)
50

Kurulum
Braket
Vidaları
Tel Somunlar
100~240V AC
Vidalar
Parantez
Teller bir dış ortama yerleştirilirse, birlikte verilen su geçirmez te
rminalin kullanılması önerilir.
Avrupa Bölgesi için
NOT: Farklı ülkelerin kablolama için farklı renkleri olabilir. Lütfen aynı
renkteki kabloları birbirine bağlayın.
TU
51

Kurulum
TU
Duvar
F1'yi brakete sabitleyin
** Not
A. Kamerayı tamir et
B. Açıyı ayarlayın
C. Yönü ayarlayın ve kamerayı sabitleyin.
52
A
B
C

Bağ
İndir
Arenti hem iOS hem de Android OS için kullanılabilir. 'Arenti' adını arayın
App Store veya Android Market'i indirin veya Uygulamayı indirmek için QR
Kodunun altına tarayın.
Cihaz ekle
Arenti'de oturum açın, "Cihaz Ekle" yi seçin ve akıllı kamerayı Uygulamaya
ekleyin ekran ipuçlarına göre (Akıllı kamerayı yönlendiriciye yakın yapın
yapılandırırken).
NOT: WiFi ağını yeniden seçmeniz gerekiyorsa, lütfen "SIFIRLA" düğmesini basılı
tutun düğmesini 5 saniye basılı tuttuğunuzda cihaz yeniden başlatılır ve gösterge
kırmızı yanıp söner.
TU
53
fonksiyon
Aydınlatma kontrolü
Zaman ayarı veya PIR ile ışığı açabilir veya kapatabilirsiniz
Tam Çift Yönlü Ses
Uygulamanızdaki vistoru kameradan görebilir ve duyabilirsiniz.
PIR
Fotoğraf makinesi birisinin durduğunu algıladığında bir alarm mesajı
gönderir cep telefonunuza.
Kayıt
Kaydı sürdürmek için SD kartı kullanma veya Cloud-Storage Hizmetini
etkinleştirme her an için.
Gündüz gece
Tamamen karanlıkta bile kesintisiz kesintisiz gece görüşü.
Gündüz Gece
TU
54

V1.0 20200520
© 2020 Laxihub. All rights reserved. All trade names are registered
trademarks of respective companies Apple, the Apple logo, iPhone
are trademarks of Apple Inc. registered in the U.S. and other
countries. Google, the Google logo, Android are trademarks of
Google Inc. App Store is a service mark of Apple Inc. Google Play
is a service mark of Google Inc.
Laxihub Europe
Zandsteen 50, 2132 MR Hoofddorp, The Netherlands
www.laxihub.com
 Loading...