


加工要求
印刷尺寸(单页):76x110mm
折叠方式:骑马钉
材质:128G铜版纸
J1
QUICK GUIDE
EN Wireless chime
FR Carillon sans fil
NL Draadloze gong
DE Drahtloses glockenspiel
IT Campanello senza fili
ES Campana inalámbrica
PT Carrilhão sem fio
RU Беспроводной звонок
TU Kablosuz zil sesi
powered by
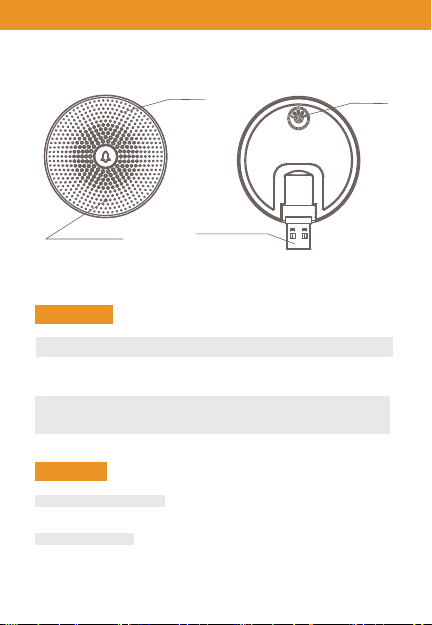
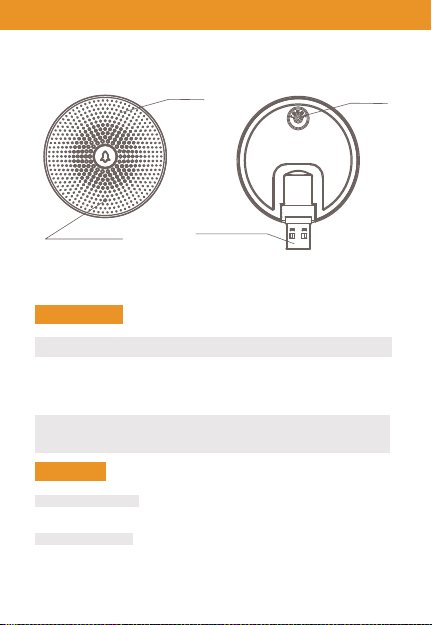
Chime Appearance
EN
Speaker
Status Light
Power Interface
Description
Mini USB
Reset
Status light
DC5V±10%, USB power supply
Press the RESET for 5s to restore Factory Settings;
Short-press the RESET button to pair the doorbell
Blue light blinks: Awaiting for configuration;
Blue light solids on: Configuration completed
Functions
Customize Your Ringtone
You can choose your own ringtone among the four ringtones
Adjust the Volume
The Chime's volume could be adjusted by sliding the volume of your
smartphone
1
Reset
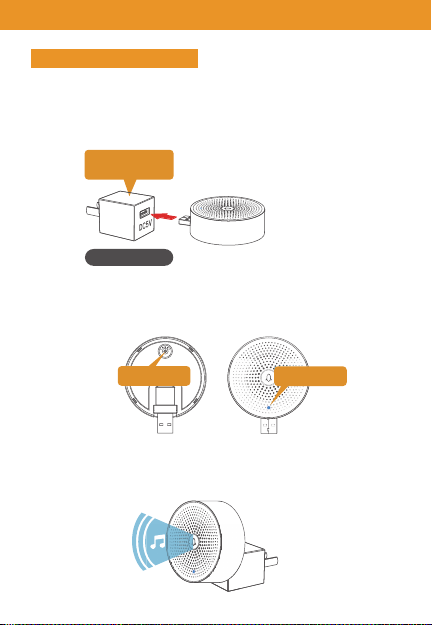
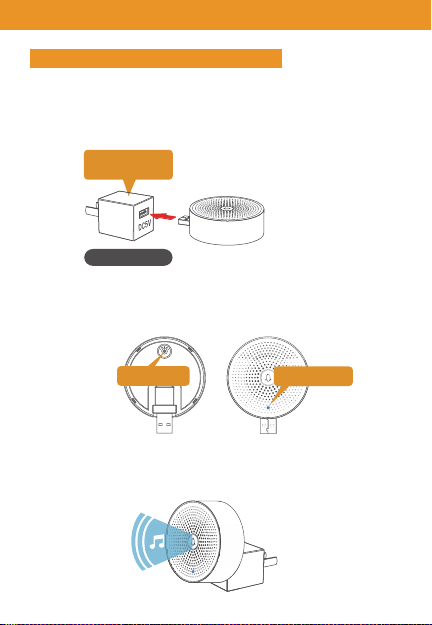
Pairing the Chime
Pair via pressing Doorbell button
Note: The Doorbell and Chime have been configured before leaving the
factory. If the Chime isn’t paired by default, please refer to the
following instructions to pair it with the doorbell camera.
Step 1: Supply power to your Chime and Doorbell.
USB compatible
charger(DC5V)
(not included)
Step 2: A short press on the RESET button on the Chime, and you will see
the indicator flashes blue, indicating the device is in pairing mode.
EN
Reset Button
Step 3: Press the doorbell button. When successfully paired, a voice or tone
will be played and the Chime LED status indicator will be in solid blue.
LED Indicator
2

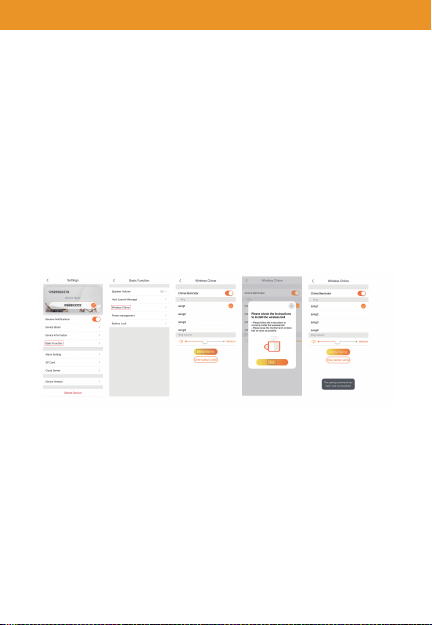
ENChime Pairing
Step 1:Short-Press the"RESET" button of the Chime. When successfully enter
the configuration mode, the LED status indicator will flash blue.
Step 2:Access to “Settings” of your App, press “Basic Function”.
Step 3:Select “Wireless Chime“, and then press “Chime Pairing“, confirm the
blue light of chime blinks.
Step 4:Press "Pair" and your Chime will automatically pair your doorbell.
Step 5:After pairing successfully, the Chime status light will be in solid on
blue.
Note:
If the configuration fails, please press the "RESET" button for 5 seconds
to reset your Chime and then short-press the "RESET" button to add it
again.
3
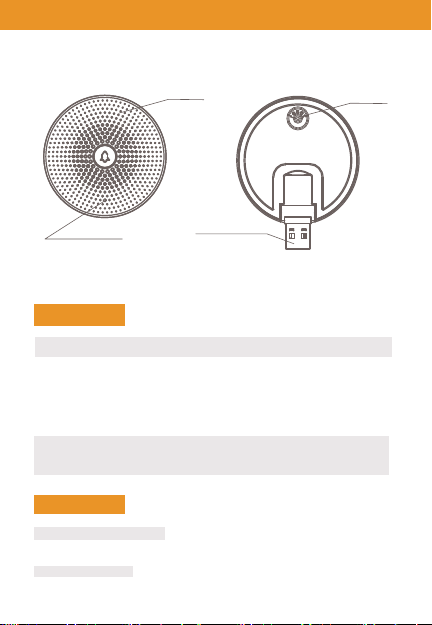
Apparition du carillon
FR
Voyant d'état
Orateur
Interface d'alimentation
Réinitialiser
La description
Mini USB
Réinitialiser
Voyant
d'état
DC5V ± 10%, alimentation USB
Appuyez sur RESET pendant 5s pour restaurer les
paramètres d'usine
Appuyez brièvement sur le bouton RESET pour coupler
la sonnette
La lumière bleue clignote: en attente de configuration
Voyant bleu allumé: configuration terminée
Les fonctions
Customize Your Ringtone
You can choose your own ringtone among the four ringtones
Adjust the Volume
The Chime's volume could be adjusted by sliding the volume of your
smartphone
4
Jumeler le carillon
FR
Associer en appuyant sur le bouton de la sonnette
Remarque: La sonnette et le carillon ont été configurés avant de quitter l'usine.
Si le carillon n'est pas couplé par défaut, veuillez vous référer aux
instructions suivantes pour le coupler avec la caméra de la sonnette.
Étape 1: Alimentez votre carillon et votre sonnette
Compatible USB
chargeur (DC5V)
(non inclus)
Étape 2: Un appui court sur le bouton RESET du carillon, et vous verrez
l'indicateur clignoter en bleu, indiquant que l'appareil est en mode d'appairage.
Bouton de réinitialisation
Étape 3: Appuyez sur le bouton de la sonnette. Une fois l'appairage réussi,
une voix ou une tonalité sera jouée et l'indicateur d'état du carillon LED
sera en bleu fixe.
Indicateur LED
5
FRCarillon Jumelage
Étape 1: Appuyez brièvement sur le bouton "RESET" du carillon. Quand entrer
avec succès le mode de configuration, l'indicateur d'état LED clignote en bleu.
Étape 2: Accédez aux "Paramètres" de votre application, appuyez sur "Fonction
de base".
Étape 3: Sélectionnez "Carillon sans fil", puis appuyez sur "Couplage du carillon",
confirmez la lumière bleue du carillon clignote.
Étape 4: Appuyez sur "Pair" et votre carillon appairera automatiquement votre
sonnette.
Étape 5: Après le couplage réussi, le voyant d'état du carillon sera allumé en
continu bleu.
emarque:
Si la configuration échoue, veuillez appuyer sur le bouton "RESET"
pendant 5 secondes pour réinitialiser votre carillon, puis appuyez
brièvement sur le bouton "RESET" pour l'ajouter encore.
6
Koppelen Verschijning
NL
Statuslampje
Spreker
Stroominterface
Reset
Omschrijving
Mini USB
Reset
Status light
DC5V ± 10%, USB-voeding
Druk 5 seconden op de RESET om de fabrieksinstellingen te
herstellen
Druk kort op de RESET-knop om de deurbel te koppelen
Blauw lampje knippert: wacht op configuratie
Blauw lampje brandt continu: configuratie voltooid
Functies
Pas uw beltoon aan
U kunt uw eigen beltoon kiezen uit de vier beltonen
Pas het volume aan
Het volume van de Chime kan worden aangepast door het volume van uw
te verschuiven smartphone
7

De gong koppelen
NL
Associer en appuyant sur le bouton de la sonnette
Remarque: De deurbel en deurbel zijn geconfigureerd voordat ze de fabriek.
Als de Chime niet standaard is gekoppeld, raadpleeg dan de
volgende instructies om het te koppelen met de deurbelcamera.
Stap 1: Voorzie uw deurbel en deurbel van stroom
USB-compatibel
oplader (DC5V)
(niet inbegrepen)
Stap 2: Druk kort op de RESET-knop op de bel en je zult het zien de indicator
knippert blauw, wat aangeeft dat het apparaat zich in de
koppelingsmodus bevindt.
Bouton de réinitialisation
Stap 3: Druk op de deurbelknop. Bij een succesvolle koppeling, een stem of toon
wordt afgespeeld en de Chime LED-statusindicator brandt continu blauw.
Indicateur LED
8

NLong koppelen
Stap 1 :Druk kort op de "RESET" -knop van de bel. Wanneer succesvol ingevoerd
In de configuratiemodus knippert de LED-statusindicator blauw.
Stap 2 :Toegang tot "Instellingen" van uw app, druk op "Basisfunctie".
Stap 3 :Selecteer "Wireless Chime" en druk vervolgens op "Chime Pairing",
bevestig de het blauwe licht van de bel knippert.
Stap 4 :Druk op "Pair" en uw Chime zal automatisch uw deurbel koppelen.
Stap 5 :Nadat het koppelen is gelukt, blijft het deurbel-statuslampje continu
branden blauw.
Notitie:
Als de configuratie mislukt, druk dan 5 seconden op de "RESET" -knop
om uw Chime opnieuw in te stellen en druk vervolgens kort op de knop
"RESET" om deze toe te voegen opnieuw.
9

Glockenspiel Aussehen
DE
Statusanzeige
Lautsprecher
Stromschnittstelle
Zurücksetzen
Beschreibung
Mini USB
Zurücksetzen
Statusleuchte
DC5V ± 10%, USB-Netzteil
Drücken Sie 5 Sekunden lang auf RESET, um die
Werkseinstellungen wiederherzustellen
Drücken Sie kurz die RESET-Taste, um die Türklingel zu
koppeln
Blaues Licht blinkt: Warten auf Konfiguration
Blaulicht-Festkörper an: Konfiguration abgeschlossen
Funktionen
Passen Sie Ihren Klingelton an
Sie können Ihren eigenen Klingelton unter den vier Klingeltönen auswählen.
Stell die Lautstärke ein
Die Lautstärke des Glockenspiels kann durch Schieben der Lautstärke Ihres
Glockenspiels eingestellt werden Smartphone.
10

Das Glockenspiel koppeln
Pairing durch Drücken der Türklingeltaste
Hinweis: Die Türklingel und das Glockenspiel wurden vor dem Verlassen des
konfiguriert fabrik. Wenn das Glockenspiel nicht standardmäßig
gekoppelt ist, lesen Sie bitte die fefolgen Sie die Anweisungen, um es
mit der Türklingelkamera zu koppeln.
Schritt 1: Versorgen Sie Ihr Glockenspiel und Ihre Türklingel mit Strom.
USB-kompatibel
Ladegerät (DC5V)
(nicht enthalten)
Schritt 2: Durch kurzes Drücken der RESET-Taste am Glockenspiel blinkt die
Anzeige blau und zeigt an, dass sich das Gerät im Pairing-Modus
befindet.
DE
Reset-Knopf
Schritt 3: Drücken Sie die Türklingeltaste. Nach erfolgreicher Kopplung wird
eine Stimme oder ein Ton abgespielt und die Statusanzeige der
Glockenspiel-LED leuchtet durchgehend blau.
LED-Anzeige
11

DEGlockenspiel-Paarung
Schritt 1: Drücken Sie kurz die Taste "RESET" des Glockenspiels. Wenn der
Konfigurationsmodus erfolgreich aufgerufen wurde, blinkt die
LED-Statusanzeige blau.
Schritt 2: Zugriff auf "Einstellungen" Ihrer App, drücken Sie "Grundfunktion".
Schritt 3: Wählen Sie „Wireless Chime“ und drücken Sie dann „Chime Pairing“.
Bestätigen Sie, dass das blaue Licht des Glockenspiels blinkt.
Schritt 4: Drücken Sie "Pair" und Ihr Glockenspiel koppelt automatisch Ihre
Türklingel.
Schritt 5: Nach erfolgreichem Pairing leuchtet die Glockenspiel-Statusanzeige
dauerhaft blau.
Hinweis:
Wenn die Konfiguration fehlschlägt, drücken Sie bitte 5 Sekunden lang die
Taste "RESET", um Ihr Glockenspiel zurückzusetzen, und drücken Sie dann
kurz die Taste "RESET", um es erneut hinzuzufügen.
12

Chime Appearance
IT
Spia di stato
Altoparlante
Interfaccia di potenza
Ripristina
Descrizione
Mini USB
Ripristina
Spia di stato
DC5V ± 10%, alimentatore USB
Premere RESET per 5 secondi per ripristinare le impostazioni
di fabbrica
Premere brevemente il pulsante RESET per accoppiare il
campanello
La luce blu lampeggia: in attesa di configurazion
Solidi luce blu accesi: configurazione completata
Funzioni
Personalizza la tua suoneria
Puoi scegliere la tua suoneria tra le quattro suonerie
Regola il volume
Il volume del Carillon può essere regolato facendo scorrere il volume del tuo
smartphone
13

Abbinamento del carillon
Associare premendo il pulsante del campanello
Nota: il campanello e il carillon sono stati configurati prima di lasciare il fabbrica.
Se Chime non è associato per impostazione predefinita, fare riferimento a
seguendo le istruzioni per abbinarlo alla videocamera del campanello.
Passaggio 1: Fornisci energia al tuo Campanello e Campanello.
USB compatibile
caricatore (DC5V)
(non incluso)
Passaggio 1: premere brevemente il pulsante RESET sul carillon e vedrai
l'indicatore lampeggia in blu, indicando che il dispositivo è in
modalità di associazione.
IT
Tasto reset
Passaggio 3: premere il pulsante del campanello. Se associato correttamente,
una voce o un tono verrà riprodotto e l'indicatore di stato a LED
Chime sarà di colore blu fisso.
Indicatore LED
14

Chime Pairing
Passaggio 1: premere brevemente il pulsante "RESET" del carillon. Quando entra
con successo modalità di configurazione, l'indicatore di stato a LED
lampeggerà in blu.
Passaggio 2: accedere a "Impostazioni" della tua app, premere "Funzione di base".
Passaggio 3: Selezionare "Wireless Chime", quindi premere "Chime Pairing",
confermare la luce blu del campanello lampeggia.
Passaggio 4: Premi "Abbina" e il tuo campanello abbinerà automaticamente il tuo
campanello.
Passaggio 5: Dopo aver eseguito correttamente l'associazione, la spia di stato di
Chime sarà accesa fissa blu.
Nota:
Se la configurazione non riesce, premere il pulsante "RESET" per 5 secondi
per resettare il tuo Chime e poi premere brevemente il pulsante "RESET" per
aggiungerlo ancora.
IT
15

Apariencia del timbre ES
Luz de estado
Altavoz
Interfaz de energía
Reiniciar
Descripción
Mini USB
Reiniciar
Luz de
estado
DC5V ± 10%, fuente de alimentación USB
Presione RESET durante 5 segundos para restaurar la
configuración de fábrica;
Presione brevemente el botón RESET para emparejar el timbre
La luz azul parpadea: en espera de configuración;
Sólidos de luz azul en: configuración completada
Las funciones
Personaliza tu tono de llamada
Puedes elegir tu propio tono de llamada entre los cuatro tonos de llamada
Ajusta el volumen
El volumen del Chime podría ajustarse deslizando el volumen de su teléfono
inteligente
16

Emparejando el timbre ES
Emparejar presionando el botón del timbre
Nota: El timbre y el timbre se han configurado antes de abandonar el fábrica.
Si el timbre no está emparejado de forma predeterminada, consulte la
siguiendo las instrucciones para emparejarlo con la cámara del timbre.
Paso 1: suministre energía a su Chime y Doorbell.
Compatible con USB
cargador (DC5V)
(No incluido)
Paso 2: Presione brevemente el botón RESET en el Chime, y verá el indicador
parpadea en azul, indicando que el dispositivo está en modo de
emparejamiento.
Botón de reinicio
Paso 3: presiona el botón del timbre. Cuando se empareja con éxito, una voz
o tono se reproducirá y el indicador de estado del LED Chime estará en azul
sólido.
Indicador LED
17

Emparejamiento de campana
Paso 1: Presiona brevemente el botón "RESET" del Chime. Cuando ingrese con
éxito En el modo de configuración, el indicador LED de estado parpadeará en
azul.
Paso 2: Acceda a la "Configuración" de su aplicación, presione "Función básica".
Paso 3: Seleccione "Timbre inalámbrico", y luego presione "Emparejamiento de
timbre", confirme la luz azul de la campanilla parpadea.
Paso 4: presione "Emparejar" y su Chime emparejará automáticamente su
timbre.
Paso 5: después de emparejar con éxito, la luz de estado de Chime estará
encendida azul.
Nota:
Si la configuración falla, presione el botón "RESET" durante 5 segundos
para restablecer su Chime y luego presione brevemente el botón "RESET"
para agregarlo de nuevo.
ES
18

Aparência do carrilhão PT
Luz de status
Alto falante
Interface de alimentação
Redefinir
Descrição
Mini USB
Redefinir
Luz de
status
DC5V ± 10%, fonte de alimentação USB
Pressione RESET por 5s para restaurar as configurações de
fábrica;
Pressione brevemente o botão RESET para emparelhar a
campainha A luz azul pisca: Aguardando configuração;
Sólidos de luz azul acesos: Configuração concluída
Funções
Personalize o seu toque
Você pode escolher seu próprio toque entre os quatro ringtones
Ajustar o volume
O volume do carrilhão pode ser ajustado deslizando o volume do seu
smartphone
19

Emparelhando o carrilhão PT
Emparelhar pressionando o botão Campainha
Nota: A campainha e o carrilhão foram configurados antes de sair do fábrica.
Se o Chime não estiver emparelhado por padrão, consulte o siga as
instruções para emparelhá-lo com a câmera da campainha.
Etapa 1: forneça energia ao seu carrilhão e campainha.
Compatível com USB
carregador (DC5V)
(Não incluso)
Passo 2: Pressione rapidamente o botão RESET no Chime e você veráo
indicador pisca em azul, indicando que o dispositivo está no modo de
emparelhamento.
Botão de reset
Etapa 3: pressione o botão da campainha. Quando emparelhado com s
ucesso, uma voz ou tom será reproduzido e o indicador de status do LED
Chime ficará em azul sólido.
Indicador LED
20

Emparelhamento de carrilhão
Passo 1: Pressione rapidamente o botão "RESET" do Chime. Quando entrar
com sucesso No modo de configuração, o indicador de status do LED pisca
em azul.
Passo 2: Acesse "Configurações" do seu aplicativo, pressione "Função básica".
Etapa 3: Selecione "Wireless Chime" e pressione "Chime Pairing", confirme a
a luz azul do carrilhão pisca.
Passo 4: Pressione "Emparelhar" e o seu Chime emparelhará automaticamente
a campainha.
Etapa 5: Após o emparelhamento bem-sucedido, a luz de status do Chime
ficará acesa azul.
Nota:
Se a configuração falhar, pressione o botão "RESET" por 5 segundos para
redefinir o seu Chime e pressione o botão "RESET" para adicioná-lo
novamente.
PT
21

Внешний вид звонка
RU
Оратор
Интерфейс питания
Индикатор состояния
Сброс
Описание
Мини USB
Сброс
Индикатор
состояния
DC5V ± 10%, блок питания USB
Нажмите RESET на 5 секунд, чтобы восстановить заводские
настройки;
Коротко нажмите кнопку RESET, чтобы подключить дверной
звонок
Мигает синий индикатор: ожидание настройки;
Синий свет включается: настройка завершена
функции
Настрой свой рингтон
Вы можете выбрать свой собственный рингтон среди четырех рингтонов
Отрегулируйте громкость
Громкость звонка можно отрегулировать, сдвинув громкость вашего
смартфона
22

Спаривание перезвона
Пара через нажатие кнопки дверного звонка
Примечание. Дверной звонок и звонок были настроены перед выходом
из завод. Если перезвон не связан по умолчанию, обратитесь к
следующие инструкции, чтобы связать его с камерой дверного звонка.
Шаг 1: Подайте питание на ваш перезвон и дверной звонок.
USB-совместимый
зарядное устройство
(5 В постоянного тока)
(Не включено)
Шаг 2: Короткое нажатие на кнопку RESET на Chime, и вы увидите
индикатор мигает синим цветом, указывая на то, что устройство
находится в режиме сопряжения.
RU
Кнопка сброса
Шаг 3: Нажмите кнопку дверного звонка. При успешном сопряжении
голос или тон будет воспроизводиться, и светодиодный индикатор
состояния Chime будет гореть синим цветом.
Светодиодный
индикатор
23

Колокольчик
Шаг 1: Коротко нажмите кнопку «СБРОС» в Chime. Когда успешно
введите В режиме конфигурации светодиодный индикатор состояния
будет мигать синим цветом.
Шаг 2: Доступ к «Настройкам» вашего приложения, нажмите «Основные
функции».
Шаг 3: Выберите «Wireless Chime», а затем нажмите «Chime Pairing»,
подтвердите синий свет перезвона мигает.
Шаг 4: Нажмите «Pair», и ваш перезвон автоматически соединит ваш
дверной звонок.
Шаг 5: После успешного сопряжения индикатор состояния Chime будет
гореть постоянно синий.
Замечания:
Если конфигурация не удалась, нажмите кнопку «СБРОС» на 5 секунд.
сбросить ваш перезвон и затем коротко нажмите кнопку «RESET», чтобы
добавить его снова.
RU
24

Zil Görünümü
TU
Durum Işığı
Konuşmacı
Güç Arayüzü
Sıfırla
Açıklama
Mini USB
Sıfırla
Durum ışığı
DC5V ±% 10,USB güç kaynağı
Fabrika Ayarlarını geri yüklemek için 5 saniye boyunca
RESET düğmesine basın;
Kapı zilini eşleştirmek için RESET düğmesine kısa basın
Mavi ışık yanıp sönüyor: Yapılandırma bekleniyor;
Mavi ışık katıları açık: Yapılandırma tamamlandı
Fonksiyonlar
Zil Sesini Özelleştir
Dört zil sesi arasından kendi zil sesinizi seçebilirsiniz
Ses seviyesini ayarla
Chime'ın sesi, akıllı telefonunuzun ses seviyesini kaydırarak ayarlanabilir
25

Çanı Eşleştirmek
Kapı Zili düğmesine basarak eşleştirin
Not: Kapı Zili ve Zil, fabrika. Chime varsayılan olarak eşlenmezse, lütfenkapı
zili kamera ile eşleştirmek için aşağıdaki talimatları izleyin.
Adım 1: Chime ve Doorbeell'e güç sağlayın.
USB uyumlu şarj
cihazı (DC5V)
(İçermez)
Adım 2: Chime'daki RESET düğmesine kısa bir süre bastığınızda, göstergesi
mavi renkte yanıp sönerek cihazın eşleştirme modunda olduğunu gösterir.
TU
Yeniden
başlatma tuşu
Adım 3: Kapı zili düğmesine basın. Başarılı bir şekilde eşleştirildiğinde, bir
ses veya ton çalınacak ve Chime LED durum göstergesi sabit mavi yanacaktır.
LED Göstergesi
26

Chime Eşleştirme
Adım 1 : Chime "RESET" düğmesine kısa basınız. Başarıyla girildiğinde
yapılandırma modunda, LED durum göstergesi mavi yanıp söner.
Adım 2 App Uygulamanızın “Ayarlar” kısmına erişin, “Temel İşlev” e basın.
Adım 3 ““ Wireless Chime ”öğesini seçin ve ardından“ Chime Pairing ”
düğmesine basın, mavi ışık yanıp söner.
Adım 4 "" Eşleştir "e basın, Zil otomatik olarak kapı zili eşleştirecektir.
Adım 5 successfully Başarılı bir şekilde eşleştirdikten sonra, Chime durum ışığı
sürekli yanar mavi.
Not:
Yapılandırma başarısız olursa, lütfen 5 saniye boyunca "RESET" düğmesine
basın Zil sesini sıfırlamak ve eklemek için "SIFIRLA" düğmesine kısa süre
basın tekrar.
TU
27
 Loading...