

Lawmate PV-FM10 Quick Manual
1 32
5 4
LawMate
Law Enforcement Products Manufacturer
®
PV-FM10
Digital Clock DVR Quick Guide
(Motion Detect)
6.1. Use memory card reader to retrieve video files.
6.2. With the device powered on and memory card inserted, connect the
device to PC by USB cable. It will be recognized by PC as an
external drive for user to retrieve the files.
6. Retrieve Files from DVR
There are two ways to read the retrieve video files.
7. Time Setting for Clock Display
8. Operation
It is highly recommended to format SD card on unit when it is connected
to monitor via A/V out cable.
LawMate
Law Enforcement Products Manufacturer
®
1
2
3 4
5
7.1. Insert a safety pin into the reset button before operation.
7.2. Long press for three seconds to access its time setting mode.
7.3. Press or to set hours and press again to set minutes.
To exit time setting mode, press .
7.4. Press to switch the displaying to 12 or 24 hour format.
7.5. Press to activate the blue LED backlight.
5
3
1
2
3
1
4
3
6
5
2
1
9
10
8.1. Insert memory card into the card slot .
8.2. Power on/off the DVR by pressing power button .
8.3. Switch to set NTSC or Pal system
8.4. Switch to Rec/Stop to start or stop recording.
8.5. The default recording mode is motion detect (1 minute)
8.6. LED indicator
Power: Blue
Charge: Green
Record: Red
2
1
5
6
V1.0
Note: The time setting here is for clock display only. It does not apply to video files.
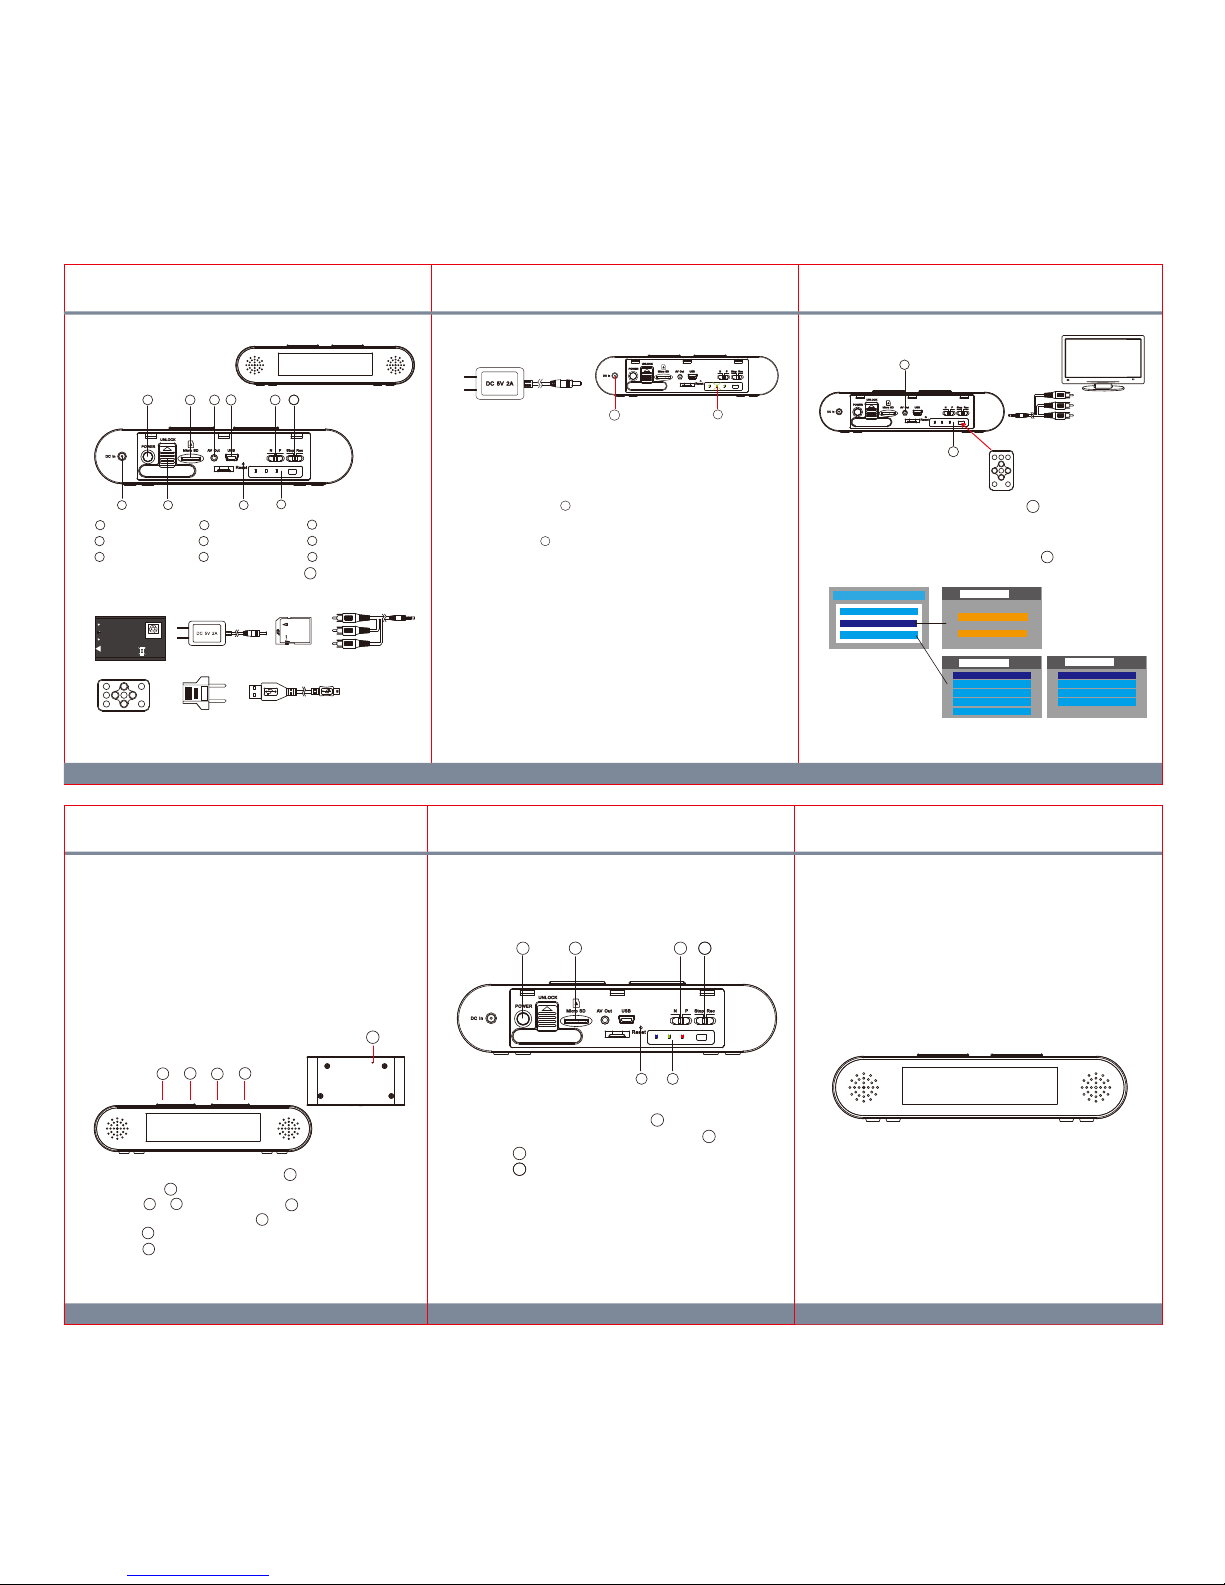
1. Names and Parts
2. Package Content
1
Power Button
2 Memory Card Slot
4 USB Socket
5
NTSC/PAL Switch
6 Stop/Rec Switch
7
DC In Port
8 Battery Slot
9 Reset 3 A/V Out Port
*No Microphones are available for USA territory.
10 LED Bar and IR Sensor
3. Charge Battery
Charge LED(Green)
When battery is fully charged,
the green LED will turn off.
LED bar
10
3.1. Remove the back cover from the DVR and connect the charger plug
to the DC In Jack .
3.2. Plug the power cord of the charger to an AC wall outlet. The
charging starts automatically.
3.3. The LED bar will illuminate green to show the device is in
charging mode. Charging time requires approximately 3 to 4 hours.
3.4. After charging is completed, green light turns off automatically.
3.5. Users may charge the battery while recording.
10
7
Connect 5V adaptor to DVR
6
7
4
5
3
21
8
9
10
Infrared Remote
Control
SD Card
A/V Out Cable
USB Cable
5V Charger
European Standard
Adapter Head
Battery
3.7V Li-ion BATTERY
BA-PV900FM
CAUTION
Li-ion
Slide the battery into place at approximately 15 degree to avoid
damaging the golden connectors on the units.
C E
7
Connect AV/Out Cable to the A/V out port on the device and
connect the RCA jacks to A/V In port on monitor.
3
5.1. Connection
5.2. Operated by infrared controller
Aim the IR remote controller to the IR sensor on the DVR and
navigate the UI by the remote control.
10
Main Menu
Video Files
Recorder Seng
Program Seng
Main Menu
Language
Time Date Display
Time Date Seng
MIC
Storage Info
Program Setting
Format SD Card
TV Out Seng
Firmware Upgrade
Load Setup Defaults
Program Setting
Normal
Moon Detect
Recorder Setting
5. Setting
3
10
4. Date and Time Setting for Video Files
4.1. Connect the device to monitor via A/V out cable to enter UI page.
4.2. Use IR remote control aiming at IR sensor to navigate between the
sections.
4.3.
Navigate DVR menu by aiming Remote Control to IR Sensor and
scroll down “Program Setting” then “Time Date Setting” to edit
accordingly.
 Loading...