

Lawmate PV-AC20HDWI Quick Manual
2 1
4
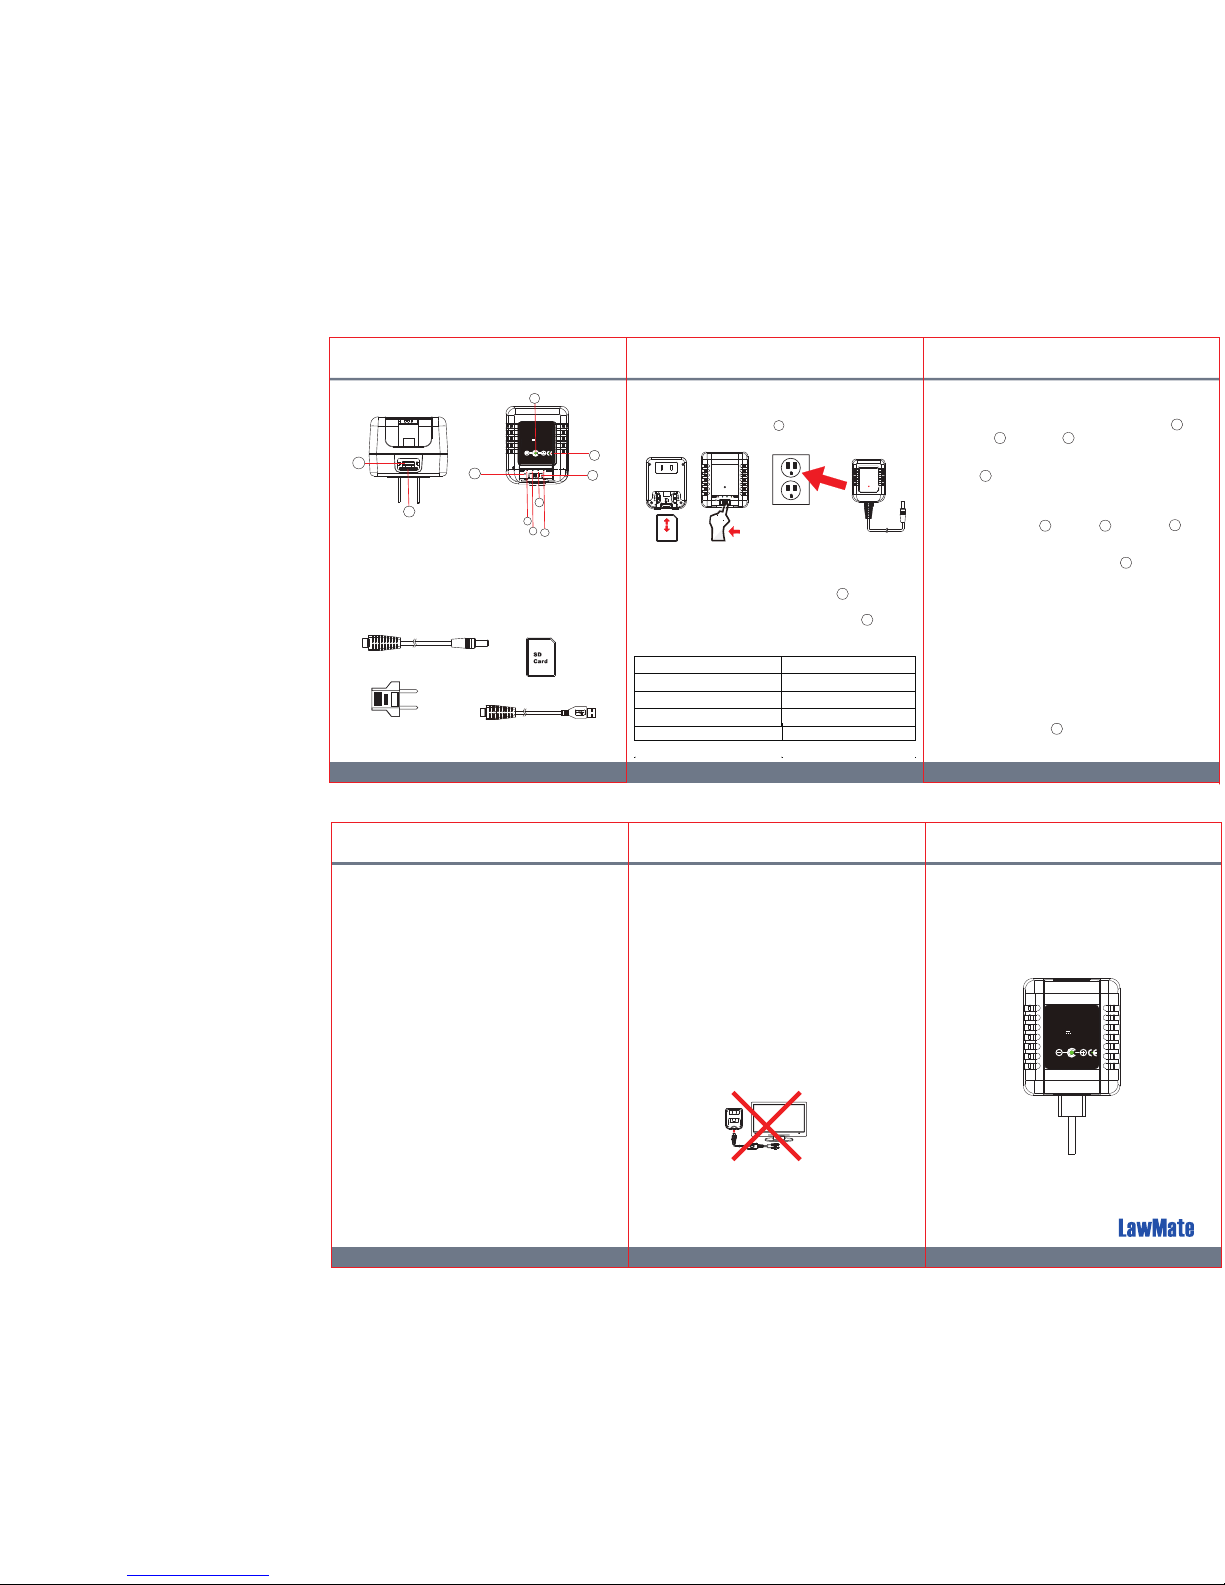
2. Package Content
1. Names and Parts
3. Recording Operation
Note:
Unlike PV-AC20, PV-AC10FHD does not include A/V Out
connection.
4.2.1. Motion detection mode & 3 resolution mode options:
1080P/720P/WVGA
4.2.2. Motion detection mode & 3 sensitivity mode options:
H/M/L
4.2.3. Motion detection mode & different time segments:
1/3/5 Mins
4.3 For snapshot function, please refer to the IP
quick guide.
A/V Out Connection
V1.0
PV-AC20HDWI
1080p Wi-Fi & IP Power Adapter DVR
Quick Guide
LawMate, innovation never stops
®
AC ADAPTOR
Model No:PV-AC10FHD
I/P:AC 100~240V 50/60Hz 0.3A
O/P:DC 5V 2A
CLASS2
TRANSFORMER
LISTED
MADE IN TAIWAN
2
ACADAPTOR
Model No:PV-AC20HDWI
I/P:AC 100~240V 50/60Hz 0.3A
O/P:DC 5V 2A
CLASS2
TRANSFORMER
LISTED
MADE IN TAIWAN
1
3
4
5
6
7
8
Memory Card
Adapter Head European Standard
Covert Power Cord
USB Connection Cable
3.1 Insert memory card into slot as shown in illustration 1.
3.2 To turn on the Wi-Fi,
slide to the left as shown
in illustration 2.
8
3.3 Simply plug the charger DVR into an electrical outlet
to power on the device. The blue LED will be on
and the system initialization will take around 40
seconds. With the presence of the red LED , it
indicates that the recording mode is on.
3.4 For the LED status indicators :
3
(1)
(2)
AC ADAPTOR
Model No:PV-AC10FHD
I/P:AC 100~240V 50/60Hz 0.3A
O/P:DC 5V 2A
CLASS2
TRANSFORMER
LISTED
MADE IN TAIWAN
(3)
※No microphones are available for USA market
1. Camera Lens
2. Microphone*
3. Power(Blue) LED
4. Record (Red) LED
5. Wi-Fi (
Orange) LED
6. Charge(Green) LED
7. Default Button
8.
Wi-Fi Switch(Left On/Right Off)
9. Memory Card Slot
10. USB Port
9
10
3.6. To set the password & SSID back to default settings,
please press the default button longer than 4 seconds
and less than 10 seconds ; You’ll see the red /
orange /green LED turning on and off at the
same time.
After 40 seconds, the presence of the flashing orange
LED indicates that the unit is ready to start the
P2P connection again (P2P password:88888888).
To set all the settings back to factory default, press
the default button longer than 10 seconds;
You’ll see the red / orange /green LED turning
on and off at the same time. After 40 seconds, all the
settings will be back to factory default settings.
You’ll see the flashing orange LED which indicates
that the unit is back to default setting successfully.
※Please note that the operation less than 4 seconds
will be invalid.
4. Normal /Motion Detection Recording
4.1. For normal recording, please refer to the IP quick
guide for further details.
4.2 For motion detection recording, plug the charger DVR
into an electrical outlet. After 10 seconds of system
initialization, the unit is now recording on motion
recording mode. When the sensor detects any moving
object, the red LED will be on steadily. You can use
the App to change the operation mode:
5. Retrieving Video Footage
5.1. Video file is stored in the SD Memory card.
5.2. Remove SD card from DVR.
5.3. Insert SD card into a card reader or SD card slot in
your PC.
5.4. Computer detects the storage and user may browse
and operate the storage as typical folder directory.
i.e. Rename, copy and paste, delete, duplicate, etc.
Note:
Vidoe files will be named as V+year+month+time;
e.g. V20150721010101
6. Date and time setting (for Windows system)
6.1. From the desktop right-click to open Notepad,
create a text file named settime.txt
6.2. On the first line of the file, enter date and time
informaiton as year.month.day hours.minutes.seconds
For example, suppose the time is October 16, 2015
15:00.Then enter 2015.10.16 15:00:00
6.3. Save the file to the root directory of the memory card.
6.4. Insert the memory card into the slot, and power on the
device.The date and time setting is now completed.
Note : When the date and time setting is completed.
The settime.txt file will not be visible when you connect
the device to the computer again.
4
5 6
4
5
5
4 5
6
3
5
AC ADAPTOR
Model No:PV-AC20HDWI
I/P:AC 100~240V 50/60Hz 0.3A
O/P:DC 5V 2A
CLASS2
TRANSFORMER
LISTED
MADE IN TAIWAN
4
LED Indicators
Device Status
Solid Red LED Recording on
Blinking orange LED Searching for P2P
Solid orange LED
Solid green LED
IP Connected
P2P Connected
 Loading...