

Lawmate PV-900HD Quick Manual
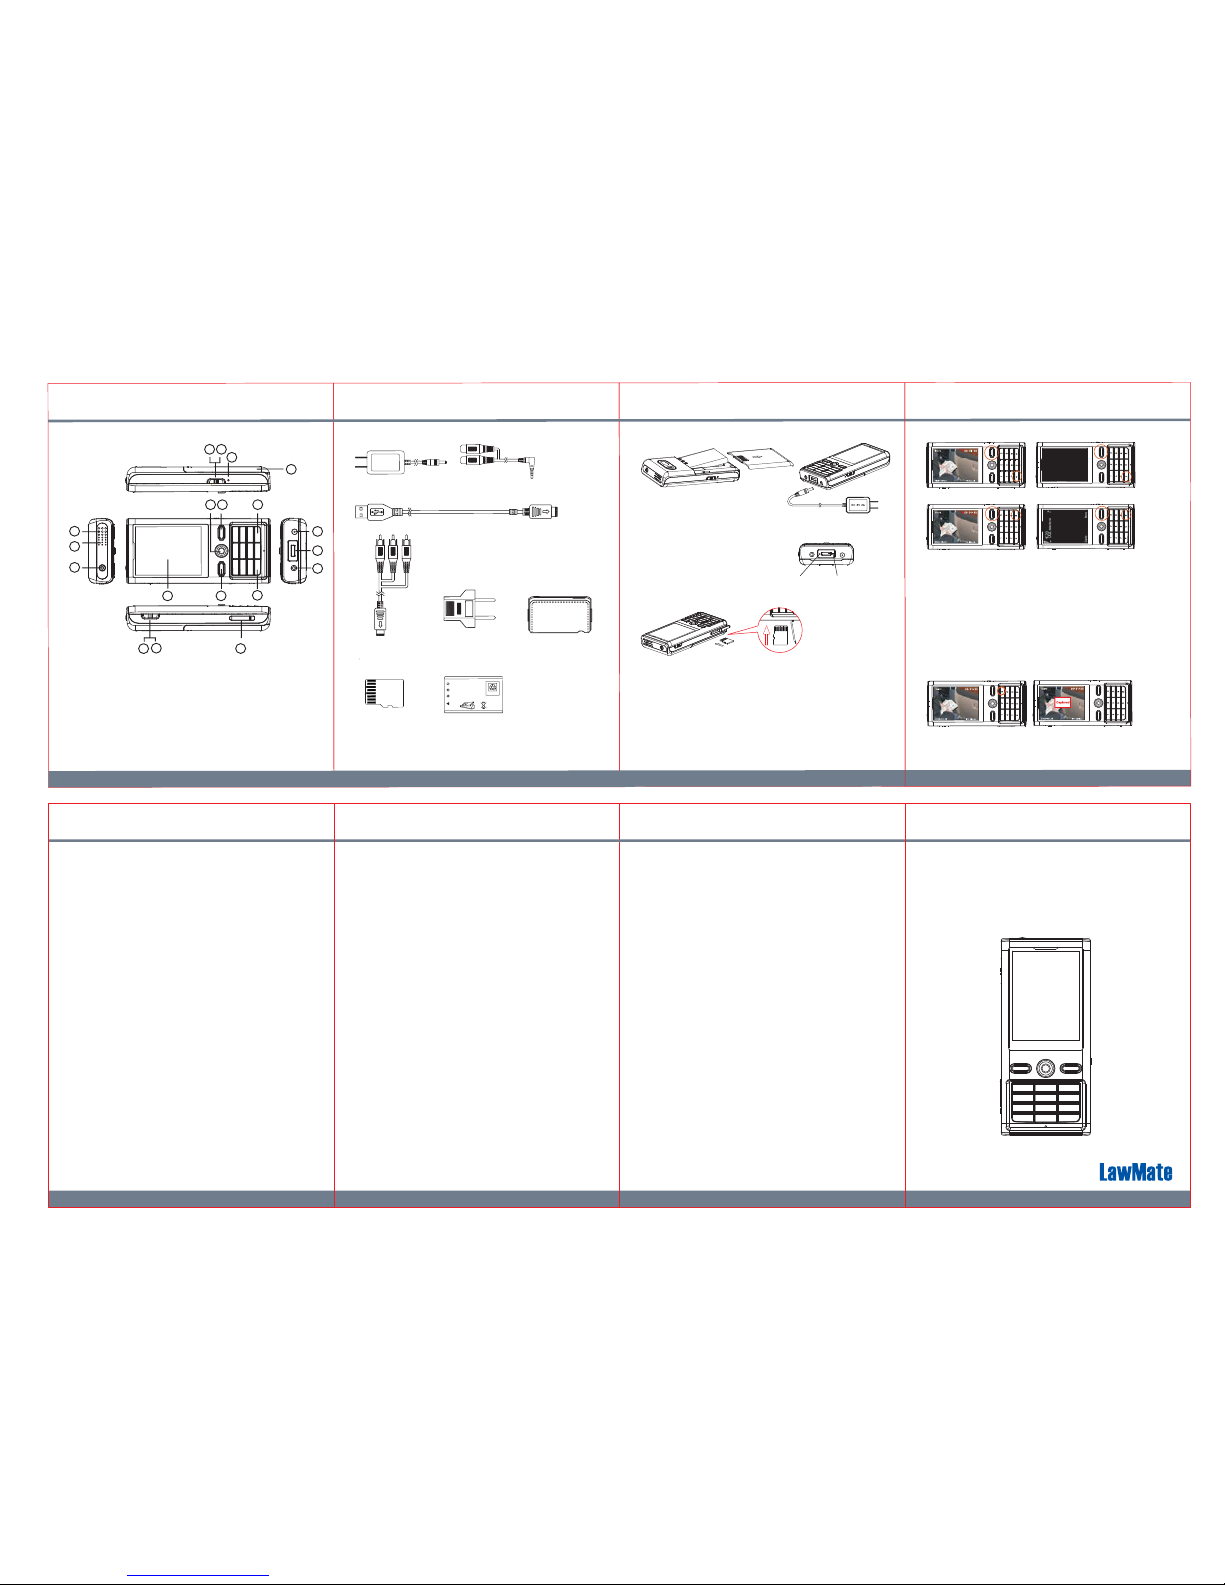
1 3 2
4
6 7 5
3. Charging The Battery
Charging LED(Orange)
Power-on LED (Blue)
Recording LED (Red)
4. Insert MicroSD Card
1. Remove the battery cover from back.
2. Slide the battery into battery tray.
3. Close the battery tray with battery cover.
4. Connect the power cord to the base of the DVR.
5. Plug the adapter into an AC wall outlet.
6. Leave the DVR charging for 12 hours
for the first charge cycle.
1. Flip up the dustproof lid of card slot.
2. Gently insert the memory card with metal contacts facing upward
before turning on the DVR.
2. Close the card slot with the attached lid.
3. All recorded files will be stored in the memory card.
4. File directory to playback recorded file:
Video file: Main Menu > Video
Picture file: Main Menu > Images
(A) Screen-off Disguise Display
(B) Cellphone Power-on Disguise Display
5. Activate Spy Mode
6. Taking A Snapshot
1. There are two different covert displays originally designed for
this model. (A) Screen-off (B) Cellphone power-on.
2. Both can be accessed by pressing the instant key.
3. To activate instant key access. Press the power button.
4. Go to Main Menu > Settings > Spy Mode > On
5. Press Menu + * button to change to screen-off display.
6. Press Menu + # button to change to Cellphone power-on display.
7. Use the navigation key to change the setting. UP/DOWN
/RIGHT/LEFT to change cursor direction. Press the key to apply
the setting.
1. Record directly without disguise, go to Main Menu > Record >
Preview. Captured images will be shown on the screen.
2. Press key 3 to take a snapshot.
2. Package Contents
5V DC Adapter
DC 5V 2A
Li-ion Battery X 2
3.7V Li-ion BATTERY
BA-PV900
CAUTION
Li-ion
Slide the battery into place at approximately 15 degree to avoid
damaging the golden connectors on the units.
A/V In Cable (2 prong)
MicroSD Card
A/V Out Cable
(3 prong)
Standard European
Adapter Plug
USB Cable
Protective Case
NTT DoCoMo
1
2
3
4 5
6
7
8
9
11
10
12
13
14
15
16
17
18
19
1. Name and Parts
1. Camera Lens 11. ESC Button
2. Microphone 12. Volume Up Button
3. Power Button 13. Volume Down Button
4. Vibration On Switch 14. DC Power Adapter Socket
5. Vibration Off Switch 15. Micro USB Port
6. Reset Button 16. AV Input Socket
7. Battery Tray 17. Stop Recording Switch
8. 2.46” LCD Display 18. Recording Switch
9. Navigation Key 19. Micro SD Card Slot
10. Menu Button
* No microphones are available for USA market.
V1.3
PV-900HD
Cellphone Design Portable DVR
Quick Guide
7. File Retreival
8. File Playback
9. Changing The Video System
10. Continuous Recording
11. Pre-event Recording
12. Motion Detect Recording
1. USB Cable Connection:
(A) Connect Micro USB Cable Hub to the DVR.
(B) Connect Mini USB cable to Micro USB Cable Hub to computer.
(C) DVR is read as External Storage from computer.
(D) Access the external storage, find the “Record” folder.
(E) Operate file applications in this folder.
2. Card Reader:
(A) Remove MicroSD card from card slot.
(B) Connect a card reader to the computer.
(C) Insert MicroSD card into the card reader.
(D) Access the card reader folder.
(E) Operate file applications in this folder.
1. Video File Playback:
(A) Go to Main Menu > Video
(B) Press Navigation Button to access “Record” folder.
(C) Press Navigation Button to playback video.
(D) Move Navigation Button to right to fast forward.
(E) Move Navigation Button to left to play backward.
(F) Press ESC button to move to previous directory.
2. Image File Playback:
(A) Go to Main Menu > Images
(B) Press Navigation Button to zoom in and zoom out.
(C) Move Navigation Button up or down to view other files.
(D) Press Menu Button to edit Slideshow option.
1. Navigate to: Main Menu > Setting > Digital Cam NTSC/PAL
2. Press Navigation Button to access selection.
3. Move Navigation Button UP and Down to change the setting.
4. Move Navigation Button to left to exit setting edit.
5. Press ESC Button to exit Setting Menu page.
13. Password Protection
1. Power On Password:
(A) Navigate to: Main Menu > Setting > Set Power On Password
(B) Use Navigation Button to change password characters.
(C) Navigate to: Main Menu > Setting > Power On Password > On
2. USB Connection Password:
(A) Navigate to:
Main Menu > Setting > Set USB Connection Password
(B) Use Navigation Button to change password characters.
(C) Navigate to:
Main Menu > Setting > USB Connection Password > On
1. Navigate to: Main Menu > Settings > Motion Detection
2. Make changes on Motion Detection Level, Motion Detection
Duration, Motion Detection Zones, and Overwrite settings.
3. Navigate to: Main Menu > Settings > Recording Mode.
4. Select Motion Detect as default recording mode.
5. Switch to REC position to start recording.
6. Switch to Stop position and press ESC button for 3 seconds to
stop.
1. Navigate to: Main Menu > Record > Pre-event
2. Captured images will show on the screen.
3. Switch to REC position to start recording.
4. Device will automatically start recording 30 seconds before REC
is pressed.
5. Switch to STOP position to stop recording.
1. Navigate to: Main Menu > Record > Preview
2. Captured images will show on the screen.
3. Switch to REC position to start recording.
4. Device will start recording continuously when REC is switched.
5. Switch to the STOP position to stop recording.
14. Timer Recording
1. Navigate to:
Main Menu > Setting > Timer Recording
2. Select any icon and edit timer settings.
3. Move to the end of the menu page.
4. Change Setting to On.
5. Turn the DVR power off.
6. DVR will start recording in response to the timer setting.
LawMate, innovation never stops
®
 Loading...