

Lawmate PV-50HD2W Quick Manual
1
32
4
V1.0
7. Operation
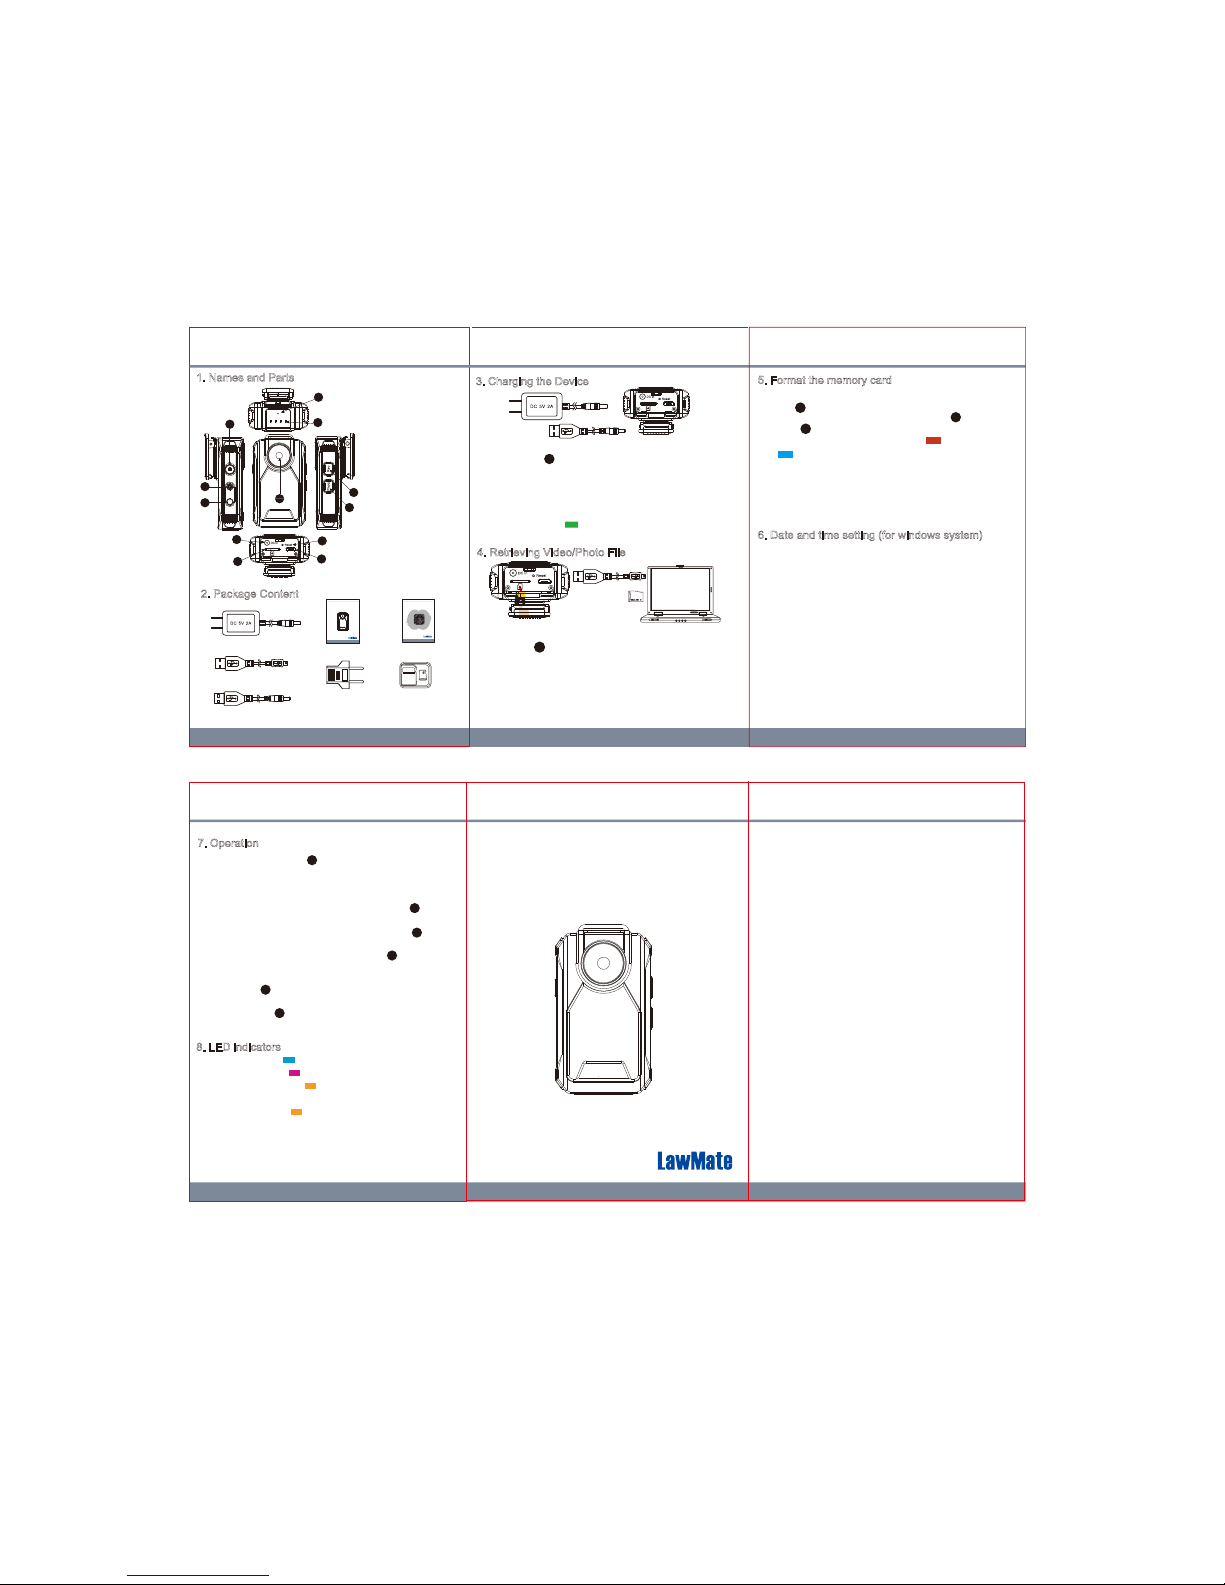
1. Names and Parts
2. Package Content
Memory Card
USB Cable
1.Power on/off
2.Wi-Fi on/off
3.Default / Format
4.DC 5V in
5.Memory Card Slot
6.Reset Key
7.USB port
8.Photo Buon
9.Rec/Stop Buon
10. LED Indicators
11. Microphone
12. Lens
2
3
4
1
7
8
9
10
4GB
Lock
Adapter
3. Charging the Device
4. Retrieving Video/Photo File
1
1.
With the DVR powered off, plug the USB cable into the
USB port on DVR and the other end to the
computer.
2. Aer the connecon is established, turn on DVR.
3. DVR will be recognized as a “removable drive” and
then user can start to download the videos to the
computer.
PV-50HD2W
1080p Body Worn Wi-Fi DVR
Quick Guide
※
Please format the memory card before the first recording.
5
6
12
11
Wi-Fi Quick Guide
Device Quick Guide
5V 2A Charger
European Standard
Adapter Head
4
1. Connect the charger plug or DC5V USB cable to the
DC In Jack .
2. Plug the power cord of the charger or the USB cable
to an AC wall outlet or other power sources. The
charging starts automacally. The device can record
while charging.
● Solid green LED - the device is charging.
● Green LED goes off - the deviced is fully charged.
●
Solid blue LED - power is on
●
Solid purple LED - recording is on
●
Blinking orange LED - device searching for Wi-Fi
connecon.
●
Solid orange LED - Wi-Fi connecon successfully
established.
7
8. LED indicators
1. With gold contact facing up, insert the memory card
into .
2. With device powered off, press and hold and then
press for 3 seconds to power on the device.
3. When you see the red blinking LED and blue LED
goes off, the formang is completed.
Note: To make sure the memory card can be read by
the computer, please format the memory card before
using it for the first me. Also, please note that
formang on computer is highly not recommended,
for it might result in the failure of formang.
1. Power on/off: Press for 3 seconds to turn on/off
the device.
※ Device cannot be powered on if no memory card is inserted.
2. Recording: With device powered on, press once
to start or stop recording.
3. Take a photo: With no recoring is on, press once
to take a picture.
4. Wi-Fi: With device powered on, press to turn
on/off Wi-Fi.
5. Restore Default Seng : With device powered off,
long press for 4 seconds to restore Wi-Fi password,
SSID name, turn on SSID visibility.
Or long press for 10 seconds to restore all the
default seng.
3
1
1. From the de sktop right-click to open Notepad,
create a text file named seme.txt
2. On the first line of the file, enter date and me
informaiton as year.month.day hours.minutes.seconds
For example, suppose the me is October 16, 2015
15:00. Then, please enter 2016.10.16 15:00:00
Note : There should be a space le between day and
hours, and the me format should be the 24-hour
format.
3. Save the file to the root directory of the memory card.
4. Insert the memory card into the slot, and power on
the device. The date and me seng is now completed.
Note : When the date and me seng is completed.
The seme.txt file will not be visible when you
connect the device to the computer again.
5
1
1
9
8
2
3
3
DC5V Charge Cable
5. Format the memory card
6. Date and time setting (for windows system)
LawMate, innovation never stops
®
1
PV-50HD2W
1080p Body Worn Wi-Fi DVR
Quick Guide
LawMate, innovation never stops
®
LawMate, innovation never stops
®
PV-Cam Viewer
App Store & Play Store
Installation Quick Guide
 Loading...