

Page 1

Lawmate PV-500 Lite Portable Digital Video
Recorder User Manual
Last Modified on 12/20/2015 10:59 pm EST
PV-500LITE
Portable Digital Video Recorder
Quick Guide
Law Enforcement Products Manufacturer
■ Name and Parts
LawMate
V1.0
Page 2

Power Button1.
Status Bar2.
Infrared Sensor3.
Analog Cam In4.
Controller Port5.
Reset Button6.
SD Card Slot7.
Battery Lock Button8.
Power Connector9.
USB 2.0 Port10.
A /V Out Port11.
2.36 Inch TFT LCD Display12.
Record/Stop Button13.
Battry Pack14.
■ Package Content
■ Charging Battery
Plug-in charger into DC In port on device.1.
PWR signals in red color. This indicates that device is charging. Charging time is 3 to 42.
hours.
After charging is completed, red color signal turns off automatically.3.
Note that if device is power-on during charging, PWR signal then switch to orange4.
color. This indicates that device is charging. At the same time, device is powered by
the charger in order to function properly.
Page 3

■ Connecting Analog Camera
To connect analog camera, plug-in analog camera jack into CAM IN port on the device.1.
Push REC/STOP switch to REC position to start recording2.
Various recording mode is optional in SETTING menu.3.
NOTE: Main device or controller automatically accesses recording status after main device
or controller is turned on without lag time.
■ Installing and Replacing Battery
NOTE: PV-500LITE has a removable battery. You can purchase extra battery from your
dealer. Follows step-by-step instruction indicated below to replace battery.
1. Battery is already placed on top of the metallic contact strip on the
device. Gently slide switch to OPEN position and push battery in red arrow
pointed direction .
Note that OPEN switch is aligned on the same side with SD Card Slot..
2. Gently push in red arrow pointed direction to secure battery and ensure
it is locked in the proper position.
3. Push OPEN switch in red arrow pointed direction to lock battery onto
device. Now, battery is properly installed.
4. To replace another battery, gently slide OPEN switch in red arrow
pointed direction to unlock battery.
5.Push battery in red arrow pointed direction.
NOTE: Follow directions indicated above to install and replace battery. Forcing device to
release would only physically damage device.
■ Connecting Wired Controller
Page 4

There is a HDMI Control port at the bottom of the device. Plug-in HDMI Cable to1.
Control port in red arrow pointed direction to connect wired controller.
Switch Rec button to Rec position.2.
Controller is ready to use to start recording instantly when it is on, and stop recording3.
when it is off.
NOTE: PV-500LITE controller only serves function to instantly turn on and off the DVR
with instant recording functionality.
To turn on PV-500LITE, slide the controller toggle downward.4.
To turn off PV-500LITE, slide the controller toggle downward again.5.
NOTE: To activate recording, it is required to edit DVR setting after main device or
controller is turned on.
■ Connecting Computer and Monitor
Flip up USB port cover. You will see one USB 2.0 port and one A/V Out port.1.
Plug-in USB Cable to connect computer and device.2.
Plug-in A/V Out Cable to connect Monitor and device.3.
NOTE: You can also plug-in Earphone to connect device and use it as a portable device.
Page 5

■ Retrieving Video Footage
Video file is stored in the SDHC Memory card.1.
There are two methods to retrieve video files2.
Using USB Cable to connect to computer1.
Using SD card reader to read and write folder directory2.
Computer detects the storage and user may browse and operate the storage as typical3.
folder directory. i.e.Rename, copy and paste, delete, duplicate, etc.
■ Using Infrared Remote Controller and Editing
Settings
Aim IR Remote Controller at the sensor area to control device remotely.1.
Editing all different settings by accessing selection SETTING.2.
Press PWR button to turn on device.A.
On the Main Menu, press navigation buttons on remote to move cursor up andB.
down.
Move the cursor to Program Setting, then press the center button to enterC.
Program Setting menu.
Page 6
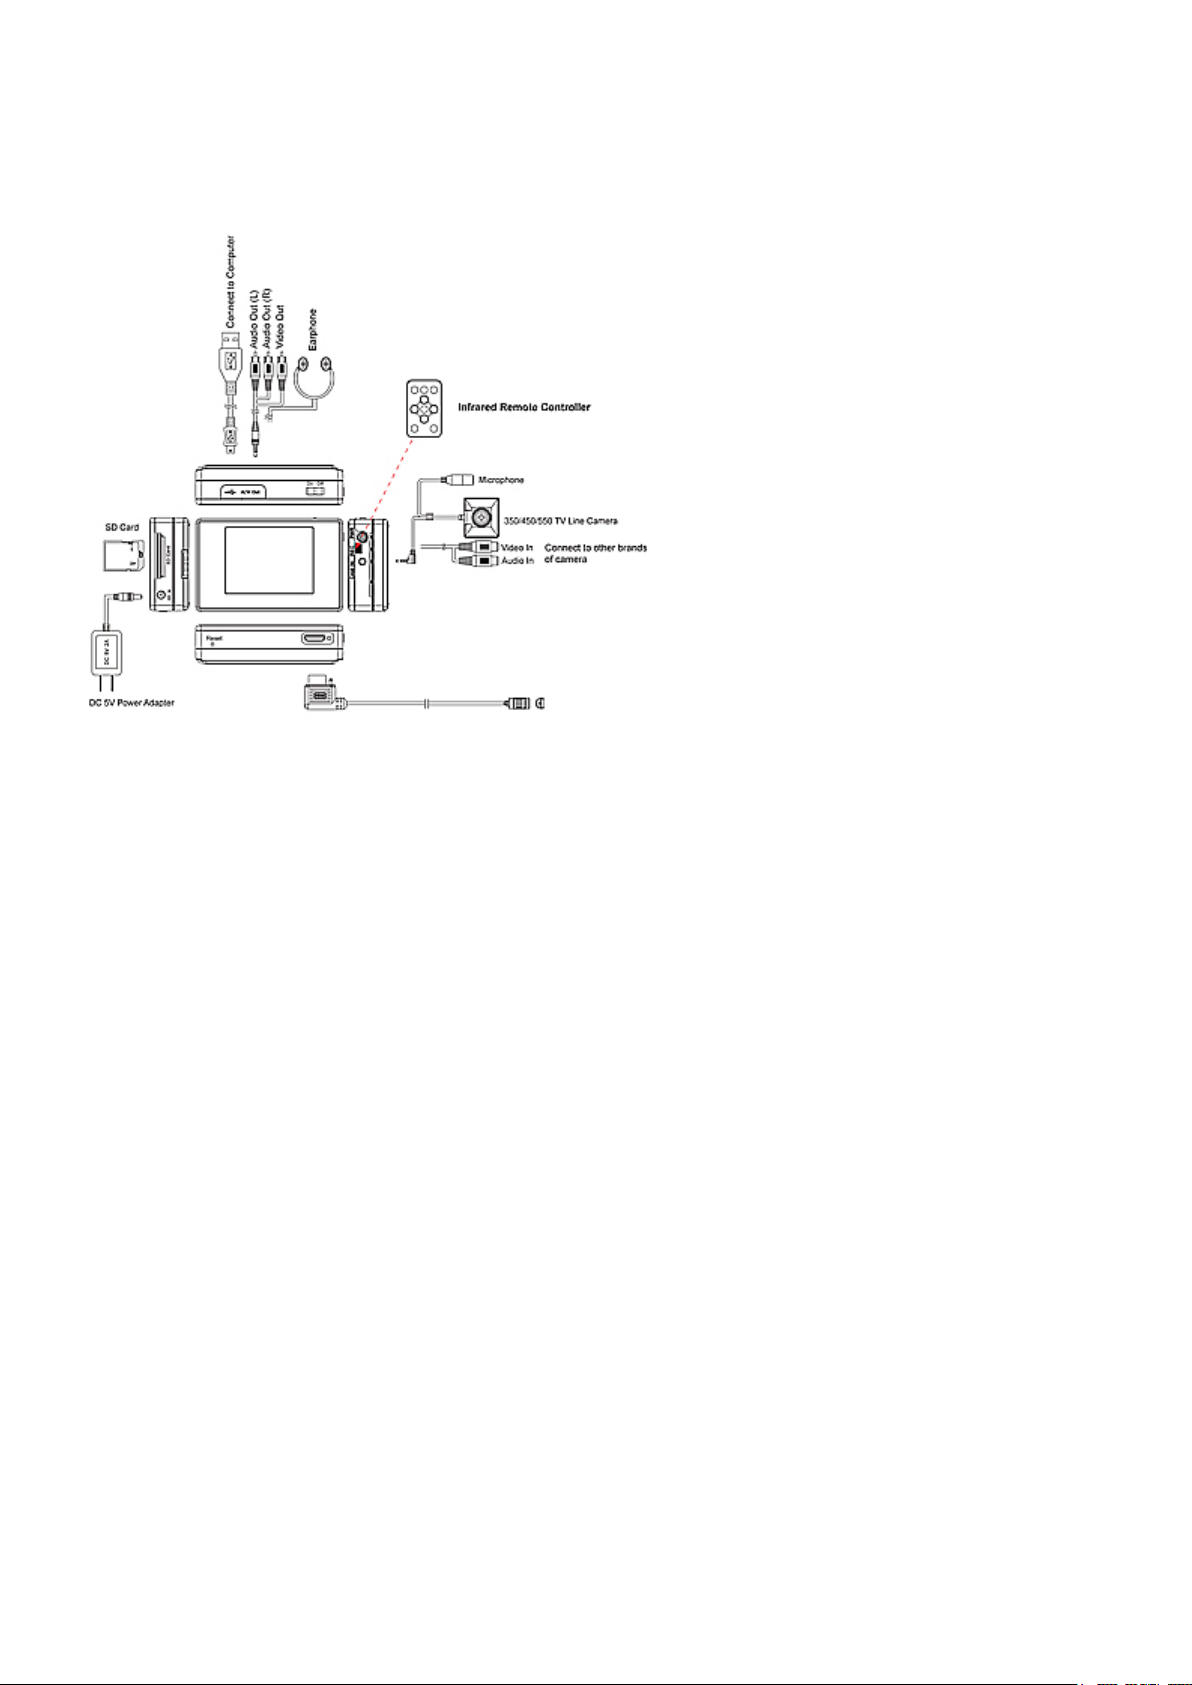
■ PV-500LITE Connection Illustration
 Loading...