

Page 1
Lava Octopus-550
Installation Manual
OCTOPUSPCI
MADE
IN
CANADA
LAVACOMPUTERS
P.N.MOKO L81.0
Rev.B00
Page 2
Windows NT 4.0 Installation
1. With the power turned off,insert the Octopus-550 card into any free
PCI slot in your PC. Boot NT logging on as “Administrator”.
2. Place the installation diskette into your floppy drive
and select Run from the Start Menu. When prompted type:
A:\NT4.0\Setup.
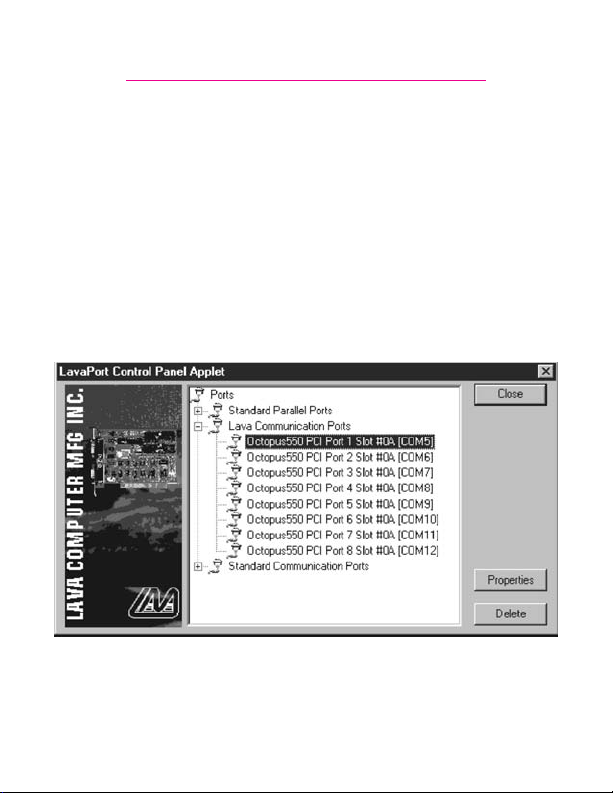
3. After the necessary files have been copied,select My Computer and
start Control Panel.A new icon will appear called “LavaPort.”This
applet should now be used to configure ALL Com Ports in your PC –
not just Lava serial ports.
Please note that Com 1 may not appear in this applet if you have your
mouse attached to Com 1.
Octopus-550
Page 3

DOS & Windows 3.x Installation
1. With the power turned off,insert the Octopus-550 card into any free
PCI slot in your PC.Turn your PC on.Boot to DOS.
2. Place the installation diskette into your floppy drive.In
the Win3.11 subdirectory of this diskette you will find a file called
“Lavaconf.exe”. Copy this file to your hard drive and run it.
3. When run, Lavaconf.exe will display two sets of four I/O addresses
and one IRQ.These correspond to the addresses and IRQ chosen by
your PC when configuring the . Make a note of them.
4. If you are using Windows 3.x,start Windows and go to Control Panel
| Ports. Choose Com 3 for Port 1 and Com 4 for Port 2 on the
Octopus-550
and IRQ for each port as reported by Lavaconf.exe. Reboot your PC
for these changes to take effect.
Note: Native DOS and Windows 3.X support a maximum of four Com
ports in a PC. If you wish to use four ports on the ,you must
disable the existing ports on your motherboard. Users running DOS or
Windows 3.x exclusively on a system with an Octopus-550 will be
unable to access four of the card's ports,regardless of configuration.
Octopus-550
Octopus-550
. Click the Advanced button and enter the I/O address
Octopus-550
Page 4

Windows 95/98/Me/2000 Installation
1. With the power turned off,insert the Octopus-550 card into any
free PCI slot in your PC.Make sure the card is well seated. Attach
the cable.Turn your PC on and start Windows.
2. Windows will automatically detect the as a new PCI
Serial Controller and ask you to insert the Installation Diskette.
The installation files are located in the root directory of this disk.
Windows XP may display a message to the effect that the drivers
are not digitally signed.This warning can be ignored.
3. After the necessary files have been copied,Windows will
complete the full installation of the . During this
process,two parents will be created in Device
Manager under Multi-Function Adapters,and eight child ports
will be created under Control Panel | System | Device Manager |
Ports.
Octopus-550
Octopus-550
Octopus-550
Page 5

Octopus-550
The hardware appears in Device Manager in two
places: under the Multi-function Adapters tree and as part of the
Ports tree.Please note that any changes to the Resources (I/O
Address & IRQ) used by any one of the eight ports on the QuattroPCI must be made through the Resources page of the appropriate
Octopus-550
PARENT – not through the individual Ports pages.
Modifying I/O Address and IRQ Resources is NOT
recommended.
Page 6

Changing the Com numbering of your
Octopus-550 ports (Windows 95/98/Me
only)
Unless you already have more than 4 Com ports installed in your
PC,Windows will by default configure the ports as
Com 5 through Com 12.To change the Com number of any of
these ports (e.g. reassign Com 5 to be Com 3), please use the Lava
Com Port Redirect Utility included in the“Utils\Redirect“
subdirectory of your Installation Diskette. Such a reassignment
may be necessary because some communications applications
programs do not recognize port designations beyond Com 4.The
Com Port Redirect utility will allow you to change the Com
numbering of your ports
resources
To install the Port Redirect Utility on your hard drive,insert the
Installation Diskette into your floppy drive,click Start, Run and
type A:\Utils\Redirect\Setup.
.
without changing I/O address
Octopus-550
Page 7

Changing the Com numbering of your Octopus-
550 ports (Windows 2000/XP only)
In Windows 2000,Com port numbering can be changed by doubleclicking the serial port entry displayed in Windows' Device Manager.
Go to Port Settings | Advanced,and choose Com Port #.
Page 8

Lava
Technical Support
9:00 am to 5:30 pm Monday to Friday (Eastern Time)
Tel: +416 674-5942
Fax:+ 416 674-8262
E-mail: tech@lavalink.com
Internet: www.lavalink.com
Lava Computer MFG Inc.
This device complies with part 15 of the FCC Rules. Operation is subject
to the following conditions: (1)This device may not cause harmful interference,
and (2) this device must accept any interference received,including interference
Lava Computer MFG Inc.908 Niagara Falls Blvd. #629.North Tonawanda NY 14120-2060
that may cause undesired operation.
 Loading...