

Page 1
LavaPort-Plus
Installation Manual
SERIAL2
LAVA
COMPUTERS
MADE
IN
LAVAPORT-PLUS
CANADA
P.N.MOKO L77.x
Rev.B00
Page 2

Congratulations on your purchase of the LavaPort-Plus Com Port
Accelerator and EPP parallel port for 56K and ISDN external modems,
printers,and other high-speed serial and parallel peripherals.
Included with your package, you should have the following:
1. The LavaPort-PCI printed circuit board
2. One software installation diskette
3. This user’s manual
If any of the above items are missing,please contact the reseller where
you purchased this product.
2
Page 3

Contents
Quick Install
Installing the LavaPort-Plus Hardware
Windows Installation
· Installing Windows Drivers
· Configuring the Parallel Port
· Optimizing the Parallel Port for Zip Drives
· Custom configuring serial ports
· Changing Port Numbers (Com 3/4/5 etc.)
· Setting LavaPort serial data rates
· Setting LavaPort FIFO Control
· Flow Control (serial ports)
· Lava Modem Speed Set - for 230.4 kbps
Note: Instructions for installing the LavaPort-Plus
under DOS,Windows 3.x,or Windows NT 4.0 may be found
in the ReadMe file of the appropriate subdirectory of
your LavaPort-Plus diskette.
3
4
5
6
6
8
10
11
14
16
18
20
22
Page 4

Quick Install
Windows (versions other than 3.x and NT)
1. With the power off,insert the LavaPort-Plus card into any free PCI
slot.
2. Launch Windows - new hardware will be detected.
3. When prompted,insert the LavaPort-Plus installation diskette and
select the file “Lava.inf” in either the root or theWin95 subdirectory.
(If the diskette is not found you may have to type“A:\WIN95\”).
4. After Windows has booted,click the Start button,then Settings,
Control Panel,System,Device Manager,Ports. The LavaPort-Plus
ports will be listed as two of your Com Ports and the Parallel Port will
appear with an appropriate LPT number.Click “Properties”to change
the default settings as desired.
5. If desired,install the Lava Com Port Redirect and Lava Modem Speed
Set utilities to change the Com numbers of your serial ports, and to
automate modem speed settings.
4
Page 5
Hardware Installation
1. Before opening the casing of your computer,make sure that all
power is off.
2. Locate an unused PCI slot and insert the LavaPort-Plus into it.Ensure
that it is well seated.Locate an unused backplane on your PC casing
and insert the second serial cable bracket into it.
3. Screw the metal backplane of the LavaPort-Plus board to your PC’s
casing and replace the machine’s cover.
4. Connect your external peripheral cables to the appropriate port on
the LavaPort-Plus and turn the PC on.
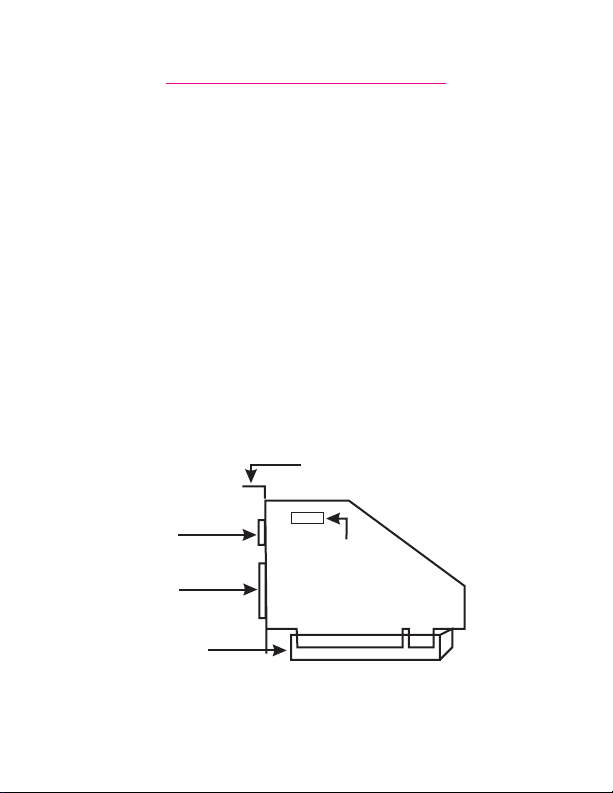
Screw for attaching card bracket
to PC casing
Serial Port 1
Parallel Port
PCI Slot
1
Serial Port 2
(cable connection)
NB: Red wire
corresponds to pin 1
5
Page 6

Windows Installation
Windows Driver Installation
Note: Make sure that you are installing the correct LavaPort-Plus
1. Once the LavaPort-Plus is installed in your PC,start your computer.
Windows will automatically detect the LavaPort-Plus as a new PCI
Controller and ask you to insert the LavaPort Installation diskette.
The installation files are located in either the root or the Win95
subdirectory of this disk. On some PC’s you may have to type
A:\WIN95 when prompted for the LavaPort Installation diskette.
2. After the necessary files have been copied,Windows will complete
the full installation of the LavaPort-Plus.During this process,a
LavaPort Parent will be created in Device Manager under MultiFunction Adapters,and two child serial ports and one parallel port
will be created in Device Manager/Ports.The following describes
how you may customize these ports for your personal needs.
drivers for the appropriate operating system.
DO NOT install NT or Windows 3.x drivers under
other versions of Windows
6
Page 7
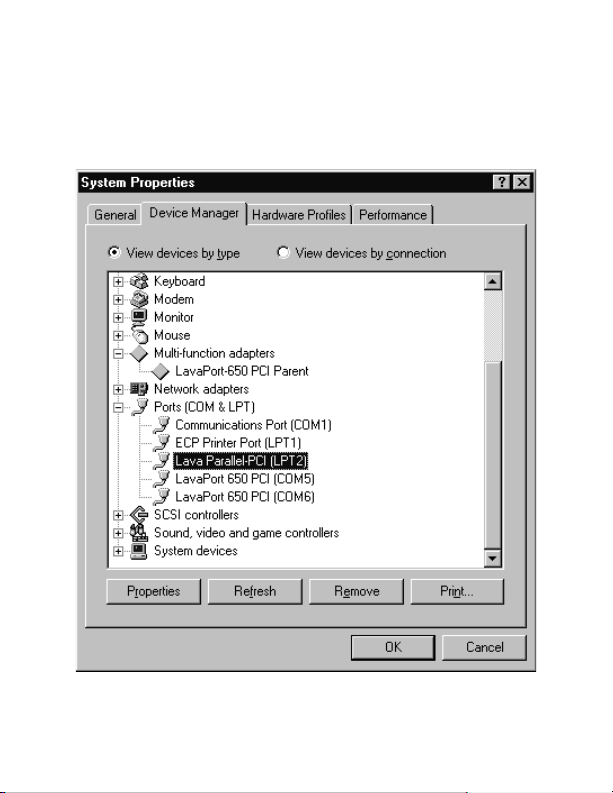
3. Click on the Start button, then choose Settings,Control Panel,
System, Device Manager.You should see a window that is similar to
the following:
7
Page 8
Configuring the LavaPort-Plus Parallel Port
Note: Most printers will not require customization of the
LavaPort-Plus parallel port. However, some parallel port devices
(e.g.External drives) require parallel ports that use standard
(legacy) ISA LPT addresses (0278h or 0378h). Because the LavaPlus is a fully compliant PCI device,the default address
(Input/Output Range) of its parallel port is beyond the standard
range of ISA I/O addresses.In order to connect such a peripheral
to the LavaPort-Plus,the I/O address range of the parallel port
must therefore be changed manually.The following section will
describe how this is done.
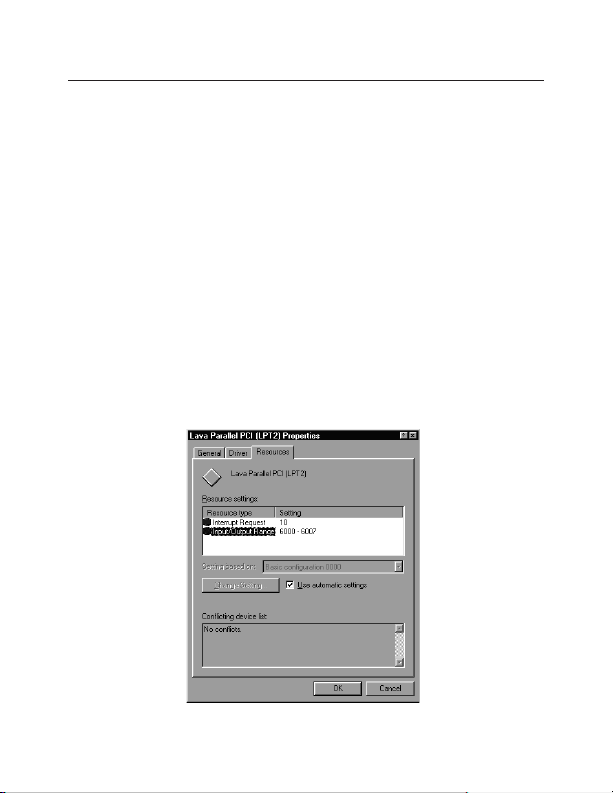
1. Open Control Panel|System|Device Manager and find the
Lava Parallel PCI listing under Ports. Click Properties, and
proceed to the Resources tab.The following screen will
appear (Note: the Input/Output Range and Interrupt of your
particular configuration may differ from the one below).
8
Page 9

2. Remove the check mark from the Use Automatic Settings box.
3. Double-click on the words Input/Output Range.The following
screen will appear:
4. Use the up/down arrows to scroll to one of the following two range
settings, or type them in manually:
0278 - 027F
0378 - 037F
5. After one of these has been entered,click OK.Windows will verify
whether you would like to force this particular configuration rather
than the automatic one that it had previously chosen. Click Yes.
6. Confirm that there are no conflicts with other parallel ports already
in your PC. If no conflicts are found,restart Windows.
9
Page 10

Optimizing the Parallel Port for use
with Iomega Zip Drives
1. Connect your Zip Drive to the Lava-Plus parallel port,and install the
drive as instructed by Iomega. On the Iomega installation diskette,
you will find a utility called“Parallel Port Accelerator”. After the drive
is installed,run this utility.
2. Open Control Panel | System | Device Manager and find the Iomega
Parallel Port Zip Interface listing under SCSI Controllers.Click
Properties and go to the Settings tab.The following screen will
appear:
3. The Parallel Port Accelerator Utility will have a text string inserted
into the area shown on this screen.The first part of this string will
read:
Change this string to read: /mode:epp
/mode:bdir
NOTE:Do NOT change the spacing or the order of the text in the string.
Doing so may result in the Zip Drive not being recognized.
10
Page 11

Customizing the LavaPort-Plus Serial Ports
1. Click on Ports and select one of the ports listed under the heading
LavaPort PCI.
2. Click Properties.The following screen will appear:
11
Page 12

3. Click the Resources tab.A screen similar to the following will appear:
Note: Do not be alarmed if Windows reports
an I/O Range or IRQ conflict between the LavaPort-Plus
and some other device in your PC.The LavaPort-Plus is a
fully compliant PCI device,and therefore allows for the
sharing of IRQ and I/O Resouces between devices.
12
Page 13

The LavaPort-Plus serial port appears in Device Manager in two places:
under the Multi-function Adapters tree and as part of the Ports tree.
Please note that the Resources (I/O Address & IRQ) used by the
LavaPort-Plus can only be modified through the LavaPort Parent device
- listed under Multi-function Adapters.
If you wish to change the Com number of either one of the serial ports
on the LavaPort-Plus (e.g.Asssign Port 1 to be Com 3 instead of the
default Com 6), please use the Lava Com Port Redirector Utility.This
program will allow you to change the numbering of your ports without
changing I/O address resources.
Interrupt Resources may be modified for the LavaPort Parent device (see
Device Manager - Multi-function Adapters), but not for individual ports
because both serial ports on the LavaPort-Plus share one IRQ. Please
note that interrupt changes require a reboot to take effect.
13
Page 14

Changing the Com numbering of your Ports
The LavaPort-Plus takes advantage of the inherent support of Windows
for a multitude of Com Ports,and allows the user to add one or more
ports beyond the traditional Com 4. Indeed because the LavaPort-Plus is
a PCI device,Windows will always configure its serial ports using Com
designations with higher numbers than Com 4.
Unfortunately many communications application programs do not
recognize Port designations beyond Com 4.It therefore may be
necessary to rename one or more of the ports in your PC to use different
Com numbers.This may be accomplished using the Lava Port Redirect
utility found in the Utils subdirectory of your LavaPort-Plus diskette.This
utility may be run from the diskette or installed onto your hard drive by
using the Setup.exe program in the Utils subdirectory.
To install the Lava Port Redirect utility on your hard drive,insert the
LavaPort diskette into your floppy drive,click Start,Run and type
A:\Utils\Setup.
14
Page 15

15
Page 16

Setting LavaPort Data Rates in Windows
The data rate of the LavaPort may be set using the Bits per Second pull
down menu.
Please note that this menu will also appear when setting the“Port
Properties”in any communications application,and may have to be set
independently of your Control Panel settings.Control Panel settings
may not necessarily be linked to those of your Communications
Application. For example,Port speeds in Dial-Up Networking are
controlled independently of speed settings in Device Manager.
For optimum performance,always verify that your LavaPort is set to the
maximum speed supported by your modem, and that all speed settings
are the same in every application.
Please note that the setting of Communications Port Data Rates is often
the most confusing of tasks encountered by modem users.For this
reason, Lava has included the Lava Modem Speed Set utility in the Utils
subdirectory of your LavaPort diskette.Lava strongly recommends using
this utility for all LavaPort-to-modem connections.
16
Page 17

17
Page 18

Setting LavaPort FIFO Control in Windows
18
Page 19

Each of the LavaPort-Plus’s two serial ports incorporates a 32-byte FIFO
(first-in-first-out) buffer.
The FIFO control tabs set the buffer“trigger”levels.When the buffer is
filled to its trigger level with the selected number of bytes,the CPU will
be interrupted and asked to either reload the buffer (for transmission),
or retrieve data from the buffer (for reception).
Most efficient data transmission occurs when the CPU is interrupted
infrequently.For each interrupt, the CPU can then service the buffer with
larger data blocks: during transmission, it can place a large burst of data
into the buffer, and during reception it can retrieve a large block from
the buffer and then continue multi-tasking.
Ideally therefore,Receive triggers should be set as high as possible and
Transmit triggers as low as possible.
However, if the Transmit trigger levels are set too low, or Receive triggers
too high, and the CPU is busy when an interrupt is called by the
LavaPort,a short period of inactivity may occur between the port and
the modem.This will reduce effective transmission/reception speeds.
Optimum buffer settings are dependent on your modem speed,your
CPU speed,and the amount of multi-tasking that occurs while online.
For a fast modem and fast CPU performing few multi-tasking functions,
set transmit triggers low and receive triggers high.If multi-tasking while
online,set transmit triggers higher and receive triggers lower.
19
Page 20

Setting LavaPort Flow Control in Windows
Flow Control refers to the type of signaling that is used between the
modem and the LavaPort.
If you are connecting the LavaPort to a modem or ISDN terminal
adapter,use the default setting of Hardware (RTS/CTS) flow control.
Software Flow Control (Xon/Xoff) is used only for connecting the
LavaPort to a non-modem serial device (e.g.Using a null-modem cable
to connect to another Com Port).
20
Page 21

21
Page 22

Lava Modem Speed Set forWindows
The LavaPort-Plus serial ports support data rates up to 460.8 kbps,
including 115.2 kbps and 230.4 kbps. However,not all modems support
Com Port rates above 115.2 kbps.
If your modem does not support higher data rates and you select a
higher data rate in the LavaPort Properties,Windows will automatically
default to the slowest supported rate in the chain.
Some modems do support higher data rates but require special settings
(AT Commands) and INF files for configuration.Lava has included a
software utility called “Lava Modem Speed Set”which automates these
functions and allows for easy speed reconfiguration.This utility may be
found in the Utils subdirectory of your LavaPort diskette,and is
constantly being updated to support more modems. Please check the
Lava web site for details:www.lavalink.com.
To install the Lava Modem Speed Set utility on your hard drive,insert the
LavaPort diskette into your floppy drive,click Start,Run and type
A:\Utils\Setup.
22
Page 23

23
Page 24

Lava
Technical Support
9:00 am to 5:30 pm Monday to Friday (Eastern Time)
Tel: +416 674-5942
Fax:+ 416 674-8262
E-mail: tech@lavalink.com
Internet: www.lavalink.com
Lava Computer MFG Inc.
This device complies with part 15 of the FCC Rules. Operation is subject
to the following conditions: (1)This device may not cause harmful interference,
and (2) this device must accept any interference received,including interference
Lava Computer MFG Inc.908 Niagara Falls Blvd. #629.North Tonawanda NY 14120-2060
that may cause undesired operation.
 Loading...