

Page 1

LAUNCH X-431IV English User’s Manual
from the owner of the applicable trademarks,
Copyright Information
Copyright © 2012 by LAUNCH TECH. CO., LTD.
All rights reserved. No part of this publication may
be reproduced, stored in a retrieval system or
transmitted, in any form or by any means of
electronic, mechanical, photocopying and
recording or otherwise, without the prior written
permission of LAUNCH. The information contained
herein is designed only for the use of this unit.
LAUNCH is not responsible for any use of this
information as applied to other units.
Neither LAUNCH nor its affiliates shall be liable to
the purchaser of this unit or third parties for
damages, losses, costs or expenses incurred by
purchaser or third parties as a result of: accident,
misuse, or abuse of this unit, or unauthorized
modifications, repairs, or alterations to this unit, or
failure to strictly comply with LAUNCH operating
and maintenance instructions. LAUNCH shall not
be liable for any damages or problems arising
from the use of any options or any consumable
products other than those designated as Original
LAUNCH Products or LAUNCH Approved
Products by LAUNCH.
Trademark Information
LAUNCH is a registered trademark of
LAUNCH TECH. CO., LTD. (LAUNCH) in China
and other countries. All other LAUNCH
trademarks, service marks, domain names, logos
and company names referred to in this manual are
either trademarks, registered trademarks, service
marks, domain names, logos and company names
of or are otherwise the property of LAUNCH or its
affiliates. In other countries where any of the
LAUNCH trademarks, service marks, domain
names, logos and company names are not
registered, LAUNCH claims other rights
associated with unregistered trademarks, service
marks, domain names, logos and company names.
Other products or company names referred to in
this manual may be trademarks of their respective
owners. You may not use any trademarks, service
marks, domain names, logos or company name of
LAUNCH or any third party without permission
service marks, domain names, logos or company
name. You may contact LAUNCH at
http://www.cnlaunch.com, or write to LAUNCH
TECH. CO., LTD.,Launch Industrial Park, North of
Wuhe Avenue, Banxuegang, Bantian, Longgang,
Shenzhen, Guangdong. P.R. China, to request
written permission to use Materials on this manual
for purposes or for all other questions relating to
this manual.
i
Page 2

LAUNCH X-431IV English User’s Manual
End User License Agreement
IMPORTANT: PLEASE READ THIS END USER
LICENSE AGREEMENT CAREFULLY. USING
LAUNCH OR LAUNCH-SUPPLIED PRODUCTS
AND SOFTWARE CONSTITUTES ACCEPTANCE
OF THIS AGREEMENT.
LAUNCH IS WILLING TO LICENSE THE
PRODUCTS, INFORMATION, SOFTWARE AND
DOCUMENTS (COLLECTIVELY, “MATERIALS”)
TO YOU ONLY UPON THE CONDITION THAT
YOU ACCEPT ALL OF THE TERMS CONTAINED
IN THIS LICENSE AGREEMENT. BY USING THE
MATERIALS, YOU ARE BINDING YOURSELF
AND THE BUSINESS ENTITY THAT YOU
REPRESENT (COLLECTIVELY, “CUSTOMER”)
TO THIS AGREEMENT. IF YOU DO NOT AGREE
TO ALL OF THE TERMS OF THIS AGREEMENT,
THEN LAUNCH IS UNWILLING TO LICENSE
THE MATERIALS TO YOU AND DO NOT USE
THE PRODUCTS AND DOWNLOAD OR INSTALL
THE SOFTWARE.
The following terms of this End User License
Agreement (“Agreement”) govern Customer’s
access and use of the product, except to the
extent there is a separate signed agreement
between Customers and LAUNCH governing
Customer’s use.
License
Conditioned upon compliance with the terms and
conditions of this Agreement, LAUNCH TECH. CO,
LTD. or its subsidiary licensing the Materials
instead of LAUNCH, grants to Customer a
nonexclusive and nontransferable license to use
for Customer’s internal business purposes the
Materials and the Document for which Customer
has paid the required license fees. “Document”
means written information (whether contained in
user or technical manuals, training materials,
specifications or otherwise) specifically pertaining
to the equipment and made available by LAUNCH
with the equipment in any manner (including on
CD-Rom, or on-line).
Unless otherwise expressly provided in the
Document, Customer shall use the Software solely
as embedded in, for execution on or (where the
applicable document permits installation on
non-LAUNCH equipment) for communication with
LAUNCH equipment owned or leased by
Customer and used for Customer’s internal
business purposes.
Note:
For evaluation or beta copies for which LAUNCH
does not charge a license fee, the above
requirement to pay license fees does not apply.
General Limitations
This is a license, not a transfer of title, to the
materials, and LAUNCH retains ownership of all
copies of the Materials. Customer acknowledges
that the Materials contain trade secrets of
LAUNCH, its suppliers or licensors, including but
not limited to the specific internal designed
structure of individual programs and associated
interface information. Accordingly, except as
otherwise expressly provided under this
Agreement, Customer shall have no right and
Customer specifically agrees not to:
(i) Transfer, assign or sublicense its license rights
to any other person or entity, or use the Materials
on unauthorized or secondhand LAUNCH
equipment, and Customer acknowledges that any
ii
Page 3

LAUNCH X-431IV English User’s Manual
attempted transfer, assignment, sublicense or use
shall be void;
(ii) Make error corrections to or otherwise modify
or adapt the Materials or create derivative works
based upon the Materials, or permit third parties to
do the same;
(iii) Reverse engineer or decompile, decrypt,
disassemble or otherwise reduce the Materials to
human-readable form, except to the extent
otherwise expressly permitted under applicable
law notwithstanding this restriction;
(iv) Use or permit the Materials to be used to
perform services for third parties, whether on a
service bureau or time sharing basis or otherwise,
without the express written authorization of
LAUNCH;
(v) Disclose, provide, or otherwise make available
trade secrets contained within the Materials in any
form to any third party without the prior written
consent of LAUNCH. Customer shall implement
reasonable security measures to protect such
trade secrets.
To the extent required by law, and at Customer’s
written request, LAUNCH shall provide Customer
with the interface information needed to achieve
interoperability between the Materials and another
independently created program, on payment of
LAUNCH’s applicable fee, if any. Customer shall
observe strict obligations of confidentiality with
respect to such information and shall use such
information in compliance with any applicable
terms and conditions upon which LAUNCH makes
such information available.
Software, Upgrades and Additional Copies
For purposes of this Agreement, “Software” shall
include (and the terms and conditions of this
Agreement shall apply to) computer programs,
including firmware, as provided to Customer by
LAUNCH or an authorized LAUNCH reseller, and
any upgrades, updates, bug fixes or modified
versions thereto (collectively, “Upgrades”) or
backup copies of the Software licensed or
provided to Customer by LAUNCH or an
authorized LAUNCH reseller.
NOTWITHSTANDING ANY OTHER PROVISION
OF THIS AGREEMENT: (1) CUSTOMER HAS NO
LICENSE OR RIGHT TO USE ANY ADDITIONAL
COPIES OR UPGRADES UNLESS CUSTOMER,
AT THE TIME OF ACQUIRING SUCH COPY OR
UPGRADE, ALREADY HOLDS A VALID LICENSE
TO THE ORIGINAL SOFTWARE AND HAS PAID
THE APPLICABLE FEE FOR THE UPGRADE OR
ADDITIONAL COPIES; (2) USE OF UPGRADES
IS LIMITED TO LAUNCH EQUIPMENT FOR
WHICH CUSTOMER IS THE ORIGINAL END
USER PURCHASER OR LESSEE OR WHO
OTHERWISE HOLDS A VALID LICENSE TO USE
THE SOFTWARE WHICH IS BEING UPGRADED;
AND (3) THE MAKING AND USE OF
ADDITIONAL COPIES IS LIMITED TO
NECESSARY BACKUP PURPOSES ONLY.
Proprietary Notices
Customer agrees to maintain and reproduce all
copyright and other proprietary notices on all
copies, in any form, of the Materials in the same
form and manner that such copyright and other
proprietary notices are included on the Materials.
Except as expressly authorized in this Agreement,
Customer shall not make any copies or duplicates
of any Materials without the prior written
permission of LAUNCH.
Term and Termination
This Agreement and the license granted herein
shall remain effective until terminated. Customer
may terminate this Agreement and the license at
iii
Page 4

LAUNCH X-431IV English User’s Manual
any time by destroying all copies of Materials and
any Document. Customer’s rights under this
Agreement will terminate immediately without
notice from LAUNCH if Customer fails to comply
with any provision of this Agreement. Upon
termination, Customer shall destroy all copies of
Software in its possession or control. All
confidentiality obligations of Customer and all
limitations of liability and disclaimers and
restrictions of warranty shall survive termination of
this Agreement.
Customer Records
Customer grants to LAUNCH and its independent
accountants the right to examine Customer’s
books, records and accounts during Customer's
normal business hours to verify compliance with
this Agreement. In the event such audit discloses
non-compliance with this Agreement, Customer
shall promptly pay to LAUNCH the appropriate
license fees, plus the reasonable cost of
conducting the audit.
Export
Software, including technical data, may be subject
to PRC. export control laws, including the PRC.
Export Administration Act and its associated
regulations, and may be subject to export or
import.
iv
Page 5

LAUNCH X-431IV English User’s Manual
Table of Contents
Copyright Information ............................................. i
Trademark Information ............................................ i
End User License Agreement ................................ ii
Safety Precautions ................................................. 1
Precautions on Operating Vehicle’s ECU ......... 1
Precaution on Operation................................... 1
Precautions on Vehicle ..................................... 1
1. Introduction ......................................................... 2
1.1 General descriptions................................... 2
1.2 Features ..................................................... 2
2. Knowledge of X-431 IV ....................................... 3
2.1 X-431IV Component Description ..................... 3
2.1.1 Components ........................................ 3
2.1.2 Components Sketch ............................ 4
2.2 X-431IV Accessory Description ........................ 5
2.3 Technical Specifications .................................. 6
2.5 X-431IV Initial Use ......................................... 7
2.5.1 X-431IV Starts ..................................... 7
2.5.2 Taskbar ................................................ 7
2.5.3 Rotate.................................................. 8
2.5.4 Input .................................................... 8
2.5.5 Control of the Application .................... 9
2.5.6 Online Help ....................................... 10
2.5.7 Load thermal paper ........................... 10
3. Vehicle Diagnosis ............................................. 11
3.1 Preparation and connections ........................ 11
3.1.1 Preparations ...................................... 11
3.1.2 Connections ...................................... 11
3.2 Start to diagnose ...................................... 12
3.2.1 Enter diagnostic program .................. 12
3.2.2 Read trouble code ............................. 13
3.2.3 Clear trouble code ............................. 14
3.2.4 DataStream Record Function ............ 14
3.2.5 Special function ................................. 17
4. Update of Diagnostic Software........................ 18
4.1 User Registration ...................................... 18
4.1.1 Register a passport .......................... 18
4.1.2 Fill in Product Information ................. 19
4.2 Software Download .................................. 20
4.3 Software Update ...................................... 21
4.4 Purchase Software ................................... 22
5. PDA function of X-431IV .................................. 23
5.1 System Information .................................. 25
5.1.1 User Information ............................... 25
5.1.2 About ................................................ 25
5.2 Tools and Games ..................................... 25
5.2.1 Tools ................................................. 25
5.2.2 Game ................................................ 28
5.3 PIM ........................................................... 29
5.3.1 Memo ................................................ 29
5.3.2 Address ............................................. 31
5.3.3 To Do ................................................ 33
5.3.4 Schedule ........................................... 35
5.4 System ..................................................... 37
5.4.1 Control Panel .................................... 37
5.4.2 System Information ........................... 41
5.4.3 Turn Off ............................................. 42
6. FAQ .................................................................... 43
6.1 About Update via Internet ........................ 43
6.2 About Hardware ....................................... 44
6.3 About System Setting ............................... 45
6.4 About Operation ....................................... 46
6.5 Questions Related to Vehicle ................... 47
6.6 Maintenance ............................................ 48
6.7 Get help ................................................... 48
7. Appendix 1: about VIN ..................................... 50
v
Page 6

LAUNCH X-431IV English User’s Manual
into a car shop.
Safety Precautions
Precautions on Operating
Vehicle’s ECU
Do not disconnect the vehicle inner
consumer when the ignition switch is on.
High voltage transients may encounters at
the moment of disconnecting, and thus may
damage sensors and ECU.
Protect the computer from magnetic object
(such as wireless speaker)
Do cut off the power supply of ECU system
before welding on the vehicle.
Pay more attention to ECU and sensors
when operation is next to them.
Ground yourself when you disassemble
PROM, otherwise ECU and sensors will be
damaged by static.
Do not use the pointer ohmmeter instead of
DMM for testing ECU and sensor without
special requirement.
Do not test electric devices in relation with
ECU with a test lamp unless otherwise
expressly provided.
Do wear a metal ground strip that one end
around your wrist and the other to the
vehicle body when you get in and out the
vehicle.
Do connect ECU harness connector firmly,
otherwise electro elements, such as IC
inside ECU, will be damaged.
Precaution on Operation
The X-431IV is a sophisticated electronic
device, never have it clashed when in use.
Main unit screen may flash at the moment
engine ignition, it’s normal.
You may unplug the main unit if the
program cannot be actuated or confused
screen occurs. Plug again to continue the
operation.
Make sure that the X-431IV is properly
connected to the DIAGNOSTIC
CONNECTOR to avoid communication
interruptions.
X-431IV is equipped with a leather Strap for
easy handling when traveling or taking it
Be careful when plugging and unplugging
the main cable and diagnostic connector.
Tighten the screw before operation to avoid
unexpected disconnecting and/or damage
to the port.
Do not insert and pull out CF card when the
X-431IV is working. Press ejector button to
pull out the card. Insert the CF in the right
place, keep the face labeled “UPSIDE”
upward, and make sure the card is fully
seated.
Handle with care and avoid crash. Unplug
the power after operation.
Put the stylus into the slot at back of
X-431IV main unit after operation, and
place the cables, connectors and other
accessories into box.
Hold the connector and do not pull the
power cord when unplug it.
Use the Cigarette lighter cable to power up,
only from the tested vehicle to prevent the
ECU from being damaged
Precautions on Vehicle
Automotive batteries contain sulfuric acid
that is harmful to skin. In operation, direct
contact with the automotive batteries should
be avoided. Pay attention not to splash the
sulfuric acid into eyes. Keep ignition
sources away from the battery at all times.
Engines produce various poisonous
compounds (hydrocarbon, carbon
monoxide, azotes oxides, etc,), which
should be avoided.
Avoid contacting high temperature
assembly such as water tank and vent-pipe,
as the temperature of the running engine is
very high.
Before starting engine, put the speed lever
in the neutral position or in the P position to
avoid injury.
Wear an ANSI-approved eye shield when
testing or repairing vehicles.
If you are using the battery as a power
source, connect the RED (+) battery clip to
the positive of the vehicle battery and the
BLACK (-) battery clip to the negative.
1
Page 7

LAUNCH X-431IV English User’s Manual
owners.
1. Introduction
1.1 General descriptions
X-431IV is a newly developed diagnostic tool,
which uses the open operating system of X-431
series and inherits a number of advantages of
Launch’s diagnosing technology, including a wide
coverage of vehicle model, powerful test
functions and precise test data, etc.
Meanwhile, X-431IV is equipped with a rotatable
diagnostic connector, which makes it more
convenient and flexible to use.
Additionally, X-431IV is highly improved in
respect of the following:
Appearance: The X-431IV integrates
Smartbox, miniprinter and main unit as a
whole set, which eliminates the
communication failure caused by frequent
unplugging and loose connections, and also
reduces the communication time between
Smartbox and main unit.
Core CPU: utilizes the self-owned
high-speed processor chip and integrates
signal processing and relay modules.
Connector: The X-431IV has a new
SMART OBDII-16E connector to replace all
CAN Bus and OBD Connector. The
diagnostic connector can be rotated within
an angle of 90° and is flexible to use.
Performance: Software structure has been
optimized. It runs more rapidly and stably
and can directly diagnose without
downloading diagnostic programs.
on the X-431IV stands for Car Cloud logo.
Car Cloud is a state-of-an-art individual
application product, which is newly developed
based on our LAUNCH’s vehicle diagnostic
devices and technology service platform with
independent intellectual property rights, mainly
providing professional, intelligent vehicle
monitoring and diagnosing service for car
Car Cloud website is an portal site and service
platform for world-wide automobile aftermarket,
which, as one of core Telematics applications,
aims to provide data processing and application
service for car users and all Telematics service
providers of automotive aftermarket by collecting
front-end DBS diagnostic data, and combining
mobile internet and background cloud processing
technology.
1.2 Features
Diagnose: it can diagnose all electrical
control systems of vehicle (including read
DTCs, clear DTCs, read datastream etc.)
PDA: supports handwriting input, personal
database, vast vocabulary
English-Chinese dictionary.
Printer: enables you to print all test
results.
2
Page 8
LAUNCH X-431IV English User’s Manual
2. Knowledge of X-431 IV
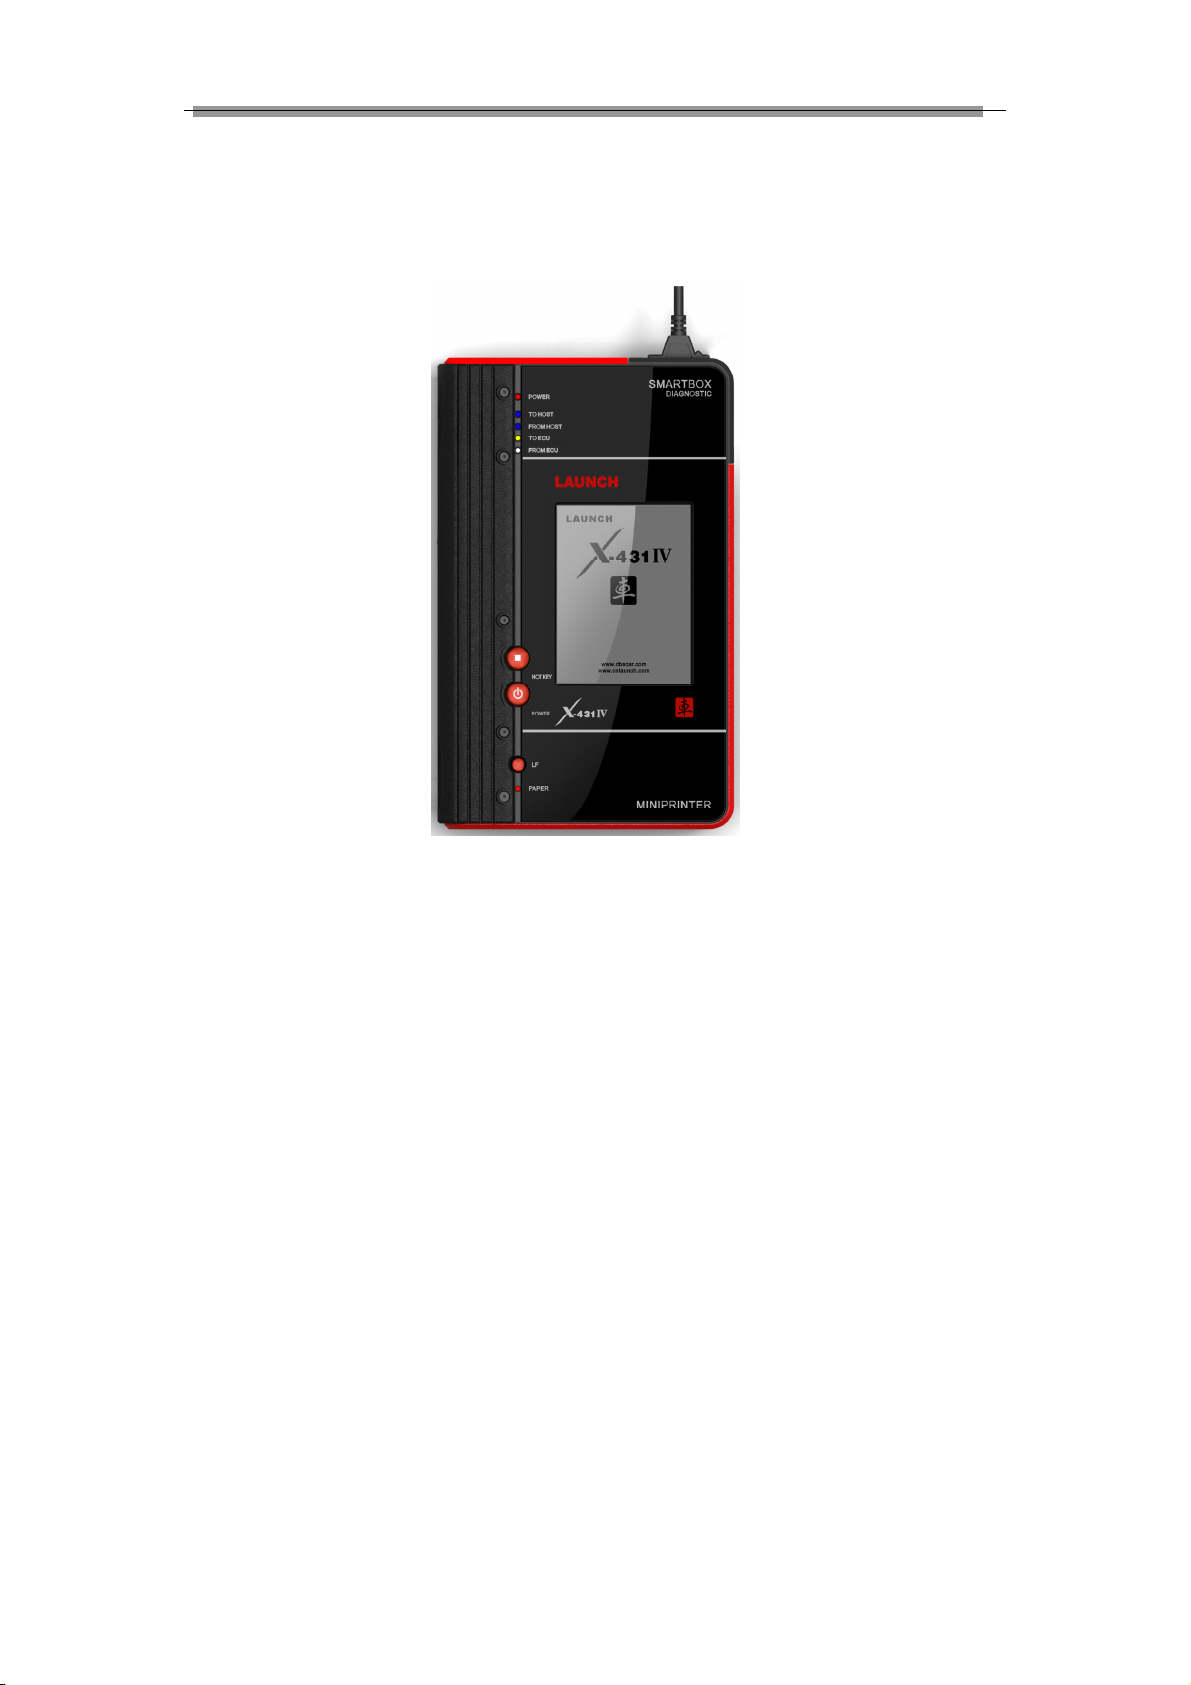
2.1 X-431IV Component Description
Figure 2-1
2.1.1 Components
They are: X-431IV main unit, SMARTBOX and MINIPRINTER. Each of the three parts has independent
function.
X-431IV Main Unit
The X-431IV main unit has all functions of a standard PDA, including personal information management,
control panel, game, etc.
Smartbox
SMARTBOX bears all the functions that are essential for vehicle diagnose. SMARTBOX is designed
elaborately in its functions for future update (download and update online).
Miniprinter
It is for printing out the test result. Thermal printing paper in size Φ30×57mm (inner hole: Φ7mm) is
used.
3
Page 9
LAUNCH X-431IV English User’s Manual
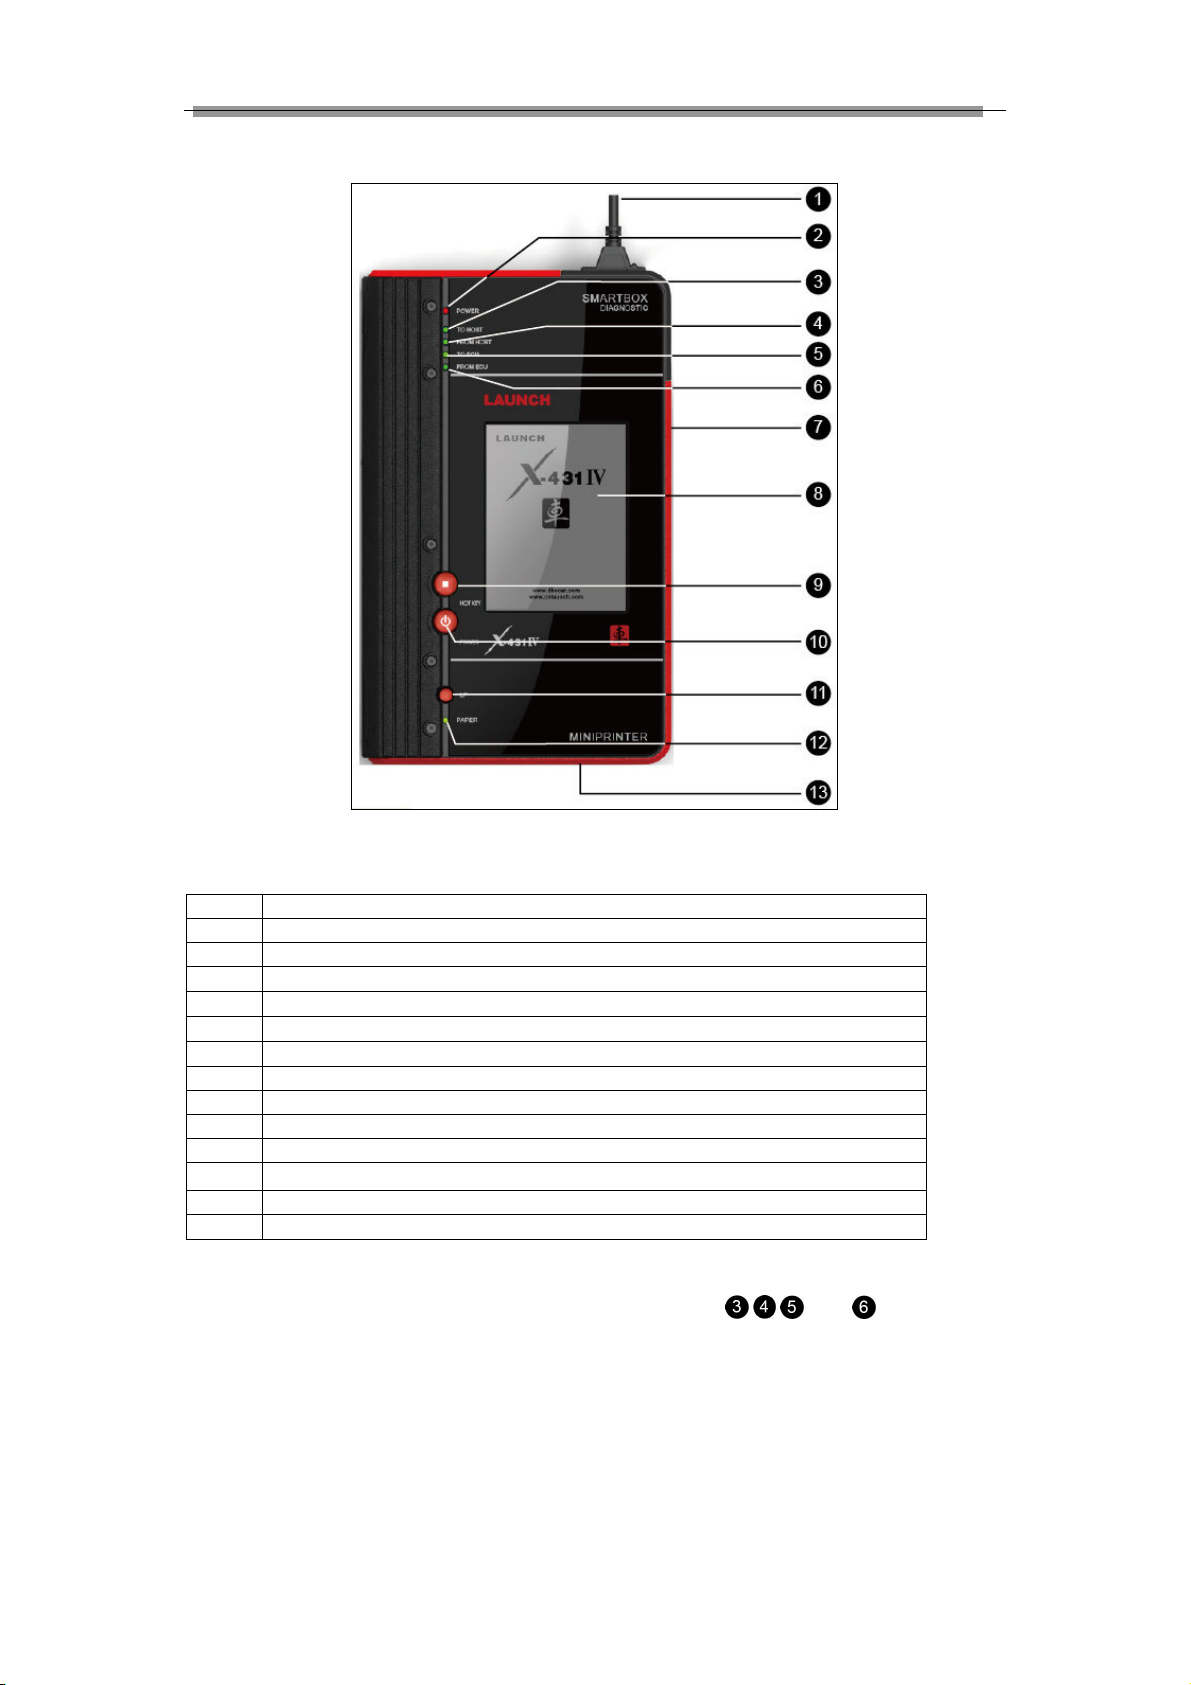
No. Descriptions
1
Diagnostic connector (Rotatable)
2
SMARTBOX
power
indicator
Indicator to show SMARTBOX sending data to the main unit
Indicator to show SMARTBOX receiving data from the main unit
Indicator to show SMARTBOX sending data to ECU
Indicator to show SMARTBOX receiving data from ECU
7 Serial port (t
o connect with PC
LINK for
extending functions
) 8 Touch screen
9
HOTKEY
button
10
POWER
button
12
Printer ready indicator
Paper out (printed the data)
2.1.2 Components Sketch
Figure 2-2 X-431IV structure view (Front)
Table 2-1 formulates all keys, ports and indicators of X-431IV front panel.
3
4
5
6
11
Printer LF buttonpaper feed
13
Check and identify working states and defeat point of X-431IV by means of the 4 indicators on the
SMARTBOX: There are 4 working state indicators on the SMARTBOX:
, , and (see figure 2-2),
their functions are described respectively as above. It’s necessary to check and identify communications
4
Page 10
LAUNCH X-431IV English User’s Manual
14
CF card slot (to install CF card)
15 Printer cover (to install printing paper)
16
Stylus slot (to place the stylus)
between X-431IV main unit, SMARTBOX and the vehicle’s electronic control unit. For example, indicator
should be on when downloading diagnostic program to SMARTBOX, if it’s off, it indicates the poor
connection between SMARTBOX and main unit or problems in SMARTBOX itself; indicator should be
on when vehicle model has been selected and the SMARTBOX is sending data to the vehicle’s electronic
control unit; similarly, indicator should be on during DataStream reading process when SMARTBOX is
receiving data from the vehicle’s electronic control unit.
Figure 2-3 X-431IV structure view (Rear)
Table 2-2 formulates all ports of X-431IV rear panel.
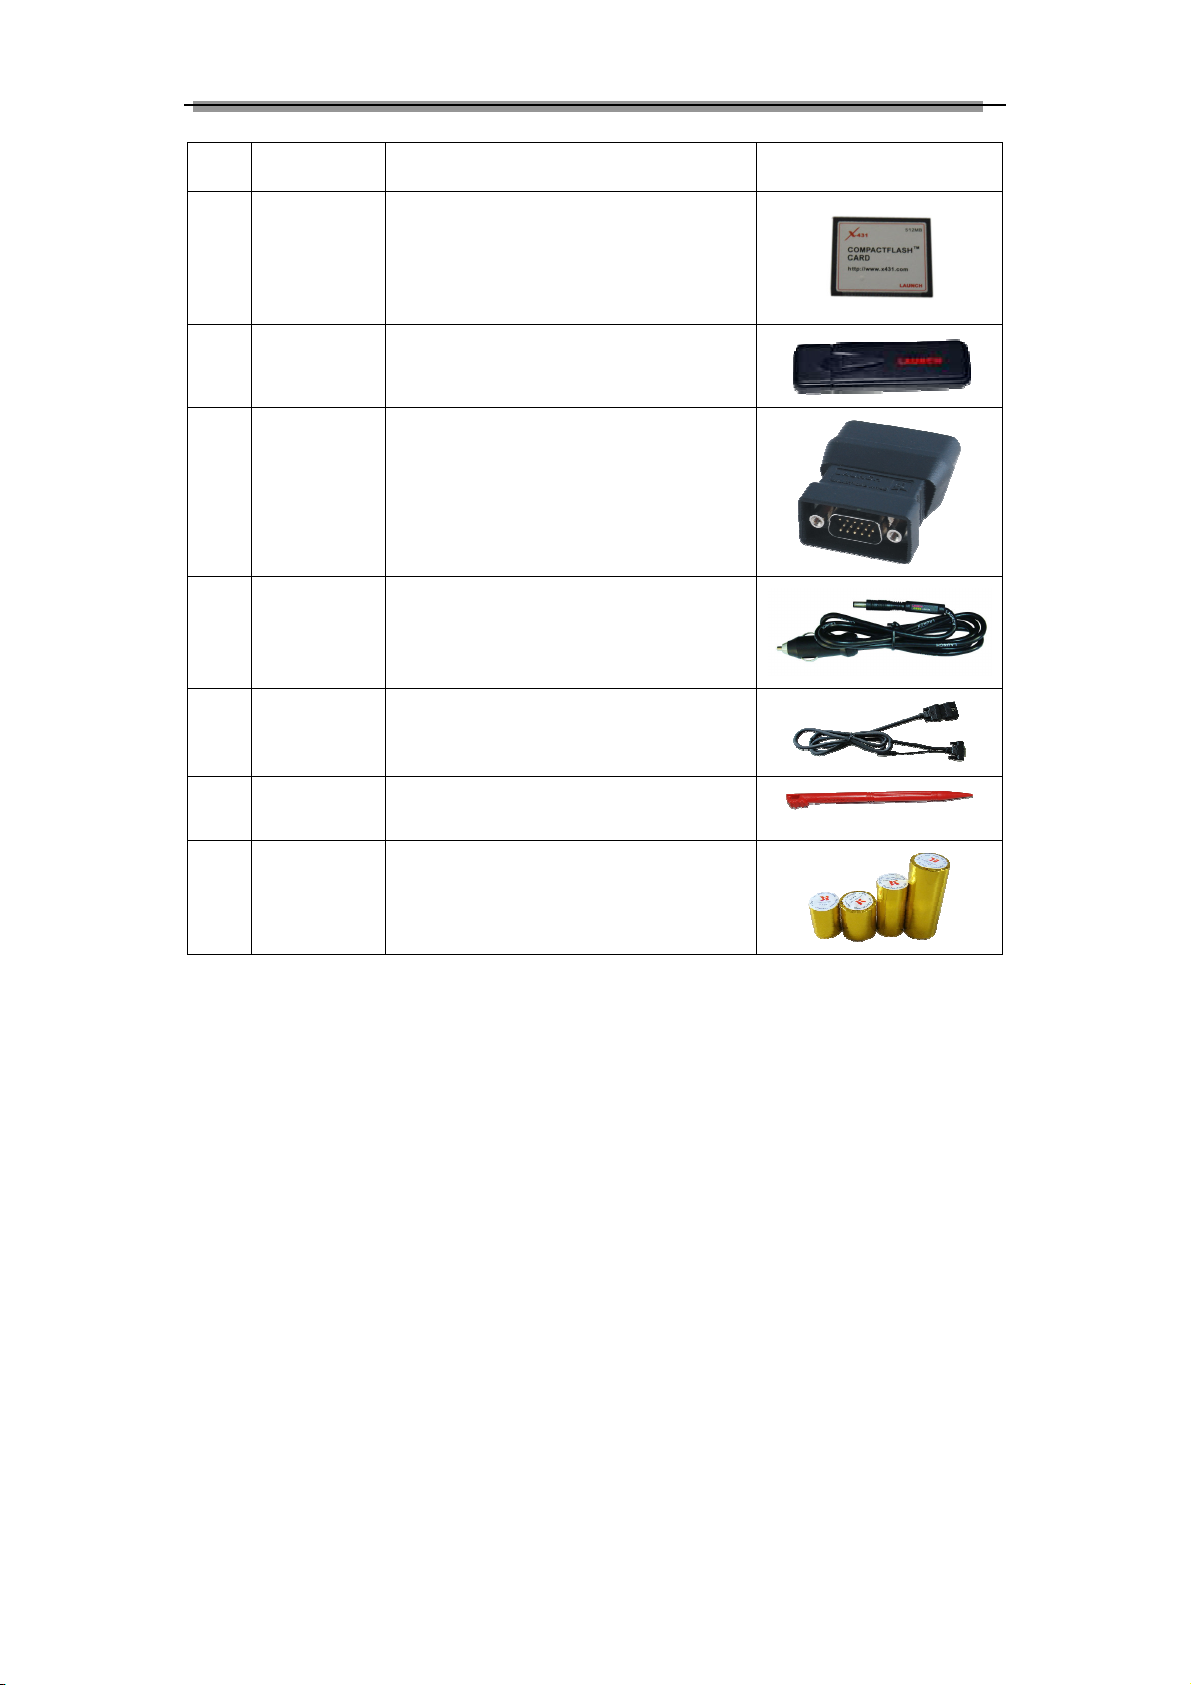
2.2 X-431IV Accessory Description
Each unit is supplied with the same universal accessories; X-431IV configurations (such as diagnostic
software, diagnostic connectors, etc.) are differed with different users. Users could consult local dealer for
the detailed information or check configuration-packing list supplied with X-431IV for the specific
configuration. The figure below is for the universal accessories:
The components name and their functions:
5
Page 11
LAUNCH X-431IV English User’s Manual
No. Name Descriptions Photos
1
CF 卡
2 CF card
reader writer
3 Diagnostic
connector
4 Cigarette
lighter cable
5 Main cable To connect the diagnostic connector and
To store diagnostic programs and data
To read or write data on the CF card
Dozens of connectors are equipped for
various vehicles. Here shows a typical one.
To get power from the vehicle cigarette lighter
X-431IV main unt
6 Stylus Click or write on the screen with the stylus
7 Thermal paper For printing
2.3 Technical Specifications
Operating System: LINUX
Memory: 16M
CF Card: 1G
Main Unit I/O: Universal Serial Bus /Standard Parallel port
Main Unit Voltage: DC12V
Main Unit Power: approximately 9W
Printer: Thermal mini-printer
Display Screen: 240X320 LCD with touch screen and backlit
Ambient temperature: 0-50℃
Relative Humidity: <90%
Dimension: 198mm×316mm×55.5mm
6
Page 12
LAUNCH X-431IV English User’s Manual
Active
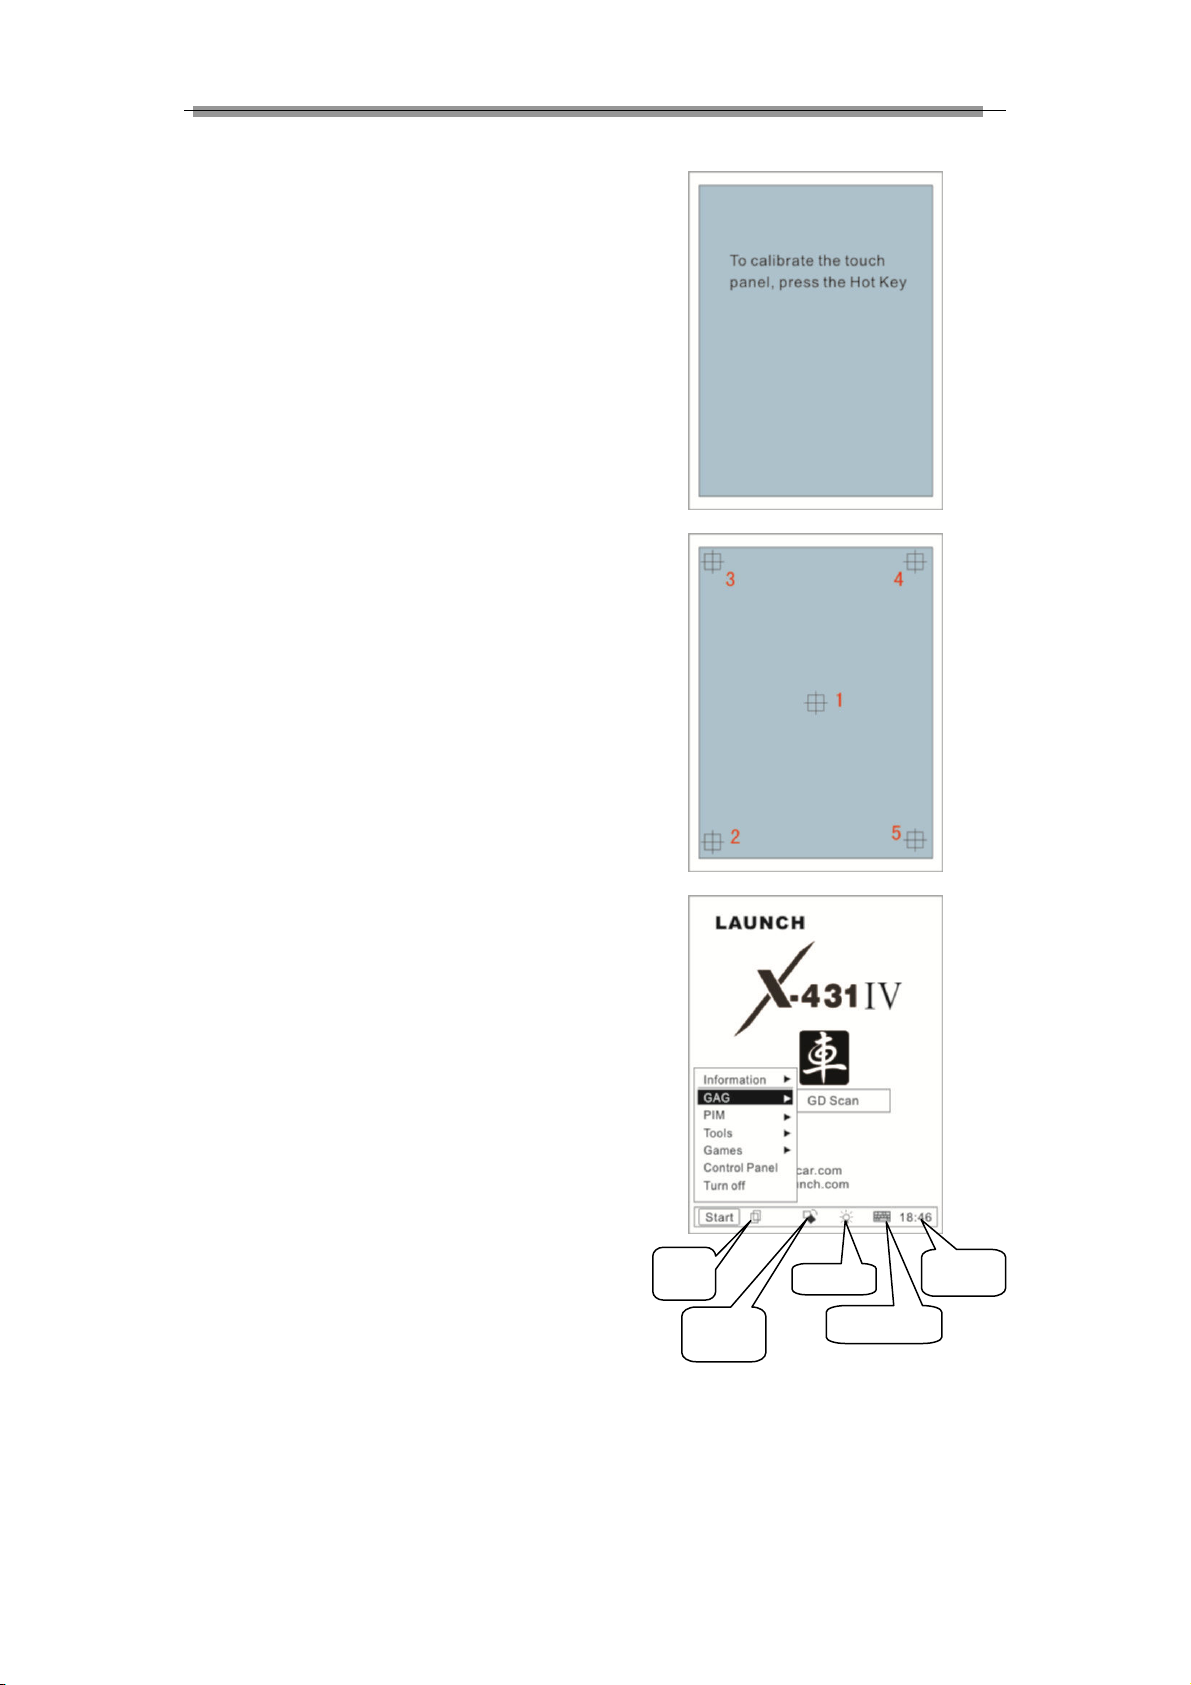
2.5 X-431IV Initial Use
2.5.1 X-431IV Starts
Plug in X-431IV main unit and press [POWER]
key on the main unit, the screen will display
initializing interface. After initialization completes,
the system will prompt you whether to calibrate
touch screen.
Press [HOTKEY] to begin calibrating, otherwise
the system will enter the main menu interface.
Use the stylus to click the target cross on the
center of the screen accurately in order. Once it
changes, you complete a calibration.
Recalibration is not required until the screen gets
a slow response or becomes missed.
Note: It is recommended to use the stylus to
make calibrations. Numberings marked in the
right figure indicate the calibration sequence and
it does not appear on the screen.
2.5.2 Taskbar
There is taskbar at the bottom of each operation
interface of X-431IV, and includes several icons,
as shown in the left figure, their functions are
described as below:
‘Start’ Button: the same as Windows. Click it with
stylus to pop up Start menu, which includes the
main functions of X-431IV, see chapter 3 and 4
for details.
‘Active Task’ icon: click to display current
interface or shift among different interfaces;
‘Rotate’ button: rotate the interface 180 degrees
for easy operation, see chapter ‘Rotate’ for
details.
‘Backlight’ icon: light on or light off the backlit
‘Soft Keyboard’ icon: display or hide the soft
keyboard, when the soft keyboard is activated,
there are 3 input options: handwriting, English
input and Chinese input (see chapter ‘Input’ for
details)
‘Current Time’ icon: see chapter ‘Date/Time’ for
time setting.
task
Rotate
button
Backlight
Soft keyboard
Current
time
7
Page 13
LAUNCH X-431IV English User’s Manual
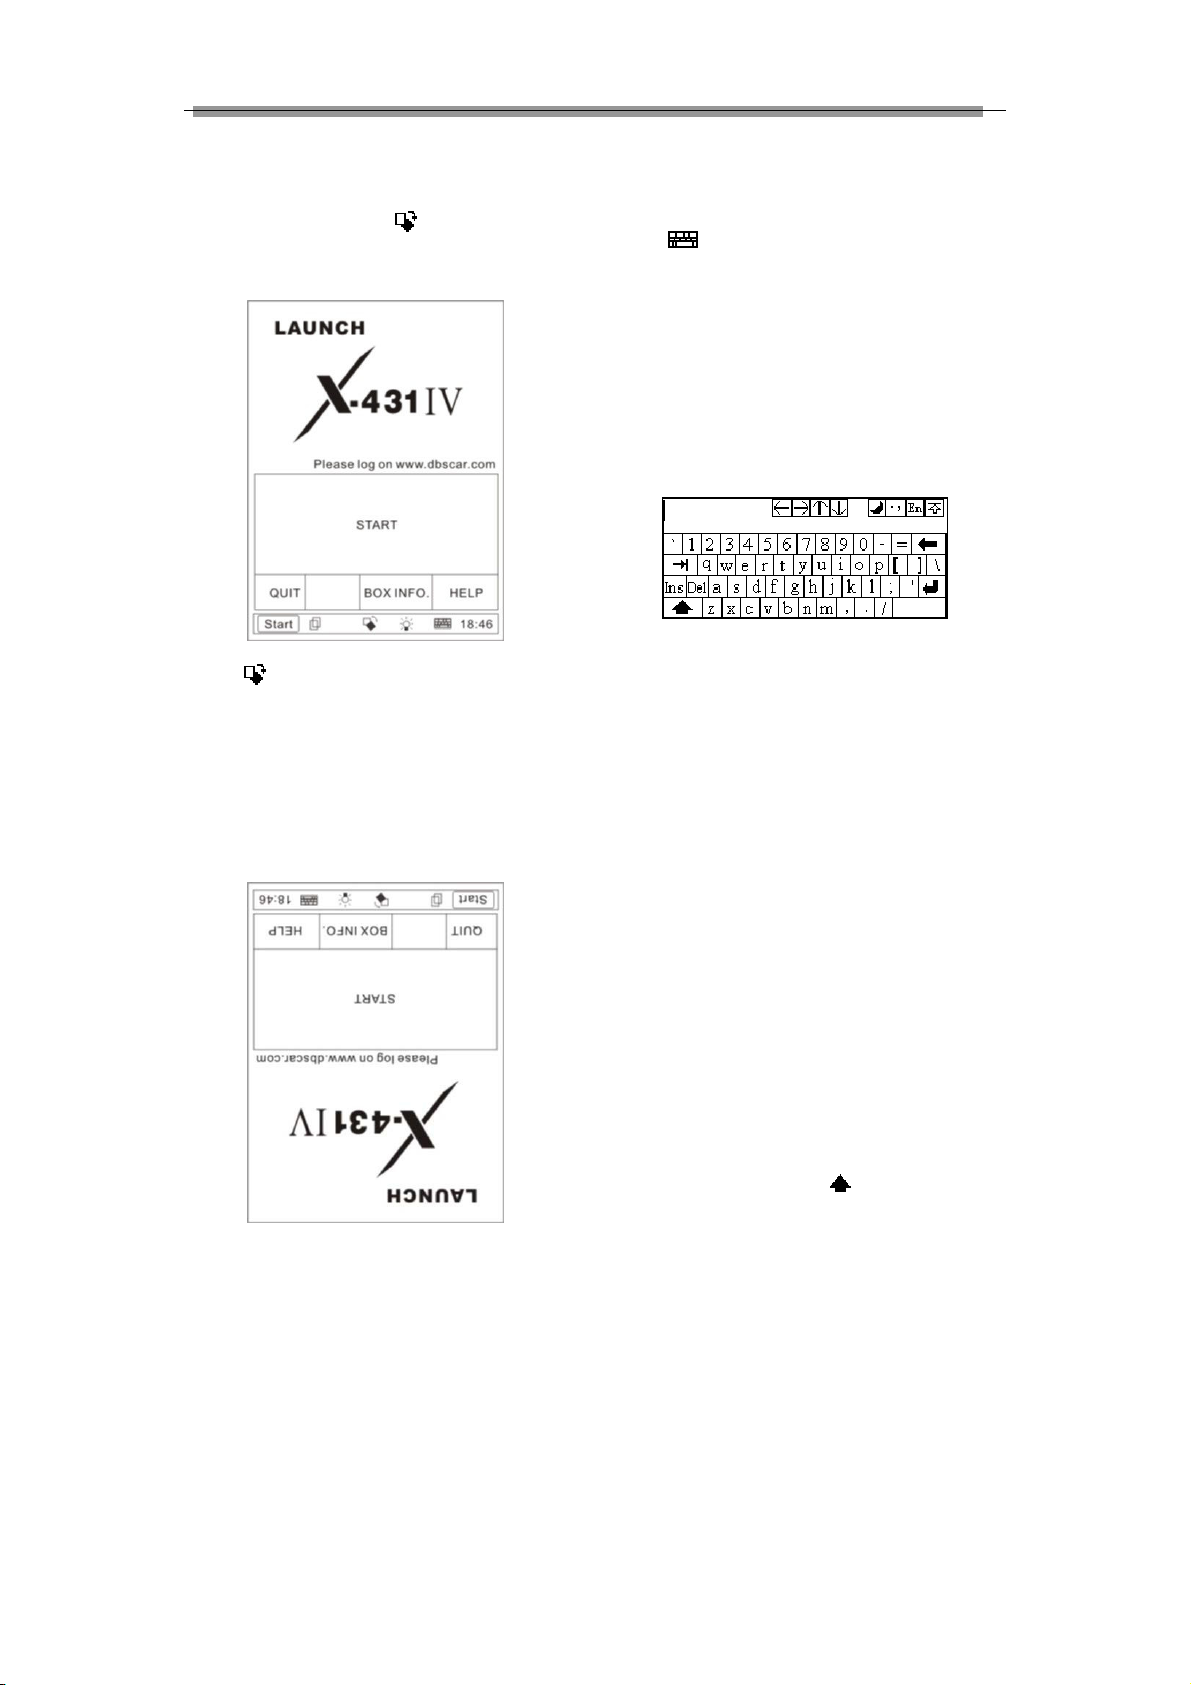
2.5.3 Rotate
Sometimes, you need to convert the perspective
for easy operating, button [
] could achieve it
by rotating the interface 180 degrees, as shown
in the below figure.
Press [
] button to perform rotate function,
interface displayed before and after clicking
the button as shown on the left, click again to
resume the interface as shown in the top left
figure; click to rotate the interface at any
working states, while the operation and
function of each button remains the same as
before.
2.5.4 Input
Note: Please activate the soft keyboard with
stylus before inputting; make sure to use the
stylus in the subsequent operations.
Use Soft Keyboard
1) Activate and hide the soft keyboard
Click icon at the bottom of the screen with
stylus to activate soft keyboard, click again to
hide it.
2) Input by soft keyboard
You have 2 ways to input by soft keyboard: one is
to input with stylus instead of finger input on
common keyboard; the other is to input by
handwriting. Input method differs for different
languages.
When in simplified Chinese, click [En] to shift
from English input to Chinese input [Ch], click
[Ch] to shift from Chinese input to handwriting
[Hw], and click [Hw] to shift from handwriting
input to English input.
When in Chinese input, the association functions
of X-431IV will facilitate your input by inferring the
words you
3) Function keys
There are 4 function keys at the upper right of the
keyboard they are DBC/SBC case, punctuation,
keyboard input/handwriting and the soft keyboard
position (you can choose to have it displayed at
the upper or lower position in the screen) from
left to right.
The four function keys at the upper-middle
position of the screen are for moving the cursor
leftward, rightward, upward or downward.
In keyboard mode, the key
at the bottom left
corner of the soft keyboard is [Shift] button, click
it with stylus to shift lowercase letter to
uppercase letter, and number keys shift to
special symbols; the white key at the bottom right
corner of the keyboard is the space key.
8
Page 14
LAUNCH X-431IV English User’s Manual
In handwriting input, there are 8 function keys at
the lower-left position of the soft keyboard. The 4
keys at the bottom to perform moving the cursor
left ward, rightward, upward and downward; the
functions of the other 4 buttons from left to right
and from top to bottom are described as
followings: to delete the first character before the
current cursor, clear handwriting, space and
return.
Input by Keyboard
1) Open an interface, says User Information;
2) Click the soft keyboard icon in the Toolbar to
activate the soft keyboard;
3) Click characters on the soft keyboard with
stylus to input data.
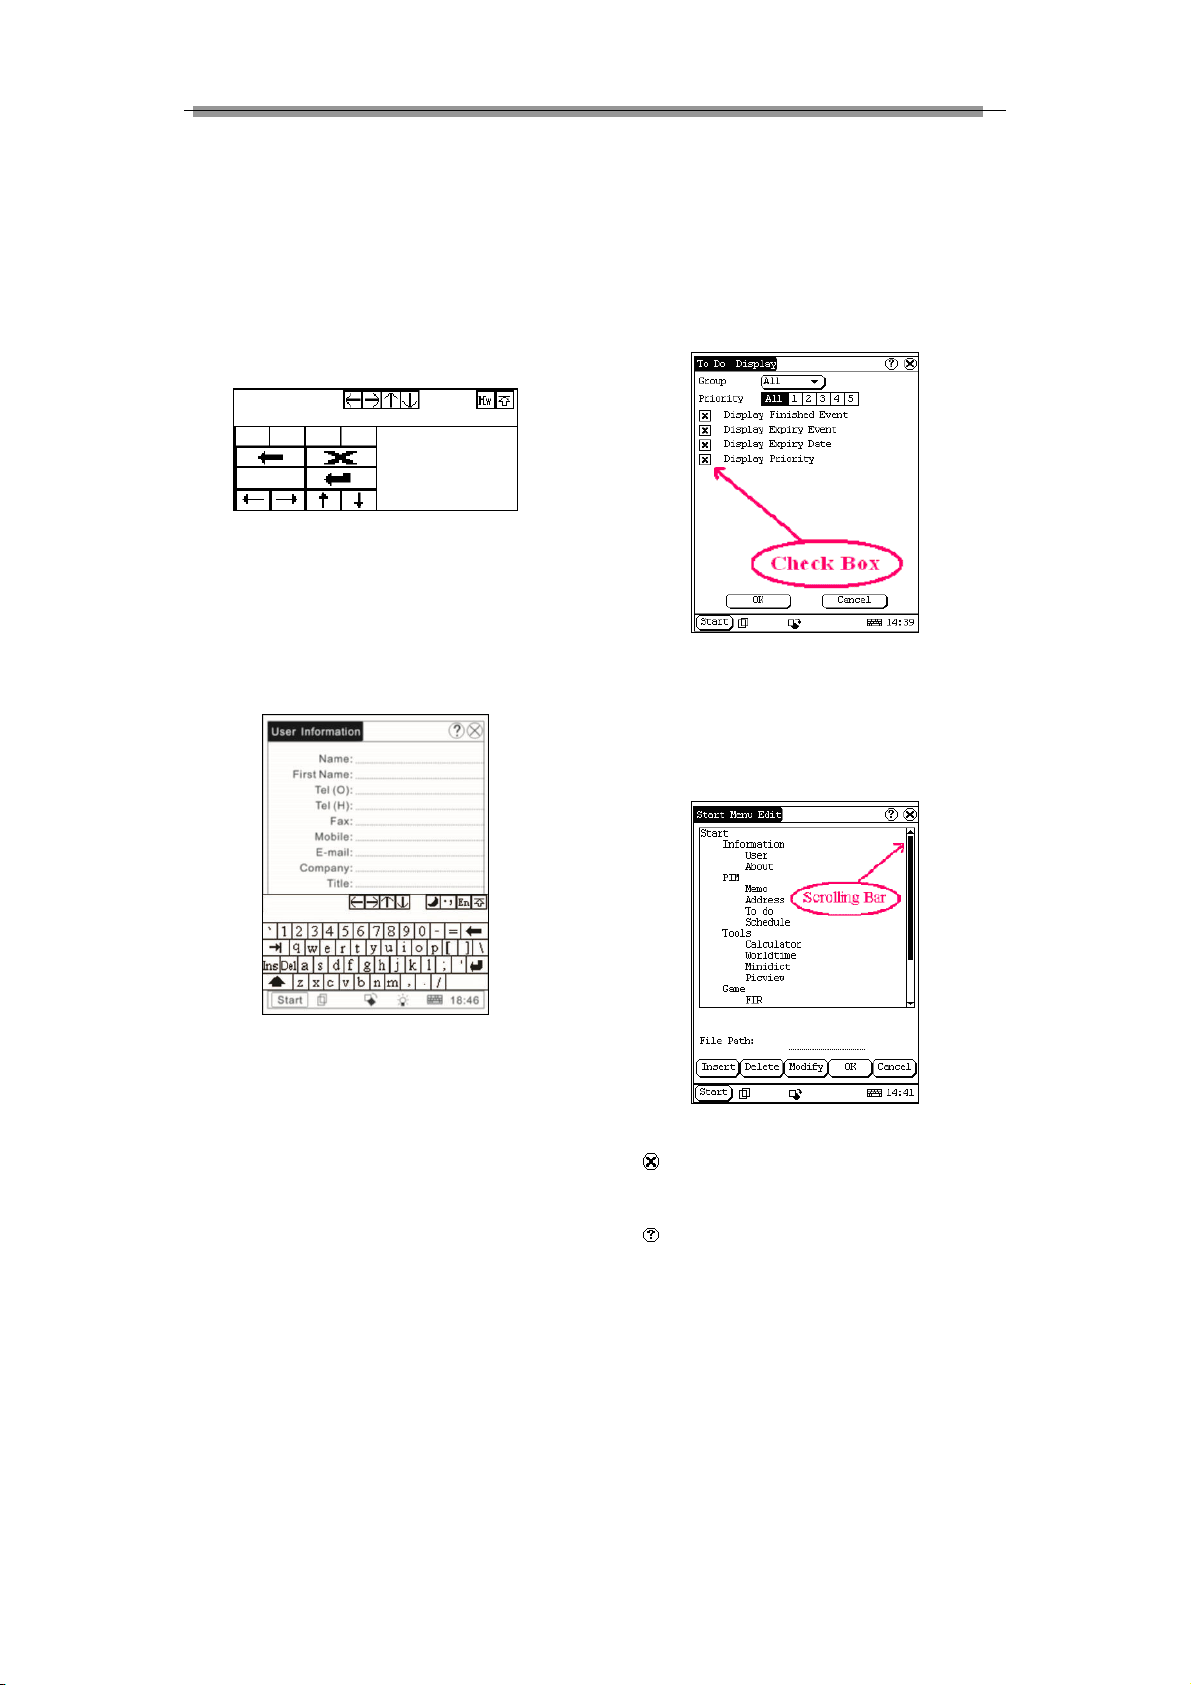
2.5.5 Control of the Application
Check Box
Click the check box to select functions. The
selected functions will be marked with [×] in the
checkbox, and the function description is
provided on the right of the checkbox. More than
one function could be selected at a time.
Scrolling Bar
Usually, the scrolling bar is on the rightmost of
the screen, click or pull it to operate. Use the
scrolling bar for view if the content could not be
fully displayed in one page.
Input by handwriting
1) Open an interface, say memo;
2) Click [New] button;
3) Click the soft keyboard icon in the toolbar to
activate the soft keyboard
4) Click function button to shift to handwriting
input (see chapter ‘Use Soft Keyboard’ for
details);
5) Write on the whiteboard to the right of the soft
keyboard with the assistant of the function keys.
Common Buttons
1)
Button at the top right of the screen: click
it to quit a current interface or give up editing in
default;
Button at the top right of the screen: click
2)
it to display online help for the current interface.
3) [Cancel] Button: click to quit the current
interface or give up editing in default.
9
Page 15
LAUNCH X-431IV English User’s Manual
Ready indicator. When it is on, mini
Paper line feed key
2.5.6 Online Help
Click button or [help] button to get ‘help’
information for the current interface.
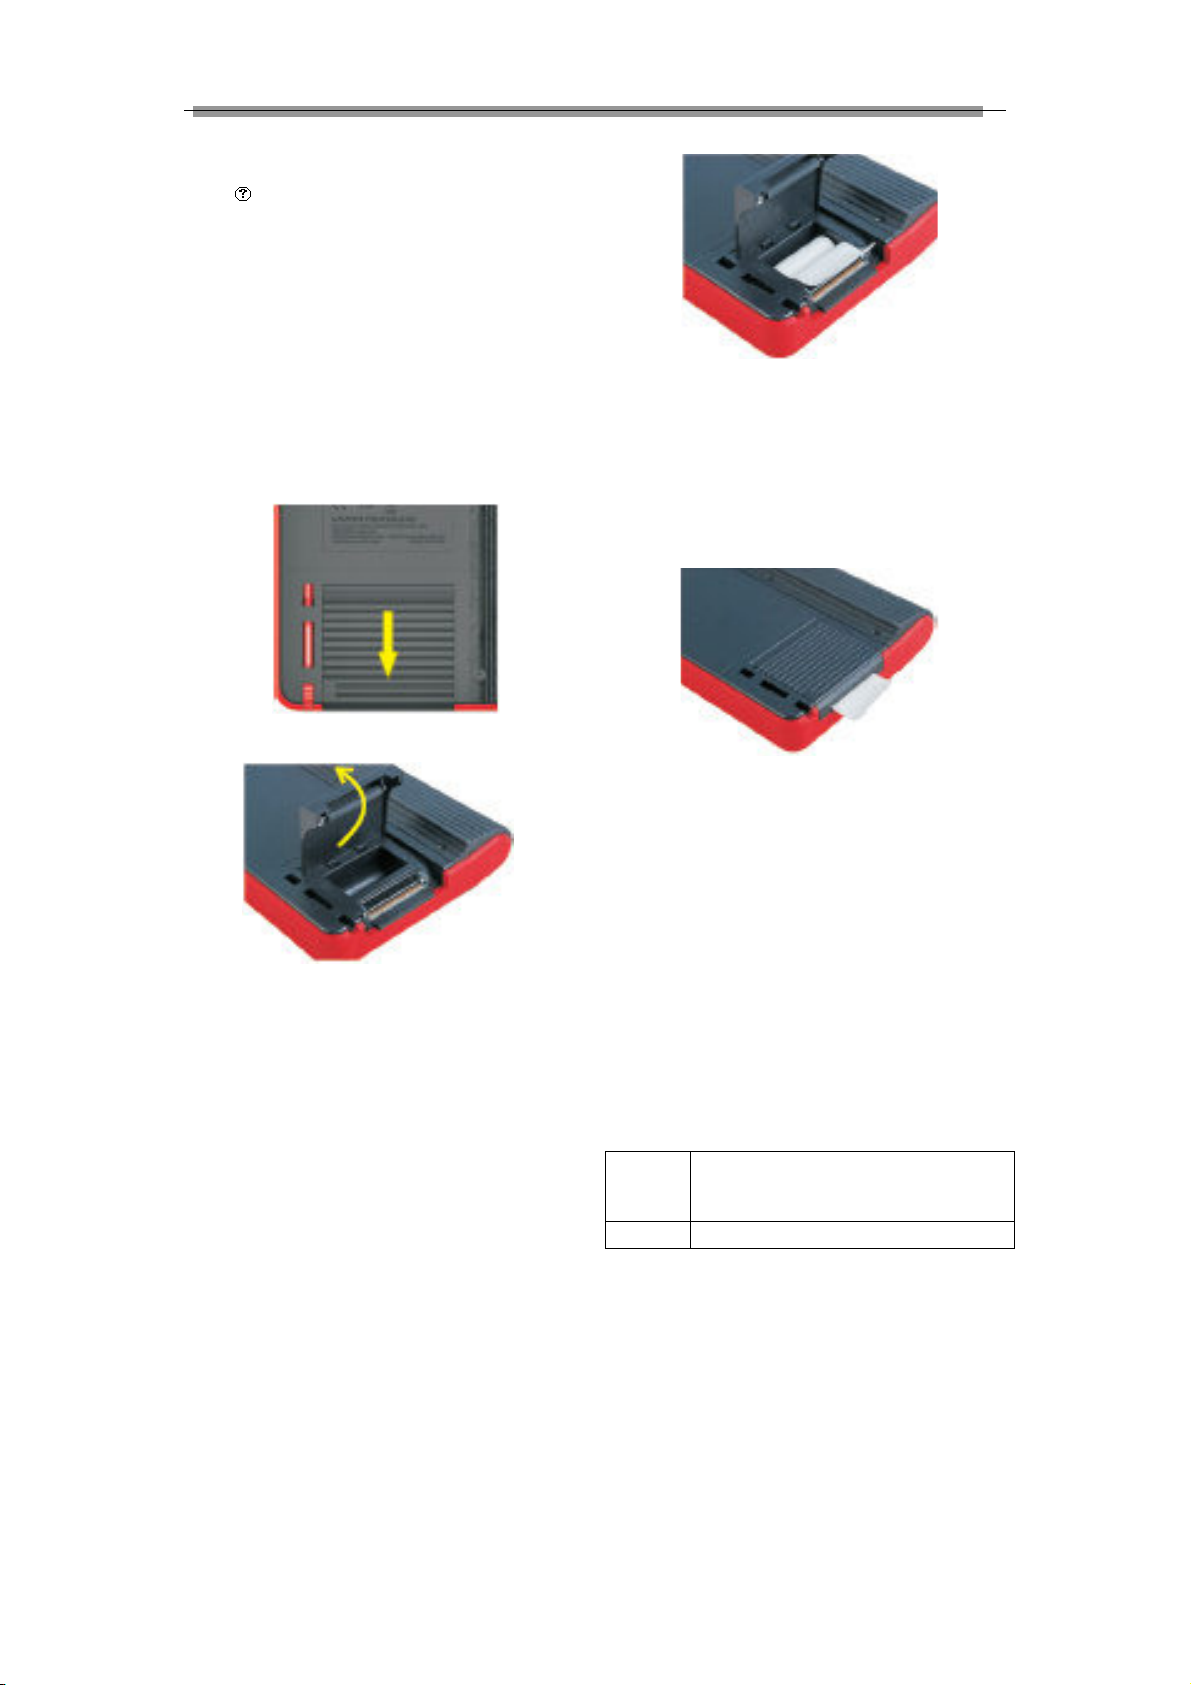
2.5.7 Load thermal paper
The mini printer applies thermal paper roll with
size of Φ30×57mm. Follow the steps described as
below to load it.
Install thermal paper
1) Push the printer cover out and open it as
indicated on Fig. a & b.
Figure c
3) Pull out some printing paper and introduce it
along the slot until it comes out of the paper
outlet shown as Fig. c. Otherwise paper can
not be fed.
4) Close the paper cover. See Fig. d.
Figure a
Figure b
2) Place the unpacked thermal paper into the
compartment with its starting end
approaching to the paper outlet (see Fig. c).
Reversing paper direction will cause that no
results will be printed out.
Note: The thermal paper should be prevented from
being heated before printing, otherwise, the paper
would be no longer effective or printing results
disappear.
Print test result
After loading the thermal paper, press [LF] key to
check whether the paper can be fed normally.
When the [PAPER] indicator is on, it indicates
that the printer is ready. Click the [PRINT] button
(if it appears) on the screen of X-431IV main unit
to print the test result.
Table 2-3 Function description of printer keys
[PAPER]
[LF]
printer works properly; if is off, printing
operation can not be executed.
10
Page 16
LAUNCH X-431IV English User’s Manual
3. Vehicle Diagnosis
3.1 Preparation and connections
3.1.1 Preparations
1. Conditions for Test
1). Turn on the vehicle.
2). The voltage of vehicle battery should be 9 - 37V. The rated voltage of the X-431IV is 12V.
3). The throttle should be in the closed position.
4). Ignition timing and idle speed should be within specification range, water and transmission oil
temperature is in normal working range (water temperature is 90 – 110°C and transmission oil
temperature is 50 – 80°C).
2. Location of the DLC on the vehicle
The location of DLC varies for different vehicle make.
3.1.2 Connections
Before diagnosing a vehicle, please make sure the following connections are properly made:
1. Open the CF card slot and plug the CF card into the slot firmly with "UP SIDE" facing up;
2. Connect one end of the diagnostic main cable to diagnostic port of X-431 IV (
to one end of the selected diagnostic connector ( ).
3. Connect the other end of diagnostic connector to the vehicle's DLC ( ).
4. Plug one end of the cigarette lighter cable into the cigarette lighter cable jack ( ) and the other end
to the cigarette lighter socket ( ) to obtain power.
Note: If the power supply on vehicle diagnostic socket is insufficient or the power pin is
damaged, you can get power from the following ways:
1. From cigarette lighter: insert one end of the cigarette lighter cable into the lighter socket in
vehicle and connect the other end to the power connector of X-431IV main cable.
2. From battery: clamp the two clips of battery cable on the positive and negative poles of
battery and insert another end of the cable into the power connector of X-431IV main cable.
), and the other end
11
Page 17
LAUNCH X-431IV English User’s Manual
3.2 Start to diagnose
The vehicle makes, vehicle models and systems
covered by X-431IV is increasing, please log in
http://mycar.dbscar.com/pad/ for the updates and
download diagnostic program of the latest
version.
3.2.1 Enter diagnostic program
After connection, press [POWER] key to start
X-431IV.
After starting the main unit, press [HOTKEY] (or
click [START] button on the main menu, and
select [GAG]→[GD Scan] on the pop-up menu),
the screen will display the home page of vehicle
diagnosis as shown in Figure 3-1.
Button descriptions:
♦ [BACK]: to return to the previous
interface.
♦ [PAGE UP]: to display the previous
page, it is inactive if the current page is
the first page.
♦ [PAGE DOWN]: to display the next page,
it is inactive if the current page is the
last page.
♦ [HELP]: to display the help information.
Click the icon of DEMO on the vehicle make
menu. The screen will be displayed as shown
in Figure 3-3.
Figure 3-2
Figure 3-1
Button descriptions:
♦ [QUIT]: to exit the diagnostic program.
♦ [BOX INFO.]: to display hardware and
software version of SMARTBOX.
♦ [HELP]: to display help information.
♦ [START]: to proceed to the next step.
Click [START] button, the screen will display
the vehicle make menu as shown in Figure
3-2.
Figure 3-3
Button descriptions:
♦ [BACK]: to return to the previous
interface.
12
Page 18
LAUNCH X-431IV English User’s Manual
♦ [HELP]: to display the help information.
Click [Demo & Self-test V14.40]. The display
will be as shown in Figure 3-4.
Figure 3-4
Click [OK] button, the screen will display the
information as shown in Figure 3-5.
♦ [HELP]: to display the help information.
Click [Engine] button, the screen will display
the information as shown in Figure 3-6.
Figure 3-6
After communication is initialized, the screen
will display the information as shown in Figure
3-7.
Figure 3-5
Note: The test operation for different systems
is similar. Here we take [Engine] as an
example to describe.
Button descriptions:
♦ [HOME]: to return to the homepage of
vehicle diagnosis.
♦ [BACK]: to return to the previous
interface.
♦ [PRINT]: to print the test result.
Figure 3-7
3.2.2 Read trouble code
Click [Read trouble code] in the function menu,
X-431IV starts to test the fault code. The
screen will display the test result when the test
is finished. Figure 3-8 is an example of a test.
13
Page 19
LAUNCH X-431IV English User’s Manual
If all fault codes are erased or there is no fault
code in the tested system, the screen will be
displayed as shown in Figure 3-10.
Figure 3-8
Button descriptions:
♦ [HOME]: to return to the homepage of
vehicle diagnosis.
♦ [BACK]: to return to the previous
interface.
♦ [PRINT]: to print the test result.
♦ [HELP]: to display the help information.
Click [BACK] button to return to the function
menu.
3.2.3 Clear trouble code
Click [Clear trouble code] in the function menu,
X-431IV starts to erase the fault code. The
screen will display the residual fault code after
erasing.
Figure 3-10
Click [OK] button to return to the function
menu.
3.2.4 DataStream Record Function
The save and display functions of DataStream
enables you get the history DataStream and
they are very important when asking for
technical support and for troubleshooting.
3.2.4.1 Save DataStream
Selected [Read data stream] function, as shown
in Figure 3-11.
Figure 3-9
Figure 3-11
14
Page 20

LAUNCH X-431IV English User’s Manual
Select the desired stream item as shown in
Figure 3-12.
Figure 3-14
Figure 3-12
Click ‘OK’ to show the data, as shown in figure
Click ‘SAVE’, and then input a filename after the
soft keyboard has been activated (see Figure
3-15):
3-13.
Figure 3-13
Click ‘SAVE’, the interface as shown in Figure
3-14 will appear:
Figure 3-15
After the filename has been input, click the icon
of the soft keyboard at the bottom right of the
interface to confirm the input, the interface will
display as shown in Figure 3-16.
15
Page 21

LAUNCH X-431IV English User’s Manual
Figure 3-16
Click ‘OK’ at the bottom left of the interface to
begin saving the DataStream.
Figure 3-17
Click ‘STOP’ in Figure 3-17, DataStream of a
specific duration (10 minutes at most) has been
saved. The below interface will appear:
Figure 3-18
User could judge working status of the vehicle
and select None/Good/Bad accordingly (see
figure 3-18). Click ‘Good’ for example, ‘Stream
save’ interface will appear (see figure 3-19).
Figure 3-19
Click ‘DISPLAY’ to view the saved DataStream of
the specific duration.
3.2.4.2 Display DataStream
To display/view DataStream records, make sure
X-431IV enters Read DataStream function menu.
16
Page 22
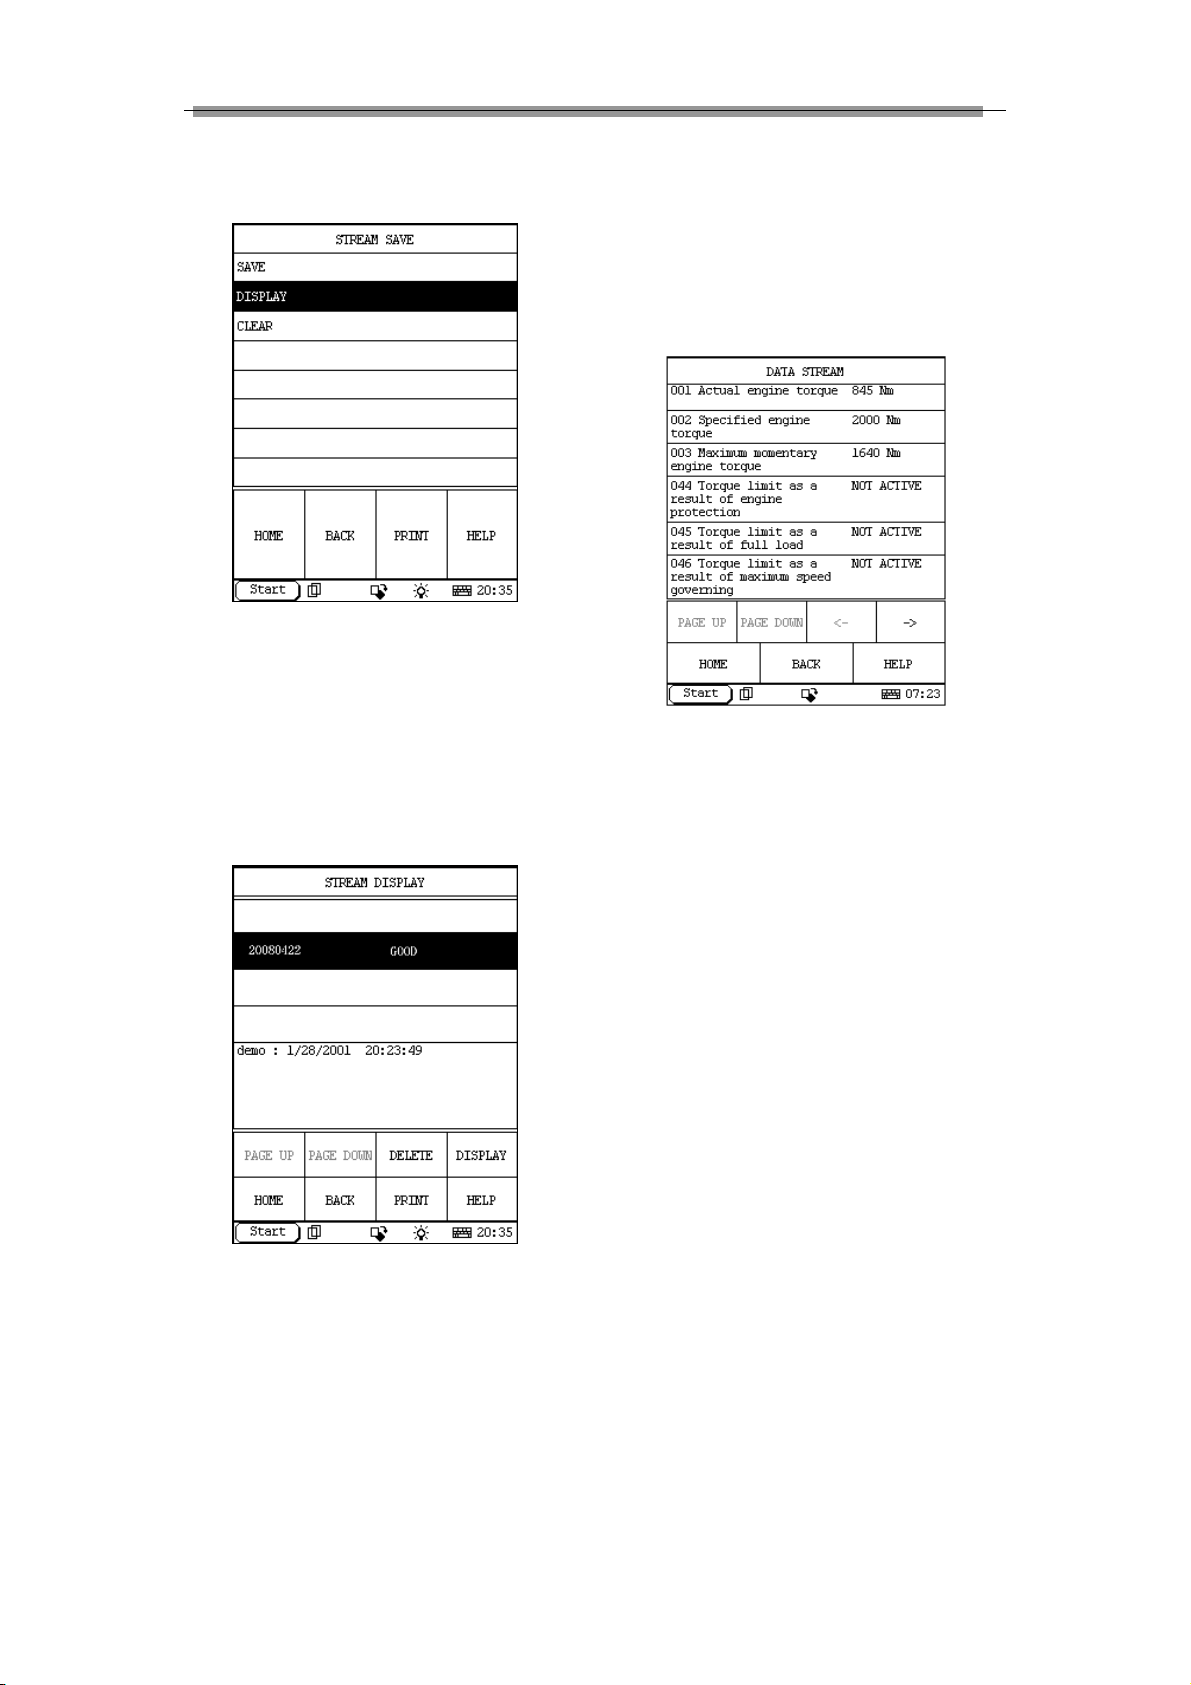
LAUNCH X-431IV English User’s Manual
Only with this function, could the saved data be
available and the related file be visited.
Figure 3-20
In figure 3-20, click [DISPLAY], all the saved files
of the DataStream will be listed out. A file
indicates the name of the diagnostic program
used, the date and the time of the recording,
these information enable user find out the
needed records.
displayed as shown in figure 3-22, click <—or
—> to view the previous or next frame of the
data. View and consider the data to find out the
changes as well as the similarities and
differences before/after the fault, thus to facilitate
the analysis and removal of the faults.
Figure 3-22
3.2.4.3 Clear DataStream
How many data could be recorded is subject to
the storage in the CF card. Clear the data if the
CF card storage is not enough or there is some
unnecessary data record. Enter the interface as
shown in figure 3-20 and choose [CLEAR], then
click [OK] from the dialog box to delete, and the
file is removed from the CF card.
Figure 3-21
In figure 2-60, select a desired file and click
[DISPLAY], one frame of the data will be
3.2.5 Special function
Click [Special function] in Figure 3-7 to enter
function selection interface, and then select the
desired one to perform.
17
Page 23

LAUNCH X-431IV English User’s Manual
4. Update of Diagnostic Software
The X-431IV comes preloaded with the software that was available at the time of the unit’s production.
This software may be several versions behind what is currently available on the Internet, but you can
update the X-431IV through the Internet.
Hardware Requirement:
1. A computer that can access the Internet.
2. A CF card reader/writer and a CF card that need to be updated.
Insert the CF card into the CF card reader/writer.
Connect one end of the USB cable to the port of the CF card reader/writer, and the other end to
the USB port of the computer.
4.1 User Registration
Log on http://mycar.dbscar.com/pad/. Select [X-431 IV] from the [Products] pull-down menu to enter
the X-431 IV homepage.
Figure 4-1
Click “Users” in the interface as shown in Figure 4-1 to enter the login screen.
4.1.1 Register a passport
If you have not registered a passport, please follow the steps described as below:
Click [Register now] to enter the user registration interface as indicated on Figure 4-2.
18
Page 24

LAUNCH X-431IV English User’s Manual
Figure 4-2
Fill in your information (items with * can not be blank and must be entered). After filling, click [Confirm
& Agree Next Terms] to register a passport. The system will send a CC number to your email
immediately.
If you are a registered member, input your CC number or user name and password, then click [login]
to enter product registration.
4.1.2 Fill in Product Information
Figure 4-3
Choose the desired product type from the pull-down list. The serial No. is marked on the back of your
X-431 IV. The registration password is in an envelope delivered with the product (the number must be
kept confidential). Vender code can be found on the last page of the user’s manual.
After the information is filled, click “Submit” to register your product.
Note: If the filled serial No. or registration No. is invalid, the screen will display a wrong
message. Click “OK” button to return to the previous interface to re-fill the correct numbers.
19
Page 25
LAUNCH X-431IV English User’s Manual
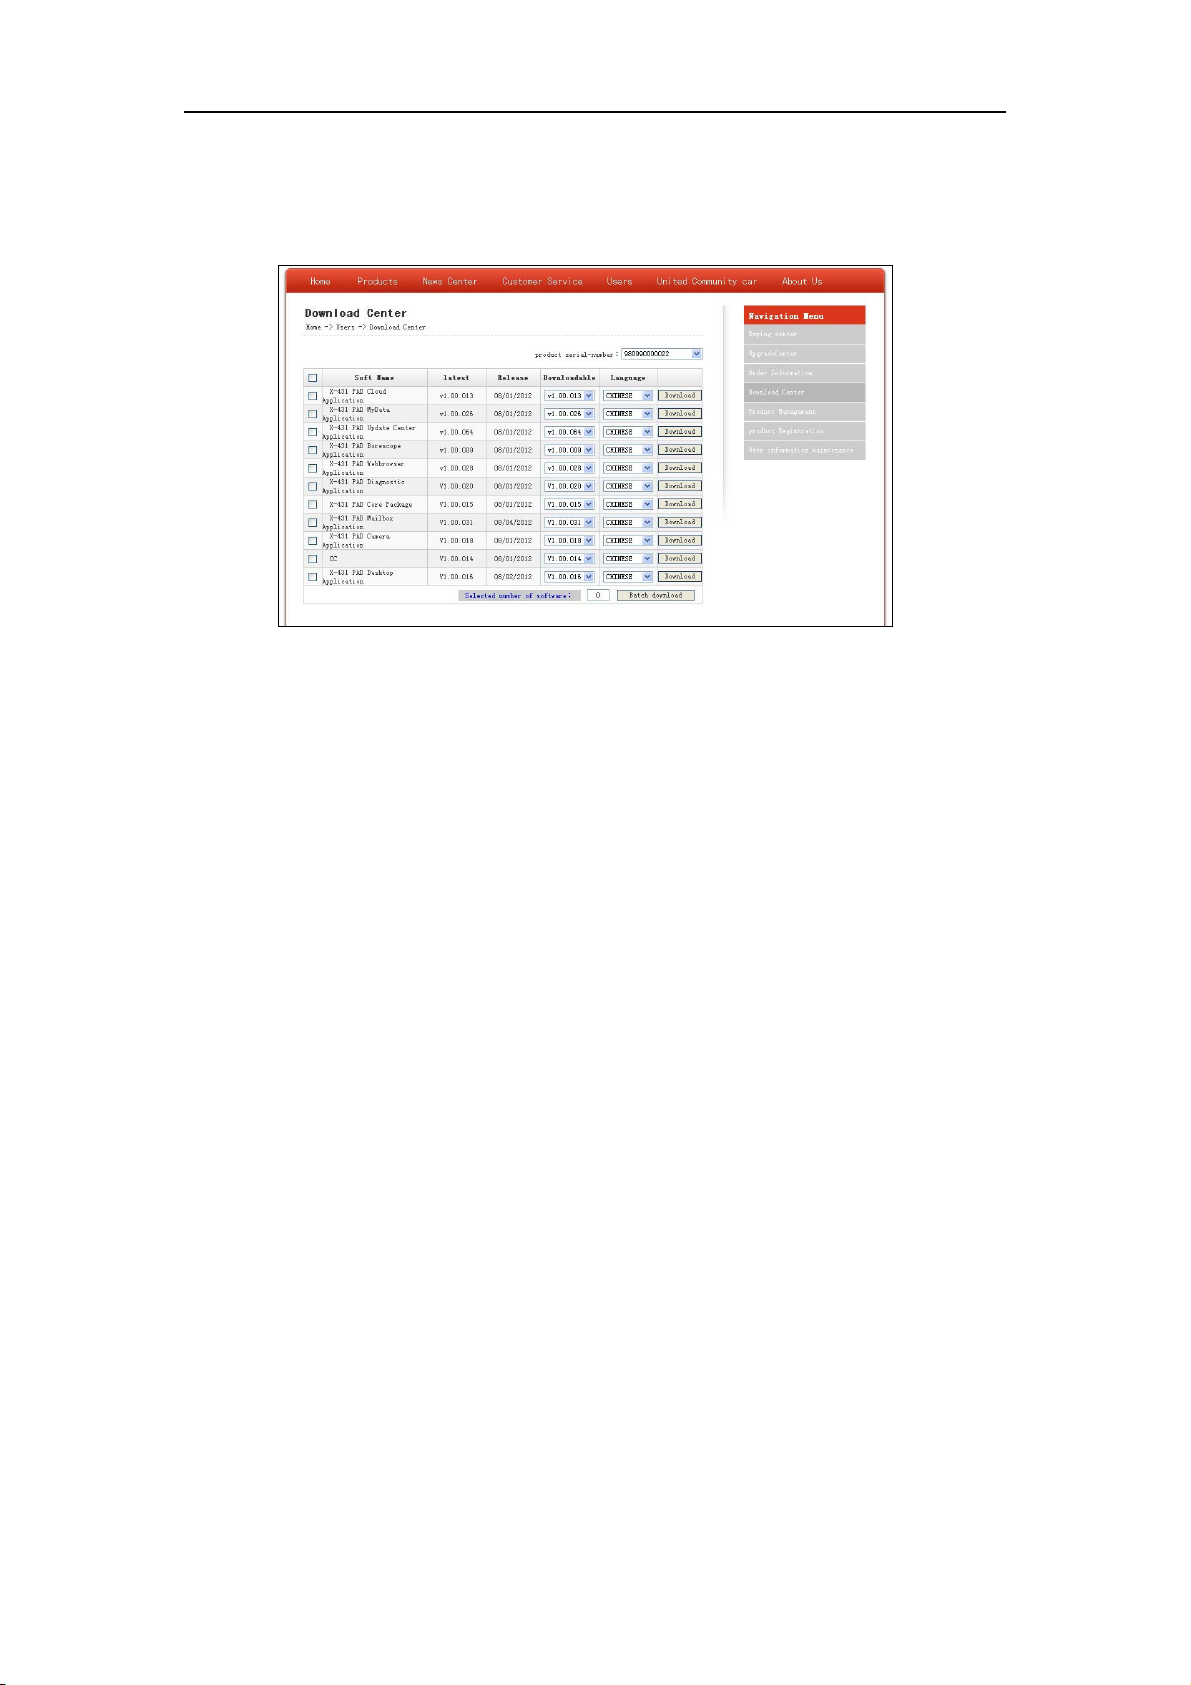
4.2 Software Download
Note: Only the registered user can download and update the software.
Click [Download center] to enter download center page after logging in successfully.
Notes:
1. Software update of charge free will be provided by LAUNCH for one year. The free period is from the
registration date on the website, not the purchase date. That is, during one year after the registration,
users could download the corresponding software for free.
2. If there is not the latest version in the download center or the latest version can not meet the needs of
the users as they are released by other companies, users could buy the version in the purchase
center or in the update center (see “software purchase”). In the purchase center, users can buy the
software that doesn’t install in the download center. In the update center, users can buy the software
that is beyond the free download period. After purchase successfully, the purchased software will be
added to the download center list automatically.
All the software listed in the download center could be downloaded for free. The name of software, the
latest version released by LAUNCH currently and the issue date, as well as the latest version which
could be downloaded for the product serial No. are provided in the software list.
It’s better for users to create a new folder named “X-431 update”, to include all the downloaded software
according to the following procedures.
Update Tool Download
Users are required to download the update tools before updating. Select language in the drop-down
menu, click [Download]. Click [Save] from the pop-up dialog box, and save the update tool in the folder
“X-431 update”.
Download Display Program
Users are required to download display program before updating diagnostic software if the display
program fitted for the latest diagnostic software is updated. Select the language from the drop-down
menu, and click [Download]. Click [Save] on the pop-up menu to save the program in the folder “X-431
update”.
20
Page 26

LAUNCH X-431IV English User’s Manual
Download Diagnostic Program
Select language and version (the default version is the latest version) on the drop-down menu. Click
[Download], then click [Save] on the pop-up menu to save it in the folder “X-431 update”. Click [view] to
learn the detailed information of the version. Users could download the other diagnostic program into the
folder “X-431 update”. Up to now, the software that is for update is downloaded completely.
4.3 Software Update
Connect card reader with TF card to PC and install drive program
Necessary hardware:
1) A computer that can access the internet.
2) A TF card reader of X-431IV and a TF card to be updated.
Connections
a) Insert the TF card into the card reader;
b) Connect one end of the USB cable to the card reader, and the other end to the USB port of the
computer.
Install TF Card Reader Drive Program
You don't need to install the drive program if the operating system of your computer is Windows
Me/2000/XP, Mac OS 9.x/Mac OS X or Linux 2.4.x, but have to install if the operating system is
Windows98.
If card reader installation succeeds, the icon "
Interruption may be caused for the following reasons during the update process. Please try again after
solving the problem.
1) TF card reader is poor connected to the computer or the drive program of the TF card is installed
incorrectly;
2) Space on TF is not enough;
3) Other reasons.
Begin to Update Software
Open the folder “X-431 Update”, double click the icon " ", and install the X-431IV update tool
according to the Wizard.
After the installation, the update icon for the X-431IV will appear on the desktop.
Double click the update icon for X-431IV on the desktop to actuate the update tool. This program will
check the update file downloaded by the user automatically, including the files of diagnostic program and
display program.
" will appear in "My computer" automatically.
Select the update program version on the right, and click [UPDATE]. When update completed, an
indication box will pop up. If the update program version doesn't exist on the right, clicking the icon "
to open the downloaded update program.
You can click the corresponding icon "
" to the G disc to view the files stored in the TF card and delete
21
"
Page 27

LAUNCH X-431IV English User’s Manual
some old software versions if necessary for more available space in TF card.
Click [EXIT] to exit.
4.4 Purchase Software
If users can’t find the software they needed in download center, they should buy the software in the
purchase center or updated in the update center.
Click [Buying center], then you can tick box before the serial number to choose the software. To uncheck
it, just click it again.
Click [Order] to add the selected software to your shopping cart.
Click [Pay] to buy the software. The bought software will be automatically added to the user’s download
center. Click [Clear] to empty the shopping cart. Click [Purchase other] to buy other software.
The operation for update center is the same as for the purchase center. But you can only find software
that beyond updated free period in the update center, while all the available software are listed in the
purchase center.
22
Page 28
LAUNCH X-431IV English User’s Manual
To record all kinds of important information and ideas,
and make
To store the detailed information of relative,
friends,
colleagues
It is convenient for user to record the business to do or being
To arra
nge the appointments,
journeys and meetings in a whole
Calculator
Both simple and scientific
calculators are available.
The time of many big cities in the world are offered.
It is a helpful
An English
-
Chinese dictionary embodies a large number of
Picture View
To enjoy all kinds of pictures which can be zoomed in/out.
To start executable
application
s which are based on the
FIR It is a kind of chess.
Reversi
To play for a whi
le in your leisure time.
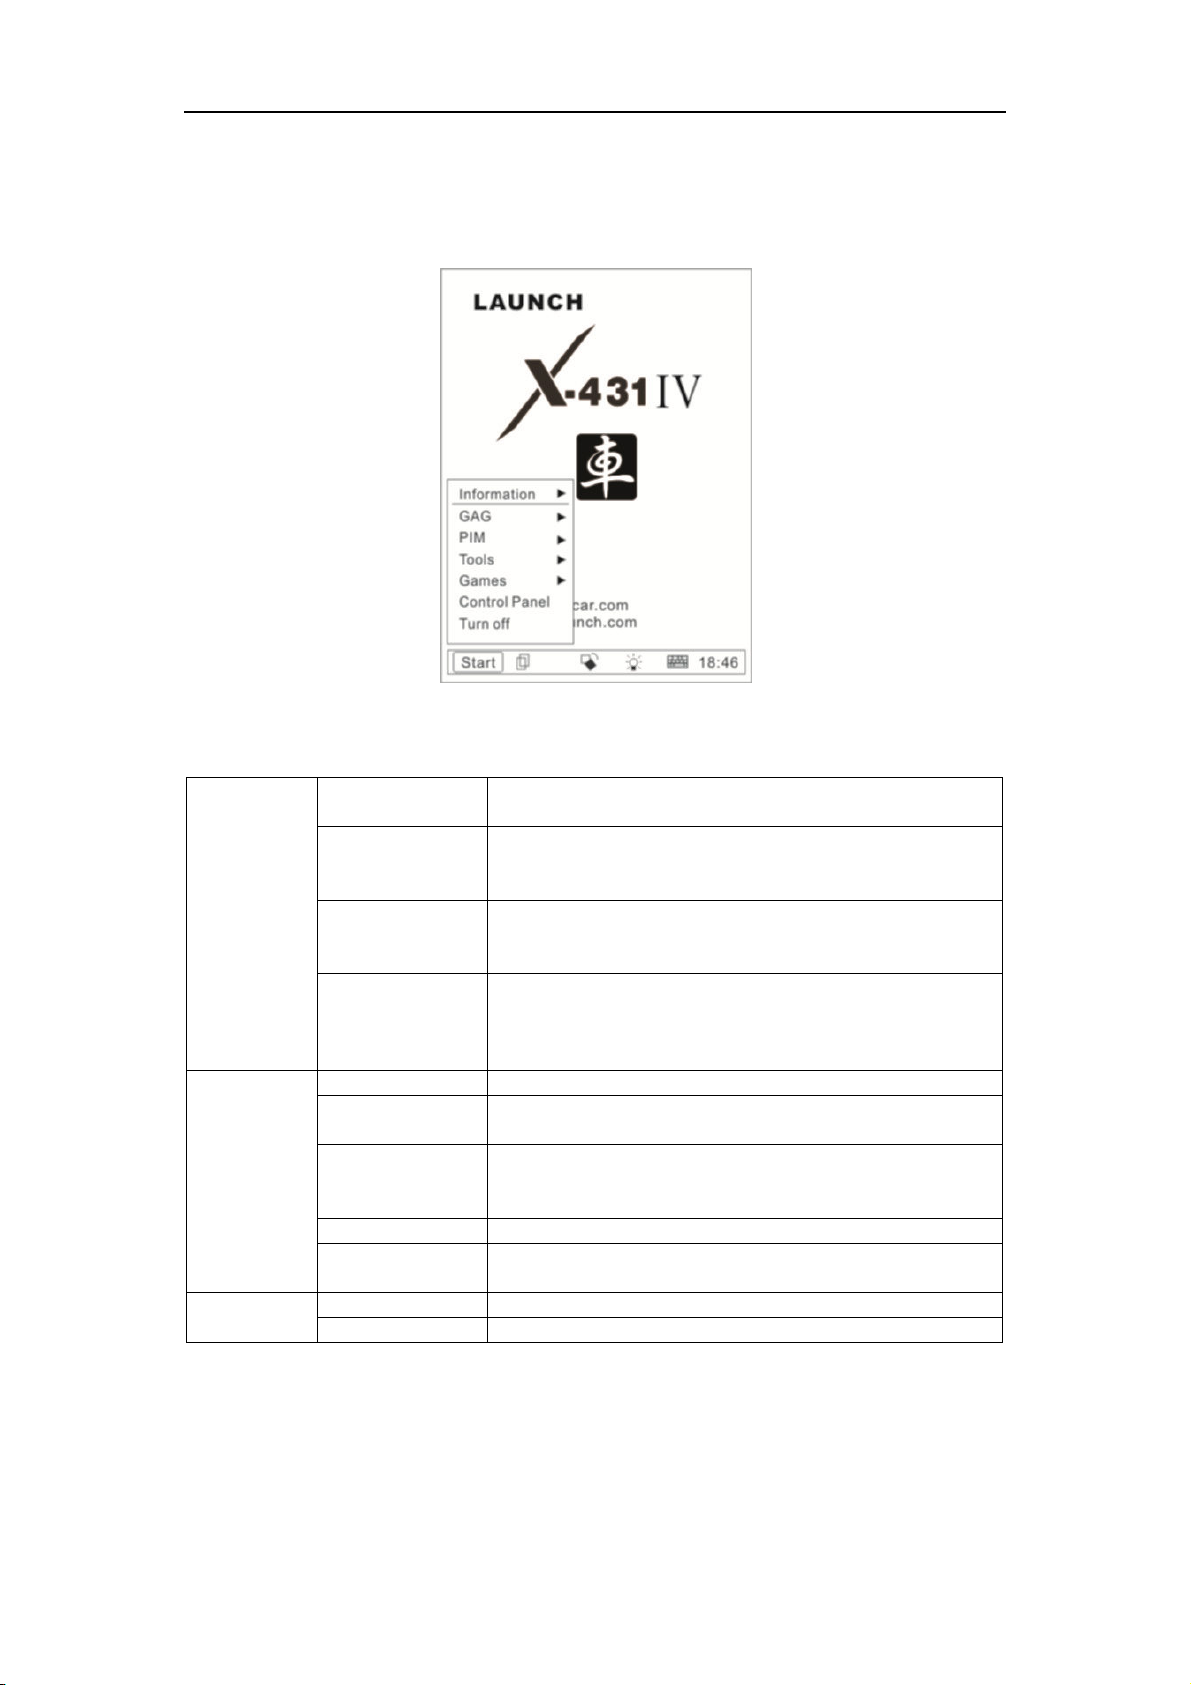
5. PDA function of X-431IV
The Start menu, which includes PDA functions of X-431IV is shown in the below figure. Select with
stylus to actuate these functions.
List of PDA functions (Figure 5-1)
Memo
Address
PIM
(Personal
Information
Management)
Tools
To Do
Schedule
World Time
Mini Dictionary
Run
Figure 5-1
corresponding classification.
and business partners, which can be easily edited, retrieved and
searched.
done, to delete or add task records, to arrange the priority of
tasks, and to browse the classified tasks.
day; to check time schedule on business daily, weekly, monthly
and/or annually; and to describe the place, time and other
details for each schedule record.
assistant for your travel.
words, which cover all fields to overcome your inconvenience in
language.
operating system of the unit.
Game
23
Page 29

LAUNCH X-431IV English User’s Manual
To link the application with
the ‘Start’
menu, or delete it from the
Power
To preset the use of power to save on electricity as possible
.
To set the system time
.
To select
language
to be used
.
Professional function of vehicle diagnosis
.
Sensor test and
To test the sensor on vehicle and simulate the output s
ignal from
Control Panel
Vehicle
maintenance
Application
‘Start’ menu.
Management
Clock Set
Contrast To adjust the contrast of display.
Language Set
Vehicle diagnosis
simulation
the sensor.
24
Page 30

LAUNCH X-431IV English User’s Manual
5.1.2 About
5.1 System Information
5.1.1 User Information
Figure 5-3
Figure 5-2
User information was input by user. Registration of
your information will better guarantee your rights
and interests.
1) Click [Start] Button;
2) Select [System Information] in the pop-up
menu.
3) Select [User Register] from the pop-up list of
[System Information] to open User
Information interface.
4) Activate soft keyboard for inputting the
information
5) Click [OK] to save and quit current interface.
Click [About] in the list of [System Information] to
display the hardware and software information of
the related system. Click [OK] to quit the about
interface.
5.2 Tools and Games
5.2.1 Tools
1) Click [Start] button.
25
Figure 5-4
Page 31

LAUNCH X-431IV English User’s Manual
2) Select ‘Tools’ in the pop-up menu.
3)
Select the function needed in the pop-up
submenu. (Refer to Figure 4-04)
5.2.1.1 Calculator
This calculator can perform not only common
calculations as a simple calculator, such as
addition and subtraction, but also the function
operations as a scientific calculator, such as
logarithm and factorial. (Refer to Figure 5-6).
1) In the pop-up menu of ‘Tools’, select
‘Calculator’ to open the Calculator
interface.
2) Click the square overlap icon on upper
left of the screen to switch between
scientific calculator and simple calculator.
3) Click ‘Unit Conversion’ button to switch
between unit conversion calculator and
simple calculator.
Figure 5-6
Common Calculator (Refer to Figure 5-5):
1) Click numeral keys on the screen to input.
2) Or activate Soft Keyboard, and click
numeral key on Soft Keyboard to input.
3) The operation is the same as that for
normal calculator.
Unit Conversion Calculator (Refer to Figure
5-7):
1) Click ‘Unit type’ button at the top right
corner to select unit type.
2) Input the number to be converted in the
blank next to the unit name, and then you
will see the conversion result.
3) If you want to return to simple calculator,
please click 'X' button at the top right
corner to close the current interface.
Figure 5-5
26
Page 32

LAUNCH X-431IV English User’s Manual
5.2.1.3 Dictionary
1) In the pop-up menu of ‘Tools’, select
‘Minidict’ to open the Dictionary interface.
(See Figure 5-9)
2) Activate Soft Keyboard, and input words.
3) Select the word from the list on the left.
4) Click the word, and then you can find the
translation in the right list.
Figure 5-7
Time
5.2.1.2 World
Figure 5-8
1) In the pop-up menu of ‘Tools’, select
‘World time’ to open the world time
interface.
2) Click the button under the ‘Home Time’
icon to select region.
3) Click the button under the ‘World Time’
icon to select region.
4) Then you can see the time directly. (See
Figure 5-8).
Figure 5-9
5.2.1.4 Picture View
1) Click [Start] button.
2) Select ‘Tools’ in the pop-up menu.
3) In the pop-up ‘Tools’ list, select ‘Picview’ to
open the Picture interface.
4) In the Picture interface, click
the toolbar on the top. (See Figure 5-10)
5) Select directory from the left list interface.
6) Select file from the right list interface.
7) Click [Parent Dir] button, and you can see
the directory of current directory’s parent.
8) You can see the directory of the picture at
the right side of ‘Path’.
9) You can see the file name of the picture at
the right side of ‘File’.
10) Click [OK] button to open the picture.
icon in
27
Page 33

LAUNCH X-431IV English User’s Manual
5.2.2 Game
Figure 5-10
Browse the pictures in current directory
1) In the Picture interface, click
icon on
the top to browse the previous picture.
2) In the Picture interface, click
icon on
the top to browse the next picture.
Note:
This operation is needed only when more
than one picture has been stored.
Zoom in and zoom out:
In the Picture interface, click
or icon
on the top, then you can zoom in or zoom out
the current picture at will.
Figure 5-11
1) Click [Start] button.
2) Select ‘Game’ in the pop-up menu.
3) Select the function in the pop-up
submenu. (See Figure 5-11)
5.2.2.1 FIR
1) In the pop-up submenu of ‘Game’, select
‘FIR’ to open the Chess Board.
2) Click black or white chessman to begin
the game. The one who select the black
chessman will start first. (See Figure
5-12)
Rules for the game:
You must try to make your five chessmen line
up and prevent your opponent from achieving
this goal in the process. The one whose 5
chessmen are lined up first is winner. You can
choose the black or white chessman at the
bottom of the Chess Board before starting
playing.
28
Page 34

LAUNCH X-431IV English User’s Manual
first. All black chessmen between two white
chessmen will turn to white ones and all white
chessmen between two black chessmen will
turn to black ones. So the player should be able
to reverse opponent‘s chessmen in each step.
When the chessboard is full of chessmen, the
number of the chessmen for each color should
be counted. The one who conserve more
chessmen on the chessboard is winner.
5.3 PIM
1) Click [Start] button.
2) Select ‘PIM ’ in the pop-up menu.
3) Select the function needed in the pop-up
list. See Figure 5-14.
Figure 5-12
5.2.2.2 Reversi
1) In the pop-up menu of ‘Game’, select
‘Reversi’ to open the Chess Board. (See
Figure 5-13)
Figure 5-13
2) Click [New Game] button to start.
3) Click [Undo] button for pull back.
4) Click [Close] button to close the Chess
Board.
Rules:
The one who chooses white chessman can play
Figure 5-14
5.3.1 Memo
The basic functions of Memo include: add new
memo, view memo, delete memo, browse by
types, etc.
1) In the pop-up ‘PIM’ list, select ‘Memo’ to
open the Memo interface. (See Figure
5-15)
2) After you click the [▼] button on top right
corner, the type list will pop up. Then you
can select the type of the memo.
3) You can also select the Edit Group in the
type list to open the Edit Group interface.
4) The memo list of corresponding type will
29
Page 35
LAUNCH X-431IV English User’s Manual
be displayed in the list box on the midst of
the Memo interface.
5) Click one memo in the memo list to open
the Memo Edit interface.
6) Click [New] button to open the New Memo
interface.
2) Then you can edit the contents of the
memo in the opened Memo Edit interface.
See Figure 5-16.
3) After editing, click [OK] button to save the
edited contents and close the Memo Edit
interface.
Figure 5-15
5.3.1.1 Add New Memo
1) In the Memo interface, click [New] button
to open the New Memo interface.
2) Activate Soft Keyboard, and fill the
subject and contents.
3) Click the button on top right corner, then
select the type in the pop-up list
4) Click [OK] button to save and close the
New Memo interface.
5) Then you can see the new memo in the
list box of the Memo interface.
5.3.1.2 View Memo
1) In the list box of the Memo interface, click
the memo that you want to view.
2) Then you can view the contents of the
memo in the opened Memo Edit interface.
3) Click [OK] button to close the Memo Edit
interface.
5.3.1.3 Edit Memo
1) In the list box of the Memo interface, click
the memo that you want to edit.
Figure 5-16
5.3.1.4 Delete Memo
1) In the list box of the Memo interface, click
the memo that you want to delete.
2) Then you can delete the memo in the
opened Memo Edit interface.
3) Click [Delete] button to delete the memo
and close the Memo Edit interface.
5.3.1.5 Edit Type
1) Click the [▼] button on the top right of the
interface
2) In the type list, select the Edit Group to
open the Edit Group interface.
3) In the Edit Group interface, activate Soft
Keyboard.
4) In the text box at the bottom of the
interface, input the name of the type.
5) Click [Add] button to add a new type and it
will be displayed in the list box of the Edit
Group interface. (See Figure 5-17)
6) Select one type in the list box, and then
click [Delete] button to delete it.
7) Click [Close] button to close the Edit
so that the type list pops up.
30
Page 36

LAUNCH X-431IV English User’s Manual
Group interface.
The interface
: It represents the Memo
Interface, the New Memo interface and the
Memo Edit interface.
Figure 5-17
5.3.1.6 Browse By Types
1) Click the [▼] button on the top right of the
Memo interface so that the type list pops
up.
2) Select the type in the list.
3) Then you can see the memo belonging to
the type in the list box.
Note: Only the memo belonging to the type
can be displayed here. If you want to browse
all memos, please select ‘All’ in the steps 1
and 2.
New interface. (See Figure 5-18)
4) Click [Find] button to pop up the Find
People interface.
The operation guide for each function is
described below:
Figure 5-18
5.3.2.1 Add New Address
1) In the Address Book interface, click [New]
button to open the Address New interface.
(See Figure 5-19)
2) Activate Soft Keyboard, and fill the
detailed information on relatives and
friends.
3) Click [OK] button to save and close the
Address New interface.
4) Then the added name will be displayed in
the list box of the Address Book interface.
5.3.2 Address
The basic functions of Address Book include:
add new address, view address, delete address,
to search address, etc.
1) In the pop-up ‘PIM’ list, select ‘Address’ to
open the Address Book interface.
2) It lists the name of persons whose
communication information has been
stored.
3) Click [New] button to open the Address
31
Page 37

LAUNCH X-431IV English User’s Manual
Figure 5-19
5.3.2.2 View Address
1) In the list box of the Address Book
interface, click the name that you want to
view.
2) Then the detailed information about the
person will be shown in the opened
Address Edit interface.
3) Click [OK] button to close the Address
Edit interface.
5.3.2.3 Edit Address
1) In the list box of the Address Book
interface, click the name that you want to
edit.
2) Then the information about the person
can be edited in the opened Address Edit
interface. See Figure 5-20.
3) After editing, click [OK] button to save the
edited contents and close the Address
Edit interface.
Figure 5-20
5.3.2.4 Delete Address
1) In the list box of the Address Book
interface, click the name that you want to
delete.
2) Then the information about the person will
be shown in the opened Address Edit
interface.
3) Click [Delete] button to delete the
person’s information and close the
Address Edit interface.
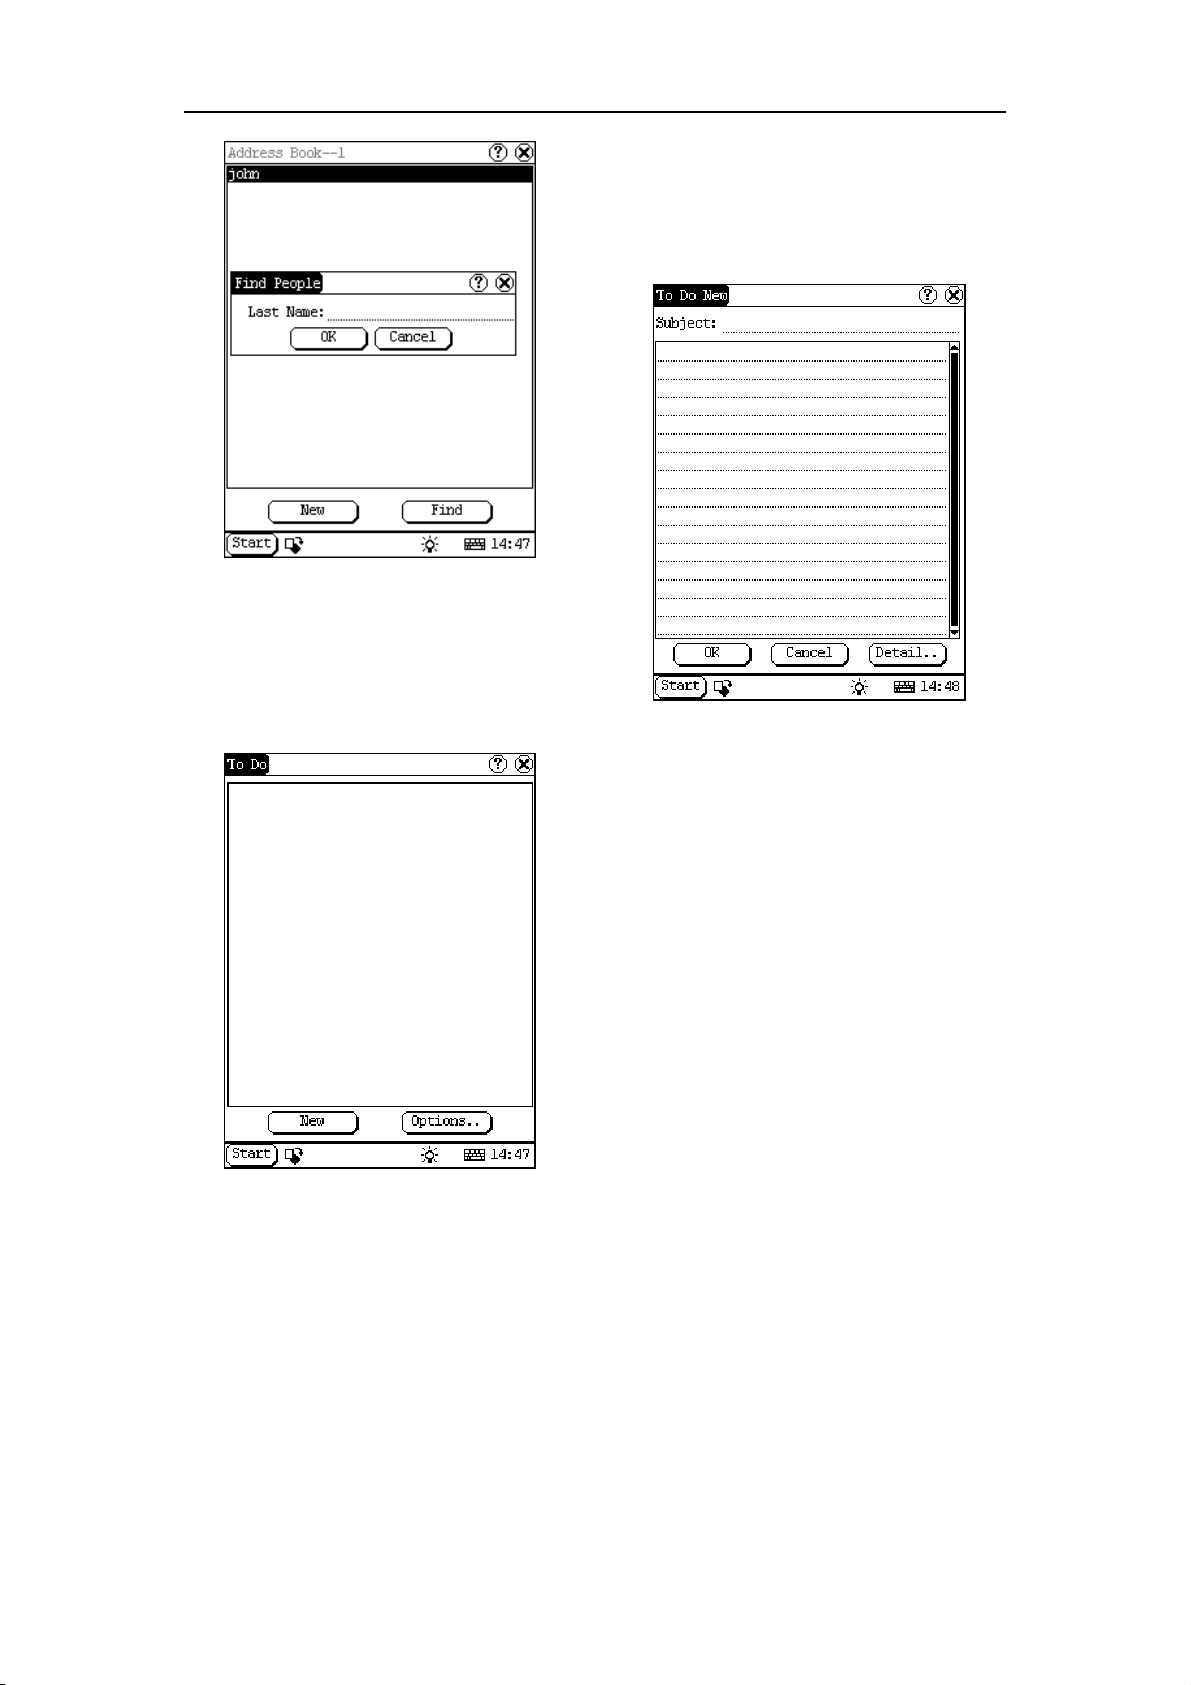
5.3.2.5 Search Address
1) In the Address Book interface, click [Find]
button to pop-up the Find People
interface. See Figure 5-21.
2) Activate Soft Keyboard, and input the
name you want to search.
3) Click [OK] button, and then you will see
that the name you search is highlighted in
the list box.
32
Page 38
LAUNCH X-431IV English User’s Manual
3) Click [Options] button to open the To Do
Display interface. (See Figure 5-22)
4) Click [New] button to open the To Do New
interface.
5.3.3.1 Add New To Do
Figure 5-21
5.3.3 To Do
The basic functions of To Do include: add new
To Do, view To Do, delete To Do and set To Do,
etc.
Figure 5-23
1) In the To Do interface, click [New] button
to open the To Do New interface. See
Figure 5-23.
2) Activate Soft Keyboard, and fill in the
subject and contents.
3) Click [Detail] button to open the To Do
Detail interface. See Figure 5-24.
4) In the To Do Detail interface, click the
button to the right of ‘Group’ to pop-up the
type list.
5) Click the button to the right of ‘Expired’,
and select the data in the pop-up list.
6) Click the number to the right of ‘Priority’ to
set the priority of the To Do.
7) If the To Do has been finished, please
click the box to the right of ‘Finished’.
When the function is selected, ‘X’ will be
marked in the box.
Figure 5-22
1) In the pop-up ‘PIM’ list, select ‘To Do’ item
to open the To Do interface.
2) The To Do list of corresponding items will
be displayed in the list box on the midst of
the Memo interface.
8) Click [OK] button to save and close the To
Do Detail interface.
9) In the To Do Detail interface, click [OK]
button to save and close the To Do New
interface.
33
Page 39

LAUNCH X-431IV English User’s Manual
5.3.3.5 Edit Type
1) Click the [▼] button to the right of ‘Group’
in the interface
so that the type list
pops up.
2) In the type list, select ‘Edit Group’ to open
the Edit Group interface. See Figure 5-25.
3) In the Edit Group interface, activate Soft
Keyboard.
4) In the text box at the bottom of the
interface, input the name of the type.
5) Click [New] button to add a new type and
it will be displayed in the list box of the
Edit Group interface.
6) Select one type in the list box, and then
click [Delete] button to delete it.
7) Click [Close] button to close the Edit
Figure 5-24
5.3.3.2 View To Do
1) In the list box of the To Do interface, click
the to do that you want to view.
2) Then the contents of the To Do will be
shown in the opened To Do Edit interface.
Group interface.
The interface
: It represents the To Do
Detail Interface (Refer to step 1-3 in the
section “Add New To Do” and “Edit To Do”),
and the To Do Display interface (Refer to
step 1 in the section “The Set of Display ”).
3) Click [OK] button to close the To Do Edit
interface.
5.3.3.3 Edit To Do
1) In the list box of the To Do interface, click
the memo that you want to edit.
2) Then the contents of the memo will be
shown in the opened To Do Edit interface.
3) Click [Detail] button to open the To Do
Detail interface, please refer to step 4~8
in the section “Add New To Do”.
4) After editing, click [OK] button to save the
edited contents and close the To Do Edit
interface.
5.3.3.4 Delete To Do
1) In the list box of the To Do interface, click
the to do that you want to delete.
2) Then the contents will be shown in the
opened To Do Edit interface.
3) Click [Delete] button to delete the To Do
and close the To Do Edit interface.
Figure 5-25
34
Page 40

LAUNCH X-431IV English User’s Manual
5.3.3.6 The Set of display
Figure 5-26
1) In the To Do interface, click [Options]
button to open the To Do Display
interface.
2) In the To Do Display interface, click the
button to the right of ‘Group’ to pop-up
type list, and select the type in the pop-up
list.
3) Click the button to the right of ‘Expired’,
and select the data in the pop-up list.
4) Click the number or ‘All’ to the right of
‘Priority’ to set the priority of the displayed
To Do.
5) Click the box to the right of each function.
When ‘X’ is displayed in the box, the
function is selected. (See Figure 5-26)
6) Click [OK] button to close the To Do
Display interface.
7) Then you can see the corresponding To
Do in the list box of the To Do interface.
5.3.4 Schedule
The basic functions of Schedule include: add
new schedule, view schedule, delete schedule,
etc.
Figure 5-27
1) In the pop-up list of ‘PIM’, select
‘Schedule’ to open the Schedule interface.
2) Click the Date button on the upper left of
the interface to open the Select Date
interface.
3) In the list box in the middle of the
interface, all schedules on that day
corresponding to the Date button will be
displayed. (See Figure 5-27)
4) Click [New] button, and then the cycle list
pops up. You may select ‘Common’,
‘Daily’, ‘Weekly’, ‘Monthly’ and ‘Annual’.
5) In the cycle list, select one item to open
the Schedule New interface.
5.3.4.1 Add New Schedule
Set the date of the schedule:
1) In the Schedule interface, click the Date
button on the upper left to open the Select
Date interface.
2) In the Select Date interface, click [
]
icon to the left of the month or year to
select the previous month or year.
3) Click the [
] icon to the right of the
month or year to select the next month or
year. (See Figure 5-28)
4) Click to select the date in the current
month. When it is highlighted, it is
selected.
5) Or click [Today] button to display the
35
Page 41

LAUNCH X-431IV English User’s Manual
current year, month and date directly.
6) Click [OK] button to save the date setting
and close the Select Date interface.
7) You may see the date you set on the
button on the top right of the Schedule
interface.
Figure 5-29
Set the content of the schedule:
Figure 5-28
Set the cycle of the schedule:
1) In the Schedule interface, click [New]
button so that the Cycle list pops up. See
Figure 5-29.
2) In the Cycle list, select ‘Common’ if it is
done on the selected date.
3) Select ‘Daily’ if it is done every day.
4) Select ‘Weekly’ if it is done on a fixed day
every week.
5) Select ‘Monthly’ if it is done on a fixed day
every month.
6) Select ‘Annual’ if it is done on a fixed day
every year.
7) After selecting, open the New Schedule
interface.
Figure 5-30
1) In the Schedule New interface, activate
Soft Keyboard, and fill the subject and
contents.
2) In the textbox on the top of the interface,
fill the time of the schedule.
3) If the selected cycle is ‘Daily’, ‘Weekly’,
‘Monthly’ or ‘Annual’, you can input the
repeat time in the textbox on the bottom
of the interface. See Figure 5-30.
36
Page 42
LAUNCH X-431IV English User’s Manual
4) “Remind” function can be selected and
the reminding time can be set in the
interface. The “Remind” function will not
be available when the machine is turned
off.
5) Click [OK] button to save and close the
Schedule New interface
5.3.4.2 View Schedule
1) In the Schedule interface, select the date
that has been scheduled. (Refer to the
section “Add New Schedule Set the
date of the schedule”)
2) In the list box of the Schedule interface,
click Scrolling Bar to turn to next page,
and click the schedule you want to view.
3) Then the contents of the schedule will be
shown in the opened Schedule View
interface.
4) Click [OK] button to close the Schedule
View interface.
5.3.4.3 Edit Schedule
1) In the Schedule interface, select the date
that has been scheduled. (Refer to the
section “Add New Schedule Set the
date of the schedule”)
2) In the list box of the Schedule interface,
click Scrolling Bar to turn to next page,
and click the schedule you want to edit.
3) Then the contents of the schedule will be
shown in the opened Schedule View
interface.
4) If the edited affair is ‘Daily’, ‘Weekly’,
‘Monthly’ or ‘Annual’, you can edit the
repeat time in the textbox on the bottom
of the interface.
5) After editing, click [OK] button to save the
edited contents and close the Schedule
View interface.
opened Schedule View interface. See
Figure 5-31.
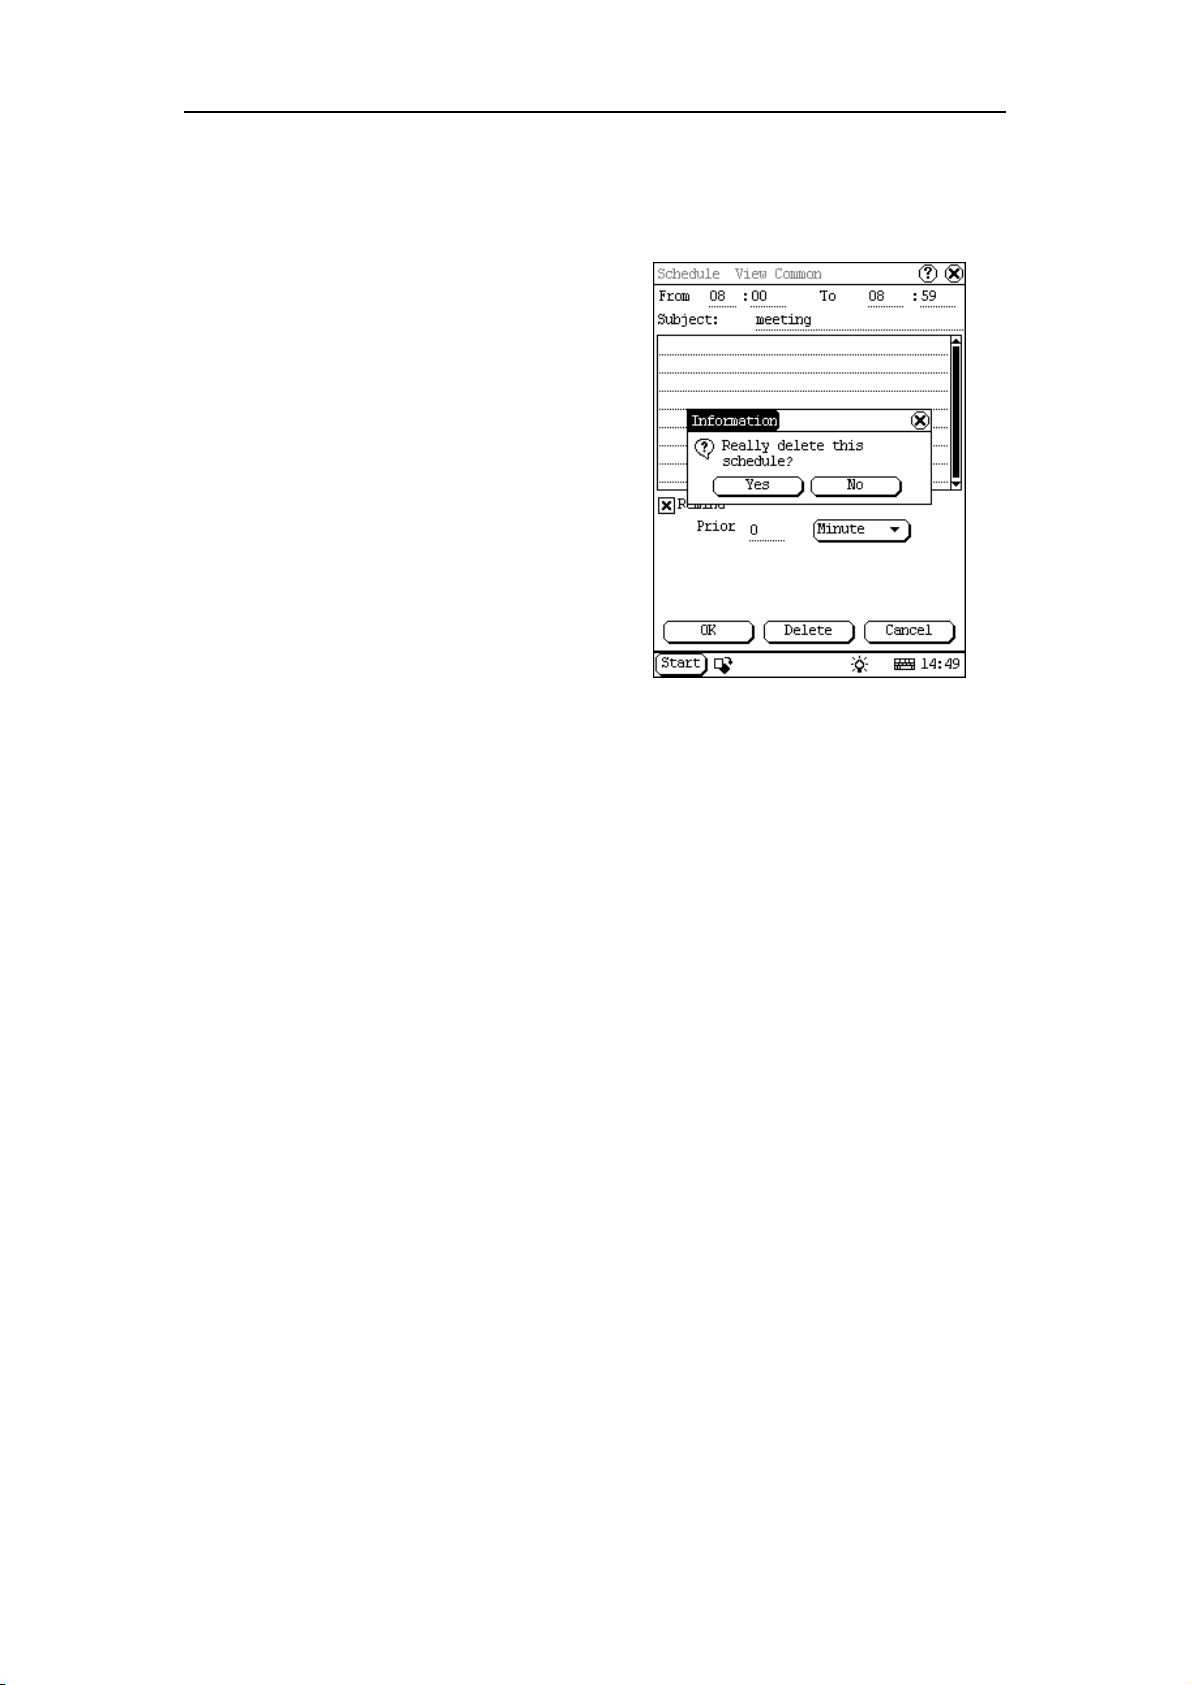
4) Click [Delete] button to delete it and close
the Schedule View interface.
Figure 5-31
5.4 System
5.4.1 Control Panel
The control panel includes all interrelated
software and hardware configurations. It makes
the software more custom-built for you by
configuring.
1) Click [Start] button.
2) Select ‘Control Panel’ in the pop-up menu.
3) Open the Control Panel interface. (See
Figure 5-32)
5.3.4.4 Delete
1) In the Schedule interface, select the date
2) In the list box of the Schedule interface,
3) Then the schedule will be shown in the
Schedule
that has been scheduled. (Refer to the
section “Add New Schedule Set the
date of the schedule”)
click Scrolling Bar to turn to next page,
and click the schedule you want to edit.
37
Page 43

LAUNCH X-431IV English User’s Manual
(See Figure 5-33)
3) Insert a new group:
Click [Insert] button and input the item
name. Then choose “Start” as its parent
and click [OK] button.
Figure 5-32
5.4.1.1 Application
It displays the application information contained
in the ‘Start’ menu, including the group name,
the submenu, etc.
Figure 5-34
4) Insert a new submenu:
Click [Insert] button and input the item
name and the file path. Then choose a
group as its parent and click [OK] button.
The path can be inputted directly or found
out in a dialogue box after clicking
[Browser] button. See Figure 5-34 and
Figure 5-35. Click [OK] button after
selecting an item in the list. Then the
selected file will be automatically copied to
the edit box.
The submenu should be linked to a
present group instead of the “Start” item or
another submenu.
5) Delete a group or a submenu:
Figure 5-33
1) In the Control Panel interface, click ‘App’
icon to open the Application Manager
interface.
2) Then you can see the corresponding
information in the list box of the interface.
Select a group or a submenu and then
click [Delete] button. When a group is
deleted, all of its submenus will be
deleted.
6) Modify a group or a submenu:
Click [Modify] button and then select the
group or submenu from the list. Now you
can modify the item name, file path and so
on followed by clicking [OK] button.
38
Page 44
LAUNCH X-431IV English User’s Manual
7) Save the information:
After editing the application, click [OK]
button. The modified information will be
saved in the corresponding file. If you
want to quit the modification, click [Cancel]
button.
Note:
Quit all other applications before saving the
modification.
Figure 5-36
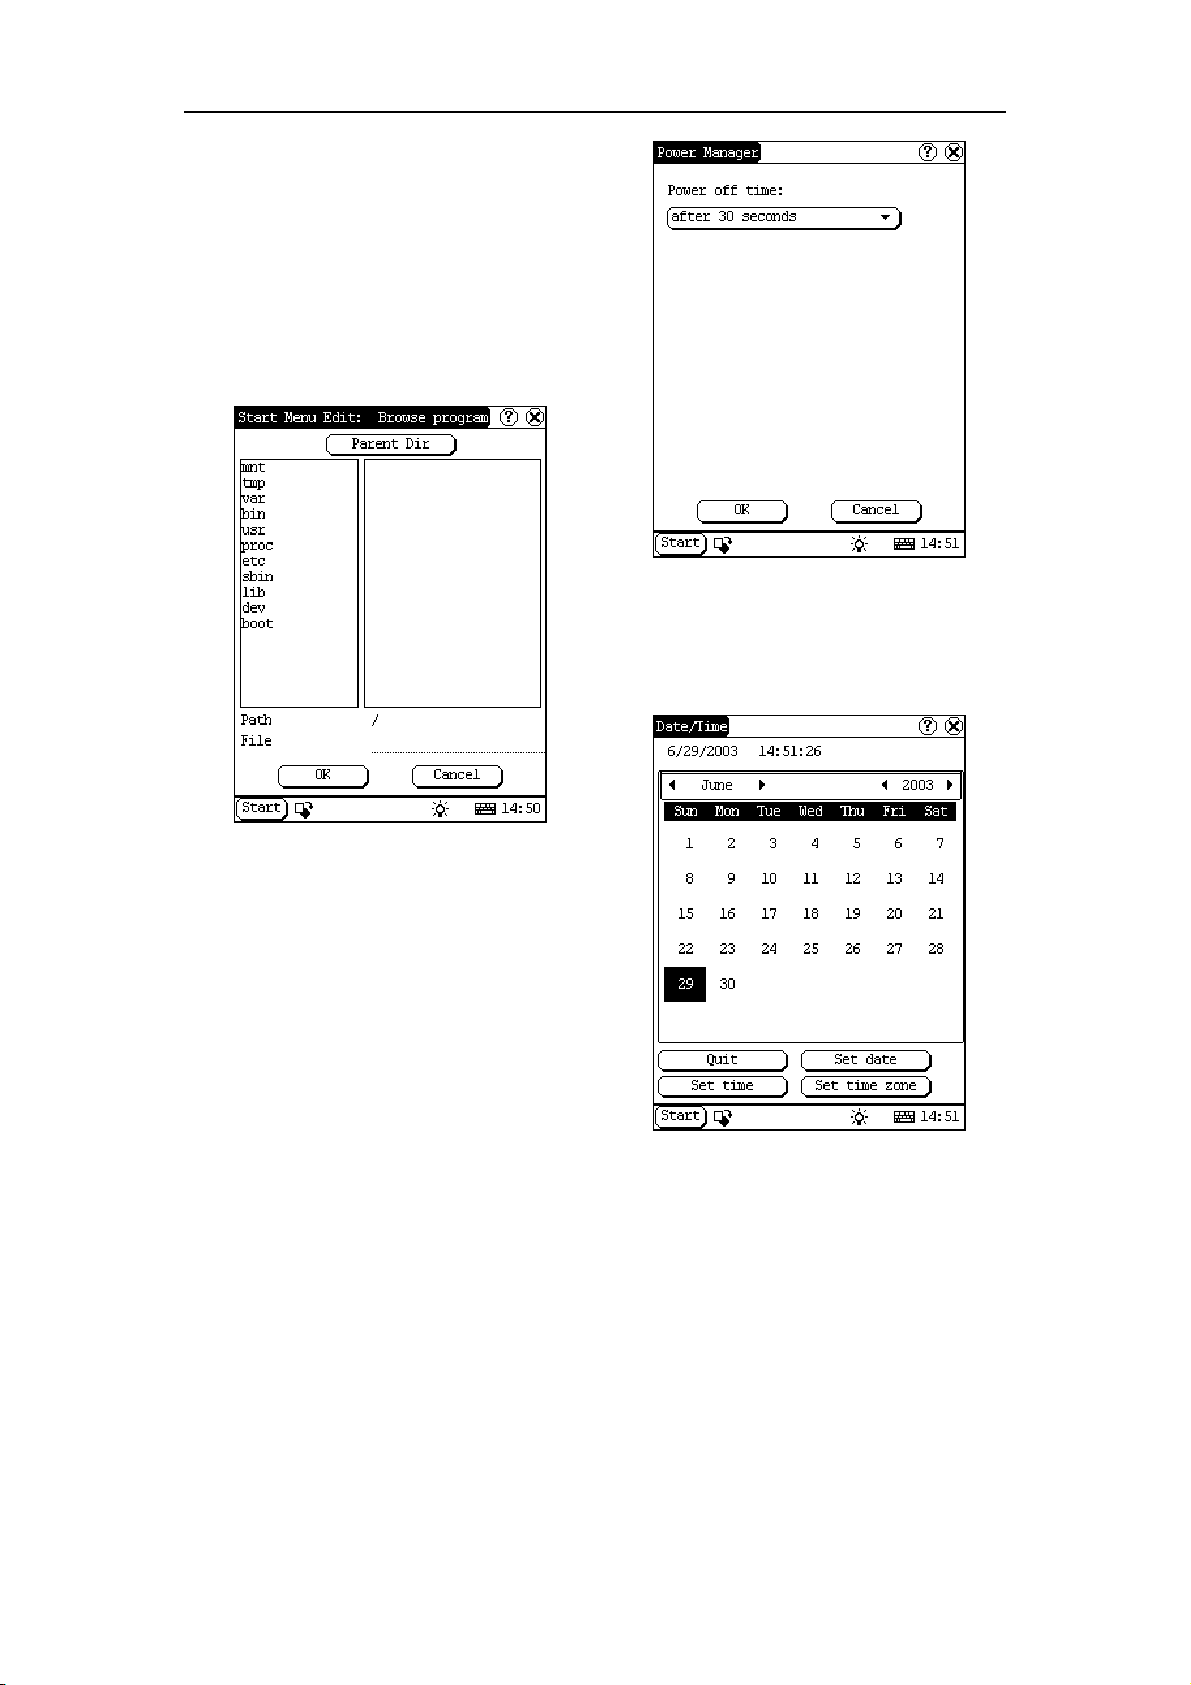
5.4.1.3 Clock
User can set the time and the time zone of the
system.
Figure 5-35
5.4.1.2 Power Management
In the Power Manager interface, you can see
the condition of memory, and set the standby
time. (See Figure 5-36)
1) In the Control Panel interface, click
‘Power’ icon to open the Power Manager
interface.
2) Click the button to the right of ‘Standby
time’, and select the time or ‘None’ in the
pop-up list.
3) Click [OK] button to save the setting and
close the Power Manager interface.
Figure 5-37
Set Time:
1) In the Control Panel interface, click ‘Clock’
icon to open the Date/Time interface as
shown in Figure 5-37.
2) In the Date/Time interface, click [Set Time]
button to open the Set Time interface as
shown in Figure 5-38.
39
Page 45
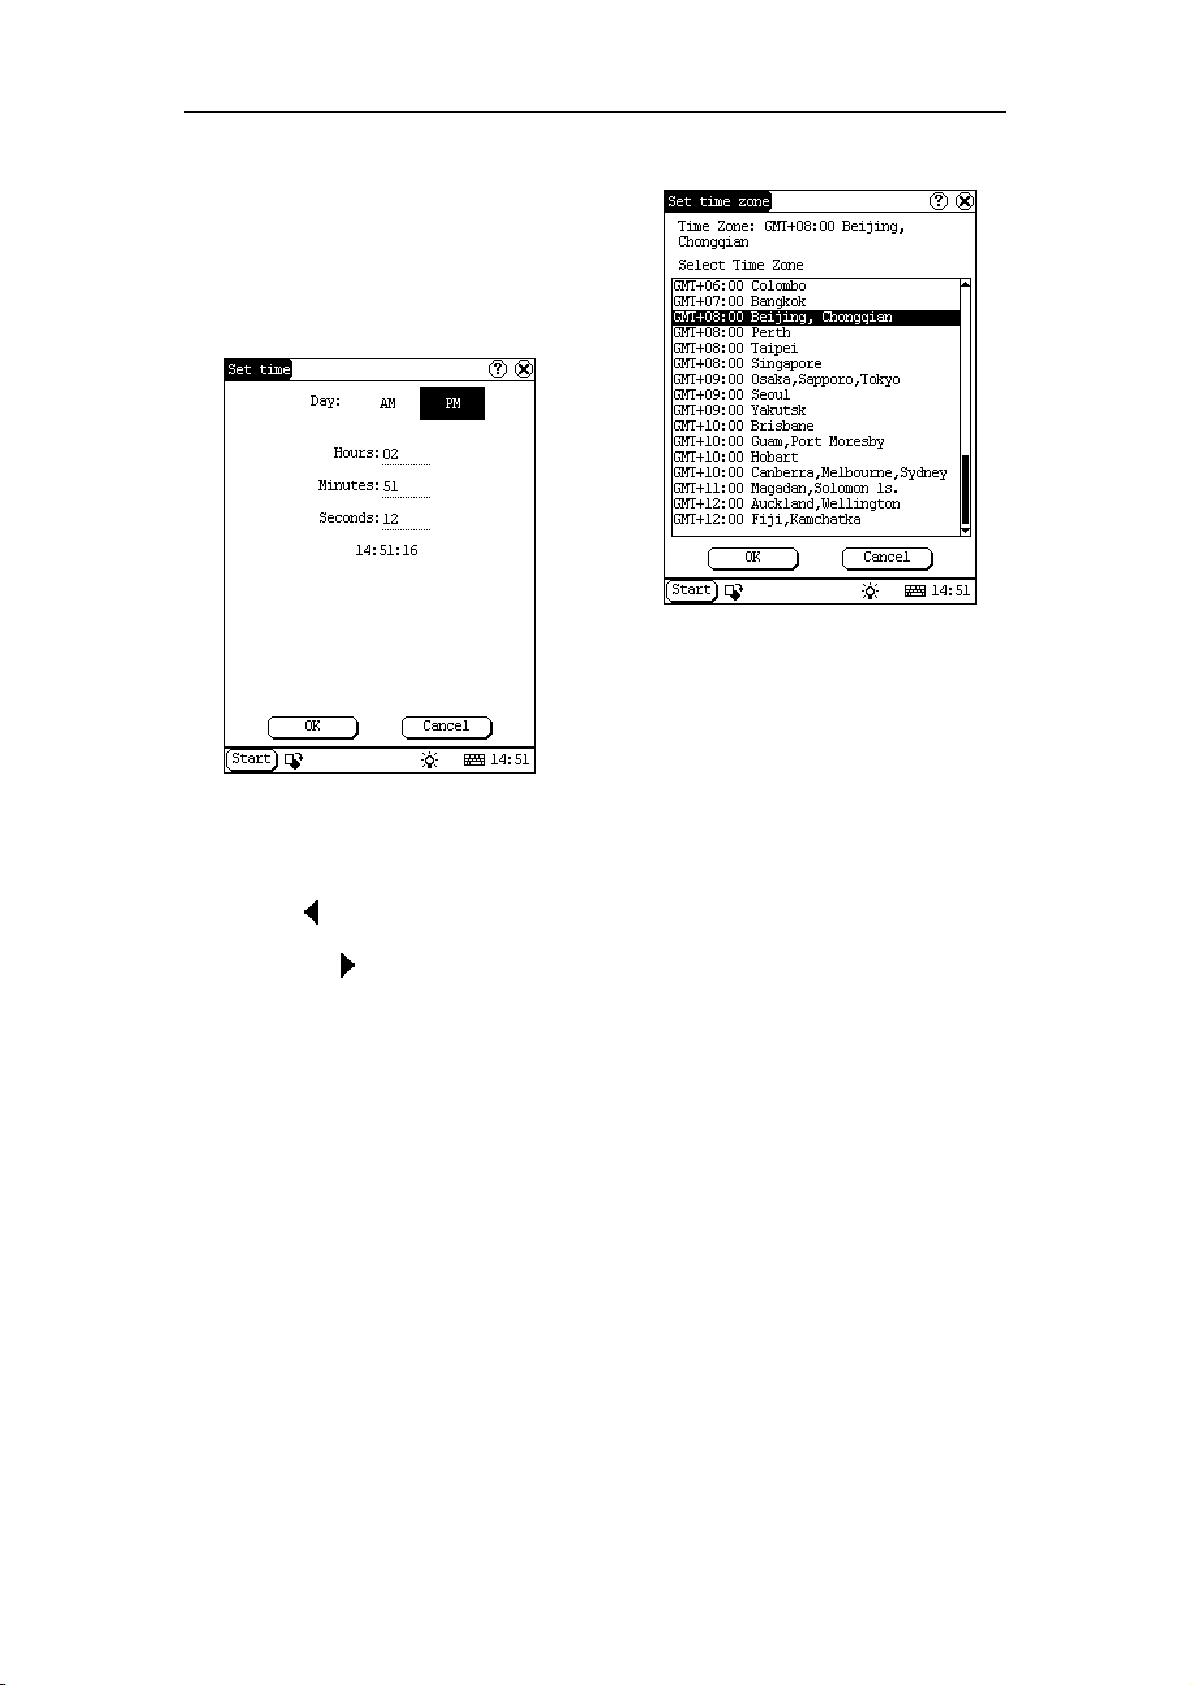
LAUNCH X-431IV English User’s Manual
3) Click the characters to the right of ‘Day’ to
set AM and PM, the selected one will be
highlighted.
4) Activate Soft Keyboard, and then you can
set ‘Hours’, ‘Minutes’ and ‘Seconds’
directly.
5) Click [OK] button to save and close the
Set Time interface.
Set Zone interface.
Figure 5-39
After finishing all settings, click [OK] button in
the Date/Time interface to exit and close the
interface.
Figure 5-38
Set Date:
1) In the Date/Time interface, you can set
date directly.
2) Click [ ] icon to the left of the month or
year to select the previous month or year.
3) Click the [
] icon to the right of the
month or year to select the next month or
year. (See Figure 5-37)
4) Click the date in the current month. It will
be highlighted when it is selected.
5) Click [Set Time] button to save the setting.
6) Click [Quit] button to exit.
Set Time Zone
1) In the Date/Time interface, click [Set Time
zone] button to open the Set Zone
interface as shown in Figure 5-39.
2) Click Scrolling Bar to turn to next page of
the list, and select your zone. It will be
highlighted when it is selected.
3) Click [OK] button to save and close the
5.4.1.4 Contrast
It is for adjusting the contrast of the screen to
make the interface clearer.
1) In the Control Panel interface, click
‘Contrast’ icon to open the Contrast
interface. See Figure 5-40.
2) In the Contrast interface, click the position
you want, and then you can set it.
40
Page 46
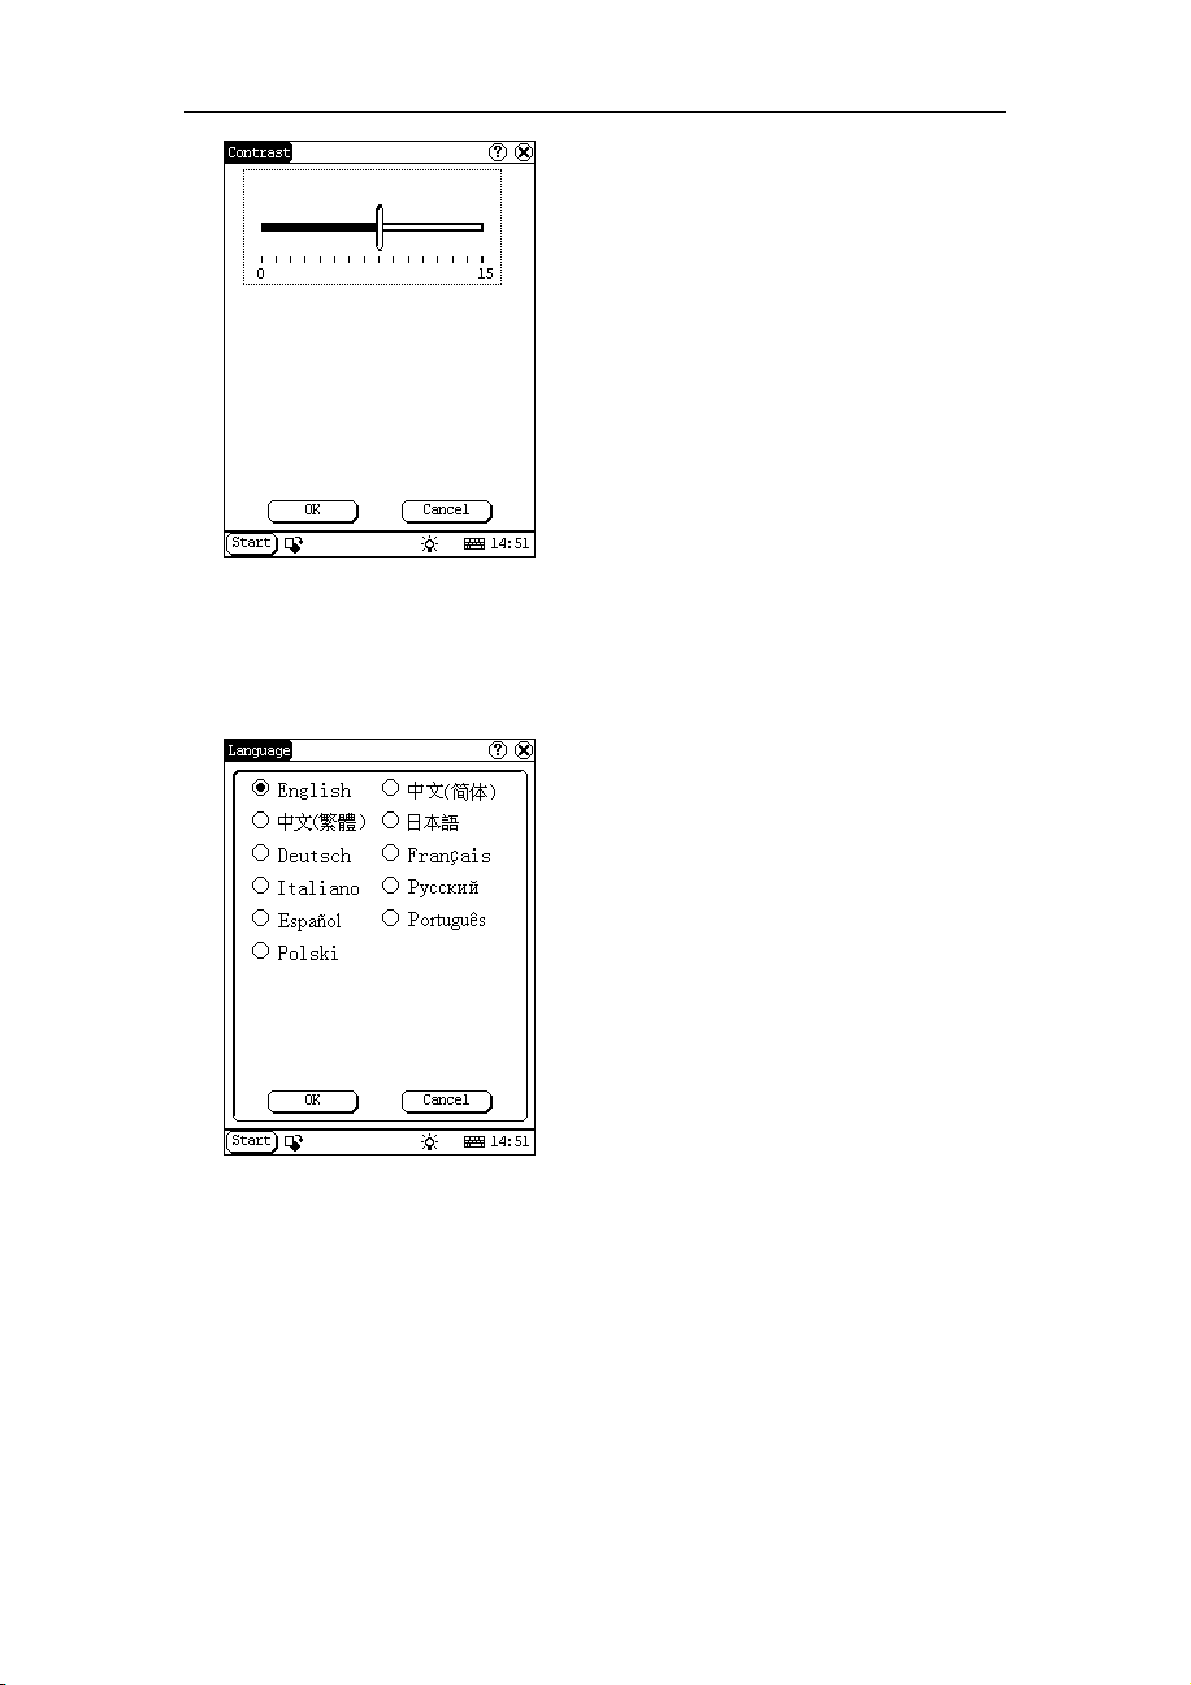
LAUNCH X-431IV English User’s Manual
Control Panel interface.
Note: Before selecting language, be sure to
quit all applications.
5.4.2 System Information
5.4.2.1 Calibrate Touch screen
It is for getting the desired accuracy of the
touch screen. Calibrating of touch screen can
be divided into two steps. The first step is to
detect noise automatically. If you click the touch
screen at this step, the noise value would be
affected. After detecting the noise, the system
will come to the calibration step. Then the cross
cursor will be displayed.
Figure 5-40
5.4.1.5 Language
You can make selection among several
languages for convenient operation of the
system.
1) After switching on the machine, follow the
tips to press the hot key. The calibration
interface will be opened.
2) Click the cross cursor on the screen
accurately, and wait until it changes. Then
one step of calibration is finished.
3) After calibration is finished for all corners,
the system will automatically return to the
start-up main interface.
Note:
♦ Do not click the touch screen before the
cross cursor appears.
♦ In the calibration step, if you fail to click
the cross cursor accurately, the cross
cursor will be displayed on the screen
again and again until the calibration is
finished completely.
Figure 5-41
1) In the Control Panel interface, click
‘Language’ icon to open the Language
interface. See Figure 5-41.
2) Select the language you want to use.
3) Click [OK] button to confirm the selection
and close the language interface and the
5.4.2.2 User Register
The user’s right can be well protected after
registration.
1) Click [Start] button.
2) Select ‘Information’ in the pop-up menu.
3) Select ‘User’ in the pop-up list to open the
User Information interface. (See Figure
5-42)
4) In the User Information interface, activate
Soft Keyboard, and input the user
information. (See Figure 5-43)
5) Click [OK] button to save the information
and close the User Information interface.
41
Page 47

LAUNCH X-431IV English User’s Manual
Figure 5-44
Figure 5-42
5.4.3 Turn Off
Click “Turn Off” in the Start menu when you
attempt to turn off the machine.
Figure 5-43
5.4.2.3 About
In ‘Information’ list, click ‘About’ to display the
information on system software and hardware,
then click [OK] button to close it. (See Figure
5-44)
42
Page 48

LAUNCH X-431IV English User’s Manual
1. The downloaded diagnostic program is not
6. FAQ
X-431IV is a hi-tech product. With the
development of modern automotive industry,
more and more new technology will be adopted
and there may be questions during operation.
Read the user’s manual to get the answer
whenever you have any question, or contact
our Customer Service Center for help.
Here we list some frequently asked questions
and answers relating to X-431IV.
6.1 About Update via Internet
Question: “Removable Disk” icon does not
appear in the catalogue of “My computer” after
the CF card reader/writer is connected to the
USB port of computer. Why?
Answer:
Possible cause: there may not be driver for CF
card reader/writer in the computer. The default
driver is with the operating systems like
Windows Me/2000/XP, Mac OS 9.x/Mac OS X
and Linux 2.4.X. However, there is no such
default driver with Windows 98.
Solution: Check if there is the driver for CF
card reader/writer in the computer. If the
computer uses Windows 98 operating system, it
is necessary to install the driver into computer
by using the CD-ROM provided with CF card
reader/writer.
When the CF card reader/writer driver is
installed successfully, a “Removable disk” icon
will appear in the catalogue of “My computer”.
Usually it is listed after original disk drive. For
example, if there were drives A, B, C and D
originally, the removable disk will be “E”. If there
were drives A, B, C, D and E originally, the
removable disk will be “F”. The rest may be
deduced by analogy.
Question: Some downloaded diagnostic
program is not listed in the update tool, what is
the reason?
Answer: There are two possible causes:
put in the same folder as other diagnostic
programs. Please move it to the same folder as
others.
2. The diagnostic program is not fully
downloaded. Please download the program
again.
Question: When the updated software is used
in vehicle diagnosis, some diagnostic program
cannot be downloaded successfully from the
CF card. Why?
Answer: possible causes and solutions:
1. The Display Program may have not been
updated. Please update the Display Program.
2. The diagnostic program for the vehicle make
is damaged. Please re-download the diagnostic
program and update.
Question: Why can’t the main unit recognize
the replaced CF card?
Answer: There are two possible causes:
1. The original 32M CF card has not been fully
copied. Please delete the incomplete file and
copy again.
2. The CF card reader/writer is not compatible
with the CF card. Monofunctional CF card
reader/writer is better in such situation.
Question: How to make a new X-431IV CF
card when the data in old one is lost or
damaged?
Answer: In case X-431IV CF card is damaged
and the program in the card cannot be used,
please use the following procedure to make a
new CF card:
1. Log onto the website "www.X431.com".
Enter your username and password to log
in.
Select the SMARTBOX No., and then
download the following programs into your
computer:
1) Necessary programs for making CF card:
43
Page 49

LAUNCH X-431IV English User’s Manual
X431 SERIES UPDATE TOOLS---- for
writing the program from computer to
CF card when doing X431 update
DISPLAY PROGRAM---- for
displaying the X-431IV diagnostic
information and managing the
X-431IV diagnostic programs
SYSTEM DATA---- system data used
by X-431IV system
2) Optional programs that can be selected
according to user's demand:
Diagnostic program for various vehicles
2. Install the X431 SERIES UPDATE TOOLS
into computer.
3. Format the X-431IV CF card.
4. Run the X431 SERIES UPDATE TOOLS
and write the display program, system data
and diagnostic programs onto CF card.
6.2 About Hardware
Question: After X-431IV downloads the
diagnostic program from the CF card it prompts
“Please contact your local dealer”. What is the
reason?
Answer: It is because the license No. in CF
card does not match the SMARTBOX. It can be
solved in the following way:
1. Download the software that is corresponding
to the SMARTBOX so that the CF card can
match the SMARTBOX.
2. Use the UPDATE TOOL that is provided on
http: // www.X431.com for update. Never use
WINZIP or other decompressing tool for update.
Question: Why does the LCD screen respond
so slowly?
Answer: It is because the ambient temperature
is close to the lower limit of operating
temperature range (0-50℃). In this situation, it
is necessary to warm up the machine for 20
minutes before test.
Question: Power cannot be turned on with the
power button on the main unit after the machine
is connected to vehicle diagnostic socket
through cables and connectors. What can I do?
Answer: Check the power pin of vehicle
diagnostic socket with multimeter for power.
The power pin in diagnostic socket varies from
one vehicle to another. Please refer to the
User’s Manual of specific vehicle diagnostic
program to find the power pin. If there is no
power supply from the diagnostic socket,
please get power in other ways, such as from
battery or cigarette lighter.
Question: There is no character on the backlit
screen. What should I do?
Answer: Check if the power is well connected.
Turn off the machine, unplug the power
connector and re-plug it. Turn on the machine
after it has been connected to the power for 1
second.
Question: Why does X-431IV fail in
communication with ECU?
Answer: Please make sure that the diagnostic
connector and diagnostic program are matching
vehicle make.
Question: The screen keeps blank after
flashing when the machine is turned on. What
should I do?
Answer: Take out the CF card and re-start the
machine to see if there is normal display. If the
display is normal when the CF card is taken out,
the CF card should be replaced. If the screen is
still blank, please contact the local service
engineer.
Question: Why does the system prompt that no
CF card is found when the machine is turned
on?
Answer: The possible cause is that no CF card
is in the machine, or CF card is inserted
improperly or damaged. If it is damaged, it is
necessary to make a new one.
44
Page 50

LAUNCH X-431IV English User’s Manual
Question: What should I do if I can’t get into
the diagnostic interface during test?
Answer: The possible cause is that no CF card
is in the machine, or CF card is inserted
improperly or damaged. If it is damaged, it is
necessary to make a new one.
Question: What can I do if the system halts or
fails during self-detection?
Answer: Please make sure that cables and CF
card are well connected.
Question: Why can’t the data be inputted after
Soft Keyboard is activated?
Answer: The position where the cursor lies
can’t be edited. Or you have not activated the
cursor on the input position. Please use the
stylus to click the part to edit. When the cursor
twinkles, you can input the data.
Question: The screen is inactive after the cross
cursor appears on the screen. Why?
Answer: The system is calibrating the touch
screen. The machine will work after the screen
is calibrated. Refer to the section “Calibrate
Touch Screen” in User’s Manual”.
Question: Why does the saved data
disappear?
Answer: There are two possible causes:
1. Your CF card is damaged.
2. You’ve changed language and the data is
related to language. You may find the data after
switching back to the former language.
Question: How to know what applications
(interfaces) are opened.
Answer: Click the active taskbar icon, then the
pop-up list will display the applications
(interfaces) opened.
Question: Why can’t I do operation in current
interface?
Answer: There are two possible causes:
1. Your current interface has exited illegally. In
this situation, you may not see the name of the
application (interface) in the pop-up list when
you click the active taskbar icon.
2. The system is busy, please wait patiently, or
click the active taskbar icon to switch to another
application.
Question: The listed icons of vehicle make
occupy more than one page of screen. I may
have to turn several pages to find a specific
icon of vehicle make. How can it be simplified?
Answer: X-431IV can test many vehicle makes
and the vehicle makes are still increasing. We
have considered the convenience when
designing the software. The system will count
the clicks and move the icon with more clicks
forward.
6.3 About System Setting
Question: The screen is too white and
characters cannot be seen. What is the reason
and what should I do?
Answer: It may be caused by improper contrast.
Please refer to the section “Contrast” to adjust
the contrast.
Question: The screen is inactive after the cross
cursor appears on the screen. Why?
Answer: The system is calibrating the touch
screen. The machine will work after the screen
is calibrated. Refer to the section “Calibrate
Touch Screen” in User’s Manual”.
Question: The screen does not respond or
responds wrongly when I click it with stylus.
What should I do?
Answer: It is necessary to calibrate the screen.
Please refer to the section “Calibrate Touch
Screen” in User’s Manual.
Question: The time displayed in the lower right
corner of the screen is incorrect. How to adjust
it?
45
Page 51

LAUNCH X-431IV English User’s Manual
Answer: It is because the time was set
incorrectly. Please refer to the section “Clock” in
the User’s Manual to set correct time.
6.4 About Operation
Question: System halts when reading data
stream. What is the reason?
Answer: It may be caused by a slackened
connector. Please turn off the machine, firmly
connect the connector, and switch on the
machine again.
Question: Why is the screen inactive when the
cross cursor is clicked during screen
calibration?
Answer: You may have touched the screen
when the system is detecting noise before the
cross cursor appears. Please turn off the
machine and then turn on. Calibrate the screen
after the cross cursor appears.
Question: Why is the machine automatically
powered off during standby?
Answer: It is because the machine has been
set for energy saving. Automatic shutdown will
take place if the machine is not operated for a
specified period of time. Refer to the section
“Power management” in User’s Manual to set
the “Power off time” to “None” or select a longer
standby time.
Question: Why can’t the tested result be
printed out?
Answer: There may be no paper in the printer
or the printer. Please mount a roll of new paper.
See the section “Printer Operation” in the
User’s Manual.
Question: Why is there no character in the
printed-paper?
Answer: The paper is mounted reversely.
Please take out the paper and mount it again.
See the section “Printer Operation” in the
User’s Manual.
Question: The displayed information cannot be
seen clearly when the ambient light is not good.
What should I do?
Answer: There is a [
] icon at the lower right
corner of the screen. Click it to turn on the
backlight so as to see the displayed information
clearly. Click the icon again for turning off the
backlight.
Question: Why can’t I input data after
activating Soft Keyboard?
Answer: The position where the cursor lies
can’t be edited. Or you have not activated the
cursor on the input position. Use the stylus to
click the part to edit. When the cursor twinkles,
you can input the data.
Question: What should I do if I am not able to
switch from Active Taskbar to the running
application interface?
Answer: Please close interfaces related to the
application, such as the Help or Detail.
Question: Why does the saved data
disappear?
Answer: There are two possible causes:
1. Your CF card is damaged. It is necessary to
make a new CF card.
2. You’ve changed language and the data is
related to language. You may find the data after
switching back to the former language.
Question: What can I do when the screen is
confused?
Answer: Please quit the current application
(interface), and run it again. If the problem still
exists, please restart the system.
Question: How to know what applications
(interfaces) are opened.
Answer: Click the active taskbar icon, then the
pop-up list will display the applications
46
Page 52

LAUNCH X-431IV English User’s Manual
(interfaces) opened.
Question: Why can’t I do operation in current
interface?
Answer: There are two possible causes:
1. Your current interface has exited illegally. In
this situation, you may not see the name of the
application (interface) in the pop-up list when
you click the active taskbar icon.
2. The system is busy, please wait patiently, or
click the active taskbar icon to switch to another
application.
6.5 Questions Related to Vehicle
Question: Why does the screen flickers during
engine starting?
Answer: It is caused by the electromagnetic
interference. No problem with X-431IV.
Question: Why is operation interrupted during
diagnosis?
Answer: It may be caused by electromagnetic
interference or incorrect connection of
connector.
Question: Why is there no response from
vehicle ECU at communication?
Answer: Make sure that the voltage of vehicle
battery, ignition timer and idle speed are in
standard range; the throttle is in the closed
position; and all electric devices, such as A/C,
headlight, stereos etc, are turned off. Refer to
the section “Conditions for Test”.
Question: Some systems cannot be diagnosed.
Why?
Answer: The diagnostic socket for the system
on some early vehicle may be separated. Refer
to the vehicle instruction manual.
Question: No trouble code is found. Why?
Answer: It may be caused by the shared circuit.
Find the nearest trouble code and circuit for
analysis.
Question: Why are there too many trouble
codes?
Answer: It may be caused by poor contact or
poor grounding. Make sure that the vehicle
model/year is selected correctly and the vehicle
is equipped with the system.
47
Page 53

LAUNCH X-431IV English User’s Manual
Maintenance of CF card
6.6 Maintenance
Storage
Leave X-431IV where it’s smooth, dry and
with suitable temperature.
Do not leave X-431IV where it’s may be
exposed to direct sunlight or near a
heater.
Do not place it near a stove or may be
susceptible to smoke corrosion or expose
to water and oil.
Do not place it where it may be expose to
shake, dust, moisture or high temperature.
If the main unit is very dirty, please clean
the out shell or screen with a soft and dry
cloth. Please note to shutdown the
machine, plug out the power before clean.
If the machine is not used to diagnose
vehicles for a long time, please actuate
X-431IV main unit regularly to avoid
expose to moisture.
Take Care of the Screen
When entered Calibrate Touch Screen
interface, never click on the touch screen
until the cross cursor appears.
Do not place an irrelevant stuff on the
surface of the main unit, avoid heavy
pressure, which may cause damage to the
inner components.
Do not place the machine near electrical
appliance, which incurs electromagnetic
interference.
It’s better to click the screen with stylus,
do not click on the screen with fingernail
or sharp stuffs (hard object) to avoid
scratch.
The LCD may be apt to dust, suggest
using the specific cleaning cloth for LCD
screen to wipe the screen carefully, do not
remove dirty with fingernails to avoid
scratch.
Do not clean the screen with mechanical
detergent.
If X-431IV is not used for a long time,
please switch off X-431IV main unit to
save power and extend the life span of the
screen as well.
Do not take out the CF card when the
main unit is running.
Take out the card when the main unit is
shutdown. Please prevent the card from
electromagnetic; the main unit should be
kept far away from the magnetic field. Do
not power on and off the main unit
frequently.
CF card is necessary for online upgrading.
Do not remove the CF card when the card
reader is in use, otherwise, data in the
card may be lost. Follow the below steps
to take out the CF card: open ‘My
Computer’ interface on the desktop, right
click ‘removable disc’ and select ‘“Eject
(J)’ in the pop-up menu, then you can
remove the card. If remove the card
without doing this, the input data would be
lost.
In case X-431IV CF card is damaged and
the program in the card can not be used,
please use the following procedure to
remake the CF card:
♦ Log onto the website "www.X431.com".
Enter your username and password to
log in. Select the SMARTBOX No., and
then download the X-431IV SERIES
UPDATE TOOLS, DISPLAY
PROGRAM, SYSTEM DATA and
necessary diagnostic program into your
computer.
♦ Install the X-431IV SERIES UPDATE
TOOLS into computer.
♦ Format the X-431IV CF card.
♦ Run the X-431IV SERIES UPDATE
TOOLS and write the display program,
system data and diagnostic programs
onto CF card.
Consumption Material
X-431IV consumes heat sensitive paper
with sizeΦ30×57mm (inner hole isΦ7mm).
Printing paper is consumable, not to
replace it timely.
6.7 Get help
X-431IV enables users to get help on the unit or
on the website.
48
Page 54

LAUNCH X-431IV English User’s Manual
When testing vehicles, users can get help
information for any current interface with the use
of [Help] button or
icon in each interface. For
more information about the latest products or
diagnostic information, please visit website at
http://www.cnlaunch.com or http://www.x431.com;
you will sure get more considerate help.
49
Page 55

LAUNCH X-431IV English User’s Manual
7. Appendix 1: about
VIN
VIN is the abbreviation of Vehicle Identification
Numbers.
A car’s vehicle identification number (VIN) is the
identifying code for your SPECIFIC automobile.
It is your car's fingerprint.
It sets your vehicles apart from the millions of
vehicles out there. Recently the VIN is reflected
by 17 digit characters. It displays a car’s
uniqueness and manufacturer and provides a
method to trace your car from the factory to the
junkyard.
Each character or digit has a particular
purpose. They are as follows:
First vehicle identification number digit
identifies the country from which the vehicle
was manufactured. For example, U.S.A. (1
or 4), Canada (2), Mexico (3), Japan (J),
Korea (K), England (S), Germany (W), Italy
(Z).
Second vehicle identification number digit
specifies the manufacturer. Audi (A), BMW
(B), Buick (4), Cadillac (6), Chevrolet (1),
Chrysler (C), Dodge (B), Ford (F), GM
Canada (7), General Motors (G), Honda (H),
Jaguar (A), Lincoln (L), Mercedes Benz (D),
Mercury (M), Nissan (N), Oldsmobile (3),
Pontiac (2 or 5), Plymouth (P), Saturn (8),
Toyota (T), Volvo (V).
Third vehicle identification number digit
indicates the vehicle type or manufacturing
division.
Fourth through eighth vehicle identification
number digit reveals the vehicle features
such as body style, engine type, model,
series, etc.
The ninth vehicle identification number digit
is a VIN accuracy check digit, verifying the
previous VIN numbers. This is how the
check digit works:
♦ STEP 1
Assign to each number in the VIN its
actual mathematical value and assign to
each letter the value specified for it in the
following chart:
ASSIGNED VALUES:
A=1 G=7 P=7 X=7
B=2 H=8 R=9 Y=8
C=3 J=1 S=2 Z=9
D=4 K=2 T=3
E=5 M=3 U=4
F=6 N=4 V=5
♦ STEP 2
Multiply the assigned value for each
character in the VIN by the position
weight factor specified in the following
chart:
VIN POSITION AND WEIGHT FACTOR:
1st = 8 10th = 9
2nd = 7 11th = 8
3rd = 6 12th = 7
4th = 5 13th = 6
5th = 4 14th = 5
6th = 3 15th = 4
7th = 2 16th = 3
8th = 10 17th = 2
9th = check digit
♦ STEP 3
Add the products from steps 1 and 2 and
divide the total by 11.
♦
STEP 4
The numerical remainder is the check
digit, which would appear in the 9th
position in the VIN. If the remainder is 10,
then the letter "X" is used for the check
digit.
Tenth vehicle identification number digit
tells the model year. 1988 (J), 1989 (K),
1990 (L), 1991 (M), 1992 (N), 1993 (P),
1994 (R), 1995 (S), 1996 (T), 199 7(V),
1998 (W), 1999 (X), 2000 (Y)------2001(1),
2002 (2), 2003 (3), 2004 (4), 2005 (5), 2006
50
Page 56

LAUNCH X-431IV English User’s Manual
(6), 2007 (7), 2008 (8), 2009 (9).
Eleventh vehicle identification number digit
reveals the assembly plant for the vehicle.
The twelfth to seventeenth vehicle
identification number digits indicate the
sequence of the vehicle for production as it
rolled of the manufacturers’ assembly line.
Your VIN can be used to track recalls,
registrations, warranty claims, thefts and
insurance coverage.
Common locations of the vehicle identification
number (VIN) vary but the following are places
to look:
Firewall of the vehicle
Left hand inner wheel arch
Steering column
Radiator Support Bracket
Dash by windshield
Drivers door or post on passenger side
Guarantee & Maintenance Book *Vehicle
documents
Machined Pad on front of engine
Component parts as listed above e.g.
engine, frame, etc.
Later model years - most common areas of
VIN:
Left instrumentation/dash panel by window
Drivers door or post
Firewall
51
Page 57

LAUNCH X-431IV English User’s Manual
2. Part number
Warranty
THIS WARRANTY IS EXPRESSLY LIMITED
TO PERSONS WHO PURCHASE LAUNCH
PRODUCTS FOR PURPOSES OF RESALE
OR USE IN THE ORDINARY COURSE OF
THE BUYER’S BUSINESS.
LAUNCH electronic product is warranted
against defects in materials and workmanship
for one year (12 months) from date of delivery
to the user.
This warranty does not cover any part that has
been abused, altered, used for a purpose other
than for which it was intended, or used in a
manner inconsistent with instructions regarding
use. The exclusive remedy for any automotive
meter found to be defective is repair or
replacement, and LAUNCH shall not be liable
for any consequential or incidental damages.
Final determination of defects shall be made by
LAUNCH in accordance with procedures
established by LAUNCH. No agent, employee,
or representative of LAUNCH has any authority
to bind LAUNCH to any affirmation,
representation, or warranty concerning
LAUNCH automotive meters, except as stated
herein.
Disclaimer
THE ABOVE WARRANTY IS IN LIEU OF ANY
OTHER WARRANTY, EXPRESSED OR
IMPLIED, INCLUDING ANY WARRANTY OF
MERCHANTABILITY OR FITNESS FOR A
PARTICULAR PURPOSE.
Order Information
Replaceable and optional parts can be ordered
directly from your LAUNCH authorized tool
supplier. Your order should include the following
information:
1. Quantity
3. Item description
Customer Service
If you have any questions on the operation of
the unit, please contact us:
Tel: 86-755-84528767
If your unit requires repair service, return it to
the manufacturer with a copy of the sales
receipt and a note describing the problem. If the
unit is determined to be in warranty, it will be
repaired or replaced at no charge. If the unit is
determined to be out of warranty, it will be
repaired for a nominal service charge plus
return freight. Send the unit prepaid to:
Attn: Customer Service Department
LAUNCH TECH. CO., LTD.
Launch Industrial Park,
North of Wuhe Avenue,
Banxuegang, Bantian,
Longgang, Shenzhen, Guangdong
P.R.China, 518129
52
Page 58

Statement: LAUNCH reserves the rights to make any change to product designs and specifications
without notice. The actual object may differ a little from the descriptions in the manual in physical
appearance, color and configuration. We have tried our best to make the descriptions and illustrations in
the manual as accurate as possible, and defects are inevitable, if you have any question, please contact
local dealer or after-sale service center of LAUNCH, LAUNCH does not bear any responsibility arising from
misunderstandings.
 Loading...